

Page 1

Clock Radio
Register your product and get support at
www.philips.com/welcome
User manual
AJL305
Page 2
1
1
2
6
7
8
ALARM
CLOCK RADIO AJL305
REC MIC
Design by Philips, Holland
CLOCK TUNER PHOTO
5
4
3
VOL
9
FM
DC IN 9V
ANT.
0
!
RESET
@
Page 3

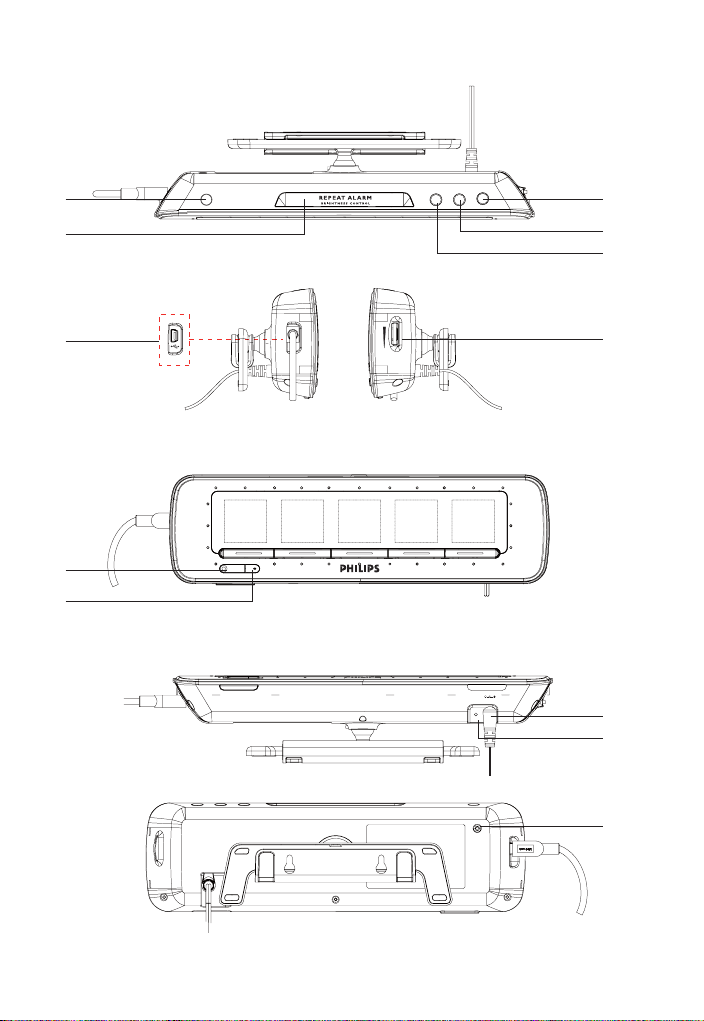
English Controls / Power supply
Controls (See 1)
Alarm
1
activates, or deactivates alarm
–
REPEAT ALARM/BRIGHTNESS
2
CONTROL
repeats alarm in 9-minute interval
–
adjusts brightness of LCD display
–
CLOCK
3
switches to clock mode
–
TUNER
4
switches to tuner mode
–
P HOTO
5
–
switches to photo mode
Mini USB port
6
connects to a USB port on PC
–
REC
7
–
switches to voice memo recording
MIC
8
records voice memos
–
VO L
9
–
adjusts volume level
DC IN
0
–
socket for DC 9 V adapter
Pigtail
!
–
FM antenna to improve reception
RESET
@
–
press if the set does not react to
operation of any button
Power supply
1 Connect the supplied power adapter to the
set's DC IN 9V socket and to the power
socket.
2 Disconnect the power adapter if you want
to switch off the set completely.
Helpful hints:
To avoid damage to the set, use only the
–
adapter supplied!
The type plate is located on the rear of the
–
set.
Page 4

General Information
Congratulations on your purchase and
welcome to Philips!
To fully benefi t from the support that
Philips offers, register your product at
www.philips.com/welcome
Supplied accessory
1 X certifi ed power adapter (Model: DSA-
–
9W-09 FUK 090100 Input: 100-240V
~50/60Hz 0.3A, Output: +9V 1A)
Restoring the set
You can restore factory settings if the set
does not react to any operation or you want
to restore all settings.
Reset
Press and hold RESET with a ballpoint or
–
other thin sticks.
Master reset
Press and hold PHOTO and TUNER at the
–
same time and press and hold RESET with
a ballpoint or other thin sticks.
Besides restoring settings, master reset
deletes all preset radio stations, photos, and
voice memos.
You can use master reset to delete
everything easily.
Environment Information
All unnecessary packaging material has
been omitted. The packaging can be easily
separated into three materials: cardboard,
polystyrene and plastic.
Your set consists of materials which can
be recycled if disassembled by a specialized
company. Please observe the local regulations
regarding the disposal of packaging, dead
batteries and old equipment.
Disposal of your old product
Your product is designed and
manufactured with high quality
materials and components, which
can be recycled and reused.
When this crossed-out wheeled
bin symbol is attached to a
product it means the product is covered
by the European Directive 2002/96/EC.
Please inform yourself about the local
separate collection system for electrical and
electronic products.
Please act according to your local rules and
do not dispose of your old products with
your normal household waste. The correct
disposal of your old product will help
prevent potential negative consequences for
the environment and human health.
Page 5
Setup - Clock
In clock mode, you can set clock time, alarm
time, auto dim, and slideshow, make the set
automatically scan FM stations, and view
memory status in the setup menu.
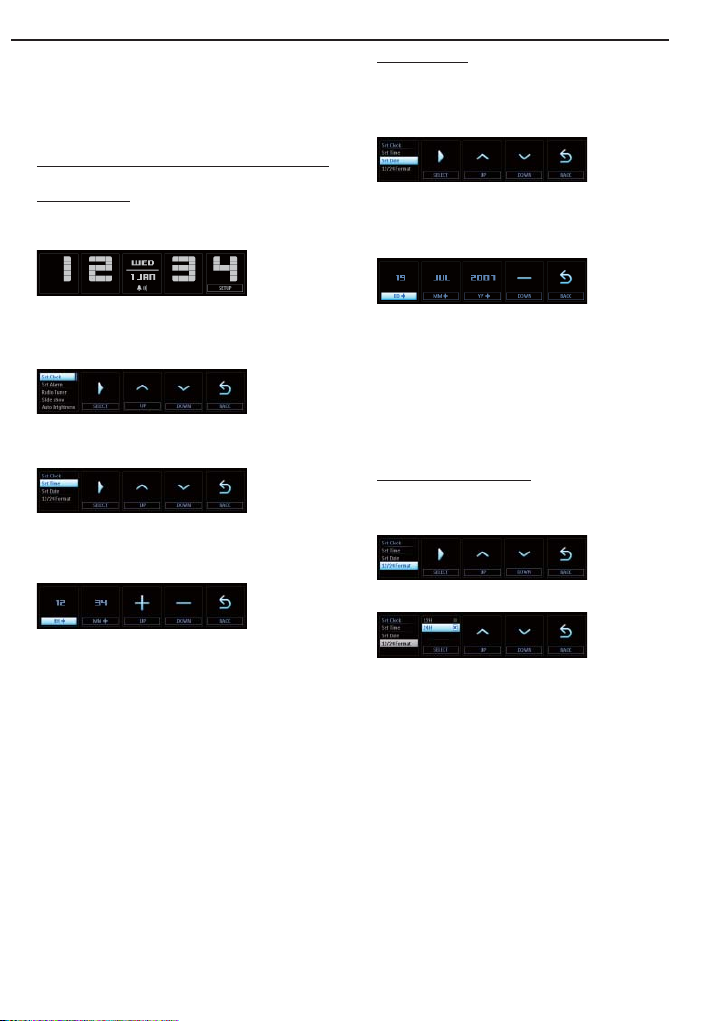
Setting Clock
Setting time
1 Press CLOCK.
2 Press SETUP to enter setup menu.
3 Press SELECT.
The set enters clock setup mode.
➜
4 Press SELECT.
The set enters time setup mode.
➜
5 Press HOUR+ or UP, DOWN repeatedly
or hold them until the desired hour is
displayed.
6 Press MIN+ or UP, DOWN repeatedly
or hold them until the desired minute is
displayed.
7 Press BACK to exit setting.
The set returns to clock setup mode.
➜
Helpful hints:
You can enter time setting quickly by
–
pressing and holding CLOCK on the set.
Setting date
1 Press DOWN to highlight Set Date.
The set enters date setup mode.
➜
2 Press SELECT.
3 Press DAY+, o r DOWN repeatedly or hold
them until the desired day is displayed.
4 Press MONTH+, or DOWN repeatedly
or hold them until the desired month is
displayed.
5 Press YEAR+ or DOWN repeatedly or
hold them until the desired year is displayed.
6 Press BACK to exit setting.
Setting 12/24 format
1 Press DOWN to highlight 12/24 Format.
2 Press SELECT.
3 Press UP or DOWN to select 12H or 24H.
4 Press SELECT to save setting and exit
Page 6

Setup - Alarm Setup-Tuner
Setting Alarm
You can set the alarm time and select the
alarm sound between Tuner and Buzzer.
1 Press CLOCK.
2 Press SETUP.
Set Alarm is highlighted.
➜
3 Press SELECT.
The set enters alarm setup mode.
➜
4 Press DOWN to highlight Alarm Time.
5 Press SELECT.
The set enters alarm setup mode.
➜
6 Press HOUR+ or UP, DOWN repeatedly
or hold them until the desired hour is
displayed.
7 Press MIN+, or UP, DOWN repeatedly
or hold them until the desired minute is
displayed.
8 Press BACK to exit alarm time setup.
9 Press DOWN to highlight Wake to….
10 Press SELECT.
Tuner and Buzzer are displayed on the
➜
second display.
Setting radio tuner
1 Press CLOCK.
2 Press SETUP.
3 Press DOWN repeatedly to highlight Radio
Tuner.
4 Press SELECT.
The set automatically scans FM stations
➜
and stores up to 15 preset stations.
5 Press BACK to stop scanning.
11 Press UP or DOWN repeatedly or hold
them to select the desired alarm sound.
12 Press SELECT to save setting and exit.
Helpful hints:
You can enter alarm setting quickly by
–
pressing and holding ALARM on the set.
Page 7

Setup-Slideshow Setup - Auto Brightness
Setting Slideshow
You can toggle slideshow on or off, and set
the frequency of slideshow.
1 Press UP or DOWN repeatedly to highlight
Slideshow.
2 Press SELECT.
The set enters slideshow setup mode.
➜
On/Off is highlighted.
➜
3 Press SELECT.
On, Off are displayed on the second
➜
display.
4 Press UP or DOWN repeatedly to switch
slideshow on or off.
5 Press BACK to return.
6 Press DOWN to highlight Frequency.
7 Press SELECT.
8 Press UP or DOWN to switch between
the following intervals:
5 sec->30 sec->1 min->10 min->30 min.
Setting Auto Brightness
The set can automatically dim at the start
time and light up at the end time.
1 Press CLOCK.
2 Press SETUP.
3 Press DOWN repeatedly to highlight Auto
Brightness.
4 Press SELECT.
5 Press SELECT.
6 Press UP or DOWN repeatedly to switch
Auto Brightness function on or off.
7 Press BACK to return.
8 Press DOWN repeatedly to highlight
Timer Settings.
9 Press SELECT.
10 Press or hold HOUR+ below the second
display or DOWN to select the desired
start time.
9 Press BACK to exit setting.
11 Press or hold HOUR+ below the second
display or DOWN to select the desired end
time.
12 Press BACK to exit setting.
Helpful hints:
You can set the timer to start at night
–
and end in the morning so that AJL305
automatically dims at night and lights up in
the morning.
Page 8

Setup-Clock Display/Viewing Memory Status Clock/Alarm
Setup-Clock Display
You can set whether to display clock or not
in photo mode.
1 Press CLOCK.
2 Press SETUP.
3 Press UP or DOWN repeatedly to highlight
Clock Display.
4 Press SELECT.
5 Press UP or DOWN to select ON or
OFF.
6 Press SELECT to save setting and exit.
Viewing Memory Status
You can check the occupied memory and
how much capacity is left.
1 Press CLOCK.
2 Press SETUP.
3 Press DOWN repeatedly to highlight
Memory Status.
The memory occupation status of photo
➜
and voice memo is displayed respectively.
Displaying clock
1 Press CLOCK.
To activate or deactivate alarm
1 Press ALARM repeatedly.
is displayed when alarm is activated.
➜
disappears when alarm is deactivated.
➜
Repeating alarm
You can repeat the alarm call at 9-minute
intervals.
During the alarm call, press REPEAT
ALARM / BRIGHTNESS CONTROL.
fl ashes.
➜
Helpful hints:
During alarm call, if no button is pressed,
–
alarm call will last 30 minutes.
Note:
For instructions on setting the clock and
–
alarm, please refer to chapter Setup - Clock
and Setup - Alarm.
4 Press UP to enter other settings.
5 Press BACK to exit setting.
Helpful hints:
During setting the set, if no button is pressed
–
within 10 seconds, the set returns to SETUP
mode automatically.
Page 9

Tuner
Tuning to radio station
1 Press TUNER to switch on radio (FM only).
2 Press and hold , for about 2 seconds,
then release.
The radio automatically tunes to a station
➜
of suffi cient reception.
3 Repeat step 2 if necessary until you fi nd the
desired station.
To tune to a weak station, press
•
briefl y and repeatedly until you have found
optimal reception.
,
Manual programming radio
stations
You can store up to a total of 15 FM radio
stations in the memory manually.
1 Press MANUAL TUNE.
2 Tune to your desired station (See “Tuning
to radio station”).
3 Press PRESET+ or PRESET- once or
more to allocate a number from 1 to 15.
4 Press SAVE to confi rm.
5 Repeat step 2-4 to store other stations.
To listen to a preset or preset
station
•
Press PRESET+ or PRESET- once or more
until the desired preset station is displayed.
To pause radio
•
Press TUNER.
OFF is displayed.
➜
Helpful hints:
To improve FM reception:
Extend and adjust the pigtail for optimum
–
reception.
Note:
You can erase a preset station by storing
–
another frequency in its place.
Page 10

Photo Voice Memo
Manual browsing
To browse all photos in albums
Press the button below a certain person’s
•
album.
Slide show
The set can display all photos automatically
at a set frequency.
1 Switch slide show on.
2 Set a desired time interval between slides.
For slide show setting, please refer to
chapter Setup - Slideshow.
Recording messages
1 Press PH OTO or REC.
Photos are displayed.
➜
2 Press SELECT button below one to fi ve
displays to select or deselect users to whom
you want to leave a message.
Helpful hints:
1 Each message can last up to 20 seconds.
2 After you fi nish recording, the set switches
to PH OTO mode automatically.
3
is displayed in the photo and indicates
the number of messages left to the user.
Playing and deleting messages
To listen to a message
1 Press the button below the photo with
Playback starts automatically from the
➜
fi rst message.
To listen to a message again
1 Press UP or DOWN to move the cursor
to the desired message.
2 Press REPLAY.
To delete a message
1 Press UP or DOWN to move the cursor
to the desired message.
2 Press DELETE.
.
3 Press REC again.
Recording begins.
➜
4 Speak near the MIC.
5 Press REC to end recording.
3 Press OK to confi rm.
4 Press BACK to return.
Page 11

Brightness Adjustment Connecting to PC/Sleep timer
You can manually adjust LCD brightness or
let the set adjust brightness automatically.
Manually adjustment
•
Press REPEAT ALARM / BRIGHTNESS
CONTROL once or more to cycle screen
brightness through 3 levels.
Automatically adjustment
To avoid strong light emitting from the unit
at night time, the auto dim function can be
used to adjust the brightness to the lowest
level automatically. (See Setting Auto
Brightness in chapter SETUP)
When auto dim is set, during auto dim
•
time span, the LCD brightness will be auto
adjusted to the lowest level. Press any button
to increase the brightness and it will last 10
seconds
When auto brightness timer reaches the
•
end time, the LCD brightness automatically
changes to the brightness level before the
Auto Brightness Timer is set.
You can load photos, restore lost photos
into albums by connecting it to the PC.
Besides, you can synchronize time and auto
dim setting on the PC with the set.
For details, please refer to the supplied
Quick Start Guide.
Sleep timer
The clock radio has a built-in sleep timer,
which enables the set to automatically turn
off radio after a set period of time.
1 Press SLEEP in clock mode.
2 Press CHANGE repeatedly to switch the
timer between: 15 min->30 min->60 min->90
min->120 min->OFF.
To turn off sleep timer,
Set the timer to OFF.•
Page 12

Safety and maintenance
If you do not intend to use the clock radio
•
for a long time, withdraw the power cord
from the wall outlet.
Place the set on a hard and fl at surface so
•
that the system does not tilt.
Where the MAINS plug or an appliance
•
coupler is used as the disconnect device,
the disconnect device shall remain readily
operable.
Install the unit near the AC outlet and where
•
the AC power plug can be easily reached.
The apparatus shall not be exposed to
•
dripping or splashing
Do not expose the set, batteries, to humidity,
•
rain, sand or excessive heat caused by
heating equipment or direct sunlight.
No objects fi lled with liquids, such as vases,
•
shall be placed on the apparatus.
No naked fl ame sources, such as lighted
•
candles, should be placed on the apparatus.
The apparatus shall not be exposed to
•
dripping or splashing and that no objects
fi lled with liquids, such as vases, shall be
placed on the apparatus.
Danger of explosion if battery is incorrectly
•
replaced. Replace only with the same or
equivalent type.
Do not cover the set. Adequate ventilation
•
with a minimum gap of 6 inches between the
ventilation holes and surrounding surfaces is
necessary to prevent heat build-up.
The mechanical parts of the set contain self-
•
lubricating bearings and must not be oiled or
lubricated.
To clean the set, use a soft dry cloth. Do not
•
use any cleaning agents containing alcohol,
ammonia, benzene or abrasives as these may
harm the housing.
Page 13

Specifi cations
TUNER
Tuning Range .........................................................................................................................FM 87.5-108 MHz
Signal-to-Noise Ratio ................................................................................................................................ 55 dB
MAIN UNIT
Power Supply Rating ................................................................................................................... 100-240 V AC
Power Consumption ................................................................................................................................ < 6 W
Weight ........................................................................................................................................................... 320 g
Dimensions (w × d × h) .................................................................................................244 x 70 x 51.5 mm
Packaging Dimensions (w × d × h) ...............................................................................256 x 143 x 91 mm
Gross weight ................................................................................................................................................ 730 g
SPEAKERS
Impedance ................................................................................................................................................ 8 Ohm
Specifi cations subject to change without prior notice
Page 14

Troubleshooting
If a fault occurs, fi rst check the points listed below before taking the set for repair. If you
are unable to remedy a problem by following these hints, consult your dealer or service
center.
WARNING
: Do not open the set as there is a risk of electric shock. Under no
circumstances should you try to repair the set yourself, as this will
invalidate the warranty.
No sound.
Volume not adjusted.
–
Adjust the VOL.
•
Occasional crackling sound during FM
broadcast.
Weak signal.
–
Extend the pigtail antenna fully.
•
The alarm does not function.
Alarm time is not set.
–
See section on Setting and activating alarm.
•
Alarm is not activated.
–
•
See section on Setting and activating alarm.
Synchronization is interrupted and the set
fails.
The software of this set is corrupted.
–
Connect the set to your PC and synchronize
•
the set again by using AJL305 Photo Manager.
The screen brightness keeps turning dark.
The set is in auto dim timing.
–
To let the screen keep bright, turn off auto
•
dim timer.
 Loading...