

Page 1

Clock Radio
Register your product and get support at
www.philips.com/welcome
QUICK START GUIDE
AJL305
Thanks for buying Philips AJL305 clock radio.
Our Quick Start guides you through just some of the features on the set.
Please read our instruction booklet to really rise & shine!
Page 2
1. Using AJL305 Photo Manager
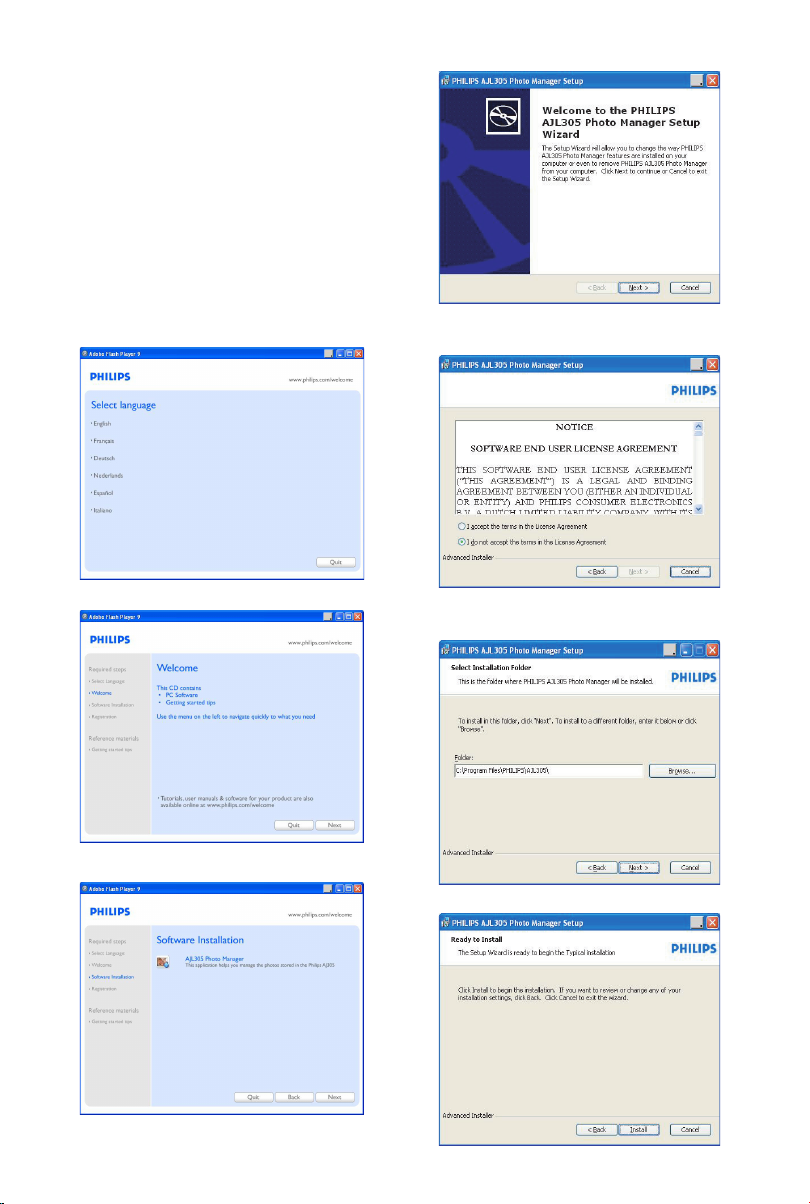
Step 1: Install Software
You can edit and synchronize photos between
the PC and AJL305 by using the supplied
software AJL305 Photo Manager.
1. Insert the supplied CD into the CD or DVD
driver on your PC.
➜ A window pops out automatically.
Tips:
If auto run is forbidden on your PC,
a. Double click the driver to open the folder.
b. Double click the file setup.exe.
4. Click “Next”.
5. Click “I accept the terms in the License
Agreement”, and then click “Next”.
2. Click “Next”.
3. Click “Next”.
6. Select the directory where you want to install
the software and then click “Next”.
7. Click “Install” to start installation.
Page 3

8. Click “Finish” to exit.
Step 2: Connecting to the PC
When you have finished installing the software,
1. Connect your AJL305 to a USB port on the PC
with the supplied USB cable.
2. Connect the supplied mains adapter to the set’s
9V DC jack and the plug into a wall outlet.
3. Double click the icon of AJL305 Photo Manager
on the desktop or select the program from the
start menu.
- AJL305 Photo Manager starts to run.
Step 3: Loading Photos
3. Browse to the photo that you want to load.
4. Click “Open”.
5. Click the zoom tools to zoom the photo in or
out.
6. Click rotation tools to rotate or flip the photo.
7. Drag the brightness tool bar to adjust the
brightness.
8. Move the selection area to the area that you
want to display on AJL305.
9. Click “Add” to add the photo into the album.
10. Repeat step 1-9 to load photos for other
albums.
1. Click in one of the album and then select one
photo.
2. Click “Load”.
- The following window is displayed.
Tips:
You can store up to four photos in the five
albums respectively.
Page 4

Step 4: Setting
You can synchronize time of the set with PC and
set auto brightness function.
Warning:
Do not disconnect the power adapter of the set
or disconnect the set from the PC during
synchronization.
Tips:
If synchronization is interrupted accidentally, plug
in AJL305 again. All five displays are blank. It is
normal. Restart AJL305 Photo Manager and click
“Sync” to synchronize AJL305 with your PC again.
1. Check box “Sync time with PC real time clock”.
2. Check box “Auto Brightness”.
3. Select the start time and end time from the list.
Tips:
You can set the timer to start at night and end in
the morning so that AJL305 automatically dims
at night and lights up in the morning.
You can back up the settings on the PC and
restore the photos deleted by mistake.
1. Browse to a directory where you want to store
the settings.
2. Click “Save” to save your settings.
To restore photos,
1. Click “Restore”.
2. Click “OK” to exit.
Step 5: Synchronization
1. Click SYNC to synchronize AJL305 Photo
Manager with AJL305.
2. Setting clock and alarm
1. Press and hold CLOCK on the set to enter
clock setting quickly.
2. Press and hold ALARM on the set to enter
alarm setting quickly.
For detailed setting operations, refer to the
supplied user manual.
3. Using voice memo
You can leave messages to each person in the
album and playback the messages.
1. Press PHOTO or REC.
2. Press SELECT below a certain per son.
3. Press REC.
4. Speak near the MIC.
5. Press REC to end recording.
6. Press the button below the photo with .
➜ Message playback starts automatically.
4. Using the stand
The set is equipped with a stand on the bottom
panel. To set the unit for a different viewing angle,
take the stand out, then place it back by
reversing the side of the stand.
 Loading...