

Page 1
Clock Radio
Radio-réveil
AJB3000
User manual
Register your product and get support at
www.philips.com/support
Page 2

Contents
1 Important 1
Safety 1
Risk of swallowing batteries! 1
Notice 1
2 Your FM/DAB radio 3
Introduction 3
About DAB 3
What’s in the box 3
Overview of the main unit 3
3 Get started 4
Prepare FM/DAB antenna 4
Connect power 5
Battery power 5
Turn on 6
Switch to standby mode 6
Adjust volume level 6
Adjust display brightness 6
View the information 6
Set the Clock 6
4 Listen to radio 7
Listen to DAB/DAB+ radio 7
Listen to FM radio 8
5 Other features 10
Set the Sleep Timer 10
Setting the alarm timer 10
6 Product information 11
7 Troubleshooting 12
1EN
Page 3

1 Important
Safety
Important Safety Instructions
• The device shall not exposed to
dripping or splashing.
• Do no place any source of danger
on the device (e.g. liquid lled
objects. lit candles).
• Where the MAINS plug or an
appliance coupler is used as the
disconnect device, the disconnect
device shall remain readily
operable.
• Make sure that there is enough
free space around the product for
ventilation.
• Battery usage CAUTION - To
prevent battery leakage which may
result in bodily injury, property
damage, or damage to the unit:
• Install all batteries correctly, +
and - as marked on the unit.
• Batteries (packed or installed)
shall not be exposed to
excessive heat such as sunshine,
re or the like.
• Remove batteries when the unit
is not used for a long time.
• Only use attachments/accessories
specied by the manufacturer.
Risk of swallowing batteries!
• The device may contain a coin/
button type battery, which can
potentially be swallowed. Keep the
battery out of reach of children at
all times! If swallowed, the battery
can cause serious injury or death.
Severe internal burns can occur
within two hours of ingestion.
• If you suspect that a battery
has been swallowed or placed
inside any part of the body, seek
immediate medical attention.
• When you change the batteries,
always keep all new and used
batteries out of reach of children.
Make sure that the battery
compartment is completely secure
after you replace the battery.
• If the battery compartment cannot
be completely secured, discontinue
use of the product. Keep out of
reach of children and contact the
manufacturer.
Warning
•
Never remove the casing of this unit.
• Never lubricate any part of this unit.
• Place this unit on a at, hard and stable
surface.
• Never place this unit on other electrical
equipment.
• Only use this unit indoors. Keep this unit
away from water, moisture and liquid-lled
objects.
• Keep this unit away from direct sunlight,
naked ames or heat.
Notice
Hereby, Gibson Innovations declares
that this product is in compliance
with the essential requirements
and other relevant provisions of
Directive 2014/53/EU. You can nd the
Declaration of Conformity on
www.philips.com/support.
Your product is designed and
manufactured with high quality
materials and components, which can
be recycled and reused.
1 EN
Page 4

When this crossed-out wheeled bin
symbol is attached to a product it
means that the product is covered by
the European Directive 2012/19/EU.
Please inform yourself about the local
separate collection system for electrical
and electronic products.
Please act according to your local rules
and do not dispose of your old products
with your normal household waste.
Correct disposal of your old product
helps to prevent potential negative
consequences for the environment and
human health.
Your product contains batteries covered
by the European Directive 2013/56/EU,
which cannot be disposed with normal
household waste.
Please inform yourself about the local
rules on separate collection of batteries
because correct disposal helps to
prevent negative consequences for the
environmental and human health.
Environmental information
All unnecessary packaging has been
omitted. We have tried to make the
packaging easy to separate into three
materials: cardboard (box), polystyrene
foam (buer) and polyethylene (bags,
protective foam sheet.)
Your system consists of materials
which can be recycled and reused
if disassembled by a specialized
company. Please observe the local
regulations regarding the disposal
of packaging materials, exhausted
batteries and old equipment.
Note
• The type plate is located on the
back of the unit.
2EN
Page 5
2 Your FM/DAB
radio
Congratulations on your purchase, and
welcome to Philips!
To fully benet from the support that
Philips oers, register your product at
www.philips.com/welcome.
Some programmes are supported by
Dynamic Label Segments (DLS).This is
data which you can read as scrolling
text on your DAB radio display. Some
stations transmit the latest news, travel,
and weather, what’s on now and next,
website addresses and phone numbers.
For more information on digital radio
coverage and services, please visit:
www.drdb.org.
Introduction
With this unit, you can enjoy both FM
radio and Digital Audio Broadcasting
(DAB) radio.
About DAB
Digital Audio Broadcasting (DAB)
DAB digital radio is a new way of
broadcasting radio via a network of
terrestrial transmitters. It provides
listeners with more choice and
information delivered in crystal clear,
crackle-free sound quality.
• The technology allows the receiver
to lock on to the strongest signal it
can nd.
• With DAB digital stations there are
no frequencies to remember, and
sets are tuned by station name, so
there’s no returning on the move.
What is a multiplex?
Digital radio operation is made up of
a single block of frequencies called a
multiplex. Each multiplex works within a
frequency spectrum, such as Band III for
DAB broadcasts.
DAB BROADCASTERS AND DLS
Each DAB broadcaster (or multiplex
operator) also provides text and audio
data services.
What’s in the box
Check and identify the contents of your
package:
• Main unit
• AC power adapter
• Printed materials
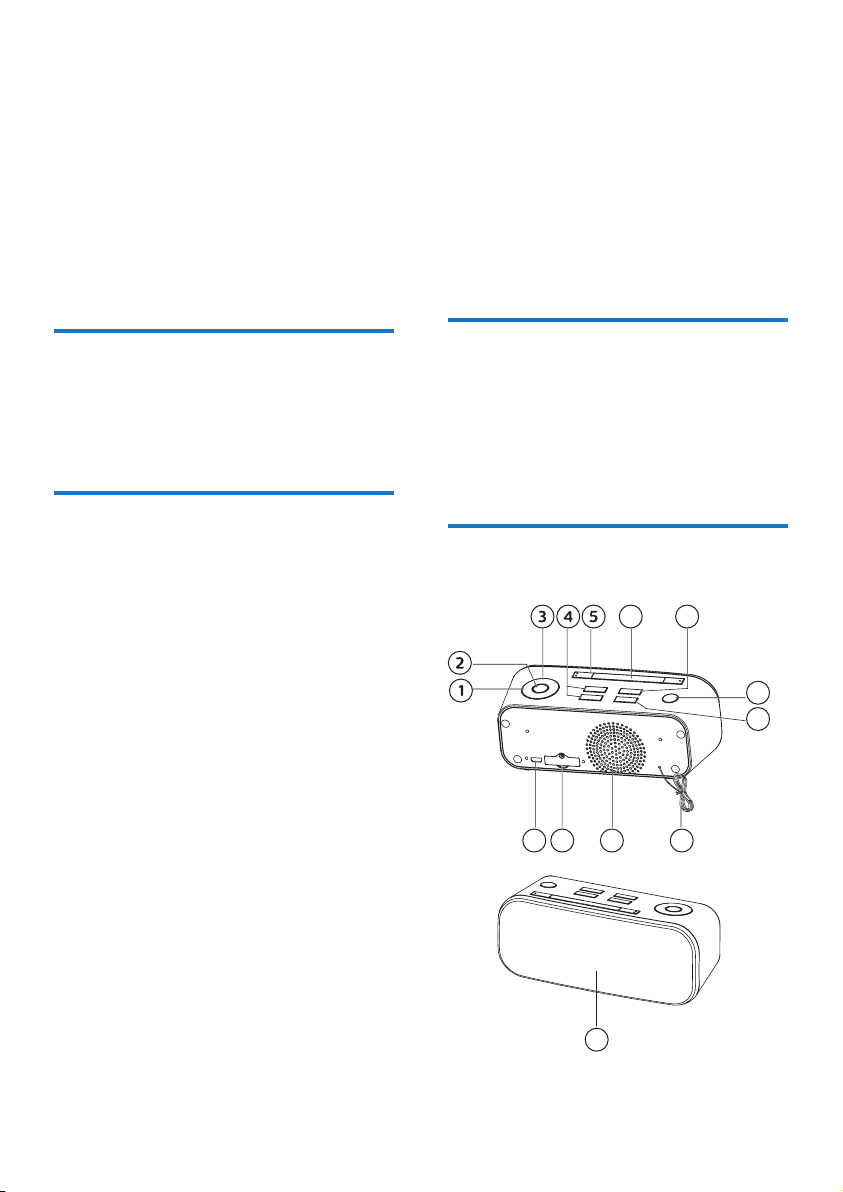
Overview of the main unit
6 7
8
9
10111213
14
3 EN
Page 6

a
• Tune to a radio station
• Adjust the date, clock time and
alarm time
• To select the menu option
b
• Set the clock
• Program radio stations
• In DAB/FM mode, conrm the
menu option
c
• Select a preset radio station
d
• Increase/decrease the volume
e
• Set the alarm timer
• Enable/disable the alarm timer
• Stop alarm
f
• Adjust the display brightness
• Repeat the alarm
g
• Set the sleep timer
h
• Turn on the unit or switch to
standby mode
• Select a source
i
• Display the current status or
time/date
• In DAB/FM mode, access the
menu
j Attached DAB/FM antenna
k Speaker
l Battery compartment
m
• Connect the AC adapter
n Display panel
• Show current status
3 Get started
Caution
•
Use of controls or adjustments or
performance of procedures other than
herein may result in hazardous radiation
exposure or other unsafe operation.
Always follow the instructions in this
chapter in sequence.
If you contact Philips, you will be asked
for the model and serial number of
this apparatus. The model number and
serial number are on the back of the
apparatus. Write the numbers here:
Model No. ________________________
Serial No. _________________________
Prepare FM/DAB antenna
For optimal reception, fully extend
and adjust the position of the FM/DAB
antenna.
Tip
•
Position the antenna as far away as
possible from your TV or other radiation
source to prevent interference.
4EN
Page 7

Connect power
Battery power
Caution
Risk of product damage! Make sure that
•
the power supply voltage corresponds
to the voltage printed on the back or the
underside of the product.
Risk of electric shock! When you unplug the
•
AC adapter, always pull the plug from the
socket. Never pull the cord.
Use only the AC adapter specied by the
•
manufacturer or sold with this unit.
Note
The type plate is located on the back of the
•
unit.
5.5
1 Connect one end of the AC adapter
to the DC input socket on the main
unit.
2 Connect the other end of the AC
adapter to the wall outlet.
For rst-time use:
Remove the protective tab to activate
the unit battery.
1 Loosen the screw on the battery
compartment cover with a
screwdriver.
2 Remove the protective tab.
Caution
Batteries (battery pack or batteries
•
installed) shall not be exposed to excessive
heat such as sunshine, re or the like.
Danger of explosion if battery is incorrectly
•
replaced. Replace only with the same
equivalent type.
Remove batteries if they are exhausted or if
•
the unit is not to be used for a long time.
Note
Batteries contain chemical substances, so
•
they should be disposed of properly.
5 EN
CR2025/3V
1 Loosen the screw on the battery
compartment cover with a
screwdriver.
Page 8

2 Replace a new lithium CR2025
battery with correct polarity (+/-) as
indicated.
3 Close the battery compartment to
the original position, and tighten the
screw with a screwdriver.
Turn on
Press to turn the system on.
Switch to standby mode
Set the Clock
1
In standby mode, press and hold
for 1 second or more.
» The hour digits blink on the
display.
2 Press to set the
hour.
3 Press to store the setting
and the minute digits begin to blink.
4 Repeat the above steps 2-3 to set
the minute, day, month and year.
Press and hold for 1 second
or more to switch the unit to standby
mode.
» The time (if set) appears on the
display.
Adjust volume level
Press to increase/decrease
the volume level.
Adjust display brightness
Press
repeatedly to select dierent levels of
display brightness.
View the information
Press repeatedly.
» The current status and the
clock time, date are displayed
consequently.
Note
If no button is pressed in 60 seconds, the
•
unit exits clock setting mode automatically.
To exit clock setting mode without storing,
•
press
.
6EN
Page 9

4 Listen to radio
Note
For optimal reception, fully extend and
•
adjust the position of the antenna.
Listen to DAB/DAB+ radio
Tuning to DAB Mode
• Press to select DAB
source.
»
on the display.
• If no
• If no DAB/DAB+ service is available.
DAB/DAB+
stored,
store DAB/DAB+ radio stations
automatically
» [ ] (scanning) is
displayed.
» All available stations are
programmed.
»
(DAB mode) appears
radio station is
the unit can search and
.
(full scan) is displayed.
Automatically
Press and hold
or more
mode.
Manually
to activate automatic program
» [ ] (scanning) is displayed.
» All available stations are
programmed.
for 1 second
1 Tune to a DAB/DAB+ radio station.
2 Press and hold for 1
second or more to activate program
mode.
» The preset number will appear.
3 Repeatedly press to
allocate a number to this radio
station.
4 Press again to store the
station.
5 Repeat the above steps 1 to 4 for
each station you want to store in
memory with a preset number.
Note
If the unit is unplugged or if a power failure
•
occurs, the preset stations will not be
erased.
Manually tuning to a DAB/
DAB+ radio station
Press to select your
desired DAB channels backward/
forward.
Store DAB/DAB+ radio stations
Note
You can store up to 20 DAB/DAB+ radio
•
stations.
7 EN
Tuning to preset radio stations
Repeatedly press until the
desired preset station is displayed.
» The unit will tune to the selected
station automatically.
DAB/DAB+ Information Display
You can view the DAB/DAB+ service
information in the following modes.
Depending on the DAB/DAB+ radio
station you are tuning to, some
information modes may be unavailable.
Page 10

Repeatedly press to view
the following information.
» Station Name
» Ensemble Name
» Clock
» DLS (Dynamic Label Segment)
» Signal Strength
» Programme Type
» Frequency
» Bit Rate
» Audio
(set 12/24 hour) and
(set date
format).
»
for resetting all radio settings
to the factory default status.
»
version) for displaying
the current version of the
rmware.
(factory reset)
(software
3 Press to exit the menu.
Use the menu
When you listen to radio, you can
access the menu for control options.
1 Press and hold for 1
second or more.
»
(full scan) is displayed.
2 Press to select
a menu option, and then press
to conrm the option or
enter the lower-level menu.
»
Scan and store DAB/DAB+ radio
stations within full range.
Tune to a DAB radio station
manually.
»
Dynamic range control: Select
a level for the eect of dynamic
range control.
Remove all invalid stations from
the station list.
(full scan)
(manual tune)
(prune)
»
»
time and date information:
date),
(automatic time
synchronization),
(system)
(time) for setting
(set time/
Listen to FM radio
Tuning in to a Station
1 Press /SOURCE button
FM source.
» FM Mode (FM mode)
on the display
.
to select
appears
2 Select a station using one of the
following methods.
»
Press and hold
for 1 second or more.
» The frequency changes
down or up automatically
until a station is found.
»
Repeatedly press TUN+ /UNto change the frequency until
you nd the station you want.
» Select a preset radio station
Repeatedly press
to select the desired preset
number.
» Its band and frequency are
displayed on the display.
(automatic tuning)
(manual tuning)
8EN
Page 11

Program radio stations
manually
Note
You can store up to 20 FM radio stations.
•
Automatically
Press and hold
or more to activate automatic program
mode.
»
» All available stations are
programmed.
» The rst programmed radio station is
broadcast automatically.
Manually
(scanning)is displayed.
for 1 second
1 Tune to a radio station.
2 Press and hold for 1
second or more to activate program
mode.
» The preset number will appear.
3 Repeatedly press to
allocate a number to this radio
station.
4 Press again to store the
station.
5 Repeat the above steps 1 to 4 for
each station you want to store in
memory with a preset number.
Note
If the unit is unplugged or if a power failure
•
occurs, the preset stations will not be
erased.
Use the menu
When you listen to radio, you can
access the menu for control options.
1 Press and hold for 1
second or more.
» [
displayed.
] (scan setting) is
2 Press to select
a menu option, and then press
to conrm the option or
enter the lower-level menu.
»
Search and store radio stations
automatically:
»
stations only) for radio
stations with strong signal
only,
»
all radio stations.
»
»
and date information:
time synchronization),
and
date format).
»
for resetting all radio settings
to the factory default status.
»
version) for displaying
the current version of the
rmware.
(scan setting)
(strong
(all stations) for
(system)
(time) for setting time
(set time/date),
(automatic
(set 12/24 hour)
(set
(factory reset)
(software
3 Press to exit the menu.
9 EN
Page 12

Show RDS information
RDS (Radio Data System) is a service
that allows FM stations to show
additional information.
1 Tune to an RDS station.
2 Repeatedly press
to displayed the
following information (if available):
» Station name
» Program type such as
(news), (sport),
(pop music)...
» Time
» Text
» Frequency
5 Other features
Set the Sleep Timer
You can set the unit to turn o
automatically after a certain period of
time.
• When the unit is turned on, press
repeatedly to select a set
period of time (in minutes):
10, 20, 30, 60, 90,
When sleep timer is activated,
displayed.
To deactivate sleep timer
Repeatedly press until (o)
is displayed and
disappears.
Setting the alarm timer
You can set two alarms which go o at
dierent time.
is
Note
Make sure that you have set the clock
•
correctly.
1 Make sure that you have set the
clock correctly. (See “Set the Clock”.)
2 Press and hold
for 1 second or more.
»
and the hour digits blink on
the display.
3 Press to set the
hour.
4 Press to store the setting
and the minute digits begin to blink.
5 Repeat the above steps 3-4 to set
the minute, alarm tone and alarm
volume level.
EN
10
Page 13

6 Press to save the alarm
detail.
Note
When the alarm rings, you can press
•
•
•
•
To deactivate or re-activate an
alarm timer
Repeatedly press
to activate the alarm function or
press again to deactivate it. If timer is
activated,
Repeat alarm
When the alarm rings, press
9 minutes later.
Stop alarm ring
When the alarm rings, press the
corresponding
stop the alarm with the alarm settings
remaining unchanged.
to adjust volume.
If other alarm sources are unavailable, the
unit switches to BUZZER automatically.
To exit clock setting mode without storing,
press
If no button is pressed in 30 seconds,
the unit exits alarm timer setting mode
automatically.
.
is displayed.
, the alarm repeats ringing
to
6 Product
information
Note
Product information is subject to change
•
without prior notice.
Amplier
• Maximum Output Power: 1 W
• Frequency Response:
100 - 20000 Hz, ±3dB
Tuner
• Tuning Range (FM): 87.5 - 108MHz
• Tuning grid (FM): 50 KHz
• Sensitivity
• Mono, 26dB S/N Ratio: < 22dBf
• Search Selectivity: < 35dBf
• Total Harmonic Distortion: < 2%
• Signal to Noise Ratio: > 45 dB
DAB
• Frequency Range: Band III
(174~240MHz)
Speakers
• Speaker Impedance: 3 ohm
• Speaker Driver: 3 inch full range
• Sensitivity: 81 ± 3dBm/W
General information
• AC/DC adapter:
• Input: 100-240V~, 50/60 Hz
• Output: DC 5.5V, 1.0A
• Model No.: TPA107-55055-EU
• Operation Power:
• Consumption: 1.65 W
• Dimensions (W x H x D):
160 x 66 x 63 mm
• Weight: 0.29 kg
11
EN
Page 14

7 Troubleshooting
Warning
Never remove the casing of this device.
•
To keep the warranty valid, never try to
repair the system yourself.
If you encounter problems when
using this apparatus, check the
following points before requesting
service. If the problem remains
unsolved, go to the Philips web site
(www.philips.com/welcome). When
you contact Philips, ensure that the
apparatus is nearby and the model
number and serial number are available.
No power
• Ensure that the power plug is
connected properly.
• Ensure that there is power at the AC
Mains.
• Ensure that the batteries are
inserted correctly.
No sound
• Adjust the volume.
No response from the unit.
• Take out the batteries and turn on
the unit again.
• Disconnect and reconnect the AC
power plug, then turn on the unit
again.
Poor radio reception
• Increase the distance between the
unit and your TV or other radiation
source.
• Fully extend the antenna.
EN
12
Page 15

Copyright © 2017 Gibson Innovations Limited.
This product has been manufactured by, and is sold under the responsibility of Gibson
Innovations Ltd., and Gibson Innovations Ltd. is the warrantor in relation to this product.
The Philips trademark and the Philips Shield Emblem are registered trademarks of
Koninklijke Philips N.V. used under license.
AJB3000_12_UM_V1.0
 Loading...