

Page 1
Register your product and get support at
EN User manual
AJB1002
Page 2

1 Important
Safety
a Read these instructions.
b Keep these instructions.
c Heed all warnings.
d Follow all instructions.
e Do not use t his apparatus near water.
f Clean only with dry cloth.
g Do not block any ventilation openings. Install in accordance
with the manufacturer’s instructions.
h Do not install near any heat sources such as radiators, heat
registers, stoves, or other apparatus (including ampliers)
that produce he at.
i Protect the power cord from being walked on or pinched,
particularly at plugs, convenience recept acles, and the point
where they exit from the apparatus.
j Only use attachments/accessories specied by the
manufacturer.
k Unplug this apparatus during lightning storms or when
unused for long periods of time.
l Refer all servicing to qualied service personnel. Ser vicing is
required when the apparatus has been damaged in any way,
such as power-supply cord or plug is damaged, liquid has
been spilled or objects have fallen into the apparatus, the
appar atus has been exposed to rain or moisture, does not
operate normally, or has bee n dropped.
Page 3
m Battery usage C AUTION – To prevent battery leakage which
may result in bodily injury, property damage, or damage to
the unit:
Install the bat ter y cor rectly.•
Remove the battery when the unit is not used for a long •
time.
n Apparatus shall not be exposed to dripping or splashing.
o Do not place any sources of danger on the apparatus (e.g.
liquid lled objects, lighted c andles).
Notice
This product complies with the radio inter ference
requirement s of the European Community.
Anychangesormodicationsmadetothisdevicethatare
not expressly approved by Philips Consume r Lifestyle may void the
user’s authority to oper ate the equipment.
Your product is designed and manufactured with high
quali ty materials and components, w hich can be recycled
and reused.
When t his crossed-out wheeled bin symbol is att ached
to a product it means that the produc t is covered by the
European Direc tive 2002/96/EC .
Please inform yourself about the local separate collec tion
system for electrical and electronic products.
Please act according to your local rules and do not dispose of your
old produc ts wi th your normal household waste. Correc t disposal of
your old product helps to prevent potential negative consequences
for the environme nt and human health.
Your product contains bat ter ies covered by the European
Directive 2006/66/EC , which cannot be disposed wit h
Page 4

normal household was te.Please inform yourself about the local rules
on separate collection of bat teries because correc t disposal helps to
preve nt negative consequences for the environment al and human
health.
Environmental information
All unnecessar y pack aging has been omitted. We have tried to make
the packaging easy to separate into three materials: cardboard (box),
polysty rene foam (buffer) and polyethylene (bags, protective foam
sheet.)
Your system consist s of materials which can be rec ycled and reused
if disassembled by a specialized company. Plea se observe the local
regulations regarding the disposal of packaging materials, exhausted
batteries and old equipment.
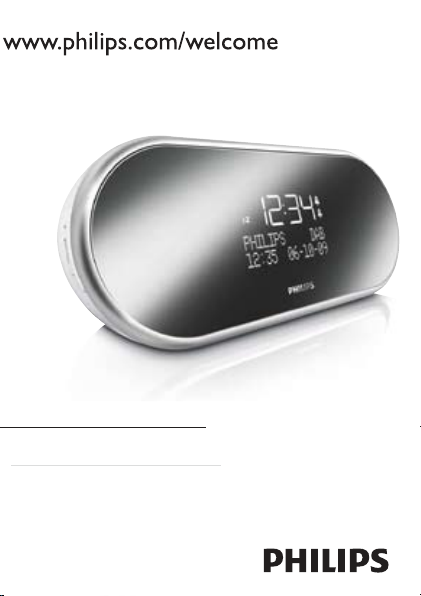
2 Your Clock Radio
Congratulations on your purchase, and welcome to Philips! To fully
benetfromthesupportthatPhilipsoffers,registeryourproductat
www.philips.com/welcome.
Introduction
With this unit, you can:
listen to FM/DAB (Digital Audio Broadcasting) radio•
wake-up by buzze r alarm or DAB/FM r adio•
enjoy audio from ex ternal devices•
What’s in the box
Check and identify the contents of your package:
Main unit (with a bat tery)•
AC power adapter•
MP3 link cable (x 1)•
User manual•
Page 5
Quick s tart guide•
c
d
e
b
c
i
h
g
f
l
k
j
a
nn
m
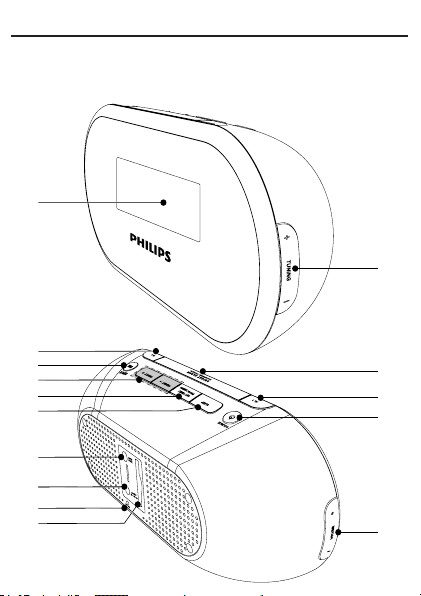
Overview of the main unit
Page 6

a + TUNI NG -
b REPE AT ALARM/BRIGHTNESS CONTROL
c AL 1/AL 2
d
e - Volume +
f Battery compar tment
g FM ANT
h DC 5V
i MP3-LINK
j SLEEP
k SET TI ME/PROG/MENU
l PRESET +/RRESE T -
m ENTER/DISPLAY
Tune to radio st ations.•
Repeat alarm.•
Adjus t display br ightness.•
Set alarm.•
Activate /deac tiv ate alarm timer.•
/SOURCE
Turn on/of f the unit.•
Select a source: FM/DAB tuner or MP3 link.•
Adjus t volume.•
Improve FM reception.•
Connect power.•
Connect external audio device.•
Set sleep timer.•
Set clock.•
Program r adio stations.•
Access DAB menu.•
Select a preset r adio station .•
Page 7

Show curre nt st atus.•
Switch between mono and stereo broadc ast.•
Conrmaselection.•
n Display panel
3 Get started
Caution
Use of controls or adjustment s or performance of procedu res •
other than herein may result i n haz ardous radiat ion ex posure or
other unsafe oper ation.
Always follow the instructions in this chapter in sequence.
If you contact Philips, you will be asked for the model and serial number
of this apparatus. The model number and serial number are on the rear
of the apparatus. Write the numbers here:
Model No. __________________________
Serial No. ___________________________
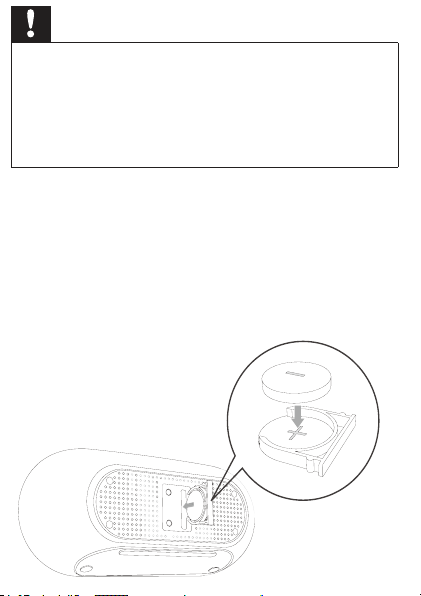
Install battery
The unit has a pre-installed lithium CR2025 battery to back up clock setting.
Page 8
Caution
Ris kofexplosio n!Kee pbat teriesawayfromh eat,sunshineorre . •
Neverd isca rdbatteriesi nre.
Risk of produc t damage! When the appa rat us is not used for long
•
periods, remove the battery.
The batter y contains chemical substances , so it s hould be disposed
•
of prop erl y.
The battery can not be u sed as power supply of this unit.
•
For rst -time use:
1 Remove the protective t ab to activate the bat ter y.
To replace the battery:
When the clock is not accurate although you have set it correctly,
replace the battery.
1 Pull ou t the battery tray and remove the old bat tery.
2 Place a new lithium CR2025 bat ter y into the battery tray with
correct polar ity (+/-) as indicated.
3 Insert the bat ter y tr ay back into the slot .
Page 9

Connect power
Caution
Risk of product damage! Ensure th at the p ower voltage corresponds •
to the voltage pri nted on the back or the underside of the
apparatus.
•
Risk of elec tric shock! When you u nplug the AC power cord, always
pull the plug f rom the socket. Never pu ll the cord.
•
Befor e connecting the AC power co rd, e nsur e that you have
completed all othe r connections .
1 Connect the power adapter to
the • DC 5V socket on the back of the main unit.
the power socket.•
Page 10

Turn on
1 Press to turn on the unit.
2 Press repeatedly to switch between standby mode and
different sources (F M/DAB/ MP3-L INK ).
To switch the unit to standby mode:
The time and date (if set) are displayed. »
1 Press for 3 seconds.
Set clock
1 In standby mode, press SET TIME for over 3 seconds.
» [SYNC ON Y] is displayed.
2 Press PRES ET +/RRESET - to select [Y] (Yes) or [N] (No).
3 Press SET TIMEtoconrm.
4 Repeat ste ps 2-3 to set 12/ 24-hour format, hour, minute, year,
If • [Y] is selected, the clock of the unit synchronizes with
that of DAB station.
The hour format begins to blink. »
month, and day in sequence.
Tip
If no button is pressed in one minute , the system exi ts clock set tin g •
mode.
Page 11

4 Listen to DAB radio
Tune to DAB radio station
Digital Audio Broadcasting (DAB) is a way of broadcasting radio digitally
through a network of transmitters. It provides you with more choice,
more information and better sound quality.
1 Press SOURCE repeatedly to select DAB .
Access DAB menu
1 In DAB mode, pr ess MENU to ac tivate DAB menu.
2 Press + TUNING - to navigate through the options.
3 To select an option, pr ess ENTER.
4 Repeat ste ps 2-3 if sub -option is available under one option.
[Manual tune]
The radio begins to scan DAB radio stations automatically. »
Whenscaniscomplete,theunittunestotherstavailable
station.
If no DAB station is found, » [No DAB Station]appears, then
[Manual tune] is displayed.
Option Function
[Manual tune] Totunetoaspecicchannelmanually.
[Autoscan full] To per form full scan to search for DAB radio s tations .
[DRC value] To add or remove a degree of compensation for
audio performance .
[Factory Reset] To restor e default settings .
[SW version] To display software ver sion.
Page 12

1 In DAB mode, pr ess MENU until [Manual tune] is displayed,
then press ENTERtoconrm .
A channel and its frequency appear on the display. »
2 Press + TUNING - repeatedly to tune to your desired station.
3 Press ENTERtoconrm.
[DRC value]
• [DRC off ]: DRC (Dynamic Range Control) is switched off.
• [DRC high]: DRC is switched on (the default option
recommended for noisy environment).
• [DRC low]: DRC is set to half nor mal level.
Store DAB radio stations in memory
You can store up to 20 DAB radio stations in preset channel.
1 Tune to a DAB radio station.
2 Press PRES ET +/RRESET - repeatedly to selec t a preset
number.
3 Press PROGtoconrm.
4 Repeat ste ps 2-3 to store more DAB radio s tations.
Note
To remove a pr e-s tored DAB radio s tat ion, stor e anot her s tation •
in its place.
•
The sy ste m will exit s toring mod e if no bu tton is pressed within 30
seconds.
Select a preset DAB radio station
1 In DAB mode, pr ess PRESE T +/RRESET - to select a preset
number.
Page 13

Show DAB information
1 While listening to DAB radio, press D IS PLAY repeatedly to
scroll through the following information (if available):
Dynamic label segment (DLS) »
Program type (PTY) »
Ensemble Name »
Channel and frequency »
Signal error rate »
Bit rate and audio status »
Time/date »
5 Listen to FM radio
Tune to FM radio station
Note
For opt imal r eception, fully extend and adju st th e posi tion of the antenna. •
1 Press SOURCE repeatedly to select FM tuner.
» [FM] and current radio frequency are displayed.
2 Press and hold + TUNING -.
3 When t he frequency s tart s to change, relea se the but ton.
4 Repeat ste ps 2-3 to tune to more stations.
To tune to a weak station:
1 Press + TUN ING -repeatedlyuntilyoundoptimalreception.
The FM tuner tunes to a station with strong reception »
automatically.
Page 14

Store FM radio stations automatically
Note
You can sto re a ma ximum of 20 preset r adio stations. •
1 Press SOURCE repeatedly to select FM tuner.
2 Press PROG for over 3 seconds.
All available stations are stored in the order of waveband »
reception strength.
Therststoredradiostationbroadcastsautomatically. »
Store FM radio stations in memory
1 Tune to an FM r adio s tation.
2 Press PROG.
3 Press PRESET +/PRESET - re peatedly to select a preset numbe r.
4 Press PROGtoconrm.
5 Repeat ste ps 1-4 to stor e more stations.
The preset channel number is displayed. »
Note
To remove a pr e-s tored FM r adio s tat ion, stor e anot her s tation in •
its place.
•
If no button is pressed w ithin 30 seconds , the s ystem exi ts storing
mode au tomatically.
Page 15

Select a preset FM radio station
1 In FM tuner mode, press PRESET +/RRESET - to select a
preset number.
Select stereo/mono broadcast
Note
For st ations with weak signals, to impr ove the reception , change to •
monau ral sound .
1 In FM tuner mode, press and hold ENTER to swi tch between mono
and stereo broadcast.
6 Other features
Set alarm
Warning
Ensur e that you have set the clock correctly. •
1 Press AL 1 or AL 2 for over 2 seconds.
2 Press PRES ET +/PRESET - to select your desired alar m source:
FM/DAB Radio or Buzzer.
3 Press AL 1 or AL 2toconr m.
4 Repeat steps 2-3 to set t he hour, minute and alarm volume level.
The hour digits begin to blink. »
Page 16

Note
If no button is pressed in one minute , the syste m exits ala rm se tting mode. •
Activate/Deactivate alarm timer
Note
Ensur e that you have already set the ala rms successfully. •
1 Press AL1 or AL2 repeatedly.
If the alarm timer is activated, »
If the alarm timer is deactivated, »
Snooze alarm
or appears.
or disappears.
1 When t he alarm sounds , press REPEAT ALARM/
BRIGHTNESS CONTROL .
The alarm sounds again 9 minutes later. »
The alarm icon begins to blink. »
Note
If no button is pressed in 30 min utes , the a larm stops ringing •
automatically.
Stop alarm sound
1 When t he alarm sounds , press the corresponding A L1/AL2.
The alarm stops but the alarm settings remain. »
Page 17

Set sleep timer
The unit can switch to standby mode automatically after a period.
1 Press SLEEP repeatedly to selec t time period.
»
is displayed.
To turn off the sleep timer:
The volume decreases gradually in the last 5 minutes. »
1 Press SLEEP repeatedly until [Sleep off ] is displayed.
»
disappears.
Adjust display brightness
1 Press REPEAT ALARM/B RIGHTNESS CONTROL repeatedly
to select different brightness levels of the display:
Full br ightness•
Half brightness•
Backlight off•
Listen to external audio device
With this unit, you can enjoy audio from an external device.
1 Connect the supplied M P3 link cable to:
2 Press SOURCE repeatedly to select MP3-LINK.
3 Press - VOLUME + repeatedly to adjust volume.
the • MP3-LINK socket on the back of this unit
the output socket of the external device.•
» [MP3-Link] is displayed.
Page 18

7 Product information
Note
Product information is sub jec t to change without prior noti ce. •
Specications
Tuner (FM)
Tuning Range 87.5 - 108MHz
Tuning grid 50KHz
Sensitivity
- Mono, 26dB S/N Ratio
Search Selectivity >28dBf
Total Har monic Distor tion <3%
Signal to Noise Ratio >50dB
<22 dBf
Page 19

General information
AC Power Input: 220 - 230 V, 50 Hz
Oper ation Power Consumption 3.0 W
Dimensions
- Main Unit ( W x H x D)
Weight
- With Packing
- Main Unit
207 x 60 x 88 mm
0.53kg
0.4kg
8 Troubleshooting
Caution
Never r emove the ca sing of this appar atus . •
To keep the warranty valid, never try to repair the system yourself.
If you encounter problems when using this apparatus, check the
following points before requesting service. If the problem remains
unsolved, go to the Philips web site (www.philips.com/support). When
you contact Philips, ensure that your apparatus is nearby and the model
number and serial number are available.
No power
Ensur e that the Mains cord is connected securely.•
Ensur e that ther e is powe r at the AC Mains .•
No sound
Adjus t the volume. •
No response from the unit
Page 20

Disconnec t and reconnect t he AC power plug, then turn on •
the unit again.
Poor radio reception
Increase t he dis tance bet ween the apparatus and your T V or •
VCR.
Fully extend the antenna. •
Timer does not work
Set the clock correctly. •
Switch on the timer. •
Clock/timer setting erased
Replace the battery. •
Power has been inter rupted or the power plug has been •
disconnec ted.
Reset t he clock/timer. •
Page 21

sense and simplicity
PHILIPS CONSUMER ELECTRONICS
WARRANTY POLICY FOR AUSTRALIA
Philips provides its Consumer Electronics products with a 1 Year
Manufacturers Warranty.
The benets given to the purchaser by this warranty are
in addition to all other rights and remedies, which the
purchaser has in respect of the product under the Trade
Practices Act or other Commonwealth or State Law.
The conditions contained in this warranty replace and override
the provision of the Philips World-Wide Guarantee for products
purchased in Australia and used in Australia.
Please record the following information for your records and keep
in a safe place. It is essential that you retain your original purchase
receipt to make a warranty claim.
Model number : ………………………………………………
Serial number : ………………………………………………..
Date of purchase : ……………………………………………
Retailer : ………………………………………………………
If you require assistance with the operation of the product, its
features or specications, you may call the Philips Technology
Care Centre on 1300 363 391 where support is provided by
our trained staff.
Effective 1st July 2009
Page 22

If the product fails within 12 months from the date of purchase,
please return the faulty product to the place of purchase.
Conditions of Warranty
a. All claims for warranty can only be made at the place of purchase
and a copy of the purchase receipt is required for any warranty
claim.
b. The warranty period is valid from the original date of purchase of
the product.
c. This warranty extends only to defects in material or workmanship
occurring under normal use of the product when operated in
accordance with the instructions.
d. Philips may, at its discretion choose to repair rather than replace
this product.
e . If a replacement product is supplied, it is warranted for the
remainder of the warranty period, from the original date of
purchase.
f. This Manufacturers Warranty is limited to 3 months for products
used in commercial applications.
g. Product accessories are covered by the same warranty period. If
an accessory is faulty, please contact the Philips Technology Care
Centre on 1300 363 391.
h. This Manufacturers Warranty is neither transferable nor valid in
countries other than Australia.
This Warranty does not cover:
a. Service costs arising from failure to correctly adjust the controls
of the product or to observe the instructions, or inspections
that reveal that the product is in normal working order.
b. Product failures caused by misuse, neglect, accidental breakage,
transit damage, un-authorised repairs or modication by unauthorised persons, external res, lightning strikes, oods, vermin
infestation or liquid spillage.
Page 23

c . Reception problems, replacement of worn or used batteries or
other consumables.
d. Second hand products or refurbished products.
e. Products failure, caused by other products.
Version 1.3: 1
st
July 2009
NEW ZEALAND-Guarantee and Service for New Zealand
Thank-you for purchasing this quality Philips product.
Philips New Zealand Ltd guarantees this product against defective
components and faulty workmanship for a period of 12 months.
Any defect in materials or workmanship occurring within 12
months from the date of purchase subject to the following
conditions will be rectied free of charge by the retailer from
whom this product was purchased.
Conditions
1. The product must have been purchased in New Zealand. As
proof of purchase, retain the original sales docket indicating the
date of purchase.
2. The guarantee applies only to faults caused by defective
components or faulty workmanship on the part of the
manufacturer.
3. The guarantee does not cover failures caused by misuse, neglect,
normal wear and tear, accidental breakage, use on the incorrect
voltage, use contrary to operating instructions, or unauthorised
modication to the product or repair by an unauthorised
technician.
Page 24

4. Reasonable evidence (in the form of a sales docket) must be
supplied to indicate that the product was purchased no more than
12 months prior to the date of your claim.
5. In the event of a failure, Philips shall be under no liability for any
injury, or any loss or damage caused to property or products
other than the product under guarantee.
This guarantee does not prejudice your rights under common law
and statute, and is in addition to the normal responsibilities of the
retailer and Philips.
How to claim
Should your Philips product fail within the guarantee period please
return it to the retailer from whom it was purchased.In most cases
the retailer will be able to satisfactorily repair or replace the product.
However should the retailer not be able to conclude the matter
satisfactorily, or if you have other difculties claiming under this
guarantee, please contact
The Guarantee Controller
Philips New Zealand Ltd.
4 PO. Box 41.021
Auckland
3 (09) 84 94 160
fax 3 (09) 84 97 858
Page 25

© 2010 Koninklijke Philips Electronics N.V.
All rights reserved.
AJB1002_79_UM_V1.0
 Loading...