

Page 1
CD Clock Radio
aj39S0
aj39S1
aj3952
aj39S3
Audio
Page 2

Return your Warranty Registration card today to
ensure you receive all the benefits youVe entitled to.
S
ptjrcnasf: ^ re^i^tere^j.
Pr^ihps urclm:
'j::' '^ni
Rt^gisr: ^.''i'CinSf^'1
a;^-'
Y^arranty
Verification
Registering your product
within 10 days confirms
your right to maximum
protection under the
terms and conditions of
Owner
Confirmation
Your completed Warranty
Registration Card serves
as verification of
ownership in the event of
product theft or loss.
your Philips warranty.
Know these
nOOiS
CAUTIOiy
RISK OF ELECTRIC SHOCKj
DO NOT OPEN I
i CAUTION TO reduce THE RISK OF ELECTRIC SHOCK 00 N0’ '
3EMQVE CDMEP, (OR BACK] NO USER-SE.RVICEABLE PARTS '
: NSIDE oEe^lR SEPyiCING TO QUALIF:ED SERVICE PERSONNEL -
itian youi
:ve proGjct covoi
À "‘'d "exclamanacu
M ^ attention to R a'-i ■
.JKJÉi you sheuId .^T-1 d •
‘Cerature closely to preven
-A" ^-Armnce problems
A
'Cty j:
u.piè.o:., m:
1 o A ' r r a 11 ■■
^ Q Tr,t- 'vvl'iirL
c ondcse^r'
t operating
Model
Registration
Returning your Warranty
Registration Card right
away guarantees youY
receive all the information
and special offers which
you qualify for as the
owner of your model.
WARNING I TC' PxbVQ
m- .'C.n -1AZ.ARD. DO D
. :;/n rmic UQ;^,jpr/|nK “
O . h' i ;p ^
CAUTION:
w e si' .' t, an d tu ily i ns ert .
Page 3

tngiisti
UUNI KUL:>/ IIV51 ALLAI lUN
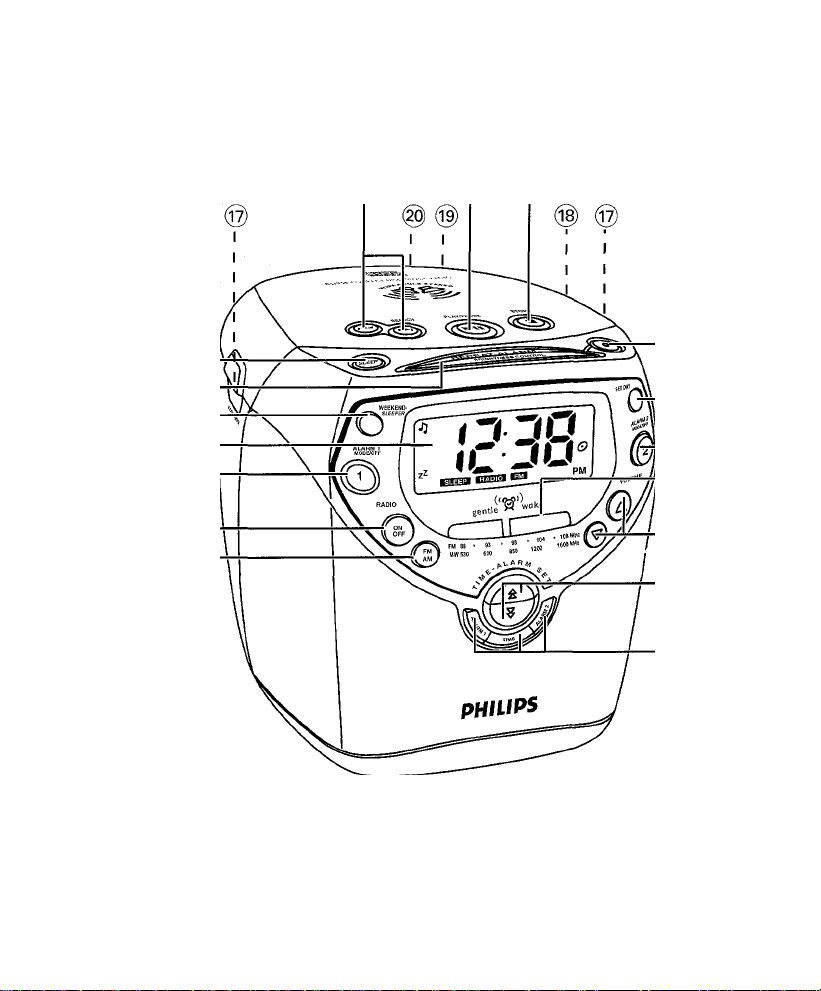
CONTROLS
CD PLAYER
®STOPB
- stops CD playback;
- stops sleep function in CD mode;
- stops the active CD alarm for 24 hours.
©PLAY/PAUSE HI
- starts/ pauses CD playback.
©SEARCH r«, M-i
- skips CD tracks/ searches for a particular passage.
GENERAL
©SLEEP
- activates and adjusts the sleep time.
©REPEAT ALARM/ brightness control
- changes the brightness of the display illumination:
- switches off the alarm for a 9 minute period:
- stops sleep function in CD, buzzer or radio mode.
©WEEKENO-SLEEPER
- deactivates alarm 1 and/ or 2 for the weekend.
©Display
- shows the clock/ alarm time and status of the set.
©ALARM 1 MODE/ OFF
- sets/ reviews/ switches off alarm 1 or 2.
RADIO
©ON/ OFF
- switches the radio on/ off:
^ stops sleep function in radio mode:
- stops the active radio alarm for 24 hours.
©FM/AM
- selects the radio waveband.
SETTING TIMES
©ALARM 1. ALARM 2, TIME
- sets the respective alarm or clock time
- adjusts clock/ alarm times;
- adjusts the gentle wake minimum and maximum
volume level for alarm I or 2;
- selects a CD wake up track for alarm 1 or 2.
©VOLUME A
- adjusts the sound level.
©Dial lens
(See figure B and [2])
or
ALARM 2 MODE/ OFF
©SET DAY
- sets the day for weekend sleeper activation.
©24 HR RESET
- stops the active buzzer, radio or CD alarms for 24
hours.
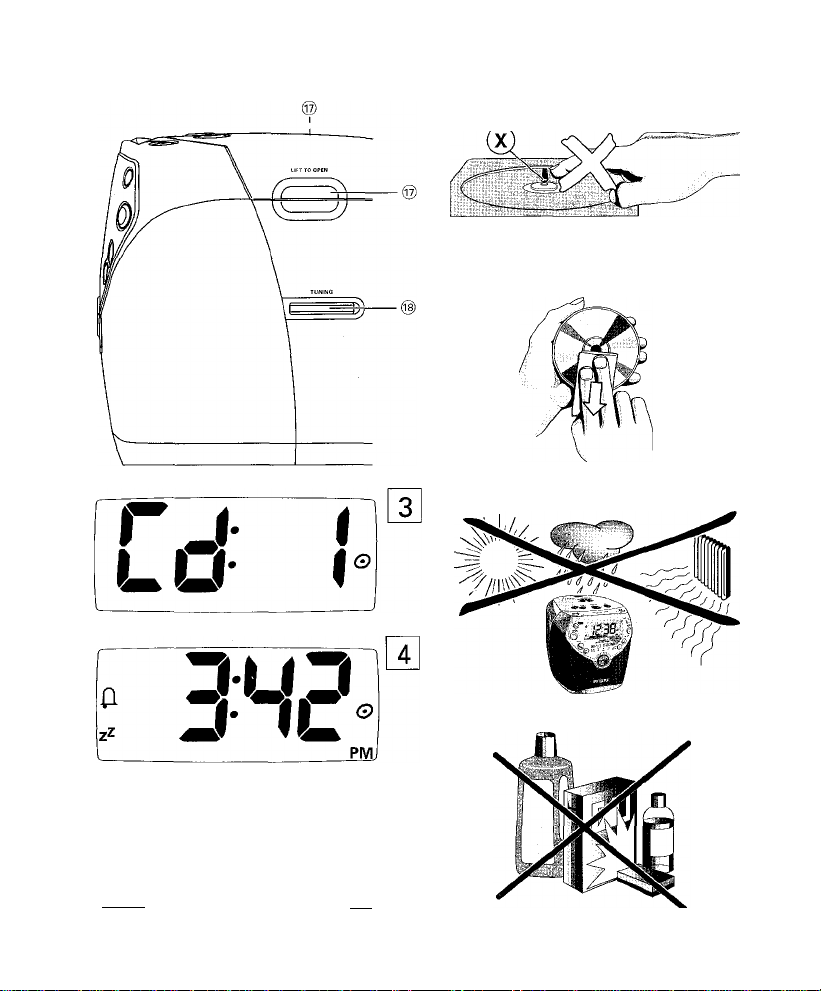
©LIFT TO OPEN
- opens/ closes CD door.
©TUNING
' tunes to a radio station.
©Pigtail
©Power cord
2 This device must accept any interference received,
procedures other than herein may result in hazardous
radiation exposure or other unsafe operation.
INSTALLATION
Power Supply and Demo mode
2
• Press any control (with the exception of
3
Standby power consumption
- antenna to improve FM reception.
- for AC power supply.
The type plate is located on the bottom of the set.
This product complies with the FCC-Rules, Part 15 and
with 21 CFH 1040.10. Operation is subject to the
following two conditions:
1 This device may not cause harmful Interference, and
including interference that may cause undesired
operation.
CAUTION
Use of controls or adjustments or performance of
1
Check if the power voltage, shown on
on the bottom of the set.
power supply. If it does not, consult your dealer or
service center.
Connect the power plug into the wall outlet. The
power supply is now switched on and the dispiay
will show the
- PH../L./PSscrolls across the display continuously.
REPEAT ALARM/ brightness control
exit the demo mode.
To disconnect the set completely from the power
supply, withdraw the power plug from the wall
outlet.
PHILIPS demo mode.
the type plate
corresponds to your local
on the set) to
(clock mode)
.....
3 W
Page 4

N
SETTING TIMES, DAY CD
MEMORY BACKUP
The memory backup conveniently allows your day, alarm
and clock time settings to be stored for up to 3 minutes
when there Is a power interruption e,g. AC power
failure.
The complete CD clock radio and illumination will be
switched off. As soon as the power supply returns, the
display will indicate the correct time,
• If power supply returns after 3 minutes, the display
will show the
need to re-enter the day, alarm and clock times.
BASIC FEATURES Illumination brightness
• Press
more.
— The brightness of the display will change In this
Volume
Press
volume level
SETTING THE CLOCK AND ALARM TIMES
The time is displayed using the 12 hour clock where the
PM indicator
7
Press
respective clock or alarm time display flashes.
2
Press and hold down i, ^to adjust both the hours
and minutes.
• By pressing 1 or J respectively, the time increases/
decreases rapidly and continuously from minutes to
hours. Release ^ or Jwhen you have reached the
correct setting.
• If you need to adjust the time slowly, minute by
minute, press 1 or J briefly and repeatedly.
3
Press
respective time setting.
PHILIPS demo mode
REPEAT ALARM/ BRIGHTNES CONTROL Once Or
sequence:
LOW-* MEDIUM-* BRIGHT-* LOW...
VOLUME
or A to adjust the volume level. The
UO-
is indicated as a number from 0-32.
lights up (on = PM, off = AM).
TIME, ALARM 1
TIME, ALARM 1
or
ALARM 2
or
ALARM 2
and you will
briefly until the
to confirm your
SETTING THE DAY
Setting the day enables you to set the
SLEEPER
WEEKEND-SLEEPER
to Sunday, 1-7) dR'd will show briefly in the display to
remind you to set the day first.
7
2
CD PLAYBACK
7
2
Insert a CD with the printed side facing up, and close
3
Press
4
Adjust the sound with
5
To interrupt, press
• The current track number shows briefly before
6
Press
7
Press
function. If you attempt to use the
Press
SET DAY.
While the day display is shown, press
again once or more to select the day numbered from
dAY 1-7
(Monday-Sunday):
The display will revert to show the clock time.
To open the CD door, lift at the edge marked
LIFT TO OPEN !
the door.
PLAY/ PAUSE Ml
^ The CD indicator taiM ,
number of tracks are shown, followed by the first
track number before returning to clock time.
-
door
is shown if you have not closed the CD
door/ open the CD door during playback.
-
naCd
is shown if no CD has been inserted/
inserted incorrectly
-
r,FCd
is shown if the CD-R(W) is non-finalized
-
or r
indicates a general error in operation of the
set.
- The display returns to clock time.
returning to clock time. Wi» flashes during pause.
PLAY/ PAUSE Ml
STOP ■
-* The display returns to clock time.
VOLUME
PLAY/ PAUSE Ml.
to stop playback.
WEEKEND-
prior to setting the day (Monday
SET DAY
to start playback.
Cd: - -
and the total
or
A.
again to resume playback.
Page 5

"
‘J
í-'ii'' =; í- 't; ^ ni " Ì ^
■ Dès que ¡achat de votre appareil Philips
est enregkîré, vous avez droit à tous les
avantages dont bénéficient les
possesseurs des produits Philips.
Je garantie
Enregistrez votre produit
dans les 1C - ai ■;'''■'
confirmer *■.<■■ o,\m- .' .
protection i'-.-r r V Mi > .<J^:r
les ten'' ' t ■ 'U'ÎM! '!>■
de votre g<r-. .:ii rM m-
Connaissez ces
symboles de Vv'
Votre carte
d'enregistrement de
garantie prouve que vous
possédez fappareii en cas
de vol < -n = V
produit
! /
SVI
i't p/ts
I il U ' "
Lb VE
ATTENTION
штат oe choc Eimmmm
ДПШТЮШ; POUR ШШ\Ш lE RESQyi SHÛO
ШЕ Pâs Ш1ШРЛ LE еауушйЁ f.^i le pmimu дшше). oet дррййен
m ШГ#0ЙТ1 AUtUr^lE PIECE РШШЗ! РР.ЙЙЕЕ РАЙ ГУШШДТЕУЙ.
SOLFIER $йп mmimú а пи теонш1Шегу шйупе.
▲
funîté, risque de provoquer un choc
électrique» Pour la sécurité de chacun,
nous vous prions de ne pas retirer le
boîtier de ce produit
▲
problèmes de fonctionnement et
d'entretien si vous ne lisez pas les
informations s'y reportant»
I^E PAS 01ШШР
Cet «éd'air à pointe de flèche»
indique quEin matériau non
isolé, situé à ilntérieur de
Le ((point d'exclamation» attire
votre attention sur des sujets
risquant de provoquer des
A
■ Remplissez et renvoyez votre carte
d'enregistrement de garantie Jointe à
votre appareil sans tardée Vous
bénéficierez de ces avantages importants.
au modèle
Renvoyez V*'Г--. en ^
d*enregistre;:a' '-a -p;.
dès аи|оугс'п'- r '
assure" п,- . w«--- . i: .
iiv -'Мг-Oino.'i;.
b>:'ii. vi--.iM-i; Л' :
di'>:=■ i.'' ni;'. :мм
¡s'.
чм'а
.m-.-
lililB«lBiilllllïllie
Cet espace vous est réservé
Inscrivez ci-dessous le numéro de série situé à h
basse du bloc. Conservez cette information pour
vous y reporter à favenir.
N*’ de modèle
N'' de série
DANGER: ne pas exposer
CET ÉQUIPEMENT A LA PLUIE NIA
UNE HUMIDITÉ EXCESSIVE POUR
ÉVITER LES RISQUES D'INCENDIE ET
DE CHOC ÉLECTRIQUE.
Al I ENIION^ Pour éviter les
chocs électriques, introduire la lame la
plus large de la fiche dans la borne
correspondante de la prise et pousser
jusqu'au fond. ^'1Ac.44s:
Page 6
®
@
®
ш
(D ®
®
(U)
é)
бг)
Page 7
ûCi
in
ЕД Elirai
lU
PM
Page 8

Read before operating equipment
This product was designed and manufactured to meet
strict quality and safety standards. There are, however,
some installation and operation precautions which you
should be particularly aware of.
1. Read these instructions
- Ail the safety and
operating instructions should be read before the
appliance is operated.
2. Keep these instructions
- The safety and
operating instructions should be retained for future
reference.
3. Heed all warnings
- All warnings on the
appliance and in the operating instructions should
be adhered to.
4. Follow all instructions
- All operating and use
instructions should be followed.
5. Do not use this apparatus near water
~ for
example, near a bathtub, washbowl, kitchen sink,
laundry tub, in a wet basement or near a swimming
pool, etc.
6. Clean only with a damp cloth.
The appliance
should be cleaned only as recommended by the
manufacturer.
7. Install in accordance with the manufacturers
instructions. Do not block any of the
ventilation openings.
For example, the appliance
should not be situated on a bed, sofa, rug, or similar
surface or placed in a built-in installation, such as a
bookcase or cabinet that may impede the flow of air
through the ventilation openings.
8. Do not install near any heat sources
such as
radiators, heat registers, stoves, or other apparatus
(including amplifiers) that produce heat.
9. Do not defeat the
safety purpose
of the
polarized or grounding-type
plug. A polarized plug has
two blades with one wider than the other. A
grounding type plug has two blades and a third
grounding prong. The wide blade or the third prong
are provided for your safety. When the provided
plug does not fit into your outlet, consult an
electrician for replacement of the obsolete outlet.
10. Protect the pewer cord
from being walked on or
pinched particularly at plugs, convenience
receptacles, and the point where they exit from the
apparatus.
11. Only use attachments/accessories
specified by
the manufacturer. ,
12. Use only with a cart,
stand, tripod,
bracket, or table specified by the
manufacturer, or sold with the apparatus.
When a cart is used, use caution when
moving the cart/apparatus combination
to avoid injury from tip-over.
13. Unplug this apparatus
during lightning storms or
when unused for long periods of time.
14. Refer all servicing
to qualified service personnel.
Servicing is required when the apparatus has been
damaged in any way, such as power-supply cord or
plug is damaged, liquid has been spilled or objects
have fallen
into the apparatus, the
apparatus has
been exposed to rain or moisture, does not operate
normally, or has been dropped.
15. Battery usage CAUTION.
To prevent battery
leakage which may result in bodily injury or damage
to the unit:
• Install
all
batteries correctly, + and - as marked
on the unit.
• Do not mix batteries
and
alkaline,
etc ).
(old
and
new
or
carbon
• Remove batteries when the unit is not used for a
long time.
EL 6475-E001-00/11
Page 9

UU/ KAUlU St I lINli ALAKM UKIIUIMS
Selecting a different track during playback
The track number appears briefly in the display when
you press
SEARCH
• Press
SEARCH
track(s).
• Press
SEARCHu^
previous tracks.
• Press
SEARCH
the beginning of the current track.
Finding a passage within a track
1
During playback, press and hold down
SEARCH
— The CD is played at high speed and low volume:
the display will show
number.
2
Release
passage you want.
— Normal CD playback and standby clock time
resumes.
RADIO
1
Press
ON/ OFF
2
Press
FM/AM
3
Adjust the sound using
4
Adjust the
To improve reception:
FM:
Extend pigtail at the back of the set fully for
optimum reception.
AM:
uses a built-in antenna. Direct the antenna by
adjusting the position of your set.
5
Press
ON/ OFF
■:T-TiTl»l and the waveband disappear from the
display.
i+< or »i to skip tracks.
once or more to skip to the next
more than once to skip to
once and playback will return to
M4 or »>1.
Cd:
and your current track
SEARCH
TUNING
r« or
»h
when you recognize the
to switch on the radio.
is displayed briefly followed by the clock time
, and the last selected waveband.
if you wish to change waveband.
VOLUME
wheel to tune to a radio station.
to switch off the radio.
or
A.
SEHING THE ALARM OPTIONS General
Two different alarm times,
the CD, radio or buzzer modes. This can be useful when
for example you need to be woken up at a different
time during the week and at the weekend.
- Remember to first set the DAY, clock and alarm time
functions correctly I
- Make sure your selected alarm symbol is shown.
Viewing the Alarm Mode Options
1
Select your choice of alarm mode by pressing
ALARM 1
find your respective mode.
The alarm mode display sequence is shown:
-
L a :IJIJ -
-
H t: 16 -
- Followed by the 3 different alarms:
(buzzer) fl
(radio)
tu,
CD mode ci> with CD and a track number / - S S.
2
Read the following chapters to adjust or select the
respective modes.
Adjusting the Gentle Wake Volume
A sure way of getting up in the mornings, the
wake
volume for the alarm begins from gentle volume
e.g
L a'00
(low) and gradually increases to a higher
volume e.g.
The default volume range is
you wish to change the default volume for the buzzer,
radio or CD alarm:
2
3
4
l-l
/■' /
1
In the standby mode, press
or
ALARM 2 MODE/OFF
As soon as
To set the maximum volume for your alarm, press
As soon as A' /■' /5 appears, press 1 or ^ until you
i o:00
more to adjust the starting volume of your alarm.
ALARM 1 MODE/ OFF
again to change to the H /■' /6 display.
reach the desired volume level (
ALARM 1
or
ALARM 2 MODE/ OFF
default volume level for start of gentle
wake alarm
default maximum volume level for
gentle wake alarm
FIL,
or
or
t.
appears, press f or Jfonce or
or 2 can be set in
once or more to
gentle
L oOJO
and
0 0 IB.
If
ALARM 1 MODE/ OFF
once.
or
ALARM 2 MODE/ OFF
!0 - 3d).
Page 10

SWITCHING OFF ALARM
Notes:
• The HI volume is always greater or equal to the
volume: e.g.i.
•
The starting volume is
volume range
¡3 !:3c',
/
• The gentle wake volume settings do not affect
normal CD and radio playback volume level,
• It is not possible to review the gentle wake volume
range
ALARM 1 MODE/ OFF
cancels the alarm completely.
• During the alarm call, if you press ior^the high
volume stops increasing immediately.
Selecting Buzzer or Radio Alarm
• Press
OFF
(radiol
Note:
If you have selected the radio alarm
you have tuned properly to a station.
CD Alarm Mode; Selecting a CD track
You can program and select a CD track number between
1-99, when the set Is in the standby or radio playback
mode.
However, if the track number programmed does not
exist on your CD, the CD will start playback from the
first track during the alarm call.
1
Insert a CO into the CD compartment.
2
Press
AURM 2 MODE/ OFF
track number display is shown.
See figure [^.
3
As soon as the CD alarm display appears,
press lor? until the desired track number is shown.
/ To review your programmed track number, press
AURM 1 MODE/ OFF
again repeatedly until the CD alarm display is shown.
L a ' /5, H I:
e.g.ii. L o ' /o', W
uCi
with a possible high volume range
~ ~1 ^
during the
ALARM 1 MODE/ OFF
repeatedly until the (buzzer) il FH or
b u
display is shown.
AURM 1 MODE/ OFF
The display returns to standby clock time,
/5'
!c‘
i o 'OD.
-
with a possible low
3c,
and the maximum volume is
active alarm call as pressing
or
ALARM 2 MODE/ OFF
or
repeatedly until the CD and
or
ALARM 2 MODE/ OFF
L o
or
AURM 2 MODE/
t u,
make sure
Note:
• The buzzer alarm option will automatically replace
SWITCHING OFF THE AURM
There are three ways of switching off the alarm. Unless
you cancel the alarm completely, the
RESET
from the time your alarm time first goes off.
It you want the alarm mode to be stopped immediately
but also wish to retain the same alarm setting for the
following day:
• Press from 3 possible options according to your
To cancel the set alarm time before it goes off, or during
the alarm call:
• Press
This will repeat your alarm call at 9-minute intervals.
• During the alarm call,
• Repeat if desired up to an hour.
Notes:
• The selected alarm mode G, •0, or
the CD alarm if you have:
- inserted a CD incorrectly:
- Inserted a damaged CD;
- forgotten to Insert any CD;
- not closed the CD door properly.
24 HOUR AURM
will be automatically selected after 59 minutes,
24 HOUR ALARM RESET
selected alarm:
a
24 HR RESET
CD alarms
b
STOP
c
ON/ OFF
- You will hear a beep tone confirming 24 hour reset
activation.
CANCELING THE ALARM COMPLETELY
AURM 1 MODE/ OFF
OFF
once or more until the selected alarm indicator
disappears from the display.
If you cancel the alarm during the alarm call, you
will also hear a beep tone confirming the alarm
has been cancelled.
REPEAT ALARM
press
REPEAT ALARM/ brightness control.
to switch off the buzzer, radio or
■ CD alarm only
radio alarm only.
or
ALARM 2 MODE/
0
indicators will
Page 11

CONSIGNES DE SECURITE IMPOR
A lire avant toute utilisation du matériel
Ce produit a été conçu et fabriqué en accord avec des
normes de sécurité et de qualité très strictes, li existe
toutefois des précautions d'installation et de fonctionnement
qu'il est important de connaître et de respecter.
1. Lisez ces instructions.
les consignes de sécurité et les instructions de
fonctionnement avant d'utiliser l'appareil.
2. Conservez ces instructions.
conserver ces consignes de sécurité et instructions de
fonctionnement pour référence ultérieure.
3. Respectez les avertissements.
avertissements inscrits sur l'appareil lui-même ou
figurant dans les instructions de fonctionnement doivent
être respectés.
4. Suivez toutes les instructions.
suivre toutes les instructions de fonctionnement et
d'utilisation.
5. N'utilisez pas cet appareil à proximité d'une
source d'eau
lavabo, un évier de cuisine, un baquet de lingerie, ou
dans une cave humide, près d'une piscine, etc.
6. Nettoyez l'appareil uniquement avec un chiffon
humide.
selon la procédure recommandée par le fabricant.
7. Installez l'appareil selen les instructions du
fabricant. N'obstruez aucun orifice de ventilation. -
Par exemple, l'appareil ne doit pas être posé sur un
canapé, un lit, un tapis, ou autre surface du même type ;
il ne doit pas non plus être placé dans un meuble intégré
comme un ensemble bibliothèque ou autre où le système
de ventilation de l'appareil serait bloqué.
8. N'installez pas l'appareil près d'une source de
chaleur
chaleur, cuisinières, ou autres appareils (même des
amplificateurs) dégageant de la chaleur.
- comme par exemple, une baignoire, un
- Cet appareil doit être nettoyé uniquement
comme par exemple des radiateurs, bouches de
- Il est impératif de lire toutes
- II est recommandé de
- Tous les
- Il est impératif de
9. Ne détruisez pas la
sécurité
prise de terre ou prise
polarisée fournie - Une prise
polarisée est dotée de deux lames dont une plus large
que l'autre. Une prise de terre est dotée de deux fiches
semblables et d'une troisième, plus large, qui assure la
mise à la terre pour votre sécurité. Si la prise fournie ne
convient pas à la prise murale dont vous disposez,
consultez un électricien pour remplacer et adapter votre
prise murale.
10. Protégez le cordon d'alimentation
éviter de marcher dessus ou de le pincer
particulièrement aux endroits des prises, mâles et
femelles, et au point de raccordement sur l'appareil lui-
même.
11. Utilisez uniquement des accessoires oq options
recommandés par le fabricant.
roulettes, veillez à le déplacer avec précaution afin
d'éviter tout accident corporel si l'équipement se
renversait.
13. Débranchez l'appareil
rester inutilisé pendant une période de temps prolongée.
14. Pour toute réparation,
qualifié. Une réparation sera nécessaire si l'appareil a
subi des dommages tels que détérioration du cordon
d'alimentation ou de la prise, liquide renversé sur
l'appareil, ou encore si un objet est tombé dessus, si
l'appareil a été exposé à la pluie ou à l'humidité, s'il ne
fonctionne pas correctement ou s'il a fait une chute.
15. PRÉCAUTION d'emploi des piles.
fuite des piles qui risquerait de causer des blessures
corporelles ou d'endommager l'appareil:
• Installez
qu'indiqués sur l'appareil.
• Ne mélangez pas les piles (pas de piles
des
usagées
alcalines,
• Enlevez les piles lorsque l'appareil reste inutilisé
pendant une longue période.
vfmm
incorporée dans la
Utilisez uniquement un meuble sur
roulettes,
ou une table de type recommandé par le
fabricant. Si vous utilisez un meuble sur
toutes
etc ).
un support, un pied, une étagère
pendant les orages ou s'il doit
faites appel à un personnel
les piles correctement, + et - tels
ou de piles au
carbone
EL6475-E001-00/11
Prise
polarisée C. A.
pour
Afin d'éviter toute
neuves
avec
avec des
Page 12

1 rapide
a. Setting TIME and week daya. Réglage TIME Iheure) et
Press/
Appuyezi
1 TIME.t/?
2 TIME
3 SET DAY (7 2'* 3~* 4‘* 5«* 6"» 7-» 7...
Pulse:
du jour de la semaine
a. Cómo establecer TIME
y el día de la semana
display/
affichage!
pantalla:
1
b. Setting ALARM TIME 1 & 2,
and the alarm modes
e.g. Alarm @ (by buzzer, tuner or
CD wakeup track:
7 ALARMI,!/;
2 ALARM 1
3 © (ALARM 1 MODE, ON/ OFF), H ;
4
5
6
7
c. Activating WEEKEND-SLEEPER c. Activation du SOMMEIL WEEKEND c. Activación de WEEKEND-SLEEPER
d. Activating SLEEP for
1 PLAY/PAUSE Wl
2 SLEEP 10'«* 30 "* 60'*
®.i/i
© Stop here for buzzer option
Arrêtez Ici pour l'option ronfleur
Parar aquí para opción de zumbador
© Stop here for radio option
Arrêtez ici pour l'option radio
Parar aquí para opción de radio
©,
i/;
Stop here for CD option
Arrêtez ici pour l'option CD
Parar aquí para opción de CD
CD or radio
b. Réglage de l'alarme 1 et 2
et de l'alarme
par. ex. Alarme © (par ronfleur,
radio ou piste CDj:
d. Activation du SOMMEIL pour c. Activación de SLEEP para CD o radio
CD ou radio
or/
oui o ON/OFF
SOminutes
OFF...
minutes hors Service!
minutos desactivación
b. Cómo establecer la hora de
alarma 1 & 2 y la alarma
por ejemplo, Alarma @ (por zumbador,
radio 0 pista de CD para despertar):
~Y t
l£
(-i
[OR
Page 13

MEXICO
nun“l«>0-î_=^
•l«ri I MVfC
Es necesario que lea cuidadosamente su instructivo de manejo.
PRECAUCION - ADVERTENCIA
No abrir, riesgo de choque eléctrico
[Verifique que el voltaje de alimentación
I
sea el requerido para su aparato
Para evitar ei riesgo de choque eléctrico, no quite la tapa.
En caso de requerir servicio, dirijase al personal calificado.
ATENCION
Descripción:
Modelo:
Alimentación:
Consumo:
Importador:
Domicilio:
Localidad y Telefono:
Exportador:
País de Origen:
Radio reloj con reproductor de CD
AJ 3950/17, AJ 3951/17, AJ 3952/17, AJ 3953/17
120-127 V ~60 Hz
10 W
Philips Mexicana, S.A. de C.V.
Norte 45, # 669, Col. Industrial Vallejo
C.P. 02300 México D.F., Tel. 57284200
Philips Electronics Hong Kong, Ltd.
China
№ de Serie:
LEA CUIDADOSAMENTE ESTE INSTRUCTIVO ANTES DE USAR SU APARATO.
Centro de Información al Consumidor
Tel. 5368-7788 Lada sin Costo 01 800 504 6200
Canada
English:
lio
Français:
This digital apparatus does not exceed the Class B limits for noise emissions from
digital apparatus as set out in the Radio Interference Regulations of the Canadian
Department of Communications.
Cet appareil numérique n'émet pas de bruits radioélectriques dépassant les
limites applicables aux appareils numériques de Classe B prescrites dans le
Régelement sur le Brouillage Radioélectrique édicté par le Ministère des
Communications du Canada.
Page 14

PHILIPS PORTABLE COMPACT DISC
One Year Free Exchange
This product must be carried in for an exchange.
WHO IS COVERED?
You must have proof of purchase to exchange the product.A sales
receipt or other document showing that you purchased the
product is considered proof of purchase.Attach it to this owner’s
manual and keep both nearby.
WHAT IS COVERED?
Warranty coverage begins the day you buy your product. For one
year thereafter, a defective or inoperative product will be replaced
with a new, renewed or comparable product at no charge to you.
A replacement product is covered only for the original warranty
period.When the warranty on the original product expires, the
warranty on the replacement product also expires.
WHAT iS EXCLUDED?
Your warranty does not cover:
• labor charges for installation or setup of the product,
adjustment of customer controls on the product, and
installation or repair of antenna systems outside of the product,
• product repair and/or part replacement because of misuse,
accident, unauthorized repair or other cause not within the
control of Philips Consumer Electronics Company.
• reception problems caused by signal conditions or cable or
antenna systems outside the unit.
• a product that requires modification or adaptation to enable it
to operate in any country other than the country for which it
was designed, manufactured, approved and/or authorized, or
repair of products damaged by these modifications.
• incidental or consequential damages resulting from the product.
(Some states do not allow the exclusion of incidental or
consequential damages, so the above exclusion may not apply to
you.This includes, but is not limited to, prerecorded material,
whether copyrighted or not copyrighted.)
• a product that is used for commercial or institutional purposes.
WHERE IS EXCHANGE AVAILABLE?
You may exchange the product in all countries where the product
is officially distributed by Philips Consumer Electronics Company.
In countries where Philips Consumer Electronics Company does
not distribute the product, the local Philips service organization
will attempt to provide a replacement product (although there may
be a delay if the appropriate product is not readily available).
BEFORE REQUESTING EXCHANGE...
Please check your owner’s manual before requesting an exchange.
Adjustments of the controls discussed there may save you a trip.
EXCHANGING A PRODUCT IN U.S.A.,
PUERTO RICO OR U.S.VIRGIN ISLANDS...
Contact your dealer to arrange an exchange. Or, ship the product,
insured and freight prepaid, and with proof of purchase enclosed,
to the address listed below.
(In U.S.A., Puerto Rico and U.S.Virgin Islands, all implied
warranties, including implied warranties of merchantability and
fitness for a particular purpose, are limited in duration to the
duration of this express warranty. But, because some states do not
allow limitations on how long an implied warranty may last, this
limitation may not apply to you.)
EXCHANGING A PRODUCT IN CANADA...
Please contact Philips at: ^
(In Canada, this warranty is given in lieu of all other warranties. No
other warranties are expressed or implied, including any implied
warranties of merchantability or fitness for a particular purpose.
Philips is not liable under any circumstances for any direct, indirect,
special, incidental or consequential damages, howsoever incurred,
even if notified of the possibility of such damages.)
TO GET OUT-OF-WARRANTY EXCHANGE...
In U.S.A., Puerto Rico or U.S.Virgin Islands, contact Philips Service
Company at (800) 531-0039 to obtain the cost of out-of-warranty
exchange.Then carefully pack the product and ship it to the Small
Product Service Center (address listed above). In Canada, call the
phone number listed above under “Exchanging a Product a
Canada” to obtain the cost of out-of-warranty exchange.
REMEMBER...
Please record the model and serial numbers found on the product
below. Also, please fill out and mall your warranty registration card
promptly. It will be easier for us to notify you if necessary.
SERIAL#
Small Product Service Center
Philips Service Company
907 Snapps Ferry Road. Plant 2, Building 6
Greeneville.TN 37743
1-800-661-6162 (French Speaking)
1-800-363-7278 (English Speaking)
This warranty gives you specific legalrights.You may have other rights which vary from state/province to state/province.
Philips Service Solutions Group, P.O. Box 2976, Longview,Texas 75606, (903) 242-4800
EL4967E003 / MAC 4108 / 10-00
Page 15

vvccivci«ii-OL.cc;rc;n/ oi-ti-r
ivmiiv I ■_i«m«wb
flash throughout the repeat alarm duration.
• If you are using the CD alarm mode, CD playback
resumes at the point interrupted by the repeat alarm,
• During the CD alarm, CD playback centinues for up to
an hour unless you cancel/ reset the alarm.
WEEKEND-SLEEPER
This feature deactivates the alarm every Saturday and
Sunday and resumes the alarm function Monday to Friday.
Make sure, however, that you have set the day first.
• See chapter on SETTING THE DAY.
1
Press
WEEKEND-SLEEPER
appears for one or both alarms.
2 To
cancel the weekend-sleeper function repeat
step 1 until disappears from the display.
See figure 0.
SLEEP About Sleep
The CD clock radio has a built-in sleep timer which
enables the set to be automatically switched off during
radio or CD playback after a set period of time. There
are four sleep times before the set turns itself off:
10, 30, 60, 90 minutes and off.
The sleep function does not affect the operation of your
alarm settings.
Setting Sleep
1
Press
PLAY/ PAUSE Ml
switch on the respective mode.
• For the CD mode, make sure you have inserted a disc
first,
2
Select your sleep time by pressing
more until the desired sleep time is shown.
See figure [5]
3
To cancel the sleep function you can either:
- press
SLEEP
once nr more untilv ■--tldd J
disappears from the display
- press
REPEAT ALARM/ brightness control
~ press
STOP
■ (CD only)
- press
ON/ OFF
(radio only).
once or more until
(CD) or
ON/ OFF
SLEEP
once or
(radio) to
MAINTENANCE
General
• If you do not Intend to use the CD clock radio for a long
time, withdraw the power plug from the wall outlet.
• Do not expose the set or CDs to humidity, rain, sand
or excessive heat caused by heating equipment or
direct sunlight.
• To clean the set, use a soft, slightly dampened
chamois leather. Do not use any cleaning agents
containing alcohol, ammonia, benzene or abrasives
as these may harm the housing.
CD player and CD handling
• The lens of the CD player should never be touched!
• Sudden changes in the surrounding temperature can
cause condensation to form and the lens of your CD
player to cloud over. Playing a CD is then not
possible. Do not attempt to clean the le’hs but leave
the set in a warm environment until the moisture
evaporates.
• Always shut the CD door to keep the CD
compartment dust-free. To clean, dust the
compartment with a soft dry cloth,
• To take a CD out of its box, press the center spindle
while lifting the CD. Always pick up the CD by the
edge and replace the CD in its box after use to avoid
scratching and dust.
• To clean the CD, wipe in a straight line from the
center towards the edge using a soft, lint-free cloth.
Do not use cleaning agents as they may damage the
disc.
• Never write on a CD or attach any stickers to it.
Environmental information
All unnecessary packaging material has been omitted to
make the packaging easy to separate into three
materials:
(buffer), polyethylene (bags, protective foam).
Your set consists of materials which can be recycled if
disassembled by a specialized company. Please observe
local regulations on the disposal of packing materials
and old equipment.
(See figure @)
cardboard ¡box),
expandable polystyrene
Page 16

I nUUDUt«JIIUU I IIVU
TROUBLESHOOTING
If a fault occurs, first check the points listed below before taking the set for repair.
If you are unable to remedy a problem by following these hints, consult your dealer or service center.If you are unaoie to i
WARNING:
Do not open the set as there is a risk of electric shocki
Under no circumstances should you try to repair the set yourself, as this will invalidate the warranty.
Problem
Possible Cause
- Remedy
No sound
Volume not adjusted
-
Adjust the volume
No reaction to any operation of the buttons
Electrostatic discharge
- Disconnect the set from the power supply and
reconnect the set after 5 minutes
•CD PLAYER
CD playback does not work
CD badly scratched or dirty
-
Replace/ clean CD
Laser lens steamed up
-
Wait until lens has acclimatized
Laser lens dirty
-
Clean lens by playing a CD lens cleaning disc
CD-RiW] Is nan-finalized
-
Use a finalized CD-R(W)
•RADIO
Occasional crackling sound during
FM broadcast
Weak signal
-
Extend pigtail fully
Continuous crackling/
hiss disturbance during AM broadcast
Electrical Interference from TVs, computers, fluorescent
lamps, etc.
- Move set away from other electrical equipment
•ALARM
The alarm does not function_______________
Alarm time not set
-
See chapter on SETTING THE CLOCK AND ALARM
TIMES
Alarm mode not selected
-
See chapter on SETTING THE ALARM OPTIONS
Volume too low for radio/ CD/ buzzer alarm mode.
-
See chapter on Adjusting the Gentle wake volume
•WEEKEND-SLEEPER
WEEKEND-SLEEPER does not function
Day selection not set/ Incorrect
-
See chapter on SETTING THE DAY
_________________
______
_____
WEEKEND-SLEEPER not set
-
Set WEEKEND-SLEEPER
Page 17

LECTEUR A DISQUE COMPACT PORTABLE PHILIPS
Échange gratuite pendant un an
Il faut porter ce produit à un centre de service pour l’échanger.
QUI EST COUVERT ?
Il faudra présenter une preuve d’achat pour pouvoir bénéficier des
services de la garantie. Le reçu, la facture ou un autre document
portant la date d’achat qui prouve que vous avez bien acheté le
produit est considéré comme preuve d’achat. L’attacher à ce
manuel d’emploi et les garder tous les deux à portée de main.
QU’EST-CE QUI EST COUVERT ?
La couverture de la garantie entre en vigueur le jour où vous achetez le
produit. Pendant un an à compter de cette date, tout produit
défectueux ou qui ne fonctionne pas sera remplacé par un produit neuf,
renouvelé ou un produit comparable sans frais aucun au consommateur.
Un produit de remplacement n’est couvert que pendant la période nonécoulée de garantie d'origine. Lorsque la garantie du produit d'origine
vient à terme, la garantie du produit de remplacement est terminée
aussi.
QU’EST-CE QUI EST EXCLU DE LA GARANTIE ?
La garantie ne couvre pas;
• les frais de main d’oeuvre pour installer ou préparer, pour régler
les commandes et pour installer ou réparer les systèmes
d’antenne à l’extérieur du produit.
• la réparation du produit et/ou d’une pièce pour cause du
mauvais emploi, d’accident, de réparations non-agréées ou d’une
autre raison qui ne peut pas être contrôlée par Philips
Consumer Electronics Company.
• des problèmes de réception dûs à des conditions de signal, au câble
ou aux systèmes d’antenne à l’extérieur de l’unité,
• un produit qui nécessite des modifications ou adaptations pour
lui permettre de fonctionner dans un pays autre que le pays
pour lequel il a été conçu, fabriqué, agréé et/ou autorisé, ou la
réparation des produits endommagés par de celles
modifications,
• des dommages indirects ou conséquents qui résultent du
produit. {Certains états ou provinces ne permettent pas
l’exclusion de dommages indirects ou conséquents. Il est donc
possible que l’exclusion ci-dessus ne s’applique pas au cas
présent. Cela comprend, mais de façon non-limitative, des
enregistrements, qu’ils soient protégés ou non par les lois sur
les droits d’auteur).
• un appareil acheté, utilisé ou réparé en dehors des États-Unis,
de Porto Rico, des îles Vierges ou du Canada ou utilisé à des fins
commerciales ou institutionnelles (y compris mais non limités
aux appareils utilisés pour la location).
OÙ L’ÉCHANGE EST-ELLE PROPOSÉE ?
Le produit pourra s’échanger dans cous les pays où le produit est
distribué officiellement par Philips Consumer Electronics Company.
Dans des pays où Philips Consumer Electronics Company ne
distribue pas le produit, l’organisme local de service Philips tentera
de fournir un produit de remplacement (mais il pourra y avoir des
retards si le bon produit n’est pas facilement disponible).
Cette foroni/'e vous donne des droits légaux spéci^ques et vous pourriez avoir d'autres droits qui varient d’état en état et de province en province.
Philips Service Solutions Group, P.O. Box 2976, Longview,Texas 75606, É.-U., (903) 242-4800
EL4967F003/ MAC 4108 /10-00
AVANT DE DEMANDER UNE ECHANGE...
Veuillez consulter le manuel d’instructions avant de demander un
produit d’échange. Un petit réglage d’une des commandes expliqué
dans le manuel d'instructions pourrait éviter de faire un trajet.
POUR BÉNÉPICIER DE L’ÉCHANGE GARANTIE AUX
É.-U.,AU PUERTO RICO OU DANS LES ÎLES VIERGES
AMÉRICAINES...
Contacter votre vendeur pour arranger l’échange. Ou bien,
renvoyer le produit, frêt et assurances payés, avec preuve d’achat
incluse, à l’adresse ci-dessous :
(Aux É.-U., au Puerto Rico et aux îles Vierges, toute garantie
implicite, y compris des garanties de vendabilité et d’aptitude à un
but spécifique, est limitée à la durée de cette garantie explicite.
Mais, étant donné que certains états et provinces ne permettent
pas de limité la durée d’une garantie implicite, cette limitation
pourrait ne pas s’appliquer au cas présent.)
POUR BÉNÉFICIER D’UNE ÉCHANGE GARANTIE AU
CANADA...
Veuillez contacter Philips â :
(Au Canada, cette garantie est consentie à la place de toute autre
garantie. Aucune autre garantie n’est donnée, qu’elle soit explicite ou
implicite, y compris une garantie implicite de vendabilité ou d’aptitude
à un but spécifique. Philips n’est pas, en aucun cas, responsable des
dommages, qu’ils soit directs ou indirects, spéciaux, secondaires ou
conséquents, quels que soient leurs origines, même en présence d'une
notification de la possibilité de tels dommages.)
POUR UNE ÉCHANGE HORS GARANTIE...
Aux É.-U., au Puerto Rico ou aux îles Vierges américaines, contacter
Philips Service Company au (800) 531-0039 pour savoir le prix d’une
échange non couverte par la garantie. Puis emballer le produit avec
soins et le renvoyer au Small Product Service Center (adresse cidessus). Au Canada, téléphonez au numéro qui se trouve sous la
rubrique « Pour bénéficier d’une échange garantie au Canada » pour
obtenir le prix d’un échange hors garantie.
RAPPEL IMPORTANT...
Veuillez inscrire ci-dessous les numéros de modèle et de série qui se
trouvent sur le produit même. De plus, veuillez remplir et renvoyer
sans délai la carte d’enregistrement de garantie. Il nous sera ainsi plus
facile de vous contacter en cas de besoin.
№ DE MODELE
№ DE SÉRIE
Small Product Service Center
Philips Service Company
907 Snapps Ferry Road, Plant 2, Building 6
Greeneville,TN 37743 É.-U.
1-800-661-6162 (Francophone)
1-800-363-7278 (Anglophone)
Page 18

Français COMMANDES/ INSTALLATION
COMMANDES
LECTEUR CD
(T) STOP«
- arrête la lecture CD;
- arrête la fonction d'arrêt programmé dans le mode CD;
- arrête l'alarme CD active pour 24 heures.
@PLAY/PAUSE Ml
- démarre/ arrête la lecture CD,
©SEARCH M-«, »1
- saute les pistes CD/ recherche un passage particulier.
GENERALITES
©SLEEP
- active et règle le temps d'arrêt programmé.
©REPEAT ALARM/brightness control
- règle la brillance de l'afficheur;
- déconnecte l'alarme pendant 9 minutes:
- arrête la fonction veille en modes CD, ronfleur ou radio.
©WEEKEND-SLEEPER
- désactive l'alarme 1 et/ ou 2 pour le week-end.
©Afficheur-
mode actuel de l'équipement.
©ALARM 1 MODE/ OFF
- met/ change/ arrête l'alarme 1 ou 2.
RADIO
©ON/OFF
- met en et hors service la radio;
- arrête la fonction d'arrêt programmé en mode radio;
- arrête l'alarme active radio pendant 24 heures.
©FM/AM
- sélectionne la fréquence radio.
REGLAGES DES HEURES
©ALARM 1, ALARM 2, TIME
- Règle respectivement l'alarme ou l'heure
-
règle les heures d'horloge/ d'alarme;
- règle le niveau confortable de volume minimum et
maximum pour l'alarme 1 ou 2;
- sélectionne une piste de réveil CD pour l'alarme 1 ou 2.
©VOLUME A
-
règle le niveau sonore.
©Lentille de cadran
©SET DAY
- règle le jour pour l'activation du réveil pendant le week-end.
(voir figures 0 et [2])
affiche l'heure d'horloge/ d'alarme et le
ou
ALARM 2 MODE/ OFF
©24 HR RESET
©LIFT TO OPEN
©TUNING
©Antenne en "tire-bouchon"
©Cordon d'alimentation
La plaquette signalétique a été apposée sur la
plaque de base de l'équipement.
L'appareil répond aux normes FCC, Part 15 et
21 CFR 1040.10. Fonctionnement soumis aux deux
conditions suivantes:
1 Cet appareil ne doit pas provoquer d'interférences
2 Cet appareil doit accepter toute interférence reçue, y
CAUTION
L'emploi de commandes, de réglages ou l'application de
procédures autres que ceux mentionnés dans ce
manuel peuvent occasionner des radiations d'exposition
ou un fonctionnement dangereux.
INSTALLATION
Alimentation et mode de démonstration
1
Vérifiez si la tension d'alimentation marquée
2
Branchez la fiche à la prise murale. La tension est
• Appuyez sur une commande quelconque (à l'exception
3
Pour déconnecter l'équipement de la tension secteur,
Consommation en mode de veille
- arrête les alarmes actives en modes ronfleur, radio
ou CD pendant 24 heures.
- ouverture/ fermeture du clapet CD,
- syntonise une station radio.
améliorer la réception FM.
nuisibles, et
compris les interférences susceptibles de provoquer
un fonctionement peu satisfaisant.
plaquette signalétique de l'équipement œnesponâ
tension secteur locale. Si ce n'est pas le cas, consultez
votre revendeur ou le centre de service après-vente.
mise et l'afficheur présente
démonstration PHILIPS.
-
PH..IL..IPS àétWe
de
REPEAT ALARM/ brightness control
l'équipementl pour sortir du mode de démonstration.
débranchez la fiche de la prise murale.
antenne pour
- pour l'alimentation CA.
sur la
le mode de
en continu à l'affichage.
de
(mode horloge).3
à la
W
Page 19

M
KbULAüb Ub5 HbUKb:>, UU JUUlf
bU
MEMOIRE AUTONOME
Cette option vous permet facilement la mémorisation
des réglages du jour, de l'alarme et de l'heure en cas
d'interruption de courant jusqu'à 3 minutes; par
exemple
une
panne de courant alternatif.
Le radio-réveil CD et l'éclairage sont totalement mis
hors circuit. Dès que le courant est rétabli, l'afficheur
Indiquera à nouveau l'heure exacte.
• SI le courant est rétabli après 3 minutes, l'afficheur
montre
le mode de démonstration PHILIPS
devrez régler à nouveau le jour, l'alarme et l'heure.
CARACTERISTIQUES DE BASE Brillance d'éclairage
• Appuyez une ou plusieurs fois sur
REPEAT ALARM/brightness control.
La brillance de l'affichage change dans l'ordre suivant:
FAIBLE «* MOYEN«* FORT * FAIBLE...
Volume
Appuyez sur
is
sonore. Le niveau sonore
pouvant aller de 0 à 32.
REGUGE DES HEURES D'HORLOGE ET D'ALARME
L'heure est affichée selon le principe de 12 heures dans
le cas où
hors circuit = AM).
/ Appuyez brièvement sur
2
Appuyez et maintenez enfoncé
• En appuyant respectivement sur 1 ou Ç, l'heure
• Si vous avez besoin de régler lentement l'heure,
3
Appuyez sur
VOLUME
l'indicateur PM
ALARM 2
l'alarme clignote, selon le cas.
des heures et des minutes.
avance/ recule rapidement et passe des minutes aux
heures. Relâchez ^ ou J lorsque vous avez atteint le
réglage correct.
minute par minute, appuyez brièvement et de
manière répétée sur 1 ou J.
confirmer votre réglage de l'heure respectif.
ou A pour régler le niveau
UO:
est indiqué par un chiffre
est allumé (en circuit = PM,
TIME, ALARM 1
jusqu'à ce que l'affichage de l'heure ou de
t, ^
TIME, ALARM 1
ou
pour le réglage
ou
ALARM 2
pour
REGLAGE DU JOUR
Le réglage du jour vous permet de régler la fonction de
sommeil week-end
essayez d'utiliser la fonction de sommeil week-end
avant de régler le jour, (du lundi au
dRy apparaîtra brièvement dans l'afficheur pour vous
rappeler de régler d'abord le jour.
/ Appuyez sur
2
Au moment où l'affichage du jour apparaît, appuyez
et vous
à nouveau une ou plusieurs fois sur
sélectionner le jour numéroté de
dimanche):
L'affichage remontrera ensuite l'heure réglée,
LECTURE CD
1
Pour ouvrir le compartiment CD, soulevez du côté
marqué
2
Insérez un CD avec la face imprimée orientée vers le
haut et refermez le compartiment,
3
Appuyez sur
lecture.
^ L'indicateur CD lay, C
de pistes sont affichés, suivis du premier numéro
de piste avant de repasser à l'affichage de l'heure.
-
dû or est
le compartiment CD/ ouvert le compartiment CD
en cours de lecture.
“
noCd
insertion incorrecte.
-
r,FCd
-
Err
fonctionnement de l'équipement.
L'afficheur repasse à l'affichage de l'heure.
4
Réglez le volume avec
5
Pour interrompre, appuyez sur
• Le numéro de piste courant est brièvement affiché
avant de repasser à l'affichage de l'heure, tay
clignote pendant la pause.
6
Appuyez à nouveau sur
reprendre la lecture.
7
Appuyez sur
L'afficheur repasse à l'affichage de l'heure.
(WEEKEND-SLEEPER).
dimanche,
SET DAY.
SET DAY
dAY 1-7
LIFT TO OPEN.
PLAY/ PAUSE ►!!
d'- -
et le nombre total
affiché si vous n'avez
est affiché s'il n'y a pas eu insertion/
est affiché si le CO-R(W) n'a pas été finalisé
indique une erreur générale dans le
VOLUME
PLAY/ PAUSE ►!!
STOP ■
pour arrêter la lecture.
ou
PLAY/ PAUSE ►II.
Si vous
1-7)
pour
(lundi-
pour commencer la
pas bien fermé
A.
pour
Page 20

!D Español
CONTROLES/ INSTALACION
de
la
Otai
;ro
lure.
né
D
CONTROLES
REPRODUCTOR DE CD
(î)STOP ■
- para la reproducción de CD;
- desactiva la función de dormitar en modo de CD;
- desactiva la alarma de CD activa durante 24 horas.
@PLAY/PAUSE ►!!
- Inicla/Interrumpe la reproducción de CD.
(DSEARCH
- salta pistas de CD/busca un pasaje particular.
GENERAL
©SLEEP
- activa y ajusta el tiempo de dormir.
©REPEAT ALARM/brightness control
- cambia la Intensidad de la iluminación de la pantalla;
- desactiva la alarma durante un período de 9 minutos;
- desactiva la función de dormir en modo de CD,
zumbador 0 radio.
©WEEKEND-SLEEPER
- desactiva las alarmas 1 y/ó 2 para el fin de semana.
©Pantalla
- muestra la bora del reloj/alarma y el estado del aparato.
©ALARM 1 MODE/OFF 0 ALARM 2 MODE/OFF
- pone/revisa/desactiva la alarma 1 ó 2.
RADID
©ON/OFF
- activa/desactiva la radio;
- desactiva la función de dormir en modo de radio;
- desactiva la alarma de radio durante 24 horas.
@FM/AM
- selecciona la banda de onda de la radio.
AJUSTE DE HORAS
©ALARM 1, ALARM 2. TIME
- establece la hora de alarma
- establece las horas de reloj/alarma;
- establece el volumen mínimo y máximo para
despertar con suavidad para la alarma 1 ó 2;
- selecciona una pista de CD para despertar para la
alarma 1 ó 2.
©VOLUME -, A
- ajusta el nivel de sonido.
©Visualización indicadora
(Véanse las figuras Q] y [2])
0
reloj respectiva
©SET DAY
- establece el día para la activación de la función de
dormir en fin de semana.
©24 HR RESET
- desactiva las alarmas activas de zumbador, radio o
CD durante 24 horas.
©LIFT TO OPEN
- abre/cierra el compartimento de CD.
©TUNING
- sintoniza una emisora de radio.
©Antena en espiral
©Cable de alimentación
La placa de especificaciones esta situada en la
parte de debajo del aparato.
El aparato cumple las normas FCC, Parte 15 y
21 CFfí 1040.10. Funcionamiento deperídlente de dos
condiciones siguientes:
1 Este aparato no puede provocar interferencia dañina, y
2 Este aparato debe aceptar cualquier interferencia
recibida, inciuyendo tas interferencias que pueden
provocar un funcionamiento insuficiente.
ATENCIÓN
El uso de mandos o ajustes o la ejecucción de métodos
que no sean los aquí descritos puede ocasionar peligro
de exposición a radiación.
INSTALACIÓN
Fuente de alimentación y modo de demostración
1 Compruebe si la tensión eléctrica, mostrada en
especificaciones situada en la parte de debajo del aparato,
corresponde a su fuente de alimentación local. En caso
contrario, consulte a su distribuidor o centro de servicio.
2
Introduzca el enchufe eléctrico en el tomacorriente
de pared. Ahora la fuente de alimentación está
activada y la pantalla mostrará el
demostración PHILIPS.
-
PH..IL..IPS
de la pantalla.
• Para salir del modo de demostración, pulse cualquier
control (excepto
REPEAT ALARM/brightness control
- para mejorar la recepción de FM.
- para suministro de CA.
la placa de
modo de
se desplaza continuamente a través
) del aparato.
Page 21

N
AJUSI t Ut HUKAb, UIA
3
Para desconectar el aparato completamente de la
fuente de alimentación, desenchúfelo del
tomacorriente de pared.
Consumo de corriente de espera
PROTECCIÓN DE MEMORIA
La función de protección de memoria permite almacenar
los ajustes de hora de día, alarma y reloj durante hasta
tres minutos cuando ocurre una interrupción de
corriente, por ejemplo un corte de corriente de CA.
La radio reloj con reproductor de CD y la Iluminación se
desactivarán. Tan pronto como la corriente vuelva a
estar conectada, la pantalla mostrará la hora correcta.
• Si la corriente se restaura después de 3 minutos, ia
pantalla mostrará el
PHILIPS
día, alarma y reloj.
modo de demostración
y necesitará volver a introducir las horas de
(modo de reloj).3W
3
AJUSTE DEL día
El ajuste del día le permite establecer la función de
dormir en fin de semana
intenta utilizar la función de dormir en fin de semana
antes de realizar el ajuste del día, (lunes a domingo,
!S)
recordarle realizar el ajuste del día en primer lugar.
7
2
ÜU
minuto, pulse i ó ? brevemente y repetidamente,
Pulse
TIME, ALARM 1 o ALARM 2
el ajuste de hora respectivo.
(WEEKEND-SLEEPER].
dRy aparecerá brevemente en la pantalla para
Pulse
SET DAY
Mientras aparece la visualización de día, vuelva a
pulsar
SET DAY
día, numerado en la escala de
-- La pantalla volverá a mostrar la hora del reloj.
una o más veces para seleccionar el
dAY 1-7
para confirmar
Sí
(lunes-domingo):
FUNCIONES BÁSICA Intensidad de la iluminación
• Pulse
REPEAT ALARM/brightnes control
-■ La intensidad de la iluminación de la pantalla
cambiará en esta secuencia:
BAJA
"*
MEDIANA * GRANDE * BAJA...
Volumen
Para ajustar el nivel del volumen, pulse
VOLUME
expresado por un número entre 0 y 32,
AJUSTES DE US HORAS DE RELOJ Y ALARMA
La hora se presenta utilizando el reloj de 12 horas, en el que
el
(encendido = PM, apagado = AM (antes del mediodía).
7
2
• Pulsando respectivamente i ó IJ, el valor de la hora
• Se necesita ajustar la hora lentamente, minuto a
ó
A,
El nivel de volumen
indicador de PM
Pulse
TIME, ALARM 1 ó AURM 2
hasta que la visualización de hora de reloj o alarma
respectiva destelle.
Pulse y mantenga apretado f ó ^ para ajustar las
horas y los minutos.
aumenta/disminuye rápidamente y continuamente de
minutos a horas. Cuando haya alcanzado la hora
correcta deje de
(después del mediodía] se enciende
pulsar i ó J.
US:
es
una vez o más.
brevemente
REPRODUCCIÓN DE CD
7
Para abrir el compartimento del CD, levante la puerta
por el borde marcado
2
Introduzca un CD con la cara impresa hacía arriba y
cierre el compartimento.
3
Pulse
el número total de pistas, seguido del número de la
primera pista, antes de volver a la hora del reloj.
- Se muestra
compartimento de CD/ se ha abierto el
compartimento de CD durante la reproducción,
- Se muestra
se ha insertado un CD incorrectamente.
- Se muestra
-
crr
del aparato.
- Lá pantalla vuelve a la hora del reloj.
4
Ajuste el volumen de sonido con
5
Para interrumpir, pulse
• El número de pista en curso aparece brevemente
antes de volver a la hora de reloj. laa destella
durante la pausa.
6
Pulse
reproducción.
LIFT TO OPEN.
PLAY/PAUSE
Se muestra
indica un error general en el funcionamiento
PLAY/PAUSE Hl
►!! para iniciar la reproducción.
el indicador de CD
door
si no se ha cerrado e
noCd
si no se ba insertado un CD/
nFSd
si el CD-R(W) no ha sido finalizado,
VOLUME
PLAY/PAUSE Hl.
de nuevo para reanudar la
laf,
o
A.
Sd:
- - y
Page 22

Envié hoy su Tarjeta de Registro de la Garantía
>ara recibir todas las ventajas correspondientes.
« Una vez que se registre la compra de su
aparato Philips, Ud. tiene derecho a todas
¡as ventajas correspondìerìtes al dueño de
un producto Philips.
Verificación i
oe la garantía
Registre su producto dentro
lliÉB^BBlilíSÍÍ®ÍBil
derecho a máxima
protección bajo ios términos
y condldones de h garantía
de PhíHps,
Conirmación i
dyeio”"
Su Tarjeta de Registro de h
Garantía comprueba que Ud.
es el dueño del aparato en
caso de robo o pérdida del
producto.
Conozca estos
símbolos de ci>(^t<CCCú(Cl(Oj{Cll
¿Sy
PRECAUCION
^liseo úB BAüumm Eimmm
PRmmm: pam muon el rnsúo de sacubím tmmA.m BBm
LA
tmmiA
E PAiisa
pmiE um
puaii mp rparapa
BEmmQ
o
PmmQmDEi
El símbolo del "rayo" índica que ADYERTENCIA: PARA EVITAR
mA. algún materia! no aislado
dentro de su unidad podría
resultar en una sacudida eléctrica. Para
la seguridad de todos, favor de no
remover la cubierta del producto.
m áBmÑ
pmmmi
PmEi
aparato,
apamtqí^q
iíaío. pe mp ì^islsahio
iimm
uiy
mumm
immm
Á
AifJsuiyA
Aimn
salificads.
= Sírvase llenar y devolver en seguida
la Tarjeta de Registro de la Gúraatía
empacada con $u aparata Saque
provecho de estas ventajas importantes.
.............
La devoiüdón lnmedíata de su
Tarjeta de Registro de la
Garantía le garantiza que
recibirá toda la información y
todas las promociones
especiales que le
corresponden por s^er el
dueño' de su modela
Para yso del ciieriteT
Escriba abajo el número de serie que se
encuentra en la. base del aparato. Guarde
esta información para el futuro.
No, de modelo
No. de serie
EL RIESGO DE SACUDIDA
ELECTRICA O INCENDIO, NO
EXPONGA ESTE EQUIPO A LLUVIA
Ni A HUHEDAD
...................
.........
..............
................
..............
.........
..........
A El "signo de exclamación" le llama,
atención a características .sobre
que üd. debe leer la
información adjunta detenidamente para
evitar problemas de funcionamiento y
mantenimiento.
PRECAUCION: Para evitar
sacudida eléctrica, introduzca la patilla
ancha del enchufe a! fondo de la ranura
ancha.
Page 23

I
NOTES
Page 24

CD/RADIO
REGLAGE DES OPTIONS D'ALARME
Sélection d'une piste différente pendant la lecture
Le numéro de piste apparaît brièvement à l'affichage
lorsque vous appuyez sur
sauter des pistes.
• Appuyez une ou plusieurs fois sur
sauter à (aux) la piste(s) suivante(s).
• Appuyez une ou plusieurs fois sur
sauter aux pistes précédentes.
• Appuyez une fois sur
repassera au début de la piste en cours.
Recherche d'un passage sur une piste
1
Pendant la lecture, appuyez et maintenez enfoncée la
touche
SEARCH
— Le CD est tu à vitesse rapide et à faible volume:
on voit rd: à l’affichage ainsi que le numéro de
la piste en cours.
2
Relâchez
SEARCH
reconnaissez le passage recherché.
^ La lecture de CD reprend normalement et
l'affichage repasse à l'heure de l'horloge.
RADIO
1
Appuyez sur
-^tu
est brièvement affiché suivi de l'heure
2
Appuyez sur
fréquence.
3
Réglez le son avec
4
Réglez le bouton
station radio.
Pour améliorer la réception:
FM:
Déroulez l'antenne en 'tire-bouchon' située à l'arrière
de l'équipement pour obtenir une réception optimale.
AM:
Utilise une antenne intégrée. Dirigez l'antenne en
orientant votre équipement.
5
Appuyez sur
- 03313 et la fréquence disparaissent de l'afficheur.
REGLAGE DES OPTIONS D'AURME Généralités
Deux heures d'alarme différentes,
SEARCH
SEARCH
r« ou ►«.
ou lorsque vous
ON/ OFF
, et de la dernière fréquence sélectionnée.
FM/ AM
si vous désirez changer de
VOLUME
TUNING
ON/ OFF
r« ou ►►i pour
SEARCH
SEARCH
et la lecture
pour mettre la radio en marche.
ou
pour syntoniser une
pour mettre la radio hors service.
ALARM 1
pour
r« pour
A.
ou 2 sont
réglables en modes CD, radio ou ronfleur. Celles-ci vous
permettent par exemple de vous réveiller à une heure
différente pendant la semaine et pendant le week-end.
- N'oubliei pas de régler d'abord correctement le jour,
l'heure et l'alarme!
- Assurez-vous que le symbole de l'alarme sélectionné
soit affiché.
Visualisation des options de mode d'alarme
1
Sélectionnez le mode d'alarme de votre choix en
appuyant une ou plusieurs fois sur
ALARM 2 MODE/ OFF
respectivement ce choix.
L'ordre d'affichage du mode d'alarme est le suivant:
-
L O -00
- niveau de volume par défaut pour
-
H I- to -
- Suivi de trois alarmes différentes:
(ronfleur) 0 n'.i, ou
(radio)-b
mode CD
2
Lisez attentivement les chapitres suivants pour régler
ou sélectionner les modes respectifs.
Réglage du volume de réveil confortable
Pour être sûr de se réveiller le matin, le volume de
réveil confortable
par exemple
ment à un volume supérieur, par exemple
La gamme de volume par défaut va de
/-/
I: 16.
pour l'alarme
1
En mode de veille, appuyez une seule fois sur
ALARM 1 MODE/ OFF
2
Dès que
sur i ou J pour régler le volume sonore de votre alarme.
3
Pour obtenir le volume maximum de votre alarme,
appuyez à nouveau sur
ALARM 2 MODE/ OFF
H 0 16.
4
Dès que
obtenir le niveau de volume désiré (
démarrer l'alarme de réveil confortable
niveau de volume maxi par défaut pour
alarme de réveil confortable
eu,
ou
(->
avec CD et un numéro de piste de / à SS.
commence par un faible volume,
L eu 00
(faible) et augmente gradueile-
Si vous désirez adapter le volume par défaut
ronfleur, radio
i o '00
apparaît, appuyez une ou plusieurs fois
à l'affichage.
6 0 16
apparaît, appuyez sur 1 ou ^ pour
ALARM 1
pour confirmer
L a :00
ou CD:
ou
ALARM 2 MODE/ OFF
ALARM 1 MODE/ OFF
pour faire apparaître
10 - 36').
ou
H 0 t I.
à
ou
Page 25

MISE HORS SERVICE D'ALARM
Remarques:
•
Le volume élevé
au volume faible (i a ): ex.i
• Le volume de départ est
{H I)
est toujours plus élevé ou égal
L o ■' /5, H ¡: ¡3
ex.il,
i a : :3, H ! :
L o '00,
avec une gamme
de volume faible possible de 00 à 33 et le volume
maximum est<V
élevée de
¡0à33.
¡'33,
avec une gamme de volume
• Les réglages du volume de réveil confortable n'affectent
en rien le réglage du volume pour la lecture CD et la radio.
• Il n'est pas possible de corriger la gamme de volume de
réveil confortable pendsnfl'alarme en marche, cars!
vous appuyez sur
MODE/ OFF,
ALARM 1 MODE/ OFF
ou
ALARM 2
l'alarme est mise hors service.
• Pendant l'appel d'alarme, si vous appuyez sur i ou ^
le volume élevé arrête immédiatement d'augmenter.
Sélection de l'alarme ronfleur ou radio
• Appuyez plusieurs fois sur
ALARM 2 MODE/ OFF
ALARM 1 MODE/ OFF
jusqu'à ce que l'indication
et /9,1 (ronfleur) ou fl 3(radio) soit affichée.
Remarque:
Si vous avez sélectionné l'alarme radio
fl t,
assurez-
vous d'avoir correctement syntonisé une station.
Remarque:
•
L'option d'alarme ronfleur remplacera
automatiquement l'alarme CD si vous avez:
- inséré incorrectement un CD;
- inséré un CD endommagé:
- oublié d'insérer un CD;
- oublié de fermer correctement le compartiment CD.
MISE HORS SERVICE DE L'ALARME
Il y a trois manières de mettre l'alarme hors service. A
moins que vous n'annuliez complètement l'alarme, la
fonction de répétition de l'alarme après 24 heures sera
automatiquement sélectionnée après 59 minutes, à partir
du moment où votre alarme s'est mise à fonctionner.
REPErmON DE L ALARME APRES 24 HEURES
Si vous voulez que le mode d'alarme s'arrête
Immédiatement, tout en voulant garder le même réglage
d'alarme pour le jour suivant:
ou
• Appuyez sur une des 3 options possibles par rapport
à votre alarme sélectionnée:
a
b
c
ON/OFF
Mode d'alarme CD: Sélection d'une piste CD
Vous pouvez programmer et sélectionner un numéro de
piste CD entre 1 et 99, lorsque l'équipement est en mode
de veille ou radio. Toutefois, si le numéro de piste
programmé n'existe pas sur votre CD, le CD démarrera la
lecture à partir de la première piste lors de l'appel d'alarme.
1
Insérez
un
CD dans le compartiment CD.
2
Appuyez plusieurs fois sur
ALARM 2 MODE/ OFF
CD et du numéro de piste soit affichée. Voir figure [
3
Aussitôt que l'affichage de l'alarme CD apparaît,
ALARM 1 MODE/ OFF
jusqu'à ce que l'Indication du
3
].
ANNULATION COMPLETE DE L'ALARME
Pour annuler le réglage de l'heure d'alarme avant qu'elle
ne se mette en marche ou pendant l'appel d'alarme:
• Appuyez une ou plusieurs fois sur
ALARM 1 MODE/ OFF
ou
jusqu'à ce que l'indication d'alarme sélectionnée
disparaisse de l'affichage.
- Si vous annulez l'alarme pendant l'appel
appuyez sur 1 ou Ç jusqu'à ce que le numéro de
piste désiré soit affiché,
— L'affichage repasse à l'heure en mode de veille.
4
Pour reprendre votre
appuyez à nouveau plusieurs fois sur
MODE/ OFF
numéro
de piste programmé,
ALARM 1
ou
ALARM 2 MODE/ OFF
jusqu'à ce
que l'indication de l'alarme CD soit affichée.
ALARME REPETEE
Ceci répétera l'appel d'alarme toutes les 9 minutes.
• Pendant l'appel d'alarme, appuyez sur
REPEAT ALARM/ BRiGHTrtiEss control.
• Vous pouvez, si vous le voulez faire répéter l'alarme
pendant une heure.
24 HR RESET
- pour mettre hors service les
alarmes ronfleur, radio ou CD
STOP
■ CD - uniquement alarme
- uniquement alarme radio.
Vous entendrez un bip sonore confirmant
l'activation de l'alarme 24 heures plus tard.
ou
ALARM 2 MODE/ OFF
d'alarme, vous entendrez également un bip
sonore confirmant que l'alarme a été annulée.
Page 26

VI CD/RADIO
7
Pulse
La pantalla vuelve a la hora de reloj.
Selección de una pista diferente durante la reproducción
El número de pista aparece brevemente en la pantalla
cuando se pulsa
• Pulse
• Pulse
pistas anteriores.
• Pulse
al principio de la pista en curso.
Localización de un pasaje dentro de una pista
1
Durante la reproducción, pulse y mantenga apretado
SEARCH
El CD se reproduce a alta velocidad y bajo volumen; la
age
)rt
pantalla mostrará
2
Cuando reconozca el pasaje deseado, deje de pulsar
SEARCH
^ Se reanuda la reproducción normal de CD y la
bora de reloj de espera.
RADIO
í
Pulse
cu
2
Pulse
3
Ajuste el sonido utilizando
4
Ajuste el botón giratorio de
una emisora de radio.
Para mejorar la recepción:
FM:
Para obtener la recepción óptima, extienda
completamente la antena en espiral situada en la
parte posterior del aparato,
AM:
Utiliza una antena incorporada. Oriente la antena
ajustando la posición del aparato.
5
Pulse
^ iiiLTorii y la banda de onda desaparece de la pantalla.
AJUSTE DE LAS OPCIONES DE ALARMA General
Es posible establecer dos horas de alarma diferentes,
AJUSTE DE OPCIONES DE ALARMA
STOP ■
para detener la reproducción.
SEARCH
SEARCH
SEARCH
SEARCH
M4 ó
N-4 o
ON/OFF
aparece brevemente, seguido de la hora del reí
FM/AM
ON/OFF
h« ó para saltar pistas.
una vez, para saltar a la próxima pista(s).
más de una vez para saltar a
r« una vez y la reproducción volverá
Cd-
y el número de pista en curso,
para encender la radio.
, y la última banda de onda seleccionada.
si quiere cambiar la banda de onda,
VOLUME
TUNING
para apagar la radio.
o
A.
para sintonizar
ALARM
1 ó 2,
en los modos de CD, radio o zumbador. Esto puede
ser útil cuando uno quiere levantarse a una hora diferente
durante la semana y en el fin de semana, por ejemplo.
- ¡Recuerde que en primer lugar debe ajustar la hora
del día, reloj y alarma correctamente!
- Asegúrese de que aparezca el símbolo de la alarma
seleccionada.
Visualización de las opciones de modo de alarma
/ Seleccione su opción de modo
ALARM 1 ó ALARM 2 MODE/OFF
para encontrar el modo respectivo.
- Se muestra la secuencia de visualización de modo
de alarma:
-
i a -'IJu -
-
- Seguido de las 3 alarmas diferentes;
(zumbador) O
con CD Y un número de pista 1-39.
2
Lea los capítulos siguientes para ajustar o
seleccionar los modos respectivos.
Ajuste del volumen para despertar con suavidad
Una forma segura de levantarse por la mañana, el
volumen para
con un volumen suave,
gradualmente a 3 /' / /,
La escala de volumen por defecto es de í. o
H I: IB.
la alarma de zumbador, radio o CD:
1
En el modo de espera, pulse
o
ALARM 2 MODE/OFF
2
Tan pronto como
o más veces para ajustar el volumen de inicio de la
alarma.
3
Para establecer el volumen máximo para la alarma,
vuelva a pulsar
MODE/OFF
4
Tan pronto como W
hasta que se alcance el nivel de volumen deseado
nivel de volumen por defecto para
inicio de alarma para despertar con suavidad
IB -
nivel de volumen máximo por defecto
para alarma para despertar con suavidad
BL,
despertarse con suavidad empieza
Si desea cambiar el volumen por defecto para
i o - B'lJ
ALARM 1 MODE/OFF o ALARM 2
para cambiara la
de alarma
o (radio) -Q t, o modo CD
i o dJü
(bajo), y aumenta
por
ejemplo.
ALARM 1 MODE/OFF
una vez
aparezca, pulse i ó J una
/-' IB
aparezca, pulse i ó
pulsando
una o más veces
dJD
a
visualización l-l t: ¡B.
?
<S>
Page 27

DESACTIVACIÓN DE LA ALARM
Notas:
• El volumen alto |.
volumen bajo (¿
• El volumen de inicio es
escala de volumen bajo de
máximo es
H i:3c,
volumen alto de
• Los ajustes de volumen de despertar con suavidad no
afectan el nivel de volumen de reproducción de CD y radio.
• No es posible modificar la escala de volumen de despertar
con suavidad
al pulsarse
ALARM 1 MODE/OFF o ALARM 2
MODE/OFF
• Durante la llamada de alarma, si se pulsa 1 u ^ el
volumen deja de aumentar inmediatamente.
Selección de alarma de zumbador o radio
• Pulse
AURM 1 MODE/OFF o ALARM 2
MODE/OFF
visualización de û Oi (zumbador) o tu (radio).
Nota:
Si ha seleccionado la alarma de radio m tu, asegúrese
de que ha sintonizado una emisora correctamente.
Modo de alarma de CD: Selección de una pista de CD
Puede programar y seleccionar un número de pista de
CD entre 1 y 99, cuando el aparato está en el modo de
espera o de reproducción de radio.
Sin embargo, si el número de pista programado no
existe en el CD, el CD empezará la reproducción por la
primera pista durante la llamada de alarma.
Introduzca un CD en el compartimento de CD.
Pulse
ALARM 1 MODE/OFF o ALARIM 2
MDDE/OFF
número de CD y de pista. Véase la figura [aj.
Tan pronto como aparezca la visualización de alarma
de CD, pulse t u ^ hasta que se muestre el número
de pista deseado.
— La pantalla vuelve a la hora de reloj de espera.
Para comprobar el número de pista programado,
vuelva a pulsar
MODE/OFF
visualización de alarma de CD.
]
siempre es mayor o igual que el
ejemplo i.
L o '
ejemplo i¡.
L a 'IJO,
OD - 3c‘,
con una posible escala de
10-33.
durante
la llamada de alarma activa ya que
se cancela la alarma completamente.
repetidamente hasta que aparezca la
repetidamente hasta que se muestre el
ALARM 1 MODE/OFF o ALARM 2
repetidamente hasta que aparezca la
/5, W /' /9
L o-' le, !-! I: le'
con una posible
y el volumen
Nota:
La opción de alarma de zumbador sustituirá
automáticamente la alarma de CD si:
- se ha colocado un CD incorrectamente;
- se ha colocado un CD dañado;
- se ha olvidado de colocar un CD;
- no se ha cerrado correctamente el compartimento de CD.
DESACTIVACION DE LA AURMA
Hay tres formas de desactivar la alarma. A menos que
la alarma se cancele completamente, se seleccionará
automáticamente la función de restauración de alarma
de 24 horas después de 59 minutos, a partir de la hora
en que la alarma se dispare.
RESTAURACIÓN DE ALARMA DE 24 HORAS
Si quiere que el modo de alarma se desactive
inmediatamente pero desea conservar el misnio ajuste
de alarma para el día siguiente:
• Seleccione una de las 3 posibles opciones
siguientes, de acuerdo con la alarma seleccionada:
a
24 HR RESET
zumbador, radio o CD
b
STOP
c
ON/OFF
^ Se oirá un pitido que confirmará la activación de
la restauración de la alarma de 24 horas.
CÓMO CANCELAR LA ALARMA COMPLETAMENTE
Para cancelar la hora de alarma establecida antes de que
la alarma se dispare o durante la llamada de alarma:
• Pulse
una o más veces hasta que el indicador de la alarma
seleccionada desaparezca de la pantalla.
Si cancela la alarma durante la llamada de
alarma, también se oirá un pitido que confirmará
que la alarma ha sido cancelada,
REPETICIÓN DE ALARMA
Esta función hará que la llamada de alarma se repita a
intervalos de 9 minutos.
• Durante la llamada de alarma, pulse
REPEAT ALARM/brightness control
• La alarma se puede repetir durante un período de
hasta una hora, si se desea.
I
- para desactivar las alarmas de
■ CD - alarma solamente
- alarma de radio solamente.
ALARM 1 MODE/OFF o ALARM 2 MODE/OFF
Page 28

11 кЪ11 ¡1I1HH LU кЧ ¥11 ['i IÜU ¡1 h} IJ 4rilJ ¡114L} IJ
Léalas antes de poner en marcha el equipo
Este producto ha sido diseñado y fabricado para cumplir
normativas rigurosas en materia de calidad y seguridad.
No obstante, deberán adoptarse ciertas precauciones
en cuanto a su instalación y manejo, que Ud. debe
conocer.
1. Lea estas instrucciones
funcionamiento el equipo, deberá leer todas las
instrucciones relativas a su manejo y seguridad.
2. Conserve estas instrucciones
relativas al manejo y a la seguridad del equipo
deberán conservarse para su posterior utilización
como material de referencia.
3. Lea todos los avisos
los avisos existentes tanto en las instrucciones de
manejo como en el propio equipo.
4. Siga todas las instrucciones
todas las instrucciones relativas ai funcionamiento y
a la utilización del equipo.
5. No utilice este aparato cerca del agua
- Por ejemplo, cerca de bañeras, lavabos,
fregaderos, lavaderos, superficies mojadas, zonas
próximas a piscinas, etc.
6. Para limpiar el aparato utilice sólo un trapo
húmedo
estrictamente las instrucciones del fabricante.
7. Proceda a su instalación de acuerdo con las
instrucciones del fabricante. No tape las
aperturas de ventilación
no deberá situarse sobre camas, sofás, alfombras,
etc. ni en espacios cerrados, como estanterías,
armarios, etc. si con ello se impidiese la libre
circulación de aire por las aperturas de ventilación.
8. No instale el equipo cerca de fuentes de calor
- Como radiadores, calentadores, estufas o cualquier
otro aparato (incluyendo los amplificadores)
generador de calor.
9. No anule la seguridad
de la clavija de corriente
(ya sea de tipo polarizado o
con toma de tierra). Las
clavijas polarizadas tienen dos patillas, una más ancha
que la otra.
- Para limpiar el equipo deberán seguirse
- Antes de poner en
- Las instrucciones
- Deberán respetarse todos
- Deberán seguirse
- Por ejemplo, el equipo
Clavija
polarizada de CA
11
12
13. Desenchufe el aparato
14. Confíe el mantenimiento y las reparaciones a
15. Uso de las pilas PRECAUCIÓN.
Las que disponen de toma de tierra tienen dos patillas
y una tercera que es la de conexión a tierra. Tanto la
patilla más ancha como la toma de tierra han sido
incorporadas a la clavija para su seguridad personal. Si
la clavija suministrada con el equipo no es compatible
con su toma de corriente, consulte a un electricista
para sustituir la toma de corriente obsoleta.
10. Proteja debidamente el cable impidiendo
pueda pisarse o incluso perforarse, especialmente
en la parte más próxima a la clavija y en el punto de
salida del equipo.
Utilice exclusivamente aquellos
dispositivos/accesorios
fabricante.
Coloque el equipa exclusivamente
sobre aquellos carros, bases, trípodes,
soportes o mesas especifitados por el
Cuando utilice un carro, tenga cuidado al desplazar
el conjunto carro/equipo para evitar posibles daños
por vuelco.
eléctricas o cuando no vaya a ser utilizado durante
largo tiempo.
personal técnico especializado.
deberá repararse siempre que haya resultado
dañado de alguna manera, como por ejemplo por
daños en el cable o en la clavija, por derrame de
líquido sobre el equipo, por objetos que hubieran
podido introducirse en su interior, por exposición del
equipo a la lluvia o a ambientes húmedos, cuando el
equipo no funcione con normalidad o cuando
hubiera sufrido algún tipo de caída.
escapes en las pilas, que pueden ocasionar lesiones
físicas o daños en la unidad:
• Instale
• No mezcle las pilas
carbono y alcalinas,
• Extraiga las pilas cuando no vaya a usar la unidad
durante largo tiempo.
comerciante o vendidos con el equipo.
todas
+ y - como está marcado en la unidad.
las pilas correctamente,
(viejas
recomendados por el
durante tormentas
El equipo
Para prevenir
con
nuevas
etc ).
EL6475-E001-00/110
o de
que
Page 29

MEXICO Garantía para México
I
POLIZA DE GARANTIA
Este aparato ha sido cuidadosamente diseñado y se ha fabricado con los mejores materiales bajo un
estricto control de calidad, garantizando su buen funcionamiento por los periodos establecidos según el
aparato (ver lista en la parte inferior) a partir de la entrega del aparato al consumidor. Esta
póliza incluye la reparación o reposición gratuita de cualquier parte o componente que
eventualmente fallase y fa mano de obra necesaria para su reparación, misma que se hará
efectiva en cualquiera de nuestros centros de servicio autorizados en el país.
Si su aparato llegase a requerir de nuestro servicio de garantía, acuda al centro de servicio más
cercano a su domicilio, de tener alguna duda por favor llame a nuestra CENTRAL DE SERVICIO al
tel,: 57 28 42 52, y en el interior del país LADA sin costo al 01 800 506 9200 en donde con gusto le
indicaremos el cetro de servicio autorizado más cercano a su domicilio.
PHILIPS MEXICANA S.A. de C.V a través de sus centros de servicio autorizados reparará y devolverá
a usted su aparato en un plazo no mayor a 20 días hábiles, contados a partir de la fecha de
ingreso, impresa en la orden de servicio de cualquiera de nuestros centros de servicio autorizados.
La garantía de esta póliza cubre cualquier desperfecto o daño eventualmente
ocasionado por los trabajos de reparación y/o traslado del aparato en el interior de
nuestros centros de servicio autorizados.
Esta póliza sólo tendrá validez, si está debidamente requisitada, sellada y firmada por
la casa vendedora, en caso de extravío de esta póliza, podrá hacer efectiva su garantía con la
presentación de su factura de compra.
ESTA POLIZA NO SE HARÁ EFECTIVA EN LOS SIGUIENTES CASOS:
• Cuando el aparato sea utilizado en condiciones anormales y los daños o desperfectos que
manifestase sean causados por mal trato, descuido o mal uso.
• Cuando el aparato no haya sido operado de acuerdo a su instructivo de uso. en donde se señalan
las condiciones normales de operación, los valores nominales y las tolerancias de las tensiones
(voltaje), frecuencia (ciclaje) de alimentación eléctrica y las características que deben reunir las
instalaciones auxiliares.
• Cuando la causa de la falla o mal funcionamiento sea consecuencia de una reparación inadecuada o
alteración producida por personas no autorizadas por PHILIPS MEXICANA S.A. de C.V.
• Cuando los datos de esta póliza hayan sido alterados o modificados.
• Por fenómenos naturales no imputables a la empresa tales como: temblores, inundaciones, incendios,
descargas eléctricas, rayos, etc,
36 MESES. - Monitores para computadora.
12 MESES. -Televisores, videocassetteras,video reproductores DVD, grabador reproductor de disco
6 MESES. - Radiograbadoras con y sin reproductor de disco compacto, reproductor de cassette
compacto, video proyectores (excepto la lámpara), cámaras de video, decodificadores
de señal (IRD), televisor para hotel, sistemas de observación, televisores de proyección,
teléfonos celulares, pagers, equipos modulares, sintoamplificadores, facsímil,
de recepción de satélite, DVD ROM, CDR ROM y CDRW ROM para computadora.
portátil, reproductor de disco compacto portátil, radio relojes, radios A.M./F.M., auto
estéros y teléfonos inalámbricos.
3 MESES. - Accesorios, controles remotos, bocinas, cinta para fax y para cámara de videoconferencia.
ESTA POLIZA ES GRATUITA
PERIODOS DE GARANTÍA
LNB,
NOM-135-
antena
PHILIPS
Page 30

ouiviiviciL vvccixcivLi// Mnnc I rnuunmviivit: tiv I nt I itiv
Notes:
•
Les indications de mode d'alarme sélectionné 0, J], ou
<2> clignotent pendant la durée de l'alarme répétée.
• SI vous utilisez le mode d'alarme CD, la lecture CD
reprend au moment de l'Interruption par l'alarme répétée
• Pendant l'alarme CD, la lecture du CD continue pendant une
heure, à moins que vous n'annuliez/ remettiez l'alarme.
SOMMEIL WEEK-END
Cette caractéristique désactive l'alarme tous les samedi et
dimanche et arrête la fonction d'alarme pour la période du
lundi au vendredi. Assurez-vous toutefois d'avoir réglé en
premier le jour. Voir chapitre REGLAGE DU JOUR.
/ Appuyez une ou plusieurs fois sur
jusqu'à ce que apparaisse pour une alarme ou pour
les deux.
2
Pour annuler la fonction weekend-sleeper, répétez le
point 1 jusqu'à ce que Z^ disparaisse de l'affichage.
Voir figure |T|.
SLEEP
Concernant la fonction d'arrêt programmé
Le radio-réveil CD est pourvu d'une minuterie d'arrêt programmé
intégrée permettant de mettre l'équipement hors service pen
dant la lecture radio ou CD après une période de temps réglée.
Il existe quatre options d'arrêt programmé avant que l'équipe
ment ne s'arrête automatiquement, c'est-à-dire 10,30,60,90
minutes et mise hors service. La fonction d'arrêt programmé
n'affecte en rien le fonctionnement de vos réglages d'alarme.
Réglage de la fonction d'arrêt programmé
7
Appuyez sur
(radio) pour mettre en service le mode en question.
• Pour le mode CD, assurez-vous d'avoir d'abord bien
inséré un disque.
2
Sélectionnez votre heure d'arrêt programmé en appuyant
une ou plusieurs fois sur
d'arrêt programmé désirée soit affichée. Voir figure
3
Pour annuler la fonction d'arrêt programmé, vous pouvez soit:
- appuyer une ou plusieurs fois sur
que BHIdd J disparaisse de l'affichage
- appuyez sur
- appuyez sur
- appuyez sur
PLAY/ PAUSE
REPEAT ALARM/ brightness control
STDP
DN/ DEF
WEEKEND-SLEEPER
(CD) ou
DN/ DEF
SLEEP
jusqu'à ce que l'heure
SLEEP
■ (uniquement CD)
(uniquement radio).
jusqu'à ce
ENTRETIEN
Généralités
- Si vous n'utilisez pas le radioréveil pendant une période de
temps prolongée, débranchez l'appareil de la prise
électrique murale. Il est également recommandé d'enlever
la pile pour éviter qu'elle ne coule et endommage l'appareil.
- Pour enlever toute trace de doigt, poussière ou autre,
utilisez un chiffon propre ou une peau de chamois
légèrement humide. N'utilisez aucun produit contenant
du benzène ou autre diluant qui pourrait abîmer le boîtier.
- N'exposez pas l'appareil à la pluie, à l'humidité ou à une
chaleur excessive pour éviter tout accident et
détérioration de l'appareil.
Maniement du lecteur CD et des CD
• Ne touchez jamais la lentille du lecteur de CD.
• De soudaines variations de la température ambiante
risquent de provoquer de la condensation dans le
lecteur de CD. Vous ne pouvez alors plus utiliser
l'appareil. N'essayez pas de nettoyer la buée mais
placez l'appareil dans un endroit plus chaud et sec et
attendez que toute trace d'humidité ait disparu.
• Laissez toujours le couvercle du compartiment CD fermé
pour éviter que de la poussière ne se dépose sur le
compartiment. Pour nettoyer, enlevez la poussière du
compartiment avec un chiffon doux et sec,
• Pour sortir un CD de sa boîte, appuyez sur le centre tout en
soulevant le disque. Tenez-le toujours par les bords et
replacez-le dans son coffret tout de suite après son utilisa
tion afin d'éviter toute rayure ou contact avec la poussière,
• Nettoyer le disque à l'aide d'un chiffon propre nonpelucheux, toujours en ligne droite du centre vers le
bord. N'utilisez aucun produit de nettoyage qui
pourrait abîmer le disque.
• N'écrivez jamais sur le disque et ne collez aucun autocollant.
Informations sur l'environnement
Tous les matériaux d'emballage superflus ont été supprimés.
Nous avons fait de notre mieux pour que l'emballage soit
facilement séparable en trois types de matériaux : carton (boîte),
polystyrène expansé (matériel tampon), polyéthylène (sachets,
panneau de protection en mousse).
Votre appareil est composé de matériaux pouvant être recyclés
s'il est démonté par une firme spécialisée. Veuillez observer les
règiements locaux lorsque vous vous débarrassez des matériaux
d'emballage, des piles usagées et de votre ancien appareil.
Dans le cas d'un problème de fonctionnement, vérifiez tout
(Voir figure f^)
Page 31

LIU
ide
ver
areil.
utrioinuc uco Mivumnuco
Dépistage des anomalies
Si vous rencontrez des difficultés, vérifiez fout d'abord les points énoncés ci-dessous.
Si vous n'arrivez pas à les résoudre, consultez votre fournisseur ou un réparateur.
Avertissement
Ne jamais ouvrir vous-même l'équipement au risque de recevoir des chocs électriques.
N'essayez en aucun cas de réparer vous-même l'équipement, car ceci vous ferait perdre le droit à la garantie.
nt
îtler.
une
nte
s
c et
ten
Isaàre.
1-
le
!ant.
îte).
Problème
Cause possible
- Remède
Absence de son
Volume non réglé
-
Réglez le volume
Aucune réaction à l'usage des touches
Décharge électrostatique
-
Débranchez l'équipement de l'alimentation et
rebranchez-le au bout de 5 minutes.
•LECTEUR CD
Lecture CD ne fonctionne pas
CD extrêmement rayé ou sale
- Remplacez/ nettoyez le CD
Lentille du laser embuée
-
Attendez que la lentille ait atteint la température
ambiante
Lentille laser sale
- Nettoyez la lentille en faisant jouer un CD de
nettoyage de lentille
CD-R(W) non finalisé
- Utilisez un CD-R(W) finalisé
•RADIO
Grésillement du son en réception FM
Signal faible
-
Sortez entièrement l'antenne télescopique
___________
___
_____
Grésillement continu/
sifflement en réception AM
Interférences électriques provenant de téléviseurs,
d'ordinateurs, de lampes fluorescentes, etc.
-
Eloignez l'équipement des autres équipements
électriques
•ALARME
L'alarme ne fonctionne pas
Heure d'alarme non réglée
-
Voir le chapitre 'REGLAGE DE L'HEURE ET DE
L'ALARME'
Mode d'alarme non sélectionné
- Voir le chapitre 'REGLAGE DES OPTIONS D'ALARME'
Volume trop faible pour le mode d'alarme radio/ CD/
ronfleur.
- Voir le chapitre 'Réglage du volume de réveil
confortable'
•WEEKEND SLEEPER
Weekend sleeper (fonction de réveil weekend)
ne fonctionne pas
Sélection du jour non réglée/ incorrectement réglée
- Voir le chapitre 'REGLAGE DU JOUR'
Weekend sleeper (fonction de réveil weekend) non réglé
- Réglez le weekend sleeper (fonction de réveil
weekend)
_____________
__________
Page 32

uuniviin CIV riiv Lie «JCIVmiVn/I/LmiVIMI lYim« • Liail*ill.ia ■ w
Notas:
•
Los indicadores 0, J], 0 <2? del modo de alarma seleccio
nado destellarán durante el modo de repetición de alarma.
• Si se esté utilizando el modo de alarma de CD, la
reproducción de CD se reanudará en el punto en que tue
interrumpida por la repetición de alarma,
• Durante la alarma de CD, la reproducción de CD continua
durante hasta una hora a menos que la alarma se
cancele/restaure.
DORMIR EN FIN DE SEMANA
Esta función desactiva la alarma cada sábado y domingo y
reanuda la función de alarma de lunes a viernes. Sin embargo,
asegúrese de que en primer lugar ha realizado el ajuste del día.
• Véase el capítulo relacionado con AJUSTE DEL DÍA.
1
Pulse
WEEKEND-SLEEPER
una o más veces hasta que
aparezca para una de las alarmas o ambas alarmas.
2
Para cancelar la función de dormir en fin de semana
repita el paso 1 hasta que desaparezca de la
pantalla. Véase la figura
[4].
DORMIR
Acerca de la función de dormir
La radio reloj
con
reproductor de CD incorpora un temporizador
de dormir que permite que el aparato se desactive automática
mente durante la reproducción de radio o de CD después de
un período de tiempo determinado. Hay cuatro opciones de
períodos de dormir antes de que el aparato se desactive:
10,30,60,90 minutos y desactivación. La función de dormir no
afecta el funcionamiento de los ajustes de alarma.
Ajuste de la función de dormir
7
Pulse
PLAY/PAUSE Hl
(CD) o
ON/OFF
(radio) para
activar el modo respectivo.
• Para el modo de CD, asegúrese de que hay un disco colocado,
2
Seleccione el período de dormir pulsando
SLEEP
o más veces hasta que aparezca el período de dormir
deseado. Véase la figura
3
Para cancelar la función de dormir, se puede:
- pulsar
SLEEP
una o más veces hasta que fctlddJ
desaparezca de la pantalla
- pulsar
REPEAT ALARM/ brightness controlI
- pulsar
STOP
ON/OFF
■ (CD solamente)
(radio solamente).
~ pulsar
MANTENIMIENTO
General
(Véase la figura @)
- Si va a estar mucho tiempo sin usar el aparato, acon
sejamos sacar la clavija del enchufe y también sacar la pila
del aparato en evitación de daños por eventuales fugas.
- No exponga el aparato, los CD, las pilas ni los cassettes
a la humedad, la lluvia, la arena, o a la luz directa del sol
o dejarlos en lugares donde ocurren altas temperaturas.
- Un cuero de gamuza levemente humedecido con agua
es suficiente para limpiar la caja. No utilice artículos de
limpieza abrasivos u otros productos disolventes, por
ejemplo gasolina, terpentina, alcohol, etc,, pues pueden
dañar la parte exterior del aparato
Mantenimiento de reproductor y CD
• No tocar nunca las lentes del reproductor de CD
• Un cambio repentino de la temperatura ambiente puede
provocar condensaciones que empañen las Jentes del
reproductor de discos haciendo imposible la reproducción.
No intente limpiar las lentes. Sitúe el equipo en un am
biente seco y cálido y espere que la humedad se evapore.
• Mantenga siempre la tapa cerrada para evitar la
acumulación de polvo en el compartimiento. Para
limpiar el compartimiento, utilice un trapo suave y seco.
• Para sacar un CD de su caja, presione el eje central
mientras levanta el disco. Coja siempre el disco por el
agujero central y guárdelo de nuevo en su caja para
evitar la acumulación de polvo y los arañazos.
• Para limpiar los discos, utilice una bayeta suave y sin
pelusa y hágalo con movimientos en línea recta desde
el centro hacia los extremos. No utilíce agentes
limpiadores que puedan dañar el disco.
• Nunca escriba o pegue adhesivos sobre el disco.
Información medioambiental
Se ha eliminado todo material redundante de empaque.
Hemos hecho todo lo posible para que el material de
una
empaque sea separable en tres materiales primarios:
cartón (caja), poliestireno expandido (amortiguación),
polietileno (bolsas, lamina protector de espuma).
Su aparato está hecho
reciclarse si está desarmado por una compañía
especialista. Por favor observe los reglamentos locales
referente al desecho de materiales de empaque, pilas
gastadas y viejos equipos.
de
materiales que pueden
Page 33

I U
pila
ttes
I sol
as.
la
: de
r
den
nCOULUOlUIV ut rnunttlVIHd
RESOLUCION DE PROBLEMAS
Si se produce un fallo, compruebe primero los puntos que se enumeran a continuación antes de llevar el equipo a reparar.
SI no consigue solucionar el problema siguiendo estos consejos, consulte a su distribuidor o centro de mantenimiento.
ADVERTENCIA:
No desmonte el aparato o correrá el riesgo de recibir una descarga eléctrica.
No trate de reparar el aparato Vd. mismo ya que tal acción Invalidaría la garantía.
Problema
Posible Causa
-
Solución
No hay sonido
El volumen no está ajustado
-
Ajustar el volumen
Se oye continuamente crepitaclón/silbidos
durante la retransmisión de AM
Interferencia eléctrica producida por televisores,
ordenadores, lámparas fluorescentes, etc.
-
Aparte el aparato de otro equipo eléctrico
•ALARMA
________
El aparato no reacciona a la pulsacién de los botones
Descarga electrostática
-
Desconecte el aparato de la fuente de alimentación y
vuelva a conectarlo después de 5 minutos
•REPRODUCTOR OE CD
La reproducción des CD no funciona
El CD está muy rayado o sucio
-
Cambiar/limplar el CD
La lente láser está empañada
-
Esperar a que la lente se haya aclimatizado
La lente láser está sucia
-
Limpiar la lente reproduciendo un disco de limpieza
de lente de CD
CD-fílWj no ha sido finalizado
-
Utilizar un CD-R(W) finalizado
•RAOlO
Se oye crepitación ocasionalmente durante la
retransmisión de FM_____________________
Señal débil
-
Extender completamente la antena en espiral
La alarma no funciona La hora de alarma no está establecida '
- Véase el capítulo referente a 'AJUSTE DE LAS
El modo de alarma no se selecciona
-
Véase el capítulo referente a 'AJUSTE DE EAS
El volumen es demasiado bajo para el modo de alarma
de radio/ CD/zumbador.
-
Véase el capítulo referente a 'Ajuste del volumen
•OORMIR EN FIN DE SEMANA
La función de dormir en fin de semana no funciona
La selección de día no está establecida/es incorrecta
^ Véase el capítulo referente a 'AJUSTE DEL DÍA
La función de dormir en fin de semana no está
establecida
-
Establezca la función de dormir en fin de semana
________________
HORAS DE RELOJ Y ALARMA'
OPCIONES DE ALARMA
para despertar con suavidad'
Page 34

TOCADISCOS DE CD PORTATIL PHILIPS
Cambio gratis por un año
Se necesita presentarse en persona con este producto para cambiario.
¡QUIEN TIENE PROTECCION!
Usted debe tener su comprobante de venta para cambiar el producto. Una
nota de venta u otro documento mostrando que usted compró el
producto se considera un comprobante de venta.Adjúntelo a este manual
de instrucciones y reténgalo a la mano.
¿QUE CUBRE?
La protección bajo la garantía comienza el mismo día en que usted
compra el producto. Durante un año a partir de esta fecha, se
reemplazará un producto inoperante o defectuoso con otro nuevo,
renovado o comparable sin cargo alguno. Un producto de reemplazo
tiene cobertura sólo durante el período de la garantía original. Una vez
que venza la garantía original del producto, también habrá vencido la
garantía de! producto de reemplazo.
¿QUE EXCLUYE LA GARANTIA?
Su garantía no cubre:
• cobros por mano de obra durante la instalación o montaje del
producto, ajuste de los controles del cliente o de preferencia e
instalación o reparación de ios sistemas con antena fuera de la
unidad.
• reparación del producto y/o reemplazo de piezas, a raíz de uso
indebido, accidente, reparación no autorizada u otra causa no bajo el
control de Philips Consumer Electronics Company.
• problemas de recepción ocasionados por condiciones de señales o
sistemas de cable o de antena fuera de la unidad.
• un producto que requiera modificación o adaptación para que opere
en un país que no sea el país para el que fue concebido, fabricado,
aprobado y/o autorizado, o la reparación de productos dañados por
tales modificaciones.
• daños incidentales o consecuentes que resulten del producto.
(Algunos estados no permiten la exclusión por daños incidentales o
consecuentes, de modo que es posible que la exclusión arriba
indicada no le sea aplicable a usted. Esto incluye, sin limitarse,
materiales pregrabados con o sin amparo de derechos de autor)
• Una unidad que se ha comprado, usado o reparado fuera de los
EE.UU., Puerto Rico, las islas Virgenes y el Canadá, o que se ha usado
para fines comerciales o institucionales (inclusive productos usados
con fines de arrendamiento, pero sin limitarse a éstos).
¿DONDE SE EFECTUA EL CAMBIO?
Usted puede cambiar el producto en todos los países con distribución
oficial del producto por Philips Consumer Electronics Company. En
países donde Philips Consumer Electronics Company no distribuye el
producto, la entidad local de servido Philips tratará de darle un
producto de reemplazo (aunque puede haber demora si el producto
apropiado no está fácilmente disponible).
ANTES DE PEDIR UN CAMBIO...
Favor de consultar el manual de instrucciones antes de pedir un cambio.
Algunos ajustes de los controles según las indicaciones en el manual Serie No.
podrían ahorrarle un viaje.
Esta garantía le otorga derechos legales específicos y usted podría gozar de otros derechos que yqríari de un estado a otro.
Philips Service Solutions Group, P.O. Box 2976, Longview,Texas 75606, (903) 242-4800
EL4967S003 / MAC 4108 / 10-00
PARA CAMBIAR UN PRODUCTO EN LOS EE.UU., PUERTO
RICO O LAS ISLASVIRGENES...
Comuniqúese con su distribuidor para concertar el cambio,También,
usted puede enviar el producto con el seguro y transporte o franqueo
prepagados, adjuntando el comprobante de venta y enviándolo a la
dirección a continuación;
(En los EE.UU., Puerto Rico o las Islas Vírgenes, toda garantía implícita,
inclusive las garantías implícitas de comerciabiíidad y aptitud para un
propósito en particular, están limitadas en cuanto a duración al plazo de
esta garantía expresa. Puesto que algunos estados no permiten
limitaciones sobre la duración de una garantía implícita, es posible que la
limitación arriba indicada no le sea aplicable a usted.)
PARA CAMBIAR UN PRODUCTO EN EL CANADA...
Favor de comunicarse con Philips al: '
(En el Canadá, esta garantía es otorgada en lugar de toda otra garantía.
No se otorga ninguna otra garantía expresa ni implícita, comprendiéndose
aquí ninguna garantía implícita de comerciabiíidad o aptitud para
propósito alguno. Philips no será responsable bajo circunstancia alguna
por daños y perjuicios directos, indirectos, especiales, incidentales o
consecuentes, independientemente de la manera ocasionada, aún con
notificación de la posibilidad de los mismos.)
PARA CAMBIAR UN PRODUCTO DESPUES DE VENCER LA
GARANTIA...
En los EE.UU., Puerto Rico o las Islas Vírgenes, comuniqúese con Philips
Service Company, llamando al (800) 531-0039 para obtener el costo de
cambio de un producto después de vencer la garantía. Luego empaque el
producto con cuidado y envíelo al Small Product Service Center, a la
dirección arriba. En el Canadá, llame teléfono encontrado arriba en la
sección "Para cambiar un producto en el Canada” para obtener el costo
para cambiar un producto no amparado por garantía.
RECUERDE...
Favor de anotar los números de modelo y serie del producto en el
espacio abajo.También, sírvase llenar y enviar oportunamente su tarjeta
de registro de la garantía.Así nos será más fácil notificarle en caso de ser
necesario.
Modelo No.
Small Product Service Center
Philips Service Company
907 Snapps Ferry Road, Plant 2, Building 6
Greeneville.TN 37743 USA
1-800-661-6162 (francófono)
1-800-363-7278 (anglòfono)
______________________________________
Page 35

MEXICO
Producto ifoporrado por:
Philips Mex-icana, S.A, de C.V
Norte 45 No. 669 Col. Ind.Vallejo,
Del.AtzcapotzaIco C.P 02300
Tels. 57284200 у 57294800
Garantía para México
Philips Mexicana, S.A. de C.V.
Centro de información al Coíisum/dor
Norte 45 No, 669 Col. Ind.VallejO
Del. AtzcapoNalco C.P 02300
Tcl. 53 687788 Lada 01 800504 6200
La presente garantía contará a partir de: DIA
En caso que en su producto se produzca alguna falla, acuda al centro de servicio más cercano a su domicilio (según listado de talleres),
de tener alguna duda, por favor llame a nuestra CENTRAL DE SERVICIO, en donde con gusto le atenderemos.
Asi mismo, cuando requiera refacciones y partes originales para su producto, acuda a los centros de servicio. Para hacer efectiva la garantía
de su producto, es necesario que presente usted esta póliza debidamente requisitada o de lo contrario presentar su factura de compra.
______________
MES
___________________
AÑO
___________________
CENTROS DE SERVICIO
Ciudad
EDO
Aíspuko
GRÒ
Cd. Juárez CHI! I. Rancho el Becerro 3011
Cd. Reynosa TAMPS Tiburdo Ga-za № 401 Rodriguez
Chihuahua CHIH. Trasvina у Retes N" 3503-A San Felipe 31240 Zener Clectronfea
Colima
COL
Cuiiacan SIN. Venusiano Carranza № 140-A Nte. Centro
Guadiílajara )AL
León
GTO Hernandez Alvarez № 726
Merida
YUC
Mewcali
B.C.N. Cau. Cuauhiemoc № 866-2 Cuauhtemoc Nte.
Mexico
D.F. Calz Valleio N'^ 1Ü45-03 Esq Poniente 124li'.dustrial Nuc'va Vallejo
Mexico D.F.
Mcx.co D.F. Pitares № 519 Local C-3 Del Valle
Monterrey
N.L.
Morelia MICH Lago de Patzcuaro № 5G0-A
Oaxaca
OAX
Pacbuca
HGO
Puebla
PUF
Queretaro
QRO
San l.uis Potosí S.LR
Tampto
TAMPS
Tijuana B.C.N Caltela. N’1540-3 Centro
EDO
Toluca
MEX
Torreón
COAH Mariano Lopez Ortiz N‘' 1126 Nte Centro
Tuxtla Gutierrez
NOTA: Los Centros que tengan (S) solo proporcionan Servicio y los que tengan (SR) venden refacciones y
CHIS
Veracruz VER Guerrero № 1877 Entre Cortes у Canal Centro 91700
Villaherrnosa TAB Sanchez Marmol N“ 206 Centi-o
proporcionan Servicio.
Calle у № Colonia C.P. Nombre Comercial
Av Revolución N" 28 M. Alcrnari 39 300 Servicio flectr'on'co Profesional
Francisco 1. Madero № 426
Av.Valiarta № 2250 1 aoron de Guevara 44600 Lcccom SA de C.V.
Calte 70 N“ 443 X 49 Depto.8
Calz.Vallejo N" 904 Loc.5
Juan Mendez № 825 Nte.
Huzares 207
Pza de las Americas Lote 28 Nucleo О Valle de Sn J.ivier 42086 Frazare Electrónica
Av. 10 Poniente N“ 2902-В
Bolivia 32
Fuente De La Glorieta № 147 Balcones de'Valle 78320 Servidos Electrónicos
Laredo № 105 Mame™ 89060 Concesionario PhilipsTampico
Calle Toluca N" 505 Sanchez 50040 Concesionario Philips Ibiuca
10 Nte. Ote 153-A
Pi'.ìdera Dorada 32610 Teloso."vicio Dominguez 16
San juan de Dios 37480 Técnicos Especializados
Industrial Vallejo
Ventura Puente
San Alejandro 72090
Lomas dc Querelare
88699
Centi-o
28000 TV Antenas dc Co'ima
80090
Centro
97000 Servicentro
21200 Baja Flectromc's
2300 C'hyr 5a. oe C.V.
2300 Tecnología y Servioo S.A. de C.V
03100
64C00 Monterrey Centro Electrónico S.A 8
Centro
5802.0 MuJtiserv.Prof.de Zamora
68000 El Franclstor S. de K L. de C.V.
Centro
76190 Electrónica Zener
22000
27000 Electrónica jomar
29000 KC-Video
Centro
86000
Telescrvicio Pejse
Esiereo Voz
Cocosionai 10 Pilares
Se.i.om 2?
Sistemas Inalámbricos de
Antza Comunicaciones
Tecn„.„,ro 93 14 31 36
Lada Telefono Fax
74 83 32 96 S
18 21 28 18 21 28 S
89
22 59 86
403 01
61618 88
616 01 26
567 22 56
56? 96 3?.
587 57 99 587 57 99
5
60S 42 15
5
605 12 76
375 16 1 / 374 85 42 SR
12 03 17 s :
647 37 s
48 77 64 48 77 64 SR'
534 07 s
12. 36 04 SR
85 95 58 85 95 58 5 :
22 00 05
32 /0 23
32 44 44
26 50 4!
403 01
615 72 62 SR
23 39 97 5
5ó7 96 32
60S 43 46 SR
32-78 23 5
14 14 01 16
331
67 1615 10
47 70 26 99 15 58 64 5
99 28 54 28
619 67 49 16 67 49 16
43
951
77 14 15 81
421 610 09
481
12
66
72 14 83 09 17 03 21
17
96 18 19 08
29
S
S I
fj
5
S
.SR
b .
s '
S
s i
S ;
5
5 '
Page 36

CD Clock Radio
PHILIPS CONSUMER ELECTRONICS COMPANY
A Division of Philips Electronics North America Corporation
Knoxville,
Tennessee
996500011054
37914-1810, U.S.A.
Meet PHILIPS at the internet http://www.philipsusa.com
Printed in Hong Kong
Cmm/RB/0046
 Loading...