

Page 1
FM Antenna (is;
ALARM 1 (g)
^LARM 1 * @
ALARM 2 * @
CLOCK DISPLAY (g)
CASSETTE ig)
BRIGHTNESS (gì
ALARM 2 @
I ® VOLTAGE
selector
REPEAT ALARM
(2) CASSETTE
(3) ALARM RESET
(i) FUNCTION
(5) CLOCK
(6) PHONES
©TUNING
® BAND
g VOLUME
' © BATTERY
Page 2

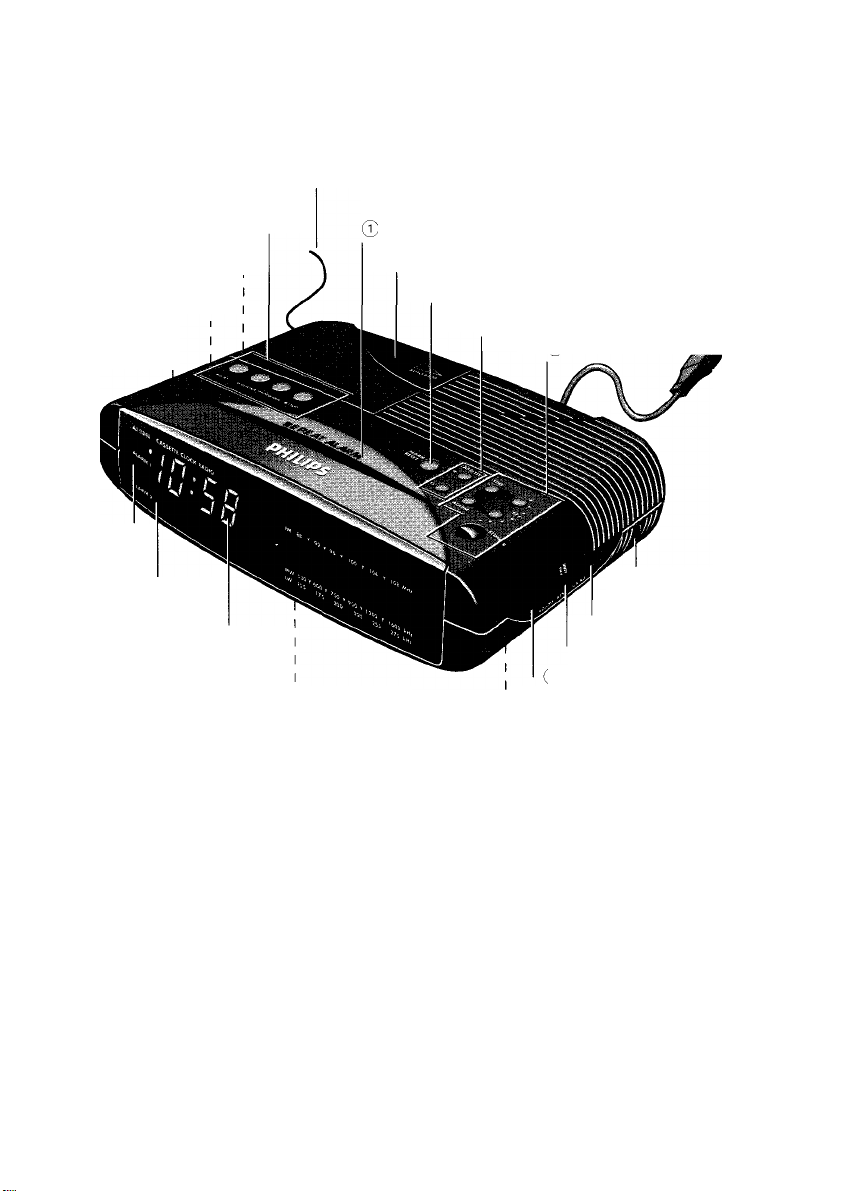
Controls
m
3
(D
«
@
@
®
®
@
®
®
@
®
REPEAT ALARM button
CASSETTE compartment
ALARM RESET button
To switch off the alarm for 24 hours.
FUNCTION buttons
- RADIO CASSETTE ON button
To switch on the radio and to put the
cassette mode on standby
- OFF button
To switch the radio/cassette or alarm off.
CLOCK buttons
- TIME SET button
To set the time
- ALARM SET button
To set the alarm
- '+' SET button
To set the time/alarm fast forward
- SET button
To set the time/alarm slow backward
- SLUMBER button
To set/switch on the slumber time
PHONES O
Stereo headphone socket
Connection for headphones (not included)
TUNING control
For station selection
BAND switch
To select between FM, MW and LW (not for
all versions)
VOLUME control
To adjust the volume level
BATTERY compartment
CLOCK DISPLAY
ALARM 2 indicator ^
Indicates that alarm 2 is switched on
ALARM 1 indicator ^
Indicates that alarm 1 is switched on
ALARM 1 Selector
- BUZZ - to be woken by the buzzer
- RAD/CASS - to be woken by the
radio/cassette
- OFF-To disable alarm 1
ALARM 2 Selector
- BUZZ - to be woken by the buzzer
- RAD/CASS - to be woken by the
radio/cassette
- OFF-To disable alarm 2
BRIGHTNESS control switch (Hi/Low)
To control the brightness of the clock display
CASSETTE buttons
- PLAY ►
To start playback
- REWIND •H
To fast-rewind the cassette
- FORWARD ►►
To fast-forward the cassette
- STOPB
To stop the playback
FM Antenna
Voltage selector (120V/240V)
(not all versions)
Clock/Radio
Mains supply
• Check that the mains voltage as shown on the
type plate (at the base of the set) corresponds
to your local mains voltage. If it does not,
consult your dealer or service organisation.
If the set is equiped with
a voltage selector, set
this selector to the local
mains voltage.
• Connect the mains lead
to the wall socket. The mains supply is now
connected. As soon as you insert the mains
plug into the wall socket, the figures on the
display will blink. This means that you must set
the correct time.
• To disconnect the set from the mains,
withdraw the mains plug from the wall socket.
Important note for users in the U.K;
When fitting a mains plug, follow the
instructions on page 8.
CLOCK
____________________________________
Clock display ®
- The clock display shows the time. The display
also indicates whether you have switched on
the alarm. If alarm 1 is on, then ALARM 1 -Slights up in the display. For alarm 2 ALARM 2 * *
lights up in the display and for the dual alarm
both light up.
Setting the time
• Keep TIME button (S) pessed and at the same
time set the correct time by:
- pressing the '-i-' button ® or
- pressing the button ®
• Release the TIME button ®. The correct time
appears in the display
Antennas
- For FM reception there is an antenna wire at
the rear of the clock radio. This wire must be
extended and if necessary adjusted slightly in
order to obtain good reception.
- The AM/MW and LW antenna is built into the
clock radio. To obtain optimum reception you
may have to adjust the position of the clock
radio slightly.
LISTENING TO THE RADIO
Switching the radio on/off
You can use this clock radio solely as a radio.
• Press the RADIO CASSETTE ON button ® to
switch on the radio. You may connect stereo
headphones with 3.5 mm plug to the socket HT
PHONES
• Select the waveband using BAND switch @
• Tune to the desired station using TUNING
control knob @.
• Set the volume using VOLUME control ®.
• To switch off the radio, press the OFF button ®
®. The loudspeaker is then muted.
_______________
Page 3

Cassette Playback
Alarm
CASSETTE PLAYBACK
• Press the RADIO CASSETTE ON button (4) to
switch on the radio and the cassette to standby
mode.
• Open the cassette door
manually and insert a
cassette tape into the
compartment. For playback,
any cassette type can be
inserted.
• Close the cassette door.
• Press ► PLAY and the radio will automatically
switch off.
- Playback will start
- Playback stops when the tape in the cassette
deck reaches the end.
- .The radio will automatically switch on.
• You may connect stereo headphones with 3.5
mm plug to the socket 0 PHONES ®. The
loudspeaker is then muted.
• Adjust the sound with the VOLUME control @
if needed.
• Press ■ STOP @ if you want to stop the
playback before the end of the tape.
- When the end of the tape is reached, the
► PLAY @ button is released automatically and
the radio is switched on.
• Press OFF button ® to switch off the radio.
Winding the tape
• Press ►► FORWARD ® button to fast forward
the tape.
• Press ** REWIND @ button to fast-rewind the
tape.
• Press ■ STOP ® to stop fast-forward or fast-
rewind, or before the end of the tape.
SETTING THE ALARM
Alarm time
You may set two different alarm times with this
clock radio. This can be useful if you need to be
woken up at different times during the week or at
the weekend.
Setting alarm time 1
• Set ALARM 1 Mode Selector @ to the
'RAD/CASS' or 'BUZZ' position and ALARM 2
Mode Selector ® to the 'OFF' position:
- BUZZ - to be woken up by the buzzer
or
- RAD/CASS - to be woken up by the
radio/cassette.
- * ALARM 1 indicator ® lights up on the
display.
• Press ALARM button ®
- The clock display shows ALARM 1 time.
• Press ALARM button ® and '+' ® or®
simultaneously. The alarm time display will
change. Release '+' ® or'-' ® when the
desired alarm time appears on the display.
Setting alarm time 2
• Set ALARM 2 Mode Selector ® to the
'RAD/CASS' or 'BUZZ' position and ALARM 1
Mode Selector @ to the 'OFF' position:
- BUZZ - to be woken up by the buzzer
or
- RAD/CASS - to be woken up by the
radio/cassette.
- # ALARM 2 indicator @ lights up on the
display.
• Press ALARM button ®
- The clock display shows ALARM 2 time.
• Repeat the above procedure to set the time for
ALARM 2
Notes:
• If the time and the alarm time met while
setting the ALARM time, you can switch off
the buzz/radio by pressing OFF button ®.
- Continue setting the alarm as per normal.
• The alarm time will not appear on the display
when:
- Both the ALARM 1 and ALARM 2 Mode
Selectors are set to the 'OFF' position.
- Both the ALARM 1 and ALARM 2 Mode
Selectors are set to the 'BUZZ' or
'RAD/CASS' position.
• When setting the alarm time, always release '+'
® or'-' ® first before releasing the ALARM ®
button.
?
Ill
Page 4

Alarm
Slumber
ALARM ON
The clock radio can awaken you in three ways:
Wake by radio
• Tune to the desired station using TUNING
control knob (7), and switch off the radio.
• Make sure the volume of the radio is loud
enough to wake you up.
• Set the ALARM Mode Selector (ALARM 1 (g)
or ALARM 2 ®) to the RADIO/CASSETTE
position.
- The respective ALARM indicator lights up
on the display.
• At the alarm time set, the radio will switch on
and it will automatically switch off 59 minutes
later.
Wake by buzzer
• Set the ALARM Mode Selector (ALARM 1 (g)
or ALARM 2 ®) to the 'BUZZ' position.
- The respective ALARM indicator * lights up
on the display.
• At the alarm time set, the alarm will
automatically switch off 59 minutes later.
Wake by the Cassette Playback
• Set the ALARM Mode Selector (ALARM 1 ®
or ALARM 2 ®) to the RADIO/CASSETTE
position.
- The respective ALARM indicator -$■ lights up
on the display.
• Open the cassette door manually and insert a
cassette into the compartment.
• Close the cassette door.
• Adjust the sound with the VOLUME control ®
on the radio mode, and switch of the radio.
• Press ► PLAY.
- Playback will start at the alarm time set.
• At the alarm time set, the alarm will be
activated by the cassette playback and it will
automatically switch off 59 minutes later.
Notes:
• Playback stops when the tape in the cassette
deck reaches the end.
- When the end of the tape is reached before
59 minutes is up, the ► PLAY @ button is
released automatically and the RADIO will be
switched on for the remaining duration of the
alarm time.
• Press ■ STOP @ if you want to stop the
playback before the end of the tape and the
radio will be switched on.
ALARM OFF
You can switch off the alarm in three ways:
Switching off the alarm temporarily
• Press the REPEAT ALARM button (T). The
alarm will temporarily switch off. 6-7 minutes
later, the alarm (radio or buzzer) will sound
again. This sequence may be repeated several
times. If the REPEAT ALARM button ® is not
pressed again, the alarm will automatically
switch off 59 minutes later. The following day
the alarm will sound again at the alarm time
set.
Switching off the alarm completely
• Set the ALARM Mode Selector (ALARM 1 ®
or ALARM 2 ®) to the 'OFF' position or
• Press the 'OFF' button once.
Switching off the alarm for 24 hours
• Press the ALARM RESET button @.
- The alarm is now switched off for 24 hours and
will sound again the next day at the same time.
SLUMBER__________________________________
The clock radio has built-in slumber function. This
function enables you to listen the radio/cassette
at bed time without having to get up to switch
off. The radio will automatically switch off at the
time set.
Slumber time
The period which you continue to listen to the
radio before you fall asleep is called the slumber
time. If you wish to set the slumber time for 59
minutes, proceed as follows:
• Press the SLUMBER button ® once. 59 will
appear on the display indicating that you have a
slumber time of 59 minutes.
If you wish to slumber for less than 59 minutes,
proceed as follows:
• Press and hold down the SLUMBER button ®
for at least 3 seconds. The slumber time starts
to count down from 55 to
the SLUMBER button ® when the desired
slumber time is displayed.
or
• Press and hold down the SLUMBER button ®
and '+' ® or'-' ® simultaneously. The slumber
time starts to change. Release both the buttons
when the desired slumber time is displayed.
Slumber off
You can switch off the radio before the slumber
time has elapsed:
• Press the OFF ® and the radio switches off.
- The slumber function does not affect the alarm.
BRIGHTNESS Control
The brightness of the clock display can be
controlled by sliding the BRIGHTNESS selector @
to the 'Hi' or 'Low' position.
00 minutes. Release
Page 5

power failure
Maintenance
POWER FAILURE
As soon as a power failure occurs, the clock radio
will switch off. As soon as the power supply
returns Du 'uD flashes, indicating that you must
reset the correct time on the clock.
Battery Back-up System
A 9 volt. E-block Type 6F22/PP3 battery or equivalent
{not supplied) can be fitted into the battery compart
ment. It will, in the event of a power failure, provide
sufficient power to maintain the Clock/Alarm,
memory. The display will not illuminate but when the
power is restored the time and alarm time will have
been retained and so will not require resetting. The
use of an alkaline battery is recommended. The nor
mal life of a new battery is about one year. For clarity:
Alarm, radio and display do not work on battery.
Before inserting the battery, connect the power
plug to the mains.
Place the battery in the compartment on the
underside of the clock radio (see diagram).
Replace the battery once year. The service of the
battery depends on how often and for how long
the power supply fails. This varies from a region to
another.
_______________
__________
MAINTENANCE
• If you do not intend to use the clock radio for a
long period, it is better to remove the power
plug horn the mains. In addition to this, it is
advisable to remove the battery from the clock
radio. This will prevent any danger of battery
leakage and the cicock radio will not be
damaged.
• To ensure good playback quality, clean the
head A, the capstans B and pressure rollers C
after every 15 hours of operation.
• Use a cassette tape cleaner or a piece of cotton
wool dipped in alcohol.
- The mechanism must not be lubricated I
- Fingerprints, dust and dirt on the clock radio
should be removed using a clean and damp
soft cloth or chamois leather. When cleaning do
not use any other products which contains
abrasive agents or solvents (benzene, thinner,
alcohol etc.)
These may damage the housing.
- Rain, dampness and extreme heat may damage
the clock radio. For this reason it should not be
exposed to direct sunlight or placed close to
heating elements for any period of time.
CLEANING THE HEADS
To ensure good recording and playback quality,
clean the parts (a) (|) (c) indicated in fig. 5 after
every 50 hours of operation or, on average, once
a month.
______________________
lU
Note: Always reset the time after a power-failure.
Open the cassette holder manually.
Use a cottonball slightly moistened with alcohol
or a special head cleaning fluid.
Clean the rubber pressure roller (g, the capstan
d), and playback head (a)
Cleaning of the heads (a) and (§) can also be
done by playing a cleaning cassette through
Page 6

Troubleshooting
m
3
If a fault occurs, first check the points listed be
«a
low before taking the set for repair.
If you are unable to remedy a problem by follow
ing these hints, consult your dealer or service
center.
WARNING
Under no circumstances should you try to repair
the set yourself, as this would void the warranty.
PROBLEM
- POSSIBLE CAUSE
• SOLUTION
No sound
- Volume is too soft
• adjust volume
- Headphones are connected
* Disconnect headphones
Poor radio reception
- Weak radio aerial signal
• Aim the aerial for best reception:
- FM: adjust aerial position
- AM (MW/LW): rotate the entire set
- Interference caused by closely located
electrical equipment like TVs, video recorders,
computers, thermostats, fluorescent lamps
(TL), engines etc.
• Keep the set away from electrical equipment
Poor cassette sound qualrty
- Dust and dirt on the heads, capstan or pressure
roller
• Clean the heads etc. (see Maintenance)
________
__________________
IMPORTANT NOTES FOR USERS IN
THE U.K.
Mains plug
This apparatus is fitted with an approved
moulded 13 Amp plug. To change a fuse in this
type of plug proceed as follows;
• Remove fuse cover and fuse.
• Fix new fuse which should be a BS1362
S Amp, A.S.T.A. or BSI approved type.
• Refit the fuse cover.
If the fitted plug is not suitable for your socket
outlets, it should be cut off and an appropriate
plug fitted in its place.
If the mains plug contains a fuse, this should
have a value of 5 Amp. If a plug without a fuse
is used, the fuse at the distribution board should
not be greater than 5 Amp.
Note: The severed plug must be disposed to
avoid a possible shock hazard should it be
inserted into a 13 Amp socket elsewhere.
How to connect a plug
The wires in the mains lead are coloured with
the following code: blue = neutral (N), brown =
live (U.
As these colours may not correspond with the
colour markings identifying the terminals in your
plug, proceed as follows:
• Connect the blue wire to the terminal marked
N or coloured blue or black.
• Connect the brown wire to the terminal
marked L or coloured brown or red.
• Do not oObnect either wire to the earth
terminal in the plug, marked E (or +) or
coloured green (or green and yellow).
Before replacing the plug cover, make certain
that the cord grip is clamped over the sheath of
the lead;:* not simply over the two wires.
If in doubt, consult a qualified electrician.
The type plate Is located on the base of the set.
This product complies with the radio interference
requirements of the European Community.
 Loading...