

Page 1
AJ 3720 Clock Radio
S
L
U
M
B
E
R
S
U
N
ALM 2
ALM 1
FM
MHz
P
3
S
L
U
M
B
E
R
S
U
N
ALM 2
ALM 1
FM
MHz
P
3
R
E
P
E
A
T
A
L
A
R
M
T
IM
E D
A
TE
R
E
P
E
A
T A
LA
R
M
TIM
E DA
TE
A
J
3
7
2
0
P
L
L
D
IG
IT
A
L
C
L
O
C
K
R
A
D
IO
A
J
3
7
2
0
P
L
L
D
IG
IT
A
L
C
L
O
C
K
R
A
D
IO
P
LL D
IG
ITA
L C
LO
C
K
R
A
D
IO
PLL D
IG
ITA
L CL
O
C
K
R
A
D
IO
1
2
3
4
5
RADIO OFF
ALARM RESET
S
L
U
M
B
E
R
RADIO ON
B
UZZER
P
R
E
S
E
T
1
2
3
4
5
RADIO OFF
ALARM
RESET
S
L
U
M
B
E
R
V
O
L
U
M
E
TU
NING
V
O
LU
M
E
TUN
ING
RADIO ON
BU
ZZER
P
R
E
S
E
T
B
A
N
D
A
L
A
R
M
1
A
L
A
R
M
2
T
U
N
IN
G
/
SLEEPER
WEEKEND
SET
F
M
•
M
W
•
L
W
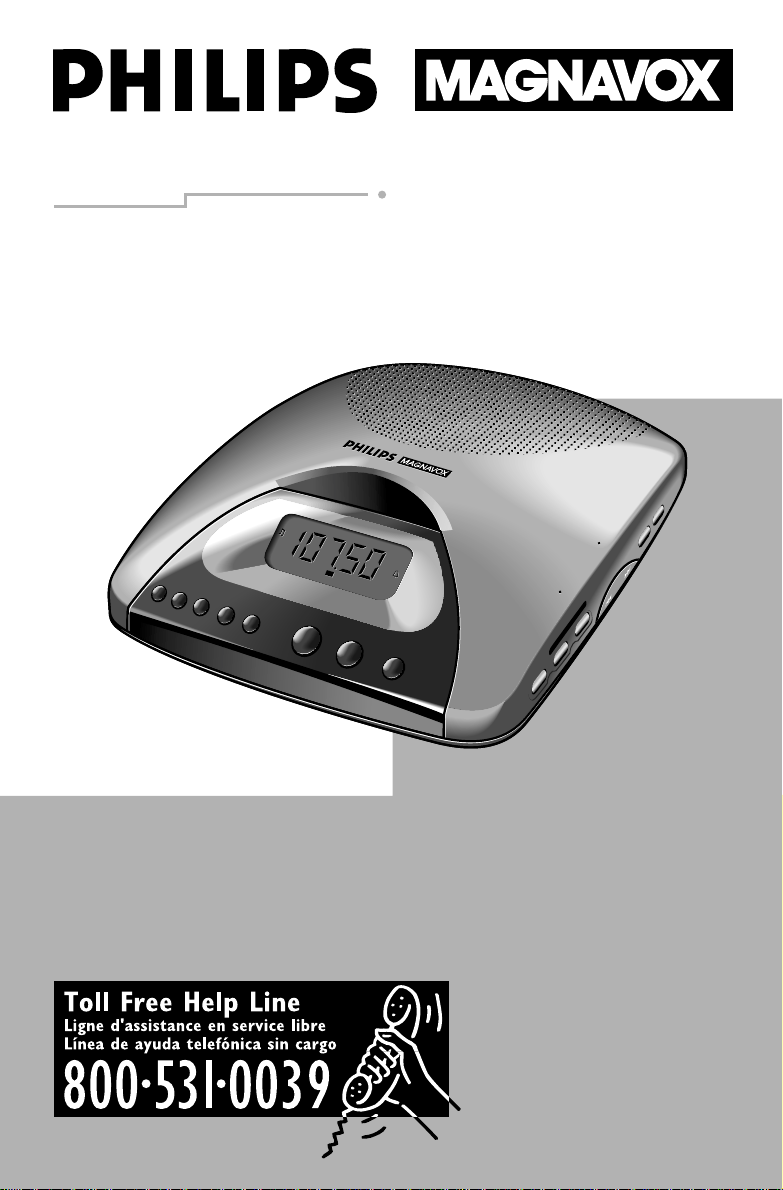
Owner’s Manual
Mode d’emploi
Instructivo de manejo
Page 2

Canada
No abrir, riesgo de choque eléctrico
Verifique que el voltaje de alimentación
sea el requerido para su aparato
2
ATENCIÓN
TS
Para evitar el riesgo de choque eléctrico, no quite la tapa.
En caso de requerir servicio, dirijase al personal calificado.
PRECAUCIÓN - ADVERTENCIA
CAUTION
RISK OF ELECTRIC SHOCK
DO NOT OPEN
CAUTION: TO REDUCE THE RISK OF ELECTRIC SHOCK, DO NOT
REMOVE COVER (OR BACK). NO USER-SERVICEABLE PARTS
INSIDE. REFER SERVICING TO QUALIFIED SERVICE PERSONNEL.
ATTENTION
RISQUE DE CHOC ELECTRIQUE
NE PAS OUVRIR
ATTENTION: POUR REDUIRE LE RESQUE DE CHOC ELECTRIQUE, NE PAS ENLEVER
LE COUVERCLE (NI LE PANNEAU ARRIERE). CET APPAREIL NE COMPORTE AUCUNE
PIECE POUVANT TRE REPAREE PAR L’UTILISATEUR. CONFIER SON ENTRETIEN A
UN TECHNICIEN QUALIFIE.
PRECAUCION
RIESGO DE SACUDIDA ELECTRICA
NO ABRIR
PRECAUCION: PARA REDUCIR EL RIESGO DE SACUDIDA ELECTRICA,NO RETIRE
LA CUBIERTA (NI EL PANEL POSTERIOR). ESTE APARATONO CONTIENE NINGUNA
PARTE QUE PUEDA SER REPARADA POREL USARIO. DE SER NECESARIO ALGUN
SERVICIO O REPARACIONDEL APARATO, LLEVELO UN TECNICO CALIFICADO.
English: This digital apparartus does not
exceed the Class B limits for
noise emissions from digital
apparatus as set out in the
Radio Interference Regulations
of the Canadian Department of
Communications.
INDEX
English ........................................... 4
Français .......................................16
Français:Cet appareil numérique n’émet
Español ....................................... 28
pas de bruits radioélectriques
dépassant les limites
applicables aux appareils
numériques de Classe B
prescrites dans le Régelement
México 2
Es
necesario que lea cuidadosamente su
instructivo de manejo.
sur le Brouillage Radioélectrique
édicté par le Ministère des
Communications du Canada.
Know these
ssaaffeettyysymbols
This “bolt of lightning”
indicates uninsulated material
t
within your unit may cause an
electrical shock.For the safety of
everyone in your household,please do
not remove product covering.
The “exclamation point” calls
attention to features for which
s
you should read the enclosed
literature closely to prevent operating
and maintenance problems.
2
Connaissez ces
symboles de
t
l’unité, risque de provoquer un choc
électrique. Pour la sécurité de chacun,
nous vous prions de ne pas retirer le
boîtier de ce produit.
s
problèmes de fonctionnement et
d’entretien si vous ne lisez pas les
informations s’y reportant.
ssééccuurriittéé
Cet ’éclair à pointe de flèche’
indique qu’un matériau non
isolé, situé à l’intérieur de
Le ’point d’exclamation’ attire
votre attention sur des sujets
risquant de provoquer des
Conozca estos símboles de
sseegguurriiddaadd
El símbolo del ’rayo’indica que
algún material no aislado dentro
t
de su unidad podría resultar en
una sacudida eléctrica. Para la seguridad
de todos, favor de no remover la
cubierta del producto.
El ’signo de exclamación’le
llama la atención a
s
características sobre las que Ud.
debe leer la información adjunta
detenidamente para evitar problemas de
funcionamiento y mantenimiento.
Page 3
A
LA
R
M
1
A
LA
R
M
2
B
A
N
D
TU
N
IN
G
/
W
E
E
K
EN
D
S
LE
E
P
ER
S
E
T
F
M
•M
W
VOLUME
7
8
9
0
!
@ #
$
^
REPEAT ALARM
TIME DATE
VOLUME
TUNING
AJ3720 PLL DIGITAL CLOCK RADIO
1
2
3
4
5
A
L
A
R
M
R
E
S
E
T
R
A
D
IO
O
F
F
BUZZER
RADIO ON
S
L
U
M
B
E
R
P
R
E
S
E
T
SLUMBER
SUN MON TUE WED THUR FRI SAT
ALM 2ALM 1
MW
FM
MHz
Z
Z
Z
Z
kHz
AM
PM
P1 P2 P3 P4 P5
1
2
3
4 5 6
%
.
3
Page 4
Return your Warranty Registration card today to
CAUTION
RISK OF ELECTRIC SHOCK
DO NOT OPEN
CAUTION: TO REDUCE THE RISK OF ELECTRIC SHOCK, DO NOT
REMOVE COVER (OR BACK). NO USER-SERVICEABLE PARTS
INSIDE. REFER SERVICING TO QUALIFIED SERVICE PERSONNEL.
ensure you receive all the benefits you’re entitled to.
• Once your Philips Magnavox purchase
is registered,you’re eligible to receive all
the privileges of owning a Philips
Magnavox product.
Warranty
Verification
Registering your product
within 10 days confirms
your right to maximum
protection under the
terms and conditions of
your Philips Magnavox
warranty.
Owner
Confirmation
Your completed Warranty
Registration Card serves
as verification of
ownership in the event of
product theft or loss.
Know these
ssaaffeettyysymbols
• So complete and return the Warranty
Registration Card enclosed with your
purchase at once.And take advantage
of these important benefits.
Model
Registration
Returning your Warranty
Registration Card right
away guarantees you’ll
receive all the information
and special offers which
you qualify for as the
owner of your model.
For Customer Use
Enter below the Serial No.which is
located on the rear of the cabinet.Retain
this information for future reference.
Model No. _______________________
This “bolt of lightning”
indicates uninsulated material
electrical shock.For the safety of
everyone in your household,please do
not remove product covering.
literature closely to prevent operating
and maintenance problems.
4
within your unit may cause an
The “exclamation point” calls
attention to features for which
you should read the enclosed
Serial No. ________________________
WARNING:TO PREVENT
FIRE OR SHOCK HAZARD,DO
NOT EXPOSE THIS EQUIPMENT TO
RAIN OR MOISTURE.
CAUTION:To prevent electric
shock,match wide blade of plug to
wide slot,and fully inser t.
MAC5097
Page 5
SAFETY
WARNING
To reduce the risk of fire or electric
shock, do not expose this appliance to
rain or moisture.
SAFETY INSTRUCTIONS – Read before operating equipment
This product was designed and manufactured to meet strict
quality and safety standards. There are, however, some
installation and operation precautions which you should be
particularly aware of.
1. Read Instructions - All the safety and operating instructions should be read before the appliance is operated.
2. Retain Instructions - The safety and operating
instructions should be retained for future reference.
3. Heed Warnings - All warnings on the appliance and in
the operating instructions should be adhered to.
4. Follow Instructions - All operating and use instructions
should be followed.
5. Water and Moisture - The appliance should not be used
near water - for example, near a bathtub, washbowl,
kitchen sink, laundry tub, in a wet basement or near a
swimming pool, etc.
6. Carts and Stands - The appliance should be used only
with a cart or stand that is recommended by the
manufacturer.
6A. An appliance and cart combination should be
moved with care. Quick stops, excessive
force, and uneven surfaces may cause the
appliance and cart combination to overturn.
7. Wall or Ceiling Mounting - The appliance should be
mounted to a wall or ceiling only as recommended by the
manufacturer.
8. Ventilation - The appliance should be situated so that its
location or position does not interfere with its proper
ventilation. For example, the appliance should not be
situated on a bed, sofa, rug, or similar surface that may
block the ventilation openings; or, placed in a built-in
installation, such as a bookcase or cabinet that may
impede the flow of air through the ventilation openings.
9. Heat - The appliance should be situated away from heat
sources such as radiators, heat registers, stoves, or other
appliances (including amplifiers) that produce heat.
10.Power Sources - The appliance should be connected to
a power supply only of the type described in the
operating instructions or as marked on the appliance.
The set complies with the FCC-Rules, Part 15.
Operation is subject to the following two conditions:
1. This device may not cause harmful interference,
and
2. This device must accept any interference received,
including interference that may cause undesired
operation
The type-plate is located on the bottom of the clock
radio.
11.Grounding or Polarization -
The precautions that should be
taken so that the grounding or
polarization means of an appliance
is not defeated.
AC
Polarized Plug
CAUTION: To prevent electric shock, match the
wide blade of this plug to the wide slot, fully insert. Do
not use this (polarized) plug with an extension cord,
receptacle or other outlet unless the blades can be fully
inserted to prevent blade exposure.
12.Power-Cord Protection - Power supply cords should be
routed so that they are not likely to be walked on or pinched by items placed upon or against them, paying particular attention to cords and plugs, convenience receptacles, and the point where they exit from the appliance.
13.Cleaning - The appliance should be cleaned only as
recommended by the manufacturer.
14.Power Lines - An outdoor antenna should be located
away from power lines.
15.Nonuse Periods - The power cord of the appliance
should be unplugged from the outlet when left unused
for a long period of time.
16.Object and Liquid Entry - Care should be taken so that
objects do not fall and liquids are not spilled into the
enclosure through openings.
17.Damage Requiring Service - The appliance should be
serviced by qualified service personnel when:
A. The power-supply cord or the plug has been damaged; or
B. Objects have fallen, or liquid has spilled into the
appliance; or
C. The appliance has been exposed to rain; or
D. The appliance does not appear to operate normally or
exhibits a marked change in performance; or
E. The appliance has been dropped, or the enclosure
damaged.
18.Servicing - The user should not attempt to service the
appliance beyond that described in the operating
instructions. All other servicing should be referred to
qualified service personnel.
91/8 EL 4562-1
5
Page 6
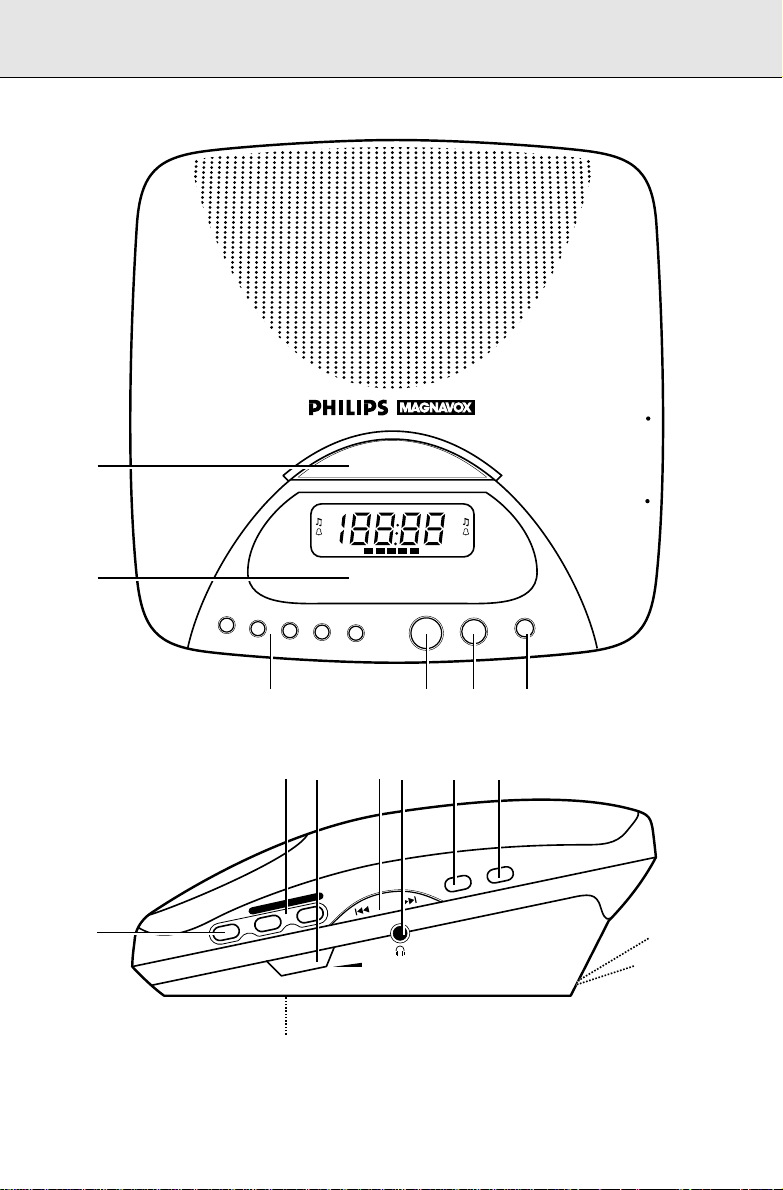
CONTROLS INSTALLATION
English
TOP, FRONT and SIDE PANEL
1 REPEAT ALARM/TIME DATE:
– To switch off the alarm for a 9 minute
period.
– To display/adjust the date (month and day)
and the year
– To resume clock time display
2 DISPLAY: To show the status of the set
3 PRESET 1-5:
– To select a preset radio station
– To select a preset radio alarm
4 ALARM RESET/RADIO OFF:
– To stop the active alarm for 24 hours
– To switch off alarm 1 or 2 completely
– To switch off the radio
5 SLUMBER/BUZZER
– To adjust the slumber time on/off
– To select the buzzer mode for alarm 1 or 2
6 RADIO ON
– To switch on the radio
– To go to radio display for 10 seconds
– To select the radio mode for alarm 1 or 2
7 BAND: To select the waveband
8 ALARM 1:To set, review or switch off alarm 1
ALARM 2: To set, review or switch off alarm 2
9 VOLUME: To adjust the radio sound level
0 TUNING / ∞ or § (up or down)
– To tune to radio stations automatically or
manually
– To adjust the clock time, alarm time, date,
year
! p: 3.5 mm headphone jack
@ WEEKEND SLEEPER
– To activate or deactivate the weekend
sleeper for alarm 1 or 2
# SET:
– To confirm preset stations stored
– To activate the setting mode for clock time
$ BRIGHTNESS CONTROL: To change the
brightness of the display illumination
% Pigtail: For FM reception
^ MAINS: for connecting the set to the power
supply
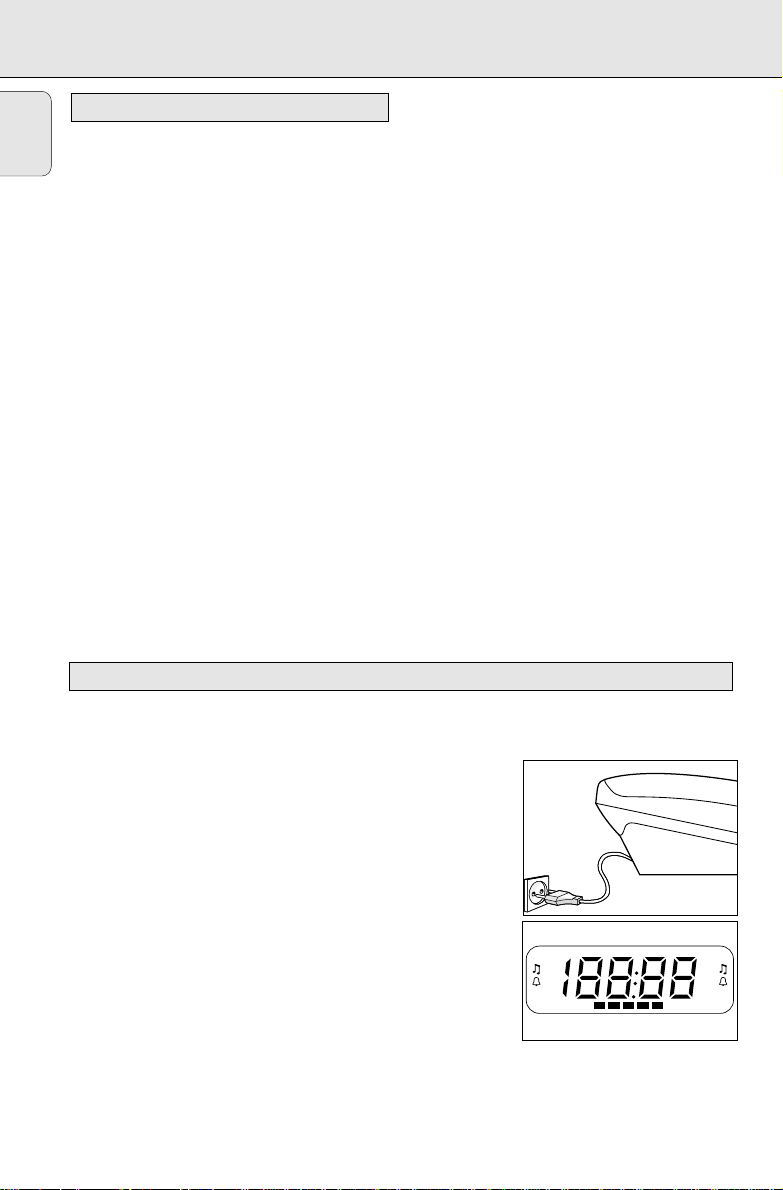
POWER CONNECTION
1. Check if the power voltage as shown on the type plate (on the
bottom of the set) corresponds to your local power voltage. If
it does not, consult your dealer or service organisation.
™ If your set is equipped with a voltage selector, found on the
bottom right-hand corner of the set, adjust the selector to
correspond with your local power.
2. Connect the power plug to the wall outlet.
– The AC power supply is now switched on and the numbers
on the display will start to flash. You will need to set the
correct time.
3. To switch off the AC power supply completely, pull the power
plug out of the wall outlet.
6
AM
Z
PM
Z
SLUMBER
SUN MON TUE WED THUR FRI SAT
P1 P2 P3 P4 P5
ALM 2ALM 1
MW
FM
MHz
Z
kHz
Z
Page 7
Power breakdown
In the event of a power failure the set will be completely
switched off. Disconnect the set first and re-plug after 3
seconds or more. Most of the settings will remain in the
memory, but you will need to reset the clock time, date and year.
INSTALLATION
English
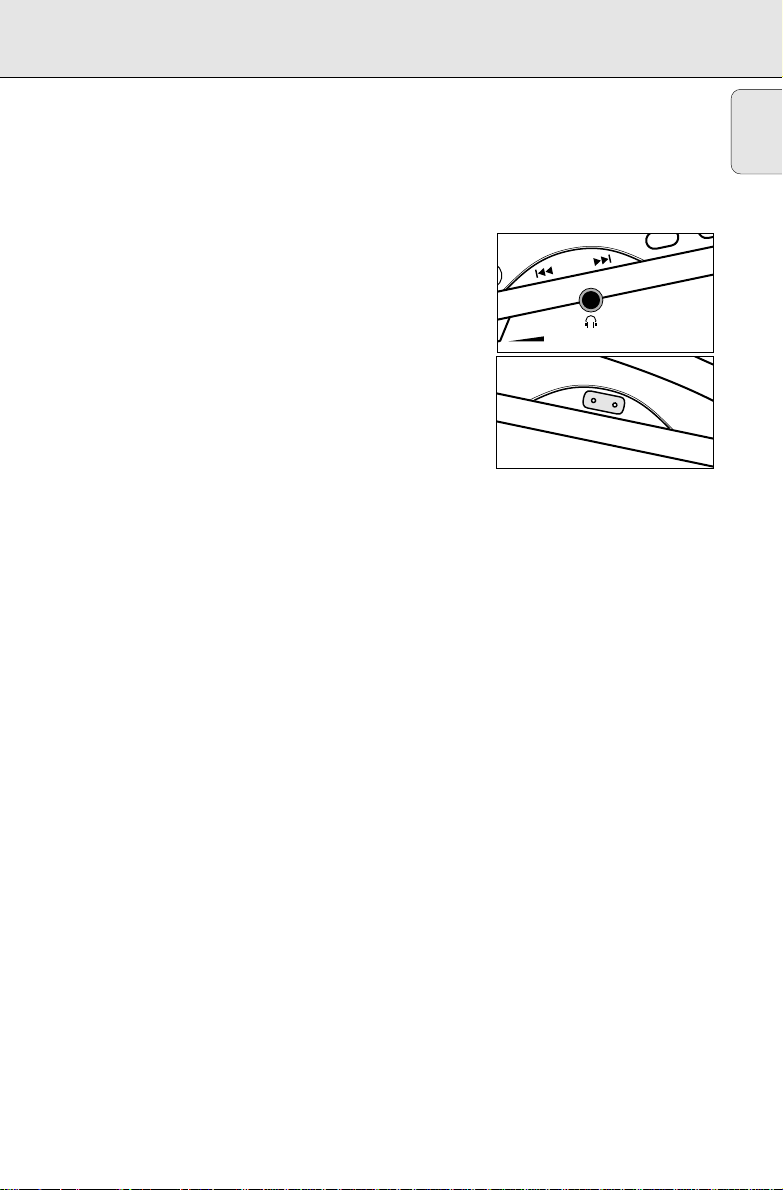
Connecting headphones / speakers
Connect headphones / speakers with a 3.5 mm jack into the
p jack.
™ The built-in speaker will now be muted.
Illumination brightness
Adjust the BRIGHTNESS CONTROL to change the brightness of
the display.
™ There are two settings: BRIGHT ™ DIM
Clock display
The time is displayed using the 12 hour clock with
AM and PM
indicators.
VOLUME
TUNING /
BRIGHTNESS
CONTROL
ALARM 1
7
Page 8
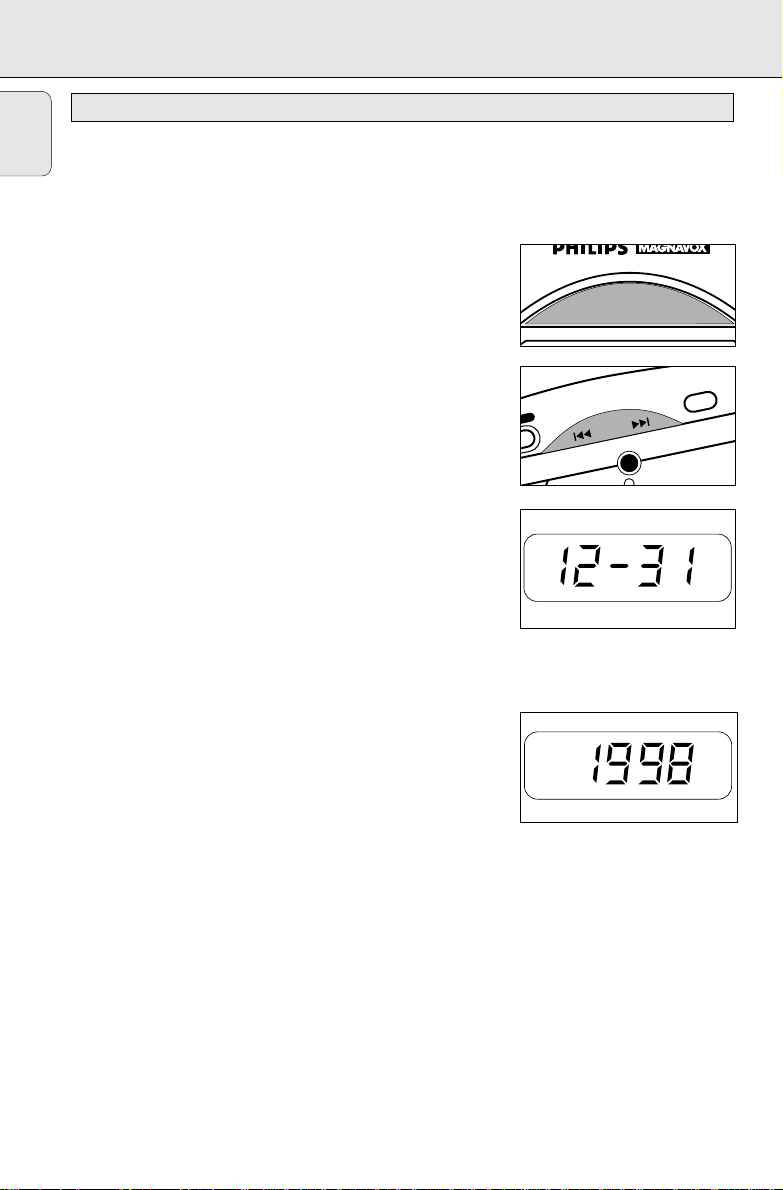
SETTING DATA
English
SETTING THE TIME, DATE AND YEAR
General
The data for the clock time, date and year need to be entered
separately.
Setting the time
1. If necessary, press the REPEAT ALARM/
until the display shows the time mode.
– If the time display 12:00 is already flashing, go to step 3.
2. Press SET to activate the setting mode.
™ The time display will start flashing.
3. Use TUNING / ∞ or § to adjust the hours and minutes.
– With TUNING / ∞ or § pressed, the display will
increase or decrease the minutes and hours rapidly and
continuously.
– Press TUNING / ∞ or § briefly and repeatedly to adjust
the time minute by minute.
4. Press SET when you have reached the correct time.
Setting the date and year
Both the day and the year display modes will be shown for 10
seconds, before reverting back to the clock time display.
The date modes refer to the month and day. E.g. December 31st
will be displayed as 12--31.
• There is no need to adjust the days of the week (
this is done automatically after you have set the date/year
correctly.
1. Press the REPEATALARM/TIME DATE button repeatedly until
the display shows the mode you wish to set (date/year).
2. Use TUNING / ∞ or § to adjust the month and day and the
year.
– With TUNING / ∞ or § pressed, the display will increase
or decrease the days/years rapidly and continuously.
– Press TUNING / ∞ or § briefly and repeatedly to adjust
the display day by day or year by year.
– Press SET when you have reached the correct date/year.
3. The date/year is now set. Press the REPEATALARM/
DATE
button if you wish to return to the clock display
immediately.
TIME DATE button
MON-SUN) as
TIME
REPEAT ALARM
TIME DATE
WEEKEND
SLEEPER
2
TUNING /
TUE
8
Page 9
RADIO RECEPTION
When you switch on the radio, the last preset or station tuned to
will be heard.
1. Press RADIO ON to switch on the radio mode.
™ The radio frequency and waveband appear in the display
for 10 seconds before reverting back to the clock display.
Press RADIO ON again if you want to view the radio
display.
2. Adjust the BAND switch to select the waveband.
3. Tune to the station either manually, automatically or by
using the presets.
To improve radio reception
FM: extend the pigtail antenna at the back of the set
completely for optimum reception.
MW(AM): uses a built-in antenna. Direct the antenna by
adjusting the position of the set.
4. Adjust the sound using the VOLUME control.
5. To switch off the radio, press ALARM RESET/RADIO OFF.
™ The display reverts to showing the clock time.
L CLOCK RADIO
ET
S
E
R
RM
A
AL
RADIO OFF
L
A
1
M
R
A
L
A
D
N
A
B
W
•L
W
•M
M
F
1
M
R
A
L
A
D
N
A
B
W
•L
W
•M
M
F
ITAL CLOCK RADIO
RESET
RM
LA
A
RADIO OFF
R
A
A
L
A
SLUM
2
M
2
M
R
U
B
VOLUME
VOLUME
SLU
ER
B
R
E
Z
Z
/
G
N
I
N
U
T
/
G
N
I
N
U
T
B
M
Z
Z
U
B
RADIO
RADIO ON
T
E
S
D
N
E
K
E
E
W
R
E
P
E
E
L
S
T
E
D
S
N
E
K
E
E
W
R
E
P
E
E
L
S
ER
R
E
English
RADIO ON
9
Page 10
RADIO ALARM
D
English
TUNING TO A STATION
MANUAL tuning
This is useful if you know the radio frequency of the station.
1. Press the TUNING / ∞ or § control briefly until you find the
desired station.
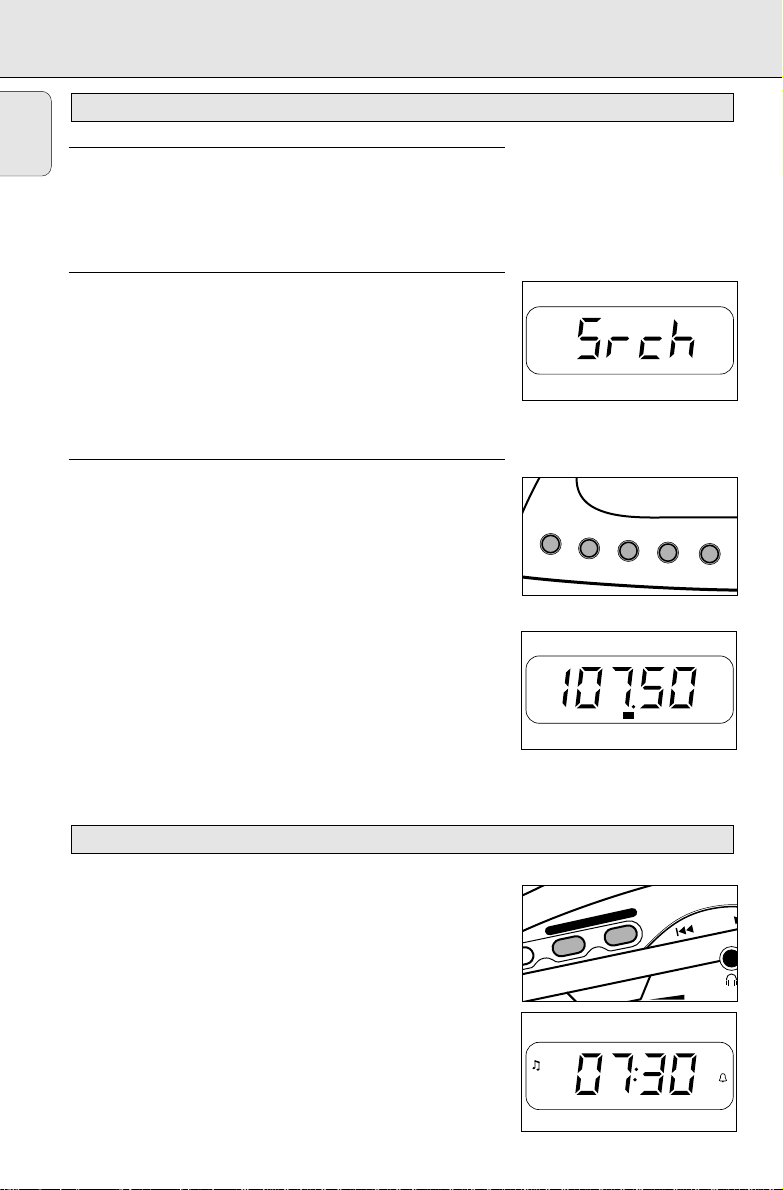
AUTOMATIC tuning
1. Keep TUNING / ∞ or § pressed until the display frequency
starts to run and then release.
– The display will show Srch.
2. When a station has been found, tuning will stop, or you can
stop the automatic tuning by pressing the TUNING / ∞ or §
control again. Repeat until you have found the desired station.
Preset stations
Storing preset stations
You can programme up to five stations from one or more bands.
You can also replace a preset station with another frequency. The
preset number of the station selected will be indicated in the
display.
1. Select and press a preset button 1 to 5.
2. Follow steps 1 to 4 under RADIO RECEPTION and tune to the
station either manually or automatically.
3. Press the SET button to confirm the preset number and
station while the display shows the desired frequency.
™ The preset number indication will blink once.
Selecting preset stations
• Select and press a preset button (1 -5) to recall the
corresponding frequency and waveband stored.
P
R
E
S
E
T
1
2
P1 P2 P3 P4 P5
3
AJ3720 PLL
4
FM
MHz
5
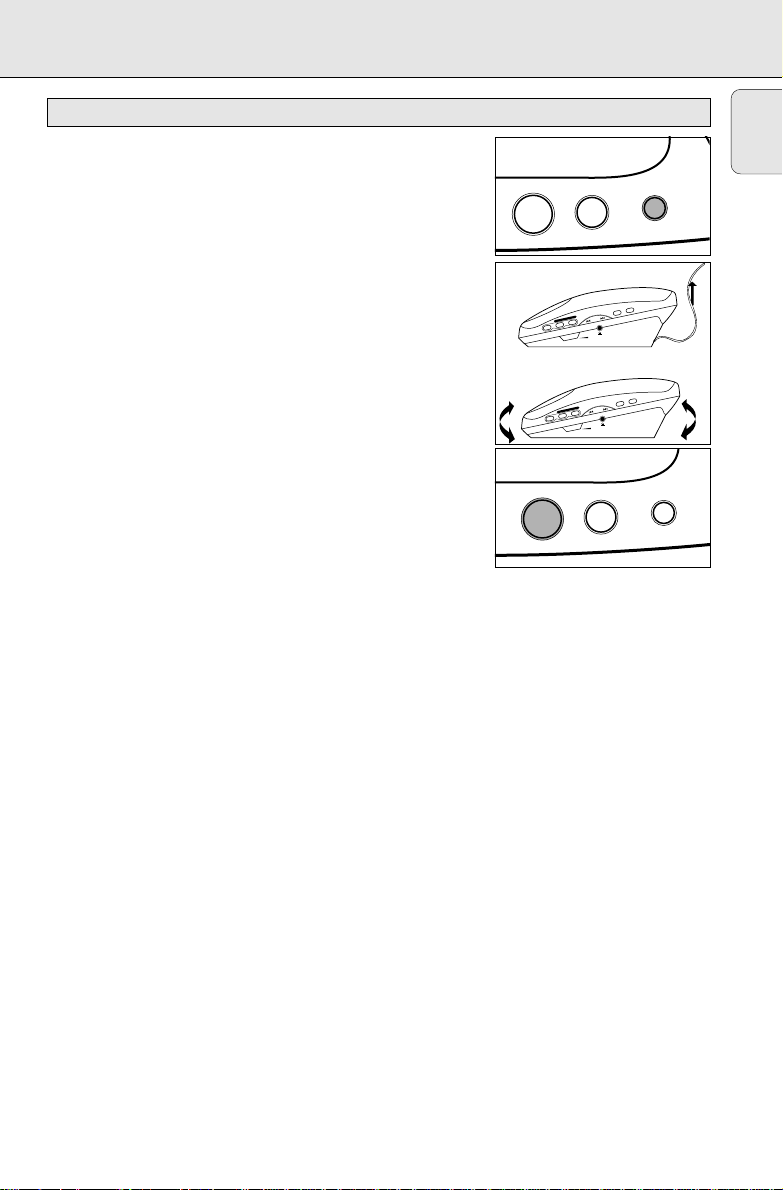
SETTING THE ALARM TIME
General
Two different alarm times can be set in a variety of modes. This
can be useful when for example you need to be woken up at a
different time during the week or at the weekend.
Note: To set the alarm, complete each step within 10 seconds.
Setting alarm 1 or 2
1. Press the ALARM 1 or 2 button.
™ The alarm time appears in the display
10
ALARM 1
AM
ALARM 2
TUNING /
VOLUME
ALM 2ALM 1
Page 11
2. Use TUNING / ∞ or § to set the alarm time;
A
– With TUNING / ∞ or § pressed, the display will increase
or decrease the alarm time rapidly and continuously from
minutes to hours.
– Press TUNING / ∞ or § briefly and repeatedly to adjust
the alarm time minute by minute.
3. Select the alarm mode by selecting one of the following alarm
modes:
SLUMBER/BUZZER – For the buzzer option (this is set at a fixed
volume and cannot be adjusted)
RADIO ON – For the last station tuned to
PRESET 1-5 – To select a preset radio station
™ ALM 1 or 2 and the chosen alarm mode indication will appear
in the display:
– and the preset number for the radio options
– for the buzzer option.
4. To review the alarm time, press the ALARM 1 or 2 button.
IMPORTANT !
If you want the alarm to wake you up, FIRST CHECK if:
– you have adjusted the volumeloud enough when using the
radio alarm modes;
– you have disconnected the headphones.
Weekend sleeper
This feature deactivates the alarm every Saturday and Sunday and
resumes the alarm function Monday to Friday.
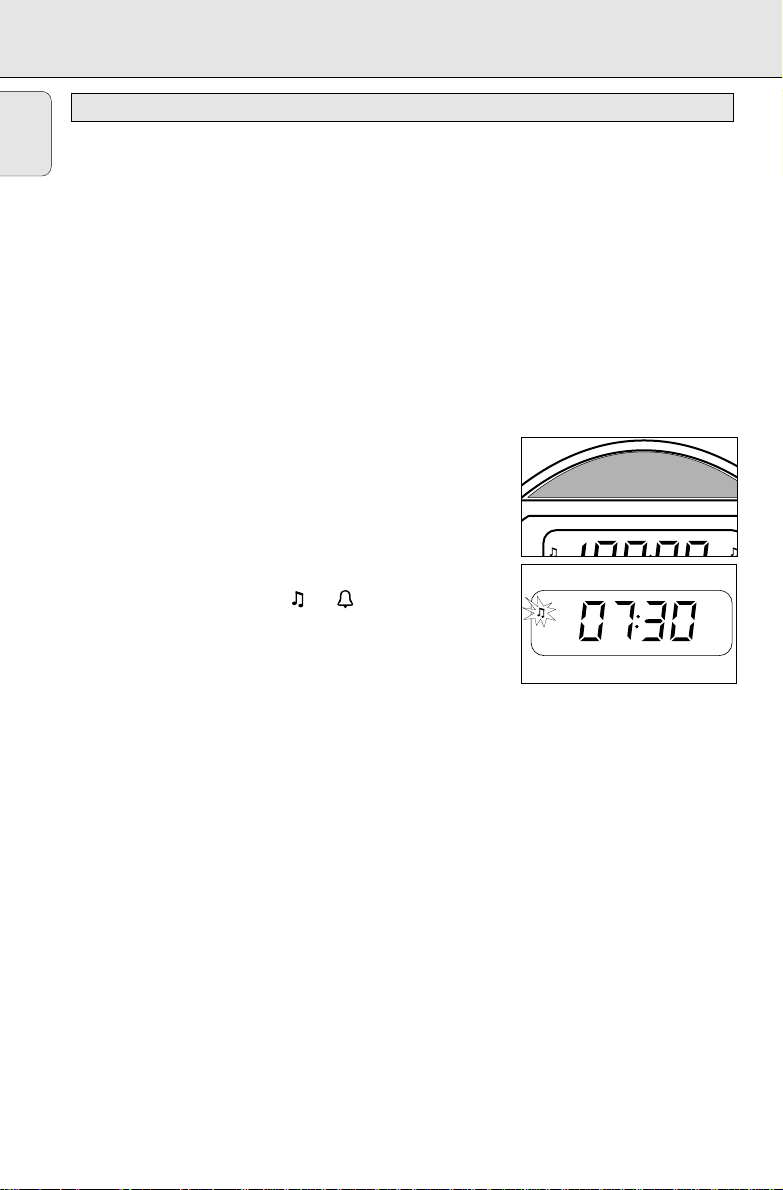
1. Press ALARM 1 or 2.
™ The display will show the set alarm time.
2. Press WEEKEND SLEEPER once.
™ If the weekend sleeper is activated,
ZZ will appear in the
display for ALARM 1 or 2.
3. To cancel the weekend sleeper function, repeat steps 1 and 2
until
ZZ no longer appears in the display.
Cancelling the alarm completely
When an alarm is cancelled, the selected alarm indication and
symbol disappear from the display.
1. To cancel the set alarm time before it goes off, press the
activated ALARM 1 or 2 button.
– The display will show the alarm time.
2. Press ALARM RESET/RADIO OFF.
– The selected alarm indication and symbol disappear from
the display.
AM
SLUMBER
P1 P2 P3 P4 P5
WEEKEND
ING /
ALM 1
Z
0 PLL DIGITAL CLOCK RADIO
SLEEPER
AM
Z
ESET
R
M
R
LA
A
5
RADIO OFF
ALARM
ALM 2ALM 1
SET
ER
B
SLUM
R
E
Z
Z
U
B
English
R
11
Page 12
ALARM on / off
English
SWITCHING OFF THE ALARM
There are two ways to switch off the alarm. Unless you cancel the
alarm completely, the ALARM RESETwill be automatically
selected after 60 minutes, from the time your alarm first sounds.
Note: During an alarm call or repeat alarm, only the ALARM
RESET/RADIO OFF and REPEATALARM/
controls on the set will operate.
Alarm reset
If you want the alarm mode to be stopped immediately but also
wish to retain the same alarm setting for the following day:
1. Press ALARM RESET/RADIO OFF.
™ You will hear a long beep tone confirm that the ALARM
RESET has been activated.
Repeat alarm
This will repeat your alarm call at approximately 9 minute
intervals.
1. During the alarm call, press REPEAT ALARM/
™ After 9 minutes the alarm will call again.
2. You can press REPEAT ALARM/
TIME DATE again as often as
desired.
™ The alarm mode indication or in the display will
flash throughout the time when REPEAT ALARM/
is active.
TIME DATE
TIME DATE.
TIME DATE
ALM 1
AM
REPEAT ALARM
TIME DATE
SUN MON TUE WED THUR FRI SAT
P1 P2 P3 P4 P5
ALM 2ALM 1
LW
12
Page 13

SLUMBERING MAINTENANCE
SLUMBER
About slumber time
The clock radio has a built-in device called the slumber, which
enables the set to be automatically switched off during radio
playback after a set period of time. There are three slumber times:
60, 30 or 10 minutes before the set turns itself off. You can set the
slumber time when the radio is either on or off.
Setting the slumber
1. Select your slumber time by pressing the SLUMBER/
BUZZER
once or more:
once: 60 minutes;
twice: 30 minutes;
three times: 10 minutes.
™ The display will show ‘SL:’ and the selected slumber
period.
™ The word
SLUMBER appears when slumber is active.
2. To cancel the slumber function,
– press the SLUMBER/
BUZZER
button repeatedly until the
radio is switched off, or
– Press ALARM RESET/RADIO OFF to cancel immediately
and switch off the set.
GENERAL
– If you do not intend to use your clock radio for a long time,
withdraw the plug from the wall socket.
– Do not expose the set to humidity, rain, sand, or excessive
heat caused by heating equipment or direct sunlight.
– A chamois leather slightly moistened with water is sufficient
for cleaning the housing. Do not use cleaning agents
containing alcohol, spirits, ammonia or abrasives as these may
harm the housing.
IGITAL CLOCK RADIO
ALM 1
A
AM
R
RM
LA
RADIO OFF
SLUMBER
T
E
ES
P1 P2 P3 P4 P5
English
ER
B
M
SLU
RADIO ON
R
E
Z
Z
U
B
Environmental information
All redundant packaging material has been omitted. We have done our utmost to make the
packaging easily separable into three mono materials: cardboard (box), expandable polystyrene
(buffer) and polyethylene (bags, protective foam sheet).
Your set consists of materials which can be recycled if disassembled by a
specialized company. Please observe the local regulations regarding the disposal of
packaging materials, exhausted batteries and old equipment.
13
Page 14

TROUBLESHOOTING
If a fault occurs, first check the points listed below before taking the set for repair.
English
If you are unable to remedy a problem by following these hints, consult your dealer or service center.
WARNING:Under no circumstances should you try to repair the set yourself, as this
would invalidate the warranty.
PROBLEM
– POSSIBLE CAUSE
• REMEDY
RADIOGENERAL
No sound
– Volume not adjusted
• Adjust the volume
– Headphones are connected
• Disconnect the headphones
No reaction to any operation of the
controls
– Electrostatic discharge
• Disconnect the set from the power supply
and reconnect the set after 3 seconds
Occasional crackling sound during FM
broadcast
– Weak signal
• Extend pigtail antenna fully
Continuous crackling/hiss disturbance
during MW(AM) broadcast
– Electrical interference from TVs, computers,
fluorescent lamps, etc.
• Move set away from other electrical
equipment
ALARM
The alarm does not function
– Alarm time not set
• Set the alarm time
– Alarm mode not selected
• see ‘SETTING THE ALARM’
– Weekend sleeper selected for Saturday and
Sunday
• Deactivate weekend sleeper
– Volume too low for alarm radio options
• Adjust the volume
14
The production plate is located on the bottom of the set.
Page 15

LIMITED W ARRANTY
PORTABLE AUDIO
One Y ear Free Exchange
This product must be carried in for an exchange.
WHO IS COVERED?
You must have proof of purchase to exchange the
product.A sales receipt or other document showing that
you purchased the product is considered proof of
purchase. Attach it to this owner’s manual and keep both
nearby.
WHAT IS COVERED?
Warranty coverage begins the day you buy your
product.For one year thereafter,a defective or
inoperative product will be replaced with a new,
renewed or comparable product at no charge to you.A
replacement product is covered only for the original
warranty period.When the warranty on the original
product expires,the warranty on the replacement
product also expires.
WHAT IS EXCLUDED?
Your warranty does not cover:
• labor charges for installation or setup of the
product,adjustment of customer controls on the
product,and installation or repair of antenna
systems outside of the product.
• product repair and/or part replacement because of
misuse, accident, unauthorized repair or other cause
not within the control of Philips Consumer
Electronics Company.
• reception problems caused by signal conditions or
cable or antenna systems outside the unit.
• a product that requires modification or adaptation
to enable it to operate in any country other than
the country for which it was designed,
manufactured,approved and/or authorized,or repair
of products damaged by these modifications.
• incidental or consequential damages resulting from
the product.(Some states do not allow the
exclusion of incidental or consequential damages,so
the above exclusion may not apply to you.This
includes,but is not limited to,prerecorded material,
whether copyrighted or not copyrighted.)
• a product used for commercial or institutional
purposes.
WHERE IS EXCHANGE AVAILABLE?
You may exchange the product in all countries where
the product is officially distributed by Philips Consumer
Electronics Company.In countries where Philips
Consumer Electronics Company does not distribute the
product,the local Philips ser vice organization will
attempt to provide a replacement product (although
there may be a delay if the appropriate product is not
readily available).
BEFORE REQUESTING EXCHANGE...
Please check your owner’s manual before requesting an
exchange.Adjustments of the controls discussed there
may save you a trip.
EXCHANGING A PRODUCT IN U.S.A.,
PUERTO RICO OR U.S.VIRGIN ISLANDS...
Contact your dealer to arrange an exchange.Or,ship
the product,insured and freight prepaid, and with proof
of purchase enclosed,to the address listed below.
(In U.S.A.,Puerto Rico and U.S.Virgin Islands, all implied
warranties,including implied warranties of merchantability
and fitness for a particular purpose, are limited in duration
to the duration of this express warranty.But, because some
states do not allow limitations on how long an implied
warranty may last,this limitation may not apply to you.)
EXCHANGING A PRODUCT IN CANADA...
Please contact Philips at:
(In Canada,this warranty is given in lieu of all other
warranties.No other warranties are expressed or
implied,including any implied warranties of
merchantability or fitness for a particular purpose.
Philips is not liable under any circumstances for any
direct,indirect, special, incidental or consequential
damages,howsoever incurred,even if notified of the
possibility of such damages.)
TO GET OUT-OF-WARRANTYEXCHANGE...
In U.S.A.,Puerto Rico or U.S.Virgin Islands, contact Philips
Service Company at (800) 851-8885 to obtain the cost of
out-of-warranty exchange.Then carefully pack the product
and ship it to the Small Product Service Center (address
listed above).In Canada, call the phone number listed above
under “Exchanging a Product in Canada” to obtain the cost
of out-of-warranty exchange.
REMEMBER...
Please record the model and serial numbers found on
the product below.Also,please fill out and mail your
warranty registration card promptly.It will be easier for
us to notify you if necessary.
MODEL # __________________________________
SERIAL # __________________________________
Small Product Service Center
Philips Service Company
907 Snapps Ferry Road,Plant 2, Building 6
Greeneville,TN 37743
1-800-661-6162 (French Speaking)
1-800-363-7278 (English Speaking)
This warranty gives you specific legal rights.You may have other rights which vary from state/province to state/province.
Philips Service Company,P.O.Box 555, Jefferson City,Tennessee 37760,(423) 475-8869
EL6095T001 / MAC5433 / 1-97
15
Page 16

Renvoyez votre carte d'enregistrement de garantie pour vous
ATTENTION
RISQUE DE CHOC ELECTRIQUE
NE PAS OUVRIR
ATTENTION: POUR REDUIRE LE RESQUE DE CHOC ELECTRIQUE, NE PAS ENLEVER
LE COUVERCLE (NI LE PANNEAU ARRIERE). CET APPAREIL NE COMPORTE AUCUNE
PIECE POUVANT TRE REPAREE PAR L’UTILISATEUR. CONFIER SON ENTRETIEN A
UN TECHNICIEN QUALIFIE.
assurer de recevoir tous les avantages auxquels vous avez droit.
• Dès que l'achat de votre appareil
Philips Magnavox est enregistré,vous
avez droit à tous les avantages dont
bénéficient les possesseurs des produits
Philips Magnavox.
Vérification
de garantie
Enregistrez votre produit
dans les 10 jours pour
confirmer votre droit à
une protection maximum
selon les termes et les
conditions de votre
garantie Philips Magnavox.
Confirmation
de possession
Votre carte
d'enregistrement de
garantie prouve que vous
possédez l'appareil en cas
de vol ou de perte du
produit.
Connaissez ces
symboles de
ssééccuurriittee
• Remplissez et renvoyez votre carte
d'enregistrement de garantie jointe à
votre appareil sans tarder.Vous
bénéficierez de ces avantages
importants.
Enregistrement
du modèle
Renvoyez votre carte
d'enregistrement de garantie
dès aujourd'hui pour vous
assurer de recevoir toutes
les informations,les offres
et les bonus auxquels vous
avez droit en tant que
possesseur de ce modèle.
Cet espace vous est réservé
Inscrivez ci-dessous le numéro de série situé
à l'arrière du bloc.Conservez cette
information pour vous y reporter à l'avenir.
N° de modèle ____________________
Cet «éclair à pointe de flèche»
indique qu'un matériau non
t
l'unité,risque de provoquer un choc
électrique.Pour la sécurité de chacun,
nous vous prions de ne pas retirer le
boîtier de ce produit.
s
problèmes de fonctionnement et
d'entretien si vous ne lisez pas les
informations s'y reportant.
16
isolé,situé à l'intérieur de
Le «point d'exclamation» attire
votre attention sur des sujets
risquant de provoquer des
N° de série ______________________
DANGER: NE PAS EXPOSER
CET ÉQUIPEMENT A LA PLUIE NI A
UNE HUMIDITÉ EXCESSIVE POUR
ÉVITER LES RISQUES D'INCENDIE
ET DE CHOC ÉLECTRIQUE.
ATTENTION: Pour éviter les
chocs électriques,introduire la lame la
plus large de la fiche dans la borne
correspondante de la prise et pousser
jusqu'au fond.
MAC5097
Page 17

SÉCURITÉ
AVIS
Afin de réduire tout risque d’incendie ou
de choc électrique, il ne faut pas exposer cet appareil à la pluie ou à l’humidi-
té.
ç Canada
Cet appareil numérique n'émet pas de bruits
radioélectriques dépassant les limites
applicables aux appareils numériques de Classe
B prescrites dans le Règlement sur le Brouillage
Radioélectrique édicté par le Ministère des
Communications du Canada.
Cet appareil doit satisfaire à la réglementation
FCC, partie 15. Son exploitation est soumise aux
deux conditions suivantes:
1. Cet appareil ne doit pas provoquer de
brouillage dangereux, et
2. Cet appareil doit accepter tout brouillage reçu,
y compris tout brouillage qui risque d'entraîner
un fonctionnement non désiré.
CONSEILS DE SÉCURITÉ –À lire avant de faire marcher le matériel
Ce produit a été conçu et fabriqué en conformité avec des
normes strictes de qualité et de sécurité. Il y a, cependant,
certains précautions d’installation et d’opération qu’il faut
spécialement observer.
1. Lisez les instructions- Il faut lire toutes les instructions de
sécurité et d’opération avant de faire marcher l’appareil.
2. Gardez les instructions- Il faut garder les instructions de
sécurité et d’opération pour pouvoir s’y référer à l’avenir.
3. Faites attention aux avertissements- Il faut observer
tous les avertissements collés à l’appareil et écrits dans le
manuel d’instructions.
4. Suivez bien les instructions- Il faut suivre toutes les
instructions d’opération et d’utilisation.
5. Eau et humidité- L’appareil ne devrait pas être utilisé près
de l’eau (par exemple, près d’un baignoire, d’un lavabo, de
l’évier, dans un sous-sol humide ou près d’une piscine.
6. Chariots et supports- Il faut utiliser cet appareil
uniquement avec un chariot ou une table recommandée par
le fabricant.
6A. Il faut déplacer un appareil et chariot avec soin.
7. Montage au mur ou au plafond- Il faut monter l’appareil
à un mur ou plafond uniquement en suivant les
recommandations du fabricant.
8. Aération- Il faut situer l’appareil de telle façon que son
emplacement ou sa position ne gêne pas la bonne aération.
Par exemple, il ne faut pas placer l’appareil sur un lit, un
sofa, un tapis ou une autre surface pareille qui risque de
boucher les ouvertures d’aération; ni l’installer dans une
bibliothèque ou un coffret qui pourrait empêcher le flux d’air
par les ouvertures d’aération.
9. Chaleur- Il faut situer l’appareil à l’écart des sources de
chaleur telles que les radiateurs, les bouches de chaleur, les
fours ou d’autres appareils (y compris les amplificateurs) qui
produisent de la chaleur.
10. Sources d’électricité - Il faut relier l’appareil uniquement
à une source d’électricité du type décrit dans les instructions
d’opération ou indiqué à même l’appareil.
Un arrêt rapide, une force excessive et des
surfaces inégales pourraient faire retourner
l’appareil et le chariot.
11.Mise à terre ou polarisation
Précautions à prendre de manière à ce que la mise à terre
et la polarisation de l’appareil
soient respectées.
ATTENTION:Pour prévenir les chocs
électriques, introduire la lame la plus large de la fiche dans
la borne la plus large et insérer à fond. Ne pas utiliser cette
fiche polarisée avec un prolongateur, une prise de courant ou
une autre sortie de courant, sauf si les lames peuvent être
insérées à fond sans en laisser aucune partie à découvert.
12. Protection du cordon d’alimentation - Il faut faire passer
les cordons d’alimentation de façon à éviter qu’on marche
dessus ou que les objets placés sur eux ou contre eux les
coincent. Faire attention en particulier au cordons et fiches
et à l’endroit où ils sortent de l’appareil.
13.Nettoyage - Il faut nettoyer l’appareil uniquement de la
façon recommandée par le fabricant.
14. Lignes de transmission - Il faut situer une antenne
extérieure à l’écart des lignes de transmission d’électricité.
15.Périodes d’inactivité - Débranchez l’appareil lorsqu’il ne
sera pas utilisé pendant une longue période de temps.
16.Entrée des objets et des liquides
tomber des objets ou des liquides par les ouvertures de
l’enclos.
17. Dommages qu’il faut faire réparer - Il faut faire réparer
l’appareil par un technicien qualifié lorsque:
A. Le cordon d’alimentation en électricité ou la fiche a été
endommagé ou
B. On a laissé tomber des objets ou du liquide dans
l’appareil ou
C. On a exposé l’appareil à la pluie ou
D. L’appareil ne paraît pas marcher normalement ou
présente de grands changements d’opération ou
E. On a laisseé tomber l’appareil ou endommager le coffret.
18. Service après-vente - L’utilisateur ne doit pas tenter de
réparer l’appareil sauf les réparations décrites dans les
instructions d’opération. Toutes les autres réparations
doivent être effectuées par un technicien qualifié.
91/8 EL 4562-2
Fiche
CA polarisée
- Évitez de laisser
17
Page 18

COMMANDES INSTALLATION
PANNEAU SUPERIEUR, FRONTAL ET
LATERAL
1 REPEAT ALARM/TIME DATE
– Pour éteindre le réveil pendant un délai de 9
Français
minutes
– Pour afficher/ajuster la date (mois et jour) et
l'année
– Pour réafficher l'heure d'horloge
2 DISPLAY: Pour indiquer l'état de l'appareil
3 PRESET 1-5:
– Pour sélectionner une station de radio préréglée
– Pour sélectionner une station de radio
préréglée pour le réveil
4 ALARM RESET/RADIO OFF:
– Pour arrêter le réveil actif pendant 24 heures
– Pour entièrement désactiver le mode réveil 1
ou réveil 2
– Pour éteindre la radio
5 SLUMBER/BUZZER
– Pour activer/désactiver l'arrêt programmé
– Pour sélectionner la fonction sonnerie pour le
réveil 1 ou 2
6 RADIO ON
– Pour allumer la radio
– Pour passer à l'affichage radio pendant 10
secondes
– Pour sélectionner la fonction radio pour le
mode réveil 1 ou 2
:
7 BAND: Pour sélectionner la bande d'ondes
8 ALARM 1: Pour régler, visualiser ou désactiver
le mode réveil 1
ALARM 2: Pour régler, visualiser ou désactiver
le mode réveil 2
9 VOLUME: Pour ajuster le niveau de son de radio
0 TUNING / ∞ ou § (vers le haut ou vers le
bas)
– Pour syntoniser les stations radio
automatiquement ou manuellement
– Pour ajuster les réglages de l'heure de
l'horloge, de l'heure de réveil, de la date, de
l'année.
! p: prise de casque de 3,5 mm
@ WEEKEND SLEEPER:
– Pour activer ou désactiver la fonction
sommeil week-end pour le mode réveil 1 ou 2
# SET:
– Pour confirmer les stations préréglées mémorisées
– Pour activer le mode de réglage de l'heure
d'horloge
$ BRIGHTNESS CONTROL: Pour changer la
luminosité de l'éclairage d'affichage
% Antenne en enroulement: Pour réception FM
^ MAINS: Pour relier l'appareil à l'alimentation
secteur
BRANCHEMENT SUR SECTEUR
1. Vérifiez que la tension secteur indiquée sur la plaque signalétique
(sous l'appareil) correspond à la tension de secteur local. Si ce n'est
pas le cas, consultez votre revendeur ou le service après-vente.
™ Si l'appareil est pourvu d'un sélecteur de tension qui se
trouve au coin droit inférieur de l'appareil, ajustez le
sélecteur de manière qu'il corresponde au secteur local.
2. Branchez la fiche d'alimentation dans la prise murale.
– L'alimentation est maintenant sous tension et les chiffres
de l'affichage commencent à clignoter. Il vous faudra
maintenant mettre l'horloge à l'heure.
3. Pour couper entièrement l'alimentation secteur, retirez la fiche
secteur de la prise murale.
18
AM
Z
PM
Z
SLUMBER
SUN MON TUE WED THUR FRI SAT
P1 P2 P3 P4 P5
ALM 2ALM 1
MW
FM
MHz
Z
kHz
Z
Page 19

INSTALLATION
Panne de courant
L'appareil s'éteindra entièrement en cas de panne de courant,
Commencez par débrancher l'appareil, puis reconnectez-le au
bout de 3 secondes ou plus. La plupart des réglages resteront en
mémoire, mais vous devrez régler à nouveau l'heure de l'horloge,
la date et l’annee.
Raccordement de casque / haut-parleurs
Reliez la fiche de casque / haut-parleurs de 3,5 mm à la prise p.
™Le haut-parleur intégré est désormais rendu inactif.
Luminosité d'éclairage
Ajuster la commande BRIGHTNESS pour modifier la luminosité
de l'affichage.
™ Deux réglages sont prévus: BRIGHT (brillant) ™ DIM (faible)
Affichage d'horloge
L’heure est affichée sur la base de 12 heures avec des indicateurs
AM/PM (AM = matin; PM = après-midi).
VOLUME
TUNING /
BRIGHTNESS
CONTROL
Français
ALARM 1
19
Page 20

REGLAGE DES DONNEES
REGLAGE DE L'HEURE, DE LA DATE ET DE L'ANNEE
Généralités
Réglez séparément les données de l'heure, de la date et de
Français
l'année.
Réglage de l'heure
1. Le cas échéant, appuyez sur le bouton REPEAT ALARM/
DATE
, jusqu'à ce que l'affichage indique le mode heure.
– Si l'affichage d'heure, 12:00 clignote déjà, passez à
l'instruction 3.
2. Appuyez sur SET pour activer le mode de réglage.
™ L'affichage d'heure commencera à clignoter.
3. Utilisez TUNING / ∞ ou § pour ajuster les heures et les
minutes.
– Lorsque TUNING / ∞ ou § est enfoncé, l'affichage
indiquera un défilement rapide et continu avant ou arrière
des minutes et des heures.
– Appuyez brièvement et plusieurs fois sur TUNING / ∞ ou
§ pour régler l'heure minute par minute.
4. Appuyez sur SET lorsque vous atteignez l'heure correcte.
Réglage de la date et de l'année
Les deux modes d'affichage de jour et d'année seront affichés
pendant 10 secondes, avant que l'affichage d'heure d'horloge
réapparaisse.
Les modes de date se rapportent au mois et au jour, par exemple
31 décembre sera affiché sous forme 12--31.
• Il n'est pas nécessaire de régler les jours de la semaine
SUN),
car ce réglage s'effectuera automatiquement, lorsque
vous aurez réglé la date et l'année correctement.
1. Appuyez plusieurs fois sur le bouton REPEAT ALARM/
DATE
jusqu'à ce que l'affichage indique le mode que vous
désirez régler (date/année).
2. Utilisez TUNING / ∞ ou § pour régler le mois, le jour et
l'année.
– TUNING / ∞ ou § enfoncé, l'affichage indiquera un
défilement rapide et continu avant ou arrière des
jours/années.
– Appuyez brièvement et plusieurs fois sur TUNING /∞ ou
§ pour régler l'affichage jour par jour ou année par
année.
– Appuyez sur SETlorsque vous atteignez la date et l'année
correctes.
3. La date et l'année sont maintenant réglées. Appuyez sur le
bouton REPEAT ALARM/
immédiatement à l'affichage d'horloge.
TIME DATE, si vous désirez retourner
TIME
(MON-
TIME
2
REPEAT ALARM
TIME DATE
SUN MON TUE WED THUR FRI SAT
TUNING /
TUE
WEEKEND
SLEEPER
20
Page 21

RECEPTION RADIO
Lorsque vous allumez la radio, c'est la dernière station préréglée
ou syntonisée que vous entendrez.
1. Appuyez sur RADIO ON pour passer au mode radio.
™ La fréquence et la bande d'ondes de la radio apparaissent
sur l'affichage pendant 10 secondes, avant que l'affichage
d'horloge réapparaisse. Appuyez à nouveau sur RADIO ON,
si vous désirez visualiser l'affichage radio.
2. Mettez le commutateur sur BAND pour sélectionner la bande
d'ondes.
3. Syntonisez sur la station manuellement, automatiquement,
ou au moyen des préréglages.
Pour améliorer la réception radio
FM: étendez entièrement le fil en enroulement qui se trouve à
l'arrière de l'appareil pour obtenir une réception optimale.
MW(AM): utilise une antenne incorporée. Dirigez
l'antenne, en réglant la position de l'appareil.
4. Ajustez le son au moyen de la commande VOLUME.
5. Appuyez sur ALARM RESET/RADIO OFF pour éteindre la radio.
™ L'affichage indique à nouveau l'heure d'horloge.
L CLOCK RADIO
ESET
R
M
R
LA
A
RADIO OFF
A
L
A
1
M
R
A
L
A
D
N
A
B
W
•L
W
M
•
M
F
A
1
M
R
A
L
A
D
N
A
B
W
•L
W
•M
M
F
ITAL CLOCK RADIO
ESET
R
M
R
LA
A
RADIO OFF
RADIO
R
BE
LUM
S
RADIO ON
R
E
Z
Z
U
B
T
E
S
D
N
E
K
E
E
W
R
E
P
E
E
L
S
/
G
N
I
N
U
T
2
M
R
VOLUME
T
E
D
S
N
E
K
E
E
W
R
E
P
E
E
L
S
/
G
N
I
N
U
T
2
M
R
A
L
VOLUME
ER
B
M
SLU
RADIO ON
R
E
Z
Z
U
B
Français
21
Page 22

RADIO REVEIL
D
SYNTONISATION DE STATION
Syntonisation MANUELLE
Ceci est utile, si vous connaissez la fréquence radio de la station.
Français
1. Appuyez brièvement sur la commande TUNING / ∞ ou sur §
jusqu'à ce que vous trouviez la station désirée.
Syntonisation AUTOMATIQUE
1. Maintenez TUNING / ∞ ou § enfoncé jusqu'à ce que la fréquence
d'affichage commence à passer, puis relâchez la commande.
– L'affichage indique maintenant Srch (recherche).
2. Lorsqu'une station est obtenue, la syntonisation s'arrêtera, ou
vous pourrez arrêter la syntonisation automatique en appuyant
à nouveau sur la commande TUNING / ∞ ou sur §.
Recommencez, jusqu'à ce que vous trouviez la station désirée.
Stations préréglées
Mémorisation de stations préréglées
Vous avez la possibilité de programmer un maximum de cinq stations
d'une bande ou de plusieurs. Vous pouvez également remplacer une
station préréglée par celle d'une autre fréquence. Le numéro préréglé
de la station sélectionnée sera indiqué sur l'affichage.
1. Sélectionnez un bouton PRESET entre 1 et 5, puis appuyez
dessus.
2. Suivez les instructions 1 à 4 à RECEPTION RADIO, puis
syntonisez sur la station manuellement ou automatiquement.
3. Appuyez sur le bouton SET pour confirmer le numéro et la
station préréglés, pendant que l'affichage indique la fréquence
désirée.
™ Le numéro préréglé clignotera une fois.
Sélection des stations préréglées
• Sélectionnez un bouton préréglé (PRESET 1 - 5) et appuyez
dessus pour rappeler la fréquence correspondante et la bande
d'ondes mémorisée.
REGLAGE DE L'HEURE DE REVEIL
Généralités
Il est possible de régler deux heures de réveil différentes en différents
modes. Ceci peut s'avérer utile, si par exemple, vous désirez vous
réveiller à une heure différente en semaine et le week-end.
Nota: Pour régler le réveil, suivez chaque instruction dans les 10
secondes.
Réglage de mode réveil 1 ou 2
1. Appuyez sur le bouton ALARM 1 ou 2.
™ L'heure de réveil apparaît sur l'affichage.
P
R
E
S
E
1
ALARM 1
AM
T
2
P1 P2 P3 P4 P5
ALARM 2
3
VOLUME
AJ3720 PLL
4
FM
MHz
TUNING /
ALM 2ALM 1
5
22
Page 23

2. Utilisez TUNING / ∞ ou § pour régler l'heure de réveil.
A
– TUNING / ∞ ou § enfoncé, l'affichage indiquera un
défilement rapide et continu avant ou arrière des minutes et
des heures.
– Appuyez brièvement et plusieurs fois sur TUNING /∞ ou
§ pour régler l'heure de réveil minute par minute.
3. Sélectionnez le mode de réveil en sélectionnant un des modes
de réveil suivants:
SLUMBER/BUZZER – Pour l'option Sonnerie (réglée à un volume
fixe qui ne peut pas être ajusté)
RADIO ON – Pour la dernière station syntonisée
PRESET 1-5 – Pour sélectionner une station de radio préréglée
™ ALM 1 ou 2 l'indication de mode de réveil choisi apparaîtra sur
l'affichage:
– et le numéro préréglé pour les options de radio
– pour l'option sonnerie.
4. Appuyez sur le bouton ALARM 1 ou 2 pour visualiser l'heure
de réveil.
IMPORTANT !
Si vous désirez que l'appareil vous réveille, COMMENCEZ PAR
VERIFIER les points suivants:
– vous avez réglé le volume suffisammentfort lorsque vous
utilisez les modes de réveil radio;
– vous avez débranché le casque.
Mode sommeil week-end
Cette fonction désactive le réveil tous les samedis et dimanches et
réactive la fonction de réveil du lundi au vendredi.
1. Appuyez sur ALARM 1 ou 2.
™ L'affichage indique l'heure de réveil réglée.
2. Appuyez une fois sur WEEKEND SLEEPER.
™ Si le mode sommeil week-end est activé,
ZZ apparaîtra sur
l'affichage du mode réveil 1 ou 2.
3. Pour annuler la fonction sommeil week-end, recommencez les
instructions 1 et 2 jusqu'à ce que
ZZ n'apparaisse plus sur
l'affichage.
Annulation complète du mode réveil
Lorsqu'un mode réveil est annulé, le symbole et l'indication de
réveil sélectionnés disparaissent de l'affichage.
1. Pour annuler l'heure de réveil réglée avant que le réveil ne soit
activé, appuyez sur le bouton ALARM 1 ou 2 activé.
– L'affichage indique l'heure de réveil.
2. Appuyez sur ALARM RESET/RADIO OFF.
– L'indication et le symbole de réveil sélectionnés
disparaissent de l'affichage.
AM
SLUMBER
P1 P2 P3 P4 P5
WEEKEND
ING /
ALM 1
Z
0 PLL DIGITAL CLOCK RADIO
SLEEPER
AM
Z
RESET
M
R
LA
A
5
RADIO OFF
REVEIL
ALM 2ALM 1
SET
BER
M
SLU
R
E
Z
Z
U
B
Français
R
23
Page 24

REVEIL marche / arrêt
EXTINCTION DU REVEIL
Il y a deux manières d'éteindre le réveil. A moins que vous ne
l'annuliez entièrement, le réenclenchement de réveil sera
sélectionné automatiquement au bout de 60 minutes, à partir du
Français
moment où vous aviez activé le réveil pour la première fois.
Note: Lorsque le réveil ou la répétition de réveil est activé, seules
les commandes ALARM RESET/RADIO OFF et REPEAT
ALARM/
Alarm reset - Réenclenchement de réveil
Si vous désirez désactiver immédiatement le mode de réveil, mais
que vous désiriez conserver le même réglage de réveil pour le
lendemain:
1. Appuyez sur ALARM RESET/RADIO OFF.
™ Vous entendrez une longue tonalité confirmant l'activation
de la fonction de réenclenchement de réveil.
Repeat alarm - Répétition de réveil
Cette fonction réactive le réveil plusieurs fois à des intervalles de
9 minutes.
1. Appuyez sur REPEAT ALARM/
réveil est opérationnel.
™ Le réveil se mettra en marche à nouveau au bout de 9
minutes.
2. Vous pouvez appuyer sur REPEAT ALARM/
de fois que vous le désirez.
™ L'indication de mode de réveil ou de l'affichage
clignotera pendant tout le temps où la fonction de
répétition de réveil est active.
TIME DATE de l'appareil interviendront.
TIME DATE pendant que le
TIME DATE autant
ALM 1
AM
REPEAT ALARM
TIME DATE
SUN MON TUE WED THUR FRI SAT
P1 P2 P3 P4 P5
ALM 2ALM 1
LW
24
Page 25

ARRET PROGRAMME ENTRETIEN
Mode SLUMBER
Informations sur la durée d'arrêt programmé
Ce radioréveil est doté de la fonction SLUMBER, qui permet
d'éteindre automatiquement l'appareil en mode radio au bout d'un
délai préréglé. Trois réglages d'arrêt programmé sont prévus à cet
effet: 60, 30 ou 10 minutes, avant que l'appareil s'éteigne
automatiquement. Vous avez la possibilité de régler la durée
d'arrêt programmé, que la radio soit allumée ou éteinte.
Réglage d'arrêt programmé
1. Sélectionnez la durée d'arrêt programmé en appuyant une ou
plusieurs fois sur SLUMBER/
BUZZER:
une fois: 60 minutes;
deux fois 30 minutes;
trois fois: 10 minutes.
™ L'affichage indique ‘SL:’ ainsi que la durée d'arrêt
programmé sélectionnée..
™ Le mot SLUMBER apparaît lorsque la fonction est opérationnelle.
2. Pour annuler la fonction Arrêt programmé,
– appuyez plusieurs fois sur le bouton SLUMBER/
BUZZER,
jusqu'à ce que la radio s'éteigne, ou
– appuyez sur ALARM RESET/RADIO OFFpour l'annuler
immédiatement et éteindre l'appareil.
IGITAL CLOCK RADIO
ALM 1
AM
ALA
RADIO OFF
SLUMBER
ESET
R
M
R
P1 P2 P3 P4 P5
ER
B
M
SLU
RADIO ON
R
E
Z
Z
U
B
Français
GENERALITES
– Si n'avez pas l'intention d'utiliser le radioréveil pendant
longtemps, débranchez-le de la prise d'alimentation.
– Evitez de l'exposer à l'humidité, à la pluie, au sable, ou à une
chaleur excessive provenant d'un appareil de chauffage ou de
la lumière directe du soleil.
– Une peau de chamois légèrement imbibée d'eau suffit pour
nettoyer la boîtier. N'utilisez-pas d'agents de nettoyage
contenant de l'alcool, de l'essence, de l'ammoniac ou des
abrasifs qui risquent d'endommager le boîtier.
Informations écologiques
Nous n'avons pas utilisé de matériaux d'emballage non nécessaires. Nous avons fait de notre mieux
pour que vous puissiez facilement séparer les matériaux d'emballage en trois éléments principaux:
carton (boîte), polystyrène extensible (cale) et polyéthylène (sachets, mousse de protection).
L'appareil est constitué de matériaux qu'il est possible de recycler, s'il est démonté par une
société spécialisée. Veuillez avoir l'obligeance de respecter les réglementations locales
concernant la manière de se débarrasser des matériaux d'emballage, piles épuisées et
matériel usé.
25
Page 26

DEPANNAGE
En cas de dysfonctionnement, vérifiez tout d'abord les points suivants, avant d'envoyer l'appareil en
vue de réparation. Si vous n'êtes pas en mesure de résoudre le problème en suivant ces
recommandations, contactez votre revendeur ou le service après-ventes.
AVERTISSEMENT: N'essayez, sous aucun prétexte, de réparer vous-même
Français
PROBLEME
– CAUSE EVENTUELLE
• REMEDE
l'appareil, car ceci annulerait la validité de la garantie.
GENERALITES
Pas de son
– Volume non réglé
• Réglez le volume
– Casque relié
• Débranchez le casque
L'appareil ne réagit pas aux commandes
– Décharge électrostatique
• Eteignez l'appareil, débranchez la fiche secteur,
puis rebranchez-la au bout de 3 secondes
RADIO
Crépitement occasionnel pendant la
radiodiffusion FM
– Faible signal
• Etendez entièrement l'antenne métallique
Perturbations constantes de
crépitement/sifflement pendant la
radiodiffusion MW (AM)
– Brouillage électrique provenant de téléviseurs,
ordinateurs, lampes fluorescentes, etc.
• Eloignez l'appareil de tout autre équipement
électrique
REVEIL
Le réveil ne fonctionne pas
– Heure de réveil non réglée
• Réglez l'heure de réveil
– Mode de réveil non sélectionné
• Voir ‘REGLAGE L’HEURE DE REVEIL’
– Mode sommeil week-end sélectionnée pour le
samedi et le dimanche
• Désactivez le mode sommeil week-end
– Volume trop bas pour les options du radioréveil
• Ajustez le volume
26
La plaque signalétique se trouve sous
l'appareil.
Page 27

GARANTIE LIMITÉE
SYSTÈME SONORE PORTABLE
Échange gratuite pendant un an
Il faut porter ce produit à un centre de service pour l’échanger.
QUI EST COUVERT ?
Il faudra présenter une preuve d’achat pour pouvoir bénéficier des
services de la garantie. Le reçu,la facture ou un autre document
portant la date d’achat qui prouve que vous avez bien acheté le
produit est considéré comme preuve d’achat.L’attacher à ce
manuel d’emploi et les garder tous les deux à portée de main.
QU’EST-CE QUI EST COUVERT ?
La couverture de la garantie entre en vigueur le jour où vous
achetez le produit.Pendant un an à compter de cette date, tout
produit défectueux ou qui ne fonctionne pas sera remplacé par
un produit neuf,renouvelé ou un produit comparable sans frais
aucun au consommateur.Un produit de remplacement n’est
couvert que pendant la période non-écoulée de garantie
d’origine.Lorsque la garantie du produit d’origine vient à terme,
la garantie du produit de remplacement est terminée aussi.
QU’EST-CE QUI EST EXCLU DE LA GARANTIE ?
La garantie ne couvre pas:
• les frais de main d’œuvre pour installer ou préparer,pour
régler les commandes et pour installer ou réparer les
systèmes d’antenne à l’extérieur du produit.
• la réparation du produit et/ou d’une pièce pour cause du
mauvais emploi,d’accident, de réparations non-agréées ou
d’une autre raison qui ne peut pas être contrôlée par Philips
Consumer Electronics Company.
• des problèmes de réception dûs à des conditions de signal,au
câble ou aux systèmes d’antenne à l’extérieur de l’unité.
• un produit qui nécessite des modifications ou adaptations
pour lui permettre de fonctionner dans un pays autre que le
pays pour lequel il a été conçu,fabriqué,agréé et/ou autorisé,
ou la réparation des produits endommagés par de telles
modifications.
• des dommages indirects ou conséquents qui résultent du
produit.(Certains états ou provinces ne permettent pas
l’exclusion de dommages indirects ou conséquents.Il est
donc possible que l’exclusion ci-dessus ne s’applique pas au
cas présent.Cela comprend, mais de façon non-limitative,des
enregistrements,qu’ils soient protégés ou non par les lois sur
les droits d’auteur).
• un appareil acheté,utilisé ou réparé en dehors des ÉtatsUnis,de Porto Rico, des Îles Vierges ou du Canada ou utilisé
à des fins commerciales ou institutionnelles (y compris mais
non limités aux appareils utilisés pour la location).
OÙ L’ÉCHANGE EST-ELLE PROPOSÉE ?
Le produit pourra s’échanger dans tous les pays où le produit est
distribué officiellement par Philips Consumer Electronics Company.
Dans des pays où Philips Consumer Electronics Company ne
distribue pas le produit,l’organisme local de service Philips tentera
de fournir un produit de remplacement (mais il pourra y avoir des
retards si le bon produit n’est pas facilement disponible).
AVANT DE DEMANDER UNE ÉCHANGE…
Veuillez consulter le manuel d’instructions avant de demander
un produit d’échange.Un petit réglage d’une des commandes
expliqué dans le manuel d’instructions pourrait éviter de faire
un trajet.
Cette garantie vous donne des droits légaux spécifiques et vous pourriez avoir d’autres droits qui varient
Philips Service Company,P.O.Box 555, Jefferson City,Tennessee 37760 É.-U., (423) 475-8869
d’état en état et de province en province.
EL6095T001 / MAC5433 / 1-97
POUR BÉNÉFICIER DE L’ÉCHANGE GARANTIE
AUX É.-U.,AU PUERTO RICO OU DANS LES ÎLES
VIERGES AMÉRICAINES…
Contacter votre vendeur pour arranger l’échange.Ou bien,
renvoyer le produit,frêt et assurances payés,avec preuve
d’achat incluse,à l’adresse ci-dessous :
(Aux É.-U.,au Puerto Rico et aux Îles Vierges,toute garantie
implicite,y compris des garanties de vendabilité et d’aptitude à
un but spécifique,est limitée à la durée de cette garantie
explicite.Mais, étant donné que certains états et provinces ne
permettent pas de limité la durée d’une garantie implicite,cette
limitation pourrait ne pas s’appliquer au cas présent.)
POUR BÉNÉFICIER D’UNE ÉCHANGE GARANTIE
AU CANADA…
Veuillez contacter Philips á :
(Au Canada,cette garantie est consentie à la place de toute autre
garantie.Aucune autre garantie n’est donnée,qu’elle soit explicite
ou implicite, y compris une garantie implicite de vendabilité ou
d’aptitude à un but spécifique. Philips n’est pas,en aucun cas,
responsable des dommages,qu’ils soit directs ou indirects, spéciaux,
secondaires ou conséquents,quels que soient leurs origines, même
en présence d’une notification de la possibilité de tels dommages.)
POUR UNE ÉCHANGE HORS GARANTIE…
Aux É.-U.,au Puerto Rico ou aux Îles Vierges américaines,
contacter Philips Service Company au (800) 851-8885 pour
savoir le prix d’une échange non couverte par la garantie.Puis
emballer le produit avec soins et le renvoyer au Small Product
Service Center (adresse ci-dessus).Au Canada, téléphonez au
numéro qui se trouve sous la rubrique « Pour bénéficier d’une
échange garantie au Canada » pour obtenir le prix d’un échange
hors garanti.
RAPPEL IMPORTANT...
Veuillez inscrire ci-dessous les numéros de modèle et de série
qui se trouvent sur le produit même.De plus,veuillez remplir et
renvoyer sans délai la carte d’enregistrement de garantie.Il nous
sera ainsi plus facile de vous contacter en cas de besoin.
Nº DE MODÈLE _______________________________
Nº DE SÉRIE _______________________________
Small Product Service Center
Philips Service Company
907 Snapps Ferry Road,Plant 2, Building 6
Greeneville,TN 37743 É.-U.
1-800-661-6162 (Francophone)
1-800-363-7278 (Anglophone)
27
Page 28

Envie hoy su Tarjeta de Registro de la Garantía
PRECAUCION
RIESGO DE SACUDIDA ELECTRICA
NO ABRIR
PRECAUCION: PARA REDUCIR EL RIESGO DE SACUDIDA ELECTRICA,NO RETIRE
LA CUBIERTA (NI EL PANEL POSTERIOR). ESTE APARATONO CONTIENE NINGUNA
PARTE QUE PUEDA SER REPARADA POREL USARIO. DE SER NECESARIO ALGUN
SERVICIO O REPARACIONDEL APARATO, LLEVELO UN TECNICO CALIFICADO.
para recibir todas las ventajas correspondientes.
• Una vez que se registre la compra de
su aparato Philips Magnavox,Ud. tiene
derecho a todas las ventajas
correspondientes al dueño de un
producto Philips Magnavox.
Verificación
de la garantía
Registre su producto
dentro de 10días para
confirmar su derecho a
máxima protección
bajo los términos y
condiciones de la garantía
de Philips Magnavox.
Confirmación
del dueño
Su Tarjeta de Registro de
la Garantía comprueba
que Ud.es el dueño del
aparato en caso de robo
o pérdida del producto.
Conozca estos
simbolos de
sseegguurriiddaadd
• Sírvase llenar y devolver en seguida
laTarjeta de Registro de la Garantía
empacada con su aparato.Saque
provecho de estas ventajas impor tantes .
Registro
del modelo
La devolución inmediata de
su Tarjeta de Registro de la
Garantía le garantiza que
recibirá toda la información
y todas las promociones
especiales que le
corresponden por ser el
dueño de su modelo.
Para uso del cliente:
Escriba abajo el número de serie que se
encuentra en el panel posterior.Guarde
esta información para el futuro.
No.de modelo ____________________
El símbolo del “rayo” indica
que algún material no aislado
t
resultar en una sacudida eléctrica.Para
la seguridad de todos,favor de no
remover la cubierta del producto.
s
Ud.debe leer la información adjunta
detenidamente para evitar problemas
de funcionamiento y mantenimiento.
28
dentro de su unidad podría
El “signo de exclamación” le
llama la atención a
características sobre las que
No.de serie ______________________
ADVERTENCIA:PARA
EVITAR EL RIESGO DE SACUDIDA
ELECTRICA O INCENDIO,NO
EXPONGA ESTE EQUIPO A LLUVIA
NI A HUMEDAD .
PRECAUCION:Para evitar
sacudida eléctrica,introduzca la patilla
ancha del enchufe al fondo de la
ranura ancha.
MAC5097
Page 29

SEGURIDAD
AVISO
Para reducir el riesgo de fuego o choque eléctrico, no exponga el aparato a
la lluvia o humedad.
INSTRUCCIONES SOBRE SEGURIDAD
- Léalas antes de hacer funcionar el equipo
Este producto fue diseñado para cumplir con normas rigurosas
de calidad y seguridad. No obstante, existen algunas medidas
de precaución para la instalación y funcionamiento con las que
Ud. debe familiarizarse en particular.
1. Lea las instrucciones- Todas las instrucciones de
seguridad y funcionamiento deben leerse antes de hacer
funcionar el aparato.
2. Guarde las instrucciones- Deben guardarse las instrucciones de seguridad y funcionamiento para consultas
futuras.
3. Preste atención a las advertencias- Ud. debe observar
todas las advertencias en el aparato y en las instrucciones
de funcionamiento.
4. Siga las instrucciones- Ud. debe seguir todas las instrucciones de funcionamiento y uso.
5. Agua y humedad- El aparato no debe usarse cerca de
agua, por ejemplo, cerca de un baño, lavabo, fregadero, tina
para lavar ropa, en un sótano húmedo o cerca de una
piscina, etc.
6. Carritos o bastidores- El aparto sólo debe usarse con un
carrito o bastidor recomendado por el fabricante.
6A. La combinación carrito-aparato debe
combinación carrito-aparato.
7. Montaje en una pared o techo interior- El aparato sólo
debe montarse en una pared o techo interior según las recomendaciones del fabricante.
8. Ventilación -El aparato debe situarse de tal modo que su
ubicación o posición no obstaculice una buena ventilación.
Por ejemplo, el aparato no debe situarse en una cama, sofá,
alfombra o superficie similar que puede bloquear las
aberturas de ventilación; tampoco debe colocarse en
muebles embutidos, tal como sería el caso de una estantería
para libros o un armario, porque así se podría impedir el
flujo de aire por las aberturas de ventilación.
9. Calor- El aparato debe situarse lejos de fuentes de calor,
tales como radiadores, rejillas para calefacción, hornos u
otros aparatos (inclusive amplificadores) que puedan
producir calor.
10. Fuentes de potencia - El aparato debe conectarse a una
fuente de energía únicamente del tipo descrito en las instrucciones de funcionamiento o según lo indicado en el
aparato.
trasladarse con cuidado. Cualquier parada
repentina, fuerza excesiva y superficie
desnivelada pueden producir el volteo de la
La placa de tipo se encuentra en la base del radio
reloj.
Este aparato cumple con las normas FCC, parte 15.
El funcionamiento está sujeto a las condiciones
siguientes:
1. Este dispositivo no puede causar interferencias
dañinas, y
2. Este dispositivo debe aceptar cualquier
interferencia recibida, incluyendo interferencias
que puedan causar un funcionamiento no
deseado.
11. Puesta a tierra o polarización
Tome las precauciónes utilizando
los medios de puesta a tierra o
de polarización de un aparato
que no estén estropeados.
AVISO: Para prevenir un
choque eléctrico, haga coincidir la clavija plana ancha con la
ranura plana y inserte a fondo. No utilice esta clavija
polarizada con un cable de prolongación o otra toma de red
a menos que las clavijas estén completamente cubiertas.
12.Protección del cable de potencia - Los cables de alimentación de energía deben encaminarse de tal modo que nadie
pise encima de ellos; también es importante que no estén
apretados por artículos colocados contra o encima de ellos.
Hay que prestar atención especial a los cables y enchufes,
receptáculos convenientes y al lugar donde éstos salen del
aparato.
13.Limpieza - El aparato sólo debe limpiarse de acuerdo con
las recomendaciones del fabricante.
14.Líneas de energía - Una antena exterior debe situarse
lejos de las líneas de energía.
15.Períodos sin uso - Se debe desenchufar el aparato cuando
no se lo usa por un período considerable de tiempo.
16. Entrada de objetos extraños o de líquidos
tener cuidado para que ningún objeto caiga dentro y también
para que no se derrame ningún líquido dentro de las aberturas
de la caja del aparato.
17.Daño que requiere servicio - El aparato sólo debe ser reparado por un técnico calificado cuando:
A. Se ha dañado el cable de suministro de energía o el en-
chufe; o
B. Algún objeto hay caído dentro del aparato o se ha
derramado algún líquido dentro de mismo; o
C. El aparato ha sido expuesto a lluvia; o
D. El aparato no parece funcionar normalmente o exhibe un
cambio marcado en su funcionamiento; o
E. El aparato se ha caído o ha habido daño a su caja.
18.Servicio - El usuario no debe tratar de reparar el aparato
más allá de lo descrito en las instrucciones de
funcionamiento. Toda otra reparación o mantenimiento debe
dejarse a cargo del personal técnico calificado para tal
finalidad.
91/8 EL 4562-3
Clavija
polarizada de CA
- Hay que
29
Page 30

MANDOS INSTALACIÓN
PANELES SUPERIOR, DELANTERO y
LATERAL
1 REPEAT ALARM/TIME DATE:
– Para desactivar la alarma durante un período
de 9 minutos.
– Para mostrar/ajustar la fecha (mes y día) y el año
– Para reanudar la presentación de la hora del
reloj en el cuadrante.
2 CUADRANTE: Para mostrar el estado del
Español
aparato
3 PRESET 1-5:
– Para seleccionar una emisora de radio prefijada
– Para seleccionar una emisora de radio
prefijada para el despertador
4 ALARM RESET/RADIO OFF:
– Para desconectar el despertador durante 24
horas
– Para desactivar el despertador 1 ó 2
completamente
– Para apagar la radio
5 SLUMBER/BUZZER
– Para activar/desactivar el tiempo de dormitado
– Para seleccionar el modo de timbre para la 1ª
o la 2ª hora de despertarse
6 RADIO ON
– Para activar la radio
– Para pasar al cuadrante de radio durante 10
segundos
– Para seleccionar el modo de radio para la 1ª o
la 2ª hora de despertarse
7 BAND: Para seleccionar la banda de onda
8 ALARM 1:Para ajustar, revisar o desactivar la 1ª
hora de despertarse
ALARM 2: Para ajustar, revisar o desactivar la
2ª hora de despertarse
9 VOLUME: Para ajustar el volumen de la radio
0 TUNING / ∞ o § (subir o bajar)
– Para sintonizar emisoras de radio
automáticamente o manualmente.
– Para ajustar la hora del reloj, la hora de
despertarse, la fecha, el año.
! p :zócalo de 3,5 mm para auriculares
@ WEEKEND SLEEPER:
– Para activar o desactivar la función de dormir
durante el fin de semana para la 1ª o la 2ª
hora de despertarse 1 ó 2
# SET:
– Para confirmar las emisoras prefijadas
almacenadas
– Para activar el modo de ajuste de la hora del reloj
$ BRIGHTNESS: Para cambiar la intensidad
del cuadrante.
% Antena en espiral: Para la recepción de FM
^ MAINS: Para conectar el aparato a la red eléctrica
CONEXIÓN A LA RED ELÉCTRICA
1. Compruebe si la tensión de la red indicada en la placa de
especificaciones (situada debajo del aparato) conforma con el
suministro de energía. De no ser así, consulte a su distribuidor
o a nuestra organización de servicio.
™ Si su aparato está equipado con un selector de tensión,
situado en el rincón inferior derecho del aparato, ajústelo a
la tensión de la red eléctrica local.
2. Conecte el enchufe eléctrico al zócalo de pared.
– El suministro de energía de la red está conectado y los
números del cuadrante empiezan a parpadear. Esto indica
que debe ajustar el reloj a la hora correcta.
3. Para desconectar el aparato de la red, desenchufe el cable
eléctrico del zócalo de pared.
30
AM
Z
PM
Z
SLUMBER
SUN MON TUE WED THUR FRI SAT
P1 P2 P3 P4 P5
ALM 2ALM 1
MW
FM
MHz
Z
kHz
Z
Page 31

Corte de corriente
En el caso de un corte de corriente, se desconecta todo el aparato.
En primer lugar desenchufe el aparato y vuelva a enchufarlo después
de 3 segundos o más. Todos los ajustes quedarán en la memoria
pero deberá volver a ajustar la hora del reloj, la fecha y el año.
Cómo conectar auriculares/altavoces
Conecte los auriculares/altavoces al zócalo p con una clavija de
3,5 mm.
™ Los altavoces del aparato se desactivarán.
Claridad del cuadrante
Se puede ajustar la claridad del cuadrante mediante la tecla
BRIGHTNESS
™ Hay dos ajustes: BRIGHT (brillante) ™ DIM (opaco)
Cuadrante del reloj
En algunas versiones, el modo de reloj utilizado es el de 12 horas
con indicadores de AM/PM.
INSTALACIÓN
TUNING /
VOLUME
BRIGHTNESS
CONTROL
Español
ALARM 1
31
Page 32

CÓMO AJUSTAR LOS DATOS
AJUSTE DE HORA, FECHA Y AÑO
Información general
Los datos de la hora, la fecha y el año necesitan introducirse por
separado en la memoria del reloj.
Cómo ajustar la hora
1. Si es necesario, pulse la tecla REPEAT ALARM/
hasta que el cuadrante muestre el modo de hora.
– Si el cuadrante de hora 12:00ya está parpadeando, vaya al
Español
paso 3.
2. Pulse SET para activar el modo de ajuste.
™ El cuadrante de la hora empieza a parpadear.
3. Use TUNING / ∞ o § para ajustar las horas y los minutos.
– Manteniendo pulsada la tecla TUNING /∞ o § en el
cuadrante se verá aumentar o disminuir los minutos y las
horas rápidamente.
– Pulse TUNING / ∞ o § brevemente y rápidamente para
ajustar la hora minuto por minuto.
4. Pulse SET cuando llegue a la hora correcta.
Ajuste de la fecha y del año
Los modos de día y año aparecerán en el cuadrante durante 10
segundos antes de volver al modo de hora del reloj.
Los modos de fecha muestran el mes y el día, por ejemplo el 31
de diciembre se mostrará como 12--31.
• No es necesario ajustar los día de la semana (
(
LUNES-DOMINGO) ya que esto se realiza automáticamente
después de que se ha ajustado la fecha y el año
correctamente.
1. Pulse la tecla REPEATALARM/TIME DATE repetidamente
hasta que el cuadrante muestre el modo que desea ajustar
(fecha/año).
2. Use TUNING / ∞ o § para ajustar el mes, el día y el año.
– Manteniendo pulsada la tecla TUNING /∞ o § en el
cuadrante se verá aumentar o disminuir los días y los años
rápidamente.
– Pulse TUNING / ∞ o § brevemente y rápidamente para
ajustar el cuadrante día a día o año a año.
– Pulse SET cuando llegue al día y al año correctos.
3. La fecha y el año están ajustadas. Pulse la tecla REPEAT
ALARM/
TIME DATE si desea devolver el cuadrante al modo de
reloj inmediatamente.
TIME DATE
MON-SUN)
REPEAT ALARM
TIME DATE
SUN MON TUE WED THUR FRI SAT
WEEKEND
SLEEPER
2
TUNING /
TUE
32
Page 33

CÓMO AJUSTAR LOS DATOS RADIO
RECEPCIÓN DE RADIO
Cuando encienda la radio oirá la última emisora prefijada o
sintonizada.
1. Pulse RADIO ON para activar el modo de radio.
™ La frecuencia y la banda de onda de radio aparecen en el
cuadrante durante 10 segundos antes de volver al
cuadrante de reloj. Pulse RADIO ON de nuevo si desea ver
el modo de radio en el cuadrante.
2. Ajuste el interruptor BAND para seleccionar la banda de onda.
3. Sintonice la emisora, o bien manualmente o usando los
ajuste prefijados.
Para mejorar la recepción de emisoras de radio
FM: extienda el cable en espiral situado en la parte trasera
del aparato para lograr la recepción óptima.
MW (AM): usa una antena incorporada. Dirija la antena
ajustando la posición del aparato.
4. Ajuste el sonido usando el mando VOLUME.
5. Para apagar la radio, pulse ALARM RESET/RADIO OFF.
™ El cuadrante vuelve a mostrar la hora del reloj.
L CLOCK RADIO
T
ESE
R
M
AR
L
A
RADIO OFF
A
L
A
1
M
R
A
L
A
D
N
A
B
W
•L
W
•M
M
F
A
1
M
R
A
L
A
D
N
A
B
W
•L
W
•M
FM
ITAL CLOCK RADIO
RESET
M
R
LA
A
RADIO OFF
SLUM
2
M
R
R
A
L
ER
B
RADIO ON
R
E
Z
Z
U
B
T
E
S
D
N
E
K
E
E
W
R
E
P
E
E
L
S
/
G
N
I
N
U
T
VOLUME
T
E
D
S
N
E
K
E
E
W
R
E
P
E
E
L
S
/
G
N
I
N
U
T
2
M
VOLUME
BER
M
SLU
RADIO ON
R
E
Z
Z
U
B
Español
33
Page 34

RADIO ALARMA
D
TUNI
SINTONIZACIÓN DE UNA EMISORA
Sintonización MANUAL
Esta función es útil si se conoce la frecuencia de radio de la emisora.
1. Pulse la tecla TUNING / ∞ o § hasta encontrar la emisora
deseada.
Sintonización AUTOMÁTICA
1. Mantenga la tecla TUNING / ∞ o § apretada hasta que la
Español
frecuencia indicada en el cuadrante empiece a correr y suéltela.
– El cuadrante muestra Srch(búsqueda).
2. Cuando se ha encontrado una emisora, la sintonización parará
o usted puede detener la sintonización automática pulsando
el mando TUNING / ∞ o § de nuevo. Repita esto hasta que
haya encontrado la emisora deseada.
Emisoras prefijadas
Cómo almacenar emisoras prefijadas
Puede programar hasta cinco estaciones prefijadas de una o más
bandas. También puede sustituir una estación prefijada por otra
frecuencia. El número de ajuste prefijado de la emisora
seleccionada se indicará en el cuadrante.
1. Seleccione y pulse una tecla de emisora prefijada PRESET de
1 a 5.
2. Siga los pasos 1 a 4 de RECEPCIÓN DE RADIO y sintonice la
emisora manualmente o automáticamente.
3. Pulse la tecla SET para confirmar el número y emisora prefijados
mientras el cuadrante muestra la frecuencia deseada.
™ La indicación del número prefijado parpadea una vez.
Selección de emisoras prefijadas
• Seleccione y pulse una tecla de emisora prefijada
(PRESET 1 -5) para activar la frecuencia y banda de onda
correspondientes almacenadas.
AJUSTE DE LA HORA DE DESPERTARSE
Información general
Es posible ajustar dos tiempos de despertarse diferente en varios
modos. Esto puede ser muy útil, por ejemplo en el caso de que
necesite despertarse a diferentes horas durante la semana y los
fines de semana.
Nota: Para ajustar la hora de despertarse, realice cada paso en
menos de 10 segundos.
Ajuste de la 1ª o la 2ª hora de despertarse
1. Pulse la tecla ALARM 1 ó 2.
™ La hora de despertarse aparece en el cuadrante.
P
R
E
ALARM 1
AM
S
E
1
T
2
P1 P2 P3 P4 P5
ALARM 2
3
VOLUME
AJ3720 PLL
4
FM
MHz
ALM 2ALM 1
5
34
Page 35

2. Use TUNING / ∞ o § para ajustar la hora de despertarse;
A
– Manteniendo pulsada la tecla TUNING /∞ o §, en el
cuadrante se verá aumentar o disminuir rápidamente la
hora de despertarse, de minutos a horas.
– Pulse TUNING / ∞ o § brevemente y rápidamente para
ajustar la hora de despertarse, minuto a minuto.
3. Seleccione el modo de despertarse para seleccionando uno de
los siguientes:
SLUMBER/BUZZER – Para la opción de timbre (éste está
ajustado a un volumen fino y no puede reajustarse)
RADIO ON – Para la última emisora sintonizada
PRESET 1-5 – Para seleccionar una emisora de radio prefijada
™ ALM 1 ó 2 y la indicación del modo de despertarse
seleccionado aparece en el cuadrante:
– y el número prefijado de las opciones de radio
– para la opción de timbre.
4. Para revisar la hora de despertarse, pulse la tecla
ALARM 1 ó 2.
¡IMPORTANTE!
Si desea que la alarma le despierte, VERIFIQUE si:
– ha ajustado un volumen suficientemente alto cuando use
los modos de despertarse con la radio;
– ha desconectado los auriculares.
Dormilón de fin de semana
Esta función desactiva la alarma cada sábado y domingo y
reanuda la función de alarma de lunes a viernes.
1. Pulse ALARM 1 ó 2.
™ El cuadrante mostrará la hora de despertarse fijada.
2. Pulse WEEKEND SLEEPER una vez.
™Si la función de dormilón de fin de semana está activada,
aparece
ZZ en el cuadrante que muestra los datos de la 1ª o
2ª hora de despertarse.
3. Para cancelar la función de dormilón de fin de semana, repita
los pasos 1 y 2 hasta que
ZZ no aparezca en el cuadrante.
Cómo desactivar el despertador completamente
Cuando se cancela una hora de despertarse, la indicación y el
símbolo de dicha hora desaparecen del cuadrante.
1. Para cancelar la hora de despertarse fijada antes de que
suene el despertador, pulse la tecla ALARM 1ó 2 pertinente.
– El cuadrante mostrará la hora de despertarse seleccionada.
2. Pulse ALARM RESET/RADIO OFF.
– La indicación y el símbolo de la hora de despertarse
desaparecen del cuadrante.
ALARMA
AM
SLUMBER
P1 P2 P3 P4 P5
WEEKEND
ING /
ALM 1
Z
0 PLL DIGITAL CLOCK RADIO
SLEEPER
AM
Z
ESET
R
M
R
LA
A
5
RADIO OFF
Español
ALM 2ALM 1
SET
BER
M
SLU
R
R
E
Z
Z
U
B
35
Page 36

DESPERTADOR activado / desactivado
DESACTIVACIÓN DE LA ALARMA
Hay dos formas de desactivar el despertador. A menos que
cancele el modo de despertador completamente, se seleccionará
automáticamente ALARM RESET (Restauración de la alarma del
despertador) después de 60 minutos, a partir del momento en que
la alarma del despertador se haya disparado.
Note: Mientras suena el despertador, solamente funcionan los
Español
mandos ALARM RESET/RADIO OFF y REPEAT ALARM/
TIME DATE del aparato.
Alarm reset - Restauración de la alarma del despertador
Si desea que el modo de despertador se cancele inmediatamente
pero al mismo tiempo desea conservar los mismos ajustes de
despertador para el día siguiente:
1. Pulse ALARM RESET/RADIO OFF.
™ Oirá un tono largo que confirmará que la función ALARM
RESET (Restauración de la alarma del despertador) ha sido
activada.
Repeat alarm- Repetir alarma de despertador
Esta función hará que su despertador suene a intervalos de 9
minutos.
1. Mientras el despertador suena, pulse REPEAT ALARM/
TIME DATE.
™ El despertador volverá a sonar a los 9 minutos.
2. Puede pulsar REPEAT ALARM/
TIME DATE
todas las veces que
desee.
™ Las indicaciones del modo de alarma o mostradas
en el cuadrante parpadearán mientras la función de
repetición de alarma esté activada.
ALM 1
AM
REPEAT ALARM
TIME DATE
SUN MON TUE WED THUR FRI SAT
P1 P2 P3 P4 P5
ALM 2ALM 1
LW
36
Page 37

TIEMPO DE DORMITADO MANTENIMIENTO
MODO DE DORMITADO
Información sobre la función de dormitado
El aparato tiene incorporada la función de dormitado que permite
apagar automáticamente el aparato durante el modo de RADIO
después de un período de tiempo determinado. Hay tres tiempos
de dormitado: 10, 30 y 60 minutos antes de que el aparato se
apague automáticamente. Puede ajustar el tiempo de dormitado
tanto si la radio está encendida o apagada.
Cómo programar el tiempo de dormitado
1. Seleccione el tiempo de dormitado pulsando la tecla
SLUMBER/
BUZZER una o más veces:
una vez: 60 minutos;
dos veces 30 minutos;
tres veces: 10 minutos.
™ EL cuadrante mostrará ‘SL:’ y el tiempo de dormitado
seleccionado.
™ La palabra
SLUMBER aparece cuando la función de
dormitado está activada.
2. Para cancelar la función de dormitado, puede:
– pulsar repetidamente la tecla SLUMBER/
BUZZER hasta que
la radio se apague, o
– pulse ALARM RESET/RADIO OFF para cancelar la función
inmediatamente y apagar el aparato.
IGITAL CLOCK RADIO
ALM 1
AM
R
ALA
RADIO OFF
SLUMBER
ESET
R
M
P1 P2 P3 P4 P5
ER
B
M
SLU
RADIO ON
R
E
Z
Z
U
B
Español
INFORMACIÓN GENERAL
– Si no se propone utilizar su radio de reloj durante un período
largo, desenchufe el aparato del zócalo de pared.
– No exponga el aparato a humedad, lluvia, arena, o calor excesivo
causado por equipo de calefacción o luz directa del sol.
– Para limpiar el alojamiento es suficiente utilizar una gamuza
ligeramente humedecida con agua. No utilice agentes de
limpieza que contengan alcohol, amoníaco o sustancias
abrasivas ya que pueden dañar el alojamiento.
Información ambiental
Se ha omitido todo el material de embalaje innecesario. Hemos hecho todo lo posible para que los
materiales de embalaje se puedan separar fácilmente entre tres tipos: cartón (caja), poliestireno
expandible (amortiguador) y polietileno (bolsas, espuma protectora).
Su aparato está formado por materiales que pueden reciclarse si pueden ser
desmantelados por una compañía especializada. Observe las normas locales relacionadas
con la eliminación de materiales de embalaje, pilas gastadas y equipo desechado.
37
Page 38

SOLUCIONES A POSIBLES ANOMALÍAS
Si ocurre una anomalía, realice las comprobaciones descritas a continuación antes de llevar el
aparato al taller de reparación. Si no puede remediar el problema siguiendo nuestras instrucciones,
consulte a su proveedor o centro de servicio.
ADVERTENCIA:No intente en ninguna circunstancia reparar Vd. mismo el aparato
pues esto cancelaría la garantía.
PROBLEMA
– CAUSA POSIBLE
• SOLUCIÓN
Español
GENERAL
No hay sonido
– El volumen no está ajustado
• Ajuste el volumen
– Los auriculares están conectados.
• Desconéctelos
El aparato no reacciona a ninguno de los
mandos
– Descarga electrostática
• Apague el aparato, desconecte el enchufe de
la red eléctrica y vuelva a conectarlo después
de 3 segundos.
RADIO
Crepitación ocasional durante recepción de
FM
– Señal débil
• Extienda la antena completamente
Crepitación/zumbido continuo durante
recepción de MW (AM)
– Interferencia causada por algún televisor,
ordenador, lámpara fluorescente, etc.
• Aparte el aparato de otro equipo eléctrico
ALARMA
Alarma no funciona
– La hora de despertarse no está ajustada
• Ajuste la hora de despertarse
– El modo de alarma no está seleccionado
• Vea ‘AJUSTAR DE LA HORA DE DESPERTARSE’
– La función de dormilón está seleccionada
para el sábado y el domingo
• Desactívela
– El volumen es demasiado bajo para las
opciones de despertarse con la radio
• Ajústelo
38
La placa de especificaciones eléctricas está
situada en la base del aparato.
Page 39

GARANTIA LIMITADA
SISTEMA DE AUDIO PORTATIL
Cambio gratis por un año
Se necesita presentarse en persona con este producto para cambiarlo.
¿QUIEN TIENE PROTECCION?
Usted debe tener su comprobante de venta para cambiar
el producto.Una nota de venta u otro documento
mostrando que usted compró el producto se considera un
comprobante de venta.Adjúntelo a este manual de
instrucciones y reténgalo a la mano.
¿QUE CUBRE?
La protección bajo la garantía comienza el mismo día en
que usted compra el producto.Durante un año a partir de
esta fecha,se reemplazará un producto inoperante o
defectuoso con otro nuevo,renovado o comparable sin
cargo alguno.Un producto de reemplazo tiene cobertura
sólo durante el período de la garantía original.Una vez que
venza la garantía original del producto,también habrá
vencido la garantía del producto de reemplazo.
¿QUE EXCLUYE LA GARANTIA?
Su garantía no cubre:
• cobros por mano de obra durante la instalación o
montaje del producto,ajuste de los controles del cliente
o de preferencia e instalación o reparación de los
sistemas con antena fuera de la unidad.
• reparación del producto y/o reemplazo de piezas,a raíz
de uso indebido,accidente, reparación no autorizada u
otra causa no bajo el control de Philips Consumer
Electronics Company.
• problemas de recepción ocasionados por condiciones de
señales o sistemas de cable o de antena fuera de la
unidad.
• un producto que requiera modificación o adaptación
para que opere en un país que no sea el país para el que
fue concebido,fabricado, aprobado y/o autorizado,o la
reparación de productos dañados por tales
modificaciones.
• daños incidentales o consecuentes que resulten del
producto.(Algunos estados no permiten la exclusión por
daños incidentales o consecuentes,de modo que es
posible que la exclusión arriba indicada no le sea
aplicable a usted.Esto incluye, sin limitarse , materiales
pregrabados con o sin amparo de derechos de autor.)
• Una unidad que se ha comprado,usado o reparado fuera
de los EE.UU.,Puerto Rico, las Islas Virgenes y el Canadá,
o que se ha usado para fines comerciales o
institucionales (inclusive productos usados con fines de
arrendamiento,pero sin limitarse a éstos).
¿DONDE SE EFECTUA EL CAMBIO?
Usted puede cambiar el producto en todos los países con
distribución oficial del producto por Philips Consumer
Electronics Company.En países donde Philips Consumer
Electronics Company no distribuye el producto,la entidad
local de servicio Philips tratará de darle un producto de
reemplazo (aunque puede haber demora si el producto
apropiado no está fácilmente disponible).
ANTES DE PEDIR UN CAMBIO…
Favor de consultar el manual de instrucciones antes de
pedir un cambio.Algunos ajustes de los controles según las
indicaciones en el manual podrían ahorrarle un viaje.
Esta garantía le otorga derechos legales específicos y usted podría gozar de otros derechos que varían de un estado a otro.
Philips Service Company,P.O.Box 555, Jefferson City,Tennessee 37760 USA,(423) 475-8869
PARA CAMBIAR UN PRODUCTO EN LOS
EE.UU.,PUERTO RICO O LAS ISLAS VIRGENES…
Comuníquese con su distribuidor para concertar el cambio.
También,usted puede enviar el producto con el seguro y
transporte o franqueo prepagados,adjuntando el comprobante
de venta y enviándolo a la dirección a continuación:
(En los EE.UU.,Puerto Rico o las Islas Vírgenes,toda garantía
implícita,inclusive las garantías implícitas de comerciabilidad y
aptitud para un propósito en particular,están limitadas en
cuanto a duración al plazo de esta garantía expresa.Puesto
que algunos estados no permiten limitaciones sobre la
duración de una garantía implícita,es posible que la limitación
arriba indicada no le sea aplicable a usted.)
PARA CAMBIAR UN PRODUCTO EN EL CANADA…
Favor de comunicarse con Philips al:
(En el Canadá,esta garantía es otorgada en lugar de toda otra
garantía.No se otorga ninguna otra garantía expresa ni
implícita,comprendiéndose aquí ninguna garantía implícita de
comerciabilidad o aptitud para propósito alguno. Philips no
será responsable bajo circunstancia alguna por daños y
perjuicios directos,indirectos, especiales, incidentales o
consecuentes,independientemente de la manera ocasionada,
aún con notificación de la posibilidad de los mismos.)
PARA CAMBIAR UN PRODUCTO DESPUES DE
VENCER LA GARANTIA…
En los EE.UU.,Puerto Rico o las Islas Vírgenes,comuníquese
con Philips Service Company,llamando al (800) 851-8885 para
obtener el costo de cambio de un producto después de vencer
la garantía.Luego empaque el producto con cuidado y envíelo
al Small Product Service Center,a la dirección arriba. En el
Canadá,llame al teléfono encontrado arribe en la sección ”Para
cambiar un producto en el Canada” para obtener el costo para
cambiar un producto no amparado por garantía.
RECUERDE…
Favor de anotar los números de modelo y serie del
producto en el espacio abajo.También,sírvase llenar y
enviar oportunamente su tarjeta de registro de la garantía.
Así nos será más fácil notificarle en caso de ser necesario.
Modelo No. ________________________________
Serie No. ________________________________
Small Product Service Center
Philips Service Company
907 Snapps Ferry Road,Plant 2, Building 6
Greeneville,TN 37743 USA
800-1-661-6162 (francófono)
800-1-363-7278 (anglófono)
39
Page 40

AJ 3720 - Clock Radio
PHILIPS CONSUMER ELECTRONICS COMPANY
A Division of Philips Electronics North America Corporation
Knoxville, Tennessee 37914-1810, U.S.A.
3140 115 2495.1 Printed in Hong Kong TCtext/CvB/9806
 Loading...