

Page 1
Register your product and get support at
EN User manual
AJ3270D
Page 2
A
e
f
g
h
i
j
a
b
c
d
k
l
m
n
Page 3
BCD
Page 4

E
Page 5
F
G
VOL +/-
Page 6
H
I
a
b
RADIO
TUNING +/-
HR
HR
PM
FM
Page 7

EN
1 Important
Safety
Read these instruc tions.•
Heed all warnings.•
Follow all ins tructions.•
Do not block any ventilation openings. Install in accordance wi th •
the manufacturer’s instructions.
Do not install near any heat sources such as r adiator s, heat •
registers, stoves, or other apparatus (including amplifi ers) that
produce heat.
Protect the power cord from being walked on or pinched , •
par ticular ly at plugs, convenience receptacles , and the point
wher e they exit from the clock radio.
Only use attachments/accessories specifi ed by the •
manufacturer.
Unplug this clock r adio during lightning storms or when unused •
for long periods of time.
Refer all ser vicing to qualifi ed service personnel. Servicing is •
required when the clock radio has been damaged in any way,
such as power -supply cord or plug is da maged, liquid has bee n
spilled or objects have fallen into the clock radio, t he clock
radio has been ex posed to rain or moisture, does not operate
normally, or has been dropped.
This clock radio shall not be exposed to dripping or splashing. •
Do not place any sources of danger on the clock radio (e.g. •
liquid fi lled objects, lighted candles).
Page 8

Wher e the MAIN S plug or an appliance coupler is used as the •
disconnec t device, the disconnect device shall remain readily
operable.
2 Your clock radio
Congratulations on your purchase, and welcome to Philips! To fully
benefi t from the support that Philips offers, register your product at
www.philips.com/welcome.
Introduction
With this clock radio, you can:
listen to FM r adio;•
enjoy audio from iPod/iPhone;•
know the time; and•
wake up by buzzer alarm, radio, or audio in iPod/iPhone. •
What’s in the box
Check and identify the contents of your package:
Main unit (wi th a battery)•
AC adapter•
User manual•
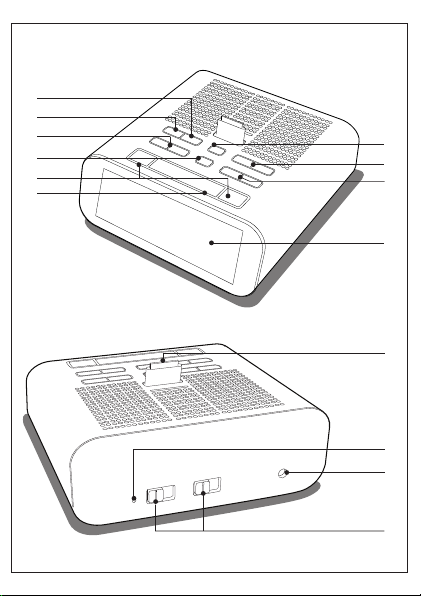
Overview of the main unit A
a iPhone
Select or exit iPhone/i Pod mode.•
b HR/TUNING +/-
Set hour.•
Page 9

Tune to radio st ations.•
c MIN/PRESE T +/-
Set minute .•
Select a pr eset radio station.•
d Display panel
Show current information.•
e SLEEP
Set sleep timer.•
f SCAN / PROG / SET TIME
Scan/store radio s tations .•
Set time.•
g VOL +/-
Adjust volume.•
h RADIO
Turn on/off radio.•
i AL1 / AL2
Set alarm.•
Tur n on /o f f al a r m .•
View alarm settings.•
j REPEAT ALARM/BRIGHTNESS CONTROL
Snooze alarm.•
Adjust display brightness.•
k DOCK for iPhone/iPod
l FM ANT
FM antenna. •
m DC IN 5V/2A
Power supply socket.•
AL1/AL2 RADIO·B UZZ·iPhone
n
Page 10

Select alarm source.•
3 Get started
Always follow the instructions in this chapter in sequence.
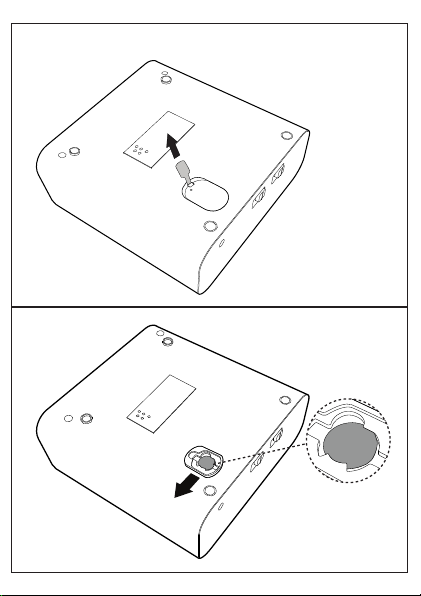
Install battery
Warning
Risk of explosion! Keep bat ter ies away from heat, sunshine or fi re. •
Never discard batte rie s in fi re.
Danger of explos ion if b atter y is incorrect ly re placed. Replace o nly
•
with t he same or equivalen t type.
The batter y cont ains c hemical substances, so it should be disposed
•
of properly.
Keep children away fr om the batter y.
•
Note
You can only use AC power as power supply. The li thium CR 2032 •
batter y is onl y for back-up p urp ose.
When powe r is disconnected, th e disp lay backlight is of f.
•
For fi rst-time use:
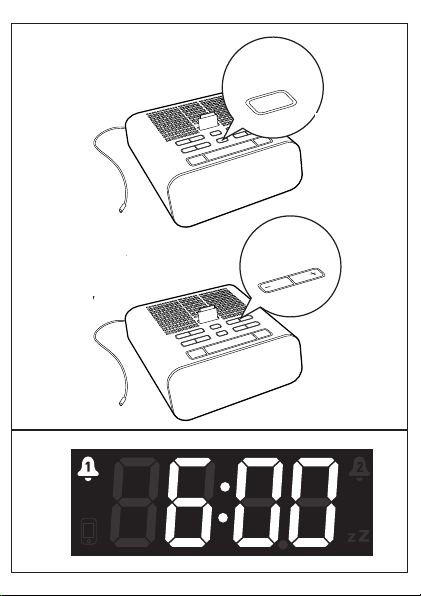
Remove the protective tab to activate the battery. B
To replace the battery: C
Page 11

Connect power D
Caution
Risk of produc t dama ge! Ensure that t he power voltage corr espo nds •
to the voltage printed on the back or under sid e of the clock r adio.
Risk of electric shock ! When you un plug t he AC adapter, always pull
•
the plug from the so cket . Never pull the cor d.
Set clock
1 In standby mode, press a nd hold SET TIME for two seconds.
The current time is displayed. »
The hour and minute digits begin to blink. »
2 Press HR+/- and MIN+/- repeatedly to set hour and minu te.
3 Press SET TIME again to confi rm.
» [12H] or [24H] is displayed.
4 Press HR+/- (or MIN+/- ) to select 12/24 hour for mat .
5 Press SET TIME to confi rm.
Note
When iPho ne/iPod is co nnected, the clock r adio synchronizes time •
with i Phone/i Pod automatically.
4 Play from iPhone/iPod
You can enjoy audio from iPhone/iPod through this clock radio.
Page 12

Compatible iPhone/iPod
The clock radio supports these iPod and iPhone models:
Made for.
iPod touch (1st, 2nd, 3rd, and 4th ge ner ation)•
iPod classic•
iPod with video •
iPod nano (1st, 2nd, 3rd, 4th , 5th, and 6th generation)•
iPod with color display•
iPod mini•
iPhone 4•
iPhone 3GS•
iPhone 3G•
iPhone •
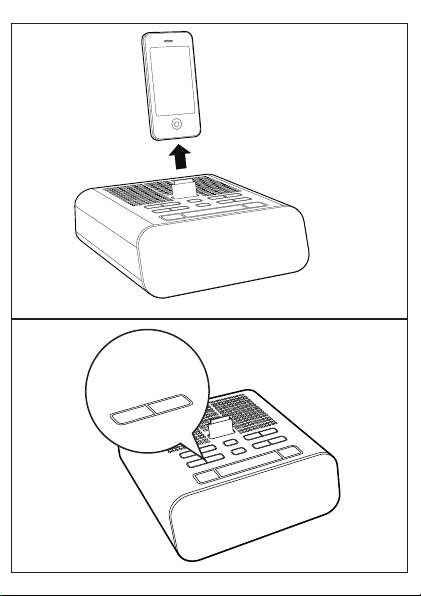
Listen to audio from iPhone/iPod E
1 Place the iPhone/iPod in the dock .
2 Press iPhone to enter iPhone/iPod mode.
3 Play audio from t he iPhone /iPod.
Tip
Press • iPhone again to s witch to standby mod e.
Remove the iPhone/iPod F
Pull the iPhone/iPod out of the dock.
Page 13

Charge the iPhone/iPod
When the clock radio is connected to power, the docked iPhone/iPod
starts charging.
Adjust volume G
5 Listen to FM radio
Tune to FM radio stations H
Tip
Position the antenna a s far a s possible f rom T V, VCR , or oth er •
radi atio n sour ce.
For better re ception, f ully e xtend an d adjust th e posi tion of the
•
antenna.
Note
To turn on /off r adio, press • RADIO .
Store FM radio stations automatically
You can store a maximum of 20 FM radio stations.
1 Press RADIO to turn on the r adio.
2 Press and hold PROG for two seconds.
Page 14

The clock radio stores all the available FM radio stations and »
broadcasts the fi rst available station automatically.
Store FM radio stations manually
1 Tune to an FM radio st ation.
2 Press PROG .
The preset number begins to blink. »
3 Press PRESET +/- or TUNING +/- r epeatedly to select a
number.
4 Press PROG again to confi rm.
5 Repeat s teps 1 to 4 to store other s tations .
Note
To remove a pre-stored s tat ion, store another s tation in its p lace. •
Select a preset radio station
In tuner mode, press PRESET +/- to select a preset number.
6 Other features
Set alarm timer I
Set alarm time
You can set two alarms to ring at dif ferent time.
Page 15

Note
Make s ure that you have set the clock cor rec tly. •
1 Press and hold AL1 / AL2 for 2 seconds to enter alarm setting
mode.
The hour and minute digits begin to blink. »
or is displayed accordingly.
»
2 Press HR+/- and MIN+/- r epeatedly to set hour and minute.
3 Press AL1 / AL2 again to confi rm.
Select alarm sound
For the alar m sound, you can select buzzer, your last heard radio or
played t rack in iPhone /iPod.
Adjust AL1/AL2 RADIO·BUZZ·iPhone to select alarm sound for
both alarms.
Tip
When alar m time arrives and you are liste ning to radio or audio in •
iPhone/i Pod, buzzer can o nly be a ctivated as alarm sound.
If you have selected iPhone /iPod sour ce, while no i Phone/i Pod is
•
connected, the clock r adio switches to buz zer source i nstead.
Activate/deactivate alarm timer
1 Press AL1 / AL2 to view alarm settings.
2 Press AL1 / AL2 again to activate or deactivate the alarm timer.
or appears if alarm timer is on and disappears if it is off.
»
Page 16

To stop alarm, press the corresponding • AL1 / AL2 .
The alarm r epeats r inging for the nex t day. •
Snooze alarm
When alarm sounds, press REPEAT ALARM .
The alarm snoozes and repeats ringing fi ve minutes later. »
To adjust alarm interval (in minutes), press REPEAT ALARM
repeatedly.
5 10 15 20 25 30
Set sleep timer
This clock radio can switch to standby mode automatically after a preset
period.
Press SLEEP repeatedly to select the sleep timer period (in minutes).
When the sleep timer is activated, »
To deactivate the sleep timer, press SLEEP repeatedly until [OFF] (off)
appears.
15 30 60 90 120
off
Adjust display brightness
Press BRIGHTNESS CONTROL repeatedly to select different
brightness level: high , mid, and low.
appears.
Page 17

7 Product information
Note
Product infor mation is subject to change w ith out prior notice. •
Specifi cations
Amplifi er
Rated Out put Power 2W RMS
Tuner
Tuning Range FM: 87.5 - 108 MHz
Tuning grid FM: 50 K Hz
Sensitivity
- Mono, 26 dB S/N Ratio
Search Selectivity FM: <28 dBu
Total Harmonic Distortion FM: <3%
Signal to Noise Ratio FM: >45 dB
FM: <2 2 dBu
Page 18

General information
AC Power Model: AS100-050-AE200;
Oper ation Power
Consumption
Standby Power Consumption <2 W
Dimensions
- Main Unit ( W x H x D)
Weig ht
- With Packing
- Main Unit
Inpu t: 100-240 V ~, 50/60 Hz,
0.5A; Output: 5 V
<10 W
130 x 78 x 146 mm
0.6 kg
0.4 kg
2.0A
8 Troubleshooting
Warning
Neve r remove the casi ng of this apparatus. •
To keep the warranty valid, never try to repair the system yourself.
If you encounter problems when using this apparatus, check the
following points before requesting service. If the problem remains
unsolved, go to the Philips web site (www.philips.com/welcome). When
you contact Philips, ensure that the apparatus is nearby and the model
number and serial number are available.
No response from the unit
Page 19

Disconnec t and r econnec t the AC power plug, then turn on the •
unit again.
Poor radio reception
Increase the distance between the unit and your TV or VCR. •
Fully extend the FM antenna. •
9 Notice
This product complies with the radio interference requirements of the
European Community.
Any changes or modifi cations made to this device that are not expressly
approved by Philips Consumer Lifestyle may void the user’s authority to
operate the equipment.
Note
The t ype plate is located on the bot tom of t he apparatus . •
“Made for iPod” and “Made for iPhone” mean that an electronic
accessory has been designed to connect specifi cally to iPod or iPhone
respectively, and has been certifi ed by the developer to meet Apple
performance standards. Apple is not responsible for the operation of
Page 20

this device or its compliance with safety and regulatory standards. Please
note that the use of this accessory with iPod or iPhone may affect
wireless performance.
iPod and iPhone are trademarks of Apple Inc., registered in the U.S. and
other countries.
Your product is designed and manufactured with high quality materials
and components, which can be recycled and reused.
When this crossed-out wheeled bin symbol is attached to a product it
means that the product is covered by the European Directive 2002/96/
EC.
Please inform yourself about the local separate collection system for
electrical and electronic products.
Please act according to your local rules and do not dispose of your old
products with your normal household waste. Correct disposal of your
old product helps to prevent potential negative consequences for the
environment and human health.
Page 21

Your product contains batteries covered by the European Directive
2006/66/EC, which cannot be disposed with normal household
waste. Please inform yourself about the local rules on separate collection
of batteries because correct disposal helps to prevent negative
consequences for the environmental and human health.
Environmental information
All unnecessary packaging has been omitted. We have tried to make
the packaging easy to separate into three materials: cardboard (box),
polystyrene foam (buffer) and polyethylene (bags, protective foam
sheet.)
Your system consists of materials which can be recycled and reused
if disassembled by a specialized company. Please observe the local
regulations regarding the disposal of packaging materials, exhausted
batteries and old equipment.
2011 © Koninklijke Philips Electronics N.V. All rights reserved.
Specifi cations are subject to change without notice. Trademarks are
the property of Koninklijke Philips Electronics N.V. or their respective
owners. Philips reserves the right to change products at any time
without being obliged to adjust earlier supplies accordingly.
Norge
Typeskilt fi nnes på apparatens underside.
Observer : Nettbryteren er sekundert innkoplet. Den innebygde
netdelen er derfor ikke frakoplet nettet så lenge apparatet er tilsluttet
nettkontakten.
For å redusere faren for brann eller elektrisk støt, skal apparatet ikke
utsettes for regn eller fuktighet.
Page 22

2011 Koninklijke Philips Electronics N.V.
All rights reserved.
AJ3270D_12_UM_V1.0
 Loading...