

Page 1

gentle wake
gentle wake
A
J
3
1
3
0
G
E
N
T
L
E
W
A
K
E
C
L
O
C
K
R
A
D
I
O
Toll Free Help Line
Ligne d'assistance en service libre
Linea de ayuda telefónica sin cargo
800-531-0039
Clock Radio
AJ 3130
AJ 3131
AJ 3132
AJ 3133
Page 2
CAUTION
RISK OF ELECTRIC SHOCK
DO NOT OPEN
CAUTION: TO REDUCE THE RISK OF ELECTRIC SHOCK, DO NOT
REMOVE COVER (OR BACK). NO USER-SERVICEABLE PARTS
INSIDE. REFER SERVICING TO QUALIFIED SERVICE PERSONNEL.
SAFETY
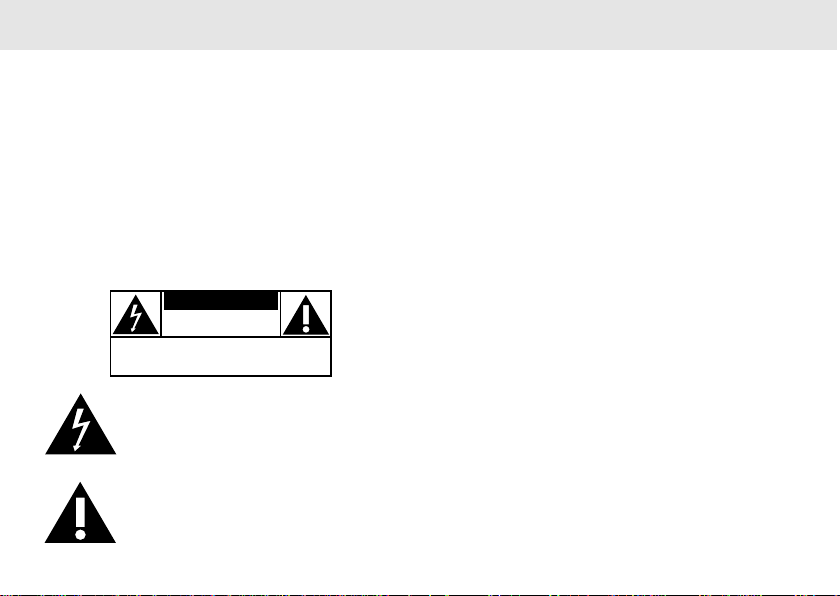
Know these ssaaffeettyy symbols
This “bolt of lightning” indicates uninsulated
material within your unit may cause an
electrical shock.For the safety of everyone in
your household,please do not remove
product covering.
The “exclamation point” calls attention to
features for which you should read the
enclosed literature closely to prevent operating
and maintenance problems.
2
WARNING: TO PREVENT FIRE OR SHOCK
HAZARD,DO NOT EXPOSE THIS EQUIPMENT TO
RAIN OR MOISTURE.
CAUTION:To prevent electric shock,match wide
blade of plug to wide slot,and fully insert.
Page 3
g
e
n
tle
w
a
k
e
A
J
3
1
3
0
G
E
N
T
L
E
W
A
K
E
C
L
O
C
K
R
A
D
I
O
CLOCK •
SLEEP
FM MHz88 • 92 • 96 • 100 • 104 • 108
AM
kHz530 630 800 1000 1300
24 HOUR
ALARM RESET
REPEAT ALARM
S
L
E
E
P
O
F
F
HR
MIN
ALARM TIME •
TIME •
SET
1 5 642 3
9
!
@
8
7
$
0
#
3
Page 4

IMPORTANT SAFETY INSTRUCTIONS – Read before operating equipment
This product was designed and manufactured to meet strict quality and
safety standards. There are, however, some installation and operation
precautions which you should be particularly aware of.
1. Read these instructions – All the safety and operating
instructions should be read before the appliance is operated.
2. Keep these instructions – The safety and operating instructions
should be retained for future reference.
3. Heed all warnings – All warnings on the appliance and in the
operating instructions should be adhered to.
4. Follow all instructions – All operating and use instructions
should be followed.
5. Do not use this apparatus near water – for example, near a
bathtub, washbowl, kitchen sink, laundry tub, in a wet basement or
near a swimming pool, etc.
6. Clean only with a damp cloth. The appliance should be cleaned
only as recommended by the manufacturer.
7. Install in accordance with the manufacturers instructions. Do
not block any of the ventilation openings. For example, the
appliance should not be situated on a bed, sofa, rug, or similar
surface or placed in a built-in installation, such as a bookcase or
cabinet that may impede the flow of air through the ventilation
openings.
8. Do not install near any heat sources such as radiators, heat
registers, stoves, or other apparatus (including amplifiers) that
produce heat.
4
9. Do not defeat the safety purpose of the
polarized or grounding-type plug. A polarized
plug has two blades with one wider than the
other. A grounding type plug has two blades and
a third grounding prong. The wide blade or the third prong are
provided for your safety. When the provided plug does not fit into your
outlet, consult an electrician for replacement of the obsolete outlet.
10. Protect the power cordfrom being walked on or pinched
particulary at plugs, convenience receptacles, and the point where
they exit from the apparatus.
11. Only use attachments/accessoriesspecified by the
manufacturer.
12. Use only with a cart, stand, tripod, bracket, or table
specified by the manufacturer, or sold with the
apparatus. When a cart is used, use caution when
moving the cart/apparatus combination to avoid injury
from tip-over.
13. Unplug this apparatusduring lightning storms or when unused
for long periods of time.
14. Refer all servicingto qualified service personnel. Servicing is
required when the apparatus has been damaged in any way, such as
power-supply cord or plug is damaged, liquid has been spilled or
objects have fallen into the apparatus, the apparatus has been
exposed to rain or moisture, does not operate normally, or has been
dropped.
AC
Polarized Plug
EL 4562-E004: 99/3
Page 5

INDEX
The set complies with the FCC-Rules, Part 15.
Operation is subject to the following two conditions:
1. This device may not cause harmful interference, and
2. This device must accept any interference received, including
interference that may cause undesired operation.
L’appareil répond aux normes FCC, Part 15.
Fonctionnement soumis aux deux conditions suivantes:
1. Cet appareil ne doit pas provoquer d’interférences nuisibles, et
2. Cet appareil doit accepter toute interférence reçue, y compris les
interférences susceptibles de provoquer un fonctionement peu
satisfaisant.
El aparato cumple las normas FCC, Parte 15.
Funcionamiento dependiente de dos condiciones siguientes:
1. Este aparato no puede provocar interferencia dañina, y
2. Este aparato debe aceptar cualquier interferencia recibida,
incluyendo las interferencias que pueden provocar un
funcionamiento insuficiente.
ENGLISH.................................................... 6
FRANÇAIS
............................................... 16
ESPAÑOL................................................. 26
CANADA
English: This digital apparatus does not exceed the Class B limits for
noise emissions from digital apparatus as set out in the Radio
Interference Regulations of the Canadian Department of
Communications.
Français: Cet appareil numérique n’émet pas de bruits
radioélectriques dépassant les limites applicables aux
appareils numériques de Classe B prescrites dans le
Régelement sur le Brouillage Radioélectrique édicté par le
Ministère des Communications du Canada
.
English
Français
Español
5
Page 6

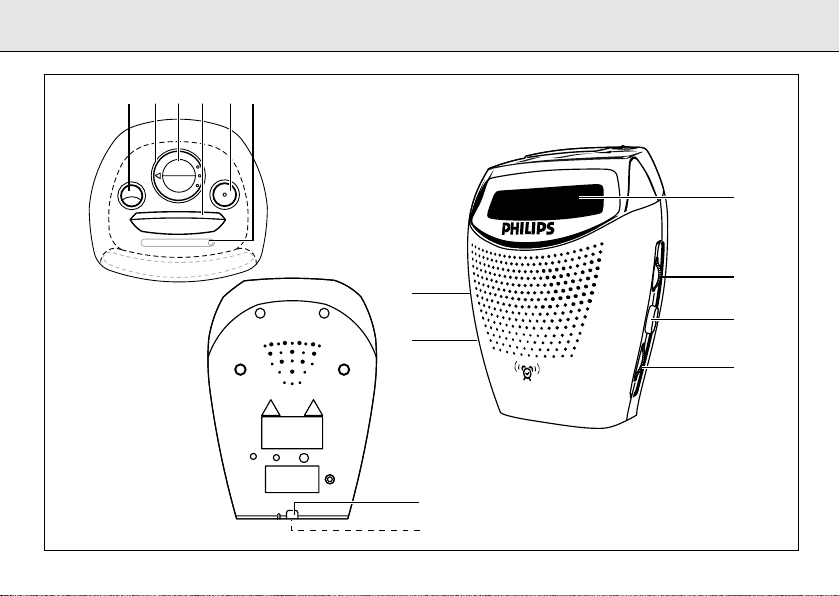
CONTROLS
1SLEEP – to activate sleep time
English
Clock control
2SET TIME – to set clock time
SET ALARM – to set /review the alarm time
CLOCK – to return to clock time display after setting
clock/alarm time
3HR – to adjust the hours for clock and alarm times
MIN – to adjust the minutes for clock and alarm times
4SLEEP OFF /REPEAT ALARM – to switch off slumber
– to switch off the alarm for a
8-9 minute period
524HOUR ALARM RESET – to stop the active alarm for
24 hours
6Dial lens
Environmental information
We have reduced the packaging to its minimum and made it easy to separate into three mono-materials: cardboard (box),
polystyrene and plastic.
Your set consists of materials, which can be recycled if disassembled by a specialized company. Please observe
the local regulations to dispose of packing materials, dead batteries and old equipment.
6
7ALARM
BUZZER – to activate gentle wake buzzer for alarm setting
RADIO – to activate radio for alarm setting
OFF – to switch off the alarm
8RADIO – to switch radio mode ON/OFF
9Display – with alarm indicators
0VOLUME – to adjust the sound level
!BAND – to select FM-AM waveband
@TUNING – to tune to radio stations
#Mains – for AC power supply and also the antenna for
FM reception
$Battery compartment – for backup battery
Both the model number and production number are in the
battery compartment.
Page 7

1. Check if the power supply, as shown on the type plate
inside the battery compartment, corresponds to your local
power supply.
2. If your set is equipped with:
• a voltage selector - found on the back of the set
• a frequency selector - inside the battery compartment
adjust these selectors to match with your local mains
supply and frequency.
3. Connect the power plug into the wall outlet. The power
supply is now switched on and the numbers on the display
will start to flash. You will need to set the correct time.
4. To disconnect the set from the power supply completely,
withdraw the power plug from the wall outlet.
Standby power consumption:..................................................3W
POWER SUPPLY
POWER BREAKDOWN BACKUP
When a power failure occurs the complete clock radio will be
switched off. When the power supply returns, the numbers on
the display will start to flash and you will need to reset the
correct time on the clock.
To retain the clock time and the set alarm time in the event of
an AC power failure or disconnection, insert a 9 volt battery,
type 6F22 (not supplied) into the battery compartment: this will
act as a power backup. However, the time will not be
illuminated on the clock display. Operation of the alarm and
radio are also excluded. For clarity, the battery backup is used
to retain the clock and alarm time only. As soon as the power
supply returns, the display will indicate the correct time.
1. Insert the battery into the battery compartment.
2. Connect the power plug to the wall outlet.
• Replace the battery once a year, or as often as necessary.
Batteries contain chemical substances, so they should be
disposed of properly.
English
7
Page 8

SETTING THE CLOCK RADIO
CLOCK DISPLAY
English
The time is displayed using the 12-hour clock system.
Important! When setting the clock or alarm time, for accurate
hour and minute adjustment always make sure you press the
HR and MIN buttons separately and not simultaneously.
1. Adjust the clock control to SET TIME.
2. Press and hold down the H
the hours and minutes respectively:
• With your finger held down on HR, the hour increases as a
digit from 1 to 12.
• With your finger held down on MIN,the minutes increases
as a digit from 00 to 59.
3. Release the HR or MIN button when you have reached the
correct time.
4. To safeguard the clock time from being accidentally
adjusted, turn the clock control to CLOCK.
8
R or MIN button to set and adjust
RADIO
You can use the clock radio solely as a radio.
1. Adjust the RADIO switch to
2. Select your wave band using the BAND switch.
3. Use TUNING to find your radio station.
4. Adjust the sound with the VOLUME control.
5. To turn off the radio, adjust RADIO to OFF.
To improve radio reception:
• For FM, use the antenna built in the power cord. Adjust the
power cord slightly to obtain optimum reception.
• For AM, the set is provided with a built-in antenna which to
function best should be placed on a non-metallic surface
e.g. wood, plastic. Direct the AM antenna by adjusting the
position of your clock radio.
ON.
Page 9

GENERAL
If you wish to use the alarm, first set the alarm time.
There is a choice of two alarm modes, buzzer or radio. The
display shows the alarm indicator if the alarm is set.
1. Adjust the clock control to SET ALARM.
2. Press and hold down the H
the hours and minutes respectively:
• With your finger held down on HR, the hour increases as a
digit from 1 to 12.
• With your finger held down on MIN, the minutes increases
as a digit from 00 to 59.
• If both the HR and MIN buttons are pressed simultaneously,
the alarm time display will be reset to 0:00.
3. Release the HR or MIN button when you have reached the
correct time.
4. Adjust the clock control to CLOCK to return to clock time.
• To review your set alarm time, adjust the clock control to
SET ALARM.
5. To select the alarm mode you wish to be awoken by, set
ALARM to RADIO or BUZZER.
• If you have selected the radio mode, make sure you have
adjusted the volume loud enough to wake you up!
• The buzzer alarm begins gently and gradually increases to a
fixed maximum volume.
R or MIN button to set and adjust
SETTING THE ALARM
SWITCHING OFF THE ALARM
There are three ways of switching off the alarm. Unless you
choose to cancel the alarm completely, the 24HOUR ALARM
RESET option will be automatically selected after 1 hour and
59 minutes from the time your alarm time first goes off.
24HR ALARM RESET
If you want the alarm mode to be stopped immediately but
also wish to repeat the alarm call at the same time for the
following day:
• Press 24HOUR ALARM RESET during the alarm call.
REPEAT ALARM
This will repeat your alarm call at 8-9 minute intervals.
• During the alarm call, press
• Press SLEEP OFF /REPEAT ALARM again during the next call
if you wish to repeat the alarm call.
• If, however, you do not press SLEEP OFF /REPEAT ALARM
again, the alarm will sound for 1 hour and 59 minutes
before turning itself off. Your alarm time setting will then
automatically enter the 24HOUR ALARM RESET mode to
sound at the same time next day.
SLEEP OFF /REPEAT ALARM.
English
9
Page 10

SETTING THE ALARM SLEEP
Canceling the Alarm Completely
• Before or during the set alarm time goes off, push the
English
ALARM switch to OFF position.
™ Alarm indicator disappears from display.
SLEEP
About Sleep
The clock radio has a built-in timer called SLEEP, which
enables the radio to be automatically switched off after 59
minutes. SLEEP allows you to lie back, listen and fall asleep.
Setting and switching off Sleep
1. Check that the clock control is in the CLOCK position.
2. Set RADIO to
3. Set your sleep time by pressing once on the SLEEP button.
• The display shows the sleep period 0: 59.
4. To cancel the sleep function before the sleep period ends,
press SLEEP OFF/ REPEAT ALARM.
Note: - The sleep function does not affect the alarm setting.
- If during SLEEP you have turned down the volume and
10
OFF position.
you have an alarm set in the radio mode, make sure
you have adjusted the volume loud enough to wake
you up the following day!
MAINTENANCE
• If you do not intend to use the clock radio for a long time,
disconnect the set by withdrawing the plug from the wall
outlet. The battery should also be removed to prevent
chemical leakage which will damage your set.
• To clean your set from fingerprints, dust and dirt, use a
clean and soft damp cloth or chamois leather. Do not use
cleaning products which contain, benzene, thinner, etc. as
these may harm the housing.
Page 11

TROUBLESHOOTING
If a fault occurs, first check the points listed below before taking the set for repair. If you are unable to remedy a problem by
If a fault occurs, first check the points listed below before taking the set for repair. If you are unable to remedy a problem by
following these hints, consult your dealer or service center.
following these hints, consult your dealer or service center.
WARNING: Under no circumstances should you try to repair the set yourself, as this will invalidate the
WARNING: Under no circumstances should you try to repair the set yourself, as this will invalidate the
warranty.
warranty.
PROBLEM
– POSSIBLE CAUSE
• REMEDY
No sound
– Volume not adjusted
• Adjust VOLUME
AM broadcast cannot be received properly
– Weak radio signal
• Rotate the set for better reception and make sure that the
set is placed on a suitable (non-metallic) surface.
Continuous crackling and hiss noise during AM
reception
– Interference from other electrical equipment e.g. TVs,
computers, fluorescent lamps
• Move the clock radio away from electrical equipment
Intermittent crackling sound during FM reception
– Weak signal
• Adjust the built-in power cord antenna
The alarm does not function
– The alarm is not set
• Set the alarm time and the alarm switch to BUZZER or
RADIO
– Volume too low for radio
• Increase the volume
SLEEP does not function
– Radio still in ON position
• Switch RADIO to OFF
– Clock control in SET TIME or SET ALARM position
• Adjust clock control to CLOCK
English
11
Page 12

LIMITED WARRANTY
PORTABLE
90 days Free Exchange
This product must be carried in for an exchange.
WHO IS COVERED?
You must have proof of purchase to exchange the product.A
sales receipt or other document showing that you purchased
the product is considered proof of purchase.Attach it to this
owner’s manual and keep both nearby.
WHAT IS COVERED?
Warranty coverage begins the day you buy your product.For
one year thereafter, a defective or inoperative product will be
replaced with a new, renewed or comparable product at no
charge to you.A replacement product is covered only for the
original warranty period.When the warranty on the original
product expires,the warranty on the replacement product also
expires.
WHAT IS EXCLUDED?
Your warranty does not cover:
• labor charges for installation or setup of the product,
adjustment of customer controls on the product,and
installation or repair of antenna systems outside of the
product.
• product repair and/or part replacement because of misuse,
accident,unauthorized repair or other cause not within the
control of Philips Consumer Electronics Company.
• reception problems caused by signal conditions or cable or
antenna systems outside the unit.
12
AUDIO
• a product that requires modification or adaptation to enable
it to operate in any country other than the country for
which it was designed,manufactured,approved and/or
authorized,or repair of products damaged by these
modifications.
• incidental or consequential damages resulting from the
product.(Some states do not allow the exclusion of
incidental or consequential damages,so the above exclusion
may not apply to you.This includes,but is not limited to,
prerecorded material,whether copyrighted or not
copyrighted.)
• a product used for commercial or institutional purposes.
WHERE IS EXCHANGE AVAILABLE?
You may exchange the product in all countries where the
product is officially distributed by Philips Consumer Electronics
Company. In countries where Philips Consumer Electronics
Company does not distribute the product,the local Philips
service organization will attempt to provide a replacement
product (although there may be a delay if the appropriate
product is not readily available).
BEFORE REQUESTING EXCHANGE...
Please check your owner’s manual before requesting an
exchange.Adjustments of the controls discussed there may save
you a trip.
Page 13

LIMITED WARRANTY
EXCHANGING A PRODUCT IN U.S.A.,
PUERTO RICO OR U.S.VIRGIN ISLANDS...
Contact your dealer to arrange an exchange.Or, ship the
product,insured and freight prepaid, and with proof of purchase
enclosed,to the address listed below.
(In U.S.A.,Puer to Rico and U.S. Virgin Islands, all implied warranties,
including implied warranties of merchantability and fitness for a
particular purpose, are limited in duration to the duration of this
express warranty. But, because some states do not allow limitations
on how long an implied warranty may last,this limitation may not
apply to you.)
EXCHANGING A PRODUCT IN CANADA...
Please contact Philips at:
(In Canada,this warranty is given in lieu of all other warranties.
No other warranties are expressed or implied,including any
implied warranties of merchantability or fitness for a particular
purpose. Philips is not liable under any circumstances for any
direct,indirect, special, incidental or consequential damages,
howsoever incurred,even if notified of the possibility of such
damages.)
Small Product Service Center
Philips Service Company
907 Snapps Ferry Road,Plant 2,Building 6
Greeneville,TN 37743
1-800-661-6162 (French Speaking)
1-800-363-7278 (English Speaking)
This warranty gives you specific legal rights.You may have other rights which vary from state/province to state/province.
Philips Service Solutions Group,P.O. Box 2976,Longview,Texas 75606, (903) 242-4800
EL6095T002 / MAC5433 / 1-97
TO GET OUT-OF-WARRANTY EXCHANGE...
In U.S.A.,Puer to Rico or U.S. Virgin Islands, contact Philips Ser vice
Company at (800) 851-8885 to obtain the cost of out-of-warranty
exchange. Then carefully pack the product and ship it to the Small
Product Service Center (address listed above).In Canada, call the
phone number listed above under “Exchanging a Product in
Canada” to obtain the cost of out-of-warranty exchange.
REMEMBER...
Please record the model and serial numbers found on the
product below.Also,please fill out and mail your warranty
registration card promptly. It will be easier for us to notify you if
necessary.
MODEL # __________________________________
SERIAL # __________________________________
13
Page 14

ATTENTION
RISQUE DE CHOC ELECTRIQUE
NE PAS OUVRIR
ATTENTION: POUR REDUIRE LE RESQUE DE CHOC ELECTRIQUE, NE PAS ENLEVER
LE COUVERCLE (NI LE PANNEAU ARRIERE). CET APPAREIL NE COMPORTE AUCUNE
PIECE POUVANT TRE REPAREE PAR L’UTILISATEUR. CONFIER SON ENTRETIEN A
UN TECHNICIEN QUALIFIE.
SÉCURITE
Connaissez ces symboles de ssééccuurriittee
Cet «éclair à pointe de flèche» indique qu’un
matériau non isolé,situé à l’intérieur de l’unité,
risque de provoquer un choc électrique.Pour
la sécurité de chacun,nous vous prions de ne
pas retirer le boîtier de ce produit.
Le «point d’exclamation» attire votre attention
sur des sujets risquant de provoquer des
problèmes de fonctionnement et d’entretien si
vous ne lisez pas les informations s’y reportant.
14
DANGER:NE PAS EXPOSER CET ÉQUIPEMENT
A LA PLUIE NI A UNE HUMIDITÉ EXCESSIVE POUR
ÉVITER LES RISQUES D’INCENDIE ET DE CHOC
ÉLECTRIQUE.
ATTENTION: Pour éviter les chocs électriques,
introduire la lame la plus large de la fiche dans la borne
correspondante de la prise et pousser jusqu’au fond.
Page 15

CONSIGNES DE SÉCURITÉ IMPORTANTES – A lire avant toute utilisation du matériel
Ce produit a été conçu et fabriqué en accord avec des normes de sécurité
et de qualité très strictes. Il existe toutefois des précautions d'installation
et de fonctionnement qu'il est important de connaître et de respecter.
1. Lisez ces instructions - Il est impératif de lire toutes les consignes
de sécurité et les instructions de fonctionnement avant d'utiliser
l'appareil.
2. Conservez ces instructions – Il est recommandé de conserver ces
consignes de sécurité et instructions de fonctionnement pour
référence ultérieure.
3. Respectez les avertissements – Tous les avertissements inscrits
sur l'appareil lui-même ou figurant dans les instructions de
fonctionnement doivent être respectés.
4. Suivez toutes les instructions – Il est impératif de suivre toutes les
instructions de fonctionnement et d'utilisation.
5. N'utilisez pas cet appareil à proximité d'une source d'eau –
comme par exemple, une baignoire, un lavabo, un évier de cuisine, un
baquet de lingerie, ou dans une cave humide, près d'une piscine, etc.
6. Nettoyez l'appareil uniquement avec un chiffon humide. Cet
appareil doit être nettoyé uniquement selon la procédure
recommandée par le fabricant.
7. Installez l'appareil selon les instructions du fabricant.
N'obstruez aucun orifice de ventilation. Par exemple, l'appareil
ne doit pas être posé sur un canapé, un lit, un tapis, ou autre surface
du même type ; il ne doit pas non plus être placé dans un meuble
intégré comme un ensemble bibliothèque ou autre où le système de
ventilation de l'appareil serait bloqué.
8. N'installez pas l'appareil près d'une source de chaleur comme
par exemple des radiateurs, bouches de chaleur, cuisinières, ou autres
appareils (même des amplificateurs) dégageant de la chaleur.
9. Ne détruisez pas la sécurité incorporée dans
la prise de terre ou prise polarisée fournie - Une
prise polarisée est dotée de deux lames dont
une plus large que l'autre. Une prise de terre est
dotée de deux fiches semblables et d'une
troisième, plus large, qui assure la mise à la terre pour votre sécurité.
Si la prise fournie ne convient pas à la prise murale dont vous
disposez, consultez un électricien pour remplacer et adapter votre
prise murale.
10. Protégez le cordon d'alimentation pour éviter de marcher dessus
ou de le pincer particulièrement aux endroits des prises, mâles et
femelles, et au point de raccordement sur l'appareil lui-même.
11. Utilisez uniquement des accessoires ou options recommandés
par le fabricant.
12. Utilisez uniquement un meuble sur roulettes, un
13. Débranchez l'appareil pendant les orages ou s'il doit rester
14. Pour toute réparation, faites appel à un personnel qualifié. Une
support, un pied, une étagère ou une table de type
recommandé par le fabricant. Si vous utilisez un meuble
sur roulettes, veillez à le déplacer avec précaution afin
d'éviter tout accident corporel si l'équipement se
renversait.
inutilisé pendant une période de temps prolongée.
réparation sera nécessaire si l'appareil a subi des dommages tels que
détérioration du cordon d'alimentation ou de la prise, liquide renversé
sur l'appareil, ou encore si un objet est tombé dessus, si l'appareil a
été exposé à la pluie ou à l'humidité, s'il ne fonctionne pas
correctement ou s'il a fait une chute.
Fiche
CA polarisée
EL 4562-E004: 99/3
15
Page 16

FONCTIONS
1SLEEP – pour activer la fonction sommeil (minuterie)
Réglage de l'horloge
2SET TIME – pour régler l'heure de l'horloge
SET ALARM – pour régler/vérifier l'heure du réveil
CLOCK – pour revenir à l'heure de l'horloge après avoir
réglé le réveil ou l'horloge
3HR – pour ajuster les heures dans le réglage de l'horloge ou
Français
du réveil
MIN – pour ajuster les minutes dans le réglage de l'horloge
ou du réveil
SLEEP OFF /REPEAT ALARM – pour éteindre la fonction
4
sommeil
– to switch off the alarm for a
8-9 minute period
524HOUR ALARM RESET – pour éteindre le réveil, une fois
qu'il est activé, pendant une
période de 24 heures
Information environnementale
Nous avons réduit l'emballage à son minimum et nous avons rendu facile sa séparation en trois matériaux élémentaires : carton
(boîte), polystyrène et plastique.
Votre poste est composé de matériaux qui peuvent être recyclés s'ils sont désassemblés par une entreprise
spécialisée. Veuillez observer les règlements en vigueur si vous souhaitez vous séparer de l'emballage, des piles
vides ou du matériel usagé.
16
6Sélection de la fréquence de la radio
7ALARM
BUZZER – pour activer la fonction réveil par sonnerie douce
RADIO – activer la fonction réveil par la radio
OFF – pour éteindre le réveil
8RADIO – pour allumer ou éteindre la radio (ON/OFF)
9Affichage – avec indications sur l'état de la fonction réveil
0VOLUME – pour ajuster le niveau sonore
!BAND – pour sélectionner une bande FM-AM
@TUNING – to tune to radio stations
#Alimentation – pour l'alimentation en courant alternatif, et
également pour l'antenne afin de réceptionner la FM
$Compartiment pour les piles – pour les piles de sauvegarde
Le numéro du modèle et son numéro de série se trouvent dans
le compartiment à piles.
Page 17

1. Vérifiez que l'alimentation électrique indiquée à l'intérieur
du compartiment à piles correspond bien à l'alimentation
électrique de votre réseau.
2. Si votre poste est équipé de:
• un sélecteur de tension - vous le trouverez au dos de
votre poste
• un sélecteur de fréquence - vous le trouverez à l'intérieur
du compartiment à piles
ajustez ces commutateurs afin qu'ils correspondent à la
tension et à la fréquence de l'alimentation électrique de
votre réseau.
3. Branchez la fiche d'alimentation dans la prise murale. La
connexion au réseau électrique est ainsi effectuée et les
chiffres sur l'écran d'affichage vont commencer à clignoter;
vous devrez alors régler l'heure exacte.
4. Pour déconnecter totalement le poste du réseau électrique,
retirez la fiche de la prise électrique.
Consommation d'électricité en mode d'attente: ....................3W
ALIMENTATION ELECTRIQUE
SAUVEGARDE DES REGLAGES EN CAS DE COUPURE DE
COURANT
En cas de panne de courant, le radio-réveil s'éteindra
totalement. Lorsque le courant sera rétabli, les chiffres sur
l'écran commenceront à clignoter et vous devrez régler de
nouveau l'heure exacte sur l'horloge.
Pour conserver l'heure de l 'horloge et l'heure de réveil dans le
cas d'une pane de réseau ou d'un débranchement accidentel,
insérez une pile de 9 Volt de type 6F22 (non fournie) dans le
compartiment à piles : ceci permettra de sauvegarder les
réglages comme si le courant n'avait pas été interrompu.
Cependant, l'heure ne sera pas visible sur l'écran d'affichage.
Le réveil et la radio ne fonctionneront pas non plus. En résumé,
les piles ne peuvent que maintenir en action l'horloge et
conserver le réglage du réveil. Au rétablissement de
l'alimentation réseau, l'écran d'affichage indiquera l'heure
exacte.
1. Insérez la pile dans le compartiment à piles.
2. Branchez la fiche dans la prise de courant.
• Remplacez les piles une fois par an, ou bien aussi souvent
que nécessaire.
Les piles contiennent des substances chimiques, elles doivent
donc être utilisées avec précaution.
Français
17
Page 18

REGLAGE DE L'HORLOGE RADIO REGLAGE DU REVEIL
ECRAN D'AFFICHAGE DE L'HORLOGE
L'heure s'affiche en suivant un cycle de deux fois 12 heures.
Attention! Quand vous réglez l'horloge ou le réveil, pour un
réglage précis des heures et des minutes, veillez à bien
appuyer séparément sur les boutons HR et MIN et non pas
simultanément.
1. Positionnez le bouton de réglage de l'horloge sur SET TIME .
2. Appuyez et maintenez enfoncé le bouton H
Français
ajuster respectivement les heures et les minutes:
• Avec votre doigt enfoncé sur HR, les chiffres des heures
défilent par ordre croissant de 1 à 12.
• Avec votre doigt enfoncé sur MIN, les chiffres des minutes
défilent par ordre croissant de 00 à 59.
3. Relâchez le bouton HR ou MIN lorsque vous avez atteint
l'heure souhaitée.
4. Pour éviter que l'heure de l'horloge ne soit accidentellement
modifiée, positionnez le bouton de réglage de l'horloge sur
CLOCK.
RADIO
Vous pouvez utiliser le radio-réveil comme une radio ordinaire.
1. Positionnez le commutateur RADIO sur ON (marche).
2. Choisissez votre bande de fréquences à l'aide du bouton
BAND.
18
R ou MIN pour
3. Servez-vous du bouton TUNING pour trouver votre station
de radio.
4. Ajustez le volume avec le bouton VOLUME.
5. Pour éteindre la radio, mettez la RADIO sur OFF (arrêt).
Pour améliorer la réception radio:
• Pour la bande FM, servez-vous de l'antenne intégrée au
cordon électrique. Ajustez légèrement l'orientation du
cordon électrique pour obtenir un réception optimale.
• Pour la bande AM, le poste est muni d'une antenne
intégrée dans le corps de l'appareil. Pour un fonctionnement
optimal, placez le poste sur une surface non-métallique ,
comme par exemple du bois ou du plastique. Dirigez
l'antenne AM en ajustant la position de votre radio-réveil.
GENERALITES
Si vous souhaitez utiliser la fonction réveil, réglez tout d'abord
l'heure de réveil.
Vous avez le choix entre deux modes de réveil: la sonnerie ou
la radio. L'écran d'affichage indique le mode choisi quand le
réveil est activé.
Page 19

1. Positionnez le bouton de réglage de l'horloge
sur SET ALARM.
2. Tenez le bouton H
R ou MIN appuyé pour ajuster
respectivement les heures et les minutes:
• Avec votre doigt enfoncé sur HR, les chiffres des heures
défilent par ordre croissant de 1 à 12.
• Avec votre doigt enfoncé sur MIN, les chiffres des minutes
défilent par ordre croissant, de 00 à 59.
• Si les boutons HR et MIN sont pressés simultanément,
l'heure du réveil se calera automatiquement sur 0:00.
3. Relâchez le bouton HR ou MIN lorsque vous avez atteint
l'heure souhaitée.
4. Positionnez le bouton de réglage de l'horloge sur CLOCK
pour revenir à l'heure de l'horloge.
• Pour vérifier l'heure de votre réveil, positionnez le bouton de
réglage de l'horloge sur SET ALARM.
5. Pour sélectionner le mode de réveil avec lequel vous
souhaitez être réveillé, réglez le commutateur ALARM sur
RADIO ou BUZZER.
• Si vous avez choisi le mode radio, veillez à ce que le volume
soit assez fort pour pouvoir vous réveiller!
• La sonnerie est douce au début, puis deviens de plus en
plus forte jusqu'à un maximum déterminé.
REGLAGE DU REVEIL
POUR ÉTEINDRE LE RÉVEIL
Il y a trois façon différentes d'éteindre le réveil. A moins que
vous ne choisissiez d'éteindre totalement le réveil, l'option
réinitialisation du réveil dans 24 heures (24HR ALARM RESET)
sera choisie automatiquement après 1 heure et 59 minutes à
partir de l'instant où l'alarme s'éteint pour la première fois.
24HR ALARM RESET
Si vous souhaitez que le réveil s'éteigne immédiatement, mais
qu'il se redéclenche à la même heure le jour suivant:
• Appuyez sur 24HOUR ALARM RESET pendant que le
réveil est en marche.
REPEAT ALARM
Ceci répétera votre sonnerie de réveil toutes les 8 à 9 minutes.
• Pendant que le réveil marche, appuyez sur
SLEEP OFF /REPEAT ALARM.
• Appuyez encore une fois sur SLEEP OFF /REPEAT ALARM
pendant la sonnerie suivante, si vous souhaitez que la
sonnerie de réveil se répète.
• De toute façon, si vous ne pressez pas à nouveau SLEEP OFF
/REPEAT ALARM, le réveil sonnera pendant 1 heure et 59
minutes avant de s'éteindre de lui-même. Le réglage du réveil
entrera alors automatiquement dans le mode réinitialisation
du réveil dans 24 heures (24HOUR ALARM RESET) et le
réveil vous réveillera à la même heure le lendemain.
Français
19
Page 20

REGLAGE DU REVEIL SLEEP
Annuler complètement le réveil
• Avant que l'heure de réveil réglée ne s'éteigne, ou pendant
que le réveil fonctionne, actionnez le bouton ALARM dans
la position
™ L'affichage n'indique plus aucun mode de réveil.
FONCTION SOMMEIL (SLEEP)
A propos de la fonction sommeil (sleep)
Le radio-réveil a une minuterie incorporée, appelée SLEEP.
Français
Celle-ci permet à la radio de s'éteindre automatiquement après
59 minutes. La fonction SLEEP vous permet de vous relaxer,
d'écouter et de vous endormir.
Pour activer et désactiver la fonction Sleep
1. Vérifier que le bouton de réglage de l'horloge est dans la
position CLOCK.
2. Mettez RADIO dans la position
3. Réglez la durée de la période pendant laquelle vous voulez
vous endormir en musique (votre « période de sommeil ») en
actionnant une fois le bouton SLEEP.
• L'écran affiche la période de sommeil 0: 59.
4. Pour éteindre la fonction sleep avant la fin de la période de
sommeil, appuyez sur SLEEP OFF/ REPEAT ALARM.
20
OFF (le réveil est alors annulé).
OFF.
Note: - La fonction sleep n'affecte pas le réglage de
l'heure de l'alarme.
- Si pendant SLEEP vous avez baissé le volume et
que vous avez réglé l'alarme de votre réveil en
mode radio, prenez garde à ce que le volume
soit suffisamment élevé pour vous réveiller le
lendemain matin!
ENTRETIEN
• Si vous avez l'intention de ne pas utiliser votre radio-réveil
pendant une longue période, déconnectez le poste en
retirant la fiche de la prise électrique murale. Les piles
doivent également être retirées, afin d'éviter des fuites de
produits chimiques qui endommageraient votre poste.
• Pour nettoyer votre poste des traces de doigts, utilisez un
tissu humide, propre et doux ou bien une peau de chamois.
N'utilisez pas de produits nettoyants contenant du benzène,
du dissolvant, etc..., car ils pourraient abîmer le boîtier de
l'appareil.
Page 21

DEPANNAGE
Si un défaut apparaît, vérifiez tout d'abord les points listés ci-dessous, avant de porter votre poste chez un réparateur. S'il ne
vous est pas possible de remédier à un problème en suivant ces instructions, prenez contact avec votre vendeur ou votre service
de réparation.
ATTENTION:
PROBLEME
– CAUSES POSSIBLES
• REMÈDE
Aucun son
– Le volume n'a pas été ajusté
• Ajustez le VOLUME
Vous ne recevez pas correctement les émissions de la
bande AM
– Le signal radio est trop faible
• Pour une meilleure réception, tournez votre poste et
assurez-vous que le poste est placé sur une surface
appropriée (pas en métal).
Craquements continuels et bruits de sifflement pendant
les réceptions AM
– Il y a des interférences provenant d'autres engins
électriques, tels que télévisions, ordinateurs, lampes
fluorescentes
• Placez votre radio-réveil à l'écart de ces appareils électriques
N'essayez sous aucun prétexte d'effectuer vous-même la réparation, car cela rendrait la
garantie caduque.
Bruits de craquement intermittents pendant la
réception FM
– Signal faible
• Ajustez le cordon de l'antenne incorporée à l'appareil
Le réveil ne fonctionne pas
– Le réveil n'a pas été actionné
• Réglez l'heure du réveil et positionnez le commutateur du
réveil sur BUZZER ou RADIO
– Le volume est trop faible pour la radio
• Augmentez le volume
SLEEP ne fonctionne pas
– La radio est toujours sur la position ON
• Mettez la RADIO en position OFF
– Le bouton de réglage de l'horloge est dans la position SET
TIME ou SET ALARM
• Positionnez le bouton de réglage de l'horloge sur CLOCK
Français
21
Page 22

GARANTIE LIMITÉE
SYSTÈME SONORE PORTABLE
Échange gratuite pendant 90 jours
Il faut porter ce produit à un centre de service pour l’échanger.
QUI EST COUVERT ?
Il faudra présenter une preuve d’achat pour pouvoir bénéficier des
services de la garantie. Le reçu,la facture ou un autre document portant la
date d’achat qui prouve que vous avez bien acheté le produit est considéré
comme preuve d’achat.L’attacher à ce manuel d’emploi et les garder tous
les deux à portée de main.
QU’EST-CE QUI EST COUVERT ?
La couverture de la garantie entre en vigueur le jour où vous achetez
le produit.Pendant un an à compter de cette date,tout produit
défectueux ou qui ne fonctionne pas sera remplacé par un produit
neuf,renouvelé ou un produit comparable sans frais aucun au
consommateur. Un produit de remplacement n’est couvert que
pendant la période non-écoulée de garantie d’origine.Lorsque la
garantie du produit d’origine vient à terme,la garantie du produit de
remplacement est terminée aussi.
QU’EST-CE QUI EST EXCLU DE LA GARANTIE ?
La garantie ne couvre pas:
• les frais de main d’œuvre pour installer ou préparer, pour régler les
commandes et pour installer ou réparer les systèmes d’antenne à
l’extérieur du produit.
• la réparation du produit et/ou d’une pièce pour cause du mauvais
emploi,d’accident, de réparations non-agréées ou d’une autre raison
qui ne peut pas être contrôlée par Philips Consumer Electronics
Company .
22
• des problèmes de réception dûs à des conditions de signal, au câble
ou aux systèmes d’antenne à l’extérieur de l’unité.
• un produit qui nécessite des modifications ou adaptations pour lui
permettre de fonctionner dans un pays autre que le pays pour
lequel il a été conçu,fabriqué,agréé et/ou autorisé, ou la réparation
des produits endommagés par de telles modifications.
• des dommages indirects ou conséquents qui résultent du produit.
(Certains états ou provinces ne permettent pas l’exclusion de
dommages indirects ou conséquents.Il est donc possible que
l’exclusion ci-dessus ne s’applique pas au cas présent.Cela
comprend,mais de façon non-limitative, des enregistrements,qu’ils
soient protégés ou non par les lois sur les droits d’auteur).
• un appareil acheté,utilisé ou réparé en dehors des États-Unis,de
Porto Rico,des Îles Vierges ou du Canada ou utilisé à des fins
commerciales ou institutionnelles (y compris mais non limités aux
appareils utilisés pour la location).
OÙ L’ÉCHANGE EST-ELLE PROPOSÉE ?
Le produit pourra s’échanger dans tous les pays où le produit est distribué
officiellement par Philips Consumer Electronics Company.Dans des pays
où Philips Consumer Electronics Company ne distribue pas le produit,
l’organisme local de service Philips tentera de fournir un produit de
remplacement (mais il pourra y avoir des retards si le bon produit n’est
pas facilement disponible).
Page 23

GARANTIE LIMITÉE
AVANT DE DEMANDER UNE ÉCHANGE…
Veuillez consulter le manuel d’instructions avant de demander un
produit d’échange.Un petit réglage d’une des commandes expliqué
dans le manuel d’instructions pourrait éviter de faire un trajet.
POUR BÉNÉFICIER DE L’ÉCHANGE GARANTIE AUX É.-
U.,AU PUERTO RICO OU DANS LES ÎLES VIERGES
AMÉRICAINES…
Contacter votre vendeur pour arranger l’échange.Ou bien,renvoyer le
produit,frêt et assurances payés,avec preuve d’achat incluse,à l’adresse
ci-dessous :
(Aux É.-U.,au Puerto Rico et aux Îles Vierges,toute garantie implicite , y
compris des garanties de vendabilité et d’aptitude à un but spécifique,
est limitée à la durée de cette garantie explicite.Mais, étant donné que
certains états et provinces ne permettent pas de limité la durée d’une
garantie implicite,cette limitation pourrait ne pas s’appliquer au cas
présent.)
POUR BÉNÉFICIER D’UNE ÉCHANGE GARANTIE AU
CANADA…
Veuillez contacter Philips á :
Small Product Service Center
Philips Service Company
907 Snapps Ferry Road,Plant 2, Building 6
Greeneville,TN 37743 É.-U.
1-800-661-6162 (Francophone)
1-800-363-7278 (Anglophone)
Cette garantie vous donne des droits légaux spécifiques et vous pourriez avoir d’autres droits qui varient d’état en état et de province en province.
Philips Service Solutions Group,P.O. Box 2976,Longview,Texas 75606, É.-U., (903) 242-4800
EL6095T002 / MAC5433 / 1-97
(Au Canada,cette garantie est consentie à la place de toute autre garantie.
Aucune autre garantie n’est donnée, qu’elle soit explicite ou implicite, y
compris une garantie implicite de vendabilité ou d’aptitude à un but
spécifique.Philips n’est pas,en aucun cas, responsable des dommages,qu’ils
soit directs ou indirects,spéciaux, secondaires ou conséquents,quels que
soient leurs origines,même en présence d’une notification de la possibilité
de tels dommages.)
POUR UNE ÉCHANGE HORS GARANTIE…
Aux É.-U.,au Puerto Rico ou aux Îles Vierges américaines,contacter
Philips Service Company au (800) 851-8885 pour savoir le prix d’une
échange non couverte par la garantie.Puis emballer le produit avec soins
et le renvoyer au Small Product Service Center (adresse ci-dessus).Au
Canada,téléphonez au numéro qui se trouve sous la rubrique « Pour
bénéficier d’une échange garantie au Canada » pour obtenir le prix d’un
échange hors garanti.
RAPPEL IMPORTANT...
Veuillez inscrire ci-dessous les numéros de modèle et de série qui se
trouvent sur le produit même.De plus,veuillez remplir et renvoyer sans
délai la carte d’enregistrement de garantie.Il nous sera ainsi plus facile
de vous contacter en cas de besoin.
Nº DE MODÈLE _______________________________
Nº DE SÉRIE _______________________________
23
Page 24

PRECAUCION
RIESGO DE SACUDIDA ELECTRICA
NO ABRIR
PRECAUCION: PARA REDUCIR EL RIESGO DE SACUDIDA ELECTRICA,NO RETIRE
LA CUBIERTA (NI EL PANEL POSTERIOR). ESTE APARATONO CONTIENE NINGUNA
PARTE QUE PUEDA SER REPARADA POREL USARIO. DE SER NECESARIO ALGUN
SERVICIO O REPARACIONDEL APARATO, LLEVELO UN TECNICO CALIFICADO.
SEGURIDAD
Conozca estos simbolos de sseegguurriiddaadd
El símbolo del “rayo” indica que algún material
no aislado dentro de su unidad podría resultar
en una sacudida eléctrica.Para la seguridad de
todos,favor de no remover la cubier ta del
producto.
El “signo de exclamación” le llama la atención a
características sobre las que Ud.debe leer la
información adjunta detenidamente para evitar
problemas de funcionamiento y mantenimiento.
24
ADVERTENCIA: PARA EVITAR EL RIESGO DE
SACUDIDA ELECTRIC A O INCENDIO, NO
EXPONGA ESTE EQUIPO A LLUVIA NI A HUMEDAD.
PRECAUCION:Para evitar sacudida eléctrica,
introduzca la patilla ancha del enchufe al fondo de la
ranura ancha.
Page 25

INSTRUCCIONES IMPORTANTES DE SEGURIDAD –
Este producto ha sido diseñado y fabricado para cumplir normativas
rigurosas en materia de calidad y seguridad. No obstante, deberán
adoptarse ciertas precauciones en cuanto a su instalación y manejo, que
Ud. debe conocer.
1. Lea estas instrucciones - Antes de poner en funcionamiento el
equipo, deberá leer todas las instrucciones relativas a su manejo y
seguridad.
2. Conserve estas instrucciones – Las instrucciones relativas al
manejo y a la seguridad del equipo deberán conservarse para su
posterior utilización como material de referencia.
3. Lea todos los avisos – Deberán respetarse todos los avisos
existentes tanto en las instrucciones de manejo como en el propio
equipo.
4. Siga todas las instrucciones – Deberán seguirse todas las
instrucciones relativas al funcionamiento y a la utilización del equipo.
5. No utilice este aparato cerca del agua – Por ejemplo, cerca de
bañeras, lavabos, fregaderos, lavaderos, superficies mojadas, zonas
próximas a piscinas, etc.
6. Para limpiar el aparato utilice sólo un trapo húmedo. Para
limpiar el equipo deberán seguirse estrictamente las instrucciones del
fabricante.
7. Proceda a su instalación de acuerdo con las instrucciones del
fabricante. No tape las aperturas de ventilación. Por ejemplo, el
equipo no deberá situarse sobre camas, sofás, alfombras, etc. ni en
espacios cerrados, como estanterías, armarios, etc. si con ello se
impidiese la libre circulación de aire por las aperturas de ventilación.
8. No instale el equipo cerca de fuentes de calor como radiadores,
calentadores, estufas o cualquier otro aparato (incluyendo los
amplificadores) generador de calor.
9. No anule la seguridad de la clavija de
corriente (ya sea de tipo polarizado o con toma
de tierra). Las clavijas polarizadas tienen dos
patillas, una más ancha que la otra. Las que
disponen de toma de tierra tienen dos patillas y una tercera que es la
de conexión a tierra. Tanto la patilla más ancha como la toma de
tierra han sido incorporadas a la clavija para su seguridad personal. Si
la clavija suministrada con el equipo no es compatible con su toma de
corriente, consulte a un electricista para sustituir la toma de corriente
obsoleta.
10. Proteja debidamente el cable impidiendo pour éviter de marcher
dessus ou de le pincer particulièrement aux endroits des prises, mâles
et femelles, et au point de raccordement sur l'appareil lui-même.
11. Utilisez uniquement des accessoires ou options que pueda
pisarse o incluso perforarse, especialmente en la parte más próxima a
la clavija y en el punto de salida del equipo.
12. Coloque el equipo exclusivamente sobre aquellos
13. Desenchufe el aparato durante tormentas eléctricas o cuando no
14. Confíe el mantenimiento y las reparaciones a personal técnico
carros, bases, trípodes, soportes o mesas especificados
por el comerciante o vendidos con el equipo. Cuando
utilice un carro, tenga cuidado al desplazar el conjunto
carro/equipo para evitar posibles daños por vuelco.
vaya a ser utilizado durante largo tiempo.
especializado. El equipo deberá repararse siempre que haya resultado
dañado de alguna manera, como por ejemplo por daños en el cable o
en la clavija, por derrame de líquido sobre el equipo, por objetos que
hubieran podido introducirse en su interior, por exposición del equipo
a la lluvia o a ambientes húmedos, cuando el equipo no funcione con
normalidad o cuando hubiera sufrido algún tipo de caída.
Léalas antes de poner en marcha el equip o
Clavija
polarizada de CA
EL 4562-E004: 99/3
25
Page 26

CONTROLES
1SLEEP – para activar el tiempo de reposo
Control del reloj
2SET TIME – para poner la hora del reloj
SET ALARM – para poner /ver la hora de la alarma
CLOCK – para volver a la pantalla de la hora del reloj
3HR – para ajustar las horas del reloj y de la alarma
MIN – para ajustar los minutos del reloj y de la alarma
SLEEP OFF /REPEAT ALARM – para apagar el
4
temporizador de alarma
– para apagar la alarma
durante un periodo de
8-9 minutos
524HOUR ALARM RESET – para parar la alarma activa en
las siguientes 24 horas
Español
6Indicador de sintonía
Información medioambiental
Hemos reducido el embalaje al mínimo y lo hemos hecho fácil de separar en
sus tres materiales individuales: cartón (caja), poliestireno y plástico.
Su equipo está realizado en materiales que pueden reciclarse si los desmonta una compañía especializada. Observe
las normativas locales para la eliminación de los materiales de embalaje, pilas consumidas y equipos obsoletos.
26
7ALARM
BUZZER – para activar el zumbador de despertado suave
para la alarma establecida
RADIO – para activar la radio para la alarma establecida
OFF – para apagar la alarma
8RADIO – para conmutar el modo de radio entre
encendido/apagado (ON/OFF)
9Pantalla – con indicadores de alarma
0VOLUME – para ajustar el nivel del sonido
!BAND – para seleccionar la banda de la onda FM-AM
@TUNING – para sintonizar las emisoras de radio
#Conexión a la red – para la alimentación con CA y para la
antena de recepción de FM
$Compartimento de la batería – para la batería de
respaldo
Tanto el número de modelo como el de producción se
encuentran en el compartimento de la batería.
Page 27

1. Compruebe si la fuente de alimentación, según indica en la
placa que se encuentra en el interior del compartimento de
baterías, se corresponde a su fuente de alimentación local.
2. Si su equipo está provisto de:
• un selector de voltaje - se encuentra en la parte posterior
del equipo
• un selector de frecuencia - en el interior del
compartimento de baterías
ajuste estos selectores para que se correspondan con su
fuente de alimentación local y su frecuencia.
3. Conecte el enchufe de corriente en la toma de la pared.
Ahora, la fuente de alimentación está encendida y los
números de la pantalla comenzarán a parpadear. Necesitará
poner la hora correcta.
4. Para desconectar el equipo de la fuente de alimentación
completamente, retire el enchufe de corriente de la toma de
la pared.
Consumo en modo de espera: ................................................3W
FUENTE DE ALIMENTACIÓN
RESPALDO PARA FALLO DE CORRIENTE
Cuando se produce un fallo en el suministro de corriente, todo
el radio-reloj se apagará. Cuando vuelve la corriente, los
números de la pantalla parpadearán y habrá que volver a poner
la hora correcta en el reloj.
Para conservar la hora del reloj y la hora establecida para la
alarma en el caso de que se produzca un fallo de suministro
eléctrico de CA o una desconexión, inserte una pila de 9
voltios, tipo 6F22 (no suministrada) en el compartimento para
la pila: dicha pila actuará como respaldo de la alimentación
eléctrica. Sin embargo, no se encenderá la hora en la pantalla
del reloj. También se excluye el uso de la alarma y la radio. En
otras palabras, la batería de respaldo se utiliza sólo parra
conservar la hora del reloj y de la alarma. Tan pronto como
vuelva a funcionar la fuente de alimentación, la pantalla
indicará la hora correcta.
1. Inserte la pila en el compartimento para la batería.
2. Conecte el enchufe en la toma de corriente de la pared.
• Cambie la pila una vez al año, o con la frecuencia que se
precise.
Las pilas contienen sustancias químicas, por tanto se han de
eliminar de forma adecuada.
Español
27
Page 28

PONER LA HORA RADIO ESTABLECIMIENTO DE LA ALARMA
PANTALLA DEL RELOJ
La hora se muestra utilizando el sistema de reloj de 12 horas.
¡Importante! Cuando ponga la hora o establezca la alarma,
para un ajuste preciso de horas y minutos, asegúrese de pulsar
los botones H
1. Coloque el control del reloj en SET TIME.
2. Pulse y mantenga pulsado el botón de HR o MIN para poner
y ajustar las horas y los minutos respectivamente:
• Cuando pulsa con su dedo el botón HR, las horas
aumentarán de uno en uno desde 1 a 12.
• Cuando pulsa con su dedo el botón MIN, los minutos
aumentarán de uno en uno desde 00 a 59.
3. Suelte el botón de HR o de MIN cuando haya alcanzado la
hora correcta.
Español
4. Para evitar que se ajuste de forma accidental la hora del
reloj, coloque el control del reloj en CLOCK.
RADIO
Puede utilizar el radio-reloj simplemente como una radio.
1. Coloque el interruptor RADIO en ON (encendido).
2. Seleccione la banda de onda con el conmutador de banda
BAND.
28
R y MIN por separado, no de forma simultánea.
3. Utilice TUNING para encontrar su emisora de radio.
4. Ajuste el sonido con el control VOLUME.
5. Para apagar la radio, coloque RADIO en OFF (apagado).
Para mejorar la recepción de la radio:
• Para FM, utilice la antena incluida en el cable de
alimentación. Ajuste el cable de alimentación ligeramente
para optimizar la recepción.
• Para AM, el equipo está provisto con una antena incluida
que, para su óptimo funcionamiento, se ha de colocar en
una superficie no metálica p. ej. madera, plástico. Dirija la
antena de AM ajustando la posición de su radio-reloj.
GENERAL
Si desea utilizar la alarma, establezca primero la hora de la
alarma. Existe la posibilidad de dos modos de alarma, el
zumbador o la radio. La pantalla muestra el indicador de
alarma si se ha activado la alarma.
1. Coloque el control del reloj en SET ALARM.
Page 29

2. Pulse y mantenga pulsado el botón de H
establecer y ajustar las horas y minutos respectivamente:
• Cuando pulsa con su dedo el botón HR, las horas
aumentarán de una en una desde 1 a 12.
• Cuando pulsa con su dedo el botón MIN, los minutos
aumentarán de uno en uno desde 00 a 59.
• Si se pulsan de forma simultánea ambos botones, HR y
MIN, la pantalla de la hora de alarma se pondrá a 0:00.
3. Suelte el botón de HR o de MIN cuando haya alcanzado la
hora correcta.
4. Coloque el control del reloj en CLOCK para volver a la hora
del reloj.
• Para volver a ver la hora establecida para la alarma,
coloque el control del reloj en SET ALARM.
5. Para seleccionar el modo de alarma a la que desea ser
despertado, coloque ALARM en RADIO o BUZZER.
• Si ha seleccionado el modo radio, ¡asegúrese de que ha
ajustado el volumen a un nivel suficientemente alto para
despertarle!
• La alarma del zumbador comienza suavemente y aumenta
de forma gradual hasta un volumen máximo fijo.
R o MIN para
ESTABLECIMIENTO DE LA ALARMA
APAGAR LA ALARMA
Existen tres formas de apagar la alarma. Salvo que opte por
cancelar la alarma completamente, se seleccionará la opción
de 24HOUR ALARM RESET de forma automática después de
1 hora y 59 minutos desde el primer momento en que apague
la alarma.
RESTABLECIMIENTO DE LA ALARMA A 24HR
Si desea que el modo de alarma se detenga de forma
inmediata, pero desea que se repita la llamada de alarma a la
misma hora el siguiente día:
• Pulse 24HOUR ALARM RESET durante la llamada de
alarma.
REPETIR ALARMA
Esto repetirá su llamada de alarma a intervalos de 8-9 minutos.
• Durante la llamada de alarma, pulse
ALARM.
• Pulse SLEEP OFF /REPEAT ALARM de nuevo la siguiente
llamada si desea repetir la llamada de alarma.
• Sin embargo, si no pulsa SLEEP OFF
nuevo, la alarma sonará durante 1 hora y 59 minutos antes
de apagarse ella sola. El valor de su hora de alarma entrará
de forma automática en el modo de 24HOUR ALARM
RESET para sonar a la misma hora el próximo día.
SLEEP OFF /REPEAT
/REPEAT ALARMde
Español
29
Page 30

ESTABLECIMIENTO DE LA ALARMA DORMIR
Cancelar la Alarma Completamente
• Antes o mientras el tiempo de alarma se apaga, pulse el
conmutador ALARM para ponerlo en la posición
™ Desaparece el indicador de alarma de la pantalla.
SLEEP
Sobre Sleep (Dormir)
El radio-reloj dispone de un temporizador incorporado
denominado SLEEP, que permite que la radio se apague de
forma automática después de 59 minutos.
La función SLEEP le permite volverse a acostar y adormilarse.
Activar y apagar Sleep
1. Compruebe que el control del reloj se encuentra en la
posición CLOCK.
2. Ponga RADIO en posición
Español
3. Establezca su tiempo de sleep pulsando una vez en el botón
SLEEP.
• La pantalla muestra el periodo de sleep 0: 59.
4. Para cancelar la función sleep antes de terminar el periodo
sleep, pulse SLEEP OFF/ REPEAT ALARM.
30
OFF.
OFF.
Nota: - La función dormir no afecta a la hora de la
alarma establecida.
- Si ha bajado el volumen durante SLEEP y ha
puesto una alarma en el modo de radio,
¡asegúrese de que ha ajustado el volumen a un
nivel suficiente para despertarle el siguiente día!
MANTENIMIENTO
• Si no va a utilizar el radio-reloj durante un periodo largo de
tiempo, desconecte el equipo retirando el enchufe de la
toma de corriente de la pared. También ha de retirar la pila
para evitar las pérdidas de productos químicos que puedan
dañar a su equipo.
• Para limpiar su equipo de huellas dactilares, polvo y
suciedad, utilice un paño limpio y suave o una gamuza de
piel. No utilice productos limpiadores que contengan
benceno, disolventes, etc. dado que podrían dañar la caja.
Page 31

SOLUCIÓN DE PROBLEMAS
Si se produce un fallo, compruebe los puntos listados más abajo antes de llevar el equipo a reparación. Si no puede remediar un
problema siguiendo estas indicaciones, consulte a su proveedor o a su centro de asistencia
técnica.
ATENCIÓN:
Bajo ninguna circunstancia ha de intentar reparar el equipo usted mismo, esto invalidaría la garantía.
PROBLEMA
– CAUSA POSIBLE
• REMEDIO
No suena
– Volumen no ajustado
• Ajuste VOLUME
La emisión de AM no se puede recibir correctamente
– Señal de radio débil
• Gire el equipo para mejorar la recepción y asegúrese de que
está colocado en una superficie adecuada (no metálica).
Crepitación y ruido de silbido continuo durante la
recepción de AM
– Interferencias de otro equipo eléctrico p. ej. TV,
ordenadores, lámparas fluorescentes
• Aleje el radio-reloj de los equipos eléctricos
Sonido de crepitación intermitente durante la recepción
de FM
– Señal débil
• Ajuste la antena incorporada en el cable de alimentación
La alarma no funciona
– No se ha establecido la alarma
• Establezca la hora de la alarma y coloque el interruptor de
alarma en BUZZER o RADIO
– Volumen demasiado bajo para la radio
• Aumente el volumen
SLEEP no funciona
– La radio todavía está en posición ON
• Coloque RADIO en OFF
– Control del reloj en posición SET TIME o SET ALARM
• Ponga el control del reloj en CLOCK
Español
31
Page 32

GARANTIA LIMITADA
SISTEMA DE AUDIO PORT
Cambio gratis por 90 días
Se necesita presentarse en persona con este producto para cambiarlo.
¿QUIEN TIENE PROTECCION?
Usted debe tener su comprobante de venta para cambiar el
producto.Una nota de venta u otro documento mostrando que
usted compró el producto se considera un comprobante de
venta.Adjúntelo a este manual de instrucciones y reténgalo a la
mano.
¿QUE CUBRE?
La protección bajo la garantía comienza el mismo día en que
usted compra el producto.Durante un año a partir de esta
fecha,se reemplazará un producto inoperante o defectuoso con
otro nuevo, renovado o comparable sin cargo alguno. Un
producto de reemplazo tiene cobertura sólo durante el período
de la garantía original.Una vez que venza la garantía original del
producto,también habrá vencido la garantía del producto de
reemplazo.
¿QUE EXCLUYE LA GARANTIA?
Su garantía no cubre:
• cobros por mano de obra durante la instalación o montaje
del producto,ajuste de los controles del cliente o de
preferencia e instalación o reparación de los sistemas con
antena fuera de la unidad.
• reparación del producto y/o reemplazo de piezas, a raíz de
uso indebido,accidente , reparación no autorizada u otra causa
no bajo el control de Philips Consumer Electronics Company.
32
ATIL
• problemas de recepción ocasionados por condiciones de
señales o sistemas de cable o de antena fuera de la unidad.
• un producto que requiera modificación o adaptación para que
opere en un país que no sea el país para el que fue
concebido,fabricado, aprobado y/o autorizado,o la reparación
de productos dañados por tales modificaciones.
• daños incidentales o consecuentes que resulten del producto.
(Algunos estados no permiten la exclusión por daños
incidentales o consecuentes,de modo que es posible que la
exclusión arriba indicada no le sea aplicable a usted.Esto
incluye,sin limitarse,materiales pregrabados con o sin amparo
de derechos de autor.)
• Una unidad que se ha comprado,usado o reparado fuera de
los EE.UU.,Puer to Rico, las Islas Virgenes y el Canadá, o que
se ha usado para fines comerciales o institucionales (inclusive
productos usados con fines de arrendamiento,pero sin
limitarse a éstos).
¿DONDE SE EFECTUA EL CAMBIO?
Usted puede cambiar el producto en todos los países con
distribución oficial del producto por Philips Consumer
Electronics Company. En países donde Philips Consumer
Electronics Company no distribuye el producto, la entidad local
de servicio Philips tratará de darle un producto de reemplazo
(aunque puede haber demora si el producto apropiado no está
fácilmente disponible).
Page 33

GARANTIA LIMITADA
ANTES DE PEDIR UN CAMBIO…
Favor de consultar el manual de instrucciones antes de pedir un
cambio.Algunos ajustes de los controles según las indicaciones
en el manual podrían ahorrarle un viaje.
PARA CAMBIAR UN PRODUCTO EN LOS EE.UU.,
PUERTO RICO O LAS ISLAS VIRGENES…
Comuníquese con su distribuidor para concertar el cambio.
También, usted puede enviar el producto con el seguro y
transporte o franqueo prepagados,adjuntando el comprobante de
venta y enviándolo a la dirección a continuación:
Small Product Service Center
Philips Service Company
907 Snapps Ferry Road,Plant 2,Building 6
Greeneville,TN 37743 USA
(En los EE.UU.,Puer to Rico o las Islas Vírgenes,toda garantía
implícita,inclusive las garantías implícitas de comerciabilidad y
aptitud para un propósito en particular, están limitadas en cuanto a
duración al plazo de esta garantía expresa.Puesto que algunos
estados no permiten limitaciones sobre la duración de una garantía
implícita,es posible que la limitación arriba indicada no le sea
aplicable a usted.)
PARA CAMBIAR UN PRODUCTO EN EL CANADA…
Favor de comunicarse con Philips al:
800-1-661-6162 (francófono)
800-1-363-7278 (anglófono)
Esta garantía le otorga derechos legales específicos y usted podría gozar de otros derechos que varían de un estado a otro.
Philips Service Solutions Group,P.O. Box 2976,Longview,Texas 75606, USA, (903) 242-4800
EL6095T002 / MAC5433 / 1-97
(En el Canadá,esta garantía es otorgada en lugar de toda otra
garantía.No se otorga ninguna otra garantía expresa ni implícita,
comprendiéndose aquí ninguna garantía implícita de comerciabilidad
o aptitud para propósito alguno.Philips no será responsable bajo
circunstancia alguna por daños y perjuicios directos,indirectos,
especiales,incidentales o consecuentes,independientemente de la
manera ocasionada,aún con notificación de la posibilidad de los
mismos.)
PARA CAMBIAR UN PRODUCTO DESPUES DE
VENCER LA GARANTIA…
En los EE.UU.,Puerto Rico o las Islas Vírgenes,comuníquese con
Philips Service Company,llamando al (800) 851-8885 para obtener
el costo de cambio de un producto después de vencer la garantía.
Luego empaque el producto con cuidado y envíelo al Small Product
Service Center,a la dirección arriba.En el Canadá, llame al teléfono
encontrado arribe en la sección ”Para cambiar un producto en el
Canada” para obtener el costo para cambiar un producto no
amparado por garantía.
RECUERDE…
Favor de anotar los números de modelo y serie del producto
en el espacio abajo.También,sírvase llenar y enviar
oportunamente su tarjeta de registro de la garantía.Así nos será
más fácil notificarle en caso de ser necesario.
Modelo No. ________________________________
Serie No. ________________________________
33
Page 34

Clock Radio
AJ 3130
English
AJ 3131
AJ 3132
AJ 3133
PHILIPS CONSUMER ELECTRONICS COMPANY
A Division of Philips Electronics North America Corporation
Français
Español
3140 115 2772.1 Printed in Hong Kong TCtext/RM/0014
Knoxville, Tennessee 37914-1810, U.S.A.
Meet Philips at the Internet: http://www.philips.com
 Loading...