

Page 1

PHILIPS
AJ30I5 Clock Radio
□ taooooD aa 2 si
Page 2

INDEX
English
Illustrations...........................................................................page 3
..........................
page 4
Français.........................page 6
Illustrations...........................................................................page 3
Deutsch.........................Seite 8
Abbildungen.........................................................................Seite 3
Nederlands
Afbeeldingen
Español
Ilustraciones......................................................................página 3
Italiano
Illustrazioni........................................................................pagina 3
............
.....................................................................
.........................
.........................
pagina 10
página 12
pagina 14
pagina 3
Svenska.............................sida 16
Figurer
...................................................................................
sida 3
Declaración de conformidad con normas
El que suscribe, en nombre y representación de:
Philips H.K. Ltd. Consumer Electronics Factory
declara, bajo su propia responsabilidad, que el
equipo: Clock radio
fabricado por; Consumer Electronics Factory
en: Far East
marca: PHILIPS
modelos: AJ 3015
objeto de esta declaración, cumple con la normativa
siguiente: Reglamento sobre Perturbaciones Radioeléctricas. Real Decreto 138/1989, Anexo
V.Hecho en: Hong Kong, 01-07-1993
Firma:
Nombre: K. B. Wong
Función; Product Safety Officer
México
Es necesario que lea cuidadosamente su
instructivo de manejo
NOM
Suomi......................... sivu 18
Kuvat......................................................................................sivu 3
Portugués
llustraçôes.........................................................................página 3
..............
página 20
NOM
Page 3
HOUR
TIME SET 0-
MIN
ALARM RESET 'Cn 'n
RADIO ON
ALARM O \
DISPLAY
A \
-0 BRIGHTNESS HIGH/LOW
VOLTAGE
TUNING
BAND
VOLUME
RADIO OFF/
REPEAT ALARM
Page 4

English
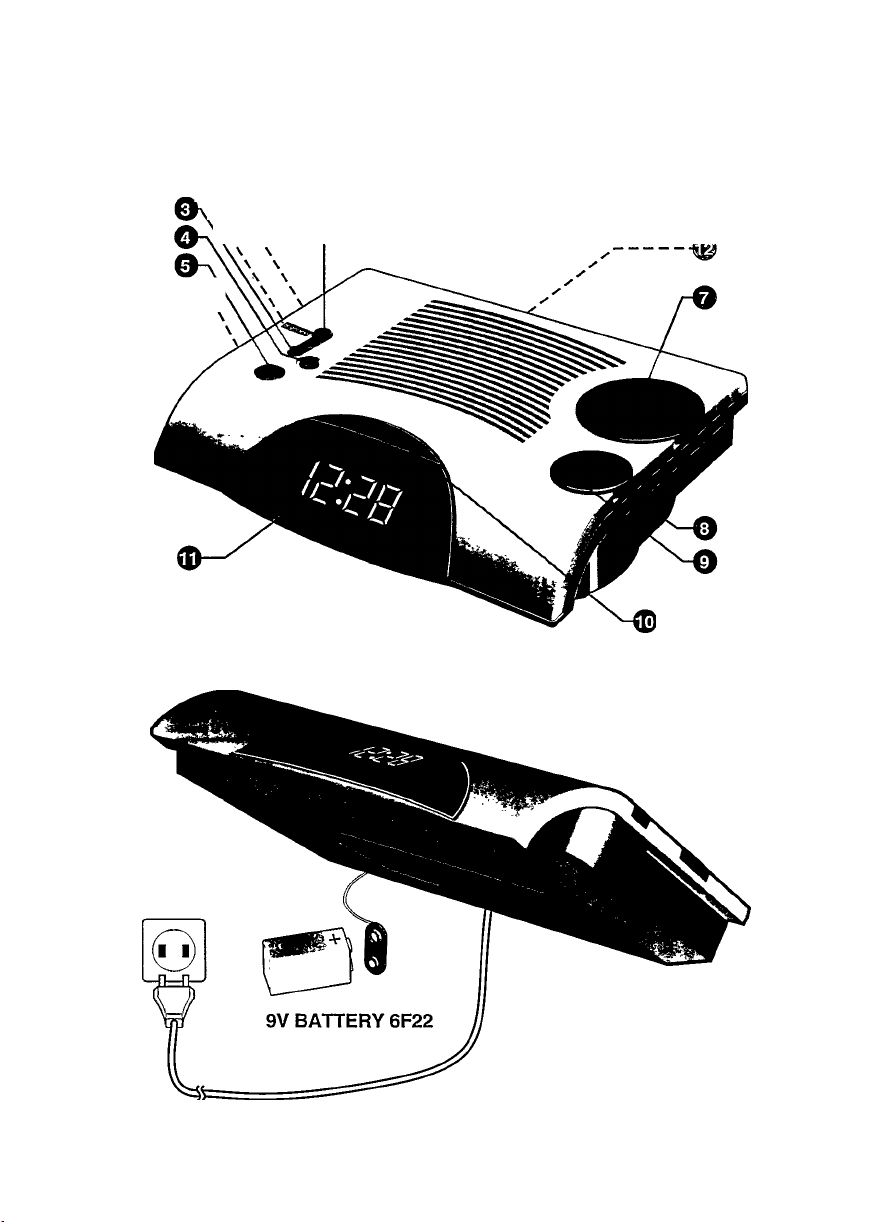
WHICH BUTTONS ARE WHERE?
® HOUR button - for setting the hours
___________________
@ TIME SET switch:
- TIME - for setting the time
- RUN - normal position
- ALARM - for setting the alarmtime
d) MIN button - for setting the minutes
® ALARM RESET button - to switch off the alarm
for 24 hours
(D RADIO ON button - to switch on radio function
® ALARM switch:
- RADIO - for waking up by radio
- BUZZER - for waking up by buzzer and radio
- OFF - alarm off
@ TUNING dial - for locating the required station
(D BAND switch - for selecting wavebands
(D VOLUME control - for adjusting the volume
® RADIO OFF / REPEAT ALARM button:
- To switch off alarm temporarily
- To sviiitch off the radio
(y) Clock display with ALARM- and PM- indicator
® VOLTAGE selector (not on at! versions)
@ BRIGHTNESS HIGH/LOW switch
MAINS COIMNECTIOIM__________________________
The clock radio is suitable for connection to a 220230 V / 50 Hz power supply (for Great Britain 240 V /
50 Hz). If the set is equipped with a VOLTAGE se
lector, set this selector to the local mains voltage.
As soon as the power plug is put into the wall
outlet, the numbers on the display will start to flash.
This means that you must set the correct time.
To disconnect the set from the mains completely,
withdraw the mams plug from the wall outlet.
Important notes for users in the U.K.:
Mains plug
Tms ¿cpsraTus is fitte j '.\iTh an ai:,oroveci mou'ded 13 Amp p'jo
To change a fuse m-th'S T.pe of plug proceed as fo"0’.* *.s
1 Remove fu:e co.er acd fuse
2 Ri. nt’.v fuse '.'.h'ch shou'd te a 8S1362 5 A’v’R ,A S T A or
8$l approved typi
3 Refit the fuse co.er
if the fitted plug IS not suitab'e tor ',our see- et outlets, it
shou'd te cut oTt and an apprognate plug fitted in its p'ace
If tne mams plug contains a fuse, this shou'd have 3 va'ue of 5
A If 3 p'ug v.ithput a fuse is used, the fuse at the oistr'butmn
t oird st' ould not be greater than 5 A
Note:
Tnc severed p'ug rr,ust te disposed off to avo d a poss ble
she;' i'Bzard shou'd ii te nsorted into a 13 A see* et eise.vhere
How to connect a plug
Tne Wires m the mams lead are co'oured m accordance v.ith
the fol'o.-.mg cede blue = neutral (N), brown = live iL)
As those co'ours n'>5v not correspond with the colour markings
ic'cntifying the terminals in your p'ug, proceed as fc''0v-.s
1 Connect the b'ue wire to the terminal marked M O'" co'oured
blue or b'ac'-.
2 Connect the bmu n w.re to the term nal marked L or
co'oured bro.'.n cr red
3 Do not ccnrect either w.re to the earth termma! in the p'ug,
msikedEor ^ O'-co'oured green O'green-and-yellow
Befoie rtp'acmiQ the plug cover ma'-.e ce.'tam that the cord
gnp IS c'amped O'.er the sheath of the lead - not simply o.er
the t.vo V'lres
If m doubt, consult a qualified electnc'sn
RADIO ON
You may use this clock radio simply as a radio.
• Set the TIME SET switch @ to RUN.
• Press RADIO ON button ® to switch the radio on.
After 59 minutes the radio v/ill be switched off
automatically.
• Select the waveband using the BAND switch @.
• Locate the required transmitter using the
TUNING dial®.
• Set the volume using the VOLUME switch @).
RADIO OFF
You can switch off the radio before the slumbertime
{59 minutes) has elapsed:
• Press the RADIO OFF button
CLOCK
Clock display
The clock indicates the time on the display. In case
of 12-hour clock system, the PM-indicator will light
up (on=PM, off=AM). The ALARM indicator lights
up when you switch on the alarm.
The luminous intensity of the display figures can
be adjusted with the BRIGHTNESS HIGH/LOW
switch ®.
Adjusting the time
• Set the TIME SET sw'itch @ to TIME
• Set the correct time using the MINUTE ® and
HOUR ® buttons.
• Set the TIME SET switch @ to RUN.
ALARM
____________________________________
Alarmtime
• Set the TIME SET switch @ to ALARM.
• Set the correct alarmtime using the MINUTE @
and HOUR ® buttons.
• Set the TIME SET switch @ to RUN.
ALARM ON
The clock radio can 'vake you up in 2 ways-
________________________________
Wake by radio
• Make sure the volume of the radio is loud
enough to wake you.
• Set ALARM switch ® to RADIO.
• You will be woken by the radio at the set alarm
time.
Wake by buzzer and radio
• Set ALARM switch ® to BUZZER.
• At the set alarm time you will be woken up by
the buzzer and the radio.
Page 5

ALARM OFF
You can.switch off the alarm in 3 ways;
Switching off the alarm for 9 minutes
• Press the REPEAT ALARM button With this
switch you temporarily switch off the alarm. After
nine minutes the alarm (radio or buzzer) will sound
again. If you press the REPEAT ALARM button @
again, the same will happen again. If the REPEAT
ALARM button @ is not pressed again, the alarm
will switch itself off after 1 hour and 59 minutes.
The following day the alarm signal will sound
again at the set alarm time.
Switching off the alarm for 24 hours
• Press the ALARM RESET button 0. The alarm is
now switched off for 24 hours and will sound
again the next day at the same time.
Switching off the alarm completely
• Set the ALARM switch © to OFF. On the display
the ALARM indicator will disappear and the
alarm will be switched off. If you wish to be
woken the following day again, you must reset
the ALARM switch to RADIO or BUZZER before
going to sleep.
SLUMBER
The clock radio has a built-in slumber function.
This function enables you to listen to the radio
before you fall asleep. You will not have to switch
off the clock radio yourself. This will take place
automatically.
__________________________________
Slumber time
The time you listen to the radio before you fall
asleep is called the slumber time. The slumber
time is 59 minutes.
If you wish to slumber, carry out the following:
• Make sure the TIME SET switch © is set to RUN.
• Press the RADIO ON button (|). The display will
show a slumber time of 59 minutes..
Slumber off
You can switch off the radio before the slumber
time has elapsed:
• Press the RADIO OFF button ® and the radio
will be switched off.
- If the TIME SET switch © is in position TIME or
ALARM, the slumber function will not work.
-The slumber function does not affect the alarm.
POWER FAILURE
-As soon as a power failure occurs, the complete
clock radio will be switched off.
-As soon as the power supply returns, the numbers
on the display start to flash. This indicates that you
must set the correct time on the clock.
-You can insert a 9 Volts pack battery (type 6F22)
in the clock radio. Should there be a power
failure, the clock will continue to function. You
will not see this, however, because the battery
does not illuminate the clock display. As soon as
the power is switched on again, the display will
indicate the correct time.
To be perfectly clear: Alarm, radio and display do
not work on battery.
• Before inserting the battery, connect the power
plug to the wall outlet.
• Place the battery in the compartment on the
bottom of the clock radio (see diagram).
-Replace the battery once a year. It cannot be
stated precisely how long the battery will last.
This depends completely on how often and for
how long the power supply fails. This varies from
country to country or even region to region.
MAINTENANCE
- If you do not intend to use the clock radio for a
long time, it is recommended to remove the plug
from the wall socket. In addition to this, it is
advisable to remove the battery from the clock
radio. This will prevent any danger of leakage and
the clock radio will not be damaged.
-Fingerprints, dust and dirt on the clock radio
should be removed using a clean and damp soft
cloth or chamois leather. When cleaning do not
use any products containing abrasive agents or
solvents (benzine, thinner, alcohol etc.). These
might affect the housing.
-Rain, dampness and extreme heat may damage
the clock radio. For this reason it should not be
placed in full sun or close to heating elements for
any period of time.
This product complies with the radio interference
requirements of the European Community.
The type-plate is located on the bottom of the
clock radio.
Page 6

Notes
22
Page 7

Notes
23
Page 8

Australia ^ Brasil
@) Guarantee and Service valid for Australia
The benefits given to the purchaser by this warranty are in addition to
all other rights and remedies, vdiich, under the Trade Practices Act or
other Commonwealth or State law, the purchaser or owner has in
respect of the product
The Philips product carries the folloiving vrarranties:
- C-seriesHifi-systems 12 months.
- Compact Disc Rayers: 12 months,
- Home Audio Systems; 6 months.
- Clock radios, portable radios, cassette recorders, cassette players
and radio recorders: SO days.
Any defect in materials or workmanship occurring within the specified
period from the date of delivery, will be rectified free of charge by the
retailer from whom this product
vias purchased.
___________________
Note: Please retain your purchase docket to assist prompt service.
Conditions of this warranty
1, All claims for warranty service must be made to the retailer from
wdiom this product v,ras purchased. All transport charges incurred in
connection with warranty service or replacement will be paid by the
purchaser.
2. These v,rarranties do not cover batteries and extend only to defects
in materials or workmanship occurring under nomnal use of the
product where operated in accordance with our instnrctions.
Philips Consumer Products Division
Technology Park
Figtree Drive, Australia Centre
Homebush2140
New South Wales
ds) Garantía para Brasil
Este aparelho é garantido pela Philips do Brasil Uda e a Philips da
Amazonia SA Indùstria E'etrònica, por um periodo sup erior ao
estabelecido por lei. Porérn, para que a garantía tenha validado, é
imprescindivel que, além deste certificado, seja apresentada a nota
fiscal de compra do prodmo.
1. A Philips do Brasil Ltda. e a Philips da Amazonia SA Indùstria
Eletrònica asseguram ao proprietàrio consumidor deste aparelho a
garanda de 180 dias (90 dias legai mais 90 adicional) contados a
partir da data de entrega do produto, conforme e.xpresso na nota
fiscal de compra que passa a fazer parte deste certificado
2. Esta garantía perderá sua validade se:
A О defedo apresentedo for ocasionado por uso indevido ou em
desacordó com о seu manual de instrufòes
B. О produto for alterado, violado, ajustado ou consertado por
pessoa nao autorizeda pela Philips
C. O produto for ligado a fonte de energía (rede elétrica, pilhas,
batería, etc.) de características diferentes das recomendadas no
manuel de instruçôes e/ou no produto
D. O número de série que identifica o produto estiver de alguma
forma adulterado ou rasurado.
3. Estáo excluidos desta carantia deferios decorrentes do
descumprimento do menual de instruçôes do produto, de casos
fortuitos ou de força maior, bem como aqueles causados por
agentes da natureza e acidentes.
4. Excluem-se igualmente desta garantía os deferios decorrentes do
uso dos produtos em serviços nao doméstico/residencial regular cu
em desacordó com o uso recomendado
5. Nos municipos onde nao e.xista oflcina autorizada de serviço Philips,
as despesas de transperte do aparelho e/ou do técnico autorizado
correm por conta do sr. consumidor requerente do seiviço
Philips do Brasil Ltda. e Philips da Amazonia SA Industria
Eletránica
Para inforraaçôes adiciona s sobre o produto ou para eventual
necessidade de utilizaçâo da rede de oficinas autorizadas, ligue para o
centro de informaçâo ao consumidor
e. 0300-123123 (discagem direta gratuita) ou escreva para a caixa
postal; 21462 сер 04898-Э70 - Sao Paulo
24
Page 9

New Zealand
México
@ 1 Guarantee and Service for New Zealand
Thank-you for purchasing this quality Philips product.
Philips Nevr Zealand Ltd guarantees this product against defective
components and faulty vvorlrmanship tor a period of 12 months. Any
defect in materials or workmanship occurring v/ithin 12 months from
the date of purchase subject to the following conditions will be
rectified free of charge by the retailer from whom this product was
purchased
Conditions
1. The product must have been purchased in New Zealand. As proof of
purchase, retain the original sales docket indicating the date of
purchase
2. The guarantee applies only to faults caused by defective compo
nents, or faulty workmanship on the part of the manufacturer.
3. The guarantee does not cover failures caused by misuse, neglect,
normal wear and tear, accidental breakage, use on the incorrect
voltage, use contrary to operating instructions, or unauthorised
modification to the product or repair by an unauthorised technician.
4. Reasonable evidence (in the fonn of a sales docket) must be
supplied to indicate that the product was purchased no more than
12 months prior to the date of your claim
5. In the event of a failure. Philips shall be under no liability for any
injury, or any loss or damage caused to property or products other
than the product under guarantee.
This guarantee does not prejudice your rights under common law and
statute, and is in addition to the normal responsibilities of the retailer
and Philips
Howto claim
Should your Philips product fail within the guarantee period, please
return It to the retailer from whom it was purchased. In most cases the
retailer will be able to satisfactorily repair or replace the product
However, should the retailer not be able to conclude the matter satis
factorily, or if you have other difficulties claiming under this guarantee,
please contact
The Guarantee Controller
Philips New Zealand Ltd.
H P.O.Box 41.021
Auckland
0(09)84 34160
fax 0(09)8497858
Garantía para México
Este aparato está fabricado con materiales de alta calidad y ha sido
cuidadosamente verificado. Philips, por lo tanto, da a usted una
garantía de 12 meses a partir de su fecha de compra.
[a garantiá ampara la reposición de las piezas defectuosas debidas a
tallas en su montaje o en los materiales, incluyendo la mano de obra
necesaria para su reemplazo en nuestras Sucursales o talleres autori
zados
En caso de fallas en su aparato le rogamos se sirva poner en contacto
con su distribuidor.
Esta garantía no cubrirá las averías que resulten como consecuencia de
una instalación incorrecta del aparato, manifiesto maltrato o uso in
adecuado del mismo.
Philips se obliga a reparar y devolver a usted su aparato en un plazo no
mayor de 30 días hábiles contados a partir de la fecha de haber ingre
sado su aparato a uno de nuestros talleres.
Con la presentación de la factura o remisión de su aparato podrá hacer
efectiva la garantía.
Si usted tiene alguna duda o pregunta que no le pueda solucionar su
distribuidor, por favor ponerse en contacto con:
Oficinas Centrales de Setvicio,
Av. Coyoacán No. 1051,
Col. del Valle,
03100 México, D.F.
O 5-75-20-22 o 5-75-01-00
25
Page 10

3140 105 20133
Printed in Hong Kong TCtextYS0793/02
 Loading...