

Page 1
PHILIPS
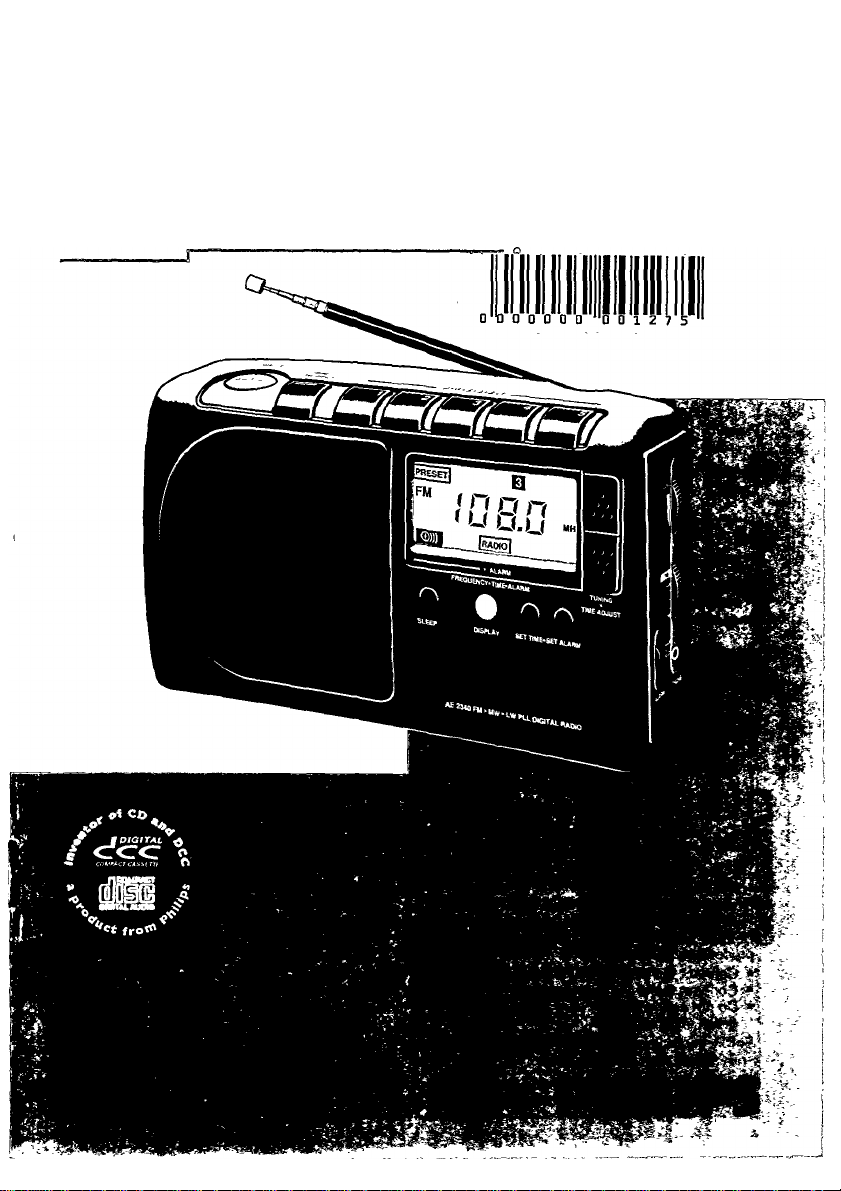
AE 2340 Portable Digital Radio
Page 2

CE) Français
INDEX
(T) Español
CE) Deutsch
Nederlands
...............
......
página 15
Seite 20
pagina 25
d) Italiano pagina 30
(E) Portugués
............
página 35
Dansk side 40
CE) Svenska
sida 45
O
C
ta
@) Suomi
CD EAAnviKà
l
.......................
sivu 50
osAiSa 55
CO
s
O
3
Page 3
Page 4
CD España
Declaración de conformidad con normas
El que suscribe, en nombre y representación de:
Product Group Portable Audio
Philips Hong Kong Ltd.
declara, bajo su propia responsabilidad, que el
equipo: Radio portátil
fabricado por: PGPA Philips HK Ltd
en: Far East
marca: Philips
modelo: AE 2340
objeto de esta declaración, cumple con la normativa
siguiente: Reglamento sobre Perturbaciones Radio-
eléctricas, Real Decreto 138/1989, Anexo V.
Hecho en: Hong Kong, 01-08-1994
Firma:
Nombre;
Cargo:
lAj^
C.S. Lau
Quality Assurance Manager
México
Lea cuidadosamente su instructivo de manejo
Garantía
.........................................................
página 56
Brasil
Garantía ..........................................................página 56
@) Australia
Guarantee
.........................................................
page 57
New Zealand
Guarantee
.........................................................
page 57
CD Norge
Typeskilt finnes pà apparatens underside.
Observer: Nettbryteren er sekundert innkoplet. Den
innebygde netdelen er derfor ikke frakoplet nettet sa
lenge apparate! er tilsluttet nettkontakten.
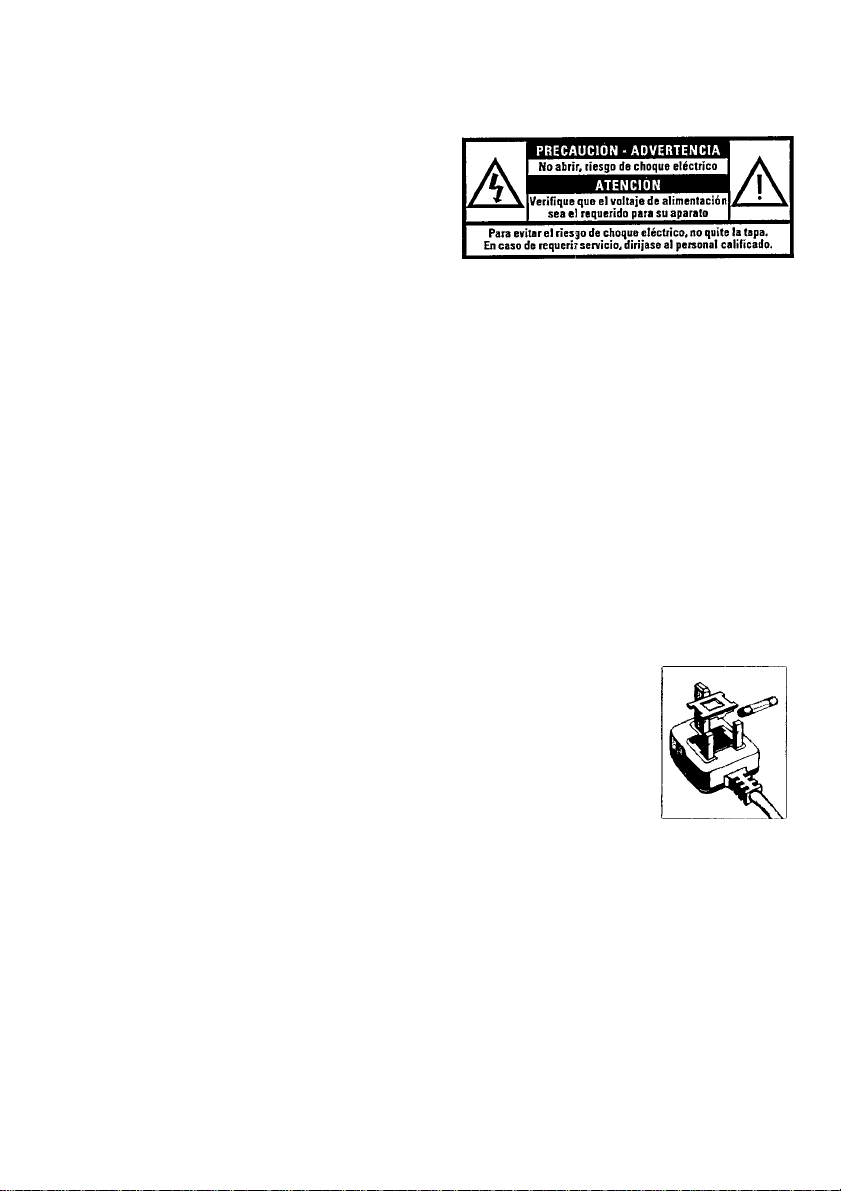
IMPORTANT NOTES FOR USERS IN THE U.K.
Mains plug
This apparatus is fitted with an approved moulded 13 Amp plug To change a fuse
in this type of plug proceed as follows:
• Remove fuse cover and fuse.
• Fix new fuse which should be a BS1362 5 Amp, A.S.T.A. or BSI approved type.
• Refit the fuse cover
If the fitted plug is not suitable for your socket outlets, it should be cui off and an
appropriate plug fitted in its place.
If the mams plug contains a fuse, this should have a value of 5 Amp. If a plug
without a fuse is used, the fuse at the distribution board should not be greater than 5 Amp
Note: The severed plug must be disposed to avoid a possible shock hazard should it be inserted into a
13 Amp socket elsewhere
Howto connect a plug
The wires in the mams lead are coloured with the following code blue = neutral (N), brown = live (U
As these colours may not correspond with the colour markings identif/mg the terminals in your plug,
proceed as follows:
• Connect the blue wire to the terminal marked N or coloured black.
• Connect the brown wire to the terminal marked L or coloured red
• Do not connect either wire to the earth terminal in the plug, marked E (or i) or coloured green (or
green and yellovi/).
Before replacing the plug cover, make certain that the cord grip is clamped over the sheath of the lead
- not simply over the two wires.
Copyright in the U.K.: Recording and playback of material may require consent See Copyright Act
1956 and The Performer's Protection Acts 1958 to 1972,
NOM
Page 5

AE2340/00 CPU BOARD
Page 6

AE2340/00 AUDIO BOARD
Page 7

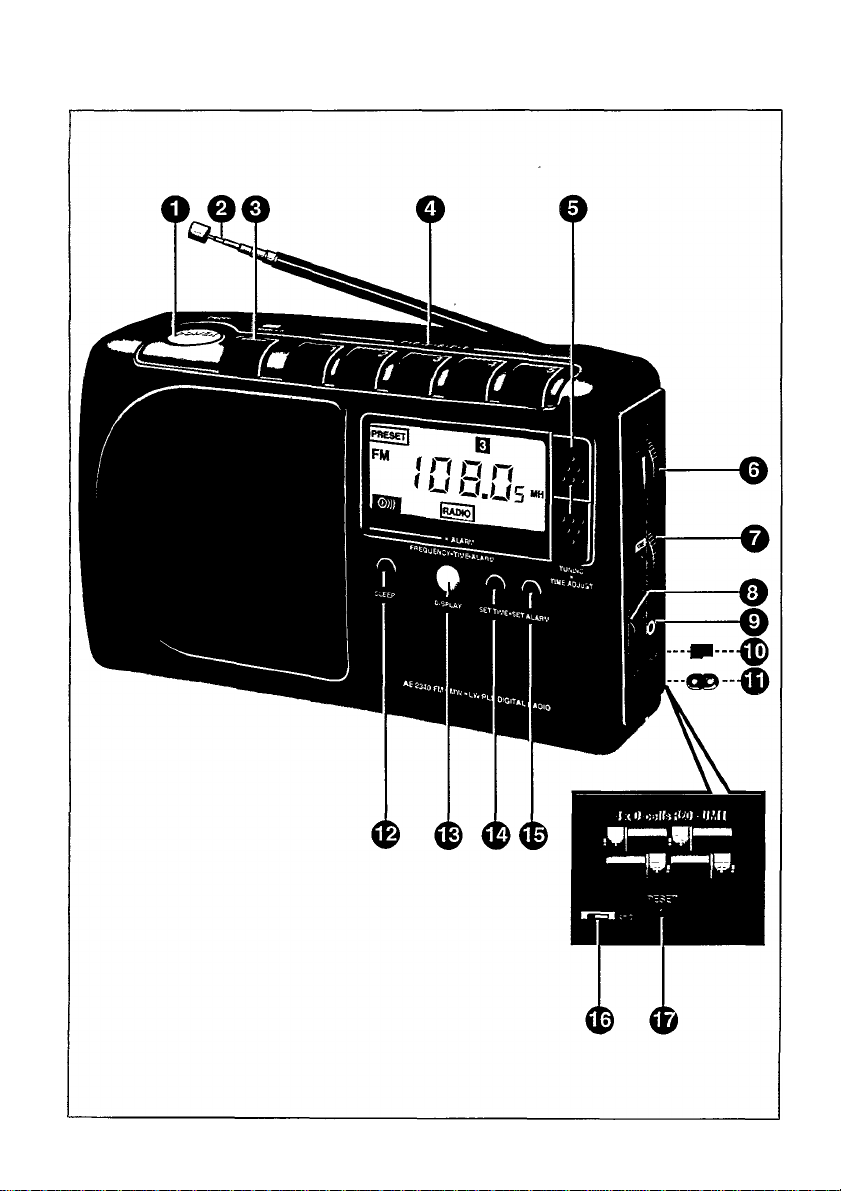
Controls Display
CONTROLS_______________________________
® POWER - for switching the radio on and off
(D Telescopic aerial
@ BAND - for selecting the wave band
0 PRESET 1...5 - for selecting and storing
preferred stations (5 per wave range)
0 TUNING/TIME ADJUST - for tuning to a radio
station and adjusting the time
© VOLUME - for adjusting the volume
0 TONE - for adjusting the tone
© ALARM - for switching the alarm on and off
@ PHONE - for connecting headphones
® Voltage selector (not all versions) - for
selecting the voltage
@ AC MAINS - for connecting the mains lead
® SLEEP - for switching on the sleep function
® DISPLAY - To display either frequency, time or
alarm time
® SET TIME - for setting the time
® SET ALARM - for setting the alarm time
® 9/10 kHz switch, having a double function:
AM tuning step
•9 kHz
•10 kHz
@ RESET - for erasing the memory
WARNINGS
- Rain, damp and excesive heat are bad for the
radio and the batteries.
- Do not leave the set for any length of time in
direct sunlight or other places where high
tempatures can occur, such as in a car which is
parked in the sun.
- Leave repairs to a recognized dealer or service
organisation.
- If you repair the set yourself, the guarantee will
be invalidated.
.........
......................
....................
_______________________________
FM tuning step
50 kHz
100 kHz
DISPLAY
The display provides information about the
functioning of your radio.
When you switch off the radio, the current time
will be indicated.
N*BESET|
™rOO-OO ™
MW
LW
U U'O.UB
Q- □
iBUZZERllRAPj^ BSiSI tZ5
Press DISPLAY @ to display the alarm time.
Press DISPLAY ® again to display the time.
The display also returns to time indication
automatically after 5 seconds.
When tuning the radio, the tuned frequency
and the selected wave range will appear.
Press DISPLAY ® to display the time.
Press DISPLAY @ again to display the alarm
time.
Press DISPLAY ® once more to display the
frequency again.
The display also returns to frequency indication
automatically after 5 seconds.
O)
E
Ui
This unit complies with the radio interference
requirements as laid down in EC (European
The type plate is located on the base of the set.
Commity) regulations.
Page 8

Power supply
Radio reception
MAINS SUPPLY
Check if the mains voltage as shown on the
type platefet the base of the set) corresponds
to your local mains supply. If it does not,
consult your dealer or service organisation.
If the set is equipped with a VOLTAGE
SELECTOR® (at the rear of the set), set this
selector to the local mains voltage.
Connect the mains lead to the AC MAINS
socket ® (at the rear of the set) and the wall
socket.
The mains supply is now switched on.
To disconnect the set from the mains
completely, withdraw the mains plug from the
wall socket.
BATTERIES
• Open the battery compartment and insert 4
batteries type R20, UM1 or D-cells.
• Remove the batteries:
- when they are exhausted;
- if they are not going to be used for a long
period of time;
- when the battery indicator ¡z) starts
flashing.
Note:
When the set is connected to the mains, the
battery supply is switched off automatically.
Warning for weak batteries
When the batteries run low, the radio will
show the time display. Pressing POWER ® or
SLEEP ® will turn on the radio for a short
period of time before it automatically turns off
again. The period will get shorter as the
batteries run lower.
Continued operation with low batteries causes
malfunctioning and losing programmed time
settings and preset radio stations. In this case,
remove the batteries, press the RESET button
@ in the battery compartment briefly and
insert fresh batteries.
Readjust the timer setting and the preset radio
stations.
POWER FAILURE
- If the power supply is interrupted, the battery
indicator 0 starts flashing.
- The programmed time settings and preset radio
stations will be kept in the memory for 2 min.
- If the AC power is interrupted, the batteries (if
present) will take over the supply. In this case
all settings will be kept in the memory.
__________________________
9/10 kHz SELECTOR
The minimum 'frequency distance' (span division)
between adjacent radio stations (measured in
kHz) is standardized all over the world.
However, North and South America use another
standard than the rest of the world.
This means that the radio should use a tuning
step according to the standard concerned in order
to obtain accurate radio tuning.
The 9/10 kHz switch (g) in the battery
compartment allows accurate tuning for both
standards and has a double function.
Position 10 kHz for the Americas
- AM tuning step 10 kHz;
- EM tuning step 100 kHz;
Position 9 kHz for the the rest of the world
- AM tuning step 9 kHz;
- FM tuning step 50 kHz;
AERIALS
- For FM reception e:<tend the telescopic aerial
- For the medium wave (AM/MW), and long
RADIO RECEPTION
• Press POWER 0 to switch the radio on.
• Adjust the sound with VOLUME (S) and TONE
• You can connect headphones to the PHONE
• Set the wave range with the BAND switch (|)
- The selected wave range will appear on the
• Tune to a radio station either manually,
• Press POWER (T) once again to switch the
___________________________
fully.
To improve the reception you can incline and
rotate the aerial. If the FM signal received is too
strong (in the direct vicinity of the transmitter)
you can retract the aerial.
wave (LW) the set has a built-in aerial, so the
telescopic aerial is not needed. You can direct
the aerial by turning the set itself.
@socket d).
The loudspeaker will then be switched off.
(LWnot on all versions).
display.
automatically or with the PRESET buttons 0
(see 'TUNING' and 'PRESET RADIO
STATIONS').
radio off. The display will now indicate the
current time.
* •
_
________________________
Page 9

Tuning Preset stations
TUNING TO A STATION
There are two possibilities for tuning to a
station:
- Automatically - the stations are sought
automatically.
- Manually - This is easy if the frequency of the
station is already known (e.g. from your radio
and television guide).
Automatic tuning
• Select the wave band using the BAND selector.
• Keep ■" or V pressed until the frequency
on the display starts running. Then release the
button and the tuner will search until a station
of sufficient strength has been found. Weak
radio stations are skipped during search tuning.
• If the radio station found is not the desired one,
repeat this step.
Manual tuning
Weak radio stations are skipped during search
tuning. If you know the frequency of the desired
radio station, you can tune to it as follows:
• Keep A or v' pressed; the frequency on the
display starts running.
• If you approach the required frequency, stop
running by pressing the opposite TUNING
button ( or V ).
• Now press A or ? briefly each time to
change the frequency step-by-step until the
required frequency has been reached or
optimum reception is obtained.
PRESET RADIO STATIONS
You can programme 15 stations into the
memory, 5 on each waveband.
• Select the wave range with the BAND switch
<D-
• Tune to a radio station automatically or
manually.
• Keep the desired PRESET button © pressed
until you hear a double bleep.
- The station has now been programmed and the
PRESET number will appear on the display.
• Repeat these steps for the other stations you
wish to programme.
Calling up preset stations
• Select the wave range with BAND switch ®.
• Press one of the PRESET 1 ...5 buttons ®.
The frequency and the PRESET number will
appear on the display.
ERASING THE MEMORY
You can erase the memory by pressing RESET
@ (in the battery compartment).
All settings must now be reprogrammed into
the memory.
Page 10

Clock
Alarm
Sleep
SETTING THE TIME
The time can be set either with the power on
or off.
• Press SET TIME®.
- The time on the display starts flashing.
• Now you can set the time using •■>. or v
ALARM FUNCTION
You can use your radio as an alarm clock. To
use this function you first have to set the alarm
time.
You can choose to be woken up by buzzer or
by radio.
The alarm time can be set either with the
power on or off.
Setting the alarm time
• Press SET ALARM®.
- The alarm time will appear and the alarm
indication will start flashing on the display:
1-n n
l-u u
• Now you can set the alarm time using or
•v ®.
Switching the alarm on
• Set ALARM® to:
- RADIO if you wish to be woken by the radio;
- BUZZ if you wish to be woken by the buzzer.
- At the set alarm time you will be woken by the
radio or the buzzer.
- The buzzer will become louder after 10
seconds.
Switching the alarm off completely
• Set ALARM ® to OFF.
Switching the aiarm off for 24 hours
• Press any button on the set to switch the alarm
off.
- The alarm switches itself off automatically after
one hour.
SLEEP FUNCTION
Your radio is equipped with a sleep function. It
enables you to continue listening to the radio
while you fall asleep After 90, 60. 30 or 10
minutes the radio will be switched off
automatically.
Switching the sleep function on
• Press SLEEP ®.
• The radio will come on and the SLEEP
indication and the length of time before the
radio will switch off will appear on the display.
• Now select the desired length of time within 5
seconds by pressing SLEEP ® briefly.
Each time you press SLEEP the length of time
will change step by step; 90,60,30 or 10
minutes.
• The frequency and the SLEEP indication will
then appear on the display.
Switching the sieep function off
The sleep function can be switched off before
the set time has elapsed:
• Press SLEEP® or POWER®.
The SLEEP indication will disappear from the
display and the radio will switch off.
Page 11

Troubleshooting
If a fault occurs, first check the points listed below before taking the system for repair.
If you are unable to remedy a problem by following these hints, consult your dealer or service
Under no circumstances should you try to repair the system units yourself, as this would
PROBLEM
No sound
Radio interrupt - Preset sleeptime due
Poor radio reception - Weak radio aerial signal
Alarm does not function - Alarm time is not adjusted
Set does not react to
operation of any button
Malfunctioning and
losing
time settings and preset
radio stations
POSSIBLE CAUSE
- Batteries are exhausted • Insert fresh batteries
- Batteries are incorrectly
inserted
- Mains lead is not properly
connected
- The VOLUME is not adjusted • Adjust the VOLUME
- Headphones are connected
- Batteries are nearly exhausted
- Interference caused by
the vicinityof electrical
equipment like TVs,_
video recorders, corhputers,
thermostats, fluorescent
lamps (TL), engines etc.
- Inaccurate tuning because
of incorrect 9/10 kHz the battery compartment
selector ® setting
Headphones are connected
- Electrostatic discharge
Continued operation with
weak batteries
centre.
WARNING
invalidate the guarantee.
REMEDY
• Insert the batteries correctly
• Connect the mains lead properly
• Disconnect the headphones
• Insert fresh batteries or
use the mains supply
• Aim the aerial for best reception:
- FM; incline and rotate
telescopic aerial
- AM (MW/LW): rotate the whole
set
• Keep the radio away from electrical
equipment
• Adjust the 9/10 kHz selector @ (in
10 kHz for the Americas
9 kHz for other countries.
Adjust the alarm time
Disconnect the headphones
Press the RESET button @ briefly
(in the battery compartment)
and readjust the time settings
and preset radio stations
7 Remove the batteries.
2 Press the RESET button @ briefly in
the battery compartment.
3 Insert fresh batteries.
4 Readjust the time settings and the
preset radio stations.
_________
_____________
Page 12

(0) México
Garantía para México
Este aparato está fabricado con materiales de alta
calidad y ha sido cuidadosamente verificado.
Philips, por lo tanto, da a usted una garantía de
12
meses a partir de su fecha de compra.
La garantiá ampara la reposición de las piezas de
fectuosas debidas a fallas en su montaje o en los
materiales, incluyendo la mano de obra necesaria
para su reemplazo en nuestras Sucursales o talle
res autorizados.
En caso de fallas en su aparato le rogamos se sir
va poner en contacto con su distribuidor.
Esta garantía no cubrirá las averías que resulten
como consecuencia de una instalación incorrecta
del aparato, manifiesto maltrato o uso inadecuado
del mismo.
Philips se obliga a reparar y devolver a usted su
aparato en un plazo no mayor de 30 días hábiles
contados a partir de la fecha de haber ingresado
su aparato a uno de nuestros talleres.
Con la presentación de la factura o remisión de su
aparato podrá hacer efectiva la garantía.
Si usted tiene alguna duda o pregunta que no le
pueda solucionar su distribuidor, por favor poner
se en contacto con:
Oficinas Centrales de Servicio,
Av. Coyoacán No. 1051,
Col. del Valle,
03100 México, D.F.
O 5-75-20-22 o 5-75-01-00
ш (в^ Brasil
Garantía para Brasil
Este aparelho é garantido pela Philips do Brasil
Ltda. e a Philips da Amazonia S.A. Indùstria Eletrónica, por um período superior ao estabelecido
por lei. Porém, para que a garantía tenha validade,
é imprescindível que, além deste certificado, seja
apresentada a nota fiscal de compra do produto.
1. Philips do Brasil Ltda. e Philips da Amazonia
S.A. Indùstria Eletrónica asseguram ao proprie
tàrio consumidor deste aparelho a garantía de
180 dias (90 dias legal mais 90 días adicional)
contados a partir da data de entrega do produ
to, conforme expresso na nota fiscal de compra
que passa a fazer parte deste certificado.
2. Esta garantía perderá sua validad© se.
A. O defedo apresentado for ocasionado por
uso indevido ou em desacordó com o seu
manual de instrugóes,
B. O produto for alterado, violado, ajustado ou
consertado por pessoa nao autorizada pela
Philips.
C. O produto for ligado a fonte de energía (rede
elétrica, pilhas, batería, etc.) de
características diferentes das recomendadas
no manual da instruçôes e/ou no produto
D. O número de série que identifica o produto
estiver de alguma forma adulterado ou rasu
rado.
3. Estáo excluidos desta garantía defeitos decorrentes do descumprimento do manual d© in
struçôes do produto, de casos fortuitos ou de
força maior, bem como aqueles causados por
agentes da natureza e acidentes.
4. Excluem-se igualmente desta garantía os defeitos decorrentes do uso dos produtos em servi
ces nao doméstico/residencial regular ou em
desacordó com o uso recomendado.
5. Nos municípos onde nao exista oficina autoriza
da de serviço Philips, as despesas de transpor
te do aparelho e/ou do técnico autorizado correm por conta do sr. consumidor requerente do
serviço.
Philips do Brasil Ltda. e
Philips da Amazonia S.A. Industria Eletrónica
Para informaçôes adicionáis sobre o produto ou
para eventual necessidade de utilizagáo da rede
de oficinas autorizadas, ligue para o centro de
informaçâo ao consumidor:
0800-123123 (discagem direta gratuita)
ou escreva para a caixa postal:
21462 сер 04693-970 - Sao Paulo
62
 Loading...