

Page 1

Size:75(w)x127.5(h)mm
User manual
GoSure
ADR900s
English
Page 2

1
微波眼全天停车监控功能...............................
Page 3

1
1
1.
2.
3.
7.
8.
Micro USB
9.
10.
11.
6
5
4.
5.
6.
微波眼停车监控指示灯
15
12.
DC
13.
14.
1 5.
OBD
16.
DC
2
3
4
7
8
9
10
11
12
13
14
16
3
Page 4

User manual
3
English 22
GoSure
ADR900s
4
Page 5

2
面
滑动开关。
1.撕去支架背面的塑料保护膜。
然后上推
5
Page 6

18~38°C
6
Page 7

OBD 12V DC输出插头插接到记录仪DC输入
OBD OBD OBD
1
8
E
16
B
C
1
8
16
9
A
D
9
7
Page 8

打开滑动开关,
8
32
Page 9

(
720P/30FPS)(720P/60FPS) (1080P/30FPS)
•
•
•
•
9
Page 10

3
5
4
5
6
7
8
9
10
11
4
3
2
1
1
2
3
7
8
9
录像时间
•
•
紧急按钮
6
10
11
10
Page 11

4
"OK"
日期时间
"OK"
/
"OK"
入日期/时间设置菜单。
"OK"
/
1
2
3
1. 设置停车监控时的分辨率。
2. 打开/关闭停车监控。
3. 打开/关闭 WaveGuard 指示灯。
日期时间
11
Page 12

4
5
6
7
8
9
10
11
12
13
14
15
16
屏幕设置
12
Page 13
5
会
WaveGuard
13
Page 14

"OK"
/
媒体文件
"OK"
/
媒体文件
"OK "
/
.
4
一般录像
"OK "
"OK"
视频文件
删除
/
"OK "
14
Page 15

/
"OK"
/
"OK"
/
"OK"
15
Page 16

6
微波眼功能(全天停车监控)
地
16
Page 17
7
微波眼全天停车监控
星光级夜视系统
2.7英寸液晶显示屏(960x240)
7
七
MOV
PCM
64M x 16 bit(1Gbit s)DDR3 SDRA M
64Mb SPI
-10°C 60°C
-20°C 7 0°C
Micro USB2.0接口,12V DC接口,
64GB)
5
32GB Class10
106.2 x 50.0 x 31.8毫米
17
Page 18

8
* 该记录仪仅适用于12伏电源供电的汽车,请使用原装
OBD供电接口,Micro USB接口仅用于数据传输。
*
32G
*
*
*
*
*
*
*
仍然无法满足您对汽车录像保护范围的要求,请将其更换
为质量更好的汽车贴膜,或在汽车贴膜上“开”一个小
窗。判断车膜是否影响微波眼功能:站在车头挥手,红灯
闪烁,则没问题。
在完全无光线或者照度极低的条件下,本产品无法拍摄清
*
晰影像。
24
控
70
°
C
控
GPS ETC
微波眼的监测范围。若通过调节系统设置
18
Page 19

•
•
•
•
•
8008-201-201
4009-201-201
19
Page 20

O X
1
2
O:
X:
OOOOOOO
O
O
O
GB/T 26572
GB/T 26572
O
O
20
Page 21

Table of Contents
1 Product Overview ..............................................................22
2 Quick Start ...........................................................................24
2.1 Inserting the Micro SD Card .............................24
2.2 Installing in a Vehicle .......................................... 24
2.3
2.4
2.5 Removing the Micro SD Card ...........................27
2.6 About the Micro SD Card ..................................27
3 User Interface.....................................................................29
4 System Settings ................................................................ 30
4.1 Setting Date and Time ........................................31
4.2 Function Settings ................................................. 31
5 Operating Instructions ....................................................32
5.1 Recording Videos ................................................ 32
5.2 Video Playback .................................................... 32
5.3 Deleting Videos ...................................................33
5.4 Locking Videos .....................................................34
6 Add-On Functions .......................................................... 35
6.1 WaveGuard Parking Monitoring ..................... 35
6.2 Driver Fatigue Alert ............................................. 35
7
8 Disclaimer ...........................................................................37
...................................27
..................... 27
................................................36
Page 22

Product Overvi ew
1
1
6
1. Bracket Holder
2. Micro SD card Slot
3. Lens
15
7. Up Button
8. Return/EasyCaptrue
Button
9. Micro USB Port
10. Status Indicator
11. Menu/OK Button
22
2
3
4
5
4. Slide Switch
5. Speaker
6. WaveGuard Indicator
7
8
9
10
11
12
13
14
16
12. DC Input Port
13. Down Button/Voice
Recording ON/OFF
14. Microphone
15. OBD Cable
16. DC Output Port
Page 23

User manual
3
English 22
GoSure
ADR900s
Bracket x 1
OBD Cable x 1
User manual x 1
Attention:
1. This device is equipped with an OBD power adapter.
The OBD is the car's On-Board Diagnostics interface
and can provide a constant power supply to the
device.
2.
user manual or ask the car dealer.
3. Please do NOT operate the device while driving!
4. Please take the Micro SD card out of the device after
any incident to prevent important videos from being
overwritten.
23
Page 24

Quick Start
2
2.1 Inserting the Mic ro SD Card
1. Insert the Micro SD card with the gold contacts
outward, toward the front of the device.
2. Push the Micro SD card until it clicks into place,
and slide the switch to ON.
2.2 Installing in a Vehicle
1. Peel o the protective plastic lm from the bracket.
24
Page 25
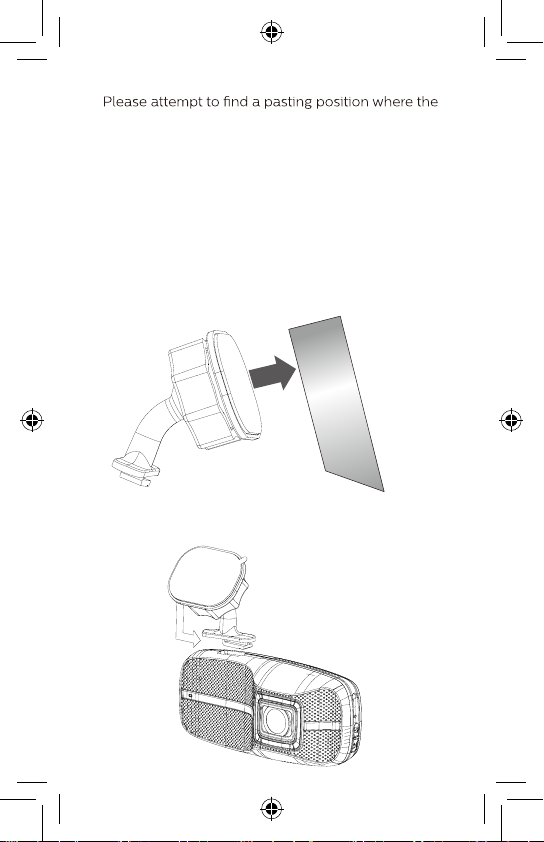
2.
portion of windscreen in front of the device's lens will
be cleaned automatically by the vehicle's windshield
wiper, and the device's status indicator can be easily
perceived by the driver's eyes. Please clean the
pasting surface of the glass beforehand.
Attention:
1. Please only proceed with pasting the bracket if the
environmental temperature is between 18 ~38°C, or
if the car's air conditioning is on.
2. The device should be installed in a position where it
will not block driver's view.
3. Mount the device after 24 hours. Attach the bracket
to the device. Slide it into the bracket holder until you
hear a click.
25
Page 26

4. Loosen the knob to adjust the device into the correct
position. Then tighten the knob to make sure the
device securely locked.
5. Connect the 12V DC connector of the OBD cable
to the DC Input port of the device.
6. Plug the OBD cable into your vehicle's OBD socket.
1
8
E
16
B
C
1
8
16
9
A
D
D
Attention:
1. In most cars, the OBD port is located in area A, B, C, D
or E.
2. The OBD cable should not hang unsafely or extrude
over 10mm from the car cabin.
3. The mounting of the device and the OBD cable should
NOT interfere with the normal operation of vehicle's
original equipment, such as the airbag, etc.
9
26
Page 27

1. Once the power of the vehicle is on, the device
automatically turns on.
2.
2.4 Manual Voice
1. When the voice recording
setting in System Setting is
OFF, press
voice recording.
2. When the voice recording
setting in System Setting is
ON, press
voice recording.
to switch on
2.5 Removing the Micro SD Card
Slide the switch to O, and push to eject the Micro SD
card out of the slot.
2.6 About the Micro SD Card
1. Please use a Micro SD card with capacity at least
32 GB, up to 64 GB, Class 10 or above.
2. Be sure to format the Micro SD card with the device
before usage.
3. Relationship between card capacity and recording
time:
27
Page 28

Micro SD Card
Capacity
32 GB 520 minutes 340 minutes 320 minutes
64 GB 1040 minutes 680 minutes 640 minutes
(720p/30 FPS) (720p/60 FPS) (1080p/30 FPS)
Video Resolution
Notes:
1. If the vehicle is not used for over a month, please
disconnect the OBD cable to avoid potential
excessive consumption of vehicle battery power.
2. Please use the dedicated OBD cable to avoid
noncompliance with the device.
3. Once connected to a PC via USB, the device only
allows data transferring.
4. To maximize parking monitoring time, you should
• Set the video resolution to 720p, to double the
valid monitoring time possible at 1080p.
• Use a 64 GB Micro SD card to double the valid
monitoring time possible with a 32 GB Micro SD.
5. Every Micro SD card has a limited lifetime, especially
if used for high-volume data reading/writing in
the-high vibration and high-temperature
environment of a car.
• Please use only a recommended Micro SD card.
• If you frequently receive the prompt "SD Abnormal,
please format
or replace it!", please replace it.
28
Page 29

User Interface
3
5
4
3
2
1
7
8
9
No. Description
1 Video recording/stop status indicator
2 Video resolution indicator
3 WDR (Wide dynamic range) ON/OFF indicator
4 Voice recording ON/OFF indicator
5 Emergency recording status indicator
6 Recording time
7 Driver fatigue index
8 ISO value
9 Date and time stamp
Status indicator
- Blue: Video recording status
10
11 Emergency button
6
10
11
29
Page 30

System Settings
4
Press "OK "
functions of the device.
4.1 Set Date and Time
1. Press " OK" to open the main
menu.
Date/Time
2. Use
/
to select the Date/
Date/Time
Time icon and press "OK" to
enter the Date/Time settings
menu.
3. To adjust the date and time
"OK " to select the
/
4. Use to select the value.
5.
6. Press the return button to save your changes.
4.2 Function Settings
Menu
Function
No.
Media
1
Files
2 Resolution
Parking
3
Surveillance
30
Description
icon
Watch and operate normal and emergency video
Users can play, pause, delete, lock, and unlock the
Set the video resolution to Full HD 1080p (FHD),
HD Premium (60 FPSHD+) or HD Premium (HD+).
1. Set the resolution of parking monitoring.
2. Switch parking monitoring ON/OFF.
3. Switch Waveguard indicator ON/OFF.
Page 31

Collision
4
Detection
Date/Time Set date and time for the device
5
LCD
6
Setting
Format Format your Micro SD Card.
7
Language Chinese and English are available for selection.
8
Voice
9
Recording
EV Value Manually adjust the exposure value.
10
Time
11
Stamp
WDR (Wide
12
Dynamic Range)
Driver
Fatigue
13
Alert
Battery
Protect
14
Voltage
Default Reset all device settings to default factory ones.
15
About
16
Select the sensitivity level of collision de tection to
or set the LCD to always on/o.
Switch the date and time watermark on the video
Adjust the low-voltage protection threshold of
the car battery.
Firmware version and other related product
information.
31
Page 32

Operating Instructions
5
5.1 Recording Videos
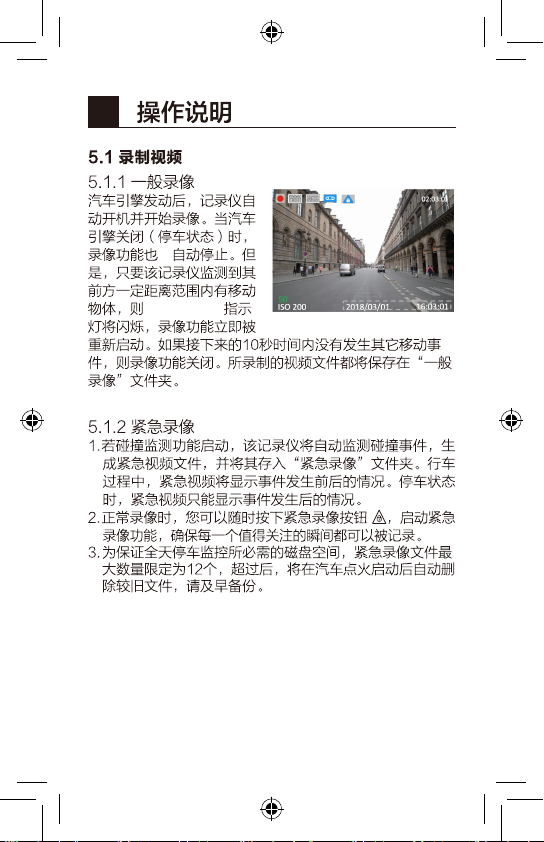
5.1.1 Normal Video Recording
When the engine of the
vehicle is on, the device
automatically turns on and
starts recording continuously.
When the engine of the
video recording will stop
automatically. However, if
any moving object at a
reasonable range in front of the device is detected, the
function will be activated immediately. If no further
movement occurs within 10 seconds, the video recording
be saved in the Normal video folder.
5.1.2 Emergency Video Recording
1. When the Collision Detection function is activated, the
device will automatically detect any collisions, create
video folder. If this occurs while driving, the emergency
video clip will show video before and after the event. If
this occurs while parked, the emergency video clip can
only show video after the event.
2. During video recording status, you can manually
create an Emergency Recording using the Emergency
will be recorded .
3. To ensure the necessary disk space for parking
restricted to 12. If that limit is exceeded, older ones
will be deleted automatically. In this case, please
backup before the vehicle engine is started.
32
Page 33

5.2 Video Pl ayback
1. Press "OK " to enter the
main Menu.
to select the
2. Use
/
Media Files icon and
press "OK" .
3.
/
Use to select the
Normal, Emergency Video,
and then press "OK".
Media Files
Media Files
4.
Use
/
Normal
"OK" and
then select Play to play it.
Video
5. During video playback, press "OK" to pause,
to fast forward, to rewind, or press the
return button to return.
5.3 Deleting Videos
1. Use
/
press "OK" and then select
Delete
to remove it.
Delete
33
Page 34
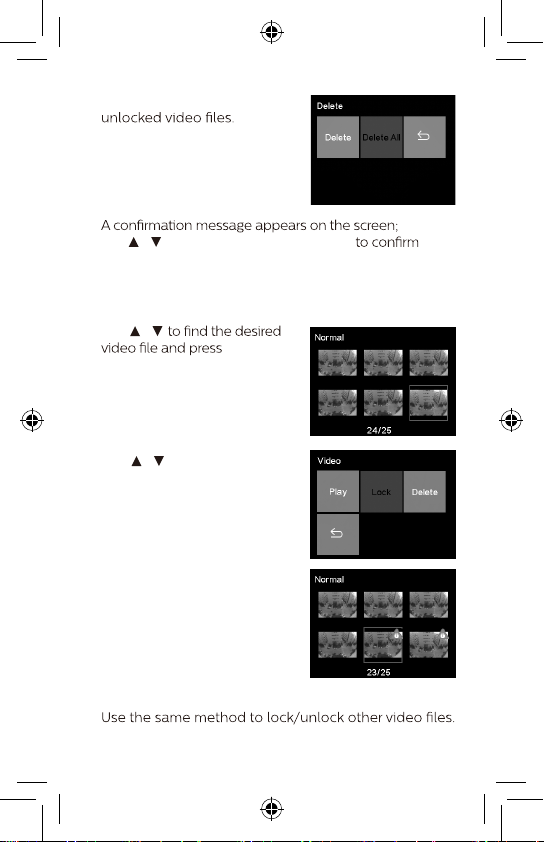
2. Select Delete All to delete all
3.
/
use
to select YES and press "OK"
deletion.
5.4 Locking Videos
To lock videos from being overwritten:
/
1. Use
"OK".
/
2. Use
to select Lock and
press "OK".
3. You will be automatically
returned to the video list,
and the selected video will be
locked.
4.
34
Page 35

Add-On Functions
6
6.1 WaveGuard Parking Monitoring
To protect your vehicle continuously while in parked
status, the device will start recording and save to the
Normal video folder whenever it detects moving objects.
The video recording function will be deactivated automatically to conserve vehicle battery power when there
are no moving objects detected. If the device detects any
collisions while in parked status, it will start video recor
and save to the Emergency video folder.
ding
6.2 Driver Fatigue Alert
To help vehicle drivers manage the development of their
fatigue, a fatigue index displays the development of the
driver's fatigue, taking into account physiological and jour
ney-related parameters such as time of day and time spent
driving. The device will alert the driver every two hours
of driving. If the fatigue index is less than 60, the value is
dis
played in green. Before the fatigue index reaches 80, a
yellow value is displayed with an alert sound. When the fa
tigue index is above 80, a red value is displayed with 3 alert
sounds and a fatigue icon pop up to alert the user. (System
time needs to be set correctly when the user switches on
fatigue index will not be displayed on the screen.
-
-
35
Page 36

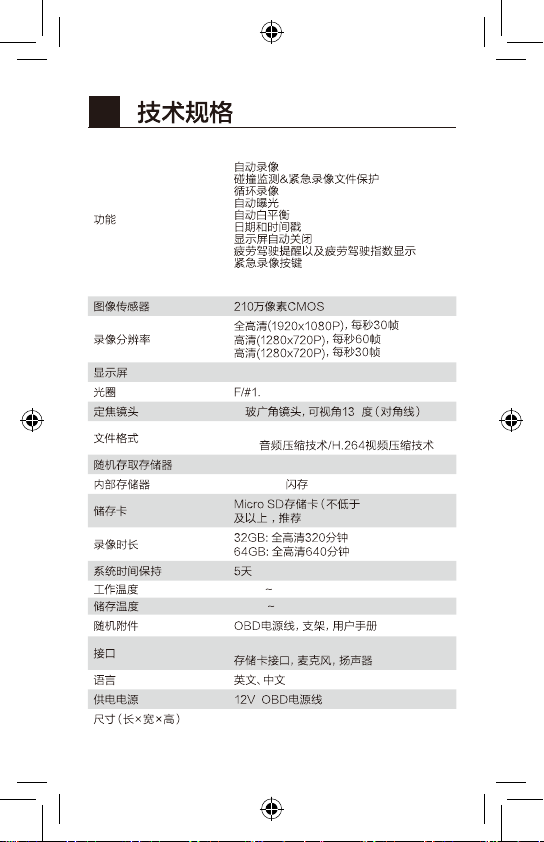
7
WaveGuard parking surveillance
Automatic video recording
protection
Seamless loop recording
Functions
Image Sensor 2.1 Megapixel CMOS
Video Resolution
Display 2.7'' LCD (960 x 240)
Aperture Range F/#1.7
Fixed Lens
File Format
Random Access Memory 64 M x 16 bit (1 Gb) DDR3 SDRAM
Internal Memory 64 Mb SPI Flash
Recording Media
(external memory)
Recording Time
RTC 5 days
Operating Temperature -10°C ~ 60°C
Storage Temperature -20°C ~ 7 0°C
cessories OBD cable, Bracket, Quick Guide
Ac
Interface
Languages English, Chinese
Power 12 V OBD cable
Dimensions (LxWxH)
36
Auto exposure
Auto white balance
ate and time stamp
D
Driver fatigue alert and fatigue index display
Emergency recording button
Advanced night view
Full HD (1920 x 1080p) @ 30 fps
HD Premium (1280 x 720p) @ 60 fps
HD Premium (1280 x 720p) @ 30 fps
7G wide-angle lens,
FOV 135° (Diagonal)
MOV
PCM audio compression/H.264 video
compression
Micro SD card
(at least 32 GB, class 10 or higher,
64 GB recommended)
320 min @ 32 GB for full HD
640 min @ 64 GB for full HD
Micro USB 2.0, DC port, Micro
SD Slot, Microphone, Speaker
106.2 x 50.0 x 32mm
(4.2 x 2.0 x 1.3inches)
Page 37

Disclaimer
8
The device is only suitable for 12V power supply
*
vehicles, please use the original OBD power cable.
Micro USB port is only used for data transmission.
To achieve 24/7 protection with video surveillance, the
*
memory card capacity must be at least 32 GB.
The device can only detect and record moving objects
*
within a limited range, and in the direction that has lens
coverage, but cannot detect any events in the reverse
direction. If you need wider vehicle protection, please
purchase 2 devices, one for forward-facing surveillance
and the other for
When the vehicle's cabin temperature exceeds 70°C, to
*
protect the vehicle's security, the device will be powered
lance will be paused.
In low temperatures in winter, or if the vehicle's battery
*
has been in use for a long time or is not fully charged, the
If the windshield becomes dirty in front of the device's
*
lens due to rain, snow, sandstorm or other natural or
evidence.
Rain, snow, swaying tree branches or busy streets/park-
*
ing lot environments will sometimes cause the video
protection time will be greatly reduced.
When the engine of an auto-start-stop enabled
*
vehicle is restarted and the battery voltage is reduced
to lower than the voltage protection threshold, the
device may be rebooted.
*
detection range. If the protection range adjustment in
the System Setting menu is still not satisfactory, please
for the device.
back-facing.
“open”
-
37
Page 38

in front of the vehicle and wave your hand, and the red
Under no light and extremely low light environment,
*
the device cannot take clear video.
38
Page 39

Page 40

Lumileds is the warrantor of this product.
Philips trademarks are used under license
from Koninklijke Philips N.V. (2018).
© Lumileds Holding B.V. 2018.
All rights reserved
3211 008 23241
 Loading...