

Page 1
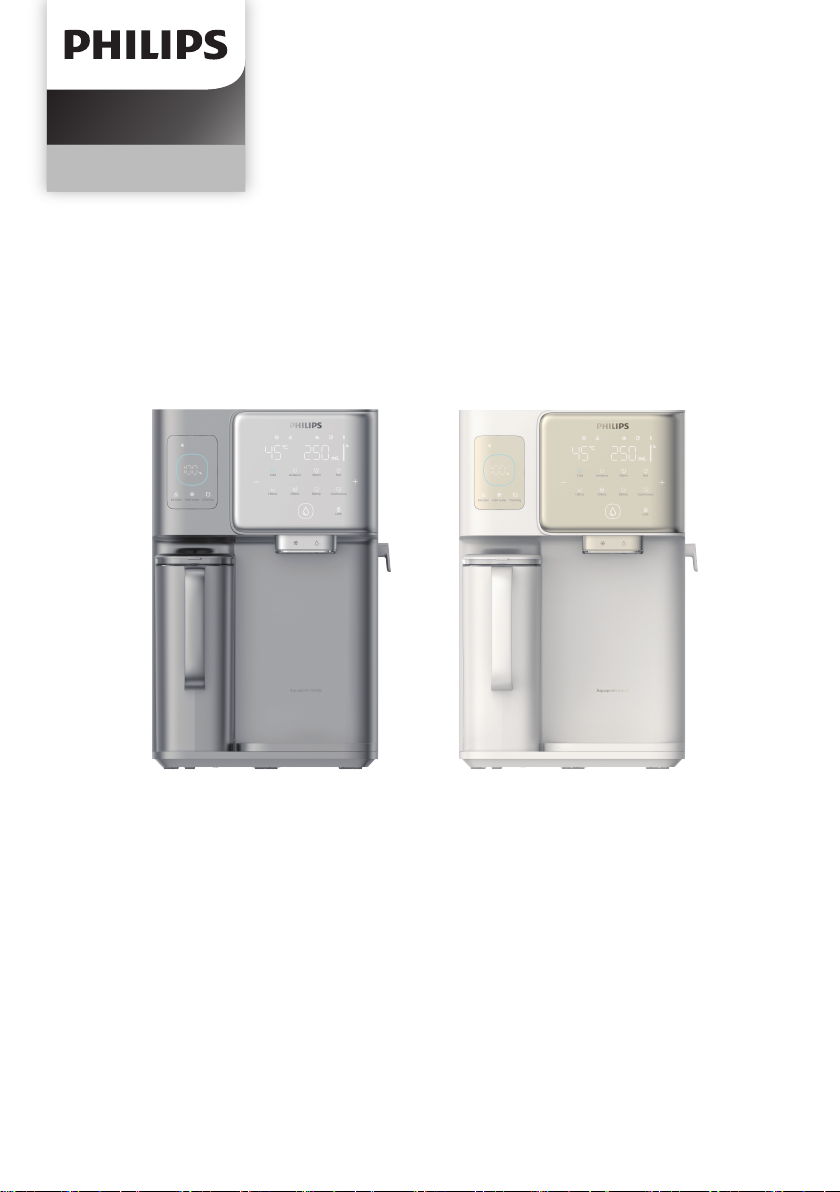
RO Dispenser
ADD6922 series
User Manual
Page 2

Page 3
CONTENTS
English
Important Safety Information1
2
Product speci�cations
Product overview3
4
Control Panel (status indicators)
5
Product setup
6
Usage instructions
7
Daily maintenance
8
Troubleshooting
1
5
6
7
9
16
28
35
9
Packing list
10
Guarantee and support
37
37
Page 4

1 Important Safety Information
Please adhere to the following safety instructions to ensure proper use and to prevent accidents or
injuries. All safety precautions are designed to enhance your experience and maintain the longevity
of the machine.
• Authorized Accessories Only: Only use accessories approved by the manufacturer. Using
unauthorized accessories voids the warranty and may lead to malfunction.
• Inspect After Unpacking:
accessories are included.
• Plastic Bag Warning:
risks.
• Water Quality Requirements: Use only municipal tap water with this machine to maintain
optimal performance.
• Avoid Unknown Substances: Do not pour unknown liquids, non-municipal water, or foreign
• Avoid Over�lling:
the outlet.
• Handle with Care: Always handle the machine carefully to avoid accidental dropping, which
could cause injury or damage.
• Keep Out of Reach of Children and Pets: Position the machine in an area that is inaccessible to
children and pets.
• Supervised Use: Children and individuals with limited ability to operate machinery should only
use the machine under adult supervision.
• Proper Placement: Place the machine in a cool, dr y indoor area away from direct sunlight,
heating equipment, or high-temperature areas.
• Avoid Combustible Gases: Do not place the machine in areas where combustible gas leakage
may occur or is likely to occur.
• Electrical Safety: Never plug in or unplug the power plug with wet hands to avoid electric shock.
• Do Not Modify or Overload: Do not attempt to disassemble, modify, or place heavy objects on
1
Page 5

• Extended Non-Use: If the machine will not be used for an extended period, disconnect the
• Temperature Guidelines:
may cause freezing and component damage.
• Indoor Use Only: This machine is intended for indoor use only and must be connected to a
properly grounded three-core socket.
User Safety and Accessibility Guidelines
• This appliance is not intended for use by individuals (including children) with reduced physical,
sensory, or mental capabilities, or lack of experience and knowledge, unless supervised by a
responsible person.
• Children aged 8 and above and vulnerable individuals may use the machine only with proper
supervision and instruction to ensure safe usage.
• Children should not play with the machine, and maintenance tasks should not be performed by
children without supervision.
Additional Precautions
• Water Replacement:
use or after extended periods of non-use.
• Use Authorized Parts:
• Cleaning Instructions: Avoid using gasoline or other organic solvents to clean the exterior of the
machine. Disconnect the power before cleaning, and use a damp cloth to gently wipe the surface.
• Malfunction Protocol: If a malfunction occurs, unplug the machine immediately and discontinue
use until it is repaired.
• Product Updates:
due to upgrades. Always refer to the actual product for accurate information.
• Hot Water Warning:
before dispensing at the desired temperature.
2
Page 6

• Filtered Water Jug: If the machine has been unused for more than 24 hours, it is advisable to
• Power Cord Safety: If the power cord is damaged, stop using the machine immediately. The
power cord should only be replaced by authorized professionals to avoid hazards.
• Unauthorized Repairs: Do not attempt to disassemble or repair the machine yourself. Only
authorized personnel should per form repairs to prevent potential risks.
• Liability Disclaimer: The manufacturer is not responsible for any consequences resulting from
failure to follow the safety precautions listed above.
Intended Use in Residential and Commercial Settings
This appliance is suitable for use in:
• Farmhouses, hotels, motels, and other residential settings.
• Bed and breakfast establishments.
• Catering and other similar non-retail applications.
Safety Warnings and Usage Precautions
• Avoid spillage on the connector.
• Misuse may lead to injury; handle with care.
• Heating element sur faces may retain heat after use.
• Only use potable water.
• Keep ventilation openings clear and unobstructed.
• Do not use non-recommended methods to accelerate defrosting.
• Avoid damaging the refrigerant circuit (if applicable).
• Do not use electrical appliances inside the food storage compartment unless recommended by
the manufacturer.
• Position the appliance so that the power cord is not trapped or damaged.
3
Page 7
• Avoid placing multiple portable sockets or power supplies behind the appliance.
Food Safety and Cleaning Guidelines
To avoid food contamination:
• Regularly clean sur faces that come into contact with food and accessible drainage systems.
growth.
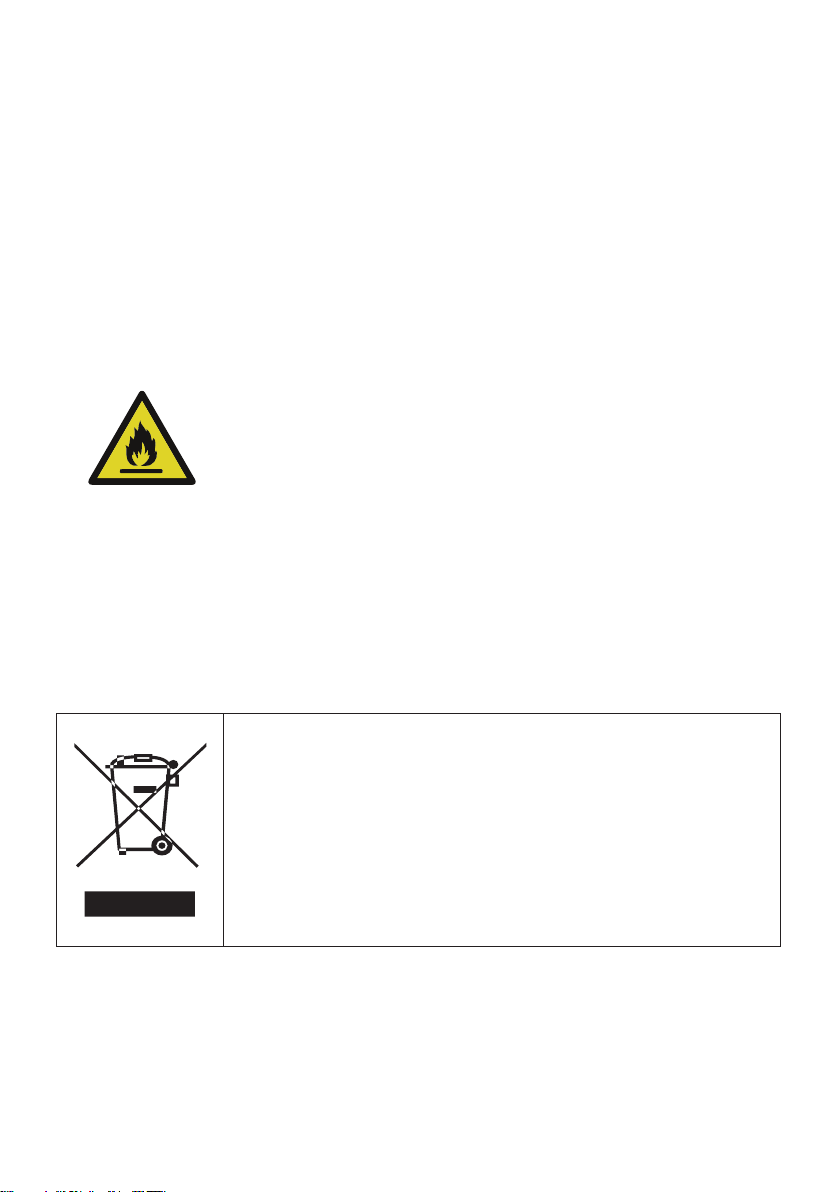
[symbol ISO 7010 W021
(2019-07)]
Warning: Risk of �re / Flammable
materials
Warning!
Refrigerators contain refrigerant and gases in the insulation. Refrigerant and gases must be
disposed of professionally as they may cause eye injuries or ignition. ensure that tubing of the
refrigerant circuit is not damage prior to proper disposal.
This marking indicates that this product should not be disposed with
other household wastes throughout the EU. To prevent possible harm
to the environment or human health from uncontrolled waste disposal,
recycle it responsibly to promote the sustainable reuse of material
resources. To return your used device, please use the return and
collection systems or contact the retailer where the product was
purchased. They can take this product for environmental safe recycling.
4
Page 8
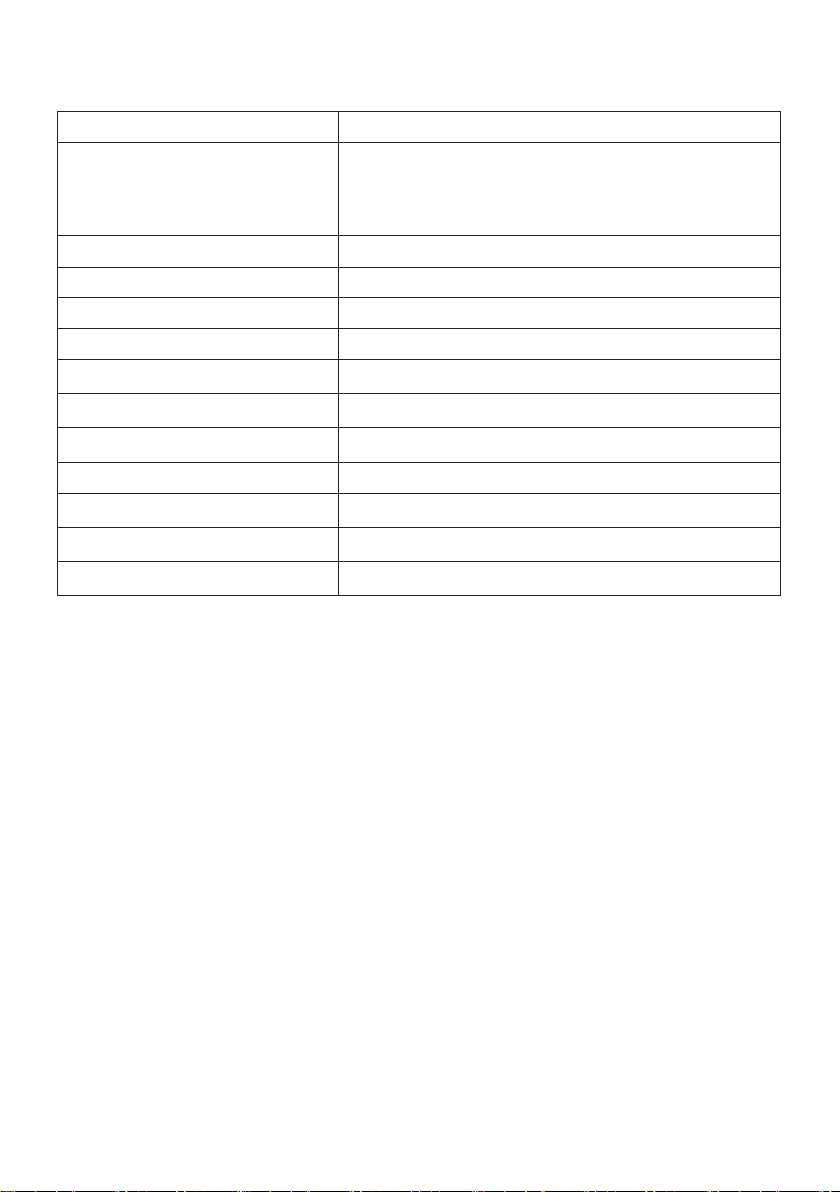
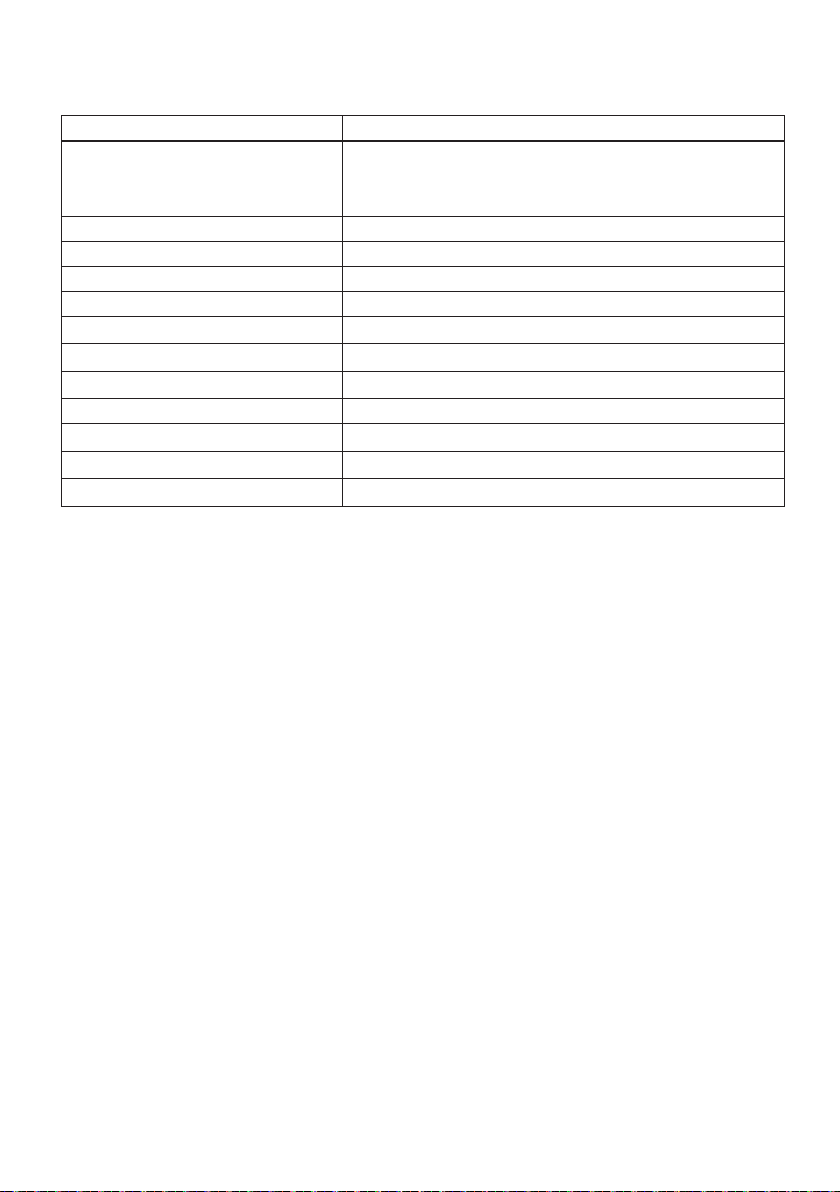
2 Product speci�cations
Philips Water DispenserProduct name
Product model
Rated frequency
Rated heating power
Rated cooling power
Rated cooling current
Climate class
Refrigerant
Rated total water production
Applicable water source
Applicable water temperature
ADD6922CG/97; ADD6922DG/79
Rated voltage
ST/N/SN/T
Municipal tap water
5-38℃
5
Page 9
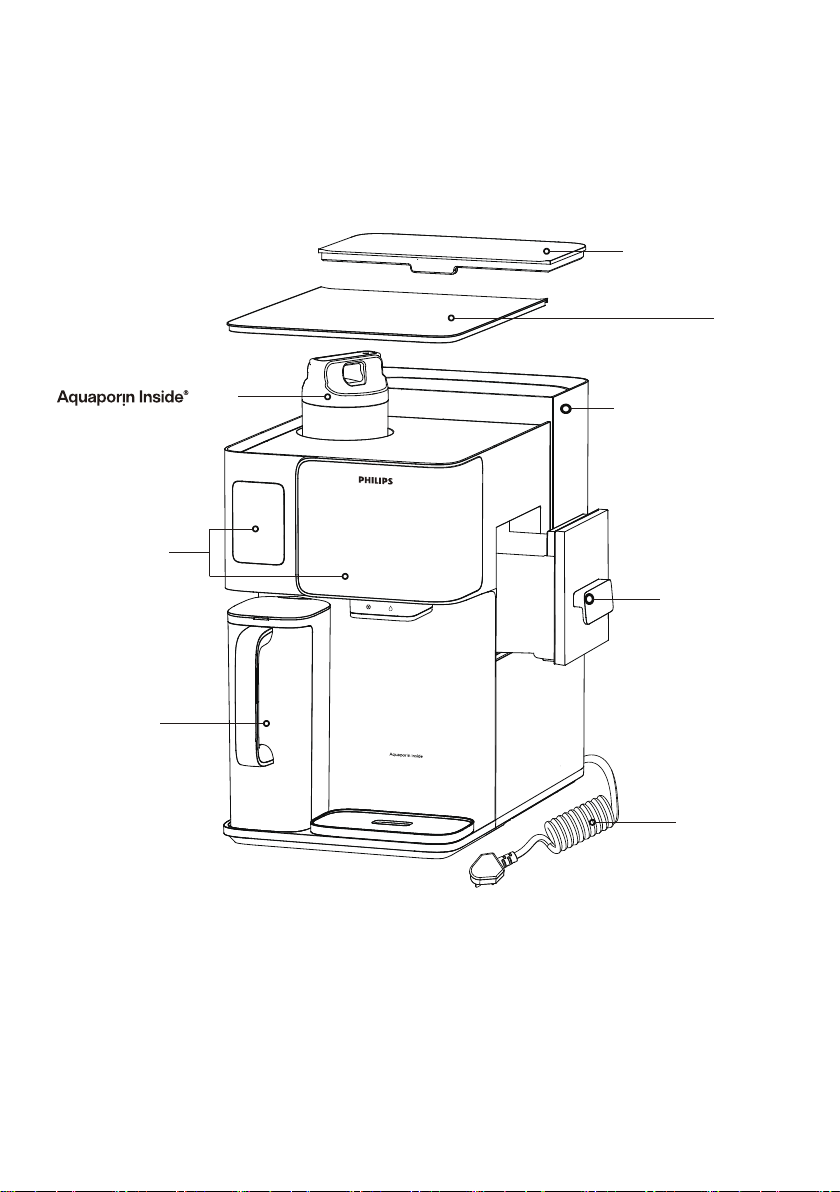
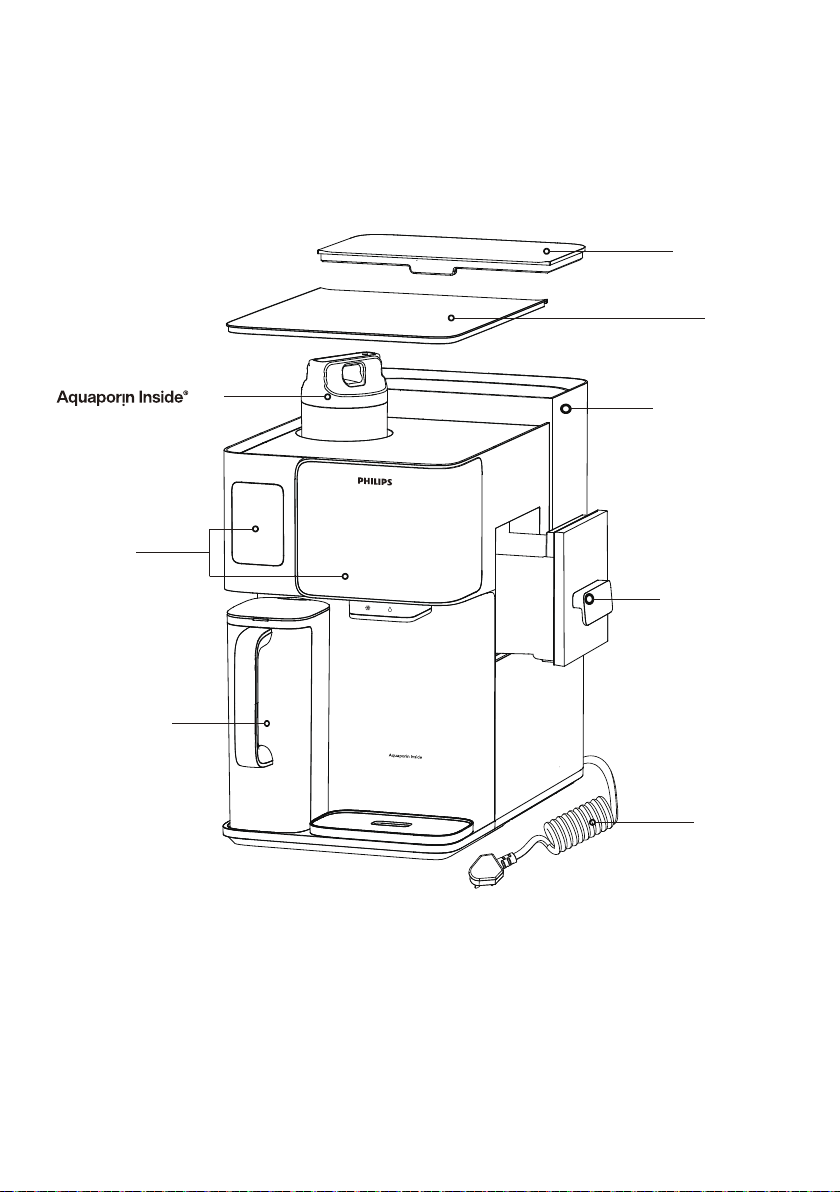
3 Product overview
Tap water tank lid
Top lid
Reverse Osmosis Filter
Display panel
1.4L �ltered
water jug
6.0L tap water tank
0.35L Ice box
Power cord
6
Page 10
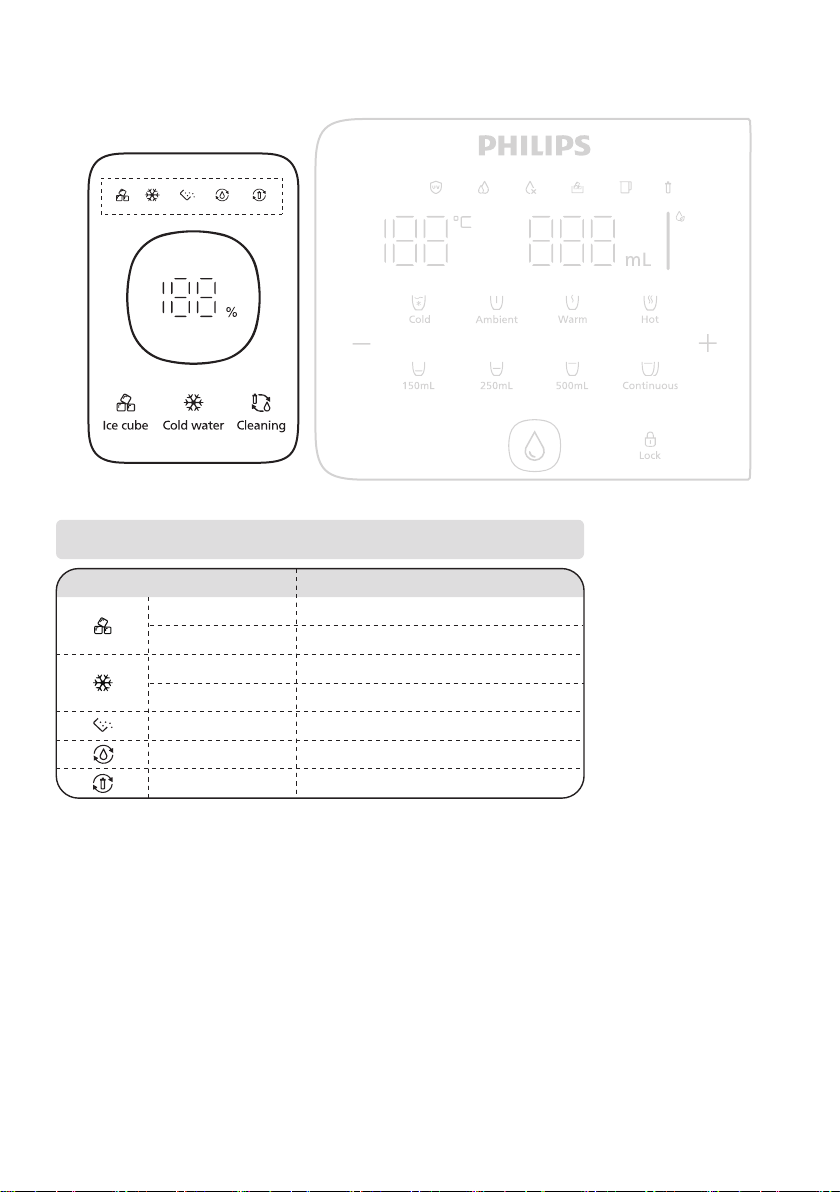
4 Control Panel (status indicators)
4.1 Water-cooling and Ice-making status indicators
Status Meaning
Flashing Ice cubes making in process
Constant light
Flashing
Constant light
Flashing
Flashing
Flashing
Ice cubes making completed
Chilled water making in process
Chilled water making completed
Empty the ice box in process
Waterway cleaning in process
7
Page 11
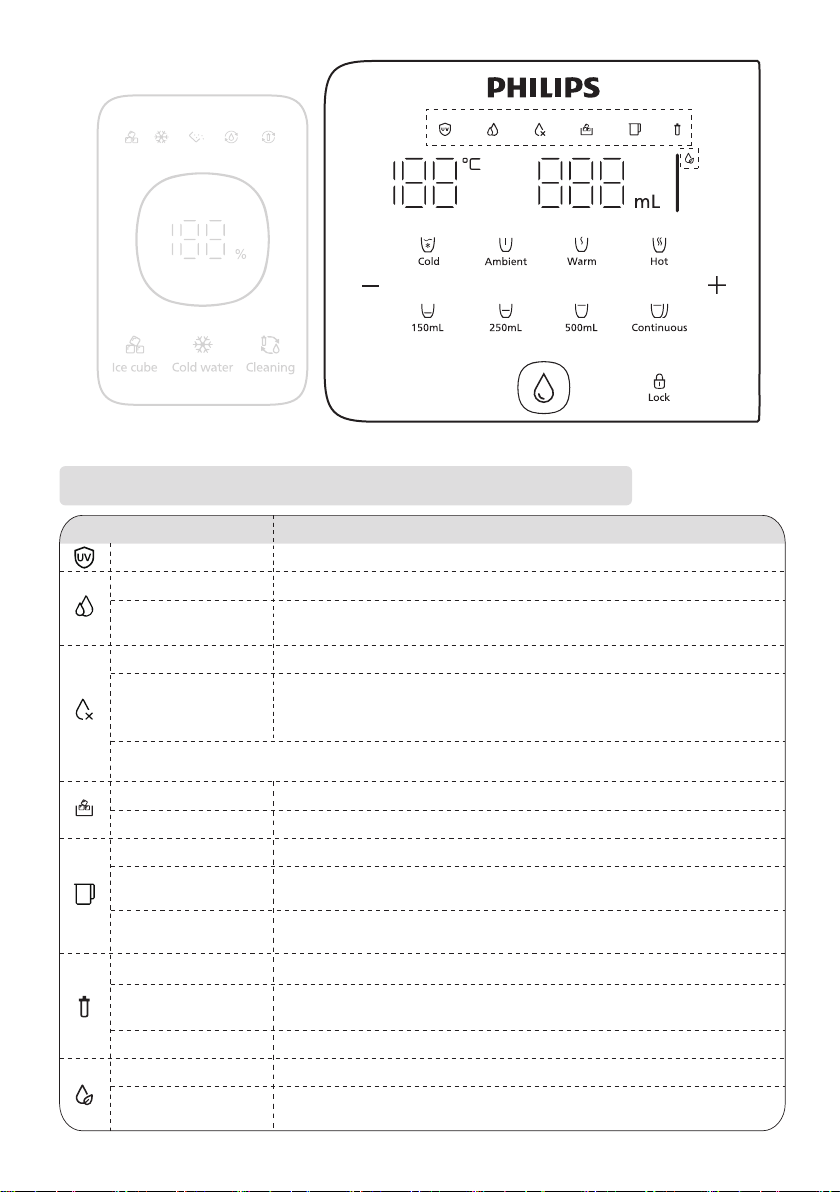
4.2 Water-�ltration and Water-quality status indicators
Status Meaning
Constant white light
Constant white light Filtration in process
Flashing white light
Flashing white light The tap water in the tap water tank has not been replaced for a long time.
Flashing red light
* The remaining w ater in the tap water tank w ill be a mixture of RO drai n water and fresh t ap water. The tap wa ter tank
Constant white light Ice box is in place.
Flashing white light Ice box is not in place. Please put it back in time after taking out the ice
Constant white light Filtered water jug is in place.
Flashing white light
Flashing red light
Constant white light Filter is within its lifespan, feel free to use.
Flashing red light
Constant red light
White light The water quality is good and safe to drink
Yellow light
The tap water in the tap water tank is at a low level or the water
quality is poor, please empty the remaining water in the tank and
Filtered water jug is not in place. Please put it back before
dispensing water.
The water quality is in low level and recommended to discard the
8
Page 12
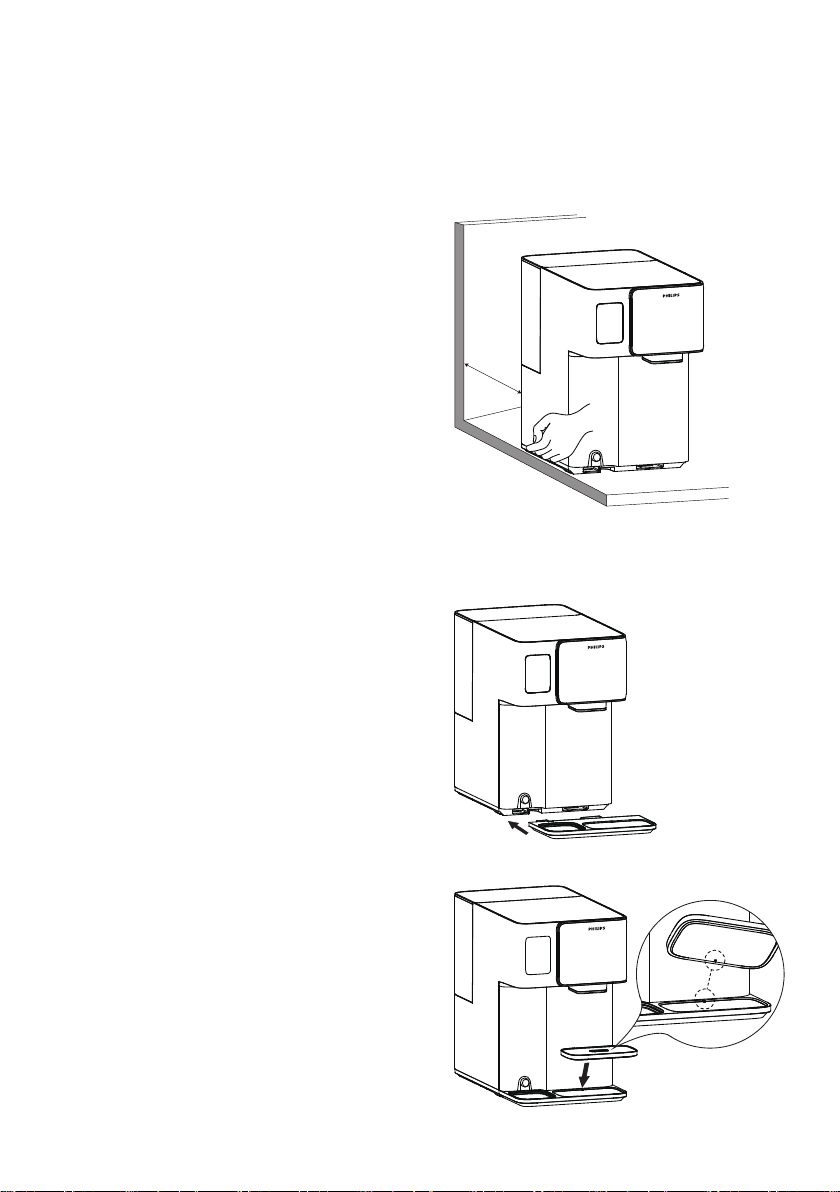
5 Product setup
Preparation:
Product Placement:
wall to ensure optimal cooling.
Installing the Water Tray:
main unit.
20cm
press to insert.
9
Page 13
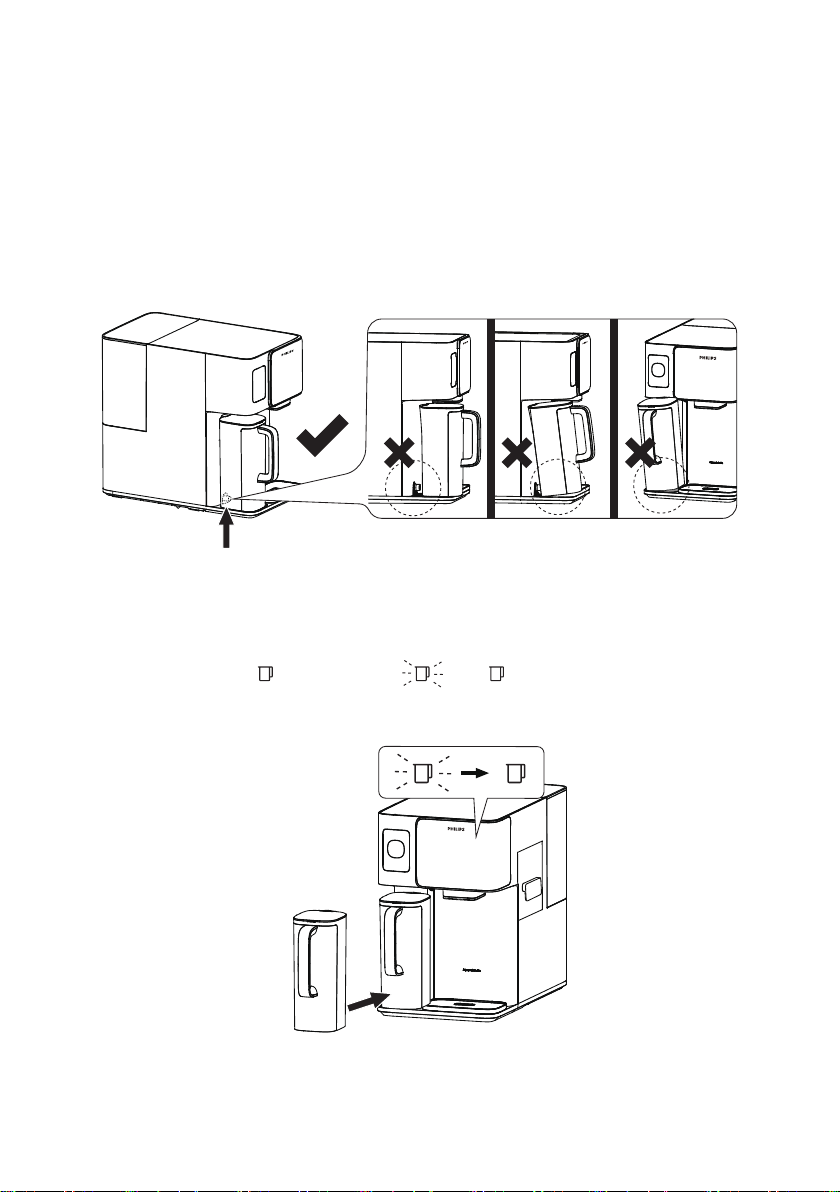
Installing the Filtered Water Jug:
• Align the Water Jug:
• Insert the Jug: Carefully inser t the jug into the main body of the unit.
• Ensure Proper Fit: Push the jug all the way in until you feel it securely slot into place.
• Check for Flat Placement:
gaps or tilting.
Status Check:
Not installed
Not installed
Installed
10
Installed
Page 14
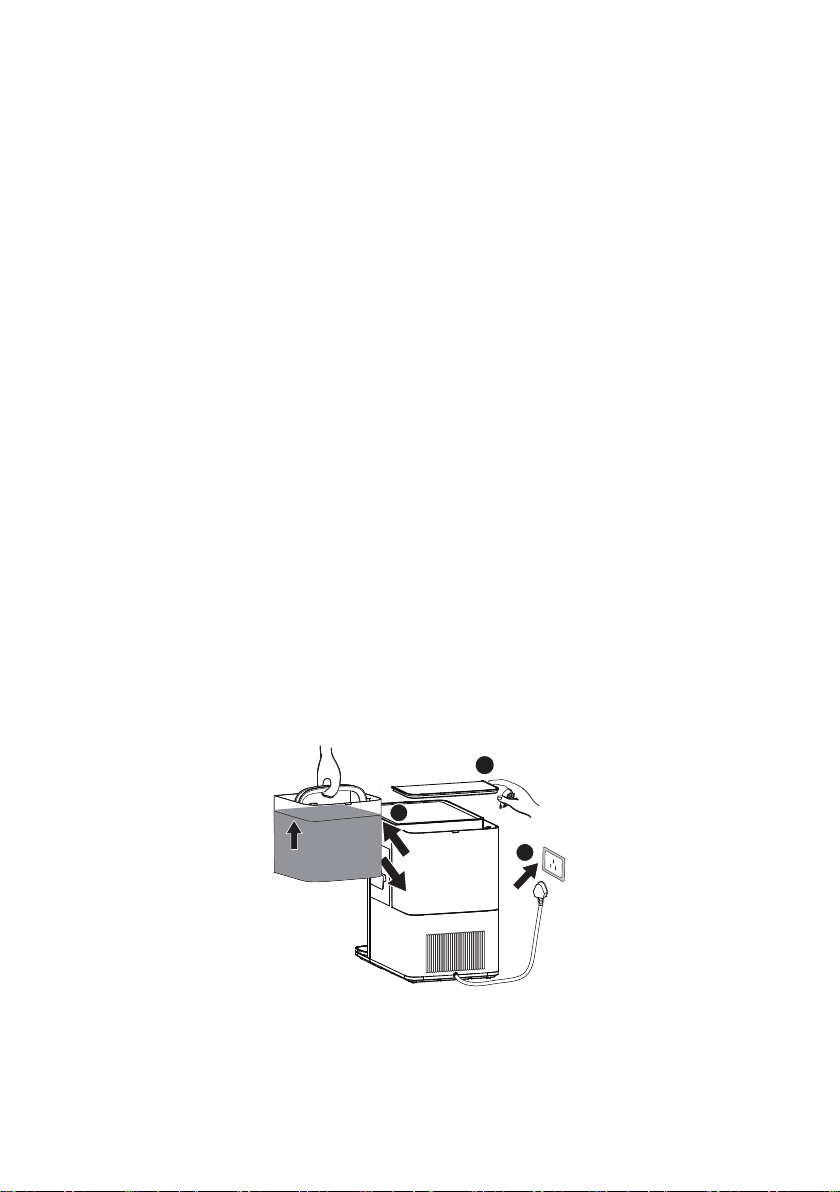
2 hours wait before cooling activation
For optimal performance, please allow the product to remain powered on for at least 2 hours
before activating the cooling function. As the produc t includes a compressor-based refrigeration
system, it may have experienced movement during transportation, which could impact its
operation if not allowed time to settle. To protect the system, the cooling function is
you may still use other functions of the product as normal.
Water Flushing (Before First Use)
• Place the product in a location away from direct sunlight to prevent microorganism growth.
Flushing Process:
1. Fill the Tap Water Tank:
• Open the lid and remove the water tank from the machine.
1
2
3
11
Page 15
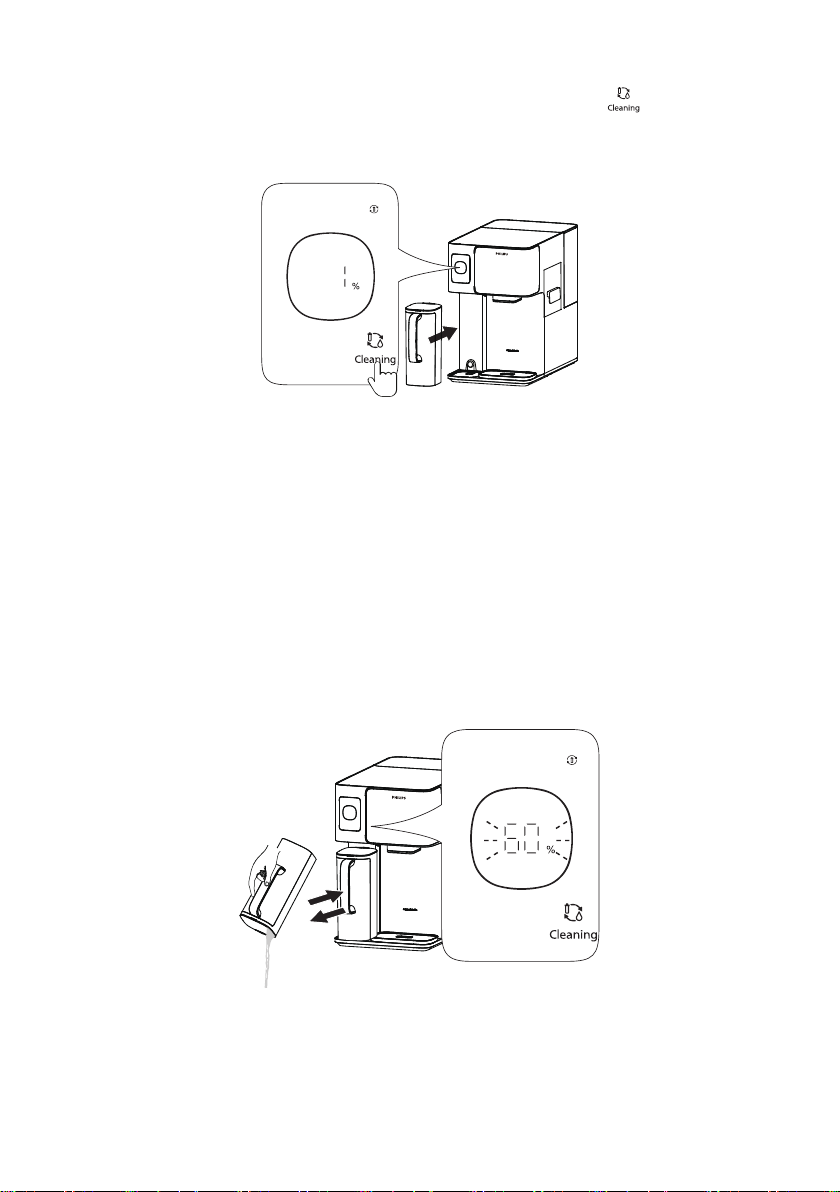
2. Start the Flushing Process:
seconds
3s
Important:
12
Page 16
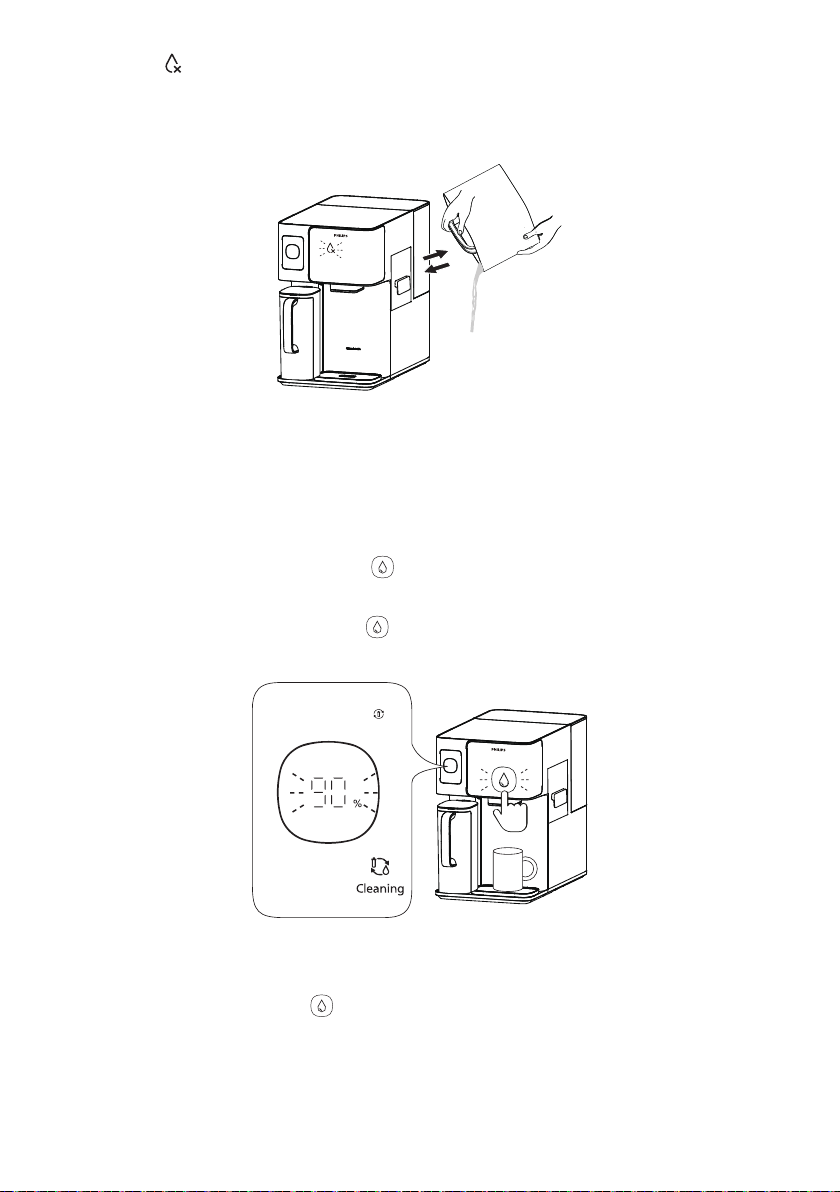
tank back
Important:
Do not add water directly to the tap water tank, otherwise the appliance will not recognize that the
water has been refreshed.
Reminder:
13
Page 17
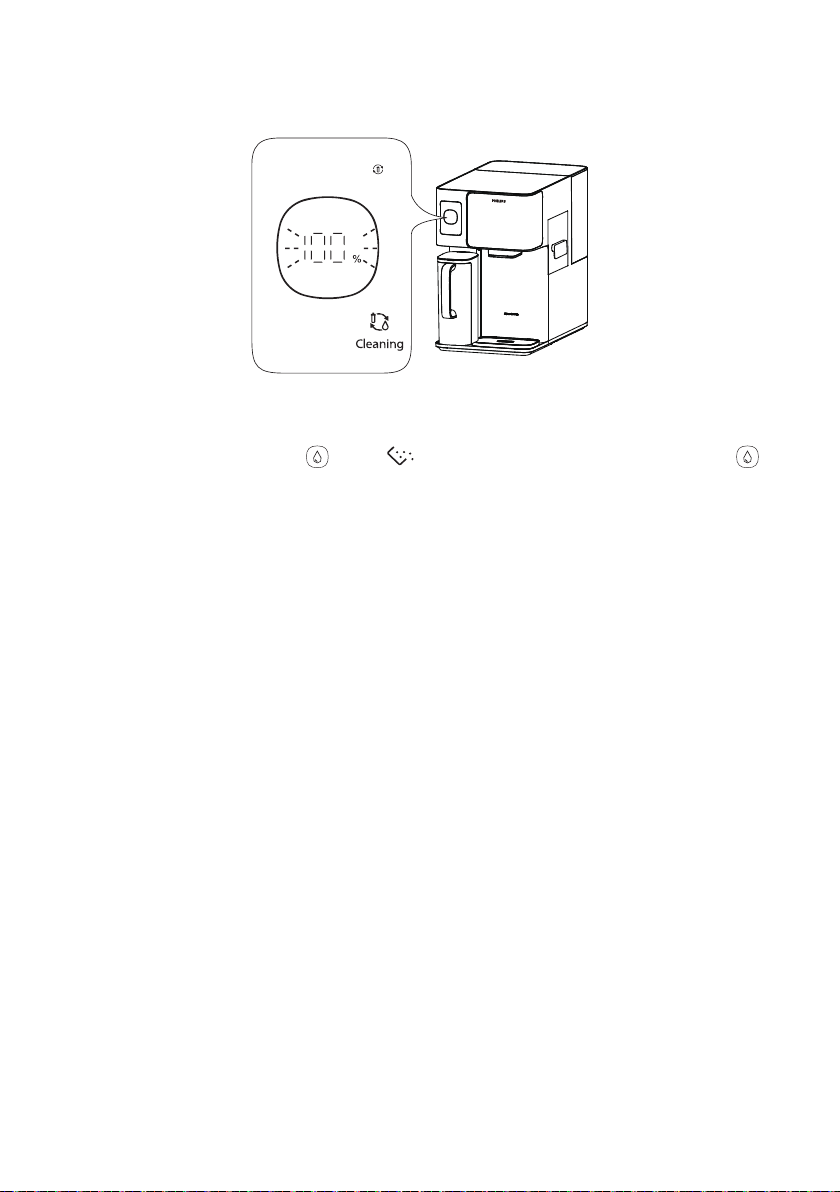
product.
Reminder:
to empty the cooling tank.
Important Notes for Flushing:
seconds. However, doing so is not recommended.
This is normal and nothing to be concerned about.
• If you notice any water leaking, hear abnormal sounds, sense burning smells or see smoke,
immediately disconnect the power and contac t customer ser vice.
• If the water in the tank or jug appears cloudy or milky, this is due to microbubbles created by the
normal.
14
Page 18

Boiling Point Calibration
Check and Adjust the Local Boiling Point:
To prevent excess steam, ensure the local boiling point is properly calibrated. This is crucial to avoid
excessive steam during the process.
Automatic Boiling Point Calibration:
boiling point.
• Important:
calibration process to catch the water. Be cautious of steam to avoid burn hazards.
Important Notes:
• Once calibration is complete, the machine is ready for normal use.
• Ensure the water jug is full before performing this calibration (the water-making light should be
ejection. Stay cautious to prevent burns.
15
Page 19
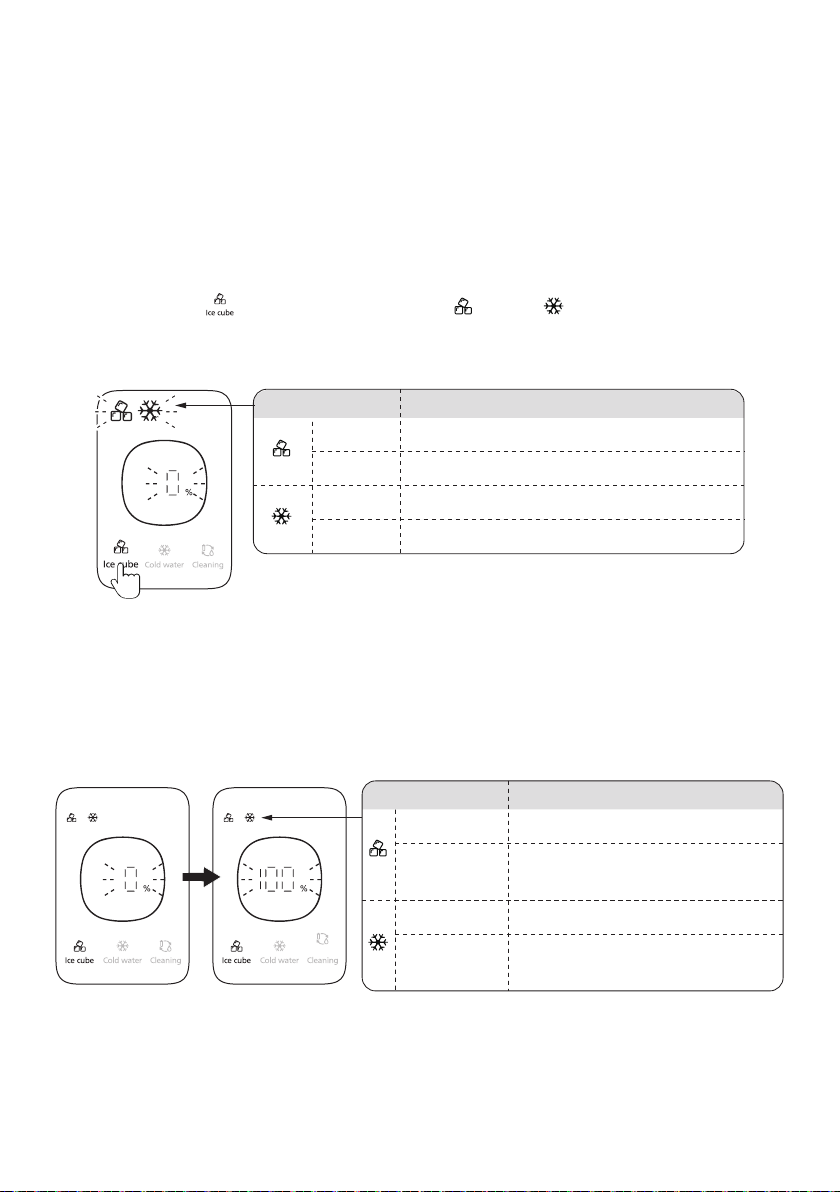
6 Usage instructions
6.1 Ice Cubes and Chilled Water Production
Note: Activating the ice cubes produc tion will also activate the chilled water production.
A. Activate Ice cube & Chilled Water production
that the function is activated
Status Meaning
Ice making function is not activated
Flashing
Ice making in process
Chilled water making function is not activated
Flashing
3s
Chilled water making in process
B. Ice Cubes production cycles (batches)
Status Meaning
Flashing light
Constant light
Flashing light
Constant light
Ice cube making cycle in progress.
Ice box is at full capacity. Ice cube
making cycle completed
Water chilling process in progress
Water in chilled water tank has
eached 5°C. Chilling function paused.
16
Page 20

C. Auto re-start of ice cube production cycles
• After the ice cubes are being taken or chilled water is dispensed, the machine willautomatically
• Wait until the indicator stays on steadily, which means the ice cubes or chilled water are ready
again.
Important Note:
• Not recommended to take out ice cubes or chilled water during the ice-making process to ensure
• The speed of making chilled water depends on the temperature of the tap water.
17
Page 21
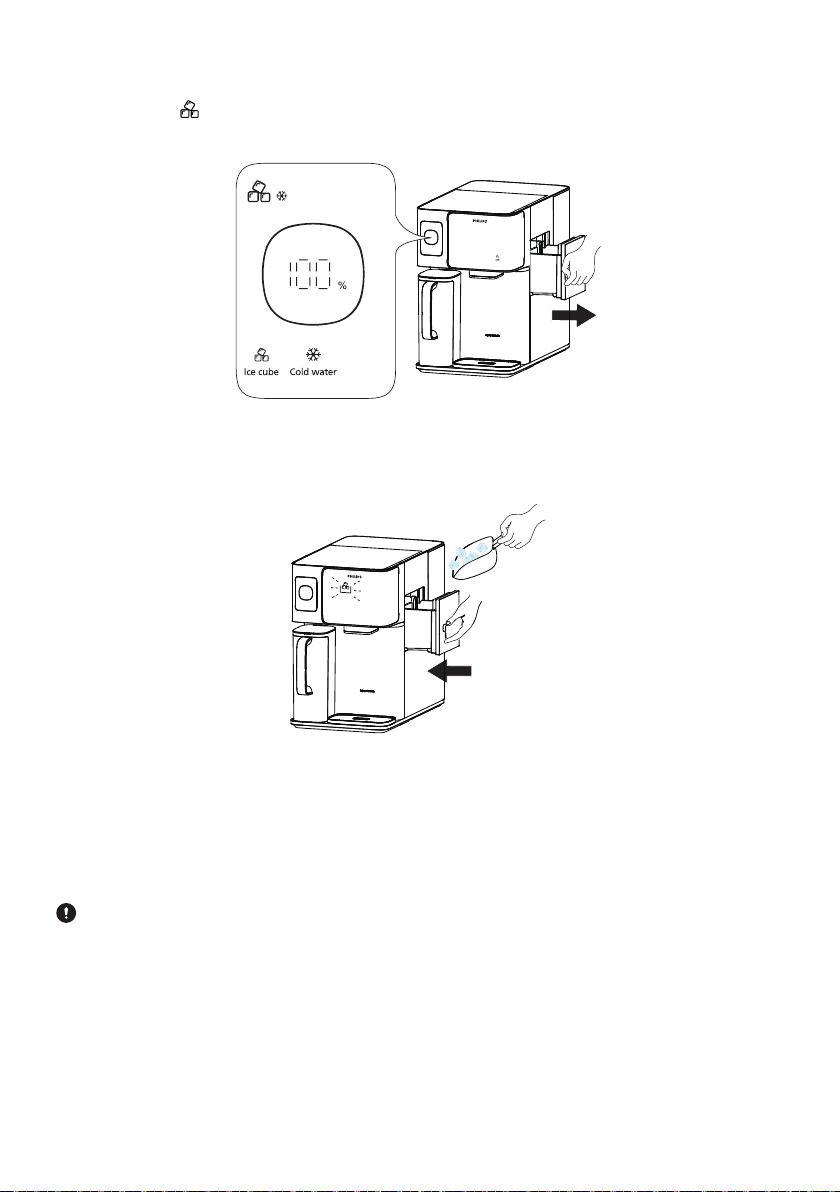
D. Taking Ice Cubes
2. Take out the ice cubes you need, then quickly return the ice box to the machine.
Reminder:
cube making function will be pause.
Important Note:
• Be careful not to dirty the ice box or place other food inside.
• Always return the ice box promptly to maintain the cold temperature.
• If the ice box is out for too long, there may be a delay before the ice-making function resumes,
which is normal.
18
Page 22
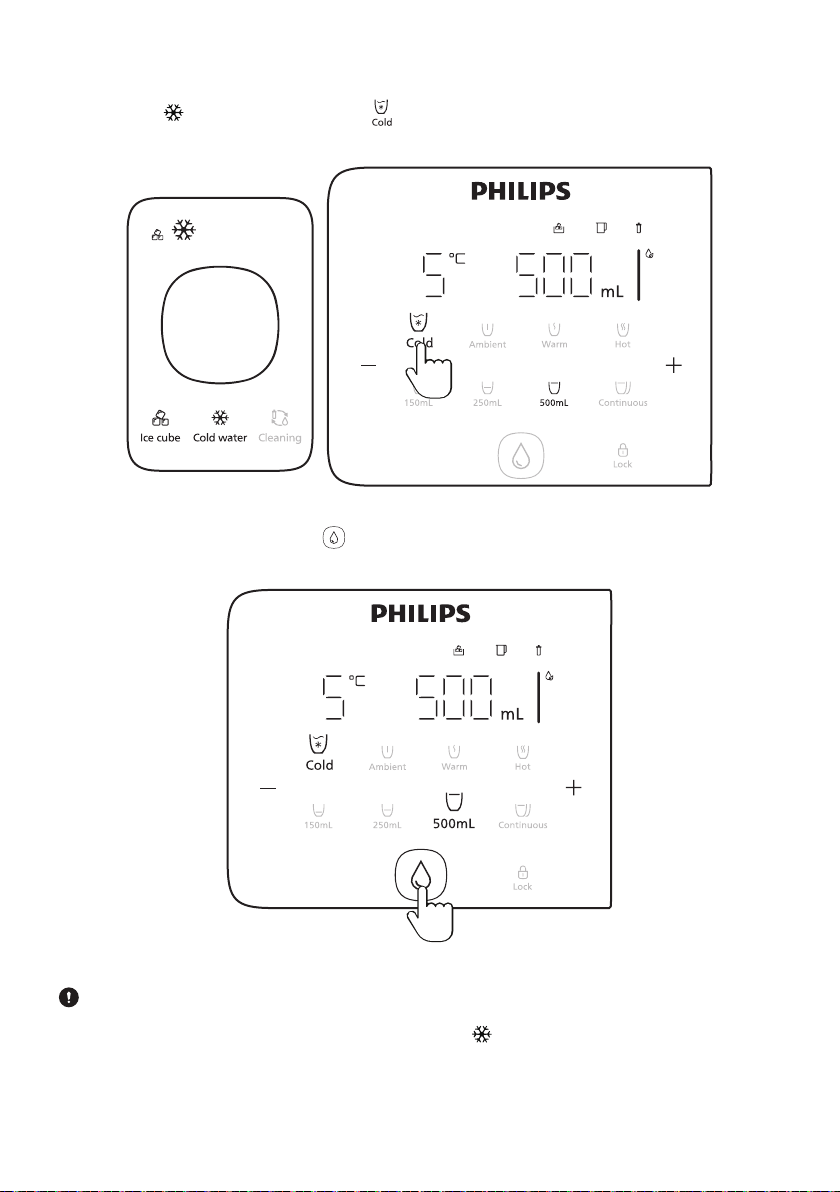
E. Extracting chilled water
Important Note:
being processed. Taking the chilled water at this time will result in a temperature higher than 5°C.
19
Page 23
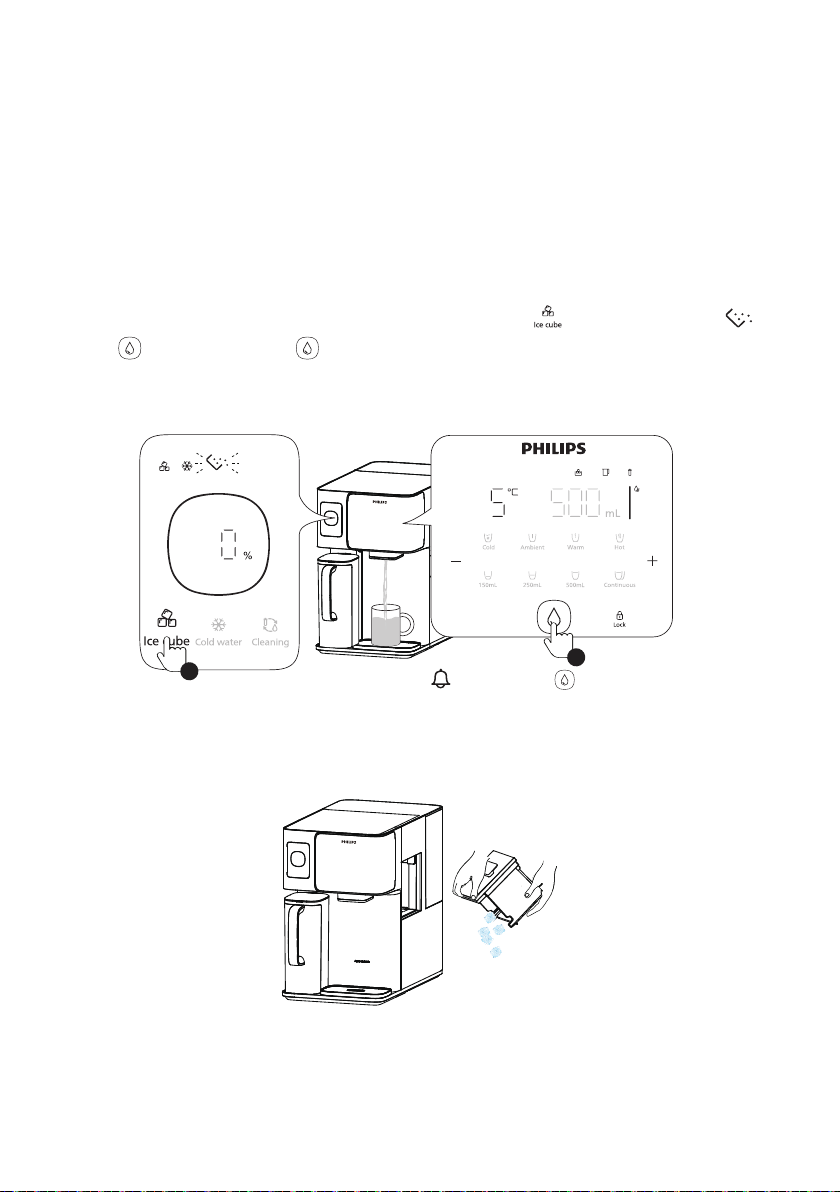
How to stop ice cubes and chilled water production:
water.
Follow the steps below to empty the chilled water tank and ice box completely to prevent bacterial
growth.
1. Empty the Cooling Tank and Ice Box:
3s
1
• While the water is draining, take out the ice box and pour out the ice cubes.
Short pressagain to pause
20
2
Page 24
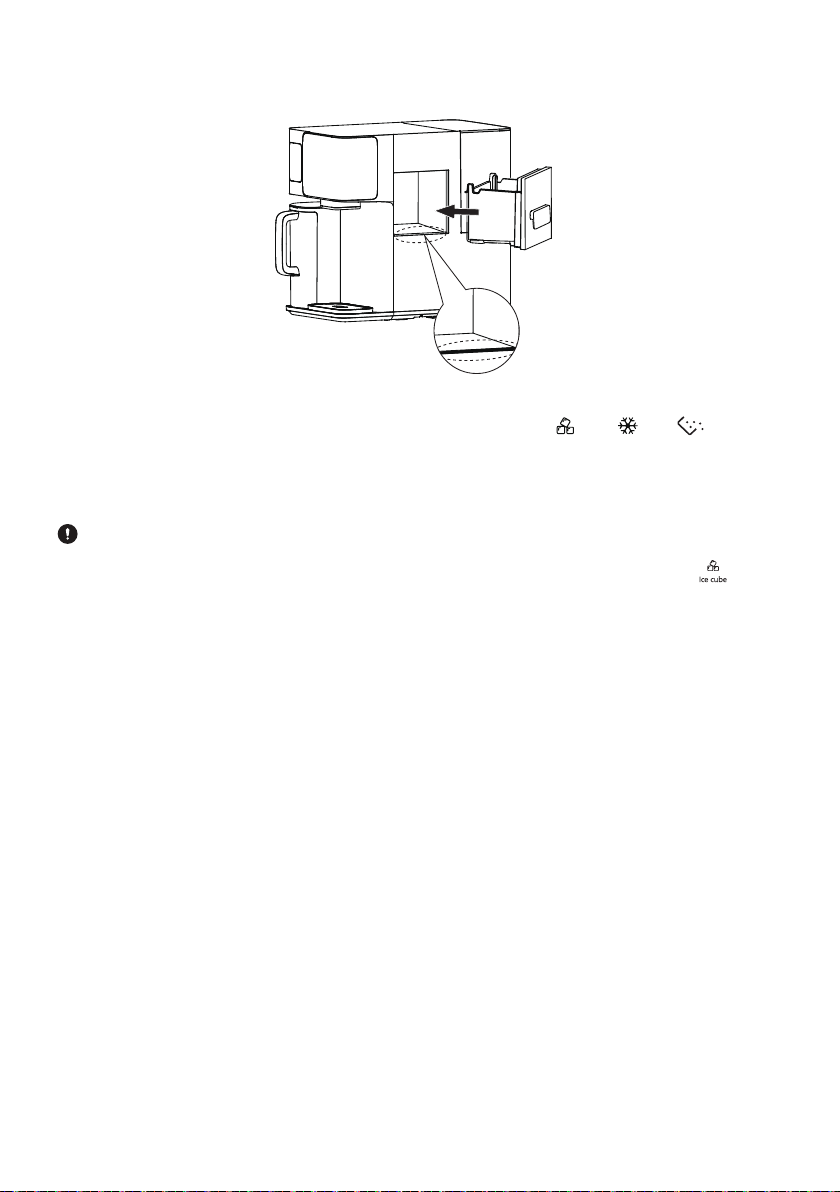
2. Clean the Ice Box: Wipe the ice box with a clean cloth, then place it back.
3. Con�rm complete:
Important Note:
seconds. The ice -making function will then resume.
• Do Not Unplug: Avoid unplugging the power during emptying. If you do, the emptying will stop,
and the ice-making will continue when the power is turned back on.
• Normal Sound: A sound will be heard during the emptying process - this is normal. The sound will
21
Page 25
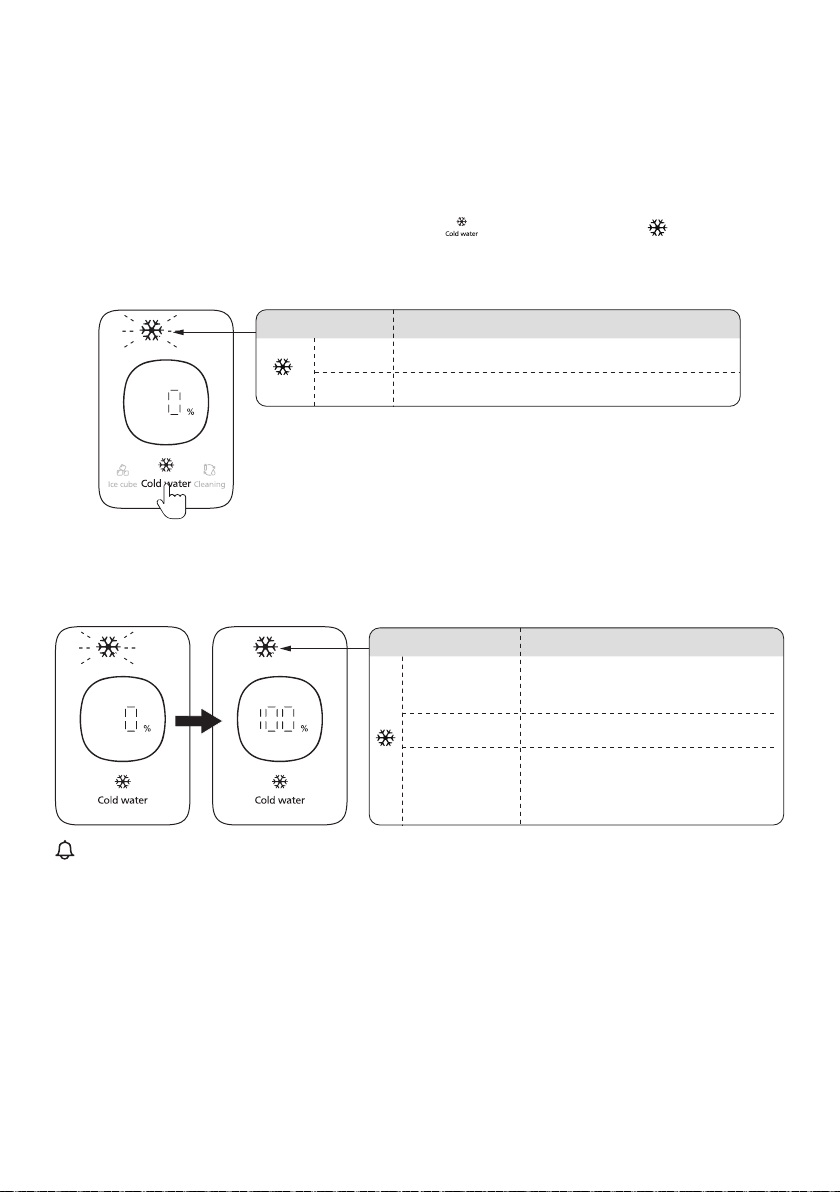
Using Chilled water function
When the chilled water function is on, the machine will only make chilled water, not ice cubes.
How to start chilled water production (without ice cubes production)
1. Activate Chilled Water Function:
means the chilled water function is now ac tive.
Status Meaning
Chilled water making function is not activated
Flashing
3s
2. Chilled Water Ready:
Refer to the status indicator light to understand the status of the cold water.
Chilled water making in process
Status Meaning
Flashing light Chilled water making in process
Constant light
Chilled water making function
is not activated
Water in chilled water tank has
reached 5°C. Chilling function
paused
22
Page 26
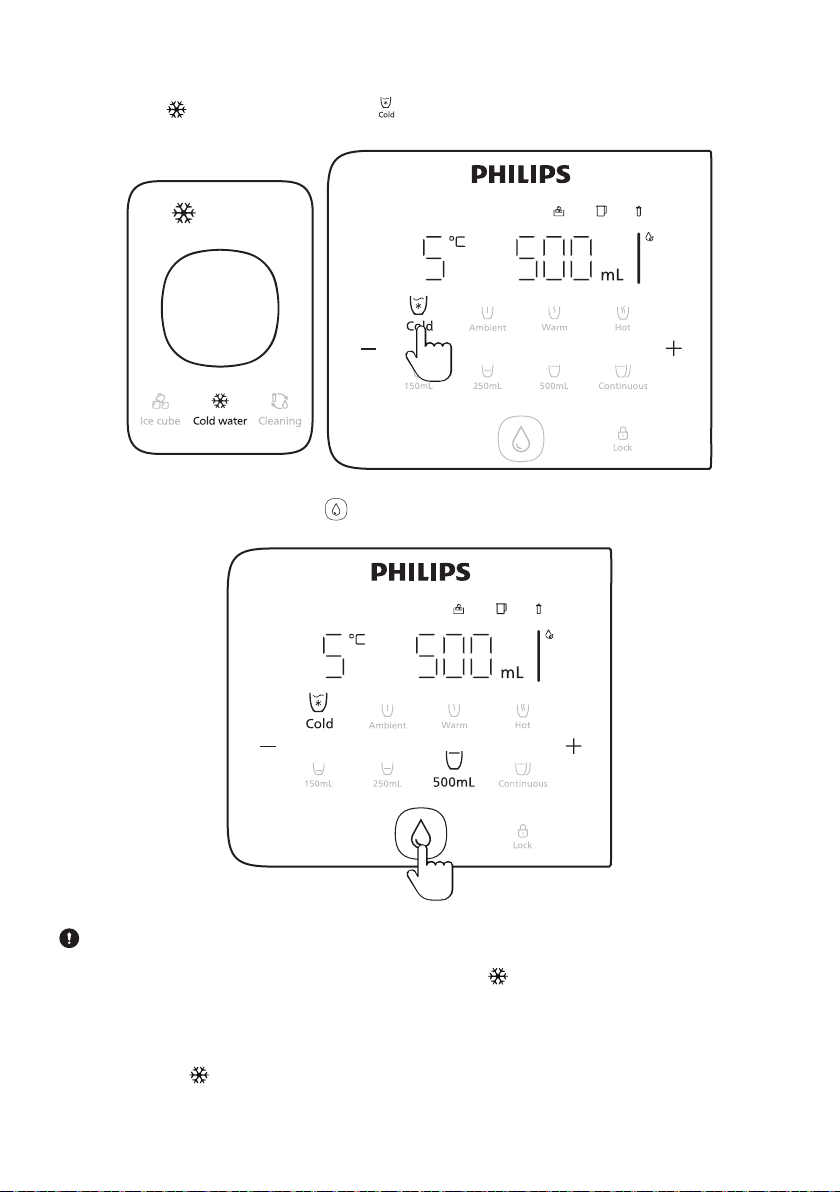
Extracting chilled water
Important Note:
being processed. Taking the chilled water at this time will result in a temperature higher than 5°C.
chilled water is ready again.
23
Page 27
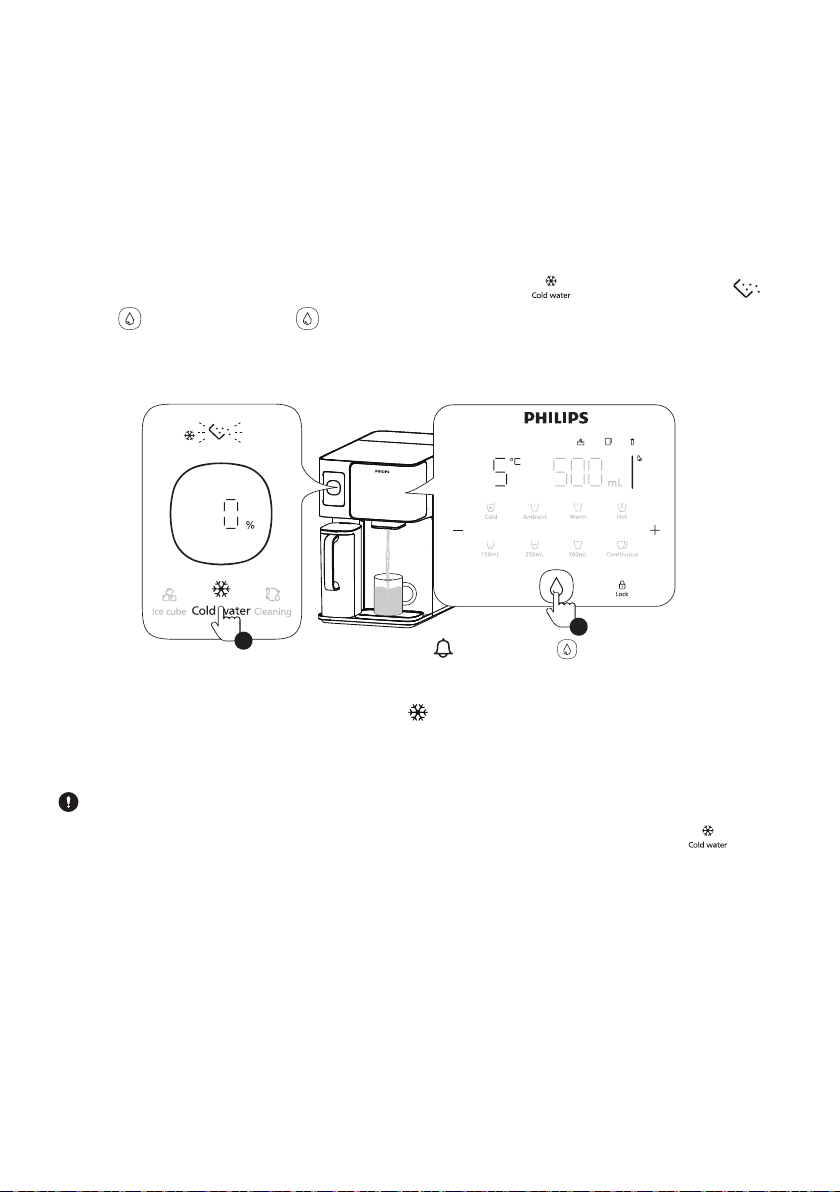
Stop chilled water production
Follow the steps below to empty the chilled water tank and ice box completely to prevent bacterial
growth.
1. Empty the Cooling:
3s
1
Important Note:
seconds. The ice -making function will then resume.
• Do Not Unplug: Avoid unplugging the power during emptying. If you do, the emptying will stop,
and the ice-making will continue when the power is turned back on.
• Normal Sound: A sound will be heard during the emptying process - this is normal. The sound will
Short pressagain to pause
24
2
Page 28
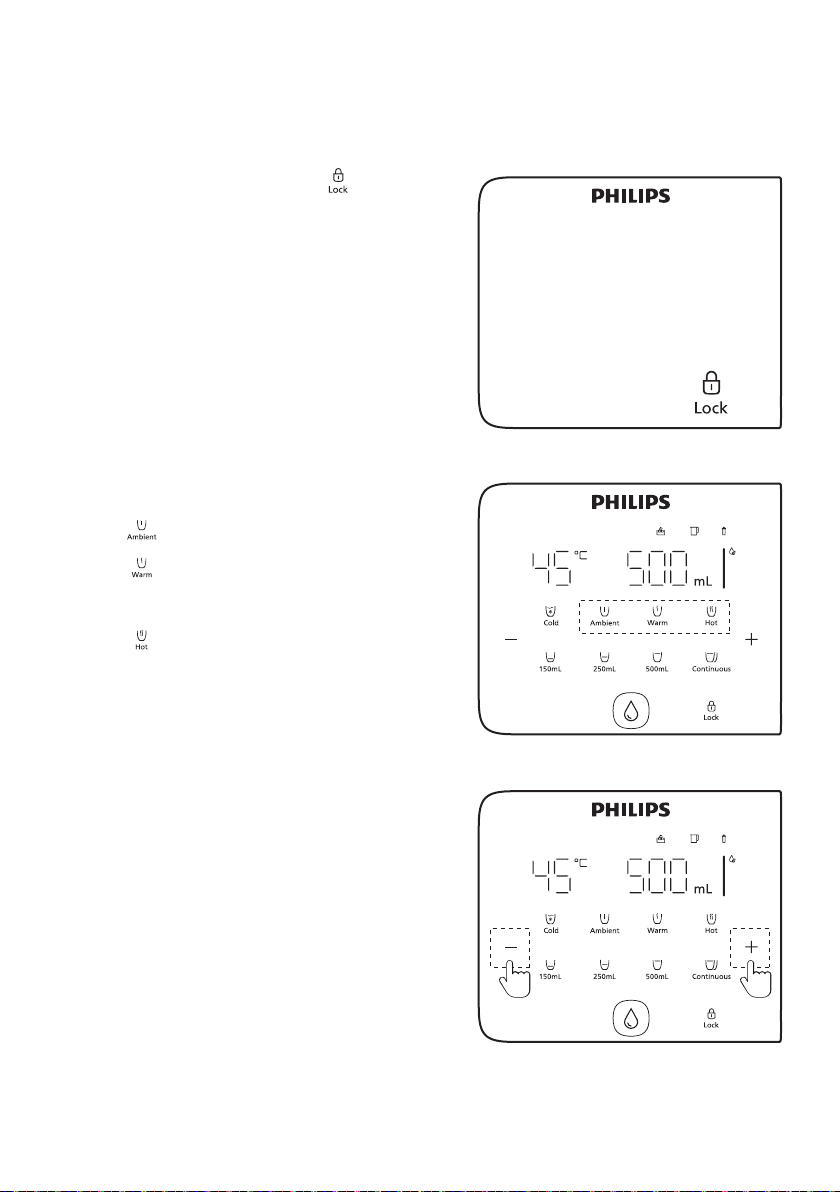
6.3 Ambient to Hot Water Production
Choose your preferred temperature and volume
1. Unclock the machine:
2. Adjust Water Temperature:
between 45°C and 55°C;
3. Set More Temperature Options:
25
Page 29
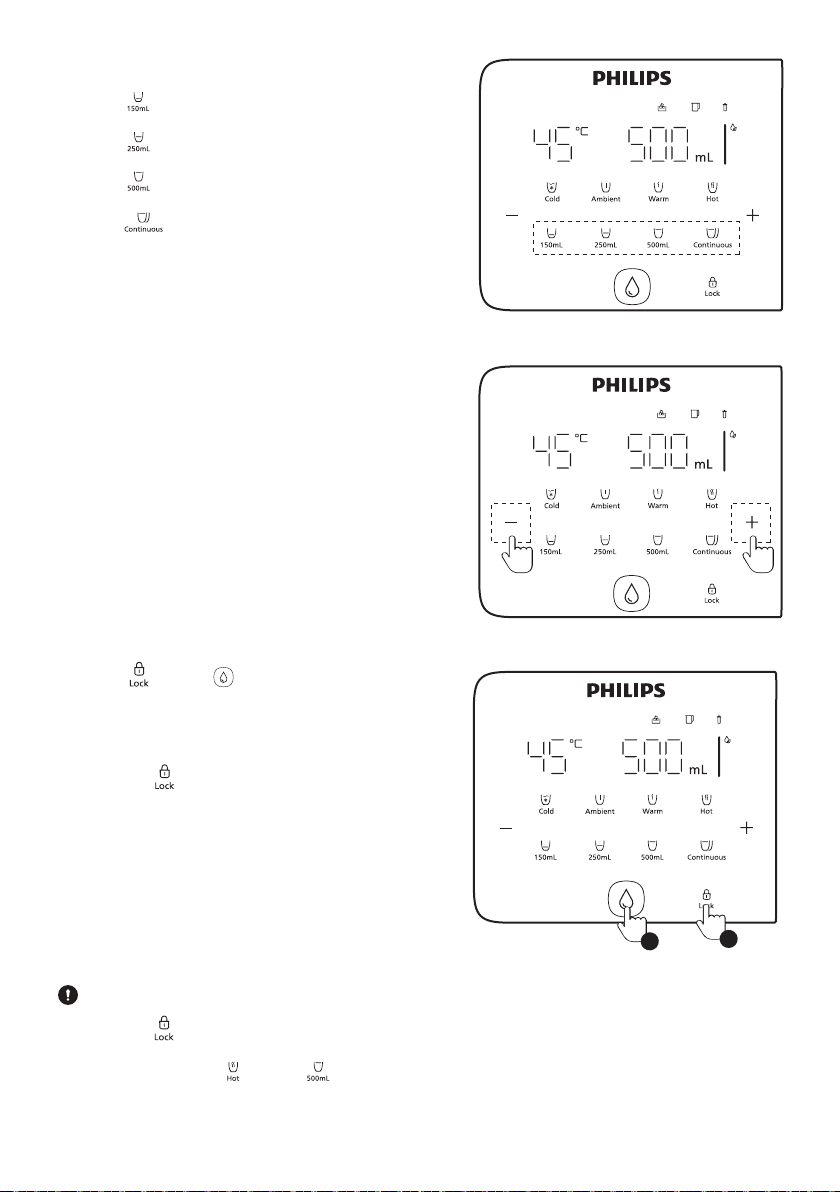
4. Adjust Water Volume:
5. Set More Water Volume Options:
the water volume.
Press again or any other button to stop.
• Ambient water can be dispensed directly without
2
Important Note:
prompt.
26
1
Page 30
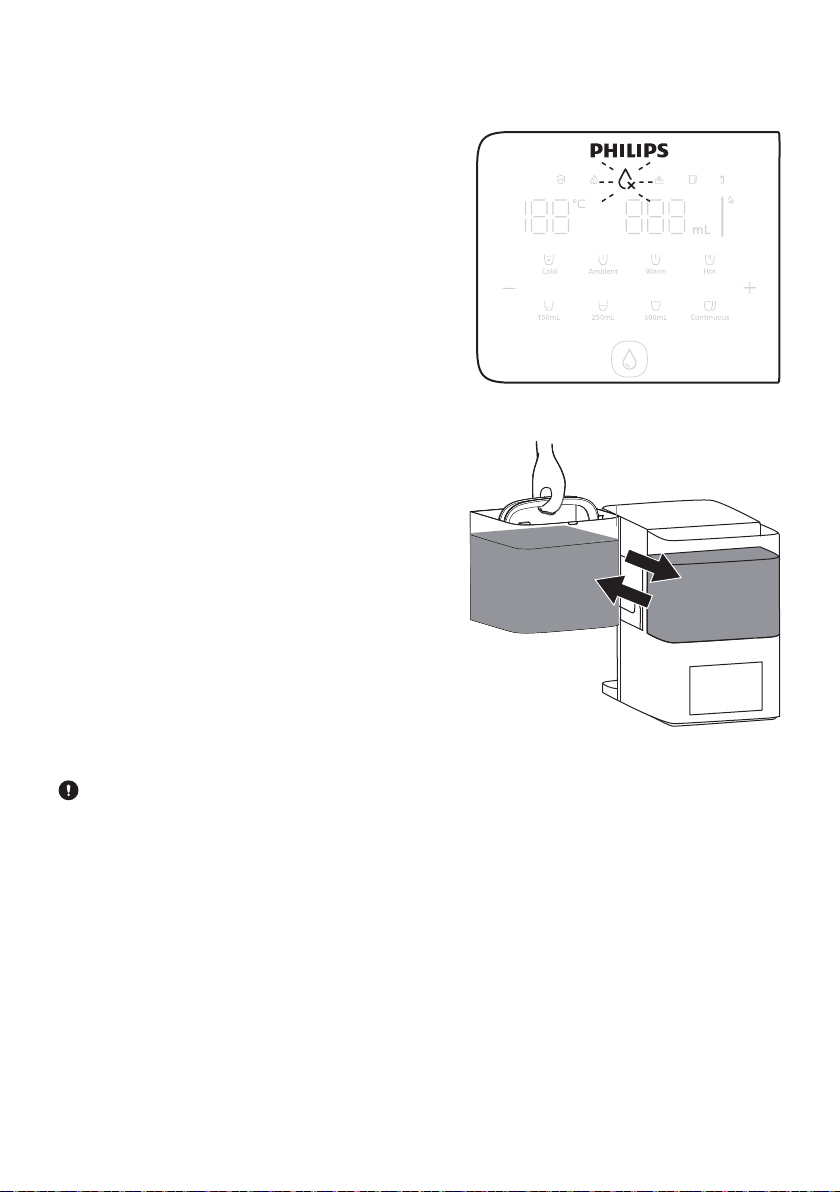
6.4 Raw water refresh and re�ll
Water Change Reminder:
The machine will prompt you to change water when:
48 hours.
• The TDS value ofthe tap water is high.
• The water quality level in the tap water tank is low.
Steps to Change Water:
2. Lift the tank out and discard any remaining water.
back in the machine, making sure the lid is closed
securely.
Important Note:
Always empty the tank before adding fresh water
27
Page 31
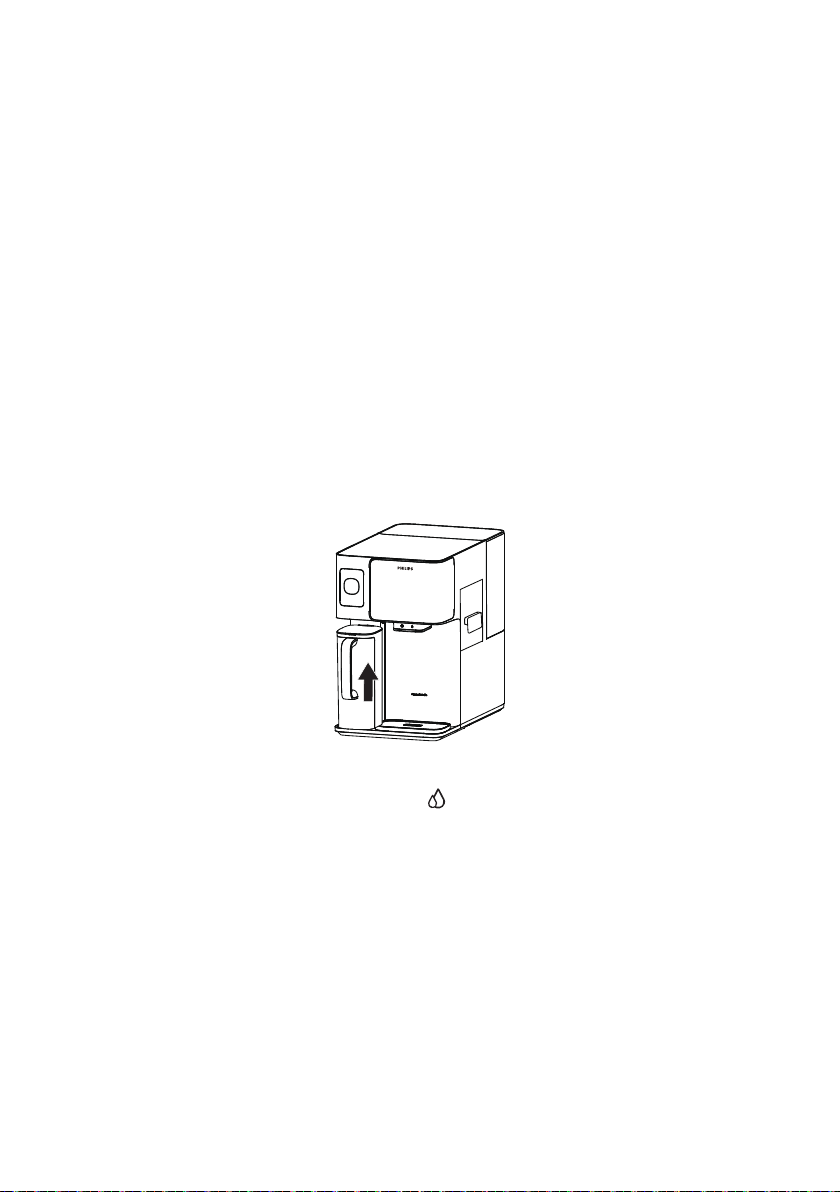
7 Daily maintenance
Waterway Cleaning
Water Change Reminder:
The machine will prompt you to cleaning the waterway when:
• Reuse the dispenser after long period of disuse
Steps to do Wateway Cleaning:
1. Cleaning preparation:
Fill the tap water tank with tap water, place it back in the machine, and put the lid on properly.
work until this happens.
28
Page 32
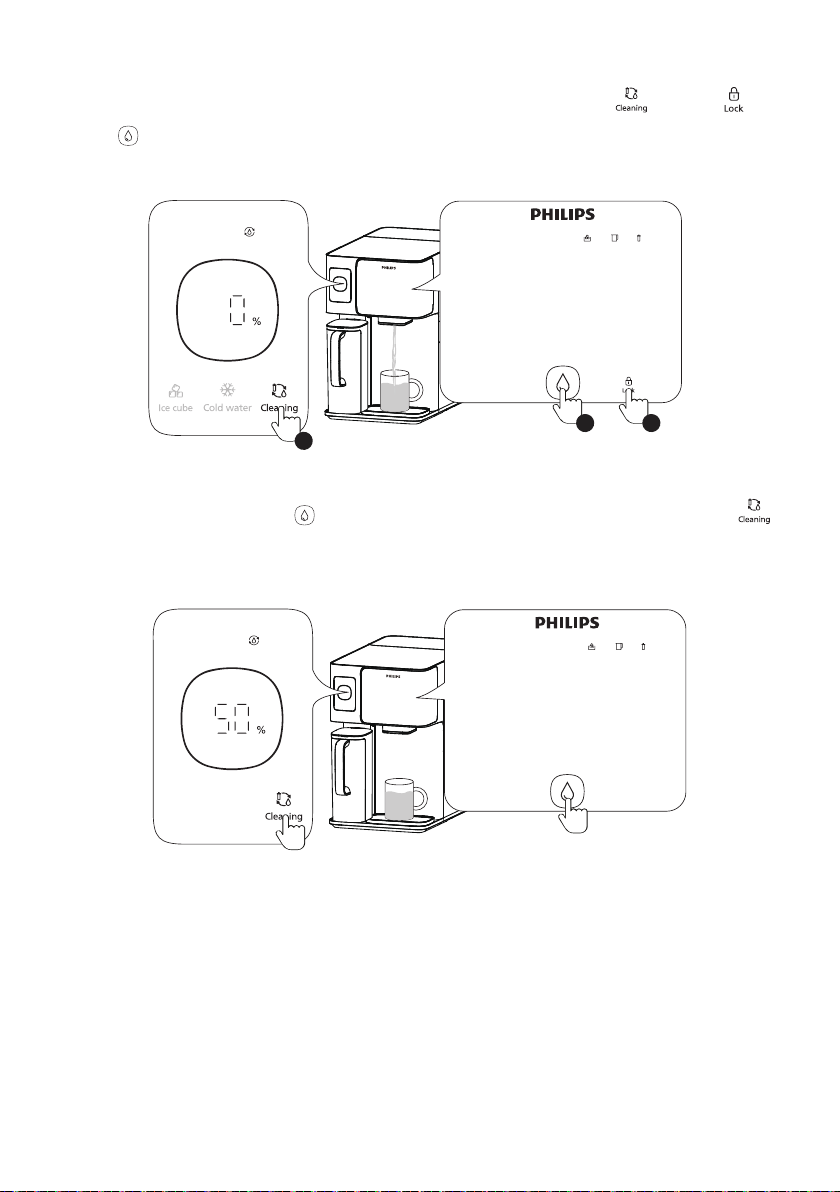
2. Set Up for Cleaning:
1
3 2
again
Quit
Pause
29
Page 33
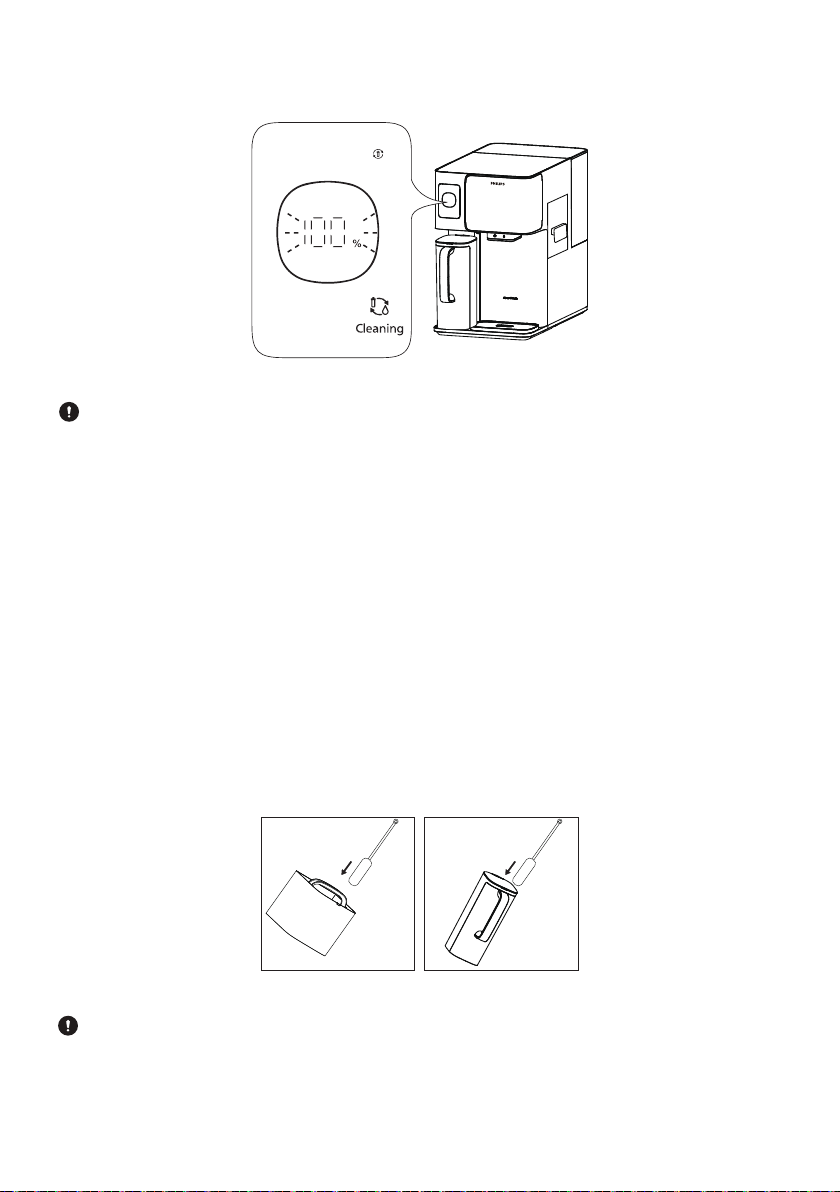
3. Complete Cleaning:
Important Note:
Clean the Tap Water Tank and Filtered Water Jug:
with water and clean them using a cleaning brush.
once a week.
Important Note:
* Please buy the cleaning brush yourself.
30
Page 34
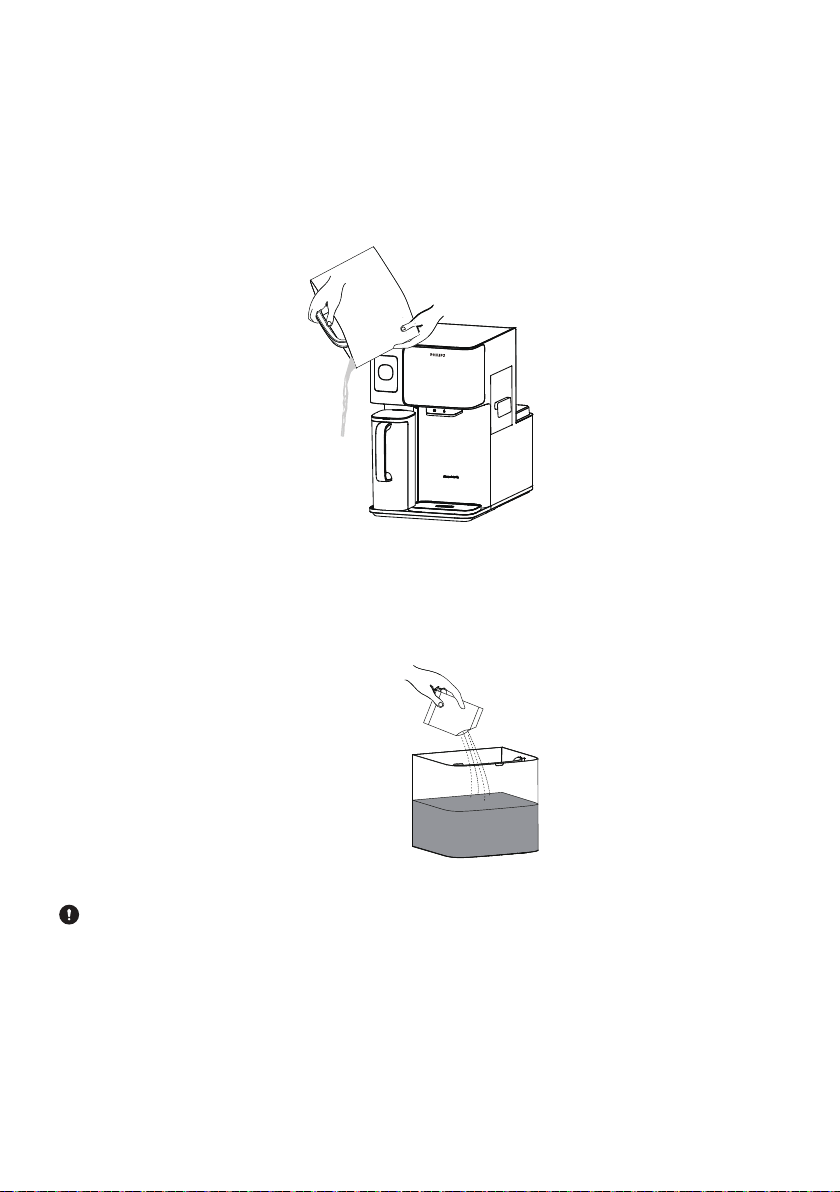
Descaling of tap water tank
Steps to do Descaling:
1. Empty the Tap Water Tank: Remove and empty the tap water tank.
2. Prepare Cleaning Solution:
lightly, then let it soak for 2 hours.
Important Note:
Do not place the tap water tank back in the dispenser during this time.
31
Page 35
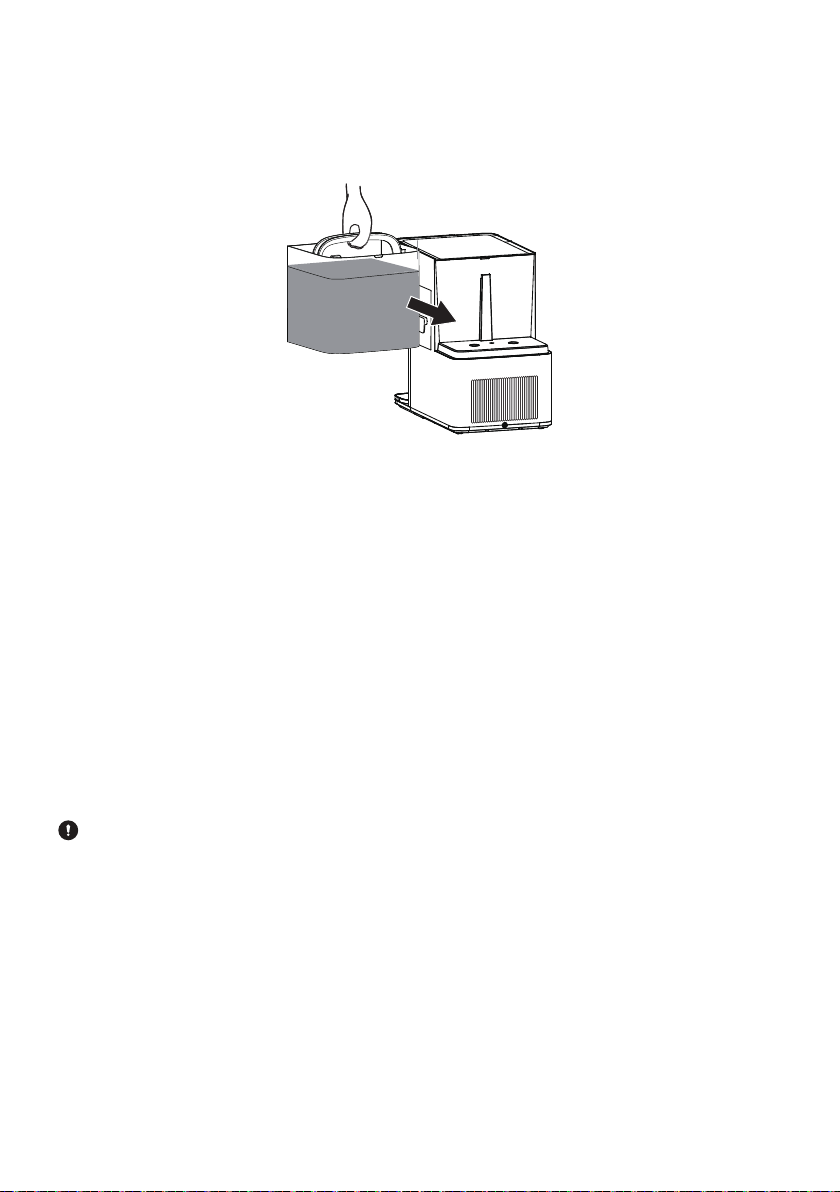
3. Rinse and Re�ll: After 2 hours, discard the citric acid solution. Clean the entire tank with tap
into the dispenser.
* Please buy the citric acid yourself.
Storage of the �lter cartridge (before 7+days non-use)
If the systemwill not be used for over 7 days, please follow these steps:
2. Disconnect the power supply: Unplug the machine from the power source.
ment (temperature between 2-5°C).
Important Note:
• Rinse before use: When you use the machine again, follow the rinsing procedure to prepare it for use.
32
Page 36
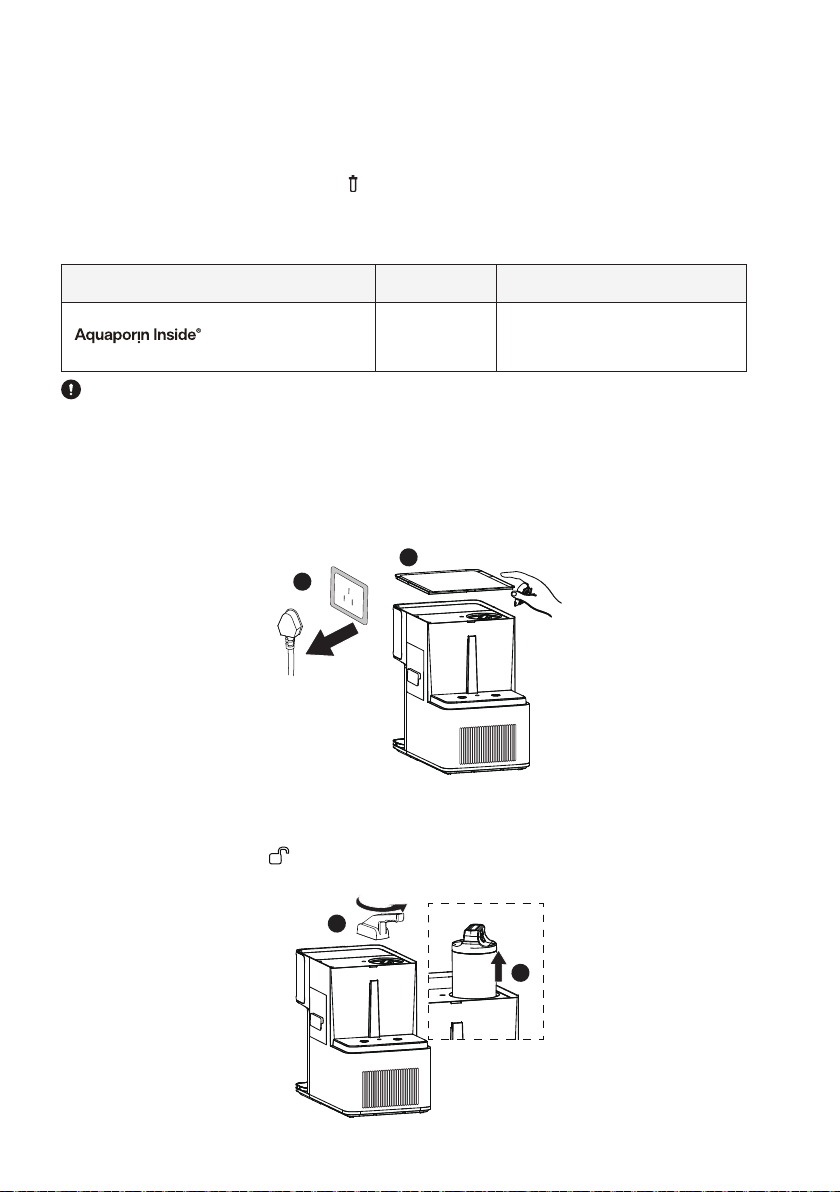
Filter replacement
Filter Replacement Guidelines
the recommended cycle.
Name Model Suggested Replacement Cycle
Reverse Osmosis Filter ADD583
Steps to Replace the Filter:
2
1
1
2
33
Page 37
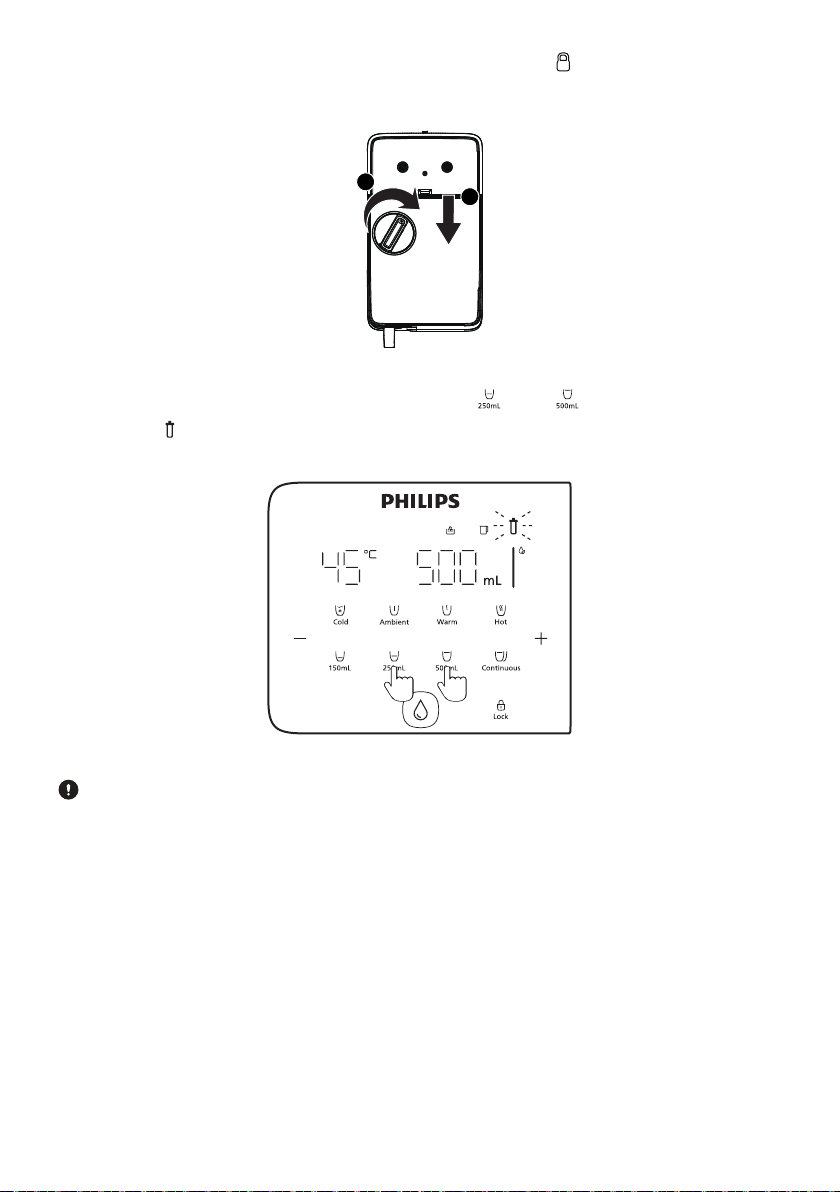
and power onthe machine.
2
3s 3s
1
Important Note:
• Rinse before use: When you use the machine again, follow the rinsing procedure to prepare it for use.
34
Page 38
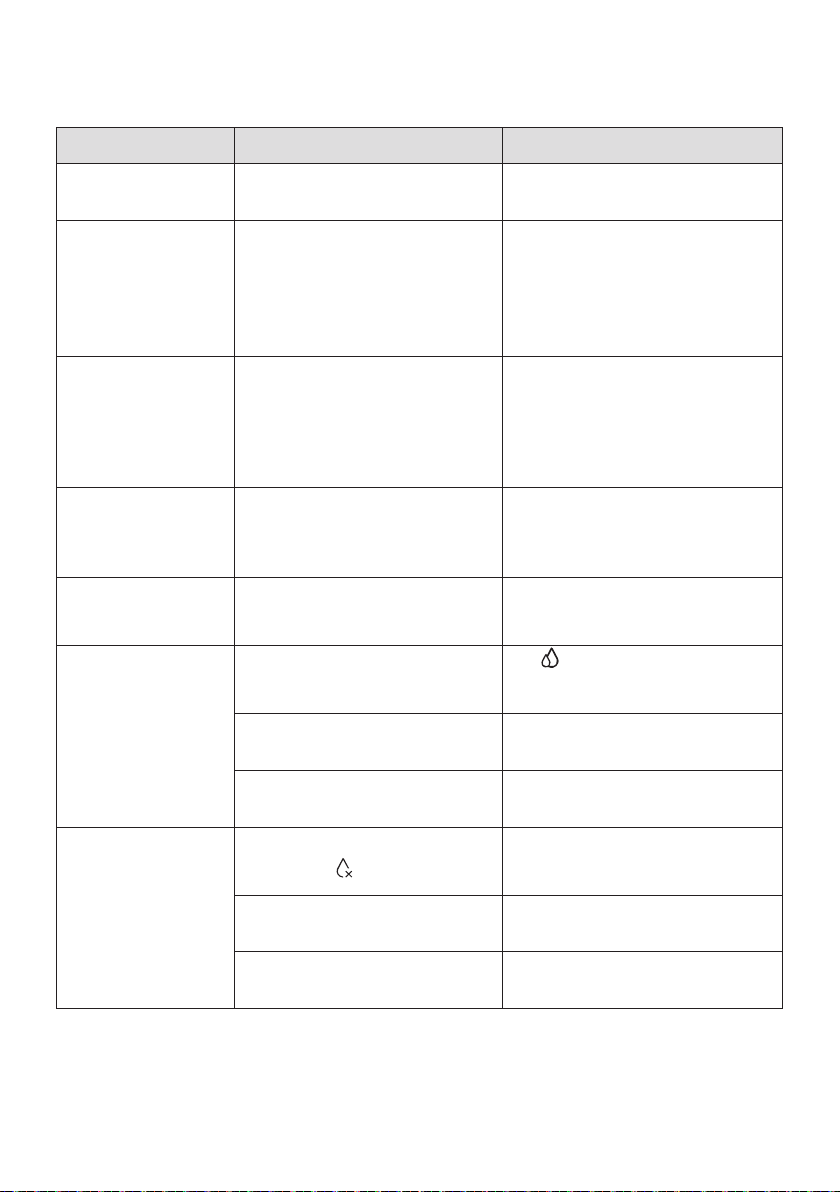
8 Troubleshooting
Error Causes Solutions
hot water.
hot water.
hot water.
dispense water
normally.
EU: Communication
abnormality of the
product.
Unable to dispense
water.
Tap water temperature
exceeds 38℃.
Abnormal alarm from the water
outlet temperature probe.
Abnormal heating alarm.
Filter not installed properly or
clogged.
Abnormal communication signal
control board.
Filtered water jug is out of water.
Filtered water jug is not installed
properly.
Make sure the tap water temperature
does not exceed 38℃.
and try extracting the hot water
again. Please contact customer
services if the problem cannot be
solved.
and try extracting the hot water
again. Please contact customer
services if the problem cannot be
solved.
please replace it.
and then reconnect the power.
water normally.
properly.
Tap water tank is not installed
properly.
Tap water tank is at a low water
Filtered water jug is not installed
properly.
Tap water tank is not installed
properly.
35
Check if the tap water tank is
installed properly.
Empty the water in the tap water
with tap water.
properly.
Check if the tap water tank is
installed properly.
Page 39
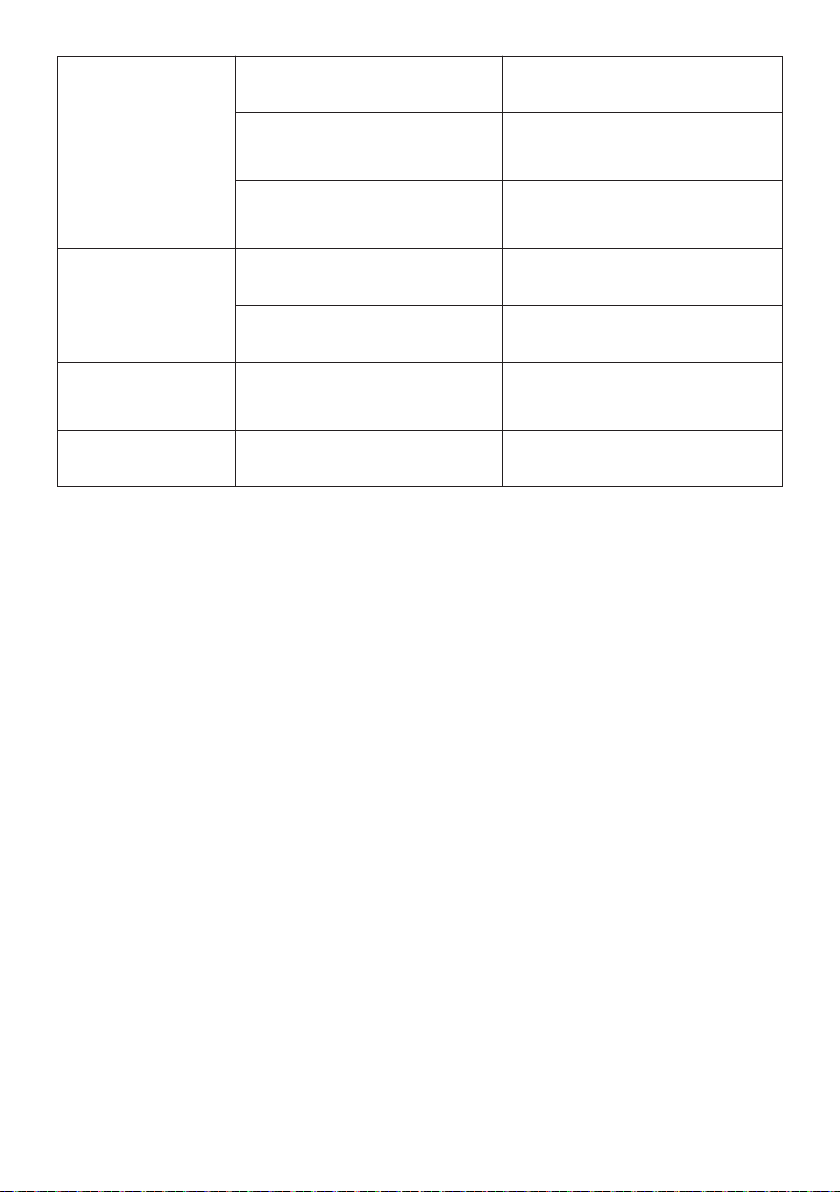
drip tray.
Water leakage.
Odd taste of the
water.
Leakage of electricity.
Buttons/display screen
does not respond.
The sealing valve at the bottom of
the tap water tank is blocked.
Filtered water jug not installed
properly.
cleaned.
Filtered cartridge is not changed
as required.
Bad grounding and the power
cord is damaged.
damag.
Hold the sealing valve with a
blockage.
the tap water tank is installed
properly.
Follow the cleaning procedures for
Three-core plug with reliable
grounding must be used. Please
contact customer services.
and then reconnect the power.
36
Page 40

9 Packing list
Water drip tray
Filtered water jug
User manual
Quick start guide
Filter replacement guide
Unpack instruction
×2
10 Guarantee and support
If you need information or have any questions, please visit w ww.philips.com/suppor t or contact
the consumer service center in your country/region. If there is no consumer service center in your
country/region, please contact your local distributor.
Within two years from the date of purchase, you will receive free warranty ser vice for any damage
caused by manufacturing process problems, or any damage to components under normal use
Warranty service excludes frequently replaced consumables, auxiliary equipment, shipping costs
and door-to-door service. Please show proof of purchase to service personnel when servicing.
Please keep this user manual for future reference.
37
Page 41
繁體中文
目錄
重要事項
1 39
2 40
主要技術參數
3 41
結構示意圖
4 42
操作與顯示介面
5 44
首次使用指南
6 49
使用說明
7
清潔與保養
8
故障診斷
9
裝箱清單
10
產品售後服務指南
60
64
66
66
Page 42

注:本專案所有內容均與安全有關,請用戶務必遵守;本專案中的注意事項 只是為了正確地使用本機器;
注意事項中解釋了危險、危害的程度大小及可能發生的事故。
• 請勿使用未經廠商許可的其他配件,若因此造成機器故障,保修將自動終止;
• 請在拆除包裝後檢查機器是否有損傷,核對配件是否齊全;
• 為了避免窒息的危險,請將塑膠袋遠離嬰兒和兒童;
• 本機器的進水水質應符合市政自來水的要求;
• 禁止往原水箱及純淨水壺倒入不明液體、不明水質的水源或其它異物;
• 請勿向純淨水壺內加水,避免超過機器自身設定的最高水位後,從出水口不斷流出等異常情況;
• 請注意輕拿輕放,以免機器跌落造成砸傷;
• 機器應放在兒童及寵物無法觸及的地方;
• 兒童及無行為能力人請在監護人監督下使用本機器;
• 本機器應放置於室內陰涼乾燥的地方,避免陽光直射,擺放位置不得靠近暖氣設備、電熱產品或其他
高溫場所;
• 機器擺放位置不得處於會出現或有可能出現可燃性氣體洩露的場所;
• 切勿用濕手插拔電源插頭,以免引發觸電危險;
• 切勿自行拆卸、改裝機器或在機器上放置重物,以免造成損壞;
• 長期不使用機器,務必斷開電源,排空原水箱和純淨水壺內的水;
• 本機器進水溫度要求5-38℃,進水溫度超過38℃時,會損壞濾芯,使濾芯失效;進水溫度低於5℃時,
可能造成冰凍,引起機器元件破裂;
• 本機器僅適用於室內安裝與使用,必須使用有可靠接地的三芯插座;
• 初次使用或長期停用後,建議更換5個原水箱的水再進入使用;
• 本機器的維護保養、更換濾芯,需使用飛利浦所審定的更換部件;
• 嚴禁使用汽油等有機溶劑擦拭本機外殼,確需清潔時,斷電後用濕抹布輕擦產品;
• 倘若發生故障,應立即拔掉電源插頭,切勿將有缺陷的機器置於工作狀態;
• 隨著產品升級,說明書的部分文案可能與實物有差異,請以產品實物為準;
• 如果先取熱水後馬上取常溫水或暖水,機器會先出一段殘留熱水,請注意防止燙傷,建議先放常溫水
10秒後再取水;
• 機器放置超過24小時建議倒掉純淨水壺內的水;
• 如果電源軟線損壞,請停止使用機器,為了避免危險,必須由製造商授權的專業人員更換;
• 請勿擅自拆解維修本機器或交由非飛利浦授權的售後人員維修,因不當的維修可能造成危險;
• 未按上述注意事項操作所造成的後果,本公司將不承擔任何責任。
39
Page 43
產品型號
額定頻率
額定加熱功率
額定製冷功率
額定製冷電流
氣候等級
冷媒量
額定總淨水量
額定淨水流量
適用水源
適用水溫
Philips RO 純淨飲水機產品名稱
ADD6922CG/97; ADD6922DG/79
220-240V額定電壓
50-60Hz
2050-2400W
100W
0.6A
ST/N/SN/T
R600a, 21g
2000L
0.2L/min
市政自來水
5-38℃
40
Page 44
原水箱蓋
頂蓋
RO 複合濾芯
操作面板
1.4L 純淨水壺
6.0L原水箱
0.35L 冰盒
電源線
41
Page 45
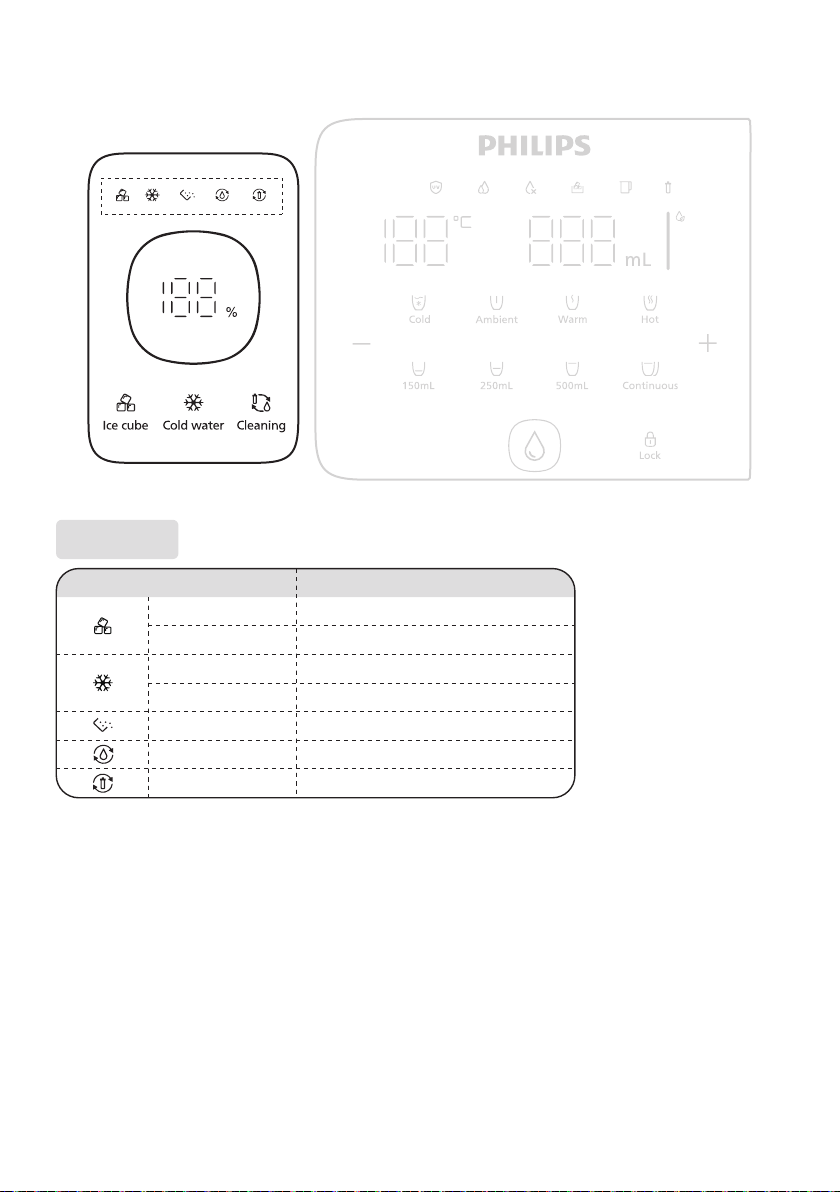
閃燈 正在製冰塊
長亮
閃燈
長亮
亮燈
閃燈
閃燈
已完成製冰
正在製冰水
已完成製冰水
正在排空冰水箱
正在進行水路清潔
正在進行濾芯沖洗
42
Page 46
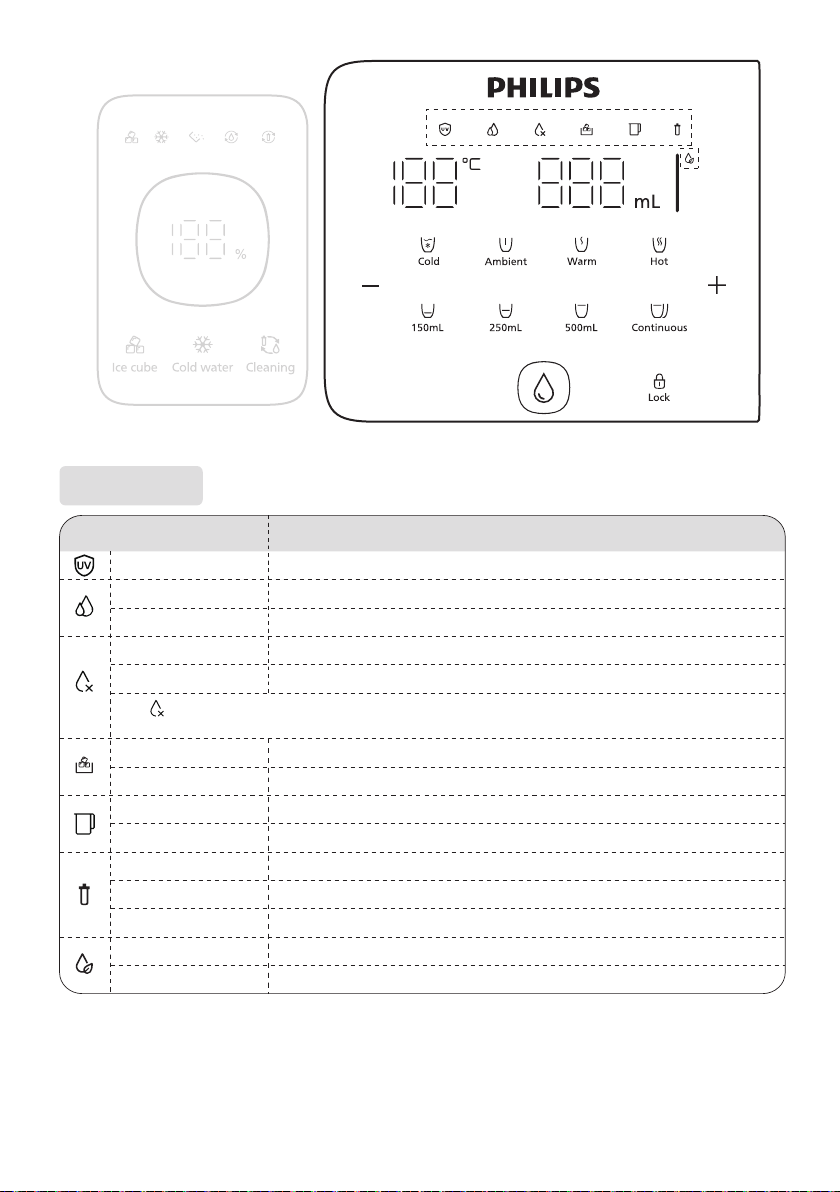
亮白燈 正在殺菌
亮白燈 正在濾水
閃白燈 正在濾水,純淨水量不足,暫無法从出水嘴取水
閃白燈 原水箱長時間未換水,建議更換
閃紅燈
* 當“ ” 提示換水時,原水箱內剩餘的水是過濾後的廢水或 水質較差,請務必倒掉再添加自來水,以保護 濾芯,保證淨水
效果
亮白燈 冰盒已放好
閃白燈 冰盒已打開,取冰完成請及時放回
亮白燈 純淨水壺已放好
亮白燈 濾芯壽命期內,請放心使用
閃紅燈
亮紅燈
亮白燈 水質優良,可放心飲用
原水箱缺水或水質狀況差,請將原水箱剩餘的水倒掉,再重新加水
純淨水壺未放好,請放回閃白燈
濾芯壽命即將到期,需及時購買濾芯
濾芯壽命已到期,需及時更換濾芯
水質一般,建議把純淨水壺的水倒掉,並重新過濾亮黃燈
43
Page 47
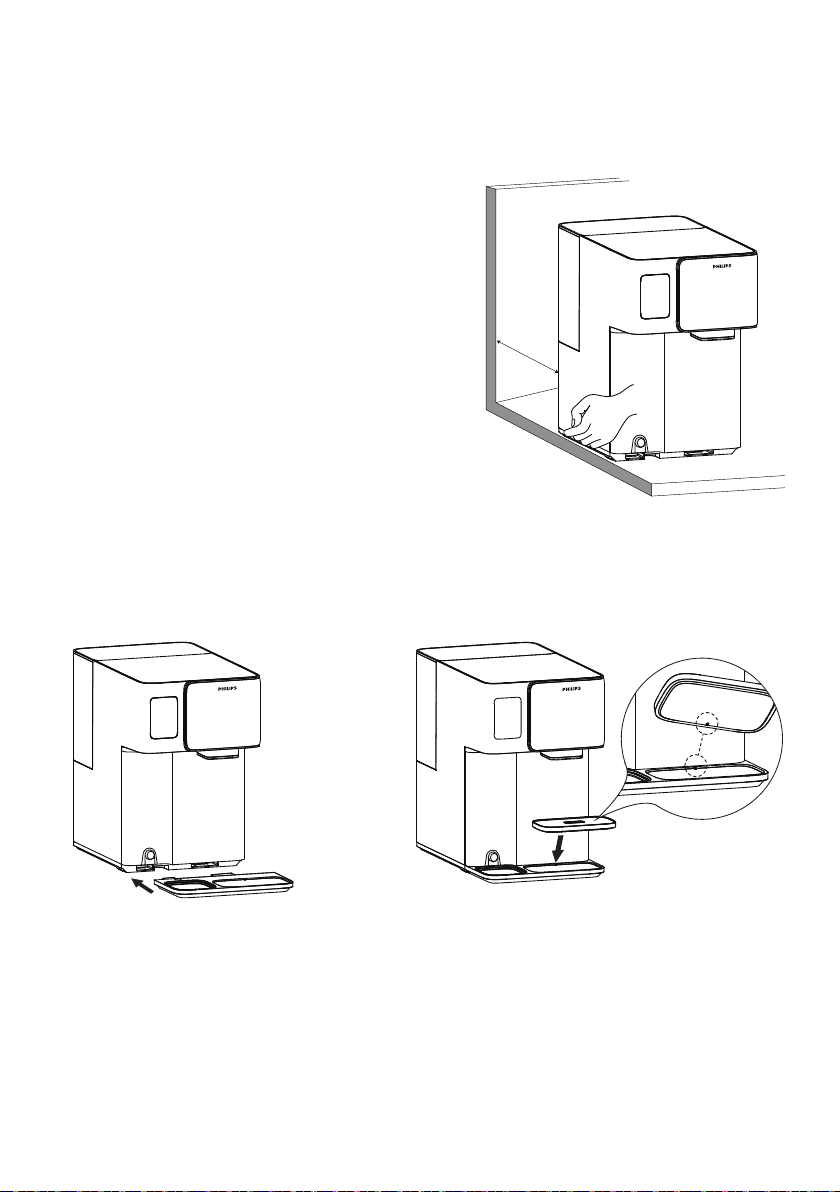
產品背部距離牆面建議預留20cm的散熱空間,以免影
響壓縮機製冷效率和壽命。
(1) 安裝接水盤。
20cm
① 將接水盤底座插裝進機身 ② 將接水盤的卡扣對準底座插好
44
Page 48
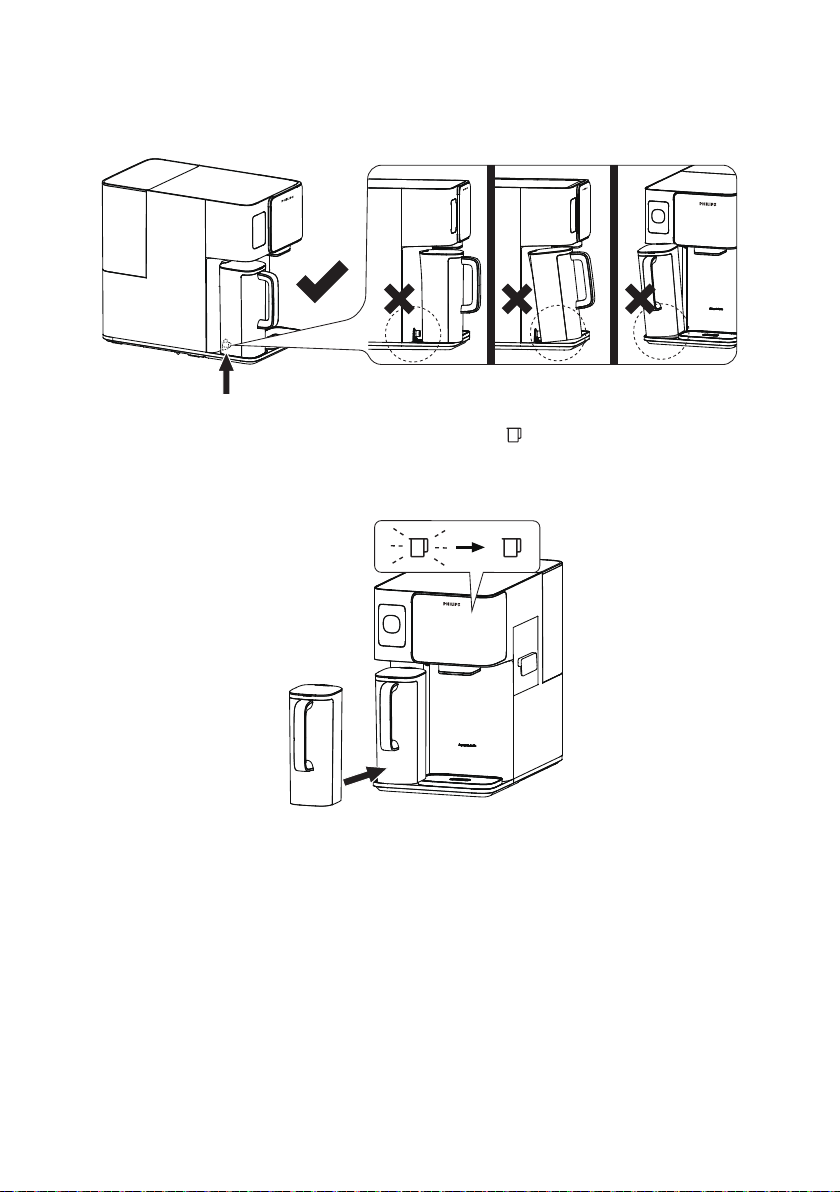
(2) 安裝純淨水壺
將純淨水壺垂直插入機身內,直到感覺純淨水壺已經完全緊密。
(機器通電後,安裝好純淨水壺,可 聽 到「嘀 」的 蜂 鳴 ,同時“ ”由「閃爍」變為「長亮」。)
未安裝
未安裝
已安裝
已安裝
因產品內含壓縮機製冷系統,受運輸顛簸影響,如未靜置易導致產品損壞。
為保證產品安全使用,產品在首次通電2小時內,默認無法開啟製冷功能。靜置期間,其他功能可照常使
用。
45
Page 49
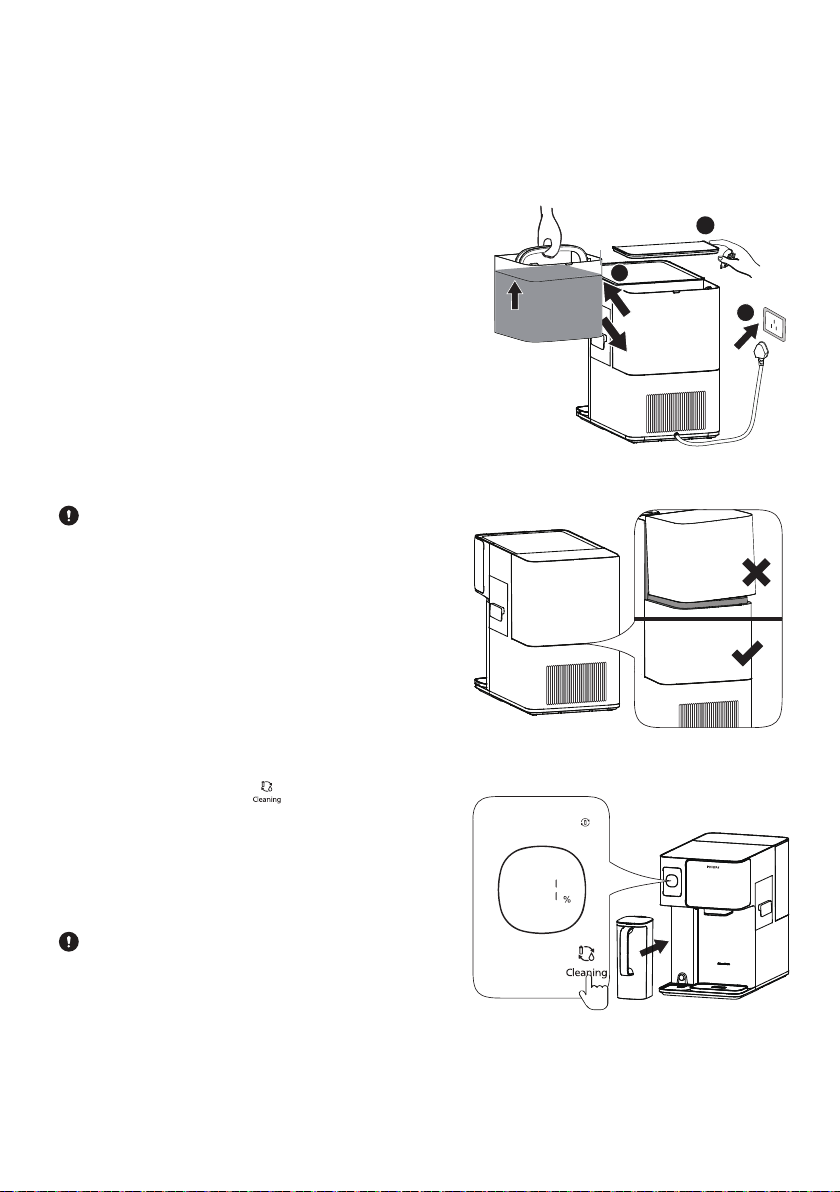
新機首次使用或更換濾芯後,按以下步驟 沖洗,沖洗過程耗時約1.5小時。
產品安放位置需避免陽光直射,以防微生物滋生。
(1) 揭開原水箱蓋,取出原水箱並加水至Max線,將
原水箱放回機器並將蓋子放回,然後接通電源。
請確保水箱與背板完全貼合,否則會導致無法正
常濾水或水箱漏水。
1
2
3
(2) 安裝好純淨水壺,長按“ ”鍵3秒,聽到 “嘀”
提示音,開始進入沖洗。
請確保純淨水壺與機身完全緊密,否則會導致
無法正常濾水或水箱漏水。
3s
46
Page 50
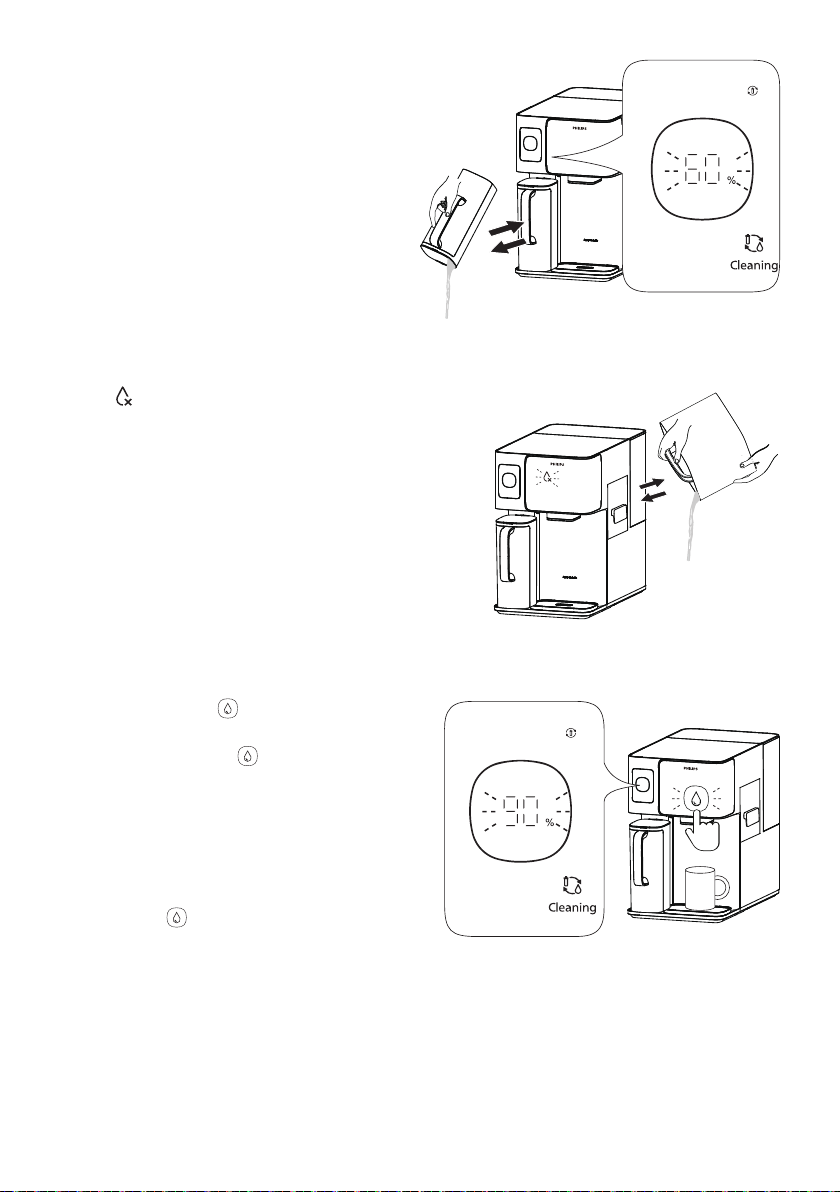
(3) 在0 - 60%的進度中,當進度百分比閃爍時,產
品發出“嘀嘀嘀”的提示音,請將純淨水壺的水
倒掉再放回。
(4) 當“ ”閃爍,產品發出“嘀嘀嘀”的提示音,將原
水箱的水倒掉,重新加自來水至Max 線再放回。
請勿直接往原水箱加水。
(5) 當進度到“90%”,“ ”閃爍,產品發出“嘀嘀嘀”
的提示音,無需倒水,在出水口放置一個大容量
容器(2公升以上),按“ ”出水。
期間可通過按“ ”暫停出水。
47
Page 51
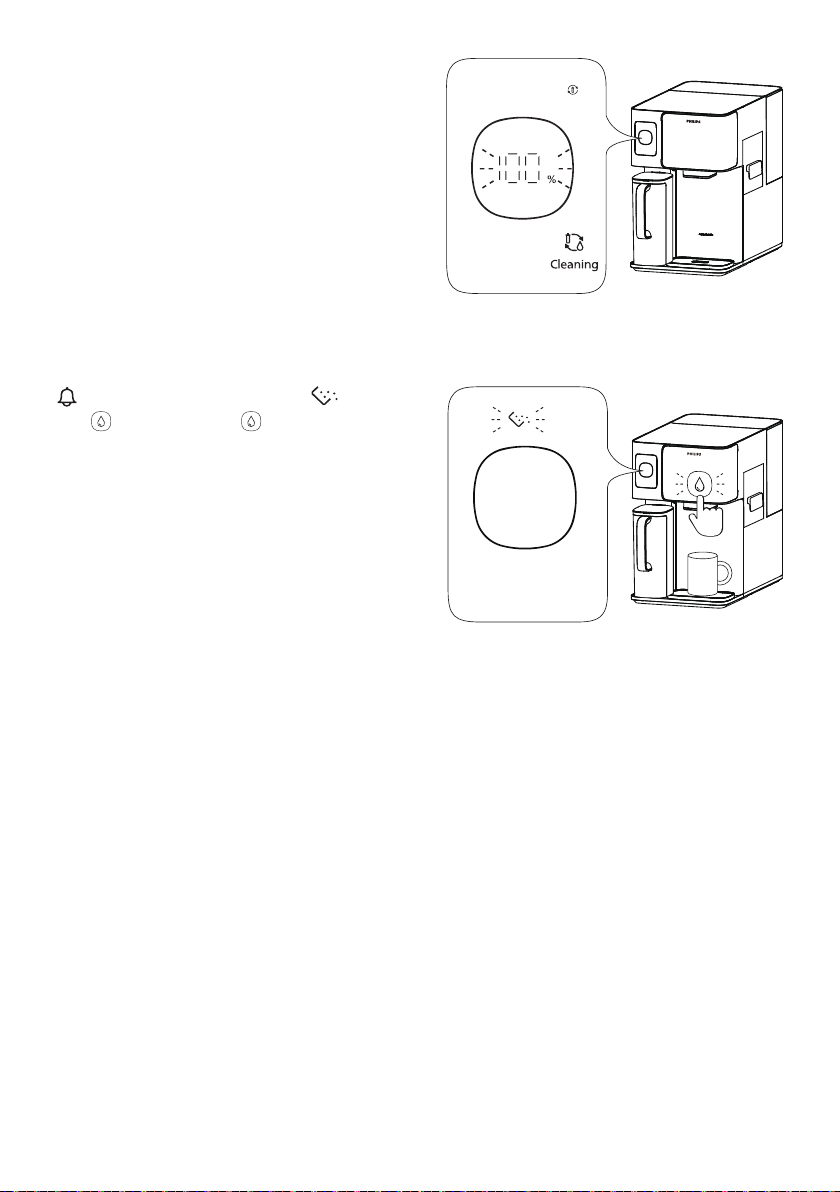
(6) 螢幕顯示100%說明沖洗完成,可開始使用。
如果中途退出沖洗,可能會出現“ ”和
“ ”閃爍,此時需按“ ”將水箱排空。
· 沖洗期間請勿退出或拔掉電源。
· 沖洗期間,機器會發出水管抽空的聲響,屬正常運作,當進 度 完成至100%時聲 響 將 停止,請勿擔心。
· 沖洗過程中,再次長按清潔鍵3秒可退出沖洗程式(不建議退出)。
· 90%-100%出水過程中,如出現水管抽空的聲響為正常現象,請勿擔心。
· 觀察產品是否有水流出或積水,或發現異響、焦糊味、冒煙等,如有上述情 況,請斷開電源連接並與售
後人員聯繫。
· 在沖洗過程中,水箱水壺出現白色渾濁為空氣經過高精度濾芯產生的微氣泡導致,若出現黑色雜質為濾
芯活性炭殘留,均為正常現象。
48
Page 52
為防止首次使用蒸汽過多,請進行沸點調節。
當過濾過程完成並第一次提取100℃的水時,沸水將從噴嘴中流出,沸點校準將自動完成。
此過程將持續大約60秒。請確保在此過程中噴嘴下方放置一個容量至少為500毫升的容器。
· 沸點校準過程中可能會有蒸汽噴出,請注意燙傷危險。
· 請在純淨水壺滿水(製水燈熄滅)的狀態下操作。
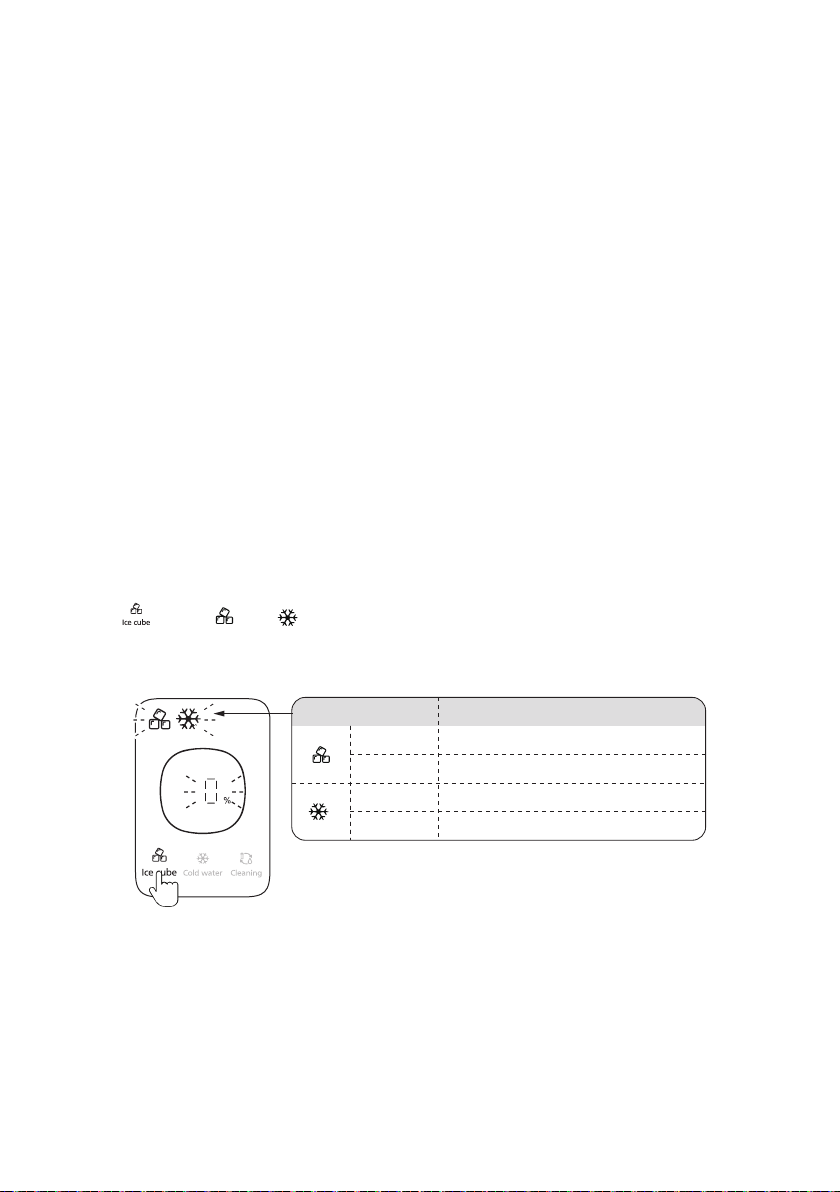
開啟冰塊功能,產品將同時製冰塊和製冰水。
(1) 長按“ ”3秒至“ ”和“ ”閃爍,說明成功開啟。
不亮 未開啟製冰塊
閃爍
不亮
閃爍
3s
已開啟製冰塊,正在製冰中
未開啟製冰水
已開啟製冰水,正在製水中
49
Page 53
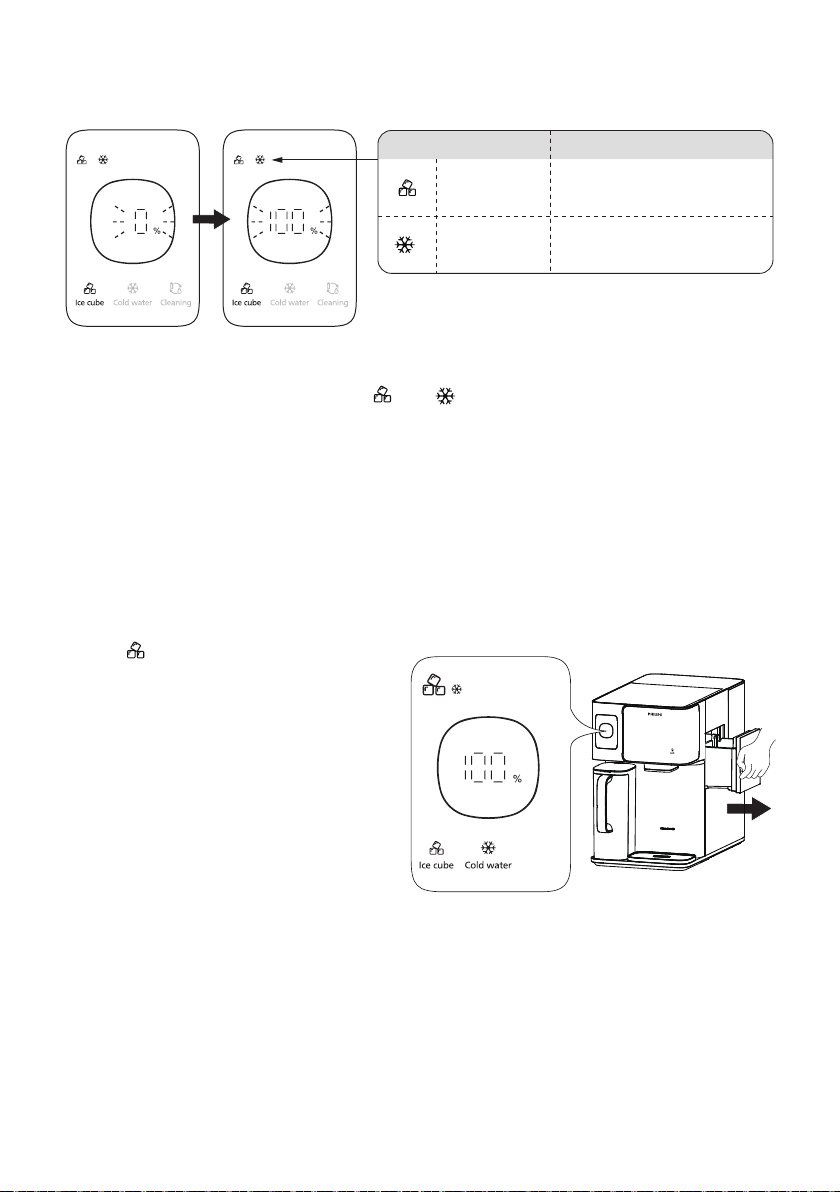
(2) 製滿冰盒需要分批完成
%表示每批冰塊的製備進度,進度每從0到100%,說明完成一批製冰塊。
閃爍變常亮
閃爍變常亮
(3) 製冷完成後取冰塊/取冰水
產品會自動重新補滿冰盒/冰水箱,此時“ ”或“ ”會閃爍。等待變為長亮後,說明冰塊/冰水製
備再次完成。
· 製冰過程中不建議取冰塊或取冰水,以免影響製冰塊和冰水效率。
· 首次開啟,預計需等待約70-110分鐘完成冰塊和冰水的製作,具體時間受環境溫度影響而有輕微波動。
· 製冰水的進度會依據實際原水水溫而定,進水溫度越低,製冰水進度越快。
冰盒已滿,冰塊製作完成
冰水已達至5℃,冰水製作
完成
(1) 等待“ ”至長亮,從側邊抽出冰盒。
50
Page 54
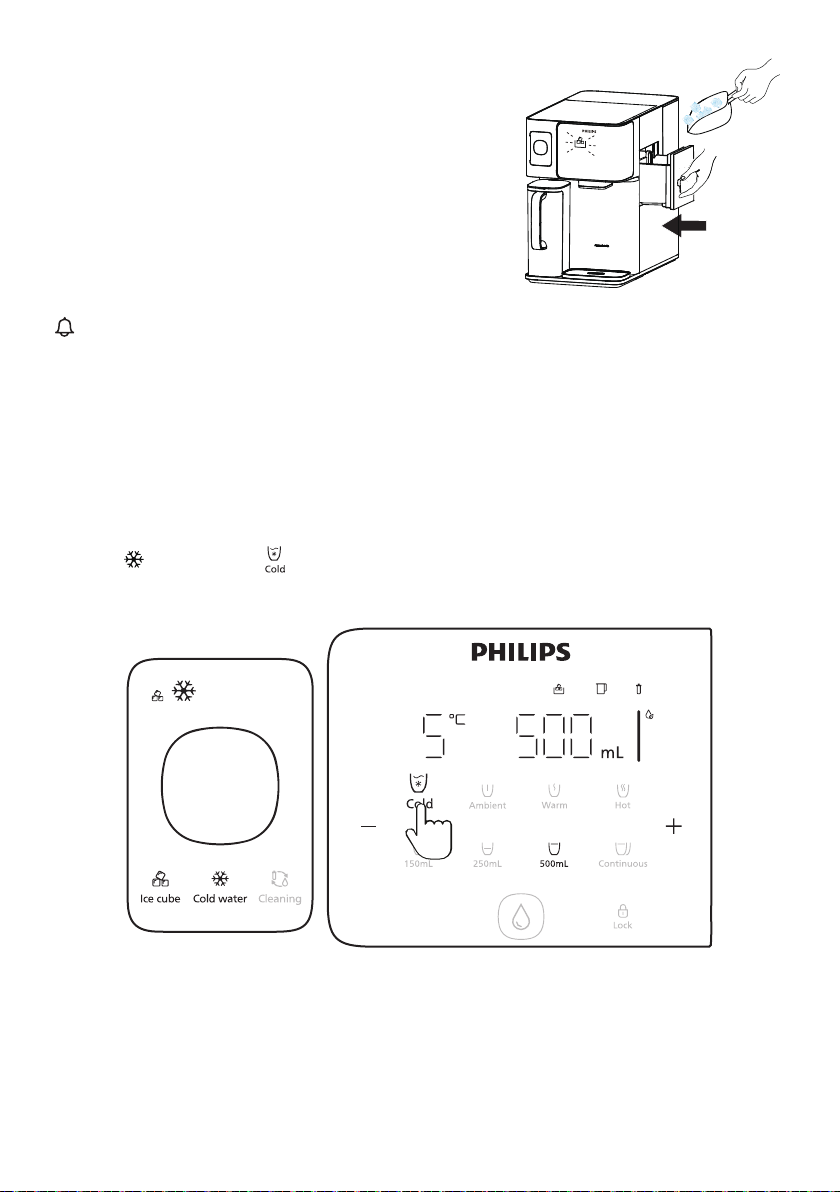
(2) 按需要取出冰塊後,請及時放好冰盒。
長時間未放好冰盒,產品會發出「嘀嘀嘀」提醒,同時製冰功能將暫停。
· 取冰時,請注意勿弄臟冰盒或在冰盒中放入其他食品。
· 取完冰塊請及時放回冰盒,以免影響冰塊冰水的保冷。
· 若冰盒取出時間較長,放回冰盒後將延遲開啟製冰功能,屬於正常現象。
(1) 等待“ ”至長亮,短按“ ”。
51
Page 55
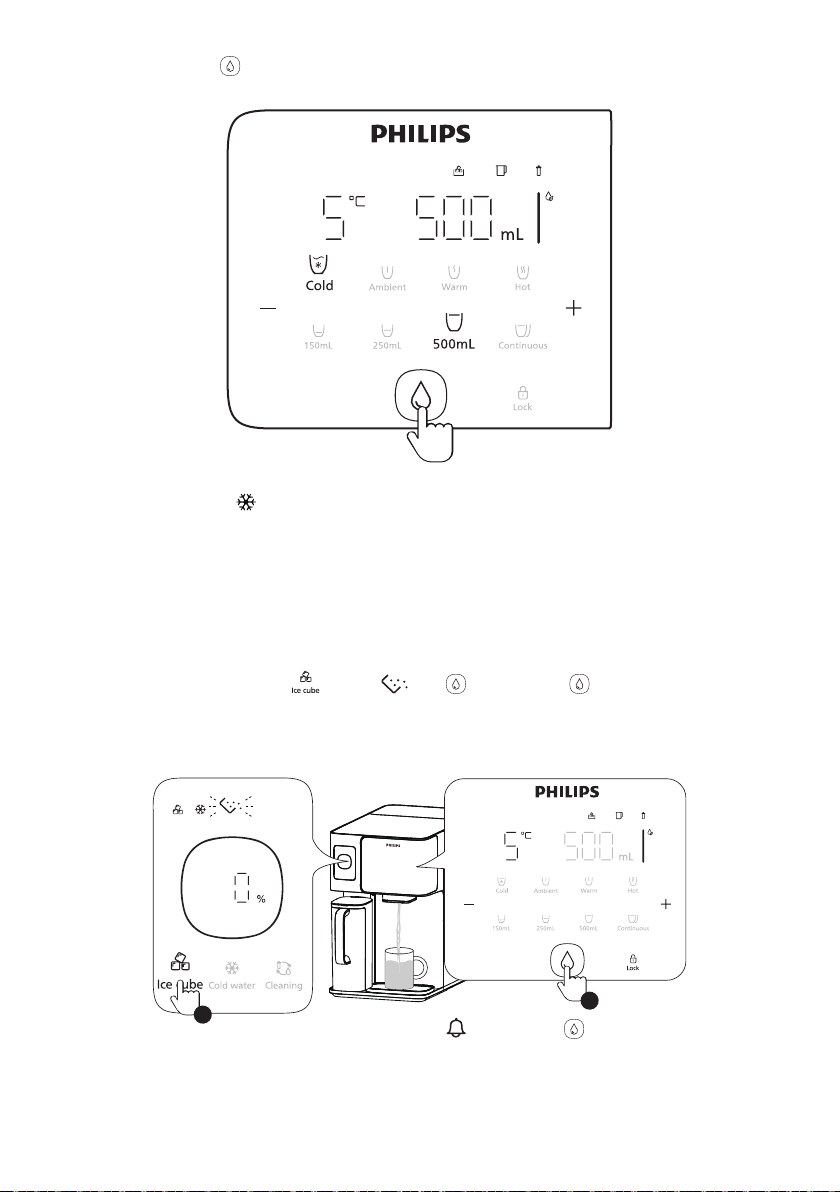
(2) 依次選擇水量,按“ ”進行取水。
冰水最低溫度為5℃,當“ ”閃爍說明正在製冰水,如此時取冰水,溫度會高於5℃。
關閉製冰功能,產品將同時停止製冰塊和製冰水。
請務必按照以下步驟完成冰水箱和冰盒的排空,以免滋生細菌。
(1) 在出水口放置大容量杯,長按“ ”3秒至“ ”和“ ”閃爍,短按“ ”出水,等待排空進度從0%
至100%。
3s
1
可再次短按“ ”暫停。
52
2
Page 56
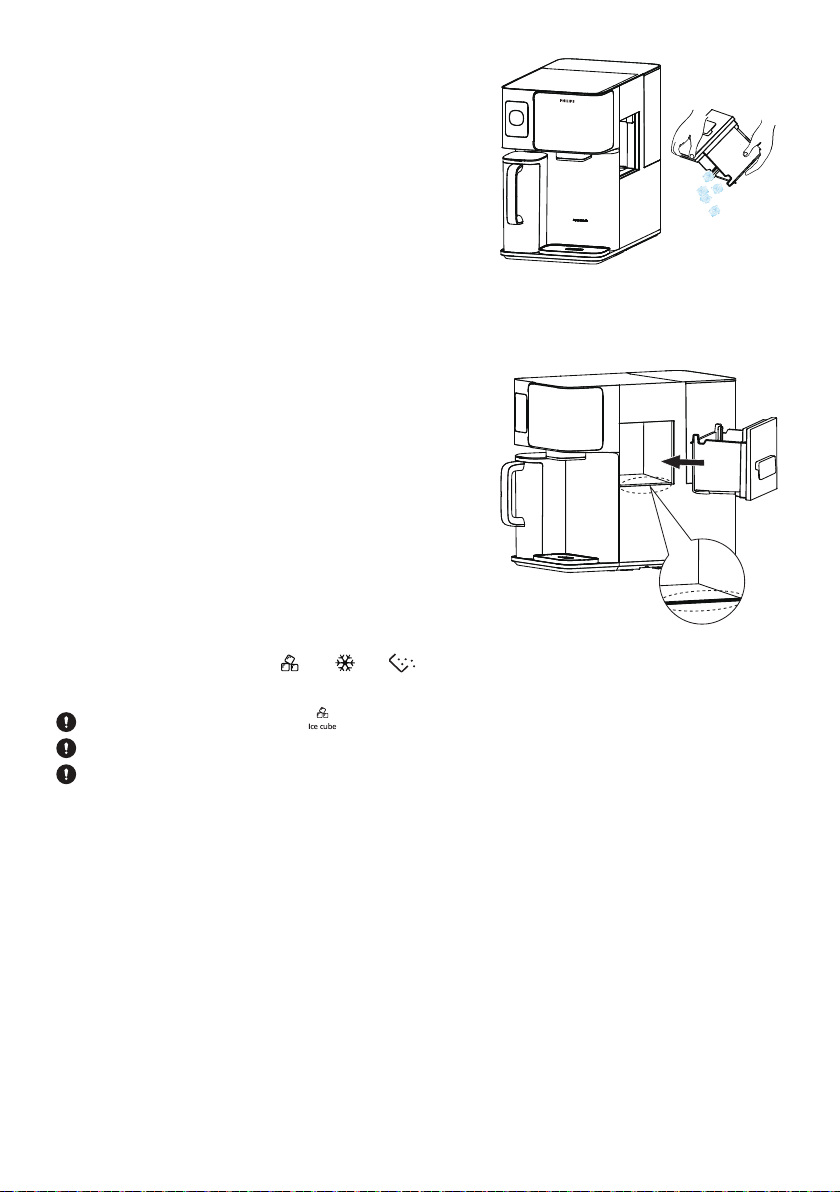
(2) 排空出水期間,取出冰盒,將冰盒內的冰塊倒掉。
(3) 用潔淨的抹布清潔冰盒和排水通道,然後將其放
回原處。
(4) 等待排空進度至100%後,“ ”、“ ”、“ ”熄滅,製冰功能關閉。
排空過程如需退出,可再次長按“ ”3秒退出排空,製冰功能將繼續開啟。
排空期間請勿拔掉電源,否則將退出排空,通電後製冰功能將繼續開啟。
排空期間,機器發出水管抽空的聲響,屬正常運作,當進度完成至100%時聲響將停止,請勿擔心。
53
Page 57
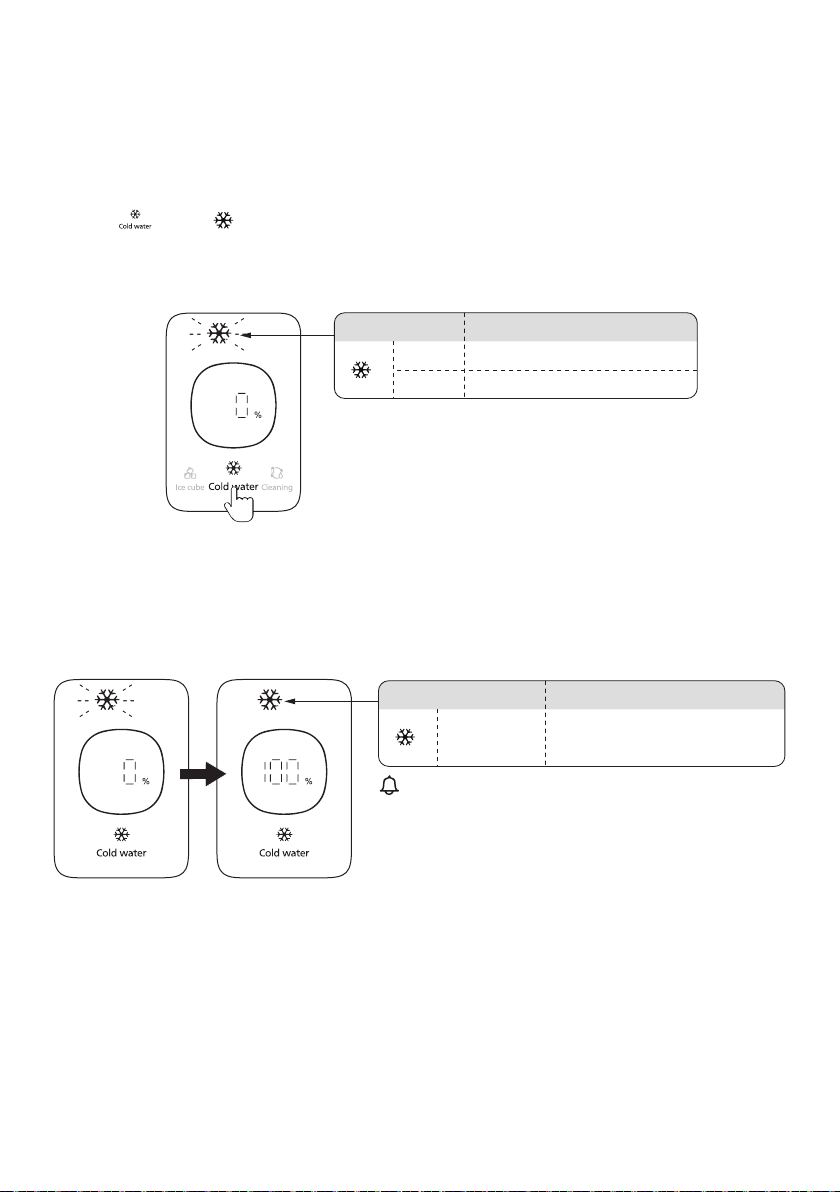
開啟冰水功能,產品只製冰水,不製冰塊。
(1) 長按“ ”3秒至“ ”閃爍,說明成功開啟。
3s
(2) 當進度到100%,說明製冰水完成。
不亮閃爍未開啟製冰水
已開啟製冰水,正在製冰水中
閃爍變常亮 冰水已達至5℃,冰水製作完成
參照狀態指示燈了解製冰水的狀態。
54
Page 58
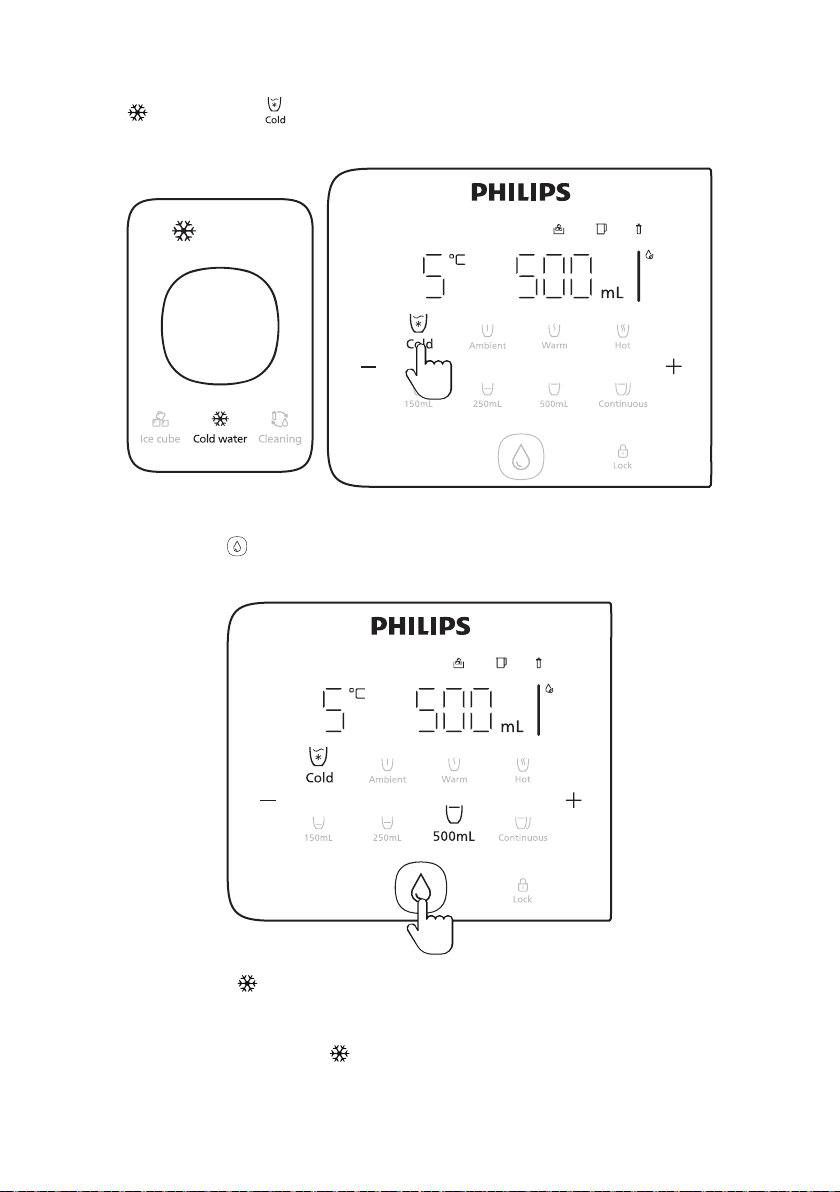
(1) 等待“ ”至長亮,短按“ ”。
(2) 依次選擇水量,按“ ”進行取水。
冰水最低溫度為5℃,當“ ”閃爍說明正在製冰水,如此時取冰水,溫度會高於5℃。
(3) 製冷完成後取冰水
產品會自動重新補滿冰水箱,此時“ ”會閃爍。等待變為長亮後,說明冰塊/冰水製備再次完成。
55
Page 59
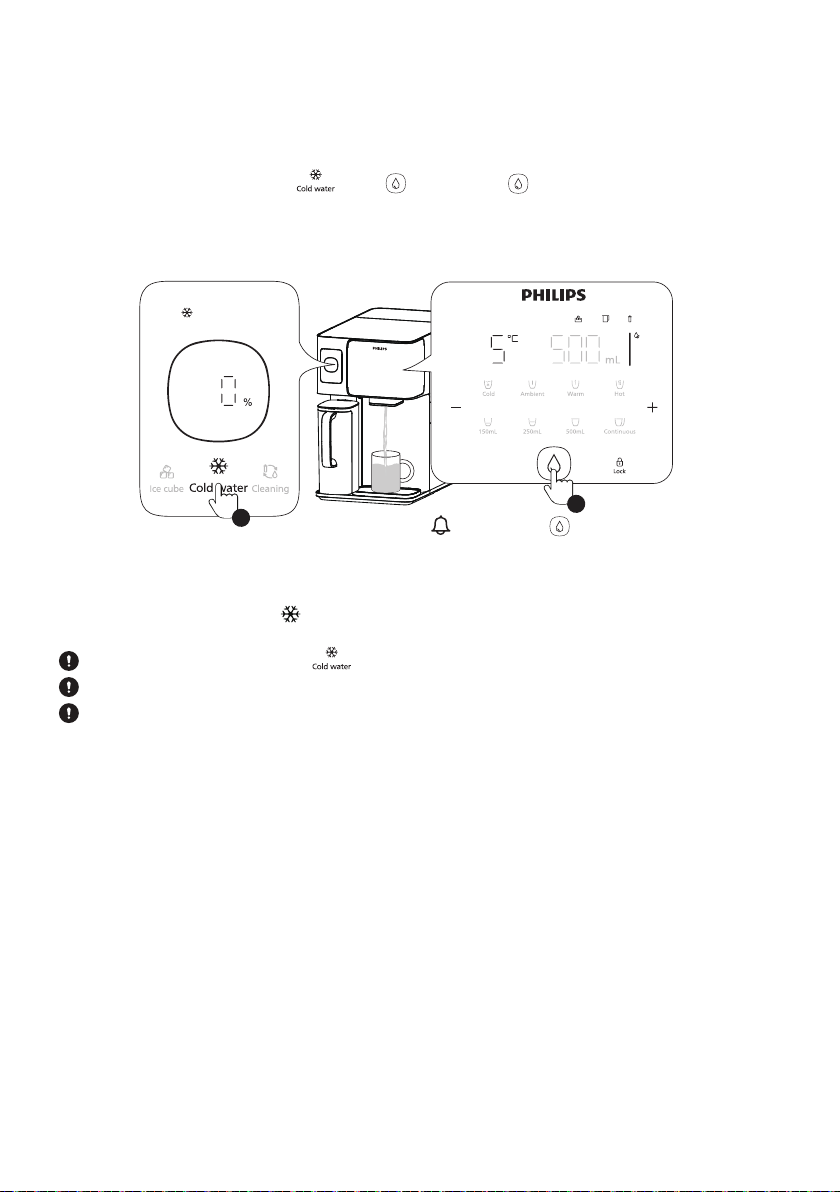
關閉冰水功能,產品將停止製 冰 水。
請務必按照以下步驟完成冰水箱和冰盒的排空,以免滋生細菌。
(1) 在出水口放置大容量杯,長按“ ”3秒“ ”閃爍,短按“ ”出水,等待排空進度從0%至100%。
3s
1
(2) 等待排空進度至100%後,“ ”熄滅,冰水功能關閉。
排空過程如需退出,可再次長按“ ”3秒 退出排空,冰水功能將繼續開啟。
排空期間請勿拔掉電源,否則將退出排空,通電後冰水功能將繼續開啟。
排空期間,機器發出水管抽空的聲響,屬正常運作,當進度完成至100%時聲響將停止,請勿擔心。
可再次短按“ ”暫停。
2
56
Page 60
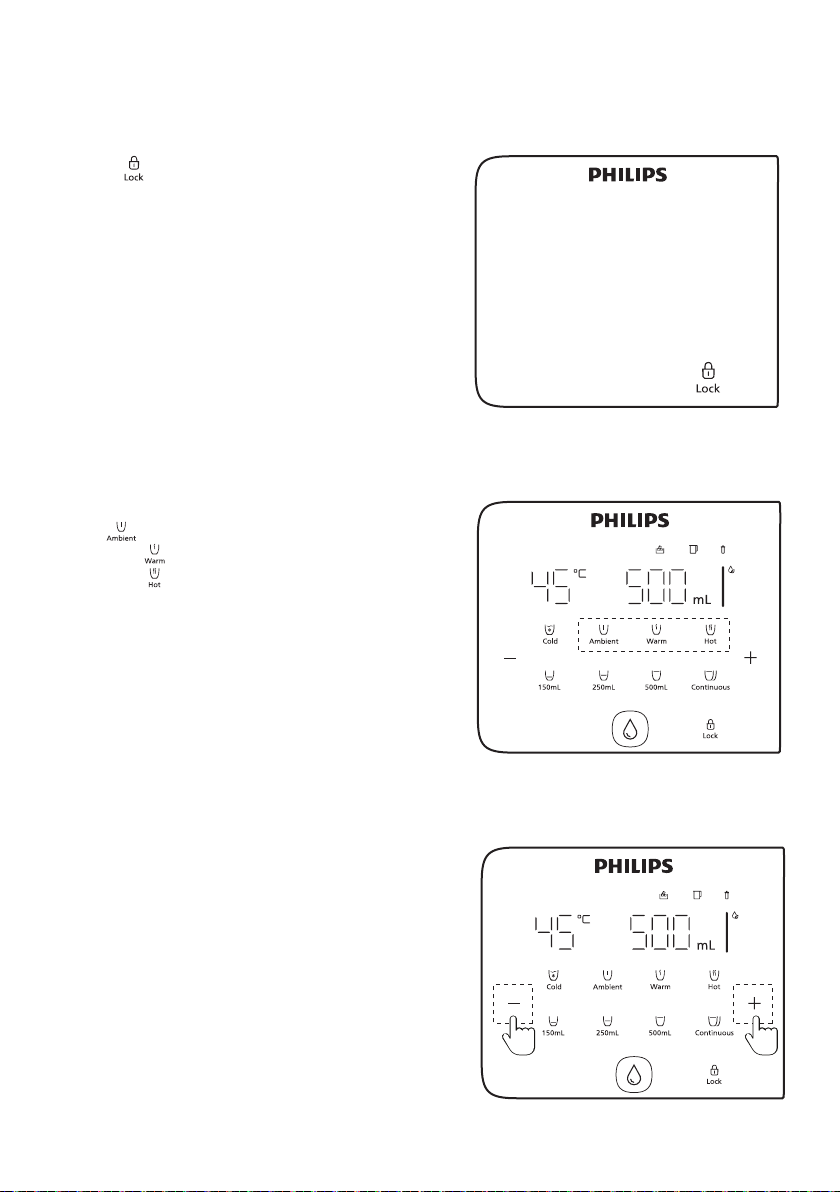
選擇您喜歡的溫度和水量
(1) 點擊“ ”喚醒螢幕。
(2) 選擇溫度:
按“ ”選擇常溫水
連續按“ ”,可選45℃或55℃;
連續按“ ”,可選85℃或100℃。
(3) 更多溫度選擇
選定任意溫度鍵,短按“ - ”或“ + ”可進行溫度的增
減調節。
57
Page 61
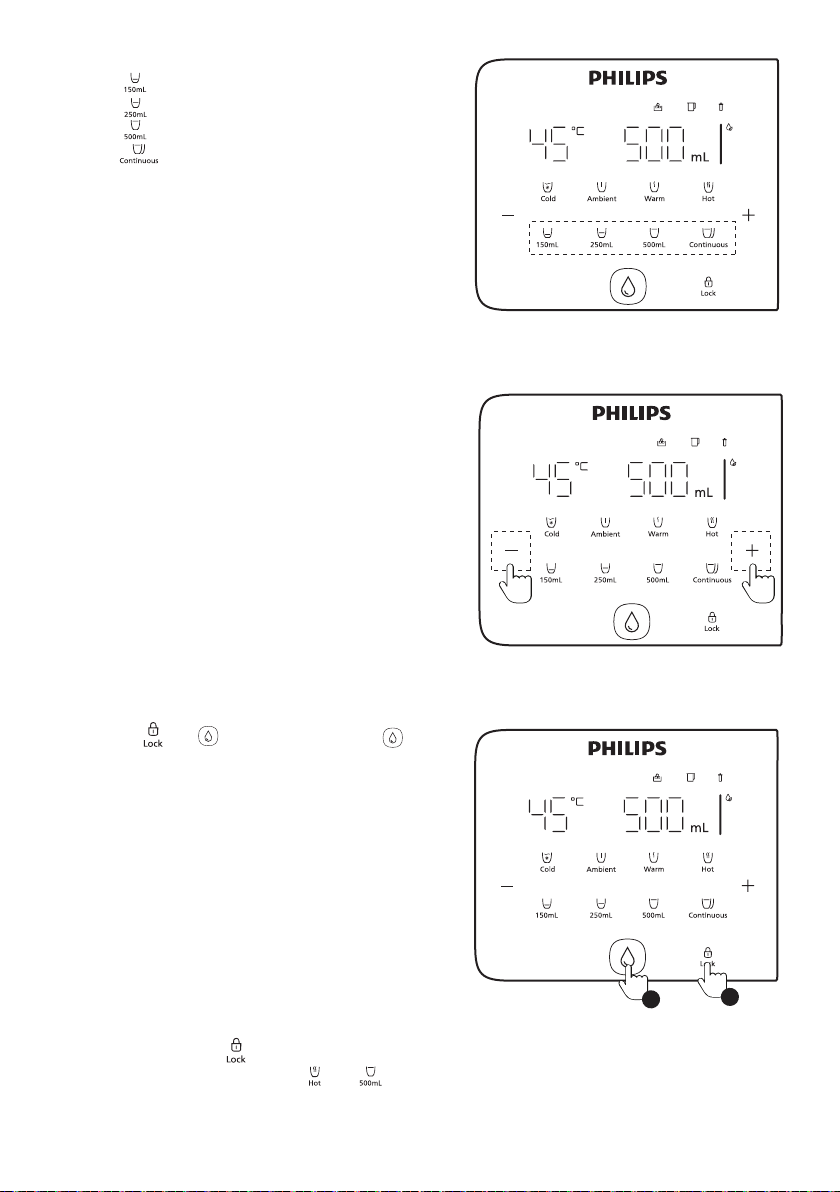
(4) 選取快捷水量
短按“ ”,可選150mL 和 120mL;
短按“ ”,可選250mL 和 350mL;
短按“ ”,可選500mL;
短按“ ”,可連續出水。
(5) 更多水量選擇
選定任意水量鍵,短按“ - ”或“ + ”可進行水量的增
減微調節,長按“ - ”或“ + ”可加快調節水量。
(6) 依次按“ ”,“ ”。出水過程中再次按“ ”,即
可停止出水。
· 取消/啟用童鎖:長按“ ”3秒。
· 取消/啟用按鍵提示音“嘀”:長按“ ”+“ ”3秒。
58
2
1
Page 62
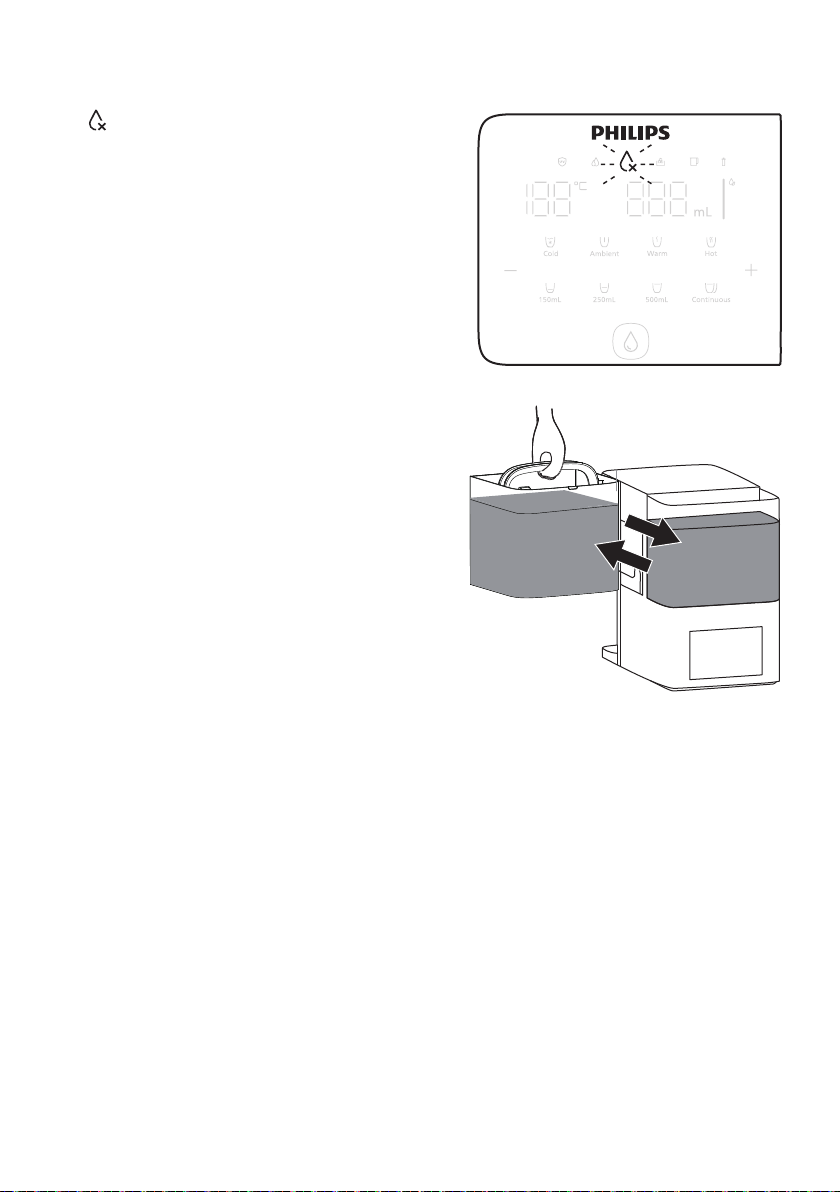
當“ ”指示燈閃爍時,以下情況請更換原水箱中的水:
(1) 原水箱水位低於或達到最低水位。
(2) 自來水的TDS值較高。
(3) 原水箱內的水48小時未更換。
· 打開原水箱頂蓋。
· 向上提起原水箱並倒掉剩餘廢水。
· 用自來水注滿原水箱,將其放回機器並蓋上蓋子。
請勿直接向原水箱加水,必須先倒掉剩餘廢水。
59
Page 63
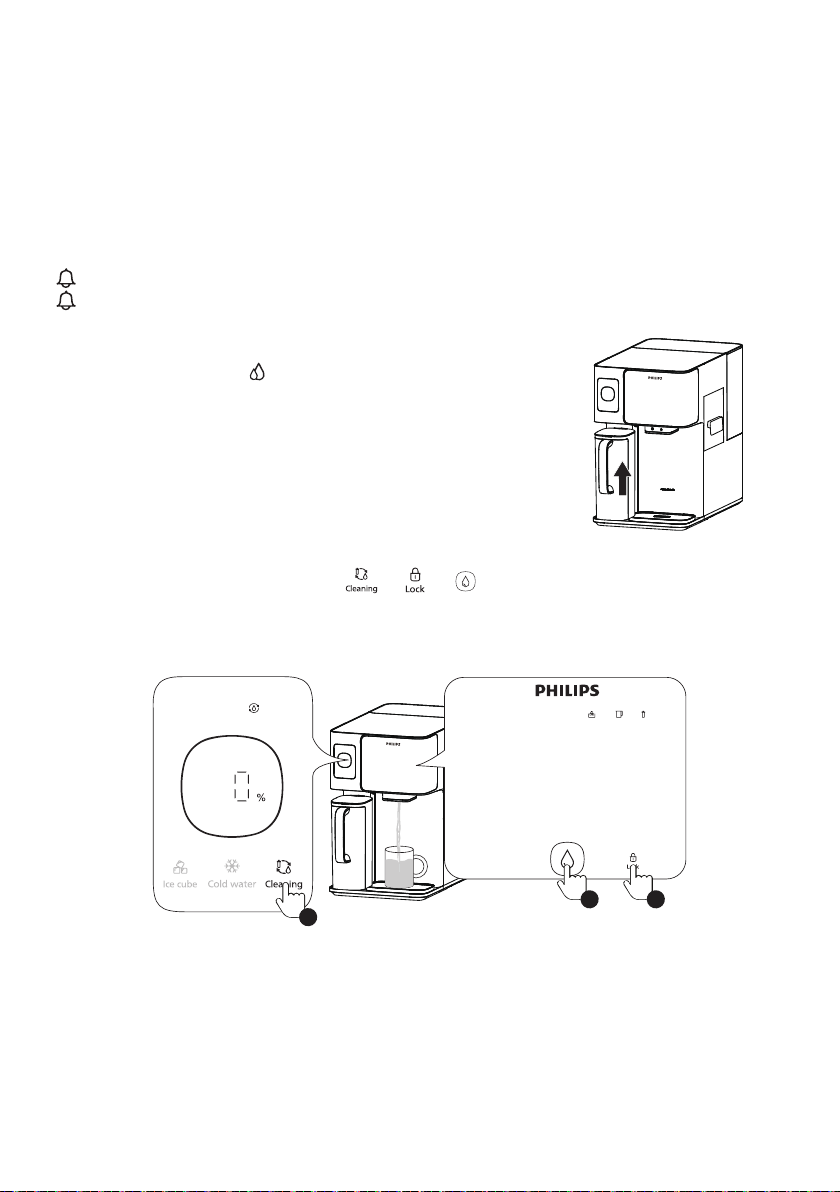
如果 產 品 超 過1周未 使 用,或連續使用1個月,建議清潔水路。
如果長時間不使用飲水機,請將產品排空並斷開飲水機的電源。將濾芯密封並存放在雪櫃中(2-5℃,請
勿放置在冰箱裏)。再次使用時,請按照首次使用時的清潔程序進行。
如未開啟冰塊/冰水功能,產品將出常溫水和熱水沖洗熱水水路,清潔過程預計出水1L 。
如已開啟冰塊/冰水功能,產品將出冷熱水沖洗冷熱水水路,清潔過程預計出水2L。
(1) 原水箱裝滿水。
(2) 待純淨水壺濾滿水(即“ ”燈熄滅),否則無法使用此功能。
(3) 放置一個大容量容器(2公升),依次按“ ”-“ ”-“ ”,啟動清潔程序。
1
3 2
60
Page 64
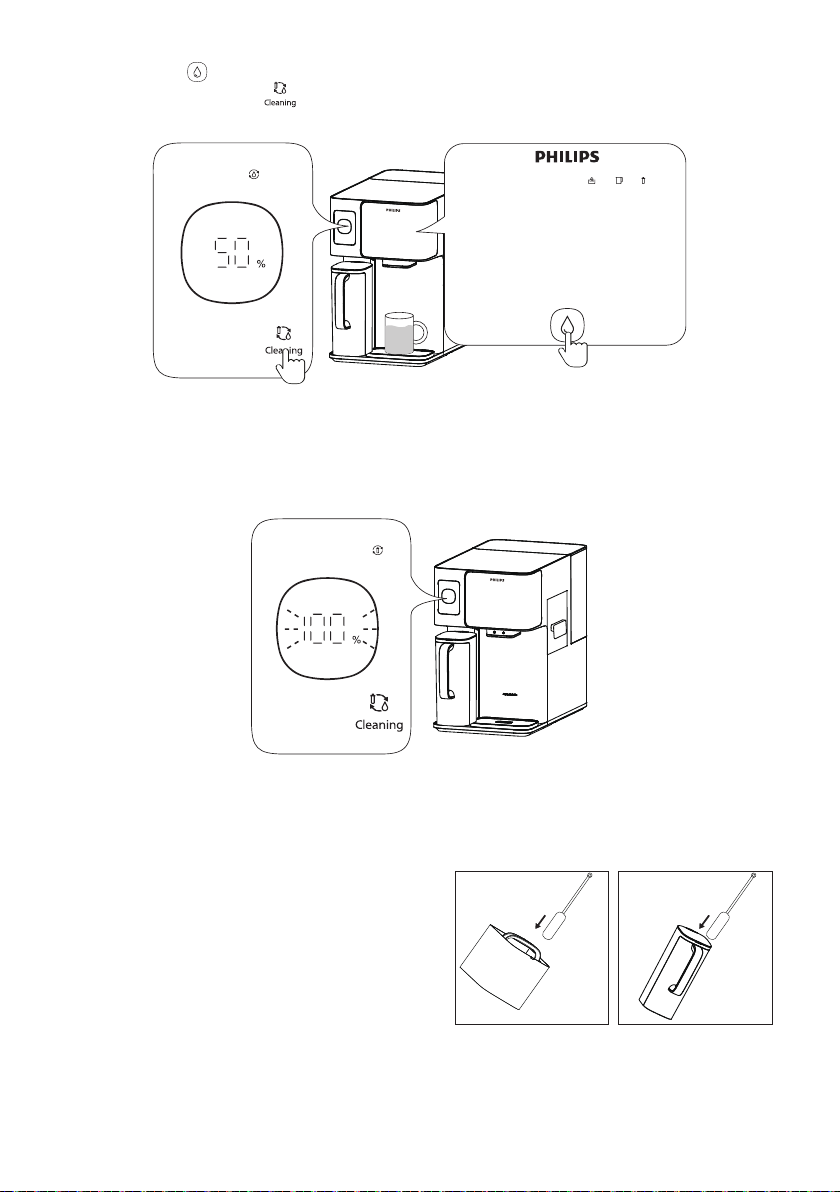
(4) 清潔過程,按“ ”暫停。
(如需退出清潔程序,長按“ ”3秒。)
退出
(5) 當“100%”閃爍,代表清潔完成。
(1) 當原水箱或純淨水壺底部出現沉積物時,需用
水進行沖洗,如無法沖洗乾淨,請使用清潔刷
進行清潔。建議最少每週使用清潔刷清潔原
水箱一次。
(2) 請勿將原水箱或純淨水壺放入洗碗機中。
暫停
61
Page 65
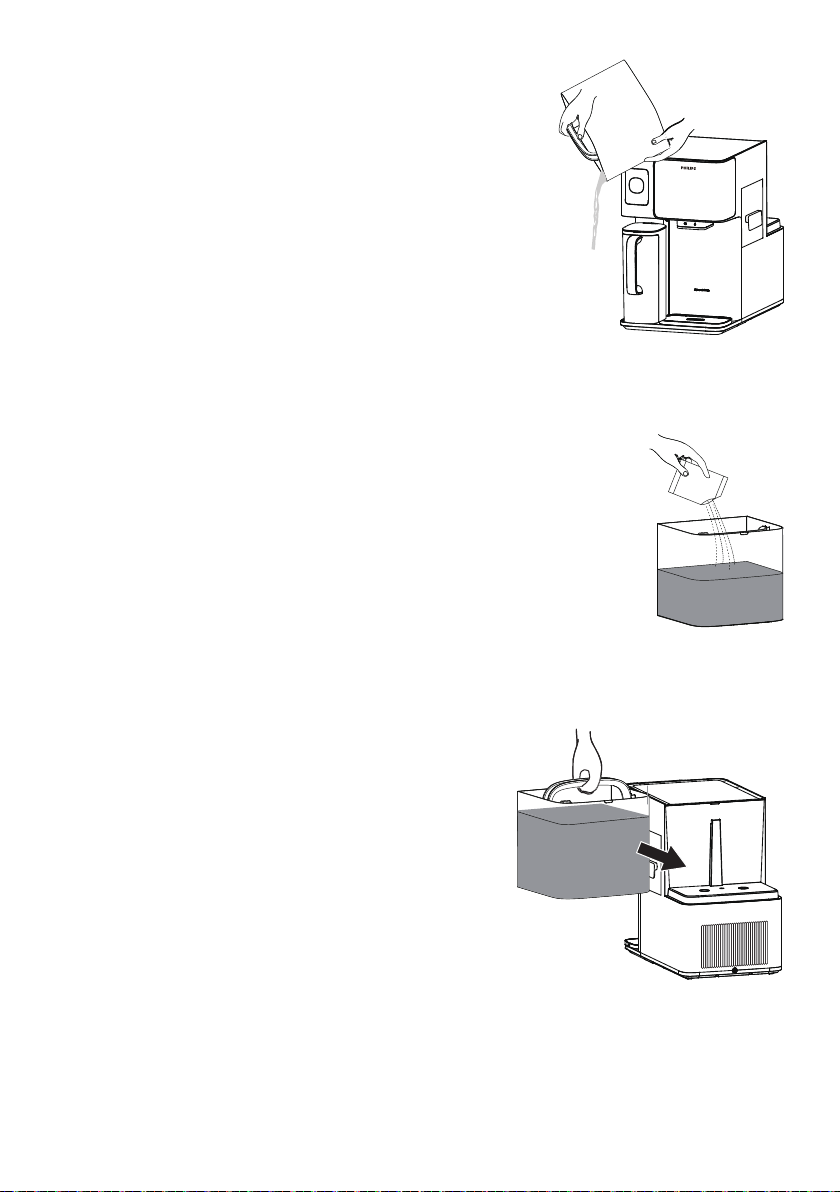
(1) 將原水箱剩餘的水倒掉。
(2) 加入3公升(約半箱) 自來水,再加入檸檬酸除垢劑
30g,攪拌溶解後放置2小時,切勿把原水箱放回
機器。
30g檸檬酸
(3) 用清水清洗乾淨原水箱,再新加入自來水裝好,放
回機器上。
* 檸檬酸与清潔刷請自行購買。
62
Page 66
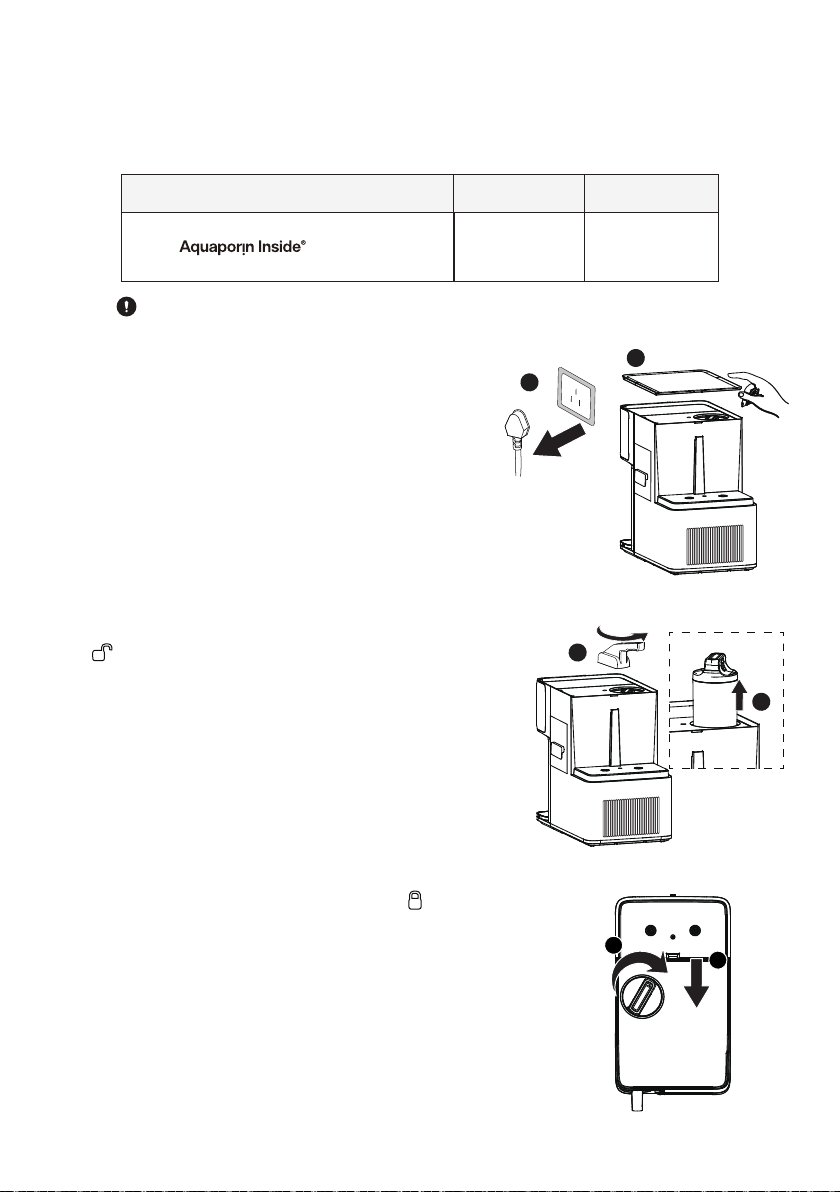
請根據顯示屏濾芯壽命提示或建議週期更換濾芯。新的濾芯可從飛利浦經銷商處或經授權的飛利浦服
務中心購得,其供應型號為:ADD583。
名稱 型號 建議更換周期
RO複合濾芯
僅可使用原裝飛利浦濾芯進行更換。
(1) 拔出電源,取出原水箱後取出頂蓋。
(2) 使用濾芯扳手*,將已到壽命的濾芯逆時針旋轉至開鎖
“ ”位置並提出。
* 售後濾芯包裝內含扳手。
一年ADD583
2
1
1
2
(3) 將新的濾芯放入濾芯座並順時針旋入至鎖上“ ”位
置,蓋上蓋,裝好原水箱。
63
2
1
Page 67
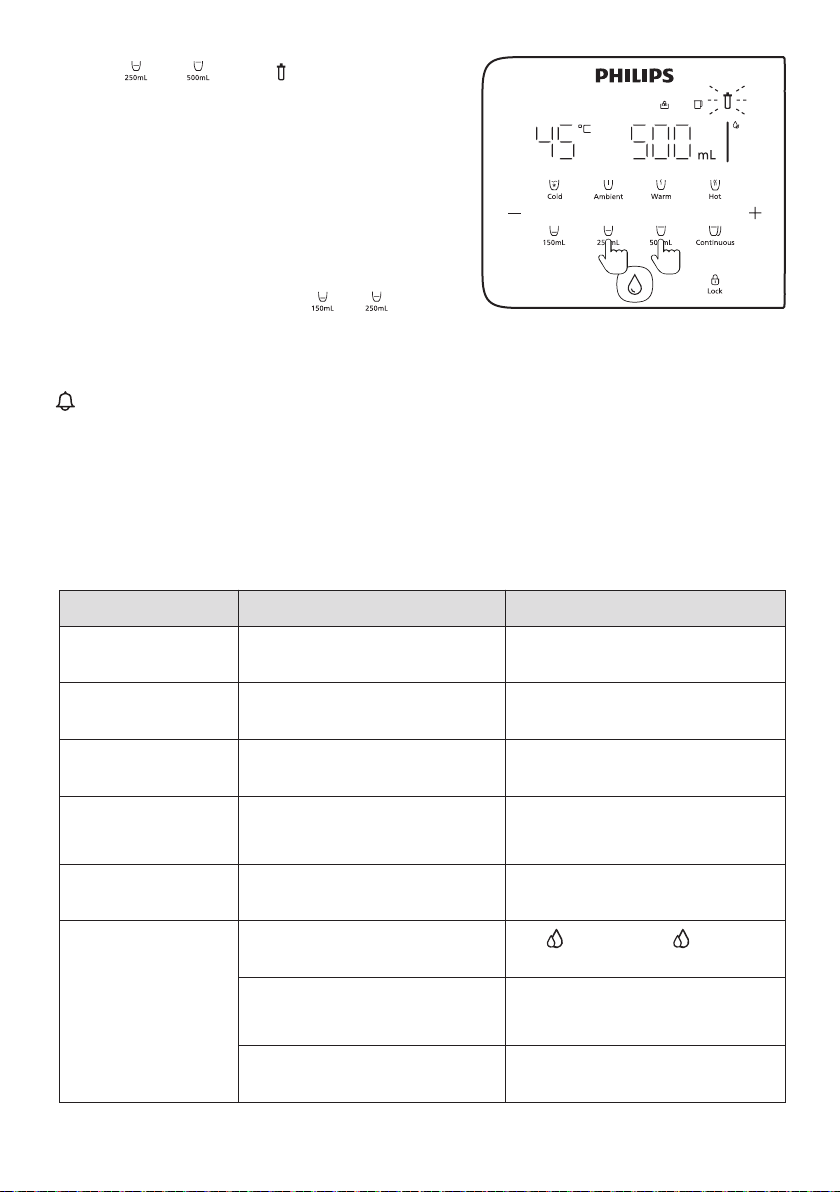
(4) 長按“ ”和“ ”3秒,“ ”閃爍,由紅燈轉
為白燈,說明重置成功。
3s 3s
(如需撤銷重置,請在2小時內长按“ ”+“ ”3秒。)
(5) 濾芯更換完成後請按照沖洗程序進行濾芯沖洗,完成沖洗後可正常使用產品。
如超過一周不使用機器,請提前倒掉原水箱和純淨水壺的水,同時,將濾芯密封好,放入雪櫃保鮮室
保存(攝氏2-5度),切勿放入冰格。再次使用時,遵照沖洗程序進行沖洗。
8
異常現象 潛在原因排查 解決方法
E1故障代碼
無法取熱水
E2故障代碼
無法取熱水
E4故障代碼
無法取熱水
E6故障代碼
產品無法正常製水
和取水
EU故障代碼
產品通訊異常
無法取水
原水箱溫度探頭故障警報,或者
加入了超 過3 8 ℃的原水
出水溫度探測異常警報
加熱異常警報
製水異常警報
濾芯未安裝到位或堵塞
通訊異常警報,電控板內部
通訊信號出現異常
純淨水壺缺水
純淨水壺未安裝到位
64
確保原水箱加入的自來水低於38℃
先取500ml常溫水,再次嘗試是否
可正常取熱水
先取3杯150ml常溫水,再次嘗試
是否可正常取熱水
檢查濾芯是否安裝到位或堵塞,若
濾芯堵塞請更換濾芯
關閉電源1-2min,再重新連接電源
若 正在閃爍,待 不再閃爍,
即可正常取水
檢查純淨水壺是否安裝到位,插裝到
位會聽到「嘀」提示音,且 屏 幕「水
壺 」燈 常 亮
檢查原水箱是否安裝到位原水箱未安裝到位
Page 68
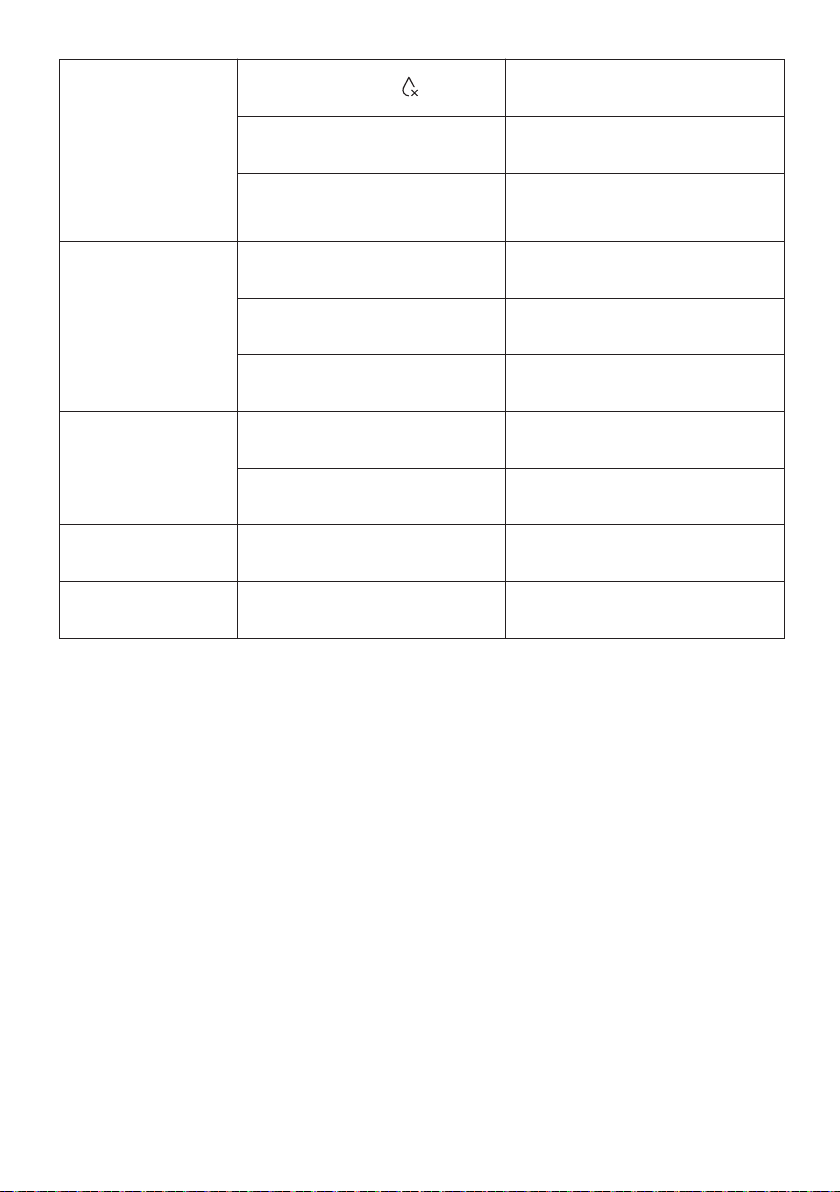
原水箱處於低水位, 閃爍紅色
全部倒掉原水箱水,再重新添加
自來水
無故障代碼
但產品不製水
機器漏水 原水箱底部密封處有異物卡住
飲用水出現異味
漏電及機身帶感應電
按鍵/顯示屏無反應
原水箱未安裝到位或未蓋好水箱蓋
純淨水壺未安裝到位
接水盤水滿溢出 清空接水盤
純淨水壺未裝好
首次使用或換新後未按要求沖洗,
或過久未使用機器。
未及時更換濾芯 參考更換濾芯步驟進行換芯和沖洗
機器接地不良或電源軟線破損
系統出現故障或硬件破損 關閉電源1-2min,再重新連接電源
檢查原水箱是否安裝到位,且是否
蓋好水箱蓋
檢查純淨水壺是否安裝到位,插裝到
位會聽到「嘀」提示音,且屏幕
「水壺」燈常亮
用頂針檢查產品底部密封彈簧處是
否存在異物卡住,並進行清理
檢查純淨水壺是否裝好插緊,勿留
縫隙
參考新機首次沖洗/更換濾芯沖洗步
驟進行沖洗
必須使用有可靠接地的三孔插座,
若電源破損需及時聯系售後更換
65
Page 69

主機
接水盤
純淨水壺
說明書
快速入門指南
濾芯更換指南
開箱指引
×1
×1
×2
×1
×1
×1
×1
如果您需要信息或有任何問題,請訪問 www.philips.com/support 或聯繫您所在國家/地區的消費者
服務中心。如果您所在的國家/地區沒有消費者服務中心,請聯繫當地經銷商。自購買之日起兩年內,因
製造過程問題造成的任何損壞,或經我們維修服務人員確認的在正常使用狀況下的部件損壞,您將獲
得免費保修服務。保修服務不包括經常更換的耗材、輔助設備、運輸費用和上門服務。維修時請向服務
人員出示購買憑證。
請妥善保管本説明書
66
Page 70

Page 71

Page 72

Register your product and learn more via the website link below:
www.philips.com/water
Speci�cations are subject to change without prior notice
All rights reserved.
Philips and the Philips Shield Emblem are registered trademar ks of
This product has been manufactured by and is sold under the responsibility of
Hong Kong AquaShield Health Technology Company Limited
and Hong Kong AquaShield Health Technology Company Limited is the warrantor in relation to this product.
Rev A JAN 25
 Loading...