

Philips ADD4970GY/70 user manual [hi]

Dispenser
ADD4962
ADD4964
ADD4970
User Manual 1-9
Petunjuk Penggunaan 11-19


Content
Main technical specication
1 1
2 2
Product overview
3 4
Indicator panel and switch
4 5
Instruction
·UV-LED light
5 7
Precautions
6 8
Routine Maintenance
7
Trouble shooting
8
Guarantee and Service
9
Packing list
6
8
9
9

1 Main technical specication
Model
Rated voltage
Rated frequency
Heating power
Cooling power
Hot water
Cold water
Environmental temp.
Coolant
Relative humidity
ADD4962 ADD4964 ADD4970
220V
50Hz
Low Power 170W / High Power 350W
85W
≥90℃, 3.8L/h with high power,
1.8L/h with low power
≤10℃,2L/h
T
R134a, 38g
≤90%
Protection of anti-electric shock
1
I

2 Product overview
ADD4962 ADD4964
1
10
2
3
5
6
7
Child Safety Lock
1 Lower Cabinet Door
2
Indicator Panel
3
Cold Water Faucet
Ambient Water Faucet
4
4
8
9
7
8
Water Bottle Cap with Hose
9
Water Bottle
Power Switch
10
11
12
13
Hot Water Faucet
5
6
Drip Tray
Condenser
11
12
Power Cord
13
Dispenser Flushing Drain
2

ADD4970
1
10
2
3
5
4
11
12
13
6
8
7
9
Child Safety Lock
1 Lower Cabinet Door
2
Indicator Panel
3
Cold Water Faucet
Ambient Water Faucet
4
7
8
Water Bottle Cap with Hose
9
Water Bottle
Power Switch
10
Hot Water Faucet
5
6
Drip Tray
Condenser
11
12
Power Cord
13
Dispenser Flushing Drain
3

3 Indicator panel and switch
Power on indicator (applicable for ADD4962)
When the dispenser is connected with power and the power button switches on,
the indicator will light up.
Heating indicator
When the dispenser is heating up the water in the hot water tank, the light will go on.
Cooling indicator
When the dispenser is cooling the water in the cold water tank, the light will be on.
Water shortage indicator
When there is no water in the bottle, the water shortage indicator will be on.
Please replace with a new bottle.
UV working status indicator (applicable for ADD4964 and ADD4970)
When the UV sterilization is working, the UV working status indicator will light up.
If there's malfunction with the UV, the light will ash to warn the user.
Cooling switch
Power Switc h
Low power heating
O
High power heating
At the back of the dispenser there is a black switch which controls the heating power. You
may press it to switch between high power, low power and OFF.
Every time when you plug in the water dispenser again, it will need some time for getting hot
and cold water.
Turn the black heating switch to ‘I’, please wait for around 30 minutes for hot water;
Turn the black heating switch to ‘II’, please wait for around 15 minutes for hot water;
Turn the green cooling switch to ‘ON’, please wait for around an hour for cold water.
4
4 Instruction
(1)Unpacking the water dispenser
· Cut and remove the straps from the box. DO NOT turn the box upside down, or lay it on its
side. The bottom of the box is separate from the top section. Lift straight up on the top box
section to remove the top box section. Remove the Styrofoam packaging and plastic bag.
Lift the water dispenser o the bottom of the bottom of the box. Wipe it clean if necessary.
· Place the machine on a hard, at surface. Make certain the unit is leveled. The unit should
not be placed near direct sunlight or other source of heat.
· It is best to place the water dispenser in an area with good air circulation. Make sure there is
at least 4 inches (10cm) of space between the back of your water dispenser and the wall.
Keep a minimum distance of 2 inches (5cm) on each side of your water dispenser.
Warning: the drain plug on the back of the unit may become loose during shipping. Fasten
the drain plug tightly before you start to operate the unit. If the drain plug is loose, the unit
may leak and cause oor damage.
(2) Settling water bottle
· Make sure the water dispenser is not plugged into an electrical outlet.
· Open the door of the lower cabinet.
· Place full water bottle on oor. Remove the plastic cover over the mouth of the water bottle.
· Place the stainless tube inside the bottle and place the water bottle cap rmly over the
mouth of the water bottle.
· Attach the hose to the top of the cap using the quick connect system shown below*.
· Slide the bottle inside the cabinet and close the lower cabinet door.
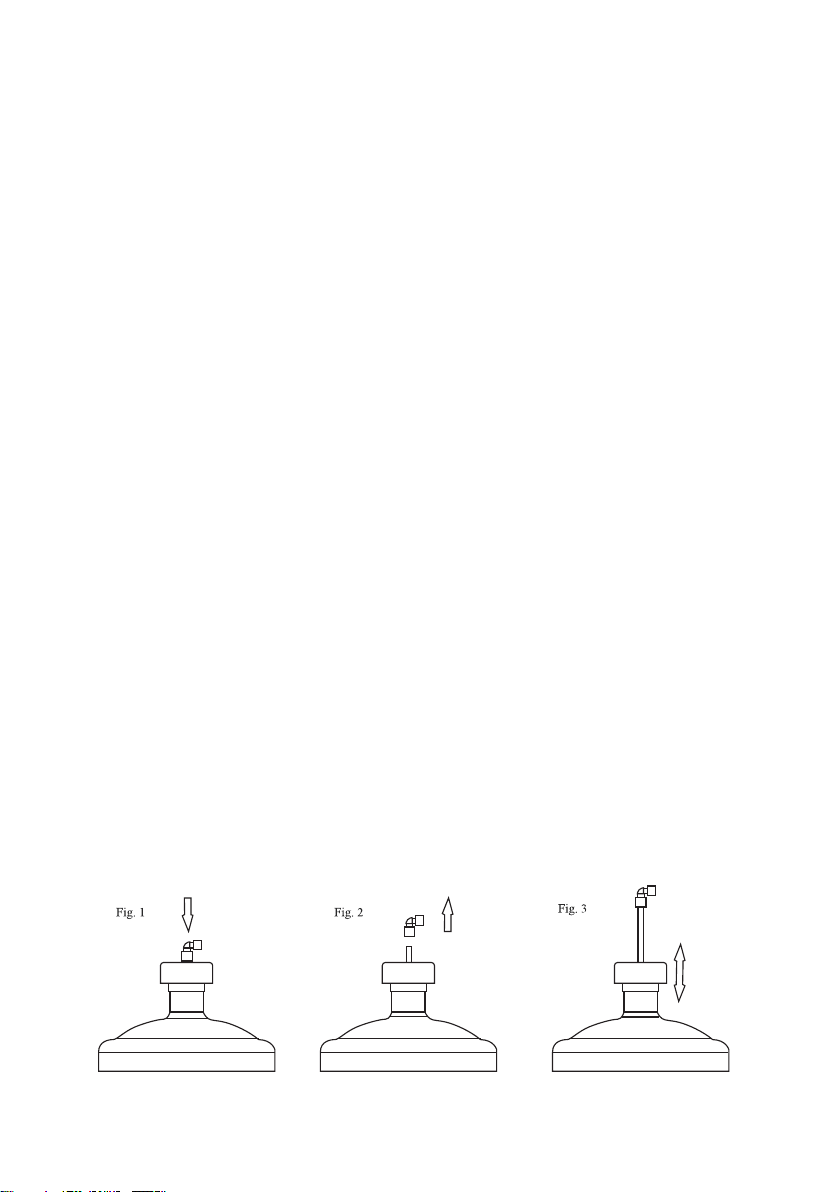
* Your new water dispenser features an adjustable quick connect system. For proper
operation, make sure the connector is sealed tight (Fig. 1);
The connector can be removed easily for cleaning with warm soapy water (Fig. 2);
The stainless steel tube can be adjusted up and down to accommodate both 3 gallon and 5
gallon water bottle (Fig. 3).
5
 Loading...