

Page 1
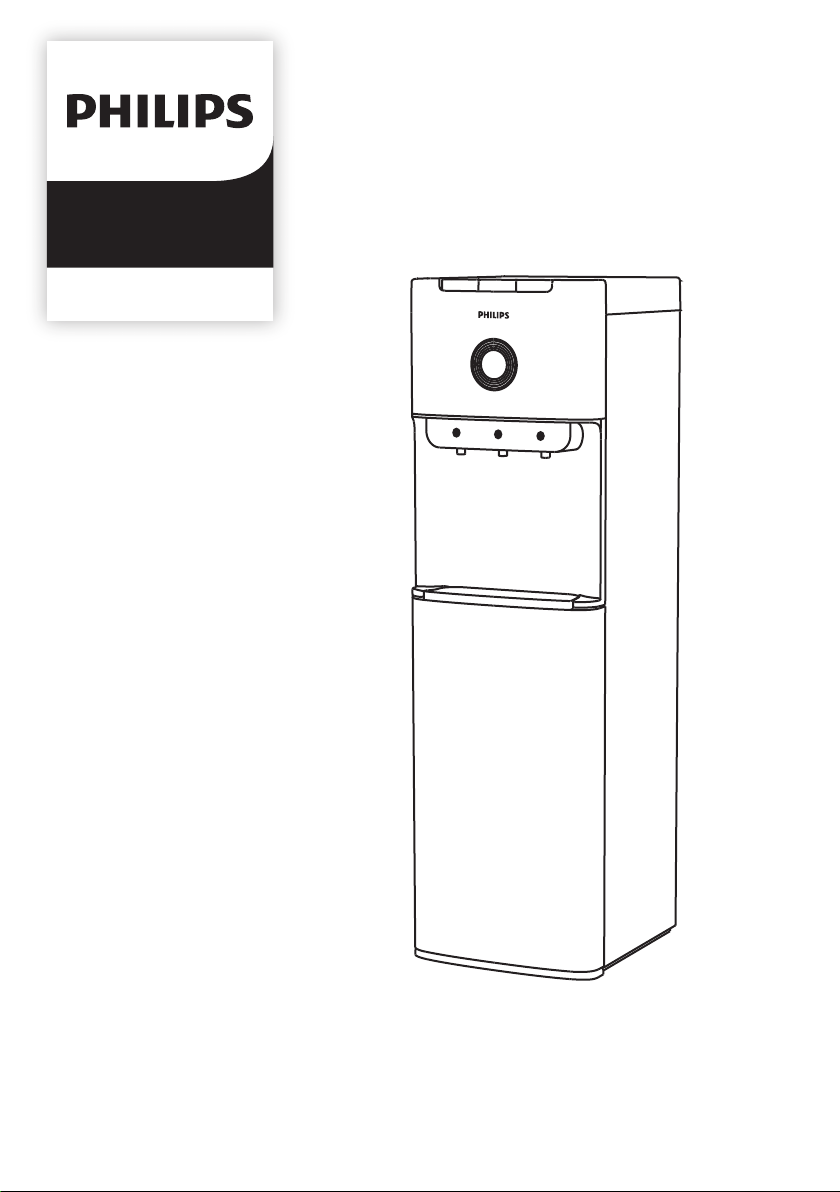
Dispenser
ADD4962
ADD4964
User Manual 1-8
Petunjuk Penggunaan 9-16
Page 2

Page 3

Content
Main technical specication
1 1
2 2
Product overview
3 3
Indicator panel and switch
4 4
Instruction
·UV-LED light
5 5
Precautions
6 6
Routine Maintenance
7
Trouble shooting
8
Guarantee and Service
9
Packing list
5
7
8
8
Page 4
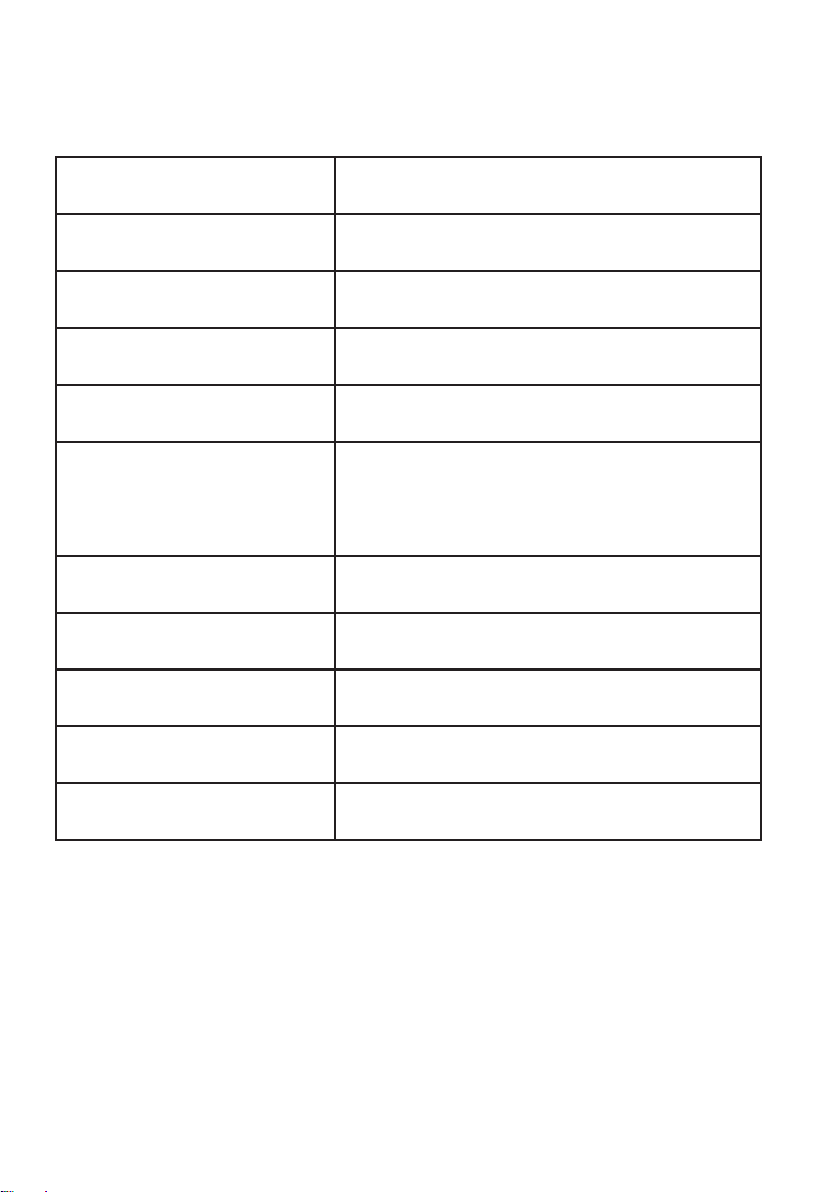
1 Main technical specication
Model
Rated voltage
Rated frequency
Heating power
Cooling power
Hot water
Cold water
Environmental temp.
Coolant
Relative humidity
ADD4962 ADD4964
220V
50Hz
170/350W
85W
≥90℃, 3.8L/h with high power,
1.8L/h with low power
≤10℃,2L/h
T
R134a, 38g
≤90%
Protection of anti-electric shock
1
I
Page 5
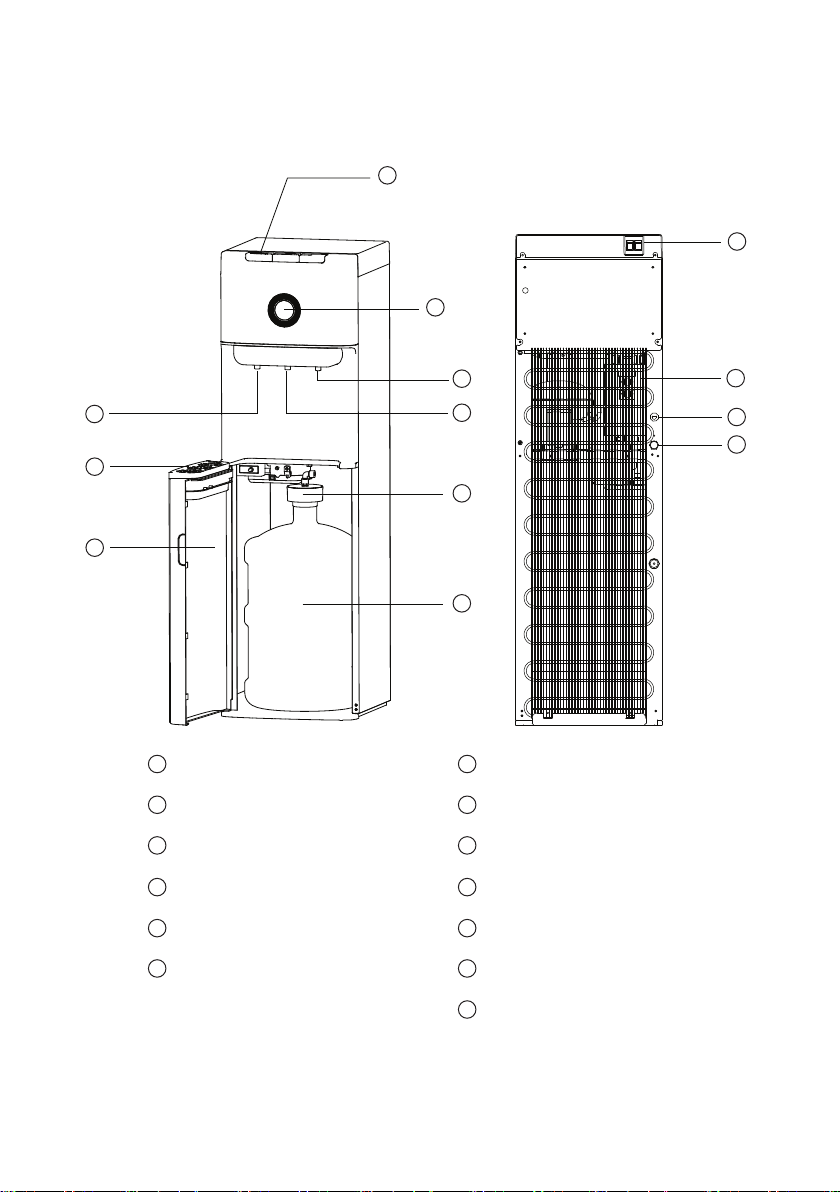
2 Product overview
1
10
2
3
5
6
7
Child Safety Lock
1 Lower Cabinet Door
2
Indicator panel
3
Cold Water Faucet
Ambient Water Faucet
4
Hot Water Faucet
5
4
8
9
7
8
Water Bottle Cap with Hose
9
Water Bottle
Power Switch
10
Conderser
11
11
12
13
6
Drip Tray
12
Power Cord
13
Dispenser Flushing Drain
2
Page 6
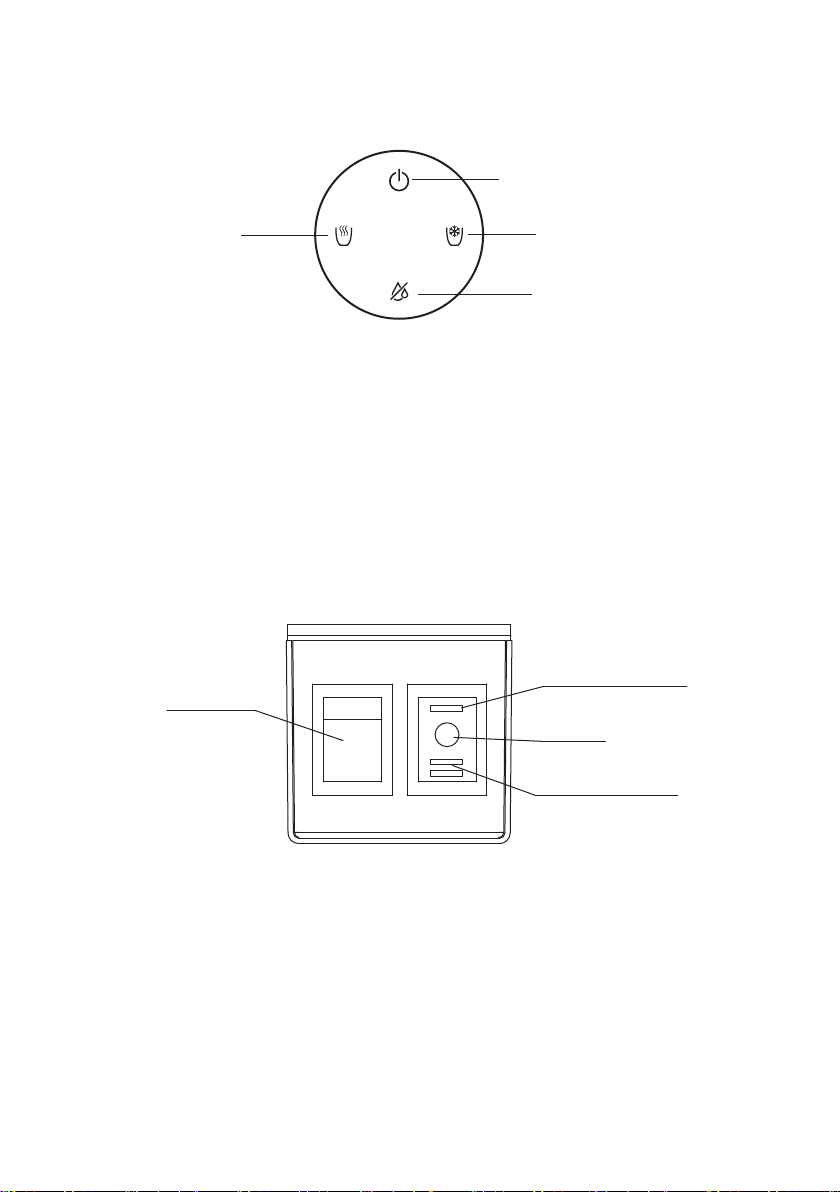
3 Indicator panel and switch
Power on indicator
Heating indicator
Indicator panel
When the dispenser is connected with power and the power button switches to ON, the
power on indicator will light up.
When the dispenser is heating up the water in the hot water tank, the heating indicator light
will be on.
When the dispenser is cooling the water in the cold water tank, the cooling indicator light
will be on.
When there's no water left in the bottle, the water shortage indicator will be on. Replace
with a new bottled water and the indicator will switch o automatically.
Cooling switch
Cooling indicator
Water shortage indicator
Low power heating
O
High power heating
Power Swi tch
At the back of the dispenser there is a black switch which controls the heating power. You
may press it to switch between high power, low power and OFF.
Every time when you plug in the water dispenser again, it will need some time for getting hot
and cold water.
Turn the black heating switch to ‘I’, please wait for around 30 minutes for hot water;
Turn the black heating switch to ‘II’, please wait for around 15 minutes for hot water;
Turn the green cooling switch to ‘ON’, please wait for around an hour for cold water.
3
Page 7
4 Instruction
(1)Unpacking the water dispenser
· Cut and remove the straps from the box. DO NOT turn the box upside down, or lay it on its
side. The bottom of the box is separate from the top section. Lift straight up on the top box
section to remove the top box section. Remove the Styrofoam packaging and plastic bag.
Lift the water dispenser o the bottom of the bottom of the box. Wipe it clean if necessary.
· Place the machine on a hard, at sur face. Make certain the unit is leveled. The unit should
not be placed near direct sunlight or other source of heat.
· It is best to place the water dispenser in an area with good air circulation. Make sure there is
at least 4 inches (10cm) of space between the back of your water dispenser and the wall.
Keep a minimum distance of 2 inches (5cm) on each side of your water dispenser.
Warning: the drain plug on the back of the unit may become loose during shipping. Fasten
the drain plug tightly before you start to operate the unit. If the drain plug is loose, the unit
may leak and cause oor damage.
(2) Settling water bottle
· Make sure the water dispenser is not plugged into an electrical outlet.
· Open the door of the lower cabinet.
· Place full water bottle on oor. Remove the plastic cover over the mouth of the water bottle.
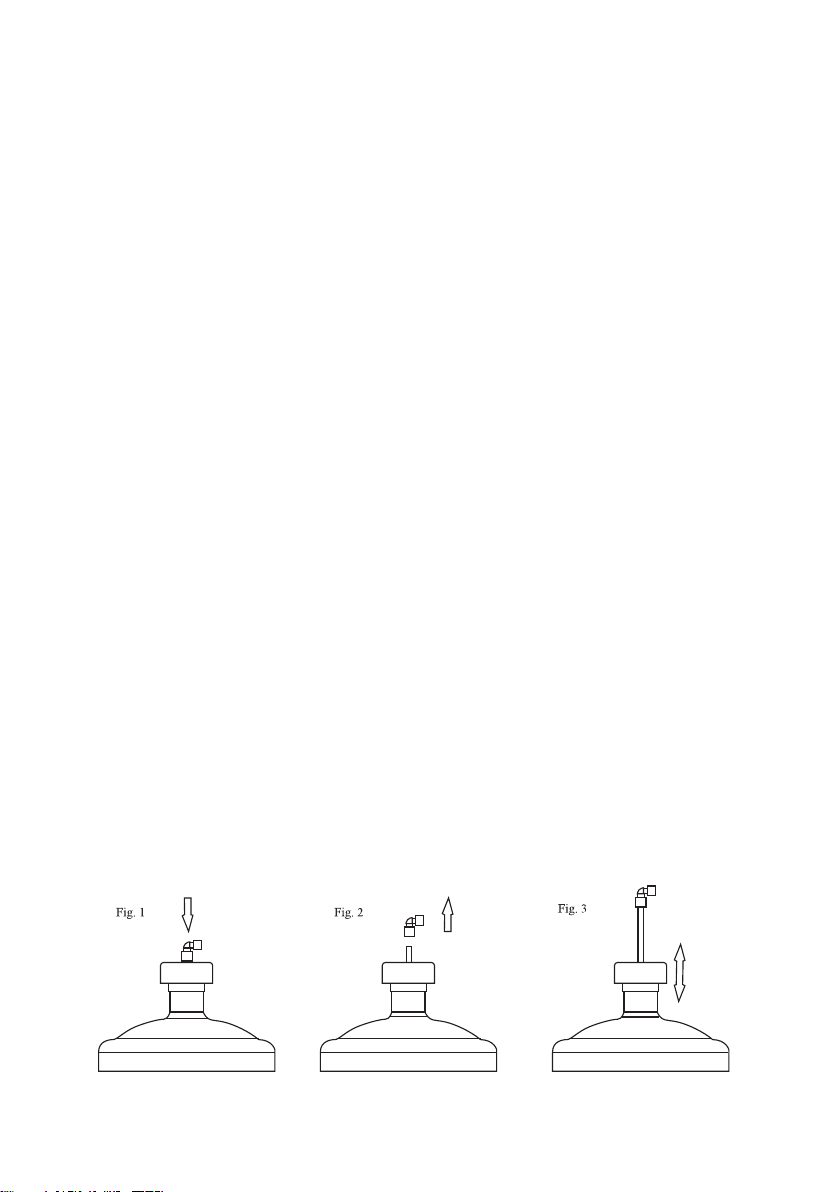
· Place the stainless tube inside the bottle and place the water bottle cap rmly over the
mouth of the water bottle.
· Attach the hose to the top of the cap using the quick connect system shown below*.
· Slide the bottle inside the cabinet and close the lower cabinet door.
* Your new water dispenser features an adjustable quick connect system. For proper
operation, make sure the connector is sealed tight (Fig. 1);
The connector can be removed easily for cleaning with warm soapy water (Fig. 2);
The stainless steel tube can be adjusted up and down to accommodate both 3 gallon and 5
gallon water bottle (Fig. 3).
4
Page 8

Note: If there is not a secure connection between the hose cap and the connector on the water
dispenser, the water pump will operate but the water dispenser will not dispense water. Make
sure the hose is connected to the water dispenser correctly.
(3) Dispense water
· Plug the water dispenser into a grounded power outlet. The unit will pump the water from
the water bottle into the cooling and heating tanks.
· Press the hot water faucet until water ows out.
· Turn on the power switch on the back of the unit. The cooling or heating feature will start
running. The indicator light will be on when heating or cooling function is working. Do not
touch both switches during the time.
· Enjoy the hot or cold water you need.
· If you are not going to use hot water, turn the black heating switch to ‘O’; if you are not going
to use cold water, turn the green cooling switch to “OFF” to conserve energy.
Note: please wait until the water pump stops running before using the unit. If the water tank is
not full, no water will dispense from the water faucet.
UV-LED light (applicable for ADD4964)
The UV-LED light is installed in the cold water tank to kill the bacteria which may grow inside.
It's controlled automatically by the software program once the dispenser is connected with
power.
5 Precautions
Warning
When using electrical appliances, basic safety precautions should be followed to reduce the
risk of re, electric shock, and injury to persons or property. Read all instructions before
using any appliance.
· Do not let hot water touch bare skin. Keep combustible material such as furniture, bedding,
pillows, clothes, and/or papers away from the back of the unit.
· Do not operate this, or any other appliance with a damaged power cord. No other appliance
should be plugged into the same outlet. Be sure that the plug is fully inserted into the outlet.
· Do not run the power cord over carpeting or other heat insulators. Do not cover the cord.
Keep cord away from high trac areas, and do not submerge in water.
· We do not recommend the use of extension cord as it may overheat and cause a risk of re.
· Exercise caution and use reasonable supervision when the appliance is used by or near
children.
5
Page 9

· Do not use your water dispenser outdoors. Place the water dispenser away from direct
sunlight and make sure that there is at least 4 inches (10cm) of space between the back of
your unit and wall. Keep a minimum of 2 inches (5cm) on each side of your unit free.
· Do not use this product to dispense anything other than water.
· To avoid a hazard due to instability of the appliance, it must be placed on even and at
surface.
· If the supply cord is damaged, please contact aftersales personnel to replace it in order to
avoid a hazard.
· This water dispenser must be positioned so that the plug is accessible.
· Disconnect the plug from the outlet when not in use.
· Remove power plug or disconnect from the main power source before serv icing the appliance.
6 Cleaning and maintenance
· To avoid accidents, turn o and unplug the water dispenser from the outlet before cleaning.
· A soft damp cloth may be used to clean the surface of the water dispenser. When necessary,
a mild detergent may be used. DO NOT use corrosive chemical solvents to clean the unit, as
this may damage the surface of the water dispenser.
· DO NOT pour water on the exterior of the unit to avoid getting the internal electrical system
wet . DO NOT immerse the unit in water when cleaning.
· The water bottle cap, hose, and drip tray may be washed in a dishwasher (top rack only).
· Keep the water dispenser 6 inches (15cm) away from the wall so it can work properly. Make
certain all ventilation openings are clear of obstruction.
· Do not damage the heating or cooling system, paying particular attention to the black
condenser or heating radiator on the back of the water dispenser.
· If you will not use the water dispenser for a long period of time, please unplug the power
cord and drain the water dispenser. Drain the water from all faucets, then remove the drain
cap on back and allow it to drain. Make certain the drain cap is fastened tightly when nished.
6
Page 10
7 Trouble shooting
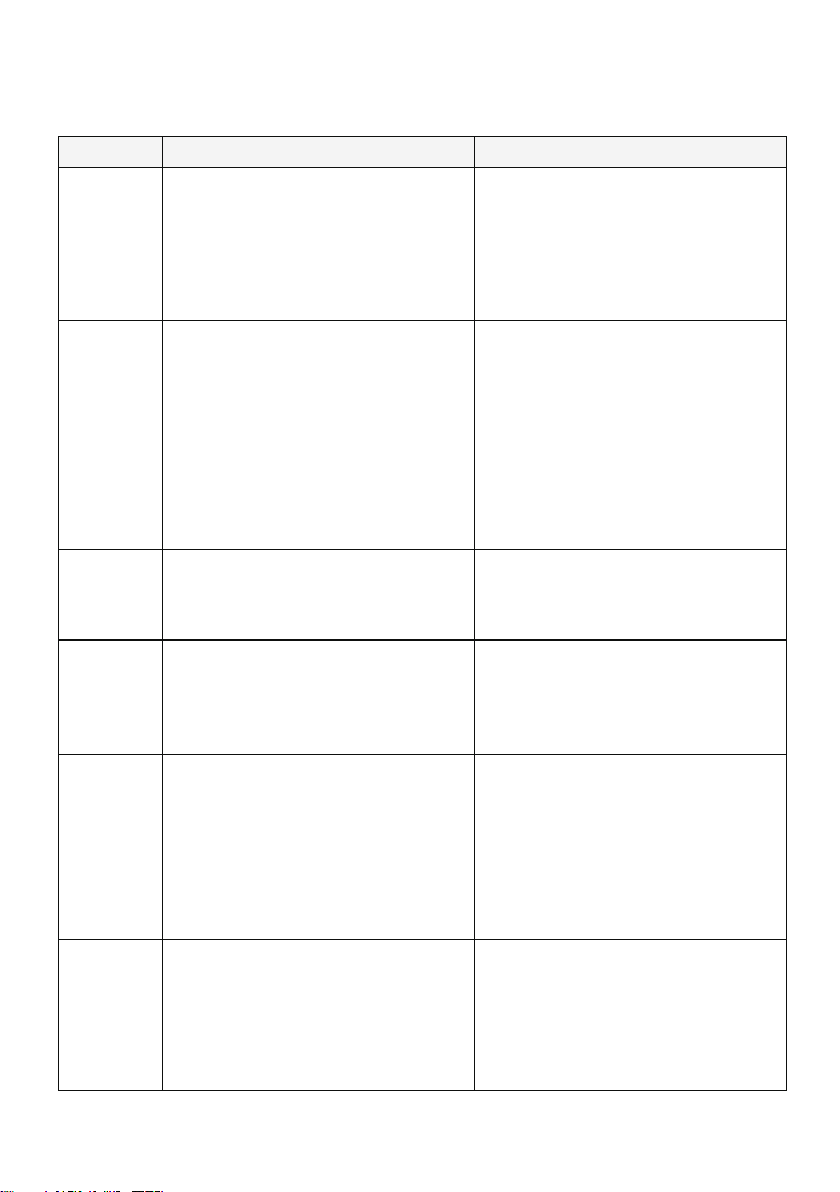
Trouble Possible causes Solutions
Unit does
not dispense
hot and
cold water.
Unit does
not dispense
cold water.
1. Unit is unplugged.
2. Main power supply is o.
3. Damaged water dispenser.
4. The water bottle cap is not
attached properly to the
connector on the water dispenser.
1. Over consumption of cold water in
a short time.
2. System Malfunction
3. The ventilation around the unit is
insucient.
4. The temperature of water in the
water bottle is too high. (When the
bottle is exposed to direct sunlight
for a long time.
1. Plug the power cord into an socket.
2. Reestablish main power supply.
3. Replace the dispenser or send for
service
4. Connect properly.
1. Wait a moment for the water to cool.
2. Contact aftersales personnel for
support.
3. Space the unit from the wall by
more than 15 cm.
4. Place the water bottle in a cool
location out of direct sunlight.
Unit does
not dispense
hot water.
Water leaks
from the
faucet.
Water is
dripping out
of the water
dispenser
and onto
the oor.
The water
being
dispensed
has a strange
taste.
7
1. Over consumption of hot water in
a short time.
2. System Malfunctions
1. The top portion of the faucet has
become loose.
2. The faucet has been damaged.
1. The Hose Connector is not
connected properly or the inside
hot or cold water tanks is leaking.
2. The drain cap on the back is not
fastened properly.
This is not uncommon with new
water dispensers. Do not worry,
this is not dangerous to your health.
This water dispenser is FDA
approved.
1. Wait a moment for the water to heat.
2. Contact aftersales personnel for
support
1. Tighten the top threaded portion
of the faucet.
2. Contact aftersales personnel for
support.
1. Make sure the hose connector is
properly connected. Contact dealer
if a water tank is leaking
2. Tighten the drain cap. If the sealing
silicon material inside the drain cap
is torn or damaged, then replace
with a new one.
Clean the hose in the dishwasher
(top rack only) or let it soak in dish
soap. The strange taste usually goes
away after the rst bottle has been
used up.
Page 11
8 Guarantee and Service
This product includes a two-year warranty for the dispenser and ve-year warranty for
compressor from the date of purchase. For more details about warranty conditions, please
refer to the warranty information in the box. If you need more information, please
visit: www.Philips.com.
Within the warranty period, you will receive free warranty service for any damage caused
by the manufacturing process or components under normal operation conrmed by our
maintenance service.
The warranty service does not include frequent replaced consumable components (water
purier lter, pitcher lter, granular activated carbon, ion exchange resin, hollow ber
membrane, etc.),auxiliary devices, transportation fee and door-to-door service.
Please show the proof of purchase to the service personnel during maintenance.
You cannot receive free warranty service under the following conditions:
1. Damage by improper operation, such as improper components connection, improper
installation, deprived of manual use, misoperation.
2. Negligence and damage because of transportation or other accident.
3. Maintenance and modication without approval.
4. Other damage caused by force majeure (such as natural disaster, abnormal voltage, etc.).
5. Damage caused by general use outside home (e.g. industrial and commercial use).
6. Aging, wear and tear caused by normal operation of the product without aecting normal
operation of the product.
This statement serves as a publicity for free maintenance within the specied time limit and
conditions, and does not limit the legal rights of consumers.
9 Packing list
Water dispenser
User Manual
1x
1x
8
Page 12

Please keep this user manual for future reference.
Page 13
Daftar Isi
Spesikasi teknis
1 1
2 2
Bagian-bagian produk
3 3
Panel indicator dan saklar
4 4
Petunjuk
·Lampu UV-LED
5 5
Tindakan pencegahan
6 6
Perawatan rutin
7
Pemecahan masalah
8
Jaminan dan layanan
9
Isi dalam kemasan
5
7
8
8
Page 14
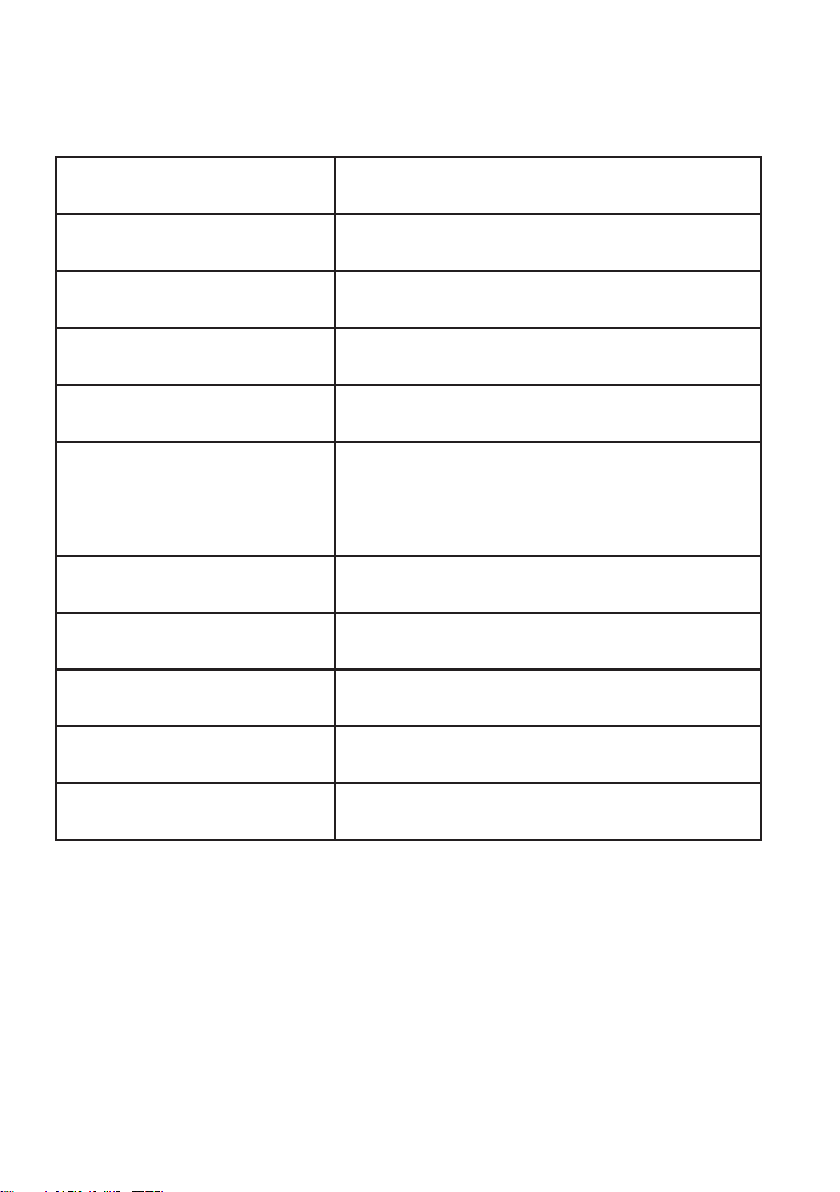
1 Spesikasi teknis
Model
Tegangan
Frekuensi
Daya pemanas
Daya pendingin
Air panas
Air dingin
Kelas iklim
Cairan pendingin
Kelembaban relatif
ADD4962 ADD4964
220V
50Hz
170/350W
85W
≥90℃, Daya tinggi : 3.8L/h,
Daya rendah : 1.8L/h
≤10℃,2L/h
T
R134a, 38g
≤90%
Kelas pengaman terhadap
bahaya kejut listrik
9
I
Page 15
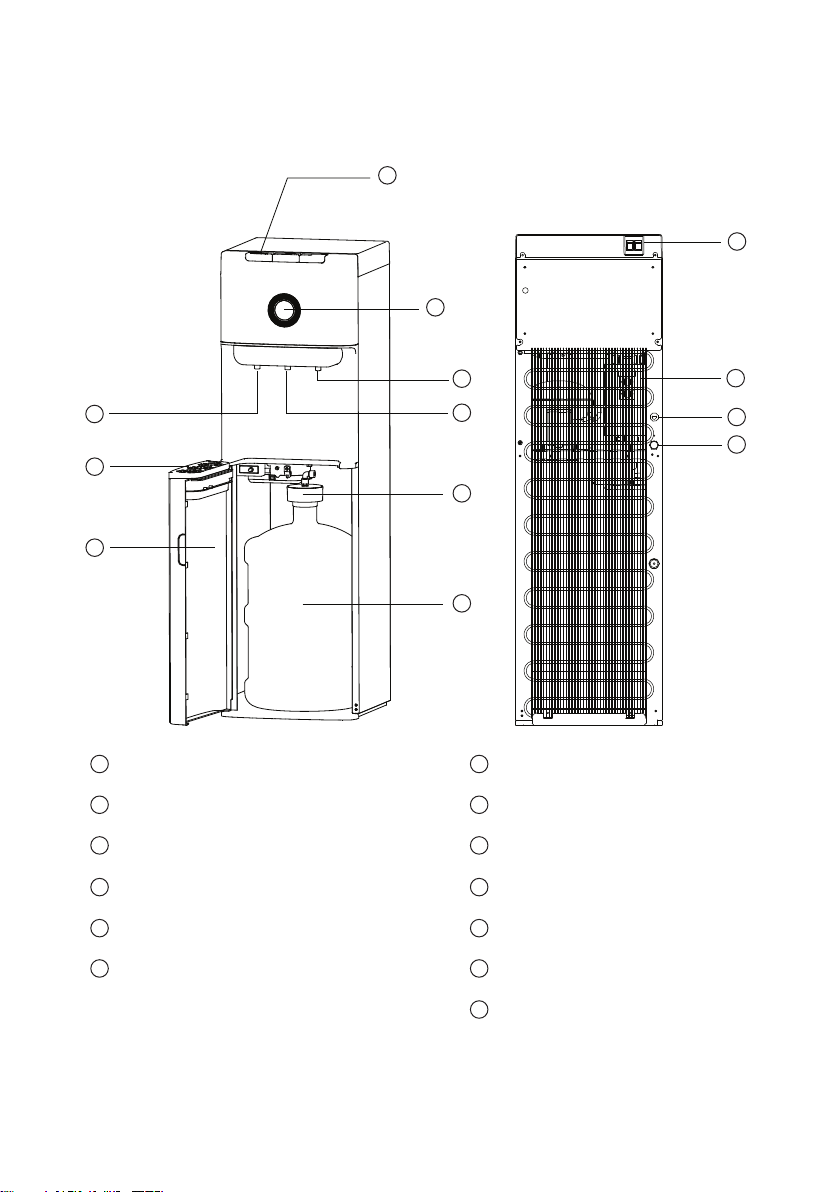
2 Bagian-bagian produk
1
10
2
3
5
6
7
Kunci pengaman anak untuk air panas
1 Pintu kabinet bawah
2
Panel indikator
3
Keran air dingin
Keran air normal
4
Keran air panas
5
4
8
9
7
8
Tutup botol galon dengan slang
9
Botol galon
Saklar daya
10
Kondensor
11
11
12
13
6
Baki tetesan air
12
Kabel daya listrik
13
Saluran pembuangan
10
Page 16
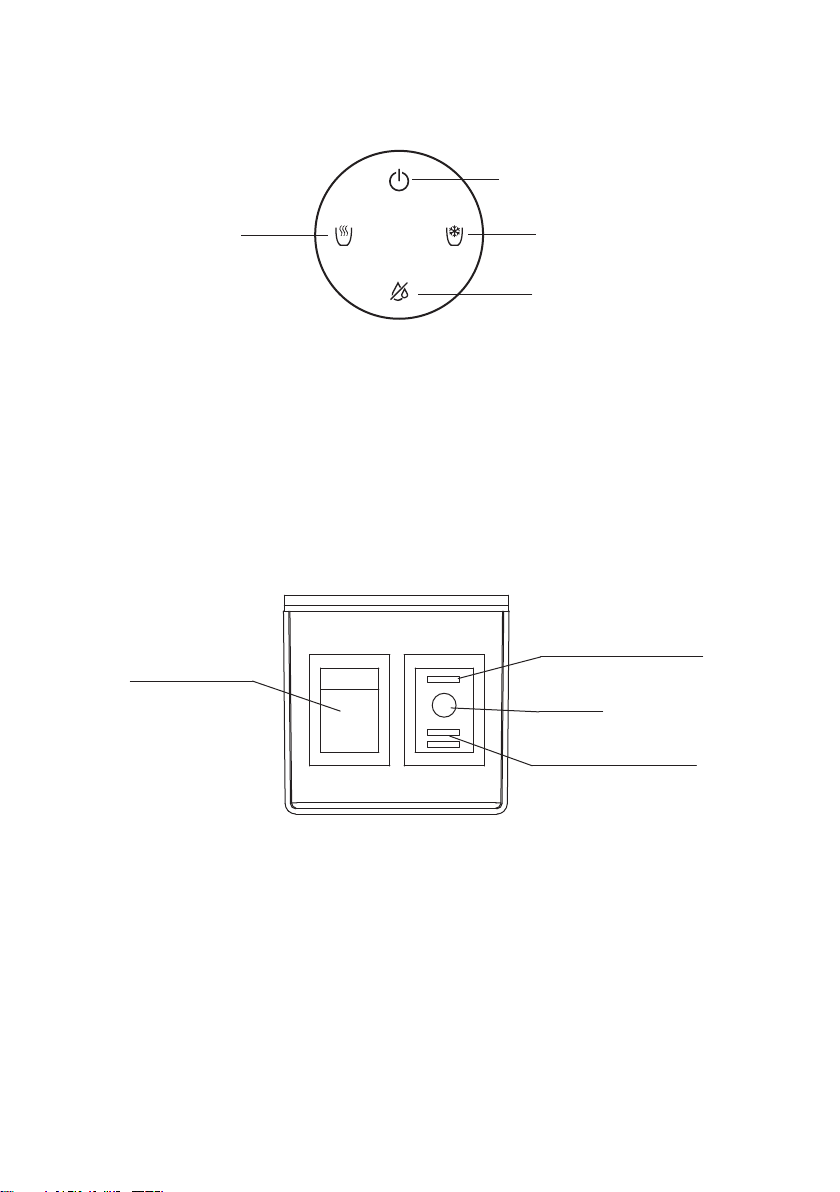
3 Panel indikator dan saklar
Indikator daya hidup
Indikator pemanas
Panel indicator
Ketika unit dispenser terhubung dengan daya listrik dan saklar daya pada posisi ke ON,
indikator daya hidup akan menyala.
Saat dispenser memanaskan air dalam tangki air panas, lampu indikator pemanas menyala.
Saat dispenser mendinginkan air dalam tangki air dingin, lampu indikator pendingin
menyala.
Ketika tidak ada air yang tersisa di botol, indikator kurang air akan menyala. Ganti dengan
air kemasan baru dan indikator akan mati secara otomatis.
Saklar pendingin
Indikator pendingin
Indikator kurang air
Pemanas daya rendah
Mati
Pemanas daya tinggi
Saklar daya
Di belakang dispenser ada saklar hitam yang mengontrol daya pemanas.
Anda dapat menekannya untuk beralih antara daya tinggi, daya rendah dan OFF.
Setiap kali Anda menghidupkan dispenser air lagi, akan perlu waktu untuk menjadikan air
panas dan dingin.
Atur saklar pemanas hitam ke ‘I’, tunggu sekitar 30 menit untuk air panas.
Atur saklar pemanas hitam ke 'II', tunggu sekitar 15 menit untuk air panas.
Atur saklar pendingin hijau ke ‘ON’, tunggu sekitar satu jam untuk air dingin.
11
Page 17
4 Petunjuk pengoperasian
(1) Buka kemasan unit dispenser.
· Potong dan lepaskan tali dari kotak. JANGAN membalikkan kotak, atau meletakkannya di
sisinya. Bagian bawah kotak terpisah dari bagian atas. Angkat lurus ke atas bagian kotak
atas untuk melepas bagian kotak atas. Lepaskan kemasan Styrofoam dan kantong plastik.
Angkat unit dispenser dari bagian bawah kotak. Bersihkan jika perlu.
• Tempatkan unit pada permukaan yang keras dan rata. Pastikan unit rata. Unit sebaiknya
tidak diletakkan di dekat sinar matahari langsung atau sumber panas lainnya.
• Yang terbaik adalah menempatkan unit dispenser di tempat dengan sirkulasi udara yang baik.
Pastikan ada setidaknya 10 cm ruang antara bagian belakang unit dispenser dan dinding.
Jaga jarak minimum 5 cm di setiap sisi unit dispenser Anda.
Peringatan: Tutup saluran pembuangan di bagian belakang unit mungkin longgar saat
pengiriman. Kencangkan tutup saluran pembuangan hingga ketat sebelum Anda mulai
mengoperasikan unit. Jika tutup saluran pembuangan longgar, air dalam unit dapat bocor keluar
dan menyebabkan lantai basah.
(2) Penempatan botol galon air
• Pastikan unit dispenser tidak terhubung ke stopkontak sumber listrik.
• Buka pintu kabinet bawah.
• Tempatkan botol galon penuh air di lantai. Lepaskan tutup plastik di mulut galon.
• Tempatkan tabung stainless ke dalam botol dan letakkan tutup botol dengan kuat di atas
mulut botol galon.
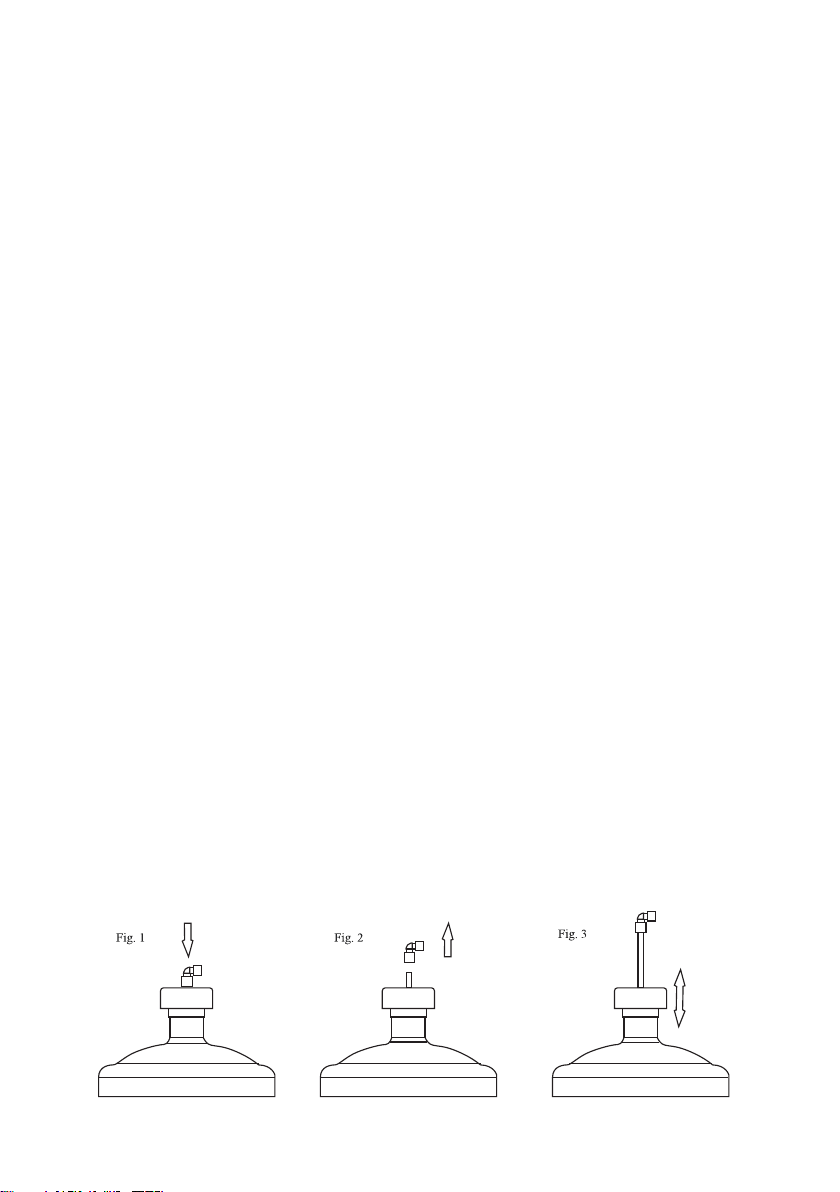
• Pasang slang ke bagian atas tutup menggunakan sistem koneksi cepat seperti ditunjukkan
pada gambar di bawah *.
• Geser botol ke dalam kabinet dan tutup pintu kabinet bawah.
* Unit dispenser air Anda memiliki sistem koneksi cepat yang dapat disesuaikan.
Untuk pengoperasian yang benar, pastikan konektor tertutup rapat (Gbr. 1);
Konektor dapat dilepas dengan mudah untuk dibersihkan dengan air sabun hangat (Gbr. 2);
Tabung stainless steel dapat disesuaikan ke atas dan ke bawah untuk mengakomodasi
botol galon air (Gbr. 3).
12
Page 18

Catatan: Jika tidak ada koneksi yang aman antara tutup slang dan konektor pada unit dispenser,
pompa air akan beroperasi tetapi dispenser tidak mengeluarkan air. Pastikan slang terhubung
ke dispenser air dengan benar.
(3) Menuangkan air
• Hubungkan steker kabel listrik unit dispenser ke stopkontak yang diarde. Unit akan memompa
air dari botol air ke tangki pendingin dan pemanas.
• Tekan kran air panas sampai air mengalir keluar.
• Hidupkan saklar daya di bagian belakang unit. Fitur pendingin atau pemanas akan mulai berjalan.
Lampu indikator menyala ketika fungsi pemanas atau pendingin bekerja. Jangan menyentuh
kedua saklar selama fungsi ini bekerja.
• Nikmati air panas atau dingin yang Anda butuhkan.
• Jika Anda tidak menggunakan air panas, atur saklar pemanas warna hitam ke posisi ‘O’; jika
Anda tidak menggunakan air dingin, atur saklar pendingin warna hijau ke posisi "OFF" untuk
menghemat energi listrik.
Catatan: Tunggu sampai pompa air berhenti bekerja sebelum menggunakan unit dispenser.
Jika tangki air tidak penuh, tidak ada air yang keluar dar i kran air.
UV-LED light (berlaku untuk ADD4964)
Lampu UV-LED yang terpasang di tangki air dingin untuk membunuh bakteri yang mungkin
tumbuh di dalamnya. Sistem ini bekerja secara otomatis melalui program perangkat lunak
begitu dispenser terhubung ke stopkontak sumber listrik.
5 Tindakan pencegahan
Peringatan
Saat menggunakan peralatan listrik, tindakan pencegahan dasar harus diikuti untuk
mengurangi resiko kebakaran, sengatan listrik, dan cedera pada orang atau properti. Baca
semua instruksi sebelum menggunakan peralatan apa pun.
• Jangan biarkan air panas mengenai kulit. Pastikan bahan yang mudah terbakar seperti
furnitur, kasur, bantal, pakaian, dan / atau kertas terletak jauh dari bagian belakang unit
dispenser.
• Jangan mengoperasikan unit ini, atau alat lain dengan kabel listrik yang rusak. Pastikan tidak
ada peralalatan lain yang dicolokkan ke stopkontak yang sama. Pastikan steker kabel daya
listrik dimasukkan sepenuhnya ke dalam stopkontak.
• Jangan biarkan kabel listrik berasa di atas karpet atau isolator panas lainnya. Jangan tutupi
kabelnya.Jauhkan kabel dari area yang banyak dilalui orang, dan jangan biarkan kabel
terendam air.
• Kami tidak merekomendasikan penggunaan kabel ekstensi karena terlalu panas dan dapat
menyebabkan resiko kebakaran.
• Berhati-hatilah dan lakukan pengawasan seadanya saat unit dispenser digunakan oleh atau
di dekat anak-anak.
13
Page 19

• Jangan tempatkan unit dispenser air Anda di luar ruangan. Tempatkan dispenser air jauh dari
sinar matahari langsung dan pastikan setidaknya ada jarak 10 cm diantara bagian belakang
unit dan dinding. Pastikan ada jarak minimum 5 cm di setiap sisi unit.
• Jangan menggunakan produk ini untuk mengeluarkan apa pun selain air.
• Untuk menghindari bahaya karena ketidakstabilan alat, unit dispenser harus ditempatkan
pada permukaan yang datar dan rata.
• Jika kabel daya listrik rusak, hubungi personel servis untuk menggantinya agar terhindar dari bahaya.
• Unit dispenser air ini harus diposisikan sedemikian rupa sehingga steker kabel daya listrik
dapat terakses ke stopkontak dengan mudah.
• Lepaskan steker kabel listrikdari stopkontak saat tidak digunakan.
• Lepaskan steker kabel listrik dari stopkontak sumber listrik sebelum memperbaiki unit dispenser.
6 Cleaning and maintenance
• Untuk menghindari kecelakaan, matikan dan cabut kabel listrik unit dispenser dari stopkontak
sebelum membersihkan.
• Kain lembab yang lembut dapat digunakan untuk membersihkan permukaan dispenser. Bila
perlu, deterjen ringan dapat digunakan. JANGAN gunakan pelarut kimia korosif untuk
membersihkan unit, karena ini dapat merusak permukaan unit dispenser.
• JANGAN tuangkan air ke bagian luar unit untuk menghindari sistem listrik internal basah.
JANGAN celupkan unit ke dalam air saat membersihkan.
• Tutup botol air, slang, dan baki tetesan air dapat dicuci di mesin pencuci piring (hanya rak atas).
• Jauhkan unit dispenser 15 cm dari dinding agar unit dapat bekerja dengan baik. Pastikan semua
lubang ventilasi terbebas dari halangan.
• Jangan merusak sistem pemanas atau pendingin, dengan memberi perhatian terhadap
kondensor warna hitam atau radiator pemanas di bagian belakang unit dispenser.
• Jika Anda tidak menggunakan unit dispenser untuk waktu yang lama, cabut kabel listrik dan
bersihkan dispenser air. Kuras air melalui semua krannya, lalu lepaskan tutup saluran pembilasan
di belakang dan biarkan air mengalir. Pastikan penutup saluran dikencangkan dengan erat saat
selesai pengurasan.
14
Page 20
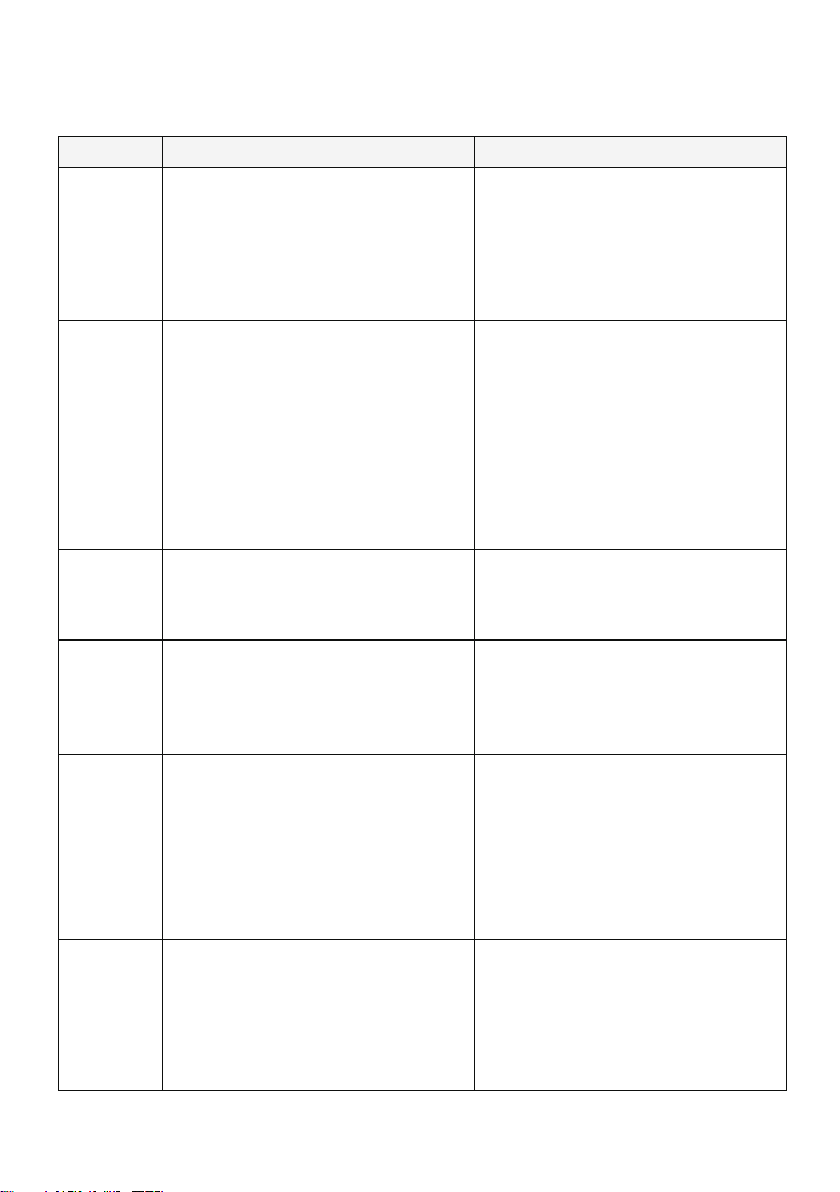
7 Pemecahan masalah
Masalah Kemungkinan penyebab Solusi
Unit dispenser
tidak
mengeluar-kan
air panas
dan dingin.
1. Kabel listrik tidak terhubung ke
stopkontak.
2. Sumber listrik mati.
3. Dispenser yang rusak.
4. Tutup botol air tidak terpasang
dengan benar ke konektor pada
unit dispenser.
1. Hubungkan steker kabel daya listrik
ke stopkontak.
2. Menyalakan kembali sumber listrik.
3. Ganti unit dispenser atau kirim ke
service center untuk diperbaiki
4. Hubungkan dengan benar.
Unit tidak
mengeluarkan air dingin
Unit tidak
mengeluarkan air panas
Air bocor
dari keran.
Air menetes
keluar dari
unit
dispenser
dan ke
lantai.
1. Banyak menkonsumsi air dingin
dalam waktu singkat.
2. Kerusakan sistem
3. Ventilasi di sekitar unit tidak cukup.
4. Suhu air dalam galon terlalu tinggi.
(Jika galon terkena sinar matahari
langsung untuk waktu yang lama)
1. Banyak mengkonsumsi air panas
dalam waktu singkat.
2. Kerusakan sistem
1. Bagian atas kran longgar.
2. Kran telah rusak.
1. Konektor slang tidak terhubung
dengan benar atau tangki air panas
atau dingin bocor.
2. Tutup saluran pembilasan di bagian
belakang tidak dipasang dengan
be nar.
1. Tunggu sebentar hingga air men
dingin.
2. Hubungi personel purna jual untuk
mendapatkan penanganan.
3. Tempatkan unit dengan jarak lebih
dari 15 cm dari dinding.
4. Tempatkan galon air di lokasi yang
sejuk, terhindar dari sinar matahari
langsung.
1. Tunggu sebentar hingga air memanas.
2. Hubungi personel purna jual untuk
mendapatkan penanganan
1. Kencangkan bagian ulir kran.
2. Hubungi personel purna jual untuk
mendapatkan penanganan.
1. Pastikan konektor slang terhubung
dengan benar. Hubungi dealer jika
tangki air bocor
2. Kencangkan penutup saluran. Jika
bahan penyegelan silikon di dalam
tutup saluran pembilasan (drain)
terkoyak atau rusak, ganti dengan
yang baru.
Air yang
tersaji
memiliki
rasa yang
aneh.
15
Hal ini jarang terjadi pada dispenser
air baru. Jangan khawatir,ini tidak
berbahaya bagi kesehatan Anda.
Unit dispenser air ini disetujui FDA.
Bersihkan slang. Rasa aneh biasanya
hilang setelah botol pertama habis.
Page 21
8 Jaminan dan layanan
Produk ini mencakup garansi dua tahun dari tanggal pembelian. Untuk detail lebih lanjut
tentang ketentuan garansi, silakan merujuk ke informasi garansi di dalam kotak. Jika Anda
memerlukan informasi lebih lanjut, silakan kunjungi: www.philips.com.
Dalam satu tahun sejak tanggal pembelian, Anda akan menerima layanan garansi gratis
untuk segala kerusakan yang disebabkan oleh proses pembuatan atau komponen dalam
operasi normal yang dikoreksi oleh layanan pemeliharaan kami.
Layanan garansi tidak termasuk komponen habis pakai yang sering diganti (lter penjernih
air, lter pitcher, karbon aktif granular, resin penukar ion, membran serat berlubang, dll.)
Perangkat tambahan, biaya transportasi, dan layanan dari pintu ke pintu.
Tolong tunjukkan bukti pembelian kepada petugas serv is selama perawatan.
Anda tidak dapat menerima layanan garansi gratis dalam kondisi berikut:
1. Kerusakan oleh operasi yang tidak benar, seperti koneksi komponen yang tidak tepat,
pemasangan yang tidak benar, kehilangan penggunaan manual, salah operasi.
2. Kelalaian dan kerusakan karena transportasi atau kecelakaan lainnya.
3. Pemeliharaan dan modikasi tanpa persetujuan.
4. Kerusakan lain yang disebabkan oleh force majeure (seperti bencana alam, tegangan
tidak normal, dll.).
5. Kerusakan yang disebabkan oleh penggunaan umum di luar rumah (mis. Penggunaan
industri dan komersial).
6. Penuaan, keausan yang disebabkan oleh operasi normal produk tanpa mempengaruhi
operasi normal produk.
Pernyataan ini berfungsi sebagai publisitas untuk pemeliharaan gratis dalam batas waktu
dan ketentuan yang ditentukan, dan tidak membatasi hak hukum konsumen.
9 Isi dalam kemasan
Unit dispenser
Petunjuk penggunaan
1x
1x
16
Page 22

Simpan Petunjuk Penggunaan untuk referensi di masa mendatang.
Page 23

Page 24

Register your product and learn more in the website link below:
www.philips.com/welcome
Specications are subject to change without notice
© 2019 AquaShield
All rights reserved.
The Philips trademark and the Philips Shield Emblem are registered trademarks
of Koninklijke Philips N.V. used under license.
This product has been manufactured by and is sold under the responsibility of Hong Kong AquaShield Health
Technology Company Limited and Hong Kong AquaShield Health Technology Company Limited is the warrantor
in relation to this product.
Rev A Sep 19
Nomor Tanda Pendaftaran: I.6.AI5.02604.0919
 Loading...