

Page 1
Dispenser
ADD4954
User Manual 1-6
Petunjuk Penggunaan 7-12
Page 2

Page 3
Content
Main technical specication
1 1
2 2
Product overview
3 3
Instruction
4 3
Precautions
5 5Cleaning and maintenance
6 5Trouble shooting
7
Guarantee and Service
8
Packing list
6
6
Page 4

1 Main technical specication
Model
Rated voltage
Rated frequency
Heating power
Cooling power
Hot water
Cold water
Environmental temp.
Coolant
Relative humidity
ADD4954
220V-240V~
50Hz
170W/350W
85W
≥90℃, 3.8L/h with high power,
1.8L/h with low power
≤10℃,2L/h
T
R134a, 38g
≤90%
Protection of anti-electric shock
1
I
Page 5
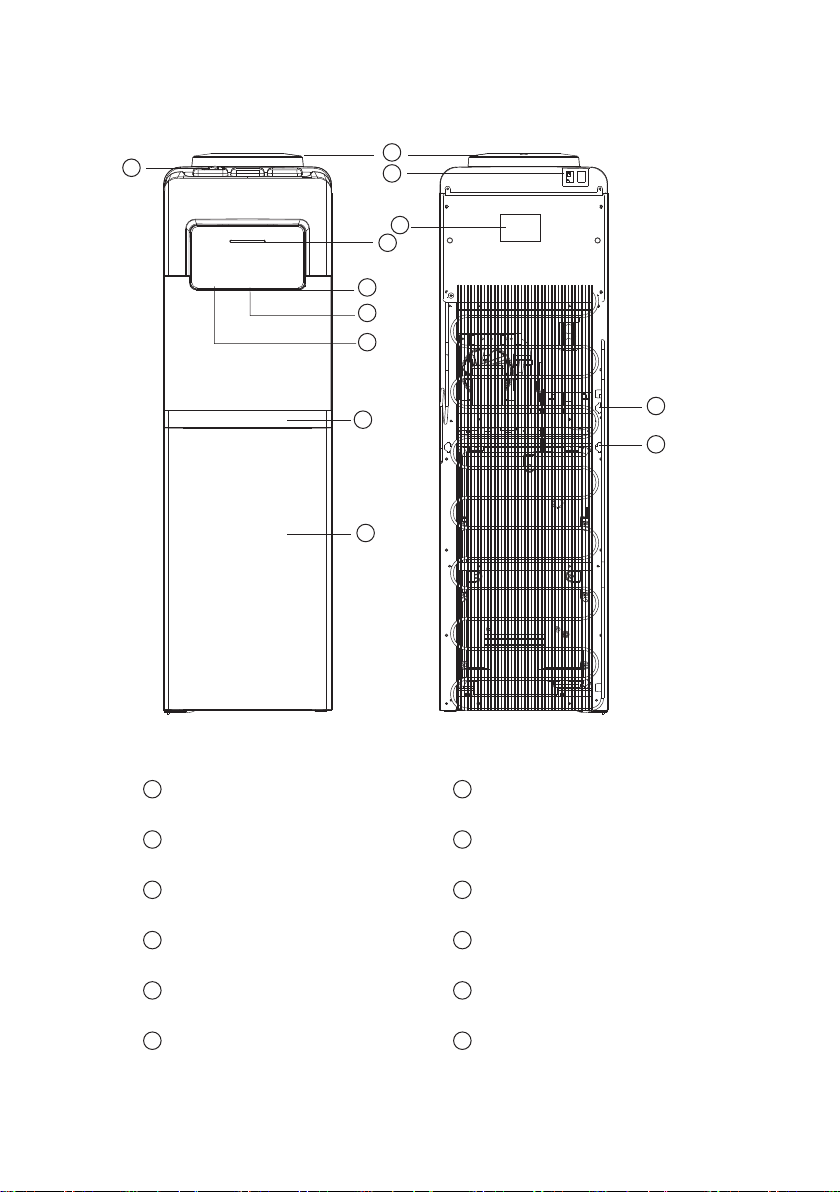
2 Product overview
5
1
2
4
3
6
7
8
9
12
10
11
Bottle Seat
1
2
Power Switch
3
Indicator Lights
Information Plate
4
Child Safety Lock
5
6
Cold Water Faucet
Ambient Water Faucet
7
8
Hot Water Faucet
9
Drip Tray
Electric Power Cord
10
Drain Plug
11
12
Lower Cabinet
2
Page 6

Low power heating
Cooling switch
O
High power heating
Power switch
At the back of the dispenser there is a black switch which controls the heating power.
You may press it to switch between high power, low power and OFF.
Every time when you plug in the water dispenser again, it will need some time for getting hot
and cold water.
Turn the black heating switch to ‘I’, please wait for around 30 minutes for hot water;
Turn the black heating switch to ‘II’, please wait for around 15 minutes for hot water;
Turn the green cooling switch to ‘ON’, please wait for around an hour for cold water.
3 Instruction
· Unpack the water dispenser. Place the dispenser indoors, on a at surface and at a distance
no less than 15 cm from the back wall.
· Insert the bottle vertically on the seat
· Press the red hot water faucet until water ows out.
· Insert the power plug to the wall socket.
· Turn on the power switch on the back of the unit. The cooling or heating feature will start
running. The indicator light will be on when heating or cooling function is work ing. Do not
touch both switches during the time.
· Enjoy the hot or cold water you need.
· If you are not going to use hot water, turn the black heating switch to ‘O’; if you are not going
to use cold water, turn the green cooling switch to “OFF” to conserve energy.
4 Precautions
· The drain plug on the back of the unit may become loose during shipping. Fasten the drain
plug tightly before you start to operate the unit. If the drain plug is loose, the unit may leak
and cause oor damage.
3
Page 7

· Make sure to have poured water from the hot water faucet before plugging and switching the
appliance ON to heat. If the dispenser is turned ON with an empty water tank, it can be
damaged.
· When you are ready to move the water dispenser, do not tilt more than 45º to avoid damage
to the compressor.
· Keep this appliance away from high temperatures and in a dry and ventilated place. Never
install it in the open air or under rain or direct sunlight.
· Children should not use the red hot water tap.
· If the appliance is not going to be used for a long period of time, unplug it and drain all water
in its interior.
· Before the rst use and after a long period of not using it, the water tank and water pipes
should be cleaned well. If possible, they should be disinfected and disinfect, and the rst
heated water must be discarded (switch the heating switch to 'O' while draining the system).
· Wash and disinfect the system every 3-6 months with a suitable cleaner and according to its
instructions for use.
· Do not pull out the cable to unplug. Do not turn on and o the appliance by connecting it
and disconnecting it from the source of electricity.
· Do not clean the outside of the appliance with water in case of electric shock. Clean it with a
soft cloth.
· If you are not using the appliance for a long period of time or during the night, you can turn it
o to save energy.
· Do not attempt to change the power cord by yourself if it has any damage. Contact the
aftersales personnel for support.
· If the power cable suers any damage, contact the aftersales personnel for support.
· The equipment must be installed keeping easy access to the electrical plug.
· WARNING – to avoid the risks of an unstable installation, the equipment must be installed
following its instruction.
· WARNING - keep the ventilation openings at the back of the appliance uncovered and
unobstructed.
· NOTICE - do not damage the refrigerant circuit.
· The environmental temperature for this appliance should be between 18° C and 38 ° C.
· This appliance can be used by children aged from 8 years and above and persons with
reduced physical, sensory or mental capabilities or lack of experience and knowledge if they
have been given supervision or instruction concerning use of the appliance in a safe way
and understand the hazards involved. Children shall not play with the appliance. Cleaning
and use maintenance shall not be made by children without supervision.
· Do not store explosive substances such as aerosol cans with a ammable propellant in this
appliance.
4
Page 8

5 Cleaning and maintenance
· To avoid accidents, turn o and unplug the water dispenser from the outlet before cleaning.
· A soft damp cloth may be used to clean the surface of the water dispenser. When necessary,
a mild detergent may be used. DO NOT use corrosive chemical solvents to clean the unit, as
this may damage the surface of the water dispenser.
· DO NOT pour water on the exterior of the unit to avoid getting the internal electrical system
wet . DO NOT immerse the unit in water when cleaning.
· The water bottle cap, hose, and drip tray may be washed in a dishwasher (top rack only).
· Keep the water dispenser 6 inches (15cm) away from the wall so it can work properly. Make
certain all ventilation openings are clear of obstruction.
· Do not damage the heating or cooling system, paying particular attention to the black
condenser or heating radiator on the back of the water dispenser.
· If you will not use the water dispenser for a long period of time, please unplug the power
cord and drain the water dispenser. Drain the water from all faucets, then remove the drain
plug on back and allow it to drain. Make certain the drain plug is fastened tightly when
nished.
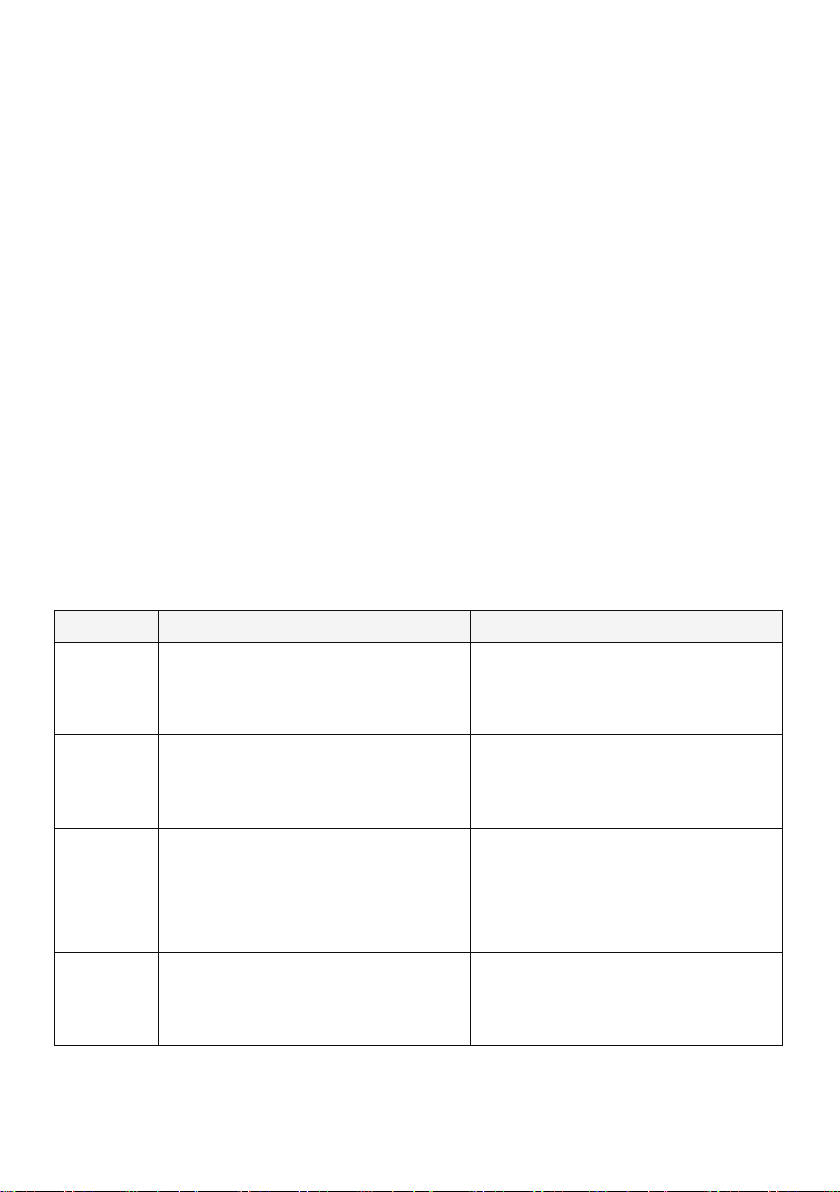
6 Trouble shooting
Trouble Possible causes Solutions
Lights do
not lit
Leaking
Not heating
Not cooling
5
1.Appliance is not connected to the
electr ical system
2.The switch is not on
1.The water tank is broken
2.The water pipe is broken
3.The faucet is damaged
1.Heating switch is damaged or
makes not contact
2.The heating tank is broken
3.The electrical connection is loose
1.Cooling switch is damaged or
makes no contact
2.The electrical connection is loose
1.Make sure that the switch is ON
and the plug is connected
2.Turn the switch into on
Contact aftersales personnel for
support
Contact aftersales personnel for
suppor t
Contact aftersales personnel for
support
Page 9

7 Guarantee and Service
This product includes a two-year warranty for the dispenser and ve-year warranty for
compressor from the date of purchase. For more details about warranty conditions, please
refer to the warranty information in the box. If you need more information, please
visit: www.Philips.com.
Within the warranty period, you will receive free warranty service for any damage caused
by the manufacturing process or components under normal operat ion conrmed by our
maintenance service.
The warranty service does not include frequent replaced consumable components (water
purier lter, pitcher lter, granular activated carbon, ion exchange resin, hollow ber
membrane, etc.),auxiliary devices, transportation fee and door-to-door service.
Please show the proof of purchase to the service personnel during maintenance.
You cannot receive free warranty serv ice under the following conditions:
1. Damage by improper operation, such as improper components connection, improper
installation, deprived of manual use, misoperation.
2. Negligence and damage because of transportation or other accident.
3. Maintenance and modication without approval.
4. Other damage caused by force majeure (such as natural disaster, abnormal voltage, etc.).
5. Damage caused by general use outside home (e.g. industrial and commercial use).
6. Aging, wear and tear caused by normal operation of the product without aecting normal
operation of the product.
This statement serves as a publicity for free maintenance within the specied time limit and
conditions, and does not limit the legal rights of consumers.
8 Packing list
Water dispenser
User Manual
1x
1x
6
Page 10

Please keep this user manual for future reference.
Page 11

Daftar Isi
Spesikasi teknis
1 7
2 8
Bagian-bagian produk
3 8
Petunjuk pengoperasian
4 9
Tindakan pencegahan
5 11Pembersihan dan perawatan
6
7
Jaminan dan layanan
8
Isi dalam kemasan
11Pemecahan masalah
12
12
Page 12

1 Spesikasi teknist
Model
Tegangan
Frekuensi
Daya pemanas
Daya pendingin
Air panas
Air dingin
Kelas iklim
Cairan pendingin
Kelembaban relatif
ADD4954
220V-240V~
50Hz
170W/350W
85W
≥90℃, Daya tinggi : 3.8L/h
Daya rendah : 1.8L/h
≤10℃,2L/h
T
R134a, 38g
≤90%
Kelas pengaman terhadap
daya kejut listrik
7
I
Page 13

2 Bagian-bagian produk
5
1
2
4
3
6
7
8
9
12
10
11
Dudukan galon
1
2
Saklar daya
3
Lampu indikator
Label informasi
4
Kunci pengaman anak untuk air panas
5
6
Tombol kran air dingin
Tombol kran air normal
7
8
Tombol kran air panas
9
Baki tetesan air
Kabel daya listrik
10
Saluran pembuangan
11
12
Kabinet bawah
8
Page 14

Pemanas daya rendah
Saklar pendingin
Mati
Pemanas daya tinggi
Saklar daya
Di belakang dispenser ada saklar hitam yang mengontrol daya pemanas.
Anda dapat menekannya untuk beralih antara daya tinggi, daya rendah dan OFF.
Setiap kali Anda menghidupkan dispenser air lagi, akan perlu waktu untuk menjadikan air
panas dan dingin.
Atur saklar pemanas hitam ke ‘I’, tunggu sek itar 30 menit untuk air panas;
Atur saklar pemanas hitam ke 'II', tunggu sek itar 15 menit untuk air panas;
Atur saklar pendingin hijau ke ‘ON’, tunggu sekitar satu jam untuk air dingin.
3 Petunjuk pengoperasian
· Buka kemasan unit dispenser. Tempatkan di dalam ruangan, pada permukaan yang rata
dan pada jarak tidak kurang dari 15 cm dari dinding belakang.
· Masukkan galon air secara ver tikal pada dudukan galon.
· Tekan tombol kran air panas merah hingga air keluar.
· Masukkan steker kabel daya listrik ke stopkontak.
· Nyalakan saklar daya di bagian belakang unit. Fitur pendingin atau pemanas akan mulai
berjalan.
· Lampu indikator menyala ketika fungsi pemanas atau pendingin bekerja. Jangan
menyentuh kedua saklar selama fungsi ini bekerja.
· Nikmati air panas atau dingin yang Anda butuhkan.
· Jika Anda tidak menggunakan air panas, atur saklar pemanas hitam ke “O” jika Anda
tidak menggunakan air dingin, atur saklar pendingin hijau ke "OFF" untuk menghemat
energi listrik.
4 Precautions
· Tutup saluran pembuangan di bagian belakang unit mungkin longgar saat pengiriman.
Kencangkan tutup saluran pembuangan hingga ketat sebelum Anda mulai mengoperasikan
unit. Jika tutup saluran pembuangan longgar, air dalam unit dapat bocor keluar dan
menyebabkan lantai basah..
9
Page 15

· Pastikan Anda telah menuangkan air dari keran air panas sebelum mencolokkan steker
kabel listrik ke stopkontak dan menghidupkan unit ke posisi panas. Jika dispenser dihidupkan
dengan tangki air kosong, beresiko rusaknya unit.
· Jika Anda memindahkan penempatan unit dispenser ini, jangan miringkan lebih dari 45o
untuk menghindari kerusakan pada kompresor.
· Jauhkan penempatan unit ini dari suhu tinggi, tempatkan di tempat yang kering dan berventilasi.
Jangan menempatkannya di udara terbuka atau di yang terkena air hujan atau sinar matahari
langsung.
· Pastikan anak-anak tidak menggunakan kran air panas warna merah.
· Jika unit tidak digunakan untuk jangka waktu lama, cabut steker kabel listrik dari stopkontak
dan buang semua air di bagian dalamnya.
· Sebelum penggunaan pertama kali dan setelah lama tidak menggunakannya, tangki air dan
pipa air harus dibersihkan dengan baik. Jika mungkin, didesinfeksi, dan air panas pertama
harus dibuang (alihkan saklar pemanas ke 'O' saat mengeringkan sistem).
· Cuci dan disinfeksi sistem setiap 3-6 bulan dengan pembersih yang sesuai dan sesuai dengan
petunjuk penggunaannya.
· Jangan mencabut bagian kabelnya saat mencabut kabel listrik dari stopkontak, pegang dan
cabut bagian stekernya. Jangan menyalakan dan mematikan unit dengan menghubungkan
dan melepaskan kabel listrik dari stopkontak sumber listrik.
· Jangan membersihkan bagian luar unit dengan air karena beresiko terkena sengatan listrik.
Bersihkan dengan kain lembut.
· Jika Anda tidak menggunakan unit untuk jangka waktu lama atau pada malam hari, Anda
dapat mematikannya untuk menghemat energi listrik.
· Jangan mencoba mengganti kabel listrik sendiri jika ada kerusakan. Hubungi personel servis
untuk mendapatkan bantuan.
· Jika kabel daya listrik mengalami kerusakan, hubungi personel servis untuk mendapatkan bantuan.
· Tempatkan unit dispenser di tempat yang mudah jangkauannya ke sumber listrik atau dekat
dengan stopkontak rumah.
· PERINGATAN - untuk menghindari resiko instalasi yang tidak stabil, unit harus dipasang
mengikuti petunjuk.
· PERINGATAN – pastikan lubang ventilasi di bagian belakang unit dispenser tetap terbuka dan
tidak terhalang.
· PEMBERITAHUAN - jangan merusak sirkuit pendingin.
· Suhu lingkungan untuk alat ini antara 18 ° C sampai 38 ° C.
· Unit dispenser ini dapat digunakan oleh anak-anak berusia 8 tahun ke atas. Untuk orang-orang
dengan kemampuan sik, sensorik atau mental yang berkurang atau kurangnya pengalaman
dan pengetahuan, perlu diberi petunjuk agar dapat menggunakan unit dispenser dengan benar
dan aman, serta memahami bahaya yang dapat ditimbulkannya. Anak-anak tidak boleh
bermain-main dengan unit dispenser ini. Pembersihan dan pemeliharaan tidak boleh
dilakukan oleh anak-anak tanpa pengawasan.
· Jangan menyimpan bahan mudah meledak seperti kaleng aerosol dengan propelan yang
mudah terbakar di unit dispenser ini.
10
Page 16
5 Pembersihan dan perawatan
· Untuk menghindari kecelakaan, matikan dan cabut steker kabel listrik dispenser dari stopkontak
sebelum membersihkan.
· Kain lembab yang lembut dapat digunakan untuk membersihkan permukaan unit. Bila perlu,
deterjen ringan dapat digunakan. JANGAN gunakan pelarut kimia korosif untuk membersihkan
unit, karena dapat merusak permukaan unit.
· JANGAN tuangkan air ke bagian luar unit untuk menghindari sistem listrik bagian dalam unit
basah
· JANGAN celupkan unit ke dalam air saat membersihkan.
· Tutup galon air, slang, dan baki tetes dapat dicuci di mesin pencuci piring (hanya rak atas).
· Beri jarak 15 cm antara unit dan dinding agar unit dapat beker ja dengan baik. Pastikan semua
lubang ventilasi tidak terhalang.
· Jangan merusak sistem pemanas atau pendingin, beri perhatian pada kondensor warna hitam
atau radiator pemanas di bagian belakang unit.
· Jika Anda tidak menggunakan dispenser untuk waktu yang lama, cabut steker kabel listrik dari
stopkontak dan bersihkan dispenser. Kuras air, keluarkan dari semua kran, lalu lepaskan tutup
saluran pembuangan di bagian belakang dan biarkan air mengalir. Pastikan tutup saluran
pembuangan terpasang kencang saat selesai pengurasan.
6 Pemecahan masalah
Masalah Possible causes Solutions
Lampu
indikator
tidak
menyala
1.Unit tidak terhubung ke sistem
listrik
2.Saklar tidak aktif
1.Pastikan saklar HIDUP dan steker
kabel listrik terhubung ke stopkontak
2.Turn the switch into on
Bocor
Pemanas
tidak
berfungsi
Pendingin
tidak
berfungsi
11
1.Ta n g k i air r u s a k
2.Pipa air rusak
3.Kran rusak
1.Saklar pemanas rusak atau tidak
bersentuhan
2.Tangki pemanas rusak
3.Sambungan listrik kendur
1.Saklar pendingin rusak atau tidak
terjadi kontak
2.Sambungan listrik longgar
Hubungi personel servis untuk
mendapatkan bantuan
Hubungi personel servis untuk
mendapatkan bantuan
Hubungi personel servis untuk
mendapatkan bantuan
Page 17
7 Jaminan dan layanan
Produk ini mencakup garansi dua tahun dari tanggal pembelian. Untuk detail lebih lanjut
tentangketentuan garansi, silakan merujuk ke informasi garansi di dalam kemasan. Jika Anda
memerlukan informasi lebih lanjut, silakan kunjungi: www.Philips.com.
Dalam satu tahun sejak tanggal pembelian, Anda akan menerima layanan garansi gratis untuk
segala kerusakan yang disebabkan oleh proses pembuatan atau komponen dalam operasi
normal yang dikonrmasi oleh servis center kami.
Layanan garansi tidak termasuk komponen habis pakai yang sering diganti (lter pemurni air,
lter pitcher, karbon aktif granular, resin penukar ion, membran serat berlubang, dll.), Perangkat
tambahan, biaya transportasi, dan layanan door-to-door. Tunjukkan bukti pembelian kepada
petugas servis selama perawatan.
Anda tidak dapat menerima layanan garansi gratis dalam kondisi berikut:
1. Kerusakan oleh pengoperasian yang tidak benar, seperti koneksi komponen yang tidak tepat,
pemasangan yang tidak benar, kehilangan petunjuk penggunaan, salah pengoperasian.
2. Kelalaian dan kerusakan karena transportasi atau kecelakaan lainnya.
3. Pemeliharaan dan modikasi tanpa persetujuan.
4. Kerusakan lain yang disebabkan oleh force majeure (seperti bencana alam, tegangan listrik
tidak normal, dll.).
5. Kerusakan yang disebabkan oleh penggunaan umum di luar rumah (mis. Penggunaan dalam
industri dan komersial).
6. Penuaan, keausan yang disebabkan oleh pengoperasian normal produk tanpa mempengaruhi
operasi normal produk.
Pernyataan ini berguna sebagai informasi untuk mendapatkan pemeliharaan gratis dalam batas
waktu dan ketentuan yang ditetapkan dan tidak membatasi hak hukum konsumen.
8 Isi dalam kemasan
Unit Dispenser
Petunjuk penggunaan
1x
1x
12
Page 18

Simpan Petunjuk Penggunaan untuk referensi di masa mendatang.
Page 19

Page 20

Register your product and learn more in the website link below:
www.philips.com/welcome
Specications are subject to change without notice
© 2019 AquaShield
All rights reserved.
The Philips trademark and the Philips Shield Emblem are registered trademarks
of Koninklijke Philips N.V. used under license.
This product has been manufactured by and is sold under the responsibility of Hong Kong AquaShield Health
Technology Company Limited and Hong Kong AquaShield Health Technology Company Limited is the warrantor in
relation to this product.
Rev A Sep 19
Nomor Tanda Pendaftaran: I.6.AI5.02604.0919
 Loading...