

Portable CD player
ACT 7583
Toll Free Help Line
Ligne d’assistance en service libre
Linea de ayuada telefónica sin cargo
800-531-0039
Return your Warranty Registration card today to
ensure you receive all the benefits you’re entitled to.
•
Once your Philips purchase is registered,
you’re eligible to receive all the privileges
of owning a Philips product.
• So complete and return the Warranty
Registration Card enclosed with your
purchase at once. And take advantage
of these important benefits.
Warranty
Verification
Registering your product
within 10 days confirms
your right to maximum
protection under the
terms and conditions of
your Philips warranty.
Owner
Confirmation
Your completed Warranty
Registration Card serves
as verification of
ownership in the event of
product theft or loss.
Model
Registration
Returning your Warranty
Registration Card right
away guarantees you’ll
receive all the information
and special offers which
you qualify for as the
owner of your model.
t
This “bolt of lightning”
indicates uninsulated material
within your unit may cause an
electrical shock. For the safety of
everyone in your household, please
do not remove product covering.
s
The “exclamation point” calls
attention to features for
which you should read the enclosed
literature closely to prevent
operating and maintenance problems.
WARNING: TO PREVENT FIRE
OR SHOCK HAZARD,DO NOT
EXPOSE THIS EQUIPMENT TO
RAIN OR MOISTURE.
CAUTION: To prevent electric
shock, match wide blade of plug to
wide slot, and fully insert.
For Customer Use
Enter below the Serial No. which is located
inside the battery compartment. Retain
this information for future reference.
Model No. ________________________
Serial No. ________________________
Know these
ssaaffeettyy symbols
CAUTION
RISK OF ELECTRIC SHOCK
DO NOT OPEN
CAUTION: TO REDUCE THE RISK OF ELECTRIC SHOCK, DO NOT
REMOVE COVER (OR BACK). NO USER-SERVICEABLE PARTS
INSIDE. REFER SERVICING TO QUALIFIED SERVICE PERSONNEL.
MAC5097
2

3
English
Safety instructions ..........................2 & 5
Controls..............................................6–7
Power Supply...................................8–10
Headphones..........................................10
General Information.............................11
CD Play...........................................12–13
Features .........................................14–18
In-car Connection.................................19
Troubleshooting.............................20–21
Limited warranty............................22–23
Español
Instrucciones sobre seguridad ......44–45
Controles .......................................46–47
Suministro eléctrico ......................48–50
Auriculares ...........................................50
Información general.............................51
Reproducción de CD ......................52–53
Características...............................54 –58
Conexión para el automóvil .................59
Localización de averías .................60–61
Garantia limitada...........................62–63
EnglishFrançaisEspañol
English: This digital apparatus does not
exceed the Class B limits for radio noise
emissions from digital apparatus as set
out in the Radio Interference Regulations
of the Canadian Department of
Communications.
Français : Cet appareil numérique n’émet
pas de bruits radioélectriques dépassant
les limites applicables aux appareils
numériques de Classe B prescrites dans le
Règlement sur le Brouillage
Radioélectrique édicté par le Ministère
des Communications du Canada.
Canada
Français
Conselis de sécurité ......................24–25
Commandes ...................................26–27
Alimentation électrique.................28–30
Ecouteurs..............................................30
Informations générales........................31
Lecture CD......................................32–33
Fonctions spéciales........................34–38
Raccordement en voiture.....................39
Pannes et remèdes........................40–41
Garantie limitée.............................42–43

4
5
English
IMPORTANT SAFETY INSTRUCTIONS
Read before operating equipment
This product was designed and manufactured
to meet strict quality and safety standards.
There are, however, some installation and
operation precautions which you should be
particularly aware of.
1. Read these instructions – All the safety
and operating instructions should be read
before the appliance is operated.
2. Keep these instructions – The safety and
operating instructions should be retained for
future reference.
3. Heed all warnings – All warnings on the
appliance and in the operating instructions
should be adhered to.
4. Follow all instructions – All operating
and use instructions should be followed.
5. Do not use this apparatus near water –
for example, near a bathtub, washbowl,
kitchen sink, laundry tub, in a wet basement
or near a swimming pool, etc.
6. Clean only with a damp cloth. The
appliance should be cleaned only as
recommended by the manufacturer.
7.
Install in accordance with the
manufacturers instructions. Do not block
any of the ventilation openings. For
example, the appliance should not be situated
on a bed, sofa, rug, or similar surface or
placed in a built-in installation, such as a
bookcase or cabinet that may impede the flow
of air through the ventilation openings.
8.
Do not install near any heat sources such
as radiators, heat registers, stoves, or other
apparatus (including amplifiers) that produce
heat.
9.
Only use attachments/accessories
specified by the manufacturer.
10.
Use only with a cart, stand,
tripod, bracket, or table specified
by the manufacturer, or sold with
the apparatus. When a cart is
used, use caution when moving
the cart/apparatus combination
to avoid injury from tip-over.
11.
Refer all servicing to qualified service
personnel. Servicing is required when the
apparatus has been damaged in any way, such
as power-supply cord or plug is damaged,
liquid has been spilled or objects have fallen
into the apparatus, the apparatus has been
exposed to rain or moisture, does not operate
normally, or has been dropped.
EL 4562-E004: 99/3

6
CONTROLS
English
6
7
8
9
0
D
B
B
P
R
O
G
P
M
O
D
E
5
4
E
S
P
3
!
@
V
O
L
T
U
O
E
N
I
L
/
1
%
2
$
#

English
7
1 p LINE OUT...3.5mm headphone socket
2 2; .................switches the player on, starts and interrupts CD play
3 ∞ ..................skips and searches backward
4 § ..................skips and searches forward
5 .......................display
6 DBB................DYNAMIC BASS BOOST enhances the bass response,
DBB 1™DBB 2™DBB 3™off
Press this button for more than 3 seconds to switch
off/on acoustic feedback.
7 PROG P ..........programs tracks and reviews the program
8 MODE ............selects the different playing possibilities: SHUFFLE,
SHUFFLE REPEAT ALL, REPEAT, REPEAT ALL and SCAN
9 9....................stops CD play, erases a program, activates charging and switches
the player off
0 .......................open the CD lid here
! RESUME ........stores the last position played
HOLD ............locks all buttons
OFF.................switches RESUME and HOLD off
@ VOL E .......adjusts the volume
# .......................typeplate
$ 4.5V DC..........socket for external power supply
% ESP / PSM ...ELECTRONIC SKIP PROTECTION is the buffer memory for
uninterrupted sound. POWER SAVE MODE is for maximum battery
play time. ESP™PSM™off
CONTROLS
CAUTION
Use of controls or adjustments or performance of procedures other than
herein may result in hazardous radiation exposure.
The set complies with the FCC-Rules, Part 15 and with 21 CFR 1040.10. Operation is
subject to the following two conditions:
1. This device may not cause harmful interference, and
2. This device must accept any interference received, including interference that
may cause undesired operation.
POWER SUPPLY
8
English
With this player you can use either:
• alkaline batteries (type LR6, UM3 or AA), or
• the rechargeable ECO-PLUS NiMH batteries AY 3362. Make sure you purchase
these special batteries, as any other batteries cannot be recharged on this set.
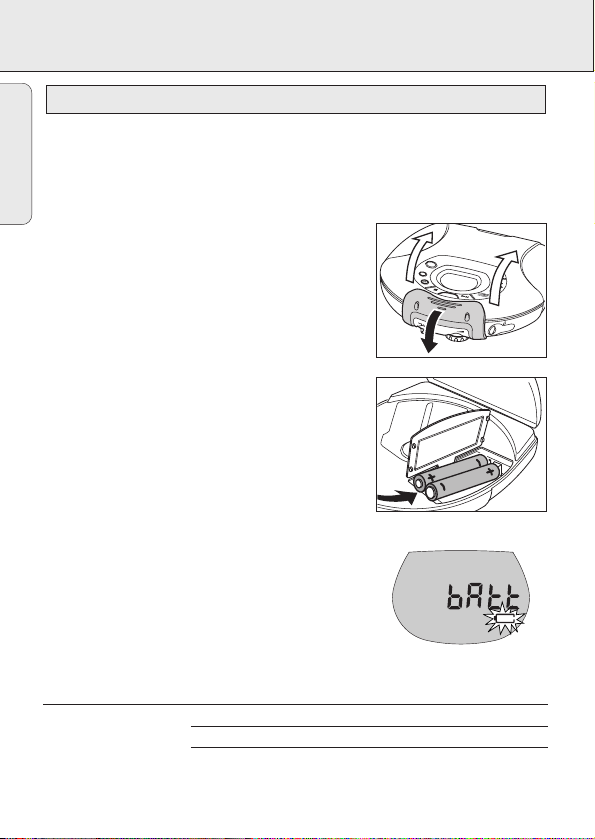
Inserting batteries
1 Unfasten the buckle.
2 Open the CD lid.
3 Open the battery compartment and insert either
2 alkaline batteries or the AY 3362 batteries.
Notes: – Old and new or different types of batteries
should not be used in combination.
– Remove batteries if they are empty or if the
player will not be used for a long time.
Batteries contain chemical substances, so they
should be disposed of properly.
Indication of battery condition
•
Full batteries: no indication.
• Weak batteries: a flashes. This symbol is not
shown when the rechargeable batteries are used.
• Empty batteries: A flashes and bAtt is displayed.
Replace the batteries or connect the power adapter.
Average playing time of batteries under normal conditions
Battery type ESP off ESP on PSM
Normal 5 hours 4 hours 6 hours
Alkaline 14 hours 12 hours 18 hours
NiMH 10 hours 8 hours 12 hours
Batteries (supplied or optionally available)
DBB
P
R
O
G
P
M
O
D
E
O
F
F
R
E
S
U
M
E
H
O
L
D
E
SP
/ LINE OUT
V
O
L
POWER SUPPLY
9
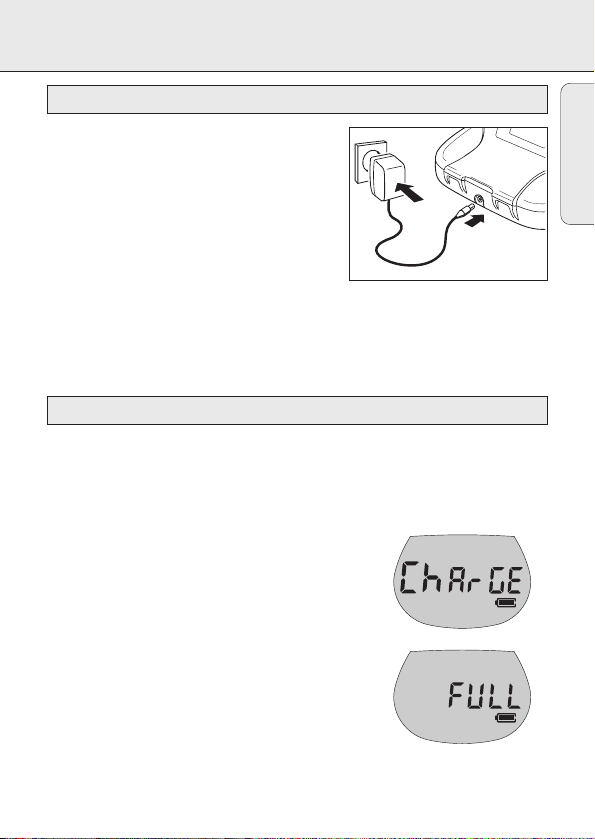
Only use the AY 3170 power adapter
(4.5V/300mA direct current, positive pole to the
center pin). Any other product may damage the
player.
1 Make sure the local voltage corresponds to the
adapter’s voltage.
2 Connect the power adapter to the 4.5V DC
socket of the player and to the wall outlet.
Notes: – Always disconnect the adapter when you are not using it.
– No acoustic feedback is available when using the adapter.
1 Make sure you insert the rechargeable ECO-PLUS NiMH batteries AY 3362.
2 Connect the power adapter to the 4.5V DC socket of the player and to the
wall outlet.
3 If necessary press 9 once or twice until the player is
switched off.
y a is shown and CHArGE is displayed.
• The approximate charging time is 5 hours.
4 When the batteries are fully recharged, a is
shown and FULL is displayed.
Note: It is normal for the battery pack to become warm
during recharging.
Recharging the AY 3362 ECO-PLUS NiMH batteries
Power adapter (supplied or optionally available)
English

POWER SUPPLY / HEADPHONES
10
English
• Recharging already charged or half-charged batteries will shorten their lifetime.
Therefore, after using the ECO-PLUS NiMH batteries a few times, discharge them
completely before recharging.
• To avoid a short circuit, the batteries should not touch any metal objects.
• If the batteries become empty soon after recharging, then they have reached the
end of their lifetime.
Connecting the headphones
• Connect the supplied headphones to p LINE OUT.
Note: p LINE OUT can also be used for connecting your
HiFi system (signal lead) or your car radio
(adapter cassette or signal lead). In both cases,
the volume of the CD player must be set to
position 8.
E
S
P
/
L
I
N
E
O
U
T
V
O
L
F
R
E
S
U
M
E
H
O
L
D
Headphones
ECO-PLUS NiMH battery information
Use your head when using headphones
Hearing safety: Do not play your headphones at a high volume. Hearing experts
advise that continuous use at high volume can permanently damage your hearing.
Traffic safety: Do not use headphones while driving a vehicle. It may create a
hazard and it is illegal in many countries. Even if your headphones are an open-air
type designed to let you hear outside sounds, do not turn up the volume so high that
you cannot hear what is going on around you.

GENERAL INFORMATION
11
• Do not touch the lens A of the CD player.
• Do not expose the player, batteries or CDs to
humidity, rain, sand or excessive heat (caused by
heating equipment or direct sunlight).
• You can clean the CD player with a soft, slightly
dampened lint-free cloth. Do not use any cleaning
agents as they may have a corrosive effect.
• To clean the CD, wipe it in a straight line from the center toward the edge using a
soft, lint-free cloth. A cleaning agent may damage the disc! Never write on a CD or
attach a sticker to it.
• The lens may cloud over when the player is moved suddenly from cold to warm
surroundings. Playing a CD is not possible then. Leave the CD player in a warm
environment until the moisture evaporates.
• Active mobile phones in the vicinity of the CD player may cause malfunctions.
• Avoid dropping the player as this may cause damage.
• Never hold the player by its buckle itself as it can damage the player!
• This player is splash-resistant. It is not meant to be used under water.
• Make sure that neither sand, dust nor water get into the player. Wipe them off
before opening the buckle or closing the lid. Always touch the player with
dry hands.
• Avoid the supplied headphones getting wet. If so, dry them with a soft cloth.
• When the 4.5V DC socket and the p LINE OUT headphone socket are not in use,
always cover them with the attached rubber caps.
• To prevent a shock hazard, do not use the player near water during AC operation.
Splash resistance
CD player and CD handling
English
A

CD PLAY
12
English
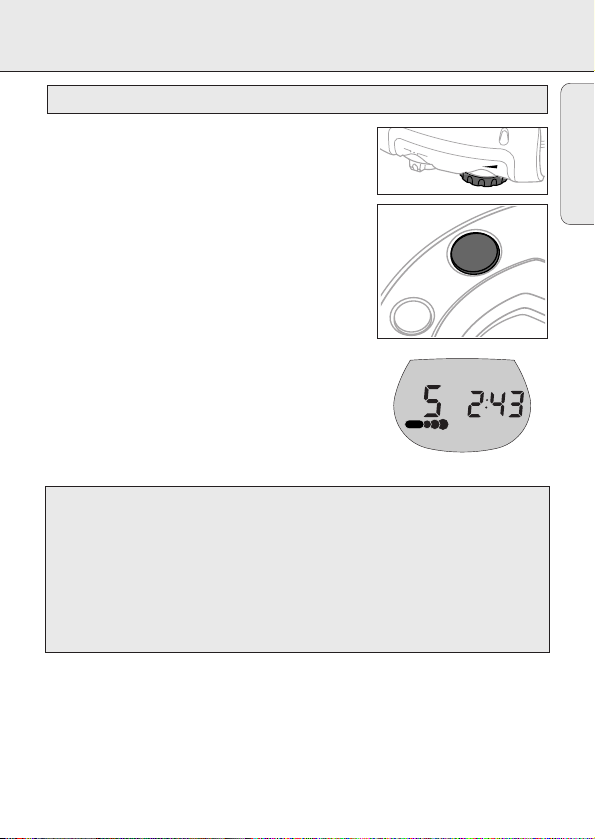
1 Unfasten the buckle.
2 Open the CD lid.
3 Insert an audio CD, printed side up, by pressing
gently on the CD center so that it fits onto the hub.
Close the lid by pressing it down on the left side.
4 Press 2; to switch the player on and start playback.
y The current track number and the elapsed
playing time of the current track are displayed.
• You can interrupt playback by pressing 2;.
y The time where playback was interrupted starts
to flash.
• Continue playback by pressing 2; again.
5 Press 9 to stop playback.
y The total number of tracks and the total playing
time of the CD are displayed.
6 Press 9 again to switch off the player.
7 To remove the CD, hold it by its edge and press
the hub gently while lifting the CD.
Notes: – Playback will stop if you open the CD lid.
– If there is no activity for 10 seconds, the set
will switch off automatically.
Playing a CD
M
O
D
E
ESP
0
CD PLAY
13
• Adjust the volume by using VOL E.
You can activate a bass enhancement to enjoy a more
powerful sound. 3 different levels of bass power can be
chosen.
1 Press DBB until the desired bass level is displayed.
y ∂❶, ∂❶❷ or ∂❶❷❸ is shown.
2 To deactivate the bass enhancement, press DBB until
the indication goes off.
Volume and sound adjustment
English
This CD player can play all kinds of audio discs, including CD-Recordables
and CD-Rewritables. Do not try to use CD-ROMs, CD-Is, CDVs or computer
CDs on this CD player. If you play a CD-Rewritable, it takes 5–25 seconds
after pressing 2; until sound reproduction starts.
Note: The display message nF dISC indicates that this CD has to be
finalized (FINALIZE) with a CD recorder before you can play it on
this CD player.
O
F
F
P
R
E
S
U
M
PROG
DBB
E
H
O
L
D
V
O
L
D
B
B
23
1

FEATURES
14
English
Selecting a track during playback
• Briefly press ∞ or § once or several times to skip
to the current, previous or subsequent track start.
y Playback continues with the selected track and
its number is displayed.
Selecting a track when playback is stopped
1 Briefly press ∞ or § once or several times.
y The selected track number is displayed.
2 Press 2; to start CD play.
y Playback starts with the selected track.
Searching for a passage during playback
1 Keep ∞ or § depressed to find a particular passage in a backward or
forward search.
y Searching is started and playback continues at a low volume. After 2 seconds
the search speeds up.
2 Release the button when you reach the desired passage.
y Normal playback continues from this position.
Note: During SCAN, searching is not possible.
Selecting a track and searching

FEATURES
15
You can select up to 99 tracks and store them in the
memory in a desired sequence. You can store any track
more than once.
1 While playback is stopped, select a track with
∞ or §.
2 Press PROG P to store the track.
y PROGRAM lights up, the track number
programmed and P with the total number of
stored tracks are displayed.
3 Select and store all desired tracks in this way.
4 Press 2; to start playback of your selected tracks.
y PROGRAM is shown and playback starts.
• You can review the program by depressing PROG P
for more than 2 seconds.
y The display shows all stored tracks in sequence.
Note: If you press PROG P and there is no track selected, SELECt is displayed.
Erasing the program
1 If necessary, press 9 to stop playback.
2 Press 9 to erase the program.
y CLEAr is displayed once, PROGRAM disappears,
and the program is erased.
Notes: The program will also be erased if you
– interrupt the power supply, or
– open the CD lid.
Programming track numbers
English
D
B
B
P
R
O
G
P
M
O
D
E
PROGRAM
PROGRAM
PROGRAM

FEATURES
16
English
You can store the last position played. When restarting,
playback continues from where you have stopped.
1 Switch the slider to RESUME during playback to
activate RESUME.
y RESUME is shown.
2 Press 9 whenever you want to stop playback.
3 Press 2; whenever you want to resume playback.
y RESUME is shown and playback continues from
where you have stopped.
• To deactivate RESUME, switch the slider to OFF.
y RESUME goes off.
Note: If you open the CD lid, the last position played will not be stored any longer.
You can lock the buttons of the player. When a key is
pressed, no action will be executed then.
1 Switch the slider to HOLD to activate HOLD.
y All buttons are locked.
HoLd is displayed by pressing any key. If the
player is switched off, HoLd is displayed only
by pressing 2;.
2 To deactivate HOLD, switch the slider to OFF.
Note: When you deactivate HOLD by switching the
slider to RESUME and restart, playback continues
from where you have stopped.
Locking all buttons – HOLD
Storing the last position played – RESUME
OFF
R
E
S
U
M
E
H
O
L
D
V
O
L
RESUME
O
F
F
RESUME
H
O
LD
V
O
L
FEATURES
17
Press the ESP button repeatedly to switch to
ESP™PSM™off.
yThe ESP/PSM symbol lights up in the display.
yThe ESP memory continuously stores in advance
the CD data to be played. This is to prevent sound
skipping during play due to shock and vibration.
yProlonged shocks and vibrations may empty the
ESP memory completely, and CD play will
be interrupted.
Note: When switching the ESP and PSM feature on and off, CD play will be delayed
or interrupted for a short time.
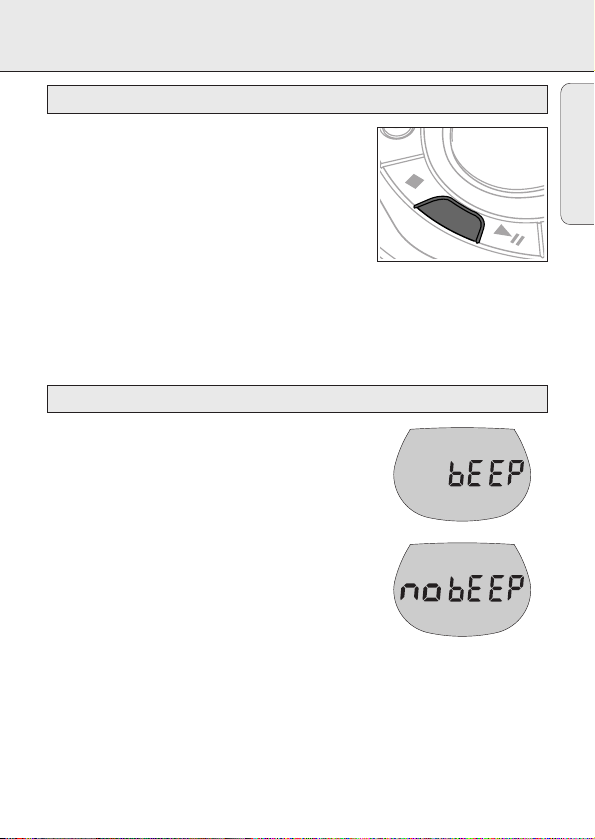
The player is equipped with a feature that accompanies
various key operations with an acoustic signal.
• Keep DBB depressed for more than 3 seconds.
If the acoustic signal was deactivated:
y bEEP is displayed and the acoustic signal is
activated.
If the acoustic signal was activated:
y no bEEP is displayed and the acoustic signal
is deactivated.
Acoustic feedback
ESP / PSM
English
ESP

FEATURES
18
English
It is possible to play tracks in random order, to repeat a track or the CD and to play the
first few seconds of each track.
1 Press MODE during playback as often as necessary
until the display shows either:
y SHUFFLE: All tracks of the CD are played in
random order until all of them have been
played once.
y SHUFFLE REPEAT ALL: All tracks of the CD are
played repeatedly in random order.
y REPEAT: The current track is played repeatedly.
y REPEAT ALL: The entire CD is played repeatedly.
y SCAN: The first 10 seconds of each of the
remaining tracks are played in sequence.
2 Playback starts in the chosen mode after 2 seconds.
3 To return to normal playback, press MODE until the display indication disappears.
OG
Selecting different playing possibilities – MODE
Environmental information
All redundant packing material has been omitted. We have done our utmost to make
the packaging easily separable into three mono materials: cardboard (box),
polystyrene foam (buffer) and polyethylene (bags, protective foam sheet).
Your player consists of materials which can be recycled if disassembled by a
specialized company. Please observe the local regulations regarding the disposal of
packing materials, exhausted batteries and old equipment.
P
M
ODE
SHUFFLE
REPEAT ALL
IN-CAR CONNECTION
19
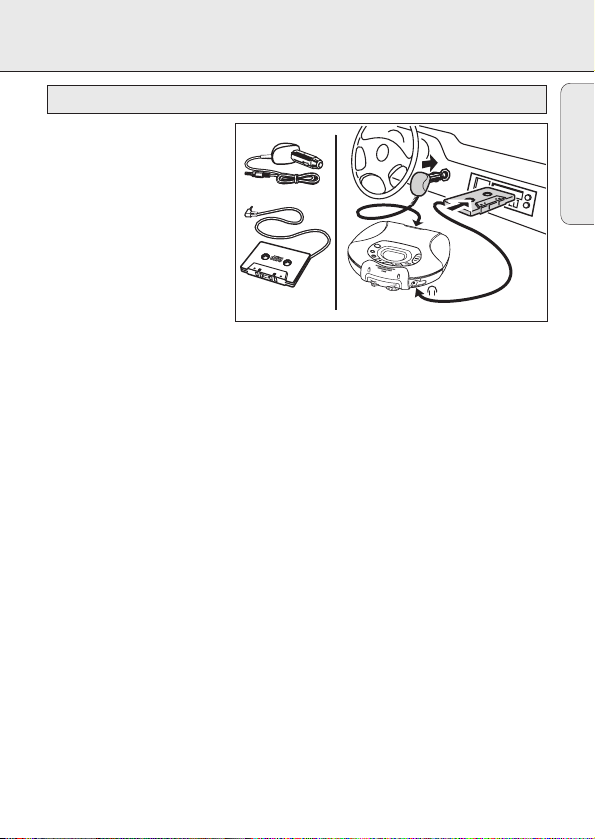
Only use the AY 3545 car
voltage converter (4.5V/600mA,
DC, positive pole to the center
pin) and the AY 3501 car
adapter cassette. Any other
product may damage the player.
1 Put the CD player on a
horizontal, vibration-free and
stable surface. Make sure it
is a safe place, where the
player is no danger or
obstacle to the driver and passengers.
2 Connect the DC plug of the voltage converter to the 4.5V DC socket of the CD
player (only for a 12V car battery, negative grounding).
3 Insert the voltage converter into the cigarette lighter socket. If necessary, clean the
cigarette lighter socket to obtain a good electrical contact.
4 Turn down the volume and switch off the autoreverse function of your car
radio cassette player.
5 Connect the adapter cassette plug to the p LINE OUT socket of the CD player.
6 Carefully insert the adapter cassette into the car radio’s cassette compartment.
7 Make sure the cord does not hinder your driving.
8 Start the CD player, set VOL E to position 8 and adjust the sound with the car
radio controls.
• Always remove the voltage converter from the cigarette lighter socket when the CD
player is not in use.
Notes: – Avoid excessive heat from the car heating or from direct sunlight (e.g. in a
parked car in the summer).
– If your car radio has a LINE IN jack, it is best to use this for the car radio
connection instead of the adapter cassette. Connect the signal lead to this
LINE IN jack and to the p LINE OUT jack of the CD player.
In-car use (connections supplied or optionally available)
English
DIGIT
DIGIT
AL
AL
DIGIT
AL
4,5 V DC
D
B
B
P
R
O
G
P
M
O
D
E
E
S
P
OFF
T
U
O
R
E
E
N
I
S
L
/
U
M
E
H
O
L
D
V
O
L

TROUBLESHOOTING
20
English
Problem Possible cause Solution
No power, Batteries
playback does Batteries inserted incorrectly Insert the batteries
not start correctly
Batteries are empty Change the batteries
Contact pins are dirty Clean them with a cloth
Mains adapter
Loose connection Connect the adapter
securely
In-car use
Cigarette lighter is not powered Switch on ignition or insert
when ignition is off batteries
nF dISC CD-RW (CD-R) is not recorded Use FINALIZE on the CD
indication properly Recorder to complete
the recording
no dISC The CD is scratched badly Replace or clean the CD
indication or dirty
CD is not or incorrectly inserted Insert a CD, label upwards
The laser lens is steamed up Wait until the lens has
cleared
HoLd HOLD is activated Deactivate HOLD
indication and/or
Electrostatic discharge Disconnect the player from
no reaction to
power supply or take out
controls
the batteries for
a few seconds
The CD skips tracks The CD is damaged or dirty Replace or clean the CD
RESUME, SHUFFLE or PROGRAM is Switch off RESUME, SHUFFLE
active or PROGRAM
WARNING
Under no circumstances should you try to repair the player yourself as this
will invalidate the guarantee.

TROUBLESHOOTING
21
Problem Possible cause Solution
No sound or PAUSE is activated Press 2;
bad sound quality
Loose, wrong or dirty Check and clean
connections connections
Volume is not adjusted Adjust the volume
Headphones worn the Pay attention to the L (left)
wrong way and R (right) indications
Strong magnetic fields near Change the player’s position
the CD player or connections
In-car use
Adapter cassette is Insert the adapter cassette
inserted incorrectly correctly
Temperature inside the car Let the CD player adjust to
is too high/low the temperature
Cigarette lighter socket Clean the cigarette
is dirty lighter socket
Wrong playback direction of the Change the autoreverse
car cassette player’s direction
autoreverse feature
Battery recharging Use of wrong batteries Only use the rechargeable
on board does ECO-PLUS NiMH batteries
not work AY 3362
Contacts are dirty Clean them with a cloth
English
If a fault occurs, first check the points listed, before taking the player for repair.
If you are unable to solve a problem by following these hints, consult your dealer or
service center.

PORTABLE COMPACT DISC
One Year Free Exchange
This product must be carried in for an exchange.
LIMITED WARRANTY
WHO IS COVERED?
You must have proof of purchase to exchange the product.A sales receipt or other document showing that you purchased the product is considered proof of purchase.Attach it
to this owner’s manual and keep both nearby.
WHAT IS COVERED?
Warranty coverage begins the day you buy your product. For one year thereafter, a
defective or inoperative product will be replaced with a new,renewed or comparable
product at no charge to you.A replacement product is covered only for the original warranty period.When the warranty on the original product expires, the warranty on the
replacement product also expires.
WHAT IS EXCLUDED?
Your warranty does not cover:
• labor charges for installation or setup of the product, adjustment of customer controls
on the product, and installation or repair of antenna systems outside of the product.
• product repair and/or part replacement because of misuse, accident, unauthorized
repair or other cause not within the control of Philips Consumer Electronics
Company.
• reception problems caused by signal conditions or cable or antenna systems outside
the unit.
• a product that requires modification or adaptation to enable it to operate in any country other than the country for which it was designed, manufactured,approved and/or
authorized, or repair of products damaged by these modifications.
• incidental or consequential damages resulting from the product.(Some states do not
allow the exclusion of incidental or consequential damages, so the above exclusion may
not apply to you.This includes, but is not limited to,prerecorded material, whether
copyrighted or not copyrighted.)
• a product that is used for commercial or institutional purposes.
WHERE IS EXCHANGE AVAILABLE?
You may exchange the product in all countries where the product is officially distributed
by Philips Consumer Electronics Company. In countries where Philips Consumer
Electronics Company does not distribute the product,the local Philips service organization will attempt to provide a replacement product (although there may be a delay if the
appropriate product is not readily available).
BEFORE REQUESTING EXCHANGE...
Please check your owner’s manual before requesting an exchange.Adjustments of the
controls discussed there may save you a trip.
Philips Service Solutions Group, P.O.Box 2976,
Longview,Texas 75606, (903) 242-4800
22

EL4967E005 / MAC 4110 / 1-97
EXCHANGING A PRODUCT IN U.S.A.,
PUERTO RICO OR U.S.VIRGIN ISLANDS...
Contact your dealer to arrange an exchange. Or, ship the product, insured and freight
prepaid, and with proof of purchase enclosed, to the address listed below.
Small Product Service Center
Philips Service Company
907 Snapps Ferry Road, Plant 2, Building 6
Greeneville,TN 37743
(In U.S.A., Puerto Rico and U.S.Virgin Islands, all implied warranties,including implied warranties of merchantability and fitness for a particular purpose, are limited in duration to
the duration of this express warranty. But, because some states do not allow limitations
on how long an implied warranty may last,this limitation may not apply to you.)
EXCHANGING A PRODUCT IN CANADA...
Please contact Philips at:
1-800-661-6162 (French Speaking)
1-800-363-7278 (English Speaking)
(In Canada, this warranty is given in lieu of all other warranties. No other warranties are
expressed or implied, including any implied warranties of merchantability or fitness for a
particular purpose. Philips is not liable under any circumstances for any direct, indirect,
special, incidental or consequential damages, howsoever incurred,even if notified of the
possibility of such damages.)
TO GET OUT-OF-WARRANTY EXCHANGE...
In U.S.A., Puerto Rico or U.S.Virgin Islands, contact Philips Service Company at (800)
851-8885 to obtain the cost of out-of-warranty exchange.Then carefully pack the product and ship it to the Small Product Service Center (address listed above). In Canada, call
the phone number listed above under “Exchanging a Product in Canada” to obtain the
cost of out-of-warranty exchange.
REMEMBER...
Please record the model and serial numbers found on the product below. Also, please fill
out and mail your warranty registration card promptly.It will be easier for us to notify
you if necessary.
MODEL # ____________________________________
SERIAL # ____________________________________
This warranty gives you specific legal rights.You may have other rights
which vary from state/province to state/province.
23

LECTEUR À DISQUE COMPACT PORTABLE
Échange gratuite pendant un an
Il faut porter ce produit à un centre de service pour l’échanger.
GARANTIE LIMITÉE
QUI EST COUVERT ?
Il faudra présenter une preuve d’achat pour pouvoir bénéficier des services de la
garantie. Le reçu, la facture ou un autre document portant la date d’achat qui prouve que
vous avez bien acheté le produit est considéré comme preuve d’achat. L’attacher à ce
manuel d’emploi et les garder tous les deux à portée de main.
QU’EST-CE QUI EST COUVERT ?
La couverture de la garantie entre en vigueur le jour où vous achetez le produit.Pendant
un an à compter de cette date, tout produit défectueux ou qui ne fonctionne pas sera
remplacé par un produit neuf, renouvelé ou un produit comparable sans frais aucun au
consommateur. Un produit de remplacement n’est couvert que pendant la période nonécoulée de garantie d’origine. Lorsque la garantie du produit d’origine vient à terme, la
garantie du produit de remplacement est terminée aussi.
QU’EST-CE QUI EST EXCLU DE LA GARANTIE ?
La garantie ne couvre pas:
• les frais de main d’œuvre pour installer ou préparer, pour régler les commandes et
pour installer ou réparer les systèmes d’antenne à l’extérieur du produit.
• la réparation du produit et/ou d’une pièce pour cause du mauvais emploi, d’accident,
de réparations non-agréées ou d’une autre raison qui ne peut pas être contrôlée par
Philips Consumer Electronics Company.
• des problèmes de réception dûs à des conditions de signal, au câble ou aux systèmes
d’antenne à l’extérieur de l’unité.
• un produit qui nécessite des modifications ou adaptations pour lui permettre de fonctionner dans un pays autre que le pays pour lequel il a été conçu, fabriqué, agréé et/ou
autorisé, ou la réparation des produits endommagés par de telles modifications.
• des dommages indirects ou conséquents qui résultent du produit. (Certains états ou
provinces ne permettent pas l’exclusion de dommages indirects ou conséquents. Il est
donc possible que l’exclusion ci-dessus ne s’applique pas au cas présent. Cela comprend, mais de façon non-limitative, des enregistrements, qu’ils soient protégés ou non
par les lois sur les droits d’auteur).
• un appareil acheté, utilisé ou réparé en dehors des États-Unis, de Porto Rico,des Îles
Vierges ou du Canada ou utilisé à des fins commerciales ou institutionnelles (y compris
mais non limités aux appareils utilisés pour la location).
OÙ L’ÉCHANGE EST-ELLE PROPOSÉE ?
Le produit pourra s’échanger dans tous les pays où le produit est distribué officiellement
par Philips Consumer Electronics Company. Dans des pays où Philips Consumer
Electronics Company ne distribue pas le produit,l’organisme local de service Philips tentera de fournir un produit de remplacement (mais il pourra y avoir des retards si le bon
produit n’est pas facilement disponible).
Philips Service Solutions Group, P.O.Box 2976,
Longview,Texas 75606 É.-U., (903) 242-4800
24

25
Français
CONSIGNES DE SÉCURITÉ IMPORTANTES
A lire avant toute utilisation du matériel
Ce produit a été conçu et fabriqué en accord
avec des normes de sécurité et de qualité très
strictes. Il existe toutefois des précautions
d'installation et de fonctionnement qu'il est
important de connaître et de respecter.
1.
Lisez ces instructions. - Il est impératif de lire
toutes les consignes de sécurité et les
instructions de fonctionnement avant d'utiliser
l'appareil.
2. Conservez ces instructions. - Il est
recommandé de conserver ces consignes de
sécurité et instructions de fonctionnement
pour référence ultérieure.
3. Respectez les avertissements. - Tous les
avertissements inscrits sur l'appareil luimême ou figurant dans les instructions de
fonctionnement doivent être respectés.
4. Suivez toutes les instructions. - Il est
impératif de suivre toutes les instructions
de fonctionnement et d'utilisation.
5. N'utilisez pas cet appareil à proximité
d'une source d'eau - comme par exemple,
une baignoire, un lavabo, un évier de
cuisine, un baquet de lingerie, ou dans une
cave humide, près d'une piscine, etc.
6. Nettoyez l'appareil uniquement avec un
chiffon humide. - Cet appareil doit être
nettoyé uniquement selon la procédure
recommandée par le fabricant.
7. Installez l'appareil selon les
instructions du fabricant. N'obstruez
aucun orifice de ventilation. - Par
exemple, l'appareil ne doit pas être posé sur
un canapé, un lit, un tapis, ou autre surface
du même type ; il ne doit pas non plus être
placé dans un meuble intégré comme un
ensemble bibliothèque ou autre où le
système de ventilation de l'appareil serait
bloqué.
8. N'installez pas l'appareil près d'une
source de chaleur comme par exemple des
radiateurs, bouches de chaleur, cuisinières, ou
autres appareils (même des amplificateurs)
dégageant de la chaleur.
9. Utilisez uniquement des accessoires ou
options recommandés par le fabricant.
10.
Utilisez uniquement un
meuble sur roulettes, un
support, un pied, une étagère ou
une table de type recommandé
par le fabricant. Si vous utilisez
un meuble sur roulettes, veillez à
le déplacer avec précaution afin
d'éviter tout accident corporel si
l'équipement se renversait.
11.Pour toute réparation, faites appel à un
personnel qualifié. Une réparation sera
nécessaire si l'appareil a subi des dommages
tels que détérioration du cordon
d'alimentation ou de la prise, liquide renversé
sur l'appareil, ou encore si un objet est
tombé dessus, si l'appareil a été exposé à la
pluie ou à l'humidité, s'il ne fonctionne pas
correctement ou s'il a fait une chute.
EL 4562-F004: 99/3

26
COMMANDES
Français
6
7
8
9
0
D
B
B
P
R
O
G
P
M
O
D
E
5
4
E
S
P
3
!
@
2
T
U
O
V
O
L
E
N
I
L
/
1
%
$
#

27
1 p LINE OUT...prise 3,5 mm pour écouteurs
2 2; .................met l’appareil en marche, démarre et interrompt la lecture CD
3 ∞ ..................saut et recherche en arrière
4 § ..................saut et recherche en avant
5 .......................afficheur
6 DBB................DYNAMIC BASS BOOST: accentue les basses,
DBB 1™DBB 2™DBB 3™arrêt
Appuyez sur cette touche pendant plus de 3 secondes pour
activer/désactiver le feedback acoustique.
7 PROG P ..........pour programmer des morceaux et passer la programmation en revue
8 MODE ............sélectionne les différents modes de lecture : SHUFFLE,
SHUFFLE REPEAT ALL, REPEAT, REPEAT ALL et SCAN
9 9....................arrête la lecture CD, efface un programme, active l’opération de
charge et arrête l’appareil
0 .......................ouvrez ici le compartiment CD
! RESUME ........enregistre en mémoire la dernière position lue
HOLD ............bloque toutes les touches
OFF.................désactive RESUME et HOLD
@ VOL E .......pour régler le volume
# .......................plaque signalétique
$ 4.5V DC..........prise pour alimentation externe
% ESP / PSM .....ELECTRONIC SKIP PROTECTION est la mémoire-tampon assurant un
son ininterrompu. POWER SAVE MODE assure une autonomie
maximale sur piles. ESP™PSM™arrêt
COMMANDES
ATTENTION
L’utilisation des commandes ou réglages ou le non-respect des procédures ciincluses peuvent se traduire par une exposition dangereuse à l’irradiation.
L’appareil répond aux normes FCC, Part 15 et 21 CFR 1040.10. Fonctionnement
soumis aux deux conditions suivantes :
1. Cet appareil ne doit pas provoquer d’interférences nuisibles, et
2. Cet appareil doit accepter toute interférence reçue, y compris les interférences
susceptibles de provoquer un fonctionement peu satisfaisant.
Français

ALIMENTATION ELECTRIQUE
28
Avec cet appareil, vous pouvez utiliser :
• des piles alcalines (de type LR6, UM3 ou AA) ou
• les piles rechargeables AY 3362 ECO-PLUS au NiMH. Veillez à acheter ces piles
spéciales, dans la mesure où toutes les autres piles ne peuvent pas être
rechargées sur cet appareil.
Mise en place des piles
1 Défaites la boucle.
2 Ouvrez le compartiment CD.
3 Ouvrez le logement des piles et placez-y soit 2 piles
alcalines, soit les piles rechargeables AY 3362
ECO-PLUS au NiMH.
Remarques : – Ne combinez jamais des piles neuves et
eanciennes, ou différents types de piles.
– Retirez les piles lorsqu’elles sont usées ou
si l’appareil doit rester inutilisé longtemps.
Les piles contiennent des substances chimiques
et doivent par conséquent être rejetées dans
les endroits appropriés.
Indication de l’état des piles
• Piles chargées : pas d’indication.
• Piles faibles : a clignote. Ce symbole n'apparaît
pas lorsque des piles rechargeables sont utilisées.
• Piles usées : A clignote et l’afficheur indique
bAtt. Remplacez les piles ou connectez le bloc
d’alimentation.
Durée moyenne d’utilisation des piles dans des conditions normales
Type de piles ESP désactivé ESP activé PSM
Normales 5 heures 4 heures 6 heures
Alcalines 14 heures 12 heures 18 heures
NiMH 10 heures 8 heures 12 heures
Piles (fournies ou en option)
Français
DBB
P
R
O
G
P
M
O
D
E
O
F
F
R
E
S
U
M
E
H
O
L
D
ESP
/ LINE OUT
V
O
L

ALIMENTATION ELECTRIQUE
29
Utilisez uniquement le bloc d’alimentation
AY 3170 (courant continu 4,5 V/300 mA, pôle plus
à la broche centrale). Tout autre produit risquerait
d’endommager l’appareil.
1 Veillez à ce que la tension locale soit bien
conforme à celle du bloc d’alimentation.
2 Connectez le bloc d’alimentation à la prise
4.5V DC de l’appareil, ainsi qu’à la prise de courant.
Remarques : – Débranchez toujours le bloc d’alimentation lorsque vous ne l’utilisez pas.
– Il n’y a pas de feed-back acoustique lorsque vous utilisez l’adaptateur.
1 Veillez à placer des piles AY 3362 ECO-PLUS NiMH rechargeables au.
2 Connectez le bloc d’alimentation à la prise 4.5V DC de l’appareil, ainsi qu’à la
prise de courant.
3 Si nécessaire, appuyez sur 9 à une ou deux reprises
jusqu’à ce que l’appareil soit à l’arrêt.
y a apparaît et l’afficheur indique CHArGE.
• La durée moyenne de charge est de 5 heures.
4 Lorsque les piles sont entièrement rechargées, a
apparaît et l’indication FULL est affichée.
Remarque : Il est normal que les piles chauffent
pendant le chargement.
Chargement des piles ECO-PLUS au NiMH sur l’appareil
Bloc d’alimentation (fourni ou en option)
Français

ALIMENTATION ELECTRIQUE / ECOUTEURS
30
• Le fait de recharger des piles déjà chargées ou chargées à moitié réduit leur durée
de vie. Par conséquent, après avoir utilisé plusieurs fois les piles ECO-PLUS au
NiMH, déchargez-les complètement avant de les recharger.
• Pour éviter les courts-circuits, les piles ne doivent pas toucher d’objets métalliques.
• Les piles se déchargent très rapidement après avoir été rechargées, lorsqu’elles
arrivent à la fin de leur durée d'utilisation.
Raccordement des écouteurs
• Raccordez les écouteurs fournis à la borne p LINE OUT.
Remarque : p LINE OUT peut également servir à
raccorder votre système HiFi (ligne de
signal) ou votre autoradio (cassette
adaptatrice ou ligne de signal). Dans les
deux cas, le volume du lecteur de CD doit
être réglé à la position 8.
E
S
P
/
L
I
N
E
O
U
T
V
O
L
F
R
E
S
U
M
E
H
O
L
D
Ecouteurs
Informations relatives aux piles ECO-PLUS au NiMH
Français
Ecoutez la musique… et la voix de la raison!
Sécurité d’écoute: ne réglez pas vos écouteurs à un volume trop élevé. Les experts
de l’audition signalent qu’un utilisation continue à volume élevé peut nuire à l’ouïe.
Sécurité routière: n’utilisez pas vos écouteurs lorsque vous conduisez un véhicule.
Cela peut entraîner des dangers, et est interdit dans nombre de pays. Même si vous
utilisez des écouteurs de type ouvert, conçus pour vous permettre d’entendre les
sons environnants, ne réglez pas le volume si fort que vous n’entendez plus ce qui se
passe autour de vous.

INFORMATIONS GENERALES
31
• Ne touchez jamais la lentille A du lecteur de CD.
• N’exposez jamais l’appareil, les piles ou les CD à
l’humidité, à la pluie ou à une chaleur excessive
(chauffage ou incidence directe du soleil).
• Vous pouvez nettoyer le lecteur de CD avec un chiffon
doux légèrement humide ne peluchant pas. N’utilisez
pas de produits de nettoyage, qui pourraient avoir un
effet corrosif.
• Pour nettoyer un CD, essuyez-le en ligne droite du centre vers le bord au moyen d’un
chiffon doux ne peluchant pas. Les produits de nettoyage peuvent endommager le
disque! N’inscrivez jamais rien sur un CD et n’y apposez pas d’étiquette.
• La lentille peut s’embuer lorsqu’elle passe soudainement d’un milieu froid en
milieu chaud. La lecture CD n’est alors pas possible. Laissez le lecteur de CD dans
un environnement chaud jusqu’à ce que l’humidité se soit évaporée.
• Les téléphones mobiles en marche à proximité du lecteur de CD peuvent en
perturber le fonctionnement.
• Ne tenez jamais l’appareil par sa boucle, ce qui risquerait de l’endommager!
• L’appareil est résistant aux éclaboussures. Il n’est pas destiné à être utilisé sous l’eau.
• Veillez à éviter la pénétration de sable, de poussière ou d’eau dans l’appareil. Le
cas échéant, essuyez-le avant d’ouvrir la boucle ou de fermer le compartiment.
Manipulez toujours l’appareil avec les mains sèches.
• Evitez que les écouteurs fournis ne se mouillent. Le cas échéant, essuyez-les avec
un chiffon doux.
• Lorsque la prise 4.5V DC et la prise p LINE OUT pour écouteurs ne sont pas
utilisées, couvrez-les toujours avec les capuchons en caoutchouc prévus à cet effet.
•
Pour éviter les risques de choc, n’utilisez pas l’appareil à proximité de l’eau en mode CA.
Résistance aux éclaboussures
Lecteur de CD et manipulation des CD
Français
A

LECTURE CD
32
1 Défaites la boucle.
2 Ouvrez le compartiment CD.
3 Introduisez un CD audio, face imprimée vers le haut,
en appuyant doucement sur le centre du CD pour le
fixer sur l’axe. Fermez le compartiment en appuyant
sur la gauche du couvercle.
4 Appuyez sur 2; pour mettre l’appareil en marche
et démarrez la lecture.
y Le numéro du morceau en cours et la durée de
lecture écoulée du morceau en cours s’affichent.
• Vous pouvez interrompre la lecture en appuyant sur 2;.
y
Le moment où la lecture a été interrompue clignote.
• Reprenez la lecture en appuyant à nouveau sur 2;.
5 Appuyez sur 9 pour mettre fin à la lecture.
y Le nombre total de morceaux et la durée totale
de lecture du CD s’affichent.
6 Appuyez à nouveau sur 9 pour arrêter l’appareil.
7 Pour retirer le CD, saisissez-le par l’arête et appuyez
doucement sur l’axe tout en soulevant le CD.
Remarques : – La lecture s’arrête si vous ouvrez le
compartiment CD.
– S’il n’y a aucune activité pendant
10 secondes, l’appareil passe
automatiquement à l’arrêt.
Lecture d’un CD
Français
M
O
D
E
ESP
0

LECTURE CD
33
• Réglez le volume au moyen de VOL E.
Vous pouvez activer l’accentuation des basses pour
bénéficier d’un son plus puissant. Vous disposez au
choix de trois différents niveaux de basses.
1 Appuyez sur DBB jusqu’à ce que le niveau de basses
voulu s’affiche.
y L’afficheur indique ∂❶, ∂❶❷ ou
∂❶❷❸.
2 Pour désactiver l’accentuation des basses, appuyez
sur DBB jusqu’à ce que l’indication disparaisse.
Réglage du volume et du son
Français
Ce lecteur peut reproduire tout type de disque audio tel que CD
enregistrable ou réenregistrable. N’essayez pas de reproduire de
CD-ROM, CD-I, CDV ou CD pour ordinateur. Lorsque vous jouez un
CD réenregistrable, cela prend de 5 à 25 secondes après avoir appuyé
sur 2; avant que la lecture démarre.
Remarque: Le message sur l’afficheur nF dISC indique que ce CD
doit d’abord être finalisé (FINALIZE) sur un enregistreur CD
avant que la lecture sur un lecteur CD soit possible.
O
F
F
P
R
E
S
U
M
PROG
DBB
E
H
O
L
D
V
O
D
B
B
23
1
L

FONCTIONS SPECIALES
34
Sélection d’un morceau en cours de lecture
• Appuyez brièvement sur ∞ ou § à une ou plusieurs
reprises pour sauter au début du morceau en cours
ou d’un morceau précédent ou suivant.
y La lecture se poursuit avec le morceau
sélectionné, dont le numéro s’affiche.
Sélection d’un morceau lorsque la lecture est
à l’arrêt
1 Appuyez brièvement sur ∞ ou § à une au plusieurs reprises.
y Le numéro du morceau sélectionné s’affiche.
2 Appuyez sur 2; pour démarrer la lecture.
y La lecture commence avec le morceau sélectionné.
Recherche d’un passage en cours de lecture
1 Maintenez ∞ ou § appuyé pour trouver un passage donné en direction
avant ou arrière.
y La recherche démarre, et la lecture se poursuit à faible volume. Au bout de
2 secondes, la recherche est accélérée.
2 Relâchez la touche lorsque vous avez atteint le passage voulu.
y La lecture normale se poursuit depuis ce point précis.
Remarque : La recherche n’est pas possible en mode SCAN.
Sélection et recherche de morceaux
Français

FONCTIONS SPECIALES
35
Vous pouvez sélectionner jusqu’à 99 morceaux et les
mémoriser dans l’ordre voulu. Vous pouvez programme
tout morceau plus d’une fois.
1 La lecture étant à l’arrêt. sélectionnez un morceau
avec ∞ ou §.
2 Appuyez sur PROG P pour mémoriser le morceau.
y PROGRAM s’allume, le numéro du morceau
programmé et le symbole P ainsi que le nombre
total de morceaux programmés s’affichent.
3 Sélectionnez et mémorisez ainsi tous les
morceaux désirés.
4 Appuyez sur 2; pour démarrer la lecture des
morceaux ainsi sélectionnés.
y PROGRAM est affiché, et la lecture démarre.
• Vous pouvez passer votre programmation en revue en
appuyant sur PROG P pendant plus de 2 secondes.
y L’affichage indique dans l’ordre tous les morceaux mémorisés.
Remarque : Si vous appuyez sur PROG P alors qu’aucun morceau n’est sélectionné,
SELECt s’affiche.
Effacer un programme
1 Le cas échéant, appuyez sur 9 pour arrêter la lecture.
2 Appuyez sur 9 pour effacer le programme.
y CLEAr apparaît, PROGRAM s’éteint et le
programme est effacé.
Remarques : Le programme sera également effacé
– si vous interrompez l’alimentation
électrique, ou
– si vous ouvrez le compartiment CD.
Programmation des numéros de morceaux
Français
D
B
B
P
R
O
G
P
M
O
D
E
PROGRAM
PROGRAM
PROGRAM

FONCTIONS SPECIALES
36
Vous pouvez mémoriser la dernière position lue. Au
redémarrage, la lecture reprend là où vous l’aviez arrêtée.
1 Poussez le commutateur en position RESUME
pendant la lecture pour activer RESUME.
y RESUME apparaît.
2
Appuyez sur 9 lorsque vous souhaitez arrêter la lecture.
3
Appuyez sur 2; lorsque vous voulez reprendre la lecture.
y RESUME est affiché, et la lecture continue au
point où vous l’aviez arrêtée.
• Pour désactiver RESUME, poussez le commutateur en
position OFF.
y RESUME s’éteint.
Remarque : Si vous ouvrez le compartiment CD, la dernière position lue ne reste pas
en mémoire.
Vous pouvez bloquer les touches de l’appareil. L’appui
sur les touches n’entraîne alors aucune réaction.
1 Mettez le commutateur en position HOLD pour
activer HOLD.
y Toutes les touches sont bloquées.
HoLd s’affiche lorsqu’on appuie sur une touche
quelconque. Lorsque l’appareil est arrêté,
HoLd ne s’affiche que si l’on appuie sur 2;.
2 Pour désactiver HOLD, mettez le commutateur
en position OFF.
Remarque : Lorsque vous désactivez HOLD en poussant
le commutateur en position RESUME et
remettez l’appareil en marche, la lecture
reprend là où vous l’aviez arrêtée.
Blocage des touches – HOLD
Mémorisation de la dernière position lue – RESUME
Français
OFF
R
E
S
U
M
O
F
F
RESUME
E
H
O
L
D
V
O
L
RESUME
H
O
LD
V
O
L

FONCTIONS SPECIALES
37
Appuyez à diverses reprises sur la touche ESP pour
la commutation ESP™PSM™arrêt.
yy
Le symbole ESP/PSM s’allume sur l’afficheur.
yy
La mémoire ESP enregistre à l’avance les données du
CD à jouer. Ceci évite les sauts en cours de lecture pour
cause de choc ou de vibration.
yy
Les chocs ou vibrations prolongés peuvent vider complètement la mémoire ESP;
dans ce cas, la lecture est interrompue.
Remarque: Lorsque vous activez ou désactivez les fonctions ESP et PSM, la lecture est
retardée ou interrompue pour un petit instant.
L’appareil est équipé d’une fonction accompagnant
différentes opérations par touches d’un signal acoustique.
• Maintenez DBB appuyé pendant plus de 3 secondes.
Si le signal acoustique était désactivé :
y bEEP est affiché et le signal est activé.
Si le signal acoustique était activé :
y no bEEP est affiché et le signal acoustique
est désactivé.
Feedback acoustique
ESP / PSM
Français
E
S
P

FONCTIONS SPECIALES
38
Vous pouvez jouer des morceaux dans un ordre aléatoire, répéter un morceau ou le CD
ou jouer les premières secondes des morceaux.
1 Appuyez sur MODE en cours de lecture aussi souvent
que nécessaire jusqu’à ce que l’afficheur indique l’un
de modes suivants :
y SHUFFLE : tous les morceaux du CD sont joués
dans un ordre aléatoire jusqu’à ce que chacun ait
été joué une fois.
y SHUFFLE REPEAT ALL : tous les morceaux du CD
sont joués de manière répétée dans un
ordre aléatoire.
y REPEAT : le morceau en cours est joué de manière répétée.
y REPEAT ALL : la totalité du CD est jouée de
manière répétée.
y SCAN : les 10 premières secondes de chacun des
morceaux restants sont jouées dans l’ordre.
2 La lecture démarre dans le mode choisi au bout de
2 secondes.
3 Pour revenir en lecture normale, appuyez sur MODE jusqu’à ce que l’indication
disparaisse de l’affichage.
OG
Sélection des différentes possibilités de lecture – MODE
Informations relatives à l’environnement
Tous les matériaux d’emballage superflus ont été supprimés. Nous avons fait de notre
mieux pour que l’emballage soit facilement séparable en trois types de matériaux :
carton (boîte), polystyrène expansé (matériel tampon), polyéthylène (sachets, panneau
de protection en mousse).
Votre appareil est composé de matériaux pouvant être recyclés s’il est démonté par une
firme spécialisée. Veuillez observer les règlements locaux lorsque vous vous débarrassez
des matériaux d’emballage, des piles usagées et de votre ancien appareil.
Français
P
M
ODE
SHUFFLE
REPEAT ALL

RACCORDEMENT EN VOITURE
39
Utilisez exclusivement le
transformateur pour voiture
AY 3545 (4,5 V/600 mA, CC, pôle
plus à la borne centrale) et la
cassette adaptatrice pour voiture
AY 3501. Tout autre produit
risquerait d’endommager l’appareil.
1
Placez le lecteur de CD sur une
surface horizontale, stable et
exempte de vibrations. Veillez à
choisir un emplacement sûr, où le
lecteur de CD ne risque pas de mettre en danger ou de gêner le conducteur ou les passagers.
2 Raccordez la fiche DC du transformateur à la prise 4.5V DC du lecteur de CD
(uniquement pour une batterie automobile 12 V, mise à la terre négative).
3 Branchez le transformateur à la prise de l’allume-cigares. Si nécessaire, nettoyez la
prise de l’allume-cigares pour assurer un bon contact électrique.
4 Diminuez le volume et désactivez la fonction Autoreverse du lecteur de
cassettes de votre autoradio.
5 Connectez la fiche de la cassette adaptatrice à la prise p LINE OUT du lecteur de CD.
6 Introduisez avec précaution la cassette adaptatrice dans le compartiment cassette
de l’autoradio.
7 Vérifiez que le câble ne vous gêne pas pour conduire.
8 Mettez le lecteur de CD en marche, réglez VOL E à la position 8 et réglez le son
au moyen des commandes de l’autoradio.
• Débranchez toujours le transformateur de la prise de l’allume-cigares lorsque vous
n’utilisez pas le lecteur de CD.
Notes : –
Evitez d’exposer l’appareil à la chaleur excessive du chauffage de la voiture ou de
l’incidence directe du soleil (par exemple dans une voiture en stationnement en été).
–
Si votre autoradio dispose d’une borne LINE IN, utilisez-la plutôt que la cassette
adaptatrice pour le raccordement à l’autoradio. Raccordez la ligne de signal à
cette borne LINE IN et à la borne p LINE OUT au lecteur de CD.
Utilisation en voiture (connecteurs fournis ou en option)
Français
DIGIT
DIGIT
AL
AL
DIGIT
AL
4,5 V DC
D
B
B
P
R
O
G
P
M
O
D
E
E
S
P
OFF
T
U
O
R
E
E
N
I
S
L
/
U
M
E
H
O
L
D
V
O
L

PANNES ET REMEDES
40
Problème Cause possible Remède
Pas de courant, Piles
la lecture ne Les piles ne sont pas installées Installez correctement les
démarre pas correctement. piles.
Les piles sont déchargées. Changez les piles.
Les broches de contact sont Nettoyez-les avec un
sales. chiffon.
Bloc d’alimentation
Mal raccordé. Raccordez correctement le
bloc d’alimentation.
Utilisation en voiture
L’allume-cigares n’est pas sous Mettez l’allumage en
tension lorsque l’allumage est marche ou insérez des piles
éteint. dans l’appareil.
Affichage Le CD-RW (CD-R) n’est pas Utilisez FINALIZE sur votre
nF dISC correctement enregistré. enregistreur de CD pour
finaliser l’enregistrement.
Affichage Le CD est rayé ou sale. Remplacez ou nettoyez
no dISC le CD.
Le CD n’est pas correctement Insérez le CD face imprimée
mis en place. vers le haut.
La lentille est embuée. Attendez que l’humidité
s’évapore.
Affichage HoLd HOLD est activé. Désactivez HOLD.
et/ou pas de
Décharge électrostatique. Débranchez l’appareil de
réaction des touches
l’alimentation électrique ou
retirez les piles pendant
quelques secondes.
La lecture saute Le CD est endommagé ou sale.
Remplacez ou nettoyez le CD.
des morceaux
RESUME, SHUFFLE ou PROGRAM Désactivez RESUME, SHUFFLE
est actif. or PROGRAM.
AVERTISSEMENT
N’essayez en aucun cas de réparer l’appareil vous-même, ce qui
invaliderait la garantie.
Français

PANNES ET REMEDES
41
Problème Cause possible Remède
Pas de son, PAUSE est activé. Appuyez sur 2;.
ou son médiocre
Raccordements défaits, Vérifiez et nettoyez les
erronés ou sales. raccordements.
Le volume est mal réglé. Réglez le volume.
Ecouteur mis à l’envers. Tenez compte des indications
L (gauche) et R (droite).
Champs magnétiques puissants Déplacez le lecteur de CD
à proximité. ou modifiez les
raccordements.
Utilisation en voiture
La cassette adaptatrice est Insérez correctement la
mal insérée. cassette adaptatrice.
La température dans la voiture Laissez le lecteur de CD
est trop élevée ou trop basse. s’adapter à la température.
Le connecteur de Nettoyez le connecteur de
l’allume-cigares est sale. l’allume-cigares.
Mauvaise direction de lecture Modifiez la direction
de la fonction Autoreverse du Autoreverse.
lecteur de cassettes.
La recharge des Utilisation de piles incorrectes.
N'utilisez que des piles
piles dans l’appareil
rechargeables AY 3362
ne fonctionne pas ECO-PLUS au NiMH.
Les contacts sont sales. Nettoyez-les avec un chiffon.
Dans le cas d’une anomalie de fonctionnement, commencez par vérifier les points
ci-dessous avant de donner votre appareil à réparer. Si vous ne parvenez pas à
résoudre le problème en suivant ces instructions, veuillez consulter votre
fournisseur ou votre centre SAV.
Français

LECTEUR À DISQUE COMPACT PORTABLE
Échange gratuite pendant un an
Il faut porter ce produit à un centre de service pour l’échanger.
GARANTIE LIMITÉE
QUI EST COUVERT ?
Il faudra présenter une preuve d’achat pour pouvoir bénéficier des services de la
garantie. Le reçu, la facture ou un autre document portant la date d’achat qui prouve que
vous avez bien acheté le produit est considéré comme preuve d’achat. L’attacher à ce
manuel d’emploi et les garder tous les deux à portée de main.
QU’EST-CE QUI EST COUVERT ?
La couverture de la garantie entre en vigueur le jour où vous achetez le produit.Pendant
un an à compter de cette date, tout produit défectueux ou qui ne fonctionne pas sera
remplacé par un produit neuf, renouvelé ou un produit comparable sans frais aucun au
consommateur. Un produit de remplacement n’est couvert que pendant la période nonécoulée de garantie d’origine. Lorsque la garantie du produit d’origine vient à terme, la
garantie du produit de remplacement est terminée aussi.
QU’EST-CE QUI EST EXCLU DE LA GARANTIE ?
La garantie ne couvre pas:
• les frais de main d’œuvre pour installer ou préparer, pour régler les commandes et
pour installer ou réparer les systèmes d’antenne à l’extérieur du produit.
• la réparation du produit et/ou d’une pièce pour cause du mauvais emploi, d’accident,
de réparations non-agréées ou d’une autre raison qui ne peut pas être contrôlée par
Philips Consumer Electronics Company.
• des problèmes de réception dûs à des conditions de signal, au câble ou aux systèmes
d’antenne à l’extérieur de l’unité.
• un produit qui nécessite des modifications ou adaptations pour lui permettre de fonctionner dans un pays autre que le pays pour lequel il a été conçu, fabriqué, agréé et/ou
autorisé, ou la réparation des produits endommagés par de telles modifications.
• des dommages indirects ou conséquents qui résultent du produit. (Certains états ou
provinces ne permettent pas l’exclusion de dommages indirects ou conséquents. Il est
donc possible que l’exclusion ci-dessus ne s’applique pas au cas présent. Cela comprend, mais de façon non-limitative, des enregistrements, qu’ils soient protégés ou non
par les lois sur les droits d’auteur).
• un appareil acheté, utilisé ou réparé en dehors des États-Unis, de Porto Rico,des Îles
Vierges ou du Canada ou utilisé à des fins commerciales ou institutionnelles (y compris
mais non limités aux appareils utilisés pour la location).
OÙ L’ÉCHANGE EST-ELLE PROPOSÉE ?
Le produit pourra s’échanger dans tous les pays où le produit est distribué officiellement
par Philips Consumer Electronics Company. Dans des pays où Philips Consumer
Electronics Company ne distribue pas le produit,l’organisme local de service Philips tentera de fournir un produit de remplacement (mais il pourra y avoir des retards si le bon
produit n’est pas facilement disponible).
Philips Service Solutions Group, P.O.Box 2976,
Longview,Texas 75606 É.-U., (903) 242-4800
42

EL4967F004 / MAC 4108 / 1-97
AVANT DE DEMANDER UNE ÉCHANGE…
Veuillez consulter le manuel d’instructions avant de demander un produit d’échange. Un
petit réglage d’une des commandes expliqué dans le manuel d’instructions pourrait éviter
de faire un trajet.
POUR BÉNÉFICIER DE L’ÉCHANGE GARANTIE AUX É.-U.,
AU PUERTO RICO OU DANS LES ÎLES VIERGES AMÉRICAINES…
Contacter votre vendeur pour arranger l’échange. Ou bien, renvoyer le produit,frêt et
assurances payés, avec preuve d’achat incluse, à l’adresse ci-dessous :
Small Product Service Center
Philips Service Company
907 Snapps Ferry Road, Plant 2, Building 6
Greeneville,TN 37743 É.-U.
(Aux É.-U., au Puerto Rico et aux Îles Vierges,toute garantie implicite, y compris des garanties
de vendabilité et d’aptitude à un but spécifique, est limitée à la durée de cette garantie
explicite. Mais,étant donné que certains états et provinces ne permettent pas de limité la
durée d’une garantie implicite, cette limitation pourrait ne pas s’appliquer au cas présent.)
POUR BÉNÉFICIER D’UNE ÉCHANGE GARANTIE AU CANADA…
Veuillez contacter Philips á :
1-800-661-6162 (Francophone)
1-800-363-7278 (Anglophone)
(Au Canada, cette garantie est consentie à la place de toute autre garantie.Aucune autre
garantie n’est donnée, qu’elle soit explicite ou implicite,y compris une garantie implicite de
vendabilité ou d’aptitude à un but spécifique. Philips n’est pas, en aucun cas, responsable des
dommages, qu’ils soit directs ou indirects, spéciaux, secondaires ou conséquents,quels que
soient leurs origines, même en présence d’une notification de la possibilité de tels dommages.)
POUR UNE ÉCHANGE HORS GARANTIE…
Aux É.-U., au Puerto Rico ou aux Îles Vierges américaines, contacter Philips Service Company
au (800) 851-8885 pour savoir le prix d’une échange non couverte par la garantie. Puis
emballer le produit avec soins et le renvoyer au Small Product Service Center (adresse cidessus).Au Canada, téléphonez au numéro qui se trouve sous la rubrique « Pour bénéficier
d’une échange garantie au Canada » pour obtenir le prix d’un échange hors garanti.
RAPPEL IMPORTANT...
Veuillez inscrire ci-dessous les numéros de modèle et de série qui se trouvent sur le produit même. De plus,veuillez remplir et renvoyer sans délai la carte d’enregistrement de
garantie. Il nous sera ainsi plus facile de vous contacter en cas de besoin.
Nº DE MODÈLE ________________________________
Nº DE SÉRIE ________________________________
Cette garantie vous donne des droits légaux spécifiques et vous pourriez
avoir d’autres droits qui varient d’état en état et de province en province.
43

Envie hoy su Tarjeta de Registro de la Garantía
para recibir todas las ventajas correspondientes.
• Una vez que se registre la compra de
su aparato Philips, Ud. tiene derecho a
todas las ventajas correspondientes al
dueño de un producto Philips.
•
Sírvase llenar y devolver en seguida
la Tarjeta de Registro de la Garantía
empacada con su aparato. Saque
provecho de estas ventajas importantes.
Verificación
de la garantía
Registre su producto
dentro de 10 días para
confirmar su derecho a
máxima protección
bajo los términos y
condiciones de la garantía
de Philips.
Confirmación
del dueño
Su Tarjeta de Registro de
la Garantía comprueba
que Ud. es el dueño del
aparato en caso de robo
o pérdida del producto.
Registro
del modelo
La devolución inmediata de
su Tarjeta de Registro de la
Garantía le garantiza que
recibirá toda la información
y todas las promociones
especiales que le
corresponden por ser el
dueño de su modelo.
t
El símbolo del «rayo» indica que
algún material no aislado dentro de
su unidad podría resultar en una sacudida
eléctrica. Para la seguridad de todos, favor
de no remover la cubierta del producto.
s
El «signo de exclamación» le
llama la atención a
características sobre las que Ud. debe
leer la información adjunta
detenidamente para evitar problemas
de funcionamiento y mantenimiento.
ADVERTENCIA: PARA
EVITAR EL RIESGO DE SACUDIDA
ELECTRICA O INCENDIO, NO
EXPONGA ESTE EQUIPO A
LLUVIA NI A HUMEDAD.
PRECAUCION: Para evitar
sacudida eléctrica, introduzca la
patilla ancha del enchufe al fondo de
la ranura ancha.
Para uso del cliente:
Introduzca más abajo el Número de
Serie que está situado dentro del
compartimento de las pilas. Guarde esta
información para el futuro.
No. de modelo ____________________
No. de serie ______________________
Conozca estos
simbolos de
sseegguurriiddaadd
PRECAUCION
RIESGO DE SACUDIDA ELECTRICA
NO ABRIR
PRECAUCION: PARA REDUCIR EL RIESGO DE SACUDIDA ELECTRICA,NO RETIRE
LA CUBIERTA (NI EL PANEL POSTERIOR). ESTE APARATONO CONTIENE NINGUNA
PARTE QUE PUEDA SER REPARADA POREL USARIO. DE SER NECESARIO ALGUN
SERVICIO O REPARACIONDEL APARATO, LLEVELO UN TECNICO CALIFICADO.
MAC5097
44

45
INSTRUCCIONES IMPORTANTES DE SEGURIDAD
Léalas antes de poner en marcha el equipo
Este producto ha sido diseñado y fabricado
para cumplir normativas rigurosas en materia
de calidad y seguridad. No obstante, deberán
adoptarse ciertas precauciones en cuanto a su
instalación y manejo, que Ud. debe conocer.
1. Lea estas instrucciones - Antes de poner
en funcionamiento el equipo, deberá leer
todas las instrucciones relativas a su
manejo y seguridad.
2. Conserve estas instrucciones - Las
instrucciones relativas al manejo y a la
seguridad del equipo deberán conservarse
para su posterior utilización como material
de referencia.
3. Lea todos los avisos - Deberán respetarse
todos los avisos existentes tanto en las
instrucciones de manejo como en el propio
equipo.
4. Siga todas las instrucciones - Deberán
seguirse todas las instrucciones relativas al
funcionamiento y a la utilización del equipo.
5. No utilice este aparato cerca del agua
- Por ejemplo, cerca de bañeras, lavabos,
fregaderos, lavaderos, superficies mojadas,
zonas próximas a piscinas, etc.
6. Para limpiar el aparato utilice sólo un
trapo húmedo - Para limpiar el equipo
deberán seguirse estrictamente las
instrucciones del fabricante.
7.
Proceda a su instalación de acuerdo con
las instrucciones del fabricante. No tape
las aperturas de ventilación - Por ejemplo,
el equipo no deberá situarse sobre camas,
sofás, alfombras, etc. ni en espacios cerrados,
como estanterías, armarios, etc. si con ello se
impidiese la libre circulación de aire por las
aperturas de ventilación.
8. No instale el equipo cerca de fuentes de
calor - Como radiadores, calentadores,
estufas o cualquier otro aparato (incluyendo
los amplificadores) generador de calor.
9. Utilice exclusivamente aquellos
dispositivos/accesorios recomendados
por el fabricante.
10. Coloque el equipo
exclusivamente sobre
aquellos carros, bases, trípodes,
soportes o mesas especificados
por el comerciante o vendidos
con el equipo. Cuando utilice un
carro, tenga cuidado al
desplazar el conjunto
carro/equipo para evitar
posibles daños por vuelco.
11.
Confíe el mantenimiento y las
reparaciones a personal técnico
especializado. El equipo deberá repararse
siempre que haya resultado dañado de alguna
manera, como por ejemplo por daños en el
cable o en la clavija, por derrame de líquido
sobre el equipo, por objetos que hubieran
podido introducirse en su interior, por
exposición del equipo a la lluvia o a ambientes
húmedos, cuando el equipo no funcione con
normalidad o cuando hubiera sufrido algún
tipo de caída.
EL 4562-S004: 99/3
Español

46
CONTROLES
Español
6
7
8
9
0
D
B
B
P
R
O
G
P
M
O
D
E
5
4
E
S
P
3
!
@
2
T
U
O
V
O
L
E
N
I
L
/
1
%
$
#

47
1 p LINE OUT...Toma de auriculares de 3,5 mm
2 2; .................pone en marcha el equipo, inicia e interrumpe la reproducción de CD
3 ∞ ..................realiza un salto y busca atrás
4 § ..................realiza un salto y busca adelante
5 .......................pantalla
6 DBB................
DYNAMIC BASS BOOST:
mejora la respuesta de los sonidos graves,
DBB 1™DBB 2™DBB 3™desconectado
Pulse esta tecla durante más de 3 segundos para
desconectar/conectar la realimentación acústica.
7 PROG P ..........programa canciones y revisa el programa
8 MODE ............selecciona las diferentes posibilidades de reproducción: SHUFFLE,
SHUFFLE REPEAT ALL, REPEAT, REPEAT ALL y SCAN
9 9....................detiene la reproducción de CD, borra un programa, activa la carga y
apaga el equipo
0 .......................abrir aquí la tapa del CD
! RESUME ........almacena la última posición que se ha reproducido
HOLD ............bloquea todos los botones
OFF.................desconecta RESUME y HOLD
@ VOL E .......ajusta el volumen
# .......................placa de características
$ 4.5V DC..........conector para fuente de alimentación externa
% ESP / PSM .....ELECTRONIC SKIP PROTECTION es la memoria búfer para sonido
ininterrumpido. POWER SAVE MODE sirve para obtener un tiempo
de reproducción máximo de las pilas. ESP™PSM™desconectado
CONTROLES
ATENCIÓN
El uso de mandos o ajustes o la ejecucción de métodos que no sean los
aquí descritos puede ocasionar peligro de exposición a radiación.
El aparato cumple las normas FCC, Parte 15 y 21 CFR 1040.10. Funcionamiento
dependiente de dos condiciones siguientes:
1. Este aparato no puede provocar interferencia dañina, y
2. Este aparato debe aceptar cualquier interferencia recibida, incluyendo las
interferencias que pueden provocar un funcionamiento insuficiente.
Español

SUMINISTRO ELÉCTRICO
48
Con este equipo podrá usted utilizar:
• Pilas alcalinas (tipo LR6, UM3 o AA), o
• Pilas recargables ECO-PLUS de NiMH modelo AY 3362. Compre siempre estas
pilas especiales, las únicas que se pueden recargar con este equipo.
Introducción de las pilas
1 Desabrochar la hebilla.
2 Abrir la tapa del CD.
3 Abra el compartimento de pilas e inserte 2, bien
alcalinas o recargables ECO-PLUS de NiMH
modelo AY 3362.
Notas: – No deberán utilizarse mezcladas pilas
nuevas con pilas descargadas, ni pilas de
diferentes tipos.
– Retirar las pilas si están descargadas o si el
equipo no va a ser utilizado durante un largo
periodo de tiempo.
Al deshacerse de las pilas, hágalo con
precaución, ya que éstas contienen sustancias
químicas peligrosas.
Indicación del estado de las pilas
•
Pilas cargadas: ninguna indicación.
• Pilas desgastadas: a parpadea. Este símbolo no se
muestra cuando se utilizan las pilas recargables.
• Pilas vacías: A parpadea y aparece bAtt. Cambie
las pilas o conecte el adaptador a la red eléctrica.
Tiempo medio de reproducción con pilas en condiciones normales
Tipo de pila ESP desactivado ESP activado PSM
Normal 5 hours 4 hours 6 hours
Alcalina 14 hours 12 hours 18 hours
NiMH 10 hours 8 hours 12 hours
Pilas (suministradas o disponibles de forma opcional)
Español
DBB
P
R
O
G
P
M
O
D
E
O
F
F
R
E
S
U
M
E
H
O
L
D
ESP
/ LINE OUT
V
O
L

SUMINISTRO ELÉCTRICO
49
Utilizar exclusivamente el adaptador de red
AY 3170 (4,5 V/300 mA corriente continua, polo
positivo en la clavija central). Cualquier otro
producto puede ocasionar daños en el equipo.
1 Asegurarse de que la tensión de red local se
corresponde con la tensión del adaptador.
2 Conectar el adaptador de red a la toma de
4.5V DC del reproductor y a la toma de alimentación eléctrica de la pared.
Notas: – Mantener siempre el adaptador desconectado cuando no se esté utilizando.
– Sin realimentación acústica cuando se utiliza el adaptador.
1 Compruebe que las pilas instaladas son ECO-PLUS NiMH AY 3362.
2 Conectar el adaptador de red a la toma de 4.5V DC del reproductor y a la toma de
alimentación eléctrica de la pared.
3 Si es necesario pulsar 9 una o dos veces hasta que
el equipo se desconecte.
y Aparece a y se visualiza CHArGE.
• El tiempo de carga es de 5 horas, aproximadamente.
4 Cuando las pilas están totalmente recargadas,
aparecerán a y FULL.
Nota: Es normal que las pilas se calienten durante el
proceso de recarga.
Recarga de las pilas ECO-PLUS NiMH AY 3362 del equipo
Adaptador de red (suministrado o disponible de forma opcional)
Español

SUMINISTRO ELÉCTRICO / AURICULARES
50
• La recarga de pilas ya cargadas o a media carga reducirá su tiempo de vida útil.
Por tanto, después de utilizar las pilas ECO-PLUS NiMH unas cuantas veces, es
conveniente recargarlas completamente antes de volver a cargarlas.
• Para evitar cortocircuitos, las pilas no deben entrar en contacto con ningún
objeto metálico.
• Si observa que las pilas se descargan rápidamente una vez recargadas, significa
que se ha alcanzado el final de su tiempo de vida útil.
Conexión de los auriculares
• Conectar los auriculares suministrados a la
conexión p LINE OUT.
Nota: La conexión p LINE OUT también puede utilizarse
para conectar su sistema de Alta Fidelidad
(conexión de señal) o la radio de su automóvil
(adaptador de cinta o conexión de señal). En
ambos casos, el volumen del reproductor de CD
debe colocarse en la posición 8.
E
S
P
/
L
I
N
E
O
U
T
V
O
L
F
R
E
S
U
M
E
H
O
L
D
Auriculares
Información sobre las pilas ECO-PLUS NiMH
Español
Use la cabeza cuando utilice los auriculares
Advertencia de seguridad: No emplee los auriculares a gran volumen. Los
especialistas de oídos advierten que el uso continuado a gran volumen puede dañar
el oído de manera permanente.
Seguridad en la carretera. No utilice los auriculares mientras conduzca un vehículo,
ya que podría provocar un accidente y es ilegal en muchos países. Aunque sus
auriculares sean para utilizar al aire libre y diseñados para permitirle oír los sonidos del
exterior, no ponga el volumen tan alto que no pueda oír lo que pasa a su alrededor.

INFORMACIÓN GENERAL
51
• No tocar la lente A del reproductor de CD.
•
No exponer el equipo, pilas o CDs a la humedad, lluvia,
polvo o excesivo calor (ya sea causado por el calentamiento
del propio equipo como por la exposición directa al sol).
•
Se puede limpiar el reproductor de CD con un paño suave
ligeramente húmedo y que no forme hilos. No utilizar
agentes limpiadores ya que pueden tener efectos corrosivos.
• Para limpiar el CD, frotarlo siguiendo líneas rectas desde el centro al exterior
utilizando un paño suave, libre de hilos. ¡Cualquier agente limpiador puede dañar el
disco! No escriba nunca sobre un CD ni pegue al mismo ningún tipo de etiqueta.
•
La lente puede quedar turbia cuando el equipo se traslade de forma rápida de un ambiente
frío a un ambiente templado. La reproducción de un CD no será posible entonces. Dejar el
reproductor CD en un ambiente templado hasta que la humedad se evapore.
• La utilización de teléfonos móviles en las proximidades del reproductor de CD
puede ser causa de mal funcionamiento.
• Evitar las caídas del equipo, ya que pueden dañar al mismo.
• No sujete nunca el reproductor por la hebilla ya que puede dañar el equipo.
•
Este equipo es resistente a las salpicaduras. No está pensado para utilizarlo bajo el agua.
• Asegúrese de que no entra arena, polvo o agua en el reproductor. Elimínelos antes de
abrir la hebilla o de cerrar la tapa. Manipule siempre el equipo con las manos secas.
• Evite que se humedezcan los auriculares que se suministran. Si ocurriera, séquelos
con un paño suave.
• Cuando no esté utilizando la toma de 4.5V DC y la toma p LINE OUT de los
auriculares, tápelas siempre con las tapas de goma que se adjuntan.
• Para evitar el riesgo de golpes, no utilice el reproductor cerca del agua durante el
funcionamiento con CA.
Resistencia a las salpicaduras
Manejo del Reproductor de CD y de los discos CD
Español
A

REPRODUCCIÓN DE CD
52
1 Desabrochar la hebilla.
2 Abrir la tapa del CD.
3 Introducir un disco CD de audio, colocando la cara
impresa hacia arriba, empujando suavemente sobre
el centro del disco de forma que se introduzca en el
eje central. Cerrar la tapa empujándola hacia abajo
por el lado izquierdo.
4 Pulse 2; para conectar el equipo y empezar la
reproducción.
y Se visualiza el número de pista y el tiempo de
reproducción transcurrido de la pista en
reproducción.
• Puede interrumpirse la reproducción pulsando 2;.
y El instante de tiempo transcurrido hasta el
momento de la interrupción permanece
parpadeando en pantalla.
• Continuar la reproducción pulsando de nuevo 2;.
5 Pulsar 9 para detener la reproducción.
y Se visualizan entonces el número total de pistas
y el tiempo total de reproducción del CD.
6 Pulsar 9 de nuevo para apagar el equipo.
7 Para extraer el CD, mantenerlo cogido por los bordes,
y presionar suavemente el eje central al tiempo que
se levanta el CD.
Notas: – La reproducción se detendrá si abre la tapa
del reproductor CD.
– Si no hay actividad durante 10 segundos,
el equipo se desconectará automáticamente.
Reproducción de un CD
Español
M
O
D
E
ESP
0

REPRODUCCIÓN DE CD
53
• Ajustar el volumen utilizando VOL E.
Se puede activar un incremento de los bajos para
disfrutar de un sonido más potente y elegir entre tres
niveles diferentes de potencia de bajos.
1 Pulse DBB hasta visualizar el nivel de bajos deseado.
y Aparece ∂❶, ∂❶❷ o ∂❶❷❸.
2 Para desactivar el aumento de los bajos, pulse DBB
hasta que desaparezca la indicación.
Ajuste de volumen y sonido
Español
Este reproductor de CD puede reproducir toda clase de discos de audio;
como los CDs Grabables y CDs reescribibles. No intentar reproducir
ningún CD-ROM, CD-I, CDV o CD de ordenador. Si se reproduce un
CD-Reescribible, el inicio de la reproducción de sonido tardará
5–25 segundos tras haber pulsado 2;.
Nota: El mensaje nF dISC indica que este CD debe finalizarse
(FINALISE) con un grabador de CD antes de que pueda
reproducirse en este reproductor de CD.
O
F
F
P
R
E
S
PROG
DBB
U
M
E
H
O
L
D
V
O
L
D
B
B
23
1

CARACTERÍSTICAS
54
Selección de una pista durante la reproducción
• Pulsar brevemente ∞ o § una o varias veces para
saltar al inicio de la pista actual, anterior o siguientes.
y La reproducción continúa con la pista
seleccionada, visualizándose su número
en pantalla.
Selección de una pista cuando se ha detenido
la reproducción
1 Pulsar brevemente ∞ or § una o varias veces.
y Se visualiza el número de pista seleccionada.
2 Pulsar 2; para iniciar la reproducción del CD.
y La reproducción se inicia con la pista seleccionada.
Búsqueda de un pasaje durante la reproducción
1 Mantener ∞ o § pulsado para encontrar respectivamente un pasaje particular en
dirección de búsqueda hacia adelante o hacia atrás.
y La búsqueda se inicia y la reproducción continúa a un volumen bajo. Después
de 2 segundos la búsqueda se acelera.
2 Soltar el botón cuando se haya alcanzado el pasaje deseado.
y La reproducción normal continúa a partir de ese punto.
Nota: La búsqueda no es posible durante SCAN.
Selección y búsqueda de pista
Español

CARACTERÍSTICAS
55
Se pueden seleccionar hasta 99 pistas y almacenarlas
en la memoria en la secuencia deseada. Se puede
almacenar cualquier pista más de una vez.
1 Mientras la reproducción se encuentra detenida,
seleccionar una pista con ∞ o §.
2 Pulsar PROG P para almacenar la pista.
y Se ilumina PROGRAM, y se visualizan el número
de pista programado junto con P y el número
total de pistas almacenadas.
3 Seleccionar y almacenar de esta misma manera todas
las pistas deseadas.
4 Pulsar 2; para iniciar la reproducción de las
pistas seleccionadas.
y Se muestra PROGRAM y se inicia la reproducción.
• Se puede revisar el programa presioinando PROG P
durante más de 2 segundos.
y La pantalla muestra todas las pistas almacenadas en secuencia.
Nota:
Si se pulsa PROG P cuando no hay ninguna pista seleccionada, se visualiza SELECt.
Borrado del programa
1 Si fuera necesario, pulsar 9 para detener la reproducción.
2 Pulsar 9 para borrar el programa.
y Se visualiza una vez CLEAr, la indicación
PROGRAM se apaga, y el programa queda borrado.
Notas: El programa también se borrará si
– interrumpe el suministro eléctrico, o
– abre la tapa del CD.
Programación de los números de pista
Español
D
B
B
P
R
O
G
P
M
O
D
E
PROGRAM
PROGRAM
PROGRAM

CARACTERÍSTICAS
56
Puede usted almacenar la última posición reproducida.
Cuando reanude la reproducción, ésta continúa desde el
mismo punto en el que se paró.
1 Colocar el deslizador en la posición de RESUME durante
la reproducción, para activar la función RESUME.
y Se muestra RESUME.
2
Pulsar 9 siempre que se desee detener la reproducción.
3 Pulsar 2; siempre que se quiera reanudar la
reproducción.
y Se muestra en pantalla la indicación RESUME y la
reproducción continúa desde el punto en que se
detuvo.
• Para desactivar RESUME, colocar el deslizador en la posición OFF.
y La indicación RESUME se apaga.
Nota: Si abre la tapa del CD, el último tema reproducido ya no se conservará guardado.
Con esta función se pueden bloquear los botones del
equipo. Cuando se pulse entonces un botón, no se
ejecutará acción alguna.
1 Colocar el deslizador en la posición HOLD para
activar la función HOLD.
y
Todos los botones quedan bloqueados.Se visualiza
HoLd al pulsar cualquier tecla. Si se desconecta el
equipo, sólo se visualiza Hold pulsando 2;
.
2
Para desactivar HOLD, pasar el deslizador a la posición OFF.
Nota: Cuando se desactive HOLD, colocando el
deslizador en la posición RESUME, y se vuelva a
iniciar la reproducción, ésta continúa desde el
punto en que se detuvo.
Bloqueo de todos los botones – HOLD
Almacenamiento de la última posición reproducida – RESUME
Español
OFF
R
E
S
U
M
E
O
F
F
RESUME
H
H
O
L
D
V
O
L
RESUME
O
LD
V
O
L

CARACTERÍSTICAS
57
Pulse la tecla ESP varias veces para cambiar a
ESP™PSM™desconectado.
yy
Se ilumina el símbolo de ESP/PSM en el visualizador.
yy
La memoria ESP guarda constantemente por adelantado
los datos del CD a reproducir. Es para evitar que el
sonido salte durante la reproducción a causa de golpes y
vibraciones.
yy
Los golpes y vibraciones prolongadas pueden vaciar completamente la memoria
ESP y la reproducción del CD se interrumpirá.
Nota: Cuando se conecta y desconecta el dispositivo ESP y PSM, la reproducción del
CD se demorará o interrumpirá durante un corto periodo de tiempo.
El equipo incorpora una característica que acompaña los
accionamientos de diferentes botones con una señal acústica.
• Mantener DBB pulsado durante más de 3 segundos.
Si la señal acústica ha sido desactivada:
y Se visualiza bEEP y la señal acústica queda
activada.
Si la señal acústica se encontraba activada:
y Se visualiza la indicación no bEEP y la señal
acústica queda desactivada.
Realimentación acústica
ESP / PSM
Español
E
S
P

CARACTERÍSTICAS
58
Es posible reproducir pistas en orden aleatorio, repetir una pista o el CD y reproducir
los primeros segundos de las pistas.
1 Pulsar MODE durante la reproducción tan a menudo
como sea necesario hasta que la pantalla muestre
alguna de las indicaciones siguientes:
y SHUFFLE: Todas las canciones del CD se reproducen
en orden aleatorio hasta que todas ellas se hayan
reproducido una vez.
y SHUFFLE REPEAT ALL: Todas las canciones del CD
se reproducen repetidamente en orden aleatorio.
y REPEAT: Se reproduce la canción actual repetidamente.
y REPEAT ALL: Se reproduce repetidamente el CD
en su totalidad.
y SCAN:
Se reproducen en secuencia los primeros
10 segundos de cada una de las canciones restantes.
2 La reproducción se inicia en el modo elegido después
de 2 segundos.
3 Para volver a la reproducción normal, pulsar MODE hasta que la indicación de
pantalla desaparezca.
OG
Selección de diferentes posibilidades de reproducción – MODE
Información medioambiental
Se ha suprimido todo el material de embalaje innecesario. Hemos hecho todo lo posible por
que el embalaje pueda separarse en tres materiales independientes: cartón (caja),
poliestireno expandible (amortiguación) y polietileno (bolsas, plancha de espuma protectora).
Los materiales que componen el equipo son reciclables y reutilizables si son desmontados
por una empresa especializada. Por favor, siga las normas y regulaciones locales a la hora
de tirar los materiales de embalaje, pilas agotadas o su antiguo equipo a la basura.
Español
P
M
O
DE
SHUFFLE
REPEAT ALL

CONEXIÓN PARA EL AUTOMÓVIL
59
Utilizar exclusivamente el convertidor de tensión para batería AY 3545
(4,5 V/600 mA corriente continua,
polo positivo en la clavija central), y
el adaptador de cinta para automóvil
AY 3501. Cualquier otro producto
puede ocasionar daños en el equipo.
1 Colocar el reproductor de CD
sobre una superficie
horizontal, libre de vibraciones
y estable. Asegurarse de que
se trata de un lugar seguro, en el que el reproductor no representa peligro u obstáculo
alguno para el conductor y los acompañantes.
2
Conectar la clavija DC del convertidor de tensión a la toma 4.5V DC del reproductor de CD
(únicamente para baterías de automóvil de 12 V, con negativo puesto a tierra).
3
Introducir el convertidor de tensión en la toma del encendedor de cigarrillos. Si fuera necesario,
limpiar la toma del encendedor de cigarrillos para obtener un buen contacto eléctrico.
4
Baje el volumen y desconecte la función autoreverse del radiocasete de su automóvil.
5 Conecte el adaptador del casete en la toma p LINE OUT del reproductor de CD.
6Introducir cuidadosamente el adaptador de cinta en el compartimento del
radiocasete del vehículo.
7 Asegurarse de que el cable no es un impedimento para la conducción.
8 Iniciar la reproducción del CD, colocar VOL E en la posición 8 y ajustar el sonido
con los controles de la radio del vehículo.
• Retirar el convertidor de tensión de la toma del encendedor de cigarrillos siempre
que el reproductor de CD no se esté utilizando.
Notas: – Evitar el calor excesivo de la calefacción del vehículo o de la luz solar
directa (por ejemplo en el caso de los coches aparcados en verano).
–
Si su vehículo posee una clavija de LINE IN, es mejor utilizar ésta para la conexión
de la radio del coche en lugar del adaptador de cinta. Conectar el cable de señal a
esta clavija de LINE IN y la clavija de
p LINE OUT
del reproductor de CD.
Utilización en el vehículo (conexiones suministradas o disponibles
de forma opcional)
Español
DIGIT
DIGIT
AL
AL
DIGIT
AL
4,5 V DC
D
B
B
P
R
O
G
P
M
O
D
E
E
S
P
OFF
T
U
O
R
E
E
N
I
S
L
/
U
M
E
H
O
L
D
V
O
L

LOCALIZACIÓN DE AVERÍAS
60
Problema Causa posible Solución
No se activa, no se Pilas
inicia la Pilas introducidas Introducir las pilas
reproducción incorrectamente correctamente
Pilas descargadas Cambiar las pilas
Clavijas de contacto sucias Limpiarlas con un paño
Adaptador de red
Conexión suelta Conectar el adaptador de
forma segura
Utilización en el vehículo
El encendedor de cigarrillos no Conectar el encendido o
se encuentra alimentado cuando introducir pilas
el encendido está desconectado
Indicación CD-RW (CD-R) no ha quedado Utilizar FINALIZE en el
nF dISC grabado adecuadamente reproductor de CD para
completar la grabación
Indicación El CD se encuentra rayado Sustituir o limpiar el CD
no dISC o sucio
No se ha introducido CD, o el Introducir el CD con la cara
CD se ha introducido al revés impresa hacia arriba
La lente láser está turbia Esperar hasta que haya
desaparecido el vapor
condensado de la lente
Indicación HoLd HOLD se encuentra activado Desactivar HOLD
y/o sin reacción
Descarga electrostática Desconectar el equipo del
a los controles
suministro eléctrico o
retirar las pilas durante
unos segundos
El CD salta pistas El CD está dañado o sucio Sustituir o limpiar el CD
RESUME, SHUFFLE o PROGRAM Desconectar RESUME,
están activos SHUFFLE o PROGRAM
ADVERTENCIA
Bajo ninguna circunstancia deberá intentar el usuario reparar por sí
mismo el equipo, ya que esto invalidará la garantía.
Español

LOCALIZACIÓN DE AVERÍAS
61
Problema Causa posible Solución
Sin sonido o calidad PAUSE se encuentra activado Pulsar 2;
de sonido deficiente
Conexiones sueltas, Comprobar y limpiar las
erróneas o sucias conexiones
El volumen no se ha ajustado Ajustar el volumen
Se han colocado los auriculares Prestar atención a las
intercambiados entre sí indicaciones L (izquierdo) y
R (derecho)
Fuertes campos magnéticos en Cambiar la posición o
las proximidades del reproductor conexiones del reproductor
de CD
Utilización en el vehículo
El adaptador de cinta está Introducir el adaptador de
introducido incorrectamente cinta correctamente
La temperatura en el interior del Permitir que el reproductor
vehículo es demasiado alta/baja de CD se ajuste a la
temperatura
El encendedor de Limpiar el encendedor de
cigarrillos/clavija están sucios cigarrillos/clavija
Dirección de reproducción Cambiar la dirección
incorrecta de la característica autoreverse
autoreverse en el reproductor
de cinta del vehículo
La recarga de Utilización de baterías Utilice sólo pilas recargables
baterías no funciona inadecuadas ECO-PLUS de NiMH
modelo AY 3362
Contactos sucios Limpiarlos con un paño
Si se produce un fallo, comprobar en primer lugar los puntos listados a continuación
antes de llevar el equipo a reparar. Si no es Usted capaz de resolver un problema
mediante el seguimiento de estas ayudas, consulte a su comercio distribuidor o
centro de servicio.
Español

TOCADISCOS DE CD PORTATIL
Cambio gratis por un año
Se necesita presentarse en persona con este producto para cambiarlo.
GARANTIA LIMITADA
¿QUIEN TIENE PROTECCION?
Usted debe tener su comprobante de venta para cambiar el producto. Una nota de venta
u otro documento mostrando que usted compró el producto se considera un comprobante de venta.Adjúntelo a este manual de instrucciones y reténgalo a la mano.
¿QUE CUBRE?
La protección bajo la garantía comienza el mismo día en que usted compra el producto.
Durante un año a partir de esta fecha, se reemplazará un producto inoperante o defectuoso
con otro nuevo, renovado o comparable sin cargo alguno.Un producto de reemplazo tiene
cobertura sólo durante el período de la garantía original. Una vez que venza la garantía original del producto, también habrá vencido la garantía del producto de reemplazo.
¿QUE EXCLUYE LA GARANTIA?
Su garantía no cubre:
• cobros por mano de obra durante la instalación o montaje del producto,ajuste de los
controles del cliente o de preferencia e instalación o reparación de los sistemas con
antena fuera de la unidad.
•
reparación del producto y/o reemplazo de piezas,a raíz de uso indebido, accidente, reparación
no autorizada u otra causa no bajo el control de Philips Consumer Electronics Company.
• problemas de recepción ocasionados por condiciones de señales o sistemas de cable o
de antena fuera de la unidad.
• un producto que requiera modificación o adaptación para que opere en un país que no
sea el país para el que fue concebido, fabricado, aprobado y/o autorizado, o la
reparación de productos dañados por tales modificaciones.
• daños incidentales o consecuentes que resulten del producto.(Algunos estados no
permiten la exclusión por daños incidentales o consecuentes, de modo que es posible
que la exclusión arriba indicada no le sea aplicable a usted. Esto incluye, sin limitarse,
materiales pregrabados con o sin amparo de derechos de autor.)
•
Una unidad que se ha comprado, usado o reparado fuera de los EE.UU., Puerto Rico,las
Islas Virgenes y el Canadá, o que se ha usado para fines comerciales o institucionales (inclusive productos usados con fines de arrendamiento, pero sin limitarse a éstos).
¿DONDE SE EFECTUA EL CAMBIO?
Usted puede cambiar el producto en todos los países con distribución oficial del producto por
Philips Consumer Electronics Company. En países donde Philips Consumer Electronics Company
no distribuye el producto,la entidad local de servicio Philips tratará de darle un producto de
reemplazo (aunque puede haber demora si el producto apropiado no está fácilmente disponible).
ANTES DE PEDIR UN CAMBIO…
Favor de consultar el manual de instrucciones antes de pedir un cambio.Algunos ajustes
de los controles según las indicaciones en el manual podrían ahorrarle un viaje.
Philips Service Solutions Group, P.O.Box 2976,
Longview,Texas 75606 USA, (903) 242-4800
62

EL4967S004 / MAC 4108 / 1-97
PARA CAMBIAR UN PRODUCTO EN LOS EE.UU.,
PUERTO RICO O LAS ISLAS VIRGENES…
Comuníquese con su distribuidor para concertar el cambio.También,usted puede enviar
el producto con el seguro y transporte o franqueo prepagados, adjuntando el comprobante de venta y enviándolo a la dirección a continuación:
Small Product Service Center
Philips Service Company
907 Snapps Ferry Road, Plant 2, Building 6
Greeneville,TN 37743 USA
(En los EE.UU., Puerto Rico o las Islas Vírgenes, toda garantía implícita, inclusive las garantías implícitas de comerciabilidad y aptitud para un propósito en particular, están limitadas
en cuanto a duración al plazo de esta garantía expresa. Puesto que algunos estados no
permiten limitaciones sobre la duración de una garantía implícita, es posible que la limitación arriba indicada no le sea aplicable a usted.)
PARA CAMBIAR UN PRODUCTO EN EL CANADA…
Favor de comunicarse con Philips al:
1-800-661-6162 (francófono)
1-800-363-7278 (anglófono)
(En el Canadá, esta garantía es otorgada en lugar de toda otra garantía. No se otorga
ninguna otra garantía expresa ni implícita, comprendiéndose aquí ninguna garantía implícita de comerciabilidad o aptitud para propósito alguno.Philips no será responsable bajo
circunstancia alguna por daños y perjuicios directos, indirectos, especiales, incidentales o
consecuentes, independientemente de la manera ocasionada, aún con notificación de la
posibilidad de los mismos.)
PARA CAMBIAR UN PRODUCTO DESPUES DE VENCER LA GARANTIA…
En los EE.UU., Puerto Rico o las Islas Vírgenes, comuníquese con Philips Service
Company, llamando al (800) 851-8885 para obtener el costo de cambio de un producto
después de vencer la garantía. Luego empaque el producto con cuidado y envíelo al Small
Product Service Center, a la dirección arriba. En el Canadá, llame al téléfono encontrado
arriba en la sección ”Para cambiar un producto en el Canada” para obtener el costo para
cambiar un producto no amparado por garantía.
RECUERDE…
Favor de anotar los números de modelo y serie del producto en el espacio abajo.
También, sírvase llenar y enviar oportunamente su tarjeta de registro de la garantía.Así
nos será más fácil notificarle en caso de ser necesario.
Modelo No. ____________________________________
Serie No. ____________________________________
Esta garantía le otorga derechos legales específicos y usted podría
gozar de otros derechos que varían de un estado a otro.
63

3140 115 2738.1 Printed in Hong Kong IB8179T001–VieAAb9947
Español
W
PHILIPS CONSUMER ELECTRONICS COMPANY
A Division of Philips Electronics North America Corporation
Knoxville, Tennessee 37914-1810, U.S.A.
CLASS 1
LASER PRODUCT
English Français
 Loading...