

Philips ACC8160 User Manual
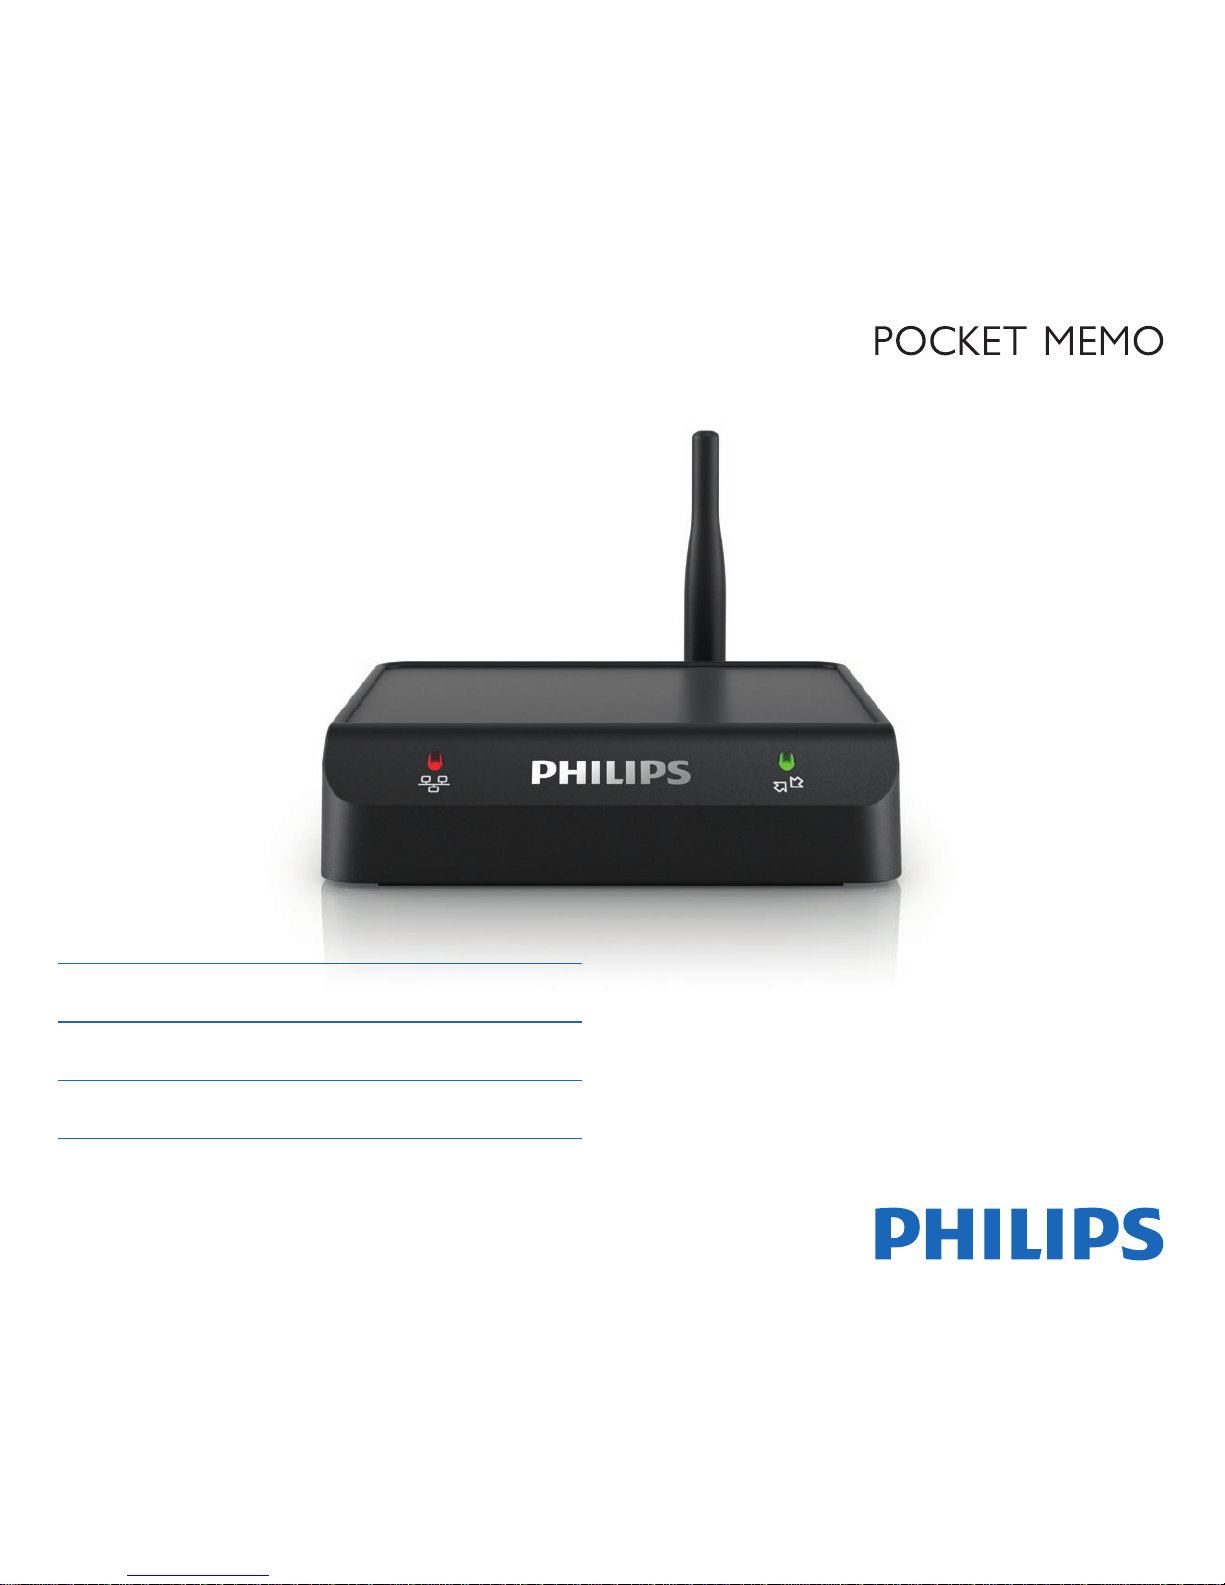
ACC8160
English 3
Deutsch 31
Français 61
Register your product and get support at
www.philips.com/dictation


3
EN
5 Service 19
Display configuration settings 19
Resetting to factory defaults 19
Upgrading the firmware 20
6 Administration tool 22
Installation 22
First-time configuration 22
If the directory is mapped to a shared
network folder 23
If the directory is not mapped to a shared
network folder 23
Overview of the WLAN adapters 23
Using the Initial Setup Installer to install a WLAN
adapter 24
Changing the settings of multiple WLAN adapters 25
Changing the settings of a single WLAN adapter 25
Upgrading the firmware 26
Troubleshooting 27
7 Technical data 30
Table of contents
1 Important 5
Safety instructions 5
Recycling 5
About this user manual 5
Symbols used 5
2 Your WLAN adapter 6
Product highlights 6
What's in the box 6
What else you’ll need 6
Overview 7
3 Get started 8
Connect the WLAN adapter 8
Installation 9
Installation using DHCP 9
Installation using the factory default IP address 10
4 Configuration 12
Access the configuration interface 12
Wireless and encryption settings 12
Setting up the FTP server 13
Setting up the file upload directory on your
FTP server 13
Files stored in the file upload directory 13
Setting up the file upload user account on
your FTP server 13
FTP settings 14
Automatic file upload 14
Changing the IP address 15
Assigning an IP address from DHCP 15
Assigning a static IP address 15
Changing the administrator password 16
Assigning a comment 17
Upgrade the firmware of connected Pocket Memo
dictation recorders 17
English

4 EN
5
EN
1 Important
Do not make any adjustments and modifications that are not
described in this manual. Follow all safety instructions to ensure
proper operation of the device. The manufacturer assumes no
liability for damages resulting from non-compliance with the
safety instructions.
Safety instructions
• Protect the device from rain or water to prevent a short
circuit.
• Do not expose the device to excessive heat caused by placing
it on a heating device or in direct sunlight.
• Protect the cables from damage by being trapped, particularly
at the plugs and where cables exit the housing.
• Back up your data and recordings. The manufacturer’s warranty does not cover loss of data resulting from user actions.
• Do not perform any maintenance operations that are not
described in this user manual. Do not disassemble the device
into its component parts to carry out repairs. The device may
only be repaired in authorized service centers.
Recycling
When the crossed-out wheeled bin symbol is attached
to a product it means that the product is covered by the
European Directive 2002/96/EC. Please inform yourself
about the local separate collection system for electrical and electronic products. Please act according to your local
rules and do not dispose of your old products with your normal
household waste. Correct disposal of your old product helps to
prevent potential negative consequences for the environment
and human health.
About this user manual
You can find a quick overview of your device in the following
pages. For detailed description, see the following chapters of this
user manual. Read this user manual carefully.
Symbols used
Tip
• This symbol identifies information that helps you to use
your device more eciently and simply.
Note
• This symbol indicates notices which you must observe
when handling or operating the device.
Caution
• This symbol warns of damage to the device and possible
data loss. Damage can be caused by improper handling.
Warning
• This symbol warns of danger to persons. Bodily injury or
damage could be caused by improper handling.
English
6 EN
2 Your WLAN adapter
We are delighted that you have chosen a Philips device.
Visit our website for comprehensive support such as user
manuals, software downloads, warranty information and more:
www . philips . com / dictaton.
Product highlights
• Direct file upload from the recorder to the network for faster
turnaround time
• Seamless and simple use with no user configuration or training
required
• Easy implementation without investment in additional hardware
• Wireless security features and FTPS support for secure file
transfer
• Password protection for safeguarding configuration access
• Kensington security slot for theft protection
• Automatic firmware updates for dictation recorders for efficient device management
• Web browser interface for easy and quick setup and configuration
• Optional administration software for remote management of
multiple WLAN adapters
What's in the box
Quick start guide
WLAN adapter Antenna Power adapter
Plug adapters 2 × USB cable
LAN cable
What else you’ll need
Pocket Memo docking
station ACC8120 or
LFH9120
Pocket Memo dictation
recorder DPM8000 series or
LFH9600 series
7
EN
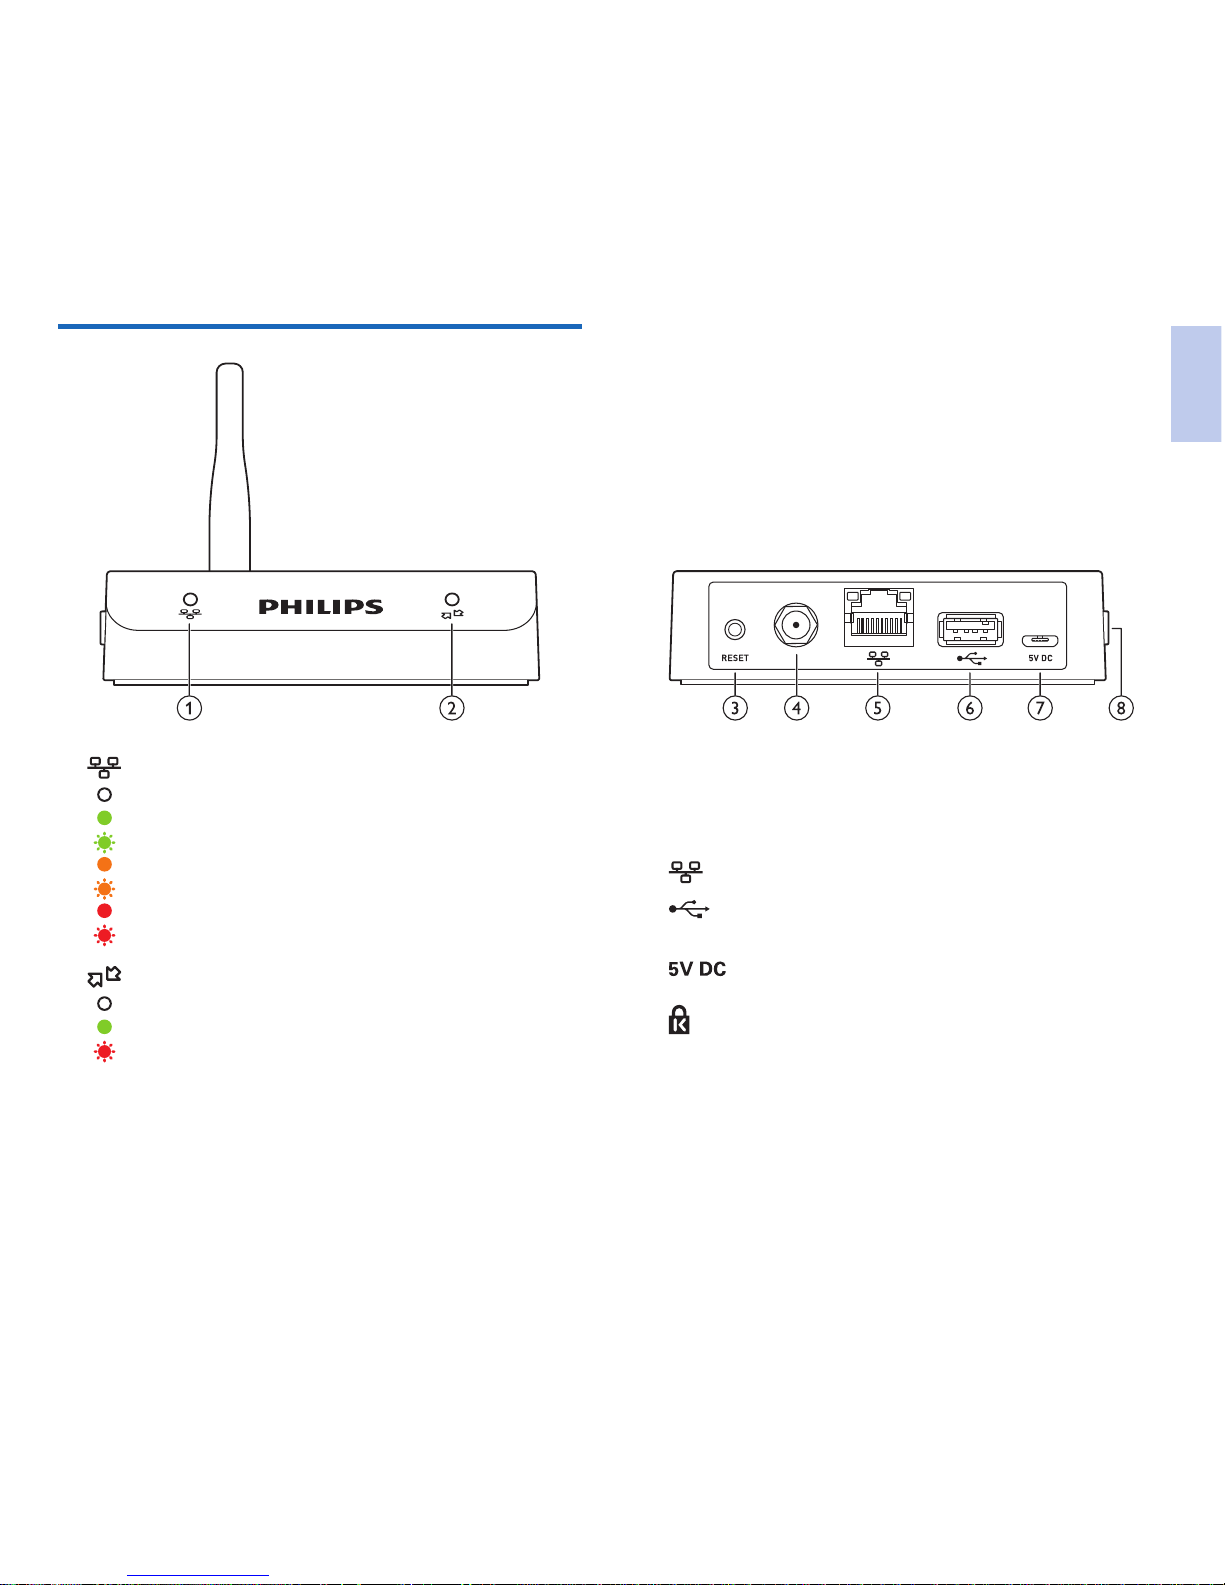
Overview
a LAN status LED
No power
Connection OK
File transfer
Booting / IP search
No access rights
No connection
Error
b Recorder status LED
No device connected
Device connected
Unsupported device
c Reset button
• Reboot the device. Does NOT reset the router to the
factory default settings.
d Antenna connector
e
LAN socket
f
USB port
• Connect the Pocket Memo docking station
g
Power adapter port
• Connect the supplied power adapter
h
Kensington security slot
• For theft protection
English
8 EN
3 Get started
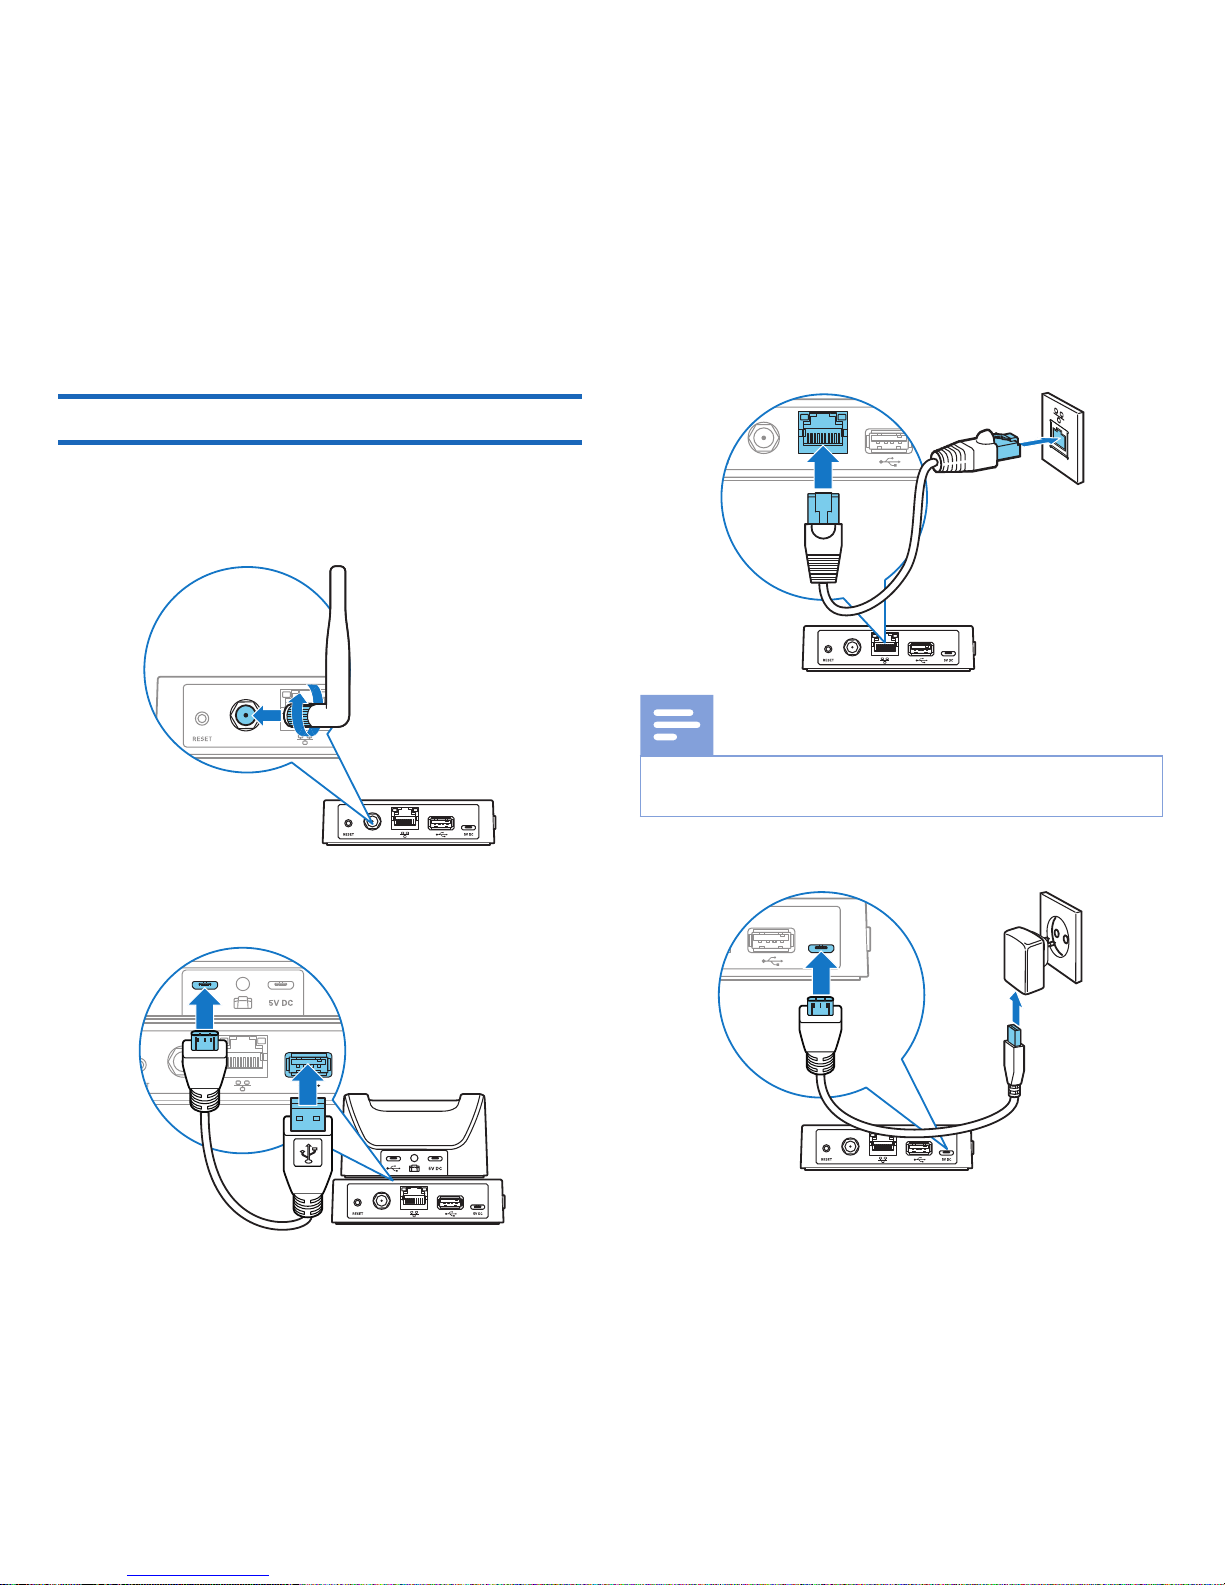
Connect the WLAN adapter
1
Remove the antenna caps and attach the supplied antenna.
Avoid touching the conductive parts of the antenna connector while installing as it can be easily damaged.
2
Use the USB cable to connect a Pocket Memo docking station to the WLAN adapter.
3
Connect the supplied Ethernet cable from the LAN port of
the WLAN adapter to an Ethernet port of your network.
Note
• Initial setup can only be done via a LAN connection, not via
a wireless connection.
4
Plug the power adapter into the device and connect to an
available power outlet.
9
EN
Installation
When installing one or more new WLAN adapters to your
network, you can set it up in one of two ways:
• Use the DHCP service on your network to assign IP addresses
to each WLAN adapter. Installation using DHCP, p. 9.
• Set the device to a default IP address to access the configuration interface and assign a fixed IP address. Installation using
the factory default IP address, p. 10.
Installation using DHCP
If your network has a DHCP server, follow the steps below to
install new WLAN adapters:
1
Make a note of the MAC address of every device that you
are about to install (The MAC address can be found on the
bottom plate of the device).
No power
Connection OK
File transfer
Booting / IP search
No access rights
No connection
Error
MAC A1:B2:C3:1A:2B:3C
Default: DHCP, user name: ---
password: administrator
2
Configure your DHCP server to assign an IP address to each
device. Refer to the documentation of your DHCP server for
more information.
3
Deploy the devices throughout your organization.
4
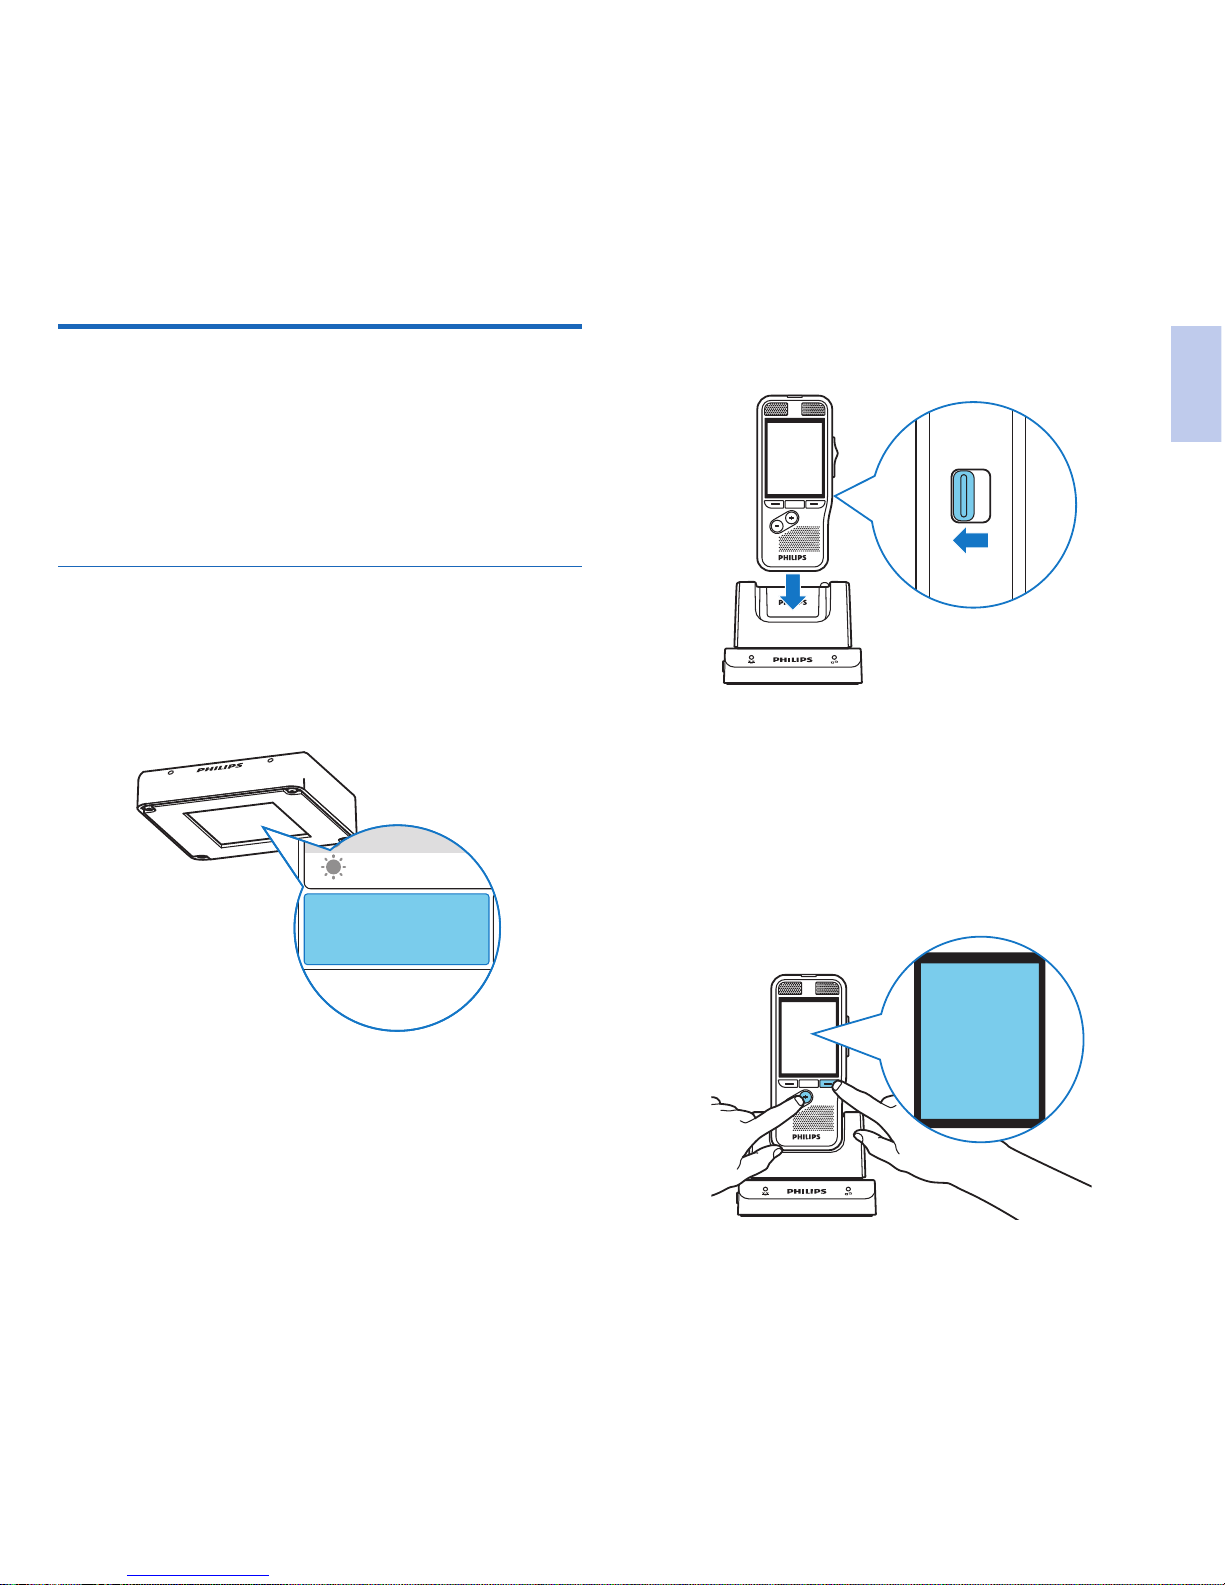
Slide a Pocket Memo dictation recorder 9600 or 8000 series
into the docking slot of the docking station.
OFF
ON
5
When using a Pocket Memo dictation recorder 9600
series, press and hold the RIGHT SMART button and
the MENU button on the recorder simultaneously for 3
seconds.
When using a Pocket Memo dictation recorder 8000 series,
press and hold the F3 and the + button on the recorder
simultaneously for 3 seconds.
X The current configuration settings of the WLAN adapter
are displayed on the recorder’s screen.
WLAN ADAPTER
IP ADDRESS:
192.168.XXX.XXX
MAC ADDRESS:
A1:B2:C3:1A:2B:3C
English
10 EN
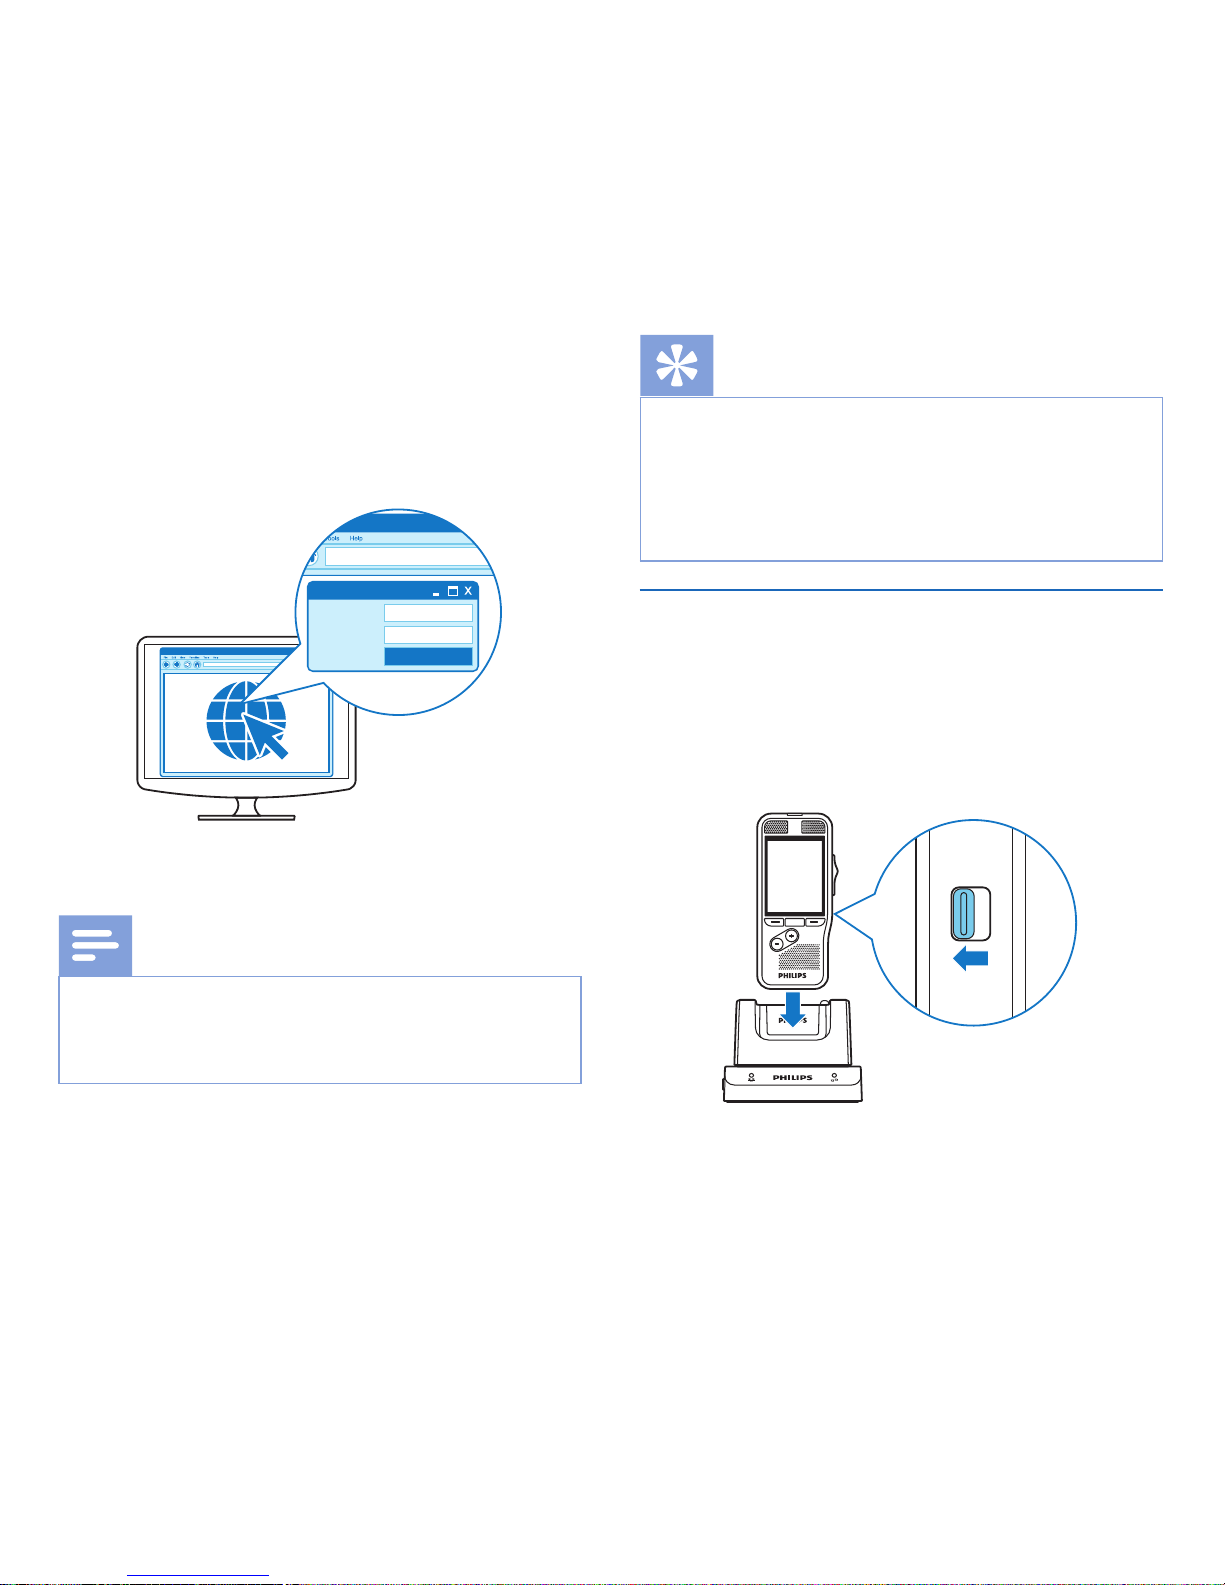
6
Open a Web browser on your PC and load the configuration interface for each assigned IP address to configure the
WLAN adapters individually. Your user name and password
is required. Leave the USER NAME field empty and enter
‚administrator‘ in the PASSWORD field.
X The configuration interface is displayed with the following
pages General, Network, Upload.
http://192.168.XXX.XXX
User name
Password administrator
LOGIN
7
Make any additional configuration changes as you see fit.
Configuration, p. 12
Note
• The device is configured by default to obtain an IP address
from your DHCP server. If this default setting has been
changed, you must reset the device to its factory default settings before starting. Resetting to factory defaults, p. 19.
Tip
• It is good practice to make a note of the location and
network socket number of each WLAN adapter before
they are deployed. You can enter this information into
the comment field of the configuration interface, which
will make it easier to troubleshoot and maintain WLAN
adapters in your network. Assigning a comment, p. 17.
Installation using the factory default IP address
If your network does not have a DHCP server, follow these steps
to install a new WLAN adapter:
1
Connect the WLAN adapter. Connect the WLAN
adapter, p. 8.
2
Slide a Pocket Memo dictation recorder 9600 or 8000 series
into the docking slot of the docking station.
OFF
ON
3
When using a Pocket Memo dictation recorder 9600 series,
press and hold the FUNCTION and the MENU button on
the recorder simultaneously for 3 seconds.
When using a Pocket Memo dictation recorder 8000 series,
press and hold the + and the – button on the recorder simultaneously for 3 seconds.
 Loading...