

Page 1
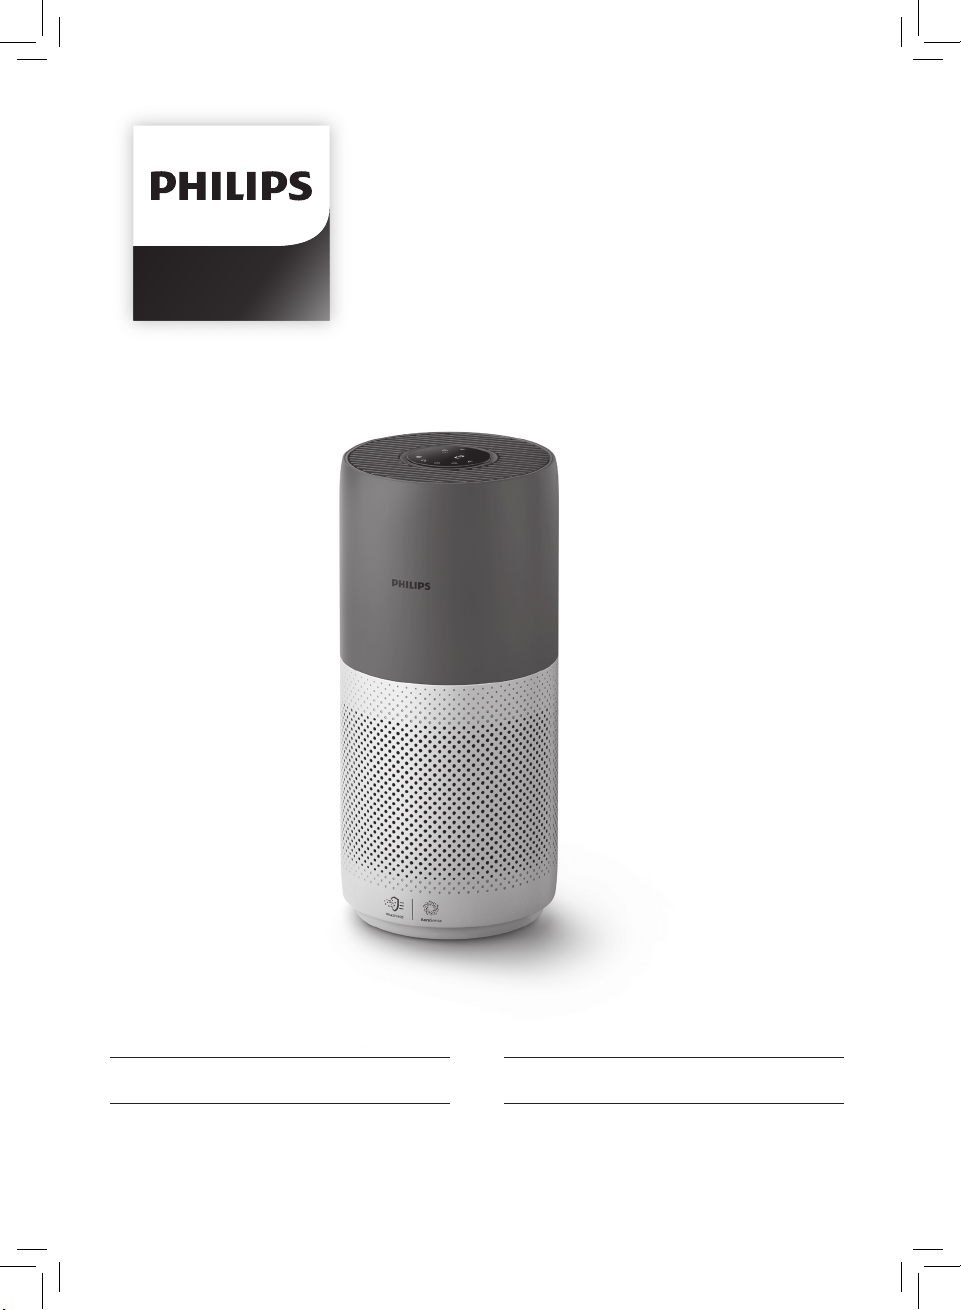
AC2936
AC2939
EN User manual 3 ZH-T 使用手冊 17
Page 2

Page 3

Contents
1 Your air purier �������������������������������������������������������������������4
Product overview �������������������������������������������������������������������������������������������� 4
Controls overview �������������������������������������������������������������������������������������������5
2 Getting started �������������������������������������������������������������������5
Installing the lter �������������������������������������������������������������������������������������������5
Wi-Fi indicator ��������������������������������������������������������������������������������������������������6
Wi-Fi connection ��������������������������������������������������������������������������������������������6
3 Using the air purier ���������������������������������������������������������6
Air quality light �������������������������������������������������������������������������������������������������6
Turning On and O ���������������������������������������������������������������������������������������� 7
Changing the mode setting ���������������������������������������������������������������������8
Switching the display indicator ��������������������������������������������������������������9
Using the light on/o function ���������������������������������������������������������������9
Checking the lter status �������������������������������������������������������������������������10
4 Cleaning and maintenance ������������������������������������������10
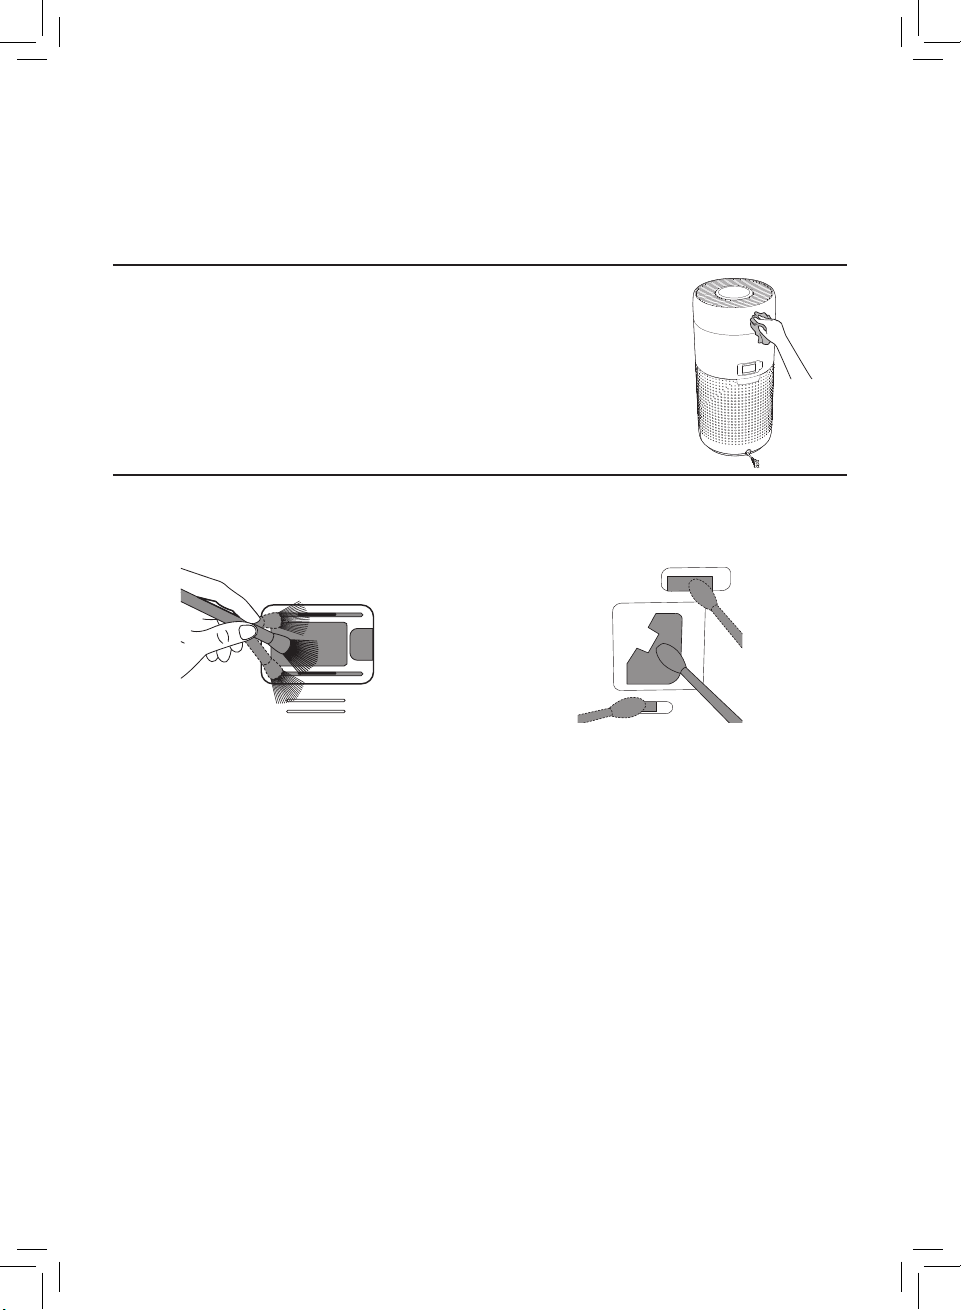
Cleaning the body of the air purier �������������������������������������������������10
Cleaning the particle sensor ������������������������������������������������������������������10
Cleaning the surface of the lter ���������������������������������������������������������� 11
Replacing the lter ��������������������������������������������������������������������������������������12
Filter reset ��������������������������������������������������������������������������������������������������������� 13
5 Storage ��������������������������������������������������������������������������������� 13
6 Troubleshooting ��������������������������������������������������������������� 14
3EN
Page 4
1 Your air purifier
Congratulations on your purchase, and welcome to Philips!
To fully benet from the support that Philips oers, register your product at
www�philips�com/welcome�
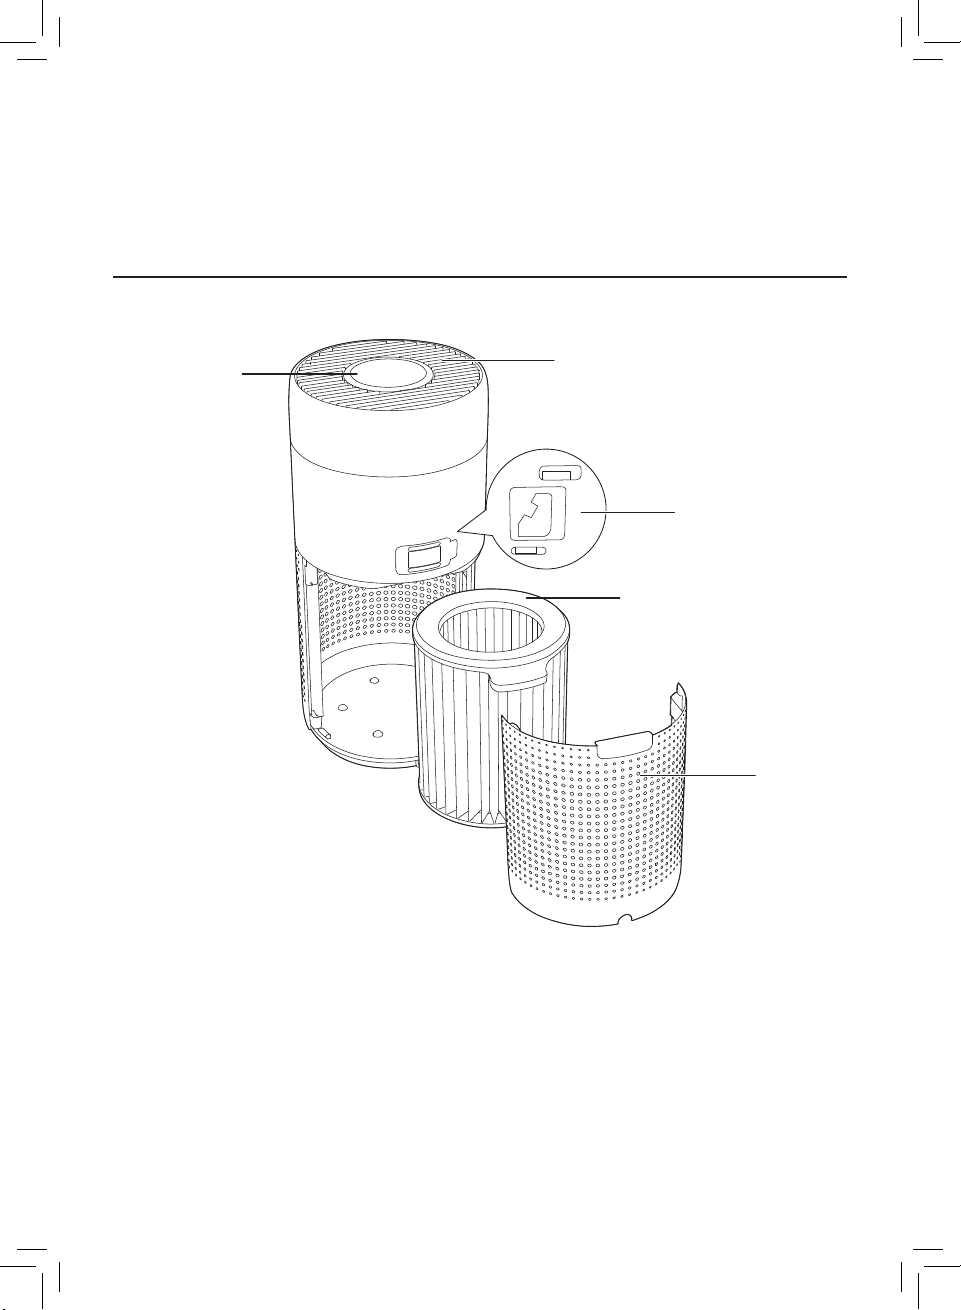
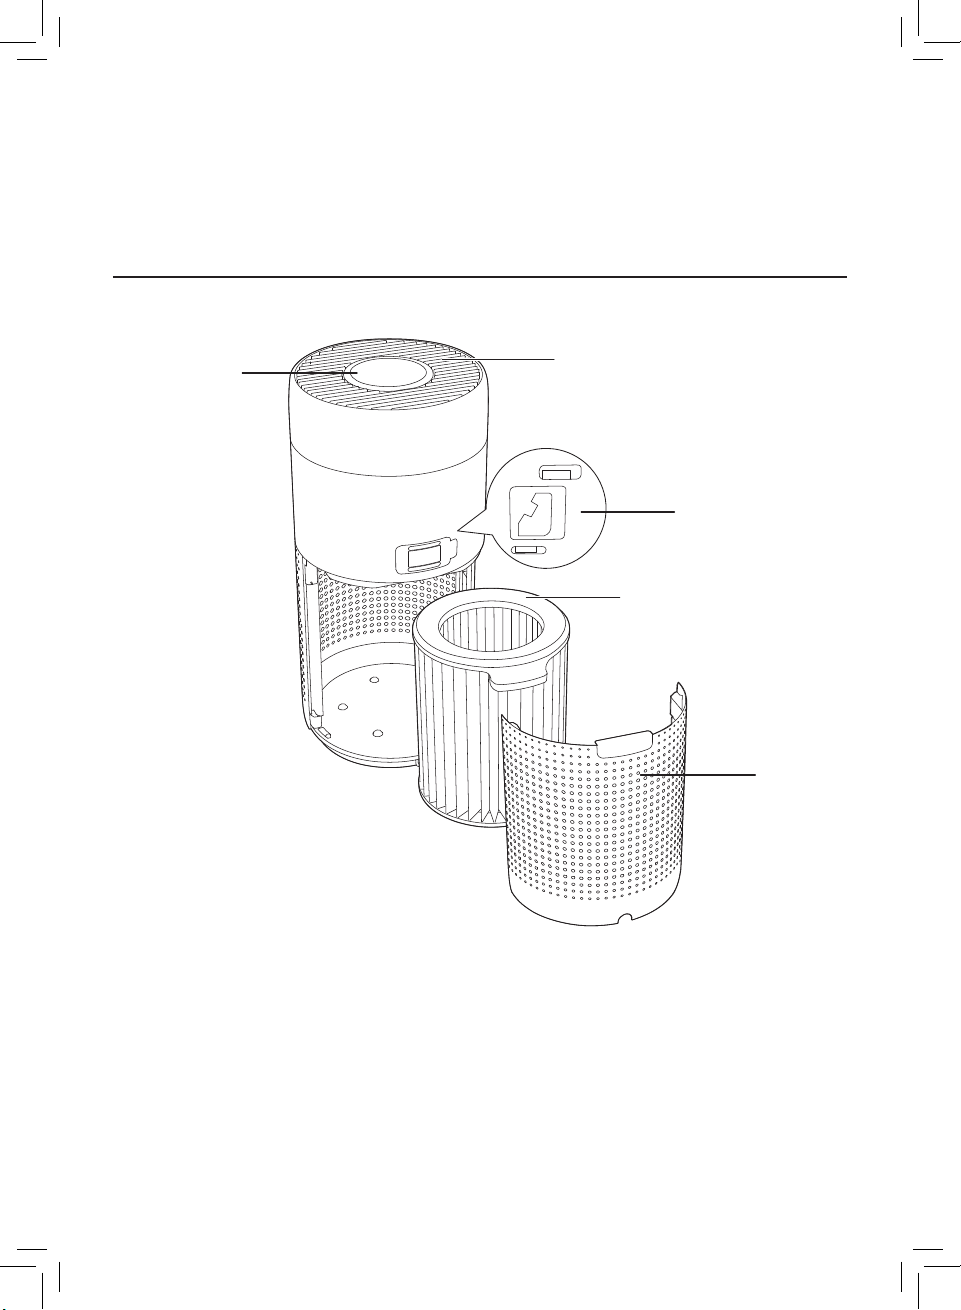
Product overview
Control panel
Air outlet
Particle sensor
NanoProtect lter
Series 3 (FY2180/30)
Back
cover
4 EN
Page 5
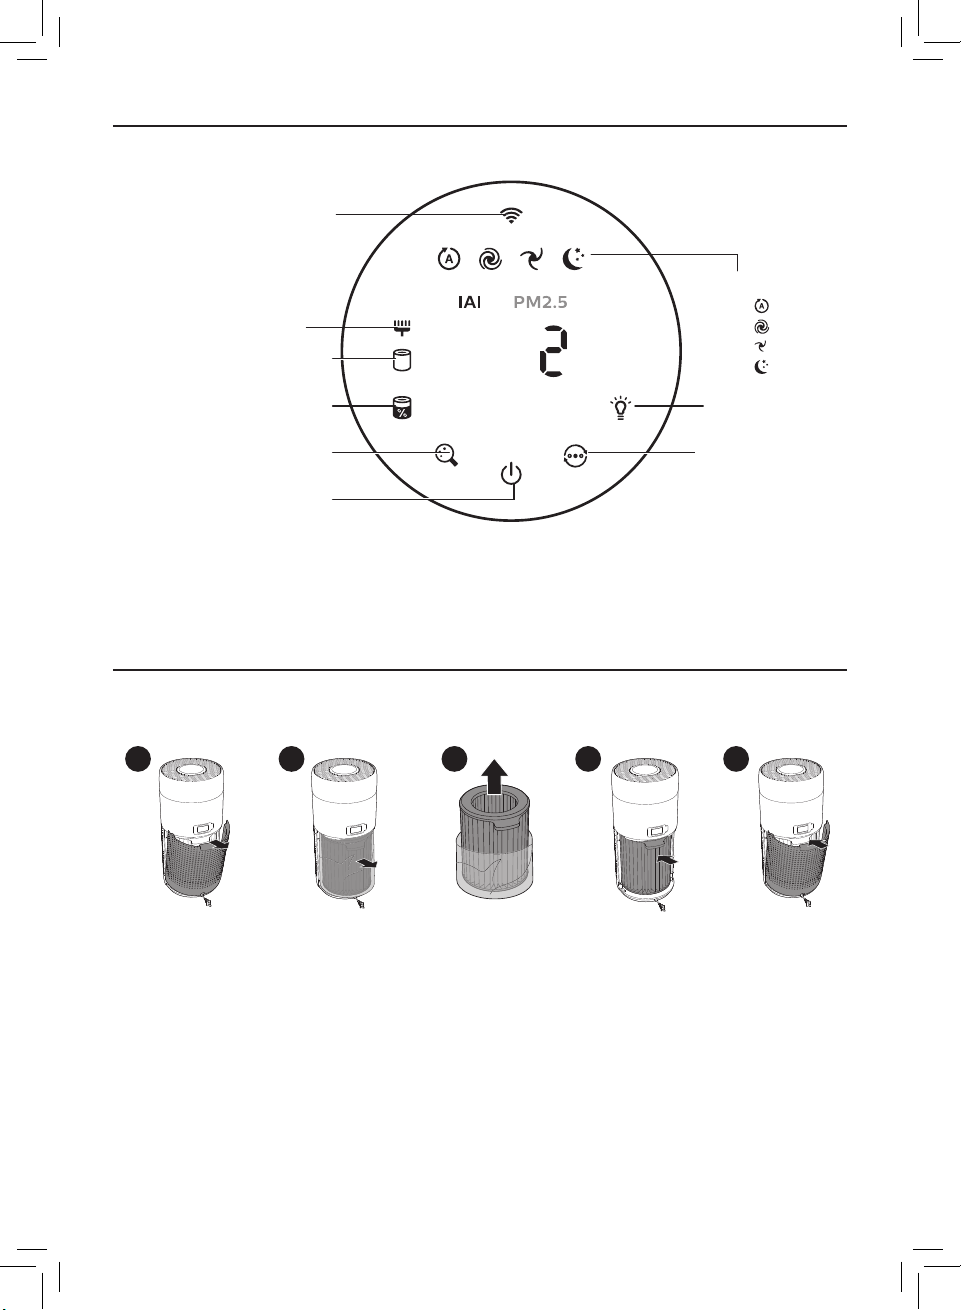
Controls overview
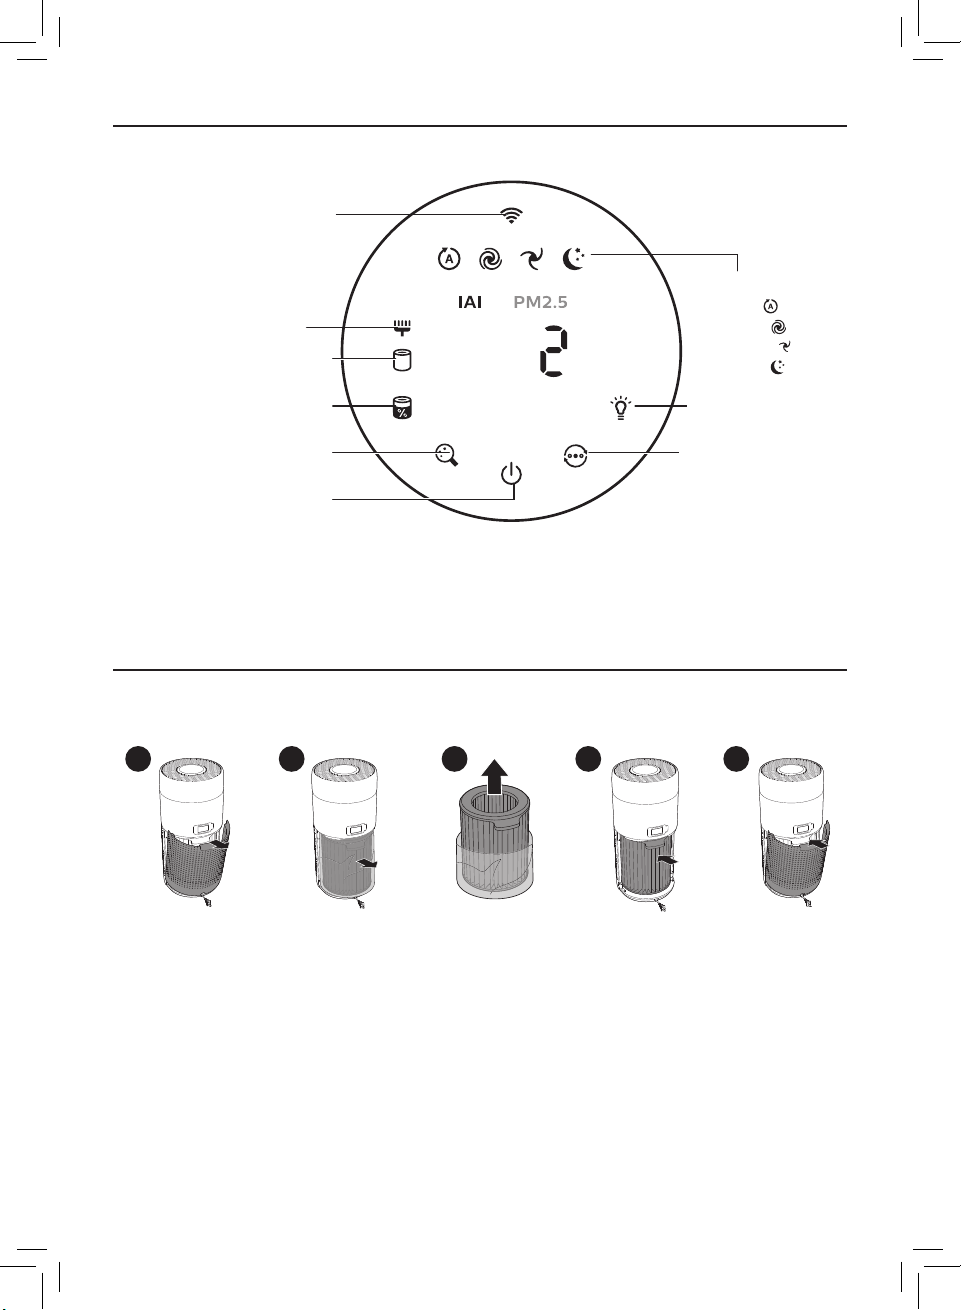
Wi-Fi indicator
Filter cleaning alert
Filter replacement alert
Mode display:
Auto ( )
Turbo ( )
Gentle ( )
Sleep ( )
Filter status/ reset button
Display switch button
Power on/o button
Light on/o button
Mode switch button
2 Getting started
Installing the lter
Note: Make sure the air purier is unplugged from the electrical outlet before installing the lter�
1 2 3 4 5
1 Pull the back cover and remove it from the appliance�
2 Pull the lter from the appliance�
3 Remove all packaging materials of the air purication lter�
4 Put the lter back into the appliance�
5 Reattach the back cover�
5EN
Page 6
Wi-Fi indicator
Wi-Fi icon status Wi-Fi connection status
Blink in orange Connecting to the smartphone
Blink in white Connecting to the router
Stable in white Connected to the router
O Wi-Fi function disabled
Wi-Fi connection
First timeconnection
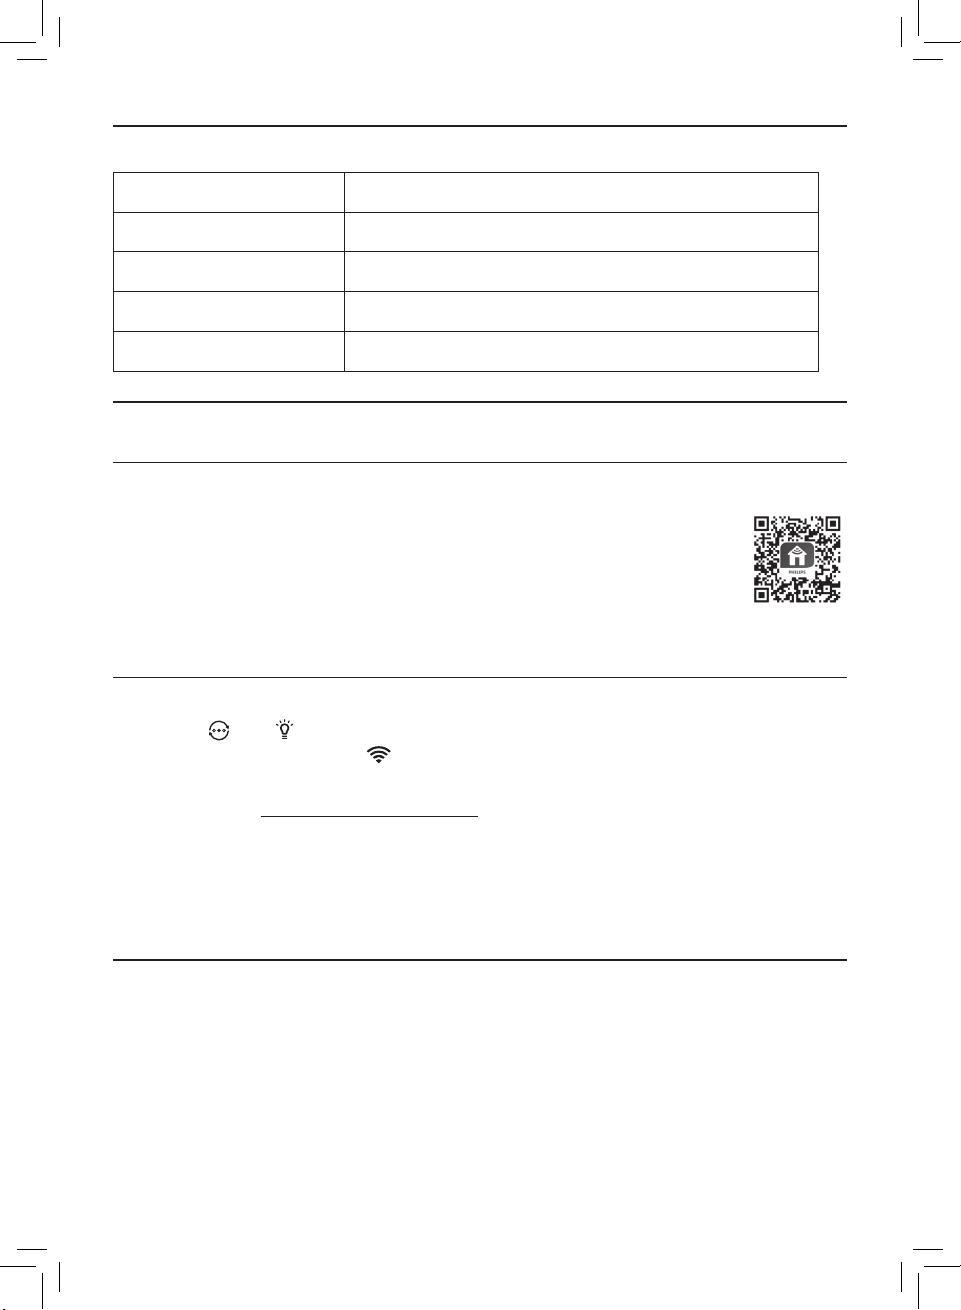
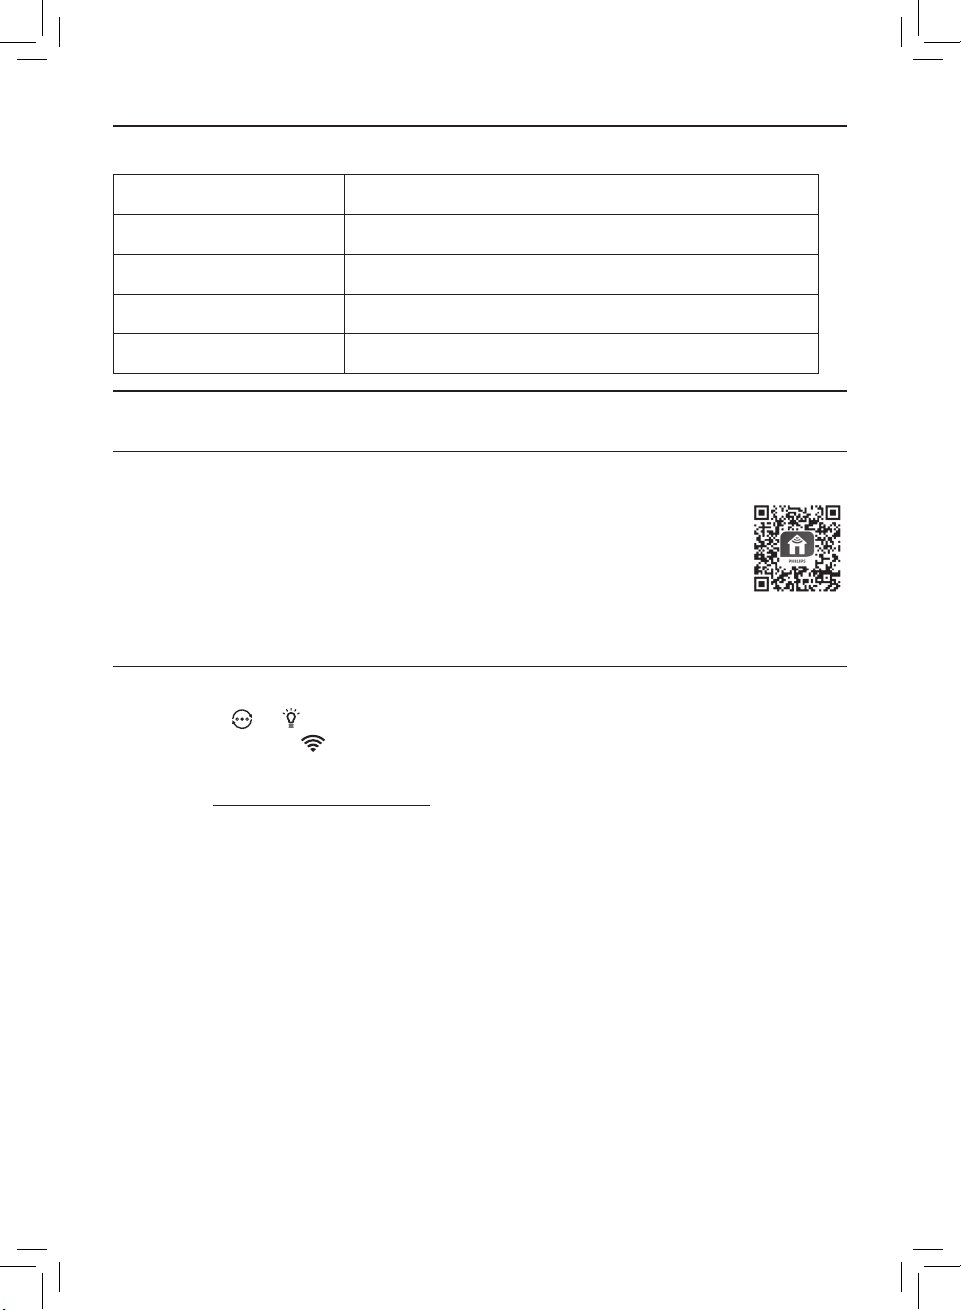
1 Download and install the Philips "Clean Home+" app from the
App Store or Google Play�
2 Connect your smartphone or tablet to your Wi-Fi network�
3 Launch the "Clean Home+" app and click on "Connect a New
Device" or press the "+" button on the top of the screen� Follow
the onscreen instructions to connect the air purier to your network�
Reset the Wi-Fi connection
1 Touch and for 3 seconds until you hear a beep�
» The Wi-Fi indicator blinks orange�
2 Follow the steps 3 in "First time connection" section�
Note: Please check www�philips�com/cleanhome for the latest update of supported Operation
System and devices�
3 Using the air purifier
Air quality light
After approximately 30 seconds, the particle sensor selects the color that
corresponds to the surrounding air quality of airborne particles�
Note: The color of the air quality light is determined by the highest risk index among PM2�5, IAI
and readings�
6 EN
Page 7
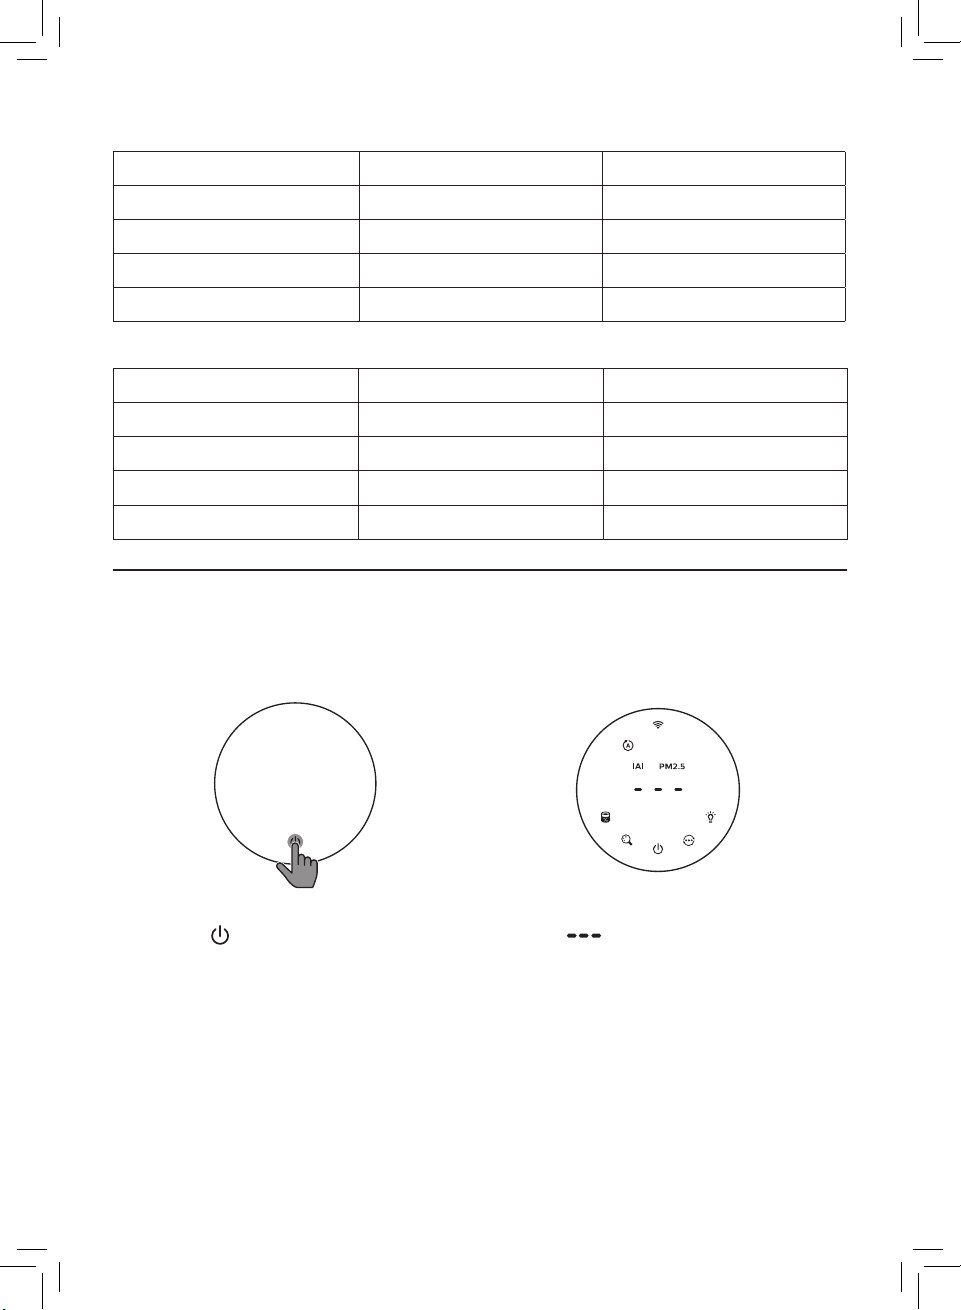
IAI refers to the level of indoor air allergen
IAI level Air quality light color Air quality level
1-3 Blue Good
4-6 Blue-purple Fair
7-9 Purple-red Poor
10-12 Red Very poor
PM2�5 refers to airborne particle pollutants smaller than 2�5 micrometers.
PM2�5 level Air quality light color Air quality level
≤12 Blue Good
13-35 Blue-purple Fair
36-55 Purple-red Poor
>55 Red Very poor
Turning On and O
Note:
• Put the plug of the air purier in the power socket�
• If the purier stays connected to the electrical outlet after turning OFF, the air purier will operate
under the previous settings when turned ON again�
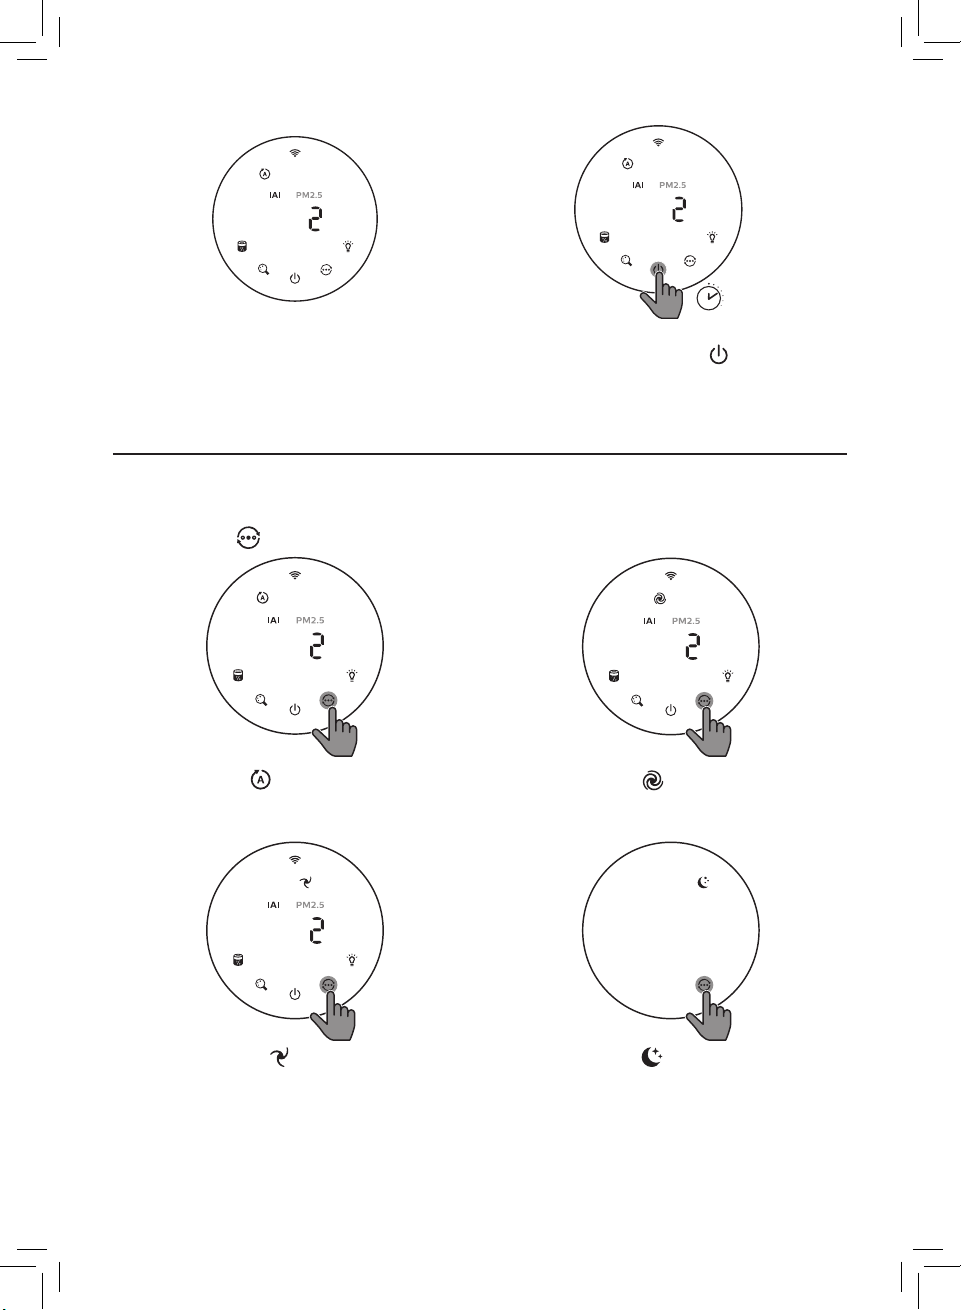
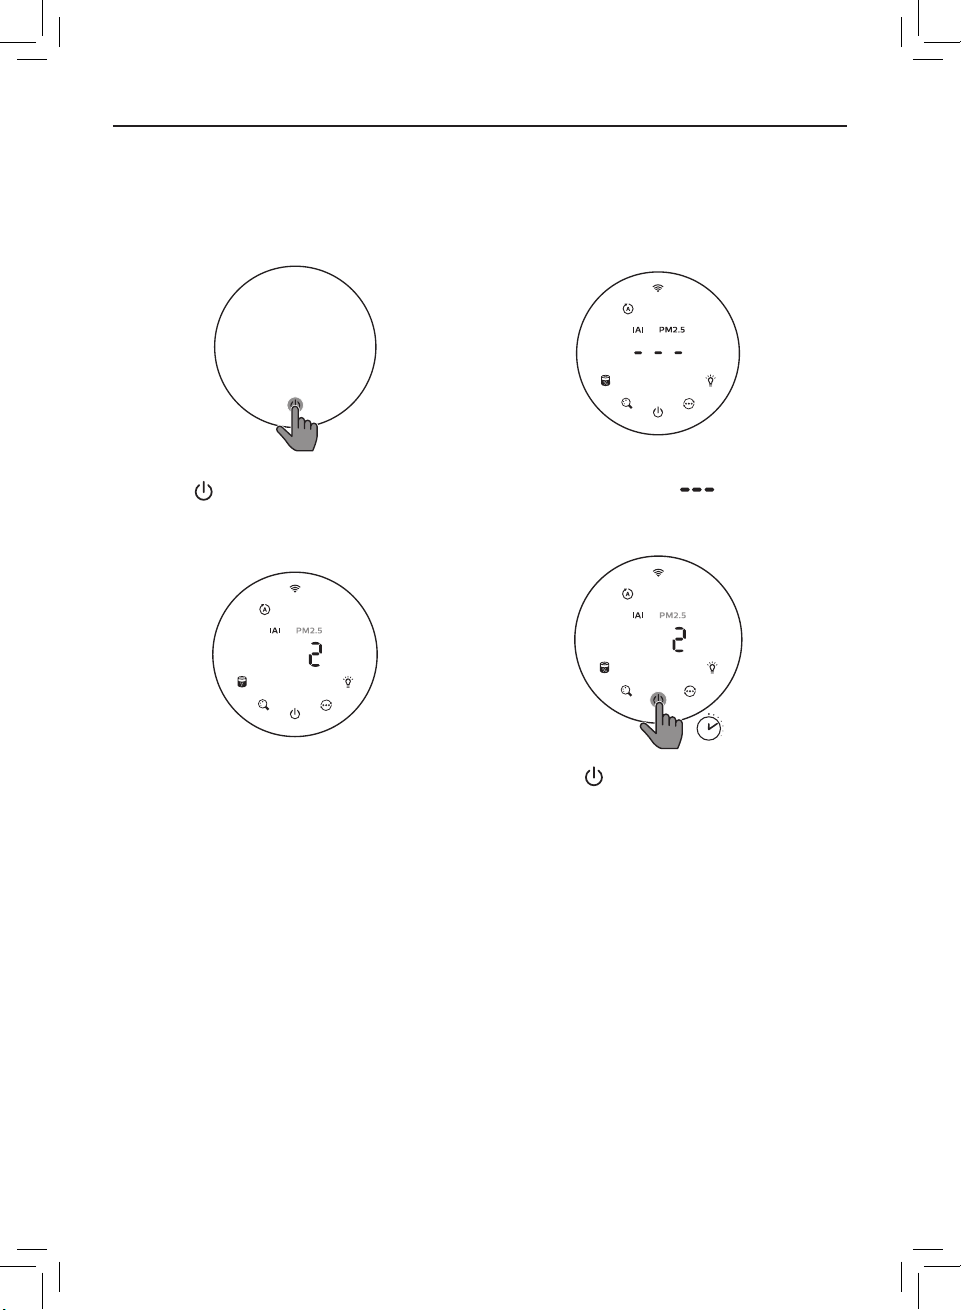
• Touch to switch on the air
pur ier�
• The " " displays on the screen
during warming up� Then the air
purier shows the IAI/PM2�5 level
after measuring the air quality�
7EN
Page 8
3’’
• The air purier operates in the
auto mode with IAI displayed on
the screen�
• Touch and hold the button for
3 seconds to switch o the air
purier�
Changing the mode setting
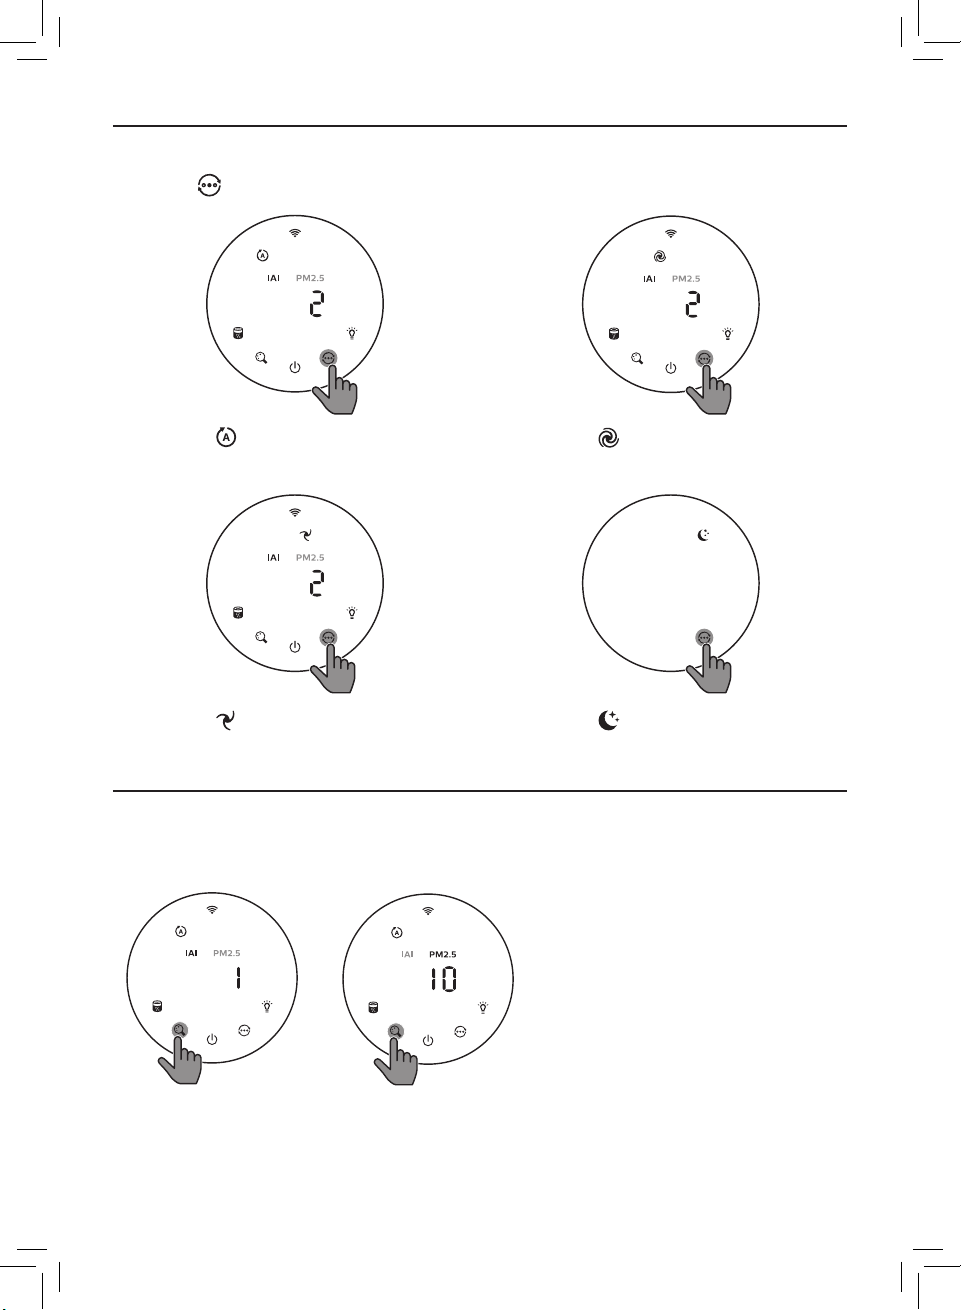
You can choose Auto mode, Turbo mode, Gentle mode or the Sleep mode by
touching the button�
Auto mode ( ): The air purier
automatically adjust the fan speed in
accordance with the ambient air quality�
Turbo mode ( ):The air purier
operates on the highest speed�
Gentle mode ( ): The air purier
operates at a low speed�
8 EN
Sleep mode ( ): The air purier
operates quietly at a low speed�
After 3 seconds, the screen lights o�
Page 9
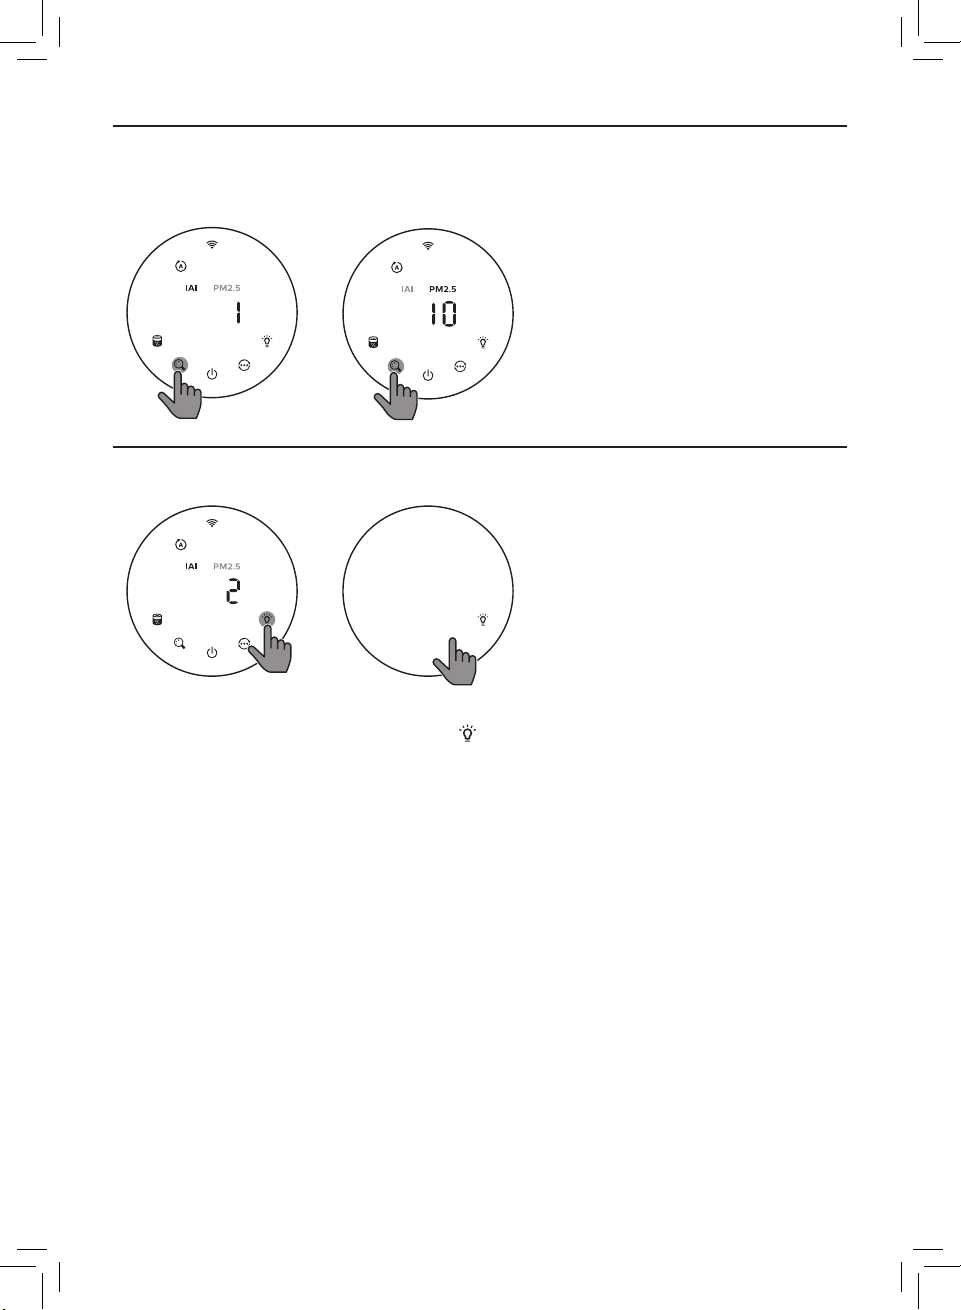
Switching the display indicator
Note:
• The appliance display IAI level by default�
Using the light on/o function
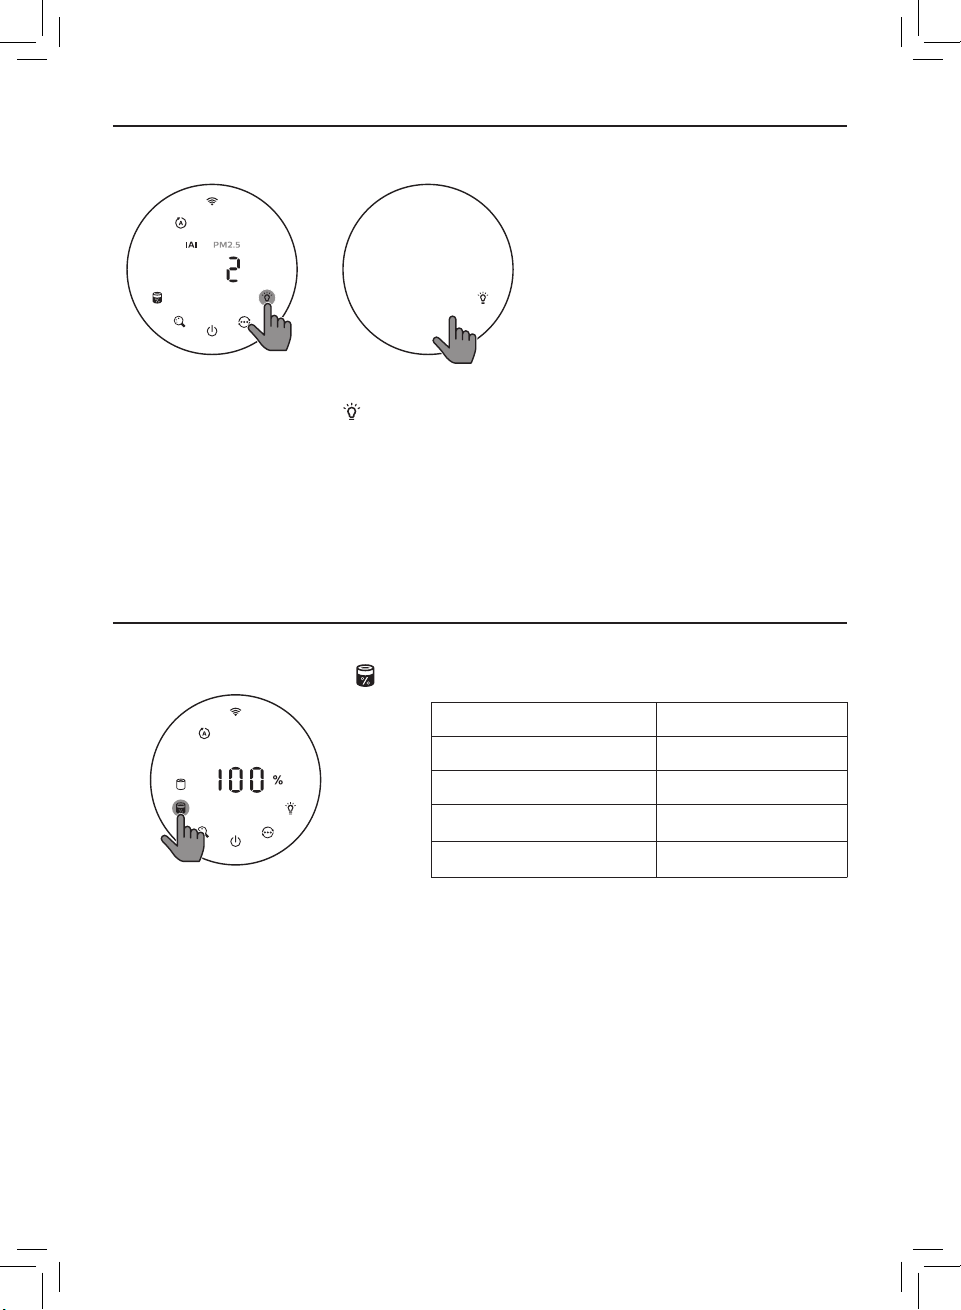
You can touch the light on/o button manually to turn o all lights and the
control pa
With the light sensor:
• The control panel can automatically turn on, turn o or dim according to
the ambient light�
• The control panel will be o or dim when the ambient light is dark�
You can touch any button to wake up all lights� If no further operation, all lights
will be o or dim again to match with the ambient light�
nel� Touch any button to wake up all lights�
9EN
Page 10
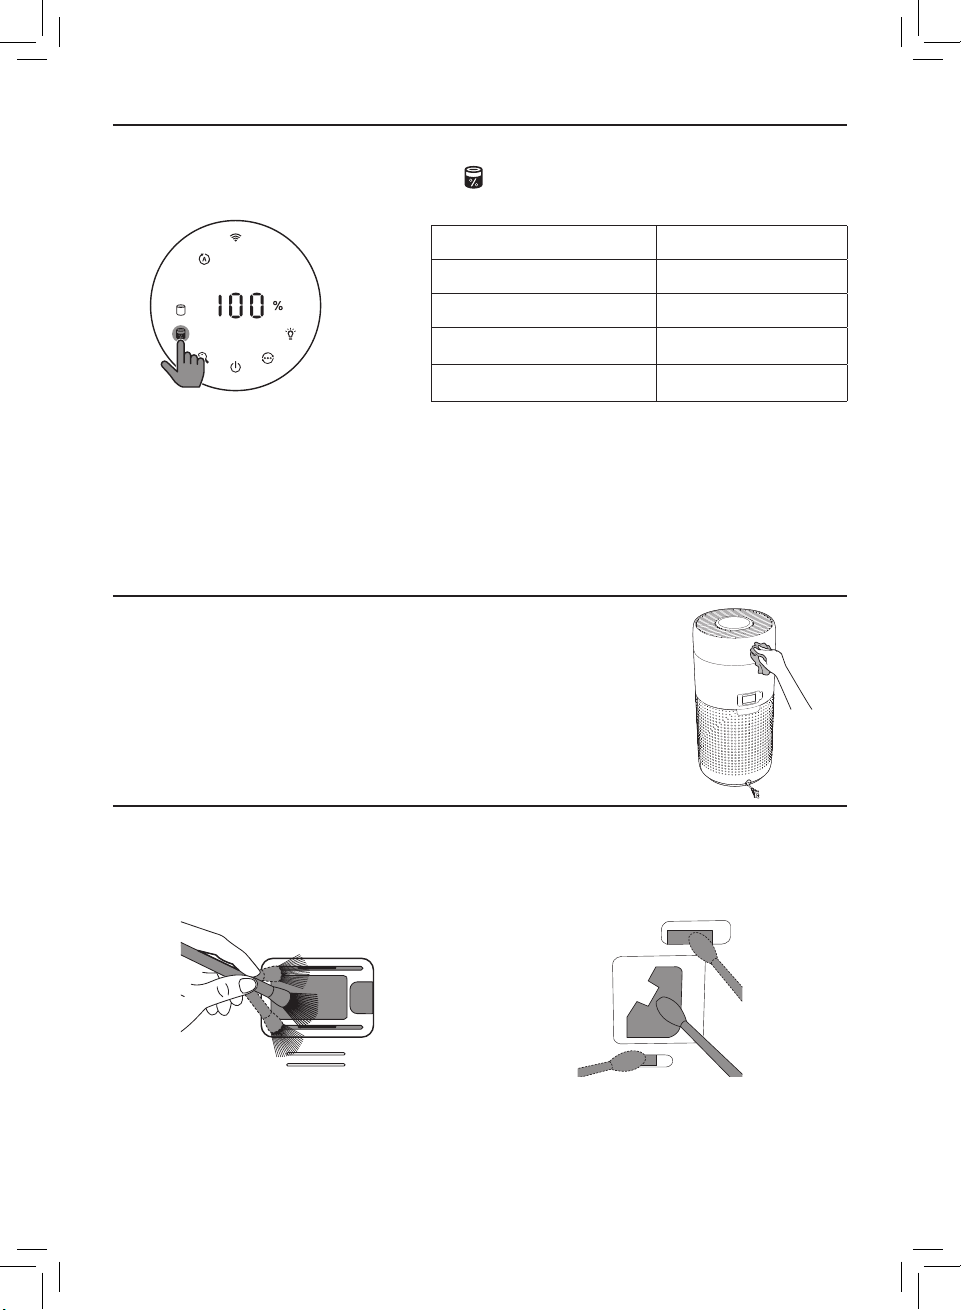
Checking the lter status
• Touch the lter status check/reset button to check the lter service life
status�
Icon color Display (%)
Blue 16-100
Blue-purple 9-15
Purple-red 4-8
Red 0-3
Note: The appliance goes back to normal display if no operations after 3 seconds�
4 Cleaning and maintenance
Note:
• Do not attempt to clean the particle sensor with a vacuum cleaner�
• Switch o the air purier and unplug from the power socket before following action�
Cleaning the body of the air purier
Use a soft, dry cloth to clean both the interior and
exterior of the air purier and the air outlet�
Cleaning the particle sensor
Clean the particle sensor every 2 months for optimal functioning of the
appliance�
1 Clean the particle sensor inlet
and outlet with a soft brush�
10 EN
2 Clean the particle sensor with a
damp cotton swab� Dry all parts
thoroughly with a dry cotton swab�
Page 11
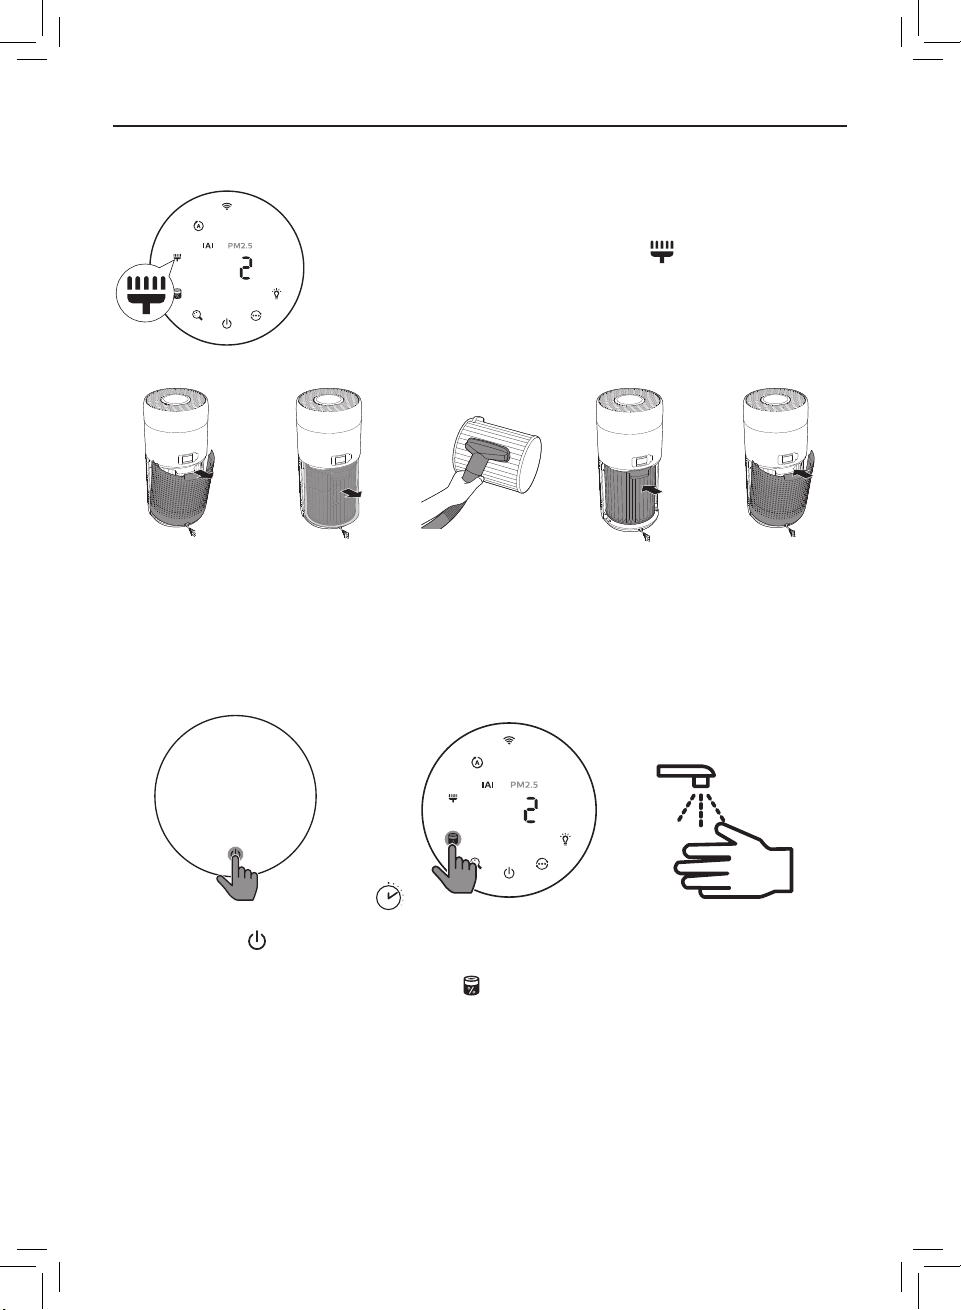
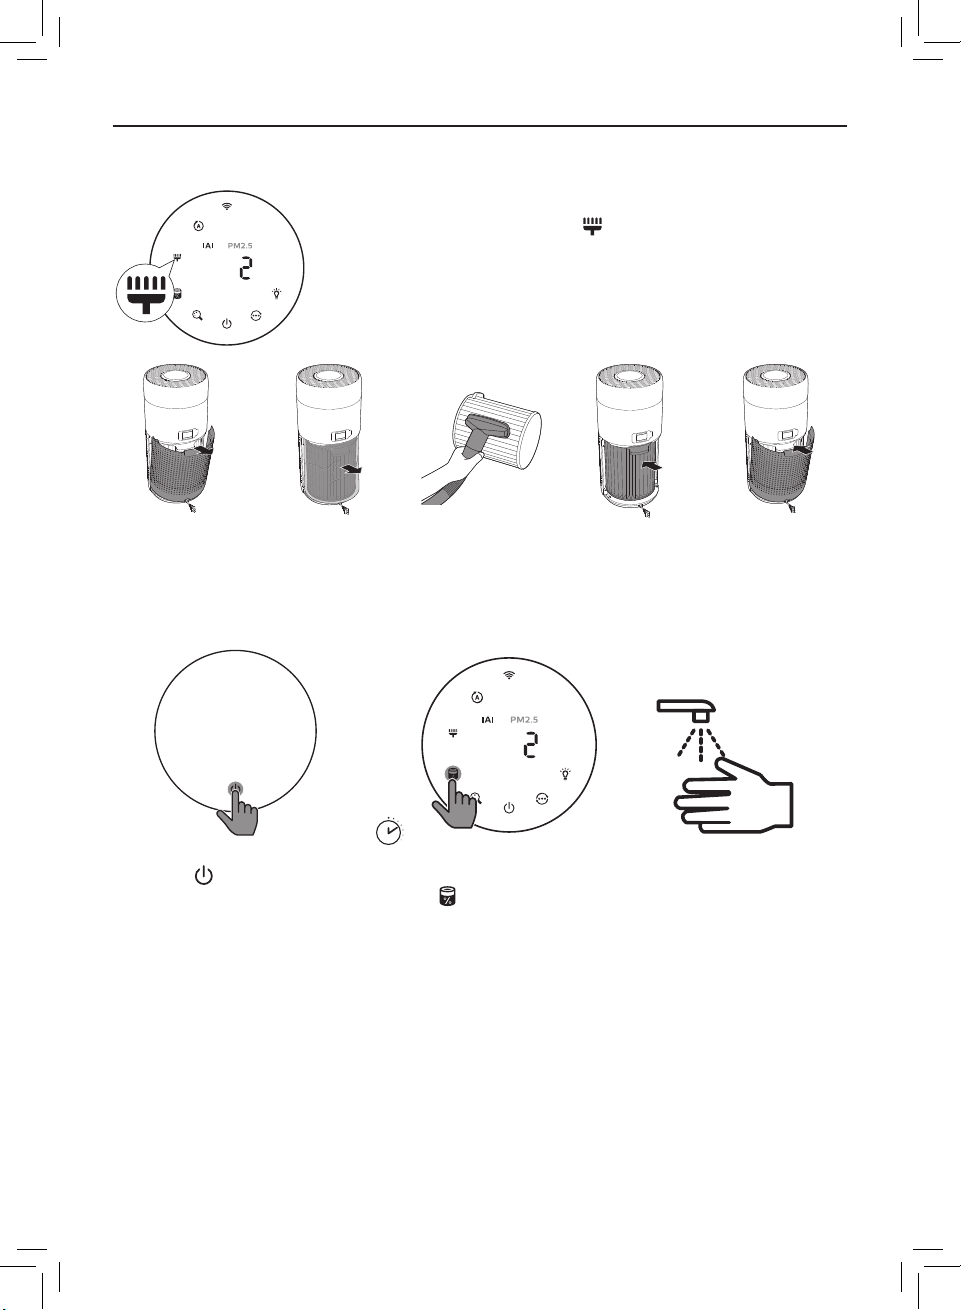
Cleaning the surface of the lter
Clean the surface of lter with vacuum cleaner
when the lter cleaning alert display on the
screen�
1 Pull the
back
cover and
remove it
from the
appliance�
2 Pull the
lter
from the
appliance�
6 Touch the button
to switch on the
appliance�
3 Clean the
surface of
the lter
with a
vacuum
cleaner�
4 Put the
3’’
7 Touch and hold the
lter status check/reset
button for 3 seconds
to reset the lter
cleaning time�
5 Reattach
lter back
into the
appliance�
the back
cover�
8 Wash your hands
thoroughly after
cleaning the lter�
11EN
Page 12
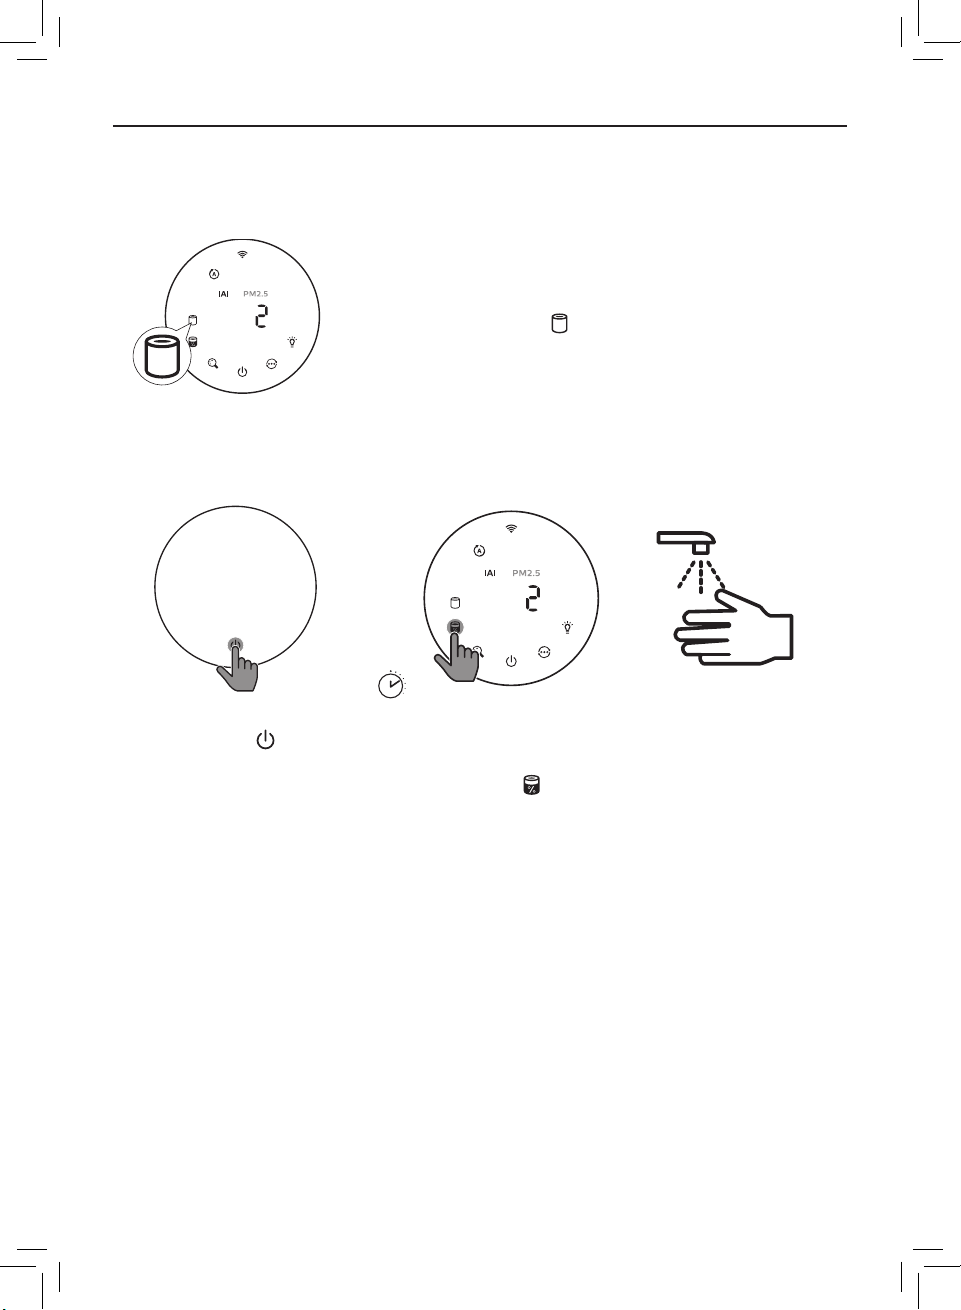
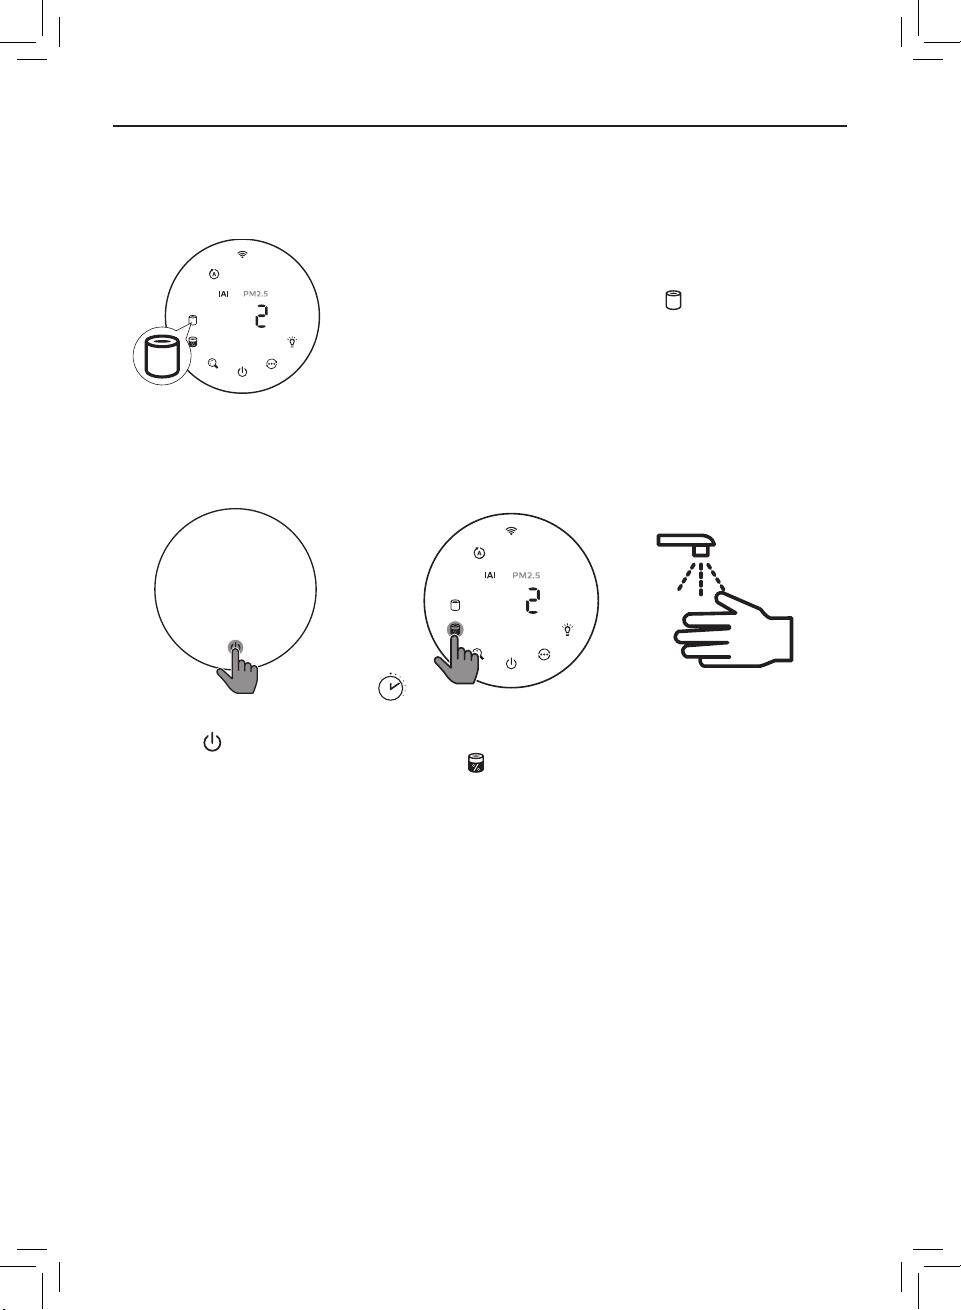
Replacing the lter
Note:
• The lter is not washable or reusable�
• Do not smell the lter as it has collected pollutants from the air�
When the lter need to be replaced, the lter
replacement alert lights up red�
1 Replace the lter with Philips NanoProtect lter Series 3 (FY2180/30) ,
Please follow the step of Chapter "Installing the lter"�
3’’
2 Touch the button
to switch on the
appliance�
12 EN
3 Touch and hold the
lter status check/
reset button for
3 seconds to reset
the lter cleaning
time�
4 Wash your
hands
thoroughly after
cleaning the
lter�
Page 13
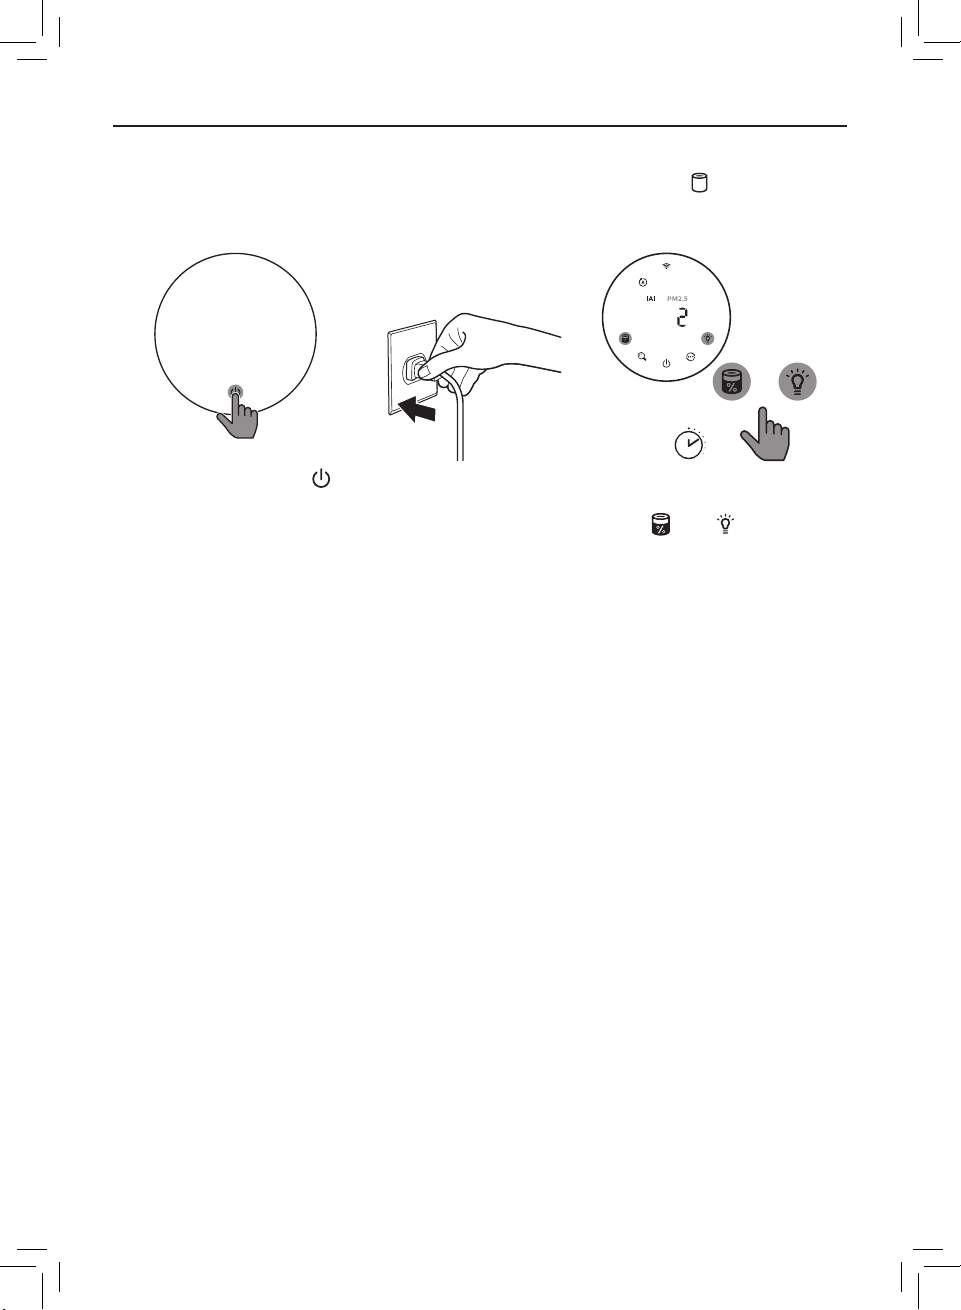
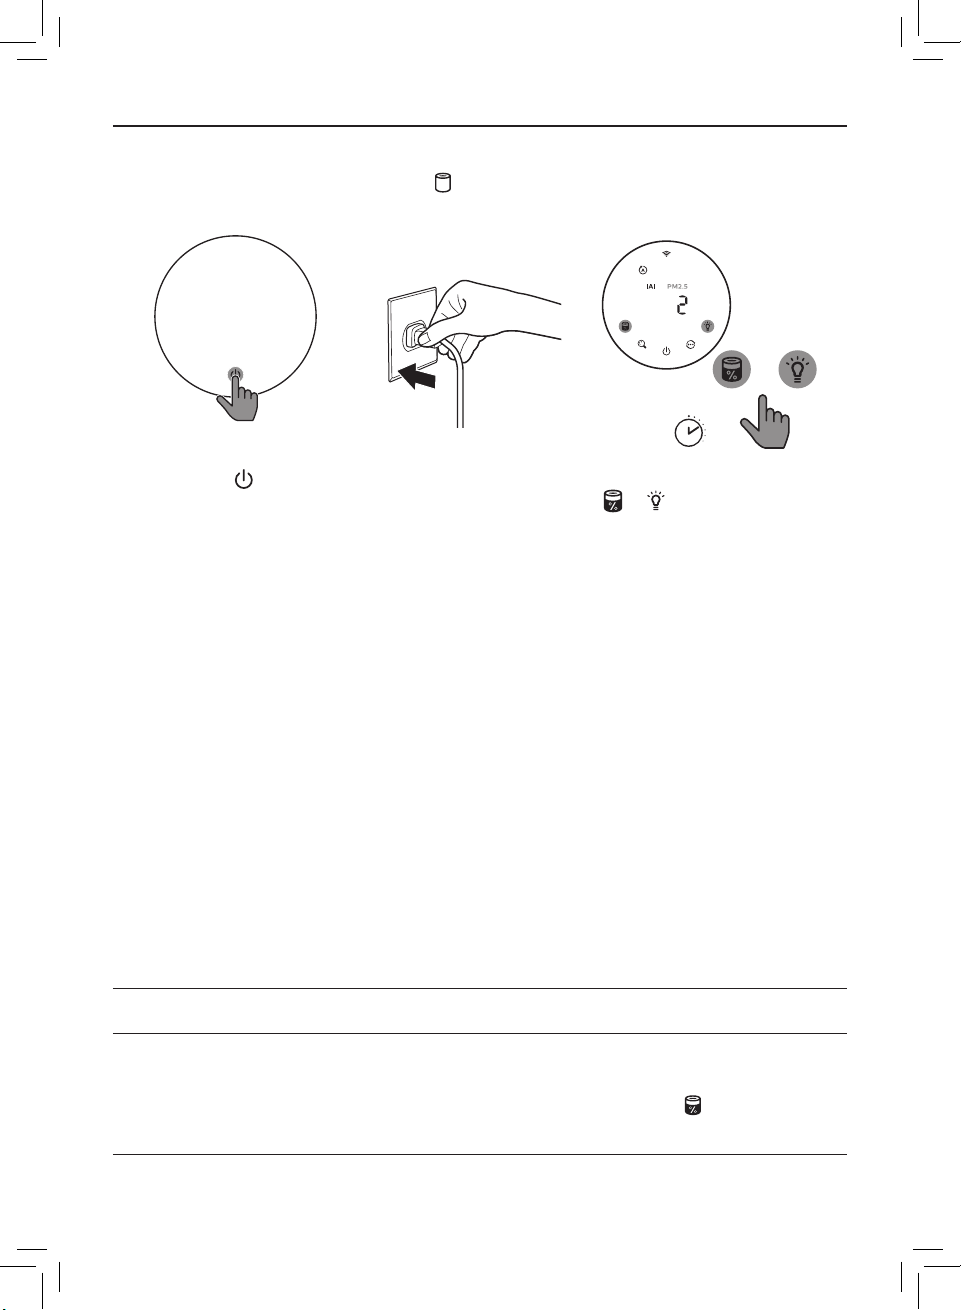
Filter reset
3’’
You can also replace the lter before lter replacement alert ( ) displays on
the screen� After replacing a lter, you need to reset the lter lifetime counter
manually�
+
1 Touch the power
button for 3 seconds
to turn o the
appliance and unplug
from power socket�
2 Put the power
plug in the power
socket�
3 Within 15 seconds after
power on, touch and
hold and button for
3 seconds to reset the
lter lifetime counter.
5 Storage
1 Turn o the air purier and unplug from the power socket�
2 Clean the air purier, particle sensor and the surface of the lter (see
chapter "Cleaning and maintenance")�
3 Let all parts air dry thoroughly before storing�
4 Wrap the lter in air tight plastic bags�
5 Store the air purier, lter in a cool, dry location�
6 Always thoroughly wash hands after handling lters�
13EN
Page 14
6 Troubleshooting
This chapter summarizes the most common problems you could encounter
with the appliance� If you are unable to solve the problem with the information
below, contact the Consumer Care Center in your country�
Problem Possible solution
The appliance
does not work
properly�
The airow that
comes out of
the air outlet
is signicantly
weaker than
before�
The air quality
does not improve,
even though the
appliance has
been operating
for a long time�
• Check if the back cover is properly installed�
• The lter replacement alert has been on continuously
but you have not replaced the corresponding lter� As a
result, the appliance is now locked� In this case, replace
the lter and long press to reset the lter lifetime
counter�
• The surface of the lter is dirty� Clean the surface of the
lter (see the chapter "Cleaning and maintenance")�
• Check if the packing material is removed from the lter�
• The lter has not been placed in the appliance� Make
sure that the lter (FY2180/30) is properly installed�
• The particle sensor is wet� The humidity level in your
room is high and causes condensation� Make sure that
the particle sensor is clean and dry (see the chapter
"Cleaning and maintenance")�
• Room size is large or the outdoor air quality is poor�
For optimum purication performance, please close the
doors and windows when operating the air purier�
• There are indoor pollution resources� For instances,
smoking, cooking, incense, perfume or alchohol�
• Filter reaches the end of life� Replace the lter with a
new one�
The color of the
air quality light
always stays the
same�
14 EN
• The particle sensor is dirty� Clean the particle sensor
(see the chapter "Cleaning and maintenance")�
Page 15
Problem Possible solution
The appliance
produces a
strange smell�
The appliance is
extra loud�
The appliance still
indicates that I
need to replace a
lter, but I already
did�
• The rst few times you use the appliance, it may
produce a plastic smell� This is normal� However, if the
appliance produces a burnt smell even if removing
lters, contact your Philips dealer or an authorized
Philips service center� The lter may produce smell after
being used for a while because of the absorption of
indoor gases� It’s recommended that you reactivate the
lter by putting it in direct sunlight for repeated use� If
odor still exists, replace the lter�
• It's normal if the appliance runs at the Turbo mode�
• In the Auto mode, if the appliance is too loud, maybe
the appliance runs at high speed because air quality
becomes worse, or your personalized setting in App
triggers a higher fan speed� You can choose the Sleep
mode, or change the settings in the app�
• If anything drops into air outlet, it may also cause
abnormal loud sound� Immediate turn o appliance,
turn appliance upside down, to get foreign objectives
out of appliance�
• If there is abnormal sound, contact the Consumer Care
Center in your country�
• Perhaps you did not reset the lter lifetime counter�
Switch on the appliance� Then touch and hold the reset
button ( ) for 3 seconds�
Error code "E1"
displays on the
screen�
• The motor has malfunctions� Contact the Consumer
Care Center in your country�
15EN
Page 16

Problem Possible solution
• If the router your purier is connected to is dual –
band and currently it is not connecting to a 2�4GHz
network, please switch to another band of the same
router (2�4GHz) and try to pair your purier again� 5GHz
networks are not supported� 5GHz networks are not
supported� If your purier is connected to a dual – band
router, please switch to the 2�4GHz network of the
router and try to pair your purier again�
• Web authentication networks are not supported�
Public Wi-Fi such as oce or hotel networks are not
supported�
• Check if the purier is within range of the Wi-Fi router�
You can try to locate the air purier closer to the Wi-Fi
router�
• Check if the Wi-Fi password is correct� The password is
case-sensitive�
The Wi-Fi setup is
not successful�
• Retry the setup with the instructions in section "Set up
the Wi-Fi connection when the network has changed"�
Retry the setup with the instructions in section "Reset
Wi-Fi Connection"�
• Keep the appliance away from other electronic devices
that may cause interferences�
• Check if the mobile device is in airplane mode� Make
sure to have the airplane mode deactivated when
connecting to the Wi-Fi network�
• If the Wi-Fi pairing fails after trying several times,
please turn of the cellular data on your smartphone in
the Settings section and start the pairing again�
• If the Wi-Fi icon on your purier’s display is in stable
white but without seeing the purier in your app, click
on "Connect a New Device'' and add the purier from
the local list on ''Begin setup'' page�
• Consult the help section in the app for extensive and
up-to-date troubleshooting tips�
16 EN
Page 17

目錄
1
您的空氣清新機
產品概要
控制鍵概覽
2
使用入門
安裝濾網
Wi-Fi
Wi-Fi
3
使用空氣清新機
空氣質素燈
開關
更改模式設定
切換顯示指示燈
使用開燈/關燈功能
檢查濾網狀態
4
清潔及保養
清潔空氣清新機機身
清潔微粒感應器
清潔濾網表面
更換濾網
重設濾網
指示燈
連接
���������������������������������������������������������������������������������������������������������������������22
����������������������������������������������������������������18
����������������������������������������������������������������������������������������������������������� 18
������������������������������������������������������������������������������������������������������ 19
�����������������������������������������������������������������������������19
����������������������������������������������������������������������������������������������������������� 19
�������������������������������������������������������������������������������������������������20
������������������������������������������������������������������������������������������������������ 20
���������������������������������������������������������������� 21
������������������������������������������������������������������������������������������������������ 21
������������������������������������������������������������������������������������������������ 23
������������������������������������������������������������������������������������������� 23
������������������������������������������������������������������������������������ 24
������������������������������������������������������������������������������������������������ 24
������������������������������������������������������������������������ 25
���������������������������������������������������������������������������������� 25
������������������������������������������������������������������������������������������� 25
������������������������������������������������������������������������������������������������ 26
�����������������������������������������������������������������������������������������������������������27
���������������������������������������������������������������������������������������������������������� 28
5
6
������������������������������������������������������������������������������������� 28
儲存
疑難排解
���������������������������������������������������������������������������� 28
17ZH-T
Page 18
1
您的空氣清新機
感謝您購買
請前往以下網址註冊您的產品,以獲得
www�philips�com/welcome
Philips
產品,同時歡迎您來到
。
產品概要
控制面板
Philips
Philips
世界!
的完整支援:
排氣口
納米級防護
(FY2180/30)
微粒感應器
S3
型濾網
18 ZH-T
後蓋
Page 19
控制鍵概覽
Wi-Fi
指示燈
清潔濾網 提示
濾網更換 警示
濾網狀態/ 重設按鈕
顯示切換按鈕
電源開/關按鈕
2
使用入門
安裝濾網
備註:安裝濾網前,請確保將空氣清新機的插頭從電源插座拔出。
1
2 3 4 5
顯示模式:
( )
自動
( )
特強
( )
柔風
( )
睡眠
開燈/關燈按鈕
模式切換按鈕
1
拉起後蓋,從產品拆下。
2
從產品拉出濾網。
3
移除空氣淨化濾網的所有包裝物料。
4
將濾網裝回本產品。
5
重新裝上後蓋。
19ZH-T
Page 20
Wi-Fi
指示燈
Wi-Fi
圖示狀態
閃爍橙色燈光
閃爍白色燈光 正在連接路由器
穩定顯示白色燈光
關閉
Wi-Fi
連接
Wi-Fi
連接狀態
正在連接智能電話
已連接至路由器
Wi-Fi
功能已停用
首次連接
1
下載並安裝
App Store 或 Google Play
2
將您的智能手機或平板電腦連接至您的
3
啟動「
畫面頂部的「+」按鈕。按照畫面上的指示,將空氣清新機連接至
您的網絡。
Wi-Fi
重設
1
同時按住
»Wi-Fi
2
請按照「首次連接」部分的步驟
備註:請瀏覽
Philips
Clean Home+
Clean Home+
「
。
」應用程式,然後點擊「連接新裝置」或點按
連線
和 3
指示燈
www�philips�com/cleanhome
秒,直至聽到「嗶」聲為止。
閃爍橙色燈光。
」 應用程式,請前往
Wi-Fi
3
操作。
,以了解支援作業系統和裝置的最新資料。
網絡。
20 ZH-T
Page 21
3
使用空氣清新機
空氣質素燈
30
約
秒後,微粒感應器會根據周遭空中粒子的空氣質素,選擇相應的顏色。
備註:空氣質素燈的顏色由
IAI
指室內過敏原水平。
PM2�5、IAI
和讀數的最高風險指數決定。
IAI
水平
1-3
4-6
7-9
10-12
PM2�5
PM2�5
12
≤
13-35
36-55
>55
指空氣中小於
水平
空氣質素指示燈的顏色 空氣質素水平
藍色 良好
藍色-紫色 一般
紫色-紅色 差
紅色 非常差
2�5
微米的的有害微粒
空氣質素指示燈的顏色 空氣質素水平
藍色 良好
藍色-紫色 一般
紫色-紅色 差
紅色 非常差
。
21ZH-T
Page 22
開關
備註:
• 將空氣清新機的插頭插入電源插座。
• 如空氣清新機在「關閉」後繼續連接至電源插座,空氣清新機在再次「啟動」時,將按之前的設定
操作。
•
•
按下
以開啟空氣清新機。
正準備運作時,「 」將顯示在
螢幕上。在測量空氣質素後,空氣
清新機會顯示
IAI/PM2�5
水平。
•
空氣清新機會以自動模式運作,並在
螢幕上顯示
22 ZH-T
IAI
。
•
輕按住
新機。
3’’
3
按鈕
秒以關閉空氣清
Page 23
更改模式設定
您可輕按
按鈕
,選擇特強模式、柔風模式或睡眠模式。
(
自動模式
質素環境自動調節風扇速度。
柔風模式
運作。
)
空氣清新機會根據空氣
:
( )
:空氣清新機以緩慢速度
切換顯示指示燈
備註:
• 此產品默認顯示
IAI
水平。
特強模式
度運作。
睡眠模式
速度安靜運作。3 秒後,螢幕的燈光
會關閉。
( )
:空氣清新機以最高速
(
)
空氣清新機以緩慢
:
23ZH-T
Page 24
使用開燈/關燈功能
您可以輕按開燈/關燈按鈕
燈光。
使用光線感應器:
• 控制面板根據環境光線自動開啟、關閉或變暗。
• 在環境光線昏暗時,控制面板便會關閉或變暗。
您可以輕按任何按鈕來喚醒所有燈光。如果沒有進一步操作,所有燈光便會關閉或變
暗以配合環境光線。
檢查濾網狀態
• 點按濾網狀態檢查/重設
來關閉所有燈光和控制面板
按鈕,以檢查濾網的使用壽命狀態。
。輕按任何按鈕來喚醒所有
備註:如果
24 ZH-T
圖示顏色 顯示
藍色
藍色-紫色
紫色-紅色
紅色
3
秒後沒有進行操作,本產品會回到正常顯示畫面。
(%)
16-100
9-15
4-8
0-3
Page 25
4
清潔及保養
備註:
• 請勿以吸塵機清潔微粒感應器。
• 關閉空氣清新機,並根據以下操作將其從電源插座拔出。
清潔空氣清新機機身
使用柔軟的乾布清潔空氣清新機和排氣口的內部和外部。
清潔微粒感應器
2
每
個月清潔一次微粒感應器,讓本產品發揮出最佳功能。
1
使用柔軟毛刷子微粒感應器的進氣
口及排氣口。
2
使用濕棉花棒清潔微粒感應器。使用
乾爽的棉花棒徹底擦乾所有部件。
25ZH-T
Page 26
清潔濾網表面
1
拉起後蓋,
從產品
拆下。
螢幕顯示清潔濾網提示
表面。
2
從產品拉出
濾網。
3
使用吸塵機
清潔濾網
表面。
時,使用吸塵機清潔濾網
4
將濾網裝回
本產品。
5
重新裝上
後蓋。
6
按下
產品。
26 ZH-T
按鈕開啟本
3’’
7
按住濾網狀態檢查/重設
3
按鈕
定濾網清潔時間。
秒,以重新設
8
清潔濾網後,必須
徹底洗淨雙手。
Page 27
更換濾網
備註:
• 請勿清洗或重用濾網。
• 因濾網滿佈空氣中的污染物,請勿嗅聞濾網。
需要更換濾網時,濾網更換提示
燈會亮起紅色。
1
更換納米級防護
步驟操作。
2
按下
產品。
S3
按鈕開啟本
型濾網
3
(FY2180/30)
濾網,請根據「安裝濾網」部分的
3’’
按住濾網狀態檢查/重
3
設按鈕
設定濾網清潔時間。
秒,以重新
4
清潔濾網後,
必須徹底洗淨雙
手。
27ZH-T
Page 28
重設濾網
3’’
您亦可以在屏幕顯示濾網更換警示( )之前更換濾網。更換濾網後,您需要手動
重設濾網壽命計算器。
+
2
1
輕按電源
以關閉本產品,並將插
頭從電源插座拔出。
5
儲存
1
關閉空氣清新機,並將插頭從牆身插座拔出。
2
清潔空氣清新機、微粒感應器和濾網表面(請參閱「清潔與保養」章節)。
3
必須讓所有部件風乾方可存放。
4
將濾網放入密封膠袋中。
5
將空氣清新機、濾網存放於陰涼乾爽的地方。
6
處理濾網後,必須徹底洗淨雙手。
6
疑難排解
本章節總結一些您在本產品上最常見的問題。如果您按照以下資料仍未能解決問
題,請聯絡您的國家的
問題 可行解決方案
3
按鈕
秒
Philips
將電源插頭插入電
源插座。
顧客服務中心。
3
開啟電源後
及
濾網壽命計算器。
按鈕
15
秒內,按住
3
,以重設
秒
本產品無法正確
操作。
28 ZH-T
• 請檢查後蓋是否正確安裝。
• 濾網更換提示燈已亮起但沒有更換相應濾網,因此本產品已
被鎖定。在這情況,請更換該濾網並按住 ,以重設濾網壽
命計算器。
Page 29
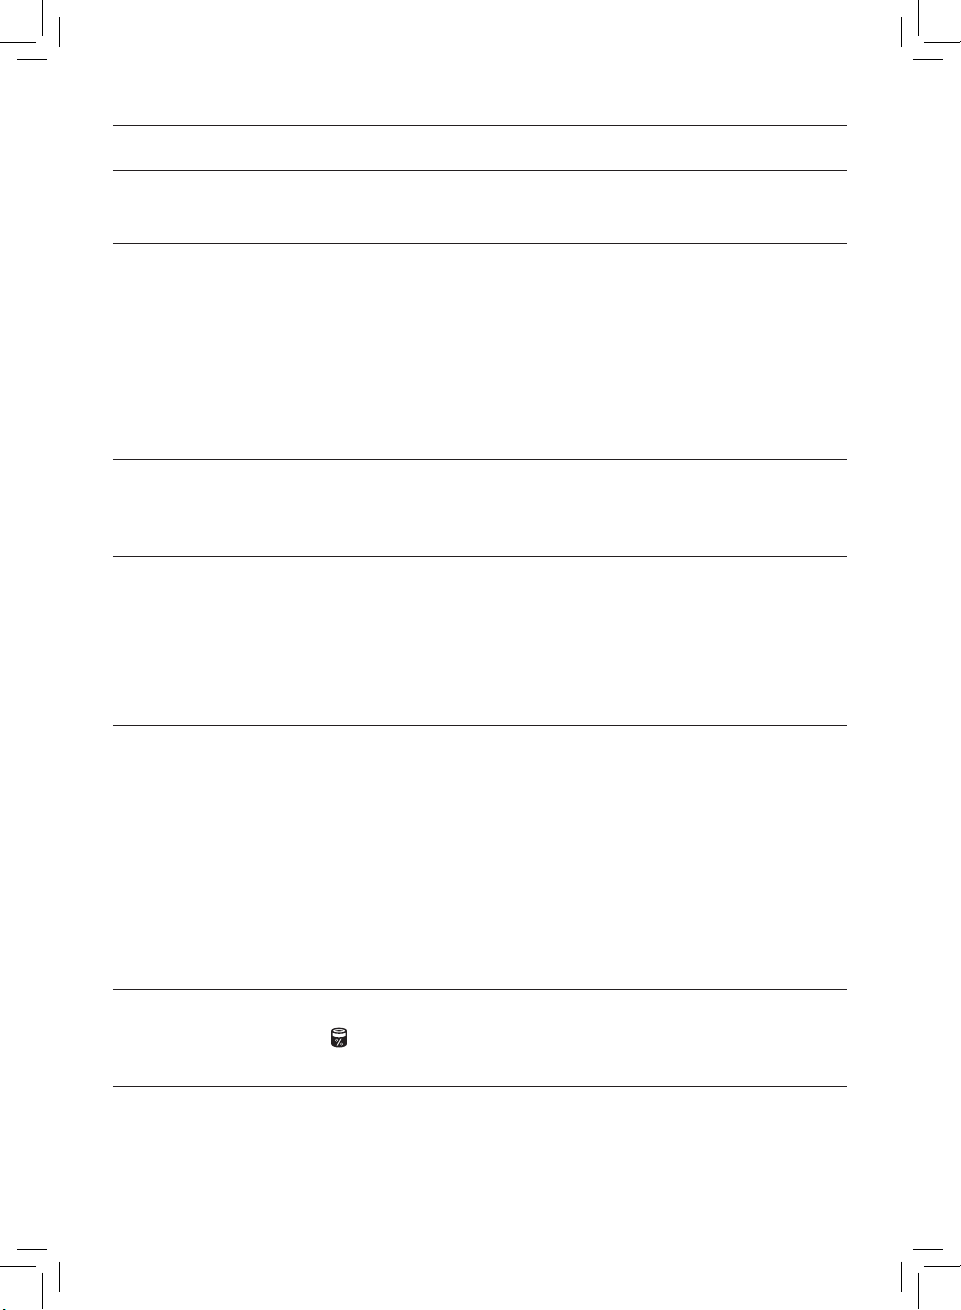
問題 可行解決方案
排氣口排出的風量
比以前明顯減弱。
本產品經過長時間
運作,空氣質素仍
沒有改善。
• 濾網的表面骯髒。清潔濾網表面(請查看「清潔與保養」章
節)。
• 請檢查是否已移除濾網的所有包裝物料。
• 本產品的濾網未有更換。確保正確安裝濾網
• 微粒感應器變濕。您的房間濕度高,導致水分凝結。確保微
粒感應器清潔和保持乾燥(請參閱「清潔與保養」章節)。
• 房間面積大或室外空氣質素差。
為獲得最佳淨化性能,請在操作空氣清新機時關閉門窗。
• 有室內污染源頭。例如,吸煙、烹飪、焚香、香水或酒精。
• 濾網的使用壽命結束。更換全新的濾網。
空氣質素光環的
顏色永遠保持同一
• 微粒感應器處於骯髒的狀態。清潔微粒感應器(請查看
「清潔與保養」章節)。
顏色。
本產品發出一陣
怪味。
• 在您最初數次使用本產品時,它可能會發出一點塑膠氣味。
此為正常。可是,如果本產品在更換濾網後發出燒焦的氣
味,請聯絡您的
Philips
經銷商或認可的
心。由於吸收了室內氣體,濾網使用一段時間後可能會產生
氣味。建議您將濾網置於陽光下,然後再重新使用。如果仍
有異味,請更換濾網。
本產品聲浪太大。 • 如果本產品運行特強模式,屬正常現象。
• 在自動模式中,如果本產品聲響太大,可能是因為空氣質素
變差,或者您在應用程式中的個人化設定令風扇速度提高,
所以產品才以高速運行。您可以選擇睡眠模式,或在應用程
式中更改設定。
• 如果有任何東西掉入排氣口,亦有可能產生異常響亮的聲
音。立即關閉產品,並倒轉產品,以便從產品中取出外來
物體。
• 如果仍然有不正常的聲響,請聯絡您所在國家/地區的客戶
服務中心。
(FY2180/30)
Philips
服務中
。
即使我已替換濾
網,本產品仍表示
需要替換。
• 可能您沒有重設濾網的使用時間。開啟本產品按住重設按鈕
( ) 3
秒。
29ZH-T
Page 30

問題 可行解決方案
螢幕顯示「E1」的
錯誤代碼。
未能成功設定
Wi-Fi
。
• 摩打出現故障。請聯絡您所在國家/地區的客戶服務中心。
• 如果本產品所連接的路由器為雙頻,而目前不是連接
2�4GHz
然後再次嘗試進行配對。不支援
網絡的話,請將該路由器的頻段切換至
5GHz
網絡。不支援
網絡。如果本產品連接至雙頻寬路由器,請切換至
網絡,然後再次嘗試進行配對。
2�4GHz
5GHz
2�4GHz
,
• 產品不支援網上驗證網絡。不支援辦公室或酒店網絡等公共
Wi-Fi
。
• 檢查本產品是否在
試將空氣清新機移近
• 請檢查
Wi-Fi
• 根據「網絡改變後設定
新設定。根據「重設
Wi-Fi
路由器所覆蓋的範圍內。您可以嘗
Wi-Fi
路由器。
密碼是否正確。密碼有大小寫之分。
Wi-Fi
連線」部分的指示,嘗試重
Wi-Fi
連線」部分的指示,嘗試重新
設定。
• 讓本產品遠離可能會造成干擾的其他電子裝置。
• 請檢查流動裝置是否處於飛行模式。連接至
Wi-Fi
網絡時,
請確保已停用飛行模式。
Wi-Fi
• 如果
配對失敗數次,請於智能手機的設定中關閉流動
數據,然後再嘗試配對。
• 如果產品螢幕的
Wi-Fi
指示燈顯示白色燈光,但在應用程式
中未能找到您的產品,請點擊「連接新裝置」,然後在「開
始設定」的列表中增加產品。
• 請參閱應用程式中的說明部分,以獲取最新的詳細疑難排解
貼士。
30 ZH-T
Page 31

Page 32
© 2020 Koninklijke Philips N.V.
All rights reserved
3000 048 50061
 Loading...