

Page 1

AC0819/AC0820
AC0830
EN
User manual
3
ZH-HK
用戶手冊
15
Page 2

Page 3

Contents
1 Important ��������������������������������������������������������������������������������������� 2
Safety ������������������������������������������������������������������������������������������������������������������������������ 2
2 Your air purier �����������������������������������������������������������������������������4
Product Overview �������������������������������������������������������������������������������������������������������4
Controls overview ������������������������������������������������������������������������������������������������������5
3 Using the air purier �������������������������������������������������������������������� 5
Understanding the air quality light ���������������������������������������������������������������������5
Installing the lter ������������������������������������������������������������������������������������������������������6
Connecting power ������������������������������������������������������������������������������������������������������6
Turning on and o ������������������������������������������������������������������������������������������������������6
Changing the mode setting ������������������������������������������������������������������������������������ 7
4 Cleaning ����������������������������������������������������������������������������������������� 7
Cleaning schedule ����������������������������������������������������������������������������������������������������� 7
Cleaning the body of the air purier ������������������������������������������������������������������� 8
Cleaning the air quality sensor �����������������������������������������������������������������������������8
Cleaning the surface of the lter ��������������������������������������������������������������������������8
5 Replacing the lter �����������������������������������������������������������������������9
Understanding the healthy air protect lock �����������������������������������������������������9
Replacing the lter ����������������������������������������������������������������������������������������������������9
Filter reset ������������������������������������������������������������������������������������������������������������������� 10
6 Storage ����������������������������������������������������������������������������������������� 10
7 Troubleshooting ������������������������������������������������������������������������� 10
8 Guarantee and service ����������������������������������������������������������������12
Order parts or accessories �������������������������������������������������������������������������������������12
9 Notices �������������������������������������������������������������������������������������������12
Electromagnetic elds (EMF) ��������������������������������������������������������������������������������12
Recycling ����������������������������������������������������������������������������������������������������������������������12
1EN
Page 4

1 Important
Safety
Read this user manual carefully before you use the appliance, and save it for future reference�
Danger
• Do not clean the appliance with water, any other liquid, or a
(ammable) detergent to avoid electric shock and/or a re hazard�
• Do not spray any ammable materials such as insecticides or fragrance
around the appliance�
Warning
• Check if the voltage indicated on the appliance corresponds to the local
power voltage before you connect the appliance�
• If the power cord is damaged, you must have it replaced by Philips, a
service center authorized by Philips, or similarly qualied persons in
order to avoid a hazard�
• Do not use the appliance if the adaptor, the power cord, or the
appliance itself is damaged�
• Only use the approved 3-pin plug adapter (KA1801A-2400750BS)
provided with the appliance�
• This appliance is not intended for use by persons (including children)
with reduced physical, sensory, or mental capabilities, or lack of
experience and knowledge, unless they have been given supervision or
instruction concerning use of the appliance by a person responsible for
their safety�
• Children shall not play with the appliance� Cleaning and maintenance
shall not be made by children without supervision�
• Do not block the air inlet and outlet�
• Do not place any items on top of the air outlet, or in front of the air
inlet�
• Make sure that foreign objects do not fall into the appliance through
the air outlet�
2 EN
Page 5

Caution
• This appliance is not a substitute for proper ventilation, regular vacuum
cleaning, or use of an extractor hood or fan while cooking�
• Always place and use the appliance on a dry, stable, level, and
horizontal surface�
• Leave at least 20cm free space around the appliance and leave at least
30cm free space above the appliance�
• Do not sit or stand on the appliance� Do not place anything on top of
the appliance�
• Do not place the appliance directly below an air conditioner to prevent
condensation from dripping onto the appliance�
• Only use the original Philips lters specially intended for this appliance�
Do not use any other lters�
• Combustion of the lter may cause irreversible human hazard and/
or jeopardize other lives� Do not use the lter as fuel or for similar
purpose�
• Avoid knocking against the appliance (the air inlet and outlet in
particular) with hard objects�
• Do not insert your ngers or objects into the air outlet or the air inlet to
prevent physical injury or malfunctioning of the appliance�
• Do not use this appliance when you have used indoor smoke-type
insect repellents or in places with oily residues, burning incense, or
chemical fumes�
• Do not use the appliance near gas appliances, heating devices or
replaces�
• Always turn o the air purier rst, then unplug adapter from wall
outlet, when you want to moving, cleaning appliance, replacing the
lters or carry out other maintenance�
• The appliance is only intended for household use under normal
operating conditions�
• Do not use the appliance in wet surroundings or in surroundings with
high ambient temperatures, such as the bathroom, toilet, or kitchen, or
in a room with major temperature changes�
• The appliance does not remove carbon monoxide (CO) or radon
(Rn)� It cannot be used as a safety device in case of accidents with
combeustion processes and hazardous chemicals�
3EN
Page 6

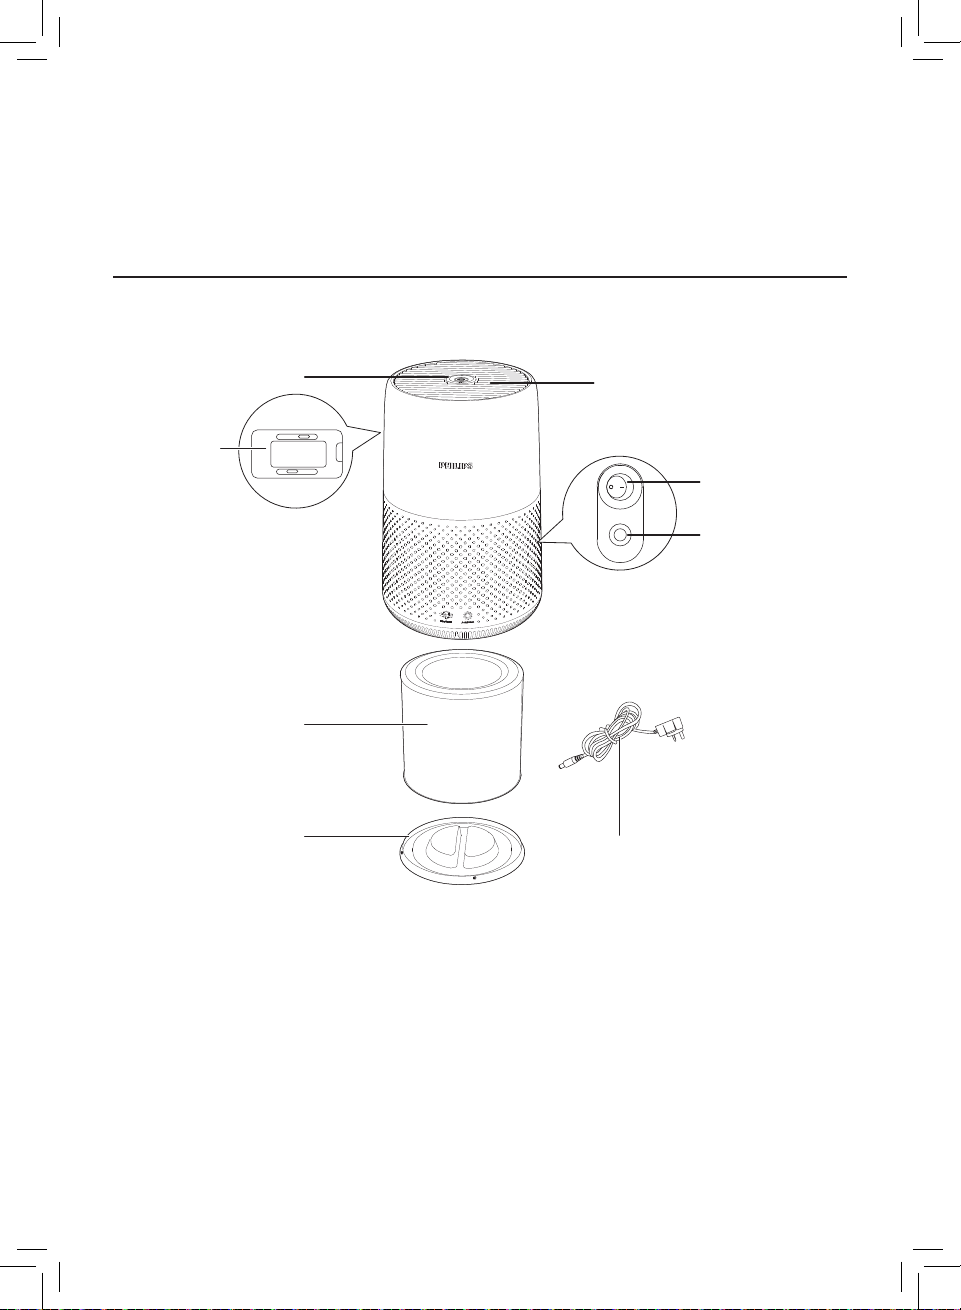
2 Your air purifier
Air quality
sensor
Congratulations on your purchase, and welcome to Philips!
To fully benet from the support that Philips oers, register your product at
www�philips�com/welcome�
Product Overview
Control panel
NanoProtect lter
Series 2 (FY0194,
FY0293*)
Base
*FY0194 is for AC0819/AC0820, FY0293 is for AC0830�
**Please use only the 3 pin plug adapter provided�
Air outlet
Power on/o
button
Power socket
3 Pin plug adapter**
(KA1801A-2400750BS)
4 EN
Page 7

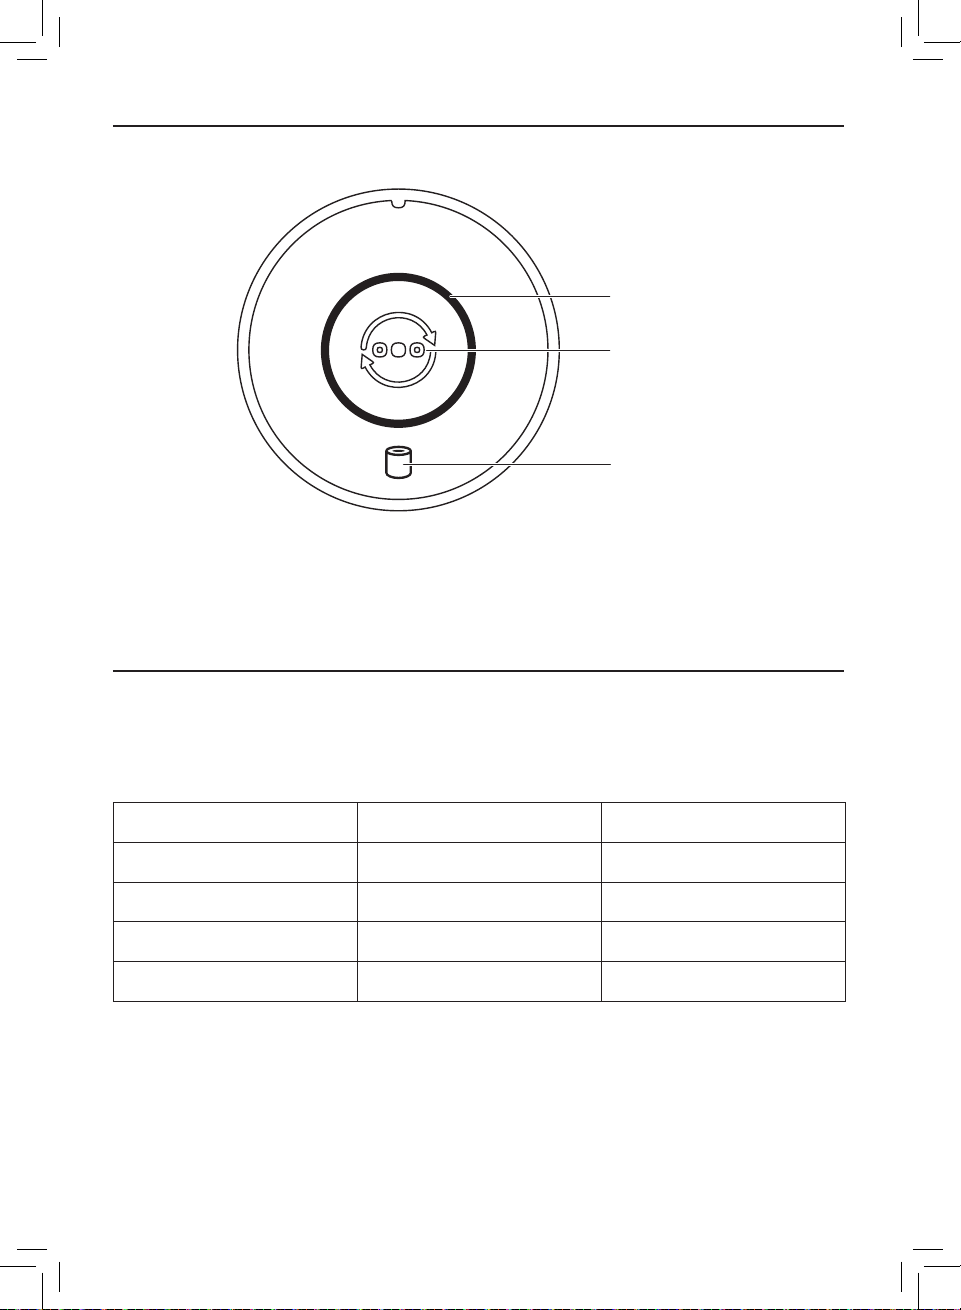
Controls overview
3 Using the air purifier
Understanding the air quality light
Air quality light
Mode switch/
Filter reset button
Filter replacement
alert
The color of air quality light corresponds to the ambient air quality�
The brightness of air quality light reects the current running mode�
PM2�5 level Air quality light color Air quality level
≤12 Blue Good
13-35 Blue-purple Fair
36-55 Purple-red Poor
>55 Red Very poor
5EN
Page 8

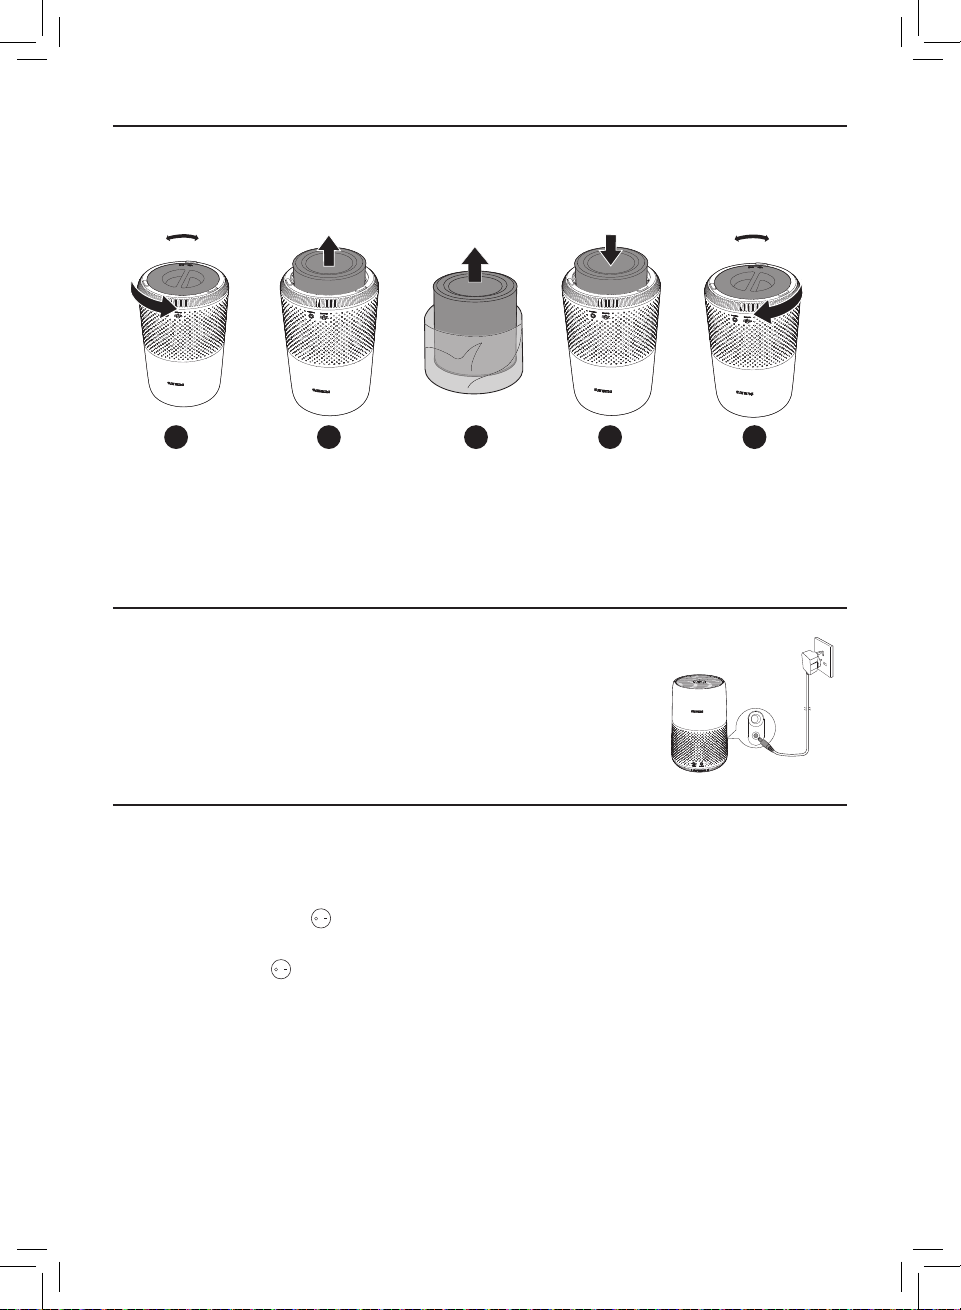
Installing the lter
Remove all packaging of the lter before use�
Note: Make sure the air purier is unplugged from the electrical outlet before installing the
lter�
CLOSEOPEN
1 2 3 4 5
CLOSEOPEN
1 Rotate the base anti-clockwise to remove it from the appliance�
2 Pull the lter out from the appliance�
3 Remove all packaging materials of the air purication lter�
4 Put the lter back into the appliance�
5 Reattach the base and rotate it clockwise to fasten the base�
Connecting power
Note: Risk of electric shock! When you unplug the AC power cord,
always pull the plug from the socket� Never pull the cord�
Connect the power adapter to:
• First, the power socket on the appliance�
• Then, the wall outlet�
Turning on and o
Note:
• For optimum purication performance, close doors and windows�
1 Press the power button on the back of the air purier to switch on�
» The air purier operates in the auto mode by default�
2 Press the power button again to switch o the air purier�
6 EN
Page 9

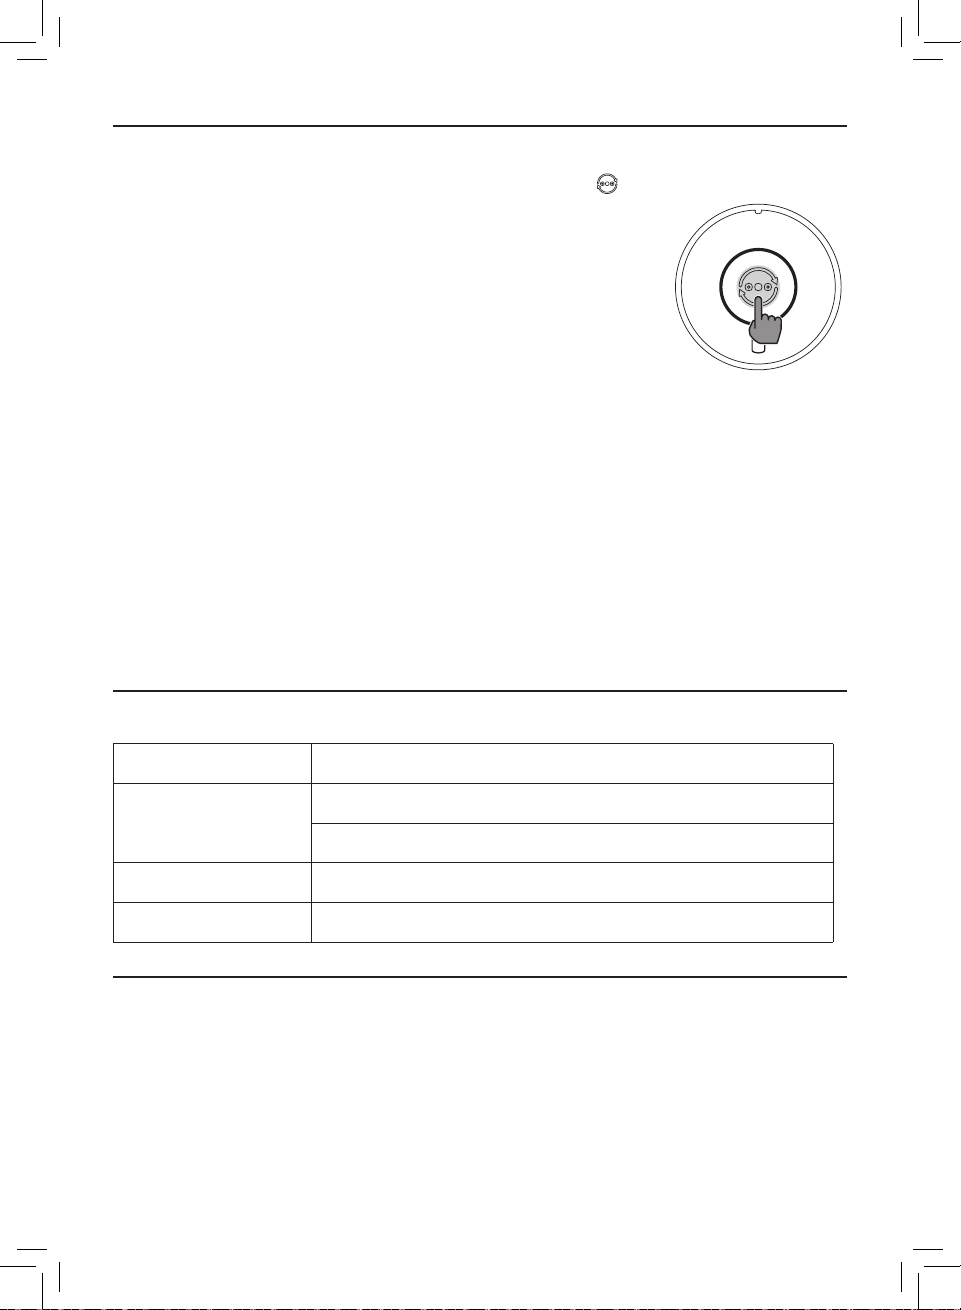
Changing the mode setting
You can choose Auto mode, Turbo mode or the Sleep mode by pressing the mode switch
button � The brightness of air quality light reects the current running mode:
• Sleep mode-lowest brightness
• Auto mode-mid level brightness
• Turbo mode-highest level brightness
Auto mode
In Auto mode, the appliance selects the fan speed in accordance with
the ambient air quality�
Turbo mode
In Turbo mode, the air purier operates on the highest speed�
Sleep mode
In Sleep mode, the air purier operates quietly at a low speed�
4 Cleaning
Note:
• Never use abrasive, aggressive, or ammable cleaning agents such as bleach or alcohol to
clean any part of the appliance�
Cleaning schedule
Frequency Cleaning method
Wipe the surface of the appliance with a soft dry cloth
When necessary
Clean the air outlet cover
Every two months Clean the air quality sensor with a dry cotton swab
Every four weeks Clean the surface of the lter
7EN
Page 10
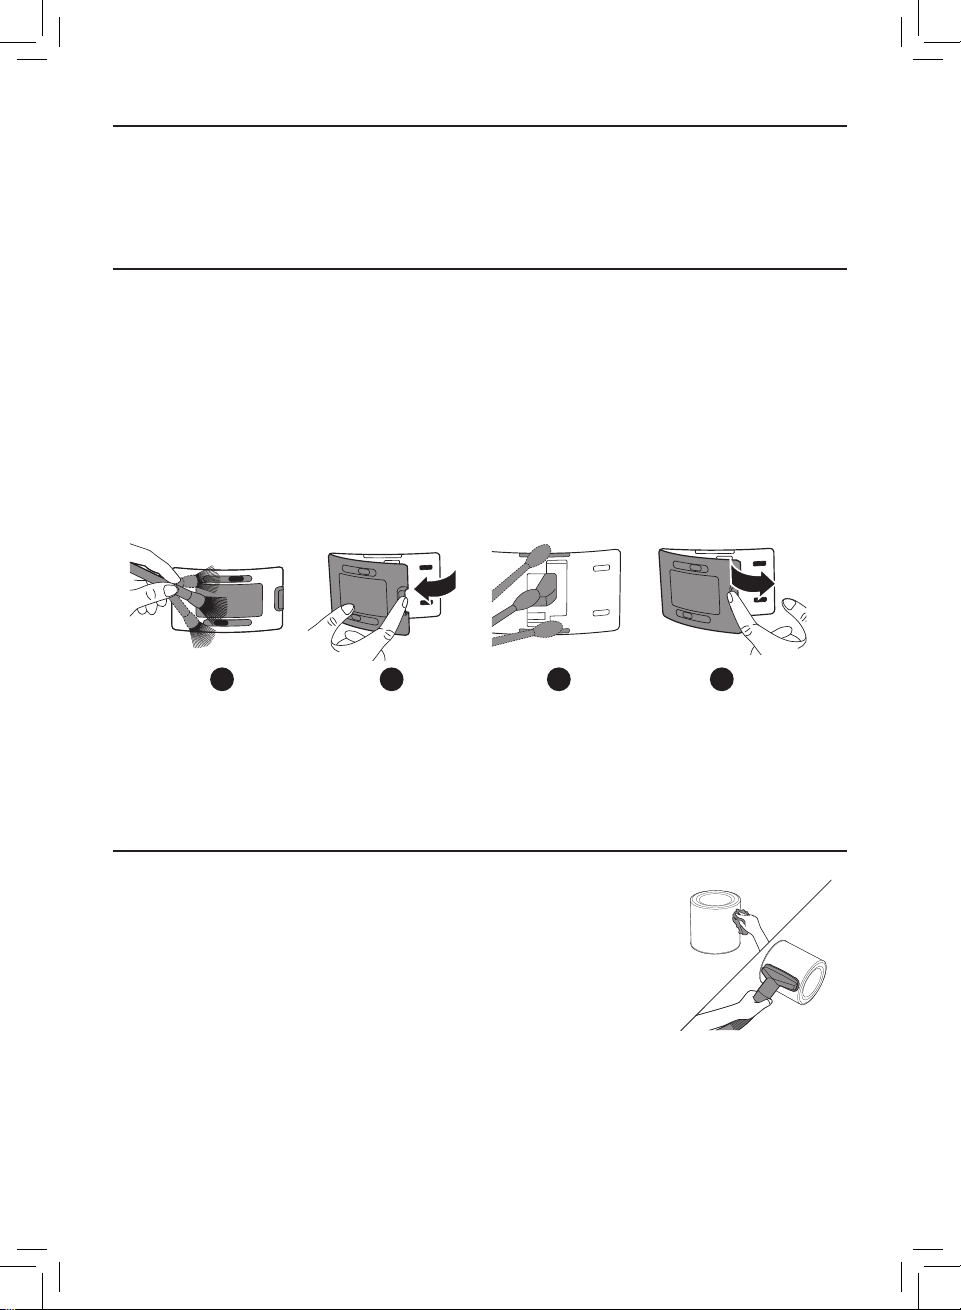
Cleaning the body of the air purier
Regularly clean the inside and outside of the air purier to prevent dust from collecting�
1 Use a soft, dry cloth to clean both the interior and exterior of the air purier�
2 The air outlet can also be cleaned with a dry, soft cloth�
Cleaning the air quality sensor
Clean the air quality sensor every two months for optimal functioning of the appliance�
Note:
• If the air purier is used in a dusty environment, it may need to be cleaned more often�
• If the humidity level in the room is very high, condensation may develop on the air quality
sensor and the air quality light may indicate a poorer air quality even though the air quality
is actually good� If this occurs, clean the air quality sensor or use the air purier on a
manual speed setting�
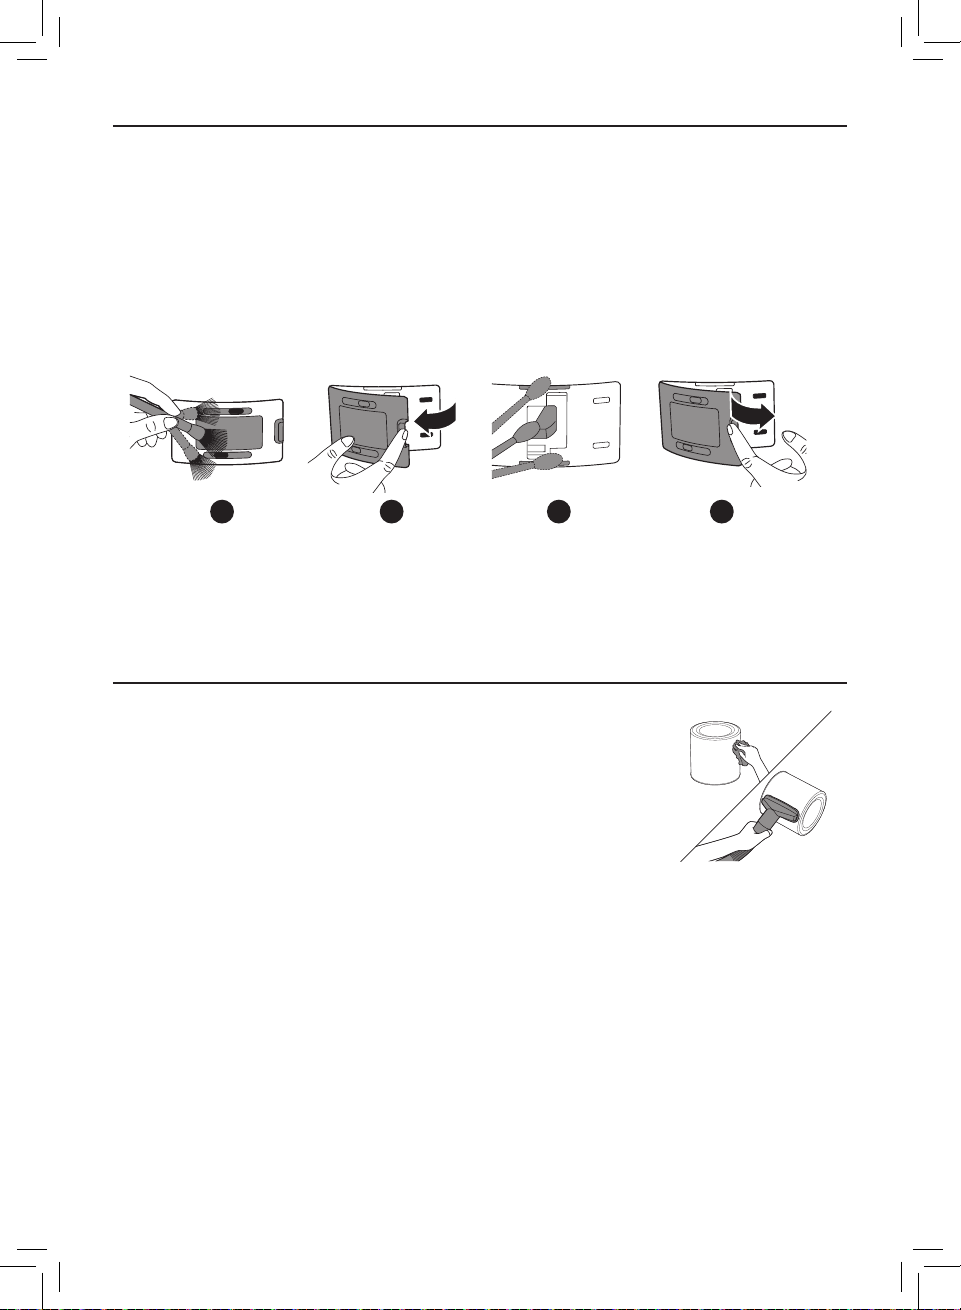
1 Switch o the air purier and unplug from the power socket�
2 3 4 6
2 Clean the inlet and outlet of the air quality sensor with a soft brush�
3 Open the air quality sensor cover�
4 Clean the air quality sensor, the dust inlet and the dust outlet with a damp cotton swab�
5 Dry all parts thoroughly with a dry cotton swab�
6 Reattach the air quality sensor cover�
Cleaning the surface of the lter
Wipe the surface of the lter with soft wet cloth or clean the surface of
the lter with a vacuum cleaner�
Note:
• if you use a high power/ industrial vacuum cleaner, it may damage the
lter�
8 EN
Page 11
5 Replacing the filter
Understanding the healthy air protect lock
This appliance is equipped with the healthy air protect lock to make sure that the
NanoProtect lter is in optimal condition when the appliance is operating� When the lter is
almost expired, the lter replacement alert ( ) lights up red, which indicates that it needs to
be replaced� If you do not replace the lter in time, the lter replacement alert ( ) will ash�
The appliance will stop operating and get locked�
Replacing the lter
Note:
• The lter is not washable or reusable�
• Always turn o the air purier and unplug from the electrical outlet before replacing the
lter�
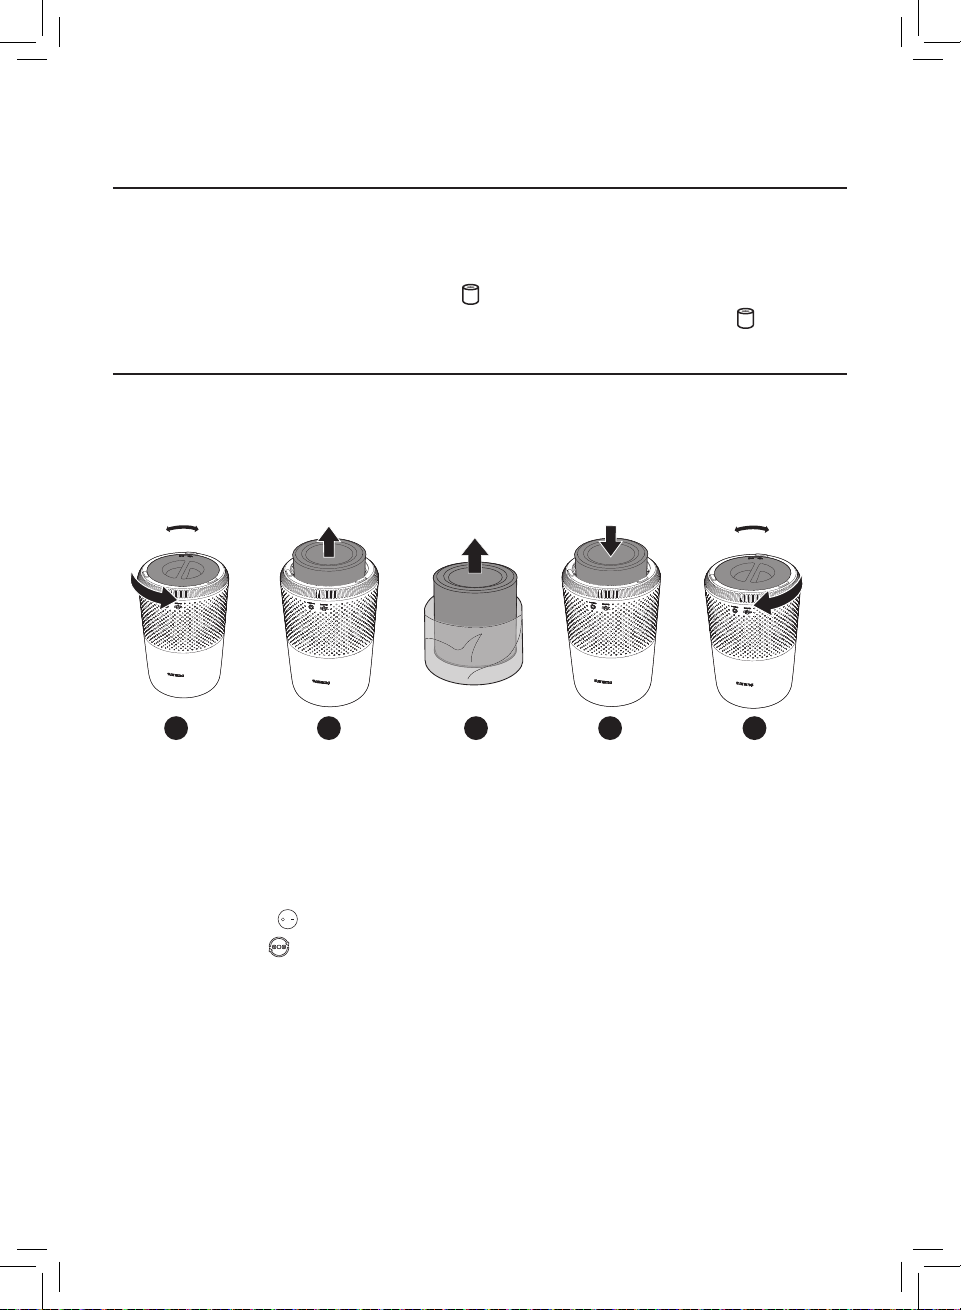
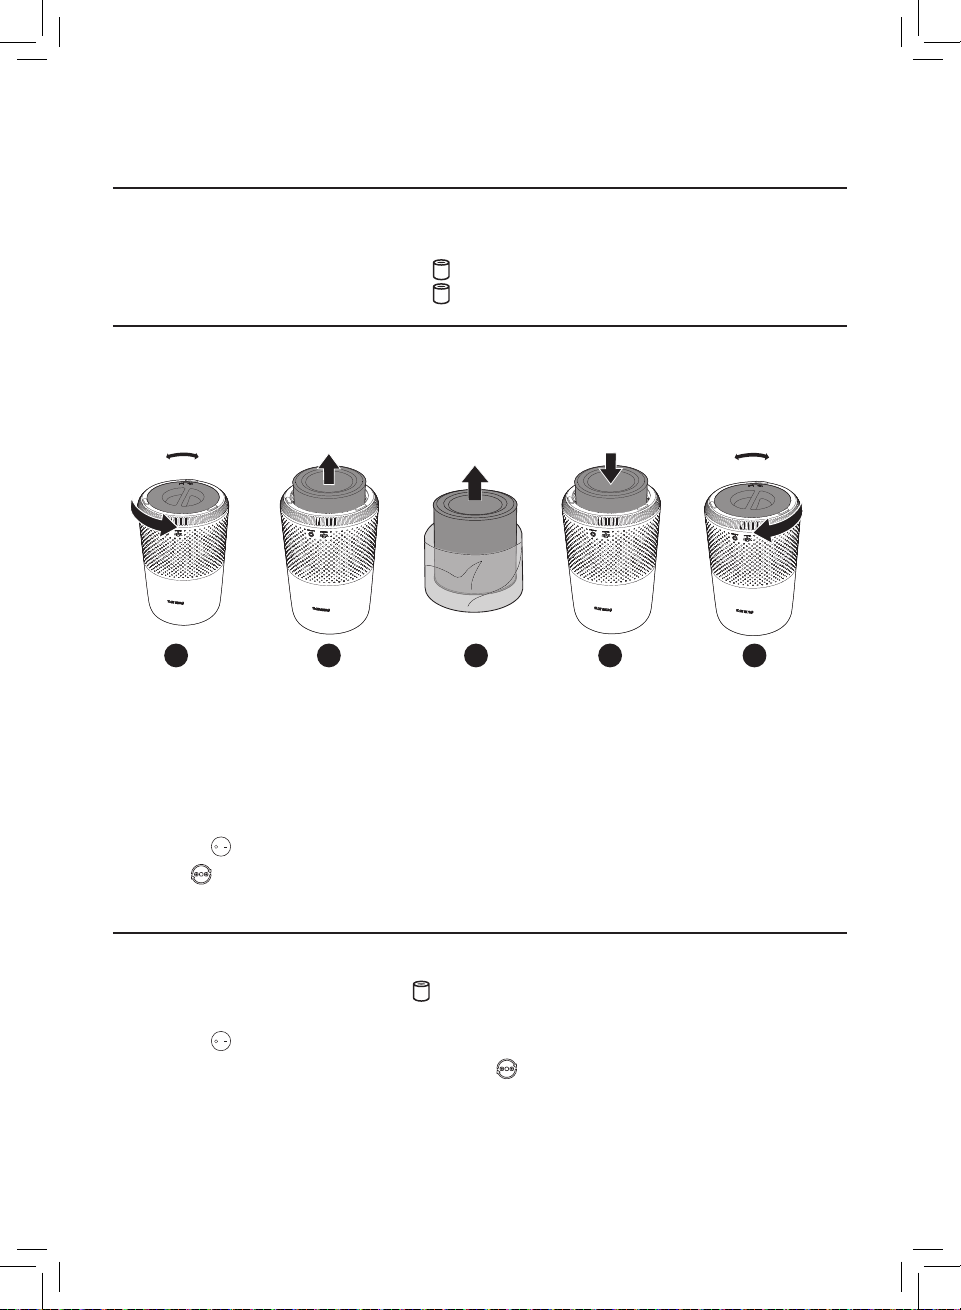
CLOSEOPEN
CLOSEOPEN
1 2 3 4 5
1 Rotate the base anti-clockwise to remove it from the appliance�
2 Pull the lter out from the appliance� Discard the used lter�
3 Remove all packaging materials of the new lter�
4 Put the lter into the appliance�
5 Reattach the base and rotate it clockwise to fasten the base�
6 Put the plug of the air purier in the power socket�
7 Press the power button to switch on the appliance�
8 Press and hold for 3 seconds to reset the lter lifetime counter�
9 Wash your hands thoroughly after replacing the lter�
9EN
Page 12
Filter reset
You can replace the lter even before lter replacement alert ( ) displays on the screen�
After replacing a lter, you need to reset the lter lifetime counter manually�
1 Press the power button to turn on the appliance�
2 Within 10 seconds after power on, press and hold the mode switch button for
5 seconds to reset the lter lifetime counter�
6 Storage
1 Turn o the air purier and unplug from the power socket�
2 Clean the air purier, air quality sensor and the surface of the lter (see the chapter
“Cleaning”)�
3 Let all parts air dry thoroughly before storing�
4 Wrap the lter in air tight plastic bags�
5 Store the air purier, lter in a cool, dry location�
6 Always thoroughly wash hands after handling a lter�
7 Troubleshooting
This chapter summarizes the most common problems you could encounter with the
appliance� If you are unable to solve the problem with the information below, contact the
Consumer Care Center in your country�
Problem Possible solution
The appliance
does not work even
though it is plugged
in�
The airow that
comes out of the air
outlet is signicantly
weaker than before�
10 EN
• The lter replacement alert is on but you have not replaced the
corresponding lter� As a result, the appliance is now locked� In
this case, replace the lter and reset the lter lifetime counter�
• The surface of the lter is dirty� Clean the surface of the lter (see
the chapter “Cleaning”)�
Page 13
Problem Possible solution
The air quality does
not improve, even
though the appliance
has been operating
for a long time�
The appliance
produces a strange
smell�
The appliance is
extra loud�
• Check if the packing material is removed from the lter�
• Make sure that the lter is properly installed�
• The air quality sensor is dirty or wet� Clean the air quality sensor
(See the chapter “Cleaning”)�
• Room size is large or the outdoor air quality is poor�
For optimum purication performance, please close the doors
and windows when operating the air purier�
• There are indoor pollution resources� For instances, smoking,
cooking, incense�
• Filter reaches the end of life� Replace the lter with a new one�
• The rst few times you use the appliance, it may produce a plastic
smell� This is normal� However, if the appliance produces a burnt
smell even if removing the lter, contact your Philips dealer or an
authorized Philips service center� The lter may produce smell
after being used for a while because of the absorption of indoor
gases� It’s recommended that you reactivate the lter by putting it
in direct sunlight for repeated use� If odor still exists, replace the
lter�
• Check if the packing of the lter is removed�
• The appliance will run in high speed when the air quality is poor,
which will causes higher noises� When using the appliance in a
bedroom at night, choose the Sleep speed�
• if anything drops into air outlet, it may also cause abnormal loud
sounds� Immediate turn o appliance, turn appliance upside
down, to get foreign objectives out of appliance�
The appliance still
indicates that I need
to replace a lter, but
I already did�
Appliance keeps
o, but air quality
light blinks for one
minute�
• Perhaps you did not reset the lter lifetime counter� Switch on the
appliance� Then press and hold the mode switch button ( ) for
3 seconds until disappears�
• The appliance has malfunctions� Contact the Consumer Care
Center in your country�
11EN
Page 14

8 Guarantee and service
If you need information or if you have a problem, please visit the Philips website at
www�philips�com or contact the Philips Consumer Care Center in your country (you can nd
its phone number in the worldwide guarantee leaet)� If there is no Consumer Care Center in
your country, go to your local Philips dealer�
Order parts or accessories
If you have to replace a part or want to purchase an additional part, go to your Philips dealer
or visit www�philips�com/support�
If you have problems obtaining the parts, please contact the Philips Consumer Care Center in
your country (you can nd its phone number in the worldwide guarantee leaet)�
9 Notices
Electromagnetic elds (EMF)
This Philips appliance complies with all applicable standards and regulations regarding
exposure to electromagnetic elds�
Recycling
Do not throw away the product with the normal household waste at the end of its life, but
hand it in at an ocial collection point for recycling� By doing this, you help to preserve the
environment�
Follow your country's rules for the separate collection of electrical and electronic products�
Correct disposal helps prevent negative consequences for the environment and human
health�
12 EN
Page 15

目錄
1
重要事項
�������������������������������������������������������������������������������������������������������������������������������14
安全
2
您的空氣清新機
產品概要
控制鍵概覽
3
使用空氣清新機
了解空氣質素指示燈
安裝濾網
連接電源
������������������������������������������������������������������������������������������������������������������������������ 18
開關
更改模式設定
4
5
���������������������������������������������������������������������������������������������� 19
清潔
清潔時間表
清潔空氣清新機機身
清潔空氣質素感應器
清潔濾網表面
更換濾網
了解清新空氣保護鎖
更換濾網
重設濾網
������������������������������������������������������������������������������������� 14
������������������������������������������������������������������������ 16
�������������������������������������������������������������������������������������������������������������������� 16
���������������������������������������������������������������������������������������������������������������� 17
�������������������������������������������������������������������������17
�������������������������������������������������������������������������������������������17
�������������������������������������������������������������������������������������������������������������������� 18
�������������������������������������������������������������������������������������������������������������������� 18
���������������������������������������������������������������������������������������������������������� 19
��������������������������������������������������������������������������������������������������������������� 19
������������������������������������������������������������������������������������������ 19
����������������������������������������������������������������������������������������� 20
��������������������������������������������������������������������������������������������������������� 20
��������������������������������������������������������������������������������������21
�������������������������������������������������������������������������������������������21
���������������������������������������������������������������������������������������������������������������������21
���������������������������������������������������������������������������������������������������������������������21
6
儲存
7
疑難排解
8
保障及服務
訂購零件或配件
9
注意
電磁場
回收
����������������������������������������������������������������������������������������������22
�������������������������������������������������������������������������������������22
���������������������������������������������������������������������������������23
�����������������������������������������������������������������������������������������������������23
��������������������������������������������������������������������������������������������� 24
(EMF)
������������������������������������������������������������������������������������������������������������������������������24
������������������������������������������������������������������������������������������������������������24
13ZH_HK
Page 16

1
重要事項
安全
使用本產品前請先閱讀本用戶手冊,並保管以作將來參考。
危險事項
• 請勿用水或任何液體或(易燃)清潔劑清潔此產品,以避免觸電
和/或火災的危險。
• 請勿在本產品周圍噴射殺蟲劑或芳香劑等易燃物品。
警告
• 在連接本產品前,請檢查產品註明的指示電壓與當地電源電壓是
否對應。
• 如果電源線損壞,為避免危險,必須由
Philips、Philips
授權的維
修中心或類似的合資格人士來更換。
• 若轉接器、電源線或產品本身已受損,請勿使用。
• 僅使用隨產品提供的經認可
• 本產品並不適合身體、感覺或心智能力低下人仕(包括兒童),
3
腳插頭變壓器
(KA1801A-2400750BS)
。
或缺乏知識及經驗人仕使用,除非該人仕已受其他負責其安全之
人仕就使用本產品的監督或指導。
• 兒童應受監督以確保他們不會以本產品玩耍。兒童不應於沒有監
督情況下對產品進行清潔及維護。
• 不要阻塞進氣口或排氣口。
• 請勿將任何物品放在排氣口頂部或進氣口前面。
• 確保異物不會通過排氣口掉入裝置內部。
14 ZH_HK
Page 17

注意
• 本產品並不是適當通風設備、正規吸塵器或煮食時使用的抽油煙
機或風扇的代替品。
• 在乾燥、穩定、平滑和水平表面上使用產品。
• 在本產品的周圍至少留出
30
厘米空間。
• 請勿坐或站立在裝置上。請勿在裝置上放置任何物品。
• 請勿在冷氣機正下方放置產品,以避免冷凝滴水到產品上。
• 僅使用本產品專用的原裝
• 燃燒濾網可能造成對健康無可挽回的危害及
20
厘米的空間,本產品上方至少留出
Philips
濾網。請勿使用任何其他濾網。
/
或危及他人生命。
不要使用濾網作為燃料或類似用途。
• 避免以硬物碰撞產品(尤其是產品的進氣口或排氣口)。
• 請勿將您的手指或其他物件放入進氣口或排氣口,以免造成身體
傷害或產品故障。
• 若您使用室內煙型驅蚊劑,或該地方有油跡、香火或化學煙霧,
請勿使用本產品。
• 請勿在煤氣用具、暖氣設備或壁爐旁邊使用本產品。
• 當移動及清潔產品、更換濾網或進行其他維修保養時,請務必先
關閉空氣清新機,然後從牆上插座拔下變壓器。
• 本產品只適合一般操作環境下的家居使用。
• 請勿在洗手間或廚房等濕潤或高溫環境,或溫度變化較大的房間
使用本產品。
• 本產品不會去除一氧化碳
(CO)
或氡
(Rn)
過程和危險化學品的意外中充當安全裝置。
。本產品不能在含有燃燒
15ZH_HK
Page 18
2
您的空氣清新機
感謝您購買
請前往以下網址註冊您的產品,以獲得
www�philips�com/welcome
Philips
產品,歡迎來到
。
Philips
產品概要
控制面板
空氣質素
感應器
NanoProtect
系列
FY0293*)
濾網
2 (FY0194,
世界!
Philips
的完整支援:
排氣口
電源開/關按鈕
電源插座
機座
*FY0194
**
請使用提供的3腳插頭變壓器。
16 ZH_HK
AC0819/AC0820,FY0293
適用於
適用於
3
腳插頭變壓器
(KA1801A-2400750BS)
AC0830
。
**
Page 19
控制鍵概覽
空氣質素指示燈
3
使用空氣清新機
了解空氣質素指示燈
空氣質素指示燈的顏色與空氣質素環境對應。
空氣質素指示燈的亮度反映現時的運行模式。
PM2�5
12
≤
13-35
水平
空氣質素指示燈的顏色 空氣質素水平
藍色 良好
藍色-紫色 一般
模式切換
濾網重設按鈕
濾網更換提示
/
36-55
>55
紫色-紅色 差
紅色 非常差
17ZH_HK
Page 20
安裝濾網
使用前,請移除濾網的所有包裝。
備註:安裝濾網前,請確保空氣清新機已經從電源插座拔除。
CLOSEOPEN
1 2 3 4 5
1
以逆時針方向旋轉機座,將其從產品中取出。
2
由本產品拉出濾網。
3
移除空氣淨化濾網的所有包裝物料。
4
將濾網裝回本產品。
5
重新連接機座,並以順時針方向旋轉以扭緊機座。
連接電源
CLOSEOPEN
備註:有觸電危險。拔除
拔下。請勿拉扯電源線。
連接電源變壓器至:
• 首先,連接至產品上的電源插座。
• 然後,連接至牆上的電源插座。
AC
電源線時,請務必將插頭從插座
開關
備註:
•
請關閉門窗,以獲得最佳的空氣淨化效果。
1
按背面的電源按鈕
» 空氣清新機以預設的自動模式運行。
2
再按一次電源
18 ZH_HK
開啟空氣清新機。
按鈕關閉空氣清新機。
Page 21
更改模式設定
可按模式切換按鈕選擇自動模式、特強模式或睡眠模式 。空氣質素指示燈的亮度
反映現時的運行模式:
• 睡眠模式
• 自動模式
• 特強模式
-
最暗亮度
-
中等亮度
-
最光亮度
自動模式
在自動模式下,本產品會根據空氣質素環境選擇風扇速度。
特強模式
在特強模式中,空氣清新機以最高速度運作。
睡眠模式
在睡眠模式中,空氣清新機會以緩慢速度安靜運作。
4
清潔
備註:
•
請勿使用磨蝕性、侵略性或易燃清潔劑(如漂白劑或酒精)清洗本產品的任何一
部分。
清潔時間表
頻率 清潔方法
必要時
每兩個月 使用乾棉花棒清潔空氣質素感應器
每四週 清潔濾網表面
用柔軟的乾布抹乾淨本產品表面
清潔排氣口護蓋
清潔空氣清新機機身
請定時清潔本空氣清新機的內部和外部,以避免積聚塵埃。
1
使用柔軟乾爽的抹布清潔空氣清新機的內部和外部。
2
排氣口亦可以柔軟乾爽的抹布清潔。
19ZH_HK
Page 22
清潔空氣質素感應器
2
每
個月清潔一次空氣質素感應器,讓本產品發揮出最佳功能。
備註:
•
如在多塵的環境內使用空氣清新機,則可能需要更常清潔。
•
如房間濕度非常高,水滴便會凝結在空氣質素感應器上,即使實際空氣質素良
好,空氣質素指示燈仍可能會顯示較差的空氣質素。在此情況下,請清潔空氣質
素感應器或以手動設定空氣清新機的速度。
1
關閉空氣淨化器,並將其從電源插座拔出。
2 3 4 6
2
使用柔軟毛刷清潔空氣質素感應器的出入口。
3
打開空氣質素感應器護蓋。
4
使用稍為濕潤的棉花棒清潔空氣質素感應器和塵埃的出入口。
5
使用乾爽的棉花棒徹底擦乾所有部件。
6
重新裝上空氣質素感測器護蓋。
清潔濾網表面
使用柔軟的濕布擦拭濾網表面,或用吸塵機清潔濾網表面。
備註:
•
如果使用高功率/工業用吸塵機,可能會損壞濾網。
20 ZH_HK
Page 23
5
更換濾網
了解清新空氣保護鎖
本產品配備清新空氣保護鎖,確保
當濾網快將到期時,濾網更換提示( )燈會亮起紅燈,表示需要更換濾網。如果
沒有及時更換濾網,濾網更換提示( )會閃動。產品將停止操作並會鎖上。
NanoProtect
濾網在本產品運作中保持最佳狀態。
更換濾網
備註:
•
請勿清洗或重用濾網。
•
更換濾網前,必須關閉空氣清新機,並將插頭從電源插座拔出。
CLOSEOPEN
1 2 3 4 5
1
以逆時針方向旋轉機座,將其從產品中取出。
2
由本產品拉出濾網。棄置用過的濾網。
3
拆去新的濾網上的所有包裝物料。
4
將濾網裝回本產品。
5
重新連接機座,並以順時針方向旋轉以扭緊機座。
6
將空氣清新機的插頭插入電源插座。
7
8
9
按電源
按住
更換濾網後,必須徹底洗淨雙手。
按鈕 以開啟本產品。
3
秒,以重新設定濾網壽命計算器。
CLOSEOPEN
重設濾網
您可以在屏幕顯示濾網更換提示( )之前更換濾網。更換濾網後,您需要手動重
設濾網壽命計算器。
1
2
按電源
開啟電源後
按鈕以開啟本產品。
10
秒內,按住模式切換按鈕
5
秒,以重設濾網壽命計算器。
21ZH_HK
Page 24
6
儲存
1
關閉空氣清新機,並將插頭從牆身插座拔出。
2
清潔空氣清新機、空氣質素感應器和濾網表面(請參閱「清潔」章節)。
3
必須讓所有部件風乾方可存放。
4
將濾網放入密封膠袋中。
5
將空氣清新機、濾網存放於陰涼乾爽的地方。
6
處理濾網後,必須徹底洗淨雙手。
7
疑難排解
本章節總結一些您在本產品上最常見的問題。如果您按照以下資料仍未能解決問
題,請聯絡您的國家的
問題 可行解決方案
產品即使插上電源
也沒有正常運作。
排氣口排出的風量
比以前明顯減弱。
本產品經過長時間
運作,空氣質素仍
沒有改善。
Philips
•
•
•
•
•
•
•
•
顧客服務中心。
濾網更換提示已亮起但您沒有更換相應濾網。
因此本產品已被鎖定。在這情況,請更換該濾網並重設
濾網使用時間。
濾網的表面骯髒。
清潔濾網表面(請查看「清潔」一章)。
請檢查是否已移除濾網的所有包裝物料。
確保正確安裝濾網。
空氣質素感應器骯髒或濕的。
清潔空氣質素感應器(請參閱「清潔」一章)。
房間面積大或室外空氣質素差。
為獲得最佳淨化性能,請在操作空氣清新機時關閉門窗。
有室內污染源頭。例如,吸煙、烹飪、焚香。
濾網的使用壽命結束。更換全新的濾網。
本產品發出一陣怪
味。
22 ZH_HK
•
在您最初數次使用本產品時,它可能會發出一點塑膠氣
味。此為正常。可是,如果本產品在更換濾網後發出燒焦
的氣味,請聯絡您的
中心。由於吸收了室內氣體,濾網使用一段時間後可能會
產生氣味。建議您將濾網置於陽光下晾曬,然後再重新使
用。如果仍有異味,請更換濾網。
Philips
經銷商或認可的
Philips
服務
Page 25
問題 可行解決方案
本產品聲浪太大。
即使我已替換濾
網,本產品仍表示
需要替換。
保持產品關閉,但
空氣質素燈閃爍一
分鐘。
8
如需其他資訊或有其他疑問,請瀏覽
地區的
的國家/地區沒有客戶服務中心,請前往當地的
保障及服務
Philips
客戶服務中心(您可在全球保障小冊子上找到其電話號碼)。如果您
•
請檢查是否已取出濾網的包裝材料。
•
當空氣質素差時,產品將以高速運行,因而產生更大的噪
聲。如晚上在睡房使用裝置,選擇睡眠速度。
•
如果有任何東西掉入排氣口,亦有可能產生異常響亮的聲
音。立即關閉產品,並倒轉產品,以便從產品中取出外來
物體。
•
可能您沒有重設濾網的使用時間。開啟本產品然後按住模
式切換按鈕( )3 秒直至
•
裝置發生故障。請聯絡您所在國家/地區的客戶服務中心。
Philips
網站
消失。
www�philips�com
Philips
經銷商。
訂購零件或配件
如果您需要更換零件或想訂購額外配件,請前往您的
www�philips�com/support
如果您索取有關零件時遇上問題,請聯絡您的國家/地區
在全球保障小冊子上找到其電話號碼)。
。
Philips
經銷商或瀏覽
Philips
客戶服務中心(您可
請聯絡您所在國家
/
23ZH_HK
Page 26

9
注意
電磁場
這款
(EMF)
Philips
產品符合一切有關電磁場暴露的適用安全標準及條例。
回收
請勿在本產品使用壽命結束後當作一般家庭垃圾廢棄,應交給官方回收站或循環再
用。這樣做有助保護環境。
請遵守您的國家/地區回收電器和電子產品的法則。正確處理有助避免對環境和人體
造成負面影響。
24 ZH_HK
Page 27

Page 28
© 2020 Koninklijke Philips N.V.
All rights reserved.
3000 060 99101
 Loading...