

Page 1

A5.600 Seismic Power 600/MMS 506
EnglishFrench
German
Italian
SpanishDutchSwedishFinishPolishTurkishRussian
5.1 Channel Compact Speaker System
MMS506Final.p65 7/29/02, 2:12 PM1
Instructions for use .............................. 5
Mode demploi ..................................... 8
Bedienungsanleitung ........................ 11
Istruzioni per l uso ............................ 14
Manual del Usuario ........................... 17
Installationsanleitung ........................ 20
Brugsanrisning .................................. 23
Käyttöohje.......................................... 26
Zalecenia dla uýytkownika ................ 29
.................................... 32
Kullaným Kýlavuzu .............................. 35
Pykoboäctbo ïo ýkcïëyaöèè ........ 38
Instrukcja obstugi ......................... 41
Bruksanvising ............................... 44
Instruções de utilização .................... 47
Norwegian
Danish
1
Portuguese
Page 2
SAFETY INSTRUCTIONS:
English French German Italian Spanish Dutch
For US/Canada only
IMPORTANT SAFETY INSTRUCTIONS - Read before operating equipment
This product was designed and manufactured to meet strict quality and safety standards. There are, however, some
installation and operation precautions which you should be particularly aware of.
1. Read these instructions - All the safety and operating instructions should be read before the appliance is operated.
2. Keep these instructions - The safety and operating instructions should be retained for future reference.
3. Heed all warnings - All warnings on the appliance and in the operating instructions should be adhered to.
4. Follow all instructions - All operating and use instructions should be followed.
5. Do not use this apparatus near water - for example, near a bathtub, washbowl, kitchen sink, laundry tub, in a wet
basement or near a swimming pool, etc.
6. Clean only with a damp cloth. The appliance should be cleaned only recommended by the manufacturer.
7. Install in accordance with the manufacturers instructions. Do not block any of the ventilation openings.
For example, the appliance should not be situated on a bed, sofa, rug, or similar surface or placed in a built-in
installation, such as a bookcase or cabinet that may impede the flow of air through the ventilation openings.
8. Do not install near any heat sources such as radiators, heat registers, stoves, or other apparatus (including
amplifiers) that produce heat.
9. Do not defeat the safety purpose of the polarized or grounding-type plug. A polarized plug has
two blades with one wider than the other. Match wide blade of plug to wide slot, fully insert. A
grounding type plug has two blades and a third grounding prong. The wide blade or the third prong
are provided for your safety. If the provided plug does not fit into your outlet, consult an electrician
for replacement of the obsolete outlet.
10. Protect the power cord from being walked on or pinched particulary at plugs, convenience receptacles, and the
point where they exit from the apparatus.
11. Only use attachments/accessories specified by the manufacturer.
12. Use only with a cart, stand, tripod, bracket, or table specified by the manufacturer, or sold with the
13. Unplug this apparatus during lightning storms or when unused for long periods of time.
Swedish Finish
14. Refer all servicing to qualified service personnel. Servicing is required when the apparatus has been damaged in
15. Warning! To reduce the risk of fire or electric shock, do not expose this appliance to rain or moisture.
Important notes for users in the U.K.
Mains plug
This apparatus is fitted with an approved 13 Amp plug.
To change a fuse in this type of plug proceed as follows:
1 Remove fuse cover and fuse.
Polish
Turkish Russian
Norwegian
2 Fix new fuse which should be a BS1362 5 Amp, A.S.T.A. or BSI approved type.
3 Refit the fuse cover.
If the fitted plug is not suitable for your socket outlets, it should be cut off and an appropriate plug fitted in its place. If the
mains plug contains a fuse, this should have a value of 5 Amp. If a plug without a fuse is used, the fuse at the distribution
board should not be greater than 5 Amp.
Note: The severed plug must be disposed of to avoid a possible shock hazard should it be inserted into a 13 Amp socket
elsewhere.
How to connect a plug
The wires in the mains lead are coloured with the following code: blue = neutral (N), brown = live (L). As these
colours may not correspond with the colour markings identifying the terminals in your plug, proceed as follows:
Connect the blue wire to the terminal marked N or coloured black.
Connect the brown wire to the terminal marked L or coloured red.
Do not connect either wire to the earth terminal in the plug, marked E (or ) or coloured green (or green and
Before replacing the plug cover, make certain that the cord grip is clamped over the sheath of the lead - not simply over
the two wires.
Copyright in the U.K.
Recording and playback of material may require consent. See Copyright Act 1956 and The Performer's Protection Acts
1958 to 1972.
Norge
Typeskilt finnes på apparatens underside.
Danish
Portuguese
Observer: Nettbryteren er sekundert innkoplet. Den
innebygde netdelen er derfor ikke frakoplet nettet så lenge
apparatet er tilsluttet nettkontakten.
For å redusere faren for brann eller elektrisk støt, skal
apparatet ikke utsettes for regn eller fuktighet.
any way, such as power-supply cord or plug is damaged, liquid has been spilled or objects have fallen into the
apparatus, the apparatus has been exposed to rain or moisture, does not operate normally, or has been dropped.
yellow).
apparatus. When a cart is used, use caution when moving the cart/apparatus combination to avoid
injury from tip-over.
AC
Polarized Plug
Deutschland
Hiermit wird bescheinigt, daß dieses Gerät in
Übereinstimmung mit den Bestimmungen der
Amtsblattverfügung 1046/1984 funkentstört ist.
Der Deutschen Bundespost wurde das Inverkehrbringen
dieses Gerätes angezeigt und die Berechtigung zur
Überprüfung der Serie auf Einhaltung der Bestimmungen
eingeräumt.
2
MMS506Final.p65 7/29/02, 2:12 PM2
Page 3
EnglishFrench
IllIllustration A
R
T
U
W
Y
Q
S
V
X
German
Italian
SpanishDutchSwedishFinishPolishTurkishRussian
1
2
lIllustration B
MMS506Final.p65 7/29/02, 2:12 PM3
Norwegian
3
4
5
6
7
8
9
10
3
Danish
Portuguese
Page 4
English French German Italian Spanish Dutch
Swedish Finish
Polish
Turkish Russian
Norwegian
Danish
Portuguese
4
MMS506Final.p65 7/29/02, 2:12 PM4
Page 5

Explanation (Illustration page 3)
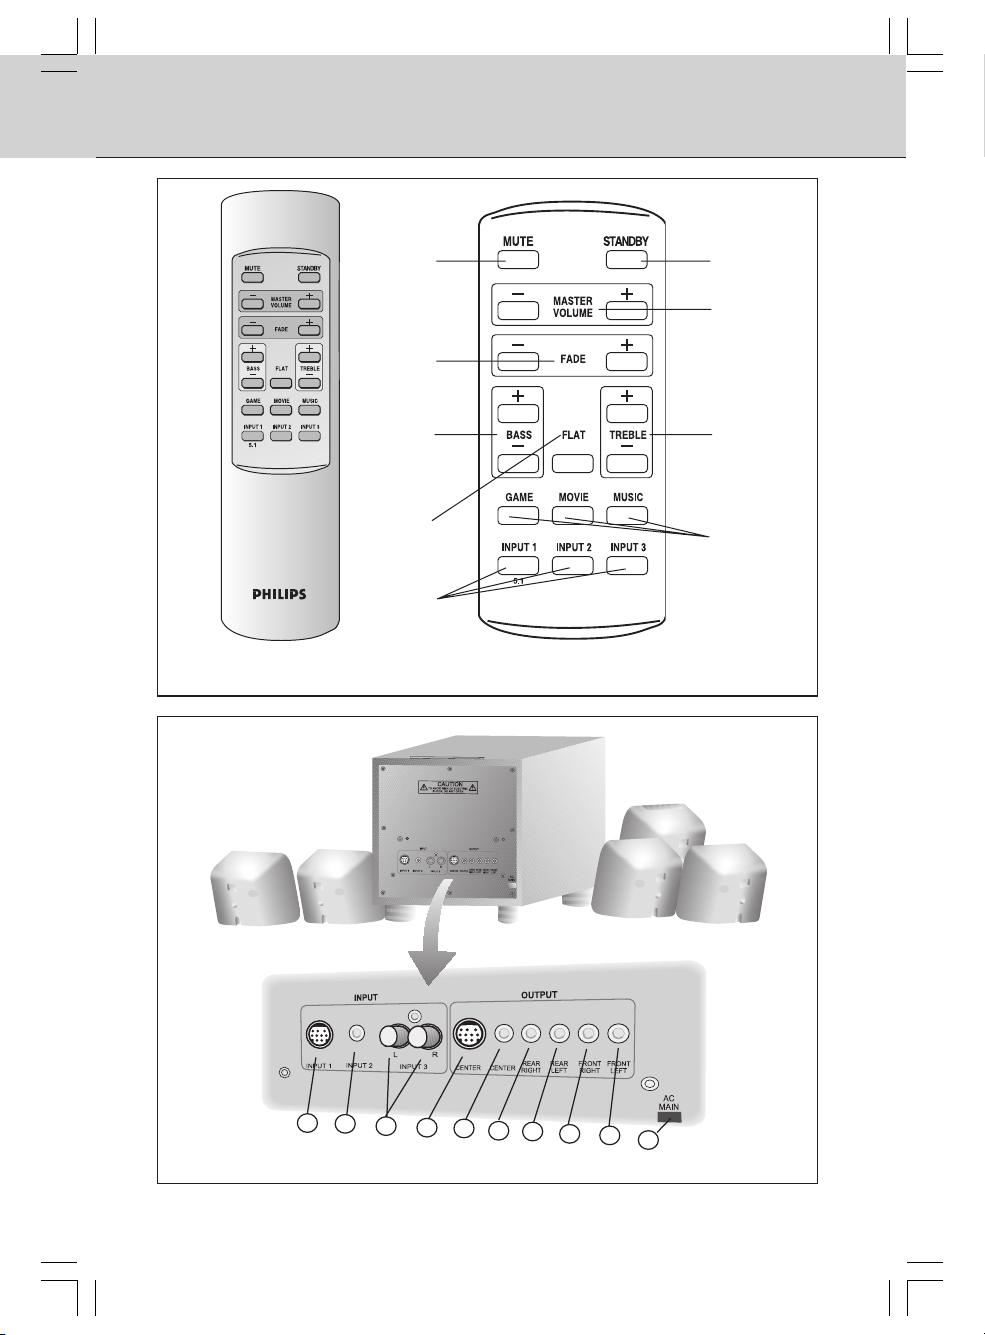
Remote Control ( See Illustration A)
À STANDBY
To switch the speaker system into
(=STANDBY) mode
Á MUTE
To switch the speaker system into mute
mode, and normal mode again
 MASTER VOLUME - / +
To adjust the master volume higher or lower
à FADE REAR / FRONT
To adjust the loudness of the rear and the
front satellite speakers
Ä BASS - / +
To adjust the bass level according your personal preference
Å TREBLE - / +
To adjust the presence of the higher tones
according to your personal preference
Æ FLAT
Removes any bass or treble boost applied
by the user.
Ç GAME/ MOVIE/ MUSIC
Choose from either the game, movie or music button for optimal pre-set sound reproduction per genre
È INPUT 1/ INPUT 2/ INPUT 3
Make your choice of audio-visual source
selection. Two separate stereo input sources
and one 5.1-channel input source can be
connected to this multi-channel speaker
system.
ON or OFF
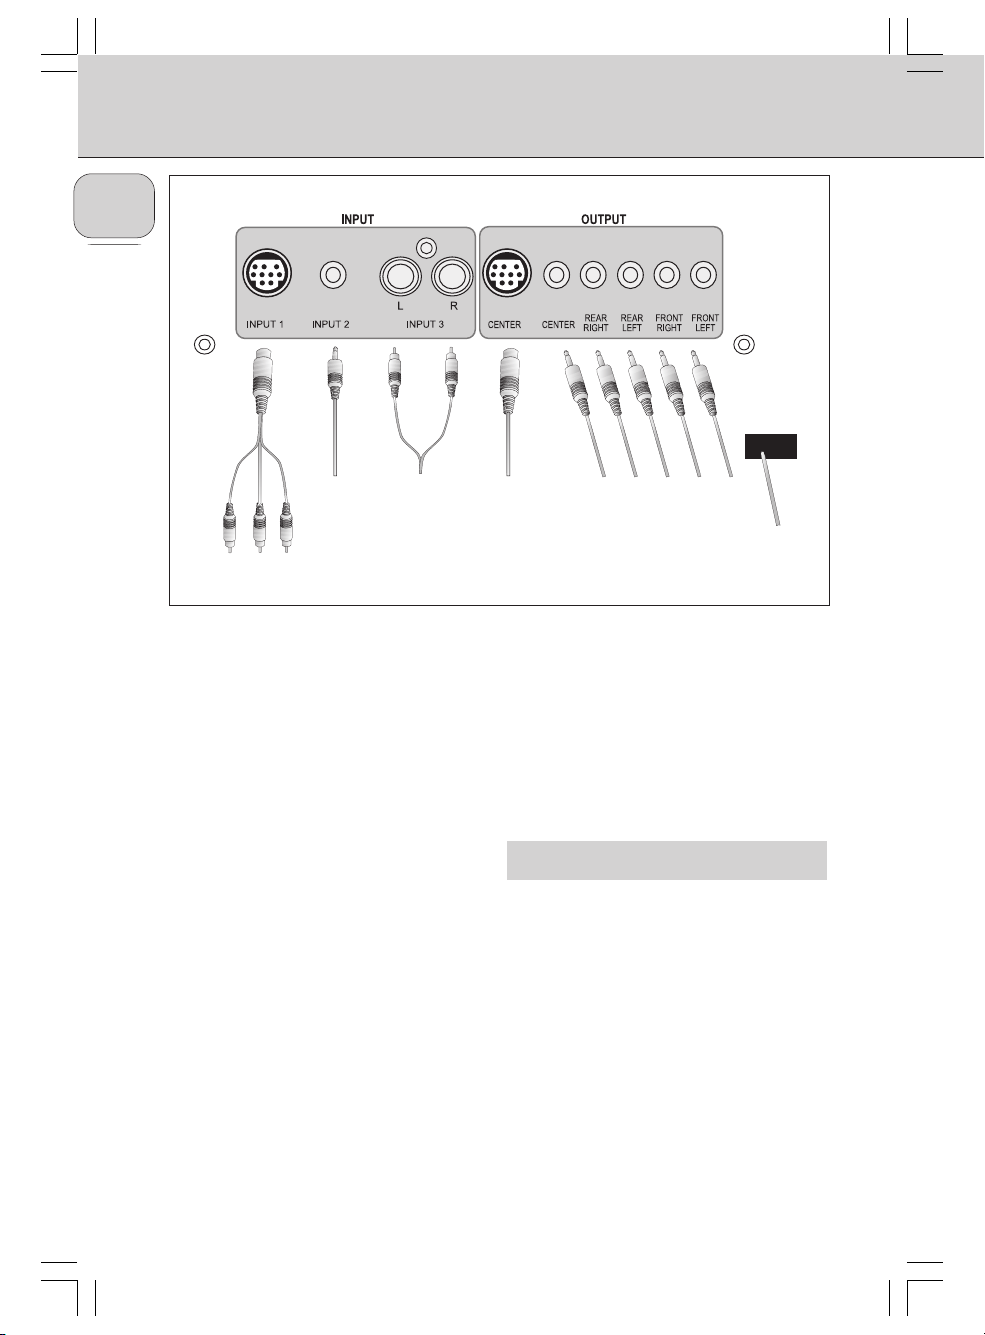
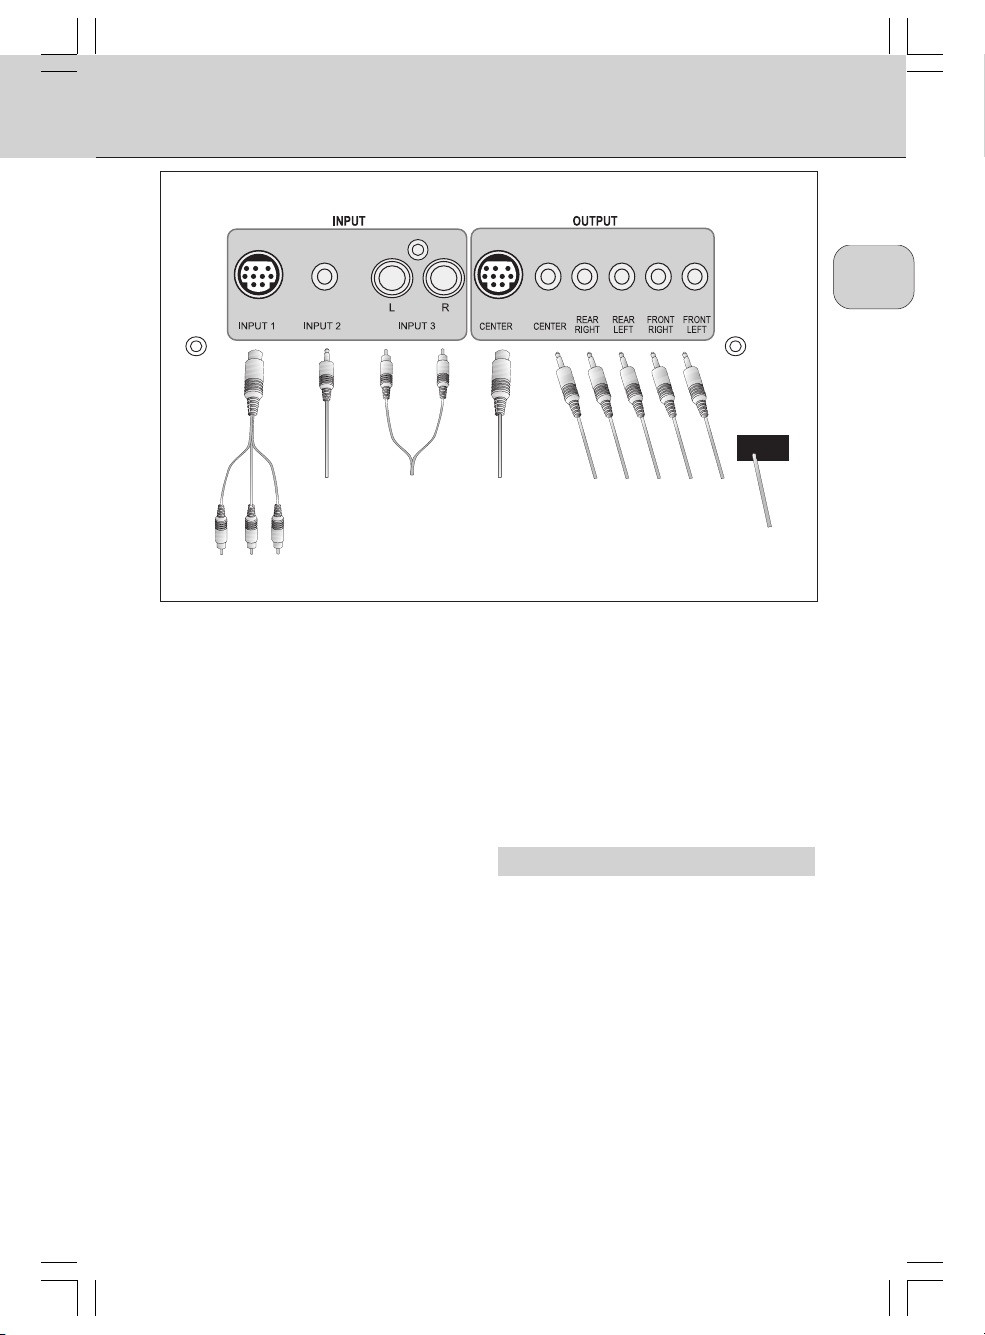
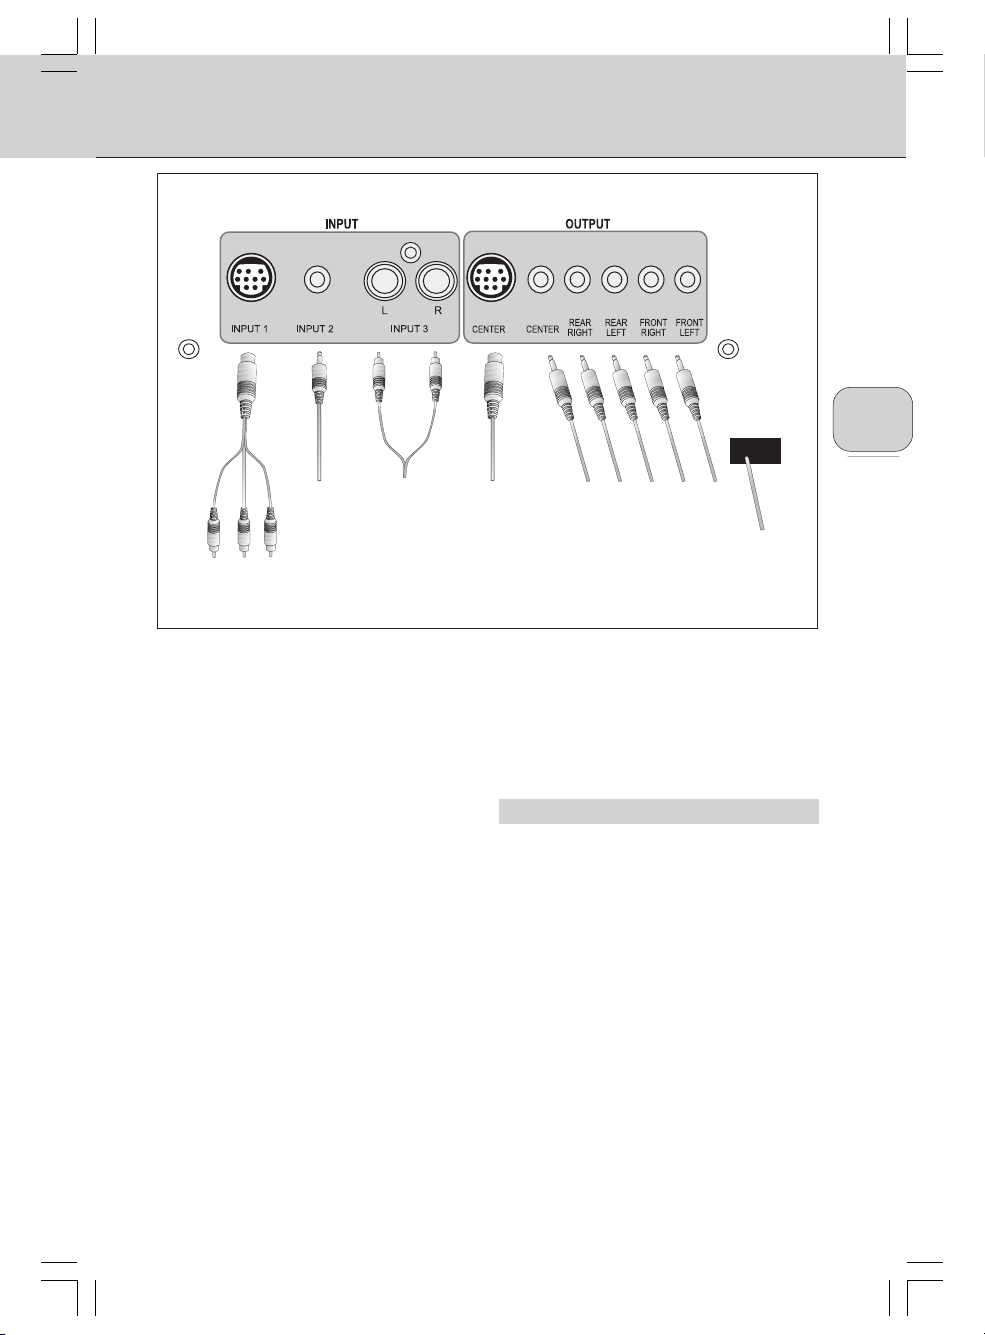
Cable Connections (see illustration B)
Inputs
1. INPUT 1 : 5.1-channel
9 pin mini DIN cable to connect a 5.1channel audio-visual source.
2. INPUT 2 :
3.5 mm stereo jack to connect a stereo
audio-visual source
3. INPUT 3 :
2 x RCA jack to connect a stereo audiovisual source.
Output
4. C
ENTER
To connect the center satellite speaker.
(DIN jack)
5. C
ENTER
To connect the center satellite speaker.
(3.5mm stereo jack)
EAR RIGHT
6. R
To connect the rear right satellite speaker.
EAR LEFT
7. R
To connect the rear left satellite speaker.
8. FRONT RIGHT
To connect the front right satellite speaker.
9. FRONT LEFT
To connect the front left satellite speaker.
10. AC MAIN
Power cable to be connected to the AC
outlet.
STEREO CHANNEL
STEREO CHANNEL
EnglishFrench
German
Italian
SpanishDutchSwedishFinishPolishTurkishRussian
MMS506Final.p65 7/29/02, 2:12 PM5
Norwegian
Danish
5
Portuguese
Page 6
English French German Italian Spanish Dutch
Installation (Illustration page 6)
AC
MAIN
23
1
Swedish Finish
Connecting to a 5.1 channel soundcard (or a
DVD player with built in 5.1 channel decoder
- cable not included)
1. Connect the 9 pin mini DIN jack to the speaker
system and the 3 mini stereo jacks to the
soundcard.
Polish
Connecting External Stereo Sources
(cables not included)
2. Connect the mini stereo jack to a source such
as an MP3 player headphone jack.
3. Connect the RCA stereo jacks to a source such
as a TV.
Turkish Russian
Satellite Speaker Connection
4. Connect the center satellite speaker to CENTER.
(DIN jack)
5. Connect the center satellite speaker to CENTER.
(3.5 mm stereo jack)
6. Connect the rear right satellite speaker to REAR
RIGHT
7. Connect the rear left satellite speaker to
Norwegian
8. Connect the front right satellite speaker to
9. Connect the front left satellite speaker to
Danish
Power Connection
10. Connect the fixed mains power code to the
Portuguese
.
LEFT
.
RIGHT
.
LEFT
.
AC outlet.
567894
Switch on (and switch off as well) the speaker
system using the standby button on the remote
control.
Tune the speaker system using the speaker settings
at the remote control.
NOTE !
Do not insert the power plug into the AC outlet until all the
connections are made!
Safety
· Do not expose the speakers to excessive heat (caused by
heating equipment or direct sunlight). To reduce the risk of
fire or electric shock, do not expose this appliance to rain
or moisture. If fluid spills into the speakers, disconnect any
connections immediately and let the speakers dry before
reusing them.
· You may clean the speakers with a soft, slightly dampened
REAR
FRONT
FRONT
lint-free cloth. Do not use any cleaning agents as they may
have a corrosive effect.
· If the speakers do not operate, disconnect them from the
power supply. Wait a few seconds before reconnecting them
to the power supply.
· If your intentions are not to use the speaker system for a
longer period of time - for example, youre going on a
vacation - it is recommended to switch off the system
completely and not to leave it in standby mode.
10
6
MMS506Final.p65 7/29/02, 2:12 PM6
Page 7
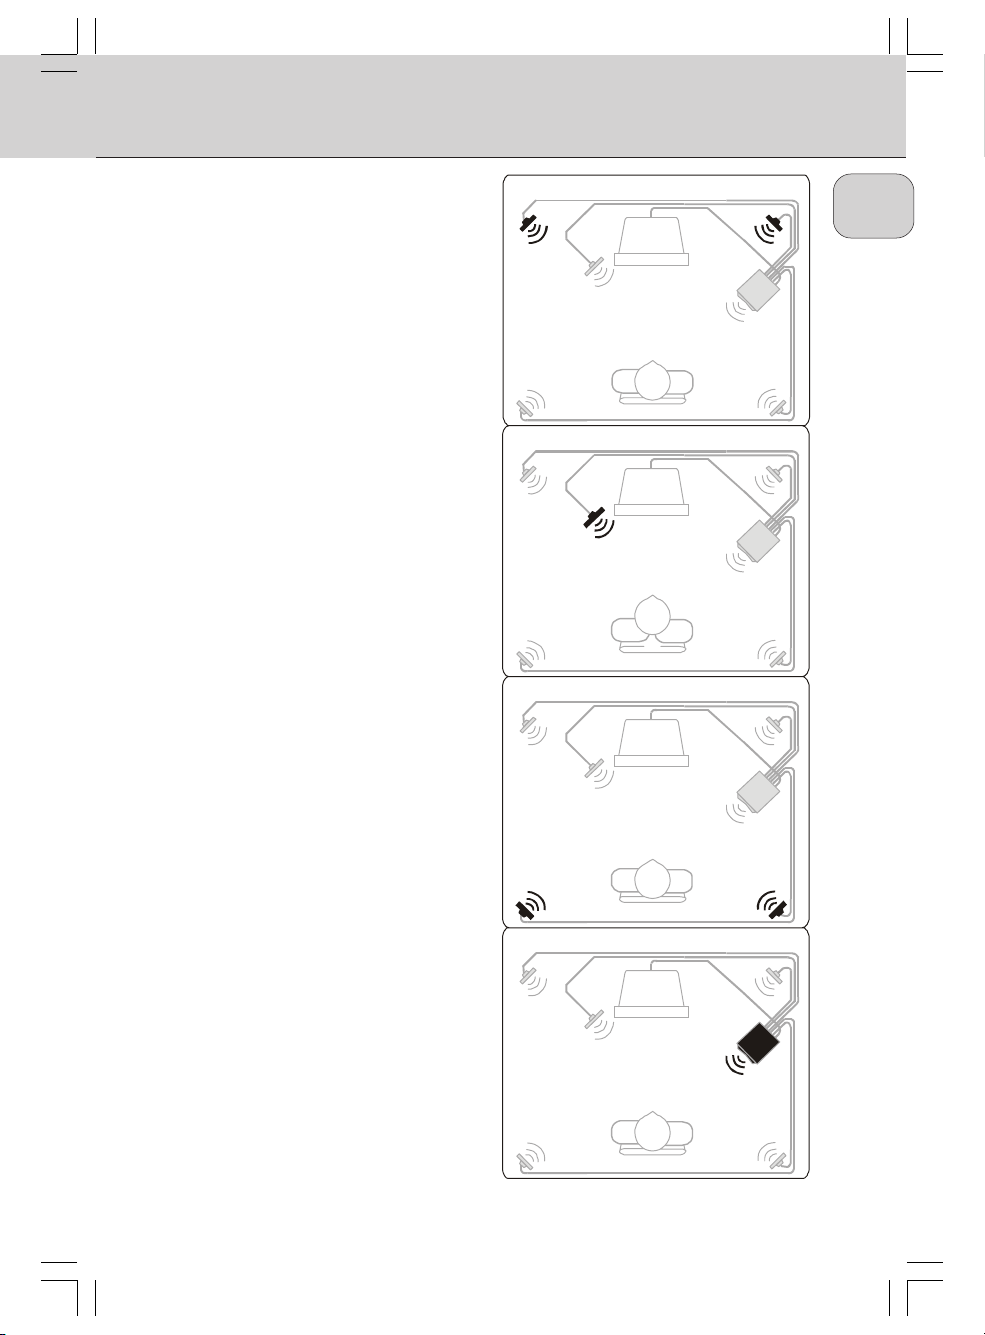
Speaker Placement
General
· Placing speakers behind curtains, furniture, or any other
objects will reduce the treble response, thus reducing
the stereo effect significantly.
· Each room has different acoustic characteristics and
the placement possibilities are often limited. You can
find the best position for your speakers by
experimenting. In general, the speakers should be
placed as symmetrical as possible in the room.
Front Satellite Speakers (figure a)
· The front left and right satellite speaker play stereo
music and the off-screen sounds of video playback.
· These satellites should be placed to the sides of your
TV.
· Viewed from the listeners position, the satellite speaker
connected to
left side, and the satellite speaker connected to
the subwoofer should be on the right side.
· The best stereo effect is obtained when the two front
satellite speakers and the listener form an equilateral
triangle.
· The optimum height for these speakers is when they
are placed at ear height (while seated).
FRL
at the subwoofer should be on the
FRR
at
Center Satellite Speaker (figure b)
· The center satellite speaker provides the on-screen
effects and dialog in Dolby Digital / Dolby Surround.
· It should be placed as close to the center of your TV
as possible (e.g. underneath or on top of your TV).
· It should be directed at the listeners ear level while
seated.
Figure a:
Figure b:
Figure c:
EnglishFrench
German
Italian
SpanishDutchSwedishFinishPolishTurkishRussian
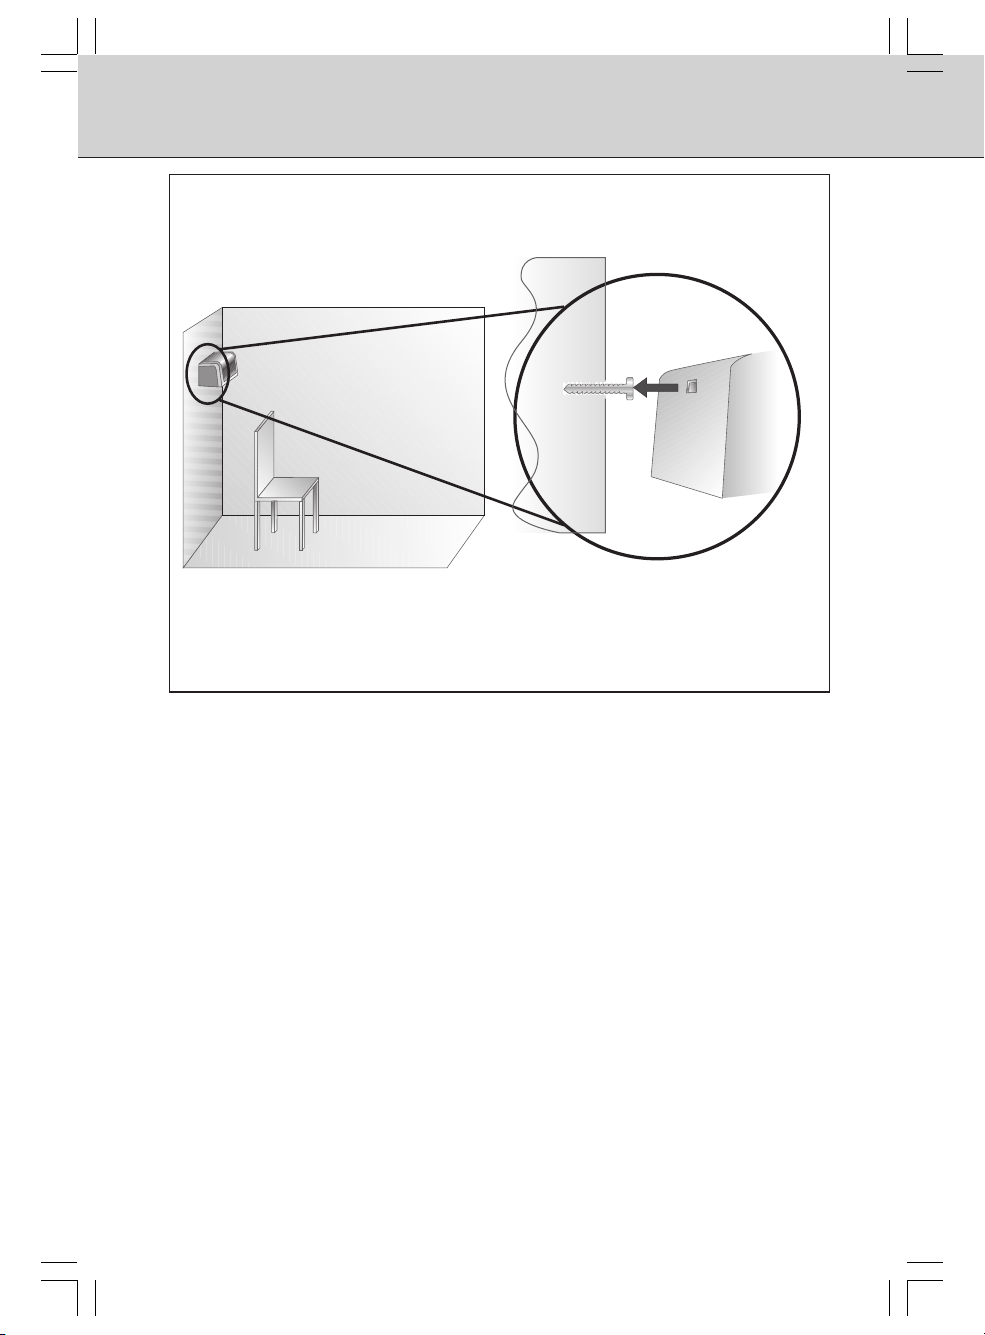
Surround Satellite Speakers (figure c)
· The surround left and right satellite speaker provide
the surround effects in Dolby Digital / Dolby Surround
· These satellites may be placed in any convenient sites
alongside the listener, even sites slightly forward the
listeners position.
· The surround satellite speakers do not have to be at
exactly the same height as the front satellite speakers.
· Viewed from the listeners position, the satellite speaker
connected to
left side, and the satellite speaker connected to
the subwoofer should be on the right side.
· If you have side walls close to your listening position,
good placement for your surround satellites is slightly
behind your position and slightly above ear level.
SRL
at the subwoofer should be on the
Subwoofer (figure d)
· The subwoofers optimum place is on the floor close to
the wall. The closer it is to the corner, the stronger the
maximum bass output.
· The subwoofer is not magnetically shielded, so position
it at least 0.5 meter from the TV.
MMS506Final.p65 7/29/02, 2:12 PM7
SRR
Figure d:
at
Norwegian
Danish
7
Portuguese
Page 8

Aperçu des fonctions (Illustration page 3)
English French German Italian Spanish Dutch
La tèlècommande (voir illustration A)
À STANDBY
Permet de mettre le systèmes denceintes
ON (sous tension) ou OFF (=VEILLE).
en mode
Á MUTE
Permet de commuter le système denceintes
entre le mode sourdine et le mode normal.
 MASTER VOLUME - / +
Pour augmenter ou diminuer le volume des
enceintes.
à FADE REAR / FRONT
Permet dajuster le fondu sonore pour les
enceintes satellite arrière et avant.
Ä BASS - / +
Swedish Finish
Pour régler le niveau des graves en fonction
de vos goûts personnels.
Å TREBLE - / +
Pour régler lintensité des tonalités aiguës
selon vos goûts personnels.
Polish
Æ FLAT
Supprime toute suramplification des graves
ou des aiguës activée par lutilisateur.
Ç GAME/ MOVIE/ MUSIC
Sélectionnez les boutons jeux, voix ou
Turkish Russian
musique pour obtenir une reproduction
sonore optimale prédéfinie.
È INPUT 1/ INPUT 2/ INPUT 3
Choisissez votre source audio-vidéo. Il est
possible de connecter deux sources dentrée
Norwegian
stéréo séparées et une source dentrée à 5.1
canaux à ce système denceintes multicanal.
Branchement des câbles
(voir illustration B)
Entrées
1. INPUT 1 : 5.1 canaux
Câble mini DIN à 9 broches à connecter
à une source audio-vidéo à 5.1 canaux.
2. INPUT 2 : canal stéréo
Prise stéréo 3,5 mm à connecter à une
source audio-vidéo stéréo
3. INPUT 3 : canal stéréo
2 prises RCA à connecter à une source
audio-vidéo stéréo.
Sorties
4. C
ENTER
Pour la connexion de lenceinte satellite
centrale. (prise DIN)
5. C
ENTER
Pour la connexion de lenceinte satellite
centrale (prise stéréo 3,5mm)
6. R
EAR RIGHT
Pour la connexion de lenceinte satellite
arrière droite.
7. REAR LEFT
Pour la connexion de lenceinte satellite
arrière gauche.
8. F
RONT RIGHT
Pour la connexion de lenceinte satellite
avant droite.
9. F
RONT LEFT
Pour la connexion de lenceinte satellite
avant gauche.
10. AC
MAIN
Câble dalimentation à brancher sur une
prise CA.
Danish
Portuguese
8
MMS506Final.p65 7/29/02, 2:12 PM8
Page 9
Installation (Illustration page 9)
AC
MAIN
EnglishFrench
German
Italian
23
1
Branchez sur une carte son 5.1 canaux (ou sur
un lecteur de DVD doté dun décodeur intégré 5.1
canaux câble non inclus)
1. Branchez la prise mini DIN à 9 broches sur le
système denceintes, ainsi que les 3 prises mini
stéréo sur la carte son.
Branchement des sources stéréo externes
(câble non inclus)
2 Branchez le mini connecteur stéréo par
exemple sur une prise casque de lecteur MP3.
3 Branchez les connecteurs jacks RCA stéréo par
exemple sur un téléviseur.
Branchement des enceintes satellites
4 Branchez lenceinte satellite centrale sur
(prise DIN)
5 Branchez lenceinte satellite centrale sur CENTER.
(prise stéréo 3,5 mm)
6 Branchez lenceinte satellite arrière droite sur REAR
.
RIGHT
7 Branchez lenceinte satellite arrière gauche sur
REAR LEFT.
8 Branchez lenceinte satellite avant droite sur
.
RIGHT
9 Branchez lenceinte satellite avant gauche sur
FRONT LEFT.
Branchement de lalimentation
10 Branchez le cordon dalimentation sur la sortie
CA.
CENTER.
FRONT
567894
10
Mettez le système denceintes sous tension (st
également horstension) en vous servant de la
touchestandby sur la télécommande du lecteur DVD.
Accordez le système denceintes en vous servant de
la touche de réglage des enceintes sur la
télécommande.
REMARQUE !
Nintroduisez pas la fiche secteur dans la sortie CA tant
que tous les branchements nont pas été effectués !
Sécurité
·
Nexposez pas les enceintes à une chaleur excessive
(provoquée par une installation de chauffage ou par les
rayons directs du soleil). Pour diminuer le risque
dincendie ou de choc électrique, nexposez pas ce
matériel à la pluie ni à lhumidité. Si du liquide devait être
renversé sur les enceintes, débranchez immédiatement
tous les connecteurs et laissez sécher les enceintes avant
de les réutiliser.
·
Pour nettoyer les enceintes, utilisez un chiffon doux non
pelucheux, légèrement humide. Nutilisez pas de produits
de nettoyage, car ils pourraient avoir un effet corrosif.
·
Si les enceintes ne fonctionnent pas, débranchez-les de
la prise secteur. Attendez quelques secondes et
rebranchez-les ensuite.
·
Si vous nenvisagez pas dutiliser le système denceintes
pendant un certain temps - vacances, par exemple - il est
recommandé de mettre le système complètement hors
tension et de ne surtout pas le laisser en mode veille.
SpanishDutchSwedishFinishPolishTurkishRussian
Norwegian
Danish
MMS506Final.p65 7/29/02, 2:12 PM9
9
Portuguese
Page 10
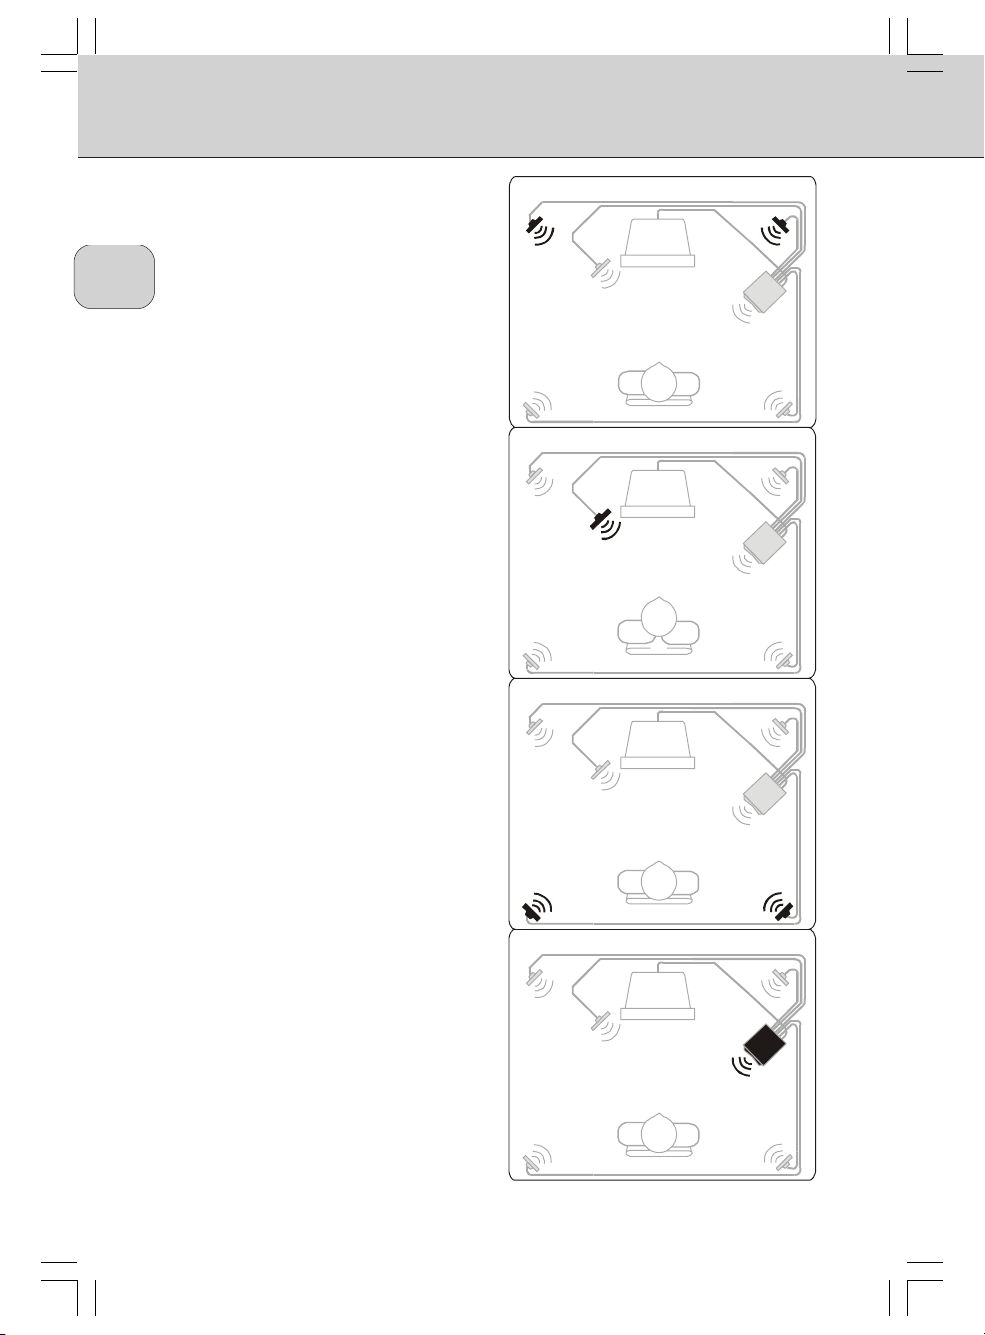
Mise en place des enceintes
English French German Italian Spanish Dutch
Conseils généraux
· Le fait de disposer les enceintes derrière les rideaux, les
meubles, ou tout autre objet diminuera la réponse des
tonalités aiguës, entraînant une réduction considérable de
leffet stéréo.
· Chaque pièce a des caractéristiques acoustiques
différentes et les possibilités de mise en place sont souvent
limitées. Cest en faisant des essais que vous trouverez la
mise en place idéale pour vos enceintes. Dune manière
générale, elles doivent être placées symétriquement dans
la pièce.
Enceintes satellite avant (figure a)
· Les enceintes satellite avant gauche et droite reproduisent la
musique stéréo, ainsi que les sons hors champ de la vidéo.
· Ces enceintes doivent être disposées de part et dautre du
téléviseur.
· Vue depuis la position découte, lenceinte satellite branchée
FRL
du subwoofer doit être placée à gauche. Lenceinte
sur
satellite branchée sur
être placée à droite.
· Vous obtiendrez le meilleur effet stéréo si les deux enceintes
satellite avant et lauditeur forment un triangle équilatéral.
· La hauteur idéale pour ces enceintes est obtenue
Swedish Finish
Polish
lorsquelles se trouvent au niveau des oreilles de lauditeur
(assis).
Enceinte satellite centrale (figure b)
· Lenceinte satellite centrale reproduit les effets hors champ
et les dialogues en Dolby Digital / Dolby Surround.
· Elle doit être placée aussi près que possible du centre du
téléviseur (par exemple en dessous ou au-dessus).
· Elle doit être orientée en direction des oreilles de lauditeur
assis.
FRR
du subwoofer doit quant à elle
Figure a:
Figure b:
Figure c:
Enceintes satellite Surround (figure c)
· Les enceintes satellite Surround gauche et droite reproduisent
les effets sonores en Dolby Digital / Dolby Surround.
· Ces enceintes peuvent être disposées nimporte où près de
Turkish Russian
Norwegian
Danish
Portuguese
MMS506Final.p65 7/29/02, 2:12 PM10
lauditeur, même légèrement en avant par rapport à ce dernier.
· Les enceintes satellite Surround ne doivent pas se trouver
forcément à la même hauteur que les enceintes satellite avant.
· Vue depuis la position découte, lenceinte satellite branchée
SRL
du subwoofer doit être placée à gauche. Lenceinte
sur
satellite branchée sur
être placée à droite.
· Si votre position découte est à proximité de murs latéraux,
il est conseillé de disposer les enceintes satellite Surround
légèrement derrière vous et juste au-dessus de vos oreilles.
Subwoofer (figure d)
· La disposition optimale du subwoofer est sur le sol, près
du mur. Plus il est près du coin, plus la reproduction
maximale des graves sera puissante.
· Le subwoofer ne dispose pas de blindage magnétique. Il convient
donc de le placer à au moins 0,5 mètre du téléviseur.
10
SRR
du subwoofer doit quant à elle
Figure d:
Page 11

Erläuterung (Abbildung Seite 3)
Fernbedienung (Siehe Abbildung A)
À STANDBY
Zum Ein- (ON) und Ausschalten (OFF =
STANDBY) des Lautsprechersystems.
Á MUTE
Zum Umschalten des Lautsprechersystems
zwischen Stummschaltung (Mute) und
normalem Betrieb.
 MASTER VOLUME - / +
Zum Einstellen der Gesamtlautstärke.
à FADE REAR / FRONT
Zur Einstellung der jeweiligen Lautstärke der
hinteren und vorderen Satellitenlautsprecher.
Ä BASS - / +
Zur Einstellung des Tieftonpegels nach Ihrem
eigenen Geschmack.
Å TREBLE - / +
Zur Einstellung des Hochtonpegels nach
Ihrem eigenen Geschmack.
Æ FLACH
Hiermit wird die vom Benutzer vorgegebene
Tiefen oder Höhenanhebung aufgehoben.
Ç GAME/ FILM/ MUSIC
Wählen Sie die Funktion Game, Speech oder
Music für optimale Klangvoreinstellungen für
jede Art von Anwendung.
Beschreibung der Kabelverbindungen
(Siehe Abbildung B)
Eingänge
1. EINGANG 1 : 5.1-Kanal
9-polige Mini-DIN-Buchse zum Anschluss
einer audiovisuellen 5.1-Kanal-Signalquelle.
2. EINGANG 2 : stereo-kanal
3,5 mm Stereo-Klinkenbuchse zum
Anschluss einer audiovisuellen StereoSignalquelle.
3. EINGANG 3 : stereo-kanal
2 x Cinch-Buchse zum Anschluss einer
audio-visuellen Stereo-Signalquelle.
Ausgang
ENTER
4. C
Zum Anschluss des Center-SatellitenLautsprechers. (DIN-Buchse)
5. C
ENTER
Zum Anschluss des Center-SatellitenLautsprechers. (3,5mm Stereo-Klinke)
FFEKT RECHTS
6. E
Zum Anschluss des rechten EffektSatellitenlautsprechers.
7. E
FFEKT LINKS
Zum Anschluss des linken EffektSatellitenlautsprechers.
8. F
RONT RECHTS
Zum Anschluss des rechten FrontSatellitenlautsprechers.
9. F
RONT LINKS
Zum Anschluss des linken EffektSatellitenlautsprechers.
EnglishFrench
German
Italian
SpanishDutchSwedishFinishPolishTurkishRussian
È INPUT 1/ INPUT 2/ INPUT 3
Zum Wählen der audiovisuellen Signalquelle.
Zwei getrennte Stereo-Eingangssignalquellen
und eine Vierkanal-Eingangssignalquelle
können an dieses MehrkanalLautsprechersystem angeschlossen werden.
MMS506Final.p65 7/29/02, 2:12 PM11
10. AC-
MAIN
Netzkabel zum Anschluss an eine Steckdose
11
Norwegian
Danish
Portuguese
Page 12

Installation (Abbildung Seite 12)
English French German Italian Spanish Dutch
AC
MAIN
23
1
Swedish Finish
Anschließen an eine 5.1-Kanal-Soundkarte (oder
einen DVD - Spieler mit eingebautem 5.1-Kanal Decoder Kabel nicht im Lieferumfang enthalten)
1. Den 9-poligen Mini-DIN-Stecker mit dem
Lautsprechersystem verbinden und die 3 Mini-StereoStecker mit der Soundkarte verbinden.
Anschließen von externen Stereo-Signalquellen
Polish
(Kabel nicht im Lieferumfang enthalten)
2 Den Mini-Stereo-Klinkenstecker mit einer
Signalquelle wie z.B. die Kopfhörerbuchse eines
MP3-Spielers anschließen.
3 Die Cinch-Stereo-Stecker an eine Signalquelle
wie z.B. ein Fernsehgerät anschließen
Turkish Russian
Anschluss der Satellitenlautsprecher
4 Den Center-Satellitenlautsprecher an die Buchse
anschließen (DIN-Buchse)
5 Den Center-Satellitenlautsprecher an die Buchse
anschließen (3,5 mm Stereo-Klinke)
6 Den rechten Effekt-Satellitenlautsprecher an die Buchse
REAR RIGHT
REAR LEFT
FRONT RIGHT
FRONT LEFT
anschließen.
anschließen.
anschließen.
anschließen.
Norwegian
7 Den linken Effekt-Satellitenlautsprecher an die Buchse
8 Den rechten Front-Satellitenlautsprecher an die Buchse
Danish
9 Den linken Front-Satellitenlautsprecher an die Buchse
Netzanschluss
Portuguese
10 Das feste Netzkabel an eine Steckdose anschließen.
567894
Die Lautsprecheranlage mit Hilfe der Taste Standby auf der
Fernbedienung einschalten (und wieder ausschalten).
Die Lautsprecheranlage mit Hilfe der
Lautsprechereinstellfunktionen auf der Fernbedienung
einstellen.
ACHTUNG !
Den Netzstecker nicht an die Steckdose anschließen, bevor
sämtliche Verbindungen hergestellt worden
Sicherheit
· Setzen Sie die Lautsprecher niemals übermäßiger Hitze
CENTER
CENTER
(von Heizkörpern oder direkter Sonneneinstrahlung) aus.
Zur Vermeidung von Brandgefahr oder elektrischen
Schlägen diese Geräte vor Regen oder Feuchtigkeit
schützen. Wenn Flüssigkeit in das Innere der
Lautsprecher gelangt, unverzüglich alle Verbindungen
trennen und die Lautsprecher trocknen lassen, bevor sie
wieder benutzt werden.
· Sie können die Lautsprecher mit einem leicht
angefeuchteten, weichen und fusselfreien Tuch reinigen.
Benutzen Sie keine Reinigungsflüssigkeiten, da diese die
Oberfläche angreifen können.
· Wenn die Lautsprecher nicht benutzt werden, sollten Sie
die Anlage vom Netz trennen. Warten Sie einige
Sekunden, bevor Sie sie wieder an das Netz anschließen.
· Wenn Sie die Anlage voraussichtlich längere Zeit nicht
benutzen, zum Beispiel, wenn Sie in Urlaub fahren,
empfiehlt es sich, die Anlage vollkommen
auszuschalten und nicht im Standby-Modus zu lassen.
10
sind!
12
MMS506Final.p65 7/29/02, 2:12 PM12
Page 13
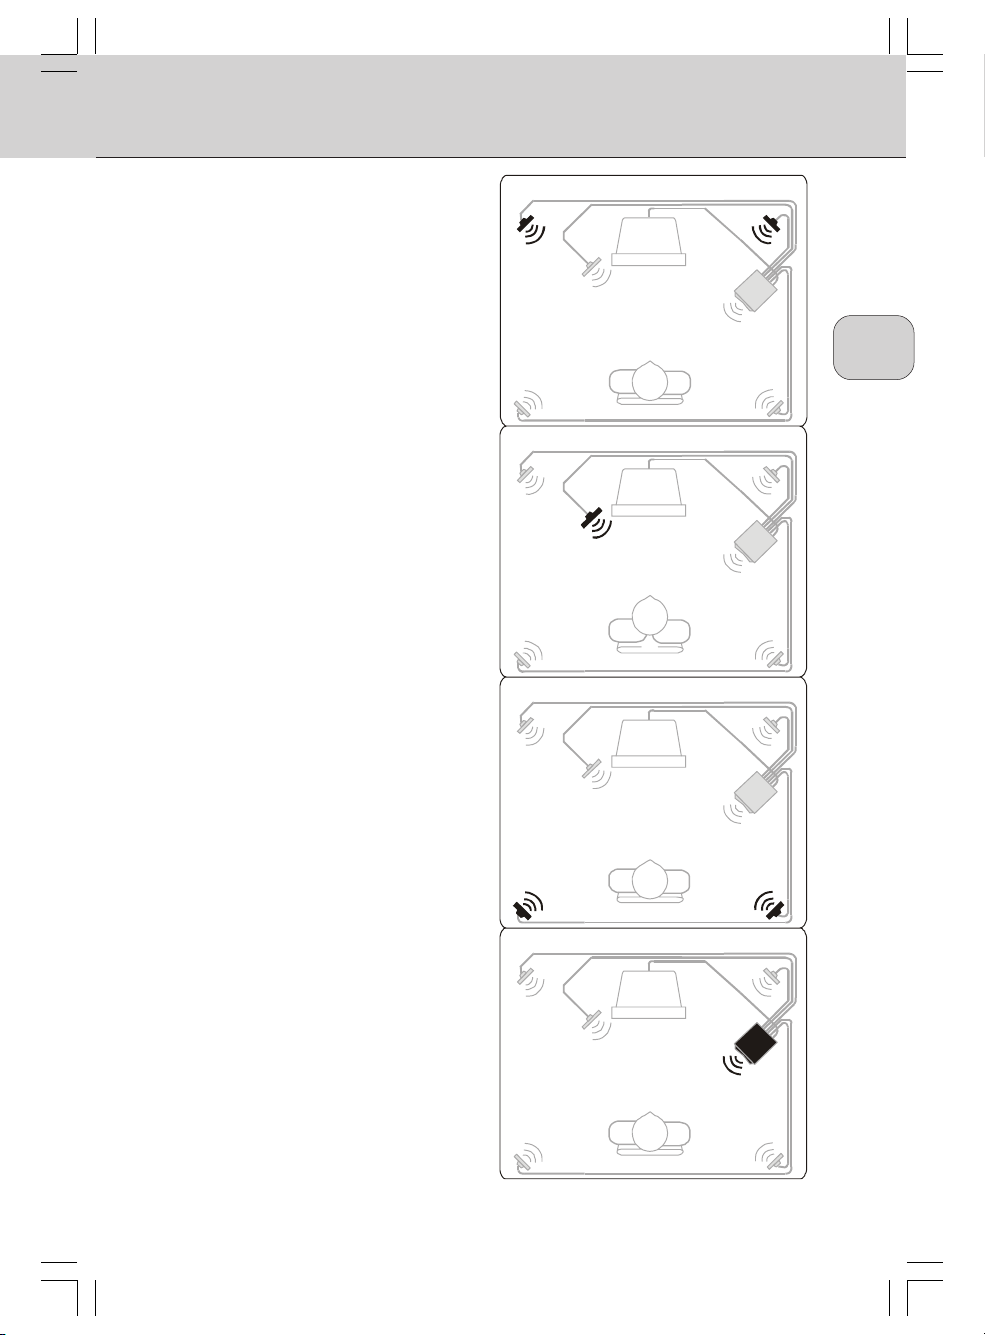
Lautsprecheraufstellung
Allgemeines
· Die Aufstellung von Lautsprechern hinter Vorhängen, Möbeln
oder anderen Gegenständen verringert die
Hochtonwiedergabe, wodurch die Stereowirkung erheblich
beeinträchtigt wird.
· Jeder Raum besitzt eigene akustische Eigenschaften und
die Aufstellungsmöglichkeiten sind häufig eingeschränkt. Die
beste Aufstellung der Lautsprecher lässt sich durch
Experimentieren herausfinden. Im Allgemeinen sollten die
Lautsprecher möglichst symmetrisch im Raum aufgestellt
werden.
Front-Satellitenlautsprecher (Abbildung a)
· Der linke und rechte Frontlautsprecher dienen zur
Wiedergabe von Stereo-Musik und Hintergrundgeräuschen
bei der Videowiedergabe.
· Diese Satelliten sollten auf beiden Seiten des
Fernsehgerätes aufgestellt werden.
· Vom Hörer aus gesehen sollte sich der an
angeschlossene Satellitenlautsprecher links vom Subwoofer
befinden, und der Satellitenlautsprecher an
rechts vom Subwoofer befinden.
· Der beste Stereoeffekt wird erzielt, wenn die beiden FrontSatellitenlautsprecher und der Hörer ein gleichschenkliges
Dreieck bilden.
· Die optimale Höhe für diese Lautsprecher ist die Ohrhöhe
des Hörers (im Sitzen).
Center-Satellitenlautsprecher (Abbildung b)
· Der Center-Satellitenlautsprecher dient zur Wiedergabe der
Geräuscheffekte und Dialoge in Dolby Digital / Dolby
Surround.
· Er sollte möglichst nahe zur Mitte des Fernsehgeräts
aufgestellt werden. (z.B. unter oder auf dem Fernsehgerät).
· Er sollte auf die Ohrhöhe des Hörers im Sitzen ausgerichtet
sein.
Surround- Satellitenlautsprecher (Abbildung c)
· Der linke und rechte Surround-Satellitenlautsprecher geben
die Surroundeffekte in Dolby Digital / Dolby Surround wieder.
· Diese Satellitenlautsprecher können an jedem geeigneten
Ort neben dem Hörer, soger ein wenig vor der Hörposition
aufgestellt werden.
· Die Surround-Satellitenlautsprecher müssen nicht genau in
der gleichen Höhe wie die Front-Satellitenlautsprecher
aufgestellt werden.
· Vom Hörer aus gesehen sollte sich der an S
angeschlossene Satellitenlautsprecher links vom Subwoofer
befinden, und der Satellitenlautsprecher an S
rechts vom Subwoofer befinden.
· Wenn sich Wände nahe der Hörposition befinden, empfiehlt
es sich, die Surround-Satellitenlautsprecher ein wenig hinter
der Hörposition und über de Ohrhöhe anzuordnen.
Subwoofer (Abbildung d)
· Der optimale Ort für den Subwoofer befindet sich am Boden
nahe der Wand. Je näher er sich in der Ecke befindet, desto
stärker ist die maximale Tieftonwiedergabe.
· Der Subwoofer ist nicht magnetisch abgeschirmt, so dass
er mindestens 0,5 Meter vom Fernsehgerät entfernt
aufgestellt werden sollte.
FRR
sollte sich
RR
sollte sich
FRL
RL
Figure a:
Abbildung a:
Figure b:
Abbildung b:
Figure c:
Abbildung c:
Figure d:
Abbildung d:
EnglishFrench
German
Italian
SpanishDutchSwedishFinishPolishTurkishRussian
Norwegian
Danish
MMS506Final.p65 7/29/02, 2:12 PM13
13
Portuguese
Page 14
Spiegazione (Illustrazione a pagina 3)
English French German Italian Spanish Dutch
Telecomando (vedere illustrazione A)
À STANDBY
Per commutare il sistema casse in modo
o OFF (=STANDBY)
Á MUTE
Per commutare il sistema casse in modo
esclusione, e nuovamente in modo normale
 MASTER VOLUME - / +
Per regolare (abbassare o diminuire) il
volume principale
à FADE REAR / FRONT
Per regolare il livello di loudness delle casse
satellitari posteriori e frontali
Ä BASS - / +
Swedish Finish
Per regolare il livello dei bassi in base alle
preferenze personali
Å TREBLE - / +
Per regolare la presenza dei toni alti in base
alle preferenze personali
Polish
Æ FLAT
Elimina il potenziamento dei bassi o degli alti
applicato dalluntente
Ç AME/ FILM/ MUSIC
Utilizzare il tasto dedicato a gioco, parlato o
Turkish Russian
musica per una preimpostazione ottimale
della riproduzione del suono in base al
genere
Descrizione dei collegamenti dei cavi
(vedere illustrazione B)
Ingressi
ON
1. INPUT 1 : canali 5.1
Cavo mini DIN a 9 pin per collegare una
sorgente audio video a 5.1 canali.
2. INPUT 2 :
Jack stereo 3,5 mm per collegare una
sorgente audio video stereo
3. INPUT 3 :
2 x jack RCA per collegare una sorgente
audio video stereo.
Uscita
4. C
ENTRALE
Per collegare il satellite centrale. (jack
DIN)
5. C
ENTRALE
Per collegare il satellite centrale. (jack
stereo 3,5 mm)
OSTERIORE DESTRO
6. P
Per collegare il satellite posteriore destro.
7. P
OSTERIORE SINISTRO
Per collegare il satellite posteriore sinistro.
8. A
NTERIORE DESTRO
Per collegare il satellite anteriore destro.
9. A
NTERIORE SINISTRO
Per collegare il satellite anteriore sinistro.
10. A
LIMENTAZIONE IN c.a.
Cavo di alimentazione da inserire nella
presa in corrente alternata
CANALE STEREO
CANALE STEREO
È INPUT 1/ INPUT 2/ INPUT 3
Per selezionare personalmente la sorgente
Norwegian
audio-visiva. Due sorgenti di ingresso stereo
separate e una sorgente di ingresso a 5.1
canali possono essere collegate al sistema
casse multicanale.
Danish
Portuguese
14
MMS506Final.p65 7/29/02, 2:12 PM14
Page 15
Installazione (Illustrazione a pagina 15)
AC
MAIN
EnglishFrench
German
Italian
23
1
Collegamento a una scheda audio a 5.1 canali
(o a un lettore DVD con decoder a 5.1 canali
integrato — non incluso)
1. Collegare il jack mini DIN a 9 pin al sistema casse
e i 3 mini jack stereo alla scheda audio.
Collegamento di sorgenti stereo esterne (cavi
non inclusi)
2 Collegare il mini jack stereo a una sorgente, ad
esempio al connettore cuffie di un lettore MP3.
3 Collegare i jack stereo RCA a una sorgente, ad
esempio a un televisore.
Collegamento satellite
4 Collegare il satellite centrale a CENTER (CENTRALE).
(jack DIN)
5 Collegare il satellite centrale a
(jack stereo 3,5 mm)
6 Collegare il satellite posteriore destro a
(POSTERIORE DESTRO).
7 Collegare il satellite posteriore sinistro a
(POSTERIORE SINISTRO).
8 Collegare il satellite anteriore destro a
(ANTERIORE DESTRO).
9 Collegare il satellite anteriore sinistro a FRONT LEFT
(ANTERIORE SINISTRO).
CENTER (CENTRALE)
REAR RIGHT
REAR LEFT
FRONT RIGHT
Collegamento alimentazione
10 Collegare il cavo di alimentazione fisso alla presa
in c.a..
Sicurezza
· Non esporre gli altoparlanti a eccessivo calore
· Pulire gli altoparlanti con un panno morbido e
· Se gli altoparlanti non funzionano, scollegarli
· Se si prevede di non utilizzare il sistema di
567894
10
Per accendere (e spegnere) il sistema degli altoparlanti
utilizzare il pulsante standby sul telecomando.
Ottimizzare il sistema degli altoparlanti tramite le
apposite regolazioni sul telecomando.
NOTA!
Prima di inserire il cavo di alimentazione nella presa in
c.a. completare tutti i collegamenti!
(provocato da dispositivi di riscaldamento o
illuminazione solare diretta). Per ridurre il rischio di
incendio o scosse elettriche non esporre il dispositivo
alla pioggia o allumidità. Se si rovesciano dei liquidi
allinterno degli altoparlanti, scollegare
immediatamente i connettori e lasciare asciugare gli
altoparlanti prima di riutilizzarli.
leggermente umido e che non lasci pelucchi. Non
utilizzare detergenti in quanto possono avere un
effetto corrosivo.
dallalimentazione. Attendere qualche secondo e
quindi ricollegarli.
altoparlanti per un lungo periodo - ad esempio prima
di una vacanza - si consiglia di disattivare
completamente il sistema e di non lasciarlo in
modalità standby
SpanishDutchSwedishFinishPolishTurkishRussian
Norwegian
Danish
MMS506Final.p65 7/29/02, 2:12 PM15
15
Portuguese
Page 16

Posizione degli altoparlanti
English French German Italian Spanish Dutch
Regole generali
· Non posizionare gli altoparlanti dietro tende, mobili o
altri oggetti, poiché altrimenti si rischia di
compromettere la risposta dei toni alti e si riduce
nettamente leffetto stereo.
· Ogni stanza ha differenti caratteristiche acustiche e
spesso le possibilità di posizionamento sono limitate.
Per individuare la posizione ottimale per gli altoparlanti,
si consiglia di fare delle prove. In linea generale,
posizionare le casse nella stanza nel modo più
simmetrico possibile.
Altoparlanti satellite frontali (figura a)
· I satelliti frontali di sinistra e destra riproducono la
musica in stereo e laudio off-screen della riproduzione
video.
· Si consiglia di posizionare questi satelliti ai lati del
televisore.
· Guardando dalla posizione dellascoltatore, il satellite
collegato a
sul lato sinistro mentre il satellite collegato a
subwoofer deve essere sul lato destro.
· I1 migliore effetto stereo si ottiene quando i due satelliti anteriori e lascoltatore formano un triangolo equilatero.
· Laltezza ottimale di queste casse è raggiunta quando
Swedish Finish
Polish
Turkish Russian
Norwegian
Danish
Portuguese
vengono posizionate al livello dellorecchio
dellascoltatore (seduto).
Altoparlante satellite centrale (figura b)
· I1 satellite centrale fornisce gli effetti on-screen e il
dialogo in Dolby Digital / Dolby Surround.
· Si consiglia di posizionarlo quanto più possibile vicino
al centro del televisore (ad esempio, sotto o sopra il
televisore).
· Si consiglia di orientare questo altoparlante al livello
dellorecchio dellascoltatore seduto.
Altoparlanti satellite surround (figura c)
· I satelliti surround di sinistra e destra forniscono gli
effetti surround in Dolby Digital / Dolby Surround
· Questi satelliti possono essere posizionati in qualsiasi
punto comodo accanto allascoltatore, anche
leggermente più avanti rispetto alla posizione di
questultimo.
· I satelliti surround non devono essere necessariamente
alla stessa altezza dei satelliti frontali.
· Guardando dalla posizione dellascoltatore, il satellite
collegato a
sinistro, mentre il satellite collegato a
deve essere sul lato destro.
· Se vicino della posizione di ascolto sono presenti pareti
laterali, una buona posizione per i satelliti surround è
leggermente dietro la propria posizione e poco sopra
il livello dellorecchio.
Subwoofer (figura d)
· La posizione ottimale per il subwoofer è sul pavimento
accanto al muro. Quanto più vicino è allangolo, tanto
maggiore sarà la potenza massima dei bassi.
· Il subwoofer non è schermato magneticamente, quindi
posizionarlo ad almeno 0,5 metri dal televisore.
FRL
del subwoofer deve essere posizionato
SRL
del subwoofer deve essere sul lato
SRR
del subwoofer
FRR
al
Figure a:
Figura a:
Figura b:
Figure b:
Figure c:
Figura c:
Figure d:
Figura d:
16
MMS506Final.p65 7/29/02, 2:12 PM16
Page 17

Explicación (ilustración página 3)
Mando a distancia (véase ilustración A)
À STANDBY
Enciende y apaga (modo de espera) el
sistema de altavoces
Á MUTE
Activa y desactiva el silenciamiento
 MASTER VOLUME - / +
Eleva y reduce el volumen global
à FADE REAR / FRONT
Ajusta la compensación acústica (loudness)
de los satélites posteriores y frontales
Ä BASS - / +
Ajuste personal del nivel de graves
Å TREBLE - / +
Ajuste personal de la presencia de altas
frecuencias
Æ FLAT
Cancela cualquier refuerzo de graves o
agudos aplicado por el usuario.
Ç GAME/ CINE/ MUSIC
Seleccione el botón deseado (juegos,
diálogos, música) para optimizar la
reproducción de sonidos predefinidos según
la aplicación
È INPUT 1/ INPUT 2/ INPUT 3
Seleccione la fuente audiovisual. El sistema
multicanal admite la conexión de dos fuentes
de entrada estéreo independientes y una de
cuatro canales
Conexiones de cables
(véase ilustración B)
Entradas
1. INPUT 1 : canal 5.1
Cable con conector mini-DIN de
9 contactos para la conexión a una
fuente audiovisual de 5.1 canales.
2. INPUT 2 : canal estéreo
Conector
conexión a una fuente audiovisual
estéreo.
3. INPUT 3 : canal estéreo
2 conectores
a una fuente audiovisual estéreo.
Salida
4. CENTER
Conexión del altavoz central (
5. C
Conexión del altavoz central (
estéreo de 3,5 mm)
6. R
Conexión del satélite posterior derecho.
7. R
Conexión del satélite posterior izquierdo.
8. F
Conexión del satélite frontal derecho.
9. F
Conexión del satélite frontal izquierdo.
10. AC
Cable de alimentación para conectar a la
toma de c.a..
jack
ENTER
EAR RIGHT
EAR LEFT
RONT RIGHT
RONT LEFT
MAIN
estéreo de 3,5 mm para la
jack
RCA para la conexión
jack
DIN)
jack
EnglishFrench
German
Italian
SpanishDutchSwedishFinishPolishTurkishRussian
MMS506Final.p65 7/29/02, 2:12 PM17
17
Norwegian
Danish
Portuguese
Page 18

Instalación (ilustración página 18)
English French German Italian Spanish Dutch
AC
MAIN
23
1
Swedish Finish
Conexión a una tarjeta de sonido de 5.1 canales
(o reproductor DVD equipado con
descodificador de 5.1 canales, cable no
incluido)
1. Conecte el terminal miniDIN de 9 contactos al
sistema de altavoces, y los tres miniconectores
Polish
Turkish Russian
Norwegian
Danish
Portuguese
estéreo a la tarjeta de sonido.
Conexión de fuentes estéreo externas (cables
no incluidos)
2 Conecte el
riculares de un equipo externo (reproductor
MP3, etc.).
3 Conecte los
externa, por ejemplo un TV
minijack
estéreo a la toma de au-
jacks
RCA estéreo a una fuente
.
Conexión de los altavoces satélite
4 Conecte el altavoz central al terminal CENTER
(
jack
DIN).
5 Conecte el altavoz central al terminal
(
jack
estéreo de 3,5 mm).
6 Conecte el satélite posterior derecho al termi-
REAR RIGHT.
nal
7 Conecte el satélite posterior izquierdo al termi-
REAR LEFT.
nal
8 Conecte el satélite frontal derecho al terminal
FRONT RIGHT.
9 Conecte el satélite frontal izquierdo al terminal
FRONT LEFT.
Conexión de alimentación
10 Conecte el cable fijo de alimentación a la toma
eléctrica (c.a.).
CENTER
567894
10
Encienda (y apague) el sistema de altavoces con el
botón STANDBY del mando a distancia.
Afine el sistema con los ajustes de altavoz del mando
a distancia.
ATENCIÓN:
No conecte el cable de alimentación a la toma eléctrica
sin haber realizado el resto de conexiones.
Seguridad
No exponga los altavoces a un exceso de calor
·
(proximidad de radiadores, luz solar directa). Para
reducir el riesgo de incendio o descarga eléctrica, no
exponga el equipo a la lluvia o a la humedad. Si se
derrama líquido en los altavoces, desconecte
inmediatamente todos los cables y espere a que se
sequen los altavoces antes de volver a utilizarlos.
· Puede limpiar los altavoces con un paño suave
ligeramente humedecido que no suelte pelusas. No
utilice productos de limpieza, ya que podrían tener un
efecto corrosivo.
· Si los altavoces no funcionan, desconéctelos de la toma
de alimentación. Espere unos segundos antes de
conectarlos de nuevo.
· Si no tiene intención de usar los altavoces durante un
periodo de tiempo prolongado (por ejemplo, si se va de
vacaciones), se recomienda desconectar el sistema por
completo (no dejarlos simplemente en el modo de
espera).
18
MMS506Final.p65 7/29/02, 2:12 PM18
Page 19

Emplazamiento de los altavoces
General
· La ubicación de los altavoces detrás de cortinas,
muebles u otros objetos reducirá la respuesta de
agudos, y por tanto el efecto estéreo.
· Cada sala tiene unas características acústicas
diferentes, y las posibilidades de emplazamiento
suelen verse limitadas. Experimente distintas
posiciones hasta encontrar la distribución óptima.
Por lo general, los altavoces deberán disponerse
lo más simétricamente posible en la sala.
Altavoces satélites frontales (figura a)
· Los altavoces satélites frontales derecho e
izquierdo se encargan de la música estéreo y de
los sonidos de fuera de la pantalla en la
reproducción de vídeo.
· Estos satélites se instalarán en los laterales del
televisor.
· Visto desde la posición del oyente, el satélite
conectado a
la izquierda, y el conectado a
· El mejor efecto estéreo se consigue cuando los
dos satélites frontales y el oyente forman un
triángulo equilátero.
· La altura óptima de estos altavoces es la altura del
oído en posición de sentado.
Altavoz satélite central (figura b)
· El satélite central aporta los efectos y los diálogos
de pantalla en Dolby Digital / Dolby Surround.
· Deberá situarse lo más cerca posible del centro
del televisor (por ejemplo, debajo o encima).
· El altavoz central deberá orientarse al oído del
espectador en posición de sentado.
Altavoces satélites envolventes (figura c)
· Los satélites derecho e izquierdo producen los
efectos de sonido envolvente en Dolby Digital /
Dolby Surround
· Estos satélites pueden instalarse en cualquier lugar
del plano transversal del oyente, incluso
ligeramente adelantados con respecto a su
posición.
· Los altavoces envolventes no tienen que estar
necesariamente a la misma altura del suelo que
los frontales.
· Visto desde la posición del oyente, el satélite
conectado a
la izquierda, y el conectado a
· Si hay paredes laterales cerca de la posición de
escucha, un buen emplazamiento de los altavoces
envolventes es ligeramente retrasados y por
encima de la altura del oído.
Subwoofer (figura d)
· El emplazamiento óptimo del subwoofer es en el
suelo y cerca de la pared. Cuanto más cerca esté
de la esquina, más intensa será la salida de graves.
· El subwoofer no incorpora apantallamiento
magnético, por lo que deberá situarlo como mínimo
a medio metro del TV/monitor.
FRL en el subwoofer deberá quedar a
SRL en el subwoofer deberá quedar a
FRR a la derecha.
SRR a la derecha.
Figure a:
Figura a:
Figura b:
Figure b:
Figure c:
Figura c:
Figure d:
Figura d:
EnglishFrench
German
Italian
SpanishDutchSwedishFinishPolishTurkishRussian
Norwegian
Danish
MMS506Final.p65 7/29/02, 2:12 PM19
19
Portuguese
Page 20

Uitleg (Illustratie pag. 3)
English French German Italian Spanish Dutch
Afstandsbediening (zie illustratie A)
À STANDBY
Om het luidsprekersysteem in of uit te
schakelen (=
STANDBY: wachtstand).
Á MUTE
Om het volume in en uit te schakelen.
 MASTER VOLUME - / +
Om het volume harder of zachter te zetten.
à FADE REAR / FRONT
Om de balans tussen voor- en
achterluidsprekers te wijzigen.
Ä BASS - / +
Om de lage tonen in te stellen.
Å TREBLE - / +
Swedish Finish
Om de hoge tonen in te stellen.
Æ FLAT
Verwijdert alle door de gebruiker toegepaste
versterkingen van de lage of hoge tonen.
Ç GAME/ FILM/ MUSIC
Polish
Om per genre (spel, spraak of muziek)
het optimale klankbeeld te kiezen.
È INPUT 1/ INPUT 2/ INPUT 3
Kies een audiovisuele bron; u kunt twee
Turkish Russian
aparte stereobronnen en één 5.1kanaalsbron op het systeem aansluiten.
Kabelaansluitingen
(zie illustratie B)
Ingangen
1. INPUT 1 : 5.1-kanaal
9-polige DIN-bus voor aansluiting van een
5.1-kanaals audiovisuele bron.
2. INPUT 2 :
3.5-mm-stereobus voor aansluiting van
een audiovisuele stereobron.
3. INPUT 3 :
2 x RCA-bus voor aansluiting van een
audiovisuele stereobron.
Uitgangen
4. CENTER
Voor aansluiting van de
middenluidspreker. (DIN-bus)
5. C
ENTER
Voor aansluiting van de
middenluidspreker. (3.5-mm-stereobus)
6. R
EAR RIGHT
Voor aansluiting van de rechterachterluidspreker.
7. R
EAR LEFT
Voor aansluiting van de linkerachterluidspreker.
8. FRONT RIGHT
Voor aansluiting van de rechtervoorluidspreker.
9. F
RONT LEFT
Voor aansluiting van de linkervoorluidspreker.
10. AC
Sluit het netsnoer op het stopcontact aan.
STEREOKANAAL
STEREOKANAAL
MAIN
Norwegian
Danish
Portuguese
20
MMS506Final.p65 7/29/02, 2:12 PM20
Page 21

Installatie (Illustratie pagina 21)
AC
MAIN
EnglishFrench
German
Italian
23
1
Aansluiting op een geluidskaart met 5.1 kanaal (of een dvd - speler met ingebouwde
decoder voor een 5.1 kanaal — exclusief
kabel)
1. Sluit de 9-pensDIN-stekker aan op het
luidsprekersysteem en de drie stereostekkers op
de geluidskaart.
Aansluiten van externe stereobronnen
(exclusief kabels)
2 Sluit de kleine stereobus aan op bijvoorbeeld een
hoofdtelefoonaansluiting van een mp3-speler.
3 Sluit de RCA-stereobussen aan op bijvoorbeeld
een tv.
Aansluiten van de satellietluidsprekers
4 Sluit de middenluidspreker aan op CENTER. (DIN-bus)
5 Sluit de middenluidspreker aan op
stereobus)
6 Sluit de rechter-achterluidspreker aan op REAR RIGHT.
7 Sluit de linker-achterluidspreker aan op
8 Sluit de rechter-voorluidspreker aan op
9 Sluit de linker-voorluidspreker aan op
Aansluiten op het lichtnet
10 Sluit het netsnoer op het stopcontact aan.
CENTER. (3.5-mm-
REAR LEFT.
FRONT RIGHT.
FRONT LEFT.
567894
10
Schakel het luidsprekersysteem in (en uit) met de knop
‘standby’ op de afstandsbediening.
Stel het luidsprekersysteem in met behulp van de
afstandsbediening.
OPMERKING!
Steek de stekker pas in het stopcontact als u alles hebt
aangesloten!
Veiligheid
·
Stel de luidsprekers niet bloot aan hoge temperaturen
(bij de verwarming of in de volle zon). Bescherm de
apparatuur tegen regen en vocht om brand of een
elektrische schok te voorkomen. Komt er vloeistof in
de luidsprekers, neem dan alle aansluitingen los en laat
de luidsprekers drogen alvorens ze weer te gebruiken.
·
U kunt de luidsprekers met een zachte, enigszins
vochtige, pluisvrije doek afnemen. Gebruik geen
reinigingsmiddelen; deze kunnen corrosie veroorzaken.
·
Als de luidsprekers niet werken, dient u de stekker uit
het stopcontact te nemen. Wacht een paar seconden
en sluit de luidsprekers weer op het net aan.
· Als u van plan bent het luidsprekersysteem langere tijd
niet te gebruiken - bij voorbeeld als u met vakantie gaat
- is het raadzaam het systeem volledig uit te schakelen
en het niet in de wachtstand (standby) te laten staan.
SpanishDutchSwedishFinishPolishTurkishRussian
Norwegian
Danish
MMS506Final.p65 7/29/02, 2:12 PM21
21
Portuguese
Page 22

Opstellen van de luidsprekers
English French German Italian Spanish Dutch
Algemeen
· Plaatsing van de luidsprekers achter gordijnen,
meubels enzovoort resulteert in een verminderde
hogetonenweergave waardoor het stereo-effect
aanzienlijk afneemt.
· Elke kamer heeft andere akoestische eigenschappen
en de plaatsingsmogelijkheden zijn vaak beperkt. Men
vindt de beste plaats voor de luidsprekers door met
de opstelling te experimenteren. In het algemeen
dienen de luidsprekers zo symmetrisch mogelijk in
de kamer opgesteld te worden.
Voorluidsprekers (figuur a)
· De linker- en rechter-voorluidsprekers geven
stereomuziek en het achtergrondgeluid bij videos
weer.
· Deze satellietluidsprekers dienen aan weerszijden van
de tv geplaatst te worden.
· Daarbij dient de luidspreker die op
subwoofer is aangesloten zich links van de luisteraar
te bevinden en de satellietluidspreker die op
de subwoofer is aangesloten, rechts.
· Het beste stereo-effect wordt verkregen wanneer de
twee voorluidsprekers en de luisteraar een gelijkzijdige
driehoek vormen.
· De luidsprekers dienen bij voorkeur op oorhoogte van
Swedish Finish
Polish
Turkish Russian
Norwegian
Danish
Portuguese
de luisteraar geplaatst te worden (als hij/zij zit).
Middenluidspreker (figuur b)
· De middenluidspreker geeft de geluidseffecten en
dialogen in Dolby Digital / Dolby Surround weer.
· Deze luidspreker dient zo dicht mogelijk bij het midden
van de tv geplaatst te worden (bijv. onder of boven op
het apparaat).
· De luidspreker dient op het oor van de luisteraar
gericht te zijn (als hij/zij zit).
Surround-luidsprekers (figuur c)
· De linker- en rechter-surroundluidsprekers geven de
rondomeffecten in Dolby Digital / Dolby Surround
weer.
· Deze satellietluidsprekers mogen op elke plek naast
de luisteraar geplaatst worden en zelfs iets vóór de
luisteraar.
· De surroundluidsprekers hoeven zich niet op precies
dezelfde hoogte als de voorluidsprekers te bevinden.
· De satellietluidspreker die op
aangesloten, dient zich links van de luisteraar te
bevinden en de luidspreker die op
subwoofer is aangesloten, rechts.
· Als er dicht bij de luisterpositie zijmuren zijn, kunnen
de surroundluidsprekers het beste iets achter de
luisterpositie en iets boven oorhoogte geplaatst
worden.
Subwoofer (figuur d)
· De beste plaats voor de subwoofer is dicht bij de muur
op de vloer. Hoe dichter de subwoofer zich bij de hoek
van de kamer bevindt, hoe krachtiger de basweergave.
· De subwoofer is niet magnetisch afgeschermd en
dient daarom minstens 0,5 meter van de tv geplaatst
te worden.
SRL
FRL
van de
FRR
van
van de subwoofer is
SRR
van de
Figuur a:
Figure a:
Figure b:
Figuur b:
Figure c:
Figuur c:
Figure d:
Figuur d:
22
MMS506Final.p65 7/29/02, 2:12 PM22
Page 23

Förklaringar (figur sidan 3)
Fjärrkontroll (Se illustration på A)
À STANDBY (VILOLÄGE)
För omkoppling av högtalarsystemet till läge
ON (PÅ) eller OFF (AV, = STANDBY)
Á MUTE (TYSTA)
För omkoppling av högtalarsystemet till läge
mute (tyst), och tillbaka till normalläget
 MASTER VOLUME - / + (HUVUDVOLYM)
För inställning av huvudvolymen, högre eller
lägre
à FADE REAR / FRONT (LJUDSTYRKA
BAKRE/FRÄMRE)
För inställning av ljudstyrkan på de bakre och
främre satellithögtalarna
Ä BASS - / + (BAS)
För inställning av basnivån, efter eget tycke
och smak
Å TREBLE - / + (DISKANT)
För inställning av diskantåtergivningen efter
eget tycke och smak
Æ FLAT (utjämna)
Tar bort all bas- eller diskantförstärkning som
användaren lagt till.
Kabelanslutningar (Se illustration på B)
INGÅNGAR
1. INPUT 1: 5.1-KANALS,
9-stifts, mini-DIN-kabel för anslutning till
en 5.1-kanals, audio-visuell signalkälla.
2. INPUT 2: STEREOKANAL
3,5 mm stereojack för anslutning till en
audio-visuell stereosignalkälla.
3. INPUT 3: STEREOKANAL
2 st. RCA-jack för anslutning till en audiovisuell stereosignalkälla.
UTGÅNGAR
ENTER
4. C
För anslutning till mittsatellithögtalaren
(DIN-jack).
ENTER
5. C
För anslutning till mittsatellithögtalaren
(3,5 mm stereo-jack).
6. R
EAR RIGHT
För anslutning till den bakre, högra
satellithögtalaren.
EAR LEFT
7. R
För anslutning till den bakre, vänstra
satellithögtalaren.
EnglishFrench
German
Italian
SpanishDutchSwedishFinishPolishTurkishRussian
Ç
GAME/ MOVIE/ MUSIC (SPEL/FILM/MUSIK)
Välj med spel-, tal- eller musikknappen bästa
möjliga förinställda ljudåtergivning per genre
È INPUT 1/ INPUT 2/ INPUT 3
Gör ditt val av audio-visuell källa. Två
separata stereokällor och en 5.1-kanalskälla
kan anslutas till detta flerkanaliga
högtalarsystem.
MMS506Final.p65 7/29/02, 2:12 PM23
RONT RIGHT
8. F
För anslutning till den främre, högra
satellithögtalaren.
RONT LEFT
9. F
För anslutning till den främre, vänstra
satellithögtalaren.
10. AC
MAIN
Nätkabel att anslutas till ett nätuttag.
23
Norwegian
Danish
Portuguese
Page 24

Installation (figur sidan 24)
English French German Italian Spanish Dutch
AC
MAIN
23
1
Swedish Finish
Anslutning till ett 5.1-kanalsljudkort (eller en DVDspelare med inbyggd 5.1-kanalsdekoder kabel
ingår ej)
1. Anslut 9-stiftskontakten (mini-DIN) till
högtalaranläggningen och de 3 ministereokontakterna till ljudkortet.
Polish
Ansluta externa stereo-ljudkällor (kablar ingår ej)
2. Anslut mini-stereokontakten till en ljudkälla,
exempelvis ett hörlursuttag till en MP3-spelare.
3. Anslut RCA-stereokontakterna till en ljudkälla,
exempelvis en TV.
Anslutning av satellithögtalare
4. Anslut center-satellithögtalaren till CENTER
Turkish Russian
Norwegian
Danish
Portuguese
(DIN-kontakt).
5. Anslut center-satellithögtalaren till CENTER
(3,5 mm stereokontakt).
6. Anslut den bakre högra satellithögtalaren till
REAR RIGHT.
7. Anslut den bakre vänstra satellithögtalaren till
REAR LEFT.
8. Anslut den främre högra satellithögtalaren till
FRONT RIGHT.
9. Anslut den främre vänstra satellithögtalaren till
FRONT LEFT.
Strömanslutning
10. Anslut den fasta nätsladden till eluttaget.
567894
10
Sätt på (och stäng även av) högtalaranläggningen
med standby-knappen på fjärrkontrollen.
Ställ in högtalaranläggningen med
högtalarinställningarna på fjärrkontrollen.
OBSERVERA!
Sätt inte i stickproppen i eluttaget förrän alla
anslutningar är gjorda!
Säkerhet
·
Utsätt inte högtalarna för stark värme (orsakad
av uppvärmningsanordningar eller direkt
solljus). För att minska risken för brand eller
elstötar, ska utrustningen inte utsättas för regn
eller fukt. Om vätska spills i högtalarna, ska du
omedelbart dra ur alla anslutningar och låta
högtalarna torka innan de används igen.
·
Du kan rengöra högtalarna med en mjuk, lätt
fuktad, luddfri trasa. Använd inga
rengöringsmedel eftersom de kan verka
frätande.
·
Om högtalarna inte fungerar, ska du dra ur
nätsladden. Vänta några sekunder innan du
ansluter dem till eluttaget igen.
·
Om du inte tänker använda
högtalaranläggningen under en längre
tidsperiod exempelvis om du ska åka på
semester rekommenderas det att du stänger
av anläggningen fullständigt och inte lämnar
den i standby-läge.
24
MMS506Final.p65 7/29/02, 2:12 PM24
Page 25

Högtalarplacering
Allmänt
· Om högtalarna placeras bakom gardiner, möbler,
eller andra föremål så kommer diskantåtergivningen
att försvagas, och på så sätt att väsentligt minska
stereoeffekten.
· Varje rum har sina unika akustiska egenskaper, och
placeringsmöjligheterna är ofta begränsade. Du kan
finna den bästa högtalarplaceringen genom att
experimentera. I regel ska högtalarna placeras så
symmetriskt som möjligt i rummet.
Främre satellithögtalarna (figur a)
· Främre vänstra och högra satellithögtalaren återger
stereomusik och off-screen-ljuden vid
videospelning.
· Dessa satelliter ska placeras vid sidan om TV:n eller
monitorn.
· Sett från lyssnarens position ska satellithögtalaren
som är ansluten till subwooferns
vänstra sidan, och satellithögtalaren som är
ansluten till subwooferns
· Den bästa stereoeffekten uppnås när de två främre
satellithögtalarna och lyssnaren bildare en liksidig
triangel.
· Den mest gynnsamma höjden för dessa högtalare
är öronhöjd (i sittande ställning).
Mittsattelithögtalaren (figur b)
· Mittsatellithögtalaren ger on-screen-effekter och
dialog i Dolby Digital / Dolby Surround.
· Den bör placeras så nära mitten på TV:n / monitorn
som möjligt (t.ex. under eller ovanpå TV:n /
monitorn).
· Den bör vara riktad mot lyssnarens öronnivå, när
denne sitter.
FRL placeras på
FRR på högra sidan.
Figure a:
Figure b:
Figure c:
EnglishFrench
German
Italian
SpanishDutchSwedishFinishPolishTurkishRussian
Surroundsatellithögtalare (figur c)
· Den vänstra och högra surroundsatellithögtalaren
ger surroundeffekter i Dolby Digital / Dolby Surround
· Dessa satelliter kan placeras på något passande
ställe bredvid lyssnaren, även framför lyssnaren.
· Surrondsatellithögtalarna behöver inte placeras på
precis samma höjd som de främre satellithögtalarna.
· Sett från lyssnarens position, ska den
satellithögtalare som är ansluten till subwooferns
SRL placeras på vänstra sidan, och satellithögtalaren
som är ansluten till subwooferns SRR på högra sidan.
· Om det finns sidoväggar nära lyssningsplatsen, så
är en bra placering för surroundsatelliterna något
bakom lyssnarpositionen och något ovanför
öronhöjd.
Subwoofer (figur d)
· Det bästa läget för subwoofern är på golvet nära
väggen. Ju närmare hörnet den befinner sig, desto
starkare basåtergivning.
· Subwoofern är inte magnetiskt skärmad, varför den
ska placeras minst 0,5 m från TV:n / monitorn.
MMS506Final.p65 7/29/02, 2:12 PM25
Figure d:
25
Norwegian
Danish
Portuguese
Page 26

Säätimet ja liitännät (ks. kuva sivulla 3)
English French German Italian Spanish Dutch
Kauko-ohjain (Katso kuvaa A)
À STANDBY
Kaiutinjärjestelmän kytkentä päälle tai pois
päältä (eli valmiustilaan)
Á MUTE
Kaiutinjärjestelmän mykistäminen ja
kytkeminen takaisin normaaliin toimintaan
 MASTER VOLUME - / +
Yleisen äänenvoimakkuuden säätö
suuremmalle tai pienemmälle
à FADE REAR / FRONT
Taka- ja etukaiuttimien suhteellisen
äänenvoimakkuuden säätö
Ä BASS - / +
Swedish Finish
Bassotason säätö omien mieltymysten
mukaiseksi
Å TREBLE - / +
Korkeiden äänien säätö omien mieltymysten
mukaiseksi
Polish
Æ FLAT
Poistaa kaikki käyttäjän asettamat basson tai
diskantin korostukset.
Kytkennät (Katso kuvaa B)
TULOLIITÄNNÄT
1. INPUT 1: 5.1-channel
9-nastainen mini-DIN-liitin 5.1-kanavaiselle
audiovisuaaliselle ohjelmalähteelle
2. INPUT 2: stereo channel
3,5 mm stereojakki audiovisuaaliselle
stereo-ohjelmalähteelle
3. INPUT 3: stereo channel
2 RCA-jakkia audiovisuaaliselle stereoohjelmalähteelle
LÄHTÖLIITÄNNÄT
4. CENTER
Keskikaiutin (DIN-jakki)
ENTER
5. C
Keskikaiutin (3,5 mm stereojakki)
EAR RIGHT
6. R
Oikea takakaiutin
EAR LEFT
7. R
Vasen takakaiutin
8. F
RONT RIGHT
Oikea etukaiutin
Ç GAME/ MOVIE/ MUSIC
Peli-, puhe- tai musiikkipainike, jolla valitaan
Turkish Russian
äänityyppiin parhaiten sopiva esiohjelmoitu
äänentoisto
È INPUT 1/ INPUT 2/ INPUT 3
Audiovisuaalisen lähteen valinta.
Monikanavakaiutinjärjestelmään voidaan
Norwegian
yhdistää kaksi erillistä stereolähdettä ja yksi
5.1-kanavainen äänilähde.
Danish
Portuguese
26
MMS506Final.p65 7/29/02, 2:12 PM26
RONT LEFT
9. F
Vasen etukaiutin
10. AC
MAIN
Verkkojohto, joka yhdistetään
pistotulppaan
Page 27

Kytkennät (ks. kuva sivulla 27)
AC
MAIN
EnglishFrench
German
Italian
23
1
Yhdistäminen 5.1-kanavaiseen äänikorttiin (tai
DVD-soittimeen jossa on sisäinen 5.1kanavadekooderi johto hankittava erikseen)
1. Yhdistä 9-nastainen mini-DIN-pistoke
kaiutinjärjestelmään ja kolme ministereoliitintä
äänikorttiin.
Ulkoisten stereolähteiden yhdistäminen (johdot
hankittava erikseen)
2. Yhdistä ministereopistoke esimerkiksi MP3soittimen kuulokeliitäntään.
3. Yhdistä RCA-stereopistokkeet esimerkiksi
televisioon.
Kaiutinliitännät
4. Yhdistä keskikaiutin liitäntään CENTER (DINliitin).
5. Yhdistä keskikaiutin liitäntään CENTER (3,5
millimetrin stereoliitin).
6. Yhdistä oikea takakaiutin liitäntään REAR
RIGHT.
7. Yhdistä vasen takakaiutin liitäntään REAR
LEFT.
8. Yhdistä oikea etukaiutin liitäntään FRONT
RIGHT.
9. Yhdistä vasen etukaiutin liitäntään FRONT
LEFT.
Yhdistäminen sähköverkkoon
10. Yhdistä kiinteä verkkojohto pistorasiaan.
567894
10
Kytke kaiutinjärjestelmä toimintaan (ja katkaise
vastaavasti toiminta) kauko-ohjaimen standbypainikkeella.
Viritä kaiutinjärjestelmä kauko-ohjaimen
kaiutinsäätimiä käyttäen.
HUOMAA!
Yhdistä verkkojohto pistorasiaan vasta sitten, kun
muut kaikki kytkennät on tehty!
Turvallisuus
· Älä sijoita kaiuttimia kuumaan paikkaan (lähelle
lämmityslaitteita tai suoraan auringonvaloon).
Palo- ja sähköiskuvaaran välttämiseksi älä jätä
kaiuttimia sateeseen tai kosteaan paikkaan.
Jos kaiuttimien sisään joutuu nestettä, irrota heti
kaikki kytkennät ja anna kaiuttimien kuivua,
ennen kuin otat ne uudelleen käyttöön.
· Kaiuttimet voi puhdistaa pehmeällä,
nukkaamattomalla, kevyesti kostutetulla liinalla.
Älä käytä puhdistusaineita, sillä ne voivat
vaurioittaa laitetta.
· Jos kaiuttimet eivät toimi, irrota ne
sähköverkosta. Odota muutama sekunti ja
kytke ne uudelleen virtalähteeseen.
· Jos et aio käyttää kaiuttimia pitkään aikaan
esimerkiksi loman aikana on hyvä katkaista
järjestelmästä virta kokonaan eikä jättää sitä
valmiustilaan.
SpanishDutchSwedishFinishPolishTurkishRussian
Norwegian
Danish
MMS506Final.p65 7/29/02, 2:13 PM27
27
Portuguese
Page 28

Kaiuttimien sijoitus
English French German Italian Spanish Dutch
Yleistä
· Kaiuttimien sijoittaminen verhojen, huonekalujen tai
muiden esineiden taakse pienentää
diskanttivastetta ja heikentää stereovaikutelmaa
huomattavasti.
· Jokaisen tilan akustiset ominaisuudet ovat erilaiset
ja sijoittelumahdollisuudet ovat usein rajalliset.
Kaiuttimien parhaat paikat löytyvät kokeilemalla.
Yleisesti ottaen kaiuttimet tulisi sijoittaa tilaan
mahdollisimman symmetrisesti.
Etukaiuttimet (kuva a)
· Vasen ja oikea etukaiutin toistavat stereomusiikkia
ja ruutukuvan ulkopuolisia ääniä.
· Nämä kaiuttimet sijoitetaan television tai monitorin
vasemmalle ja oikealle puolelle.
· Kaiutin, joka on yhdistetty subwooferin liitäntään
FRL, sijoitetaan kuulijasta katsottuna vasemmalle
puolelle ja kaiutin, joka on yhdistetty subwooferin
FRR, sijoitetaan oikealle puolelle.
liitäntään
· Paras stereovaikutelma syntyy, kun kaksi
etukaiutinta ja kuulija muodostavat tasasivuisen
kolmion.
· Korkeussuunnassa nämä kaiuttimet on parasta
Swedish Finish
Polish
sijoittaa korvan korkeudelle (kuulijan istuessa).
Keskikaiutin (kuva b)
· Keskikaiutin välittää Dolby Digital- ja Dolby Surround koodatut ruutukuvan äänitehosteet ja
dialogit.
· Kaiutin sijoitetaan mahdollisimman lähelle television tai monitorin keskipistettä (esim. television tai
monitorin alle tai päälle).
· Se suunnataan kuulijan korvia kohti.
Figure a:
Kuva a:
Kuva b:
Figure b:
Kuva c:
Figure c:
Surround-kaiuttimet (kuva c)
· Vasen ja oikea surround-kaiutin välittävät Dolby
Digital- ja Dolby Surround -äänitehosteet.
· Nämä kaiuttimet voidaan sijoittaa sopiviin kohtiin
kuulijan sivulle, haluttaessa jopa hiukan
Turkish Russian
Norwegian
Danish
Portuguese
MMS506Final.p65 7/29/02, 2:13 PM28
kuuntelutason etupuolelle.
· Surround-kaiuttimien ei tarvitse olla täsmälleen
etukaiuttimien korkeudella.
· Kaiutin, joka on yhdistetty subwooferin liitäntään
SRL, sijoitetaan kuulijasta katsottuna vasemmalle
puolelle ja kaiutin, joka on yhdistetty subwooferin
SRR, sijoitetaan oikealle puolelle.
liitäntään
· Jos tilan sivuseinät ovat lähellä kuuntelukohtaa, surround-kaiuttimet on hyvä sijoittaa kuuntelutasosta
hiukan taaksepäin jonkin verran korvien yläpuolelle.
Subwoofer (kuva d)
· Subwooferin paras paikka on lattialla seinän lähellä.
Mitä lähemmäksi nurkkaa se sijoitetaan, sitä
voimakkaampi bassotoisto on.
· Koska subwoofer ei ole magneettisesti suojattu, se
tulee sijoittaa vähintään 0,5 metrin päähän
televisiosta tai monitorista.
28
Kuva d:
Figure d:
Page 29

Objaúnienie (Ilustracja na stronie 3)
Obsùuga pilota (Patrz Rysunek A)
À
STANDBY (CZEKIWANIE)
Sùuýy do wùàczania zestawu
gùoúnikowego lub przeùàczania go w tryb
OCZEKIWANIA
Á
MUTE (WYCISZANIE)
Sùuýy do przeùàczania zestawu
gùoúnikowego w tryb chwilowego
wyciszenia dêwiæku i z powrotem
Â
MASTER VOLUME - / +
(GÙOÚNOÚÃ)
Sùuýy do regulacji gùoúnoúci
Ã
FADE REAR / FRONT (BALANS
PRZÓD/TYÙ)
Sùuýy do równowaýenia gùoúnoúci
przednich i tylnych gùoúników
satelitarnych
Ä
BASS - / + (REGULACJA NISKICH
TONÓW)
Sùuýy do regulacji poziomu niskich
tonów, w zaleýnoúci od upodobania
uýytkownika
Å
TREBLE - / + (REGULACJA
WYSOKICH TONÓW)
Sùuýy do regulacji poziomu wysokich
tonów, w zaleýnoúci od upodobania
uýytkownika
Æ
FLAT
Niweluje wzmocnienie tonów niskich i
wysokich wybrane przez uýytkownika
Ç
GAME/ MOVIE/ MUSIC (GRA /
ROZMOWA / MUZYKA)
Umoýliwiajà wybór pomiædzy
optymalnymi ustawieniami parametrów
odtwarzania dla nastæpujàcych rodzajów
dúwiæku: gra, rozmowa lub muzyka
È
INPUT 1/ INPUT 2/ INPUT 3
(WEJÚCIA 1. 2, 3)
Umoýliwia wybór pomiædzy
audiowizualnymi êródùami sygnaùu. Do
wielokanaùowego zestawu gùoúñikowego
mogà byã podùàczone dwa urzàdzenia
stereo i jedno 5.1-kanaùowe êródùo
sygnaùu.
Podczanie kabli
(Patrz Rysunek B)
WEJÚCIA
1. INPUT 1: 5.1-kanaùowe
Przewód z 9-stykowym zùàczem
typu mini DIN, sùuýàcy do
podùàczenia 5.1-kanaùowego
urzadzenia audio-wideo.
2. INPUT 2: STEREO CHANNEL
Gniazdo stereofoniczne typu jack o
úrednicy 5,5 mm, sùuýàce do
podùàczenia stereofonicznego
urzàdzenia audio-wideo.
3. INPUT 3: STEREO CHANNEL
2 gniazda RCA sùuýàce do
podùàczenia stereofonicznego
urzàdzenia audio-wideo.
WYJÚCIA
4. C
ENTER
Do podùàczenia gùoúnika
centralnego (gniazdo DIN).
5. C
ENTER
Do podùàczenia gùoúnika
centralnego (gniazdo
stereofoniczne typu jack, o úrednicy
3,5 mm).
EAR RIGHT
6. R
Do podùàczenia gùoúnika prawego
tylnego.
EAR LEFT
7. R
Do podùàczenia gùoúnika lewego
tylnego.
RONT RIGHT
8. F
Do podùàczenia gùoúnika prawego
przedniego.
9. F
RONT LEFT
Do podùàczenia gùoúnika lewego
przedniego.
MAIN
10. AC
Przewód sieciowy podùàczany do
gniazda úciennego.
EnglishFrench
German
Italian
SpanishDutchSwedishFinishPolishTurkishRussian
Norwegian
Danish
MMS506Final.p65 7/29/02, 2:13 PM29
29
Portuguese
Page 30

Instalacja (ilustracja - str. 30)
English French German Italian Spanish Dutch
AC
MAIN
23
1
Swedish Finish
Podùàczanie do 5.1-kanaùowej karty dêwiækowej
(lub odtwarzacza DVD z wbudowanym dekoderem
sygnaùu 5.1-kanaùowego przewód nie naleýy do
wyposaýenia)
1. Podùàcz 9-stykowe zùàcze typu mini DIN do
zestawu gùoúnikowego, a 3 zùàcza
stereofoniczne typu mini jack do karty
Polish
Turkish Russian
Norwegian
Danish
Portuguese
dêwiækowej.
Podùàczanie urzàdzenia stereofonicznego
(przewody nie naleýà do wyposaýenia)
2. Poùàcz gniazdo stereofoniczne typu mini jack
z odpowiednim gniazdem wyjúciowym (np.
sùuchawkowym) urzàdzenia takiego jak
przenoúny odtwarzacz MP3.
3. Poùàcz stereofoniczne gniazda RCA z
odpowiednimi gniazdami urzàdzenia
zewnætrznego takiego jak odbiornik TV.
Podùàczanie gùoúników satelitarnych
4. Podùàcz gùoúnik centralny do gniazda CENTER
(gniazdo DIN)
5. Podùàcz gùoúnik centralny do gniazda CENTER
(gniazdo stereofoniczne typu jack, o úrednicy 3,5
mm)
6. Podùàcz gùoúnik prawy tylny do gniazda REAR
RIGHT.
7. Podùàcz gùoúnik lewy tylny do gniazda REAR LEFT.
8. Podùàcz gùoúnik prawy przedni do gniazda FRONT
RIGHT.
9. Podùàcz gùoúnik lewy przedni do gniazda FRONT
LEFT.
Podùàczanie do êródùa zasilania
10. Podùàcz przewód sieciowy zestawu do gniazda
zasilajàcego.
567894
10
Zestaw naleýy wùàczaã (i wyùàczaã) za pomocà
przycisku zasilania na pilocie.
Za pomocà przycisków pilota zmienia siæ takýe
ustawienia dêwiækowe.
UWAGA!
Przewód sieciowy naleýy podùàczyã do gniazda
zasilajàcego dopiero po wykonaniu wszystkich innych
poùàczeñ!
Bezpieczeñstwo
· Gùoúniki naleýy chroniã przed wysokà
temperaturà (dlatego nie naleýy ich ustawiaã
w pobliýu êródeù ciepùa ani w miejscu
naraýonym na bezpoúrednie dziaùanie promieni
sùonecznych). Zestaw naleýy chroniã przed
wilgocià i deszczem. W przeciwnym wypadku
moýe dojúã do poýaru lub poraýenia
uýytkownika pràdem. Jeúli do gùoúników
dostanie siæ jakakolwiek ciecz, naleýy
niezwùocznie odùàczyã je od êródùa zasilania i
poczekaã, aý wilgoã odparuje.
· Gùoúniki moýna czyúciã przy uýyciu miækkiej,
lekko zwilýonej i nie strzæpiàcej siæ úciereczki.
Zabronione jest uýywanie jakichkolwiek
úrodków czyszczàcych, gdyý mogà mieã one
wùaúciwoúci ýràce.
· Jeúli gùoúniki przestanà dziaùaã, naleýy je
odùàczyã od êródùa zasilania. Przed ponownym
podùàczeniem naleýy odczekaã kilka sekund.
· Jeúli zestaw nie bædzie wykorzystywany przez
dùuýszy czas na przykùad z powodu wyjazdu
uýytkownika zalecane jest odùàczenie go od
êródùa zasilania (nie powinien pracowaã w trybie
gotowoúci).
30
MMS506Final.p65 7/29/02, 2:13 PM30
Page 31

Rozmieszczanie gùoúników
Informacje ogólne
·
Umieszczanie gùoúników za zasùonami, meblami lub
jakimikolwiek innymi przedmiotami powoduje zmniejszenie
natæýenia tonów wysokich, co w znaczàcy sposób przyczynia
siæ do osùabienia efektu stereo.
·
Kaýde pomieszczenie posiada odmienne wùaú ciwoúci
akustyczne oraz róýne moýliwoúci ustawienia gùoúników.
Najlepszym sposobem optymalnego ustawienia gùoúników
jest wypróbowanie kilku alternatywnych ustawieñ. Zgodnie
z ogólnàzasadà, gùoúniki powinny byã ustawione w
pomieszczeniu moýliwie najbardziej symetrycznie.
Przednie gùoúniki satelitarne (rys. a)
·
Przedni lewy oraz prawy gùoúnik satelitarny odtwarza dýwiæk
stereo oraz pozaekranowe dýwiæki towarzyszàce filmom.
·
Gùoúniki te powinny byã ustawione po bokach odbiornika
telewizyjnego lub monitora.
·
Patrzàc z pozycji sùuchacza, gùoúnik satelitarny podùàczony
do gniazda frl powinien znajdowaã siæ po lewej stronie, a
gùoúnik satelitarny podùàczony do gniazda frr powinien
znajdowaã siæ po stronie prawej.
·
Najlepszy efekt stereo uzyskuje siæ wtedy, gdy dwa przednie
gùoúniki satelitarne tworzà z sùuchaczem trójkàt równoboczny.
·
Optymalnà wysokoúcià, na jakiej powinno siæ umieszczaã
gùoúniki jest wysokoúã ucha sùuchacza w pozycji siedzàcej.
Centralny gùoúnik satelitarny (rys. b)
·
Centralny gùoúnik satelitarny sùuýy do odtwarzania
ekranowych efektów dýwiækowych oraz dialogów w systemie
Dolby Digital/Dolby Surround.
·
Powinno siæ go umieszczaã moýliwie najbliýej úrodka
odbiornika telewizyjnego lub monitora (na przykùad pod lub
na odbiorniku telewizyjnym lub monitorze).
·
Zaleca siæ równieý ustawienie go na poziomie ucha
sùuchacza w pozycji siedzàcej.
Gùoúniki satelitarne surround (rys. c)
·
Lewy oraz prawy gùoúnik satelitarny surround sùuýy do
uzyskania efektów surround w systemie Dolby Digital/Dolby
Surround.
·
Gùoúniki te mogà byã ustawiane w jakimkolwiek dogodnym
miejscu po obu stronach sùuchacza, a nawet nieco przed
nim.
·
W przeciwieñstwie do przednich gùoúników satelitarnych,
gùoúniki satelitarne surround nie muszà
znajdowaã siæ na takiej samej wysokoúci.
·
Patrzàc z pozycji sùuchacza, gùoúnik satelitarny podùàczony
do gniazda srl powinien znajdowaã siæ
po lewej stronie, a gùoúnik satelitarny podùàczony do gniazda
srr powinien znajdowaã siæ po stronie prawej.
·
Jeúli boczne úciany znajdujà siæ w niedalekiej odlegùoúci od
sùuchacza, zaleca siæ umieszczenie gùoúników satelitarnych
surround nieco za sùuchaczem i nieco powyýej poziomu
ucha.
Subwoofer (rys. d)
·
Optymalnym miejscem instalacji subwoofera jest podùoga
tuý przy úcianie. Im bliãýej rogu úcian, tym peùniejsze
brzmienie basów.
·
Subwoofer nie jest chroniony przed dziaùaniem pola
elektromagnetycznego, dlatego teýpowinien znajdowaã siæ
w odlegùoúci co najmniej 0,5 m od odbiornika telewizyjnego
lub monitora.
Rys. a:
Figure a:
Figure b:
Rys. b:
Figure c:
Rys. c:
Figure d:
Rys. d:
EnglishFrench
German
Italian
SpanishDutchSwedishFinishPolishTurkishRussian
Norwegian
Danish
MMS506Final.p65 7/29/02, 2:13 PM31
31
Portuguese
Page 32

==
=E !"#$%
==
!" !"
!"
!" !"
E !"# ^
1 STANDBY !"#
!"#$%&
2 MUTE !"#
!"#$%&'()*+,
3
MASTER VOLUME - /+ !"#$%&
!"#$%&
4 FADE REAR/FRONT
E !"#$%&'()
!"#$ ! !
5 BASS - / + !"#$%
!"#$%&
6 TREBLE - / + !"#$%
!"#$%&
7 FLAT !
!"#$%&'()*+
8 GAME/MOVIE/MUSIC
L L
!"#$%&'()*+,-
!"#$%&'(")*+
9 INPUT1/ONPUT2/INPUT3
E ! 1 • 2 • 3 F
O !"#$%&'()*+,
!" RKN !"#$%&
!"#$%
!" !"
!"
!" !"
E !"# _
==
=
==
=N
INPUT 1 :
V afk !"# RKN
!"#$%&'()
INPUT 2
=O
PKRãã= !"#$%&'
!"#$
INPUT 3
=P
O=ñ=o`^ !"#$%&
!"#$%
==
=
==
=Q
CENTER
!"#$%&=E afk F
=R
CENTER
!"#$%&EPKR !F
REAR RIGHT (
=S
!"#$%&'
REAR LEFT
=T
!"#$%&'
FRONT RIGHT (
=U
!"#$%&'
=V
FRONT LEFT (
!"#$%&'
AC-MAIN ()
NM
!"#$%&'()*
RKN
!"#
!"#
!"#$
!"#$
!"F
E !"F
!"F
!"F
32
MMS506Chinese 7/29/02, 3:06 PM32
Page 33

==
=E !"#
==
AC
MAIN
23
1
RKNRKN
N=
!"##$%& !"##$%&
!"##$%&
!"##$%& !"##$%&
OK 3.5 !"# $!
PK RCA !"# $!%&' !
!"#$%&' !"#$%&'
!"#$%&'
!"#$%&' !"#$%&'
QK !"#$%& CENTER !
RK !"#$%& CENTER !
SK !"#$%& REAR RIGHT
TK !"#$%&REAR LEFT
UK !"#$%& FRONT RIGHT
VK !"#$%& FRONT LEFT
! !
!
! !
NMK !"!#$%!"&'()*
RKN
RKNRKN
RKNRKN
!"# !"#
RKN
!"#
RKNRKN
!"# !"#
• !"#$%&'()*+,-.
!"#$%&'()*+,
!"
m = !
!"#$
PKR !"
!!
""
!
!!
"
""
##
#
##
==
!"#$% !"#$%
=
!"#$%
==
!"#$% !"#$%
=E=E
!"# !"#
=E
!"#
=E=E
!"# !"#
$$
$
$$
%%
%
%%
FF
F
FF
&&
&
&&
567894
10
!"#$%&'()'*+(,-./
!"#$%"&'()$%*+,
!"#"$%&'()*
!"#$% &'(
==
=
==
•
!"#$%&'()*+,-./
!"#$%&'()*+,-.
!"#$%&'()*+,-./
!"#$%&'()*+,'%-
!"#$%&'()*+,-
•
!"#$%&'()*(+,)
!"#$%&'()*+,
•
!"#$%&'()*+,-.'
!"#$%&'()*+,-
•
!"#$%&'()*+,-./
!"=J !"#$%&'("
!"#$%&'
MMS506Chinese 7/29/02, 3:08 PM33
33
Page 34

!"#$ !"#$
!"#$
!"#$ !"#$
• !"#$%&'()*+,-.
!"#$%&'( )*+,-
!"#
• !"# $%&'()*+
!"#$%&'()*+,"#
!
!" !"
!"
!" !"
• O !"#$%&'() *
• !"#$%&'()*+,-.
!"
• !"#$%&'()*+!
FRL !"#$%&'( FRR
!"#$%&'
• !"#$%&'()*+,-.
!"#$%
• !"#$%&'()*+!,-
!" !"
!"
!" !"
• !"#$%&'()*+'(
ali_v=proolrka !"
ali_v=afdfq^i
• != !"#$%&'()
! !"#$%&'()*
!"#
• !"#$%&'()*+,
!"#$ !"#$
!"#$
!"#$ !"#$
• != !"#$%&'()
• !"#$%&'()*+,-.
!"#$
• !"#$%&'()*+,-.
!
• !"#$%&' SRL !
!"#$%&SRR= !"
!"
• !"#$%&'()*+,-!
!"#$%= !"#$%
!"#$%"#&'()
!!
!
!!
""
"
""
!!
!
!!
^^
^
^^
__
_
__
""
"
""
``
`
``
!!
""
aa
• !"#$%&'()*+,-.
!"#$%&'()*+,
• !"#$%&'()' &*+
!"# MKR
34
MMS506Chinese 7/29/02, 3:10 PM34
!
!!
"
""
a
aa
Page 35

Açýklama (Çizim sayfa 3)
Uzaktan Kumanda
(Bakýnýz Þekil sayfa 3)
À STANDBY
Hoparlör sisteminin ON ya da OFF
(=STANDBY) durumuna getirilmesi
Á MUTE
Hoparlör sisteminin sessiz duruma
ve tekrar normal duruma getirilmesi
 MASTER VOLUME - / +
Asýl sesin daha yüksek ya da alçak
olarak ayarlanmasý
à FADE REAR / FRONT
Arka ya da ön uydu hoparlörlerin ses
yüksekliðinin ayarlanmasý
Ä BASS - / +
Bas düzeyinin kiþisel tercihinize göre
ayarlanmasý
Å TREBLE - / +
Yüksek tonlarýn kiþisel tercihinize
göre ayarlanmasý
Æ FLAT
Kullanýcý tarafýndan uygulanan her
türlü bas veya tiz artýþýný kaldýrýr
Kablo Baðlantýlarý
GÝRÝÞLER
1. GÝRÝÞ 1: 5.1 KANAL
5.1-kanal görsel iþitsel kaynaðýna
ba
ðlamak i
2. GÝRÝÞ 2: STEREO KANAL
Stereo bir görsel iþitsel kaynaðýna
ba
ðlamak i
3. GÝRÝÞ 3: STEREO KANAL
Stereo bir görsel iþitsel kaynaðýna
ba
ðlamak i
ÇIKIÞLAR
4. MERKEZ
Merkez uydu hoparlörüne baðlamak
için. (DIN jak)
5. MERKEZ
Merkez uydu hoparlörüne baðlamak
için. (3.5 mm stereo jak)
6. SAÐ ARKA
Sað arka uydu hoparlörüne
baðlamak için.
(Bakýnýz Þekil sayfa 3)
çin 9 pin mini DIN kablosu.
çin 3.5 mm stereo jak.
çin 2 x RCA jak.
EnglishFrench
German
Italian
SpanishDutchSwedishFinishPolishTurkishRussian
Ç GAME/ FÝLM/ MUSIC
Her tür için en uygun olarak önceden
ayarlý ses üretiminin, game, speech
or music düðmelerinin birinden
seçilmesi
È ÝNPUT 1/ INPUT 2/ INPUT 3
Ýþitsel - görsel kaynak seçiminizi
yapýn. Bu çok kanallý hoparlör
sistemine iki ayrý stereo giriþ kaynaðý
ve bir 5.1-kanallý giriþ kaynaðý
baðlanabilir
MMS506Final.p65 7/29/02, 2:13 PM35
7. SOL ARKA
Sol arka uydu hoparlörüne baðlamak
için.
8. SAÐ ÖN
Sað ön uydu hoparlörüne baðlamak
için.
OL ÖN
9. S
Sol ön uydu hoparlörüne baðlamak
için.
10. AC ÞEBEKE
AC çýkýþýna baðlanacak güç
kablosu.
35
Norwegian
Danish
Portuguese
Page 36

Montaj (Þekil sayfa 36)
English French German Italian Spanish Dutch
AC
MAIN
23
1
Swedish Finish
Bir 5.1 kanal ses kartýna (veya yerleþik 5.1
kanal dekoderine sahip bir DVD oynatýcýsýna
baðlanmasý kablo dahil deðildir)
1. 9 pin mini DIN jaký hoparlör sistemine 3
mini stereo jaký da ses kartýna baðlayýnýz.
Dýþ Stereo Kaynaklara Baðlanmasý (kablo
dahil deðildir)
Polish
2. Mini stereo jaký bir MP3 çalýcý kulaklýk
jaký gibi yerel kaynaða baðlayýnýz.
3. RCA stereo jaklarý TV gibi bir kaynaða
baðlayýnýz.
Uydu Hparlör Baðlantýsý
4. Merkez uydu hoparlörünü MERKEZe
Turkish Russian
Norwegian
Danish
Portuguese
(DIN jaký) baðlayýnýz
5. Merkez uydu hoparlörünü MERKEZe
(3.5 mm stereo jak) baðlayýnýz
6. Sað arka uydu hoparlörünü ARKA
SAÐa baðlayýnýz.
7. Sol arka uydu hoparlörünü ARKA SOLa
baðlayýnýz.
8. Sað ön uydu hoparlörünü ÖN SAÐa
baðlayýnýz.
9. Sol ön uydu hoparlörünü ÖN SOLA
baðlayýnýz.
Güç baðlantýsý
10. Sabit þehir þebekesi kablosunu AC
çýkýþýna baðlayýnýz.
567894
10
Uzaktan kumanda üzerindeki standby
düðmesini kullanarak hoparlör sistemini açýnýz
(ve kapatýnýz).
Uzaktan kumanda üzerindeki hoparlör
ayarlarýný kullanarak hoparlör sistemini
ayarlayýnýz.
NOT !
Baðlantýlarýn hepsi yapýlana kadar güç
kablosunu AC çýkýþýna takmayýnýz!
Güvenlik
·
Hoparlцrleri (эsэtma ekipmanlarэ veya dire
gьneю эюэрэndan kaynaklanan) aюэrэ эsэya
maruz bэrakmayэnэz. Yangэn veya elektrik
зarpmasэ riskini azaltmak iзin bu aygэtэ
yaрmur veya neme maruz bэrakmayэnэz.
Eрer hoparlцrlerin iзerisine sэvэ girerse,
baрlantэlarэn hepsini sцkьnьz ve tekrar
kullanmadan цnce hoparlцrleri kurumaya
bэrakэnэz.
·
Hoparlörleri yumuþak, hafifçe nemlendirilmiþ
tüysüz bir bezle temizleyebilirsiniz. Herhangi
bir temizleme sývýsý kullanmayýnýz,
paslanmaya neden olabilir.
·
Eðer hoparlörler çalýþmazsa, güç kaynaðý
baðlantýsýný kesiniz. Güç kaynaðýna tekrar
baðlamadan önce birkaç saniye bekleyiniz.
·
Eðer hoparlör sistemini uzun bir süre
kullanmayý düþünmüyorsanýz - mesela tatile
çýkacaksanýz - sistemi tamamen kapatmanýz
ve standby modunda býrakmamanýz önerilir.
36
MMS506Final.p65 7/29/02, 2:13 PM36
Page 37

Hoparlörün Yerleþtirilmesi
Genel
·
Hoparlörlerin perde, mobilya veya diðer nesnelerin
arkasýna yerleþtirilmesi hoparlör yanýtýný düþürecek,
ve steryo etkisini önemli oranda azaltacaktýr.
·
Her odanýn ses özellikleri farklýdýr ve yerleþtirme
imkanlarý sýklýkla sýnýrlýdýr. Hoparlörleriniz için en iyi
yeri deneyerek bulabilirsiniz. Genelde hoparlörler oda
içinde mümkün oldukça simetrik olarak
yerleþtirilmelidir.
Ön Uydu Hoparlörleri (þekil a)
·
Ön sol ve sað uydu hoparlörü steryo müziði ve video
aygýtýndan çýkan sesleri çalar.
·
Bu uydular TV veya monitörünüzün kenarlarýna
yerleþtirilmelidir.
·
Dinleyicinin konumundan bakýldýðýnda uydu
hoparlörü frl derin ses hoparlörü sol yanda olmalý,
ve uydu hoparlörü frr derin ses hoparlörü sað yanda
olmalýdýr.
·
En iyi steryo etkisi, iki ön uydu hoparlörü ve dinleyici
bir eþ kenar üçgen oluþturduðunda elde edilir.
·
Bu hoparlörlerin optimum yüksekliði (oturduðunda)
kulak yüksekliðine yerleþtirilmeleridir.
Orta Uydu Hoparlörleri (þekil b)
·
Orta uydu hoparlörü ekran üzerindeki efektleri ve
Dolby Digital / Dolby Surround diyaloðu saðlar.
Mümkün oldukça TVniz/ monitörünüzün ortasýna
yakýn (örneðin TV/ monitörünüzün altýna veya
üstüne) yerleþtirilmelidir.
·
Oturduðunda dinleyicinin kulak düzeyine yönelmiþ
olmalýdýr.
Surround Uydu Hoparlörleri (þekil c)
·
Surround sol ve sað uydu hoparlörü Dolby Digital /
Dolby Surrounddeki surround etkileri sunar.
·
Bu uydular dinleyici çevresindeki uygun yerlere, hatta
dinleyici konumuna hafif yönelmiþ yerlere
yerleþtirilebilir.
·
Surround uydu hoparlörlerinin ön uydu hoparlörleriyle
tam ayný yükseklikte olmasý gerekmez. Dinleyicinin
konumundan bakýldýðýnda uydu hoparlörü srl derin
ses hoparlörü sol yanda olmalý, ve uydu hoparlörü
srr derin ses hoparlörü sað yanda olmalýdýr.
Dinleme konumuna yakýn yan duvarlarýnýz varsa,
surrount uydu hoparlörleriniz için konumunuzun hafif
arkasý ve kulak seviyesinden hafif yukarýsý iyi bir yer
olabilir.
Derin Ses Hoparlörü (þekil d)
Derin ses hoparlörü için en iyi yer duvara yakýn zemin
olacaktýr. Köþeye yakýn oldukça maksimum bas
çýkýþý güçlenir.
Derin ses hoparlörü manyetik olarak korunaklý
olmayýp, TV/ monitörden en az 0.5 metre uzaða
yerleþtiriniz.
Figure a:
Þekil a:
Þekil b:
Figure b:
Figure c:
Þekil c:
Figure d:
Þekil d:
EnglishFrench
German
Italian
SpanishDutchSwedishFinishPolishTurkishRussian
Norwegian
Danish
MMS506Final.p65 7/29/02, 2:13 PM37
37
Portuguese
Page 38

Объяснение
(Рисунок на стр. 3)
English French German Italian Spanish Dutch
Пояснение для пульта
дистанционного управления
(См. рисунок на стр.3, рис. A)
À STANDBY
Для включения и выключения
акустической системы, (=
Á MUTE
Для переключения акустической
системы в режим приглушения
звука и назад в режим нормальной
работы
 MASTER VOLUME - / +
Для увеличения или уменьшения
громкости основного звука
à FADE REAR / FRONT
Для регулировки громкости
тыловых и фронтальных колонок
Swedish Finish
Ä BASS - / +
Для регулировки уровня басов в
соответствии с вашим вкусом
Å TREBLE - / +
Для регулировки уровня верхних
Polish
звуковых частот по вашему
желанию
Æ PABHOMEPHAß
TMeÿeT ïoäúeM басов и низKèX
O
÷acTOT, ycTaHOBëeHHÜIÉ
ïOëüçoBaTeëeM
Turkish Russian
Ç GAME/ MOVIE/ MUSIC
Выберите с помощью oкнahobопки
игра (game), ки
музыка (music) оптимальную для
данного жанра предустановку
воспроизведения
Norwegian
È INPUT 1/ INPUT 2/ INPUT 3
Выберите аудио-видео источник.
К ýòîé многоканальной
акустической системе можно
Danish
подключить äâà разных
стереофонических источника и
один 5.1-канальный источник
Portuguese
STANDBY)
Ho (movie) èëè
Пояснение для кабельных
соединений
(См. рисунок на стр.3, рис. B)
Входы
1. INPUT 1: 5.1-channel
9-контактный кабель со
штекером mini-DIN для
подключения к источнику 5.1канального объемного звука
2. INPUT 2: STEREO CHANNEL
3.5-ìì стереофонический
штекер для подключения к
аудио- или видеоаппаратуре с
выходом стереозвука
3. INPUT 2: STEREO CHANNEL
2 разъема тюльпан для
подключения к аудио- или
видеоаппаратуре с выходом
стереозвука
Выходы
4. C
ENTER
Для подключения центральной
колонки (штекер DIN)
5. CENTER
Для подключения центральной
колонки (3.5-мм стереофонический
штекер)
EAR RIGHT
6. R
Для подключения правой
тыловой колонки
EAR LEFT
7. R
Для подключения левой тыловой
колонки
8. F
RONT RIGHT
Для подключения правой
фронтальной колонки
9. FRONT LEFT
Äëÿ подключения левой
фронтальной колонки
10. AC MAIN
Шнур питания для подключения
к электрической розетке
38
MMS506Final.p65 7/29/02, 2:13 PM38
Page 39

Установка
(Рисунок на стр. 39)
AC
MAIN
EnglishFrench
German
Italian
23
1
Подключение к звуковой плате с выходом 5.1канального объемного звука (или проигрывателю
DVD со встроенным 5.1-канальным декодером кабель в комплект не входит):
1. Подключите 9-контактный штекер мини-DIN к
акустической системе, а три стереофонических
3.5-мм штекера - к звуковой плате.
Подключение внешних источников стереосигнала
(кабели в комплект не входят)
2. Разъем для стереофонического 3.5-мм
штекера используется, например, для
подключения к MP3-плееру (через гнездо для
наушников).
3. Стереоразъемы тюльпан используются для
подключения к телевизору и другим
устройствам.
Подключение звуковых колонок
4. Подключите центральную колонку к разъему с
маркировкой CENTER (разъем DIN)
5. Подключите центральную колонку к разъему с
маркировкой CENTER (3.5-мм
стерефонический штекер)
6. Подключите правую тыловую колонку к
разъему с маркировкой REAR RIGHT.
7. Подключите левую тыловую колонку к разъему
с маркировкой REAR LEFT.
8. Подключите правую фронтальную колонку к
разъему с маркировкой FRONT RIGHT.
9. Подключите левую фронтальную колонку к
разъему с маркировкой FRONT LEFT.
Подключение к сети
10. Подключите несъемный шнур питания к
электрической розетке.
567894
10
Акустическая система включается (и
выключается) кнопкой включения на
пульте ДУ.
Громкость и тембр регулируются
кнопками управления акустической
системой на пульте ДУ.
ВНИМАНИЕ!
Не включайте шнур питания в розетку до
того, как будут выполнены все остальные
подключения!
Безопасность
·
Не подвергайте колонки воздействию высоких
температур (вследствие нагревания
работающей аппаратурой или прямым
солнечным светом). Во избежание поражения
электрическим током оберегайте устройство от
дождя и влаги. При попадании на колонки
жидкости немедленно отсоедините все кабели,
дайте колонкам высохнуть и лишь потом
подключайте их снова.
·
Колонки можно протирать слегка увлажненной
мягкой тканью, не оставляющей волокон. Не
используйте растворители, поскольку они
могут повредить поверхность.
·
Если колонки не работают, отсоедините их от
блока питания. Подождите несколько секунд
и подключите их к блоку питания снова.
·
Если Вы не будете пользоваться колонками
продолжительное время - например, уезжаете
в отпуск, - рекомендуется полностью отключить
систему от сети, не оставляя ее работать в
режиме ожидания.
SpanishDutchSwedishFinishPolishTurkishRussian
Norwegian
Danish
MMS506Final.p65 7/29/02, 2:13 PM39
39
Portuguese
Page 40

Размещение колонок
English French German Italian Spanish Dutch
Общая информация
· Колонки не должны закрываться шторами, мебелью и
другими предметами. Это приведет к снижению уровня
верхних звуковых частот, что, в свою очередь, приведет
к заметному ухудшению стереоэффекта.
· Каждая комната имеет уникальные акустические
характеристики, и возможности размещения колонок
часто ограничены. Как правило, колонки размещаются
в комнате как можно более симметрично.
Фронтальные колонки (ðèñ. a)
· Левая и правая фронтальные колонки воспроизводят
стереофоническую музыку и те звуки на
воспроизводимых видеозаписях, источники которых
располагаются за пределами экрана.
· Эти колонки должны располагаться по обе стороны
от вашего телевизора или монитора.
· Если смотреть с позиции слушателя, колонка,
подключенная к разъему
располагаться слева, а колонка, подключенная к
FRR
разъему
справа.
· Оптимальный стереоэффект достигается в том случае,
когда две фронтальные колонки и слушатель
расположены в вершинах равностороннего
треугольника.
· Оптимальной для этих колонок является установка на
уровне уха сидящего слушателя.
Центральная колонка (ðèñ. b)
Swedish Finish
· Центральная колонка воспроизводит звуковые
эффекты происходящего на экране и диалоги,
записанные в формате Dolby Digital / Dolby Surround.
· Колонка должна быть расположена как можно ближе
к центру вашего телевизора / монитора (например,
под телевизором или сверху на телевизоре /
мониторе).
· Колонка должна распространять звук в направлении
Polish
Turkish Russian
Norwegian
Danish
уха сидящего слушателя.
Колонки окружающего звука (ðèñ. c)
· Левая и правая колонки окружающего звука
воспроизводят эффекты окружающего звука в
формате Dolby Digital / Dolby Surround.
· Эти колонки должны быть расположены в любых
удобных для установки местах по обе стороны от
слушателя, желательно немного впереди относительно
позиции зрителя.
· Колонки окружающего звука могут располагаться не
на той же точно высоте, что и фронтальные колонки.
· Если смотреть с позиции слушателя, колонка,
подключенная к разъему
располагаться слева, а колонка, подключенная к
разъему
справа.
· Если близко от позиции слушателя находятся боковые
стены, то желательно установить колонки окружающего
звука немного сзади по отношению к позиции
слушателя и на высоте немного выше уровня уха.
Сабвуфер (ðèñ. d)
· Для обеспечения оптимальных характеристик звучания
сабвуфер рекомендуется устанавливать на полу возле
стены. Чем ближе сабвуфер к углу помещения, тем
выше уровень воспроиз
на сабвуфере, должна располагаться
SRR
на сабвуфере, должна располагаться
FRL
на сабвуфере, должна
SRL
на сабвуфере, должна
Ðèñ. a:
Figure a:
Ðèñ. b:
Figure b:
Ðèñ. c:
Figure c:
Figure d:
Ðèñ. d:
Portuguese
40
MMS506Final.p65 7/29/02, 2:13 PM40
Page 41

Forklaring (se figur på side 3)
Fjernkontroll (Se figur A)
À STANDBY
Slår høyttalersystemet på (ON) eller av (OFF =
STANDBY-modus)
Á MUTE
Slår lyden av og på
 MASTER VOLUME - / +
Justerer masterlydstyrken (lavere eller
høyere)
à FADE REAR / FRONT
Justerer lydstyrken på bakre og fremre
satellitthøyttaler
Ä BASS - / +
Justerer bassnivået
Å TREBLE - / +
Justerer diskanten
Æ FLAT
Fjerner all bass eller diskantøkning som er
lagt til av brukeren
Ç GAME/ MOVIE/ MUSIC
Velg mellom GAME (spill), MOVIE (tale) eller
MUSIC (musikk) for optimal forhåndsinnstilt
lyd
È INPUT 1/ INPUT 2/ INPUT 3
Velg kilde til audioinngangen. To adskilte
stereoenheter og en firekanalsenhet kan
koples til dette flerkanals høyttalersystemet
Ledningskoplinger (Se figur B)
INNGANGER
1. INNGANG 1: 5,1-kanal
9-pins mini DIN-kabel for å koble en 5,1-
kanal audiovisuell kilde.
2. INNGANG 2: Stereokanal
3,5 mm stereojack for å koble til en stereo
audiovisuell kilde.
3. INNGANG 3: Stereokanal
2 x RCA-jack for å koble til en stereo
audiovisuell kilde.
UTGANG
IDTRE
4. M
Til kobling av den midtre satellitthøyttaleren
(DIN-jack).
IDTRE
5. M
Til kobling av den midtre satellitthøyttaleren
(3,5 mm stereojack).
6. H
ØYRE BAK
Til kobling av den høyre satellitthøyttaleren
bak.
ENSTRE BAK
7. V
Til kobling av den venstre satellitthøyttaleren
bak.
ØYRE FORAN
8. H
Til kobling av den høyre satellitthøyttaleren
foran.
9. VENSTRE FORAN
Til kobling av den venstre satellitthøyttaleren
foran.
EnglishFrench
German
Italian
SpanishDutchSwedishFinishPolishTurkishRussian
MMS506Final.p65 7/29/02, 2:13 PM41
TRØMINNGANG
10. S
Strømledning skal kobles til strømuttak.
41
Norwegian
Danish
Portuguese
Page 42

Installering (Figur side 42)
English French German Italian Spanish Dutch
AC
MAIN
23
1
Swedish Finish
Tilkopling til et 5.1-kanals lydkort (eller til en
DVD-spiller med innebygd 5.1-kanals dekoder
kabel følger ikke med)
1. Kople den 9-bens mini-DIN-kontakten til
høyttalersystemet og de 3 ministereokontaktene til lydkortet.
Polish
Tilkopling til eksterne stereokilder (kabler
følger ikke med)
2. Kople mini-stereokontakten til f.eks.
kontakten på MP3-høretelefonene.
3. Kople RCA-stereokontaktene til f.eks. en TV.
Tilkopling til satellitthøyttalere
Turkish Russian
4. Kople midtre satellitthøyttaler til MIDTRE
(DIN-kontakt)
5. Kople midtre satellitthøyttaler til MIDTRE
(3,5 mm stereokontakt)
6. Kople bakre høyre satellitthøyttaler til
BAKRE HØYRE.
7. Kople bakre venstre satellitthøyttaler til
Norwegian
Danish
Portuguese
BAKRE VENSTRE.
8. Kople fremre høyre satellitthøyttaler til
FREMRE HØYRE.
9. Kople fremre venstre satellitthøyttaler til
FREMRE VENSTRE.
Strømtilkopling
10. Sett støpselet i stikkontakten.
567894
10
Skru på (og slå av) høyttaleranlegget ved hjelp
av standby-knappen på fjernkontrollen.
Juster høyttaleranlegget ved hjelp av
høyttalerinnstillingene på fjernkontrollen.
MERK !
Sett ikke støpselet i stikkontakten før du er ferdig
med alle tilkoplinger!
Sikkerhet
·
Ikke utsett høyttalerne for overdreven varme
(forårsaket av utstyr som varmes opp eller
direkte sollys). For å redusere faren for brann
eller elektriske støt, ikke utsett anlegget for
regn eller fukt. Hvis det kommer væske inn i
høyttalerne må du øyeblikkelig kople fra alle
ledninger og la høyttalerne tørke før du
bruker dem igjen.
·
Du kan rengjøre høyttalerne med en myk,
lett fuktig klut som ikke loer. Ikke bruk
rengjøringsmidler, da de kan være
skadelige.
·
Hvis høyttalerne ikke virker, kople dem fra
strømtilførselen. Vent noen minutter før du
kopler dem til igjen.
·
Hvis du ikke skal bruke høyttaleranlegget på
en stund f.eks. dersom du reiser på ferie
anbefaler vi at du slår av systemet helt, i
stedet for å la det stå på standby.
42
MMS506Final.p65 7/29/02, 2:13 PM42
Page 43

Plassering av høyttalere
Generelt
·
Ved å plassere høyttalerne bak gardiner, møbler eller
andre gjenstander reduseres diskanten, og dermed blir
stereoeffekten straks dramatisk redusert.
·
Hvert rom har ulike akustiske særtrekk, og plasseringsmulighetene er ofte begrensede. Du kan finne den beste
stillingen på høyttalerne dine ved å eksperimentere.
Generelt sett skal høyttalerne plasseres så symmetrisk
som mulig i rommet.
Fremre satellitthøyttalere (figur a)
·
De fremre venstre og høyre satellitthøyttalerne spiller
stereo musikk og off-screen-lydene når du ser på video.
·
Disse høyttalerne bør plasseres på hver sin side av TVeller dataskjermen din.
·
Sett fra lytterens stilling skal satellitthøyttaleren som er
FRL
på subwooferen befinne seg på venstre side,
tilkoplet
og satellitthøyttaleren som er tilkoplet
subwooferen, skal befinne seg på høyre side.
·
Den beste stereoeffekten får du når de to fremre satellitthøyttalerne og lytterne utgjør en likesidet trekant.
·
Den optimale høyden på disse høyttalerne er når de er
plassert i ørehøyde (når du sitter).
Sentral satellitthøyttaler (figur b)
·
Den sentrale satellitthøyttaleren gir on-screen-effektene
og dialog i Dolby Digital / Dolby Surround.
·
Den bør plasseres så nært midten av din TV- eller dataskjerm som mulig (f.eks. under eller oppå TV- eller dataskjermen din).
·
Den skal innstilles mot lytterens ørenivå når han sitter.
Satellitthøyttalere med surroundlyd (figur c)
·
Venstre og høyre satellitthøyttaler med surroundlyd gir
surroundeffektene i Dolby Digital / Dolby Surround
·
Disse høyttalerne kan plasseres hvor det måtte passe
på siden av lytteren, også på en plass som er litt foran
lytterens plassering.
·
Satellitthøyttalerne med surroundlyd trenger ikke plasseres i akkurat samme høyde som de fremre satellitthøyttalerne.
·
I forhold til lytteren skal satellitthøyttaleren som er koplet
til
SRL
på subwooferen befinne seg til venstre, mens
satellitthøyttaleren som er koplet til
SRR
på subwooferen
skal befinne seg til høyre.
·
Hvis du har sidevegger rett ved der du befinner deg, får
du god effekt dersom du plasserer satellitthøyttalerne
dine med surroundlyd like bak deg og like ovenfor ørenivå.
Subwoofer (figur d)
·
Subwooferens optimale plassering er på gulvet nær veggen. Jo nærmere den kommer hjørnet, desto kraftigere
blir den maksimale basslyden.
·
Subwooferen er ikke magnetisk beskyttet, så plasser den
minst 0,5 meter fra TV- /dataskjermen.
FRR
på
Figure a:
Figure b:
Figure c:
Figure d:
EnglishFrench
German
Italian
SpanishDutchSwedishFinishPolishTurkishRussian
Norwegian
Danish
MMS506Final.p65 7/29/02, 2:13 PM43
43
Portuguese
Page 44

Forklaring af fjernbetjeningens funktion
(Se illusrationen side 3, billede A)
English French German Italian Spanish Dutch
Fjernbetjening
À STANDBY
Til at sætte højttalersystemet i TIL eller FRAtilstand (=STANDBY).
Á MUTE
Til at sætte højttalersystemet i mute-tilstand,
og tilbage i normal tilstand igen
 MASTER VOLUME - / +
Til at sætte master lydstyrken højere eller
lavere
à FADE REAR / FRONT
Til at justere lydstyrken på bag og
satellithøjttalerne foran
INPUT
1. INPUT 1: 5.1-kanal
9 bens mini DIN-kabel til tilslutning af en
5.1-kanals audiovisuel kilde
2. INPUT 2: STEREOKANAL
3,5 mm stereojackstik til tilslutning af en
audiovisuel kilde i stereo
3. INPUT 3: STEREOKANAL
2x RCA jackstik til tilslutning af en
audiovisuel kilde i stereo
OUTPUT
ENTER
4. C
Tilslutning af centersatellithøjtaler (DIN-stik)
Ä BASS - / +
Swedish Finish
Til at justere bassen efter eget ønske
Å TREBLE - / +
Til at justere de høje toner efter eget ønske
Æ FLAT
Fjerner eventuel bas eller diskantforstærkning,
Polish
der er indstillet af brugeren
Ç GAME/ MOVIE/ MUSIC
Vælg på enten spil, tale eller musik knappen
til at få den bedst mulige forhåndsindstillede
lydgengivelse for hver enkelt genre
Turkish Russian
È INPUT 1/ INPUT 2/ INPUT 3
Vælg audiovisuel kilde. To separate stereo
indgangskilder og én 5.1-kanals indgangskilde
kan forbindes med dette flerkanals
højttalersystem
Norwegian
Danish
5. CENTER
Tilslutning af centersatellithøjtaler (3,5 mm
stereojackstik)
6. HØJRE BAGESTE
Tilslutning af højre bageste satellithøjttaler
7. VENSTRE BAGESTE
Tilslutning af venstre bageste
satellithøjttaler
8. HØJRE FORRESTE
Tilslutning af højre forreste satellithøjttaler
9. VENSTRE FORRESTE
Tilslutning af venstre forreste
satellithøjttaler
NET
10. AC
Netledning til tilslutning til lysnettet
Portuguese
44
MMS506Final.p65 7/29/02, 2:13 PM44
Page 45

Installering (Illustration side 45)
AC
MAIN
EnglishFrench
German
Italian
23
1
Tilkobling af et 5.1 kanals lydkort (eller en DVDafspiller med indbygget 5.1 kanals dekoder
eksklusive kabel)
1. Slut 9-bens mini DIN jackstikket til
højttalersystemet og de 3 ministereojackstik til
lydkortet
Tilslutning af løse stereokilder (kabler medfølger
ikke)
2. Forbind mini stereojackstikket med den lokale
kilde som f.eks. hovedtelefonstikket på en
MP3-afspiller.
3. Forbind RCA stereojackstikkene med en kilde
som for eksempel et fjernsyn.
Tilslutning af satellithøjttalere
4. Forbind centersatellithøjttaleren til CENTER
(DIN-jackstik)
5. Forbind centersatellithøjttaleren til CENTER
(3.5 mm stereo jack)
6. Forbind bageste højre satellithøjttaler til REAR
RIGHT.
7. Forbind bageste venstre satellithøjttaler til
REAR LEFT.
8. Forbind forreste højre satellithøjttaler til
FRONT RIGHT.
9. Forbind forreste venstre satellithøjttaler til
FRONT LEFT.
Tilslutning til lysnettet
10. Sæt den faste el-netledning til stikkontakten.
567894
10
Tænd (og sluk) højttalersystemet med standbyknappen på fjernbetjeningen.
Juster højttalersystemet med højttalerindstillingerne
på fjernbetjeningen.
Bemærk!
Sæt ikke stikket i stikkontakten, før alle forbindelser
er sammenkoblet!
Sikkerhed
·
Udsæt ikke højttaler for for høj varme (på
grund af varmeinstallationer eller direkte
sollys). Nedsæt risikoen for brand eller
elektrisk stød ved at undgå at udsætte udstyret
for regn eller fugt. Hvis der spildes væske ind
i højttalerne, skal alle forbindelser straks
afbrydes, og højttalerne skal tørres før de
anvendes.
·
Højttalerne må tørres med en blød, let fugtet,
fnugfri klud. Anvend ikke rengøringsmidler, da
de kan være ætsende.
·
Hvis højttalerne ikke fungerer, skal de kobles
fra strømforsyningen. Vent nogle få sekunder,
før de kobles til strømforsyningen igen.
·
Hvis du ikke vil anvende højttalersystemet i
længere tid hvis du for eksempel skal på
ferie anbefales det at afbryde systemet helt
og ikke efterlade det i standby.
SpanishDutchSwedishFinishPolishTurkishRussian
Norwegian
Danish
MMS506Final.p65 7/29/02, 2:13 PM45
45
Portuguese
Page 46

Højttalerne s placering
English French German Italian Spanish Dutch
Generelt
·
Hvis højttalerne anbringes bag gardiner, møbler eller
andre genstande vil dette reducere diskantsvaret, og
stereoeffekten til således blive kraftigt forringet.
·
Hvert rum har since særlige akustiske forhold, og
anbringelsesmulighederne er ofte begrænsede. Du klan
prøve dig frem for at finde den bedste plads til dine
højttalere. I almindelighed gælder, at højttalerne bør
placeres så symmetrisk som muligt i rummet.
Front satellitøjttalere (figur a)
·
Venstre og højre front satellithøjttaler spiller stereomusik
og baggrundslydene ved videoafspilning.
·
Disse satellitter bør anbringes ved siderne af dit tv eller
din monitor.
·
Set fra lytterens position skal den satellithøjttaler, der er
forbunder med FRL på subwooferen, være på venstre
side, og den satellithøjttaler, der er forbundet med FRR
på subwooferen, skal være til højre.
·
Den bedste stereoeffekt opnås, når de to satellithøjttalere
foran og lytteren tilsammen danner en ligesidet trekant.
·
Swedish Finish
Polish
Turkish Russian
Norwegian
Danish
Portuguese
Den bedste højde for disse højttalere er ørejøjde (mens
du sidder).
Centersatellithøjttaler (figur b)
·
Center satellithøjttaleren leverer forgrundseffekter og
dialog i Dolby Digital / Dolby Surround.
·
Den bør anbringes så tæt som muligt på midten af dit tv/
din monitor (f.eks. under eller oven på dit tv / din monitor).
·
Den skal væ re rettet mod en siddende lytters ørehøjde.
Surround satellithøjttalere (figur c)
·
Venstre surround og højre surround satellithøjttaler
leverer surroundeffekterne i Dolby Digital / Dolby
Surround
·
Disse satellitter kan anbringes på et hvilket som kelst
passende sted i forhold til lytteren, selv på steder, der er
lige foran lytteren.
·
Surround satellithøjttalerne behøver ikke befinde sig i
nøjagtigt samme højde som front satellithøjttalerne.
·
Set fra lytterens position skal den satellithøjttaler der er
forbundet med SRL på subwooferen, være på venstre
side, og den satellithøjttaler, der er forbundet med SRR
på subwooferen, skal være på højde side.
·
Hvis der er sidevægge nær ved din lytteposition, er det
godt at placere dine surround satellitter lidt bag ved egen
position og lidt oer ørehøjde.
Subwoofer (figur d)
·
Den bedste sted at placere subwooferen er på gulvet
nær væggen. Jo nærmere den står ved hjørnet, jo
stærkere er den maksimale baseffekt.
·
Subwooferen er ikke magnetiskafskærmet, så stil den
mindst 0.5 meter fra dit tv / din monitor.
Figure a:
Figure b:
Figure c:
Figure d:
46
MMS506Final.p65 7/29/02, 2:13 PM46
Page 47

Explicação (ver ilustração na pág. 3)
CONTROLO REMOTO
(ver ilustração A)
À STANDBY
Para LIGAR ou DESLIGAR o sistema de
colunas. Modo (=
STANDBY)
Á MUTE
Para passar o sistema de colunas entre o
modo silêncio e o modo normal.
 MASTER VOLUME - / +
Para regular o volume principal, aumentando
ou reduzindo.
à FADE REAR / FRONT
Para regular a intensidade sonora das
colunas satélite traseiras e frontais
Ä BASS - / +
Para regular o nível de baixas frequências
de acordo com as suas preferências
pessoais
Å TREBLE - / +
Para regular a presença dos tons mais
elevados de acordo com as suas
preferências pessoais
Æ FLAT
Elimina o auxiliar de baixas ou altas
frequências aplicadas pelo utilizador
Ç GAME/ MOVIE/ MUSIC
Escolha o botão de jogos, voz ou música
para obter a melhor reprodução sonora
predefinida por género
È INPUT 1/ INPUT 2/ INPUT 3
Escolha a sua selecção de fonte audiovisual.
É possível ligar a este sistema de colunas
multi-canais duas fontes de entrada estéreo
independentes e uma fonte de entrada de
5.1 canais
ENTRADAS
(ver ilustração B)
1. ENTRADA 1: canal 5.1
Cabo DIN mini de 9 pinos para ligar uma fonte
audiovisual de canal 5.1.
2. ENTRADA 2: CANAL ESTÉREO
Ficha estéreo de 3,5 mm para ligar uma fonte
audiovisual estéreo.
3. ENTRADA 3: CANAL ESTÉREO
Ficha RCA x 2 para ligar uma fonte
audiovisual estéreo.
SAÍDA
4. C
ENTRAL
Para ligar o altifalante satélite central. (Ficha
DIN)
5. C
ENTRAL
Para ligar o altifalante satélite central. (Ficha
estéreo 3,5 mm)
6. DIREITA TRASEIRA
Para ligar a coluna satélite direita traseira.
7. E
SQUERDA TRASEIRA
Para ligar a coluna satélite esquerda traseira.
8. D
IREITA FRONTAL
Para ligar a coluna satélite direita frontal.
9. E
SQUERDA FRONTAL
Para ligar a coluna satélite esquerda frontal.
10. Alimentação Eléctrica
Cabo eléctrico a ligar à tomada do PC.
EnglishFrench
German
Italian
SpanishDutchSwedishFinishPolishTurkishRussian
MMS506Final.p65 7/29/02, 2:13 PM47
47
Norwegian
Danish
Portuguese
Page 48

Instalação (Ilustração na pág. 48)
English French German Italian Spanish Dutch
AC
MAIN
23
1
Swedish Finish
Ligar a uma placa de som 5.1 (ou leitor de DVDs
com um descodificador de canais 5.1
incorporado cabo não fornecido)
1. Ligue a tomada DIN mini de 9 pinos ao sistema
de altifalantes e as 3 tomadas mini estéreo à
placa de som.
Ligar Fontes Estéreo Externas (cabos não
Polish
fornecidos)
2. Ligue a fonte local à ficha estéreo mini, como
uma ficha de auriculares de leitor de MP3.
3. Ligue as fichas RCA estéreo a uma fonte como
um televisor.
Ligação dos Altifalantes Satélite
4. Ligue o altifalante satélite central a CENTER
Turkish Russian
Norwegian
Danish
Portuguese
(ficha DIN).
5. Ligue o altifalante satélite central a CENTER
(ficha estéreo de 3,5 mm).
6. Ligue o altifalante satélite direito frontal a
REAR RIGHT.
7. Ligue o altifalante satélite esquerdo frontal a
REAR LEFT.
8. Ligue o altifalante satélite direito frontal a
FRONT RIGHT.
9. Ligue o altifalante satélite esquerdo frontal a
FRONT LEFT.
Ligação Eléctrica
10. Ligue o cabo de alimentação fixo à respectiva
tomada eléctrica.
567894
10
Ligue (e desligue) o sistema de altifalantes, utilizando
o botão de espera no controlo remoto.
Ajuste o sistema de altifalantes com as definições
dos altifalantes no controlo remoto.
NOTA!
Não introduza a ficha eléctrica na tomada antes de
fazer todas as ligações!
Segurança
·
Não exponha os altifalantes a calor excessivo
(provocado por aquecedores ou luz solar directa).
Para reduzir o risco de ocorrência de incêndios
ou choques eléctricos, não exponha este aparelho
à chuva nem à humidade. Se caírem líquidos no
interior dos altifalantes, desligue imediatamente
todas as ligações e deixe que sequem antes de
os voltar a utilizar.
·
Pode limpar os altifalantes com um pano macio,
ligeiramente húmido e sem cotão. Não utilize
agentes de limpeza porque poderão provocar a
corrosão.
·
Se os altifalantes não funcionarem, desligue-os
da alimentação eléctrica. Espere alguns
segundos antes de voltar a ligá-los à alimentação
eléctrica.
·
Se não tiver a intenção de utilizar o sistema de
altifalantes durante um período prolongado de
tempo, por exemplo, quando vai de férias,
recomenda-se que desligue completamente o
sistema, não o deixando em modo de espera
(standby).
48
MMS506Final.p65 7/29/02, 2:13 PM48
Page 49

Colocação das colunas
Generalidades
·
A colocação das colunas atrás de cortinas, mobília
ou outros objectos reduzirá a resposta das altas
frequências, diminuindo, assim, significativamente o
efeito estéreo.
·
Cada compartimento apresenta características
acústicas diferentes e as possibilidades de colocação
são, frequentemente, limitadas. Pode encontrar a
melhor posição das colunas através da
experimentação. Em geral, as colunas deverão ser
colocadas tão simetricamente quanto possível na
sala.
Colunas Satélite Frontais (figura a)
·
As colunas satélite frontais esquerda e direita
reproduzem música estéreo e sons fora do ecrã da
leitura de vídeos.
·
Estes satélites deverão ser colocados ao lado do
televisor ou monitor.
·
A partir da posição do ouvinte, a coluna satélite ligada
a FRL no subwoofer deverá ficar do lado esquerdo
enquanto a coluna satélite ligada a FRR no subwoofer
deverá ficar do lado direito.
·
O melhor efeito estéreo obtém-se quando duas
colunas satélites frontais e o ouvinte formam um
triângulo equilátero.
·
A altura óptima para estas colunas é quando se
encontram ao nível dos ouvidos (na posição de
sentado).
Coluna Satélite Central (figura b)
·
A coluna satélite central proporciona efeitos no ecrã
e diálogos em Dolby Digital / Dolby Surround.
·
Deve ser colocada tão perto do centro do televisor/
monitor quanto possível (por exemplo, debaixo ou
por cima do televisor/monitor).
·
Deverá ficar direccionada para os ouvidos do ouvinte
na posição de sentado.
Colunas Satélite Surround (figura c)
·
As colunas satélite esquerda e direita surround
proporcionam os efeitos em Dolby Digital / Dolby
Surround.
·
Estes satélites podem ser colocados em qualquer
local conveniente ao lado do ouvinte, até ligeiramente
para a frente relativamente à posição do ouvinte.
·
As colunas satélite surround não têm de estar
exactamente à mesma altura das colunas satélite
frontais.
·
A partir da posição do ouvinte, a coluna satélite ligada
a SRL no subwoofer deverá ficar do lado esquerdo
enquanto a coluna satélite ligada a SRR no subwoofer
deverá ficar do lado direito.
·
Se tiver paredes laterais perto da posição de audição,
uma boa colocação dos satélites surround é
ligeiramente atrás da sua posição e ligeiramente
acima do nível dos ouvidos.
Subwoofer (figura d)
·
O melhor local do subwoofer é no chão perto da
parede. Quanto mais perto estiver do canto, mais
potente é a saída máxima de baixas frequências.
·
O subwoofer não dispõe de blindagem magnética,
por isso, coloque-o a uma distância mínima de 0,5 m
relativamente ao televisor/monitor.
Figure a:
Figura a:
Figura b:
Figure b:
Figure c:
Figura c:
Figure d:
Figura d:
EnglishFrench
German
Italian
SpanishDutchSwedishFinishPolishTurkishRussian
Norwegian
Danish
MMS506Final.p65 7/29/02, 2:13 PM49
49
49
Portuguese
Portuguese
Page 50

English French German Italian Spanish Dutch
Swedish Finish
Polish
PHILIPS CONSUMER ELECTRONICS COMPANY
A Division of Philips Electronics North America Corporation
Knoxville, Tennessee 37914-1810, U.S.A.
www.pcsound.philips.com
www.philips.com/sound
www.philips.com
Turkish Russian
Norwegian
Danish
Portuguese
MMS506Final.p65 7/29/02, 2:13 PM50
4399 294 60491
50
Printed in Malaysia
 Loading...