

www.philips.com/welcome
EN User manual 1
Customer care and warranty 16
Troubleshooting & FAQs 17
A222C

Table of Contents
1. For Your Safety ....................................... 1
1.1 Precautions.........................................................1
1.2 Cleaning ...............................................................2
1.3 Special notes on All-in-One PC .............2
2. Setting up the All-in-One PC .............. 3
2.1 Installation ...........................................................3
2.2 Operating the All-in-One PC ..................5
3. About Windows 8.1 .............................. 6
3.1 Start screen .......................................................6
3.2 Apps .......................................................................6
3.3 Charm bar ..........................................................7
3.4 Snap feature ......................................................7
3.5 Turn off ...............................................................8
4. TechnicalSpecications ....................... 9
4.1 A222C6 ...............................................................9
4.2 A222C3 ............................................................11
4.3 Resolution & Preset PC Modes ..........12
5. Regulatory Information .....................13
6. Customer care and warranty ...........14
6.1 Philips’ Flat Panel Monitors Pixel
Defect Policy ..................................................14
6.2 Customer Care & Warranty .................16
7. Troubleshooting & FAQs ..................17
7.1 Troubleshooting ...........................................17
7.2 FAQs ...................................................................17

1
1. For your safety
1. For Your Safety
Before operating the All-in-One PC, please read
this manual thoroughly. This manual should be
retained for future reference.
FCC Class B Radio Frequency Interference
Statement
WARNING: (FOR FCC CERTIFIED MODELS)
NOTE:
This equipment has been tested and found
to comply with the limits for a Class B digital
device, pursuant to Part 15 of the FCC Rules.
These limits are designed to provide reasonable
protection against harmful interference in a
residential installation. This equipment generates,
uses and can radiate radio frequency energy,
and if not installed and used in accordance with
the instructions, may cause harmful interference
to radio communications. However, there is
no guarantee that interference will not occur
in a particular installation. If this equipment
does cause harmful interference to radio or
television reception, which can be determined
by turning the equipment off and on, the user is
encouraged to try to correct the interference
by one or more of the following measures:
1. Reorient or relocate the receiving antenna.
2. Increase the separation between the
equipment and receiver.
3. Connect the equipment into an outlet on
a circuit different from that to which the
receiver is connected.
4. Consult the dealer or an experienced
radio/TV technician for help.
NOTICE:
1. The changes or modications not expressly
approved by the party responsible for
compliance could void the user’s authority
to operate the equipment.
2. Shielded interface cables and AC power
cord, if any, must be used in order to
comply with the emission limits.
3. The manufacturer is not responsible
for any radio or TV interference caused
by unauthorized modication to this
equipment. It is the responsibilities of the
user to correct such interference.
WARNING:
To prevent re or shock hazard, do not
expose the LCD display to rain or moisture.
Dangerously high voltages are present inside
the LCD display. Do not open the cabinet. Refer
servicing to qualied personnel only.
1.1 Precautions
• Do not use the All-in-One PC near water,
e.g. near a bathtub, washbowl, kitchen sink,
laundry tub, swimming pool or in a wet
basement.
• Do not place the All-in-One PC on
an unstable cart, stand, or table. If the
All-in-One PC falls, it can injure a person
and cause serious damage to the appliance.
Use only a cart or stand recommended
by the manufacturer or sold with the
All-in-One PC.
• Slots and openings in the back and
bottom of the cabinet are provided for
ventilation. To ensure reliable operation of
the All-in-One PC and to protect it from
overheating, be sure these openings are
not blocked or covered. Do not place the
All-in-One PC on a bed, sofa, rug, or similar
surface. Do not place the All-in-One PC
near or over a radiator or heat register. Do
not place the All-in-One PC in a bookcase
or cabinet unless proper ventilation is
provided.
• The All-in-One PC should be operated
only from the type of power source
indicated on the label. If you are not sure
of the type of power supplied to your
home, consult your dealer or local power
company.

2
1. For your safety
• The All-in-One PC is equipped with a
three-pronged grounded plug, a plug with
a third (grounding) pin. This plug will fit
only into a grounded power outlet as
a safety feature. If your outlet does not
accommodate the three-wire plug, have an
electrician install the correct outlet, or use
an adapter to ground the appliance safely.
Do not defeat the safety purpose of the
grounded plug.
• Unplug the unit during a lightening storm
or when it will not be used for long period
of time. This will protect the All-in-One PC
from damage due to power surges.
• Do not overload power strips and
extension cords. Overloading can result in
fire or electric shock.
• Never push any object into the slot on the
All-in-One PC cabinet. It could short circuit
parts causing a fire or electric shock. Never
spill liquids on the All-in-One PC.
• Do not attempt to service the
All-in-One PC by yourself; opening or
removing covers can expose you to
dangerous voltages and other hazards.
Please refer all servicing to qualified service
personnel.
• The wall socket shall be installed near the
equipment and shall be easily accessible.
• For use only with the attached power
adapter (Output 19V DC) (only for LCD
display with power adapter).
Model: ADPC1965
Manufacturer: TPV ELECTRONICS
(FUJIAN) CO., LTD.
Model: ADS-65LSI-19-1 19065G
Manufacturer: SHENZHZEN HONOR
ELECTRONIC CO., LTD.
1.2 Cleaning
• Clean the cabinet regularly with cloth. You
can use soft-detergent to wipe out the
stain, instead of strong-detergent which will
cauterize the product cabinet.
• When cleaning, make sure no detergent is
leaked into the product. The cleaning cloth
should not be too rough as it will scratch
the LCD display surface.
• Please disconnect the power cord before
cleaning the product.
1.3 Special notes on All-in-One PC
The following symptoms are normal with
All-in-One PC and do not indicate a problem.
Note
• Due to the nature of the fluorescent light,
the LCD display may flicker during initial
use. Turn off the Power Switch and then
turn it on again to make sure the flicker
disappears.
• You may find slightly uneven brightness on
the LCD display depending on the desktop
pattern you use.
• The LCD display has effective pixels of
99.99% or more. It may include blemishes
of 0.01% or less such as a missing pixel or a
pixel lit all of the time.
• Due to the nature of the LCD display, an
afterimage of the previous screen may
remain after switching the image when the
same image has been displayed for a long
time. The All-in-One PC will slowly recover
from this.
• When the LCD display becomes black
or flashing, or cannot illuminate any more,
contact your dealer or service center to
replace parts. Don’t repair the LCD display
by yourself!

3
2. Setting up the All-in-One PC
2. Setting up the All-in-One PC
2.1 Installation
Package contents
A222C
AC/DC pter Ada
2
0
1
5
K
o
n
i
n
k
l
i
j
k
e
P
h
i
l
i
p
s
N
.
V
.
A
l
l
r
i
g
h
t
s
r
e
s
e
r
v
e
d
.
U
n
a
u
t
h
o
r
i
z
e
d
d
u
p
l
i
c
a
t
i
o
n
i
s
a
v
i
o
l
a
t
i
o
n
o
f
a
p
p
l
i
c
a
b
l
e
l
a
w
s
.
M
a
d
e
a
n
d
p
r
i
n
t
e
d
i
n
C
h
i
n
a
.
V
e
r
s
i
o
n
M
6
A
2
2
2
C
6
E
I
T
All-in-One PC
User’s Manual
使用產品前請閱讀使用說明
保留備用
Web Cam
Base and Quick Screw
Keyboard, Mouse
and USB receiver dongle
Note
• Use only the AC/DC adapter provided by
Philips.
• Do not install the All-in-One PC in a
location near heat sources such as radiators
or air ducts, or in a place subject to direct
sunlight, or excessive dust or mechanical
vibration or shock.
• Save the original shipping carton and
packing materials, as they will come in
handy if you ever have to ship your LCD
display.
• For maximum protection, repackage your
LCD display as it was originally packed at
the factory.
• Do not scratch the LCD display with sharp
or hard objects, it may cause permanent
damage.
• Don’t leak liquid into LCD display which
will result in the damage of component.
• To keep the All-in-One PC looking new,
periodically clean it with a soft cloth.
Stubborn stains may be removed with
a cloth lightly dampened with a mild
detergent solution. Never use strong
solvents such as thinner, benzene, or
abrasive cleaners, since these will damage
the cabinet. As a safety precaution, always
unplug the All-in-One PC before cleaning it.
Attaching the base
Before you start attaching the base, please
follow the instructions below to avoid any
possible damage or injury.
1. Place the LCD display face down on
a smooth surface. Pay attention not to
scratch or damage the LCD display.
2. Align and assemble the base to the neck.
3. Tighten the screw into the bottom of the
base.
4
2. Setting up the All-in-One PC
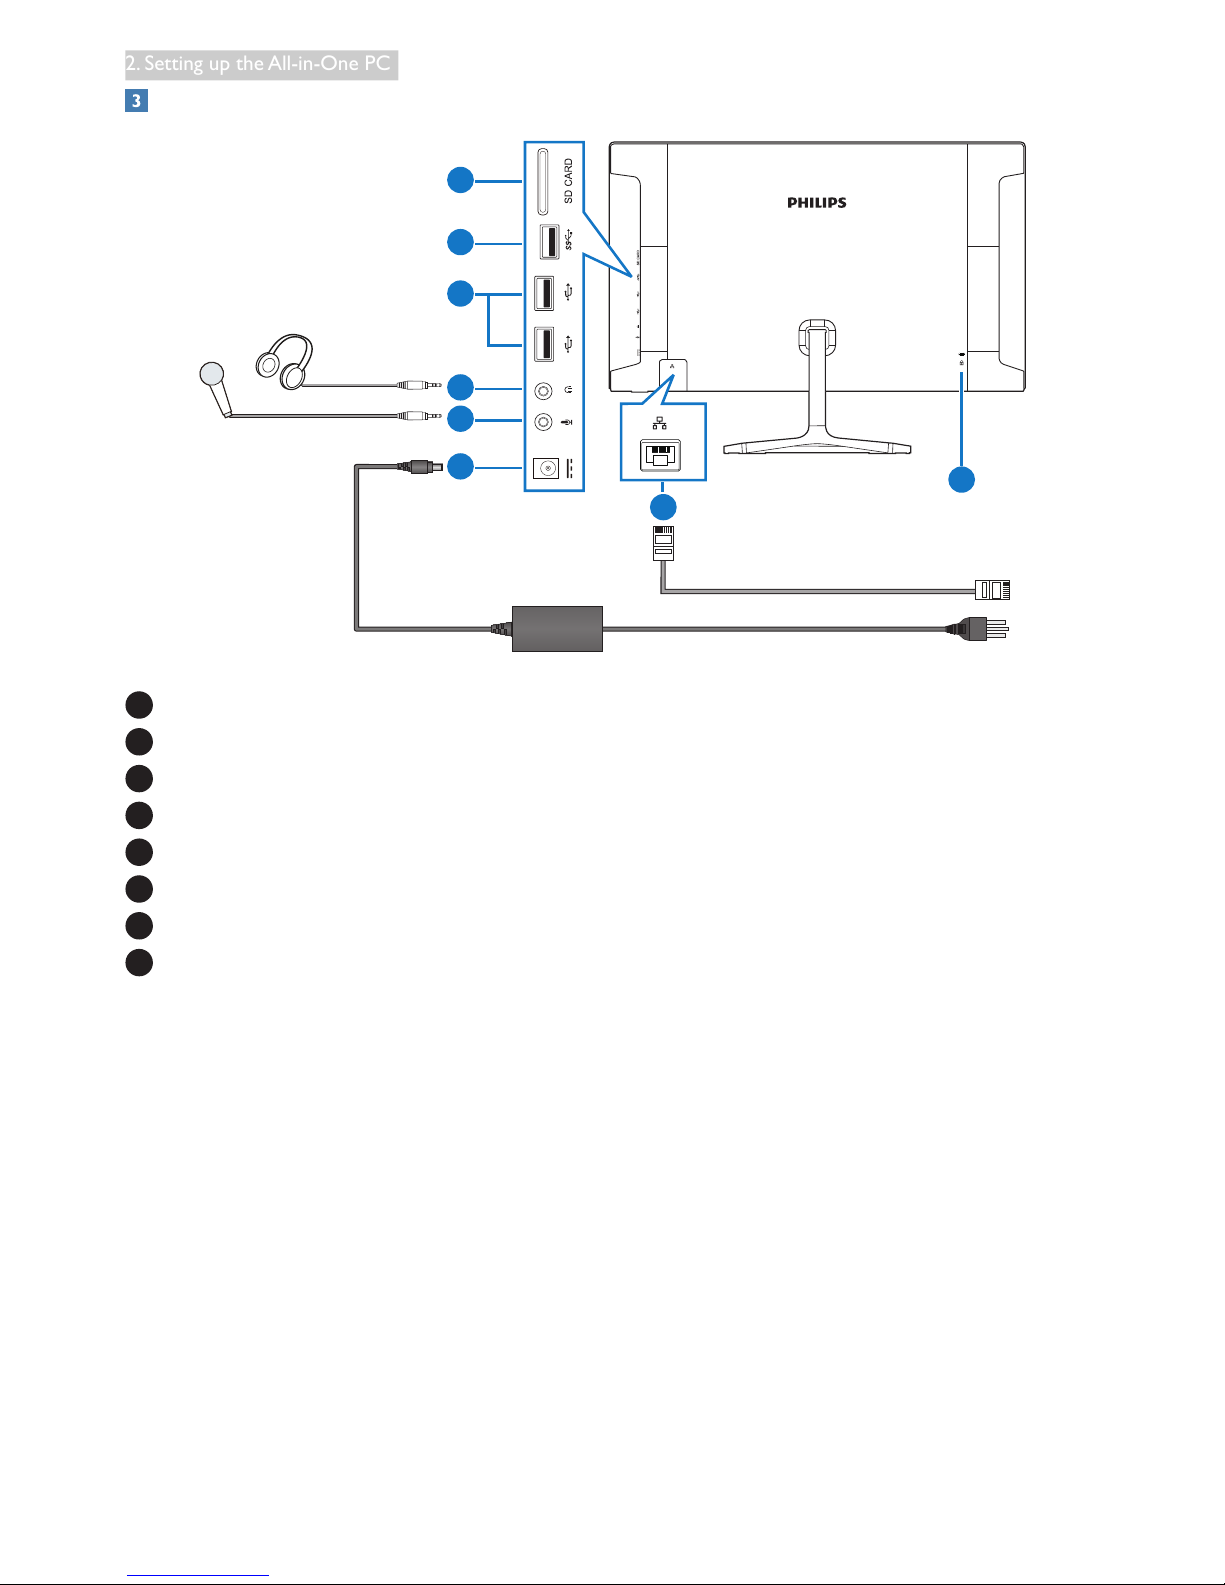
Connection
7
8
6
5
4
3
2
1
1
SD Card Slot
2
USB 3.0
3
USB 2.0
4
Audio Output (3.5 mm Stereo)
5
Microphone Input (3.5 mm Stereo)
6
DC Power Input
7
LAN Port (RJ-45)
8
Kensington Anti-theft Lock
Insert your SD card to the card slot.
Connect to either WiFi or Ethernet for
All-in-One PC input
1. Connect RJ-45 LAN cable to your LAN
port for wired connection.
2. Connect power cord to All-in-One PC
rmly and press the power button on.
5
2. Setting up the All-in-One PC
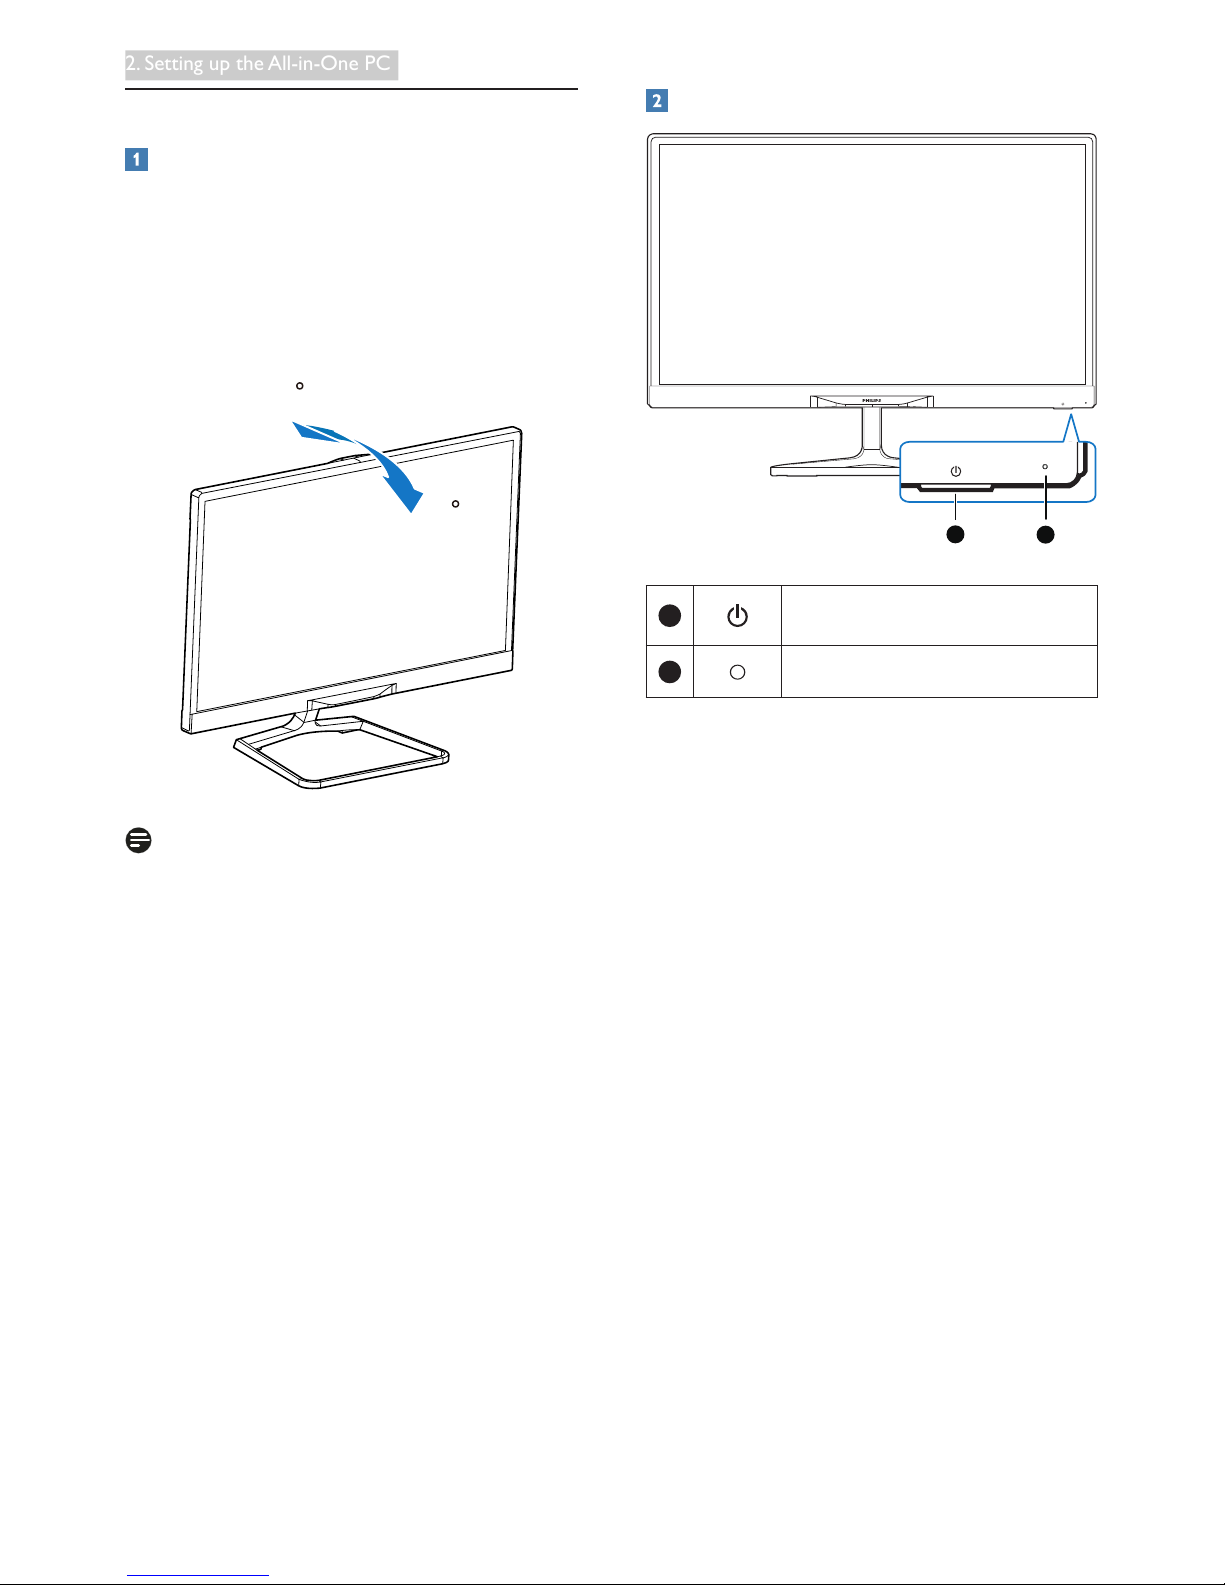
2.2 Operating the All-in-One PC
Adjusting viewing angle
For optimal viewing, it is recommended to
look at the full face of the All-in-One PC, then
adjust the All-in-One PC’s angle to your own
preference.
The All-in-One PC's tilted angle is adjustable
from 5° frontward to 20° backward.
20
-5
Note
• Do not touch the LCD display when you
adjust the angle. It may cause damage or
break the LCD display.
• Pay careful attention to the placement of
your fingers and hands when adjusting the
All-in-One LCD monitor. Injury may occur
if you are not careful.
• For displaying with glossy bezels, please
place the bezel away from direct reflecting
lights or bright surfaces, as it may cause
irritation to your eyes.
Front control
1
2
1
Press to turn All-in-One PC’s
power ON or OFF.
2
Power indicator

6
3. About Windows 8.1
3. About Windows 8.1
3.1 Start screen
The Start screen appears after successfully signing in to your user account. You can organize all the
applications and desktop programs, and get to your favorite websites and les. The live titles on Start
screen can show new mails, app notications, and the next appointment on your calendar at a glance.
User
3.2 Apps
You can nd all your applications and desktop programs in the Apps view.

7
3. About Windows 8.1
3.3 Charm bar
The Charm bar is a toolbar that can be triggered on the right side of your screen. It consists of several
tools that provide quick access for setting, and allow you to work with your All-in-One PC more
conveniently.
3.4 Snap feature
Snap feature displays two apps side-by-side, resize open windows, and allows you to switch and work
between two apps.

8
3. About Windows 8.1
Using Snap
1. Launch the app.
2. Hover the mouse point on the top side of your screen.
3. Once the pointer changes to a hand icon, drag then drop the app to the left or right side of your
screen.
4. Launch another app.
5. You can resize two windows by draging the snap bar where is in the middle of two windows.
3.5 Turn off
Turning your All-in-One PC off
1. Triggered to display the Charm bar.
2. Click . , then click .
3. Choose [Shut down] to do a normal shutdown.

9
4 . Technical Specications
4. Technical Specifications
4.1 A222C6
Picture/Display
LCD Panel Type AH-IPS
Backlight Type W-LED system
Panel Size 21.5 inch / 54.62 cm
Effective Viewing Area 476.064 (H) x 267.786 (V) mm
Aspect Ratio 16:9
Optimum Resolution 1920 x 1080 @ 60 Hz
Brightness (typ.) 250 cd/m²
Viewing Angle (typ.) 178º (H) / 178º (V), @ C/R > 10
Display Colors 16.7 M
Operation system
Windows Free Dos, support Windows 8.X/7(64bit)
CPU Intel® Pentium® Processor N3540 @2.16GHz
Sound
Speaker (typ.) 2.0 W x 2
Video/Audio Playback
Media Format Follow Windows Mdeia Codes / Windows Media Player
Storage Media
Bulit-in memory capacity 4GB DDR-3L
External storage expansion SDHC / SDXC / USB Flash
Connectivity
USB connectors 1x USB 3.0
2x USB 2.0
1x USB 2.0 For Webcam
Signal Input Ethernet connection
SD/MMC Card SDHC Card Slot
Wireless LAN Wireless LAN 802.11b/g/n
Bluetooth Bluetooth 4.0
Audio In/Out 1x Headphone-out
1x Microphone-in
Convenience
Camera Support USB2.0 Webcam
Other Convenience Kensington lock
LAN Speed 10/100/1000Mbps
RF Module M/N RTL8723BE
Stand
Tilt 5° frontward to 20° backward

10
4. Technical Specications
Power
On Mode 36.805 W (typ.), 62.435 W (max.)
Power Saving 0.568 W (typ.)
Off Mode 0.449 W (typ.)
Power LED Indicator Operation - White, Standby mode- White (blinking)
Power Supply Input: 100~240VAC, 50~60Hz
Output: DC 19V
Dimensions
Product with Stand
500 (W) x 380 (H) x 182 (D) mm
Product with Packaging 572 (W) x 433 (H) x 161 (D) mm
Weight
Product with Stand 3.9 kg
Product with Packaging 6.305 kg
Operating conditions
Temperature Range
(operation)
0°C ~ 40°C
Temperature Range (storage) -20°C ~ 60°C
Relative Humidity 20% ~ 80%
Sustainability
Environmental and Energy China RoHS, China WEEE
Recyclable Packaging Material 100 %
Compliance and standards
Regulatory Approvals SRRC
Cabinet
Color White
Finish Glossy

11
4 . Technical Specications
4.2 A222C3
Picture/Display
LCD Panel Type AH-IPS
Backlight Type W-LED system
Panel Size 21.5 inch / 54.62 cm
Effective Viewing Area 476.064 (H) x 267.786 (V) mm
Aspect Ratio
16:9
Optimum Resolution 1920 x 1080 @ 60 Hz
Brightness (typ.) 250 cd/m²
Viewing Angle (typ.) 178º (H) / 178º (V), @ C/R > 10
Display Colors 16.7 M
Operation system
Windows Free Dos, support Windows 8.X/7(32&64bit)
CPU Intel® Core™ i3-4030U Processor @1.90 GHz
Sound
Speaker (typ.) 2.0 W x 2
Video/Audio Playback
Media Format Follow Windows Mdeia Codes / Windows Media Player
Storage Media
Bulit-in memory capacity 4GB DDR-3L
External storage expansion SDHC / SDXC / USB Flash
Connectivity
USB connectors 1x USB 3.0
2x USB 2.0
1x USB 2.0 For Webcam
Signal Input Ethernet connection
SD/MMC Card SDHC Card Slot
Wireless connections Wireless LAN 802.11b/g/n
Bluetooth Bluetooth 4.0
Audio In/Out 1x Headphone-out
1x Microphone-in
Convenience
Camera Support USB2.0 Webcam
Other Convenience Kensington lock
LAN Speed 10/100/1000Mbps
RF Module M/N RTL8723BE
Stand
Tilt 5° frontward to 20° backward

12
4. Technical Specications
Power
On Mode 35.059 W (typ.), 61.390 W (max.)
Power Saving 0.92 W (typ.)
Off Mode 0.654 W (typ.)
Power LED Indicator Operation - White, Standby mode- White (blinking)
Power Supply Input: 100~240VAC, 50~60Hz
Output: DC 19V
Dimensions
Product with Stand
500 (W) x 380 (H) x 182 (D) mm
Product with Packaging 572 (W) x 433 (H) x 161 (D) mm
Weight
Product with Stand 3.9 kg
Product with Packaging 6.305 kg
Operating conditions
Temperature Range
(operation)
0°C ~ 40°C
Temperature Range (storage) -20°C ~ 60°C
Relative Humidity 20% ~ 80%
Sustainability
Environmental and Energy China RoHS, China WEEE
Recyclable Packaging Material 100 %
Compliance and standards
Regulatory Approvals SRRC
Cabinet
Color White
Finish Glossy
4.3 Resolution & Preset PC Modes
Maximum Resolution
1920x1080@60Hz
Recommended Resolution
1920x1080@60Hz
Note
Please notice that your LCD display works best at native resolution of 1920x1080@60Hz. For best
display quality, please follow this resolution recommendation.

13
5. Regulatory Infomation
5. Regulatory Information
China RoHS
根据中国大陆《电子电气产品有害物质限制使用标识要求》,以下部分列出了本产品中可能
包含的有害物质的名称和含量。
零部件名称
有害物质
铅
(Pb)
汞
(Hg)
镉
(Cd)
六价铬
(Cr 6+)
多溴联苯
(PBB)
多溴二苯醚
(PBDE)
塑料外框 ○ ○ ○ ○ ○ ○
后壳 ○ ○ ○ ○ ○ ○
LCD panel
CCFL × × ○ ○ ○ ○
LED × ○ ○ ○ ○ ○
电路板组件* × ○ ○ ○ ○ ○
底座 ○ ○ ○ ○ ○ ○
电源线 × ○ ○ ○ ○ ○
其他线材 × ○ ○ ○ ○ ○
*: 电路板组件包括印刷电路板及其构成的零部件,如电阻、电容、集成电路、连接器等。
本表格依据SJ/T 11364 的规定编制。
O: 表示该有害物质在该部件所有均质材料中的含量均在 GB/T 26572规定的限量要求以下。
X: 表示该有害物质至少在该部件的某一均质材料中的含量超出GB/T 26572规定的限量要求。
上表中打“×”的部件,应功能需要,部分有害物质含量超出GB/T 26572规定的限量要求,
但符合欧盟RoHS法规要求(属于豁免部分)。
China WEEE
《废弃电器电子回收处理条例》提示性说明
为了更好地关爱及保护地球,当用户不再需要此产品或产品寿命终止时,请遵守国家废弃电
器电子产品回收处理相关法律法规,将其交给当地具有国家认可的回收处理资质的厂商进行
回收处理。

14
6. Customer care and warranty
6. Customer care and warranty
6.1 Philips’ Flat Panel Monitors Pixel Defect Policy
Philips strives to deliver the highest quality products. We use some of the industry's most advanced
manufacturing processes and practice stringent quality control. However, pixel or sub pixel defects on
the TFT Monitor panels used in at panel monitors are sometimes unavoidable. No manufacturer can
guarantee that all panels will be free from pixel defects, but Philips guarantees that any monitor with
an unacceptable number of defects will be repaired or replaced under warranty. This notice explains
the different types of pixel defects and denes acceptable defect levels for each type. In order to
qualify for repair or replacement under warranty, the number of pixel defects on a TFT Monitor panel
must exceed these acceptable levels. For example, no more than 0.0004% of the sub pixels on a
monitor may be defective. Furthermore, Philips sets even higher quality standards for certain types or
combinations of pixel defects that are more noticeable than others. This policy is valid worldwide.
subpixel
pixel
Pixels and Sub pixels
A pixel, or picture element, is composed of three sub pixels in the primary colors of red, green and
blue. Many pixels together form an image. When all sub pixels of a pixel are lit, the three colored sub
pixels together appear as a single white pixel. When all are dark, the three colored sub pixels together
appear as a single black pixel. Other combinations of lit and dark sub pixels appear as single pixels of
other colors.
Types of Pixel Defects
Pixel and sub pixel defects appear on the LCD display in different ways. There are two categories of
pixel defects and several types of sub pixel defects within each category.
Bright Dot Defects
Bright dot defects appear as pixels or sub pixels that are always lit or 'on'. That is, a bright dot is a sub-
pixel that stands out on the screen when the monitor displays a dark pattern. There are the types of
bright dot defects.

15
6. Customer care and warranty
One lit red, green or blue sub pixel.
Two adjacent lit sub pixels:
- Red + Blue = Purple
- Red + Green = Yellow
- Green + Blue = Cyan (Light Blue)
Three adjacent lit sub pixels (one white pixel).
Note
A red or blue bright dot must be more
than 50
percent brighter than neighboring dots while
a green bright dot is 30 percent brighter than
neighboring dots.
Black Dot Defects
Black dot defects appear as pixels or sub pixels
that are always dark or 'off'. That is, a dark dot is
a sub-pixel that stands out on the screen when
the monitor displays a light pattern. These are
the types of black dot defects.
Proximity of Pixel Defects
Because pixel and sub pixels defects of the
same type that are near to one another may be
more noticeable, Philips also species tolerances
for the proximity of pixel defects.
Pixel Defect Tolerances
In order to qualify for repair or replacement
due to pixel defects during the warranty period,
a TFT Monitor panel in a Philips at panel
monitor must have pixel or sub pixel defects
exceeding the tolerances listed in the following
tables.
BRIGHT DOT DEFECTS ACCEPTABLE
LEVEL
1 lit subpixel 3
2 adjacent lit subpixels 1
3 adjacent lit subpixels (one
white pixel)
0
Distance between two bright
dot defects*
>15mm
Total bright dot defects of all
types
3
BLACK DOT DEFECTS ACCEPTABLE
LEVEL
1 dark subpixel 5 or fewer
2 adjacent dark subpixels 2 or fewer
3 adjacent dark subpixels 0

16
6. Customer care and warranty
BLACK DOT DEFECTS ACCEPTABLE
LEVEL
Distance between two black
dot defects*
>15mm
Total black dot defects of all
types
5 or fewer
TOTAL DOT DEFECTS ACCEPTABLE
LEVEL
Total bright or black dot
defects of all types
5 or fewer
Note
1 or 2 adjacent sub pixel defects = 1 dot defect
6.2 Customer Care & Warranty
For warranty coverage information and
additional support requirement valid for your
region, please visit www.philips.com/support
website for details. You may also contact your
local Philips Customer Care Center number
listed below.
Contact Information for China:
Country Call Center
Consumer Care
Number
China
PCCW Limited
4008 800 008

17
7. Troubleshooting & FAQs
7. Troubleshooting & FAQs
7.1 Troubleshooting
This page deals with problems that can be
corrected by a user. If the problem still persists
after you have tried these solutions, contact
Philips customer service representative.
Common Problems
No Picture
• Make sure the power cord is plugged into
both the power outlet and the side of the
All-in-One PC.
• The Energy Saving feature may be activated
Visible signs of smoke or sparks
• Do not perform any troubleshooting steps
• Disconnect the All-in-One PC from mains
power source immediately for safety
• Contact with Philips customer service
representative immediately.
Imaging Problems
Image appears distorted. Text is fuzzy or
blurred.
• Set the PC’s display resolution to the same
mode as monitor’s recommended screen
native resolution.
Green, red, blue, dark, and white dots appears
on the screen
• The remaining dots are normal
characteristic of the liquid crystal used in
today’s technology, Please refer the pixel
policy for more detail.
7.2 FAQs
Q1: What is the recommended refresh
rate for All-in-One PC?
Ans.: Recommended refresh rate in
All-in-One PC is 60Hz.
Q2: Whatarethe.infand.icmlesonthe
CD-ROM? How do I install the drivers
(.inf and .icm)?
Ans.: These are the driver les for your
All-in-One PC. Follow the instructions
in your user manual to install the
drivers. Your computer may ask you for
monitor drivers (.inf and .icm les) or
a driver disk when you rst install your
All-in-One PC. Follow the instructions
to insert the ( companion CD-ROM)
included in this package. Monitor drivers
(.inf and .icm les) will be installed
automatically.
Q3: How do I adjust the resolution?
Ans.: Your video card/graphic driver and
monitor together determine the
available resolutions. You can select the
desired resolution under Windows®
Control Panel with the "Display
properties".
Q4: Is the LCD display resistant to
scratches?
Ans.: In general it is recommended that
the panel surface is not subjected to
excessive shocks and is protected from
sharp or blunt objects. When handling
the LCD display, make sure that there
is no pressure or force applied to the
panel surface side. This may affect your
warranty conditions.
Q5: How should I clean the LCD display
surface?
Ans.: For normal cleaning, use a clean, soft
cloth. For extensive cleaning, please use
isopropyl alcohol. Do not use other
solvents such as ethyl alcohol, ethanol,
acetone, hexane, etc.

18
7. Troubleshooting & FAQs
Q6: Why is my LCD display not showing
sharp text, and is displaying jagged
characters?
Ans.: Your All-in-One PC works best at its
native resolution of 1920x1080@60Hz.
For best display, please use this
resolution.
Q7: Do I have to use any special Keyboard
or mouse?
Ans.: General keyboard and mouse can be
utilized on this All-in-One PC. Some
special keys may not function as
intended if the keyboard is intended for
different operating system.
Q8: How can I connect to Internet when
it’s on the All-in-One PC mode?
Ans.: You can connect to Internet with built
in Ethernet or WiFi.
Q9: Can I rotate my LCD display?
Ans.: No, you cannot rotate your LCD display.
Its default and only mode is landscape
mode.

© 2015 Koninklijke Philips N.V. All rights reserved.
Philips and the Philips Shield Emblem are registered trademarks of
Koninklijke Philips N.V. and are used under license from Koninklijke
Philips N.V.
Specicationsaresubjecttochangewithoutnotice.
Version: M6A222C6E1T / M6A222C3E1T
 Loading...