

Page 1
Discover Your Phone
Philips continuously strives to improve its
products.Therefore, Philips reserves the rights to
revise this user guide or withdraw it at any time
without prior notice. Philips provides this user
guide “as is” and does not accept, except as
required by applicable law, liability for any error,
omission or discrepancy between this user guide
and the product described. The device is meant to be
connected to GSM/GPRS networks.
How to ...
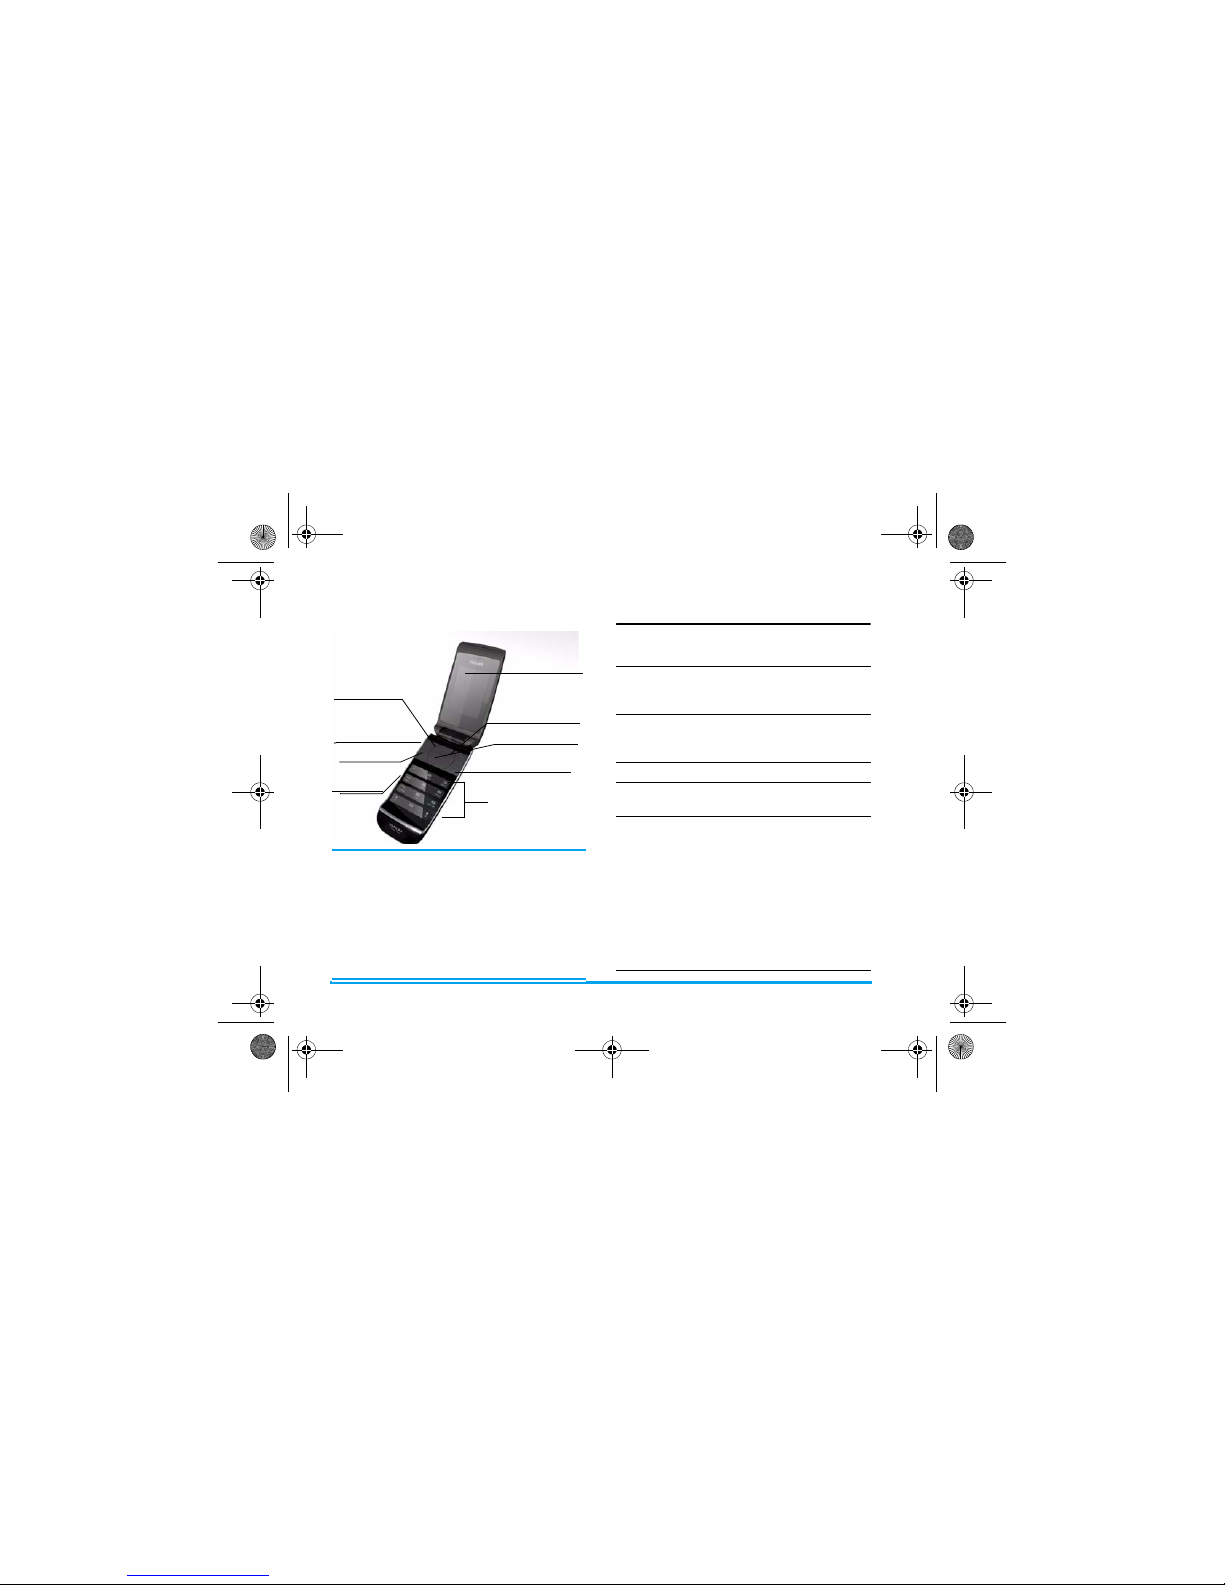
Alphanumeric
keypad
262K colour
TFT LCD
Navigation keys
Hang up and
on/off key
Left softkey
Right softkey
Pick up key
ack of phone:
amera lens
Headset, charger,
and data cable
connector
Micro SD
card slot
Switch the phone
On/Off
Long press and release ).
Enter your PIN
code
Enter your PIN code using
the keypad and press , or
L to confirm.
Make a call Enter the phone number
using the keypad and press
(.
End a call Press ).
Answer a call When the phone rings, press
(.
Activate/
deactivate
handsfree mode
In idle mode, enter the
phone number using the
keypad or select a contact in
the phonebook.
Press , or L Options,
then select call handsfree
and press ,.
During a call, press , or
L Options to access the
handsfree option.
When there is an incoming
call, long press (.
Xsaber_00_DiscoverYourPhone.fm Page 0 Tuesday, December 11, 2007 10:25 AM
Page 2
1
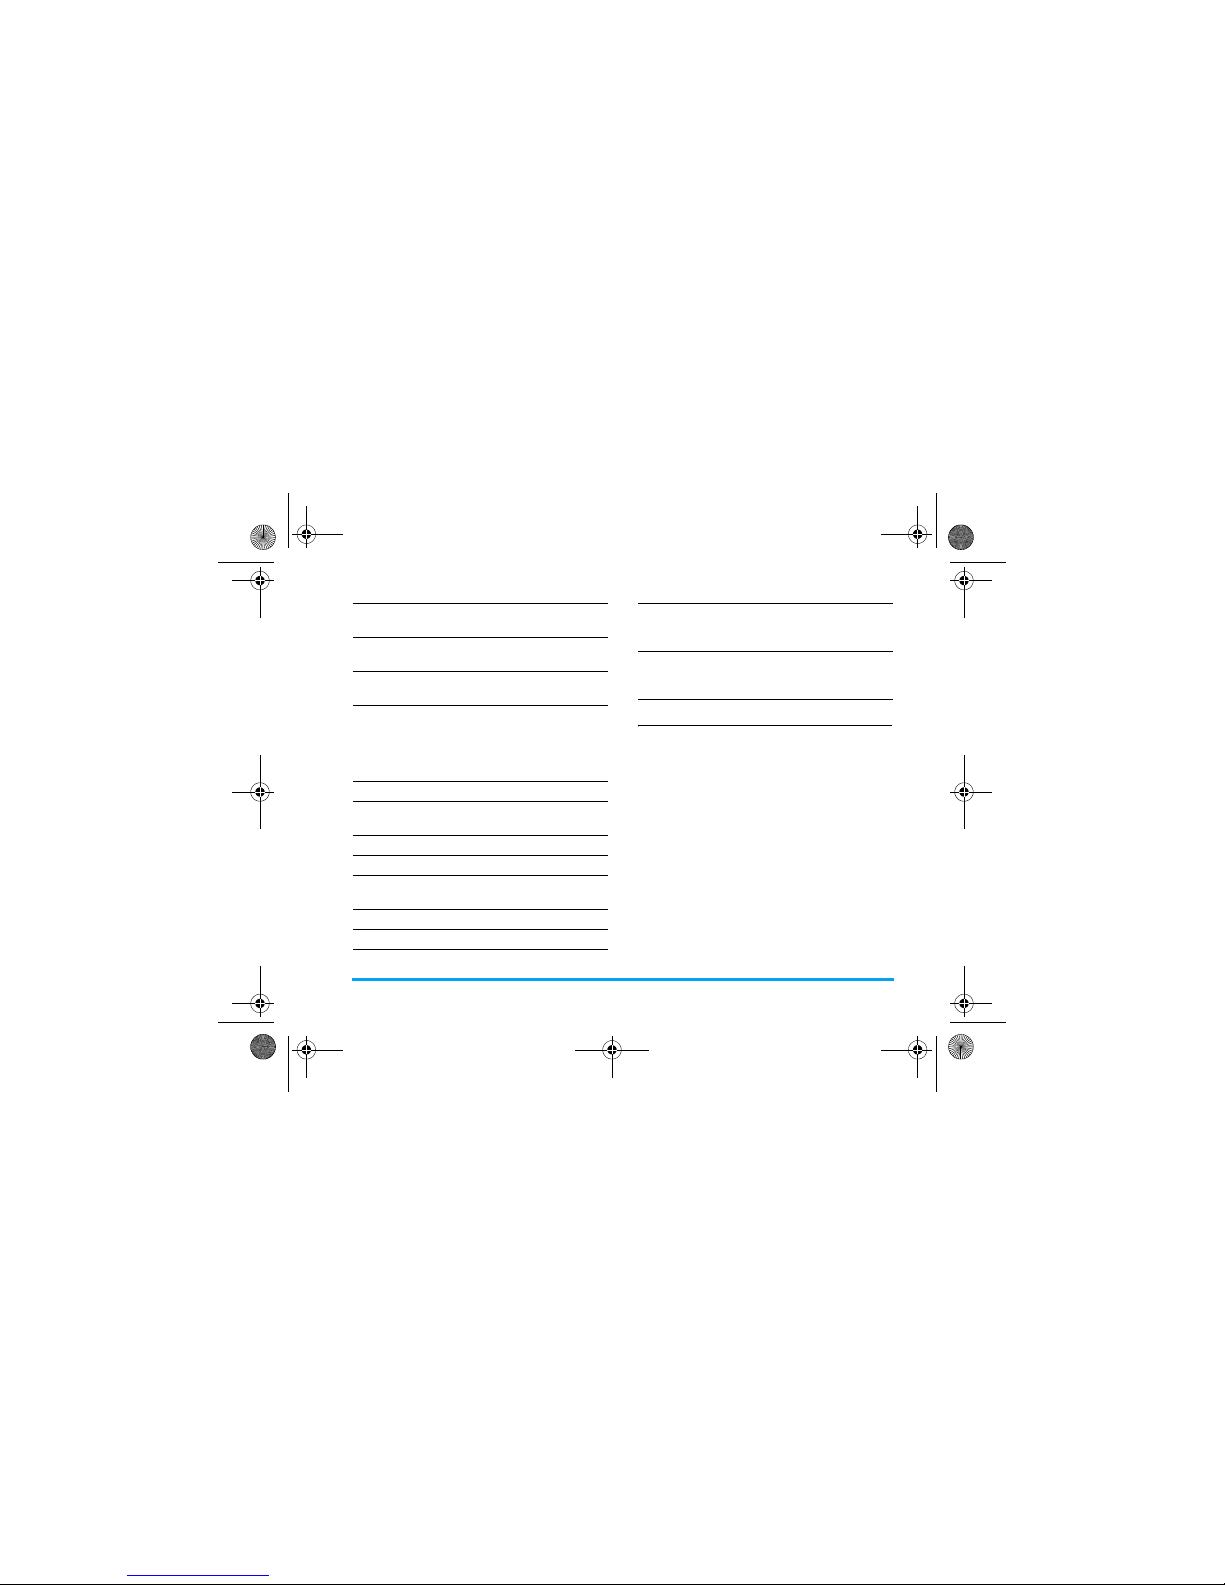
External LED
The LED icons show the status of messages, missed
calls, incoming calls and the battery. For autonomy
purposes, LED icons will be asleep mode immediately
every time you close the clamshell cover. You can
wake up phone by short press volume keys.
Mute a call When the phone rings, press
R
.
Reject a call When the phone rings, press
)
.
Adjust conversation
volume
Press
<
and > keys to adjust the
volume during a call.
Adjust ringer
volume
When the phone is in idle
mode, press
,
> Settings >
Sounds > Ring volume to
adjust the ring volume of an
incoming call.
Access all calls list Press
(
in idle mode.
Access WAP
browser
Press
+
in idle mode.
Access Contacts Press
-
in idle mode.
Access My Files Press
<
in idle mode.
Access Write
Message
Press
>
in idle mode.
Access Main Menu Press
,
or L in idle mode.
Access Music player Press
R
in idle mode.
Go to previous
menu
Press R Back when
browsing menu or in editing
mode.
Quickly return to
idle when browsing
menus
Short press
)
.
X-Saber_00_DiscoverYourPhone.fm Page 1 Wednesday, Novemb er 14, 2007 2:52 PM
Page 3
2
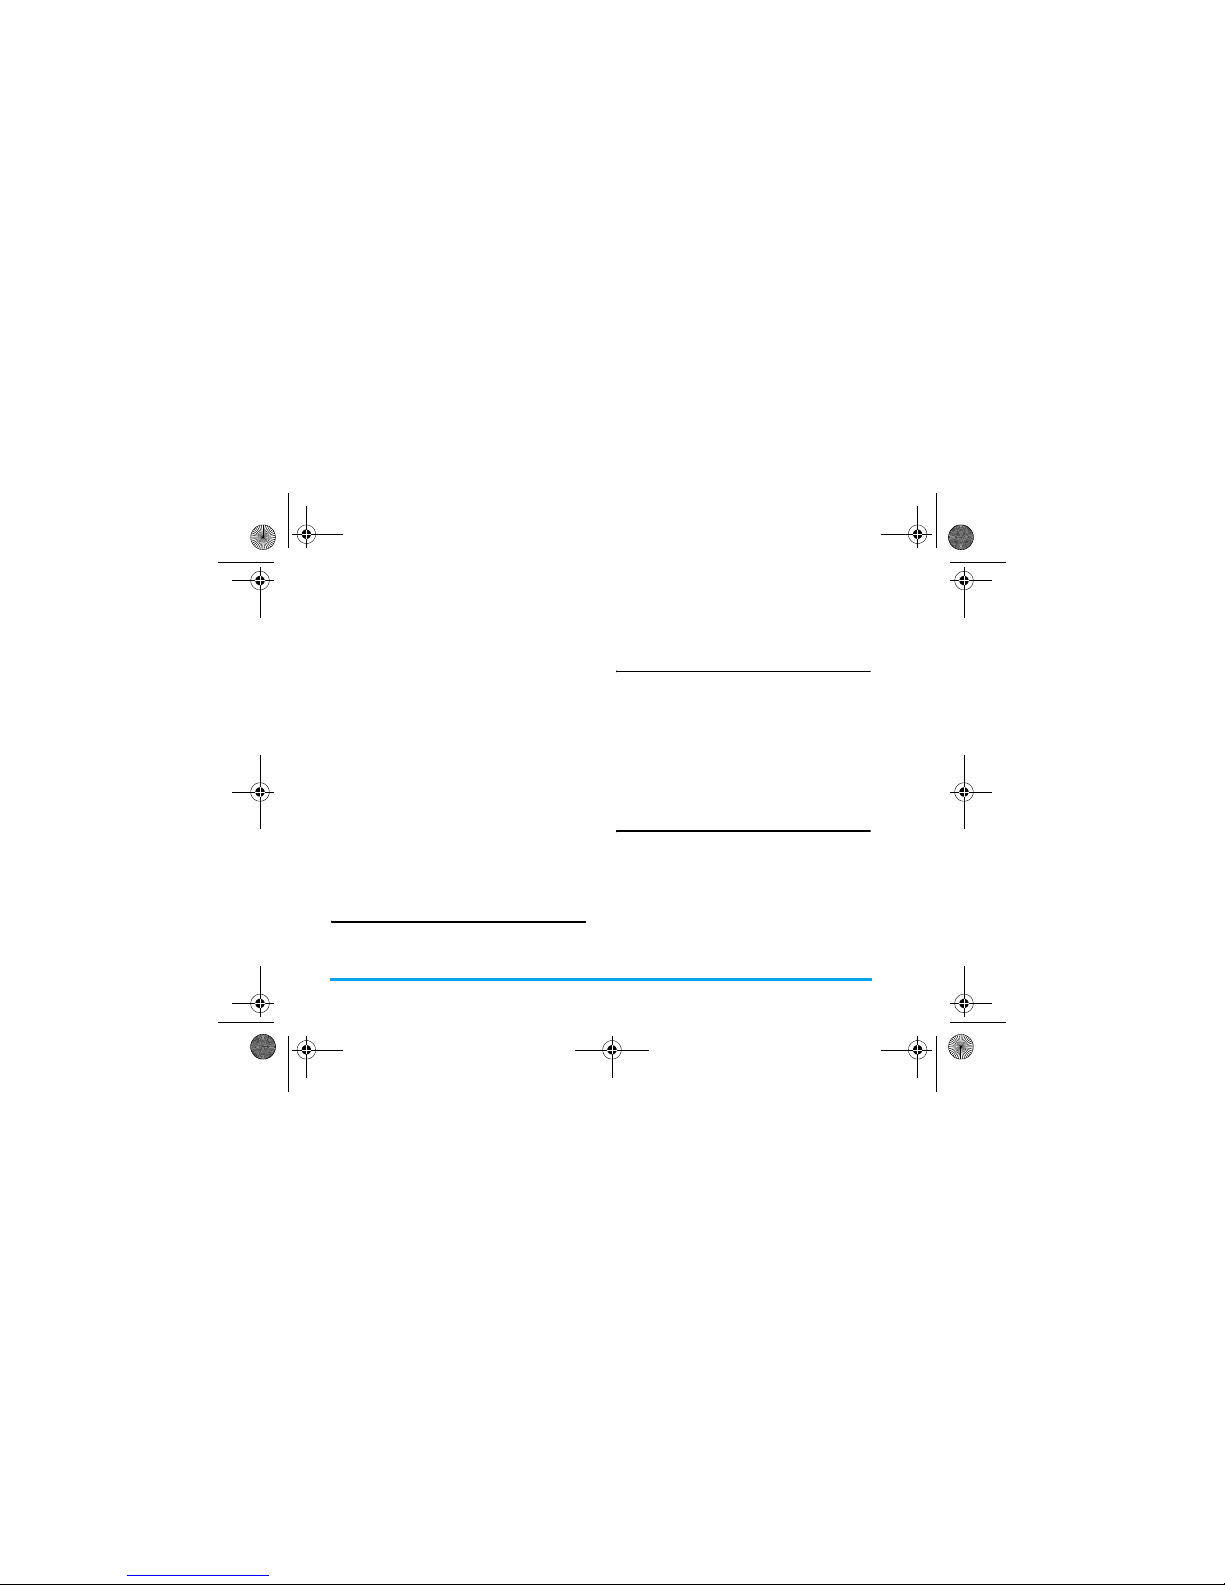
Message icon
Whe n a me ssag e (SM S or MM S) ar rive s, th is ico n wil l
blink for 1 minute.
Missed call icon
When you have missed a phone call, this icon will
blink for 1 minute.
Incoming call icon
When there is an incoming call from the callers in the
contact list, this icon will blink rapidly.
When there is a call from an unknown caller, this icon
will blink slowly.
If you using a headset and close the clamshell cover
during the call, this icon will stay on for 30 seconds to
indicate the call is in progress.
Battery icon
If you plug in the charger with clamshell cover closed,
this icon will stay on continuously while charging
until it is fully charged.
When there is 15 minutes of battery left, this icon will
flash to alert you.
Softkeys
The left and right soft keys (L and R) are located
at the top of keypad area. Pressing the soft keys allows
you to select the option displayed on the screen
directly above them, including options during a call.
The functions of the soft keys change according to the
current context.
Operations of the headset
The following operations are applicable to headsets
with only one key.
When you enter a phone number in idle mode, short
press the headset key to dial the number. To stop
dialling, long press the headset key.
During a call, short press the headset key to record or
stop recording; long press to hang up the phone.
When there is an incoming call, press the headset key
to answer the call; long press to reject the call.
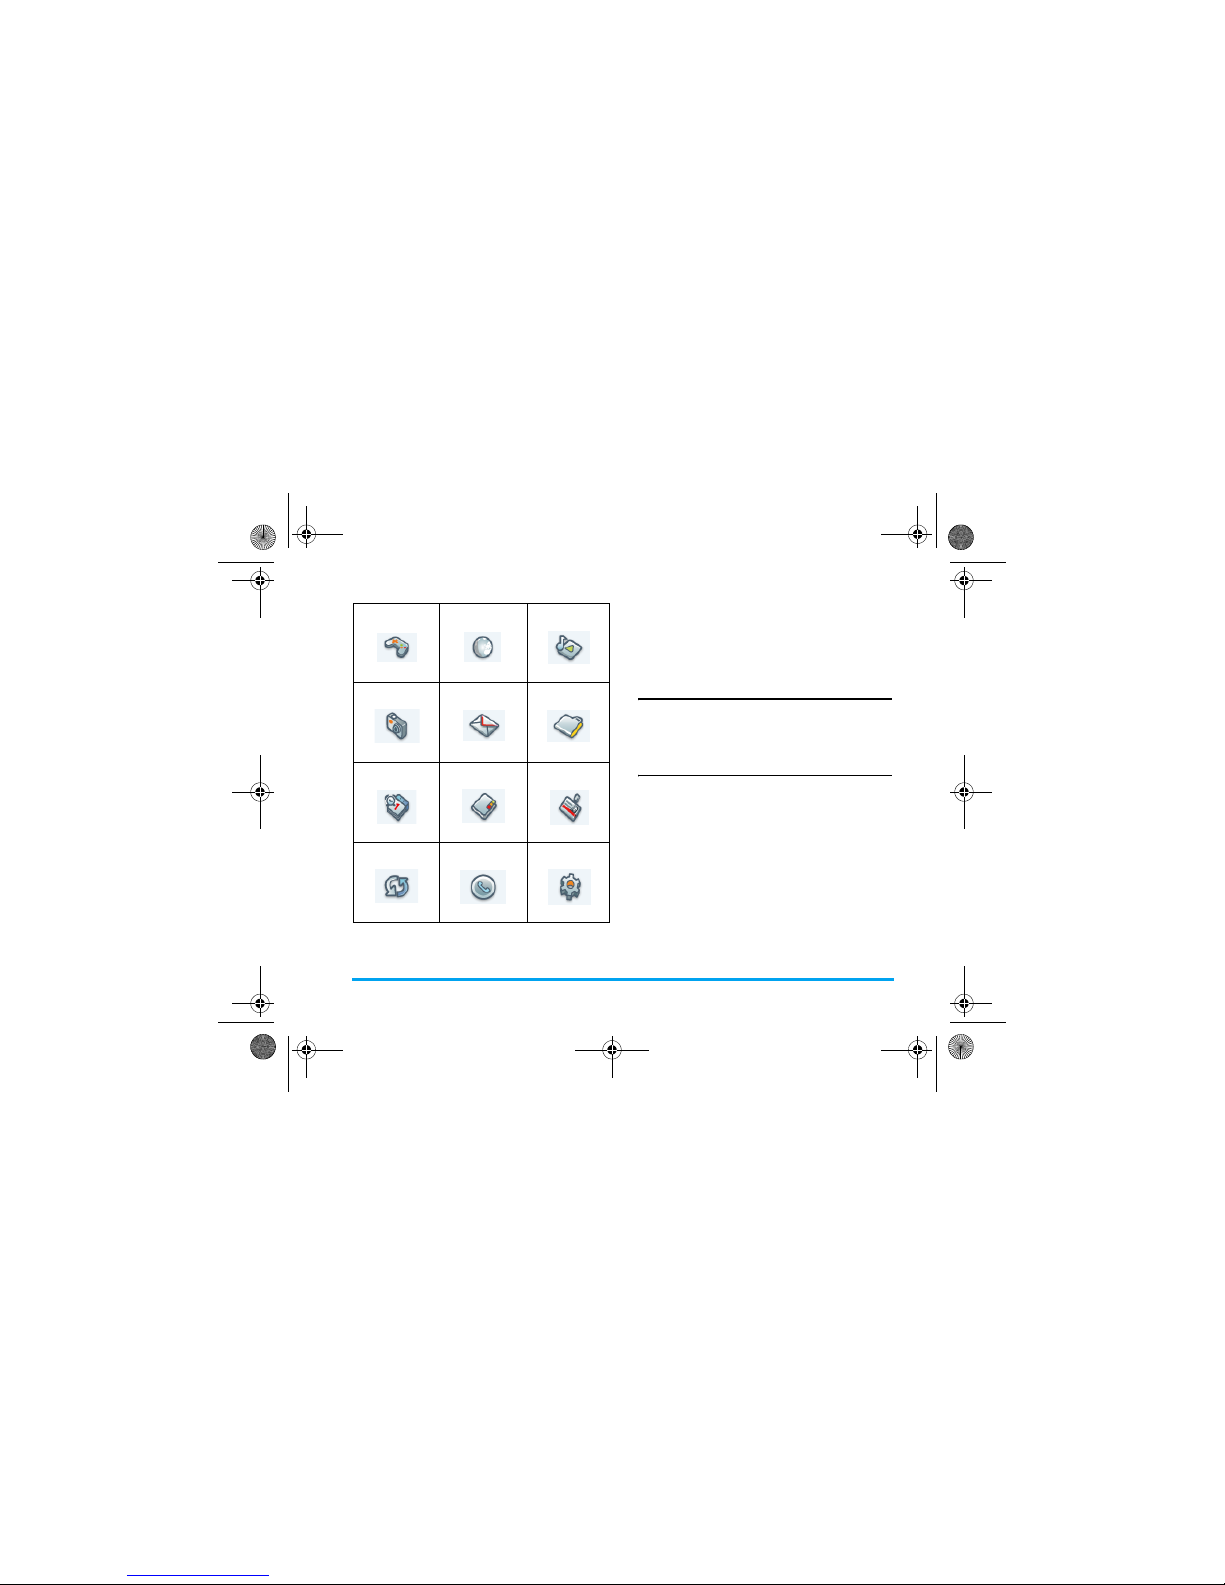
Main Menu
You can access the different features of your Xenium
9@9q phone from the main menu. The following table
summarises the structure of the Main menu, what the
icons represent and the page number on which you can
obtain more information regarding the menu functions.
x-saber_master_en.book Page 2 Wednesday, November 14, 2007 12:42 PM
Page 4
3
Press , in idle mode to access the main menu and press
+, -, <
or > to navigate through the icons and lists, or press
0 - 9
keys, and * or # keys to access the options
and functions directly. When navigating through a list,
the scrolling bar on the right of the screen will indicate
your current position in the list. Press
L
Select or , to
access the corresponding options of the selected item in
the list. Press
R
Back to return to the previous menu.
Menu without SIM
If you do not insert a SIM card, those menu items
whose functions that cannot work without SIM will
be greyed out and not accessible.
How to use this manual
This user manual strives to provide you with concise
and complete information regarding your Xenium
9@9q phone. It includes the following:
Entertainment Browser Music Player
page 25
page 26
page 29
Camera Messages My Files
page 33
page 38
page 48
Tools Contacts Profiles
page 52
page 57
page 61
Connectivity Calls Settings
page 64
page 66
page 69
Discover
your phone
This section presents an overview of
your mobile phone and information
on the most commonly used features.
Chapter 1:
Getting
started
Information on how to set up your
mobile phone for the first time, such as
installation of SIM card, battery, etc.
Chapter 2:
Main
features
How to make and answer calls, as
well as some frequently used call
functions.
x-saber_master_en.book Page 3 Wednesday, November 14, 2007 12:42 PM
Page 5
4
New Events
Some events may modify the idle screen (such as
missed calls, new SMS, new MMS, etc). Whenever
there is a new event, the phone will emit an audible
alert (except for the reception of cell broadcast
messages). You can press
L
View to display the
missed calls list, enter the list of unread SMS or MMS,
etc. Press
R
Back to exit from the new events screen.
At all times, you can only clear the new events from the
idle screen by pressing R Back.
Chapter 3:
Text entry
How to enter text using the
alphanumeric keypad.
Chapters 4
to 15
Description of the main features of
this phone.
Other
sections
Icons & Symbols, Precautions,
Troubleshooting, Philips Authentic
Accessories, SAR information (if
available at the time of publication,
otherwise included as a separate
document), and finally the Limited
Warranty information.
x-saber_master_en.book Page 4 Wednesday, November 14, 2007 12:42 PM
Page 6
5
Table of contents
1. Getting Started ............................................8
Inserting the SIM card ......................................8
Switching on the phone ................................ 10
Charging the battery ..................................... 10
Insert a micro SD Card ................................ 11
Setting hotkeys ............................................... 11
2. Calling ............................................................. 13
Switch on the phone ..................................... 13
Switch off the phone ..................................... 13
Make a call ....................................................... 13
Options during a call ..................................... 13
Mute or unmute a call ................................... 14
Adjust speaker/earpiece volume ................14
Call recording ................................................. 14
End a call .......................................................... 14
Make an international call ............................14
Make an emergency call ............................... 14
Make a second call (Network dependent) 15
Make a Conference Call
(Network dependent) ................................... 15
Switch calls (Network dependent) ............16
Call Handsfree ................................................ 16
IP Dial (China & HK only) ............................ 16
Answer a call .................................................. 16
Reject a call ..................................................... 16
Answer a second call
(Network dependent) .................................. 16
Contact Picture .............................................. 17
3. Text and number entry ...................... 18
Input method .................................................. 18
Entering texts and numbers ........................ 18
Entering symbols ............................................ 19
Shift case .......................................................... 19
Delete ............................................................... 19
T9
®
English input ........................................... 19
Basic text input ............................................... 20
Pinyin Input ...................................................... 21
Stroke input .................................................... 22
4. Entertainment ........................................... 25
Games .............................................................. 25
Java .................................................................... 25
5. Browser ........................................................ 26
WAP ................................................................. 26
Push Inbox ....................................................... 28
x-saber_master_en.book Page 5 Wednesday, November 14, 2007 12:42 PM
Page 7

6
6. Media Player ............................................... 29
Music Player .................................................... 29
Tracks ............................................................... 29
Artists ............................................................... 29
Playlists ............................................................. 30
Last played ....................................................... 30
Now playing .................................................... 30
Settings ............................................................. 31
7. Camera .......................................................... 33
Camera mode ................................................. 33
Video recorder ............................................... 35
8. Messages ....................................................... 38
SMS .................................................................... 38
MMS (network dependent) .........................39
Inbox ................................................................. 40
Outbox ............................................................. 41
My favourites ................................................... 42
Draft .................................................................. 43
SIM archive ...................................................... 44
Templates ........................................................ 44
Voice mail ........................................................ 44
Cell broadcast ................................................. 45
Message Settings ............................................. 45
9. My Files ......................................................... 48
Pictures ............................................................ 48
Videos ............................................................... 49
Sounds .............................................................. 50
Memory status ................................................ 51
Memory card .................................................. 51
10. Tools ............................................................ 52
Calendar ........................................................... 52
Alarm ................................................................ 53
Calculator ........................................................ 53
Voice recorder ............................................... 54
International clock ......................................... 54
Stop watch ....................................................... 54
Unit converter ................................................ 55
Countdown ..................................................... 55
Firewall ............................................................. 55
11. Contacts .................................................... 57
Create contacts .............................................. 57
View group ...................................................... 58
Special numbers ............................................. 59
Quick call ......................................................... 59
Advanced ......................................................... 60
12. Profiles ........................................................ 61
Profile selection .............................................. 62
Personalise settings ....................................... 62
x-saber_master_en.book Page 6 Wednesday, November 14, 2007 12:42 PM
Page 8
7
13. Connectivity ............................................ 64
Bluetooth ......................................................... 64
USB function ................................................... 65
14. Calls .............................................................. 66
Call list .............................................................. 66
Clear history ................................................... 66
Call settings ..................................................... 66
15. Settings ........................................................ 69
General ............................................................. 69
Display .............................................................. 70
Sounds .............................................................. 71
Connectivity .................................................... 71
Icons & Symbols ............................................ 73
Precautions ....................................................... 76
Troubleshooting ............................................ 81
Philips Authentic Accessories .............. 83
Trademark Declaration ............................ 84
Limited warranty .......................................... 87
Xsaber_EnglishMasterTDM.fm Page 7 Tuesday, December 11, 2007 11:23 AM
Page 9
8 Getting Started
1. Getting Started
Please read the safety instructions in the
"Precautions" section before use.
Before you start using your phone, you must insert
a valid SIM card supplied by your GSM operator or
retailer. The SIM card contains your subscription
information, your mobile telephone number, and a
small quantity of memory in which you can store
phone numbers and messages (for more
information, see “Contacts” on page 62).
You can also insert a memory card. This provides
you with expanded memory capability, which
allows you to store additional music, photo, and
video files separate from the phone's built-in
memory.
Inserting the SIM card
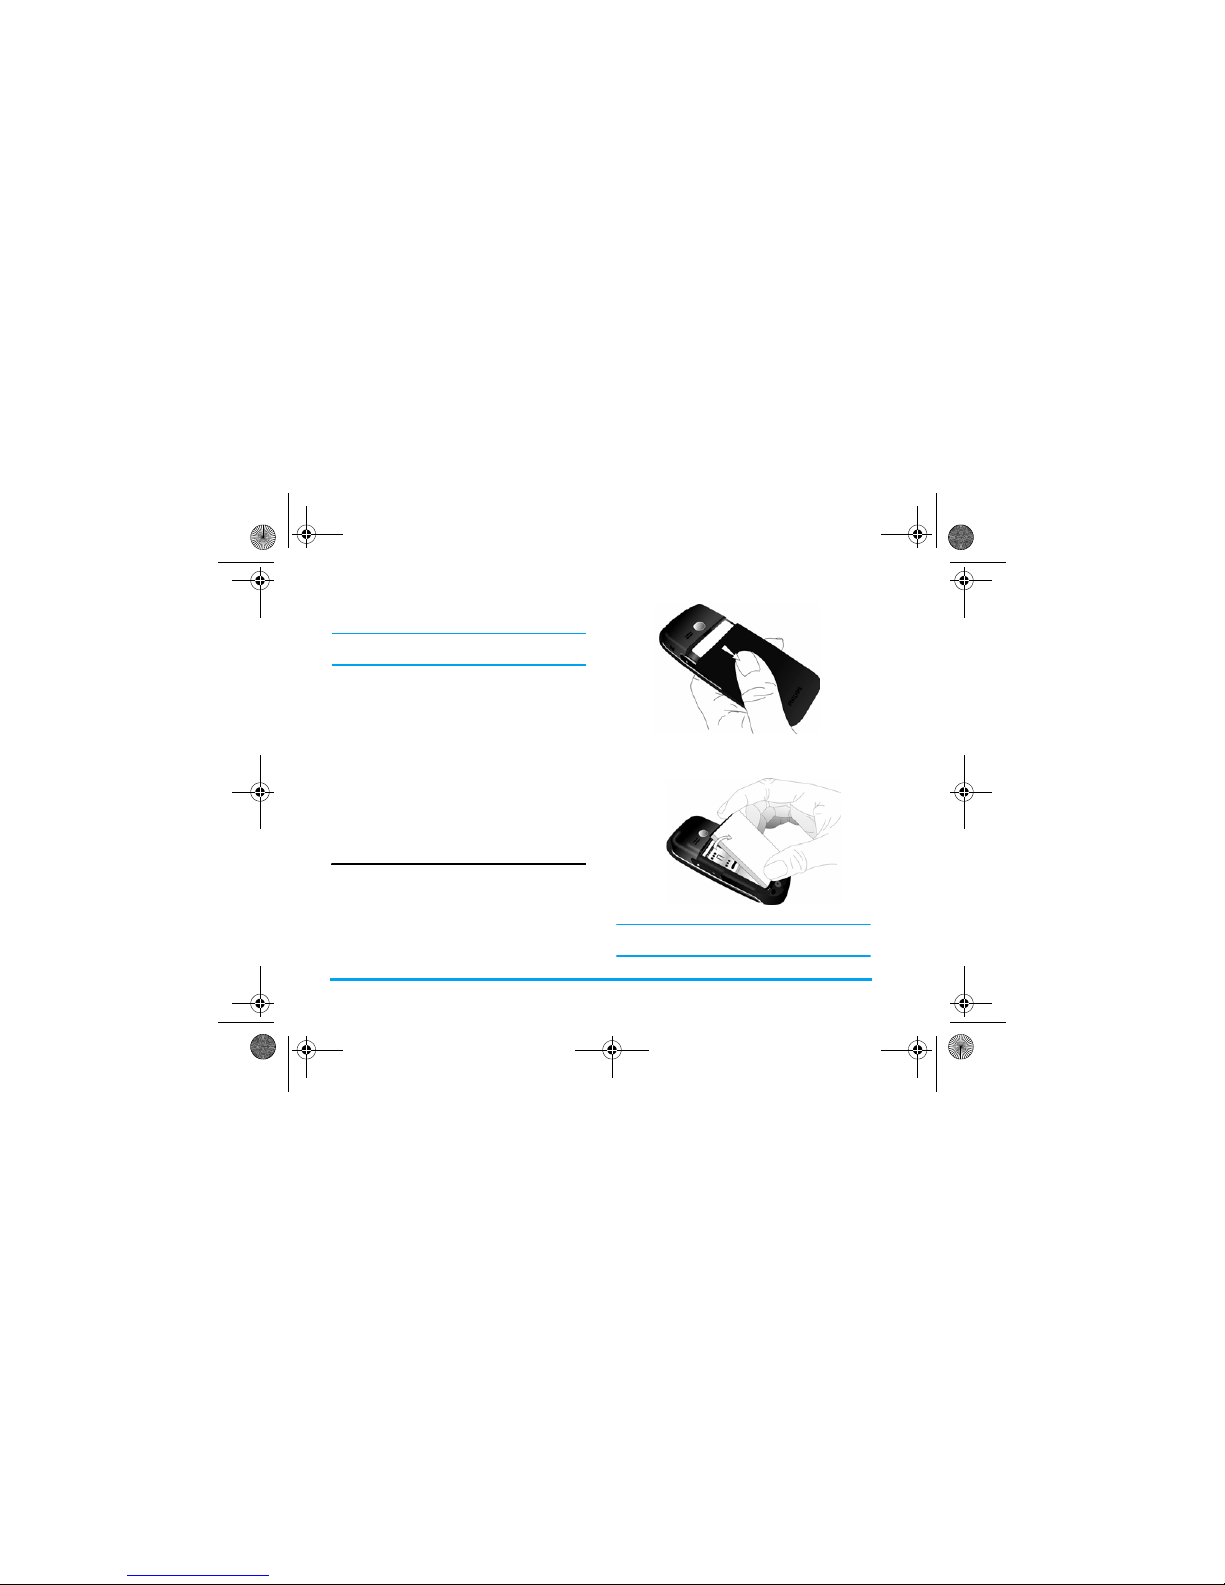
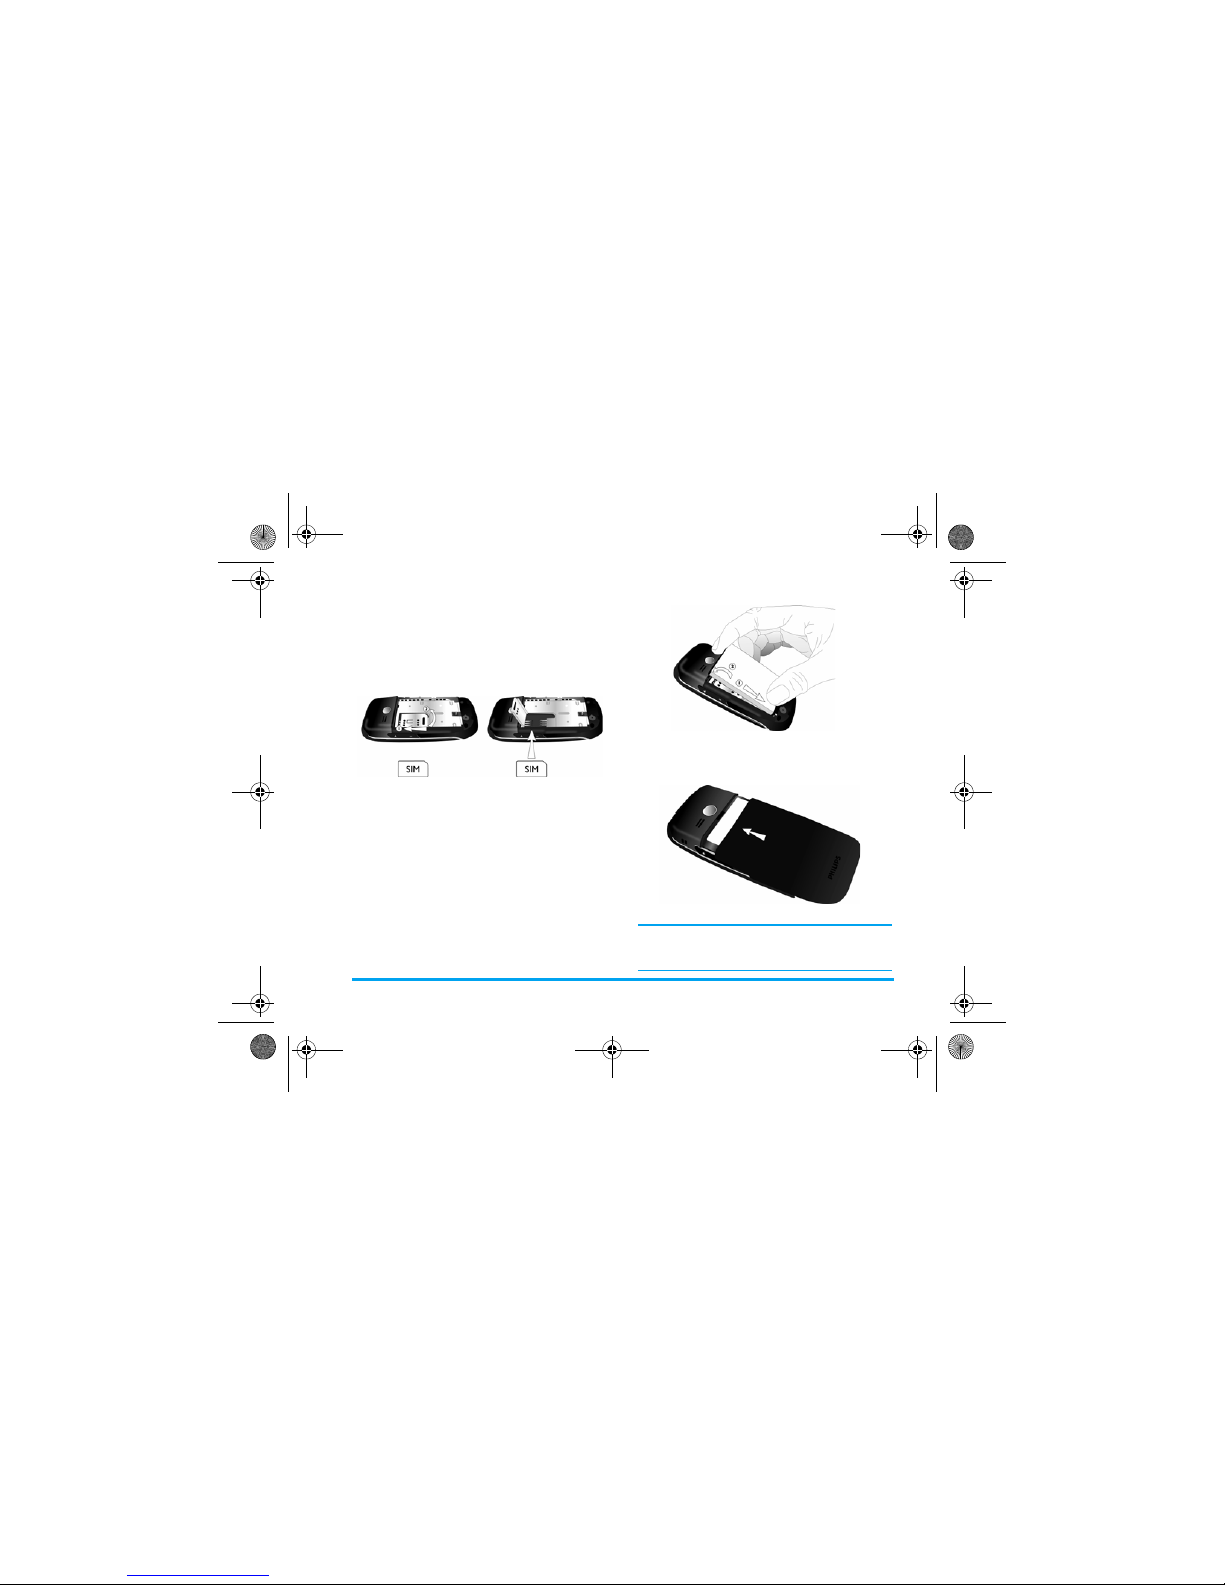
Remove the back cover
Make sure that the phone is switched off. You need
to remove the back cover of your phone before you
can insert the SIM card. Press on the back cover
with your thumb and slide the cover downwards as
shown below. the release catch and lift up the back
cover from its slot.
Remove the battery
Lift up the battery from the top to remove it..
You may lose all your personal settings if you
remove the battery when the phone is switched on.
Xsaber_01_GettingStarted.fm Page 8 Monday, December 10, 2007 6:11 PM
Page 10
Getting Started 9
Insert the SIM card
Slide the SIM card holder unlock it and then lift it
up on its hinge. Place the SIM card in the space
provided, making sure that the clipped corner of the
card is in the correct corner and that the gold
contacts are facing down.
Replace the battery
Place the battery into its slot, with the gold contact
facing the corresponding gold contacts on the side
of the phone.
Replace the back cover
Replace the back cover by sliding it up into its slot,
until it stops.
When inserting the battery, be careful not to
damage the metallic connectors of the SIM card
slot.
Xsaber_01_GettingStarted.fm Page 9 Monday, December 10, 2007 6:11 PM
Page 11
10 Getting Started
Switching on the phone
To switch on the phone, long press and release the )
key. Enter the PIN code if required (the 4 to 8 digit
secret code of your SIM card). It is preconfigured and
provided to you by your network operator or retailer.
For more information on PIN code, see “Security” on
page 76.
If you enter an incorrect PIN code 3 times in
succession, your SIM card will be blocked. To
unblock it, you must obtain the PUK code from your
network operator.
Charging the battery
Your phone is powered by a rechargeable battery. The
new battery is partially charged. A sound alert will be
emitted to warn you when the battery level becomes
low.
We recommend that you do not
remove
the battery
when the phone is switched on as you may lose all
your personal settings as a result. If you do remove
it, the date and time settings are only memorized
for a short while. As such, you need to reset the
information after you have installed the battery
back again.
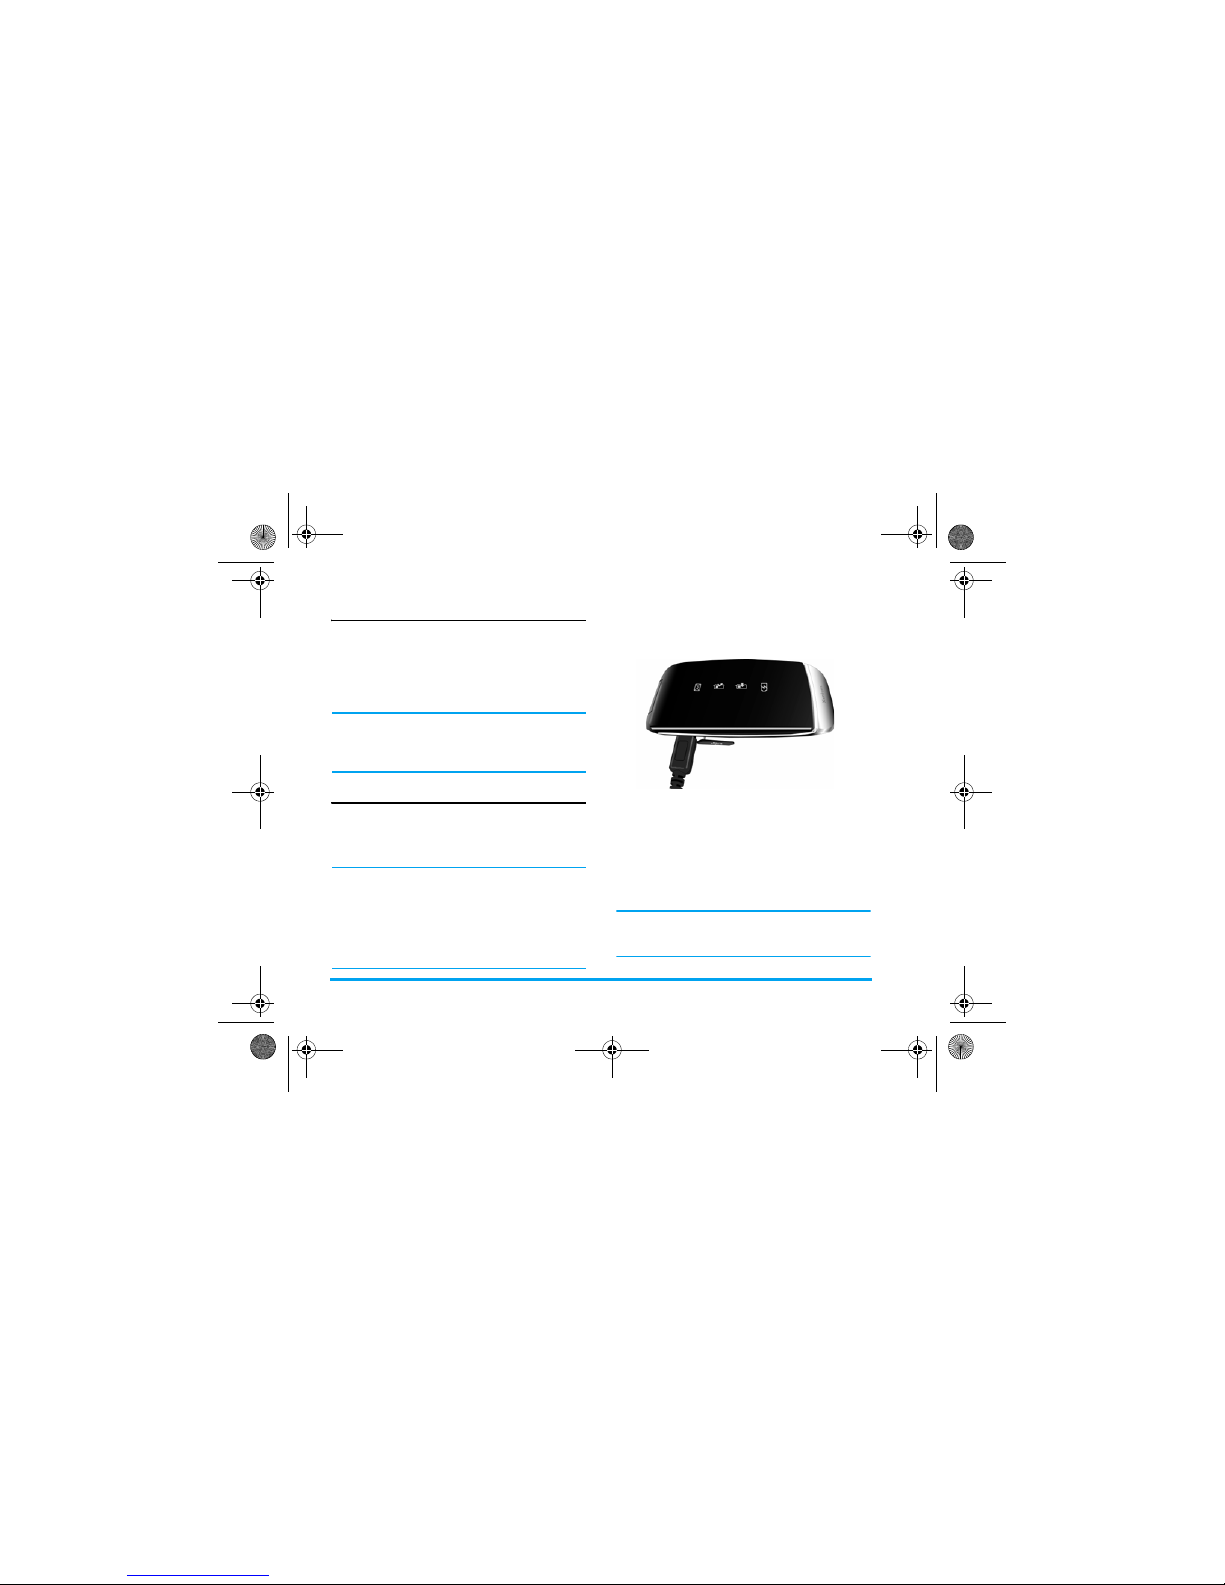
Once the battery and battery cover are installed, you
can charge the phone. Plug in the connector as
shown below. Then plug the other end into an AC
power socket.
The battery symbol indicates the state of charge.
During charging, the charge indicators will scroll; it
takes around 2.5 hours to fully charge the battery.
When all the scroll bars are steady, the battery is
fully charged. You can then disconnect the charger.
Depending on the network and condition of use, talk
time and stand-by time can go up to 9 hours* and
750 hours* respectively.
*Depending on the network conditions, user
settings, method of use, etc the actual results may
differ.
Xsaber_01_GettingStarted.fm Page 10 Monday, December 10, 200 7 6:11 PM
Page 12
Getting Started 11
Keeping the charger plugged to the mobile phone
when the battery is fully charged will not damage
the battery. The only way to turn off the charger is
to unplug it, so it is advisable to use an easily
accessible AC power socket.
If you do not intend to use your phone for several
days, we recommend that you remove the battery.
You can use the phone while it is charging (note
that the vibra alert goes off when the charger is
connected). If the battery is completely flat, the
battery icon will only reappear after a few minutes
of charging.
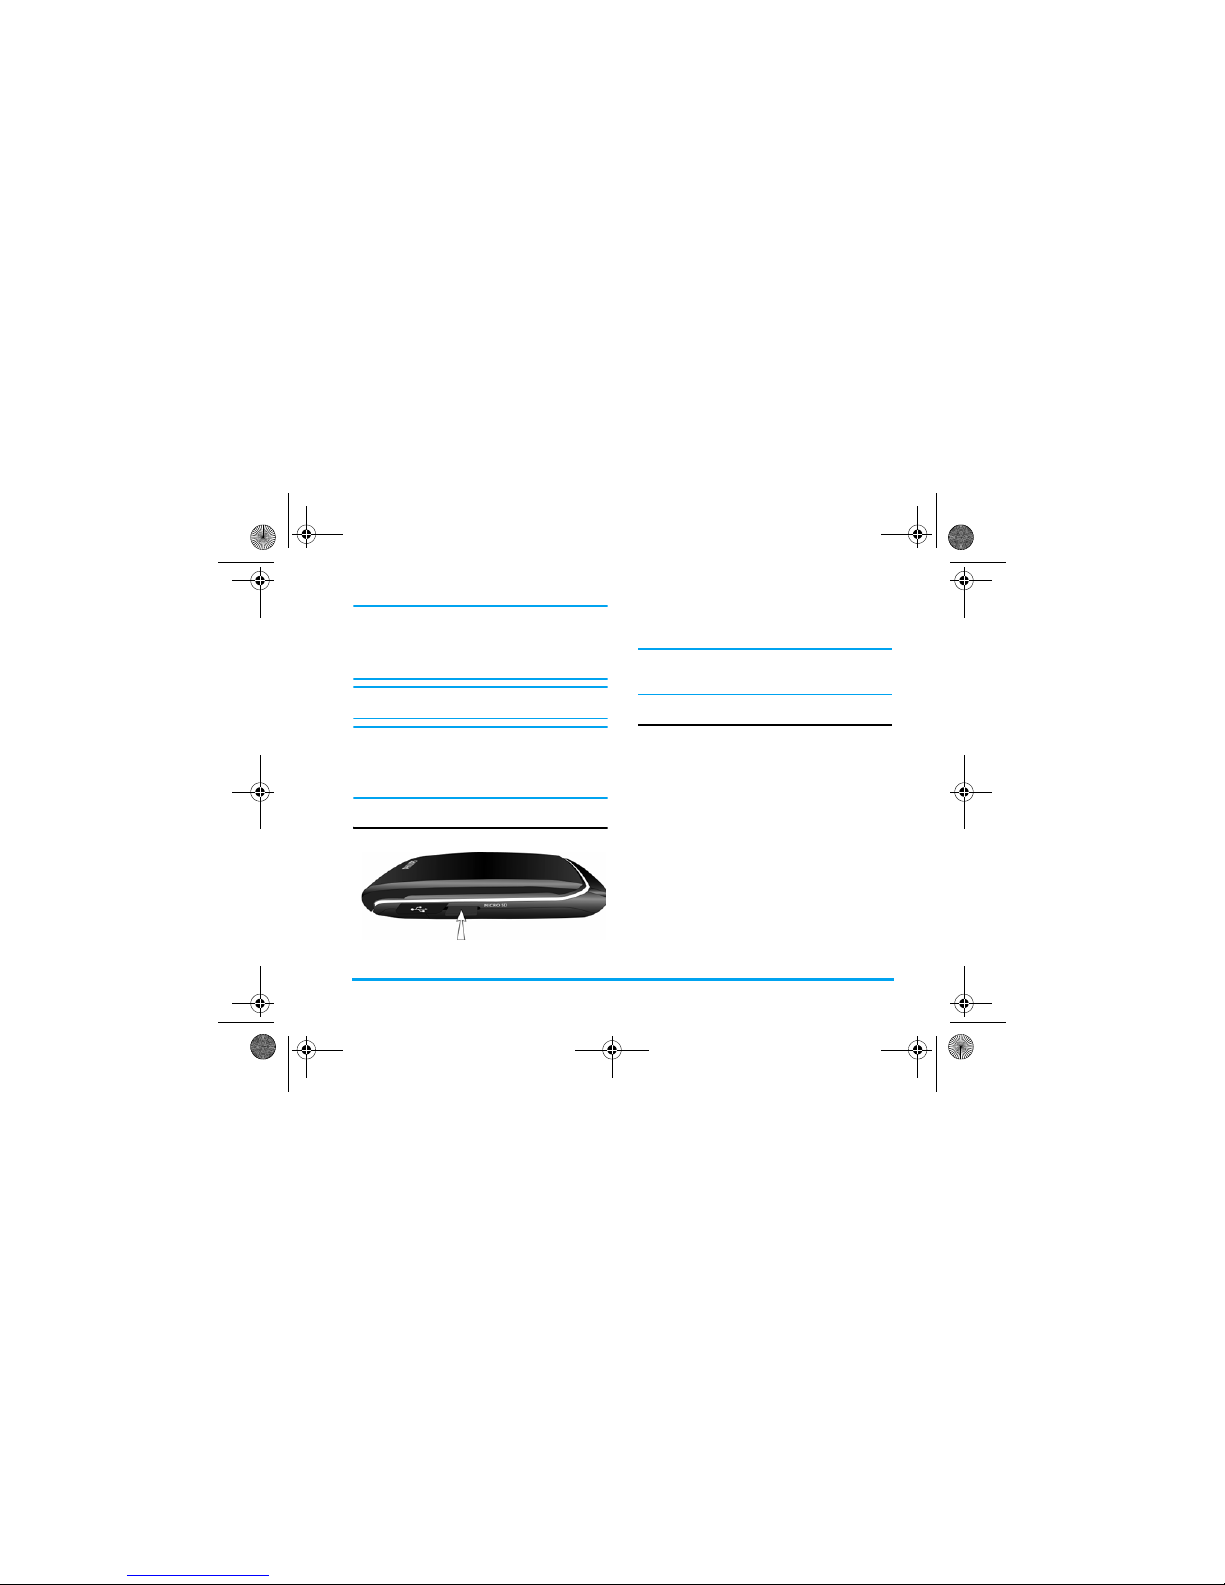
Insert a micro SD Card
Gently slip the card into the micro SD card slot and
press it down until the card locks into place, the
card's gold contacts will be facing upwards.
To remove the micro SD card, push down the card
into its slot and release it. The card will spring out
of the slot.
Setting hotkeys
You can configure the numeric keys 2 - 9, +, -,
<, >, L and R to access your favorite features.
Once they have been set, you can simply long press
the numeric key to access the corresponding
features.
Majority of the hotkeys have been preset and
configured. To check the hotkey settings, go to Settings
> General > Shortcuts > Hotkey. To change the hotkey
setting, press the numeric key you wish to change and
select Options > Change, then select a feature to be
associated with the numeric key from the following
list:
• Alarm • Flight mode
•Calendar •Games
•Voice Memo •Homepage
Xsaber_01_GettingStarted.fm Page 11 Monday, December 10, 200 7 6:11 PM
Page 13
12 Getting Started
Numeric keys 0, 1, # and
*
have been
preconfigured as the default keys to enter “+”,
access voice mailbox, activate Meeting profile and
unlock the keypad respectively, and cannot be
modified.
•Inbox • Menu
• Bluetooth • Calculator
• Firewall • Music
• Languages • My Files
• Call list • Profiles
• Camera • Ringtones
• Contacts • Shortcuts
• Create message • Unit converter
• Create SMS • Quick call
• Create MMS • Sound recorder
Xsaber_01_GettingStarted.fm Page 12 Monday, December 10, 200 7 6:11 PM
Page 14
Calling 13
2. Calling
This chapter describes the features and options related
to making and receiving calls.
Switch on the phone
Long press ) to switch on the phone.
You may set a security code (PIN code) on your
phone to protect it from unauthorised use. When you
have set a security code, you will be prompted to enter
the corresponding security code when you switched
on the phone.
1. Enter the PIN code. For security reasons, the
screen will display “*” to represent the numbers
you have entered. If you have entered the wrong
number, press
R
Clear to clear it.
2. Press
L
OK. The phone will validate the PIN
code and commence network registration.
3. Once a network name is displayed on the screen,
you are ready to make or answer a call. If there is
no network name on the screen, you need to reregister.
If you enter a wrong PIN code 3 times in succession,
your SIM card will be blocked. To unblock it, you
must request the PUK code from your operator. If you
enter a wrong PUK code 10 times in succession, your
SIM card will be permanently blocked and cannot be
used anymore. If this happens, please contact your
network operator.
Switch off the phone
At all times, you can long press ) to switch off the
phone.
Make a call
You can make a call only when the network name
appears on the screen.
1. Enter the phone number.
2. Press
(
to dial the number; or press
L
Options to enter options menu, then select Dial >
IP Dial, Handsfree dial, or IP Handsfree dial.
Options during a call
During a call, you can press L Options to carry out
the following operations:
- Activate/cancel handsfree
- Activate bluetooth headset (if applicable)
- Mute/Unmute the call
- Put the call on hold
- Dial a new number
x-saber_master_en.book Page 13 Wednesday, November 14, 2007 12:42 PM
Page 15
14 Calling
- End the current call
-Send SMS
- Record phone conversation (which includes 3
sub-options: Record both, Record the opposite
party and Record own)
- Access Contacts list
Mute or unmute a call
During a call, press L Options and select Mute or
Unmute. If you select Mute, the microphone will be
deactivated.
When you switch from one call to another, muting
will be cancelled.
Adjust speaker/earpiece volume
During a call, call on hold or call waiting, you can
press
</>
to increase or decrease the volume (if you are
not browsing the call options menu).
When the volume has been set, the call volume will
take effect immediately and the settings will be
applied to your subsequent calls.
Call recording
During a call, press L Options and select Record to
access the 3 recording options; namely, Record both
(default), Record the opposite party and Record own
(applicable to two-party calls or multi-party calls).
When you start recording, a recording icon will
appear on the screen. When you end the call, the
recording will stop and saved automatically in AMR
format under My Files > Sounds.
There is no limit to the length of the recording; the
recording will stop only when you press
R
key to stop
the recording, when there is insufficient memory, or
when the call has ended.
End a call
Press R End or ) to end a call.
Make an international call
1. Long press 0 until "+"appears on the screen.
2. Enter the country code.
3. Enter the area code (normally without the 0 in
front), followed by the phone number.
4. Press
(
to call directly.
Make an emergency call
You can make an emergency call anytime, irrespective
of whether the mobile phone has been registered on
the network.
x-saber_master_en.book Page 14 Wednesday, November 14, 2007 12:42 PM
Page 16
Calling 15
1. In idle mode, enter the emergency call number
(specific number in the caller's country)
2. Press
(
.
Note that an emergency call will not be stored in the
call record.
3. Alternatively, after switching on the mobile
phone and entering the PIN number, press
R
SOS to go to the emergency call screen. If there is
no SIM card, pressing
R
SOS can also bring
you to the emergency call screen, displaying the
call number. Then press
(
or the OK softkey to
directly make an emergency call and the dial
animation will be displayed.
Make a second call (Network
dependent)
You can make a second call by putting the current call
on hold:
1. During a call with Party A, you can enter Party's
B number using the keypad.
2. Press
(
to dial Party B's number. Party A will
be put on hold automatically.
Make a Conference Call (Network
dependent)
Your phone supports multi-party call of up to five
members. The screen will display Conference call
during the multi-party call.
When there is a call waiting while you are already on
the phone, you can carry out the following operations
to establish the multi-party call:
1. Press
(
to answer the second call. The first call
will be put on hold automatically.
2. Select Conference Call from the call menu. The
two calls will be combined and a conference call is
established.
During the multi-party call, you can answer a new
incoming call or add a new member to the call by
dialing the new member (the ongoing multi-party call
will be put on hold automatically). Once the call is
established, select Establish conference call from the
call menu to add the new member to the multi-party
call (you can add up to five members).
X-Saber_02_Calling.fm Page 15 Wednesday, November 14, 20 07 3:02 PM
Page 17
16 Calling
If you wish to separate one member from the call, you
can select Split conference Call during the multi-party
call. To disconnect a member from the call, select End
call in conference.
Switch calls (Network dependent)
When you have one active call and one call on hold,
you can press
L
Options, then select Swap to switch
between the 2 calls.
Call Handsfree
During a call, press L Options and select Handsfree.
When the headset is plugged into the phone, you
cannot activate handsfree mode.
IP Dial (China & HK only)
You may select IP dial. When you select IP dial option,
the mobile phone will automatically add the IP special
service number preset by you in front of the phone
number and then make IP dial. You can also long
press
(
to activate IP dial.
When you have entered several IP special service
numbers, you will be prompted to verify them to avoid
adding them repeatedly.
Answer a call
Press ( to answer a call.
Reject a call
Press ) to reject a call.
Answer a second call (Network
dependent)
If you have activated Call waiting, you will be alerted
when there is a second incoming call. You can:
1. Press
(
to answer the second call. The current
call will be put on hold automatically.
2. Press
)
to reject the second call and continue
with your current call.
3. When there is one active call and one call on
hold, you can press
L
Options to carry out the
following operations:
• Swap • Establish
conference
call
• Handsfree
• Audio device
(if applicable)
• Mute • End held
calls
x-saber_master_en.book Page 16 Wednesday, November 14, 2007 12:42 PM
Page 18
Calling 17
If you press the numeric keys, the notepad editor will
open under call waiting mode.
Contact Picture
This feature allows you to link a contact in your
phonebook to a photo you have taken using the
Camera function, or a picture you have downloaded
via WAP or data cable. During a call, if the other
party's name card is linked to a picture, the incoming
call background will display the corresponding
picture. This feature is referred to as Contact picture.
Contact picture is only available on the phone memory.
The photo size should not be larger than 128 x 160
pixels.
• End active call • Send SMS • Record
• View contacts
X-Saber_02_Calling.fm Page 17 Wednesday, November 14, 20 07 3:03 PM
Page 19
18 Text and number entry
3. Text and number entry
Input method
Your mobile phone supports several input methods,
which include:
*During text editing, you can press
*
to switch
input mode; the status bar on the screen will display
your current input mode. represents
Simplified Chinese Pinyin input mode;
represents Simplified Chinese stroke input mode;
represents Traditional Chinese BoPoMo
input mode; represents Traditional Chinese
stroke input mode; 『en』 represents T9 English
input mode; 『abc』 represents English alphabets
input mode; 『123』represents numeric input mode.
In addition, you can press
#
to input punctuations.
The text editor remembers the last input method you
have used before you exit the editing screen. When
you access the editor again, it will automatically select
the last input method you have used.
Entering texts and numbers
You can input text in the editor using: T9 English
input, English alphabets, Pinyin, Simplified Chinese
Stroke or Traditional Chinese Stroke. In addition,
there are two input methods for you to enter numbers
and punctuations. The icon displayed on the screen
shows the current input method. You can press
*
to
switch from one mode to another. Long press to
activate or deactivate T9. Short press
#
to enter
punctuations or long press it to select input language.
• T9 Pinyin: Enter chinese characters with T9
Pinyin;
• T9 Stroke: Enter Chinese characters with T9
wubi and stroke components;
• T9 Traditional Chinese stroke: Enter
Traditional Chinese characters with Wubi or
stroke components;
• T9 English (T9eng/T9Eng): Enter English
text using T9 English;
• Multi-Tap (abc/Abc/ABC): Press the keys
that are marked with the corresponding letter
you wish to enter. Press once to get the first
letter on the key, press twice quickly to get the
second letter and so on until the letter you
want is displayed on the screen.
• 123: Enter numbers
This phone supports T9 Simplified Chinese
association input method as well.
x-saber_master_en.book Page 18 Wednesday, November 14, 2007 12:42 PM
Page 20
Text and number entry 19
Entering symbols
In any input mode, press # to open/close symbols
input screen. If the symbols occupy more than one
screen, press
+/-
to scroll up/down the pages. Press
,
to confirm the symbol input.
Shift case
Press * to shift case in the English input editor.
Delete
When there are contents in the input row, press
R
Clear to delete the rightmost character or symbol. The
candidate area will be updated accordingly until the
input row is cleared. Long press
R
Clear to clear the
input row.
When the input row is empty, press
R
Clear will
delete the character on the left of the cursor in the text
area. Long press
R
Clear to clear the contents in the
text area.
T9® English input
What is it?
T9® predictive Text Input is an intelligent editing
mode for messages, which includes a comprehensive
dictionary. It allows you to quickly enter text. You
need to press only once on the key corresponding to
each letter needed to spell a word: keystrokes input are
analysed and the word suggested by T9
®
is displayed
at the pop-up window. If there are more than 3
candidates, a scroll bar is shown, press
+ or -
to browse
the list and choose from those proposed by the T9
®
built-in dictionary (see example below). After you
have input the word, press
,
or L to confirm.
How to use it?
Alphabets and symbols represented by each key are as
follows:
0
to 9To input letters.
+
or -To br ows e t he l as t or ne xt c and id ate wo rd.
L
OK To confirm the letter or word.
R
Clear
Short press to clear a letter, long press to
clear all entries.
*
Shift case, select input mode. Long press
to turn on/off T9 feature.
#
Short press to activate/deactivate
punctuation mode, long press to select
input language.
x-saber_master_en.book Page 19 Wednesday, November 14, 2007 12:42 PM
Page 21
20 Text and number entry
Example: How to enter the word "Home"
1. Press
4 6°6 3
, the screen displays the first
word on the list: Good.
2. Press
-
to browse and select Home.
3. Press
L
OK to confirm Home.
Basic text input
If you wish to use basic text input mode, press * to
select "ABC" basic text input. This method requires
multiple key presses to reach the desired character: the
letter "h"is the second letter on the
4
key, so you
must press
4
twice to enter "h". Using this mode
requires you to press a key as many times as is equal to
the order of the letter.
To enter the word «Home» in basic text input mode,
you should therefore key
4, 4
(GHI) 6, 6,
6
(MNO), 6 (MNO), 3, 3 (DEF).
Letters, numbers and symbols are located on each key
as follows:
Key
Letters and numbers
1
Space 1 @ _ # = < > ( ) & £ $ ¥
2
a b c 2 à ä å æ ç
3
d e f 3 é è ∆ Φ
4
g h i 4 Γ ì
5
j k l 5 Λ
6
m n o 6 ñ ò ö ø
7
p q r s 7 β Π Θ Σ
8
t u v 8 ü ù
9
w x y z 9 Ω Ξ Ψ
0
Input space
*
Switch text input mode
#
Input symbol
x-saber_master_en.book Page 20 Wednesday, November 14, 2007 12:42 PM
Page 22
Text and number entry 21
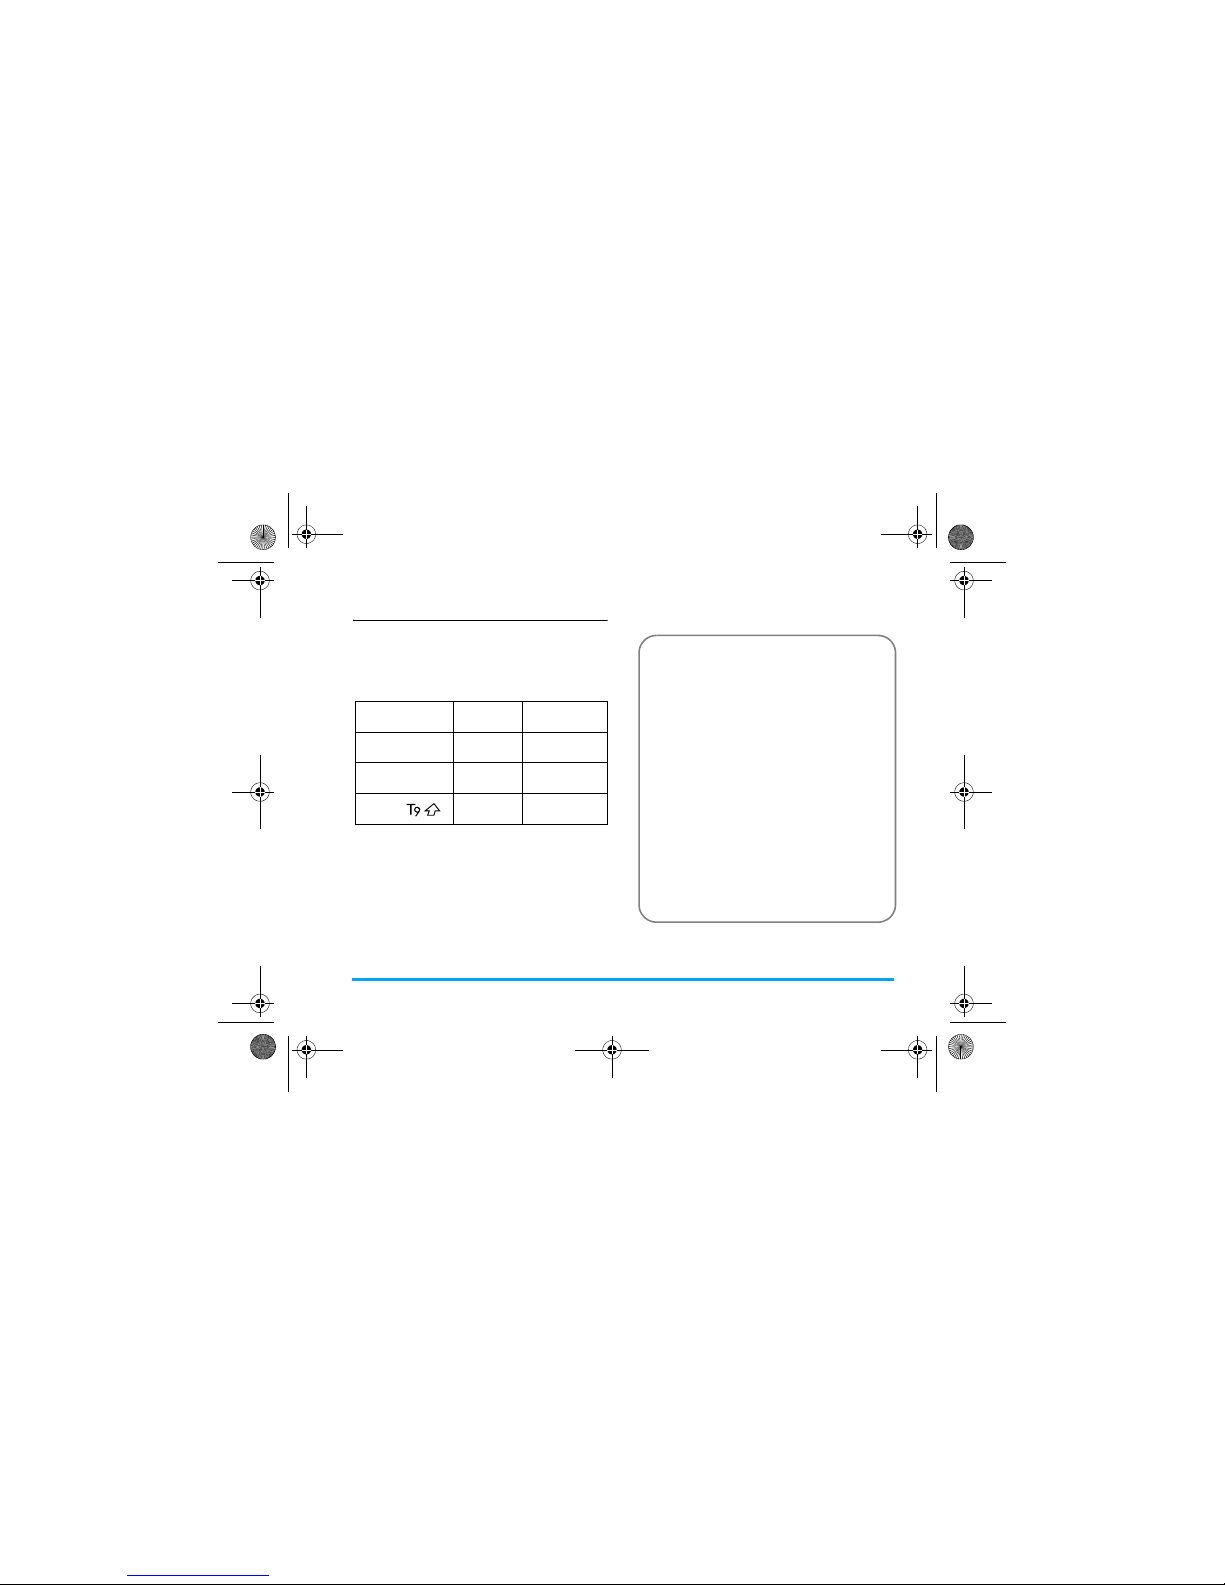
Pinyin Input
Press * and select Pinyin input mode. Each Pinyin
letter is represented by one of the numeric keys as
shown below: (Note that Pinyin input mode is solely
meant for the input of Simplified Chinese characters.
You cannot input Traditional Chinese characters).
The general steps of using Pinyin input method are as
follows:
12
ABC
3
DEF
4
GHI
5
JKL
6
MNO
7
PQRS
8
TUV
9
WXYZ
*
Mode
0#
Punctuation
1. Enter Pinyin letters
2
to
9
R
Clear
to clear
2. Select Pinyin combination
<
or
>
3. Confirm Pinyin combination,
4. Select from candidate list< or > /
+ or
-
(scroll list)
5. Confirm selection
,
6. Select and enter association character, or return to
step 1 to enter new words.
7. Or press
R
Back
to exit from association
character input mode, then press , to complete the
editing.
X-Saber_03_TextEntry.fm Page 21 Wednesday, November 14, 2007 3:06 PM
Page 23
22 Text and number entry
Enter the pinyin letters accordingly. Press once on the
key corresponding to the pinyin letter without having
to consider its position on the key. Pinyin input
method will automatically select and list all possible
combinations for you to select.
For example, to input the character
『王』 , with the
Pinyin letters
『wang』, press
9 2 6 4
and use
>
to select the desired pinyin combination for
『wang』 , then press
,
to confirm combination.
As soon as you have selected and entered a character,
the candidate list will be updated and a list of
association characters will be displayed. Press
<
or > to
select the desired association character and press
,
to
confirm entry. This speeds up the input process
further.
When you have finished editing a name on the
phonebook or SMS, press
R
Back to exit from
association character input mode and press
,
to
confirm completion of the editing process.
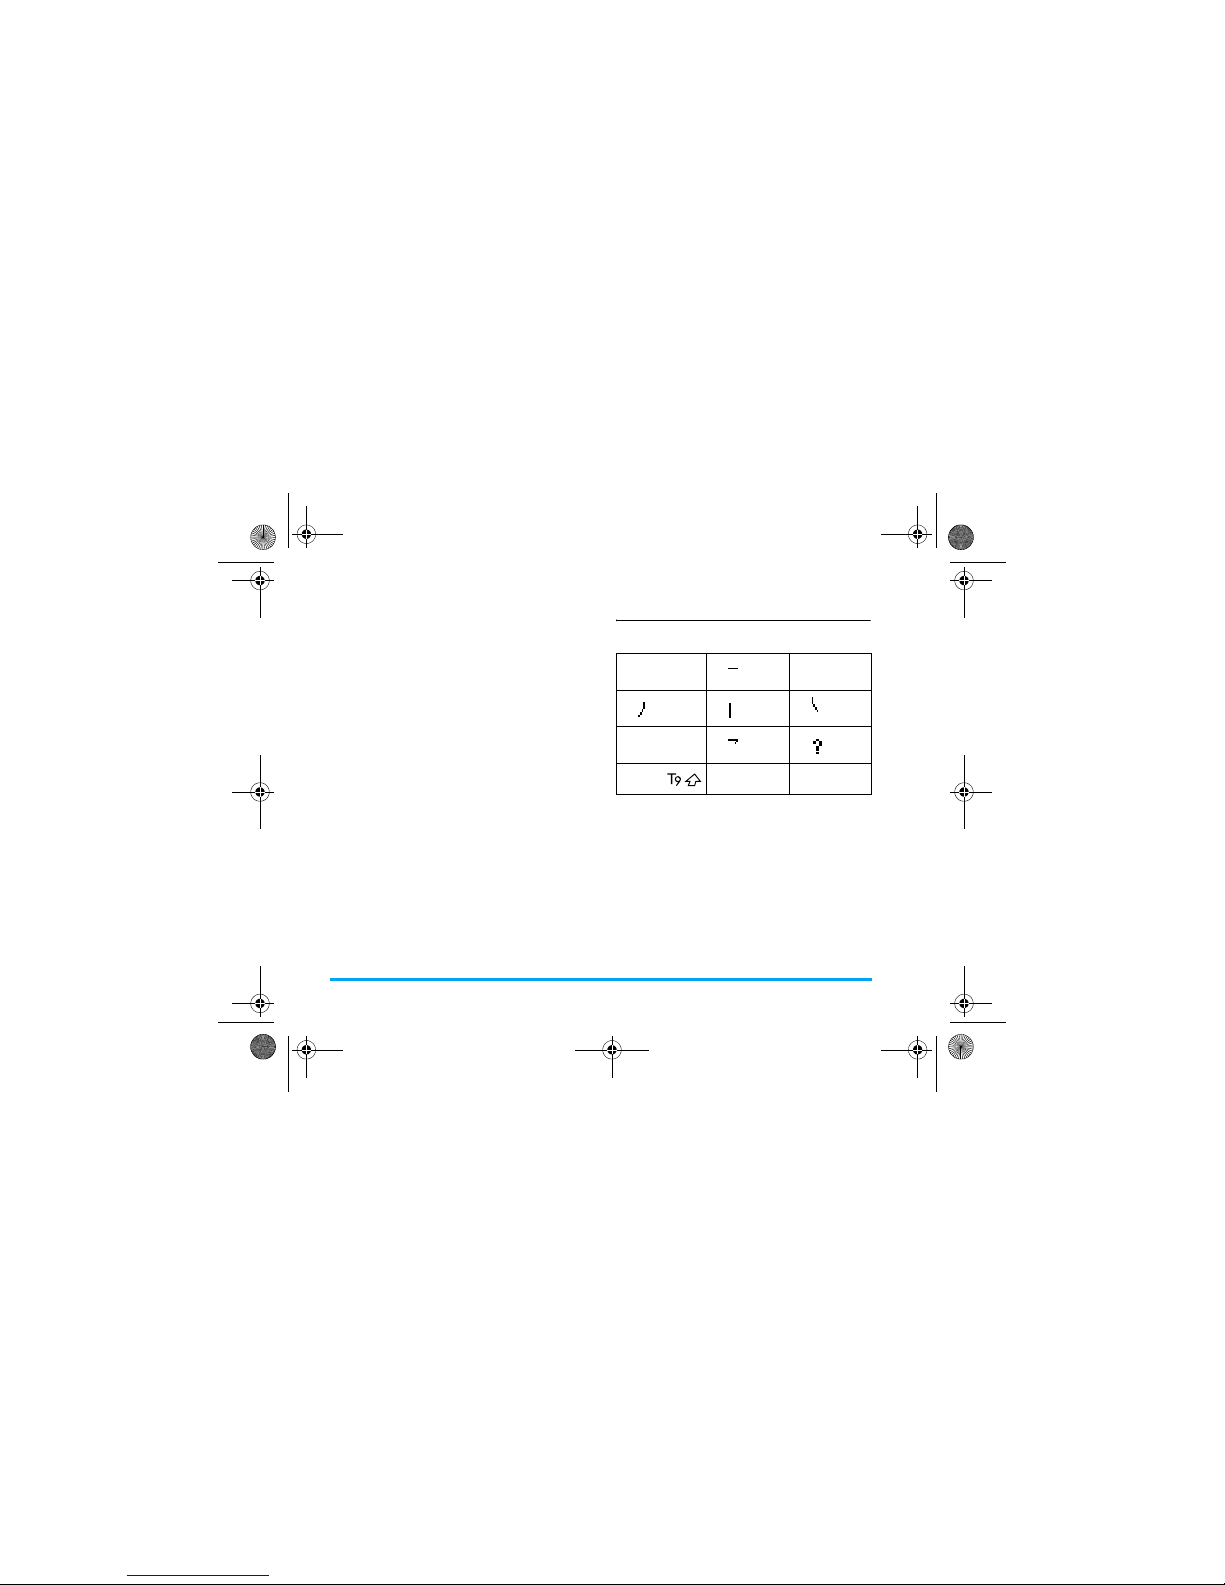
Stroke input
Press * to select stroke input mode. The strokes are
represented on each key as follows:
1
2
Horizontal
3
4
Left-falling5 Vert ic al
6
Right-falling
7
8
Over-
down
9
Special
*
Mode
0
#
Punctuation
x-saber_master_en.book Page 22 Wednesday, November 14, 2007 12:42 PM
Page 24
Text and number entry 23
The basic steps of Stroke input are as follows:
The principle of stroke input is to dissect and separate
every stroke of a chinese character according to
sequence. When you wish to input the character, press
the keys corresponding to the required strokes
according to sequence to get the desired character.
The stroke input method in this phone classifies a
chinese character into 5 basic strokes: (horizontal,
vertical, left falling stroke, right falling stroke and
over-down) as well as a special stroke. When the
stroke you need does not correspond to the 5 basic
strokes, replace it with the special stroke.
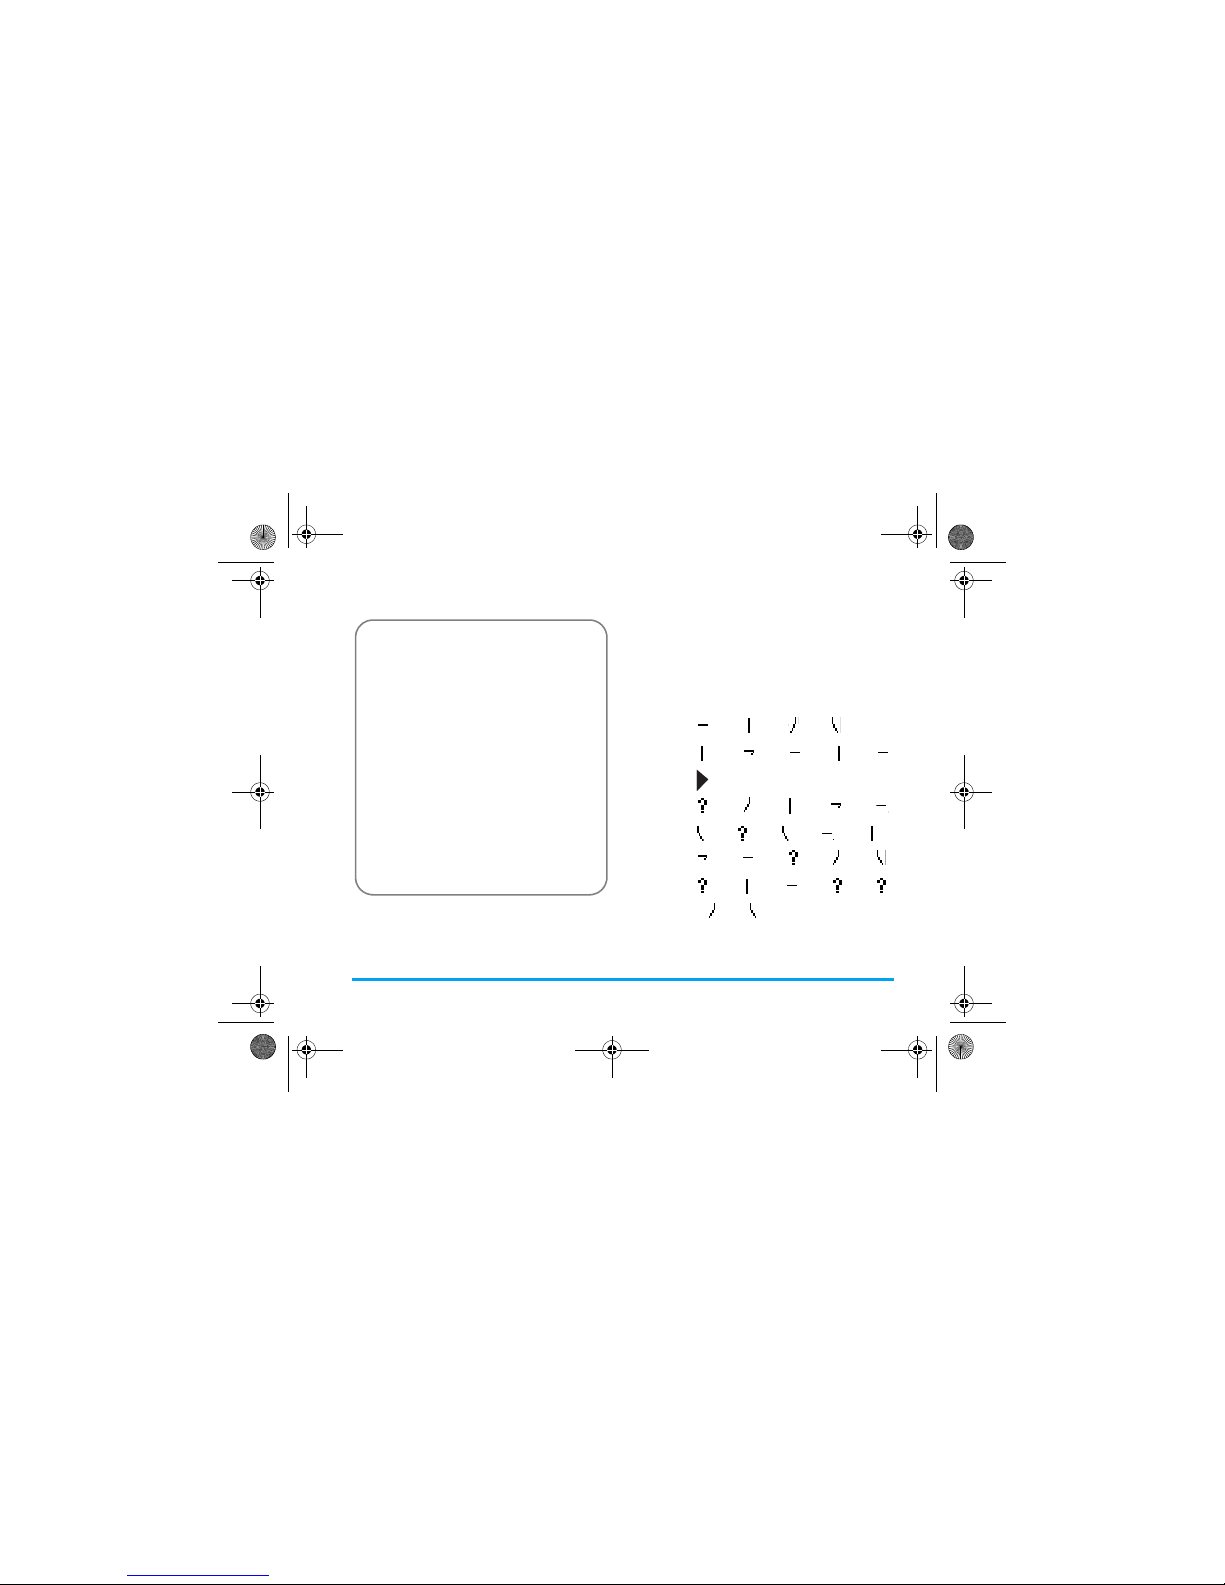
The examples below will give you a clearer
understanding of how to use stroke input method:
1.
木∶
2
+ 5 + 4 + 6
2.
田∶5
+ 8 + 2 + 5 + 2
+
3.
加∶
9
+ 4 + 5 + 8 + 2
4.
凉∶
6
+ 9 + 6 + 2 + 5
+
8
+
2 +
9 + 4
+ 6
5.
陈∶
9
+ 5 + 2 + 9 + 9
+
4 + 6
1. Enter strokes
2
to
9
(excluding 3 and
7) R
Clear
to
clear.
2. Select from candidate list
<
or > / + or
-
( scroll list)
3. Confirm selection
,
4.
Select and enter association character, or
return to step 1 to enter new strokes.
5. Or press
R
Back
to exit from association
character input mode, then press , to complete the
editing.
x-saber_master_en.book Page 23 Wednesday, November 14, 2007 12:42 PM
Page 25
24 Text and number entry
Generally, you will be able to find a desired character
before you finished entering all the strokes. After you
have entered the name of the phonebook or SMS,
press
R
Back to exit from the association character
list and press
,
to confirm completion of text editing.
The input mode for Traditional chinese stroke and
Simplified Chinese stroke are similar, with the
exception of the character coding.
x-saber_master_en.book Page 24 Wednesday, November 14, 2007 12:42 PM
Page 26
Entertainment 25
4. Entertainment
This section describes the games and additional tools
installed on your mobile phone.
Some of the features described here are dependent on
the configuration of your mobile phone, the country in
which you purchased your mobile phone, and/or your
service provider.
Games
Default games
This menu features games that are pre-installed in
your mobile phone. Press
,
to enter the main menu
from idle mode and select Entertainment > Games.
Java
Your mobile phone features a Java run-time
environment, which allows you to run Java
applications, such as games downloaded from the
network.
• Press Java > Launch to launch a new application
after you download it into the phone.
x-saber_master_en.book Page 25 Wednesday, November 14, 2007 12:42 PM
Page 27

26 Browser
5. Browser
Your phone comes with a WAP browser. You can
obtain news, sports and weather information, as well
as services from the internet via the WAP browser.
This feature is available only if your subscription
includes WAP access services. The settings have been
pre-configured (depends on country variants) and you
do not need to modify them. For more information,
please contact your network operator.
WAP
Normally, the phone would have been pre-configured.
If you wish to add or modify the configuration
parameters, you need to obtain the necessary
information from your network operator before you
proceed. Philips is not liable to give prior notification
nor shall it bear any consequences for any failures
arising from changes of configuration made by you or
by the network operator. Please check with your
network operator for the most updated information.
Homepage
Select this menu to access the homepage directly. You
can also set the homepage address in the settings
menu.
Bookmark
You can save the current web page or the web pages
that you frequently visit to the Bookmark list, manage
and organize them.
When you enter the menu, a list of bookmark entries
is displayed. To connect to the web address of a
particular bookmark entry, select an entry using
+
or
-
and press ,.
If there are no existing entries, you can select the
following options to add and manage your
bookmarks:
Add
bookmark
Edit the title and web address.
Manage
bookmarks
Delete or edit a bookmark entry.
x-saber_master_en.book Page 26 Wednesday, November 14, 2007 12:42 PM
Page 28
Browser 27
To add a new bookmark:
To edit a bookmark:
History
This menu allows you to manage, organize and
quickly access the last web page you have visited.
1. When you enter this menu, the last web page
you have previously visited will be shown.
2. Press
L
Options to access the following:
Enter address
Enter the web address and press L or , to connect,
press
R
Back to return to previous web page.
Settings
This menu allows you to configure the web settings
for web browsing. Your phone may have been preconfigured with the settings of a specific network
operator. If you are a subscriber of the network
operator, you may start using your WAP browser
immediately. Otherwise, you need to re-configure the
settings.
Go to Bookmark menu Press
,
to enter the
main menu from idle
mode and select Browser
> Bookmark.
Select Add Bookmark Press
,
.
Add a new bookmark Enter the Address and
Title of the new
bookmark and press
L
Save.
Go to Bookmark menu Press
,
to enter the
main menu from idle
mode and select Browser
> Bookmark.
Select Manage
bookmarks
Press
+
or - and press ,.
Select a bookmark you
wish to edit
Press + or - and press ,.
Select Edit Press
+
or - and press
L
Select.
Edit the bookmark Edit the Address and Title
of the bookmark and
press
L
Save.
Homepage Save as
Back Send as MMS
Refresh Save as homepage
Bookmark Exit
Enter address Setting
x-saber_master_en.book Page 27 Wednesday, November 14, 2007 12:42 PM
Page 29
28 Browser
Philips is not liable to give prior notification nor shall
it bear any consequences for failures arising from
changes in configuration made by you or by the
network operator, or changes in WAP address or
contents made by the internet content provider. Please
check with your network operator and your internet
content provider for the most updated information.
The following options are available:
Push Inbox
Allows you to check your Push messages and configure
your Push settings, such as select whether or not to
accept Push messages, delete push messages, etc.
Browser
options
Allows you to configure the browser
parameters, such as Show images,
Enable Refresh, etc.
Cache Allows you to set the Cache mode
and Clear cache.
Cookies Allows you to Enable cookies or Clear
cookies.
x-saber_master_en.book Page 28 Wednesday, November 14, 2007 12:42 PM
Page 30
Media Player 29
6. Media Player
Music Player
This feature allows you to download music from the
network, save the audio files, edit your playlist, and
play music. The phone supports audio files in MP3,
AAC and WMA format. However, only MP3 format
is supported with the bluetooth headset.
Tracks
This feature allows you to play downloaded music in
your Phone memory or Memory card. From the listed
tracks, use
+/-
to select the music file you want to play
and then press
L
Options.
Artists
A list of singer names is displayed on the screen. You
can press
+/-
to select a certain artist and press L or
,
to display all tracks of the selected artist.
From the listed tracks, use
+/-
to select the music file
you want to play and then press
L
Options.
Options Description
Open Open the music player to play the
selected track.
Add to
playlist
Open the playlist, select a playlist and
add the selected track to the playlist.
Delete track Delete the selected track.
Details View detailed information of the
selected track.
Options Description
Open Open the music player to play the
selected track.
Add to
playlist
Open the playlist, select a playlist
and add the selected track to the
playlist.
Delete track Delete the selected track.
Delete artist Delete all tracks of the same artist.
Details View detailed information of the
selected track.
x-saber_master_en.book Page 29 Wednesday, November 14, 2007 12:42 PM
Page 31
30 Media Player
Playlists
The stored playlists are displayed on the screen. To
create a new playlist, select New playlist. Enter the
playlist name and press
,
. Then use +/- to select a
playlist, press
,
, and then press L Options, select
Edit playlist and select the tracks that you want to add
to the playlist by pressing
,
. You can press +/- to
move up or down. Then press
L
Done to confirm
and store the songs in the playlist.
You can create up to 10 playlist. The available options
include:
Last played
List the last 10 tracks you have played, and the last
played track is displayed at the top of the list.
Now playing
The screen displays the last played song. This function
enables you to go on playing the last playlist you were
listening to.
Keys operation
The keypad operations during music playback are as
follows:
Options Description
Open Open the music player to play the
currently selected file.
Edit playlist Edit the playlist.
Rename
playlist
Modify the playlist name.
Delete
playlist
Delete the current playlist.
Tracks
sequence
Modify the play sequence of the
current playlist.
Details View detailed information of the
selected file.
Key Operation
,
key Short press to Start/Pause/resume
music playback.
Long press to stop playback.
<
or
>
Short press to select the previous
song/next song. Long press to fast
rewind/fast forward the track during
playback.
+ or side key
Adjust volume. Once you have set
the volume, the settings will be
saved until the next time you adjust
it again.
x-saber_master_en.book Page 30 Wednesday, November 14, 2007 12:42 PM
Page 32
Media Player 31
Press L Options to carry out the following
operations:
Settings
The available options include:
L
Options Open options menu.
R
Stop Stop playback.
R
Back Return to previous menu.
Play/Pause Play/Pause the selected audio file.
Add to
playlist
Open the playlist, select a playlist
and add the selected file to the
playlist.
Play mode Shuffle: On or Off
Repeat: None, Repeat Single or
Repeat playlist.
Equalizer Select Bass boost, Dance, Hip-hop,
Pop, R&B or Rock.
3D surround To activate the 3D surround sound
(only available on applicable audio
device).
Detail Display detailed information of the
selected audio file.
Flip exit Select On or Off (default). If you
select On, once you close the flip,
you will exit from the music player.
Options Description
Equalizer Select Bass boost, Dance, Hip-hop,
Pop, R&B or Rock.
3D surround To activate the 3D surround sound
(only available on applicable audio
device).
Play mode Shuffle: On or Off
Repeat: None, Repeat Single or
Repeat playlist.
Help Display descriptions on how to use
the music player.
Refresh list All tracks stored in the phone
memory and the memory Card will
be refreshed.
x-saber_master_en.book Page 31 Wednesday, November 14, 2007 12:42 PM
Page 33
32 Media Player
x-saber_master_en.book Page 32 Wednesday, November 14, 2007 12:42 PM
Page 34
Camera 33
7. Camera
Your mobile phone features a digital camera that
allows you to take pictures and record videos, store
them in your phone and memory card, use them as
wallpaper or send them to your friends.
Please ensure that the camera lens is clean before you
take pictures, as small dust particles can strongly affect
the picture quality.
Camera mode
Consult the table below on how to carry out some
common operations with your camera.
How to ...
At any point in time, you can press ) key to
cancel the current operation and return to idle
mode.
Camera option menu
When the camera mode is activated and before a
picture is taken, you can change a number of settings
by pressing
L
Options.
Launch Camera Press
,
to enter the main
menu from idle mode and
select Camera.
Zoom in/out Press
</>
.
Only available for picture
resolution of 480*640 at x1.6,
and 176*220 at x1.9.
Adjust brightness Press +/-.
Brightness level is -3 to +3.
Default level is 0.
Take a picture Press
,
.
The picture will be
automatically saved and stored
in My Files > Pictures.
Exit from Camera
and return to idle
mode
Press
)
key or R Back
twice.
Options Description
Switch to
video
Exi t fr om C amer a mod e an d swi tch to
Video mode.
Picture
resolution
Select image size: 1280x1024,
768x1024, 480x640 and 176x220.
x-saber_master_en.book Page 33 Wednesday, November 14, 2007 12:42 PM
Page 35

34 Camera
Photo preview option menu
Once you have activated the camera, simply press
,
to take a picture. The picture is automatically saved
and displayed on the screen. You can press
L
Options to carry out the following operations:
When there is not enough memory space, you will not
be able to save the picture and you will be prompted
wtih a warning message. You have to delete existing
pictures before you can store new ones.
Picture
Quality
Select image quality: Super fine, Fine
and Normal.
The last selected value will remain
active until you change it again.
View
picture
Enter My Files > Pictures to view the
pictures taken.
Mode Color effect: Off (default), B & W,
Sepia or Blue.
The selected color effect will be
displayed on the screen in real time.
Night mode: On or Off
Self-timer: On or Off
The time limit is 8 seconds.
Multishot: On or Off
Three pictures can be taken at the
same time.
Advanced Storage location: Phone memory or
Memory card
Default name: modify the default
name of the photo
Anti-flicker: 50HZ or 60HZ
Options Description
Send Send the picture:
Via Bluetooth or Via MMS.
Delete Delete the current picture.
Capture Return to the viewfinder screen to take
a new picture.
Set as
contact
picture
Link the picture to a contact in your
mobile phone so that the picture will be
displayed when the contact calls you.
Available for picture resolution of 176
x 220 only.
Set as
wallpaper
Set the picture as a wallpaper in idle
screen.
x-saber_master_en.book Page 34 Wednesday, November 14, 2007 12:42 PM
Page 36
Camera 35
Video recorder
This option allows you to record short videos. You
can play the video, store it in your phone or in the
memory card. You can also send the video to your
friends via MMS or Bluetooth.
How to ...
Video option menu
When the video mode is activated and before you start
recording, you can change a number of settings by
pressing
L
Options.
Launch Video Camera Press
,
to enter the main
menu in idle mode, select
Camera
and press
>
to
shift to the video recorder
tab.
Zoom in/out Press
</>
.
Adjust brightness Press +/-.
Brightness level is -3 to
+3. Default level is 0.
Record a video Press
,
key once. Press
again to stop recording.
The video will be
automatically saved and
stored in My Files >
Videos.
Exit from Video mode
and return to idle
mode
Press
)
key or
R
Back twice.
Options Description
Switch to
camera
Exit from Video mode and switch
to Camera mode.
Video Quality Select video quality: Fine or Normal
The last selected value will remain
active until you change it again.
View
videos
Enter My Files > Videos to view the
recorded videos.
Mode Color effect: Off (default), B & W,
Sepia or Blue
The selected color efffect will be
displayed on the screen.
Video format: MPEG-4 or H263
FPS: 5, 10 or 15 frame per second
x-saber_master_en.book Page 35 Wednesday, November 14, 2007 12:42 PM
Page 37
36 Camera
Video Playback
Once you have activated the video mode, simply press
,
to start recording. Press again to stop recording.
The video is automatically saved and the last recorded
scene is displayed on the screen. You can press
L
Options to carry out the following operations:
Advanced Storage location: Phone memory or
Memory card
Default name: modify the default
name of the video
Mute: On or Off
If you select On, sound will not be
recorded.
Video length: MMS (default) or
Unlimited.
If you select MMS, the size of the
recorded video will be smaller than
the currently specified maximum
MMS size. Recording will stop
when reaching the maximum
MMS size and the video will be
stored automatically. If you select
Unlimited, there will be no
restrictions on the size of the
recorded video. The maximum size
shall be determined by the memory
capacity of your mobile phone or
the memory card.
Options Description
Playback Play the recorded video.
During playback, you can:
Pause playback by pressing
,
Pause
or
L
Full to enlarge the display
screen.
Resume playback by pressing
,
or
L
Play.
Adjust volume by pressing +/-.
Fast rewind by pressing and holding
<
.
Fast forward by pressing and holding
>
.
Go to previous menu level by pressing
R
.
Return to idle screen by pressing
)
.
Send Send the recorded video:
Via Bluetooth and Via MMS.
Delete Delete the recorded video.
x-saber_master_en.book Page 36 Wednesday, November 14, 2007 12:42 PM
Page 38
Camera 37
When there is not enough memory space, you will not
be able to save the recorded video and you will be
prompted wtih a warning message.
Record new Return to video mode to record a new
video clip.
x-saber_master_en.book Page 37 Wednesday, November 14, 2007 12:42 PM
Page 39
38 Messages
8. Messages
SMS
SMS enables you to send text messages to the other
party, which is a convenient and affordable mode of
communication. You can use the SMS menu to send
messages to another handphone or a device that is
capable of receiving SMS.
Your phone can store up to 1000 messages. Once you
have reached 1000 messages, the screen will flash an
icon to alert you. You need to delete some messages in
order to receive new ones.
Create, edit and send SMS
You need to enter the correct message centre number
before you can send SMS. The number can be
obtained from your network operator.
1. In idle mode, press
,
to enter the main menu.
2. Select Messages > Create Message > SMS and
press
,
. The SMS editing screen will appear.
3. Enter the SMS content in the SMS editor and
press
L
Options to carry out the following
operations:
If your SMS is not sent successfully, you can resend it.
If your SMS cannot be sent successfully after several
attempts, please check if your SMS centre number has
been set correctly.
When editing SMS, for certain reasons (such as an
incoming call, out of battery), you are forced to exit
from the SMS editing screen before you managed to
send or save your message successfully, the edited
message will be saved automatically. The next time
you enter the SMS editor, the message will be
displayed on the screen.
Continue Enter the phone number of the
recipient by selecting Phone number.
You can also select it from Contacts
list or Groups. Press
,
to send the
SMS.
Save as
draft
Save the SMS as draft.
Save as
template
Save the SMS as template.
x-saber_master_en.book Page 38 Wednesday, November 14, 2007 12:42 PM
Page 40
Messages 39
MMS (network dependent)
Your phone allows you to send and receive
multimedia messages, known as MMS, which features
texts, pictures, sound and video clips. MMS can
comprise one or several slides. Whether you send it to
an e-mail address or to another mobile phone, the
MMS will be played as a slide show.
Your phone can support 50 MMS (maximum
100KB). When the maximum of 50 MMS is reached,
the screen will display a MMS icon to alert you. You
will need to delete some old MMS in order to receive
new ones.
Before you can send MMS, you need to enter the
correct MMS Center number and ensure that the
network profile of your MMS has been correctly
configured. You can obtain such information from
your network operator.
Create, edit and send MMS
1. In idle mode, press , to enter the main menu.
2. Select Messages > Create Message > MMS and
press
,
. The MMS editing screen will appear.
3. Enter the MMS content in the MMS editor and
press
L
Options to carry out the following
operations:
Continue Enter details for the MMS:
To: Select
L
Add to enter the phone
number of the recipient, you can
select it from Contacts or Groups list.
Subject: Enter a subject for the
message.
Cc: Send a courtesy copy to other
recipients.
Bcc: Send a blind courtesy copy to
other recipients.
Insert
object
Insert picture, video, melody, page or
object.
Only a picture, a melody and a video
can be inserted on one page. If 3 of
them exist at the same time, only one
can be saved.
Change
object
It appears after you have inserted
objects. You can change these inserted
objects.
Remove
object
Delete inserted objects.
x-saber_master_en.book Page 39 Wednesday, November 14, 2007 12:42 PM
Page 41
40 Messages
When there is more than one page, you can press </> to
view the different pages of the MMS. At the same
time, the title bar at the top of the screen will display
the current page you are viewing and the total number
of pages in your MMS.
Inbox
The Inbox stores the messages you have received.
1. In idle mode, press
,
to enter the main menu.
2. Select Messages > Inbox and press
,
.
3. If there are messages in the Inbox, they will be
listed on the screen in the order they were
received (the most recent message will appear at
the top of the list).
4. Press
+/-
to select a message. When a message is
selected, its contents will be displayed on the
screen. Press
L
Options to carry out the
following operations:
Preview Preview the current MMS.
Page timing Set play time of the MMS slides. The
default value is 3 seconds.
Save as
draft
Save the MMS as Draft.
Save to
template
Save the MMS as Templates.
View View the selected message.
Reply The sender's number will be used as
the destination number automatically
and the message editor will be
activated. Enter your reply and send
the message.
Forward When you select Forward, the
contents of the selected message will
appear in the message editor. You
may edit the message before sending.
Delete Delete the message from the Inbox.
Delete all Delete all the messages in the Inbox.
Archive to
SIM
Add the selected message to the SIM
card.
Move to my
favourite
Move the selected message to My
Favourites.
Details View information of the message
such as date, time and sender.
x-saber_master_en.book Page 40 Wednesday, November 14, 2007 12:42 PM
Page 42
Messages 41
5. Press , to enter the next screen whereby the
message details will be displayed. Press
L
Options to carry out the following operations:
Outbox
The Outbox allows you to save the messages you have
sent successfully and which you have chosen to save
before sending.
1. In idle mode, press
,
to enter the main menu.
2. Select Messages > Outbox and press
,
.
3. If there are messages in the Outbox, they will be
listed on the screen.
Dial Extract the sender's number from
the message and dial the number.
Select
multiple
You can select several messages one
by one or all at once. You can press
,
to select/cancel the operations on
multiple messages. Checkboxes will
be marked on the left of the selected
message. Press
L
Options to delete
the selected messages, or you can
move them to My Favourites.
Reply The sender's number will be used as
the destination number automatically
and you can select reply by SMS or
MMS. Enter your reply in the edit or
and send the message.
Forward When you select Forward, the
contents of the selected message will
appear in the message editor. You
may edit the message before sending.
Delete Delete the message from the Inbox.
Extract
numbers
Opens the list of numbers available
in the message. In this list, the
L
option opens a pop-up window
showing the following options:
• Save
• Dial
• Send message
Archive to
SIM
Add the selected message to the SIM
card.
Move to my
favourite
Move the selected message to My
Favourites.
Details View information of the message
such as date, time and sender.
Dial Extract the sender's number from
the message and dial the number.
x-saber_master_en.book Page 41 Wednesday, November 14, 2007 12:42 PM
Page 43
42 Messages
4. Press +/- to select a message. When a message is
selected, its contents will be displayed on the
screen. When you press
L
Options, you can
carry out the following operations:
5. Press
,
to enter the next screen whereby the
details will be displayed.
My favourites
This menu contains all the messages received and saved
in the phone memory via Move to my f avour ite option.
1. In idle mode, press
,
to enter the main menu.
2. Select Messages > My Favourites and press ,.
3. If there are messages in My Favourites, they will
be listed on the screen.
4. Press
+/-
to select a message. When a message is
selected, its content will be displayed on the
screen. Press
L
Options to carry out the
following operations:
View View the selected message.
Resend Resend the message to the recipient.
Forward When you select Forward, the contents
of the selected message will appear on
the message editor. You may edit the
message before sending.
Delete Delete the message from the Outbox.
Delete all Delete all the messages in Outbox.
Details View information of the message such
as date and time.
Select
multiple
You can select several messages one by
one or all at once. You can press
,
to
select/cancel the operations on
multiple messages. Checkboxes will be
marked on the left of the selected
message. Press
L
Options to delete
the selected messages, or you can move
them to My Favourites.
Resend Resend the message to the recipient.
Forward When you select Forward, the contents
of the selected message will appear on
the message editor. You may edit the
message before sending.
Delete Delete the message from the Outbox.
Details View information of the message such
as date and time.
x-saber_master_en.book Page 42 Wednesday, November 14, 2007 12:42 PM
Page 44
Messages 43
5. Press , to enter the next screen whereby the
details will be displayed. Press
L
Options to
carry out the following operations:
Draft
List the messages that were created and saved but were
not sent, and messages that were automatically saved
before you were able to save or send them when you
exit from the message editor.
View View the selected message.
Reply The s ender' s numb er wil l be use d as th e
destination number automatically and
the message editor will be activated.
Enter your reply and send the message.
Forward When you select Forward, the contents
of the selected message will appear in
the message editor. You may edit the
message before sending.
Delete Delete the message from My Favourites.
Delete all Delete all the messages in My Favourites.
Details View information of the message such
as date, time and sender.
Dial Extract the sender's number from the
message and dial the number.
Select
multiple
You can select several messages one by
one or all at once. You can press
,
to
select/cancel the operations on multiple
messages. Checkboxes will be marked on
the left of the selected message. Press
L
Options to delete the selected
messages.
Reply The sender's number will be used as the
destination number automatically and
the message editor will be activated.
Enter your reply and send the message.
Forward When you select Forward, the contents
of the selected message will appear in
the message editor. You may edit the
message before sending.
Delete Delete the message from My Favourites.
Details View information of the message
such as date, time and sender.
Dial Extract the sender's number from the
message and dial the number.
x-saber_master_en.book Page 43 Wednesday, November 14, 2007 12:42 PM
Page 45
44 Messages
Select a message from the Draft box and press
L
Options to: View, Send, Edit, Delete, Delete all, Details,
Select multiple. If you select View, the subsequent
procedures would be similar to the Inbox operations.
SIM archive
In the menu, you can see the read and unread
messages saved in the SIM Card. The available
options include:
Templates
If you have save message as a template in create MMS,
this menu allows you to send, modify and delete your
preset messages.
Voice mail
This menu allows you to set your voice mailbox
number and listen to voice messages your
correspondents have left for you.
You can forward your calls to your voice mailbox (the
phone number for callers to leave a message) via the
Call forwarding feature.
Call voice mail
When you receive a voice mail, the phone will send
you an alert. You can then call your voice mailbox
number to retrieve your voice mail.
Options Description
View Open the current message and view
the detailed contents of the message.
Reply Reply the message.
Forward Forward the message to other recipients.
Delete Delete the message.
Delete all Delete all messages.
Details View information of the message,
such as date, time and sender, etc.
Dial Call the sender of the message.
Select
mutiple
You can press
,
to select/cancel the
operations on multiple messages.
Checkboxes will be marked on the left
of the selected message. You can
delete the selected messages.
x-saber_master_en.book Page 44 Wednesday, November 14, 2007 12:42 PM
Page 46
Messages 45
In idle mode, long press 1 to call your voice mailbox
directly. If the number is empty, you will be prompted
to enter the number.
Voice mail number
Generally, you can obtain two sets of numbers from
your network provider:
• number for the caller to leave a message (this
number can also used for Call Forwarding)
• number for you to retrieve your voice messages
Cell broadcast
This is a network service which allows you to receive
text messages of various contents, such as news, traffic,
etc. These messages are provided by the network to
the subscribers within a certain network area. If this
service is available, the network will provide you with
the broadcast channel numbers. It gives you access to
the options listed below.
Reception
You can set the reception of broadcast messsages On or
Off. If you select Off, you will not receive any
broadcast messages, even if you have set the
corresponding channel numbers.
When you received a broadcast message, the message
content will be displayed on the screen until you press
R
Back. Broadcast messages will not be saved on your
mobile phone or your SIM card. Once you exit from
the mes sage scr een, you will not b e ab le to rea d it a gai n.
To obtain the codes corresponding to the different
types, you must contact your operator.
Message Settings
SMS
Select Messages > Settings > SMS to open the list of
SMS accounts. Press
L
Options > Edit to edit the
SMS settings:
Options Description
Reception Select to turn on/off the reception of
new cell broadcast messages.
Topics Add, change or delete channels.
<Add new>: Press
L
Add to add a new
channel.
Change: Edit a channel number.
Delete: Delete a channel in the channel
list.
x-saber_master_en.book Page 45 Wednesday, November 14, 2007 12:42 PM
Page 47
46 Messages
Service center number
This menu allows you to save and edit the SMS service
center number of your home network. If the service
center number is empty, you will not be able to send
any SMS.
Validity period
Allows you to select the duration by which your
messages will be stored in the service center. You can
select from: 1 hour, 12 hours, 1 day, 1 week and
Maximum (default). Press
+
/ - to select a value.
This option is useful when your recipient is not
connected to the network and is not able to receive
your messages immediately.
This feature is subscription dependent.
Delivery report
You can select
L
On or Off. This option allows you
to set whether or not to notify you the send status of
your messages: successfully sent to the recipient, or
not sent successfully.
This feature is subscription dependent.
Signature
You can select
L
On or Off (Default is Off). If set to
On, it opens an editor where you can enter your
signature. The signature will be added to the end of
your message before it is sent to your recipient.
If the SMS is too long after adding the signature, the
signature will be ignored.
Storage location
You can press
L
Change to select the preferred
storage location of your messages: SIM card (Default)
or Mobile phone.
MMS
This menu allows you to set your MMS center and
personalize your MMS settings. The options include:
Profiles
You can select or edit the parameters.
Sender visibility
You can press
L
Change to set this option On or off.
It is used to set if your identity will be visible when
MMS is sent.
Priority
This option allows you to set the priority level of your
MMS. You can set Low, Normal (default) or High.
Delivery report
You can press
L
Change to set this option On or off.
When set to On, a report will be sent to notify you if
the MMS has been delivered to the recipient.
x-saber_master_en.book Page 46 Wednesday, November 14, 2007 12:42 PM
Page 48
Messages 47
Read report
You can press
L
Change to set this option On or off.
When set to On, a report will be sent to notify you if
the MMS has been read by the recipient.
Expiry time
Allows you to select the duration by which your MMS
will be stored in the MMS center. You can choose
from 6 hours, 12 hours, 1 day, 1 week or Maximum
(default).
Retrieval
Allows you to select Automatic, Deferred, Auto in home
network when downloading of MMS messages.
x-saber_master_en.book Page 47 Wednesday, November 14, 2007 12:42 PM
Page 49
48 My Files
9. My Files
This menu allows you to store the files in different
folders (Pictures, Videos, Sounds, Others) to facilitate
more efficient management of files in your phone and
the memory card. In addition, you can obtain
information regarding your phone and memory card,
such as number of files, memory utilised, percentage of
memory utilised via the Memory status option.
Pictures
When you enter this menu, the photos which you
have taken using the phone's camera as well as
pictures you have downloaded via MMS, WAP, BT
or USB will be displayed in a list.
1. Select My files > Pictures and press
,
to enter the
menu.
2. Press
L
Options to carry out the following
operations to a selected file:
Options Description
View View the picture in full screen.
Send Send the selected file: Via bluetooth
and Via MMS.
Advanced Copy: Copy the selected file to
another folder.
Cut: Similar to copy, but the original
file will be deleted.
Rename: Modify the name of the
selected file.
Details: Display detailed information
of the selected photo, such as last
modified date, file size, etc.
Add frame: Add a photo frame to the
selected picture by pressing
</>
.
Available only when the picture size is
176*220.
Use As contact ID: If you select this option,
the phonebook list will be displayed.
After you have selected a contact from
the phonebook, press
L
Select to
associate the picture to the selected
contact.
Only available for picture of 176*220
or smaller.
x-saber_master_en.book Page 48 Wednesday, November 14, 2007 12:42 PM
Page 50

My Files 49
3. The folder options include:
Videos
When you enter this menu, the videos which you have
recorded using the phone's camera as well as videos
you have downloaded via MMS, WAP, BT or USB
will be displayed as a list.
1. Select My files > Videos and press
,
to enter the
menu.
2. Press
L
Options to carry out the following
operations to a selected file:
As wallpaper: If the selected photo is
176*220 or smaller, it will be
displayed as wallpaper in its original
siz e. I f it is la rger tha n 176 *22 0, it wil l
be re-sized accordingly.
Delete Delete the selected picture.
Slide show If you select this option, the screen
will display the full screen view of all
the pictures in the form of slideshow
every 4 seconds. Press any key to exit
from the slide show mode.
Change
view
You can select to view the pictures in
List view, Grid view or Full screen.
Sort Sort the pictures and folders by name,
date, or size.
Select
multiple
Select one by one: select the picture
one by one and then Cut, Copy or
Delete them.
Select all: select all the pictures and
then Cut, Copy or Delete them.
Open Browse the selected folder.
Advanced Rename: Modify the name of the
selected folder.
Details: View detailed information of
the selected folder.
Delete Delete the selected folder.
Change
view
Select List view or Grid view.
Sort Sort the pictures and folders by name
or date.
x-saber_master_en.book Page 49 Wednesday, November 14, 2007 12:42 PM
Page 51
50 My Files
3. The folder options and their operations are the
same as Pictures menu.
Videos are played in the middle of the screen. A status
bar is displayed at the top of the screen. The keypad
operations when playing videos are as follows:
Sounds
When you enter this menu, the sounds which you
have stored or downloaded via MMS, WAP, BT or
USB will be displayed in a list.
1. Select My files > Sounds and press
,
to enter the
menu.
2. P res s
L
Options to carry out the following
operations to a selected file:
Options Description
Play/Pause Play the selected video.
Send Send the selected file: Via Infrared, Via
bluetooth and Via MMS.
Advanced Copy: Copy the selected file to
another folder.
Cut: Similar to copy, but the original
file will be deleted.
Rename: Modify the name of the
selected file.
Details: Display detailed information
of the selected video, such as last
modified date, file size, etc.
Delete Delete the selected video.
Change
view
You can select to view the video files
in List view, Grid view.
Sort Sort the videos and folders by name,
date, or size.
Select
multiple
Select one by one: select the videos one
by one and then Cut, Copy or Delete
them.
Select all: select all the videos and then
Cut, Copy or Delete them.
Key Operation
,
Start/pause playback.
L
Full screen mode.
<
Long press to rewind.
>
Long press to fast forward.
R
Exit/return to an upper menu level.
)
Return to idle screen.
x-saber_master_en.book Page 50 Wednesday, November 14, 2007 12:42 PM
Page 52
My Files 51
3. The folder options and their operations are the
same as Pictures menu.
Memory status
All memory capacity, used memory capacity and free
memory capacity between all memory capacity and
used in both the mobile phone and memory card will
be displayed.
Settings
The phone has a micro SD memory card slot to
increase the phone's memory. The phone supports
FAT16 and FAT32 format micro SD cards up to
2GB. Go to Memory card tab > Settings to uninstall
or format the memory card.
Memory card
The phone has a micro SD memory card slot to
increase the phone's memory. The phone supports
FAT16 and FAT32 format micro SD cards up to
2GB. You can uninstall or format the memory card.
Play Play the selected audio file.
Send The available options are: Via
bluetooth and Via MMS.
Advanced Copy: Copy the selected file to
another folder
Cut: Similar to copy, but the original
file will be deleted
Rename: Modify the name of the
selected file
Details: Display detailed information
of the selected audio file, such as last
modified date, file size, etc.
Use You can set the audio file: As
incoming call ringtone or As Contact
ID.
Delete Delete the selected audio file.
Change view Select List view or Grid view.
Sort Sort the audios and folders by name
or date.
Select
multiple
Select one by one: select the audio
files one by one and then Cut, Copy
or Delete them.
Select all: select all the audio files and
then Cut, Copy or Delete them.
x-saber_master_en.book Page 51 Wednesday, November 14, 2007 12:42 PM
Page 53
52 Tools
10. Tools
Calendar
This menu displays the calendar. You can select Day
view, Week view or Month view. You can create new
appointments, view appointments list, delete or
modify appointments in the calendar. The calendar
stores the alarm date and time of every event. If the
current date and time correspond with the date and
time of the event, the phone will emit an alarm (if
needed), and the screen will display a prompt to
indicate that a new event has arrived.
You can create a maximum of 30 events. The list will
display part of the contents. Once you have selected
an event, you can press
,
to view the detailed
information.
1. Enter the menu.
2. The options include: View day, View Week, New
event, Go to date, Advanced.
Add new event
The list of events will be displayed. When you add a
new event, you need to enter the corresponding
information of the event, such as subject, location,
start date, start time, end date, end time, reminder
and repeat method.
If the memory space for events is full, the phone will
prompt you that there is no more space.
When editing date and time, the phone will display
the default or the selected date and time. You can
edit or confirm them directly.
The maximum length of an event is 40 characters.
Alert type
No reminder, On time, 5 min. before, 15 min. before,
1 hour before, 1 day before and other (the reminder
time can be set by you).
Repeat method
The phone provides the following repeat methods:
Once, Daily, Weekly, Monthly and Annually.
Whe n you c hang e the d ate an d tim e of yo ur pho ne, t he
next alert will be repeated based on the modified date
and time of the phone.
When you switched off the phone, the organizer alert will
be postponed until the next time you switch on the phone.
For repeated events, only the latest one will be alerted.
x-saber_master_en.book Page 52 Wednesday, November 14, 2007 12:42 PM
Page 54
Tools 53
Alarm
This phone supports 24-hour alarm.
The available options are:
If you have downloaded your own ring tones and have
selected such a ring tone to be the alarm alert, then
after you set the alarm and switched off the phone, the
alert tone will be changed back to the original factory
settings. This does not apply if the ring tone you have
chosen is one that comes as default with your phone.
Calculator
Your mobile phone has a built in calculator. Enter the
numbers with the keypad.
The maximum length of the numbers and the result is
10 digits. The result of the calculator is indicative.
Options Description
Simple
alarm
A simple alarm rings only once. Set the
alarm status to On or Off by pressing
L
Change. When set to On, you need
to specify the alarm time and press
,
or L OK to confirm.
Reccurent
alarm
A recurrent alarm rings according to
the day you specify in a week. For
example, if you press
,
to select
Sunday and Monday, the alarm clock
will ring every Sunday and Monday.
Alarm tone Select an alarm tone.
Snooze Select On or Off.
Options Description
+
Addition
-
Subtraction
>
Multiplication
<
Division
,
or L
Options >
Calculate
Equals.
*
To toggle between negative and
positive figures.
L
Options
> %
Add a percentage symbol.
L
Options
> Modular
Calculate a remainders of a division.
#
Add a decimal point.
x-saber_master_en.book Page 53 Wednesday, November 14, 2007 12:42 PM
Page 55
54 Tools
Voice recorder
This menu allows you to record a voice memo.
From the main menu, select Tools > Voice recorder.
To start recording, press
L
Option and select New
episode or
,
. During the process, the recorded time
will be displayed in real time. To stop recording, press
R
and the file will be saved in My files > Sounds.
International clock
The International clock allows you to check the time
of the major cities of the world. You can activate or
deactivate the clock display in the Clock status submenu by pressing
L
Change to toggle between On
and Off.
Local settings
To set the local time zone. The screen displays a world
map with the current date and time. A vertical
highlight in green indicates the current zone on the
map, and a text bar shows the display with ‘GMT’ and
the current cities.
Move the highlight with
<
/ > key to update other
information in real time.
You can access the following options:
Foreign settings
To set the foreign time zone. The operations and
options are the same as Local time zone. However, Set
time option is not available in the menu.
Switch local/foreign
Select the L Change. Press L or OK to switch the
time between the local and foreign clocks.
Stop watch
Your phone features a stop watch and the minimum
unit is 0.1 second.
The starting time is 00:00.0, in the format “mm:ss.n”,
where mm stands for minutes of the watch, which can
be any number from 0 to 59; ss stands for seconds, a
number between 0 and 59; n stands for 0.x second, x
Select Choose the current time zone as the
local setting.
Set time Open time editor screen.
Daylight
saving
Turn summer time on or off.
City list Open an information screen with a
list of cities in the currently
highlighted time zone.
x-saber_master_en.book Page 54 Wednesday, November 14, 2007 12:42 PM
Page 56
Tools 55
being any number from 0 to 9. The stopwatch will
start the timing when you press
L
Start or ,. You
can pause the timing, press
L
Pause, to resume
L
Go, to stop the timing, press R Stop.
Unit converter
This application allows you to convert many types of
units such as exchange rate, area, energy, mass, power,
pressure, temperature and volume.
You need to enter the conversion Type, Amount 1,
Amount 2, Unit 1 and Unit 2. Press
+
or - to switch
between the different input boxes.
Countdown
This feature is very simliar to the alarm clock, except
that you will be alerted of the remaining time, and the
phone will emit an alarm at the end of the countdown. The alarm tone is the same as your alarm clock.
The minimum time is 1 minute. The format of the
time is hh:mm:ss, and the maximum time input is 23
hours 59 minutes 59 seconds.
You can start the countdown by pressing
,
key or
L
Option to start or edit time timer. To stop
countdown, press
L
Pause, to reset, press
L
Option to continue or reset. and you can exit the
menu by pressing the
R
Back.
The count-down timer will switch on automatically
and emit an alarm at the end of the count-down even
if your phone is switched off.
Firewall
This function provides a simple and quick method for
you to avoid nuisance calls and SMS. Blacklist
contains a list of phone numbers from which you do
not wish to receive calls or SMS.
Select Tools > Firewall > Enable and choose between
the following options:
•SMS
• Incoming call
• SMS and incoming call
•Off
To add phone numbers into the black list, select Black
list, press
L
Add or OK on Add new, then you can
carry out the following operations:
Option Operation
New
number
Open the phone number editor,
enter the new number and save the
number into the black list.
x-saber_master_en.book Page 55 Wednesday, November 14, 2007 12:42 PM
Page 57
56 Tools
You can press +/- to select a particular number in the
black list, then press
L
Options to carry out the
following operations:
Contacts Open the phonebook list and select a
phone number for saving into the
black list.
Change Open the phone number editor, to
edit the selected number in the black
list.
Delete Delete the selected number in the
black list.
x-saber_master_en.book Page 56 Wednesday, November 14, 2007 12:42 PM
Page 58
Contacts 57
11. Contacts
Your phone features two phonebooks. The SIM
phonebook is located on your SIM card and the
number of entries you can store depends on the SIM
card. The second phonebook (Smart phonebook) is
integrated in the phone memory and the maximum
number of name cards you can store is 1000 (a
namecard can consist of a name, 4 phone numbers,
groups, email address, address, and postal code) etc.
The SIM card is the default phonebook, but the
entries in the two phonebooks are combined, sorted
and displayed as a list. When you add a new contact
to your phonebook, the new contact will only be
added to the phonebook you have selected.
You can store up to 1000 name cards, provided other
features in the phone such as Organizer, Schedules,
Sounds, Pictures, and Videos, etc. did not use up a
large amount of the phone's memory space.
Create contacts
To create a new SIM/phone contact:
To create a contact, you must enter at least a phone
number.
Most of the fields are free-text, which means you can
enter alphanumeric data using the text entry functions
of your mobile phone (for more information on text
entry, see “Text and number entry” on page 18).
Enter New Contact Press , and select Contacts >
View contacts > <Add new>.
Enter contact
details
Enter the following for SIM
card contacts.
•Name
•Number
Enter the following for
onboard phonebook contacts:
•Name
• Mobile
•Home
• Office and etc
Store the new
contact
Press
L
Save.
x-saber_master_en.book Page 57 Wednesday, November 14, 2007 12:42 PM
Page 59
58 Contacts
Phonebook Options
In the phonebook, you can display the details of a
contact by selecting it and pressing
L
Options to
carry out the following operations:
View group
The View group feature allows you to organize your
contacts so that you can associate images and/or
ringtones with a group of contacts and send messages
to all the members of the group. From the Contacts
menu, select View group and the list of groups is
displayed.
Options Description
View View the details of the selected contact.
Send
message
Send a SMS or MMS to the contact.
Dial Call the contact.
Handsfree
dial
Call the contact by handsfree mode.
Delete Delete the contact.
Add to
blacklist
Add the contact into the blacklist.
Go to Go to the website in the record (if
available).
Default
number
Set Mobile number, Home number or
Office number as the default number
(if record is in the phone).
Send
Contact
Send the selected record: via SMS or
via Bluetooth.
Copy to
SIM
Copy the phone entry to SIM card.
Copy to
phone
Copy the SIM entry to phone.
Move to
SIM
Similar to copy, but the source record
will be deleted after copy.
Move to
phone
Similar to copy, but the source record
will be deleted after copy.
Add picture Add a picture ID to the contact. This
option is only available for contacts in
the onboard phonebook.
Select
multiple
Select one contact at a time or select
all contacts.
x-saber_master_en.book Page 58 Wednesday, November 14, 2007 12:42 PM
Page 60
Contacts 59
View
Select a group and press L Options > View to display
the members of the group.
Group Options
Special numbers
This menu allows you to keep a list of useful numbers
such as your own numbers, service numbers,
voicemail and SOS numbers.
Quick call
This feature allows you to set your 4 of your preferred
or most frequently dialled numbers. You can then
quickly call one of them by selecting the corresponding
icon or picture on the screen, thereby eliminating the
need to enter and browse the contact list.
You may edit a list of quick calls.
Options Description
View Display the group members.
Rename Rename the group.
Message Send an SMS or MMS to members of
a group.
Reset Restore group to default settings.
Options Description
My number View, Edit or Clear your own phone
number.
Service
numbers
This entry of the SIM phonebook
allow you to select one of the available
services provided by your operator and
to copy it into the selected phonebook.
Voice mail
number
Dial the number for your voice mail
service provider.
SOS Display emergency phone number.
IP number
(China &
HK only)
Dial IP prefix of your network
operator.
Enter Quick call menu Press
,
to enter the
main menu from idle
mode and select Contacts
> Quick call.
Go to the desired icon
position
Press the navigation
keys.
x-saber_master_en.book Page 59 Wednesday, November 14, 2007 12:42 PM
Page 61
60 Contacts
Advanced
This menu provides you with advanced features so
that you can view and edit your contacts:
Add a number to the
selected location and
then display all the
contacts or return to the
main menu.
L
Add
or
R
Back
Select a contact from the
phonebook.
Press
+
or -.
Confirm the added
contact and add picture
or Cancel.
Press
L
Select or
R
Back.
Options Description
Default
contact list
Switch contact list between SIM,
Phone or All.
Default
contact
location
Select the new contact entry saved on
the SIM or phone memory.
Copy to SIM Copy all the entries to SIM.
Copy to
phone
Copy all the entries to Phone.
Move to
SIM
Move all the entries to SIM.
Move to
phone
Move all the entries to Phone.
Delete all
contacts
Delete all contacts.
x-saber_master_en.book Page 60 Wednesday, November 14, 2007 12:42 PM
Page 62
Profiles 61
12. Profiles
Your mobile phone has been preconfigured with the
following modes:
You can activate and modify all the modes, except
Flight mode and Silent mode. These 2 modes can only
be activated and viewed.
The profiles and their respective parameters are as
follows:
•Personal (default) • Car • Flight
• Home • Meeting • Outdoors
• Silent
Personal Ring volume
Level 9
Ringtones
Default
Alert type
Ring
Key sound
On
Backlight level
High
Car Ring volume
Level 8
Ringtones
Default
Alert type
Ring
Key sound
Off
Backlight level
Maximum
Flight Ring volume
Silence
Ringtones
Default
Alert type
Off
Key sound
Off
Backlight level
High
Home Ring volume
Level 4
Ringtones
Default
Alert type
Ring
Key sound
Off
Backlight level
High
x-saber_master_en.book Page 61 Wednesday, November 14, 2007 12:42 PM
Page 63
62 Profiles
Profile selection
To select a different profile:
Personalise settings
The available options include:
Meeting Ring volume
Silence
Ringtones
Default
Alert type
Vibrate
Key sound
Off
Backlight level
Medium
Outdoors Ring volume
Level 9
Ringtones
Default
Alert type
Ring
Key sound
Off
Backlight level
Maximum
Silent Ring volume
Silence
Ringtones
Default
Alert type
None
Key sound
Off
Backlight level
Medium
Go to Profiles
menu
Press , to enter the main menu
from idle mode and select Profiles.
Select the
desired profile.
Press
+
or -.
Enter the
Options menu
Press
L
Options. You may select:
• Activate: To activate the profile.
• Personalize: To modify the setting
in the profile.
Options Description
Ring volume Select from 10 volume levels.
Ringtone Select the ringtone for Contacts,
Call, Other calls, Alarm,
Appointments, Calendar,
Messages or Cell info.
Alert type Select an alert type: Ring only,
Vibrate only, Ring and Vibrate,
Vibrate then ring or None.
Key sound Turn the key sound On or Off.
x-saber_master_en.book Page 62 Wednesday, November 14, 2007 12:42 PM
Page 64
Profiles 63
Backlight level Select a backlight level:
Maximum, High, Medium, Low
x-saber_master_en.book Page 63 Wednesday, November 14, 2007 12:42 PM
Page 65
64 Connectivity
13. Connectivity
This menu provides you with more features to set up
a connection with these external devices.
Bluetooth
Your phone supports Bluetooth wireless technology,
allowing connection to a compatible Bluetooth
device. To ensure interoperability between other
Bluetooth devices, please check with the
manufacturers of other devices. The Bluetooth
connection can be subjected to interference from
obstructions such as walls or other electronic devices.
To use Bluetooth connection, the device with which
you want to establish a connection must support
Bluetooth function. Please contact the device's
manufacturer or its accompanied documentation.
Establish a Bluetooth connection
To activate, press , to enter the main menu from idle
mode and then select Connectivity > Bluetooth. On the
Bluetooth screen, select Activate. Next, select Search
for devices. When the list of devices appears, press
L
to select the device you wish to establish a connection
with.
If you do not intend to use the Bluetooth feature for
some time, you should deactivate it in order to
conserve battery power.
Bluetooth menu
Options Description
Activate Turn Bluetooth feature On or Off.
Search for
devices
Search for the external devices that
you can connect to.
My devices Display the bluetooth devices that
you can connect to.
You can select the desired device by
pressing
L
in the devices list. You
can also open the Options menu of the
device. The options are:
Connect/Disconnect (if applicable)
Browse files (if applicable)
Activate/Deactivate stereo (if applicable)
Rename
Delete
x-saber_master_en.book Page 64 Wednesday, November 14, 2007 12:42 PM
Page 66
Connectivity 65
When searching for a device, you are presented with a
list of any devices discovered within the range of your
Bluetooth-enabled phone. As soon as you select a
device and a connection is made, you are prompted to
enter a passkey in order to pair with the device. This
passkey is supplied by the manufacturer of the other
Bluetooth device. Refer to its documentation for
further information. The passkey feature ensures that
only legitimate connections are allowed to connect
either to your device or to the selected device.
USB function
Connect your phone to a PC via USB cable, your
phone will then behave like a USB drive. You can
access your phone memory and memory card. You can
upload and download music, videos and pictures via
the USB cable, and the size of file transfer is unlimited
until your memory is full.
Besides, your phone can perform PC connections
with the Mobile Phone Tools. From main menu,
select Connectivity > USB drive > PC SYNC, you can
connect your phone to the computer via Bluetooth;
select USB drive > Off, you can connect your phone to
the computer via Bluetooth or USB cable. PC
software offers instant sychronization between your
phone and your computer, and enables you to backup
your mobile phone data and recover the data saved in
the computer, receive SMS and edit your mobile
phone contacts.
When the transfer is finished, please make sure that
you safely remove your device by clicking .
Settings Select to display more features:
• My name: edit the name of the
device
• Visibility: choose to show or hide the
device by select toggle On or Off
• My Profiles: lists the phone’s
available profiles
x-saber_master_en.book Page 65 Wednesday, November 14, 2007 12:42 PM
Page 67
66 Calls
14. Calls
Most options described in this chapter are operator
and/or subscription dependent and require either a
PIN2 code or a phone code. For more information on
PIN codes, see “Security” on page 70.
Call list
This menu provides you with a list of calls you have
missed, answered and made. The calls include All calls,
Missed calls, Answered call and Outgoing calls, which
are displayed in chronological order with the most
recent call at the top of the list. Select a call from one
of the lists and press OK, then press
L
Options to
access the following:
Clear history
This menu allows you to clear the call history in:
Outgoing/Answered/Missed/Delete all. Press
L
Select
to confirm deletion and
R
Back to cancel deletion.
Call settings
This menu allows you to configure the call settings:
Options Description
Save Save the number if the number is not
in the Contacts list.
Delete Delete the selected number from the
list.
Dial Call the selected number.
Send
message
Send a message to the selected number.
You can send by SMS or MMS.
Edit
number
Open the contacts list and edit the
number if it is in the contacts list.
Add to
black list
To add the phone number into the
black list, see “Firewall” on page 55.
Options Description
Auto
answer
Turn Auto answer on/off. When this
function is on, the incoming call will be
answered automatically after 10 seconds.
Any key
answer
Turn Any key answer on/off. When this
function is on, you can answer
incoming calls by pressing any key.
x-saber_master_en.book Page 66 Wednesday, November 14, 2007 12:42 PM
Page 68
Calls 67
Minute
reminder
Select On or Off to activate or deactivate
the minute reminder during a call. The
default is Off and the default setting is
45 seconds.
Call
services
The available options include:
• Call time: Display the duration of
your calls and their charges: Last call,
Total incoming calls, Total outgoing
calls and Total calls.
• Call waiting: Select Enable or Cancel,
or check Status.
This feature is network/ subscription
dependent.
• Own ID: Select Show ID or Hide ID or
Set by network to determine your
phone number or identity will be
displayed or not to the called party.
• Caller ID: To check your operator
setting of showing the identity of
your caller.
This feature is network/ subscription
dependent.
• Cost settings: This option is available
only when the charge information is
included in your SIM card. You can
view information of the current call
and all recent calls. You need to enter
the PIN2 code to manage,
maximum cost credit and unit rate.
Call divert Set the following call divert options: All
voice calls, If out of reach, If no reply, If
busy.
•When All voice calls is on, all incoming
calls will be diverted to the pre-set
number without any reminder.
•When If out of reach is on, incoming
calls will be diverted to the pre-set
number when the user is not
connected to the network.
•When If no reply is on, incoming calls
will be diverted if the user does not
answer.
•When If busy is on, calls will be
diverted if the user is already online
or if the call is rejected.
• You can also check the Status of your
call diverts or Cancel all call diverts.
x-saber_master_en.book Page 67 Wednesday, November 14, 2007 12:42 PM
Page 69
68 Calls
Auto redial
You can set auto redial option On or Off. When set to
On and the party you wish to call is not connected,
you will be asked to redial or not.
Call
barring
This menu allows you to limit the use
of your phone to specific calls by
preventing the reception or making of
different types of calls. To activate call
barring, you need to enter a
communication limit code. This PIN2
code will then be sent to the network
for validation.
Note that this operation only supports
GSM calls.
The types of calls you can bar are as
follows:
• All outgoing calls
• All international calls
• Only here & home
• All incoming calls
• Incoming if abroad
You can also check the Status of your
call barring or Cancel all call barring.
x-saber_master_en.book Page 68 Wednesday, November 14, 2007 12:42 PM
Page 70
Settings 69
15. Settings
You can configure your Xenium 9@9q mobile phone
to best suit your usage preference. You can configure
the following settings: General, Display, Sounds and
Connectivity.
General
This menu allows you to configure some general
settings:
Enter the menu Press
,
to enter the main
menu from idle mode and
select Settings.
Select a settings menu Press
<
or >.
Enter the menu options Press
+
or -.
Options Description
Active flip Select On or Off. You can change the
current selection by pressing
L
.
When you select On, you can answer
an incoming call simply by opening
the flip.
Languages Set the display language of the phone.
Time &
date
• Display time: Select On or Off.
When you select On, the time
information will be displayed in
idle screen.
• Time zone: Go to International
clock menu and change
the time
zone.
• Set time: Set the time in the
format HH:MM.
• Set date: Set the date.
• Time format: Set the time format
as 24 hours or 12 hours.
• Date format: Set the date format as
YYY/MM/DD, YYYY.MM.DD,
DD.MM.YYYY, YYYY-MM-DD or
DD-MM-YYYY.
• Power-on time: Set a time for the
phone to be switched on. You can
select On or Off. When you select
On, you need to enter the time you
want your phone to be switched on.
• Power-off time: same as above.
x-saber_master_en.book Page 69 Wednesday, November 14, 2007 12:42 PM
Page 71
70 Settings
Display
You may configure your phone with different display
settings:
Security
• PIN protection: Select On or Off.
When you select On, you need to
enter the PIN code when you
switch on the phone.
The default PIN code is network
dependent on your service provider.
Please contact your service operator
for the PIN information.
• Change PIN: Modify the PIN code.
• Change PIN2: Modify the PIN2
code.
• Safeguard: You can safeguard
important information such as
messages, contacts on your phone by
activating safeguard. You can also
change the safeguard password.
The default safeguard password is
0000.
Shortcuts Displays a list of shortcut features.
You can set a new shortcut key by
establishing a link between a certain
feature and a numeric or navigation
key. You can also change or delete an
existing shortcut key.
Default
storage
Set the default storage location: Phone
memory or Memory card.
Memory
status
You can check the memory status of
Contacts, Messaging and My files. You
can also check the memory status of
memory card if it is inserted.
Default
settings
Restore your phone settings to the
default values.
Options Description
Wallpaper Turn wallpaper display On or Off.
Backlight
level
Select from 4 backlight levels. You can
select the backlight level by pressing
+
or - keys. Press , or L to confirm.
Backlight
duration
Select backlight duration from 60
seconds, 30 seconds and 15 seconds.
x-saber_master_en.book Page 70 Wednesday, November 14, 2007 12:42 PM
Page 72
Settings 71
Sounds
You can set your phone to operate with different
sound profiles. For details, see “Profiles” on page 61.
If you have downloaded your own ring tones and have
selected such a ring tone to be the alarm alert, then
after you set the alarm and switched off the phone, the
alert tone will be changed back to the original factory
settings. This does not apply if the ring tone you have
chosen is one that comes as default with your phone.
Connectivity
Call settings
For more information, see “Call settings” on page 66.
Message settings
For more information, see “Message Settings” on page 45.
Network settings
The network name will be displayed on the idle
screen. If the phone is not able to identify the network
name, it will display the country code and the
network code of the unknown network.
Select network
It will vary according to the search mode you have
selected. If you select Automatic, the network will be
searched automatically. If you select Manual, the
search will commence only when you confirm to start
searching.
Greeting Turn greetings On or Off. When you
select On, you can edit the greetings
message.
The maximum length of greetings is 20
Chinese words or 50 English characters.
Options Description
Alert type You can select Ring only, Vibrate only,
Vibrate then ring or None.
Ringtones Select the ringtone for Contacts calls,
Appointments, Messages, Cell info,
Alarm and Other calls.
Ring
volume
Select from 10 volume levels.
Key sound Turn key sound On or Off.
Shutter
sound
Select from 3 shutter sounds. You can
also select Off.
Low battery Turn warning On or Off.
x-saber_master_en.book Page 71 Wednesday, November 14, 2007 12:42 PM
Page 73
72 Settings
Search mode
You can select Automatic or Manual.
Preferred Networks
Preferred network list is stored in the SIM card. It
specifies the priority by which your phone will register
to the available network during automatic registration.
1. In idle mode, press
,
to enter the main menu.
2. Select Settings > Connectivity > Network settings >
Preferred networks and press
,
.
3. Press
,
or L Select to enter the preferred
network list. The most preferred network will be
at the top of the list.
L
4. Press +/- to select a certain network and press
L
Option.
5. You can then select to Insert, Add to end or Delete
the selected network.
Attach GPRS
This option allows you to set the GPRS attach mode
during PDP session. You can choose either one of the
following:
• Always attached
• Attached during PDP session
Browser
Various parameters relative to browser can be set
under this option, including WAP parameters and
Push message.
WAP profiles
You can set up to 5 groups of WAP profiles. You can
activate and use one of the profiles. At the same time,
you can edit or directly connect to the address. Select
Edit to access the following settings:
• Profile name: A name to identify the server.
• IP address: The numeric address of the server in
nnn.nnn.nnn.nnn format.
• Port: The port number on the server. The number
is usually 0 (=9201).
• Homepage: The URL of the homepage.
• Linger time: The duration your phone stays
connected to the WAP.
• Connection: Select HTTP or WSP connection.
• CSD profiles: Select one of the CSD profiles.
• GPRS profiles: Select one of the GPRS profiles.
• Bearer: Select CSD or GPRS.
x-saber_master_en.book Page 72 Wednesday, November 14, 2007 12:42 PM
Page 74
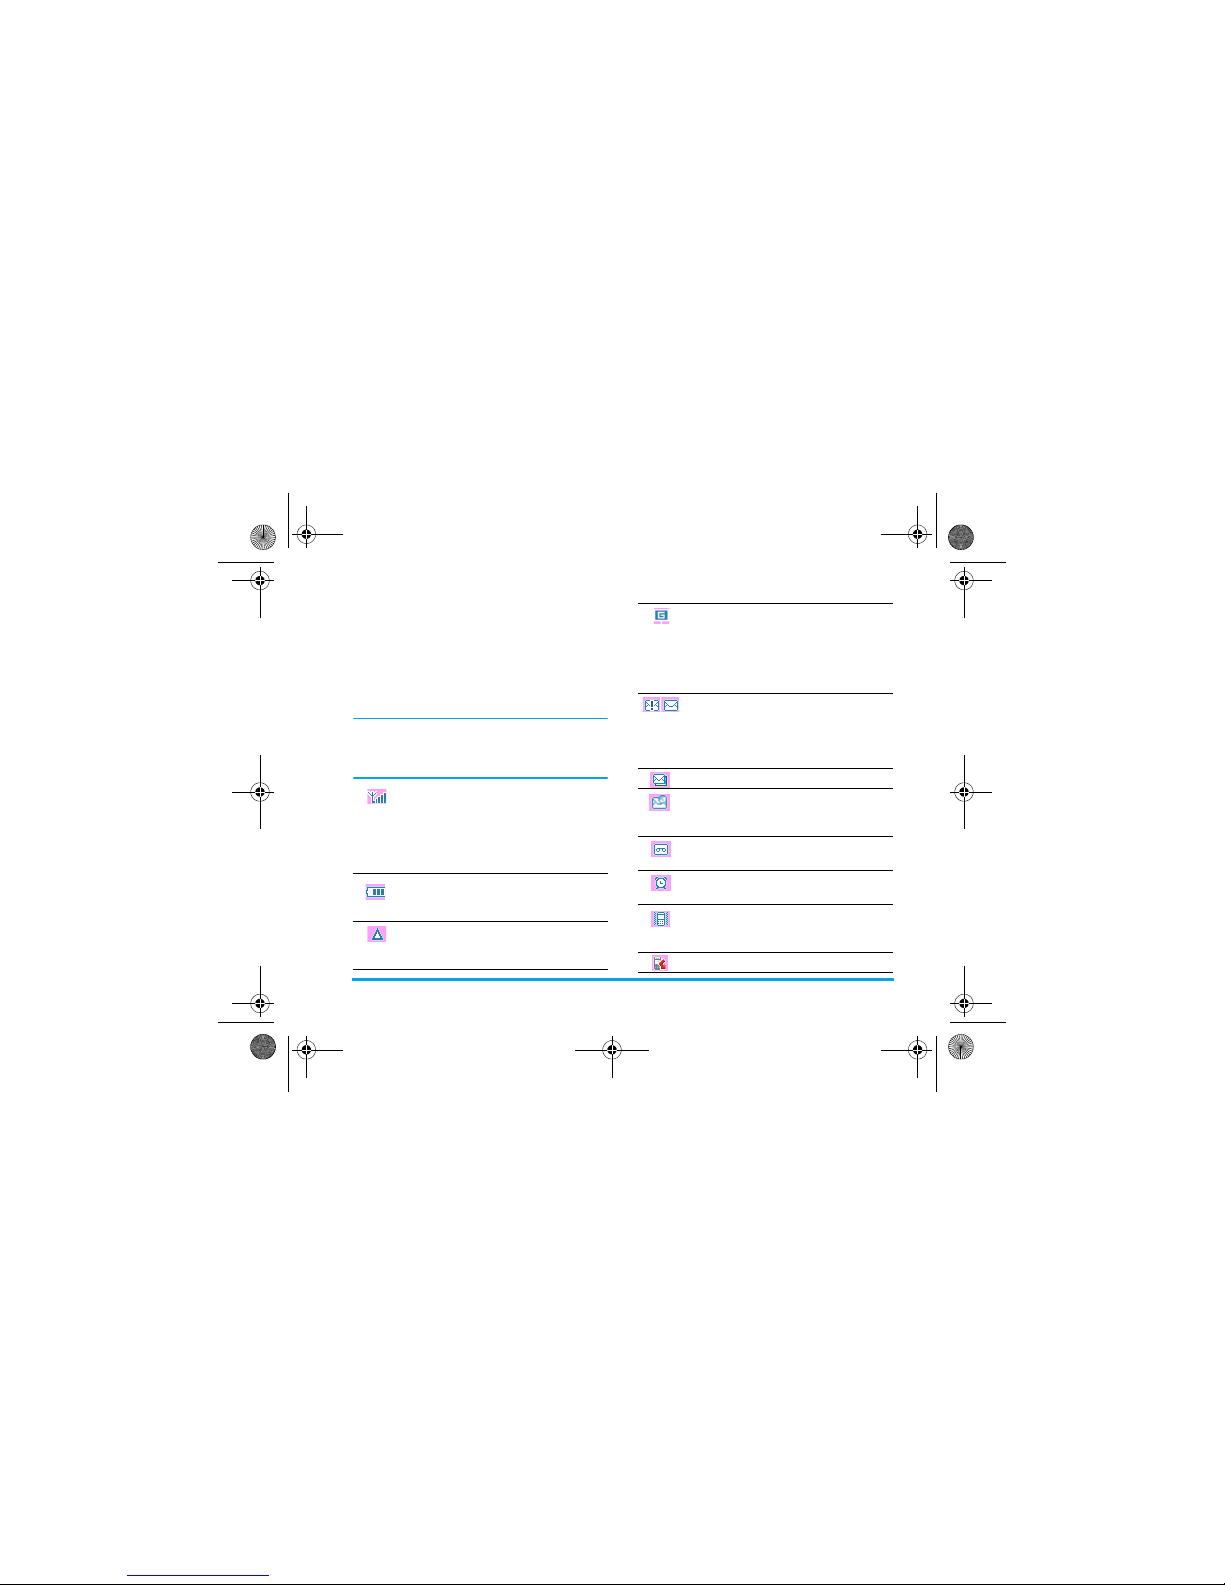
Icons & Symbols 73
Icons & Symbols
In idle mode, several icons and symbols can be
displayed on the sub-display and main screen. The
status, network and battery icons are displayed all the
time. The rest of the icons are displayed if the feature
is available, and not displayed if the feature is
unavailable.
If the network symbol is not displayed, it implies that
the network is currently unavailable. You may be in a
bad reception area; moving to a different location may
help.
Network - Network icon comprises of 2
portions. The left portion indicates
whether or not your phone is already
registered with a network, and the right
portion indicates signal strength in 5
levels (from no signal to strongest).
Battery - Indicates battery level with 5
battery level indicator bars. When
charging, a scrolling icon will be displayed.
International roaming - Displayed when
your phone is registered to a network
other than your own.
Whether to log on GPRS - There are 2
GPRS status which are mutually
exclusive: GPRS network is available but
not in use; or GPRS network is available
and in use. The icon will be displayed only
when you have logged on to GPRS.
SMS - Indicates that you have at least one
unread message. The first icon indicates
that the memory is full, while the second
icon indicates that there is unread SMS
while the memory is full.
MMS - Indicates there is a MMS message.
WAP Push message - Indicates there is a
WAP push message. Go to Browser > Push
Inbox to check it.
Voicemail- Indicates voice messages that
have not been heard.
Alarm Clock - Indicates that the alarm
clock is activated.
Vibration - Your phone will vibrate when
there is an incoming call or when the
alarm clock rings.
Miss call - Indicates there is a miss call.
x-saber_master_en.book Page 73 Wednesday, November 14, 2007 12:42 PM
Page 75
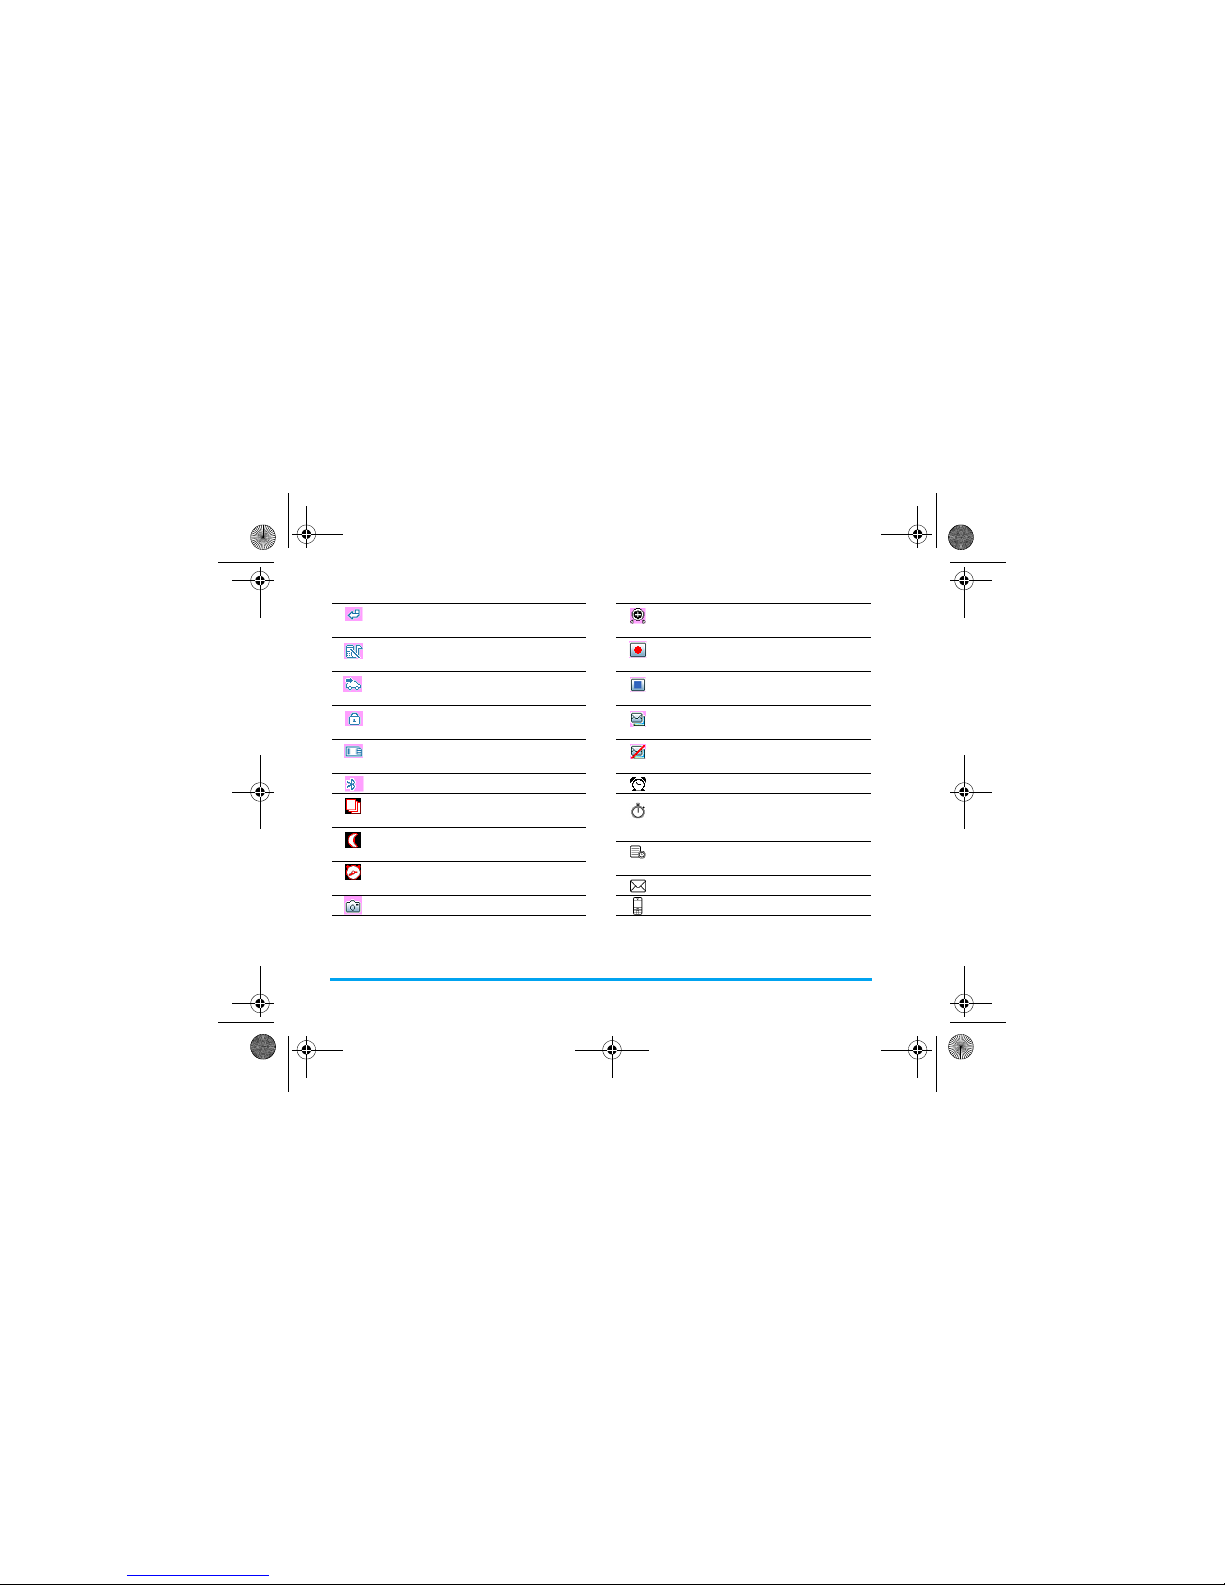
74 Icons & Symbols
Call Divert - Indicates that the call divert
function is activated.
Silence - Indicates that silent mode is
activated.
Auto answer - Indicates that Auto answer
is on.
MP3 Key Locked - Indicates that the MP3
key is locked.
Memory card - Indicates the memory card
is in use.
Bluetooth - Feature is activated.
Camera’s multishot - Indicates camera will
take multiple 3 shots.
Camera’s night mode- Indicates camera
night mode is on.
Camera’s self-timer - Indicates camera’s
self timer is on.
Capture - Indicates OK to capture photo.
Camera’s zoom - Indicates zoom feature
of the camera is on.
Start recording - Indicates OK to start
video recording.
Stop recording - Indicates OK to stop
video recording.
Video MMS on - Indicates video recording
in MMS size is on.
Video MMS off - Indicates video recording
in MMS size is off.
Alarm - Indicates the alarm is on.
Countdown timer - Indicates the
countdown timer is due on the
subdisplay.
Event - Alerts you an organiser event is
due.
SMS - Indicates there is a SMS message.
In call - Indicates the phone is in a call.
x-saber_master_en.book Page 74 Wednesday, November 14, 2007 12:42 PM
Page 76
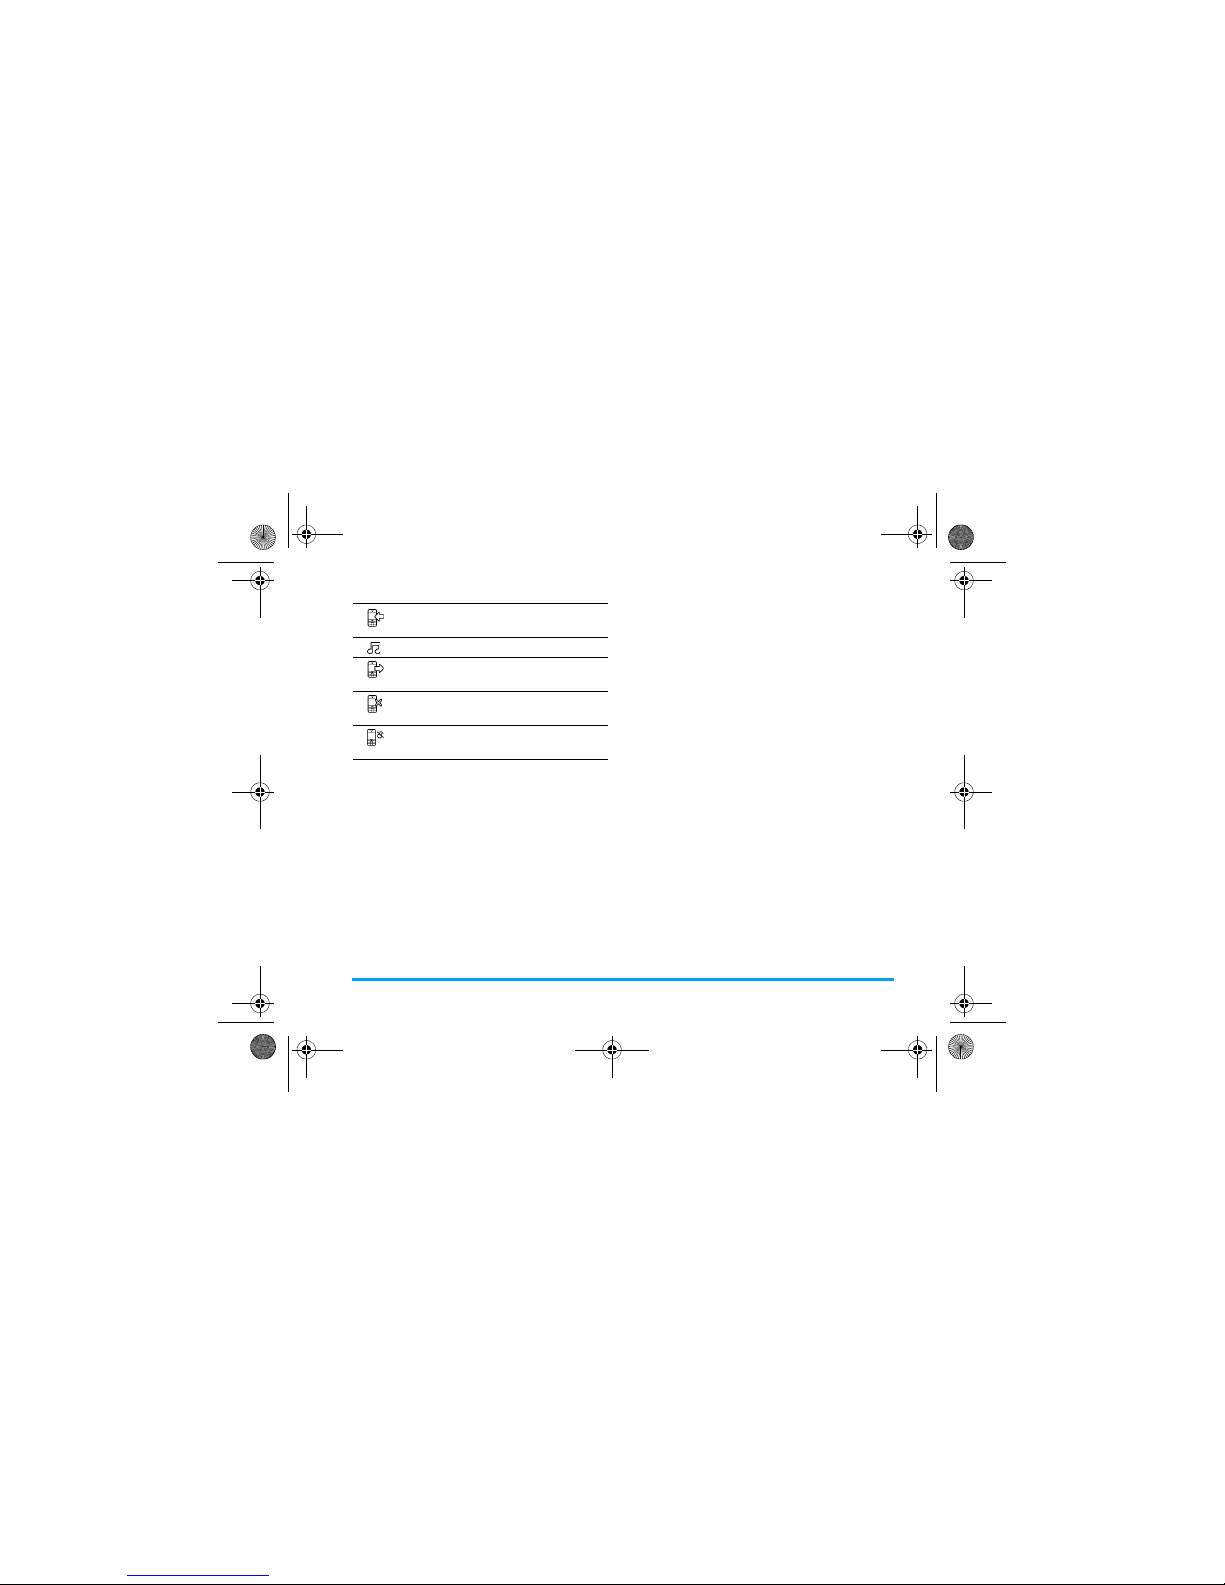
Icons & Symbols 75
Incoming call - Indicates there is an
incoming call.
Music - Indicates the music feature is on.
Outgoing call - Indicates the phone is in an
outgoing call.
Reject call - Indicates there is a rejected
call.
Silence incoming call ringer - Indicates that
the incoming call ringer has been silenced.
x-saber_master_en.book Page 75 Wednesday, November 14, 2007 12:42 PM
Page 77
76 Precautions
Precautions
Radio Waves
Your cellular mobile phone is a low power
radio transmitter and receiver. When it is
operating, it sends and receives radio waves.
The radio waves carry your voice or data
signal to a base station that is connected to the
telephone network. The network controls the power
at which the phone transmits.
• Your phone transmits/receives radio waves in the
GSM frequency (900 / 1800 / 1900 MHz).
• The GSM network controls transmission power
(0.01 to 2 watts).
• Your phone complies with all relevant safety
standards.
• The CE mark on your phone shows compliancy
with European electromagnetic compatibility (Ref.
89/336/EEC) and low voltage directives (Ref. 73/
23/EEC).
Your cellular mobile phone is your responsibility. To
avoid damage to yourself, to others or to the phone
itself, read and follow all the safety instructions and
make them known to anyone borrowing your
phone.Furthermore to prevent unauthorized use of
your phone:
Keep your phone in a safe place and keep it
out of small children's reach.
Avoid writing down your PIN code. Try to
remember it instead.
Switch off the phone and remove the battery if you are
going to leave it unused for a long time.
Change your PIN code after purchasing the phone
and to activate call restriction options.
The design of your phone complies with all
applicable laws and regulations. However
your phone may cause interference with
other electronic devices. Consequently you
should follow all local recommendations and
regulations when using your cellular phone both at
home and when away. Regulations on the use of
cellular phones in vehicles and aircraft are
particularly stringent.
Public concern has been focused for some time on the
possible health risks for users of cellular phones. The
current research on radio wave technology, including
the GSM technology, has been reviewed and safety
standards have been drawn up to ensure protection from
exposure to radio wave energy. Your cellular telephone
complies with all applicable safety standards and the
Radio Equipment and Telecommunications Terminal
Equipment Directive 1999/5/EC.
x-saber_master_en.book Page 76 Wednesday, November 14, 2007 12:42 PM
Page 78
Precautions 77
Always switch off your phone
Inadequately protected or sensitive electronic
equipment may be affected by radio energy. This
interference can lead to accidents.
Before boarding an aircraft and/or when
packing the phone in your luggage: the use
of mobile phones in an aircraft may be
dangerous for the operation of the aircraft, disrupt the
mobile phones network and may be illegal.
In hospitals, clinics, other health care
centres and anywhere else where you may be
in the close vicinity of medical equipment.
In areas with a potentially explosive
atmosphere (e.g. petrol stations and also
areas where the air contains dust particles,
such as metal powders).
In a vehicle transporting flammable products (even if
the vehicle is parked) or a vehicle powered by l iquefied
petroleum gas (LPG), check first that the vehicle
complies with the applicable safety rules.
In areas where you are requested to turn off radio
transmitting devices, such as quarries or other areas
where blasting operations are in progress.
Check with the vehicle manufacturer that
electronic equipment used in your vehicle
will not be affected by radio energy.
Pacemakers
If you have a pacemaker:
• Always keep the phone more than 15 cm from your
pacemaker when the phone is switched on, in order
to avoid potential interference.
• Do not carry the phone in a breast pocket.
• Use the ear opposite to the pacemaker to minimize
the potential interference.
• Switch off your phone if you suspect that
interference is taking place.
Users of hearing aids
If you are a user of a hearing aid, consult your
physician and hearing aid manufacturer to learn
whether your particular device is susceptible to
cellular phone interference.
Improved performance
In order to improve the performance of your phone,
reduce radio energy emission, reduce battery
consumption and ensure safe operation adhere to the
following guidelines:
x-saber_master_en.book Page 77 Wednesday, November 14, 2007 12:42 PM
Page 79
78 Precautions
For the optimal and satisfactory operation of
the phone, you are recommended to use the
phone in the normal operating position
(when not using in hands-free mode or with
a hands-free accessory).
• Do not expose your phone to extreme temperatures.
• Treat the phone with care. Any misuse will void the
International Guarantee.
• Do not immerse the phone in any liquid; if your
phone is damp, switch it off, remove the battery.
and let them dry for 24hrs before using them again.
• To clean the phone, wipe it with a soft cloth.
• Placing and receiving calls consumes the same
amount of battery energy. However, the mobile
consumes less energy in idle screen when kept in
the same place. When in idle screen and while you
are moving, your phone consumes energy to
transmit updated location information to the
network. Setting the backlight for a shorter period
of time as well as avoiding unnecessary navigating
in the menus will also help to save the battery's
energy for longer phoning and stand-by
performances.
Battery information
• Your phone is powered by a rechargeable battery.
• Use specified charger only.
• Do not incinerate.
• Do not deform or open the battery.
• Do not allow metal objects (such as keys in your
pocket) to short circuit the battery contacts.
• Avoid exposure to excessive heat (>60°C or 140°F),
moisture or caustic environments.
You should only use Philips authentic
battery and accessories, as the use of any
other accessories may damage your phone
and may be dangerous, and will make all
guarantees for your Philips phone null and
void. The use of an incorrect type of battery may also
cause an explosion.
Make sure damaged parts are replaced immediately by
a qualified technician and that they are replaced with
genuine Philips replacement parts.
x-saber_master_en.book Page 78 Wednesday, November 14, 2007 12:42 PM
Page 80
Precautions 79
Do not use your phone while driving
Speaking on the telephone while driving
lowers your concentration, which can be
dangerous. Adhere to the following
guidelines:
• Give your full attention to driving. Pull off the road
and park before using the phone.
• Respect the local regulations in countries where you
drive and use your GSM phone.
• If you want to use your phone in a vehicle, install the
hands-free car kit which is designed for that purpose.
• Ensure that your phone and car kit do not block any
air bags or other security devices fitted in your car.
The use of an alarm system to operate a vehicle's lights
or horn to indicate incoming phone calls is prohibited
on public roads in some countries. Check local
regulations.
EN60950 Norm
In case of hot weather or after a prolonged exposure to
the sun (e.g., behind a window or a windscreen), the
temperature of your phone's casing might increase,
especially when featuring a metallic finish. Be very
careful in this case when picking up your phone and also
avoid using it with an ambient temperature over 40°C.
For pluggable phone, the socket-outlet shall be
installed near the phone and shall be accessible.
Environmental care
Remember to observe the local regulations
regarding the disposal of the packaging
materials, exhausted batteries and old phone
and please promote recycling.
Philips has marked the battery and packaging with
standard symbols designed to promote recycling and
appropriate disposal of your eventual waste.
The labelled packaging material is
recyclable.
A financial contribution has been made
to the associated national packaging
recovery and recycling system.
The plastic material is recyclable (also
identifies the type of plastic).
x-saber_master_en.book Page 79 Wednesday, November 14, 2007 12:42 PM
Page 81
80
WEEE Marking in the DFU: “Information
to the Consumer”
Disposal of your old product
Your product is designed and manufactured with
high quality materials and components, which can be
recycled and reused.
When this crossed-out wheeled bin
symbol is attached to a product it means
the product is covered by the European
Directive 2002/96/EC
Please inform yourself about the local
separate collection system for electrical
and electronic products.
Please act according to your local rules and do not
dispose of your old products with your normal
household waste. The correct disposal of your old
product will help prevent potential negative
consequences for the environment and human
health.
FCC Compliance Statement
This equipment has been tested and found to comply
with the limits for a Class B digital device, pursuant
to Part 15 of the FCC Rules. These limits are
designed to provide reasonable protection against
harmful interference in a residential installation.
This equipment generates, uses and can radiate radio
frequency energy and, if not installed and used in
accordance with the instructions, may cause harmful
interference to radio communications. However,
there is no guarantee that interference will not occur
in a particular installation.
If this equipment does cause harmful interference to
radio or television reception, which can be
determined by turning the equipment off and on, the
user is encouraged to try to correct the interference
by one or more of the following measures:
-- Reorient or relocate the receiving antenna.
-- Increase the separation between the equipment
and receiver.
-- Connect the equipment into an outlet on a circuit
different from that to which the receiver is
connected.
Any changes or modifications not expressly
approved by the party responsible for compliance
could void the user’s authority to operate the
equipment.
Some electronic devices are susceptible to
electromagnetic interference sent by phone if
inadequately shielded. Please use phone at least
20cm or as far as you can from TV set,adio and other
automated office equipement so
as to avoid interference.
9@9q_Precautions.fm Page 80 Friday, January 4, 2008 10:43 A M
Page 82
81
Troubleshooting
The phone does not switch on
Remove/reinstall the battery. Then charge the phone
until the battery icon stops scrolling. Unplug from
charger and try to switch on the phone.
Your phone doesn’t return to the idle screen
Long press the hangup key or switch off the phone,
check that the SIM card and the battery have been
installed correctly and switch it on again.
The network symbol is not displayed
The network connection is lost. Either you are in a
radio shadow (in a tunnel or between tall buildings) or
you are outside the network coverage area. Try from
another place, try to reconnect to the network
(especially when abroad), check that the antenna is in
place if your mobile has an external antenna, or contact
your network operator for assistance/information.
The display doesn’t respond (or the
display responds slowly) to key presses
The display responds more slowly at very low
temperatures. This is normal and does not affect the
operation of the phone. Take the phone to a warmer
place and try again. In other cases, please contact your
phone supplier.
Your battery seems to over heat
You might be using a charger that was not intended
for use with your phone. Make sure you always use the
Philips authentic accessory shipped with your phone.
Your phone doesn’t display the phone
numbers of incoming calls
This feature is network and subscription dependent.
If the network does not send the caller’s number, the
phone will display Call 1 or Withheld instead. Contact
your operator for detailed information on this subject.
You can’t send text messages
Some networks don’t allow message exchanges with
other networks. First check that you entered the
number of your SMS centre, or contact your operator
for detailed information on this subject.
You have the feeling that you miss some
calls
Check your call divert options.
The display shows INSERT SIM
Check that the SIM card has been inserted correctly.
If the problem remains, your SIM card may be
damaged. Contact your operator.
x-saber_master_en.book Page 81 Wednesday, November 14, 2007 12:42 PM
Page 83
82
When attempting to use a feature in the
menu, the mobile displays NOT
ALLOWED
Some features are network dependent. Therefore,
they are only available if the network or your
subscription supports them. Contact your operator
for detailed information on this subject.
Your phone is not charging
If your battery is completely flat, it might take several
minutes of pre-charge (up to 10 minutes in some
cases) before the charging icon is displayed on the
screen.
x-saber_master_en.book Page 82 Wednesday, November 14, 2007 12:42 PM
Page 84
83
Philips Authentic
Accessories
Some accessories, such as a standard battery and a
charger, are included as standard accessories in your
mobile phone package. Additional accessories may
also be provided or sold separately. Package contents
may therefore vary.
To maximize the performance of your Philips phone
and not to void the warranty, always purchase Philips
Authentic Accessories that are specially designed for
use with your phone. Philips Consumer Electronics
cannot be held liable for any damages due to use with
non authorized accessories.
Charger
Charges your battery in any AC outlet. Small enough
to carry in a briefcase/handbag.
Data connect kit
Provides easy data connection to your Philips mobile
phone. The USB cable enables high-speed
communication between your phone and your
computer. The provided software allows you to
download pictures and melodies and to synchronize
your contacts and appointments.
Deluxe Headset
The integrated answer button offers you a simple way
to answer your calls. Simply answer an incoming call
by pressing the button or long press to reject the
incoming call.
x-saber_master_en.book Page 83 Wednesday, November 14, 2007 12:42 PM
Page 85
84
Trademark Declaration
JAVA is a trademark of Sun
Microsystems, Inc.
T9
®
is a trademark of Tegic
Communications Inc.
Bluetooth™ is a trade-mark
owned by telefonaktiebolaget
L M Ericsson, Sweden and
licensed to Philips.
Tegic Euro. Pat.
App. 0842463
x-saber_master_en.book Page 84 Wednesday, November 14, 2007 12:42 PM
Page 86
87
Limited warranty
1. What Does This Limited Warranty Cover?
Philips warrants to the original retail purchaser
(“Consumer” or “You”) that this Philips cellular
product and all accessories originally provided by
Philips in the sales package (“Product”) are free
from defects in materials, design and
workmanship under normal use in accordance
with the operating instructions and pursuant to
the following terms and conditions. This limited
warranty extends only to the Consumer for
Products purchased and used in the original
country of purchase. The limited warranty is
valid only in Philips’ intended country of sales of
the product.
2. How Long is The Limited Warranty Period?
The limited warranty period for the Product
extends for ONE (1) YEAR from the date of
purchase of the Product, documented by valid
proof of purchase. The limited warranty for
original Philips rechargeable battery extends for
six (6) months from the date of purchase.
3. What Will Philips Do if The Product is Not Free
From Material Defects in Materials and
Workmanship During The Limited Warranty
Period?
During the limited warranty period, Philips or its
authorized service representative will, at its
option either repair or replace, without charge for
parts or labour, a materially defective Product
with new or refurbished parts or Product and
return such repaired or replaced Product to the
Consumer in working condition. Philips will
retain defective parts, modules or equipment.
Repaired or replaced Product will be covered by
this limited warranty for the balance of the
original limited warranty period or ninety (90)
days from the date of repair or replacement
whichever is longer. Repair or replacement of
Product, at Philips’ option is your exclusive
remedy.
4. What is Not Covered By This Limited Warranty?
This limited warranty does not cover:
a) Product that has been subjected to misuse,
accident, shipping or other physical damage,
improper installation, abnormal operation
handling, neglect, inundation, fire, water or
other liquid intrusion; or
x-saber_master_en.book Page 87 Wednesday, November 14, 2007 12:42 PM
Page 87
88
b) Product that has been damaged due to
repair, alteration, or modification by anyone
not authorized by Philips; or
c) Product that has reception or operation
problems caused by signal conditions,
network reliability or cable or antenna
systems; or
d) Product defects or problems caused by uses
with non-Philips products or accessories; or
e) Product which warranty/quality stickers,
product serial number or electronic serial
number has been removed, altered or
rendered illegible; or
f) Product purchased, used, serviced, or
shipped for repair from outside the original
country of purchase, or used for commercial
or institutional purposes (including but not
limited to Products used for rental
purposes); or
g) Product returned without valid proof of
purchase or which proof of purchase has
been altered or is illegible.
h) Normal wear and tear or Force Majeure.
5. How Do You Get Warranty Service?
a) Return the Product to an authorized service
center of Philips. You may contact the local
Philips office for the location of the nearest
authorized service center.
b) The SIM card must be removed from the
Product before it is given to Philips. Philips
assumes no liability for damaged or loss of
the SIM card or the data contained therein.
c) If the Product failure is not covered by this
limited warranty, or this limited warranty is
inapplicable, void or invalid due to any
terms and conditions stated herein, the
Consumer will be charged for the cost of
repair or replacement of the Product and all
other related cost incurred in repairing or
replacing the Product.
d) IMPORTANT - you are required to return
the Product together with a valid proof of
purchase which must identify the point of
purchase, date of purchase, Product model
and Product serial number clearly.
6. Other Limitation: This Warranty is The Entire
Agreement.
EXCEPT FOR THE EXPRESS
WARRANTIES SET FORTH ABOVE AND
THOSE IMPLIED BY LAW AND WHICH
CANNOT BE EXCLUDED OR MODIFIED
BY AGREEMENT, PHILIPS PROVIDES NO
OTHER WARRANTY WHETHER EXPRESS
OR IMPLIED (WHETHER BY STATUTE,
UNDER THE OPERATION OF LAW OR
OTHERWISE) AND SPECIALLY DISCLAIMS
x-saber_master_en.book Page 88 Wednesday, November 14, 2007 12:42 PM
Page 88
89
ANY WARRANTY OF SATISFACTORY
QUALITY MERCHANTABILITY OR
FITNESS FOR A PARTICULAR PURPOSE.
PHILIPS’ TOTAL LIABILITY FOR
DAMAGES RELATING TO OR ARISING
OUT OF THE PURCHASE OR USE OF THE
PRODUCT, REGARDLESS OF THE TYPE
OR CAUSE OF SUCH DAMAGE OR THE
FORM OR CHARACTERISATION OF THE
CLAIM ASSERTED (E.G. CONTRACT OR
TOPIT), SHALL NOT EXCEED THE
ORIGINAL PURCHASE PRICE PAID FOR
THE PRODUCT.
HOWEVER IN NO EVENT SHALL PHILIPS
BE LIABLE FOR ANY PUNITIVE, SPECIAL,
INCIDENTAL, INDIRECT OR
CONSEQUENTIAL DAMAGES (INCLUDING
BUT NOT LIMITED TO THE LOSS OF
USE, LOSS OF TIME, INCONVENIENCE,
COMMERIAL LOSS, LOST PROFITS, LOST
BUSINESS OPPORTUNITIES, COST OF
SUBSTITUTION OF GOODS OR
SERVICES, INVESTMENTS, DAMAGE TO
GOODWILL OR REPUTATION, OR LOSS
OF DATA AND CLAIMS BY THIRD
PARTIES) RESULTING FROM PURCHASE
OR USE OF THE PRODUCT, TO THE
FULLEST EXTENT ALLOWED BY LAW,
WHETHER OR NOT PHILIPS HAS BEEN
ADVISED OF THE POSSIBILTY OF SUCH
DAMAGES. THESE LIMITATIONS SHALL
APPLY NOTWITHSTANDING THE
FAILURE OF THE ESSENTIAL PURPOSE
OF ANY LIMITED REMEDY.
This limited warranty represents the complete
and exclusive agreement between the Consumer
and Philips with respect to this cellular Product
and it supercedes all prior agreements between
the parties, oral or written, and all other
communications between the parties relating to
the subject matter of this limited warranty. No
carrier, retailer, agent, dealer, employee, thereof,
or employee of Philips is authorized to make
modifications to this limited warranty and you
should not rely on any such representation.
This limited warranty does not affect the
Consumer’s statutory rights under applicable
national laws in force.
x-saber_master_en.book Page 89 Wednesday, November 14, 2007 12:42 PM
Page 89
90 Specific Absorption Rate Information
Specific Absorption Rate Information
International standards
THIS MOBILE PHONE MEETS THE INTERNATIONAL RECOMMENDATIONS FOR EXPOSURE TO
RADIO WAVES
Your mobile phone is a radio transmitter and receiver. It is designed and manufactured not to exceed the l imit s
for exposure to radio frequency (RF) energy defined by the international standards. These recommendations
have been established by the International Commission on Non-Ionizing Radiation Protection (ICNIRP) and,
the Institute of Electrical and Electronics Engineers (IEEE) that f orecast a substantial safe ty margin for assuring
the protection of all persons, regardless of age and health.
The exposure recommendations for mobile phones use a measurement unit known as the Specific Absorption
Rate (SAR). The SAR limit recommended by the ICNIRP for the mobile phones used by the general public is
2.0W/kg averaged over ten grams of tissue and, is 1,6W/kg averaged over one gram of tissue by IEEE Std
1528 for the head.
Tests for SAR have been conducted using recommended operating positions with the mobile phone transmitt ing
at its highest certified power level in all tested frequency bands. Although the SAR is determined at the highest
certified power level, the actual SAR levels of the mobile phone while operating are generally below the
maximum SAR value. This is because the phone is designed to operate at mult iple power leve ls so as to use only
the power required to reach the network. In general, the closer you are to a base station antenna, the lower the
power output.
While there may be differences between the SAR levels of various phones and at various positions, they all meet
the international protection standards for exposure to radio waves.
The highest SAR value for this Philips Xenium 9@9q mobile phone when tested for compliance against the
standard was 0,266W/kg for ICNIRP recommendation and 0,076W/kg for IEEE Std 1528.
For limiting the radio waves exposure, it is recommended to reduce the mobile phone call duration or to use a
headset. The purpose of those precautions is to take the mobile phone away from the head and the body.
9@9Q_SAR.fm Page 90 Friday, January 4, 2008 10:35 AM
Page 90
Specific Absorption Rate Information 91
USA
Your wireless phone is a radio transmitter and receiver. It is designed and manufactured not to exceed limits
for exposure to radio frequency (RF) energy set by the Federal Communications Commission (FCC) of the
U.S. Government. These limits are part of comprehensive guidelines and establish permitted levels of RF
energy for the general population. The guidelines are based on standards that were developed by independent
scientific organizations through periodic and thorough evaluation of scientific studies. The standards include
a substantial safety margin designed to assure the safety of all persons, regardless of age or health. The
exposure standard for wireless fixed phoned employs a unit of measuremen t known as the Specific Absorption
Rate, or SAR. The SAR limits set by the FCC are 1.6W/kg. Tests for SAR are conducted using standard
operating positions accepted by the FCC with the phone transmitting as its highest certified power level in all
tested frequency bands.
Although the SAR is determined at the highest certified power level, the actual SAR level of the phone while
operating can be well below the maximum value. This is because the phone is designed to operate at multiple
power levels so as to use only the power required to reach the network. In general, the closer you are to a
wireless base station, the lower the output power. The Highest SAR Values for this model phone when tested
for use on the Right cheek were 0.266 mW/g.
This device complies with part 15 of the FCC Rules. Operation is subject to the following two conditions:
(1) This device may not cause harmful interference, and
(2) this device must accept any interference received, including interference that may cause undesired
operation.
9@9Q_SAR.fm Page 91 Friday, January 4, 2008 10:35 AM
 Loading...