


ENGLISH
1/DVD-930/935-ENGLISH 10-08-1999 09:55 Pagina 1
This apparatus is fitted with an approved 13 Amp plug.
To change a fuse in this type of plug, proceed as follows:
1. Remove fuse cover and fuse.
2. Fix new fuse which should be a BS1362 5A, A.S.T.A. or BSI approved
type.
3. Refit the fuse cover.
If the fitted plug is not suitable for your socket outlets, it should be cut off
and an appropriate plug fitted in its place.
If the mains plug contains a fuse, this should have a value of 5A. If a plug
without a fuse is used, the fuse at the distribution board should not be
greater than 5A.
NOTE
The severed plug must be destroyed to avoid a possible shock
hazard should it be inserted into a 13A socket.
How to connect a plug
The wires in the mains lead are coloured in accordance with the following
code:
Blue - 'Neutral' ('N'); Brown - 'Live' ('L')
1. The Blue wire must be connected to the terminal which is marked with
the letter 'N' or coloured Black.
2. The Brown wire must be connected to the terminal which is marked
with the letter 'L' or coloured Red.
3. Do not connect either wires to the earth terminal in the plug which is
marked by the letter 'E' or by the safety earth symbol or coloured green
or green-and-yellow.
Before replacing the plug cover, make certain that the cord grip is
clamped over the sheath of the lead - not simply over the two wires.
IMPORTANT NOTE FOR USERS IN THE UK
DK
N
Advarsel:
Laserudstråling ved åbning når sikkerhesafbrydere er ude af
funktion. Undgå u tsættelse for stråling.
Bemærk:
Netafbryderen POWER er sekundært indkoblet og afbryder ikke
strømmen fra nettet. Den indbyggede netdel er derfor tilsluttet til
lysnettet så længe netstikket sidder i stikkontakten.
Observer:
Nettbryteren POWER er sekundert innkoplet. Den
innebygdenetdelen er derfor ikke frakoplet nettet så lenge
apparatet er tilsluttet nettkontakten.
S
Klass 1 laserapparat
Varning!
Om apparaten används på annat sätt än i denna bruksanvisning
specificerats, kann användaren utsättas för laserstrålning, som
överskrider gränsen för läserklass 1.
Observera!
Strömbrytaren POWER är sekundärt kopplad och inte bryter
strömmen fråan nätet Den inbyggda nätdelen är därför ansluten
till elnätet så länge stickproppen sitter i vägguttaget.
SF
Luokan 1 laserlaite + Klass 1 laserapparat
Varoitus!
Laitteen käyttäminen muulla kuin tässä käyttöohjeessa mainitulla
tavalla saattaa altistaa käyttäjän turvallisuusluokan 1 ylittävälle
lasersäteilille.
Huom.
Toiminnanvalitsin POWER on kytketty toisiopuolelle, eikä se kytke
laitetta irti sähköverkosta. Sisäänrakennettu verkko-osa on
kytkettynä sähköverkkoon aina silloin, kun pistoke on pistorasiassa.
IMPORTANT NOTE
2
This product incorporates copyright protection
technology that is protected by method claims of
certain U.S. patents and other intellectual property
rights owned by Macrovision Corporation and other
rights owners. Use of this copyright protection
technology must be authorized by Macrovision
Corporation, and is intented for home and other
limited viewing uses only unless otherwise authorized
by Macrovision Corporation. Reverse engineering or
disassembly is prohibited.
Manufactured under license from Dolby Laboratories.
“Dolby” and the double-D symbol are trademarks of
Dolby Laboratories. Confidential Unpublished Works.
©1992-1997 Dolby Laboratories, Inc. All rights
reserved.
1/DVD-930/935-ENGLISH 10-08-1999 09:55 Pagina 2
3
GB
F
E
NL
D
I
P
S
GB
E
NL
D
I
P
S
F
ENGLISH P 4
FRANÇAIS P 18
ESPAÑOL P 33
NEDERLANDS P 48
DEUTSCH P 63
ITALIANO P 78
PORTUGUÊS P 93
SVENSKA P 108
ENGLISH P 4
FRANÇAIS P 18
ESPAÑOL P 33
NEDERLANDS P 48
DEUTSCH P 63
ITALIANO P 78
PORTUGUÊS P 93
SVENSKA P 108
ENGLISHFRANÇAISESPAÑOL
NEDERLANDS
DEUTSCHITALIANO
PORTUGUÊS
SVENSKA
CONTENTS
CLASS 1
LASER PRODUCT
LASER SAFETY: This unit employs a laser. Only a
qualified service person should remove the cover or
attempt to service this device, due to possible eye
injury.
For Customer Use:
Read carefully the information
located at the bottom of your
DVD-VIDEO player and enter
below the Serial N°.
Retain this information for
future reference.
Model N°. DVD-VIDEO 930/935
Serial N°.
The DVD-VIDEO player is in conformity with the
EMC directive and low-voltage directive.
LUOKAN I
LASERLAITE
KLASS 1
LASERAPPARAT
1/DVD-930/935-ENGLISH 10-08-1999 09:55 Pagina 3

ENGLISH
4
CONTENTS
INTRODUCTION P 4
INSTALLATION P 5
STANDARD CONNECTIONS P 7
GETTING STARTED P 10
PLAYING A DVD-VIDEO DISC P 11
PLAYING A VIDEO CD P 13
PLAYING A CD P 14
SETTINGS P 15
PARENTAL CONTROL P 16
BEFORE REQUESTING SERVICE P 17
INTRODUCTION
DVD-VIDEO-THE ENTERTAINMENT MEDIUM FOR THE
MILLENIUM
Video was never like this before! Perfect digital studio-quality
pictures with truly 3-dimensional digital multichannel audio.
Story sequences screened from your own choice of camera
angle. Language barriers broken down by sound tracks in as
many as eight languages, plus subtitles - when you want them
- as many as 32. And whether you watch DVD-Video on widescreen or regular TV, you always see it the way it was meant to
be.
THE PHILIPS MATCHLINE PLAYER: DVD-VIDEO AT ITS
BRILLIANT BEST
Top model of the Philips DVD-Video player range, the
DVD930/935 Matchline player guarantees you the highest
quality, convenience, and simplicity of operation available in
this new medium. What’s more, it gives you outstanding
reproduction of Video and Audio CDs. Thus, you get the best
of both worlds - upgrading to DVD-Video, while still enjoying
the unrestricted use of your existing disc collection.
That’s player performance out of the top drawer, from Philips.
And it’s guaranteed by the most advanced technology, and
based on the longest experience, in the optical disc industry.
DIGITAL VIDEO
DVD-Video uses state-of-the-art MPEG2 data compression
technology to register an entire movie on a single 5-inch disc.
DVD’s variable bitrate compression, running at up to 9.8
Mbits/second, captures even the most complex pictures in their
original quality.
The crystal-clear digital pictures have a horizontal resolution
of over 500 lines, with 720 pixels (picture elements) to each
line. This resolution is more than double that of VHS, superior
to Laser Disc, and entirely comparable with digital masters
made in recording studios.
DVD-Video discs conform to either the PAL or NTSC video
standard. This dual-standard player can play both types, and
present them in the best possible way on your multistandard
TV screen.
As the universal video system of the future, DVD-Video offers
optimal pictures on any TV screen.
CONSTRUCTION
DVD has afour times denser recording pattern, and only half
the focal length of CD. But full compatibility demands accurate
signal readout from both types of disc. That’s why this player
features a Dual-lens, single-laser optical pickup, guaranteeing
the best accuracy in both cases. The individual lenses are
optimized for spherical aberration, which is not possible with
dual-focus hologram systems. Lens selection is automatic
whenever a disc is loaded.
Stepping motor technology (already proven in Philips CD-ROM
drives) ensures very fast direct access to the video and audio of
your choice. Years of experience in optical drive control are
embedded in the Philips High-Density signal processor which
optimizes stepping motor control to get the best possible
readout of high-density DVD-Video discs.
INTRODUCTION
1/DVD-930/935-ENGLISH 10-08-1999 09:55 Pagina 4
ENGLISH
5
Your Philips DVD-Video player is one of the first-generation
players for digital video discs conforming to the universal DVD
Video standard. With it, you will be able to enjoy full-length
movies with true cinema picture quality, and stereo or
multichannel sound (depending on the disc, and on your
playback set-up). The unique features of DVD-Video, such as
selection of sound track and subtitle languages, and of
different camera angles (again depending on the disc), are all
included. What’s more, Philips Parental Control lets you decide
which discs your children will be able to see.
You will find your player remarkably easy to use, by way of the
On-Screen Display and player display, in combination with the
remote control.
In addition to DVD-Video discs, you will also be able to play all
Video CDs and audio CDs. The disc types which run on the
player feature one or more of these logos on the disc
packaging:
First check and identify the contents of your DVD-Video player
package, as listed below:
• DVD-Video player;
• Remote Control Handset with separately-packed batteries;
• 2-core power cord;
• Euroconnector cable (Europe);
• S-Video cable (USA);
• 1-way video (CVBS) cable;
• 2-way audio cable;
• User Manual
If any item should be damaged or missing, please inform your
supplier without delay.
Keep the packaging materials; you may need them to
transport your player in the future.
• Place the player on a firm, flat surface.
• Keep away from domestic heating equipment and direct
sunlight.
• In a cabinet, allow about 2.5 cm (1 inch) of free space all
around the player for adequate ventilation.
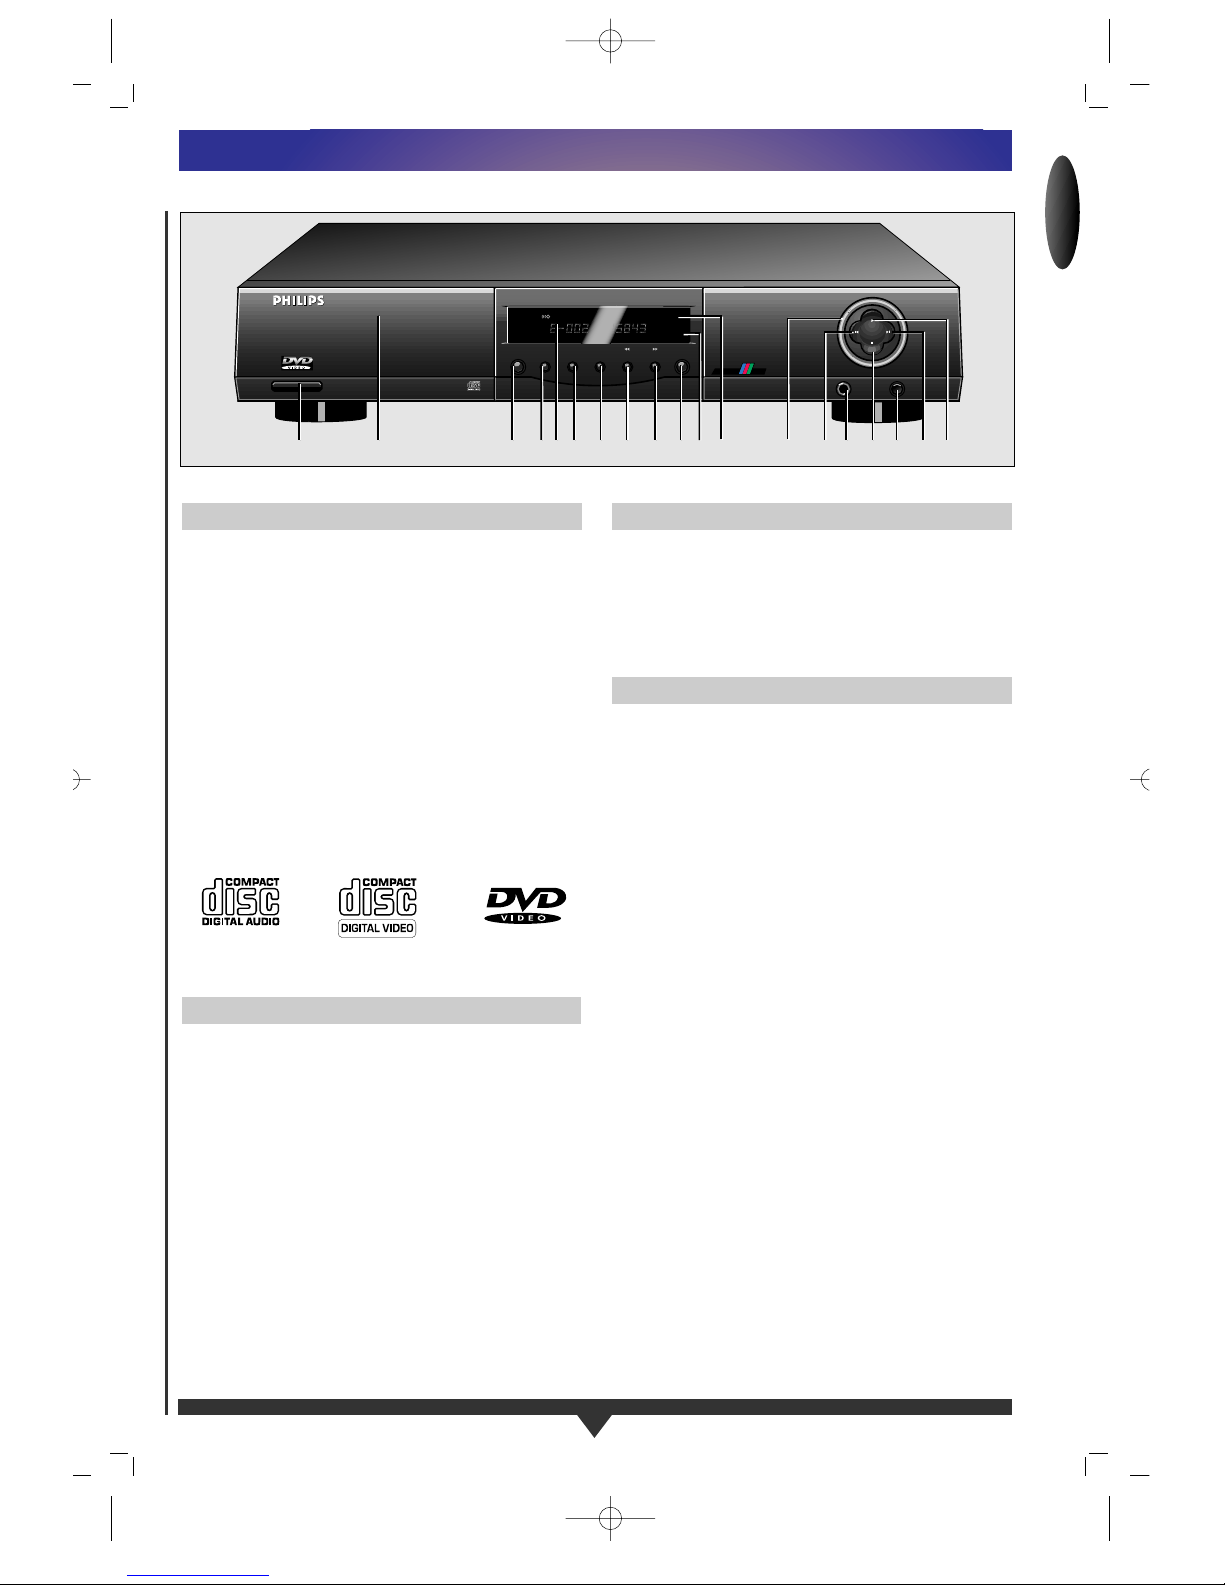
1 On/Off button.
2 Disc loading tray (behind door).
3 Tray Open/Close key.
4 Scan key.
5 Display.
6 Repeat key.
7 Shuffle key.
8 Search
11 key.
9 Search 22 key.
10 FTS selector key.
11 Remote control sensor.
12 Standby indicator.
13 Stop key.
14 O Previous title/chapter/track key.
15 Phone; Headphone jack.
16 Pause/Still, Step key.
17 Level; Headphone volume control.
18 P Next title/chapter/track key.
19 Play key.
FRONT OF PLAYER
PLACEMENT
UNPACKING
INTRODUCTION
TITLE CHAPTER TIME
REPEAT TITLE
ON/OFF
OPEN/CLOSE SCAN REPEAT SHUFFLE SEARCH FTS
LEVELPHONES
STOP
STOP
PLAY
PAUSE
DVD / VIDEO CD / CD PLAYER
1
23456789
1310 11 12 14 15 1816 17 19
MATCH
LIN
E
INSTALLATION
1/DVD-930/935-ENGLISH 10-08-1999 09:55 Pagina 5
ENGLISH
6
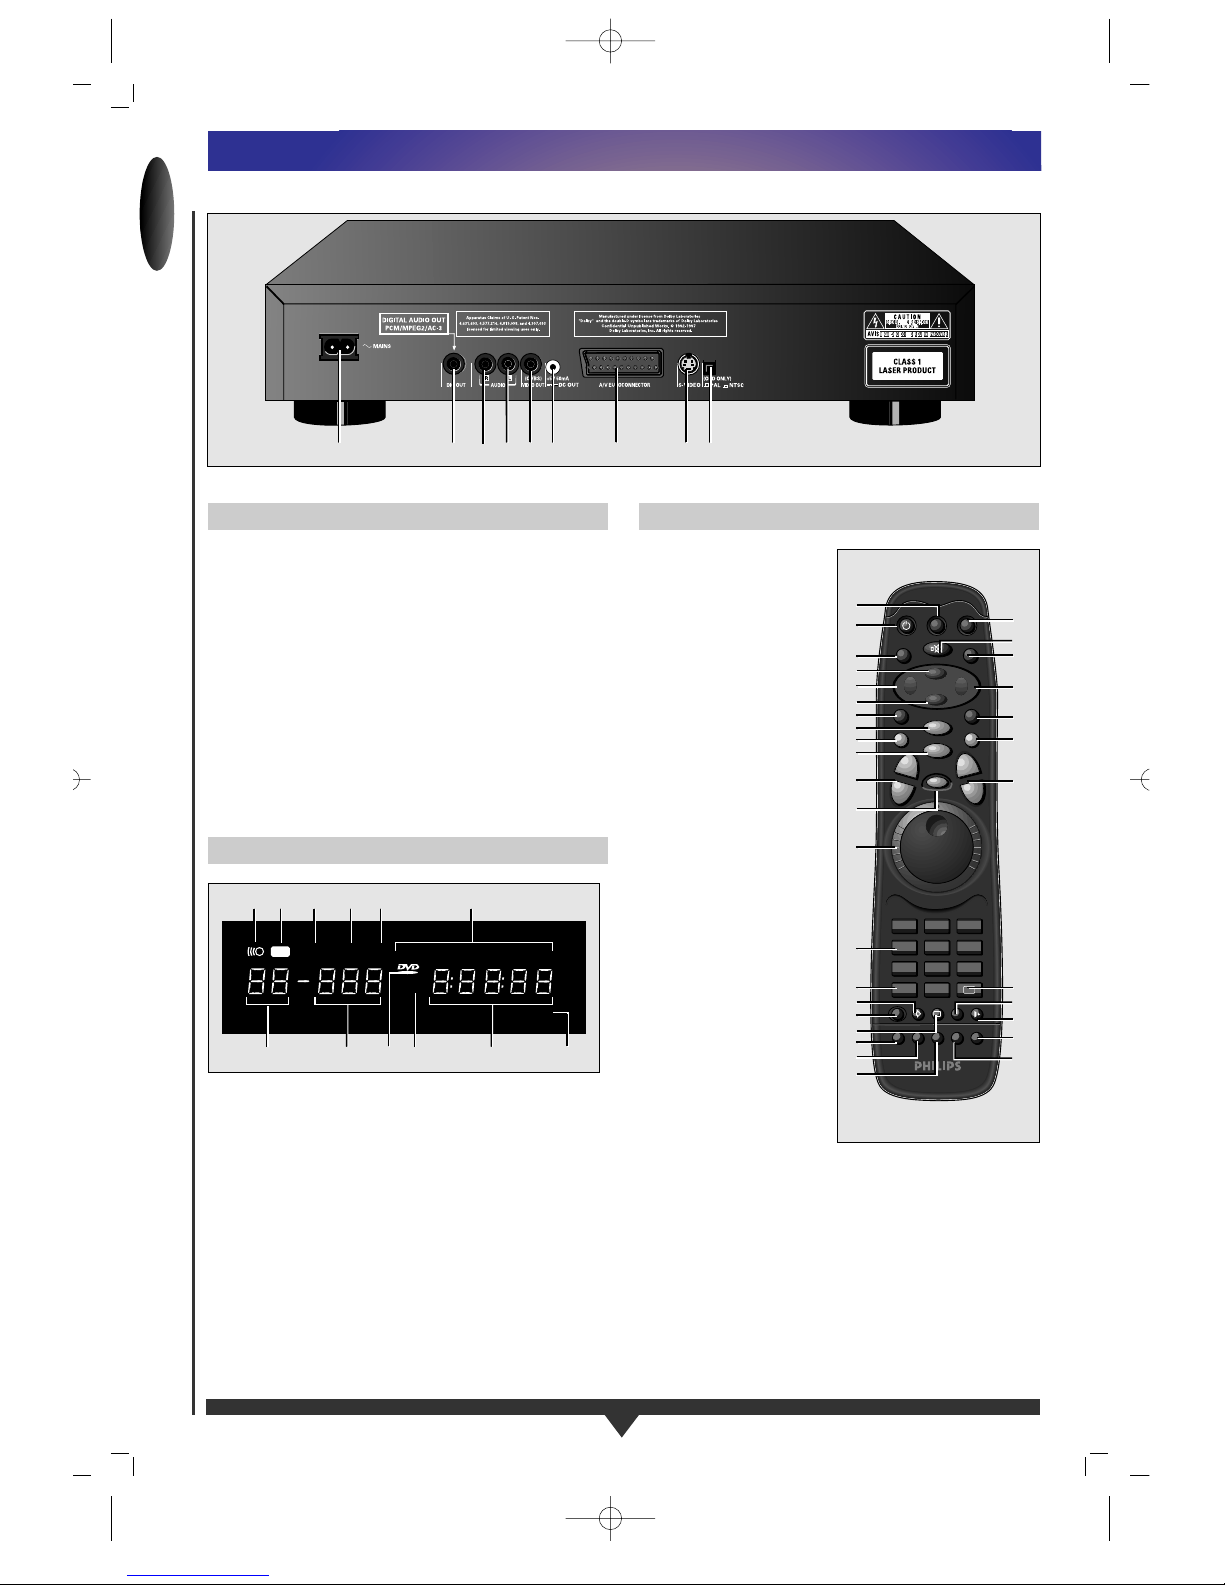
1 Power supply socket.
2 Digital audio output connector.
3 Audio R; Audio output R.
4 Audio L; Audio output L.
5 Video (CVBS); Video output.
6 DC Power output connector
7 Euroconnector (Europe only).
8 S-Video (USA only).
9 NTSC/PAL switch (for player menus).
CAUTION
DO NOT TOUCH THE INNER PINS OF REAR-PANEL
CONNECTORS. ELECTROSTATIC DISCHARGE MAY CAUSE
PERMANENT DAMAGE TO THE UNIT.
1 Remote control active (flashing).
2 FTS (Favourite Track Selection) active.
3 SHUFFLE active.
4 PAUSE active.
5 SCAN active.
6 REPEAT A-B/CHAPTER/TITLE/TRACK mode active.
7 Chapter or track calendar.
8 TOTAL/REMaining/TRACK TIME in hours, minutes and
seconds.
9 (V)CD play.
10 DVD play.
11 DVD CHAPTER or VCD/CD TRACK number.
12 DVD TITLE number.
1 REPEAT (chapter, track,
title, disc).
2 A-B REPEAT.
3 SCAN On/Off.
4 SUBTITLE language
selector or Subtitle
On/Off.
5 SETUP; Select player
SETTINGS menu (in Stop
mode only).
6 Select DVD camera
ANGLE.
7T-C;mode selector
Title/Chapter.
8 Numerical key pad.
9 Jog/shuttle control.
10 JOG/PAUSE (On/Off)
11 TV VOLume (Up/Down).
12 STOP 9 or EJECT.
13 PREVIOUS O /search
backward.
14 PLAY 2.
15 RETURN.
16 Cursor down 4.
17 Cursor left 1.
18 Cursor up 3.
19 TITLE; title menu
On/Off.
20 TV POWER.
21 TV /DVD selector.
22 DVD /Standby.
23 TV Audio MUTE.
24 MENU; root menu
On/Off.
25 Cursor right 2.
26 ENTER (acknowledge
menu selection).
27 NEXT P /search forward.
28 TV Preset (Up/Down).
29 OSD (On-Screen Display) on/off.
30 AUDIO language selector.
31 RESUME play from last position.
32 FTS (Favourite Track Selection).
33 SHUFFLE on/off.
+
--
+
--
+
--
+
--
TV
TITLE
RETURN
EJECT
TV VOL
TV P
JOG/PAUSE
ENTER
MENU
TV/DVD DVD
J
K
2
9
123
456
789
0
T-C
+ j
ANGLESETUP SUBTITLE AUDIO RESUME
FTSSHUFFLEREPEATREPEAT
A-B
SCAN
....
12
3
4
3
5
7
8
9
11
12
14
13
15
17
19
20
4
16
6
21
18
33
32
30
31
29
27
25
24
28
22
23
26
1
10
2
REMOTE CONTROL
TRACKTITLESCANPAUSE
TIMETRACKTOTAL REM
CHAPTER
1 2 3 4 5 6 7 8 9 10 11 12 13 14 15
CD
REPEAT
SHUFFLE
F S
T
CHAPTERTITLE TRACK
V
-BA
......... . . . . .
+
1 3104 52 6
712 11 9 8
DISPLAY
REAR OF PLAYER
20 18 16 14 12 108642
19 17 15 13 11 9 7 5 3 1
21
1
2
3
456 89
7
INSTALLATION
1/DVD-930/935-ENGLISH 10-08-1999 09:55 Pagina 6

ENGLISH
7
STANDARD CONNECTIONS
CONNECTION TO A TV WITH AN A/V EUROCONNECTOR SOCKET (EUROPE)
This method produces the highest possible picture and sound
quality from your TV.
•
Connect the Euroconnector (7) on the rear of the player to
the corresponding connector on the TV using the cable
supplied.
•
You can also connect the audio Left and Right channel
sockets (3-4) on the player rear panel to the corresponding
sockets on your stereo system.
Use the TV/DVD button (21) on the remote control to
temporarily switch back from DVD to TV viewing and vice versa.
Do not connect your DVD-player via your VCR, because the
video quality could be distorted by the copy protected system.
20 18 16 14 12 108642
19 17 15 13 11 9 7 5 3 1
21
A/V EUROCONNECTOR CABLE
CONNECTION TO A TV WITH AN S-VIDEO SOCKET (USA)
This method produces the highest possible picture and sound
quality from your TV.
•
Connect the S-video socket (8) on the rear of the player to
the corresponding socket on the TV using the cable supplied.
•
Connect the audio Left and Right channel sockets (3-4) on
the rear of the player to the corresponding sockets on the TV
using the cable supplied. Alternatively, you can use the same
cable to connect the audio Left and Right sockets on the rear
of the player to the corresponding sockets on your stereo
system.
20 18 16 14 12 108642
19 17 15 13 11 9 7 5 3 1
21
S-VIDEO
IN
S-VIDEO CABLE
AUDIO CABLE
AUDIO
IN
CONNECTION TO A TV WITH A VIDEO (CVBS) SOCKET
This method produces excellent picture and sound quality from
your TV.
•
Connect the Video socket (5) on the rear of the player to the
corresponding socket on the TV using the cable supplied.
•
Connect the audio Left and Right channel sockets (3-4) on
the rear of the player to the corresponding sockets on the TV
using the cable supplied. Alternatively, you can use the same
cable to connect the audio Left and Right sockets on the rear
of the player to the corresponding sockets on your stereo
system.
CAUTION
DO NOT CONNECT THE PLAYER’S AUDIO OUTPUT (3-4) TO
THE PHONO INPUT OF YOUR STEREO SYSTEM.
20 18 16 14 12 108642
19 17 15 13 11 9 7 5 3 1
21
VIDEO
IN
VIDEO CABLE
AUDIO CABLE
AUDIO
IN
NOTE
– Depending on your TV and other equipment, there are
various ways you could connect the DVD-Video player.
These are shown below.
– Please refer to your TV, VCR, Stereo System and any other
User Manual(s) as necessary to make the optimal
connections.
1/DVD-930/935-ENGLISH 10-08-1999 09:55 Pagina 7

ENGLISH
8
STANDARD CONNECTIONS
MULTI-CHANNEL SOUND FOR HOME THEATRE
For multichannel sound, your player provides both digital and
analog audio outputs.
DIGITAL (MPEG 2 MULTICHANNEL OR DOLBY DIGITAL™)
MULTICHANNEL SOUND
For this, which provides the highest possible sound quality, you
need a digital multichannel A/V receiver. Connect the player’s
digital audio output to the corresponding input on the receiver
using the optional digital audio cable. In this case, do not use
the player’s audio Left and Right outputs.
You will need to activate the digital output of the player
(See
Settings p. 16).
The audio format of the digital output is dependent on the
audio format of the selected audio stream.
Make sure that the selected audio stream matches the
capabilities of the receiver connected to the digital output.
ANALOG (DOLBY PRO LOGIC™) MULTICHANNEL SOUND
If your TV set has a Dolby Pro Logic™ decoder, you simply
hook up the player to the TV using the Euroconnector, S-Video
and audio, or Video (CVBS) and audio connections p. 7. If not,
you need to make the Euroconnector, S-Video, or Video (CVBS)
connection to the TV p. 7, and connect the player’s audio Left
and Right outputs to the corresponding inputs on a Dolby
Pro Logic™ Audio/Video receiver, using the cable supplied.
For speaker connections, follow the instructions given in the TV
set or A/V receiver user manual.
NOTE
– You cannot use the RF antenna connection for home theatre.
– If the audio format of the digital output does not match the
capabilities of your receiver, the sound will be muted.
2018 1614 12108642
1917 1513 119 7 5 3 1
21
20 18 16 14 12 108642
19 17 15 13 11 9 7 5 3 1
21
DIGITAL AUDIO
IN
DIGITAL AUDIO
CABLE
HEADPHONES
To listen to the player sound directly, plug the headphone jack
into the headphone socket on the front of the player. Adjust
the volume as desired with the headphone volume control.
DIGITAL AUDIO (STEREO) SOUND CONNECTION
For this connection, which produces the highest possible stereo
sound quality, you need an audio amplifier with digital audio
input. Connect the player’s digital audio output to the
corresponding input on the amplifier. In this case, do not use
the player’s audio Left and Right outputs.
NTSC/PAL SETTING
Use this switch to set the player menu output according to the
TV-set used.
NOTE
– The video output standard for Video CD and DVD-Video
discs most corresponds to the disc being played.
1/DVD-930/935-ENGLISH 10-08-1999 09:55 Pagina 8

ENGLISH
9
CONNECTING THE POWER SUPPLY
• Plug the female end of the power cable supplied into the
Power connector (1) on the rear of the player.
• Plug the male end of the cord into an AC outlet.
NOTE
–
The player will automatically adjust to the local mains voltage.
–
When the player is in the “OFF” position, it is stil consuming
some power. If you wish to disconnect your player completely
from the mains, withdraw the plug from the AC Outlet.
CAUTION
ONLY A QUALIFIED SERVICE PERSON SHOULD REMOVE
THE COVER OR ATTEMPT TO SERVICE THIS DEVICE.
USE OF CONTROLS, ADJUSTMENTS OR PERFORMANCE
OF PROCEDURES OTHER THAN THOSE SPECIFIED HEREIN
MAY RESULT IN HAZARDOUS RADIATION EXPOSURE OR
OTHER UNSAFE CONDITIONS.
INFRA RED REMOTE CONTROL
LOADING THE BATTERIES
• Open the battery compartment cover.
• Insert 3 'AA' (R6 or SUM3) batteries as indicated inside the
battery compartment.
• Close the cover.
CAUTION
DO NOT MIX OLD AND NEW BATTERIES. AND NEVER MIX
DIFFERENT TYPES OF BATTERIES (STANDARD, ALKALINE
AND SO ON).
STANDARD CONNECTIONS
PROGRAMMING THE UNIVERSAL REMOTE CONTROL
The remote control of the DVD-Video player can be
programmed to control your Television, Amplifier or Receiver.
For the control of these products the following buttons on the
remote control are available:
• Amplifier - Volume Up/Down and Audio Mute.
• Receiver - Volume Up/Down and Audio Mute.
• Television - Volume Up, Volume Down, Channel Up/Down
and TV Mute.
In order to change the remote control to control your brand of
Television, Amplifier or Reciever follow the next steps.
1 Select either your brand of Television, Amplifier or Receiver
from the next table. Mark the first 3 digit code number
behind the brand name.
2 Press ENTER en RETURN simultaneously until the Jog/Pause
button lights up.
NOTE
– Note that your remote control is now disabled for all
functions.
3 Enter the digits of the selected 3 digit code number. Every
time you enter a digit, the Jog/Pause button will blink shortly.
When entering the last (3-rd) digit, the Jog/Pause button will
blink twice and then switches off to confirm that the
programming sequence was correctly executed.
NOTE
– In case you press a wrong key or an incorrect number, the
Jog/Pause button will switch off and flashes once. The remote
control has not been re-programmed. Repeat step 1,2 and 3.
4 The remote control is now programmed to control your
Television or Amplifier or Receiver. If it does not react
properly on the mentioned buttons, select the next 3 digit
code number behind the your brand of Television, Amplifier
or Receiver and repeat step 2 and 3.
AMPLIFIERS CODE
Aiwa 431
Grundig 420, 432
Kenwood 428, 447
Marantz 420
Philips 420, 445
Pioneer 401
Sony 415
Technics 423, 434
Yamaha 427
RECEIVERS CODE
Aiwa 536, 546, 573, 581,
586, 606, 617, 636,
647, 649
Denon 502, 704
Grundig 557, 561, 580
Harman/
Kardon 531
JVC 521, 630, 645, 658
Kenwood 510, 523, 589, 590
Luxman 660, 705
Marantz 538, 557, 568
Onkyo 528, 535, 539
Philips 557, 663, 677
Pioneer 582, 645
Sansui 665, 689
Sony 545, 549
Technics 564, 588
Yamaha 526, 551, 691
TELEVISION CODE
Bang &
Olufsen 057,058
Grundig 048, 115, 119, 124, 256,
267, 271
Hitachi 026, 029, 033, 034, 064,
071, 074, 079, 095, 120,
121,134, 137, 139, 160,
173, 196, 230, 269, 273,
276
JVC 029, 039, 047, 092, 098,
114, 116, 207
Panasonic 095, 130, 131, 138, 149,
192, 204, 273
Philips 000, 010, 011, 030, 033,
058, 117, 181, 209, 271
Radiola 010, 030, 181
Saba 052, 058, 074, 095, 120,
121, 124, 130, 165, 170,
187, 194, 273
Samsung 000, 007, 030, 032, 059,
134, 155, 166, 184, 206,
253, 257
SBR 010, 011, 030, 033, 117
Schneider 011, 030, 135, 148, 172,
181, 188, 197, 207, 221,
268
Sony 001, 008, 009, 029, 075,
263
Telefunken 006, 051, 056, 068, 074,
130, 151, 154, 173, 187,
194, 251, 260
Thomson 074, 120, 121, 124, 165,
170, 186, 194, 196, 223
Toshiba 028, 029, 048, 147, 262,
270
1/DVD-930/935-ENGLISH 10-08-1999 09:55 Pagina 9

ENGLISH
10
GETTING STARTED
OPERATION/GETTING STARTED
NOTE
– Unless otherwise mentioned, all operations can be carried
out with the remote control. Always point the remote control
directly at the player, making sure there are no obstructions
in the path of the infrared beam.
– When there are corresponding keys on the front panel, they
can also be used.
SWITCHING ON
Switch on the TV and select the video input for your DVD-Video
player.
To enjoy sound through your stereo system, turn on the system
and select the source input for the DVD-Video player.
To enjoy DVD-Video with multichannel (surround) sound,
switch on the Home Theatre system and select the source input
for your video player.
• On the front of the DVD-Video player, press Power On/Off.
The player display lights, and the OSD invites you to load a
disc.
• With Autoplay on (the factory setting) any disc already
loaded in the player starts to play.
LOADING A DISC
•
Press Open/Close on the front of the player, or hold down
the Stop/Eject button (12) on the remote control to activate
eject. The disc loading tray opens.
•
Lay your chosen disc in the tray, label side up. Make sure it is
sitting properly in the correct recess.
•
Gently push the tray, or press Open/Close, to close the tray.
– With Autoplay on (the factory setting) play starts.
– With Autoplay off, the (play) screen for the type of disc
loaded appears on the OSD, and information about the disc’s
contents and total playing time appear on the display.
– To turn Autoplay off or on, see Settings P.16.
NOTE
– Since it is usual for DVD movies to be released at different
times in different regions of the world, all players have region
codes and discs can have an optional region code. If you load
a disc of a different region code to your player, you will see
the region code notice on the screen. The disc will not play,
and should be unloaded.
TITLE CHAPTER
REPEAT TITLE
POWER ON/OFF
OPEN/CLOSE SCAN REPEAT SHUFFLE SEA
R
POWER ON/OFF
1/DVD-930/935-ENGLISH 10-08-1999 09:55 Pagina 10

ENGLISH
11
PLAYING A DVD-VIDEO DISC
You will recognize DVD-Video discs by the logo. Depending on
the material on the disc (a movie, video clips, a drama series,
etc.) these discs may have one or more Titles, and each Title
may have one or more Chapters. Play stops at the end of each
Title. To make access easy and convenient, your player lets you
move between Titles, and also between Chapters.
NOTE
– During play, various icons will appear on the TV screen for
about 2 seconds when functions are selected. You can get rid
of these icons by pressing OSD.
– At any time during play, you can press OSD to call up the
Play Banner, which shows you which functions are active, for
about 2 seconds. To keep the Play Banner on the screen, hold
down OSD for a couple of seconds. To get rid of the Play
Banner, press OSD again.
PLAYING A TITLE
•
With Autoplay on (see Settings p.16), play starts when you
close the disc drawer.
•
With Autoplay off, press 2 (play).
NOTE
– Some DVD-Video discs carry their own Autoplay, in which
case play always starts automatically.
•
The disc may invite you to select an item from a menu. If the
selections are numbered, press the appropriate numerical
key; if not, use the Up/Down, Left/Right keys to highlight
your selection, and press OK.
•
As the disc plays, the player display shows the current title
and chapter, and the elapsed playing time.
•
Play will stop at the end of the Title. To go on to the next
Title, press 2 (play).
•
To stop play at any other time, press 9.
•
You can resume play from the point at which you stopped.
Press Resume.
•
The Resume feature applies, not only to the disc in the player,
but also to the last four discs you have played. Simply reload
the disc, press Resume.
MOVING TO ANOTHER CHAPTER
When a title on a disc has more than one chapter (which you
can see from the Player display), you can move to another
chapter as follows:
•
Press P briefly during play to step forward to the next
chapter.
•
Press O briefly during play to return to the beginning of the
current chapter. Press O briefly again to step back to the
previous chapter.
•
To go directly to any chapter, enter the chapter number
using the numerical keys.
NOTE
– If the number has more than one digit, press the keys in
rapid succession.
– For more information about chapters, see “Checking the
contents of DVD-Video discs: Menus” p. 12.
MOVING TO ANOTHER TITLE
When a disc has more than one title (which you can see from
both the OSD and the Player Display if you press 9), you can
move to another title as follows:
•
Press T-C, then press P briefly during play to step forward
to the next title.
•
Press T-C, then press O briefly during play to return to the
beginning of the current title. Press O briefly again to step
back to the previous title.
•
To go directly to any title, press T-C, then enter the title
number using the numerical keys.
NOTE
– If the number has more than one digit, press the keys in
rapid succession.
– For more information about titles, see “Checking the
contents of DVD-Video discs: Menus” p. 12.
PARENTAL
CONTROL
•
If you activate
Parental Control,
only discs that
you have already
authorised as
suitable for all ages
can be played as
above.
•
To play any other
DVD-Video disc,
the OSD will ask for the Parental Control Pin Code to be
entered. When this has been done, play starts automatically.
•
To activate Parental Control, and to authorize discs, see
Activating Parental Control (p.16).
NOTE
–
If you forget your pin code, you can erase it when the code is
requested as above, by pressing Stop four times. Parental
Control will then be de-activated. To re-activate it,
see
Activating Parental Control (p.16).
JOG/SHUTTLE
This is a convenient way to view still pictures (Jog), and to
search in slow, normal or fast motion (Shuttle). Both
functions work in reverse as well as forward play.
•
To select Jog/Shuttle, press Jog/Pause. The key lights up, and
the player goes into Pause mode.
TITLE 1 TITLE 2
CHAPTER 1 CHAPTER 2 CHAPTER 1 CHAPTER 2 CHAPTER 3
DVD-VIDEO DISC
PLAYING A DVD-VIDEO DISC
1/DVD-930/935-ENGLISH 10-08-1999 09:55 Pagina 11

ENGLISH
PLAYING A DVD-VIDEO DISC
Jog
•
With the Shuttle ring in the center position, turn the Jog disk
clockwise to view still pictures forwards, or anticlockwise to
view them in reverse. Turn slowly for step frames, faster to
move quickly through a sequence.
Shuttle
•
From the center position, turn the Shuttle ring clockwise for
forward movement, anticlockwise for reverse. In both cases
you can choose from 6 speeds: x1/8, 1/2, Normal, x2, x4
and x8 speed.
•
To exit Jog/Shuttle, press Jog/Pause: the Jog/Pause key goes
out.
STILL PICTURE AND STEP FRAME
(ON FRONT OF PLAYER)
•
To get a still picture, press ; during play.
•
To step forward to the next picture frame, press ; again.
•
To return to play, press 2 (play).
SEARCH
(ON FRONT OF PLAYER)
•
To search forwards or backwards through the disc at 2x
normal speed, press R or AA during play.
•
Search begins, and sound is muted.
To step up to 8x normal speed, press R or AA again.
•
To go directly to 8x normal speed, hold down R or AA
until the (8x) icon appears.
•
To return to 2x normal speed, press R or AA again.
•
Search speed and direction are indicated on the screen for 2
seconds each time R or AA is pressed.
•
To end the search, press 2, ; or 9 as desired.
SHUFFLE
This shuffles the playing order of chapters within a title, if the
title has more than one.
•
Press Shuffle during play. The Shuffle icon appears on the
screen for about 2 seconds.
•
As each chapter is played, its number disappears from the
track calendar.
•
To return to normal play, press Shuffle again.
REPEAT CHAPTER/TITLE/DISC
•
To repeat the currently-playing chapter, press Repeat: REPEAT
CHAPTER appears on the player display.
•
To repeat the currently-playing title, press Repeat a second
time: REPEAT TITLE appears on the display.
•
To repeat the entire disc, press Repeat a third time; REPEAT
appears on the display.
•
To exit Repeat mode, press Repeat a fourth time.
REPEAT A-B
To repeat or loop a sequence in a title:
•
Press Repeat A-B at your chosen starting point; A appears on
the player display.
•
Press Repeat A-B again at your chosen end point; A-B appears
on the display, and the repeat sequence begins.
•
To exit the sequence, press Repeat A-B again.
CAMERA ANGLE
•
If the disc contains sequences recorded from different camera
angles, the angle icon appears, showing the number of
available angles, and the angle being shown. You can then
change the camera angle if you wish.
•
To get another angle, press Angle. The angle icon will show
the next angle.
•
To go to any angle directly, enter the angle number using the
numerical keys (1-9).
NOTE
– The angle icon remains on the screen unless you turn off the
angle feature. You will need to do that if you want to use the
numerical keys to change a title or chapter for another
purpose.
•
To turn off the angle feature, press OSD: the angle icon
disappears.
•
To turn the angle feature on again, press angle again: the
angle icon reappears.
CHANGING THE AUDIO LANGUAGE AND CHANNEL
CONFIGURATION
This changes the language and the audio channel
configuration when alternatives are available on the disc.
•
Press Audio during play. The audio language and channel
configuration icons appear on the screen for 2 seconds.
•
Press Audio repeatedly to step through the options. At each
step, the language changes. If the sound configuration
changes too (for example from multichannel to stereo) this
is also indicated.
SUBTITLES
•
When subtitles are available on a disc, you can turn them on
by holding Subtitle down during play until the subtitles
appear.
•
To step through the language options, press Subtitle
repeatedly.
•
To turn the subtitles off, hold Subtitle down again.
SCAN
Plays the first 10 seconds of each title on the disc.
•
Press Scan.
•
To continue play at your chosen title, press Scan again, or press
2 (play).
CHECKING THE CONTENTS OF DVD-VIDEO DISCS: MENUS
For Titles and chapters, selection menus may be included on the
disc. The DVD’s Menu feature allows you to make selections
from these menus.
If the selections are numbered, press the
appropriate numerical key; if not, use the Up/Down, Left/Right
keys to highlight your selection, and press OK
• Press Title. If the disc has a Title menu, this now appears on the
OSD.
• To remove the Title menu, press Title again.
• Press Menu. If the present Title has a Root menu, this now
appears on the OSD.
• The Root menu can lists camera angles, spoken language and
subtitle options, and Chapters for the Title.
• To remove the Root menu, press Menu again.
+
--
+
--
+
--
+
--
TV VOL
TV CH
JOG/PAUSE
JOG
SHUTTLE
12
1/DVD-930/935-ENGLISH 10-08-1999 09:56 Pagina 12

ENGLISH
13
You will recognize Video CDs by the logo. Depending on the
material on the disc (a movie, video clips, a drama series, etc.)
these discs may have one or more Tracks, and tracks may have
one or more Indexes, as indicated on the disc case. To make
access easy and convenient, your player lets you move between
Tracks, and between Indexes.
Some Video CDs have Play Back Control (PBC), which is a
predefined playback sequence stored on the disc.
NOTE
– During play, various icons will appear on the TV screen for
about 2 seconds to confirm that a function has been selected.
You can get rid of the icon by pressing OSD.
– At any time during play, you can press OSD to call up the
Play Banner, which shows you which functions are active, for
about 2 seconds. To keep the Play Banner on the screen, hold
down OSD for a couple of seconds. To get rid of the Play
Banner, press OSD again.
PLAYING A DISC
•
With Autoplay on (see Settings p.16), play starts when you
close the disc drawer.
•
With Autoplay off, press Play.
•
As the disc plays, the player display shows the current track,
and the elapsed playing time.
•
Play will stop at the end of the disc.
•
To stop play at any other time, press 9.
•
You can resume from the point at which you stop. Press
Resume.
•
The Resume feature applies, not only to the disc in the player,
but also to the last four discs you have played. Simply reload
the disc, press Resume.
MOVING TO ANOTHER TRACK
When a disc has more than one track (which you can see from
both the OSD and the Player Display if you press 9), you can
move to another track as follows:
•
Press T-C, then press P briefly during play to step forward to
the next track.
•
Press T-C, then press O briefly during play to return to the
beginning of the current tack. Press O briefly again to step
back to the previous track.
•
To go directly to any track, press T-C, then enter the track
number using the numerical keys.
NOTE
– If the number has more than one digit, press the keys in rapid
succession.
MOVING TO ANOTHER INDEX
When a track has more than one index (as indicated on the disc
case), you can move to another index as follows:
•
Press P briefly during play to step forward to the next index.
•
Press O briefly during play to return to the beginning of the
current index. Press O briefly again to step back to the
previous index.
•
To go directly to any index enter the index number using the
numerical keys
NOTE
– If the number has more than one digit, press the keys in rapid
succession.
PLAYBACK CONTROL
•
Load a Video CD with PBC and press 2 (play). The PBC
Menu appears on the TV screen.
•
Go through the menu with the keys indicated on the TV
screen until your chosen passage starts to play.
If a PBC menu consists of a list of titles, you can select a title
directly.
•
Enter your choice with the P / O or numerical keys.
•
Press 2 (play) to start play of the title.
•
Press Return to go back to the previous menu.
PARENTAL
CONTROL
•
If you activate
Parental Control,
only discs that
you have already
authorised as
suitable for all
ages can be
played as above.
•
To play any other
Video CD, the
OSD will ask for the Parental Control Pin Code to be entered.
When this has been done, play starts automatically.
•
To activate Parental Control, and to authorize discs, see
Activating Parental Control (p.16).
NOTE
–
If you forget your pin code, you can erase it when the code
is requested as above, by pressing Stop four times. Parental
Control will then be de-activated. To re-activate it,
see
Activating Parental Control (p.16).
JOG/SHUTTLE
This is a convenient
way to view still
pictures (Jog), and to
search in slow,
normal or fast
motion (Shuttle).
Both functions work
in reverse as well as
forward play.
•
To select
Jog/Shuttle, press Jog/Pause. The key lights up, and the
player goes into Pause mode.
Jog
•
With the Shuttle ring in the center position, turn the Jog disk
clockwise to view still pictures forwards, or anticlockwise to
view them in reverse. Turn slowly for step frames, faster to
move quickly through a sequence.
Shuttle
•
From the center position, turn the Shuttle ring clockwise for
forward movement, anticlockwise for reverse. In both cases
you can choose from 6 speeds: x1/8, 1/2, Normal, x2, x4
and x8 speed.
•
To exit Jog/Shuttle, press Jog/Pause: the Jog/Pause key goes
out.
STILL PICTURE AND STEP FRAME
(ON FRONT OF PLAYER)
•
To get a still picture, press ; (pause) during play.
•
To step forward to the next picture frame, press ; (pause)
again.
•
To return to play, press 2 (play).
+
--
+
--
+
--
+
--
TV VOL
TV CH
JOG/PAUSE
JOG
SHUTTLE
PLAYING A VIDEO CD
PLAYING A VIDEO CD
1/DVD-930/935-ENGLISH 10-08-1999 09:56 Pagina 13

ENGLISH
Audio CDs contain music tracks only. You will recognize CDs by
their logo. You can play them in conventional style using a
stereo system, or via the TV using the OSD. With the OSD, you
can compile FTS programs for your discs by either selecting or
excluding tracks.
You can play audio CDs using the OSD or, through a stereo
system only, using keys on the remote control and/or front
panel.
PLAYING A DISC
•
With Autoplay on,
play starts when
you close the disc
drawer. With
Autoplay off, press
Play.
•
The disc starts to
play; if the TV is
on, the CD Play
screen appears on
the OSD.
•
Play will stop at the end of the disc. To stop play at any other
time, press Stop.
PAUSE
•
Press Jog/Pause during play.
•
To return to play, press 2 (play).
SEARCH
(ON FRONT OF PLAYER)
•
To search forwards or backwards through the disc at 2x
normal speed, press R or AA during play.
•
Search begins, and sound is partially muted.
•
To step up to 8x normal speed,press R or AA again.
•
Search goes to 8x speed, and the sound is muted.
•
To go directly to 8x normal speed, hold down R or AA
until the (8x) icon appears.
•
To return to 2x normal speed, press R or AA again.
•
If the TV is on, search speed and direction are indicated on
the screen each time R or AA is pressed.
•
To end the search, press 2 (play), ; (pause), or 9 as
desired.
SHUTTLE
This is a convenient way to search in fast motion. The function
work in reverse as well as forward search.
•
To select Shuttle, press Jog/Pause. The key lights up, and the
player goes into Pause mode.
•
From the center position, turn the Shuttle ring clockwise for
forward movement, anticlockwise for reverse. In both cases
you can choose from 2 speeds: x2 and x8 speed.
•
To exit Shuttle, press Jog/Pause: the Jog/Pause key goes out.
MOVING TO ANOTHER TRACK
•
Press P briefly during play to step forward to the next track.
•
Press O briefly during play to return to the beginning of the
current track. Press O briefly again to step back to the
previous track.
•
To go directly to any track, enter the track number using the
numerical keys.
SHUFFLE
•
Press Shuffle during play. The order of the tracks is changed.
•
As each track is played, its number disappears from the
player display.
•
To return to normal play, press Shuffle again.
REPEAT TRACK/DISC
•
To repeat the currently-playing track, press Repeat: REPEAT
TRACK appears on the display.
•
To repeat the entire disc, press Repeat a second time; REPEAT
appears on the display.
•
To exit Repeat mode, press Repeat a third time.
REPEAT A-B
To repeat or loop a sequence:
•
Press Repeat A-B at your chosen starting point; A appears on
the display.
•
Press Repeat A-B again at your chosen end point; A-B appears
on the display, and the repeat sequence begins.
•
To exit the sequence, press Repeat A-B again.
SCAN
Plays the first 10 seconds of each track on the disc.
• Press
Scan.
•
To continue play at your chosen track, press Scan again,
or press 2 (play).
PLAYING A CD
PLAYING A CD
SEARCH (ON FRONT OF PLAYER)
•
To search forwards or backwards through the disc at 2x
normal speed, press R or AA during play.
•
Search begins, and sound is muted.
To step up to 8x normal speed, press R or AA again.
•
To go directly to 8x normal speed, hold down R or AA
until the (8x) icon appears.
•
To return to 2x normal speed, press Ror AA again.
•
Search speed and direction are indicated on the screen for 2
seconds each time R or AA is pressed.
•
To end the search, press 2 (play), ; (pause) or 9 as desired.
SHUFFLE
This shuffles the playing order of the tracks, if the disc has more
than one.
•
Press Shuffle during play. The Shuffle icon appears on the
screen for about 2 seconds.
•
As each track is played, its number disappears from the Track
Calendar.
•
To return to normal play, press Shuffle again.
REPEAT TRACK/DISC
•
To repeat the currently-playing track, press Repeat: REPEAT
TRACK appears on the player display.
•
To repeat the entire disc, press Repeat a second time; REPEAT
appears on the display.
•
To exit Repeat mode, press Repeat a third time.
REPEAT A-B
To repeat or loop a sequence:
•
Press Repeat A-B at your chosen starting point; A appears on
the player display.
•
Press Repeat A-B again at your chosen end point; A-B appears
on the display, and the repeat sequence begins.
•
To exit the sequence, press Repeat A-B again.
SCAN
Plays the first 10 seconds of each track on the disc.
•
Press Scan.
•
To continue play at your chosen title, press Scan again,
or press 2 (play).
PLAYING A VIDEO CD
14
1/DVD-930/935-ENGLISH 10-08-1999 09:56 Pagina 14

ENGLISH
PLAYING A CD
15
SETTINGS
In the settings menu, you can customize your player to suit
your own particular requirements.
In Stop mode:
•
Press Setup to obtain the Settings screen.
•
Move to the function you want to change using 3/4, then
use < /> to scroll to your preferred option.
•
To exit Settings menu, press Return or Setup.
AUDIO:
The sound will be in the language you choose provided this is
available on the disc in play. If not, speech will revert to the first
spoken language on the disc.
SUBTITLE :
The subtitles will be in the language you choose provided this is
available on the disc in play. If not, subtitles will revert to the
first subtitle language on the disc.
PARENTAL
CONTROL:
This is described separately under ‘Parental Control’ p. 16.
TV SHAPE:
Factory setting wide screen (16:9). If you have a regular (4:3)
TV, you can choose Letterbox for a ‘wide-screen’ picture with
black bars top and bottom, or Pan Scan, for a full-height
picture with the sides trimmed. If a disc has Pan Scan, the
picture then moves (scans) horizontally to keep the main action
on the screen.
SETTINGS
FTS (Favorite Track Selection)
NOTE
– FTS Favourite Track Selections can only be compiled with
OSD On.
If Auto FTS is set to on (see Settings P. 16), play of the FTS
program starts immediately. If not:
•
Press FTS; FTS lights up on the player display.
•
Press Play.
•
To change to normal play, press FTS again.
Compiling an FTS
program
On this player, FTS
programs can be
compiled by
selecting the tracks
you want to play
(“Track Selection”)
or by excluding the
tracks you don’t
want to play
(“Exclude Tracks”).
To exclude tracks:
•
Load a disc and go to Stop mode.
•
press <.
•
Use the < or > key to move to the first track number you
want to exclude.
•
Press the 4 key.
•
Exclude further track numbers in the same way.
•
If you change your mind, you can re-include any track
number by moving back to it and pressing the 3 key.
•
To clear your whole selection and start again, press 9.
To select Tracks:
•
Load a disc and
go to Stop mode.
•
Press >.
•
Use the < or > key
to move to the
first track number
you want to
select.
•
Press the 3 key.
•
Select further
track numbers in
the same way. If
you change your
mind, you can de-select track numbers in reverse order by
pressing the 4 key as required.
•
To clear your whole selection and start again, press 9.
When your FTS program is complete, press play to start play, or
Return to go back to Stop mode. In either case, the FTS
program will be automatically memorized.
NOTE
– You can have a total of at least 100 FTS programmed discs.
If you excees that number, the least frequently played
program(s) are automatically deleted.
1/DVD-930/935-ENGLISH 10-08-1999 09:56 Pagina 15

ENGLISH
16
PARENTAL CONTROL
ACTIVATING PARENTAL CONROL
This can only be done in Stop mode.
• Press Setup to obtain the Settings menu.
• Move to Parental Control using the (up/down) keys.
• Press < or > to change Parental Control to Active.
• You will be asked to enter a 4-digit pin code of your own choice,
and then to confirm your choice.
• This code must then be entered to play any DVD-Video or Video
CD disc, unless you have previously authorized the disc as
suitable for all ages.
• To de-activate Parental Control repeat the above procedure.
Authorizing discs
1
Load the disc you wish to authorize and close the tray
2 The OSD will ask for your pin code.
Enter your pin code.
3 Go to Stop, press 9.
4
Select Parental Control on the OSD by pressing >: the OSD
will ask you to enter your pin code.
5
The disc is now authorized, and will play in the normal way,
without the pin code.
To cancel your authorization, repeat steps 4 and 5.
NOTE
– You can have a total of 50 authorized discs. If you exceed
that number, the least frequently played disc(s) are
automatically de-authorized.
Insert Disc
Is this
disc Authorized?
Normal operation
Select
Parental Control
Enter Pin
Open Tray
Insert Disc
Is this
disc Authorized?
Normal operation
Select
Parental Control
Enter Pin Code
Press "STOP"
Enter Pin
Open Tray
NOT OK
OK
OK
NO
YES
NOT OK
TRY 3X
Change
Autorization
Change
Autorization
Enter Pin Code
Press "STOP"
NOT OK
OK
OK
NO
YES
NOT OK
TRY 3X
When Parental Conteol is active
When Parental Control is active
AUTOPLAY:
Factory setting On means that discs start to play automatically
when loaded. Set to Off if you prefer to start play manually.
AUTO FTS:
Factory setting On means that when a disc with an FTS
program (see ‘Compiling an FTS Program’ p. 15) is loaded, the
FTS program automatically starts to play. Set to Off if you
prefer to control FTS play manually.
VIDEO SHIFT:
Factory setting is such that the video will be centered on your
screen. Use this setting to personalize the position of the
picture on your TV by scrolling it to the left or right.
DIGITAL OUTPUT:
Factory setting Off means that there is no audio signal at the
digital output. If you are connecting equipment with a
digital input, change the setting to on.
If your equipment doesn't incluid a digital decoder, (e.g. digital
speakers) set the digital output to PCM.
OSD LANGUAGE:
The player’s on-screen display will be in the language you
choose.
SETTINGS
1/DVD-930/935-ENGLISH 10-08-1999 09:56 Pagina 16

ENGLISH
17
BEFORE REQUESTING SERVICE
If it appears that the DVD-Video player is faulty, first consult
this checklist.
It may be that something simple has been overlooked.
Under no circumstances attempt to repair the system yourself;
this will invalidate the warranty.
Look for the specific
symptom(s). Then perform only the
actions listed to remedy the specific symptom(s).
SYMPTOM
REMEDY
No power......................• Check if the ON/OFF
button (1) on the front of the
player is set to on.
• Check if both plugs of the mains
cord are properly connected.
• Check if there is power at the AC
outlet by plugging in another
appliance.
No picture.....................• Check if the TV is switched on.
• Select the same channel and source
on the TV as on the player.
• Check the video connection.
Distorted picture ..........•
Check the disc for fingerprints and
clean
with a soft cloth, wiping from
centre to edge.
• Sometimes a small
amount of picture distortion may
appear .This is not a malfunction.
Completely distorted
picture with
player menu..................• NTSC/PAL switch in wrong
position.
No colour in picture
with player menu .........• NTSC/PAL switch in wrong
position.
Disc can’t be played .....• Ensure the disc label is upwards.
• Clean the disc.
• Check if the disc is defective by
trying another disc.
No sound ......................• Check audio connections.
• If using a HiFi amplifier, try another
sound source.
Distorted sound
from HiFi amplifier .......• Check to make sure that no audio
connections are made to amplifier
phono input.
No return to start-up
screen when disc is
removed .......................• Reset by switching the player OFF,
then ON again.
• Check to see if the program
requires another disc to be loaded.
The player does not
respond to the
remote control .............• Aim the remote control directly at
the sensor on the front of the player
• Avoid all obstacles which may
interfere with the signal path.
• Inspect or replace the batteries.
Distorted or B/W picture
with DVD or Video
CD disc..........................• The disc format is not according to
the TV-set used (PAL/NTSC)
SYMPTOM
REMEDY
No audio at
digital output ...............• check the digital connections
• Check the settings menu to make
sure that the digital output is set
to on.
• Check if the audio format of the
selected audio language matches
your receiver capabilities.
Buttons do not work ....• Turn the player OFF and ON
with the power ON/OFF button (1)
on the front of the player.
Cleaning Discs
Some problems occur because
the disc inside the player
is dirty.
To avoid these problems clean
your discs regularly, in the
following way:
• When a disc becomes dirty,
clean it with a cleaning cloth.
Wipe the disc from the centre
out.
CAUTION
DO NOT USE SOLVENTS SUCH
AS BENZINE, THINNER,
COMMERCIALLY AVAILABLE CLEANERS, OR ANTI-STATIC
SPRAY INTENDED FOR ANALOG DISCS.
OTHER INFORMATION
If the player remains faulty you can start the Diagnosic
Program in the player.
How does the Diagnosic Program works:
You can operate the Diagnosis Program by following the
intructions step by step.
Instructions:
1 Switch the player off with the ON/OFF button.
2 Press the OPEN/CLOSE and PAUSE button simultaneously
and keep them pressed while you switch on the recorder
with the ON/OFF button.
3 On the display appears the message: BUSY together with a
counter. This counter indicates the termination of the test
when zero is reached
4 After a few minutes the message on the local display
changes over from BUSY into Error or into PASS.
5 When the message Error appears on the display there is
apparently a failure in your player and your player has to be
repaired.
6 Consult your dealer or the Philips Consumer Information
Centre (CIC) for the nearest Service Repair Shop in you
country. The phone number of the CIC is mentioned in your
warranty booklet.
7 When the message PASS appears on the display there is
apparently no failure in your player in this case the failure
can be caused by a wrong interpretation of the operating
instructions or a wrong disc is used or your player is not
correctly connected.
In this case you can consult your dealer or the Philips
Consumer Infrormation Centre for further assistance in
solving the problem.
8 When the problem remains then go to point 6 of this
instuction for finding the nearest repair shop.
9 Switch the player off with the ON/OFF button to leave
the Diagnostic Program.
1/DVD-930/935-ENGLISH 10-08-1999 09:56 Pagina 17
 Loading...