

Philips 900 User Manual

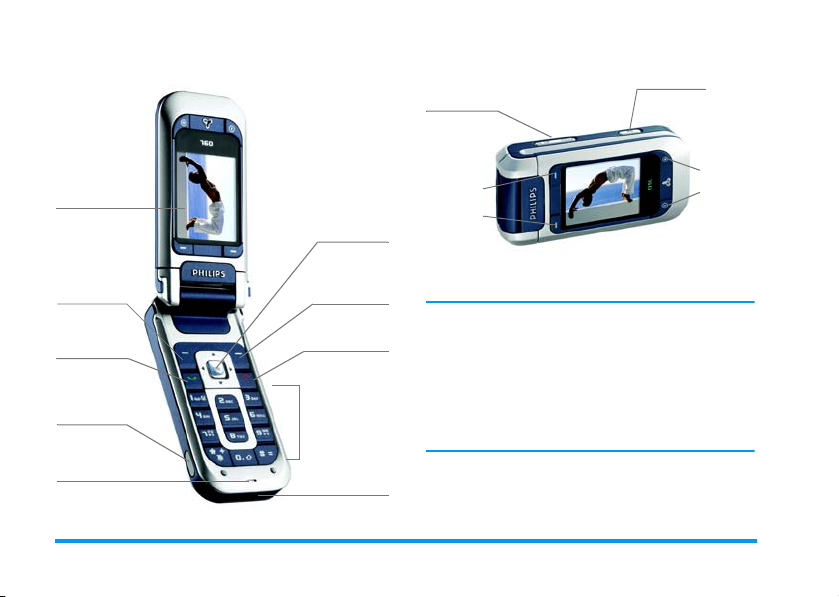
Discover your phone
y
Camera key
Side keys
65K-colour
screen
eft softkey
Pick up key
Infrared
port
Microphone
Phone mode
Navigation
and OK key
Right softke
Hang up and
on/off key
Alphanumeric
keypad
Charger &
headset
connecter
Camera
Camera
softkeys
softkeys
Camera mode
Philips continuously strives to improve its products.
Therefore, Philips reserves the right to revise this user
guide or withdraw it at any time without prior notice.
Philips provides this user guide "as is" and does not
accept, except as required by applicable law, liability
for any error, omission or discrepancy between this
user guide and the product described. The device is
meant to be connected to GSM/GPRS networks.

How to...
Switch phone
On / Off
Enter PIN code
Make a call
Answer a call
End a call
Reject a call
Set the ringer volume
Press and hold ).
Enter your PIN code using
the keypad and press
L
OK to confirm.
Enter the phone number on
the keypad and press
to dial.
Press ( when your phone
rings.
Press ) or R End call.
Press ) or long press
either volume side key.
Press either volume side key
when the phone is open and
in idle mode.
A short press on the volume
side key will mute the ringer
when you receive a call.
,
(
or
Set conversation
volume
Access the
Use the
Open the
Access the Quickcall
feature
Access the main menu
Open the
Quickly return to idle
when browsing menus
Open the
Picture album
Open the
Sound album
Contacts
Contacts
Call list
MMS
menu
Press either volume side key
during the call.
Press- in idle mode.
Browse the list using
+or-
to call the selected name.
Press ( in idle mode.
Press + in idle mode.
Press , or L Menu in
idle mode.
Press R MMS in idle
mode.
Press ).
Press<in idle mode.
Press>in idle mode.
and press
(

Activate a
programmed
voice command
Launch
WAP
In idle, press and hold
,
then say your voice tag.
Press and hold 0.
Camera mode
Your phone features a swivel screen which allows you
to activate the camera. Turn the screen anticlockwise
and close the phone.
The phone is now in camera mode and the preview
screen is displayed. See chapter “Camera” page 39 on
how to use the camera.
Open the phone and turn the screen back to return to
phone mode.
Softkeys
The behaviour of the softkeys is contextual and is
indicated on the screen. Your phone features 6
softkeys:
• 2 softkeys are used in phone mode
• 4 softkeys are used in camera mode. The camera
softkeys
P
phone mode.
In most cases when you are in phone mode, pressing
the
L
The
R
while browsing menus or Cancel when in an edition
screen).
and M are not active when in
softkey has the same result as pressing,.
softkey is used for going back one step (Back
LR
.
Accessing the menus
,
To access the main menu, press
when in idle mode.
Use the navigation keys to browse the menu and
press
,
or LSelect to make a selection. Another
sub-menu or list will then appear.
When navigating in a list, a scroll bar located on the
right hand side of the screen shows your actual
position in the list.
or LMenu

Events
Some events may modify the idle screen (missed call,
new message, etc.). Press
the corresponding menu or
the idle screen.
,
or L Read to access
R
Back to go back to


Table of contents
1. Getting started ............................................1
Insert the SIM card and the battery .............1
Set date and time ..............................................2
Copy the SIM phonebook ...............................2
Switch on the phone ........................................2
Charge the battery ...........................................2
2. Main features ................................................4
Access and view the phonebook ...................4
Make a call ..........................................................4
Answer and end a call ......................................4
Call handsfree ....................................................5
Options during a call ........................................5
Adjust the earpiece volume ............................6
Change the ringer .............................................6
Activate the silence mode ..............................6
Activate the vibra alert ....................................6
Taking pictures ..................................................6
Quickcall .............................................................6
MMS Foto talk ...................................................7
3. Menu tree .......................................................8
4. Text or number entry ......................... 11
Basic text input ............................................... 11
T9 ® text input ............................................... 12
5. Contacts ....................................................... 13
Settings ............................................................. 13
Names list ........................................................ 13
Edit and manage contacts ............................ 14
6. Settings .......................................................... 17
Sounds .............................................................. 17
Display .............................................................. 18
Shortcuts ......................................................... 18
Security ............................................................ 20
Network .......................................................... 21
Time and date ................................................. 22
Auto switch on & off .................................... 23
Language .......................................................... 23
7. Profiles ........................................................... 24
8. Messages ....................................................... 25
SMS ................................................................... 25
MMS .................................................................. 28
E-Mail ................................................................ 33
Broadcast SMS ................................................ 38
9. Camera .......................................................... 39
Activating the camera ................................... 39
i

Camera preview screen ............................... 39
Taking pictures ...............................................40
Camera options .............................................. 41
Reviewing pictures ......................................... 42
Calls ................................................................... 42
10. Multimedia ................................................ 43
Sound album .................................................... 43
Picture album .................................................. 43
TV slideshow ................................................... 45
Demo mode .................................................... 45
Memory status ................................................ 45
Sound recording ............................................. 46
Camera ............................................................. 46
11. Games & appli. ....................................... 47
Calculator ........................................................ 47
Time zones ...................................................... 47
Alarm clock ..................................................... 48
Organiser ......................................................... 48
Brick game ....................................................... 50
Unit converter ................................................ 50
ii
JAVA ................................................................. 50
12. Infrared ....................................................... 52
Position of devices ......................................... 52
Sending data .................................................... 52
Receiving data ................................................. 53
Using the phone as a modem ..................... 53
13. Call information .................................... 54
Settings ............................................................. 54
Call list .............................................................. 55
Counters .......................................................... 56
14. Operator services ............................... 58
WAP ................................................................. 58
DTMF tones .................................................... 61
Handling several calls .................................... 61
Icons & symbols ............................................ 64
Precautions ....................................................... 65
Troubleshooting ........................................... 69
Philips authentic accessories ................. 72

2.
1 • Getting started
Read the safety instructions in the "Precautions" section
before use (see page 65).
To use your phone, you must insert a valid SIM card
supplied by your GSM operator or retailer. The SIM
card contains your subscription, your mobile number,
and memory in which you can store phone numbers
and messages.
Insert the SIM card and the
Insert the SIM card in its slot making sure that
the clipped corner is in the correct place. Push
the clip holder until it maintains the card.
3.
Insert the battery: place one edge against one
edge of the phone and press until it clips (make
sure connectors are facing each other).
battery
1.
Slide the back cover of the phone to remove it.
4.
Replace the back cover by sliding it until it stops.
Remove the protective film covering the screen
before using the phone.
Getting started 1

Switch on the phone
1.
To switch on the phone, long press).
2.
Enter the PIN code if required (i.e. the 4 to 8digit secret code of your SIM card). It is
preconfigured and communicated to you by
your operator or retailer. Press
to confirm (press
personalise the PIN code, see page 20.
If you enter an incorrect PIN code 3 times, your SIM
card is blocked. To unblock it, you must request the
PUK code from your operator.
R
,
Cancel to correct it). To
or LOK
Set date and time
When you switch on your phone the first time, you
will be prompted to set the date and time. Use the
alphanumeric keypad to enter numbers.
For complete date and time options, see page 22.
Copy the SIM phonebook
The mobile phone detects a SIM card that already
con tai ns names, and a mes sage a sks you if you want to
copy your SIM phonebook onto the built-in
phonebook. Press
cancel.
If you choose not to copy the SIM phonebook at this
time, you can do it manually at a later date. See “Copy
to phone” page 13 for details.
L
Yes to accept or RNo to
Charge the battery
Your phone is powered by a rechargeable battery. A
new battery is partially charged and an alarm will warn
you when the battery reaches low. If the battery is
completely flat, it will take 2 or 3 minutes of charging
for its icon to reappear.
You may lose all your personal settings if you remove
the battery when the phone is switched on.
1.
Once the battery is in place and the battery cover
is clipped on the phone, plug the connector of
the charger (supplied with the phone, in the
box) into the socket at the bottom of the phone
2Getting started

on one end, then plug it into a main AC power
socket with easy access on the other end.
2.
The battery symbol indicates the state of charge:
- during charging, the 4 charge indicators scroll;
it takes around 2 hours to fully recharge your
mobile phone.
- when all 4 bars are steady the battery is fully
charged: disconnect the charger.
Depending on the network and condition of use, talk
time goes from 2 to 4 hrs and 40 min. and stand-by
time from 200 to 560 hrs.
Keeping the charger connected to the mobile when the
battery is fully charged doesn’t damage the battery.
The only way to turn off the charger is to unplug it, so
use an easily accessible AC power socket. You can
connect the charger to an IT supply (Belgium only).
Getting started 3

2 • Main features
Access and view the phonebook
In idle mode, press-. Depending on the selected
phonebook (in SIM or in phone), the content that
appears on the screen may vary: see “Contacts”
page 13 for details.
In the phonebook, select <Search> then enter the
first letters of the name you are searching for and press
,
to go directly to that name.
To view the phonebook during a call, press
L
Options, and select Names List, press , and
scroll through the entries by pressing
Press
R
Back twice to return to the in-call screen.
To read your own mobile phone number, press -in
idle mode and select Own number > Show.
Make a call
1.
In idle mode, enter the phone number using the
keypad. To correct an error, press
2.
Press ( to dial.
3.
Press)or R End call to hang up.
-
R
,
or +.
Cancel.
For an international call, press and hold * to enter
the "+" sign instead of the usual international prefix.
Using the phonebook
1.
Press - in idle mode.
2.
Select a contact in the list and press (. If the
phone phonebook is selected and you saved
several numbers under one name, press
>
to select another number than the default
one (see page 14).
3.
Press)or R End call to hang up.
or
Answer and end a call
When receiving a call, th e number of the caller may be
displayed. If the number is stored in the selected
phonebook, the corresponding name is displayed
instead of the number.
• Answer the call: press
the Active flip option is On (see page 54).
• Reject the call: press
volume key). If you have activated Call forward,
the call is diverted to a number or voice mail.
• Hang up: press
The phone will not ring if in Silence mode (see
page 6). If you have selected Any Key Answer, you
(
or open the phone if
)
(or long press either
)
or close the phone.
<
4 Main features
or

can accept a call by pressing any key, except ) (see
page 54).
Call handsfree
For your own comfort and safety, ensure you move the
phone away from your ear when calling handsfree,
especially when increasing the volume.
1.
In idle mode, enter the phone number using the
keypad or select a contact in the phonebook.
2.
Press ,or LOptions then select Call
handsfree or press
If you are already on the phone, long press ( to
switch to handsfree mode and back.
,
.
Options during a call
,
During a call, press
following options.
Mute / unmute the microphone
Allows you to mute or unmute the microphone so
that your caller cannot hear you.
or LOptions to access the
Record dialogue
In most countries, conversation recording is subject to
legislation. We advise you to notify the caller if you
intend to record your conversation and only do so if
they agree. You should also keep any recording private.
1 min. is the maximum recording time available (see
“Sound recording” page 46).
To record a conversation during a call, select Record
dialogue and press
to end the recording: an edit window allows you to
name the recording, which is then available in
Multimedia > Sound recording.
If you select Mute, then Record dialogue, only the
caller’s voice is recorded.
,
. Press,again or LSave
Notepad
Allows you to note down a number. You can then
store it in the phonebook, call, or send a message to
this number.
Main features 5

Other options during a call
• Activate handsfree • Equaliser (page 17)
• Names list (page 13) • SMS (page 25)
• Call list (page 55) • Organiser (page 48)
•End call
Adjust the earpiece volume
During a call, move the volume side key up or down
to increase or decrease the volume.
Change the ringer
,
Press
Sounds > Ringtone. Move
ringer in the list. Press
or LMenu, and select Settings >
+or-
,
to confirm your choice.
to select a
Activate the silence mode
If you don’t want your phone to ring when you
receive a call, deactivate the ringer by selecting
Settings > Sounds > Silent then On.
You can also mute the ringer when receiving a call by
pressing the volume side key.
Activate the vibra alert
If you want your phone to vibrate when you receive a
call, activate the vibra alert by selecting
Settings> Sounds > Vibra alert, then On.
Activating the vibra doesn’t mute the ringer. If you
want to both mute it and keep the vibra On, activate
the Silent mode as described above.
The vibra alert is automatically set to Off when you
plug in th e charger.
Taking pictures
Your mobile phone features a camera allowing you to
take pictures and send them to your friends or
relatives. To use the camera, you must activate the
camera mode as described in “Discover your phone”
section. P ress
page 39 for complete details.
C
to take the picture. See “Camera”
Quickcall
Allows you to set your 4 preferred or most frequently
dialled numbers. You can then quickly call one of
them by selecting the corresponding icon or picture
on the screen, thereby removing the need to enter and
browse the Contacts list.
6 Main features

Setting a Quickcall contact
1.
In idle mode, press+to access the Quickcall
screen. Select a thumbnail to configure and press
,
or LSet.
2.
Select a name in the contacts list, and press
again to access the Picture album and select a
picture. Proceed the same way for each
thumbnail.
,
Calling a Quickcall contact
To make a call, press+when in idle mode, then
select the thumbnail of your choice and press
To reconfigure a thumbnail, select it and press
to Replace the name and/or picture.
If a picture is already associated to a contact, it is
displayed in the Quickcall screen. Changing the
picture in one of the menu will also update it in the
other.
(
,
MMS Foto talk
This feature allows you to send a picture via MMS
and to add a sound recording to it. The picture can be
selected from the Picture album or can be a picture
you have just taken with the camera.
From the Picture album
1.
Select a picture, press ,or LOptions, then
select Send by...>MMS.
2.
When the Add sound? message appears, press
,
.
or L Yes , then record a sound. Press
L
OK to stop recording.
3.
Select Add contacts to choose your recipient(s)
in the contacts list, then Add media to go the
MMS creation screen. See “MMS creation”
page 29 for details.
From the camera mode
1.
Activate the camera mode (see “Discover your
phone” section) and press
picture.
2.
Select Send > MMS (a message will tell you to
swivel the screen).
3.
Repeat steps 2 and 3 from previous section.
C
to take your
Main features 7

3 • Menu tree
The table below describes the complete menu tree of
your mobile phone, and the page reference you should
refer to for more information.
Profiles p24
Sound recording p46
Camera p46
Games & appli. p47
Multimedia p43
Picture album p43
Sound album p43
Demo mode p45
Memory status p45
TV slideshow p45
Calculator p47
Time zones p47
Local settings / Foreign settings /
International clock display
Alarm clock p48
Organiser p48
Unit converter p50
Brick game p50
8 Menu tree

JAVA p50
Games
This menu is subscription dependent
Operator services p58
Service numbers
The numbers available in this menu are
operator and subscription-dependent, please
check with your operator.
WAP
Services +
This menu is operator and subscriptiondependent, please check with your operator.
Messages p25
SMS p25
Archive / Send SMS / S end to multircpt./
Read SMS / SMS settings
E-Mail p33
For each available mail box
Settings / Open mailbox / Send mail
Broadcast SMS p38
District codes / Reception / Topics
MMS p28
New MMS / Inbox / Drafts / Templates/
Outbox / Settings
Settings p17
Sounds p17
Silent / Ringer volume / Ringtone /
Messages ringer / Equaliser / Key tones /
Sounds alerts/ Vibra alert
Display p18
Animation / Backlight / Wallpaper
Shortcuts p18
Hotkeys / Voice command / Voice dial /
Quick Call
Menu tree 9
Security p20
Public names / Call barring / Change
codes / PIN protection
Network p21
GPRS attach / Register again / Preferred
list / Access settings
Time and date p22
Clock display / Set date / Time zone /
Daylight saving / Set time
Language p23
Auto switch on & off p23
Auto switch on / Auto switch off
Infrared p52
Data / Receive
Contacts p13
Names list p13
Settings p13
Delete all / Contacts select / Copy to
phone
Call information p54
Call list p55
Call list / Reset
Counters p56
GSM counters / GPRS counters
Settings p54
Info at call end / Any key answer / Call
waiting / Caller ID / Call forward /
Mailboxes / Active flip / Auto redial
10 Menu tree

4 • Text or number entry
Text can be entered in editing screens in two different
ways: by using T9
input. Two other modes, for numbers and for
punctuation marks, are also available. The highlighted
icon appearing on the screen indicates the active
mode.
Basic text input
Press
*
This method requires multiple key presses to reach the
desired character: the letter "h" is the second letter on
the
4
Short press
to clear all text.
Example: how to enter the word "home":
Press 4, 4 (GHI) 6, 6, 6 (MNO),
6
(MNO), 3, 3 (DEF). Press , when
the message is completed.
®
predictive text input, or basic text
to switch from T9® to basic text input.
key, so you must press it twice to enter "h".
R
Cancel to clear one entry, long press
Letters, numbers and symbols are located on each key
as follows:
Short press Long press
space 1. , @ / : ; " ’ ! ¡ ? ¿ # + - * =
1
% < > ( ) & £ $ ¥
2
a b c 2 à ä å æ ç 2
3
d e f 3 é è ∆ Φ 3
4
g h i 4 Γ ì4
5
j k l 5 Λ 5
6
m n o 6 ñ ò ö 6
7
p q r s 7 β Π Θ Σ 7
8
t u v 8 ü ù 8
9
w x y z 9 ø Ω Ξ Ψ 9
To shift letter case: Standard,
0
lower or UPPERCASE letters.
To open symbols and
#
punctuation mode.
To shift mode: T9®, basic or
*
numeric.
1
0
Text or number entry 11

T9® text input
T9® predictive text input is an intelligent editing
mode for messages, including a comprehensive
dictionary. It allows you to quickly enter text. Press
only once on the key corresponding to each letter
needed to spell a word: keystrokes input is analysed
and the word suggested by T9
edition screen. If several words are available, the first
word in the list is displayed and highlighted. Press
+/-
from those proposed by the T9
(see example below).
or L to browse the list and to choose
®
is displayed in the
®
built-in dictionary
How to use it?
Letters and symbols represented by each key are as
follows:
to
or
To key in letters.
9
To browse the list of candidate words.
1
To confirm entry.
Short press to clear one entry, long press
to clear all text.
To shift letter case: Standard, lower or
UPPERCASE letters.
To open symbols and punctuation
mode.
To shift mode: T9®, basic or numeric.
2
L
or
+/-
,
R
0
#
*
Example: how to enter the word "home":
1.
Press 4 6 6 3. The screen displays
the first word of a list:
2.
Press+or Lto scroll and select
3.
Press , or 1 to confirm selection of the
word
Home
.
Good
.
Home
.
12 Text or number entry

5 • Contacts
phonebooks and if you delete it in the phone, it
remains unchanged in the SIM.
Delete all
Contacts are stored in one of the two available
phonebooks: in your SIM card (number of entries
depending on capacity) or in your phone (up to 999
names). When entering new names, they will only be
added to the phonebook you have selected.
999 is the maximum number of names and events
cards, provided that other features (memos, sounds,
pictures, etc.) are not using a significant amount of the
phone’s memory.
Settings
Contacts select
This menu allows you to select the phonebook to use,
either In SIM or In phone. Press
a phonebook. Contacts added to the selected
phonebook can then be copied into the other, via the
Copy to SIM or Copy to phone options.
Your mobile phone only manages one phonebook at
a time and will ignore the information relative to the
other one, e.g. if "Smith" is present in both
+
or - to select
To delete all contacts at once. This option only
applies to the phonebook in phone, NOT to the SIM
phonebook.
Copy to phone
This option will copy the content of your SIM card
into your phone. If you cancelled or aborted the
automatic copy of your SIM phonebook when you
first switch on your phone, you can do it manually
with this option.
Selecting this option twice will duplicate all the
names.
Names list
From idle mode, press-to access this list.
Adding contacts to the SIM phonebook
1.
Select <
New>
2.
Enter the name and the number of your choice,
then the type of number allocated to the name
(
Phone, Fax
name in your phonebook.
in the list.
or
Data
) and press , to store this
Contacts 13

A number is limited to 40 digits, depending on your
SIM card. Entering international prefix, country and
area codes allows you to dial a number from any
location.
Adding contacts in the phone phonebook
1.
Select <
New>
2.
Enter the first, then last name (up to 20 latin
characters); one of the two fields can be empty,
but not both.
3.
Then select the
hold up to 40 digits and one "+" sign and
alphanumeric fields (e-mail and note) feature up
to 50 latin characters. Each contact can feature a
maximum of 5 numeric fields (e.g. 2 mobile
numbers, 3 work numbers, an e-mail address
and a text note).
If you wish to personalise this contact with a picture
and/or a sound, see below.
in the list.
Numbe r type
. Numeric fields can
Own numbers
The
Own numbers
list allows you to store your own phone number. We
advise that you enter your mobile number as well as
any other relevant information.
item that appears in the contacts
Although all its fields can be empty, the
item cannot be deleted.
Own numbers
Emergency number
The emergency number will call the emergency
services number in your country. In most cases, you
can call this number even if you haven’t yet inserted a
SIM card or entered your PIN.
In Europe the standard emergency number is 112, in
the UK it is 999.
Edit and manage contacts
-
Press
To search for a given name:
wh en in idl e m ode to acc es s the ph oneb ook .
2
to
9
Press the key for the letter that you
want to go to in the list (e.g. press
8
twice to access the letter "U").
The first record starting with this
letter is selected in the list.
14 Contacts

#
Press this key then enter the first
letters of the name you are
searching, and press
directly to that name.
You can also use the <Search> item
appearing in the phonebook.
,
to go
In the SIM phonebook
Choose a contact in your SIM phonebook and
press
,
or Options to access the following options:
•Call
•Call handsfree
•Send SMS
•Send MMS
•Voice dial
•Flash dial
• Copy to phone
• Delete
•Change
•Show
In the phone phonebook
Choose a contact of your phone phonebook and
press
,
or Options to access the following options:
•Call
•Call handsfree
•Send SMS
• Send MMS
• Send by infrared
•Show
• Delete
• Change name
• Select picture
• Select sound
Select Show to access the list of numbers or fields
saved for this contact. Select <New> to create a new
field or select one of the number and press
access a second set of options, among which are:
Make default The first number you enter
Copy to SIM
card
Show To display the details of the
Change type To change or to define the field
Change To change the number of the
becomes the default number which
is automatically dialled when
pressing
(
you to set another default number.
To copy a contact of your phone
phonebook into the SIM
phonebook (it is then always
updated when switching
phonebooks or when using another
phone).
selected field.
type of the selected number.
selected field.
. This option allows
,
to
Contacts 15

Voice dial To set a voice tag that will call the
contact when pronounced (see
page 19).
Flash dial To set a direct access to this co ntact
by linking to a key (see page 18).
Alphanumeric fields (note and e-mail) can only be
changed or deleted.
Adding picture and sound to contacts
Contacts stored in the phone phonebook can be
personalised with a picture and/or a sound.
This function is only available when you select the
phone phonebook.
1.
Select a contact and press ,or LOptions.
2.
In the list, choose Select picture to add a picture
from the Picture album and choose Select
melody to open the list of ringers and add a
melody.
When the contact calls, the picture and/or sound
associated with this contact will be displayed/played.
The picture associated with a contact is also used for
the Quickcall feature.When you change it, it is also
updated in the Quickcall settings.
16 Contacts

6 • Settings
This menu allows you to change the settings related to
each available option (sounds, time and date, security,
etc.) and to customise your phone.
Sounds
Silent
When this mode is On, all alerts are deactivated and
the vibra alert is active.
The
Silent
mode also applies to key tones.
Ringer volume
Press+or-to set the volume of your ringer
from Silent to Increasing.
Ringtone
Allows you to select a ringer tone. The list also
includes recorded sounds and melodies you saved.
Scroll through the list and wait to hear the selected
melody being played.
You will not hear the melody if the volume ringer is set
to
Silent
or if the Silent mode was activated.
Messages ringer
Allows you to set On or
receive a new message. When
alert of your choice from the ringers list.
Off
an alert for each time you
On
, you can select the
Equaliser
This option allows you to choose from diffe rent audio
settings. It is also available while a call is in progress.
Scroll through the list and wait a few seconds to hear
the difference.
Key tones
Allows you to switch the key tones On or
when set
Off
(see page 61).
, DTMF tones can be played during calls
Off
. Even
Sounds alerts
Allows you to set alert sounds for the following items:
• Organiser: when an event programmed in your
organiser is due,
• Missed call,
•
Battery
alert: when the battery is running low
and requires charging,
• Minute alert for a beep alert that sounds every
minute during a call to help you manage the
duration of your call (the beep cannot be heard
by the caller).
Settings 17
 Loading...