

Page 1
GRAPHIC DEVELOPMENT MMD
)
)
)(
)
Back Cover (P3
1. Connect (P6)
F&A(P2)What’s in box (P5
1. Connect (P6
Product name
Project name
PhotoFrame
7FF2FPA PF QSG
PhotoFrame
What’s in the box
Project no.
Finishing
Scale
Size Speads
Size
Operator(s)
Date amended
VERSION No.
QC Lithographer
Product Manager
Date Check
ARTWORK DOCUMENT
P10
Paper
Numbers of colours
140gsm White ArtPaper
Folded sheet
1:1
740 (W) x 203 (H) mm
148 (W) x 203 (H) mm
Howard Yo
July 31, 2007
EN0.1
APPROVAL
2Cx2C
Set Auto on/off timer functions
Set Auto on/off mode Set on/off mode Set on/off time mode
Photo display can be enabled to turn on and off at pre-set times
daily.
•
Press
, keys to select SETTINGS. Press key to
enter.
•
Press
, keys to select Auto On/Off. Press key to
enter.
•
Press
, keys to select Set On/Off to switch. Press
key to set On or Off, and then press enter.
•
•
Press
Press
, keys to set auto on or auto off time.
key to return main menu and exit SETTINGS.
CAUTION Auto on/off
settings are erased if the
photo frame is unplugged.
Frequently Asked Questions
Is the LCD screen touch-enabled?
Q
The LCD screen is not touch-enabled. Use the keys in the back of the
A
frame to control digital photo display.
After copying photos, how can I check to see if the photos are already
Q
stored inside?
The photos are copied after the screen confi rms with “Finished”
A
message. You may review them in the internal memory.
Can I switch between different photo slideshows by using different
Q
memory cards?
Yes, photo frame will show the slideshow photos in the
A
card currently connected.
Can I use photo frame to delete photos on memory card?
Q
Yes, it supports operations to delete photos on external devices.
A
Can I print photos from Digital photo display?
Q
No, it does not support direct photo printing.
A
Quick start guide
7FF2FPA
Digital PhotoFrame
Digital PhotoFrame
Digital User Manual and
PC software
Register at www.philips.com/welcome
2
0
0
7
©
K
o
n
i
n
k
l
i
j
k
e
P
h
i
l
V 1.0
1
1
1
0
0
A
1
0
1
1
A
0
8
1
m
o
c
.
s
p
i
i
p
l
i
s
h
E
p
.
l
e
w
c
t
w
r
o
w
n
.
i
d
c
e
s
v
N
r
e
.
s
V
e
.
r
A
s
l
t
l
h
r
g
i
Digital user manual
Frame Stand
Quick start guide
Connect
1
Install
2
Enjoy
3
Quick start guide
What else you’ll need
7FF2 series
5FF2 series
Power adaptor USB cable
Pantone 3005c - - Black
Spotcolor
----
Aftertreatment
---
-
Welcome to Philips!
Register your product and get support at
Online help: www.philips.com/welcome
1
2
3
Connect
Setup
Enjoy
AC
Power outlet
(your photos on)
Memory card
OR
(your photos on)
PC
Cropping
Coating
Varnishing
silk coated
2007 © Koninklijke Philips Electronics N.V.
All rights reserved.
Embossing
Cutterguide
Die-cut
Specifi cations are subject to change without notice.
Trademarks are the property of Koninklijke Philips
Electronics N.V. or their respective owners.
Binding
Glue
Page 2
)
GRAPHIC DEVELOPMENT MMD
Back Cover (P3
1. Connect (P6)
F&A(P2) What’s in box (P5)
1. Connect (P6) (P10)
Product name
Project name
PhotoFrame
7FF2FPA PF QSG
Project no.
Finishing
Scale
Size Speads
Size
Operator(s)
Date amended
VERSION No.
Folded sheet
1:1
740 (W) x 203 (H) mm
148 (W) x 203 (H) mm
Howard Yo
July 31,2007
EN0.1
APPROVAL
QC Lithographer
Product Manager
Date Check
ARTWORK DOCUMENT
Paper
Numbers of colours
Pantone 3005c - - Black
Spotcolor
----
Aftertreatment
---
140gsm White ArtPaper
Cropping
Coating
silk coated
Varnishing
Embossing
Cutterguide
Die-cut
Binding
Glue
2Cx2C
-
1
A
A
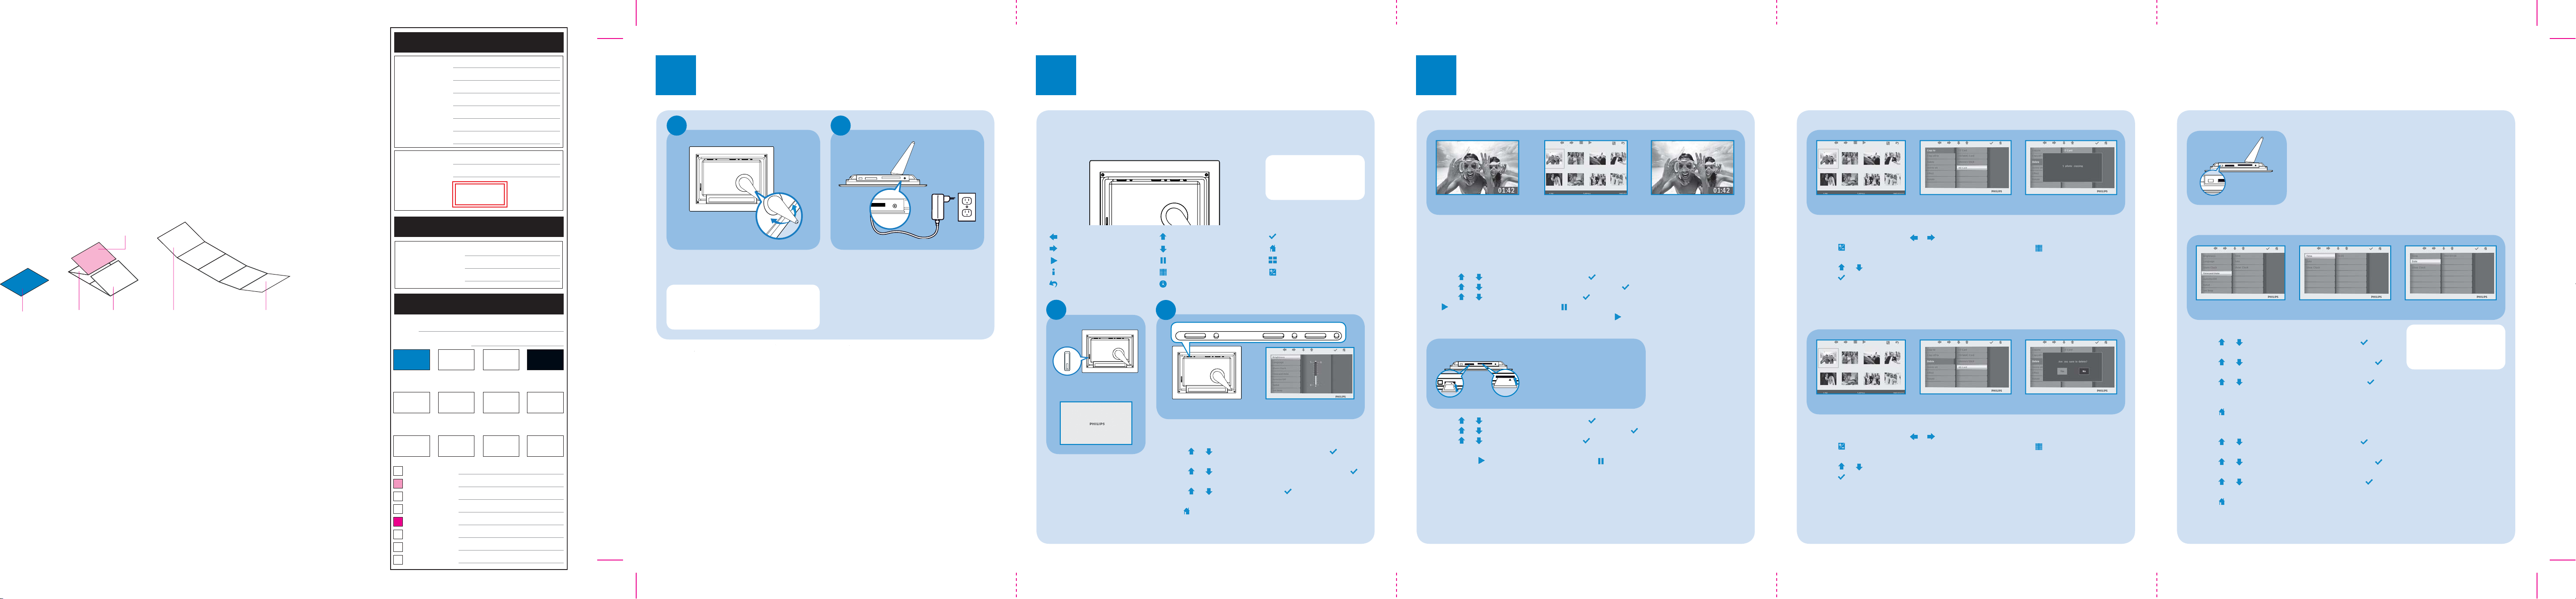
Place the head of the stand in the socket.
•
Rotate counterclockwise until the stand
•
clicks into place.
CAUTION To help prevent damage, do
not hold the frame by the stand.
Grasp the frame fi rmly using two hands.
Connect
Attach the Stand
A
Connect the power adaptor
B
Connect the supplied power adaptor to
•
the photo frame and then plug it to a
power outlet.
2
Setup
Locate the control keys
Control keys on the back of the frame and corresponding function icons on the front of the
•
LCD display enable you to maneuver through the menus and customize your settings.
NOTE Not all of the
icons will appear on the
screen at the same time.
Back/Left
Next/Right
Slide Mode
Show/Hide menu
Return
Up
Down
Browse Mode
Photo menu
Clock
Enter
Main Menu
Thumbnail Mode
Add/Cancel photo
Turn on
A
the PhotoFrame
A
PhotoFrame (back)
Power button
PhotoFrame (front)
Startup screen
•
Push the power button on
the back of the frame for
approximately 2 seconds.
A
Choose language
B
MainMenu OK Up Down Right Left
PhotoFrame (back)
Menu buttons are on the back of the photo frame. Icons
indicate location of buttons found on the back of the panel.
•
Press
enter.
•
Press
key to enter.
•
Press
language.
•
Use
, keys to select SETTINGS. Press key to
, keys to select Language settings. Press
, keys to select. Press key to set your
key to return and exit SETTINGS.
PhotoFrame (front) Language Setting
3
Enjoy
View pre-stored photos
Browse Mode Thumbnail Mode Slide Mode
There are 3 view modes to choose from:
Browse Mode: manual viewing of photos one by one.
Thumbnail Mode: list of all photos.
Slide Mode: automatic, rotating display of photos.
Press
•
•
Press
•
Press
•
You may also enter Slide Mode directly by pressing
, keys to select PHOTO. Press key to enter.
, keys to select Internal Memory. Press key to enter.
, keys to select Album. Press key to enter Thumbnail Mode, and press
key to enter Slide Mode, press key to enter Browse Mode.
key from the main menu.
View photos from your memory card
Photo display (underside)
left slot right slot
Press , keys to select PHOTO. Press key to enter.
•
Press
•
Press
•
seconds, photos in your memory card will appear.
Then press
•
If the memory card is inserted before the power is ON, Slideshow will automatically start.
, keys to select inserted memory card. Press key to enter.
, keys to select Album. Press key to enter Thumbnail Mode, After a few
key to enter Slide Mode, press key to enter Browse Mode.
Use left slot for Secure Digital/MMC/
xD/Memory Stick card. Slide
card with end fi rst and face up.
User right slot for Compact Flash card.
Slide card with end fi rst and
face down.
Copy or copy all photos from your memory card
Thumbnail Mode Copying photo mode Copied photo mode
Copying photo mode
•
In the thumbnail mode, use , keys to select photo.
•
Press
menu.
•
Press
•
Press
Photo frame will keep a resized copy of the photo until it’s internal memory is full (message
shown).
key to add/cancel selected photos. After selecting, press key to show photo
, keys to select Copy to or Copy all to your memory card.
key to copy.
Delete or Delete all photos from your memory card
Thumbnail Mode Deleting photo mode Deleted photo mode
Deleting photo mode
•
In the thumbnail mode, use , keys to select photo.
•
Press
menu.
•
Press
•
Press
key to add/cancel selected photos. After selecting, press key to show photo
, keys to select Delete or Delete all from your memory card.
key to delete.
Copy/ Delete photos by connecting to your computer
You may copy, delete and move photos by connecting the
photo framewith the computer through the provided USB
cable.
Turn on the power of the photo frame, and then plug the
•
smaller end of the USB cable into the USB port on the
USB port
underside of the photo frame.
Plug the other end of the USB cable into the USB port of
•
the computer.
Set Time and Date functions
Set Time/Date mode Set Time mode Set Date mode
Set Time functions
Press , keys to select SETTINGS. Press key to
•
enter.
Press
•
key to enter.
Press
•
to set
•
hour and minutes.
Press
Set Date functions
•
Press , keys to select SETTINGS. Press key to
enter.
•
Press
key to enter.
•
Press
to set year, month and day.
•
Press
, keys to select Time and Date. Press
, keys to select Time to setup. Press key
key to return main menu and exit SETTINGS.
, keys to select Time and Date. Press
, keys to select Date to setup. Press key
key to return main menu and exit SETTINGS.
CAUTION Time and date
settings are erased if the
photo frame is unplugged.
 Loading...