

Philips 7FF1M4/05, 7FF1CWO, 7FF1CWO/05, 7FF1MS/00B, 7FF1CWO-37B User Manual
...
User manual
Manuel d’utilisation | Benutzerhandbuch | Manual del usuario
Gebruikershandleiding | Manuale per l'utent | Manual do usuário
Användar-handbok
7FF1PhotoFrame™
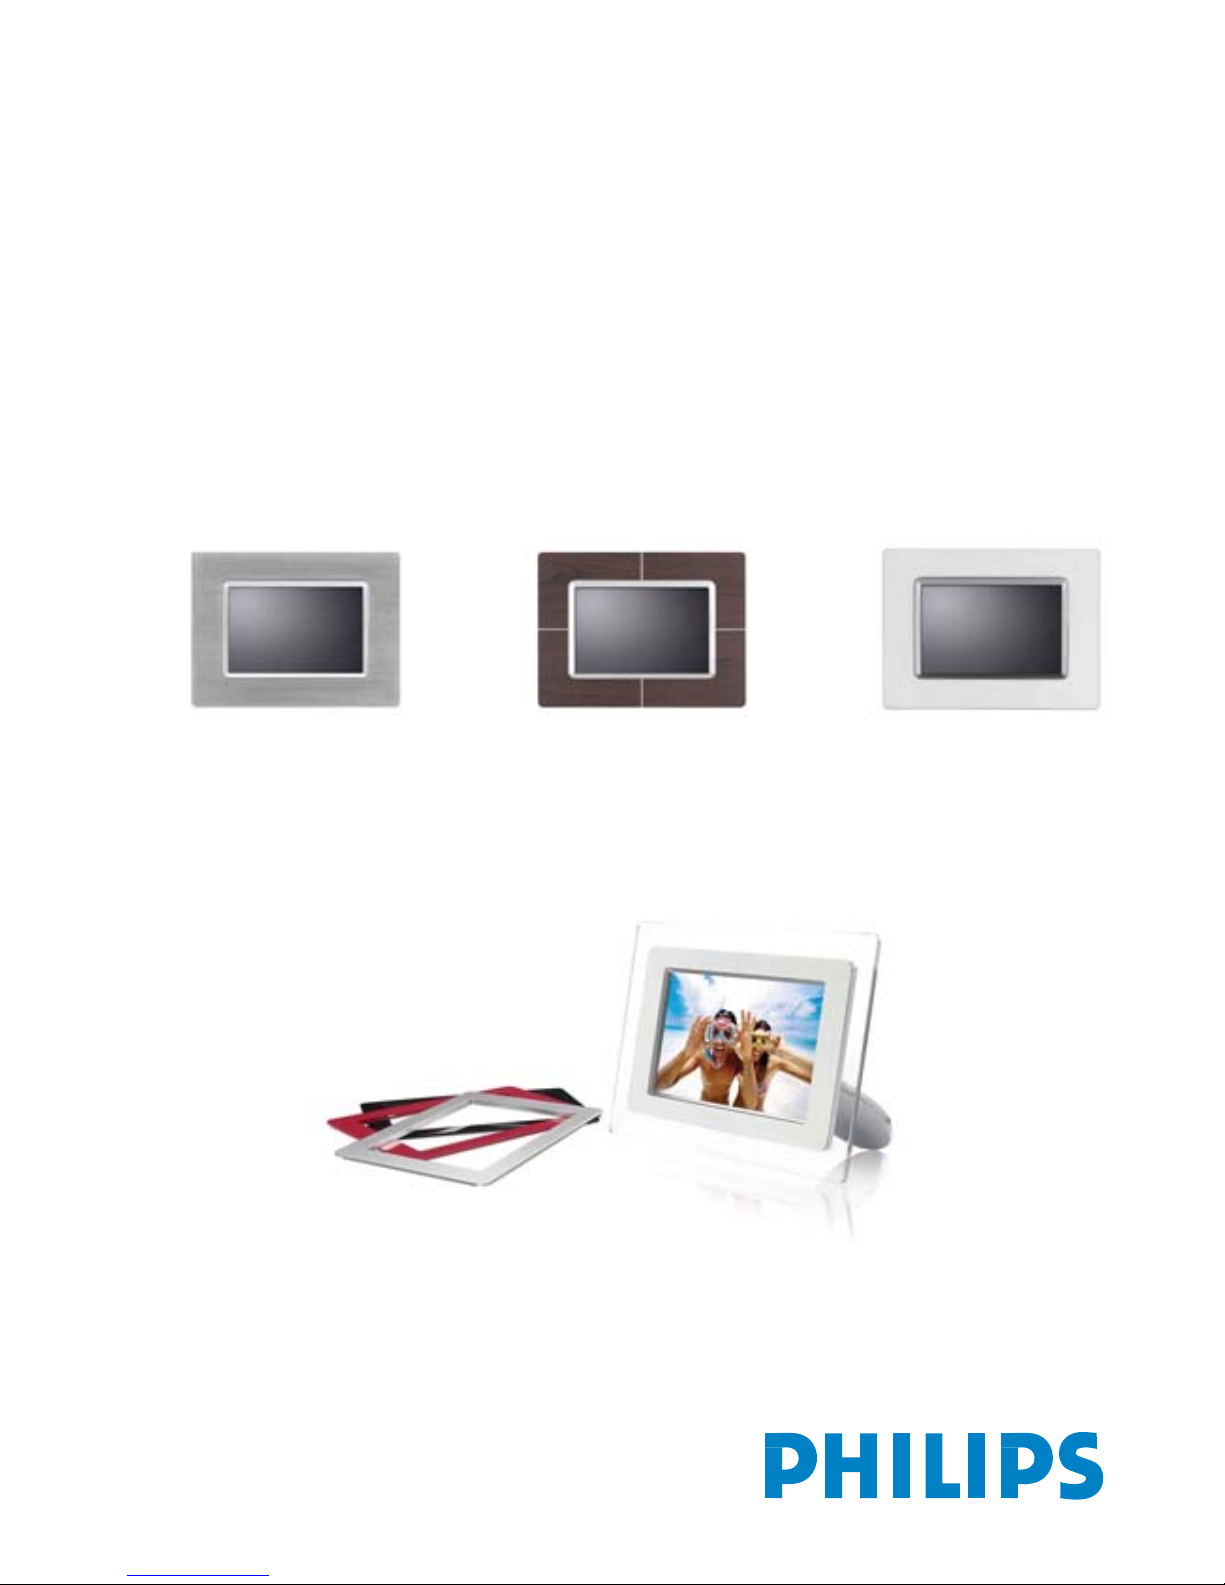
Modern
Classic
7FF1M4
7FF1CME 7FF1CWO 7FF1CMI
•
Packing list
•
Initial setup
•
Specification
Getting started
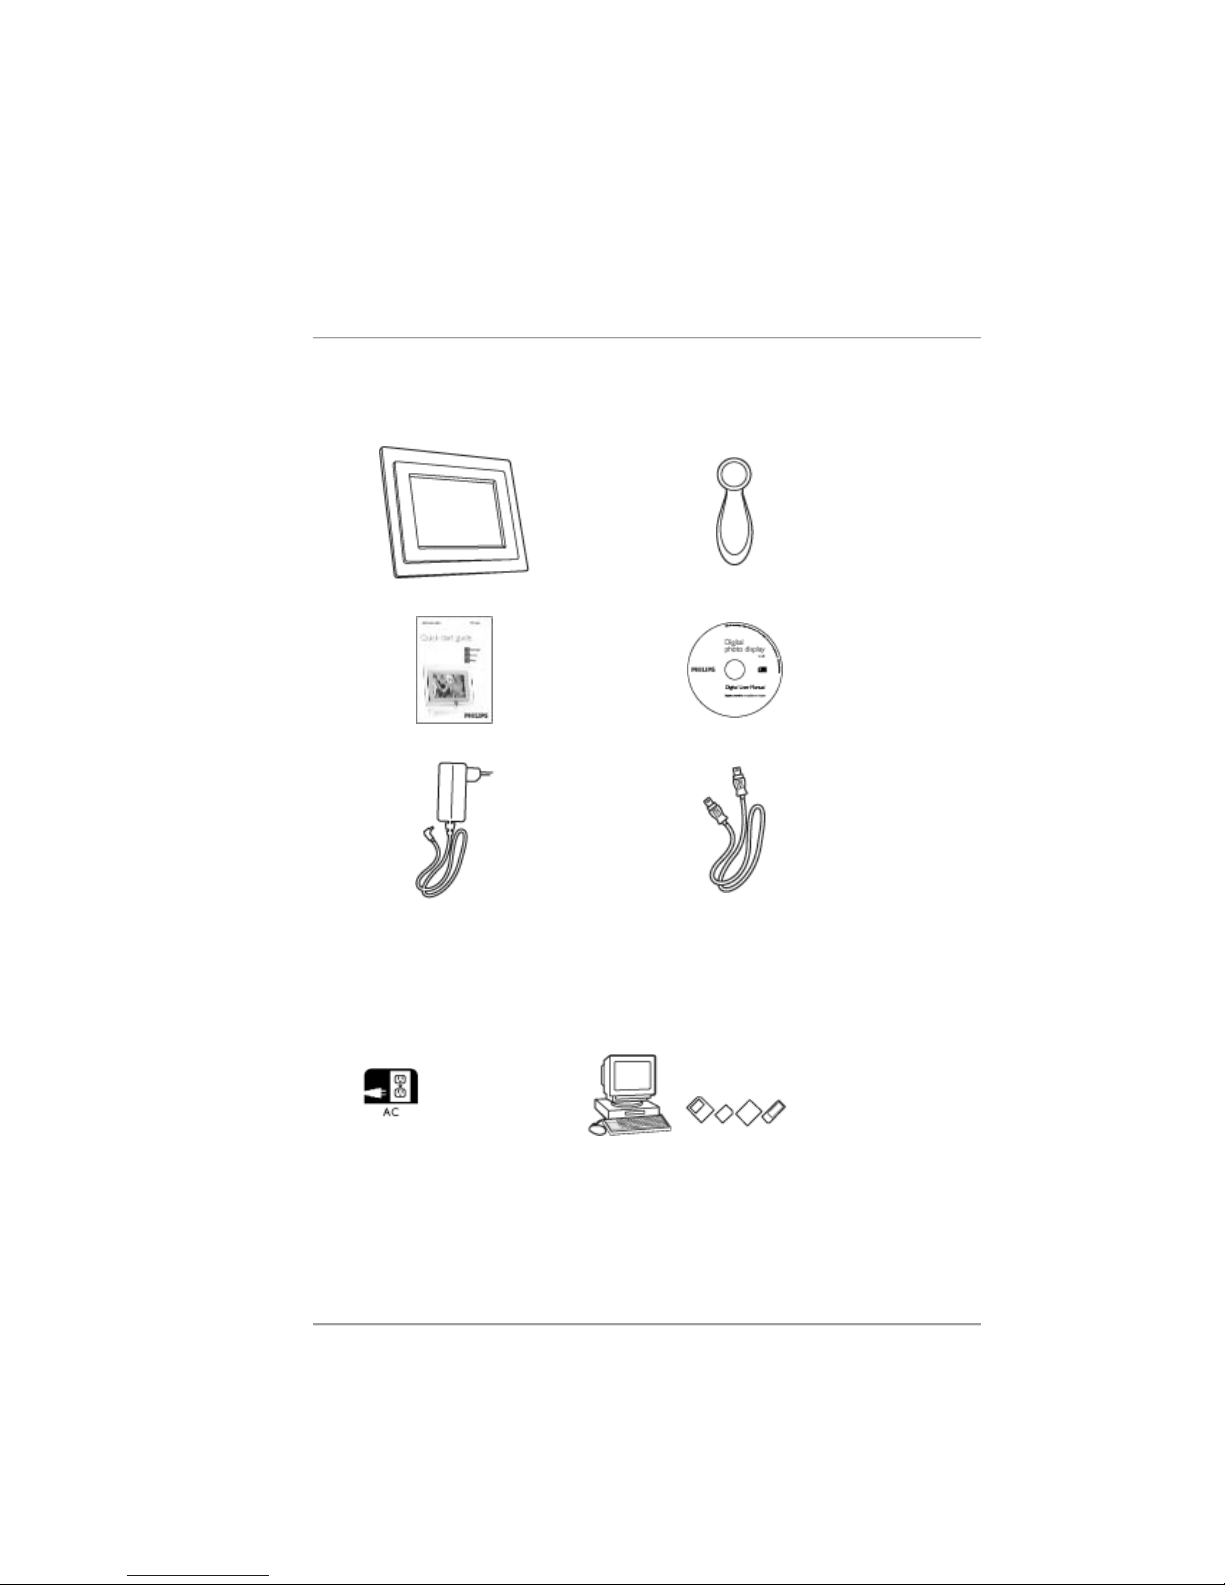
Packing List
Digital PhotoFrame™ PhotoFrame™ Stand
Quick start guide User manual CD
Power adaptor
USB Cable to PC
(male A type plug)
What else you'll need
Power outlet Digital Photos, memory card or PC
RETURN TO TOP OF THE PAGE
©2005 Koninklijke Philips Electronics NV
A
ll rights reserved. Reproduction, copying, use, modification, hiring, renting, public performance,
transmission and/or broadcasting in whole or in part is prohibited without written consent of Philips
Electronics NV

•
Packing list
•
Initial setup
•
Specification
Getting started
Initial setup
Philips digital PhotoFrame™ can be placed either vertically or horizontally to
fit the photos on display. Its internal rechargeable battery provides you the
freedom to pass it around and show photos without the power cord. Or, you
can place it somewhere in the room for constant PhotoFrame™ by connecting
it to the main.
A. Removing the protective bag/film on parts
B. Attaching the PhotoFrame™ stand
•
Place head of stand into socket
•
Rotate clockwise until stand locks in-place
C. Connecting to a power source
•
Connect the supplied power cable from PhotoFrame™ to a power outlet .
The internal battery will start charging and the battery LED turn orange.
Locate control keys
•
Use your PhotoFrame™ by pressing the control keys in the back.

RETURN TO TOP OF THE PAGE
•
LCD display also shows the function icon for each key at the same position.
Previous/Left Switch view Setup
Next/ Right Show/ Hide icon Photo setting
Up Copy Confirm
Down Delete Escape
C. Turning on PhotoFrame™
•
Slide the power switch up to the ON position.
The power LED will be green and the Startup screen will appear.
D. Choose your preferred language
•
Press the key (the 3rd key from the left on the rear of PhotoFrame™)
A menu with general settings for PhotoFrame™ will appear.
•
Use the or key to highlight Language and press the key to
select.
•
Use the or key to choose your preferred language. Press to
confirm your selection. The new setting will be effective immediately.
•
Press again to leave the Language menu.

•
Packing list
•
Initial setup
•
Specification
Getting started
Specification
Picture/Display
-
Effective display area: 137 x 91 mm (5.4" x 3.6"), 6.5" diagonal
-
Vertical dot pitch: 0.1905 mm
-
Horizontal dot pitch: 0.1905 mm
-
Resolution: 720 x 480 pixels
-
Brightness: 200 nits
-
Viewing angle (CR>5): Horizontal (-85°~85°), Vertical (-85°~85°)
-
Backlight Half-Life time: 20,000 hours
Connectivity
-
Card reader: Built-in Secure digital (SD), Multimedia card (MMC), Memory stick
(MS, MS Pro), Compact flash (CF) type I only.
Convenience
Photo format supported: Up to 12M pixels, JPEG photos following EXIF and DCF
standards
Memory size: 50 photos or more
Placement supported: Landscape, Portrait
Control buttons: 6 buttons
Display mode Automatic slideshow, Full-Screen browse, Thumbnail browse
Setup menu:

Photo menu:

OSD languages: English, French, German, Italian, Spanish, Simplified Chinese,
Russian, Japanese
Plug & Play compatibility: Windows 2000/XP or later, Mac OS X or later, Linux
Accessories
-
Included accessories: AC power adaptor (AC 100~240V 50/60 Hz 0.36A-->DC 5V
2.5A), USB cables, Quick start guide
-
User manual: Yes (in CD-ROM)
Power
-
Power LED indicator Green (power on), Off (power off)
-
Battery LED indicator Orange (charging), Off (not charging)
-
Power mode supported Battery powered, AC powered
RETURN TO TOP OF THE PAGE
•
Viewing
photos
•
Copying
photos
•
Viewing
photo
slideshows
•
Deleting
and
Rotating
photos
Enjoying photos
Viewing Photos
When there is no memory card in PhotoFrame™, it displays photos stored in local memory.
When a memory card is inserted to PhotoFrame™, it will display photos from most recently
connected media in a "Last-in, First-display" order.
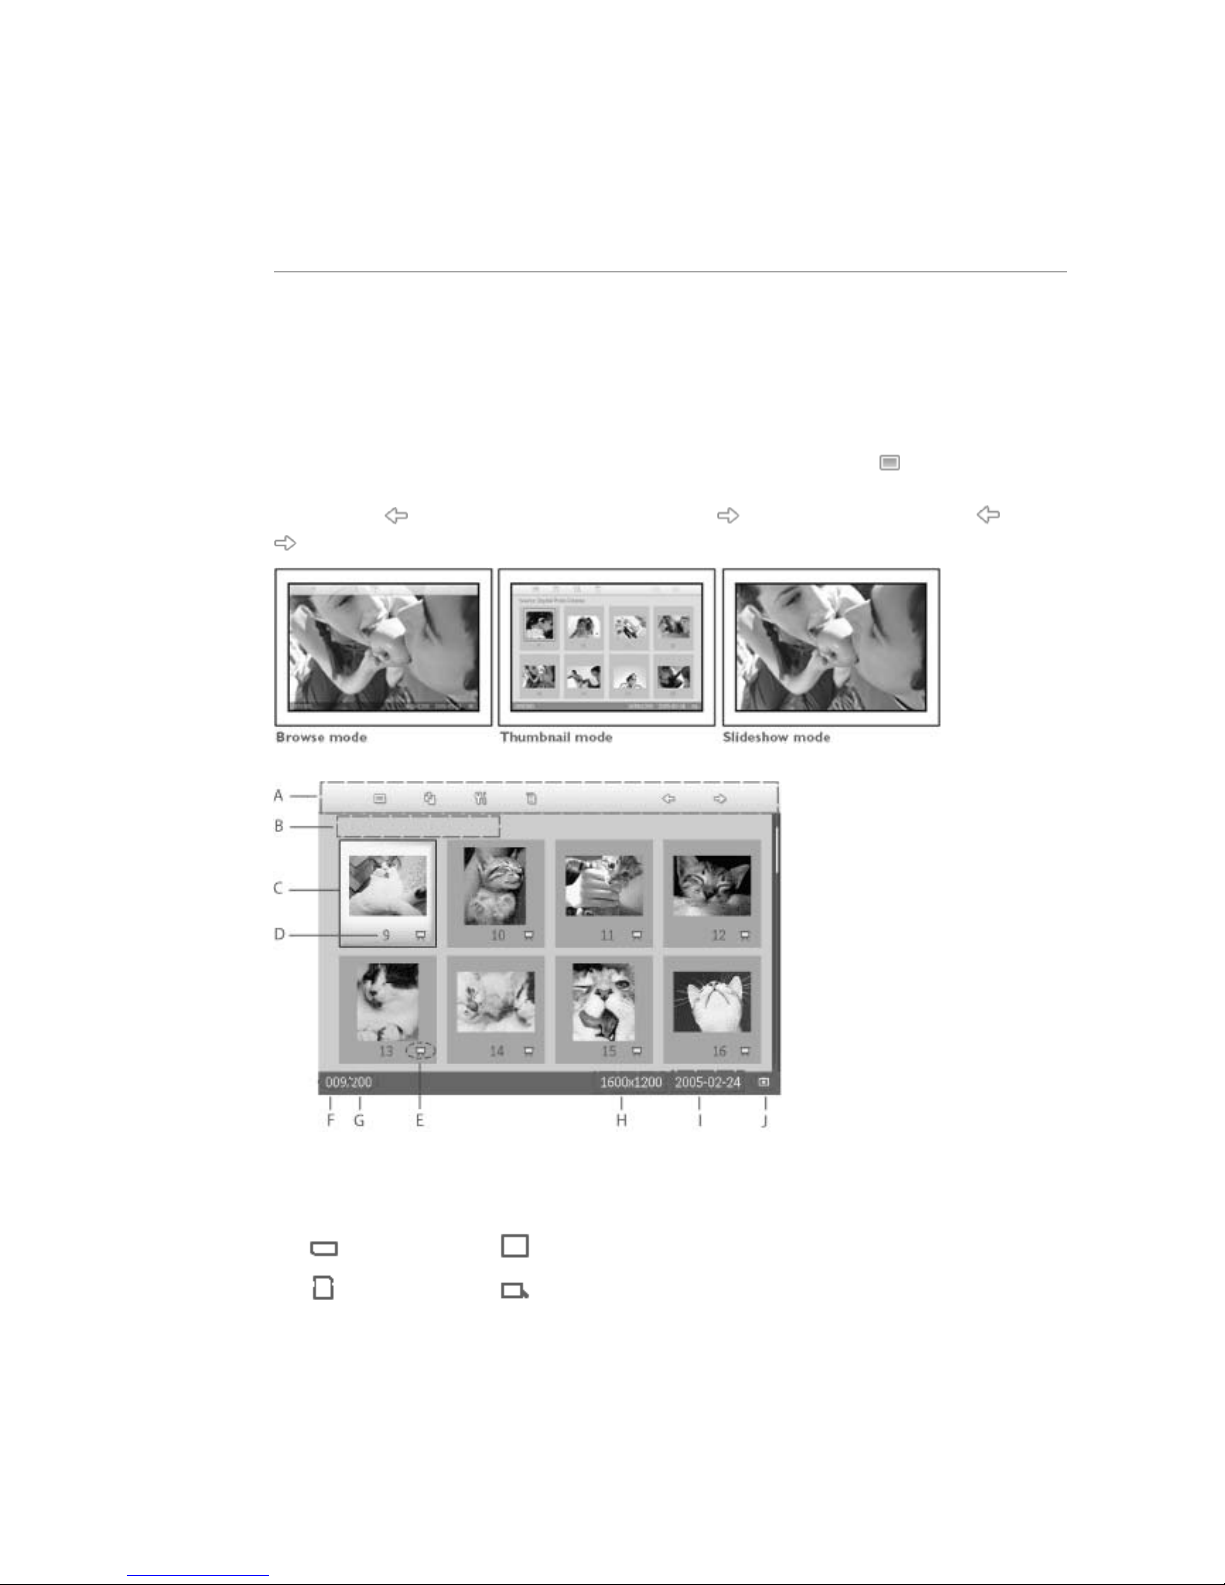
You can choose from three PhotoFrame™ viewing modes. Press ( the 1st key
from the left on the rear of PhotoFrame™) to toggle among the three viewing
modes; use to view the previous photo and to view the next photo. ( and
are the first two keys from the right on the rear of PhotoFrame™. )
THUMBNAIL-List of photos.
A
Each icon represents the function of the corresponding
key in the rear of PhotoFrame™.
B Source of photos on screen
Memory stick Compact flash
SD, MMC PhotoFrame™
C Current Photo
D Current Photo number
E
Slideshow icon
(If shown, this photo will be shown in slideshow.)
F Current photo number, same as D
G Total photo count
H Resolution of current photo (in pixels).
I Date current photo was taken
J Source of displayed photos.
SLIDESHOW- Automatic, Rotating display of photos.
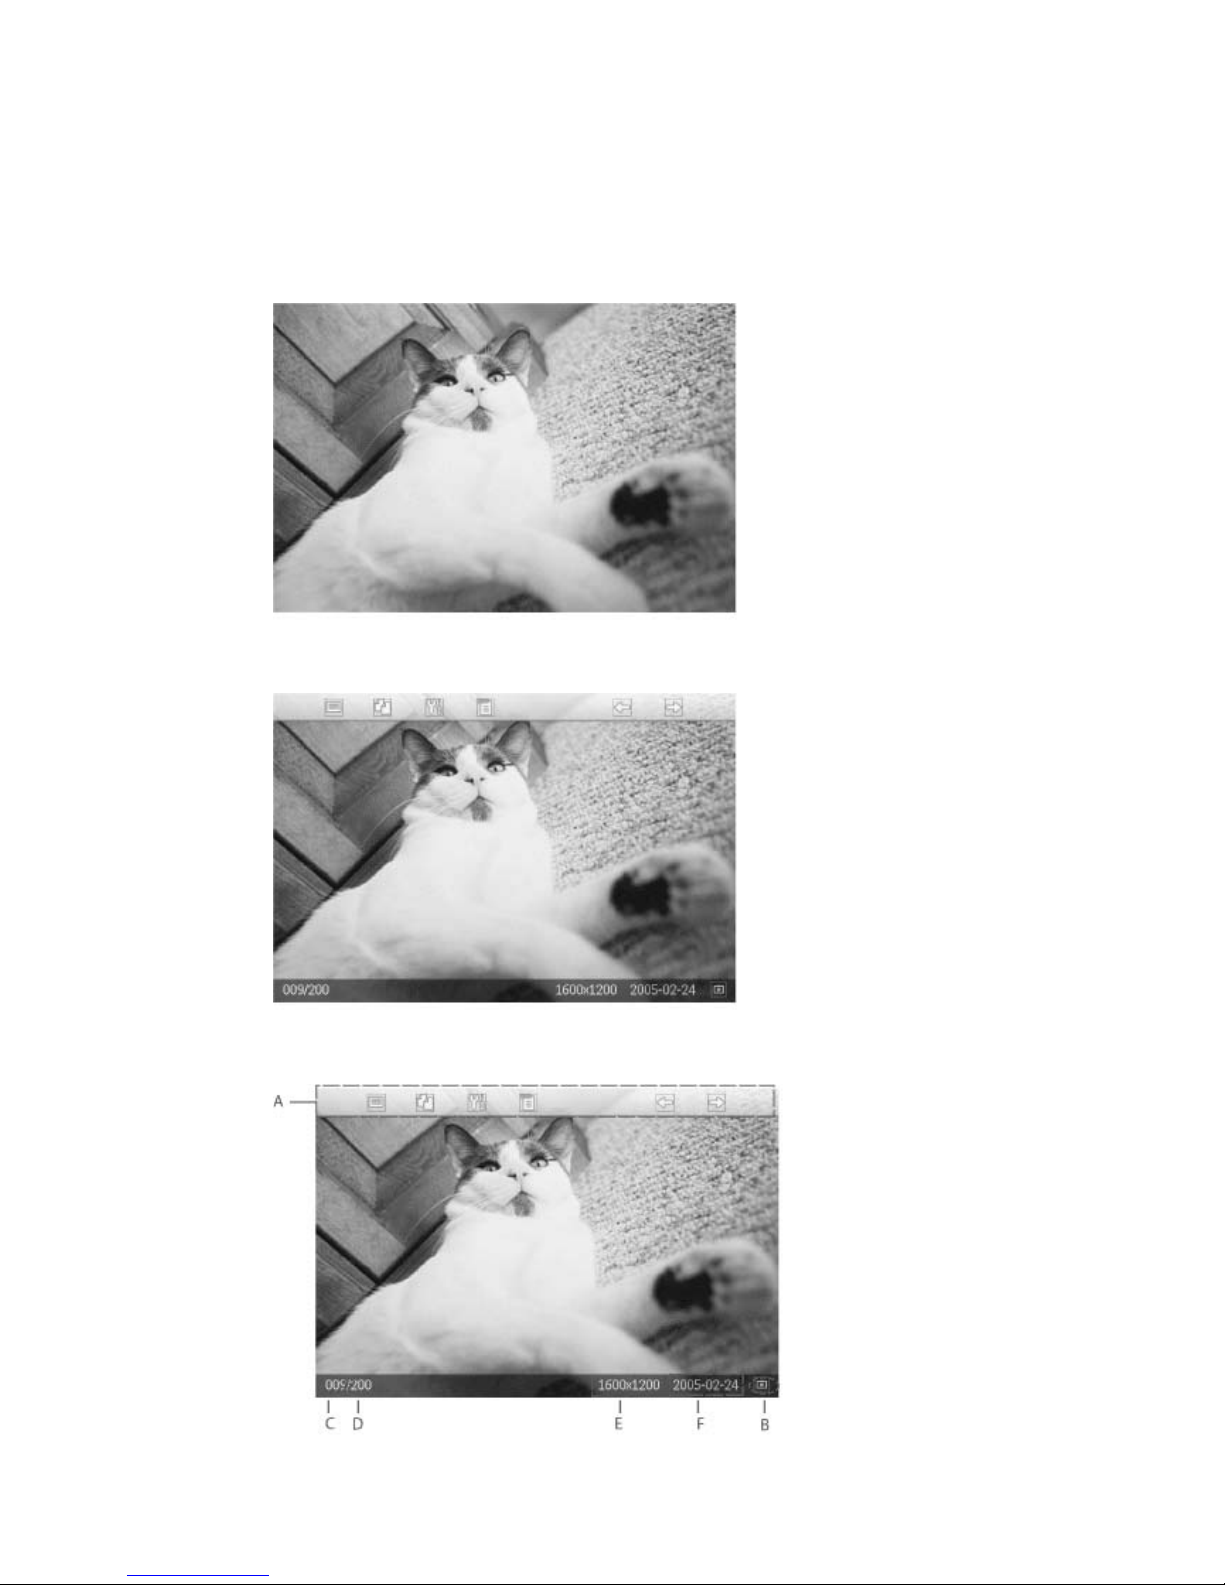
BROWSE—Manual viewing of photos one-by-one. (Displays size and date)
Each icon represents the function of the corresponding key in the rear of PhotoFrame™.

A
Each icon represents the function of the corresponding
key in the rear of PhotoFrame™.
B Source of photos on screen
Memory stick Compact flash
SD, MMC PhotoFrame™
C Current Photo number
D Total photo count
E Resolution of current photo (in pixels)
F Date current photo was taken
Viewing photos on PhotoFrame™
•
Remove any memory card from PhotoFrame™.
Photos stored in the PhotoFrame™ will appear.
Viewing digital camera photos from a memory card
•
Insert the memory card into the slot in the frame:
•
For Compact Flash card, firmly slide card in the larger slot end first and face DOWN.
•
For SD, MMC, or Memory Stick card, slide card in the smaller slot end first and face UP
until it locks in-place.
After a few seconds photos on the memory card will display.
How to remove a memory card:
•
To remove Compact Flash card, pull out the card slowly.
•
To remove SD, MMC, or Memory Stick card, push the card again to unlock and then pull
out the card.
RETURN TO TOP OF THE PAGE
•
Viewing
photos
•
Copying
photos
•
Viewing
photo
slideshows
•
Deleting
and
Rotating
photos
Enjoying photos
Copying Photos
You can copy photos stored on a memory card, or PC to PhotoFrame™. PhotoFrame™ will
then internally store a resized copy of the original photo. This resized copy will remain
inside PhotoFrame™ until you delete it from PhotoFrame™.
PhotoFrame™'s internal memory will store 50 or more resized photos. Please see the
Deleting and Rotating Photos section to learn how to delete photos stored in
PhotoFrame™.
Copying from a memory card
You may copy photos one by one in Browse mode or several photos at once in Thumbnail
Mode
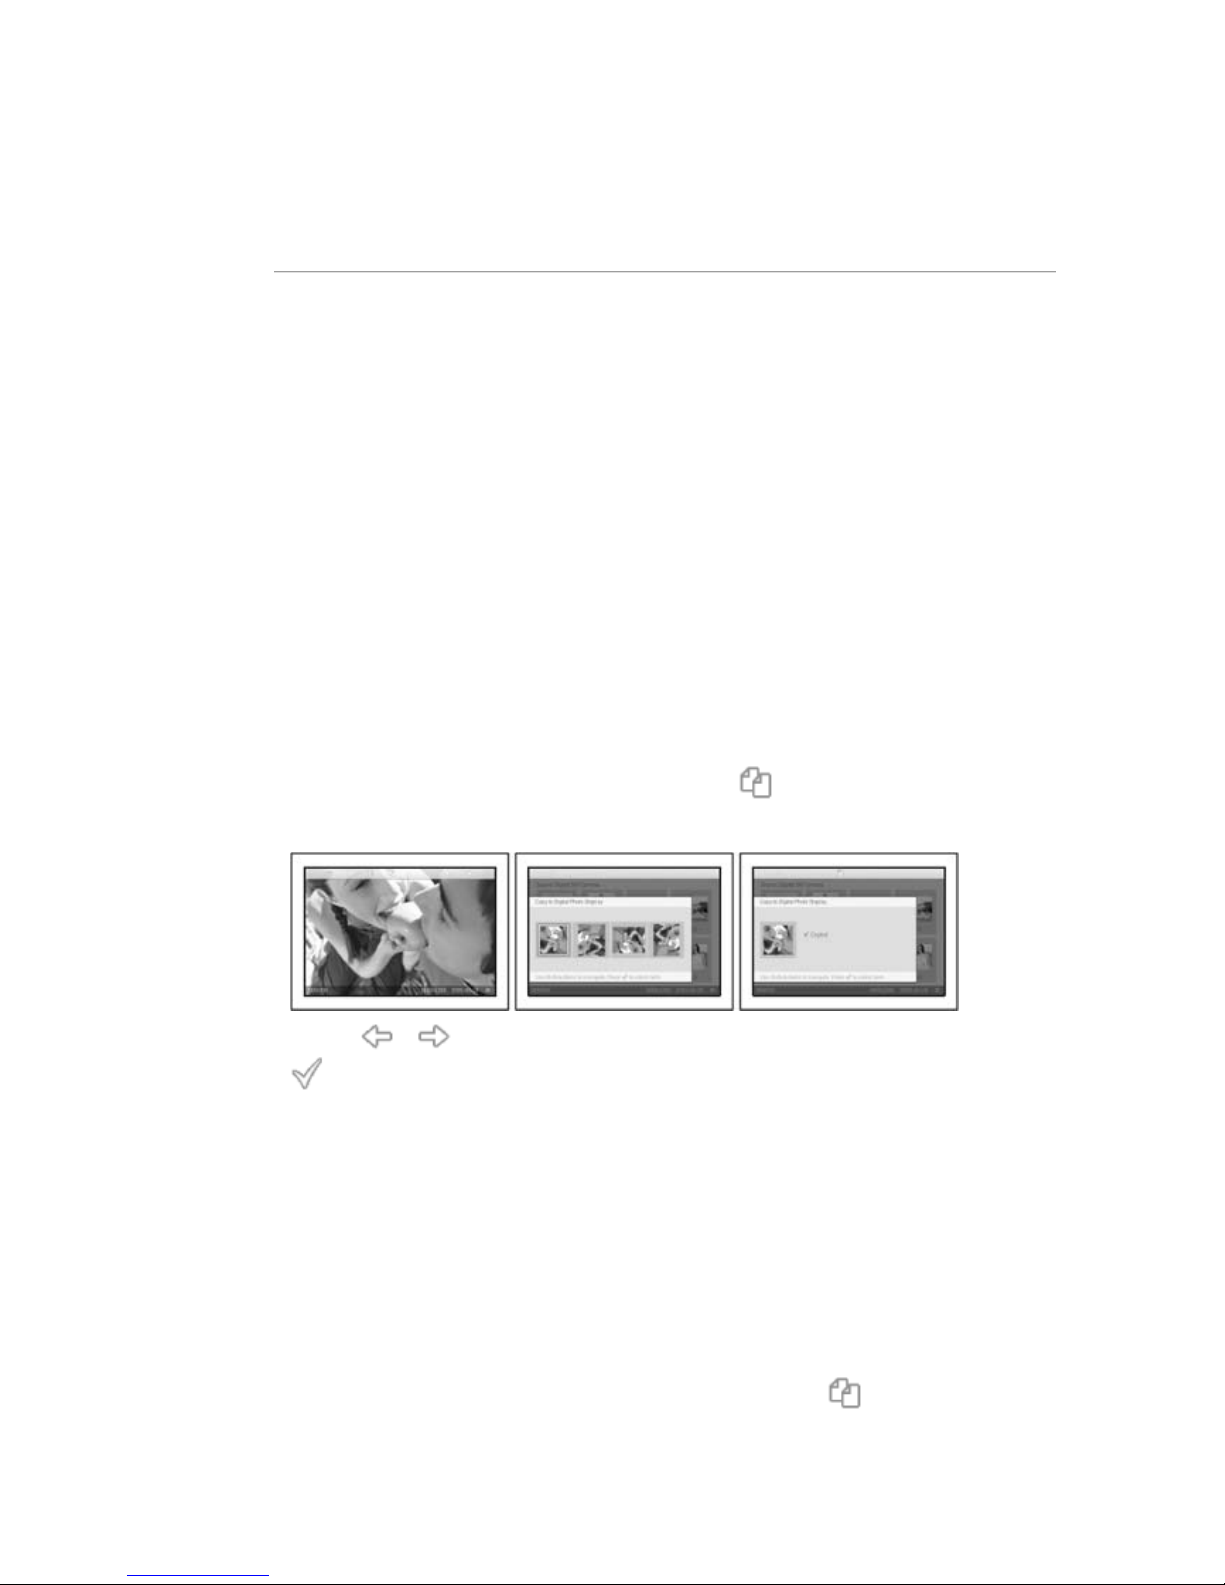
Copying photo one by one in Browse mode
•
Change view mode to Browse.
•
Insert the memory card into PhotoFrame™.
Photos from memory card will appear.
•
With the photo for copy shown on screen, press the key (the 4th key from the left
on the rear of PhotoFrame™). Four different orientations of the selected photo will
appear.
•
Use the or key to select the desired photo orientation and then press the
key.
Do not remove the memory card before the copy screen disappears upon completion.
If a warning message shows up indicating no free space for more photos, you may need
to remove some already stored photos first before copying more photos.
• After the copy screen disappears upon completion, a resized copy of the photo is stored
inside PhotoFrame™.
• You may move to other photos and continue this process until all the photos you want
are copied to Photos Frame.
Copy several photos at once in Thumbnail mode
•
Change view mode to Thumbnail.
• Insert the memory card into PhotoFrame™.
Photos from memory card will appear.
•
Highlight the photo for copy in Thumbnail mode and press the key (the 4th key from
the left on the rear of PhotoFrame™).
A multi-photo copy screen with small photos from current thumbnail screen will appear.

•
Use the or key to move, to add photos to copy list, to remove photos
from copy list, and then press the to confirm the copy list.
Photos on the copy list are shown with a small copy icon .
Do not remove the memory card before the copy screen disappears upon completion.
If a warning message shows up indicating no free space for more photos, you may need
to remove some already stored photos first before copying more photos.
• You may move to other Thumbnail pages and continue this process until all the photos
you want are copied to PhotoFrame™.
copying PC Photos to PhotoFrame™
•
For copying photos from a PC to the PhotoFrame™ , install the
Auto Run software PhotoFrame™ manager
Philips Auto Run Program for PhotoFrame™ is a windows based
application for user to manage photos between Philips
PhotoFrame™ and PC. It provides easy-to-use user interface for
user to browse and preview the photos in both PC directories and
PhotoFrame™ albums, and for user to perform operations, such as
copying, moving and deleting photo(s).
•
For installation and more detail about the application, please
follow the instructions in the PC software user manual located on
the CD
RETURN TO TOP OF THE PAGE
•
Viewing
photos
•
Copying
photos
•
Viewing
photo
slideshows
•
Deleting
and
Rotating
photos
Enjoying photos
Viewing Photo Slideshows
When you set the PhotoFrame™ view mode to Slideshow, it will automatically rotate the
PhotoFrame™ed on screen. You may handpick the photos for slideshow and choose
slideshow frequency – for example, how long a photo remains on screen – transition
effect – how next photo replaces current one on screen – and sequential or random
PhotoFrame™. You may also select to show all slideshow photos in either vertical or
horizontal orientation to match how you place the PhotoFrame™.
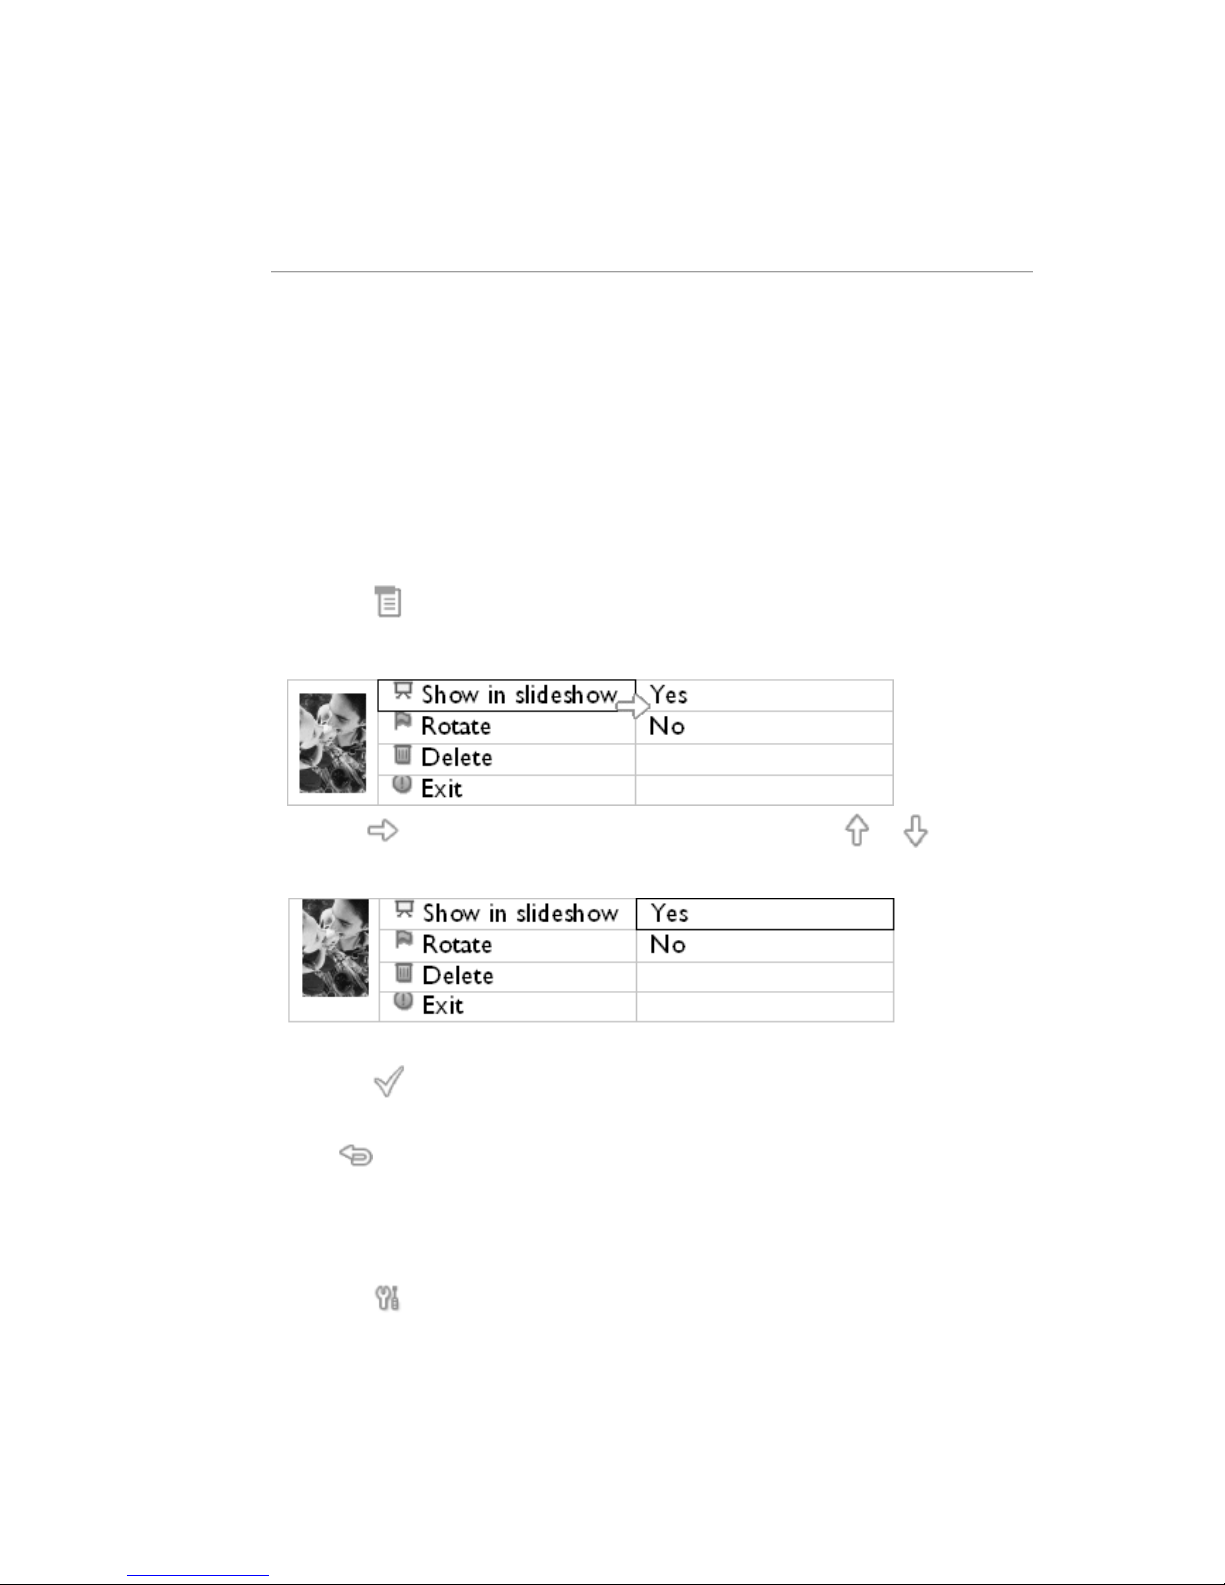
Picking photos for slideshow
Note: This function only applies to photos stored on PhotoFrame™'s internal memory.
•
Change view mode to Browse or Thumbnail.
•
Press the key (the 4th key from the left on the rear of PhotoFrame™).
A menu with specific settings for the selected photo will appear.
•
Press the key to select Show in slideshow setting and use the or key to
decide if you want to display this photo in the Slideshow mode.
Default setting is Yes for Show in slideshow.
•
Press the to confirm.
Now your selected setting is confirmed.
•
Press to leave this menu.
Choosing slideshow frequency
Note: This function applies to photos stored on all media.
•
Press the key (the 3rd key from the left on the rear of PhotoFrame™).
A menu with general settings for PhotoFrame™ will appear.
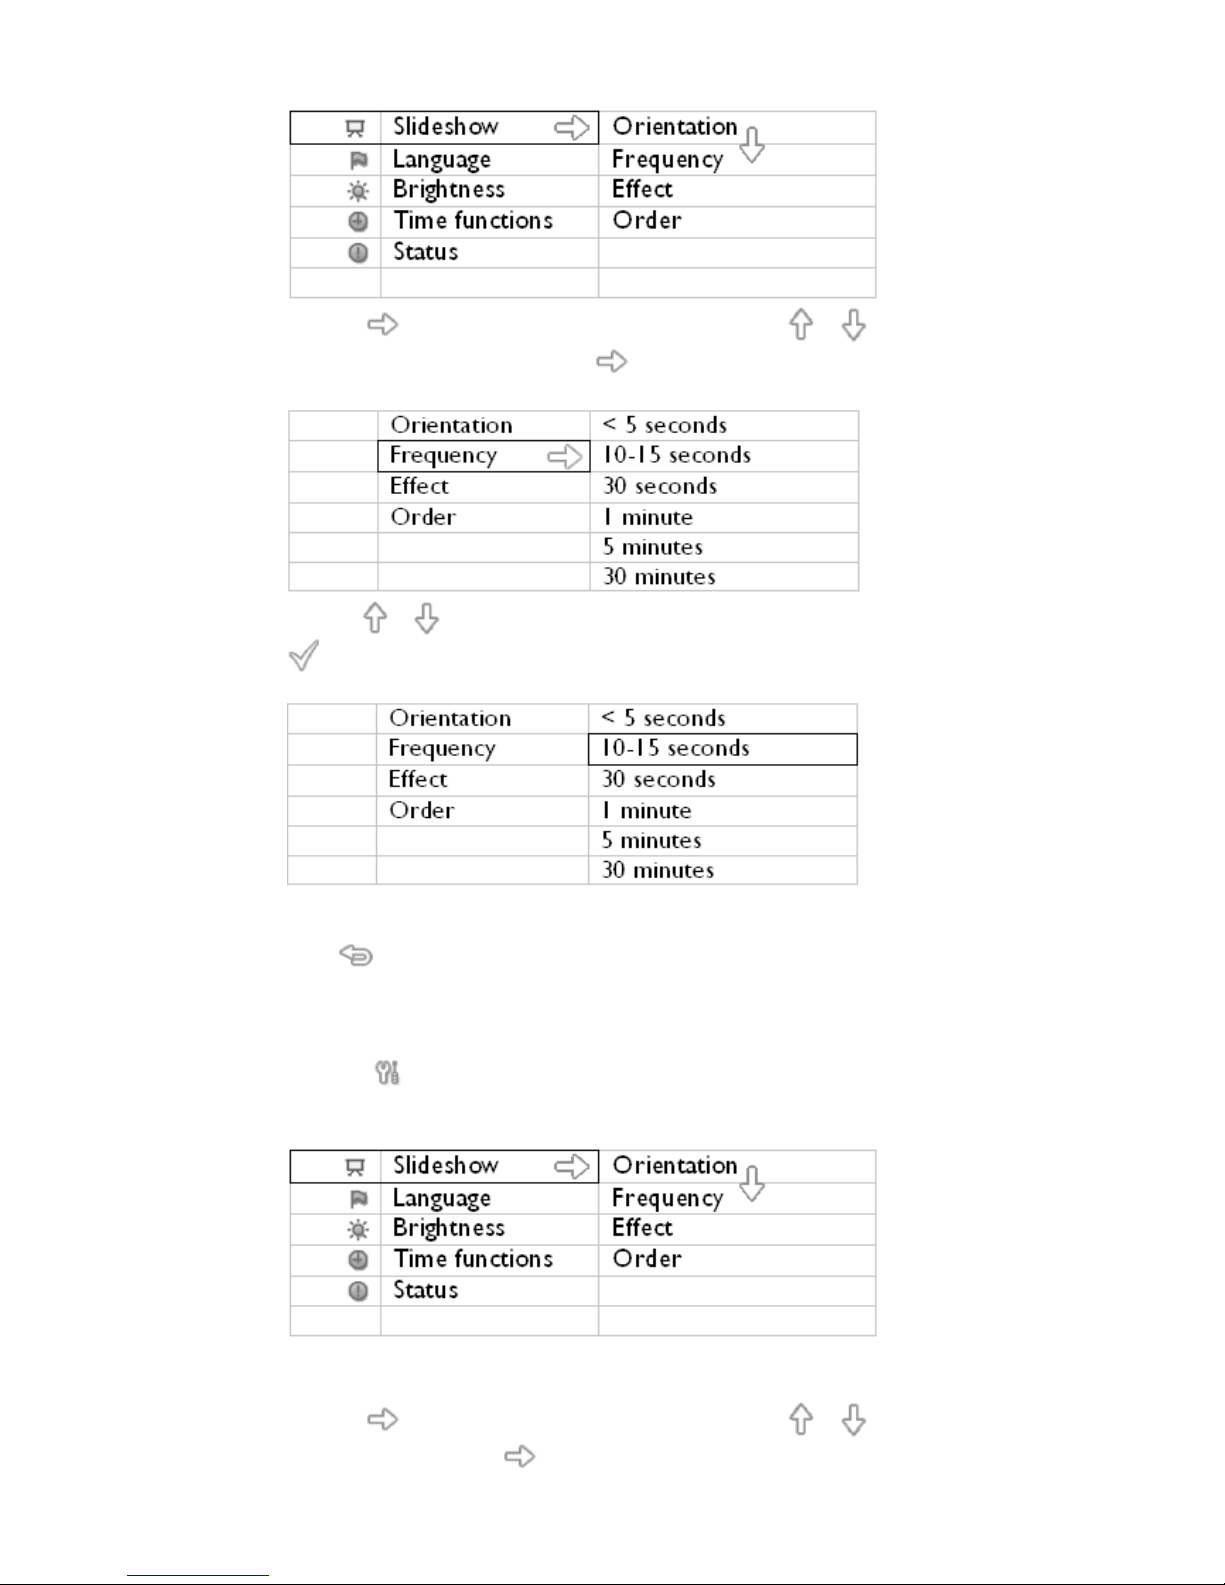
•
Press the key to select Slideshow settings and use the or key to move to
the Frequency item. Next press the key again to select Frequency settings.
•
Use the or key to highlight the interval a photo remains on screen and press
to confirm.
•
Now your selected setting is confirmed.
•
Press to leave this menu.
Choosing transition effects
Note: This function applies to photos stored on all media.
•
Press the key (the 3rd key from the left on the rear of PhotoFrame™).
A menu with general settings for PhotoFrame™ will appear.
•
Press the key to select Slideshow settings and use the or key to move to
the Effect item. Press the key again to select Effect settings.

•
Use the or key to highlight the way one photo replaces the next on screen.
Press to confirm your selection.
Now your selected setting is confirmed.
Press to leave this menu.
Choosing photo order
Note: This function applies
to photos stored on all media.
•
Press the key (the 3rd key from the left on the rear of PhotoFrame™).
• A menu with general settings for PhotoFrame™ will appear.
•
Press the key to select Slideshow settings and use the or key to move to
the Order item. Next press the key again to select Order settings.
•
Use the or key to highlight your preference and press to confirm.
Now your selected setting is confirmed.
•
Press to leave this menu.
Indicating PhotoFrame™ placement orientation
•
Press the key (the 3rd key from the left on the rear of PhotoFrame™).
A menu with general settings for PhotoFrame™ will appear.
 Loading...