

Page 1
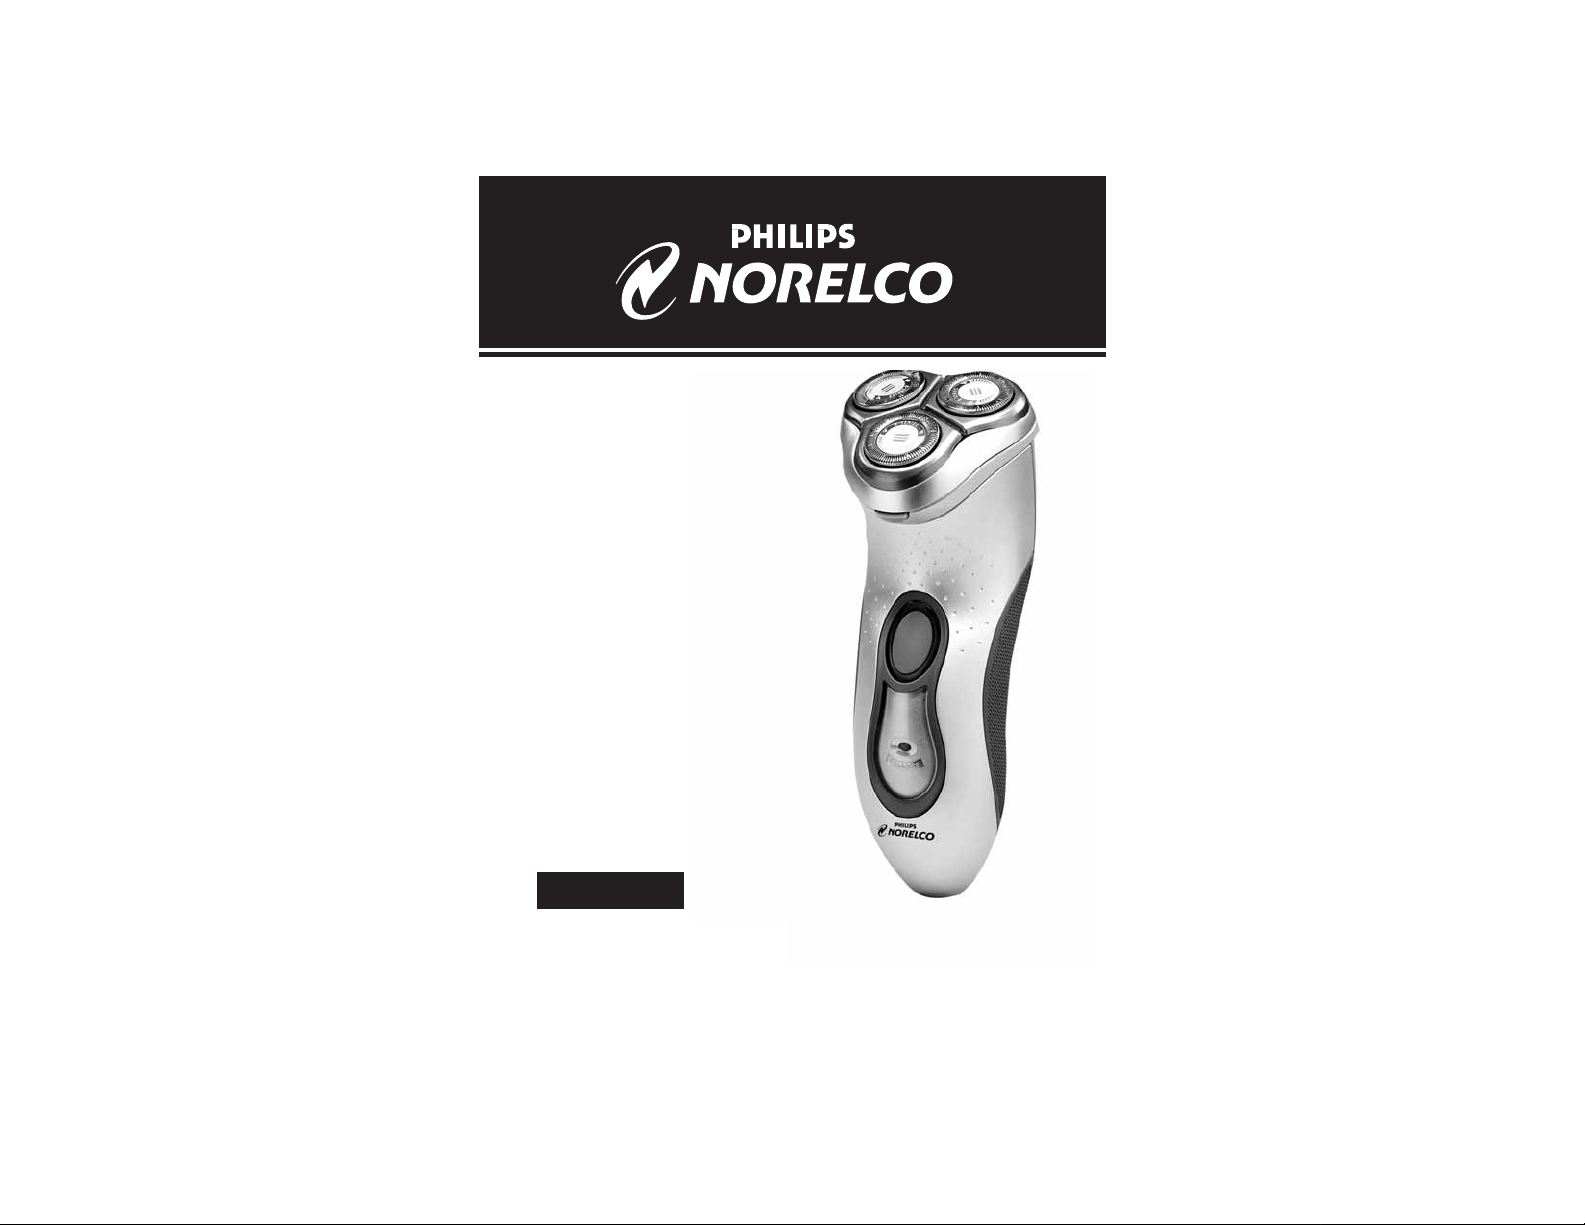
7800XLCC
Rechargeable T ripleheader
®
Cordless/Cord Razor
with
JetCleanSystem
UADRA
Page 2
2
ENGLISH 4
ESPAÑOL 30
7800XLCC
Page 3

ENGLISH ENGLISH 54 54
IMPORTANT SAFETY
INSTRUCTIONS
When using an electric appliance, basic precautions should always
be followed,including the following:
Read all instructions before using this appliance.
DANGER
To reduce the risk of electric shock:
1. Do not reach for a corded razor/Jet Clean System that has fallen
into water. Unplug immediately.
2. Use razor only in dry condition. Do not use a razor/Jet Clean
System while bathing or in a shower.
3. Do not submerge razor in water.
4. Do not place or store a razor or Jet Clean System where it can
fall or be pulled into a tub or sink.Do not place or drop a razor
or Jet Clean System into water or other liquid.
5. Always unplug this razor/Jet Clean System from the electrical
outlet immediately after use, except when razor is (re)charging.
6. Unplug and remove power supply cord from razor before
cleaning.
WARNING
To reduce the risk of burns,fire, electric shock, or injur y
to persons:
1. Close supervision is necessary when this razor/
Jet Clean
System
is used by, on, or near children or invalids.
2. Use this razor/
Jet Clean System
for its intended household use
as described in this manual.Do not use attachments or a
cleaning solution not recommended by Philips Electronics
North America Corporation.
3. Never operate this razor/
Jet Clean System
if it has a damaged
cord or charging plug,if it is not working properly, if it has
been dropped or damaged,or dropped into water while
plugged in.Return the razor/
Jet Clean System
to the Philips
Norelco Service Location for examination and repair.
4. Keep the razor,
Jet Clean System
,cord and charging plug away
from heated surfaces.
5. Never drop or insert any object into any opening.
6. Donot clean,charge or plug in razor/
Jet Clean System
outdoors
or operate where aerosol (spray) products are being used or
where oxygen is being administered.
7. Do not use this razor with a damaged or broken comb,as facial
injury may occur.
8. Always attach plug to razor/
Jet Clean System
first,then to outlet.
Becertain that plug is inserted firmly into razor/
JetClean System
,
up to mark indicated on plug.For
Jet Clean System
use, always
put razor in first,attach cord to Jet Clean System, then plug into
outlet.To disconnect, turn razor/
JetClean System
off then
remove charging plug from outlet.
9. Never put the razor/
Jet Clean System
in direct sunlight or store
at a temperature above 140°F.
10.Razor can be rinsed under running tap water. Do not charge or
operate razor corded until fully dried.
11.Keep the
Jet Clean System
and cord dry at all times. Do not
handle with wet hands.Do not store in a damp environment.
12.To prevent possible damage to the cord, do not wrap cord
around the razor or
Jet Clean System
.
SAVE THESE
INSTRUCTIONS
IMPORTANT:The power plug contains a transformer. Do not
cut off the power plug to replace it with another plug,as this will
cause a hazardous condition.
CAUTION: Keep cleaning solution out of reach of children.Do
not take internally.Avoid contact with eyes.In case of eye contact,
thoroughly flush with cold water. If irritation persists,get medical
attention.
Page 4
ENGLISH ENGLISH 76
Table of Contents
Features.......................................................8-11
LED Charging Indicator..............................12
Before First Use............................................12
Charging...................................................12-15
Recharging......................................................15
Put It T o The T est & Shaving Tips........15-16
How T o Shave With An
Electric Razor................................................16
Trimming.........................................................17
Cleaning....................................................17-26
Maintenance...................................................26
Storage............................................................27
Assistance.......................................................28
Accessories....................................................28
War ranty.........................................................29
Spanish............................................................30
76
60 - DAY MONEY-BACK GUARANTEE
To enjoy the closest and most comfortable shave from your new Philips Norelco
Men’s Razor, the razor should be used exclusiv
ely for 3 weeks. This allows your
hair and skin enough time to adapt to the Philips Norelco Shaving System.If, after
that period of time, you are not fully satisfied with your Philips Norelco Men’s
Razor, send the product back and we’ll refund you the full purchase price.
The razor must be shipped prepaid by insured mail, insurance prepaid,
and have the sales slip, indicating purchase price and the date of
purchase, enclosed. The razor must be postmarked no later than 60 da
ys
after the date of purchase. Philips Norelco reserves the right to verify the
purchase price of the razor and limit refunds not to exceed suggested retail price.
Send dated sales slip, your complete name and address as indicated
below,and the razor, prepaid to:
Philips Domestic Appliances and Personal Care Company
A Division of Philips Electronics North America Corporation
450 North Medinah Rd, Dock 16
Roselle, IL 60172-2329
Please allow 4-6 weeks for delivery of check. (Please Print)
Name_________________________________________________________
Address________________________________________________________
City___________________________________________________________
State_____Zip__________________________________________________
Daytime Telephone No. (____)______________________________________
E-mail Address__________________________________________________
REASON FOR RETURNING:______________________________________
______________________________________________________________
______________________________________________________________
______________________________________________________________
______________________________________________________________
______________________________________________________________
______________________________________________________________
Area Code
Page 5
ENGLISH 9ENGLISH8 98
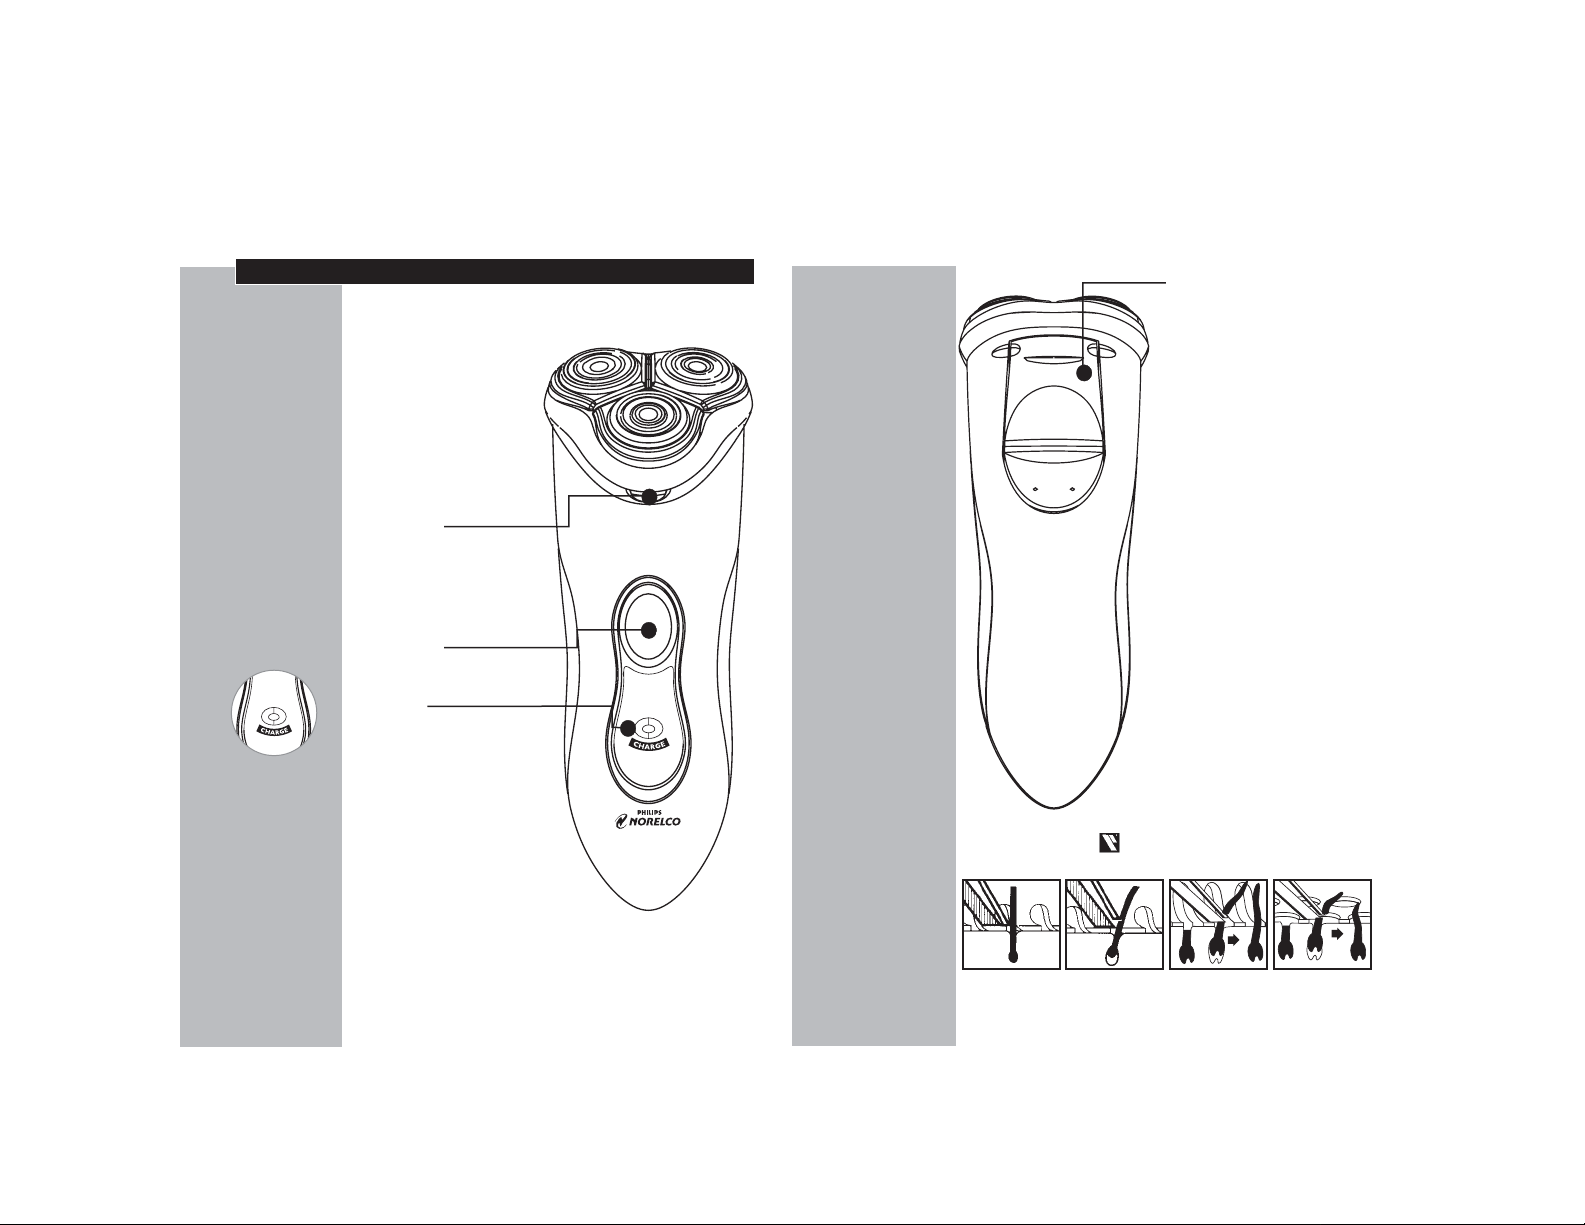
Spring-Release T rimmer
Automatic W orldwide
Voltage100V to 240V AC
Cleaning Brush
Rechargeable -
8 hour full charge
for up to
10 days of
cordless shave time
Cordless/Cord - To shave
with or without a cord
Full 2-Year Warranty
60-Day Money-Back
Guarantee
How the Unique Philips Norelco Lift and
Cut
®
Shaving System Makes Close Comfortable:
Groove channels beard
closer to cutting system
Lifter raises hair Slots to cut long hairs Holes to cut short hairs
even closer
Features
Spectra Shaving Heads
Razor Head Assembly
Protective Razor
Head Cap
Individually Floating
Heads
Razor Head Release
Button
• Hair Chamber
captures shaven
hair
Electronic ON/OFF
Button
LEDCharge Indicator
Light
• Indicates razor is
(re)charging
Page 6
10 ENGLISH 11
Features
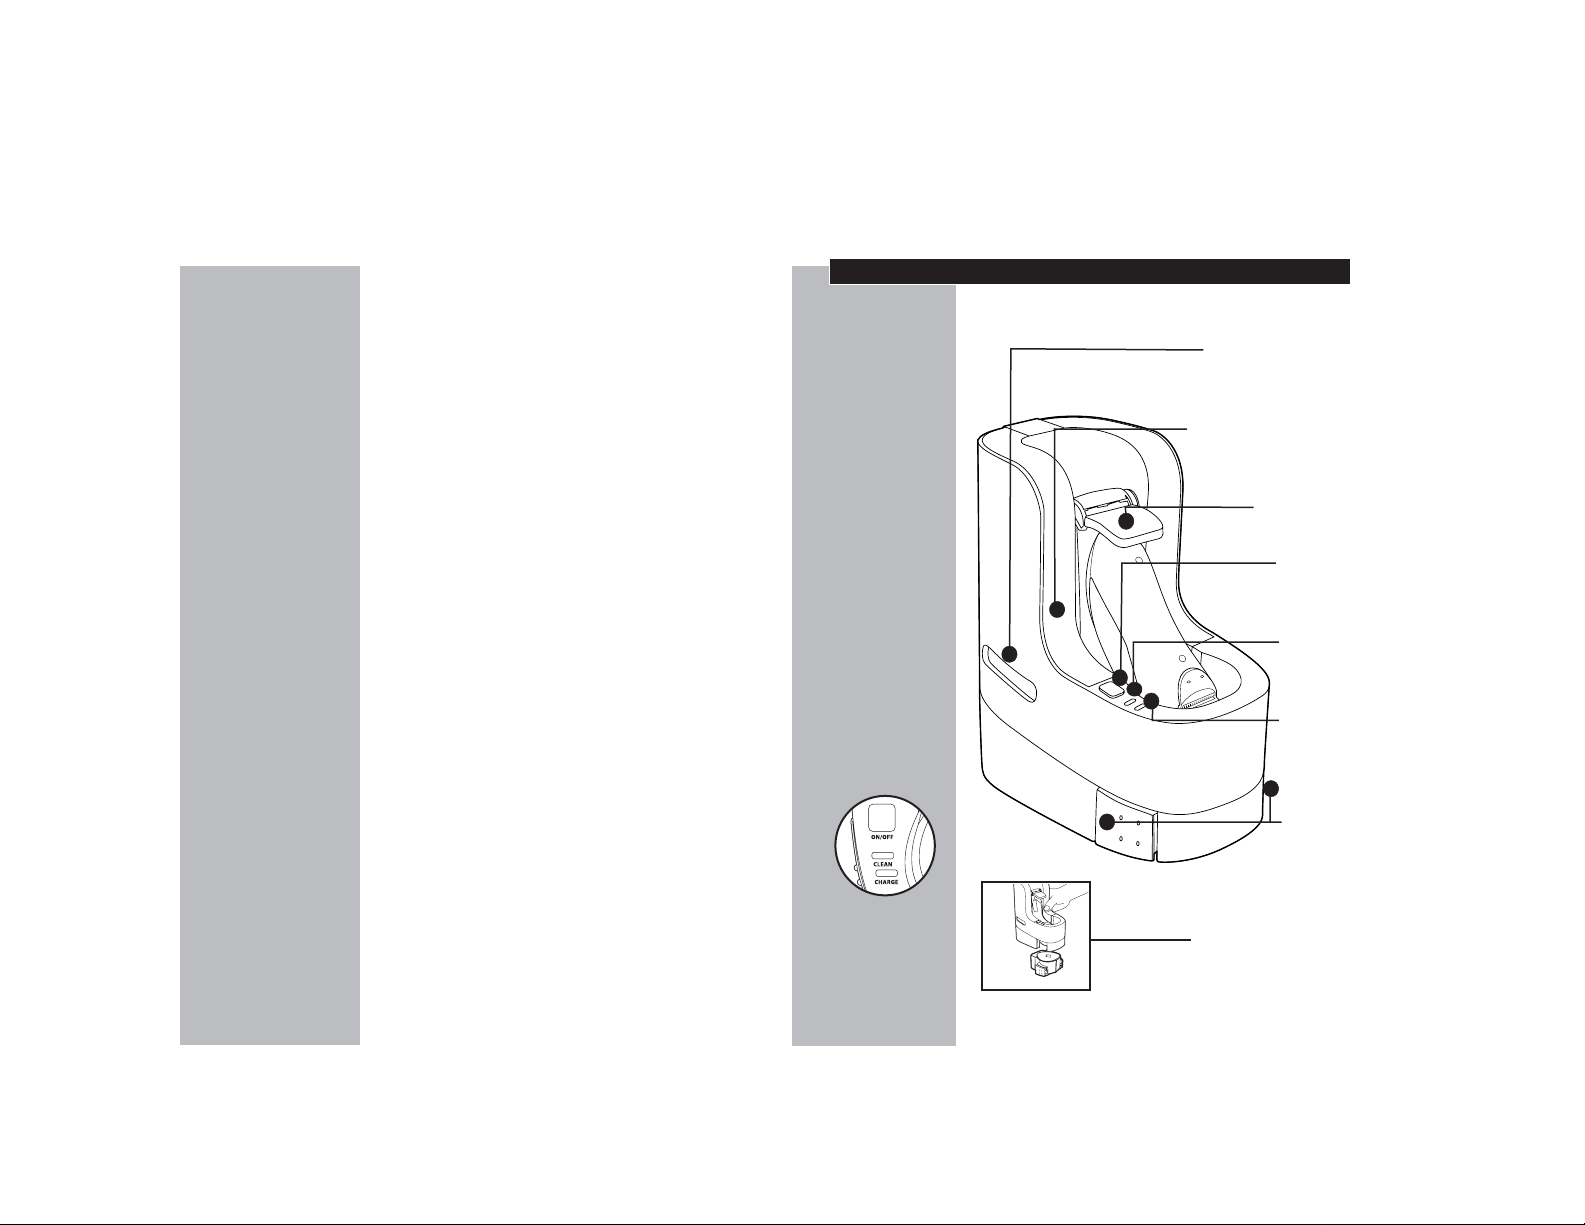
Jet Clean System
Reservoir Solution
Level Indicator
Transparent Cleaning
Solution Reservoir
Razor Lever
ON/OFF
Button
Cleaning
Indicator
Light
Charging
Indicator
Light
Cleaning
Solution
Canister
Release
Buttons
Removable Cleaning
Solution Canister
Page 7
ENGLISH 13ENGLISH12
Charging Razor with a Cord
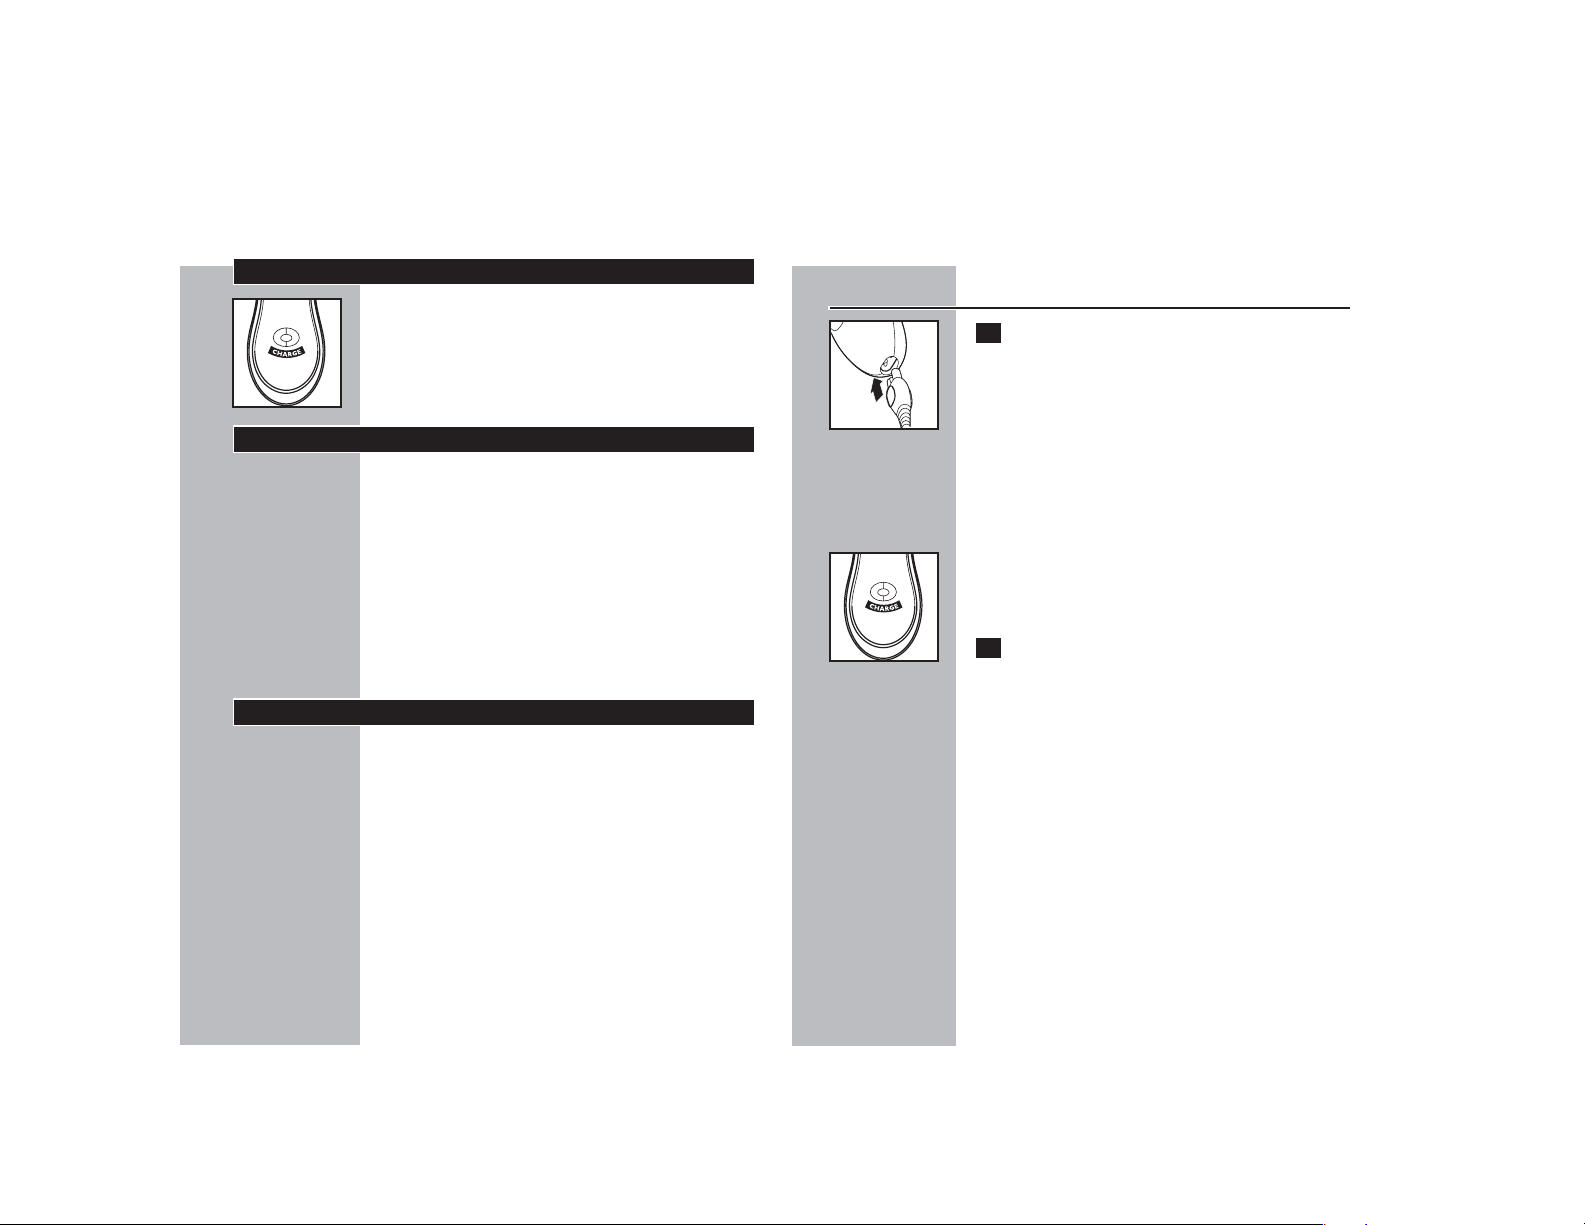
C 1 Connect cord directly to razor and connect
the charging plug into any 100V to 240V AC
outlet.Use only the charging plug provided.
◗ An adaptor plug may be necessary for
charging plug usage in some foreign countries.
Use an attachment plug adaptor of the proper
configuration for the power outlet.
The charging plug will automatically convert to
work on 100V to 240V AC systems.
C ◗ As you charge razor,the green Charging
Indicator light will light up to indicate razor is
(re)charging.
2 Charging and recharging requires a full
8 hours. A fully charged razor has a
cordless shaving time of up to 10 days.
◗ Do not leave the razor continuously plugged
into outlet charging as it would reduce the life
of batteries.Remove the plug from outlet as
soon as the razor is fully charged.
LED Charging Indicator
C ◗ LED Charging Indicator Light
The green Charging Indicator Light will light up
to indicate razor is (re)charging.
Before First Use
◗ Charge the razor before you start using it
(see ‘Charging’). Make sure the razor is
switched off before you start charging it.
Important
◗ Only use the power plug or Jet Clean System
provided to charge the razor.
◗ The charging plug converts 100 – 240V AC to
less than 24V DC.
Charging
◗ Battery performance is best if you recharge
only when the batteries are (almost)
completely empty.
◗ Charging or recharging at temperatures below
40ºF or higher than 95ºF adversely affects
lifetime of batteries.
◗ Continuously recharging or continuously using
as a corded razor will reduce life of batteries.
◗ You may also shave using the cord provided.
This razor will not recharge while being used
corded.
◗ Do not charge/recharge or use razor corded
until fully dried.
Page 8
ENGLISH 15ENGLISH14
◗ You may store your razor in the Jet Clean
System. Unplug from outlet when
charging/cleaning is complete.
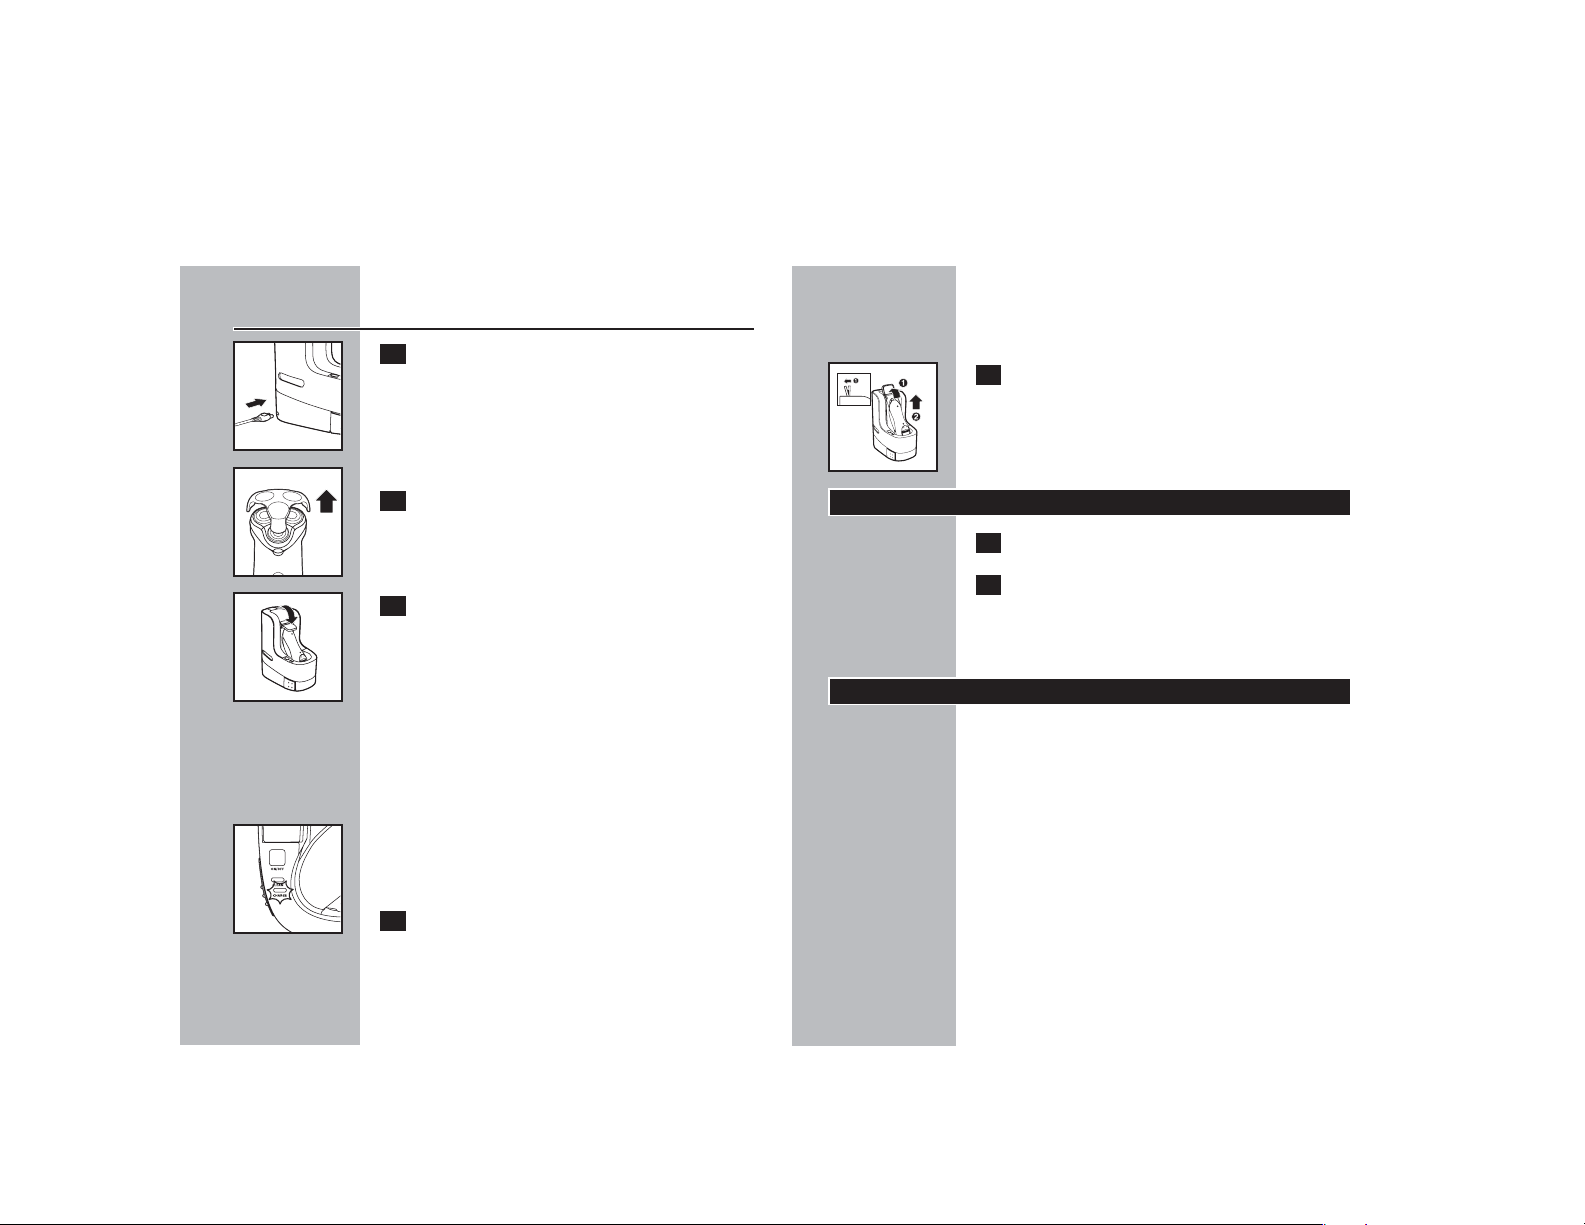
C 5 Raise the lever holding the razor to the
highest position (1) and carefully remove
razor from the Jet Clean System (2).
When razor is removed from theJet Clean System,
the charging light will turn off.
Recharging
1 Recharging requires 8 hours.
2 When razor is fully charged,disconnect
the charging plug from outlet.
Do not keep razor or Jet Clean System
permanently plugged into outlet.
Put It T o The T est & Shaving Tips
◗ 21DayTrial and ConversionProcess.It is a fact
that your skin and beard need time to adjust to
a new shavingsystem.
◗ Use your new razor exclusivel y f or 3 weeks to
fully enjoy the closeness of aPhilips Norelco
shave.
◗ At first you may not get asclose a shave as you
expect,or yourface mayevenbecome slightly
irritated.Thisis normalsince your beardand
skin will need timeto adjust.Invest3 weeks and
you’llsoon experience the full joy of your new
razor.
Charging Razor with Jet Clean
System
C 1 Connect the small plug to the Jet Clean
System. Connect thechargingplugintoany
100Vto240VAC outlet. Useonlythe
chargingplugprovided.
The razor holder automatically moves up to the
highest position.
C 2 Removeprotectiverazor head cap from
razor.
C 3 Place the razor head side down inthe razor
holder so that therazor head fits into the
configuration shown inside the Jet Clean
System.Gently pressthe baseofthe razor
towardsthe backof the Jet Clean Systemso
that the razor basefits snuglyin place.Lock
the razor into placeby pushing thelever
downcompletely.The lever willnot lock
downunless the razor has beenproperly
placed in the holder.Do notforce lever .
C ◗ The charging light blinks to indicate the razor is
being automatically (re)charged and will light up
continuously when fully charged.
4 Charging and recharging requires a full
8 hours. A fully charged razor has a
cordless shaving time of up to 10 days.
When batteries are fully charged, the charging light
on the Jet Clean System will light up continuously.
Page 9
ENGLISH 17ENGLISH16
◗ Stickwith it! If you alternate shavingmethods
during the adjustment period,it may makeit
moredifficult to adapt tothe Philips Norelco
shavingsystem.
◗ Ifyou arestill notconvinced after21 days,
Philips Norelcowill refundyou the full purchase
price,guaranteed.
How To Shave With An Electric Razor
◗ Use this razor for its intended household use
as described in this manual.
◗ Shaving with a clean,dry face gives the best
results.
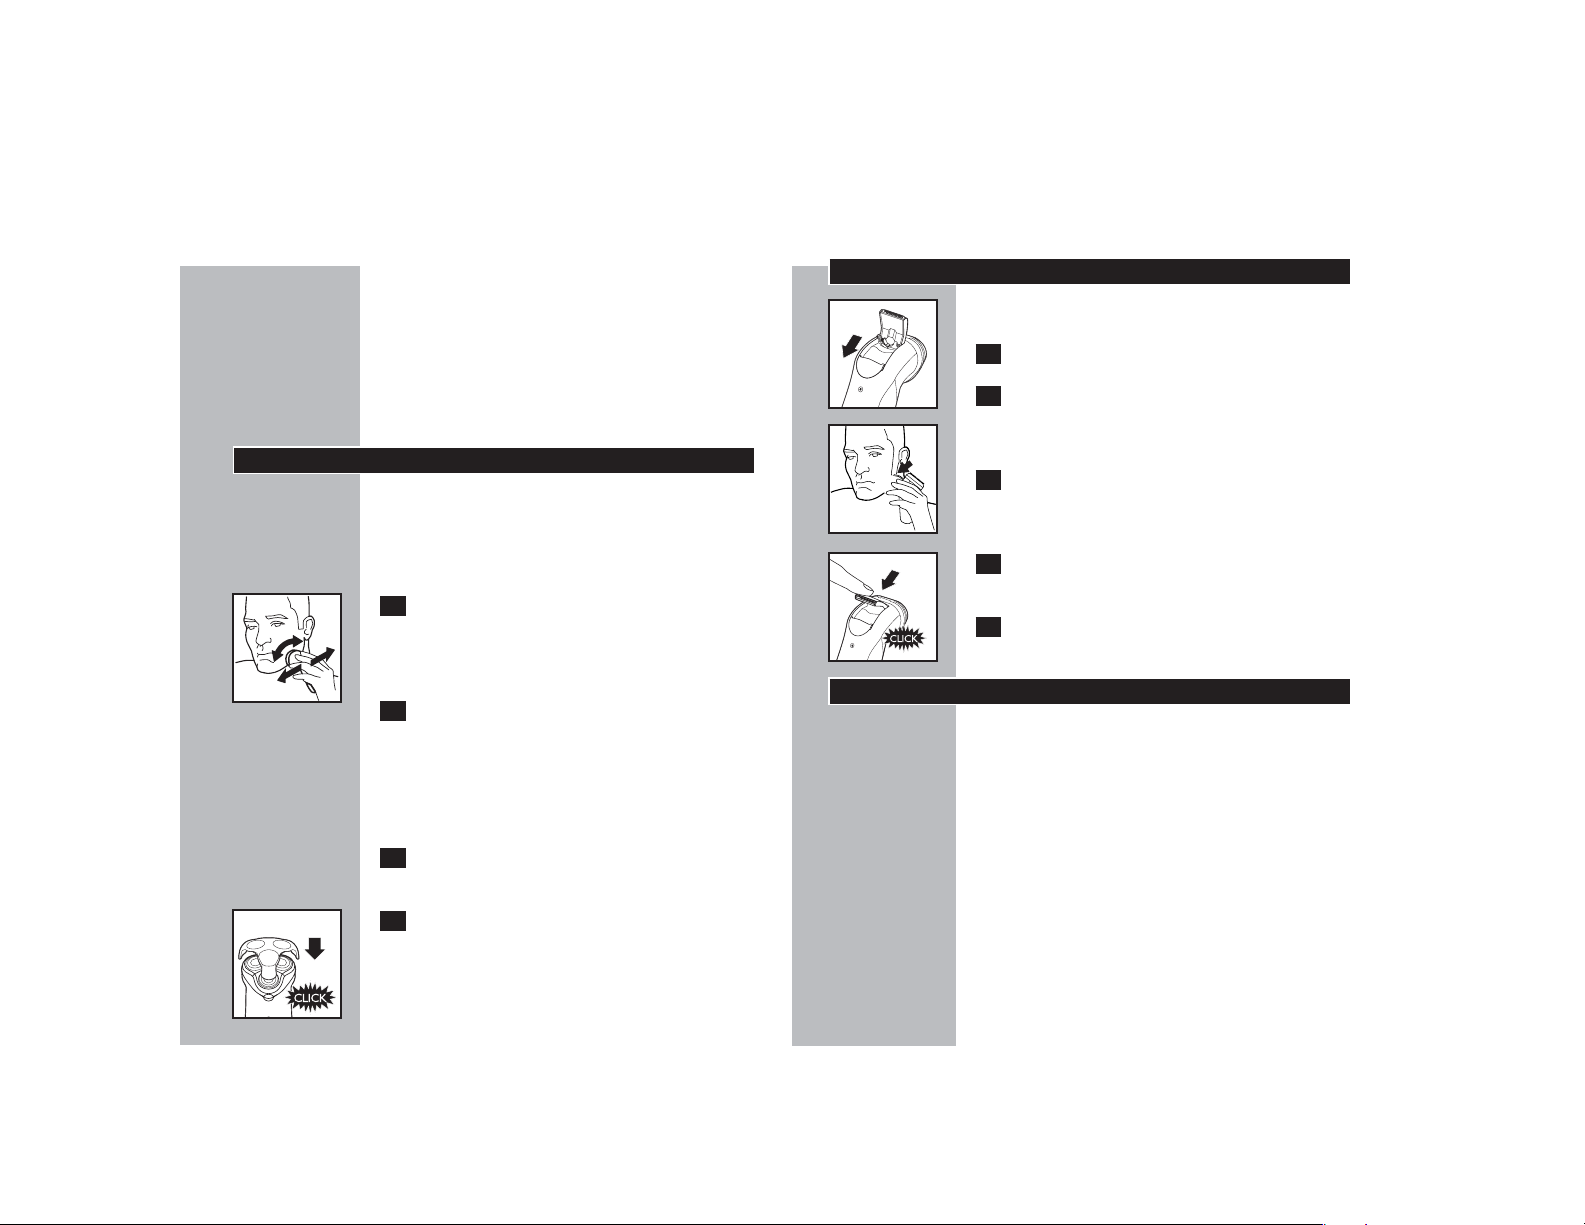
C 1 Turn razor ON by pressing the on/off
button once.Shave against the direction of
beard growth using both straight and
circular movements.
2 Stretch your skin with your free hand so
blades can lift and cut whiskers.Gently
press razor to skin so the floating heads can
follow the contours of your face. DO NOT
press too hard.Too much pressure can
pinch the skin into the combs.
3 Turn razor OFF by pressing the on/off
button once.
C 4 Put the protective razor head cap on the
razor to protect razor heads.
For optimal shaving results,replace razor heads
(model #HQ8) once a year.
Trimming
To groom sideburns and moustache:
1 Turn razor ON.
C 2 Push down spring-release trimmer switch.
The trimmer can be activated while the razor is
running.
C 3 Hold trimmer as shown and move in
downward strokes with gentle pressure.
C 4 Close trimmer by pressing trimmer down.
5 Turn razor OFF.
Cleaning
◗ Regular cleaning guarantees better shaving
results.
◗ Always switch Razor OFF, unplug and remove
power cord before cleaning.
◗ Never clean,remove or replace head
assembly while motor is on.
◗ Do not apply pressure to combs. Do not
touch razor heads with hard objects as this
may dent or damage precision-made slotted
combs.
◗ Do not use razor if combs are damaged or
broken. Facial injury may occur.
Page 10
ENGLISH 19ENGLISH18
Preparing Jet Clean System For Use
Important
◗ Onlyusetherazor,powerplug,Jet Clean System
andHQ200 cleaningsolutionprovidedto charge
orcleanrazor.
◗ Only use a Philips Norelco ‘XLCC’ model
razor with the Jet Clean System.
◗ OtherPhilips Norelco‘X’,‘XL’or‘LC’model
razors DO
NO
Tworkwith a Jet Clean System.
◗ Empty the cleaning solution canister and
thoroughly rinse the canister clean with warm
water every 2 weeks.
◗ The Jet Clean System thoroughly cleans but
does not disinfect your razor, therefore,do not
share razor with others.
◗ Thecharging plug converts 100-240VACto
lessthan24VDC.
◗ PlacetheJet Clean Systemonaflat,stable
surfacetoavoidanyleakage. Be careful nottotip
ormovetheJet Clean Systemifitisfilledwith
thecleaning solution.
◗ To avoid evaporation,do not expose cleaning
solution to direct sunlight.
◗ Remove the protectiv e razor head ca p from
the razor before charging or cleaning the razor
in the Jet Clean System.
◗ Use this appliance for its intended household
use as described in this manual.
1 PlacetheJet Clean Systemonaflat,level
surface.
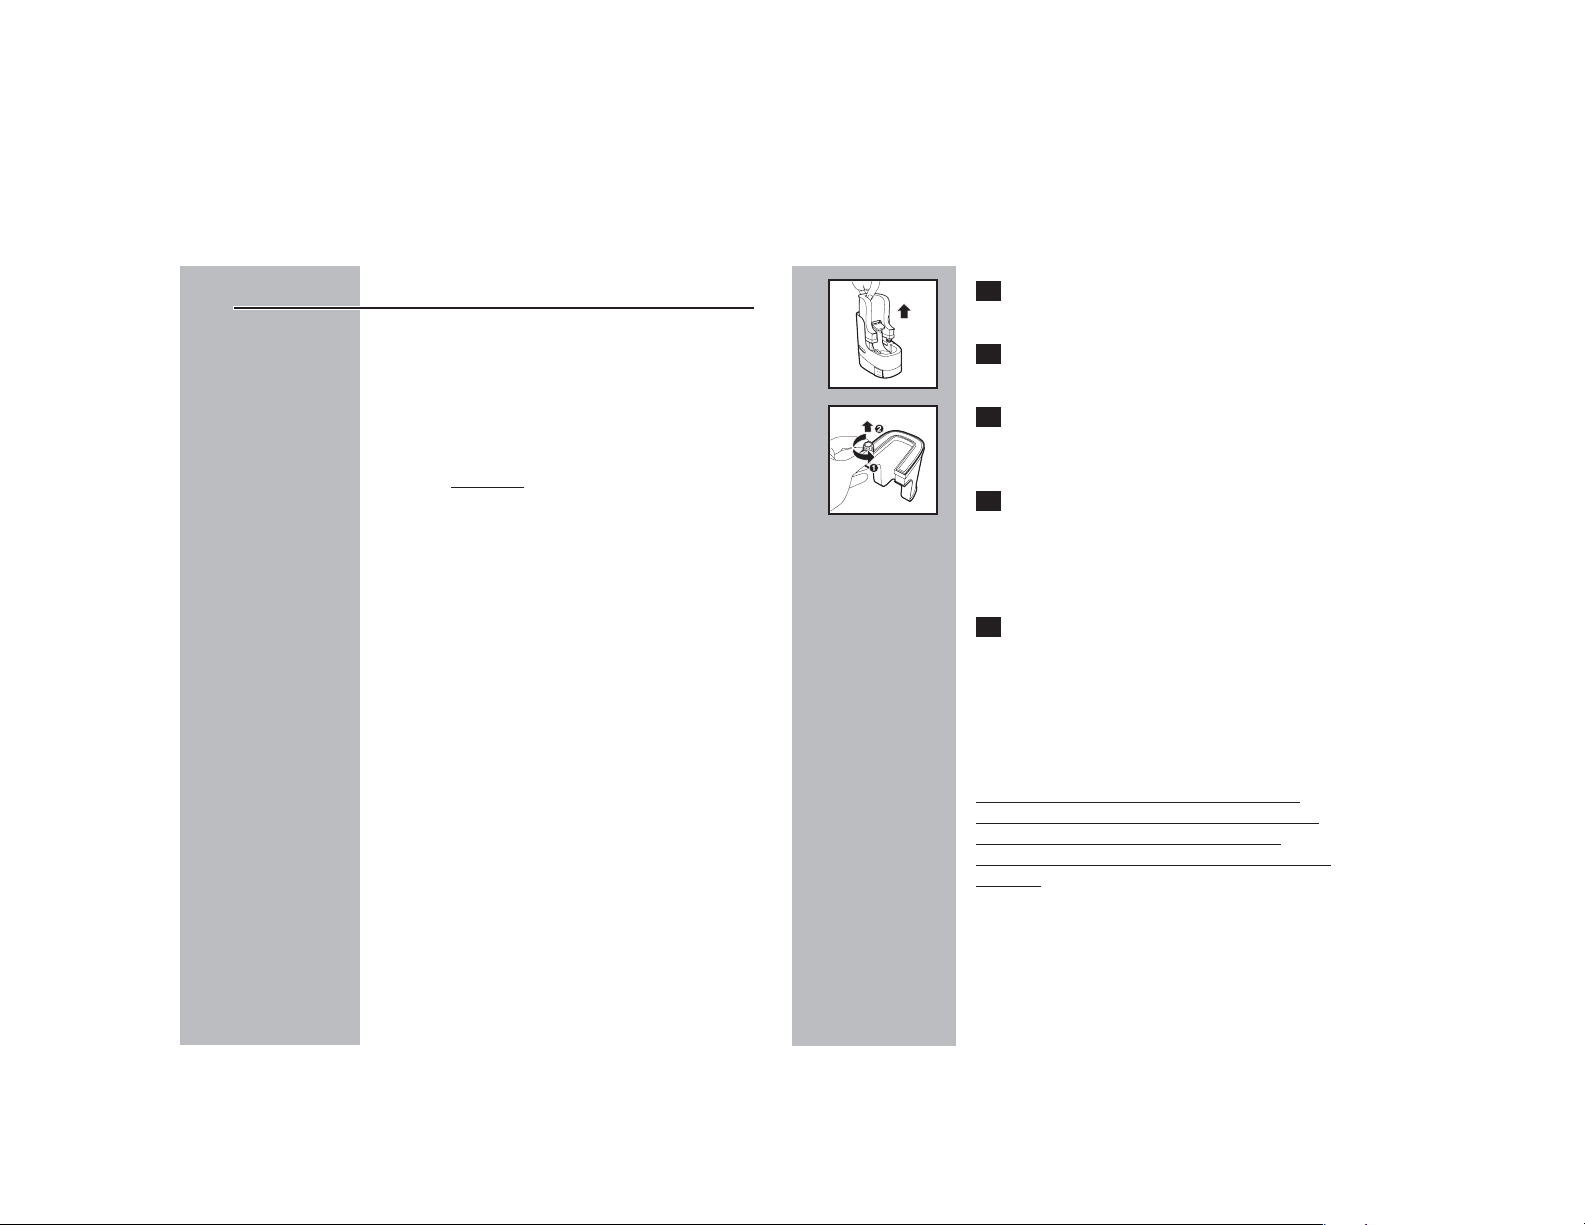
C 2 Lift the transparent cleaning reservoir
from the Jet Clean System.
C 3 Turnthereservoircapcounterclockwise
(1) and removefromthecleaning
reservoir(2).
4 UnscrewthelidontheJetCleanSolution
bottle(ModelHQ200)providedwith the
razor. Removetheairtightsealbyliftingup
thetabsontheseal. Replacelidonthebottle
makingsurethelidisscrewedonsecurely .
5 OpenlidandpourtheJetCleanSolutioninto
thetransparentcleaningreservoir.The
reservoircanbecompletelyfilledwithone
(1)bottleoftheJetCleanSolution(Model
HQ200).Discard cleaning solution bottle
aftercontentshavebeenpoured into the
reservoir.
NO
TE:
ONL
YUSEPHILIPSNORELCO JET
CLEAN
SOLUTION(MODEL
HQ200)WITH
THE
JETCLEAN
SYSTEM. ANY OTHER
SOLUTION
MAY
CAUSEDAMAGE TO YOUR
RAZOR.
Page 11

ENGLISH 21
C 1 Connect the small plug to the Jet Clean
System. Connect the charging plug into
any 100V to 240V AC outlet. Use only the
charging plug provided.
The razor holder automatically moves up to the
highest position.
2. Place the Jet Clean System on a
flat,level surface. Fill the cleaning
reservoir with cleaning solution (see
‘Preparing Jet Clean System For Use’).
C 3 Remove protective razor head cap from
razor.
C 4 Place the razor head side down in the
razor holder so that the razor head fits
into the configuration shown inside the Jet
Clean System.Gently press the base of the
razor towards the back of the Jet Clean
System so that the razor base fits snugly in
place.Lock the razor into place by pushing
the lever down completely.
The charging light will blink to indicate the razor
automatically begins to charge.
C 5 Press the ON/OFF button to start the
cleaning cycle.
The cleaning light on the Jet Clean System starts
blinking and the razor is automatically lowered
into the cleaning solution.The razor stops
charging while it is cleaning.
ENGLISH20
C 6 The amount of cleaning solution in the
transparent cleaning reservoir is visible on
both sides of the Jet Clean System. When
the level gets low,refill with Philips
Norelco HQ200 Cleaning Solution.
◗ The cleaning solution is automatically supplied
from the reservoir to the cleaning canister
through a special mechanism in the reservoir
cap.
C 7 Replacecaponreservoir(2)and turn
clockwise(1)makingsurecapisscrewedon
securely.
◗ Thecleaningsolutionmayfoam if the reservoir
levelis too low.Discardremaining solution,rinse
thereservoirwithwarmwaterfromthetapand
refillwith newcleaning solution.
◗ If you clean your razor every day, you should
refill the reservoir approximately once a
month.
C 8 Carefully lower the cleaning reservoir back
into the Jet Clean System making sure the
reservoir is properly aligned with the base
unit.
Jet Cleaning the Razor
◗ If the razor does not contain enough power
for one (1) shave,the Jet Clean Cleaning
System may not work properly. Charge the
razor in the Jet Clean System before using it
to clean your razor.
Page 12

ENGLISH 23ENGLISH22
◗ During the first few minutes of the cleaning
cycle,the razor will automatically turn on and
off several times while the razor holder
lowers and raises the razor’s position in the
cleaning solution,removing all debris.
◗ After approximately 5 minutes,the razor
holder will be raised slightly and will stay in
this position for about 55 minutes.The
cleaning light will remain blinking until the
entire process is complete.
◗ Do not lift the razor lever or press the
ON/OFF button while the cleaning cycle is
running. If this does occur,the cleaning cycle
will stop and the razor holder will
automatically move to the highest position.
The cleaning cycle can be re-started by
pressing the ON/OFF button once.
◗ If the power plug is disconnected before the
cleaning cycle is complete,the razor holder
will remain in its current position. Reconnect
the plug into the outlet or
Jet Clean System
and the razor holder will automatically
move to the highest position. The cleaning
cycle can be re-started by pressing the
ON/OFF button once.
C 6 When the entire cleaning cycle is complete
and the razor is hygienically clean,the razor
will be raised to the highest position and
the cleaning light on the Jet Clean System
will light up continuously.
C 7 Raise the lever holding the razor to the
highest position (1) and carefully remove
the razor from the
Jet Clean System
(2).
◗ You may quickly rinse the razor heads with
warm water after using the Jet Clean System
to remove any residual cleaning solution.
◗ If the razor needs to be recharged,you can
simply leave it in the
Jet Clean System
after
cleaning and the razor will automatically
recharge.The charging light on the Jet Clean
System will blink to indicate the razor is
recharging.
◗ For optimal razor drying time after cleaning,
remove razor fr om Jet Clean System after the
cleaning cycle is complete and allow to air dry.
◗ You may store your razor in the
Jet Clean
System
.Unplug from the outlet when
charging/cleaning is complete.
Quick Cleaning: Razor Heads
The razor heads may also be quickly cleaned
after each use by rinsing with hot water. Water
from the tap should be on a hot setting,BUT BE
CAREFUL TO TEST W A TER FIRST SO AS NOT
TO BURN OR SCALD HANDS.
◗ Regular cleaning guarantees better shaving
results.
◗ Do not immerse razor in water.
C ◗ The tap symbol on the back of the razor
indicates that the razor can be rinsed under
running tap water.
C ◗ While rinsing razor heads, water may drip out
of the base ofrazor. Thisisa normal occurrence.
1 Alwaysturn razor OFF,unplug from outlet
and remove cord fromrazorbefore
cleaning.
Page 13

ENGLISH 25ENGLISH24
After Each Use: Trimmer
1 Turn razor OFF.
2 Push down spring-release trimmer switch.
C 3 Clean trimmer with the brush every time
you use it.
C 4 Lubricatethe trimmer teeth with Philips
NorelcoRazor Lubricant (modelAL80) or
with one dropof mineral oil every 6 months.
5 Close trimmer by pressing trimmer down.
This
razor and Jet CleanSystem havenoother user serviceable parts. Any other service should be
performed by the Philips Norelco Service Location.
Cleaning the Jet Clean Canister
ForoptimalperformanceoftheJetClean System,it
isrecommendedthatyouempty the cleaning
solutioncanisterandthoroughlyrinse thecanister
clean every2weeks.
1 Place the Jet Clean System on a flat,level
surface.
C 2 Simultaneouslypressthe buttons located on
both sides of theJet Clean System(1)and
lift the appliance off the JetClean canister(2).
Always remove appliance from canister b y lifting
straight up. Do not tilt Jet Clean System.
C 2 Press the Razor Head Release Button,flip
open the Razor Head Assembly.
C 3 Clean inside razor heads and hair chamber
by running under hot water.
C 4 Clean outside of Razor Head Assembly by
running under hot water.
5 Close the Razor Head Assembly and shake
off excess water.
C 6 Open Razor Head assembly again and
leave open to air dry.
NO
TE: Do not wipe or dry the shaving heads
with a tow
el or tissue.
This could damage the
shaving heads.
C 7 If the shaving unit becomes detached from
the razor,you can easily reattach it.
8 You may also clean the hair chamber
without water by using the supplied brush.
Page 14

ENGLISH 27ENGLISH26
Storage
C ◗ The razor can be placed in the Jet Clean
System for safe storage.If storing razor in Jet
Clean System,remove the plug from outlet as
soon as the razor is fully charged or cleaned.
◗ If appliance will not be used for an extended
period of time,it is recommended that the
cleaning solution in both the reservoir and
canister be emptied out before storing.
◗ Be sure razor is turned off.Remove cord from
outlet and razor or Jet Clean System before
storing in a safe,dry location where it will not
be crushed,banged,or subject to damage.
◗ Do not wrap cord around razor or Jet Clean
System when storing.
◗ Store cord in a safe location where it will not
be cut or damaged.
◗ Do not keep razor or Jet Clean System
permanently plugged into outlet.
◗ Do not place or store razor or Jet Clean
System where it can fall or be pulled into a
tub or sink,water or other liquid while
plugged in.
C ◗ If storing razor outside the Jet Clean System,
put the Protective Razor Head Cap on razor
to protect heads.
C 3 Discard any remaining cleaning solution in
the canister.
The cleaning solution can be safely poured down
the sink as there are no harmful ingredients.
C 4 Simply rinse the canister with warm water.
Wipe the canister with a towel or tissue
to remove excess water.
C 5 Carefully lower the Jet Clean System over
the canister making sure the release
buttons snap back into position.
Maintenance
◗ Always remove razor from the Jet Clean
System before cleaning appliance.
◗ Unplug the Jet Clean System.The Jet Clean
System may be wiped clean using a damp cloth.
◗ Before refilling transparent cleaning reservoir,
discard remaining cleaning solution and rinse
the outside and inside of the reservoir
completely with warm water from the tap.
◗ Water from the tap should be on a warm
setting to clean all washable parts.
Note;
DO NOT place or clean any parts of the
Jet Clean System in a dishwasher.
Page 15

ENGLISH 29
FULL TWO YEAR W ARRANTY
Philips Electronics North America Corporation warrants each new Philips Norelco Product, Model
7800XLCC (except cutters and combs) against defects in materials or workmanship for a period of two
years from the date of purchase,and agrees to repair or replace any defective product without charge.
IMPORTANT:This warranty does not cover damage resulting from accident,misuse or abuse, lack of
reasonable care,the affixing of any attachment not provided with the product or loss of parts or
subjecting the product to any but the specified voltage.* Use of unauthorized replacement parts will void
this warranty.
PHILIPS ELECTRONICS NORTH AMERICA CORPORATION WILL NOT PAY FOR
WARRANTY SERVICE PERFORMED BY A NON-AUTHORIZED REPAIR SERVICE AND
WILL NOT REIMBURSE THE CONSUMER FOR DAMAGE RESULTING FROM
WARRANTY SERVICE PERFORMED BY A NON-AUTHORIZED REPAIR SERVICE.NO
RESPONSIBILITY IS ASSUMED FOR ANY SPECIAL, INCIDENTAL OR
CONSEQUENTIAL DAMAGES.
In order to obtain warranty service, simply ship the product postage prepaid to the Philips Norelco
Service Location (information available online at www.philips.com/norelco or at 1-800-243-3050). It is
suggested that for your protection you return shipments of product by insured mail, insurance prepaid.
Damage occurring during shipment is not covered by this warranty.
NOTE: No other warranty,written or oral, is authorized by Philips Electronics North America
Corporation.
This warranty gives you specific legal rights,and you may also have other rights which vary from state to
state. Some states do not allow the exclusion or limitation of incidental or consequential damages, so the
above exclusion and limitations may not apply to you.
* Read enclosed instructions carefully.
Manufactured for:
Philips Domestic Appliances and Personal Care Company
A Division of Philips Electronics North America Corporation
1010 Washington Blvd.,Stamford, CT 06912-0015
This symbol on the product’s nameplate means it is
listed by Underwriters’ Laboratories,Inc.
Norelco,,Tripleheader, Lift and Cut, and are Registered Trademarks of Philips Electronics North
America Corporation.
is a Trademark of Philips Electronics North America Corporation.
PHILIPS is a Registered Trademark of Koninklijke Philips Electronics N.V.
© 2006 Philips Electronics North America Corporation. All Rights Reserved.
ENGLISH28
Assistance
◗ For assistance call toll free:
1-800-243-3050
or visit our website:
www.philips.com/norelco
◗ Information is available 24 hours a day,7 days
a week.
Accessories
◗ Replacement Heads
Model HQ8 - For maximum razor
performance, replace your Philips Norelco
razor heads once a year or as soon as the
replacement head symbol starts blinking.
◗ Razor Lubricant
AL80 - Philips Norelco Razor Lubricant.
◗ Cleaning Solution
HQ200 - Philips Norelco Jet Clean Solution,
10 fl.oz. /300 ml.
◗ Car Cord Adaptor Cable
HQ8010 - Charges razor from a 12V battery
in your car,truck,van, boat or camper.
◗ Philips Norelco Razor Accessories may be
purchased at a store near you or on our
website www
.philips.com/norelco
Page 16

ESPAÑOL
31
ESPAÑOL
30
IMPORTANTES
INSTRUCCIONES DE
SEGURIDAD
Cuando uso el aparato,debe seguir siempre las precauciones
básicas incluyendo lo siguiente:
Antes de usar el aparato lea todas las instrucciones.
PELIGRO
Para reducir el riesgo de choque eléctrico:
1. No alcance para una afeitadora corded o un soporte de carga
que ha caído en el agua.Desenchúfela inmediatamente.
2. Utilice la afeitadora solamente en condiciones secas.No utilice
una afeitadora o un soporte de carga cuando esté bañándose o
duchándose.
3. No sumerja la afeitadora en agua.
4. No ponga ni almacene una afeitadora o un soporte de carga
donde puede caer o ser empujada a una bañera o lavabo.No
ponga ni caiga o una afeitadora o un soporte de carga en el agua
o el otro líquido.
5. Siempre desenchufe la afeitadora o la soporte de carga
inmediatamente después de utilizarla,excepto cuando la
afeitadora se está recargándo.
6. Desenchufe y quite la cuerda de la fuente de alimentación de la
afeitadora antes de limpiar.
ADVERTENCIA
Para reducir el riesgo de quemaduras,fuego, choque
eléctrico o daños a las personas:
1. Es necesaria una atenta vigilancia cuando esta afeitadora o
soporte de carga sea usada por o cerca de niños o inválidos.
2. Utilice esta afeitadora o soporte de carga para el uso
doméstico para el cual está destinada,tal como se describe en
este manual.No utilice accesorios o una solución de la limpieza
no recomendados por Philips Electronics North America
Corporation.
3. No utilice nunca esta afeitadora o soporte de carga si la clavija o el
cable cargador de red están deteriorados,si no funciona
adecuadamente,si se ha caido o deteriorado,o si se ha caido al
agua mientras estaba enchufada.Lleve el aparato un Servicio de
Asistencia dePhilips Norelcopara serexaminadayreparada.
4. Mantenga la afeitadora, el sopor te de carga, la cuerda y el
enchufe decarga lejos de superficies calentadas.
5. No deje caer ni introduzca ningún objeto por cualquierabertura.
6. No limpie, cargue ni enchufe la afeitadora o el soporte de carga
en el exterior ni la haga funcionar cuando se estén usando
aerosoles (sprays) o donde se está administrando oxígeno.
7. No utilice esta afeitadora con un protector de las cuchillas
deteriorado o roto,ya que podría producirse daños en la cara.
8. Una siempre el enchufe a la afeitadora o soporte de carga
primero,entonces el enchufe .Asegúrese de que la clavija esté
firmemente insertada en la afeitadora o soporte de carga hasta
la marca indicada en la clavija.Para el uso de carga del sopor te ,
ponga siempre la afeitadora en soporte primero,una la cuerda
al soporte, después enchufe en el enchufe.Para sacarla, apague
la afeitadora o soporte de carga y desenchúfela de la red.
9. No exponga nunca la afeitadora o soporte de carga a la luz
directa del sol ni la guarde a temperaturas por encima de 140°F.
10.La afeitadora puede enjuagarse bajo el agua del grifo.No
funcione la afeitadora hasta que está secado completamente.
11.Conserve el soporte de carga y el cable siempre secos. No lo
tome con las manos mojadas.No lo guarde en ambientes
húmedos.
12.Para prevenir posibles deterioros del cable de red, no lo enrolle
alrededor de la afeitadota o del soporte de carga.
GUARDE ESTAS
INSTRUCCIONES
IMPORTANTE: La clavija adaptadora incorpora un transformador.
No quite la clavija adaptadora para sustituirla por otro enchufe, ya
que podría producírse una situación de peligro.
Page 17

ESPAÑOL
33
ESPAÑOL
32
Indice de Contenidos
Caracteristicas . . . . . . . . . . . . . . . . . . . . . . . . . . . . .34-37
LED Indicador De Carga . . . . . . . . . . . . . . . . . . . .38
Antes Del Primer Uso . . . . . . . . . . . . . . . . . . . . . . .38
Carga . . . . . . . . . . . . . . . . . . . . . . . . . . . . . . . . . . . . . . . . . .38-41
Recarga . . . . . . . . . . . . . . . . . . . . . . . . . . . . . . . . . . . . . . . . . . . .41
Prueba Y Consejos De Afeitado . . . . . . . . . .42
Cómo Afeitarse Con Una
Afeitadora Eléctrica . . . . . . . . . . . . . . . . . . . . . .42-43
Cortapatillas
. . . . . . . . . . . . . . . . . . . . . . . . . . . . . . . . . . . . .44
Limpieza . . . . . . . . . . . . . . . . . . . . . . . . . . . . . . . . . . . . . .44-54
Mantenimiento . . . . . . . . . . . . . . . . . . . . . . . . . . . . . . . . .55
Almacenamiento . . . . . . . . . . . . . . . . . . . . . . . . . . . . . . .56
Asistencia . . . . . . . . . . . . . . . . . . . . . . . . . . . . . . . . . . . . . . . . .57
Accesorios . . . . . . . . . . . . . . . . . . . . . . . . . . . . . . . . . . . . . . .58
Garantia . . . . . . . . . . . . . . . . . . . . . . . . . . . . . .Back Cover
60 DIAS DE GARANTIA DE DEVOLUCIÓN
DEL DINERO
Para disfrutar de la afeitado mas cómoda y al ras de su nueva Afeitadora Philips
Norelco para Hombres, la afeitadora debe ser usada como único sistema de
afeitado durante 3 semanas. Ello dará a su barba y a su piel el tiempo suficiente
para adaptarse al Sistema de Afeitado Philips Norelco. Si transcurrido ese tiempo
no está completamente satisfecho con su Afeitadora Philips Norelco para
Hombres, devuelva el producto y le reembolsaremos el precio de compra en su
totalidad. La afeitadora debe ser enviada, por correo certificado, con la
certificación pagada y aportes pagados, incluyendo el tíquet de compra
que indique el precio y la fecha de compra. La afeitadora debe ser
matasellada durante los 60 días posteriores a la fecha de compra. Philips Norelco
se reserva el derecho de verificar el precio de compra de la afeitadora y de
limitar el importe de la devolución de modo que no supere el precio de venta al
público sugerido.
Envíe el tíquet de compra con la fecha, su nombre y dirección completos tal como
se indica más adelante, junto con la afeitadora a portes pagados a:
Philips Domestic Appliances and Personal Care Company
A Division of Philips Electronics North America Corporation
450 North Medinah Rd, Dock 16
Roselle, IL 60172-2329
Por favor, espere entre 4 y 6 semanas a recibir el cheque.
Nombre_______________________________________________________
Dirección_______________________________________________________
Ciudad_________________________________________________________
Estado _____Zip________________________________________________
Número de teléfono de dia. (____)_________________________________
Email Dirección ________________________________________________
MOTIVO DE LA DEVOLUCIÓN:___________________________________
______________________________________________________________
______________________________________________________________
______________________________________________________________
______________________________________________________________
______________________________________________________________
(Código de área)
Page 18

ESPAÑOL
35
ESPAÑOL
34
Resorte-lanzan Cortapatillas
Adaptación automática
a cualquier voltaje de
100V a 240V CA
Cepillo de limpieza
Recargable:Carga
completa durante
8 horas,lo que le
proporcionará un tiempo
de afeitado sin cable
dehasta 10 días
Con/sin cable de red.
Para afeitarse con o
sin cable de red
Garantía completa
durante 2 años
60 días de garantía de
devolución del dinero
Características
Spectra
Afeitado Cabezal
Montaje del Cabezal
de la Afeitadora
Cubierta protectora
del Cabezal de
la Afeitadora
Conjuntos Cortantes
que flotan
individualmente
Botón de apertura
del Cabezal de la
Afeitadora
• La Cámara del Pelo
recoge el pelo
afeitado
Botón electrónico
de encendido/apagado
Luz de Indicador
de carga del LED
• Indica que la
afeitadora está
cargando
El Sistema de Afeitado de Philips Norelco
"Levanta y Corta" proporciona un confortable apurado:
El surco dirige la barba
más cerca del sistema de
corte
El elevador levanta el
pelo
Ranuras para cortar los
pelos más largos
Agujeros para cortar
pelos cortos con un
apurado aún mayor.
Page 19

36
ESPAÑOL
37
Características
Sistema de Jet Clean
Indicator Llano de la Solución
de Depósito
Depósito T ransparente
de la Limpieza
Palanca de la
Afeitadora
Botón de
Encendido/Apagado
Luz de
Indicador
de la
Limpieza
Luz de
Indicador
de Carga
Botónes
del Lanzamiento del
Frasco de la Solución
de la Limpieza
Quite el Frasco
de la Solución
de la Limpieza
Page 20

ESPAÑOL
39
ESPAÑOL
38
◗ Nocargar/recargarousolaafeitadoracon cable
deredhastaqueestánsecadoscompletamente.
Carga la Afeitadora con una Cuerda
C 1 Conectela cuerdadirectamente conla
afeitadoray conecte el enchufe de carga en
cualquier100V con el enchufe de la CA
240V.Utilice solamente elenchufe de carga
proporcionado .
◗ En algunos países puedeser necesario usar un
adaptadorde la clavija parautilizar el cable
cargadordered .Useunadaptorconlas
correctasconfiguraciónes para la salida electrica
de red.
El enchufe de carga convertirá automáticamente al
trabajo sobre
100V a los sistemas de la CA 240V.
C ◗ Cuando cargue la afeitadora, la luz de indicador
verde de carga se encenderá hasta indica que la
afeitadora está recargando.
2 Carga o una recargarequerirá 8 horas. La
afeitadora totalmente cargada tiene un
tiempode afeitadosin cordónde 10 días.
◗ No deje la afeitadora tapó continuamente en el
enchufe carga pues reduciría la vida de baterías.
Quite el enchufe del enchufe tan pronto como
la afeitadora se cargue completamente.
LED Indicador De Carga
C ◗ LED Luz de Indicador de Carga
La luz de indicador verde de carga se encenderá
hasta indica que la afeitadora está recargando.
Antes Del Primer Uso
◗ Cargue la afeitadora antes de comenzar a
utilizarlo (véase 'Carga’). Ceriórese de la
afeitadora esté dada vuelta apagado antes de
que usted comience a cargarla.
Importante
◗ Para cargar la afeitadora,utilice únicamente la
clavija del enchufe y el Sistema de Jet Clean
suministrados.
◗ La clavija del enchufe convertidos la entrada
de 100-240 V de CA a 24 V de CC.
Carga
◗ El funcionamiento de las baterías es mejor si
las recargan sólo cuando estén (casi)
completamente descargadas.
◗ Cargar o recargar atemperaturas por debajo
de 40ºF y porencima de 95ºF afecta
desfavorablementea la vida útilde las baterías.
◗ Larecarga continuao eluso continuo de la
afeitadoracon cable de red reducirá la vida de
las baterías.
◗ También puede afeitarse usando conla cuerda
que se suministra.Esta afeitadora no se
recargarámientras la use con el cable dered.
Page 21

ESPAÑOL
41
ESPAÑOL
40
4 Carga o una recarga requerirá 8 horas.
Una afeitadora completamente cargado
tiene un rato que afeita sin cuerda de hasta
10 días.
Cuando las baterías estén completamente
cargados, la luz de carga en el Sistema de Jet
Clean se encenderá para arriba continuamente.
◗ Usted puede almacenar su afeitadora en el
Sistema de Jet Clean . Desenchufe del
enchufe cuando carga/limpieza es complete.
C 5 Levante la palanca que sostiene la
afeitadora a su posición más alta (1) y
quite cuidadosamente la afeitadora con el
Sistema de Jet Clean (2).
Cuando la afeitadora se quita del Sistema de Jet
Clean,la luz de carga vuelta apagado.
Recarga
1 Recarga requiere 8 horas.
2 Cuando la afeitadora este completamente
cargada,desconecte el enchufe de carga
del enchufe.
No mantenga la afeitadora o el Sistema de Jet
Clean tapado permanentemente en el enchufe.
La Afeitadora de Carga con Sistema
de Jet Clean
C 1 Conecte el enchufe pequeño de la cuerda
con el Sistema de Jet Clean.Conecte el
enchufe de carga en culguier 100V con el
enchufe de la CA 240V.Utilice solamente el
enchufe de carga proporcionada.
Elsoportedelaafeitadorasemoverá
automáticamenteasuposiciónmás alta.
C 2 Quite la cubierta protectora de cabezal de
la afeitadora.
C 3 Coloquelaafeitadoraenelladode la cabeza
delsostenedordelaafeitadoraabajode
modoquelacabezaquepa laconfiguración
demostrada dentro delSistema de Jet
Clean. Presione suavementelabase de la
afeitadorahacia la parte posteriora del
Sistema de Jet Cleande modo que la base
de la afeitadora quepa comodamente
en lugar.Trabe la afeitadora enlugar
empujandola palanca hacia abajo totalmente.
La palanca no setrabará abajo a menos que
la afeitadora se haya colocadoen el
sostenedor.No fuercela palanca.
C ◗ El piloto de carga parpadear para indicar que
la afeitadora se está automáticamente
recargando y se encenderá para arriba
continuamente cuando está carga
completamente.
Page 22

ESPAÑOL
43
ESPAÑOL
42
C 1 Ponga la afeitadora en marcha.Haciendo
movimientos tanto rectos como circulares,
aféitese en dirección contraria a la del
crecimiento del pelo.
2 Con su mano libre estírese la piel para que
los conjuntos cortantes puedan levantar y
cortar la barba.Presione suavemente la
afeitadora sobre la piel a fin de que los
conjuntos cortantes flotantes puedan
seguir los contornos de su cara.NO
apriete demasiado fuerte.Demasiada
presión puede pellizcar la piel con los
conjuntos cortantes.
3 Apague la afeitadora presionando una vez
más el boton de encendido/apagado.
C 4 Para proteger los conjuntos cortantes,
ponga la tapa del cabezal afeitador en la
afeitadora.
Para unos óptimos resultados en el afeitado,
sustituya los conjuntos cortantes (tipo HQ8) una
vez al año.
Prueba Y Consejos Afeitado
◗ Prueba durante 21 días y Conversión.Es un
hecho que su piel y su barba necesitan tiempo
para adaptarse a cualquier nuevo sistema de
afeitado.
◗ Utilice exclusivamente su nueva afeitadora
durante 3 semanas para disfrutar
completamente del apurado de un afeitado
Philips Norelco.
◗ Al principio puede que no obtenga un afeitado
tan apurado como esperaba,o incluso es
posible que su cara se irrite ligeramente.Esto
es normal,ya que su barba y su piel
necesitarán tiempo para adaptarse.Emplee
3 semanas y podrá disfrutar por completo de
su nueva afeitadora.
◗ ¡Persevere con ella! Si va alternando métodos
de afeitado durante el período de adaptación,
esto hará que sea más difícil la adaptación al
sistema de afeitado Philips Norelco.
◗ Si después de 21 días no está convencido,
Philips Norelco le garantiza la devolución
completa del precio de compra.
Cómo Afeitarse Con Una Afeitador Eléctrica
◗ Solo utilice este producto para el uso
personal doméstico previsto,como se
describe en este manual.
◗ El afeitarse con la cara limpia,seca da los
mejores resultados.
Page 23

ESPAÑOL
45
ESPAÑOL
44
◗ No aplique presión sobre los cabezales.No
toque los cabezales con objetos duros ya que
podría hundir las ranuras o dañar su precisión.
◗ No utilice la afeitadora si los cabezales están
dañados o rotos.Éstos podrían provocar
lesiones faciales.
Preparando Sistema de Jet Clean
Para el Uso
PRECAUCIÓN:Mantenga la solución de
limpieza lejos del alcance de los niños.No tome
internamente.Evite el contacto con los ojos.En
caso de que del contacto visual,limpie con un
chorro de agua fría.Si persiste la irritación,
consiga la atención médica.
Importante
◗ Paracargarolimpielaafeitadora,utilice
únicamentelaafeitadora,clavijadelaenchufe,
Sistema de Jet CleanyHQ200 soluciónde
limpieza.
◗ Para de sistema Jet Clean,utilice únicamente a
Philips Norelco ‘XLCC’ tipo afeitador.
◗ Otras Philips Norelco tipo afeitadoras ‘X’,‘XL’
o ‘LC’ NO FUNCTIONAN
con un Sistema de
Jet Clean.
◗ Vacie el frasco de la solución de la limpieza y
aclare a fondo el frasco limpio con agua
caliente cada 2 semanas.
Cortapatillas
Para recortar las patillas y el bigote:
1 Ponga la afeitadora en marcha.
C 2 Empuje abajo resorte-lanzan el interruptor
del condensador de ajuste.
El cortapatillas puede ponerse en marcha
mientras la afeitadora está en funcionamiento.
C 3 Sostenga el cortapatillas como se indica y
haga pasadas hacia abajo con una suave
presión.
C 4 Condensador de ajuste cercano
presionando el condensador de ajuste
abajo.
5 Apague la afeitadora.
Limpieza
◗ Una limpieza regular garantiza los mejores
resultados en al afeitado.
◗ Siempre apague la afeitadora,desenchufe y
retírela clavija el cable antes de limpiarla.
◗ Nunca limpie,retire ni vuelva a colocar el
conjunto de los cabezales mientras la
afeitadora está encendida.
Page 24

ESPAÑOL
47
ESPAÑOL
46
5 Abra la tapa y vierta la Jet Clean Solución
en el depósito transparente de la limpieza.
El depósito se puede completamente de
una (1) botella de la Jet Clean Solución
(tipo HQ200).Deseche la botella de
solución de limpieza una vez que se vertió
el contenido en el depósito transparente.
NO
TA:
SOLAMENTE USO PHILIPS
NORELCO
JET CLEAN
SOLUCIÓN (TIPO HQ200) CON
EL
SISTEMADEJETCLEAN. CUALQUIEROTRA
SOLUCIÓN PUEDE DANARSU AFEITADORA.
C 6 La cantidad de solución de la limpieza en el
depósito transparente de la limpieza es
visible en ambos lados del Sistema de Jet
Clean. Cuando el nivel está bajo ,vuelva a
llenar con Philips Norelco HQ200 solución
de la limpieza.
◗ La solucíon de la limpieza se provee
automáticamente de depósito al frasco de la
limpieza a través de un mecanismo especíal en
el casquillo de depósito.
C 7 Substituya la tapa en depósito (1) y gire
sentido horario (2) de que la tapa está
atornillada encendido con seguridad.
◗ La solución de la limpieza pueda hacer mucha
espuma si el nivel del depósito es demasiado
bajo. Deseche la solución restante,enjuague
el depósito con agua caliente del grifo y vuelva
con la nueva solución de la limpieza.
◗ El Sistema de Jet Clean pero no disinfecta a
fondo su afeitadora,por lo tanto,no comparta
la afeitadora con otras.
◗ La clavija de la enchufe conv ertidos la entrada
de 100-240V de CA a 24V de CC.
◗ Paraevitarpérdidasde la soluciónde limpieza,
coloqueSistema de Jet Cleansobrauna
superficieplana.Procureno voltearla,moverla
bruscamentenitrajinarlade maneraalgunasi
contienesolución.
◗ Paraevitarlaevaporación,noexpongalasolución
delimpiezaalaluzsolardirecta.
◗ Quitelacubiertaprotectoradecabezaldela
afeitadoraantesdecargarolimpiezala afeitadora
enel Sistema de Jet Clean.
◗ Solo utilice este aparato para el uso personal
doméstico previsto,como se describe en este
manual.
1 Lugar el Sistema de Jet Clean en una
superficie plana,llana.
C 2 Levante el depósito transparente de la
limpieza del Sistema de Jet Clean.
C 3 Gire la tapa del depósito antihorario (1) y
quite del depósito de la limpieza (2).
4 Desenrosquea la tapa en la Jet Cleanbotella
(tipo HQ200)suministraconlaafeitadora.
Quiteelselloherméticolevantandoencima
delaslengüetasenelsello. Substituyala tapa
enlabotellacerciorándosedeque la tapa
estáatornillada encendido con seguridad.
Page 25

ESPAÑOL
49
ESPAÑOL
48
C 4 Coloque la afeitadora en el lado de la
cabeza del sostenedor de la afeitadora
abajo de modo que la cabeza quepa la
configuración demostrada dentro del
Sistema de Jet Clean.Presione suavemente
la base de la afeitadora hacia la parte
posteriora del Sistema de Jet Clean de
modo que la base de la afeitadora quepa
comodamente en lugar.Encájela en su sitio
presionando la palanca completamente
hacia abajo.
La luz de carga centelleo para indicar que la
afeitadora está cargando automáticamente.
C 5 Pulse el botón de encendido/apagado para
comenzar el ciclo de limpieza.
LaluzdelimpiezaenelSistema de Jet Clean
empiezaaparpadearylaafeitadorasesumerge
automáticamenteenlasolucióndelimpieza.La
afeitadoraparaelcargar mientrasqueestálimpiando.
◗ Durante los minutos primeros del ciclo de
limpieza,la afeitadora dará vuelta
automáticamente por intervalos a varias
veces mientras que el sostenedor de la
afeitadora baja y levanta la posición de la
afeitadora en la solución de la limpieza,
quitando toda la ruina.
◗ Después de aproximadamente 5 minutos,el
sostenedor de la afeitadora será levantado
levemente y permanecerá en esta posición por
cerca de 55 minutos.La luz de la limpieza
seguirá siendo centellante hasta que el proceso
entero es completo.
◗ Si limpia su afeitadora todos los días,deberá
rellenar el depósito aproximadamente una
vez al mes.
C 8 Baje cuidadosamente el depósito de la
limpieza nuevamente dentro del Sistema de
Jet Clean de tal forma que la parte superior
y frontal del recipiente es corr ectamente
alineadas con la unidad baja.
Jet Limpieza la Afeitadora
◗ Si la afeitadora no contiene energía para uno
(1) afeitado,el Jet Clean Limpieza System
puede no trabajar. Carga la afeitadora en el
Sistema de Jet Clean antes del uso para limpiar
su afeitadora.
C 1 Conecte la enchufe pequeño con el Sistema
de Jet Clean. Conecte la enchufe de carga
en cualquier 100V con la enchufe de la CA
240V. Utilice solamente la enchufe de carga
proporcionada.
El soporte de la afeitadora se moverá
automáticamente a su posición más alta.
2 Lugar el Sistema de Jet Clean en una
superficie plana,llana. Llene el depósito de
la limpieza de la solución de la limpieza
(véase ‘Preparando Sistema de Jet Clean
Para el Uso’).
C 3 Quite la cubierta protectora del cabezal de
la afeitadora.
Page 26

ESPAÑOL
51
ESPAÑOL
50
◗ Sitambiénnecesitacargar la afeitadora,puede
dejarlasimplementeenelSistema de Jet Clean
después limpiezay la afeitadora recargará
atomáticamente. La luz de carga en el Sistema
de Jet Clean centelleo para indicar que la
afeitadora está recargando.
◗ Tiempo de secado de la afeitadora óptima
después de limpiar,quite la afeitadora del
Sistema de Jet Clean después del ciclo de
limpieza es completo y tenga en cuenta para
ventilar seco.
◗ Usted puede almacenar su afeitadora en el
Sistema de Jet Clean. Desenchufe de la
enchufe cuando carga/limpieza es completo.
Rápido Limpieza:Conjuntos
Cortantes
Las conjuntos cortantes se pueden también
limpiar rápido después de cada uso aclarando
con la agua caliente.El agua del grifo deberá
estar caliente.TENGA CUIDADO Y PRUÉBELA
ANTES PARA NO QUEMARSE LAS MANOS.
◗ Una limpieza regular garantiza los mejores
resultados en el afeitado.
◗ Nosumergir la afeitadora en agua.
C ◗ El símbolo del golpecito en la parte posteriora
de la afeitadora indica que la afeitadora se
puede aclarar debajo del agua de
funcionamiento del golpecito.
C ◗ Mientras que aclara conjuntos cortantes,el
agua puede gotear fuera de la base de la
afeitadora.Esto es una ocurrencia normal.
◗ No levante la palanca de la afeitadora ni pulse
el botón de encendido/apagado mientras que
el ciclo de limpieza está funcionando.Si
ocurre esto,el ciclo de limpieza parará y el
sostenedor de la afeitadora se mueve
automáticamente a la posición más alta. El
ciclo de limpieza puede ser recomenzado
presionando el botón de encendido/apagado.
◗ Si la enchufe la clavija se desconecta antes del
ciclo de limpieza es complete,el sostenedor
de la afeitadora permanecerá en la posición
actual. Vuelva a conectar la enchufe en la
enchufe o Sistema de Jet Clean y el
sostenedor de la afeitadora se mueva
automáticamente a la posición más alta.El
ciclo de limpieza puede ser recomenzado
presionando el botón de encendido/apagado.
C 6 Cuando el ciclo de limpieza entero es
completo y la afeitadora está higiénico
limpia,la afeitadora será levantada a la
posición más alta y la luz de la limpieza en
el Sistema de Jet Clean se encenderá para
arriba continuamente.
C 7 Levante la palanca que sostiene la
afeitadora a su posición más alta (1) y
quite cuidadosamente la afeitadora con el
Sistema de Jet Clean (2).
◗ Ustedpuedeenjuagarrápidamentelos
conjuntos cortantescon agua caliente después
de usar de sistemaJet Clean para quitar
solución residual de la limpieza.
Page 27

ESPAÑOL
53
ESPAÑOL
52
8 También puede limpiar sin agua la cámara
de pelo usando el cepillo que se suministra.
Después de Cado Uso:Cortapatillas
1 Apague la afeitadora.
2 Empuje abajo resorte-lanzan el interruptor
del condensador de ajuste.
C 3 Limpie el cortapatillas con el cepillo.
C 4 Lubrique el cortapatillas con Philips
NorelcoRazor Lubricant (tipoAL80) o con
una gota de aceite mineral.
5 Condensador de ajuste cercano
presionandoel condensador de ajuste
abajo.
Esta
afeitadora
y Sistema de Jet Cleanno tiene mas
partes
que
sean usadas por el usuario para se
reparadas.
Cualqier
otro servicio debe ser
realizado
por la
Servicio deAsistencia Philips
Norelco.
1 Antes de limpiarla,apague siempre la
afeitadora,desenchúfela de la red y quite el
cable de la afeitadora.
C 2 Presione el botón de liberación del
Cabezal Afeitador y abra el Bloque del
cabezal afeitador.
C 3 Limpie los conjuntos cortantes y la cámara
de recogida del pelo bajo el agua caliente
del grifo.
C 4 Limpie fuera del montaje de la cabeza de la
afeitadora funcionando debajo de la agua
caliente.
5 Cierre el Bloque del Cabezal Afeitador y
sacuda el exceso de agua.
C 6 Vuelva a abrir el Bloque del Cabezal
Afeitador y déjelo abierto para que se
seque al aire.
NO
T
A: No limpie o seque los conjuntos
cortantes con una toalla o servilleta de papel.
Esto puede dañar los conjuntos cortantes.
C 7 Si la unidad que afeita llega a ser separada
de la afeitadora,usted puede reatarla
fácilmente.
Page 28

ESPAÑOL
55
ESPAÑOL
54
Mantenimiento
◗ Quite siempre la afeitadora de Sistema de Jet
Clean antes de limpiar el aparado.
◗ Desenchufe el Sistema de Jet Clean.El Sistema
de Jet Clean sé limpiar con paño mojado.
◗ El agua del grifo estar un ajuste caliente para
limpiar todas las piezas lavables.
◗ Solamente el frasco se puede lavar en un
lavaplatos.El resto de las piezas sé limpiar con
paño mojado.
Nota:
NO ponga ni limpie ninguna partes del Jet
Clean Sistema en un lavaplatos.
Limpieza del Frasco de Jet Clean
Para el funcionamiento óptimo de sistema Jet
Clean,se recomienda que usted vacie el frasco de
la solución de la limpieza y aclare a fondo limpio
el frasco cada dos semanas.
1 Lugar el Sistema de Jet Clean en una
superficie plana,llana.
C 2 Presione simultáneamente los botones
situados a ambos lados del Sistema de Jet
Clean (1) y saque el aparato de Jet Clean
frasco (2).
Quite siempre el aparato de frasco una pausa la
elevación derecha para arriba.No inclineel soporte.
C 3 Deseche cualquier solución restante de la
limpieza en el frasco.
La solución de la limpieza se puede verter con
seguridad abajo del fregadero pues no hay
ingrediente dañoso.
C 4 Aclare simplemente el frasco con agua
caliente. Limpie el frasco con una toalla o
un tejido fino para quitar exceso de agua.
C 5 Vuelva a colocar con cuidad el Sistema de
Jet Clean encima el frasco asegúrese de
que los botones de liberación vuelven a
estar en su sitio.
Page 29

ESPAÑOL
57
ESPAÑOL
56
Asistencia
◗ Para asistencia llame (sin cargo) al teléfono:
1-800-243-3050
o visite nuestra página web:
www.philips.com/norelco
◗ La información está disponible 24 horas al día,
7 días a la semana.
Almacenamiento
C ◗ La afeitadorasepuedecolocarenelSistema de
Jet Cleanpara elalmacenaje seguro.Sialmacena
laafeitadoraenSistema de Jet Clean,quiteel
enchufedelenchufetanprontocomo la
afeitadorase cargue completamente.
◗ Si la aplicación no es utilizada por un período
deltiempoextendido,serecomiendaque la
solucióndelalimpiezaeneldepósitoyelfrasco
estévaciadaantesdealmacenar.
◗ Seaseguro que la afeitadora de ajuste está dado
vuelta apagado.Quite lacuerda delenchufe y
entoncesdeSistema de Jet Cleanantes de
almacenar en una localización segura,seca en
donde no será machacado,golpeado,conforme
a daño.
◗ Noenvuelva lacuerda alrededorde la
afeitadorao del Sistema de Jet Clean al
almacenar.
◗ Almacene la cuerda en una localización
seguraen donde no será cortada ni sera
dañada.
◗ No mantenga la afeitadora o el Sistema de Jet
Clean tapado permanentemente en el
enchufe.
◗ No coloque o almacene la afeitadora o el
Sistema de Jet Clean en un lugar donde se
pueda caer a la afeitadora o el lavabo, el agua
o el otro líquido.
C ◗ Si almacena la afeitadora fuera del Sistema de
Jet Clean,para proteger los conjuntos
cortantes,ponga la tapa del cabezal afeitador
en la afeitadora.
Page 30

59
ESPAÑOL
58
Accesorios
◗ Sustitución de los conjuntos cortantes
Tipo HQ8 - Para la máxima eficacia de la
afeitadora,sustituya sus conjuntos cortantes de
Philips Norelco una vez al año o cuando el
símbolo de la cabeza del reemplazo comienza a
centelleo.
◗ Lubricante para la afeitadora
AL80-Lubricantepara AfeitadoraPhilipsNorelco.
◗ Solución de la limpieza
HQ200 - Philips Norelco Jet Clean Solución,
10 fl.oz/300 ml.
◗ Cable adaptador para coche
HQ8010 - Carga la afeitadora desde una
batería de 12 V de su coche,camión, caravana,
barco o tienda de campaña.
◗ Los accesorios para la afeitadora Philips
Norelco pueden comprarse en una tienda o en
nuestra página Web www
.philips.com/norelco
Page 31

GARANTÍA COMPLETA DURANTE DOS AÑOS
Philips Electronics North America Corporation garantiza cada nuevo producto Philips Norelco Modelo
7800XLCC (excepto cuchillas y protectores) contra defectos de los materiales o de fabricación durante
un período de dos años desde la fecha de compra,y está de acuerdo en reparar o sustituir sin cargo
cualquier producto defectuoso.
IMPORTANTE: Esta garantía no cubre deterioros producidos por accidente, mal uso o abuso, falta de
un cuidado razonable, la fijación de cualquier accesorio no suministrado con el producto, o la pérdida de
piezas o el sometimiento del producto a cualquier voltaje diferente a los especificados.* El uso de piezas
de sustitución no autorizadas anulará esta garantía
PHILIPS ELECTRONICS NORTH AMERICA CORPORATION NO PAGARÁ SERVICIOS
DE GARANTÍA LLEVADOS A CABO POR SERVICIOS DE REPARACIÓN NO
AUTORIZADOS,Y NO INDEMNIZARÁ AL CONSUMIDOR POR DETERIOROS
RESULTANTES DEL SERVICIO DE GARANTIA LLEVADO A CABO POR SERVICIOS DE
REPARACIÓN NO AUTORIZADOS. NO SE ASUME LA RESPONSABILIDAD POR
CUALESQUIERA DETERIOROS ESPECIALES,INCIDENTALES O CONSECUENCIALES.
A fin de obtener el servicio de garantía, simplemente envíe el producto (a portes pagados) a la Ser viceo
Centro de Asistencia de Philips Norelco (información accesible en www.philips.com/norelco or 1-800243-3050).Le sugerimos que, para mayor seguridad,haga los envíos por correo certificado (con la
certificación pagada). Los deterioros producidos durante el envío no están cubiertos por esta garantía.
NOTA:Ninguna otra garantía, escrita o de palabra, está autorizada por Philips Electronics North America
Corporation.Esta garantía le da derechos legales específicos y también puede tener otros derechos que
varían de un estado a otro.Algunos estados no permiten la exclusión o limitación de los deterioros
incidentales o consecuenciales,por lo cual las anteriores exclusiones y limitaciones pueden no ser de
aplicación en su caso.
* Lea cuidadosamente las instrucciones que se incluyen
Fabricado por:
Philips Domestic Appliances and Personal Care Comapny
A Division of Philips Electronics North America Corporation
1010 Washington Blvd.,Stamford, CT 06912-0015
Este símbolo colocado en la placa de características del producto significa que está registrado por
Underwriters' Laboratories,Inc
Norelco,Lift and Cut,Tripleheader y son Marcas Registradas de Philips Electronics North America
Corporation.
es una marca de fábrica de Philips Electronics North America Corporation.
PHILIPS es una Marca Registrada de Koninklijke Philips Electronics N.V.
© 2006 Philips Electronics North America Corporation. All Rights Reserved.
4222 002 4644 1
 Loading...