

Page 1
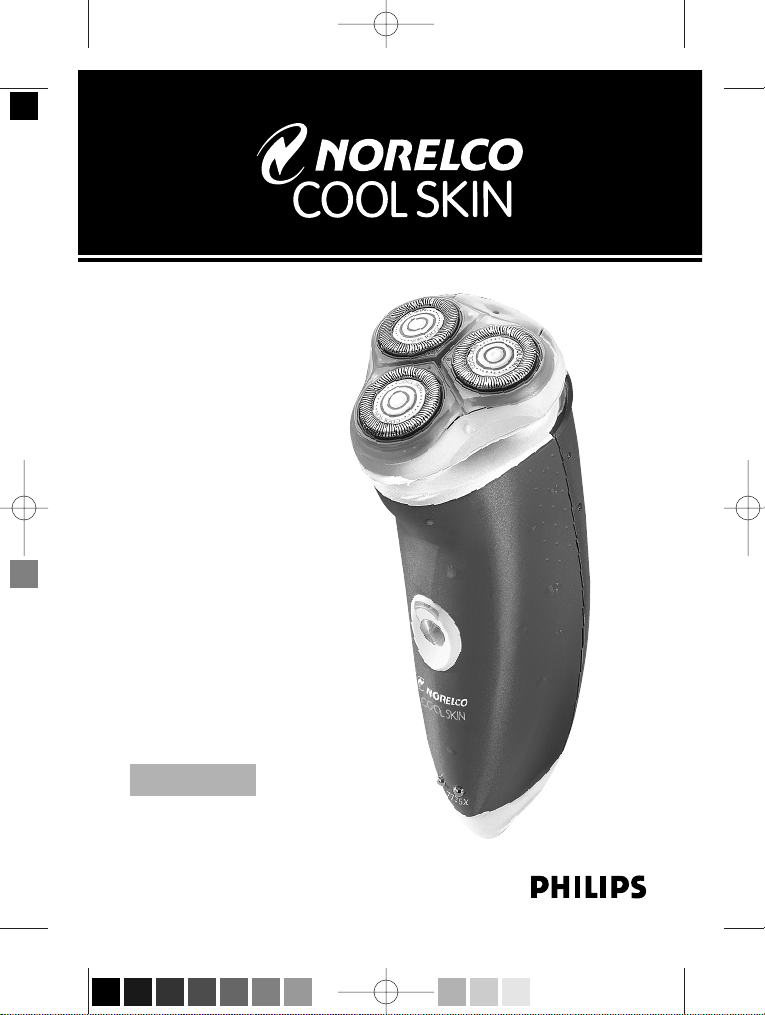
7735X
Shaving Lotion
Dispensing
Razor
Rechargeable
Cordless Tripleheader®Razor
7735X DFU 12_12_03 12/12/03 3:45 PM Page 1 (Black plate)
Page 2

ENGLISH 4
ESPAÑOL 32
7735X
3
7735X DFU 12_12_03 12/12/03 3:45 PM Page 3 (Black plate)
Page 3
IMPORTANT SAFETY
INSTRUCTIONS
When using an electric razor, basic safety precautions should
always be followed, including the following:
Read all instructions before using this appliance.
DANGER
To reduce the risk of electric shock:
1. Do not reach for a charging stand that has fallen into water.
Unplug immediately.
2. Do not use a charging stand while bathing or in a shower.
3. Do not place or store a charging stand where it can fall or be
pulled into a tub or sink. Do not place charging stand in or
drop into water or other liquid.
4. Always unplug charging stand from the electrical outlet
immediately after using, except when razor is (re)charging.
5. Unplug charging stand before cleaning.
6.
When discarding razor, unplug razor and remove rechargeable
batteries. See Battery Removal instructions.
WARNING
To reduce the risk of burns, fire, electric shock, or injury to
persons:
1. Close supervision is necessary when this razor is used by, on, or
near children or invalids.
2. Use this razor for its intended household use as described in
this manual. Do not use attachments not recommended by
Philips Electronics North America Corporation.
3. Never operate this razor if it has a damaged cord or plug, if it is
not working properly, if it has been dropped or damaged, or
ENGLISH4
7735X DFU 12_12_03 12/12/03 3:45 PM Page 4 (Black plate)
Page 4
dropped into water. Return the razor to an Authorized
Norelco Service Location for examination and repair.
4. Keep the razor and cord away from heated surfaces.
5 Never drop or insert any object into any opening.
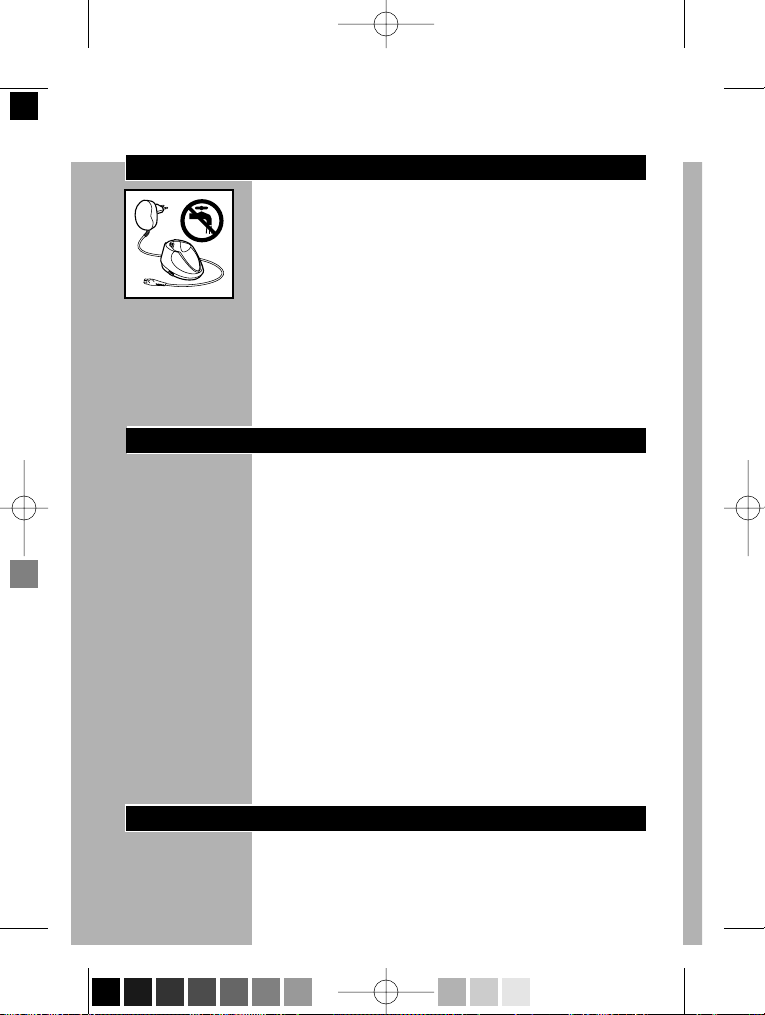
6. Do not charge razor or plug in charging stand outdoors or
operate where aerosol (spray) products are being used or
where oxygen is being administered.
7. Do not use this razor with a damaged or broken comb,as facial
injury may occur.
8. Always place razor in stand first,then plug stand into outlet.To
disconnect, turn razor off then remove plug from stand from
outlet.
9. To prevent possible damage to the cord, do not wrap cord
around the charging stand.
10. Never put razor in direct sunlight or store in a pouch at a
temperature above 140ºF.
11. Razor is water-safe and can be rinsed under running tap water
or used in shower. Do not submerge razor in water.
SAVE THESE
INSTRUCTIONS
IMPORTANT: The power plug contains a transformer. Do not
cut off the power plug to replace it with another plug, as this will
cause a hazardous condition.
IMPORTANT
YOUR RAZOR CONTAINS NICKEL-CADMIUM
RECHARGEABLE BATTERIES. See Battery Removal instruction
sheet
for battery disposal information
.
ENGLISH 5
7735X DFU 12_12_03 12/12/03 3:45 PM Page 5 (Black plate)
Page 5
ENGLISH6
60 - DAY MONEY-BACK GUARANTEE
To enjoy the closest and most comfortable shave from your new Norelco Men’s
Razor, the razor should be used exclusiv
ely for 3 weeks. This allows your hair
and skin enough time to adapt to the Norelco Shaving System. If, after that
period of time, you are not fully satisfied with your Norelco Men’s Razor, send
the product back and we’ll refund you the full purchase price.
The razor must be shipped prepaid by insured mail, insurance prepaid,
and have the sales slip, indicating purchase price and the date of
purchase, enclosed. The razor must be postmarked no later than 60 da
ys
after the date of purchase. Norelco reserves the right to verify the purchase
price of the razor and limit refunds not to exceed suggested retail price.
Send dated sales slip, your complete name and address as indicated
below, and the razor, prepaid to:
Norelco Consumer Products Company
A Division of Philips Electronics North America Corporation
450 North Medinah Road, Dock 16
Roselle, IL 60172-2329
Please allow 4-6 weeks for delivery of check. (Please Print)
Name_________________________________________________________
Address________________________________________________________
City___________________________________________________________
State_____Zip__________________________________________________
Daytime Telephone No. (____)_____________________________________
Email Address___________________________________________________
REASON FOR RETURNING:______________________________________
______________________________________________________________
______________________________________________________________
______________________________________________________________
______________________________________________________________
______________________________________________________________
______________________________________________________________
AREA CODE
7735X DFU 12_12_03 12/12/03 3:45 PM Page 6 (Black plate)
Page 6
Table of Contents
Features.........................................................8-9
Important .......................................................10
Introduction ..................................................10
Before First Use........................................... 10
Charging....................................................11-12
Recharging......................................................12
Inserting The First Cartridge.....................13
Replacing Cartridges ...................................14
Put It To The Test & Shaving Tips ..............15
How To Shave With An
Electric Razor..........................................16-17
Trimming....................................................17-18
Cleaning.....................................................19-23
Replacing The Shaving Heads.......... ..........23
Storage......................................................23-24
Assistance.......................................................24
Battery Removal...........................................24
Accessories....................................................25
Warranty ........................................................26
Spanish ............................................................28
ENGLISH 7
7735X DFU 12_12_03 12/12/03 3:45 PM Page 7 (Black plate)
Page 7
Features
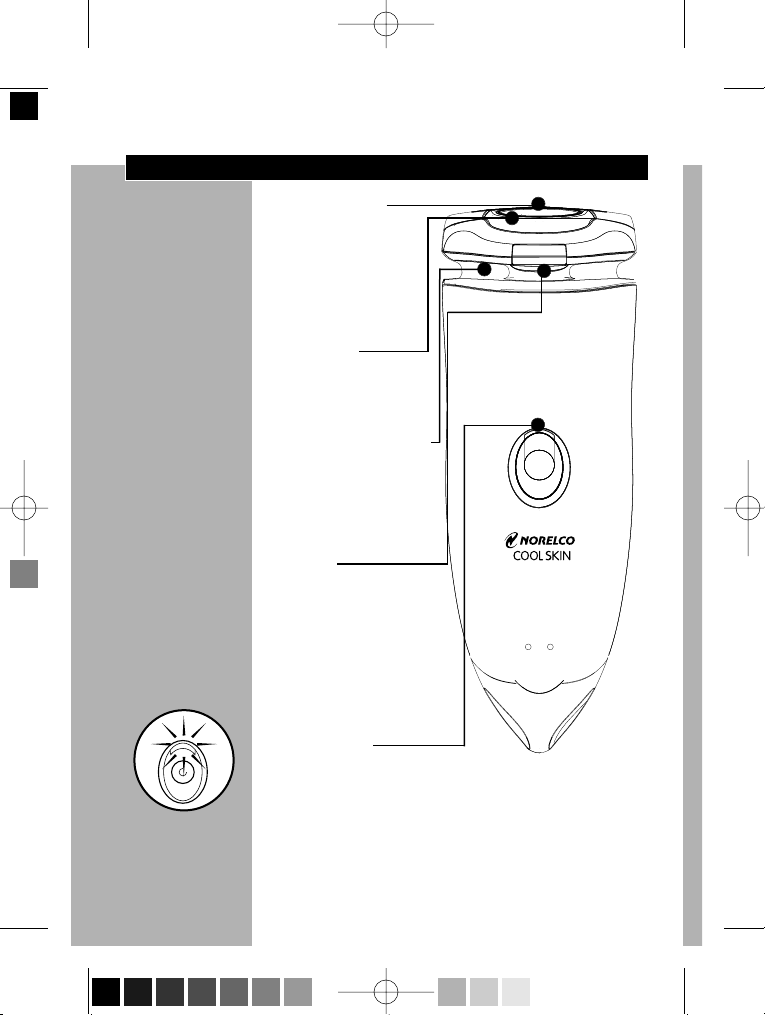
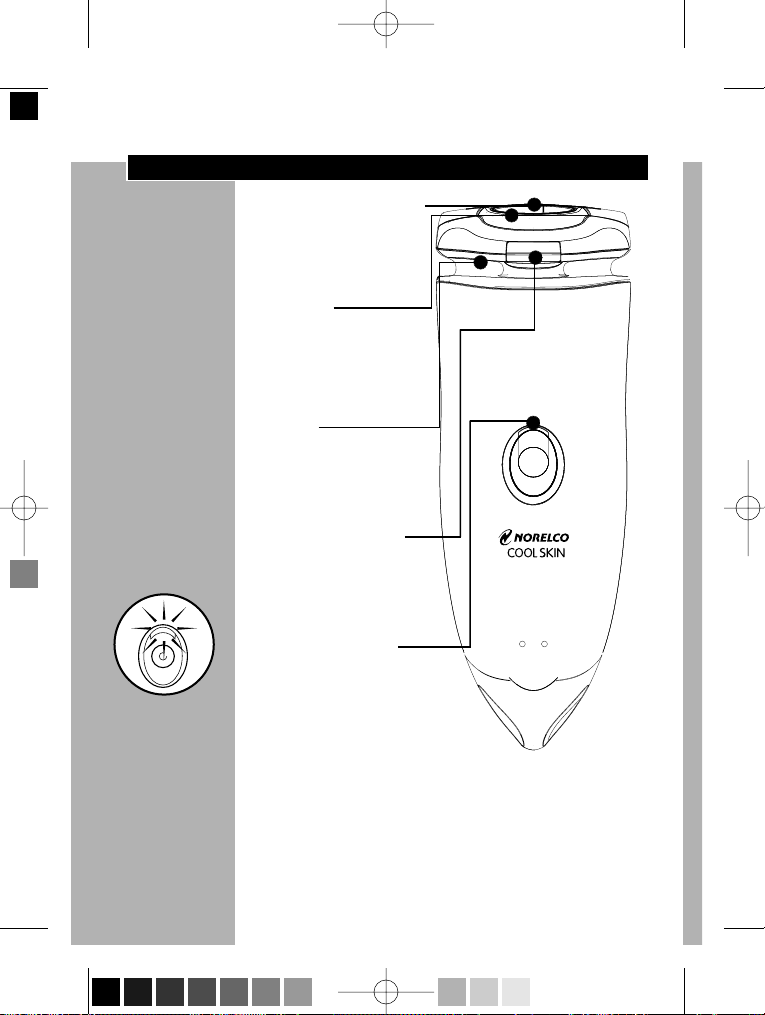
Nivea for Men
Shaving Lotion
Applicator
Reflex Action
®
System
Glide Rings
Razor Head
Assembly
Quick Clean System
Individually Floating
Heads
Razor Head Release
Button
• Hair Chamber
captures shaven hair
Electronic Locking
On/Off Button
LED Battery
Charge & Low Indicator
7735X
ENGLISH8
7735X DFU 12_12_03 12/12/03 3:45 PM Page 8 (Black plate)
Page 8
Click-On Trimmer
Attachment for
beard, moustache
and sideburns
Automatic
Worldwide Voltage
100V to 240V AC
Cleaning Brush
Travel / Storage
Pouch
Rechargeable
Cordless- 8 hour
full charge
Up to 40 minutes
cordless shave time
Charging Stand
Full 2-Year
Warranty
60-Day Money-
Back Guarantee
ENGLISH 9
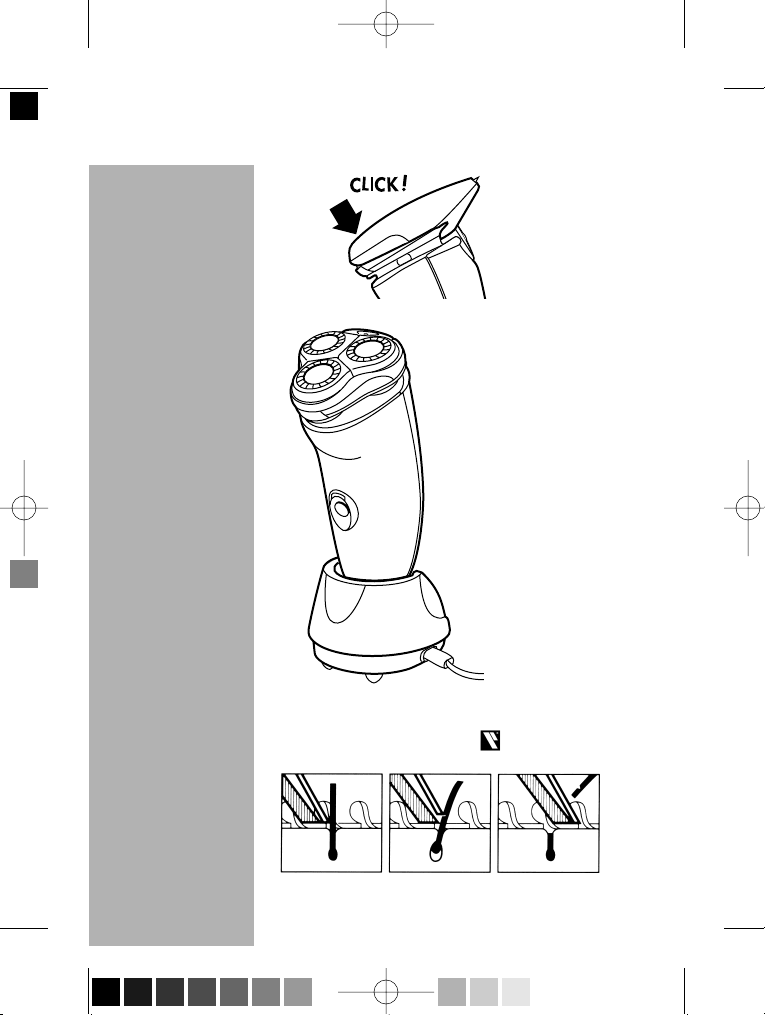
How the Unique Norelco Lift and Cut
®
Shaving System Makes Close Comfortable:
Groove channels beard
closer to cutting system
Lifter raises hair Blade cuts hair which
then drops below skin level
7735X DFU 12_12_03 12/12/03 3:45 PM Page 9 (Black plate)
Page 9

Important
C
◗ Only use the power plug and the charging
stand provided to charge the razor.
◗ The power plug transforms 100-240 AC volts
to 12 volts DC.
◗ An adaptor plug may be necessary for cord
usage in some foreign countries.Your new razor
will automatically convert internally to work on
100V to 240V AC systems.
Introduction
The Cool Skin Razor comes with two different
kinds of NIVEA FOR MEN cartridges:
Moisturizing Shaving Lotion for sensitive skin and
Extra Fresh Shaving Gel for a fresh sensation
during and after shaving.This gives you the
opportunity to try them out and discover which
one suits your skin type best.
The Glide Rings on the shaving heads distribute
the unique NIVEA FOR MEN shaving lotion/gel
evenly over the skin,offering an even smoother
and closer shave, causing less skin irritation and
leaving your skin feeling refreshed.
Before first use
◗ Charge the razor before you start using it (see
'Charging').
ENGLISH10
7735X DFU 12_12_03 12/12/03 3:45 PM Page 10 (Black plate)
Page 10
Charging
◗ Charging or recharging at temperatures below
40ºF or higher than 95ºF adversely affects
lifetime of batteries.
◗ Battery performance is best if you recharge
only when batteries are (almost) completely
empty.
◗ Do not leave the charging stand with the razor
in it continuously plugged into outlet. If storing
razor in stand, remove the plug from outlet as
soon as the razor is fully charged.
◗ Do not charge razor in pouch.
◗ First time charging and recharging after non-use
for 1 month or more requires a full 8 hours.
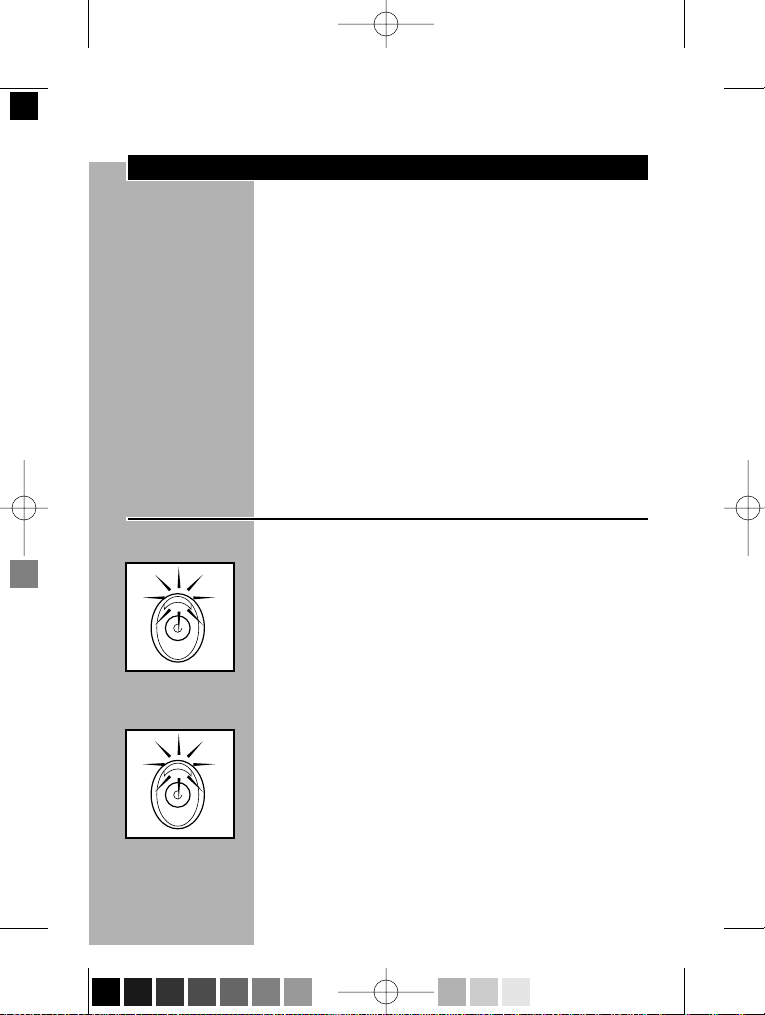
Charge indications
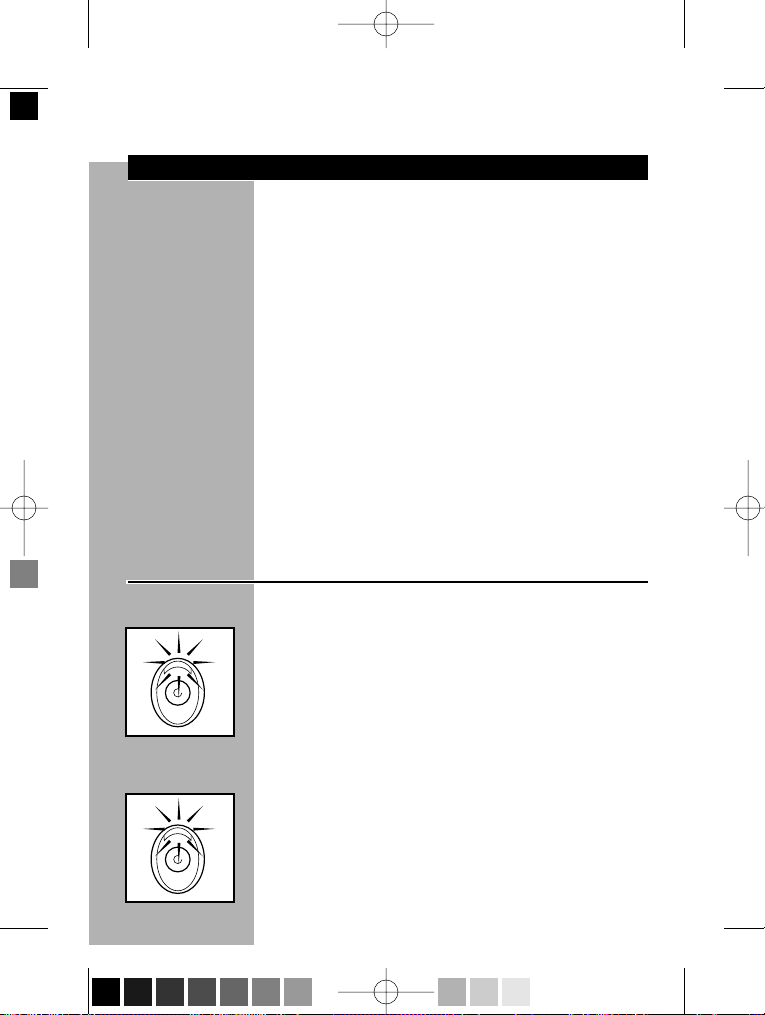
Low Battery Indicator
C
◗ When the battery is running low,the low
battery light burns red during shaving.
◗ When you switch the razor off if the battery is
nearly empty,the battery light blinks red for a
few seconds.
Charging Indicator
C
◗ During charging, the charging light burns green.
ENGLISH 11
7735X DFU 12_12_03 12/12/03 3:45 PM Page 11 (Black plate)
Page 11
ENGLISH12
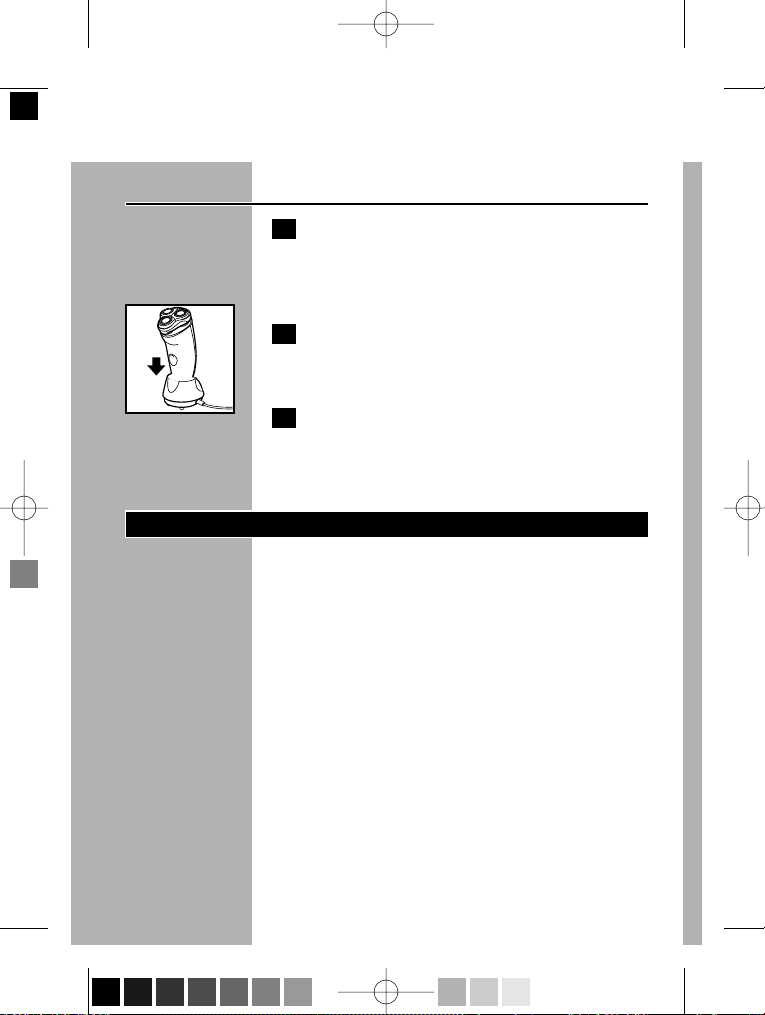
Charging the razor
1 Connect the small plug into the charging
stand and put the power plug into any
100V to 240V AC outlet. Use only the
cord and stand provided.
C
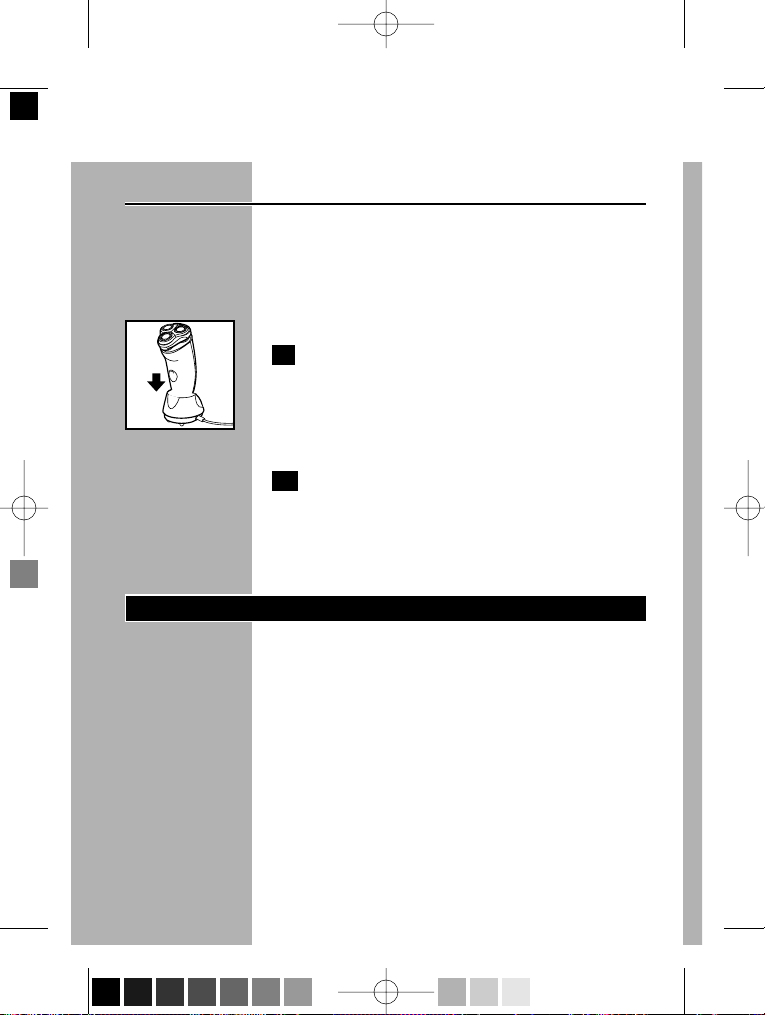
2 Place the razor in the charging stand. The
razor automatically switches off when
placed in the charging stand.
3 Remove the power plug from outlet as
soon as the battery is fully charged. You
may then store the razor in the charging
stand.
Recharging
◗ First time charging and recharging after non-use
for 1 month or more requires a full 8 hours.
◗ A fully charged razor has cordless shaving time
up to approx. 40 minutes.
◗ Return razor to charging stand after shaving.
◗ Red recharging indicator light will blink when
batteries are almost empty.
◗ Remove the power plug from outlet as soon as
the battery is fully charged. You may then store
the razor in the charging stand.
7735X DFU 12_12_03 12/12/03 3:45 PM Page 12 (Black plate)
Page 12
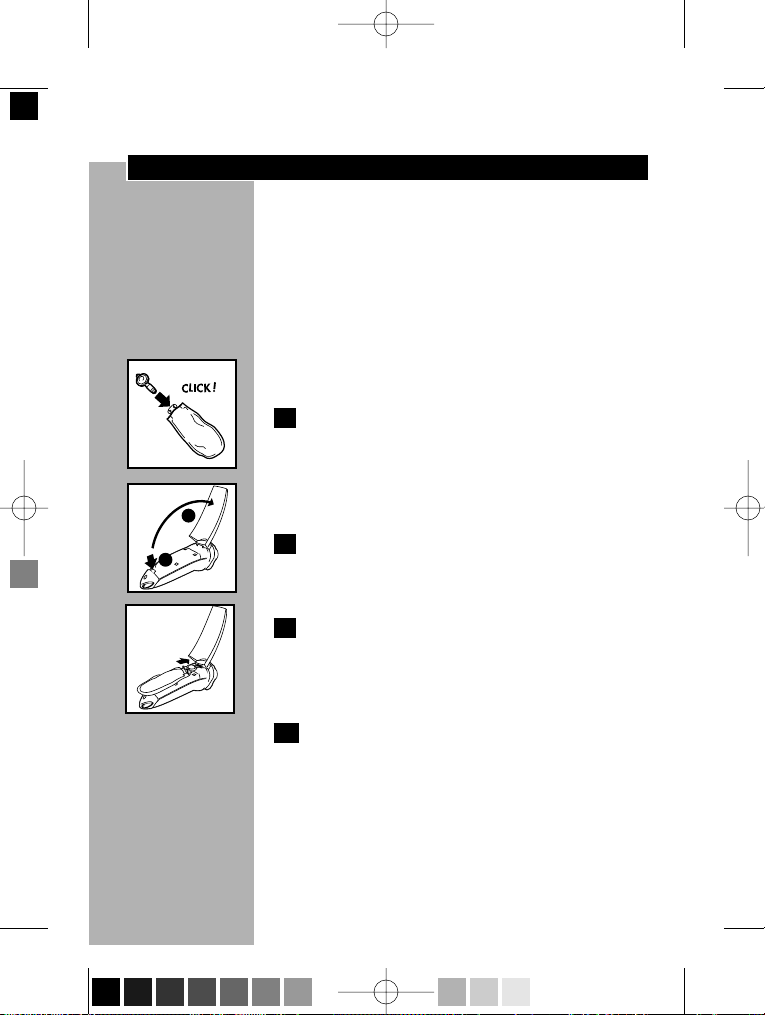
Inserting the First Cartridge
◗ One connector is supplied for use with all four
cartridges. Do not throw connector away
when you replace an empty cartridge.
◗ For hygienic reasons, it is advised that you use a
new connector when you start using a new set
of replacement cartridges.
◗ Remove the shaving lotion/gel cartridge from
the razor when you are not going to use the
razor for more than one week.
C
1 Take one lotion or gel cartridge.Take the
connector supplied and remove it from
the plastic bag. Push it into the plastic cap
of cartridge until it locks into position with
a click.
C
2 Press the release button on the back of
razor and open the cover of the cartridge
compartment.
C
3 Slide the cartridge with the connector in
place into the razor. It only fits properly if
the white side of the connector is pointing
upwards. Close the cover.
4 Press the applicator button a few times
until the Nivea for Men shaving lotion or
gel appears in the small hole located on
razor head assembly.The razor is now
ready for use.
ENGLISH 13
7735X DFU 12_12_03 12/12/03 3:45 PM Page 13 (Black plate)
2
1
Page 13
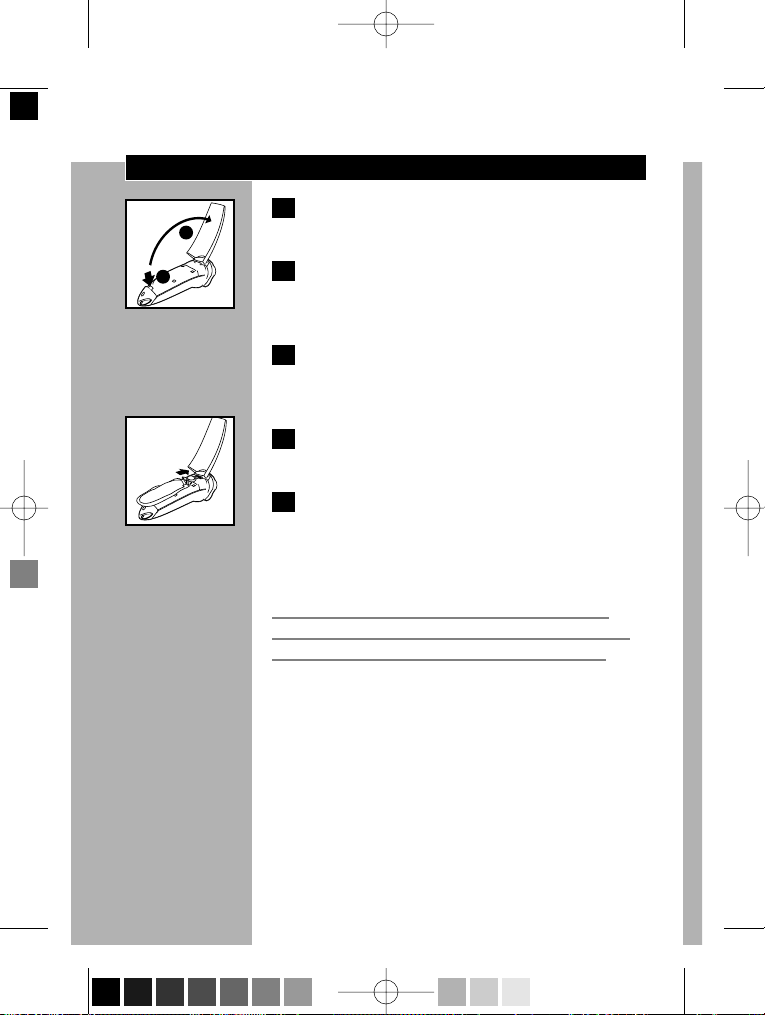
Replacing Cartridges
C
1 Press the release button and open the
back cover of razor.
2 Remove empty cartridge, pull out and save
the connector. DO NOT discard the
connector.
3 Rinse out cartridge compartment with
water before replacing cartridge. Air dry
thoroughly.
C
4 Insert connector into the plastic cap of
new cartridge until it clicks into position.
5 Follow steps 2-4 for “Inserting the First
Cartridge.”
Use only Norelco Cool Skin Nivea for
Men shaving lotion (HQ170) or gel
(HQ171) cartridges with this razor.
Do not throw the connector away when you
replace an empty cartridge.You will need to use
the same connector for the other cartridges.
The Nivea for Men shaving lotion or gel
cartridges should be stored at a temperature
between 32ºF and 104ºF.
ENGLISH14
7735X DFU 12_12_03 12/12/03 3:45 PM Page 14 (Black plate)
2
1
Page 14
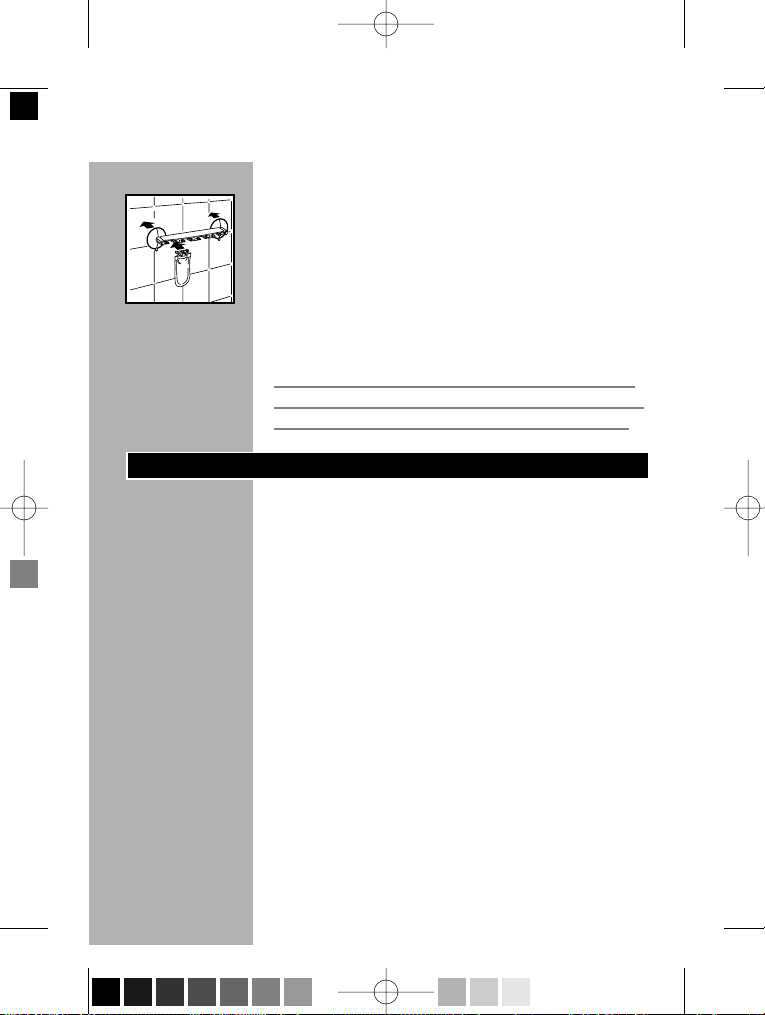
Wall holder
C
◗ You can conveniently store the other cartridges
by attaching them to the wall holder supplied.
The holder has suction caps which allow you to
attach it to the wall easily. In this way you
always have the cartridges close at hand, which
is very convenient, especially when you shave in
the shower.
IMPORTANT:The wall holder is only suitable for
storing cartridges. Never hang or place the shaver
on the wall holder. If you do, the shaver may fall!
Put It To The Test & Shaving Tips
◗ 21-Day Trial and Conversion Process. It is a fact
that your skin and beard need time to adjust to
any new shaving system.
◗ Use your new razor exclusively for 3 weeks
to fully enjoy the closeness of a Norelco shave.
◗ At first you may not get as close a shave as you
expect, or your face may even become slightly
irritated.This is normal since your beard and
skin will need time to adjust. Invest 3 weeks and
you’ll soon experience the full joy of your new
razor.
◗ Stick with it! If you alternate shaving methods
during the adjustment period, it may make it
more difficult to adapt to the Norelco shaving
system.
◗ If you are still not convinced after 21 days,
Norelco will refund you the full purchase price,
guaranteed.
ENGLISH 15
7735X DFU 12_12_03 12/12/03 3:45 PM Page 15 (Black plate)
Page 15

How To Shave With An Electric Razor
◗ Use this razor for its intended household use as
described in this manual.
Switching the razor on
1 Switch the razor on by pressing the on/off
button once.
C
2 Press the yellow pump button to apply
NIVEA FOR MEN shaving lotion/gel to
your skin.
3 Move the shaving heads over your skin.
Shave against the direction of beard
growth using quick and both straight and
circular motions.
C
4 While shaving, press the pump button
frequently to apply more NIVEA FOR
MEN shaving lotion/gel so that the razor
keeps gliding smoothly over your face.
You may use this shaving system on either wet or
dry skin.The shaving lotion or gel provides
immediate hydrating action and lessens drag or
pull against skin.
5 Easy does it. Gently press the razor to
your skin so the floating heads can follow
the contours of your face.DO NOT press
too hard.Too much pressure can pinch the
skin into the combs.
◗ For the best shaving results, shaving lotion/gel
should be pumped up frequently.
ENGLISH16
7735X DFU 12_12_03 12/12/03 3:45 PM Page 16 (Black plate)
Page 16
ENGLISH 17
◗ The razor will not perform optimally when
used without shaving lotion/gel.
Switching the razor off
1 Switch the razor off by pressing the on/off
button once.
2 Clean the razor.
Rinse the razor under hot water after each shave.
Remove the cartridge if you are not going to use
the appliance for more than one week (see
chapter 'Cleaning and maintenance').
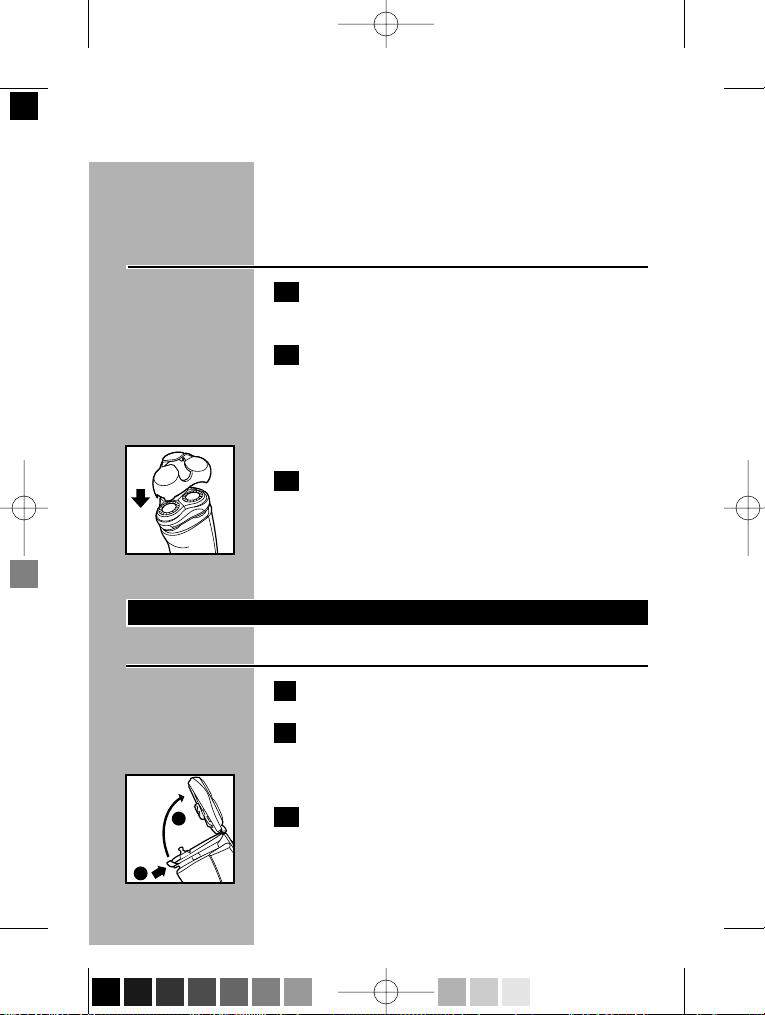
C
3 Put the protection cap on the razor when
you store it, to prevent the shaving heads
from getting damaged. Replace Cool Skin
razor heads (model HQ177) once a year
for optimal shaving results.
Trimming
To Groom Sideburns and Moustache:
1 Switch the razor off.
2 Clean the razor and razor head assembly
by running under hot water before
installing Trimmer.
C
3 Press the Razor Head Release Button
located on front side of razor, directly
under the shaving heads to remove head
assembly from razor.
7735X DFU 12_12_03 12/12/03 3:45 PM Page 17 (Black plate)
2
1
Page 17
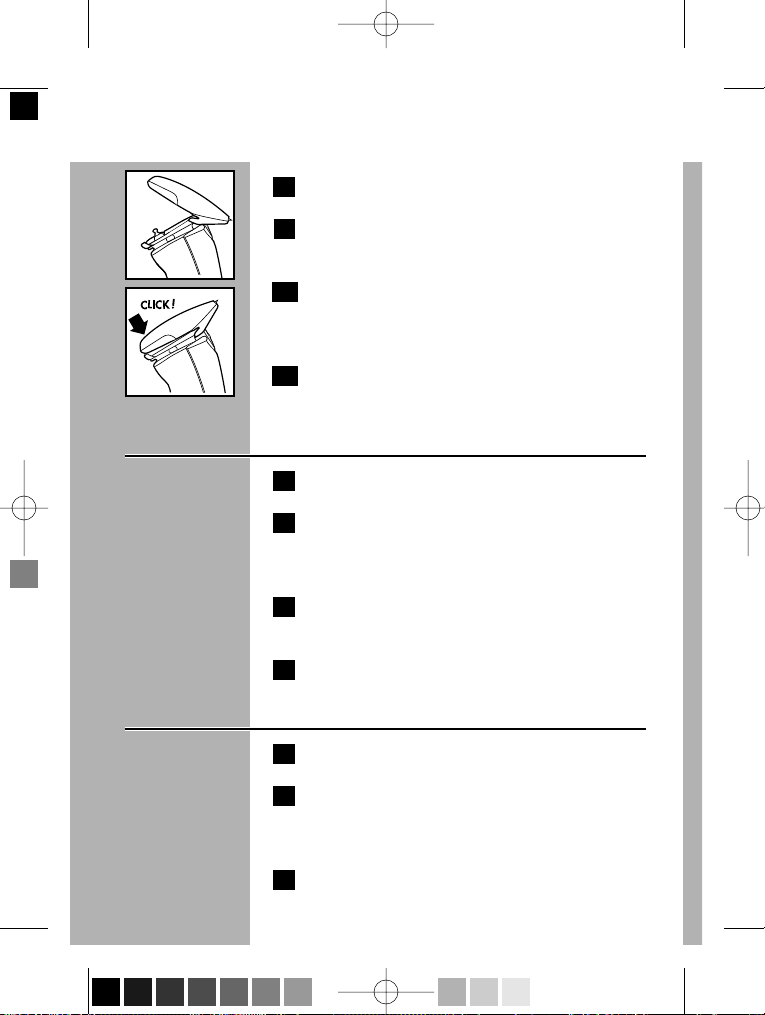
4 Remove razor head assembly from razor.
C
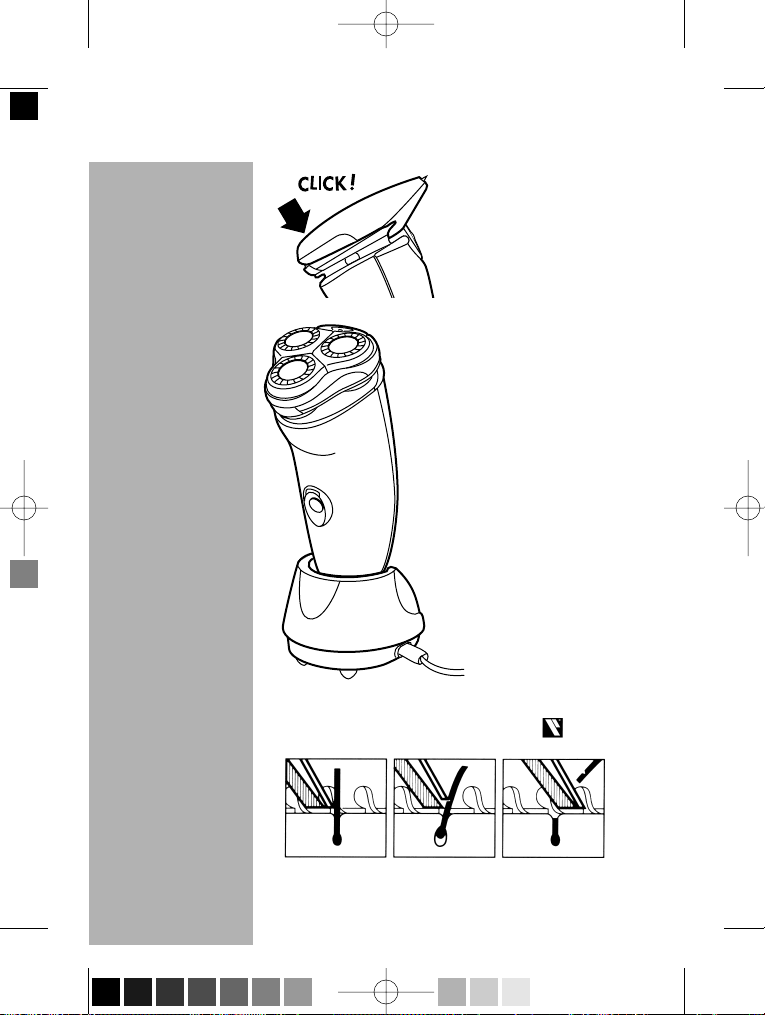
5 Tilt the Trimmer Slightly backwards.
C
6 Fit the Trimmer onto the razor (you will
hear a click).The Trimmer is now ready for
use.
7 Activate the Trimmer by pressing the
on/off button once.
To Use Trimmer:
1 Turn razor on.
2 Hold Trimmer to exact hairline desired.
Move Trimmer downward with gentle
pressure.
3 Trim beard, moustache or sideburns using
the Trimmer.
4 Turn razor OFF when finished.
To Remove Trimmer:
1 Turn razor off.
2 Press button located on front side of razor
directly under the shaving heads,to unlock
and remove Trimmer assembly from razor.
3 Replace razor head assembly.
ENGLISH18
7735X DFU 12_12_03 12/12/03 3:45 PM Page 18 (Black plate)
Page 18
Cleaning
Important
◗ Always switch Razor OFFand remove from
charging stand before cleaning.
◗ Always store Razor with Protective Razor Head
Cap on shaving heads.
◗ Never clean, remove or replace head assembly
while motor is on.
◗ Do not apply pressure to combs. Do not touch
razor heads with hard objects as this may dent
or damage precision-made slotted combs.
◗ Do not use razor if combs are damaged or
broken. Facial injury may occur.
◗ Never dry the shaving unit with a towel or
tissue as this may damage the razor heads.
Shaving Unit: Quick Clean After Every Shave
1 Make sure the razor is switched off.
2 Keep the Razor Head Assembly closed.
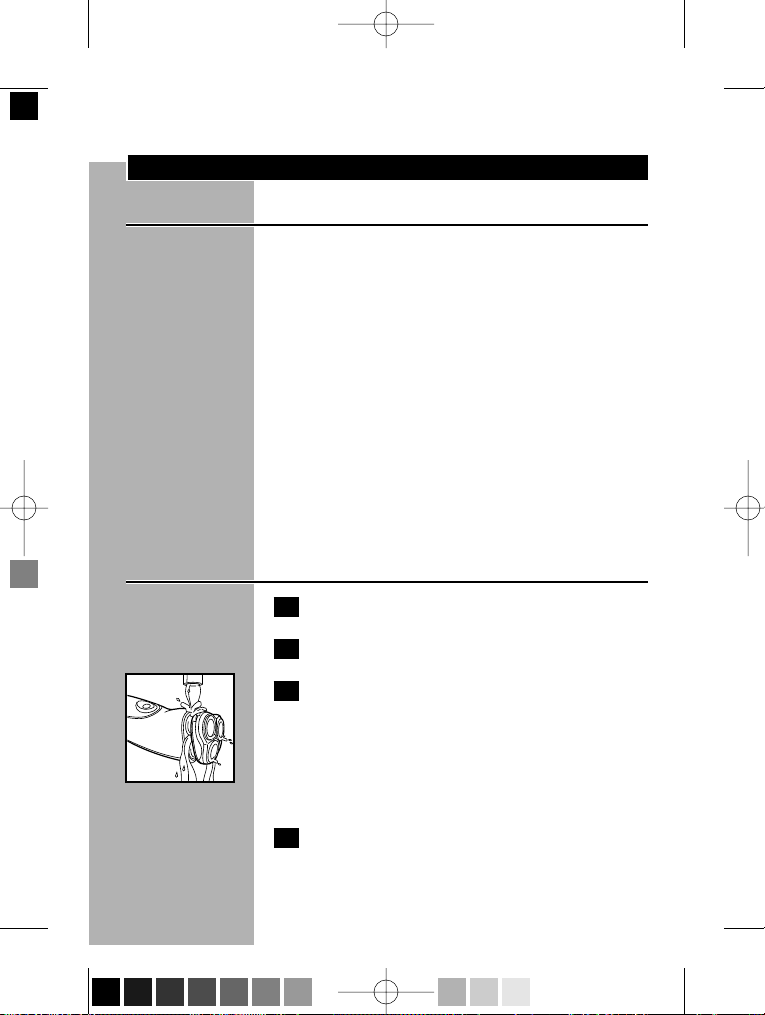
C
3 Rinse the Razor Head Assembly and the
hair chamber under a hot tap by letting
the water run through the openings below
the assembly for at least 30 seconds.
BE CAREFUL TO TEST WATER FIRST SO AS
NOT TO BURN OR SCALD HANDS.
4 Shake off excess water.
ENGLISH 19
7735X DFU 12_12_03 12/12/03 3:45 PM Page 19 (Black plate)
Page 19
ENGLISH20
Shaving Unit: Every Week
We advise you clean the appliance thoroughly at
least once a week to maintain optimal shaving
performance.
You can also follow this procedure when the
shaving heads have to be cleaned.
1 Switch the razor off.
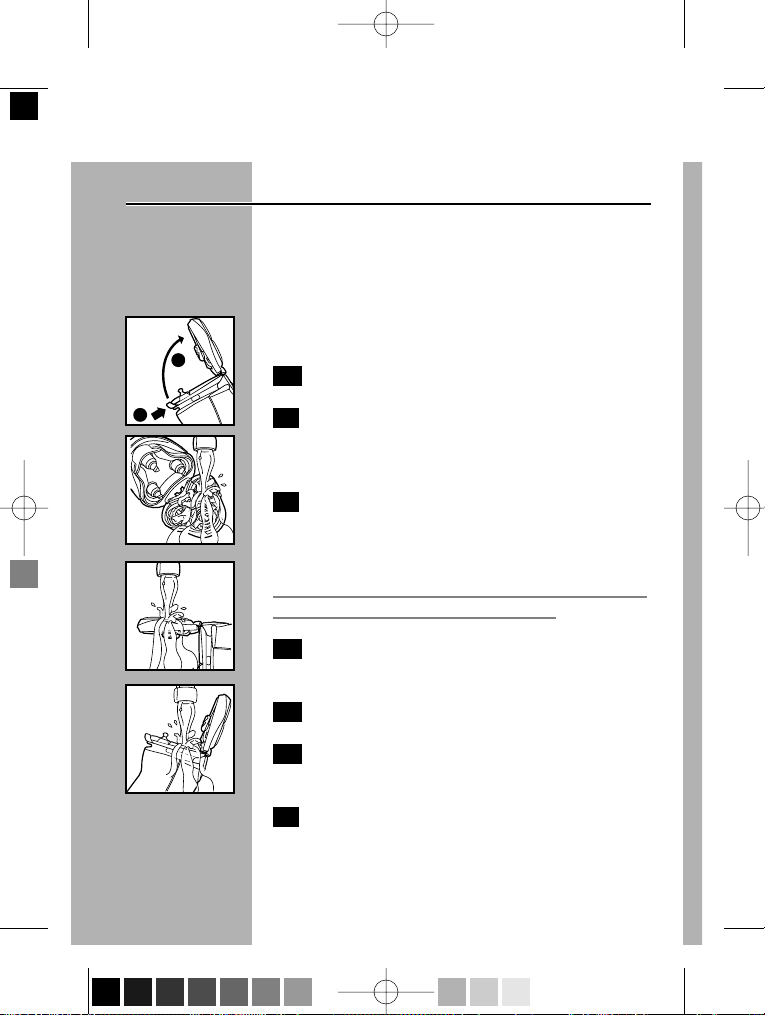
C
2 Press the Razor Head Release Button
located under razor heads on front side of
Razor.
C
3 Rinse the inside of the Razor Head
Assembly by running under hot water.
Water from the tap should be on a hot
setting,
BUT BE CAREFUL TOTEST WATER FIRSTSO AS
NOT TO BURN ORSCALD HANDS.
C
4 Rinse the outside of the Razor Head
Assembly.
C
55 Rinse the hair chamber.
6 Shake off excess water. Close Razor Head
Assembly and shake off excess water.
7 Open the Razor Head Assembly and leave
it open to air dry completely.
7735X DFU 12_12_03 12/12/03 3:45 PM Page 20 (Black plate)
2
1
2
Page 20
Charging Stand
1 Unplug the charging stand.
2 Clean the charging stand with a moist cloth.
After Each Use:Trimmer
1 Clean the outside of the Trimmer with the
brush supplied after every use.
The Trimmer can also be cleaned by rinsing it
under the tap.
C
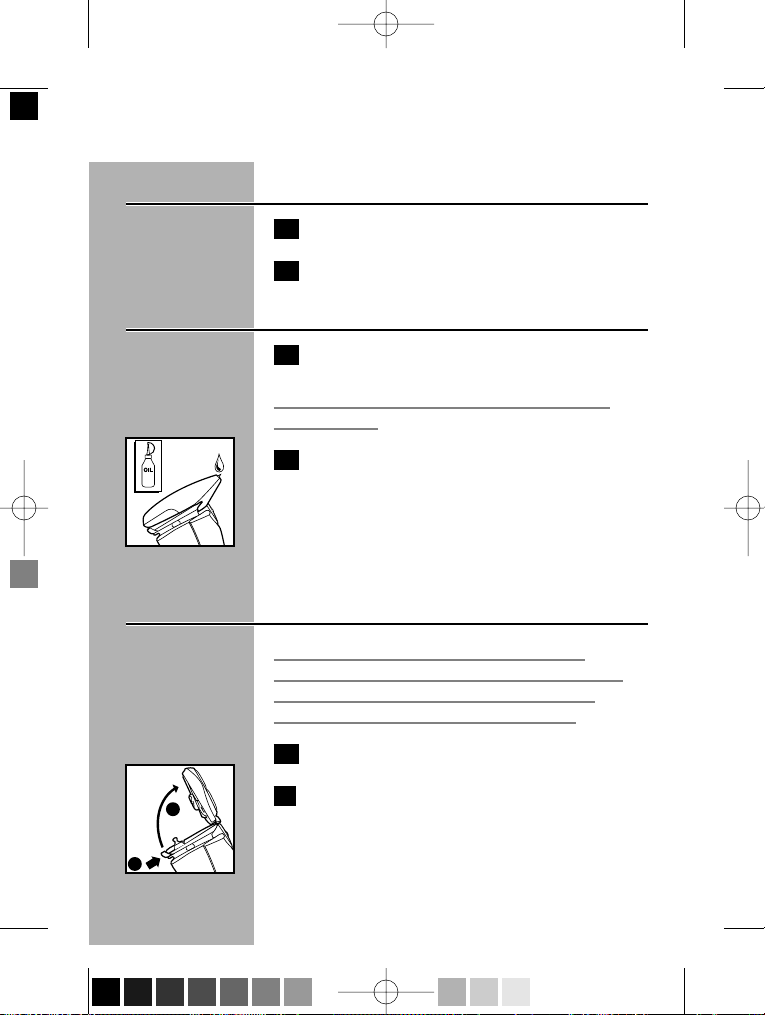
2 Lubricate Trimmer teeth twice a year with
Norelco Razor Lubricant, model AL80, or
one drop of mineral oil.
Every Two Months:Razor Heads
IMPORTANT: Do Not mix up the cutters
and combs as the shaving performance may be
adversely affected for several weeks before
optimal shaving performance is restored.
1 Switch razor OFF.
C
2 Press the Razor Head Release Button
located under razor heads on front side of
Razor.
ENGLISH 21
7735X DFU 12_12_03 12/12/03 3:45 PM Page 21 (Black plate)
2
1
Page 21
C
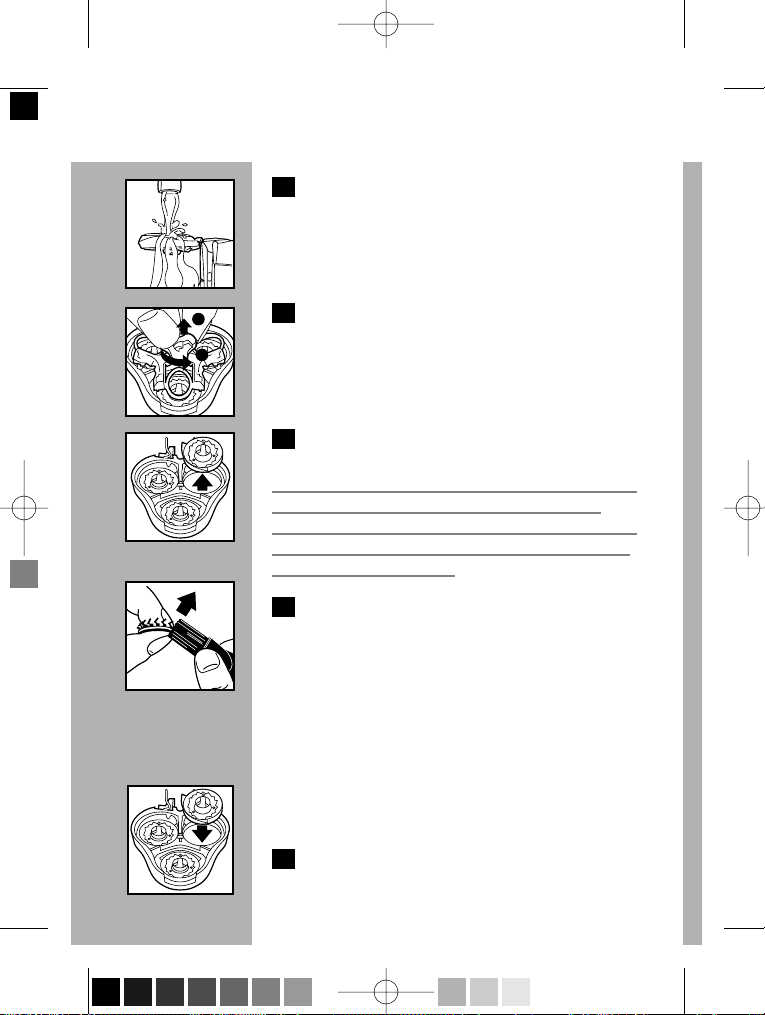
3 Remove the Razor Head Assembly and
clean the razor heads and hair chamber by
running under hot water. Be sure water is
not too hot so as to cause burns or
scalding.
C
4 While holding Razor Head Assembly in
one hand, turn center wheel
counterclockwise to release and remove
frame. Set frame aside.
C
5 Remove and clean one cutter and comb, at
a time.
Do not clean more than one cutter and comb at
a time since they are all matching sets. If you
accidentally interchange the cutters and combs, it
could take several weeks before optimal shaving
performance is restored.
C
6 Cutter should be held with cutters facing
up and brushed in an upward motion.
Clean razor comb with long bristles of
brush in a circular motion.
For optimum performance, razor cutters and
combs should be cleaned in a degreasing liquid
(e.g., Norelco Razor Cleaner, model RC1776, or
alcohol) and lubricated with Norelco Razor
Lubricant, model AL80, or one drop of mineral oil
(in the center of the head).This helps prevent
wear of shaving heads.
C
7 While holding Razor Head Assembly in
one hand, replace cutter and comb back
ENGLISH22
7735X DFU 12_12_03 12/12/03 3:45 PM Page 22 (Black plate)
2
1
Page 22
into the Razor Head Assembly.
8 Repeat the process for the other two sets
of cutters and combs.
C
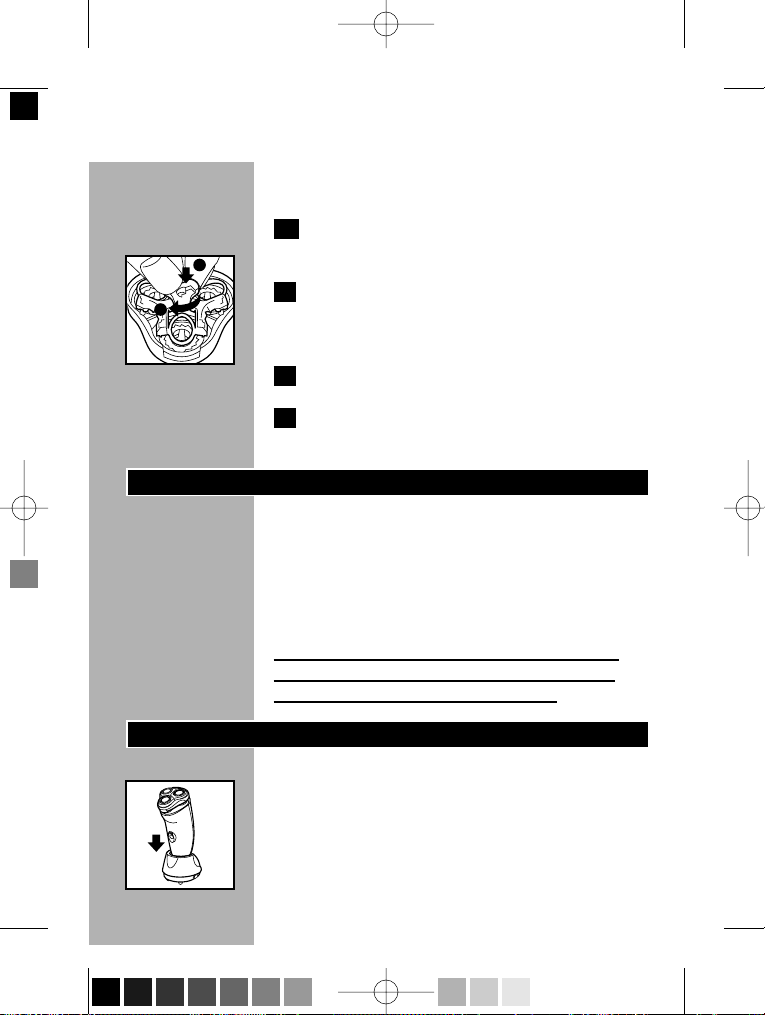
9 Replace frame back into Razor Head
Assembly. While pressing down, turn
wheel clockwise to lock frame into place.
10 Press Razor Head Assembly back on razor.
11 Put the protective razor head cap on the
razor to protect heads.
Replacing the razor heads
Replace the razor heads once a year for optimal
shaving results.
Replace damaged or worn shaving heads with
model HQ177 Norelco Cool Skin razor heads
only.
This razor has no other user-serviceable parts.
Any other service should be performed by an
Authorized Norelco Service Location.
Storage
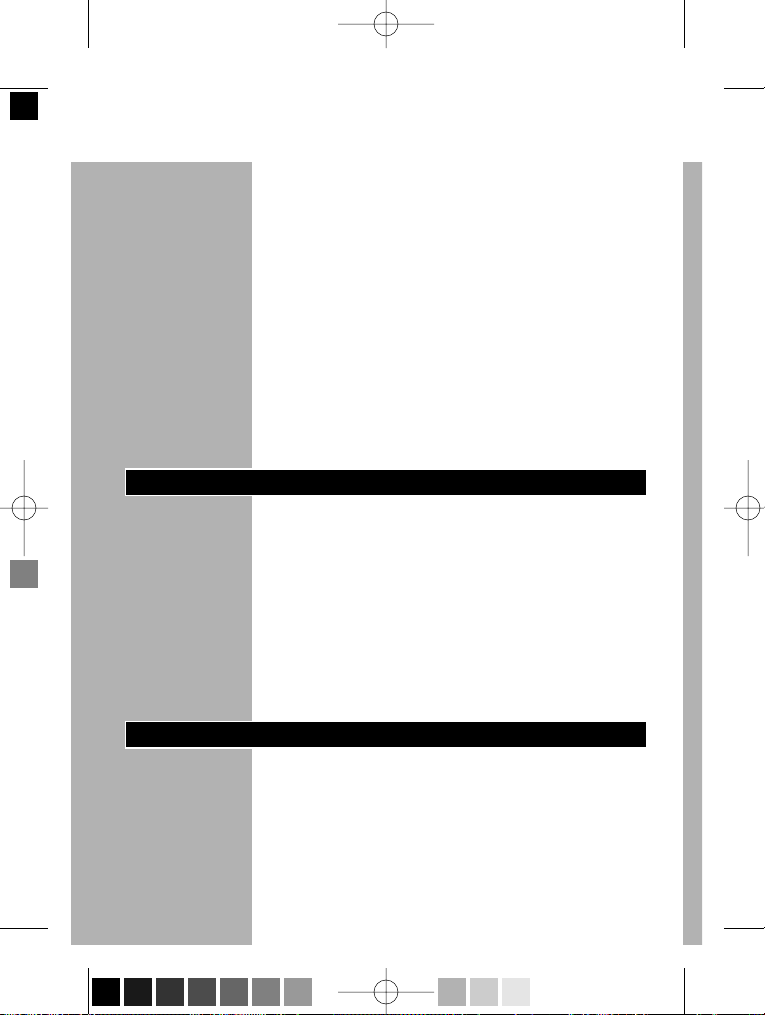
Charging stand
C
◗ After cleaning, the razor can be placed in the
charging stand for safe storage.
◗ Put the protective razor head cap on razor to
protect heads.
ENGLISH 23
7735X DFU 12_12_03 12/12/03 3:45 PM Page 23 (Black plate)
1
2
Page 23
Pouch
◗ The razor can be stored in the pouch supplied.
There is also room for two NIVEA FOR MEN
Cool Skin cartridges.The pouch will provide
extra protection during travel.
Hanging cord
◗ The razor can also be stored by hanging it from
the hanging cord supplied. Storing the shaver by
means of the hanging cord ensures optimal
drying conditions.
Assistance
◗ For assistance or the Authorized Norelco
Service Location nearest you, call toll free:
1-800-243-3050
or visit our website: www.norelco.com
◗ Authorized Norelco Service Location
information is available 24 hours a day, 7 days a
week.
Y Battery Removal
◗ This Norelco Razor contains Nickel-Cadmium
batteries, which must be disposed of properly.
◗ Batteries should only be removed when razor
is to be discarded.
◗ Refer to Battery Removal instruction sheet
for directions on removing the rechargeable
batteries.
ENGLISH24
7735X DFU 12_12_03 12/12/03 3:45 PM Page 24 (Black plate)
Page 24
Accessories
◗ Replacement Heads
Model HQ177 - For maximum razor
performance, replace your Norelco Cool Skin
7000 Series razor heads once a year.
◗ NOTE: Model HQ156 & HQ167 Cool Skin or
Advantage Replacement Heads DO NOT fit
this razor.
◗ DO NOT USEshaver sharpeners as this will
damage your blades and lifters and will
adversely affect the shaving performance.
◗ HQ170 Nivea for Men Shaving Lotion
Replacement Cartridges
Cool Skin Nivea for Men Shaving Lotion
Cartridges, 5 to a box.
◗ HQ171 Nivea for Men Shaving Gel
Replacement Cartridges
Cool Skin Nivea for Men Shaving Gel
Cartridges, 5 to a box.
◗ Razor Lubricant:
AL80 Norelco Razor Lubricant.
◗ Razor Head Cleaner
RC1776 Norelco Razor Cleaner.
◗ Norelco Razor Accessories may be purchased
at a store near you, an Authorized Norelco
Service Location, on our website
www
.norelco.com or by using the order form
enclosed.
ENGLISH 25
7735X DFU 12_12_03 12/12/03 3:45 PM Page 25 (Black plate)
Page 25
ENGLISH26
FULL TWO YEAR WARRANTY
Philips Electronics North America Corporation warrants each new Norelco Product, Model
7735X (except cutters and combs) against defects in materials or workmanship for a period of
two years from the date of purchase, and agrees to repair or replace any defective product
without charge.
IMPORTANT: This warranty does not cover damage resulting from accident, misuse or abuse,
lack of reasonable care, the affixing of any attachment not provided with the product or loss of
parts or subjecting the product to any but the specified voltage.* Use of unauthorized
replacement parts will void this warranty.
PHILIPS ELECTRONICS NORTH AMERICA CORPORATION WILL NOT PAY
FOR WARRANTY SERVICE PERFORMED BY A NON-AUTHORIZED REPAIR
SERVICE AND WILL NOT REIMBURSE THE CONSUMER FOR DAMAGE
RESULTING FROM WARRANTY SERVICE PERFORMED BY A NONAUTHORIZED REPAIR SERVICE. NO RESPONSIBILITY IS ASSUMED FOR
ANY SPECIAL, INCIDENTAL OR CONSEQUENTIAL DAMAGES.
In order to obtain warranty service, simply take or ship the product postage prepaid to the
nearest Authorized Norelco Service Location. It is suggested that for your protection you return
shipments of product by insured mail, insurance prepaid. Damage occurring during shipment is
not covered by this warranty.
NOTE: No other warranty, written or oral, is authorized by Philips Electronics North America
Corporation.
This warranty gives you specific legal rights, and you may also have other rights which var y from
state to state. Some states do not allow the exclusion or limitation of incidental or consequential
damages, so the above exclusion and limitations may not apply to you.
* Read enclosed instructions carefully.
Manufactured for:
Norelco Consumer Products Company
A Division of Philips Electronics North America Corporation
1010 Washington Blvd., Stamford, CT 06912-0015
MADE IN HOLLAND.
This symbol on the product’s nameplate means it is
listed by Underwriters’ Laboratories, Inc.
Norelco,Tripleheader,Advantage, Lift and Cut, and are Registered Trademarks of
Philips Electronics North America Corporation.
, Glide Rings and Quick Clean System are Trademarks of Philips Electronics North
America Corporation.
Nivea for Men is a Registered Trademark of Beiersdorf AG.
Cool Skin and PHILIPS are Registered Trademarks of Koninklijke Philips Electronics N.V.
© 2004 Philips Electronics North America Corporation. All Rights Reserved.
®
LISTED
TM
ULTRA CLOSE, ULTRA COMFORTABLE ... GUARANTEED!
7735X DFU 12_12_03 12/12/03 3:45 PM Page 26 (Black plate)
Page 26
27
7735X DFU 12_12_03 12/12/03 3:45 PM Page 27 (Black plate)
Page 27
ESPAÑOL28
IMPORTANTES
INSTRUCCIONES DE
SEGURIDAD
Siempre que utilice una afeitadora eléctrica, debe respetar ciertas
precauciones básicas, incluyendo las indicadas a continuación.
Lea todas las instrucciones antes de utilizar este aparato.
PELIGRO
Para reducir el riesgo de choque eléctrico:
1. No intente recuperar una base de carga que se haya caído al
agua. Desenchúfela inmediatamente.
2. No utilice la base mientras se baña o se ducha.
3. No coloque ni guarde la base en un sitio donde pueda caerse o
ser empujada a una bañera o lavabo. No la coloque ni la deje
caer en agua ni en ningún otro líquido.
4. Siempre desenchufe la base inmediatamente después de
utilizarla, excepto cuando la afeitadora se está recargando.
5. Desenchufe la base antes de limpiarla.
6. Cuando se deshaga de la afeitadora, desenchúfela y quite las
baterías recargables. Consulte las instrucciones para quitar las
baterías.
ADVERTENCIA
Para reducir el riesgo de quemaduras, fuego, choque
eléctrico o daños a las personas:
1.
Es necesario un estrecho control cuando la afeitadora es utilizada por
niños o personas discapacitadas, o cerca ellos.
2.
Utilice esta afeitadora para el uso doméstico previsto, tal como se
describe en este manual. No utilice accesorios no recomendados por
Philips Electronics North America Corporation.
3. No utilice nunca la afeitadora o la base si el cordón o el
7735X DFU 12_12_03 12/12/03 3:45 PM Page 28 (Black plate)
Page 28
enchufe están dañados, si no funcionan
correctamente, si han
sufrido una caída o se han dañado o si la base se ha caído al agua.
Lleve la afeitadora a un centro de servicio autorizado de Norelco para
que sea examinada y reparada.
4. Mantenga el cordón alejado de las superficies calientes.
5. No deje caer ni inserte nunca objeto alguno en ninguna de las
aberturas.
6. No cargue la afeitadora ni enchufe la base mientras está al aire libre, ni
la haga funcionar cuando se estén utilizando productos en aerosol
(pulverizadores) o cuando se esté suministrando oxígeno.
7. No utilice esta afeitadora con un cabezal dañado o roto ya que puede
provocar lesiones faciales.
8. Siempre coloque primero la afeitadora en la base y luego la base en el
toma de corriente. Para desconectarla, apague la afeitadora y luego
retire del toma de corriente el enchufe de la base.
9. Para evitar posibles daños al cordón, no lo enrolle alrededor de la
base.
10. Nunca exponga la afeitadora o la base a la luz directa del sol ni la
guarde en una bolsa a temperaturas superiores a 140ºF (60ºC).
11. La afeitadora es hermética y puede enjuagarse bajo el chorro del grifo.
No sumerja la afeitadora en agua.
GUARDE ESTAS
INSTRUCCIONES
IMPORTANTE: La clavija adaptadora incorpora un
transformador. No quite la clavija adaptadora para sustituirla por
otro enchufe, ya que podría producirse una situacíon de peligro.
IMPORTANTE
SU AFEITADORA CONTIENE BATERÍAS
RECARGABLES DE NIQUEL-CADMIO.
Consulta la hoja “Instrucciones para quitar las Baterías” para
información sobre cómo deshacerse de las baterías.
ESPAÑOL 29
7735X DFU 12_12_03 12/12/03 3:45 PM Page 29 (Black plate)
Page 29
Nombre
Dirección
Ciudad
Estado Zip
Número de teléfono de dia: ( )
Dirección de email
MOTIVO DE LA DEVOLUCIÓN:
ESPAÑOL30
60 DIAS DE GARANTIA DE
DEVOLUCIÓN DEL DINERO
Para disfrutar de la afeitada mas cómoda y al ras de su nueva Afeitadora Norelco para
Hombres, la afeitadora deberá ser usada como único sistema de afeitado durante 3 semanas.
Ello proporcionará a su pelo y a su piel tiempo suficiente para adaptarse al Sistema de
Afeitado Norelco. Si después de ese período de tiempo no está completamente satisfecho
con su afeitadora Norelco para Hombres, devuelva el producto y le retornaremos lo que le
costó al comprarlo.
La afeitadora debe ser enviada, a portes pagados, por correo certificado (con la
certificación pagada) incluyendo el tíquet de compra indicando el precio y la
fecha de compra. La afeitadora debe ser matasellada antes de que hayan transcurrido 60
días desde la fecha de compra. Norelco se reserva el derecho de verificar el precio de
compra de la afeitadora y de limitar la devolución de modo que no supere el precio de
venta al público sugerido.
Envíe el tíquet de compra con la fecha, su nombre y dirección completos tal como se indica
más adelante, junto con la afeitadora a portes pagados a:
Norelco Consumer Products Company
A Division of Philips Electronics North America Corporation
450 North Medinah Road, Dock16
Roselle, IL 60172-2329
Por favor, espere entre 4 y 6 semanas a recibir el cheque.
Código de área
7735X DFU 12_12_03 12/12/03 3:45 PM Page 30 (Black plate)
Page 30
ESPAÑOL 31
Indice de Contenidos
Características....................................... 32-33
Importante .....................................................34
Introducción..................................................34
Antes Del Primer Uso ...............................34
Carga ...............................................................35
Recarga .....................................................36-37
Cómo Insertar El
Primer Cartucho....................................37-38
Reemplazo De Los Cartuchos ...........38-39
Prueba Y Consejos El Afeitado ...........39-40
Cómo Afeitarse Con Una
Afeitadora Eléctrica...............................40-41
Recorte De las Patillas..........................42-43
Limpieza....................................................43-48
Sustitución De Los
Conjuntos Cortantes..................................48
Cóma guardar el aparato...........................49
Asistencia........................................................50
Retiro de las Baterías..................................50
Accesorios .....................................................51
Garantia ..........................................................52
7735X DFU 12_12_03 12/12/03 3:45 PM Page 31 (Black plate)
Page 31
7735X
ESPAÑOL32
Características
Aplicador para la Loción
de afeitar Nivea for Men
Sistema Reflex Action
®
Glide Rings
Conjunto de cabezales de
la afeitadora
Sistema Quick
Clean
Cabezales flotantes
individuales
Botón de liberación del
cabezal de la afeitadora
• Cámara de captura
de la barba afeitada
Carga de la batería del
LED e indicador bajo
7735X DFU 12_12_03 12/12/03 3:45 PM Page 32 (Black plate)
Page 32
Cortapatillas para bigotes,
barba y patillas
Adaptacíon automática a
cualqier voltage de 100V a
240V de CA
Cepillo de limpieza
Bolsa de viaje y
almacenamiento
Carga total de
8 horas para uso sin
cordón, recargable.
Permite hasta 40 minutos de
afeitado sin cordón.
El Soporte De Carga
Garantía completa de
2 años
60 días de garantia de
devolucíon del dinero.
ESPAÑOL 33
Cómo el sistema de afeitado Norelco
Lift and Cut®proporciona un apurado confortable:
El surco dirige la barba
más cerca del sistema de
corte
El elevador levanta el pelo La cuchilla corta el pelo
y después éste se
esconde por debajo del
nivel de la piel.
7735X DFU 12_12_03 12/12/03 3:45 PM Page 33 (Black plate)
Page 33
Importante
C
◗ Para cargar la afeitadora, utilice únicamente la
clavija del enchufe y el soporte de carga
suministrados.
◗ La clavija del enchufe transforma la entrada de
100-240 V de CA a 12 V de CC.
◗ Es posible que en algunos países extranjeros
sea necesario utilizar un adaptador para poder
enchufar el cordón. Su nueva afeitadora efectúa
la conversión automática interna para funcionar
con sistemas de 100 V a 240 V de CA.
Introducción
La afeitadora se suministra con dos tipos
diferentes de cartuchos NIVEA FOR MEN: un Gel
Extra Refrescante para el Afeitado que da
sensación de frescor durante y después del
afeitado y una Loción Hidratante para el Afeitado
para pieles sensibles. Así tendrá la oportunidad de
probar ambos y descubrir cuál se adapta mejor a
su tipo de piel.
Los nuevos Glide Rings de los conjuntos
cortantes distribuyen uniformemente el gel o la
loción NIVEA FOR MEN sobre la piel, dejándola
revitalizada y con menos irritación y
proporcionando un afeitado más suave, uniforme
y apurado.
Antes del primer uso
◗ Cargue el aparato antes de comenzar a
utilizarlo (véase 'Cómo cargar el aparato).
ESPAÑOL34
7735X DFU 12_12_03 12/12/03 3:45 PM Page 34 (Black plate)
Page 34
Carga
◗ La carga o la recarga en temperaturas inferiores
a 40ºF (4°C) o superiores a 95ºF (35°C) puede
afectar adversamente la vida útil de las baterías.
◗ El mejor rendimiento de las baterías se obtiene
si se recargan exclusivamente cuando están
(casi) totalmente agotadas.
◗ No deje el soporte de carga con la maquinilla
de afeitar en ella tapó contiunamente en el
enchufe. Si almacena la maquinilla de afeitar en
soporte, quite el enchufe del enchufe tan
pronto como la maquinilla de afeitar se cargue
completamente.
◗ No cargue la afeitadora dentro de la bolsa.
◗ La primera carga y la recarga, después de una
interrupción de uso de un mes o más,
requieren 8 horas completas.
Indicaciones de carga
La batería se está agotando
C
◗ El luz roja indicadora de recarga se enciende
cuando las baterías estan casi vacias.
◗ Si la batería está casi vacía, cuando desconecte
la afeitadora, el piloto de la batería parpadeará
en color rojo.
Batería cargada
C
◗ La lámpara LED verde se encenderá para
indicar que la afeitadora está (re) cargándose.
ESPAÑOL 35
7735X DFU 12_12_03 12/12/03 3:45 PM Page 35 (Black plate)
Page 35
Cómo cargar la afeitadora
Conecte el conector pequeño en el soporte
de carga y coloque la clavija del enchufe en
cualquier enchufe de 100V a 240 V de CC.
Utilice solamente el cordón y el soporte
suministrados.
C
2 Coloque la afeitadora en el soporte de
carga. Se encenderá la luz verde del
indicador de carga. La afeitadora apaga
automáticamente cuando está colocada en
el soporte de carga.
3 Quite el enchufe de energía del enchufe
tan pronto como la batería se cargue
completamente. Usted puede entonces
almacenar la maquinilla de afeitar en el
soporte de carga.
Recarga
◗ La primera carga y la recarga, despés de una
interrupcíon de uso de un mes o mas,
requieren 8 horas completas.
◗ Una afeitadora cargada complemente permite
afeitarse, sin cordón, durante aproximadamente
40 minutos.
◗ Después de afeitarse, coloque nuevamente la
afeitadora en el soporte de carga.
◗ El luz roja indicadora de recarga se enciende
cuando las basterias estan casi vacias.
◗ Quite el enchufe de energía del enchufe tan
pronto como la batería se cargue
ESPAÑOL36
7735X DFU 12_12_03 12/12/03 3:45 PM Page 36 (Black plate)
Page 36
completamente. Usted puede entonces
almacenar la afeitador en el soporte de carga.
Cómo Insertar El Primer Cartucho
◗ No tire el conector cuando sustituya un
cartucho vacío. La necesitará para los otros
cartuchos.
◗ Por razones higiéncas, le aconsejamos que
inserte una nueva conector cuando empiece a
usar un nuevo conjunto de cinco cartuchos.
◗ Quite del aparato el cartucho de locíon o gel
para el afeitado cuando no vaya a usar la
afeitadora durante más de una semana.
C
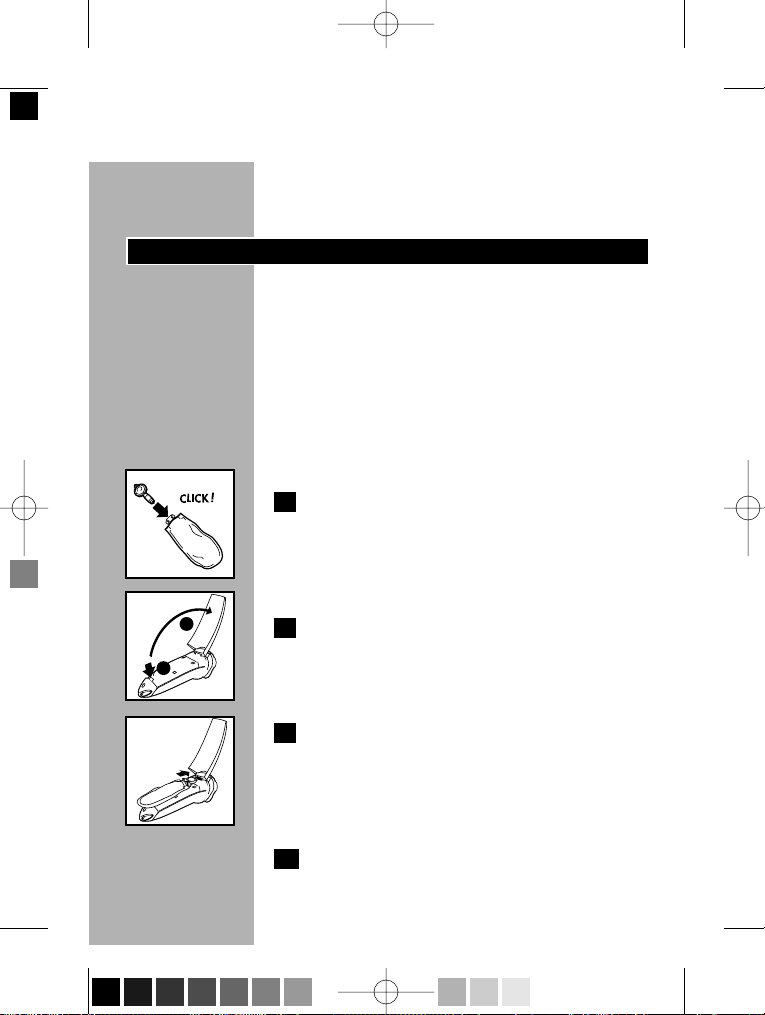
1 Tome un cartucho de gel o loción.Tome el
conector suministrado y retírelo de la
pequeña bolsa. Insértelo en la tapa plástica
del cartucho hasta que se trabe en
posición (escuchará un clic).
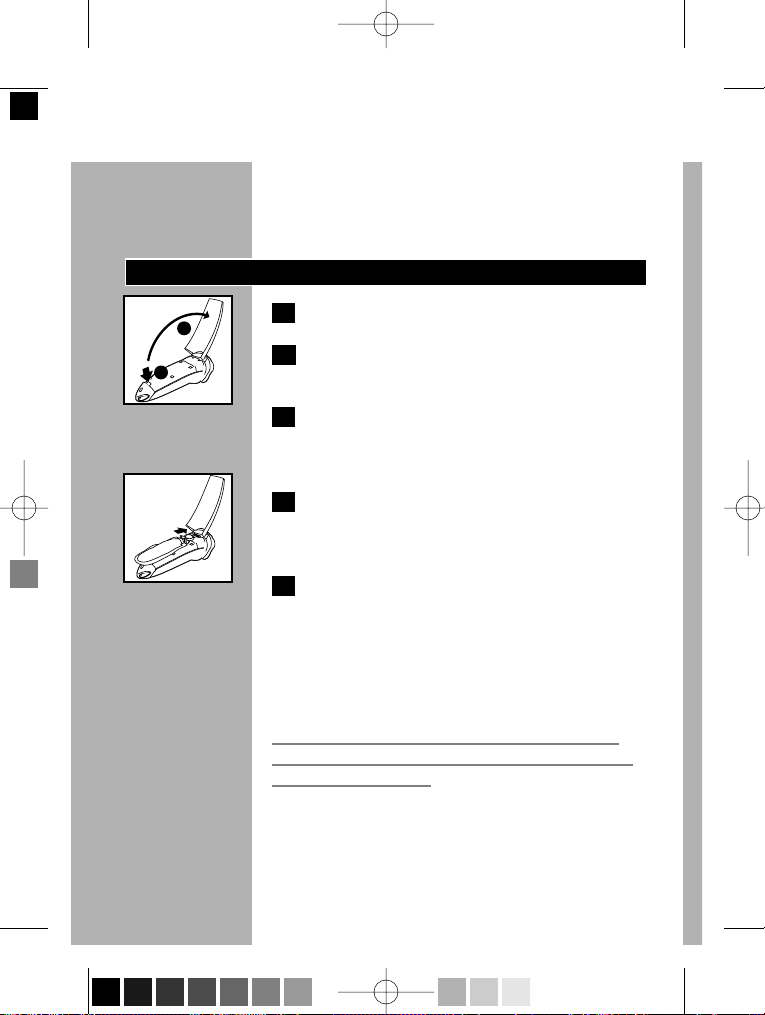
C
2 Deslice hacia abajo la traba que se
encuentra en la parte posterior de la
afeitadora, y abra la cubierta del
compartimiento para el cartucho.
C
3 Coloque el cartucho con el conector en
su lugar dentro de la afeitadora. Sólo
calzará correctamente si el lado blanco del
conector está orientado hacia arriba.
Cierre la cubierta.
4 Presione varias veces el botón del
aplicador hasta que el gel o la loción de
ESPAÑOL 37
7735X DFU 12_12_03 12/12/03 3:45 PM Page 37 (Black plate)
2
1
Page 37
afeitar para hombres Nivea for Men
comience a aparecer. La afeitadora está
ahora lista para su uso.
Reemplazo De Los Cartuchos
C
1 Abra la cubierta posterior de la afeitadora.
2 Retire el cartucho vacío,saque el conector
y guárdelo.
NO deseche el conector.
3 Enjuague el compartimiento con agua
antes de reemplazar el cartucho. Déjelo al
aire hasta que seque completamente.
C
4 Inserte el conector en la tapa plástica del
nuevo cartucho hasta que se trabe en
posición (escuchará un clic).
5 Siga los pasos 2 a 4 en “Cómo insertar el
primer cartucho”.
Con esta afeitadora sólo se debe utilizar los
cartuchos de la loción de afeitar (HQ170) o del
gel (HQ171) Nivea for Men para la afeitadora
Advantage de Norelco.
No deseche el conector cuando reemplaza un
cartucho vacío. Necesitará utilizarlo nuevamente
para la otra cartucha.
El gel o la loción de afeitar Nivea for Men debe
almacenarse a temperaturas entre 32ºF (0ºC) y
104ºF (35ºC).
ESPAÑOL38
7735X DFU 12_12_03 12/12/03 3:45 PM Page 38 (Black plate)
2
1
Page 38
Soporte de pared
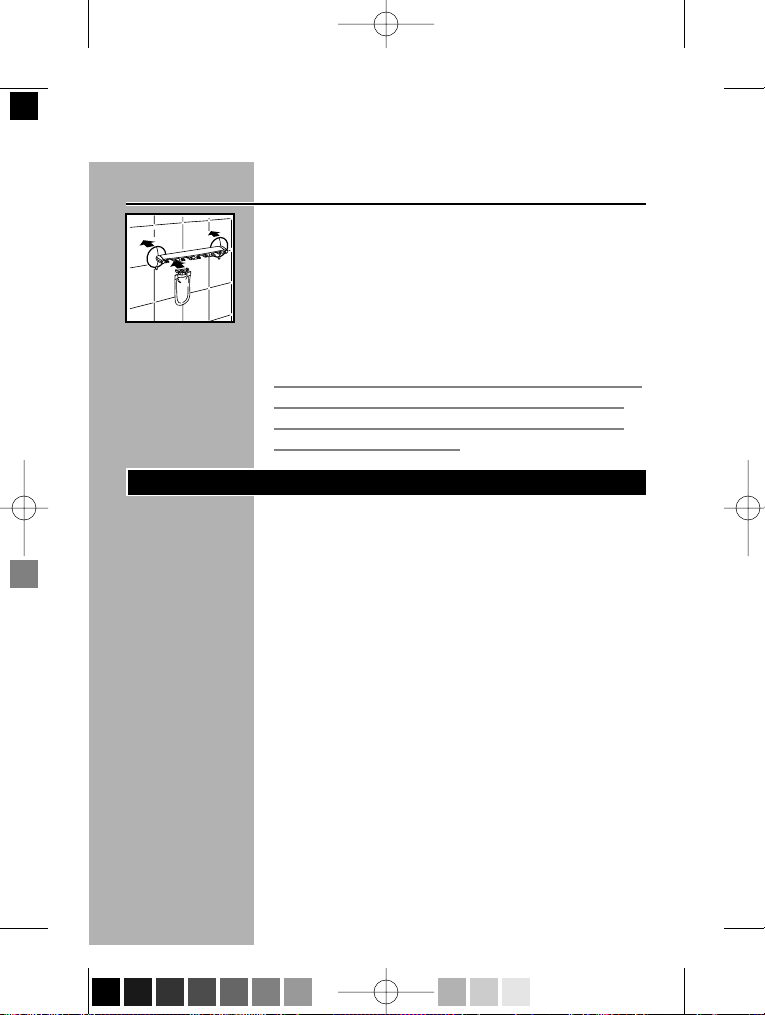
C
◗ Puede guardar cómodamente los otros
cartuchos, fijándolos al soporte de pared que
se suministra. El soporte tiene ventosas que
permiten fijarlo fácilmente a la pared. De este
modo siempre tendrá los cartuchos a mano,
lo cual es muy cómodo, sobre todo si se afeita
en la ducha.
Nota: El soporte de pared sólo es adecuado para
guardar cartuchos. Nunca cuelgue o coloque la
afeitadora en el soporte de pared. Si lo hace, la
afeitadora se podría caer.
Prueba Y Consejas Para El Afeitado
◗ Prueba durante 21 días y Proceso de
Conversión. Es un hecho que su piel y su
barba necesitan tiempo para adaptarse a
cualquier nuevo sistema de afeitado.
◗ Use exclusivamente su nueva afeitadora
durante 3 semanas para disfrutar
completamente del apurado de un afeitado
Norelco.
◗ Al principio puede que no obtenga un
afeitado tan apurado como esperaba, o
incluso es posible que su cara se irrite
ligeramente. Esto es normal, ya que su barba y
su piel necesitarán tiempo para adaptarse.
Emplee 3 semanas y podrá disfrutar por
completo de su nueva afeitadora.
◗ ¡Persevere con ella! Si va alternado métodos
de afeitado durante el período de adaptación,
esto hará que sea más difícil la adaptación al
ESPAÑOL 39
7735X DFU 12_12_03 12/12/03 3:45 PM Page 39 (Black plate)
Page 39
ESPAÑOL40
sistema de afeitado Norelco.
◗ Si después de 21 días no está convencido,
Norelco le garantiza la devolución completa
del precio de compra.
Cómo Afeitarse Con Una Afeitadora Eléctrica
◗ Solo utilice este producto para el uso personal
doméstico previsto, como se describe en este
manual.
Cómo conectar la afeitadora
1 Conecte la afeitadora presionando una vez
el botón de encendido/apagado.
C
2 Presione el botón amarillo de la bomba
para aplicar gel o loción hidratante para el
afeitado NIVEA FOR MEN sobre la piel.
3 Aféitese en la dirección contraria al
crecimiento de la barba utilizando
movimientos rápidos circulares y rectos.
C
4 Mientras se afeita, presione con frecuencia
el botón de la bomba para aplicar más gel
o loción hidratante para el afeitado NIVEA
FOR MEN, de modo que la afeitadora se
deslice suavemente sobre el rostro.
La afeitadora puede utilizarse con la piel seca o
mojada. El gel o la loción de afeitar proporciona
inmediatamente una acción hidratante y reduce
el arrastre o estirado de la piel.
7735X DFU 12_12_03 12/12/03 3:45 PM Page 40 (Black plate)
Page 40
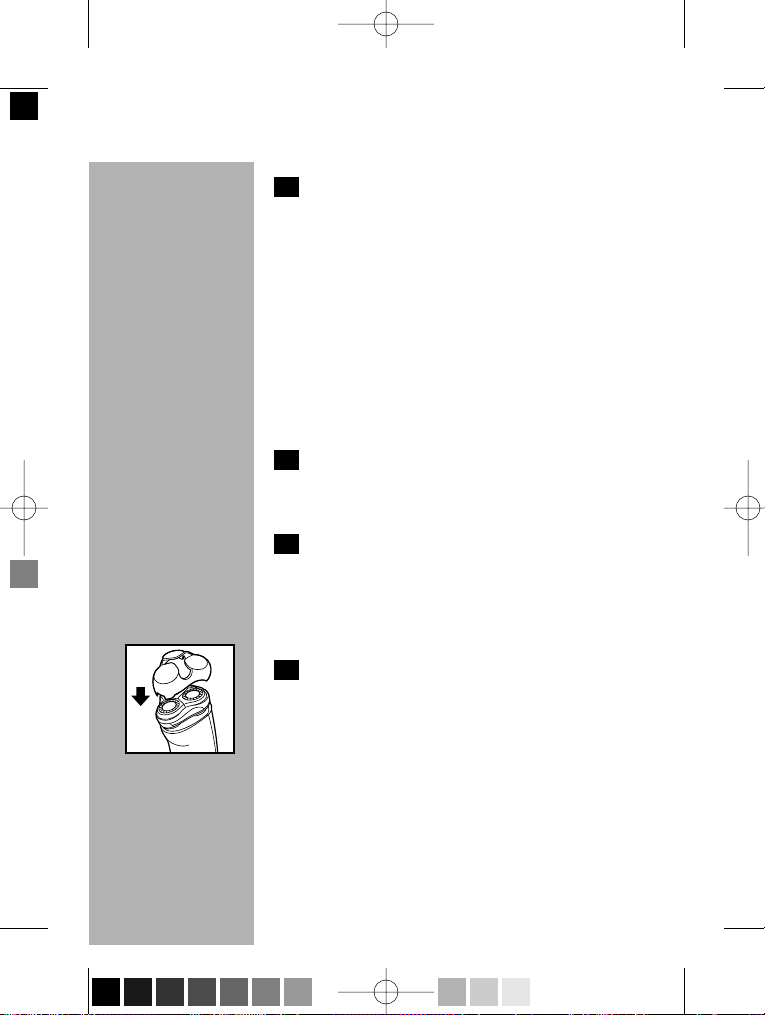
5 Hágalo con calma. Presione suavemente la
afeitadora contra la piel, de manera que los
cabezales flotantes puedan adaptarse al
contorno de la cara. NO presione
demasiado fuerte. Demasiada presión
puede pellizcar la piel.
◗ Para obtener mejores resultados,aplique con
frecuencia loción o gel para el afeitado.
◗ La afeitadora no funcionará correctamente si
la utiliza sin loción o gel para el afeitado.
Cómo desconectar la afeitadora
1 Presionando una vez más el botón
marcha/parada (On/Off), desconecte la
afeitadora.
2 Limpie la afeitadora
Limpie la afeitadora después de cada uso. Quite el
cartucho si no va a usar el aparato durante más
de una semana (consulte el capítulo 'Limpieza y
mantenimiento').
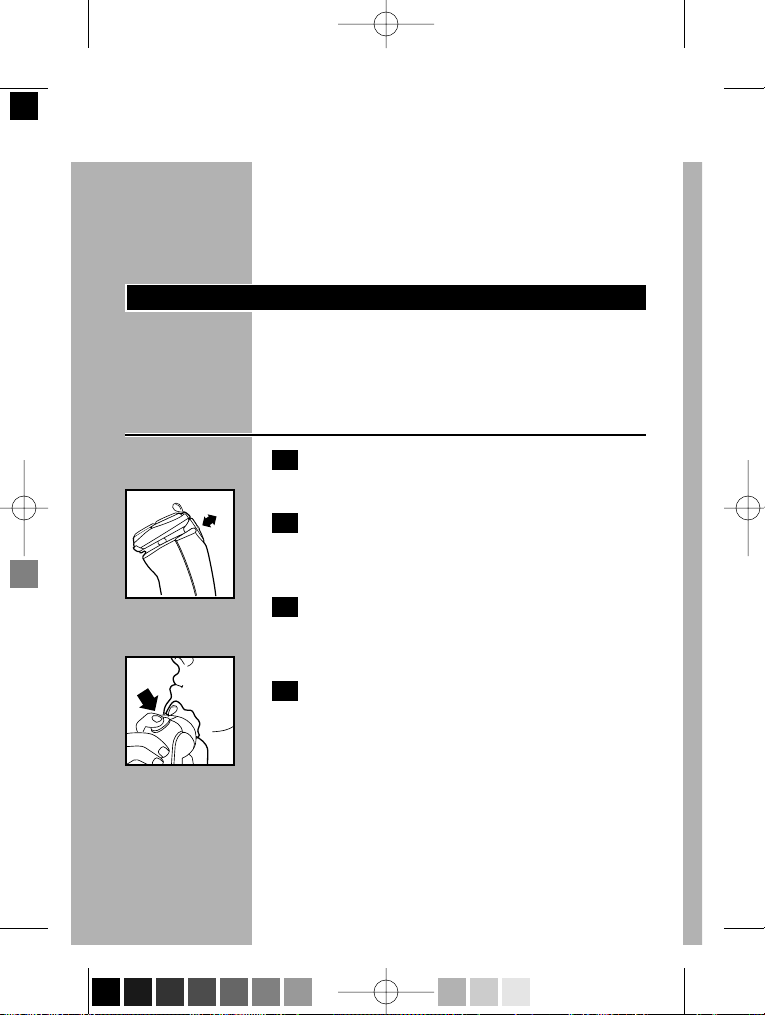
C
3 Cuando guarde la afeitadora, póngale
siempre la funda de protección para evitar
que se dañen los conjuntos cortantes.
ESPAÑOL 41
7735X DFU 12_12_03 12/12/03 3:45 PM Page 41 (Black plate)
Page 41
Recorte De Las Patillas
Para recortar las patillas y el bigote:
1 Apague la afeitadora.
2 Limpie la afeitadora y el conjunto de
cabezales colocándolos bajo el chorro de
agua caliente del grifo antes de instalar el
cortapatillas.
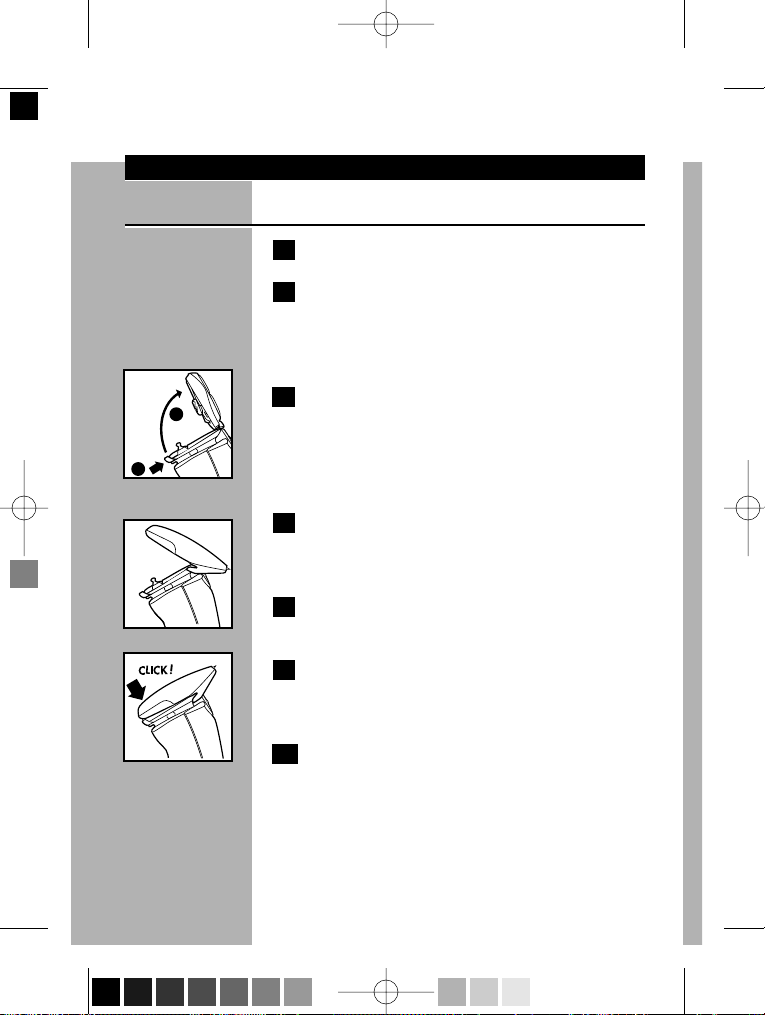
C 3 Presione el botón liberador de los cabezales
ubicado en el frente de la afeitadora
directamente bajo los cabezales, para
remover el conjunto de cabezales de la
afeitadora.
4 Retire el conjunto de cabezales de la
afeitadora tirando hacia arriba y hacia
afuera.
C
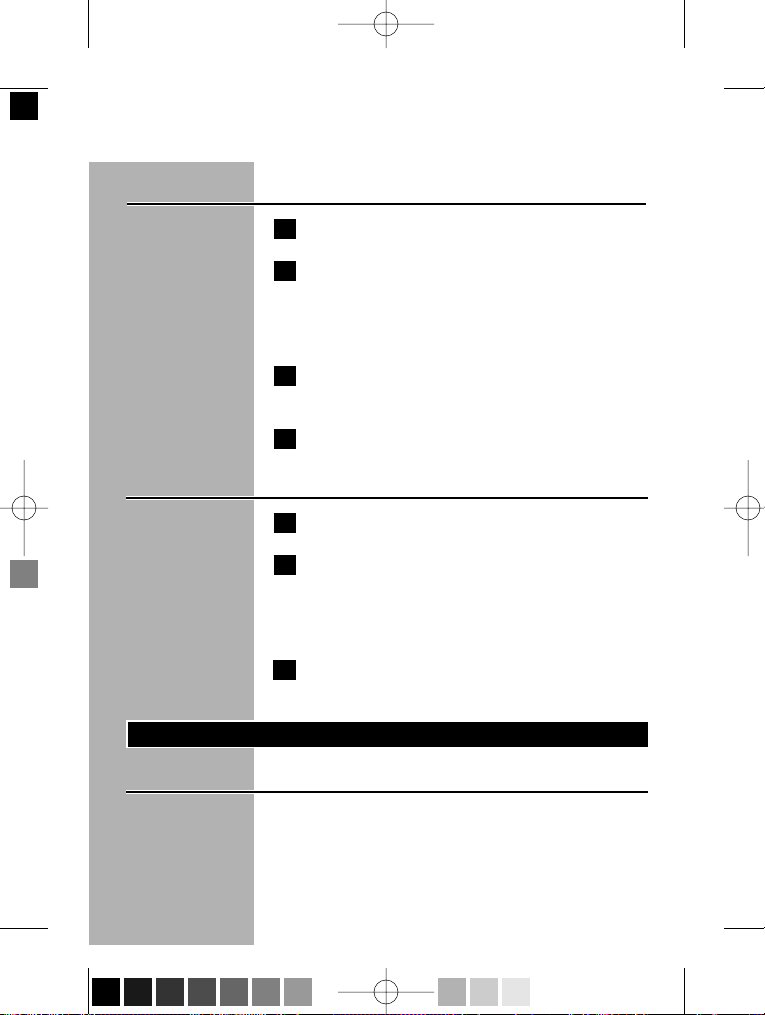
5 Incline ligeramente el cortapatillas hacia
atrás.
C
6 Encaje el cortapatillas a la afeitadora (oirá
un clic).Ahora el cortapatillas ya está listo
para usar.
7 Active el cortapatillas pulsando una vez el
botón de marcha/parada (on/off).
ESPAÑOL42
7735X DFU 12_12_03 12/12/03 3:45 PM Page 42 (Black plate)
2
1
Page 42
Cómo usar el cortapatillas
1 Encienda la afeitadora.
2 Sostenga el cortapatillas exactamente en la
línea de nacimiento del cabello que usted
desea. Mueva el cortapatillas hacia abajo
presionando ligeramente.
3 Utilice el cortapatillas para recortar la
barba, el bigote o las patillas.
4 Cuando termine apague la afeitadora.
Cómo quitar el cortapatillas
1 Apague la afeitadora.
2 Presione el botón ubicado en el frente de
la afeitadora, directamente bajo los
cabezales, para destrabar y quitar
el cortapatillas de la afeitadora.
3 Coloque nuevamente el conjunto de
cabezales de la afeitadora.
Limpieza y mantenimiento
Importante
◗ Siempre apague la afeitadora y retírela de la
base antes de limpiarla.
◗ Guárdela siempre con la cubierta protectora
de los cabezales colocada en su sitio.
ESPAÑOL 43
7735X DFU 12_12_03 12/12/03 3:45 PM Page 43 (Black plate)
Page 43
◗ Nunca limpie, retire ni vuelva a colocar el
conjunto de los cabezales mientras la afeitadora
está encendida.
◗ No aplique presión sobre los cabezales. No
toque los cabezales con objetos duros ya que
podría hundir las ranuras o dañar su precisión.
◗ No utilice la afeitadora si los cabezales están
dañados o rotos. Éstos podrían provocar
lesiones faciales.
Unidad afeitadora: Quick Clean
después de cada afeitado
1 Asegúrese de que la afetadora está apaque.
2 Mantenga cerrada la unidad afeitadora.
C
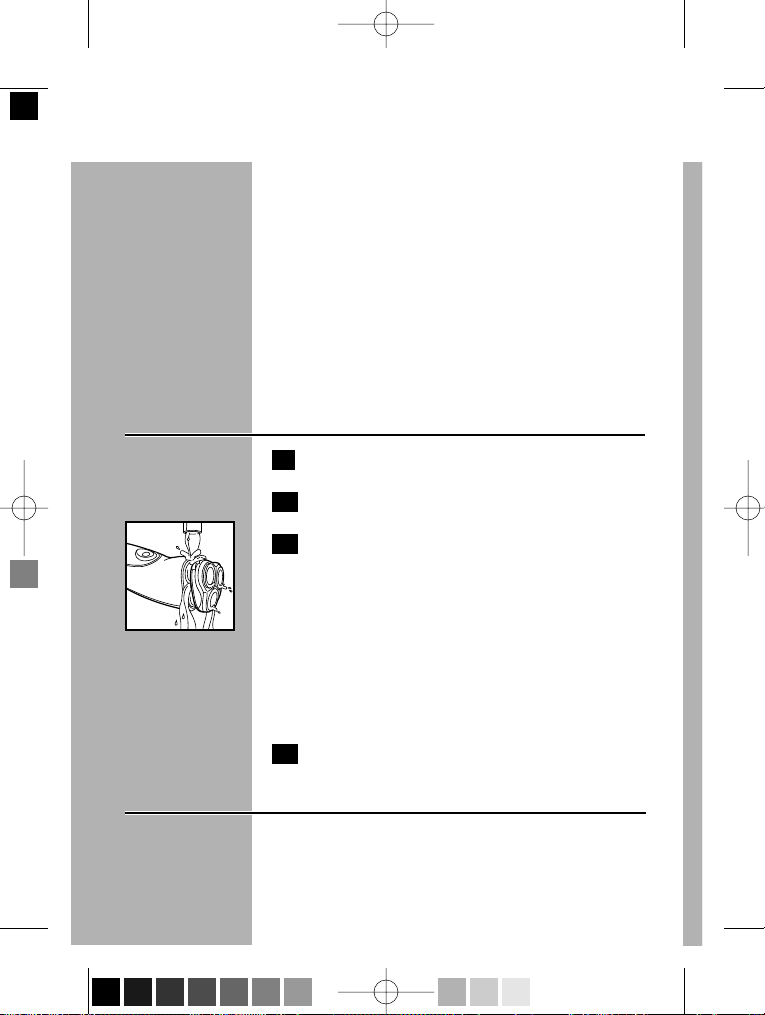
3 Limpie la unidad afeitadora y la cámara de
recogida de pelo con agua caliente del
grifo, dejando que el agua corra por las
aberturas que se encuentran debajo de la
unidad afeitadora durante al menos
30 segundos.
PERO PRUÉBELA ANTES CON CUIDADO
PARA NO QUEMARSE EN ESCALDARSE LAS
MANOS.
4 Sacuda el exceso de agua.
Unidad afeitadora: todas las semanas
Le recomendamos que limpie a fondo el aparato
al menos una vez a la semana para mantener un
rendimiento óptimo.
ESPAÑOL44
7735X DFU 12_12_03 12/12/03 3:45 PM Page 44 (Black plate)
Page 44
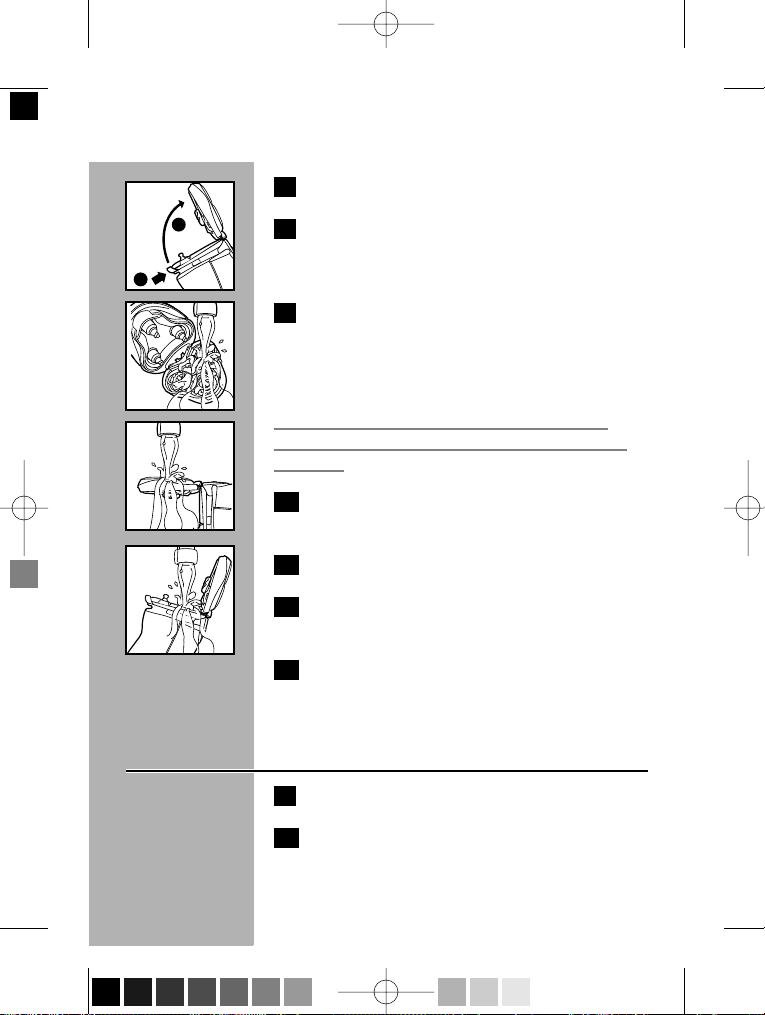
1 Apague la afeitadora.
C
2 Presione el botón liberador de los
cabezales ubicado debajo de los mismos,
en el frente de la afeitadora.
C
3 Abra el conjunto de los cabezales y limpie
los cabezales y la cámara de la barba
enjuagándolos bajo el chorro de agua
caliente del grifo. El agua del grifo debe
estar caliente,
PERO PRUÉBELA ANTES CON CUIDADO
PARA NO QUEMARSE NI ESCALDARSE LAS
MANOS.
C
4 Limpie el exterior de la unidad afeitadora.
C
5
Limpie la cámara de recogida de pelo.
.
6
Sacuda el exceso de agua del conjunto de
cabezales de la afeitadora y ciérrela
7 Vuelva a abrir la unidad afeitadora y déjela
abierta para que el aparato se seque
completamente.
Soporte de carga
1 Desconecte el soporte de carga.
2 Limpie el soporte de carga con un paño
húmedo.
ESPAÑOL 45
7735X DFU 12_12_03 12/12/03 3:45 PM Page 45 (Black plate)
2
1
2
Page 45
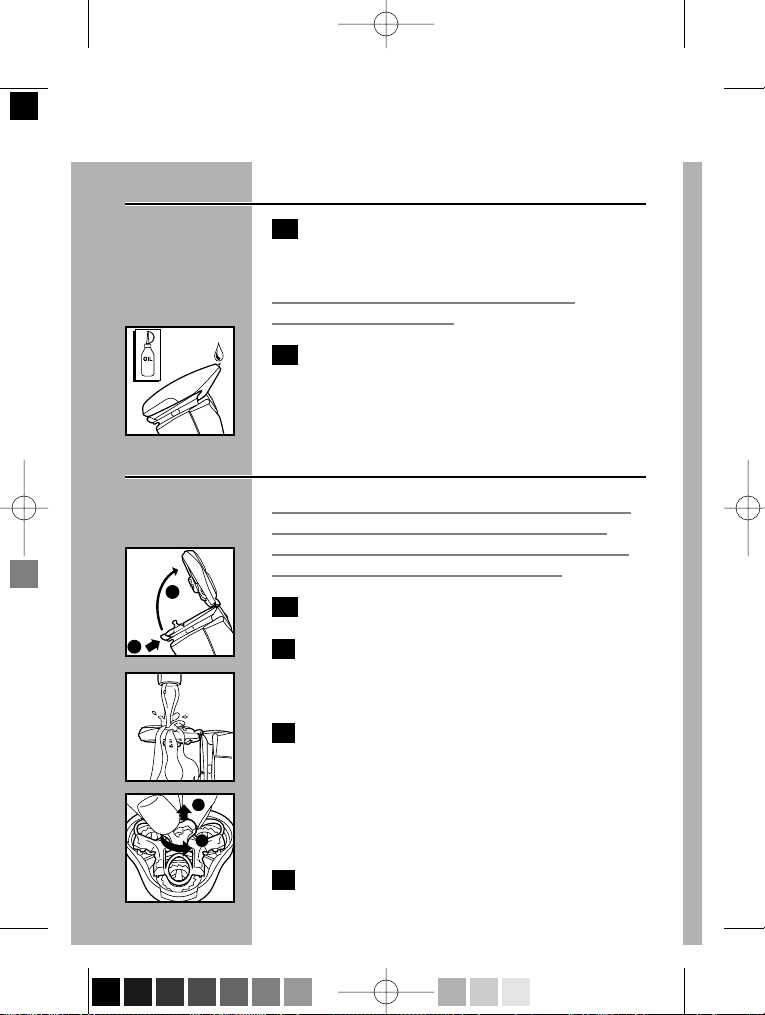
Cortapatillas
1 Después de cada uso, limpie el exterior del
cortapatillas con el cepillo que se
suministra.
También se puede limpiar el cortapatillas
aclarándolo bajo el grifo.
C
2 Si se usa frecuentemente el cortapatillas,
lubrique los dientes del cortapatillas con
una gota de aceite para máquinas de coser
cada seis meses.
Cabezales de la afeitadora: cada dos meses
No mezcle las cuchillas y los protectores, ya que
el funcionamiento en al afeitado puede verse
adversamente afectado durante varias semanas
antes de que se restablezca el óptimo.
1 Apague la afeitadora.
C
2 Presione el botón liberador de los
cabezales ubicado bajo los cabezales, en el
frente de la afeitadora.
C
3 Retire el conjunto de los cabezales y
limpie los cabezales y la cámara de la barba
enjuagándolos bajo el chorro de agua
caliente del grifo.Verifique que el agua no
esté demasiado caliente para evitar
quemaduras o escaldaduras.
C
4 Sostenga el conjunto de cabezales con una
ESPAÑOL46
7735X DFU 12_12_03 12/12/03 3:45 PM Page 46 (Black plate)
2
1
2
1
Page 46
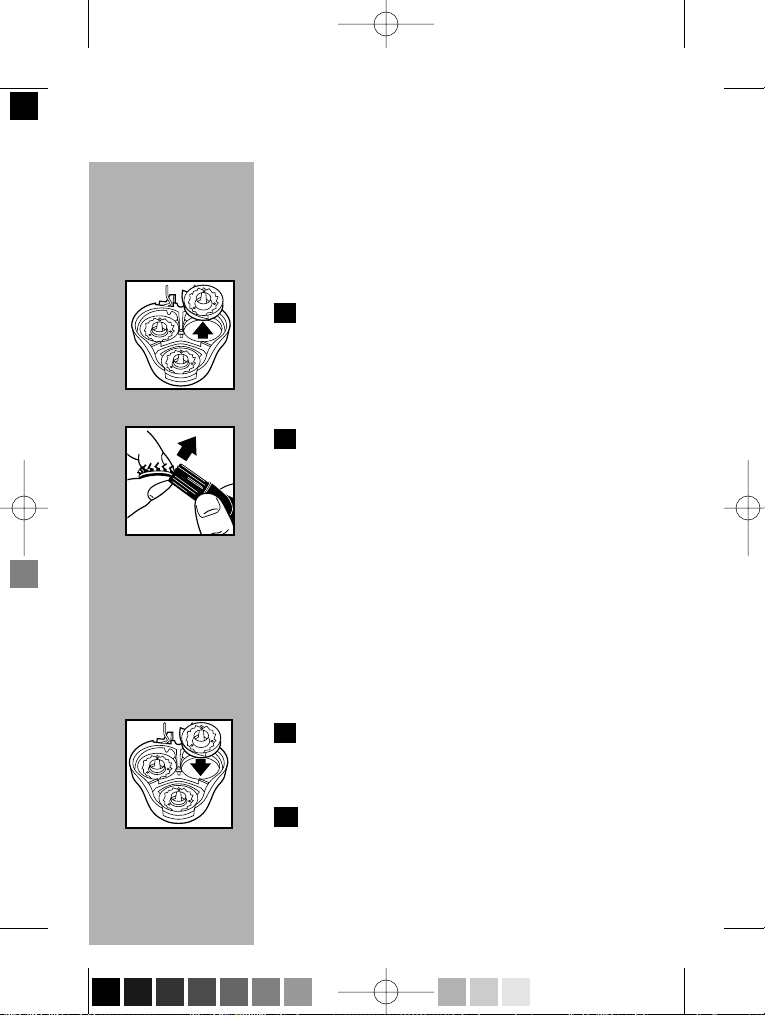
mano y empuje hacia abajo y gire la perilla
del marco en dirección contraria a las
agujas del reloj para soltarlo,luego
levántelo hacia arriba. Coloque el marco a
un lado.
C
5 Retire una cuchilla y un cabezal por vez,
sacándolos fuera del marco.
C
6 Sostenga la cuchilla con el filo hacia arriba
y cepíllela con movimientos ascendentes.
Limpie el cabezal con el lado de cerdas
largas del cepillo, haciendo movimientos
circulares.
Para obtener un mejor rendimiento, los cabezales
y las cuchillas deben limpiarse con un líquido
desengrasante (por ej.: el limpiador de afeitadoras
Norelco, tipo RC1776 o con alcohol) y lubricarse
con el lubricante de afeitadoras Norelco, tipo
AL80, o una gota de aceite mineral sobre los
cabezales flotantes.
C
7 Sostenga el conjunto de cabezales con una
mano, y coloque suavemente una cuchilla y
un cabezal en el conjunto.
8 Repita el procedimiento para los otros dos
cabezales.
ESPAÑOL 47
7735X DFU 12_12_03 12/12/03 3:45 PM Page 47 (Black plate)
Page 47
ESPAÑOL48
C
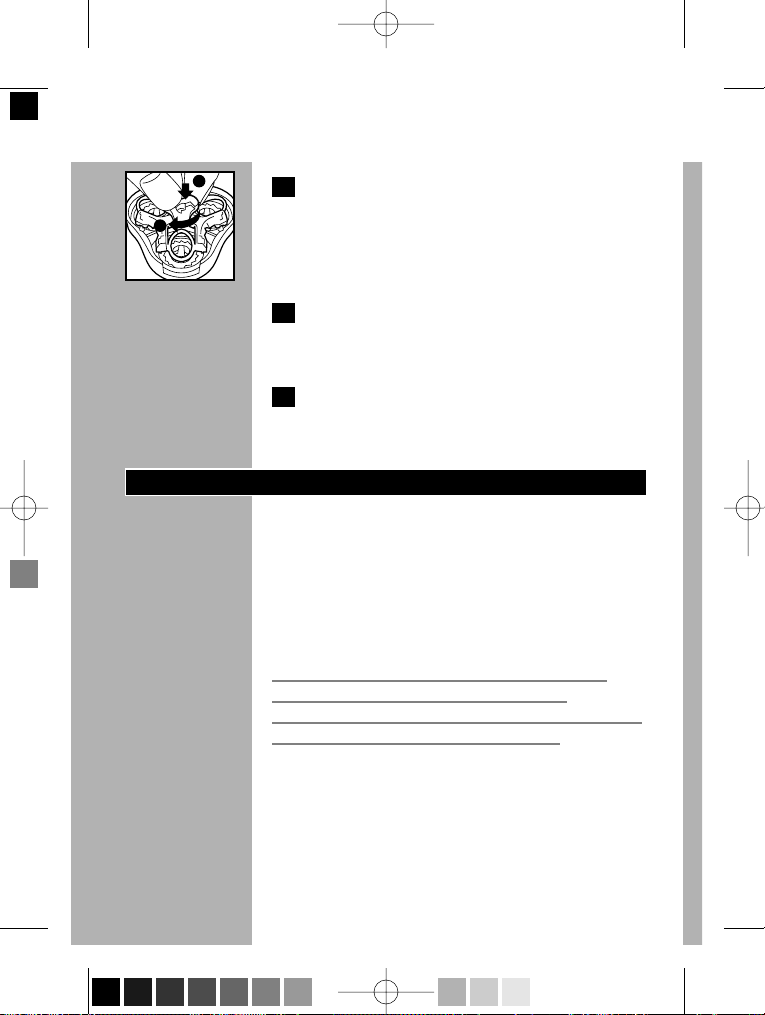
9 Vuelva a colocar el marco en el conjunto
de cabezales. Mientras presiona hacia
abajo, gire la perilla del marco en la
dirección de las agujas del reloj para
trabarlo en su sitio.
10 Presione para volver a colocar el conjunto
de cabezales en el compartimiento
ubicado en la afeitadora.
11 Para proteger los conjuntos cortantes,
ponga la tapa del cabezal afeitador en la
Afeitadora.
Sustitución de los conjuntos cortantes
Para unos resultados óptimos en el afeitado,
sustituya los conjuntos cortantes cada dos años.
Sustituya los conjuntos cortantes dañados o
gastados sólo por conjuntos cortantes Norelco
Cool Skin tipo HQ177.
Esta afeitadora no tiene mas partes que sean
usadas por el usario para ser reparadas.
Cualquier otro servicio debe ser realizado por un
Servicio de Asistencia Ténica Norelco.
7735X DFU 12_12_03 12/12/03 3:45 PM Page 48 (Black plate)
1
2
Page 48
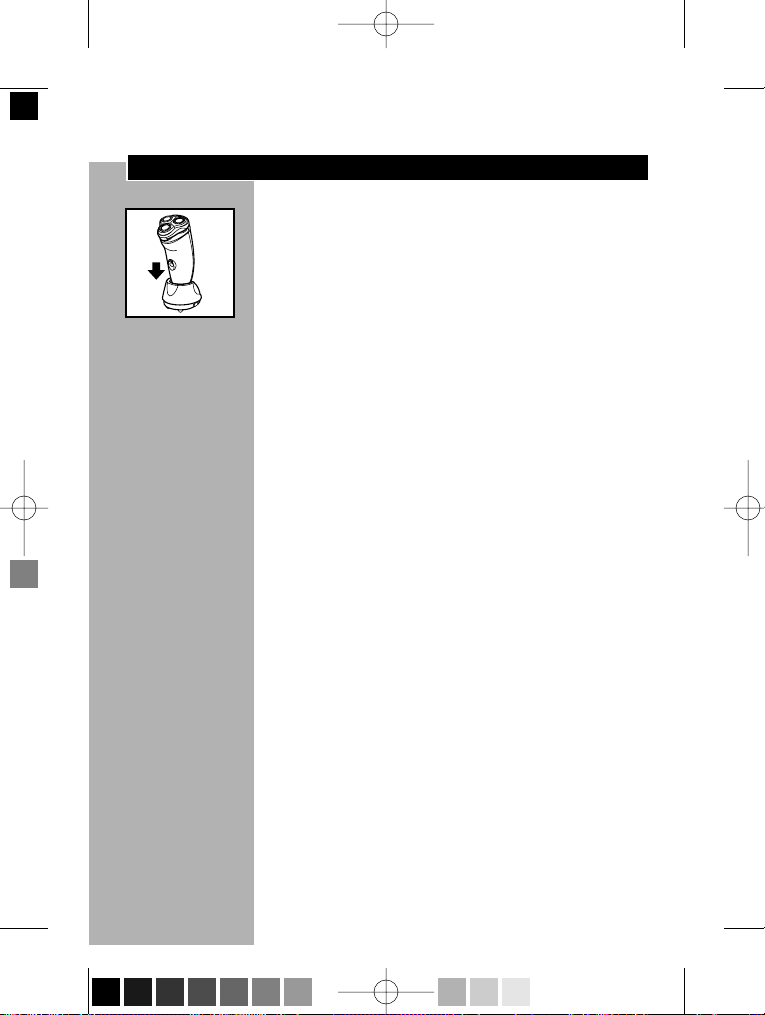
Cómo guardar el aparato
Soporte de carga
C
◗ Después de limpiarla, la afeitadora mojada
puede colocarse en el soporte de carga.
Funda
◗ La afeitadora se puede guardar en la funda
que se suministra.También caben dos
cartuchos Cool Skin de NIVEA FOR MEN. La
funda protegerá el aparato durante los viajes.
Colgante
◗ Otra manera de guardar el aparato es
colgarlo del colgante que se suministra. Este
método garantiza un secado óptimo.
ESPAÑOL 49
7735X DFU 12_12_03 12/12/03 3:45 PM Page 49 (Black plate)
Page 49
Asistencia
◗ Si necesita asistencia o información acerca del
centro de servicio autorizado de Norelco más
cercano a su domicilio, llame gratis al:
1-800-243-3050
o visite nuestro sitio web:www.norelco.com
◗ La información sobre centros de servicio
autorizados de Norelco está disponible 24
horas al día los 7 días de la semana.
:Retiro De Las Baterías
◗ Esta afeitadora Norelco incluye baterías
recargables de níquel-cadmio, que deben
desecharse de manera correcta.
◗ Las baterías deben retirarse de la afeitadora
solamente cuando ésta va a ser desechada.
◗ Consulte la hoja de instrucciones adjunta para
obtener instrucciones sobre el retiro de las
baterías recargables.
ESPAÑOL50
7735X DFU 12_12_03 12/12/03 3:45 PM Page 50 (Black plate)
Page 50
Accesorios
◗ Reemplazo de los cabezales
Tipo HQ177 - Para obtener el máximo
rendimiento, reemplace los cabezales de su
afeitadora Norelco Cool Skin 7000 Series una vez
por año.
Nota:Tipo HQ156 or HQ167 Advantage o Cool
Skin Reemplazo de los cabezales no puede ser
utilizado por esta afeitadora.
NO UTILICE afiladores de afeitadoras ya que
dañará las cuchillas y los elevadores de pelo, y
afectará adversamente la calidad de la afeitada.
◗ Cartuchos de reemplazo de la loción de
afeitar para hombres Nivea for Men,HQ170
Cartuchos de loción de afeitar Nivea for Men
para la afeitadora Cool Skin, 5 unidades por
caja.
◗ Cartuchos de reemplazo del gel de afeitar
para hombres Nivea for Men,HQ171
Cartuchos de gel de afeitar Nivea for Men para
la afeitadora Cool Skin, 5 unidades por caja.
◗ Lubricantes y Limpiadores de la afeitadora:
AL80 Lubricante de afeitadoras Norelco
RC1776 Limpiador de afeitadoras Norelco
◗ Los accesorios para la afeitadora Norelco
pueden adquirirse en cualquier negocio
cercano, en las oficinas de servicio Norelco
autorizadas, mediante el formulario de pedido
adjunto o en nuestro sitio web:
www
.norelco.com
ESPAÑOL 51
7735X DFU 12_12_03 12/12/03 3:45 PM Page 51 (Black plate)
Page 51
GARANTÍA COMPLETA DURANTE DOS AÑOS
Philips Electronics North America Corporation garantiza cada nuevo producto Norelco Modelo 7735X (excepto
cuchillas y protectores) contra defectos de los materiales o de fabricación durante un período de dos años desde
la fecha de compra, y está de acuerdo en reparar o sustituir sin cargo cualquier producto defectuoso.
IMPORTANTE: Esta garantía no cubre deterioros producidos por accidente, mal uso o abuso, falta de un
cuidado razonable, la fijación de cualquier accesorio no suministrado con el producto, o la pérdida de piezas o el
sometimiento del producto a cualquier voltaje diferente a los especificados.* El uso de piezas de sustitución no
autorizadas anulará esta garantía.
PHILIPS ELECTRONICS NORTH AMERICA CORPORATION NO PAGARÁ SERVICIOS DE
GARANTÍA LLEVADOS A CABO POR SERVICIOS DE REPARACIÓN NO AUTORIZADOS,Y NO
INDEMNIZARÁ AL CONSUMIDOR POR DETERIOROS RESULTANTES DEL SERVICIO DE
GARANTIA LLEVADO A CABO POR SERVICIOS DE REPARACIÓN NO AUTORIZADOS. NO SE
ASUME LA RESPONSABILIDAD POR CUALESQUIERA DETERIOROS ESPECIALES,
INCIDENTALES O CONSECUENCIALES.
A fin de obtener el servicio de garantía, simplemente lleve o envíe el producto (a portes pagados) al más cercano
Servicio de Asistencia Técnica de Norelco. Le sugerimos que, para mayor seguridad, haga los envíos por correo
certificado (con la certificación pagada). Los deterioros producidos durante el envío no están cubiertos por esta
garantía.
NOTA: Ninguna otra garantía, escrita o de palabra, está autorizada por Philips Electronics North America
Corporation. Esta garantía le da derechos legales específicos y también puede tener otros derechos que varían de
un estado a otro. Algunos estados no permiten la exclusión o limitación de los deterioros incidentales o
consecuenciales, por lo cual las anteriores exclusiones y limitaciones pueden no ser de aplicación en su caso.
* Lea cuidadosamente las instrucciones que se incluyen
Fabricado por:
Norelco Consumer Products Company
A Division of Philips Electronics North America Corporation
1010 Washington Blvd., Stamford,CT 06912-0015
FABRICADO EN HOLANDA
Este símbolo colocado en la placa de características del producto significa que está registrado por
Underwriters' Laboratories, Inc.
Norelco,Tripleheader, Lift and Cut, y son Marcas Registradas de Philips Electronics North America
Corporation.
, y, Glide Rings y Quick Clean son de fábrica de Philips Electronics North America Corporation.
Nivea for Men es una marca registrada de Beiersdorf AG.
Cool Skin y PHILIPS son Marca Registrada de Koninklijke Philips Electronics N.V.
© 2004 Philips Electronics North America Corporation. All Rights Reserved.
®
LISTED
TM
ULTRA CLOSE, ULTRA COMFORTABLE ... GUARANTEED!
4222 002 4322 1
ESPAÑOL 52
7735X DFU 12_12_03 12/12/03 3:45 PM Page 52 (Black plate)
 Loading...