

Page 1

ISTRUZIONI PER L’USO
OPERATING INSTRUCTIONS
GEBRAUCHSANWEISUNG
MODE D’EMPLOI
INSTRUCCIONES DE USO
GEBRUIKSAANWIJZING
INSTRUCÇOES E MODO DE EMPREGO
SYNCRONY
LOGIC
RAPID STEAM
FOR HOUSEHOLD USE ONLY
Page 2

Congratulazioni!
Ci congratuliamo con voi per l’acquisto di questa macchina per caffè espresso, di qualità superiore, e vi
ringraziamo per la fiducia accordataci. Prima di mettere in funzione la macchina, vi consigliamo di leggere
attentamente le istruzioni per l’uso che vi spiegano come utilizzarla, pulirla e mantenerla in perfetta
efficienza. Se avete altre domande, rivolgetevi al rivenditore o direttamente alla nostra casa. Saremo lieti
di darVi tutti i chiarimenti desiderati.
Congratulations!
Congratulations on choosing this top-quality espresso machine and many thanks you for you confidence in
our products. Before operating the machine, we reccomend you read the following instructions thoroughly
which explain how to use, clean and maintain the machine. For any other information, please contact the
leader or our company directly. We will be glad to provide you with any explanations you may need.
Félicitations!
Nous vous felicitons de l’achat de cette machine pour café express de qialité superieure et Vous
remencions pour Votre préférence. Avant de mettre la machine en marche, nous Vous recommandons
de lire attentivement ces instructions d’emploi qui expliquent comment employer, nettoyer et conserver
la machine en parfait état de functionnement. Si Vous avez des questions à poser, nous Vous prions
de contacter le détaillant ou directement notre maison. Nous Vous donnerons avec plaisir toutes les
informations nécessaires.
Wir gratulieren Jhnen Kauf dieser Espressomaschine höchster Qualität und danken Ihnen für Ihr Vertrauen.
Vor der Inbetribnahme der Maschine empfehlen wir, diese Bedienung sanleitung sorgfaltig durchzulesen,
die Anweisungen über den Gebrauch, die Reinigung und die Pflege der Maschine gibt. Wenn Sie weitere
Fragen haben, werden Sie sich bitte an den Handler oder direkt an uns. Wir werden Ihnen gerne alle
notwendigen Erklärungen geben.
Felicidades!
Congratulándonos con Ud por haber comprado esta máquina para café expreso, de calidad superior,
Le agradecemos la confianza depositada en nuestros productos. Antes de poner en marcha el aparado
Le aconsejamos lea atentamente las intrucciones de empleo que explican como utilizarla, limpiarla y
mantenerla correctamente. En caso tenga más cuestiones, acuda al revendedor o directamente a nuestra
casa. Será un placer darle las informaciones deseadas.
Parabéns!
Obrigado por ter adquirido esta máquina de café expresso de qualidade superior e pela confiança
demonstrada. Antes de utilizar a máquina é aconselhável ler atentamente o manual de instruções, no qual
explicamos como utilizá-la, limpá-la e mantê-la em perfeitas condições. Caso existam outras dúvidas é
aconselhável contatar o revendedor ou o fabricante diretamente. Estaremos à disposição para todos os
esclarecimentos necessários.
Gefeliciteerd!
Wij feliciteren u met het feit dat u dit espresso-apparaat van topkwaliteit gekocht heeft en wij danken u voor
het in ons gestelde vertrouwen. Voordat u het apparaat in gebruik neemt, adviseren wij u deze instructies
aandachtig te lezen. In deze gebruiksaanwijzing wordt namelijk uitgelegd hoe u het apparaat het beste
kunt gebruiken, schoonmaken en onderhouden zodat het apparaat lang meegaat.
Page 3

345
Page 4

Page 5

Page 6
6
PRECAUZIONI IMPORTANTI
Durante l’utilizzo di elettrodomestici, è consigliabile
prendere alcune precauzioni per limitare il rischio di
incendi, scosse elettriche e/o incidenti.
1 Leggere attentamente tutte le istruzioni ed infor-
mazioni riportate in questo manuale e in qualsiasi
altro opuscolo contenuto nell’imballo prima di av-
viare od utilizzare la macchina espresso.
2 Non toccare superfici calde.
3 Non immergere cavo, spine o il corpo della macchina
in acqua o altro liquido per evitare incendi, scosse
elettriche o incidenti.
4 Fare particolare attenzione durante l’utilizzo della
macchina espresso in presenza di bambini.
5 Togliere la spina dalla presa se la macchina non
viene utilizzata o durante la pulizia. Farla raffred-
dare prima di inserire o rimuovere pezzi e prima di
procedere alla sua pulizia.
6 Non utilizzare la macchina con cavo o spina danneggiati
o in caso di guasti o rotture. Far controllare o riparare
l’apparecchio presso il centro di assistenza più vicino.
7 L’utilizzo di accessori non consigliati dal produttore
possono causare danni a cose e persone.
8 Non utilizzare la macchina espresso all’aperto.
9 Evitare che il cavo penda dal tavolo o che tocchi
superfici calde.
10 Tenere la macchina espresso lontano da fonti di calore.
11 Controllare che la macchina espresso sia in posizione
“Spento” prima di inserire la spina nella presa. Per
spegnerla, posizionarla su “Spento” e rimuovere
quindi la spina dalla presa.
12 Utilizzare la macchina unicamente per uso domestico.
13 Fare estrema attenzione durante l’utilizzo del vapore.
CONSERVARE QUESTE
ISTRUZIONI
AVVERTENZA
La macchina espresso è stata studiata unicamente per
uso domestico. Qualsiasi intrvento di assistenza, fatta
eccezione per le operazioni di pulizia e di normale
manutenzione, dovrà essere prestato da un centro di
assistenza autorizzato. Non immergere la macchina
in acqua.Qualsiasi riparazione dovrà essere effettuata
unicamente dal centro di assistenza autorizzato.
1 Controllare che il voltaggio indicato sulla targhetta
corrisponda al vostro.
2 Non utilizzate mai acqua tiepida o calda per riempire
il serbatoio dell’acqua. Utilizzate unicamente acqua
fredda.
3 Non toccate con le mani le parti calde della macchina
ed il cavo di alimentazione durante il funzionamento.
4 Non pulire mai con detersivi corrosivi o utensili che
graffiano. è sufficiente un panno morbido inumidito
con acqua.
5 Per evitare la formazione di calcare, si può utilizzare
acqua minerale naturale.
ISTRUZIONI SUL CAVO
ELETTRICO
A Viene fornito un cavo elettrico abbastanza corto per
evitare che si attorcigli o che vi inciampiate.
B Si possono utilizzare, con molta attenzione, delle
prolunghe.
C Qualora venga utilizzata una prolunga, verificare:
1 che il voltaggio riportato sulla prolunga sia
perlomeno, uguale al voltaggio elettrico
dell’lettrodomestico;
2 che sia munito di una spina a tre pin con messa
a terra (qualora il cavo dell’lettrodomestico sia
di questo tipo);
3 che il cavo non penda dal tavolo per evitare di
inciamparvi.
Page 7
GENERALITÀ - DATI TECNICI
7
1 GENERALITÀ
La macchina da caffè è indicata per la preparazione di
caffè espresso impiegando sia caffè in grani sia caffè
macinato ed è dotata di un dispositivo per l’erogazione
del vapore e dell’acqua calda. Il corpo della macchina
dall’elegante design è stato progettato per uso
domestico e non è indicato per un funzionamento
continuo di tipo professionale.
Attenzione. Non si assumono responsabilità
per eventuali danni in caso di:
• impiego errato e non conforme agli scopi previsti;
• riparazioni non eseguite presso i centri d’assistenza autorizzati;
• manomissione del cavo di alimentazione;
• manomissione di qualsiasi componente della
macchina;
• impiego di pezzi di ricambio ed accessori non
originali.
In questi casi viene a decadere la garanzia.
1.1 Per facilitare la lettura
Il triangolo d’avvertimento indica tutte
le istruzioni importanti per la sicurezza
dell’utente.
Attenersi scrupolosamente a tali indicazioni per evitare ferimenti gravi!
Il riferimento ad illustrazioni, parti della macchina
ed organi di comando avviene mediante numeri e
lettere, come da esempio, il riferimento all’illustrazione
2 di questo paragrafo.
Questo simbolo evidenzia le informazioni
da tenere in maggiore considerazione, per
un migliore utilizzo della macchina.
Le illustrazioni corrispondenti al testo si trovano nel
risvolto di copertina.
Tenere questa pagina aperta
durante la lettura delle istruzioni
per l’uso.
sicuro ed allegarle alla macchina per caffè qualora
un’altra persona dovesse utilizzarla.
Per ulteriori informazioni o nel caso di problemi, non
trattati del tutto o soltanto insufficientemente nelle
presenti istruzioni, rivolgetevi ai Centri di Assistenza
Autorizzati.
2 DATI TECNICI
• Tensione nominale
Vedi targhetta posta sull’apparecchio
• Potenza nominale
Vedi targhetta posta sull’apparecchio
• Materiale corpo
Termoplastico (ABS)
• Dimensioni (l x a x p) (mm)
390 x 380 x 330
• Peso (Kg)
8,7
• Lunghezza cavo (mm)
1200
• Pannello comandi
Frontale
• Serbatoio acqua
Estraibile
• Alimentazione
Vedi targhetta posta sull’apparecchio
• Serbatoio acqua (lt.)
1,7
• Capacità contenitore caffè (gr)
350 di caffè in grani
• Pressione pompa (bar)
15
• Caldaie
Acciao Inox e Alluminio
• Dispositivi di sicurezza
Valvola di sicurezza pressione caldaia;
termostato di sicurezza.
Con riserva di modifiche di costruzione ed esecuzione dovute al progresso tecnologico.
1.2 Impiego di queste istruzioni per l’uso
Conservare queste istruzioni per l’uso in un luogo
Macchina conforme alla Direttiva Europea 89/336/
CEE (Decreto legislativo 476 del 04/12/92), relativa
all’eliminazione dei disturbi radiotelevisivi.
Page 8
8
NORME DI SICUREZZA
misure in millimetri
Page 9
NORME DI SICUREZZA
9
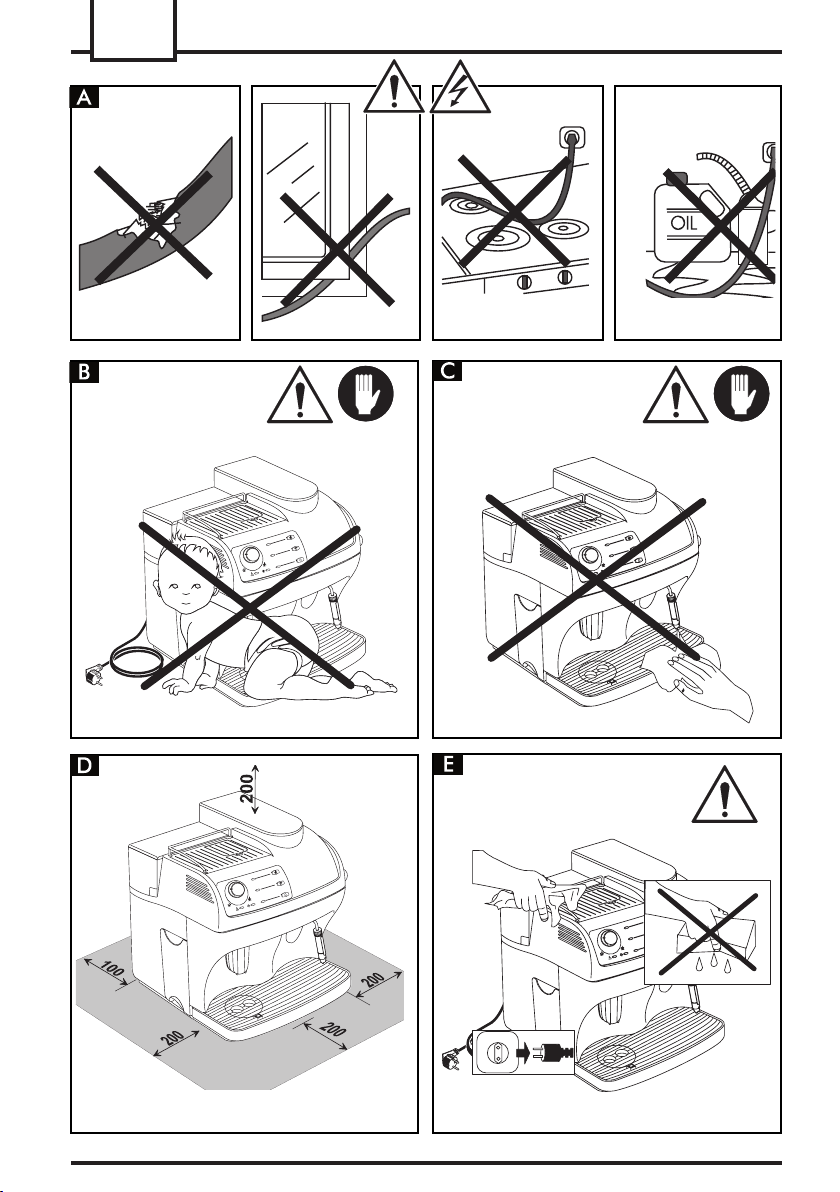
3 NORME DI SICUREZZA
Mai mettere a contatto dell’acqua le parti sotto
corrente: pericolo di cortocircuito! Il vapore surriscaldato e l’acqua calda possono provocare
scottature! Mai dirigere il getto di vapore o dell’acqua calda verso parti del corpo, toccare con
precauzione il beccuccio vapore / acqua calda:
pericolo di scottature!
Destinazione d’uso
La macchina per caffè è prevista esclusivamente per
l’impiego domestico.
È vietato apportare modifiche tecniche e ogni impiego
illecito, a causa dei rischi che essi comportano!
La macchina per caffè deve essere utilizzata solo da
adulti in condizioni psico-fisiche non alterate.
Alimentazione di corrente
Allacciare la macchina per caffè soltanto ad una presa
di corrente adeguata.
La tensione deve corrispondere a quella indicata sulla
targhetta dell’apparecchio.
Cavo d’alimentazione
Mai usare la macchina per caffè se il cavo d’alimentazione è difettoso.
Se il cavo d’alimentazione è danneggiato, deve
essere cambiato dal produttore o dal suo servizio
assistenza clienti.
Non far passare il cavo d’alimentazione per angoli e
su spigoli vivi, sopra oggetti molto caldi e proteggerlo
dall’olio. Non portare o tirare la macchina per caffè
tenendola per il cavo. Non estrarre la spina tirandola
per il cavo oppure toccarla con le mani bagnate.
Evitare che il cavo d’alimentazione cada liberamente
da tavoli o scaffali.
Protezione d’altre persone
Assicurarsi che nessun bambino abbia la possibilità
di giocare con la macchina per caffè. I bambini non
si rendono conto del pericolo connesso agli elettrodomestici.
Pericolo d’ustioni
Evitare di dirigere contro se stessi e/o altri il getto di
vapore surriscaldato e/o d’acqua calda: pericolo di
scottature!
Usare sempre le apposite maniglie o manopole.
Ubicazione
Sistemare la macchina per caffè in un posto sicuro,
dove nessuno può rovesciarla o venirne ferito.
Non usare la macchina per caffè all’aperto.
Non posare la macchina su superfici molto calde e
nelle vicinanze di fiamme aperte per evitare che la
carcassa fonda o comunque si danneggi.
Pulizia
Prima di pulire la macchina, è indispensabile posizionare l’interruttore generale (7) su -0- e poi staccare
la spina dalla presa di corrente.
Inoltre, aspettare che la macchina si raffreddi.
Mai immergere la macchina nell’acqua!
È severamente vietato cercare d’intervenire all’interno
della macchina.
Spazio per l’uso e la manutenzione
Per il corretto e buon funzionamento della macchina
per caffè si consiglia quanto segue:
• Scegliere un piano d’appoggio ben livellato;
• Scegliere un ambiente sufficientemente illuminato,
igienico e con presa di corrente facilmente accessibile;
• Prevedere una distanza minima dalle pareti della
macchina come indicato in figura.
• Non tenere la macchina a temperature inferiori a
0°C; c’è il pericolo che il gelo possa danneggiare
la macchina.
Custodia della macchina
Quando la macchina rimane inutilizzata per un periodo
prolungato, spegnere la macchina e staccare la
spina dalla presa. Custodirla in luogo asciutto e non
accessibile ai bambini. Proteggerla dalla polvere e
dallo sporco.
Riparazioni / Manutenzione
Nel caso di guasti, difetti o sospetto di difetto dopo
una caduta, staccare subito la spina dalla presa. Mai
mettere in funzione una macchina difettosa.
Page 10

10
NORME DI SICUREZZA - INSTALLAZIONE
Soltanto i Centri di Assistenza Autorizzati possono
effettuare interventi e riparazioni.
Le riparazioni vanno eseguite unicamente da un centro
di assistenza autorizzato.
Nel caso di interventi non eseguiti a regola d’arte, si
declina ogni responsabilità per eventuali danni.
Antincendio
In caso di incendio utilizzare estintori ad anidride
carbonica (CO2). Non utilizzare acqua o estintori a
polvere.
Legenda componenti macchina
Contenitore caffè in grani
Coperchio contenitore caffè in grani
Pomello regolazione macinatura
Pomello regolazione dose
Coperchio dosatore caffè macinato
Piano appoggia-tazze
Interruttore generale (ON/OFF)
Coperchio serbatoio acqua
Serbatoio acqua
Cassetto raccoglifondi
Cavo alimentazione
Vasca raccogligocce + griglia
Galleggiante livello vasca raccogligocce
Erogatore caffè regolabile in altezza
Tubo vapore/acqua calda
Sportello anteriore
Pomello erogazione vapore
Gruppo erogatore caffè
Chiave gruppo erogatore caffè
Spazzolino per pulizia
Misurino caffè macinato
Pannello comandi
Pomello regolazione quantità caffè in tazza
Pulsante erogazione caffè
Led pronto temperatura / funzione caffè
Pulsante selezione caffè macinato
Led selezione caffè macinato
Pulsante selezione funzione acqua calda
Led selezione funzione acqua calda
Led macchina accesa
Led segnalazione allarmi
4 INSTALLAZIONE
Per la propria sicurezza e quella di terzi attenersi
scrupolosamente alle “Norme di sicurezza” riportate nel cap.3.
4.1 Imballaggio
L’imballo originale è stato progettato e realizzato per
proteggere la macchina durante la spedizione.
Si consiglia di conservarlo per un eventuale trasporto
futuro.
4.2 Operazioni preliminari
• Prelevare dall’imballo la vasca raccogligocce (12)
con griglia.
• Prelevare dall’imballo la macchina da caffè e posizionarla in un luogo idoneo rispondente ai requisiti
richiesti e descritti nelle norme di sicurezza (cap.3).
• Inserire la vasca raccogligocce (12) nell’apposita
sede sulla macchina; assicurarsi che la vasca
stessa, il cassetto fondi (10) ed il gruppo erogatore
caffè (18) siano inseriti correttamente e che lo
sportello anteriore (16) sia chiuso.
• Posizionare il coperchio contenitore caffè in grani
(2) sul contenitore caffè in grani (1). Conservare a
portata di mano lo spazzolino per la pulizia (20), la
chiave gruppo erogatore caffè (19) ed il misurino
per il caffè macinato (21).
• Prima di inserire la spina nella presa di corrente,
assicurarsi che l’interruttore generale (7) sia in
posizione -0-.
Se all’accensione della macchina il led rosso (30)
lampeggia, significa che una delle parti sopra descritte
non è stata posizionata correttamente.
Nota importante: É importante leggere quanto
riportato nel Capitolo 14, ove viene spiegato
in dettaglio il significato di tutte le segnalazioni che
la macchina fornisce all’utilizzatore, mediante le luci
posizionate sul pannello comandi.
4.3 Prima accensione
• Estrarre il serbatoio acqua (9) sollevandolo
e togliere il coperchio (8). Sciacquarlo e riempirlo
con acqua fresca; si consiglia di non riempire il
serbatoio in modo eccessivo. Reinserire il serbatoio
Page 11

INSTALLAZIONE - MACINACAFFE' - REGOLAZIONE DOSE CAFFE'
11
nella sede apposita e riposizionare il coperchio (8)
sopra ad esso.
Immettere nel serbatoio (9) sempre e
soltanto acqua fresca non gassata.
Acqua calda nonché altri liquidi possono danneggiare il serbatoio e/o la macchina.
Non mettere in funzione la macchina senza acqua:
accertarsi che ve ne sia a sufficienza all’interno
del serbatoio.
• Togliere il coperchio (2) ed immettere caffè in
grani nel contenitore (1).
Immettere nel contenitore (1) sempre e
soltanto caffè in grani. Caffè macinato,
liofilizzato, nonché altri oggetti danneggiano la
macchina.
• Riposizionare il coperchio (2) nel contenitore caf-
fè (1).
• Inserire la spina (11) in una presa adeguata.
• La macchina si presenta con l’interruttore genera-
le (7) in posizione -0-; per accenderla è sufficiente
premere il pulsante (7); si illumina il led (29) del
pannello comandi.
• Per caricare il circuito, dirigere il tubo vapo-
re (15) sulla vasca raccogligocce, mettere una
tazza o un recipiente adatto sotto il beccuccio
del tubo vapore, premere il pulsante (27), il led
28 si illumina.
Ruotare il pomello in senso antiorario ed attendere
fino a quando fuoriesce acqua, in modo regolare,
dal tubo vapore; per interrompere l’erogazione di
acqua, ruotare il pomello in senso orario.
• Premere nuovamente il pulsante (27) per riportare
la macchina nel modo di funzionamento normale.
Nota: Prima di procedere alla prima messa in
funzione, in caso di prolungata inattività o se
il serbatoio acqua è stato vuotato completamente,
è consigliabile caricare il circuito.
• Terminate le operazioni di cui sopra, la macchina
è predisposta per l’uso.
• Per erogare caffè, acqua calda o vapore, ed
utilizzare correttamente la macchina, seguire
attentamente le istruzioni che seguono.
5 MACINACAFFÈ
Attenzione! La manopola di regolazione della
macinatura, posta all’interno del contenitore
caffè, deve essere ruotata solo quando il macinacaffè
è in funzione. Non inserire caffè macinato e/o
liofilizzato nel contenitore caffè in grani.
È vietato introdurre qualsiasi materiale che
non sia caffè in grani. Il macinacaffè contiene
organi in movimento che possono essere pericolosi;
vietato introdurre le dita e/o altri oggetti. Prima di
intervenire, per qualsiasi motivo, all’interno del
contenitore caffè, disinserire l’interruttore generale
e staccare la spina dalla presa di corrente. Non
immettere caffè in grani quando il macinacaffè è
in funzione.
La qualità ed il gusto del caffè dipendono, oltre che
dalla miscela utilizzata anche dal grado di macinatura.
La macchina è dotata di un pomello (3) per la
regolazione del grado di macinatura. Per variare
il grado di macinatura ruotare il pomello graduato
quando il macinacaffè è in funzione; le cifre riportate
sulla manopola indicano il grado di macinatura.
Ogni apparecchio è regolato, in fabbrica, su un grado
di macinatura medio: se la macinatura risulta essere
troppo fine è necessario ruotare la manopola verso
valori più alti; se la macinatura risulta essere troppo
grossa è necessario ruotare la manopola verso valori
più bassi.
La variazione del grado di macinatura si noterà
soltanto dopo l’erogazione di tre/quattro caffè.
Usare miscele di caffè in grani per macchine espresso.
Evitare di utilizzare gradi di macinatura in posizioni
estreme (Es.1 – 16); in questi casi utilizzare miscele
di caffè differenti. Conservare il caffè al fresco, in un
contenitore chiuso ermeticamente.
La macinatura deve essere regolata nel caso in cui il
caffè venga erogato in modo non ottimale:
Erogazione troppo veloce = macinatura troppo grossa
> Regolare la manopola su numeri più bassi;
Erogazione a gocce e/o assente = macinatura troppo
fine > Regolare la manopola su numeri più alti.
Page 12

12
EROGAZIONE CAFFE'
6 REGOLAZIONE DOSE CAFFÈ
Nella macchina è possibile regolare la quantità
del caffè (dose) che si desidera macinare.
La dose viene impostata, dal costruttore, su un valore
medio che soddisfa la maggior parte delle esigenze;
tacca (A) in corrispondenza del riferimento (B).
Ruotando il pomello (4), situato all’interno del contenitore caffè, in senso antiorario si aumenta la dose di
caffè macinato; ruotando il pomello in senso orario si
diminuisce la dose di caffè macinato.
La regolazione della dose deve essere effettuata
prima di premere il pulsante di erogazione caffè.
Questo sistema permette di ottenere un’erogazione
ottimale con tutti i tipi di caffè presenti in commercio.
7 EROGAZIONE CAFFÉ
Nota: nel caso in cui la macchina non eroghi
caffè, verificare che il serbatoio acqua
contenga acqua; nel lato sinistro della macchina si
può verificare il livello dell’acqua nel serbatoio.
Prima di erogare caffè verificare che il led
verde di pronto temperatura (24) sia acceso
fisso, che il serbatoio acqua e che il serbatoio
caffè siano pieni.
• Posizionare 1 o 2 tazze sotto ai beccucci
dell’erogatore (14); potete regolare l’altezza
dell’erogatore in modo che si adatti alle vostre
tazzine.
• L’erogatore può essere spostato per con-
sentire l’utilizzo di tazze grandi.
Per utilizzare tazze di grandi dimensioni occorre
spingere manualmente l’erogatore verso la
macchina fino a battuta (in questo caso utilizzare
solo una tazza alla volta); per sistemare l’erogatore
nella posizione ideale all’utilizzo delle tazzine,
occorre tirare l’erogatore nella posizione più
esterna assicurandosi che sia bloccato.
• Regolare la quantità di caffè che si desidera nella
tazzina mediante il pomello (22): ruotandolo in
senso orario si aumenta la quantità di caffè che
viene erogato; ruotandolo in senso antiorario si
diminuisce la quantità di caffè che viene erogato.
Nota: quando il galleggiante livello (13)
si solleva è consigliato vuotare la vasca
recupero acqua.
7.1 Erogazione con caffè in grani
• Per erogare il caffè occorre premere il pulsante (23),
successivamente si avvia il ciclo di erogazione: per
erogare 1 caffè premere una sola volta il pulsante
(23); per erogare 2 caffè premere 2 volte di seguito
il pulsante (23).
In questa modalità di funzionamento, la
macchina provvede automaticamente a
macinare e dosare la giusta quantità di caffè;
la preparazione di due caffè richiedere due cicli
di macinatura e due cicli di erogazione gestiti
automaticamente dalla macchina.
• Dopo aver compiuto il ciclo di preinfusione, il
caffè comincerà a fuoriuscire dal beccuccio
erogatore (14).
• L’erogazione del caffè si fermerà automaticamente
quando viene raggiunto il livello impostato con il
pomello (22); è comunque possibile interrompere
l’erogazione del caffè premendo il pulsante (23).
7.2 Erogazione con caffè macinato
Inserire nel dosatore (5) solo caffè macinato
per macchine espresso; caffè in grani,
liofilizzato, ed altri materiali danneggiano la
macchina.
È vietato inserire le dita all’interno del
dosatore caffè macinato, vi sono degli
organi in movimento.
• Per prelevare la giusta quantità, di caffè macinato,
da inserire nel dosatore, utilizzare solo il misurino
(21) in dotazione alla macchina
Inserire un solo misurino, di caffè maci-
nato, alla volta; per ottenere due caffè
è obbligatorio effettuare due cicli separati in
successione l’uno all’altro.
• Premere il pulsante (25) per selezionare la fun-
zione; il led (26) si accende.
Page 13

EROGAZIONE ACQUA CALDA - EROGAZIONE VAPORE
13
• Sollevare il coperchio dosatore caffè macinato (5).
• Prelevare, con il misurino (21), una dose di caffè;
togliere la quantità eccessiva di caffè macinato
presente nel misurino.
• Vuotare il caffè macinato all’interno del dosatore.
• Chiudere il coperchio (5).
• Per erogare il caffè occorre premere il pulsante
(23), successivamente si avvia il ciclo di erogazione.
• Dopo aver compiuto il ciclo di preinfusione, il caffè
comincerà a fuoriuscire dal beccuccio erogatore (14).
• L’erogazione del caffè si fermerà automaticamente
quando viene raggiunto il livello impostato con il
pomello (22); è comunque possibile interrompere
l’erogazione del caffè premendo il pulsante (23).
• Successivamente la macchina si riporta automaticamente nel modo di funzionamento normale
(vedi par. 7.1).
8 EROGAZIONE ACQUA CALDA
Attenzione: all’inizio possono verificarsi
brevi spruzzi di acqua calda: pericolo di
scottature.
Il tubo di erogazione dell’acqua calda può raggiungere temperature elevate: evitare di toccarlo
direttamente con le mani.
9 EROGAZIONE VAPORE/PREPA-
RAZIONE DEL CAPPUCCINO
Il vapore può essere utilizzato per montare il latte
per il cappuccino ma anche per il riscaldamento
delle bevande.
Pericolo di scottature! All’inizio dell’ero-
gazione possono verificarsi brevi spruzzi
di acqua calda.
Il tubo di erogazione può raggiungere temperature elevate: evitare di toccarlo direttamente
con le mani.
• Prima di erogare vapore verificare che il led di
pronto temperatura (24) sia acceso in modo fisso.
La macchina è subito pronta per l’erogazione del
vapore.
• Dirigere il tubo vapore (15) sopra la vasca
raccogligocce, aprire il pomello (17) “Acqua
calda/vapore” per qualche istante, in modo da far
uscire l’acqua residua dal tubo vapore; in breve
tempo comincerà ad uscire solo vapore.
• Chiudere il pomello (17).
• Riempire con latte freddo 1/3 del contenitore
che si desidera utilizzare per preparare il
cappuccino.
Per garantire un miglior risultato nella
preparazione del cappuccino, il latte e la
tazza utilizzata debbono essere freddi.
• Prima d'erogare acqua calda verificare che la luce
verde di pronto temperatura (24) sia accesa.
Con la macchina pronta per l’erogazione del caffè,
procedere nel seguente modo:
• Premere il pulsante (27), il led (28) si accende.
• Mettere una tazza e/o un recipiente sotto al tubo
acqua calda/vapore (15).
• Aprire in senso antiorario il pomello (17).
• Prelevare la quantità desiderata di acqua calda;
per fermare l’erogazione dell’acqua calda ruotare
in senso orario il pomello (17).
• Premere nuovamente il pulsante (27) per riportare
la macchina nel modo di funzionamento normale, il
led (28) si spegne.
• Immergere il tubo vapore nel latte da
riscaldare ed aprire il pomello (17); far ruotare
il recipiente con lenti movimenti dal basso verso
l’alto per rendere uniforme la formazione di
schiuma.
• Dopo aver utilizzato il vapore per il tempo desiderato chiudere il pomello (17).
• Lo stesso sistema può essere utilizzato per il
riscaldamento di altre bevande.
Pulire, dopo questa operazione il tubo vapore con
un panno umido.
Potete erogare subito il caffè nel latte appena montato
per preparare un vero cappuccino all’italiana.
Page 14

14
PULIZIA E MANUTENZIONE - DECALCIFICAZIONE
10 PULIZIA E MANUTENZIONE
Pulizia generica
• La manutenzione e la pulizia possono essere
effettuate soltanto quando la macchina è fredda e
scollegata dalla rete elettrica.
• Non immergere la macchina nell’acqua e non
inserire i componenti nella lavastoviglie.
• Non utilizzare oggetti acuminati o prodotti chimici
aggressivi (solventi) per la pulizia.
Si consiglia di pulire quotidianamente il serbatoio
dell’acqua:
- Estrarre il filtro (C) posto all’interno del serbatoio
e pulirlo con acqua corrente potabile.
- Riposizionare il filtro (C) nel suo alloggiamento
esercitando una leggera pressione combinata ad
una leggera rotazione.
- Riempire il serbatoio con acqua fresca potabile.
Pulire quotidianamente, se utilizzato, il dosatore
caffè macinato:
- Prendere il pennello in dotazione e pulire il do-
satore.
• Per la pulizia dell’apparecchio utilizzare un panno
morbido inumidito con acqua.
• Non asciugare la macchina e/o i suoi componenti
utilizzando un forno a microonde e/o un forno
convenzionale.
• Pulire il vano di servizio ed il gruppo erogatore,
raccomandiamo di vuotare ogni giorno il cassetto
raccoglifondi (10).
• L’erogatore caffè (14) può essere tolto per la pulizia;
risciacquare accuratamente i canali di erogazione
con acqua calda.
10.1 Gruppo erogatore
• Il gruppo erogatore (18) deve essere pulito ogni
volta che si riempie il contenitore di caffè in polvere
o, in ogni caso, almeno una volta alla settimana.
• Spegnere la macchina premendo l’interruttore (7)
in posizione -0- ed estrarre la spina dalla presa di
corrente.
• Togliere quindi il cassetto raccoglifondi (10)
e la vasca raccogli-gocce (12), successivamente
aprire lo sportello di servizio (16).
• Estrarre il gruppo erogatore (18) tenendolo per
l’apposita maniglia e premendo sul tasto «PRESS».
Il gruppo erogatore può essere lavato solo con
acqua calda senza detergente.
• Assicurarsi che i due filtri in acciaio siano liberi
da ogni residuo di caffè. Il filtro superiore si può
togliere svitando, in senso antiorario, il perno di
plastica con l’apposita chiave in dotazione (19).
• Lavare ed asciugare accuratamente tutte le parti
del gruppo erogatore
• Rimontare il filtro e riavvitare con cura il perno in
plastica servendosi dell’apposita chiave.
• Pulire accuratamente il vano.
• Tenendolo per l’apposita maniglia, introdurre
di nuovo il gruppo erogatore nell’apposito vano fino
ad ottenerne l’aggancio.
• Chiudere quindi lo sportello, inserire il cassetto
raccoglifondi e la vasca raccogligocce.
11 DECALCIFICAZIONE
La formazione del calcare avviene con l’uso
dell’apparecchio; la decalcificazione è necessaria
ogni 3-4 mesi o quando si osserva una riduzione della
portata dell’acqua.
Qualora si voglia eseguirla personalmente,
si può utilizzare un prodotto decalcificante
per macchine da caffè di tipo non tossico e/o
nocivo, comunemente reperibile in commercio.
Attenzione! Non utilizzare in nessun caso
l’aceto come decalcificante.
• Miscelare il decalcificante con acqua come
specificato sulla confezione del prodotto decalcificante e riempire il serbatoio dell’acqua.
• Accendere la macchina con l’interruttore gene-
rale (7).
• Dirigere il tubo vapore (15) sulla vasca raccogli
gocce.
• Premere il pulsante (27), il led (28) si accende.
• Prelevare ad intervalli (una tazza per volta)
l’intero contenuto del serbatoio dell’acqua ruotando
il pomello vapore (17) in senso antiorario; per
fermare l’erogazione ruotare il pomello (17) in
senso orario.
• Premere nuovamente il pulsante (27) per riportare
la macchina nel modo di funzionamento normale,
il led (28) si spegne.
Page 15

INFORMAZIONI CARATTERE GIURIDICO - SMALTIMENTO
15
• Durante i singoli intervalli si deve lasciare agire per
circa 10-15 minuti, scollegando la macchina con
l’interruttore generale (7) su -0-.
• Terminata la soluzione decalcificante, sciacquare
il serbatoio dell’acqua e riempirlo con acqua
fresca.
• Accendere la macchina con l’interruttore generale.
• Premere il pulsante (27), il led (28) si accende.
• Vuotare 2/3 del contenuto del serbatoio
dell’acqua ruotando il pomello vapore (17) in
senso antiorario; per fermare l’erogazione ruotare
il pomello (17) in senso orario.
• Lasciare riscaldare la macchina e vuotare il
rimanente contenuto del serbatoio dell’acqua
ruotando il pomello vapore (17) in senso antiorario;
per fermare l’erogazione ruotare il pomello (17) in
senso orario.
• Premere nuovamente il pulsante (27) per riportare
la macchina nel modo di funzionamento normale,
il led (28) si spegne.
Qualora si utilizzi un prodotto diverso
da quello consigliato si raccomanda di
rispettare comunque le istruzioni della casa produttrice riportate sulla confezione del prodotto
decalcificante.
precedente o già esistente, di un accordo o di
un contratto legale e che non ne cambiano la
sostanza.
• Tutti gli obblighi del costruttore si basano sul relativo
contratto di compravendita che contiene anche il
regolamento completo ed esclusivo riguardo alle
prestazioni di garanzia.
• Le norme di garanzia contrattuali non vengono
né limitate né estese in base alle presenti spiegazioni.
• Le istruzioni per l’uso contengono informazioni
protette dal diritto d’autore.
• Non è permesso fotocopiarle o tradurle in un’altra
lingua senza previo accordo scritto da parte del
Costruttore.
13 SMALTIMENTO
• Rendere inutilizzabile gli apparecchi non più in
uso.
• Staccare la spina dalla presa e tagliare il cavo
elettrico.
• Consegnare gli apparecchi fuori uso a un centro di
raccolta idoneo.
12 INFORMAZIONI DI CARATTERE
GIURIDICO
• Le presenti istruzioni per l’uso contengono le
informazioni necessarie per l’impiego corretto, per
le funzioni operative e la manutenzione accurata
dell’apparecchio.
• Queste conoscenze e l’osservanza delle presenti
istruzioni, rappresentano la premessa per un uso
senza pericolo nel pieno rispetto della sicurezza
in caso di funzionamento e manutenzione dell’apparecchio. Se si desiderano ulteriori informazioni,
o se dovessero subentrare particolari problemi che
si ritiene nelle presenti istruzioni d’uso non siano
stati spiegati con sufficiente chiarezza, preghiamo
di rivolgersi al rivenditore o direttamente alla ditta
costruttrice.
• Inoltre facciamo notare che il contenuto di queste
istruzioni d’uso non è parte di una convenzione
Page 16
16
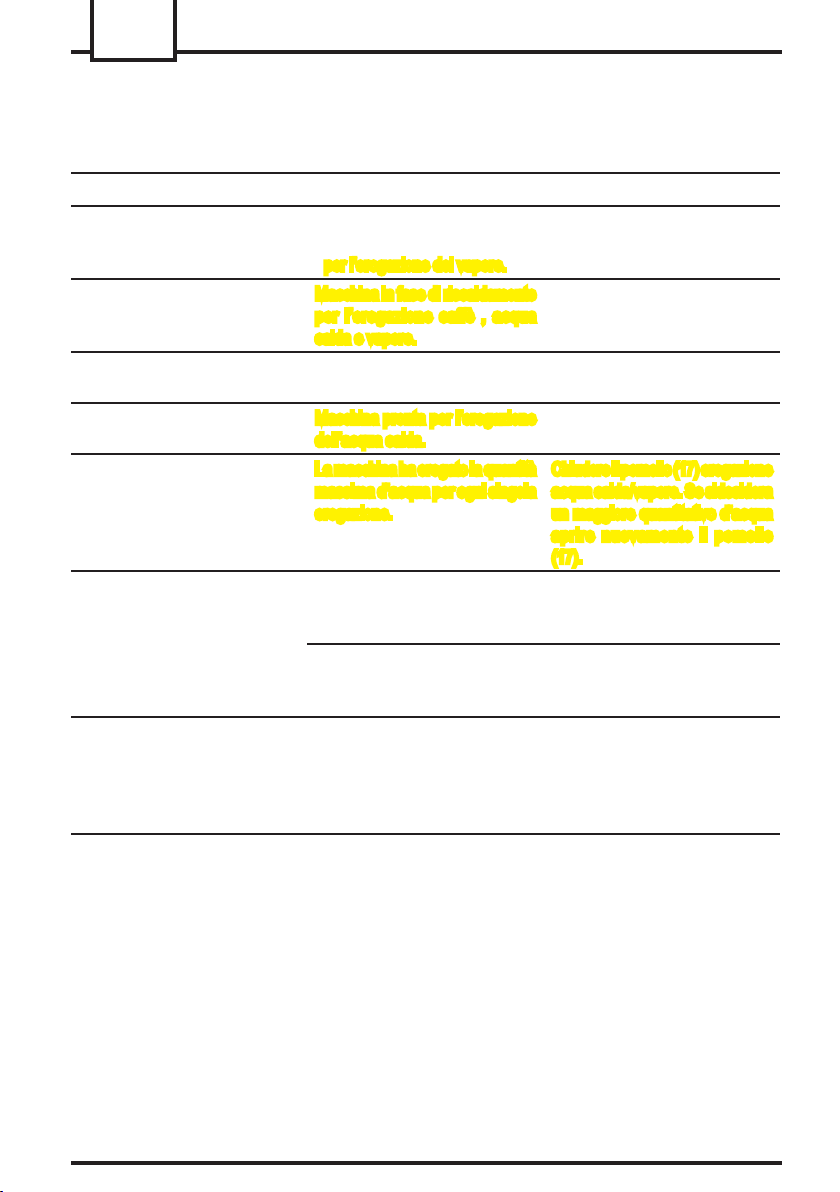
14 SPIE PANNELLO COMANDI
Segnalazioni Cause Rimedi
Luce verde (29)
Luce verde (24) fissa
Luce verde (24) lampeggiante
Luce verde (26) fissa
Luce verde (28) fissa
Luce verde (24) lampeggiante
Luce verde (26) lampeggiante
Luce verde (28) lampeggiante
contemporaneamente
Luce rossa (30) fissa
Luce rossa (30) lampeggiante
Macchina accesa.
Macchina in temperatura pronta:
- per l’erogazione del caffè;
- per l’erogazione del vapore.
Macchina in fase di riscaldamento
per l’erogazione caffè , acqua
calda e vapore.
Macchina in erogazione con caffè
macinato.
Macchina pronta per l’erogazione
dell’acqua calda.
La macchina ha erogato la quantità
massima d’acqua per ogni singola
erogazione.
Quantità d’acqua insufficiente nel
serbatoio.
Serbatoio caffè vuoto. Riempire il serbatoio con caffè in
Gruppo erogatore, cassetto fondi,
vasca raccogli gocce, sportello
anteriore non in posizione corretta per il funzionamento della
macchina.
Chiudere il pomello (17) erogazione
acqua calda/vapore. Se sidesidera
un maggiore quantitativo d’acqua
aprire nuovamente il pomello
(17).
Riempire il serbatoio con acqua
fresca potabile, caricare il circuito ed
iniziare nuovamente la procedura.
grani ed iniziare nuovamente la
procedura.
Per spegnere la luce rossa fissa,
verificare che tutti i componenti
siano inseriti o chiusi in modo
corretto.
SPIE PANNELLO COMANDI
Page 17
PROBLEMI - CAUSE - RIMEDI
Problemi Cause Rimedi
La macchina non si accende La macchina non è collegata alla
rete elettrica
Lo sportello di servizio è aperto Chiudere lo sportello
Il caffè non è abbastanza caldo Le tazzine sono fredde Scaldare le tazzine
Non fuoriesce acqua calda o
vapore
Il caffè ha poca crema La miscela non è adatta o il caffè
La macchina impiega troppo tempo
per scaldarsi o la quantità di acqua
che fuoriesce dal tubo è limitata
Il gruppo erogatore non può essere
estratto
Caffè non fuoriesce Manca Acqua Riempire il serbatoio dell’acqua e
Caffè fuoriesce lentamente Dose alta Diminuire la dose (Par.6)
Caffè fuoriesce all’esterno dell’erogatore
Il foro del tubo vapore è otturato Pulire il foro del tubo vapore con
non è fresco di torrefazione oppure
è macinato troppo grosso
Il circuito della macchina è intasata
dal calcare
Gruppo erogatore fuori posizione Accendere la macchina. Chiudere
Cassetto raccoglifondi inserito Estrarre il cassetto raccoglifondi
Gruppo sporco Puli r e il grup p o er oga t ore
Dose alta Diminuire la dose (Par.6)
Circuito non carico Ricaricare il circuito (Par.4.3)
Caffè troppo fine Cambiare miscela di caffè o
Circuito non carico Ricaricare il circuito (Par.4.3)
Gruppo erogatore sporco Puli r e il grup p o er oga t ore
Erogatore non in posizione cor-
retta
Collegare la macchina alla rete
elettrica
uno spillo
Cambiare miscela di caffè o
regolare la macinatura come al
par.5 Aumentare la dose par.6
Decalcificare la macchina
lo sportello di servizio. Il gruppo
erogatore ritorna automaticamente
nella posizione iniziale
prima di estrarre il gruppo di
erogazione
ricaricare il circuito (Par.4.3)
(Par.10.1)
regolare la macinatura come al
par.5 Diminuire la dose par.6
(Par.10.1)
Rimettere in posizione l’erogatore
17
Erogatore otturato Pulire l’erogatore ed i suoi fori
d’uscita
Per i guasti non contemplati dalla suddetta tabella o in caso che i rimedi suggeriti non li risolvano,
rivolgersi ad un centro assistenza.
Page 18

18
IMPORTANT SAFEGUARDS
When using electrical appliances, basic safety precautions
should always be followed to reduce the risk of fire, electric
shock, and/or injury to persons, including the following:
1 Read all instructions and information in this
instruction book and any other literature included in
this carton referring to this product before operating
or using this appliance.
2 Do not touch hot surfaces. Use handles or knobs.
3 To protect against fire, electric shock and personal
injury do not immerse cord, plugs or appliance in
water or other liquid.
4 Close supervision is necessary when any appliance
is used by or near children.
5 Unplug from outlet when not in use and before
cleaning. Allow to cool before putting on or taking
off parts, and before cleaning the appliance.
6 Do not operate any appliance with a damaged cord
or plug or after the appliance malfunctions or has
been damaged in any way. Return appliance to the
nearest authorized service centre for examination,
repair or adjustment.
7 The use of accessory attachments not recommended
by the appliance manufacturer may result in fire,
electric shock or personal injury.
8 Do not use outdoors.
9 Do not let cord hang over edge of table or counter,
or touch hot surfaces.
10 Do not place on or near a hot gas or electric burner,
or in a heated oven.
11 Always turn appliance “OFF”, then plug cord into
the wall outlet. To disconnect, turn switch to “OFF”,
then remove plug from wall outlet.
12 Do not use appliance for other then intended
household use.
13 Use extreme caution when using hot steam.
CAUTION
This appliance is for household use. Any servicing, other
than cleaning and user maintenance, should be performed
by an authorized service centre. Do not immerse base
in water. To reduce the risk of fire or electric shock, do
not disassemble the base. There are no user serviceable
parts inside. Repair should be done by authorized service
personnel only.
1 Check voltage to be sure that the voltage indicated
on the nameplate agrees with your voltage.
2 Never use warm or hot water to fill the water tank.
Use cold water only.
3 Keep your hands and the cord away from hot parts
of the appliance during operation.
4 Never clean with scouring powders or hard
implements. Simply use a soft cloth dampened with
water.
5 To avoid your coffee maker scaling up, use purified
or bottled water.
INSTRUCTIONS FOR THE
POWER SUPPLY CORD
A A short power-supply cord is provided to reduce risks
of getting tangled up or tripping over a longer cord.
B Longer extension cords are available and may be
used if care is exercised in their use.
C If a long extension cord is used:
1 cthe marked electrical rating of the extension
cord should be at least as great as the electrical
rating of the appliance.
2 if the appliance is of the grounded type, the
extension cord should be a grounding type
3 the cable does not hang from the table to avoid
the risk of getting caught up in it.
SAVE THESE INSTRUCTIONS
Page 19

GENERAL INFORMATION - TECHNICAL SPECIFICATIONS
19
1 GENERAL INFORMATION
This coffee machine is ideal for preparing espresso
coffee using either coffee beans or ground coffee,
and is equipped with a device for dispensing steam
and hot water.
The elegantly styled machine is designed for normal
home use only, and is not suitable for continuous
professional use.
Caution. The manufacturer accepts no liability for damage or injury caused by:
• improper use outside the defined operating
parameters;
• repairs carried out by anyone other than authorized service centers;
• tampering with the power cable;
• tampering with any component of the machine;
• use of non-original spare parts and accessories.
In such cases the warranty shall be null and void.
1.1 To facilitate interpretation
A warning triangle indicates all the
instructions that are important for user
safety.
Follow these directions scrupulously to
avoid serious injury!!
Illustrations, parts of the machine and control
functions are referred to by number or letter, e.g.
illustration 2 in this paragraph.
This symbol identifies the most important
information for ensuring optimal use of
the machine.
The illustrations corresponding to the text may be
found on the inside cover flap.
Keep this page open while reading
the operating instructions.
1.2 How to use these operating instructions
Keep these operating instructions in a safe place and
make them available to anyone else who should use
the coffee machine.
For more information, or should you meet with any
problems not completely or sufficiently explained in
these instructions, contact your Authorized Service
Center.
2 TECHNICAL SPECIFICATIONS
• Rated voltage
See rating plate on machine
• Rated power
See rating plate on machine
• Casing material
Thermoplastic (ABS)
• Dimensions (w x h x d) (mm)
390 x 380 x 330
• Weight (Kg)
8,7
• Cable length (mm)
1200
• Control panel
Front
• Water container
Extractable
• Power supply
See rating plate on machine
• Water container (lt.)
1.7
• Coffee container capacity (gr)
350 of coffee beans
• Pump pressure (bar)
15
• Boilers
Stainless steel and aluminium
• Safety features
Boiler pressure safety valve;
safety thermostat.
The manufacturer reserves the right to change the
machine’s specifications in line with technological
progress.
The machine conforms to European Directive 89/336/
EEC (Legislative Decree 476 of 04/12/92), regarding
the elimination of radio-television interference.
Page 20

20
SAFETY RULES
sizes in millimeter
Page 21

SAFETY RULES
21
3 SAFETY RULES
Never place electrical parts in contact with water:
danger of short-circuit! The superheated steam
and hot water may cause scalding! Never aim
the steam or hot water flow towards parts of your
body, use caution when touching the steam / hot
water nozzle: danger of scalding!
Intended use
The coffee machine is designed for home use only.
To avoid risks, do not make any technical changes
or use the machine for purposes other than those
stated!
The coffee machine must be used exclusively by
adults in good psychological and physical condition.
Power supply
Plug the coffee machine into a suitable mains outlet.
The voltage must correspond to the value indicated
on the rating plate.
Power cable
Never use the coffee machine if the power cable is
defective.
If the power cord is damaged, it must be replaced by
the manufacturer or an authorised service centre.
Do not pass the cable around corners, over sharp
edges or over hot objects and keep it away from oil.
Do not use the cable to carry or pull the coffee machine.
Do not remove the plug by tugging on the cable or
touch it with wet hands. Make sure the cable cannot
drop freely from tables or shelves.
Protecting others
Do not allow children to play with the coffee machine.
Children are not aware of the dangers connected with
household appliances.
Danger of burns
Avoid aiming the superheated steam and/or hot water
flow at yourself and/or at others: danger of scalding!
Always use the handles or knobs provided.
Siting
Place the coffee machine in a safe place where no
one can tip it over or be injured by it.
Never use the coffee machine outdoors.
To prevent melting or damage to the casing, do not
rest the machine on very hot surfaces or near open
flames.
Cleaning
Before cleaning the machine, you must set the main
switch (7) to -0- and remove the plug from the mains
outlet.
Also wait for the machine to cool down.
Never immerge the machine in water!
It is strictly forbidden to tamper with internal machine
parts.
Space for use and maintenance
To ensure that the coffee machine works properly and
efficiently, we recommend that you:
• Rest it on a perfectly level surface;
• Place it in an adequately lit, hygienic site with an
electric outlet within easy reach;
• Ensure a minimum clearance between the machine
and the walls as shown in the figure.
• Do not keep the machine in a place where the
temperature may fall below 0°C; freezing may
damage the machine.
Storing the machine
If the machine is to remain out of use for a lengthy
period, turn it off and pull out the plug.
Store it in a dry place out of children’s reach.
Keep it away from dust and dirt.
Repairs / Maintenance
In the event of a breakdown, fault or suspected
damage after a fall, unplug the machine immediately.
Never operate a faulty machine.
Maintenance and repairs are to be carried out exclusively by Authorized Service Centers.
The manufacturer will accept no liability for any damage caused by unauthorized servicing.
Fire safety
In the event of fire, use carbon dioxide (CO2) extinguishers. Do not use water or powder extinguishers.
Page 22

22
SAFETY RULES - INSTALLATION
Key to machine components
Coffee bean container
Coffee bean container lid
Grinder adjustment knob
Dose adjustment knob
Ground coffee dispenser lid
Cup plate
Power switch (ON/OFF)
Water container lid
Water container
Dregs box
Power cable
Water tray + grill
Water tray level float
Height-adjustable coffee dispenser
Steam/hot water tube
Front door
Steam knob
Coffee dispenser unit
Coffee dispenser unit wrench
Cleaning brush
Ground coffee measuring spoon
Control panel
Knob for regulating the quantity of coffee
dispensed in one cup
Coffee dispensing button
Coffee temperature / function ready light
Ground coffee selector button
Ground coffee light
Hot water button
Hot water LED
Machine ON light
Warning light
4 INSTALLATION
For your own safety and the safety of others,
you must strictly comply with the “Safety Rules”
described in chap.3.
4.1 Package
The original packaging was designed and made to
protect the machine during shipping.
We recommend keeping it for future transport purposes.
4.2 Preliminary operations
• Remove the water tray (12) with grating from the
packaging materials.
• Take the coffee machine out of its packing
and position it in a suitable place that meets
the requirements described in the safety rules
(chap.3.).
• Insert the water tray (12) into the slot provided on
the machine; make sure that the tray, the dregs
box (10) and the coffee dispensing unit (18) are correctly fitted and that the front door (16) is closed.
• Fit the coffee bean container lid (2) onto the coffee
bean container (1).
Store the cleaning brush (20), the coffee dispensing
unit wrench (19) and ground coffee measuring
spoon (21) in a safe and convenient place.
• Before plugging in the machine, make sure the
power switch (7) is set to -0-.
If the red light (30) flashes when you turn on the
machine, it means that one of the above-described
parts has not been correctly fitted in place.
Important note: It is important to read the
contents of Chapter 14, which explains in
detail the meaning of all machine signals provided
to the user by the lights on the control panel.
4.3 Turning on for the first time
• Lift out the water container (9) and remove the
lid (8). Rinse it out and fill it with fresh drinking water,
making sure you do overfill it. Lower the container
back into place inside the machine and replace the
lid (8).
Fill the container (9) only with cool, still
water. Hot water or other liquids may
damage the container and/or the machine. Always
make sure there is enough water inside the
container before starting the machine.
• Take off the lid (2) and fill the container with
coffee beans (1).
Fit the lid of the coffee container (1) back
into place. Ground or freeze-dried coffee or
Page 23
INSTALLATION - COFFEE GRINDER - DOSE ADJUSTMENT
23
any other objects will damage the machine.
• Replace the lid (2) on the coffee container (1).
• Insert the plug (11) into a suitable outlet.
• The power switch (7) is set to -0-. Simply press the
button (7) to turn on the machine; the green pilot
light (29) will go on.
• To prime the machine, direct the steam wand
(15) over the drip tray, place a cup or suitable
receptacle beneath the steam nozzle and press
the button (27); LED 28 will light up.
Turn the knob anticlockwise and wait until water
flows out in a regular stream from the steam
nozzle; to shut off the flow of water, turn the knob
clockwise
.• Press the button (27) again to switch the machine
back into the normal operating mode.
Note: Before starting up for the first time,
if the machine has been inoperative for a
lengthy period or the water container has been
completely emptied, it is advisable to load the
circuit.
• Once you have completed the above operations,
the machine is ready for use.
• Carefully follow the directions below to dispense
coffee, hot water, or steam, and ensure proper use
of the machine.
5 COFFEE GRINDER
Warning! The grinder adjustment knob inside
the coffee container must be turned only while
the coffee grinder is operating.
Do not introduce ground and/or freeze-dried coffee
into the coffee bean container.
It is strictly forbidden to introduce any material
other than coffee beans.
The coffee grinder contains moving parts that may
be hazardous; do not place your fingers and/or other
objects inside the grinder.
Before performing any kind of operation inside
the coffee container, switch off the machine and
unplug it.
Do not add coffee beans while the grinder is operating.
The quality and flavour of your coffee will depend
not only on the blend you use but also on how finely
you grind it.
The machine has a knob (3) for adjusting the grind.
To adjust the grind, turn the graduated knob while the
grinder is operating; the numbers on the knob indicate
the fineness of the grind.
Every machine is factory-regulated to a medium-sized
grind; turn the knob to higher numbers to obtain a
coarser grind, turn the knob to lower numbers to
obtain a finer grind.
The variation in the fineness of the grind will be
noted only after three or four coffees have been
dispensed.
Use blends of coffee beans specifically for espresso
machines.
Avoid using extreme grinding settings (e.g. 1 - 16);
if you do use them, also use different blends of
coffee.
Store coffee in an airtight container in a cool, dry
place.
You should adjust the fineness of the grind when the
coffee is not dispensed properly:
Coffee pours out too fast = excessively coarse grind
> Set the knob on lower numbers;
Coffee drips out slowly and/or not at all = excessively
fine grind > Set the knob on higher numbers.
6 DOSE ADJUSTMENT
The machine allows you to adjust the amount
of coffee (dose) to be ground according to your
requirements.
The manufacturer has set a standard dose that
satisfies most needs: notch (A) corresponding to
reference point (B).
Turn the knob (4) inside the coffee container counterclockwise to increase the dose of ground coffee; turn it
clockwise to reduce the dose of ground coffee.
The dose must be adjusted before pressing the button
to dispense coffee.
This system makes it possible to obtain optimal coffee
with all types of commercially available coffee.
Page 24

24
DISPENSING COFFEE - DISPENSING HOT WATER
7 DISPENSING COFFEE
Note: If the machine fails to dispense coffee,
make sure the water container contains
water; you may check the water level in the
container on the left-hand side of the machine.
Before dispensing coffee, make sure that
the green temperature ready light (24)
remains lit, and that both the water and coffee
containers are full.
• Place 1 or 2 cups beneath the dispenser
nozzles (14); you may adjust the height of the
dispenser to suit your cups.
• The dispenser may be moved so that you may
use large cups. In this case you must manually push
the dispensing unit towards the machine as far as
it will go (allowing dispensing into only one cup t a
time); to set the dispenser in the ideal position for
small cups, pull it all the way outward and make
sure it is locked in place.
• Use the knob (22) to adjust the amount of coffee in
the cup: turn it clockwise to increase the amount of
coffee dispensed; turn it counterclockwise to reduce
the amount of coffee dispensed.
Note: we recommend emptying the water
tray when the level float (13) rises.
7.1 Dispensing with coffee beans
• To dispense coffee, press the button (23) to begin
the dispensing cycle: press the button (23) once
to dispense 1 cup; press it twice in succession to
dispense 2 cups.
In this operating mode, the machine
automatically grinds and dispenses the
correct amount of coffee; it takes two automatic
grinding cycles and two automatic dispensing
cycles to prepare two coffees.
• After completing the pre-brewing cycle, the coffee
will begin to flow from the dispensing nozzle (14).
• The machine will automatically stop dispensing
coffee when it reaches the level set with the
knob (22); you may however stop flow at any time
by pressing the button (23).
7.2 Dispensing with ground coffee
Fill the dispenser (5) only with coffee ground
specifically for espresso machines; coffee
beans, freeze-dried coffee, and other materials will
damage the machine.
It is prohibited to insert your fingers into the
ground coffee dispenser, which contains
hazardous moving parts.
• Use only the measuring spoon (21) provided with
the machine to measure out the correct amount of
ground coffee to place in the dispenser.
Add only one measuring spoonful of
ground coffee at a time.
To make two coffees, you must carry out two
separate consecutive cycles.
• Press the button (25) to select the function; the pilot
light (26) will light.
• Lift the ground coffee dispenser lid (5).
• Use the measuring spoon (21) to measure out a
dose of coffee, removing any excess coffee powder
from the measuring spoon.
• Empty the ground coffee into the dispenser.
• Close the lid (5).
• To dispense coffee, press the button (23) to begin
the dispensing cycle.
• After completing the pre-brewing cycle, the coffee
will begin to flow from the dispensing nozzle (14).
• The machine will automatically stop dispensing
coffee when it reaches the level set with the
knob (22); you may however stop flow at any time
by pressing the button (23).
• Then the machine automatically returns to the
normal operating mode (see para. 7.1).
8 DISPENSING HOT WATER
Warning: The steam may be preceded
by brief sprays of hot water: danger of
scalding! The dispensing tube can reach very
high temperatures: avoid touching it directly with
your hands.
Page 25

DISPENSING STEAM - CLEANING AND MAINTENANCE
25
• Before dispensing hot water, make sure that the
green temperature ready light (24) remains lit.
When the machine is ready to dispense coffee,
proceed as follows:
• Press the button (27); the LED (28) will light up.
• Place and cup and/or a receptacle beneath the hot
water/steam tube (15).
• Turn the knob (17) counter-clockwise.
• Dispense the desired amount of hot water; turn
the knob (17) clockwise to cut off the flow of hot
water.
• Press the button (27) again to switch the machine
back into the normal operating mode. The LED (28)
will go off.
9 DISPENSING STEAM/MAKING
CAPPUCCINO
The steam may be used to froth milk for cappuccino
and to heat other beverages.
Danger of scalding! Dispensing may be
preceded by brief sprays of hot water. The
dispensing tube can reach very high temperatures:
avoid touching it directly with your hands.
• Before dispensing steam, make sure that the
temperature ready LED (24) remains steadily lit.
The machine will be immediately ready to dispense
steam.
• Position the steam tube (15) over the drip tray and
open the “hot water/steam” knob (17) for a few
seconds to discharge residual water from the steam
tube; soon only steam will issue from the tube.
• Close the knob (17).
• Fill the receptacle you want to use for making
cappuccino 1/3 of the way with cold milk.
To ensure best results when making
cappuccino, make sure both the milk and
receptacle are cold.
• Place the tip of the steam tube in the milk to
be heated and open the knob (17); slowly raise
the receptacle, with gentle rotating movements, to
obtain an even layer of foam.
• After dispensing the amount of steam desired, close
the knob (17).
• The same procedure may be used to heat other
beverages.
After this operation, wipe the steam tube clean with
a damp cloth.
You can immediately brew coffee into the freshly frothed
milk to prepare a real Italian-style cappuccino.
10 CLEANING AND MAINTENANCE
Basic cleaning
• Maintenance and cleaning may be carried out only
when the machine is cold and disconnected from
the power supply.
• Do not immerge the machine in water and do not
place any of its components in a dishwasher.
• Do not use sharp objects or aggressive chemical
products (solvents) for cleaning.
It is recommended that you clean the water
container daily:
- Remove the filter (C) located inside the container,
and rinse with clean drinking water.
- Return the filter (C) to its slot, pressing gently
while turning slightly.
- Fill the container with fresh drinking water.
Use the brush provided to clean the ground coffee
dispenser daily when in use.
• Use a soft cloth moistened with water to clean the
machine.
• Do not dry the machine and/or its components in a
microwave and/or conventional oven.
• Clean the machine compartment and the
dispensing unit, we recommend emptying out the
dregs box (10) every day.
• The coffee dispenser (14) may be removed for
cleaning. Rinse the dispensing channels thoroughly
with hot water.
10.1 Dispensing unit
• The dispensing unit (18) must be cleaned every
time you fill the ground coffee container or, in any
case, at least once a week.
• Turn off the machine by setting the power switch
(7) to -0- and remove the plug from the power
socket.
Page 26

26
DESCALING - LEGAL NOTICE
• Remove the dregs box (10) and drip tray (12),
then open the service door (16).
• Take out the dispensing unit (18), holding it
by the handle provided and pushing the «PRESS»
button. Use hot water only, without detergents, to
clean the dispensing unit.
• Make sure that there are no coffee residues
on the two steel filters. You may remove the upper
filter by unscrewing the plastic pin with the wrench
provided (19).
• Thoroughly wash and dry all the parts of the dispensing unit.
• Replace the filter and use the wrench provided to
tighten the plastic pin firmly into place.
• Thoroughly clean the machine compartment.
• Holding the dispensing unit by its handle, fit it
back securely into place inside the compartment.
• Then close the door and set the dregs box and drip
tray back into place.
11 DESCALING
Scale forms while the machine is in use; it is necessary
to remove scale every 3-4 months of use or whenever
you observe a decreased flow of water.
If you wish to descale the machine yourself,
you may use any commercially available
non-toxic, non-harmful descaling agent for coffee
machines.
Warning! Never use vinegar as a descaling
agent.
• Mix the descaling agent with water as directed on
the package and pour the solution into the water
container.
• Turn on the machine by means of the power
switch (7).
• Position the steam tube (15) over the drip tray.
• Press the button (27); the LED (28) will light up.
• Empty the contents of the water container at
intervals (one cup at a time) by turning the steam
knob (17) counterclockwise; turn the knob (17)
clockwise to cut off flow.
• Press the button (27) again to switch the machine
back into the normal operating mode. The LED (28)
will go off.
• During each interval, allow the descaling agent
to act for about 10-15 minutes, switching off the
machine by setting the power switch (7) to -0-.
• When all of the descaling agent has been used up,
rinse out the water container and fill it with fresh
water.
• Turn on the machine by means of the main switch.
• Press the button (27); the LED (28) will light up.
• Empty out 2/3 of the water in the tank by
turning the steam knob (17) counterclockwise; turn
the knob (17) clockwise to cut off flow.
• Let the machine heat up and empty out the water
remaining in the tank by turning the steam knob (17)
counterclockwise; turn the knob (17) clockwise to
cut off flow.
• Press the button (27) again to switch the machine
back into the normal operating mode. The LED
(28) will go off.
Should you use a descaling agent other
than the one recommended you are
advised in any case to follow the manufacturer’s
directions on the package.
12 LEGAL NOTICE
• The present operating instructions contain all
information necessary to use the machine correctly,
understand its functions, and carry out proper
maintenance.
• The user must be familiar with and observe these
instructions in order to ensure safe operation
and maintenance of the machine. For any further
information, or in case of any problems that may
arise for which you believe the present operating
instructions are not sufficiently clear and thorough,
please contact your dealer or the manufacturer
directly.
• We also note that these operating instructions
do not constitute part of any prior or pre-existing
agreement or legal contract, nor do they change
the provisions thereof.
• All manufacturer obligations are derived from the
corresponding sale contract, which also includes
the complete and sole rules governing the
warranty.
Page 27
DISPOSAL
• The contractual warranty terms are not limited nor
extended by the explanations contained herein.
• The operating instructions contain information
protected by copyright.
• It is prohibited to photocopy or translate them
without prior written authorization from the manufacturer.
13 DISPOSAL
• When the machine is no longer in use, it should be
rendered unusable.
• Unplug the machine from the socket and cut the
power cable.
• Dispose of obsolete machines at an appropriate
disposal facility.
27
Page 28

28
CONTROL PANEL PILOT LIGHTS
14 CONTROL PANEL PILOT LIGHTS
Warning Causes Remedies
Green light (29)
Green light (24) remains lit
Green light (24) flashing
Green light (26) remains lit
Green light (28) remains lit
Green light (24) flashing
Green light (26) flashing
Green light (28) flashing
simultaneously
Red light (30) remains lit
Red light (30) flashing
Machine on
Machine at temperature, ready:
- to dispense coffee
- for dispensing steam.
Machine warming up to brew
coffee and dispense hot water
and steam.
Machine dispensing with ground
coffee
Machine ready to dispense hot
water.
The machine has dispensed the
max. quantity of water programmed
per operation.
Not enough water in the container Fill the container with fresh drinking
Coffee container empty Fill the container with coffee beans
Dispensing unit, dregs box, drip
tray, front door not correctly positioned to allow the machine to
function
Turn the hot water/steam knob
clockwise. If you want more
water, turn the knob anticlockwise
again.
water, load the circuit and start the
procedure over again
and start the procedure over
again
To shut off the red light, make sure
that all parts have been correctly
fitted in place or closed
Page 29

PROBLEMS - CAUSES - REMEDIES
Problems Causes Remedies
The machine does not turn on The machine is not plugged into
the electrical mains
The service door is open Close the door
The coffee is not hot enough The cups are cold Heat the cups
No hot water or steam flows out The steam tube hole is clogged Use a pin to clean the steam
The coffee is not creamy on the
surface
The machine takes too long to heat
up, or not enough water flows from
the tube
The dispensing unit cannot be
taken out
No coffee is dispensed There is no water Refill the water container and
Coffee drips out slowly Dose too high Reduce the dose (Par.6)
Coffee leaks outside the dispensing
unit
The blend is not suitable or the
coffee is not freshly roasted or is
ground too coarsely
The machine circuit is clogged
with scale
Dispensing unit out of place Turn on the machine. Close the
Dregs box still in place Remove the dregs box before
Unit is dirty Cle a n th e disp e nsi ng unit
Dose too high Reduce the dose (Par.6)
Circuit not loaded Reload the circuit (Par.4.3)
Coffee ground too finely Change the coffee blend or adjust
Circuit not loaded Reload the circuit (Par.4.3)
Dispensing unit dirty Clean the dispensing unit
Dispensing unit not correctly
positioned
Plug the machine into the electrical
mains
tube hole
Change the coffee blend or adjust
the grinder as directed in par.5
Increase the dose (Par .6)
Descale the machine
service door The dispensing unit
will automatically go back into
place
taking out the dispensing unit
reload the circuit (Par.4.3)
(Par.10.1)
the grinder as directed in par.5.
Reduce the dose (Par .6)
(Par.10.1)
Position the dispensing unit cor-
rectly
29
Dispensing unit clogged Clean the dispensing unit and its
outlets
If you should have a problem that is not dealt with in the above table or is not resolved by any of these
solutions please contact an authorised service centre.
Page 30

30
IMPORTANT
Lors de l’utilisation d’appareils électriques, il est important
de prendre les précautions suivantes, afin d’éviter les
décharges électriques, les courts circuits et les accidents
corporels.
1 Lire toutes les instructions et les indications
données dans cette brochure, ainsi que toute autre
information que contient l’emballage, avant de
mettre la machine en marche.
2 Ne pas toucher les surfaces chaudes de la machine.
Utiliser les poignées ou boutons.
3 Ne pas plonger le fil électrique, la prise ou l’appareil
lui-même dans l’eau ou tout autre liquide.
4 Faire très attention lorsque l’appareil est utilisé par
ou près des enfants.
5 Débrancher l’appareil lorsqu’il n’est pas en service
et laissez-le refroidir avant de retirer les accessoires
pour le nettoyage ou de les mettre en place.
6 Ne pas utiliser l’appareil avec un cordon ou une
prise en mauvais état ou après que l’appareil ait
été endommagé de quelque manière que ce soit.
Confiez votre appareil au service après-vente
autorisé le plus proche pour examen ou réparation.
7 L’utilisation d’accessoires non recommandés par le
fabricant de l’appareil pourrait poser des problèmes.
8 Ne pas utiliser à l’extérieur.
9 Ne pas laisser le cordon pendre de la table ou de la
surface de travail, ni toucher des surfaces chaudes.
10 Ne pas poser sur une cuisinière ou dans un four
chaud.
11 Mettre toujours l’appareil en position «éteint» avant
de le débrancher. Mettre aussi tous les interrupteurs
à «éteint» avant de le débrancher.
12 Usage domestique seulement.
13 Faire très attention en utilisant la vapeur.
GARDER CES ISTRUCTIONS
PRÉCAUTIONS
Machine est réservée à un usage domestique. Tout
entretien, en dehors du nettoyage et de l’entretien usuel par
l’usager, doit être fait par un centre de service autorisé. Ne
pas plonger la base dans l’eau. Pour éviter les courts-circuits
et les décharges électriques, ne pas démonter la base. Elle
ne contient aucune pièce qui demande un entretien de la
part de l’usager. Toute réparation doit être effectuée par le
personnel d’un service après-vente autorisé.
1 Vérifier si le voltage correspond bien aux spécifications
apparaissant sur la plaque des données techniques.
2 Ne jamais mettre de l’eau tiède ou chaude dans le
réservoir; mais toujours de l’eau froide.
3 Ne pas toucher les surfaces chaudes de l’appareil
pendant le fonctionnement et en écarter le cordon
électrique.
4 Ne jamais nettoyer avec des poudres à récurer ou
des instruments durs.
5 Utiliser de l’eau purifiée ou en bouteille pour éviter
la formation de tartre.
INSTRUCTIONS SUR LE
CORDON ELECTRIQUE
A Votre appareil est muni d’un cordon électrique court afin
d’éviter qu’il ne s’emmêle ou qu’on ne s’y accroche.
B On peut utiliser une rallonge électrique en prenant
certaines précautions.
C Si on utilise une rallonge, vérifier:
1 que sa tension est au moins égale à celle de
l’appareil
2 qu’elle est munie d’une prise à trois fiches, avec
mise à la terre, si c’est le cas pour le cordon de
l’appareil
3 que le câble ne pende pas de la table afin
d’éviter de trébucher.
Page 31

GÉNÉRALITÉS - CARACTÉRISTIQUES TECHNIQUES
31
1 GÉNÉRALITÉS
Cette machine à café est en mesure de préparer des
cafés expresso à partir de mélanges soit en grains, soit
moulus et est équipée d’un dispositif de distribution
de la vapeur et de l’eau chaude. Avec un habillage
machine au design élégant, cet appareil a été conçu
pour un usage domestique et n’est donc pas indiqué
pour un usage intensif de type professionnel.
Attention! Le Fabricant décline toute responsabilité en cas de dommages dérivant de:
• un usage impropre et non conforme aux fonctions prévues;
• des réparations non effectuées par un centre
d’assistance agréé;
• une modification du cordon d’alimentation;
• une modification d’un composant quelconque
de la machine;
• l’emploi de pièces détachées et d’accessoires
non d’origine.
Dans de telles éventualités, la garantie est considérée comme nulle et non avenante.
1.1 Pour faciliter la lecture
Le triangle, symbole de danger, indique
toutes les instructions importantes pour
la sécurité de l’usager. Prière de respecter
scrupuleusement ces avertissements
pour prévenir tout accident grave!
Dans le texte qui suit, le lecteur trouvera des
numéros et des lettres de référence qui le renvoient à des
illustrations, des pièces de l’appareil ou des éléments de
commande (ex. voir fig. 2 de cette section).
Ce symbole met en évidence les informations les plus importantes, pour une
meilleure utilisation de l’appareil.
Les illustrations citées dans le texte se trouvent sur le
volet de la première page. Laisser
cette page ouverte pendant la
lecture du mode d’emploi.
joindre à la machine à café, au cas où un autre personne doit l’utiliser.
Pour plus d’informations ou en cas de problèmes non
envisagés par cette notice ou simplement non suffisamment traités, prière de s’adresser à un Centre
d’Assistance Agréé.
2 CARACTÉRISTIQUES TECHNIQUES
• Tension nominale
Voir plaquette signalétique de l’appareil
• Puissance nominale
Voir plaquette signalétique de l’appareil
• Coque
Thermoplastique (ABS)
• Dimensions (l x h x p) (mm)
390 x 380 x 330
• Poids (kg)
8,7
• Longueur du cordon (mm)
1200
• Panneau de commande
Frontal
• Réservoir d’eau
Amovible
• Alimentation
Voir plaquette signalétique de l’appareil
• Réservoir d’eau (l)
1,7
• Capacité du bac à café (g)
350 de café en grains
• Pression de la pompe (bars)
15
•Chaudière
Acier inox et aluminium
• Dispositifs de sécurité
Soupape de sécurité pression réchauffeur;
thermostat de sécurité.
Sous réserve de modifications de fabrication et
exécution dues au progrès technologique.
1.2 Comment lire ce mode d’emploi
Conserver ce mode d’emploi dans un lieu sûr et le
Machine conforme à la Directive Européenne 89/336/
CEE (Décret législatif 476 du 04/12/92), relative à
l’élimination des perturbations hertziennes.
Page 32

32
NORMES DE SÉCURITÉ
mesures en millimètres
Page 33

NORMES DE SÉCURITÉ
33
3 NORMES DE SÉCURITÉ
Ne jamais mettre les pièces sous tension au contact
de l’eau: danger de courtcircuit! La vapeur et l’eau atteignent une température élevée: danger de brûlures!
Ne jamais diriger le jet de vapeur ou d’eau chaude
vers des parties du corps, toucher le bec vapeur / eau
chaude avec précaution: danger de brûlures!
Usages prévus
Cette machine à café est prévue exclusivement pour
un usage domestique.
Il est interdit d’apporter des modifications techniques
et d’utiliser improprement la machine à cause des
risques que cela comporte!
La machine à café doit être utilisée exclusivement par
des adultes, en possession de toutes leurs facultés
psychiques et physiques.
Alimentation en énergie électrique
Brancher la machine à café uniquement sur une prise
de courant adéquate.
La tension doit correspondre à celle indiquée sur la
plaquette signalétique de l’appareil.
Cordon d’alimentation
Ne jamais utiliser la machine à café si le cordon
d’alimentation est défectueux.
Si le cordon d’alimentation est endommagé, le fabricant
ou son service après-vente doivent le changer.
Ne pas faire passer le cordon d’alimentation là où il
peut s’user par frottement (coins et arêtes vives) et sur
des objets très chauds; le protéger contre l’huile. Ne
pas transporter ou tirer la machine à café en la tenant
par son cordon d’alimentation. Ne pas débrancher
l’appareil en tirant sur le cordon; ne pas toucher la
fiche avec des mains mouillées.
Ne pas laisser le cordon pendre librement d’une table
ou d’une étagère
Protection d’autres personnes
S’assurer qu’aucun enfant n’ait la possibilité de jouer
avec la machine à café. Les enfants ne se rendent
pas compte du danger lié aux électroménagers.
Danger de brûlures
Eviter de diriger le jet de vapeur et/ou d’eau chaude vers
soi ou vers d’autres personnes: danger de brûlures!
Utiliser toujours les leviers ou boutons prévus à cet
effet.
Emplacement
Positionner la machine à café dans un lieu sûr où
personne ne peut la renverser ou se blesser.
Ne pas utiliser la machine à café en plein air.
Ne pas poser la machine sur des surfaces très
chaudes ou à proximité de flammes vives pour éviter
que la carcasse ne fonde ou ne s’abîme.
Nettoyage
Avant de nettoyer la machine, il est indispensable de
positionner le sélecteur (7) sur -0- puis de débrancher
le cordon d’alimentation. Attendre que la machine se
refroidisse. Ne jamais plonger la machine dans l’eau!
Il est sévèrement interdit d’intervenir à l’intérieur de
la machine.
Espace nécessaire pour l’utilisation et la
maintenance
Pour un fonctionnement optimal de la machine à café,
il est conseillé de:
• Choisir un plan d’appui bien plat;
• Choisir un environnement suffisamment éclairé,
propre et avec une prise de courant facile d’accès;
• Prévoir une distance minimale entre le mur et la
machine comme l’indique le dessin.
• La machine ne doit pas être entreposée à des
températures inférieures à 0°C. Le froid pourrait
endommager la machine.
Ranger l’appareil
Si la machine doit rester inutilisée pendant longtemps,
la mettre hors tension et débrancher son cordon
d’alimentation.
Le ranger dans un lieu sec et hors de la portée des
enfants. La protéger de la poussière et des saletés.
Réparations / Maintenance
En cas de pannes ou de défectuosités présumées ou
réelles, après une chute, débrancher immédiatement
le cordon d’alimentation. Ne jamais mettre en marche
un appareil défectueux.
Seuls les Centres d’Assistance Agréés peuvent
Page 34

34
NORMES DE SÉCURITÉ - INSTALLATION
effectuer des interventions et des réparations.
Les réparations doivent être effectuées exclusivement
par un Centre d’Assistance Agréé.
Dans le cas d’interventions non effectuées dans la
règle de l’art, le Fabricant décline toute responsabilité
en cas de dommages.
Normes en cas d’incendie
En cas d’incendie, utiliser des extincteurs à anhydride
carbonique (CO2). Ne pas utiliser d’eau ou d’extincteurs
à poudre.
Description des composants
Bac de café en grains
Couvercle du bac de café en grains
Bouton de réglage de la mouture
Bouton de réglage de la dose
Couvercle du doseur de café moulu
Appui-tasse
Interrupteur général (ON/OFF)
Couvercle du réservoir d’eau
Réservoir d’eau
Bac du marc à café
Cordon d’alimentation
Bac récupérateur + grille
Flotteur niveau du bac récupérateur d’eau
Distributeur de café réglable en hauteur
Bec vapeur / eau chaude
Porte avant
Robinet de vapeur
Distributeur de café
Clé du distributeur de café
Brosse pour le nettoyage
Mesure de café moulu
Panneau de commandei
Bouton de réglage de la quantité de café par tasse
Bouton de distribution de café
LED température / fonction café
Sélecteur de café moulu
LED sélection café moulu
Bouton de sélection fonction Eau chaude
LED de la fonction Eau chaude
LED machine alimentée
LED alarmes
4 INSTALLATION
Pour votre sécurité et celle des autres, suivre
strictement les “Normes de sécurité” reportées
dans la section 3.
4.1 Emballage
L’emballage original a été conçu et réalisé pour
protéger l’appareil pendant l’expédition.
Il est recommandé de le conserver pour un éventuel
futur transport.
4.2 Opérations préliminaires
• Déballer le bac récupérateur (12) et la grille.
• Déballer la machine à café et la déposer à un
endroit qui répond aux conditions prévues par
la réglementation en matière de sécurité (section 3).
• Installer le bac récupérateur (12) dans le logement
de la machine prévu à cet effet; vérifier si le bac
(12), le bac du marc (10) et le distributeur de café
(18) sont installés correctement et si la porte avant
(16) est fermée.
• Fermer le bac de café en grains (1) avec le
couvercle (2). Ranger, à portée de main des futurs
usagers, la brosse (20), la clé du distributeur de
café (19) et la mesure de café moulu (21).
• Avant d’enfoncer le cordon d’alimentation dans la
prise, vérifier si l’interrupteur général (7) est sur la
position -0-.
Si, à la mise sous tension de la machine, la LED
rouge (30) clignote, cela veut dire qu’une des pièces
décrites supra n’est pas bien installée.
Remarque importante: L’usager est prié de
lire la section 14 qui reporte, dans le détail,
l’interprétation de tous les signaux lumineux des
LEDs, situées sur le panneau de commande de
la machine.
4.3 Mise en service
• Soulever le réservoir d’eau (9) pour l’extraire
de la machine et retirer le couvercle (8).
Le rincer et le remplir d’eau froide; il est recommandé
de ne pas dépasser le niveau maximum. Réinstaller
le réservoir dans le logement prévu à cet effet et
reposer le couvercle (8).
Page 35

MOULIN À CAFÉ - RÉGLAGE DE LA DOSE DE CAFÉ
35
Pour remplir le réservoir (9), utiliser exclusi-
vement de l’eau froide non pétillante. De
l’eau chaude et tout autre liquide peuvent abîmer
le réservoir et/ou la machine. Ne pas mettre la machine en marche sans eau: vérifier si le réservoir
contient assez d’eau.
• Retirer le couvercle (2) et remplir le bac de
café en grains (1).
Ne remplir ce bac (1) qu’avec du café en
grains. Du café moulu, lyophilisé ou autres
produits peuvent abîmer la machine.
• Reposer le couvercle (2) sur le bac à café (1).
• Enfoncer la fiche (11) dans une prise adéquate.
• La machine se présente avec l’interrupteur géné-
ral (7) sur la position -0-; pour la mettre sous tension,
presser le bouton (7); la LED (29) du panneau de
commande s’allume.
• Pour charger le circuit, diriger le conduit de
vapeur (15) sur la cuvette d’égouttoir, mettre une
tasse ou un récipient de la bonne grandeur sous
le bec du conduit de vapeur, appuyer sur le bouton
(27), la LED 28 s’allume. Tourner le pommeau dans
le sens contraire des aiguilles d’une montre et
attendre que l’eau coule régulièrement du conduit
de vapeur. Pour fermer l’eau, tourner le pommeau
dans le sens des aiguilles d’une montre.
• Appuyer de nouveau sur le bouton (27) pour
ramener la machine au mode de fonctionnement
normal.
Nota bene: Après une longue période
d’inactivité, avant la première mise en
service ou si le réservoir a été entièrement vidé, il
est recommandé d’amorcer le circuit.
• Ces opérations terminées, la machine est prête à
l’emploi.
• Pour utiliser la machine correctement, c’est-à-dire
pour la distribution de café, eau chaude ou vapeur,
suivre attentivement les instructions suivantes.
5 MOULIN À CAFÉ
Attention! Tourner le bouton de réglage de
la mouture, situé à l’intérieur du bac à café,
uniquement quand le moulin est en marche. Ne pas
remplir le bac de café en grains avec du café moulu
et/ou lyophilisé.
Il est interdit de remplir le bac avec autre
chose que du café en grains. Le moulin
à café contient des organes en mouvement
qui peuvent être dangereux; il est interdit d’y
introduire les doigts et/ou autres objets. Avant
d’intervenir à l’intérieur du bac à café, mettre la
machine hors tension avec l’interrupteur général
et débrancher le cordon d’alimentation. Ne pas
remplir le bac de café en grains quand le moulin
est en marche.
La qualité et le goût du café dépendent non seulement
du mélange utilisé mais aussi de la mouture.
La machine est équipée d’un bouton (3) qui permet
de régler la mouture.
Pour modifier la mouture, tourner le bouton gradué
quand le moulin à café est en marche; les chiffres
reportés sur le bouton correspondent au type de
mouture (haute ou basse).
Tous nos appareils sont réglés en usine sur une
mouture moyenne: si la mouture est trop fine, tourner
le bouton vers un numéro plus grand; si la mouture
est trop grosse, tourner le bouton vers un numéro
plus petit.
Pour goûter une variation dans la mouture, il faut
attendre la distribution de trois ou quatre cafés.
Utiliser des mélanges de café en grains pour machines
expresso. Ne pas utiliser des moutures extrêmes (ex.
1 – 16); dans ce cas, utiliser des mélanges de café
différents. Conserver le café au frais, dans un récipient
hermétiquement fermé.
Régler la mouture si le café ne coule pas très bien.
Si le café sort très rapidement = la mouture est trop
grosse > Régler le bouton sur des numéros plus
bas;
Si le café sort à gouttes ou pas du tout = la mouture
est trop fine > Régler le bouton sur des numéros
plus élevés.
Page 36

36
DISTRIBUTION DE CAFÉ
6 RÉGLAGE DE LA DOSE DE CAFÉ
Cette machine permet de régler la quantité de
café (dose) que l’on souhaite moudre. La dose est
réglée, par le Fabricant, sur une valeur moyenne
qui répond à la plupart des exigences; l’entaille (A)
à hauteur du repère (B). Pour augmenter la dose de
café moulu, tourner le bouton (4), situé à l’intérieur du
bac de café, dans le sens contraire des aiguilles d’une
montre; pour diminuer la dose de café moulu, tourner
le bouton dans le sens des aiguilles d’une montre.
Le réglage de la dose doit être effectué avant de
presser le bouton de distribution du café. Ce système
permet d’obtenir une distribution optimale avec toutes
les catégories de café en vente dans le commerce.
7 DISTRIBUTION DE CAFÉ
Nota bene: Si la machine ne distribue plus
de café, vérifier si le réservoir d’eau n’est
pas vide; le niveau d’eau du réservoir est visible
sur le côté gauche de la machine.
Avant de distribuer du café, vérifier si la
LED de température verte (24) est allumée
dans le mode continu et si le réservoir d’eau et le
bac à café sont remplis.
• Poser 1 ou 2 tasses sous les becs du distri-
buteur (14); la hauteur du distributeur peut être
réglée de manière à mieux s’adapter aux tasses.
• Le distributeur peut être déplacé pour per-
mettre l’utilisation de tasses plus grandes.
Pour utiliser des grandes tasses, il suffit de pousser
le distributeur à la main vers le haut jusqu’au fin
de course (dans ce cas, utiliser une seule tasse à
la fois); pour placer le distributeur dans la position
idéale à l’utilisation de petites tasses, tirer sur le
distributeur le plus à l’extérieur possible et vérifier
s’il est bien bloqué.
• Régler la quantité de café à verser dans la tasse
avec le bouton (22): pour augmenter la quantité de
café à verser, le tourner dans le sens des aiguilles
d’une montre; pour diminuer la quantité, le tourner
dans le sens contraire des aiguilles d’une montre.
Nota bene: quand le flotteur (13) se sou-
lève, il est recommandé de vider le bac
récupérateur d’eau.
7.1 Distribution à partir de café en grains
• Pour faire couler le café, presser le bouton (23):
le cycle de distribution démarre. pour distribuer 1
café, presser une seule fois le bouton (23); pour
distribuer 2 cafés, presser le bouton (23) deux fois
de suite.
Dans ce mode de fonctionnement, la
machine se charge automatiquement de
moudre et doser la juste quantité de café; la
préparation de deux cafés demande deux cycles
de mouture et deux cycles de distribution, gérés
de manière automatique par la machine.
• Le cycle de pré-infusion terminé, le café commencera
à sortir par le bec verseur (14).
• La distribution du café s’arrête automatiquement
dès que le niveau choisi avec le bouton (22) est
atteint; il est toutefois possible d’interrompre la
distribution de café à tout moment, en pressant le
bouton (23).
7.2 Distribution à partir de café moulu
Introduire dans le doseur (5) uniquement
du café moulu pour machines expresso;
le café en grains, lyophilisé et autres produits
abîment la machine.
Il est interdit de mettre les doigts à l’intérieur
du doseur de café moulu: organes en
mouvement.
• Pour prendre la juste quantité de café moulu, à
introduire dans le doseur, utiliser uniquement la
mesure (21) fournie avec la machine.
Introduire une seule mesure de café moulu
à la fois; pour obtenir deux cafés, il faut
effectuer deux cycles séparés l’un après l’autre.
• Presser le bouton (25) pour sélectionner la fonction;
la LED (26) s’allume.
• Soulever le couvercle du doseur de café mou-
lu (5).
• Prendre, avec la mesure (21), une dose de café;
éliminer le surplus de café moulu de la mesure.
Page 37

DISTRIBUTION D’EAU CHAUDE - DISTRIBUTION DE VAPEUR
37
• Vider le café moulu à l’intérieur du doseur.
• Fermer le couvercle (5).
• Pour faire couler le café, presser le bouton (23): le
cycle de distribution démarre.
• Le cycle de pré-infusion terminé, le café commencera
à sortir par le bec verseur (14).
• La distribution du café s’arrête automatiquement
dès que le niveau choisi avec le bouton (22) est
atteint; il est toutefois possible d’interrompre la
distribution de café à tout moment, en pressant le
bouton (23).
• Ensuite, la machine retourne automatiquement au
fonctionnement normal (voir par. 7.1).
8 DISTRIBUTION D’EAU CHAUDE
Attention! au début, de petits jets d’eau
chaude peuvent s’échapper du bec: danger
de brûlures. Le bec du distributeur peut être
extrêmement chaud: ne jamais le toucher à
mains nues.
• Avant la distribution d’eau chaude, vérifier si la LED
de température verte (24) est allumée.
Quand la LED est allumée, la machine est prête à
distribuer du café; procéder comme suit:
• Appuyer sur le bouton (27), la LED (28) s’allume.
Poser une tasse et/ou un récipient en dessous du
bec eau chaude / vapeur (15).
• Ouvrir le robinet (17) dans le sens contraire
des aiguilles d’une montre.
• Prendre la quantité d’eau chaude souhaitée;
pour arrêter la distribution d’eau chaude, tourner
le robinet (17) dans le sens des aiguilles d’une
montre.
• Appuyer de nouveau sur le bouton (27) pour
ramener la machine au mode de fonctionnement
normal. La LED (28) s’éteint.
9 DISTRIBUTION DE VAPEUR /
PRÉPARATION DU CAPPUCCINO
La vapeur sert à faire mousser le lait pour le cappuccino mais elle peut aussi être utilisée pour
réchauffer toutes sortes de boissons.
Danger de brûlures! Au début de la distri-
bution, de petits jets d’eau chaude peuvent
s’échapper du bec. Le tube peut atteindre une
très haute température. ne jamais le toucher à
mains nues.
• Avant de faire fonctionner la production de
vapeur, vérifier que la LED (24), qui indique que
la température est prête, soit allumée et fixe. La
machine est aussitôt prête pour la production de
la vapeur.
• Diriger le bec vapeur (15) sur le bac récupérateur,
ouvrir le robinet (17) «Eau chaude/vapeur» le temps
de faire couler l’eau résiduelle du bec vapeur; très
vite, de la vapeur commencera à sortir.
• Fermer le robinet (17).
• Remplir, avec du lait froid, 1/3 du récipient utilisé
pour préparer le cappuccino.
Pour obtenir un meilleur résultat, le lait
et la tasse utilisés dans la préparation du
cappuccino doivent être froids.
• Plonger le tube vapeur dans le lait à réchauffer
et ouvrir le robinet (17); faire tourner le récipient
lentement du bas vers le haut pour faire mousser
le lait de manière uniforme.
• Après avoir utilisé la vapeur le temps souhaité,
fermer le robinet (17).
• Le même système peut être utilisé pour réchauffer
d’autres boissons.
Après cette opération, nettoyer le bec vapeur avec
un chiffon humide.
Vous pouvez aussitôt faire du café et le mélanger
au lait, passé à la vapeur, pour obtenir un véritable
cappuccino à l’italienne.
10 NETTOYAGE ET MAINTENANCE
Nettoyage général
• Pour la maintenance et le nettoyage, la machine doit
être froide et débranchée de la ligne d’alimentation
en énergie électrique.
• Ne pas plonger pas la machine dans l’eau et ne
pas laver ses composants dans un lave-vaisselle.
• Ne pas utiliser d’objets pointus ou de produits
chimiques agressifs (solvants) pour le nettoyage.
Page 38

38
NETTOYAGE ET MAINTENANCE - DÉTARTRAGE
Il est recommandé de nettoyer chaque jour le
réservoir d’eau:
- Extraire le filtre (C) situé à l’intérieur du réservoir
et le nettoyer avec de l’eau courante portable.
- Reposer le filtre (C) dans son logement et le
faire tourner doucement en exerçant une légère
pression.
- Remplir le réservoir avec de l’eau froide
potable.
Nettoyer chaque jour le doseur de café moulu,
si utilisé:
- Avec le pinceau fourni avec la machine, nettoyer
le doseur.
• Pour le nettoyage de l’appareil, utiliser un chiffon
doux, imbibé d’eau.
• Ne pas sécher la machine et/ou ses composants
dans un four à microondes et/ou un four conventionnel.
• Nettoyer le logement de service et le distributeur; il est recommandé de vider chaque jour le
bac du marc (10).
• Le distributeur de café (14) peut être démonté pour
le nettoyage. Rincer soigneusement les conduits de
distribution avec de l’eau chaude.
10.1 Groupe distributeur
• Le distributeur (18) doit être nettoyé à chaque
remplissage du bac à café ou au moins une fois
par semaine.
• Mettre la machine hors tension avec l’interrupteur
(7) sur la position -0- et la débrancher.
• Extraire le bac du marc (10) et le bac
récupérateur (12); ouvrir ensuite la porte de service (16).
• Extraire le groupe distributeur (18) en le
tenant par la poignée prévue à cet effet et en
pressant la touche “PRESS”. Le distributeur peut
être lavé uniquement avec de l’eau chaude sans
détergent.
• Vérifier si les deux filtres en acier sont propres
sans résidus de café. Pour démonter le filtre
supérieur, dévisser, dans le sens contraire des
aiguilles d’une montre, la cheville en plastique avec
la clé (19) fournie avec la machine.
• Laver et sécher soigneusement toute les pièces du
distributeur.
• Remonter le filtre et revisser avec soin la cheville
en plastique en utilisant la clé prévue à cet effet.
• Nettoyer soigneusement le logement.
• Remettre en place le distributeur en le tenant
par la poignée prévue à cet effet.
• Fermer ensuite la porte, remettre en place le bac
du marc et le bac récupérateur.
11 DÉTARTRAGE
Avec le temps, du calcaire se forme à l’intérieur de
l’appareil; nettoyer l’appareil des dépôts de calcaire
quand on observe une réduction du débit d’eau ou
encore tous les 3-4 mois.
Si vous souhaitez l’effectuer person-
nellement, vous pouvez utilisez un produit
de détartrage pour machines à café de type non
toxique et/ou nocif, en vente libre.
Attention! N’utilisez jamais de vinaigre
comme produit détartrant.
• Mélanger le détartrant à de l’eau comme spécifié
sur l’emballage du produit détartrant et remplir le
réservoir d’eau.
• Mettre la machine sous tension avec l’interrupteur
général (7).
• D iri g er le be c vap e ur (15) sur le bac
récupérateur.
• Appuyez sur le bouton (27), la LED (28) s’allume.
• Vider tout le contenu du réservoir d’eau
une tasse à la fois en tournant le robinet de la
vapeur (17) dans le sens contraire des aiguilles
d’une montre; pour arrêter la distribution, tourner
le bouton (17) dans le sens des aiguilles d’une
montre.
• Appuyer de nouveau sur le bouton (27) pour
ramener la machine au mode de fonctionnement
normal. La LED (28) s’éteint.
• Entre deux tasses, laisser agir la solution pendant
environ 10-15 minutes; mettre la machine hors
tension avec l’interrupteur général (7) sur -0-.
• La solution détartrante terminée, rincer le réservoir
d’eau et le remplir avec de l’eau froide.
• Mettre la machine sous tension avec l’interrupteur
général.
• Appuyez sur le bouton (27), la LED (28) s’allume.
• Vider 2/3 du contenu du réservoir d’eau
Page 39

INFORMATIONS DE NATURE JURIDIQUE - MISE À LA DÉCHARGE
39
en tournant le robinet vapeur (17) dans le sens
contraire des aiguilles d’une montre; pour arrêter
la distribution, tourner le robinet (17) dans le sens
des aiguilles d’une montre.
• Laisser la machine chauffer et vider le reste du
réservoir d’eau en tournant le robinet vapeur (17)
dans le sens contraire des aiguilles d’une montre;
pour arrêter la distribution, tourner le robinet (17)
dans le sens des aiguilles d’une montre.
• Appuyer de nouveau sur le bouton (27) pour
ramener la machine au mode de fonctionnement
normal
Si vous utilisez un produit différent du
produit préconisé, il est recommandé de
respecter les instructions du fabricant, reportées
sur l’emballage du produit détartrant.
12 INFORMATIONS DE NATURE
JURIDIQUE
• Ce mode d’emploi contient toutes les informations
nécessaires pour pouvoir utiliser correctement
l’appareil, connaître ses fonctions et en effectuer
la maintenance.
• Le respect du mode d’emploi et des instructions
sur la maintenance est une condition fondamentale
d’une utilisation sans danger et en toute sécurité
de l’appareil.
Pour plus d’informations ou si l’usager rencontre un
problème pour lequel cette notice ne fournit pas une
aide suffisante, prière de s’adresser au revendeur
ou directement au Fabricant.
• Nous rappelons également que ces instructions
ne font partie d’aucune convention préalable ou
préexistante, d’aucun accord ou contrat légal et que
dans l’éventualité d’un accord entre le Fabricant et
l’Acheteur, elles ne changent en rien la teneur de
celui-ci.
• Toutes les obligation du Fabricant se basent sur le
contrat de vente qui contient le règlement complet
et exclusif des conditions de la garantie.
• Les remarques énoncées supra ne limitent, ni éten-
dent, les conditions de garantie contractuelles.
• Le mode d’emploi contient des informations qui sont
protégées par les droits d’auteur.
• Il ne peut donc être ni photocopié, ni traduit dans
une autre langue sans l’autorisation préalable et
écrite du Fabricant.
13 MISE À LA DÉCHARGE
• Mettre hors d’usage l’appareil hors service.
• Débrancher l’appareil de la ligne et couper le cordon
d’alimentation.
• Mettre l’appareil à la décharge conformément à la
réglementation en vigueur.
Page 40

40
TÉMOINS DU PANNEAU DE COMMANDE
14 TÉMOINS DU PANNEAU DE COMMANDE
Signalisations Causes Remèdes
Temoin vert (29)
Temoin vert (24) mode continu
Temoin vert (24) mode clignotant
Temoin vert (26) mode continu
Temoin vert (28) mode continu
Temoin vert (24) mode clignotant
Temoin vert (26) mode clignotant
Temoin vert (28) mode clignotant
simultanement
Temoin rouge (30) mode continu
Temoin rouge (30) mode clignotant
Machine alimentée
Température atteinte:
- pour la distribution de café
- pour la production de vapeur.
Machine en cours de réchauffement
pour la préparation de café, d’eau
chaude et de vapeur.
La machine est dans le mode
distribution avec café moulu
Machine prête pour la production
de l’eau chaude.
La machine a produit la quantité
maximale d’eau pour chaque
tirage.
Le réservoir n’a plus assez d’eau Remplir le réservoir avec de l’eau
Le bac à café est vide Remplir le bac avec du café en
La position du distributeur ou du
bac à marc ou du bac récupérateur
ou de la porte avant n’autorise pas
le fonctionnement de la machine
Fermer le pommeau de vapeur/eau
chaude. Pour obtenir plus d’eau,
ouvrir de nouveau le pommeau.
froide potable, amorcer le circuit et
recommencer
grains et recommencer
Pour éteindre le témoin rouge,
vérifier si tous ces composants
sont correctement installés ou
fermés
Page 41

SYMPTÔME - CAUSES - REMÈDE
Problèmes Causes possibles Remèdes
La machine ne s’allume pas La machine n’est pas reliée à la
ligne d’alimentation électrique
La porte de service est ouverte Fermer la porte
Le café n’est pas assez chaud Les tasses sont froides Chauffer les tasses
L’eau chaude ou la vapeur ne
sort pas
Le café ne mousse pas Le mélange ne convient pas ou
La machine se réchauffe trop lentement ou la quantité d’eau qui sort
du bec est insuffisante
Le distributeur ne peut être démonté
Le café ne sort pas Le réservoir d’eau est vide Remplir le réservoir d’eau et
Le café coule lentement La dose est haute Diminuer la dose (voir sect. 6)
Le café sort à l’extérieur du distributeur
L’orifice du bec vapeur e s t
colmaté
le café n’a pas été fraîchement
torréfié ou encore la mouture est
trop grosse
Le circuit de la machine est colmaté
par des dépôts de calcaire
Le distributeur est mal mis Mettre la machine sous tension.
Le bac à marc est installé Extraire le bac à marc avant d’ex-
Le distributeur est sale Nettoyer le distributeur (voir sec-
La dose est haute Diminuer la dose (section 6)
Le circuit n’est pas amorcé Réamorcer le circuit (voir sec-
Le café est trop fin Changer de mélange de café ou
Le circuit n’est pas amorcé Réamorcer le circuit (voir sec-
Le distributeur est sale Nettoyer le distributeur (voir se-
Le distributeur n’est pas dans la
bonne position
Le distributeur est colmaté Nettoyer le distributeur et les ori-
Relier la machine à la ligne
Nettoyer l’orifice du bec vapeur
avec une aiguille
Changer de mélange de café ou
régler la mouture (voir section
5). Augmenter la dose (voir section 6)
Détartrer la machine
Fermer la porte de service. Le
distributeur retourne automatiquement à sa position d’origine
traire le distributeur
réamorcer le circuit (voir section
4.3)
tion 10.1)
tion 4.3)
régler la mouture (sect. 5).
Diminuer la dose (sect. 6)
tion 4.3)
ction 10.1)
Remettre le distributeur dans la
bonne position.
fices par où sort le café.
41
Si vous ne trouvez pas la description du symptôme que vous recherchez ou si le remède conseillé est
inefficace, veuillez vous adressez à un Centre d’Assistance Agréé.
Page 42

42
WICHTIGE
VORSICHTSMASSNAHMEN
Bei der Verwendung von Elektrogeräten empfiehlt es sich, sich
an einige Vorsichtsmaßnahmen zu halten, um die Gefahr von
Brand, elektrischen Schlägen und Unfällen einzuschränken.
1 Alle in diesem oder jedem anderen in der Verpackung
enthaltenen Heft angegebenen Anweisungen und
Informationen aufmerksam durchlesen, ehe die Es-
pressomaschine eingeschaltet oder benutzt wird.
2 Keine heißen Flächen berühren.
3 Netzkabel, Stecker oder den Maschinenkörper nicht in
Wasser oder andere Flüssigkeit tauchen, um Brand,
elektrische Schläge und Unfälle zu vermeiden.
4 Im Beisein von Kindern die Espressomaschine mit
besonderer Vorsicht handhaben.
5 Den Stecker aus der Steckdose ziehen, sobald die
Maschine nicht mehr benutzt wird oder gereinigt wird.
Bevor Teile entnommen oder eingesetzt werden sowie
vor der Reinigung die Maschine abkühlen lassen.
6 Keine kaputten oder defekten Geräte oder Geräte mit
beschädigtem Netzkabel oder –stecker verwenden Das
schadhafte Gerät beim nächsten Händler oder Kun-
dendienst prüfen, reparieren oder neu einstellen lassen.
7 Die Verwendung nicht vom Hersteller empfohlenen Zubehörs
kann Brand, elektrische Schläge und Unfälle verursachen.
8 Die Espressomaschine nicht im Freien verwenden.
9 Das Kabel darf nicht vom Tisch herunterhängen oder
heiße Flächen berühren.
10 Die Espressomaschine nicht in der Nähe von heißen
Küchenherden oder Backöfen verwenden.
11 Prüfen, ob die Maschine sich in Stellung „0” befindet,
bevor man den Stecker einsteckt. Zum Ausschalten auf
„0” stellen, dann den Stecker aus der Steckdose ziehen.
12 Die Maschine nur im Haushalt verwenden.
13 Bei Verwendung von heißem Dampf mit äußerster
Vorsicht verfahren.
DIESE ANWEISUNGEN GUT
AUFBEWAHREN
HINWEISE
Diese Espressomaschine wurde ausschließlich für
den Haushalt entwickelt. Sämtliche Eingriffe mit
Ausnahme der Reinigung oder normalen Wartung dürfen
ausschließlich durch den autorisierten Kundendienst
vorgenommen werden. Das Gerät nicht in Wasser
tauchen. Reparaturen dürfen nur durch Fachpersonal des
autorisierten Kundendienstes erfolgen.
1 Sicherstellen, dass die auf dem Datenschild des
Geräts angegebene Spannung mit der Ihres
Netzanschlusses übereinstimmt.
2 Nie lauwarmes oder heißes Wasser in den Wasserbehälter
füllen. Ausschließlich kaltes Wasser verwenden.
3 Während des Betriebs nie die heißen Teile oder das
Netzkabel der Maschine berühren.
4 Keine Schleif- oder Scheuermittel zum Reinigen ver-
wenden. Es genügt ein weicher Lappen mit Wasser.
5 Zur Vermeidung von Kalkablagerungen kohlen-
säurefreies Mineralwasser verwenden.
BETRIEBSANLEITUNGEN
ZUM NETZKABEL
A Das mitgelieferte Netzkabel ist relativ kurz, damit es
sich nicht verdrehen kann oder Sie darüber stolpern.
B Längere Netzkabel können verwendet werden, doch
sollte man dabei mit grösste Vorsicht vorgehen.
C Sollte ein längeres Netzkabel verwendet werden,
folgendes überprüfen:
1 dass die auf der Verlängerungsschnur vermerkte
Spannung mindestens der des Elektrogerätes
entspricht;
2 dass es einen Stecker mit drei Stiften (Erdung)
hat, falls das Netzkabel des Elektrogerätes
ebenfalls drei hat;
3 Das Netzkabel darf nicht am Tisch herunterhängen;
Sie könnten darüber stolpern.
Page 43

ALLGEMEINES - TECHNISCHE DATEN
43
1 ALLGEMEINES
Diese Kaffeemaschine ist für die Zubereitung von
Espressokaffee konzipiert, wobei sowohl ganze
Kaffeebohnen als auch vorgemahlener Kaffee verwendet werden kann; sie verfügt über eine Dampfund Heißwasserdüse. Die Maschine mit elegantem
Design ist ausschließlich für den privaten und nicht
den professionellen Dauerbetrieb bestimmt.
Achtung. In den folgenden Fällen wird jede
Verantwortung seitens des Herstellers
verweigert:
• Unsachgemäßer und nicht vom Hersteller vorgesehener Einsatz der Maschine;
• Reparaturen, die nicht von den autorisierten
Servicestellen durchgeführt wurden;
• Änderungen am Netzkabel;
• Änderungen an irgendwelchen Bauteilen der
Maschine;
• Benutzung von nicht originalen Ersatz- und
Zubehörteilen.
In all diesen Fällen erlischt die Garantie.
1.1 Benutzungshinweise
Alle für die Sicherheit des Benutzers
wichtigen Hinweise sind mit einem Warndreieck gekennzeichnet. Diese Hinweise
sind strengstens zu beachten, um
schwere Verletzungen zu vermeiden!
Hinweise auf Abbildungen, Geräte- und Bedienelemente erfolgen durch Ziffern und Buchstaben, wie
zum Beispiel der Hinweis auf Abbildung 2 dieses
Abschnittes.
Mit diesem Symbol werden Informationen
gekennzeichnet , auf die besonders
geachtet werden muss und die die Leistung der
Maschine verbessern.
1.2 Gebrauch dieser Bedienungsanleitung
Bewahren Sie diese Bedienungsanleitung an einem
sicheren Platz auf und legen Sie sie der Maschine
immer bei, wenn sie von anderen Personen benutzt
wird. Für weitere Fragen oder bei Problemen,
die nicht ganz oder im Detail in der vorliegenden
Bedienungsanleitung beschrieben sind, wenden Sie
sich bitte an die zuständigen Servicestellen.
2 TECHNISCHE DATEN
• Nennspannung
Siehe Typenschild auf dem Gerät
• Nennleistung
Siehe Typenschild auf dem Gerät
• Material
Thermoplastik
• Abmessungen (L x H x T) (mm)
390 x 380 x 330
• Gewicht (kg)
8,7
• Kabellänge (mm)
1200
• Bedienfeld
Frontal
• Wassertank
Abnehmbar
• Stromversorgung
Siehe Typenschild auf dem Gerät
• Wassertank (l)
1,7
• Fassungsvermögen Kaffeebehälter (g)
350 g Bohnenkaffee
• Pumpenleistung (bar)
15
•
Durchlauferhitzer
Edelstahl und Aluminium
• Sicherheitsvorrichtungen
Sicherheitsventil; Überhitzungsschutz.
Die Abbildungen, die sich auf den Text beziehen,
befin-den sich auf der aufklappbaren Rückseite
des Deckblatts. Diese Seite
ist während des Lesens der
Bedienungsanleitung immer
offen zu halten.
Technische Änderungen der Konstruktion und
Ausführung sind aufgrund von Weiterentwicklungen
der Maschine vorbehalten.
Die Maschine entspricht der europäischen Richtlinie
89/336/CEE (Gesetzesdekret 476 vom 04.12.92), über
die Funkentstörung.
Page 44

44
SICHERHEITSVORSCHRIFTEN
Maße in Milimeter
Page 45

SICHERHEITSVORSCHRIFTEN
45
3 SICHERHEITSVORSCHRIFTEN
Die unter Spannung stehenden Bauteile dürfen nie
mit Wasser in Kontakt kommen: Kurzschlussgefahr!
Heißer Dampf und heißes Wasser können zu
Verbrennungen führen! Nie den Dampfstrahl auf
Körperteile richten. Die Dampf-/Heißwasserdüse
immer vorsichtig anfassen: Verbrennungsgefahr!
Sachgemäßer Einsatz der Maschine
Die Espressomaschine darf nur für den Hausgebrauch
verwendet werden. Technische Änderungen bzw. ein
unsachgemäßer Gebrauch sind verboten, da dies zu
Risiken führen kann! Die Espressomaschine darf nur
von Erwachsenen in guter körperlicher und geistiger
Verfassung benutzt werden.
Stromversorgung
Die Espressomaschine nur an eine Steckdose mit
der richtigen Spannung anschließen. Die Spannung
muss mit derjenigen übereinstimmen, die auf dem
Typenschild angegeben ist.
Netzkabel
Die Espressomaschine niemals benutzen, wenn
das Netzkabel defekt ist. Wenn das Netzkabel
beschädigt ist, muss es vom Hersteller oder dessen
Kundendienst ausgewechselt werden. Das Netzkabel
nicht stark biegen oder um scharfe Kanten oder
auf heiße Gegenstände legen; vor Öl schützen.
Die Espressomaschine nie am Netzkabel anheben
oder ziehen. Den Stecker nicht am Kabel aus der
Steckdose ziehen und den Stecker nicht mit nassen
Händen berühren. Das Netzkabel nicht frei von
Tischen oder Regalen hängen lassen.
Schutz dritter Personen
Sicherstellen, dass Kinder keine Möglichkeit haben,
mit der Espressomaschine zu spielen. Kinder können
die Gefahren nicht erkennen, die von einem solchen
Elektrogerät ausgehen.
Verbrennungsgefahr
Den Dampf- bzw. Heißwasserstrahl niemals auf sich
selbst oder andere richten: Verbrennungsgefahr!
Immer die entsprechenden Griffe und Drehknöpfe
verwenden.
Aufstellung
Die Espressomaschine an einem sicheren Ort
aufbewahren, wo sie niemand umstoßen oder sich
daran verletzen kann. Die Espressomaschine nie
im Freien verwenden. Die Espressomaschine nie
auf heiße Oberflächen und in die Nähe von offenem
Feuer stellen, da das Gehäuse sonst schmelzen oder
auf andere Art beschädigt werden könnte.
Reinigung
Bevor man die Espressomaschine reinigt, muss die
Taste (7) auf -0- gestellt und dann der Stecker aus der
Steckdosegezogen werden.
Dann warten, bis die Espressomaschine abgekühlt ist.
Die Espressomaschine niemals ins Wasser tauchen!
Es ist strengstens verboten, Änderungen im Innern
der Espressomaschine vorzunehmen.
Aufstellort und Wartung
Für die ordnungsgemäße und optimale Funktion der
Espressomaschine empfehlen wir folgendes:
• Eine ebene Aufstellungsfläche wählen;
• Einen gut beleuchteten Aufstellort wählen; er
sollte darüber hinaus hygienisch sein und eine gut
zugängliche Steckdose aufweisen;
• Immer einen Mindestabstand zu den Seitenwänden
der Espressomaschine einhalten wie in der Abbildung gezeigt.
• Die Maschine keinen Temperaturen unter 0°C
aussetzen; es besteht Gefahr, dass der Frost die
Maschine beschädigt.
Aufbewahren der Maschine
Wenn die Espressomaschine für einen längeren Zeitraum nicht benutzt wird, so muss man sie ausschalten
und den Netzstecker aus der Steckdose ziehen.
Die Maschine an einem trockenen Ort aufbewahren,
zu dem Kinder keinen Zugang haben.
Vor Staub und Schmutz schützen.
Reparaturen / Wartung
Bei Schäden, Defekten oder dem Verdacht auf
Defekte nach einem Sturz der Maschine sofort das
Netzkabel aus der Steckdose ziehen. Niemals eine
defekte Espressomaschine in Betrieb nehmen.
Nur die autorisierten Servicestellen dürfen Arbeiten
und Reparaturen vornehmen.
Die Reparaturen müssen ausschließlich von auto-
Page 46

46
SICHERHEITSVORSCHRIFTEN - INSTALLATION
risierten Servicestellen ausgeführt werden.
Sollten Eingriffe von nicht autorisierten Servicestellen
vorgenommen worden sein, wird jegliche Haftung für
eventuelle Schäden abgelehnt.
Brandschutz
Im Falle eines Brandes sind nur Feuerlöscher mit
Kohlendioxyd (CO2) zu verwenden. Niemals Wasser
oder Trockenlöscher verwenden.
Legende der Bauteile der Maschine
Kaffeebohnenbehälter
Deckel Kaffeebohnenbehälter
Drehknopf zur Einstellung der Mahlstufe
Drehknopf zur Einstellung der Kaffeepulverportion
Deckel Einfüllschacht für Kaffeepulver
Tassenablage
Hauptschalter (EIN/AUS)
Wassertankdeckel
Wassertank
Kaffeesatzbehälter
Netzkabel
Abtropfschale und Abtropfgitter
Schwimmer Abtropfschale
Höhenverstellbarer Kaffeeauslauf
Heißwasser-/Dampfdüse
Servicetür
Dampfdrehknopf
Brühgruppe
Schlüssel für Brühgruppe
Reinigungsbürste
Messlöffel für Kaffeepulver
Bedienfeld
Drehknopf für die Regulierung der Füllmenge
in der Tasse
Taste Kaffeezubereitung
Kontrollleuchte Temperatur erreicht / Kaffee-
funktion
Wählschalter Kaffeepulver
Kontrollleuchte Kaffeepulver gewählt
Wählschalter Funktion Heißwasser
Kontrollleuchte Funktion Heißwasser
Kontrollleuchte Maschine eingeschaltet
Kontrollleuchte Alarmanzeige
4 INSTALLATION
Für die eigene Sicherheit und die Sicherheit anderer Personen muss man sich strengstens an die
Sicherheitsvorschriften im Kap. 3 halten.
4.1 Verpackung
Die Originalverpackung ist für den Schutz der Maschine
beim Transport gedacht und konzipiert.
Sie sollte deshalb für eventuelle spätere Transporte
aufbewahrt werden.
4.2 Vorbereitende Schritte
• Abtropfschale (12) mit Abtropfgitter aus der Verpackung nehmen.
• Die Espressomaschine aus der Verpackung
nehmen und an einem geeigneten Ort aufstellen,
der den Anforderungen der Sicherheitsvorschriften
(Kap.3.) entspricht.
• Die Abtropfschale (12) in die Maschine einsetzen;
sicherstellen, dass die Abtropfschale, der Kaffeesatzbehälter (10) und die Brühgruppe (18) ordnungsgemäß eingesetzt sind und die Servicetür
(16) geschlossen ist.
• Den Deckel (2) auf den Kaffeebohnenbehälter (1)
setzen. Den Reinigungspinsel (20), den Schlüssel
für die Brühgruppe (19) sowie den Messlöffel (21)
griffbereit aufbewahren.
• Bevor man das Netzkabel an die Steckdose
anschließt, ist sicherzustellen, dass der Hauptschalter (7) auf -0- steht.
Sollte beim Einschalten der Maschine die rote
Kontrollleuchte (30) blinken, so bedeutet dies, dass
ein Bestandteil nicht richtig eingesetzt ist.
Wichtiger Hinweis: Es ist wichtig, das
Kapitel 14 zu lesen, wo die Bedeutung aller
Anzeigen genau erklärt wird, die die Maschine
dem Benutzer mit den Kontrollleuchten auf dem
Bedienfeld liefert.
4.3 Erste Inbetriebnahme
• Den Wassertank (9) durch Anheben heraus-
nehmen und den Deckel (8) abnehmen.
Mit frischem Wasser ausspülen und füllen. Es
empfiehlt sich, den Tank nicht allzu sehr zu füllen.
Den Tank wieder in seinen Sitz einsetzen und den
Deckel (8) aufsetzen.
Page 47

INSTALLATION - KAFFEEMÜHLE
47
Den Wassertank (9) immer und ausschließlich
mit kaltem Wasser, nie mit kohlesäurehaltigem
Wasser füllen. Heißes Wasser bzw. andere
Flüssigkeiten können den Tank bzw. die Maschine
beschädigen. Die Maschine nie ohne Wasser
betreiben: immer sicherstellen, dass sich genügend
Wasser im Tank befindet.
• Den Deckel (2) abnehmen und Kaffeebohnen
in den Behälter (1) füllen.
In den Behälter (1) immer und ausschließlich
Kaf f e e bohnen geben. Kaffeepulver,
gefriergetrockneter Kaffee oder anderes können
zu Schäden an der Maschine führen.
• Den Deckel (2) wieder auf den Kaffeebohnen-
behälter (1) setzen.
• Den Stecker (11) in eine geeignete Steckdose
stecken.
• Die Maschine wird mit dem Hauptschalter (7) auf -0-
ausgeliefert. Zum Einschalten der Maschine muss
man nur den Schalter (7) drücken; nun leuchtet die
grüne Kontrollleuchte (29) auf.
• Um die Leitungen zu füllen, das Dampfrohr
(15) auf die Abtropfschale richten, eine Tasse oder
einen geeigneten Behälter unter die Düse des
Dampfrohrs stellen und den Knopf (27) drücken;
die LED 28 leuchtet auf.
Den Knopf gegen den Uhrzeigersinn drehen und
warten, bis Wasser gleichmäßig aus dem Dampfrohr
austritt; zum Unterbrechen der Wasserabgabe den
Knopf im Uhrzeigersinn drehen.
• Erneut Knopf (27) drücken, um die Maschine wieder
in den normalen Betriebsmodus zu versetzen.
Hinweis: Vor der ersten Inbetriebnahme,
nach längerem Stillstand oder nach einem
kompletten Entleeren muss der Wasserkreislauf der
Maschine wieder aufgefüllt werden.
• Nach Beenden der obengenannten Schritte ist die
Maschine betriebsbereit.
• Um Kaffee zuzubereiten oder Dampf oder Wasser
herauszulassen und die Maschine ordnungsgemäß
bedienen zu können, muss man sich genauestens
an diese Bedienungsanleitung halten.
5 KAFFEEMÜHLE
Achtung! Der Drehknopf zur Regulierung
der Mahlstufe, der sich im Kaffeebehälter
befindet, darf nur betätigt werden, wenn die
Kaffeemühle in Betrieb ist. Keinen gemahlenen
bzw. gefriergetrockneten Kaffee in den Kaffeebohnenbehälter füllen.
Es ist verboten, irgendwelche Materialien außer
Kaffeebohnen in die Kaffeemühle zu füllen. In
der Kaffeemühle befinden sich bewegliche Teile, die
gefährlich sein können; auf keinen Fall die Finger
bzw. irgendwelche Gegenstände in die Kaffeemühle
stecken. Bevor Sie aus einem beliebigen Grund
irgendeinen Eingriff im Kaffeebehälter durchführen,
muss die Maschine durch den Hauptschalter
ausgeschaltet und der Stecker aus der Steckdose
gezogen werden. Keine Kaffeebohnen nachfüllen,
wenn die Kaffeemühle in Betrieb ist.
Die Qualität und der Geschmack des Kaffees hängen
einerseits von der verwendeten Kaffeemischung,
andererseits aber auch von der Mahlstufe ab. Die
Maschine verfügt über einen Drehknopf (3) für
die Regulierung der Mahlstufe. Zum Nachstellen
der Mahlstufe, dreht man den Knopf, wenn die
Kaffeemühle lauft; die Zahlen auf dem Knopf geben
die Mahlstufe an.
Jede Maschine ist werksseitig auf eine mittlere
Mahlstufe eingestellt; durch Drehen des Knopfes auf
die niedrigeren Zahlen wird die Mahlstufe verringert,
durch Drehen des Knopfes auf höhere Nummern wird
die Mahlstufe erhöht.
Die Veränderung der Mahlstufe wird erst nach
dem Zubereiten von drei bis vier Tassen Kaffee
feststellbar.
Kaffeebohnenmischungen für Espressomaschinen
verwenden. Extreme Mahlstufen (z.B. 1 - 16) sollten
vermieden werden, man sollte dann besser eine
andere Kaffeebohnenmischung verwenden. Den
Kaffee an einem kühlen Ort hermetisch verschlossen
aufbewahren.
Die Mahlstufe muss nachgestellt werden, falls der
Kaffee nicht optimal zubereitet wird:
zu schnelle Zubereitung = zu grobe Mahlstufe > Den
Page 48

48
EINSTELLUNG DER KAFFEEPULVERPORTION - KAFFEEZUBEREITUNG
Drehgriff auf die niedrigeren Zahlen einstellen;
tröpfelnde oder ganz ausbleibende Zubereitung =
zu feine Mahlstufe > Den Drehgriff auf die höheren
Zahlen einstellen.
6 EINSTELLUNG DER KAFFEE
PULVERPORTION
In der Maschine kann die zu mahlende Kaffeemenge (Portion) eingestellt werden.
Die Portion ist werksseitig auf eine mittlere Menge
eingestellt, die die meisten Anforderungen erfüllt,
Kerbe (A) auf dem Bezugspunkt (B).
Durch Drehen im Gegenuhrzeigersinn des Knopfes (4) im Kaffeebehälter wird die Portion gemahlenen
Kaffees größer, durch Drehen im Uhrzeigersinn wird
sie kleiner.
Die Portioneneinstellung muss vor dem Betätigen
der Taste für die Kaffeezubereitung erfolgen. Dieses
System ermöglicht eine optimale Zubereitung mit allen
im Handel erhältlichen Kaffeemischungen.
7 KAFFEEZUBEREITUNG
Anmerkung: Falls die Maschine keinen
Kaffee zubereitet kontrollieren, ob im
Wassertank Wasser vorhanden ist. Auf der linken
Seite der Maschine kann der Wasserstand im Tank
kontrolliert werden.
Bevor man Kaffee zubereitet, muss
man sicherstellen, dass die grüne Kontrollleuchte (24) “Betriebstemperatur erreicht”
konstant leuchtet sowie der Wassertank als auch
der Kaffeebehälter gefüllt sind.
Stellung für kleine Tassen zu bringen, muss
man ihn möglichst weit nach außen ziehen und
sicherstellen, dass er blockiert ist.
• Die gewünschte Kaffeefüllmenge in der Tasse
mit dem Drehknopf (22) einstellen: wird er
im Uhrzeigersinn gedreht, wird eine größere
Menge Kaffee zubereitet, beim Drehen im
Ge genuhrzeig ersinn wird die zuber eitete
Kaffeemenge kleiner.
Anmerkung: Wenn sich der Schwimmer (13)
nach oben bewegt, sollte die Abtropfschale
geleert werden.
7.1 Zubereitung mit Bohnenkaffee
• Zum Zubereiten des Kaffees, die Taste (23)
drücken; der Kaffeezubereitungszyklus wird nun
gestartet: um 1 Kaffee zuzubereiten, die Taste
(23) einmal drücken, um 2 Kaffees zuzubereiten,
die Taste (23) zweimal drücken.
In dieser Betriebsweise mahlt und dosiert
die Maschine automatisch die richtige
Kaffeemenge. Die Zubereitung von 2 Tassen Kaffee
erfordert zwei Mahl- und zwei Zubereitungszyklen,
die von der Maschine automatisch gesteuert
werden.
• Nachdem der Vorbrühzyklus beendet ist, tritt der
Espresso aus dem Kaffeeauslauf (14) aus.
• Die Kaffeezubereitung wird automatisch gestoppt,
wenn die durch den Drehknopf (22) eingestellte
Füllmenge erreicht ist; man kann jedoch die
Kaffeezubereitung durch Drücken der Taste (23)
unterbrechen.
• 1 oder 2 Tassen unter den Kaffeeauslauf
(14) stellen; die Höhe des Kaffeeauslaufs kann
eingestellt werden, um sie an die Größe der Tassen
anzupassen.
• Der Kaffeeauslauf kann verstellt werden,
wodurch auch große Tassen benutzt werden
können. Zur Verwendung von großen Tassen
muss man den Kaffeeauslauf von Hand bis
zum Anschlag in Richtung Maschine schieben
(in diesem Fall wird jeweils nur eine Tasse
verwendet); um den Kaffeeauslauf in die ideale
7.2 Zubereitung mit Kaffeepulver
In den Einfüllschacht (5) nur Kaffeepulver für
Espressomaschinen einfüllen. Bohnenkaffee, gefriergetrockneter Kaffee oder anderes
können zu Schäden an der Maschine führen.
Es ist verboten, die Finger in den Einfüllschacht zu stecken, da dort in Bewegung
befindliche Organe vorhanden sind.
• Mit dem mitgelieferten Messlöffel (21) die richtige
Menge Kaffeepulver in den Einfüllschacht füllen.
Page 49

HEISSWASSERFUNKTION - DAMPFFUNKTION
49
Jeweils nur einen Messlöffel Kaffeepulver einfüllen. Für zwei Tassen müssen zwei separate
Zyklen hintereinander ausgeführt werden.
• Den Wählschalter Kaffeepulver (25) drücken. Die
Kontrollleuchte (26) leuchtet auf.
• Den Deckel des Einfüllschachts für Kaffeepulver
(5) öffnen.
• Mit dem Messlöffel (21) eine Portion Kaffee
abmessen. Überschüssiges Pulver aus dem
Messlöffel entfernen.
• Das Kaffeepulver in den Einfüllschacht
geben.
• Den Deckel (5) schließen.
• Für die Kaffeezubereitung die Taste (23) drücken,
danach beginnt der Zubereitungszyklus.
• Nachdem der Vorbrühzyklus beendet ist, tritt der
Kaffee aus dem Kaffeeauslauf (14) aus.
• Die Kaffeezubereitung wird automatisch gestoppt,
wenn die durch den Drehknopf (22) eingestellte
Füllmenge erreicht ist; man kann jedoch die
Kaffeezubereitung durch Drücken der Taste (23)
unterbrechen.
• Dann setzt sich die Maschine automatisch auf
Normalbetrieb wieder (siehe Abschnitt 7.1).
8 HEISSWASSERFUNKTION
• Erneut Knopf (27) drücken, um die Maschine wieder
in den normalen Betriebsmodus zu versetzen; die
LED (28) erlischt.
9 DAMPFFUNKTION/CAPPUCCI-
NO-ZUBEREITUNG
Der Dampf kann zum Aufschäumen der Milch für den
Cappuccino, aber auch zum Wärmen von anderen
Getränken verwendet werden.
Verbrennungsgefahr! Beim Beginn der
Dampferzeugung können heiße Wasserspritzer austreten. Das Dampfrohr kann sehr heiß
werden: niemals mit bloßen Händen berühren.
• Vor Abgabe von Dampf kontrollieren, ob die
Temperaturkontrollleuchte (24) anhaltend leuchtet.
Die Maschine ist sofort zur Dampfabgabe bereit.
• Die Dampfdüse (15) über die Abtropfschale
schwenken, den Drehknopf (17) ”Heißwasser/
Dampf ” kurz öffnen, damit das noch in der Düse
befindliche Wasser austreten kann; nach kurzer
Zeit tritt nur noch Dampf aus.
• Den Drehknopf (17) wieder zudrehen.
• 1/3 des Behälters, in dem der Cappuccino
zubereitet werden soll, mit kalter Milch füllen.
Achtung: Am Anfang können heiße Wasser-
spritzer austreten: Verbrennungsgefahr.
Die Dampfdüse kann sehr heiß werden: niemals
mit bloßen Händen berühren.
• Bevor man heißes Wasser herausfließen lässt,
sicherstellen, dass die grüne Kontrollleuchte
”Betriebstemperatur erreicht“ (24) leuchtet.
Mit für die Kaffeezubereitung bereiter Maschine wie
folgt vorgehen:
• Knopf (27) drücken, die LED (28) leuchtet auf.
• Eine Tasse oder ein anderes Gefäß unter die Dampf/
Heißwasserdüse (15) stellen.
• Den Drehknopf (17) im Gegenuhrzeigersinn
aufdrehen.
• Die gewünschte Menge heißes Wasser austreten
lassen; zum Stoppen den Drehknopf (17) im
Uhrzeigersinn schließen.
Di e Milch und der Behälter für die
Zubereitung des Cappuccinos müssen
kalt sein, nur so erhält man einen optimalen
Cappuccino.
• Die Dampfdüse in die Milch tauchen und
den Drehknopf (17) öffnen; den Behälter langsam
von unten nach oben bewegen, damit sich
gleichmäßiger Schaum bildet.
• Nachdem genügend lange aufgeschäumt wurde,
den Drehknopf (17) wieder zudrehen.
• Dieser Vorgang kann auch zum Wärmen von
anderen Getränken benutzt werden.
Nach diesem Vorgang die Dampfdüse mit einem
feuchten Lappen reinigen.
Sie können sofort den Kaffee in die aufgeschäumte
Milch geben, um einen echten italienischen Cappuccino zuzubereiten.
Page 50

50
REINIGUNG UND WARTUNG - ENTKALKEN
10 REINIGUNG UND WARTUNG
Allgemeine Reinigung
• Die Wartung und Reinigung dürfen nur bei kalter
Maschine und unterbrochener Stromversorgung
erfolgen.
• Die Maschine nicht ins Wasser tauchen oder die
Bauteile im Geschirrspüler waschen.
• Keine spitzen Gegenstände oder aggressive chemische Produkte (Lösungsmittel) für die Reinigung
verwenden.
Der Wassertank sollte täglich gereinigt werden:
- Den Filter (C) im Tank herausnehmen und unter
fließendem Trinkwasser reinigen.
- Den Filter (C) mit leichtem Druck und gleichzeiti-
gem leichtem Drehen wieder in seine Aufnahme
einsetzen.
- Den Wassertank mit frischem Trinkwasser füllen.
Wenn verwendet, den Einfüllschacht für Kaffee-
pulver täglich reinigen:
- Den Einfüllschacht mit dem mitgelieferten Pinsel
reinigen.
• Für die Reinigung der Maschine einen weichen,
feuchten Lappen benutzen.
• Die Maschine bzw. ihre Bauteile nicht in einem
Mikrowellenofen oder einem herkömmlichen
Backofen trocknen.
• Den Kaffeesatzbehälter und die Brühgruppe
reinigen; der Kaffeesatzbehälter (10) sollte am
besten täglich entleert werden.
• Der Kaffeeauslauf (14) kann zum Reinigen abgenommen werden. Die Kanäle mit heißem Wasser
spülen.
10.1 Brühgruppe
• Die Brühgruppe (18) muss immer dann gereinigt
werden, wenn der Kaffeebohnenbehälter gefüllt
wird, bzw. mindestens einmal pro Woche.
• Die Maschine mit dem Schalter (7) auf -0ausschalten und den Stecker aus der Steckdose
ziehen.
• Dann den Kaffeesatzbehälter (10) sowie
die Abtropfschale (12) herausnehmen und die
Servicetüre (16) öffnen.
• Die Brühgruppe (18) herausziehen, indem man
sie am entsprechenden Griff fasst und auf die Taste
“PRESS” drückt. Die Brühgruppe darf nur mit heißem
Wasser und ohne Reinigungsmittel gespült werden.
• Sicherstellen, dass die beiden Stahlsiebe von
jeglichen Kaffeerückständen befreit werden. Das
obere Sieb kann abmontiert werden, indem man
den Plastikbolzen mit dem beiliegenden Schlüssel
(19) im Gegenuhrzeigersinn abschraubt.
• Alle Bauteile der Brühgruppe sorgfältig spülen und
abtrocknen.
• Das Sieb wieder montieren und den Plastikbolzen
mit dem beiliegenden Schlüssel wieder sorgfältig
festschrauben.
• Den Innenraum gut reinigen.
• Die Brühgruppe am entsprechenden Griff
halten und wieder in den Sitz einsetzen, bis sie
eingerastet ist.
• Danach die Servicetüre schließen, den Kaffeesatzbehälter und die Abtropfschale wieder einsetzen.
11 ENTKALKEN
Beim Benutzen der Maschine bildet sich Kalk; das
Entkalken muss nach jeweils 3-4 Monaten der
Benutzung der Maschine durchgeführt werden bzw.
wenn ein Verringern der Wasserleistung festgestellt
wird.
Wenn man das Entkalken selbst durchführen
will, muss man ein handelsübliches,
unschädliches und ungiftiges Entkalkungsmittel
für Kaffeemaschinen verwenden.
Achtung! Auf keinen Fall zum Entkalken
Essig verwenden.
• Das Entkalkungsmittel laut Packungsbeilage mit
Wasser verdünnen und den Wassertank damit
füllen.
• Die Maschine mit dem Hauptschalter (7) ein-
schalten.
• Die Dampfdüse (15) über die Abtropfschale
schwenken.
• Knopf (27) drücken, die LED (28) leuchtet auf.
• In Intervallen (von jeweils einer Tasse) den
gesamten Inhalt des Wassertanks durchlaufen
lassen, indem man den Dampfdrehknopf (17) im
Gegenuhrzeigersinn dreht; um das Ablassen zu
Page 51

RECHTLICHE INFORMATIONEN - ENTSORGUNG
51
stoppen, den Drehknopf (17) im Uhrzeigersinn
drehen.
• Erneut Knopf (27) drücken, um die Maschine wieder
in den normalen Betriebsmodus zu versetzen; die
LED (28) erlischt.
• Während der einzelnen Intervalle das Mittel ca. 1015 Minuten bei ausgeschalteter Maschine einwirken
lassen (Hauptschalter (7) auf -0-).
• Wenn das Entkalkungsmittel verbraucht ist, den
Wassertank ausspülen und mit frischem Wasser
füllen.
• Die Maschine mit dem Hauptschalter einschalten.
• Knopf (27) drücken, die LED (28) leuchtet auf.
• 2/3 des Inhalts des Wassertanks ablassen,
in d em man den Dampfdrehk n opf (17) im
Gegenuhrzeigersinn dreht; um das Ablassen zu
stoppen, dreht man den Dampfdrehknopf (17) im
Uhrzeigersinn.
• Die Maschine aufwärmen lassen und den restlichen
Inhalt des Wassertanks ablassen, indem man den
Dampfdrehknopf (17) im Gegenuhrzeigersinn
dreht; um das Ablassen zu stoppen, dreht man den
Dampfdrehknopf (17) im Uhrzeigersinn.
• Erneut Knopf (27) drücken, um die Maschine wieder
in den normalen Betriebsmodus zu versetzen; die
LED (28) erlischt.
Falls ein anderes Entkalkungsmittel als das
empfohlene verwendet wird, so müssen die
Anweisungen des Herstellers auf der Packung des
Entkalkungsmittels beachtet werden.
zu wenden.
• Des weiteren weisen wir darauf hin, dass der Inhalt
dieser Bedienungsanleitung kein Bestandteil einer
vorherigen oder vorher existierenden Konvention,
einer Vereinbarung oder eines rechtskräftigen Vertrags ist und deren Inhalt somit nicht ändert.
• Alle Verpflichtungen des Herstellers beziehen sich
auf den entsprechenden Kaufvertrag, der auch die
kompletten und ausschließlichen Bedingungen für
die Garantieleistungen enthält.
• Die vertraglichen Garantiebedingungen werden
durch die vorliegenden Erläuterungen weder beschnitten noch erweitert.
• Die Bedienungsanleitung enthält Informationen, die
urheberrechtlich geschützt sind.
• Das Fotokopieren oder Übersetzen in eine andere
Sprache ohne vorherige schriftliche Genehmigung
des Herstellers ist verboten.
13 ENTSORGUNG
• Die nicht mehr in Gebrauch befindlichen Maschinen
müssen unbrauchbar gemacht werden.
• Den Stecker aus der Steckdose ziehen und das
Stromversorgungskabel durchschneiden.
• Die nicht mehr in Gebrauch befindlichen Maschinen
bei einer geeigneten Sondermülldeponie abgeben.
12 RECHTLICHE INFORMATIONEN
• Diese Bedienungsanleitung enthält alle für den
ordnungsgemäßen Gebrauch der Maschine, ihre
Funktionen sowie die vorschriftsmäßige Wartung
notwendigen Informationen.
• Die Kenntnis der vorliegenden Bedienungsanleitung
ist unter Beachtung aller Sicherheitsvorschriften
grundlegend für den gefahrenfreien Gebrauch und
die Wartung der Maschine.
Wenn weitere Informationen benötigt werden, oder
wenn spezielle Probleme auftauchen sollten, die
in dieser Bedienungsanleitung nicht ausreichend
erläutert wurden, so bitten wir Sie, sich an den
örtlichen Fachhändler oder direkt an den Hersteller
Page 52

52
KONTROLLLEUCHTEN BEDIENFELD
14 KONTROLLLEUCHTEN BEDIENFELD
Leuchten Ursachen Behebung
Grüne Leuchte (29)
Grüne Leuchte (24) leuchtet
konstant
Grüne Leuchte (24) blinkt
Grüne Leuchte (26) leuchtet
konstant
Grüne Leuchte (28) leuchtet
konstant
Grüne Leuchte (24) blinkt
Grüne Leuchte (26) blinkt
Grüne Leuchte (28) blinkt
gleichzeitig
Rote Leuchte (30) leuchtet
konstant
Rote Leuchte (30) blinkt
Maschine eingeschaltet
Maschine auf Betriebstemperatur:
- für Kaffeezubereitung;
- für die Dampfabgabe.
Ge rät i n Er hitz u ngsphase f ür
Kaffee-, Heißwasser- und/oder
Dampfausgabe.
Maschine bereit für Kaffeezubereitung mit Kaffeepulver
Ger ät bere it für Hei ßwass erausgabe.
Das Gerät hat d ie maximale
Wa ssermeng e pro einzeln e n
Vorgang ausgegeben.
Zuwenig Wasser im Tank Frisc hes Trinkwas s er in Tank
Kaffeebehälter leer Bohnenkaffee einfüllen und das
Brühgruppe, Kaffeesatzbehälter,
Abtropfschale, Servicetür für den
Betrie b de r Maschine nicht in
richtiger Position
De n Heiß was ser-/Da mpfknop f
zu dreh e n. Falls eine gr ößere
Wassermenge gewünscht wird,
den Knopf erneut aufdrehen.
einfüllen, Wasserkreislauf auffüllen
und das Vorgehen nochmals
beginnen
Vorgehen nochmals beginnen
Damit die rote Leuchte ablöscht
prüfen, dass alle Bestandteile richtig
eingesetzt oder geschlossen sind
Page 53

PROBLEME - URSACHEN - BEHEBUNG
53
Probleme Ursachen Behebung
Die Maschine schaltet nicht ein Die Maschine ist nicht an das
Stromnetz angeschlossen
Die Servicetür ist offen Servicetür schließen
Der Kaffee ist nicht heiß genug Die Tassen sind kalt Tasse vorwärmen
Es tritt kein Wasser oder Dampf
aus
Der Kaffee hat wenig Schäumchen Die Mischung ist nicht geeignet, der
Es dauert zu lange, bis die Maschine
geheizt ist oder es tritt wenig Wasser
aus der Düse aus
Der Brühgruppe kann nicht herausgenommen werden
Es wird kein Kaffee geliefert Kein Wasser Den Wassertank füllen und das
Der Kaffee läuft langsam heraus Portion zu groß Portion verkleinern (Abschn.6)
Der Kaffee läuft außerhalb des
Kaffeeauslaufes heraus
Das Loch in der Dampfdüse ist
verstopft
Kaffee ist nicht röstfrisch oder zu
grob gemahlen
Die Leitungen der Maschine sind
verkalkt
Der Brühgruppe ist nicht in der
richtigen Position
Kaffeesatzbehälter eingesetzt Zuerst den Kaffeesatzbehälter
Brühgruppe verschmutzt Brühgruppe reinigen (Abschn.10.1)
Portion zu groß Portion verkleinern (Abschn.6)
System nicht aufgefüllt System auffüllen (Abschn.4.3)
Kaffeepulver zu fein Kaffeemischung wechseln oder
System nicht aufgefüllt System auffüllen (Abschn.4.3)
Brühgruppe verschmutzt Brühgruppe reinigen (Abschn.10.1)
Der Kaffeeauslauf ist nicht in der
richtigen Position
Kaffeeauslauf verstopft Kaffe eausla uf und Kaffeeaus -
Die Maschine an das Stromnetz
anschließen
Das Loch in der Dampfdüse mit einer
Stecknadel reinigen
Kaffeemischung wechseln oder
die Mahlstufe nach Abschn. 5
nachstellen. Portion vergrößern,
Abschn. 6
Die Maschine entkalken
Die Maschine einschalten.
Die Servicetür schließen.
Der Brühgruppe kehrt automatisch in
die Ausgangsposition zurück
und dann erst den Brühgruppe
herausnehmen
System auffüllen (Abschn.4.3)
die Mahlstufe nach Abschn. 5
nachstellen. Portion verkleinern
Abschn.6
Kaffeeauslauf wieder in Position
bringen
lauflöcher reinigen
Bei Defekten, die nicht in der obigen Tabelle aufgeführt sind, bzw. wenn die vorgeschlagenen
Behebungsmethoden nicht funktionieren sollten, wenden Sie sich bitte an einen autorisierten
Fachhändler.
Page 54

54
PRECAUCIONES
IMPORTANTES
Durante el uso de electrodomésticos, se aconseja tomar
algunas precauciones para evitar el riesgo de sacudidas
eléctricas o incendios.
1 Leer atentamente todas las instrucciones e infor-
maciones descritas en este manual y en cualquier
otro folleto que venga dentro del embalaje antes de
poner en marcha o utilizar la máquina espresso.
2 No tocar superficies calientes.
3 No sumergir el cable, los enchufes o el cuerpo de la
máquina en agua o en cualquier otro líquido para
evitar incendios, sacudidas eléctricas o accidentes.
4 Poner particular atención durante el uso de la
máquina espresso en presencia de niños.
5 Desenchufar la máquina cuando no se esté utilizan-
do o mientras que se está limpiando. Enfriarla antes
de introducir o quitar piezas y antes de empezar a
limpiarla.
6 No utilizar la máquina si el cable o el enchufe están
dañados o en caso de averías o roturas. Haga que
controlen o reparen el electrodoméstico en el centro
de asistencia más cercano.
7 El uso de accesorios no aconsejados por el fabricante
podrá causar daños a cosas y personas.
8 No utilizar la máquina espresso en espacios abiertos.
9 Evitar que el cable cuelgue de la mesa o que toque
superficies calientes.
10 Mantener la máquina espresso lejos de fuentes de calor.
11 Controlar que la máquina espresso esté en posición
“Apagado” antes de enchufarla. Para apagarla, ponerla
en “Apagado” y, a continuación, desenchufarla.
12 Utilizar la máquina únicamente para uso doméstico.
13 Extremar el cuidado durante la utilización de vapor.
CONSERVAR ESTAS
INSTRUCCIONES
ADVERTENCIA
La máquina espresso ha sido estudiada únicamente
para uso doméstico. Cualquier intervención de asistencia, excepto para las operaciones de limpieza y de
mantenimiento normal, deberá ser efectuada por un
centro de asistencia autorizado.
No sumergir la máquina en agua.
Cualquier reparación deberá ser efectuada únicamente
por el centro de asistencia autorizado.
1 Controlar que el voltaje indicado en la chapa
corresponda con el suyo.
2 Nunca utilice agua tibia o caliente para rellenar el
recipiente de agua. Utilice únicamente agua fría.
3 No toque con las manos las partes calientes de la
máquina ni el cable de alimentación durante el
funcionamiento.
4 Nunca limpie con detergentes agresivos o utensilios
que rayen. Es suficiente un paño suave humedecido
con agua.
5 Para evitar la formación de cal, se puede utilizar
agua mineral natural.
INSTRUCCIONES ACERCA
DEL CABLE ELÉCTRICO
A Se suministra un cable eléctrico corto para evitar
que se enrosque o que se enrede.
B También es posible utilizar extensiones pero se
aconceja utilizar con mucha atención.
C En caso de que se utilicen una extensión,verificar:
1 Que el voltaje anotado en la extensión sea por
lo menos igual al voltaje eléctrico del electrodoméstico.;
2 Que esté dotado de un enchufe de tres pin con
colocación a tierra (en caso de que el cable del
electrodoméstico sea de este tipo);
3 que el cable no cuelgue de la mesa para evitar
tropezar con él.
Page 55

INFORMACIONES DE CARÁCTER GENERAL - DATOS TÉCNICOS
55
1 INFORMACIONES DE CARÁCTER
GENERAL
Esta máquina de café es indicada para la preparación
de café expreso tanto con café en granos como con
café molido y está provista de un dispositivo para el
suministro del vapor y del agua caliente. La máquina,
con cuerpo de elegante diseño, ha sido proyectada
para uso doméstico y no es adecuada para un
funcionamiento continuo de tipo profesional.
Atención. El fabricante declina toda responsabilidad por posibles daños en caso de:
• uso inadecuado, no conforme con los objetivos
a los cuales la máquina está destinada;
• reparaciones no efectuadas en los centros de
asistencia autorizados;
• alteración del cable de alimentación;
• alteración de uno cualquiera de los componentes
de la máquina;
• uso de piezas de recambio y accesorios no
originales.
En estos casos se pierde el derecho a la garantía.
1.1 Para facilitar la lectura
El triángulo de advertencia indica todas
las instrucciones importantes para la
seguridad del usuario. ¡Atenerse minuciosamente a tales indicaciones para
evitar heridas graves!
La referencia hecha a ilustraciones, partes de la
máquina y órganos de control, se efectúa mediante
números y letras, como por ejemplo, la referencia a
la ilustración 2 de este apartado.
Este símbolo indica las informaciones que
hay que tener en mayor consideración para
un mejor uso de la máquina.
Las ilustraciones correspondientes al texto se
encuentran en el reverso de la
portada. Mantener esta página
abierta durante la lectura de las
instrucciones de uso.
1.2 Cómo utilizar estas instrucciones de uso
Guardar estas instrucciones de uso en un lugar seguro
y junto a la máquina de café cuando ésta sea utilizada
por otra persona. Para ulterior información, o en caso
que se presente algún tipo de problema que haya
sido ignorado o no haya sido abordado de manera
exhaustiva en el presente manual de instrucciones,
les rogamos que se dirijan a los Centros de Asistencia
Autorizados.
2 DATOS TÉCNICOS
• Tensión nominal
Ver placa colocada en el aparato
• Potencia nominal
Ver placa colocada en el aparato
• Material cuerpo
Termoplástico (ABS)
• Dimensiones (l x a x p) (mm)
390 x 380 x 330
• Peso (kg)
8,7
• Longitud cable (mm)
1200
• Panel control
Frontal
• Depósito agua
Extraíble
• Alimentación
Ver placa colocada en el aparato
• Depósito agua (l)
1,7
• Capacidad contenedor café (g)
350 de café en granos
• Presión bomba (bares)
15
• Calderas
Acero Inox y Aluminio
• Dispositivos de seguridad
Válvula de seguridad presión caldera;
termostato de seguridad
Con reserva de variaciones de fabricación y
ejecución debidas al progreso tecnológico.
Máquina conforme a las Directivas Europeas 89/336/
CEE (Decreto legislativo 476 del 04/12/92), relativa a
la eliminación de interferencias radiotelevisivas.
Page 56

56
NORMAS DE SEGURIDAD
medidas en milímetros
Page 57

NORMAS DE SEGURIDAD
57
3 NORMAS DE SEGURIDAD
No poner nunca en contacto con el agua las partes
por las que pasa la corriente: ¡peligro de cortocircuito! ¡ El vapor calentado y el agua caliente
pueden provocar quemaduras! No dirigir nunca el
chorro de vapor o de agua a las partes del cuerpo,
tocar con precaución el pitón del vapor/agua
caliente: ¡peligro de quemaduras!
Destinación de uso
La máquina de café está concebida exclusivamente
para un uso doméstico. ¡Está terminantemente prohibido
modificar la parte técnica de la máquina así como hacer
de ella un uso indebido, precisamente por los riesgos que
tales comportamientos entrañan! La máquina de café
debe ser utilizada únicamente por personas adultas en
condiciones psicofísicas no alteradas.
Alimentación de corriente
Conectar la máquina de café únicamente a una
toma de corriente adecuada. La tensión utilizada
debe corresponder a la tensión indicada en la placa
del aparato.
Cable de alimentación
No utilizar nunca la máquina de café si el cable de
alimentación no se encuentra en buen estado. En caso
de que el cable de alimentación esté dañado, deberá ser
cambiado por el fabricante o por su Servicio de asistencia
clientes. No hacer pasar el cable de alimentación por
esquinas o cantos vivos, ni por encima de objetos a
elevada temperatura, protegerlo del aceite. No llevar
ni tirar la máquina de café cogiéndola por el cable. No
extraer el enchufe tirando del cable ni tocarlo con las
manos mojadas.Evitar que el cable de alimentación caiga
libremente de mesas o estanterías.
agua caliente contra sí mismo u otras personas:
¡peligro de quemaduras! Usar siempre las manillas
o los agarres correspondientes.
Ubicación
Colocar la máquina de café en un lugar seguro, donde
nadie pueda volcarla ni hacerse daño. No utilizar la
máquina de café al aire libre. No colocar la máquina
sobre superficies demasiado calientes ni cerca de
llamas abiertas con el fin de evitar que la parte exterior
de la máquina se funda o se dañe.
Limpieza
Antes de limpiar la máquina, es indispensable disponer
el interruptor general (7) en -0- y a continuación retirar
el enchufe de la toma de corriente. Además, esperar
que la máquina se enfríe. ¡No sumergir nunca la
máquina en el agua! Está terminantemente prohibido
tratar de intervenir en el interior de la máquina.
Espacio para el uso y el mantenimiento
Para un correcto funcionamiento de la máquina de
café se aconseja lo siguiente:
• escoger un plano de apoyo correctamente
nivelado;
• escoger un ambiente suficientemente iluminado,
higiénico y con una toma de corriente de fácil
acceso;
• dejar una distancia mínima indispensable entre
las paredes y la máquina, tal como se indica en la
figura.
• No mantener la máquina a temperaturas inferiores
a 0 °C; ya que el hielo podría dañarla.
Para guardar la máquina
Cuando la máquina permanece inutilizada durante un
período de tiempo prolongado, apagarla y desconectar
el enchufe de la toma de corriente. Guardarla en un
lugar seco, inaccesible para los niños. Proteger la
máquina respecto del polvo y de la suciedad.
Protección de otras personas
Mantener la máquina de café fuera del alcance de los
niños y excluir todas las posibilidades de que jueguen
con ella. Los niños no se dan cuenta de los peligros
que entrañan los electrodomésticos.
Peligro de quemaduras
Evítese dirigir el chorro de vapor calentado y/o de
Reparaciones/Mantenimiento
En caso de avería, defecto o sospecha de desperfecto
después de una caída, desconectar enseguida el
enchufe de la toma de corriente.
No poner nunca en funcionamiento una máquina que
presenta una avería o un desperfecto.
Únicamente los Centros de Asistencia Autorizados
pueden manipular y reparar la máquina.
Page 58

58
NORMAS DE SEGURIDAD - INSTALACIÓN
Las reparaciones deben ser efectuadas únicamente
por un Centro de Asistencia Autorizado.
En caso que se lleven a cabo manipulaciones en
la máquina sin haberse atenido a las precedentes
indicaciones, el fabricante declinará toda responsabilidad que derive de eventuales daños.
Antiincendio
En caso de incendio, utilizar extintores de anhídrido
carbónico (CO2). No utilizar agua ni extintores de
polvo.
Lista componentes de la máquina
Contenedor café en granos
Tapa del contenedor café en granos
Pomo de regulación molienda
Pomo de regulación dosis
Tapa del dosificador café molido
Plano de apoyo tazas
Interruptor general (ON-OFF)
Tapa del depósito agua
Depósito agua
Cajón para residuos
Cable de alimentación
Recipiente recogedor de goteo + rejilla
Flotador de nivel del recipiente recogedor de goteo
Suministrador de café de altura regulable
Tubo vapor/agua caliente
Portezuela delantera
Pomo de suministro vapor
Unidad de suministro café
Llave unidad de suministro café
Escobilla para limpieza
Cubilete de medición café molido
Panel de mandos
Pomo de regulación cantidad de café en taza
Botón de suministro café
Led temperatura adecuada “lista”/función café
Botón de selección café molido
Led de selección café molido
Botón de selección función agua caliente
Led de selección función agua caliente
Led de máquina encendida
Led indicador de alarma
4 INSTALACIÓN
Para garantizar la propia seguridad personal y la
de terceras personas, atenerse escrupulosamente
a las “Normas de seguridad” ilustradas en el
capítulo 3.
4.1 Embalaje
El embalaje original ha sido proyectado y realizado para
proteger la máquina durante el transporte.Se aconseja
guardarlo para un eventual transporte futuro.
4.2 Operaciones preliminares
• Extraer del embalaje el recipiente recogedor de
goteo (12) con rejilla.
• Extraer del embalaje la máquina de café y colocarla
en un lugar adecuado que responda a los requisitos
descritos en las normas de seguridad (cap. 3.).
• Introducir el recipiente recogedor de goteo (12)
en el lugar expresamente indicado en la máquina;
controlar que el mismo recipiente, el cajón para
residuos (10) y la unidad suministradora de café
(18) estén correctamente instaladas y que la
portezuela delantera (16) esté cerrada.
• Colocar la tapa del contenedor de café en granos
(2) en este contenedor (1). Conservar al alcance
de la mano la escobilla de limpieza (20), la llave
de la unidad de suministro café (19) y el cubilete
de medición para el café molido (21).
• Antes de enchufar la máquina a la toma de
corriente, controlar que el interruptor general (7)
se encuentre en posición -0-.
Si al encender la máquina se enciende de modo
intermitente el led rojo (30), significa que una de
las partes anteriormente indicadas no ha sido
correctamente colocada.
Nota importante. Es importante leer cuanto
se indica en el Capítulo 14, donde se explica
en detalle el significado de todas las señales que
la máquina facilita al usuario, mediante las luces
colocadas en el panel de control.
4.3 Primer encendido
• Extraer el depósito agua (9) levantándolo y
quitar la tapa (8). Enjuagarlo y llenarlo con agua
fresca; se aconseja no llenar excesivamente este
Page 59

INSTALACIÓN - MOLINILLO DE CAFÉ
59
depósito. Introducir de nuevo el depósito en su
alojamiento y colocarle su tapa (8).
Introducir en el depósito (9) únicamente
agua fresca sin gas. El agua caliente, así
como otros líquidos pueden dañar el depósito
y/o la máquina. No poner en funcionamiento la
máquina sin agua: controlar que haya suficiente
cantidad de agua en el interior del depósito.
• Quitar la tapa (2) e introducir el café en granos
en el contenedor (1).
Introducir en el contenedor (1) únicamente
café en granos. Café molido, liofilizado u otras
sustancias u objetos provocan daños a la máquina.
• Reinstalar la tapa (2) en el contenedor de café (1).
• Introducir el enchufe (11) en una toma de corriente
adecuada.
• La máquina se presenta con el interruptor general
(7) en posición -0-; para encenderla es suficiente
presionar el botón (7); se ilumina el led (29) del
panel de control.
• Para cargar el circuito, dirigir el tubo vapor (15)
hacia la cubeta receptora de gotas, poner una taza
o un recipiente adecuado debajo de la boquilla del
tubo vapor y presionar el botón (27), con lo cual se
enciende el led 28.
Girar el pomo en el sentido contrario al de las
manecillas del reloj y esperar que salga agua
de manera regular desde el tubo vapor; para
interrumpir el suministro de agua se deberá girar
el pomo en el sentido de las manecillas del reloj.
• Presionar nuevamente el botón (27) para resta-
blecer el funcionamiento normal de la máquina.
5 MOLINILLO DE CAFÉ
¡Atención! El mando de regulación de la
molienda -situado en el interior del contenedor
de café- debe ser girado sólo cuando el molinillo está
funcionando. No introducir café molido ni liofilizado
en el contenedor de café en granos.
Está prohibido introducir cualquier material
o sustancia que no sea café en granos. El
molinillo de café contiene órganos móviles que
pueden ser peligrosos; prohibido introducir los
dedos u objetos. Antes de intervenir en el interior
del contenedor de café se debe suspender la
alimentación eléctrica mediante el interruptor
general y retirar el enchufe de la toma de corriente.
No introducir el café en granos durante el funcionamiento del molinillo.
La calidad y el sabor del café dependen de la mezcla
utilizada y también del grado de molienda. La máquina
cuenta con un pomo (3) para la regulación del grado
de molienda; para efectuar esta regulación girar
este pomo graduado durante el funcionamiento del
molinillo; las cifras que aparecen en este mando
indican el grado de molienda.
La máquina ha sido regulada en la fábrica dejándola
en un grado de molienda medio. En caso de que la
molienda resulte ser demasiado fina se deberá girar
el pomo hacia valores más altos y, en caso de que
la molienda resulte ser demasiado gruesa, el pomo
deberá ser girado hacia valores más bajos.
La variación del grado de molienda se observará sólo
después del suministro de tres o cuatro cafés.
Nota. Se aconseja cargar el circuito antes de
efectuar la primera puesta en marcha y en
caso de prolongada inactividad o de que el depósito
de agua haya sido vaciado por completo.
• Una vez terminadas las acciones descritas ante-
riormente, la máquina está lista para ser puesta en
funcionamiento.
• Para el suministro de café, agua caliente o vapor,
utilizar correctamente la máquina y seguir con
atención las instrucciones indicadas a continuación.
Usar mezclas de café en granos para máquinas
expreso. Evítese el uso de grados extremos de
molienda (por ej. 1 – 16); en tales casos utilizar mezclas
diferentes de café. Consérvese el café en lugar fresco,
en un contenedor herméticamente cerrado.
La molienda debe regularse en caso de que el café
sea suministrado de manera inadecuada:
suministro demasiado veloz = molienda demasiado
gruesa -> Arreglar el pomo sobre números más bajos;
suministro por gotas y/o ausente = molienda demasiado
fina -> Arreglar el pomo sobre números más altos.
Page 60

60
REGULACIÓN DOSIS CAFÉ - SUMINISTRO DE CAFÉ
6 REGULACIÓN DOSIS CAFÉ
Es posible regular la cantidad de café (dosis)
que se desea moler. La dosis es programada por
el fabricante en un valor medio, adecuado para la
mayor parte de los requerimientos; muesca (A) en
correspondencia con la referencia (B). Girando el
pomo (4) situado en el interior del contenedor del
café en sentido contrario al de las manecillas del
reloj se aumenta la dosis de café molido y, girando
este pomo en sentido opuesto, se reduce la dosis
de café molido.
La regulación de la dosis debe efectuarse antes de
presionar el botón de suministro café. Este sistema
permite obtener un suministro optimizado con todos
los tipos de café presentes en el comercio.
7 SUMINISTRO DE CAFÉ
Nota. En caso de que la máquina no suministre
café, controlar que no falte agua en el
depósito. El nivel del agua del depósito puede ser
controlado en el lado izquierdo de la máquina.
Antes de suministrar café controlar que el
led verde de temperatura adecuada “lista”
(24) esté encendido con luz fija y que el depósito
del agua y el contenedor del café estén llenos.
• Colocar 1 ó 2 tazas debajo de los pitones
de suministro (14); es posible regular la altura del
suministrador a fin de adaptarlo a las tazas.
• El suministrador puede desplazarse para
permitir el uso de tazas grandes. Para el uso de
tazas de gran tamaño hay que empujar manualmente el suministrador hacia la máquina hasta
la posición de tope (en este caso utilizar sólo una
taza por vez); para colocar el suministrador en la
posición ideal para el uso de tacitas, hay que tirar
el suministrador hacia la posición más externa,
controlando que quede bloqueado.
• Regular la cantidad de café que se desea utilizar
para la tacita operando para ello con el pomo
(22): girándolo en el sentido de las manecillas del
reloj se aumenta la cantidad de café suministrado
y girándolo en el sentido opuesto se reduce la
cantidad de café suministrado.
Nota. Al elevarse el flotador de nivel (13)
es conveniente vaciar el recipiente de
recuperación agua.
7.1 Suministro con café en granos
• Para suministrar el café se debe presionar el botón
(23) con lo que se activa el ciclo de suministro:
para suministrar un café presionar una sola vez el
botón (23) y para suministrar dos cafés presionar
dos veces en sucesión el botón (23).
En esta modalidad de funcionamiento, la
máquina muele y dosifica automáticamente
la cantidad adecuada de café; la preparación de dos
cafés requiere dos ciclos de molienda y dos ciclos
de suministro, los que también son gestionados de
modo automático por la máquina.
• Después de haber efectuado el ciclo de preinfusión,
el café empezará a salir a través del pitón del suministrador (14).
• Una vez alcanzado el nivel predispuesto mediante
el pomo (22), el suministro de café se detendrá
automáticamente; es posible interrumpir en
cualquier momento el suministro del café, para lo
cual basta presionar el botón (23).
7.2 Suministro con café molido
Introducir en el dosificador (5) sólo café
molido para máquinas expreso; café en
granos, liofili-zado u otros materiales dañan la
máquina.
Está prohibido introducir los dedos en
el dosificador de café molido ya que allí
existen órganos móviles.
• Para obtener la cantidad adecuada de café molido
a introducir, se deberá utilizar sólo el cubilete
de medición (21) que se entrega junto con la
máquina.
Introducir sólo el café correspondiente a un
cubilete de medición por vez; para preparar
dos cafés es obligatorio ejecutar dos ciclos de
preparación separados y sucesivos.
• Presionar el botón (25) para seleccionar la función;
Page 61

UMINISTRO DE AGUA CALIENTE - SUMINISTRO VAPOR
61
se enciende el led (26).
• Quitar la tapa del dosificador de café molido (5).
• Utilizar el cubilete de medición (21) para tomar una
dosis de café; quitar la cantidad de café molido en
exceso presente en el cubilete de medición.
• Introducir el café molido en el dosificador.
• Aplicar la tapa (5).
• Para suministrar el café se debe presionar el botón
(23) con lo que se activa el ciclo de suministro.
• Después de haber efectuado el ciclo de preinfusión,
el café empezará a salir a través del pitón del
suministrador (14).
• Una vez alcanzado el nivel predispuesto mediante
el pomo (22), el suministro de café se detendrá
automáticamente; es posible interrumpir en
cualquier momento el suministro del café, para lo
cual basta presionar el botón (23).
• Luego la máquina se vuelve automáticamente en
funcionamiento normal (véase párr. 7.1).
8 SUMINISTRO DE AGUA CALIENTE
Atención. Al comenzar pueden producirse
rociaduras de agua caliente, con peligro de
sufrir quemaduras. El tubo de suministro de agua
caliente puede alcanzar temperaturas elevadas:
no tocarlo directamente con las manos.
9 SUMINISTRO VAPOR/PREPA-
RACIÓN DEL CAPUCHINO
El vapor puede ser utilizado para montar la leche
para el capuchino pero también para calentar las
bebidas.
¡Peligro de quemaduras! Al comenzar el
suministro pueden producirse rociaduras
de agua caliente, con peligro de sufrir quemaduras.
El tubo de suministro de agua caliente puede
alcanzar temperaturas elevadas: no tocarlo directamente con las manos.
• Antes de extraer vapor controlar que el led de
temperatura requerida alcanzada (24) permanezca
encendido de modo fijo. Ello significa que la
máquina está lista para suministrar vapor.
• Situar el tubo de vapor (15) encima del recipiente
recogedor de goteo, abrir el pomo (17) “Agua
caliente/vapor” durante unos momentos a fin de
facilitar la salida del agua residual a través del tubo
de vapor; pasados unos instantes empezará a salir
solamente vapor.
• Cerrar el pomo (17).
• Llenar con leche fría 1/3 del contenedor que se
desea utilizar para preparar el capuchino.
• Antes de suministrar el agua caliente controlar que
la luz verde de temperatura adecuada “lista” (24)
esté encendida.
Con la máquina lista para suministrar el café se debe
proceder de la siguiente forma:
• Presionar el botón (27), con lo cual se enciende el
led (28).
• Colocar una taza y/o un recipiente debajo del tubo
de agua caliente/vapor (15).
• Hacer girar el pomo (17) en sentido contrario
al de las manecillas del reloj.
• Una vez obtenida la cantidad de agua caliente
deseada, para interrumpir el suministro, hacer
girar el pomo (17) en el sentido de las manecillas
del reloj.
• Presionar nuevamente el botón (27) para restablecer
el funcionamiento normal de la máquina, con lo cual
el led (28) se apaga.
Para garantizar un mejor resultado en la
preparación del capuchino, la leche y la
taza utilizada deben estar frías.
• Sumergir el tubo de vapor en la leche que
hay que calentar y abrir el pomo (17); hacer girar
el recipiente con movimientos lentos de abajo hacia
arriba para hacer que la formación de la espuma
sea uniforme.
• Después de haber utilizado el vapor durante el
tiempo que se desee, cerrar el pomo (17).
• Este mismo sistema puede utilizarse para calentar
otras bebidas.
Una vez ejecutada esta operación limpiar el tubo vapor
con un paño húmedo.
Será posible agregar de inmediato el café a la leche
recién batida para preparar un auténtico capuchino
a la italiana.
Page 62

62
LIMPIEZA Y MANTENIMIENTO - DESCALCIFICACIÓN
10 LIMPIEZA Y MANTENIMIENTO
Limpieza genérica
• El mantenimiento y la limpieza pueden ser efectuados únicamente cuando la máquina está fría y
desconectada de la red eléctrica.
• No sumergir la máquina en el agua ni introducir
ninguna de sus partes en el lavavajillas.
• No utilizar objetos afilados ni productos químicos
agresivos (disolventes) para la limpieza.
Se aconseja limpiar diariamente el depósito
del agua:
- Extraer el filtro (C) situado en el interior del
depósito y limpiarlo con agua corriente potable.
- Colocar de nuevo el filtro (C) en su lugar correspondiente ejerciendo una ligera presión
combinada con una ligera rotación.
- Llenar de nuevo el depósito con agua fresca
potable.
Limpiar diariamente, si ha sido utilizado, el
dosificador de café molido:
- Limpiar el dosificador utilizando para ello el pincel
que se entrega adjunto.
• Limpiar el aparato utilizando un paño suave
humedecido con agua.
• No secar la máquina ni sus componentes
utilizando un horno microondas ni un horno
convencional.
• Limpiar el compartimiento de servicio y la
unidad de suministro; se recomienda vaciar diariamente el cajón recogedor de residuos (10).
• El suminis t rador de café (1 4 ) puede ser
quitado para efectuar la limpieza; enjuagar
concienzudamente con agua caliente los canales
de suministro.
“PRESS”. La unidad de suministro puede ser lavada
solamente con agua caliente sin detergente.
• Asegurarse de que los dos filtros de acero
no presenten ningún tipo de incrustación ni
residuos de café. El filtro superior puede quitarse
desenroscando, en sentido contrario al de las
manecillas del reloj, el perno de plástico utilizando
la respectiva llave que se entrega adjunta (19).
• Lavar y secar concienzudamente todas las partes
de la unidad de suministro.
• Montar de nuevo el filtro y enroscar de nuevo y con
cuidado el perno de plástico, utilizando siempre la
llave antedicha.
• Limpiar concienzudamente el compartimiento.
• Cogiéndola por la correspondiente manilla,
introducir de nuevo la unidad de suministro en
el respectivo compartimiento hasta obtener que
quede enganchada.
• Por último cerrar la portezuela e instalar el cajón
recogedor de residuos y el recipiente recogedor de
goteo.
11 DESCALCIFICACIÓN
La formación de calcio tiene lugar con el uso
continuado del aparato; la descalcificación es
necesaria cuando se observa una reducción del
caudal del agua y, en todo caso, cada tres o cuatro
meses.
Si se desea efectuar personalmente esta
operación, se puede utilizar un producto
descalcificador para máquinas de café de tipo
no tóxico ni nocivo, normalmente disponible en
comercio.
10.1 Unidad de suministro
• La unidad de suministro (18) debe ser limpiada
cada vez que se llena el contenedor de café en
polvo y al menos una vez a la semana.
• Apagar la máquina disponiendo el interruptor (7) en
posición -0- y desconectar el enchufe de la toma
de corriente.
• Quitar a continuación el cajón recogedor de
residuos (10) y el recipiente recogedor de goteo
(12) y abrir la portezuela de servicio (16).
• Extraer la unidad de suministro (18) cogiéndola
por la respectiva manilla, presionando la tecla
¡Atención! En ningún caso utilizar vinagre
como descalcificador.
• Mezclar el descalcificador con agua como se
indica en el envase del producto mismo y llenar el
depósito del agua.
• Encender la máquina mediante el interruptor
general (7).
• Situar el tubo vapor (15) en el recipiente recogedor
de goteo.
• Presionar el botón (27), con lo cual se enciende el
led (28).
Page 63

DESCALCIFICACIÓN - INFORMACIONES DE CARÁCTER LEGAL - DESGUACE
63
• Extraer a intervalos (una taza por vez) el
contenido completo del depósito del agua, girando
el pomo del vapor (17) en sentido contrario al de las
manecillas del reloj; para interrumpir el suministro
girar el pomo (17) en el sentido de las manecillas
del reloj.
• Presionar nuevamente el botón (27) para restablecer
el funcionamiento normal de la máquina, con lo cual
el led (28) se apaga.
• Durante cada uno de los intervalos, hay que dejar
actuar durante unos 10-15 minutos; disponer cada
vez en -0- el interruptor general (7) para desconectar la máquina.
• Terminada la solución descalcificadora, enjuagar el
depósito del agua y llenarlo nuevamente con agua
fresca.
• Encender la máquina mediante el interruptor general.
• Presionar el botón (27), con lo cual se enciende el
led (28).
• Vaciar 2/3 del contenido del depósito haciendo
girar el pomo vapor (17) en sentido contrario al
de las manecillas del reloj; para interrumpir el
suministro, girar el mismo pomo (17) en sentido
opuesto al precedente.
• Dejar que se caliente la máquina y vaciar el
contenido residual presente en el depósito del
agua, haciendo girar el pomo del vapor (17) en
sentido contrario al de las manecillas del reloj; para
interrumpir esta operación, girar el mismo pomo
(17) en sentido opuesto al precedente.
• Presionar nuevamente el botón (27) para restablecer
el funcionamiento normal de la máquina, con lo cual
el led (28) se apaga.
Si se utiliza un producto diferente del que
se ha aconsejado, se deberán aplicar las
instrucciones del fabricante que aparecen en el
envase del producto descalcificador.
• Tales contenidos, sumados a la aplicación de los
mismos, representan la premisa indispensable para
un uso sin peligro de la máquina, respetando en
todo momento las normas de seguridad durante
su funcionamiento y mantenimiento. Si se desea
obtener ulterior información, o si se observa que
en el presente manual de instrucciones de uso
no han sido explicados con suficiente claridad
algunos puntos que se estiman de interés, le
rogamos comunicarse con su revendedor local o
directamente con la empresa fabricante.
• Además, queremos subrayar que el contenido del
presente manual no forma parte de una convención
anterior o ya existente, ni tampoco de un acuerdo
ni de un contrato legal, los cuales no cambian su
sentido.
• Cada una de las obligaciones del fabricante se
basa en el contrato de compraventa que contiene
también un reglamento completo y exclusivo por
lo que concierne a las condiciones de la garantía.
• El alcance de las normas contractuales de garantía
no se limita ni se extiende en base a las presentes
explicaciones.
• Este manual de instrucciones de uso contiene
información protegida por el derecho de autor.
• Este documento no puede ser fotocopiado ni
traducido a otro idioma sin previa autorización
escrita de parte del fabricante.
13 DESGUACE
• Inutilizar los aparatos en desuso.
• Desenchufar el aparato de la corriente y cortar el
cable eléctrico.
• Entregar los aparatos en desuso a un centro
específico de recogida.
12 INFORMACIONES DE CARÁCTER
LEGAL
• El presente manual de instrucciones para el uso
contiene la información necesaria para un uso
correcto, para las funciones operativas y para un
cuidadoso mantenimiento del aparato.
Page 64

64
TESTIGO PANEL DE CONTROL
14 TESTIGO PANEL DE CONTROL
Señalacion Causas Remedio
Luz verde (29)
Luz verde (24) fija
Luz verde (24) intermitente
Luz verde (26) fija
Luz verde (28) fija
Luz verde (24) intermitente
Luz verde (26) intermitente
Luz verde (28) intermitente
simultaneamente
Luz roja (30) fija
Luce roja (30) intermitente
Máquina encendida
Máquina en temperatura “lista”:
- para el suministro del café
- para la extracción de vapor.
Máquina en fase de calentamiento
para suministrar café, agua caliente
y vapor.
Máquina en suministro con café
molido
Máquina lista para suministrar
agua caliente.
La máquina ha suministrado la
cantidad máxima de agua prevista
para cada suministro.
Cantidad insuficiente de agua en
el depósito
Depósito café está vacío Llenar el depósito con café en
Unidad de suministro, cajón para
residuos, recipiente recogedor
de goteo o portezuela delantera
en posición incorrecta para el
funcionamiento de la máquina
Cerrar el pomo de suministro agua
caliente/vapor. Para obtener una
cantidad adicional de agua abrir
nuevamente el pomo.
Llenar el depósito con agua fresca
potable, cargar el circuito e iniciar
nuevamente el procedimiento
granos e iniciar nuevamente el
procedimiento
Para obtener que se apague
esta luz roja, verificar que todos
los componentes se encuentren
correctamente i n s talados y
cerrados
Page 65

PROBLEMAS - CAUSAS - REMEDIO
65
Problemas Causas Remedio
La máquina no se enciende La máquina no está conectada a la red
eléctrica
La portezuela de servicio está abierta Cerrar la portezuela
El café no es tá suficien temente
caliente
No sale agua caliente ni vapor El aguje ro del tubo vapor est á
El café tiene poca crema La mezcla es inadecuada o el café no
La máqu ina empl ea demas iad o
tiempo para calentarse o suministra
poca agua a través del tubo
No se logra extraer la unidad de
suministro
No sale café Falta agua Llenar el depósito del agua y cargar
El café fluye lentamente Dosis excesiva Reducir la dosis (apart. 6)
Café fluye fuera del suministrador Suministrador en posición incor-recta Si t uar correctame nte e l s umi-
Las tazas están frías Calentar las tazas
obstruido
es de torrefacción fresca o bien ha sido
molido demasiado grueso
El circuito de la máquina está obstruido
con incrustaciones de calcio
Un idad de sum inis tro f uera de
posición
Cajón para residuos instalado Extraer el cajón para residuos antes de
Unidad sucia Limpiar la unidad de suministro
Dosis excesiva Reducir la dosis (apart. 6)
Circuito no cargado Cargar el circuito (apart. 4.3)
Café demasiado fino Cambiar mezcla de café o regular la
Circuito no cargado Cargar el circuito (apart. 4.3)
Unidad de suministro sucia Limpiar la unidad de suministro
Suministrador obstruido Limpiar el suministrador y sus agujeros
Cone ctar l a máqu ina a la r ed
eléctrica
Limpiar el agujero del tubo vapor
mediante una aguja
Cambiar mezcla de café o regular la
molienda de la manera ilustrada en
apart. 5. Aumentar la dosis apart. 6
Descalcificar la máquina
Encen der la máquin a. Cerrar la
portezuela de servicio. La unidad de
suministro retorna automáticamente a
su posición inicial
extraer la unidad de suministro
nuevamente el circuito (apart. 4.3)
(apart. 10)
molienda según apart. 5. Reducir la
dosis, apart. 6
(apart. 10.1)
nistrador
de salida
Para averías que no estén contempladas en la tabla descrita o en caso que los remedios sugeridos no
las resuelvan, dirigirse a un centro de asistencia.
Page 66

66
PRECAUÇÕES IMPORTANTES
Quando se usam electrdomésticos é aconselhável tomar
algumas precauções para limitar o risco de incêndios,
choques eléctricos e/ou acidentes.
1 Ler atentamente todas a instruções e informações
apresentadas neste manual e em qualquer outro
folheto contido nas embalagens, antes de preparar
ou utilizar a máquina expresso.
2 Não tocar nas superfícies quentes.
3 Não mergulhar o fio, a ficha ou o corpo da máquina
em água ou outro líquido, para evitar incêndios,
choques eléctricos ou acidentes.
4 Ter particular cuidado ao utilizar a máquina
expresso na presença de crianças.
5 Retirar a ficha da tomada quando a máquina não
estiver a ser utilizada, ou durante a sua limpeza.
Deixar a máquina arrefecer antes de inserir ou
retirar peças e antes de proceder à sua limpeza.
6 Não utilizar a máquina com o fio ou a ficha
danificados, nem em caso de avarias ou roturas.
Mandar verificar ou reparar o aparelho no centro de
assistência mais próximo.
7 A utilização de acessórios não aconselhados pelo
fabricante pode provocar danos a coisas e pessoas.
8 Não utilizar a máquina expresso ao ar livre.
9 Evitar que o fio fique pendurado da mesa ou esteja
em contacto com superfícies quentes.
10 Manter a máquina expresso longe de fontes de calor.
11 Verificar se a máquina expresso está na posição
“Off” antes de inserir a ficha na tomada. Para a
desligar, colocá-la no “Off” e retirar depois a ficha
da tomada.
12 Utilizar a máquina unicamente para uso doméstico.
13 Ter muito cuidado durante a utilização do vapor.
GUARDAR AS PRESENTES
INSTRUÇÕES DE USO
CUIDADOS:
A máquina expresso foi concebida unicamente para uso
doméstico: Qualquer intervenção de assistência, com
excepção das operações de limpeza e de manutanção
normal deverá ser prestada por um centro de assistência
autorizado. Não mergulhar a máquina em água. Qualquer
reparação deverá ser efctuada unicamente por pessoal
do centro de assistência autorizado.
1 Verificar se a voltagem indicada na placa técnica
corresponde à sua.
2 Nunca utilizar água tépida ou quente para encher o
reservatório de água. Utilizar unicamente água fria.
3 Não tocar com as mãos nas partes quentes da
máquina, nem no fio de alimentação durante o seu
funcionamento.
4 Nunca limpar com detergentes corrosivos, nem
com utensílios duros. É suficiente um pano macio
humidecido com água.
5 Para evitar a formação de calcário, pode-se utilizar
água mineral natural.
INSTRUÇOS SOBRE O
CABO ELETRICO
A O cabo eletrico fornecido é curto para facilitar o uso
e para impedir que prenda-se em outros objetos.
B Podem ser utilizados prolongamentos mas
prestando muito cuidado.
C Se utilizar um prolongamento controlar:
1 que a voltagem do prolongamento seja igual à
do eletrodomestico.
2 que seja dotado de uma tomada com tres
pin com ponto de terra (seja o cabo do
eletrodomestico deste tipo);
3 que o cabo não pendure da mesa para não
tropecar.
Page 67

GENERALIDADES - DADOS TÉCNICOS
67
1 GENERALIDADES
A máquina de café é indicada para a preparação
de café expresso, utilizando tanto café em grãos
como café em pó, e possui um dispositivo para o
fornecimento de vapor e de água quente. O corpo da
máquina, com design elegante, foi projetado para uso
doméstico e não é indicado para um funcionamento
contínuo, de tipo profissional.
Atenção. Não se assumem responsabilidades por eventuais danos, no caso de:
• emprego incorreto e não conforme os objetivos
previstos;
• consertos não efetuados nos centros de assistência autorizados;
• alterações do cabo de alimentação;
• alterações de quaisquer componentes da
máquina;
• emprego de peças de substituição e acessórios
não originais;
Nestes casos a garantia deixa de valer.
1.1 Para facilitar a leitura
O triângulo de advertência indica
todas as instruções importantes para
a segurança do usuário. Manter-se
absolutamente conforme tais indicações
para evitar ferimentos graves!
A referência a ilustrações, partes da máquina
e órgãos de comando ocorre através de números e
letras, como por exemplo a referência à ilustração 2
deste parágrafo.
Este símbolo evidencia as informações
a serem levadas em maior consideração
para a melhor utilização da máquina.
As ilustrações correspondentes ao texto encontramse
na aba da capa. Manter esta
página aberta durante a leitura das
instruções para o uso.
1.2 Emprego destas instruções de uso
Conservar estas instruções de uso em local seguro
e anexá-las à máquina de café, para que uma outra
pessoa possa utilizá-las, se for o caso.
Para ulteriores informações ou no caso de problemas
não exauridos ou tratados de modo insuficiente
nas presentes ilustrações dirigir-se aos Centros de
Assistência Autorizados.
2 DADOS TÉCNICOS
• Tensão nominal
Vide etiqueta colocada no aparelho
• Potência nominal
Vide etiqueta colocada no aparelho
• Material do corpo
Termoplástico (ABS)
• Dimensões (l x a x p) (mm)
390 x 380 x 330
• Peso (Kg)
8,7
• Comprimento do cabo (mm)
1200
• Painel de comandos
Frontal
• Reservatório de água
Extraível
• Alimentação
Vide etiqueta colocada no aparelho
• Reservatório de água (l)
1,7
• Capacidade do recipiente de café (g)
350 de grãos de café
• Pressão da bomba (bar)
15
• Caldeiras
Aço Inox e Alumínio
• Dispositivos de segurança
Válvula de segurança da pressão da caldeira;
termostato de segurança.
Salvo mudanças na fabricação devidas ao progresso tecnológico.
Máquina em conformidade à Diretiva Européia 89/336/
CEE (Decreto legislativo 476 de 04/12/92), relativa à
eliminação dos distúrbios radiotelevisivos.
Page 68

68
NORMAS DE SEGURANÇA
medidas en milímetros
Page 69

NORMAS DE SEGURANÇA
69
3 NORMAS DE SEGURANÇA
Nunca colocar as partes ligadas à corrente elétrica
em contato com a água: perigo de curto-circuito!
O vapor superaquecido e a água quente podem
provocar queimaduras! Nunca posicionar o jato
de vapor ou de água quente em direção às partes
do corpo, tocar com cuidado o bico de vapor/ água
quente: perigo de queimaduras!
Destinação do uso
A máquina para café é prevista para o emprego
exclusivamente doméstico.
É proibido efetuar modificações técnicas e realizar
qualquer tipo de emprego ilícito pois pode comportar
riscos! A máquina para café deve ser utilizada somente
por adultos em boas condições psicofísicas.
Alimentação da corrente
Ligar a máquina de café somente à uma tomada
de corrente adequada. A tensão deve corresponder
àquela indicada na etiqueta do aparelho.
Cabo de alimentação
Nunca usar a máquina para café se o cabo de
alimentação estiver com defeito.
Se o cabo de alimentação estiver danificado, deve ser
trocado pelo fabricante ou pelo serviço de assistência
ao cliente. Não passar o cabo de alimentação através
de cantos e arestas pontudas, sobre objetos muito
quentes e protegê-lo do óleo.
Não carregar ou puxar a máquina para café
segurando-a pelo cabo.
Não extrair o plugue puxando-o pelo cabo ou mesmo
tocando-o com as mãos molhadas. Evitar que o
cabo de alimentação caia livremente de mesas ou
estantes.
de água quente para si e/ou outros: perigo de
queimaduras.
Usar sempre as devidas manilhas ou alças.
Localização
Colocar a máquina para café em um local seguro,
onde ninguém possa derrubá-la ou ferir-se com ela.
Não usar a máquina para café ao ar livre.
Não apoiar a máquina em superfícies muito quentes
e perto de chamas abertas para evitar que a estrutura
funda ou sofra danos.
Limpeza
Antes de limpar a máquina, é indispensável colocar
o interruptor geral (7) em -0- e depois tirar o plugue
da tomada de corrente.
Além disto, esperar que a máquina se esfrie.
Nunca emergir a máquina na água!
É severamente proibido tentar intervir no interior da
máquina.
Espaço para o uso e a manutenção
Para o correto e bom funcionamento da máquina para
café aconselha-se o quanto segue:
• Escolher um plano de apoio bem nivelado;
• Escolher um ambiente suficientemente iluminado,
higiênico e com tomada de corrente facilmente
acessível;
• Prever uma distância mínima das paredes em
relação à máquina, como indicado na figura.
• Não manter a máquina em temperaturas inferiores
a 0ºC; a formação de gelo pode danificar a
máquina.
Conservação da máquina
Quando a máquina permanecer inutilizada por um
período prolongado, desligá-la e retirar o plugue da
tomada.
Guardá-la em local seco e não acessível às crianças.
Protegê-la da poeira e da sujeira.
Proteção de outras pessoas
Certificar-se de que nenhuma criança tenha a
possibilidade de brincar com a máquina para café.
As crianças não percebem o perigo inerente aos
eletrodomésticos.
Perigo de queimaduras
Evitar dirigir o jato de vapor superaquecido e/ou
Reparação / Manutenção
No caso de problemas, defeitos ou suspeita de defeito
após uma queda desligar imediatamente o plugue
da tomada.
Nunca funcionar uma máquina com defeito.
Somente os Centros de Assistência Autorizados
podem efetuar intervenções e reparações.
As reparações devem ser executadas unicamente por
Page 70

70
NORMAS DE SEGURANÇA - INSTALAÇÃO
um centro de assistência autorizado.
No caso de intervenções não efetuados de acordo
com as regras declina-se qualquer responsabilidade
por eventuais danos.
Anti-incêndio
Em caso de incêndio utilizar extintores de gás carbônico (CO2). Não utilizar água ou extintores a pó.
Legenda dos componentes da máquina
Recipiente para grãos de café
Tampa do recipiente para grãos de café
Botão de regulagem da moagem
Botão de regulagem da dose
Tampa do dosador de pó de café
Plano de apoio das xícaras
Interruptor geral (ON/OFF)
Tampa do reservatório de água
Reservatório de água
Gaveta recolhedora de sedimentos
Cabo de alimentação
Recipiente recolhe-gotas + grade
Bóia de nível do recipiente recolhe-gotas
Fornecedor de café ajustável na altura
Tubo de vapor/água quente
Abertura dianteira
Botão de fornecimento de vapor
Grupo fornecedor de café
Chave grupo fornecedor de café
Escova para a limpeza
Dosador para pó de café
Painel de comandos
Botão para a regulagem da quantidade de
café na xícara
Botão para o fornecimento de café
Led de temperatura pronta / função café
Botão seleção pó de café
Led seleção pó de café
Botão de seleção da função água quente
Led de seleção da função água quente
Led máquina ligada
Led sinalização alarmes
4 INSTALAÇÃO
Para a própria segurança e a de terceiros manterse absolutamente de acordo com as “Normas de
segurança” indicadas no cap. 3.
4.1 Embalagem
A embalagem original foi projetada e realizada para
proteger a máquina durante a expedição.
Aconselha-se conservá-la para um eventual transporte
no futuro.
4.2 Operações preliminares
• Retirar da embalagem o recipiente recolhe-gotas
(12) e a grade.
• Retirar da embalagem a máquina de café e
posicioná-la em um local seguro, que tenha os
requisitos pedidos e descritos nas normas de
segurança (cap. 3)
• Colocar o recipiente recolhe-gotas (12) no devido
lugar na máquina; certificar-se de que tal recipiente,
a gaveta para sedimentos (10) e o grupo fornecedor
de café (18) estejam colocados corretamente e de
que a abertura dianteira (16) esteja fechada.
• Colocar a tampa do recipiente para grãos de café
(2) no recipiente para grãos de café (1). Conservar
a escova para a limpeza (20) em local de fácil
acesso, a chave do grupo fornecedor de café (19)
e o dosador de pó de café (21).
• Antes de colocar o plugue na tomada de corrente,
certificar-se de que o interruptor geral (7) esteja na
posição -0-.
Se ao ligar a máquina o led vermelho (30) piscar,
significa que uma das peças descritas acima não está
colocada corretamente.
Nota importante: É fundamental ler o con-
teúdo do Capítulo 14, no qual se explica em
detalhes o significado de todas as sinalizações que a
máquina dá ao usuário, através das luzes localizadas
no painel de comandos.
4.3 Primeira ligação
• Extrair o reservatório de água (9) puxando-o
para cima e retirar a tampa (8). Enxaguá-lo e enchêlo com água fria; aconselha-se não encher muito o
reservatório. Recolocar o reservatório no seu lugar
Page 71

INSTALAÇÃO - MOEDOR DE CAFÉ - REGULAGEM DA DOSE DE CAFÉ
71
e colocar novamente a tampa (8) sobre ele.
Colocar no reservatório (9) sempre e so-
mente água fria sem gás. A água quente,
assim como outros líquidos, pode danificar o
reservatório e/ou a máquina. Não colocar a máquina
para funcionar sem água: certificar-se de que a sua
quantidade seja suficiente no reservatório.
• Retirar a tampa (2) e pôr os grãos de café no
recipiente (1).
Colocar sempre e exclusivamente grãos
de café no recipiente (1). Café em pó, liofilizado, além de outros objetos, podem danificar
a máquina.
• Recolocar a tampa (2) no recipiente para café (1).
• Ligar o plugue (11) em uma tomada de corrente
adequada.
• A máquina apresenta-se com o interruptor geral (7)
na posição -0-; para ligá-la é suficiente pressionar
o botão (7); o led (29) do painel de comandos
acende-se.
• Para carregar o circuito, direcionar o tubo de
vapor (15) sobre o recipiente recolhe-gotas, colocar
uma xícara ou um recipiente adequado abaixo do
bico do tubo de vapor, pressionar o botão (27); o
led 28 se acende.
Rodar o botão no sentido anti-horário e esperar
que saia água de modo regular do tubo de vapor;
para interromper o fornecimento de água rodar o
botão no sentido horário.
• Pressionar novamente o botão (27) para recolocar
a máquina no modo de funcionamento normal.
5 MOEDOR DE CAFÉ
Atenção! O botão de regulagem da moagem,
situado dentro do recipiente para café, deve
ser rodado somente quando o moedor de café estiver
funcionando. Não colocar café em pó e/ou liofilizado
no recipiente para grãos de café.
É proibido introduzir qualquer outro material
que não seja café em grãos. O moedor de
café contém peças em movimento que podem ser
perigosas; proibido colocar os dedos e/ou outros
objetos. Antes de realizar intervenções, por qualquer
motivo, dentro do recipiente para café, desativar
o interruptor geral e tirar o plugue da tomada de
corrente. Não colocar grãos de café quando o
moedor de café estiver funcionando.
A qualidade e o gosto do café dependem, além da
mistura utilizada, também do grau de moagem. A
máquina possui um botão (3) para regular o grau de
moagem. Para modificar o grau de moagem, rodar
o botão graduado quando o moedor de café estiver
funcionando; os números apresentados no botão
indicam o grau de moagem.
Todo aparelho é regulado na fábrica em um grau
de moagem médio: se a moagem for muito fina é
necessário rodar o botão, colocando-o em valores
mais altos; se a moagem for muito grossa é
necessário rodar o botão, colocando-o em valores
mais baixos.
A mudança do grau de moagem poderá ser notada
somente depois do fornecimento de três ou quatro
cafés.
Nota: Antes de proceder ao primeiro
funcionamento em caso de inatividade
prolongada ou se o reservatório de água foi esvaziado completamente é aconselhável carregar o
circuito.
• Terminadas as ações indicadas acima a máquina
está pronta para o uso.
• Para fornecer café, água quente ou vapor e utilizar
corretamente a máquina, seguir atentamente as
instruções seguintes.
Usar misturas de grãos de café para máquinas de
café expresso. Evitar utilizar graus de moagem em
posições extremas (Ex.1 – 16); nesses casos, utilizar
misturas de café diferentes. Conservar o café em local
fresco, num recipiente hermeticamente fechado.
A moagem deve ser regulada caso o café não seja
fornecido de modo ideal:
Fornecimento rápido demais = moagem muito
grossa > Regular o botão, colocando-o em números
mais baixos;
Page 72

72
REGULAGEM DA DOSE DE CAFÉ - FORNECIMENTO DE CAFÉ
Fornecimentos em gotas/ou ausente = moagem muito
fina > Regular o botão, colocando-o em números
mais altos.
6 REGULAGEM DA DOSE DE CAFÉ
Na máquina é possível regular a dosagem de
café (dose) que se deseja moer.
A dose definida na fábrica tem um valor médio que
satisfaz a maior parte das exigências; marca (A)
correspondendo à referência (B). Rodando o botão
(4), situado dentro do recipiente de café, em sentido
anti-horário aumenta-se a dose de pó de café;
rodando o botão em sentido horário diminui-se a
dose de pó de café.
A regulagem da dose deve ser feita antes de pressionar o botão de fornecimento de café.
Esse sistema permite obter um fornecimento ideal
com todos os tipos de café presentes no comércio.
7 FORNECIMENTO DE CAFÉ
Nota: Caso a máquina não forneça café,
verificar se o reservatório de água contém
água; no lado esquerdo da máquina pode-se
verificar o nível de água do reservatório.
Antes de fornecer café, verificar se o led
verde de temperatura pronta (24) está
aceso fixamente e se o reservatório de água e o
reservatório de café estão cheios.
• Posicionar 1 ou 2 xícaras abaixo do bico
fornecedor (14); pode-se regular a altura do
fornecimento de modo que ele se adapte às suas
xícaras.
• A posição do fornecedor pode ser mudada
para consentir a utilização de xícaras grandes.
Para utilizar xícaras de dimensões grandes
deve-se apertar manualmente o fornecedor em
direção à máquina até o fim (neste caso utilizar
somente uma xícara por vez); para posicionar o
fornecedor na posição ideal para a utilização de
xícaras pequenas deve-se puxar o fornecedor
na posição mais externa, certificando-se de que
esteja firme.
• Regular a quantidade de café que se deseja na
xícara, usando o botão (22): rodando-o em sentido
horário aumenta-se a quantidade de café fornecida;
rodando-o em sentido anti-horário diminui-se a
quantidade de café fornecida.
Nota: quando a bóia de nível (13) suspendese é aconselhável esvaziar o recipiente
recolhedor de água.
7.1 Fornecimento com grãos de café
• Para fornecer o café é necessário pressionar
o botão (23), em seguida inicia-se o ciclo de
fornecimento: para fornecer 1 café pressionar
o botão (23) uma vez; para fornecer 2 cafés
pressionar duas vezes seguidas o botão (23).
Neste modo de funcionamento, a máquina
mói e dosa a quantidade certa de café
automaticamente; a preparação de dois cafés
exige dois ciclos de moagem e dois ciclos de
fornecimento geridos automaticamente pela
máquina.
• Depois de ter passado pelo ciclo de pré-infusão, o
café começa a sair pelo bico fornecedor (14).
• O fornecimento do café interrompe-se auto-
maticamente quando for atingido o nível preestabelecido pelo botão (22); no entanto, é possível
interromper o fornecimento do café pressionando
o botão (23).
7.2 Fornecimento com pó de café
Colocar somente pó de café para máquinas
de café expresso no dosador (5); café
em grãos, liofilizado e outros materiais podem
danificar a máquina.
É proibido colocar os dedos dentro do
dosador de pó de café, pois existem peças
em movimento.
• Para pegar a quantidade certa de pó de café a
ser colocada no dosador, utilizar somente o dosador (21) fornecido com a máquina.
Colocar somente uma dose de pó de
café por vez; para preparar dois cafés é
obrigatório realizar dois ciclos separados, um
depois do outro.
Page 73

FORNECIMENTO DE ÁGUA QUENTE - FORNECIMENTO DE VAPOR
73
• Pressionar o botão (25) para selecionar a função,
o led (26) acende-se.
• Levantar a tampa do dosador para pó de
café (5).
• Pegar uma dose de café com o dosador (21); tirar
o excesso de pó de café presente no dosador.
• Esvaziar o pó de café dentro do dosador.
• Fechar a tampa (5).
• Para fornecer o café é preciso pressionar o
botão (23); em seguida, inicia-se o ciclo de
fornecimento.
• Depois de ter passado pelo ciclo de pré-infusão, o
café começará a sair pelo bico fornecedor (14).
• O fornecimento do café será interrompido automaticamente quando for atingido o nível preestabelecido pelo botão (22); no entanto, é possível
interromper o fornecimento do café pressionando
o botão (23).
• Em seguida, a máquina volta automaticamente
para o modo de funcionamento normal (ver
parág. 7.1).
8 FORNEC IM EN TO DE ÁG UA
QUENTE
Atenção: no início podem ocorrer breves
jatos de água quente com perigo de
queimaduras. O tubo de fornecimento de água
quente pode atingir temperaturas elevadas: evitar
tocá-lo diretamente com as mãos.
• Antes do fornecimento de água quente verificar
se a luz verde de temperatura pronta (24) está
acesa.
Com a máquina pronta para o fornecimento do café,
proceder do seguinte modo:
• Pressionar o botão (27), o led (28) se acende.
• Colocar uma xícara e/ou um recipiente abaixo do
tubo de água quente/vapor (15).
• Abrir o botão em sentido anti-horário (17).
• Retirar a quantidade desejada de água quente; para
interromper o fornecimento de água quente rodar o
botão (17) em sentido horário.
• Pressionar novamente o botão (27) para recolocar
a máquina no modo de funcionamento normal; o led
(28) se apaga.
9 FORNECIMENTO DE VAPOR/
PREPARAÇÃO DO CAPPUCCINO
O vapor pode ser utilizado para dar volume ao leite
do cappuccino e também para o aquecimento das
bebidas.
Perigo de queimaduras! Ao início do
fornecimento podem ser verificados breves
esguichos de água quente.
O tubo de fornecimento pode atingir temperaturas
elevadas: evite de tocá-lo diretamente com as
mãos.
• Antes de fornecer vapor verificar se o led de
temperatura pronta (24) está aceso de modo fixo.
A máquina está pronta para o fornecimento de
vapor.
• Direcionar o tubo de vapor (15) sobre o recipiente
recolhe-gotas, abrir o botão (17) “Água quente
/vapor” por alguns instantes, de modo que a água
residual saia do tubo de vapor; em pouco tempo
começará a sair somente vapor.
• Fechar o botão (17).
• Encher com leite frio 1/3 do recipiente que se deseja
utilizar para preparar o cappuccino.
Para garantir um melhor resultado na
preparação do cappuccino, o leite e a
xícara utilizados devem ser frios.
• Emergir o tubo de vapor no leite a ser
aquecido e abrir o botão (17); girar o recipiente
com movimentos lentos de baixo para cima, para
tornar uniforme a formação da espuma.
• Após haver utilizado o vapor pelo tempo desejado,
fechar o botão (17).
• O mesmo sistema pode ser utilizado para o aque-
cimento de outras bebidas.
Após esta operação, limpar o tubo de vapor com um
pano úmido.
Pode-se colocar imediatamente o café no leite
com espuma que foi preparado para fazer um
verdadeiro cappuccino à italiana.
Page 74

74
LIMPEZA E MANUTENÇÃO - DESCALCIFICAÇÃO
10 LIMPEZA E MANUTENÇÃO
Limpeza geral
• A manutenção e a limpeza podem ser efetuadas
somente quando a máquina estiver fria e desligada
da rede elétrica.
• Não emergir a máquina na água e não colocar os
componentes na máquina de lavar louças.
• Não utilizar objetos pontudos ou produtos químicos
agressivos (solventes) para a limpeza.
Aconselha-se a limpeza cotidiana do reservatório
de água:
- Retirar o filtro (C) localizado no interior do reservatório e limpá-lo com água corrente potável.
- Reposicionar o filtro (C) no seu lugar, exercendo
uma leve pressão combinada a uma leve
rotação.
- Encher o reservatório com água fresca potável.
Limpar o dosador de pó de café todos os dias,
caso utilizado:
- Pegar o pincel fornecido com a máquina e limpar
o dosador.
• Para a limpeza do aparelho utilizar um pano macio
umedecido com água.
• Não enxaguar a máquina e/ou os seus componentes utilizando um forno microondas e/ou um forno
convencional.
• Limpar o vão de serviço e o grupo fornecedor;
recomendamos esvaziar todos os dias a gaveta
recolhedora de sedimentos (10).
• O fornecedor de café (14) pode ser retirado para a
limpeza; enxaguar cuidadosamente os canais de
fornecimento com água quente.
água quente sem detergente.
• Certificar-se de que os dois filtros de aço
estejam livres de resíduos de café. O filtro superior
pode ser retirado desparafusando em sentido antihorário o pino de plástico com a chave ade-quada
anexa (19).
• Lavar e enxugar cuidadosamente todas as partes
do grupo fornecedor.
• Montar novamente o filtro e parafusar com cuidado
o pino de plástico, utilizando a chave adequada.
• Limpar cuidadosamente o vão.
• Segurando-o pela devida manilha introduzir
de novo o grupo fornecedor no vão adequado até
que fique travado.
• Então, fechar a abertura, colocar a gaveta
recolhedora de sedimentos e o recipiente recolhegotas.
11 DESCALCIFICAÇÃO
A formação de calcário acontece com o uso do
aparelho; a descalcificação é necessária a cada 3
ou 4 meses ou quando se observa uma redução da
capacidade de água.
Caso se deseje fazer a descalcificação
pessoalmente, pode-se utilizar um produto
para a descalcificação adequado para máquinas
de café que não seja tóxico e nem nocivo, facilmente encontrado no comércio.
Atenção! Não utilizar de modo algum o
vinagre para a descalcificação.
10.1 Grupo fornecedor
• O grupo fornecedor (18) deve ser limpo cada vez
que for enchido o recipiente de pó de café ou,
de qualquer modo, pelo menos uma vez por semana.
• Desligar a máquina girando o seletor (7) na posição -0- e retirar o plugue da tomada de corrente.
• Retirar, então, a gaveta recolhedora de
sedimentos (10) e o recipiente recolhe-gotas (12);
em seguida abrir a abertura de serviço (16).
• Retirar o grupo fornecedor (18), segurando-o
pela devida manilha e apertando a tecla “PRESS”.
O grupo fornecedor pode ser lavado somente com
• Misturar o produto para descalcificação com água,
como especificado na embalagem e encher o
reservatório de água.
• Ligar a máquina através do interruptor geral (7).
• Direcionar o tubo de vapor (15) sobre o recipiente
recolhe-gotas.
• Pressionar o botão (27); o led (28) se acende.
• Retirar em intervalos (uma xícara por vez) o
conteúdo total do reservatório de água, girando
o botão vapor (17) em sentido anti-horário; para
interromper o fornecimento girar o botão (17) em
sentido horário.
• Pressionar novamente o botão (27) para recolocar
Page 75

INFORMAÇÕES DE CARÁTER JURÍDICO - DESATIVAÇÃO DA MÁQUINA
75
a máquina no modo de funcionamento normal; o
led (28) se apaga.
• Durante cada intervalo deve-se deixar agir de 10
a 15 minutos, desligando a máquina, colocando o
interruptor geral (7) em -0-.
• Terminada a solução para descalcificação enxaguar o reservatório de água e enchê-lo com água
fresca.
• Ligar a máquina através do interruptor geral.
• Pressionar o botão (27); o led (28) se acende.
• Esvaziar 2/3 do conteúdo do reservatório
de água, girando o botão vapor (17) em sentido
anti-horário; para interromper o fornecimento girar
o botão (17) em sentido horário.
• Deixar aquecer a máquina e esvaziar o conteúdo
restante do reservatório de água, girando o botão
vapor (17) em sentido anti-horário; para interromper
o fornecimento girar o botão (17) em sentido
horário.
• Pressionar novamente o botão (27) para recolocar
a máquina no modo de funcionamento normal; o
led (28) se apaga.
Caso seja utilizado um produto diverso
daquele aconselhado, recomenda-se
respeitar, de todo modo, as instruções do
fabricante, indicadas na embalagem do produto
para descalcificação.
seu conteúdo.
• Todas as obrigações do fabricante baseiam-se no
relativo contrato de compra-venda, que contém
também o regulamento completo e exclusivo da
garantia.
• Estas instruções não limitam nem alargam as
normas de garantia contratual.
• As instruções contêm informações protegidas pelos
direitos de autor.
• É proibido fotocopiá-las ou traduzi-las numa outra
língua sem a prévia autorização escrita por parte
do fabricante.
13 DESATIVAÇÃO DA MÁQUI-NA
• Inutilizar os aparelhos fora de uso.
• Retirar o plugue da tomada e cortar o cabo
elétrico.
• Entregar os aparelhos inutilizados a um centro de
recolhimento autorizado.
12 INFORMAÇÕES DE CARÁTER
JURÍDICO
• Estas instr uções contê m as infor mações
necessárias para o uso correto do aparelho, das
suas funções operativas e da sua manutenção
cuidadosa.
• Estas informações e o cumprimento das instruções
permitem usar sem perigo e em segurança o
aparelho.
• Se desejar mais informações ou caso se verifiquem
problemas que se considere não terem sido
tratados com clareza, contatar o revendedor local
ou o fabricante diretamente.
• Ressalta-se que estas instruções não são parte
duma convenção precedente ou já existente, de
um acordo ou contrato legal e que não alteram o
Page 76

76
LUZES DE SINALIZAÇÃO DO PAINEL DE COMANDOS
14 LUZES DE SINALIZAÇÃO DO PAINEL DE COMANDOS
Sinalizações Causas Soluções
Luz verde (29)
Luz verde (24) fixa
Luz verde (24) intermitente
Luz verde (26) fixa
Luz verde (28) fixa
Luz verde (24) Intermitente
Luz verde (26) Intermitente
Luz verde (28) intermitente
simultânea
Luz vermelha (30) fixa
Luz vermelha (30) intermitente
Máquina ligada
Máquina em temperatura pronta:
- para o fornecimento do café
- para fornecer vapor.
Máquina em fase de aquecimento
para o fornecimento de café, água
quente e vapor.
Máquina em fornecimento com pó
de café
Máquina pronta para fornecer
água quente.
A máquina distribuiu a quantidade
máx ima de água pa ra cada
fornecimento simples.
Quantidade de água insuficiente
no reservatório
Reservatório de café vazio Encher o reservatório com café
Grupo fornecedor, gaveta para
sedimentos, recipiente recolhegotas e abertura dianteira não
estão na posição correta para o
funcionamento da máquina
Fechar o botão de fornecimento de
água quente/vapor. Se se deseja
uma quantidade maior de água
abrir novamente o botão.
Encher o reservatório com água
fria potável, carregar o circuito
e começar novamente o procedimento
em grãos e começar novamente
o procedimento
Para desligar a luz vermelha fixa,
verificar se todos os componentes
estão colocados ou fechados
corretamente
Page 77

PROBLEMAS - CAUSAS - SOLUÇÕES
Problemas Causas Soluções
A máquina não liga A máquina não está ligada à rede
elétrica
A abertura de serviço está aberta Fechar a abertura
O café não está suficientemente
quente
Não sai água quente ou vapor O furo do tubo de vapor está
O café tem pouco creme A mistura não é adequada ou o
A máquina leva tempo demais para
se aquecer ou a quantidade de
água que sai do tubo é limitada
O grupo fornecedor não pode ser
retirado
O café não sai Falta água Encher o reservatório de água e
O café sai lentamente Dose elevada Diminuir a dose (Parág. 6)
O café sai fora do fornecedor Fornecedor em posição incorreta Colocar o fornecedor na posição
As xícaras estão frias Aquecer as xícaras
obstruído
café não foi torrado recentemente
ou foi moído muito grosso
O circuito da máquina está obstruído pelo calcário
Grupo fornecedor está fora de
posição
Gaveta recolhedora de sedimentos
colocada
Grupo sujo Lim p a r o grupo fornec e d o r
Dose elevada Diminuir a dose (Parág. 6)
Circuito não carregado Recarregar o circuito (Parág. 4.3)
Café muito fino Mudar a mistura de café ou regular
Circuito não carregado Recarregar o circuito (Parág. 4.3)
Grupo fornecedor sujo Lim p a r o grupo fornec e d o r
Fornecedor obstruído Limpar o recipiente de café e os
Ligar a máquina à rede elétrica
Limpar o furo do tubo de vapor com
uma agulha
Mudar a mistura de café ou regular
a moagem de acordo com o parág.
5. Aumentar a dose (parág. 6)
Descalcificar a máquina
Ligar a máquina. Fechar a abertura
de serviço. O grupo fornecedor
retorna automaticamente à posição
inicial
Retirar a gaveta recolhedora de
sedimentos antes de retirar o
grupo de fornecimento
recarregar o circuito (Parág. 4.3)
(Parág. 10.1)
a moagem como descrito no parág.
5. Diminuir a dose (p. 6)
(Parág. 10.1)
correta
seus furos para saída
77
Para os problemas não contemplados pela tabela acima, ou caso as soluções sugeridas não os resolvam,
contatar um centro de assistência.
Page 78

78
BELANGRIJKE
VOORZORGSMAATREGELEN
Bij het gebruik van elektrische huishoudelijke apparaten
is het raadzaam enkele voorzorgsmaatregelen in acht
te nemen, om brandgevaar, elektrische schokken en/of
dergelijke ongelukken zoveel mogelijk te voorkomen.
1 Aandachtig alle aanwijzingen en informatie in deze
gebruiksaanwijzing en andere folders lezen, die
zich in de verpakking mochten bevinden, voordat
het espresso apparaat wordt gebruikt.
2 De hete oppervlakken niet aanraken.
3 Geen kabels, stekkers of het apparaat zelf in water of
andere vloeistoffen onderdompelen om brandgevaar,
elektrische schokken of ongelukken te vermijden.
4 Extra goed opletten indien het apparaat gebruikt
wordt met kinderen in de buurt.
5 De stekker uit het stopcontact trekken als het apparaat
niet gebruikt of gereinigd wordt. Wachten totdat het
apparaat afgekoeld is voordat de onderdelen verwijderd
worden of aangebracht, ook in geval van reiniging.
6 Het apparaat niet gebruiken als de kabel of stekker
beschadigd zijn ofwel in geval van schade of breuk.
Het apparaat laten controleren of repareren bij het
dichtstbijzijnde servicecentrum.
7 Door het gebruik van niet door de producent
aangeraden onderdelen kan er schade aan dingen
of letsel aan personen worden aangericht.
8 Het espresso apparaat nooit in de open lucht gebruiken.
9 De kabel niet van de tafel laten hangen en niet met
hete oppervlakken in aanraking laten komen.
10 Het espresso apparaat uit de buurt van
warmtebronnen houden.
11 Controleren dat het espresso apparaat altijd in
de stand “0” (uit) staat, voordat de stekker in
het stopcontact wordt gestoken. Indien men het
apparaat uitschakelen wil,de machine uitzetten en
dan de stekker uit het stopcontact trekken.
12 Het apparaat mag alleen voor huishoudelijk
gebruik gebruikt worden.
13 Uiterst goed opletten tijdens het gebruik van de stoom.
GELIEVE DEZE GEBRUIKSAAN-
WAARSCHUWING
Het espresso apparaat is alleen maar voor huishoudelijk
gebruik geschikt. Al de servicewerkzaamheden of reparaties,
behalve de reiniging en het normale onderhoud moeten
door een bevoegd Servicecentrum uitgevoerd worden.
Het apparaat niet in water onderdompelen.
Elke reparatie dient door een bevoegd Servicecentrum te
worden uitgevoerd.
1 Controleren dat de aangetoonde spanning op het plaatje
overeenkomt met de spanning van het stopcontact.
2 Nooit lauw of warm water gebruiken, om het
waterreservoir te vullen. Alleen maar koud water
gebruiken.
3 De warme onderdelen van het apparaat en de
voedingskabel tijdens de werking niet met de
handen aanraken.
4 Nooit reinigen met schuurmiddelen of scherp
gereedschap. Een met water bevochtigde zachte
doek is voldoende.
5 Gebruik mineraalwater zonder koolzuur, om de
vorming van kalkaanslag te vermijden.
AANWIJZINGEN OVER DE
ELEKTRICITEITSKABEL
A Er wordt een nogal kort elektriciteitssnoer geleverd
om te voorkomen dat het in elkaar draait of dat u
erover kunt struikelen.
B Er kan een verlengsnoer gebruikt worden.
C Als u een verlengsnoer gebruikt, controleer dan:
1 of de spanning die op het verlengsnoer vermeld
is minstens gelijk is aan de spanning van het
apparaat;
2 of er een stekker aan zit met drie pinnen met aarde
(als het snoer van het apparaat van dit type is);
3 of het snoer niet van de tafel hangt zodat u er
niet over kunt struikelen.
WIJZINGEN TE BEWAREN
Page 79

ALGEMEENALGEMEEN - TECHNISCHE GEGEVENS
79
1 ALGEMEEN
Het koffiezetapparaat is geschikt voor het zetten
van espressokoffie met het gebruik van zowel
koffiebonen als gemalen koffie en is uitgerust met een
installatie voor afgifte van stoom en warm water. Het
apparaat heeft een elegant design, is ontworpen voor
huishoudelijk gebruik en is niet geschikt voor continu,
professioneel gebruik.
Let op. Er wordt geen aansprakelijkheid
aanvaard voor eventuele schade in het
geval van:
• foutief gebruik en gebruik dat niet in overeenstemming is met de beoogde doelen;
• reparaties die niet zijn uitgevoerd bij de erkende
assistentiecentra;
• onklaar gemaakt elektriciteitssnoer;
• onklaar gemaakte componenten van het apparaat;
• gebruik van niet-originele vervangingsonderdelen en accessoires.
In deze gevallen komt de garantie te vervallen.
1.1 Om het lezen te vergemakkelijken
De waarschuwingsdriehoek geeft alle belangrijke aanwijzingen voor de veiligheid
van de gebruiker aan. Houdt u nauwgezet
aan deze aanwijzingen om ernstige verwondingen te vermijden!
Voor de verwijzingen naar illustraties, onderdelen
van het apparaat en bedieningsorganen worden cijfers
en letters gebruikt, zoals in het voorbeeld de verwijzing
naar illustratie 2 van deze paragraaf.
Dit symbool wijst op informatie waaraan
grotere aandacht geschonken moet worden,
voor een beter gebruik van het apparaat.
De illustraties die corresponderen met de tekst
bevinden zich op de uitklapbare
binnenkaft.
Houd deze pagina open terwijl u
de instructies leest.
1.2 Gebruik van deze instructies
Bewaar deze instructies op een veilige plaats, en doe
ze bij het koffiezetapparaat als iemand anders het
apparaat gaat gebruiken. Voor nadere informatie of in
het geval van problemen die niet helemaal of slechts
onvoldoende in deze aanwijzingen worden behandeld,
kunt u zich wenden tot de Erkende Sevicecentra.
2 TECHNISCHE GEGEVENS
• Nominale spanning
Zie het plaatje op het apparaat
• Nominaal vermogen
Zie het plaatje op het apparaat
• Materiaal behuizing
Thermoplastic (ABS)
• Afmetingen (l x a x p) (mm)
390 x 380 x 330
• Gewicht (Kg)
8,7
• Lengte snoer (mm)
1200
• Bedieningspaneel
Frontaal
• Waterreservoir
Uittrekbaar
• Voeding
Zie het plaatje op het apparaat
• Waterreservoir (lt.)
1,7
• Inhoud koffiehouder (gr)
350 koffiebonen
• Pompdruk (bar)
15
• Ketels
Roestvrij staal en Aluminium
• Veiligheidsvoorziening
Veiligheidsdrukventiel verwarmingselement;
veiligheidsthermotaat.
Wijzigingen in de bouw en de uitvoering, t.g.v.
technologische vooruitgang, voorbehouden.
Apparaat in overeenstemming met de Europese
richtlijn 89/336/EEG (Wetsdecreet 476 del 04/12/92),
inzake de opheffing van radiostoringen.
Page 80

80
VEILIGHEIDSVOORSCHRIFTEN
afstanden in mm
Page 81

VEILIGHEIDSVOORSCHRIFTEN
81
3 VEILIGHEIDSVOORSCHRIFTEN
Laat onderdelen die onder stroom staan nooit in
aanraking komen met water: gevaar voor kortsluiting! Oververhitte stroom en heet water kunnen
brandwonden veroorzaken! Richt nooit stralen
stoom of heet water op lichaamsdelen, wees voorzichtig bij het aanraken van het mondstuk voor
stoom/heet water: gevaar voor brandwonden!
Bestemming
Het koffiezetapparaat is uitsluitend bedoeld voor
huishoudelijk gebruik. In verband met risico’s is het
verboden technische wijzigingen aan te brengen of het
apparaat te gebruiken voor ongeoorloofde doeleinden!
Het koffiezetapparaat mag alleen door volwassenen
worden gebruikt die in goede fysieke en psychische
gezondheid verkeren.
Elektrische voeding
Sluit het koffiezetapparaat uitsluitend aan op een
geschikt stopcontact.
De spanning moet corresponderen met de spanning
die vermeld staat op het plaatje van het apparaat.
Snoer
Gebruik het koffiezetapparaat nooit als het snoer
defect is. Indien de voedingskabel beschadigd is, moet
deze door de fabrikant of door diens klantendienst
worden vervangen.
Laat het snoer niet over hoeken of scherpe randen
lopen of over zeer hete voorwerpen, en bescherm het
tegen olie. Draag of trek het koffiezetapparaat niet aan
het snoer. Trek de stekker niet aan het snoer uit het
stopcontact en raak hem niet met natte handen aan.
Zorg ervoor dat het snoer niet vrij omlaag hangt van
tafels of planken.
Bescherming van andere personen
Controleer of kinderen niet de mogelijkheid hebben
om met het koffiezetapparaat te spelen. Kinderen
hebben geen besef van gevaren die verbonden zijn
aan elektrische huishoudelijke apparatenI.
Gevaar voor verbranding
Zorg ervoor dat de straal oververhitte stoom en/of
water niet op uzelf of anderen wordt gericht: gevaar
voor brandwonden.
Gebruik altijd de handgrepen of knoppen die op het
apparaat aanwezig zijn.
Plaatsing
Zet het koffiezetapparaat op een veilige plek, waar
niemand het kan omstoten of erdoor verwond kan
raken. Gebruik het koffiezetapparaat niet in de open
lucht. Zet het apparaat niet op zeer hete oppervlakken
en in de buurt van open vuur, om te vermijden dat de
behuizing smelt of op andere wijze beschadigd raakt.
Reiniging
Alvorens het apparaat te reinigen dient men de
hoofdschakelaar (7) op -0- te zetten en vervolgens de
stekker uit het stopcontact te halen. Wacht bovendien
tot het apparaat is afgekoeld. Dompel het apparaat
nooit onder in water! Het is streng verboden te
proberen reparaties te verrichten aan het binnenwerk
van het apparaat.
Ruimte voor het gebruik en het onderhoud
Voor een juiste, goede werking van het koffiezetapparaat
wordt het volgende geadviseerd:
• Kies een vlakke ondergrond om het apparaat op te
zetten;
• Kies een voldoende verlichte, hygiënische ruimte
met een gemakkelijk te bereiken stopcontact;
• Zorg voor de minimum afstand tussen de wanden
en het apparaat. Deze worden op de afbeelding
aangegeven.
• Plaats het apparaat niet in een ruimte waar de
temperatuur lager is dan 0°C. Vorst kan het
apparaat beschadigen.
Bewaren van het apparaat
Als het apparaat lange tijd niet gebruikt wordt, moet
het worden uitgeschakeld en moet de stekker uit het
stopcontact worden gehaald.
Bewaar het op een droge plaats, buiten het bereik
van kinderen.
Bescherm het apparaat tegen stof en vuil.
Reparaties / Onderhoud
In het geval van storingen, defecten of vermoedelijke
defecten na een val, moet de stekker onmiddellijk uit
het stopcontact worden gehaald.
Schakel een defect apparaat nooit in.
Alleen erkende servicecentra mogen ingrepen en
reparaties verrichten.
Page 82

82
VEILIGHEIDSVOORSCHRIFTEN - INSTALLATIE
Reparaties mogen uitsluitend worden uitgevoerd door
een erkend servicecentrum.
In het geval van ingrepen die niet correct zijn uitgevoerd, wordt elke aansprakelijkheid voor eventuele
schade afgewezen.
Brandpreventie
Gebruik brandblusapparaten met kooldioxyde (CO2),
in het geval van brand. Gebruik geen water of poederblusapparaten.
Legenda componenten apparaat
Koffiebonenhouder
Deksel koffiebonenhouder
Knop afstelling maling
Knop afstelling dosis
Deksel doseerder gemalen koffie
Blad voor koffiekopjes
Hoofdschakelaar (ON/OFF)
Deksel waterreservoir
Waterreservoir
Koffiediklaatje
Elektriciteitssnoer
Druppelbakje + rooster
Niveauvlotter druppelbakje
In hoogte verstelbaar koffiemondstuk
Stoom-/heetwaterpijp
Voordeurtje
Stoomafgifteknop
Koffie-afgiftegroep
Sleutel koffie-afgiftegroep
Reinigingsborsteltje
Maatbekertje gemalen koffie
Bedieningspaneel
Knop afstellen hoeveelheid koffie in kopje
Toets afgifte koffie
Lampje temperatuur bereikt/ koffiefunctie
Knop keuze gemalen koffie
Lampje keuze gemalen koffie
Knop selectie heetwaterfunctie
Lampje selectie heetwaterfunctie
Lampje apparaat in werking
Lampje alarmsignalering
4 INSTALLATIE
Neem, voor uw eigen veiligheid en die van anderen,
de “Veiligheidsvoorschriften” van hoofdstuk 3
nauwgezet in acht.
4.1 Verpakking
De originele verpakking is ontworpen en gerealiseerd
om het apparaat te beschermen tijdens het transport.
Men raadt aan de verpakking te bewaren voor eventueel transport in de toekomst.
4.2 Werkzaamheden vooraf
• Haal het druppelbakje (12) met het rooster uit de
verpakking.
• Haal het koffiezetapparaat uit de verpakking en
zet het op een geschikte plaats, die voldoet aan
de gestelde eisen die worden beschreven in de
veiligheidsvoorschriften (hoofdst.3.)
• Breng het druppelbakje (12) aan op zijn plaats
in het apparaat; controleer of het bakje zelf, de
opvanglade (10) en de koffie-afgiftegroep (18)
correct geplaatst zijn en of het voordeurtje (16)
dicht is.
• Plaats het deksel van de koffiebonenhouder
(2) op de koffiebonenhouder (1). Houd het reingingsborsteltje (20), de sleutel van de koffieafgiftegroep (19) en het maatbekertje voor de
gemalen koffie (21) bij de hand.
• Alvorens de stekker in het stopcontact te steken
dient men te controleren of de hoofdschakelaar (7)
op -0- staat.
Het knipperen van het rode lampje (30) bij het
aanzetten van het apparaat wil zeggen dat een
van de eerder beschreven onderdelen niet goed
geplaatst is.
Belangrijke Opmerking: het is belangrijk
hoofdstuk 14 te lezen, waarin gedetailleerd
de betekenis wordt uitgelegd van alle signaleringen
van het apparaat door middel van de lampjes op het
bedieningspaneel.
4.3 Eerste inschakelingEerste inschakeling
• Haal het waterreservoir (9) weg door het op
te tillen en verwijder het deksel (8). Spoel het om
en vul het met vers water; men raadt aan om het
Page 83

INSTALLATIE - KOFIEMOLEN - AFSTELLING KOFFIEDOSIS
83
reservoir niet te vol te maken. Zet het reservoir weer
op zijn plaats en plaats het deksel (8) erop.
Doe uitsluitend vers water zonder koolzuur
in het reservoir (9). Warm water of andere
vloeistoffen kunnen het reservoir en/of het
apparaat beschadigen. Schakel het apparaat niet
in zonder water: controleer of er voldoende water
in het reservoir zit.
• Verwijder het deksel (2) en doe de koffiebonen
in de houder (1).
Alléén koffiebonen in de houder (1) doen.
Gemalen en gelyofiliseerde koffie of ander
materiaal berokkenen het apparaat schade.
• Plaats het deksel (2) op de koffiehouder (1).
• Steek de stekker (11) in een geschikt stopcontact.
• De hoofdschakelaar (7) van het apparaat staat
gewoonlijk op -0-. Men zet het apparaat aan door
op de knop (7) te drukken; het lampje (29) van het
bedieningspaneel gaat dan branden.
• Om het circuit te vullen richt u het stoompijpje
(15) op de druppelopvangbak, plaatst u een
kopje of een geschikte bak onder de tuit van het
stoompijpje en drukt u op knop (27). Led (28) gaat
branden.
Draai de knop tegen de wijzers van de klok in
en wacht tot er op regelmatige wijze water uit
het stoompijpje loopt. Om de waterafgifte te
onderbreken draait u de knop met de wijzers van
de klok mee.
• Druk opnieuw op knop (27) om het apparaat weer
in de normale werkwijze te zetten.
Opmerking: alvorens het apparaat voor het
eerst aan te zetten, in het geval het lange
tijd niet wordt gebruikt of als het waterreservoir
helemaal leeggeraakt is, is het raadzaam het
circuit te vullen.
• Als de bovenstaande handelingen zijn voltooid, is
het apparaat klaar voor het gebruik.
• Voor de afgifte van koffie, warm water of stoom en
voor het juiste gebruik van het apparaat dient men
zich zorgvuldig aan de hieropvolgende instructies
te houden.
5 KOFIEMOLEN
Let op! Men mag alleen draaien aan de
knop voor de afstelling van de maling,
die zich aan de binnenkant van de koffiehouder
bevindt, wanneer de koffiemolen in werking is.
Geen gemalen en/of glyofiliseerde koffie in de
koffiebonenhouder doen.
Het is verboden om iets anders dan koffie-
bonen te gebruiken. De koffiemolen bevat
elementen die bewegen en die gevaarlijk kunnen
zijn.
Het is verboden om er de vingers of voorwerpen
in te stoppen. Alvorens werkzaamheden in de
koffiehouder uit te voeren dient men de hoofdschakelaar uit te schakelen en de stekker uit het
stopcontact te halen. Geen koffiebonen toevoegen
gedurende de werking van de koffiemolen.
De kwaliteit en de smaak van de koffie zijn behalve
van de melange ook afhankelijk van de maling.
Het apparaat heeft een knop (3) om de maling in
te stellen. Men dient daaraan te draaien als de
koffiemolen in werking is. De cijfers op de knop
duiden op de mate van maling.
Elke machine is in de fabriek afgesteld op een
gemiddelde maling. Als de maling te fijn is, dient
men de knop naar de hogere cijfers te draaien, als
de maling te grof is naar de lagere cijfers.
Men merkt het verschil in maling pas na de afgifte van
drie/vier kopjes koffie.
Gebruik een koffiebonenmelange voor espressoapparaten.
Stel niet af op te hoge of te lage nummers (bijv. 1
–16). Gebruik in deze gevallen ander koffiemelanges.
Bewaar de koffie op koele plaatsen, in een hermetisch
afgesloten houder.
De maling moet afgesteld worden indien de koffieafgifte
niet goed is.
Te snelle afgifte = maling is te grof- De knop moet op
de lagere nummers gezet worden.
Geen afgifte of druppelsgewijs = maling is te fijn- De
knop moet op de hogere nummers gezet worden.
Page 84

84
AFGIFTE VAN KOFFIE'
6 AFSTELLING KOFFIEDOSIS
Het is mogelijk om de hoeveelheid koffie (dosis)
die men wenst te malen, af te stellen.
De dosis wordt door de fabriek afgesteld op een
gemiddeld niveau dat overeenkomt met de wensen
van de meeste klanten; streepje (A) op de hoogte
van (B). Door de knop (4) in de koffiehouder tegen
de wijzers van de klok in te draaien wordt de dosis
gemalen koffie verhoogd, met de wijzers van de klok
mee, wordt deze verlaagd.
De dosis moet afgesteld worden alvorens op de
koffie-afgiftetoets te drukken. Met dit systeem verkrijgt
men een optimale afgifte bij alle soorten koffie die in
de handel verkrijgbaar zijn.
7 AFGIFTE VAN KOFFIE
Opmerking: als het apparaat geen koffie
afgeeft, moet worden gecontroleerd of het
waterreservoir water bevat; op de linkerkant van
het apparaat kan het waterniveau in het reservoir
worden gecontroleerd.
Vóór de afgifte van koffie dient men
te controleren of het groene lampje
“temperatuur bereikt” (24) continu brandt en of
het water- en koffiereservoir vol zijn.
• Zet 1 of 2 kopjes onder de afgiftemondstukken
(14); u kunt het mondstuk in hoogte regelen, zodat
het zich aanpast aan uw kopjes.
• Het mondstuk kan worden verplaatst voor het
gebruik van grote kopjes.
Duw om grote kopjes te gebruiken het mondstuk
zover als het gaat met de hand naar het
apparaat. (gebruik in dit geval slechts één kopje
per keer).
Om het mondstuk in de ideale gebruikspositie te
brengen moet het in de buitenste stand worden
getrokken. Men dient te controleren of het
geblokkeerd is.
• De gewenste hoeveelheid koffie met behulp van
de knop (22) in het kopje laten lopen: als men
met de wijzers van de klok mee draait, krijgt men
meer koffieafgifte, tegen de wijzers van de klok
in minder koffieafgifte.
Opmerking: als de niveauvlotter (13) stijgt,
wordt geadviseerd het opvangbakje te
legen.
7.1 Afgifte bij koffiebonen
• Voor koffieafgifte dient men op de toets (23) te
drukken, vervolgens begint de afgiftecyclus: Voor
1 kopje koffie een keer op de toets (23) drukken;
voor 2 kopjes koffie tweemaal achter elkaar op de
toets (23) drukken.
Bij deze werkwijze maalt en doseert het
apparaat automatisch de juiste hoeveelheid
koffie; voor de bereiding van twee kopjes koffie
worden twee maling- en twee afgiftecyclussen
automatisch door het apparaat uitgevoerd.
• Nadat de koffie de pre-infusiecyclus uitgevoerd
heeft, komt de koffie uit de afgiftemond (14).
• De afgifte van de koffie stopt automatisch wanneer
het niveau dat met de knop (22) ingesteld is, bereikt
wordt; niettemin kan men de afgifte stoppen door
op de toets (23) te drukken.
7.2 Afgifte bij gemalen koffie
Men dient in de doseerder (5) alléén ge-
malen koffie voor espressoapparaten te
doen: koffiebonen, gelyofiliseerde koffie of ander
materiaal zijn schadelijk voor het apparaat.
Het is verboden uw vingers in het apparaat
te steken omdat het bewegende onderdelen
bevat.
• Gebruik alleen het maatbekertje (21) dat bij het
apparaat geleverd wordt om de juiste hoeveelheid
gemalen koffie voor de doseerder te nemen
Doe er maar één maatbekertje gemalen
koffie per keer in; voor twee kopjes koffie
moet men tweemaal achter elkaar de cyclus
uitvoeren.
• Druk op de toets (25) om de functie te kiezen; het
lampje (26) gaat aan.
• Doe het deksel van de doseerder voor gemalen
koffie (5) omhoog.
• Neem met het doseerbekertje (21) een koffiedosis:
Page 85

WAFGIFTE HEET WATER - AFGIFTE STOOM - REINIGING EN ONDERHOUD
85
verwijder de overtollige gemalen koffie van het
maatbekertje.
• Doe de gemalen koffie in de doseerder.
• Sluit het deksel (5).
• Voor afgifte van koffie dient men op de toets te
drukken (23), vervolgens start de afgiftecyclus.
• Nadat de koffie de pre-infusiecyclus uitgevoerd
heeft, komt de koffie uit de afgiftemond (14).
• De afgifte van de koffie stopt automatisch wanneer
het niveau dat met de knop (22) ingesteld is, bereikt
is; niettemin kan men de afgifte stoppen door op de
toets (23) te drukken.
• Vervolgens gaat het apparaat weer op de normale
werking over (zie par. 7.1).
8 AFGIFTE HEET WATER
Gevaar voor brandwonden! Aan het begin
van de afgite kunnen er spatten heet water
naar buiten komen. Het afgiftepijpje kan zeer
heet worden: raak het niet rechtstreeks aan met
uw handen.
• Controleer vóór afgifte van heet water of het groene
lampje van de temperatuur (24) brandt.
Ga, met het apparaat gereed voor afgifte van koffie,
als volgt te werk:
• Druk op knop (27). Led (28) gaat branden.
• Zet een kop en/of een bak onder de heetwater-
/stoompijp (15).
• Draai de knop (17) tegen de klok in.
• Laat de gewenste hoeveelheid water naar buiten
komen: Draai de knop (17) met de klok mee om de
afgifte van water te stoppen.
• Druk opnieuw op knop (27) om het apparaat weer in
de normale werkwijze te zetten. Led (28) gaat uit.
9 AFGIFTE STOOM/HET ZETTEN
VAN EEN CAPPUCCINO
De stoom kan worden gebruik om de melk te
kloppen voor cappuccino, maar ook om dranken te
verwarmen.
Gevaar voor brandwonden! Aan het begin
van de afgite kunnen er spatten heet water
naar buiten komen. Het afgiftepijpje kan zeer
heet worden: raak het niet rechtstreeks aan met
uw handen.
• Voordat u de stoomafgifte activeert, controleert
u of de led “temperatuur gereed” (24) permanent
brandt. Het apparaat is onmiddellijk gereed voor de
stoomafgifte.
• Richt de stoompijp (15) op de druppelbak, draai de
knop (17) “Warm water/stoom” even open zodat het
overgebleven water uit de stoompijp kan komen:
na enkele momenten zal er stoom naar buiten
komen.
• Sluit de knop (17).
• Vul 1/3 van de houder die u wilt gebruiken voor het
maken van een cappuccino met koude melk.
Voor het beste resultaat bij het maken van
een cappuccino, moeten koude melk en
een koud kopje worden gebruikt.
• Dompel het stoompijpje onder in de melk die
verwarmd moet worden en open de knop (17);
laat de houder met langzame bewegingen van
beneden naar boven draaien, voor een gelijkmatige
schuimvorming.
• Na de stoom gedurende de gewenste tijd te hebben
gebruikt sluit u de knop (17).
• Hetzelfde systeem kan worden gebruikt voor het
verwarmen van andere dranken.
Maak na deze handelingen het stoompijpje schoon
met een vochtige doek.
U kunt onmiddellijk koffie in de pas geklopte melk
schenken om een echte Italiaanse cappuccino te
bereiden.
10 REINIGING EN ONDERHOUD
Algemene reiniging
• Het onderhoud en de reiniging kunnen alleen
worden uitgevoerd als het apparaat koud is en
losgekoppeld van het elektriciteitsnet.
• Dompel het apparaat niet onder in water en zet
geen onderdelen in de vaatwasmachine.
• Gebruik geen scherpe voorwerpen of agressieve
chemische producten (oplosmiddelen) voor de
Page 86

86
REINIGING EN ONDERHOUD - ONTKALKING
reiniging.
Het wordt geadviseerd het water-reservoir
dagelijks schoon te maken:
- Haal het filter (C) dat in het reservoir zit weg en
maakt het schoon onder stromend drinkwater.
- Plaats het filter (C) terug in zijn behuizing, door er
zachtjes op te drukken en tegelijkertijd een beetje
te draaien.
- Vul het reservoir met vers drinkwater.
Bij gebruik de doseerder voor gemalen koffie
dagelijks reinigen:
- Pak het bijgele verde kwastje, reinig de
doseerder.
• Gebruik een zachte doek met weinig water om het
apparaat schoon te maken.
• Droog het apparaat en/of de componenten ervan
nooit in een magnetron en/of een oven.
• Maak de ruimte en de afgiftegroep schoon,
wij adviseren om de opvanglade (10) dagelijks te
legen.
• Het koffiemondstuk (14) kan worden weggehaald
voor reiniging; spoel de afgiftekanalen zorgvuldig
met warm water.
10.1 Afgiftegroep
• De afgiftegroep (18) moet telkens wanneer
de houder met gemalen koffie wordt gevuld,
schoongemaakt worden, of minstens eenmaal per
week.
• Schakel het apparaat uit door de keuzeschakelaar
(7) in de stand -0- te draaien, en trek de stekker uit
het stopcontact.
• Haal vervolgens de opvanglade (10) en het
druppelbakje (12) weg, en open vervolgens het
deurtje (16).
• Haal de afgiftegroep (18) weg met de
daarvoor bestemde handgreep en door op de
toets «PRESS» te drukken. De afgiftegroep mag
alleen worden afgewassen met warm water zonder
afwasmiddel.
• Controleer of de twee stalen filters geen
koffieresten bevatten. Het bovenste filter kan
worden verwijderd door de plastic pen tegen
de klok in los te schroeven met de bijgeleverde
sleutel (19).
• Was alle onderdelen van de afgiftegroep af en maak
ze zorgvuldig droog.
• Plaats het filter terug en schroef de plastic pen
zorgvuldig terug met behulp van de sleutel.
• Maak de ruimte nauwkeurig schoon.
• Zet de afgiftegroep weer met de handgreep
terug in de daarvoor bestemde ruimte, totdat hij
vasthaakt.
• Sluit vervolgens het deurtje en plaats de opvanglade
en het druppelbakje weer.
11 ONTKALKING
Kalkvorming ontstaat wanneer het apparaat gebruikt
wordt; ontkalking is eens in de 3-4 maanden nodig
of wanneer men een verminderde watertoevoer
waarneemt.
In dien men zelf wil ontka lken, kan
men een niet toxisch en/of schadelijk
onkalkingsmiddel ge-bruiken dat normaal in de
handel verkrijgbaar is.
Let op! Gebruik in geen geval azijn als
ontkalkingsmiddel.
• Meng het ontkalkingsmiddel met water, zoals
aangegeven op de verpakking van het ontkalkingsmiddel, en vul het waterreservoir.
• Zet het apparaat aan met de hoofdschake-
laar (7).
• Richt het stoompijpje (15) op het druppelbakje.
• Druk op knop (27). Led (28) gaat branden.
• Laat met tussenpozen (een kopje per keer)
de hele inhoud uit het waterreservoir komen door
de stoomknop (17) tegen de klok in te draaien; om
de afgifte te stoppen draait u de knop (17) met de
klok mee.
• Druk opnieuw op knop (27) om het apparaat weer
in de normale werkwijze te zetten. Led (28) gaat
uit.
• Tijdens de intervallen moet u het product ongeveer
10-15 minuten laten inwerken en dient u het
apparaat uit te zetten door de hoofdschakelaar (7)
op -0- te zetten.
• Als de ontkalkingsoplossing op is, moet het
waterreservoir worden omgespoeld en met vers
water worden gevuld.
• Zet het apparaat aan met de hoofdschakelaar.
Page 87

INFORMATIE VAN JURIDISCHE AARD - VERWERKING ALS AFVAL
87
• Druk op knop (27). Led (28) gaat branden.
Leeg 2/3 van de inhoud van het waterreservoir
door de stoomknop (17) tegen de klok in te draaien;
om de afgifte te stoppen draait u de knop (17) met
de klok mee.
• Laat het apparaat warm worden en leeg de
resterende inhoud van het waterreservoir door de
stoomknop (17) tegen de klok in te draaien; stop
de afgifte door de knop (17) met de klok mee te
draaien.
• Druk opnieuw op knop (27) om het apparaat weer
in de normale werkwijze te zetten. Led (28) gaat
uit.
Als er een ander product gebruikt wordt,
raadt men aan de aanwijzingen op te volgen
van de fabrikant van het ontkalkingsproduct, die
op de verpakking vermeld worden.
12 INFORMATIE VAN JURIDISCHE
AARD
• Deze instructies bevatten de informatie die nodig is
voor een correct gebruik, voor de bediening en voor
een zorgvuldig onderhoud van het apparaat.
• Deze kennis, en het in acht nemen van deze
instructies vormen een voorwaarde om het apparaat
zonder risico’s in volledig veilige omstandigheden
te kunnen gebruiken en onderhouden.
• Als nadere informatie gewenst wordt, of als er
bijzondere problemen ontstaan waarvan men
denkt dat die in de instructies voor het gebruik niet
duidelijk genoeg zijn uitgelegd, verzoeken wij u
contact op te nemen met de plaatselijke dealer of
rechtstreeks met de fabrikant.
• Wij wijzen er verder op dat de inhoud van deze
instructies geen deel uitmaakt van een vorige
of al bestaande conventie, overeenkomst of
juridisch contract en dat ze er de inhoud niet van
veranderen.
• Alle plichten van de fabrikant zijn gebaseerd op het
betreffende verkoopcontract dat ook het volledige
en exclusieve regelement bevat met betrekking tot
de garantievoorwaarden.
• De contractuele garantievoorschriften worden
noch beperkt, noch uitgebreid op grond van deze
uitleg.
• De instructies voor het gebruik bevatten informatie
die beschermd wordt door het auteursrecht.
• Het is verboden deze te fotokopiëren of in een
andere taal te vertalen, zonder voorafgaande
schriftelijke toestemming van de fabrikant.
13 VERWERKING ALS AFVAL
• Maak het apparaat dat niet meer gebruikt wordt,
onbruikbaar.
• Haal de stekker uit het stopcontact en snijd de
elektrische kabel door.
• Overhandig het niet meer gebruikte apparaat aan
een afvalverzamelcentrum.
Page 88

88
LAMPJES BEDIENINGSPANEEL
14 LAMPJES BEDIENINGSPANEEL
Signaleringen Oorzaken Oplossingen
Groen lampje (29)
Groen lampje (24) brandt continu
Groen lampje (24) knippert
Groen lampje (26) brandt continu
Groen lampje (28) brandt continu
Groen lampje (24) knippert
Groen lampje (26) knippert
Groen lampje (28) knippert
tegelijkertijd
Rood lampje (30) brandt continu
Rood lampje (30) knippert
Machine aan
Machine op “temperatuur bereikt”:
- voor afgifte van koffie;
- voor de stoomafgifte.
Apparaat in fase van opwarming
voor de afgifte van koffie, heet
water en stoom.
Machine geeft koffie af (gemalen)
Apparaat gereed voor de afgifte
van heet water.
Het apparaat heeft voor elke
a f z o nd er li jk e af gi ft e de
maximumhoeveelheid water
afgegeven.
Onvoldoende water in het reservoir Het reservoir met vers water vullen,
Reservoir koffie leeg Het reservoir met koffiebonen
Af giftegro ep, koffiedikl aatje,
druppelbak, voordeurtje niet op
de juiste plaats voor de werking
van het apparaat
Draai de knop voor de afgifte van
heet water/stoom dicht. Draai
de knop weer open indien u een
grotere hoeveelheid water wenst
het circuit vullen en de procedure
opnieuw starten.
vullen en de procedure opnieuw
starten.
Controleren of alle onderdelen op
hun juiste plaats zitten
Page 89

PROBLEMEN - OORZAKEN - OPLOSSINGEN
Problemen Oorzaken Oplossingen
Het apparaat gaat niet aan Het apparaat is niet op het elektri-
citeitsnet aangesloten
Het deurtje is open Sluit het deurtje
De koffie is niet warm genoeg De kopjes zijn koud Verwarm de kopjes
Er komt geen water of stoom naar
buiten
De koffie heeft weinig crema De melange is niet goed of de
Het apparaat wordt te langzaam
warm of er komt te weinig water
uit de pijp
Het lukt niet om de afgiftegroep te
verwijderen
Er komt geen koffie naar buiten Water ontbreekt Vul het waterreservoir en vul het
De koffie komt langzaam naar
buiten
Koffie komt baar buiten uit het
afgiftemondstuk
Het gat van de stoompijp is ver-
stopt
koffie is niet versgebrand of de
maling is te grof
Het circuit van het apparaat is
verstopt door kalkafzetting
De afgiftegroep zit niet op zijn
plaats
Koffiediklaatje aanwezig Verwijder het koffiediklaatje al-
Groep vuil Reinig de afgiftegroep (Par.10.1)
Grote hoeveelheid Verminder de hoeveelheid (Par.6)
Circuit niet gevuld Vul het circuit (Par.4.3)
Grote hoeveelheid Verminder de hoeveelheid (Par.6)
Te fijne koffie Verander van melange of stel de
Circuit niet gevuld Vul het circuit (Par.4.3)
Afgiftegroep vuil Maak de afgiftegroep schoon
Afgiftemondstuk niet in juiste
positie
Sluit het apparaat aan op het
elektriciteitsnet
Reinig het gat van de stoompijp
met een knopspeld
Verander van melange of stel de
maling in zoals in par. 5 staat.
Verhoog de dosis, par.6
Ontkalk het apparaat
Zet het apparaat aan. Doe het
deurtje dicht.De afgiftegroep
gaat automatisch terug naar de
beginpositie
vorens de afgiftegroep weg te
halen
circuit (Par.4.3)
maling in zoals in par. 5 staat.
Verhoog de dosis, par.6
(Par.10.1)
Zet het afgiftemondstuk weer op
zijn plaats
89
Afgiftemondstuk verstopt Maak het afgiftemondstuk en zijn
gaten schoon
Bij defecten die niet in deze tabel staan of wanneer de oplossingen de defecten niet verhelpen, dient
men zich tot een servicecentrum te wenden.
Page 90

90
Page 91

91
Page 92

92
Type Sup020R
COD. 1.6.589.93.00 REV. 00 DEL 28/10/04
 Loading...