

Page 1

TYPE SUP 025 PYR
OPERAOPERA
OPERA
OPERAOPERA
INSTRUCCIONES DE USOINSTRUCCIONES DE USO
INSTRUCCIONES DE USO
INSTRUCCIONES DE USOINSTRUCCIONES DE USO
FOR YOUR SAFETY CAREFULLY READ THE OPERATING INSTRUCTIONS.
POUR VOTRE SÉCURITÉ, LISEZ SOIGNEUSEMENT LES INSTRUCTIONS D’EMPLOI.
LEER ATENTAMENTE ESTAS INSTRUCCIONES DE USO ANTES DE UTILIZAR LA MÁQUINA.
TING INSTRUCTIONSTING INSTRUCTIONS
TING INSTRUCTIONS
TING INSTRUCTIONSTING INSTRUCTIONS
MODE DMODE D
MODE D
MODE DMODE D
’EMPL’EMPL
’EMPL
’EMPL’EMPL
OIOI
OI
OIOI
FOR HOUSEHOLD USE ONLY
Page 2

Congratulations on your choice!
As the proud owner of this wonderful machine, you can now experience
the taste of a delicious cup of espresso or cappuccino in the comfort of
your own home.
Félicitations pour votre choix.
Grâce à cette machine, vous pouvez maintenant déguster chez vous un
délicieux espresso ou un cappuccino.
¡Les felicitamos por su decisión!
Gracias a ésta máquina podrán degustar un delicioso café o capuchino
en la comodidad de su hogar.
• 2 •
Page 3
• 3 •
Page 4
• 4 •
Page 5
• 5 •
Page 6

ENGLISH
IMPORTANT SAFEGUARDS
When using electrical appliances, basic safety precautions
should always be followed to reduce the risk of fire, electric
shock, and/or injury to persons, including the following:
1 Read all instructions and information in this instruction
book and any other literature included in this carton
referring to this product before operating or using this
appliance.
2 Do not touch hot surfaces. Use handles or knobs.
3 To protect against fire, electric shock and personal injury
do not immerse cord, plugs or appliance in water or
other liquid.
4 Close supervision is necessary when any appliance is
used by or near children.
5 Unplug from outlet when not in use and before
cleaning. Allow to cool before putting on or taking off
parts, and before cleaning the appliance.
6 Do not operate any appliance with a damaged cord or
plug or after the appliance malfunctions or has been
damaged in any way. Return appliance to the nearest
authorized service center for examination, repair or
adjustment.
7 The use of accessory attachments not recommended
by the appliance manufacturer may result in fire,
electric shock or personal injury.
8 Do not use outdoors.
9 Do not let cord hang over edge of table or counter, or
touch hot surfaces.
10 Do not place on or near a hot gas or electric burner, or
in a heated oven.
11 Always turn appliance OFF, then plug cord into the
wall outlet. To disconnect, turn switch to OFF, then
remove plug from wall outlet.
12 Do not use appliance for other than intended household
use.
13 Use extreme caution when using hot steam.
CAUTION
This appliance is for household use. Any servicing, other
than cleaning and user maintenance, should be performed
by an authorized service center. Do not immerse base in
water. To reduce the risk of fire or electric shock, do not
disassemble the base. There are no user serviceable parts
inside. Repair should be done by authorized service
personnel only.
1 Check voltage to be sure that the voltage indicated on
the nameplate agrees with your voltage.
2 Never use warm or hot water to fill the water tank.
Use cold water only.
3 Keep your hands and the cord away from hot parts of
the appliance during operation.
4 Never clean with scouring powders or hard implements.
Simply use a soft cloth dampened with water.
5 For optimal taste of your coffee, use purified or
filtered water. Your appliance will still need descaling
every 2-3 months.
INSTRUCTIONS FOR THE
POWER SUPPLY CORD
A A short power-supply cord is provided to reduce risks
of getting tangled up or tripping over a longer cord.
B Longer extension cords are available and may be used
if care is exercised in their use.
C If a long extension cord is used:
1 the marked electrical rating of the extension cord
should be at least as great as the electrical rating
of the appliance.
2 if the appliance is of the grounded type, the
extension cord should be a grounding type
3 the cable does not hang from the table to avoid
the risk of getting caught up in it.
SAVE THESE INSTRUCTIONS
• 6 •
Page 7

1 GENERALITIES
This coffee maker is designed to make espresso
coffee using both coffee beans and preground
coffee; it is also equipped with a device for
supplying steam and hot water.
This elegantly designed appliance has been
designed for household use and is not suitable
for continuous, professional-type use.
Caution: The manufacturer cannot be
held liable for any damages/injury
attributable to the following:
• Incorrect use and not in keeping with the
intended use.
• Repairs not carried out by authorized
service centers.
• Tampering with the supply cord.
• Tampering with any machine part.
• Use of not original spare parts and
accessory attachments.
• Limescale and / or freezing damage.
In these cases, the warranty is voided.
1.1 Reading this instruction book
The following symbols have been
used to facilitate reading: The
caution triangle denotes all
instructions important for the safety
of the user. Follow these instructions
scrupulously to avoid serious injury!
This symbol denotes information that
should be taken into account to get
the most out of the appliance.
The figures referred to in the
text can be found on the
cover flap.
Keep these pages open when
reading the instructions.
1.2 Using this instruction book
Keep these instructions in a safe place and hand
them over to any other person who uses this
coffee maker.
For additional information or for information on
topics not covered or inadequately covered in
this book, contact the authorized service centers.
ENGLISH
2 TECHNICAL INFORMATION
• Nominal Voltage
See nameplate found on the appliance.
• Rated Output
See nameplate found on the appliance.
• Material of Body
Thermoplastic (ABS)
• Dimensions (l x h x d)
11" x 15.2" x 15.4" / 280 x 385 x 390 mm
• Weight
17.6 lbs / 8 kg
• Cord Length
4 ‘/ 1200 mm
• Control Panel
Front
• Water Tank
Removable
• Power Supply
See nameplate found on the appliance.
• Water Tank
46 oz / 1.3 l
• Coffee Container Capacity (Coffee Beans)
8 oz / 230 g
• Pump Pressure (bar)
15
• Boiler
Aluminum
• Safety Devices
Boiler pressure safety valve
Safety thermostat
The manufacturer reserves the right to
change the make up of the machine in
the light of any technological
breakthrough.
The machine complies to the European Standard
89/336/EEC (legislative decree 476 04.12.92),
referring to the elimination of broadcasting
disturbance.
• 7 •
Page 8

ENGLISH
100
250
100
100
100
sizes in millimeter
• 8 •
Page 9

3 SAFETY STANDARDS
ENGLISH
- Children are not aware of the risks involved
in electrical appliances.
- Do not leave packing material near children.
Never let live parts come into contact with
water: short-circuit hazard! The superheated
steam and hot water can cause scalding!
Never direct the steam or the hot water jet
towards body parts! Touch the steam /hot
water nozzle carefully: scalding hazard!
Intended Use
- This coffee maker is intended for household
use only.
- Do not make technical changes and use the
appliance inappropriately: damage/injury
hazard!
- The coffee maker must only be used by adults
who are in full control of their mental and
physical capacities.
Power Supply
- Connect the coffee maker to a suitable outlet
only.
- The voltage must match the one specified on
the nameplate of the appliance.
Power Supply Cord (Fig.A)
- Never use the coffee maker if it has a faulty
cord.
- The defective cord must be replaced
immediately.
- An authorized service center must replace the
defective cords and plugs immediately.
- Do not let the cord touch sharp edges, very
hot objects and oily surfaces.
- Do not carry or pull the coffee maker by the
cord.
- Do not pull the cord to remove the plug, and
do not touch the plug with wet hands or feet.
- Avoid letting the cord dangle from tables or
raised surfaces.
Preventing Injury (Fig.B)
- Ensure that the machine is out of the reach of
children.
Scalding Hazard (Fig.C)
- Do not direct the flow of the superheated
steam and/or hot water towards yourself and/
or others: scalding hazard!
- Always use the correct handles or knobs.
- Do not insert objects through the openings in
the appliance.
Space necessary to installation, usage,
and maintenance. (Fig.D)
- Place the machine on a flat, even surface.
- The machine must be positioned in a safe
place where it cannot be knocked over or
cause injury.
- Choose a position that is well lit, hygienic and
where a wall socket is easily accessible.
- To prevent melting or damage to the casing,
do not rest the machine on very hot surfaces
or near open flames.
- Place the coffee maker 4"/ 10 cm away from
walls and cooking tops.
- Do not keep the machine at a temperature
below 32° F/0°C; freezing may damage the
machine.
- The wall outlet must be reachable at all times.
- Do not use the coffee maker outdoors.
Cleaning (Fig.E)
- Before cleaning the coffee maker, switch the
ON/OFF switch (7) to “O”/OFF; then, remove
the plug from the wall outlet.
- Wait for the machine to cool down.
- Never immerse the appliance in water! Avoid
splashes.
- Never tamper with the machine inside parts.
Storing the Appliance
- When the appliance is not used regularly,
switch OFF the appliance and remove the plug
from the wall outlet.
- Store it in a dry place, away from children.
- Protect it from dust and dirt.
• 9 •
Page 10

ENGLISH
Repairing / Maintenance
- If the coffee maker falls and you see or suspect
damages or malfunctions, immediately
remove the plug from the wall. Never use faulty
machines.
- Repairs must be made by authorized service
centers only.
- If authorized service centers do not carry out
maintenance work and/or repairs, the
manufacturer is not liable for any damages.
Fire Fighting
- In the event of a fire, use carbon dioxide
extinguishers (CO2). Do not use water or
powder extinguishers.
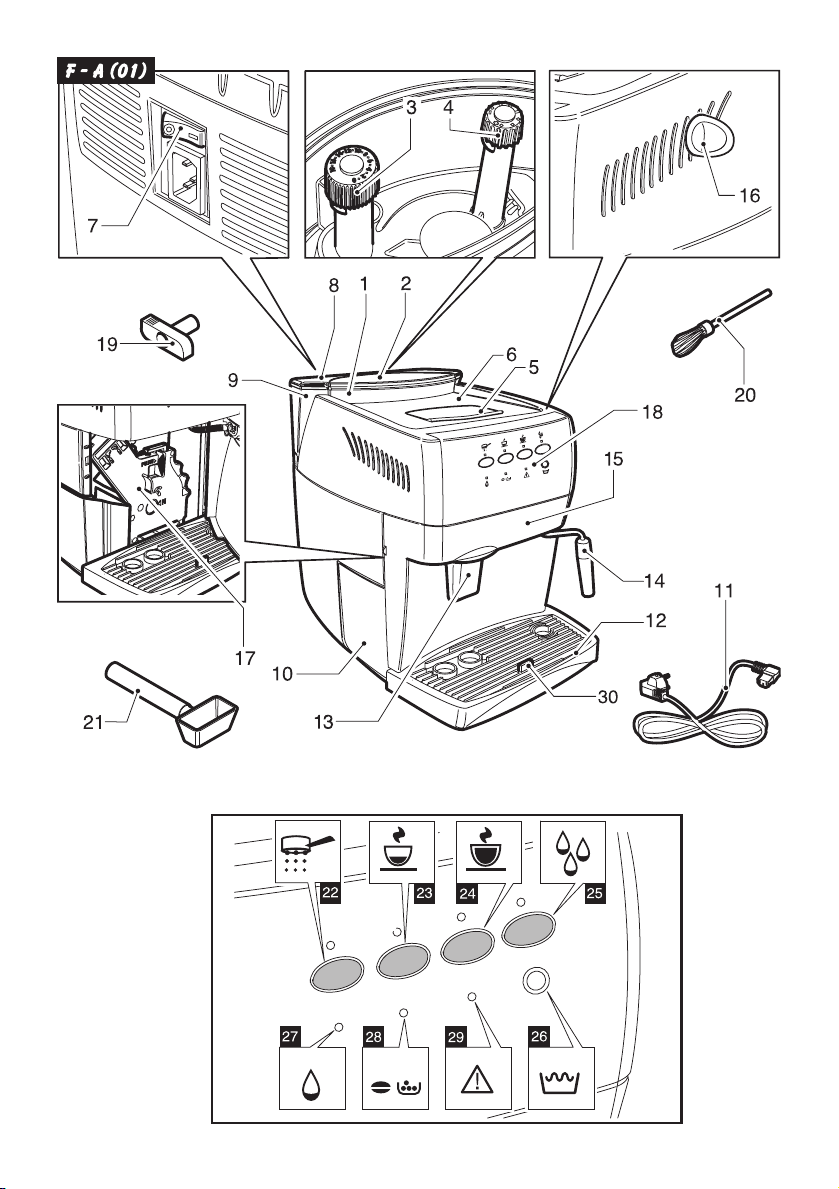
DESCRIPTION OF PARTS
See Fig.01
1 Coffee bean container
2 Coffee bean container lid (aroma
preserver)
3 Grinder control knob
4 Dose control knob
5 Preground coffee doser lid
6 Cup warming surface
7 ON- OFF switch
8 Water tank lid
9 Water tank
10 Dump box
11 Power cord
12 Drip tray + grill
13 Height adjustable coffee dispenser
14 Steam / hot water nozzle
15 Front door
16 Steam / hot water knob
17 Brew unit
18 Control panel
19 Brew unit key
20 Cleaning brush
21 Preground coffee measuring scoop
Control panel
22 Preground coffee button /LED
23 Espresso coffee button / temperature-ready
LED
24 Long coffee button / temperature ready LED
25 Hot water button / LED
26 Descale button / LED
27 Water warning light
28 Our of bean warning light / full dump box
warning light
29 Malfunction warning light
30 Full drip tray float
• 10 •
Page 11

4 INSTALLING THE COFFEE
MAKER
For your safety and the safety of third parties,
follow the Safety Standards (see chapter 3).
4.1 Packaging
The original packaging was designed and made
to protect the appliance during shipment. We
recommend you keep it for future needs.
4.2 Preliminaries
• Remove the coffee maker from the packaging
and position it in a suitable location that meets
the requirements specified and described in
the safety standards (chap.3).
• Open the machine door, take the drip tray (12)
from the package, and fit the dump box (10);
then, fit the drip tray in the machine (Fig.21).
• Make sure that the drip tray and grill (Fig.01,
pos. 12), the dump box (10) and the brew
unit (17) are inserted correctly and that the
front door (15) is closed.
• Keep the cleaning brush (20) and the brew
unit key (19) handy as you will need them for
regular maintenance.
If the red light (29) is still on when the
machine is started, it means that one of the
parts described above is positioned
incorrectly.
Caution: You must read chapter 15.
This chapter explains in detail the
meaning of all the visual signals displayed
to the user through the lights (LEDs) found
on the control panel.
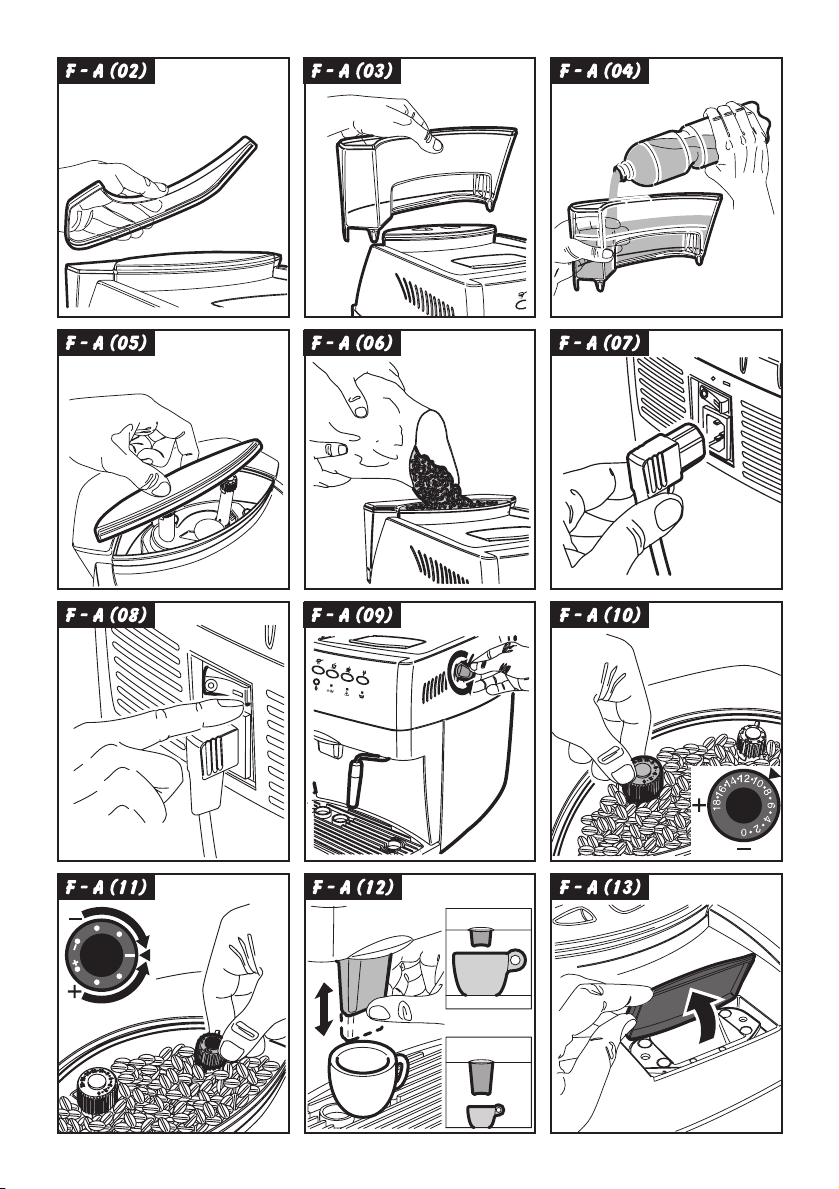
4.3 Preparing the coffee maker for use
• Remove the water tank lid (Fig.02) and
remove the tank (Fig.03). Rinse and fill with
fresh water (Fig.04); we recommend that you
do not exceed the MAX level mark. Put the
water tank back in its place and put the lid
on it.
Always fill the tank (9) with fresh still
water. Hot water and other liquids can
ENGLISH
damage the tank and/or the appliance. Do
not operate the appliance without water:
make sure that there is enough water inside
the tank.
• Lift the coffee bean container lid (Fig.05) and
fill the container with coffee beans (Fig.06).
Use coffee beans only. Ground and
instant coffee, as well as other items,
cause damage to the appliance.
• Put the lid of the coffee bean container (1)
back in place.
• Insert the plug into the outlet at the back of
the coffee maker (Fig.07) after making sure
that the ON/OFF switch (7) is in the “O”/
OFF position. Insert the other end of the plug
into a suitable wall outlet.
• When not in use, the ON/OFF switch of
the appliance is in the “O” position. To
switch ON the coffee maker, simply press
the switch (Fig.08) to the “I”/ON position.
The LEDs (23) and (24) start flashing on
the control panel.
• To prime the machine, position the steam/hot
water nozzle (Fig.01, item 14) over the drip
tray and place a cup under the steam nozzle.
• Press the hot water button (25) and turn the
steam/hot water knob (16) counterclockwise.
Wait for water to flow regularly from the nozzle
and, then, shut off the flow by turning the knob
clockwise.
Note: You must prime the machine
as soon as it is switched ON for the
first time, if the machine has not been used
for a long time, if the water tank has been
emptied completely or if the warning light
(27) flashes.
• After switching ON the appliance, LEDs (23)
and (24) flash simultaneously during the
heating phase. Once the heating phase is
finished, LEDs (23) and (24) come on steady.
• At this point, your coffee maker is ready for
use. Follow the instructions below to dispense
coffee, hot water or steam and use the
appliance correctly.
• 11 •
Page 12

ENGLISH
5 THE COFFEE GRINDER (FIG.10)
Caution! Only turn the grinder
control knob, found inside the coffee
bean container (Fig .10), when the coffee
grinder is working and in increments of 2
settings at a time only. Do not insert
ground and/or instant coffee in the coffee
bean container.
Do not insert anything other than coffee
beans in the container. The coffee grinder
contains dangerous moving parts; keep
fingers and/or other objects away.
Before carrying out any operations in the
coffee bean container, switch OFF the ON/
OFF switch (7) and remove the plug from
the wall outlet. Do not insert coffee beans
when the coffee grinder is working. Do
not use frozen beans.
The quality and the taste of your coffee depend
not only on the blend you use, but also on the
grinder setting.
The appliance comes with a grinder
adjustment knob (Fig.10). To use this feature,
turn the graduated knob when the coffee
grinder is working and in increments of 2. The
numbers displayed on the knob indicate the
grinder setting. The manufacturer sets the knob
to an average grinder setting at the factory: if
the ground coffee is too fine, turn the knob
toward the higher numbers; if the ground
coffee is too coarse, turn the knob toward the
lower numbers.
You will notice the change only after brewing
three /four cups of coffee.
Use coffee beans for espresso coffee makers.
Avoid using extreme grinder positions (e.g. 1
and 16); if this is necessary, try using different
coffee blends.
Store the coffee in a cool and dry place, in an
airtight container.
You should change the grinder position if the
coffee does not flow optimally, specifically:
Too fast = grinding too coarse > grind coffee
finer (smaller setting);
Too slow (drips and/or no flow) = grinding too
fine > grind coffee coarser (higher setting).
6 ADJUSTING THE COFFEE
DOSE (FIG.11)
You may select the quantity of coffee beans
(dose) that you wish to grind per cup. The
manufacturer sets an average dose at the factory.
To change the coffee dose, simply turn the knob
(Fig. 11) found inside the coffee bean container.
Turn it counterclockwise to increase the dose
(towards +) and clockwise to decrease the dose
(towards -). The - = 6g and + = 9 g.
You must adjust the dose before pressing the
desired coffee button.
This system allows you to obtain an optimal cup
of coffee with all types of marketed coffee.
7 THE COFFEE DISPENSER
Note: If the appliance does not dispense coffee, check the water level
in the tank.
• Before making coffee, make sure that the
green temperature-ready LEDs (23) and (24)
are on steady and that the water tank and the
coffee bean container are full.
• Place 1 or 2 coffee cups under the coffee
dispenser spouts; you can adjust the height of
the dispenser by moving it up or down manually
(Fig.12) to adjust the spouts to your cups.
7.1 Making coffee with coffee beans
• To dispense the coffee, press the desired
coffee button (23) or (24). The selected
button starts flashing (see chap.15), while the
other switches off.
• To make 1 cup of coffee, position a single cup
under the coffee dispenser spouts and press
the button (23) or (24) only once; to make 2
cups of coffee or a double shot, position one
or two cups under the spouts and press the
button (23) or (24) twice in rapid succession.
• In this operating mode, the appliance
automatically grinds and doses the right
quantity of coffee; going through two grinding
and dispensing cycles automatically and
• 12 •
Page 13

dispensing 2 cups of coffee or a double shot.
• Then, the dispensing cycle starts. After carrying
out the prebrewing cycle, coffee will start to
come out of the spout (Fig.01, pos.13).
The coffee will stop flowing automatically when
the preset level is reached (see par.7.3). You
can interrupt the flow of coffee by pressing
the button (Fig.01, pos.23 or 24).
7.2 Making coffee with preground coffee
In this operating mode, you must use
the supplied measuring scoop (Fig.01,
pos.21) to dose the preground coffee.
Only use preground coffee suitable
for espresso coffee makers in the
doser (5); placing coffee beans, instant
coffee and other materials inside the doser
causes damage to the appliance.
Keep fingers away from the
preground coffee doser since there
are moving parts.
Use the supplied measuring scoop (21) to
measure the right quantity of preground coffee
to place in the doser.
Use only one level measuring scoop at a time;
to make two cups of coffee using preground,
you must go through the entire process twice.
• Press the button (22) to select the preground
function, the LED lights up.
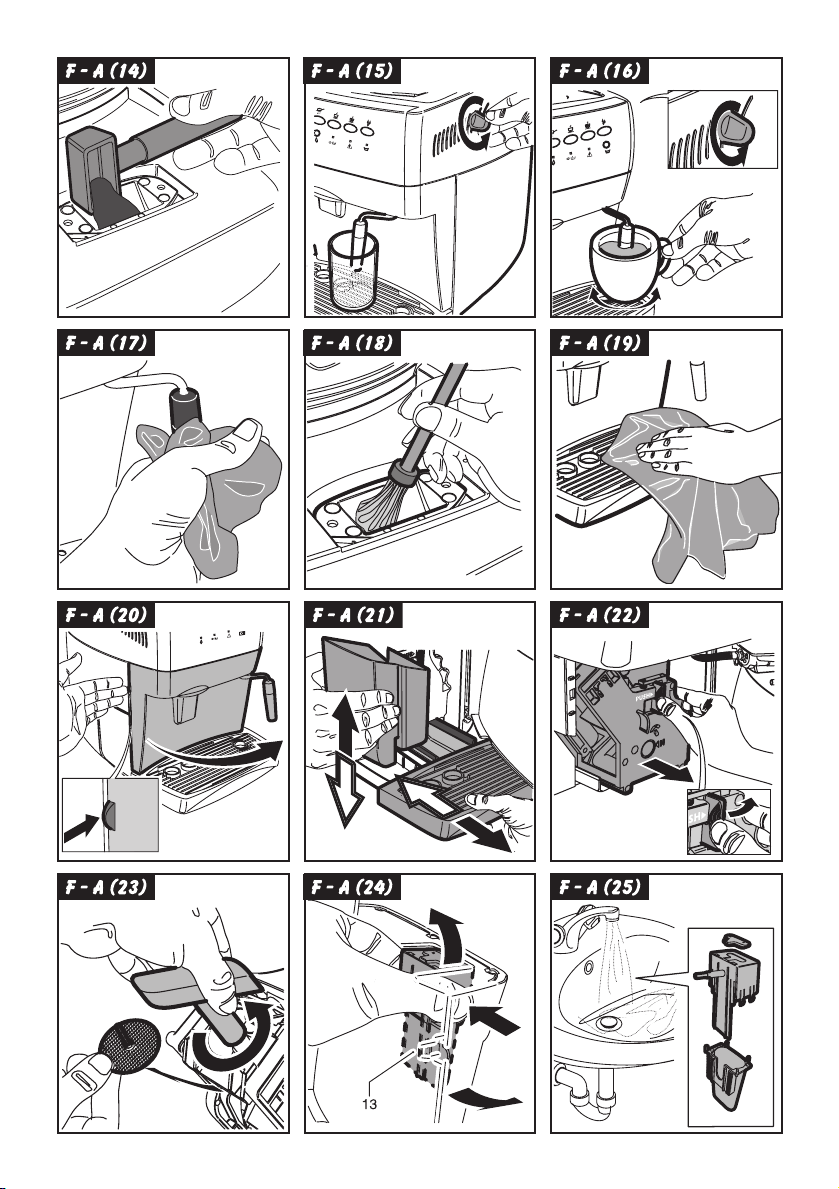
• Lift the lid of the preground coffee doser (Fig.13).
• Fill one level scoop of preground coffee;
discard any excess quantity of ground coffee.
• Fill the doser with the preground coffee (Fig.14)
• Close the lid of the preground coffee doser.
• To make the coffee, press the desired coffee button
(23) or (24); the selected button starts flashing
(see chapter 15), while the other switches off.
• The dispensing cycle begins.
• After carrying out the prebrewing cycle, coffee
will start to come out of the spout (13).
The coffee will stop flowing automatically when
the preset level is reached (see par. 7.3).
You can interrupt the flow of coffee by pressing
either coffee button (23) or (24).
• Then the machine automatically returns to the
normal operating mode (see par. 7.1).
ENGLISH
7.3 Adjusting the quantity of coffee per
cup
Your coffee maker has been programmed to
make 2 types of coffee: espresso coffee with the
button (23) and long coffee with the button (24).
To adjust the programmed values to the size of
your cups, place the cup under the coffee
dispenser (13), press the button of the desired
type of coffee (23) or (24) and keep it pressed.
Wait for the machine to fill the cup up to the
desired level and, then, release the button.
Note: keep coffee button (23) or (24)
pressed during the entire coffee
dispensing process. Maximum level is 8 oz.
In this way, the appliance is reprogrammed to
supply the quantity of coffee you selected.
8 DISPENSING HOT WATER
Caution: splashing may occur at the
start - scalding hazard! The hot water
nozzle can reach high temperatures: avoid
touching directly with your hands.
• Before dispensing hot water, make sure that
the hot water button (25) is activated (light
will be on steady).
• Proceed as follows when the appliance is ready
to dispense hot water:
• Place a cup and/or pitcher under the steam/
hot water nozzle (Fig.15).
• Turn the knob counterclockwise as shown in Fig.15.
• When you have obtained the desired quantity
of hot water, turn the knob clockwise to shut
off the flow. The appliance is immediately
ready to brew coffee.
9 DISPENSING STEAM /
PREPARING CAPPUCCINO
Steam can be used to froth milk for
cappuccinos and also to heat other
beverages. Scalding hazard!
Splashing may occur at the start -
scalding hazard! The hot water nozzle
can reach high temperatures: avoid
touching directly with your hands.
• 13 •
Page 14
ENGLISH
This appliance has a Rapid Steam® feature which
eliminates waiting time between frothing and
brewing.
Making cappuccinos and lattes has never been
this easy!
• Before dispensing steam, make sure the hot
water button (25) is OFF.
• Direct the steam nozzle (14) towards the drip
tray and turn the steam/ hot water knob (16).
• Purge any residual water in the system and
close the steam knob as soon as you get a
good jet of steam through the nozzle.
• Fill a pitcher or a cup 1/3 full with cold milk.
For best results when making
cappuccinos, the milk and the used
cup should be cold.
• Immerse the steam nozzle 1/4" into the milk
to be frothed and turn the steam knob (16)
counterclockwise.
• Turn the container slowly with up and down
movements to make a uniform froth (Fig.16).
• Continue steaming until you have the desired
amount of froth and the milk is approx.165°F
hot, then close the steam knob (16).
• The same system can be used to heat other
beverages. Clean the steam nozzle with a
damp cloth (Fig.17)
9.1 Making coffee after using the
steam function
• If you want to make more coffee immediately
after steaming milk, you can go straight into
brewing a cup of coffee. Just press the desired
coffee button!
10 CLEANING AND MAINTE-
NANCE
General Cleaning
• Maintenance and cleaning should only be
carried out when the appliance is cold and
disconnected from the power supply.
• Do not immerse the appliance in water and
do not wash any parts in the dishwasher.
• Do not use abrasives or aggressive chemicals
(solvents) for cleaning.
• Do not dry the machine and/or any of its parts
using a microwave and/or conventional oven.
• We recommend you clean the water tank and
change the water daily.
• Clean the preground coffee doser daily.
- Use the supplied brush to clean the doser
(Fig.18).
• To clean the appliance, use a soft cloth
dampened with water (Fig.19).
• Clean the service area and the brew unit.
• We recommend you empty and clean the drip
tray (12) and the dump box (10) daily; to carry
out this operation you must open the front door
(Fig.20) and remove the drip tray (Fig.21); then,
you can empty and clean all the components.
Note: if warning light 28 is flashing,
you must empty the dump box while
the machine is ON. See section 15 (p. 18)
• You can remove the coffee dispenser in order
to clean it (Fig.24):
- lower the dispensing nozzles
- take the dispensing unit as shown in Fig. 24,
and remove it from its housing
- wash the whole unit with warm water .
10.1 The brew unit
The brew unit (17) must be cleaned
each time you fill the coffee bean
container or at least once a week.
• Switch off the appliance by pressing the ON/
OFF switch (7) to the “O”/OFF position and
remove the plug from the wall outlet.
• Open the service door (15). Remove the drip
tray (12) and the dump box.
• Remove the brew unit by holding it by its
handle and pressing the PUSH button (Fig.22)
• Make sure that the stainless steel filter is free
from any coffee residue. The top filter can be
removed by unscrewing the plastic pin
counterclockwise using the specific brew unit
key supplied with the machine (Fig.23).
• Wash the brew unit only with cold or warm
water: do not use detergents. Then thoroughly
wash and dry all its components.
• Put the filter back on and carefully hand tighten
the plastic pin back on using the specific key.
• 14 •
Page 15

• Clean the compartment inside the appliance.
• Holding it by its handle, slide the brew unit
back in place until it locks in place.
• Insert the dump box, the drip tray and grill
back in place. Close the door (15).
• Regular lubrication of the brew unit is also
recommended.
• Contact the nearest Service Center to you for
more information.
11 DESCALING
Limescale / mineral / scale build-up will occur during
the lifespan of this appliance. To ensure the longevity
of your machine, you should descale it every 2-3
months, or sooner if you notice a reduction in the
water flow or when the LED of the button (26) flashes.
We recommend the Saeco descaler.
You can also use any citric based,
non-toxic and non-chemical descaler/
decalcifier for these systems.
Caution! Never use vinegar.
ENGLISH
counterclockwise; to shut off the flow, turn the
knob (16) clockwise.
• Let the appliance heat up and empty the
remaining contents of the water tank by
pressing the hot water button (25) and turning
steam knob (16) counterclockwise; to stop
flow, turn it clockwise.
If you use a descaling/ decalcifying
product other than Saeco’s, follow
the manufacturer’s directions on the
package to mix the right quantity of
product/water. Then descale as described
above.
If the descaling cycle is interrupted
by switching the machine OFF, it will
continue when the machine is switched back
ON . You must finish the descaling cycle.
12 FUNCTION PROGRAMMING
The appliance allows you to program some
parameters depending on your needs.
To descale the appliance proceed as follows:
• Mix the descaler with water as specified on
the package and fill the water tank.
• Switch ON the appliance with the ON/OFF
switch (7).
• Press the button (26) for at least 5 seconds to
select the descaling operating mode; the LED
will come on steady when descaling activated.
• Direct the steam nozzle (14) toward the drip tray.
• Position a large container under the steam
nozzle and turn the hot water knob
counterclockwise (16). The appliance starts
an automatic descaling cycle with pauses
preset by the manufacturer and managed
automatically by the appliance.
• At the end of the cycle, the flow of the
descaling solution is shut off and the 5 buttons
start flashing simultaneously.
• Turn the knob of the hot water nozzle (16)
clockwise to OFF. At this time the warning light
(27) flashes.
• Rinse the water tank and fill it with fresh water.
• Position a large container under the steam
nozzle and empty 2/3 of the contents of the
water tank by turning the steam knob (16)
To program the functions, you must enter the
programming mode as follows:
• Ensure that the ON/OFF switch (7) of the
appliance is switched to “O”/OFF and that
the hot water / steam knob (16) is OFF.
• Press the buttons (23) and (25) and, at the
same time, switch ON the appliance using
the ON/OFF switch (7).
You are now in the programming mode.
To quit the programming mode and
implement your changes, switch the machine
OFF and, then, back ON again using the
main switch (7).
12.1 Programming water hardness
Water hardness varies, depending on the area
and type of water used. This coffee maker can
be adjusted so that it will work optimally with
the water hardness level, expressed on a scale
from 1 to 4, of your area.
The appliance is already set to an average value
(hardness 3).
• 15 •
Page 16

ENGLISH
Before proceeding, you must check
the water hardness of your area
using the strip supplied with the appliance.
Quickly immerse (1 second) the strip into
the water and shake slightly. After a minute, the strip shows the test results.
To program this function, proceed as follows:
• Press the button (22); the number of lit buttons
indicates the programmed water hardness;
• If you desire to change the water hardness
level, press the button (22) repeatedly until
the correct number of lit buttons are displayed,
indicating the water hardness level.
• If in doubt, program to a higher water
hardness.
Hardness 1 = buttons (22) and (23) lit
Hardness 2 = buttons (22), (23) and (24) lit
Hardness 3 = buttons (22), (23), (24) and (25) lit
Hardness 4 = buttons (22), (23), (24), (25) and (26) lit
The hardness index matches the 1-4 squares on
the strip.
1 = softest and 4 = hardest water setting.
12.2 Programming the rinsing cycle
When first switched ON, the machine will carry
out an automatic rinsing cycle. Approx. 3-4 oz
of water are dispensed through the system and
out through the coffee dispenser to ensure you
get fresh water for your first cup of coffee.
To program this function, proceed as follows:
• Press the button (23); when the function is ON,
the warning light (27) lights up.
12.3 Programming Prebrewing
The prebrewing process slightly dampens the
coffee before brewing to improve the extraction;
this brings out the full aroma of the coffee and
gives it an excellent taste.
To program this function, proceed as follows:
• Press the button (24); when the function is ON,
the warning light (28) lights up.
Note: the manufacturer has already
activated this function.
12.4 Programming Pregrinding
The pregrinding procedure makes the machine
grind twice: the first time, for the cup of coffee
just selected, and then, for the next cup of coffee
(not yet selected). This function is only useful
when preparing numerous cups of coffee in rapid
succession (for example, during a dinner party)
as you always have a dose of ground coffee
ready to go inside of the machine.
To program this function, proceed as follows:
• Press the button (25); when the function is ON,
the warning light (29) lights up.
13 LEGAL INFORMATION
• This instruction book contains the necessary
information to use and upkeep your appliance
correctly.
• The information should be viewed as a
guideline to use and upkeep your coffee maker
in safety. The information is not exhaustive. For
additional information or for information on
topics not covered or inadequately covered in
this book, please contact the authorized service
centers or the manufacturer directly.
• In addition, we should mention that these
instructions are not a part of a previous or
existing agreement, legal contract or similar
and that the information is not changed by
any other document.
• All the manufacturer’s obligations and liabilities
are based on the relative sale contract that also
specifies all warranty terms and conditions.
• The contractual warranty terms and conditions
are not limited or extended based on this
instruction book.
• This instruction book contains information
protected by copyright.
• This instruction book cannot be photocopied
or translated into other languages without the
explicit written consent of the manufacturer.
14 SCRAPPING
• Make unusable any appliances not in use.
• Detach the plug from the wall outlet and cut
the electric cord.
• Deliver broken appliances to a suitable
collection center.
• 16 •
Page 17

15 CONTROL PANEL LEDS
GREEN LED (22)
- Appliance ready to brew with preground coffee
GREEN LED (23), FIXED
GREEN LED (24), FIXED SIMULTANEOUSLY
- Temperature-ready:
To dispense coffee
To dispense hot water or steam (depending on which function selected LED 25)
GREEN LED (23), FLASHING
GREEN LED (24), FLASHING SIMULTANEOUSLY
- Appliance is heating up to dispense coffee, hot water or steam
GREEN LED (23), SLOW FLASHING
- Appliance dispensing 1 espresso coffee
GREEN LED (23), FAST FLASHING
- Appliance dispensing 2 espresso coffees
GREEN LED (24), SLOW FLASHING
- Appliance dispensing1 long coffee
GREEN LED (24), FAST FLASHING
- Appliance dispensing 2 long coffees
ENGLISH
GREEN LED (25), FIXED
- Hot water function selected. To prime machine or dispense hot water.
GREEN LED (25), OFF
- Steam function selected.
RED LED (26), FLASHING
- The appliance needs a descaling cycle
Descale as described in par. 11.
To cancel the selection, press another button keeping the knob turned OFF.
RED LED (26), FIXED
- The descaling function has been selected
To descale as described in par. 11, turn the hot water knob (16)
counterclockwise.
Descaling cycle must be completed before machine is ready to brew coffee.
• 17 •
Page 18

ENGLISH
RED WARNING LIGHT (27), FIXED
- Insufficient quantity of water in the water tank
Fill the tank with fresh water and prime the machine.
If the light doesn’ t clear, check the grey plastic float in the water tank. If
missing or sinking to bottom, contact an authorized service center for
replacement float.
RED WARNING LIGHT (27), FLASHING
- The machine needs to be primed.
Prime the machine (section 4.3)
RED WARNING LIGHT (28), FIXED
- The coffee bean container is empty
Fill the container with coffee beans and press the coffee button again.
RED WARNING LIGHT (28), FLASHING
- The dump box is full or cup count on machine is telling machine dump box is full.
**You must empty the dump box while the unit is ON.
RED WARNING LIGHT (29), FIXED
- Incorrectly positioned brew unit, drip tray and/ or front door.
The fixed red light goes off when all the components are correctly positioned
or closed.
RED WARNING LIGHT (29), FLASHING
- The coffee grinder motor is blocked
- Brew unit motor shutdown.
Contact an authorized service centre
** Caution: The dump box must only be emptied when the appliance is ON. Remove
for at least 5 seconds and then put back in place. Machine has cup count on it to
signal when the dump box is full. If you empty it while the machine is OFF, the machine
will not reset the counter and you will not be able to brew coffee.
• 18 •
Page 19

16 TROUBLESHOOTING
melborPesuaCgnitoohselbuorT
NO
dlocootsieeffocehTdloceraspucehT spucehttaeH
)reyalhtorf-maerc(
resnepsideht
reniatnoc
hctiwstonseodecnailppaehT
maetsroretawtohoNsielzzonmaetsehtfoelohehT
ylwolsdesnepsidsieeffoCenifootsieeffoC rodnelbeeffocehtegnahC
"amerc"elttilsaheeffocehT
otgnolootsekatecnailppaehT
foemulovdetimilaroputaeh
elzzonehtfotuosemocretaw
demmajsitinuwerbehTecalpnidekcoltonsitinuwerbehT
desnepsidsieeffocoNretawoN emirpdnaretawhtiwknatehtlliF
edistuodesnepsidsieeffoC
ylkciuqoottuosemoceeffoCreniatnocehtedisnieeffocelttilooT dnuorghtiwreniatnocehtlliF
ehtfotuosemocretaW
teltuoeht
deggolc
tinuwerbytriD tinuwerbehtnaelC
gnilacsybdeggolc
yltcerroc
ecalpnixobpmuD pmuddnayartpirdehtevomeR
tinuwerbytriD tinuwerbehtnaelC
esodegraL esodehtesaerceD
enifooteeffoC sitinuelihwgnittesrednirgtsujdA
wol
dnelbeeffocesraoC dnelbfoepytehtegnahC
esodllamS esodehtesaercnI
otnideggulptonsiecnailppaehT
ehtroelbatiustonsidnelbehT
sirodnuorgylhserftonsieeffoc
ylesraocootdnuorg
siecnailppaehtfotiucricehT
demirptonenihcaM enihcamehtemirP
ootsileveleeffocfognimmargorP
yltcerrocdettiftonsitinuwerbehT tinuwerbehttifeR
deggolcsitinuwerbehT stuopsstidnatinuwerbehtnaelC
llufootsireniatnocehT taolfehtfonoitisopehtkcehC
ENGLISH
ehtotecnailppaehttcennoC
ehterusekamdnateltuo
"I"ehtnosinottubFFO/NO
noitisop
htiwelohelzzonmaetsehtnaelC
.nipa
.raPnideificepssagnidnirgtsujda
)6.raP(esodehtesaerceD.5
rodnelbeeffocehtegnahC
nidebircsedsagnidnirgtsujda
)6.raP(esodehtesaercnI.5.raP
ecnailppaehtelacseD
ekaM.ecnailppaehtNOhctiwS
werbdnaxobpmud,yartpirderus
esolC.yltcerrocecalpnieratinu
lliwtinuwerbehT.roodtnorfeht
laitinistiotnruteryllacitamotua
noitisop
werbehtgnivomererofebxob
.tinu
enihcameht
gnittesresraocaotgnidnirg
aotnottubeeffocmargorpeR
)3.7.rapees(levelrehgih
)eeffoctnatsniton(eeffoc
.reniatnocehtytpmedna
• 19 •
Page 20

FRANÇAIS
IMPORTANT
Lors de l’utilisation d’appareils électriques, il est important
de prendre les précautions suivantes, afin d’éviter les
décharges électriques, les courts circuits et les accidents
corporels.
1 Lire toutes les instructions et les indications données
dans cette brochure, ainsi que toute autre information
que contient l’emballage, avant de mettre la machine
en marche.
2 Ne pas toucher les surfaces chaudes de la machine.
Utiliser les poignées ou boutons.
3 Ne pas plonger le fil électrique, la prise ou l’appareil
lui-même dans l’eau ou tout autre liquide.
4 Faire très attention lorsque l’appareil est utilisé par
ou près des enfants.
5 Débrancher l’appareil lorsqu’il n’est pas en service et
laissez-le refroidir avant de retirer les accessoires pour
le nettoyage ou de les mettre en place.
6 Ne pas utiliser l’appareil avec un cordon ou une prise
en mauvais état ou après que l’appareil ait été
endommagé de quelque manière que ce soit. Confiez
votre appareil au service après-vente autorisé le plus
proche pour examen ou réparation.
7 L’utilisation d’accessoires non recommandés par le
fabricant de l’appareil pourrait poser des problèmes.
8 Ne pas utiliser à l’extérieur.
9 Ne pas laisser le cordon pendre de la table ou de
la surface de travail, ni toucher des surfaces
chaudes.
10 Ne pas poser sur une cuisinière ou dans un four chaud.
11 Mettre toujours l’appareil en position «éteint» avant
de le débrancher. Mettre aussi tous les interrupteurs à
«éteint» avant de le débrancher.
12 Usage domestique seulement.
13 Faire très attention en utilisant la vapeur.
GARDER CES ISTRUCTIONS
PRÉCAUTIONS
Machine est réservée à un usage domestique. Tout
entretien, en dehors du nettoyage et de l’entretien usuel
par l’usager, doit être fait par un centre de service autorisé.
Ne pas plonger la base dans l’eau. Pour éviter les
courtscircuits et les décharges électriques, ne pas démonter
la base. Elle ne contient aucune pièce qui demande un
entretien de la part de l’usager. Toute réparation doit être
effectuée par le personnel d’un service après-vente autorisé.
1 Vérifier si le voltage correspond bien aux spécifications
apparaissant sur la plaque des données techniques.
2 Ne jamais mettre de l’eau tiède ou chaude dans le
réservoir; mais toujours de l’eau froide.
3 Ne pas toucher les surfaces chaudes de l’appareil pendant
le fonctionnement et en écarter le cordon électrique.
4 Ne jamais nettoyer avec des poudres à récurer ou des
instruments durs.
5 Utiliser de l’eau purifiée ou en bouteille pour assurer
le bon goût du café. Quand même il vous sera
nécessaire de faire le détrartage de votre machine tous
les 2-3 mois.
INSTRUCTIONS SUR LE
CORDON ELECTRIQUE
A Votre appareil est muni d’un cordon électrique court
afin d’éviter qu’il ne s’emmêle ou qu’on ne s’y
accroche.
B On peut utiliser une rallonge électrique en prenant
certaines précautions.
C Si on utilise une rallonge, vérifier:
1 que sa tension est au moins égale à celle de
l’appareil
2 qu’elle est munie d’une prise à trois fiches, avec
mise à la terre, si c’est le cas pour le cordon de
l’appareil
3 que le câble ne pende pas de la table afin d’éviter
de trébucher.
• 20 •
Page 21

1 GÉNÉRALITÉS
Cette machine est indiquée pour la préparation
de café espresso à partir de café en grains ou
de café moulu; elle est dotée d’une valve vapeur
et eau chaude.
Le corps de la machine, à l’élégant design, a
été conçu pour un usage domestique et n’est
donc pas indiqué pour un fonctionnement
continu de type professionnel.
Attention. Aucune responsabilité n’est
assumée pour les éventuels
dommages résultant de:
• Emploi erroné et non conforme aux buts
prévus;
• Réparations effectuées en dehors des
centres de service autorisés;
• Manipulation frauduleuse du cordon
d’alimentation;
• Manipulation frauduleuse de l’un
composants de la machine;
• Emploi de pièces de rechange et
d’accessoires non originaux.
• Dommages causés par gel ou tartre.
Dans les cas ci-dessus, la garantie déchoit.
1.1 Pour faciliter la lecture
Le triangle d’avertissement indique
toutes les instructions importantes
pour la sécurité de l’utilisateur.
Suivre scrupuleusement ces
indications pour éviter les risques
de blessures graves.
Ce symbole sert à mettre en exergue
les informations les plus importantes,
pour une utilisation optimale de la machine.
Vous trouverez les
illustrations correspondant
au texte de la présente
brochure dans le volet de la
jaquette. Tenir ces pages ouvertes pendant la
lecture du mode d’emploi.
1.2 Utilisation du mode d’emploi
Conserver cette brochure dans un endroit sûr et
la joindre à la machine si une autre personne
• 21 •
FRANÇAIS
devait l’utiliser. Pour d’ultérieurs renseignements
ou en cas de problèmes non traités ou
insuffisamment traités dans la présente brochure,
veuillez vous adresser aux Centres de Services
autorisés.
2 DONNÉES TECHNIQUES
• Tension nominale
Voir plaque située sur l’appareil
• Puissance nominale
Voir plaque située sur l’appareil
• Matériau du corps de la machine
Thermoplastique (ABS)
• Dimensions (l x a x p)
11" x 15.2" x 15.4" / 280 x 385 x 390 mm
• Poids
17.6 lbs / 8 Kg
• Longueur du cordon
4 ‘ / 1200 mm
• Tableau de commande
Frontal
• Réservoir à eau
Amovible
• Alimentation
Voir plaque située sur l’appareil
• Réservoir à eau
46 oz / 1,3 l
• Capacité du récipient à café
8 oz / 230 g de café en grains
• Pression pompe (bars)
15
• Chaudière
Aluminium
• Dispositifs de sécurité
Valve de sécurité pression chaudière;
thermostat de sécurité.
Sous réserve de modifications de
construction et d’exécution dues au progrès
technologique.
Machine conforme à la Directive Européenne
89/336/CEE (Décret législatif 476 du 04/12/92),
relative à l’élimination des perturbations
radiotechniques.
Page 22

FRANÇAIS
100
250
100
100
100
mesures en millimètres
• 22 •
Page 23

3. NORMES DE SÉCURITÉ
Ne jamais mettre au contact de l’eau les
parties sous courant: risques de courtcircuit!
La vapeur surchauffée et l’eau chaude
peuvent provoquer des brûlures! Ne jamais
diriger le jet de vapeur ou d’eau chaude
vers des parties du corps et toucher avec
précaution le bec vapeur / eau chaude:
risques de brûlures!
A qui cette machine est destinée
- Cette machine est réservée exclusivement à
un usage domestique.
- Toute modification technique et tout emploi
illicite sont formellement interdits, à cause des
risques qu’ils comportent!
- Cette machine doit être utilisée uniquement
par des adultes en bonnes conditions
psychologiques et physiques.
Courant électrique
- Brancher la machine à une prise de courant
appropriée.
- La tension doit correspondre à celle qui est
indiquée sur la plaque de l’appareil.
Cordon d’alimentation (Fig.A)
- Ne jamais utiliser cette machine si le cordon
d’alimentation est défectueux.
- Faire tout de suite remplacer par un centre de
service autorisé les prises et les cordons
défectueux.
- Ne pas faire passer le cordon d’alimentation
par des angles, sur des arêtes vives et sur
des objets très chauds, et le protéger de
l’huile.
- Ne pas porter ni tirer la machine en la tenant
par le cordon.
- Ne pas débrancher l’appareil en tirant sur le
cordon d’alimentation; ne pas toucher la fiche
avec des mains et des pieds mouillés.
- Eviter que le cordon d’alimentation pende
librement d’une table ou d’une étagère.
FRANÇAIS
Protection d’autres personnes (Fig.B)
- Assurez-vous qu’aucun enfant n’ait la
possibilité de jouer avec la machine à café.
- Les enfants ne se rendent pas compte des
dangers liés aux appareils électroménagers.
- Ne laissez pas les matériaux employés pour
emballer la machine à la portée des enfants.
Danger de brûlures (Fig.C)
- Ne pas diriger contre soi-même et/ou
quelqu’un d’autre le jet de vapeur surchauffé
et/ou d’eau chaude: danger de brûlures.
- Utilisez toujours les poignées ou les boutons
prévus à cet effet.
- Ne pas insérer d’objets à travers les ouvertures
de l’appareil.
Espace nécessaire pour l’installation,
l’utilisation et la maintenance (Fig.D)
- Choisir un plan d’appui bien nivelé.
- Positionner la machine à café dans un lieu sûr
où personne ne peut la renverser ou se blesser.
- Choisir un environnement suffisamment
éclairé, propre et avec une prise de courant
facile d’accès;
- Ne pas poser la machine sur des surfaces très
chaudes ou à proximité de flammes vives pour
éviter que la carcasse ne fonde ou ne s’abîme.
- Placer la machine à 4" / 10 cm de distance
des murs et des plaques de cuisson.
- Ne pas laisser la machine à une température
inférieure à 32°F / 0°C : le gel risque de
l’endommager.
- La prise de courant doit pouvoir être atteinte
à tout moment.
- Ne pas utiliser la machine à l’extérieur.
Nettoyage (Fig.E)
- Avant de nettoyer la machine, il est
indispensable de mettre l’interrupteur général
(7) sur «O» / OFF, puis de débrancher le
cordon électrique de la prise de courant.
- Attendre également que la machine ait refroidi.
- Ne jamais plonger la machine dans l’eau!
- Eviter qu’elle entre en contact avec des jets d’eau.
- Il est strictement interdit de démonter la base
de la machine.
• 23 •
Page 24

FRANÇAIS
Rangement de la machine
- Lorsque la machine n’est pas employée
pendant longtemps, l’éteindre et débrancher
le cordon électrique de la prise.
- La ranger dans un endroit sec et non
accessible aux enfants.
- La protéger de la poussière et de la saleté.
Réparations / Entretien
- En cas de pannes, de défauts ou d’apparences
défectueuses après une chute, débrancher tout
de suite le cordon électrique de la prise de
courant. Ne jamais mettre en marche une
machine défectueuse.
- Seuls les centres de services autorisés peuvent
effectuer des interventions et réparations.
- En cas d’interventions et/ou réparations non
exécutées par des centres de services
autorisés, on décline toute responsabilité pour
les éventuels dommages en résultant.
Dispositif ignifugé
- En cas d’incendie, utiliser des extincteurs à
anhydride carbonique (CO2). Ne pas utiliser
d’eau ni d’extincteurs à poudre.
DESCRIPTION DES COMPOSANTS:
Fig.01
1 Récipient à café en grains
2 Couvercle mobile du récipient à café en
grains (protège-arôme)
3 Pommeau de réglage de la mouture
4 Pommeau de réglage de la dose
5 Couvercle doseur café moulu
6 Plan d’appui et chauffage des tasses
7 Interrupteur général (ON/OFF)
8 Couvercle du réservoir à eau
9 Réservoir à eau
10 Réceptacle
11 Cordon d’alimentation
12 Cuvette d’égouttoir + grille
13 Distributeur de café réglable en hauteur
14 Conduit vapeur / eau chaude
15 Panneau avant
16 Pommeau sélection vapeur
17 Groupe café
18 Tableau de commande
19 Clé du groupe café
20 Brosse pour le nettoyage
21 Mesure café moulu
Tableau de commande
22 Bouton / Voyant sélection café moulu
23 Bouton écoulement café espresso / Voyant
de température correcte atteinte
24 Bouton écoulement café allongé / Voyant
de température correcte atteinte
25 Bouton/Voyant de sélection fonction eau
chaude
26 Bouton/Voyant de sélection fonction
détartrage
27 Voyant lumineux indiquant qu’il n’y a plus
d’eau
28 Voyant lumineux indiquant qu’il n’y a plus
de café en grains ou qu’il faut vider le
réceptacle
29 Voyant lumineux indiquant un
dysfonctionnement
30 Flotteur indiquant que la cuvette d’égouttoir
est pleine
• 24 •
Page 25

4 INSTALLATION
Pour sa sécurité personnelle et celle des
autres, suivre scrupuleusement les «Normes
de sécurité» indiquées au chapitre 3.
4.1 Emballage
L’emballage d’origine a été conçu et réalisé pour
protéger la machine pendant son transport.
Il est recommandé de le conserver pour un
éventuel transport ultérieur.
FRANÇAIS
Remplir le réservoir (9) exclusivement
avec de l’eau froide non gazeuse.
L’eau chaude, de même que les autres
liquides, risquerait d’endommager le
réservoir et/ou la machine. Ne jamais
mettre la machine en marche sans eau:
vérifier si le réservoir en contient
suffisamment.
• Soulever le couvercle (Fig.05) et mettre du café
en grains dans le récipient (Fig.06).
4.2 Opérations préliminaires
• Retirer la machine de son emballage et
l’installer dans un endroit approprié répondant
aux caractéristiques requises et décrites dans
les normes de sécurité (chap.3).
• Ouvrir la porte de la machine ; déballer la
cuvette d’écoulement (12) et y introduire le
bac à marc (10) ; puis installer la cuvette
d’écoulement dans la machine (Fig.21).
• S’assurer que la cuvette d’égouttoir munie
de sa grille (Fig.01 - pos.12), le réceptacle
(10) et le groupe café (17) soient bien
enclenchés et que le panneau avant (15) soit
bien fermé.
• Conserver à portée de main la brosse pour le
nettoyage (20) ainsi que la clé du groupe
café (19) qui sont fournis avec la machine.
Si, à la mise sous tension de la machine, la
LED rouge (29) reste allumée, cela veut dire
qu’une des pièces citées supra n’est pas bien
installée.
Note importante: Il est important de
lire le contenu du Chapitre 15, dans
lequel il est expliqué en détail le sens de
tous les signaux que la machine fournit à
l’usager, par l’intermédiaire des voyants
lumineux situés sur le tableau de commande.
4.3 Première utilisation
• Ouvrir le couvercle du réservoir à eau (Fig.02)
et ôter le réservoir (Fig.03). Le rincer et le remplir
d’eau froide potable (Fig.04); il est
recommandé de ne pas dépasser la ligne MAX.
Réinsérer le réservoir à eau dans son logement
et replacer le couvercle au-dessus de celui-ci.
Utiliser exclusivement du café en
grains. Le café en poudre, lyophilisé
ou autre risquerait d’endommager la
machine.
• Replacer le couvercle sur le récipient à café (1).
• Brancher le cordon d’alimentation à la prise
de courant située à l’arrière de la machine
(Fig.07), après s’être assuré que
l’interrupteur général (7) soit bien en
position (0) / OFF.
Brancher l’autre côté du cordon électrique à
une prise de courant murale adaptée.
• L’interrupteur de la machine doit
normalement être sur la position (0); pour
l’allumer il suffit d’appuyer sur le bouton
(Fig.08); les voyants (23) et (24) du tableau
de commande commencent alors à
clignoter.
• Pour charger le circuit, allumer le bouton
fonction eau (25) diriger le bec à vapeur
(Fig.01 - pos.14) sur la cuvette d’égouttoir,
mettre ensuite une tasse ou un récipient
adapté sous le bec à vapeur et tourner le
pommeau (Fig.09) dans le sens contraire des
aiguilles d’une montre et attendre que l’eau
s’écoule, régulièrement, du bec à vapeur.
Pour interrompre l’écoulement de l’eau,
tourner le pommeau dans le sens des
aiguilles d’une montre.
Note: Avant de remettre la machine
en marche, si celle-ci n’est pas utilisée
sur une longue période, si le réservoir à eau
a été complètement vidé ou si le voyant
lumineux (27) clignote, il est obligatoire de
charger le circuit de la machine.
• 25 •
Page 26

FRANÇAIS
• Après l’allumage, pendant la phase de
chauffage de la machine, les voyants (23) et
(24) clignotent simultanément. Lorsque la
phase de chauffage est terminée, les voyants
(23) et (24) restent allumés de manière fixe.
• Une fois les opérations décrites ci-dessus
terminées, la machine est prête à l’emploi.
• Pour distribuer du café, de l’eau chaude ou de
la vapeur, et utiliser correctement la machine,
suivre attentivement les instructions suivantes
5 MOULIN À CAFÉ (FIG.10)
Attention! Le bouton de réglage de
la mouture, situé à l’intérieur du
récipient à café (Fig.10), doit être tourné
uniquement lorsque le moulin à café est en
marche et par non plus de deux numéros à
la fois. Ne pas mettre de café moulu et/ou
lyophilisé dans le récipient à café en grains.
Il est interdit d’introduire autre chose que
du café en grains. Le moulin à café contient
des organes en mouvement qui peuvent
être dangereux; il est interdit d’y introduire
les doigts et/ou d’autres objets. Avant d’intervenir, pour quelque raison que ce soit, à
l’intérieur du récipient à café, éteindre
l’interrupteur général (7) et débrancher le
cordon électrique de la prise de courant.
Ne pas ajouter de café en grains quand le
moulin à café est en marche.
La qualité et le goût du café dépendent non
seulement du mélange utilisé, mais aussi du type
de mouture.
La machine est dotée d’un pommeau (Fig.10)
qui permet de régler la mouture du café. Pour
changer de type de mouture, tourner le
pommeau gradué lorsque le moulin à café est
en marche et par non plus de deux numéros à
la fois; les chiffres reportés sur le bouton
indiquent le degré de mouture.
Chaque appareil est réglé, en usine, sur un
degré de mouture moyen: si la mouture est trop
fine il faut tourner le bouton vers des chiffres
plus élevés ; si la mouture est trop grosse il
faut tourner le bouton vers des chiffres plus bas.
Le changement de type de mouture ne se
remarquera qu’après l’écoulement de trois/
quatre cafés.
• 26 •
Utilisez toujours des mélanges de café en grains
pour machines à «espresso». Evitez d’utiliser des
types de mouture extrêmes (Ex. 1 – 16); dans
ces cas, utiliser des mélanges de café différents.
Conservez le café au frais dans un bocal
étanche. Ne pas insérer du café congelé dans
le récipient à café en grains.
La mouture doit être réglée si le café ne s’écoule
pas parfaitement bien.
Si le café coule trop vite, cela signifie qu’il est
moulu trop gros et il faut donc augmenter le
degré de mouture.
Si le café coule au goutte à goutte ou ne coule
pas du tout, cela signifie qu’il est moulu trop fin
et il faut donc diminuer le degré de mouture.
6 RÉGLAGE DE LA DOSE DE
CAFÉ (FIG.11)
Cette machine permet de régler la quantité
de café (dose) que l’on souhaite moudre entre
6 g (-) et 9 g (+). La dose est réglée par le
fabricant sur une vapeur moyenne qui satisfait
la plupart des exigences.
En tournant le pommeau (Fig.11), situé à
l’intérieur du récipient à café, dans le sens
contraire des aiguilles d’une montre (vers le +),
on augmente la dose de café en poudre ; en
tournant le pommeau dans le sens des aiguilles
d’une montre (vers le -) on diminue la dose de
café en poudre.
Le réglage de la dose doit être effectué avant
d’appuyer sur le bouton de distribution de café.
Ce système permet d’obtenir un écoulement
optimal avec tous les types de café que l’on
trouve dans le commerce
7 DISTRIBUTION DU CAFÉ
Note: Si le café ne passe pas, vérifier
si le réservoir contient suffisamment
d’eau.
• Avant de distribuer le café, vérifier si les
voyants verts de température (23) et (24)
Page 27

restent allumés, et si le réservoir à eau et le
réservoir à café sont pleins.
• Placez une ou deux tasses sous les becs de
distribution; vous pouvez régler la hauteur du
distributeur en le déplaçant manuellement vers
le haut ou vers le bas (Fig.12), afin qu’il
s’adapte à vos tasses.
7.1 Distribution avec du café en grains
• Pour que le café s’écoule, il faut appuyer sur
le bouton de distribution du café (23 ou 24);
la touche sélectionnée commence à clignoter
(voir chapitre 15) et celle qui n’est pas
sélectionnée reste éteinte.
• Pour obtenir 1 café, placez une seule tasse
sous les becs de distribution de café et appuyez
une seule fois sur le bouton (23 ou 24); pour
obtenir 2 cafés, placez deux tasses sous les
becs de distribution de café et appuyez 2 fois
de suite sur le bouton (23 ou 24).
• Dans cette modalité de fonctionnement, la
machine se charge automatiquement de
moudre et de doser la bonne quantité de café;
la préparation de deux cafés nécessite deux
cycles de mouture et deux cycles de distribution
gérés automatiquement par la machine.
• Le cycle de distribution démarre ensuite.
• Après avoir accompli le cycle de préinfusion,
le café commencera à sortir du bec de
distribution (Fig.01 - pos.13).
L’écoulement du café s’arrêtera
automatiquement lorsque le niveau
préalablement sélectionné (voir par.7.3) sera
atteint; il est néanmoins possible d’interrompre
l’écoulement du café en appuyant sur le
bouton (Fig.01- pos.23 ou 24).
FRANÇAIS
car il contient des organes en mouvements.
Pour mettre la bonne quantité de café moulu
dans le doseur, utilisez la mesure (21) fournie
avec la machine. Mettez une seule mesure de
café moulu à la fois; pour obtenir deux cafés, il
faut effectuer deux cycles séparés l’un après
l’autre.
• Appuyez sur le bouton (22) pour sélectionner
la fonction café moulu; le voyant lumineux
du bouton s’allume.
• Soulevez le couvercle du doseur de café moulu
(Fig.13).
• Prenez, à l’aide de la mesure, une dose de
café nivellée; enlevez la quantité excessive de
café contenue dans la mesure.
• Videz le café moulu contenu dans le doseur
(Fig.14).
• Refermez le couvercle du doseur à café moulu.
• Pour obtenir un café, appuyez sur la touche
de distribution de café (23 ou 24): la touche
sélectionnée commence à clignoter (voir
chap.15), et celle qui n’est pas sélectionnée
reste éteinte.
• Le cycle de distribution démarre.
• Après avoir accompli le cycle de pré-infusion,
le café commencera à sortir du bec de
distribution (13).
• L’écoulement du café s’arrêtera
automatiquement lorsque le niveau
préalablement sélectionné (voir par.7.3) sera
atteint; il est néanmoins possible d’interrompre
l’écoulement du café en appuyant sur le
bouton (23 ou 24).
• Ensuite, la machine retourne automatiquement
au fonctionnement normal (voir par. 7.1).
7.2 Distribution avec du café moulu
Pour utiliser cette fonction, il faut
utiliser la mesure (Fig.01-pos.21)
servant à doser le café moulu.
N’insérez dans le doseur (5) que du
café moulu pour machines espresso;
le café en grains, lyophilisé ou autre
risquerait d’endommager votre machine.
Il est interdit d’introduire les doigts à
l’intérieur du doseur de café moulu
7.3 Réglage de la quantité de café par
tasse
Cette machine a été conçue pour distribuer 2
types de café: café espresso: touche (23) et café
allongé: touche (24).
Pour adapter les valeurs programmées aux
dimensions des tasses, placez une tasse sous le
distributeur (13), appuyez sur la touche de
distribution du type de café désiré (23 ou 24) et
maintenez-la appuyée.
Attendez que la tasse se remplisse avec la
quantité de café désirée, puis relâchez la touche.
• 27 •
Page 28

FRANÇAIS
Précautions: maintenez la touche (23
ou 24) appuyée pendant toute la
distribution du café. Maximum 8 oz / 230 ml.
Lorsque la machine est prête à distribuer le
café, elle est aussi prête à distribuer de l’eau
chaude e du vapeur.
De cette manière, la machine est programmée
pour distribuer la quantité de café que vous
désirez.
8 DISTRIBUTION D’EAU CHAUDE
Attention: Au début, il est possible
qu’un peu d’eau s’échappe de la
machine: faites attention à ne pas vous
brûler. Le conduit de distribution d’eau
chaude peut atteindre des températures
élevées: évitez de le toucher directement
avec les mains.
• Avant de distribuer l’eau chaude, vérifiez si
les voyants lumineux verts de bonne
température atteinte (23 et 24) restent allumés.
• Lorsque la machine est prête à distribuer le
café, suivez les instructions suivantes:
• Placez une tasse et/ou un récipient sous le
conduit eau chaude/vapeur (Fig.15).
• Appuyez le bouton fonction eau chaude (25)
• Ouvrez, dans le sens contraire des aiguilles
d’une montre, le pommeau comme indiqué
à la Fig.15.
• Prenez la quantité d’eau chaude désirée; pour
arrêter l’écoulement de l’eau chaude tournez
le pommeau dans le sens des aiguilles d’une
montre. La machine se remet alors en mode
de fonctionnement normal.
9 DISTRIBUTION DE VAPEUR /
PRÉPARATION DU CAPPUCCINO
• Avant de distribuer la vapeur, assurez vous
que le bouton eau chaude (25) soit éteint.
• Dirigez le bec à vapeur (14) sur l’égouttoir,
ouvrez le pommeau (16) «Eau chaude/vapeur»
pendant quelques instants, afin de faire sortir
toute l’eau du conduit à vapeur; très vite, il ne
commencera plus à sortir que de la vapeur.
• Fermez le pommeau (16).
• Remplissez avec du lait froid 1/3 du récipient
que vous utiliserez pour préparer votre cappuccino.
Pour préparer un excellent cappuccino, le lait et la tasse utilisée doivent
être froids.
• Plongez le conduit à vapeur dans le lait à
chauffer et ouvrez le pommeau (16); faites
tourner le récipient avec des mouvements lents
de bas en haut afin de former une mousse
uniforme (Fig.16).
• Lorsque vous aurez terminé d’utiliser la vapeur,
fermez le pommeau (16).
• Vous pouvez utiliser ce même système pour
réchauffer d’autres boissons.
• Après cette opération, nettoyez le conduit à
vapeur à l’aide d’un chiffon humide (Fig.17).
Il est conseillé de charger le circuit pour enlever
résidu du lait à l’intérieur du conduit à vapeur.
9.1 Passage de la vapeur au café
• Cette machine est munie du fonction Rapid
Steam®. Le passage de la vapeur au café est
immédiat!
Vous pouvez utiliser la vapeur pour
faire mousser le lait de votre cappuccino, mais vous pouvez également
l’utiliser pour chauffer vos boissons. Risques
de brûlures!
Au début, il est possible qu’un peu
d’eau s’échappe de la machine.
Le conduit de distribution d’eau chaude peut
atteindre des températures élevées: évitez
de le toucher directement avec les mains.
10 NETTOYAGE ET ENTRETIEN
Nettoyage général
• L’entretien et le nettoyage ne peuvent être
effectués que lorsque la machine est froide et
qu’elle est débranchée.
• Ne pas plonger la machine dans l’eau et ne
pas mettre ses composants au lave-vaisselle.
• N’utilisez pas d’objets acérés ou de produits
chimiques agressifs (solvants) pour la nettoyer.
• N’utilisez pas de four à micro-ondes et/ou
• 28 •
Page 29

un four traditionnel pour sécher la machine
et/ou ses composants
• Il est recommandé de nettoyer quotidiennement
le réservoir à eau et de changer l’eau qu’il
contient.
• Nettoyez quotidiennement le doseur à café
moulu:
- Prenez le pinceau fourni avec la machine et
nettoyez le doseur (Fig.18).
• Pour nettoyer le corps de la machine, utilisez
un chiffon humide (Fig.19).
• Nettoyez le corps de la machine et le groupe
café.
• Il est recommandé de vider et de nettoyer tous
les jours la cuvette d’égouttoir (12) ainsi que
le réceptacle (10); pour effectuer cette
opération il faut ouvrir le panneau avant
(Fig.20) et sortir la cuvette d’égouttoir (Fig.21),
après quoi, il est possible de la vider et de
nettoyer tous ses composants.
FRANÇAIS
d’une montre le pivot en plastique à l’aide de
la clé fournie avec la machine (Fig.23).
• Le groupe café ne peut être lavé qu’avec de
l’eau froide ou tiède sans détergent. Tous ses
composants doivent être lavés et séchés
soigneusement.
• Remontez le filtre et vissez à nouveau, avec
soin, le pivot en plastique à l’aide de la clé
prévue à cet effet.
• Nettoyez soigneusement le compartiment interne de la machine.
• En le tenant par le pommeau, introduisez à
nouveau le groupe café dans son logement
et veillez à ce qu’il soit bien enclenché.
• Insérez le réceptacle et la grille dans la cuvette
d’égouttoir et insérez cette dernière dans la
machine.
• Refermez le panneau (15).
• Nous conseillons aussi de lubrifier le groupe café
chaque mois. Veuillez vous adresser aux Centres
de Services autorisés pour ultérieure information.
Note: Si le voyant (28) clignote, il faut
vider le receptacle (10) pendant que
l’appareil est allumé. Voir section 15.
• Le distributeur de café (13) peut être enlevé
pour le nettoyer (Fig.24):
- Baisser les becs verseurs du distributeur.
- Saisir le distributeur comme l’indique la
Fig.24 et l’extraire de son logement.
- Laver le tout avec de l’eau chaude.
10.1 Groupe café
Le groupe café (17) doit être nettoyé
à chaque fois que l’on remplit le
récipient à café en grains ou au moins une
fois par semaine.
• Eteignez la machine en appuyant sur l’interrupteur
(7) en position (0) et débranchez le cordon
d’alimentation de la prise de courant murale.
• Ouvrez le panneau de service (15), puis ôtez
la cuvette d’égouttoir (12) et le réceptacle.
• Retirez le groupe café en le tenant par le
pommeau et en appuyant sur la touche
«PUSH» (Fig.22).
• Vérifiez si le filtre en acier ne contienne pas
de résidus de café. Le filtre peut être ôté en
dévissant dans le sens contraire des aiguilles
11 DETARTRAGE
La formation de tartre est liée à la fréquence
d’utilisation de la machine et au type d’eau
utilisé; détartrez celle-ci tous les 2-3 mois ou
plus souvant si vous observez une réduction du
débit d’eau ou lorsque le voyant (26) clignote.
Nous conseillons d’utiliser le détartrant
Saeco. Vous pouvez aussi utiliser un
détartrant pour machines à café de type non
toxique, non chimique et/ou nocif, que vous
trouverez facilement dans le commerce.
Attention! N’utilisez en aucun cas du
vinaigre pour détartrer votre machine.
Pour détartrer la machine, suivez les instructions
suivantes:
• Mélangez le détartrant avec de l’eau comme
cela est indiqué sur l’emballage du produit et
remplissez-en le réservoir à eau.
• Appuyez sur l’interrupteur général (7) pour
allumer la machine.
• Appuyez sur la touche (26) pendant au moins 5
secondes pour sélectionner la fonction détrartage;
le voyant restera allumé sans intermittence.
• Dirigez le bec à vapeur (14) sur la cuvette
d’égouttoir.
• 29 •
Page 30

FRANÇAIS
• Placez un récipient d’une contenance adaptée
sous le bec à vapeur et ouvrez dans le sens
contraire des aiguilles d’une montre le
pommeau eau chaude (16). La machine
commence un cycle automatique de détartrage
avec des pauses préétablies par le fabricant et
gérées automatiquement par celle-ci.
• A la fin du cycle, la solution détartrante ne
s’écoule plus et les 5 touches commencent à
clignoter simultanément.
• Refermez le pommeau d’écoulement d’eau
chaude (16) en le tournant dans le sens des
aiguilles d’une montre. Le voyant (27) clignote
également.
• Rincez le réservoir à eau et remplissez-le d’eau
froide potable.
• Placez un récipient d’une contenance adaptée
sous le bec à vapeur et videz les 2/3 du
contenu du réservoir à eau en tournant le
pommeau vapeur (16) dans le sens contraire
des aiguilles d’une montre; pour arrêter
l’écoulement d’eau, tournez le pommeau (16)
dans le sens des aiguilles d’une montre.
• Laissez chauffer la machine et videz le contenu
restant du réservoir à eau en activant le bouton
eau chaude (25) et en tournant le pommeau
vapeur (16) dans le sens contraire des aiguilles
d’une montre ; pour arrêter l’écoulement
d’eau, tournez le pommeau dans le sens des
aiguilles d’une montre.
Si vous utilisez une solution différente
de celle qui est recommandée dans
cette brochure, veillez à respecter les
instructions du fabricant reportées sur la
solution détartrante que vous avez choisie.
Si vous éteignez la machine, le cycle
de détartrage sera interrompu, et il
repartira si vous la rallumez.
12 PROGRAMMATION DES
FONCTIONS DE LA MACHINE
La machine permet de programmer différents
paramètres en fonction des exigences de
l’usager.
Pour programmer ces fonctions il est obligatoire
d’entrer dans la modalité de programmation en
suivant les instructions suivantes:
• Vérifiez que l’interrupteur général (7) de la
machine soit sur la position (0) / OFF et que
le pommeau eau chaude (16) soit bien fermé.
• Appuyez en même temps sur les touches (23)
et (25) et allumez la machine en appuyant
sur l’interrupteur général (7).
Vous êtes ainsi dans la modalité de
programmation de la machine.
Pour sortir de la programmation et activer les
fonctions programmées, éteindre et rallumer
la machine en appuyant sur l’interrupteur
général (7).
12.1 Programmation «dureté de l’eau»
Etant donné que l’eau peut être plus ou moins
calcaire selon les régions et le genre d’eau utilisé,
votre machine peut être réglée selon le degré de
dureté (de 1 pour moins dure à 4 pour le plus dure)
de l’eau de la région à laquelle elle est destinée.
La machine est déjà programmée sur une valeur
moyenne (dureté 3).
Avant d’effectuer ce réglage, il faut
vérifier la dureté de l’eau à l’aide de
la lame fournie avec la machine. Plongez
brièvement (pendant 1 seconde) la lame
dans l’eau et secouez-la légèrement. Après
une minute, les résultats du test sont visibles
sur la lame.
Pour programmer cette fonction, suivez les
instructions suivantes:
• Appuyez sur la touche (22); le nombre de
touches qui s’allumeront indique la dureté de
l’eau programmée;
• Si vous désirez modifier le degré de dureté de
l’eau, appuyez plusieurs fois sur la touche (22)
jusqu’à ce que l’allumage des touches indique
le degré de dureté sélectionné.
Dureté 1 = touches (22) et (23) allumées
Dureté 2 = touches (22), (23) et (24) allumées;
Dureté 3 = touches (22), (23), (24) et (25)
allumées
Dureté 4 = touches (22), (23), (24), (25) et (26)
allumées.
• 30 •
Page 31

L’indice de dureté de l’eau correspond aux
valeurs 1-4 de la lame (1 = moins calcaire
et 4 = plus calcaire).
Si le degré de dureté n’est pas clair, programmer
un degré superieur.
12.2 P rogrammation du «cycle de
rinçage»
Tout de suite après l’allumage de la machine,
l’eau qui est restée dans les conduits est
automatiquement éliminée afin de garantir que
les cafés soient exclusivement préparés avec de
l’eau fraîche.
Pour programmer cette fonction, suivez les
instructions suivantes:
• Appuyez sur la touche (23); lorsque la fonction
est activée, le voyant (27) s’allume.
12.3 P rogrammation de la «préinfusion»
Le processus de pré-infusion, avec lequel le café
est légèrement humidifié avant la véritable
infusion, rehausse tout l’arôme du café, qui
acquière ainsi un goût excellent.
Pour programmer cette fonction, suivez les
instructions suivantes:
• Appuyez sur la touche (24); lorsque la fonction
est activée, le voyant (28) s’allume.
Note: cette fonction est déjà activée
par le fabricant.
12.4 P rogrammation de la «prémouture»
Avec le processus de pré-mouture, la
machine moud deux fois le café: la première
mouture pour le type de café sélectionné, la
deuxième pour le café suivant (pas encore
sélectionné).
Cette fonction n’est utile que lorsqu’on doit
préparer en même temps plusieurs cafés (par
ex. lors d’une visite, une fête, etc.).
FRANÇAIS
Pour programmer cette fonction, suivez les
instructions suivantes:
• Appuyez sur la touche (25); lorsque la fonction
est activée, le voyant (29) s’allume.
13 INFORMATIONS A CARACTERE
JURIDIQUE
• La présente brochure contient toutes les
informations permettant d’employer et
d’entretenir correctement la machine.
• Ces connaissances ainsi que l’observation des
présentes instructions représentent les
prémisses pour une utilisation sans danger et
conforme aux normes de sécurité concernant
le fonctionnement ou l’entretien de la
machine. Si vous désirez d’ultérieures
informations, ou en cas de problèmes
particuliers n’étant pas clairement expliqués
dans la présente brochure, veuillez vous
adresser à un revendeur local ou directement
au fabricant de la machine.
• Nous vous faisons en outre remarquer que le
contenu du présent mode d’emploi ne fait
partie d’aucune convention précédente ou
déjà existante, d’aucun accord ou contrat
légal et qu’ils n’en changent pas la substance.
• Toutes les obligations du fabricant sont basées
sur le contrat de vente correspondant qui
contient le règlement complet et exclusif des
prestations de garantie.
• Les normes de garantie contractuelles ne sont
ni limitées ni étendues en fonction des
présentes explications.
• La présente brochure contient des informations
protégées par le droit d’auteur.
• Il est interdit de la photocopier et de la traduire
dans une autre langue sans l’accord écrit du
fabricant.
14 DESTRUCTION
• Rendre inutilisables les machines qui ne sont
plus employées.
• Débrancher le cordon électrique de la prise
de courant et couper le cordon.
• Livrer les machines hors d’usage à un centre
de collecte prévu à cet effet.
• 31 •
Page 32

FRANÇAIS
15 VOYANTS DU TABLEAU DE COMMANDE
LUMIÈRE VERTE (22)
- Machine prête pour la distribution de café moulu
LUMIÈRE VERTE (23) FIXE
LUMIÈRE VERTE (24) FIXE SIMULTANÉMENT
- Machine à la bonne température:
Prête à verser le café
Prête à verser l’eau chaude / vapeur (dépendant sur la fonction sélectionnée – voir lumière 25)
LUMIÈRE VERTE (23) CLIGNOTANTE
LUMIÈRE VERTE (24) CLIGNOTANT SIMULTANÉMENT
- Machine en phase de chauffage avant la distribution de café, d’eau chaude et du vapeur
LUMIÈRE VERTE (23) CLIGNOTANT LENTEMENT
- Machine en cours de distribution d’1 café espresso
LUMIÈRE VERTE (23) CLIGNOTANT RAPIDEMENT
- Machine en cours de distribution de 2 cafés espresso
LUMIÈRE VERTE (24) CLIGNOTANT LENTEMENT
- Machine en cours de distribution d’1 café allongé
LUMIÈRE VERTE (24) CLIGNOTANT RAPIDEMENT
- Machine en cours de distribution de 2 cafés allongés
LUMIÈRE VERTE (25) FIXE
- Fonction eau sélectionnée. Prête pour charger circuit et distribuer de l’eau chaude
LUMIÈRE VERTE (25) ETEINTE
- Fonction vapeur sélectionnée.
LUMIÈRE ROUGE (26) CLIGNOTANTE
- La machine a besoin d’un cycle de détartrage
Effectuer le détartrage comme le décrit le paragraphe 11.
Pour annuler la présélection, appuyer sur une autre touche tout en maintenant
le robinet fermé.
• 32 •
Page 33

LUMIÈRE ROUGE (26) FIXE
- La fonction de détartrage a été sélectionnée.
Pour effectuer le détartrage comme le décrit le paragraphe 11, ouvrir le
pommeau eau chaude (16).
Le cycle de détartrage doit être fini avant de pouvoir continuer avec le
fonctionnement normal de l’appareil.
VOYANT ROUGE (27) FIXE
- Quantité d’eau insuffisante dans le réservoir.
Remplir le réservoir avec de l’eau froide potable, charger le circuit et
recommencer la procédure.
Si le voyant rouge reste fixe, verifiez le flotteur gris dans le reservoir. Si le
flotteur n’est pas dans sa position ou il coule ou bas du reservoir, contactez
le Centre d’Assistance plus proche pour obtenir un nouveau flotteur.
VOYANT ROUGE (27) CLIGNOTANT
- Circuit d’eau non chargé
Charger le circuit
VOYANT ROUGE (28) FIXE
- Réservoir à café en grains vide
Remplir le réservoir à café en grains et recommencer la procédure.
FRANÇAIS
VOYANT ROUGE (28) CLIGNOTANT
- Réceptacle plein
**Pour éteindre le témoin rouge qui clignote, vider le bac à marc pendant
que la machine est allumée.
VOYANT ROUGE (29) FIXE
- Le groupe café, la cuvette d’égouttoir et le panneau avant ne sont pas bien positionnés
pour que la machine puisse fonctionner.
Pour éteindre le témoin rouge, vérifier si tous ces composants sont
correctement installés ou fermés.
VOYANT ROUGE (29) CLIGNOTANT
- Moteur du moulin à café bloqué
- Le moteur du distributeur est bloqué.
S’adresser au centre de service autorisé.
** Note importante: le réceptacle ne doit être vidé que lorsque la machine est allumée.
Le réceptacle doit être retiré pendant au moins 5 secondes. Si vous videz le réceptacle
lorsque la machine est éteinte, le café ne pourra pas s’écouler lorsque vous la rallumerez.
• 33 •
Page 34

FRANÇAIS
16 ANOMALIES, CAUSES ET REMÈDES
semèlborPsesuaCsedèmeR
sapemulla'senenihcamaLeéhcnarbsaptse'nenihcamaL -nemila'dnodrocelrehcnarB
duahczessasaptse'néfaceLsediorftnossessatseL sessatselreffuahC
esirpenuàenihcamalednoitat
euqrelôrtnoctetnaruoced
émullatioslarenegruetpurretni'l
)"I"noitisop(
saptnetros
es
ériterertê
sapeluocenéfaceLuae'dzessasapay'nlI teuaeàriovresérelrilpmeR
ruetubirtsid
enruepavaluoeduahcuae'L
tnemetnelporteluocéfaceLnifportuluomtseéfaceL uoéfacedegnalémedregnahC
àspmetedporttemenihcamaL
eétimiltsetiudnocudtros
udrueirétxe'làeluocéfaceL
etivporteluocéfaceLelsnadéfacedzessasapay'nlI
éhcuob
-suomedzessasapa'néfaceL
iuquae'détitnauqaluoreffuahc
saptuepenéfacepuorgeL
értratne
érésnielcatpecéR edtnavaelcatpecérelrevelnE
elastseepuorgeL epuorgelreyotteN
sabportessat
énnoitisop
.éfacàtneipicér
elastseéfacepuorgeL .)01.raP(éfacepuorgelreyotteN
sorgportuluomtseliuo
eéveléporttseesodaL esodalreunimiD
égrahcsaptse'ntiucriceL tiucricelregrahceR
nifportuluomtseéfaceL alreunimiD.erutuomalrelgéR
éhcuobtseruetubirtsideL sesteruetubirtsidelreyotteN
sorgportuluomtseéfaceL egnalémedepytedregnahC
tseruepavàcebudecifiro'L
el,étpadasaptse'negnalémeL
éiférrottnemehcîarfsaptse'néfac
tseenihcamaledtiucriceL
éhcnelcnelamtseéfacepuorgeL elremreF.enihcamalremullA
.esod
rapéfacedétitnauqaledegalgéR
neibsaptse'nruetubirtsideL
secifiro
elliugiaenu'dedia'là
)6.rap(esodal
)6.rap(esodalretnem
enihcamalrertratéD
.elaitininoitisop
éfacepuorgelritros
tiucricelregrahcer
)3.7.rap(éfacehc
noitisopennob
ruepavàcebudecifiro'lreyotteN
-idniemmocerutuomalrelgér
reunimiD.5ehpargarapuaéuq
uoéfacedegnalémedregnahC
-idniemmocerutuomalrelgér
-guA.5ehpargarapuaéuq
éfacepuorgeL.ecivreseduaennap
assnadtnemeuqitamotuatemeres
-uotaluaevuonàzemmargorP
alsnadruetubirtsidelerttemeR
edéfacàtneipicerelrilpmeR
ezilihpoylnonuluoméfac
essabporttseesodaL esodalretnemguA
riottuogé'd
ettevucaledtrosuae'leD
enielpportriottuogé'dettevuC teruettolfudnoitisopalreifiréV
riottuogé'dettevucalrediv
• 34 •
Page 35

FRANÇAIS
NOTE - NOTA
___________________________________________________________
___________________________________________________________
___________________________________________________________
___________________________________________________________
___________________________________________________________
___________________________________________________________
___________________________________________________________
___________________________________________________________
___________________________________________________________
___________________________________________________________
___________________________________________________________
___________________________________________________________
___________________________________________________________
___________________________________________________________
___________________________________________________________
___________________________________________________________
___________________________________________________________
___________________________________________________________
___________________________________________________________
___________________________________________________________
___________________________________________________________
___________________________________________________________
___________________________________________________________
___________________________________________________________
___________________________________________________________
___________________________________________________________
___________________________________________________________
___________________________________________________________
___________________________________________________________
___________________________________________________________
___________________________________________________________
___________________________________________________________
___________________________________________________________
___________________________________________________________
___________________________________________________________
___________________________________________________________
• 35 •
Page 36

ESPAÑOL
PRECAUCIONES
IMPORTANTES
Durante el uso de electrodomésticos, se aconseja tomar
algunas precauciones para evitar el riesgo de sacudidas
eléctricas o incendios.
1 Leer atentamente todas las instrucciones e
informaciones descritas en este manual y en cualquier
otro folleto que venga dentro del embalaje antes de
poner en marcha o utilizar la máquina espresso.
2 No tocar superficies calientes.
3 No sumergir el cable, los enchufes o el cuerpo de la
máquina en agua o en cualquier otro líquido para
evitar incendios, sacudidas eléctricas o accidentes.
4 Poner particular atención durante el uso de la máquina
espresso en presencia de niños.
5 Desenchufar la máquina cuando no se esté utilizando
o mientras que se está limpiando. Enfriarla antes de
introducir o quitar piezas y antes de empezar a
limpiarla.
6 No utilizar la máquina si el cable o el enchufe están
dañados o en caso de averías o roturas. Haga que
controlen o reparen el electrodoméstico en el centro
de asistencia más cercano.
7 El uso de accesorios no aconsejados por el fabricante
podrá causar daños a cosas y personas.
8 No utilizar la máquina espresso en espacios abiertos.
9 Evitar que el cable cuelgue de la mesa o que toque
superficies calientes.
10 Mantener la máquina espresso lejos de fuentes de calor.
11 Controlar que la máquina espresso esté en posición
“Apagado” antes de enchufarla. Para apagarla, ponerla
en “Apagado” y, a continuación, desenchufarla.
12 Utilizar la máquina únicamente para uso doméstico.
13 Extremar el cuidado durante la utilización de vapor.
CONSERVAR ESTAS
ADVERTENCIA
La máquina espresso ha sido estudiada únicamente para
uso doméstico. Cualquier intervención de asistencia,
excepto para las operaciones de limpieza y de
mantenimiento normal, deberá ser efectuada por un centro
de asistencia autorizado.
No sumergir la máquina en agua.
Cualquier reparación deberá ser efectuada únicamente por
el centro de asistencia autorizado.
1 Controlar que el voltaje indicado en la chapa
corresponda con el suyo.
2 Nunca utilice agua tibia o caliente para rellenar el
recipiente de agua. Utilice únicamente agua fría.
3 No toque con las manos las partes calientes de la máquina
ni el cable de alimentación durante el funcionamiento.
4 Nunca limpie con detergentes agresivos o utensilios que
rayen. Es suficiente un paño suave humedecido con agua.
5 Aconsejamos utilizar agua purificada o mineral para
mejorar el sabor del café. Para evitar la formación de
cal, hay que descalcificar la máquina cada 2-3 meses.
INSTRUCCIONES ACERCA
DEL CABLE ELÉCTRICO
A Se suministra un cable eléctrico corto para evitar que
se enrosque o que se enrede.
B También es posible utilizar extensiones pero se
aconseja utilizar con mucha atención.
C En caso de que se utilice una extensión, verificar:
1 Que el voltaje anotado en la extensión sea por lo
menos igual al voltaje eléctrico del electrodoméstico.;
2 Que esté dotado de un enchufe de tres pin con
colocación a tierra (en caso de que el cable del
electrodoméstico sea de este tipo);
3 que el cable no cuelgue de la mesa para evitar
tropezar con él.
INSTRUCCIONES
• 36 •
Page 37

1 GENERALIDADES
La máquina de café está indicada para preparar café espresso utilizando café en grano o café
molido y está dotada de un dispositivo para la
erogación de vapor y de agua caliente.
El cuerpo de la máquina, de elegante diseño,
ha sido diseñado para uso doméstico y no está
indicado para el funcionamiento continuo de
tipo profesional.
ATENCIÓN.
No se asumen responsabilidades por
los posibles daños en caso de:
• uso incorrecto y no conforme con los
objetivos previstos.
• reparaciones no realizadas en centros de
asistencia autorizados.
• dañar el cable de alimentación.
• dañar cualquier componente de la máquina.
• utilización de piezas de recambio y
accesorios no originales.
• daños causados por cal o temperaturas
bajo cero.
En estos casos se pierde la garantía.
1.1 Para facilitar la lectura
El triángulo de advertencia indica
todas las instrucciones importantes
para la seguridad del usuario.
¡Atenerse minuciosamente a
dichas indicaciones para evitar
heridas graves!.
Este símbolo evidencia las
informaciones a las que hay que prestar una mayor atención, para utilizar mejor
la máquina.
Las ilustraciones correspondientes
al texto se encuentran en la
solapa de la tapa. Mantener estas
páginas abiertas durante la
lectura de las instrucciones de uso.
1.2 Utilización de estas instrucciones
de uso
Conservar estas instrucciones de uso en un lugar
seguro y adjuntarlas a la máquina de café
ESPAÑOL
cuando otra persona vaya a utilizarla.
Para información adicional o en el caso de
problemas, no tratados en su totalidad o
insuficientemente en éstas instrucciones,
póngase en contacto con los Centros de
Asistencia Autorizados.
2 DATOS TÉCNICOS
Tensión nominal
Véase placa situada en el aparato
Potencia nominal
Véase placa situada en el aparato.
Material del cuerpo
Termoplástico (ABS)
Dimensiones (ancho x largo x alt.)
11" x 15.2" x 15.4" / 280 x 385 x 390 mm
Peso
17.6 lbs / 8 kg
Longitud del cable
4’ / 1200 mm
Panel de mandos
Frontal
Recipiente del agua
Extraíble
Capacidad del recipiente del agua
46 oz / 1.3 Lt.
Capacidad del contenedor de café
8 oz / 230 gr. de café en grano
Presión de la bomba (bar)
15
Caldera
Aluminio
Dispositivos de seguridad
Válvula de seguridad presión caldera;
Termostato de seguridad.
Se reserva la facultad de eventuales
cambios debido a los avances del progreso
tecnológico.
Máquina conforme a la Directiva Europea 89/
336/CEE (Decreto legislativo 476 del 04/12/
92), relativa a la eliminación de las molestias
radiotelevisivas.
• 37 •
Page 38

ESPAÑOL
100
250
100
100
100
medidas en milímetros
• 38 •
Page 39

3 NORMAS DE SEGURIDAD
Nunca poner en contacto con agua las
partes bajo corriente: ¡peligro de
cortocircuito! ¡El vapor recalentado y el
agua caliente pueden provocar
quemaduras! Nunca dirija el chorro de
vapor o de agua caliente hacia partes del
cuerpo, tocar con precaución la boquilla
vapor/agua caliente: ¡peligro de
quemaduras!.
Destino de uso
- La máquina de café está prevista
exclusivamente para uso doméstico.
- Está prohibido hacer modificaciones técnicas
y uso ilícito, ¡debido a los riesgos que esto
comportaría!
- La máquina de café debe ser utilizada solo
por adultos en condiciones psico-físicas
inalteradas.
Alimentación de corriente
- Conectar la máquina de café solo a una toma
de corriente adecuada.
- La tensión debe corresponder con la indicada
en la placa del aparato.
Cable de alimentación (Fig.A)
- Nunca utilizar la máquina de café si el cable
de alimentación está defectuoso.
- Sustituya inmediatamente los cables y los
enchufes defectuosos en un Centro de
Asistencia Autorizado.
- No pasar el cable de alimentación por
esquinas y por cantos, sobre objetos muy
calientes y protegerlo de aceite.
- No trasladar o tirar de la máquina de café
sujetándola por el cable.
- No extraer el enchufe tirándolo por el cable
ni tocarlo con las manos o pies mojados.
- Evitar que el cable de alimentación caiga
libremente por mesas o estanterías.
ESPAÑOL
Protección de otras personas (Fig.B)
- Mantener la máquina de café fuera del
alcance de los niños y excluir todas las
posibilidades de que jueguen con ella.
- Los niños no se dan cuenta de los peligros
que entrañan los electrodomésticos.
- No dejar los materiales utilizados en el
embalaje de la máquina al alcance de los
niños.
Peligro de ignición (Fig.C)
- No dirigir hacia uno mismo y/o hacia otros
la boquilla de vapor recalentada y/o de agua
caliente: peligro de quemaduras.
- Usar siempre las manillas o los agarres
correspondientes.
- No introducir objetos a través de las aperturas
del aparato.
Espacio para la instalación, el uso y el
mantenimiento. (Fig.D)
- Escoger una base de apoyo bien nivelada.
- Colocar la máquina de café en un lugar seguro,
donde nadie pueda volcarla ni hacerse daño.
- Escoger un ambiente suficientemente
iluminado, higiénico y con una toma de
corriente de fácil acceso.
- No colocar la máquina sobre superficies
demasiado calientes ni cerca de llamas
abiertas con el fin de evitar que la parte
exterior de la máquina se funda o se dañe.
- Colocar a 4" / 10 cm de distancia de paredes
y placas de cocina.
- No exponer la máquina a temperaturas
inferiores a 32° F / 0°C; existe peligro de que
el hielo pueda dañarla.
- La toma de corriente debe estar accesible en
todo momento.
- No utilizar la máquina de café en espacios
abiertos.
Limpieza (Fig.E)
- Antes de limpiar la máquina, es indispensable
colocar el interruptor general (7) en posición
“O” / OFF y después desenchufar el enchufe
de la toma de corriente.
• 39 •
Page 40

ESPAÑOL
- Esperar a que la máquina se enfríe.
- ¡Nunca sumergir la máquina en agua!
- Evitar el contacto con chorros de agua.
- Está totalmente prohibido operar en el interior
de la máquina.
Guardar la máquina
- Cuando la máquina no se va a utilizar durante un largo periodo de tiempo, apagarla
y desenchufarla de la corriente.
- Guardarla en lugar seco e inaccesible para
los niños.
- Protegerla de polvo y de suciedad, y de
temperaturas bajo 32°F / 0°C.
Reparaciones / Mantenimiento
- En caso de roturas, defectos o sospecha de
defecto después de una caída, sacar
rápidamente el enchufe de la toma de
corriente. Nunca poner en funcionamiento
una máquina defectuosa.
- Sólo en Centros de Asistencia Autorizados
pueden efectuar intervenciones y
reparaciones.
- En caso de intervenciones y/o reparaciones
no realizadas en centros de asistencia
autorizados, se declina toda responsabilidad
por posibles daños.
DESCRIPCIÓN DE LOS COMPONENTES
Fig.01
1 Contenedor café en grano
2 Tapa móvil contenedor café en grano
(protector del aroma)
3 Pomo regulación moledura.
4 Pomo regulación dosis.
5 Tapa dosificación café molido.
6 Base apoya y calienta tazas
7 Interruptor general (ON/OFF)
8 Tapa recipiente agua
9 Recipiente del agua
10 Cajón recogedor de posos
11 Cable de alimentación
12 Vasija recogedora de gotas + rejilla
13 Erogador de café regulable en altura
14 Tubo vapor / agua caliente
15 Puertecilla anterior
16 Pomo erogación café
17 Grupo erogador café
18 Panel de mandos
19 Llave grupo erogador café
20 Cepillito de limpieza
21 Medidor de café molido
Antiincendio
- En caso de incendio utilizar extintores de
anhídrido carbónico (CO2). No utilizar agua
o extintores de agua.
Panel de mandos
22 Pulsador / Led selección café molido
23 Pulsador erogación café espresso
24 Pulsador erogación café solo / Led tem-
peratura a punto
25 Pulsador / Led selección función agua
caliente
26 Pulsador / Led selección función
descalcificación
27 Led alarma agua
28 Led alarma falta de café en grano o vaciar
cajón recoge posos.
29 Led señalización mal funcionamiento.
30 Indicador recipiente lleno
• 40 •
Page 41

4 INSTALACIÓN
Por su seguridad y por la de terceros
atenerse totalmente a las “Normas de
seguridad” descritas en el cap.3.
4.1 Embalaje
El embalaje original ha sido diseñado y realizado
para proteger la máquina durante el traslado.
Se aconseja conservarlo para posibles traslados
en el futuro.
ESPAÑOL
meter el recipiente del agua en su lugar
correspondiente y volver a colocar la tapa
encima del mismo.
Siempre poner en el recipiente (9)
solo agua fresca sin burbujas. El agua
caliente, al igual que otros líquidos, pueden
dañar el recipiente y/o a la máquina. No
poner en funcionamiento la máquina sin
agua: asegurarse que hay la suficiente en
el interior del recipiente.
4.2 Operaciones preliminares
• Sacar del embalaje la máquina de café y
colocarla en un lugar idóneo correspondiente
con los requisitos necesarios y descritos en
las normas de seguridad (cap.3).
• Abrir la portezuela de la máquina, retirar la
cuba receptora de goteo (12) del embalaje y
colocar el cajón receptor de residuos café
(10); sucesivamente instalar la cuba receptora
de goteo en la máquina (Fig.21).
• Asegurarse que la vasija recogedora de gotas
con la rejilla (Fig.01 - pos.12), el cajón de
posos (10) y el grupo erogador de café (17)
estén colocados correctamente y que la
puertecilla delantera (15) esté cerrada.
• Conservar a mano el cepillito de limpieza (20)
y la llave del grupo erogador de café (19)
que se suministran con la máquina.
Si al encender la máquina el led rojo (29)
permanece encendido, significa que una de
las partes antedichas no ha sido
correctamente instalada.
Nota importante: Es importante que
lea todo lo que se describe en el
Capítulo 15, donde se explica con detalle el
significado de todas las señalizaciones que
la máquina proporciona al usuario, a través
de las luces situadas en el panel de mandos.
• Levantar la tapa (Fig.05) y poner café en grano en el contenedor (Fig.06).
Usar siempre y solo café en grano. El
café molido, liofilizado, al igual que
otros objetos dañan la máquina.
• Volver a poner la tapa en el contenedor de
café (1).
• Meter el enchufe en la toma de corriente de
la parte trasera de la máquina de café
(Fig.07), después de haberse asegurado que
el interruptor general (7) esté en posición (O).
Introducir el enchufe del otro extremo del
cable en una toma de la pared con la corriente
adecuada.
• La máquina se entrega con el interruptor
general en posición (O) / OFF; para
encenderla es suficiente presionar el
pulsador (Fig.08); comienza a parpadear el
led (23) y (24) del panel de mandos.
• Para cargar el circuito, pulsar el tasto selección
agua caliente (25), dirigir el tubo de vapor
(Fig.01-pos.14) hacia la vasija recogedora de
gotas, poner una taza o un recipiente
apropiado debajo de la boquilla del tubo de
vapor y girar el pomo (Fig.09) en sentido contrario a las agujas del reloj y esperar hasta
que salga agua, de forma regular, del tubo de
vapor; para interrumpir la erogación de agua,
girar el pomo en sentido de las agujas del reloj.
4.3 Primer encendido
• Abrir la tapa del recipiente del agua (Fig.02)
y sacar el recipiente (Fig.03). Enjuagar y llenar,
con agua fresca potable (Fig.04), el recipiente; es aconsejable no superar la marca
señalada con la palabra “MAX”. Volver a
Nota: Antes de proceder con la
primera puesta en funcionamiento,
en el caso de inactividad prolongada, si el
recipiente de agua se ha vaciado completamente o si el led (27) parpadea, es
obligatorio cargar el circuito de la máquina.
• 41 •
Page 42

ESPAÑOL
• Después de encenderla, durante la fase de
calentamiento de la máquina, los led (23) y
(24) parpadean simultáneamente. Finalizada
la fase de calentamiento los led (23) y (24) se
encienden en modo fijo.
• Erminadas las operaciones descritas, la
máquina está preparada para el uso.
• Para erogar café, agua caliente o vapor, y
utilizar adecuadamente la máquina, realizar
correctamente las instrucciones siguientes.
5 MOLEDOR DE CAFÉ (FIG.10)
posiciones extremas (Ej. 1-16); en estos casos
utilizar mezclas de cafés diferentes. Conservar
el café en un lugar fresco, en un recipiente
cerrado herméticamente. No utilizar granos de
café congelados – pueden dañar el molinillo.
El molido se debe regular en caso de que el
café salga erogado de forma no óptima.
Erogación muy rápida=molido demasiado
grueso>aumentar el grado de molido;
Erogación a gotas y/o ausente=molido
demasiado fino>disminuir el grado de molido.
¡Atención! El manubrio de regulación
de la moledura, situado dentro del
contenedor de café (Fig.10), se debe girar
solo cuando el moledor de café está en
funcionamiento y solo dos números a la vez.
No introducir café molido y/o liofilizado en
el contenedor de café en grano.
Está prohibido introducir cualquier material
que no sea café en grano. El moledor de
café contiene órganos en movimiento que
pueden ser peligrosos; prohibido introducir
los dedos y/u otros objetos. Antes de intervenir, por cualquier motivo, en el interior
del contenedor de café, desenchufar el
interruptor general (7) y sacar el enchufe
de la toma de corriente. No poner café en
grano cuando el moledor de café esté
funcionando.
La calidad y el gusto del café dependen, además
de la mezcla utilizada, del grado de molido.
La máquina dispone de un pomo (Fig.10) para
regular el grado de molido. Para variar el grado de molido girar el pomo graduado cuando
el moledor de café esté en funcionamiento y
solo dos números a la vez; las cifras reportadas
en el manubrio indican el grado de molido.
Cada aparato está regulado, de fábrica, a un
grado de molido medio: si el molido resulta ser
demasiado fino se tendrá que girar el manubrio hacia valores superiores; si el molido resulta
ser demasiado grueso se tendrá que girar el
manubrio hacia valores inferiores.
La variación del grado de molido se notará solo
después de la erogación de tres/cuatro cafés.
Usar mezclas de café en grano para máquinas
espresso. Evitar utilizar grados de molido en
• 42 •
6 REGULACIÓN DOSIS DE CAFÉ
(FIG.11)
En la máquina es posible regular la cantidad
de café (dosis) que se desea moler entre
6 gr (-) y 9 gr (+). La dosis está establecida,
por el fabricante, sobre un valor medio de
satisfacción de la mayor parte de las
exigencias.
Girando el pomo (Fig.11), situado en el interior
del contenedor de café, en sentido contrario a
las agujas del reloj se aumenta la dosis de café
molido (hacia el +); girando el pomo en sentido
de las agujas del reloj se disminuye la dosis de
café molido (hacia el -).
La regulación de la dosis se debe efectuar antes
de presionar el pulsador de erogación de café.
Este sistema permite obtener una erogación
óptima con todas las clases de café que existen
en el mercado.
7 EROGACIÓN DE CAFÉ
Nota: En el caso de que la máquina
no erogue café, comprobar que el
depósito correspondiente contenga
suficiente agua
• Antes de erogar café comprobar que los Led
verdes de temperatura a punto (23) y (24) están
encendidos en modo fijo, y que el recipiente
de agua y el recipiente de café estén llenos.
• Colocar 1 o 2 tazas debajo de las boquillas
del erogador; se puede regular la altura del
erogador desplazándolo manualmente hacia
arriba o hacia abajo (Fig.12), de forma que
se adapte a sus tazas.
Page 43

7.1 Erogación con café en grano
• Para erogar el café es necesario pulsar el
botón de erogación café (23) y (24); el botón
seleccionado comienza a parpadear (véase
Cap.15), mientras que el que no está
seleccionado está apagado.
• Para erogar 1 café, colocar una sola taza de
café debajo de las boquillas de erogación de
café y presionar una sola vez el pulsador (23)
y (24); para erogar 2 cafés, colocar dos tazas
de café debajo de las boquillas de erogación
de café y presionar dos veces seguidas el
pulsador (23 o 24).
• En está modalidad de funcionamiento, la
máquina proporciona automáticamente el
molido y la dosis justa de cantidad de café;
la preparación de dos cafés requiere dos
ciclos de molido y dos ciclos de erogación
gestionados automáticamente por la
máquina.
• Sucesivamente se pone en marcha el ciclo de
erogación.
• Después de que haya finalizado el ciclo de
preinfusión, el café comenzará a salir por la
boquilla del erogador (Fig.01-pos.13).
La erogación del café se parará
automáticamente cuando se alcance el nivel
preseleccionado (véase apdo.7.3); de
cualquier modo, es posible interrumpir la
erogación del café presionando el pulsador
(Fig.01-pos.23 o 24).
ESPAÑOL
que se suministra con la máquina. Poner un solo
medidor, de café molido, cada vez, para obtener
dos cafés es obligatorio efectuar dos ciclos
separados en sucesión uno después de otro.
• Presionar el pulsador (22) para seleccionar
la función; el led situado en el pulsador se
enciende.
• Levantar la tapa del dosificador de café
molido (Fig.13).
• Medir, con el medidor, una dosis de café;
quitar la cantidad excesiva de café molido
del medidor.
• Poner el café molido en el interior del
dosificador (Fig.14).
• Cerrar la tapa del dosificador de café molido.
• Para erogar el café es necesario presionar el
botón (23 o 24); el botón seleccionado
comienza a parpadear (véase Cap.15),
mientras que el que no se ha seleccionado
permanece apagado.
• Se pone en funcionamiento el ciclo de
erogación.
• Después de finalizado el ciclo de preinfusión, el
café comenzará a salir por la boquilla del
erogador (13). La erogación del café se detendrá
automáticamente cuando se alcance el nivel
preseleccionado (véase apdo.7.3); de cualquier
modo, es posible interrumpir la erogación de café
presionando el pulsador (23 o 24).
• Luego la máquina vuelve automáticamente
al funcionamiento normal (véase párr. 7.1).
7.2 Erogación con café molido
Para utilizar ésta función es necesario
utilizar el medidor (Fig.01- pos.21)
para dosificar el café molido.
Introducir en el dosificador (5) solo
café molido para máquinas espresso; la introducción de café en grano,
liofilizado, u otros materiales, en este
dosificador, dañan la máquina.
Está prohibido introducir los dedos en
el interior del dosificador de café
molido, ya que hay órganos en movimiento.
Para poner la justa cantidad, de café molido,
en el dosificador, utilizar solo el medidor (21)
7.3 Regulación de la cantidad de café
por taza
La máquina ha sido programada para erogar 2
tipos de café: café espresso con el pulsador (23)
y café solo con el pulsador (24).
Para adaptar los valores programados a las
dimensiones de las tazas, colocar la taza debajo
del erogador de café (13), presionar el botón
de erogación del tipo de café deseado (23 o
24) y mantenerlo presionado.
Esperar hasta que la taza se llene con la cantidad
deseada y en ese momento soltar el botón.
Advertencia: mantener el botón
(23 o 24) presionado durante todo
el proceso de erogación del café. Máximo
volumen 8 oz / 230 ml.
• 43 •
Page 44

ESPAÑOL
De este modo la máquina se programa para
erogar la cantidad de café que se desea.
8 EROGACIÓN DE AGUA
CALIENTE
de vapor; en poco tiempo comenzará a salir
vapor.
• Cerrar el pomo (16).
• Llenar con leche fría 1/3 del contenedor que
se desea utilizar para preparar el capuchino.
Atención: al inicio se pueden producir
pequeñas salpicaduras de agua
caliente: peligro de quemaduras.
El tubo de erogación de agua caliente
puede alcanzar temperaturas elevadas:
evitar tocarlo directamente con las manos.
• Antes de erogar agua caliente comprobar que
las luces verdes de temperatura a punto (23
y 24) estén encendidas en modo fijo.
Con la máquina preparada para la erogación
del café, proceda del modo siguiente:
• Activar el pulsador agua caliente (25)
• Poner una taza y/o un recipiente debajo del
tubo de agua caliente/vapor (Fig.15).
• Abrir, en sentido contrario a las agujas del
reloj, el pomo como se indica en la Fig.15.
• Erogar la cantidad deseada de agua caliente;
para detener la erogación de agua caliente
girar el pomo en sentido de las agujas del
reloj. La máquina se sitúa en funcionamiento
normal.
9 EROGACIÓN DE VAPOR /
PREPARACIÓN DEL CAPUCHINO
El vapor se puede utilizar para montar la leche para el capuchino pero
también para calentar bebidas.
¡Peligro de quemaduras!
Al inicio de la erogación se pueden
producir pequeñas salpicaduras de agua
caliente.
El tubo de erogación puede alcanzar
temperaturas elevadas: evitar tocarlo
directamente con las manos.
Con la máquina lista para erogar café,
Asegurarse que el pulsador agua caliente (25)
esté apagado.
• Dirigir el tubo de vapor (14) sobre la vasija
recogedora de gotas, abrir el pomo (16)
“Agua caliente/vapor” durante unos instantes,
de forma que salga el agua residual del tubo
• 44 •
Para garantizar un mejor resultado
en la preparación del capuchino, la
leche y la taza utilizada deben estar frías.
• Sumergir el tubo de vapor en la leche a
calentar y abrir el pomo (16); girar el recipiente con movimientos lentos de abajo a
arriba para que la formación de espuma sea
uniforme (Fig.16).
• Después de haber utilizado el vapor durante
el tiempo deseado cerrar el pomo (16).
• El mismo sistema se puede utilizar para
calentar otras bebidas.
• Limpiar, después de esta operación, el tubo
de vapor con un paño húmedo (Fig.17).
Aconsegamos tambien erogar un poco de
agua por el tubo para eliminar cualquier residuo de leche.
9.1 Paso de vapor a café
Su máquina tiene la función Rapid Steam® que
le permite pasar directamente de la erogación
vapor a la erogación de café!
10 LIMPIEZA Y MANTENIMIENTO
Limpieza general
• El mantenimiento y la limpieza se deben
realizar solo cuando la máquina esté fría y
desenchufada de la red eléctrica.
• No sumergir la máquina en agua y no meter
los componentes en el lavavajillas.
• No utilizar objetos afilados o productos
químicos agresivos (disolventes) para realizar
la limpieza.
• No secar la máquina y/o sus componentes
utilizando un horno microondas y/o un horno
convencional.
• Se aconseja limpiar diariamente el recipiente
de agua, realizando el recambio del agua.
• Limpiar el dosificador de café molido
diariamente:
- Coger el pincel que se suministra y limpiar
el dosificador (Fig.18)
Page 45

• Para la limpieza del aparato utilizar un paño
suave humedecido con agua (Fig.19).
• Limpiar la cavidad de servicio y el grupo erogador.
• Recomendamos vaciar y limpiar cada día la
vasija recogedora de gotas (12) y el cajón
recogedor de posos (10); para realizar ésta
operación es necesario abrir la puertecilla
delantera (Fig.20) y extraer la vasija
recogedora de gotas (Fig.21); sucesivamente
se puede proceder con el vaciado y con la
limpieza de todos los componentes.
Nota: si el LED 28 parpadea, es
necesario vaciar el cajón recogedor
de posos mientras que la máquina está
encendida. Ver sección 15.
ESPAÑOL
con cuidado, el perno de plástico con la llave
correspondiente que se suministra.
• Limpiar perfectamente el vano interior de la
máquina.
• Sujetándolo por la manecilla debida,
introducir de nuevo el grupo erogador en el
vano adecuado hasta que se enganche.
• Introducir el cajón recogedor de posos y la
rejilla en la vasija recogedora de gotas e
introducir esta última en la máquina.
• Cerrar la puertecilla (15).
• Aconsejamos también de lubrificar el grupo
erogador cada mes.. Contacten el centro de
asistencia más cercano para ulterior información.
11 DESCALCIFICACIÓN
• El erogador de café se puede sacar para
limpiarlo (Fig.24):
- bajar las boquillas del suministrador;
- empuñar el suministrador de la manera
indicada en Fig.24 y extraerlo de su
alojamiento;
- lavar el conjunto con agua caliente.
10.1 Grupo erogador
El grupo erogador (17) se debe
limpiar cada vez que se llena el
contenedor de café en grano o, en todo
caso, al menos una vez a la semana.
• Apagar la máquina presionando el interruptor
(7) en posición (O) y extraer el enchufe de la
toma de corriente de la pared.
• Abrir la puertecilla de servicio (15),
sucesivamente quitar la vasija recogedora de
gotas (12) y en consecuencia el cajón
recogedor de posos.
• Extraer el grupo erogador manteniéndolo por
la manecilla adecuada presionando sobre el
botón indicado con la palabra “PUSH” (Fig.22).
• Asegurarse que el filtro en acero no tenga
resíduos de café. Para sacar el filtro, destornillar
hacia izquierda el eje en plástica por medio de
la llave suministrada con la máquina (Fig.23).
• El grupo erogador se puede lavar solo con agua
fría o tibia sin detergente. Después, lavarlo y
secar perfectamente todos sus componentes.
• Volver a montar el filtro y apretar nuevamente,
• 45 •
La formación de cal se produce con el uso de
la máquina; la descalcificación es necesaria
cada 2-3 meses, o más a menudo cuando se
observa una reducción de la cantidad de agua
o cuando parpadea el Testigo luminoso del
pulsador (26).
Aconsejamos utilizar el descalcificador Saeco.
Se puede utilizar tambien un
producto descalcificador para
máquinas de café del tipo no tóxico, no
químico y/o nocivo, que se encuentran normalmente en las tiendas.
¡Atención! No utilizar en ningún caso
vinagre como descalcificante.
Para proceder con la descalcificación de la
máquina realizar las siguientes instrucciones:
• Mezclar el descalcificante como se especifica
en la etiqueta del producto descalcificante y
volver a llenar el recipiente del agua.
• Encender la máquina con el interruptor
general (7).
• Presionar el pulsador (26), durante al menos
5 segundos, para seleccionar la función
descalcificación automática; el led permanece
encendido en modo fijo.
• Dirigir el tubo del vapor (14) hacia la vasija
recogedora de gotas.
• Colocar un contenedor de adecuada capacidad
debajo del tubo de vapor y abrir en sentido
contrario a las agujas del reloj el pomo de agua
Page 46

ESPAÑOL
caliente (16). La máquina inicia un ciclo
automático de descalcificación intercalado con
pausas preestablecidas por el fabricante y
gestionadas automáticamente por la máquina.
• Al final del ciclo se detiene la erogación de la
solución descalcificante y los 5 botones inician
a parpadear simultáneamente.
• Cerrar el pomo de erogación de agua caliente
(16) girándolo en sentido de las agujas del reloj.
En este caso parpadea también el led (27).
• Aclarar el recipiente del agua y llenarlo con
agua fresca potable.
• Colocar un contenedor de adecuada capacidad
debajo del tubo de vapor y vaciar 2/3 el
contenido del recipiente del agua girando el
pomo de vapor (16) en sentido contrario a las
agujas del reloj; para detener la erogación girar
el pomo (16) en el sentido de las agujas del reloj.
• Dejar que se caliente la máquina y vaciar el
contenido remanente en el recipiente de agua,
activando el pulsador agua caliente (25), girando el pomo de vapor (16) en sentido contrario a
las agujas del reloj; para detener la erogación
girarlo en el sentido de las agujas del reloj.
Cuando se utiliza un producto
diferente al aconsejado se
recomienda respetar las instrucciones de la
casa fabricante descritas en la etiqueta del
producto descalcificante.
Si el ciclo de descalcificación se
interrumpe apagando la máquina,
éste se reestablece cuando se vuelve a
encender la misma.
12 PROGRAMACIÓN DE LAS
FUNCIONES DE LA MÁQUINA
La máquina permite programar algunos parámetros
en función de las exigencias del usuario.
Para programar las funciones es obligatorio
entrar en la modalidad de programación
realizando lo siguiente:
• Asegurase que el interruptor general (7) de la
máquina esté en posición (O) y que el pomo
de agua caliente (16) esté cerrado.
• Presionar los botones (23) y (25) y
contemporáneamente encender la máquina
con el interruptor general (7).
• 46 •
De este modo se sitúa en la modalidad de
programación de la máquina.
Para salir de la programación y activar las
funciones programadas apagar y reencender la
máquina con el interruptor general (7).
12.1 Programación “dureza del agua”
El agua corriente y mineral es más o menos
calcárea dependiendo de la región y del tipo
de agua utilizado.
Por este motivo el aparato se puede regular
según el grado de dureza del agua de la
localidad de destino, expresada en escala de 1
(menos duro) a 4 (más duro).
El aparato ya viene programado a un valor
medio (dureza 3).
Antes de efectuar esta regulación es
necesario comprobar la dureza del
agua mediante la tira que se suministra con
la máquina.
Sumergir brevemente (1 segundo) la tira
suministrada en el agua y sacudirla
ligeramente. Después de un minuto los
resultados de la prueba están visibles en
la tira.
Para programar esta función realice lo
siguiente:
• Pulsar el botón (22); sucesivamente el número
de los botones encendidos indica la dureza
del agua programada;
• Si se desea modificar el grado de dureza del
agua presionar repetitivamente el botón (22)
hasta cuando se indique, por el encendido
de los botones, el grado de dureza
seleccionado.
• En caso de duda, programar a un grado de
dureza más alto.
Dureza 1 = encendidos los botones (22) y (23)
Dureza 2 = encendidos los botones (22), (23)
y (24)
Dureza 3 = encendidos los botones (22), (23),
(24) y (25)
Dureza 4 = encendidos los botones (22), (23),
(24), (25) y (26)
Page 47

El índice de dureza corresponde a los cuadros
1-4 de la tira. En caso de duda, aconsejamos
programar a un grado de dureza más alto.
12.2 P rogramación del “ciclo de
aclarado”
Inmediatamente después de calentarse a temperatura café / agua caliente / vapor, el aparato
elimina automáticamente los restos de agua
restantes en los tubos para garantizar que los
cafés se preparan solo con agua fresca.
Para programar esta función realizar lo
siguiente:
• Presionar el botón (23); cuando la función
está activada se enciende el led (27).
12.3 Programación de la “preinfusión”
El proceso de preinfusión, con el que el café se
humedece ligeramente antes de la infusión
verdadera, hace resaltar todo el aroma del café,
que adquiere un gusto excelente.
• Presionar el botón (24); cuando la función
está activada se enciende el led (28).
Nota: esta función ya está activada
por el fabricante.
12.4 Programación del “premolido”
Con el proceso de premolido el aparato muele
dos veces: la primera para el tipo de café
seleccionado, la segunda para el café siguiente
(todavía sin seleccionar).
Esta función conviene solo si se deben preparar
contemporáneamente diversos cafés (ej: durante
una visita, una fiesta).
Para programar esta función realizar lo
siguiente:
• Presionar el botón (25); cuando la función
está activada se enciende el led (29).
ESPAÑOL
utilización correcta, para las funciones
operativas y el mantenimiento necesario del
aparato.
• Estos conocimientos y la observación de éstas
instrucciones, representan la premisa para un
uso sin peligro respetando totalmente la
seguridad en caso de funcionamiento y
mantenimiento del aparato. Si se desea
información adicional o si debiesen subintrar
problemas particulares que se consideran que
no están explicados en éstas instrucciones de
uso con la suficiente claridad, le rogamos se
ponga en contacto con el vendedor o
directamente con el fabricante.
• Además, resaltamos que el contenido de estas
instrucciones de uso no forman parte de una
convenio precedente o ya existente, de un
acuerdo o de un contrato legal y que no le
cambian la sustancia.
• Todas las obligaciones del fabricante se basan
en el respectivo contrato de compraventa que
contiene también el reglamento completo y
exclusivo referente a las prestaciones de
garantía.
• Las normas de garantía contractuales no se
limitan ni se extienden en base a las presentes
explicaciones.
• Las instrucciones de uso contienen
información protegida por el derecho de
autor.
• No está permitido fotocopiarlas o traducirlas
en otro idioma sin el previo acuerdo escrito
por parte del Fabricante.
14 SUPRESIÓN
• Inutilizar los aparatos que no se vayan a usar
más.
• Quitar el enchufe de la toma y cortar el cable
eléctrico.
• Entregar los aparatos fuera de uso a un centro de recogida apropiado.
13 INFORMACIONES DE CARÁC-
TER JURÍDICO
• Las siguientes informaciones de uso contienen
las informaciones necesarias para una
• 47 •
Page 48

ESPAÑOL
15 TESTIGOS LUMINOSOS DEL PANEL DE MANDOS
LUZ VERDE (22)
- Máquina en erogación con café molido
LUZ VERDE (23) FIJA
LUZ VERDE (24) FIJA CONTEMPORÁNEAMENTE
- Máquina con temperatura a punto:
para la erogación de café;
para la erogación de agua caliente / vapor. (depende de la función seleccionada - ver LUZ (25)).
LUZ VERDE (23) PARPADEANTE
LUZ VERDE (24) PARPADEANTE CONTEMPORANEAMENTE
- Máquina de café en fase de calentamiento para la erogación de café, agua caliente y
vapor.
LUZ VERDE (23) PARPADEANTE EN MODO LENTO
- Máquina en erogación de 1 café espresso.
LUZ VERDE (23) PARPADEANTE EN MODO RÁPIDO
- Máquina en erogación de 2 cafés espressos.
LUZ VERDE (24) PARPADEANTE EN MODO LENTO
- Máquina en erogación de 1 café.
LUZ VERDE (24) PARPADEANTE EN MODO RÁPIDO
- Máquina en erogación de 2 cafés.
LUZ VERDE (25) FIJA
- Función agua caliente seleccionada.
LUZ VERDE (25) APAGADA
- Función vapor seleccionada.
LUZ VERDE (26) PARPADEANTE
- La máquina necesita un ciclo de descalcificación
Realizar la descalcificación como se describe en el Apdo.11.
Para cancelar la preselección presionar otro botón manteniendo el pomo
de erogación agua caliente cerrado (16)
• 48 •
Page 49

LUZ ROJA (26) FIJA
- Ha sido seleccionada la función de descalcificación.
Para realizar la descalcificación como se describe en el Apdo. 11. abrir el
pomo de erogación de agua caliente (16).
La función de descalcificación ha de ser completada antes de poder conti-
nuar con el uso normal del aparato.
LED ROJO (27) FIJO
- Cantidad de agua insuficiente en el recipiente.
Llenar el recipiente con agua fresca potable, cargar el circuito e iniciar
nuevamente el procedimiento.
Si la luz fija no desaparece, controlen el indicador gris que se encuentra al
interior del recipiente de agua. Si no está en su posición o no flota, contacten
el Centro de Asistencia más cercano para obtener un indicador nuevo.
LED ROJO (27) PARPADEANTE
- Circuito de agua sin cargar
Cargar el circuito
LED ROJO (28) FIJO
- Recipiente café en grano vacío
Llenar el recipiente con café en grano e iniciar nuevamente el procedimiento.
ESPAÑOL
LED ROJO (28) PARPADEANTE
- Cajón de posos lleno
**Para obtener el apagamiento de la luz roja intermitente es necesario vaciar
el cajón de los residuos de café mientras que la máquina esté encendida.
LED ROJO (29) FIJO
- Grupo erogador, vasija recogedora de gotas, puertecilla anterior en posición incorrecta
para el funcionamiento de la máquina.
Para obtener el apagamiento de la luz roja fija verificar que todos los
componentes estén instalados o cerrados de modo correcto.
LUZ ROJA (29) PARPADEANTE
- Motor de molido bloqueado
- Motor del grupo suministrador bloqueado
Póngase en contacto con el centro de asistencia
** Nota importante: el cajón recogedor de posos se debe vaciar solo cuando la
máquina está encendida. El cajón se debe extraer durante al menos 5 segundos. El
vaciado del cajón con la máquina apagada no permite la erogación del café cuando se
vuelva a encender la misma.
• 49 •
Page 50

ESPAÑOL
16 ANOMALÍAS, CAUSAS Y REMEDIOS
samelborPsasuaCsoidemeR
edneicneesonaniuqámaLaadatcenocátseonaniuqámaL
olátseonéfaclE
etneilacetnemetneicifus
ropavoetneilacaugaelasoNátseropavedobutledoicifirolE
etnematnelelaséfaclEonifodaisamedéfaC oéfacedalczemalraibmaC
amercacopeneitéfaclEleoadaucedaalseonalczemaL
odaisamedatisecenaniuqámaL
aloesratnelacarapopmeit
ledelaseuqaugaeddaditnac
adatimilátseobut
edeupesonrodagoreopurglE
reartxe
elasonéfaclEaugaatlaF yaugaedetneipicerleranelL
ledroiretxeleropelaséfaclE
rodagore
etnemadipáryumelaséfaclE-etnocledroiretnileneéfacocoP
roden
edotisópedleropaugaelaS
auga
acirtcélederal
.odarutbo
oicusrodagoreopurG rodagoreopurgleraipmiL
lacedodacsata
odicudortni
oicusopurG opurgleraipmiL
atlasisoD sisodalriunimsiD
agracnisotiucriC otiucricleragraceR
onifodaisamedéfaC alriunimsido/yodilomleralugeR
odiurtsborodagorE soicifirosusyrodagoreleraipmiL
aseurgéfacedalczeM alczemedopitleraibmaC
ajabsisoD sisodalratnemuA
sodnofedrodegocernójaC
ajabodaisamedazatrop
saírfnátseéfacedsazatsaL éfacedsazatsalratnelaC
onóiccaferrotedocserfseonéfac
oseurgyumseodilomleneib
átseaniuqámaledotiucriclE
nóicisopedareufrodagoreopurG alrarreC.aniuqámalrednecnE
éfaceddaditnacalednóicalugeR
atcerrocninóicisopnerodagorE rodagoreleracolocarevloV
onellodaisamedaugaedotisópeD yrodatolflednóicisopracifireV
deralaaniuqámalratcenoC
leeuqesrarugesayacirtcéle
."I"nóicisopneétseefuhcne
edobutledoicifiroleraipmiL
reliflanunocropav
.)5.odpA(odilomleraluger
)6.odpA(sisodalriunimsiD
)01.odpA(
oéfacedalczemalraibmaC
leneomocodilomleraluger
sisodalratnemuA.5.odpA
)6.odpA(
aniuqámalracificlacseD
opurglE.oicivresedallicetreup
-acitámotuaevleuvrodagore
laicininóicisopalaetnem
sodnofedrodegocernójacleracaS
-oreedopurgleracasedsetna
nóicag
otiucricleratnelac
sisod
anuaéfacnótobleramargorP
atlasámdaditnac
adilased
éfacnocrodenetnocleranelleR
odazilifoilonodilom
augaedotisópedleraicav
• 50 •
Page 51

ESPAÑOL
NOTE-NOTA
___________________________________________________________
___________________________________________________________
___________________________________________________________
___________________________________________________________
___________________________________________________________
___________________________________________________________
___________________________________________________________
___________________________________________________________
___________________________________________________________
___________________________________________________________
___________________________________________________________
___________________________________________________________
___________________________________________________________
___________________________________________________________
___________________________________________________________
___________________________________________________________
___________________________________________________________
___________________________________________________________
___________________________________________________________
___________________________________________________________
___________________________________________________________
___________________________________________________________
___________________________________________________________
___________________________________________________________
___________________________________________________________
___________________________________________________________
___________________________________________________________
___________________________________________________________
___________________________________________________________
___________________________________________________________
___________________________________________________________
___________________________________________________________
___________________________________________________________
___________________________________________________________
___________________________________________________________
___________________________________________________________
• 51 •
Page 52

COD. 1.6.589.59.00 REV. 00 DEL 15/06/02
 Loading...