

Page 1

Register your product and get support at
www.philips.com/TVsupport
61x2 series
User Manual
55PUT6102
65PUT6162
Page 2

Contents
1 My new TV 4
1.1 Smart TV 4
1.2 App gallery 4
1.3 Rental videos 4
1.4 Ultra HD TV 4
1.5 Social Networks 4
1.6 Pause TV and recordings 4
2 Setting up 5
2.1 Read safety 5
2.2 TV stand and wall mounting 5
2.3 Tips on placement 5
2.4 Power cable 5
2.5 Antenna cable 5
3 Network 7
3.1 Network and Internet 7
4 Connect devices 11
4.1 About Connections 11
4.2 HDMI Ports 11
4.3 Y Pb Pr - Component 12
4.4 CVBS - Audio L R 13
4.5 Audio Out - Optical 13
4.6 Receiver - Set-Top Box 13
4.7 Home Theatre System - HTS 14
4.8 Smartphones and tablets 14
4.9 Blu-ray Disc Player 14
4.10 DVD Player 15
4.11 Headphones 15
4.12 Game Console 15
4.13 USB Hard Drive 16
4.14 USB Keyboard 17
4.15 USB Flash Drive 17
4.16 Photo Camera 18
4.17 Camcorder 18
4.18 Computer 18
5 Switching On and Off 20
5.1 On or standby 20
5.2 Keys on TV 20
5.3 Sleep timer 20
5.4 Switch off timer 20
6 Remote control 22
6.1 Key overview 22
6.2 IR sensor 23
6.3 Batteries 23
6.4 Cleaning 23
7 Channels 24
7.1 Install Channels 24
7.2 Switch channels 24
7.3 Channel lists 24
7.4 Watching channels 25
7.5 Favourite Channels 27
7.6 Interactive TV 27
8 TV Guide 29
8.1 What you need 29
8.2 Using the TV guide 29
9 Recording and Pause TV 31
9.1 Recording 31
10 Home menu 33
10.1 About the Home menu 33
10.2 Open the Home menu 33
11 Utilities 34
11.1 About Utilities 34
12 Netflix 35
12.1 About Netflix 35
13 Freeview Plus 36
13.1 About Freeview Plus 36
13.2 Launch Freeview Plus 36
14 Sources 37
14.1 Switch to a device 37
14.2 Options for a TV Input 37
14.3 Scan connections 37
14.4 Game or computer 37
15 Internet 38
15.1 Start Internet 38
15.2 Options on Internet 38
16 Movie, photos and music 39
16.1 From a USB connection 39
16.2 From a computer 39
16.3 Menu bar and sorting 39
16.4 Play your movie 39
16.5 View your photos 39
16.6 Play your music 40
17 Smartphones and tablets 41
17.1 Miracast 41
17.2 MHL 42
17.3 Smart TV 42
18 Multi room 46
18.1 About Multi room 46
18.2 What you need 46
18.3 Using Multi room 46
19 Settings 47
19.1 Quick settings 47
19.2 Picture 47
19.3 Sound 50
19.4 Eco settings 53
19.5 General settings 54
19.6 Clock and language 56
19.7 Universal access 58
20 Networks 60
21 Channel installation 61
21.1 Antenna/cable installation 61
21.2 Channel list copy 63
22 Software 65
22.1 Update software 65
22.2 Software version 65
22.3 Local updates 65
22.4 Look for OAD updates 65
22.5 Open source software 66
22.6 Open source license statement 66
22.7 Open source license 66
23 Specifications 77
23.1 Environmental 77
2
Page 3

23.2 Power 77
23.3 Reception 77
23.4 Display 78
23.5 Dimensions and Weights 78
23.6 Connectivity 78
23.7 Sound 78
23.8 Multimedia 78
24 Troubleshooting and support 80
24.1 Register your TV 80
24.2 Help 80
24.3 Troubleshooting 80
24.4 Online help 82
24.5 Consumer care / Repair 82
25 Safety and care 84
25.1 Safety 84
25.2 Screen care 85
26 Terms of use, copyrights and licenses
86
26.1 Terms of use 86
27 Copyrights 87
27.1 Dolby 87
27.2 MHL 87
27.3 Ultra HD 87
27.4 HDMI 87
27.5 DTS 2.0 + Digital Out ™ 87
27.6 Microsoft 87
27.7 Wi-Fi Alliance 87
27.8 Kensington 87
27.9 Other trademarks 88
28 Disclaimer regarding services and/or
software offered by third parties 89
Index 90
3
Page 4

1
My new TV
* Depending on the video streaming service of the
selected video store.
1.1
Smart TV
Connect this Philips Smart LED TV to the Internet
and discover a new world of television. You can make
a wired connection to your router or you can link up
wirelessly with Wi-Fi.
With the TV connected to your home network, a
smartphone can show a photo on TV, you can play
videos stored on your computer or control the TV with
your tablet.
With your TV connected to the Internet, you can
watch a rental video from an online video store, read
the online TV guide or record your favourite TV show
on a USB Hard Drive.
The Smart TV Apps add to the fun with all sorts of
entertainment and convenient services.
In Help, press Keywords and look up Smart
TV for more information.
1.4
Ultra HD TV
This TV has an Ultra HD display. Its resolution is four
times as much as normal HD displays. Ultra HD
means 8 million pixels for the most refined and lifelike
picture on TV.
On top, the new Ultra Pixel HD Engine continuously
converts any incoming TV signal into Ultra HD
resolution. So you can enjoy this stunning picture
quality the moment you switch on the TV. Or you can
watch native Ultra HD videos through an HDMI
connection. Ultra HD offers TV viewing that is crisp
and sharp even on a big screen.
1.5
1.2
App gallery
Open the App gallery in Smart TV to browse the
Apps, the collection of tailored websites for TV.
There are Apps to rent a video from an online video
store and Apps for watching programmes you
missed.
If the App gallery does not hold what you are
looking for, try the World Wide Web and surf the
Internet on TV.
In Help, press Keywords and look up App
gallery for more information.
1.3
Rental videos
To watch a rental video, you don't need to leave
your home. Simply rent the latest movie from your
regional online video store.
Start Smart TV and add the video store App to the
Smart TV start page.
Open the video store App, create your personal
account, select the movie and press play. No fuss
with downloading, you can watch the
movie immediately*.
Social Networks
No need to get up to check your friend's messages on
your computer.
On this TV you get the messages from your social
network on your TV screen. You can send a return
message from your couch.
For more information, in Help, press the colour
key Keywords and look up Apps.
1.6
Pause TV and recordings
If you connect a USB Hard Drive, you can pause and
record a broadcast from a digital TV channel.
Pause your TV and answer that urgent phone call or
simply take a break during a sports match, while the
TV stores the broadcast on the USB Hard Drive. You
can watch it again later.
With a USB Hard Drive connected, you can also
record digital broadcasts. You can record while you
are watching a programme or schedule a recording of
an upcoming programme.
For more information, in Help, press the colour
key Keywords and look up Pause
TV or Recording.
In Help, press Keywords and look up Rental
videos for more information.
4
Page 5
2
Setting up
2.1
Read safety
Read the safety instructions first before you use the
TV.
2.4
To read the instructions, in Help, press the colour
key Keywords and look up Safety instructions.
2.2
TV stand and wall mounting
You can find the instructions for mounting the TV
stand in the Quick Start Guide that came with the TV.
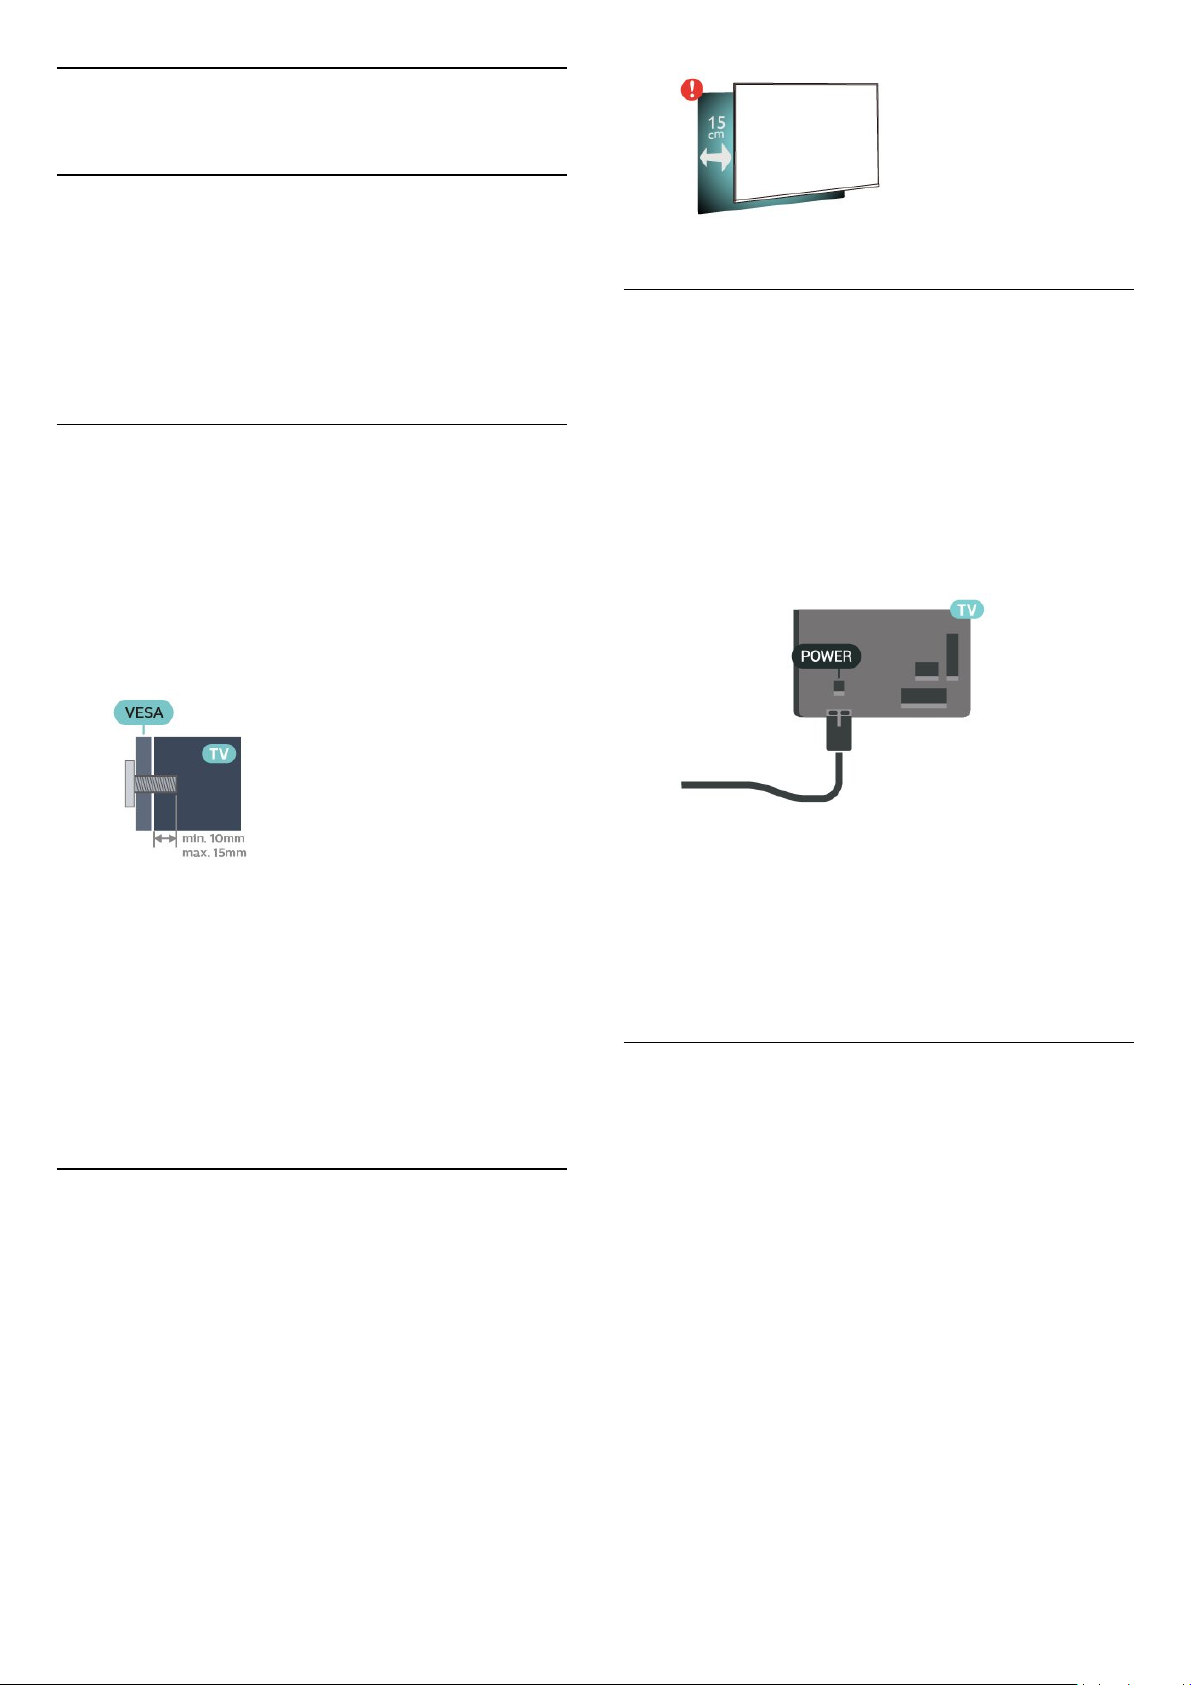
Your TV is also prepared for a VESA-compliant wall
mount bracket (sold separately).
Use the following VESA code when purchasing the
wall mount . . .
• For 50-inch TV: VESA MIS-F 200x200, M6
• For 55-inch TV: VESA MIS-F 400x200, M6
• For 65-inch TV: VESA MIS-F 400x200, M6
Caution
Wall mounting the TV requires special skills and
should only be performed by qualified personnel. The
TV wall mounting should meet safety standards
according to the TVs weight. Also read the safety
precautions before positioning the TV.
Power cable
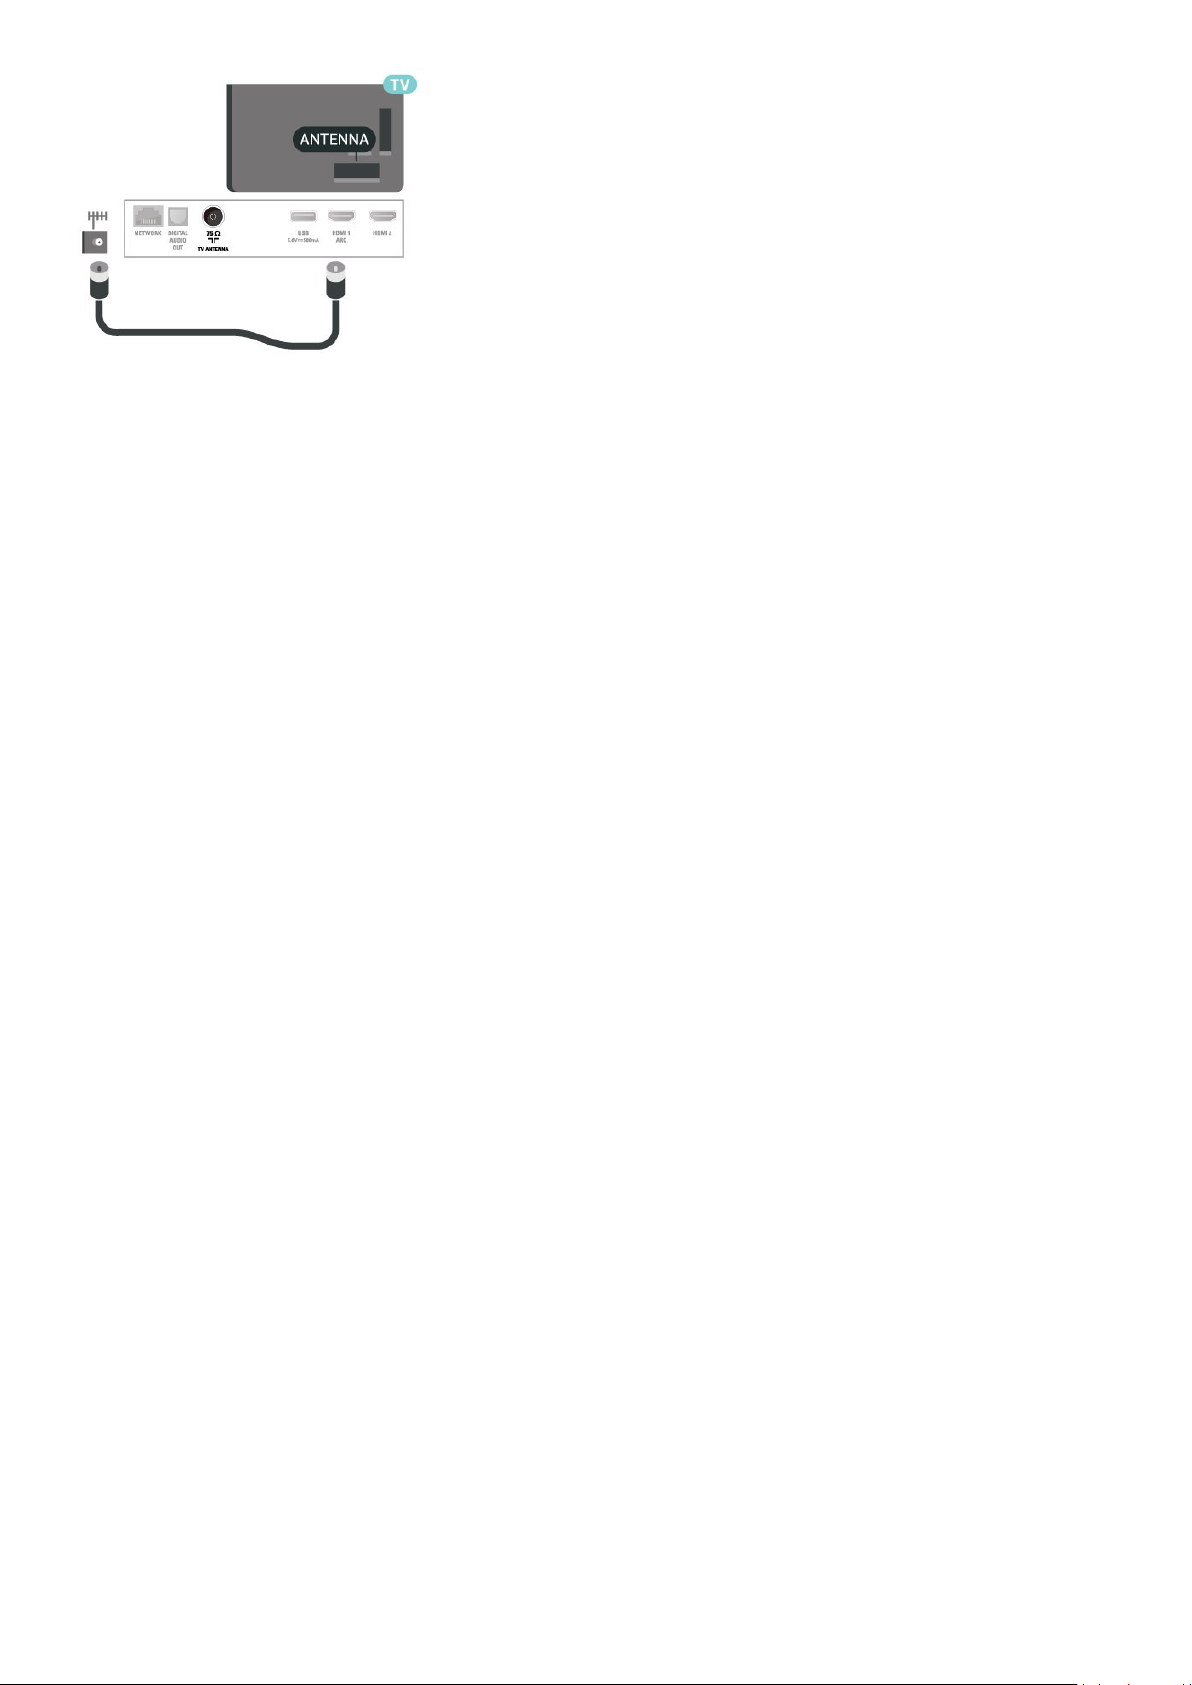
• Insert the power cable into the POWER connector
on the back of the TV.
• Make sure the power cable is securely inserted in
the connector.
• Make sure that the power plug, in the wall socket, is
accessible at all times.
• When you unplug the power cable, always pull the
plug, never pull the cable.
Although this TV has a very low standby power
consumption, unplug the power cable to save energy
if you do not use the TV for a long period of time.
For more information, in Help, press the colour
key Keywords and look up Switching on for
more information.
2.5
Antenna cable
2.3
Tips on placement
• Position the TV where light does not shine directly
on the screen.
• Position the TV up to 15 cm away from the wall.
• The ideal distance to watch TV is 3 times its diagonal
screen size. When seated, your eyes should be level
with the centre of the screen.
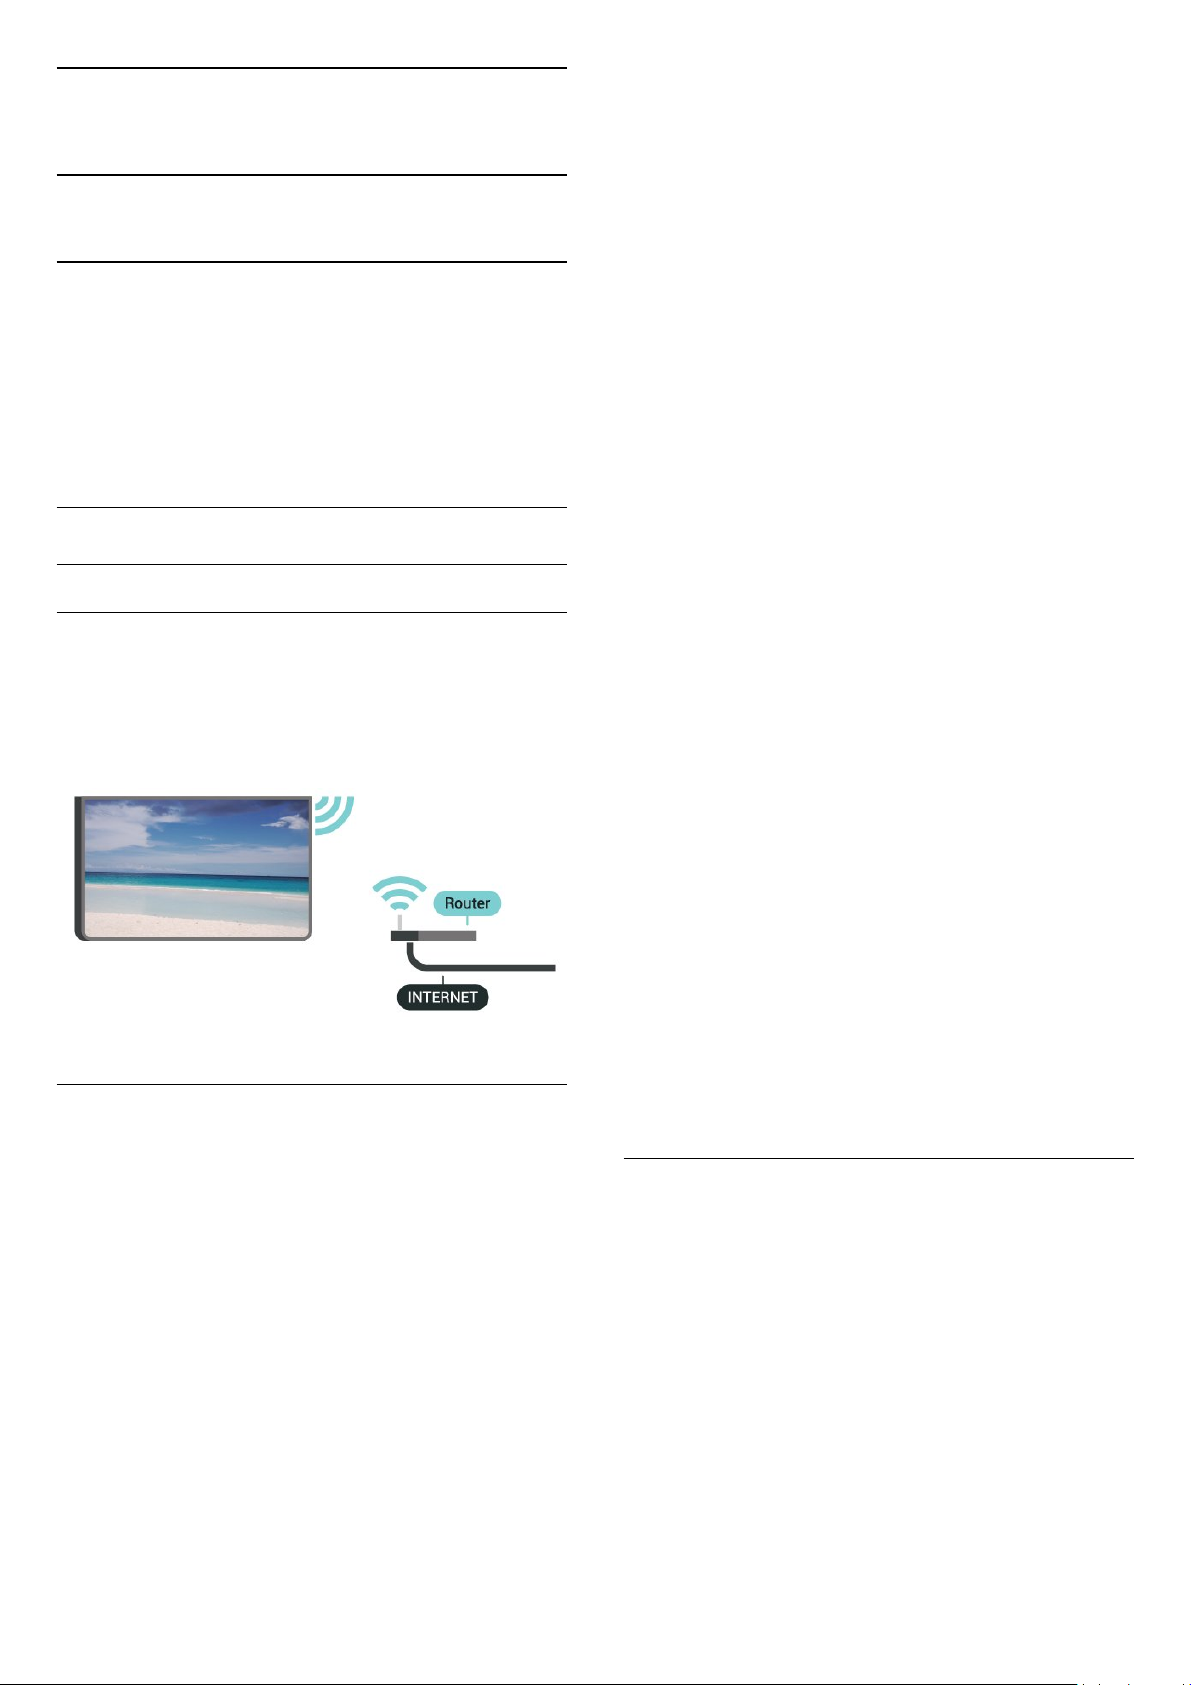
Insert the antenna plug firmly into
the Antenna socket at the back of the TV.
You can connect your own antenna or an antenna
signal from an antenna distribution system. Use an
IEC Coax 75 Ohm RF antenna connector.
Use this antenna connection for DVB-T and DVB-C
input signals.
5
Page 6
6
Page 7
3
Network
3.1
Network and Internet
Home network
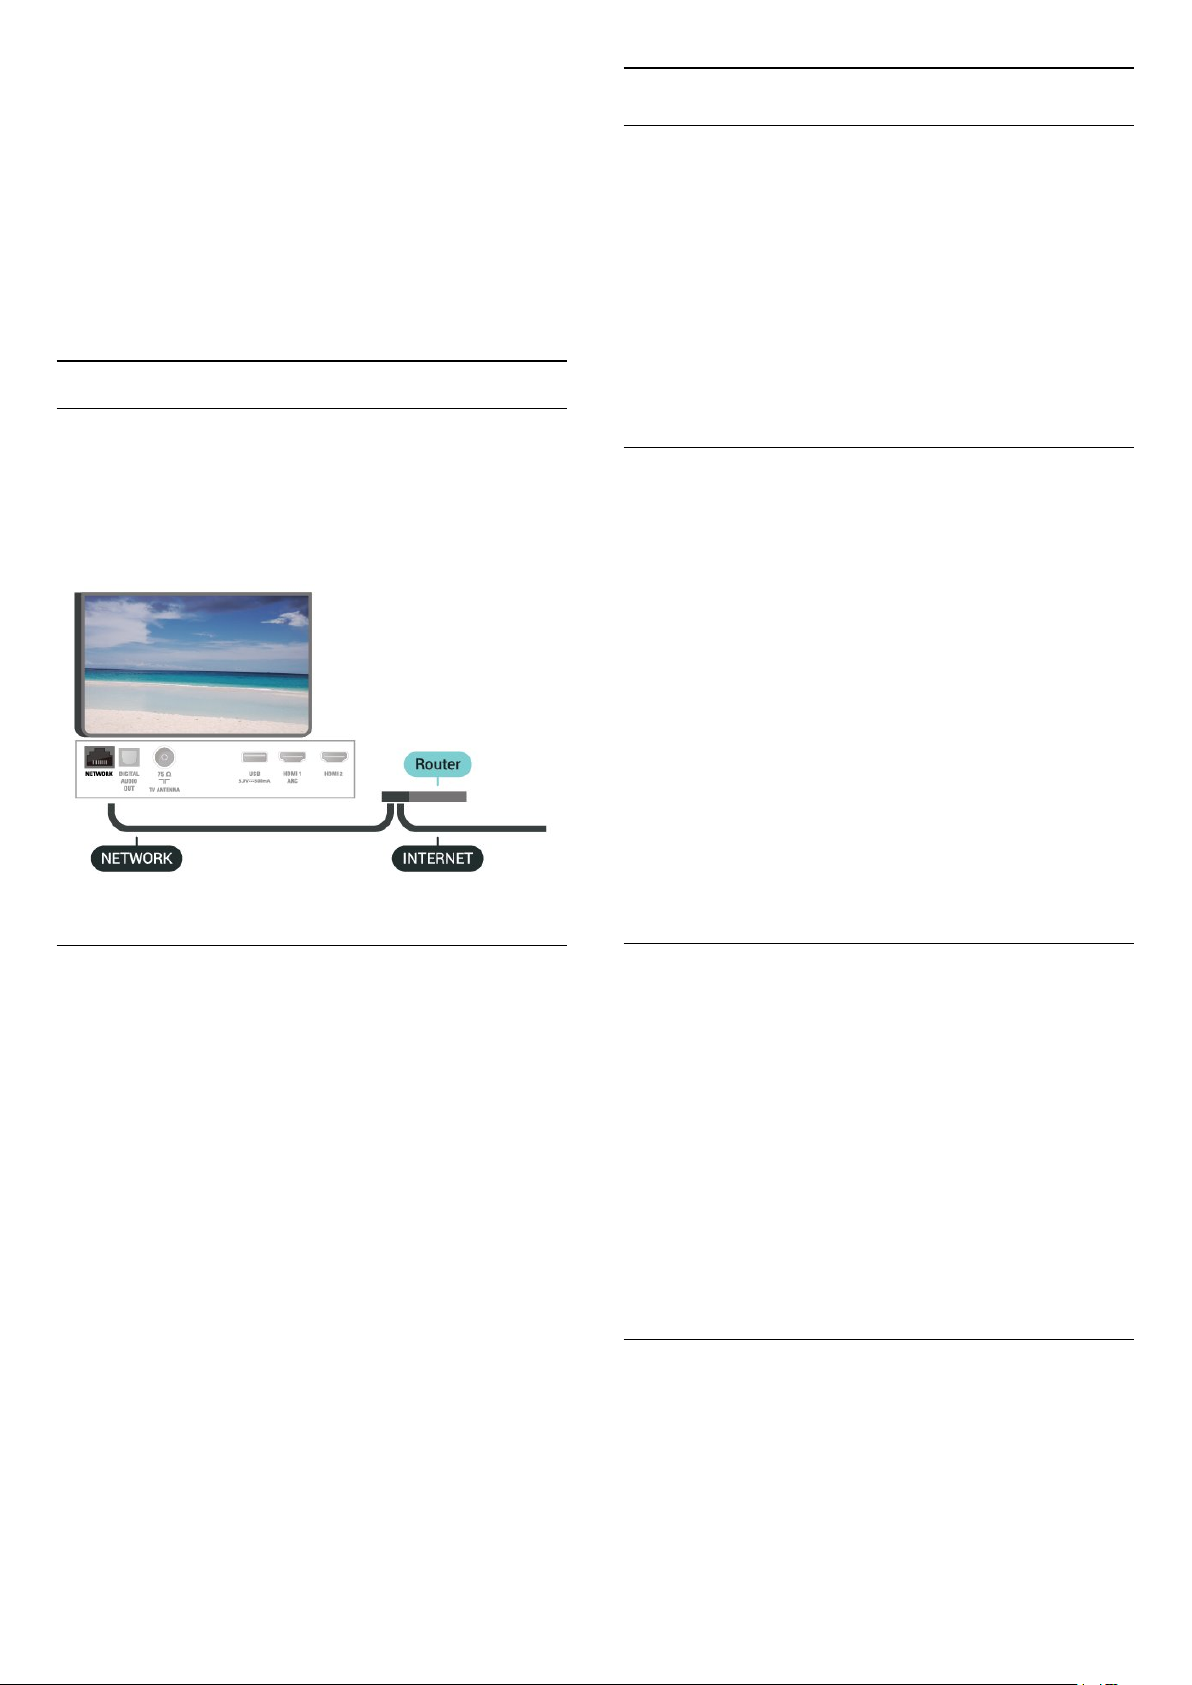
To enjoy the full capabilities of your TV, your TV must
be connected to the Internet.
Connect the TV to a home network with a high-speed
Internet connection. You can connect your TV
wirelessly or wired to your network router.
networks in your proximity.
• WPS
If your router has WPS, you can directly connect to
the router without scanning. Go to the router, press
the WPS button and return to the TV within 2 minutes.
Then press Connect to make the connection.
If you have devices in your wireless network that use
the WEP security encryption system, you cannot use
WPS.
If you must use the WPS PIN code to connect, select
Scan instead of WPS.
Step 7 - In the list of networks found, select your
wireless network and press OK.
If your network is not in the list because the network
name is hidden (you switched off the SSID broadcast
of the router), select Manual entry to enter the
network name yourself.
Connect to network
Wireless connection
What you need
To connect the TV to the Internet wirelessly, you need
a Wi-Fi router with a connection to the Internet.
Use a high-speed (broadband) connection to the
Internet.
Make the connection
Step 8 - Depending on the type of router, you can
now enter your encryption key (WEP, WPA or WPA2).
If you entered the encryption key for this network
before, you can select Next to make the connection
immediately.
If your router supports WPS or WPS PIN, you select
WPS, WPS PIN or Standard. Select your choice and
press OK.
• Standard
Select Standard to enter the encryption key
(password, passphrase or security key) manually.You
can use the keyboard on the remote control to enter
the encryption key. Once you have entered the key,
press Connect.
• WPS PIN
To make a secured WPS connection with a PIN code,
select WPS PIN and press OK. Write down the 8-digit
PIN code shown and enter it in the router software on
your PC. Return to the TV and press Connect. Consult
the router manual on where to enter the PIN code in
the router software.
Step 9 - A message will be shown when the
connection is successful.
To make a wireless connection…
Step 1 - Make sure that the router of your wireless
network is switched on.
Step 2 - Press , select Network and press
(right) to enter the menu.
Step 3 - Select Connect to network > Start now and
press OK.
Step 4 - Select Connect and press OK.
Step 5 - Select Wireless and press OK.
Step 6 - Select Scan to scan for your wireless
network. If you have a router with WPS (Wi-Fi
Protected Setup), you can select WPS. Select your
choice and press OK.
• Scan
Select Scan to scan for your wireless network (your
wireless router). The TV might find several wireless
Problems
Wireless network not found or distorted
• Microwave ovens, DECT phones or other Wi-Fi
802.11b/g/n devices in your proximity might disturb
the wireless network.
• Make sure that the firewalls in your network allow
access to the TV's wireless connection.
• If the wireless network does not work properly in
your home, try the wired network installation.
Internet does not work
• If the connection to the router is OK, check the
router connection to the Internet.
The PC and Internet connection are slow
7
Page 8
• Look in your wireless router's user manual for
information on indoor range, transfer rate and other
factors of signal quality.
• Use a high-speed (broadband) Internet connection
for your router.
DHCP
• If the connection fails, you can check the DHCP
(Dynamic Host Configuration Protocol) setting of the
router. DHCP should be switched on.
Wired connection
What you need
Network settings
View network settings
You can view all current network settings here. The
IP and MAC address, signal strength, speed,
encryption method, etc.
To view the current network settings…
1 - Press , select Network and press (right) to
enter the menu.
2 - Select View network settings and press OK.
3 - Select Close to close the menu.
To connect the TV to the Internet, you need a
network router with a connection to the Internet.
Use a high-speed (broadband) connection to the
Internet.
Make the connection
To make a wired connection…
1 - Connect the router to the TV with a network cable
(Ethernet cable**).
2 - Make sure that the router is switched on.
3 - Press , select Network and press (right) to
enter the menu.
4 - Select Connect to network > Start now and
press OK.
5 - Select Connect and press OK.
6 - Select Wired and press OK. The TV constantly
searches for the network connection.
7 - A message will be shown when the connection is
successful.
Network configuration
If you are an advanced user and want to install your
network with Static IP addressing, set the TV to Static
IP.
To set the TV to Static IP…
1 - Press , select Network and press (right) to
enter the menu.
2 - Select Network configuration and press OK.
3 - Select Static IP and press OK to enable Static
IP configuration.
4 - Select Static IP configuration and configure the
connection.
5 - You can set the number for IP
address, Netmask, Gateway, DNS 1, or DNS 2.
6 - Press (left) repeatedly if necessary, to close
the menu.
Switch On with Wi-Fi (WoWLAN)
You can switch this TV on from your smartphone or
tablet if the TV is in Standby. The setting Switch On
with Wi-Fi (WoWLAN) must be switched on.
To switch on WoWLAN…
1 - Press , select Network and press (right) to
enter the menu.
2 - Select Switch on with Wi-Fi (WoWLAN) and
press OK.
3 - Select On and press OK.
4 - Press (left) repeatedly if necessary, to close
the menu.
If the connection fails, you can check the DHCP
setting of the router. DHCP should be switched on.
Digital Media Renderer - DMR
If your media files do not play on your TV, make sure
that the Digitial Media Renderer is switched on. As a
factory setting, DMR is switched on.
To switch on DMR…
1 - Press , select Network and press (right) to
enter the menu.
8
Page 9

2 - Select Digital Media Renderer - DMR and
press OK.
3 - Select On and press OK.
4 - Press (left) repeatedly if necessary, to close
the menu.
Switch on Wi-Fi connection
To switch on Wi-Fi Smart Screen…
1 - Press , select Network and press (right) to
enter the menu.
2 - Select Wi-Fi smart screen and press OK.
3 - Select On and press OK.
4 - Press (left) repeatedly if necessary, to close
the menu.
You can switch on or off Wi-Fi connection on your
TV.
To switch on Wi-Fi…
1 - Press , select Network and press (right) to
enter the menu.
2 - Select Wi-Fi On/Off and press OK.
3 - Select On and press OK.
4 - Press (left) repeatedly if necessary, to close
the menu.
Switch on Wi-Fi Miracast
Switch on Wi-Fi Miracast to share the screen of your
smartphone, tablet or computer on the TV.
To switch on Miracast…
1 - Press , select Network and press (right) to
enter the menu.
2 - Select Wi-Fi Miracast and press OK.
3 - Select On and press OK.
4 - Press (left) repeatedly if necessary, to close
the menu.
For more information, in Help, press the colour
key Keywords and look up Miracast™, switch
on.
TV network name
If you have more than one TV in your home network,
you can give the TV a unique name.
To change the TV name…
1 - Press , select Network and press (right) to
enter the menu.
2 - Select TV network name and press OK.
3 - Enter the name with the on-screen keyboard.
4 - Select Done to confirm the change.
5 - Press (left) repeatedly if necessary, to close
the menu.
Netflix settings
With Netflix settings, you can view ESN number or
deactive Netflix device.
To enter Netflix settings…
1 - Press , select Network and press (right) to
enter the menu.
2 - Select Netflix settings and press OK.
3 - Press (left) repeatedly if necessary, to close
the menu.
Reset Wi-Fi Miracast connections
Clear the list of connected and blocked devices that
are used with Miracast.
To clear Miracast connections…
1 - Press , select Network and press (right) to
enter the menu.
2 - Select Reset Wi-Fi Miracast connections and
press OK.
3 - Select Clear all and press OK.
4 - Press (left) repeatedly if necessary, to close
the menu.
Wi-Fi smart screen
To watch digital TV channels on your smartphone,
you must switch on Wi-Fi Smart Screen. Some
scrambled channels might not be available on your
mobile device.
Clear Internet memory
With Clear Internet Memory, you can clear all
Internet files and logins stored on your TV, such as
passwords, cookies, and history.
To clear the Internet memory…
1 - Press , select Network and press (right) to
enter the menu.
2 - Select Clear Internet memory and press OK.
3 - Select OK to confirm.
4 - Press (left) repeatedly if necessary, to close
the menu.
9
Page 10

File sharing
The TV can connect to other devices in your wireless
network, like your computer or smartphone. You can
use a computer with Microsoft Windows or Apple OS
X.
On this TV, you can open photos, music and videos
stored on your computer.
10
Page 11
4
4.2
Connect devices
4.1
About Connections
Connectivity Guide
Always connect a device to the TV with the highest
quality connection available. Also, use good quality
cables to ensure a good transfer of picture and
sound.
When you connect a device, the TV recognizes its
type and gives each device a correct type name. You
can change the type name if you wish. If a correct
type name for a device is set, the TV automatically
switches to the ideal TV settings when you switch to
this device in the Sources menu.
If you need help to connect several devices to the TV,
you can visit the Philips TV connectivity guide. The
guide offers information on how to connect and
which cables to use.
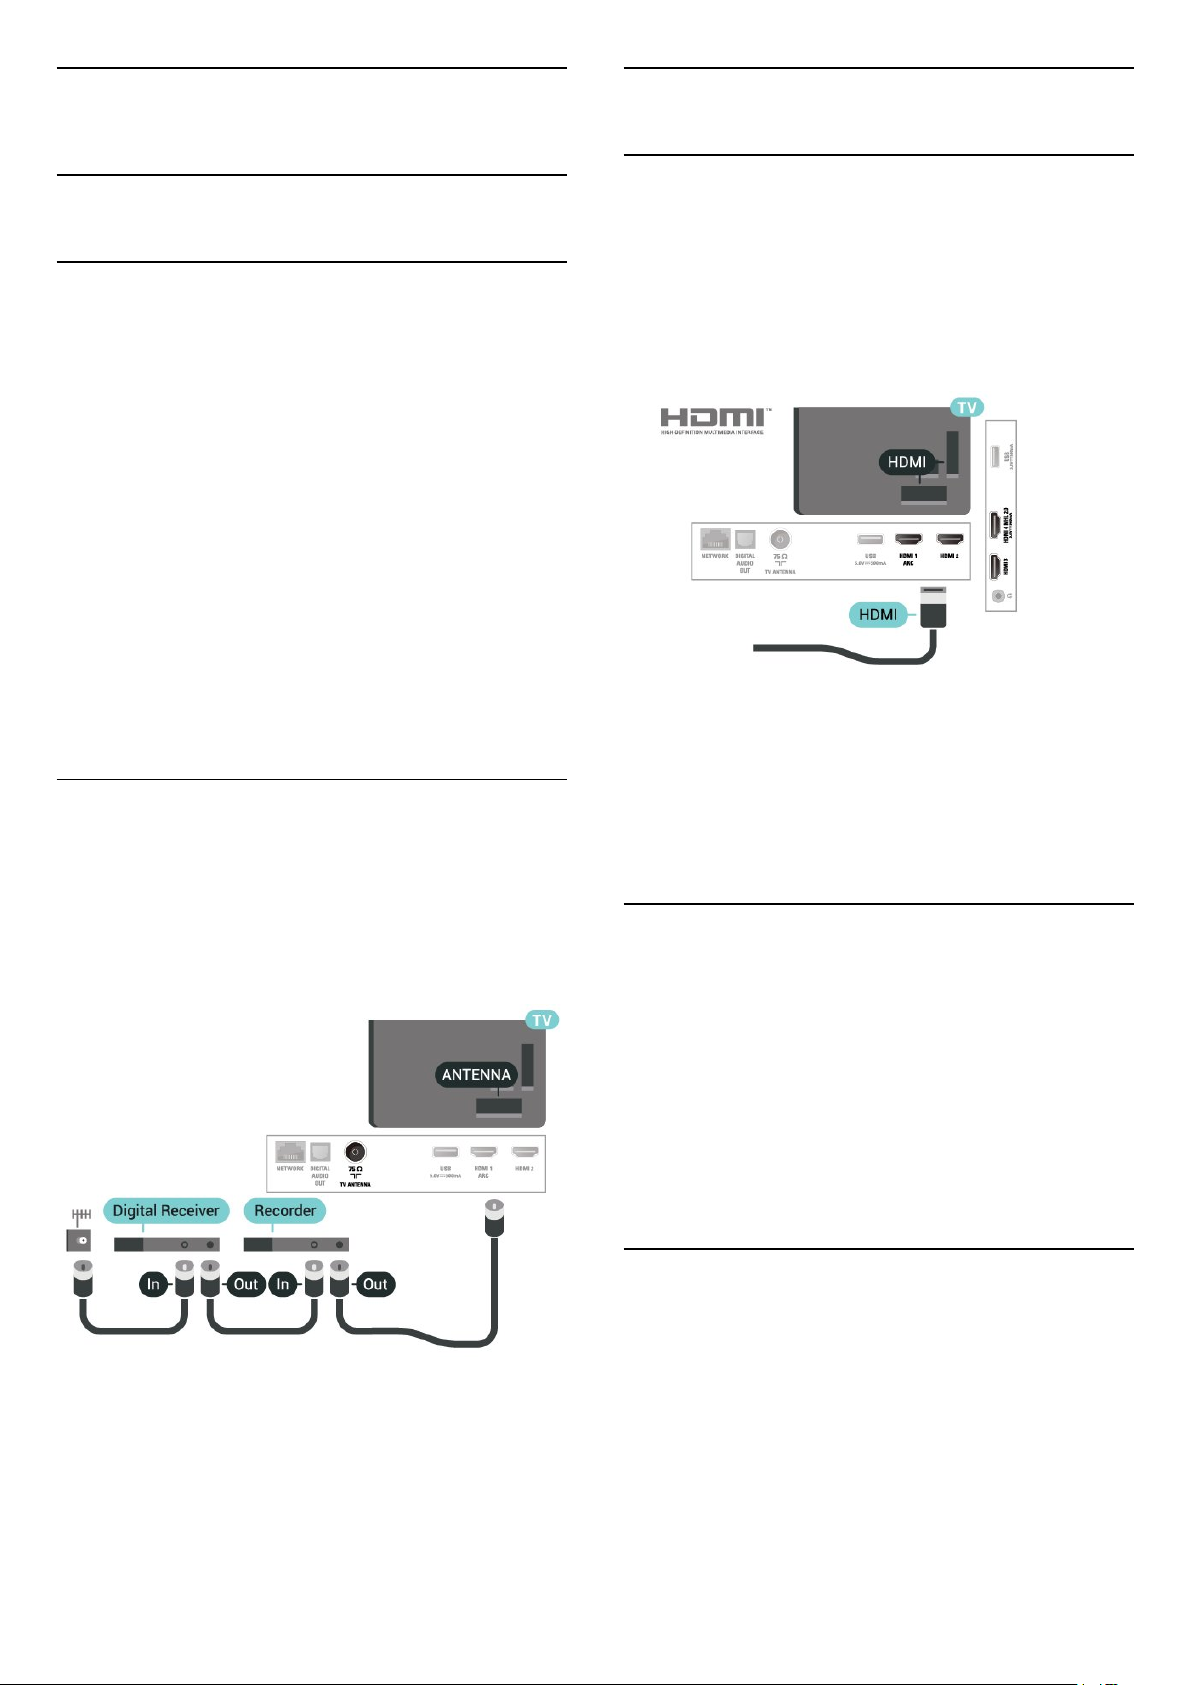
Antenna Port
If you have a Set-top box (a digital receiver) or
Recorder, connect the antenna cables to run the
antenna signal through the Set-top box and/or
Recorder first before it enters the TV. In this way, the
antenna and the Set-top box can send possible
additional channels to the Recorder to record.
HDMI Ports
HDMI Quality
An HDMI connection has the best picture and sound
quality. One HDMI cable combines video and audio
signals. Use an HDMI cable for TV signal.
For best signal quality transfer, use a High speed
HDMI cable and do not use an HDMI cable longer
than 5 m.
Copy protection
HDMI cables support HDCP (High-bandwidth Digital
Content Protection). HDCP is a copy protection signal
that prevents copying content from a DVD disc or Bluray Disc. Also referred to as DRM (Digital Rights
Management).
HDMI ARC
Only HDMI 1 on the TV have HDMI ARC (Audio
Return Channel).
If the device, typically a Home Theatre System (HTS),
also has the HDMI ARC connection, connect it
to HDMI 1 connection on this TV. With the HDMI
ARC connection, you do not need to connect the
extra audio cable that sends the sound of the TV
picture to the HTS. The HDMI ARC connection
combines both signals.
HDMI MHL
With HDMI MHL, you can send what you see on your
Android smartphone or tablet to a TV screen.
The HDMI 4 connection on this TV
incorporates MHL 2.0 (Mobile High-Definition Link).
This wired connection offers great stability and
bandwidth, low latency, no wireless interference and
good quality sound reproduction. On top of that, the
MHL connection will charge the battery of your
smartphone or tablet. Although connected, your
11
Page 12
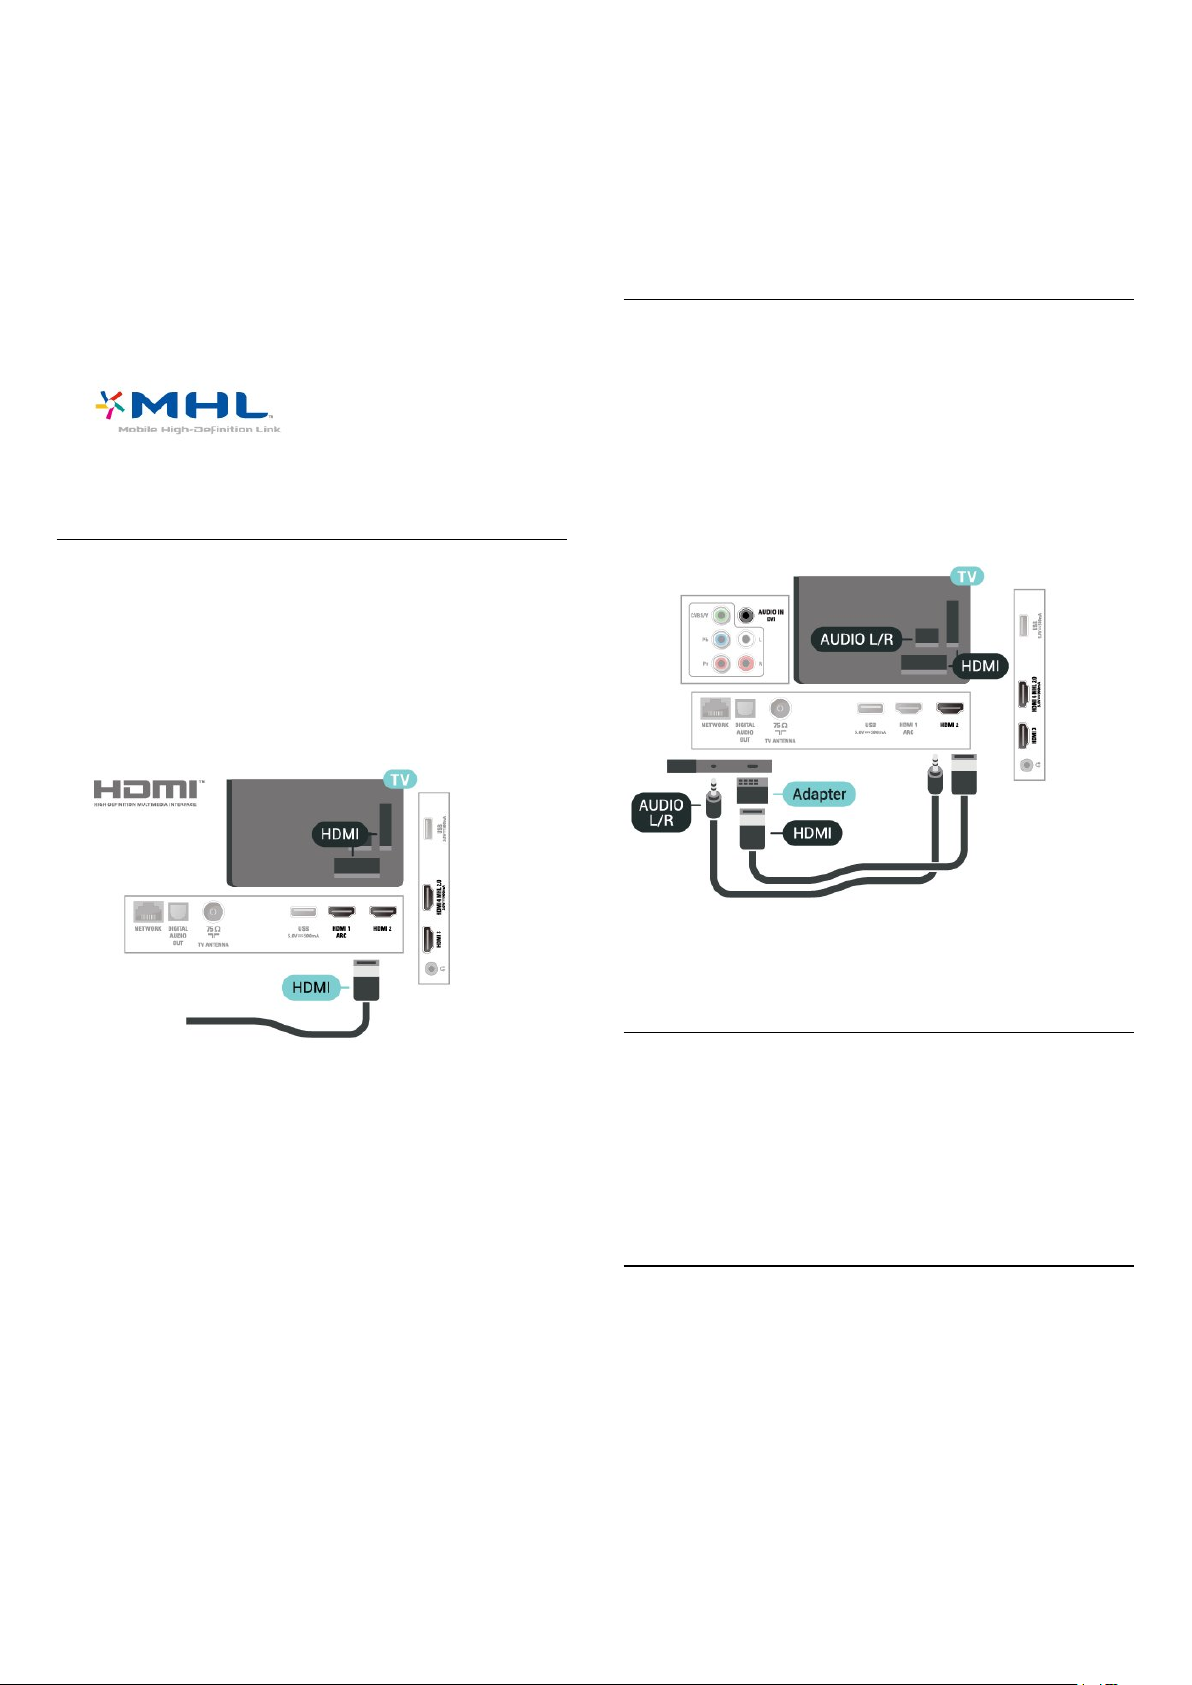
mobile device will not be charging when the TV is on
standby.
Inform yourself about what passive MHL cable is
suited for your mobile device. In particular, with the
HDMI connector for the TV on one side, the type of
connector you need to connect to your smartphone
or tablet.
MHL, Mobile High-Definition Link and the MHL Logo
are trademarks or registered trademarks of the MHL,
LLC.
HDMI CEC - EasyLink
An HDMI connection has the best picture and sound
quality. One HDMI cable combines video and audio
signals. Use an HDMI cable for High Definition (HD)
TV signals. For best signal quality transfer, use a High
speed HDMI cable and do not use an HDMI cable
longer than 5 m.
The HDMI CEC functionality has different names on
different brands. Some examples are: Anynet, Aquos
Link, Bravia Theatre Sync, Kuro Link, Simplink and
Viera Link. Not all brands are fully compatible with
EasyLink.
Example HDMI CEC branding names are property of
their respective owners.
DVI to HDMI
If you still own a device that only has a DVI
connection, you can connect the device to any of
the HDMI connection with a DVI to HDMI adapter.
Use a DVI to HDMI adapter if your device only has a
DVI connection. Use one of the HDMI connections
and add an Audio L/R cable (mini-jack 3.5mm) to
Audio In for sound, on the back of the TV.
EasyLink HDMI CEC
If your devices are connected with HDMI and have
EasyLink, you can operate them with the TV remote
control. EasyLink HDMI CEC must be switched On on
the TV and the connected device.
With EasyLink you can operate a connected device
with the TV remote control. EasyLink uses HDMI CEC
(Consumer Electronics Control) to communicate with
the connected devices. Devices must support HDMI
CEC and must be connected with an HDMI
connection.
EasyLink setup
The TV comes with EasyLink switched on. Make sure
that all HDMI CEC settings are properly set up on the
connected EasyLink devices. EasyLink might not work
with devices from other brands.
HDMI CEC on other brands
Copy Protection
DVI and HDMI cables support HDCP (High-bandwidth
Digital Content Protection). HDCP is a copy protection
signal that prevents copying content from a DVD disc
or Blu-ray Disc. Also referred to as DRM (Digital
Rights Management).
4.3
Y Pb Pr - Component
Y Pb Pr - Component Video is a high quality
connection.
The YPbPr connection can be used for High Definition
(HD) TV signals. Next to the Y, Pb and Pr signals add
the Audio Left and Right signals for sound.
Match the YPbPr (green, blue, red) connector colours
with the cable plugs when you connect.
12
Page 13
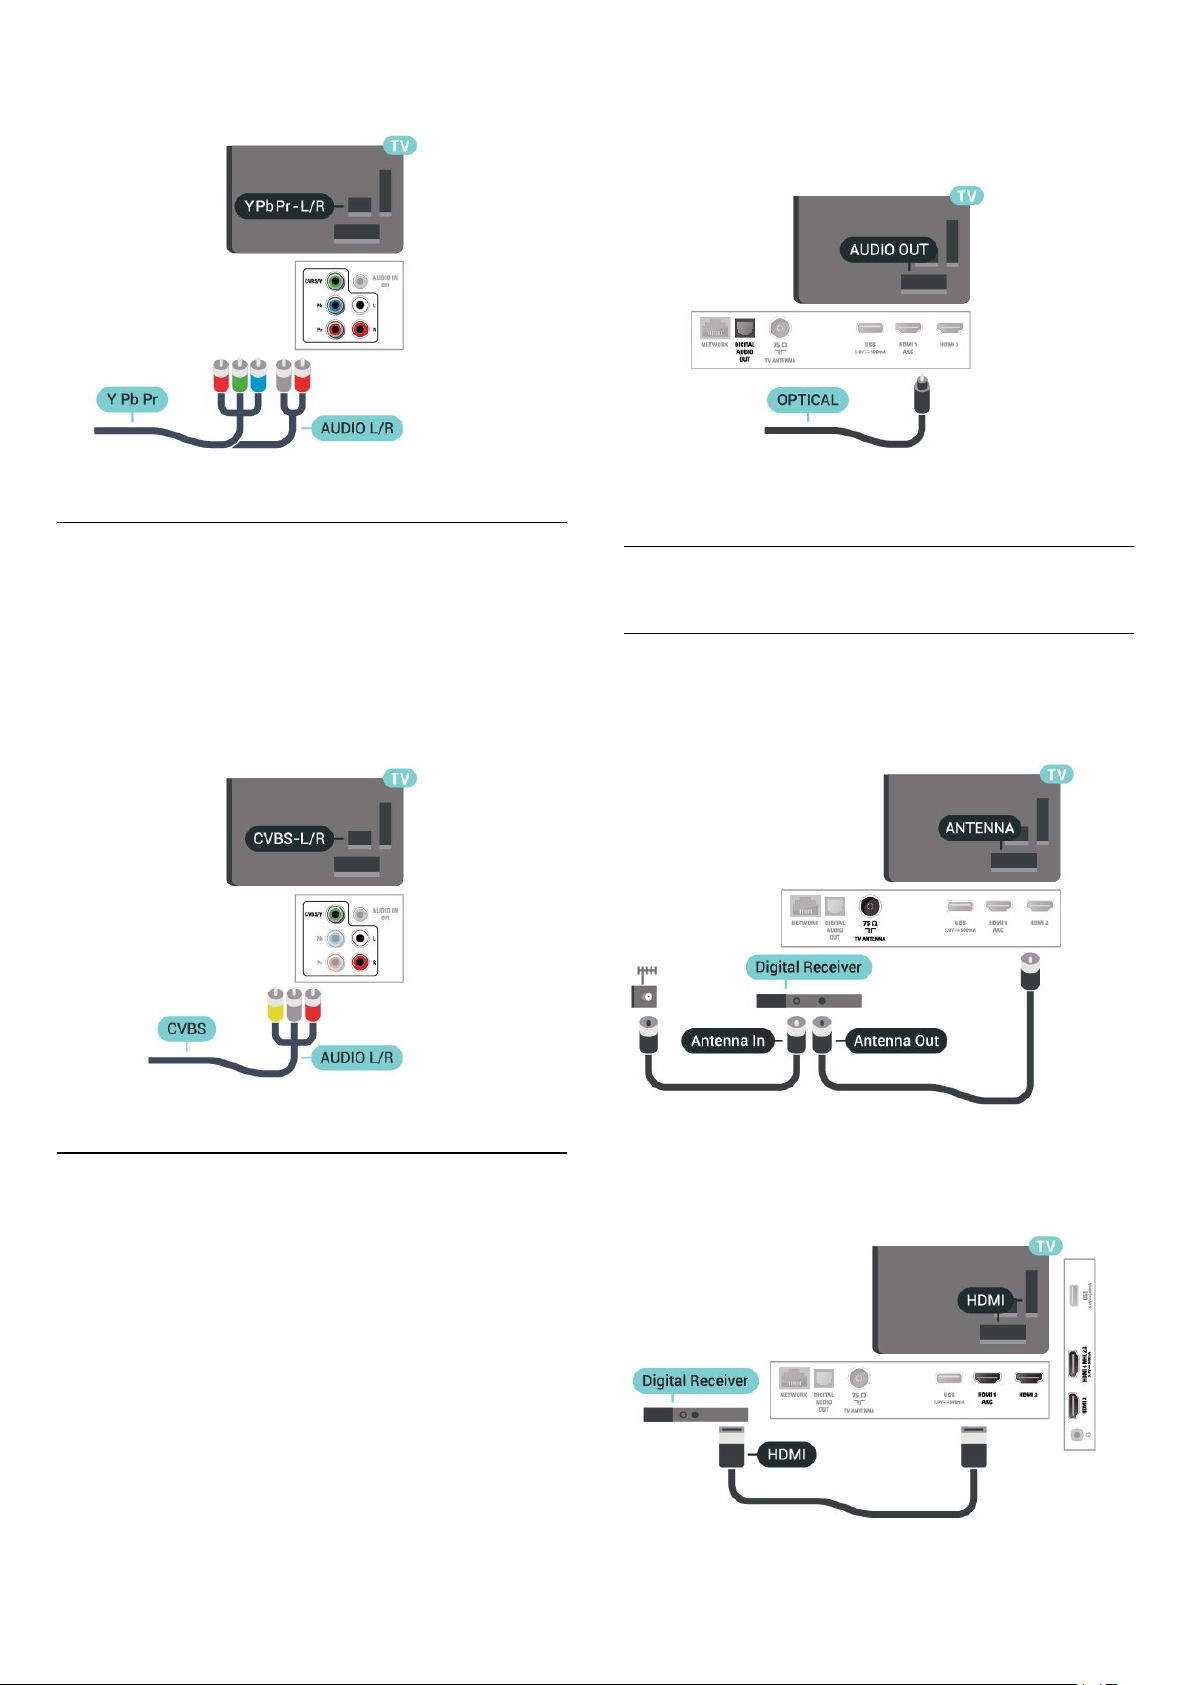
Use an Audio L/R cinch cable if your device also has
sound.
4.4
CVBS - Audio L R
CVBS - Composite Video is a high quality
connection. Next to the CVBS signal adds the Audio
Left and Right signals for sound.
• Y shares the same jack with CVBS.
• Component and Composite share audio jacks.
If the sound does not match the video on screen, you
can adjust the audio to video synchronisation.
For more information, in Help, press the colour
key Keywords and look up Audio to video sync.
4.6
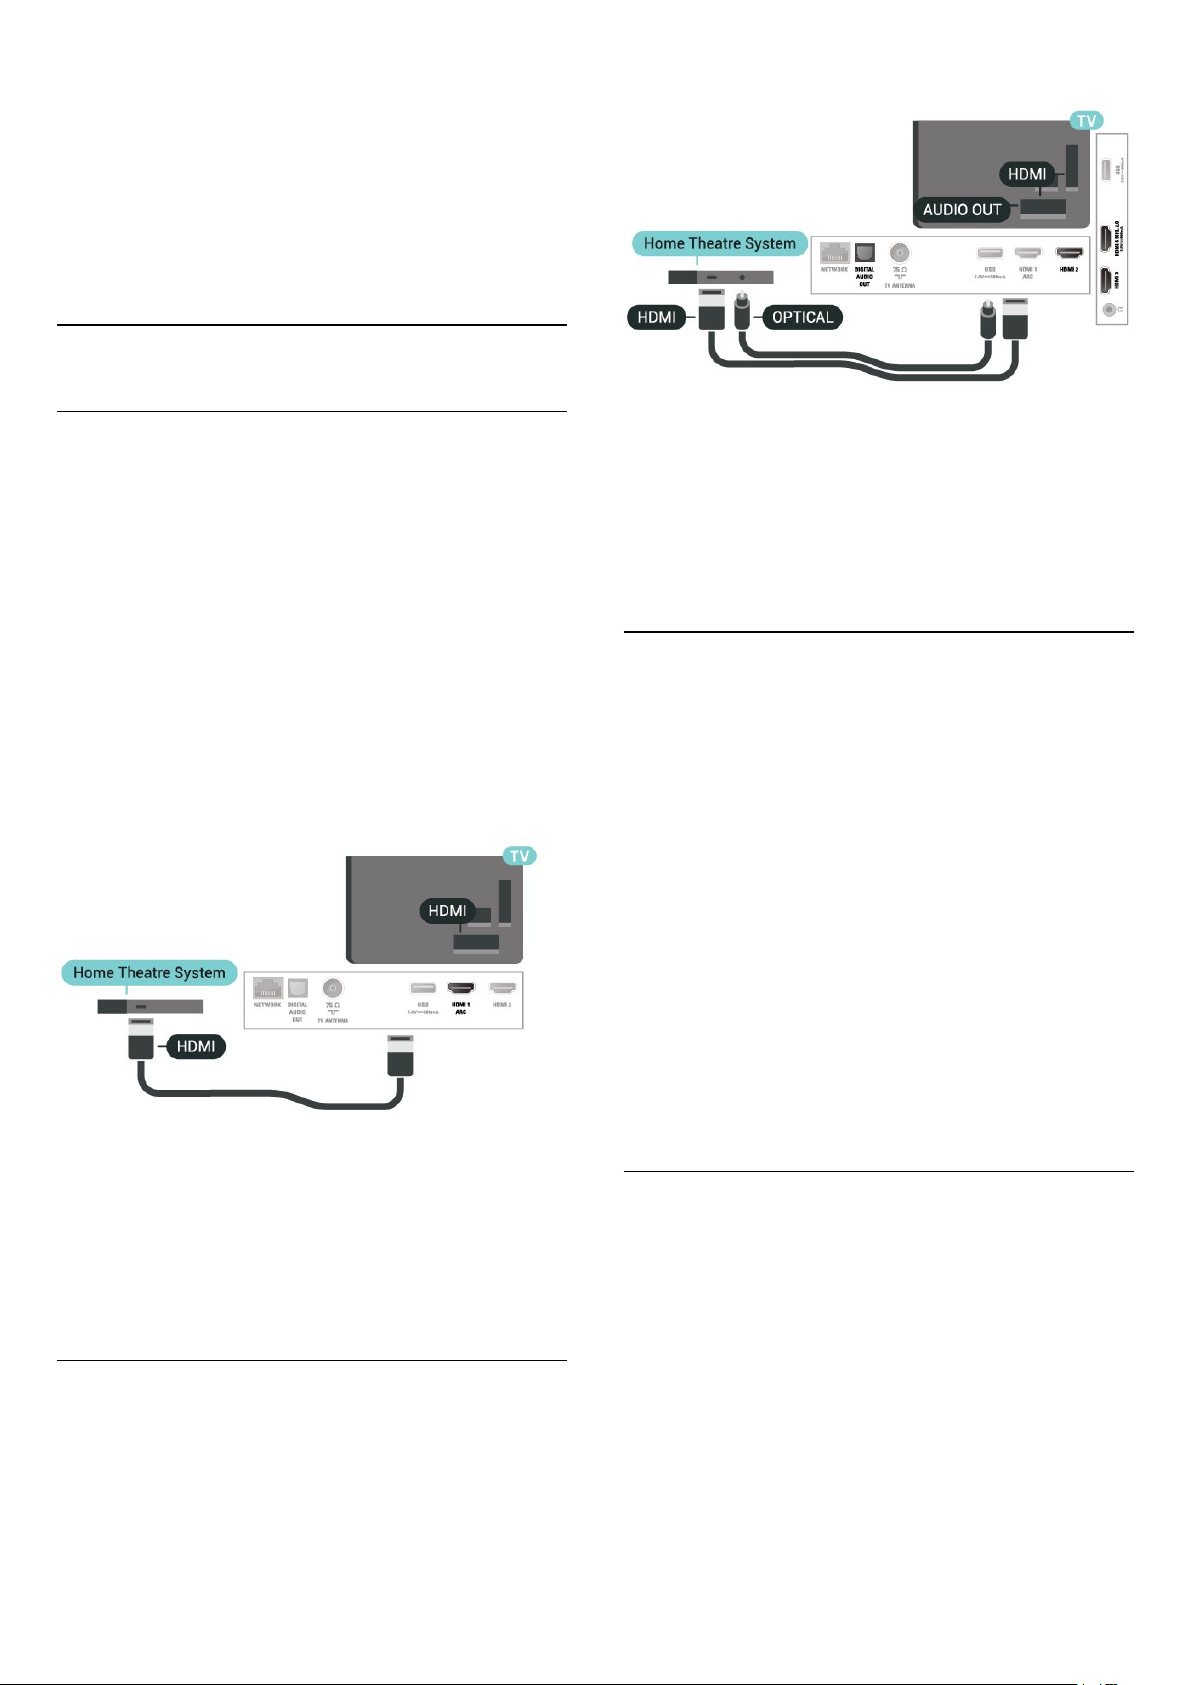
Receiver - Set-Top Box
Cable Box
Use 2 antenna cables to connect the antenna to the
Set-top box (a digital receiver) and the TV.
4.5
Audio Out - Optical
Audio Out - optical is a high quality sound
connection.
This optical connection can carry 5.1 audio channels.
If your device, typically a Home Theatre System
(HTS), has no HDMI ARC connection, you can use this
connection with the Audio In - Optical connection on
the HTS. The Audio Out - Optical connection sends
the sound from the TV to the HTS.
You can set the type of the audio out signal to fit the
audio capabilities of your Home Theatre System.
For more information, in Help, press the colour
key Keywords and look up Audio out settings.
Next to the antenna connections, add an HDMI cable
to connect the Set-top box to the TV.
Switch Off Timer
13
Page 14
Switch off this automatic timer, if you only use the
remote control of the Set-top box. Switch this timer
off to prevent the TV from switching off automatically
after a 4 hour period without a key press on the
remote control of the TV.
For more information, in Help, press the colour
key Keywords and look up Switch off timer for
more information.
4.7
Home Theatre System - HTS
the TV picture to the Home Theatre System.
Connect with HDMI ARC
Use an HDMI cable to connect a Home Theatre
System (HTS) to the TV. You can connect an HTS with
a built-in disc player.
HDMI ARC
If your Home Theatre System has an HDMI ARC
connection, you can use HDMI 1 on the TV to
connect. With HDMI ARC, you do not need to
connect the extra audio cable. The HDMI ARC
connection combines both signals.
HDMI 1 on the TV can offer the Audio Return
Channel (ARC) signal. But once you have connected
the Home Theatre System, the TV can only send the
ARC signal to this HDMI connection.
Audio to video synchronisation (sync)
If the sound does not match the video on screen, you
can set a delay on most Home Theatre Systems with
a disc player to match the sound with the video.
For more information, in Help, press the colour
key Keywords and look up Audio to video sync.
Problems with HTS sound
Sound with loud noise
If you watch a video from a plugged in USB flash drive
or connected computer, the sound from your Home
Theatre System might be distorted. This noise is heard
when the audio or video file has DTS sound but the
Home Theatre System has no DTS sound processing.
You can fix this by setting the Audio out format of
the TV to Stereo.
Press for Sound > Advanced > Audio out
format.
No sound
Audio to video synchronisation (sync)
If the sound does not match the video on screen, you
can set a delay on most Home Theatre Systems with
a disc player to match the sound with the video.
For more information, in Help, press the colour
key Keywords and look up Audio to video sync.
Connect with HDMI
Use a HDMI cable to connect a Home Theatre System
(HTS) to the TV. You can connect a HTS with a built-in
disc player.
If the Home Theatre System has no HDMI ARC
connection, add an optical cable to send the sound of
If you cannot hear the sound from the TV on your
Home Theatre System, check if you connected the
HDMI cable to an HDMI1 ARC connection on the
Home Theatre System.
4.8
Smartphones and tablets
To connect a smartphone or tablet to the TV, you can
use a wired connection.
Wired
For a wired connection, use the HDMI 4 MHL
connection on the back of the TV. In Help, press the
colour key Keywords and look up HDMI
MHL for more information.
14
Page 15
4.9
Blu-ray Disc Player
Use a High speed HDMI cable to connect the Bluray Disc player to the TV.
To adjust the volume…
1 - Press , select Sound > Headphones
volume and press OK.
2 - Press the arrows (up) or (down) to adjust
the value.
3 - Press (left) repeatedly if necessary, to close
the menu.
4.10
DVD Player
Use an HDMI cable to connect the DVD player to the
TV.
If the DVD player is connected with HDMI and has
EasyLink CEC, you can operate the player with the TV
remote control.
4.12
Game Console
HDMI
For best quality, connect the game console with a
High speed HDMI cable to the TV.
4.11
Headphones
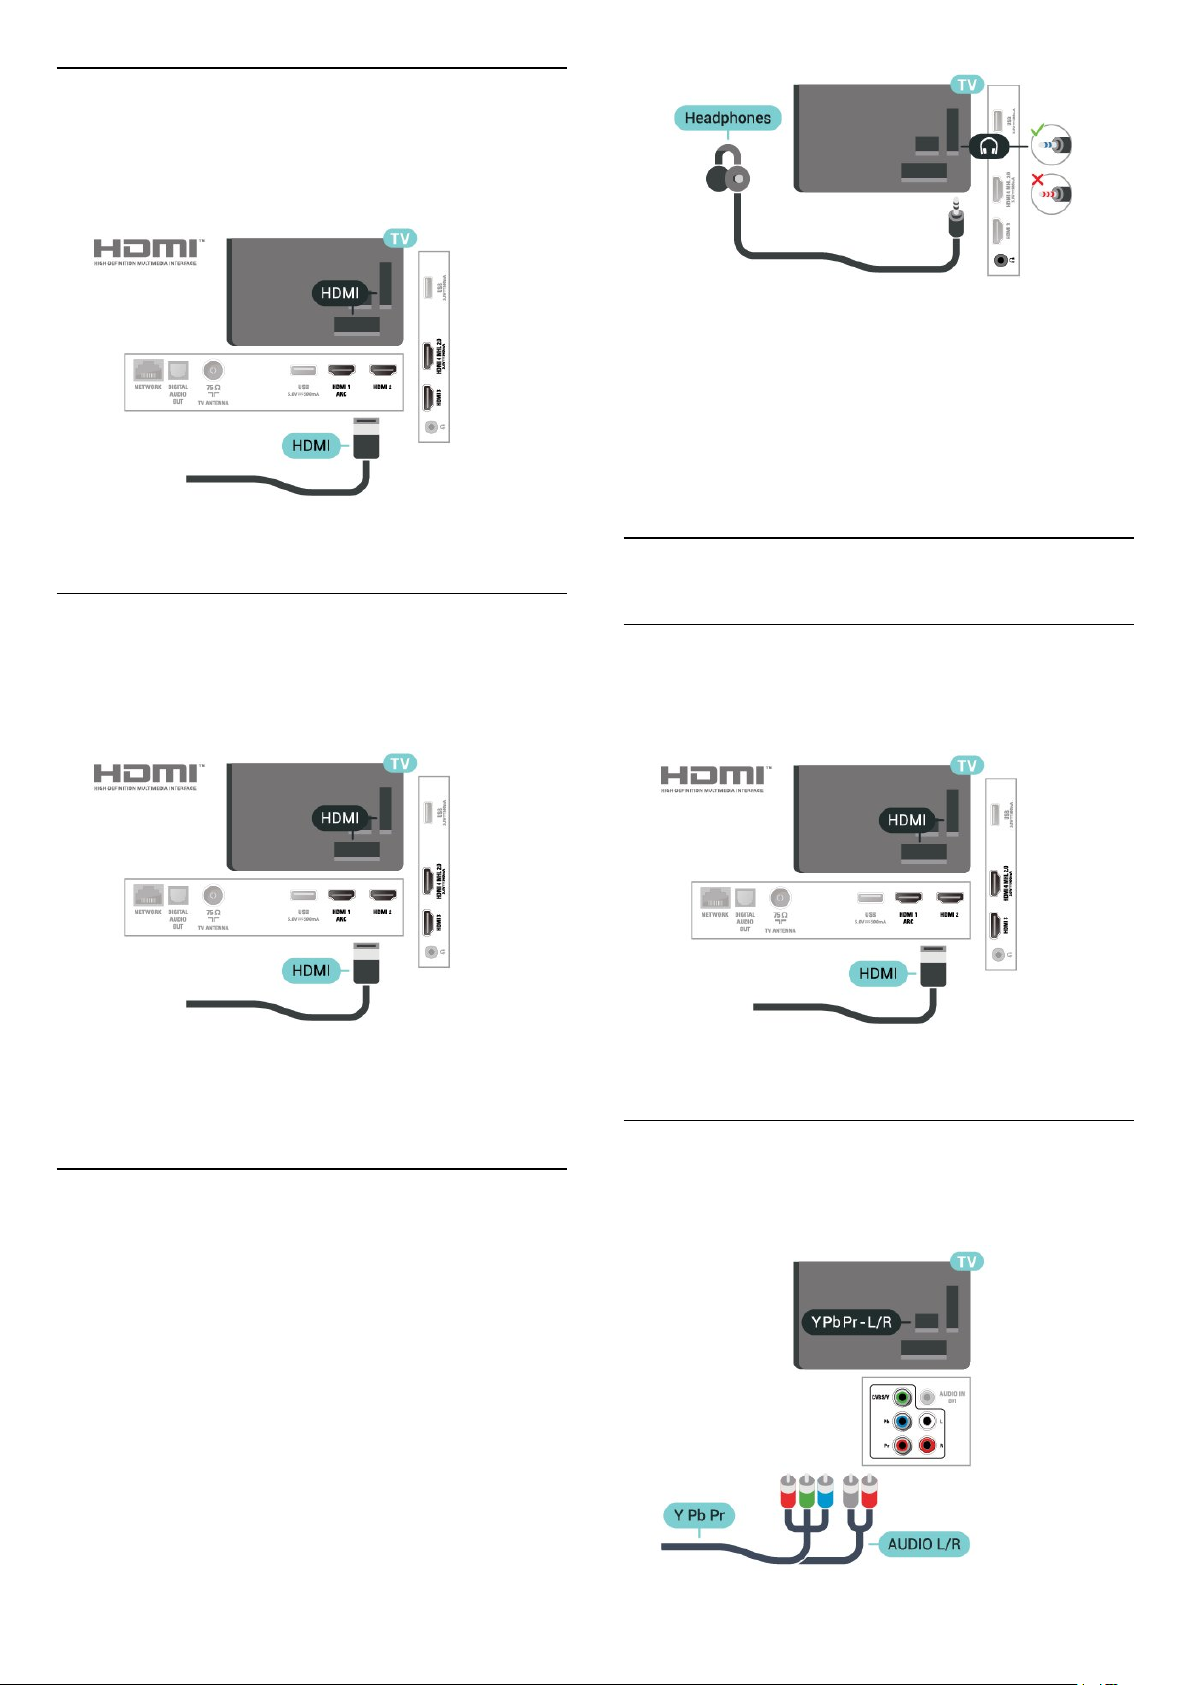
You can connect a set of headphones to
the connection on the back of the TV. The
connection is a mini-jack 3.5mm. You can adjust the
volume of the headphones separately.
Y Pb Pr - Component
Connect the game console with a component video
cable (Y Pb Pr) and an audio L/R cable to the TV.
15
Page 16
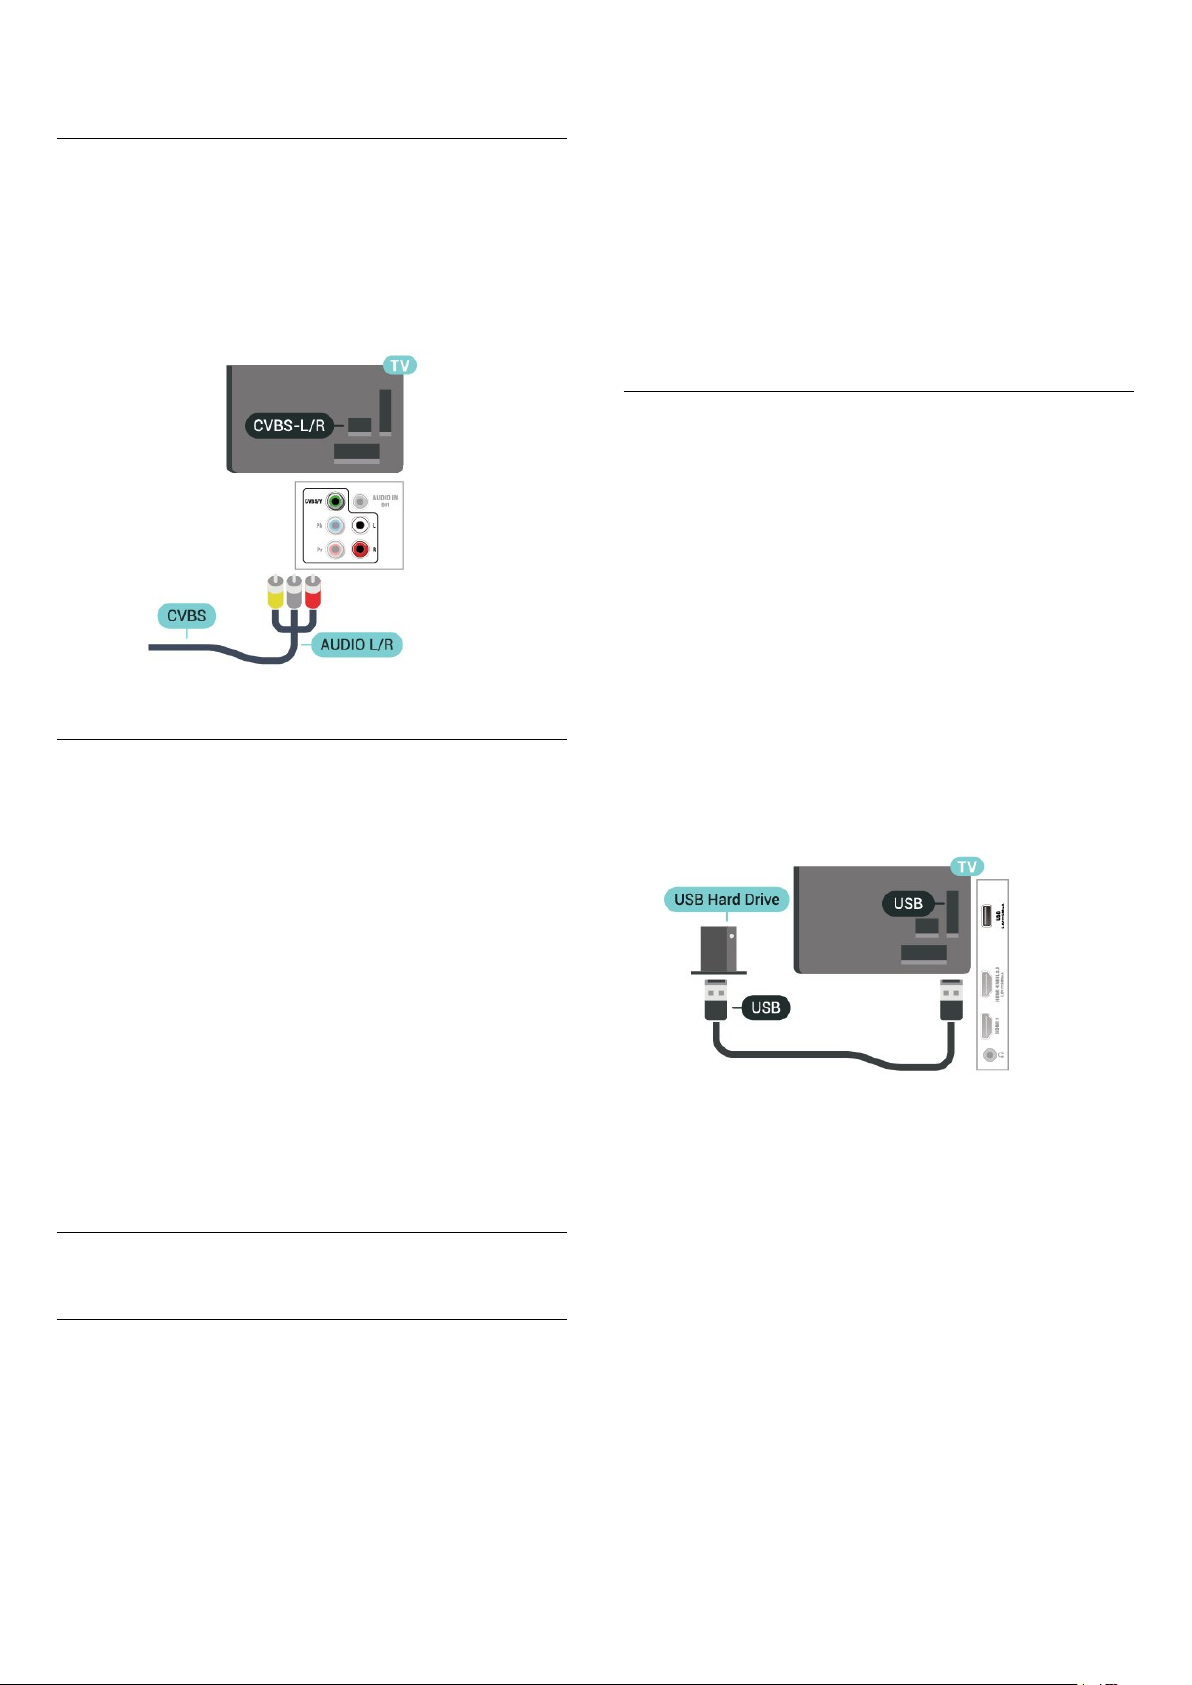
CVBS - Audio L R
CVBS - Composite Video is a high quality
connection. Next to the CVBS signal adds the Audio
Left and Right signals for sound.
• Y shares the same jack with CVBS.
• Component and Composite share audio jacks.
To Record
To pause and record a broadcast, you need a
minimum of 250GB disk space. If you want to record
a broadcast with TV guide data from the Internet, you
need to have the Internet connection installed on
your TV before you install the USB Hard Drive.
For more information on how to install a USB Hard
Drive, in Help, press the colour
key Keywords and look up USB hard drive,
installation.
Installation
Before you can pause or record a broadcast, you
must connect and format a USB Hard Drive.
Formatting removes all files from the USB Hard Drive.
1 - Connect the USB Hard Drive to one of
the USB connections on the TV. Do not connect
another USB device to the other USB ports when
formatting.
2 - Switch on the USB Hard Drive and the TV.
3 - When the TV is tuned to a digital TV channel,
press (Pause). Trying to pause will start the
formatting.
Best Setting
Before you start playing a game from a connected
game console, we advice you to set the TV in the
ideal setting Game.
When you finish playing a game and start watching
TV again, remember to switch the Game or
Computer setting back to Off.
To set the TV to the ideal setting…
1 - Press , select Picture and press (right) to
enter the menu.
2 - Select Advanced > Game or Computer, and
select the device type you want to use. To switch
back to TV, select Off.
3 - Press (left) repeatedly if necessary, to close
the menu.
4.13
USB Hard Drive
What You Need
Follow the instructions on screen.
When the USB Hard Drive is formatted, leave it
connected permanently.
Warning
The USB Hard Drive is formatted exclusively for this
TV, you cannot use the stored recordings on another
TV or PC. Do not copy or change recording files on
the USB Hard Drive with any PC application. This will
corrupt your recordings. When you format another
USB Hard Drive, the content on the former will be lost.
A USB Hard Drive installed on your TV will need
reformatting for use with a computer.
If you connect a USB Hard Drive, you can pause or
record a TV broadcast. The TV broadcast must be a
digital broadcast (DVB broadcast or similar).
To Pause
To pause a broadcast, you need a USB compatible
Hard Drive with a minimum of 4GB disk space.
16
Page 17
Formatting
Before you can pause or record a broadcast, you
must connect and format a USB Hard Drive.
Formatting removes all files from the USB Hard Drive.
Warning
The USB Hard Drive is formatted exclusively for this
TV, you cannot use the stored recordings on another
TV or PC. Do not copy or change recording files on
the USB Hard Drive with any PC application. This will
corrupt your recordings. When you format another
USB Hard Drive, the content on the former will be lost.
A USB Hard Drive installed on your TV will need
reformatting for use with a computer.
To format a USB Hard Drive…
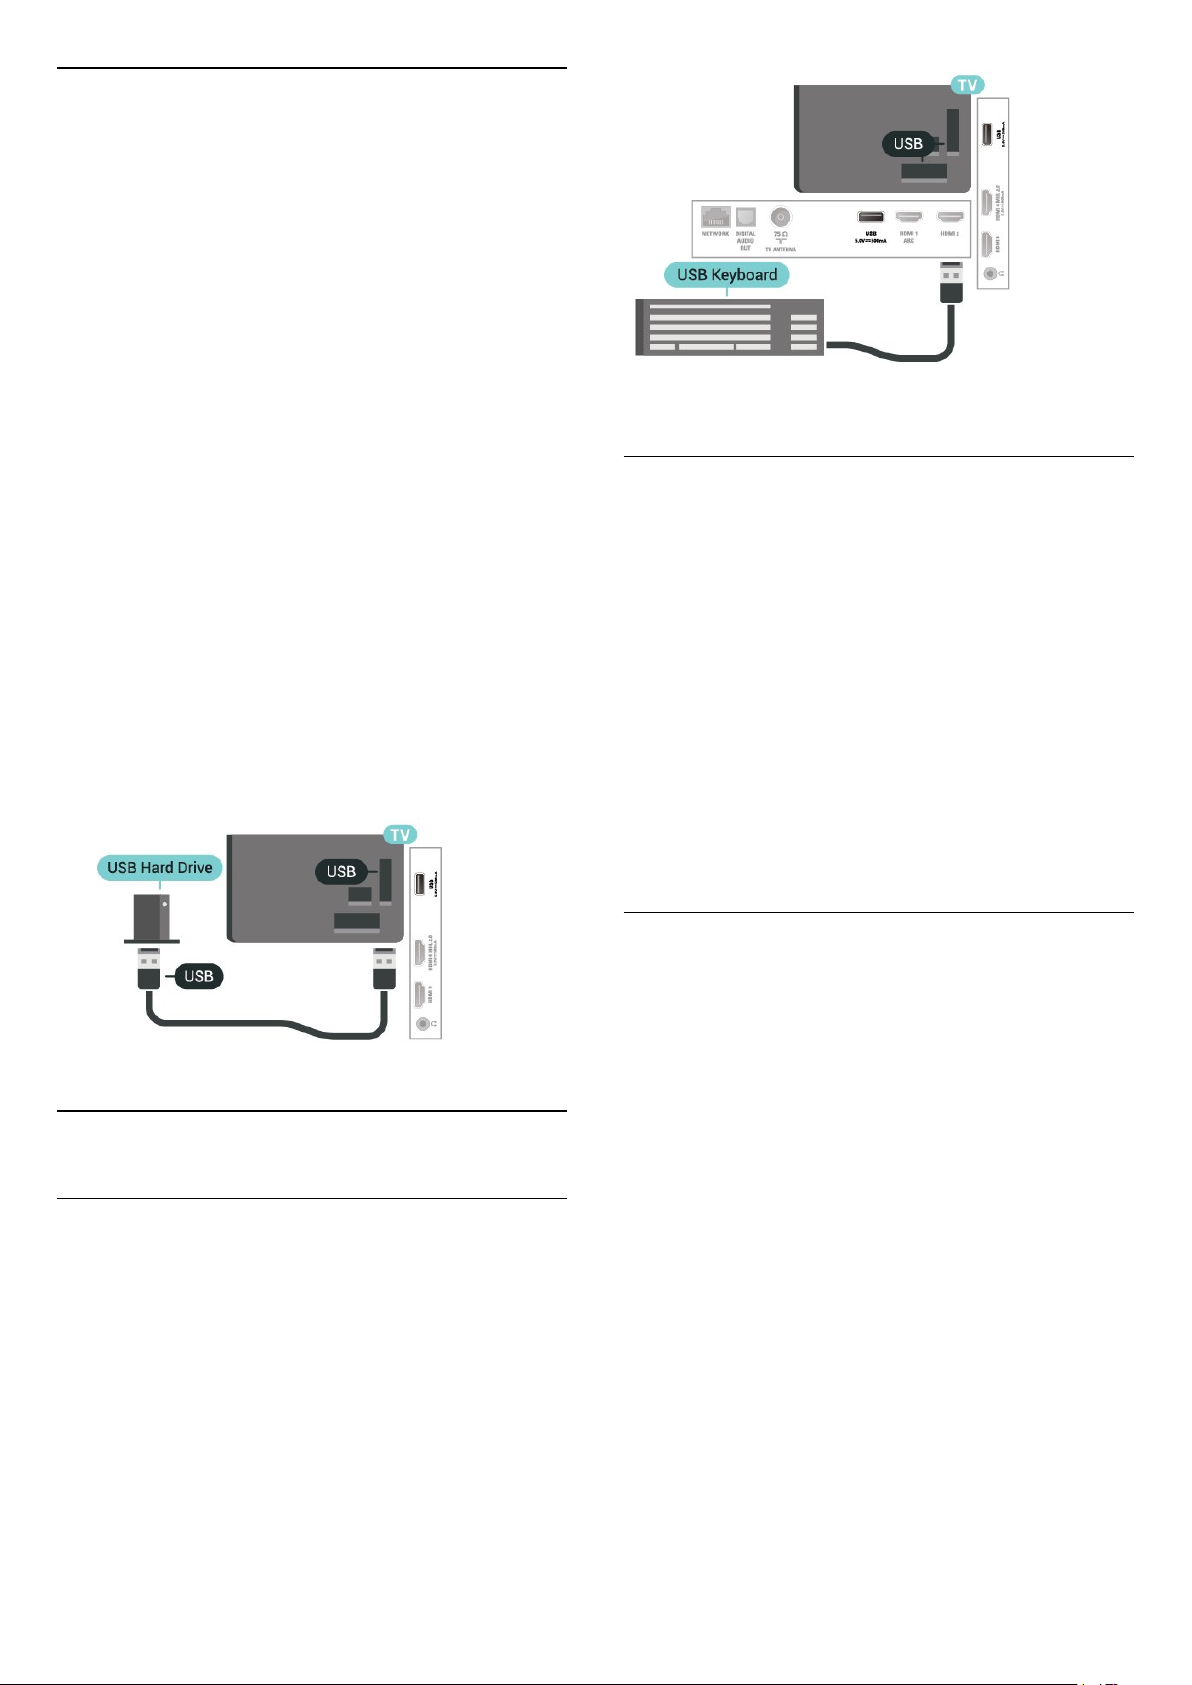
1 - Connect the USB Hard Drive to one of
the USB connections on the TV. Do not connect
another USB device to the other USB ports when
formatting.
2 - Switch on the USB Hard Drive and the TV.
3 - When the TV is tuned to a digital TV channel,
press (Pause). Trying to pause will start the
formatting. Follow the instructions on screen.
4 - The TV will ask if you want to use the USB Hard
Drive to store apps, agree to the question if you do.
5 - When the USB Hard Drive is formatted, leave it
connected permanently.
4.14
USB Keyboard
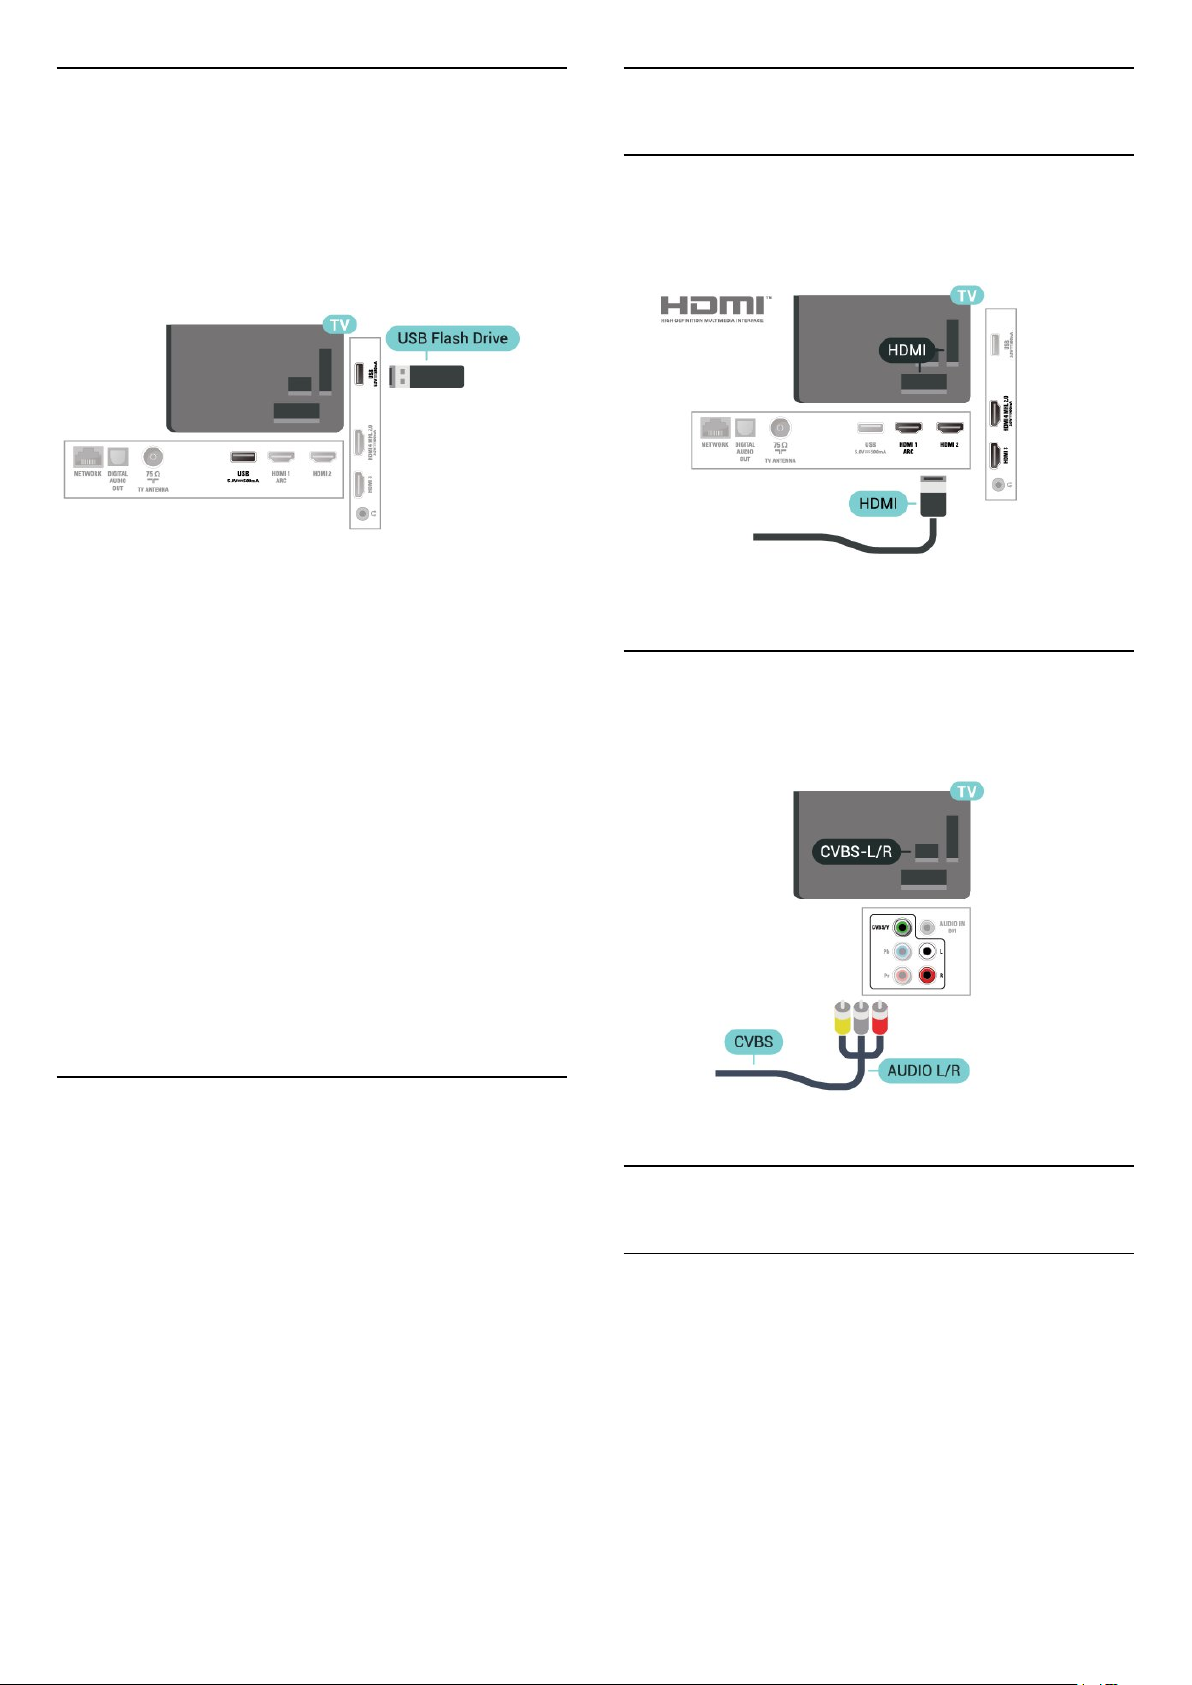
Connect
Connect a USB keyboard (USB-HID type) to enter text
on your TV.
Use one of the USB connections to connect.
Configure
To install the USB keyboard, switch on the TV and
connect the USB keyboard to one of
the USB connections on the TV. When the TV
detects the keyboard for the first time, you can select
your keyboard lay-out and test your selection. If you
select a Cyrillic or Greek keyboard layout first, you
can select a secondary Latin keyboard layout.
To change the keyboard layout setting when a layout
was selected…
1 - Press , select General settings and
press (right) to enter the menu.
2 - Select USB keyboard settings, and press OK to
start the keyboard setup.
Special Keys
Keys for entering text
• Enter key = OK
• Backspace = delete character before cursor
• Arrow keys = navigate within a text field
• To switch between keyboard layouts, if a secondary
layout is set, press the Ctrl + Spacebar keys
simultaneously.
Keys for apps and Internet pages
• Tab and Shift + Tab = Next and Previous
• Home = scroll to the top of the page
• End = scroll to the bottom of the page
• Page Up = jump one page up
• Page Down = jump one page down
• + = zoom in one step
• - = zoom out one step
• * = fit the web page to the screen width
17
Page 18
4.15
4.17
USB Flash Drive
You can view photos or play your music and movie
from a connected USB flash drive.
Insert a USB flash drive in one of
the USB connections on the TV while the TV is
switched on.
The TV detects the flash drive and opens a list
showing its content.
If the contents list does not appear automatically,
press SOURCES and select USB.
To stop watching the USB flash drive content,
press EXIT or select another activity.
To disconnect the USB flash drive, you can pull out
the flash drive anytime.
Camcorder
HDMI
For best quality, use an HDMI cable to connect the
camcorder to the TV.
Audio Video LR
You can use an HDMI or YPbPr connection to connect
your camcorder.
Ultra HD on USB
You can view photos in Ultra HD resolution from a
connected USB device or flash drive. The TV will
downscale the resolution to Ultra HD if the resolution
of the photo is higher.
For more information on watching or playing content
from a USB flash drive, in Help, press the colour
key Keywords and look up Photos, movie and
music.
4.16
Photo Camera
To view photos stored on your digital photo camera,
you can connect the camera directly to the TV.
Use one of the USB connections on the TV to
connect. Switch on the camera after you made the
connection.
If the contents list does not appear automatically,
press SOURCES , and select USB.
Your camera might need to be set to transfer its
content with PTP (Picture Transfer Protocol). Read
the user manual of the digital photo camera.
For more information on viewing photos, in Help,
press the colour key Keywords and look
up Photos, movie and music.
4.18
Computer
Connect
You can connect your computer to the TV and use
the TV as a PC monitor.
With HDMI
Use an HDMI cable to connect the computer to the
TV.
18
Page 19
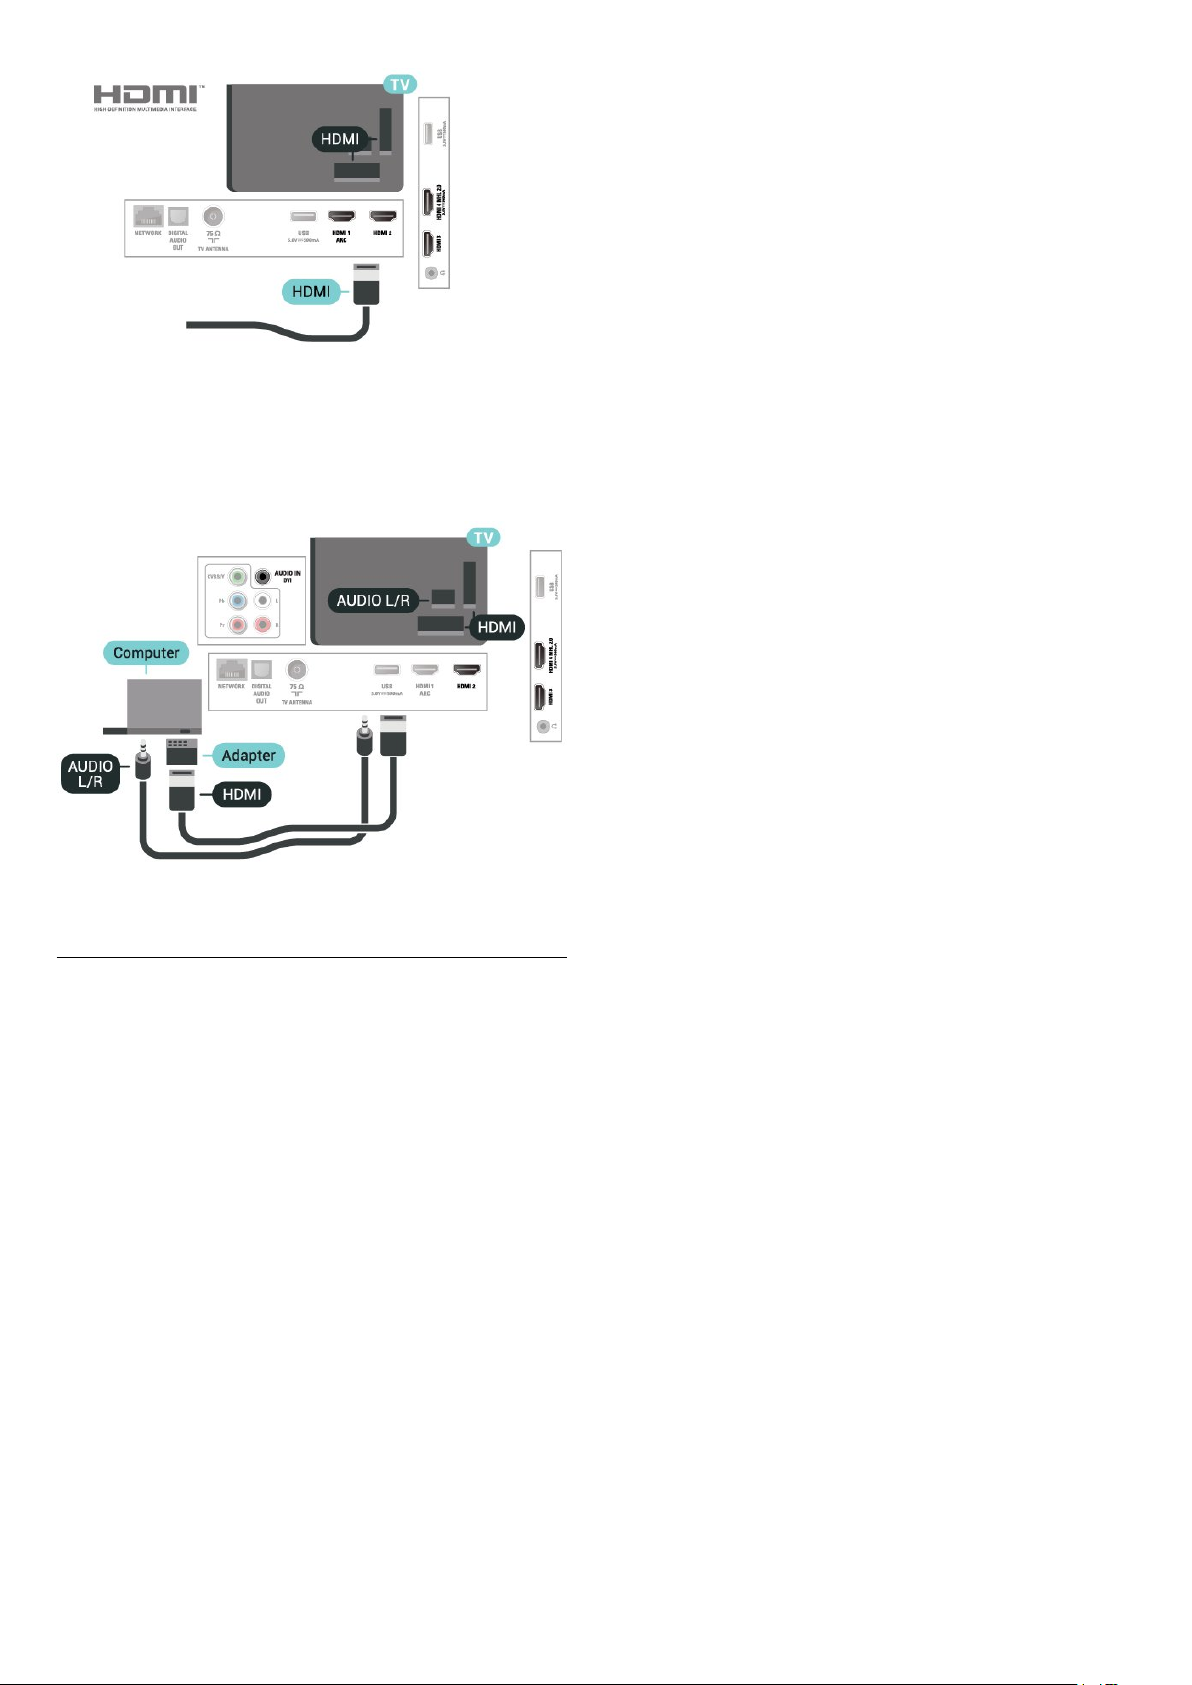
With DVI to HDMI
Alternatively, you can use a DVI to HDMI adapter
(sold separately) to connect the PC to HDMI and an
audio L/R cable (mini-jack 3.5mm) to AUDIO IN L/R
on the back of the TV.
the menu.
Remember to set Game or computer setting
to Off when you stop playing the game.
Ideal Setting
If you connect a computer, we advice you to give the
connection, on which the computer is connected, the
correct device type name in the Source menu. If you
then switch to Computer in the Source menu, the TV
is set to the ideal Computer setting automatically.
You can manually switch the ideal setting to Off for
watching TV or Game for playing a game from a
connected game console (remember to switch back
to Off when you stop playing a game).
If you switch to a source and change the Game or
Computer setting, it will be stored for this selected
source.
To set the TV to the ideal setting…
1 - Press , select Picture and press (right) to
enter the menu.
2 - Select Advanced > Game or computer, and
press OK.
3 - Select Game (for gaming) or
select Computer (for watching a movie).
4 - Press (left) repeatedly if necessary, to close
19
Page 20
5
Switching On and
Off
5.1
On or standby
Before you switch on the TV, make sure you plugged
in the mains power in the POWER connector on the
back of the TV.
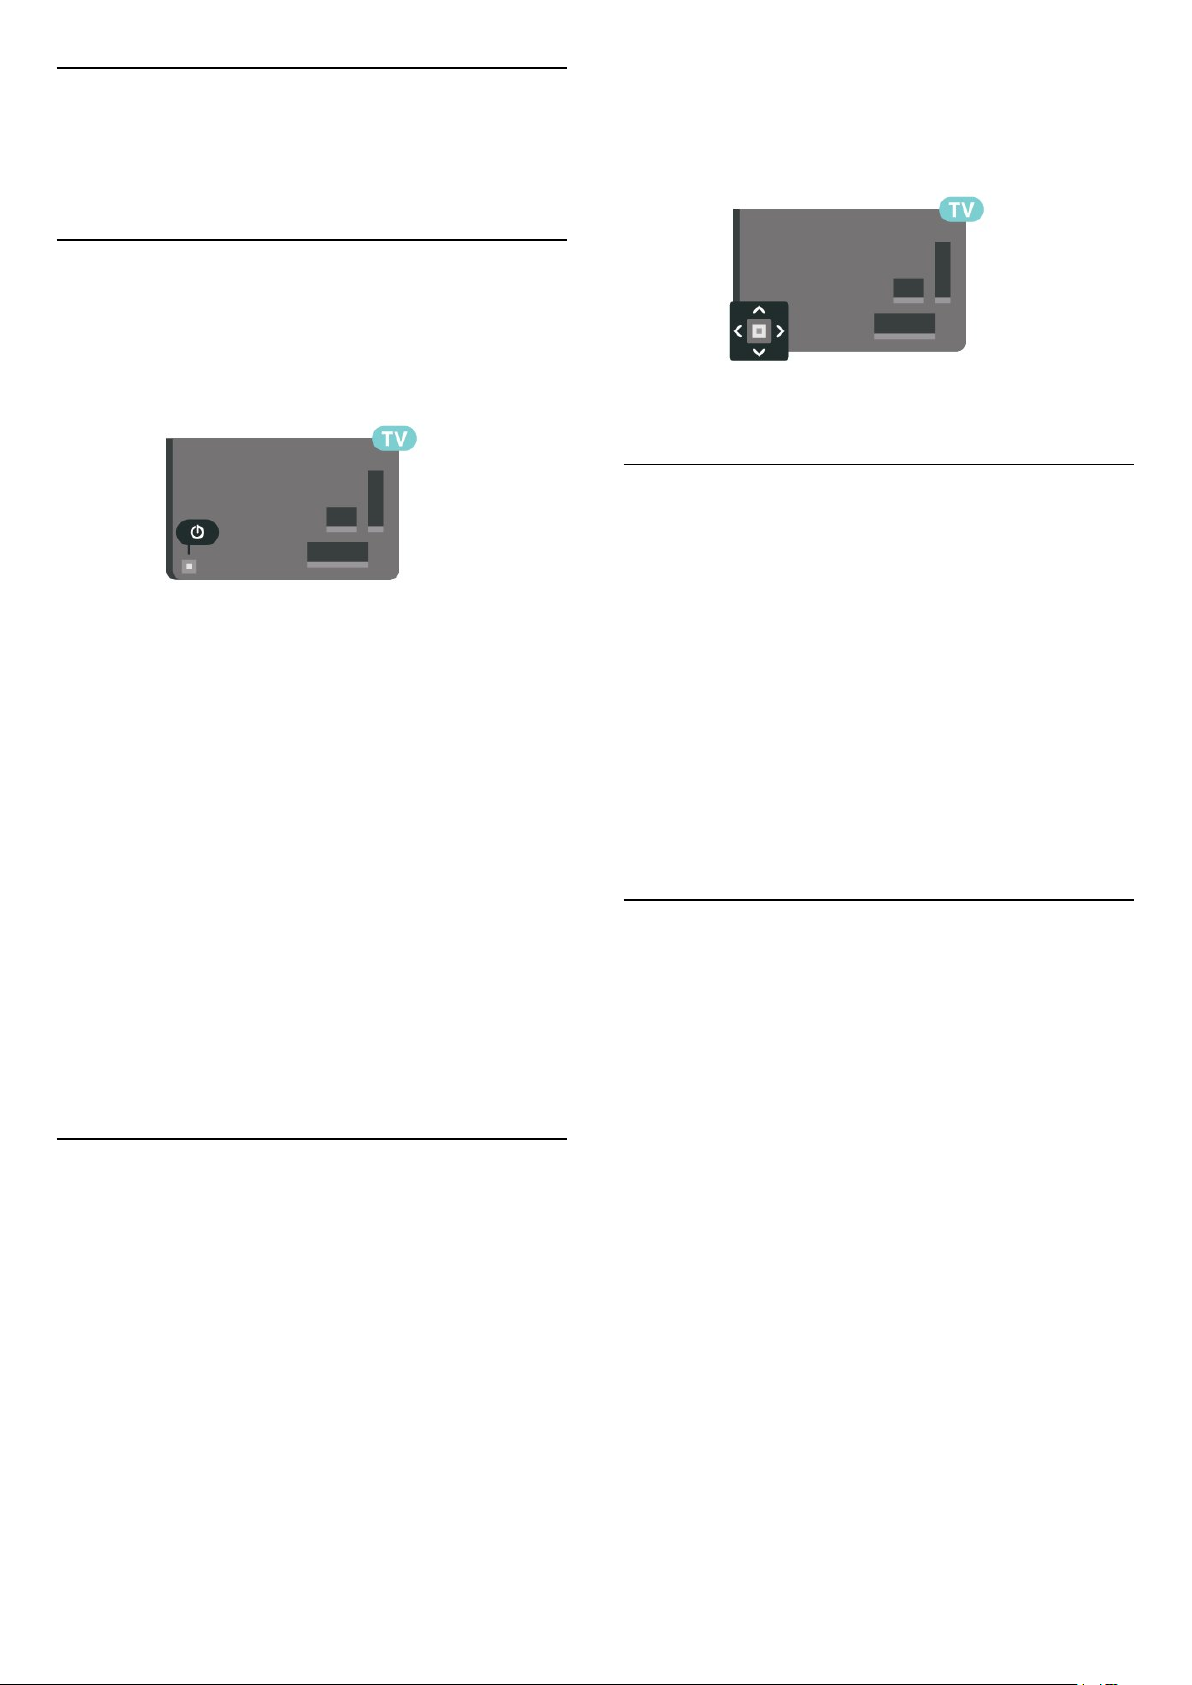
movie.
4 - The menu will disappear automatically.
To switch the TV on standby, select and press the
joystick key.
5.3
Sleep timer
With the Sleep Timer, you can set the TV to switch to
Standby automatically after a preset time.
With the TV in Standby, press on the remote
control to switch the TV on. You can also press the
small joystick key on the back of the TV to switch the
TV on in case you can't find the remote control or its
batteries are empty.
Switch to standby
To switch the TV to standby, press on the remote
control. You can also press the small joystick key on
the back of the TV.
In standby mode, the TV is still connected to the
mains power but consumes very little energy.
To switch off the TV completely, disconnect the
power plug.
When disconnecting the power plug, always pull the
power plug, never the cord. Ensure that you have full
access to the power plug, power cord and outlet
socket at all times.
5.2
Keys on TV
If you lost the remote control or its batteries are
empty, you can still do some basic TV operations.
To open the basic menu…
1 - With the TV switched on, press the joystick key on
the back of the TV to bring up the basic menu.
2 - Press left or right to select Volume,
Channel or Sources. Select Demo, to start a
demo movie.
3 - Press up or down to adjust the volume or tune to
the next or previous channel. Press up or down to go
through the list of sources, including the tuner
selection. Press the joystick key to start the demo
To set the Sleep Timer…
1 - Press , select General settings > Sleep
timer and press OK.
2 - With the slider bar you can set the time to up to
180 minutes in increments of 5 minutes. If set to 0
minutes, the Sleep Timer is switched off. You can
always switch off your TV earlier or reset the time
during the countdown.
3 - Press BACK to close the menu.
5.4
Switch off timer
If the TV receives a TV signal but you don't press a
key on the remote control during a 4 hour period, the
TV switches off automatically to save energy. Also, if
the TV does not receive a TV signal nor a remote
control command for 10 minutes, the TV switches off
automatically.
If you use the TV as a monitor or use a digital receiver
to watch TV (a Set-Top Box - STB) and you do not
use the remote control of the TV, you should
deactivate this automatic switch off.
To deactivate the Switch Off Timer …
1 - Press , select Eco settings and
press (right) to enter the menu.
2 - Select Switch off timer and press OK.
3 - Press the arrows (up) or (down) to adjust
the value. The value 0 deactivates the automatic
switch off.
4 - Press (left) repeatedly if necessary, to close
the menu.
For more information on environmentally friendly TV
settings, in Help, press the colour
20
Page 21

key Keywords and look up Eco settings.
21
Page 22
6
Remote control
6.1
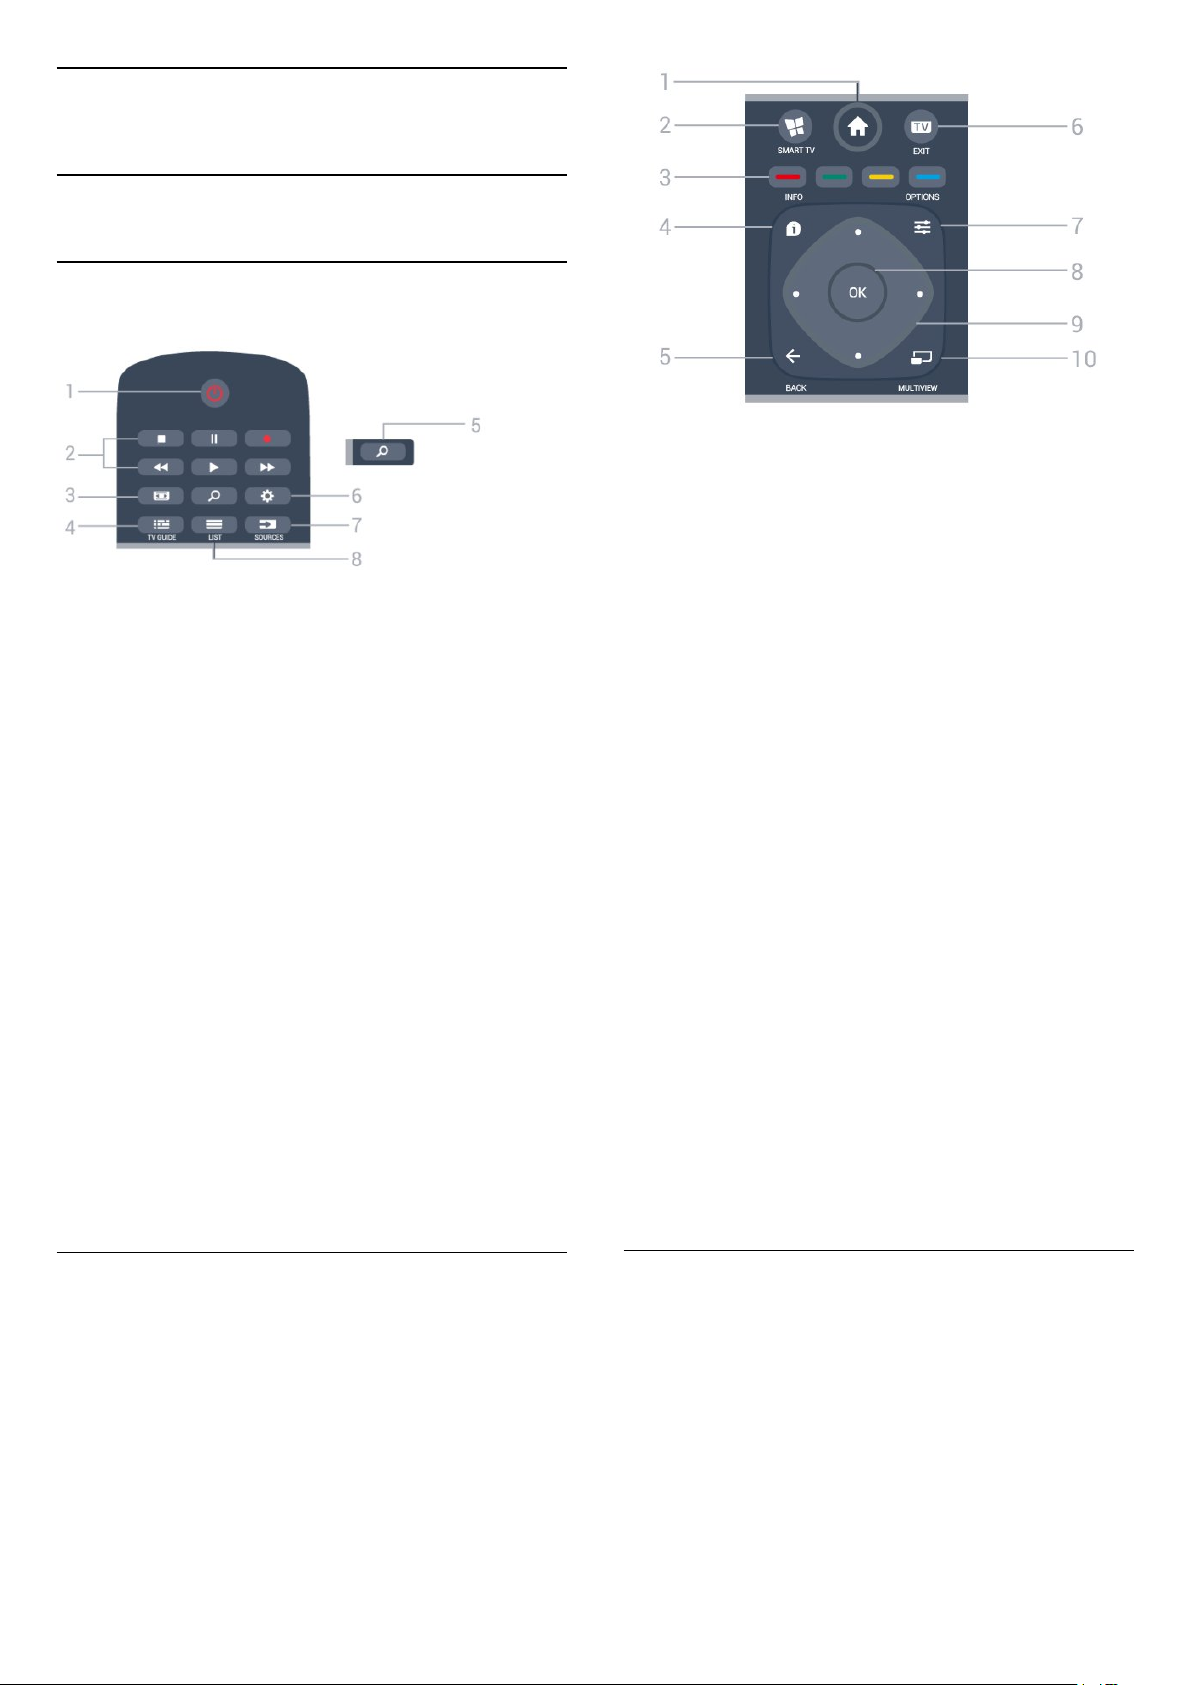
Key overview
Top
1 - Standby / On
To switch the TV on or back to Standby.
2 - Playback and Record
• Play , to playback.
• Pause , to pause playback
• Stop , to stop playback
• Rewind , to rewind
• Fast forward , to go fast forward
• Record , to start recording
3 - Picture Format
To open or close the Picture Format menu.
4 - TV GUIDE
To open or close the TV Guide.
5 - Search
To open the searches page.
6 - Settings
To open the Settings menu.
7 - SOURCES
To open the Sources menu.
8 - LIST
To open or close the channel list.
1 - Home
To open the Home menu.
2 - SMART TV
To open the Smart TV start page.
3 - Colour keys
Direct selection of options. Blue key , opens Help.
4 - INFO
To open or close programme info.
5 - BACK
To switch back to the previous channel you selected.
To close a menu without changing a setting.
To go back to the previous App/Internet page.
6 - EXIT
To switch back to watch TV.
7 - OPTIONS
To open or close the Options menu.
8 - OK key
To confirm a selection or setting. To open the channel
list while watching TV.
9 - Arrow / navigation keys
To navigate up, down, left or right.
10 - MULTIVIEW
To open an extra small screen of TV channel on the
corner of the TV screen. This function enables user to
watch TV channel while TV is on a Smart TV App or
the Internet.
Middle
Bottom
22
Page 23
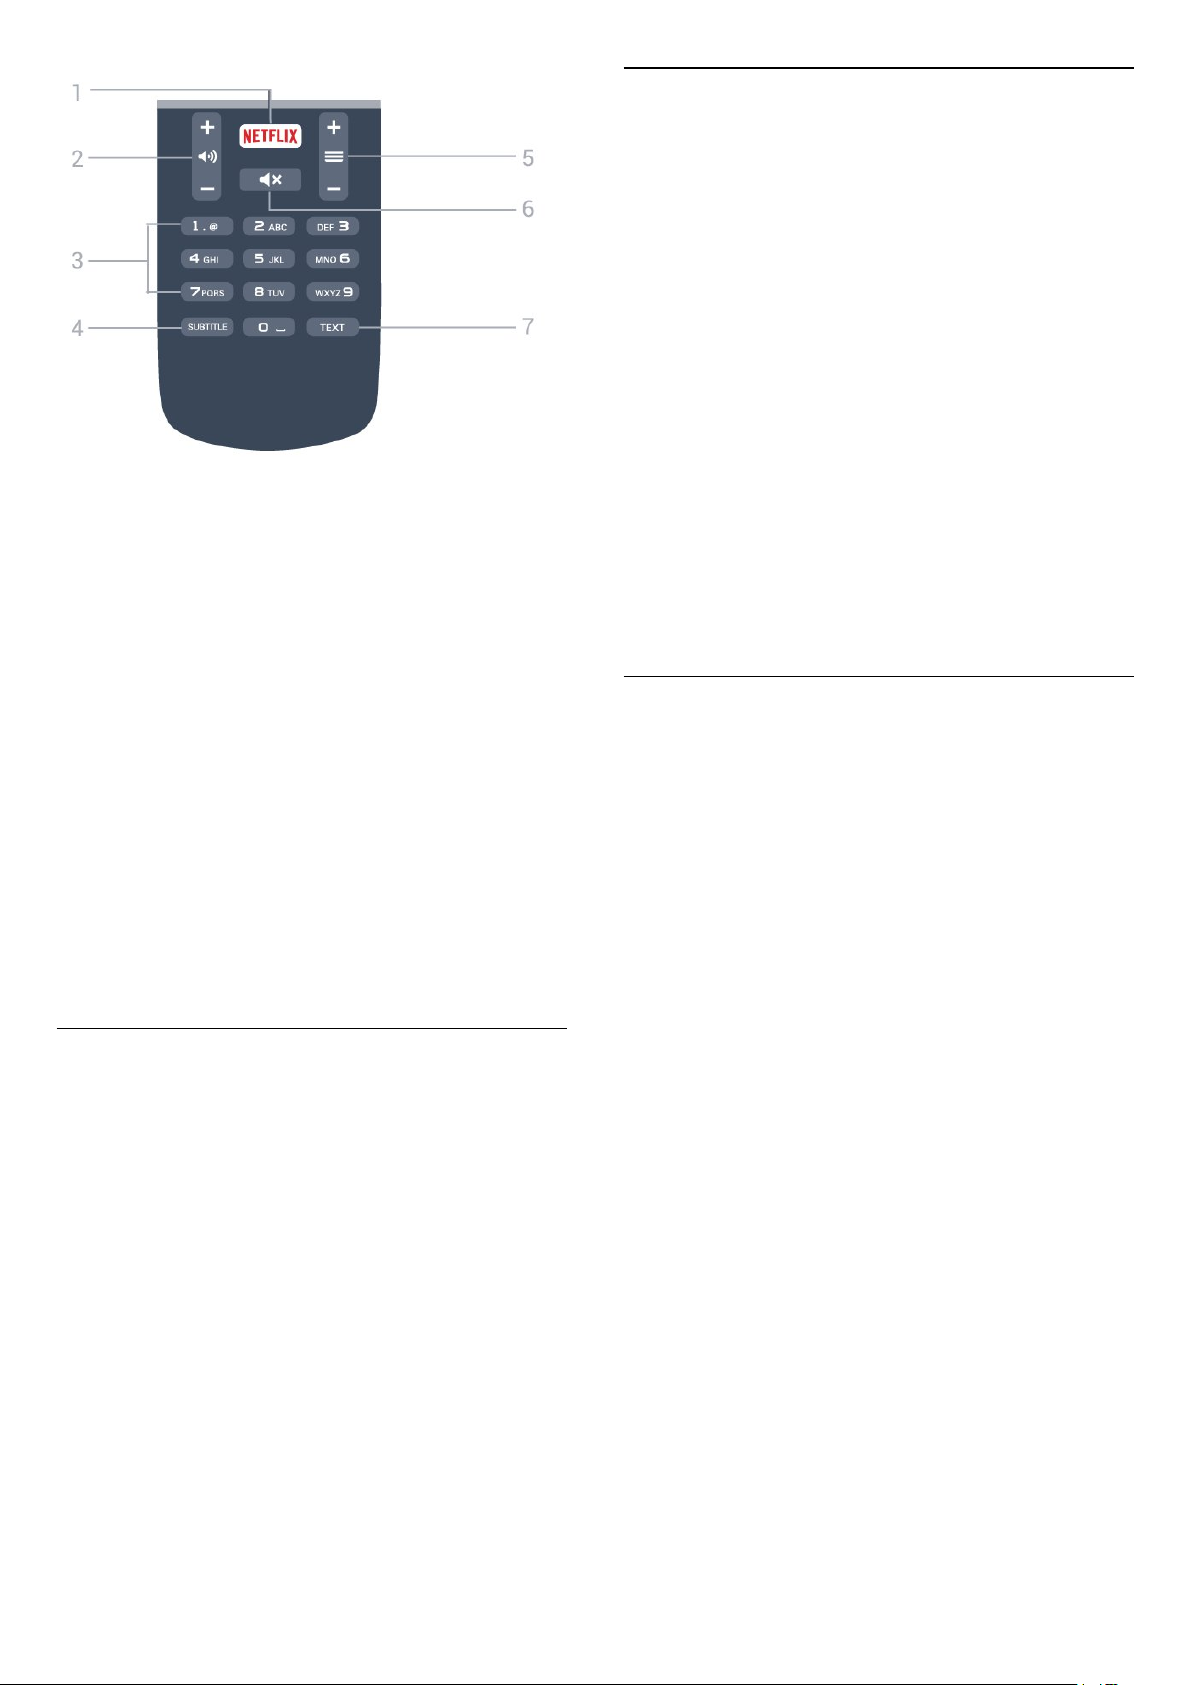
1 -
To open the Netflix App directly. With the TV switched
on or from standby.
2 - Volume
To adjust the volume level.
3 - Number keys
To select a channel directly.
4 - SUBTITLE
To switch subtitle on, off or to show automatically.
6.3
Batteries
If the TV does not react on a key press on the remote
control, the batteries might be empty.
To replace the batteries, open the battery
compartment on the back of the remote control.
1 - Slide the battery door in the direction shown by
the arrow.
2 - Replace the old batteries with 2
type AAA-R03-1.5V batteries. Make sure the + and
the - ends of the batteries line up correctly.
3 - Reposition the battery door and slide it back until
it clicks.
Remove the batteries if you are not using the remote
control for a long time.
Safely dispose of your old batteries according to the
end of use directions.
For more information, in Help, press the colour
key Keywords and look up End of use.
6.4
Cleaning
5 - Channel
To switch to the next or previous channel in the
channel list. To start the next or previous chapter on a
disc.
6 - Mute
To mute the sound or to restore it.
7 - TEXT
To open or close Text/Teletext.
6.2
IR sensor
The TV can receive commands from a remote control
that uses IR (infrared) to send commands. If you use
such a remote control, always make sure you point
the remote control at the infrared sensor on the front
of the TV.
Warning
Do not put any objects in front of IR sensor of the TV,
it may block the IR signal.
Your remote control is treated with a scratch-resistant
coating.
To clean the remote control, use a soft damp cloth.
Never use substances such as alcohol, chemicals or
household cleaners on the remote control.
23
Page 24

7
Channels
If you lock a channel, it will be marked with
a (lock).
Radio stations
7.1
Install Channels
For more information, in Help, press the colour
key Keywords and look up Channel, Antenna
installation or Channel, Cable installation.
7.2
Switch channels
• To watch TV channels, press EXIT. The TV tunes to
the TV channel you last watched.
• Alternatively, press Home to open the Home
menu and select Channels and press OK.
• To switch channels, press + or . If you
know the channel number, type in the number with
the number keys. Press OK after you entered the
number to switch channels.
• To switch back to the previously tuned channel,
press BACK .
To switch to a channel from a channel list
While watching a TV channel, press LIST to open
the channel lists.
The channel list can have several pages with
channels. To view the next or previous page,
press + or -.
To close the channel lists without switching channels,
press LIST again.
If digital broadcasting is available, digital radio
stations are installed during installation. Switch to a
radio channel just like you switch to a TV channel.
Channel list views
In the channel lists, you can find all installed TV and
radio channels.
Next to the channel list All, which holds all installed
channels, you can set up a list of Favourites, view the
installed Radio stations separately or discover the
newly added channels in New channels.
Open a Channel List
Next to the list with all channels for each tuner,
Antenna or Cable, you can select a filtered list or you
can select one of the favourite lists you created.
To open the current channel list…
1 - Press EXIT, to switch to TV.
2 - Press LIST to open the current channel list.
3 - Press LIST again to close the channel list.
Alternatively, you can select the list name at the top
of the channel list and press OK to open the list
menu.
Radio channels
If digital broadcasting is available, digital radio
stations are installed during installation. Switch to a
radio channel just like you switch to a TV channel.
7.3
Channel lists
About channel lists
After a channel installation, all channels appear the
channel list. Channels are shown with their name and
logo if this information is available.
For each type of tuner - Antenna or Cable - there is a
channel list with all installed channels. You can filter
this list to only show TV or only Radio channels.
With a channel list selected, you can only tune to the
channels in that list when using or keys.
Channel icons
Filter a Channel List
You can filter a list with all channels. You can set the
channel list to show only Digital TV channels or only
Analogue channels.
To set a filter on a list with all channels…
1 - Press EXIT.
2 - Press LIST to open the current channel list.
3 - Press OPTIONS.
4 - Select Digital + Analogue and press OK.
5 - Select the list you want to filter.
6 - In the Options menu, select the filter you want
and press OK to activate. The name of the filter
appears as part of the channel list name on top of the
channel list.
7 - Press (left) to go back one step or
press BACK to close the menu.
24
Page 25

Search for a Channel
Tune to a channel
You can search for a channel to find it in a long list of
channels.
The TV can search for a channel within one of the
channel lists - the Antenna or Cable channel list.
To search for a channel…
1 - Press LIST to open the current channel list
and select All.
2 - Press OPTIONS.
3 - Select Digital + Analogue and press OK.
4 - Select the list you want to filter and press OK.
5 - Press the colour key (green) to
open Find Channel and press OK to open a text
field.
6 - Enter a number, a name or part of a name and
select Done and press OK. The TV will search for
matching channel names in the list you selected.
Search results are listed as a channel list - see the list
name at the top. The search results disappear once
you select another channel list or close the list with
search results.
To start watching TV channels, press EXIT. The TV
tunes to the channel you last watched.
Switch Channels
To switch channels, press or .
If you know the channel number, type in the number
with the number keys. Press OK after you entered
the number to switch immediately.
Previous channel
To switch back to the previously tuned channel,
press BACK.
Child Lock/ Lock a channel
Lock and unlock a channel
To prevent children from watching a channel, you can
lock a channel. To watch a locked channel, you must
enter the 4 digit Child Lock PIN code first. You
cannot lock programmes from connected devices.
To lock a channel…
Rename channels
You can rename channels in the channel list.
1 - Select the channel you want to rename in one of
the channel lists.
2 - Select the channel to rename.
3 - Press .
You can enter text with the remote control keyboard
or open the on-screen keyboard.
With the on-screen keyboard
• To open the on-screen keyboard, place the cursor in
the name text field and press OK.
• To delete the character in front of the cursor,
press Backspace .
• To enter a character, select the character with the
arrow keys and press OK.
• To select uppercase characters, press .
• To select numbers or special characters, press .
• When you are ready, press BACK to close the
on-screen keyboard.
• To finish renaming, select Done and press OK.
7.4
Watching channels
1 - Press EXIT.
2 - Press LIST to open the channel list. If
necessary change the channel list.
3 - Select the channel you want to lock.
4 - Press OPTIONS and select Channel
lock and press OK.
5 - Enter your 4 digit PIN code if the TV asks for it. A
locked channel is marked with a (lock).
6 - Press (left) to go back one step or
press to close the menu.
To unlock a channel…
1 - Press EXIT.
2 - Press LIST to open the channel list. If
necessary change the channel list.
3 - Select the channel you want to unlock.
4 - Press OPTIONS and select Unlock
Channel and press OK.
5 - Enter your 4 digit PIN code if the TV asks for it.
6 - Press (left) to go back one step or
press to close the menu.
If you lock or unlock channels in a channel list, you
only have to enter the PIN code just once until you
close the channel list.
For more information, in Help, press the colour
key Keywords and look up Child Lock for more
information.
25
Page 26

Parental rating
To prevent children from watching a programme not
suitable for their age, you can set an age rating.
Digital channels can have their programmes age
rated. When the age rating of a programme is equal to
or higher than the age you have set as age rating for
your child, the programme will be locked. To watch a
locked programme, you must enter the Parental
rating code first.
To set an age rating…
1 - Press , select Child lock >
Parental rating and press OK.
2 - Enter a 4-digit Child lock code. If you did not set
a code yet, select Set code in Child lock. Enter a
4-digit Child lock code and confirm. Now you can set
an age rating.
3 - Back in Parental rating, select the age and
press OK.
4 - Press (left) repeatedly if necessary, to close
the menu.
again to confirm.
5 - Press (left) repeatedly if necessary, to close
the menu.
The new code is set.
Channel options
Open options
While watching a channel, you can set some options.
Depending on the type of channel you are watching
(analogue or digital) or depending on the TV settings
you made, some options are available.
To open the options menu…
1 - While watching a channel, press OPTIONS.
2 - Press OPTIONS again to close.
Subtitles
To switch off the parental age rating, select None.
However, in some countries you must set an age
rating.
For some broadcasters/operators, the TV only locks
programmes with a higher rating. The parental age
rating is set for all channels.
Set code/ Change code
The Child Lock PIN code is used to lock or unlock
channels or programmes.
To set the lock code or to change the current code…
1 - Press , select Child lock and press (right)
to enter the menu.
2 - Select Set code or Change code and
press OK.
3 - Enter a 4 digit code of your choice. If a code is set
already, enter the current Child Lock code and then
enter the new code twice.
4 - Press (left) repeatedly if necessary, to close
the menu.
The new code is set.
Forgotten your Child Lock PIN code?
If you forgot your PIN code, you can override the
current code and enter a new code.
To switch on Subtitles, press SUBTITLE.
You can switch subtitles on or off with Subtitles on
or Subtitles off. Alternatively you can
select Automatic.
Automatic
If language information is part of the digital broadcast
and the broadcasted programme is not in your
language (the language set on TV), the TV can show
subtitles automatically in one of your preferred
subtitle languages. One of these subtitle languages
must also be part of the broadcast.
You can select your preferred subtitle languages
in Subtitle language.
Subtitle Language
Select the desired subtitle language. For more
information, in Help, press Keywords and look
up Subtitle language.
Audio language
For digital broadcast, you can select an available
audio language temporarily if none of your preferred
languages are available.
For more information, in Help,
press Keywords and look up Audio language.
1 - Press , select Child lock and press (right)
to enter the menu.
2 - Select Change code and press OK.
3 - Enter the overriding code 8888.
4 - Now enter a new Child Lock PIN code and enter it
26
Page 27

Status
You can view the technical characteristics of a
particular channel, like digital or analogue, sound
type, etc.
7.5
Favourite Channels
About Favourite Channels
To view the technical information on a channel…
1 - Tune to the channel.
2 - Press OPTIONS, select Status and
press OK.
3 - To close this screen, press OK.
Dual I-II
If an audio signal contains two audio languages but
one language or both has no language indication, this
option is available.
HbbTV on this channel
If you want to avoid access to HbbTV pages on a
specific channel, you can block the HbbTV pages for
this channel only.
1 - Tune to the channel of which you want to block
the HbbTV pages.
2 - Press OPTIONS and select HbbTV on this
channel and press (right).
3 - Select Off and press OK.
4 - Press (left) to go back one step or
press BACK to close the menu.
To block HbbTV on TV completely…
1 - Press , select General settings > HbbTV.
2 - Select Off and press OK.
3 - Press (left) to go back one step or
press BACK to close the menu.
In a favourite channel list, you can collect the
channels you like.
With a Favourites List selected, you can only tune to
the channels in that list when using
the or keys.
Set up your Favourites List
You can create a favourite channel list that only holds
the channels you want to watch. With the Favourite
channel list selected, you will only see your favourite
channels when you switch through channels.
Create your favourite channel list
1 - While watching a TV channel, press LIST to
open the channel list.
2 - Select All to view all channels.
3 - Select the channel, and press to mark as
favourite.
4 - The selected channel is marked with a .
5 - To finish, press BACK . The channels are
added to the Favourites list.
To remove a channel from the favourites list, select
the channel with , then press again to unmark
as favourite.
Reorder Channels
Mono / Stereo
You can switch the sound of an analogue channel to
Mono or Stereo.
To switch to Mono or Stereo…
1 - Tune to an analoge channel.
2 - Press OPTIONS, select Mono/Stereo and
press (right).
3 - Select Mono or Stereo and press OK.
4 - Press (left) to go back one step or
press BACK to close the menu.
Reorder
You can reorder — reposition — channels in the
Favourite channel list.
1 - In the channel list Favourites, highlight the
channel you want to reposition.
2 - Press .
3 - Select the channel to reorder and press OK.
4 - Press the Navigation buttons to move the
highlighted channel to another location and
press OK.
5 - Press (Done).
6 - Once complete, press EXIT to exit from
the Favourite channel list.
You can highlight another channel and do the same.
27
Page 28

7.6
Interactive TV
About iTV
the HbbTV pages.
2 - Press OPTIONS and select HbbTV on this
channel.
3 - Select Off.
With interactive TV, some digital broadcasters
combine their normal TV programme with information
or entertainment pages. On some pages, you can
respond to a programme or vote, do online shopping
or pay for a video-on-demand programme.
HbbTV, MHEG, . . .
Broadcasters use various interactive TV systems :
HbbTV (Hybrid Broadcast Broadband TV) or iTV
(Interactive TV - MHEG). Interactive TV is sometimes
referred to as Digital Text or Red button. But each
system is distinct.
Visit the broadcaster's Internet website for more
information.
About Interactive TV
With interactive TV, some digital broadcasters
combine their normal TV programme with information
or entertainment pages.
Note:
Use Interactive TV
Open iTV pages
Most channels that offer iTV invite you to press the
colour key (red) or OK key to open their
interactive programme.
Navigate iTV pages
You can use the arrow and colour keys, the number
keys and the BACK key to navigate the iTV
pages.
You can use the (Play), (Pause) and (Stop)
keys to watch videos within iTV pages.
Close iTV pages
Most iTV pages inform you which key to use to close.
To force an iTV page to close, switch to the next TV
channel and press BACK.
• You cannot download files to your TV with this
feature.
• Not all TV programmes, commercials and features
include subtitle information.
• You cannot respond to the digital content.
Visit the broadcaster's Internet website for more
information.
What you need
Interactive TV is only available on digital TV channels.
To enjoy the full benefits of Interactive TV, you need
a high-speed (broadband) Internet connection to the
TV.
HbbTV
If a TV channel offers HbbTV pages, you must first
switch on HbbTV in the TV settings to view the pages.
1 - Press , select General settings > HbbTV and
press OK.
2 - Select On.
3 - Press (left) repeatedly if necessary, to close
the menu.
If you want to avoid access to HbbTV pages on a
specific channel, you can block the HbbTV pages for
this channel only.
1 - Tune to the channel of which you want to block
28
Page 29

8
TV Guide
8.1
select Change day.
Select Today or Next day and press OK, to select
the day of the schedule.
The TV guide can show scheduled programmes for
the upcoming days (maximum up to 8 days).
What you need
With the TV Guide you can view a list of the current
and scheduled TV programmes of your channels.
Depending on where the TV guide information (data)
is coming from, analogue and digital channels or only
digital channels are shown. Not all channels offer TV
Guide information.
The TV can collect TV Guide information for the
channels that are installed on the TV. The TV cannot
collect the TV Guide information for channels viewed
from a digital receiver or decoder.
8.2
Using the TV guide
Open the TV guide
To open the TV Guide, press TV GUIDE. The TV
Guide shows the channels of the selected tuner.
Press TV GUIDE again to close.
The first time you open the TV Guide, the TV scans all
TV channels for programme information. This may
take several minutes. TV Guide data is stored on TV.
f the TV guide information comes from the
broadcaster, you can press + to view the
schedule of one of the next days. Press - to go
back to the previous day.
To change day…
1 - Press TV GUIDE.
2 - Press OPTIONS.
3 - Select Change day, select Today or Next
day and press OK.
4 - Press BACK to close the menu.
Set a reminder
You can set reminders that alert you of the start of a
programme with a message on screen.
• To set a reminder, select the programme in the
schedule and press for Set reminder. The
programme is marked with a clock.
• To cancel the reminder, press the for Clear
reminder.
• To view a list of all reminders you have set,
press OPTIONS, and select All reminders.
Search by genre
Tune to a programme
From the TV Guide, you can tune to a current
programme.
To switch to the programme (channel), select the
programme and press OK.
View programme details
To call up the details of the selected programme…
1 - Press INFO.
2 - Press BACK to close.
Change day
The TV guide can show scheduled programmes for
the upcoming days (maximum up to 8 days).
If the TV guide information comes from the
broadcaster, you can press + to view the
schedule of one of the next days. Press - to go
back to the previous day.
Alternatively, you can press OPTIONS and
If the information is available, you can look up
scheduled programmes by genre like movies, sports,
etc.
To search for programmes by genre…
1 - Press TV GUIDE.
2 - Press OPTIONS.
3 - Select Search by genre and press OK.
4 - Select the genre you want and press OK. A list
with the found programmes appears.
5 - You can set reminders or schedule a recording on
a selected programme.
6 - Press BACK to close the menu.
Set a recording
You can set a recording in the TV Guide*.
To see the recording list, press Recordings , a
programme set to be recorded is marked with
a (red dot) on the front of the programme name.
To record a programme…
1 - Press TV GUIDE and select a future or
29
Page 30

ongoing programme.
2 - Press the colour key Record .
3 - Press BACK to close the menu.
To cancel a recording…
1 - Press TV GUIDE and select the programme
set for recording.
2 - Press the colour key Clear Recording .
3 - Press BACK to close the menu.
30
Page 31

9
Recording and
Pause TV
9.1
Press (Right) or (Left) to scroll through the
programmes of a channel.
To change the date of the list, press OPTIONS
and select Select day. In the list, select the day you
want and press OK. If the TV guide comes from the
Internet, you can select the date at the top of the
page and press OK.
Recording
What you need
You can record a digital TV broadcast and watch it
later.
To record a TV programme you need…
• a connected USB Hard Drive formatted on this TV
• digital TV channels installed on this TV
• to receive channel information for the on screen TV
Guide
• a reliable TV clock setting. If you reset the TV clock
manually, recordings may fail.
You cannot record when you are using Pause TV.
Some digital TV operators do not allow the recording
of channels.
For more information on installing a USB Hard Drive,
in Help, press the colour key Keywords and
look up USB hard drive, installation.
Record a programme
Record now
To record the programme you are watching,
press (Record) on the remote control.
If you receive TV guide information from the Internet,
you can adjust the end time of the recording in the
pop-up window before you confirm the recording.
If you receive TV guide information from the
broadcaster, the recording starts immediately. You
can adjust the end time of the recording in the list of
recordings.
To stop recording, press (Stop).
2 - With the programme highlighted, press
Record or press OPTIONS and select Record.
The TV adds some time buffer at the end of the
programme. You can add some extra buffer if
needed.
3 - Select Schedule and press OK. The programme is
scheduled for recording. A warning will appear
automatically when overlapping recordings are
scheduled.
If you plan to record a programme in your absence,
remember to leave the TV switched to standby and
the USB Hard Drive switched on.
List of recordings
To view the list of recordings and scheduled
recordings, press Home , select Utilities
> Recordings and press OK.
In this list, you can select a recording to watch,
remove recorded programmes, adjust the end time of
an ongoing recording or check the free disk space.
Also in this list, if the TV guide comes from the
Internet, you can schedule a recording for which you
set the beginning and end time yourself, as a timed
recording not linked to a programme. To set a timed
recording, select Schedule recording at the top of
the page and press OK. Set the channel, date and
time span. To confirm the recording,
select Schedule and press OK.
Remove a scheduled recording
Select the scheduled recording,
press Remove and press OK.
Schedule a recording
You can schedule a recording of an upcoming
programme for today or a few days from today
(maximum of 8 days away).
1 - To schedule a recording, press TV Guide .
On the TV guide page, select the channel and
programme you wish to record.
You can enter the channel number to jump to the
channel in the list.
Specifics
• While recording a programme, you can watch a
previously recorded programme.
• While recording, you cannot switch TV channels.
• While recording, you cannot pause the TV
broadcast.
• To Record, broadcasters need a reliable clock
setting. If you reset the TV clock manually, recordings
may fail.
• The Audio Description audio (commentary) for the
visually impaired cannot be recorded.
31
Page 32

• You can record the digital (DVB) subtitles of channel.
You cannot record subtitles that come from Text
services. To check if digital (DVB) subtitles are
available, tune to the TV channel and
press OPTIONS , select Subtitle language to
open the list of Subtitles. You can only record a
subtitle language preceded by a DVB icon.
Watch a recording
Hard Drive starts buffering the broadcast. When you
switch to another digital channel, the broadcast of the
new channel is buffered and the broadcast of the
former channel is cleared. When you switch to a
connected device (a Blu-ray Disc player or digital
receiver) the USB Hard Drive stops buffering and the
broadcast is cleared. Also when you switch the TV to
standby the broadcast is cleared.
Whilst recording a programme on the USB Hard Drive,
you cannot pause a broadcast.
To watch a recording . . .
1 - Press Home ,
select Utilities > Recordings and press OK.
2 - In the list, select the recording and
press (Play) to start the playback. You can use
the (Forward), (Rewind), (Pause)
or (Stop) keys on the remote control.
Expired recording
Broadcasters can limit the number of days a recording
can be viewed. A recording in the list can show the
number of days before it expires.
Failed recording
When a scheduled recording was prevented by the
broadcaster or when the broadcast was interrupted, a
recording is marked as Failed.
Delete a recording
To delete a made recording, select the recording in
the list, press Remove and press OK.
For more information, press Keywords and look
up Record a programme.
Instant replay
Whilst watching a broadcast from a digital TV
channel, you can easily instant replay the broadcast.
To replay the last 10 seconds of a broadcast,
press (Pause) and press (Left).
You can press repeatedly until you reach the start
of the broadcast buffer or the maximum time span.
Progress bar
With the progress bar on screen, press (Rewind)
or press (Forward) to select from where you want
to start viewing the paused broadcast. Press these
keys repeatedly to change speed.
Pause TV
You can pause a TV broadcast and resume watching
it later. Only digital TV channels can be paused. You
must connect a USB Hard Drive to buffer the
broadcast. You can pause a broadcast for a maximum
time span of 90 minutes.
For more information, press Keywords and look
up USB hard drive.
Pause or resume a broadcast
To pause a broadcast, press (Pause). A progress
bar appears briefly on screen.
To call up the progress bar, press (Pause) again.
To resume watching, press (Play). The icon on
screen indicates you are watching a paused
broadcast.
Back to the actual TV broadcast
To switch back to the actual TV broadcast,
press (Stop).
The moment you switch to a digital channel, the USB
32
Page 33

10
Home menu
10.1
About the Home menu
Channels
This row contains all channles.
Sources
This row contains available sources in this TV.
Utilities
This row contains TV functions which are available for
user.
Quick settings
This row contains settings which are available for
user.
10.2
Open the Home menu
To open the Home menu and open an item…
1 - Press Home .
2 - Select an item and press OK to open or start it.
3 - Press BACK to close the Home menu
without starting anything.
33
Page 34

11
Utilities
11.1
About Utilities
Smart TV
Open Smart TV page.
TV guide
For more information, in Help, press the colour
key Keywords and look up TV guide.
Recordings
For more information, in Help, press the colour
key Keywords and look up Recording.
Channel
View channel list.
Update software
For more information, in Help, press the colour
key Keywords and look up Update software.
Demo Me
View Demo Me for demo on this TV.
Help
Use Help function to diagnose and get more
information about your TV.
34
Page 35

12
Netflix
12.1
About Netflix
If you have a Netflix membership subscription, you
can enjoy Netflix on this TV. Your TV must be
connected to the Internet.
To open Netflix, press to open the Netflix
App. You can open Netflix immediately from a TV in
standby.
www.netflix.com
35
Page 36

13
Freeview Plus
13.1
About Freeview Plus
This TV is certified by Freeview Plus.
Freeview Plus* provides access to content and
services from the Freeview networks. The Freeview
Plus service provides a 7+ day Electronic Program
Guide, all available Catch Up TV on the TV,
recommendations and the ability to set reminders
and favourites. Freeview Plus is available by pressing
the Green button on the remote control.
*Freeview Plus uses HbbTV technology which
combines broadcast and broadband. Internet
connection is required. Data usage charges and
conditions apply.
conditions apply.
Find more information on www.freeview.com.au
Freeview Plus* is a new television service which
provides a state of the art EPG and seamless access
to Catch Up TV from free-to-air networks with the
simple press of a button. Freeview Plus provides an
unrivalled user experience and places free to air
television at the forefront of innovation, with services
that include:
• A 7-day, easy-to-use EPG
• All available Catch Up TV on the TV screen
• Featured recommendations
• Ability to browse by genre and search programs for
the next 7 days
• A Favourites function with reminders for live and
Catch Up programs
13.2
Launch Freeview Plus
What You Need
• you need a high-speed (broadband) Internet
connection to the TV
To launch Freeview Plus
When you are watching TV, you will briefly see a
prompt at the top left of the screen.
• Press the colour key on the remote control to
launch Freeview Plus.
• Follow the on-screen instructions and use the
colour keys, arrow keys, and OK button to navigate.
*Freeview Plus uses HbbTV technology which
combines broadcast and broadband. Internet
connection is required. Data usage charges and
36
Page 37

14
14.3
Sources
14.1
Switch to a device
From the list of Sources, you can switch to any of the
connected devices. You can switch to a tuner to
watch TV, open the content of a connected USB Flash
Drive or see the recordings you made on a connected
USB Hard Drive. You can switch to your connected
devices to watch their programme, a digital receiver or
a Blu-ray Disc player.
To switch to a connected device…
1 - Press SOURCES to open the Sources menu.
2 - Select one of the item in the source list and
press OK. The TV will show the programme or
content of the device.
3 - Press SOURCES again to close the menu.
One Touch Play
With the TV in standby, you can switch on a disc
player with your TV remote control.
To switch on both disc player and TV from standby
and start playing the disc immediately,
press (play) on the TV remote control. The device
must be connected with an HDMI cable and both TV
and device must have HDMI CEC switched on.
14.2
Options for a TV Input
Some TV input devices offer specific settings.
To set the options for a specific TV input…
Scan connections
To rescan connections and update the Sources menu,
press Scan connections. (if key is available
on the bottom of the screen.)
14.4
Game or computer
The device type determines picture and sound styles,
resolution values and other specifics. You don't have
to worry about the ideal settings.
For some devices the type of the device is not that
clear. A game console can have a built-in Blu-ray
Disc player and the type is set to Player because it is
used as a disc player most of the time. For this kind of
devices, you can temporarily switch to the ideal
settings for gaming. Or alternatively, switch to the
ideal settings for a connected computer.
You can only use the setting Game or
Computer when you switch to a connected device in
the Sources menu. The Game or Computer setting is
stored for the selected device.
To switch to the ideal settings for gaming or computer
manually…
1 - Press , select Picture > Advanced and
press OK.
2 - Select Game or Computer and press OK.
3 - Select Game, Computer or Off.
4 - Press (left) to go back one step or
press BACK to close the menu.
Remember to set this setting back to Off when you
stop playing the game.
1 - Press SOURCES.
2 - Select the TV input in the list and press OK.
3 - Press OPTIONS. You can set the options for
the selected TV input here.
4 - Press OPTIONS again to close the Options
menu.
Possible options…
Controls
With this option you can operate the connected
device with the TV remote control. The device must
be connected with an HDMI cable and both TV and
device must have HDMI CEC switched on.
37
Page 38

15
Internet
15.1
Start Internet
You can browse the Internet on your TV. You can
view any Internet website but most of them are not
prepared for a TV screen.
• Some plug-ins (e.g. to view pages or videos) are not
available on your TV.
• You cannot send or download files.
• Internet pages are shown one page at a time and
full screen.
To start the Internet browser…
1 - Press SMART TV > Open Internet and
press OK.
2 - Enter an Internet address and press OK.
3 - To close Internet, press Home or EXIT.
15.2
Options on Internet
Some extras are available for the Internet.
To open the extras…
1 - With the website open, press OPTIONS.
2 - Select one of the items and press OK.
3 - Press (left) repeatedly if necessary, to close
the menu.
• Add to Speed Dial
• Add to Bookmarks
• Page Security
• New Private Tab
• Settings
• Help
• Exit Internet Browser
38
Page 39

16
Movie, photos and
music
16.1
From a USB connection
You can view your photos or play your music and
videos from a connected USB flash drive or USB Hard
Drive.
Navigate to the menu bar and select the type of file
you want to watch or play.
Select Photos , Music or Movie .
Alternatively, you can open the Folders view
and browse your folders to look for a file.
Sorting
To browse your photos by date, month, year or
alphabetically by name, press Sort .
To browse your music by album, artist, genre or
alphabetically by name, press Sort .
Videos are sorted alphabetically.
With the TV switched on, plug in a USB flash drive or a
USB Hard Drive to one of the USB connections. The
TV detects the device and will list your media files.
If the list of files does not appear automatically…
1 - Press SOURCES, select USB and press OK.
2 - Select USB Devices and press (right) to
select the USB device you need.
3 - You can browse your files in the folder structure
you have organised on the drive.
4 - To stop playing videos, photos and music,
press EXIT.
Warning
If you try to pause or record a programme with a USB
Hard Drive connected, the TV will ask you to format
the USB Hard Drive. This formatting will delete all
current files on the USB Hard Drive.
16.2
From a computer
If the TV and the computer are in the same network,
the TV can browse and play files stored on your
computer.
16.4
Play your movie
Play movie
• To play a video, select Movie in the menu bar,
select a video and press OK.
• If there are more videos in the same folder,
press Play all to play all videos in this folder.
• To jump to the next or previous
video, press + or - .
• To pause the video, press OK. Press OK again to
continue.
• To make a 10-second jump forward or backward in a
video, press or .
• To rewind or go fast forward, press or . Press
the keys several times to speed up - 2x, 4x, 8x, 16x,
32x.
• To stop the video playback, press (Stop).
Info
To view info on a video (playhead position, duration,
title, date, etc.), select the video and press INFO .
Press again to hide the info.
On your computer, you need to install media server
software like Twonky™ to share your files with the TV.
The TV shows your files and folders as they are
organised on your computer.
To browse the files on your computer,
press SOURCES , select Network and press OK.
16.3
Menu bar and sorting
With a USB device connected, the TV sorts the files by
type. Navigate to the menu bar and select the type of
file you are looking for.
If you browse files from a computer, you can only
browse the files and folders as they are organized on
the computer.
The menu bar
Movie options
During the video playback, press OPTIONS to…
• Subtitles
• Subtitle language
• Audio language
• Character set
• Status
• Repeat
• Subtitle settings
39
Page 40

16.5
16.6
View your photos
View photos
To view photos, select Photos in the menu bar,
select a photo thumbnail and press OK.
If there are several photos in the same folder, select a
photo and press Slide show to start a slide show
of all photos in this folder.
To jump to the next or previous photo,
press + or - .
To stop the slide show or close the photo,
press (Stop).
Info
To view info on a photo (size, creation date, file path,
etc.), select a photo and press INFO .
Press again to hide the info.
Slideshow with music
You can watch a slideshow of your photos and listen
to your music at the same time. You must start the
music before you start the photo slideshow.
Play your music
Play music
• To play music, select Music in the menu bar,
select a song and press OK.
• If there are more songs in the same folder,
press Play all to play all songs in this folder.
• To jump to the next or previous song, press +
or - .
• To pause the music, press OK. Press OK again to
continue.
• To make a 10-second jump in a song or 10-second
jump back, press or .
• To rewind or fast forward, press or . Press the
keys several times to speed up - 2x, 4x, 8x, 16x, 32x.
• To stop the music playback, press (Stop).
Info
To view song info (title, artist, duration, etc.), select
the song and press INFO .
Press again to hide the info.
Music options
To play music with the slide show…
1 - Select a song or a folder with songs and
press OK.
2 - Press INFO to hide the browser list.
3 - Press BACK .
4 - Now use the navigation arrows to select the
folder with photos.
5 - Select the folder with photos and press Play
All.
6 - To stop the slideshow, press BACK .
Photo options
With a photo on screen, press OPTIONS to…
• Shuffle – Play your files in a random order.
• Repeat – Play the slide show once or continuously.
• Slide show speed – Set the speed of the slide
show.
• Slide show transition – Set the style of the photo
transitions.
Options for playing music...
• Repeat – Plays all songs in this folder once or
continuously.
40
Page 41

17
Share a screen on TV
Smartphones and
tablets
17.1
Miracast
About Wi-Fi Miracast
You can view your photos or play your music and
videos from a mobile device on your TV with Wi-Fi
Miracast™. The mobile device and the TV should be
within range, which usually means being in the same
room.
Check if your mobile device is ready for Miracast.
Your TV is a Wi-Fi CERTIFIED Miracast™ device.
With Miracast™, you can watch and share the screen
of your smartphone, tablet or computer on your TV
screen wirelessly. You can stream videos (audio and
video), share photos or anything else that's on screen
of the device. No need to connect the device to your
home network. Both the TV and the device must be
Wi-Fi CERTIFIED Miracast™ devices and have
Miracast switched on.
Miracast on this TV is subject to the HDCP protocol
and cannot display copy-protected premium content
sent by a device. The maximum video resolution
supported is 720p for 2.4GHz Wi-Fi or 1080p for 5GHz
Wi-Fi.
For more information on Wi-Fi CERTIFIED Miracast™
go to www.wi-fi.org
Wi-Fi®, the Wi-Fi CERTIFIED logo, the Wi-Fi logo are
registered trademarks of the Wi-Fi Alliance. Wi-Fi
CERTIFIED Miracast™, Miracast™ are trademarks of
the Wi-Fi Alliance.
To share the screen of your smartphone, tablet or
computer on the TV…
1 - Switch on the TV.
2 - On the device, in the settings menu, set the
device to cast or mirror its display. Miracast uses Wi-Fi
Direct™.
3 - On the device scan for the available Miracast
devices and select the TV to connect.
4 - On the TV, agree to the request to connect. You
might be asked to enter a PIN code from the device
on the TV - enter the numbers with the digit keys on
the remote control. Alternatively, you might be asked
to enter a PIN code on the device. If the connection is
made, the TV will show the screen of the device.
5 - On the device, select the videos, photos or files
you want to watch on TV.
* Miracast is supported by WiDi 3.5 onwards.
You might find the Wi-Fi connection (e.g.
'DIRECT_tvname') also in lists of available networks
on other network devices, e.g. your laptop computer.
However, this connection can only be used by Wi-Fi
Miracast devices.
Stop sharing
You can stop sharing a screen from the TV or from the
mobile device.
From the device
With the application you use to start Miracast, you
can disconnect and stop watching the screen of the
device on TV. The TV will switch back to the last
selected programme.
From the TV
To stop watching the screen of the device on TV, you
can . . .
Switch on Miracast
Make sure Wi-Fi Miracast is switched on.
1 - Press , select Network and press (right) to
enter the menu.
2 - Select Wi-Fi Miracast and press OK.
3 - Select On and press OK.
4 - Press (left) repeatedly if necessary, to close
the menu.
• press EXIT to watch a TV broadcast
• press Home to start another activity on TV
• press SOURCES to open the Sources menu and
select a connected device.
Block a device
The first time you receive a request to connect from a
device, you can block the device. The request from
this device and all its requests in the future, will be
ignored.
To block a device…
Select Block… and press OK.
Unblock all devices
41
Page 42

All previously connected and also blocked devices
are stored in the Wi-Fi Miracast list of connections. If
you clear this list, all blocked devices will be
unblocked.
To unblock all blocked devices…
1 - Press , select Network and press OK.
2 - Select Reset Wi-Fi Miracast connections and
press OK. The list is cleared.
3 - Press (left) repeatedly if necessary, to close
the menu.
Blocking a previously connected device
If you want to block a device that you previously
connected, you need to clear the Wi-Fi Miracast
connections list first. If you clear this list, you will have
to confirm or block the connection for every device
again.
Screen delay
The normal delay when sharing a screen with
Miracast is about 1 second. The delay might be longer
if you are using older devices with less processing
power.
In Help, press Keywords and look up HDMI
MHL for more information.
17.3
Smart TV
About Smart TV
Connect this TV to the Internet and discover a new
world of television. You can make a wired connection
to your router or you can link up wirelessly with Wi-Fi.
With the TV connected to your home network, a
smartphone can show a photo on TV, you can play
videos stored on your computer or control the TV with
your tablet.
With your TV connected to the Internet, you can
watch a rental video from an online video store, read
the online TV guide or record your favourite TV show
on a USB Hard Drive. The Smart TV Apps add to the
fun with all sorts of entertainment and convenient
services.
17.2
MHL
This TV is MHL™ compliant.
If your mobile device is also MHL compliant, you can
connect your mobile device with a MHL cable to the
TV. With the MHL cable connected you can share
what's on your mobile device on the TV screen. Your
mobile device charges its battery at the same time.
The MHL connection is ideal for watching movies or
playing games from your mobile device on TV for a
longer time.
Charging
With the MHL cable connected, your device will
charge while the TV is switched on (not in standby).
MHL Cable
You need a passive MHL cable (HDMI to Micro USB)
to connect your mobile device to the TV. You might
need an extra adapter to connect to your mobile
device. To connect the MHL cable to the TV use
the HDMI 4 MHL connection.
What you need
To enjoy Smart TV Apps you must connect the TV to
a router with a high-speed (broadband) connection
to the Internet. You can use a home network
connected to the Internet. You do not need a
computer.
For more information, press Keywords and look
up Network.
Tip
To enter text or to navigate an Internet page more
easily, you can consider to connect a USB keyboard
and a USB mouse to the TV.
For more information, press Keywords and look
up USB keyboard or USB mouse.
Setup Smart TV
The first time you open Smart TV, you need to
configure your connection. Read and agree to the
terms and conditions to continue. If you do not want
to set up Smart TV, press BACK.
Parental control
MHL, Mobile High-Definition Link and the MHL Logo
are trademarks or registered trademarks of the MHL,
LLC.
To lock Adult 18+ rated apps . . .
1 - Switch on Smart TV parental control by
selecting Enable and then press OK.
2 - Enter an unlock PIN code of your choice.
3 - Confirm your PIN code.
Adult 18+ rated apps are now locked. To open a
42
Page 43

locked app, select the app and press OK. The TV will
ask you to enter your 4-digit code.
Smart TV Apps
Open Smart TV
The Smart TV start page is your link to the Internet.
You can rent movies online, read newspapers, watch
videos and listen to music, also shop online, open
your social network page or watch TV programmes
when it suits you with Online TV.
To do this, you open Apps - Internet sites which are
tailored for TV. With your TV connected to the
Internet, you can open Smart TV.
Open Smart TV
To open the Smart TV start page, press Smart TV .
Alternatively, you can press Home > Utilities,
select Smart TV and press OK.
full screen.
Recommended Apps
In this window, Philips presents a range of
recommended Apps for your country, Apps for Online
TV or a selection of rental movies from Video stores.
You can select and open them from the
Recommended Apps window.
Search
With Search, you can search the App gallery for
relevant Apps.
Enter a keyword in the text field, select and
press OK to start searching. You can enter names,
titles, genres and description keywords to search.
Alternatively, you can leave the text field empty and
search for the most popular searches/keywords for a
range of categories. In the list of found keywords,
select a keyword and press OK to search for items
with that keyword.
The TV connects to the Internet and opens the Smart
TV start page. This may take a few seconds.
Close Smart TV
To close the Smart TV start page,
press Home and select another activity.
TP Vision Europe B.V. bears no responsibility
regarding the content and the quality of the content
provided by the content service providers.
Smart TV start page
1 - Now on your TV
2 - Your Apps
3 - App gallery
4 - Internet
5 - Recommended Apps
6 - Search
7 - Colour keys for control
Your Apps
You start Apps from the Smart TV start page. If the
start page does not hold any Apps yet, you can add
Apps from the App gallery.
App gallery
In the App gallery you find all available Apps.
Internet
The Internet App opens the World Wide Web on your
TV.
On your TV, you can view any Internet website but
most of them are not tailored for a TV screen.
- Some plug-ins (e.g. to view pages or videos) are not
available on your TV.
- Internet pages are shown one page at a time and
Open an App
To open an App, you must add it to your list of Apps
in the Smart TV start page first.You can add Apps to
your list from the App gallery.
The list of your Apps on the Smart TV start page can
be several pages long. Use the arrow keys to go to the
next or previous page.
Open an App
To open an App . . .
1 - Press Home > Utilities > Smart TV .
2 - On the start page, select an App icon and
press OK.
In an App, press BACK to go back 1 step or page.
Close an App
To close an App and return to the Smart TV start
page, press Smart TV .
Reload an App page
If an App page did not load properly,
press OPTIONS and select Reload to reload
the page.
Zoom
To zoom in on an App page . . .
1 - Press OPTIONS and select Zoom page.
2 - Use the slider bar to set the zoom level.
3 - Return to normal view by resetting the slider bar.
View security info
You can check the security level of an App page.
On an App page, press OPTIONS and
select Security info. If a lock is shown next to the
loading animation on the bottom of the screen while
loading a page, the transfer is secured.
43
Page 44

Feedback on an App
Select the App and press Feedback to select a
'like' or 'don't like' button and send a suggestion or
remark to us. You can also report an App malfunction.
Manage your Apps
In the list of Apps on the Smart TV start page you can
. . .
• Remove an App
To remove an App from the list, select the App icon
and press Remove . The App is still available in
the App gallery.
• Move an App
To reposition an App in the list, select the App icon,
press Move and use the arrow keys to reposition
the App. Press OK to confirm the position.
• Manage an App
To manage an App from the list, select the App icon
and press Manage .
App gallery
Open the App gallery in Smart TV to browse the
Apps, the collection of tailored websites for TV.
downloaded rental movie. Consult the video store
regarding the rental duration of rental movies.
Internet traffic
Streaming or downloading many videos may exceed
your monthly Internet traffic limit.
Online TV
With the Online TV App on the Smart TV start page*,
you can watch TV programmes you missed or watch
programmes whenever it suits you best.
Open Online TV
To open the Online TV App . . .
1 - Press Smart TV .
2 - On the start page, select the Online TV icon
and press OK.
3 - Select a programme on the page and
press OK to start watching. You can use
the (Play) and (Pause) keys.
List per broadcaster
To view the Online TV programmes ordered by
broadcaster, press All broadcasters .
Select a broadcaster and press OK.
Find the App for YouTube videos, a national
newspaper, an online photo album, etc. There are
Apps to rent a video from an online video store and
Apps for watching programmes you missed. If the
App gallery does not hold what you are looking for,
try the World Wide Web and surf the Internet on TV.
Rental video Apps
With the video store Apps in Smart TV, you can rent
your favourite movie from an online rental video
store. You can pay securely with your credit card.
Rent a movie
1 - Open a Video store App in your list of Apps or
select a recommended video on the Smart TV start
page.
2 - Select a movie.
3 - Make the online payment.
4 - Start watching. You can use the (Play)
and (Pause) keys.
Most Video stores ask you to create a login account.
Streaming video
With this TV, you can watch rental movies sent as a
streaming video format. You can almost instantly
watch the movie. You might need a USB Hard Drive to
store some video buffer. If you have a USB Hard
Drive connected, you can also download rental
movies from video stores that offer movie
downloading only. You can pause or restart a
* If available in your region.
Multi View
While you are on a Smart TV App or the Internet, you
can watch the current TV channel. Multi view opens
a small screen for the TV channel next to the Smart
TV screen.
To open Multi view…
1 - Press SMART TV to open Smart TV.
2 - Press MULTI VIEW to open the small screen.
3 - Press + or – to change the TV channel
in the small screen.
Reset Smart TV
To reset your connection with Smart TV, clear the
Internet memory on the TV.
You will clear your Philips Smart TV registration and
parental rating setting, your video store app logins, all
Smart TV app favourites, Internet bookmarks and
history.
To clear the Internet memory…
1 - Press , select Network and press (right) to
enter the menu.
2 - Select Clear Internet memory and press OK.
3 - Select OK to confirm.
4 - Press (left) repeatedly if necessary, to close
44
Page 45

the menu.
45
Page 46

18
Multi room
18.1
About Multi room
With Multi Room you can watch a TV programme that
comes from another TV in your home. The
programme is streamed from one TV to the other. You
can stream a programme to a TV that has no antenna
connection or has no Smart card subscription of its
own. You can also stream a recorded programme
from a TV with a connected Hard Drive.
The TV that streams the programme to the other TV,
must be switched on and must tune to the channel or
play the recording.
Streaming a TV programme with Multi Room will
reduce the picture resolution to 720p maximum. You
cannot stream radio channels. Some broadcasters
protect their programmes to prevent this kind of
streaming.
18.2
What you need
To stream a TV programme from one TV to another,
the programme must come from a digital TV channel.
Both TVs must be connected to your wireless home
network. For more information,
press Keywords and look up Wireless Network.
Make sure that both TVs have the setting Switch on
with Wi-Fi (WoWLAN) switched on in the TV setup.
To check this setting on this TV…
standby.
Stream a TV channel
With Multi room, you can watch the current TV
channel or open the channel list of the other TV. If
you select a channel from the list, the other TV will
also switch to the channel you selected. If the other
TV has a build-in satellite tuner with installed
channels or a connected Hard Disc Drive (HDD) with
recordings*, you can also watch these on this TV. You
cannot switch channels while the other TV is
recording or in Pause TV mode.
To watch a TV channel from the other TV . . .
1 - Make sure the other TV is switched on.
2 - On this TV, press SOURCES, select Browse
network and press OK.
3 - If the TV is not yet connected to your home
network, the network installation will start
automatically. If the TV is already connected, go to
step 4.
4 - In the Browse network menu, select the name
of the other TV and press OK. If you have several TVs
in your home, you might want to change the name of
the other TV. You can do that on the TV itself.
5 - Select what you want to watch from the other TV
. . .
• to watch the current channel of the other TV,
select Current channel and press OK.
• to open the channel list of the other TV,
select Watch TV and press (Right).
• to open the list of recordings* on the other TV,
select Watch recordings and press (Right).
• you can switch channels with + and -. You
cannot switch channels when the other TV is
recording or in Pause TV mode.
1 - Press , select Network and press (right) to
enter the menu.
2 - Select Switch on with Wi-Fi (WoWLAN) and
press OK.
3 - Select On and press OK.
4 - Press (left) repeatedly if necessary, to close
the menu.
18.3
Using Multi room
First time use
When you start Multi room for the first time, switch on
both TVs.
Once this TV made a connection with the other TV,
the other one will appear automatically in
the Browse network menu even when it's in
TV network name
If you have more than one TV in your home network,
you can give the TV a unique name.
To change the TV name…
1 - Press , select Network and press (right) to
enter the menu.
2 - Select TV network name and press OK.
3 - Enter the name with the on-screen keyboard.
4 - Select Done to confirm the change.
5 - Press (left) repeatedly if necessary, to close
the menu.
46
Page 47

19
Sleep timer
Settings
19.1
Quick settings
Eco settings
For more information, in Help, press the colour
key Keywords and look up Eco settings.
Picture style
For more information, in Help, press the colour
key Keywords and look up Picture style.
Picture format
For more information, in Help, press the colour
key Keywords and look up Picture format.
Sound style
For more information, in Help, press the colour
key Keywords and look up Sound style.
For more information, in Help, press the colour
key Keywords and look up Sleep timer.
19.2
Picture
Picture style
Select a style
For easy picture adjustment, you can select a preset
Picture Style.
1 - While watching a TV channel, press .
2 - Select Picture > Picture style, and select one of
the styles in the list.
3 - Press (left) repeatedly if necessary, to close
the menu.
The available styles are…
• Personal - The picture preferences you set during
the first start up.
• Vivid - Ideal for daylight viewing
• Natural - Natural picture settings
• Standard - Most energy conscious setting - Factory
setting
• Movie - Ideal for watching movies
• Photo - Ideal for viewing photos
Headphones volume
For more information, in Help, press the colour
key Keywords and look up Headphones
volume.
Speakers
For more information, in Help, press the colour
key Keywords and look up TV speakers.
Clock
For more information, in Help, press the colour
key Keywords and look up Clock.
Customise a style
Any picture setting you adjust, like Colour or Contrast,
is stored in the currently selected Picture style. It
allows you to customise each style.
Only the style Personal can save its settings for
each connected device in the Sources menu.
Restore a style
The selected style will store the changes you made.
We recommend to adjust the picture settings for the
style Personal only. The Picture Style - Personal can
save its settings for each individual connected device
in Sources menu.
To restore the style to its original setting…
1 - While watching a TV channel, press .
2 - Select Picture > Picture style, and select the
Picture Style you want to restore.
3 - Press the colour key Restore style , and press
OK. The style is restored.
4 - Press (left) repeatedly if necessary, to close
the menu.
47
Page 48

Home or Shop
Advanced picture settings
If the Picture style is switched back to Vivid every
time you switch on the TV, the TV location is set
to Shop. A setting meant for in-store promotion.
To set the TV for Home use…
1 - Press , select General settings and
press (right) to enter the menu.
2 - Select Location > Home and press OK.
3 - Press (left) repeatedly if necessary, to close
the menu.
Picture settings
Colour
With Colour, you can adjust the colour saturation of
the picture.
To adjust the colour…
1 - Press , select Picture and press (right) to
enter the menu.
2 - Select Colour and press (right) .
3 - Press the arrows (up) or (down) to adjust
the value.
4 - Press (left) repeatedly if necessary, to close
the menu.
Game or computer
When you connect a device, the TV recognizes its
type and gives each device a correct type name. You
can change the type name if you wish. If a correct
type name for a device is set, the TV automatically
switches to the ideal TV settings when you switch to
this device in the Sources menu.
If you have a game console with a built-in Blu-ray
Disc player, you might have set the type name to Bluray Disc. With Game or computer you can switch to
the ideal settings for gaming manually. Don't forget to
switch the Game or Computer setting off, when you
return to watch TV.
To switch to the ideal settings for gaming or computer
manually…
1 - Press , select Picture > Advanced and
press OK.
2 - Select Game or computer and press OK.
3 - Select Game, Computer or Off.
4 - Press (left) to go back one step or
press BACK to close the menu.
Colour settings
Contrast
With Contrast, you can adjust the contrast of the
picture.
To adjust the contrast…
1 - Press , select Picture and press (right) to
enter the menu.
2 - Select Contrast and press (right).
3 - Press the arrows (up) or (down) to adjust
the value.
4 - Press (left) repeatedly if necessary, to close
the menu.
Sharpness
With Sharpness, you can adjust the level of
sharpness in fine detail of the picture.
To adjust the sharpness…
1 - Press , select Picture and press (right) to
enter the menu.
2 - Select Sharpness and press (right).
3 - Press the arrows (up) or (down) to adjust
the value.
4 - Press (left) repeatedly if necessary, to close
the menu.
Colour enhancement
With Colour enhancement, you can enhance the
colour intensity and the details in bright colours.
To adjust the level…
1 - Press , select Picture and press (right) to
enter the menu.
2 - Select Advanced > Colour > Colour
enhancement and press OK.
3 - Select Maximum, Medium, Minimum or Off.
4 - Press (left) repeatedly if necessary, to close
the menu.
Colour temperature
With Colour temperature, you can set the picture to a
preset colour temperature or select Custom to set a
temperature setting yourself with Custom colour
temperature. Colour Temperature and Custom Colour
Temperature are settings intended for expert users.
To select a preset…
1 - Press , select Picture and press (right) to
enter the menu.
2 - Select Advanced > Colour > Colour
temperature and press OK.
3 - Select Normal, Warm or Cool. Or
select Custom if you want to customise a colour
48
Page 49

temperature yourself.
4 - Press (left) repeatedly if necessary, to close
the menu.
Custom colour temperature
With Custom colour temperature, you can set a
colour temperature yourself. To set a custom colour
temperature, first select Custom in the Colour
Temperature menu. Custom Colour Temperature is a
setting intended for expert users.
To set a custom colour temperature…
1 - Press , select Picture and press (right) to
enter the menu.
2 - Select Advanced > Colour > Custom colour
temperature and press OK.
3 - Press the arrows (up) or (down) to adjust
the value.
4 - Press (left) repeatedly if necessary, to close
the menu.
Contrast settings
Brightness
With Brightness, you can set the level of brightness
of the picture signal. Brightness is a setting intended
for expert users. We recommend non-expert users to
adjust the brightness of the picture with
the Contrast setting.
To adjust the level…
1 - Press , select Picture and press (right) to
enter the menu.
2
- Select Advanced > Contrast > Brightness, and
press OK.
3 - Press the arrows (up) or (down) to adjust
the value.
4 - Press (left) repeatedly if necessary, to close
the menu.
Video contrast
With Video Contrast, you can decrease the range of
the video contrast.
To adjust the level…
Contrast modes
With Contrast Mode, you can set the level at which
power consumption can be reduced by dimming the
intensity of the screen. Choose for the best power
consumption or for the picture with the best intensity.
To adjust the level…
1 - Press , select Picture and press (right) to
enter the menu.
2 - Select Advanced > Contrast > Contrast
mode and press OK.
3 - Select Standard, Best power, Best picture,
or Off.
4 - Press (left) repeatedly if necessary, to close
the menu.
Dynamic contrast
With Dynamic Contrast, you can set the level at
which the TV automatically enhances the details in
the dark, middle and light areas of the picture.
To adjust the level…
1 - Press , select Picture and press (right) to
enter the menu.
2 - Select Advanced > Contrast > Dynamic
contrast and press OK.
3 - Select Maximum, Medium, Minimum or Off.
4 - Press (left) repeatedly if necessary, to close
the menu.
1 - Press , select Picture and press (right) to
enter the menu.
2 - Select Advanced > Contrast > Video
contrast, and press OK.
3 - Press the arrows (up) or (down) to adjust
the value.
4 - Press (left) repeatedly if necessary, to close
the menu.
Gamma
With Gamma, you can set a non-linear setting for
picture luminance and contrast. Gamma is a setting
intended for expert users.
To adjust the level…
1 - Press , select Picture and press (right) to
enter the menu.
2 - Select Advanced > Contrast > Gamma, and
press OK.
3 - Press the arrows (up) or (down) to adjust
the value.
4 - Press (left) repeatedly if necessary, to close
the menu.
Sharpness settings
Ultra Resolution
With Ultra Resolution, you switch on a superior
sharpness in line edges and contours.
To switch on or off…
49
Page 50

1 - Press , select Picture and press (right) to
enter the menu.
2 - Select Advanced > Sharpness > Ultra
Resolution, and press OK.
3 - Select On or Off.
4 - Press (left) repeatedly if necessary, to close
the menu.
Picture format
Fill the screen settings
If the picture is not filling the whole screen, if black
bars are showing on the top or bottom or at both
sides, you can adjust the picture to fill the screen
completely.
Noise reduction
With Noise reduction, you can filter out and reduce
the level of image noise.
To adjust the noise reduction…
1 - Press , select Picture and press (right) to
enter the menu.
2 - Select Advanced > Sharpness > Noise
reduction, and press (right) to enter the menu.
3 - Select Maximum, Medium, Minimum or Off.
4 - Press (left) repeatedly if necessary, to close
the menu.
MPEG artefact reduction
With MPEG artefact reduction, you can smoothen
the digital transitions in the picture. MPEG artefacts
are mostly visible as small blocks or jagged edges in
images.
To reduce the MPEG artefacts…
1 - Press , select Picture and press (right) to
enter the menu.
2 - Select Advanced > Sharpness > MPEG
artefact reduction, and press (right) to enter the
menu.
3 - Select On and press OK .
4 - Press (left) repeatedly if necessary, to close
the menu.
To select one of the basic settings to fill the screen…
1 - Press , select Picture and press (right) to
enter the menu.
2 - Select Picture format and press (right).
3 - Select Fill screen, Fit to screen or Wide
screen, and press OK.
4 - Press BACK to close the menu.
• Fill screen – automatically enlarges the picture to
fill the screen. Picture distortion is minimal, subtitles
remain visible. Not suitable for PC input. Some
extreme picture formats can still show black bars.
• Fit to screen – automatically zooms in the picture
to fill the screen without distortion. Black bars may be
visible. Not suitable for PC input.
Advanced
If the two basic settings are inadequate to format the
picture you want, you can use the advanced settings.
With the advanced settings you manually format the
picture on your screen.
You can zoom, stretch and shift the picture until it
shows what you need – e.g. missing subtitles or
scrolling text banners . If you format the picture for a
specific Source – like a connected game console –
you can return to this setting the next time you use
the game console. The TV stores the last setting you
did for each connection.
Motion settings
Natural motion
With Natural motion, you can reduce the motion
judder, visible in movies on TV. Natural Motion makes
any movement smooth and fluent.
To adjust the motion judder…
1 - Press , select Picture and press (right) to
enter the menu.
2 - Select Advanced > Motion > Natural
motion, and press OK.
3 - Select Maximum, Medium, Minimum or Off.
4 - Press (left) repeatedly if necessary, to close
the menu.
To format the picture manually…
1 - Press , select Picture and press (right) to
enter the menu.
2 - Select Picture format and press (right).
3 - Press Advanced and press OK.
4 - Use Shift, Zoom, Stretch or Original to adjust
the picture. Select Undo to return to the setting the
picture had when you opened Picture Format.
• Last setting – Select to return to the last setting.
• Shift – Select on the arrows to shift the picture. You
can only shift the picture when it is zoomed in.
• Zoom – Select on the arrows to zoom in.
• Stretch – Select on the arrows to stretch the
picture vertically or horizontally.
• Original – Shows the original format of the
incoming picture. This is a 1:1 pixel on pixel format.
Expert mode for HD and PC input.
• Undo – Select to return to the picture format you
started with.
50
Page 51

19.3
Sound
Sound style
Select a style
enter the menu.
2 - Select Bass and press (right).
3 - Press the arrows (up) or (down) to adjust
the value.
4 - Press (left) repeatedly if necessary, to close
the menu.
For easy sound adjustment, you can select a preset
setting with Sound Style.
1 - While watching a TV channel, press .
2 - Select Sound and press (right) to enter the
menu.
3 - Select Sound style, and select one of the styles
in the list.
4 - Press (left) repeatedly if necessary, to close
the menu.
The available styles are…
• Personal - The sound preferences you set during
the first start up.
• Original - Most neutral sound setting
• Movie - Ideal for watching movies
• Music - Ideal for listening to music
• Game - Ideal for gaming
• News - Ideal for speech
Restore a style
With a Sound Style selected, you can adjust any
sound setting in Setup > Sound…
The selected style will store the changes you made.
We recommend to adjust the sound settings for the
style Personal only. The Sound Style - Personal can
save its settings for each individual connected device
in Sources menu.
Treble
With Treble, you can adjust the level of high tones in
the sound.
To adjust the level…
1 - Press , select Sound and press (right) to
enter the menu.
2 - Select Treble and press (right).
3 - Press the arrows (up) or (down) to adjust
the value.
4 - Press (left) repeatedly if necessary, to close
the menu.
Surround mode
With Surround Mode, you can set the sound effect of
the TV speakers.
To set the surround mode…
1 - Press , select Sound and press (right) to
enter the menu.
2 - Select Surround mode and press (right) to
enter the menu.
3 - Select Stereo or Incredible surround.
4 - Press (left) repeatedly if necessary, to close
the menu.
To restore the style to its original setting…
1 - While watching a TV channel, press .
2 - Select Sound and press (right) to enter the
menu.
3 - Select Sound style , and select the Sound Style
you want to restore.
4 - Press the colour key Restore style . The style
is restored
5 - Press (left) repeatedly if necessary, to close
the menu.
Sound settings
Bass
With Bass, you can adjust the level of low tones in
the sound.
To adjust the level…
1 - Press , select Sound and press (right) to
Advanced sound settings
Auto volume levelling
With Auto Volume Levelling, you can set the TV to
automatically level out sudden volume differences.
Typically at the beginning of adverts or when you are
switching channels.
To switch on or off…
1 - Press , select Sound and press (right) to
enter the menu.
2 - Select Advanced and press (right) to enter
the menu.
3 - Select Auto volume levelling and
press (right) to enter the menu.
4 - Select On or Off.
5 - Press (left) repeatedly if necessary, to close
the menu.
51
Page 52

Delta volume
Clear sound
With Delta volume, you can set the TV to
automatically level out sudden volume differences.
To adjust the value…
1 - Press , select Sound and press (right) to
enter the menu.
2 - Select Advanced and press (right) to enter
the menu.
3 - Select Delta volume and press (right) to
enter the menu.
4 - Press the arrows (up) or (down) to adjust
the value.
5 - Press (left) repeatedly if necessary, to close
the menu.
TV speakers
You can send the TV sound to a connected audio
device - a Home Theatre System or audio system.
You can select where you want to hear the TV sound
and how you want to control it.
• If you select TV speakers > Off, you permanently
switch off the TV speakers.
• If you select TV speakers > On, the TV speakers
are always on.
With Clear Sound, you improve the sound for
speech. Ideal for news programmes. You can switch
the speech improvement on or off.
To switch on or off…
1 - Press , select Sound and press (right) to
enter the menu.
2 - Select Advanced > Clear sound and press OK.
3 - Select On or Off, then press OK.
4 - Press (left) repeatedly if necessary, to close
the menu.
Audio out format
For more information, in Help, press the colour
key Keywords and look up Audio out format.
Audio out levelling
For more information, in Help, press the colour
key Keywords and look up Audio out levelling.
HDMI 1 - ARC
With an audio device connected with HDMI CEC, you
can use one of the EasyLink settings.
• If you select EasyLink, the TV sends the TV sound
to the audio device. The TV will switch off the TV
speakers when the device is playing the sound.
• If you select EasyLink autostart, the TV will switch
on the audio device, send the TV sound to the device
and switch off the TV speakers.
With EasyLink or EasyLink Autostart selected, you can
still switch to TV speakers if necessary.
To set the TV speakers…
1 - Press , select Sound and press (right) to
enter the menu.
2 - Select Advanced and press (right) to enter
the menu.
3 - Select TV speakers and press (right) to
enter the menu.
4 - Select On, Off, EasyLink,
or EasyLink autostart .
5 - Press (left) repeatedly if necessary, to close
the menu.
To switch to speakers directly…
1 - While watching TV, press .
2 - Select Quick settings > Speakers and
select TV or Amplifier (audio system).
3 - Press (left) repeatedly if necessary, to close
the menu.
To switch on or off…
1 - Press , select Sound and press (right) to
enter the menu.
2 - Select Advanced > HDMI 1 - ARC and
press OK.
3 - Select On or Off, then press OK.
4 - Press (left) repeatedly if necessary, to close
the menu.
Audio out delay
If you set an Audio sync delay on your Home Theatre
System, to synchronise the sound with the picture,
you must switch off Audio Out Delay on the TV.
To switch off Audio Out Delay…
1 - Press , select Sound and press (right) to
enter the menu.
2 - Select Advanced > Audio out delay and
press OK.
3 - Select Off.
4 - Press (left) repeatedly if necessary, to close
the menu.
For more information, in Help, press the colour
key Keywords and look up Audio out delay.
52
Page 53

Audio out offset
Energy saving
If you cannot set a delay on the Home Theatre
System, you can set a delay on the TV with Audio
Out Offset.
To synchronise the sound on the TV…
1 - Press , select Sound and press (right) to
enter the menu.
2 - Select Advanced > Audio out offset and
press OK.
3 - Use the slider bar to set the sound offset and
press OK.
4 - Press (left) repeatedly if necessary, to close
the menu.
For more information, in Help, press the colour
key Keywords and look up Audio out offset.
Headphone volume
With Headphones Volume, you can set the volume
of a connected headphone separately.
To adjust the volume…
Eco settings bundles the settings that help the
environment.
Energy Saving
If you select Energy Saving, the TV switches to Picture
Style - Standard automatically, the most ideal energy
conscious setting for the picture.
To set the TV in Energy Saving…
1 - Press , select Eco settings and
press (right) to enter the menu.
2 - Select Energy saving, the Picture style is set to
Standard automatically.
3 - Press (left) repeatedly if necessary, to close
the menu.
Screen off
If you only listen to music, you can switch off the TV
screen to save energy.
To only switch off the TV screen…
1 - Press , select Sound and press (right) to
enter the menu.
2 - Select Headphones volume and press OK.
3 - Press the arrows (up) or (down) to adjust
the value.
4 - Press (left) repeatedly if necessary, to close
the menu.
TV placement
As part of the first installation, this setting is set to
either On a TV stand or Hung on the wall. If you
have changed the placement of the TV since then,
adjust this setting accordingly for best sound
reproduction.
1 - Press , select Sound and press (right) to
enter the menu.
2 - Select TV placement and press OK.
3 - Select On a TV stand or On the wall.
4 - Press (left) repeatedly if necessary, to close
the menu.
1 - Press , select Eco settings and
press (right) to enter the menu.
2 - Select Screen off.
3 - Press (left) repeatedly if necessary, to close
the menu.
To switch the screen back on, press any key on the
remote control.
Switch off timer
If the TV receives a TV signal but you don't press a
key on the remote control during a 4 hour period, the
TV switches off automatically to save energy. Also, if
the TV does not receive a TV signal nor a remote
control command for 10 minutes, the TV switches off
automatically.
If you use the TV as a monitor or use a digital receiver
to watch TV (a Set-Top Box - STB) and you do not
use the remote control of the TV, you should
deactivate this automatic switch off.
To deactivate the Switch Off Timer …
19.4
Eco settings
1 - Press , select Eco settings and
press (right) to enter the menu.
2 - Select Switch off timer and press OK.
3 - Press the arrows (up) or (down) to adjust
the value. The value 0 deactivates the automatic
switch off.
4 - Press (left) repeatedly if necessary, to close
the menu.
For more information on environmentally friendly TV
53
Page 54

settings, in Help, press the colour
key Keywords and look up Eco settings.
EasyLink remote control
To switch off EasyLink remote control…
19.5
General settings
Languages
In Help, press Keywords and look
up Language settings for more information.
Clock
In Help, press Keywords and look up Clock
settings for more information.
Sleep timer
For more information, in Help, press the colour
key Keywords and look up Sleep timer.
Switch off timer
1 - Press , select General settings and
press (right) to enter the menu.
2 - Select Switch off timer and press OK.
3 - Press the arrows (up) or (down) to adjust
the value. The value 0 deactivates the automatic
switch off.
4 - Press (left) repeatedly if necessary, to close
the menu.
For more information, in Help, press the colour
key Keywords and look up Switch off timer.
1 - Press , select General settings and
press (right) to enter the menu.
2 - Select EasyLink > Easylink remote control, and
press OK.
3 - Select Off.
4 - Press (left) repeatedly if necessary, to close
the menu.
Pixel Plus Link
Some devices, a DVD or Blu-ray Disc player, might
have their own picture quality processing. To avoid
bad picture quality caused by interference with the
TV processing, the picture processing of these devices
should be disabled. The TV comes with Pixel Plus link
switched on and disables the picture quality
processing of recent Philips devices connected to the
TV.
To switch off Pixel Plus link…
1 - Press , select General settings and
press (right) to enter the menu.
2 - Select EasyLink > Pixel Plus link, and
press OK.
3 - Select Off.
4 - Press (left) repeatedly if necessary, to close
the menu.
Auto switch off devices
You can set the TV to switch off the connecting HDMICEC compliant devices if they are not the active
source. The TV switches the connected device to
standby after 10 minutes of inactivity.
EasyLink
EasyLink
To switch off EasyLink completely…
1 - Press , select General settings and
press (right) to enter the menu.
2 - Select EasyLink, press (right) and
select EasyLink one step further.
3 - Select Off.
4 - Press (left) repeatedly if necessary, to close
the menu.
HDMI Ultra HD
This TV can display Ultra HD signals. Some devices connected with HDMI - do not recognise a TV with
Ultra HD and might not work correctly or show
distorted picture or sound. To avoid the
malfunctioning of such a device, you can set the
signal quality to a level the device can handle. If the
device is not using Ultra HD signals, you can switch
off Ultra HD for this HDMI connection.
The setting UHD 4:4:4/4:2:2 allows UHD YCbCr 4:4:4
/ 4:2:2 signals. The setting UHD 4:2:0 allows UHD
YCbCr 4:2:0 signals.
To set the signal quality…
1 - Press , select General settings and
press (right) to enter the menu.
2 - Select HDMI Ultra HD > HDMI 3 & 4 and
54
Page 55

press OK.
3 - Select UHD 4:4:4/4:2:2, UHD
4:2:0 or UHD Off and press OK.
4 - Press (left) repeatedly if necessary, to close
the menu.
USB keyboard settings
To install the USB keyboard, switch on the TV and
connect the USB keyboard to one of
the USB connections on the TV. When the TV
detects the keyboard for the first time, you can select
your keyboard lay-out and test your selection. If you
select a Cyrillic or Greek keyboard layout first, you
can select a secondary Latin keyboard layout.
To change the keyboard layout setting when a layout
was selected…
1 - Press , select General settings and
press (right) to enter the menu.
2 - Select USB keyboard settings, and press OK to
start the keyboard setup.
Mouse settings
To Adjust the motion speed of the USB mouse.…
1 - Press , select General settings and
press (right) to enter the menu.
2 - Select Mouse settings, and press OK to start
the mouse speed setup.
Shop setup
If the Location is set to Shop, you can set the
availablility of a specific demo for in store use.
1 - Press , select General settings and
press (right) to enter the menu.
2 - Select Shop setup and press (right) to enter
the menu.
3 - Select banner, and select Commercial banner
or Promotional banner as in store demo.
4 - Press (left) repeatedly if necessary, to close
the menu.
HbbTV
If a TV channel offers HbbTV pages, you must first
switch on HbbTV in the TV settings to view the pages.
1 - Press , select General settings and
press (right) to enter the menu.
2 - Select HbbTV, and press OK.
3 - Select On or Off.
4 - Press (left) repeatedly if necessary, to close
the menu.
If you want to avoid access to HbbTV pages on a
specific channel, you can block the HbbTV pages for
this channel only.
1 - Tune to the channel of which you want to block
the HbbTV pages.
2 - Press OPTIONS and select HBB TV on this
channel and press OK.
3 - Select Off and press OK.
Home or Shop
If the TV is installed in a shop, you can set the TV to
display an in store promotion banner. Picture
style is set to Vivid automatically. Switch off
timer is switched off.
To set the TV to Shop location…
1 - Press , select General settings and
press (right) to enter the menu.
2 - Select Location > Shop, and press OK.
3 - Press (left) repeatedly if necessary, to close
the menu.
If you use the TV at home, set the TV in Home
location.
Factory settings
You can set the TV back to the original TV settings
(the factory settings).
To switch back to the original settings…
1 - Press , select General settings and
press (right) to enter the menu.
2 - Select Factory settings and press OK.
3 - Press (left) repeatedly if necessary, to close
the menu.
Reinstall TV
You can redo a full TV installation. The TV is
completely reinstalled.
To redo a full TV installation…
1 - Press , select General settings and
select Reinstall TV.
2 - Follow the instructions on screen. The installation
may take a few minutes.
55
Page 56

Channel list copy
For more information, in Help, press the colour
key Keywords and look up Channel List Copy,
copy.
19.6
Clock and language
settings > Clock > Time zone, and press OK.
2 - Select one of the time zones.
3 - Press (left) repeatedly if necessary, to close
the menu.
Menu language
To change the language of the TV menus and
messages…
Clock
Date and time
In some countries, digital broadcasts do not send
UTC - Coordinated Universal Time information. The
daylight saving change might be ignored and the TV
might show an incorrect time.
When you record programmes - scheduled in the TV
Guide, we recommend not to change the time and
date manually. In some countries, for some network
operators, the Clock setting is hidden to avoid an
incorrect clock setting.
To correct the TV clock automatically...
1 - Press , select General
settings > Clock > Auto clock mode.
2 - Select Automatic and press OK.
3 - Press (left) repeatedly if necessary, to close
the menu.
To set the TV clock manually…
1 - Press , select General
settings > Clock > Auto clock mode, and
select Manual.
2 - Select Date and Time to adjust.
3 - Press (left) repeatedly if necessary, to close
the menu.
1 - Press , select General
settings > Language > Menu language and
press OK.
2 - Select on the language you need and press OK.
3 - Press (left) repeatedly if necessary, to close
the menu.
Language preferences
Audio language settings
Digital TV channels can broadcast audio with several
spoken languages for a programme. You can set a
preferred primary and secondary audio language. If
audio in one of these languages is available, the TV
will switch to this audio.
If none of the preferred audio languages is available,
you can select another audio language which is
available.
To set the primary and secondary audio language…
1 - Press , select General settings >
Languages > Primary audio or Secondary
audio and press OK.
2 - Select on the language you need.
3 - Press (left) repeatedly if necessary, to close
the menu.
Country dependent
Here is another way to correct the TV
clock automatically...
1 - Press , select General
settings > Clock > Auto clock mode, and
select Country dependent.
2 - Select Daylight savings and select the
appropriate setting.
3 - Press (left) repeatedly if necessary, to close
the menu.
Time zone
To set the time zone…
1 - Press , select General
To select an audio language when none of your
preferred audio language is available…
1 - Press OPTIONS .
2 - Select Audio language and select on the audio
language you want temporarily.
Subtitles
Switch on
To switch on Subtitles, press SUBTITLE.
You can switch subtitles on or off with Subtitles on or
Subtitles off.
Or to show subtitles automatically when the
broadcasted programme is not in language – the
language set for the TV – select Automatic. This
setting will also show Subtitles automatically when
56
Page 57

you mute the sound.
subject at the bottom of the screen.
Text sub-pages
Subtitle language settings
Digital channels can offer several subtitle languages
for a programme. You can set a preferred primary and
secondary subtitle language. If subtitles in one of
these languages are available, the TV will show the
subtitles you selected.
To set the primary and secondary subtitle language…
1 - Press , select General
settings > Language > Primary
subtitle or Secondary subtitle and press OK.
2 - Select on the language you need.
3 - Press (left) repeatedly if necessary, to close
the menu.
If none of the preferred subtitle languages are
available, you can select another subtitle language
which is available. If no subtitle languages are
available, you cannot select this option.
To select a subtitle language when none of your
preferred languages are available…
1 - Press OPTIONS .
2 - Select Subtitle language and select on the
language you want temporarily.
Subtitles from Text
If you tune to an analogue channel, you need to
make the subtitles available for each channel
manually.
1 - Switch to a channel and press TEXT to open
Text.
2 - Enter the page number for subtitles, usually 888.
3 - Press TEXT again, to close Text.
If you select On in the Subtitle menu when watching
this analogue channel, subtitles will be shown if
available.
Text / Teletex Languages
A Text page number can hold several subpages. The
subpage numbers are shown on a bar next to the
main page number.
To select a subpage, press or .
T.O.P. Text pages
Some broadcasters offer T.O.P. Text.
To open T.O.P. Text pages within Text,
press OPTIONS and select T.O.P. overview.
Favourite pages
The TV makes a list of the last 10 Text pages you
opened. You can easily reopen them again in the
Favourite Text pages column.
1 - In Text, select the star in the top left corner of
the screen to show the column of favourite pages.
2 - Press (down) or (up) to select a page
number and press OK to open the page.
You can clear the list with the option Clear favourite
pages.
Search Text
You can select a word and scan Text for all
occurences of this word.
1 - Open a Text page and press OK.
2 - Select a word or number with the arrow keys.
3 - Press OK again to jump immediately to the next
occurence of this word or number.
4 - Press OK again to jump to the subsequent
occurence.
5 - To stop searching, press (up) until nothing is
selected.
Text from a connected device
Some devices that receive TV channels can also offer
Text.
To open Text from a connected device . . .
1 - Press , select the device and press OK.
2 - While watching a channel on the device,
press OPTIONS , select Show device keys and
select the key and press OK.
3 - Press BACK to hide the device keys.
4 - To close Text, press BACK again.
Text pages
To open Text/Teletext press TEXT, while you are
watching TV channels.
To close Text, press TEXT again.
Select a Text page
To select a page . . .
1 - Enter the page number with the number keys.
2 - Use the arrow keys to navigate.
3 - Press a colour key to select a colour-coded
Text options
In Text/Teletext, press OPTIONS to select the
following…
• Freeze page
To stop the automatic rotation of subpages.
• Dual screen / Full screen
To show the TV channel and Text alongside each
other.
• T.O.P. overview
To open T.O.P. Text.
57
Page 58

• Enlarge
To enlarge the Text page for comfortable reading.
• Reveal
To unhide hidden information on a page.
• Cycle subpages
To cycle subpages when these are available.
• Language
To switch the group of characters that Text uses to
display correctly.
• Text 2.5
To activate the Text 2.5 for more colours and better
graphics.
Text setup
Text language
Some digital TV broadcasters have several Text
languages available.
To set your primary and secondary Text language . . .
1 - Press , select General
settings > Language > Primary text or Secondary
text and press OK.
2 - Select your preferred Text languages.
3 - Press (left) repeatedly if necessary, to close
the menu.
Text 2.5
If available, Text 2.5 offers more colours and better
graphics. Text 2.5 is activated as a standard factory
setting.
To switch off Text 2.5…
1 - Press TEXT.
2 - With Text/Teletext open on screen,
press OPTIONS.
3 - Select Text 2.5 > Off.
4 - Press (left) repeatedly if necessary, to close
the menu.
3 - Select On and press OK.
4 - Press (left) repeatedly if necessary, to close
the menu.
With Universal access switched on, the
option Universal access is added in the Options
menu.
Hard of hearing
Some digital TV channels broadcast special audio and
subtitles adapted for the hard of hearing or deaf
people. With Hearing impaired switched on, the TV
automatically switches to the adapted audio and
subtitles, if available. Before you can switch
on Hearing impaired, you have to switch
on Universal access.
To switch on Hearing impaired…
1 - Press , select Universal access and
press (right) to enter the menu.
2 - Select Hearing impaired and press (right) to
enter the menu.
3 - Select On and press OK.
4 - Press (left) repeatedly if necessary, to close
the menu.
To switch on Hearing impaired while watching TV...
1 - While watching a TV channel,
press OPTIONS , select Universal access and
press OK.
2 - Select Hearing impaired, and select On.
To check whether a hearing impaired audio language
is available, press OPTIONS , select Audio
Language and look for an audio language marked
with a .
If Accessibility does not appear in the Options menu,
switch on Universal access in setup menu.
19.7
Universal access
Switch on
With Universal access switched on, the TV is
prepared for use for the deaf, hard of hearing, blind or
partially sighted people.
Switch on
If you did not switch on Universal access during the
installation, you can still switch it on in Universal
access menu.
To switch on Universal access…
1 - Press , select Universal access and
press (right) to enter the menu.
2 - Select Universal access one step further.
For more information, in Help, press the colour
key Keywords and look up Universal access.
Audio description
Switch on
Digital TV channels can broadcast special audio
commentary describing what is happening on
screen.
To be able to set the visually impaired audio and
effects, you have to switch on Audio
description first.
Also, before you can switch on Audio description, you
have to switch on Universal access in setup menu.
With Audio description, a narrator's commentary is
added to the normal audio.
To switch on the commentary (if available)…
58
Page 59

To switch on Audio description…
1 - Press , select Universal access and
press (right) to enter the menu.
2 - Select Audio description and press (right) to
enter the menu.
3 - Select Audio description one step further
4 - Select On and press OK.
5 - Press (left) repeatedly if necessary, to close
the menu.
1 - Press , select Universal access and
press (right) to enter the menu.
2 - Select Audio description > Audio effects > On
and press OK.
3 - Press (left) repeatedly if necessary, to close
the menu.
Speech
To switch on Audio description while watching TV...
1 - While watching a TV channel,
press OPTIONS , select Universal access and
press OK.
2 - Select Audio description, and select On.
You can check if an audio commentary is available.
In the Options menu, select Audio language and
look for an audio language marked with a .
Speakers/ headphones
With Speakers/ headphones, you can select where
you want to hear the audio commentary.
On the TV speakers only, on the headphones only or
on both.
To set Speakers/ headphones…
1 - Press , select Universal access and
press (right) to enter the menu.
2 - Select Audio Description > Speakers/
headphones and press OK.
3 - Select Speakers, Headphones or Speakers +
Headphones and press OK.
4 - Press (left) repeatedly if necessary, to close
the menu.
The audio commentary can also hold subtitles for the
words which are spoken.
To switch on these subtitles (if available) . . .
1 - Press , select Universal access and
press (right) to enter the menu.
2 - Select Audio description > Speech and press
OK.
3 - Select Descriptive or Subtitles and press OK.
4 - Press (left) repeatedly if necessary, to close
the menu.
Mixed volume
You can mix the volume of the normal audio with the
audio commentary.
To mix the volume…
1 - Press , select Universal access and
press (right) to enter the menu.
2 - Select Audio Description > Mixed volume and
press OK.
3 - Press the arrows (up) or (down) to adjust
the value.
4 - Press (left) repeatedly if necessary, to close
the menu.
Audio effect
Some audio commentary can hold extra audio
effects, like stereo or fading sound.
To switch on Audio effects (if available)…
59
Page 60

20
Networks
For more information, in Help, press the colour
key Keywords and look up Network, for more
information on connecting the TV to a network.
60
Page 61

21
Channel installation
21.1
3 - Select Search for channels and press OK.
4 - Select Start now and press OK.
5 - Select Update channels and press OK.
6 - Press BACK to close the menu.
Antenna/cable installation
Update channels
Automatic channel update
If you receive digital channels, you can set the TV to
automatically update the list with new channels.
Alternatively, you can start a channel update yourself.
Automatic channel update
Once a day, at 6 AM, the TV updates the channels
and stores new channels. New channels are stored in
the All channels list but also in the New channels list.
Empty channels are removed.
If new channels are found or if channels are updated
or removed, a message is shown at TV start up. The
TV must be in standby to automatically update
channels.
To switch off the message at start up . . .
1 - Press , select Antenna/cable installation and
press OK.
2 - Enter your PIN code if necessary.
3 - Select Automatic channel update and
press OK.
4 - Select Off and press OK.
5 - Press BACK to close the menu.
When new channels are found or if channels are
updated or removed, a message is shown at TV start
up. To avoid this message to appear after every
channel update, you can switch it off.
To switch off the message…
1 - Press , select Antenna/cable installation and
press OK.
2 - Enter your PIN code if necessary.
3 - Select Channel update message and press OK.
4 - Select Off and press OK.
5 - Press BACK to close the menu.
Reinstall channels
Reinstall all channels
You can reinstall all channels and leave all other TV
settings untouched.
If a PIN code is set, you will need to enter this code
before you can reinstall channels.
To reinstall channels…
Note: Not support DVB-C.
1 - Press , select Antenna/cable installation and
press OK.
2 - Enter your PIN code if necessary.
3 - Select Search for channels and press OK.
4 - Select Start now and press OK.
5 - Select Re-install channels and press OK.
6 - Select the country where you are now and
press OK.
7 - Select Antenna (DVB-T).
8 - Select Start and press OK to update channels.
This can take a few minutes.
9 - Press BACK to close the menu.
Reinstall TV
You can redo a full TV installation. The TV is
completely reinstalled.
To redo a full TV installation…
1 - Press , select General settings > Reinstall
TV and press OK.
2 - Enter your PIN code if necessary.
3 - Select Yes and press OK to confirm.
4 - The TV will reinstall completely. All settings will
be reset and installed channels will be replaced. The
installation can take a few minutes.
5 - Press BACK to close the menu.
In certain countries, the Automatic channel update is
done while watching TV or on any moment when the
TV is in standby.
Manual channel update
You can always start an channel update yourself.
To start a channel update manually…
1 - Press , select Antenna/cable installation and
press OK.
2 - Enter your PIN code if necessary.
DVB-T or DVB-C
DVB-T or DVB-C reception
During the channel installation, just before you search
for channels, you selected Antenna (DVB-T). Antenna
DVB-T searches for terrestrial analogue channels and
digital DVB-T/T2 channels.
Note: Not support DVB-C.
61
Page 62

Channel Number Conflicts
In some countries, different TV channels
(broadcasters) might have the same channel number.
While installing, the TV shows the list with channel
number conflicts. You need to select which TV
channel you want to install on a channel number with
multiple TV channels.
Note: Not support DVB-C.
Frequency step size
The TV searches for channels in steps of 8MHz.
If this results in having no channels installed or if
some channels are missing, you can search in smaller
steps of 1MHz. Using the 1MHz steps will take more
time to search for and install channels.
Digital channels
DVB settings
Access DVB settings
1 - Press , select Antenna/cable installation and
press OK.
2 - Enter your PIN code if necessary.
3 - Select Search for channels and press OK.
4 - Select Start now and press OK.
5 - Select Re-install channels, select Next and
press OK.
6 - Select the country where you are now and
press OK.
7 - Select Cable (DVB-C).
8 - Select Start to search channels, or
select Settings for DVB-C settings .
9 - Press BACK to close the menu.
Network frequency mode
If you intend to use the fast Quick scan method
in Frequency scan to search for channels,
select Automatic. The TV will use 1 of the predefined
network frequencies (or HC - homing channel) as
used by most cable operator in your country.
If you received a specific network frequency value to
search for channels, select Manual.
Network frequency
With the Network frequency mode set to Manual,
you can enter the network frequency value received
from your cable operator here. To enter the value,
use the number keys.
If you know your cable operator is not offering digital
channels, you can skip searching for digital channels.
Analogue channels
If you know your cable operator is not offering
analogue channels, you can skip searching for
analogue channels.
Reception quality
You can check the quality and signal strength of a
digital channel. If you have your own antenna, you
can reposition the antenna to try and improve the
reception.
To check the reception quality of a digital channel…
1 - Tune to the channel.
2 - Press , select Antenna/Cable installation and
press OK. Enter your PIN code if necessary.
3 - Select Digital: reception test and press OK.
The digital frequency is shown for this channel. If the
reception is poor, you can reposition your antenna.
To check the signal quality of this frequency again,
select Search and press OK.
To enter a specific digital frequency yourself, use the
remote control digit keys. Alternatively, select the
frequency, position the arrows on a number
with and and change the number
with and . To check the frequency,
select Search and press OK.
Frequency scan
Select the method of searching for channels. You can
select the faster Quick scan method and use the
predefined settings used by most cable operator in
your country.
If this results in having no channels installed or if
some channels are missing, you can select the
extended Full scan method. This method will take
more time to search for and install channels.
Manual installation
Analogue TV channels can be manually installed,
channel by channel.
To install analogue channels manually…
1 - Press , select Antenna/Cable installation and
press OK. Enter your PIN code if necessary.
2 - Select Analogue: Manual Installation and
press OK.
• System
To set up the TV system, select System.
62
Page 63

Select your country or the part of the world where
you are now and press OK.
• Search channel
To find a channel, select Search channel and
press OK. You can enter a frequency yourself to find
a channel or let the TV search for a channel.
Press (right) to select Search and press OK to
search for a channel automatically. The found
channel is shown on screen and if the reception is
poor, press Search again. If you want to store the
channel, select Done and press OK.
• Fine tune
To fine tune a channel, select Fine tune and
press OK. You can fine tune the channel
with or .
If you want to store the channel found,
select Done and press OK.
• Store
You can store the channel on the current channel
number or as a new channel number.
Select Store Current Channel or Store as New
Channel and press OK. The new channel number is
shown briefly.
You can redo these steps until you have found all
available analogue TV channels.
2 - Select Current Software Info and press OK.
3 - The version, release notes and creation date are
shown. Also, the Netflix ESN Number is shown if
available.
4 - Press (left) repeatedly if necessary, to close
the menu.
Copy a channel list
To copy a channel list…
1 - Switch on the TV. This TV should have channels
installed.
2 - Plug in a USB flash drive.
3 - Press , select General settings > Channel
List Copy and press OK.
4 - Select Copy to USB and press OK. You might
be asked to enter the Child Lock PIN code to copy the
channel list.
5 - When copying is done, unplug the USB flash
drive.
6 - Press (left) repeatedly if necessary, to close
the menu.
Now you can upload the copied channel list onto
another Philips TV.
Channel list version
Check the current version of the channel list...
21.2
Channel list copy
Introduction
Channel List Copy is intended for dealers and expert
users.
With Channel List Copy, you can copy the channels
installed on one TV onto another Philips TV of the
same range. With Channel List Copy, you avoid the
time-consuming channel search by uploading a
predefined channel list on a TV. Use a USB flash drive
of minimum 1 GB.
Conditions
• Both TVs are from the same year range.
• Both TVs have the same hardware type. Check the
hardware type on the TV type plate on the back of
the TV. Typically noted as Q . . . LA
• Both TVs have compatible software versions.
Current software version
To check the cuurent version of the TV software…
1 - Press , select Update Software and
press (right) to enter the menu.
1 - Press , select General settings > Channel List
Copy and press OK.
2 - Select Current version, then press OK.
3 - Press (left) repeatedly if necessary, to close
the menu.
Upload a channel list
To not installed TVs
Depending on whether your TV is already installed or
not, you must use a different method to upload a
channel list.
To a TV that is not yet installed
1 - Plug in the power plug to start the installation and
select language and country. You can skip the
channel search. Finish the installation.
2 - Plug in the USB flash drive that holds the channel
list of the other TV.
3 - To start the channel list upload, press ,
select General settings and press OK.
4 - Select Channel List Copy > Copy to TV and
press OK. Enter your PIN code if necessary.
5 - The TV notifies you if the channel list is copied to
the TV successfully. Unplug the USB flash drive.
63
Page 64

To installed TVs
Depending on whether your TV is already installed or
not, you must use a different method to upload a
channel list.
To an already installed TV
1 - Verify the country setting of the TV. (To verify this
setting, see chapter Reinstall All Channels. Start this
procedure until you reach the country setting.
Press BACK to cancel the installation.)
If the country is correct continue with step 2.
If the country is not correct, you need to start a
reinstallation. See chapter Reinstall All Channels and
start the installation. Select the correct country and
skip the channels search. Finish the installation. When
done, continue with step 2.
2 - Plug in the USB flash drive that holds the channel
list of the other TV.
3 - To start the channel list upload, press ,
select General settings and press OK.
4 - Select Channel List Copy > Copy to TV and
press OK. Enter your PIN code if necessary.
5 - The TV notifies you if the channel list is copied to
the TV successfully. Unplug the USB flash drive.
64
Page 65

22
Software
22.1
Update the TV software
1 - Insert the USB flash drive into the TV again. The
update starts automatically. The TV switches itself off
for 10 seconds and then back on again. Please wait.
Do not . . .
Update software
Update from Internet
If the TV is connected to the Internet, you may receive
a message from TP Vision to update the TV software.
You need a high-speed (broadband) Internet
connection.
If you receive this message, we recommend you carry
out the update.
Select Update. Follow the instructions on screen.
You can also look for new updates yourself.
To look for an update . . .
1 - Press , select Update software > Search for
updates, then press OK.
2 - Select Internet, then press OK. Follow the
instructions on screen.
When the update is complete, the TV switches off and
back on again automatically.
Wait for the TV to switch itself back on.
• use the remote control
• remove the USB memory device from the TV
If a power cut occurs during the update, never
remove the USB memory device from the TV. When
the power returns, the update will continue.
At the end of the update, the message Operation
successful appears on screen. Remove the USB
memory device and press on the remote control.
Do not . . .
• press twice
• press the power switch on the TV
The TV switches itself off (for 10 seconds) and then
back on again. Please wait.
The TV software has been updated. You can use the
TV again.
To prevent an accidental update of the TV software,
delete the autorun.upg file from the USB memory
device.
22.2
Update from USB
It might be necessary to update the TV software. You
need a computer with an high-speed Internet
connection and a USB flash drive to upload the
software on the TV. Use a USB flash drive with at least
500MB free space. Make sure that write protection is
switched off.
To update the TV software…
1 - Press and press OK.
2 - Select Update Software > Search for
Updates and press OK.
3 - Select USB and press OK.
Identify the TV
1 - Insert the USB flash drive into one of the USB
connections of the TV.
2 - Select Write to USB and press OK. An
identification file is written on the USB flash drive.
Download the software
1 - Insert the USB flash drive into your computer.
2 - On the USB flash drive, locate the
file update.htm and double click it.
3 - Click Send ID.
4 - If new software is available, download the .zip
file.
5 - After the download, unzip the file and copy the
file autorun.upg onto the USB flash drive. Do not
place this file in a folder.
Software version
To view the current TV software version…
1 - Press , select Update Software > Current
Software Info and press OK.
2 - The version, Release Version is shown. Also, the
Netflix ESN Number is shown if available.
3 - Press (left) repeatedly if necessary, to close
the menu.
22.3
Local updates
For dealers and expert users…
1 - Press , select Update Software > Local
updates and press OK.
2 - Follow the on-screen instruction.
3 - Press (left) repeatedly if necessary, to close
the menu.
65
Page 66

22.4
22.7
Look for OAD updates
Search for an Over-the-air software update…
1 - Press , select Update Software > Look for
OAD updates and press OK.
2 - Select Start now. Follow the on-screen
instruction.
3 - Press (left) repeatedly if necessary, to close
the menu.
22.5
Open source software
This television contains open source software. TP
Vision Europe B.V. hereby offers to deliver, upon
request, a copy of the complete corresponding
source code for the copyrighted open source
software packages used in this product for which such
offer is requested by the respective licences.
This offer is valid up to three years after product
purchase to anyone in receipt of this information.
To obtain the source code, please write in English to .
. .
22.6
Open source license
statement
Acknowledgements and License Texts for any open
source software used in this Philips TV.
This is a document describing the distribution of the
source code used on the Philips TV, which fall either
under the GNU General Public License (the GPL), or
the GNU Lesser General Public License (the LGPL), or
any other open source license. Instructions to obtain
source code for this software can be found in the user
manual.
PHILIPS MAKES NO WARRANTIES WHATSOEVER,
EITHER EXPRESS OR IMPLIED, INCLUDING ANY
WARRANTIES OF MERCHANTABILITY OR FITNESS
FOR A PARTICULAR PURPOSE, REGARDING THIS
SOFTWARE. Philips offers no support for this
software. The preceding does not affect your
warranties and statutory rights regarding any Philips
product(s) you purchased. It only applies to this
source code made available to you.
Open source license
Freetype (2.4.3)
FreeType is a software font engine that is designed to
be small, efficient, highly customizable, and portable
while capable of producing high-quality output
(glyph images).
This piece of software is made available under the
terms and conditions of the FreeType Project license,
which can be found below.
Source: http://freetype.sourceforge.net
zlib (1.2.3)
The 'zlib' compression library provides in-memory
compression and decompression functions, including
integrity checks of the uncompressed data.
This piece of software is made available under the
terms and conditions of the zlib license, which can be
found below.
Source: http://www.zlib.net/
Fraunhofer AAC Ecnoder (3.3.3)
AAC Ecnoder.
Source: Android JB source code
unicode (3.2)
This library is used to perform UNICODE string
manipulation.
This piece of software is made available under the
terms and conditions of the ICU license, which can be
found below.
Source: http://www.icu-project.org/
libpng (1.2.43)
PNG decoder.
This piece of software is made available under the
terms and conditions of the libpng license, which can
be found below.
Source: http://www.libpng.org/pub/png/libpng.html
libjpg (6b)
This library is used to perform JPEG decoding tasks.
This piece of software is made available under the
terms and conditions of the libjpg license, which can
be found below.
Source: http://www.ijg.org/
libmng (1.0.10)
libmng -THE reference library for reading, displaying,
writing and examining Multiple-Image Network
Graphics.MNG is the animation extension to the
popular PNG image-format.
This piece of software is made available under the
terms and conditions of the libmng license, which can
be found below.
Source:
http://sourceforge.net/projects/libmng/files/
66
Page 67

u-Boot loader (1.3.4)
Used by boot loader and only linked with boot
loader, GPL license.
This piece of software is made available under the
terms and conditions of the u-Boot loader license,
which can be found below.
Source: http://sourceforge.net/projects/u-boot/files/
u-boot/U-Boot-1.1.4/u-boot-1.1.4.tar.bz2/download
Libcurl (7.21.7)
HTTP client;libcurl is a free and easy-to-use clientside URL transfer library, supporting FTP, FTPS, HTTP,
HTTPS, SCP, SFTP, TFTP, TELNET, DICT, LDAP,
LDAPS, FILE, IMAP, SMTP, POP3 and RTSP. libcurl
supports SSL certificates, HTTP POST, HTTP PUT, FTP
uploading, HTTP form based upload, proxies, cookies,
user+password authentication (Basic, Digest, NTLM,
Negotiate, Kerberos4), file transfer resume, http proxy
tunneling and more!
This piece of software is made available under the
terms and conditions of the Libcurl license, which can
be found below.
Source: http://curl.haxx.se/
c-ares (1.7.4)
c-ares is a C library that performs DNS requests and
name resolves asynchronously.
This piece of software is made available under the
terms and conditions of the c-ares license, which can
be found below.
Source: http://c-ares.haxx.se/c-ares-1.7.1.tar.gz
openssl (1.0.0d)
OpenSSL is an open source implementation of the
SSL and TLS protocols. The core library (written in the
C programming language) implements the basic
cryptographic functions and provides various utility
functions. Wrappers allowing the use of the OpenSSL
library in a variety of computer languages are
available.
This piece of software is made available under the
terms and conditions of the 1.7.4 license, which can be
found below.
Source:
http://www.openssl.org/source/openssl-1.0.0.tar.gz
Expat (2.01)
xml paser; Expat is an XML parser library written in C.
It is a stream-oriented parser in which an application
registers handlers for things the parser might find in
the XML document (like start tags). An introductory
article on using.
This piece of software is made available under the
terms and conditions of the Expat license, which can
be found below.
Source: http://expat.sourceforge.net/
DirectFB include SAWMAN (1.4.0)
It is a software library for GNU/Linux/UNIX based
operating system with a small memory footprint that
provides graphics acceleration, input device handling
and abstraction layer, and integrated windowing
system with support for translucent windows and
multiple display layers on top of the Linux
framebuffer without requiring any kernel
modifications.
This piece of software is made available under the
terms and conditions of the DirectFB license, which
can be found below.
Source: http://sourceforge.net/projects/jointspace/fil
es/remote_applications_SDK/remote_spplications_S
DK_v1.3.1/DirectFB141_source_1.3.1.7z/download
SAWMAN
SquashFS is a compressed read-only file system for
Linux. SquashFS compresses files, inodes and
directories, and supports block sizes up to 1 MB for
greater compression. SquashFS is also the name of
free/open software, licensed under the GPL, for
accessing SquashFS filesystems.
Source: http://squashfs.sourceforge.net/
Linux Kernel (3.0)
The Linux kernel is an operating system kernel used
by the Linux family of Unix-like operating systems.
This piece of software is made available under the
terms and conditions of the Linux Kernel license,
which can be found below.
Source: http://www.kernel.org
SQLite (3.7.2)
SQLite is a in-process library that implements a selfcontained, serverless, zero-configuration,
transactional SQL database engine.
This piece of software is made available under the
terms and conditions of the SQLite license, which can
be found below.
Source: http://www.sqlite.org/download.html
SquashFS (3.4)
SquashFS is a compressed read-only file system for
Linux. SquashFS compresses files, inodes and
directories, and supports block sizes up to 1 MB for
greater compression. SquashFS is also the name of
free/open software, licensed under the GPL, for
accessing SquashFS filesystems.
This piece of software is made available under the
terms and conditions of the SquashFS license, which
can be found below.
Source: http://squashfs.sourceforge.net/
glibc (2.6.1)
Any Unix-like operating system needs a C library: the
library which defines the ``system calls'' and other
basic facilities such as open, malloc, printf, exit...The
GNU C library is used as the C library in the GNU
system and most systems with the Linux kernel
This piece of software is made available under the
terms and conditions of the glibc license, which can
be found below.
67
Page 68

Source: http://www.gnu.org/software/libc/
mtd-utils (1)
The aim of the system is to make it simple to provide
a driver for new hardware, by providing a generic
interface between the hardware drivers and the upper
layers of the system. Hardware drivers need to know
nothing about the storage formats used, such as FTL,
FFS2, etc., but will only need to provide simple
routines for read, write and erase. Presentation of the
device's contents to the user in an appropriate form
will be handled by the upper layers of the system.
This piece of software is made available under the
terms and conditions of the mtd-utils license, which
can be found below.
Source: http://www.linuxmtd.infradead.org/index.html
WPA Supplicant (0.5.10 & 0.6.7)
These packages are used to provide WiFi access.The
supplier for these tools is Atheros.These pieces of
software are made available under the terms and
conditions of the GPL v2 license, which can be found
below.
This piece of software is made available under the
terms and conditions of the WPA Supplicant license,
which can be found below.
Source: http://hostap.epitest.fi/wpa_supplicant/
ntfsprogs (2.0.0)
Some useful tool for ntfs file sytem.
This piece of software is made available under the
terms and conditions of the ntfsprogs license, which
can be found below.
Source: http://sourceforge.net/projects/linux-ntfs
libusb (1.0.6)
This is the home of libusb, a library that gives user
level applications uniform access to USB devices
across many different operating systems. libusb is an
open source project licensed under the GNU Lesser
General Public License version 2.1.Many participants
in the libusb community have helped and continue to
help with ideas, implementation, support and
improvements for libusb.
This piece of software is made available under the
terms and conditions of the libusb license, which can
be found below.
Source:
http://libusb.wiki.sourceforge.net
http://www.libusb.org/
libusb-compat (0.1.3)
Library to enable user space application programs to
communicate with USB devices.
This piece of software is made available under the
terms and conditions of the libusb-compat license,
which can be found below.
Source:
http://libusb.wiki.sourceforge.net/LibusbCompat0.1
fuse (2.8.4)
Fuse is a simple interface for userspace programs to
export a virtual filesystem to the linux kernel.
This piece of software is made available under the
terms and conditions of the fuse license, which can
be found below.
Source: http://fuse.sourceforge.net/
libiconv (1.11.1)
This library provides an iconv() implementation, for
use on systems which don't have one, or whose
implementation cannot convert from/to Unicode. .
This piece of software is made available under the
terms and conditions of the libiconv license, which
can be found below.
Source: http://ftp.gnu.org/pub/gnu/libiconv
electric-fence (2.1.13)
Used for memory corruption detection.
This piece of software is made available under the
terms and conditions of the electric-fence license,
which can be found below.
Source: http://perens.com/FreeSoftware/ElectricFenc
e/electric-fence_2.1.13-0.1.tar.gz
NTFS-3G Read/Write Driver (2010.5.22)
NTFS-3G is an open source cross-platform
implementation of the Microsoft Windows NTFS file
system with read-write support. NTFS-3G often uses
the FUSE file system interface, so it can run
unmodified on many different operating systems. It is
runnable on Linux, FreeBSD, NetBSD, OpenSolaris,
BeOS, QNX, WinCE, Nucleus, VxWorks,
Haiku,MorphOS, and Mac OS X It is licensed under
either the GNU General Public License or a
proprietary license. It is a partial fork of ntfsprogs and
is under active maintenance and development.
This piece of software is made available under the
terms and conditions of the NTFS-3G Read/Write
Driver license, which can be found below.
Source: http://www.tuxera.com
liveMedia
When Wifi Display or streaming RtspPlayer are
enabled.
This piece of software is made available under the
terms and conditions of the electric-fence license,
which can be found below.
Source: www.live555.com
QT (4.7.0)
Netflix skpe besttv pandora picasa? will use QT.
This piece of software is made available under the
terms and conditions of the QT license, which can be
found below.
Source: http://qt.nokia.com/
e2fsprogs (1.41.14)
e2fsprogs provides the filesystem utilities for use with
68
Page 69

the ext2 filesystem, it also supports the ext3 and ext4
filesystems.
This piece of software is made available under the
terms and conditions of the e2fsprogs license, which
can be found below.
Source: http://e2fsprogs.sourceforge.net/
alsa (1.0.24.1)
Advanced Linux Sound Architecture (ALSA).
This piece of software is made available under the
terms and conditions of the alsa license, which can be
found below.
Source: http://www.alsa-project.org
lvm2 (2.02.89)
DM_VERITY.
This piece of software is made available under the
terms and conditions of the lvm2 license, which can
be found below.
Source:
ftp://sources.redhat.com/pub/lvm2/releases/
encfs (1.3.2)
A library provides an encrypted filesystem in userspace.
Source: http://www.arg0.net/encfs
boost (1.15.0)
A library provides free peer-reviewed portable C++
source libraries is used for encfs.
Source: http://www.boost.org
rlog (1.4)
A library that provides a flexible message logging
facility for C programs and libraries is used for encfs.
Source: http://www.arg0.net/rlog
iptables (1.4.15)
For Cross connection.
Source: http://www.netfilter.org/projects/iptables/
bash (3.2.48)
Bash is the shell, or command language interpreter,
that will appear in the GNU operating system.
Bash is an sh-compatible shell that incorporates
useful features from the Korn shell (ksh) and C shell
(csh).
It is intended to conform to the IEEE POSIX
P1003.2/ISO 9945.2 Shell and Tools standard.
It offers functional improvements over sh for both
programming and interactive use.
In addition, most sh scripts can be run by Bash
without modification.
Source: http://www.gnu.org/software/bash/
coreutils (6.9)
The GNU Core Utilities are the basic file, shell and text
manipulation utilities of the GNU operating system.
These are the core utilities which are expected to
exist on every operating system.
Source: http://www.gnu.org/software/coreutils/
findutils (4.2.31)
The GNU Find Utilities are the basic directory
searching utilities of the GNU operating system.
These programs are typically used in conjunction with
other programs to provide modular and powerful
directory search and file locating capabilities to other
commands.
Source: http://www.gnu.org/software/findutils/
gawk (3.1.5)
If you are like many computer users, you would
frequently like to make changes in various text files
wherever certain patterns appear, or extract data from
parts of certain lines while discarding the rest.
To write a program to do this in a language such as C
or Pascal is a time-consuming inconvenience that
may take many lines of code.
The job is easy with awk, especially the GNU
implementation: gawk.
Source: http://www.gnu.org/software/gawk/
grep (2.5.1a)
The grep command searches one or more input files
for lines containing a match to a specified pattern. By
default, grep prints the matching lines.
Source: http://www.gnu.org/software/grep/
gzip (1.3.12)
GNU Gzip is a popular data compression program
originally written by Jean-loup Gailly for the GNU
project. Mark Adler wrote the decompression part.
Source: http://www.gnu.org/software/gzip/
inetutils (1.4.2)
Inetutils is a collection of common network
programs.
Source: http://www.gnu.org/software/inetutils/
iputils (s20101006)
The iputils package is set of small useful utilities for
Linux networking. It was originally maintained by
Alexey Kuznetsov.
Source: http://www.skbuff.net/iputils/
module-init-tools (3.12)
Provides developer documentation for the utilities
used by Linux systems to load and manage kernel
modules (commonly referred to as "drivers").
Source: https://modules.wiki.kernel.org/index.php/M
ain_Page
ncurses (5.7)
The Ncurses (new curses) library is a free software
emulation of curses in System V Release 4.0, and
more.
It uses Terminfo format, supports pads and color and
multiple highlights and forms characters and functionkey mapping, and has all the other SYSV-curses
69
Page 70

enhancements over BSD Curses.
Source: http://www.gnu.org/software/ncurses/
net-tools (1.6)
The Net-tools?package is a collection of programs for
controlling the network subsystem of the Linux
kernel.
Source: http://www.linuxfromscratch.org/blfs/view/6.
3/basicnet/net-tools.html
procps (ps, top) (3.2.8)
procps is the package that has a bunch of small
useful utilities that give information about processes
using the /proc filesystem.
The package includes the programs ps, top, vmstat, w,
kill, free, slabtop, and skill.
Source: http://procps.sourceforge.net/index.html
psmisc (22.13)
This PSmisc package is a set of some small useful
utilities that use the proc filesystem. We're not about
changing the world, but providing the system
administrator with some help in common tasks.
Source: http://psmisc.sourceforge.net/
sed (4.1.5)
sed (stream editor) isn't an interactive text editor.
Instead, it is used to filter text, i.e., it takes text input,
performs some operation (or set of operations) on it,
and outputs the modified text.
sed is typically used for extracting part of a file using
pattern matching or substituting multiple occurrences
of a string within a file.
Source: http://www.gnu.org/software/sed/
uriparser (0.7.7)
For MPEG-DASH
Source: http://uriparser.sourceforge.net/
xerces-c++ (3.1.1)
For MPEG-DASH
Source: http://xerces.apache.org/
webp (0.2.1)
For Netflix
Source: https://code.google.com/p/webp/
wget (1.10.2)
GNU Wget is a free software package for retrieving
files using HTTP, HTTPS and FTP, the most widelyused Internet protocols.
It is a non-interactive commandline tool, so it may
easily be called from scripts,?cron?jobs, terminals
without X-Windows support, etc.
Source:
http://ftp.gnu.org/gnu/wget/wget-1.10.2.tar.gz
wireless_tools (0.29)
The Wireless Tools (WT)?is a set of tools allowing to
manipulate the Wireless Extensions.
They use a textual interface and are rather crude, but
aim to support the full Wireless Extension.
Source: http://www.hpl.hp.com/personal/Jean_Tourri
lhes/Linux/Tools.html
ezxml (0.8.6)
ezXML is a C library for parsing XML documents. Used
inside Philips libraries.
Source: http://sourceforge.net/projects/ezxml/
tar (1.17)
GNU Tar provides the ability to create tar archives, as
well as various other kinds of manipulation.
For example, you can use Tar on previously created
archives to extract files, to store additional files, or to
update or list files which were already stored.
Source: http://www.gnu.org/software/tar/
util-linux-ng (2.18)
Various system utilities.
Source: http://userweb.kernel.org/~kzak/util-linuxng/
udhcpc (0.9.8cvs20050303-3)
Udhcpc is a very small?DHCP?client geared
towards?embedded systems.
Source: http://udhcp.sourcearchive.com/downloads/
0.9.8cvs20050303-3/
Libxml2 (2.7.8)
The "libxml2" library is used in AstroTV as a support
for the execution of NCL application. This library was
developed for the GNOME software suite and is
available under a "MIT" license.
Source: http://www.xmlsoft.org
SQLite (3.7.7.1)
SQLite is a in-process library that implements a selfcontained, serverless, zero-configuration,
transactional SQL database engine.
Source: http://www.sqlite.org/download.html
AES (aes-src-29-04-09.zip)
Advanced Encryption Standard (AES) is a
specification for the encryption of electronic data.
Used inside Philips libraries.
Source: http://gladman.plushost.co.uk/oldsite/AES/
microhttpd (libmicrohttpd-0.9.9.tar.gz)
GNU libmicrohttpd is a small C library that is
supposed to make it easy to run an HTTP server as
part of another application.
The original download site for this software is :
http://www.gnu.org/software/libmicrohttpd/This
piece of software is made available under the terms
and conditions of the LGPL v2.1 license
Source: http://ftp.gnu.org/gnu/libmicrohttpd/libmicro
httpd-0.9.9.tar.gz
yajl (lloyd-yajl-2.0.1-0-gf4b2b1a.tar.gz)
YAJL is a small event-driven (SAX-style) JSON parser
70
Page 71

written in ANSI C, and a small validating JSON
generator. YAJL is released under the ISC license.
The original download site for this software is :
http://lloyd.github.com/yajl/This piece of software is
made available under the terms and conditions of the
ISC license
Source: http://pkgs.fedoraproject.org/repo/pkgs/yajl/
lloyd-yajl-2.0.1-0-gf4b2b1a.tar.gz/df6a751e7797b9c21
82efd91b5d64017/lloyd-yajl-2.0.1-0-gf4b2b1a.tar.gz
HMAC-SHA1 (0.1)
keyed-hash message authentication code (HMAC) is
a specific construction for calculating a message
authentication code (MAC) involving a cryptographic
hash function in combination with a secret
cryptographic key.
As with any MAC, it may be used to simultaneously
verify both the data integrity and the authentication
of a message.
Any cryptographic hash function, such as MD5 or
SHA-1, may be used in the calculation of an HMAC;
the resulting MAC algorithm is termed HMAC-MD5 or
HMAC-SHA1 accordingly.
Source:
http://www.deadhat.com/wlancrypto/hmac_sha1.c
gSoap (2.7.15)
The gSOAP toolkit is an open source C and C++
software development toolkit for SOAP/XML Web
services and generic (non-SOAP) C/C++ XML data
bindings.
Part of the software embedded in this product is
gSOAP software. Portions created by gSOAP are
Copyright 2000-2011 Robert A. van Engelen, Genivia
inc. All Rights Reserved.
Source: http://sourceforge.net/projects/gsoap2/
jquery (1.10.2)
jQuery is a fast and concise JavaScript Library that
simplifies HTML document traversing, event handling,
animating, and Ajax interactions for rapid web
development.
Source: http://jquery.com/
Source: http://developer.apple.com/bonjour/Acknow
ledgements and License Texts for any open source
software used in this Philips TV.
This is a document describing the distribution of the
source code used on the Philips TV, which fall either
under the GNU General Public License (the GPL), or
the GNU Lesser General Public License (the LGPL), or
any other open source license. Instructions to obtain
source code for this software can be found in the user
manual.
PHILIPS MAKES NO WARRANTIES WHATSOEVER,
EITHER EXPRESS OR IMPLIED, INCLUDING ANY
WARRANTIES OF MERCHANTABILITY OR FITNESS
FOR A PARTICULAR PURPOSE, REGARDING THIS
SOFTWARE. Philips offers no support for this
software. The preceding does not affect your
warranties and statutory rights regarding any Philips
product(s) you purchased. It only applies to this
source code made available to you.
Freetype (2.4.3)
FreeType is a software font engine that is designed to
be small, efficient, highly customizable, and portable
while capable of producing high-quality output
(glyph images).
This piece of software is made available under the
terms and conditions of the FreeType Project license,
which can be found below.
Source: http://freetype.sourceforge.net
zlib (1.2.3)
The 'zlib' compression library provides in-memory
compression and decompression functions, including
integrity checks of the uncompressed data.
This piece of software is made available under the
terms and conditions of the zlib license, which can be
found below.
Source: http://www.zlib.net/
Fraunhofer AAC Ecnoder (3.3.3)
AAC Ecnoder.
Source: Android JB source code
Libupnp (1.2.1)
The Linux* SDK for UPnP* Devices (libupnp) provides
developers with an API and open source code for
building control points, devices, and bridges that are
compliant with Version 1.0 of the UPnP Device
Architecture Specification.
Source: http://upnp.sourceforge.net/
mDNSResponder (mDNSResponder-320.10.80)
The mDNSResponder project is a component of
Bonjour,
Apple's ease-of-use IP networking
initiative:<http://developer.apple.com/bonjour/>
In our project, Bonjour is used for the automatic
discovery of devices and services
unicode (3.2)
This library is used to perform UNICODE string
manipulation.
This piece of software is made available under the
terms and conditions of the ICU license, which can be
found below.
Source: http://www.icu-project.org/
libpng (1.2.43)
PNG decoder.
This piece of software is made available under the
terms and conditions of the libpng license, which can
be found below.
Source: http://www.libpng.org/pub/png/libpng.html
71
Page 72

libjpg (6b)
This library is used to perform JPEG decoding tasks.
This piece of software is made available under the
terms and conditions of the libjpg license, which can
be found below.
Source: http://www.ijg.org/
libmng (1.0.10)
libmng -THE reference library for reading, displaying,
writing and examining Multiple-Image Network
Graphics.MNG is the animation extension to the
popular PNG image-format.
This piece of software is made available under the
terms and conditions of the libmng license, which can
be found below.
Source:
http://sourceforge.net/projects/libmng/files/
u-Boot loader (1.3.4)
Used by boot loader and only linked with boot
loader, GPL license.
This piece of software is made available under the
terms and conditions of the u-Boot loader license,
which can be found below.
Source: http://sourceforge.net/projects/u-boot/files/
u-boot/U-Boot-1.1.4/u-boot-1.1.4.tar.bz2/download
Libcurl (7.21.7)
HTTP client;libcurl is a free and easy-to-use clientside URL transfer library, supporting FTP, FTPS, HTTP,
HTTPS, SCP, SFTP, TFTP, TELNET, DICT, LDAP,
LDAPS, FILE, IMAP, SMTP, POP3 and RTSP. libcurl
supports SSL certificates, HTTP POST, HTTP PUT, FTP
uploading, HTTP form based upload, proxies, cookies,
user+password authentication (Basic, Digest, NTLM,
Negotiate, Kerberos4), file transfer resume, http proxy
tunneling and more!
This piece of software is made available under the
terms and conditions of the Libcurl license, which can
be found below.
Source: http://curl.haxx.se/
c-ares (1.7.4)
c-ares is a C library that performs DNS requests and
name resolves asynchronously.
This piece of software is made available under the
terms and conditions of the c-ares license, which can
be found below.
Source: http://c-ares.haxx.se/c-ares-1.7.1.tar.gz
openssl (1.0.0d)
OpenSSL is an open source implementation of the
SSL and TLS protocols. The core library (written in the
C programming language) implements the basic
cryptographic functions and provides various utility
functions. Wrappers allowing the use of the OpenSSL
library in a variety of computer languages are
available.
This piece of software is made available under the
terms and conditions of the 1.7.4 license, which can be
found below.
Source:
http://www.openssl.org/source/openssl-1.0.0.tar.gz
Expat (2.01)
xml paser; Expat is an XML parser library written in C.
It is a stream-oriented parser in which an application
registers handlers for things the parser might find in
the XML document (like start tags). An introductory
article on using.
This piece of software is made available under the
terms and conditions of the Expat license, which can
be found below.
Source: http://expat.sourceforge.net/
DirectFB include SAWMAN (1.4.0)
It is a software library for GNU/Linux/UNIX based
operating system with a small memory footprint that
provides graphics acceleration, input device handling
and abstraction layer, and integrated windowing
system with support for translucent windows and
multiple display layers on top of the Linux
framebuffer without requiring any kernel
modifications.
This piece of software is made available under the
terms and conditions of the DirectFB license, which
can be found below.
Source: http://sourceforge.net/projects/jointspace/fil
es/remote_applications_SDK/remote_spplications_S
DK_v1.3.1/DirectFB141_source_1.3.1.7z/download
SAWMAN
SquashFS is a compressed read-only file system for
Linux. SquashFS compresses files, inodes and
directories, and supports block sizes up to 1 MB for
greater compression. SquashFS is also the name of
free/open software, licensed under the GPL, for
accessing SquashFS filesystems.
Source: http://squashfs.sourceforge.net/
Linux Kernel (3.0)
The Linux kernel is an operating system kernel used
by the Linux family of Unix-like operating systems.
This piece of software is made available under the
terms and conditions of the Linux Kernel license,
which can be found below.
Source: http://www.kernel.org
SQLite (3.7.2)
SQLite is a in-process library that implements a selfcontained, serverless, zero-configuration,
transactional SQL database engine.
This piece of software is made available under the
terms and conditions of the SQLite license, which can
be found below.
Source: http://www.sqlite.org/download.html
SquashFS (3.4)
SquashFS is a compressed read-only file system for
Linux. SquashFS compresses files, inodes and
72
Page 73

directories, and supports block sizes up to 1 MB for
greater compression. SquashFS is also the name of
free/open software, licensed under the GPL, for
accessing SquashFS filesystems.
This piece of software is made available under the
terms and conditions of the SquashFS license, which
can be found below.
Source: http://squashfs.sourceforge.net/
glibc (2.6.1)
Any Unix-like operating system needs a C library: the
library which defines the ``system calls'' and other
basic facilities such as open, malloc, printf, exit...The
GNU C library is used as the C library in the GNU
system and most systems with the Linux kernel
This piece of software is made available under the
terms and conditions of the glibc license, which can
be found below.
Source: http://www.gnu.org/software/libc/
mtd-utils (1)
The aim of the system is to make it simple to provide
a driver for new hardware, by providing a generic
interface between the hardware drivers and the upper
layers of the system. Hardware drivers need to know
nothing about the storage formats used, such as FTL,
FFS2, etc., but will only need to provide simple
routines for read, write and erase. Presentation of the
device's contents to the user in an appropriate form
will be handled by the upper layers of the system.
This piece of software is made available under the
terms and conditions of the mtd-utils license, which
can be found below.
Source: http://www.linuxmtd.infradead.org/index.html
libusb (1.0.6)
This is the home of libusb, a library that gives user
level applications uniform access to USB devices
across many different operating systems. libusb is an
open source project licensed under the GNU Lesser
General Public License version 2.1.Many participants
in the libusb community have helped and continue to
help with ideas, implementation, support and
improvements for libusb.
This piece of software is made available under the
terms and conditions of the libusb license, which can
be found below.
Source:
http://libusb.wiki.sourceforge.net
http://www.libusb.org/
NTFS-3G Read/Write Driver (2010.5.22)
NTFS-3G is an open source cross-platform
implementation of the Microsoft Windows NTFS file
system with read-write support. NTFS-3G often uses
the FUSE file system interface, so it can run
unmodified on many different operating systems. It is
runnable on Linux, FreeBSD, NetBSD, OpenSolaris,
BeOS, QNX, WinCE, Nucleus, VxWorks,
Haiku,MorphOS, and Mac OS X It is licensed under
either the GNU General Public License or a
proprietary license. It is a partial fork of ntfsprogs and
is under active maintenance and development.
This piece of software is made available under the
terms and conditions of the NTFS-3G Read/Write
Driver license, which can be found below.
Source: http://www.tuxera.com
WPA Supplicant (0.5.10 & 0.6.7)
These packages are used to provide WiFi access.The
supplier for these tools is Atheros.These pieces of
software are made available under the terms and
conditions of the GPL v2 license, which can be found
below.
This piece of software is made available under the
terms and conditions of the WPA Supplicant license,
which can be found below.
Source: http://hostap.epitest.fi/wpa_supplicant/
ntfsprogs (2.0.0)
Some useful tool for ntfs file sytem.
This piece of software is made available under the
terms and conditions of the ntfsprogs license, which
can be found below.
Source: http://sourceforge.net/projects/linux-ntfs
fuse (2.8.4)
Fuse is a simple interface for userspace programs to
export a virtual filesystem to the linux kernel.
This piece of software is made available under the
terms and conditions of the fuse license, which can
be found below.
Source: http://fuse.sourceforge.net/
libiconv (1.11.1)
This library provides an iconv() implementation, for
use on systems which don't have one, or whose
implementation cannot convert from/to Unicode. .
This piece of software is made available under the
terms and conditions of the libiconv license, which
can be found below.
Source: http://ftp.gnu.org/pub/gnu/libiconv
libusb-compat (0.1.3)
Library to enable user space application programs to
communicate with USB devices.
This piece of software is made available under the
terms and conditions of the libusb-compat license,
which can be found below.
Source:
http://libusb.wiki.sourceforge.net/LibusbCompat0.1
electric-fence (2.1.13)
Used for memory corruption detection.
This piece of software is made available under the
terms and conditions of the electric-fence license,
which can be found below.
Source: http://perens.com/FreeSoftware/ElectricFenc
e/electric-fence_2.1.13-0.1.tar.gz
73
Page 74

liveMedia
When Wifi Display or streaming RtspPlayer are
enabled.
This piece of software is made available under the
terms and conditions of the electric-fence license,
which can be found below.
Source: www.live555.com
QT (4.7.0)
Netflix skpe besttv pandora picasa? will use QT.
This piece of software is made available under the
terms and conditions of the QT license, which can be
found below.
Source: http://qt.nokia.com/
e2fsprogs (1.41.14)
e2fsprogs provides the filesystem utilities for use with
the ext2 filesystem, it also supports the ext3 and ext4
filesystems.
This piece of software is made available under the
terms and conditions of the e2fsprogs license, which
can be found below.
Source: http://e2fsprogs.sourceforge.net/
alsa (1.0.24.1)
Advanced Linux Sound Architecture (ALSA).
This piece of software is made available under the
terms and conditions of the alsa license, which can be
found below.
Source: http://www.alsa-project.org
lvm2 (2.02.89)
DM_VERITY.
This piece of software is made available under the
terms and conditions of the lvm2 license, which can
be found below.
Source:
ftp://sources.redhat.com/pub/lvm2/releases/
encfs (1.3.2)
A library provides an encrypted filesystem in userspace.
Source: http://www.arg0.net/encfs
boost (1.15.0)
A library provides free peer-reviewed portable C++
source libraries is used for encfs.
Source: http://www.boost.org
rlog (1.4)
A library that provides a flexible message logging
facility for C programs and libraries is used for encfs.
Source: http://www.arg0.net/rlog
iptables (1.4.15)
For Cross connection.
Source: http://www.netfilter.org/projects/iptables/
bash (3.2.48)
Bash is the shell, or command language interpreter,
that will appear in the GNU operating system.
Bash is an sh-compatible shell that incorporates
useful features from the Korn shell (ksh) and C shell
(csh).
It is intended to conform to the IEEE POSIX
P1003.2/ISO 9945.2 Shell and Tools standard.
It offers functional improvements over sh for both
programming and interactive use.
In addition, most sh scripts can be run by Bash
without modification.
Source: http://www.gnu.org/software/bash/
coreutils (6.9)
The GNU Core Utilities are the basic file, shell and text
manipulation utilities of the GNU operating system.
These are the core utilities which are expected to
exist on every operating system.
Source: http://www.gnu.org/software/coreutils/
findutils (4.2.31)
The GNU Find Utilities are the basic directory
searching utilities of the GNU operating system.
These programs are typically used in conjunction with
other programs to provide modular and powerful
directory search and file locating capabilities to other
commands.
Source: http://www.gnu.org/software/findutils/
gawk (3.1.5)
If you are like many computer users, you would
frequently like to make changes in various text files
wherever certain patterns appear, or extract data from
parts of certain lines while discarding the rest.
To write a program to do this in a language such as C
or Pascal is a time-consuming inconvenience that
may take many lines of code.
The job is easy with awk, especially the GNU
implementation: gawk.
Source: http://www.gnu.org/software/gawk/
grep (2.5.1a)
The grep command searches one or more input files
for lines containing a match to a specified pattern. By
default, grep prints the matching lines.
Source: http://www.gnu.org/software/grep/
gzip (1.3.12)
GNU Gzip is a popular data compression program
originally written by Jean-loup Gailly for the GNU
project. Mark Adler wrote the decompression part.
Source: http://www.gnu.org/software/gzip/
inetutils (1.4.2)
Inetutils is a collection of common network
programs.
Source: http://www.gnu.org/software/inetutils/
iputils (s20101006)
The iputils package is set of small useful utilities for
Linux networking. It was originally maintained by
74
Page 75

Alexey Kuznetsov.
Source: http://www.skbuff.net/iputils/
module-init-tools (3.12)
Provides developer documentation for the utilities
used by Linux systems to load and manage kernel
modules (commonly referred to as "drivers").
Source: https://modules.wiki.kernel.org/index.php/M
ain_Page
ncurses (5.7)
The Ncurses (new curses) library is a free software
emulation of curses in System V Release 4.0, and
more.
It uses Terminfo format, supports pads and color and
multiple highlights and forms characters and functionkey mapping, and has all the other SYSV-curses
enhancements over BSD Curses.
Source: http://www.gnu.org/software/ncurses/
net-tools (1.6)
The Net-tools?package is a collection of programs for
controlling the network subsystem of the Linux
kernel.
Source: http://www.linuxfromscratch.org/blfs/view/6.
3/basicnet/net-tools.html
procps (ps, top) (3.2.8)
procps is the package that has a bunch of small
useful utilities that give information about processes
using the /proc filesystem.
The package includes the programs ps, top, vmstat, w,
kill, free, slabtop, and skill.
Source: http://procps.sourceforge.net/index.html
psmisc (22.13)
This PSmisc package is a set of some small useful
utilities that use the proc filesystem. We're not about
changing the world, but providing the system
administrator with some help in common tasks.
Source: http://psmisc.sourceforge.net/
sed (4.1.5)
sed (stream editor) isn't an interactive text editor.
Instead, it is used to filter text, i.e., it takes text input,
performs some operation (or set of operations) on it,
and outputs the modified text.
sed is typically used for extracting part of a file using
pattern matching or substituting multiple occurrences
of a string within a file.
Source: http://www.gnu.org/software/sed/
tar (1.17)
GNU Tar provides the ability to create tar archives, as
well as various other kinds of manipulation.
For example, you can use Tar on previously created
archives to extract files, to store additional files, or to
update or list files which were already stored.
Source: http://www.gnu.org/software/tar/
util-linux-ng (2.18)
Various system utilities.
Source: http://userweb.kernel.org/~kzak/util-linuxng/
udhcpc (0.9.8cvs20050303-3)
Udhcpc is a very small?DHCP?client geared
towards?embedded systems.
Source: http://udhcp.sourcearchive.com/downloads/
0.9.8cvs20050303-3/
Libxml2 (2.7.8)
The "libxml2" library is used in AstroTV as a support
for the execution of NCL application. This library was
developed for the GNOME software suite and is
available under a "MIT" license.
Source: http://www.xmlsoft.org
uriparser (0.7.7)
For MPEG-DASH
Source: http://uriparser.sourceforge.net/
xerces-c++ (3.1.1)
For MPEG-DASH
Source: http://xerces.apache.org/
webp (0.2.1)
For Netflix
Source: https://code.google.com/p/webp/
wget (1.10.2)
GNU Wget is a free software package for retrieving
files using HTTP, HTTPS and FTP, the most widelyused Internet protocols.
It is a non-interactive commandline tool, so it may
easily be called from scripts,?cron?jobs, terminals
without X-Windows support, etc.
Source:
http://ftp.gnu.org/gnu/wget/wget-1.10.2.tar.gz
wireless_tools (0.29)
The Wireless Tools (WT)?is a set of tools allowing to
manipulate the Wireless Extensions.
They use a textual interface and are rather crude, but
aim to support the full Wireless Extension.
Source: http://www.hpl.hp.com/personal/Jean_Tourri
lhes/Linux/Tools.html
ezxml (0.8.6)
ezXML is a C library for parsing XML documents. Used
inside Philips libraries.
Source: http://sourceforge.net/projects/ezxml/
SQLite (3.7.7.1)
SQLite is a in-process library that implements a selfcontained, serverless, zero-configuration,
transactional SQL database engine.
Source: http://www.sqlite.org/download.html
AES (aes-src-29-04-09.zip)
75
Page 76

Advanced Encryption Standard (AES) is a
specification for the encryption of electronic data.
Used inside Philips libraries.
Source: http://gladman.plushost.co.uk/oldsite/AES/
microhttpd (libmicrohttpd-0.9.9.tar.gz)
GNU libmicrohttpd is a small C library that is
supposed to make it easy to run an HTTP server as
part of another application.
The original download site for this software is :
http://www.gnu.org/software/libmicrohttpd/This
piece of software is made available under the terms
and conditions of the LGPL v2.1 license
Source: http://ftp.gnu.org/gnu/libmicrohttpd/libmicro
httpd-0.9.9.tar.gz
yajl (lloyd-yajl-2.0.1-0-gf4b2b1a.tar.gz)
YAJL is a small event-driven (SAX-style) JSON parser
written in ANSI C, and a small validating JSON
generator. YAJL is released under the ISC license.
The original download site for this software is :
http://lloyd.github.com/yajl/This piece of software is
made available under the terms and conditions of the
ISC license
Source: http://pkgs.fedoraproject.org/repo/pkgs/yajl/
lloyd-yajl-2.0.1-0-gf4b2b1a.tar.gz/df6a751e7797b9c21
82efd91b5d64017/lloyd-yajl-2.0.1-0-gf4b2b1a.tar.gz
development.
Source: http://jquery.com/
Libupnp (1.2.1)
The Linux* SDK for UPnP* Devices (libupnp) provides
developers with an API and open source code for
building control points, devices, and bridges that are
compliant with Version 1.0 of the UPnP Device
Architecture Specification.
Source: http://upnp.sourceforge.net/
mDNSResponder (mDNSResponder-320.10.80)
The mDNSResponder project is a component of
Bonjour,
Apple's ease-of-use IP networking
initiative:<http://developer.apple.com/bonjour/>
In our project, Bonjour is used for the automatic
discovery of devices and services
Source: http://developer.apple.com/bonjour/
HMAC-SHA1 (0.1)
keyed-hash message authentication code (HMAC) is
a specific construction for calculating a message
authentication code (MAC) involving a cryptographic
hash function in combination with a secret
cryptographic key.
As with any MAC, it may be used to simultaneously
verify both the data integrity and the authentication
of a message.
Any cryptographic hash function, such as MD5 or
SHA-1, may be used in the calculation of an HMAC;
the resulting MAC algorithm is termed HMAC-MD5 or
HMAC-SHA1 accordingly.
Source:
http://www.deadhat.com/wlancrypto/hmac_sha1.c
gSoap (2.7.15)
The gSOAP toolkit is an open source C and C++
software development toolkit for SOAP/XML Web
services and generic (non-SOAP) C/C++ XML data
bindings.
Part of the software embedded in this product is
gSOAP software. Portions created by gSOAP are
Copyright 2000-2011 Robert A. van Engelen, Genivia
inc. All Rights Reserved.
Source: http://sourceforge.net/projects/gsoap2/
jquery (1.10.2)
jQuery is a fast and concise JavaScript Library that
simplifies HTML document traversing, event handling,
animating, and Ajax interactions for rapid web
76
Page 77

23
Specifications
23.1
Environmental
Saving energy
Energy saving
This Picture style sets the picture in the most ideal
energy conscious setting.
For more information, press Keywords and look
up Picture style.
Screen off
If you only listen to music, you can switch off the TV
screen to save energy.
Select Screen off and press OK. To switch the
screen back on, press any key on the remote control.
Switch off timer
If you do not press a key on the remote control during
a 4 hour period, or if the TV receives no signal for 10
minutes, the TV switches off automatically to save
energy.
If you use the TV as a monitor or use a digital receiver
to watch TV (a Set-top box - STB) and you do not use
the remote control of the TV, deactivate the
automatic switch off.
In addition to the Eco settings, your TV also has
environmentally friendly technology with regard to
power consumption.
Please inform yourself about the local separate
collection system for electrical and electronic
products.
Please act according to your local rules and do not
dispose of your old products with your normal
household waste. Correct disposal of your old
product helps to prevent potential negative
consequences for the environment and human
health.
Your product contains batteries covered by the
European Directive 2006/66/EC, which cannot be
disposed with normal household waste.
Please find out for yourself about the local rules on
separate collection of batteries because correct
disposal will help to prevent negative consequences
for the environment and human health.
23.2
Power
Product specifications are subject to change without
notice. For more specification details of this product,
see www.philips.com/support
End of use
Disposal of your old product and batteries
Your product is designed and manufactured with high
quality materials and components, which can be
recycled and reused.
When this crossed-out wheeled bin symbol is
attached to a product it means that the product is
covered by the European Directive 2012/19/EU.
Power
• Mains power : AC 110-240V +/-10%
• Ambient temperature : 5°C to 35°C
• Power saving features : Eco mode, Picture mute (for
radio), Auto switch-off timer, Eco settings menu.
The power rating stated on the product typeplate is
the power consumption for this product during
normal household use (IEC 62087 Ed.2). The
maximum power rating, stated between brackets, is
used for electrical safety (IEC 60065 Ed. 8.0).
23.3
Reception
• Aerial input : 75 ohm coaxial (IEC75)
• Tuner bands : Hyperband, S-Channel, UHF, VHF
• DVB : DVB-T2, DVB-C (cable) QAM
• Analogue video playback : SECAM, PAL
• Digital video playback : MPEG2 SD/HD (ISO/IEC
77
Page 78

13818-2), MPEG4 SD/HD (ISO/IEC 14496-10)
• Digital audio playback (ISO/IEC 13818-3)
23.4
Display
Type
Diagonal screen size
• 50PUT6102 : 127 cm / 50 inch
• 55PUT6102 : 139 cm / 55 inch
• 65PUT6162 : 164 cm / 65 inch
Display resolution
• 3840 x 2160p
90.26 mm - Weight ± 15.28 kg
• with TV stand:
Width 1239.20 mm - Height 780.34 mm - Depth
259.06 mm - Weight ± 15.6 kg
65PUT6162
• without TV stand:
Width 1462.30 mm - Height 844.70 mm - Depth
92.50 mm - Weight ± 24.5 kg
• with TV stand:
Width 1462.30 mm - Height 906.70 mm - Depth
271.50 mm - Weight ± 26.2 kg
23.6
Connectivity
Input resolution
Video formats
Resolution — Refresh rate
• 480i - 60 Hz
• 480p - 60 Hz
• 576i - 50 Hz
• 576p - 50 Hz
• 720p - 50 Hz, 60 Hz
• 1080i - 50 Hz, 60 Hz
• 1080p - 24 Hz, 25 Hz, 30 Hz
• 2160p - 24 Hz, 25 Hz, 30 Hz, 50 Hz, 60 Hz
Computer formats
Resolutions (amongst others)
• 640 x 480 - 60 Hz
• 800 x 600 - 60 Hz
• 1024 x 768 - 60 Hz
• 1280 x 768 - 60 Hz
• 1360 x 765 - 60 Hz
• 1360 x 768 - 60 Hz
• 1280 x 1024 - 60 Hz
• 1920 x 1080 - 60 Hz
• 3840 x 2160 - 60 Hz
TV Side
• HDMI 3 in
• HDMI 4 in - MHL
• USB x 1 - USB 2.0
• Headphones - Stereo mini-jack 3.5mm
TV Rear
CVBS/Y Pb Pr : CVBS/Y Pb Pr, Audio L/R
Serv.U
Audio in: DVI
TV Bottom
• HDMI 1 in - ARC
• HDMI 2
• USB x 1
• Digital Audio out-Optical
• Network LAN - RJ45
• Antenna (75 ohm)
23.7
Sound
• HD Stereo
• Output power (RMS) : 20W
• Dolby Audio™
• DTS 2.0+ Digital out ™
23.5
Dimensions and Weights
50PUT6102
• without TV stand:
Width 1129.54 mm - Height 656.45 mm - Depth 83.17
mm - Weight ± 12.8 kg
• with TV stand:
Width 1129.54 mm - Height 717.72 mm - Depth 259.18
mm - Weight ± 13.15 kg
55PUT6102
• without TV stand:
Width 1239.20 mm - Height 714.04 mm - Depth
23.8
Multimedia
Connections
• USB 2.0
• Ethernet LAN RJ-45
• Wi-Fi 802.11b/g/n (built-in)
Supported USB file systems
• FAT 16, FAT 32, NTFS
Playback formats
• Containers : 3GP, AVCHD, AVI, MPEG-PS, MPEG-TS,
MPEG-4, Matroska (MKV), Quicktime (MOV, M4V,
M4A), Windows Media (ASF/WMV/WMA)
78
Page 79

• Video Codecs : MPEG-1, MPEG-2, MPEG-4 Part 2,
MPEG-4 Part 10 AVC (H.264), VC-1, WMV9, HEVC,
VP9
• Audio Codecs : AAC, HE-AAC (v1/v2), AMR-NB,
Dolby Digital, Dolby Digital Plus, DTS 2.0 + Digital
Out™, MPEG-1/2/2.5 Layer I/II/III (includes MP3),
WMA (v2 to v9.2), WMA Pro (v9/v10)
• Subtitles :
– Formats : SAMI, SubRip (SRT), SubViewer (SUB),
MicroDVD (TXT), mplayer2 (TXT), TMPlayer (TXT)
– Character encodings : UTF-8, Central Europe and
Eastern Europe (Windows-1250), Cyrillic
(Windows-1251), Greek (Windows-1253), Turkish
(Windows-1254), Western Europe (Windows-1252)
• Image Codecs : JPEG
• Limitations :
– Maximum supported total bit rate for a media file is
30Mbps.
– Maximum supported video bit rate for a media file
is 20Mbps.
– MPEG-4 AVC (H.264) is supported up to High
Profile @ L4.1.
– VC-1 is supported up to Advanced Profile @ L3.
Wi-Fi Certified
This TV supports Miracast certified devices.
Supported media server software (DMS)
• You can use any DLNA V1.5 certified media server
software (DMS class).
• You can use the Philips TV Remote app (iOS and
Android) on mobile devices.
Performance may vary, depending on the capabilities
of the mobile device and the software used.
79
Page 80

24
Troubleshooting
Check the Network
and support
24.1
Register your TV
Register your TV and enjoy a range of benefits
including full support (including downloads),
privileged access to information about new products,
exclusive offers and discounts, the chance to win
prizes and even participate in special surveys about
new releases.
Go to www.philips.com/welcome
24.2
Help
Introduction
This TV offers help on screen.
Open Help
1 - Press to open the Home menu.
2 - Select Help and press OK.
To look up topics alphabetically, select Keywords .
To read the Help as a book, select Book.
Before you execute the Help instructions, close Help.
To close Help, press .
Direct help
Press the key (blue) to open Help immediately.
Help will open on the chapter that is most relevant to
what you are doing or what is selected on TV.
With Check the Network, you can check your TV
wirelessly or wired to your network router.
User manual
Press the key (blue) to open Help immediately.
Help will open on the chapter that is most relevant
to what you are doing or what is selected on TV. To
look up topics alphabetically, press the
colour key Keywords.
To read the Help as a book, select Book. Before you
execute the Help instructions, close Help. To close
Help, press the colour key Close.
TV Help on your tablet, smartphone or computer
To carry out extended sequences of instructions
more easily, you can download the TV Help in PDF
format to read on your smartphone, tablet
or computer. Alternatively, you can print the
relevant Help page from your computer.
Contact info
You can view the contact information of the local
service center in this page.
24.3
Troubleshooting
Switch on and remote control
TV Help on your tablet, smartphone or computer
To carry out extended sequences of instructions more
easily, you can download the TV Help in PDF format
to read on your smartphone, tablet or
computer. Alternatively, you can print the relevant
Help page from your computer.
To download the Help (user manual) go
to www.philips.com/support
Check the TV
The TV can play a short High-Definition (HD) video
clip. During the playback, check if the picture, the
sound are working OK. Switch to the TV source with
the problem before you start the video clip.
Press the key (blue) to open Help immediately.
The TV does not switch on
• Disconnect the power cable from the power outlet.
Wait for one minute then reconnect it.
• Make sure that the power cable is securely
connected.
Creaking sound at startup or switch off
When you are turning the TV on, off or to standby,
you hear a creaking sound from the TV chassis. The
creaking sound is due to the normal expansion and
contraction of the TV as it cools and warms up. This
does not affect performance.
TV does not respond to the remote control
The TV requires some time to start up. During this
time, the TV does not respond to the remote control
or TV controls. This is normal behaviour.
If the TV continues to be unresponsive to the remote
80
Page 81

control, you can check if the remote control is working
by means of a mobile phone camera. Put the phone
in camera mode and point the remote control to the
camera lens. If you press any key on the remote
control and you notice the infra red LED flicker
through the camera, the remote control is working.
The TV needs to be checked.
If you do not notice the flickering, the remote control
might be broken or its batteries are low.
This method of checking the remote control is not
possible with remote controls which are wirelessly
paired with the TV.
The TV goes back to standby after showing the
Philips startup screen
When the TV is in standby, a Philips startup screen is
displayed, then the TV returns to standby mode. This
is normal behaviour. When the TV is disconnected
and reconnected to the power supply, the startup
screen is displayed at the next startup. To switch on
the TV from standby, press on the remote control or
the TV.
The standby light keeps on blinking
Disconnect the power cable from the power outlet.
Wait 5 minutes before you reconnect the power
cable. If the blinking reoccurs, contact Philips TV
Consumer Care.
• Loud speakers, unearthed audio devices, neon
lights, high buildings and other large objects can
influence reception quality. If possible, try to improve
the reception quality by changing the antenna
direction or moving devices away from the TV.
• If reception on only one channel is poor, fine-tune
this channel with Manual Installation.
Poor picture from a device
• Make sure that the device is connected properly.
• Make sure that the picture settings are set correctly.
Picture settings change after a while
Make sure that Location is set to Home . You can
change and save settings in this mode.
A commercial banner appears
Make sure that Location is set to Home.
Picture does not fit the screen
Change to a different picture format.
Picture format keeps changing with different
channels
Select a non 'Auto' picture format.
Picture position is incorrect
Picture signals from some devices may not fit the
screen correctly. Check the signal output of the
connected device.
Channels
No digital channels found during the installation
See the technical specifications to make sure that
your TV supports DVB-T or DVB-C in your country.
Make sure that all cables are properly connected and
that the correct network is selected.
Previously installed channels are not in the channel
list
Make sure that the correct channel list is selected.
Picture
No picture / distorted picture
• Make sure that the antenna is properly connected to
the TV.
• Make sure that the correct device is selected as the
display source.
• Make sure that the external device or source is
properly connected.
Sound but no picture
• Make sure that the picture settings are set correctly.
Poor antenna reception
• Make sure that the antenna is properly connected to
the TV.
Computer picture is not stable
Make sure that your PC uses the supported resolution
and refresh rate.
Sound
No sound or poor sound quality
If no audio signal is detected, the TV automatically
switches the audio output off — this does not indicate
malfunction.
• Make sure that the sound settings are correctly set.
• Make sure that all cables are properly connected.
• Make sure that the volume is not muted or set to
zero.
• Make sure that the TV audio output is connected to
the audio input on the Home Theatre System.
Sound should be heard from the HTS speakers.
• Some devices may require you to manually enable
HDMI audio output. If HDMI audio is already enabled,
but you still do not hear audio, try changing the digital
audio format of the device to PCM (Pulse Code
Modulation). Refer to the documentation
accompanying your device for instructions.
81
Page 82

HDMI and USB
HDMI
• Note that HDCP (High-bandwidth Digital Content
Protection) support can delay the time taken for a TV
to display content from an HDMI device.
• If the TV does not recognise the HDMI device and
no picture is displayed, switch the source from one
device to another and back again.
• If the picture and sound of a device connected with
HDMI is distorted, check if a different HDMI Ultra
HD setting can solve this problem. In Help, press the
colour key Keywords and look up HDMI Ultra
HD.
• If there are intermittent sound disruptions, make
sure that output settings from the HDMI device are
correct.
• If you use an HDMI-to-DVI adapter or HDMI-to-DVI
cable, make sure that an additional audio cable is
connected to AUDIO IN (mini-jack only), if available.
HDMI EasyLink does not work
• Make sure that your HDMI devices are HDMI-CEC
compatible. EasyLink features only work with devices
that are HDMI-CEC compatible.
No volume icon shown
• When an HDMI-CEC audio device is connected and
you use the TV Remote Control to adjust the volume
level from the device, this behaviour is normal.
Photos, videos and music from a USB device do not
show
• Make sure that the USB storage device is set to Mass
Storage Class compliant, as described in the storage
device's documentation.
• Make sure that the USB storage device is compatible
with the TV.
• Make sure that the audio and picture file formats are
supported by the TV.
Choppy playback of USB files
• The transfer performance of the USB storage device
may limit the data transfer rate to the TV which
causes poor playback.
• Look in your wireless router's user manual for
information on indoor range, transfer rate and other
factors of signal quality.
• Use a high-speed (broadband) Internet connection
for your router.
DHCP
• If the connection fails, you can check the DHCP
(Dynamic Host Configuration Protocol) setting of the
router. DHCP should be switched on.
Wrong menu language
Wrong menu language
Change the language back to your language.
To change the language of the TV menus and
messages…
1 - Press , select General
settings > Language > Menu Language and
press OK.
2 - Select on the language you need and press OK.
3 - Press (left) repeatedly if necessary, to close
the menu.
24.4
Online help
To solve any Philips TV related problem, you can
consult our online support. You can select your
language and enter your product model number.
Go to www.philips.com/TVsupport .
On the support site you can find your country's
telephone number to contact us as well as answers to
frequently asked questions (FAQs). In some countries,
you can chat with one of our colaborators and ask
your question directly or send a question by email.
You can download new TV software or the manual to
read on your computer.
Wi-Fi and Internet
Wi-Fi network not found or distorted
• Microwave ovens, DECT phones or other Wi-Fi
802.11b/g/n devices in your proximity might disturb
the wireless network.
• Make sure that the firewalls in your network allow
access to the TV's wireless connection.
• If the wireless network does not work properly in
your home, try the wired network installation.
Internet does not work
• If the connection to the router is OK, check the
router connection to the Internet.
The PC and Internet connection are slow
24.5
Consumer care / Repair
For support and repair, call the Consumer Care
hotline in your country. Find the telephone number in
the printed documentation that came with the TV.
Or consult our website www.philips.com/TVsupport.
TV model number and serial number
You might be asked to provide the TV product model
number and serial number. Find these numbers on
the packaging label or on the type label on the back
or bottom of the TV.
Warning
82
Page 83

Do not attemp to repair the TV yourself. This may
cause severe injury, irrepairable damage to your TV
or void your warranty.
83
Page 84

25
Safety and care
25.1
Safety
Important
Read and understand all safety instructions before
you use the TV. If damage is caused by failure to
follow instructions, the warranty does not apply.
Risk of electric shock or fire
• Never expose the TV to rain or water. Never place
liquid containers, such as vases, near the TV.
If liquids are spilt on or into the TV, disconnect the TV
from the power outlet immediately.
Contact Philips TV Consumer Care to have the TV
checked before use.
• Never expose the TV, remote control or batteries to
excessive heat. Never place them near burning
candles, naked flames or other heat sources,
including direct sunlight.
• Never insert objects into the ventilation slots or other
openings on the TV.
• Never place heavy objects on the power cord.
• Avoid force coming onto power plugs. Loose power
plugs can cause arcing or fire. Ensure that no strain is
exerted on the power cord when you swivel the TV
screen.
• To disconnect the TV from the mains power, the
power plug of the TV must be disconnected. When
disconnecting the power, always pull the power plug,
never the cord. Ensure that you have full access to
the power plug, power cord and outlet socket at all
times.
ensure that the power voltage matches the value
printed on the back of the TV. Never connect the TV
to the power outlet if the voltage is different.
Risk of injury to children
Follow these precautions to prevent the TV from
toppling over and causing injury to children:
• Never place the TV on a surface covered by a cloth
or other material that can be pulled away.
• Ensure that no part of the TV hangs over the edge of
the mounting surface.
• Never place the TV on tall furniture, such as a
bookcase, without anchoring both the furniture and
TV to the wall or a suitable support.
• Teach children about the dangers of climbing on
furniture to reach the TV.
Risk of swallowing batteries !
The remote control may contain batteries which can
easily be swallowed by small children. Keep these
batteries out of reach of children at all times.
Risk of overheating
Never install the TV in a confined space. Always leave
a space of at least 10 cm or 4 inches around the TV
for ventilation. Ensure curtains or other objects never
cover the ventilation slots on the TV.
Lightning storms
Disconnect the TV from the power outlet and antenna
before lightning storms.
During lightning storms, never touch any part of the
TV, power cord or antenna cable.
Risk of injury or damage to the TV
• Two people are required to lift and carry a TV that
weights more than 25 kg or 55 lbs.
• If you mount the TV on a stand, only use the
supplied stand. Secure the stand to the TV tightly.
Place the TV on a flat, level surface that can support
the weight of the TV and the stand.
• When wall mounted, ensure that the wall mount can
safely bear the weight of the TV set. TP Vision bears
no responsibility for improper wall mounting that
results in accident, injury or damage.
• Parts of this product are made of glass. Handle with
care to avoid injury or damage.
Risk of damage to the TV !
Before you connect the TV to the power outlet,
Risk of hearing damage
Avoid using earphones or headphones at high
volumes or for prolonged periods of time.
Low temperatures
If the TV is transported in temperatures below 5°C or
41°F, unpack the TV and wait until the TV temperature
reaches room temperature before connecting the TV
to the power outlet.
84
Page 85

Humidity
In rare occasions, depending on temperature and
humidity, minor condensation can occur on the inside
of the TV glass front (on some models). To prevent
this, do not expose the TV to direct sunlight, heat or
extreme humidity. If condensation occurs, it will
disappear spontaneously while the TV is playing for a
few hours.
The condensation moisture will not harm the TV or
cause malfunction.
25.2
Screen care
• Never touch, push, rub or strike the screen with any
object.
• Unplug the TV before cleaning.
• Clean the TV and frame with a soft damp cloth and
wipe gently. Never use substances such as alcohol,
chemicals or household cleaners on the TV.
• To avoid deformations and colour fading, wipe off
water drops as quickly as possible.
• Avoid stationary images as much as possible.
Stationary images are images that remain onscreen
for extended periods of time. Stationary images
include onscreen menus, black bars, time displays,
etc. If you must use stationary images, reduce screen
contrast and brightness to avoid screen damage.
85
Page 86

26
Terms of use,
copyrights and
licenses
26.1
Terms of use
2017 © TP Vision Europe B.V. All rights reserved.
This product was brought to the market by TP Vision
Europe B.V. or one of its affiliates, hereinafter referred
to as TP Vision, which is the manufacturer of the
product. TP Vision is the warrantor in relation to the
TV with which this booklet was packaged. Philips and
the Philips Shield Emblem are registered trademarks
of Koninklijke Philips N.V.
Specifications are subject to change without notice.
Trademarks are the property of Koninklijke Philips N.V
or their respective owners. TP Vision reserves the right
to change products at any time without being obliged
to adjust earlier supplies accordingly.
assembly procedures not recommended or
authorised in this manual, shall void the warranty.
Pixel characteristics
This LCD/LED product has a high number of colour
pixels. Although it has effective pixels of 99.999% or
more, black dots or bright points of light (red, green or
blue) may appear constantly on the screen. This is a
structural property of the display (within common
industry standards) and is not a malfunction.
TP Vision is committed to developing, producing and
marketing products that cause no adverse health
effects. TP Vision confirms that, as long as its products
are handled properly for their intended use, they are
safe to use according to scientific evidence available
today. TP Vision plays an active role in the
development of international EMF and safety
standards, enabling TP Vision to anticipate further
developments in standardisation for early integration
in its products.
The written material packaged with the TV and the
manual stored in the memory of the TV or
downloaded from the Philips
website www.philips.com/TVsupport are believed to
be adequate for the intended use of the system.
The material in this manual is believed adequate for
the intended use of the system. If the product, or its
individual modules or procedures, are used for
purposes other than those specified herein,
confirmation of their validity and suitability must be
obtained. TP Vision warrants that the material itself
does not infringe any United States patents. No
further warranty is expressed or implied. TP Vision
cannot be held responsible neither for any errors in
the content of this document nor for any problems as
a result of the content in this document. Errors
reported to Philips will be adapted and published on
the Philips support website as soon as possible.
Terms of warranty - Risk of injury, damage to TV or
void of warranty!
Never attempt to repair the TV yourself. Use the TV
and accessories only as intended by the
manufacturer. The caution sign printed on the back of
the TV indicates risk of electric shock. Never remove
the TV cover. Always contact Philips TV Customer
Care for service or repairs. Find the telephone number
in the printed documentation that came with the
TV. Or consult our
website www.philips.com/TVsupport and select
your country if needed. Any operation expressly
prohibited in this manual, or any adjustments and
86
Page 87

27
27.5
Copyrights
27.1
Dolby
Manufactured under license from Dolby Laboratories.
Dolby, Dolby Audio and the double-D symbol are
trademarks of Dolby Laboratories.
27.2
MHL
MHL, Mobile High-Definition Link and the MHL Logo
are trademarks or registered trademarks of the MHL,
LLC.
DTS 2.0 + Digital Out ™
For DTS patents, see http://patents.dts.com.
Manufactured under license from DTS Licensing
Limited. DTS, the Symbol, & DTS and the Symbol
together are registered trademarks, and DTS
2.0+Digital Out is a trademark of DTS, Inc. © DTS, Inc.
All Rights Reserved.
27.6
Microsoft
Windows Media
Windows Media is either a registered trademark or
trademark of Microsoft Corporation in the United
States and/or other countries.
27.3
Ultra HD
The DIGITALEUROPE UHD Display Logo is a
trademark of DIGITALEUROPE.
27.4
HDMI
The terms HDMI and HDMI High-Definition
Multimedia Interface, and the HDMI Logo are
trademarks or registered trademarks of HDMI
Licensing LLC in the United States and other
countries.
Microsoft PlayReady
Content owners use Microsoft PlayReady™ content
access technology to protect their intellectual
property, including copyrighted content.
This device uses PlayReady technology to access
PlayReady-protected content and/or WMDRMprotected content. If the device fails to properly
enforce restrictions on content usage, content owners
may require Microsoft to revoke the device's ability to
consume PlayReady-protected content. Revocation
should not affect unprotected content or content
protected by other content access technologies.
Content owners may require you to upgrade
PlayReady to access their content. If you decline an
upgrade, you will not be able to access content that
requires the upgrade.
27.7
Wi-Fi Alliance
Wi-Fi®, the Wi-Fi CERTIFIED logo, the Wi-Fi logo are
registered trademarks of the Wi-Fi Alliance.
87
Page 88

27.8
Kensington
Kensington and Micro Saver are registered US
trademarks of ACCO World Corporation with issued
registrations and pending applications in other
countries throughout the world.
27.9
Other trademarks
All other registered and unregistered trademarks are
the property of their respective owners.
88
Page 89

28
Disclaimer regarding
services and/or
software offered by
third parties
Services and/or software offered by third parties may
be changed, suspended, or terminated without prior
notice. TP Vision does not bear any responsibility in
these sorts of situations.
89
Page 90

Index
A
Antenna connection 5
Antenna, Manual Installation 62
App gallery 44
Audio commentary 58
Audio Description 58
Audio Language, Primary 56
Audio Language, Secondary 56
Audio out, tips 13
Auto Volume Levelling 51
Automatic switch off 20
B
Bass 51
Blu-ray Disc player, connect 15
C
Cable, Manual Installation 62
Camcorder, connect 18
Channel 24
Channel List Copy, copy 63
Channel List Copy, current version 63
Channel List Copy, upload 63
Channel List, all 24
Channel List, filter 24
Channel List, open 24
Channel List, rename 25
Channel List, search 25
Channel Update Message 61
Channel, Antenna installation 61
Channel, Cable Installation 61
Channel, Channel List 24
Channel, Channel List, about 24
Channel, Manual channel update 61
Channel, Options 26
Channel, parental ratings 26
Channel, Radio stations 24
Channel, Reinstall 61
Channel, switch to a channel 25
Channel, TV guide 29
Child lock 26
Clear Internet Memory 9
Clear Miracast connection 9
Clear Sound 52
Clock settings 56
Colour 48
Colour, Colour enhancement 48
Colour, colour temperature 48
Colour, custom colour temperature 49
Computer, connect 18
Consumer Care 82
Contact Philips 82
Contrast 48
Contrast, Contrast Mode 49
Contrast, Dynamic Contrast 49
Contrast, Gamma 49
Contrast, Video Contrast 49
D
Disposal of TV or batteries 77
DMR, Digital Media Renderer 8
DVB (Digital Video Broadcast) 61
DVD Player, connect 15
E
EasyLink 12
Eco settings 53
End of use 77
Environmental, Eco settings 77
F
Freeview Plus 36
Frequency Scan 62
Frequency Step Size 62
G
Game Console, connect 15
Game or Computer 37
Game or Computer, setting 48
Gamma 49
H
HbbTV 28
HDMI 1 - ARC 52
HDMI Ultra HD 54
HDMI, DVI connection 12
Headphones Volume 53
Headphones, connect 15
Hearing impaired 58
Help 80
Help, check the TV 80
Home Menu 33
Hung on the wall, TV Placement 53
I
Incredible Surround 51
Interactive TV 28
Interactive TV, about 28
I
iTV 28
K
Keys on TV 20
L
Language settings 56
M
Media 39
Media files, from a computer or NAS 39
Media files, from a USB drive 39
Menu language 56
Miracast™ 9
Miracast™, switch on 41
Motion, Natural Motion 50
MPEG Artefact Reduction 50
Multi room 46
N
Natural Motion 50
Netflix 35
Network Frequency 62
Network Frequency Mode 62
Network installation 7
Network, Clear Wi-Fi Miracast connection 9
90
Page 91

Network, connect 7
Network, problem 7
Network, settings 8
Network, static IP 8
Network, Switch on Wi-Fi 9
Network, TV Network Name 9
Network, view settings 8
Network, Wi-Fi Smart Screen 9
Network, wired 8
Network, wireless 7
Network, WoWLAN 8
Network, WPS 7
Network, WPS with PIN code 7
Noise Reduction 50
O
On a TV stand, TV Placement 53
On screen Help 80
Open source software 66
Options on a Channel 26
P
Parental rating 26
Pause TV 32
Photo camera, connect 18
Photos, movie and music 39
Picture Format 50
Picture Format, advanced 50
Picture Format, basic 50
Picture Style 47
Picture, Colour 48
Picture, Sharpness 48
Pixel Plus link 54
Placement, TV placement 5
Placement, viewing distance 5
Power connection 5
Power consumption, check 77
Problems 80
Problems, Channels 81
Problems, Connection, Internet 82
Problems, Connection, Wi-Fi 82
Problems, Menu language 82
Problems, Picture 81
Problems, Remote control 80
Problems, Sound 81
Sound, Auto Volume Levelling 51
Sound, Bass 51
Sound, Clear Sound 52
Sound, Headphones Volume 53
Sound, surround mode 51
Sound, Treble 51
Sources 37
Subtitle Language, Primary 57
Subtitle Language, Secondary 57
Support, online 82
Surround Mode 51
Switch off timer 53
Switching on 20
T
Test Reception 62
Text language, primary 58
Text language, secondary 58
Treble 51
TV Guide 29
TV Guide, Reminder 29
TV Installation 61
U
Universal access 58
Universal access, Hard of hearing 58
Universal Access, Speakers/Headphones 59
USB Hard Drive, disk space 16
USB Hard Drive, Installation 16
USB Keyboard 17
USB Keyboard, connect 17
Utilities 34
W
Watch TV 25
Wi-Fi 7
Wired network 8
Wireless network 7
WoWLAN 8
Y
YPbPr connection, tips 12
R
Reception Quality 62
Record a programme 31
Recording 31
Recording, schedule a recording 31
Register your product 80
Reinstall TV 61
Remote control and batteries 23
Rental videos 44
Repair 82
S
Safety instructions 84
Screen care 85
Screen off 77
Sharpness 48
Sharpness, MPEG Artefact Reduction 50
Sharpness, Noise reduction 50
Sleep Timer 20
Smart TV 42
Software, Update 65
Sound Style 51
91
Page 92

Powered by TCPDF (www.tcpdf.org)
92
 Loading...