

Page 1
1
3135 035 20212
Y
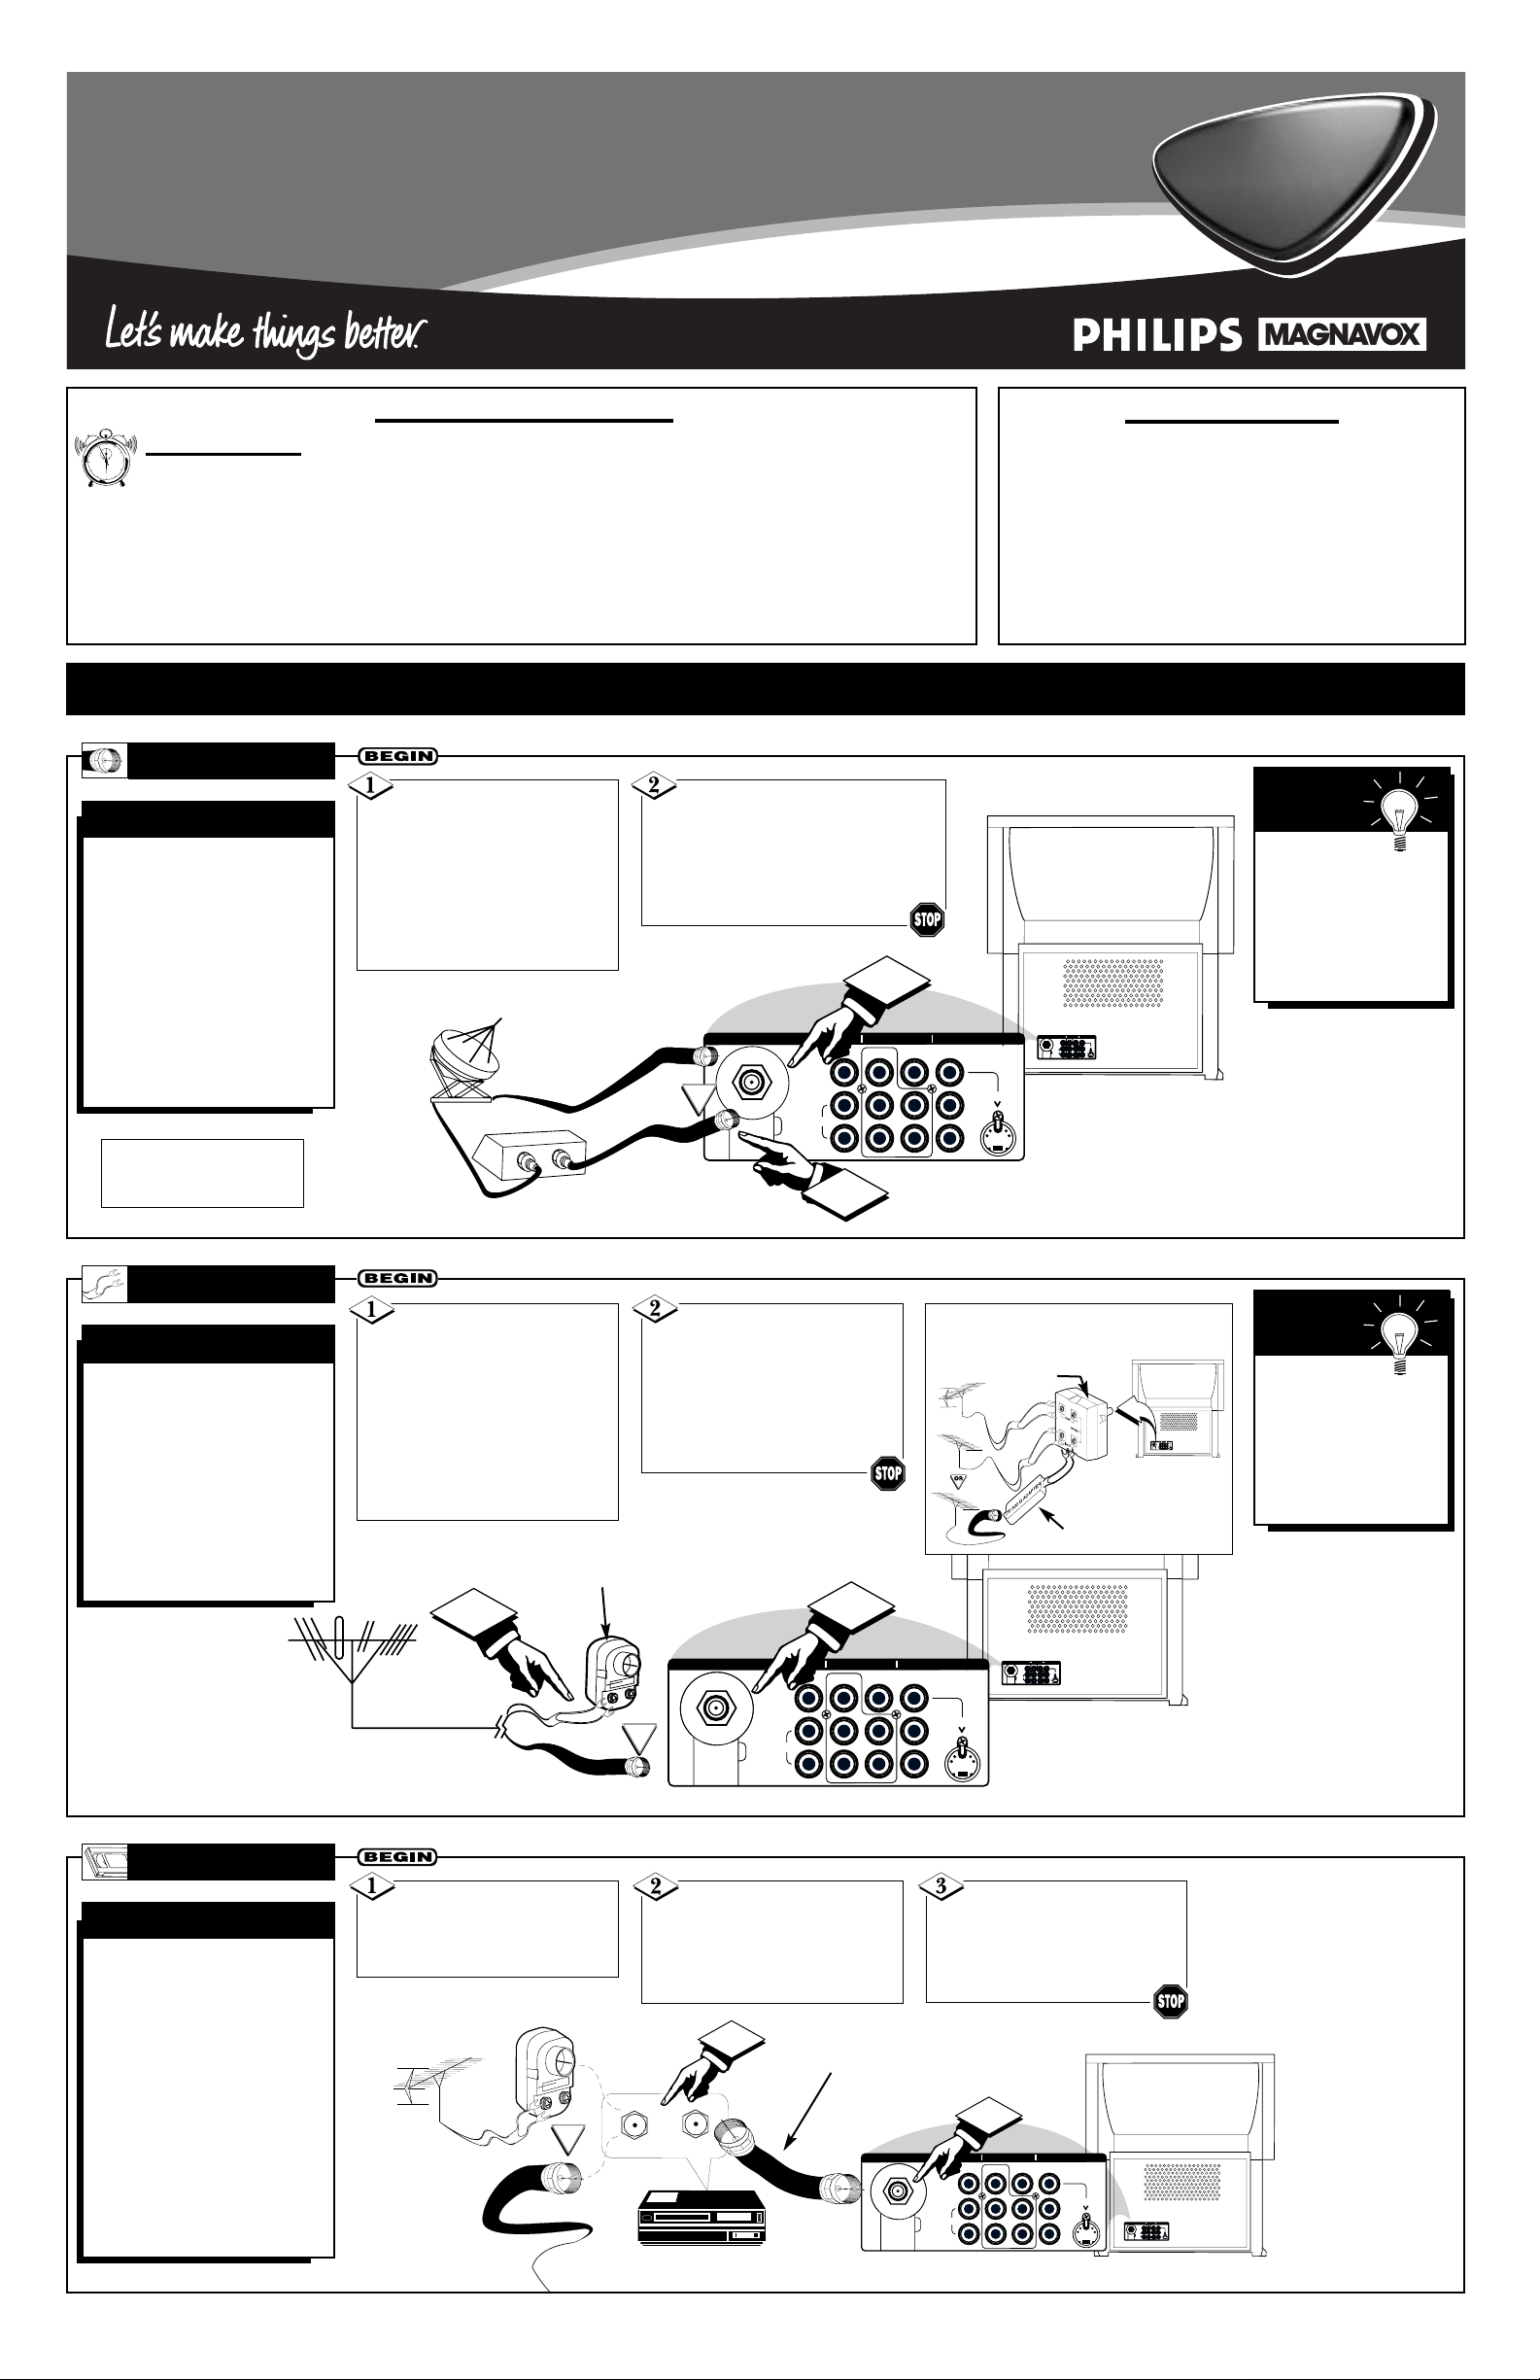
our Cable TV input into
your home may be a
single (75 ohm) cable or a
converter box installation.
In either case, the connection to the TV is very easy.
Just put the threaded end of
the cable signal to the TV’s
antenna plug and screw it
down tightly.
CABLE TV
CABLE INPUT/CONVERTER
F
ollow the steps to the
right to connect a
basic antenna or cable TV
signal to a VCR, and then
the VCR to the TV. For
information on other
hookups (possible when
cable/descrambler boxes
are included), refer to the
owner’s manuals for the
VCR and the cable converter.
TV TO VCR
BASIC CONNECTION
If your Cable TV signal
comes from a single round
cable (75 ohm), then you're
ready to connect to the TV.
If you have a cable converter
box, connect the cable TV signal
to the cable signal IN(put) plug
on the converter.
Connect the cable TV cable to
the ANTENNA IN 75Ω plug on the TV.
If you have a cable converter box,
connect the OUT(put) plug from the
converter to the ANTENNAIN 75Ω
(ohm) plug on the TV.
Connect your antenna
or cable TV signal to the IN
FROM ANT(enna) plug on the
VCR.
Connect the OUT TO
TV plug on the VCR to the
ANTENNA IN 75Ω plug on
the TV (connecting cable supplied with the VCR).
Back of TV
Round Cable
75Ω (Ohm)
Cable TV
Converter Box
Connection
Cable TV Company
Cable TV Signal Input
Round Cable
75Ω (Ohm) Supplied with VCR
Outdoor
VHF/UHF
Antenna
300Ω (Ohm) to
75Ω (Ohm) Adapter
Cable TV signal
Back of TV
Refer to the owner's
manual included with your
VCR for other possible connections and TV/VCR operating
details.
OR
NOTE: The connecting cable
for the converter is supplied
by the cable TV company.
VCR
A
combination antenna
receives normal broadcast channels (VHF 2–13
and UHF 14–69). Your connection is easy because
there is only one ANTENNA
IN 75Ω (ohm) plug on the
back of your TV, and that’s
where the antenna goes.
ANTENNA
COMBINATION UHF/VHF
To get optional
accessories to make
the connections shown
here, contact your
dealer, or our Parts
Information Center at
1-800-851-8885.
SMART
HELP
If your antenna has a
round cable (75 ohm) on the
end, then you're ready to connect it to the TV.
If your antenna has flat, twinlead wire (300 ohm), you first
need to attach the antenna wires
to the screws on a 300- to 75ohm adapter.
Push the round end of
the adapter (or antenna) onto
the ANTENNA IN 75Ω plug on
the back of the TV. If the
round end of the antenna wire
is threaded, screw it down finger tight.
300Ω (Ohm) to
75Ω (Ohm) Adapter
Combination VHF/UHF
Antenna
(Outdoor or Indoor)
Twin–Lead
Wire
Round Cable
75Ω (Ohm)
Back of TV
OR
NOTE: For homes with separate UHF and
VHF antennas, you will need an optional combiner to connect to the TV.
ANTENNA IN 75Ω
MONITOR OUT AV1 IN AV2 IN
S-VIDEO
Y
Pb
Pr
VIDEO
MONO/L
AUDIO
R
U/V
Combiner
300- to 75-Ohm Adapter
Back of TV
TABLE OF CONTENTS
Getting Started
Warning/Important Notice . . . . . . . . . . . . . .1
Making Basic Antenna/Cable Hookups . . . .1
Using the TV Buttons . . . . . . . . . . . . . . . . . . . . . . . .2
Using the Remote Control Buttons . . . . . . . . . . . . . .2
Setting the TV’s On-screen Menu Language . . . . . . .3
Setting the Tuner Mode Control . . . . . . . . . . . . . . . .3
Running Auto Program . . . . . . . . . . . . . . . . . . . . . . .3
Editing Channels . . . . . . . . . . . . . . . . . . . . . . . . . . .4
Using AutoChron to Set the TV’s Clock . . . . . . . . . .4
Naming Channels . . . . . . . . . . . . . . . . . . . . . . . . . . .4
Projection
Television
Projection
Television
Quick Use and Setup Guide
HOOKING UP YOUR
TV (BASIC TV CONNECTIONS)
Quick Use and Setup Guide
IMPORTANT
NOTE: This owner's manual is used with several
different television models. Not all features (and
drawings) discussed in this manual will necessarily match those found with your television set.
This is normal and does not require you contacting your dealer or requesting service.
WARNING: TO PREVENT FIRE OR SHOCK
HAZARD DO NOT EXPOSE THIS UNIT TO
RAIN OR EXCESSIVE MOISTURE.
AutoChron, Incredible Surround, SmartPicture, and SmartSound are trademarks of Philips Consumer Electronics Company. Copyright © 2001 Philips Consumer
Electronics Company. All rights reserved.
Use the Auto
Program feature to
store in the TV’s memory only the channels
with active broadcast
stations. See page page
3 for details.
SMART
HELP
12
1
11
2
10
3
9
4
8
5
7
6
2
ANTENNA IN 75Ω
ANTENNA IN 75Ω
MONITOR OUT AV1 IN AV2 IN
VIDEO
MONO/L
AUDIO
R
Y
Pb
Pr
1
IN
OUT
MONITOR OUT AV1 IN AV2 IN
ANTENNA IN 75Ω
Y
VIDEO
Pb
S-VIDEO
MONO/L
AUDIO
Pr
R
S-VIDEO
1
ANTENNA IN 75Ω
ANTENNA IN 75Ω
MONITOR OUT AV1 IN AV2 IN
VIDEO
MONO/L
AUDIO
R
2
Y
Pb
Pr
MONITOR OUT AV1 IN AV2 IN
ANTENNA IN 75Ω
Y
VIDEO
Pb
S-VIDEO
MONO/L
AUDIO
Pr
R
S-VIDEO
OR
1
IN FROM ANT.
OUT TO TV
ANTENNA IN 75Ω
2
MONITOR OUT AV1 IN AV2 IN
VIDEO
MONO/L
AUDIO
R
Y
Pb
Pr
S-VIDEO
MONITOR OUT AV1 IN AV2 IN
ANTENNA IN 75Ω
Y
VIDEO
Pb
MONO/L
AUDIO
Pr
R
S-VIDEO
Page 2
TV AND REMOTE CONTROL OPERATION
TELEVISION
Battery Usage CAUTION—To prevent battery leakage which
may result in bodily injury or damage to the unit:
• Install ALL batteries correctly, + and – as marked on the unit.
• Do not mix batteries: (OLD and NEW or CARBON and
ALKALINE, etc.)
• Remove batteries when the unit is not used for a long time.
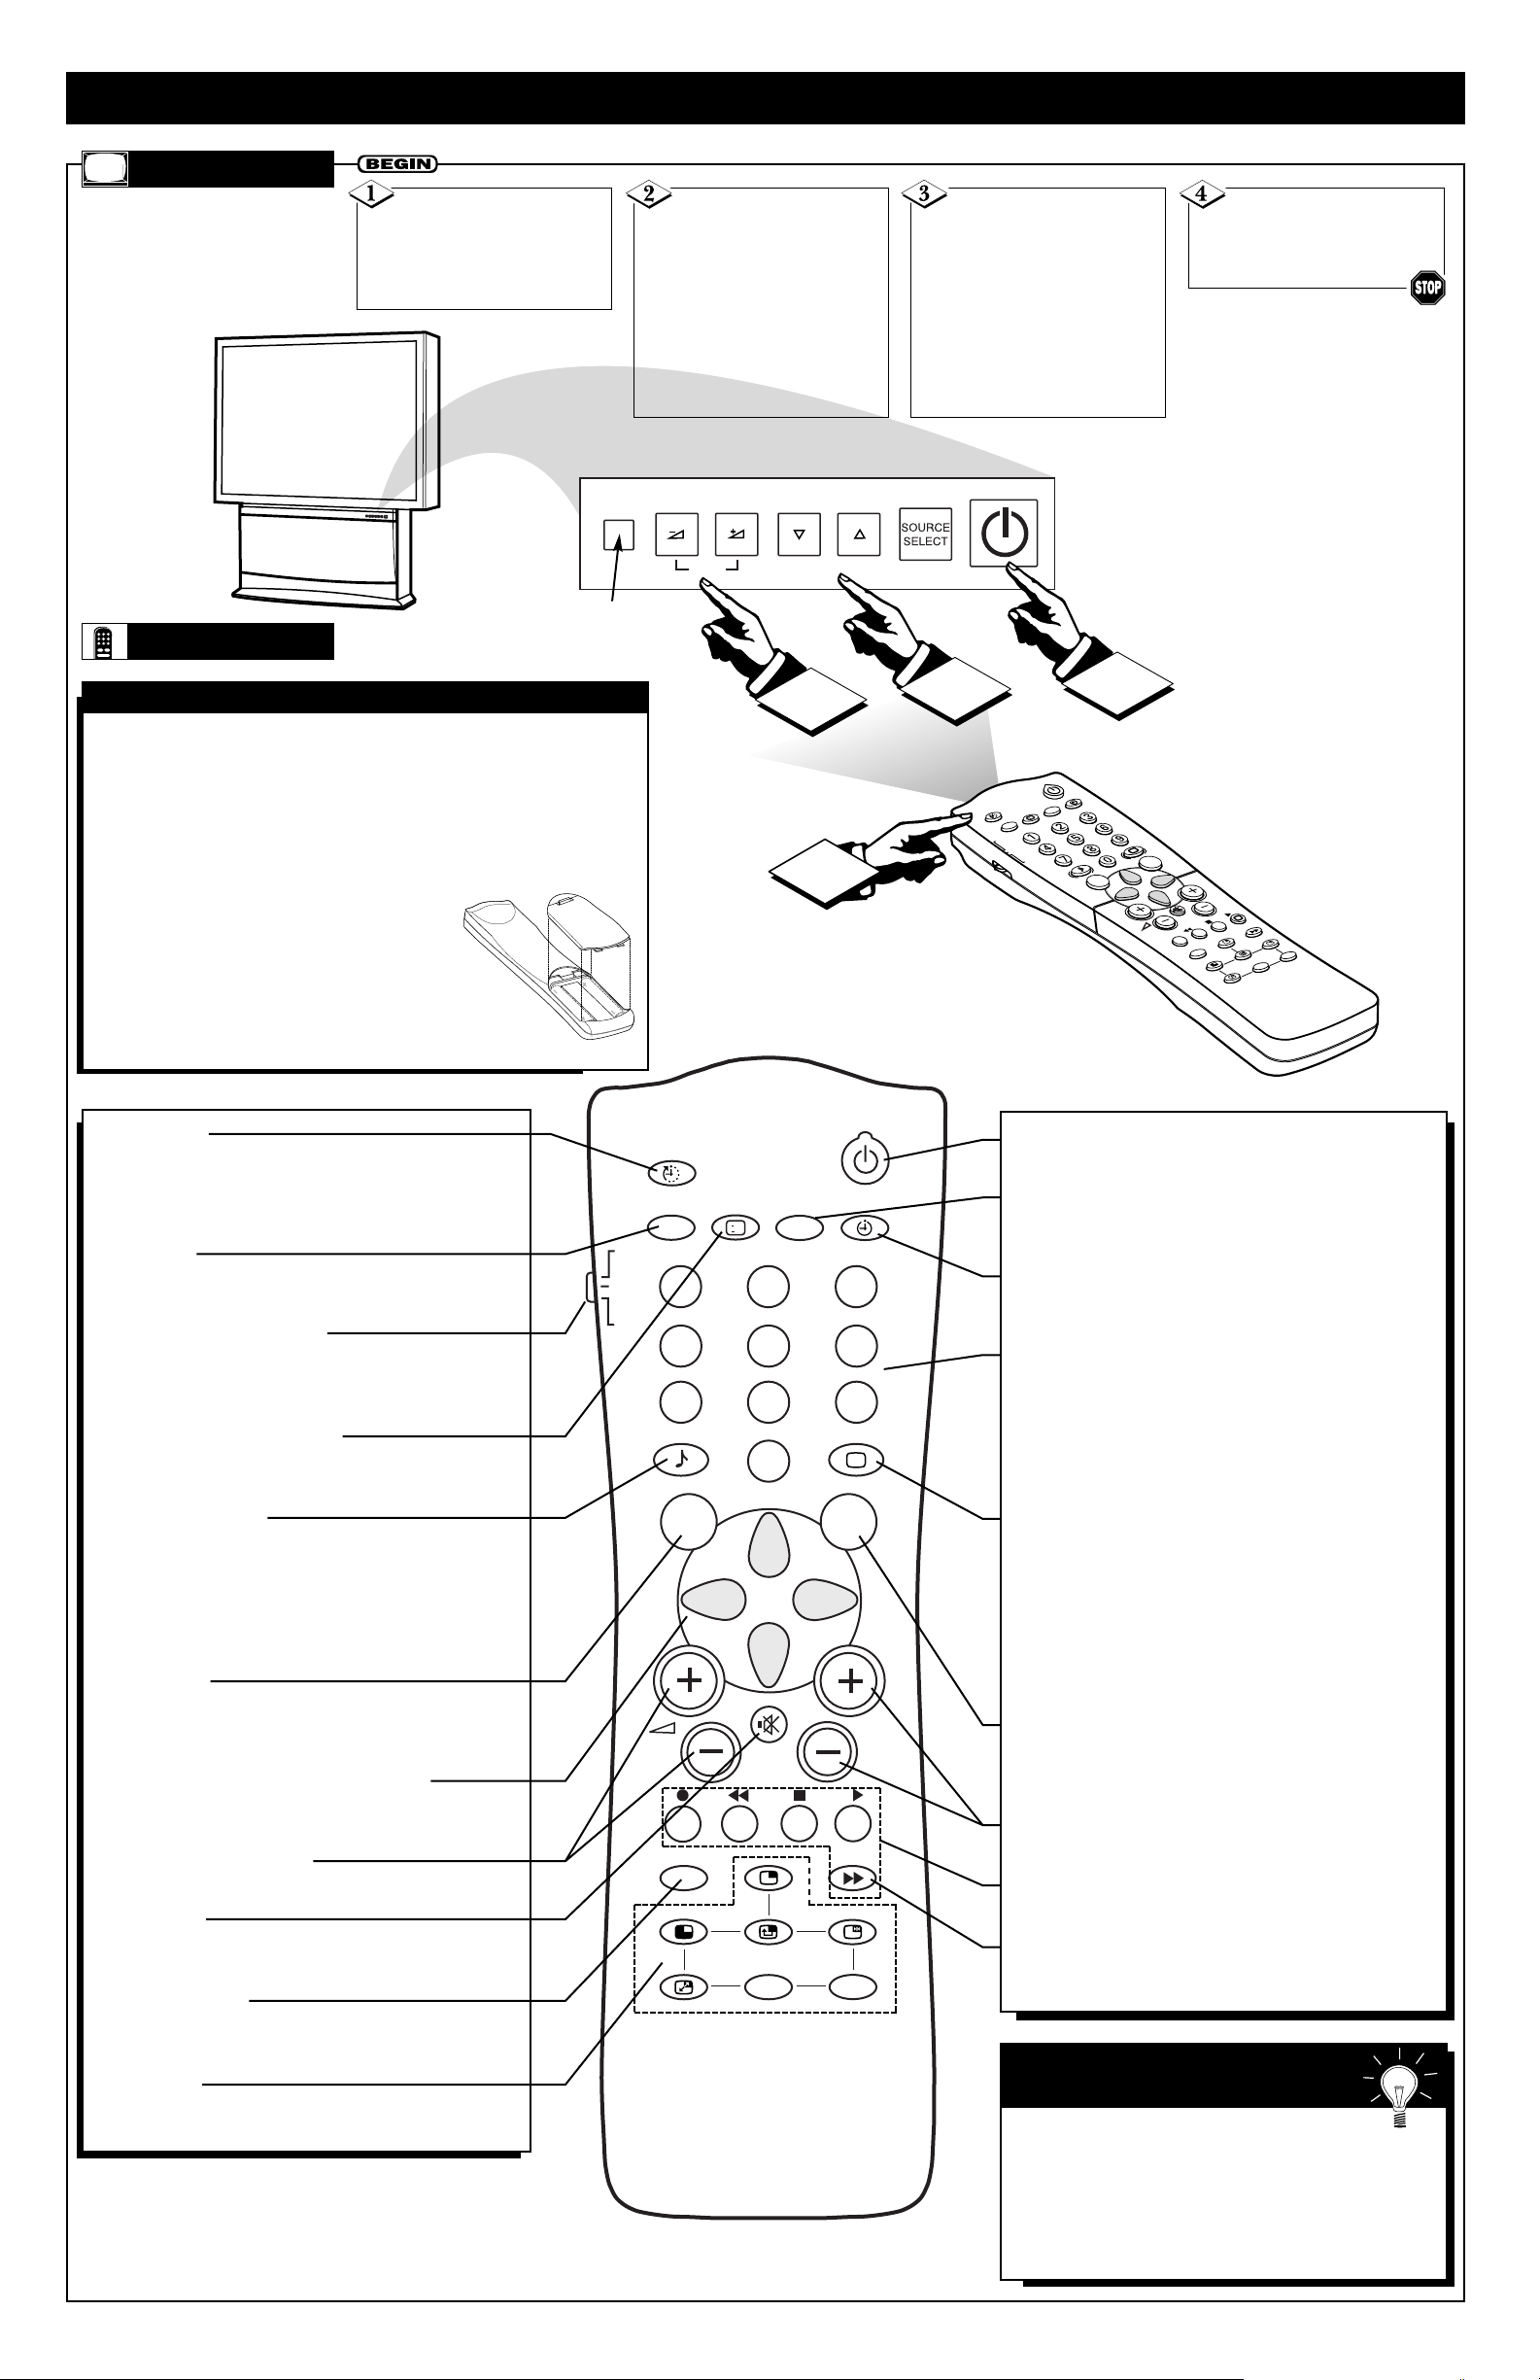
To load the supplied batteries into the remote:
1. Remove the battery compartment lid
on the back of the remote.
2. Place the batteries (2- AA) in the remote.
Be sure the (+) and (–) ends of the batteries line
up correctly (the inside of the case is marked).
3. Reattach the battery lid.
BATTERY INSTALLATION
Press the
POWER/STANDBY button
to turn the TV on. Allow about
10 seconds for the TV power
on.
Press the VOL(+) button to increase the sound level
or the VOL (–) button to
lower the sound level.
Pressing both buttons at the
same time will display the on-
screen menu. After you are in
the menu, use these buttons to
make adjustments or selections.
Press the CH ▼ (down)
or ▲ (up) button to select TV
channels. Use these buttons to
make adjustments or selections
in the on-screen menu.
NOTE: Press three number
buttons on the remote control
for channels 100 or above. For
example: Press 1 then 2 then 5
for channel 125.
REMOTE
Point the remote control
toward the remote sensor window on the TV to use the
remote to operate the TV.
Power Button
Press to turn the TV on and off.
SAP Button
Press to select Second Audio Program (SAP) if available
with the program you are watching.
Clock Button
Press the CLOCK button to access the Timer menu, where
you can manually set the clock.
Number Buttons
Press the number buttons to select TV channels. When
selecting single-digit channels, press the number of the
desired channel. The TV will pause for a few seconds and
then tune to the selected channel. (Note: You can also press
0, then the number.) For channels 100 and above, first press
1 then the next two numbers of the desired channel.
SmartPicture Button
Press to select an SmartPicture control. Choose from four
factory-set controls (MOVIES, SPORTS, WEAK SIGNAL,
and MULTIMEDIA) and a PERSONAL control that you set
according to your own preferences through the on-screen
PICTURE menu. The four factory-set controls will tailor
the TV picture to enhance the particular type of program
you are watching or to improve the picture of a program
with a weak broadcast signal.
Surf Button
Press to quickly view a list of up to 10 channels you have
placed in memory. Go to the channels directly from the Surf
screen. (Details are in the Directions for Use manual. )
CH(annel) Scan (+) or (–) Buttons
Press to change the tuned channel.
VCR §§, ■, ©, ©©, II Buttons
Press to rewind, stop, play, fast forward, or pause a videotape.
A/CH Button
Press to toggle between the currently viewed channel and
the previously viewed channel.
Sleep Button
Press to set the TV to automatically turn itself off. Press to
set the TV to automatically turn itself off after a period of
time. Choose 15, 30, 45, 60, 90, 120, 180, or 240 minutes
before the TV will automatically turn off.
A/V Button
Press repeatedly to select the different signal sources connected to the TV.
TV/VCR/ACC Mode Switch
Slide to position of TV to control TV functions, VCR to control VCR functions and ACC for cable converter, satellite
receiver, DVD, and laser disc accessory device functions.
i+ (on-screen display) Button
Press to see the current channel number on the TV screen.
Also press to clear the TV screen after control adjustments.
SmartSound Button
Press to select an SmartSound control. Choose from three
factory-set controls (VOICE, MUSIC, and THEATRE) and
a PERSONAL control that you set according to your own
preferences through the on-screen Sound menu. The three
factory-set controls will tailor the TV sound to enhance the
type of program you are watching.
Menu Button
Press for the on-screen menu to appear. Pressing the menu
button after menu selections are made will eliminate the
menu from the display.
Cursor Buttons (Left, Right, Up, Down)
Press these buttons to highlight, select, and adjust items on
the TV's on-screen menu.
Volume (+) or (–) Buttons
Press to adjust the TV sound level.
Mute Button
Press to turn the TV sound off. Press again to return the
sound to its previous level.
Incr. Surr. Button
Press to select various factory Surround Sound listening
modes.
PIP Buttons
Press to operate Picture-In-Picture features. See the PIP section in the Directions for Use manual for details.
Remember, you can press any button on the
front of the TV to turn the TV on.
The tuned channel number will always briefly appear
on the screen when the TV is first turned on (and when
the channel is changed).
You also can press the i+ button (on the remote control) to see what channel the TV is on.
SMART HELP
2
Remote Sensor
Window
VOL
MENU
2
4
CH
3
1
SAP
+
i
AV
TV
VCR
ACC
SMART
SMART
SURF
MENU
INCR. SURR.
CH
A/CH
PIP
DN
PIP CH
UP
+
i
TV
VCR
ACC
AV
1
4
7
SMART
MENU SURF
INCR. SURR.
SAP
23
5
6
89
SMART
0
CH
PIP
UP
A/CH
PIP CH
DN
Page 3

3
PICTURE
SOUND
FEATURES
INSTALL
LANGUAGE
TUNER MODE
AUTO PROGRAM
CHANNEL EDIT
AutoChron
LANGUAGE
TUNER MODE
AUTO PROGRAM
CHANNEL EDIT
AutoChron
INSTALL
INSTALL
LANGUAGE
TUNER MODE
AUTO PROGRAM
CHANNEL EDIT
AutoChron
ENGLISH
FRANCAIS
ESPANOL
˜
TV
VCR
ACC
SMART
SMART
MENU SURF
CH
1
23
4
5
6
7
89
0
UP
PIP
INCR. SURR.
A/CH
PIP CH
AV
SAP
i
+
1
23
4
5
6
7
89
0
MENU SURF
UP
4
1
5
2
3
5
6
HOW TO USE THE INSTALLATION FEATURES
F
or or Spanish- and
French-speaking TV
owners, an on-screen LANGUAGE option is present.
The LANGUAGE control
enables you to set the TVÕs
on-screen menu to be shown
in either English, Spanish, or
French.
LANGUAGE
Press the MENU button
on the remote control to show
the on-screen menu.
Press the CURSOR
DOWN button repeatedly
until INSTALL is highlighted.
Press the CURSOR
RIGHT button to highlight
the LANGUAGE control
options area.
Press the CURSOR UP
or CURSOR DOWN button
to select ENGLISH,
ESPA„OL (Spanish), or
FRANCAIS (French).
Press the CURSOR
RIGHT button to enter the
INSTALL menu.
AUTO PROGRAM
Press the MENU button
on the remote control to show
the on-screen menu.
Press the CURSOR
DOWN button repeatedly until
INSTALL is highlighted.
Press the CURSOR
RIGHT button to enter the
INSTALL menu.
T
UNERMODE
Press the MENU button
on the remote control to show
the on-screen menu.
Press the CURSOR
DOWN button repeatedly until
INSTALL is highlighted.
Press the CURSOR
RIGHT button to highlight the
tuner options area.
Press the CURSOR
DOWN button until the dot
and triangle are to the left of
the option that matches your
signal connection. If you want
the TV to determine the type
of signal, select AUTO.
Press the CURSOR
RIGHT button to enter the
INSTALL menu.
Press the CURSOR
DOWN button repeatedly
until the AUTO PROGRAM
control is highlighted.
Press the CURSOR
RIGHT button to start the
Auto Program scanning of
channels.
After youÕve run Auto
Program, check the
results. Press the CH(annel) (+,
Ð) button and see which channels you can select.
Remember, an antenna or cable
TV signal must first be connected to your TV (see instructions for making connections
on page 1 of this guide).
If you want to delete any
unwanted channels from the
TVÕs memory, see the ÒCHANNEL EDITÓ section on page 4.
SMART HELP
Remember, the LANGUAGE control
makes only the TVÕs on-screen menu items
appear in English, Spanish, or French text. It does
not change the other on-screen text features, such as
Closed Captioning (CC), with TV shows.
Pressing the i+ button on your remote control after
making adjustments to the TV will remove the menu
from the screen. You also can back out of the menu
by repeatedly pushing the menu button on your
remote control.
SMART HELP
Press the CURSOR
DOWN button once to high-
light TUNER MODE.
When CABLE is
selected, channels 1–125
are available.
When ANTENNA is selected,
channels 2–69 are available.
SMART HELP
Press the i+ button to
clear the menu from the
screen.
Press the i+ button to
clear the menu from the
screen.
Press the i+ button to
clear the menu from the
screen.
S
et the TUNER MODE
control according to the
type of signal you have connected to the TV: ANTENNA
or CABLE. If you select
AUTO, the TV will automatically detect the type of signal you have connected.
A
UTO PROGRAM will
scan for and store only
channels with active broadcast stations in th TV’s memory. After you run AUTO
PROGRAM, you can use the
CH(annel) Scan (+,–) buttons to quickly and easily
select stations.
1
SMART
MENU SURF
MENU SURF
PICTURE
SOUND
FEATURES
INSTALL
7
AV
TV
VCR
ACC
4
4
7
7
89
89
0
0
1
1
23
23
5
5
SMART
i
+
SAP
6
6
LANGUAGE
TUNER MODE
AUTO PROGRAM
CHANNEL EDIT
AutoChron
INSTALL
LANGUAGE
TUNER MODE
AUTO PROGRAM
CHANNEL EDIT
AutoChron
INSTALL
LANGUAGE
TUNER MODE
AUTO PROGRAM
CHANNEL EDIT
AutoChron
INSTALL
LANGUAGE
TUNER MODE
AUTO PROGRAM
CHANNEL EDIT
AutoChron
AUTO
CABLE
ANTENNA
INCR. SURR.
PIP
A/CH
UP
UP
PIP CH
DN
DN
1
UP
UP
INCR. SURR.
PIP CH
DN
DN
PIP
A/CH
CH
MENU SURF
MENU SURF
CH
2
4
TV
VCR
1
ACC
1
4
4
7
7
SMART
89
89
0
0
2
5
5
SMART
4
3
5
6
LANGUAGE
TUNER MODE
AUTO PROGRAM
CHANNEL EDIT
AutoChron
6
PICTURE
SOUND
FEATURES
INSTALL
AV
i
+
SAP
23
23
6
6
3
5
INSTALL
LANGUAGE
TUNER MODE
AUTO PROGRAM
CHANNEL EDIT
AutoChron
INSTALL
LANGUAGE
TUNER MODE
AUTO PROGRAM
CHANNEL EDIT
AutoChron
INSTALL
SEARCH
LANGUAGE
TUNER MODE
AUTO PROGRAM
CHANNEL EDIT
AutoChron
CABLE
PLEASE WAIT
CHANNEL 12
Page 4

4
PICTURE
SOUND
FEATURES
INSTALL
LANGUAGE
TUNER MODE
AUTO PROGRAM
CHANNEL EDIT
AutoChron
LANGUAGE
TUNER MODE
AUTO PROGRAM
CHANNEL EDIT
AutoChron
INSTALL
INSTALL
LANGUAGE
TUNER MODE
AUTO PROGRAM
CHANNEL EDIT
AutoChron
INSTALL
LANGUAGE
TUNER MODE
AUTO PROGRAM
CHANNEL EDIT
AutoChron
66 SKIPPED
67 SKIPPED
68 SKIPPED
69 SKIPPED
AV1
TV
VCR
ACC
SMART
SMART
MENU SURF
CH
1
23
4
5
6
7
89
0
DN
PIP
A/CH
AV
SAP
i
+
1
23
4
5
6
7
89
0
MENU SURF
DN
1
3
2
4
6
5
6
7
8
HOW TO USE THE INSTALLATION FEATURES
C
HANNEL EDIT makes
it easy for you to add or
delete channels from the list
of channels stored in the
TVÕs memory.
CHANNEL EDIT
Press the MENU button
on the remote control to show
the on-screen menu.
Press the CURSOR
DOWN button repeatedly
until INSTALL is highlighted.
Press the CURSOR
DOWN button repeatedly
until the CHANNEL EDIT
control is highlighted.
Press the CURSOR
RIGHT button to access the
CHANNEL EDIT menu.
Press the CURSOR
RIGHT button to enter the
INSTALL menu.
NAME
Press the MENU button
on the remote control to show
the on-screen menu.
Press the CURSOR
DOWN button repeatedly until
INSTALL in highlighted.
Press the CURSOR
DOWN button repeatedly until
the NAME control is highlighted.
If you want to choose
from among the preset list of
name options, press the
CURSOR UP or DOWN
button to highlight the choice
you would like to select for
the name. Then press the
CURSOR RIGHT button.
Press the CURSOR
RIGHT button to enter the
INSTALL menu.
AutoChron
Press the MENU but-
ton on the remote to show the
on-screen menu.
Press the CURSOR
DOWN button repeatedly
until INSTALL is highlighted.
Press the CURSOR
DOWN button until the
AutoChron control is highlighted.
Press the CURSOR
RIGHT button to enter the
INSTALL menu.
Press the CURSOR UP
or CURSOR DOWN button
to scroll through the list of
available channels. Or press the
NUMBER buttons on your
remote control to select a specific channel (for example, press 0
and then 2 to select channel 2).
With the channel you
want to edit selected, press
the CURSOR RIGHT button
to mark the channel as
SKIPPED. The channel youÕve
marked SKIPPED will not
appear when you are changing
from channel to channel while
watching TV.
When you want to add a channel that has been marked
SKIPPED, press the CUR-
SOR UP or CURSOR
DOWN button to highlight
the channel; then press the
CURSOR RIGHT button to
remove the word SKIPPED.
Press the CURSOR
RIGHT button to highlight the
NAME options area.
If you want to create
your own personal name for
the channel or edit a name you
chose previously, press the
CURSOR RIGHT button to
choose a PERSONAL option.
Then press the CURSOR UP
or DOWN button to select the
first character of the name.
You can input up to four more
characters in creating the
name. Press the MENU button
after you finish.
Press the CURSOR
RIGHT button to enter the
AutoChron SET TIME area.
NOTE: When setting the
clock manually, press the
number buttons on the remote
control to enter the time.
Remember to set AM or PM
with the CURSOR UP or
DOWN button.
Follow these
on-screen
instructions
to set
AutoChron
automatically.
Follow these
on-screen
instructions
to set
AutoChron
manually.
Press the i+ button to
clear the menu from the
screen.
The five characters that the channel NAME feature allows you to
input can be letters, a dash character, or the numbers 0 through 9.
SMART HELP
Press the CURSOR
RIGHT button again to
select AUTO. Within a few
seconds, a menu containing
the time zone options will
appear.
Press the CURSOR UP
or DOWN button to high-
light your correct time zone.
Then press the CURSOR
RIGHT button. Go through
the same process for the
Daylight Savings time option.
Use the NUMBER but-
tons on your TV remote to
enter the channel number for
your PBS station.
NOTE: If you enter the wrong
channel number for your PBS
station, the time will not be
found and you will be prompted to enter another channel
number.
When finished, press
the i+ button to clear the
menu from the screen.
Up to 5 characters
Press the i+ button to
clear the menu from the
screen.
A
utoChroncan automati-
cally set the TVÕs onscreen clock. Because the
time is received from a
broadcast signal, you must
be sure you have a signal
source connected before you
attempt to use the
AutoChron feature.You will
also need to know the channel number of your Public
Broadcasting Station.
T
he channel NAME fea-
ture allows you to list
the ÒcallÓ letters of your
favorite stations beside their
channel numbers when they
appear on the screen. The
TV has in memory a list of
the 50 most popular channel
names (ABC, NBC, FOX, for
example). You can also enter
a PERSONAL name of up to
five characters.
PICTURE
SOUND
FEATURES
INSTALL
LANGUAGE
TUNER MODE
AUTO PROGRAM
CHANNEL EDIT
AutoChron
INSTALL
LANGUAGE
TUNER MODE
AUTO PROGRAM
CHANNEL EDIT
AutoChron
ENGLISH
FRANCAIS
ESPANOL
INSTALL
LANGUAGE
TUNER
AUTO PROGRAM
CHANNEL EDIT
AutoChron
INSTALL
LANGUAGE
SET TIME
AUTO
MANUAL
TUNER MODE
AUTO PROGRAM
CHANNEL EDIT
AutoChron
SET TIME
AUTO
MANUAL
INSTALL
LANGUAGE
TUNER MODE
AUTO PROGRAM
CHANNEL EDIT
AutoChron
TIME ZONE?
CENTRAL
MOUNTAIN
PACIFIC
INSTALL
LANGUAGE
TUNER MODE
AUTO PROGRAM
CHANNEL EDIT
AutoChron
DAYLIGHT
SAVING TIME?
YES
NO
INSTALL
LANGUAGE
TUNER MODE
AUTO PROGRAM
CHANNEL EDIT
AutoChron
SEARCH FOR
TIME
ENTER CHANNEL
02 PBS
INSTALL
LANGUAGE
TUNER MODE
AUTO PROGRAM
CHANNEL EDIT
AutoChron
SET TIME
AUTO
MANUAL
INSTALL
LANGUAGE
TUNER MODE
AUTO PROGRAM
CHANNEL EDIT
AutoChron
ENTER TIME
11:00 AM
INSTALL
LANGUAGE
TUNER MODE
AUTO PROGRAM
CHANNEL EDIT
AutoChron
SEARCH FOR
TIME
PLEASE WAIT
15 PBS
INSTALL
LANGUAGE
TUNER MODE
AUTO PROGRAM
CHANNEL EDIT
AutoChron
SEARCH FOR
TIME
TIME FOUND
PRESS EXIT TO END
11:15 AM
PICTURE
SOUND
FEATURES
AV
TV
1
MENU SURF
MENU SURF
A/CH
CH
INCR. SURR.
PIP
PIP CH
DN
DN
ACC
4
4
7
7
SMART
0
0
2
VCR
i
+
1
1
23
23
5
5
89
6
89
6
SMART
3
4
7
SAP
5
8
6
INSTALL
LANGUAGE
TUNER MODE A
TUNER MODE B
INSTALL
AUTO PROGRAM
LANGUAGE
CHANNEL EDIT
TUNER MODE
AUTO PROGRAM
CHANNEL EDIT
AutoChron
INSTALL
TUNER MODE
AUTO PROGRAM
CHANNEL EDIT
AutoChron
NAME PERSONAL
INSTALL
TUNER MODE
AUTO PROGRAM
CHANNEL EDIT
AutoChron
NAME
PERSONAL
WX-
WXY-
WXYZ-
WXYZ3
 Loading...