

Page 1
HDTV Monitor
with Pixel Plus
™
HDTV Monitor
with Pixel Plus
™
Quick Use and Setup Guide
Quick Use and Setup Guide
3135 035 22893
Contents
WARNING: TO PREVENT FIRE OR SHOCK HAZARD, DO NOT
EXPOSE THIS UNIT TO RAIN OR EXCESSIVE MOISTURE.
As an Energy Star® Partner, Philips Consumer Electronics has deter-
mined this product meets the Energy Star® guidelines for energy
efficiency. Energy Star® is a U.S. registered mark. Using products
with the Energy Star® label can save energy. Saving energy reduces air pollution
and lowers utility bills.
Warning . . . . . . . . . . . . . . . . . . . . . . . . . . . . . . . . . . . . . . . . . . . . . . . . . . . . . . .1
See the User Manual . . . . . . . . . . . . . . . . . . . . . . . . . . . . . . . . . . . . . . . . . . . . .1
Positioning the TV . . . . . . . . . . . . . . . . . . . . . . . . . . . . . . . . . . . . . . . . . . . . . . .2
Mounting the Swivel to the TV . . . . . . . . . . . . . . . . . . . . . . . . . . . . . . . . . . . . .2
Mounting the Swivel and TV to the Stand . . . . . . . . . . . . . . . . . . . . . . . . . . . . .3
Making Basic Connections to the TV . . . . . . . . . . . . . . . . . . . . . . . . . . . . . . .3–5
Operating the TV . . . . . . . . . . . . . . . . . . . . . . . . . . . . . . . . . . . . . . . . . . . . . . . .5
Using the Remote Control . . . . . . . . . . . . . . . . . . . . . . . . . . . . . . . . . . . . . . . . .6
Using the On-screen Menu . . . . . . . . . . . . . . . . . . . . . . . . . . . . . . . . . . . . . . . . .7
Using the Demo Mode . . . . . . . . . . . . . . . . . . . . . . . . . . . . . . . . . . . . . . . . . . . .7
Using the Installation Features . . . . . . . . . . . . . . . . . . . . . . . . . . . . . . . . . . . . . .8
8/4/04
3
1
3
5
0
35
2
12
8
1
H
D
TV M
onitor
with Pixel Plus
™
HDTV M
onitor
with Pixel Plus
™
™
44
P
L
97
74
55
P
L
9774
Refer to the Quick Use and Setup Guide (supplied with your TV)
for information on basic connections,remote control button
descriptions,on-screen menu language, and Autoprogram.
H
ighlights
• Liquid-crystal-on-silicon (LC
O
S)
H
igh-definition
Im
a
ging
•H
igh-r
esolution D
ispla
y—
1280
x 720 pixels
• Pixel Plus™
Features
•D
igital
N
atural
M
otion™
•D
igital
C
rystal Clear™
•A
ctiv
e Control™
—
anal
yzes and adjusts incom
ing
signal
• Two-tuner,D
ouble-windo
w
PIP (Picture-in-Picture)
•D
olb
y
®
Virtual Surround, 40-w
att
RM
S
•3D
Y/C
C
om
b
Filter
•HD
C
om
ponent
and DVI Input
•C
enter
C
hannel
A
udio Input
• Side AV Convenience Jacks
• Matching stand and sw
iv
el available
4
/
2
1
/
0
3
See the User Manual for Important Maintenance Information
Keep the Directions for Use manual
accessible to correctly maintain and
care for your TV, as well as to
understand and use its features.
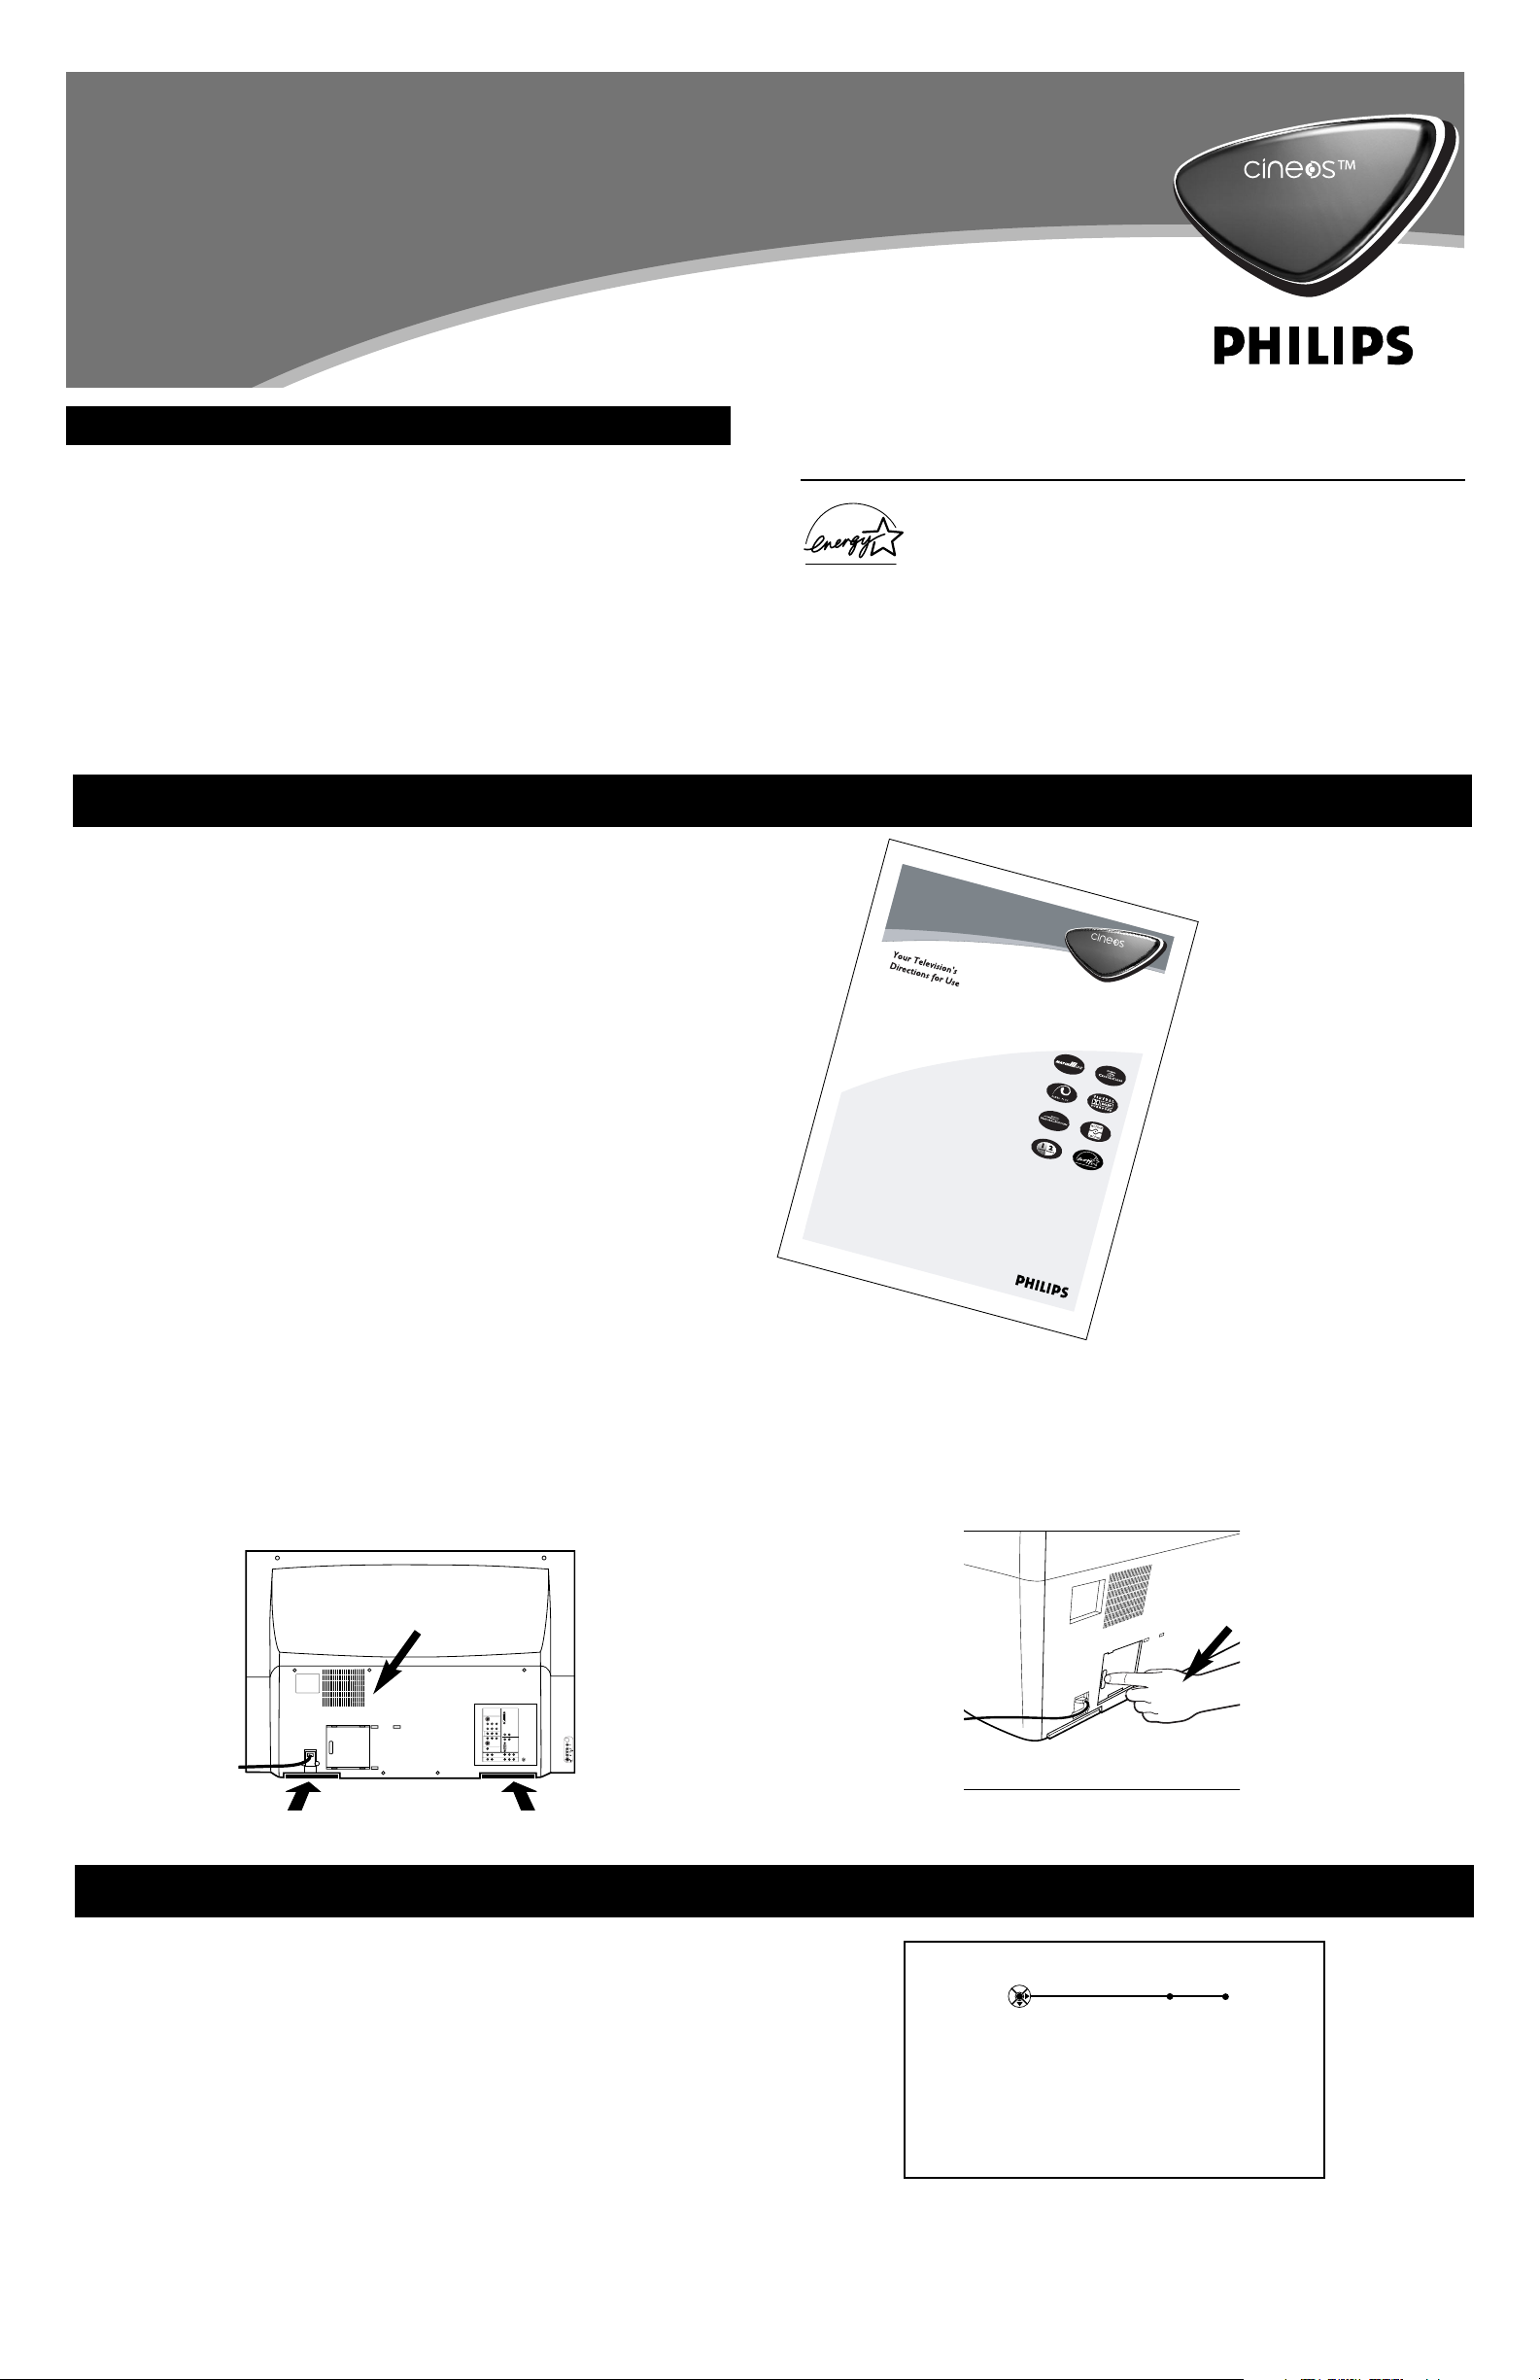
Locations of Air Filters
Ventilation Slots
The lamp door must be closed for the TV to operate.
Lamp Door
Back of TV
Back of TV
In addition to providing information about safety, connecting accessory devices,
and using the TV’s features, the Directions for Use manual explains how to care
for and maintain your Cineos television. The TV contains air filters that must be
maintained and eventually replaced, and a lamp that eventually will need to be
replaced.
Air Filters
The air filters (located at the bottom of the TV) must be kept clean and free of
blockage.
NOTE: DO NOT operate the TV without the filters. Damage to the TV will occur.
Allow four to six inches of space behind the TV for air flow through the back
slots.
IMPORTANT: Excessive heat inside the TV resulting from inadequate ventilation
will cause the TV to shut down or not
to operate.
Lamp
An on-screen message will alert you when the lamp is nearing the end of its
expected lifetime so that you can change it before it wears out.
IMPORTANT: The TV will not operate if the lamp door is left open, and the TV
will shut down if the door is opened during operation.
Picture Settings
Your TV was set up at the factory for optimal showroom viewing. For optimal
home viewing change the Auto Picture setting to Natural. See page 34 in the
Direction for Use Manual.
IMPORTANT! Initial TV Setup
When you turn on your TV for the first time it will prompt you to enter
some setup information about Language preference and Channel programming. See page 8 in this Quick Use and Setup Guide for more information
about these menus.
Please read this Quick Use and Setup Guide completely before
you turn on the TV.
C
2
SERVICE 1
DVI
G
S-VIDEO
RLV
AV1MONSUB OUT AV2AV3AV4
Pr Pb Y
RL
V
RL
OUT
RL
V
RL
G
S-VIDEO
AV5 AV6
RGB+HV
Pr Pb Y
RL
STANDARD/
HD INPUTS
TUNER
Pr Pb Y
STANDARD/
HD INPUTS
RL
Language Autoprogram
Select your menu language with
the cursor up/down.
Press the OK key on the remote
control to confirm.
Page 2
Positioning the TV
2
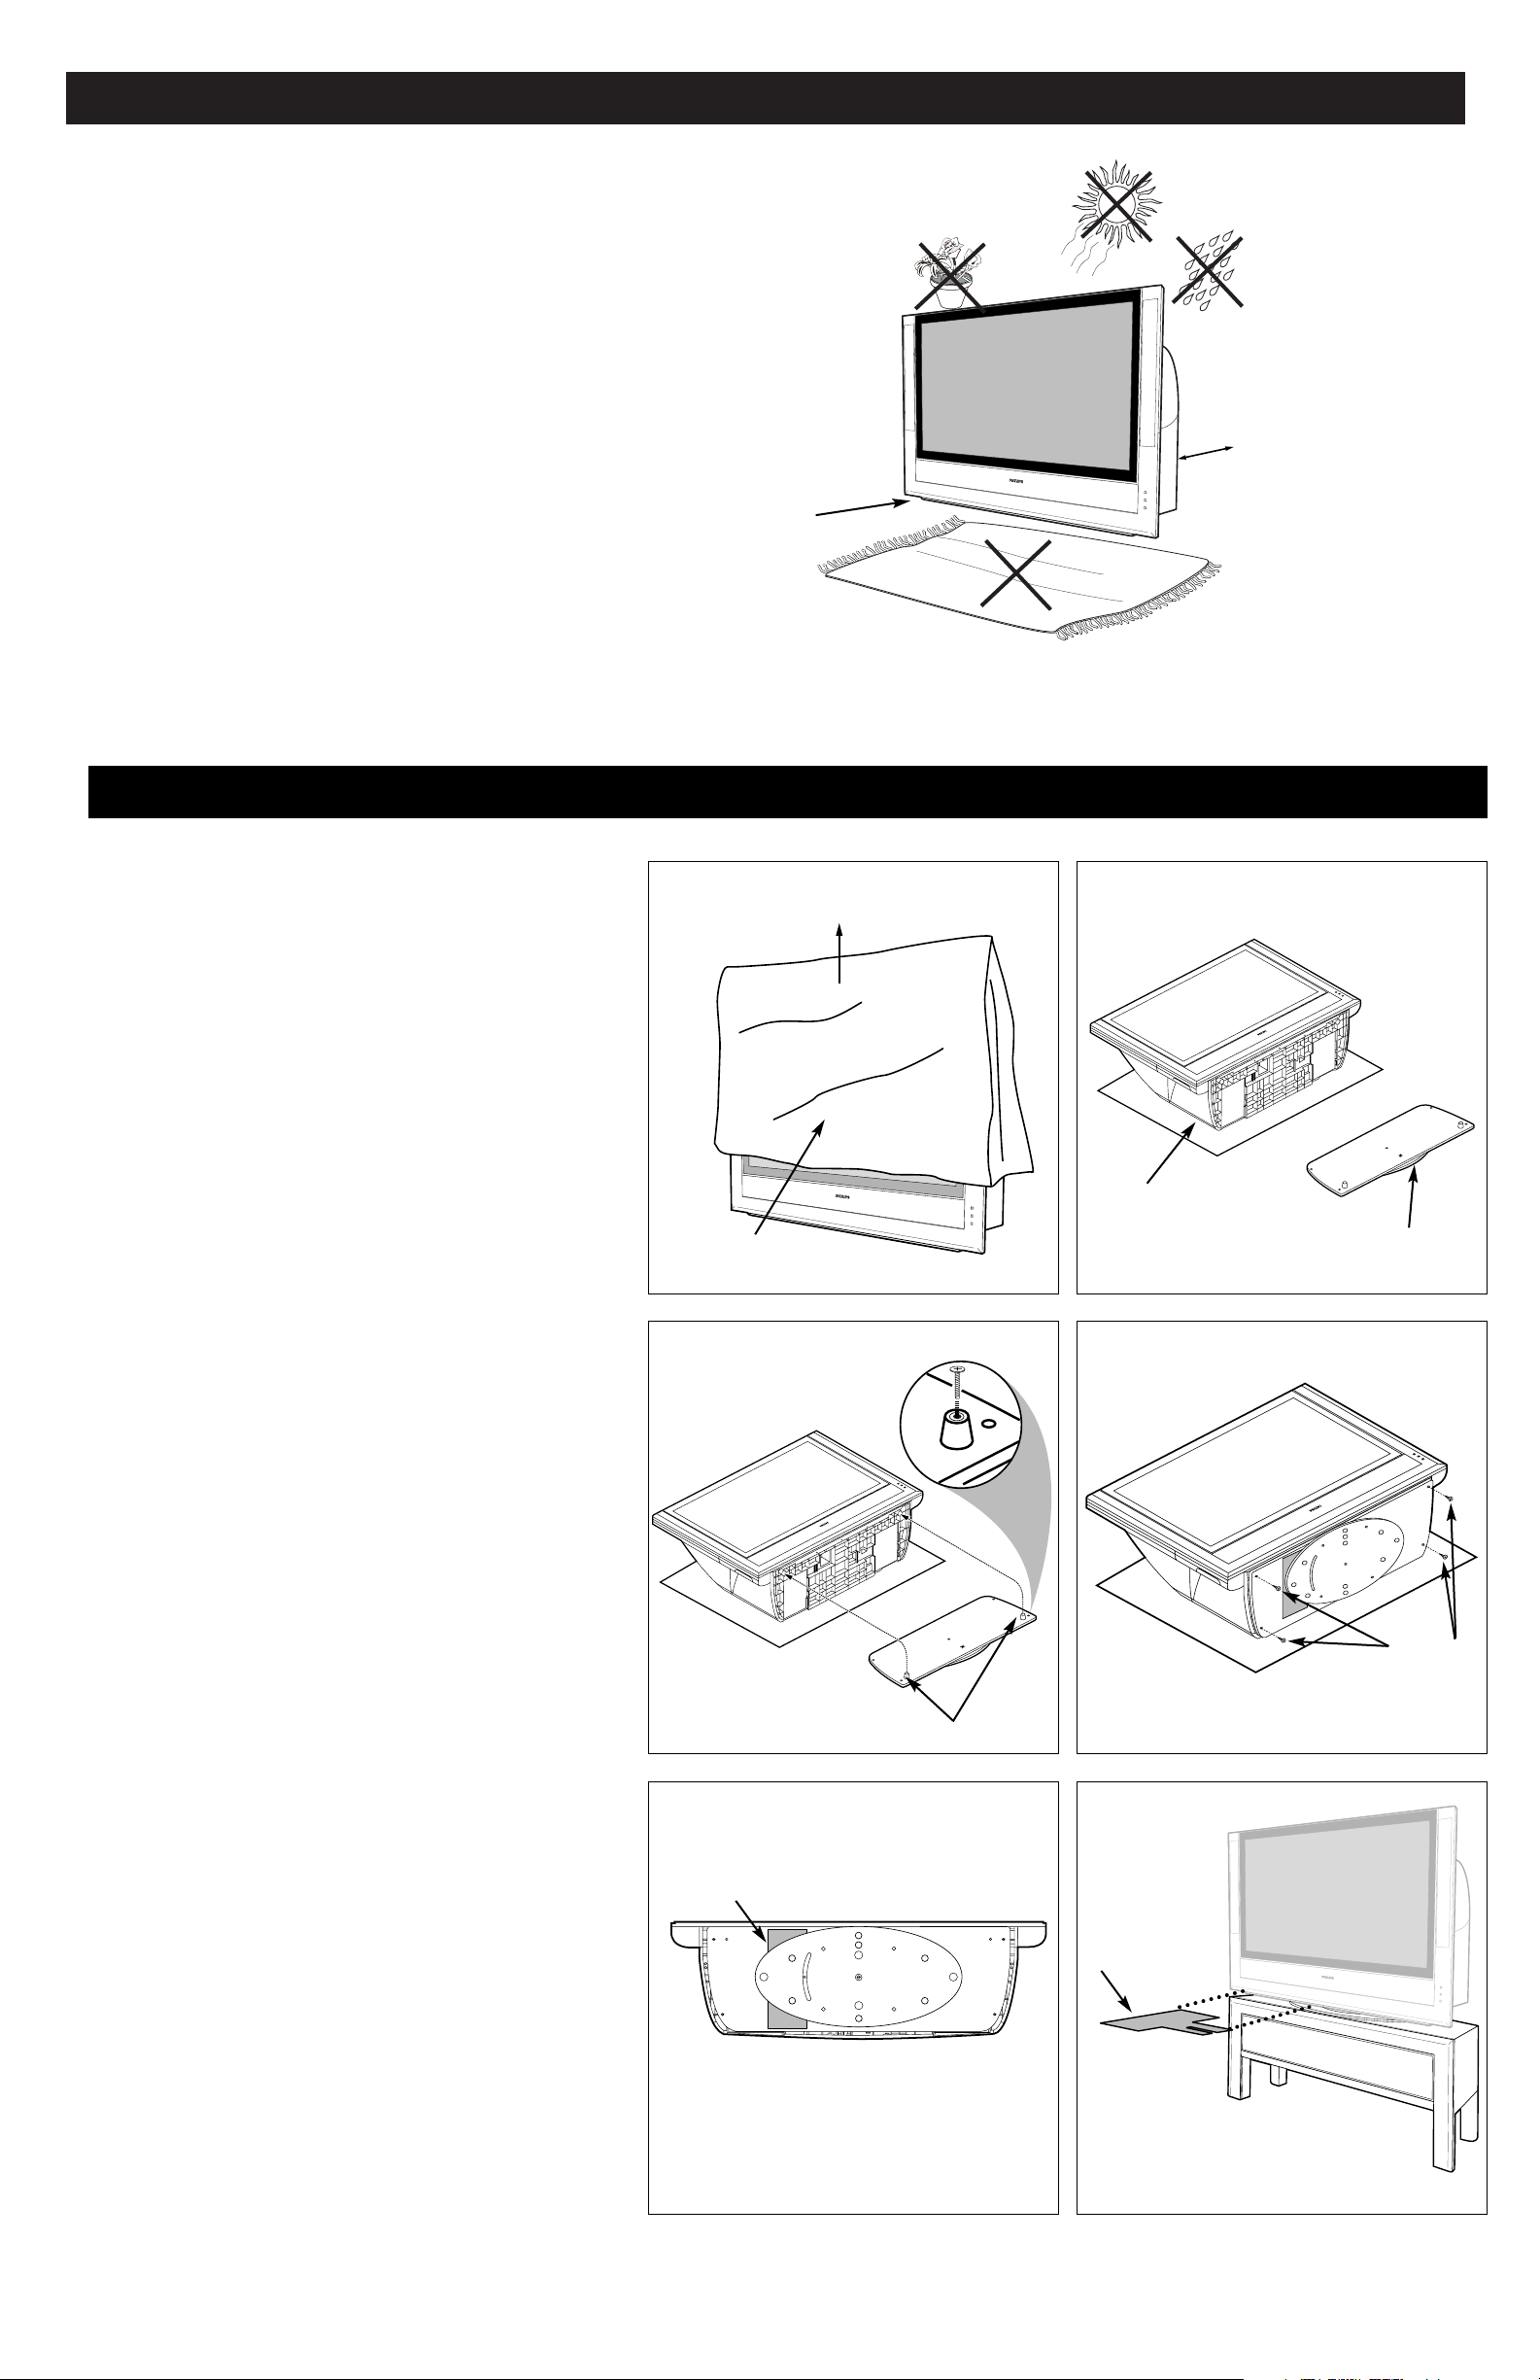
Before connecting accessory devices—VCR, DVD player, or HD
receiver, for example—please keep the following in mind:
• Place the TV on a flat surface. An unlevel surface may adversely
affect picture performance.
• Do not place the TV on shag carpet or any surface that will
block the air inlets at the bottom of the set. Blockage will cause
the TV to overheat and shut down.
• Allow 4 to 6 inches of space behind the TV for ventilation.
• To purchase an optional swivel and/or stand to go with your
Philips Cineos TV, see the electronics dealer where you bought
your TV.
• Test various locations in the room to find the optimal spot to
locate the set for best viewing.
• Do not place the TV in direct sunlight or near a heating appliance.
• Do not expose the TV to rain or moisture.
• To prevent any unsafe situations, do not place objects on top of
the TV.
Mounting the Swivel to the TV
Following are instructions for mounting the optional swivel.
NOTE: Attach the swivel before hooking up the TV.
1
Remove the foam cushion polybag from around your TV
and place it on the floor.
2
NOTE: At least two people are required to perform this task.
Carefully lay the TV back flat on the foam cushion polybag
with the screen up.
3
Use screws to fasten rubber bumpers to the swivel as
shown. Guide the two rubber bumpers on the swivel into
the corresponding holes on the bottom of the TV.
4
Use the supplied screws (4) to fasten the swivel to the TV.
Tighten the screws until hand tight. Do not overtighten.
5
Be sure the swivel is in center position.
6
Place the TV and mounted swivel upright on a level surface, preferably a TV stand. An unlevel surface may
adversely affect picture performance. Once you have positioned TV on a TV stand or other surface, remove the
wooden 0-Degree Holder by pulling it to the left, then
toward the front of the TV. The swivel will not turn until it
is removed.
2
Optional Swivel
Polybag
Rubber Bumpers
Optional Stand
Swivel in Center Position
Screws
Polybag
Remove and Place on Floor
1
3 4
5 6
Allow 4 to 6 inches
behind the TV for
ventilation.
Place the TV on
a flat surface.
Do not place the TV on a surface that will block
the air filters located underneath the set.
Situate the TV where it will not
be exposed to heat or moisture.
For safety, do not set
objects on top of the TV.
0-Degree Holder
0-Degree Holder
Page 3
3
Making Basic Connections to the TV
Cable TV
Connect the cable TV signal to the TUNER jack on the back of
the TV. See page 8 for details on using Autoprogram to store channels in the TV’s memory.
NOTE: This connection will supply stereo sound to the TV if it is
being broadcast by the station you are watching.
Back of TV
Incoming
Cable TV
Signal
Connect the incoming cable
TV signal to the TUNER
jack on the back of the TV.
Mounting the Swivel and TV to the Stand
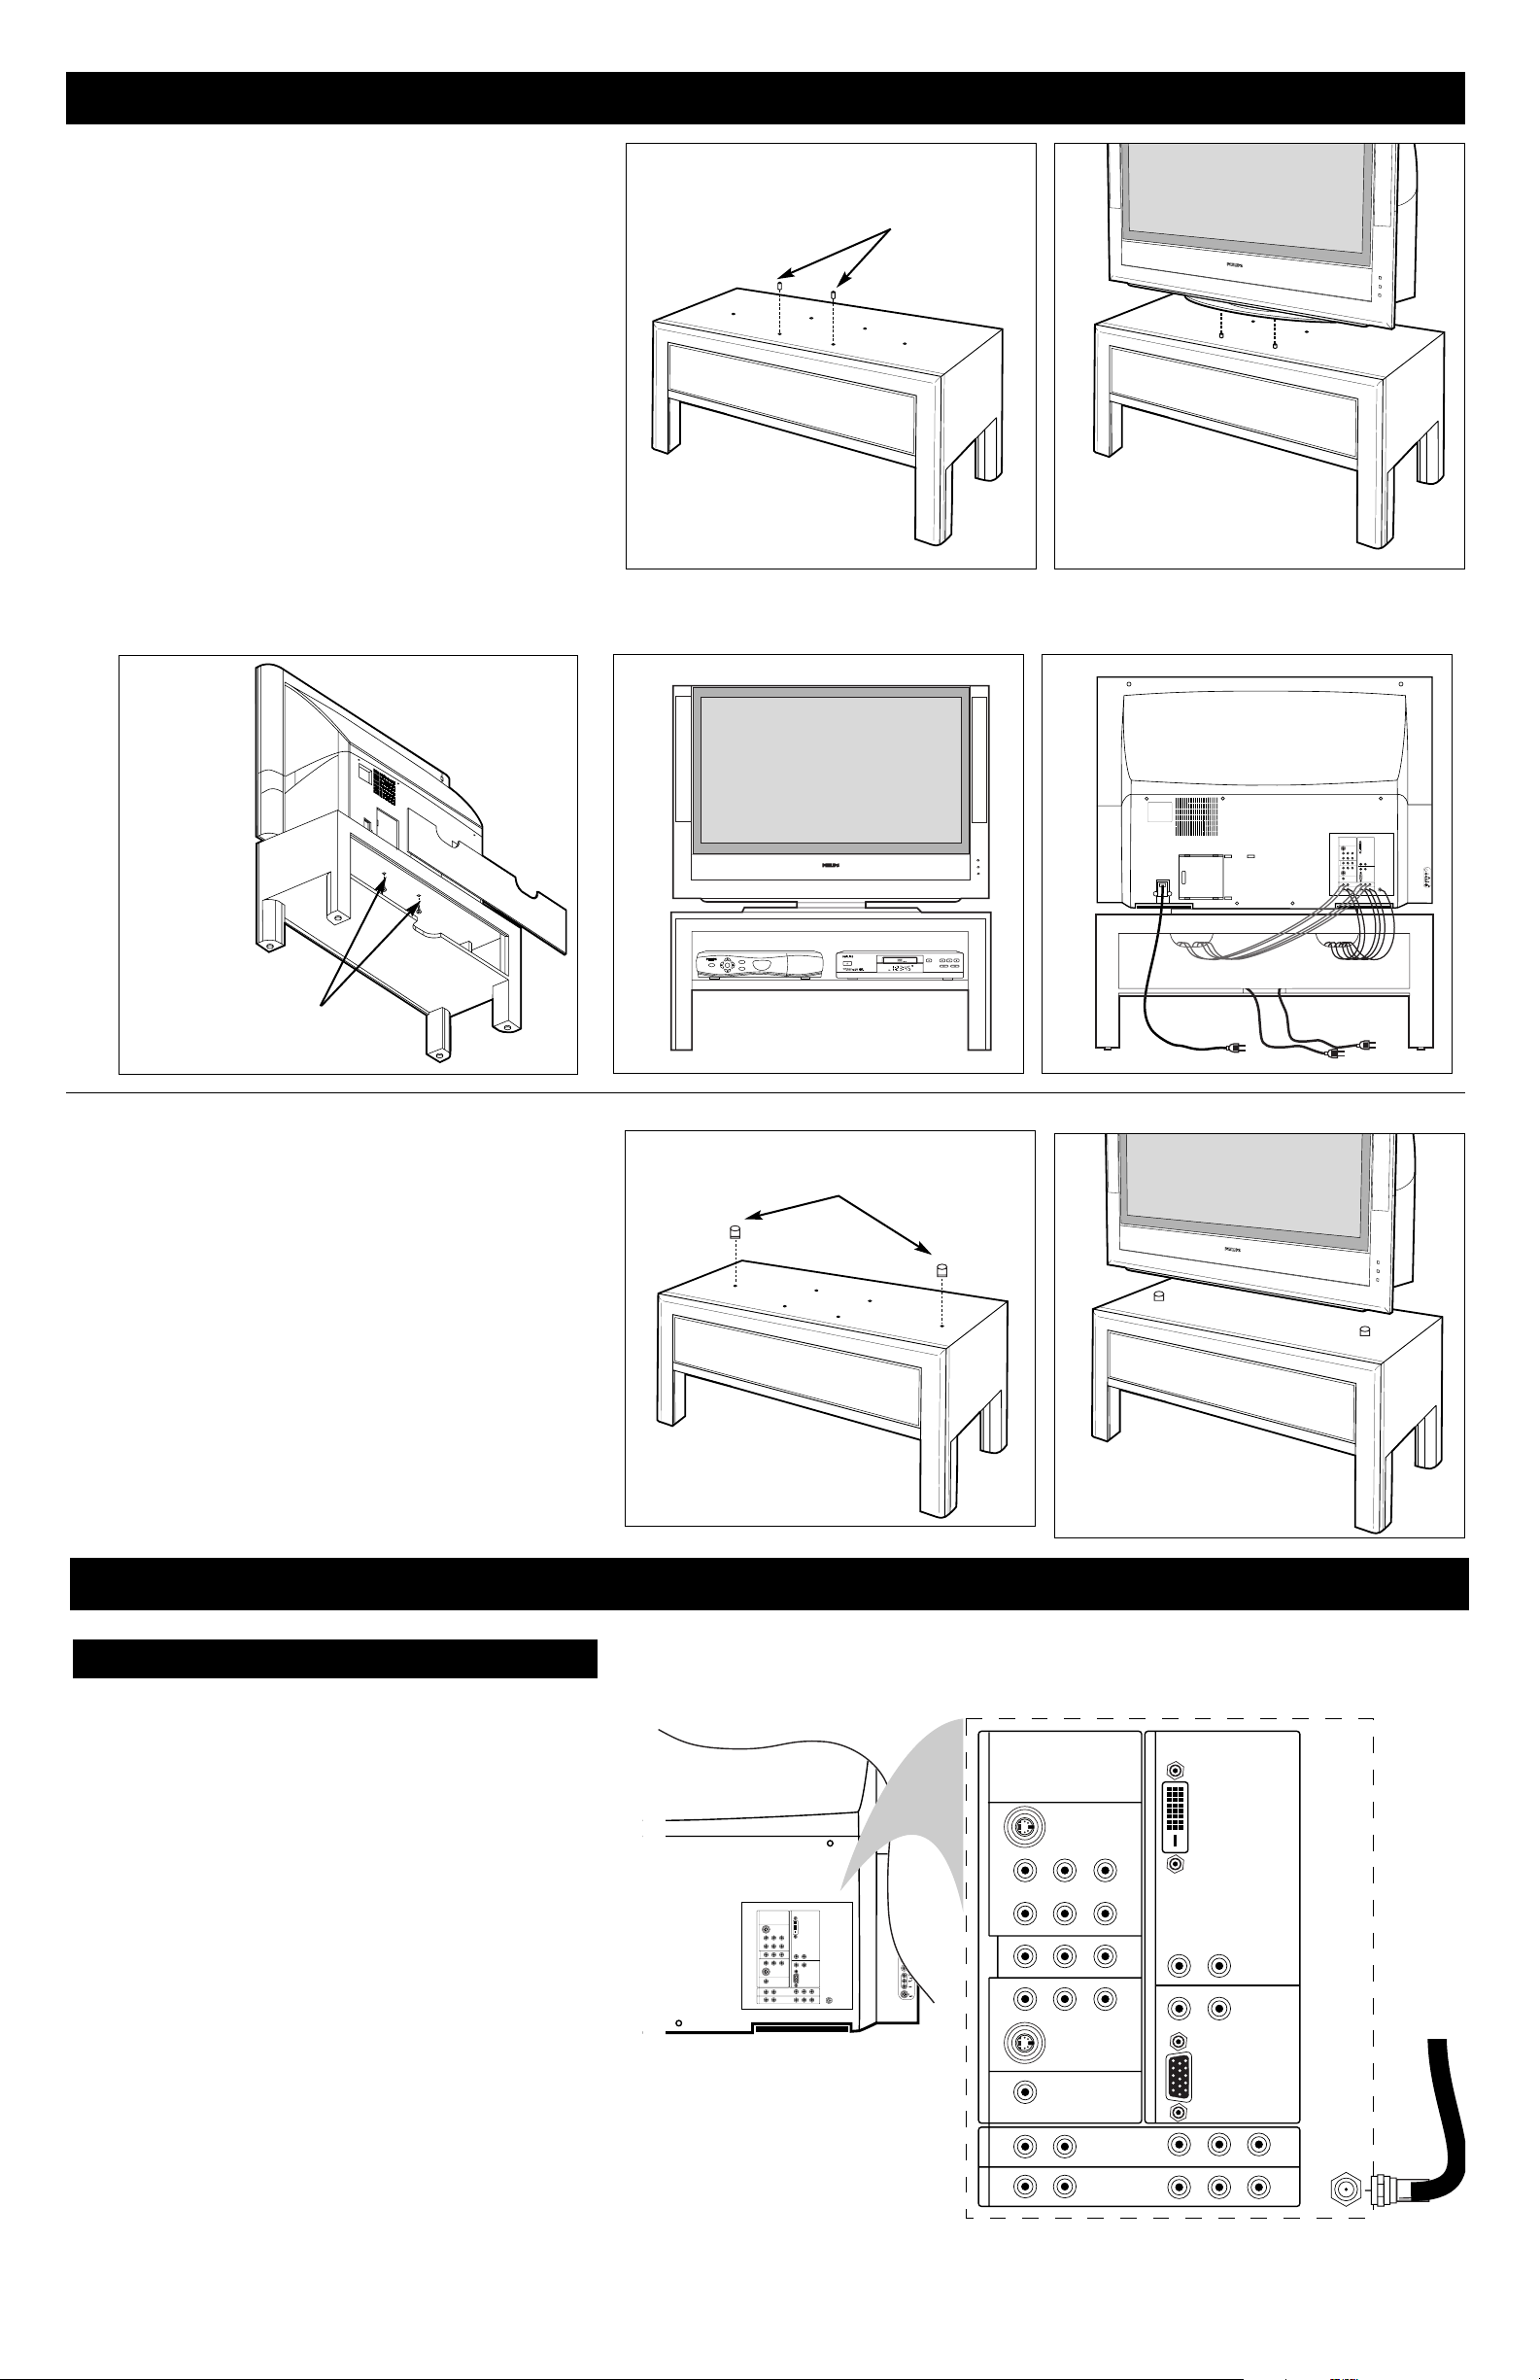
1
1
Install the plastic position pins in the stand.
2
Place the TV and mounted swivel on the stand, aligning the
front and sides of the TV with the front and sides of the
stand. This will help properly seat the TV on the positioning pins and align the pre-drilled holes on the stand and
swivel. You do not need the rubber bumpers and long
screws if you have already attached the swivel to the TV.
3
Use the supplied screws (2) and screw key to fasten the swivel to
the stand. Install the back cover by sliding it up into the groove
above the opening, the slide into the lower groove.
Note: If accessories and cables protrude from the stand, leave the
back cover off.
4
Place accessory devices—HD satellite receiver, cable box, DVD
player, or VCR, for example—inside the stand. (See below and
Directions for Use manual for connection information.) Route the
power cords through the opening in the bottom of the stand shelf,
and route the connection cables through the openings in the back of
the stand.
5
Before swiveling the TV, make sure you have left enough slack in
the cords of any connected accessory devices. This will prevent
damage to the cords.
Screws
Positioning
Pins
2
3
4 5
Placing the TV on the Stand
without the Swivel
If you should decide not to purchase the optional swivel, you can
place the TV directly on the stand.
• First locate the nut and washer for each supplied rubber locator
(2).
• Place the rubber locators over the pre-drilled holes in the stand.
• Place the washer and nut on each rubber locator.
• Tighten each nut.
• Place the TV and mounted swivel on the stand, aligning the
front and sides of the TV with the front and sides of the stand.
This will help properly seat the TV. The rubber locators will
prevent the TV from sliding.
Rubber Locators
NOTE:
Installing these
screws
reduces the
risk of the TV
sliding.
DVD619 DVD/CD PLAYER
GUIDE
POWER
POWER
SELECT
INFO
HIGH DEFINITION
STANDBY-ON
OPEN/CLOSE
PLAY PAUSE
STOP
PREV NEXT
C
2
SERVICE 1
DVI
G
S-VIDEO
RLV
AV1MONSUB OUT AV2AV3AV4
Pr Pb Y
RL
V
RL
OUT
RL
RL
V
G
S-VIDEO
AV5 AV6
RGB+HV
Pr Pb Y
RL
STANDARD/
HD INPUTS
TUNER
Pr Pb Y
STANDARD/
HD INPUTS
RL
C
2
SERVICE 1
AV5 AV6
DVI
RL
RL
RGB+HV
Pr Pb Y
Pr Pb Y
TUNER
G
S-VIDEO
RLV
AV1MONSUB OUT AV2AV3AV4
C
2
SERVICE 1
DVI
G
S-VIDEO
RLV
AV1MONSUB OUT AV2AV3AV4
Pr Pb Y
V
RL
RL
OUT
RL
RL
V
G
S-VIDEO
AV5 AV6
RGB+HV
Pr Pb Y
RL
STANDARD/
HD INPUTS
TUNER
Pr Pb Y
STANDARD/
HD INPUTS
RL
OUT
Pr Pb Y
RL
RL
G
S-VIDEO
RL
RL
STANDARD/
HD INPUTS
STANDARD/
HD INPUTS
V
V
Page 4
Making Basic Connections to the TV
Back of TV
Back of Cable Box
(example only)
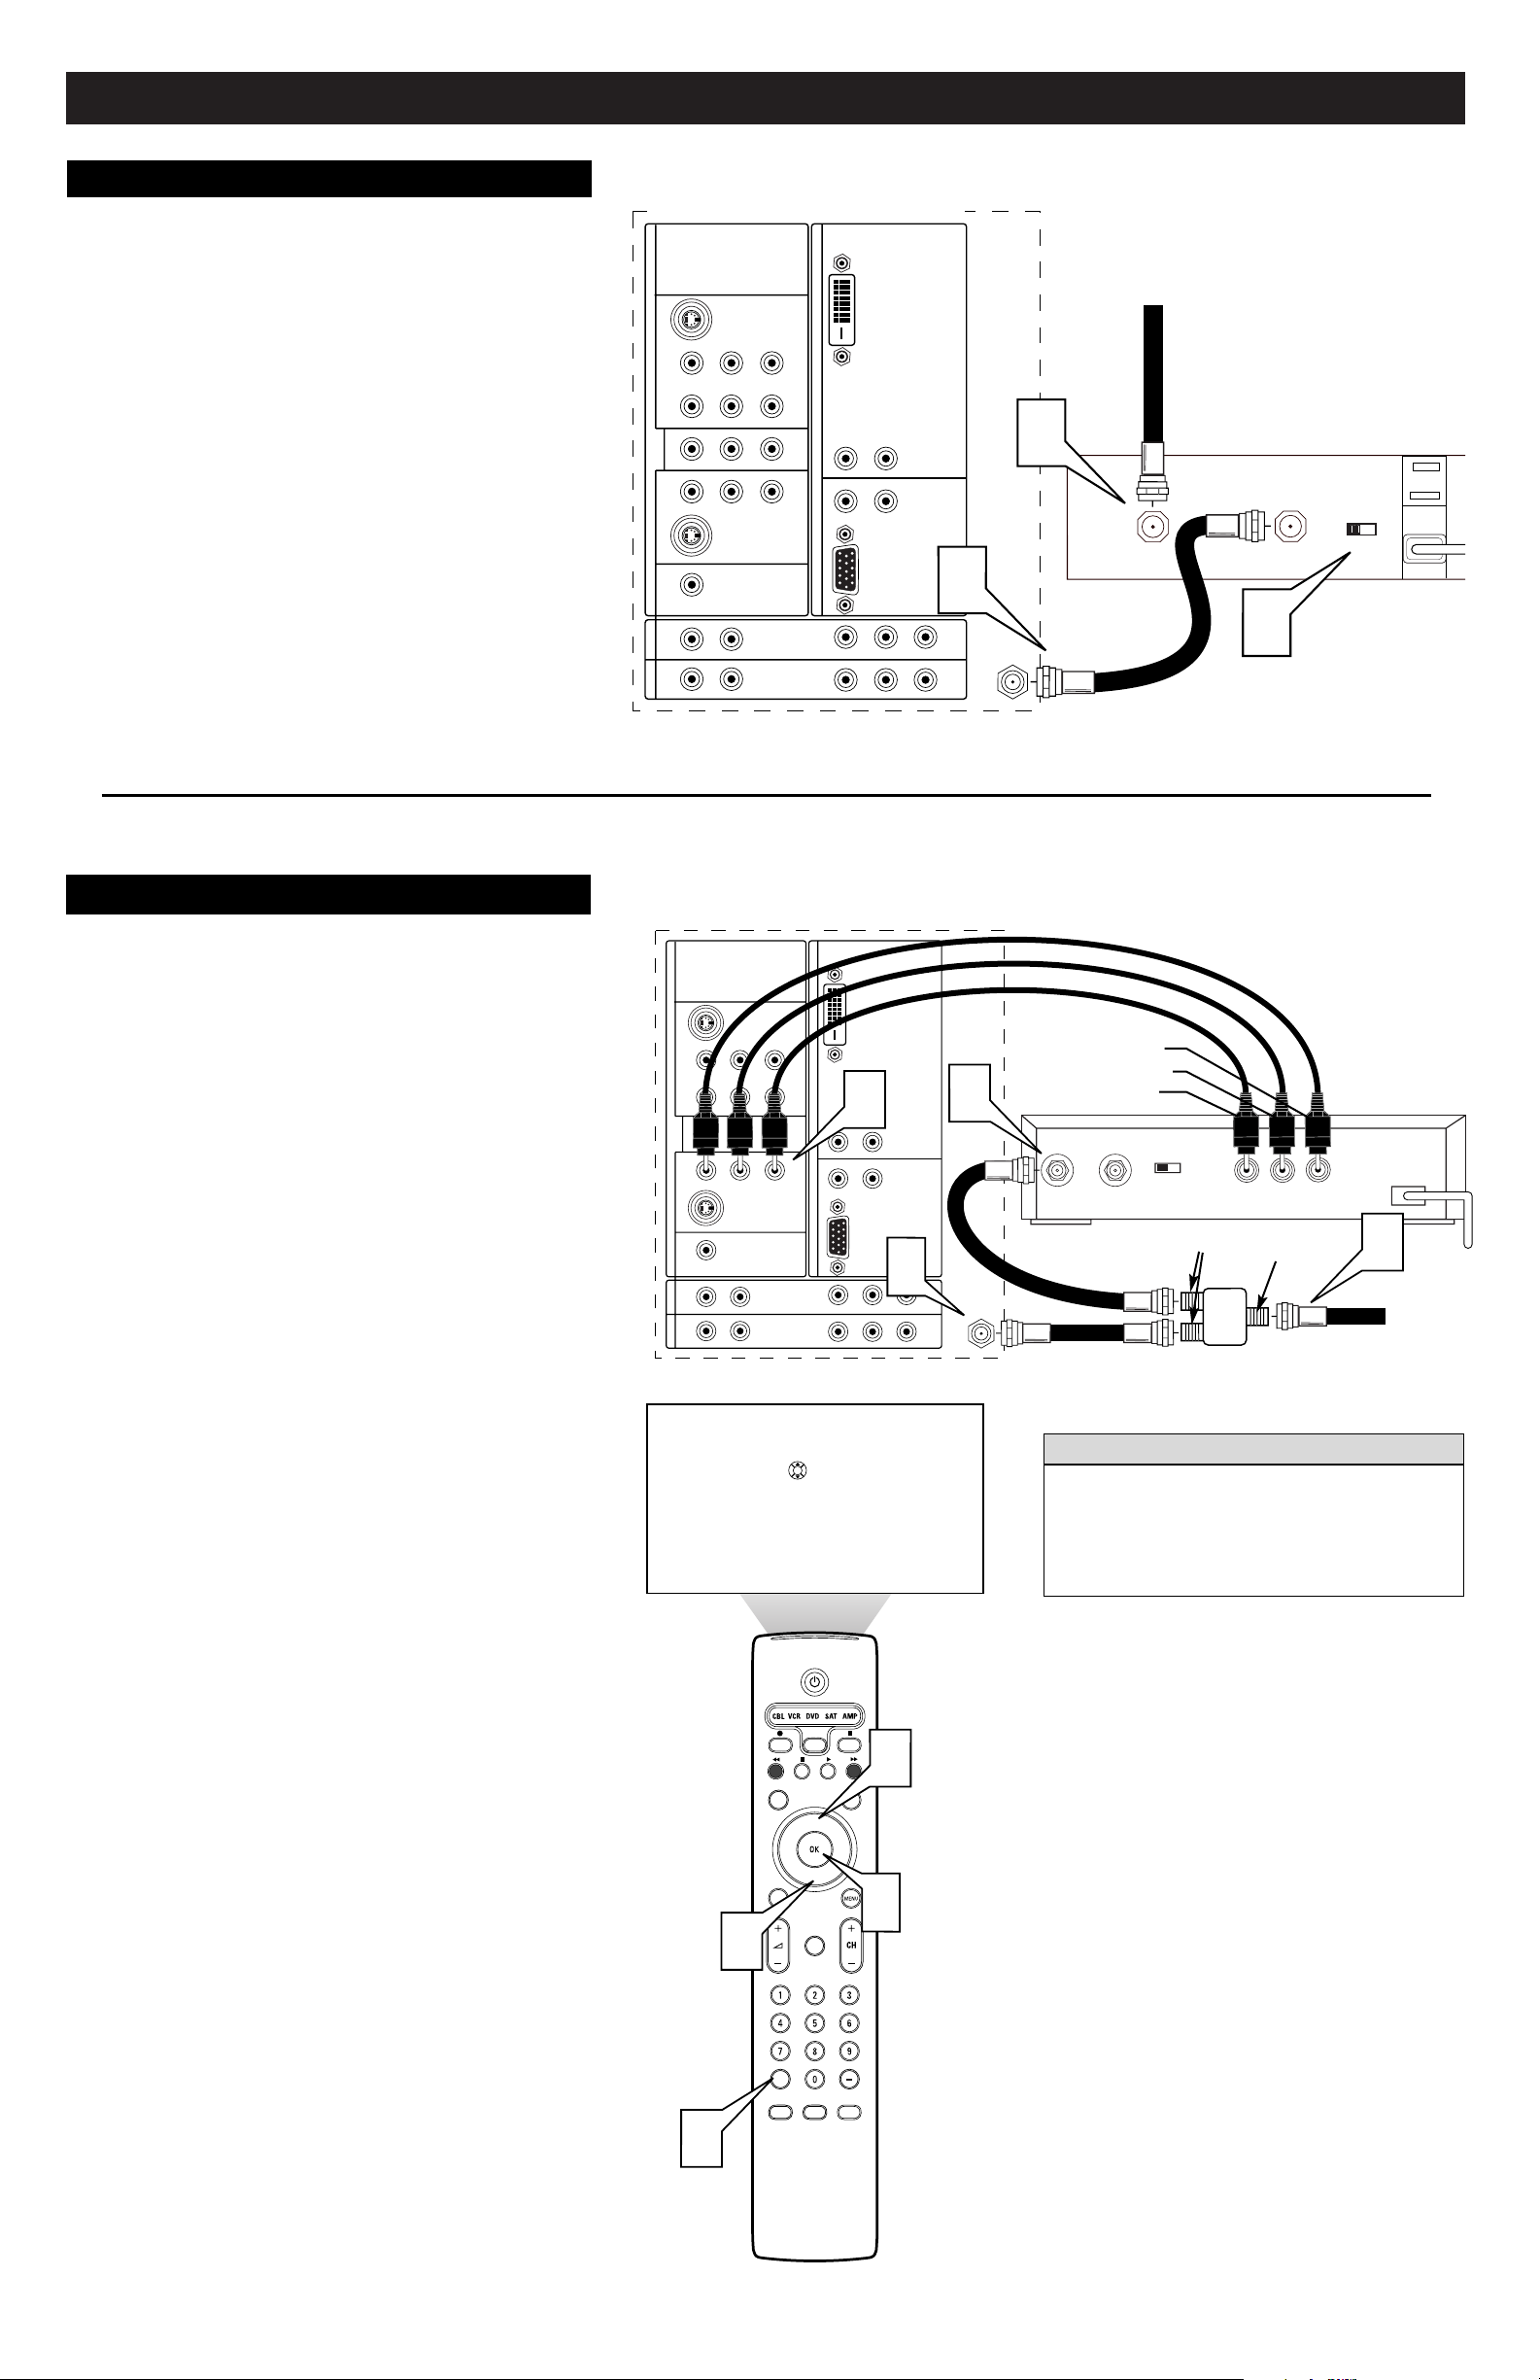
Cable Box with RF IN/OUT
1
Connect the incoming cable TV signal to the CABLE IN
jack on the back of the cable box.
2
Connect a coaxial cable (not supplied) to the TO TV jack
on the back of the cable box and to the TUNER jack on the
back of the TV.
3
Set the Output Channel switch on the back of the cable box
to CH 3 or 4 (whichever is correct for your cable box),
then tune the TV to the corresponding channel. Once tuned,
change channels at the cable box, not the TV.
NOTE: This connection will not supply stereo sound to the TV.
The reason is that the RF output on a cable box—labeled “TO
TV,” “OUT,” or “OUTPUT,” for example—will not send a stereo
signal to the tuner (VHF/UHF) input on a TV.
Incoming
Cable TV
Signal
Your TV remote is capable of operating accessory
devices such as cable boxes. See the sections on
“Programming the Remote Control” and
“Operating Accessory Devices with the TV
Remote” in the Directions for Use manual that
came with the TV.
HELPFUL HINT
Cable Box with A/V Outputs
Back of TV
Back of Cable
Box
(example only)
1
Connect the incoming cable TV signal to a signal splitter
(not supplied).
The signal splitter enables you to avoid having to use the
TO TV jack on the back of the cable box. This jack will not
supply stereo sound to the TV.
NOTE: Your cable box may have a different label for the
TO TV jack, such as OUTPUT or OUT.
2
Connect a coaxial cable (not supplied) to a connector on
the signal splitter and to the TUNER jack on the TV.
3
Connect a coaxial cable (not supplied) to a connector on
the signal splitter and to the CABLE IN jack on the back of
the cable box.
4
Connect A/V cables (not supplied) to the VIDEO and
AUDIO L and R outputs on the back of the cable box and
to the AV2 video (labeled V) and audio (labeled L and R)
jacks on the back of the TV.
5
To view programs from your cable box, first press the
Source (AV+) button on the remote control.
6
Press the Cursor Down or Up buttons until the AV2 signal
source is selected.
7
Press the OK button to confirm your selection. The AV2
input source becomes current for the viewing of cable TV
programs through your cable box.
NOTE: If your cable box Audio/Video outputs will not supply
video and stereo audio to the TV, you will need to make the
connection shown above in the example “Cable Box with
RF IN/OUT.”
Watching Cable TV Programs That
Don’t Require the Cable Box
Since you’ve connected the cable TV signal directly to the TV’s
tuner (step 2 above), you can also watch the unscrambled programs by simply tuning to the desired channel. You must first use
Autoprogram, however, to store channels in the TV’s memory.
See page 8.
NOTE: This connection will supply stereo sound to the TV if it is
being broadcast by the station you are watching.
Incoming
Cable TV
Signal
Signal Splitter
(example)
4
Video (yellow)
Audio L (white)
Audio R (red)
Audio R (red)
Audio L (white)
Video (yellow)
Input
Outputs
C
2
SERVICE 1
AV1MONSUB OUT AV2AV3AV4
OUT
G
S-VIDEO
RLV
Pr Pb Y
RL
RL
G
S-VIDEO
RL
RL
V
V
STANDARD/
HD INPUTS
STANDARD/
HD INPUTS
AV5 AV6
DVI
RL
RL
RGB+HV
Pr Pb Y
Pr Pb Y
2
TUNER
1
CABLE
IN
OUTPUT
CH
TO TV
3 4
3
C
2
SERVICE 1
AV1MONSUB OUT AV2AV3AV4
OUT
G
S-VIDEO
RLV
Pr Pb Y
RL
RL
G
RL
RL
S-VIDEO
Source
V
V
STANDARD/
HD INPUTS
STANDARD/
HD INPUTS
OK
AV5 AV6
TV
AV1:Other
AV2:Other
AV3:Other
AV4:Other
AV5:Other
AV6:Other
SIDE:Other
DVI
4
RL
RL
RGB+HV
2
Pr Pb Y
Pr Pb Y
3
TUNER
CABLE
TO
IN
TV
OUTPUT
CH
3 4
VIDEO
OUT
LR
AUDIO
OUT
1
5
6
SURF
INFO
SELECT
PIXEL PLUS
SURR
CC
TV
®
PIP
HD
6
SCREEN
FORMAT
®
®
®
7
MUTE
AV+
ACTIVE
CLOCK
CONTROL
SAP
Page 5
Making Basic Connections to the TV
5
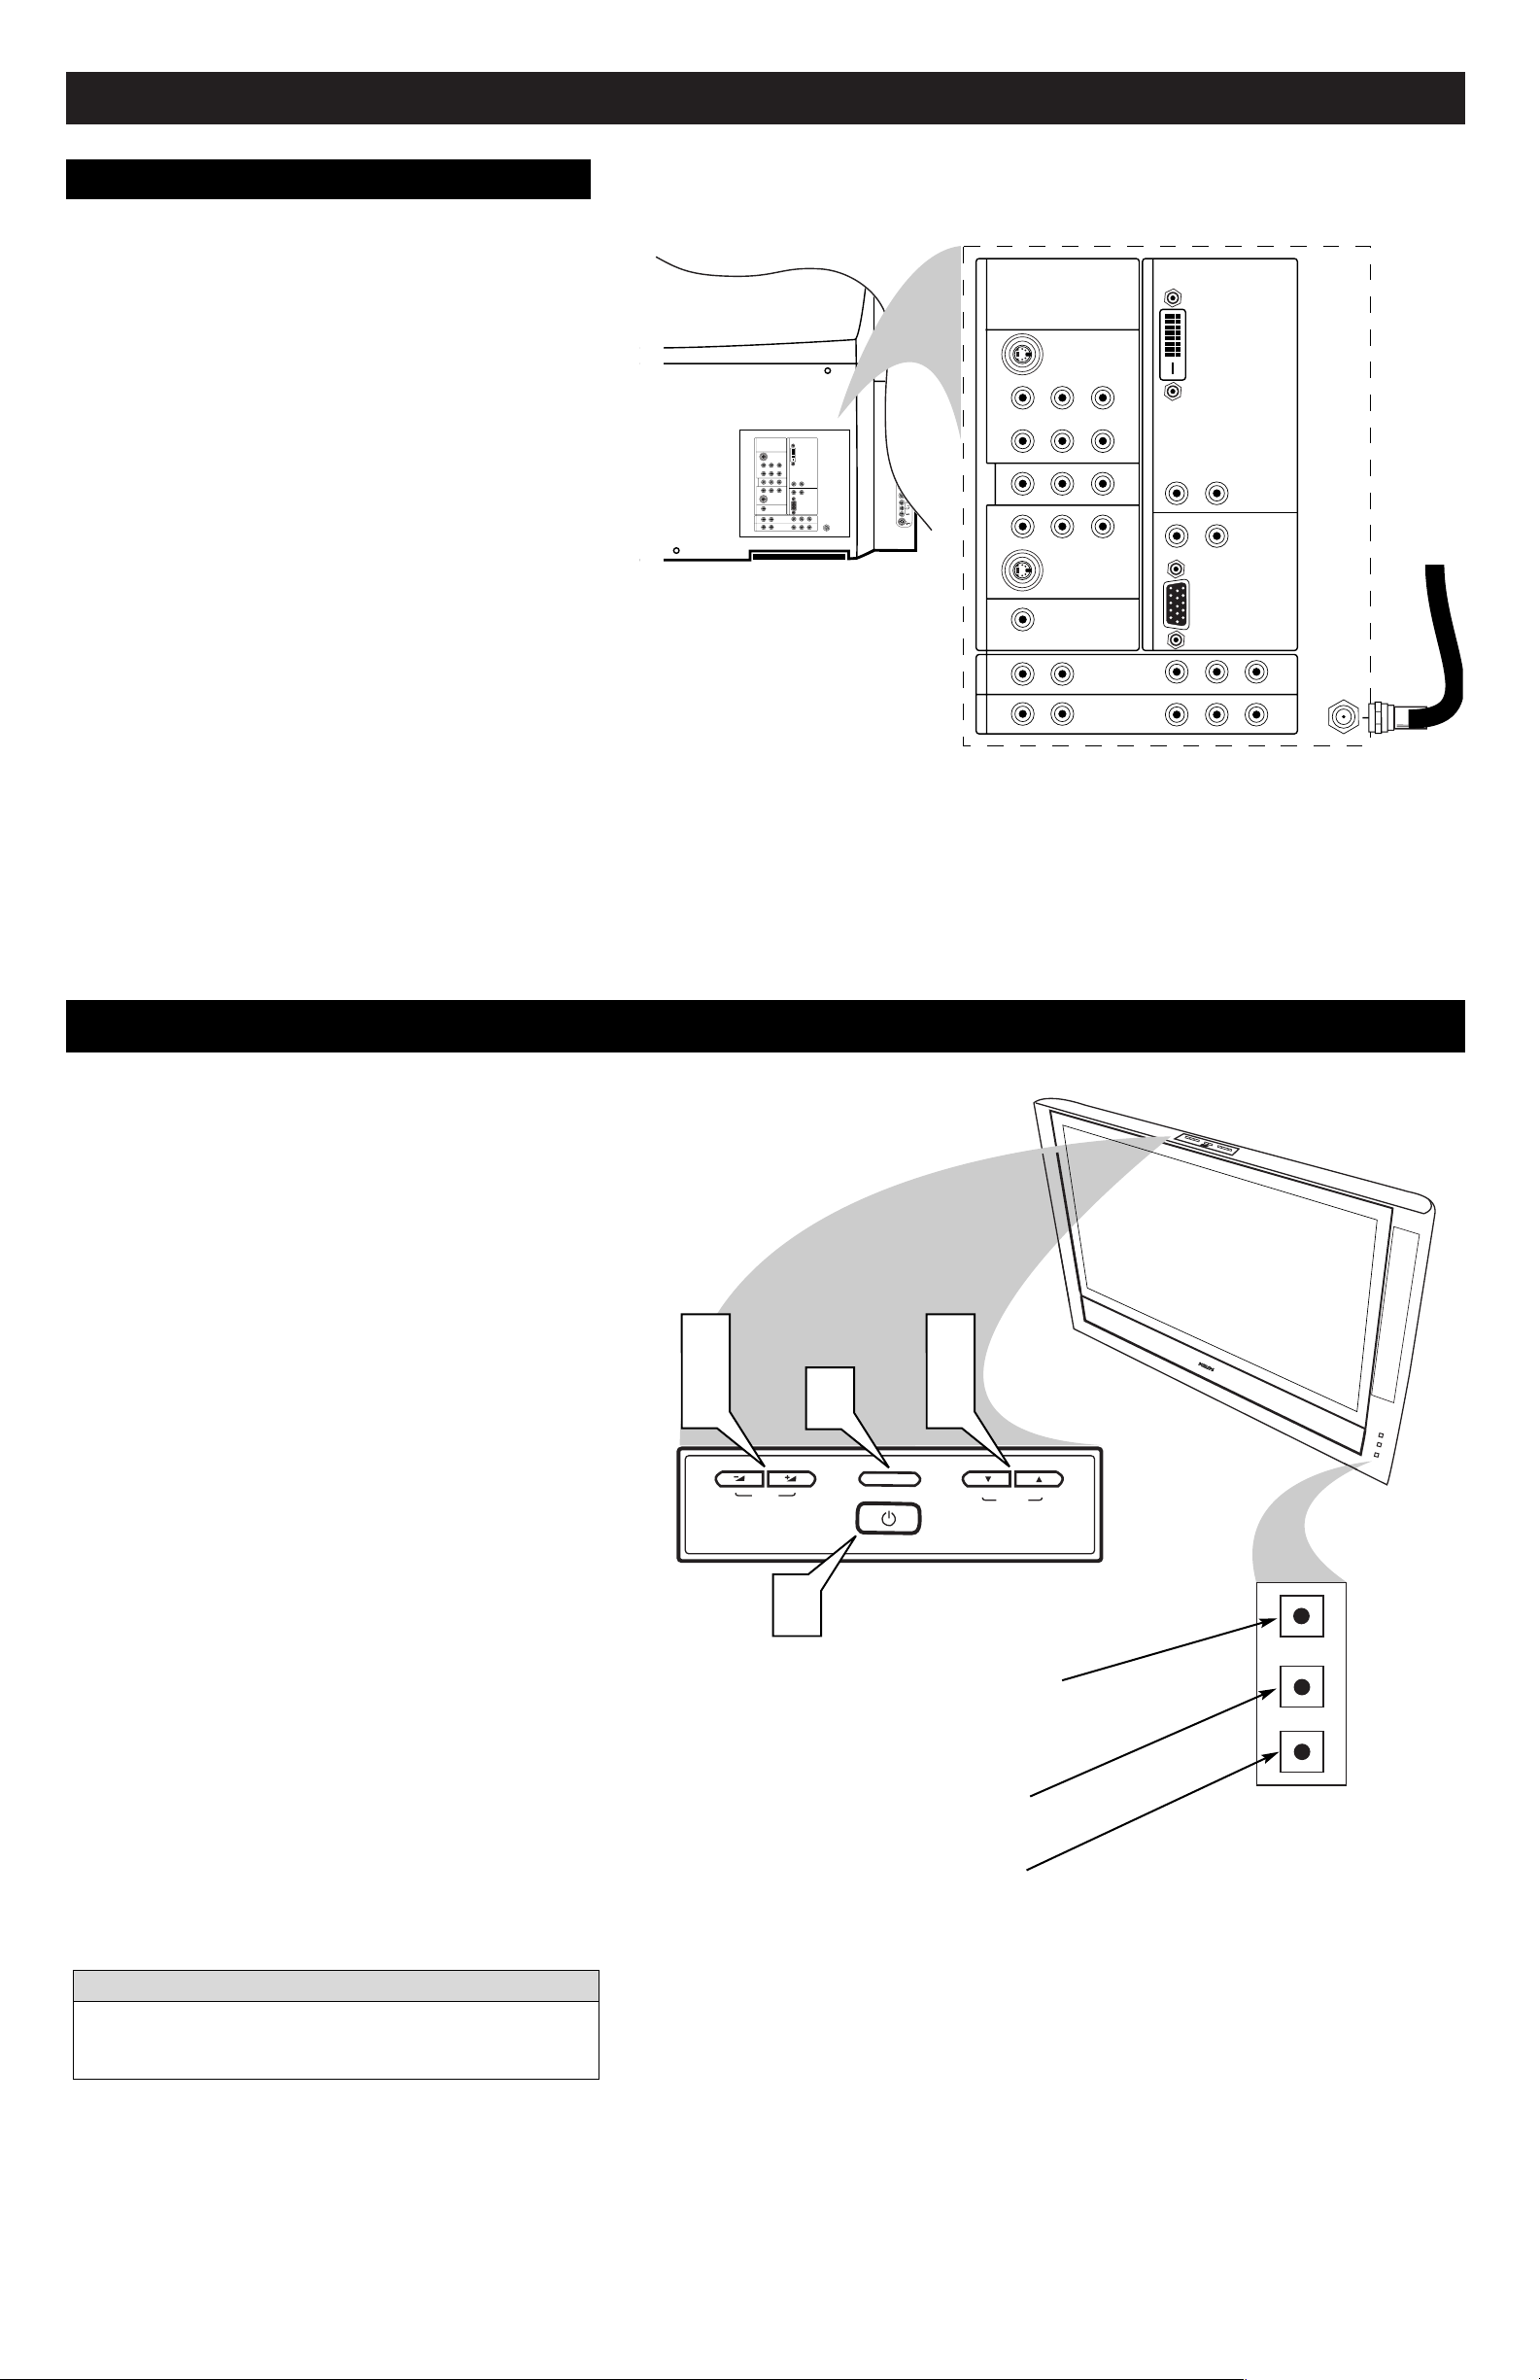
Operating the TV
Antenna
Connect the incoming antenna signal to the TUNER jack on the
back of the TV. See page 8 for details on using Autoprogram to
store channels in the TV’s memory.
NOTE: This connection will supply stereo sound to the TV if it is
being broadcast by the station you are watching.
Back of TV
Incoming
Antenna
Signal
Connect the incoming
Antenna signal to the
TUNER jack on the
back of the TV.
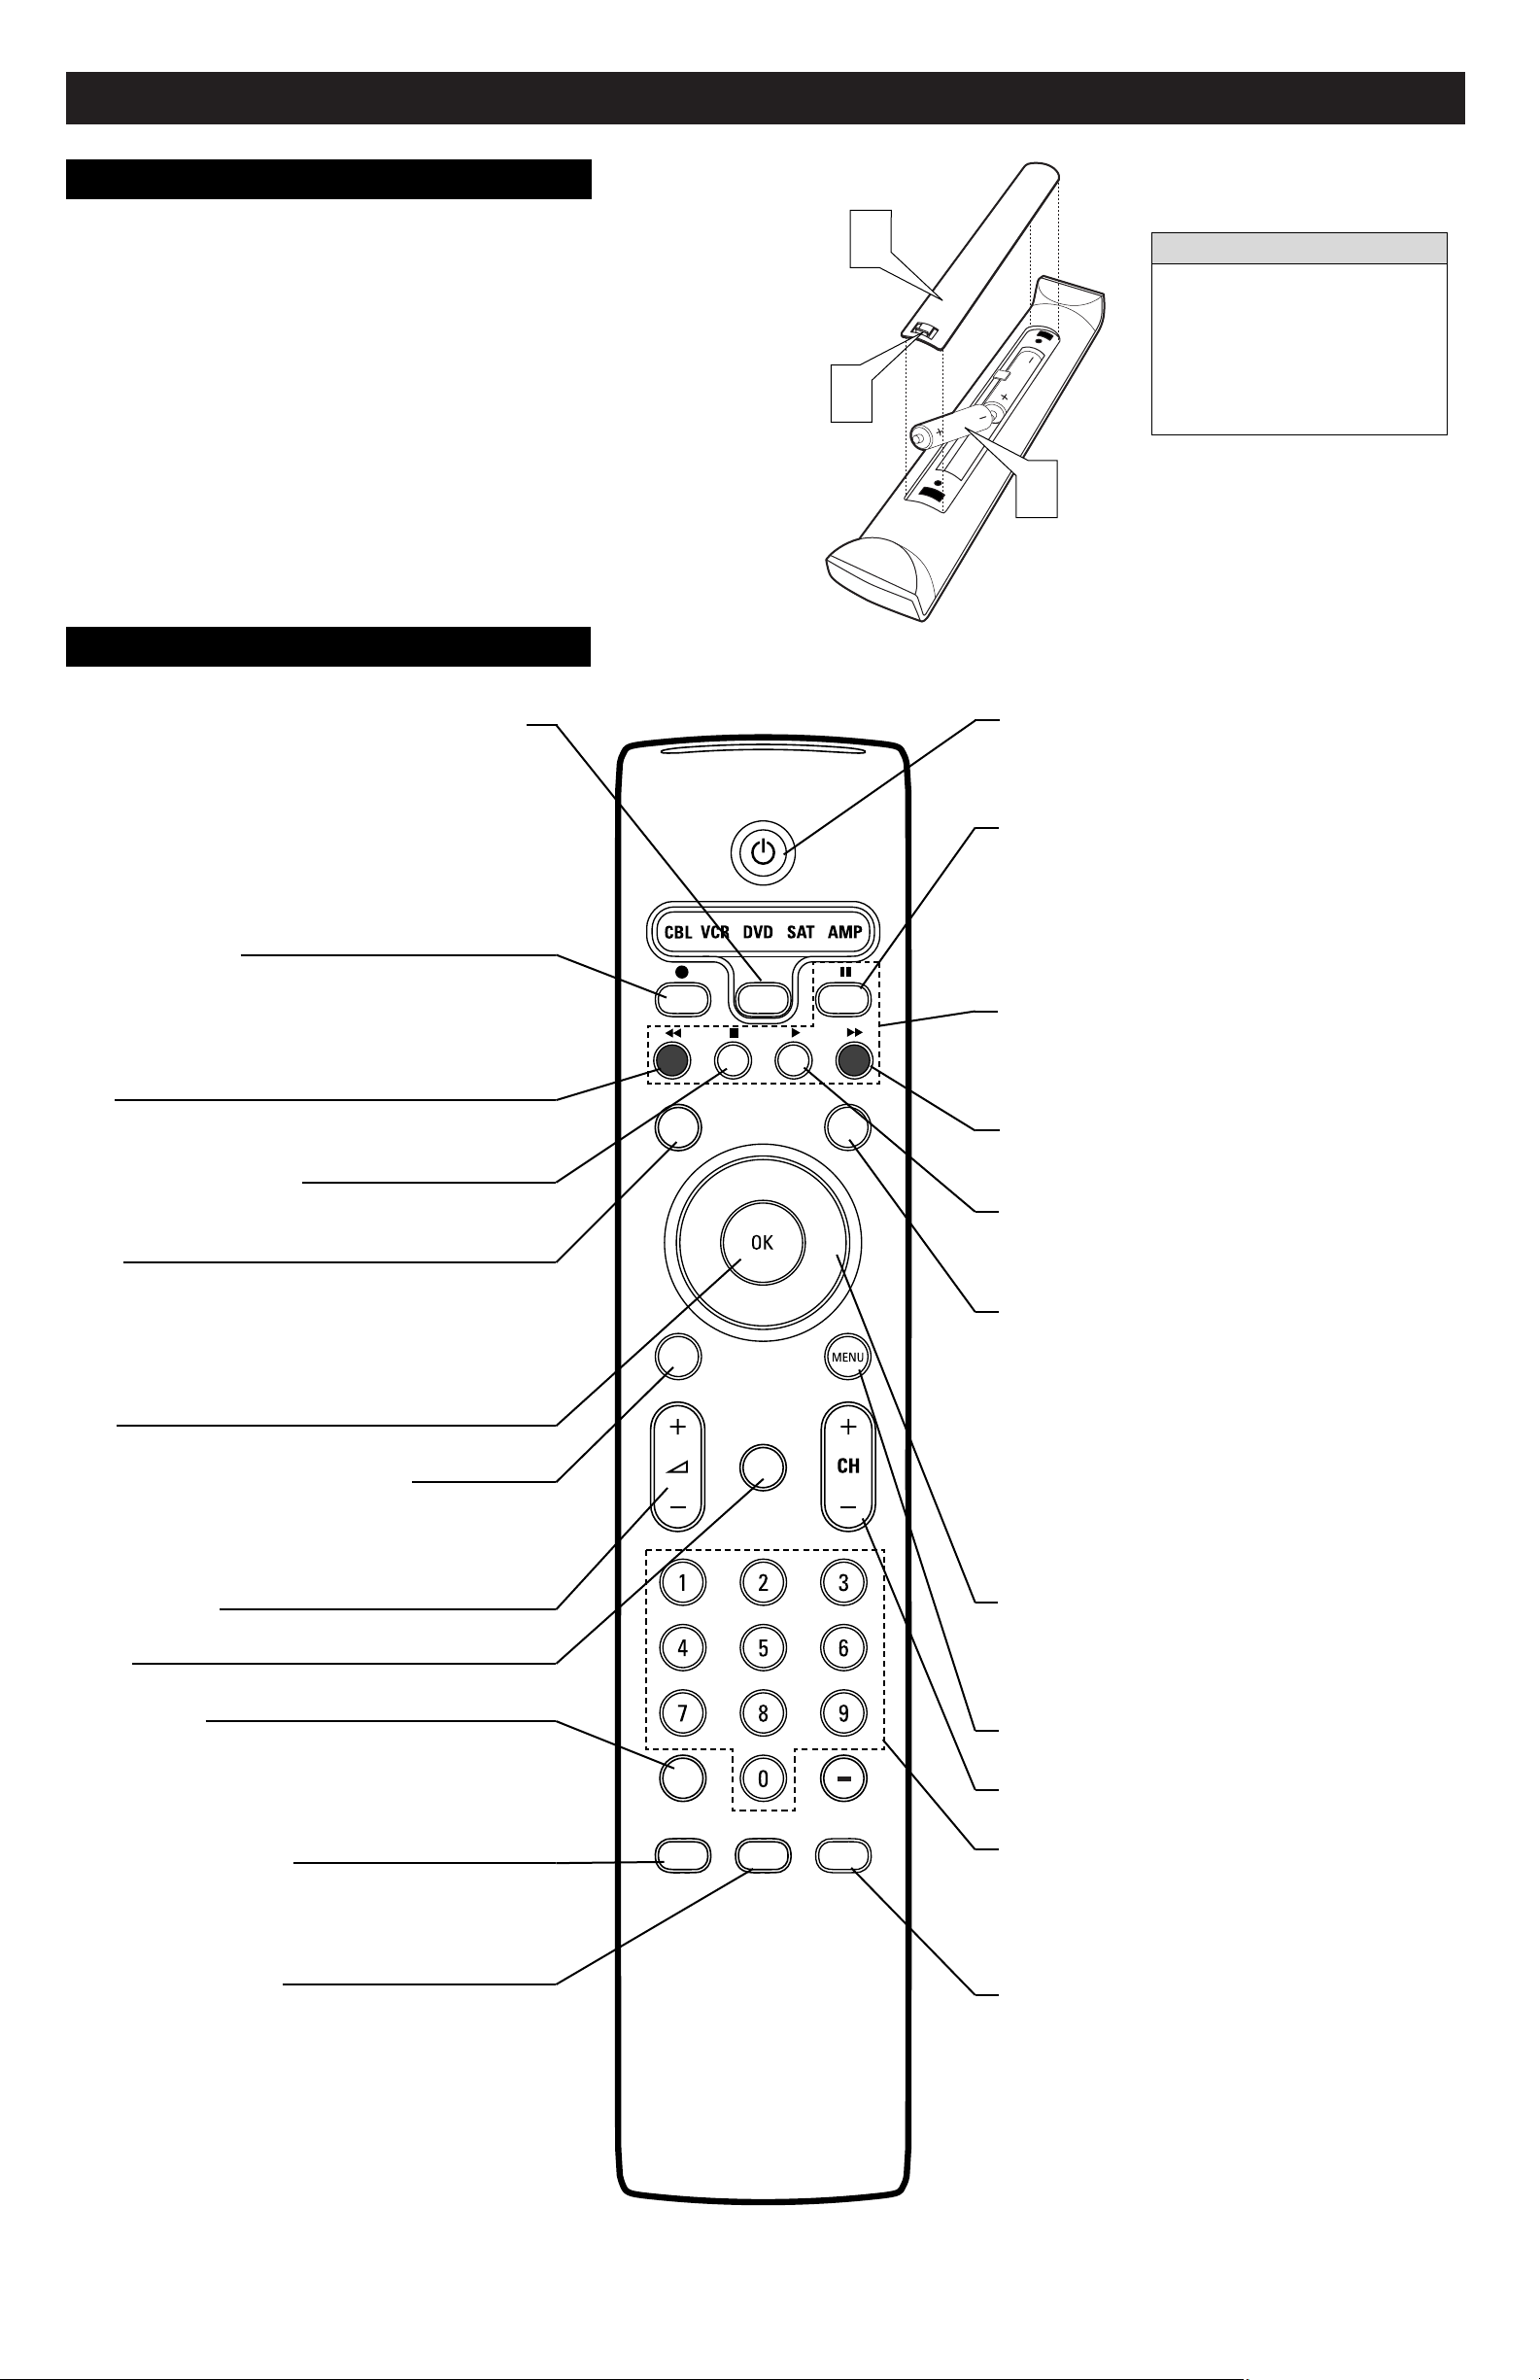
Remote Sensor Window
Receives commands from the remote control.
Active Control™ Plus+ Window
This window contains a sensor that monitors the ambient
light conditions in the room and adjusts key picture settings
for best viewing.
Cabinet Buttons
Your television has a set of buttons located on the top of the
cabinet for use when the remote control is not needed or
unavailable.
1
Press the Standby–On button to turn the TV on.
NOTES:
Due to the complexity and advanced design of the
Cineos TV, a turn-on time of 16 seconds should be expected.
When you turn the TV off, it remains in Active Standby
mode (orange light on) for 30 seconds and will not respond
to any presses of the remote control or cabinet buttons
during that time. This is to protect the lamp.
2
Press the VOLUME + (up) button to increase the sound
level or the VOLUME – (down) button to lower the sound
level. Or use the buttons to navigate right or left when the
on-screen menu is displayed.
3
Press the CHANNEL K (up) or L (down) button to select
TV channels. Or use the buttons to navigate up and down
when the on-screen menu is displayed.
4
To access the on-screen menu, press the MENU button. To
navigate the menu, use the VOLUME + (up)/– (down) and
CHANNEL K (up)/L (down) buttons to navigate the menu
as described in the previous steps.
Active Standby Window
Active Standby—the condition in which the TV is either in
the process of turning on or off. Active Standby is entered by
pressing the Standby-On button 2 on the TV or remote
control. An orange light appears in the window. Active
Standby mode occurs when the TV is turned on—to allow
for the automatic calibration of the clock—and for 30 seconds after the TV has been powered off. The 30-second
Active Standby period at power off is to protect the lamp.
During this time, the TV will not respond to presses of cabinet or remote control buttons.
On—the TV has picture and sound. A green light shows in
the window.
Standby—the condition in which the TV is plugged into the
AC outlet and is in the off state. No light is on in the window. The TV’s microprocessors and their standby supplies
are the only active components in this state, and the power
consumption is less than 1 watt.
The Cabinet button panel is protected during shipping by a
adhesive plastic film. You may peel this off and discard it.
HELPFUL HINT
C
2
SERVICE 1
AV5 AV6
DVI
RL
RL
RGB+HV
Pr Pb Y
Pr Pb Y
TUNER
G
S-VIDEO
RLV
AV1MONSUB OUT AV2AV3AV4
C
2
SERVICE 1
DVI
G
S-VIDEO
RLV
AV1MONSUB OUT AV2AV3AV4
Pr Pb Y
RL
V
RL
OUT
RL
RL
V
G
S-VIDEO
AV5 AV6
RGB+HV
Pr Pb Y
RL
STANDARD/
HD INPUTS
TUNER
Pr Pb Y
STANDARD/
HD INPUTS
RL
OUT
Pr Pb Y
RL
RL
G
S-VIDEO
RL
RL
STANDARD/
HD INPUTS
STANDARD/
HD INPUTS
V
V
2
4
4
VOLUME
3
4
MENU
1
CHANNEL
Page 6
Using the Remote Control
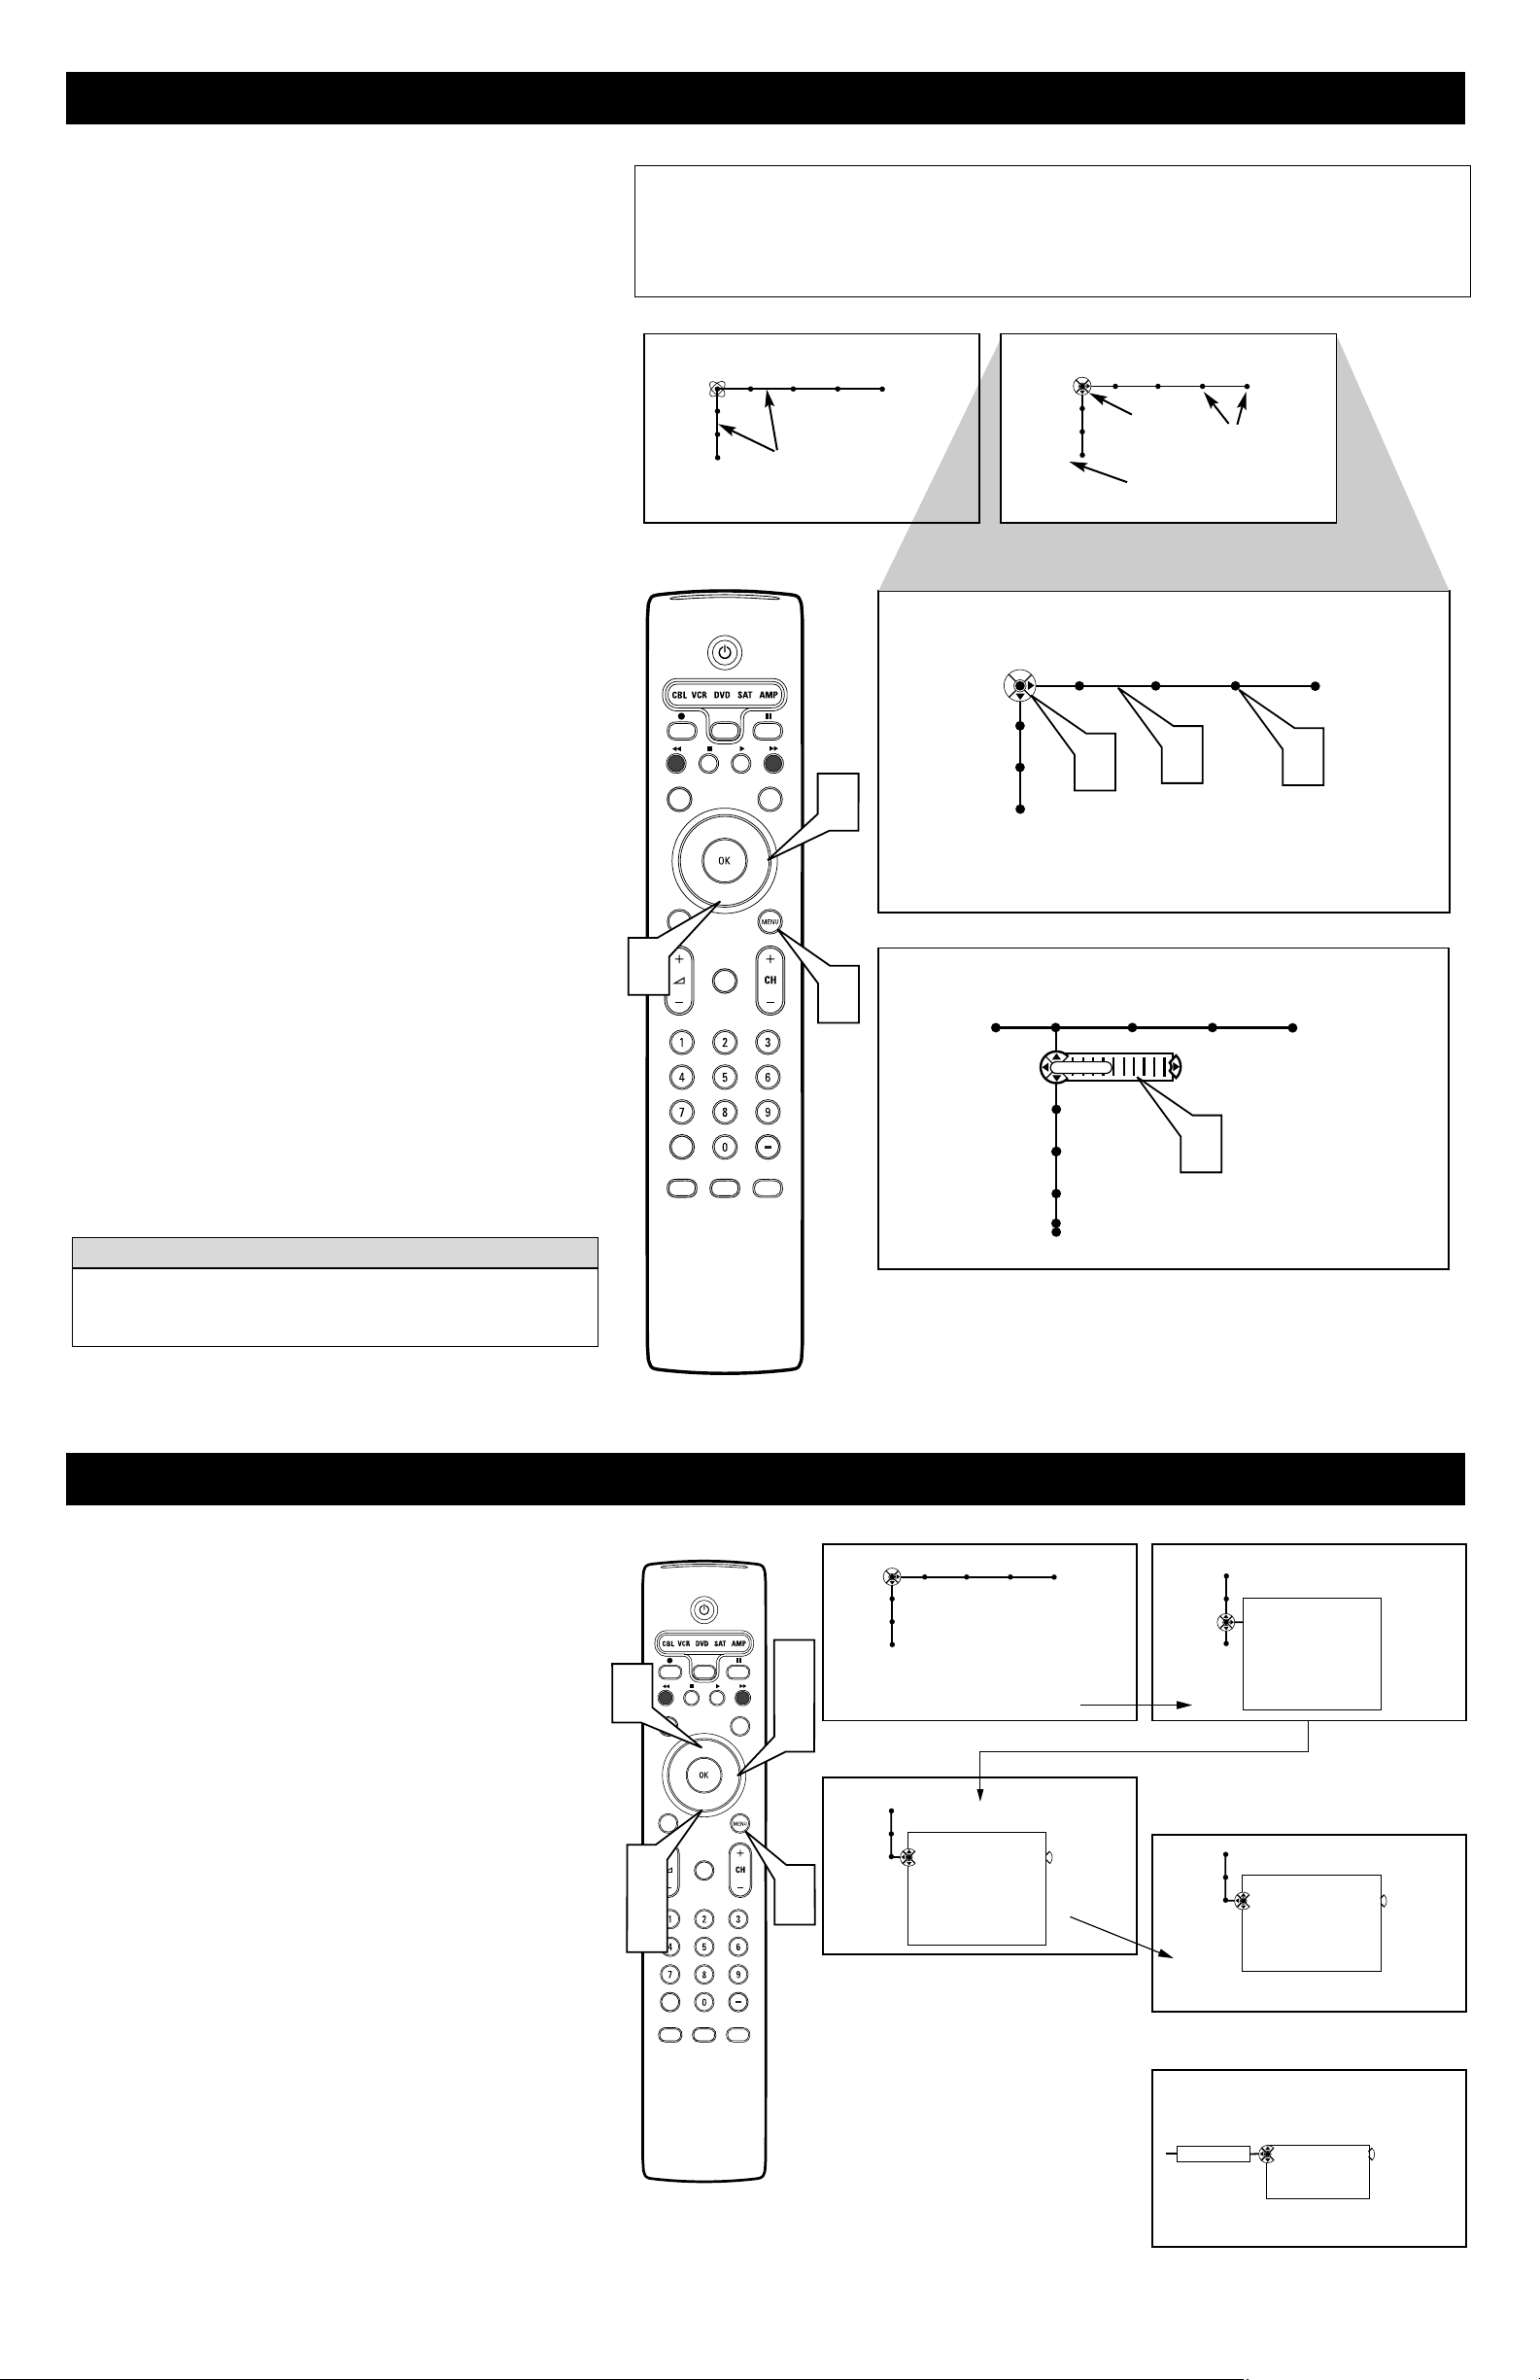
To load the supplied batteries into the remote:
1
Remove the battery compartment door on the back of
the remote.
2
Place the batteries (2-AA) in the remote. Make sure the (+)
and (–) ends of the batteries line up correctly (the inside of
the case is marked).
3
Reattach the battery compartment door.
Be sure to point the remote at the Remote Sensor window on the
front of the television when using it to operate the television.
Installing the Batteries
Remote Control
(shown from the bottom)
Remote Control Buttons
Active Control, AutoSurf, Incredible Surround, and Pixel Plus are trademarks of Philips Consumer Electronics. Copyright 2003 Philips Consumer
Electronics. All rights reserved.
*Manufactured under license from Dolby Laboratories. “Dolby” and the double-D symbol are trademarks of Dolby Laboratories.
6
When the batteries in your remote
control run low, the remote control
will send a “Battery low” command
to the TV. The TV will then display
a message on the screen reminding
you to replace the batteries as soon
as possible.
H
ELPFUL HINT
Select (CBL VCR DVD SAT AMP) and Backlight
Press this button to cycle across the accessory mode dial.
Stop pressing when the mode you desire is lighted. The
light will stay on for 2 seconds and then begin blinking to
indicate the remote is in your desired mode. As long as
the button blinks, the remote is in the accessory mode.
(See pages 22–25 for programming the remote) Pressing
and holding the Select button for 2 seconds backlights the
remote control buttons. The buttons remain lighted for 5
seconds after you press Select.
Information Plus
Press to show information (when available) about the current channel, program, source, number or name, local
time, CC availability, SAP availability, program ratings,
display format, sound mode, and remaining length of a
Sleeptimer setting.
TV
Press to directly set the TV into the TV mode of operation.
CC (Closed Captioning)
Press to turn Closed Captioning off, on, or on during
mute. (See page 47 in the Directions for Use manual.)
Surf
If you set the Surf control in the TV’s on-screen menu to
two channels, this button will allow you to toggle between
the current channel and the last viewed channel. If you
choose the nine-channel Surf, pressing this button allows
you to add and scroll up to nine of your favorite channels.
See page 57 in the Directions for Use manual.
OK
Press to activate or confirm menu choices.
Dual Screen/PIP (Picture-in-Picture)
Press to turn the PIP dual screen on or off. Continuing to
hold the Dual Screen/PIP button down will cycle through
the Dual Screen/PIP options. (See page 58 in the
Directions for Use manual.)
VOL (Volume)
Press + or – to adjust the volume.
Mute
Press to interrupt or restore sound.
Source (AV+)
Press to display a list of source options—TV, AV1, AV2,
AV3, AV4, AV5, AV6, or Side. Use the Cursor Up/Down
buttons to select the next item, then press the OK button
to confirm or press the Source (AV+) Select button to
select the next item in the list.
Alternate Audio (SAP)
When you tune to a channel where SAP (Second Audio
Program) is available, you can toggle between Main and
SAP. If SAP is not available, only Main can be selected.
(See page 42 in the Directions for Use manual.)
Active Control™ Plus
NOTE: Active Control™ Plus is not available for use
with the AV3, AV4, AV5, and AV6 input sources.
Press to toggle the options Off, Minimum, Medium, and
Maximum. Maximum is the recommended option. See
page 28 in the Directions for Use manual.
Standby–On
Press to turn the TV on or off.
NOTE: The TV is never powered off completely unless
it is physically unplugged from the power source.
Pixel Plus™ Demo
Press to activate the demo, which illustrates the benefits
of Pixel Plus™. Press again to turn the demo off. Press
and the TV screen will be divided in half displaying the
Pixel Plus™ Demo. The left side will show the picture
with Pixel Plus™ switched off. The right side of the
screen will show the picture with Pixel Plus™ switched
on. (See page 30 in the Directions for Use manual.)
VCR/DVD Functions
When the remote is in the VCR mode, these buttons will
allow you start a recording (●), rewind a tape (),
stop the playback of a tape (■), play a videotape (), or
fast-forward a videotape ().
HD
Press to activate the AV6 (High Definition) jacks and
place the TV in the High Definition Mode of operation.
Surround Sound
Press to display a list of available sound modes. Choose
from Incredible Surround™ and Dolby* Virtual settings.
(See page 41)
Screen Format
Press to display a list of available picture formats for
showing video images in the traditional 4:3 proportions.
Press this button repeatedly to select a picture format.
Choose from Automatic, Super zoom, Panoramic, 4:3,
Movie expand 14:9, Movie expand 16:9, 16:9 subtitle,
and Wide screen. See pages 35–36 in the Directions for
Use manual.
NOTES:
• With AV3–AV6 connections, the Automatic picture
format option is not available.
• In Dual Screen mode, press the Screen Format button
to switch between a full or 4:3 letterbox picture format.
Cursor Up, Down, Right, Left
Use to navigate the on-screen menu and make control
adjustments or settings.
Additionally, use these buttons to pan the screen up or
down to show any excluded parts of the picture.
Menu On/Off
Press to display the TV’s on-screen menu or to turn it off.
CH (Channel Selection)
Press to browse through the TV channels.
Digit (Number Buttons)
Press to directly access a specific TV channel. For a twoor three-digit channel, enter all numbers. Press a singledigit button and hold a bit longer to directly access a single-digit channel. These buttons can also be used to enter
values in certain on-screen menu controls.
Time Display (Clock)
Press to display the current time on the TV screen. (See
page 64 in the Directions for Use manual to set the
clock)
1
3
2
INFO
TV
SURF
PIP
SELECT
CC
®
®
®
MUTE
SURR
PIXEL PLUS
HD
SCREEN
FORMAT
®
AV+
SAP
ACTIVE
CONTROL
CLOCK
Page 7
7
Using the On-screen Menu
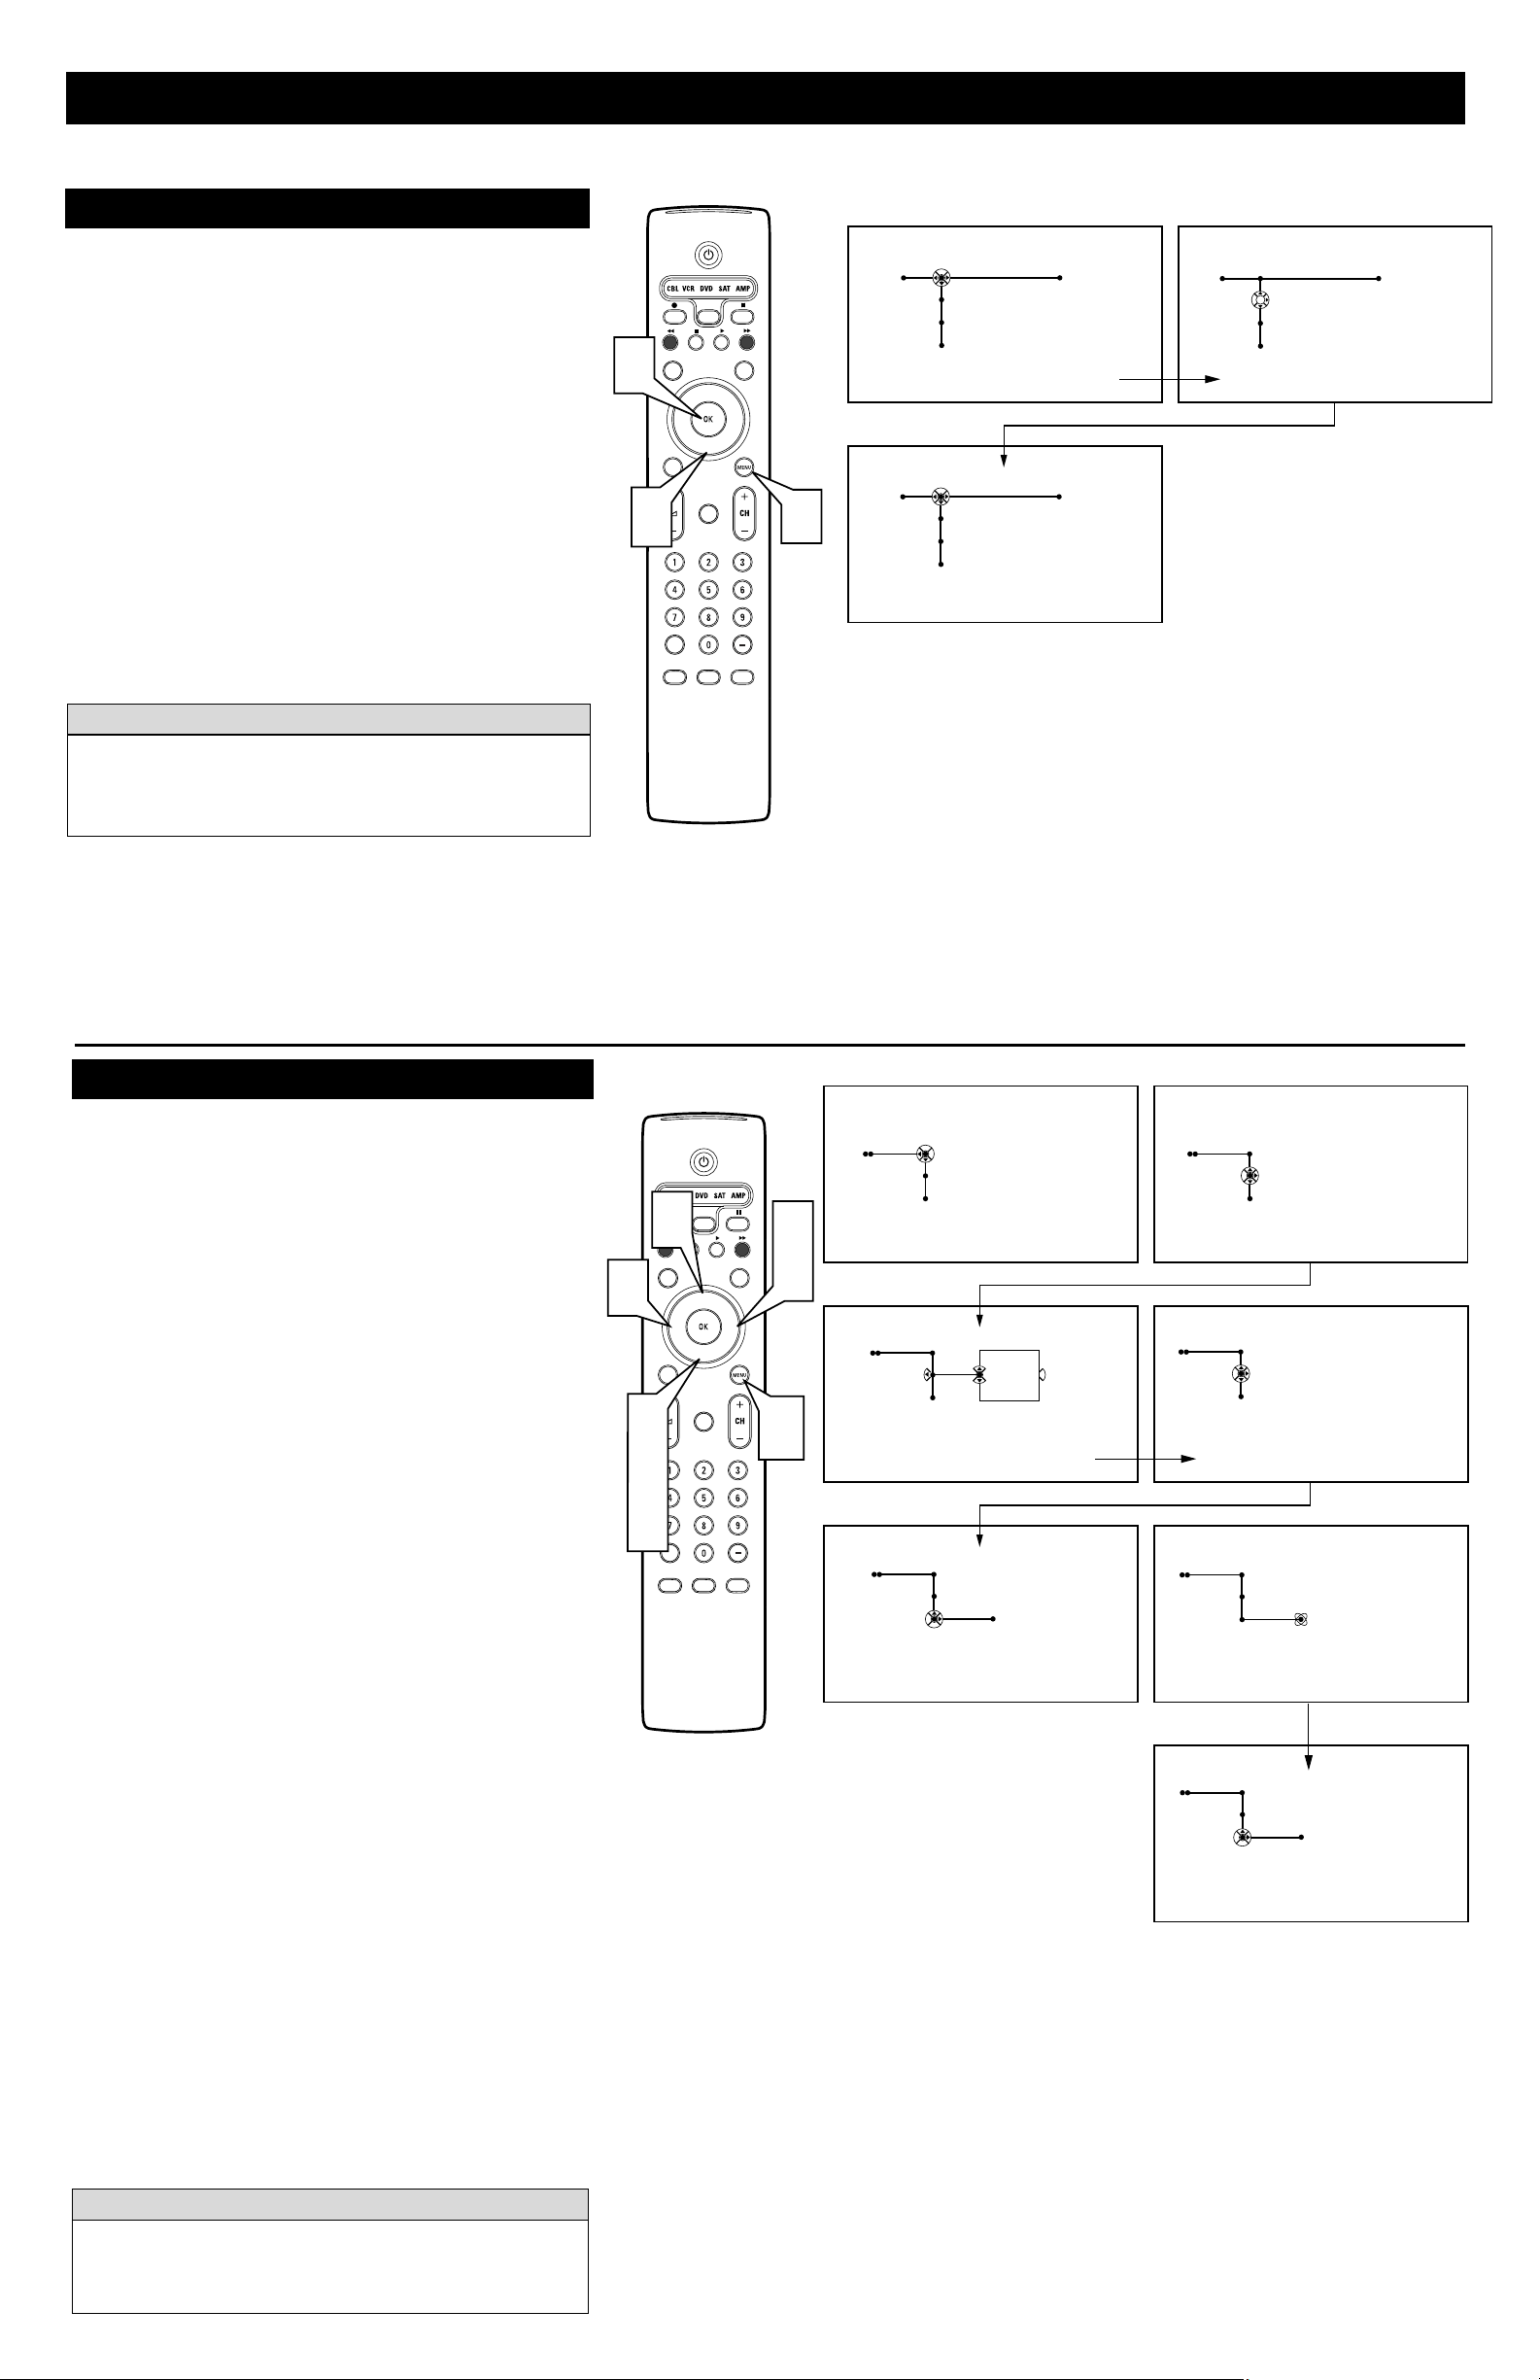
Several features of this television can be placed in a demo
mode, which will show you how a feature works. Auto
Demo will automatically show all the feature demos one
after another except for the Dealer Demo mode. Specific
demo modes can be selected from the list of options within
the Demo control (Auto demo, Dual screen, PIP, and Install,
for example).
The Dealer Demo also has a sublist of the following
options: Digital options, Lightsensor, and 3D Y/C Comb
filter.
1
Press the Menu button on the remote control to show the
on-screen menu.
2
Press the Cursor Down button repeatedly until “Demo”
is selected.
3
Press the Cursor Right button to shift the menu to display
the list of Demo mode options.
4
Press the Cursor Down or Up button to select a Demo
mode option.
5
Press the Cursor Right button to activate the Demo.
Using the Demo Mode
Press the Cursor Down button to see
more Demo Mode options.
To see the Dealer Demo sublist,
press the Cursor Down button to
select Dealer Demo, then press the
Cursor right. Press the Cursor
Down or Up to select a mode, then
press the Cursor Right to activate
the mode.
Pipes
Balls
Puck
Feature Titles
or Controls
Pressing the Menu button once will display the on-screen menu.
Pressing the Menu button any time the on-screen menu is displayed will remove the on-screen menu from the TV screen.
HELPFUL HINT
The TV’s on-screen menu controls are viewed within a
mobile map or pipe system. This system allows you to
move along linked paths tied to specific Feature Title categories (“TV,” “Picture,” “Sound,” “Features,” and
“Channels”). Each press of a Cursor button on the remote
moves the cursor control to balls indicating specific controls. Each specific control may have multiple features that
can be adjusted or set. The animated on-screen menu structure will expand to show all available on-screen controls. As
it expands, it will display a series of balls grouped together
to reveal more controls.
1
Pipes represent the structure of the on-screen menu. They
tie all the controls together and show the path you can follow to access the available controls.
2
Balls indicate the titles of features or controls available on
this television. When highlighted, some of these controls
may show more Pipes and Balls, indicating subcategories
or lists of controls within the highlighted control. These
subcontrols will also have Pipes and Balls.
3
The Puck tells you which way movement may take place
within the on-screen menu. The arrows on the Direction
Indicator simulate the Cursor buttons on the remote control
(Up, Down, Left, or Right).
4
The Slider controls will be displayed on some features,
allowing adjustments to the values of the controls. Some
may show a box containing a list of multiple options settings. Others may have only an “On” or “Off” option.
5
To navigate the on-screen menu, start by pressing the Menu
button on the remote control. This will display the onscreen menu in its starting position.
6
Press the Cursor Down button to select any of the Setting,
Demo, or Install controls. Starting from the TV item, press
the Cursor Right button on the remote control to select any
of the Picture, Sound, Features, or Channel controls.
See the “Using the Demo Mode” and “Using the Installation
Features” on this page and the next. Refer to the Directions for
Use manual for all other control descriptions (Picture, Sound,
Features, Channels, or Settings).
The first time you turn on the TV after purchasing it, it will be in a special mode designed to
inform you that you can change the menu language and on-screen displays to English, French, or
Spanish. Also included in this mode is Autoprogram to encourage you to have the set program
channels into the TV’s memory. For more details on the Language and Autoprogram features, see
page 8.
Picture Sound Features Channels
TV
Demo
Install
Settings
Demo
Install
Picture Sound Features Channels
TV
Settings
Picture Sound Features Channels
TV
6
INFO
TV
SURF
PIP
SELECT
PIXEL PLUS
SURR
CC
®
MUTE
HD
SCREEN
FORMAT
®
®
®
6
5
Settings
Demo
Install
3
1
2
Picture Sound Features Channels
TV
Contrast
40
4
2
4
TV
SURF
Brightness
AV+
ACTIVE
CLOCK
CONTROL
SAP
Picture Sound Features Channels
TV
Settings
Demo
Install
INFO
SELECT
PIXEL PLUS
SCREEN
FORMAT
®
CLOCK
3
HD
5
Demo
1
Auto demo
Dual screen
Freeze-Replay-Photo finish
Install
Main Menu
Picture
- - -
SURR
CC
®
®
®
PIP
MUTE
AV+
ACTIVE
CONTROL
SAP
Color
Sharpness
4
TV
Settings
Demo
Install
Demo
Dealer demo
Auto demo
Dual screen
Freeze-Replay-Photo finish
Install
Main Menu
Picture
- - -
Freeze-Replay-Photo finish
Install
Main Menu
Picture
Active Control
Dealer demo
Digital options
Lightsensor
3D Y/C Comb filter
Page 8
8
Using the Installation Features
Your TV can automatically set itself for local area (or cable
TV) channels. This makes it easy for you to select only the
TV stations in your area by pressing the CH + or – button
on the remote control.
1
Press the Cursor Down button to select “Install” mode
control.
2
Press the Cursor Right button to display a list of Install
mode options: “Antenna,” “Automatic,” “Cable.”
3
Press the Cursor Up or Down button to select one of the
options. Select “Antenna” for normal outside- or insidetype antenna. Select “Cable” for a cable company supplied signal. When “Automatic” is selected, the TV will
automatically set the mode based on the type of signal it
detects coming into the TV. The programming process
may be faster if you choose the specific type of connection you have made, either Antenna or Cable.
4
Press the Cursor Left button after making your “Install”
mode selection.
5
Press the Cursor Down button to select “Install.”
6
Press the Cursor Right button to start the programming
process.
7
Press the Menu button to remove the on-screen menu from
the TV screen when the Autoprogramming process has finished.
After Autoprogram is finished, check the results. Press the CH
(+) or (–) button on the remote control to see which channels
you can select. See page 51 in the Directions for Use manual
for instructions on removing channels.
HELPFUL HINT
Autoprogram
When you plug in your TV for the first time it will prompt
you to set the Language and Autoprogam the channels.
For Spanish- and French-speaking TV owners, an on-screen
Language option is present. The Language control enables
you to set the TV’s on-screen menu to be shown in either
English, Spanish, or French.
1
Press the Cursor Down button to select English, Español
(Spanish), or Francais (French).
2
After you have made your language selection, press the
OK button to confirm your selection.
3
Press the MENU button to remove the on-screen menu
from the TV screen or continue with Autoprogramming
below.
Language
Remember, the Language control makes only the TV’s on-
screen Menu items appear in English, Spanish, or French text.
It does not change the other on-screen text features, such as
Closed Captioning (CC), with TV shows.
HELPFUL HINT
2
1
SURF
Language Autoprogram
Press the cursor down to select
English
INFO
SELECT
PIXEL PLUS
SURR
CC
TV
®
PIP
MUTE
HD
SCREEN
FORMAT
®
®
®
3
AV+
ACTIVE
CLOCK
CONTROL
SAP
Français
Español
Français
Español
your menu language
Language Autoprogram
The language you have chosen is
English
English
Language Autoprogram
OK
English
Français
Español
Select your menu language with
the cursor up/down.
Press the OK key on the remote
control to confirm.
4
1
3
5
INFO
3
TV
SURF
PIP
AV+
SAP
Install mode
Install mode
Install
Autoprogram
Install
Autoprogram
Automatic
Automatic
Keep the predefined automatic
detection of
cable or anntenna
or make your own
selection.
Autoprogram
Install mode
SELECT
PIXEL PLUS
SCREEN
FORMAT
®
2
HD
6
Install mode
SURR
CC
®
®
®
MUTE
The TV will search for, find and store
all the available channels.
Install
Press the cursor down to proceed.
Autoprogram
Install
Antenna
Automatic
Cable
7
ACTIVE
CONTROL
CLOCK
Autoprogram
Install mode
Install
To Autoprogram Analog channels, press the right arrow.
Start
Autoprogram
Install mode
Install
24 analog channels found
Searching
Autoprogram
Install mode
Install
60 analog channels found
Autoprogramming is complete
Start
 Loading...