

Philips 60PP960199 User Manual
SET-UP AND QUICK USE GUIDE
TABLE OF CONTENTS
Getting Started
Warning/Precautions..................................1
Hooking Up Your TV................................1
How to Use the First Time Set-Up Control ..............2
Basic TV and Remote Control Operation .................3
How to Use the On-Screen Menu Controls...............4
• For details on product registration, warranty,
and service refer to the other literature included
with your TV information packet.
Please retain all these materials and keep them
handy for future reference.
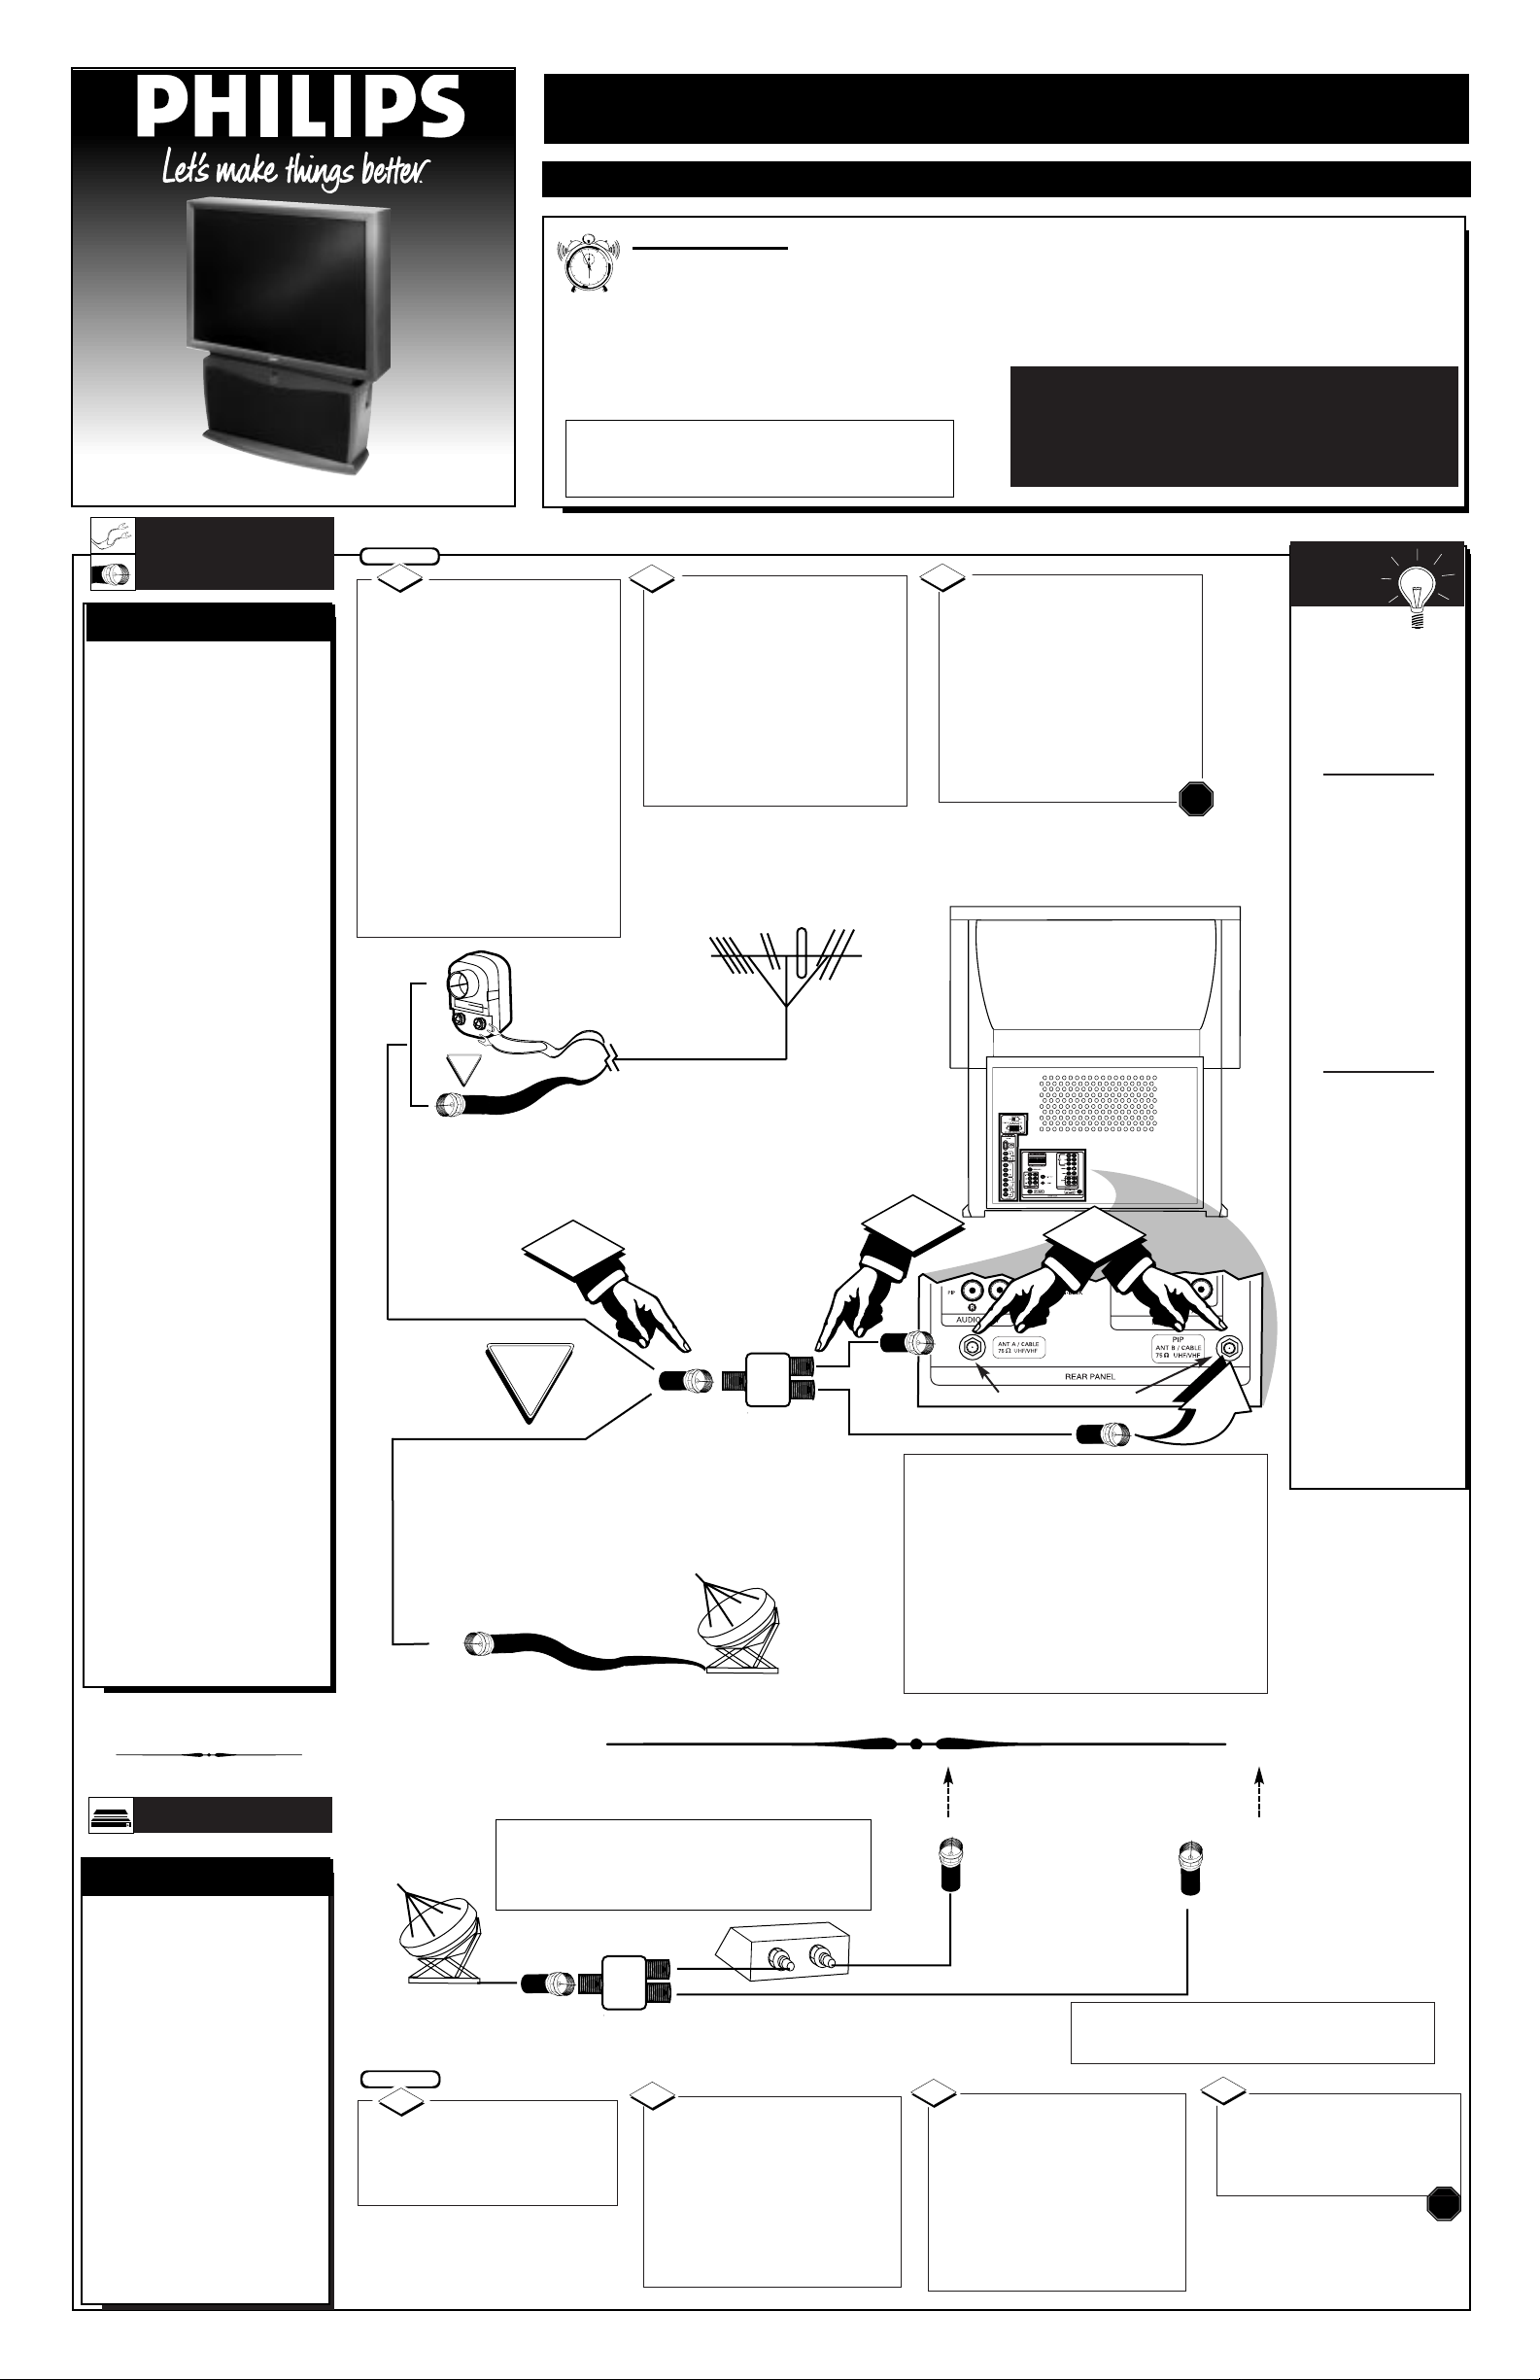
F
or homes with Cable
TV Converter
Descrambler Boxes (with
Premium/Movie Channels
scrambled), follow the
steps to the right for an
alternative ANT A and
ANT B PIP feature
hookup. Note the Cable TV
signal will be split before
connection to the
Converter box (an optional two-way 75 ohm Signal
Splitter will be required).
CABLE BOX
CABLE CONVERTER BOXES
Connect your Cable
TV signal to the single 75 ohm
INPUT plug on a two-way
Signal Splitter (optional).
Connect one end of RF
Coaxial Cable to each of the
OUTPUT plugs on the 75 ohm
Signal Splitter. The two lengths
of RF Coaxial Cable need Ftype connectors (screw-on or
push type) for both ends.
2
1
Round Cable
75Ω Ohm
Cable TV Company
Cable TV Signal
Connect one of the Signal
Splitter OUTPUTs to the
INput terminal on the Cable
TV Converter Box. Then route
another connection from the
Cable Converter OUTput terminal to the ANTA Input on
the rear of the TV.
3
STOP
Y
our TV has two separate ANT(enna)/Cable
inputs on the rear of the
set. These two signal
inputs offer convenient
hook-up options for both
normal TV program viewing and Picture-In-Picture
(PIP) features.
The ANT(enna) A input is
intended for use and view-
ing on the TV’s main
screen. Your home’s primary Antenna, or Cable
TV signal, should be connected to this input for
normal TV setup, use and
feature operation.
The ANT(enna) B input is
a second, or auxiliary sig-
nal source, designed to
supply your TV’s PictureIn-Picture (PIP) feature.
For many homes the use of
a single existing Antenna
(or Cable TV) source, for
both ANT A and B, will be
the preferred method of
connection. This type of
connection (optional
Signal Splitter required)
will work properly for the
TV’s Main on-screen features, as well as retain all
the features designed for
PIP. For more details refer
to the Picture-In-Picture
section in your other
owner’s manual.
ANTENNA OR
CABLE TV
ANT(ENNA) A& B INPUTS
Remember,
be sure to set the
TV for the type signal you've connected (see "SETUP"
on page 2 of this
Guide.)
Your TV can set
itself to select only
the channel numbers
on your Cable system (see “Setup"
page 2). If you use a
Cable Converter box,
set the TV to the
same channel as the
converter's CH 3/4
switch (on the rear of
the converter.)
To order any
optional accessory
contact your dealer
or call the toll-free
accessory ordering
number (1-800-851-
8885):
• Two Way Splitter
(M61000)
• 300-75 ohm
Adapter
(M61020)
• UHF/VHF
Antenna
Combiner
(SBV111133A01)
SMART
HELP
A typical ANT(enna)
A and B connection (using a
common signal source and an
optional Signal Splitter):
If your Antenna or Cable TV
signal has a round cable connector
(75 ohm) on the end,
then you're ready to connect it
to the 75ohm Signal Splitter.
If your antenna has flat twinlead wire (300 ohm), you first
need to attach the antenna wires
to the screws on a 300 to 75
ohm adapter before connecting
to the 75ohm Signal Splitter.
Connect your Antenna or
Cable TV signal to the single
75 ohm input plug on the twoway Signal Splitter (optional).
Then connect two lengths of RF
Coaxial Cable to the two Output
plugs on the two-way Signal
Splitter (F-type connector on
both ends).
2
300 to 75Ω Adapter
(483521827003)
Twin Lead
Wire
Back of TV
BEGIN
1
WARNING: TO PREVENT FIRE OR SHOCK
HAZARD DO NOT EXPOSE THIS UNIT TO
RAIN OR EXCESSIVE MOISTURE.
Round Cable
75Ω Ohm
- Outdoor or Indoor Antenna -
receives normal broadcast channels
2-13 (VHF) and 14-69 (UHF).
OR
Note: Proper operation of your TV is not dependent upon
connection of the ANT B input. Its main purpose is to provide
an easily connected, dedicated picture source for PIP feature
use. Other signal source options (such as a satellite dish system, additional external antenna, VCR, or Video Game) could
also be connected and displayed on the TV screen through the
use of the ANT B input.
Note: Although the ANT B input can be used and swapped
as the source for the TV’s Main picture, certain setup fea-
tures (such as Smart Clock) are only based on a signal being
detected at the ANTAinput. To ensure that all features are
operating properly, you may not want to rely solely on the ANT
B input as your TV’s Main screen signal source.
Connect the twin Output
plugs on the Signal Splitter to
the ANT A and ANT B inputs
on the rear of the TV. Push the
round connector end of the RF
Coaxial Cable onto the
ANT(enna) plug and screw it
down tight (if using threaded
cables).
OPTIONAL TWO-WAY
SIGNAL SPLITTER
OR
3
STOP
Combination VHF/UHFAntenna
(single 75ohm Input to twin
75 ohm Outputs - optional
RF Coaxial connecting
cables also required)
ANT(enna) A
Input
ANT(enna) B
Input
• The signal routed to the TV’s ANT B input will allow for
the selection and viewing of Cable channels at the TV
(except for the scrambled Premium/Movie channels).
OPTIONAL TWO-WAY
SIGNAL SPLITTER
Cable TV Converter
Box Connection
Cable TV Company
Connect the remaining
Signal Splitter OUTPUT
from the Splitter to the ANT
B Input on the rear of the TV.
4
• The signal routed to the TV’s ANT A input will allow for
Premium/Movie channels to be viewable on the TV.
• Channel selection will be at the Converter.
• The ANTAinput channel on the TVshould be set to the same
output channel as the Converter box (usually CH3 or 4).
Connect to ANTAInput
Connect to ANT B Input
1 - 3135 015 21411
NOTE: This owner's manual is used with several different
television models. Not all features (and drawings) discussed in this manual will necessarily match those found
with your television set. This is normal and does not
require you contacting your dealer or requesting service.
HD Projection Television
12
1
11
10
9
8
5
7
6
1
2
3
4
2
3
BEGIN
IN
OUT
FEATURES
EXIT
MAIN MENU
SOUNDPICTURE
1ST TIME SETUP
POSITION
213
546
879
0
TV
VCR
ACC
GUIDE
AV
INFO
SWAP PIP CH
ON
UP
SOURCEFREEZE
SLEEP
AUTO
STATUS/
EXIT
VOL
CH
MUTE
SURF
100+
POWER
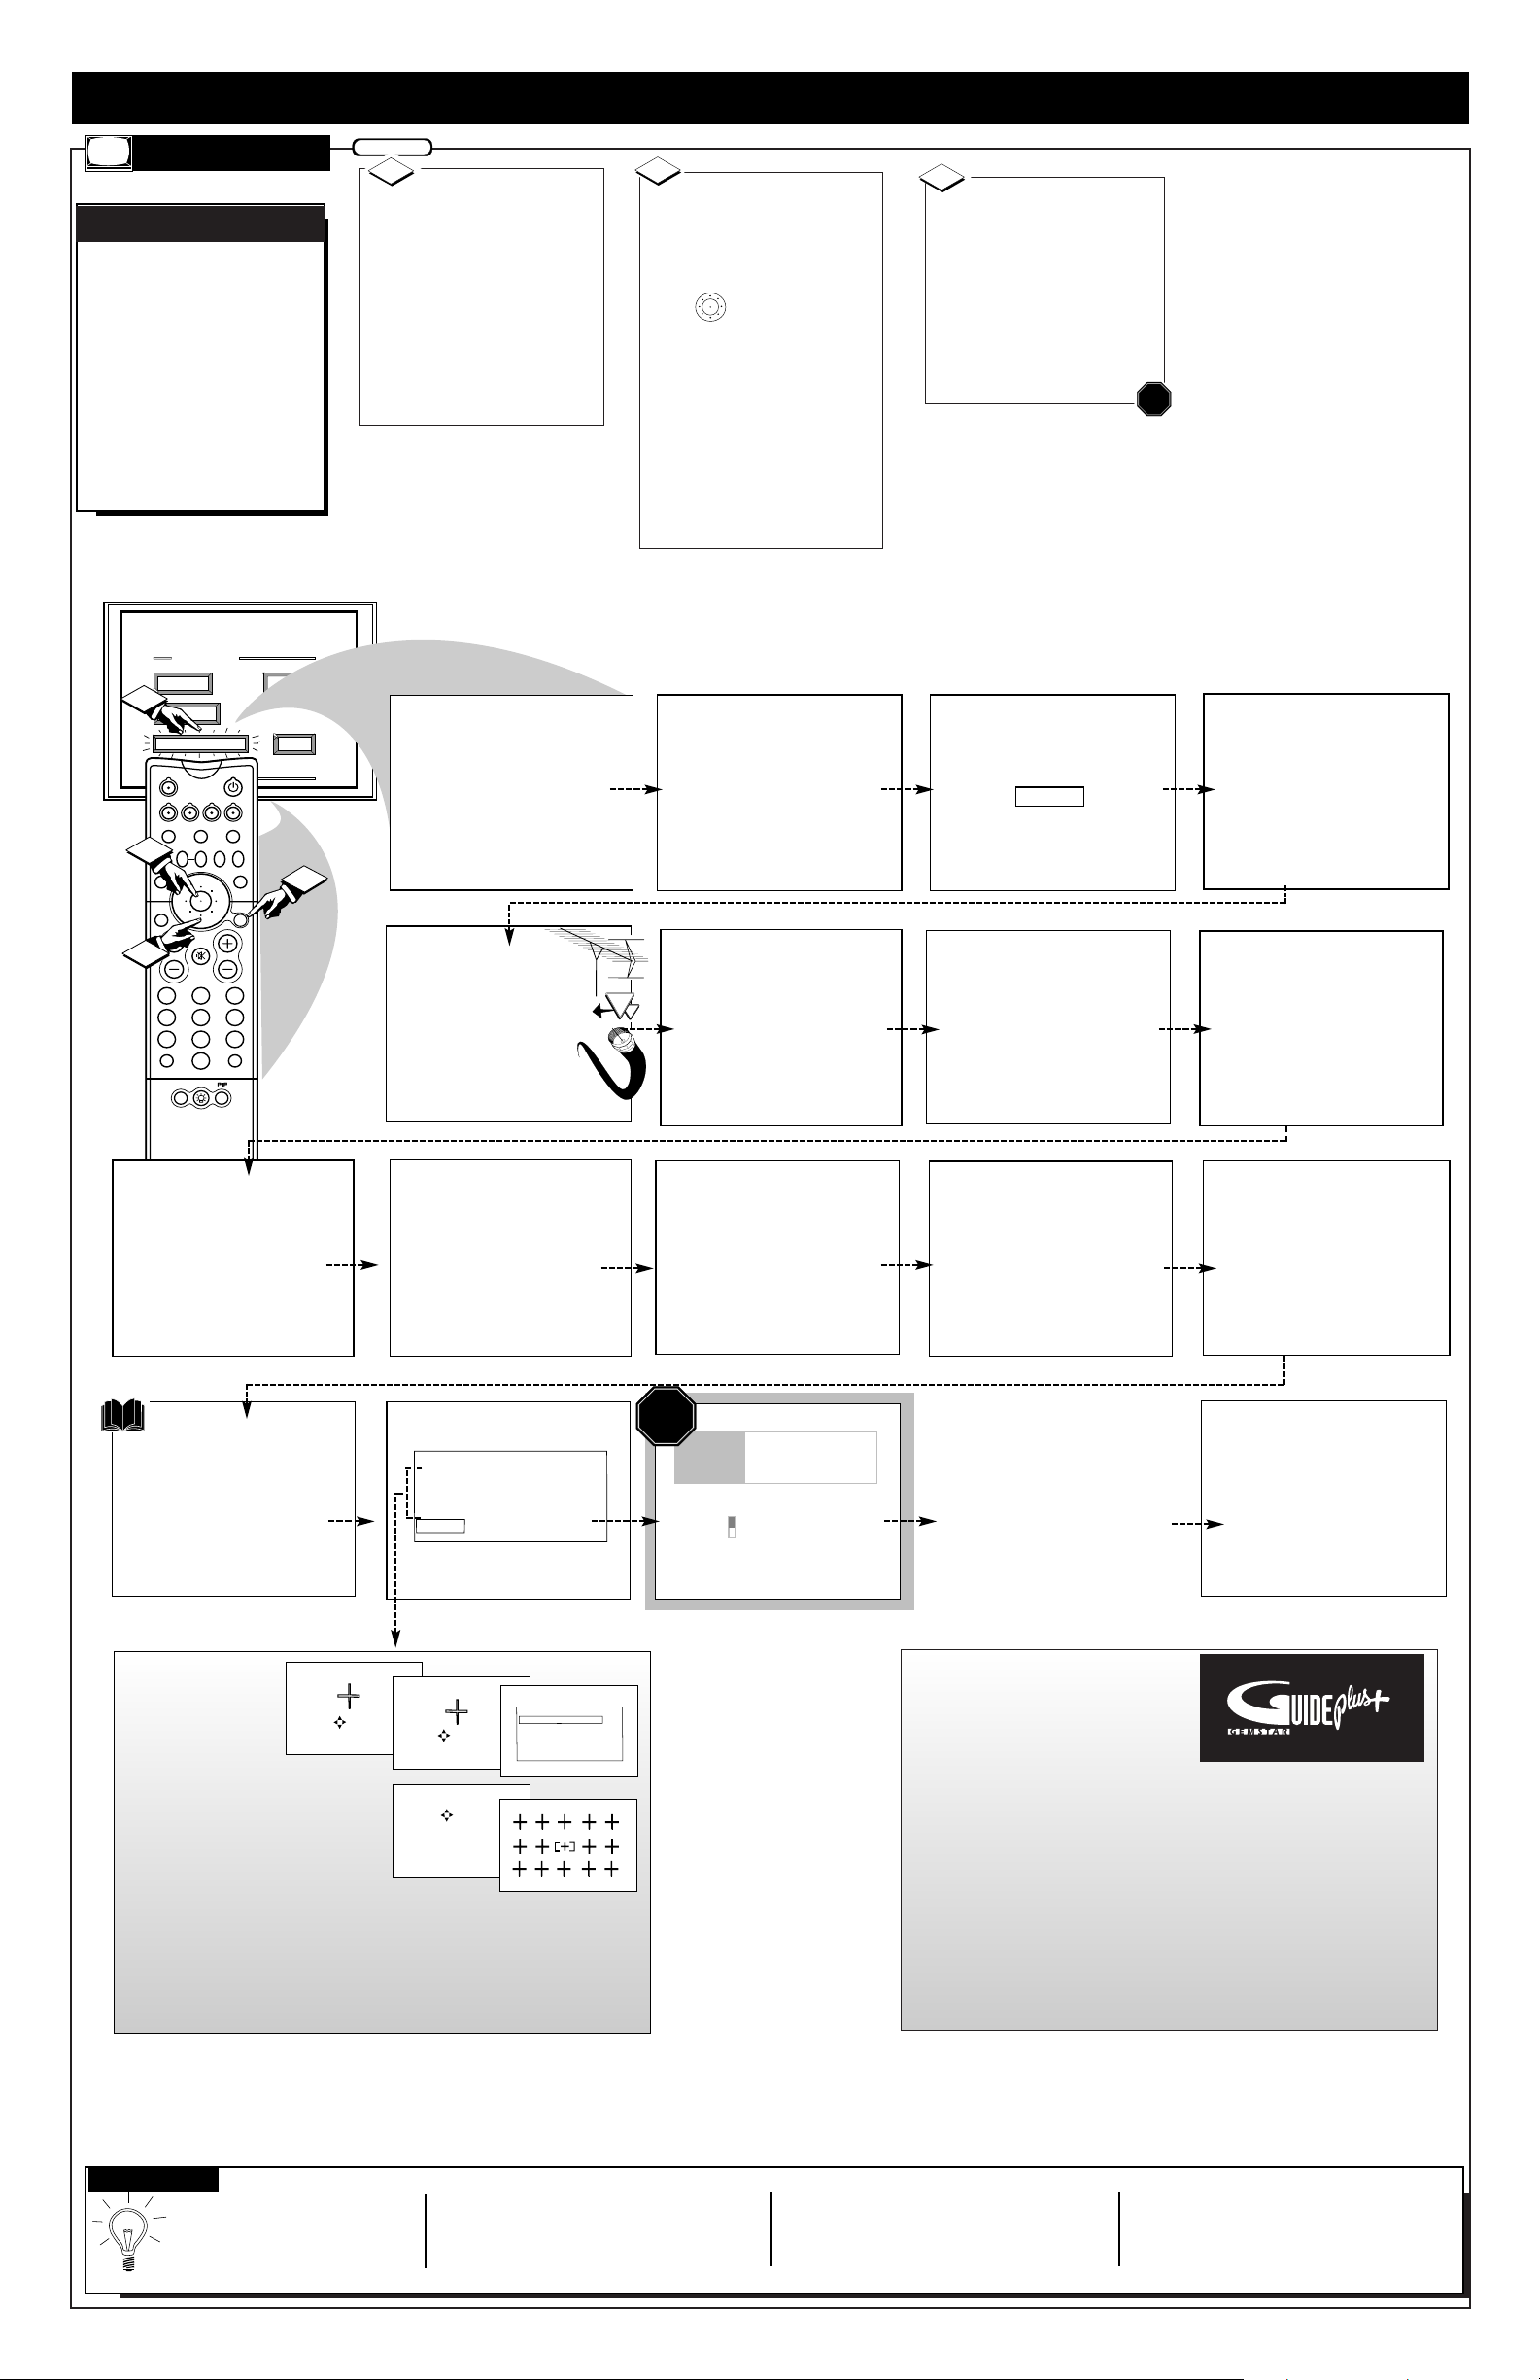
This completes the
First-Time Setup.
Press "M" to Exit Setup
TV GUIDE PLUS +
Setup
10:17a
Where do you live?
B USA
Y CANADA
Press color key to select
STOP
After ALL connections
and First-Time Setup for
the GUIDE PLUS+ system
are completed, the TV
will have to be turned
OFF overnight to receive
program information.
Many of the current TV
control settings will be
modified by continuing
with First-Time Setup.
Press STATUS to Quit
or
Press "M" to Continue
System is testing for
correct tuning mode
for ANT A.
* Please Wait *
1
The search for active
channels is complete
for ANT A.
17 channels were found
and saved in memory
.
Press "M" to Continue
System is searching for
all active channels
on ANT A.
* Please Wait *
Testing channel 2
in cable mode.
The First-Time Setup
provides a simple method
of adjusting the most
important controls for
this television receiver.
Press "M" To Continue
~
!
Press "▲▼" to select the
language you would like
the TV displays to use.
ENGLISH
ESPANOL
FRANCAIS
Press "M" to Continue
Please check that your
other antenna or cable is
connected to the plug
marked ANT B on
the TV rear input panel.
This TV is equipped with
the TV Guide Plus+ feature.
This feature is designed
to operate only on the
main antenna, ANT A.
Press "M" to Continue
OR
Please check that your
main antenna or cable is
connected to the plug
marked ANT A on
the TV rear input panel.
Press STATUS to Quit
or
Press "M" to Continue
System is testing for
correct tuning mode
for ANT B.
* Please Wait *
1
The search for active
channels is complete
for ANT B.
17 channels were found
and saved in memory
.
Press "M" to Continue
System is searching for
all active channels
on ANT B.
* Please Wait *
Testing channel 2
in cable mode.
Press STATUS to Quit
or
Press "M" to Continue
2
1
3
2
This TV is equipped with
a Surround-Sound system.
Surround Sound requires
the use of additional
speakers being placed
around your room.
Press "M" to Continue
Please thoroughly read
the section in your
owners manual which
details the proper setup
and operation of the
Surround-Sound System.
Press "M" to Continue
˜
MENU/
SELECT
CONVERGENCE MENU
ALIGN RED
ALIGN BLUE
CONVERGE MULTI POINT
BACK
PLEASE REFER
TO YOUR
GUIDE PLUS+
INSTRUCTION MANUAL
FOR DETAILS ON
1st TIME SETUP.
®
HOW TO USE FIRST TIME SETUP
F
irst Time Setup automati-
cally takes care of some
basic TV control settings for
you. Follow the steps in this
section to quickly add area
channel numbers into the
TV's memory, and set the TV
for your connected signal
(Antenna or Cable.) You can
also set the TV's Guide Plus+
system feature (if desired).
AUTOMATIC SETTINGS
SETUP
Press the MENU
SELECT button on the
remote or TV.
An on-screen list of TV fea-
tures shows on the "MAIN
MENU".
Note: You may also press the
center Menu ring button area
on the remote to select the
TV’s Main Menu.
BEGIN
1
Select "1ST TIME
SETUP" on the TV's Main
Menu. (Selected MENU item
is highlighted in RED.)
Press the remote's outer
Menu ring buttons to
move UP/DOWN and from
SIDE-TO-SIDE within the
list of on-screen features.
Press CH(annel) ▲▼ and
VOL(ume) (+) (-) on the TV
keyboard to also move
UP/DOWN and from SIDETO-SIDE within the list of
on-screen features.
2
Press the center Menu
ring button on the remote
(or the Menu button on the
TV) to begin SETUP.
Follow the instructions
shown on the TV screen to
guide you through the First
Time Setup and use of your
new TV.
3
STOP
OR
2
• Press the STATUS/EXIT but-
ton on the remote or TV to
stop the SETUP at any time.
• Remember, SETUP is a first -use, onetime operation and will not have to be
repeated (only the clock settings can be
lost).
• Even if there is no Antenna or Cable
signal connected to the ANT(enna) B
input (located on the rear of the TV), 1st
Time Setup will still attempt to add
channels into memory for that source.
In such cases, a channel search in the
Antenna Mode will be completed, and
“0 channels saved in memory” will be
displayed on-screen.
SMART HELP
Note: The Guide Plus+™ system is
an electronic program service available with your set to show you current and future TV listings; program
content descriptions, and other programming information. Your TV may display a Guide Plus+ system demonstration mode when first turned on for normal operation and use. Pressing the TV’s control panel or remote control
buttons will enable you to bypass the demonstration and continue
with normal TV program viewing.
Remove the Guide Plus+ Demo Mode Pin (tag label attached to
the “G-LINK” connection plug at the rear of TV) when setting up
the Guide Plus+ system for use (and to completely disable the
automatic demo). Follow the instructions contained in your separate Guide Plus+ information manual for feature installation and
other operation details.
®
Note: Convergence
(or lining up of red
and blue light paths
on the TV screen)
has been preset at
the factory for your conve-
nience and should not need
any further adjustments.
However, Convergence con-
trols are provided (in both the
First Time Setup and Picture
Menu areas) in case the picture on your TV shows color fringing.
Color fringing is when colors “bleed” or appear around the edges
of onscreen images and objects. Please refer to the TV’s Picture
Menu Convergence control page section for further details.
PRESS TO ALIGN BLUE
PRESS MENU TO RETURN
PRESS TO ALIGN RED
PRESS MENU TO RETURN
CONVERGENCE MULTI POINT
CONVERGE RED POINTS
CONVERGE BLUE POINTS
RESTORE FACTORY SETTINGS
SAVE ADJUSTMENTS
BACK
CONVERGE RED POINTS
USE TO ADJUST
DIGIT 2, 4, 6, 8 TO MOVE CURSOR
MENU TO RETURN
PRESS MENU NOW TO CONTINUE
 Loading...