

Philips 60PP940199 User Manual
IB8304E002 H462942
Directions for Use
• 1080i/540p scan with line doubling
• 3D Y/C comb filter
• Auto IntelliSense™Focus
• First-surface mirror
• Component video inputs
• Front A/V convenience jacks
• Protective filter
• Dual-tuner
Picture-in-Picture
HDTV Monitor
HDTV Monitor
55PP9401
55PP9401
60PP9401
60PP9401
2
Once your PHILIPS purchase is registered, you’re eligible to receive all the privileges of owning a
PHILIPS product. So complete and return the Warranty Registration Card enclosed with your pur-
chase at once. And take advantage of these important benefits.
Return your Warranty Registration card today to ensure you
receive all the benefits you’re entitled to.
Congratulations
on your
purchase,
and welcome to the
“family!”
Dear PHILIPS product owner:
Thank you for your confidence in PHILIPS. You’ve selected one of the best-built, best-backed products available today. And we’ll do everything in our power to keep you happy with your purchase
for many years to come.
As a member of the PHILIPS “family,” you’re entitled to protection by one of the most comprehensive
warranties and outstanding service networks in the industry.
What’s more, your purchase guarantees you’ll receive all the information and special offers for which
you qualify, plus easy access to accessories from our convenient home shopping network.
And most importantly you can count on our uncompromising commitment to your total satisfaction.
All of this is our way of saying welcome–and thanks for investing in a PHILIPS product.
Sincerely,
Lawrence J. Blanford
President and Chief Executive Officer
Know these
safetysymbols
t This “bolt of lightning” indicates uninsulated material within your unit may cause an electri-
cal shock. For the safety of everyone in your household, please do not remove product covering.
s The “exclamation point” calls attention to features for which you should read the enclosed
literature closely to prevent operating and maintenance problems.
WARNING: TO PREVENT FIRE OR SHOCK HAZARD, DO NOT EXPOSE THIS EQUIPMENT
TO RAIN OR MOISTURE.
CAUTION: To prevent electric shock, match wide blade of plug to wide slot, and fully insert.
ATTENTION: Pour éviter les chocs électriques, introduire la lame la plus large de la fiche dans la
borne correspondante de la prise et pousser jusqu’au fond.
CAUTION
RISK OF ELECTRIC SHOCK
DO NOT OPEN
CAUTION: TO REDUCE THE RISK OF ELECTRIC SHOCK, DO NOT
REMOVE COVER (OR BACK). NO USER-SERVICEABLE PARTS
INSIDE. REFER SERVICING TO QUALIFIED SERVICE PERSONNEL.
Warranty
Verification
Registering your product within
10 days confirms your right to
maximum protection under the
terms and conditions of your
PHILIPS warranty.
Owner
Confirmation
Your completed Warranty
Registration Card serves as
verification of ownership in the
event of product theft or loss.
Model
Registration
Returning your Warranty
Registration Card right away guarantees you’ll receive all the information and special offers which
you qualify for as the owner of your
model.
P.S. Remember, to get the most from your PHILIPS
product, you must return your
Warranty Registration Card within 10 days. So
please mail it to us right now!
R
E
G
I
S
T
R
A
T
I
O
N
N
E
E
D
E
D
W
I
T
H
I
N
1
0
D
A
Y
S
Hurry!
Visit our World Wide Web Site at http://www.philips.com
3
IMPORTANT SAFETY INSTRUCTIONS
Read before operating equipment
1. Read these instructions.
2. Keep these instructions.
3. Heed all warnings.
4. Follow all instructions.
5. Do not use this apparatus near water.
6. Clean only with a dry cloth.
7. Do not block any of the ventilation openings. Install in
accordance with the manufacturers instructions.
8. Do not install near any heat sources such as radiators, heat
registers, stoves, or other apparatus (including amplifiers)
that produce heat.
9. Do not defeat the safety purpose of the polarized or grounding-type plug. Apolarized plug has two blades with one
wider than the other. A grounding type plug has two blades
and third grounding prong. The wide blade or third prong
are provided for your safety. When the provided plug does
not fit into your outlet, consult an electrician for replacement
of the obsolete outlet.
10. Protect the power cord from being walked on or pinched
particularly at plugs, convenience receptacles, and the point
where they exit from the apparatus.
11. Only use attachments/accessories specified by the manufacturer.
12. Use only with a cart, stand, tripod, bracket, or table
specified by the manufacturer, or sold with the apparatus. When a cart is used, use caution when
moving the cart/apparatus combination to avoid
injury from tip-over.
13. Unplug this apparatus during lightning storms or when
unused for long periods of time.
14. Refer all servicing to qualified service personnel. Servicing
is required when the apparatus has been damaged in any
way, such as power-supply cord or plug is damaged, liquid
has been spilled or objects have fallen into apparatus, the
apparatus has been exposed to rain or moisture, does not
operate normally, or has been dropped.
15. This product may contain lead and mercury. Disposal of
these materials may be regulated due to environmental considerations. For disposal or recycling information, please
contact your local authorities or the Electronic Industries
Alliance: www.eiae.org
16. Damage Requiring Service - The appliance should be
serviced by qualified service personnel when:
A. The power supply cord or the plug has been damaged;
or
B. Objects have fallen, or liquid has been spilled into the
appliance; or
C. The appliance has been exposed to rain; or
D. The appliance does not appear to operate normally or
exhibits a marked change in performance; or
E. The appliance has been dropped, or the enclosure
damaged.
17. Tilt/Stability - All televisions must comply with recommended international global safety standards for tilt and stability
properties of its cabinet design.
• Do not compromise these design standards by applying
excessive pull force to the front, or top, of the cabinet which
could ultimately overturn the product.
• Also, do not endanger yourself, or children, by placing
electronic equipment/toys on the top of the cabinet. Such
items could unsuspectingly fall from the top of the set and
cause product damage and/or personal injury.
18. Wall or Ceiling Mounting - The appliance should be
mounted to a wall or ceiling only as recommended by the
manufacturer.
19. Power Lines - An outdoor antenna should be located away
from power lines.
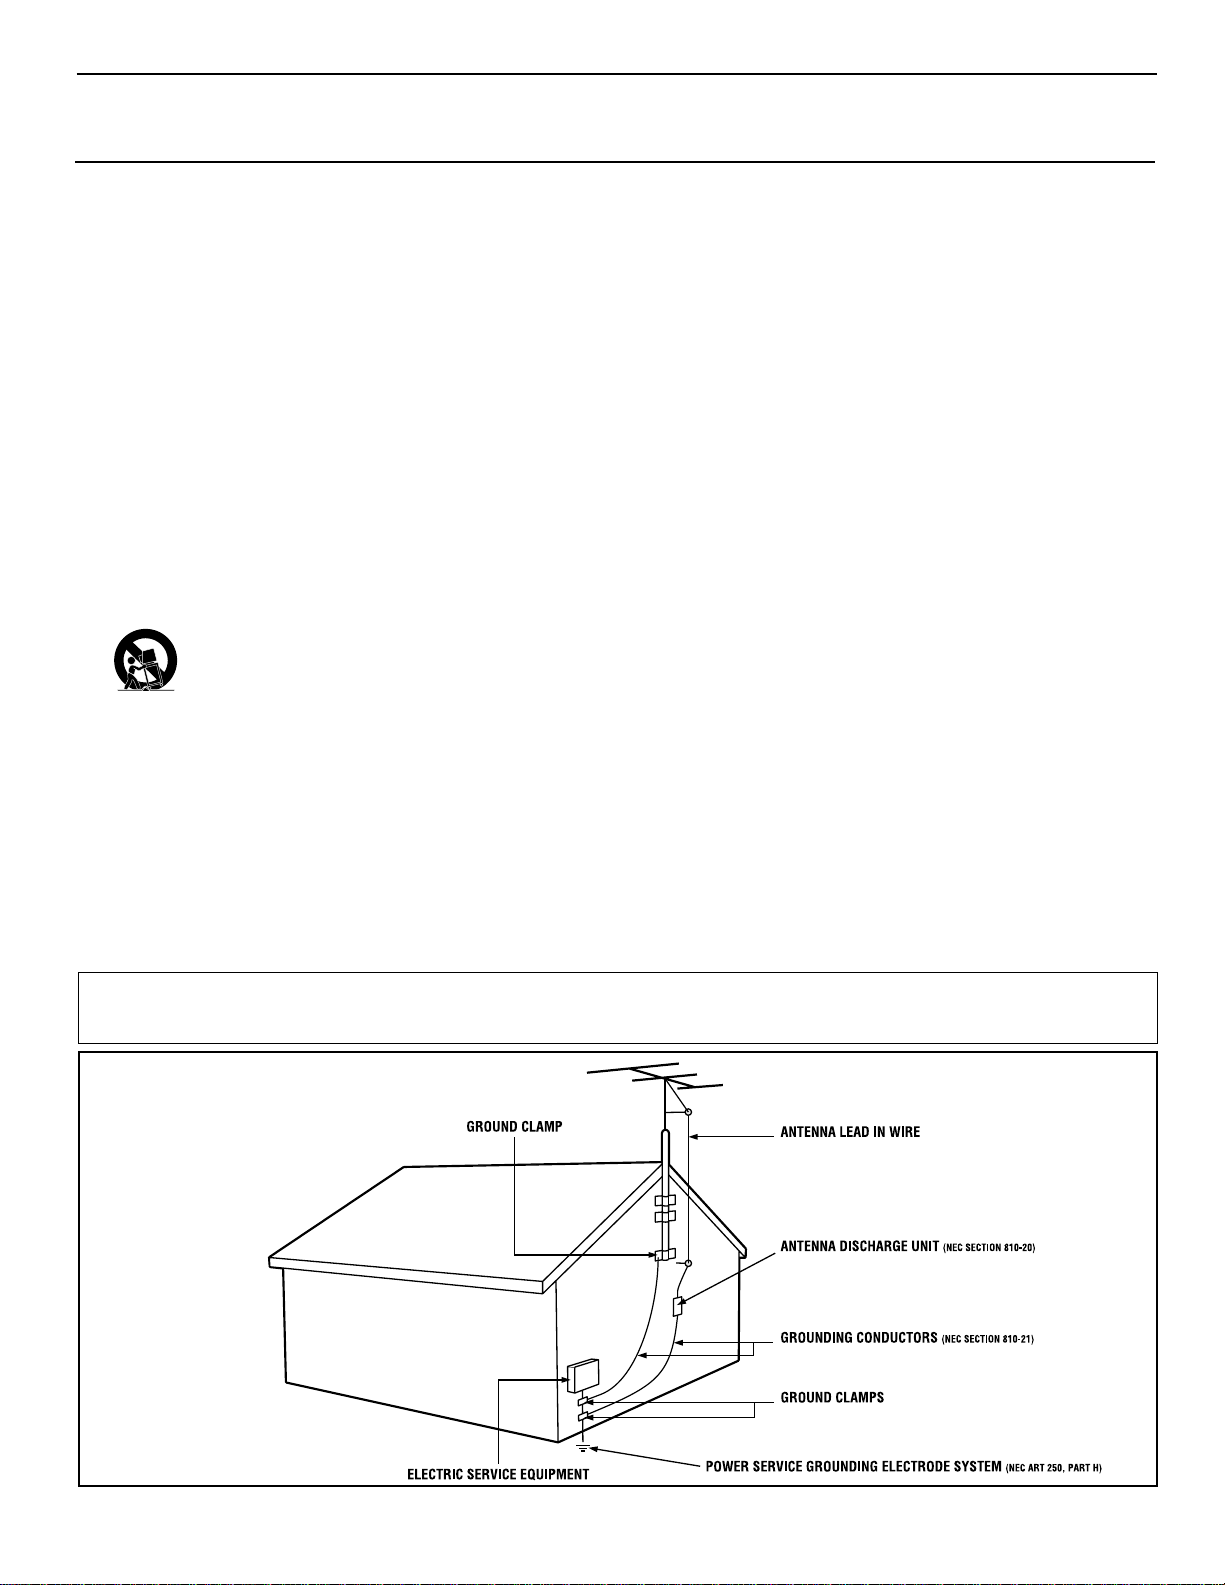
20. Outdoor Antenna Grounding - If an outside antenna is
connected to the receiver, be sure the antenna system is
grounded so as to provide some protection against voltage
surges and built up static charges.
Section 810 of the National Electric Code, ANSI/NFPA No.
70-1984, provides information with respect to proper
grounding of the mast and supporting structure, grounding
of the lead-in wire to an antenna discharge unit, size of
grounding connectors, location of antenna-discharge unit,
connection to grounding electrodes and requirements for
the grounding electrode. See Figure below.
21. Object and Liquid Entry - Care should be taken so that
objects do not fall and liquids are not spilled into the enclosure through openings.
Example of Antenna Grounding
as per NEC - National Electric Code
Note to the CATV system installer: This reminder is provided to call the CATV system installer's attention to Article 820-40 of the NEC that provides
guidelines for proper grounding and, in particular, specifies that the cable ground shall be connected to the grounding system of the building, as close
to the point of cable entry as practical.
Rev. 8/13/01
4
TABLE OF CONTENTS
Getting Started
Welcome/Registration of Your TV . . . . . . . . . . . . .2
Safety/Precautions . . . . . . . . . . . . . . . . . . . . . . . . . . . . . . .3
Table of Contents . . . . . . . . . . . . . . . . . . . . . . . . . . . . . . . .4
Features . . . . . . . . . . . . . . . . . . . . . . . . . . . . . . . . . . . . . . .5
Features Menu
Labeling Channels . . . . . . . . . . . . . . . . . . . . . . .6–7
Labeling Signal Source Inputs . . . . . . . . . . . . . . . . . . . .8–9
Using Family Favorites . . . . . . . . . . . . . . . . . . . . . . . . . .10
Using Favorite Channels/SURF . . . . . . . . . . . . . . . . . . . .11
Using AutoLock™to Block Picture and Sound . . . . . .12–15
Setting the Timer . . . . . . . . . . . . . . . . . . . . . . . . . . . .16–17
Using Closed Captioning . . . . . . . . . . . . . . . . . . . . . . . . .18
Selecting the Menu Background . . . . . . . . . . . . . . . . . . . .19
Picture Menu
Adjusting Picture, Brightness, Color,
Tint, and Sharpness . . . . . . . . . . . . . . . . . . . . . . . . . . . . .20
Using Advanced Picture Settings . . . . . . . . . . . . . . . . . . .21
Sound Menu
Adjusting Bass, Treble, and Balance . . . . . . . . . . .22
Using Advanced Sound Settings . . . . . . . . . . . . . . . . . . . .23
Theater Menu
Automatically Setting Picture
and Sound for a Particular Type of Program . . . . . . . . . .24
Creating 3D Surround Sound with SRS
(Sound Retrieval System) . . . . . . . . . . . . . . . . . . . . . . . . .25
Rear Panel Jacks
Taking Full Advantage of the Rear Panel Jacks . .26
Connecting a VCR or Laserdisc Player . . . . . . . .27
Connecting an S-Video VCR or Laserdisc Player . . . . . . .28
Connecting a Laserdisc/DVD Player
or HDTV Set-top Box . . . . . . . . . . . . . . . . . . . . . . . . . . .29
Connecting an External Audio Amplifier . . . . . . . . . . . . .30
Remote Control Use with Accessory Devices
Using the Direct Method . . . . . . . . . . . . . . . . . . . . .31
Using the Entry Code Method . . . . . . . . . . . . . . . . .32
Using the Search Method . . . . . . . . . . . . . . . . . . . . . . . . .33
Remote Control Entry Code List . . . . . . . . . . . . . . . .34–35
VCR-related Remote Control Buttons . . . . . . . . . . . . . . .36
Picture-in-Picture (PIP)
Using Picture-in-Picture . . . . . . . . . . . . . . . . . . . .37
Using Surf Mode PIP . . . . . . . . . . . . . . . . . . . . . . . . . . . .38
Using the PIP Remote Buttons . . . . . . . . . . . . . . . . . . . . .39
General Information
Troubleshooting Tips . . . . . . . . . . . . . . . . . . .40–41
Reception Difficulties . . . . . . . . . . . . . . . . . . . . . . . . . . .42
Care of the TV and Remote Control . . . . . . . . . . . . . . . . .43
Glossary of Television Terms . . . . . . . . . . . . . . . . . . . . . .44
Index . . . . . . . . . . . . . . . . . . . . . . . . . . . . . . . . . . . . . . . .45
Warranty . . . . . . . . . . . . . . . . . . . . . . . . . . . . . . . . . . . . . 46
1
2
1
2
3
4
5
6
7
8
9
1
0
1
1
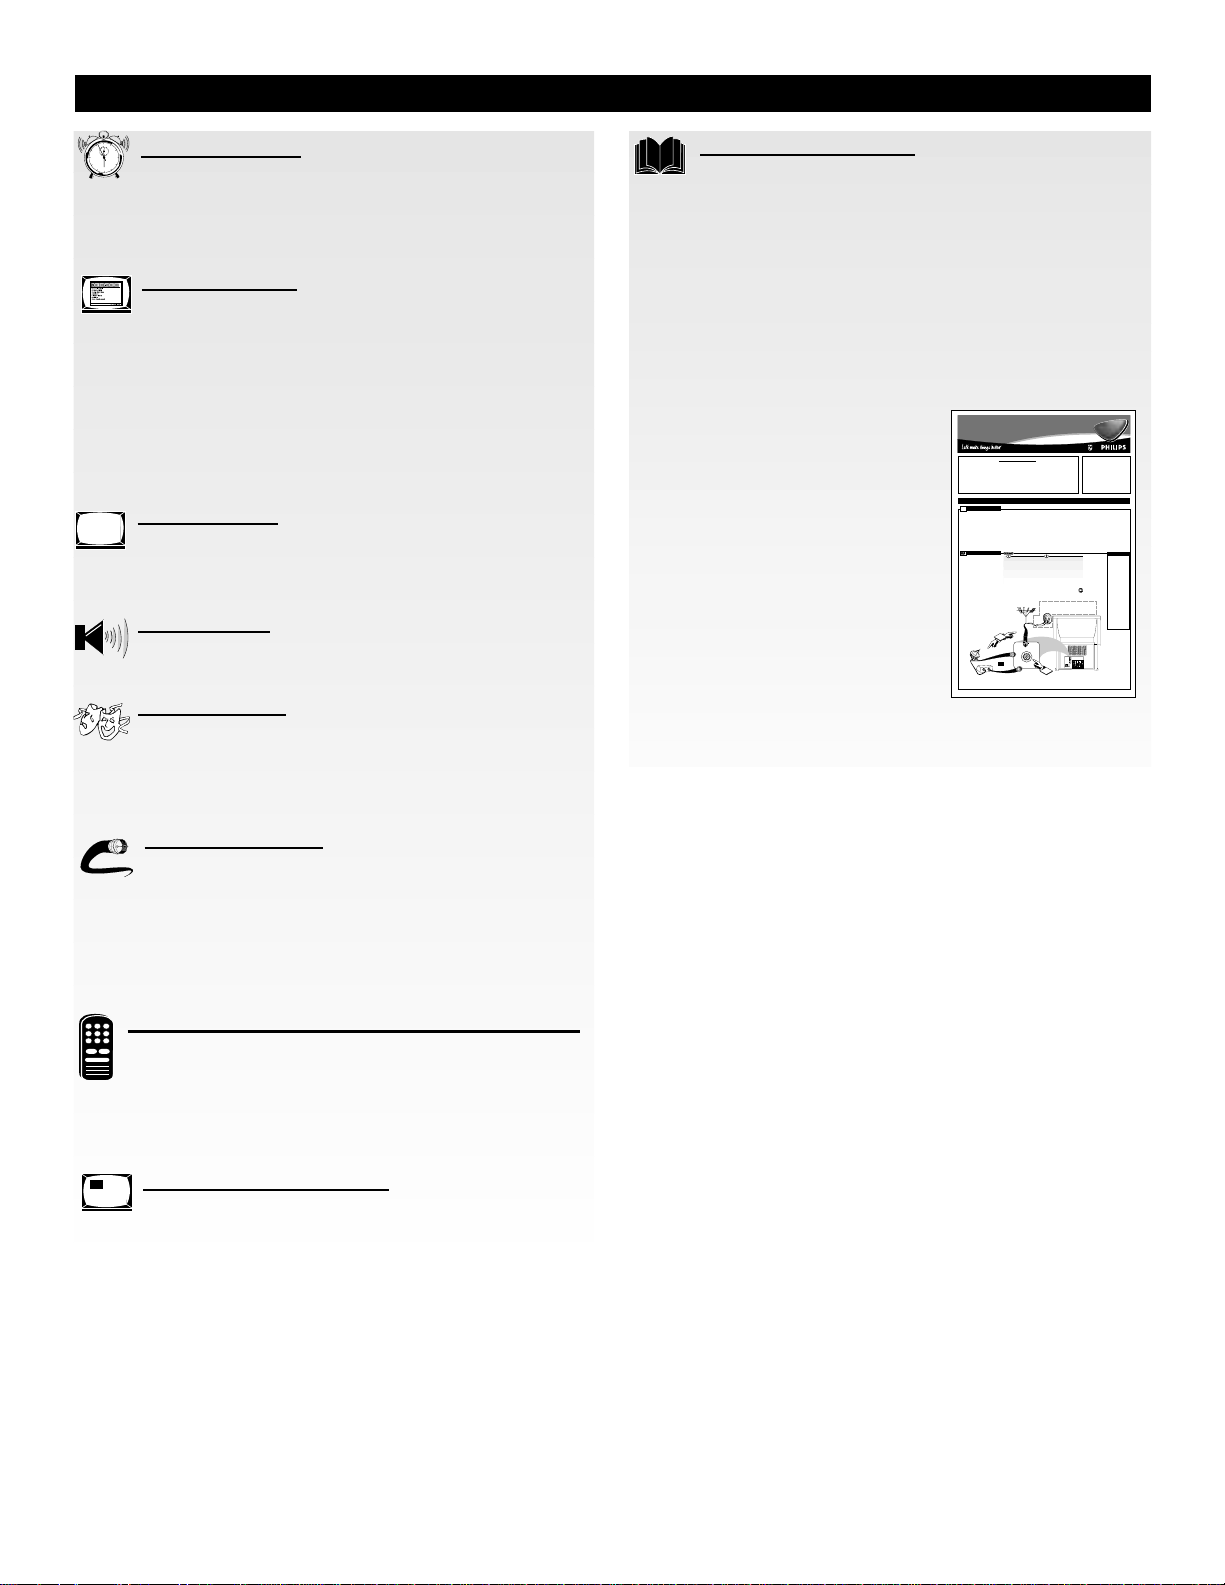
Quick Use and Setup Guide
The simple Quick Use and
Setup Guide (supplied with
your TV) provides you with
information about:
• Connecting signals to the
TV
• Performing basic TV and
remote control operations
• Using the on-screen menu
• Using the TV’s Setup
controls.
Copyright © 2001 Philips Consumer Electronics Company. All rights reserved.
HDTV Monitor
Magnetic fields, such as those of
external speakers, may cause the
picture to distort if they are placed
too close to the television. Move
the magnetic field source away
from the TVuntil there is no picture distortion.
If the TVsignal is from a 75Ω
F-type coaxialcable/connector,
then you’re ready to connect it to the
antenna input on the back of the TV.
If you’re using a cable signal with a
convertor box, first connect the cable
TVsignal to the cable signal IN(put)
plug on the converter box. Then connect from the OUT(put) on the converter box to the ANT(enna) input on
the back of the TV.
300Ωto 75Ω
Adapter
(483521827003)
Ω
Coaxial
2
Note: A300Ωto 75 Ω Adaptermay be
equired if the UHF/VHFantenna you are
r
using has a “twin-lead wire” instead of the
single F-type 75Ωcoaxial cable/connector.
Back of TV
HDTV Monitor
55PP9401
55PP9401
60PP9401
60PP9401
WARNING: TO PREVENTFIRE OR
SHOCK HAZARD DO NOTEXPOSE
THIS UNITTO RAIN OR EXCESSIVE MOISTURE.
Quick Use and Setup Guide
Quick Use and Setup Guide
TABLEOF CONTENTS
Safety/Important Notice . . . . . . . . . . . . . . . . . . . . . . . .1
Selecting the Tuner Mode . . . . . . . . . . . . . . . . . . . . . .5
Best Viewing . . . . . . . . . . . . . . . . . . . . . . . . . . . . . . . .1
Using the Auto Program Control . . . . . . . . . . . . . . . . .5
Making a Basic Antenna or Cable TVHookup . . . . . . .1
Using the Channel Edit Control . . . . . . . . . . . . . . . . . .6
Making a Basic VCR Hookup . . . . . . . . . . . . . . . . . . .2
Using the Channel List Control . . . . . . . . . . . . . . . . . .6
Using the Front Panel Jacks . . . . . . . . . . . . . . . . . . . . .2
Setting the TV’s Clock . . . . . . . . . . . . . . . . . . . . . . . . .7
Performing Basic TVOperations . . . . . . . . . . . . . . . . .3
Using the Auto IntelliSense™Focus Control . . . . . . . .7
Learning Remote Control Buttons . . . . . . . . . . . . . . . .3
Using the Formats Control . . . . . . . . . . . . . . . . . . . . . .8
Using the On-screen Menu . . . . . . . . . . . . . . . . . . . . . .4
Learning More about the Rear Panel Jacks . . . . . . . . . .8
Setting the Language Control . . . . . . . . . . . . . . . . . . . .4
YOUR PROJECTIONTV (BASIC TV CONNECTIONS)
HOOKING UP
BESTVIEWING
To avoid cabinet warping, cabinet
he major benefit of this projection
color changes, and increased
T
television is its large viewing
chance of set failure, do not place
screen. To see this large screen at its
the TVwhere temperatures can
best, test various locations in the
become excessively hot, for exam-
room to find the optimum spot for
ple, in direct sunlight or near a
viewing.
heating appliance.
Be sure to allow a free flow of air to
and from the perforated back cover of
the set.
ANTENNA/CABLETV HOOKUP
he TVsignal coming into your
Connect thecoaxial cable/con-
T
home may be from a Cable TV
nectorto the ANT(enna) Ainput on the
back of the TV.
company or a combination UHF/VHF
If you’re using a cable converter box,
antenna. In either case, the basic con-
connect the OUT(put) plug from the
is very easy.
nection to the TV
converter to the ANT(enna) Ainput on
ACable TVsignal may use a cable
the back of the TV.
box or a direct connection and can
receive up to 125 channels.
AUHF/VHF antenna can receive
normal broadcast channels 2–13 for
VHF and 14–69 for UHF band signals.
Unless your TVis connected to a
Combination VHF/UHF
cable TVsystem or to a centralized
antenna system, a good outdoor color
TVantenna is recommended for best
performance. But if you are located in
an area with an exceptionally good
signal that is free from interference
and multiple image “ghosts,” an
indoor antenna may be sufficient.
Antenna
(Outdoor or Indoor)
Twin-lead
Wire
F-type
75
Cable/Connector
1
TVSignal from
F-type 75Ω
Cable Company
Coaxial
ANT A
Cable/Connector
Cable Converter Box
OR
O
U
T
I
N
F-type 75ΩCoaxial
Cable/Connector
EL6487E001 H462951
CHECK ITOUT
✔To set the TVto
select only the channel numbers in your
area see how to
“Program" or "Add"
channels in memory
on page 5 (Auto
Program section).
✔If you intend to
use separate UHF
and VHF antennas,
you will need an
optional combiner to
connect to the TV.
To order any optional accessory contact
your dealer or call
the toll-free accessory ordering number
(1-800-851-8885).
✔See page 8 for
more information on
the Rear Panel
jacks.

5
FEATURES
Dual Tuner Picture-in-Picture—allows you to enjoy the ben-
efits of Picture-in-Picture (PIP) without a VCR, if you choose.
Watch your favorite show on the main screen while displaying
other programs in PIP subpictures.
AutoLock
™
—allows you to block the viewing of channels or
programs to prevent children from viewing inappropriate
materials.
First-surface Mirror—eliminates light refraction, delivering
virtually all of the light created in the optics bed right to the
viewing screen. In concert with other advanced features in this
model, your picture displays a brilliance never before possible
on a screen with these dimensions.
3D Y/C Comb Filter—uses spatial and temporal filtering to
eliminate cross color luminance with improved diagonal resolution.
Dual Component Video Inputs—support advanced video
input (such as DVD) for superb color purity, crisp color detail,
and reduced color noise.
Auto IntelliSense
™
Focus—automatically adjusts picture
convergence at the push of a button. After reviewing a special
test pattern, optical sensors send position information to the
controller, which then corrects the pictures. Auto IntelliSense
Focus responds to the natural and man-made magnetic field
conditions where the projection TV is located, so you always
enjoy the best possible picture.
Illuminated Home Cinema Universal Remote Control
(Remote #RC2016)—controls all features and functions of this
television with direct menu access. It activates PIP and allows
you to change the channels and video input source, as well as
freeze, swap, and reposition the PIP subpicture. This remote
also controls all important operating features and functions of
virtually all infrared VCRs, DVDs, laserdisc players, satellite
receivers, and on/off and channel up/down on most cable converter/decoders.
Front A/V Jacks—allow quick and easy connection of external video sources (VCR, camcorder, or video games). Located
behind a cover, these inputs are inconspicuous.
Surf
™
—simplifies going from channel to channel by storing
up to 36 favorite stations in the “Favorite Channel” Surf memory. Press the SURF button to access the Favorite Channel
screen, which has 6 categories with 6 channels per category.
Add or delete channels from the Favorite Channel list through
the on-screen display.
SRS®3D Surround Sound—fills the room with the sound
and feel of a live performance. SRS retrieves the spatial information from mono, stereo, or surround encoded recordings
and restores the original three-dimensional sound field.
Auto Theater Picture and Sound—Select a Theater Mode to
automatically tailor the TV’s picture and sound to the type of
program you are watching.
24-Watt dbx
®
Hi-fi Stereo Sound Systemı—offers 12 watts
RMS per channel into 8 ohms, from 50 Hz to 20 kHz, with no
more than 0.5% total harmonic distortion.
Items Included with This TV
As you unpack your TV please note that the following items
have been included with your set:
• Owner's Manual
– Safety Tip Information
– Factory Service Center Locations
• Warranty Registration Card
• Remote Control Transmitter
• Batteries for Remote Control Use
Refer to the back of this manual for instructions for the care of
your TV and remote control.
End-of-life Disposal
Your new projection television and its packaging contain
materials that can be recycled and reused. Specialized companies can recycle your product to increase the amount of
reusable materials and minimize the amounts which need to be
properly disposed.
Your product also uses batteries which should not be thrown
away when depleted, but should be handed in and disposed of
as small chemical waste.
Please find out about the local regulations on how to dispose
of your old television, batteries, and packaging materials
whenever you replace existing equipment.
AutoLock™, ImageMax™, IntelliSense™, and Surf™are registered trademarks
of Philips Consumer Electronics Company. Copyright © 2001 All rights
reserved. dbx
®
is a registered trademark of dbx, Sunnyvale, CA. SRS®and the
SRS symbol are registered trademarks of SRS Labs, Inc., in the United States
and selected foreign countries. SRS technology is incorporated under license
from SRS Labs, Inc.
Digital-ready Projection TV
This Projection Television is capable of connecting to both the
current analog television signals of today as well as interfacing
with new, upcoming digital source playback products and
devices. This TV includes multiple signal connectors
(Component Video, S-Video, and Composite Video), which
give you a variety of equipment playback options for digital
set-top boxes, satellite receivers, cable boxes, and other digital
devices.
While there may exist some digital devices with connections
not available on this television, you should be adequately prepared for the vast majority of products coming onto the digital
consumer electronics market. NOTE: You should always use
the connection output on digital devices that gives the highest
level of picture quality possible. As listed above, the
Component Video (or Y Pb Pr) input delivers the best color
and picture reproduction, followed by S-Video, and then
Composite Video. In addition to these inputs, your television
also includes the standard 75-ohm cable signal connector for
use with antennas or analog cable boxes.
1
1
1
0
1
9
8
7
6
2
1
2
3
4
5
6
FEATURES M
ENU
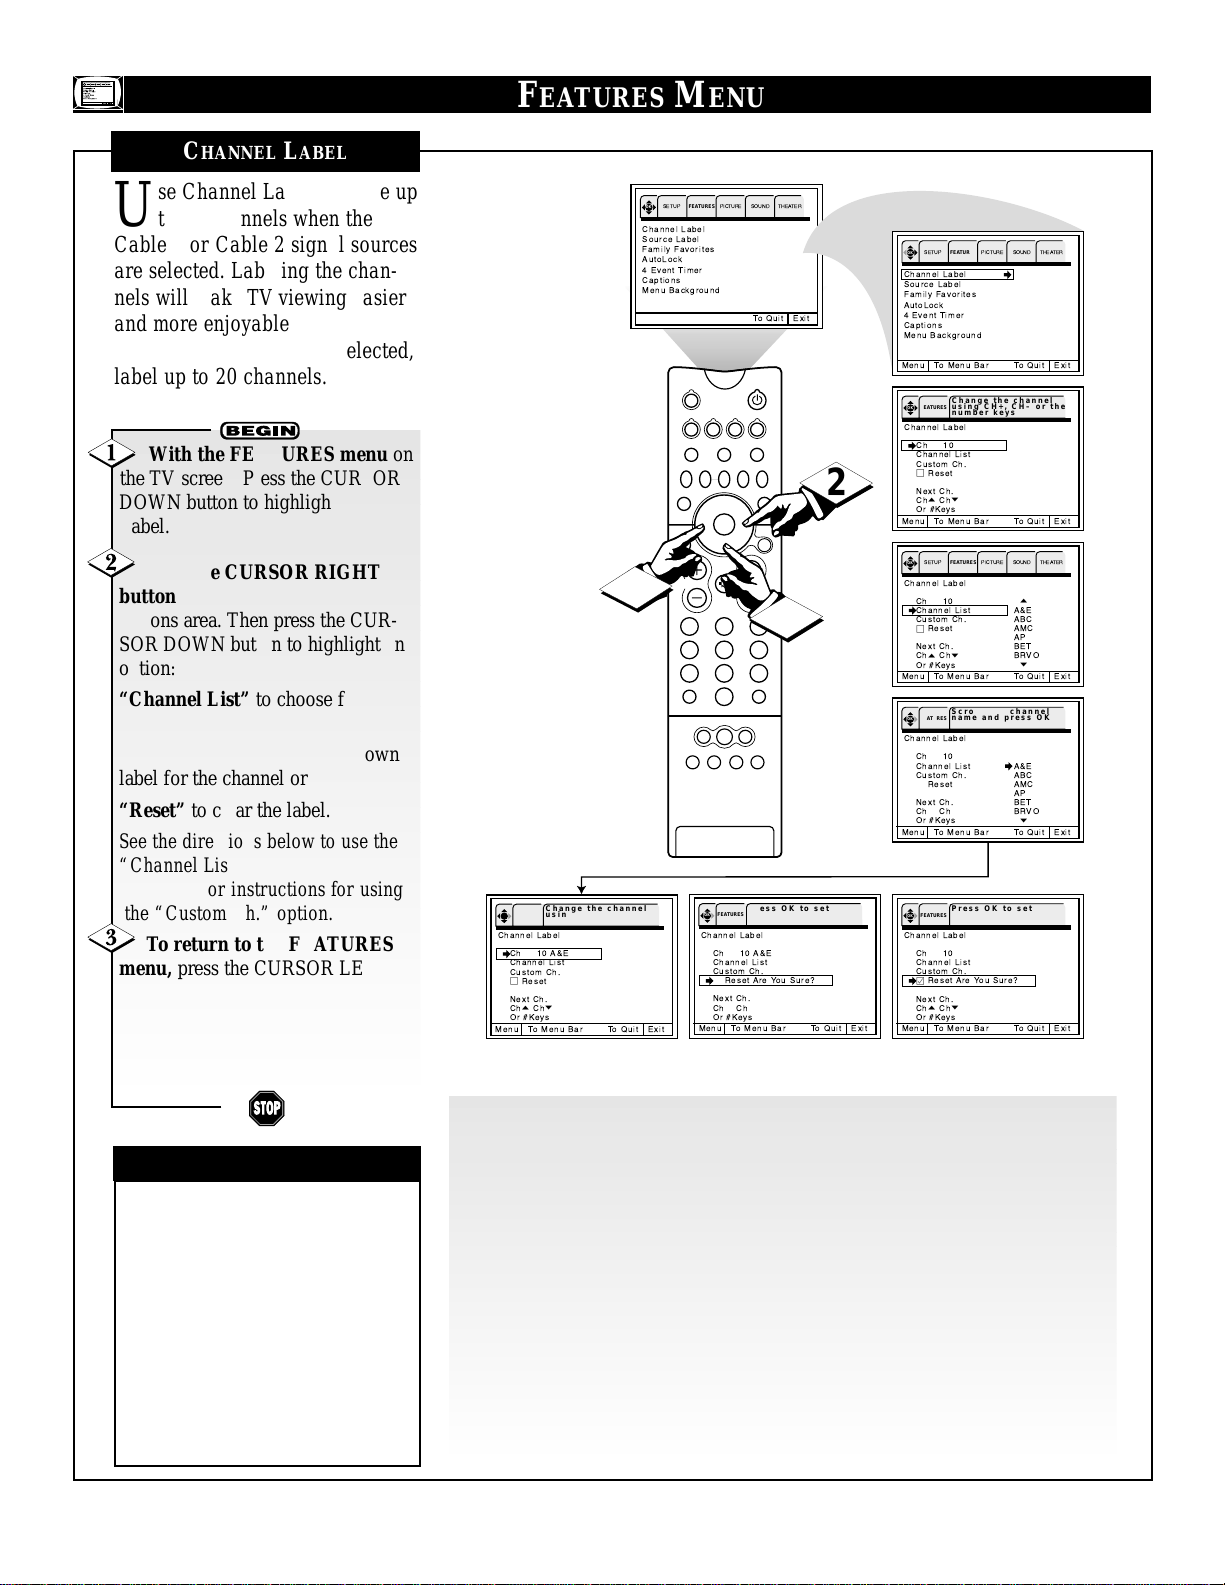
CHANNEL LABEL
U
se Channel Label to name up
to 60 channels when the
Cable 1 or Cable 2 signal sources
are selected. Labeling the channels will make TV viewing easier
and more enjoyable. When the
Antenna signal source is selected,
label up to 20 channels.
With the FEATURES menu on
the TV screen, Press the CURSOR
DOWN button to highlight Channel
Label.
Press the CURSOR RIGHT
button to enter the Channel Label
options area. Then press the CURSOR DOWN button to highlight an
option:
“Channel List” to choose from a
list of prewritten channels names
“Custom Ch.” to create your own
label for the channel or
“Reset” to clear the label.
See the directions below to use the
“Channel List” option. Go to the
next page for instructions for using
the “Custom Ch.” option.
To return to the FEATURES
menu, press the CURSOR LEFT
button. To go to the Menu Bar,
press the MENU/SELECT button.
To clear the screen, press the STATUS/EXIT button.
✔If ANT(enna) A and ANT(enna)
B are in the same
ANTENNA/CABLE mode (see the
“Tuner Mode” section on page 5 of
the Quick Use and Setup Guide that
came with your set ), the Channel
Labels for both antenna inputs will
be the same.
✔Channel Labels will be displayed
only when the channel is displayed
as the main picture.
CHECK IT OUT
Use Channel List to choose from a list of prewritten channel names:
Press the CH(annel) +, – buttons or the number buttons to select the desired station.
With “Channel List” highlighted, press the CURSOR RIGHT button to enter the
list.
Press the CURSOR DOWN or Up buttons to scroll through the list of names.
With the name you want to label the channel highlighted, press the OK button.
The OK button is in the center of the CURSOR button ring.
Press the CH(annel) +, – or the NUMBER buttons to select another channel to
label.
To return to the FEATURES menu, press the CURSOR LEFT button. To go to
the Menu Bar, press the MENU/SELECT button. To clear the screen, press the
STATUS/EXIT button.
OK
Channel Label
Source Label
Family Favorites
AutoLock
4 Event Timer
Captions
Menu Background
3
Change the channel
OK FEATURES
using CH+, CH- or the
number keys
Channel Label
Ch 10 A&E
Channel List
Custom Ch.
□
Reset
Next Ch.
p
Cho Ch
Or #Keys
Menu To Menu Bar To Quit Exit
SETUP
FEATURES
PICTURE SOUND THEATER
To Quit Exit
SOURCE
VCR
DVD
ACC
LIGHT
FORMAT
SOURCE FREEZE
+
–
PIP ON/OFF
MENU/
SELECT
CH
213
1
HELP
SWAP PIP CH
PIP POSITION
STATUS/
EXIT
VOL
TV
546
879
A/CH
AV1 AV2 AV3 AV4
SURF
0
TUNER A
TUNER B FRONT
Press OK to set
OK FEATURES
Channel Label
Ch 10 A&E
Channel List
Custom Ch.
□
Reset Are You Sure?
Next Ch.
p
Cho Ch
Or #Keys
Menu To Menu Bar To Quit Exit
2
OK
SETUP
FEATURES
PICTURE SOUND THEATER
Channel Label
Source Label
Family Favorites
AutoLock
4 Event Timer
Captions
Menu Background
Menu To Menu Bar To Quit Exit
Change the channel
OK FEATURES
using CH+, CH– or the
number keys
Channel Label
Ch 10
Channel List
Custom Ch.
□
Reset
Next Ch.
p
Cho Ch
Or #Keys
Menu To Menu Bar To Quit Exit
OK
SETUP
FEATURES
PICTURE SOUND THEATER
Channel Label
Ch 10
Channel List A&E
Custom Ch. ABC
□
Reset AMC
Next Ch. BET
p
Cho Ch
Or #Keys
Menu To Menu Bar To Quit Exit
Scroll to a channel
OK FEATURES
name and press OK
Channel Label
Ch 10
Channel List A&E
Custom Ch. ABC
□
Reset AMC
Next Ch. BET
p
Cho Ch
Or #Keys
Menu To Menu Bar To Quit Exit
Press OK to set
OK FEATURES
Channel Label
Ch 10
Channel List
Custom Ch.
Reset Are You Sure?
Next Ch.
p
Cho Ch
Or #Keys
Menu To Menu Bar To Quit Exit
o
AP
BRVO
p
o
AP
BRVO
p
7
FEATURES MENU
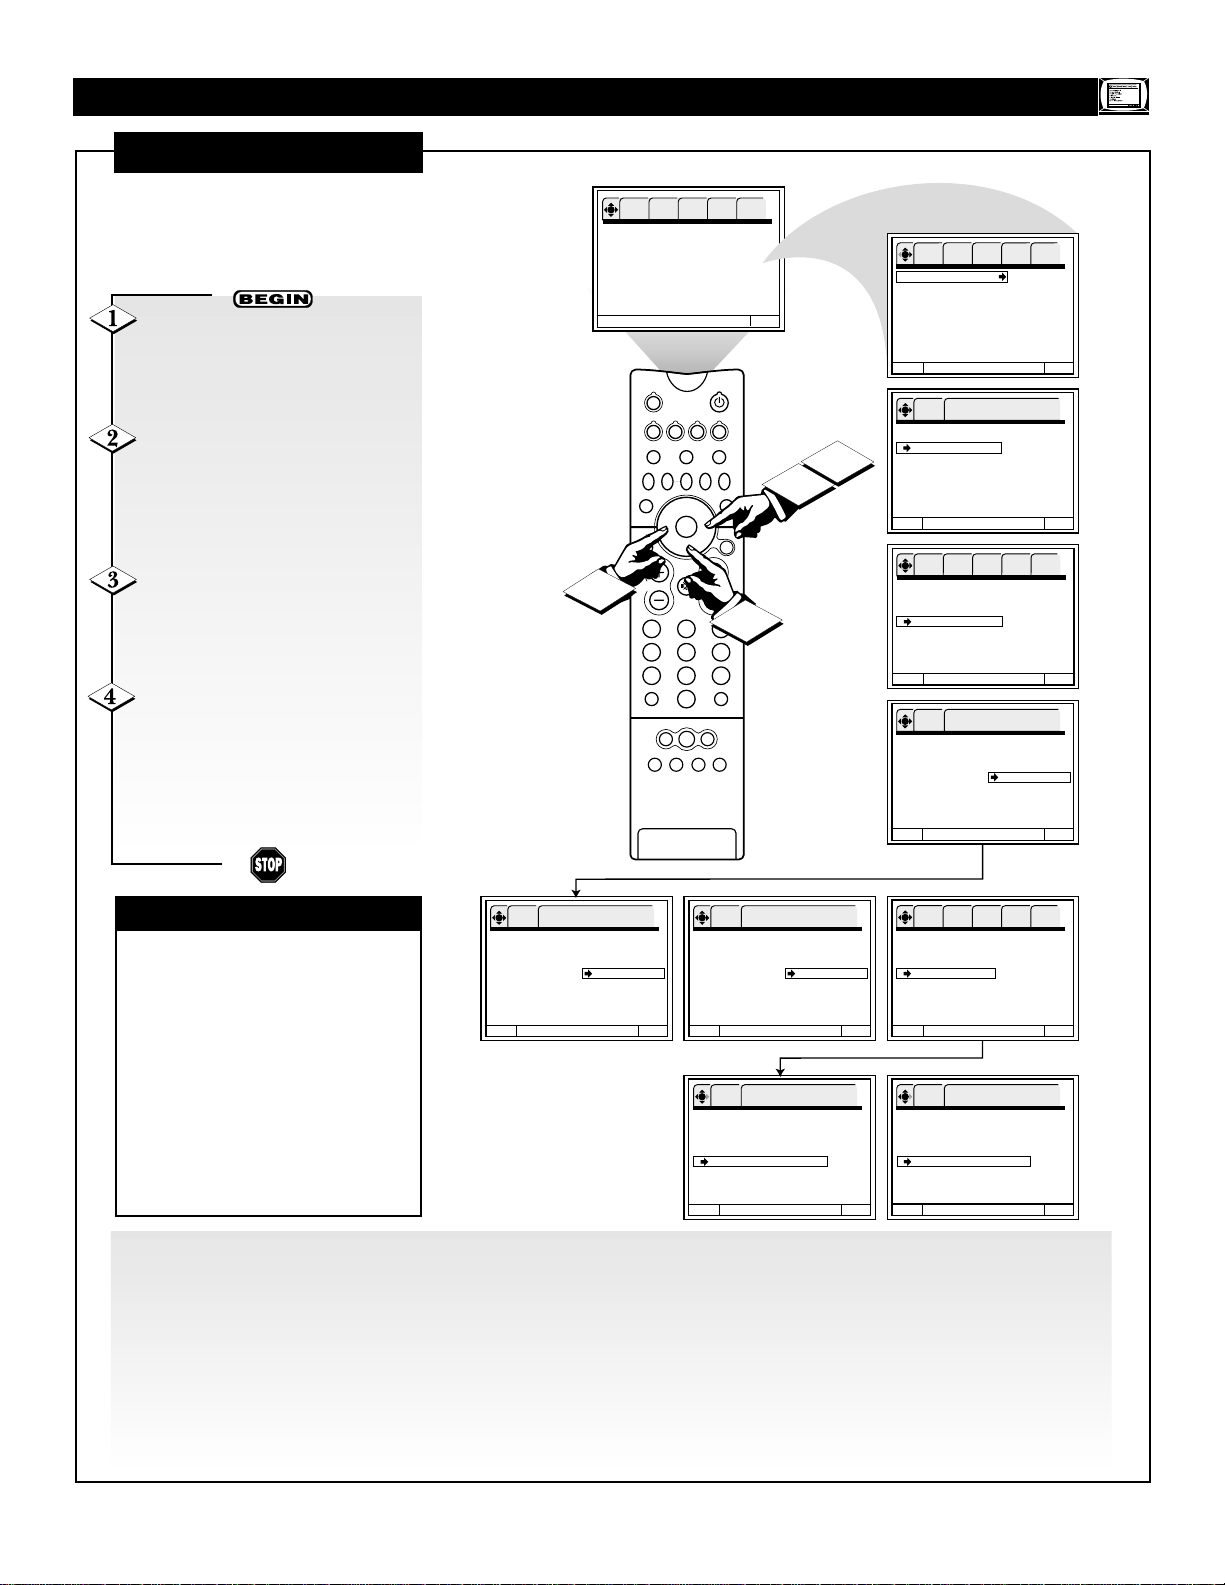
CHANNEL LABEL (CONTINUED)
T
his page contains instructions
for using the Channel Label
Custom Ch option.
✔If ANT(enna) A and ANT(enna)
B are in the same ANTENNA/
CABLE mode (see the “Tuner
Mode” section on page 5 of the
Quick Use and Setup Guide that
came with your set ), the Channel
Labels for both antenna inputs will
be the same.
✔Channel Labels will be displayed
only when the channel is displayed
as the main picture.
CHECK IT OUT
Use “Custom Ch.” to create your own label for a channel.
Press the CH(annel) +, – buttons to select the desired station.
Press the CURSOR UP or DOWN button to select a letter.
Press the CURSOR LEFT or RIGHT button to change character position. The symbol (*) represents a blank space.
Press the OK button. The OK button is in the center of the CURSOR button ring.
Press the CH(annel) +, – or NUMBER buttons to select another channel to label.
To return to the FEATURES menu, press the CURSOR LEFT button. To go to the Menu Bar, press the
MENU/SELECT button. To clear the screen, press the STATUS/EXIT button.
With the FEATURES menu on
the TV screen, Press the CURSOR
DOWN button to highlight Channel
Label.
Press the CURSOR RIGHT
button to enter the Channel Label
options area. Then press the CURSOR DOWN button until the
“Custom Ch” option is highlighted.
Press the CURSOR RIGHT
button again to highlight ****
(Custom). Follow the steps below to
label the channel.
To return to the FEATURES
menu, press the CURSOR LEFT
button. To go to the Menu Bar,
press the MENU/SELECT button.
To clear the screen, press the STATUS/EXIT button.
OK SETUP FEATURES PICTURE SOUND THEATER
Channel Label
Source Label
Family Favorites
AutoLock
4 Event Timer
Captions
Menu Background
SOURCE
VCR
DVD
TV
LIGHT
FORMAT
SOURCE FREEZE
+
–
4
HELP
SWAP PIP CH
PIP POSITION
STATUS/
EXIT
VOL
213
546
879
A/CH
0
TUNER A
TUNER B FRONT
AV1 AV2 AV3 AV4
To Quit Exit
ACC
PIP ON/OFF
MENU/
SELECT
CH
1
SURF
2
3
OK SETUP FEATURES PICTURE SOUND THEATER
Channel Label
Source Label
Family Favorites
AutoLock
4 Event Timer
Captions
Menu Background
Menu To Menu Bar To Quit Exit
Change the channel
OK FEATURES
using CH+, CH– or the
number keys
Channel Label
Ch 10
Channel List
Custom Ch.
□
Reset
Next Ch.
Cho Chp
Or #Keys
Menu To Menu Bar To Quit Exit
OK SETUP FEATURES PICTURE SOUND THEATER
Channel Label
Ch 10
Channel List
Custom Ch. **** (Custom)
□
Reset
Next Ch.
Cho Chp
Or #Keys
Menu To Menu Bar To Quit Exit
o
To change letter
p
OK FEATURES
Channel Label
Ch 10
Channel List
Custom Ch. **** (Custom)
□
Reset
Next Ch.
Cho Chp
Or #Keys
Menu To Menu Bar To Quit Exit
o
To change letter
p
OK FEATURES
Channel Label
Ch 10
Channel List
Custom Ch. H*** (Custom)
□
Reset
Next Ch.
Cho Chp
Or #Keys
Menu To Menu Bar To Quit Exit
o
To change letter
p
OK FEATURES
Channel Label
Ch 10
Channel List
Custom Ch. HOME (Custom)
□
Reset
Next Ch.
Cho Chp
Or #Keys
Menu To Menu Bar To Quit Exit
OK SETUP FEATURES PICTURE SOUND THEATER
Channel Label
Ch 10 HOME
Channel List
Custom Ch. HOME (Custom)
□
Reset
Next Ch.
Cho Chp
Or #Keys
Menu To Menu Bar To Quit Exit
Press OK to set
OK FEATURES
Channel Label
Ch 10 HOME
Channel List
Custom Ch. HOME
□
Reset Are You Sure?
Next Ch.
Cho Chp
Or #Keys
Menu To Menu Bar To Quit Exit
Press OK to set
OK FEATURES
Channel Label
Ch 10
Channel List
Custom Ch.
Reset Are You Sure?
Next Ch.
Cho Chp
Or #Keys
Menu To Menu Bar To Quit Exit
8
FEATURES M
ENU
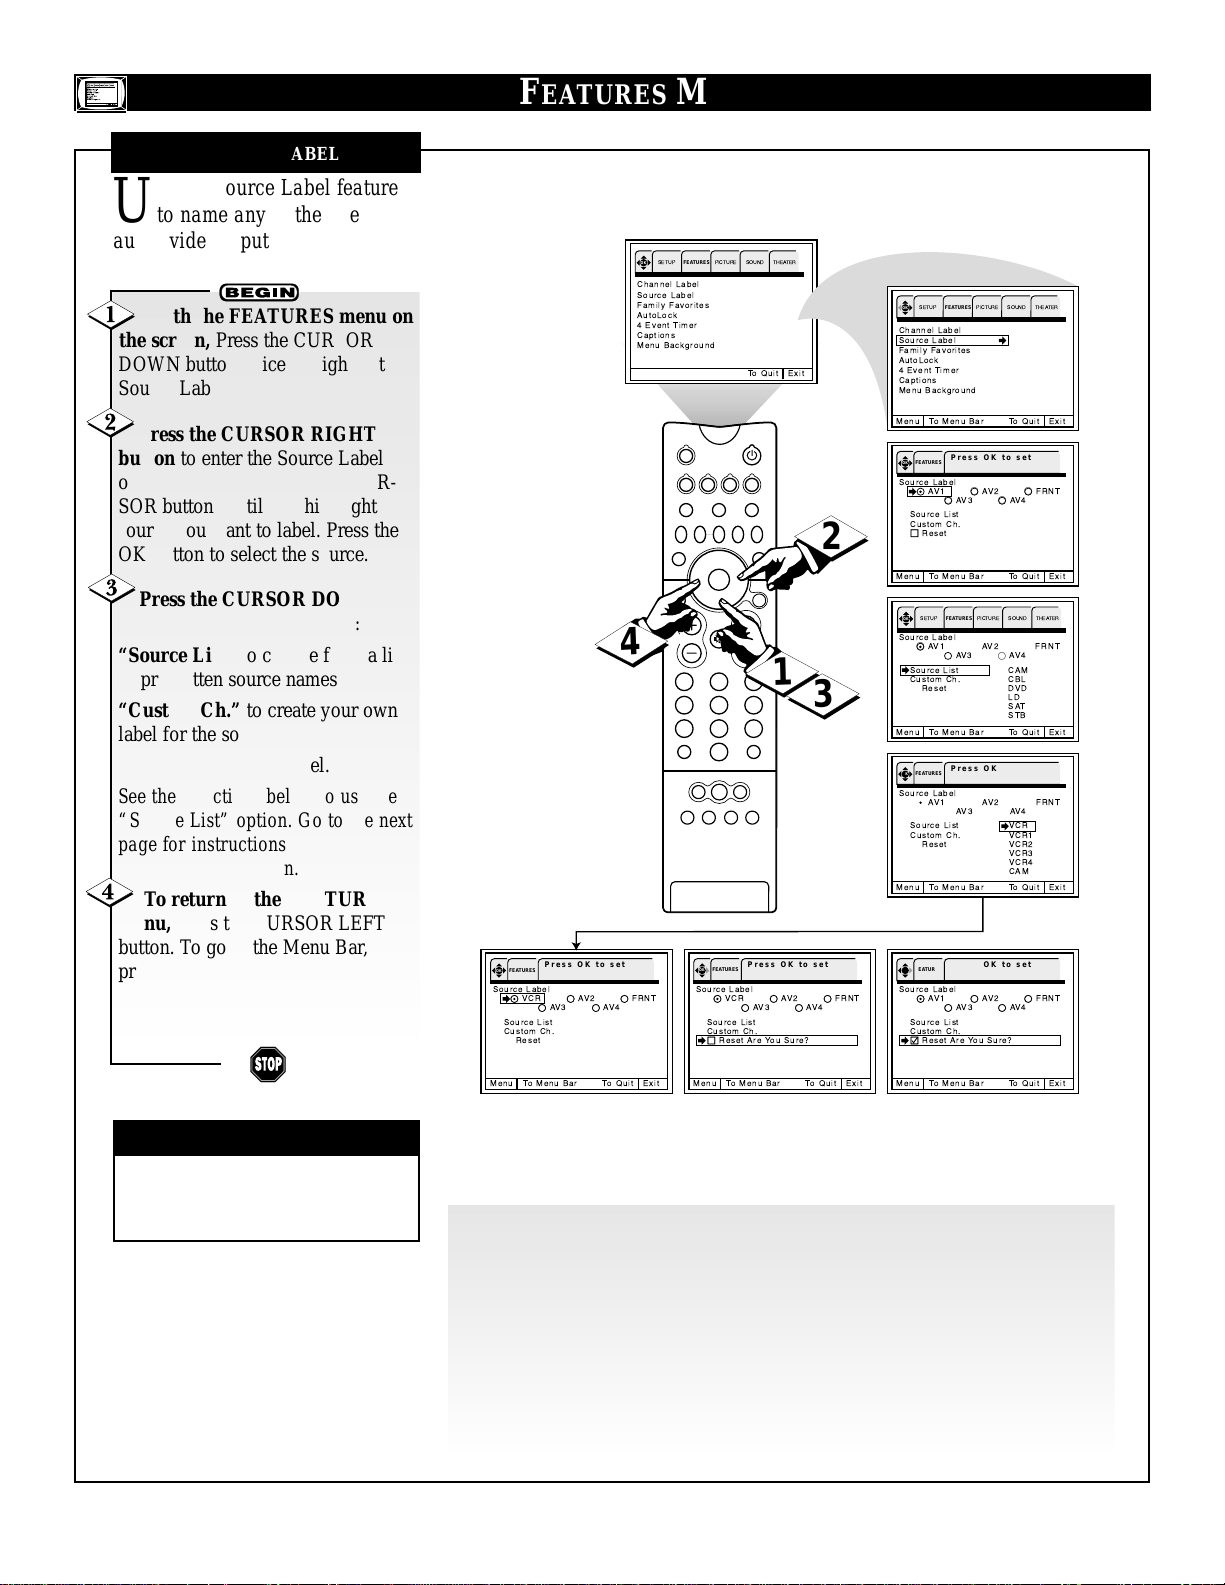
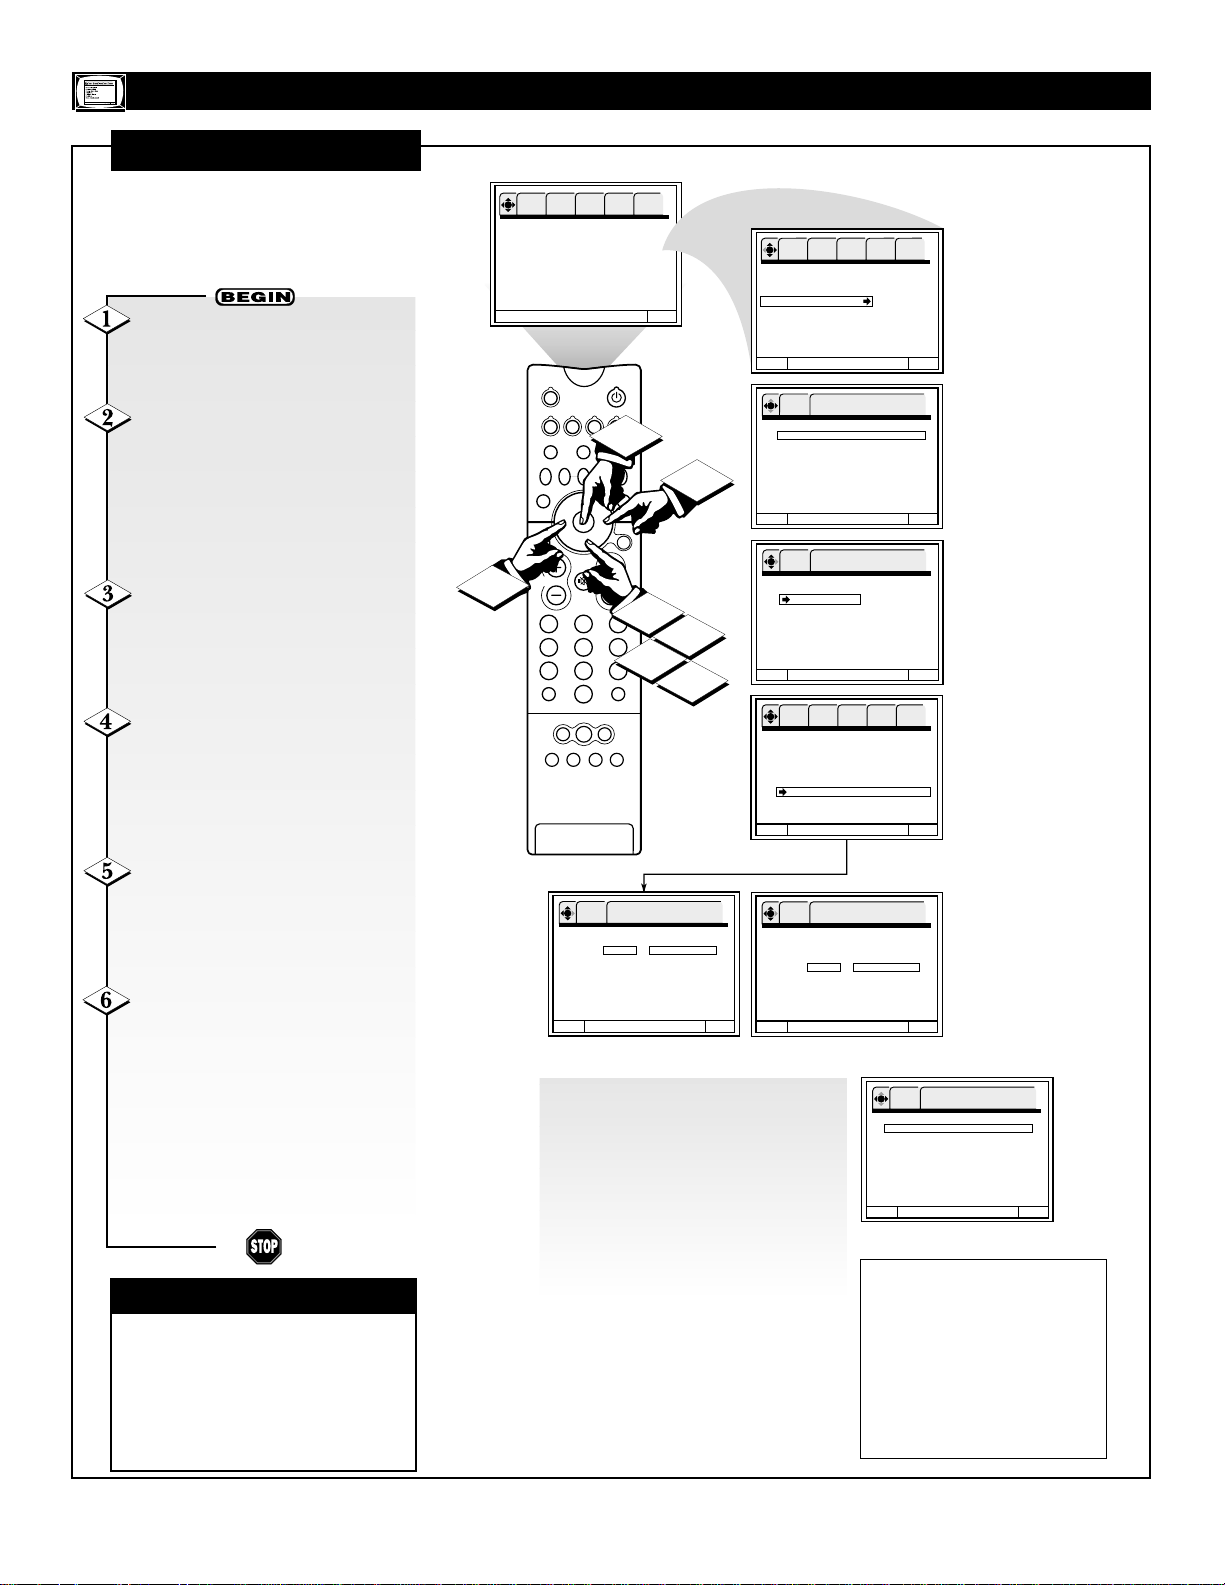
SOURCE LABEL
U
se the Source Label feature
to name any of the five
audio/video inputs.
With the FEATURES menu on
the screen, Press the CURSOR
DOWN button twice to highlight
Source Label.
Press the CURSOR RIGHT
button to enter the Source Label
options area. Then press the CURSOR buttons until you highlight the
source you want to label. Press the
OK button to select the source.
Press the CURSOR DOWN
button to highlight an option:
“Source List” to choose from a list
of prewritten source names
“Custom Ch.” to create your own
label for the source or
“Reset” to clear the label.
See the directions below to use the
“Source List” option. Go to the next
page for instructions for using the
“Custom Ch” option.
To return to the FEATURES
menu, press the CURSOR LEFT
button. To go to the Menu Bar,
press the MENU/SELECT button.
To clear the screen, press the STATUS/EXIT button.
✔ The Source Label will be dis-
played only when A/V input is displayed as a main picture.
CHECK IT OUT
Use “Source List” to choose from a list of prewritten source names:
With “Source List” highlighted, press the CURSOR RIGHT button to enter the
list.
Press the CURSOR DOWN or UPbuttons to scroll through the list of names.
With the name you want to label the source highlighted, press the OK button
The OK button is in the center of the CURSOR button ring.
To return to the FEATURES menu, press the CURSOR LEFT button. To go to
the Menu Bar, press the MENU/SELECT button. To clear the screen, press the
STATUS/EXIT button.
OK
Channel Label
Source Label
Family Favorites
AutoLock
4 Event Timer
Captions
Menu Background
4
Press OK to set
OK FEATURES
Source Label
AV2
FRNT
AV4
VCR
Source List
Custom Ch.
□
Reset
AV3
SETUP
FEATURES
SOURCE
TV
HELP
SWAP PIP CH
PIP POSITION
STATUS/
EXIT
VOL
A/CH
TUNER A
AV1 AV2 AV3 AV4
PICTURE SOUND THEATER
To Quit Exit
VCR
DVD
ACC
LIGHT
FORMAT
SOURCE FREEZE
+
–
PIP ON/OFF
MENU/
SELECT
CH
213
546
879
SURF
0
TUNER B FRONT
Press OK to set
OK FEATURES
Source Label
VCR
AV3
Source List
Custom Ch.
□
Reset Are You Sure?
1
AV2
OK
SETUP
FEATURES
PICTURE SOUND THEATER
Channel Label
Source Label
Family Favorites
AutoLock
4 Event Timer
Captions
Menu Background
Menu To Menu Bar To Quit Exit
Press OK to set
OK FEATURES
Source Label
AV1
AV3
Source List
Custom Ch.
□
2
Reset
Menu To Menu Bar To Quit Exit
OK
SETUP
FEATURES
Source Label
AV1
AV3
Source List CAM
Custom Ch. CBL
□
Reset DVD
3
Menu To Menu Bar To Quit Exit
FRNT
AV4
Press OK to set
OK FEATURES
Source Label
AV1
AV3
Source List VCR
Custom Ch. VCR1
□
Reset VCR2
Menu To Menu Bar To Quit Exit
Press OK to set
OK FEATURES
Source Label
AV1
AV3
Source List
Custom Ch.
Reset Are You Sure?
AV2
AV4
PICTURE SOUND THEATER
AV2
AV4
o
LD
SAT
STB
p
AV2
AV4
o
VCR3
VCR4
CAM
p
AV2
AV4
FRNT
FRNT
FRNT
FRNT
Menu To Menu Bar To Quit Exit
Menu To Menu Bar To Quit Exit
Menu To Menu Bar To Quit Exit
9
FEATURES MENU
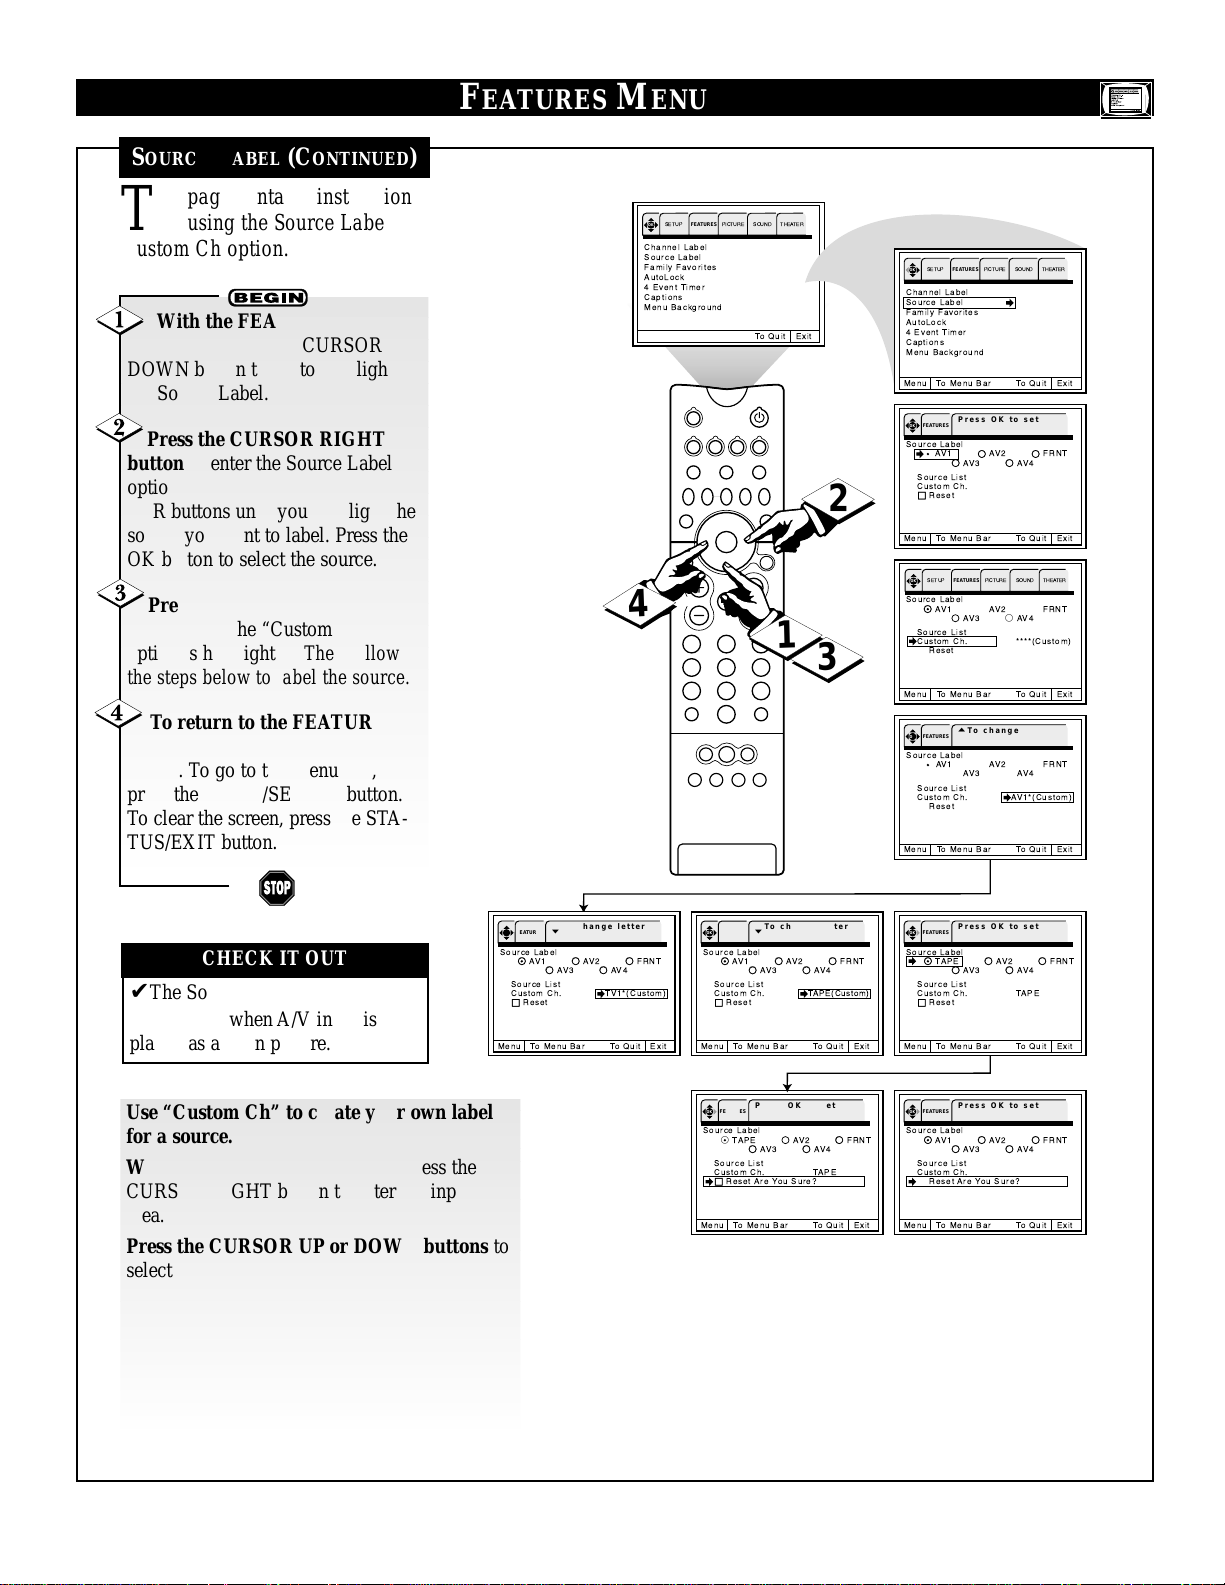
SOURCE LABEL (CONTINUED)
T
his page contains instructions
for using the Source Label
Custom Ch option.
With the FEATURES menu on
the screen, Press the CURSOR
DOWN button twice to highlight
the Source Label.
Press the CURSOR RIGHT
button to enter the Source Label
options area. Then press the CURSOR buttons until you highlight the
source you want to label. Press the
OK button to select the source.
Press the CURSOR DOWN
button until the “Custom Ch”
option is highlighted. Then follow
the steps below to label the source.
To return to the FEATURES
menu, press the CURSOR LEFT
button. To go to the Menu Bar,
press the MENU/SELECT button.
To clear the screen, press the STATUS/EXIT button.
✔The Source Label will be dis-
played only when A/V input is displayed as a main picture.
CHECK IT OUT
Use “Custom Ch” to create your own label
for a source.
With “Custom Ch” highlighted, press the
CURSOR RIGHT button to enter the input
area.
Press the CURSOR UP or DOWN buttons to
select letters. Press the CURSOR RIGHT or
LEFT buttons to change position. The symbol
(*) represents a blank space.
To return to the FEATURES menu, press the
CURSOR LEFT button. To go to the Menu Bar,
press the MENU/SELECT button. To clear the
screen, press the STATUS/EXIT button.
OK
SETUP
FEATURES
Channel Label
Source Label
Family Favorites
AutoLock
4 Event Timer
Captions
Menu Background
SOURCE
TV
HELP
SWAP PIP CH
PIP POSITION
STATUS/
EXIT
VOL
4
A/CH
AV1 AV2 AV3 AV4
PICTURE SOUND THEATER
To Quit Exit
VCR
DVD
ACC
LIGHT
FORMAT
SOURCE FREEZE
+
–
PIP ON/OFF
213
546
879
SURF
0
TUNER A
TUNER B FRONT
OK
SETUP
FEATURES
PICTURE SOUND THEATER
Channel Label
Source Label
Family Favorites
AutoLock
4 Event Timer
Captions
Menu Background
Menu To Menu Bar To Quit Exit
Press OK to set
OK FEATURES
Source Label
AV1
AV3
Source List
Custom Ch.
□
2
MENU/
SELECT
CH
1
Reset
Menu To Menu Bar To Quit Exit
OK
SETUP
FEATURES
Source Label
AV1
AV3
Source List
Custom Ch. ****(Custom)
□
Reset
AV2
AV4
PICTURE SOUND THEATER
AV2
AV4
FRNT
FRNT
3
Menu To Menu Bar To Quit Exit
o
To change letter
OK FEATURES
p
Source Label
Menu To Menu Bar To Quit Exit
AV1
AV3
Source List
Custom Ch. AV1*(Custom)
□
Reset
AV2
FRNT
AV4
Menu To Menu Bar To Quit Exit
o
To change letter
OK FEATURES
p
Source Label
AV1
AV3
Source List
Custom Ch. TV1*(Custom)
□
Reset
AV2
AV4
FRNT
o
To change letter
OK FEATURES
p
Source Label
Source List
Custom Ch. TAPE(Custom)
□
Menu To Menu Bar To Quit Exit
OK FEATURES
Source Label
Source List
Custom Ch. TAPE
□
Menu To Menu Bar To Quit Exit
AV1
AV2
AV3
Reset
Press OK to set
TAPE
AV3
Reset Are You Sure?
AV2
Press OK to set
OK FEATURES
Source Label
FRNT
AV4
FRNT
AV4
Source List
Custom Ch. TAPE
□
Menu To Menu Bar To Quit Exit
OK FEATURES
Source Label
Source List
Custom Ch.
Menu To Menu Bar To Quit Exit
TAPE
Reset
AV1
Reset Are You Sure?
AV2
AV3
Press OK to set
AV2
AV3
FRNT
AV4
FRNT
AV4

10
FEATURES MENU
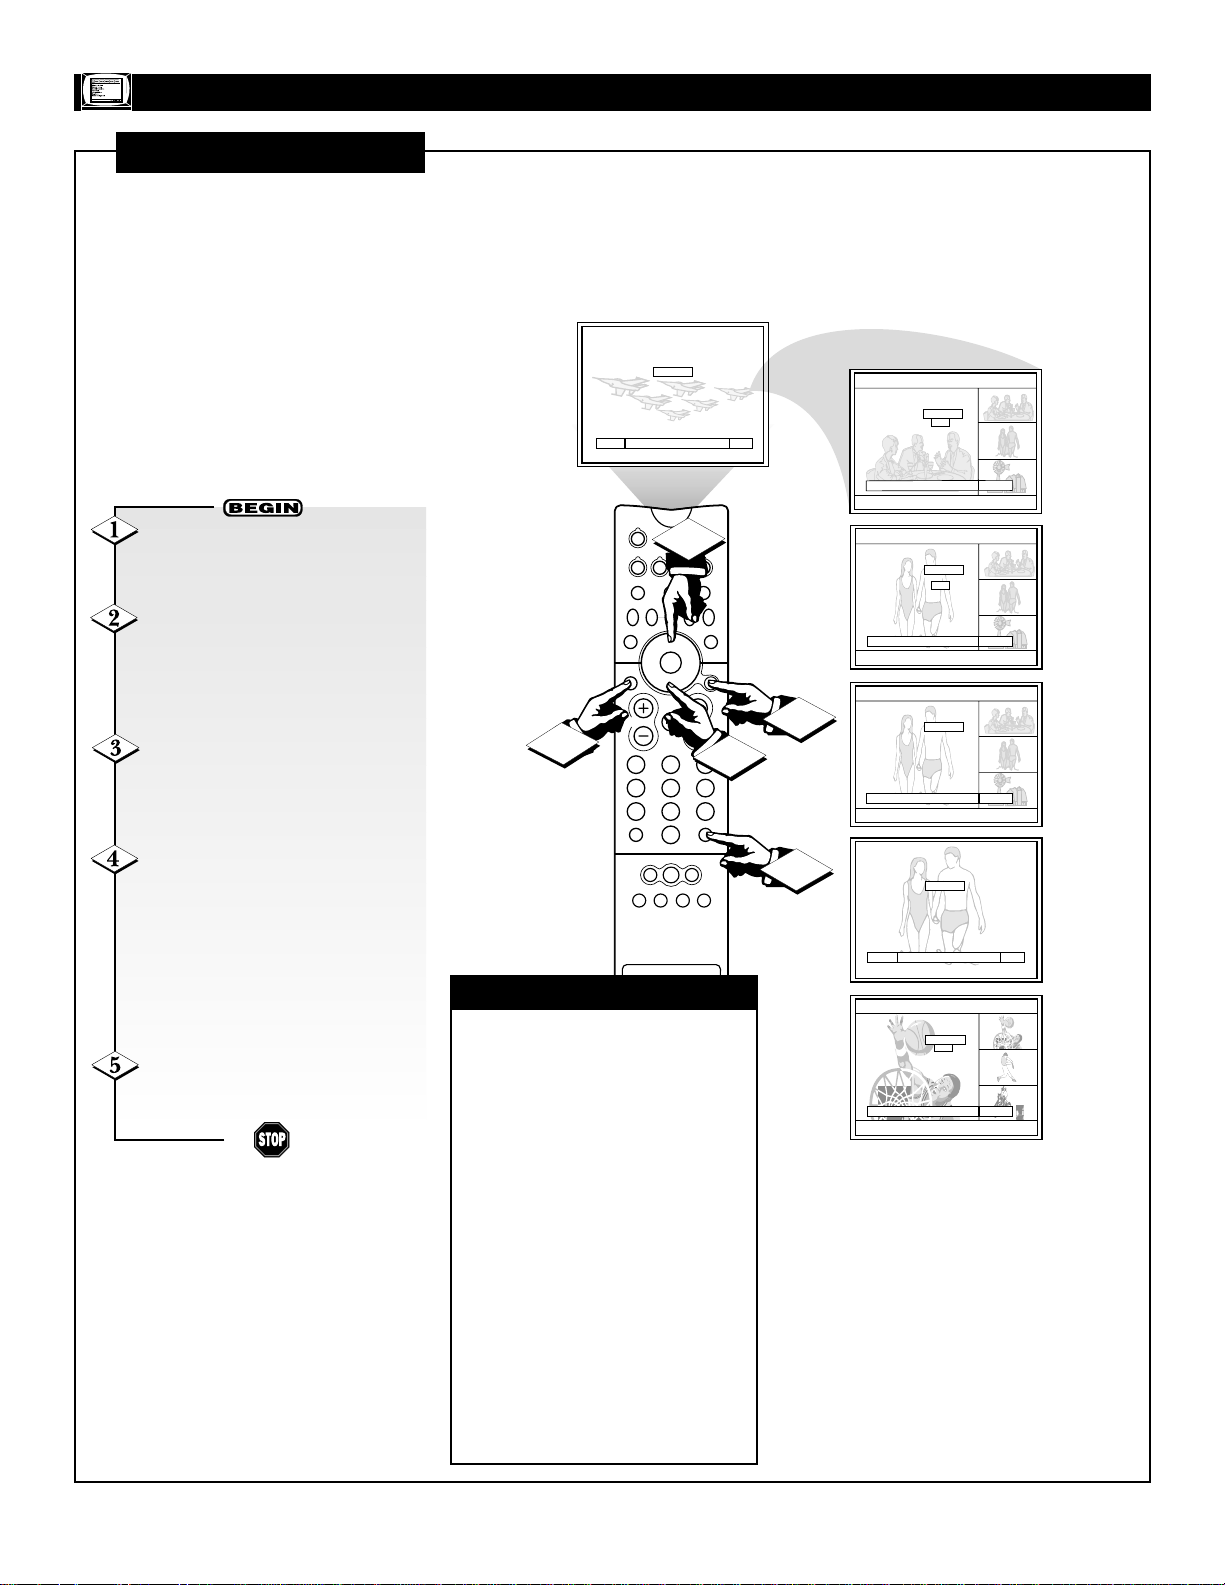
FAMILY FAVORITES
T
he Family Favorites feature
allows you to group your
favorite channels into six personalized categories that you can
rename. Thirty-six channels can
be stored in Family Favorites.
Channels stored using Auto
Program (see page 5 in the Quick
Use and Setup Guide) automatically appear in Family Favorites.
(See the next page for information
on using the SURF button.
Pressing SURF will display the
“Set Favorite Ch.” screen.)
With the FEATURES menu on
the TV screen, Press the CURSOR
DOWN button repeatedly until
Family favorites is highlighted.
Then press the CURSOR RIGHT
button to enter the Family Favorites
options area.
To rename a category, press the
CURSOR RIGHT or LEFT buttons
to highlight a category you want to
rename. Press the CURSOR UP or
DOWN button to change a letter.
Press the CURSOR RIGHT button
to highlight the next character to
change.
To enter a channel into a cate-
gory, press the CURSOR DOWN,
UP, LEFT, or RIGHT button to go
to an empty location. Then press the
CH(annel) +, – or NUMBER buttons to select the desired channel.
Repeat until the category has been
set with your favorite channels.
Press the CURSOR UP and
then the CURSOR LEFT button
until you return to the FEATURES
menu. To go to the Menu Bar, press
the MENU/SELECT button. To
clear the screen, press the STATUS/EXIT button.
✔ Family Favorites cannot be
accessed when ANT(enna) B is the
main channel.
CHECK IT OUT
OK SETUP FEATURES PICTURE SOUND THEATER
Channel Label
Source Label
Family Favorites
AutoLock
4 Event Timer
Captions
Menu Background
To Quit Exit
SOURCE
VCR
DVD
TV
HELP
4
SWAP PIP CH
PIP POSITION
STATUS/
EXIT
VOL
A/CH
AV1 AV2 AV3 AV4
ACC
LIGHT
FORMAT
SOURCE FREEZE
+
PIP ON/OFF
MENU/
SELECT
CH
1
213
546
879
SURF
0
TUNER A
TUNER B FRONT
Select channel using
OK FEATURES
CH up/down or number
key
Family Favorites Ch 12
MY-CH SPORTS NEWS
3 14 33
6 15 45
8 21
11 28
12 30
13 32
Menu To Menu Bar To Quit Exit
3
2
OK SETUP FEATURES PICTURE SOUND THEATER
Channel Label
Source Label
Family Favorites
AutoLock
4 Event Timer
Captions
Menu Background
Menu To Menu Bar To Quit Exit
OK SETUP FEATURES PICTURE SOUND THEATER
Family Favorites Ch 12
MOVIES SPORTS NEWS
3 14 33
6 15 45
8 21
11 28
12 30
13 32
Menu To Menu Bar To Quit Exit
Up/Down to change
OK FEATURES
letters
Family Favorites Ch 12
MOVIES SPORTS NEWS
3 14 33
6 15 45
8 21
11 28
12 30
13 32
Menu To Menu Bar To Quit Exit
Up/Down to change
OK FEATURES
letters
Family Favorites Ch 12
MY-CH* SPORTS NEWS
3 14 33
6 15 45
8 21
11 28
12 30
13 32
Menu To Menu Bar To Quit Exit
Select channel using
OK FEATURES
CH up/down or number
key
Family Favorites Ch 12
MY-CH SPORTS NEWS
3 14 33
6 15 45
3 21
11 28
12 30
13 32
Menu To Menu Bar To Quit Exit
4
11
FEATURES MENU
FAVORITE CHANNELS/SURF
U
sing the Family Favorites
menu, you can group your
favorite channels into personalized categories (see the previous
page). Pressing the SURF button
on your remote allows you to
quickly access the category lists
on screen. From the screen, you
can go to a favorite channel or
preview groups of your favorite
channels as subpictures.
Press the SURF button on the
remote control. The Set Favorite Ch.
screen will be displayed.
Press the MENU/SELECT but-
ton and the category will be dis-
played as subpictures at the right
edge of the screen. This is useful for
previewing a category.
Press the CURSOR DOWN or
UP buttons to highlight a favorite
channel. The TV will automatically
tune to that channel.
Press the CURSOR UP button
until the Favorite Channel category
name (MOVIES, SPORTS, NEWS,
etc.) is highlighted. Press the CURSOR RIGHT button to change to
another category. Then Surf the category and/or tune to channels as
described above.
Press the STATUS/EXIT but-
ton to clear the screen.
✔ If a category has some blank
channels entries, these channels
will appear as black subpictures.
✔ Each category contains two
groups of three channels. Pressing
the MENU/SELECT button will
display one group per category,
depending on which group you
select.
✔
When you activate any of the
AutoLock TV, Movies, or Canadian
ratings to block programs, the option
of viewing Favorite Channels as subpictures will be unavailable. When
you deactivate the blocks, the subpictures option will be available again.
(See pages 12–15 for information on
using the AutoLock feature.)
CHECK IT OUT
Set Favorite Ch. Ch. 7
MOVIES
3
6
8
11
12
Menu To Surf To Quit Exit
13
Set Favorite Ch. 3
MOVIES
3
6
6
8
11
12
13
18
To Quit Exit
SOURCE
4
VCR
DVD
ACC
LIGHT
FORMAT
SOURCE FREEZE
+
PIP ON/OFF
213
546
879
SURF
0
TUNER A
TUNER B FRONT
MENU/
SELECT
CH
3
5
TV
HELP
SWAP PIP CH
PIP POSITION
STATUS/
EXIT
VOL
A/CH
AV1 AV2 AV3 AV4
2
1
Set Favorite Ch. 3
MOVIES
3
6
6
8
11
12
13
8
To Quit Exit
Set Favorite Ch. 3
MOVIES
3
6
6
8
11
12
13
8
To Quit Exit
Set Favorite Ch. Ch. 6
SPORTS
14
15
21
28
30
32
Menu To Surf To Quit Exit
Set Favorite Ch. 14
SPORTS
14
15
21
28
30
32
To Quit Exit
15
21

12
FEATURES M
ENU
AUTOLOCK
A
utoLock allows you to block
the picture and sound of a
selected channel or video input.
This feature also enables you to
block the viewing of programs
based on their ratings—Movie or
TV. The information to the right
and on the next page explains
what the ratings mean.
To enter the AutoLock settings
areas, you must input a four-digit
Access Code number. The factory
preset code number is 0711,
which you can change.
To familiarize yourself with the
AutoLock options, read the information below. See the directions
for making AutoLock settings on
pages 14 and 15.
Functions of the AutoLock
options when turned on:
“Channel” blocks the picture and
sound of a chosen channel.
“Video Lock” blocks the picture
and sound of all video inputs. To
lock the video inputs, you must be
tuned to one of the video inputs.
“Quick Lock” blocks the picture
and sound for channels 3 and 4 on
both ANT(enna) A and B and all
video inputs.
“Front Panel Lock” deactivates all
buttons on the TV’s front panel
except the POWER button.
“Movie Ratings” blocks programs
according to movie ratings.
“TV Ratings” blocks programs
according to TV ratings.
“Canadian (Eng[lish])” blocks
various types of movies and TV
programs used in Canada that you
feel may be inappropriate due to its
content. “Canadian Ratings (Frn
[French])” blocks Canadian French
programs according to various program ratings that you feel may be
inappropriate due to its content.
TV-Y—Appropriate for all children: This
type of programming is designed for a very
young audience, including children ages
2–6. Programming with these ratings is not
expected to frighten younger children.
TV-Y7—Appropriate for children seven
and older: This programming may frighten
children under the age of 7. Such programming may be more appropriate for children
who have acquired the development skills
needed to distinguish between make-believe
and reality. These shows may include mild
fantasy and comedic violence (FV).
TV-G—General Audience:This type of
programming contains little or no violence,
no strong language, and little or no sexual
dialogue or situations.
TV-PG —Parental Guidance suggested:
This type of programming contains one or
more of the following: moderate violence
(V), some sexual situations (S), infrequent
coarse language (L), and some suggestive
dialogue (D).
TV-14—Unsuitable for children under
14: This type of programming contains one
or more of the following: intense violence
(V); intense sexual situations (S); strong,
coarse language (L); or intensely suggestive
dialogue (D).
TV-MA—Mature audiences only: This
type of programming contains one or more
of the following: graphic violence (V);
explicit sexual situations (S); or crude, indecent language (L).
• (FV)—Fantasy Violence: This type of
content may frighten children under
seven. Some cartoons may have this rating. This rating is available only in the
TV-Y7 category.
• (V)—Violence
• (S)—Sexual situations
• (L)—Language
• (D)—Inappropriate dialogue
TV PARENTAL
GUIDELINES
(TV BROADCASTERS)
See the next page for information on
the Canadian ratings.
G—General Audience: Most parents
would find this program suitable for all
ages. This type of programming contains
little or no violence, no strong language,
and little or no sexual dialogue or situations.
PG—Parental Guidance Suggested:
This programming contains material that
parents may find unsuitable for younger
children. It may contain one or more of
the following: moderate violence, some
sexual situations, infrequent coarse language, or some suggestive dialogue.
PG-13—Parents Strongly Cautioned:
This programming contains material that
parents my find unsuitable for children
under the age of 13. It contains one or
more of the following: violence, sexual situations, coarse language, or suggestive
dialogue.
R—Restricted: This programming is
specifically designed for adults. Anyone
under the age of 17 should view this programming only with an accompanying parent or guardian. It contains one or more of
the following: intense violence; intense
sexual situations; strong, coarse language;
or intensely suggestive dialogue.
NC-17—No one under the age of 17 will
be admitted: This type of programming
should be viewed only by adults. It contains graphic violence; explicit sex; or
crude, indecent language.
X—Adults Only: This type of programming contains one or more of the following: very graphic violence, very graphic
and explicit or indecent sexual acts, or
very coarse and intensely suggestive language.
NR—(Not Rated) (and [NA] [Not
Applicable]): This programming contains
no rating. It has not been rated or ratings
do not apply.
MOVIE RATINGS
(M
OTIONPICTURE
A
SSOCIATION OFAMERICA
)

13
FEATURES MENU
AUTOLOCK (CONTINUED)
C—Programming intended for children under age 8: Violence
Guidelines: Careful attention is paid to themes which could threaten children’s sense of security and well-being. There will be no
realistic scenes of violence. Depictions of aggressive behavior will
be infrequent and limited to portrayals that are clearly imaginary,
comedic, or unrealistic in nature. Other Content Guidelines: There
will be no offensive language, nudity, or sexual content.
C8+—Programming generally considered acceptable for children 8 years and over to watch on their own: Violence
Guidelines: Violence will not be portrayed as the preferred,
acceptable, or only way to resolve conflict; or encourage children
to imitate dangerous acts which they may see on television. Any
realistic depictions of violence will be infrequent, discreet, of low
intensity, and will show the consequences of the acts. Other
Content Guidelines: There will be no profanity, nudity, or sexual
content.
G—General Audience: Violence Guidelines: Will contain very little
violence, either physical or verbal or emotional. Will be sensitive to
themes which could frighten a younger child, will not depict realistic
scenes of violence which minimize or gloss over the effects of violent acts. Other Content Guidelines: There may be some inoffensive
slang, not profanity, and no nudity.
PG—Parental Guidance: Programming intended for a general audience but which may not be suitable for younger children. Parents
may consider some content inappropriate for unsupervised viewing
by children ages 8–13. Violence Guidelines: Depictions of conflict
and/or aggression will be limited and moderate; may include physical, fantasy, or supernatural violence. Other Content Guidelines:
May contain infrequent mild profanity, or mildly suggestive language. Could also contain brief scenes of nudity.
14+—Programming contains themes or content which may not
be suitable for viewers under the age of 14: Parents are strongly
cautioned to exercise discretion in permitting viewing by preteens
and early teens. Violence Guidelines: May contain intense scenes of
violence. Could deal with mature themes and societal issues in a
realistic fashion. Other Content Guidelines: May contain scenes of
nudity and/or sexual activity. There could be frequent use of profanity.
Adult: Violence Guidelines: May contain violence integral to the
development of the plot, character, or theme intended for adult audiences. Other Content Guidelines: May contain graphic language and
explicit portrayals of nudity and/or sex.
CANADIAN RATINGS
(ENGLISH)
G (General)—Programming intended for audiences of all ages.
Contains no violence, or the violent content is minimal or is
depicted appropriately with humor or caricature or in an unrealistic manner.
8 ans + (8 + General)—Not recommended for young children:
Programming intended for a broad audience but contains light or
occasional violence that could disturb young children. Viewing
with an adult is therefore recommended for young children
(under the age of 8) who cannot differentiate between real and
imaginary portrayals.
13 ans +—Programming may not be suitable for children under
the age of 13: Contains either a few violent scenes or one or more
sufficiently violent scenes to affect them. Viewing with an adult is
therefore strongly recommended for children under 13.
16 ans +—Programming is not suitable for children under the
age of 16: Contains frequent scenes of violence or intense violence.
18 ans +—Programming restricted to adults: Contains constant
violence or scenes of extreme violence.
CANADIAN RATINGS
(FRENCH)
14
AUTOLOCK (CONTINUED)
T
he steps below tell you how to
select the general lock and
Movie Ratings lock options.
FEATURES MENU
✔All ratings higher than the rating
you choose to BLOCK will automatically be blocked. For example,
select PG-13 and all movies rated
PG-13 and higher (R, NC-17, and
X) will also be blocked.
CHECK IT OUT
With the FEATURES menu on
the TV screen, Press the CURSOR
DOWN button repeatedly until
AutoLock is highlighted.
Press the CURSOR RIGHT
button to enter the AutoLock
options area. Then press the NUMBER buttons to enter the factory
preset Access Code, 0711. To
change the Access Code, see the
information below, right.
Press the CURSOR DOWN
button to highlight an option. (See
the option descriptions on page 12.)
Then press the OK button (center of
ring) to select.
To set AutoLock according to
Moving Ratings, press the CUR-
SOR DOWN button until Movie
Ratings is highlighted. Then press
the CURSOR RIGHT button to
enter the settings area.
Press the CURSOR DOWN
and UP button to highlight an
option. Then press the OK button
(center of ring) to either BLOCK or
allow viewing (VIEW).
To return to the main
AutoLock options area, press the
CURSOR LEFT button. To go to
the Menu Bar, press
MENU/SELECT. To clear the
screen, press the STATUS/EXIT
button.
To set TV Ratings or Canadian
Ratings, go to the next page .
To change the Access Code—highlight “Change Access Code?”
Then press the NUMBER buttons to
input the desired code. NOTE: If
you forget your Access Code, use
the factory code 7777 to erase your
number. This will reset the Access
Code number to the factory preset
Access Code, 0711.
NOTES
• If ANT(enna) A and
ANT(enna) B are in
the same signal
source mode when a
channel is blocked,
the blocking will
affect both antenna
inputs.
• “Child Locked” will
be displayed when
someone attempts to
watch a blocked
channel or video
source. You must go
to the AutoLock settings area and deselect the lock before
the channel or video
source will be viewable. “Rating
Blocked” will be displayed when anyone
attempts to watch a
program blocked by
a Movie Rating setting. You must go to
the Movie Ratings
settings area and
change the setting to
VIEW to allow
viewing.
NOTE: Parents, if you find
that your Access Code has
been changed, and you did
not change it, then you will
know that someone has
altered the code and perhaps
viewed programming you
intended to be blocked.
OK SETUP FEATURES PICTURE SOUND THEATER
Channel Label
Source Label
Family Favorites
AutoLock
4 Event Timer
Captions
Menu Background
SOURCE
VCR
DVD
TV
HELP
FORMAT
SOURCE FREEZE
SWAP PIP CH
+
PIP POSITION
STATUS/
EXIT
VOL
6
213
546
879
A/CH
0
TUNER A
TUNER B FRONT
AV1 AV2 AV3 AV4
OK FEATURES
Movie Ratings
Menu To Menu Bar To Quit Exit
To Quit Exit
ACC
LIGHT
5
PIP ON/OFF
MENU/
SELECT
CH
2
1
3
4
SURF
Press OK to set
VIEW G
VIEW PG
VIEW PG-13
VIEW R
VIEW NC-17
VIEW X
VIEW Not Rated (NR)
5
OK SETUP FEATURES PICTURE SOUND THEATER
Channel Label
Source Label
Family Favorites
AutoLock
4 Event Timer
Captions
Menu Background
Menu To Menu Bar To Quit Exit
Use number buttons to
OK FEATURES
enter secret code
AutoLock
**** Enter Access Code
□
Channel 10
□
Video Lock
□
Quick Lock
□
Front Panel Lock
Movie Ratings
TV Ratings
Canadian Ratings (Eng)
Canadian Ratings (Frn))
Menu To Menu Bar To Quit Exit
Press OK to set
OK FEATURES
AutoLock
---- Change Access Code?
Channel 10
□
Video Lock
□
Quick Lock
□
Front Panel Lock
Movie Ratings
TV Ratings
Canadian Ratings (Eng)
Canadian Ratings (Fr n )
Menu To Menu Bar To Quit Exit
OK SETUP FEATURES PICTURE SOUND THEATER
AutoLock
---- Change Access Code?
Channel 10
□
Video Lock
□
Quick Lock
□
Front Panel Lock
Movie Ratings
TV Ratings
Canadian Ratings (Eng)
Canadian Ratings (Frn)
Menu To Menu Bar To Quit Exit
Press OK to set
OK FEATURES
Movie Ratings
VIEW G
VIEW PG
BLOCK PG-13
BLOCK R
BLOCK NC-17
BLOCK X
VIEW Not Rated (NR)
Menu To Menu Bar To Quit Exit
OK FEATURES
AutoLock
**** Change Access Code?
□
Channel 10
□
Video Lock
□
Quick Lock
□
Front Panel Lock
Movie Ratings
TV Ratings
Canadian Ratings (Eng)
Canadian Ratings (Frn))
Menu To Menu Bar To Quit Exit
Use number buttons to
enter secret code
 Loading...