

Page 1
ENGLISH - ESPAÑOL
Home
Find...
Go To..
R
Viper
Upright V acuum Cleaner
Aspiradora Vertical
Model No.:
608669
Operator and Parts Manual
Manual del Operador y Piezas
TENNANT COMPANY
701 NORTH LILAC DRIVE
MINNEAPOLIS, MN 55422
MAILING ADDRESS:
TENNANT COMPANY
P.O. BOX 1452
MINNEAPOLIS, MN 55440–1452
NOBLES CUSTOMER SER VICE:
1–800–365–6625
FAX: 1–800–678–4240
TECHNICAL SUPPORT:
1–800–522–7839 EXT. 5356
608680
Rev. 03 (06-03)
Page 2

OPERATION
Home
Find...
Go To..
This manual is furnished with each new upright
vacuum cleaner. It provides necessary operation,
maintenance instructions and parts list.
Read this manual completely and understand the
machine before operating or servicing it.
When ordering replacement parts use the Parts Lists
section in this manual. Before ordering parts or
supplies, be sure to have your machine model number
and serial number handy. Parts and supplies may be
ordered by phone or mail from any Authorized Service
Center or Distributor.
This machine will provide excellent service. However,
the best results will be obtained at minimum costs if:
S The machine is operated with reasonable care.
S The machine is maintained regularly - per the
machine maintenance instructions provided.
S The machine is maintained with manufacturer
supplied or equivalent parts.
MACHINE DATA
Please fill out at time of installation for future reference.
Model No.Install. Date Serial No.-
E 1999, 2000, 2003 Tennant Company Printed in U.S.A.
Nobles and Viper are registered United States trademarks of Tennant
Company. EZGrip is a United States trademark of Tennant Company.
Specifications and parts are subject to change without notice.
TABLE OF CONTENTS
SAFETY PRECAUTIONS 3. . . . . . . . . . . . . . . . . . . .
GROUNDING INSTRUCTIONS 4. . . . . . . . . . .
WARNING LABELS 4. . . . . . . . . . . . . . . . . . . . . . . . .
MACHINE COMPONENTS 5. . . . . . . . . . . . . . . . . . .
MACHINE INSTALLATION 5. . . . . . . . . . . . . . . . . . .
ATTACHING HANDLE 5. . . . . . . . . . . . . . . . . . . .
INSTALLING VACUUM HOSE/WAND 6. . . . . .
MACHINE SETUP 6. . . . . . . . . . . . . . . . . . . . . . . . . .
MACHINE OPERATION 7. . . . . . . . . . . . . . . . . . . . .
ELECTRONIC SENSOR SYSTEM 7. . . . . . . . .
WAND OPERATION 8. . . . . . . . . . . . . . . . . . . . .
MACHINE MAINTENANCE 8. . . . . . . . . . . . . . . . . .
DAILY MAINTENANCE 8. . . . . . . . . . . . . . . . . . .
WEEKLY MAINTENANCE 8. . . . . . . . . . . . . . . .
QUARTERLY MAINTENANCE 9. . . . . . . . . . . .
BRUSH MAINTENANCE 9. . . . . . . . . . . . . . . . .
FOOT LATCH ADJUSTMENT 9. . . . . . . . . . . . .
STORING MACHINE 10. . . . . . . . . . . . . . . . . . . . . . . .
RECOMMENDED STOCK ITEMS 10. . . . . . . . . . . . .
TROUBLE SHOOTING 11. . . . . . . . . . . . . . . . . . . . . .
SPECIFICATIONS 12. . . . . . . . . . . . . . . . . . . . . . . . . .
ELECTRICAL DIAGRAMS 24. . . . . . . . . . . . . . . . . . .
PARTS LIST 26. . . . . . . . . . . . . . . . . . . . . . . . . . . . . . .
BAG HOUSING GROUP 26. . . . . . . . . . . . . . . . .
VACUUM MOTOR HOUSING GROUP 28. . . . .
BRUSH BASE GROUP 30. . . . . . . . . . . . . . . . . . .
OPTIONS 32. . . . . . . . . . . . . . . . . . . . . . . . . . . . . . . . . .
OPTIONAL ATTACHMENT KIT 32. . . . . . . . . . . .
REPLACEMENT BAGS 32. . . . . . . . . . . . . . . . . .
2
ViperR Upright Vacuum Cleaner (06–03)
Page 3

SAFETY PRECAUTIONS
Home
Find...
Go To..
OPERATION
The following information signals potentially
dangerous conditions to the operator or
equipment:
This machine is intended for commercial use only.
It is designed exclusively to pick up dirt, dry
debris and dust in an indoor environment and is
not constructed for any other use. The pick up of
any type of fluid or dangerous/toxic materials is
prohibited. Use only recommended accessories.
All operators must read, understand and practice
the following safety precautions.
The following warning alert symbol and the “FOR
SAFETY” heading are used throughout this manual as
indicated in their description:
WARNING: To warn of hazards or unsafe
practices which could result in severe personal
injury or death.
FOR SAFETY: To identify actions which must be
followed for safe operation of equipment.
Failure to follow these warnings may result in:
personal injury, electrocution, electric shock, fire
or explosion:
WARNING: Do Not Use Flammable Liquids Or
Operate Machine In Or Near Flammable Liquids,
Vapors Or Combustible Dusts.
This machine is not equipped with an explosion
proof motor. The electric motor will spark upon
start up and during operation which could cause a
flash fire or explosion if machine is used in an
area where flammable vapors/liquids or
combustible dusts are present.
WARNING: Do Not Pick Up Flammable Or
Toxic Materials, Burning Or Smoking Debris.
WARNING: Do Not Operate With Damaged
Power Cord. Do Not Modify Plug. Unplug Power
Cord Before Servicing Machine
If the supply cord is damaged or broken, it must
be replaced by the manufacturer or it’s service
agent or a similarly qualified person in order to
avoid a hazard.
WARNING: Do Not Use Outdoors Or On Wet
Surfaces. Do Not Expose to Rain. Store Indoors.
FOR SAFETY:
1. Do not operate machine:
– In flammable or explosive areas.
– Unless trained and authorized.
– Unless operator manual is read and
understood.
– Unless cord is properly grounded.
– With damaged cord or plug.
– If not in proper operating condition.
– On wet or damp surfaces.
– In outdoor areas.
– Without bag and/or filters in place.
– With the use of an extension cord.
2. Before operating machine:
– Make sure all safety devices are in place
and operate properly.
3. When using machine:
– Do not pull machine by plug or cord.
– Do not pull cord around sharp edges or
corners.
– Do not close doors on cord.
– Do not unplug by pulling on cord.
– Do not stretch cord.
– Do not handle plug with wet hands.
– Keep cord away from heated surfaces.
– Do not pick up burning or smoking debris,
such as cigarettes, matches or hot ashes.
– Report machine damage or faulty
operation immediately.
– Never allow children to play on or around.
4. Before leaving or servicing machine:
– Turn off machine.
– Unplug cord from wall outlet.
5. When servicing machine:
– Unplug cord from wall outlet.
– Avoid moving parts. Do not wear loose
jackets, shirts, or sleeves.
– Use manufacturer supplied or approved
replacement parts.
– All repairs must be performed by a
qualified service person.
– Do not modify the machine from it’s
original design.
ViperR Upright Vacuum Cleaner (06–03)
3
Page 4

OPERATION
Home
Find...
Go To..
GROUNDING INSTRUCTIONS
Machine must be grounded. If it should
malfunction or breakdown, grounding provides a
path of least resistance for electrical current to
reduce the risk of electrical shock. This machine
is equipped with a cord having an
equipment–grounding conductor and grounding
plug. The plug must be plugged into an
appropriate outlet that is properly installed in
accordance with all local codes and ordinances.
Do not remove ground pin; if missing, replace
plug before use.
WARNING LABELS
The warning labels appear on the machine in the
locations indicated. Replace labels if they become
damaged or illegible.
Grounded
3 Hole Outlet
Ground Pin
WARNING LABEL –
Located on back side of machine
WARNING LABEL –
Located on back side of machine
!
!
4
ViperR Upright Vacuum Cleaner (06–03)
Page 5
OPERATION
Home
Find...
Go To..
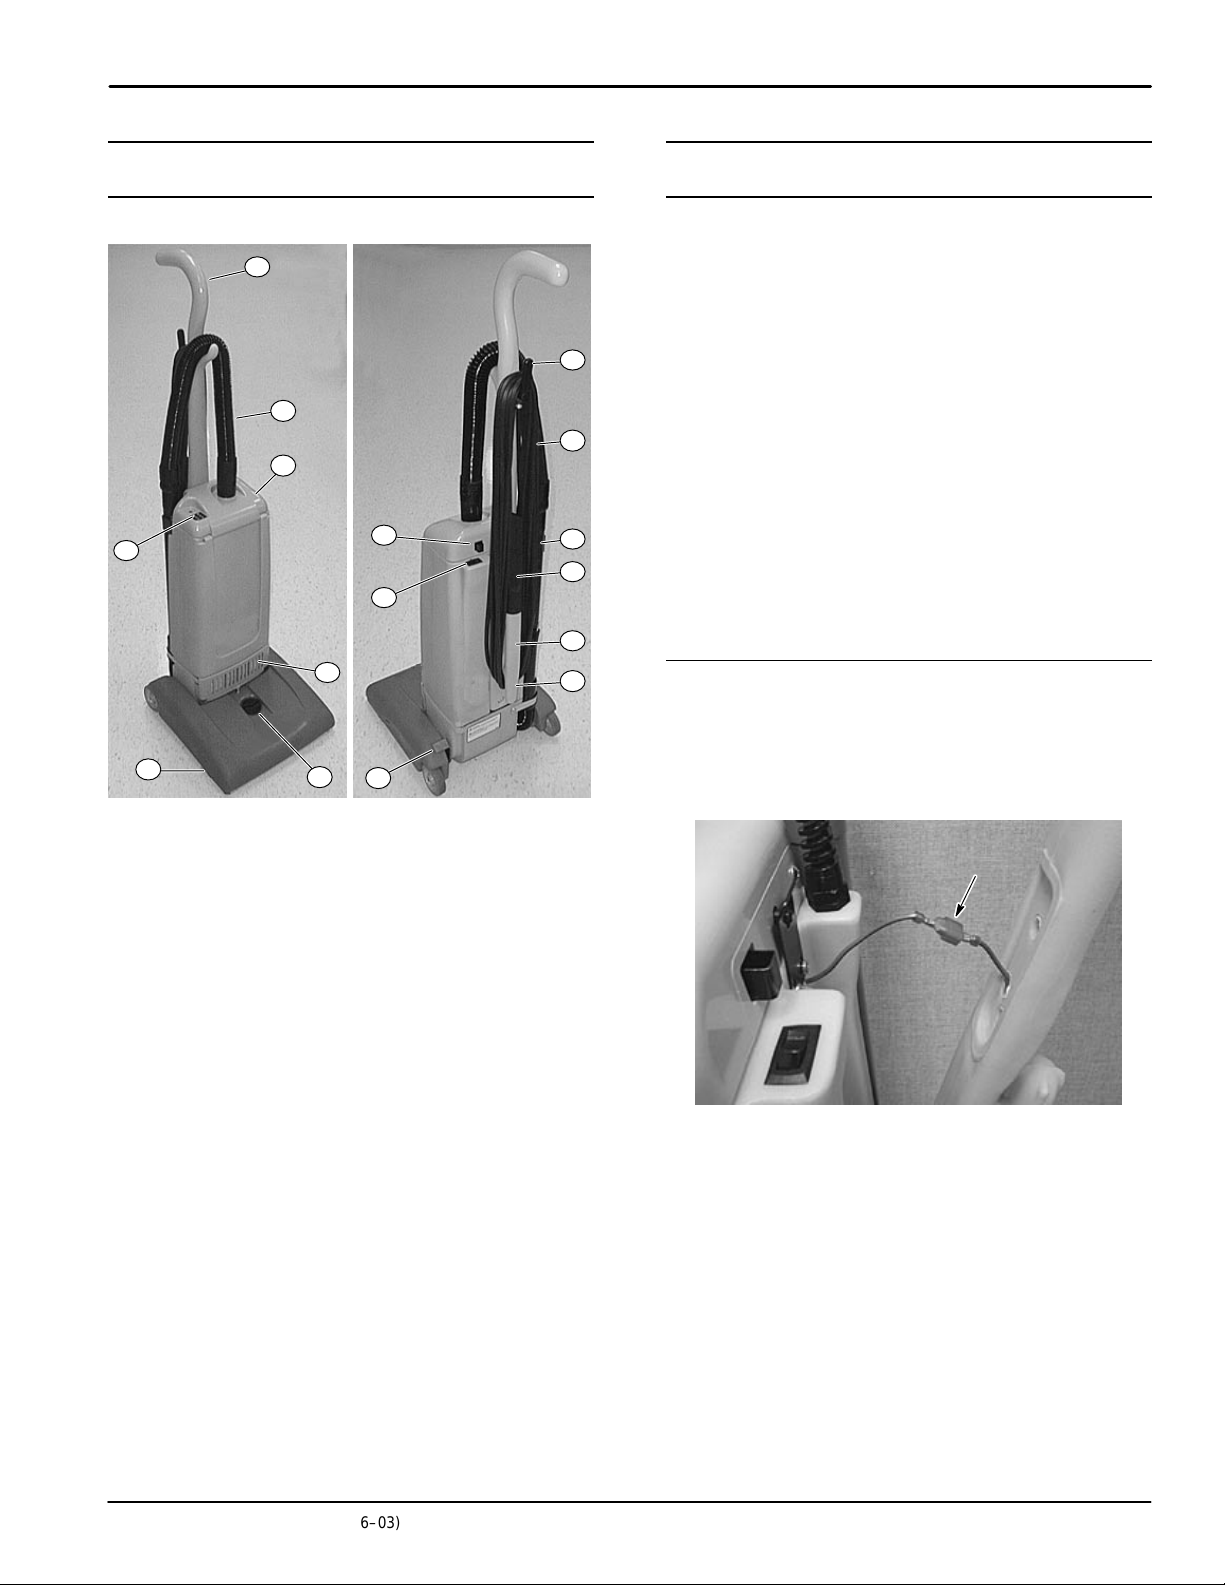
MACHINE COMPONENTS
1
4
6
8
13
14
15
7
9
16
11
10
12
MACHINE INSTALLATION
Carefully check carton for signs of damage. Report
damages to carrier immediately.
Check Machine Contents to ensure carton is
complete. Contact distributor for missing items.
Machine Contents:
- Machine
- Handle
- Vacuum Hose/Wand
- Crevice Tool
3
5
2
- Paper Filter Bag (Pre-installed)
- Secondary Filter (Pre-installed)
- Exhaust Filter (Pre-installed)
ATTACHING HANDLE
1. Remove two factory-installed handle mounting
screws from bag compartment.
2. Connect the anti-static wires and tuck wire
connectors inside of handle (Figure 1).
1. EZGript Handle
2. Carrying Handle
3. Cleaning Wand
4. Expandable Vacuum Hose
5. Onboard Crevice Tool
6. Filter Bag Compartment Lid
7. Bag Compartment Lid Latch
8. Electronic Sensor System
9. Power ON/OFF Switch
10. 12m (40 ft) Power Cord
11. Quick-Release Cord Hook
12. Lower Cord Hook
13. Exhaust Filter Cover
14. Brush Base w/ Edge Cleaning Shoe
15. Brush Height Adjustment Dial
16. Handle Release Latch
FIG. 1
3. Align handle on bag compartment and replace
screws securely (Figure 2).
ViperR Upright Vacuum Cleaner (06–03)
5
Page 6
OPERATION
Home
Find...
Go To..
4. Secure power cord with factory-installed cord
clamp, located on handle (Figure 2).
FIG. 2
5. Wrap power cord around quick release hook and
the lower handle hook.
INSTALLING VACUUM HOSE/WAND
1. Slide hose cuff over spout on bag compartment lid
and wand into base cuff as shown. Snap wand
into retainer clip (Figure 3).
2. Store crevice tool on carrying handle (Figure 3).
FIG. 4
2. Adjust brush height. Turn brush height adjustment
dial to desired setting as follows (Figure 5):
Brush Height Settings:
1–2 Short Carpet Pile
3–4 Medium Carpet Pile
5–6 High Carpet Pile
Wand
Spout
FIG. 3
Base
Cuff
MACHINE SETUP
WARNING: Do Not Operate With Damaged
Power Cord. Do Not Modify Plug. Unplug Power
Cord Before Servicing Machine
1. Install filter bag (pre–installed). Depress latch on lid
to open bag compartment (Figure 4) .
Contact distributor for optional cloth bag #900034.
NOTE: The machine will not operate without a filter
bag in place. The protective vacuum motor lockout
device will automatically sense when a bag is not
installed.
FIG. 5
6
ViperR Upright Vacuum Cleaner (06–03)
Page 7
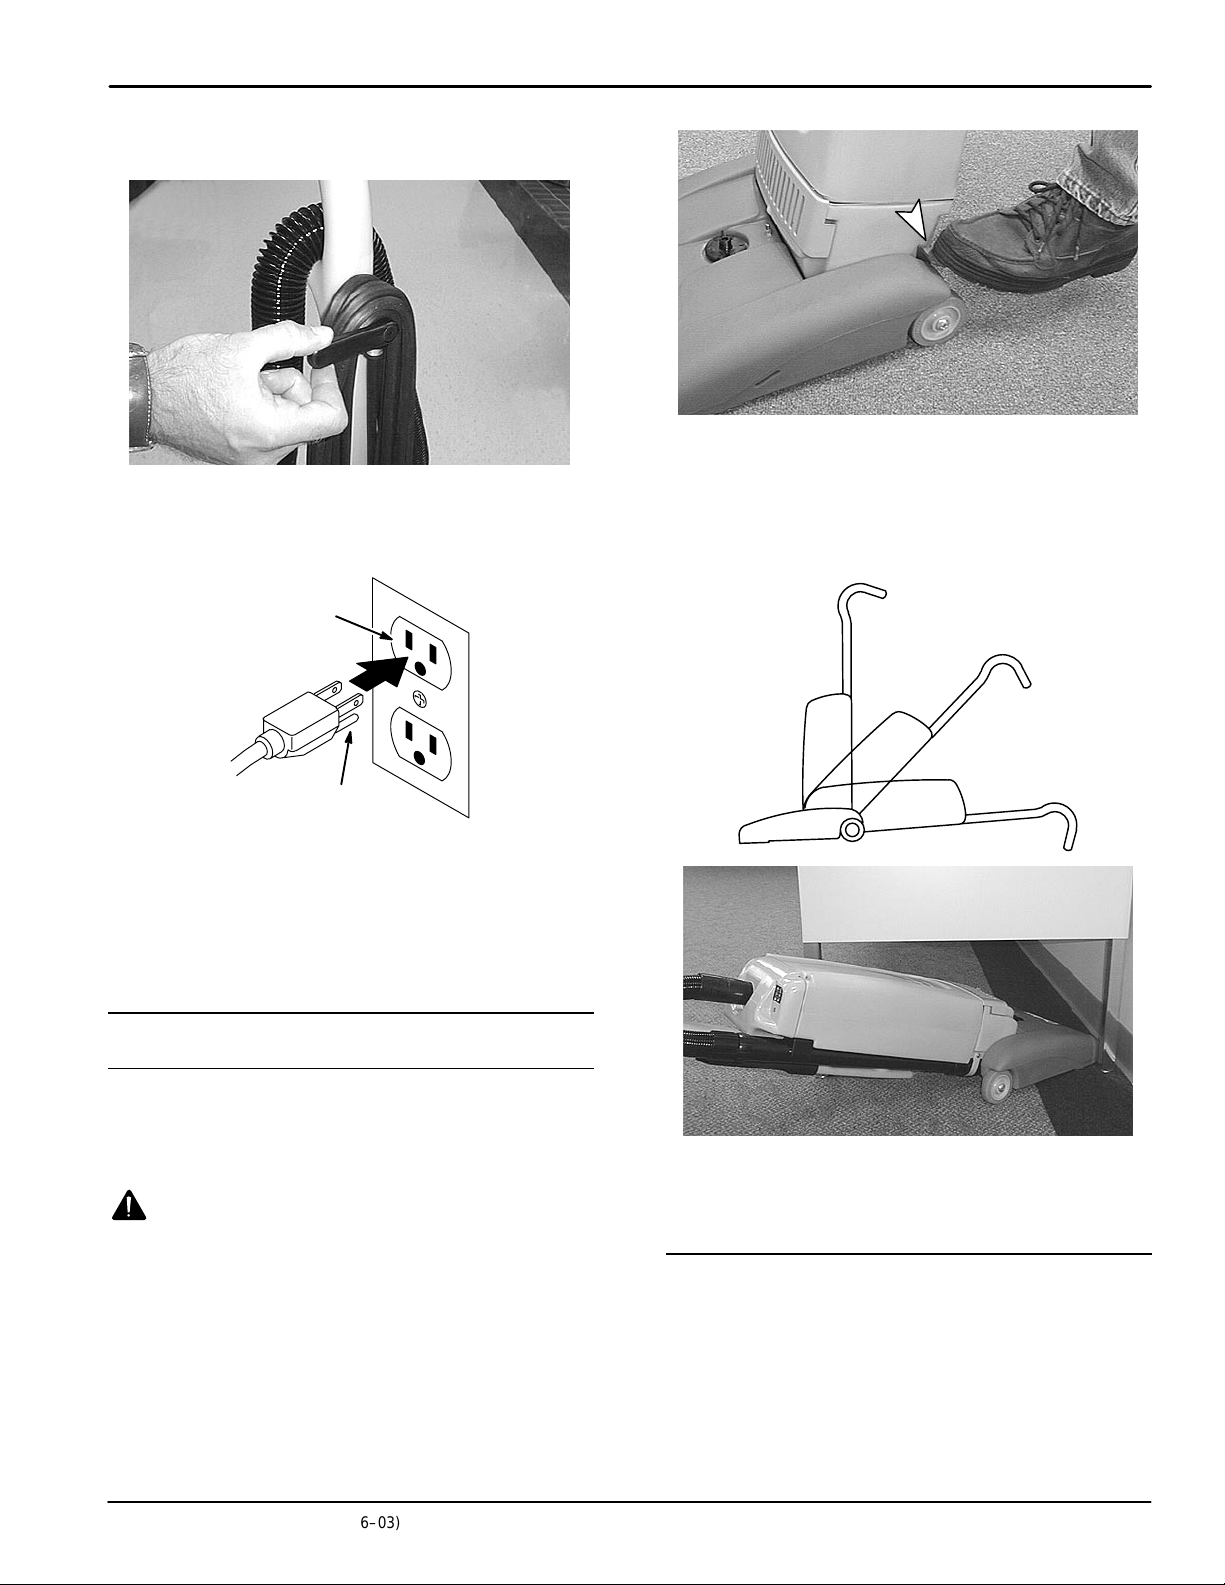
3. Pull and turn quick-release hook to remove power
Home
Find...
Go To..
cord (Figure 6).
FIG. 6
4. Plug power cord into a grounded wall outlet
(Figure 7).
Grounded
3 Hole Outlet
OPERATION
FIG. 8
3. Begin vacuuming floor. Operate machine with a
back and forth motion or “W” pattern.
4. To operate in the horizontal position, lower handle
to the stop point and step on release latch again
(Figure 9).
Upright
Position
Operating
Position
Ground Pin
FIG. 7
FOR SAFETY: Do not operate machine unless
cord is properly grounded.
FOR SAFETY: Do not operate machine with the
use of an extension cord.
MACHINE OPERATION
FOR SAFETY: Do not operate machine unless
operator manual is read and understood.
1. Activate ON/OFF switch.
WARNING: Do Not Pick Up Flammable Or
Toxic Materials, Burning Or Smoking Debris.
2. Lower handle to operating position by stepping on
handle release latch (Figure 8).
NOTE: Brush motor will not start until handle is lowered.
Horizontal
Position
FIG. 9
5. To stop vacuuming, raise handle to the upright
position and turn off power switch.
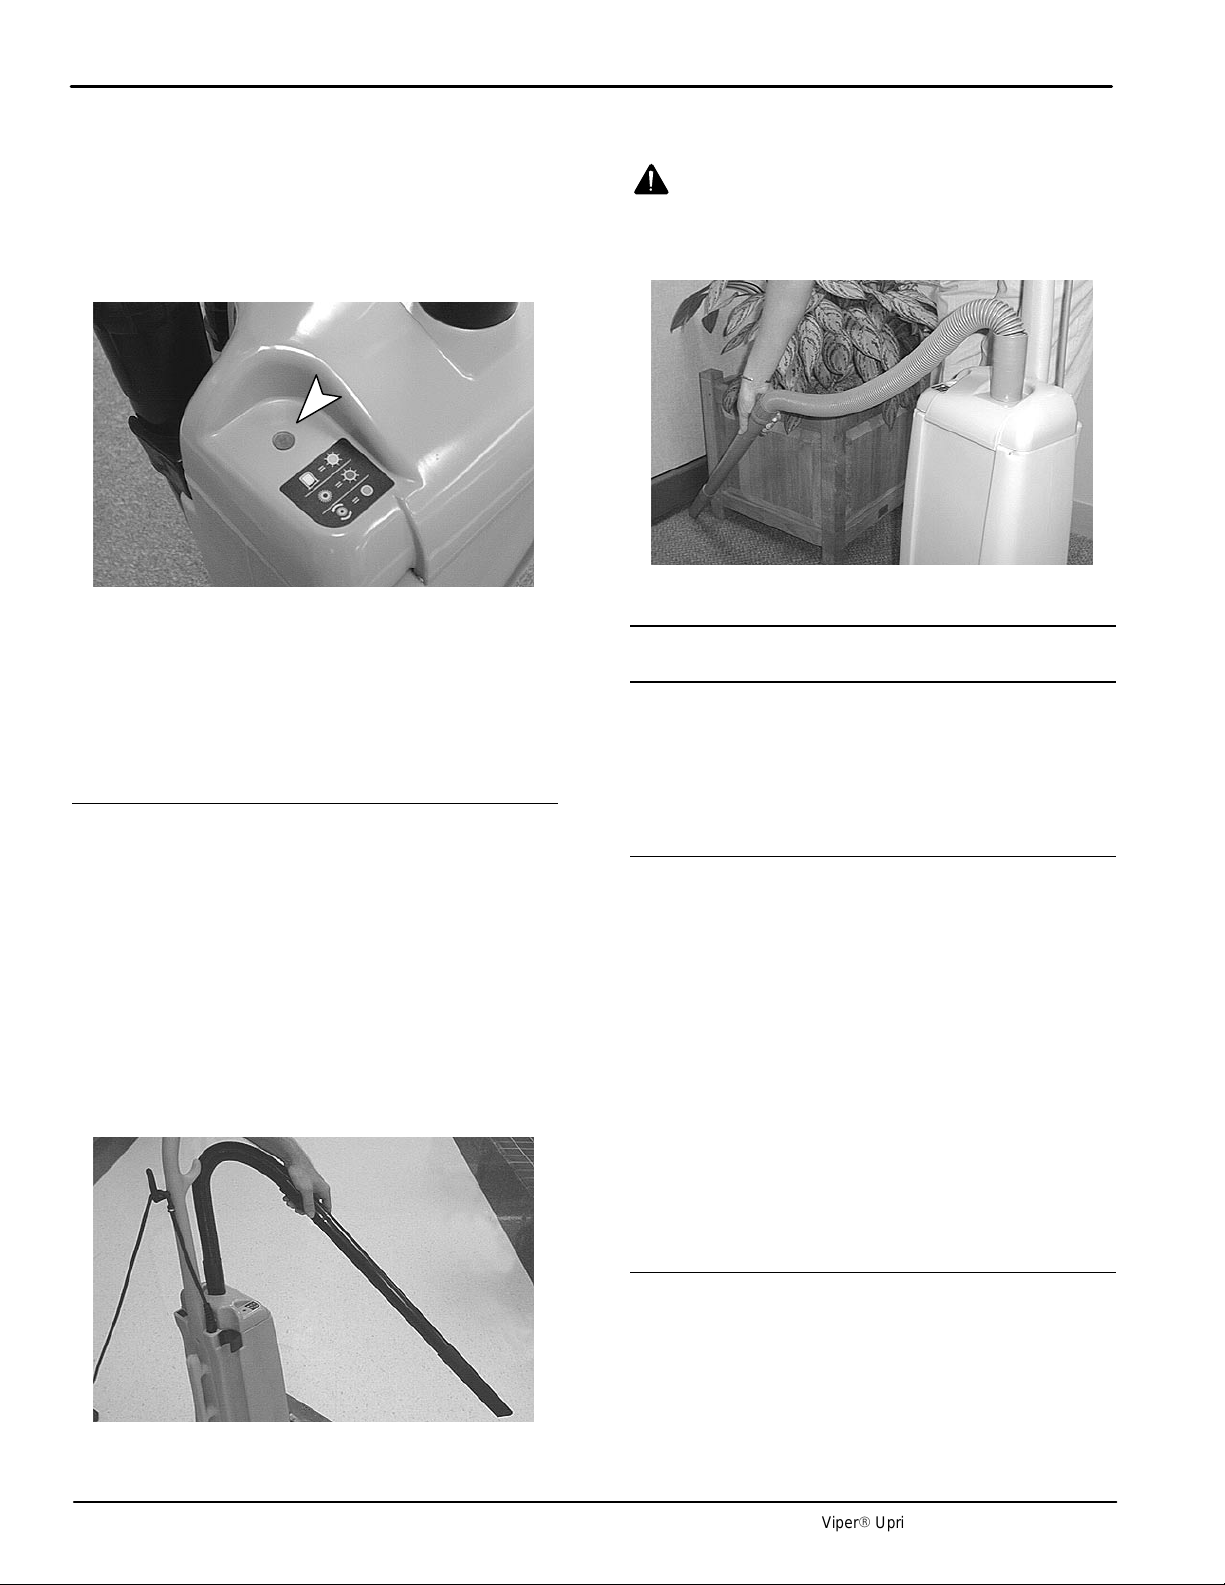
ELECTRONIC SENSOR SYSTEM
The machine’s Electronic Sensor System monitors the
condition of the machine while operating. The sensor
light, located on the bag compartment lid (Figure 10),
will indicate the following conditions:
ViperR Upright Vacuum Cleaner (06–03)
Green Light = Machine Functioning Properly.
7
Page 8
OPERATION
Home
Find...
Go To..
Blinking Orange Light = Full Bag or Air
Obstruction. Replace bag or remove air
obstruction in vacuum hose.
Blinking Red Light = Brush Obstruction or
Brush Height set too low (Amp. overload).
Remove brush obstruction or readjust brush
height.
FIG. 10
To reset sensor system, turn power switch off and then
back on again.
NOTE: The vacuum motor is also protected by an
internal thermal overload sensor. If motor temperature
gets too high, the thermal sensor will shut off motor.
Sensor will automatically reset when motor cools.
3. Activate ON/OFF switch.
WARNING: Do Not Pick Up Flammable Or
Toxic Materials, Burning Or Smoking Debris.
The wand’s hose expands up to 2.4m (8 ft) in
reach (Figure 12)
FIG. 12
MACHINE MAINTENANCE
To keep machine in good working condition, simply
follow machine’s daily, weekly and quarterly
maintenance procedures.
WAND OPE RATION
The machine is equipped with a “ready to use” wand
and crevice tool.
Contact local distributor for Optional Tool Kit #604802
Kit includes: Upholstery Tool and Dusting Brush.
1. Stand machine upright. When upright, the power
to the brush motor automatically shuts off.
ATTENTION: When using the wand, keep machine
upright to prevent possible carpet damage.
2. Detach wand from retainer clip and attach crevice
tool located on carrying handle (Figure 11).
FIG. 11
FOR SAFETY: When servicing machine, unplug
cord from wall outlet.
DAILY MAINTENANCE
(Every 4 Hours of Operation)
1. Check filter bag for fullness, replace bag as
needed. Do not reuse paper bags. Inspect optional
cloth bag for tears or holes, replace if damaged.
2. Remove entangled debris from brush.
3. Inspect vacuum hose for damage and clogged
debris.
4. Inspect power cord and strain relief for damage.
Replace if necessary.
5. Wind power cord around cord hooks rather than
loosely looped over handle.
6. Clean machine housing with an all purpose
cleaner and damp cloth.
WEEKLY MAINTENANCE
(Every 20 Hours of Operation)
1. Remove secondary filter and tap or blow off dust
build–up, filter is located below filter bag. Do not
clean with water. Replace filter if needed
(Figure 13).
8
ViperR Upright Vacuum Cleaner (06–03)
Page 9
OPERATION
Home
Find...
Go To..
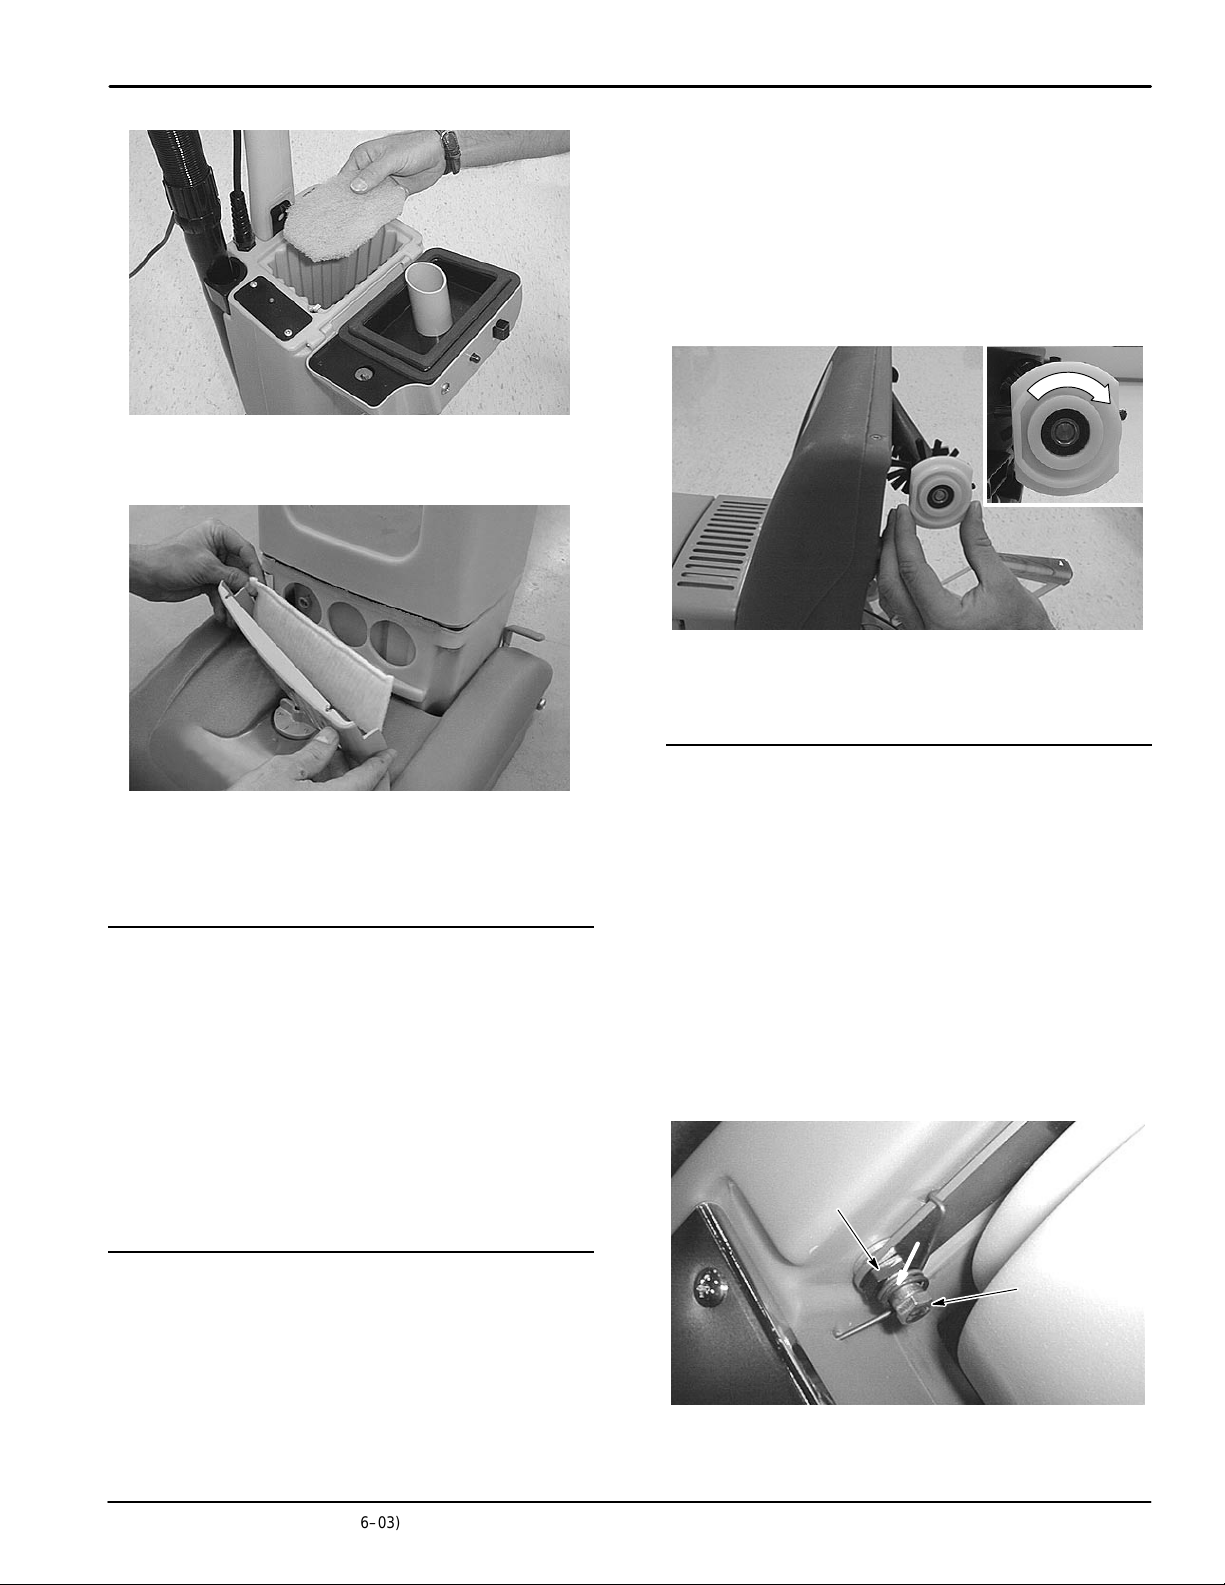
2. Remove brush assembly. Grip brush on opposite
side of belt and pull outward.
3. Inspect drive belt(s) for wear; replace if necessary.
4. Rotate both bearing blocks 180_ and reinstall
brush (Figure 15).
NOTE: Brush bearing blocks are labeled with
numbers. To extend brush life, position label “2”
outwards when reinstalling brush.
FIG. 13
2. Remove exhaust cover and inspect exhaust filter
(Figure 14). Replace filter if needed.
FIG. 14
3. Inspect brush bristles for wear. If bristles are worn
to 14mm (0.56 in.) or less in length, see Brush
Maintenance.
QUARTERLY MAINTENANCE
(Every 250 Hours of Operation)
Check motors for carbon brush wear. Replace brushes
when worn to a length of 10mm (0.38 in.) or less.
Contact an Authorized Service Center for carbon
brush inspection.
FOR SAFETY: When servicing machine, unplug
cord from wall outlet.
FOR SAFETY: When servicing machine all repairs
must be performed by a qualified service person.
1
1
FIG. 15
5. Replace metal brush shoe after brush is properly
installed.
FOOT LATCH ADJUSTMENT
Foot latch adjustment is required if machine handle
doesn’t lock in the upright position and/or brush motor
continues to run while in the upright position.
Follow adjusting instructions below:
FOR SAFETY: When servicing machine, unplug
cord from wall outlet.
1. Lay vacuum cleaner face down.
2. Loosen foot latch screw,10mm wrench required
(Figure 16).
3. Turn adjustment bushing to realign foot latch,
16mm wrench required. Bushing has an off-center
hole to allow for foot latch adjustment.
Adjustment
Bushing
2
2
BRUSH MAINTENANCE
If brush bristles are worn to 14mm (0.56 in.) or less,
rotate the bearing blocks to extend brush life as
follows:
FOR SAFETY: When servicing machine, unplug
cord from wall outlet.
1. Remove metal brush shoe from brush base
(Philips screwdriver is required).
ViperR Upright Vacuum Cleaner (06–03)
Foot Latch
Screw
FIG. 16
4. Retighten foot latch screw.
9
Page 10

OPERATION
Home
Find...
Go To..
STORING MACHINE
Store machine in a dry area in the upright position.
ATTENTION: Do not expose to rain. Store
indoors.
RECOMMENDED STOCK ITEMS
Refer to Parts List section for recommended stock
items. Stock Items are clearly identified with a bullet
preceding the parts description. See example below
(Figure 17):
FIG. 17
10
ViperR Upright Vacuum Cleaner (06–03)
Page 11

TROUBLE SHOOTING
operate.
Home
Find...
Go To..
PROBLEM CAUSE SOLUTION
Machine does not operate.
Vacuum motor does not
operate.
Brush does not operate.
Poor vacuum performance.
Poor brush pick–up.
Filter bag not installed. Install filter bag.
Faulty power cord. Contact Service Center.
Faulty ON/OFF switch. Contact Service Center.
Faulty electronic sensor system. Contact Service Center.
Loose wiring. Contact Service Center.
Building circuit breaker tripped. Reset circuit breaker.
Internal thermal overload sensor tripped
in vacuum motor.
Faulty electronic sensor system. Contact Service Center.
Worn carbon brushes in vacuum motor. Contact Service Center.
Defective vacuum motor. Contact Service Center.
Electronic sensor system activated
(blinking red light).
Loose or broken brush belt(s). Replace belt(s).
Defective brush motor. Contact Service Center.
Faulty electronic sensor system. Contact Service Center.
Full bag (blinking orange light). Replace bag.
Loose vacuum hose connections. Tighten hose connections.
Defective vacuum hose. Replace hose.
Clogged secondary filter. Clean or replace secondary filter.
Bag compartment lid not closed tightly. Close lid.
Improper brush height. Adjust brush height.
Entangled debris in brush. Remove clogged material.
Worn brush bristles or bearings. See BRUSH MAINTENANCE.
Loose drive belt(s). Inspect belt(s), replace if needed.
Remove air obstruction. Let motor cool
for 20 minutes.
Turn off machine. Inspect brush for
obstruction or readjust brush height.
OPERATION
ViperR Upright Vacuum Cleaner (06–03)
11
Page 12

OPERATION
Home
Find...
Go To..
SPECIFICATIONS
MODEL 120V
LENGTH 368mm (14.5 in.)
WIDTH 356mm (14.0 in.)
HEIGHT 1194mm (47.0 in.)
WEIGHT 9.5 Kg (21 lbs) without power cord
BRUSH MOTOR 120V, 0.1hp, 1A, 3000 rpm
V ACUUM MOTOR 120V, 1hp, 7.9A, 915W
POWER CORD LENGTH 12m (40 ft.)
SWEEPING PATH WIDTH 356mm (14 in.) includes edge cleaning
VACUUM BAG CAPACITY 5 L (5.2 qts)
FILTRATION SYSTEM
DECIBEL RATING AT OPERATOR’S EAR,
INDOORS ON CARPET
Triple filtration: Filter bag, secondary filter and exhaust filter.
High efficiency (99.9%) to 0.1 micron
69.5 dB(A)
12
ViperR Upright Vacuum Cleaner (06–03)
Page 13

Este manual se incluye con cada nueva aspiradora
Home
Find...
Go To..
vertical. Proporciona las instrucciones necesarias de
operación y mantenimiento, y lista de las piezas.
OPERACIÓN
DATOS MECANICOS
Lea completamente este manual y entienda la
máquina antes de operarla o repararla.
Al pedir piezas de repuesto usar la sección de Listas
de Piezas en este manual. Antes de pedir piezas o
suministros, asegurarse de tener el número de modelo
y de serie. Las piezas y suministros pueden ser
pedidos por teléfono o por correo de cualquier
Centro de Servicio o Distribuidor, Autorizados.
Esta máquina proporcionará un servicio excelente. Sin
embargo, los mejores resultados serán obtenido a los
costos mínimos si:
S La máquina se opera con un cuidado razonable.
S La máquina se mantiene regularmente – según las
instrucciones de mantenimiento provistas.
S La máquina se mantiene con las piezas provistas
por el fabricante o equivalentes.
Por favor complete en momento de instalación para
referencia futura.
Modelo No.-
Fecha de inst. No. de serie -
INDICE
MEDIDAS DE SEGURIDAD 14. . . . . . . . . . . . . . . . . .
INSTRUCCIONES DE CONEXION A TIERRA 15
ETIQUETAS DE ADVERTENCIA 15. . . . . . . . . . . . .
COMPONENTES DE LA MÁQUINA 16. . . . . . . . . . .
INSTALACIÓN DE LA MÁQUINA 16. . . . . . . . . . . . .
FIJACIÓN DEL MANGO 16. . . . . . . . . . . . . . . . . .
INSTALACIÓN DE LA MANGUERA/VARA DE
VACíO17. . . . . . . . . . . . . . . . . . . . . . . . . . . . . . . . .
PREPARACION DE LA MÁQUINA 17. . . . . . . . . . . .
OPERACIÓN DE LA MÁQUINA 18. . . . . . . . . . . . . .
SISTEMA DEL SENSOR ELECTRÓNICO 19
FUNCIONAMIENTO DE LA VARA 19. . . . . .
MANTENIMIENTO DE LA MÁQUINA 20. . . . . . . . .
MANTENIMIENTO DIARIO 20. . . . . . . . . . . . . . .
MANTENIMIENTO SEMANAL 20. . . . . . . . . . . . .
MANTENIMIENTO TRIMESTRAL 20. . . . . . . . .
MANTENIMIENTO DEL CEPILLO 21. . . . . .
AJUSTE DEL PESTILLO DE PIE 21. . . . . . . . . .
ALMACENAMIENTO DE LA MÁQUINA 21. . . . . . .
ARTíCULOS RECOMENDADOS PARA
MANTENER EN EXISTENCIA 21. . . . . . . . . . . . . . . .
LOCALIZACIÓN DE AVERÍAS 22. . . . . . . . . . . . . . .
ESPECIFICACIONES 23. . . . . . . . . . . . . . . . . . . . . . .
DIAGRAMAS ELECTRICAS 24. . . . . . . . . . . . . . . . .
LISTA DE PIEZAS 26. . . . . . . . . . . . . . . . . . . . . . . . . .
GRUPO DEL ARMAZON DE LA BOLSA 26. . . .
GRUPO DEL ARMAZON DEL MOTOR DE
VACIO 28. . . . . . . . . . . . . . . . . . . . . . . . . . . . . . . . .
GRUPO DE LA BASE DEL CEPILLO 30. . . . . .
OPCIONES 32. . . . . . . . . . . . . . . . . . . . . . . . . . . . . . . .
JUEGO DE ADITAMENTOS OPCIONALES 32.
BOLSAS DE REPUESTO 32. . . . . . . . . . . . . . . . .
ViperR Upright Vacuum Cleaner (06–03)
13
Page 14

OPERACIÓN
Home
Find...
Go To..
MEDIDAS DE SEGURIDAD
La información siguiente señala condiciones
potencialmente peligrosas para el operador o el
equipo:
Esta máquina está destinada solamente al uso
comercial. Está diseñada exclusivamente para
recoger suciedad, escombros secos y polvo de
interiores y no está indicada para ningún otro
uso. La recogida de cualquier líquido o polvo
peligroso/tóxico está prohibida. Utilice solamente
los accesorios recomendados.
Todos los operadores deben leer, entender y
practicar las precauciones siguientes de
seguridad.
El siguiente símbolo de alerta de advertencia y el
encabezamiento de ”PARA SEGURIDAD” se usan en
este manual como se indica en su descripción:
ADVERTENCIA: Para advertir de riesgos o
prácticas inseguras que podrían resultar en
lesiones personales graves o la muerte.
PARA SEGURIDAD: Para identificar acciones que
deben seguirse para el funcionamiento seguro del
equipo.
El no seguir estas advertencias puede resultar en:
lesiones personales, electrocución, choque
eléctrico, fuego o explosión.
ADVERTENCIA: No use líquidos inflamables
ni opere la máquina en o cerca de líquidos y
vapores inflamables o polvos combustibles.
Esta máquina no está equipada con motores a
prueba de explosión. Los motores eléctricos
emiten chispas al arrancar y durante el
funcionamiento lo que podría causar un fuego
explosivo o explosión si la máquina se usa en una
área donde están presentes vapores/líquidos
inflamables o polvos combustibles.
ADVERTENCIA: No recoja materiales tóxicos
o inflamables ni residuos humeantes o ardiendo.
ADVERTENCIA: No opere con un cordón
eléctrico dañado. No modifique el enchufe.
Desenchufe el cordón eléctrico antes de reparar la
máquina.
Si el cordón del suministro se daña o se rompe,
debe ser reemplazado por el fabricante o su
agente de servicio o una persona similarmente
calificada para evitar un riesgo.
ADVERTENCIA: No use al aire libre o en
superficies húmedas. No exponga a la lluvia.
Almacén bajo techo.
PARA SEGURIDAD:
1. No opere la máquina:
– En zonas inflamables o donde puedan
producirse explosiones.
– A menos que se capacitó y fue autorizado.
– A menos que se haya leído y entendido el
manual del funcionamiento.
– A menos que el cordón se conecte
apropiadamente a tierra.
– Con un cordón o enchufe dañados.
– Si no está en una condición apropiada de
operación.
– Sobre superficies mojadas o húmedas.
– En áreas al aire libre.
– Sin haber colocado los filtros y/o la bolsa.
– Con el uso de una extensión de cordón.
2. Antes de arrancar la máquina:
– Asegúrese que todos los dispositivos de
seguridad están en su lugar y operando
apropiadamente.
3. Al usar máquina:
– No tire de la máquina por el enchufe o el
cordón.
– No tire del cordón alrededor de bordes o
esquinas aguzados.
– No cierra las puertas sobre el cordón.
– No desenchufe tirando del cordón.
– No estire el cordón.
– No maneje el enchufe con las manos
húmedas.
– Mantenga el cordón lejos de las
superficies calientes.
– No recoja restos ardiendo o humeantes
como cigarrillos, cerillas o cenizas
calientes.
– Informe inmediatamente acerca de daños
o una operación defectuosa de la
máquina.
– Nunca permita que los niños jueguen en o
alrededor de la máquina.
4. Antes de salir de o reparar la máquina:
– Apague la máquina.
– Desenchufe cordón del tomacorriente de
la pared.
5. Al prestar servicio a la máquina:
– Desenchufe cordón del tomacorriente de
la pared.
– Evite las piezas móviles. No use
chaquetas, camisas, o mangas, holgadas.
14
ViperR Upright Vacuum Cleaner (06–03)
Page 15

OPERACIÓN
Home
Find...
Go To..
– Use piezas de repuesto provistas o
aprobadas por el fabricante.
– Todas las reparaciones se deben realizar
por una persona cualificadad para el
servicio.
– No modifique la máquina de su diseño
original.
INSTRUCCIONES DE CONEXION A TIERRA
La máquina debe conectarse a tierra. En caso de
mal funcionamiento o desarreglo, la conexión a
tierra provee un recorrido de menor resistencia
para la corriente eléctrica para reducir el riesgo de
choque eléctrico. Esta máquina está equipada con
un cordón con un conductor de conexión a tierra
del equipo y enchufe de conexión a tierra. El
ETIQUETAS DE ADVERTENCIA
Las etiquetas de advertencia aparecen en la máquina
en las ubicaciones indicadas. Reemplace las etiquetas
si se dañan o son ilegibles.
enchufe debe enchufarse en un tomacorrientes
apropiado correctamente instalado de acuerdo
con todos los códigos y ordenanzas locales. No
extraer la clavija de conexión a tierra; si falta,
reemplazar el enchufe antes de usar.
Conexión a tierra
Tomacorrientes de
3 orificios
Clavija de
conexión a tierra
ETIQUETA DE ADVERTENCIA –
Situado en la parte trasera de la máquina.
ETIQUETA DE ADVERTENCIA –
Situado en la parte trasera de la máquina.
!
!
ViperR Upright Vacuum Cleaner (06–03)
15
Page 16

OPERACIÓN
Home
Find...
Go To..
COMPONENTES DE LA MÁQUINA
1
4
6
7
8
9
13
11
10
12
INSTALACIÓN DE LA MÁQUINA
Inspeccionar cuidadosamente la caja por señales de
daño. Informar al transportista inmediatamente acerca
de daños observados.
Inspeccionar el contenido de la caja para asegurar
que esté completo. Avise al distribuidor por los
artículos perdidos.
Contenido de la Máquina:
– La máquina
– Mango
3
5
2
– Manguera/vara de vacío
– Herramienta para hendiduras
– Bolsa de filtro de papel (Preinstalado)
– Filtro secundario (Preinstalado)
– Filtro de descarga (Preinstalado)
FIJACIÓN DEL MANGO
14
15
16
1. Mango EZGrip
2. Mango de transporte
3. Vara de limpieza
4. Manguera extensible de aspiración
5. Herramienta Onboard para hendiduras
6. Tapa del compartimiento de la bolsa de filtro
7. Pestillo de la tapa de compartimiento de la bolsa
8. Sistema del Sensor electrónico
9. Interruptor de Encendido/Apagado
10. Cordón eléctrico de 12m (40 pies)
11. Gancho de desconexión rápida del cordón
12. Gancho del cordón inferior
13. Tapa del filtro de descarga
14. Base del cepillo con zapata de limpieza de Borde
15. Ajuste de la altura del cepillo
16. Pestillo de desconexión del mango
1. Extraer los dos tornillos de montaje del mango,
instalados de fábrica, del compartimiento de la
bolsa.
2. Conecte los conductores antiestáticos y ajuste los
conectores de cable dentro del mango (Figura 1).
FIG. 1
16
ViperR Upright Vacuum Cleaner (06–03)
Page 17

3. Alinear el mango en el compartimiento de la bolsa
Home
Find...
Go To..
y volver a colocar los tornillos bien ajustados
(Figura 2).
4. Asegurar el cordón eléctrico con la mordaza del
cordón, instalada de fábrica, ubicada en el
mango.(Figura 2)
FIG. 2
5. Envolver el cordón eléctrico alrededor del gancho
de desconexión rápida y el gancho inferior de la
manija.
OPERACIÓN
PREPARACION DE LA MÁQUINA
ADVERTENCIA: No opere con un cordón
eléctrico dañado. No modifique el enchufe.
Desenchufe el cordón eléctrico antes de reparar la
máquina.
1. Instale la bolsa del filtro (preinstalada). Deprima el
pestillo en la tapa para el compartimiento de la
bolsa (Figura 4).
Consultar con el distribuidor para la tela opcional de la
bolsa #900034.
NOTA: La máquina no funciona sin una bolsa del filtro
en su lugar. El mecanismo protector del motor de
vacío detecta automáticamente cuando la bolsa no
está instalada.
INSTALACIÓN DE LA MANGUERA/VARA DE
VACíO
1. Deslizar la camisa de la manguera sobre el pico
en la tapa del compartimiento y la vara en la
camisa de base según se ilustra. Calzar la vara
instantánea en la grapa del retenedor (Figura 3).
2. Guardar la herramienta para hendiduras en el
mango para transportar (Figura 3).
Vara
Pico
FIG. 3
Base
Camisa
FIG. 4
2. Ajuste de la altura del cepillo. Girar el dial de
ajuste de la altura del cepillo a la graduación
deseada como sigue (Figura 5):
Graduaciones de la altura del cepillo:
1–2 Altura pequeña del pelaje
3–4 Altura mediana del pelaje
5–6 Altura elevada del pelaje
ViperR Upright Vacuum Cleaner (06–03)
17
Page 18

OPERACIÓN
Home
Find...
Go To..
FIG. 5
3. Tirar de girar el gancho de desconexión rápida
para extraer el cordón eléctrico (Figura 6).
OPERACIÓN DE LA MÁQUINA
PARA SU SEGURIDAD: No utilice la máquina
salvo que el operario haya leído y comprendido el
manual de instrucciones.
1. Activar el interruptor de ENCENDIDO/APAGADO.
ADVERTENCIA: No recoja materiales tóxicos
o inflamables ni residuos humeantes o ardiendo.
2. Bajar el mango a la posición de operación
parándose sobre el pestillo de desconexión del
mango (Figura 8).
NOTA: el motor del cepillo no arranca hasta que se
baje el mango.
FIG. 6
4. Enchufar el cordón eléctrico a un tomacorriente de
pared conectado a tierra (Figura 7).
Conexión a tierra
Tomacorrientes de
3 orificios
Clavija de
conexión a tierra
FIG. 7
PARA SEGURIDAD: No operar la máquina a
menos que la máquina esté bien conectada a
tierra.
PARA SEGURIDAD: No operar la máquina con el
uso de un cordón de extensión.
FIG. 8
3. Comenzar a limpiar el suelo con la aspiradora.
Operar la máquina con un movimiento de un lado
a otro o un recorrido en ”W”. Para parar, pararse
nuevamente sobre el pestillo de desconexión del
mango.
4. Para operar en la posición horizontal, bajar el
mango a la posición de parada inferior y pisar
nuevamente el pestillo de desconexión
(Figura 9).
18
ViperR Upright Vacuum Cleaner (06–03)
Page 19

Posición
Home
Find...
Go To..
vertical
OPERACIÓN
Posición de
operación
Posición
horizontal
FIG. 10
Para restablecer el sistema del sensor, apagar el
interruptor eléctrico y encender nuevamente.
NOTA: El motor del vacío también está protegido por
un sensor de carga térmica interior excesiva. Si la
temperatura de motor se eleva demasiado, el sensor
térmico apaga el motor. El sensor se restablece
automáticamente cuando el motor se enfría.
FIG. 9
5. Para dejar de limpiar con aspiradora, levantar el
mango a la vertical a apagar el interruptor
eléctrico.
SISTEMA DEL SENSOR ELECTRÓNICO
El Sistema del Sensor Electrónico de la máquina
supervisa la condición de la máquina mientras está
operando. La luz del sensor, ubicado en la tapa del
compartimiento de la bolsa (Figura 10), indica las
condiciones siguientes:
Luz Verde = Máquina que funciona
apropiadamente.
Luz Anaranjada centelleante = Bolsa Llena o
área de obstrucción. Reemplazar la bolsa o quitar
el área de obstrucción en la manguera del vacío.
Luz Roja centelleante = Obstrucción del Cepillo
o Altura del Cepillo demasiado baja (carga
excesiva de amperios). Quitar la obstrucción del
cepillo o reajustar la altura del cepillo.
FUNCIONAMIENTO DE LA VARA
La máquina está provista con una vara ” lista para
usar” y una herramienta para hendiduras.
Consultar con el distribuidor local para el Juego de
Herramienta Opcional No. 604802 El equipo incluye:
Herramienta de Tapicería y el Cepillo para Polvo.
1. Máquina en posición vertical. Cuando está en
posición vertical, se corta automáticamente la
electricidad al motor de vacío.
ATENCIÓN: Al usar la vara, mantener la máquina
vertical para prevenir daños posibles a la
alfombra.
2. Separar la vara de la grapa del retenedor y fijar la
herramienta de hendiduras ubicada en el mango
para transportar (Figura 11).
ViperR Upright Vacuum Cleaner (06–03)
FIG. 11
19
Page 20

OPERACIÓN
Home
Find...
Go To..
3. Activar el interruptor de ENCENDIDO/APAGADO.
ADVERTENCIA: No recoja materiales tóxicos
o inflamables ni residuos humeantes o ardiendo.
La manguera de la vara se extiende a 2.4m
(8 pies) de alcance (Figura 12)
FIG. 12
MANTENIMIENTO DE LA MÁQUINA
Para guardar la máquina en un buen estado de
funcionamiento buena, simplemente seguir los
procedimientos diarios, semanales y trimestrales de
mantenimiento.
MANTENIMIENTO SEMANAL
(
Cada 20 horas de uso)
1. Quitar el filtro secundario y golpear suavemente o
soplar el polvo acumulado, el filtro está ubicado
debajo de la bolsa del filtro. No limpiar con agua.
Reemplazar el filtro si fuera necesario (Figura 13).
FIG. 13
2. Quitar la tapa de la descarga e inspeccionar el
filtro de descarga (Figura 14). Reemplazar el filtro
si fuera necesario.
PARA SEGURIDAD: Al revisar la máquina,
desconecte el cable eléctrico del enchufe de la
pared.
MANTENIMIENTO DIARIO
(
Cada 4 horas de uso)
1. Reemplace la bolsa de polvo después de cada
uso o según las necesidades. Inspeccione la
bolsa de tela por rasguños o agujeros. Sustituirla
si está dañada. Nunca lave la bolsa de tela.
2. Quitar los desechos enredados en el cepillo.
3. Inspeccionar la manguera de vacío por daños y
obstrucciones por desechos.
4. Inspeccionar el cordón de electricidad y el
amortiguador de esfuerzos, por daños.
Reemplazar si fuera necesario.
5. Enrollar el cordón de electricidad alrededor de los
ganchos del cordón en lugar de flojamente sobre
el mango.
6. Limpiar el armazón de la máquina con un
limpiador de uso múltiple y un trapo húmedo.
FIG. 14
3. Inspeccionar las cerdas del cepillo para el uso.
Si las cerdas están gastadas a 14mm (0.56 en) o
menos en longitud, ver Mantenimiento del Cepillo.
MANTENIMIENTO TRIMESTRAL
(Cada 250 horas de uso)
Inspeccione el motor por desgaste de las escobillas
de carbón. Reemplace todas las escobillas si se han
desgastado a un largo de 10mm (0.38 pulg.) o menos.
Para la inspección de las escobillas de carbón
consulte con su Centro Autorizado de Servicio.
PARA SEGURIDAD: Al revisar la máquina,
desconecte el cable eléctrico del enchufe de la
pared.
20
ViperR Upright Vacuum Cleaner (06–03)
Page 21

OPERACIÓN
Home
Find...
Go To..
PARA SEGURIDAD: Al prestar servicio a la
máquina, todas las reparaciones deben realizarse
por una persona calificada de servicio.
MANTENIMIENTO DEL CEPILLO
Si las cerdas del cepillo se han gastado a 14mm (0.56
pulg.) o menos, rodar los bloques para prolongar la
vida del cepillo como sigue:
PARA SEGURIDAD: Al revisar la máquina,
desconecte el cable eléctrico del enchufe de la
pared.
1. Quite la zapata de metal del cepillo de la base del
cepillo (se requiere un destornillador Philips).
2. Quitar el conjunto del cepillo. Sujetar el cepillo del
lado opuesto de la correa y tirar hacia afuera.
3. Inspeccionar la correa(s) por desgaste;
reemplazar si fuera necesario.
4. Girar ambos bloques de rodamiento 180 grados y
reinstalar el cepillo (Figura 15).
NOTA: Los bloques de los rodamientos del cepillo
están rotuladas con números. Colocar en posición el
rótulo “2” hacia afuera para reinstalar el cepillo
(Figura 15), para prolongar la vida del cepillo.
1. Colocar la aspiradora con el frente hacia abajo.
2. Aflojar el tornillo del pestillo de pie, se requiere
una llave de 10mm (Figura 16).
3. Girar el cojinete de ajuste para realinear el pestillo
de pie, se requiere una llave de 16mm. El cojinete
tiene un orificio fuera del centro para permitir el
ajuste del pestillo de pie.
Cojinete
de ajuste
Tornillo del
pestillo de
pie
FIG. 16
4. Reajustar el tornillo del pestillo de pie.
ALMACENAMIENTO DE LA MÁQUINA
1
1
FIG. 15
5. Después que el cepillo se ha instalado
correctamente, volver a colocar la zapata de metal
del cepillo.
AJUSTE DEL PESTILLO DE PIE
Si la máquina no se bloquea en la posición vertical y/o
el motor de vacío continúa funcionando, se requiere
ajustar el pestillo de pie.
PARA SEGURIDAD: Al revisar la máquina,
desconecte el cable eléctrico del enchufe de la
pared.
2
2
Almacenar la máquina en un área seca en posición
vertical.
ATENCION: No exponga a la lluvia. Almacene bajo
techo.
ARTICULOS RECOMENDADOS PARA MANTENER EN EXISTENCIA
Para los artículos recomendados a mantener en
existencia referirse a la sección de Lista de Piezas.
Los artículos a mantener en existencia están
claramente identificados con una bala precediendo a
la descripción de los artículos. Ver el ejemplo de
abajo:
FIG. 17
ViperR Upright Vacuum Cleaner (06–03)
21
Page 22

OPERACIÓN
Home
Find...
Go To..
LOCALIZACION DE A VERÍAS
PROBLEMA CAUSA SOLUCIÓN
La máquina no funciona.
El motor de vacío no funciona.
El cepillo no funciona.
Mala aspiración.
Mala aspiración del cepillo.
La bolsa de filtro no está instalada. Instalar la bolsa de filtro.
Cordón eléctrico defectuoso. Consultar con el Centro de Servicio.
Interruptor de Encendido/Apagado
defectuoso.
Sistema electrónico defectuoso del sen-
sor.
Cableado flojo. Consultar con el Centro de Servicio.
Activado el interruptor de circuitos del
edificio.
El sensor interno de carga térmica
excesiva se ha activado en el motor de
vacío.
Sistema electrónico de sensor
defectuoso.
Escobillas de carbón gastadas en el
motor de vacío.
Motor de vacío defectuoso. Consultar con el Centro de Servicio.
Activado el sistema electrónico del
sensor (luz roja centelleante).
Correa(s) del cepillo floja(s) o rota(s). Reemplazar la correa(s).
Motor del cepillo defectuoso. Consultar con el Centro de Servicio.
Sistema electrónico del sensor
defectuoso.
Bolsa llena (luz anaranjada
centelleante).
Conexiones flojas de la manguera de
vacío.
Manguera de vacío defectuosa. Reemplazar la manguera.
Filtro secundario taponado. Limpiar o reemplazar el filtro
La tapa del compartimiento de la bolsa
no está bien ajustada.
Altura inadecuada del cepillo. Ajustar la altura del cepillo.
Desechos enredados en el cepillo. Quitar el material obstructor.
Cerdas o rodamientos gastados. Ver MANTENIMIENTO DEL CEPILLO.
Correa(s) propulsora(s) flojas. Inspeccionar la correa(s), reemplazar si
Consultar con el Centro de Servicio.
Consultar con el Centro de Servicio.
Restablecer el interruptor de circuitos.
Quitar la obstrucción de aire. Permitir
que el motor se enfríe por 20 minutos.
Consultar con el Centro de Servicio.
Consultar con el Centro de Servicio.
Apagar la máquina. Inspeccionar el
cepillo por obstrucciones o reajustar la
altura del cepillo.
Consultar con el Centro de Servicio.
Reemplazar la bolsa.
Ajustar las conexiones de la manguera.
secundario.
Cerrar la tapa.
fuera necesario.
22
ViperR Upright Vacuum Cleaner (06–03)
Page 23

OPERACIÓN
Home
Find...
Go To..
ESPECIFICACIONES
MODELO 120V 220V/230V/240V
LARGO 368mm (14.5 pulg.) 368mm (14.5 pulg.)
ANCHO 356mm (14.0 pulg.) 356mm (14.0 pulg.)
ALTO 1194mm (47.0 pulg.) 1194mm (47.0 pulg.)
PESO 9.5 Kg (21 lbs) 9.5 Kg (21 lbs)
MOTOR DEL CEPILLO 120V, 0.16hp, 1A, 3000 rpm 230V, 0.1hp, 0.5A, 3000 rpm
MOTOR DE VACIO 120V, 1.2hp, 7.9A, 915 vatios 230V, 1.2hp, 3.8A, 874 vatios
LARGO DEL CORDON ELECTRICO 12m (40 pies) 12m (40 pies)
ANCHO DE BARRIDO
CAPACIDAD DE LA BOLSA DE VACIO 5 L (5.2 cuart.) 5 L (5.2 cuart.)
SISTEMA DE FILTRACION
CLASIFICACION DE DECIBELES EN EL
OIDO DEL OPERADOR, INTERIOR
SOBRE ALFOMBRA
356mm (14 pulg.) incluye limpieza del
borde
Filtración triple: Bolsa de filtro, filtro
secundario y filtro de descarga. Alta
eficiencia (99.9%) a un 0.1 micrón
69.5 dB(A) 69.5 dB(A)
356mm (14 pulg.) incluye limpieza del
borde
Filtración triple: Bolsa de filtro, filtro
secundario y filtro de descarga. Alta
eficiencia (99.9%) a un 0.1 micrón
ViperR Upright Vacuum Cleaner (06–03)
23
Page 24

ELECTRICAL DIAGRAMS
Home
Find...
Go To..
DIAGRAMAS ELECTRICAS
120V
WHT
GRN
BLK
MAIN
SWITCH
BLK
RED
SENSOR
SYSTEM
LIGHT
BAG LOADED
SWITCH
RED
BRN
RED
BRN
BLK
CONTROL
BOARD
BLK
WHT
WHT WHT
WHT
ORG
ORGBLK
GRN
WHT
GRN
GRN
CONTROL BOARD
MOUNTING BRACKET
24
WHT WHT
BRUSH MOTOR
INTERRUPT SWITCH
BLK WHT
BRUSH
MOTOR
ORG
VACUUM
MOTOR
GRN
WHT
GRN
BRUSH BASE
PLATE
ViperR Upright Vacuum Cleaner (06–03)
Page 25

220V/230V/240V
Home
Find...
Go To..
ELECTRICAL DIAGRAMS
DIAGRAMAS ELECTRICAS
BLUE
BRN
SENSOR
SYSTEM
LIGHT
GRN
BLK
MAIN
SWITCH
BAG LOADED
SWITCH
RED
GRN
GRN
RED
BLK
CONTROL
BOARD
CONTROL BOARD
MOUNTING PLATE
RED
BRUSH MOTOR
INTERRUPT SWITCH
BLK
BRUSH
MOTOR
ORG
VACUUM
MOTOR
RED
BRN
BRN
BLK
WHT
GRN
WHT WHT
ORGBLK
WHT
ORG
WHT
GRN
WHT
GRN
GRN
BRUSH BASE
PLATE
ViperR Upright Vacuum Cleaner (06–03)
25
Page 26

PARTS LIST
Home
Find...
Go To..
LISTA DE PIEZAS
BAG HOUSING GROUP
GRUPO DEL ARMAZON DE LA BOLSA
20
37
19
21
25
22
26
4
32
27
35
36
28
26
7
33
21
14
32
1
2
5
3
6
8
39
9
15
16
17
18
38
23
10
13
30
31
12
24
37
29
32
11
34
33
26
ViperR Upright Vacuum Cleaner (06–03)
Page 27

BAG HOUSING GROUP
Home
Find...
Go To..
GRUPO DEL ARMAZON DE LA BOLSA
REF PART # DESCRIPTION QTY.
∇ 605011 DASM., VAC HOSE WAND 1
Y 1 604840 HOSE, VAC WAND 1–1/4 ID 1
Y N/S 604841 WAND, 35MM ID X 19 LG SWIVEL 1
Y 2 604929 CUFF, 1–1/4” 1
3 605998 LABEL, INDICATOR LIGHT 1
4 609417 HANDLE, GREEN 1
5 604930 SCREW, M5X.8X10 TRSPHL 1
6 605016 LATCH, LID 1
7 200017494 SCREW, M8X30 SHLDR 1
8 603114 DOWEL, 1/8 DIA X 1–1/4 2
9 604836 PLATE, BOTTOM LID 1
10 140825 SCREW, #6X1/2 PANPHL 4
11 613279 LABEL, WARNING AC VACUUM 1
12 604833 DGASKET, LID 1
13 604838 DBAG, PAPER (100 CASE) 1
14 140297 NUT , M5 HEXLCK 2
15 604839 DSWITCH, SNAP ACTION ON/OFF 1
16 200070266 SCREW, M3X.5X16 PANPHL 2
17 606357 HOSE, 1/8ID X 1/4OD, 18” 1
18 605984 BUSHING, BAG–FULL–HOSE 1
19 604835 BRACKET, SWITCH/LIGHT 1
20 579211 NUT, M3 HEXLCK 2
21 605994 DCONTROL BOARD (120V) 1
22 604832 DFILTER, VAC MOTOR
23 604842 DCORD, 18/3 X 40’ GRAY (120V) 1
24 130166 DCORD GRIP, NYLON/BLK W/NUT 1
(SECONDARY)
PARTS LIST
LISTA DE PIEZAS
REF PART # DESCRIPTION QTY.
25 604847 DCLIP, WAND 1
26 607006 SCREW, M4X.7X12 TRSPHL 3
27 604844 STRIKE, LID LATCH 1
28 611311 DSPRING, COMPRESSION 1
29 578005000 DSWITCH, ROCKER ON/OFF
30 609415 HOUSING, BAG, GREEN 1
31 605013 LABEL, VIPER LOGO 1
∇ 32 607286 KIT, ANTI-STATIC WIRING 1
Y 130130 TERMINAL, RING #10 1
Y 140297 NUT, M5 HEX 1
Y 607284 ASM., WIRE #18X18GRN 1/4F 1
Y 130133 TERMINAL, 1/4M 1
Y 607285 ASM., WIRE #18X18GRN #6 RING 1
Y 140825 SCREW, #6X1/2 PANPHL 1
33 607137 SCREW, M6X1X35 TRSPHL 2
34 604804 DTOOL, CREVICE 35MM (1.38 IN.) 1
35 140324 DCLAMP, CORD 1
36 610906 DHOOK, CORD QUICK–RELEASE 1
37 606694 SCREW, M4X.7X8 TRSPHL 4
38 608917 HOSE, 1/8ID X 1/4OD, 18” RED 1
39 608678 LID, BAG HOUSING, GREEN 1
1
(120 VOLT)
1
∇ ASSEMBLY / CONJUNTO
Y INCLUDED IN ASSEMBLY / INCLUIDO EN EL CONJUNTO
D RECOMMENDED STOCK ITEMS / ARTICULOS RECOMENDADOS
ViperR Upright Vacuum Cleaner (06–03)
27
Page 28

PARTS LIST
Home
Find...
Go To..
LISTA DE PIEZAS
3
VACUUM MOTOR HOUSING GROUP
GRUPO DEL ARMAZON DEL MOTOR DE VACIO
7
5
10
1
24
2
17
9
4
24
8
12
6
13
15
28
11
14
21
21
23
22
18
19
16
20
ViperR Upright Vacuum Cleaner (06–03)
Page 29

VACUUM MOTOR HOUSING GROUP
Home
Find...
Go To..
GRUPO DEL ARMAZON DEL MOTOR DE VACIO
REF PART # DESCRIPTION QTY.
∇ 605011 DASM., VAC HOSE WAND 1
Y 1 604840 HOSE, VAC WAND 1–1/4 ID 1
Y 2 604841 WAND, 35MM ID X 19 LG SWIVEL 1
Y 3 604929 CUFF, 1–1/4” 1
4 604815 DMOTOR, V AC 5.1” (120V) 1
606382 DCARBON BRUSH (120V) (2 PACK) 2
5 604816 GASKET, VA C M O TOR 1
6 604822 FOAM, NOISE 1/4X14–1/4X5 1
7 604826 INLET PLATE, V AC MOTOR 1
8 605080 GASKET, INLET PLATE 1
9 607006 SCREW, M4X.7X12 TRSPHL 2
10 606732 GASKET, UPPER CLAMP PLATE 1
11 608679 COVER, EXHAUST FILTER, GREEN 1
∇ ASSEMBLY / CONJUNTO
Y INCLUDED IN ASSEMBLY / INCLUIDO EN EL CONJUNTO
D RECOMMENDED STOCK ITEMS / ARTICULOS RECOMENDADOS
PARTS LIST
LISTA DE PIEZAS
REF PART # DESCRIPTION QTY.
12 606730 CLAMP PLATE, VAC MOTOR 1
13 606731 GASKET, LOWER CLAMP PLATE 1
14 606982 DFILTER, EXHAUST (3 PACK) 1
15 611734 SCREW, SHOULDER PIVOT 2
16 606723 PLATE, FOOT LATCH 1
17 604830 STRAP, WAND CUFF 1
18 602595 LABEL, WARNING VACUUM CSA 1
19 609413 HOUSING, VACUUM MOTOR,
20 604827 STUD, FOOT–LATCH 2
21 607137 SCREW, M6X1X35 TRSPHL 4
22 608196 MOUNT, SPRING VAC HSG 1
23 608071 SPRING, EXT .50X5.00X.067 1
24 579259 SCREW, M4X.7X12 PANPHL 4
N/S 605981 HARNESS, LOWER WIRE 1
GREEN
1
ViperR Upright Vacuum Cleaner (06–03)
29
Page 30

PARTS LIST
Home
Find...
Go To..
LISTA DE PIEZAS
BRUSH BASE GROUP
GRUPO DE LA BASE DEL CEPILLO
1
2
3
35
7
6
4
5
9
8
39
11
10
38
13
14
36
12
37
16
17
15
41
33
31
40
32
25
30
27
18
26
29
34
20
19
24
21
28
22
23
33
30
ViperR Upright Vacuum Cleaner (06–03)
Page 31

BRUSH BASE GROUP
Home
Find...
Go To..
GRUPO DE LA BASE DEL CEPILLO
REF PART # DESCRIPTION QTY.
1 140825 SCREW, #6X1/2 PANPHL 1
2 604811 KNOB, HT. ADJUSTMENT 1
3 608670 BASE, GREEN 1
4 608189 LABEL, “NOBLES” 1
5 578005000 DSWITCH, ON/OFF ROCKER 1
∇ 605010 DASM., VAC HOSE 1
Y 6 604805 CUFF, BASE INLET 1
Y 7 604806 HOSE FLEX 1–1/4 ID 1
Y 8 604829 CUFF, WAND 1
9 610905 SCREW, M6X1X25 HXHDCP 1
10 610861 SPRING, TORSION FOOT–LATCH 1
11 140154 SPACER, .25X.38X.31 1
12 579210 WASHER, M6 FLAT 1
13 605078 BUSHING, FOOT–LATCH
14 604808 LATCH, FOOT BASE 1
15 605079 SCREW, M8X1.25X35 TRSPHL 2
∇ 16 630450 DWHEEL, 76 DIA X 22 WD RUBBER 2
Y 17 103070 BUSHING, WHEEL 2
18 230754 DCAM, HEIGHT ADJUSTER 1
19 604812 GASKET, FOAM BRUSH MTR 1
∇ ASSEMBLY / CONJUNTO
Y INCLUDED IN ASSEMBLY / INCLUIDO EN EL CONJUNTO
D RECOMMENDED STOCK ITEMS / ARTICULOS RECOMENDADOS
ADJUSTMENT
PARTS LIST
LISTA DE PIEZAS
REF PART # DESCRIPTION QTY.
∇ 20 604803 DBRUSH ASSEMBLY 1
Y 21 140125 DBEARING 2
Y 22 230429 DBLOCK, BEARING 2
Y 23 230348 DPULLEY, BRUSH (DOUBLE ”V”) 1
24 230349 DBELT, BRUSH DRIVE 2
∇ 501086 DASM., BASE ROLLER & BRACKET 1
Y 25 605317 ROLLER, BASE HOUSING FRONT 1
Y 26 230753 BRACKET, ROLLER 1
Y 27 140436 SPRING, TORSION HEIGHT
Y 28 140710 RIVET, AXLE 3/8 X 1.6 2
Y 29 230769 BRACKET, ROLLER PIVOT 1
30 140264 SCREW, # 8 –32X1/4 TRSPHL 2
1
31 606733 SHOE, BASE 14” 1
32 140297 NUT , M5 HEX 1
33 606694 SCREW, M4X.7X8 TRSPHL 5
34 140826 SCREW, #6X3/4 PANPHL 2
35 606691 LABEL, HEIGHT ADJUSTMENT 1
36 608071 SPRING, EXT .50X5.00X.067 1
37 606507 SCREW, M8X1.25X25 PANPHL 1
38 230347 PULLEY, MOTOR (DOUBLE ”V”) 1
39 130398 DMOTOR, BRUSH DRIVE (120V) 1
40 N/A LABEL, CSA 1
41 N/A LABEL, CRI 1
ADJUSTMENT
1
ViperR Upright Vacuum Cleaner (06–03)
31
Page 32

OPTIONS
Home
Find...
Go To..
OPCIONES
OPTIONAL ATTACHMENT KIT
JUEGO DE ADITAMENTOS OPCIONALES
1
3
REF PART # DESCRIPTION QTY.
∇ 604802 DKIT, ATTACHMENT 1
Y 1 609194 UPHOLSTERY TOOL 1
Y 2 609196 ADAPTOR 1
Y 3 609193 DUSTING BRUSH 1
Y 4 609195 EXTENSION WAND 1
2
4
REPLACEMENT BAGS
BOLSAS DE REPUESTO
1
2
REF PART # DESCRIPTION QTY.
1 611787 DBAG, PAPER (CARTON OF 100) 1
2 900034 DBAG, CLOTH 1
∇ ASSEMBLY / CONJUNTO
Y INCLUDED IN ASSEMBLY / INCLUIDO EN EL CONJUNTO
D RECOMMENDED STOCK ITEMS / ARTICULOS RECOMENDADOS PARA
MANTENER EN EXISTENCIA
32
ViperR Upright Vacuum Cleaner (06–03)
 Loading...