

Page 1
!!!"#$%&%#'"()*+!,&()*,
-,.%'/,012)301#0)43(/15641.,/1'3##)0/15/
78 !"#$%&'()'*
9:;<=>>99
Page 2

!"#"$%$&'()(*+),*-$./)+)01$2+-345'()31$6787
9++$5):/41$5-1-5;-<7$=0-3)>)3?4)'(1$?5-$1@A,-34$4'$3/?(:-$B)4/'@4$
('4)3-7$C5?<-D?5*1$?5-$4/-$05'0-54E$'>$&'()(*+),*-$./)+)01$2+-345'()31$
6787$'5$4/-)5$5-10-34);-$'B(-517
./)+)01$5-1-5;-1$4/-$5):/4$4'$3/?(:-$05'<@341$?4$?(E$4)D-$B)4/'@4$
A-)(:$'A+):-<$4'$?<,@14$-?5+)-5$1@00+)-1$?33'5<)(:+E7$C/-$D?4-5)?+$)($4/-$
@1-5$D?(@?+$)1$A-+)-;-<$?<-F@?4-$>'5$4/-$)(4-(<-<$@1-$'>$4/-$1E14-D7$
G>$4/-$05'<@34H$'5$)41$)(<);)<@?+$D'<@+-1$'5$05'3-<@5-1H$?5-$@1-<$>'5$
0@50'1-1$'4/-5$4/?($4/'1-$10-3)>)-<$/-5-)(H$3'(>)5D?4)'($'>$4/-)5$
;?+)<)4E$?(<$1@)4?A)+)4E$D@14$A-$'A4?)(-<7$./)+)01$B?55?(41$4/?4$4/-$
D?4-5)?+$)41-+>$<'-1$('4$)(>5)(:-$?(E$I()4-<$=4?4-1$0?4-(417$6'$>@54/-5$
B?55?(4E$)1$-J05-11-<$'5$)D0+)-<7
!"##"$%&
6'$3'D0'(-(41$?5-$@1-5K1-5;)3-?A+-7$6-;-5$'0-($'5$5-D';-$3';-51$
?(<$(-;-5$)(1-54$'A,-341$)($4/-$;-(4)+?4)'($1+'41$'5$)(1-5 4$'A,-341$('4$
1@)4?A+-$>'5$4/-$10-3)>)3$3'((-34'517$L-0?)51$D?E$'(+E$A-$<'(-$AE$
./)+)01$=-5;)3-$M-(45-1$?(<$'>>)3)?+$5-0?)51/'017$N?)+@5-$4'$<'$1'$1/?++$
;')<$?(E$B?55?(4EH$14?4-<$'5$)D0+)-<7$9(E$'0-5?4)'($-J05-11+E$
05'/)A)4-<$)($4/)1$D?(@?+H$?(E$?<,@14D-(41H$'5$?11-DA+E$05'3-<@5-1$
('4$5-3'DD-(<-<$'5$?@4/'5)1-<$)($4/)1$D?(@?+$1/?++$;')<$4/-$
B?55?(4E7
'()*+,-."#"-%*#(/%(-/
C/)1$OMP$05'<@34$/?1$?$/):/$(@DA-5$'>$3'+'@5$0)J-+17$9+4/'@:/$)4$/?1$
->>-34);-$0)J-+1$'>$QQHQQQR$'5$D'5-H$A+?3*$<'41$'5$A5):/4$0')(41$'>$
+):/4$S5-<H$:5--($'5$A+@-T$D?E$?00-?5$3'(14?(4+E$'($4/-$135--(7C/)1$)1$
?$145@34@5?+$05'0-5 4E$'>$4/-$<)10+?E$SB)4/)($3'DD'($)(<@145E$
14?(<?5<1T$?(<$)1$('4$?$D?+>@(34)'(7
01*$,/23#-*,/24%5"#*
C/)1$4-+-;)1)'($3'(4?)(1$'0-($1'@53-$1'>4B?5-7$./)+)01$/-5-AE$'>>-51$4'$
<-+);-5$'5$D?*-$?;?)+?A+-H$@0'($5-F@-14H$>'5$?$3/?5:-$('$D'5-$4/?($
4/-$3'14$'>$0/E1)3?++E$0-5>'5D)(:$1'@53-$<)145)A@4)'(H$?$3'D0+-4-$
D?3/)(-5-?<?A+-$3'0E$'>$4/-$3'55-10'(<)(:$1'@53-$3'<-$'($?$
D-<)@D$3@14'D?5)+E$@1-<$>'5$1'>4B?5-$)(4-53/?(:-7$C/)1$'>>-5$)1$;?+)<$
>'5$?$0-5)'<$'>$U$E-?51$?>4-5$4/-$<?4-$'>$0@53/?1-$'>$4/)1$05'<@347$C'$
'A4?)($4/-$1'@53-$3'<-H$B5)4-$4'
V0-($='@53-$C-?DH$./)+)01$2+-345'()31
W):/$C-3/$M?D0@1$X+<$WCMKYY
Z[""$92$2)(</';-(
C/-$6-4/-5+?(<1
2KD?)+\$'0-(71'@53-]0/)+)0173'D
6271+("$-*,5(%.,89:
&'()(*+),*-$./)+)01$2+-345'()31$6787$D?(@>?34@5-1$?(<$1-++1$D?(E$
05'<@341$4?5:-4-<$?4$3'(1@D-51H$B/)3/H$+)*-$?(E$-+-345'()3$?00?5?4@1H$
)($:-(-5?+$/?;-$4/-$?A)+)4E$4'$-D)4$?(<$5-3-);-$-+-345'D?:(-4)3$1):(?+1
7$
V(-$'>$./)+)01^$+-?<)(:$X@1)(-11$.5)(3)0+-1$)1$4'$4?*-$?++$(-3-11?5E$
/-?+4/$?(<$1?>-4E$D-?1@5-1$>'5$'@5$05'<@341H$4'$3'D0+E$B)4/$?++$
?00+)3?A+-$+-:?+$5-F@)5-D-(41$?(<$4'$14?E$B-++$B)4/)($4/-$2_N$
14?(<?5<1$?00+)3?A+-$?4$4/-$4)D-$'>$05'<@3)(:$4/-$05'<@3417$./)+)01$)1$
3'DD)44-<$4'$<-;-+'0H$05'<@3-$?(<$D?5*-4$05'<@341$4/?4$3?@1-$('$
?<;-51-$/-?+4/$->>-3417$./)+)01$3'(>)5D1$4/?4$)>$)41$05'<@341$?5-$/?(<+-<$
05'0-5+E$>'5$4/-)5$)(4-(<-<$@1-H$4/-E$?5-$1?>-$4'$@1-$?33'5<)(:$4'$
13)-(4)>)3$-;)<-(3-$?;?)+?A+-$4'<?E7$./)+)01$0+?E1$?($?34);-$5'+-$)($4/-$
<-;-+'0D-(4$'>$)(4-5(?4)'(?+$2_N$?(<$1?>-4E$14?(<?5<1H$-(?A+)(:$
./)+)01$4'$?(4)3)0?4-$>@54/-5$<-;-+'0D-(41$)($14?(<?5<)1?4)'($>'5$-?5+E$
)(4-:5?4)'($)($)41$05'<@3417
8;<,#*=3+"%(2$
C/)1$?00?5?4@1$D--41$0-5>'5D?(3-$35)4-5)?$9$>'5$2=P7$G($3?1-$4/-$
?00?5?4@1$<'-1$('4$5-3';-5$)($PO69$D'<-$<@-$4'$-+-345'14?4)3$
<)13/?5:-H$@1-5$)(4-5>-5-(3-$)1$5-F@)5-<7
9"($/,43/*,>?@,2$+&A
C/)1$C8$)1$>)44-<$B)4/$?($?005';-<$D'@+<-<$0+@:7$=/'@+<$)4$A-3'D-$
(-3-11?5E$4'$5-0+?3-$4/-$D?)(1$>@1-H$4/)1$D@14$A-$5-0+?3-<$B)4/$",43/*,
24,%.*,/"7*,B"+3*,"/,($C(-"%*C$'($4/-$0+@:$S-J?D0+-$#"9T7
#7$L-D';-$>@1-$3';-5$?(<$>@1-7
!7$C/-$5-0+?3-D-(4$>@1-$D@14$3'D0+E$B)4/$X=$#U[!$?(<$/?;-$4/-$
9=C9$?005';?+$D?5*7$G>$4/-$>@1-$)1$+'14H$3'(4?34$E'@5$<-?+-5$)($'5<-5$
4'$;-5)>E$4/-$3'55-34$4E0-7
U7$L->)4$4/-$>@1-$3';-57
G($'5<-5$4'$D?)(4?)($3'(>'5D)4E$4'$4/-$2_M$<)5-34);-H$4/-$D?)(1$0+@:$
'($4/)1$05'<@34$D@14$('4$A-$<-4?3/-<$>5'D$4/-$D?)(1$3'5<7$
621&#(=.%/
82=9H$NP_G$?(<$4/-$82=9$_'@(4)(:$M'D0+)?(4$+':'$?5-$45?<-D?5*1$
'>$4/-$8)<-'$2+-345'()31$=4?(<?5<1$911'3)?4)'(7
_?(@>?34@5-<$@(<-5$+)3-(1-$>5'D$P'+AE$O?A'5?4'5)-17$`P'+AE^H$`.5'$
O':)3^$?(<$4/-$<'@A+-$P$1EDA'+H$?5-$45?<-D?5*1$'>$P'+AE$
O?A'5?4'5)-17
a)(<'B1$_-<)?$)1$-)4/-5$?$5-:)14-5-<$45?<-D?5*$'5$45?<-D?5*$'>$
_)35'1'>4$M'50'5?4)'($)($4/-$I()4-<$=4?4-1$?(<b'5$'4/-5$3'@(45)-17
PO69cH$4/-$PO69$+':'$?(<$P6O9$M-54)>)-<d$?5-$45?<-D?5*1H$
1-5;)3-$D?5*1H$'5$3-54)>)3?4)'($D?5*1$'>$4/-$P):)4?+$O);)(:$6-4B'5*$
9++)?(3-7
9++$'4/-5$5-:)14-5-<$?(<$@(5-:)14-5-<$45?<-D?5*1$?5-$4/-$05'0-5 4E$'>$
4/-)5$5-10-34);-$'B(-517
Page 3
!"#$%&'
!"#"$%&'()*+*,-'.//0123*1"'4,,+*523*0/-'6787'9"5+2#"-'3)23'3)*-'
3"+"1*-*0/'*-'*/'50:,+*2/5"';*3)'3)"'"--"/3*2+'#"<=*#":"/3-'2/9'
03)"#'#"+"12/3',#01*-*0/-'0>'?*#"53*1"'@AAABCBDE7
()*+&,'
!*"#:*3'"#F+G#3'()*+*,-'.//0123*1"'4,,+*523*0/-'6787'92--'-*5)'
92-'H"#/-")I"#G3'*/'J$"#"*/-3*::=/I':*3'9"/'I#=/9+"I"/9"/'
4/>0#9"#=/I"/'=/9'9"/'K$#*I"/'"*/-5)+GI*I"/'L"-3*::=/I"/'
9"#'M*5)3+*/*"'@AAABCBDN'$">*/9"37
-./"0/%&
(2#'+2',#O-"/3"'()*+*,-'.//0123*1"'4,,+*523*0/-'6787'9O5+2#"'<="'
5"3'2,,2#"*+'9"'3O+O1*-*0/'"-3'50/>0#:"'2=P'"P*I"/5"-'
"--"/3*"++"-'"3'2=P'2=3#"-'9*-,0-*3*0/-',"#3*/"/3"-'9"'+2'
9*#"53*1"'@AAABCBED7
1)2).$/"2&
!*"#$*Q'1"#F+22#3'()*+*,-'.//0123*1"'4,,+*523*0/-'6787'923'9"R"'
3"+"1*-*"'*/'01"#""/-3"::*/I'*-':"3'9"'"--"/3*S+"'"*-"/'"/'9"'
2/9"#"'#"+"12/3"'$",2+*/I"/'12/'#*5)3+*Q/'@AAABCBDN7
!&3/45$
(0#':"9*0'9" '+2' ,#"-"/3"'()*+*,- '.// 0123*1"'4,,+* 523* 0/-' 6787'
9"5+2#2'<="'"+'3"+"1*-0#'5=:,+"'50/'+0-'#"<=*-*30-'"-"/5*2+"-'%'
5=2+"-<=*"#2'03#2-'9*-,0-*5*0/"-'2,+*52$+"-'0'"P*I*$+"-'9"'+2'
?*#"53*12'@AAABCBED7
6+/$%/"5
E0/'+2',#"-"/3"'()*+*,-'.//0123*1"'4,,+*523*0/-'6787'9*5)*2#2'
5)"'<="-30'3"+"1*-0#"'T'50/>0#:"'2*'#"<=*-*3*'"--"/R*2+*'"9'2++"'
2+3#"'9*-,0-*R*0/*',"#3*/"/3*'-32$*+*3"'92++2'9*#"33*12'@AAABCBED7
75. + *#*8&
()*+*,-'.//0123*1"'4,,+*523*0/-'6787'9"5+2#2'<="'"-3"'3"+"1*-0#'
"-3U'50/>0#:"'50:'0-'#"<=*-*30-'"--"/5*2*-'"'0=3#2-'
9*-,0-*VW"-'92'?*#"53*12'@AAABCBED7
(ƪƪƦƬƨƩƛ
ƍƆƔƈƎƑƂƒƐƕƓƂƈ()*+*,-'.//0123*1"'4,,+*523*0/-'6787
ƅƈƌƙƎƆƊƐƔƊ+ƔƈƌƆžƒƂƓƈƓƕƍƍƐƒƖƙƎƆƔƂƊƑƒƐƓ
ƔƊƓƐƕƓƊƙƅƆƊƓƂƑƂƊƔƈƓƆƊƓƋƂƊƔƊƓƌƐƊƑƆƓƓƗƆƔƊƋƆƓ
ƅƊƂƔƂƏƆƊƓƔƈƓƐƅƈƄƊƂƓƆƋ
9:)"&;/
!G#:"9'*/3%I2#'()*+*,-'.//0123*1"'4,,+*523*0/-'6787'233'9"//2'
X8'-3Y#'*'Z1"#"/--3G::"+-"':"9'9"'1G-"/3+*I2'"I"/-F2,-F#21'
05)'Z1#*I2'#"+"12/32'$"-3G::"+-"#'-0:'>#2:IY#'21'9*#"F3*1'
@AAABCBDN7
15.&;
()*+*,-'.//0123*1"'4,,+*523*0/-'6787'"#F+[#"#')"#1"9'23'=3-3%#"3'
X8'"#'*'-2:-12#':"9'9"'I#=//+"II"/9"'F#21'0I'\1#*I"'
#"+"12 / 3"'F# 21'*'9* #"F3*1 ' @AAAB CBDH7
(/"&;
]/9"#3"I/"9"'()*+*,-'.//0123*1"'4,,+*523*0/-'6787'"#F+[#"#'
)"#1"9&'23'9"33"'X8''01"#)0+9"#'9"'1[-"/3+*I"'F#21'0I'\1#*I"'
#"+"12 / 3"'F# 21'*'9* #"F3*1 ' @AAAB CBDH7
9*5<%
()*+*,-'.//0123*1"'4,,+*523*0/-'6787'12F==3322'3G3"/'"33G'3G:2G'
3"+"1*-*0'0/'9*#"F3**1*/'@AAABCBD^'0+""++*-3"/'1223*:=-3"/'Q2'-*3G'
F0-F"1*"/'9*#"F3**1*/':=*9"/'")30Q"/':=F2*/"/7
75$ &;%
)LUPD3KLOLSV,QQRYDWLYH$SSOLFDWLRQV19QLQLHMV]\PRőZLDGF]D
ůH¶7HOHZL]RU·MHVW]JRGQ\]]DVDGQLF]\PLZ\PRJDPLRUD]
SR]RVWDã\PLVWRVRZQ\PLSRVWDQRZLHQLDPL'\UHNW\Z\
@AAABCBDE7
6+/$%/"5=
_*-3":2'X8';*#"+"-./>0#:23*0/*'-=++"'/0#:23*1"'2,,+*52$*+*
("#'*+':"#523 0'*3 2+*2 /0
XVRSULYDWR'HFUHWROHJLVODWLYR&RGLFHGHOOH
FRPXQLFD]LRQHHOHWWURQLFKH,QSDUWLFXODUHO·DUWLFROR
-,"5*>*52'*'52-*'*/'5=*'0550##"'#*5)*"9"#"'=/'2=30#*RR2R*0/"'
JHQHUDOHPHQWUHO·$UWLQGLFDLFDVLLQFXLO·XWLOL]]RqOLEHUR
UHJRODPHQWD]LRQHGHOODIRUQLWXUDGHOO·DFFHVVR5/$1GHO
,=$$+*50'2++"'#"3*'"'2*'-"#1*R*',=$$+*5*'9*'50:=/*52R*0/"'
"+"33#0/*52'`"-7'-*-3":2'X8';*#"+"--a7'?"5#"30':*/*-3"#*2+"'
HUHODWLYHPRGLILFKHH$UWDXWRUL]]D]LRQH
I"/"#2+"',"#'#"3*'"'-"#1*R*'9*'50:=/*52R*0/"'"+"33#0/*5*a'9"+'
E09*5"'9"++"'50:=/*52R*0/"'"+"33#0/*5)"
XVRSULYDWR'HFUHWRPLQLVWULDOH
>/#?/.
4+=+b#033&'()*+*,-'.//0123*1"'4,,+*523*0/-'6787'/%*+23F0R0:&')0I%'
DWHOHYt]LyPHJIHOHODYRQDWNR]yDODSYHWʼnN|YHWHOPpQ\HNQHNpV
D](&LUiQ\HOYHJ\pEHOʼntUiVDLQDN
ĆHVN\
3KLOLSV,QQRYDWLYH$SSOLFDWLRQV19WtPWRSURKODåXMHçHWHQWR
WHOHYL]RUMHYHVKRGĖVH]iNODGQtPLSRçDGDYN\DGDOåtPL
SŏtVOXåQîPLXVWDQRYHQtPLVPĖUQLFH(6
9$5:)"&;?
3KLOLSV,QQRYDWLYH$SSOLFDWLRQV19WîPWRY\KODVXMHçHWHQWR
WHOHYt]RUVSĴŀD]iNODGQpSRçLDGDYN\DYåHWN\SUtVOXåQp
=-32/01"/*2'_:"#/*5"'@AAABCBD_7
9$5:)"&;5
()*+*,-'.//0123*1"'4,,+*523*0/-'6787'*RQ21+Q2&'92'Q"'32'3"+"1*R0#'1'
VNODGX]ELVWYHQLPL]DKWHYDPLLQRVWDOLPLUHOHYDQWQLPLGRORĈLOL
9*#"F3*1"'@AAABCBD_7
!)&+%
cG"-0+"12I2'F*//*32$'()*+*,-'.//0123*1"'4,,+*523*0/-'6787'
-"29:"'X"+"#'12-321=-3'9*#"F3**1*'@AAABCBDJ',W)*/W="3"+"'Q2'
/*:"323=9'9*#"F3 **1*-3'3=+"/"123"+"'3"*-3"+"'2-Q2F0) 2-3"+"'
-G3"3"+"7
@/+:%&;%
$UåR3KLOLSV,QQRYDWLYH$SSOLFDWLRQV19GHNODUĎND
¶7HOHYL]RUV·DWELOVW'LUHNWĦYDV(.EşWLVNDMüPSUDVĦEüP
XQFLWLHPDUWRVDLVWĦWDMLHPQRWHLNXPLHP
/LHWXYLŦ
d*=0'()*+*,-'.//0123*1"'4,,+*523*0/-'6787'9"F+2#=0Q2&'F29'e*-'
¶7HOHYL]RULXV·DWLWLQNDHVPLQLXVUHLNDODYLPXVLUNLWDV(%
?*#"F3%10-'/=0-3232-7
>/$+%
!2;/)"FF&'()*+*,-'.//0123*1"'4,,+*523*0/-'6787&'Q*99*FQ2#2'+*'92/'
¶7HOHYLVLRQ·MLNNRQIRUPDPDOĢWLĜLMLHWHVVHQ]MDOLXPD
SURYYHGLPHQWLRĢUDMQUHOHYDQWLOLKHPPILG'LUUHWWLYD
@AAABCBDE7
A&$)"&;/
+pUPHìOîVLU3KLOLSV,QQRYDWLYH$SSOLFDWLRQV19\ILUðYtDì
¶7HOHYLVLRQ·HUtVDPUPLYLìJUXQQNU|IXURJDìUDUNU|IXUVHP
I"#f2#'"#='b'3*+-F*,=/'@AAABCBDE7
$FRS\RIWKH'HFODUDWLRQRI&RQIRUPLW\LVDYDLODEOHDW
KWWSZZZSKLOLSVFRPVXSSRUW
D=#0,"
DE'?"5+2#23*0/'0>'E0/>0#:*3%
X)*-'"<=*,:"/3':2%'$"'0,"#23"9'*/'3)"'>0++0;*/I'D=#0,"2/
FRXQWULHV¬«
7KLVHTXLSPHQWFDQEHRSHUDWHGLQRWKHUQRQ(XURSHDQ
50=/3#*"-7
4X LD LN E! E^ Eg
?D ?c DD D_ H. HM
NL NM !] .D ._ .X
/, /7 /8 /9 hX 1/
6i 3/ (X Mi _D _c
6/ XM
Page 4

1
1.1
1.2
1.3
1.4
1.5
2
2.1
2.2
2.3
2.4
2.5
2.6
3
3.1
3.2
3.3
3.4
3.5
3.6
4
4.1
4.2
4.3
4.4
4.5
5
5.1
5.2
5.3
5.4
5.5
5.6
6
6.1
6.2
6.3
6.4
6.5
6.6
6.7
7
7.1
7.2
7.3
7.4
7.5
7.6
7.7
7.8
Contents
To begin 5
TV tour 5
Setting up 12
Keys on the TV 18
Register your TV 20
Help and support 21
Use your TV 22
Remote control 22
Menus 25
Watch TV 29
Watch a connected device 33
Ambilight 34
Net TV 36
More on ... 39
Closed Caption - CC 39
Interactive TV 40
Multimedia 41
Locks and timers 43
Audio languages 44
Universal access 45
Setup 46
Picture, Sound, Ambilight 46
Channels 48
Network 49
Devices 50
Software 52
Connections 53
First connections 53
About cables 54
Connect devices 56
Connect more devices 64
Network 68
3D 70
Troubleshooting 71
Contact information 71
TV and remote control 72
TV channels 73
Picture and sound 74
Devices 75
Multimedia 76
Network 77
Specifications 78
Software 78
Environmental 79
Power and reception 80
Display and sound 81
Display resolutions 82
Multimedia 83
Connectivity 84
Dimensions and weights 85
Index 86
Contents 4
Page 5
1
1.1
To begin
TV tour
Cinema 21:9
This Cinema 21:9 TV perfectly matches the original movie format
and is equipped with a full High Definition (HD) display. A full HD
2560x1080p, the highest resolution of HD sources.
This display offers a brilliant flickerfree progressive scan picture with
optimum brightness and superb colours. Advanced formatting
technology continuously analyses the incoming signals and
progressively stretches non 21:9 images to full screen and avoids
distortion.
The remote control
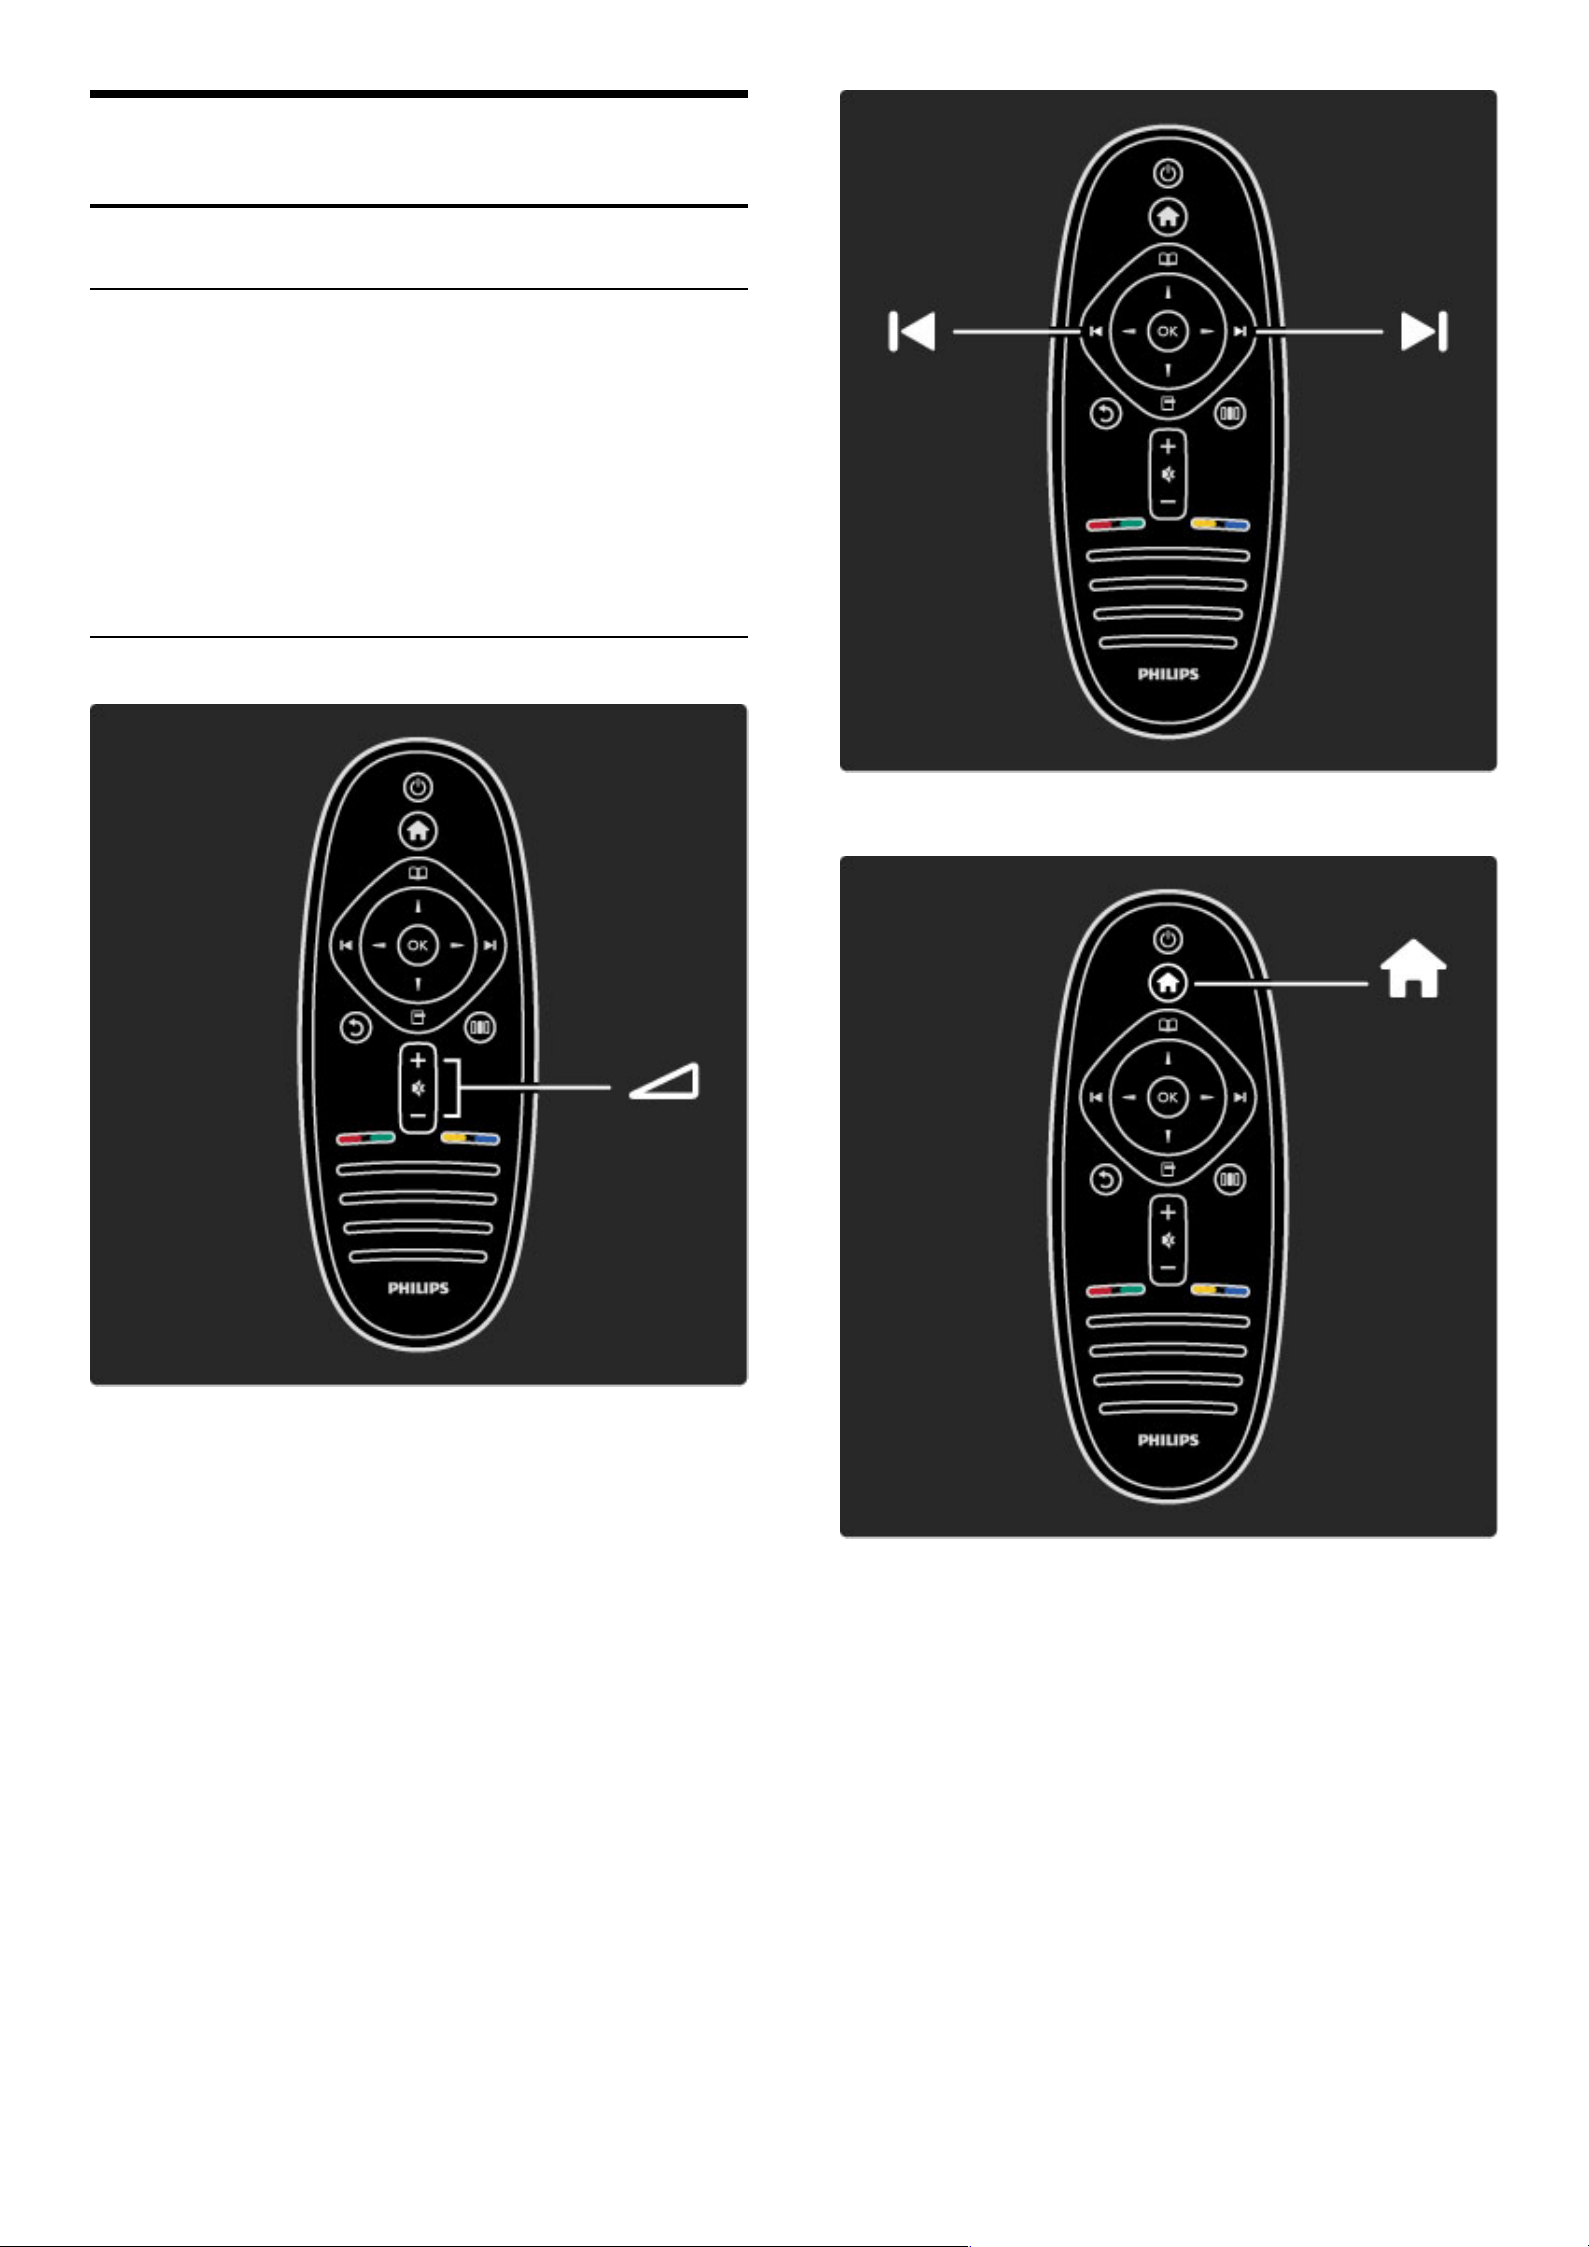
To adjust the volume.
To switch TV channels.
To open or close the Home menu h.
In the Home menu, you can start or stop a TV activity. Like watching
TV or watching a movie from a connected DVD player.
To begin / TV tour 5
Page 6

To open or close the Browse menu e.
In the Browse menu, you can open the Channel list or the TV
programme guide.
To open or close the Options menu o.
In the Options menu, you can select settings related to what is
shown on screen.
While you watch a channel, mark it as a favourite or stop the
slideshow of your photos shown on screen.
To open or close the Adjust menu s.
In the Adjust menu, you can quickly adjust some picture and sound
settings.
Back b.
With Back you go back to the previous TV channel or go one step
back in a menu.
6 To begin / TV tour
Page 7
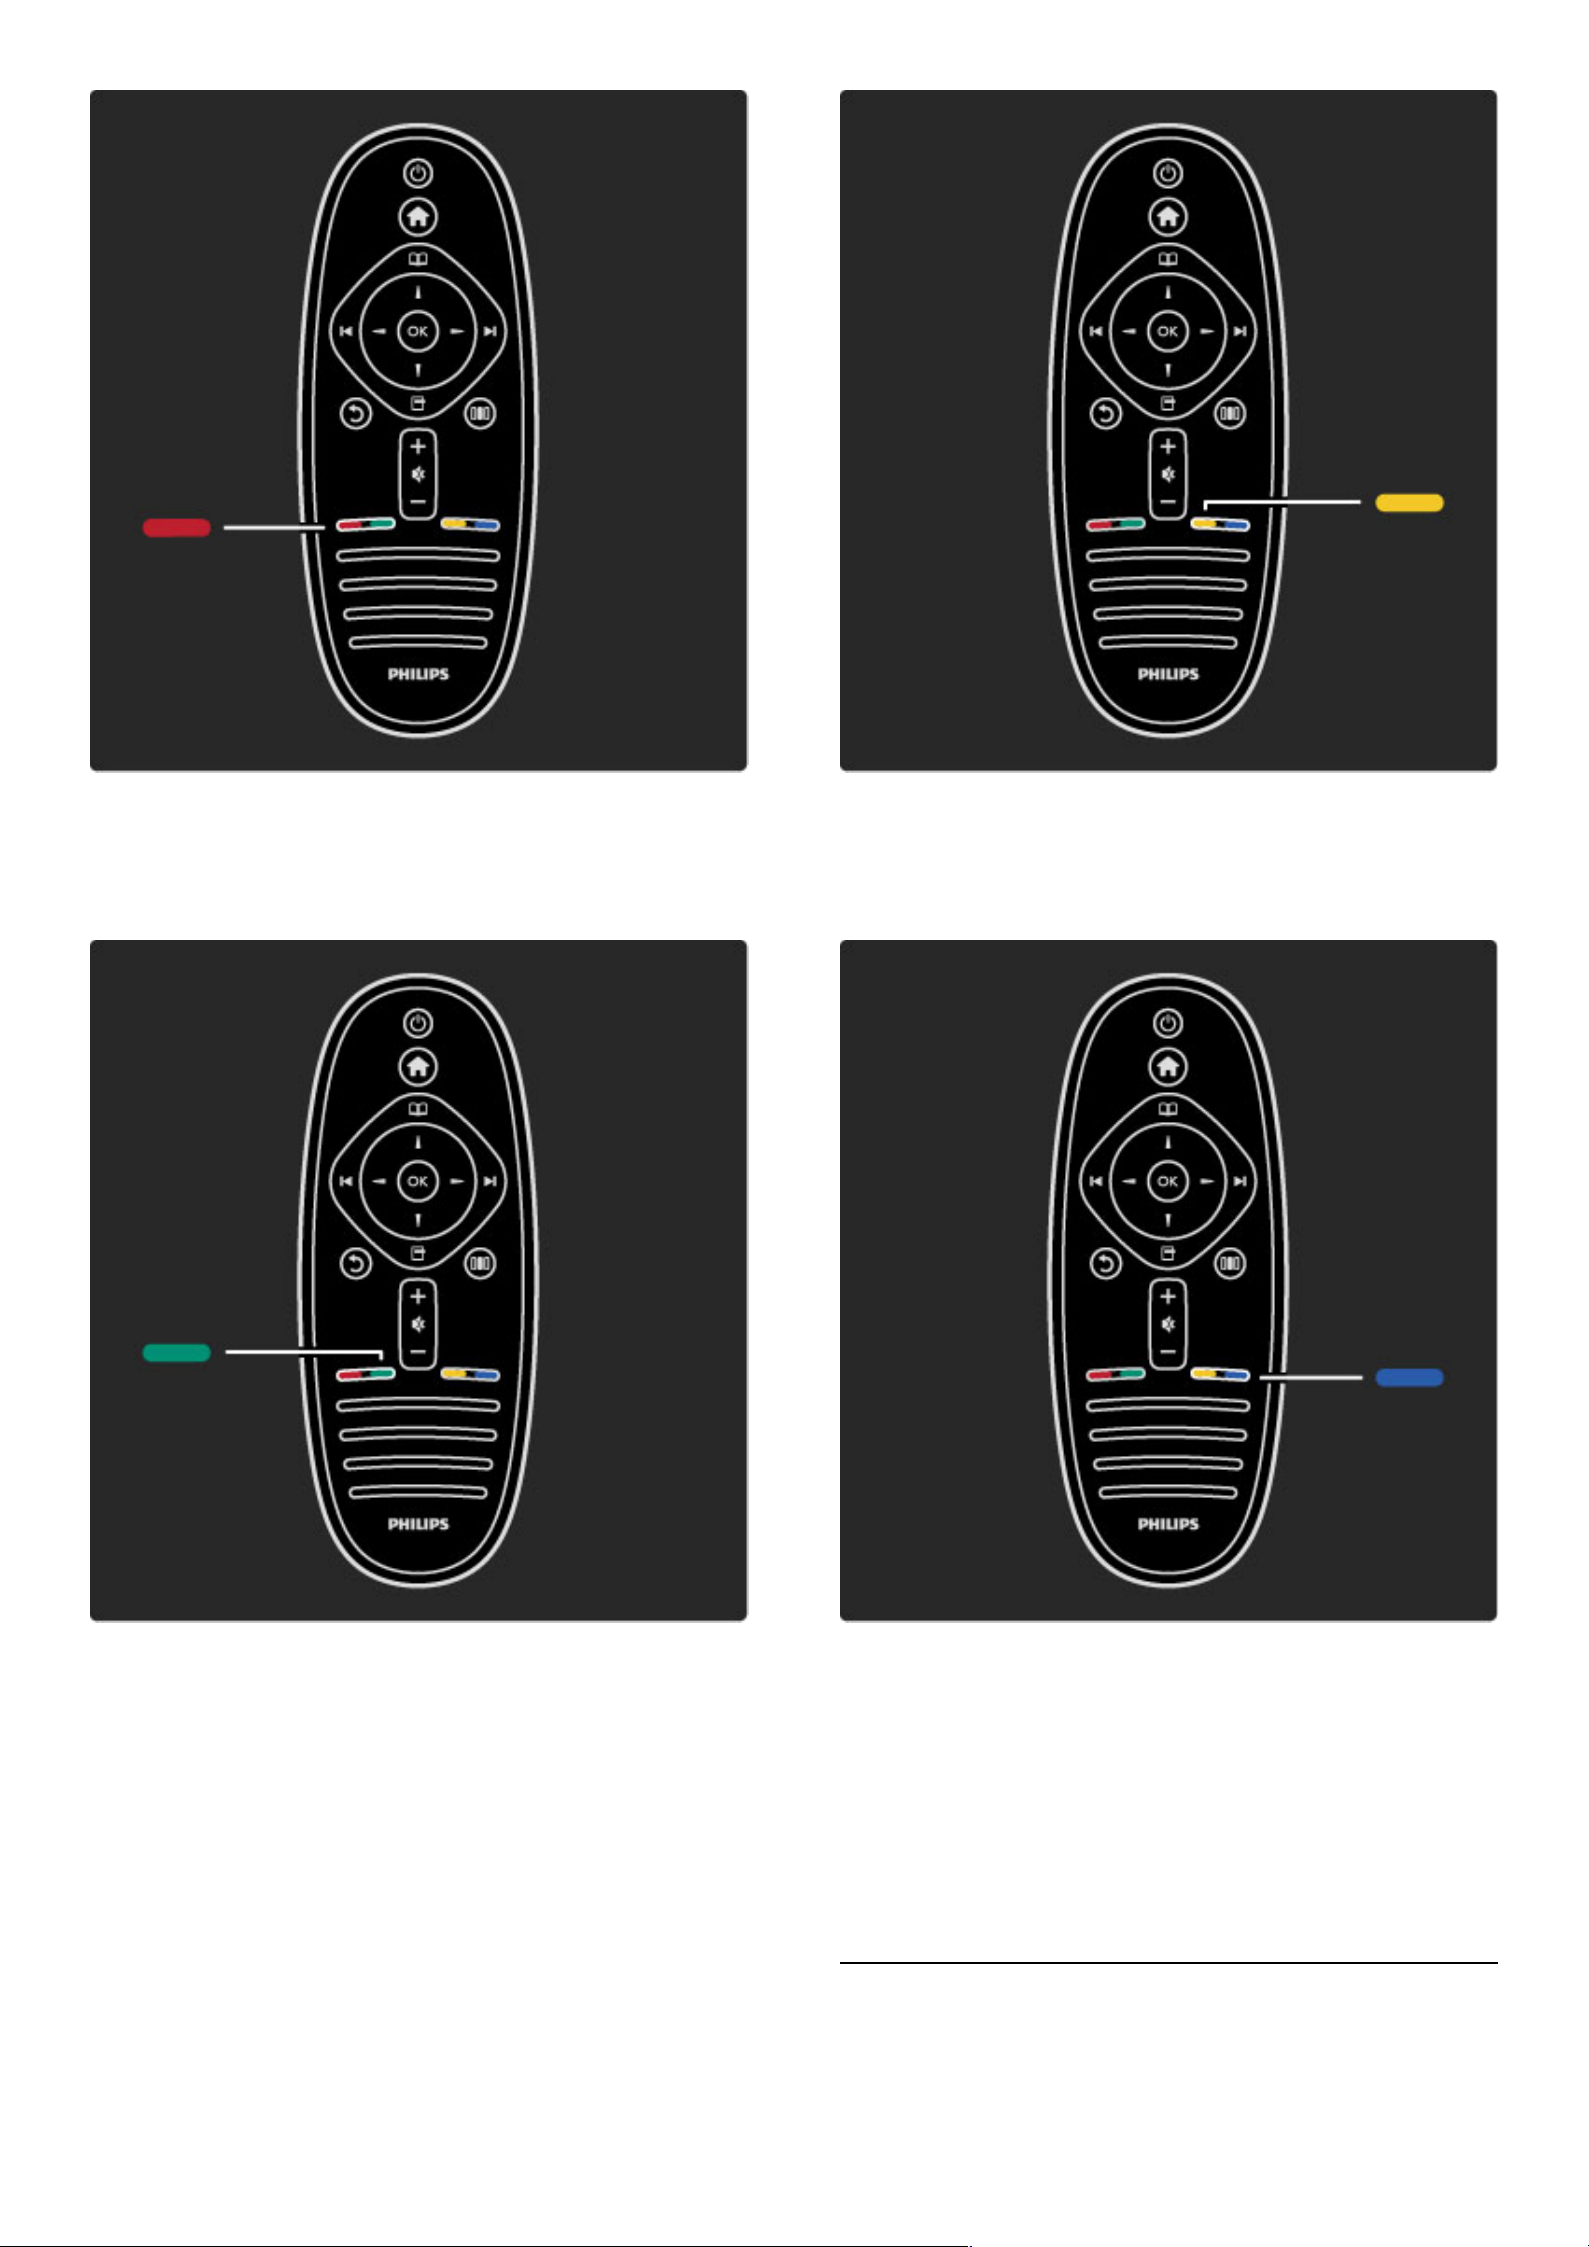
Red
With the red key, you select the red option or open digital
Interactive TV services or some TV demonstration clips.
Green
With the green key, you select the green option or the Eco settings.
Yellow
With the yellow key, you select the yellow option or the Help
menu.
Blue
With the blue key, you select the blue option.
Read more about the remote control in Help > Use your TV >
Remote control > Overview.
Or go to the ¬ Search page to look for any topic.
Press u to select the next TV tour.
The TV menus
To begin / TV tour 7
Page 8
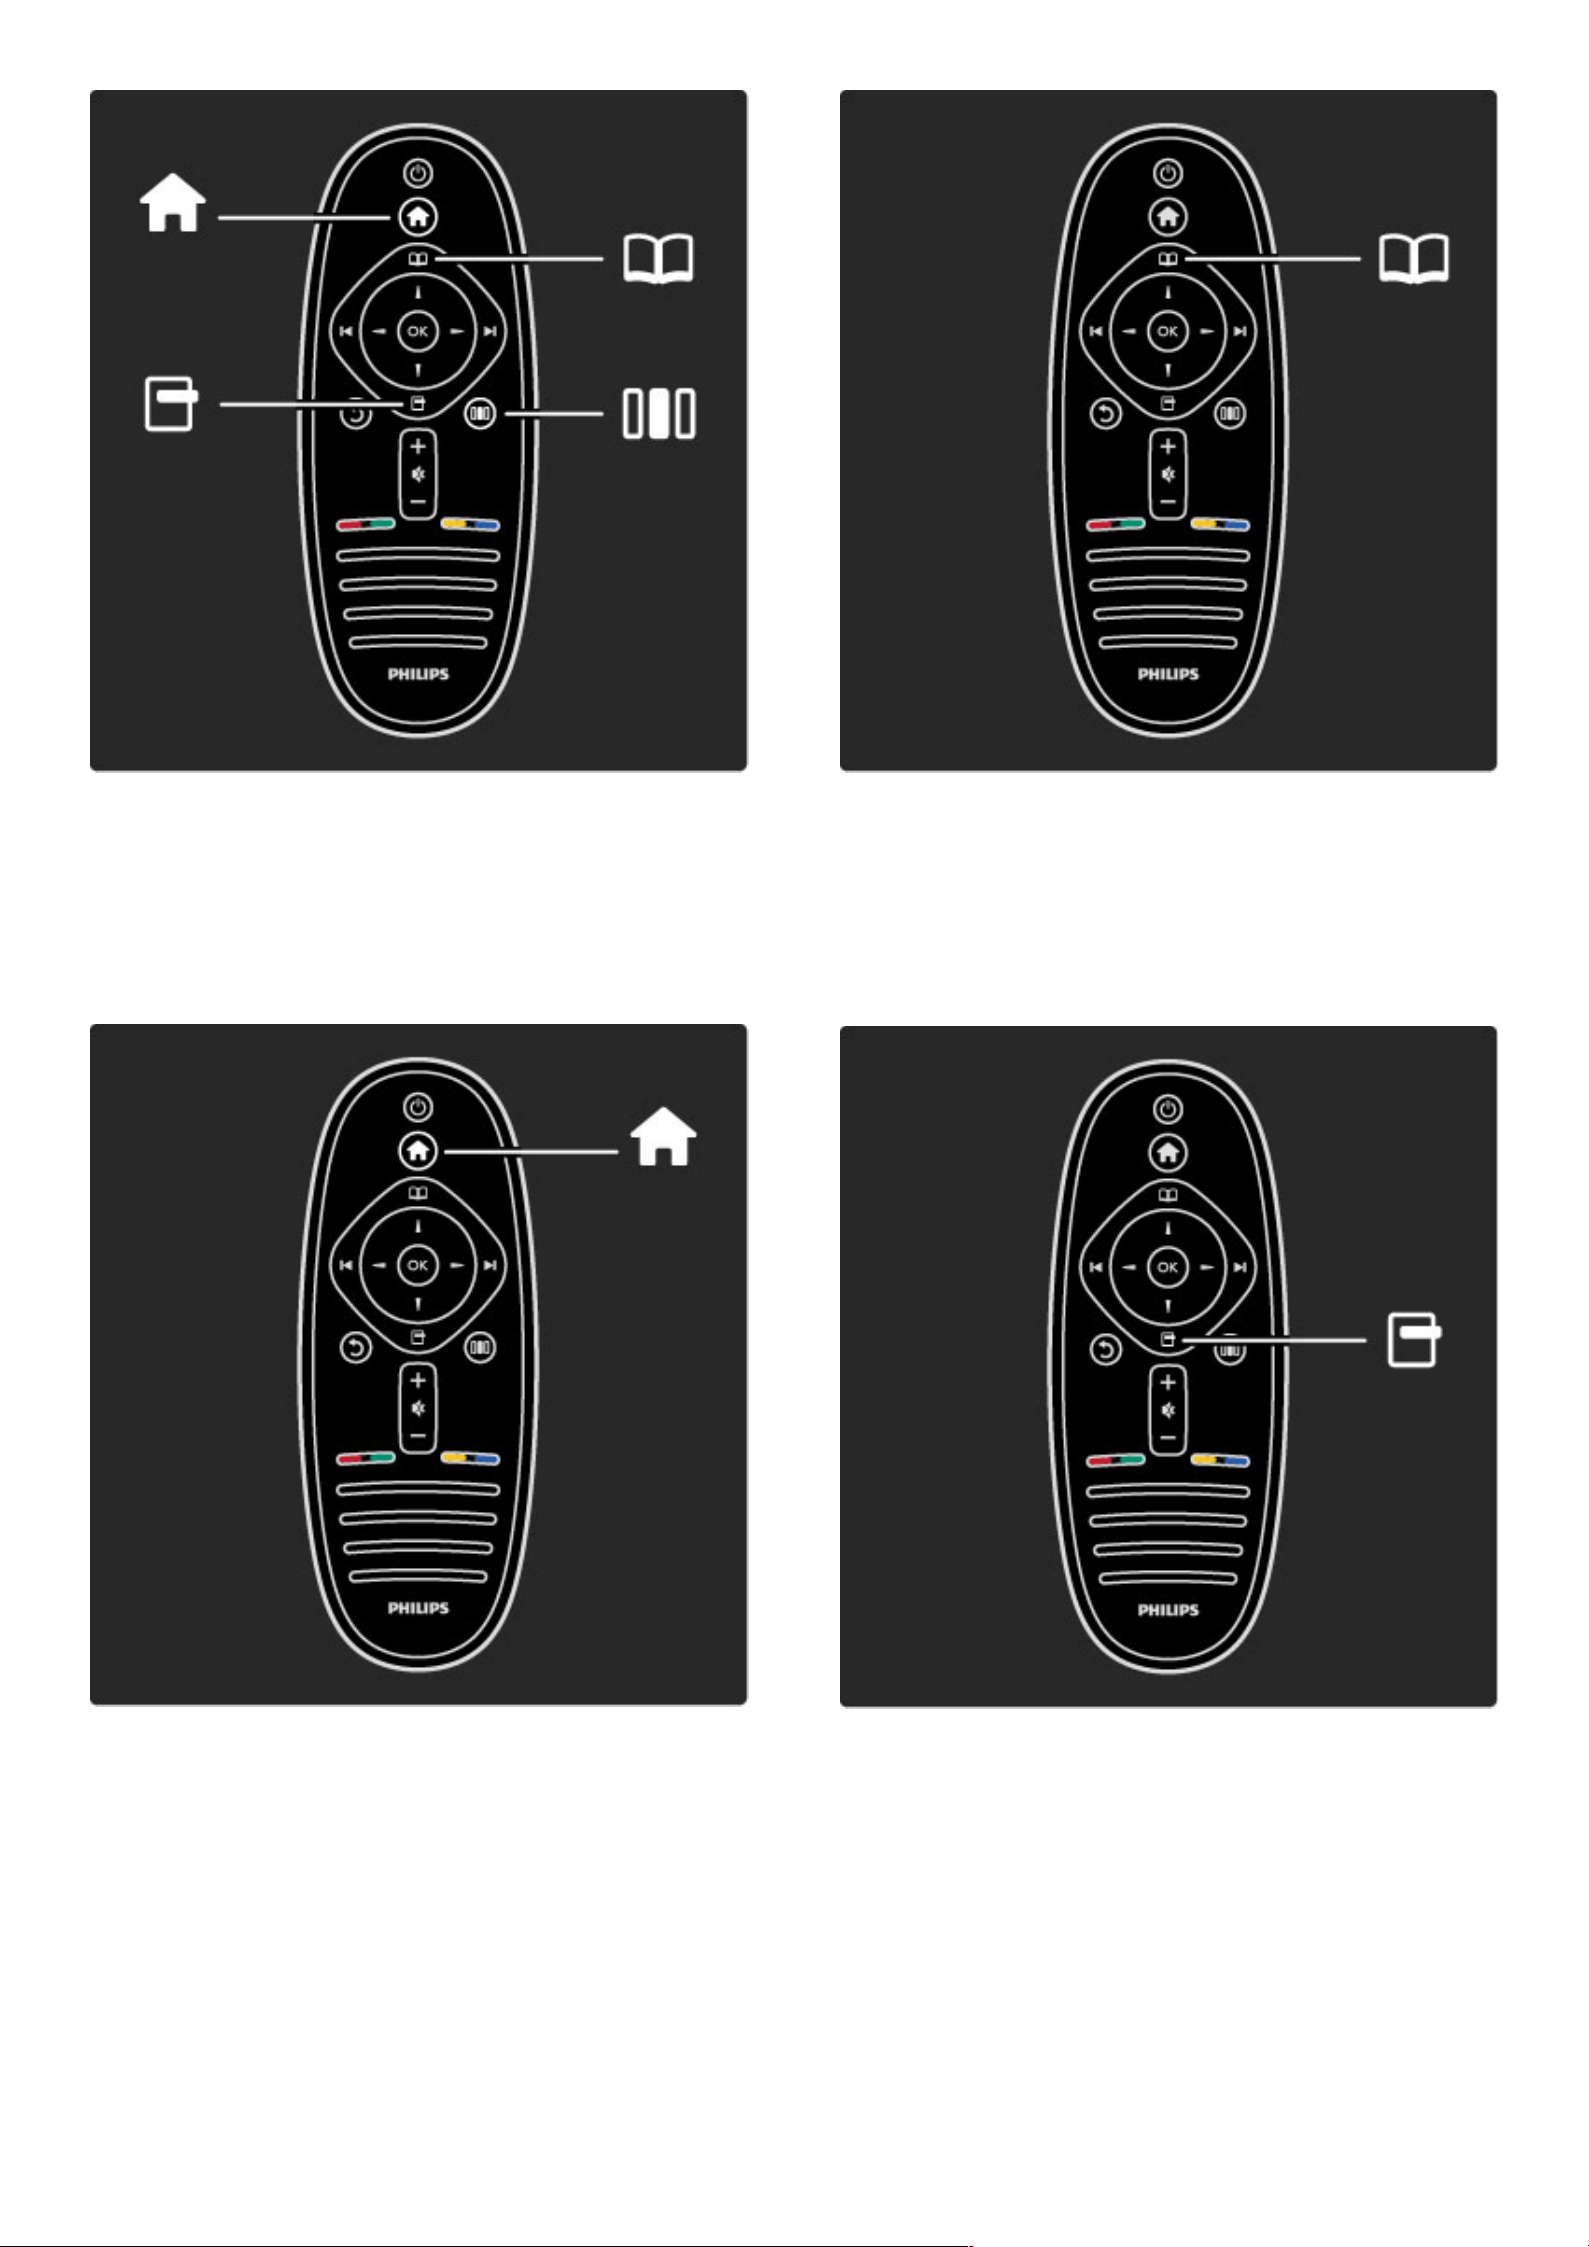
You can operate the TV with the 4 menus.
Discover and learn their specific uses.
• the Home menu
• the Browse menu
• the Options menu
• the Adjust menu
To open or close the Home menu h.
Open the Home menu as a starting point to operate the TV.
In the Home menu, you can start or stop a TV activity. Like watching
TV - Watch TV - or watching a movie from a connected DVD
player.
To open or close the Browse menu e.
With an activity started in the Home menu, open the Browse menu
to find the activity content.
While watching TV, you can find a channel in the Channel list or
open Text.
To open or close the Options menu o
Open the Options menu to select a setting related to what is shown
on screen.
While you watch a channel, mark it as a favourite but also open the
DVD disc menu while watching a DVD movie.
8 To begin / TV tour
Page 9

To open or close the Adjust menu s
Open the Adjust menu to quickly adjust the picture and sound
settings.
You can set the Smart picture setting to Game, which is ideal for
gaming, or change the Smart sound setting of the TV speakers.
Go to the ¬ Search page to look for any topic in Help.
Connecting devices
To connect a DVD, Blu-ray Disc player or game console, use the
HDMI connection.
The HDMI connection offers the best picture and sound quality and,
if your device has EasyLink (HDMI-CEC), the TV can add the device
in the Home menu automatically.
When a device is added in the Home menu, you can select it to
watch its programme. If the device has no EasyLink or you do not
use the HDMI connection, you must add the connected device in
the Home menu using Add your devices.
Read more about Add your devices in Help > Use your TV >
Menus > Home menu.
Read more about EasyLink in Help > Setup > EasyLink HDMI-CEC.
In the chapter Help > Connections, drawings like these help you to
connect most common devices.
To begin / TV tour 9
Page 10

High Definition TV
This TV can display High Definition programmes, but to enjoy HD
TV you need to get programmes in HD first. If you are not watching
HD programmes, the picture quality will be that of a normal TV.
Watch HD TV programmes from . . .
• a Blu-ray Disc player
• a Digital HD receiver connected with HDMI and with a
subscription to HD programmes
• Over-the-air HD broadcasts
• channels offering HD on a digital network
• an HD game console connected with HDMI and playing an HD
game
HD video clip
To experience the stunning sharpness and picture quality of HD TV,
you can start the High Definition video clip from the Home menu.
Press Home > Setup > Watch demos (on the second page of the
Setup menu).
Contact your dealer for more information.
Go to www.philips.com/support to find FAQs featuring the list of
HD channels or providers in your country.
Network and Net TV
PC network
You can connect the TV to your PC network. Enjoy your pictures,
videos and music files from your PC on a big TV screen.
Read more about PC Network in Help > Setup > Network.
10 To begin / TV tour
Page 11

Net TV
If you have an Internet connection on your home network, you can
connect to Net TV. Net TV offers you online movies, pictures,
music, infotainment, games and much more.
Read more about Net TV in Help > Use your TV > Net TV.
To begin / TV tour 11
Page 12
1.2 Setting up
Wall or stand mounting
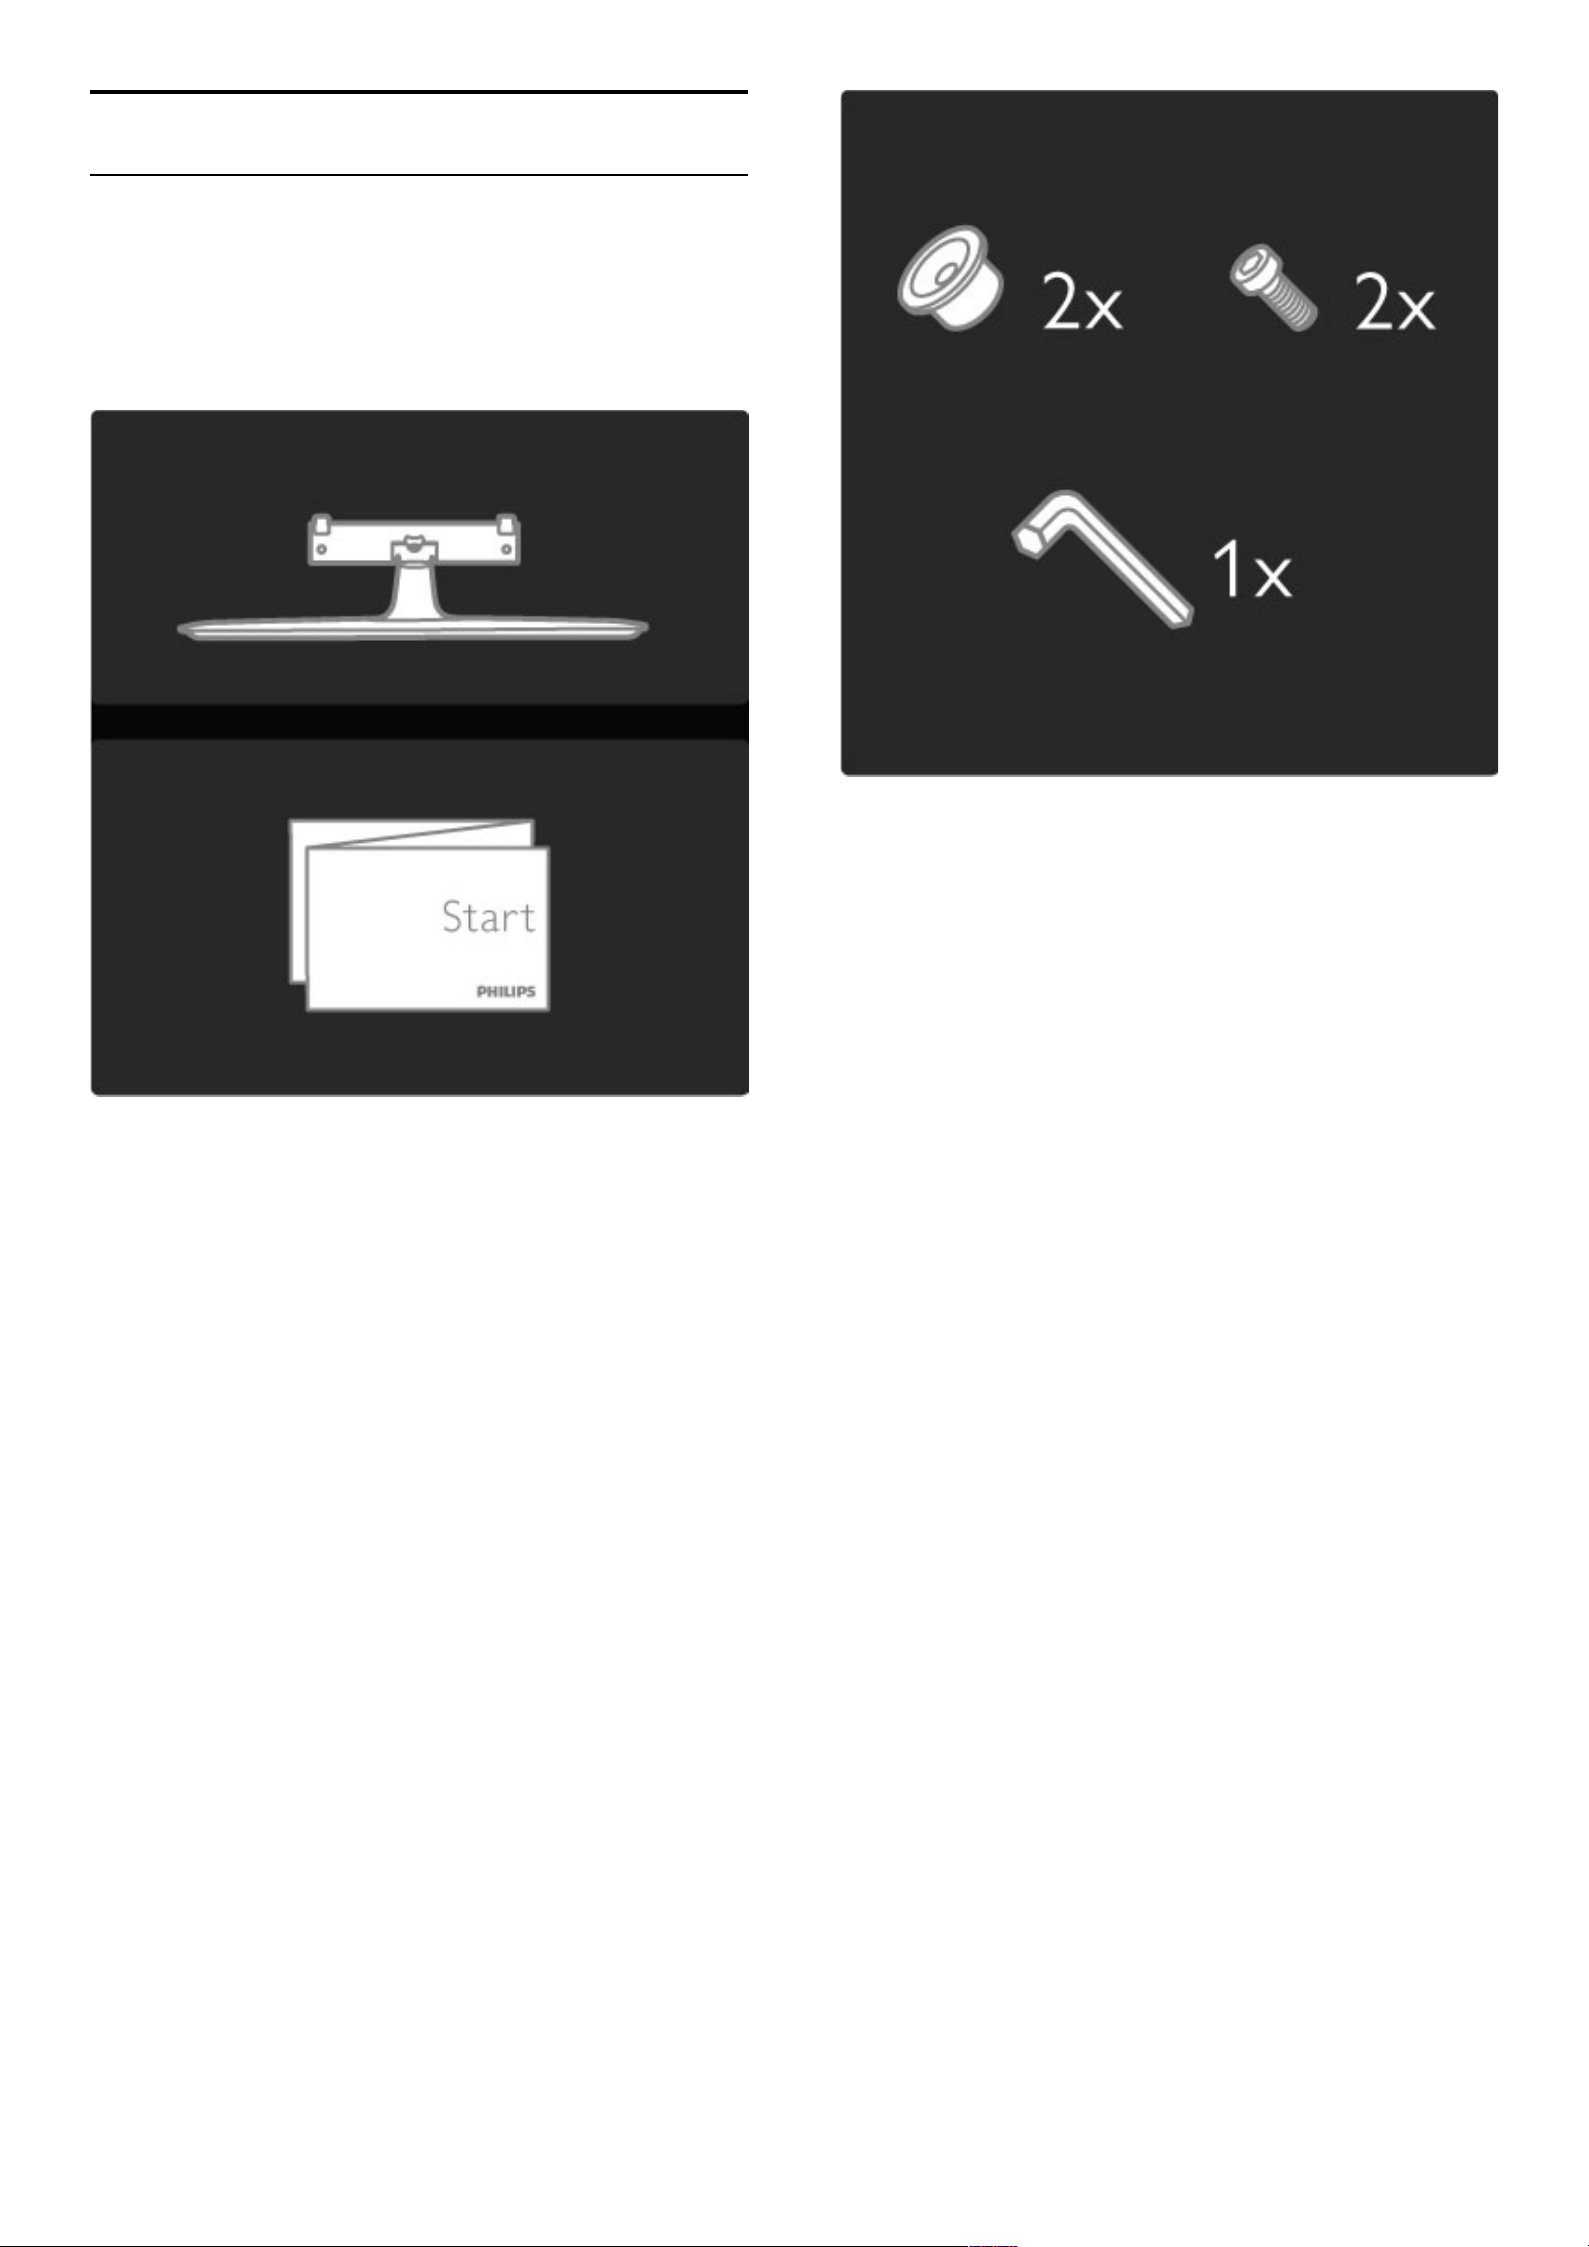
The 2-in-1 stand that comes with the TV, can be used as a table-top
stand or as a wall mount bracket. Instructions to mount the 2-in-1 stand
are also included in the printed Start guide.
Read the instructions on the following pages.
Caution
Wall mounting the TV requires special skills and should only be
performed by qualified personnel. The TV wall mounting should
meet safety standards according to the TV's weight. Read also the
safety precautions before positioning the TV.
Koninklijke Philips Electronics N.V. bears no responsibility for improper
mounting or any mounting that results in accident or injury.
Unmount the TV from the stand if necessary.
To wall mount the TV, you need the 2 screws used to fix the TV
onto the TV stand and the 2 mounting discs as shown.
Unscrew the bolt in the middle of the bar with the supplied hex key.
12 To begin / Setting up
Page 13

Turn the bar as shown.
Reposition the bar on the stand and fix the bolt with the hex key.
Fix the stand to the TV.
To begin / Setting up 13
Page 14
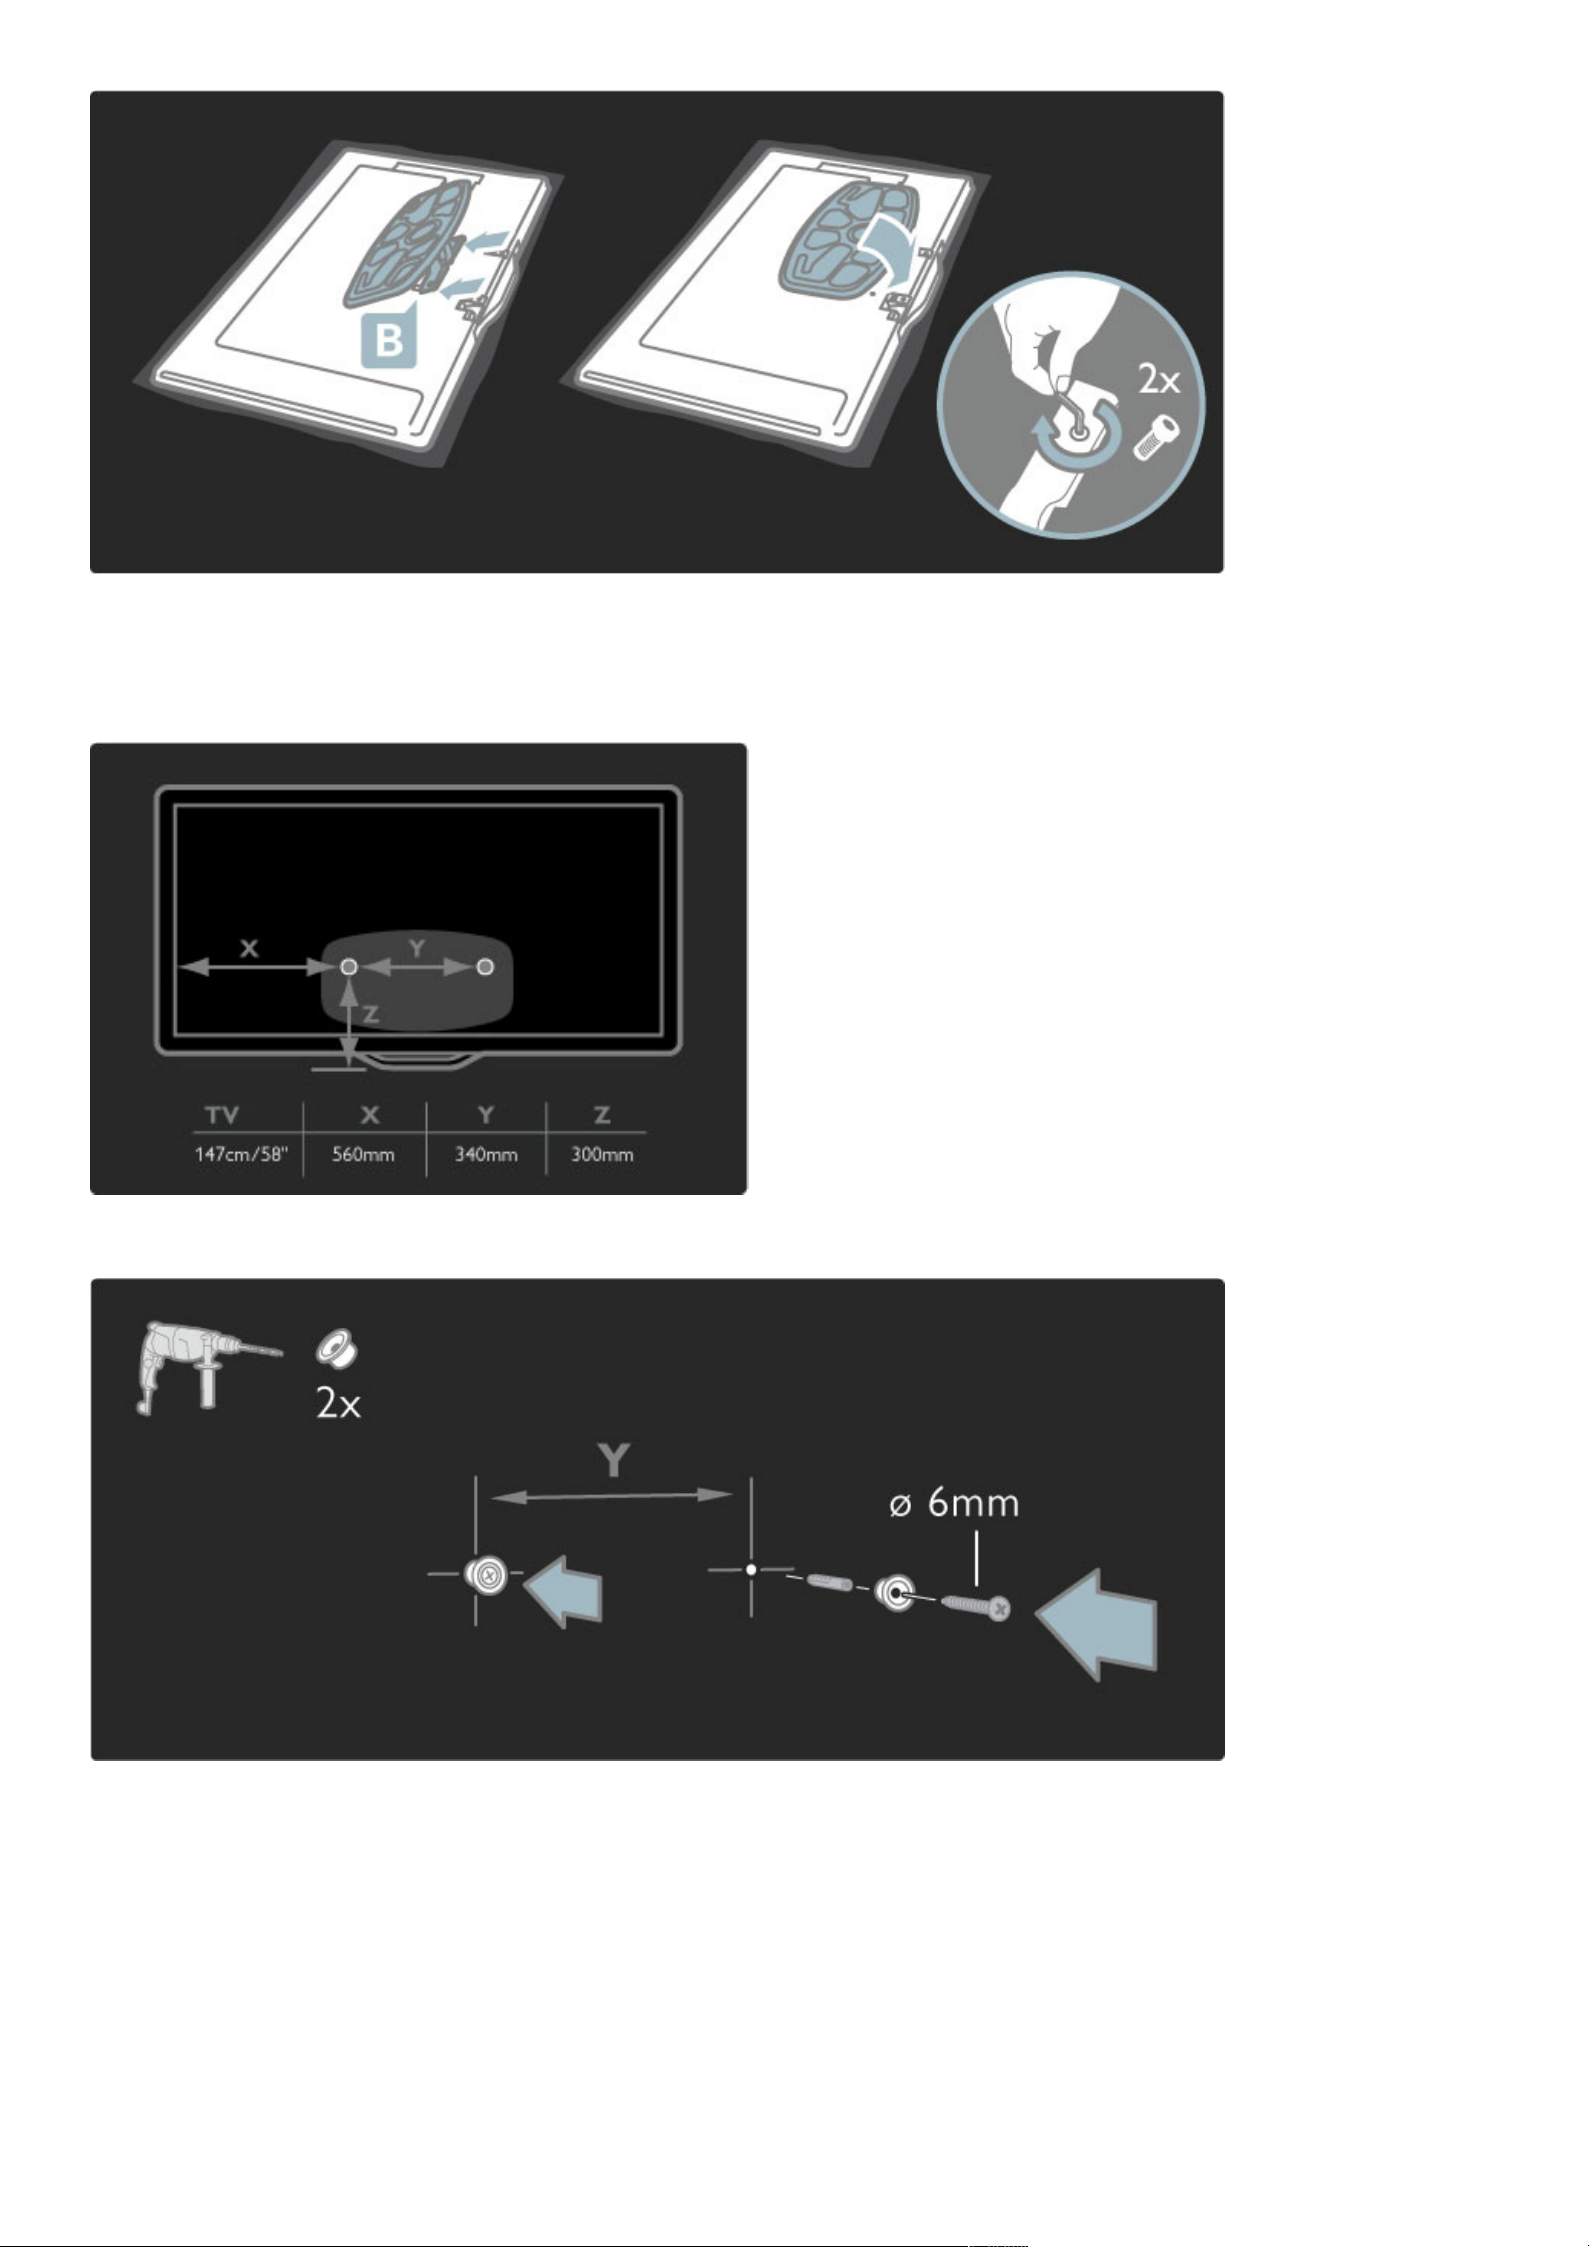
The TV is mounted at the correct height if your eyes are level with
the centre of the screen when you sit down.
Distance between the 2 fixing points is 340mm (58PFL9955)
Fix the 2 mounting discs. Use screws with a diameter of max 6mm.
Slide the bottom plate of the stand onto the mounting discs.
14 To begin / Setting up
Page 15

To level the TV, pull the bottom of the TV towards you slightly and
let it slide on the discs.
Unscrew the bolt and turn the bar in the position shown.
VESA info
Your TV is prepared for a VESA-compliant wall mount bracket (not
included).
VESA codes to purchase the bracket:
VESA MIS-F 400,300,M6 (for 58PFL9955)
Use a screw length as shown in the drawing.
To begin / Setting up 15
Page 16
Positioning the TV
Carefully read the safety precautions before positioning the TV.
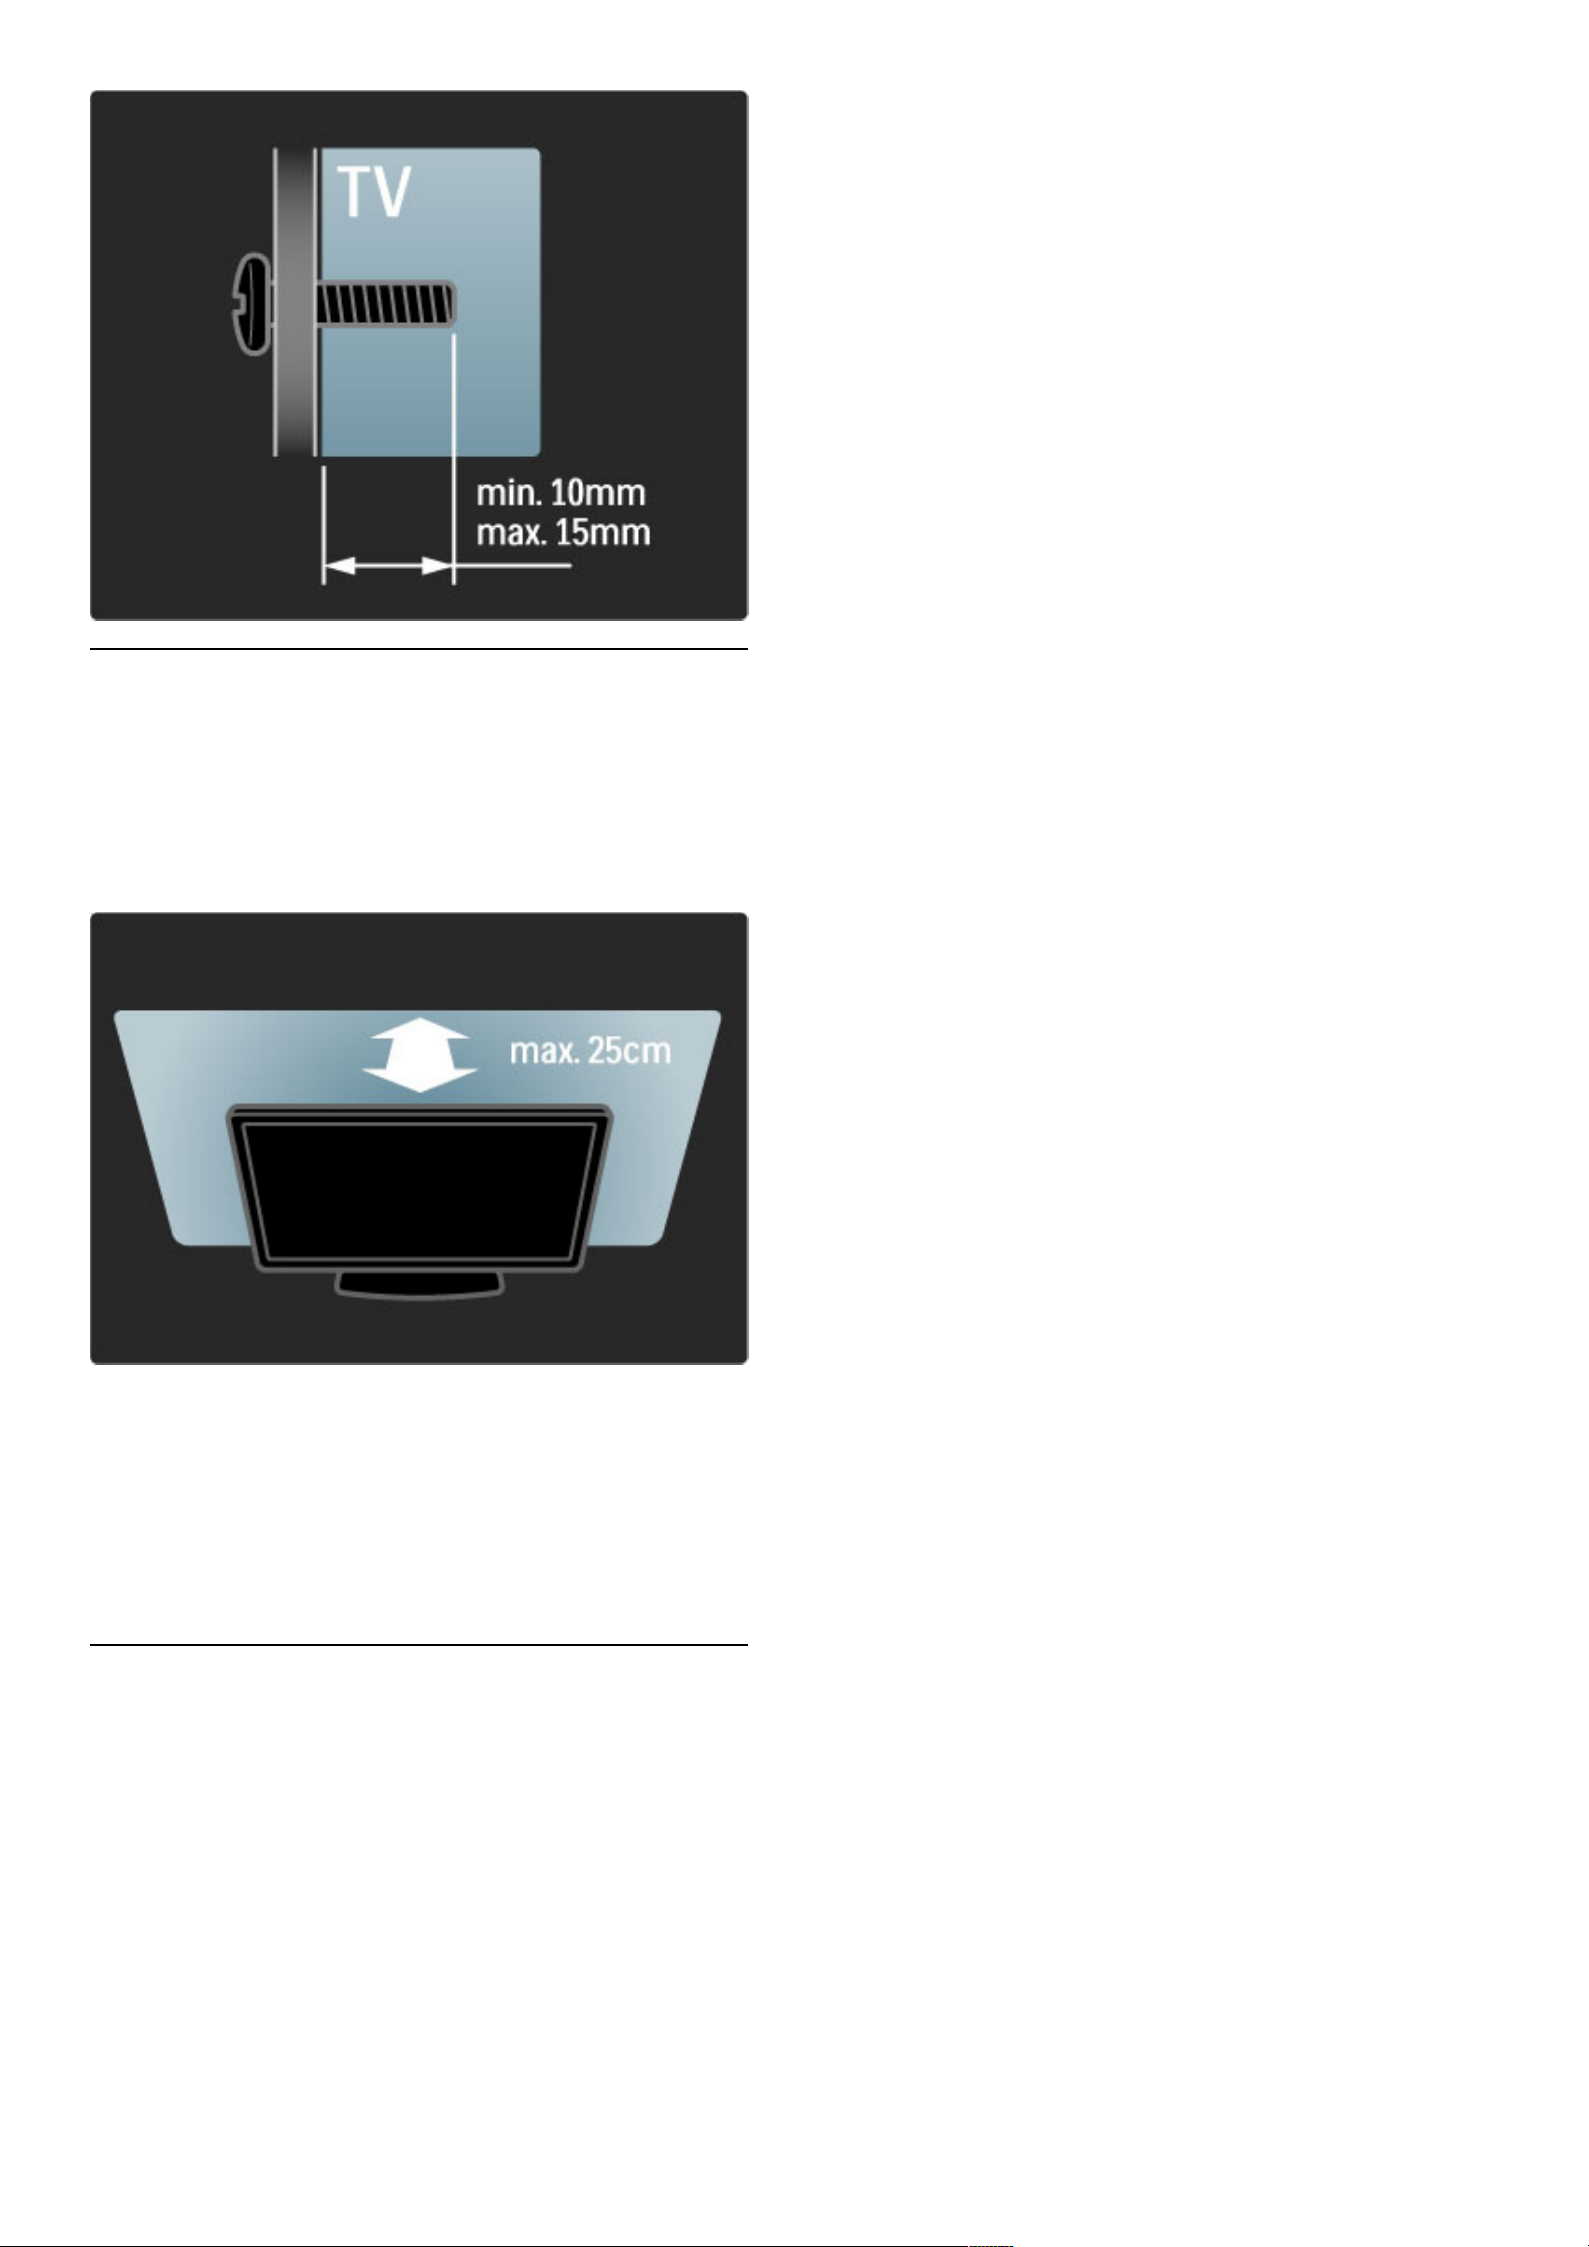
• Position the TV where light does not shine directly on the screen.
• Dim lighting conditions in the room for best Ambilight effect.
• Position the TV up to 25 cm away from the wall for the best
Ambilight effect.
Position the TV at the ideal viewing distance. Get more from HD TV
picture or any picture without straining your eyes. Find the 'sweet spot',
right in front of the TV, for the best possible TV experience and relaxed
viewing.
The ideal distance to watch TV from is three times its diagonal
screen size. When seated, your eyes should be level with the centre
of the screen.
Safety and care
Make sure you have read and understood all instructions before using
your TV. The warranty becomes invalid if any damage is caused by
failure to follow instructions.
Risk of electric shock or fire!
• Never expose the TV or remote control to rain, water or
excessive heat.
• Never place liquid containers, such as vases, near the TV. If liquids
are spilt on or into the TV, disconnect the TV from the power outlet
immediately. Contact Philips Consumer Care to have the TV
checked before use.
• Never place the TV, remote control or batteries near naked flames
or other heat sources, including direct sunlight.
• Keep candles and other naked flames away from this product at all
times.
• Never insert objects into the ventilation slots or other openings on
the TV.
• Ensure power plugs do not come under heavy force. Loose power
plugs can cause arcing and are a fire hazard.
• Never place the TV or any objects on the power cord.
• When disconnecting the power cord, always pull the plug, never
the cord.
Risk of injury or damage to the TV!
• Two people are required to lift and carry a TV that weighs more
than 25 kg.
• If you mount the TV on a stand, only use the supplied stand.
Secure the stand to the TV tightly. Place the TV on a flat, level
surface that can support the weight of the TV.
• When mounting the TV on a wall, ensure that the wall mount can
safely bear the weight of the TV set. Koninklijke Philips Electronics
N.V. bears no responsibility for improper wall mounting that results
in accident, injury or damage.
Risk of injury to children!
Follow these precautions to prevent the TV from toppling over and
causing injury to children:
• Never place the TV on a surface covered by a cloth or other
material that can be pulled away.
• Ensure that no part of the TV hangs over the edge of the
mounting surface.
• Never place the TV on tall furniture, such as a bookcase, without
anchoring both the furniture and TV to the wall or a suitable
support.
• Educate children about the dangers of climbing on furniture to
reach the TV.
Risk of overheating!
Always leave a space of at least 10 cm around the TV for ventilation.
Ensure curtains or other objects never cover the ventilation slots on
the TV.
Lightning storms
Disconnect the TV from the power outlet and antenna before
lightning storms. During lightning storms, never touch any part of the
TV, power cord or antenna cable.
Risk of hearing damage!
Avoid using earphones or headphones at high volumes or for
prolonged periods of time.
Low temperatures
If the TV is transported in temperatures below 5°C, unpack the TV
and wait until the TV temperature reaches room temperature before
connecting the TV to the mains.
• Risk of damage to the TV screen! Never touch, push, rub or strike
the screen with any object.
• Unplug the TV before cleaning.
• Clean the TV and frame with a soft damp cloth. Never use
substances such as alcohol, chemicals or household cleaners on the
TV.
• To avoid deformations and colour fading, wipe off water drops as
soon as possible.
• Avoid stationary images as much as possible. Stationary images are
images that remain onscreen for extended periods of time. Stationary
images include onscreen menus, black bars, time displays, etc. If you
must use stationary images, reduce screen contrast and brightness to
avoid screen damage.
16 To begin / Setting up
Page 17

Temperature and humidity
In rare occasions, depending on temperature and humidity, minor
condensation can occur on the inside of the TV glass front. To
prevent this, do not expose the TV to direct sunlight, heat or
extreme humidity. If condensation occurs, it will disappear
spontaneously while the TV is playing for a few hours. The
condensation moisture will not harm the TV or cause malfunction.
To begin / Setting up 17
Page 18

1.3 Keys on the TV
Power switch
Switch the TV on or off with the power switch at the bottom of the
TV. When switched off, the TV does not consume any energy.
If the red indicator light is off, switch on the TV with the power
switch.
If the red indicator is on (standby indication), press O on the
remote control to switch on the TV. Alternatively, you can switch on
the TV from standby with any key on the TV. It takes a few seconds
for the TV to start up.
V Volume
Press V (Volume) - or + to adjust the volume. Or use the + or keys on the remote control.
J Ambilight
Press J (Ambilight), to switch Ambilight on or off.
While the TV is on standby, you can switch Ambilight on and create
an Ambilight LoungeLight effect in your room. Read more about
LoungeLight in Help > Use your TV > Use Ambilight >
LoungeLight
h Home
Press h (Home) to open the Home menu on screen. You can
navigate the Home menu with the Volume - or + (left or right) and
the Channel - or + (down or up) keys on the TV. To confirm your
choice, press h again.
Read more about Home in Help > Use your TV > Menus > h
Home
18 To begin / Keys on the TV
Page 19
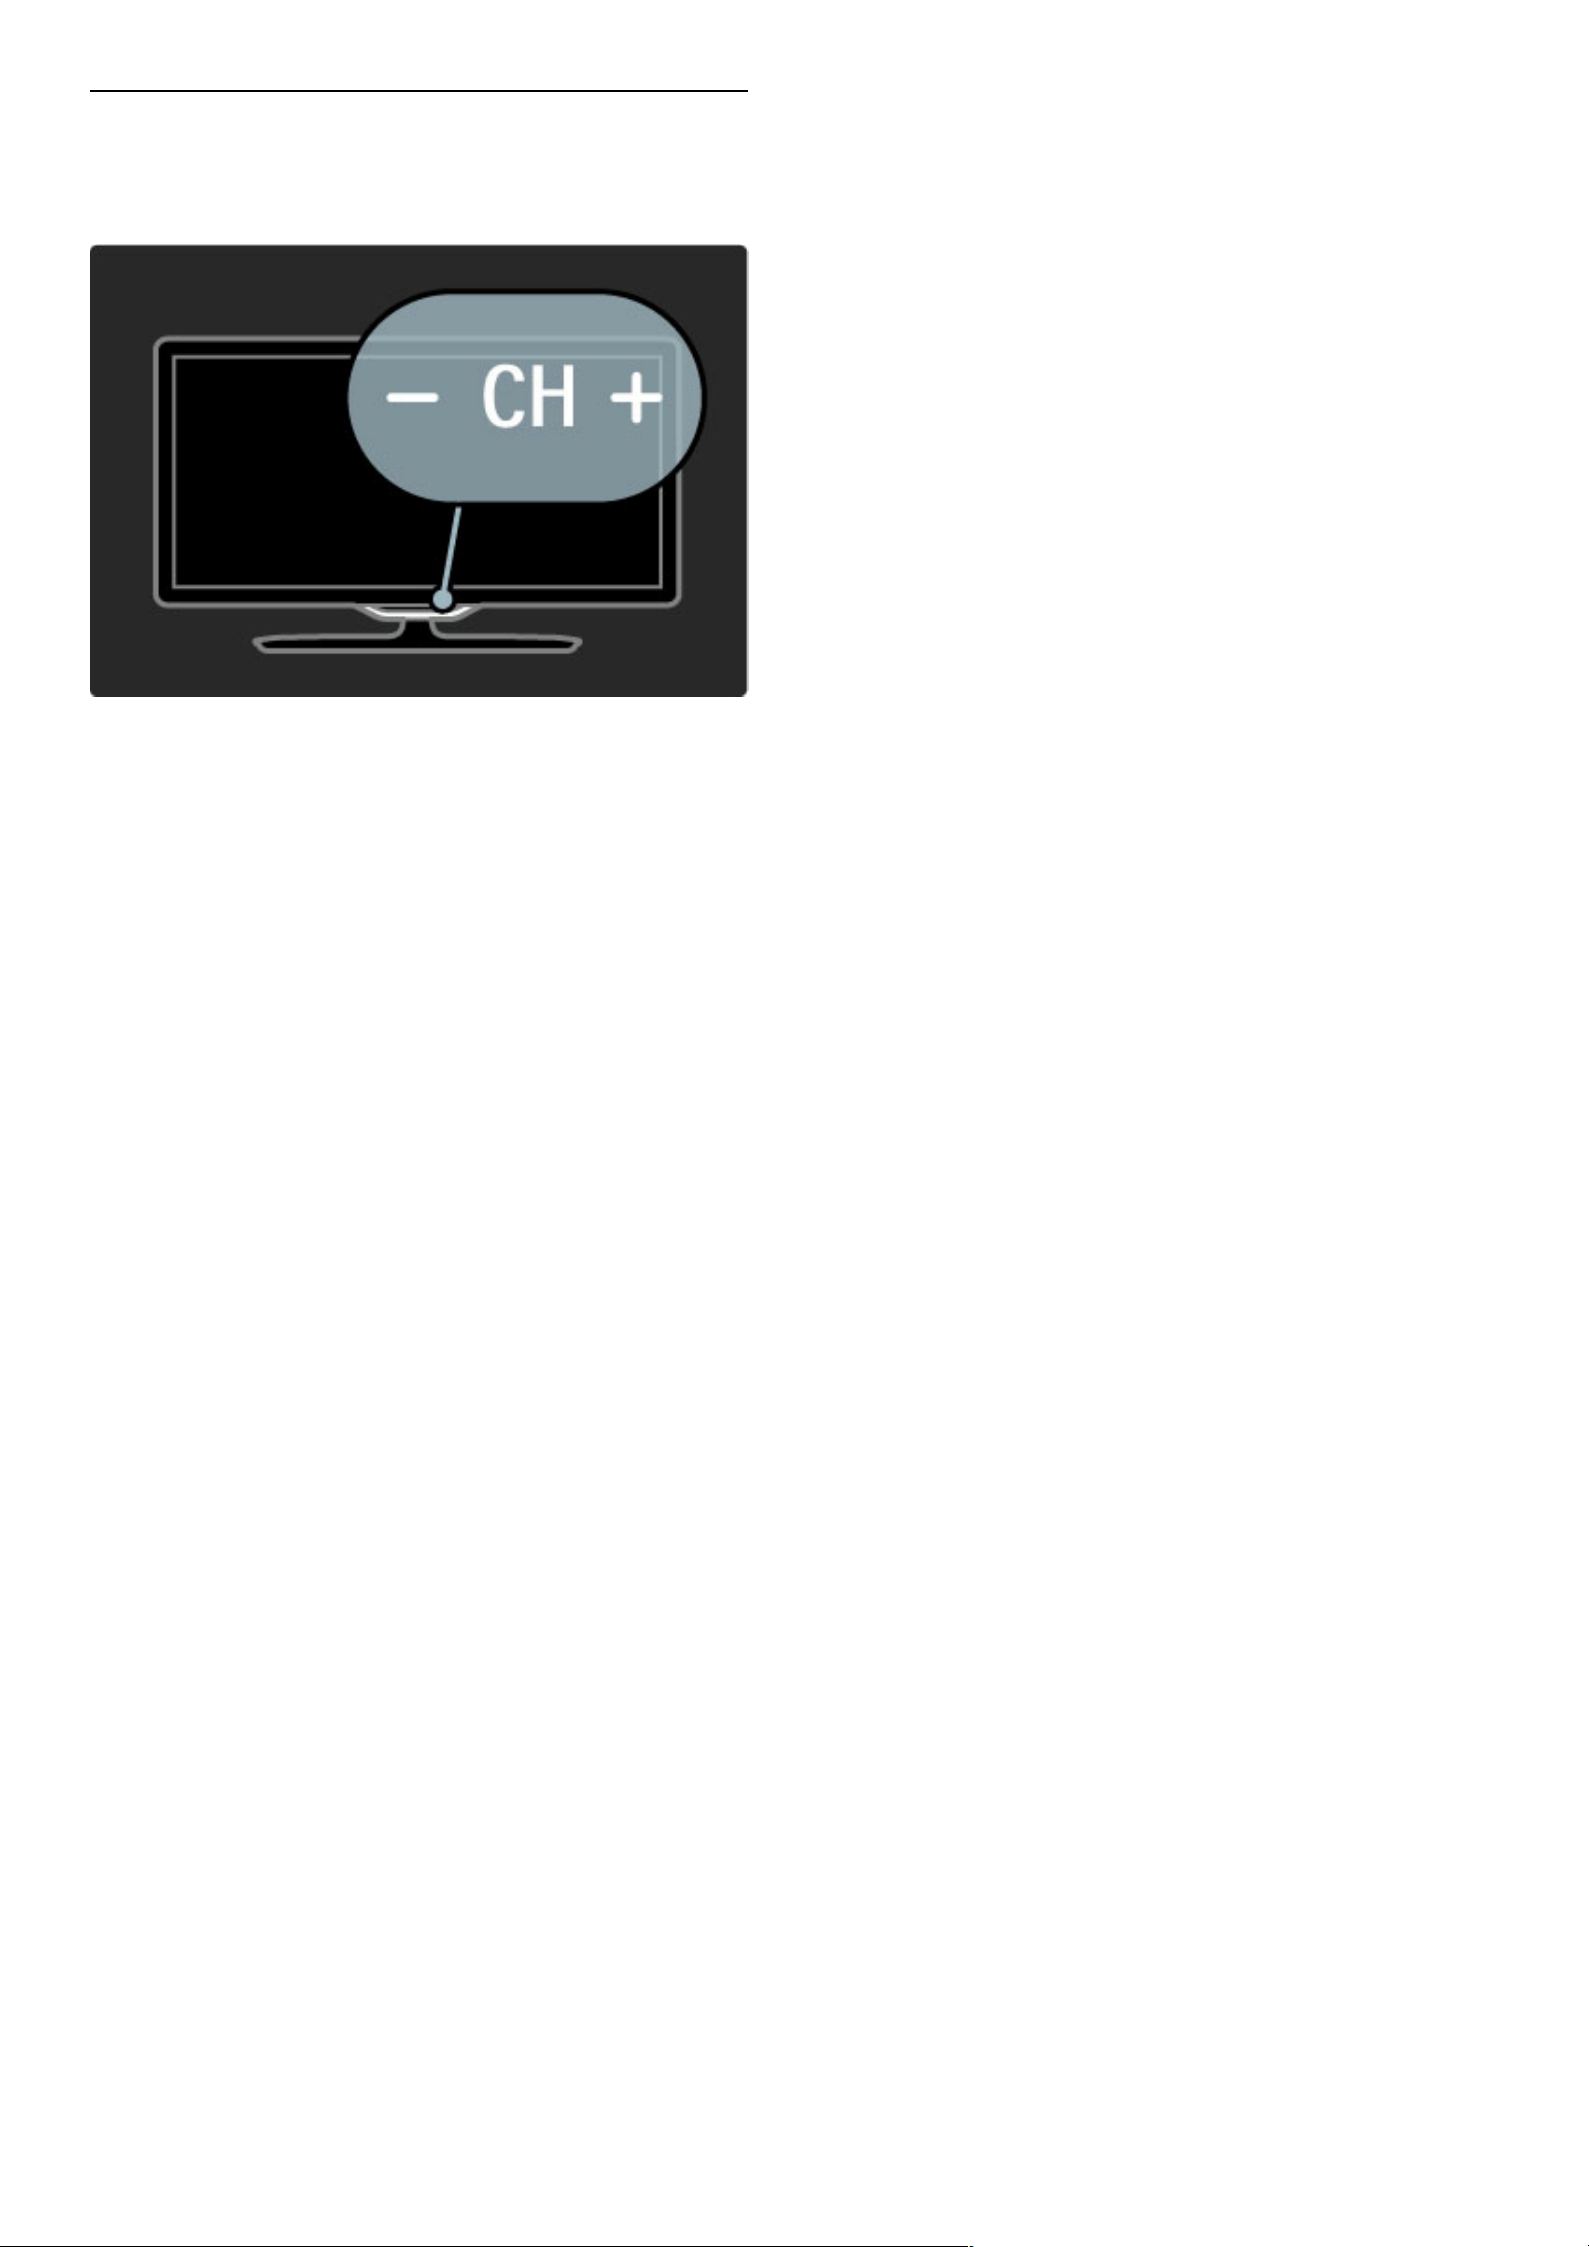
CH Channel
Press CH (Channel) - or + to switch channels. Or use the W or X
keys on the remote control.
To begin / Keys on the TV 19
Page 20

1.4 Register your TV
Congratulations on your purchase and welcome to Philips.
Register your TV and enjoy a range of benefits including full support
(including downloads), privileged access to information about new
products, exclusive offers and discounts, the chance to win prizes
and even participate in special surveys about new releases.
Go to www.philips.com/welcome
20 To begin / Register your TV
Page 21
1.5 Help and support
Using Help and Search
Help
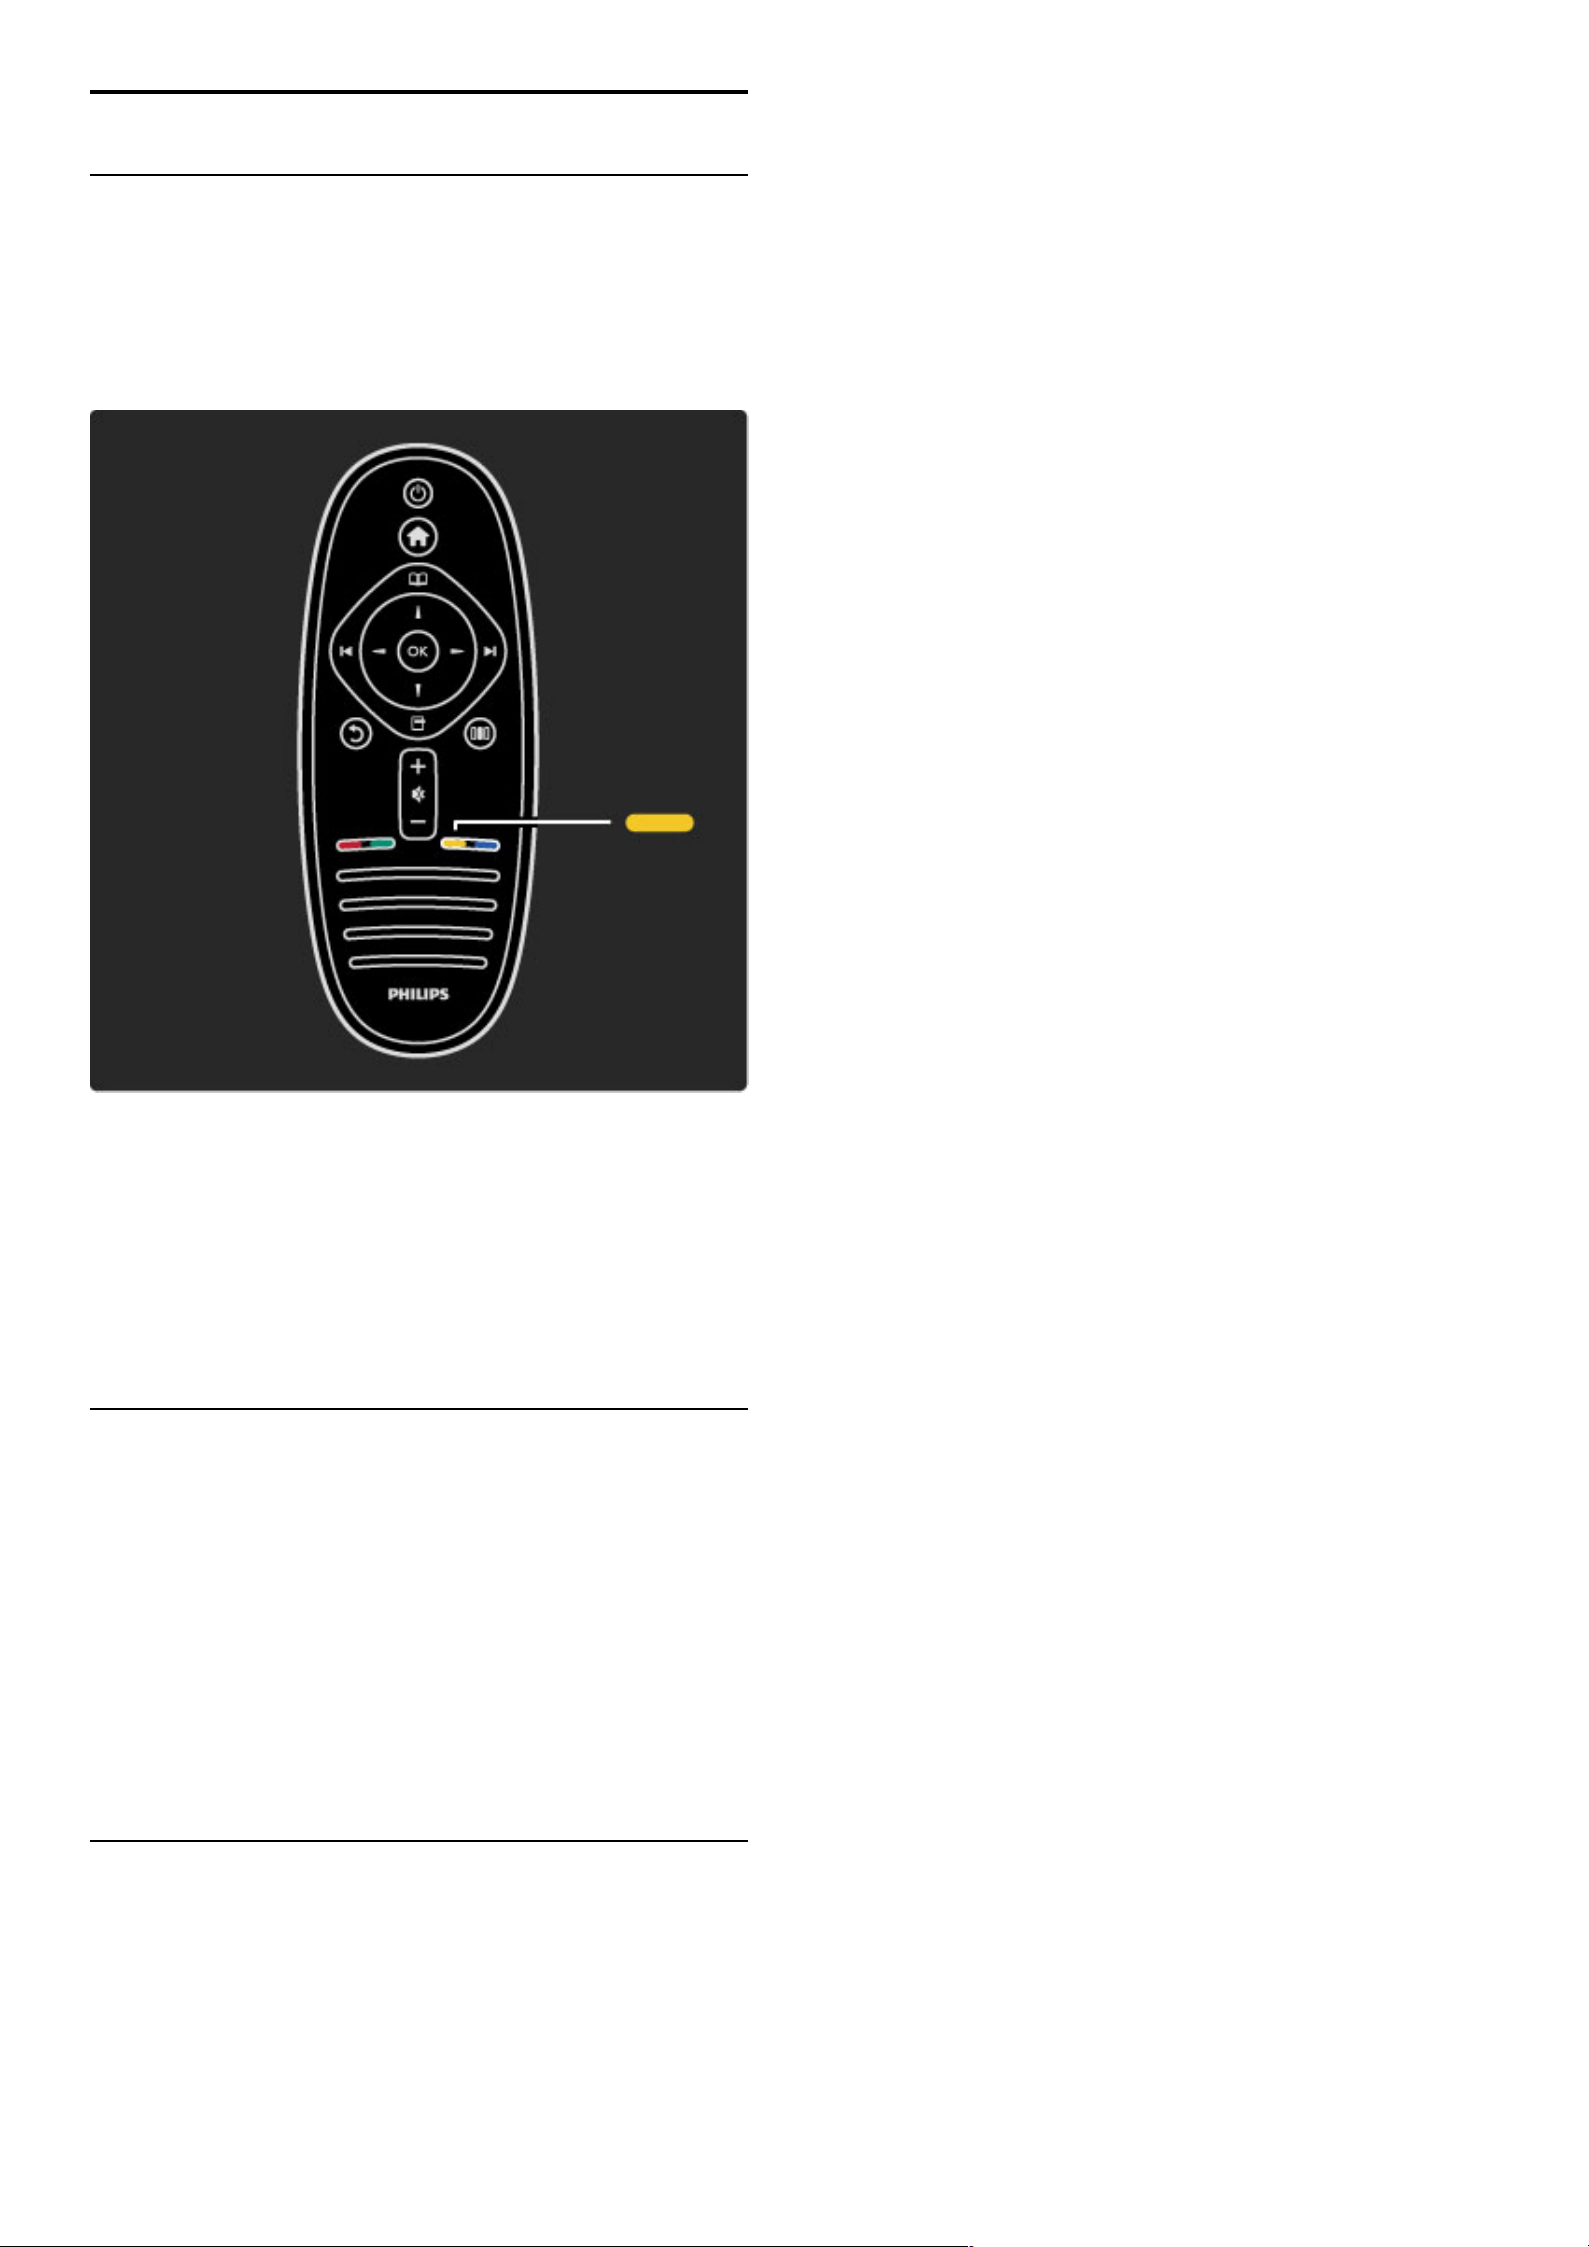
You can open Help from the Home menu. In most cases, you can
also press the Yellow key on your remote control to open or close
Help directly. For some activities, like Ginga, the colour keys have
specific functions and cannot open Help.
Before you follow the Help instructions, close Help. Press the Yellow
key or press h to close Help. When you press the Yellow key
again, Help will open on the page where you closed it.
¬ Search
In Help, use ¬ Search to find a topic you need. Select a topic from
the list with the navigation keys and press OK. The topic you are
looking for might not be present on the first page but a few pages
further on. Press x to go to the next page.
Online support
To solve any Philips TV related problem, you can consult our online
support. You can select your language and enter your product model
number.
Go to www.philips.com/support
On the support site you can find your country's telephone number
to contact us as well as answers to frequently asked questions
(FAQs).
You can download new TV software or the manual to read on your
PC. You can email a specific question or, in some countries, chat
online with one of our collaborators.
Contact Philips
For support, you can call the Philips Consumer Care hotline in your
country. Find the telephone number on the printed documentation
that came with the TV.
Or consult our website www.philips.com/support
TV model number and serial number
You might be asked to provide the TV product model number and
serial number. Find these numbers on the packaging label or on the
type label on the back or bottom of the TV.
To begin / Help and support 21
Page 22
2
2.1
Use your TV
Remote control
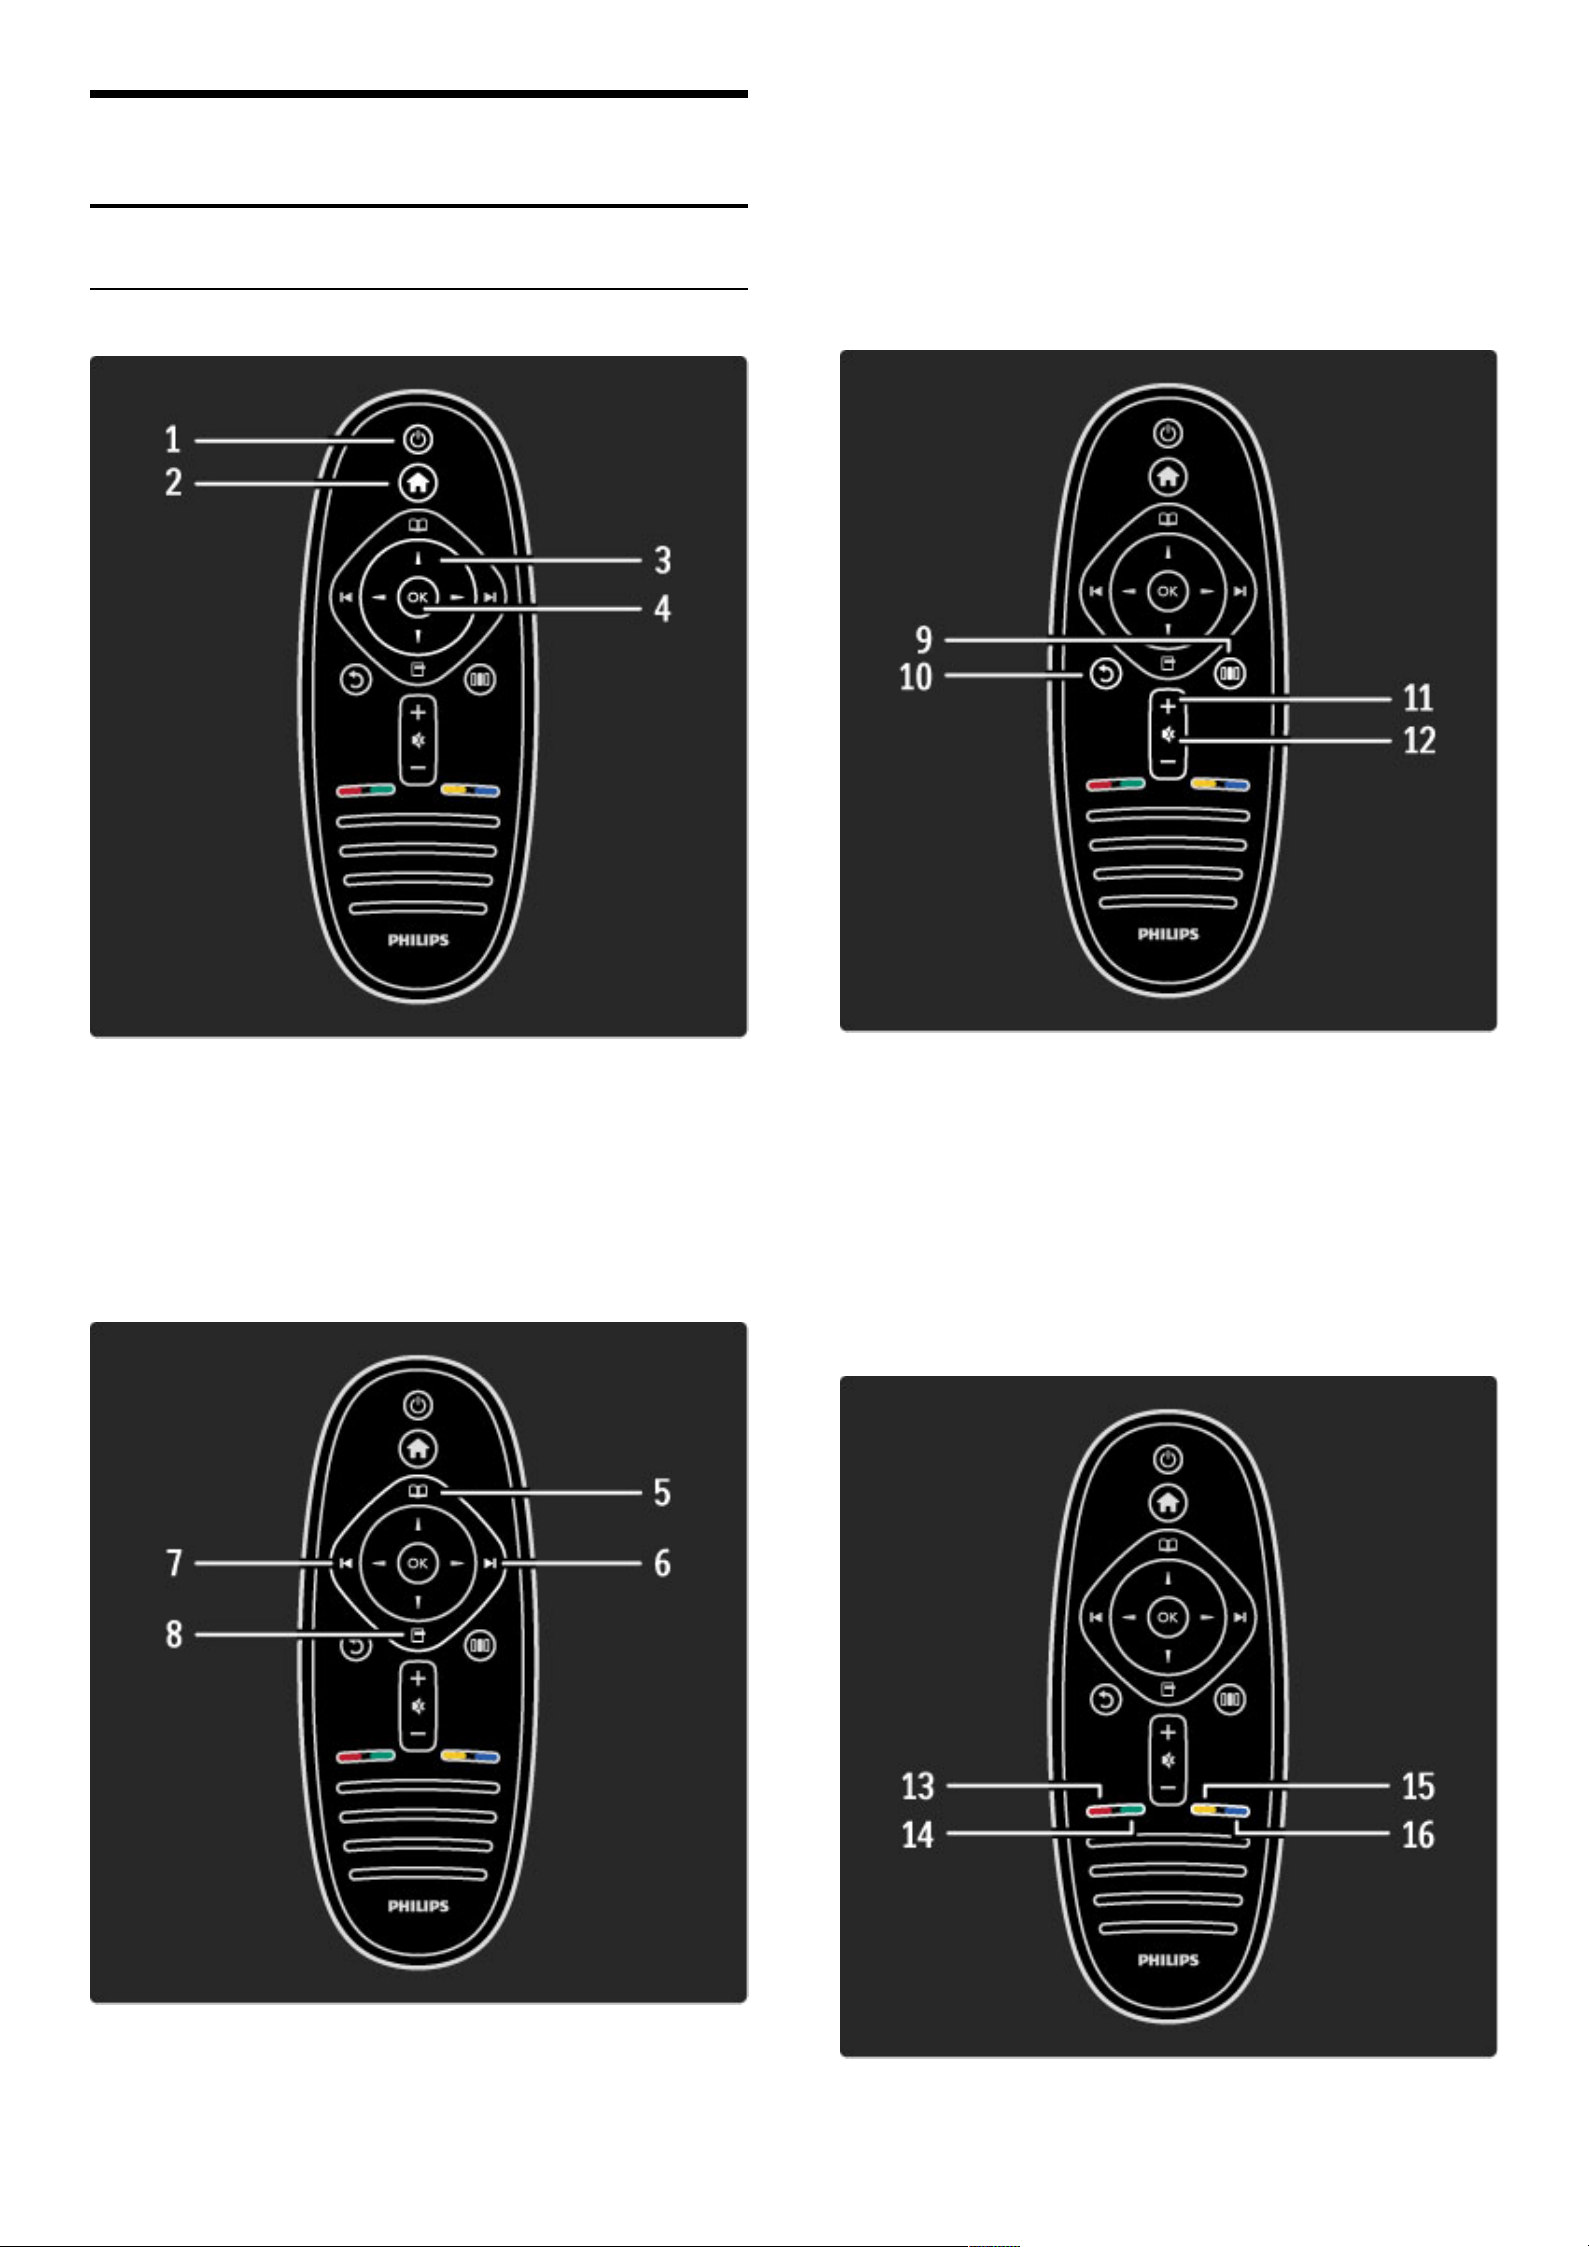
Overview
1 Standby O
To switch the TV on or back to standby.
2 Home h
To open or close the Home menu.
3 Navigation key
To navigate up, down, left or right.
4 OK key
To activate a selection.
5 Browse e
To open or close the Browse menu.
6 Next W
To switch to the next channel, page or chapter.
7 Previous X
To switch to the previous channel, page or chapter.
8 Options o
To open or close the Options menu.
9 Adjust s
To open or close the most used settings like picture, sound or
Ambilight.
10 Back b
To go back to the previous channel. To exit a menu without
changing a setting. To go back to the previous Net TV page.
11 Volume V
To adjust the volume level.
12 Mute m
To mute the sound or to restore it.
22 Use your TV / Remote control
Page 23
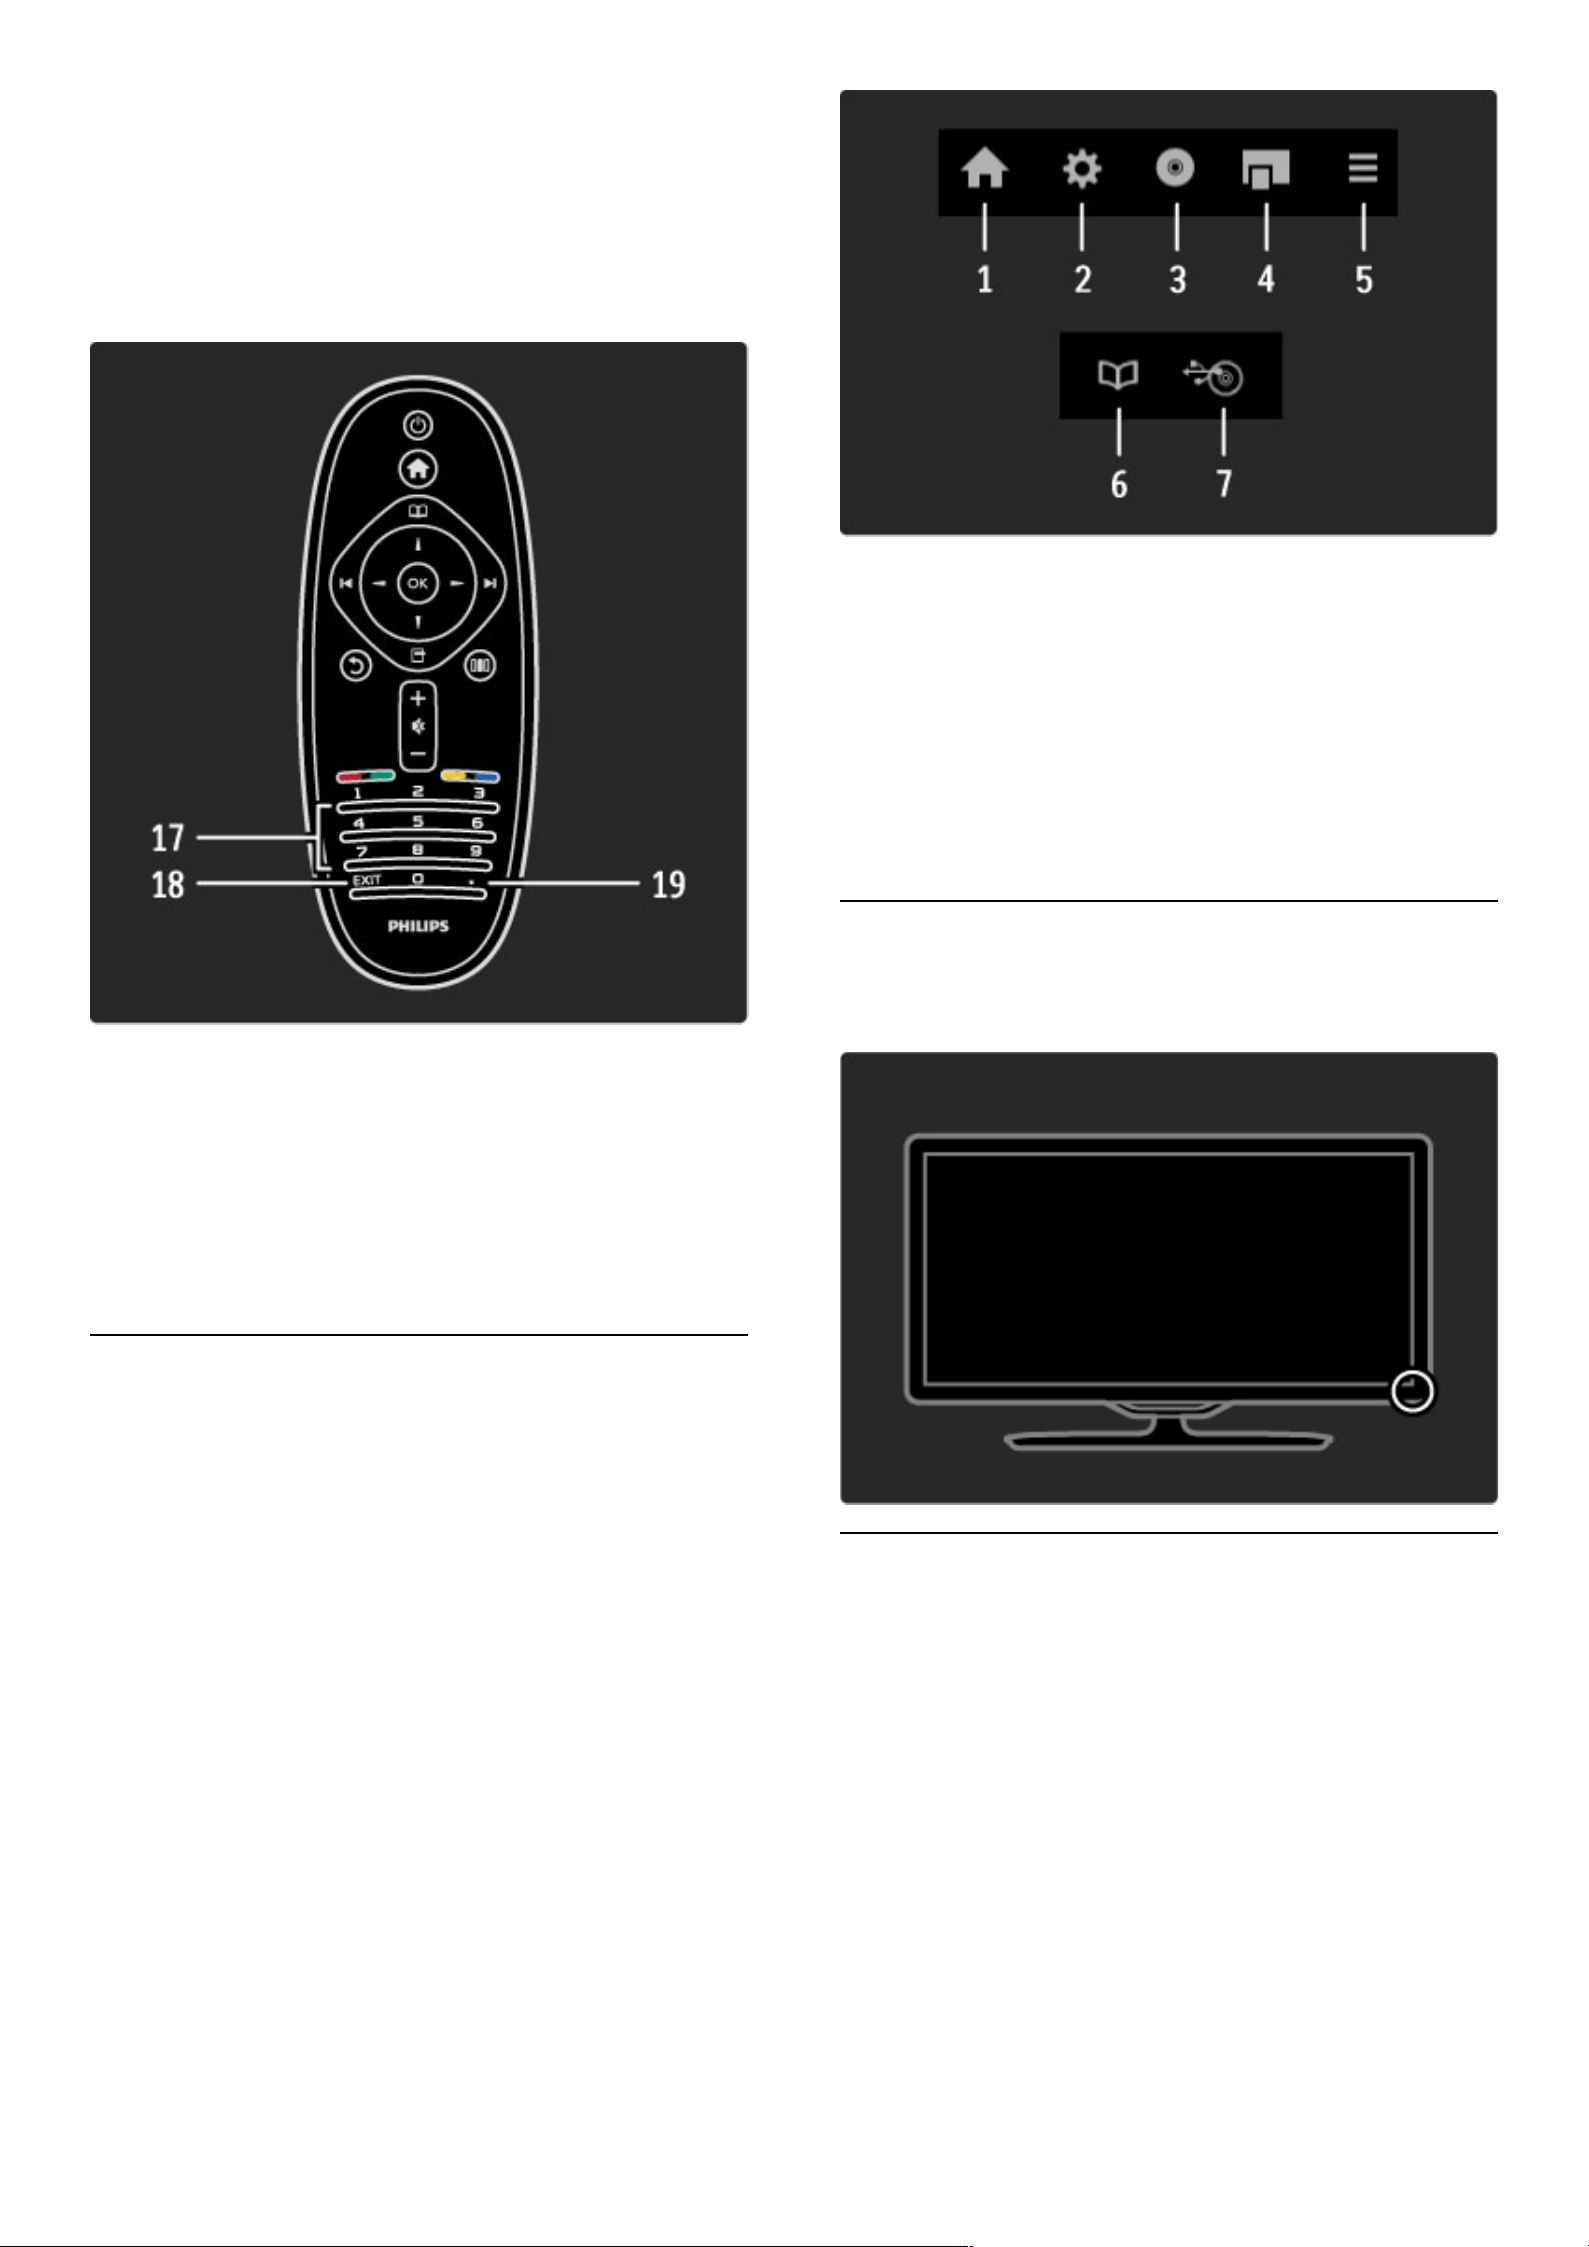
13 Red colour key
To open interactive TV or to select a Ginga page.
14 Green colour key
To open the Eco settings or to select a Ginga page.
15 Yellow colour key
To open and close Help or to select a Ginga page.
16 Blue colour key
To select a Ginga page.
17 Number keys and text keypad
To select a TV channel directly or to enter text.
18 Exit
To exit Ginga.
19!
To select a digital subchannel number.
To learn how to use the remote control, read Help > To begin >
TV tour > Remote control.
EasyLink Remote Control
The remote control of the TV can also operate a connected device. The
device must have EasyLink (HDMI-CEC) and have it switched on. The
device must also be connected with an HDMI cable.
Operate an EasyLink device
To operate such a device with the TV remote control, select the
device -or its activity- in the h Home menu and press OK. The
commands of all keys, except the h key, is forwarded to the
device.
If the key you need is not on the TV remote control, you can show
extra keys on screen with Show remote control.
Show remote control keys
To show the device keys on screen, press o (Options) and select
Show remote control. Select the key you need and press OK.
To hide the remote control keys of the device, press b (Back).
In general, these keys open the following device menus:
1 Home menu
2 Setup menu
3 Disc menu (disc content)
4 Pop-up menu
5 Options menu
6 Programme guide
7 Media selection
Read more about EasyLink in Help > Setup > Devices > EasyLink
HDMI-CEC.
IR sensor
Always make sure you point the remote control at the remote
control infrared sensor on the front of the TV.
Batteries
To open the battery cover, press the small button on the edge of
the remote control inwards and lift the cover. Use 2 type AAALR03-1.5V batteries. Make sure the + and the - ends of the batteries
line up correctly.
Use your TV / Remote control 23
Page 24
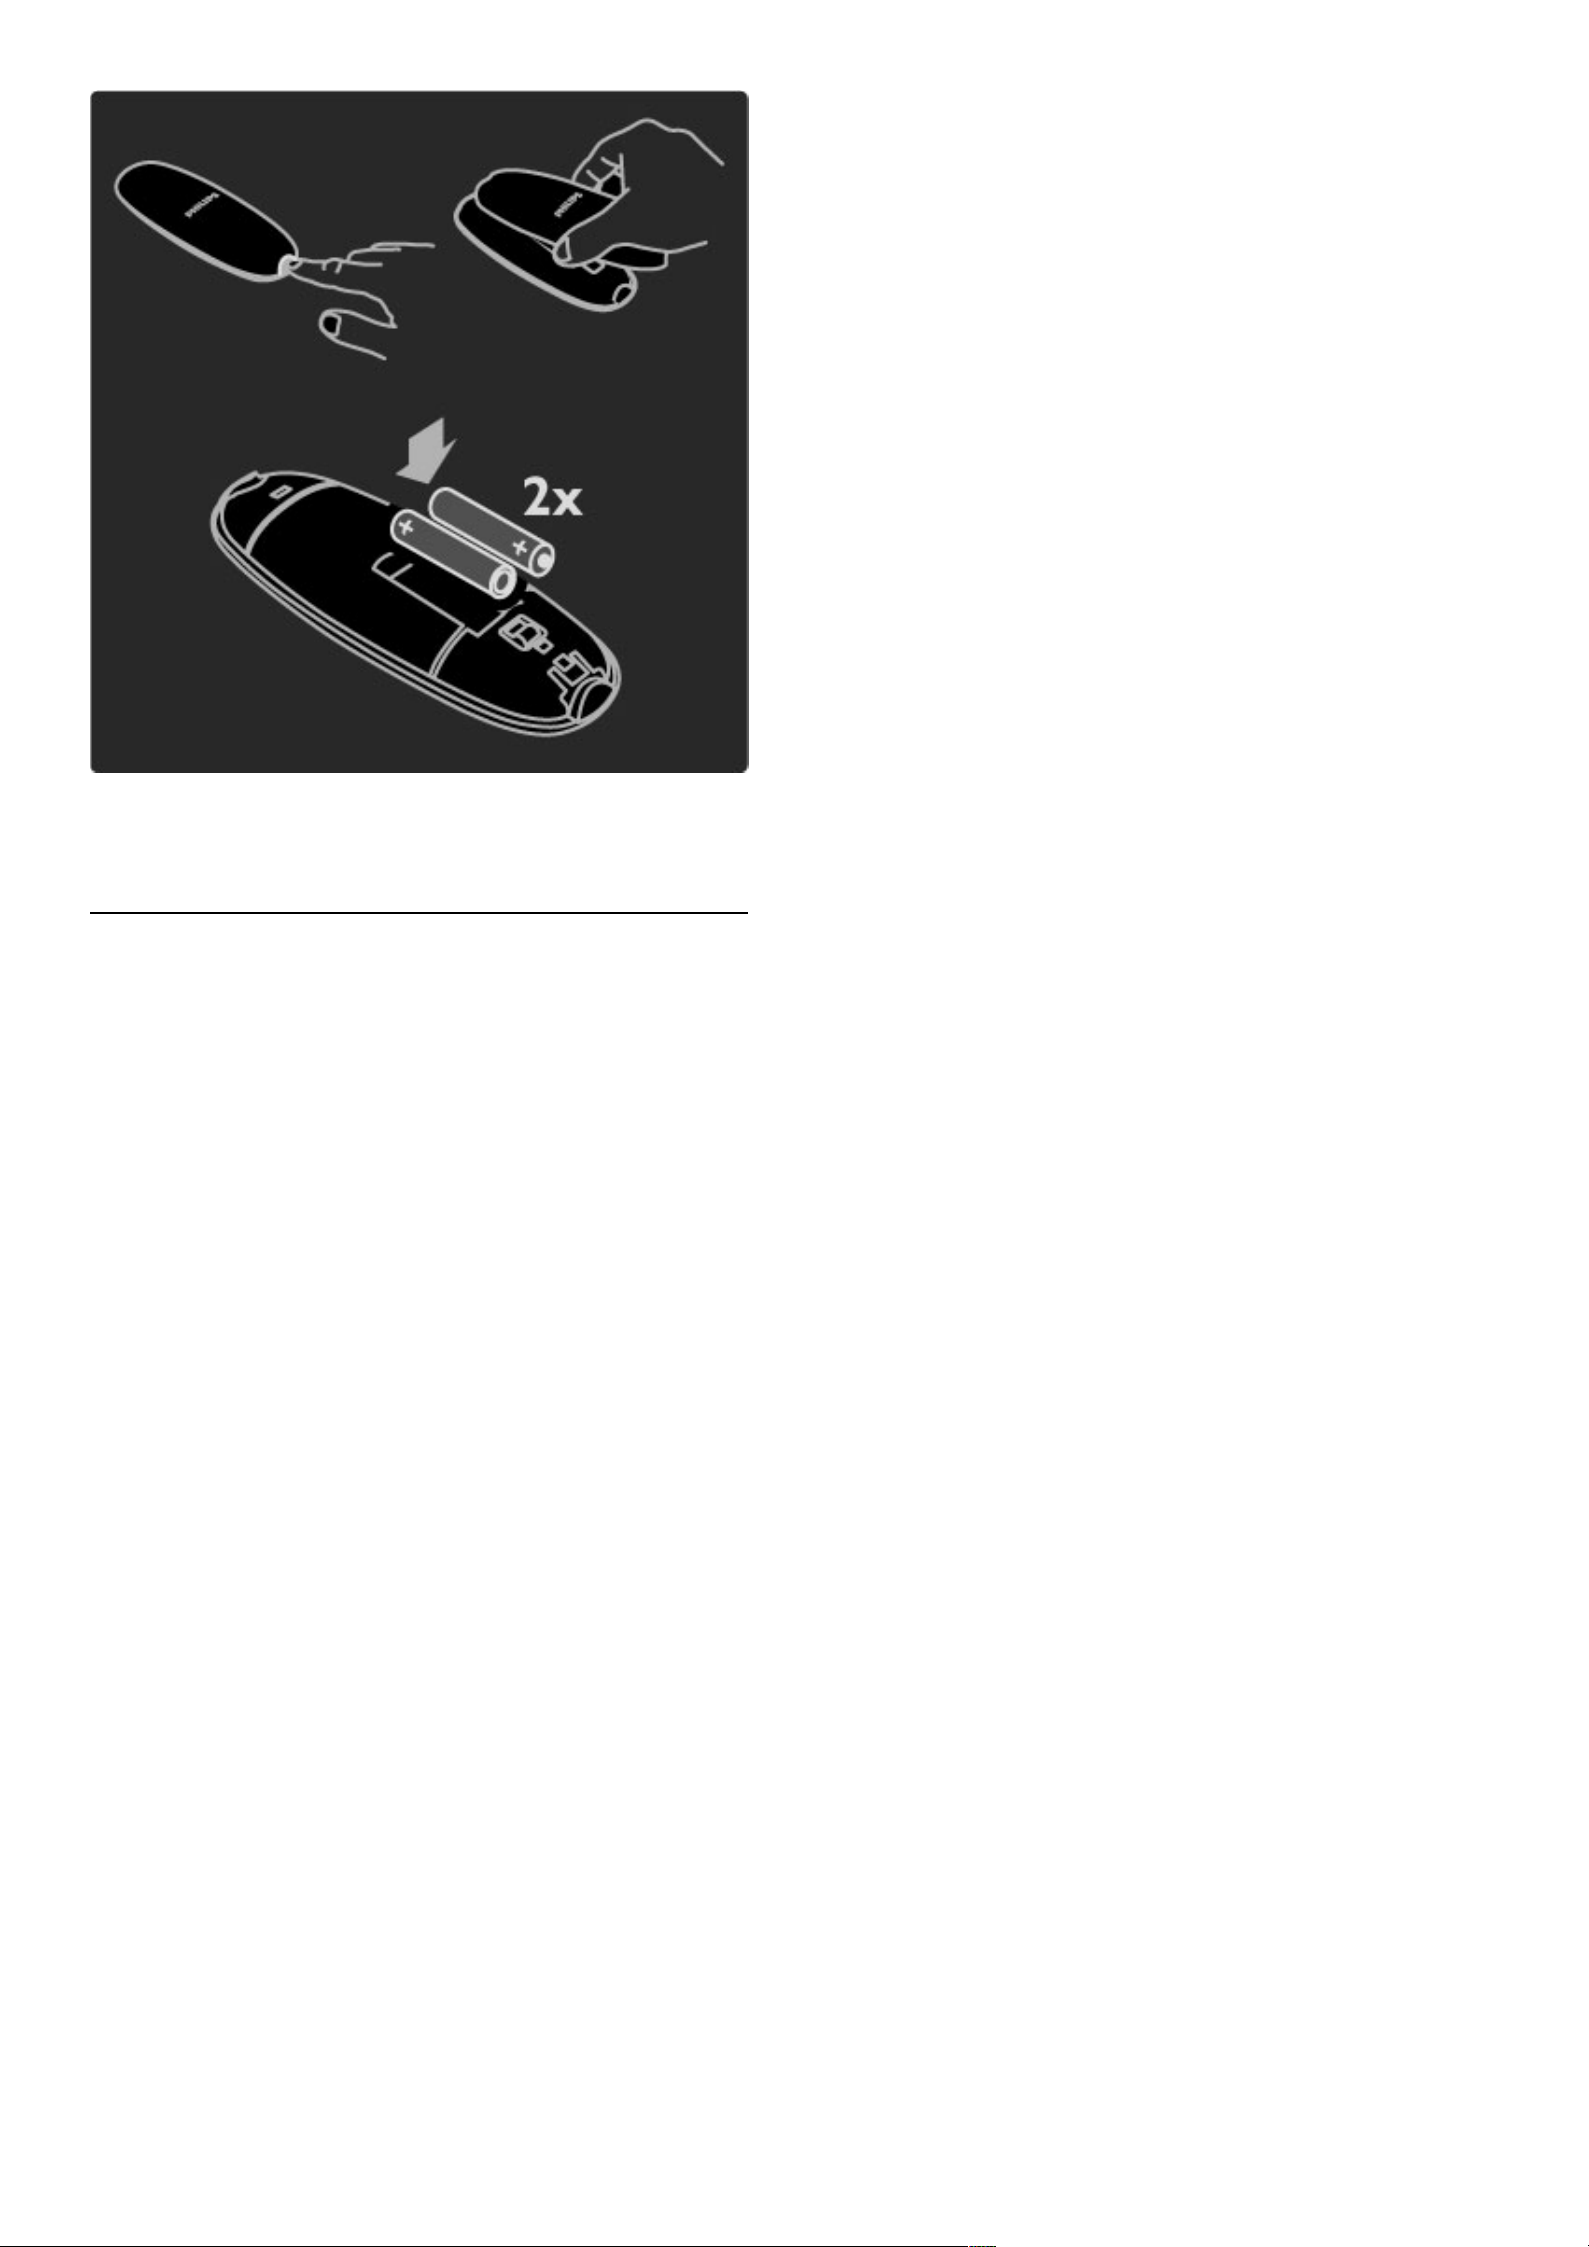
Remove the batteries if you are not using the remote control for a
long time. Dispose of batteries according to the end of use
directives. Read Help > To begin > Setting up > End of use.
Cleaning
Your remote control is treated with a scratch-resistant coating.
To clean the remote control, use a soft damp cloth. Never use
substances such as alcohol, chemicals or household cleaners on the
TV or remote control.
24 Use your TV / Remote control
Page 25
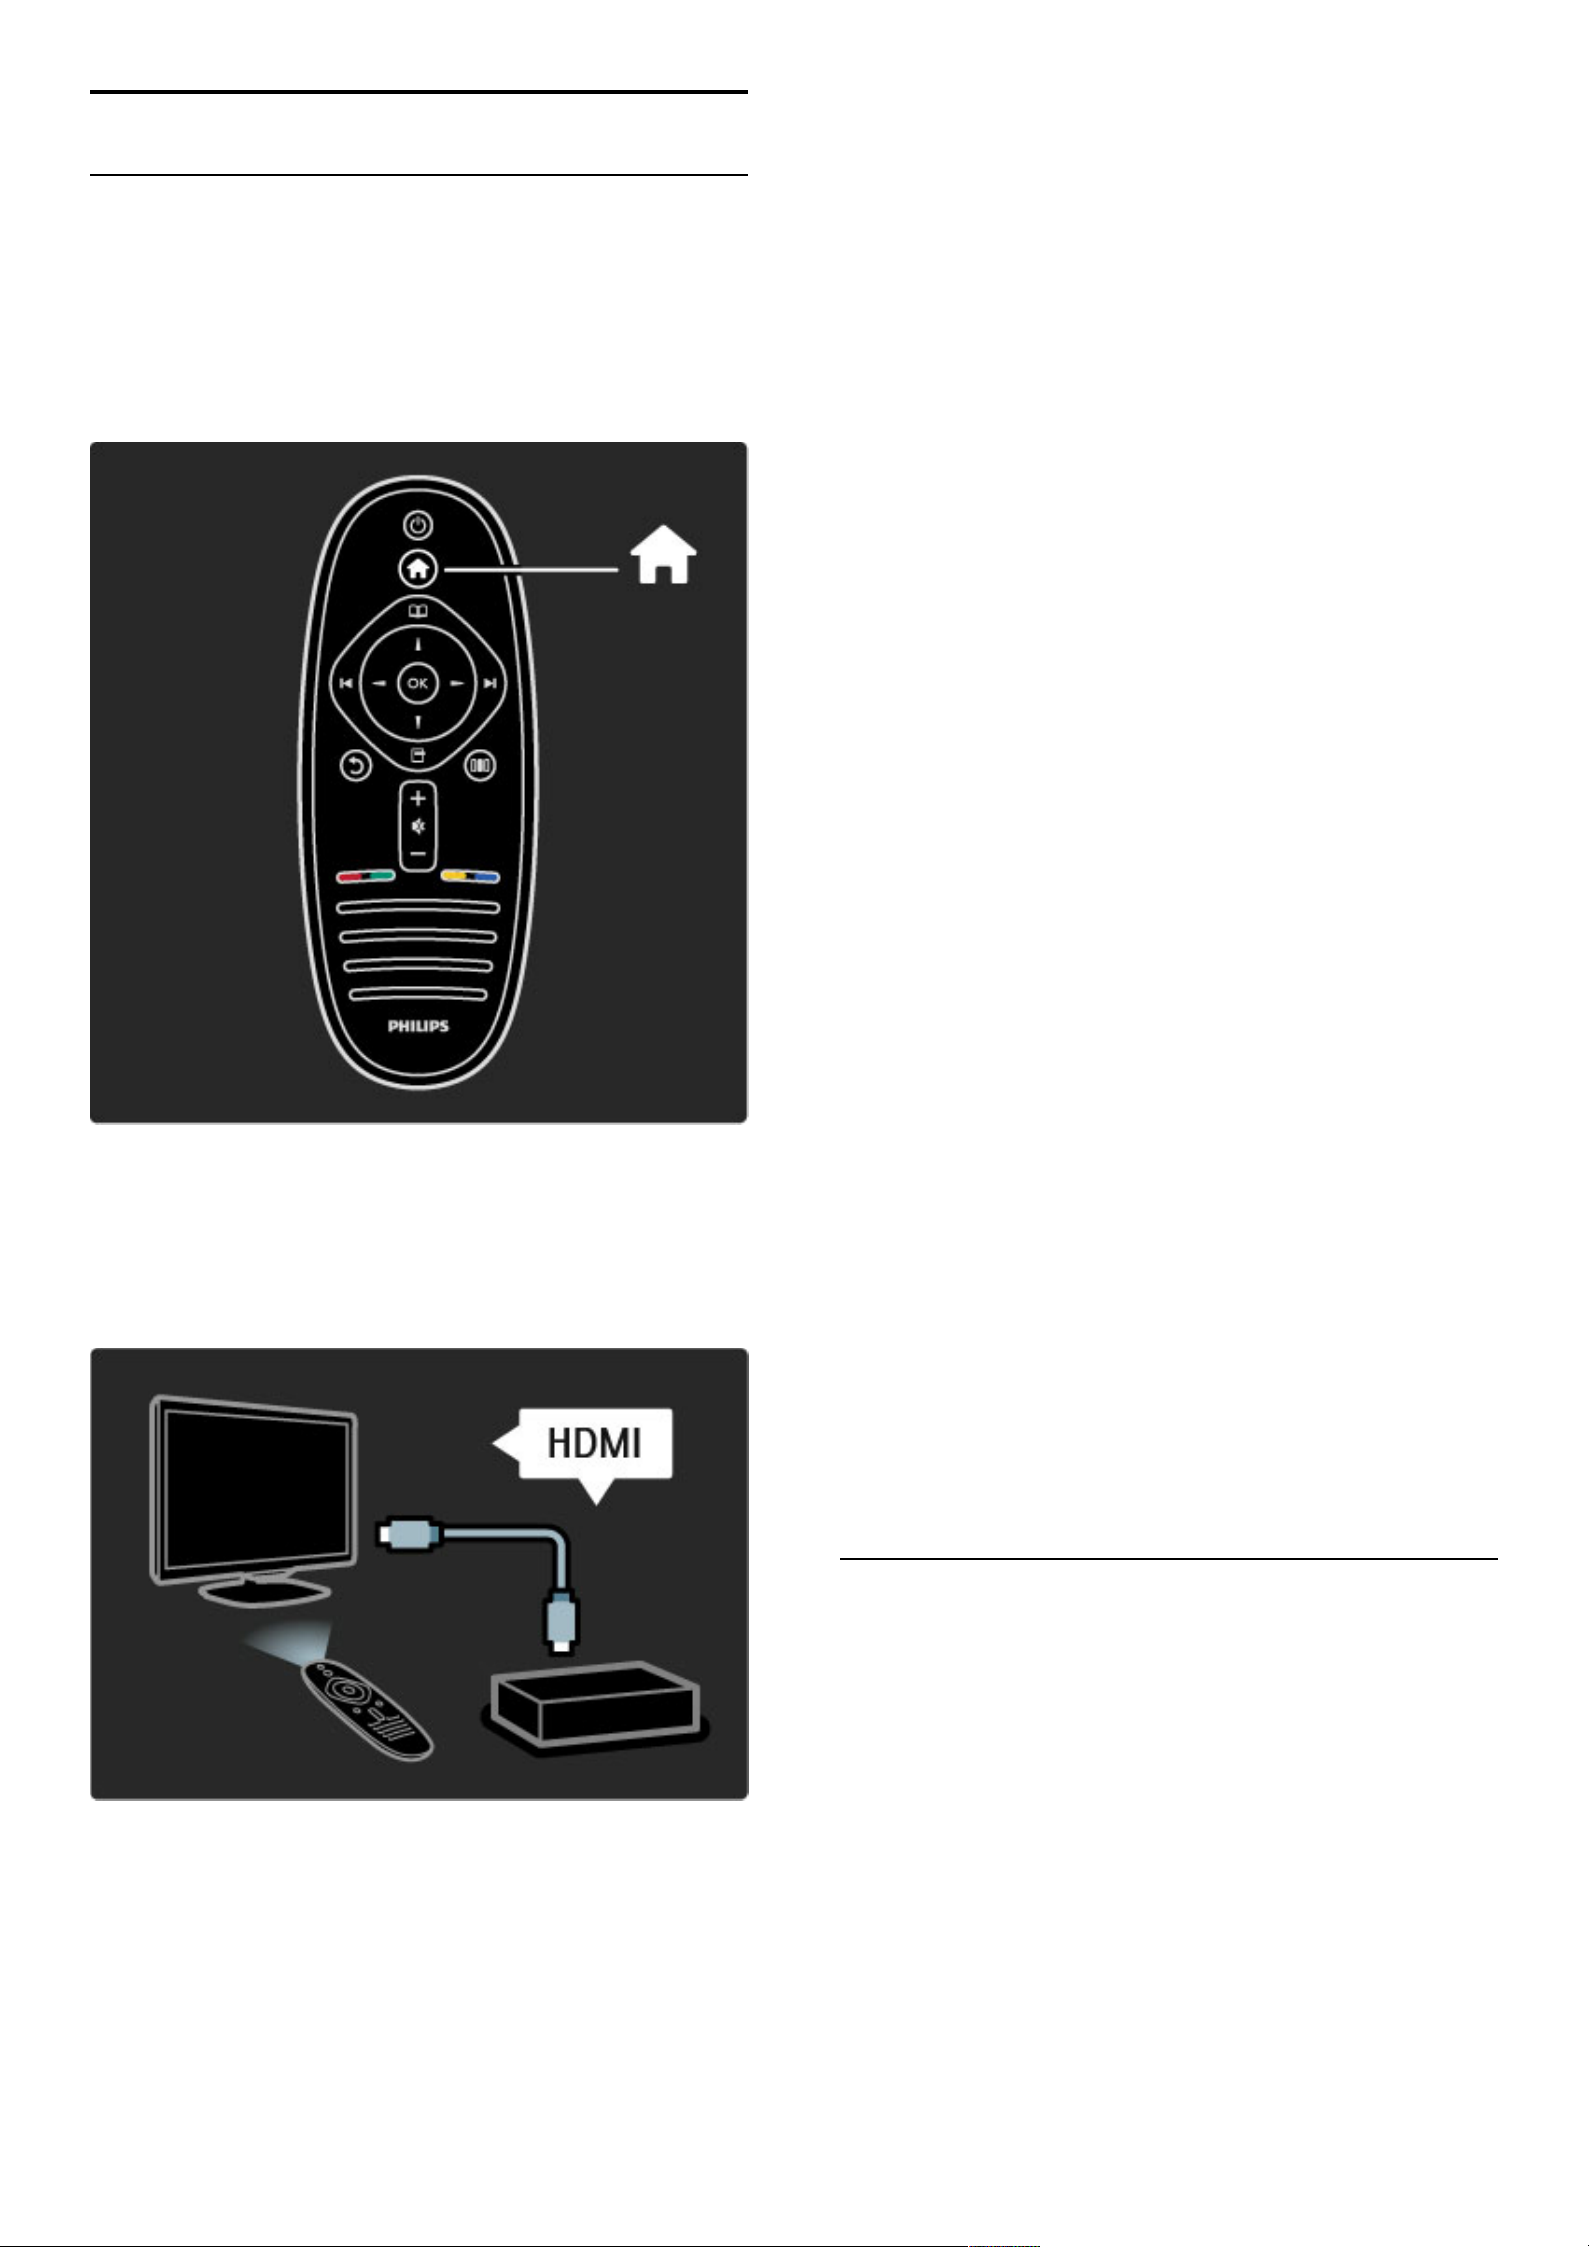
2.2 Menus
h Home
With the Home menu, you can start watching TV or a movie disc or start
any other activity. You can add an activity when you connect a device to
the TV.
Press h to open the Home menu.
To start an activity, select it with the navigation keys and press OK.
To close the Home menu, press h again.
Operate a selected device
The TV remote control can operate a device if the device is
connected with HDMI and has EasyLink (HDMI-CEC).
Read more about EasyLink Remote control in Help > Use your TV
> Remote control > EasyLink Remote control.
Add a device
Devices connected with EasyLink (HDMI-CEC) automatically show
their activity in the Home menu. A single device can add several
activities. The device must be connected with an HDMI cable.
If your connected device does not show itself in the Home menu,
EasyLink on the device may be switched off.
If your connected device does not have EasyLink (HDMI-CEC) or is
not connected with an HDMI cable, you need to manually add your
device with Add your devices in the Home menu.
Add your devices
In the Home menu, select Add your devices and press OK. Follow
the instructions on screen.
The TV asks you to select the device and the connection to which
the device is connected.
The device or its activities are now added to the Home menu.
Rename a device
To rename an added device or activity, press o (Options) and
select Rename. Use the keypad on the remote control as you do for
SMS/text messaging to enter the new name.
Delete a device
To delete a device or activity from the Home menu, select the item
and press o (Options) and then select Remove this device. If a
device or activity keeps appearing in the Home menu after you
deleted it, switch off the EasyLink setting on the device to prevent
this automatic pop-up appearing again.
Read more about EasyLink in Help > Setup > EasyLink HDMI-CEC.
Options for a device
To view the available options for a device or activity in the Home
menu, select it and press o (Options). You can Rename or Remove
devices and activities, Reorder the sequence of them or Restore
activities if you deleted one of several activities of a device.
Reorder
To reorder a device or an activity in the Home menu, select it and
press o (Options).
1 Select Reorder.
2 With the navigation keys, reposition the device or activity where
you want it. You can only reorder the sequence of the added
devices and activities.
3 Press OK to confirm the position. All devices and activities shift to
the right.
You can highlight another device or activity and reposition it.
To stop Reorder, press o (Options) and select Exit reorder.
Restore activities
To recall a deleted activity from a device with several activities, select
the device or one of its activities and press o (Options). Select
Restore activities and press OK. All deleted activities of this device
appear again.
e Browse
With the Browse menu, you find the channel you want to watch from
the Channel list or a future programme from the onscreen Programme
guide.
Press e to open the Browse menu.
Select your choice with the navigation keys and press OK.
To close the Browse menu, press e again.
Use your TV / Menus 25
Page 26
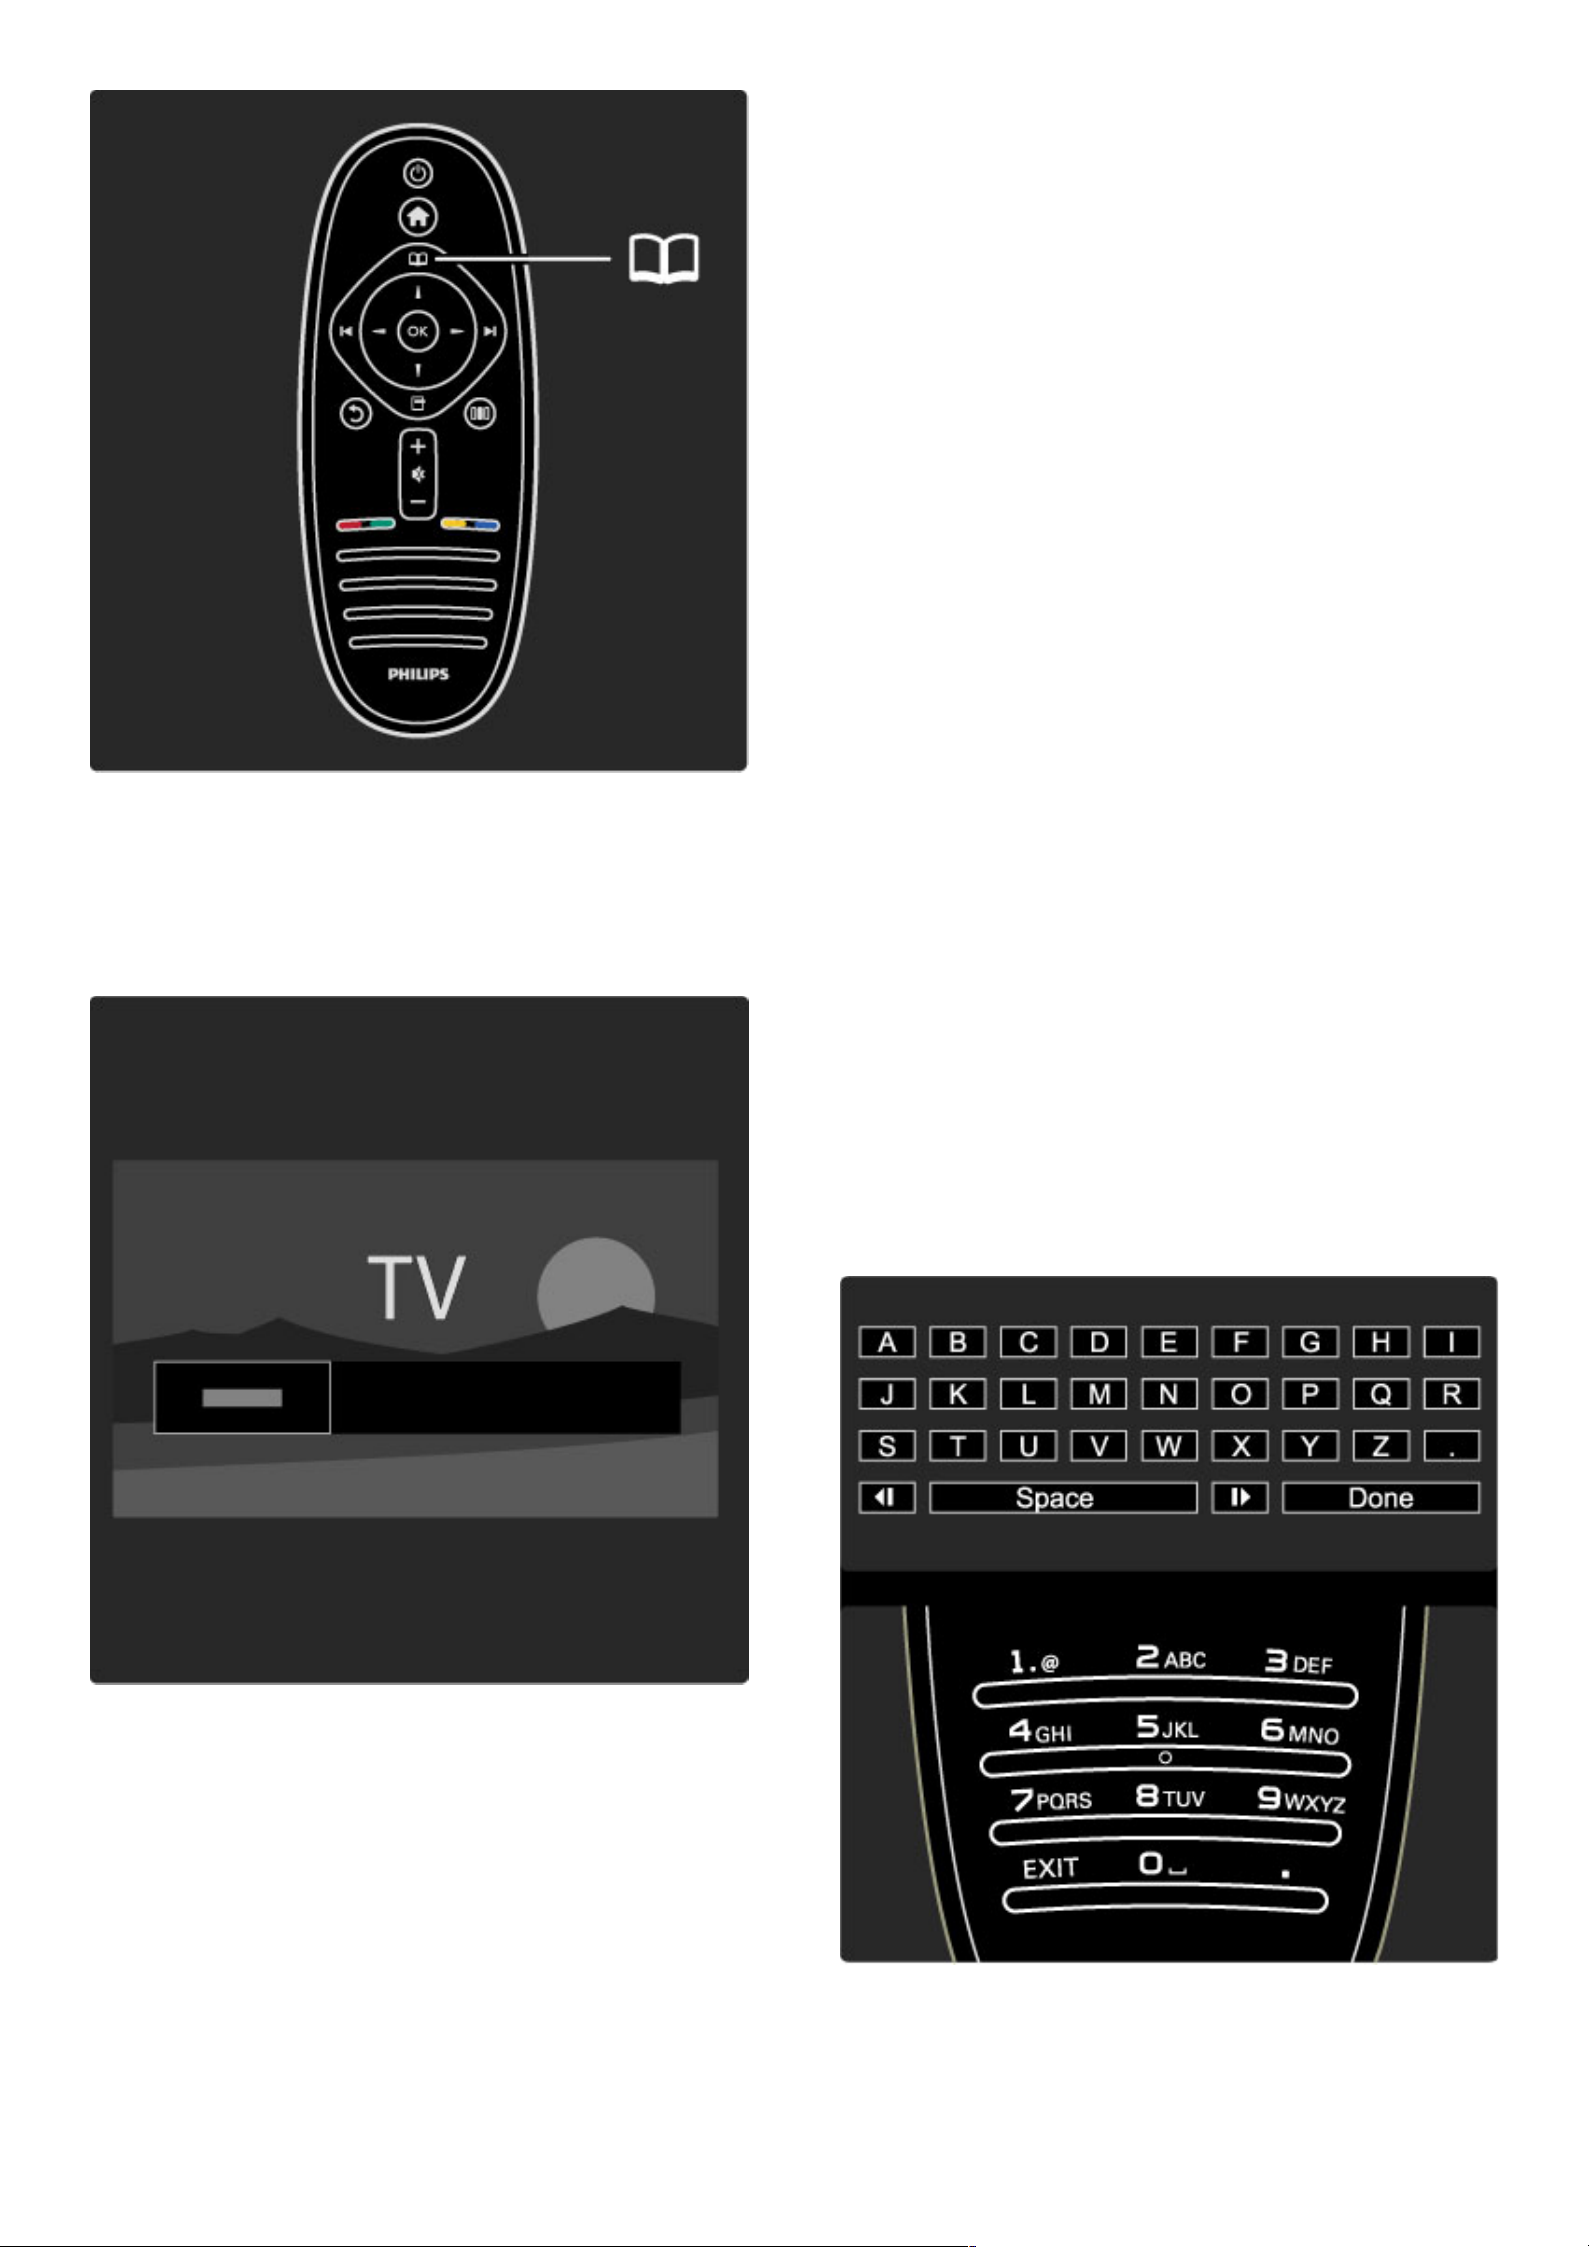
Find your content
While watching TV, open the Browse menu to open the Channel list
or the Programme guide.
When other activities are selected in the Home menu, like Browse
PC or Browse USB, use the Browse menu to find a picture, music or
video stored on your computer or USB.
Channel list
The Channel list shows the TV channels and radio stations installed on
your TV.
While watching TV, press e to open the Browse menu and select
Channel list. Navigate to a channel or station and press OK to
watch or listen to the selected channel or station.
Press b (Back) to leave the channel list without changing the
channel.
Channel list options
With the Channel list on screen, you can press o (Options) to
select the following options :
• Select list
• Mark as favourite
• Reorder
• Rename
• Hide channel
• Show hidden channels
Select list
Use this option to select which channels are shown in the Channel
list. The list you select here determines which channels you look
through with W and X while watching TV.
Mark as favourite
When a channel is highlighted in the Channel list, you can set it as a
favourite channel.
Read Use your TV > Watch TV > Favourite channels.
Reorder
You can reposition channels within the list.
1 Press o (Options) and select Reorder to start reordering
channels.
2 Highlight a channel and press OK.
3 Reposition the channel where you want it with the navigation keys.
Alternatively, enter the new position directly with the number keys.
4 Press OK to confirm the position. You can insert the channel or
swap it.
You can highlight another channel and do the same.
To stop Reorder, press o (Options) and select Exit reorder.
Rename
You can rename a channel in the Channel list.
1 In the channel list, highlight the channel you want to rename.
2 Press o (Options) and select Rename to start renaming. You can
enter text directly with the remote control keypad or open a full
keyboard on top of the text entry menu.
26 Use your TV / Menus
Page 27
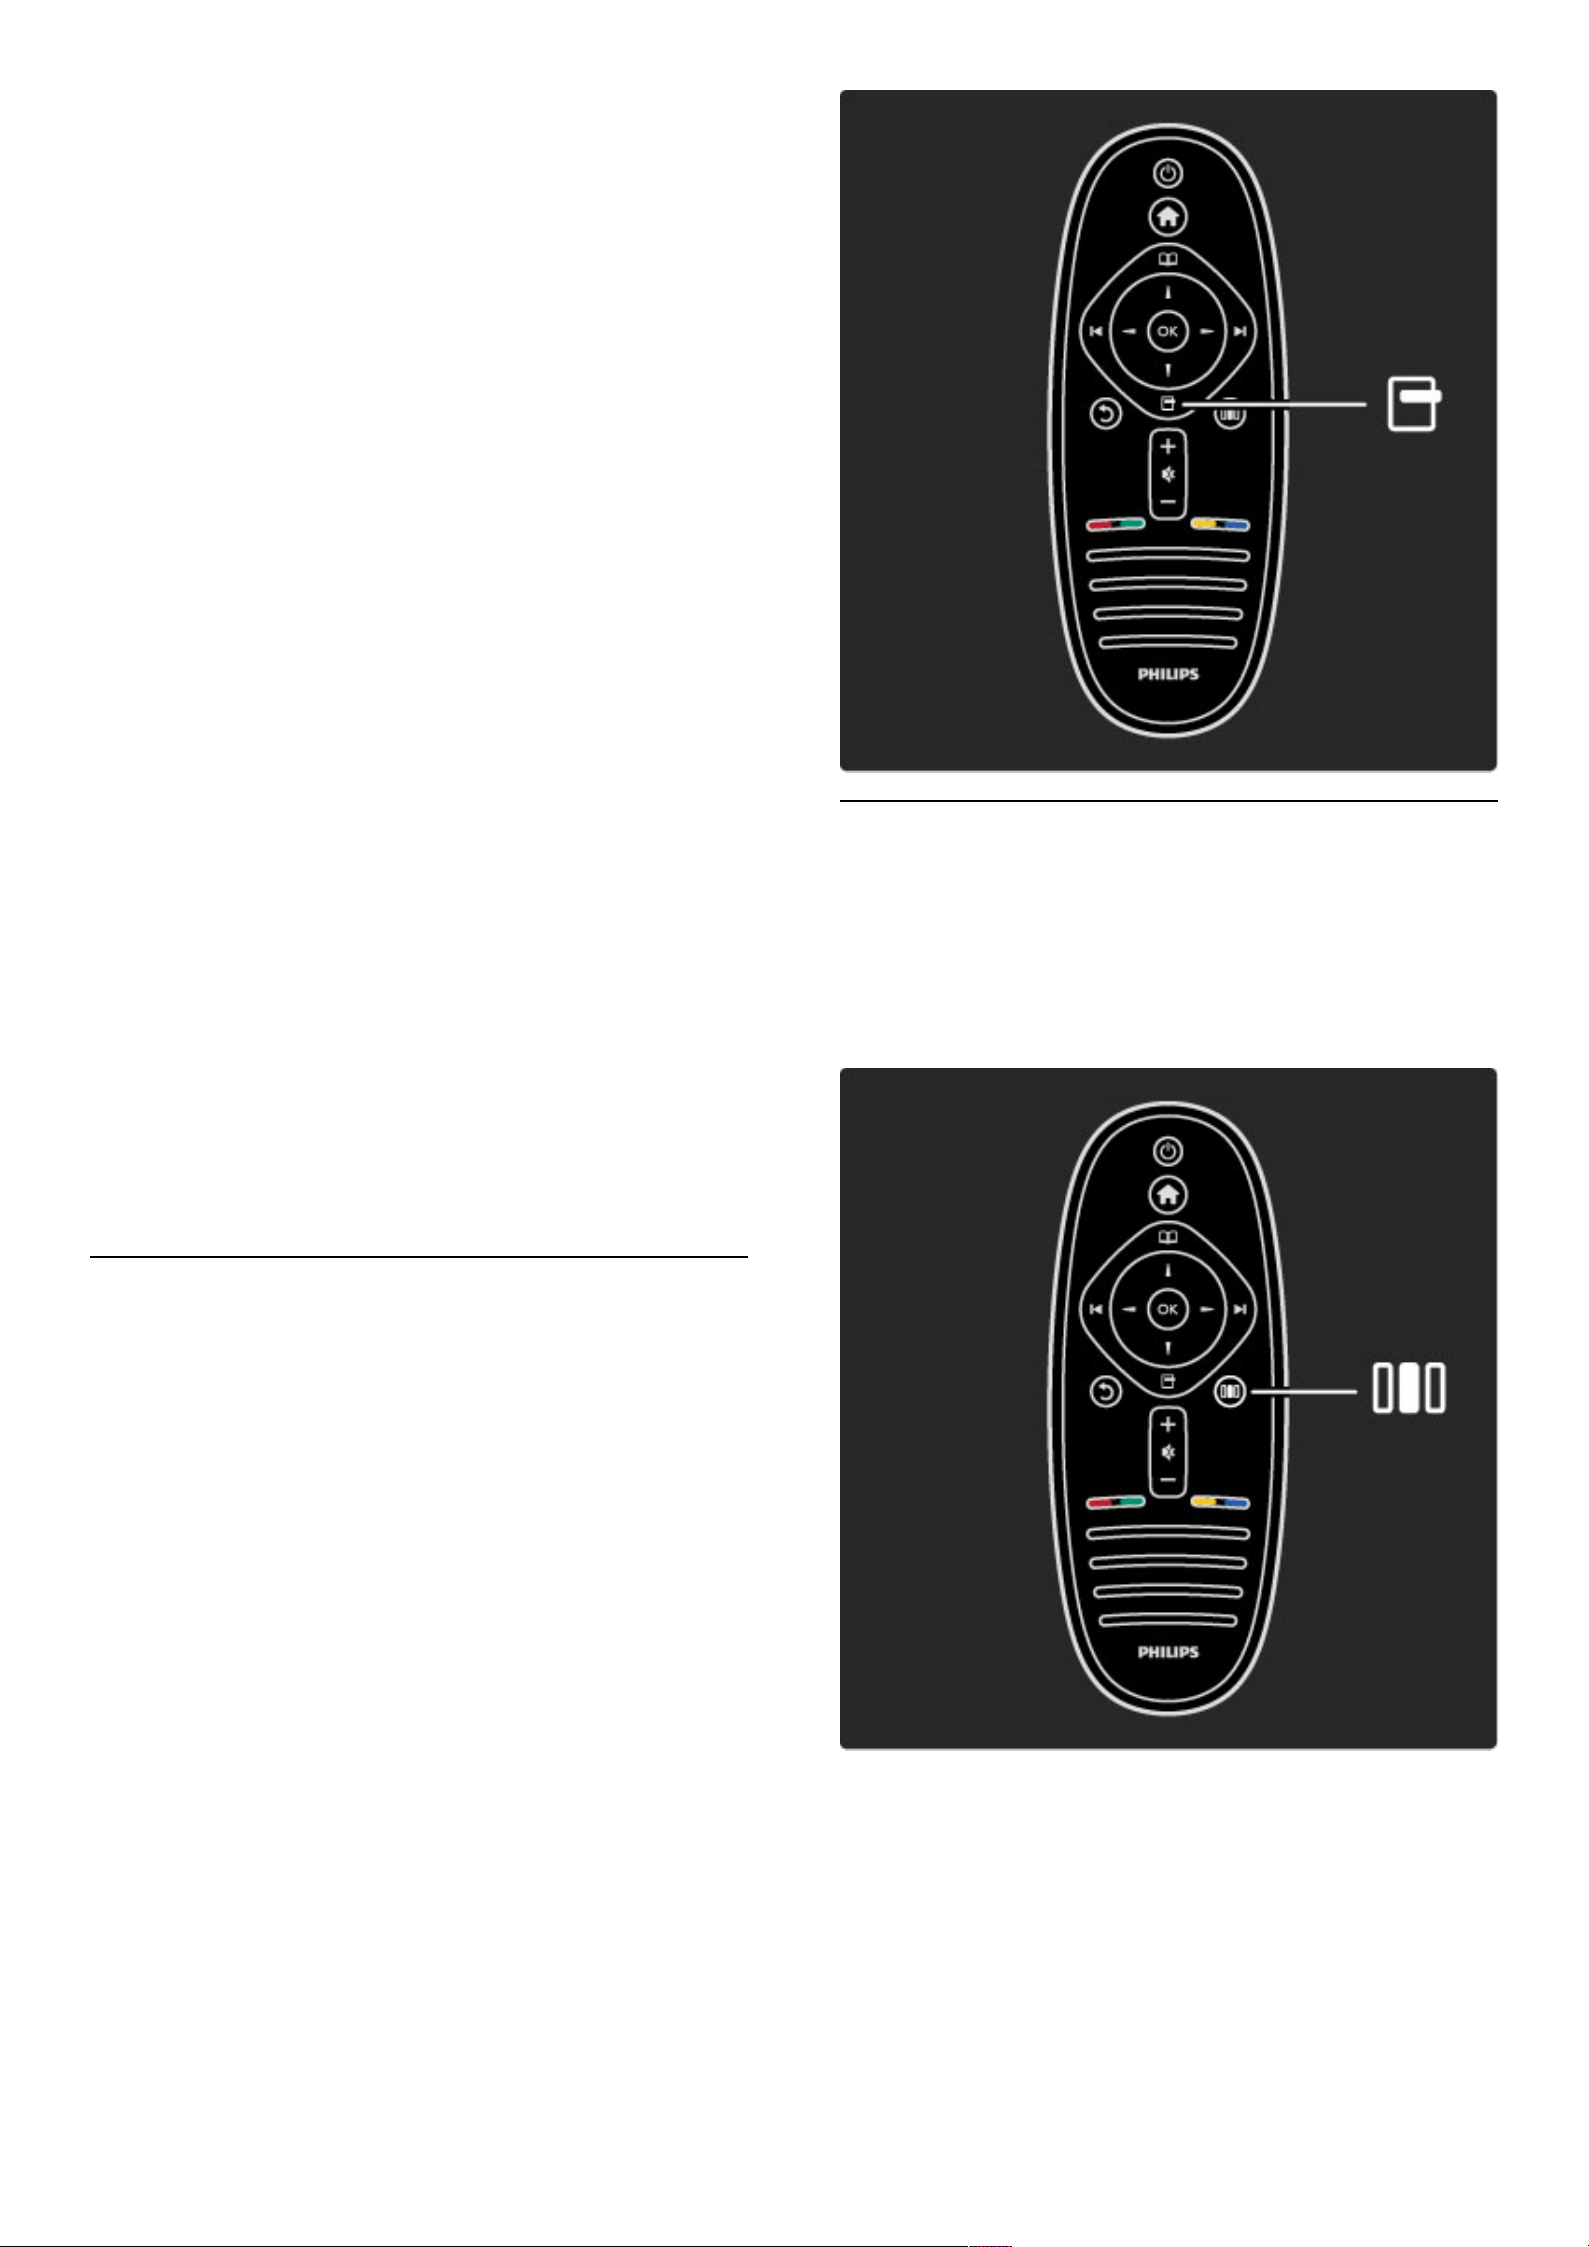
Enter text with the remote control keypad
Use the navigation keys to position the cursor in the text. Press b
(Back) to delete a character.
Use the remote control keypad as you do for SMS/text messaging to
enter a character. Use the 1 key to select a special character. Select
Clear to delete a character.
Select Done to end Rename.
Enter text with the on-screen keyboard
To open the on-screen keyboard on top of the text entry menu,
press OK when the cursor in the text blinks.
On the keyboard, use the navigation keys to position the highlight on
a character and press OK to enter it. To delete a character, press b
(Back) or highlight ! and press OK.
To switch from uppercase to lowercase or to a set of special
characters, press W (Next) or X (Previous).
To edit a character within a line of text, position the cursor on this
character and use the z and Z keys at both ends of the on-
screen spacebar.
To close the on-screen keyboard, highlight Done and press OK.
Hide channel
You can hide a channel in the Channel list. When looking through
channels, a hidden channel will be skipped.
1 In the Channel list, highlight the channel you want to hide.
2 Press o (Options) and select Hide channel. The channel is hidden
as soon as you close the Channel list.
Show hidden channels
You can recall all hidden channels and unhide them again.
1 In the Channel list, press o (Options) and select Show hidden
channels. The Channel list now shows all channels again.
2 Press o (Options) and select Unhide all to unhide the previously
hidden channels.
Or, if you want to leave the previously hidden channels hidden,
press o (Options) and select Exit.
o Options
The Options menu gives settings related to what is shown on screen.
Depending on what is shown, the Options menu holds different settings.
Press o (Options) at any time to see which options are available.
To close the Options menu, press o again.
s Adjust
With the Adjust menu, you can adjust picture, sound and Ambilight
settings quickly.
Press s to open the Adjust menu.
Select your choice with the navigation keys and press OK.
To close the Adjust menu, press s again.
Benefits
In the Adjust menu you can quickly lower or speed up the Ambilight
dynamics, adjust the Picture format or shift the picture up a little to
view the subtitles and select a preset setting for picture or for sound
according to what you are watching. If a Home Theatre System,
connected with EasyLink, is forwarding its sound presets, you can
select these too.
Use your TV / Menus 27
Page 28

In the Adjust menu you can adjust the following:
• Ambilight On or Off
• Ambilight dynamics
• Picture format
• Smart picture (presets)
• Smart sound (presets)
• Speakers
• Surround
• Picture shift
Ambilight
Read more about the Ambilight settings in Help > Use your TV >
Use Ambilight.
Picture format
Read more about the Picture format settings in Help > Use your TV
> Watch TV > Picture format.
Smart picture, Smart sound
You can set the TV to the pre-defined setting that best suits what
you're watching.
Read more about Smart settings in Help > Use your TV > Watch
TV > Smart settings
Speakers
To hear the sound through the TV speakers, close Help, press s
(Adjust), select Speakers and select TV.
Select Amplifier if you want to hear the sound through a connected
Home Theatre System or Amplifier.
These settings temporarily override any EasyLink settings.
Surround
To switch the TV automatically to the best surround sound mode
(only available when a Home Theatre System is connected), close
Help, press s (Adjust), select Surround and select On.
Picture shift
You can shift the picture on screen in a vertical or a horizontal
direction depending on the TV input. For instance, you can shift the
picture up vertically to view subtitles fully.
While watching TV, press s (Adjust), select Picture shift and press
OK. Shift the picture with the navigation keys. Press OK to stop
Picture shift.
28 Use your TV / Menus
Page 29
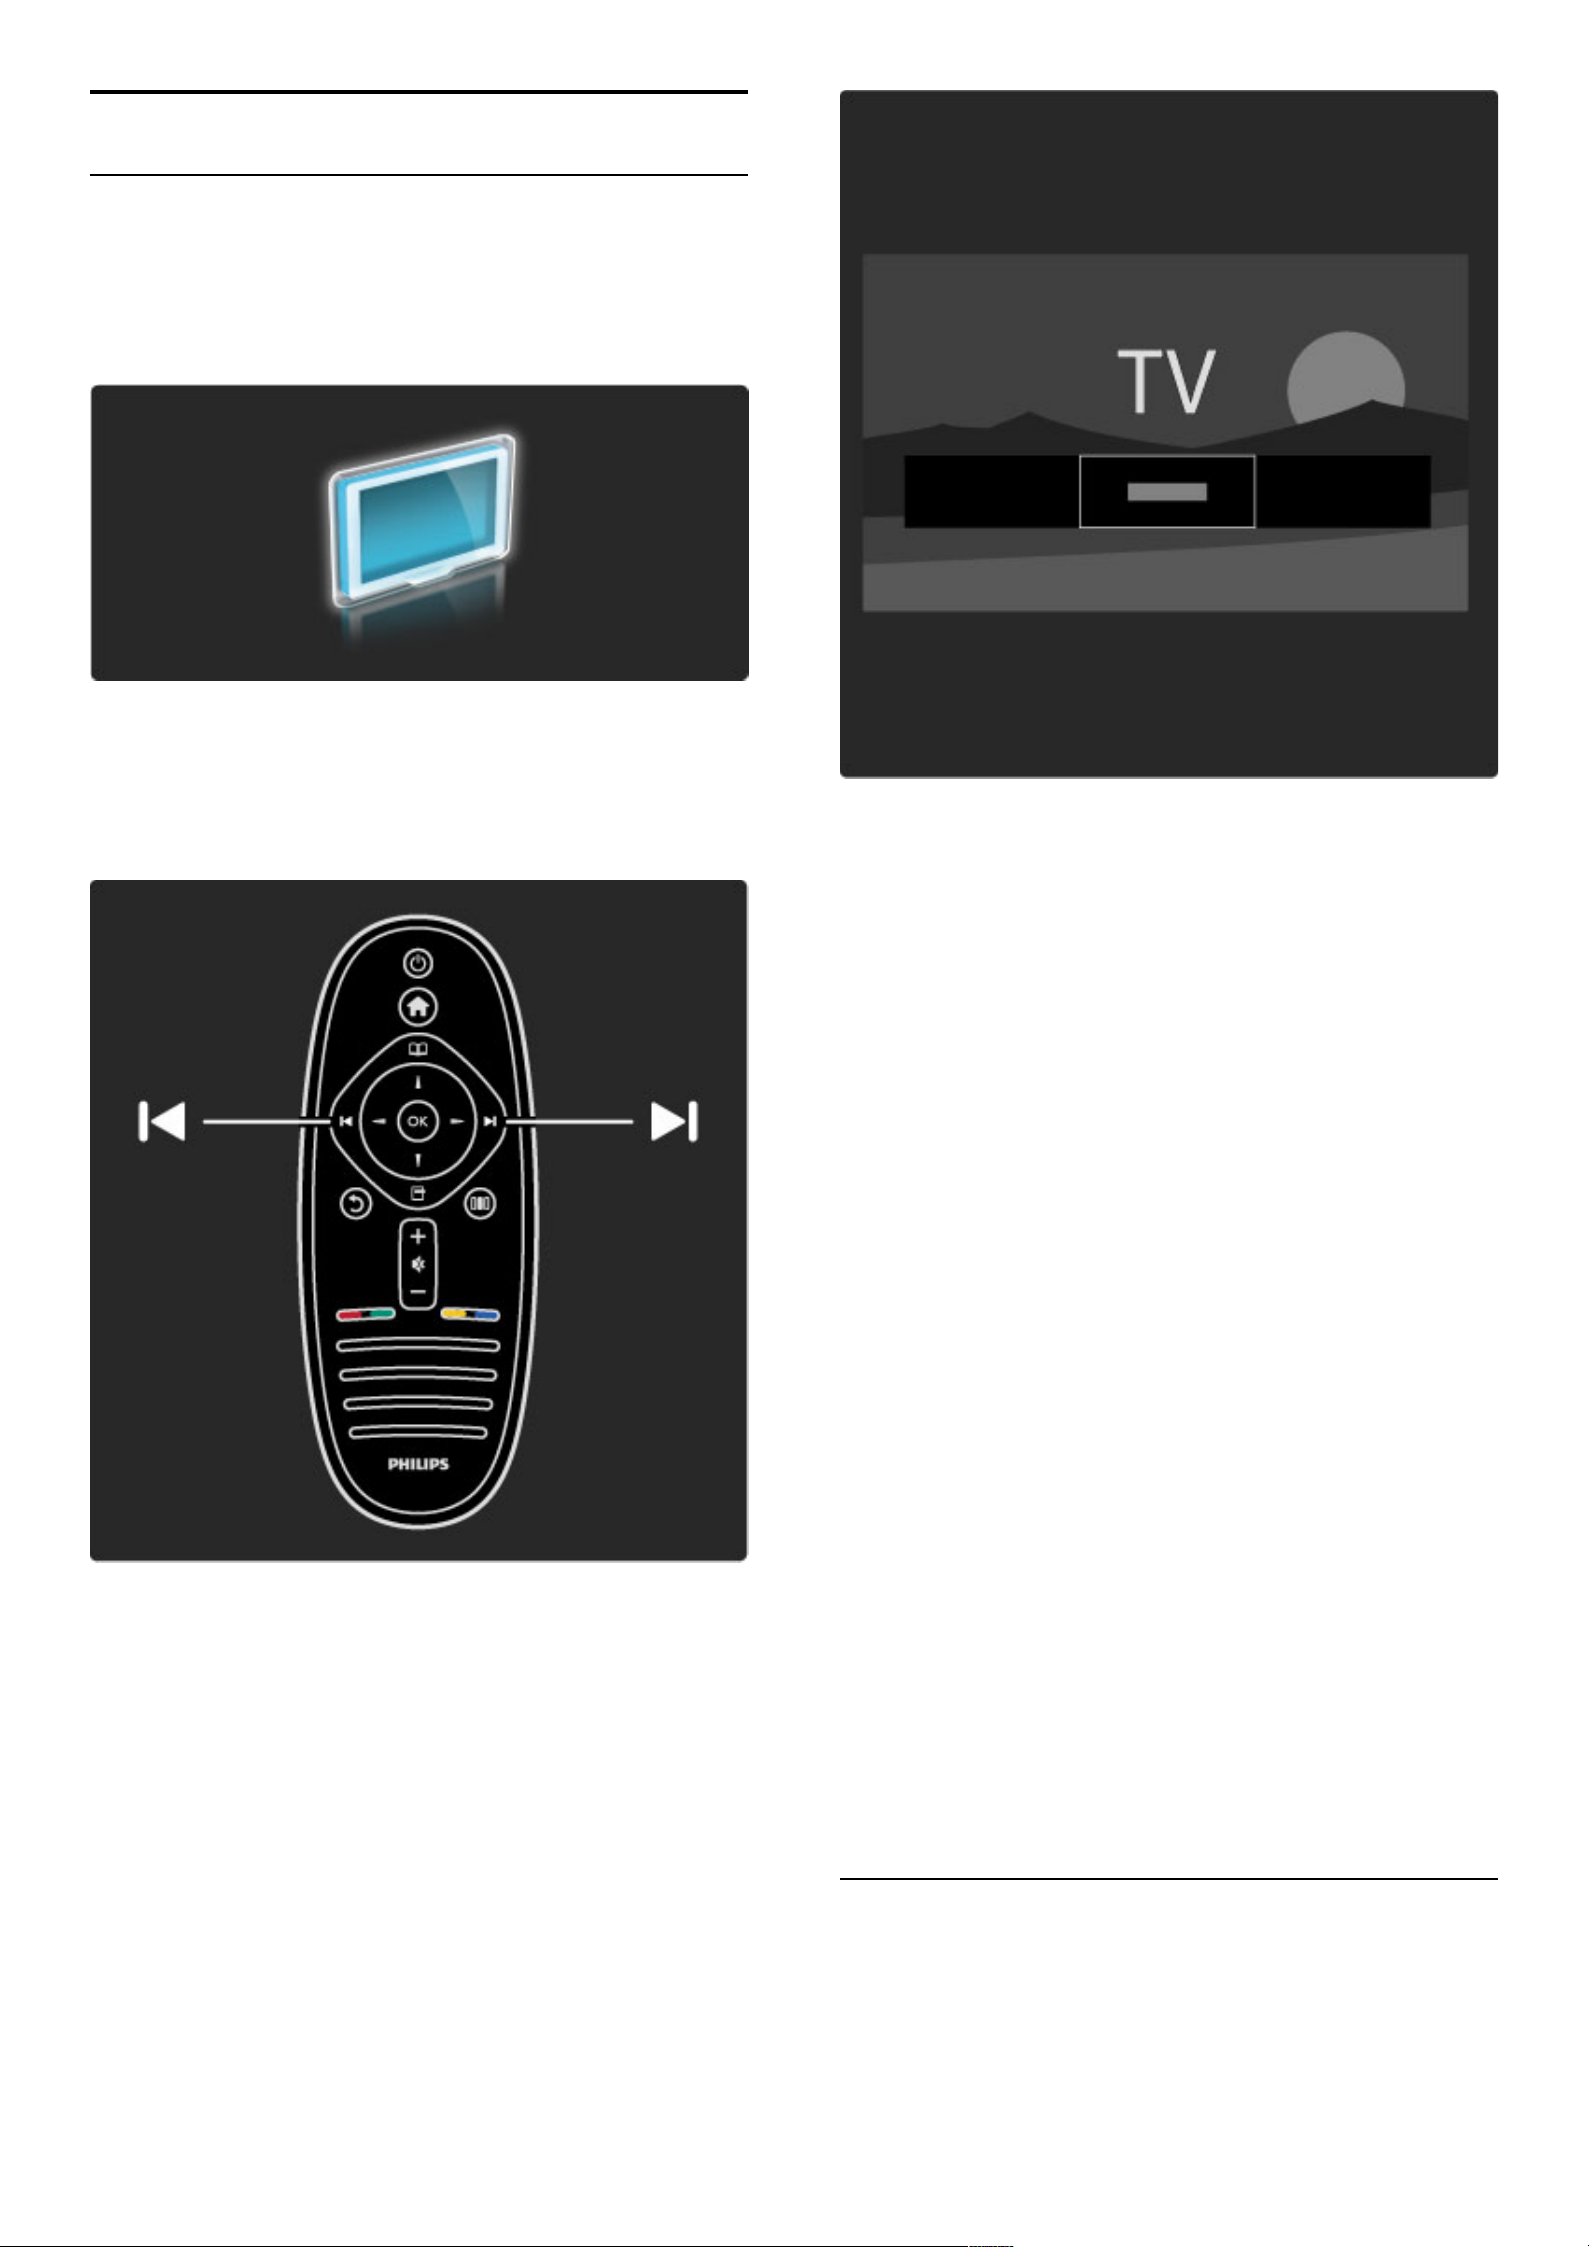
2.3 Watch TV
Switch channels
To watch TV and switch TV channels, make sure the Watch TV
activity is selected in the Home menu.
To watch TV, press h, select Watch TV and press OK.
To switch TV channels, press W or X on the remote control. You
can use the number keys if you know the channel number or you
can use the Channel list to select a channel.
To switch back to the previous channel, press b (Back).
Channel list
To open the Channel list, while watching TV, press e to open the
Browse menu. Select Channel list and press OK. Select a channel
with the navigation keys and press OK to switch to the channel.
To leave the Channel list without changing the channel, press b
(Back).
Channel list pages
The channel list can have several pages. To view the next or previous
Channel list page, press W or X.
You can Reorder and Rename channels or make a channel a
favourite. Read more about Channel list in Help > Use your TV >
Menus > Browse e.
Radio channels
If digital broadcasting is available, digital radio stations are installed
during installation. Switch to a radio channel just like you switch to a
TV channel.
Options for watching TV channels
With digital TV broadcast, you can see what programme is on now or
coming up next, switch Subtitles on or off or even view the channel
diagnostics.
While watching TV channels, press o (Options) to select an
available option.
What's on
This option shows information on the current and next programme
on this channel. Use the navigation keys to scroll through text or to
go to the next column.
Status
Depending on the broadcast, the Status page will show relevant
information. You can use this information to improve the channel
signal or to check if certain services are available.
Video selection
Digital TV channels can offer multi video signals (multifeed
broadcasts), different camera viewpoints or angles of the same event
or different programmes on one TV channel. The TV shows a
message to advise if any such TV channels are available. When
available, press o (Options) and select Video selection to select
your choice.
Favourite channels
In the Channel list you can mark a channel as a favourite. You can set
the Channel list to only show your favourite channels.
To open the Channel list, while watching TV, press e (Browse) on
your remote control.
Use your TV / Watch TV 29
Page 30
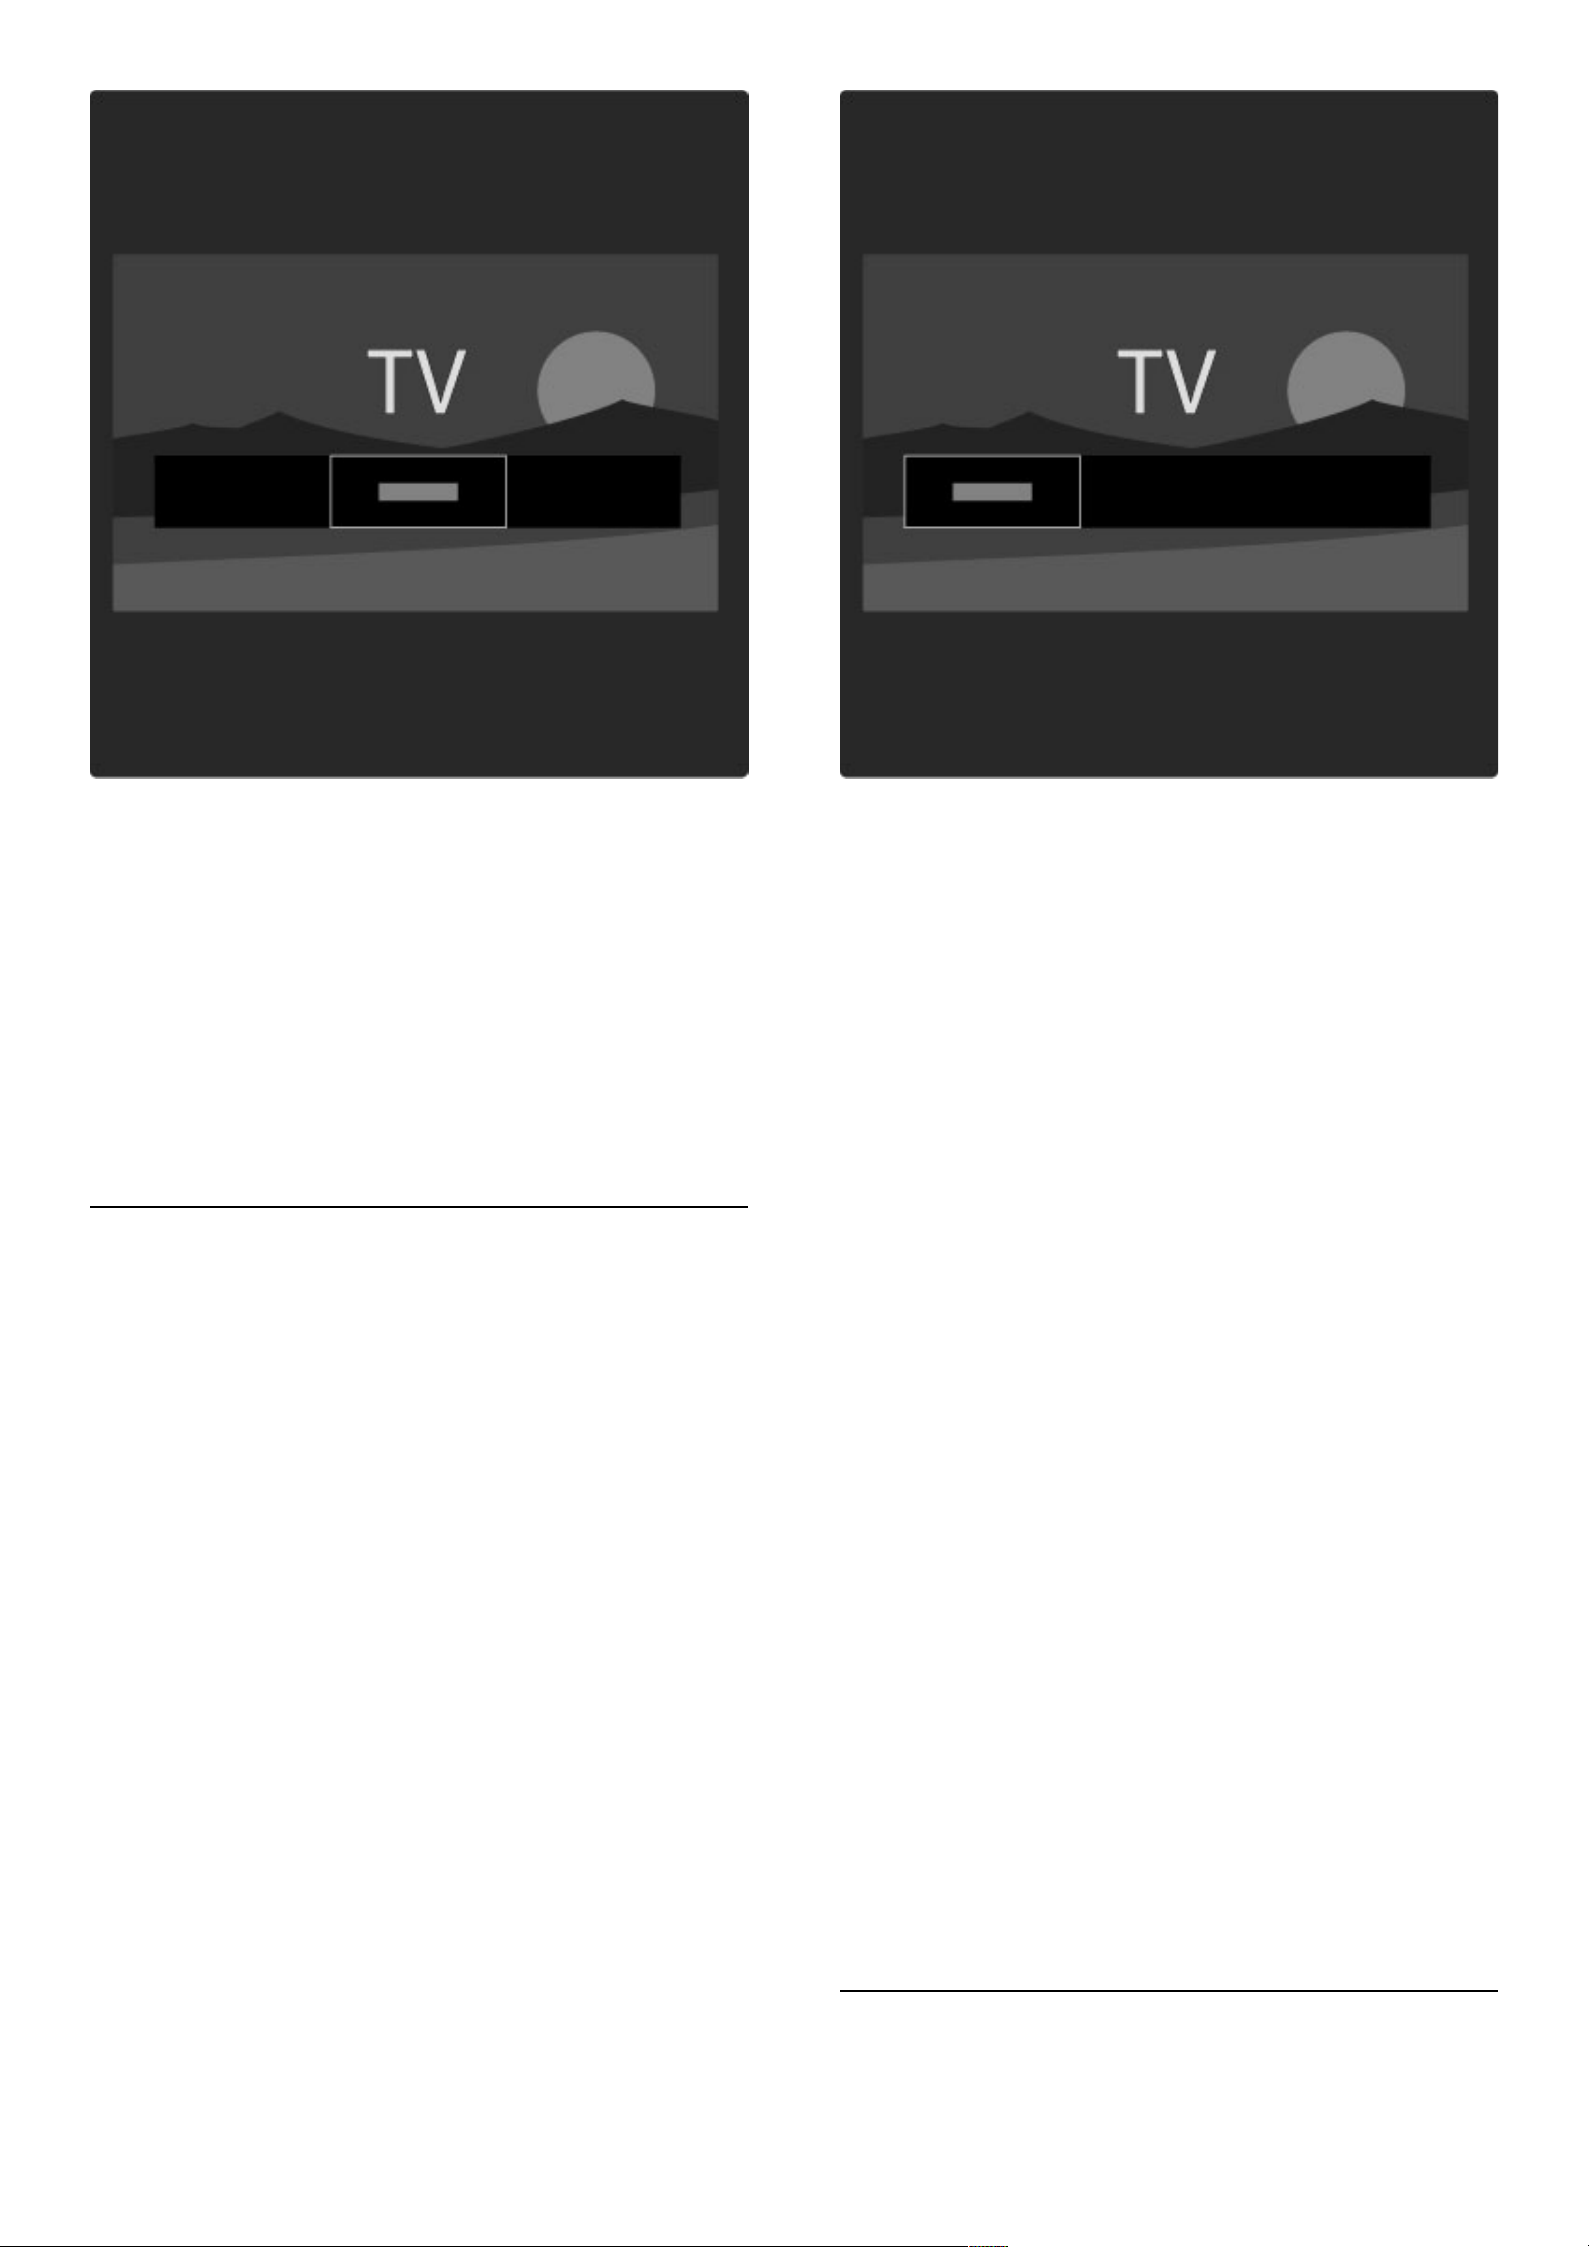
Set up a favourite channel
While watching TV, press e to open the Browse menu. Select
Channel list and press OK. Navigate to a channel you want to mark
as favourite and press o (Options). Select Mark as favourite. In the
Channel list, the favourite channel is marked with a F.
You can unmark a favourite channel with Unmark favourite.
Only watch your favourite channels
You can set the Channel list to show only your favourite channels.
With the list on screen, press o (Options) and select Select list.
Select Favourites from the list and press OK.
With the Favourites list selected, you will only see your favourite
channels when you look through the channels.
Programme guide
The Programme guide is an on-screen guide for scheduled TV
programmes. You can set a reminder to tell you when a programme is
due to start or select programmes by genre.
The Programme guide is provided by the broadcaster or Net TV.
To open the Programme guide, while watching TV, press e to
open the Browse menu. Select Programme guide and press OK.
To leave the Programme guide without changing a setting, press b
(Back).
First use
The first time you open the Programme guide, the TV scans all TV
channels for programme guide information. This can take several
minutes. This data is stored in the TV. Read also Update Programme
guide in the Programme guide options.
Programme guide options
Select a programme with the navigation keys and press o
(Options) to select the following :
• Set reminder
To set an on-screen reminder for when a programme is due to start,
select Set reminder and press OK. The programme is marked with
©. To cancel this reminder, select Clear reminder and press OK.
• Change day
View the previous or next day's programmes.
• More info
Shows the programme details and summary.
• Search by genre
View all programmes selected by genre.
• Scheduled reminders
If a reminder is set, you can view a list of all scheduled reminders.
• Update Programme guide
After the first scan, the TV stores the programme guide data. If you
update or reinstall channels or reorder the Channel list, you will
need to update this data.
To update this data, select Update Programme guide. Reminders are
cleared and the new data is stored.
———————————————————————
Specifics
Dependant of the amount of channels carrying programme guide
data, the TV stores guide information for up to eight days.
Smart picture and sound settings
30 Use your TV / Watch TV
Page 31
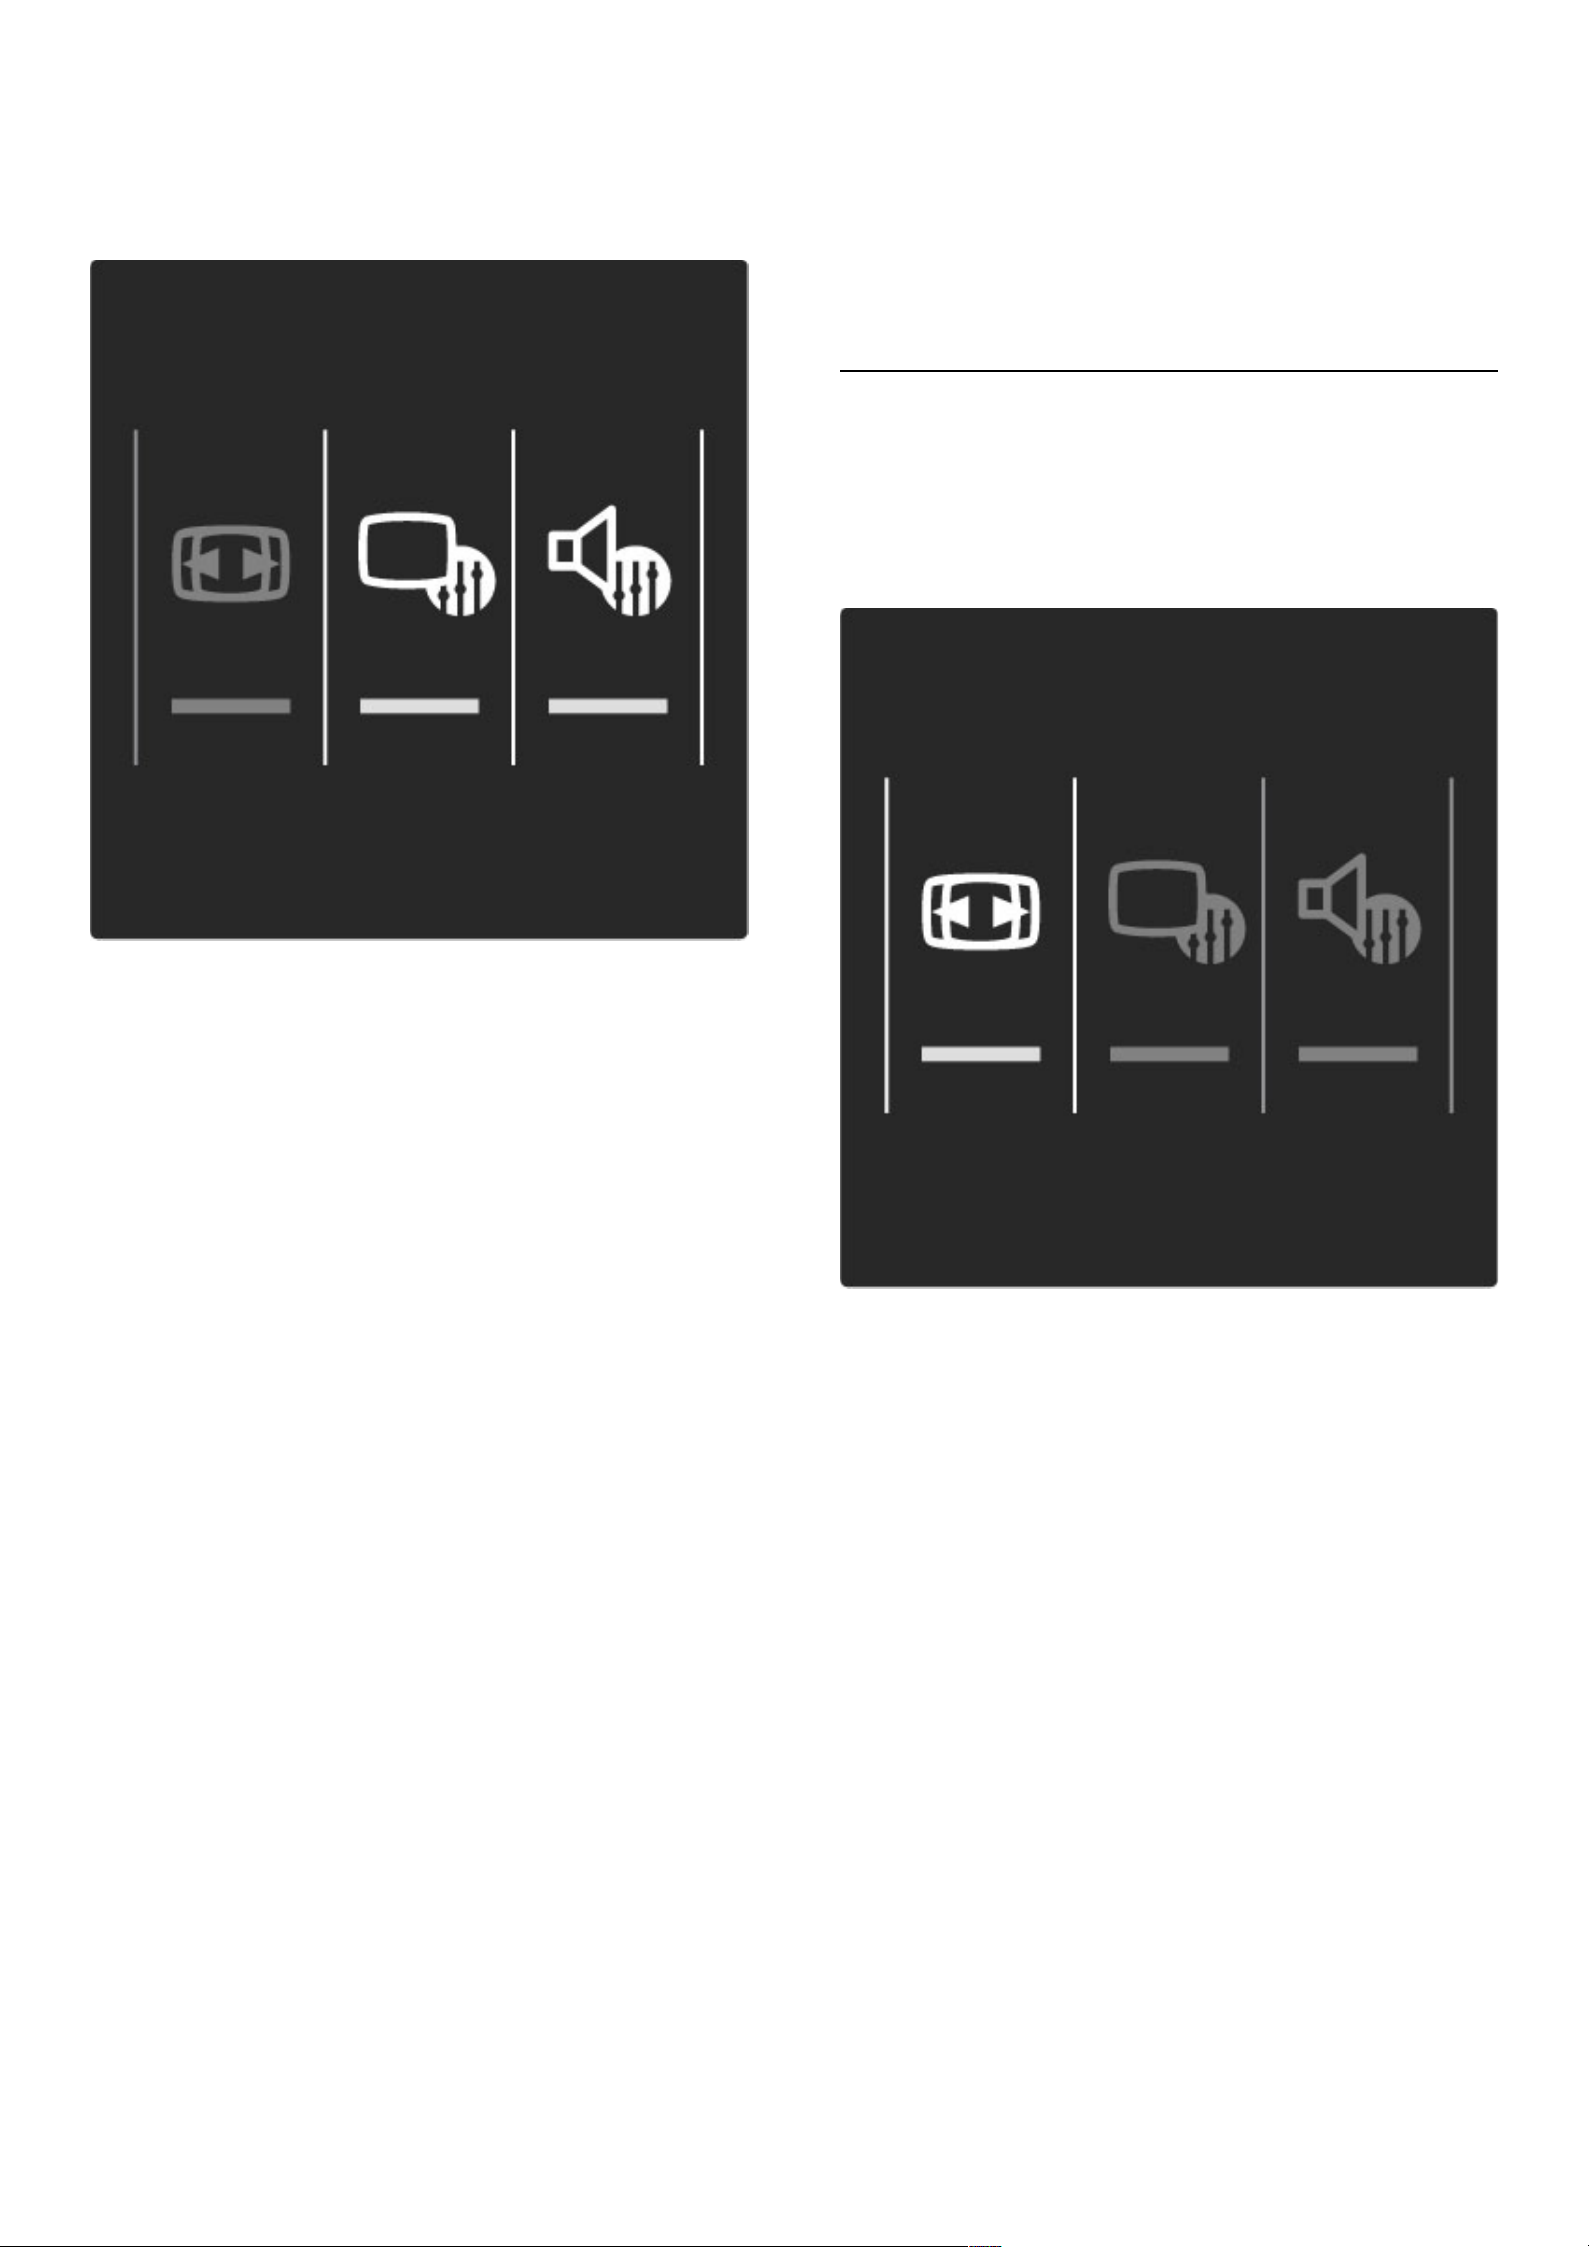
For easy picture or sound adjustment, you can select a preset setting
for each.
While watching TV, press s to open the Adjust menu and select
Smart picture or Smart sound. Make a selection from the list and
press OK.
Smart picture and Smart sound
Smart settings are a combination of preset settings suited to a
specific use like gaming or daylight viewing.
You can adjust a specific setting like Brightness or Contrast, Bass or
Treble, of a chosen smart setting. The smart setting will remember
the adjustments you made.
Adjust smart settings
To adjust a specific setting of a smart setting, select the smart setting
and press OK. Then press h and select Setup. Select TV settings,
navigate to the individual setting and adjust it.
To return to the original smart setting values, undoing the
adjustments you made, first set the TV in the smart setting you want
to reset. Then press h > Setup > TV settings, select Reset, press
OK and confirm.
Read more about adjusting separate settings in Help > Setup >
Picture, Sound and Ambilight.
Smart picture list
• Personal - Your choices made in Personalise picture and sound
• Vivid - Ideal for daylight viewing
• Natural - Natural picture settings
• Cinema - Ideal for watching movies
• Game - Ideal for gaming
• Energy saving - Energy-conscious settings
• Standard - Factory standard settings
• Photo - Ideal for viewing photos
• Custom - A smart picture setting free for any setting you wish
Smart sound list
• Personal - Your personal choices made in Personalise picture and
sound
• Standard - Factory standard
• News - Ideal for speech
• Movie - Ideal for watching movies
• Game - Ideal for gaming
• Drama - Ideal for TV soaps
• Sports - Ideal for sports programmes
Picture format
If black bars appear on the screen, you can adjust the picture format to
a format that fills the screen.
While watching TV, press s to open the Adjust menu and select
Picture format. Select a format from the list and press OK.
Picture formats
The following formats are available according to the picture on
screen:
• Auto fill
Automatically enlarges the picture to fill the screen. Minimal picture
distortion, subtitles remain visible. Not fit for PC input.
• Auto zoom
Automatically zooms the picture in to fill the screen as much as
possible without distortion. Black bars may be visible. Not fit for PC
input.
• 16:9
Sets the picture in 16:9 format for HD 16:9 broadcast.
• Super zoom
Removes the black bars on the side of 4:3 broadcasts. The picture is
adjusted to fit the screen.
• Super zoom 16:9
Sets the picture in 16:9 format with minimal distortion for 4:3
broadcast.
Use your TV / Watch TV 31
Page 32

• Movie expand
Scales the picture to a 16:9 format.
• Cinema 21:9
Sets the picture in cinema 21:9 format for original 21:9 movies.
• Cinema 21:9 subtitle
Sets the picture in cinema 21:9 format but subtitles in the bottom
black bar are visible.
• Unscaled
Expert mode for HD or PC input. Pixel for pixel display. Black bars
may appear with pictures from a PC.
• Wide screen
Stretches the picture to a 16:9 format.
Switch to standby
If the TV is on, press O on the remote control to switch to standby.
The red standby key indicator is on.
Although the TV consumes very little power when on standby, energy
does continue to be consumed.
When the TV is not in use for an extended period of time, we
recommend you switch the TV off completely with the power switch.
32 Use your TV / Watch TV
Page 33

2.4 Watch a connected device
Select a device
When a connected devices is added to the Home menu, you can easily
select it.
To select and watch a connected device or activity, press h to
open the Home menu and select the device or its activity and press
OK. Make sure the device is switched on.
Read more about Add your devices in Help > Use your TV >
Menus > Home menu.
Use the TV remote control
The TV remote control can operate a device if the device is
connected with HDMI and has EasyLink (HDMI-CEC).
Read more about EasyLink Remote control in Help > Use your TV
> Remote control > EasyLink Remote control.
Use your TV / Watch a connected device 33
Page 34
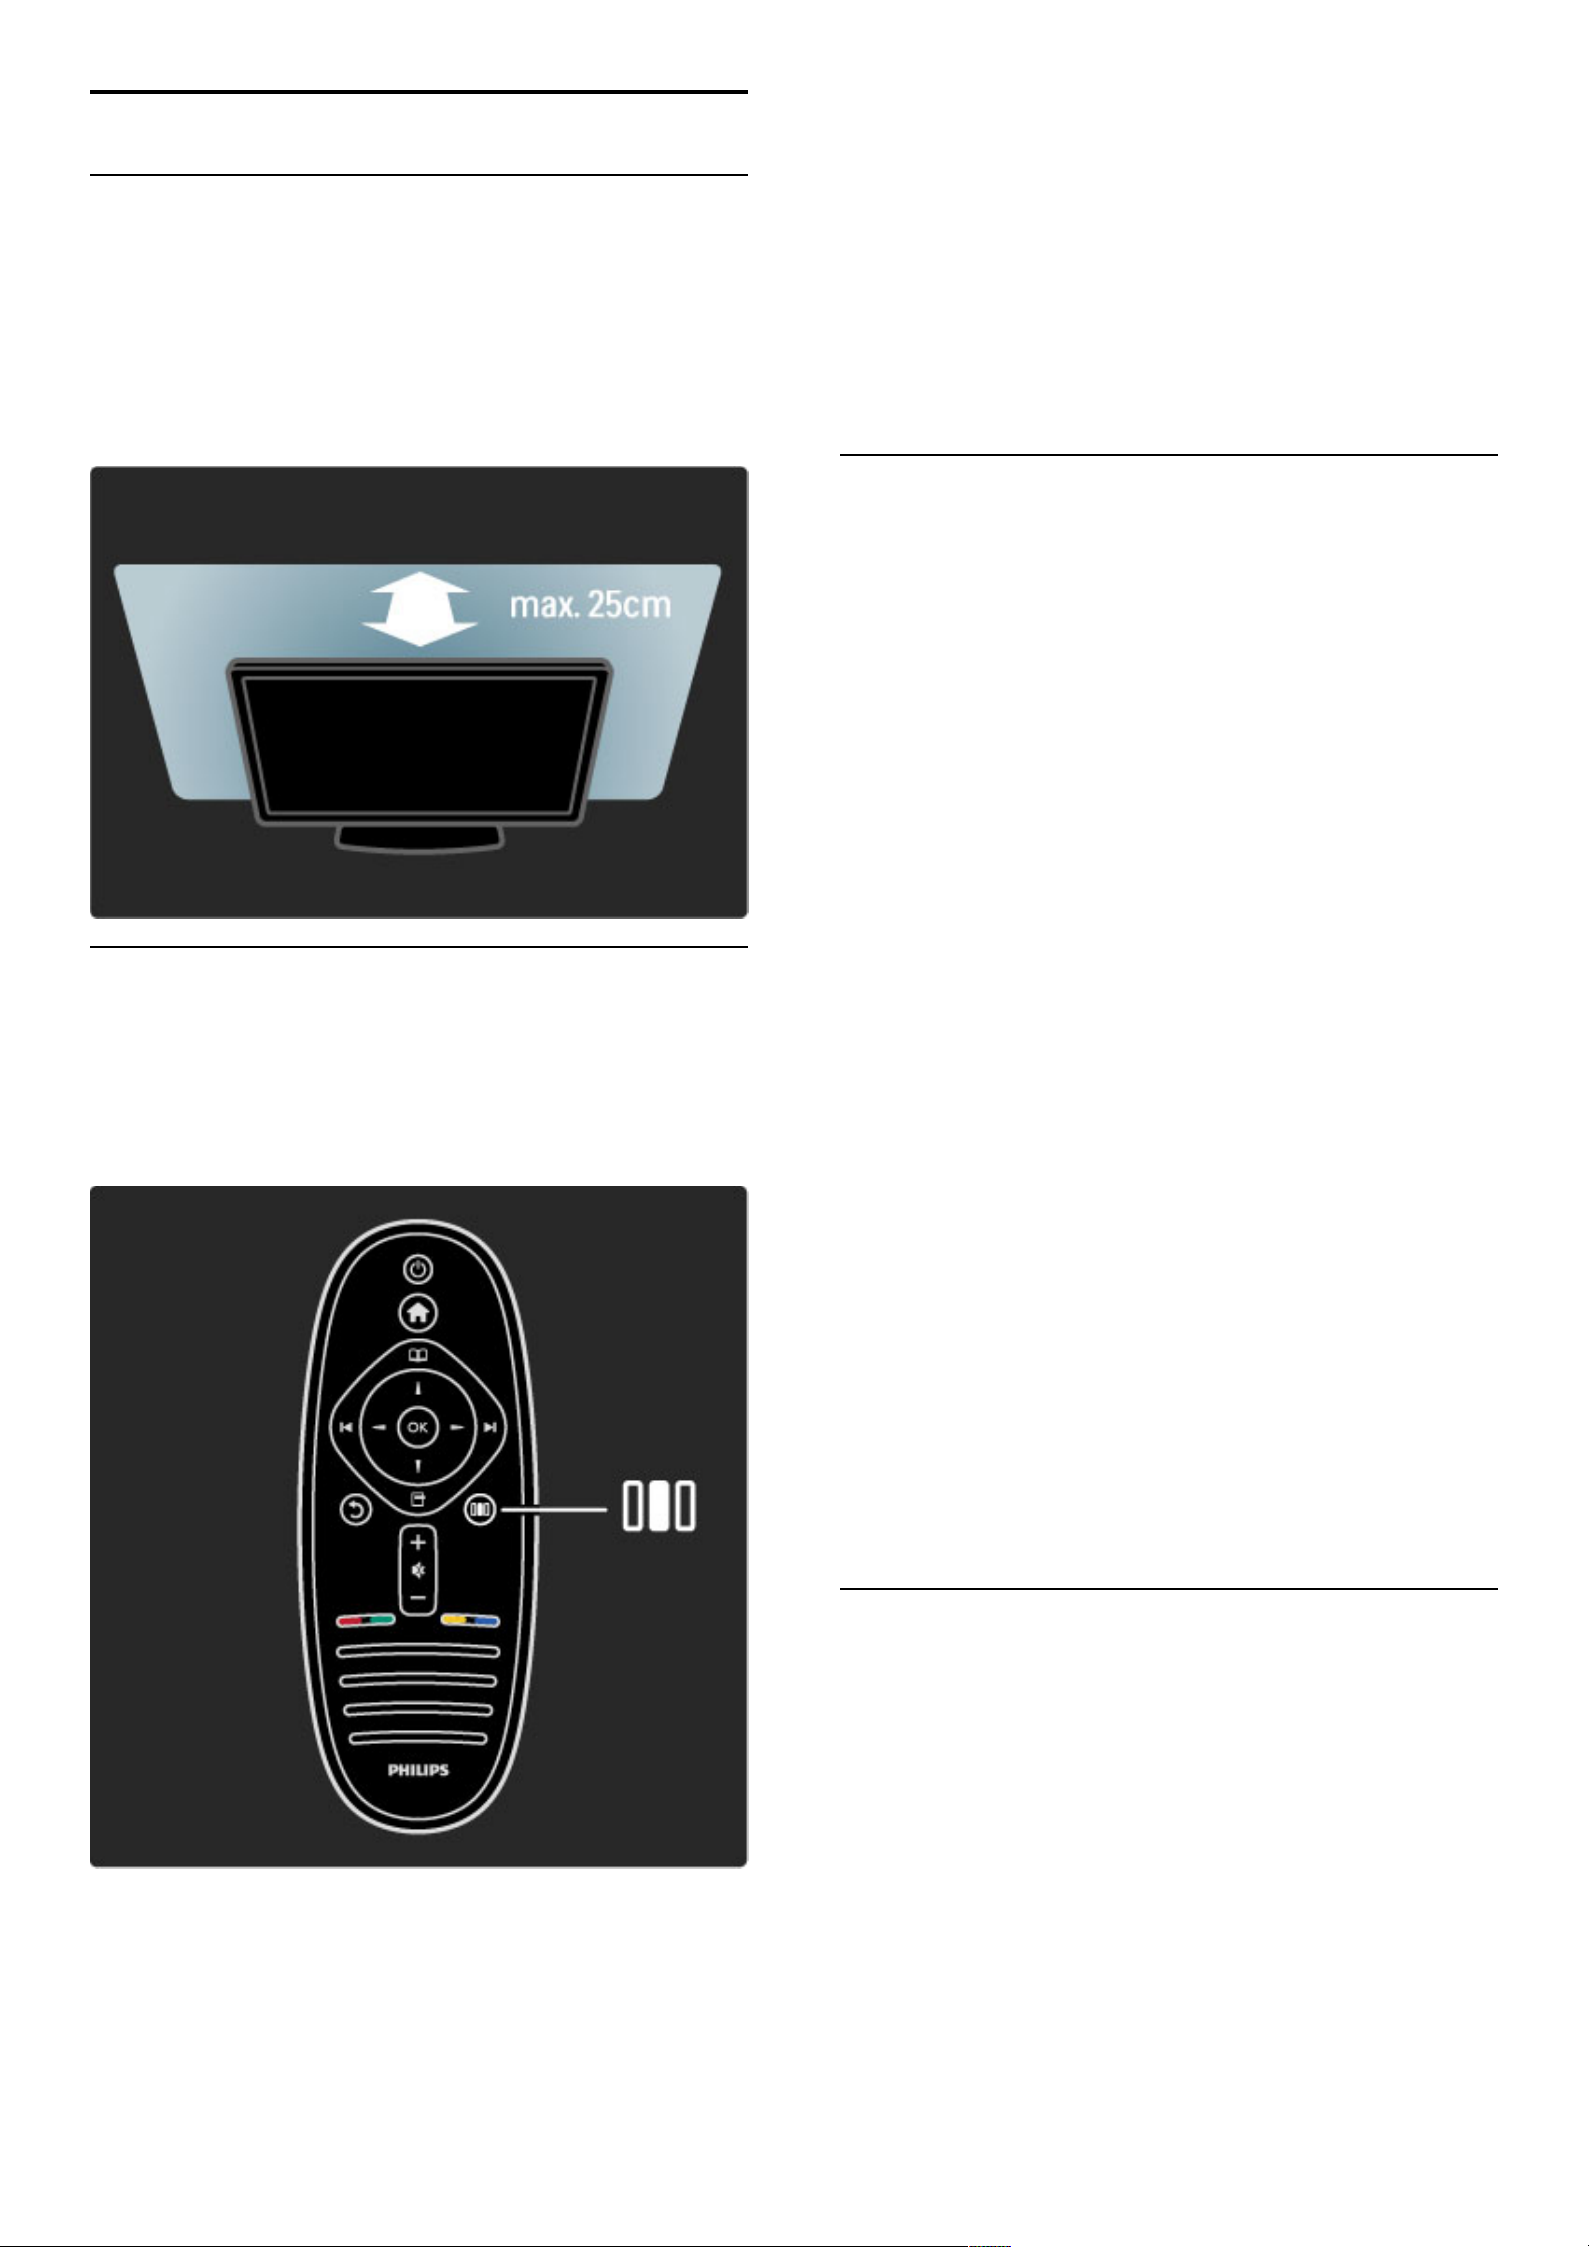
2.5 Ambilight
Benefits
With Ambilight, you enjoy a more relaxed viewing experience and
improved perceived picture quality.
Dim the lighting conditions in the room and position the TV up to
25cm away from the wall for the best Ambilight effect. To prevent
poor infrared remote control reception, position your devices out of
sight of Ambilight.
Adjust
You can use the Adjust menu to set the most used Ambilight
settings.
While watching TV, press s to open the Adjust menu.
To close the Adjust menu, press s again.
Switch Ambilight on or off
In the Adjust menu, select Ambilight and press OK. Switch Ambilight
On or Off.
Ambilight dynamic
In the Adjust menu, select Ambilight dynamic and press OK. Adjust
the speed at which Ambilight responds to onscreen images.
Ambilight brightness
In the Adjust menu, select Ambilight brightness and press OK.
Adjust the light output of Ambilight.
Ambilight colour
In the Adjust menu, select Ambilight colour and press OK. Select
Dynamic, if Ambilight should respond to onscreen images or select
one of the fixed colours. Select Custom if you want to set a specific
fixed colour.
Read more about Ambilight settings in Help > Use your TV > Use
Ambilight > Setup.
Setup
As well as the settings in the Adjust menu, Ambilight offers some
advanced settings. You can set a fixed colour of your own or a delayed
Ambilight switch off after you switched off the TV.
To open the Ambilight menu, press h and select Setup > TV
settings > Ambilight.
Custom colour
To set a Ambilight colour of your own, select Custom in the
Ambilight Colour menu. With Custom selected, you can open the
Custom colour menu. Select Palette to choose your own colour.
Ambilight Custom colour is a fixed (non-dynamic) colour setting.
Separation
To set the difference in colour level between the lights on each side
of the TV, select Separation. Separation Off gives a dynamic but
uniform Ambilight colour.
TV switch off
To set Ambilight to fade out and switch off a few seconds after you
have switched off the TV, select TV switch off. Allow Ambilight to
fade out and switch off completely before you switch the TV back
on again.
Scenea lounge light
To always switch off Ambilight when Scenea is switched on, select
Scenea lounge light and select Off.
Wall colour
The colour of the wall behind your TV can influence the colour
effect of Ambilight. To correct this influence, select Wall colour and
select a colour that matches the wall colour. Ambilight will correct its
colours to mix best with the colour of the wall behind the TV.
Lounge light mood
Read more about Lounge light mood in Help > Use your TV > Use
Ambilight > Lounge light mood.
Lounge light mood
When the TV is on standby, you can switch Ambilight on and create a
Lounge light mood in your room.
To switch Ambilight on while the TV is on standby, press J on the
TV.
34 Use your TV / Ambilight
Page 35
To change the Lounge light mood colour scheme, press J on the
TV again.
To switch off Lounge light mood, press and hold J on the TV for 3
seconds.
You can also set up the colour scheme in the Setup menu.
With the TV switched on, press h and select Setup. Select TV
settings > Ambilight > Lounge light mood. Select the colour
scheme with which Lounge light mood will start up.
Use your TV / Ambilight 35
Page 36
2.6 Net TV
What is Net TV ?
Net TV offers Internet services and websites tailored for your TV.
You can visit popular sites, look at infotainment or listen to music.
Net TV pages
The most popular websites have tailored their web pages for use on
TV. Read the newspaper headlines, watch the latest video hit or
check the weather forecast.
Net TV programme guide
Once you are connected to Net TV, the TV programme guide uses
the Internet to gather its information.
Missed a programme?
If a broadcaster offers this service, you can catch-up with a favourite
programme you missed. Watch this programme when it suits you.
Read more about Net TV in the following chapters.
New services
New services are added regularly. Consult the Net TV pages from
time to time to discover the newly-added services.
Specifics
• The availability of Net TV services vary per country.
• With Net TV you can also link up to the Internet. You can view
any website you like but remember that most Internet websites are
not tailored to be viewed on a TV screen and certain plug-ins (e.g.
to view pages or videos) are not available on your TV.
• Net TV online services can be added, changed or stopped.
• Net TV shows one page at a time and full screen.
• You cannot download and save files or install plug-ins.
What you need
To enjoy Net TV, you need to connect the TV to a router with a
high-speed connection to the Internet.
Read Help > Setup > Network.
Once the connection is made, select Browse Net TV in the Home
menu to start the Net TV on-screen setup.
Read Help > Use your TV > Net TV > First use.
First use
1 Agree to the Terms of Use.
2 Register for Net TV.
3 Switch on Parental control.
Net TV is ready for use.
How to register
To register, you need an email address and a PC connected to the
Internet. If you skip the registration at first use, you can register from
the Net TV Start page later on.
To start the Net TV registration, enter your email address on screen.
To open the on-screen keyboard, press OK with the text field
highlighted. Enter the characters one by one. Select Register and
press OK.
A message will appear if a registration email has been send to your
email address. Open the email on your PC and click the link to the
registration form. Complete the form and click the button to submit.
On the TV, select OK and press OK to open the Net TV Start
page.
Switch on Parental control
The first time you open the Net TV Start page, you can switch on
Parental control. If you switch on Parental control, you need to enter
a personal lock/unlock code. Enter a 4 digit code as your Net TV
lock/unlock code.
Use the number keys on the remote control. Enter the same code
again to confirm.
Net TV is ready to use.
Registration benefits
When you have registered, your favourite or locked Net TV pages
are stored as a back-up. Also, the last 16 web addresses (URLs) you
visit are stored. You can share these pages with another Net TV
television if you register that TV with the same email address.
When registered, you can restore these selected pages after an
accidental reset of Net TV with Clear history.
Parental control benefits
With Parental control switched on ...
• you can lock and unlock services and/or categories of services
• some services that are not suitable for children are locked from the
start but can be unlocked
Parental control specifics
• Only services on the Net TV pages can be locked. Advertisements
and Internet websites cannot be locked.
• Services are locked per country. Categories are locked for all
countries.
Browse Net TV
36 Use your TV / Net TV
Page 37

To open Net TV, close this Help and press h, select Browse Net
TV and press OK. The TV links up to Net TV and opens the Start
page.
To exit Net TV, press h and select another activity.
The F Start page
The F Start page shows your favourite services and some
recommended services. You can browse Net TV from this page.
To return to the F Start page, press e (Browse).
Open a Net TV service
Select a Net TV service with u or v, w or x keys. To open a
selected service, press OK.
A closing lock animation means that the page you have opened is a
secure page.
Navigate a Net TV service
Navigating a Net TV service can differ from using another service.
You can mainly use the navigation keys and the OK key to browse
the service. Some services indicate how to browse their service.
To go back one page, press b (Back).
All services
To view the available services for your country, select † Services
and press OK.
On this page, you can view all services or view them by category,
e.g. News or Entertainment. To view the services by category,
select a category in the column at the left and press OK.
Options
Press o (Options) to select the following:
• Lock service
• Mark favourite
• Disable parental control
• Show remote control
• Reload page
• Zoom page
• Security info
• Clear Net TV memory
Lock service
To lock a Net TV service, select its icon and press o (Options).
Select Lock service and press OK. The service icon is marked with
a k.
To open a locked service, you must enter your 4 digit code. Once
you have opened a locked service, you can delete the lock.
Mark favourites
To mark a service as a favourite, select the service icon and press o
(Options). Select Mark favourite and press OK.
You can mark up to 12 services as favourites. All of your favourite
services are shown in the F Start page. In † Services, favourite
services are marked with a star F.
Only Net TV services can be marked as favourites. Advertisements
and Internet websites cannot be marked.
Unmark favourites
To Unmark a favourite, select the icon of a favourite service and
press o (Options) and select Unmark favourite.
Disable parental control
To switch off Parental control, press o (Options) and select Disable
parental control. Enter the 4 digit code to disable Parental control.
Show remote control
Keys like Play x, Rewind T and Fast Forward Q can be called up
with Show remote control.
Press o (Options) and select Show remote control. With these
keys on screen, you can operate audio or video players. Select a key
and press OK to carry out its function. Press b (Back) to hide
these on-screen keys.
Reload page
If something went wrong during the loading of a page, you can try
and reload it. Press o (Options) and select Reload page.
Zoom page
To zoom an Internet page in or out, press o (Options) and select
Zoom page. Use the slider bar to set the enlargement.
To scroll through an Internet page, use the navigation keys to jump
from highlight to highlight.
Security info
To view a page's security information, press o (Options) and select
Security info.
Clear Net TV memory
‹ Warning - this option resets Net TV completely.
To clear the Net TV memory completely, including your Favourite,
the Parental control code, passwords, cookies and history, press o
(options) and select Clear Net TV memory.
Net TV services for another country
Another country might have other services available.
To switch to the services of another country, select Country : … at
the bottom right of the page and press OK. Select a country and
press OK.
Koninklijke Philips Electronics N.V. bears no responsibility regarding
the content and the quality of the content provided by the content
service providers.
Internet websites
With Net TV you can also link up to the Internet. You can view any
website you like but remember that most Internet websites are not
meant to be viewed on a TV screen and certain plug-ins (e.g. to
view pages or videos) are not available on your TV.
Open an Internet site
To go to an Internet page, select fi Internet and press OK. Using
the on-screen keyboard, you can enter the web address you need.
Select a character and press OK to enter it in the address line at the
top of the page. Once you entered the address, select Go and press
OK to load the Internet website.
Use the u or v, w or x keys to navigate to the available links on an
open Internet page, press OK to go to the link.
Internet history
Net TV will automatically add every site you visit to the history list.
Later, you can select a site icon in the list and press OK to open it.
To scroll through the history list, use the navigation keys.
Use your TV / Net TV 37
Page 38

Clear Net TV history
With a site icon selected in the history list, you can clear the whole
list. Press o (Options) and select Clear history.
38 Use your TV / Net TV
Page 39
3
3.1
More on ...
Closed Caption - CC
Introduction
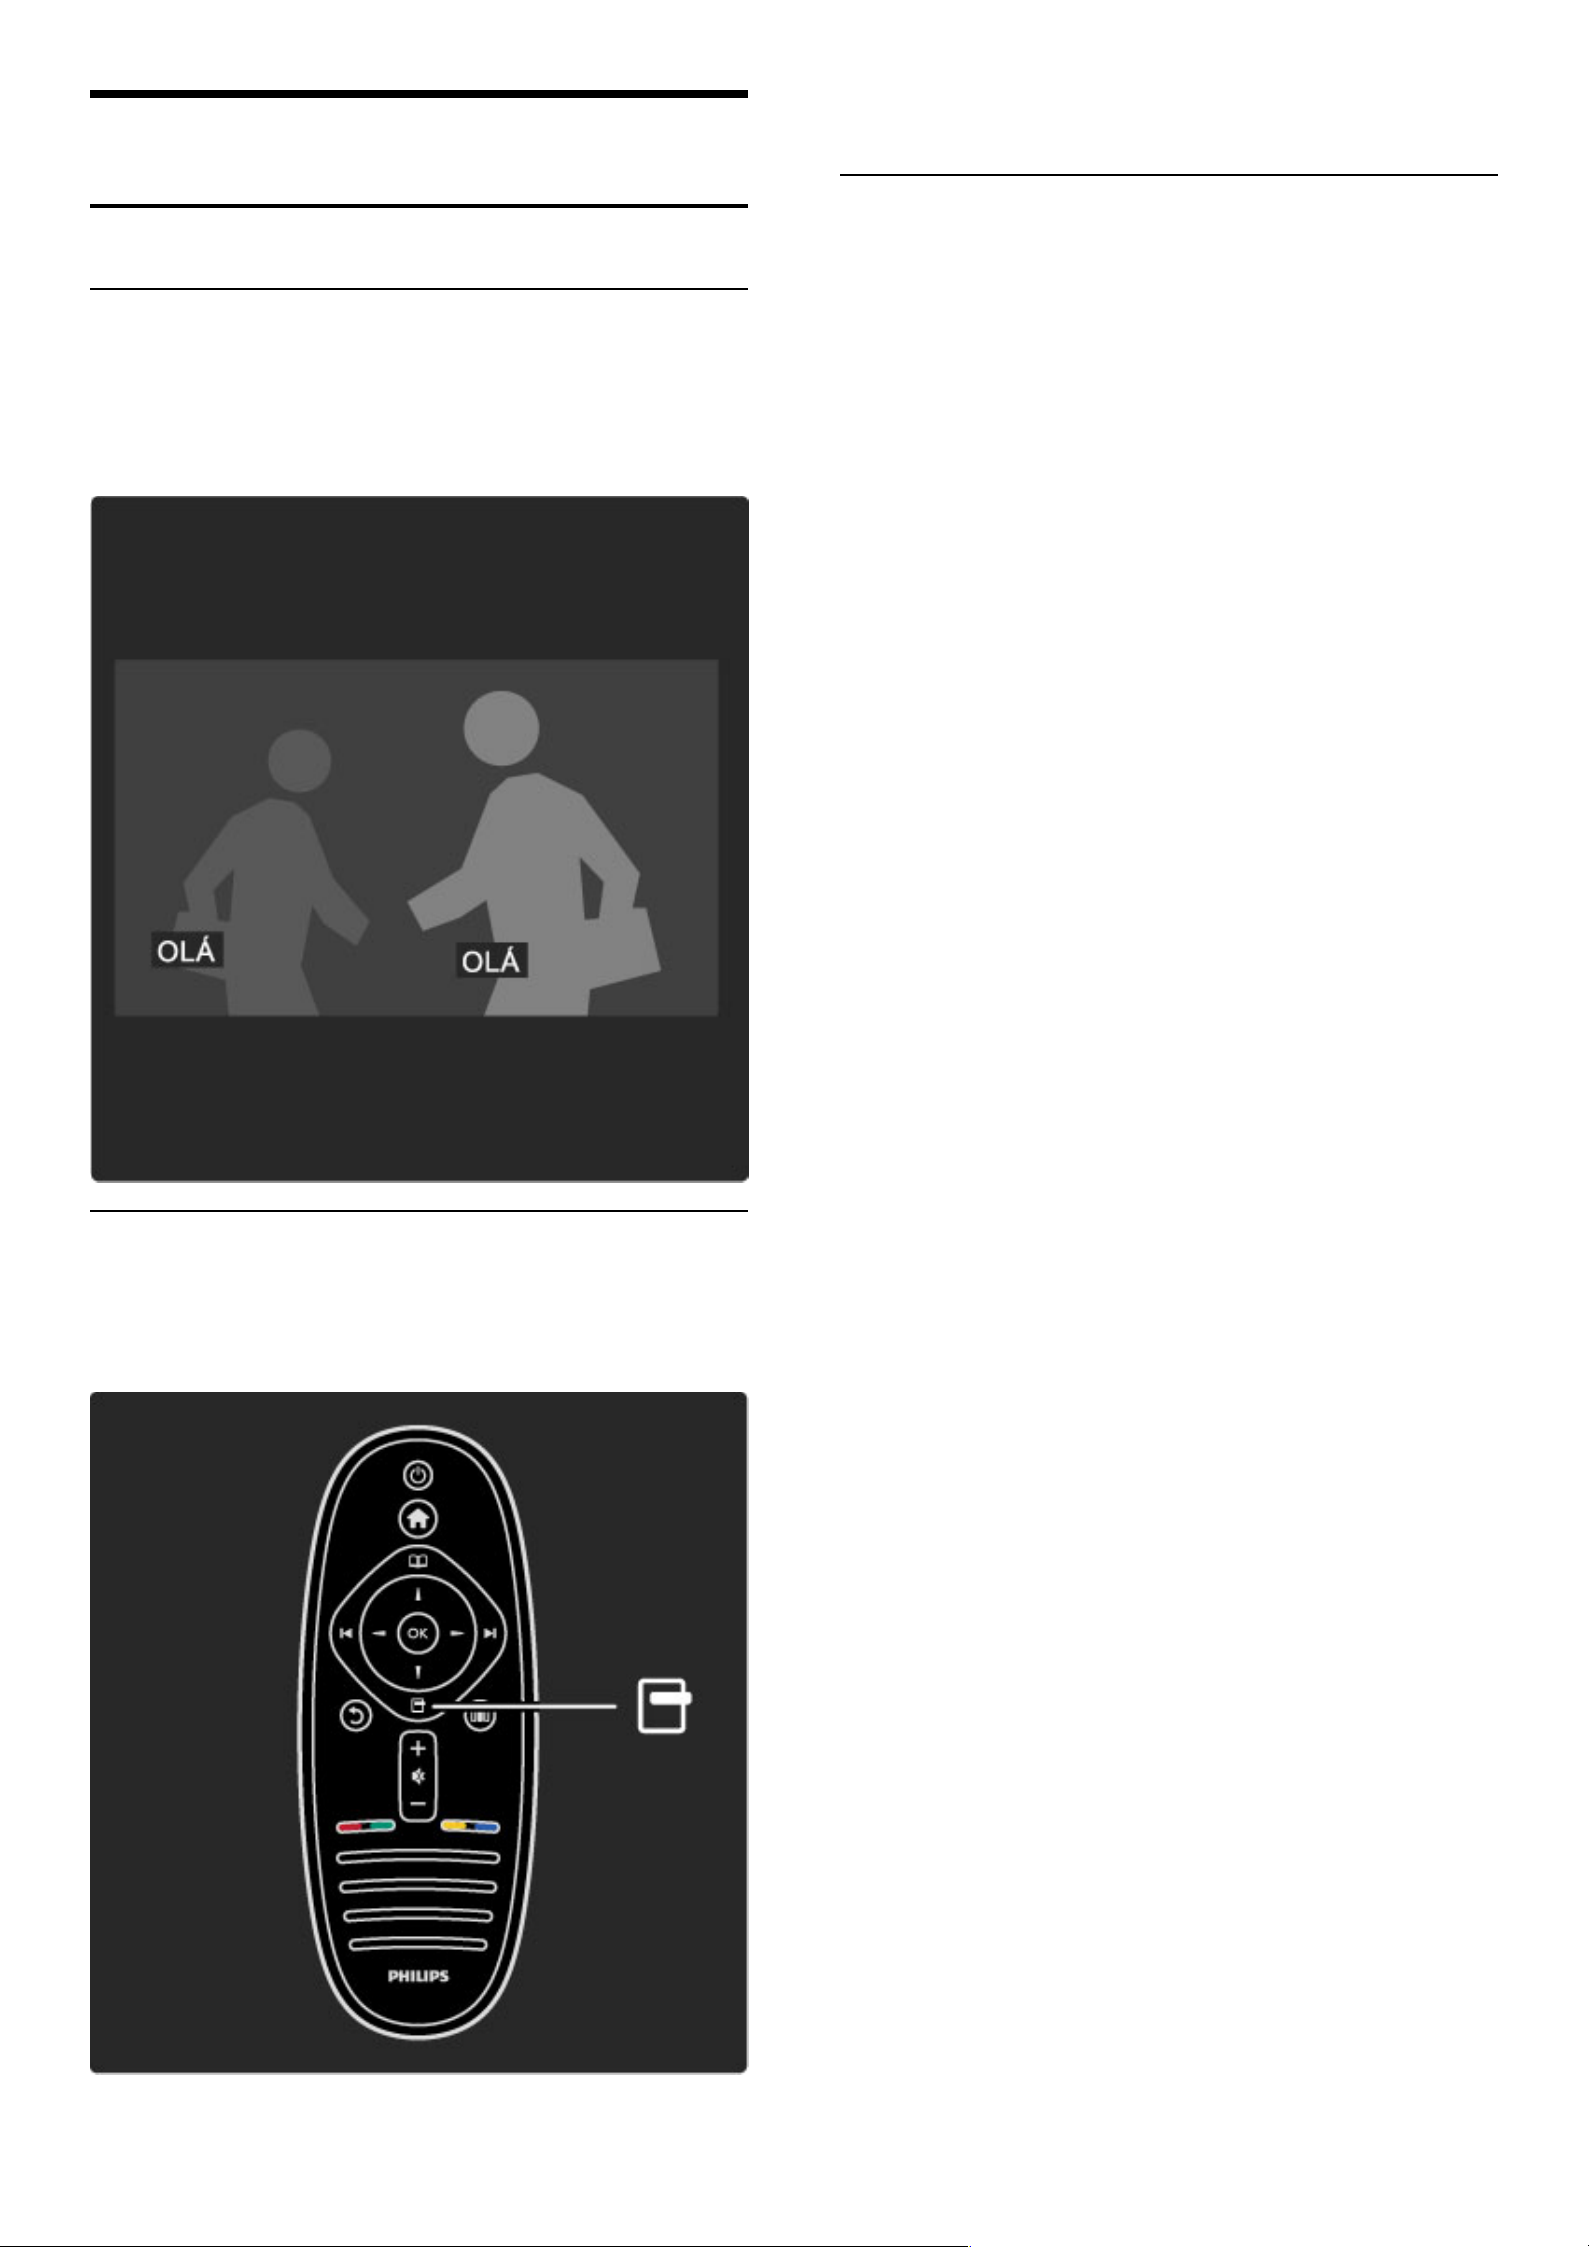
With Closed Caption you can show the spoken words of a
programme as text on screen. Some channels offer specific Closed
Caption services as info on Sports or News. Closed Captioning is not
always available.
Open Closed Caption
To open Closed Caption, while watching a TV channel, press o
(Options) and select Closed Caption, select On, On during mute or
Off and press OK.
Ginga
Switch off Closed Captioning to allow Ginga applications to load.
Closed Caption services
To select a specific Closed Caption service, a specific language or
type of information (if available), press o (Options) and select
Caption service, select a service from the list and press OK.
More on ... / Closed Caption - CC 39
Page 40
3.2 Interactive TV
Benefits
Interactive TV can offer additional infotainment or programmes on a
digital TV channel. Interactive TV is dependent on the country or
broadcast. Benefits range from enhanced text to online TV and much
more.
For some iTV services, you need a high-speed connection to the
Internet. Read Help > Setup > Network.
Use iTV
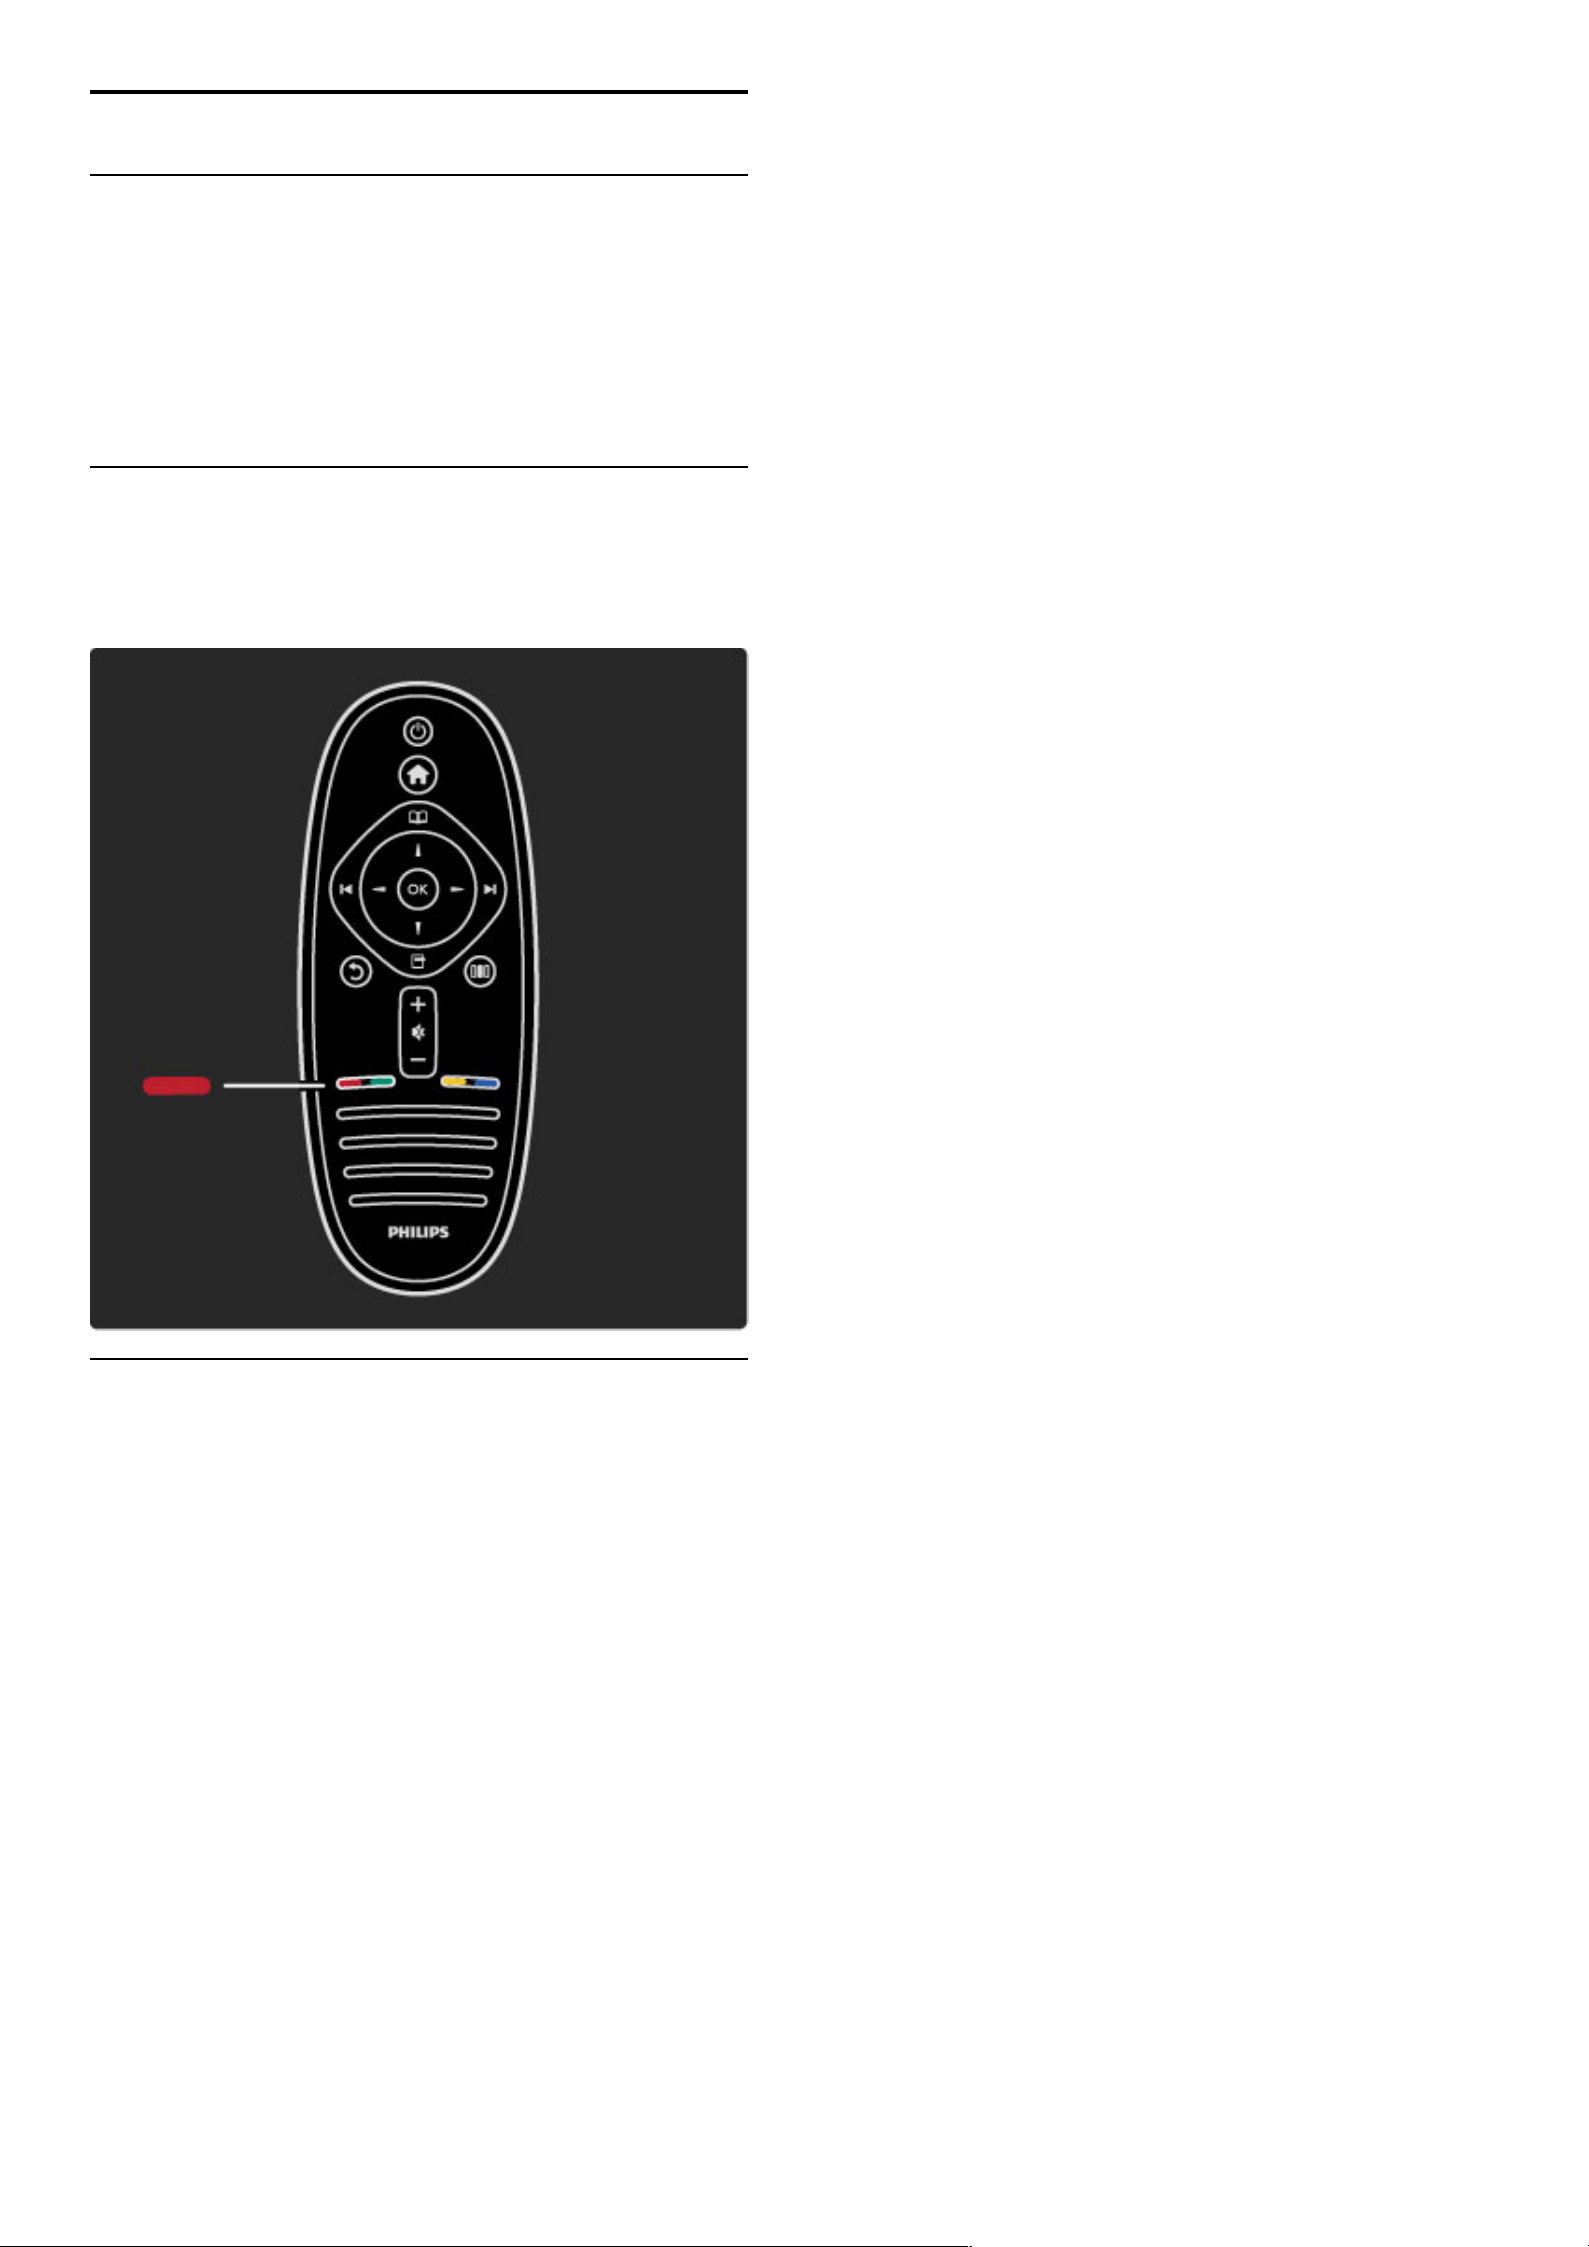
To open iTV, press the Red key while watching a digital channel. If
interactive TV is available, the Home page of the broadcaster opens.
To close iTV, press b (Back) repeatedly until the iTV page closes.
Ginga iTV
If the TV is installed for country Brazil, Ginga is active. The Ginga
applications are provided by the broadcasters. The Ginga application
pages offer all kinds of interactivity and entertainment.
To fully enjoy Ginga you need a high-speed connection to the
Internet. Read more about connecting the TV to the Internet in
Help > Setup > Network.
Open Ginga
When you tune to a TV channel that offers Ginga, wait for the
Ginga icon to fully load the application.
The Ginga application opens automatically or you might need to
press OK.
To close Ginga, press Exit.
Navigate Ginga pages
You can use the navigation and colour keys, the number keys and
the b (Back) key to navigate the Ginga pages. You can use the
keypad on the remote control as you do for SMS/text messaging to
enter text.
Closed CaptioningGinga applications cannot load when Closed
Captioning is on.
To switch off Closed Captioning, while watching a TV channel, press
o (Options), select Closed Captioning and select Off.
40 More on ... / Interactive TV
Page 41
3.3 Multimedia
Browse USB
You can view photos or play your music and videos from a USB memory
device.
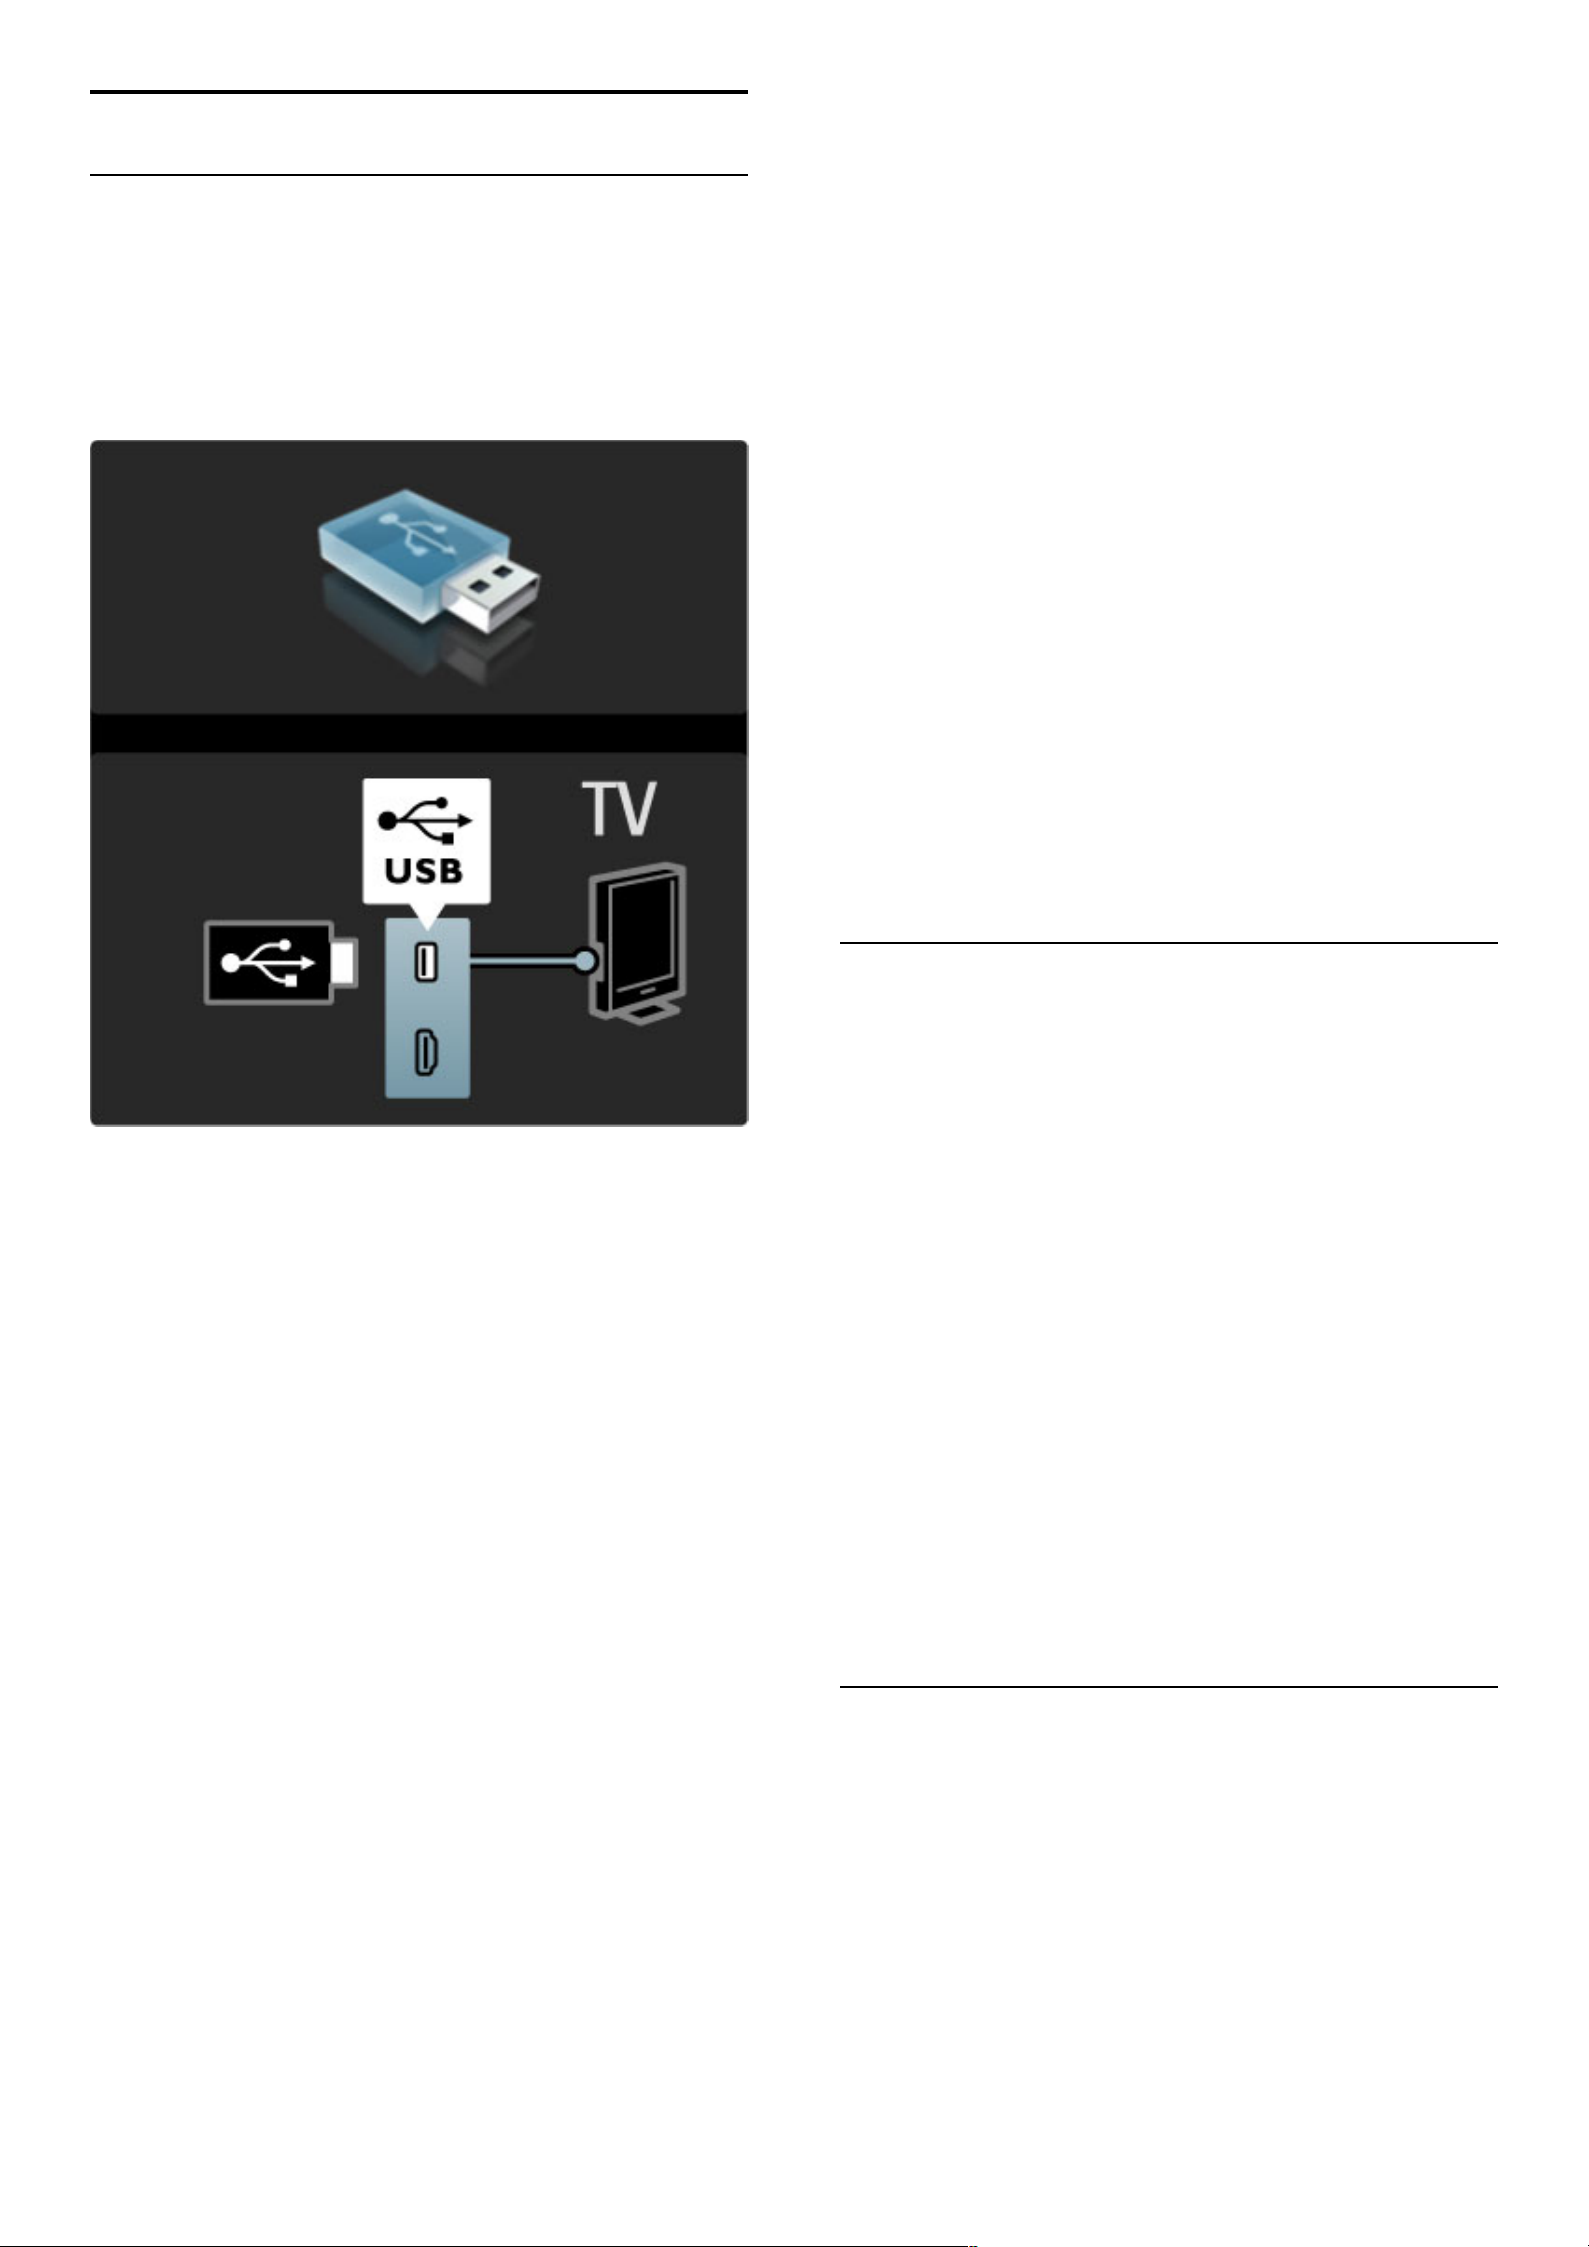
Insert a USB device in the USB connection on the left-hand side of
the TV while the TV is switched on. The TV detects the device and
opens a list showing its content. If the list does not appear
automatically, press h, select Browse USB and press OK.
To close Browse USB, press h and select another activity or
disconnect the USB device.
View photos
To view photos, select a photo in the list and press OK. If there are
more photos in the folder, the TV starts a slideshow of these photos.
To stop, press o (Options) and select Stop.
To pause or play the slideshow again, press OK.
To view the next photo, press W.
To view the previous photo, press X.
Options for photos
Press o (Options) to select the following:
• Show info
• Stop
• Play once / Repeat
• Rotate
• Shuffle on / off
• Slideshow speed
• Slideshow transition
• Set as Scenea
Shuffle on
Plays the files randomly.
Set as Scenea
Sets the current photo as a wallpaper photo for Scenea.
Play videos or music
To play videos or music, select the file in the list and press OK. If
there are more music or video files in the folder, the TV plays the
files one after the other. To stop, press o (Options).
To pause or play, press OK.
To play the next file in the folder, press W.
To play to the previous file, press X.
To fast forward, press x.
To rewind, press w.
Options for music and videos
Press o (Options) to select the following:
• Stop
• Play once / Repeat
• Shuffle on / off
Music with photos
You can play music and show photos at the same time. You must
start the music first then the photos.
1 Select a folder with music files and press OK.
2 Select a folder with photo files and press OK.
To stop, press o (Options) and select Stop.
Mute screen
If you only listen to music, you can mute the TV screen to save
energy.
To mute the screen, press the Green key, select Mute screen and
press OK. To switch the screen back on, press any key on the
remote control.
See the list of compatible playback formats in Help > Specifications
> Multimedia.
Browse PC
You can view photos or play your music and videos from a PC in your
home network.
What you need
To browse these PC files, you need to connect the TV to your
home network. You also need to set the PC media server software
to share the files with the TV.
Read more about connecting to a network in Help > Setup >
Network.
Browse PC
To browse your PC files, press h, select Browse PC and press
OK. If the network is not yet installed when you select Browse PC,
Network installation starts automatically. Follow the instructions on
screen.
To close Browse PC, press h and select another activity.
To select, view and play your files, read Help > More on … >
Multimedia > Browse USB.
See the list of compatible playback formats in Help > Specifications
> Multimedia.
Scenea
With Scenea, you can set a photo as a painting on your TV screen. Select
your favourite photo from your collection.
To open Scenea, press h, select Scenea and press OK. If you did
not yet select a photo of your own, a preset photo is shown.
To close the Scenea photo, press a key on the remote control.
More on ... / Multimedia 41
Page 42

Select a photo for Scenea
1 Select a photo from a connected USB device or from a connected
PC. This photo must be in JPEG format.
2 With the photo highlighted in the Browse USB or Browse PC list,
press o (Options) , select Set as Scenea and press OK. By agreeing
to overwrite the current photo, the new photo is set.
Scenea lounge light
To switch off Ambilight when Scenea is on, press s (Adjust). Or
press J (Ambilight) on the front of the TV.
Energy saving
To switch the TV to the energy conscious setting, press s (Adjust),
select Smart picture and press OK. Select Energy saving.
Specifics
With Scenea switched on, the TV will automatically switch to
standby after 4 hours. You will be warned 1 minute before switch off.
This automatic switch to standby prevents unnecessary energy use in
case you forget that Scenea is on.
If the Sleep timer is set, the TV will also switch to standby after the
set time has elapsed.
Scenea has no sound.
42 More on ... / Multimedia
Page 43

3.4 Locks and timers
Child locks
To prevent children from watching a channel or a programme, you can
lock channels or block age-rated programmes.
Parental rating
Some digital broadcasters have programmes rated. When the rating
is equal or higher than the rating you have set for your child’s age,
the programme will be blocked.
To watch a blocked programme you must enter the Child lock code.
The parental age rating is set for all channels.
Set an age rating
Press h and select Setup > Channel settings and select Child lock
> Parental rating.
To select an age rating, you must first enter your 4 digit child lock
code. If no child lock code is set, you can set the code now.
When the code is entered, you can select the age rating. When the
rating of a programme is equal or higher than the rating you have set
for your child's age, the programme will be blocked. The TV will ask
for the code to unblock the programme. For some operators, the
TV only blocks programmes with a higher rating.
Lock a channel
To lock a channel, press h and select Setup > Channel settings
and select Child lock > Channel lock. In the list of channel numbers,
select a channel and press OK to lock a channel.
In the list, a locked channel is marked with an X. Now, you can
select another channel to lock or unlock. The lock is activated as
soon as you close the menu.
You cannot lock programmes from connected devices.
Change code
To change the current code, press h and select Setup > Channel
settings and select Child lock > Change code.
Enter the current code and then enter the new code twice. The
new code is set.
Forgotten your code ?
To override the code if you forget it, enter 8888.
Sleep timer
With Sleep timer you can switch the TV to standby at a specified time.
To set the sleep timer, press h > Setup > TV settings >
Preferences > Sleep timer. With the slider bar you can set the time
up to 180 minutes in increments of 5 minutes. If set to 0 minutes,
Sleep timer is switched off.
You can always switch off your TV earlier or reset the time during
the countdown.
More on ... / Locks and timers 43
Page 44

3.5 Audio languages
Audio languages
Digital TV channels can broadcast audio that transmits several languages
for a program.
To check if an audio language is available, press o (Options) and
select Audio language. You can select another audio language from
the list.
44 More on ... / Audio languages
Page 45

3.6 Universal access
Switch on
With Universal access switched on, the TV is set for use for hearing and
visually impaired people.
Switch on
If you did not switch on Universal access at first use, you can still
switch it on in Setup.
To switch on Universal access, press h > Setup > TV settings >
Preferences > Universal access. Select On and press OK.
With Universal access switched on in Setup, the Universal access
option is added in the Options menu.
Key beep
Key beep gives an audio feedback each time you press a key on the
remote control. The volume of the beep is fixed.
Switch on
To switch on Key beep, press o (Options), select Universal access
and press OK. Select Key beep and select On.
If Universal access does not appear in the Options menu, switch on
Universal access in the Setup. Read Help > More on … > Universal
access > Switch on.
More on ... / Universal access 45
Page 46

4
4.1
Setup
Picture, Sound, Ambilight
Smart settings
You can adjust each Smart setting with the settings in Picture or
Sound in Setup, TV settings. Adjust the brightness for a particular
Smart picture or adjust the bass for a Smart sound.
To return to the original smart setting values, undoing the
adjustments you made, first set up the TV in the smart setting you
want to reset. Then press h > Setup > TV settings, select Reset,
press OK and confirm.
Read more about Smart picture and sound settings in Help > Use
your TV > Watch TV > Smart picture and sound settings.
Picture
In the Picture menu, you can adjust all picture settings individually.
To open the Picture settings, press h > Setup > TV settings >
Picture.
• Contrast
Sets the contrast level of the picture.
• Brightness
Sets the brightness level of the picture.
• Colour
Sets the level of colour saturation.
• Hue
If NTSC is broadcast, hue compensates the colour variations.
• Sharpness
Sets the level of sharpness of fine detail.
• Noise reduction
Filters out and reduces the image noise in the picture.
• Tint
Sets the colours to Normal, Warm (reddish) or Cool (bluish).
Select Custom to set up your own personal settings in the Custom
menu.
• Custom tint
Use the slider bar to set the colour temperature of the picture.
• Perfect Pixel HD
Controls the advanced settings of the Perfect Pixel HD Engine.
— Perfect Natural Motion removes motion judder and reproduces
smooth movement, especially in movies.
— 440 Hz Clear LCD gives a superior motion sharpness, better
black level, high contrast with a flicker-free, quiet image and a larger
viewing angle.
— Super resolution enables superior sharpness, especially on lines
and contours in the picture.
— Perfect contrast sets the level at which the TV automatically
enhances the details in the dark, middle and light areas of the
picture.
— Dynamic backlight sets the level at which power consumption
can be reduced by dimming the brightness intensity of the screen.
Choose for the best power consumption or for the picture with the
best brightness intensity.
— MPEG artefact reduction smooths the digital transitions in the
picture.
— Colour enhancement makes the colours more vivid and
improves the resolution of details in bright colours.
— Gamma is a non-linear setting for picture luminance and contrast.
Use the slider bar to set a higher or lower gamma value.
• PC mode
Sets the TV to the ideal pre-defined computer setting if a computer
has been connected.
• Light sensor
Adjusts the picture and Ambilight settings automatically to the
lighting conditions of the room.
• Picture format
Read Help > Use your TV > Watch TV > Picture format.
!• Screen edges
Slightly enlarge the picture to hide distorted edges.
• Picture shift
Move the picture up / down or left / right with the cursor keys.
Sound
In the Sound menu, you can adjust all sound settings individually.
To open Sound settings, press h > Setup > TV settings > Sound.
• Bass
Sets the level of low tones in the sound.
• Treble
Sets the level of high tones in the sound.
• Surround
Sets the surround sound effect from internal speakers.
• Headphones volume
Sets the volume for the headphone connection of the TV.
• Auto volume levelling
Reduces sudden volume differences like at the beginning of adverts
or when switching from one channel to another.
• Balance
Sets the balance of the left and right speakers to best fit your
listening position.
Ambilight
Read the chapter Ambilight in Help > Use your TV > Ambilight.
Eco settings
Eco settings bundle the TV settings that help the environment.
While watching TV, press the Green key to open Eco settings.
Active settings are marked with a ê.
Press again to close.
Energy saving
This Smart picture setting sets the picture, together with Ambilight, in
the most ideal energy conscious setting. To switch on, select Energy
saving in Eco settings and press OK.
To switch off Energy saving, select another Smart picture in the s
Adjust menu.
Mute screen
If you only listen to music, you can mute the TV screen to save
energy. Select Mute screen and press OK. To switch the screen
back on, press any key on the remote control.
46 Setup / Picture, Sound, Ambilight
Page 47

Light sensor
The built-in light sensor automatically adjusts the picture, together
with Ambilight, to the lighting conditions of the room. To switch on,
select Light sensor and press OK. To switch off, press OK again.
Setup / Picture, Sound, Ambilight 47
Page 48

4.2 Channels
Reorder and rename
You can reorder and rename channels in the Channel list.
To reorder or rename a channel, read Help > Use your TV >
Menus > e Browse.
Update channels
On first use, the TV installed all channels in the Channel list. If the TV
installed digital channels, the TV can automatically update the Channel
list with new channels. You can also start an update of the Channel list
yourself. The update is for digital channels only.
Automatic channel update
Once a day, at 6 AM, the TV updates the channels and stores new
channels. Empty channels are removed. For new or removed
channels, a message is shown at TV start up. The TV must be in
Standby to automatically update channels.
To switch off the message at start up, press h > Setup > Channel
settings and press OK. Select Channel installation > Channel
update message and select Off.
To switch off the automatic channel update, press h > Setup >
Channel settings and press OK. Select Channel installation >
Automatic channel update and select Off.
Start an update
To start an update the channel list for new channels yourself, press
h > Setup > Search for channels and press OK. Select Update
channels and press OK. Press Start. The update can take a few
minutes. Follow the instructions on screen.
Reinstall
On first use, the TV installed all channels in the Channel list. You can
redo this full installation to reset your language, country and install all
available TV channels.
Full installation
To reinstall the TV, press h > Setup > Search for channels and
press OK. Select Reinstall channels and press OK. Press Start. The
update can take a few minutes. Follow the instructions on screen.
You can reorder and rename channels in the Channel list.
Reception quality
If you receive digital TV broadcasting, you can check the quality and
signal strength of a channel.
If you use an antenna, you can reposition the antenna to try and improve
the reception.
To check the reception quality of a digital channel, switch to the
channel and press h > Setup > Channel settings and press OK.
Select Channel installation > Digital : reception test and press OK.
The digital frequency is shown for this channel. If the reception is
poor, you can reposition your antenna. To check the signal quality of
this frequency again, select Search and press OK.
To enter a specific digital frequency yourself, select the frequency,
position the arrows on a number with x and w and change the
number with u and v. To check the frequency, select Search and
press OK.
Clock settings
In some countries, digital broadcasts do not send UTC - Coordinated
Universal Time information. The daylight saving change might be ignored
and the TV might show an incorrect time.
To correct the TV clock, press h > Setup > TV settings >
Preferences > Clock and select Country dependent. Select
Daylight saving and select the appropriate setting.
To set the time and date manually, select Manual. Then select Time
or Date.
48 Setup / Channels
Page 49
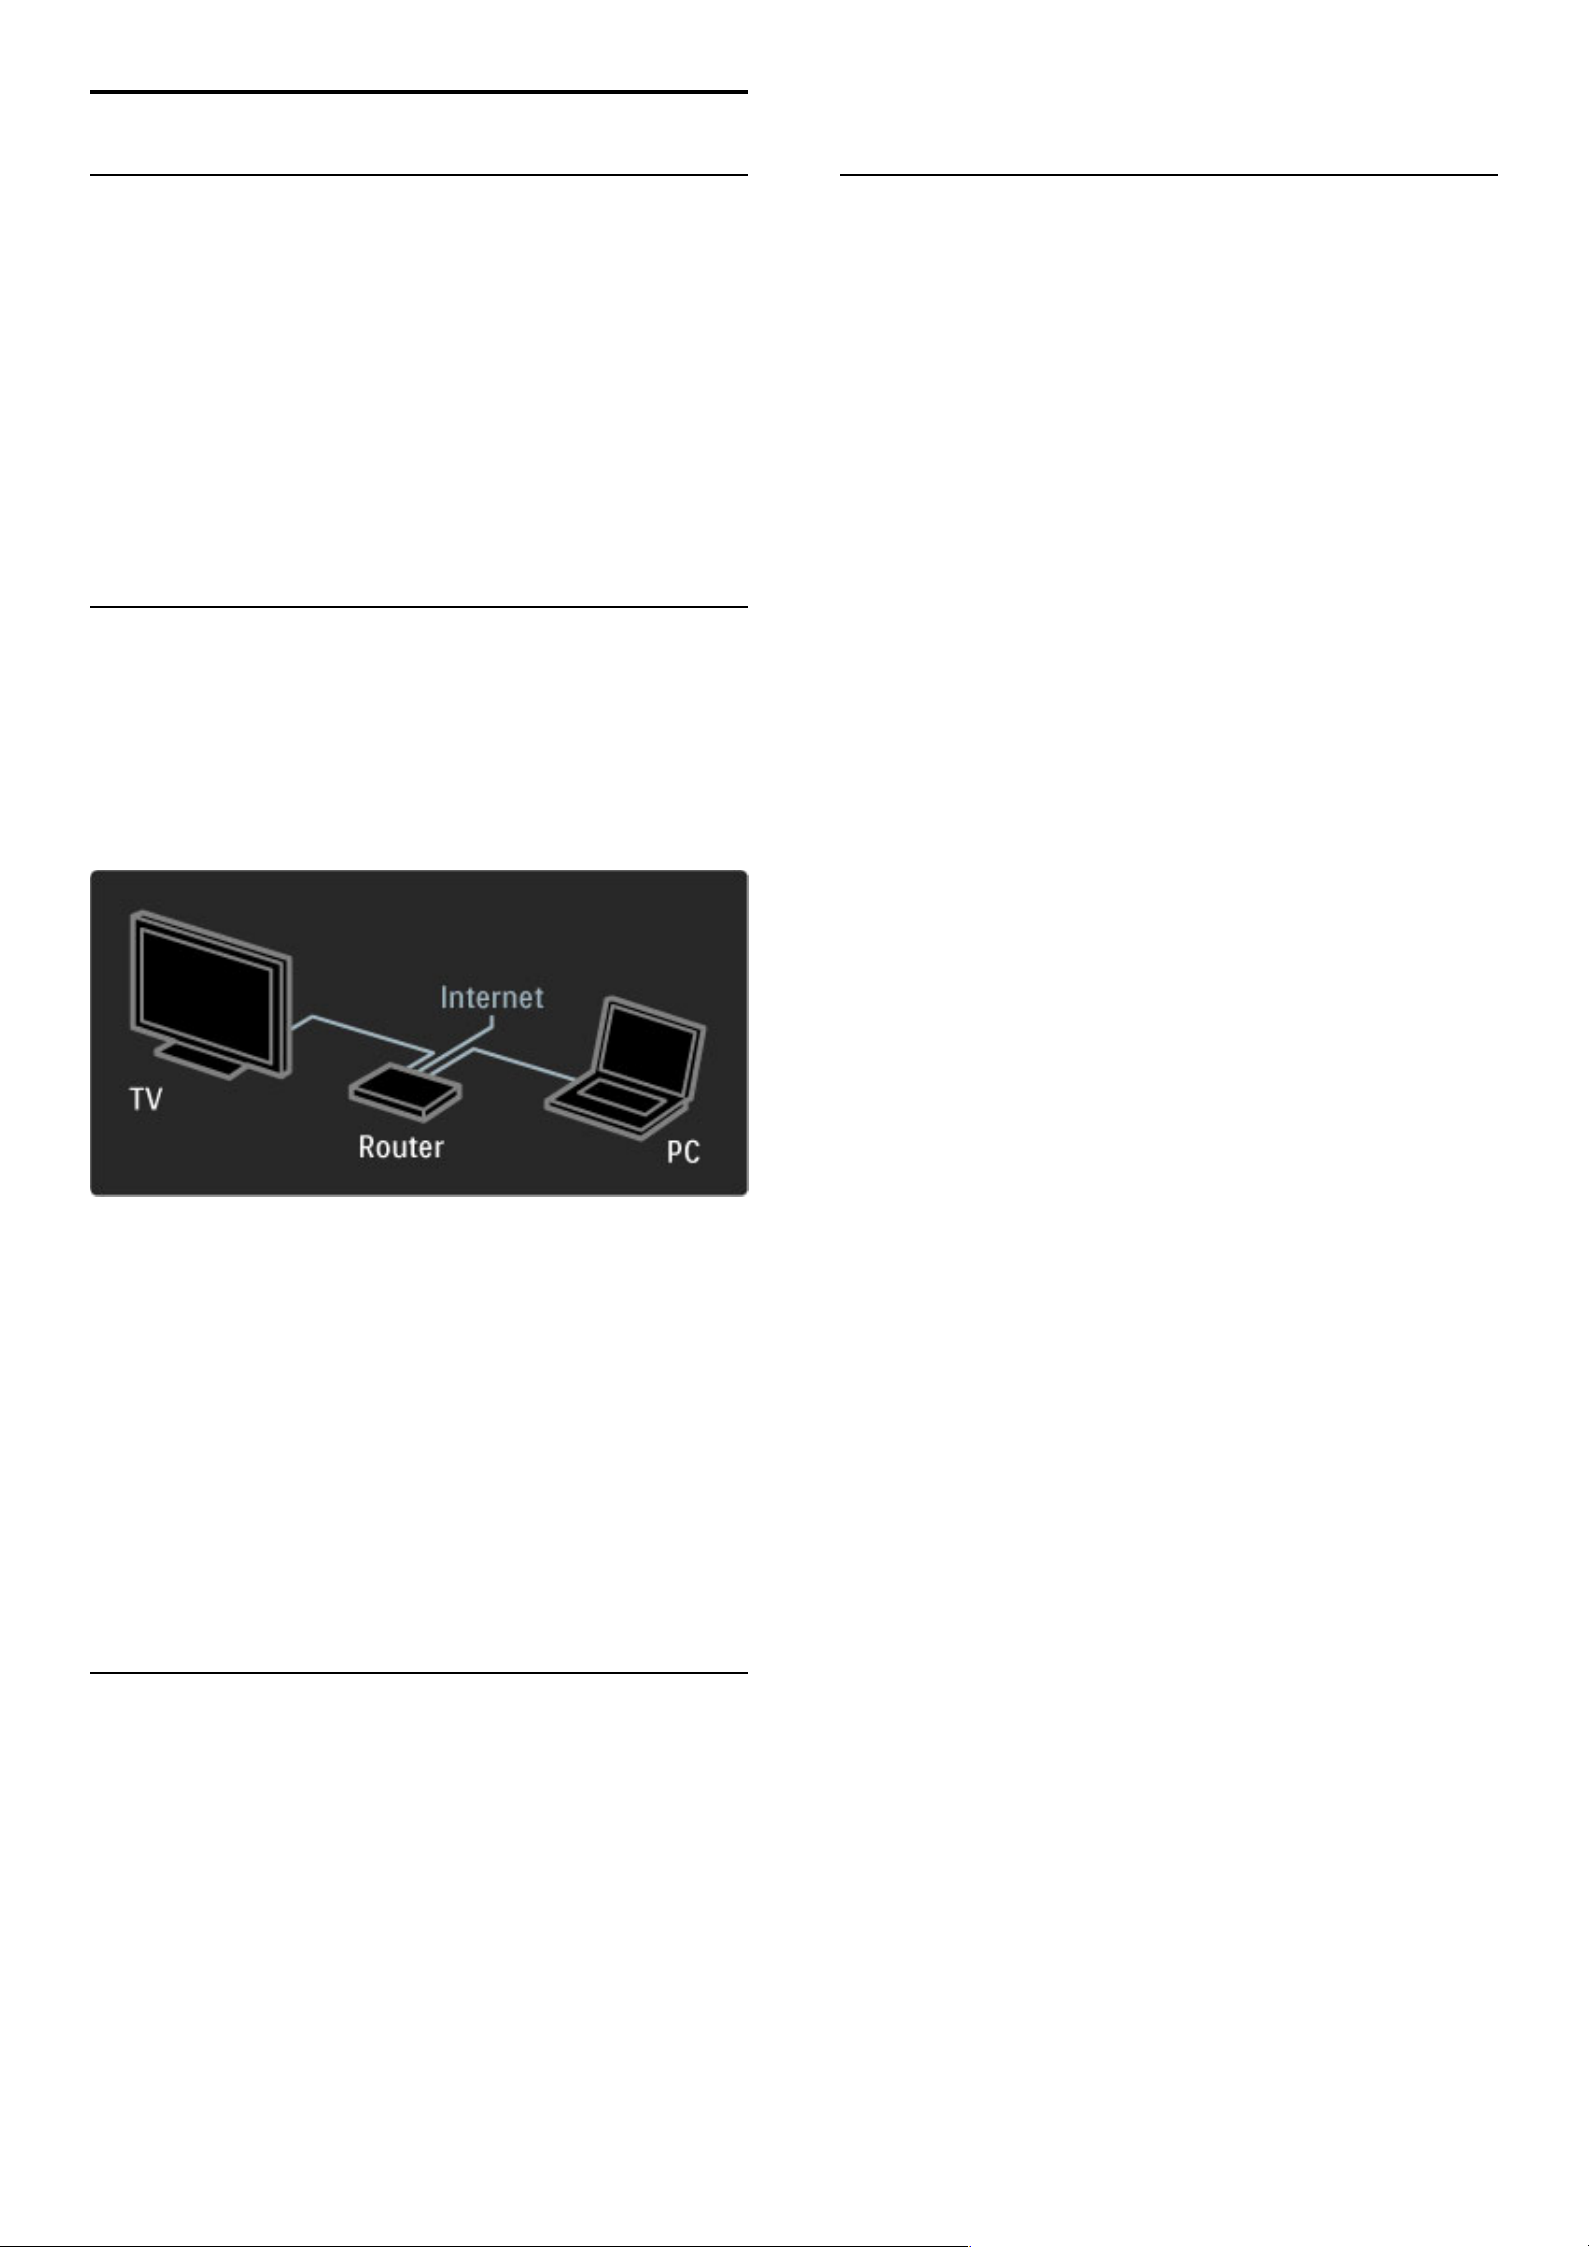
4.3 Network
Benefits
Browse PC
If you connect the TV to a home network, you can play photos,
music and videos from your computer or storage device. Once the
network is installed on the TV, you can find and play the files from
your PC on the TV screen.
Net TV
If you connect the TV to a home network, you can link up the TV
to Net TV. Net TV offers Internet services and websites tailored to
your TV. Play music and videos, consult infotainment, rent movies
and much more. Once the network is installed, you can enjoy the
best of the Internet for your TV.
What you need
To connect the TV to a home network and Internet, you need a
router in your home network. The router must be set to DHCP
server on. Use a router with a high-speed connection to the
Internet.
You can make a wireless connection to the TV with the Philips
PTA01 Wireless USB adapter (sold separately).
If you use a wired connection to the router you need a network
(Ethernet) cable.
The TV uses a DLNA-certified protocol. You can use a computer
with Microsoft Windows XP or Vista, Intel Mac OSX or Linux as the
operating system.
Find your PC files
To select your PC files on screen, you need recent media server
software on your computer, like Windows Media Player 11 or
similar. To find your files on the TV, some media server software
must be set up to share the PC files with the TV.
See the list of supported media server software, read Help >
Specifications > Multimedia.
Wired installation
Connect the router to the TV and switch on your router before you
start the network installation.
To start the network installation, press h, select Setup > Connect
to network and press OK. Follow the instructions on screen.
The TV constantly searches for a network connection. The router
must be set to DHCP server on.
If asked for, agree to the End User licence Agreement.
Read more about how to connect in Help > Connections >
Network > Wired.
Network settings
To open the Network settings, press h > Setup > Network
settings and press OK.
You can view the network type, IP and MAC address, the signal
strength, speed and encryption method etc. You can set DHCP and
Auto IP, the IP configuration settings, DMR and the TV network
name.
Setup / Network 49
Page 50

4.4 Devices
EasyLink HDMI-CEC
With the TV remote control you can operate devices that have EasyLink
(HDMI-CEC) and are connected with an HDMI cable. Devices with
EasyLink automatically show their activity in the Home menu. The TV
comes with EasyLink switched on.
With an EasyLink device connected, EasyLink offers the following:
• One touch play
Insert a disc and press Play on the device. The TV switches on from
standby and starts playing the disc.
• System standby
Press O on the remote control to switch all EasyLink devices to
standby.
Make sure that all HDMI-CEC settings are properly set up on the
device. EasyLink and EasyLink Remote control might not work with
devices from other brands.
HDMI-CEC on other brands
The HDMI-CEC functionality has different names on different
brands. Some examples of name are: Anynet, Aquos Link, Bravia
Theatre Sync, Kuro Link, Simplink and Viera Link. Not all brands are
fully compatible with EasyLink.
EasyLink Remote control
With EasyLink Remote Control, the TV remote control can operate the
device you are watching on TV. The device must have EasyLink (HDMICEC) and have it switched on. The device must also be connected with
an HDMI cable.
With an EasyLink device connected, select the device (the activity)
and the TV remote control will now operate some or all of the
functions of the device.
To switch back to TV, select Watch TV in the Home h menu and
press OK.
Switch off EasyLink Remote Control
To switch off EasyLink Remote Control, press Home h > Setup >
TV settings and select EasyLink > EasyLink Remote Control and
select Off.
Read more about EasyLink in Help > Setup > Devices > EasyLink
HDMI-CEC.
Add a new device
Devices connected with EasyLink (HDMI-CEC) automatically show
their activity in the Home menu. A single device can add several
activities. The device must be connected with an HDMI cable.
If your connected device does not appear in the Home menu, on
the device EasyLink may be switched off.
If your connected device does not have EasyLink (HDMI-CEC) or is
not connected with an HDMI cable, you need to manually add your
device with Add your devices in the Home menu.
Add your devices
In the Home menu, select Add your devices and press OK. Follow
the instructions on screen.
The TV asks you to select the device and the connection to which
the device is connected.
The device or its activities are now added to the Home menu.
Rename a device
To rename an added device or activity, press o (Options) and
select Rename. Use the keypad on the remote control as you do for
SMS/text messaging to enter the new name.
Delete a device
To delete a device or activity from the Home menu, select the item
and press o (Options) and then select Remove this device.
If the device or activity, keeps appearing in the Home menu after
you deleted it, switch off the EasyLink setting on the device to
prevent this automatic pop-up appearing again.
Sound
With an audio system connected, EasyLink also offers the following:
• System audio control
If you connect an audio system, you can listen to the audio from the
TV through the audio system. The TV speakers are muted
automatically.
• Surround mode
With a recent Philips device selected in the Home menu, you can
change the surround sound setting of the device on the TV. To
change this setting, press s (Adjust), select Surround mode and
press OK. On Next mode, press OK to toggle through the available
modes on the device.
• Smart sound
With a recent Philips device selected in the Home menu, you can
change the Smart sound setting of the device on the TV. To change
this setting, press s (Adjust), select Smart sound and press OK.
Select a sound mode from the list.
• Screen off
If a recent Philips device that is selected in the Home menu is only
sending audio to the TV, the device may suggest switching off the TV
screen. To switch off the screen when this message appears, select
Screen off and press OK. To switch the screen back on, press h.
• TV speakers
The TV speakers mute automatically when an EasyLink audio device
is selected in the Home menu. You can also set the TV speakers to
always or never play sound or set the TV to always start up the
audio device and play sound from the device.
To set the TV speakers, press h > Setup > TV settings > EasyLink
> TV speakers. Select EasyLink Autostart only if you always want
to play sound from the audio device.
Audio to Video sync
With a Home Theatre System (HTS) connected to the TV, the picture on
TV and the sound from the HTS should be synchronized. A mismatch is
visible in scenes with people talking. When they finish sentences before
their lips stop moving.
HDMI-ARC
Latest Home Theatre Systems with built-in disc players adjust the
audio to video sync automatically when they are connected to the
HDMI-ARC connections (HDMI - Audio Return Channel).
Audio sync delay
Other Home Theatre Systems might need an audio sync delay to
synchronize. On the HTS, increase the delay value until there is a
match between picture and sound. A delay value of 180ms may be
required. Read the user manual of the HTS.
50 Setup / Devices
Page 51

With a delay value set up on the HTS, you need to switch off Audio
Out delay on the TV if the HTS has this delay set up for all its
output connections. To switch off Audio Out delay, press h and
select Setup > TV settings > Preferences > Audio Out delay. Select
Off and press OK.
If you cannot set up a delay on the HTS or its maximum setting is
insufficient, you can switch off the Perfect Natural Motion picture
processing of the TV. To switch off Perfect Natural Motion, press
h and select TV settings > Picture > Perfect Natural Motion.
Select Off and press OK.
Auto subtitle shift
If you play a DVD or Blu-ray Disc from a recent Philips player, the
TV can move the subtitles upwards. Subtitles will then be visible
whatever Picture format you select. The TV comes with Auto
subtitle shift switched on.
To switch off Auto subtitle shift, press h > Setup > TV settings >
EasyLink > Auto subtitle shift. Select Off.
Pixel Plus link
Some other devices, DVD or Blu-ray Disc players, might have their
own picture quality processing. To avoid bad picture quality caused
by interference with the TV processing, the picture processing of
these devices should be disabled. The TV comes with Pixel Plus link
switched on and disables the picture quality processing of a
connected device.
To switch off Pixel Plus link, press h > Setup > TV settings >
EasyLink > Pixel Plus link. Select Off.
Setup / Devices 51
Page 52

4.5 Software
Current version
To view the current TV software version, press h > Setup >
Software settings and press OK. Select Current software info and
read Version: . . ..
Update from Internet
If the TV is connected to the Internet, you may receive a message
from Philips to update the TV software. You need a high-speed
Internet connection.
If you receive this message, we recommend you carry out the
update. Select Update. Follow the instructions on screen.
You can also look for new updates yourself. To look for an update,
press h > Setup > Update software and press OK. Follow the
instructions on screen.
When the update is complete, the TV switches itself off and back on
again automatically. Wait for the TV to switch itself back on. Do not
use the Power switch O on the TV.
Update with USB
It might be necessary to update the TV software. You need a PC
with an high-speed Internet connection and a USB memory device
to upload the software on the TV. Use an USB memory device with
256Mb free space. Make sure that write protection is switched off.
1 Start
2 Identify
3 Download
4 Update TV
1 Start the update on TV
To start the software update, press h > Setup > Update now.
2 Identify the TV
Insert the USB memory on the side of the TV, select Start and press
OK. An identification file is written on the USB memory.
3 Download the TV software
Insert the USB memory in your PC. On the USB memory, locate the
file update.htm and double click it. Click on Send ID. If new software
is available, download the .zip file. After the download, unzip the file
and copy the file autorun.upg onto the USB memory. Do not place
this file in a folder.
4 Update the TV software
Insert the USB memory in the TV again. The update starts
automatically. The TV switches itself off for 10 seconds and then
back on again. Please wait.
Do not . . .
• use the remote control
• remove the USB memory from the TV
If a power cut occurs during the update, never remove the USB
memory from the TV. When the power returns, the update will
continue.
At the end of the update, the message Operation succesful appears
on screen. Remove the USB memory and press O on the remote
control.
Do not . . .
• press O twice
• use the O switch on the TV
The TV switches itself off (for 10 seconds) and then back on again.
Please wait.
The TV software has been updated. You can use the TV again.
To prevent an accidental update of the TV software, delete the
autorun.upg file from the USB memory.
52 Setup / Software
Page 53
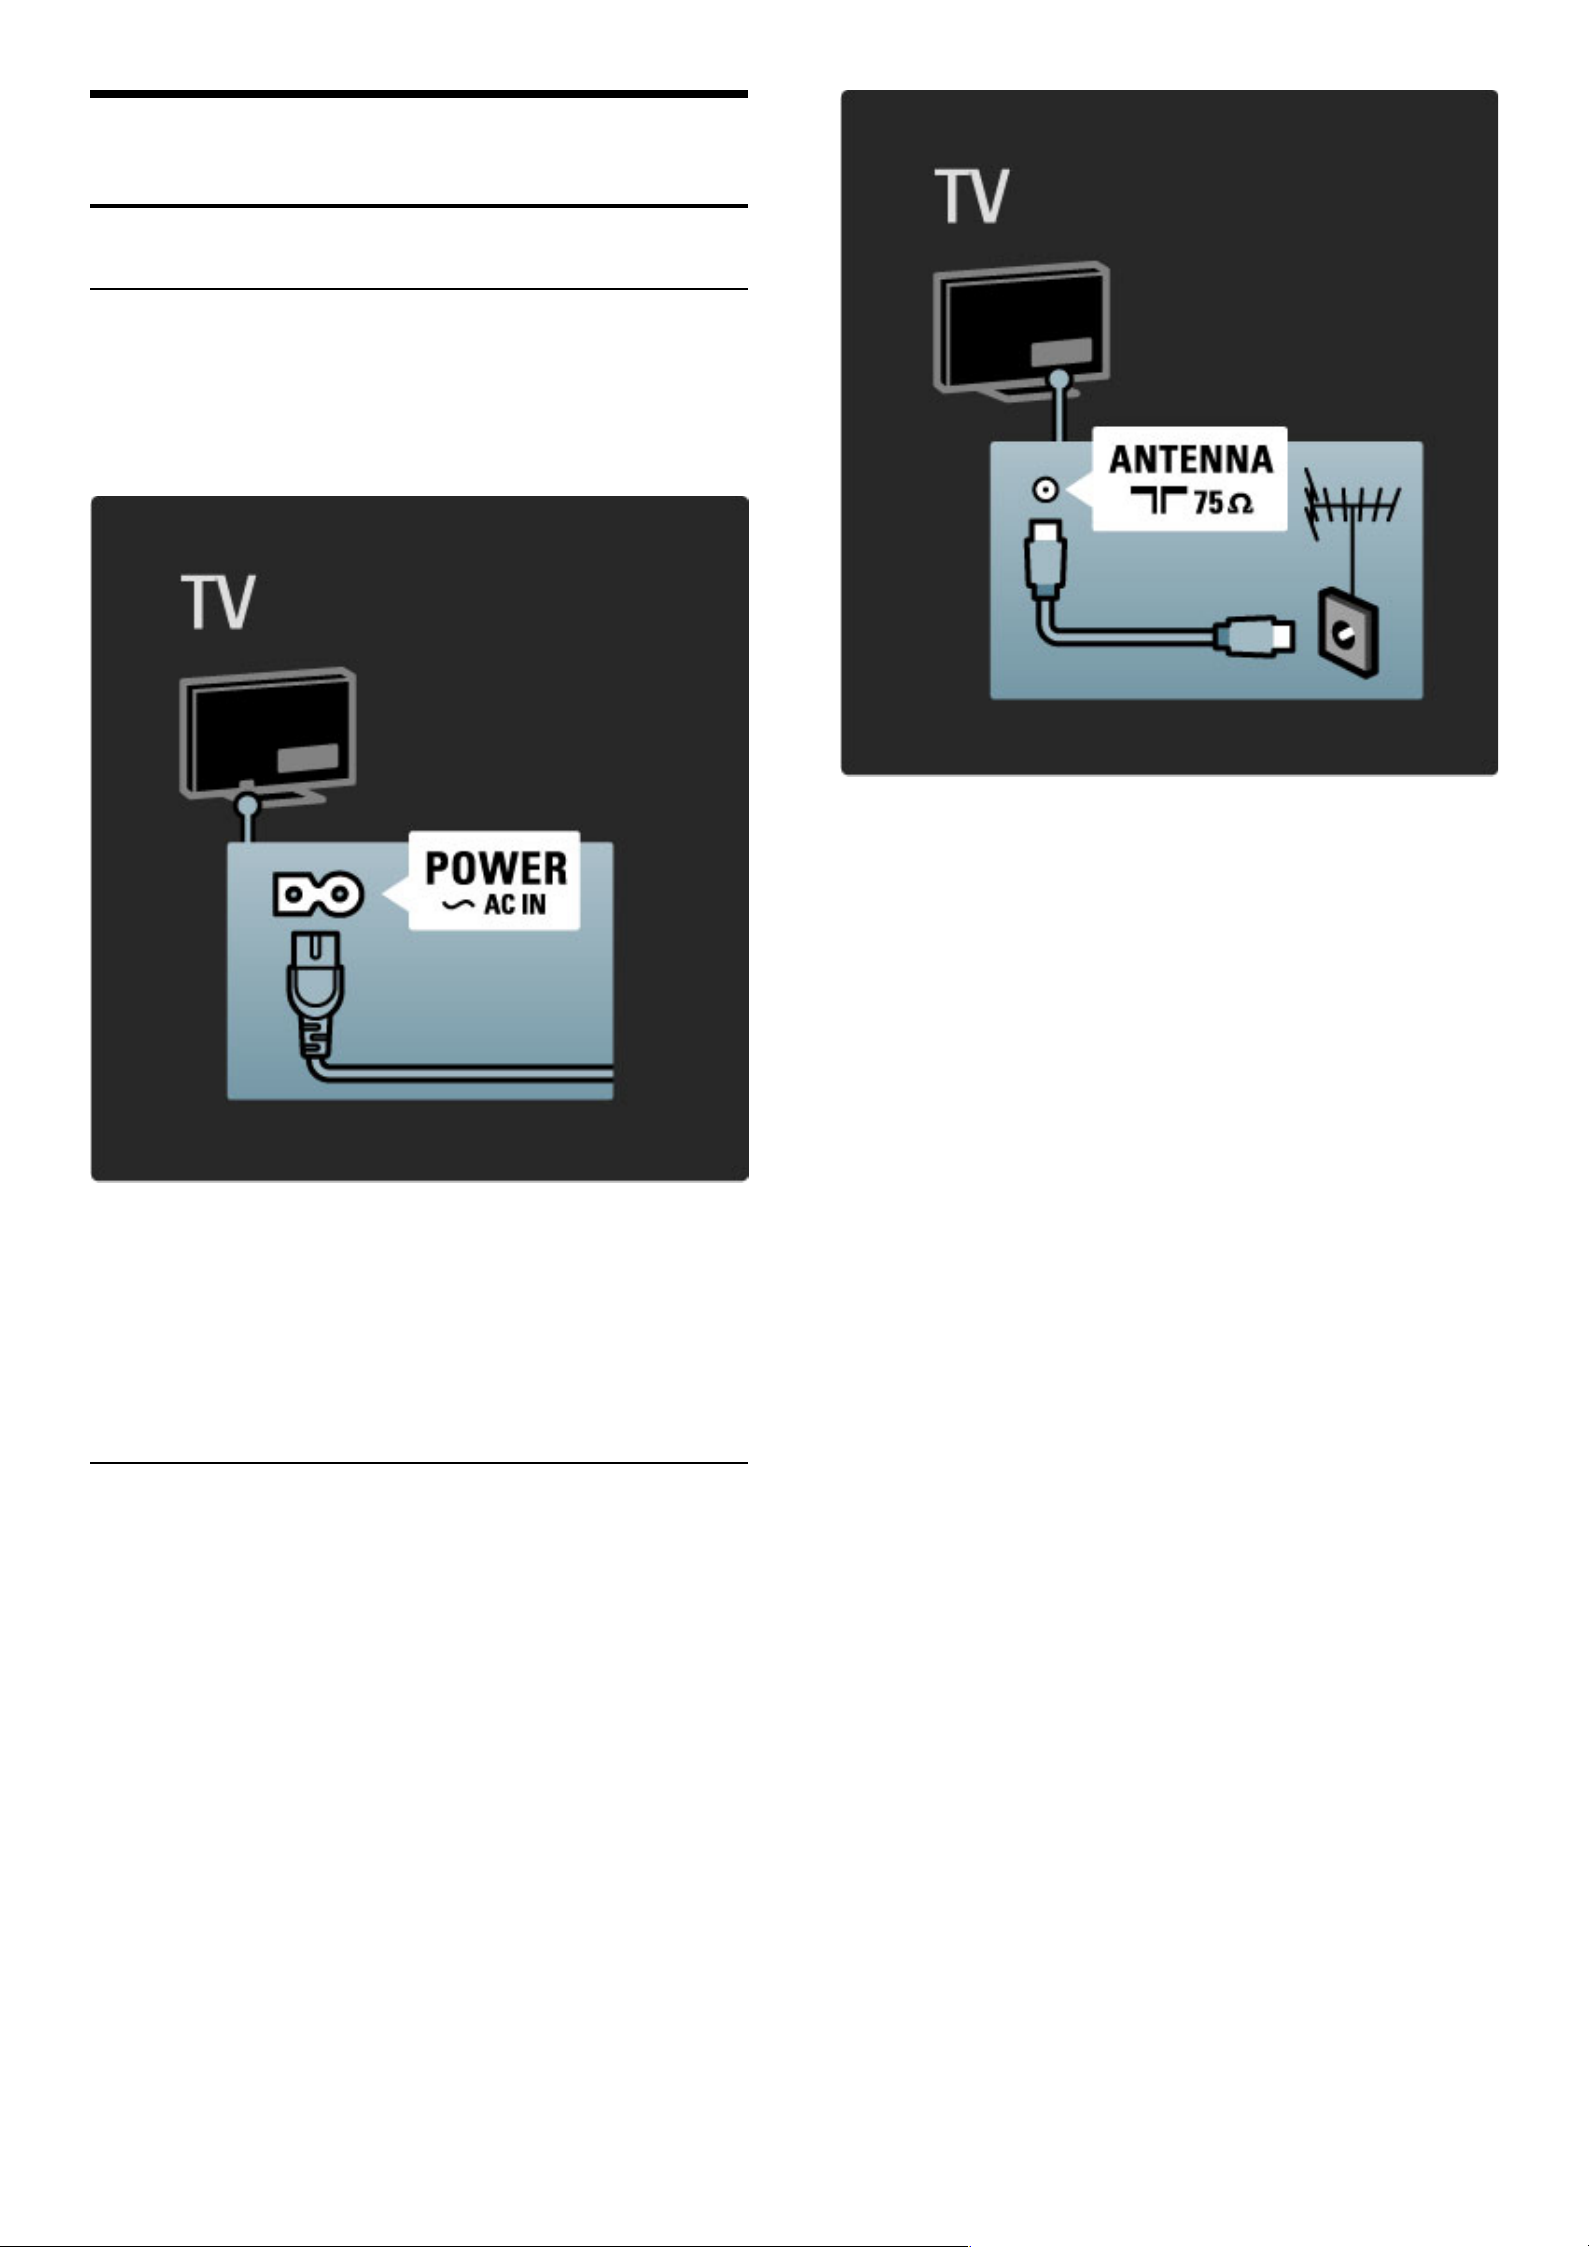
5
5.1
Connections
First connections
Power cable
Insert the power cable in the power socket of the TV.
When disconnecting the power cable, always pull the plug, never the
cable.
Although this TV has a very low standby power consumption, switch
off the TV with the power switch to save energy if you do not use
the TV for a long period of time.
Read more about the power switch in Help > To begin > Keys on
the TV > Power switch.
Make sure the power cable is securely inserted in the TV. Make sure
that the power plug in the wall socket is accessible at all times.
Antenna cable
Locate the antenna connection at the back of the TV. Insert the
antenna cable securely in the Antennaa socket.
Connections / First connections 53
Page 54
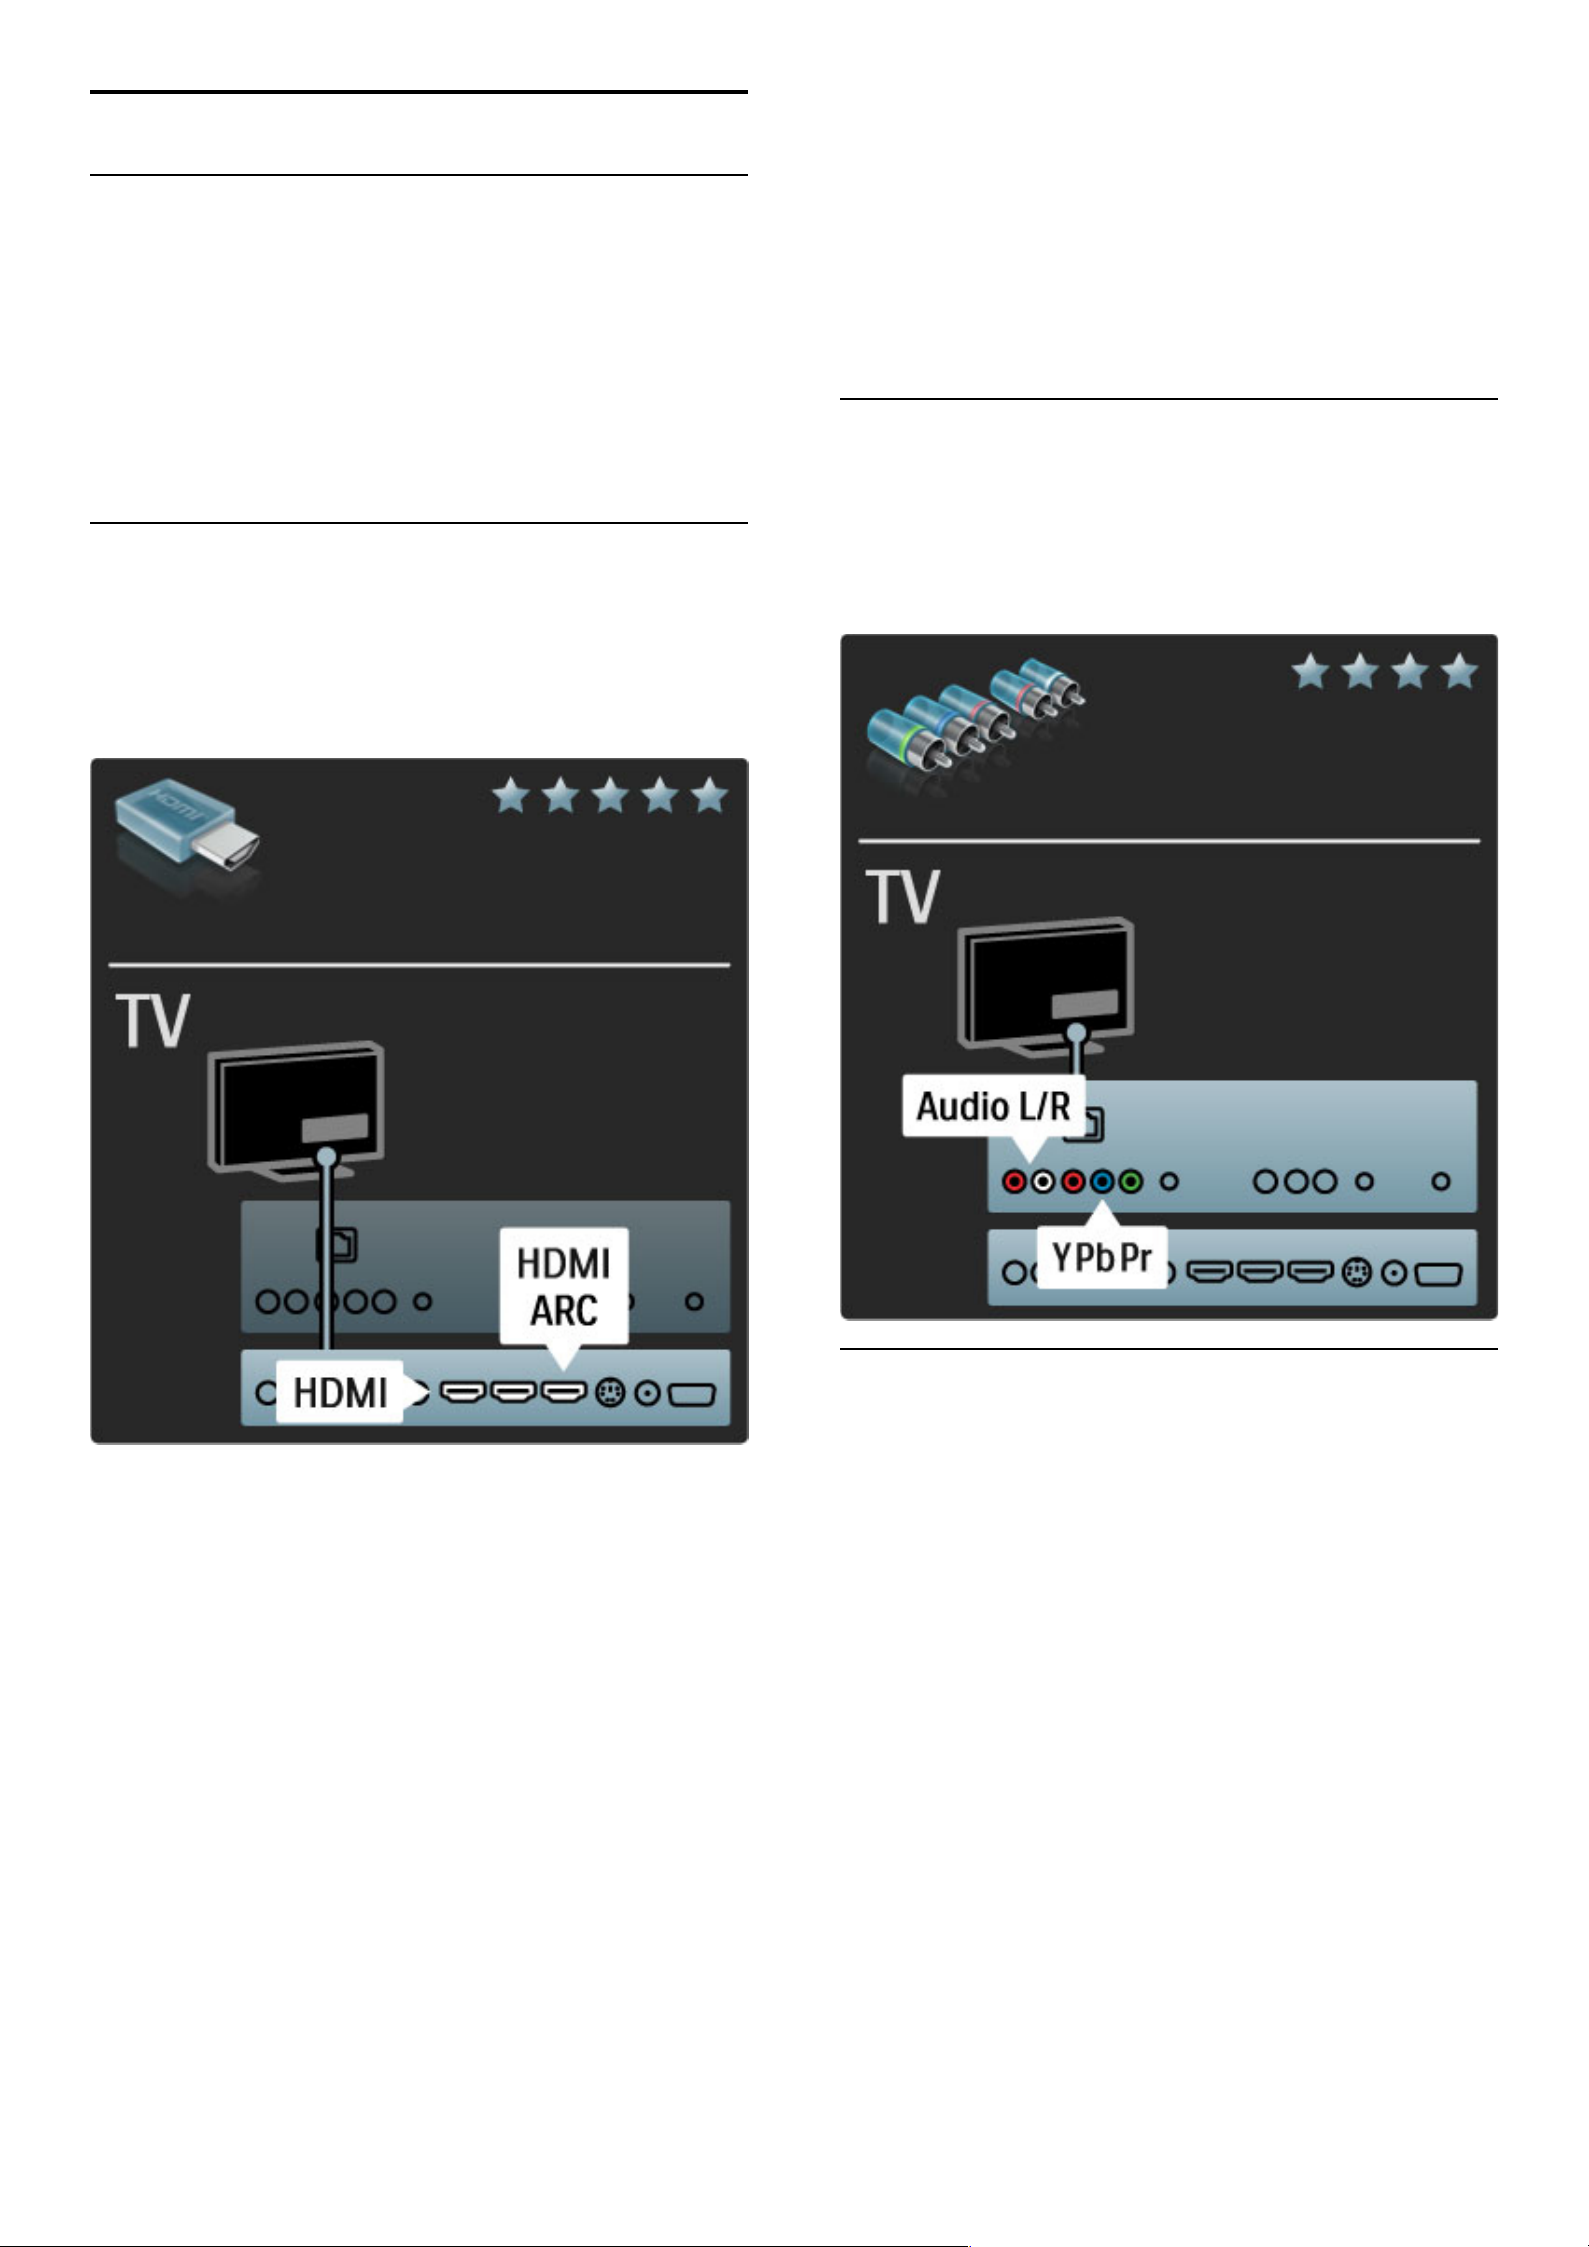
5.2 About cables
Cable quality
Before you connect devices to the TV, check which connectors are
available on the device. Connect the device to the TV with the
highest quality connection available. Good quality cables ensure a
good transfer of picture and sound. Read the other chapters of
About cables.
The connections diagrams shown in Help > Connections >
Connect devices are recommendations. Other solutions are
possible.
HDMI
An HDMI connection has the best picture and sound quality. One
HDMI cable combines video and audio signals. Use an HDMI cable
for High Definition (HD) TV signals. An HDMI cable transfers picture
and sound signals in only one direction. Do not use an HDMI cable
longer than 5m.
EasyLink HDMI-CEC
If your devices are connected with HDMI and have EasyLink, you can
operate them with the TV remote control. Read more about
EasyLink in Help > Setup > Devices > EasyLink HDMI-CEC.
HDMI-ARC
If you have a Home Theatre System with an HDMI-ARC (Audio
Return Channel) connection, you can connect this device with the
TV with only a HDMI cable. Use the HDMI1 ARC connection.
You can skip the audio cable that is added normally (the cable that
connects the TV Digital audio Out to the device Digital audio In).
The return audio connection in this HDMI-ARC connector is builtin. You do not need a special HDMI cable.
You can leave the ARC channel switched on if you use the
additional digital audio cable. Still you can switch off HDMI-ARC. To
switch off the ARC in the HDMI 1 connection, press h > Setup >
TV settings > EasyLink > HDMI 1 ARC, select Off and press OK.
DVI to HDMI
Use a DVI to HDMI adapter if your device only has a DVI
connection. Use one of the HDMI connections and add an Audio
L/R cable to Audio In VGA/HDMI for sound, on the back of the TV.
Copy protection
A DVI and HDMI cable support HDCP (High-bandwidth Digital
Contents Protection). HDCP is a copy protection signal that
prevents copying content from a DVD disc or Blu-ray Disc. Also
referred to as DRM (Digital Rights Managament).
Y Pb Pr
Use the Component Video YPbPr connection together with an
Audio Left and Right connection for sound.
Match the YPbPr connector colours with the cable plugs when you
connect. YPbPr can handle High Definition (HD) TV signals.
Video
If you have a device with only a Video (CVBS) connection, use the
AV In connection on the back of the TV.
54 Connections / About cables
Page 55
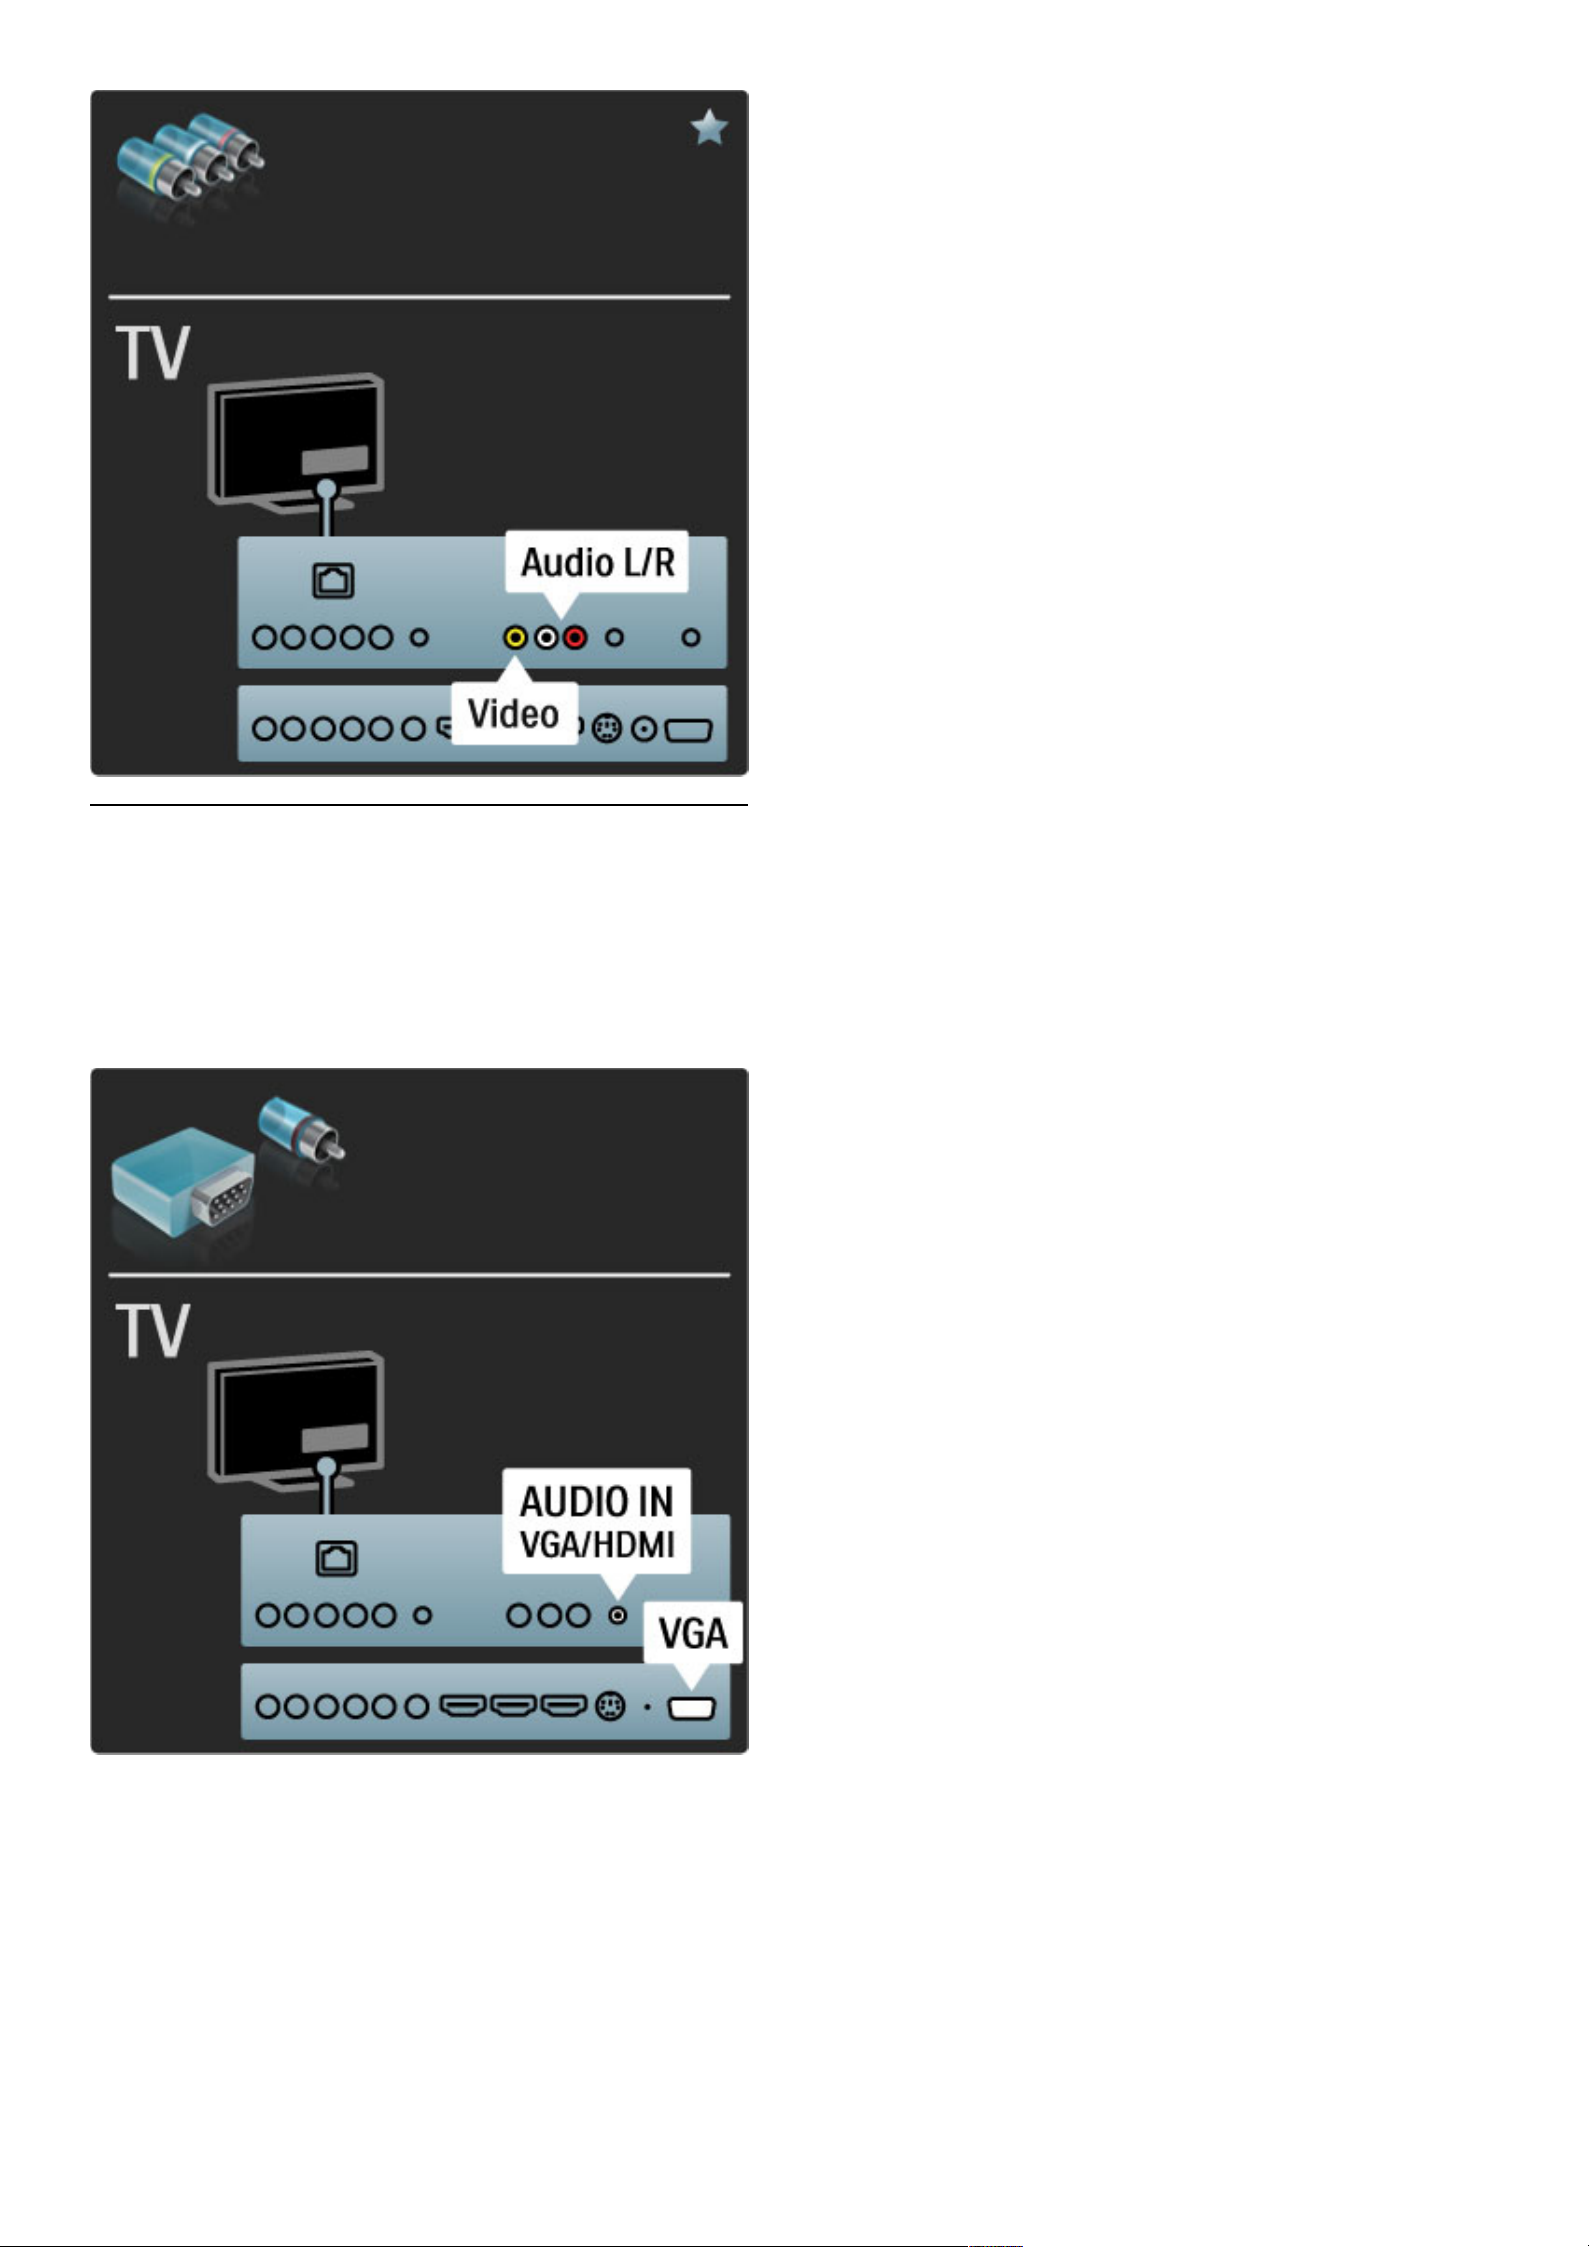
VGA
Use a VGA cable (DE15 connector) to connect a computer to the
TV. With this connection you can use the TV as a computer
monitor. You can add an Audio L/R cable for sound.
To connect a computer with the VGA connection, read Help >
Connections > Connect more devices > TV as PC monitor.
Connections / About cables 55
Page 56
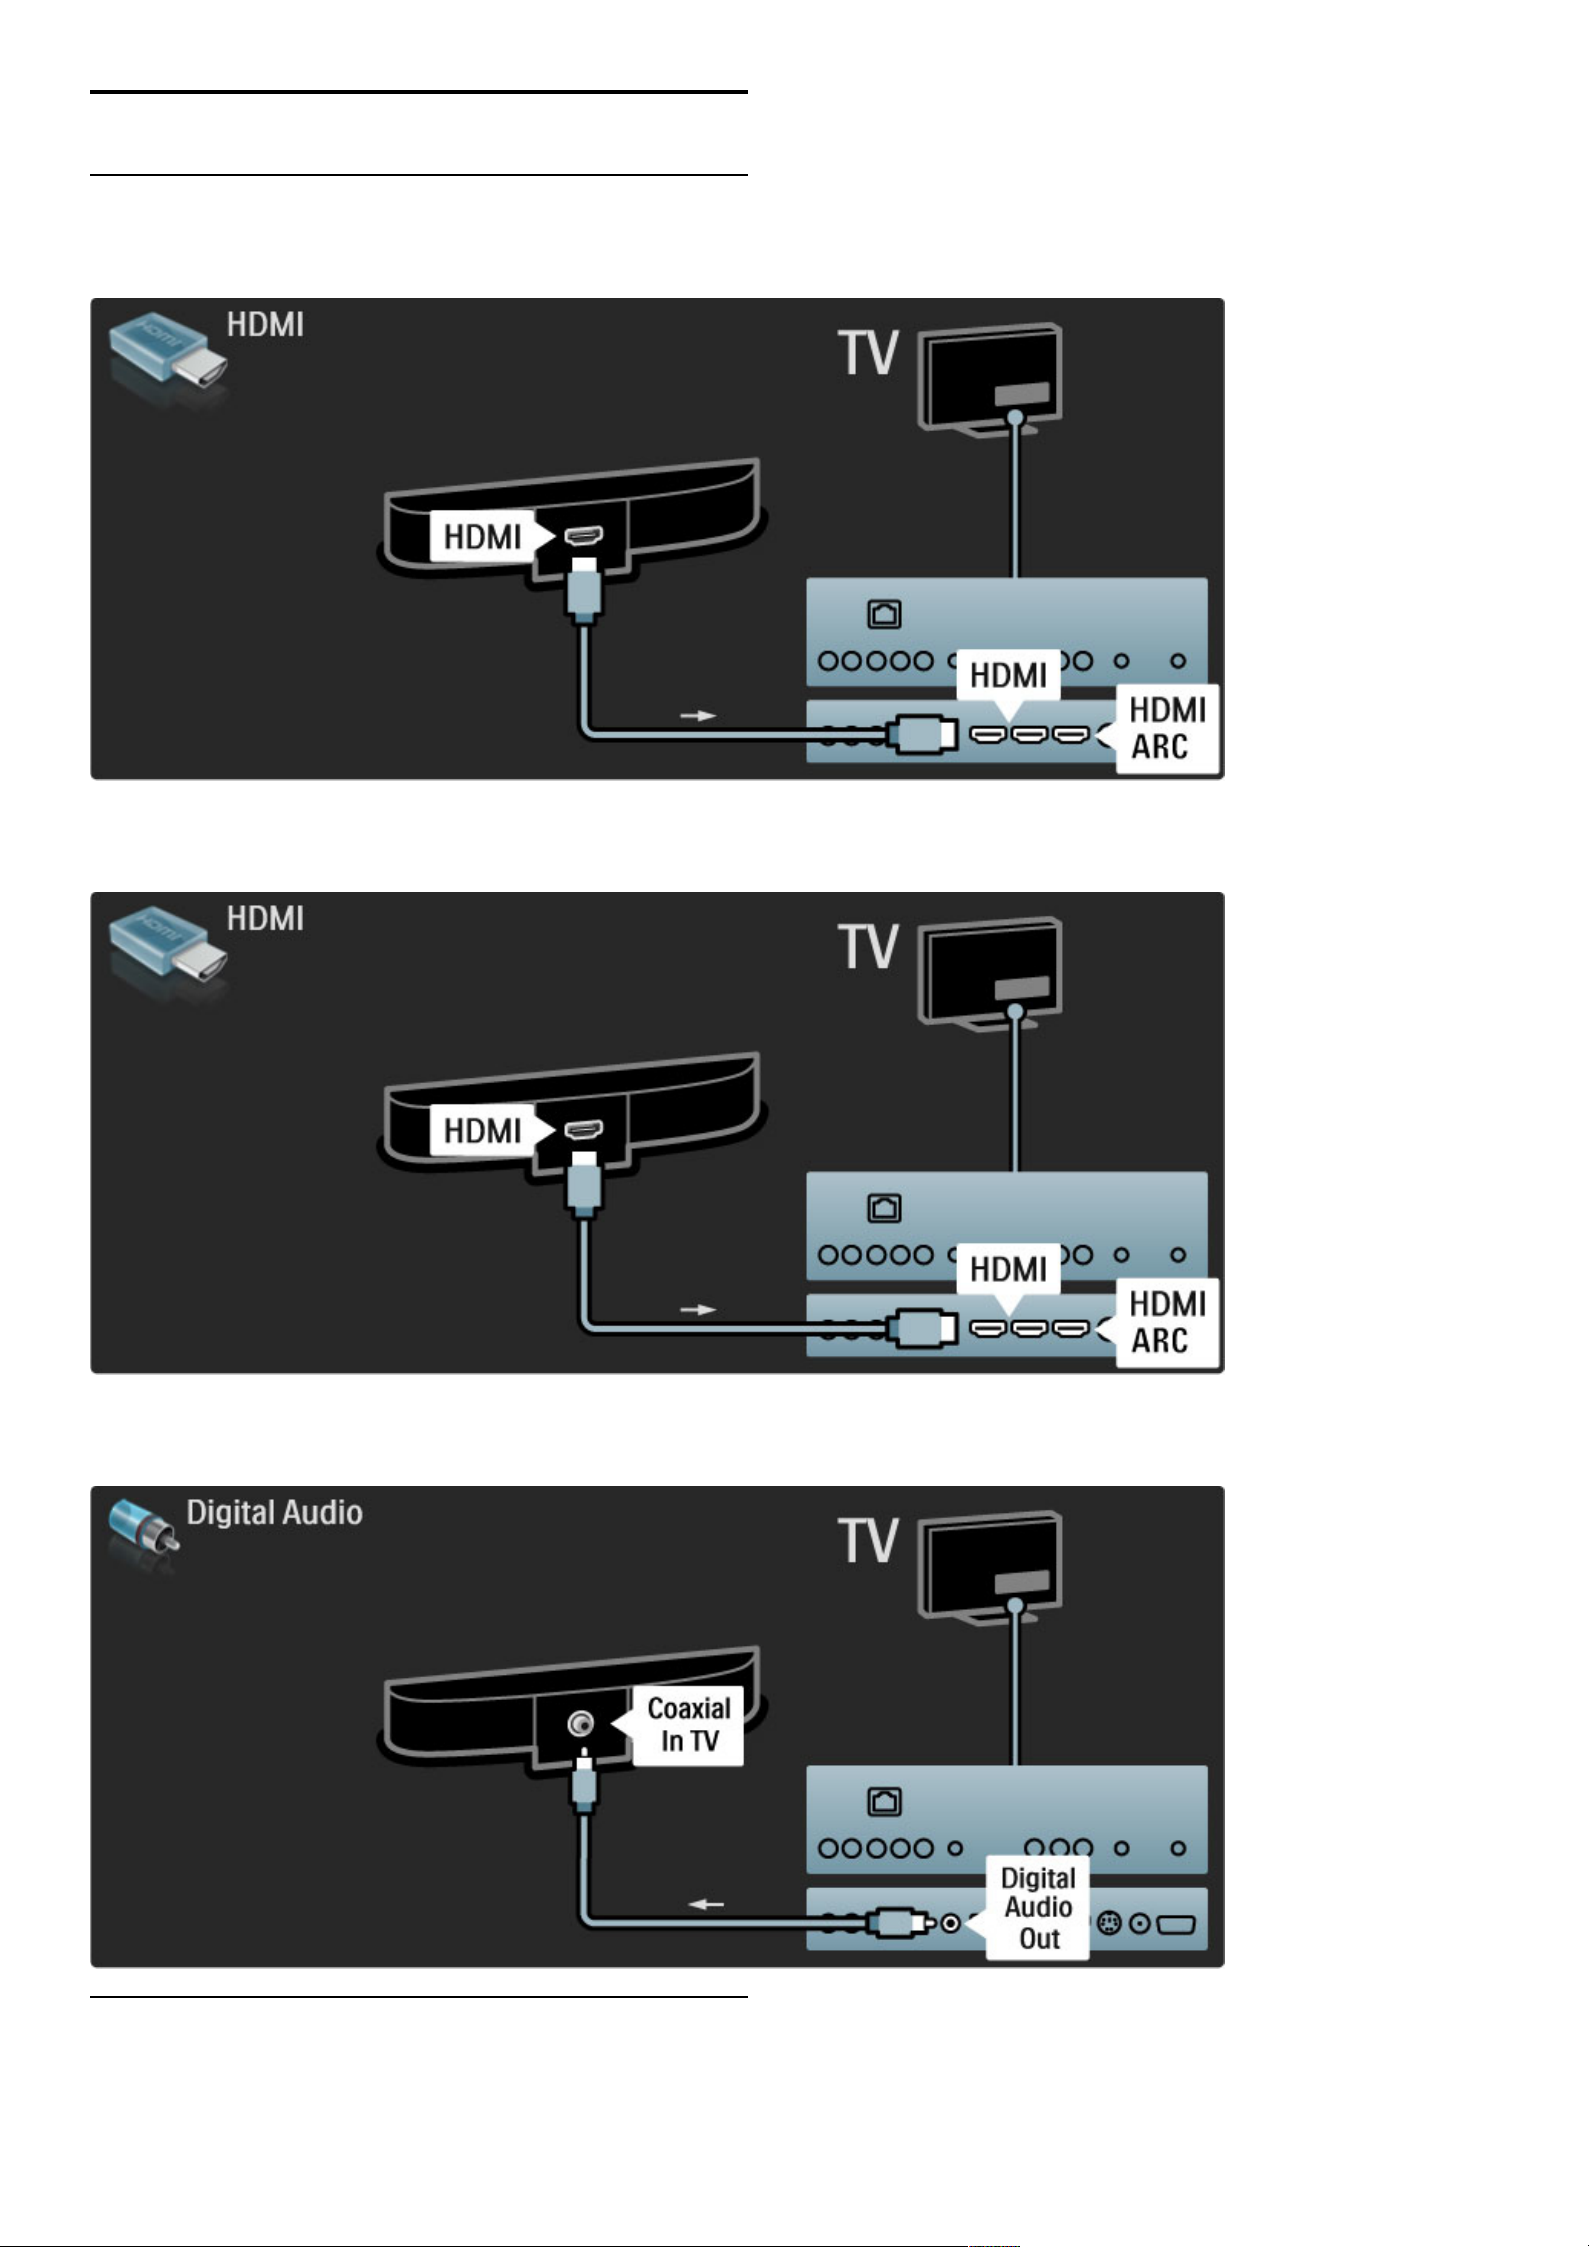
5.3 Connect devices
SoundBar
Use an HDMI cable to connect the device to the TV.
If you use the HDMI-ARC connections on both TV and device, no
other cable is needed. If not, read on.
If you do not use the HDMI-ARC connection, add a digital audio
cable (cinch coaxial).
Blu-ray Disc / DVD player
Use an HDMI cable to connect the device to the TV.
56 Connections / Connect devices
Page 57
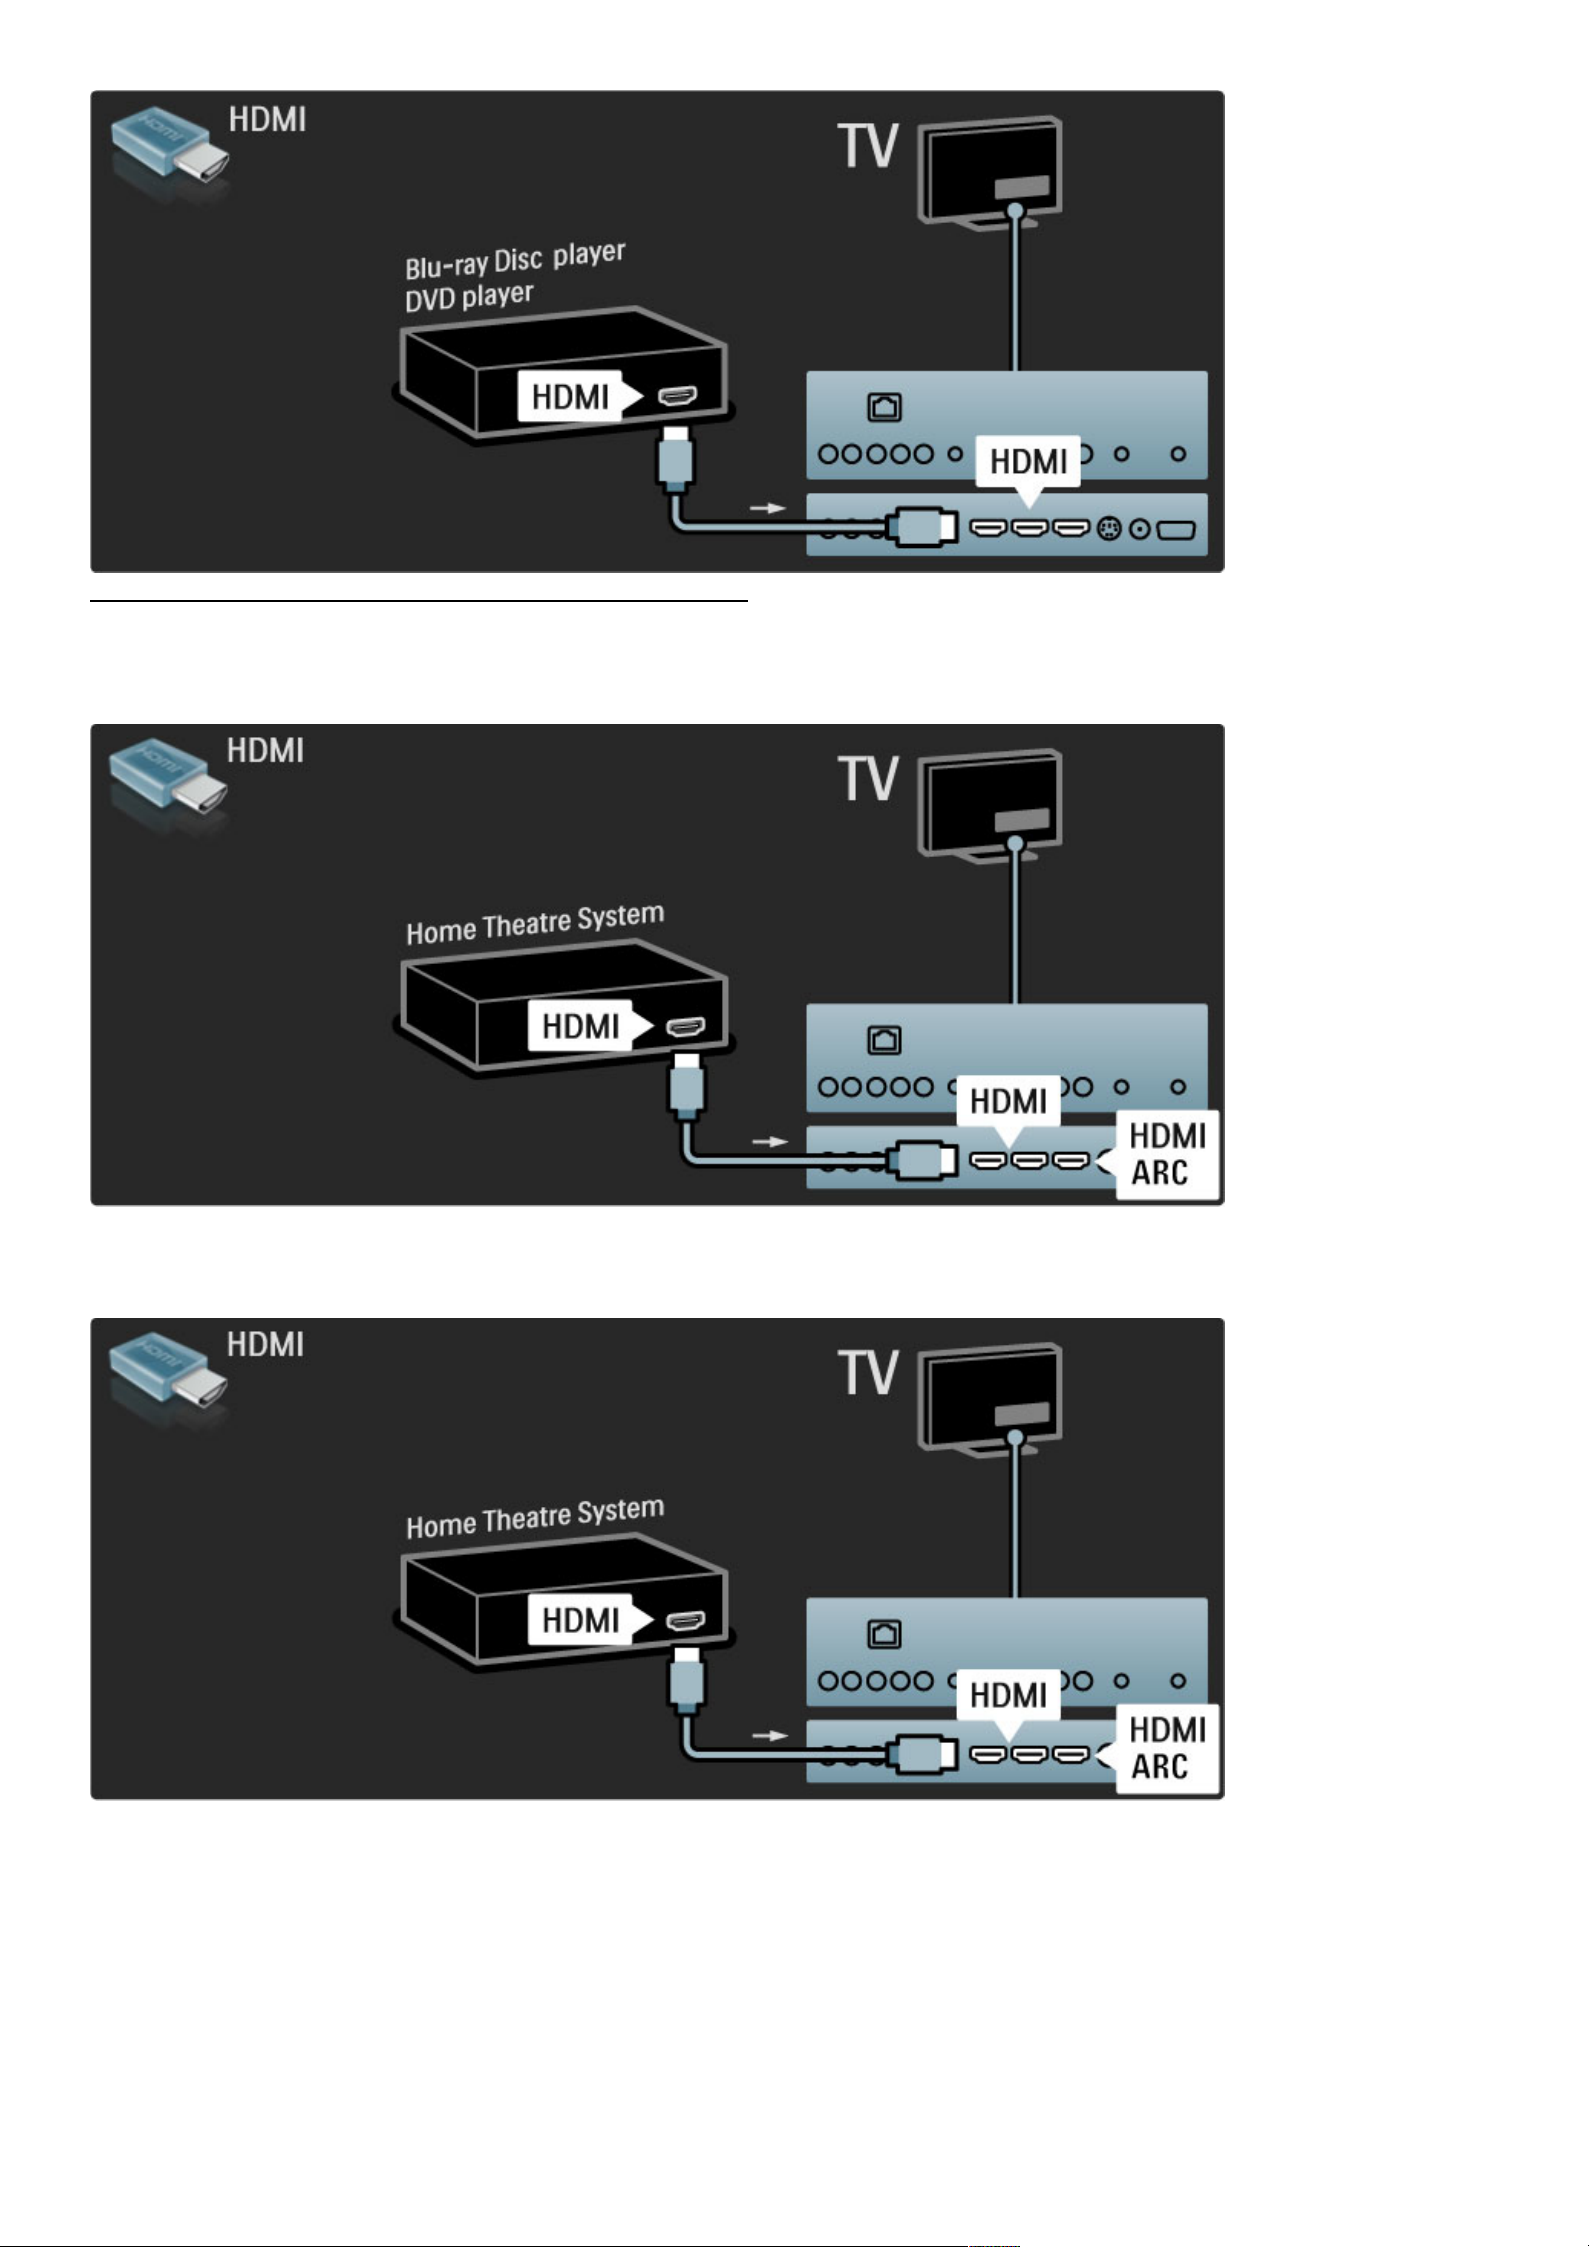
Home Theatre System with disc player
Use an HDMI cable to connect the device to the TV.
If you use the HDMI-ARC connections on both TV and device, no
other cable is needed. If not, read on.
If you do not use the HDMI-ARC connection, add a digital audio
cable (cinch coaxial).
Connections / Connect devices 57
Page 58
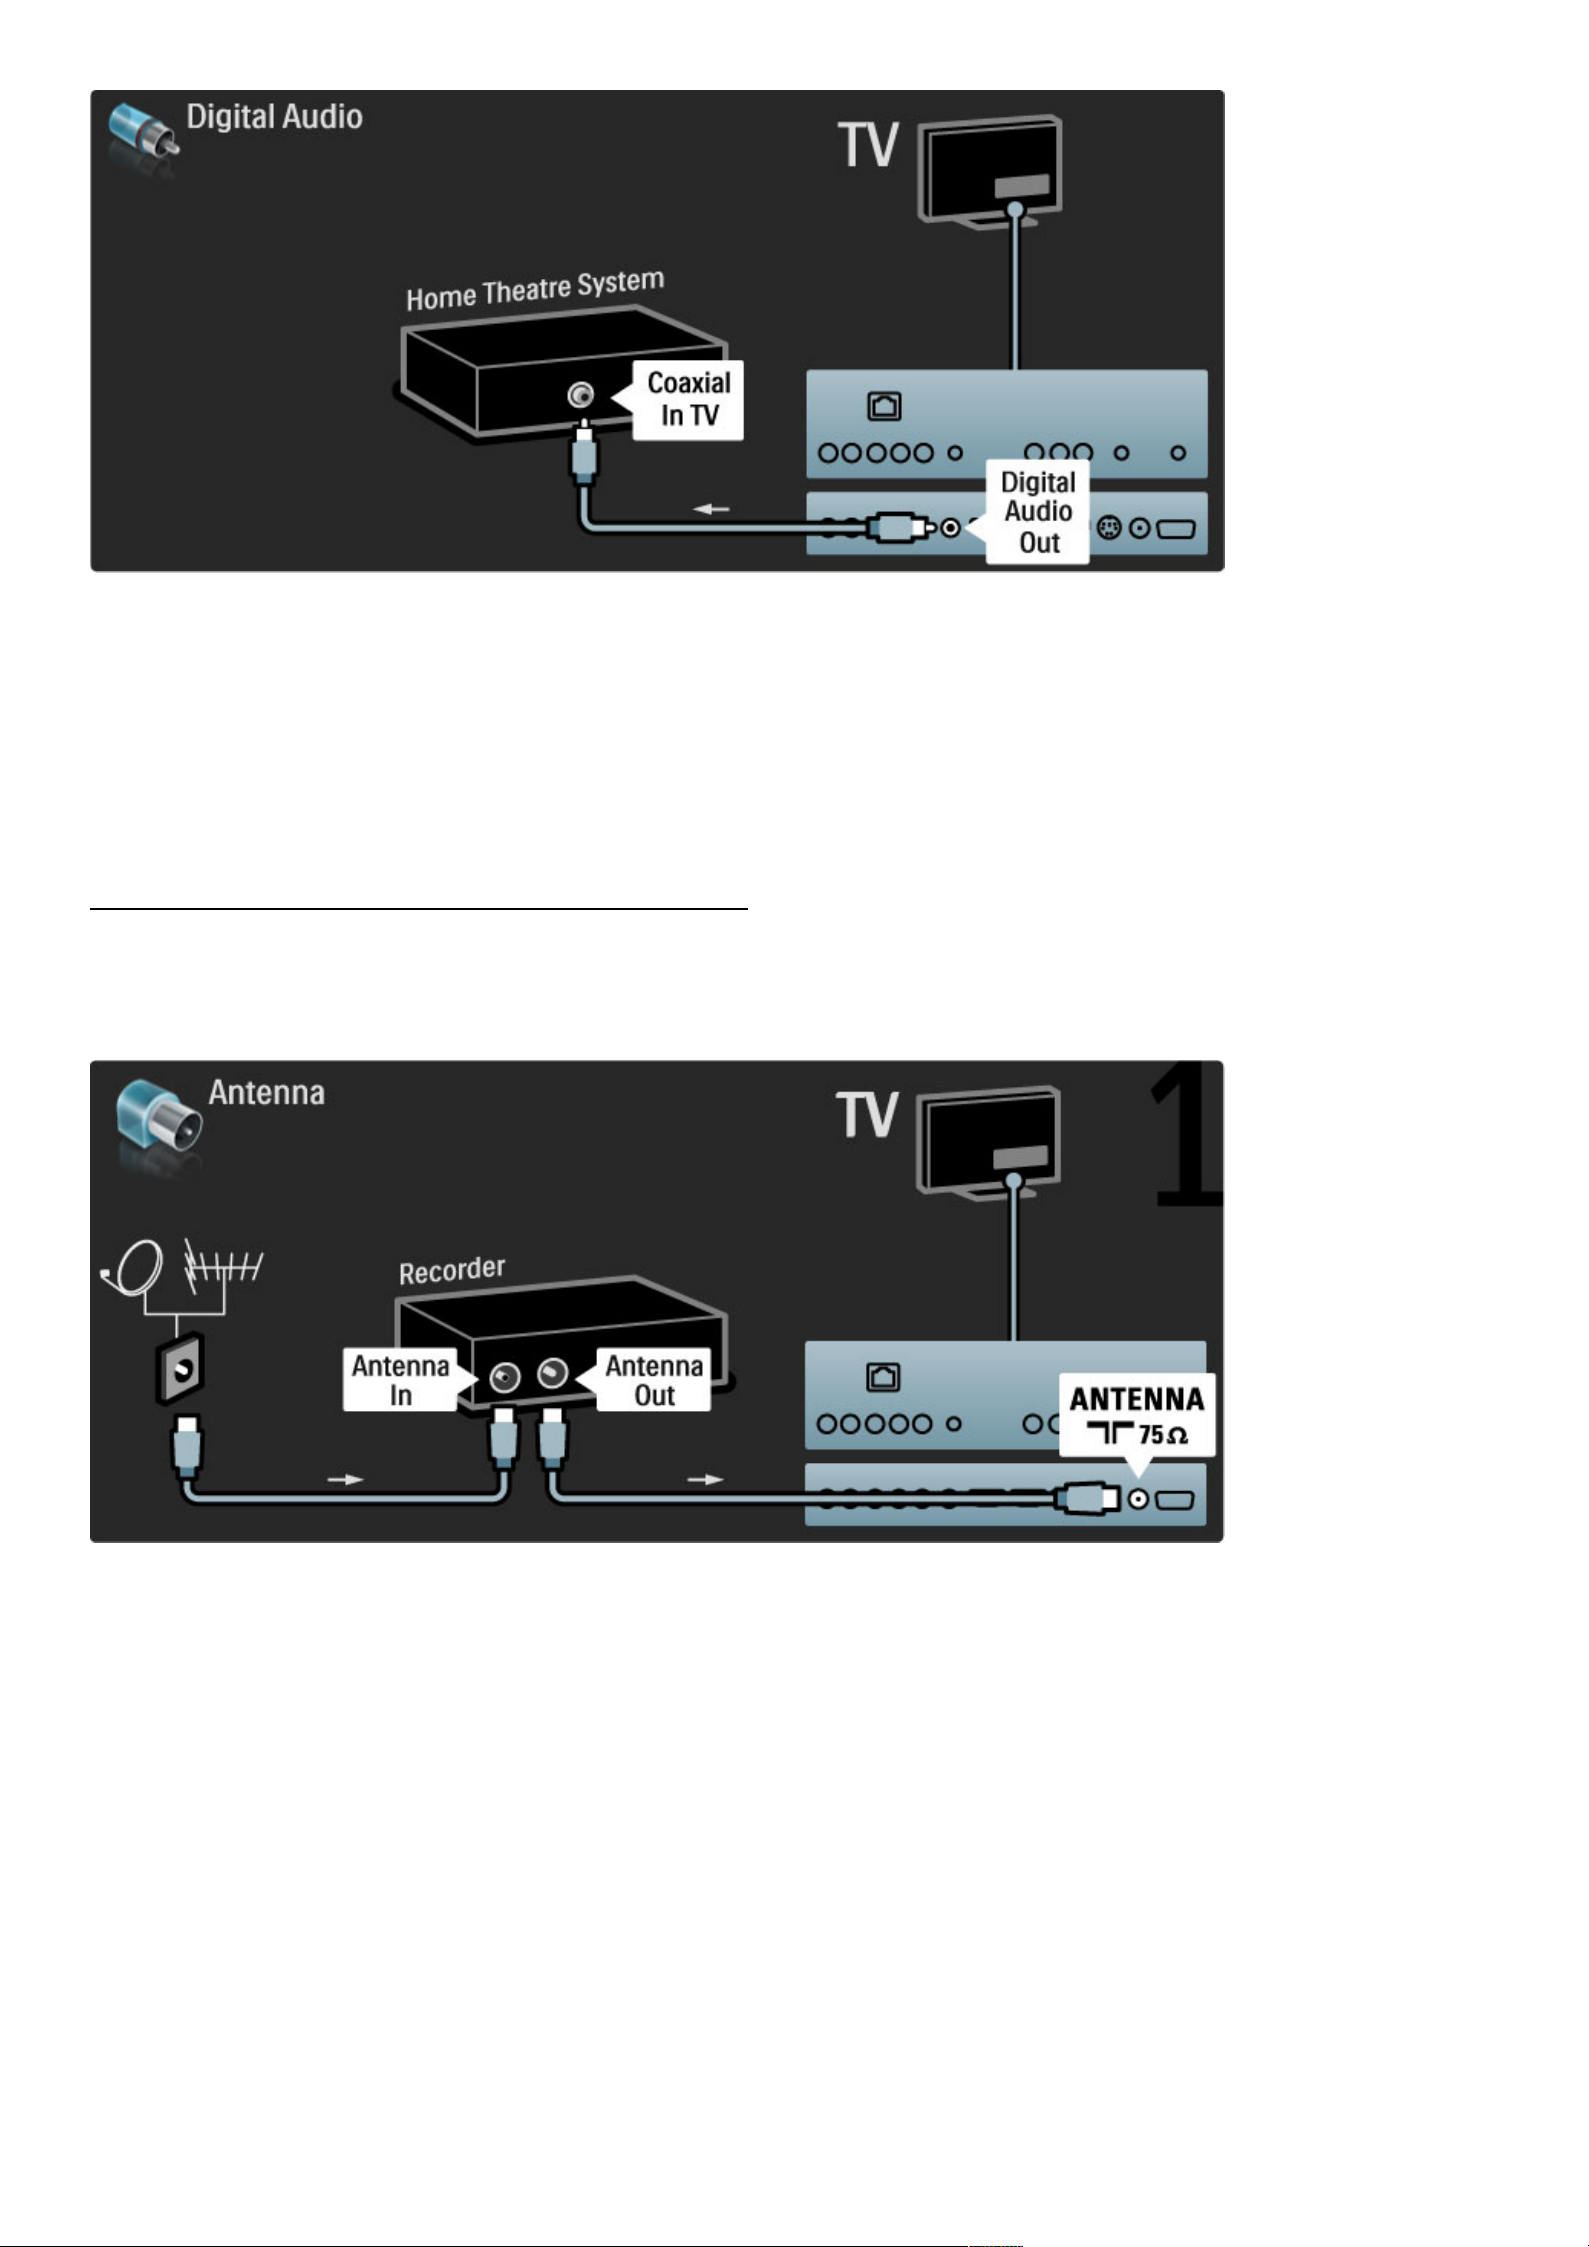
Audio to Video synchronisation (sync)
If the sound does not match with the video on screen, you can set a
delay on most DVD Home Theatre Systems to match the sound and
video.
Read more about Audio to Video sync in Help > Setup > Devices
> Audio to Video sync.
Do not connect the audio signal from a DVD player or other device
directly to the Home Theatre System. Always route the sound
through the TV first.
Recorder
Use 2 antenna cables to connect the antenna to the device and the
TV.
Add an HDMI cable to connect the device to the TV.
58 Connections / Connect devices
Page 59
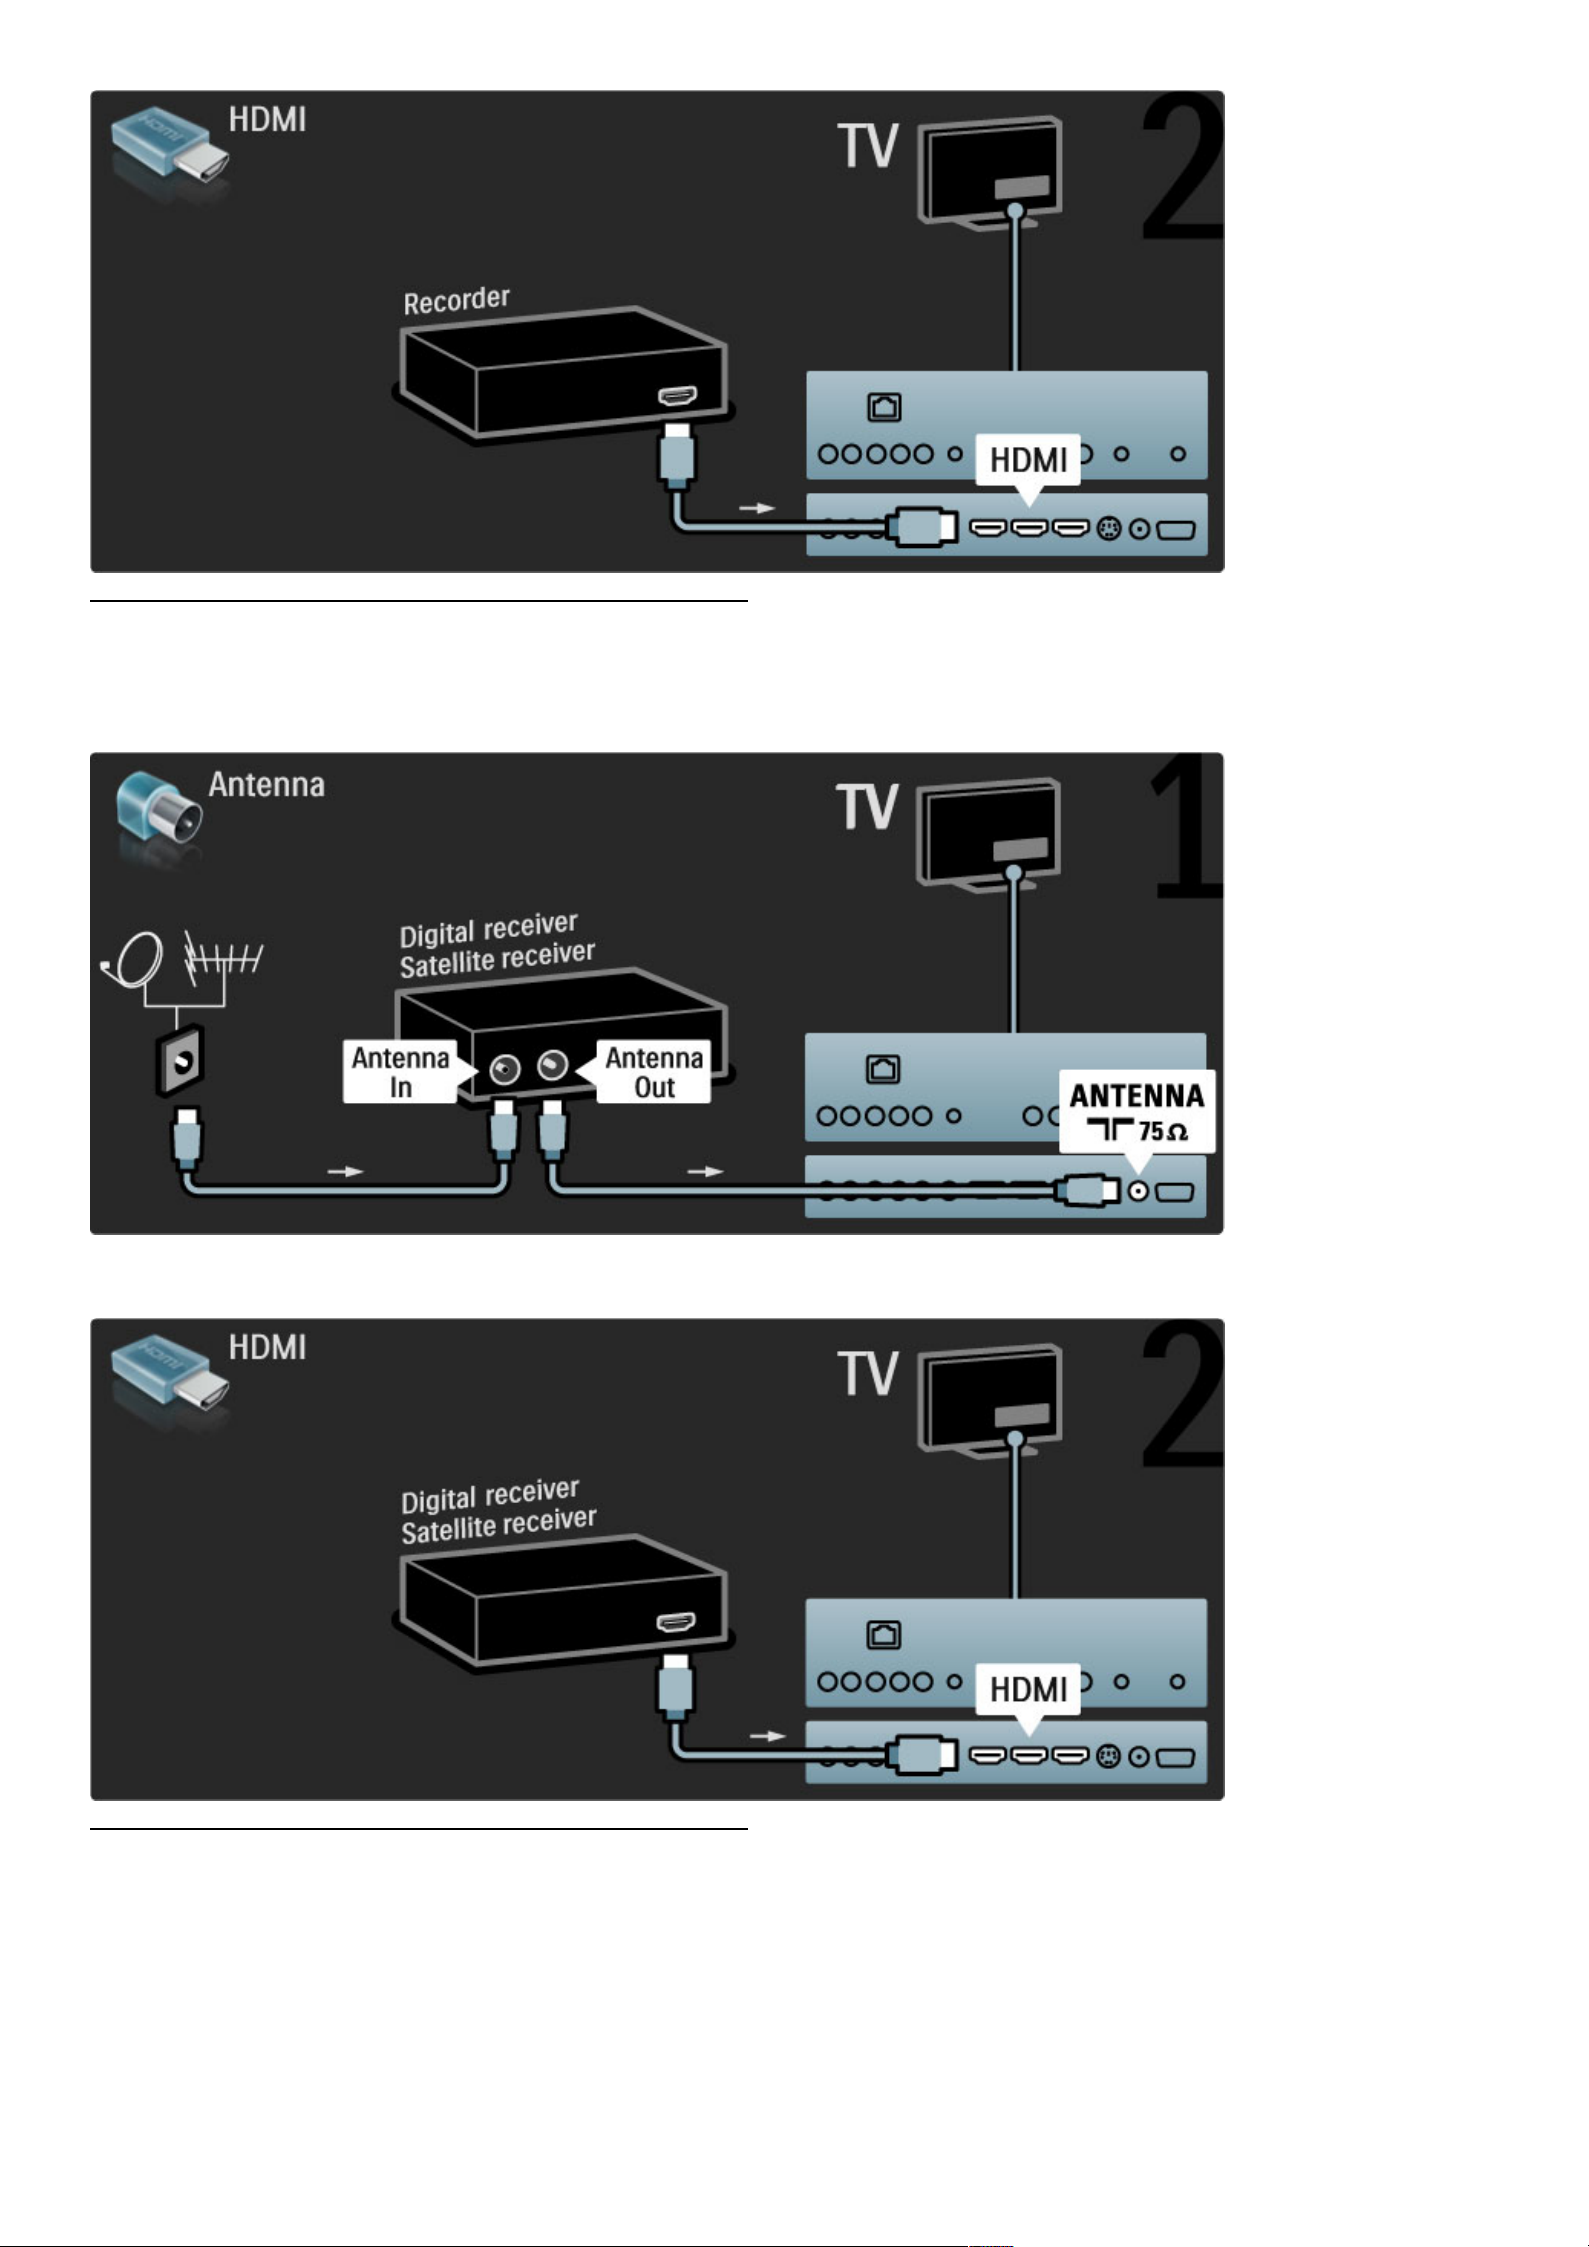
Digital receiver / Sat.
Use 2 antenna cables to connect the antenna to the device and the
TV.
Add an HDMI cable to connect the device to the TV.
Dig. receiver + Disc Recorder
First, use 3 antenna cables to connect the devices to the TV.
Connections / Connect devices 59
Page 60
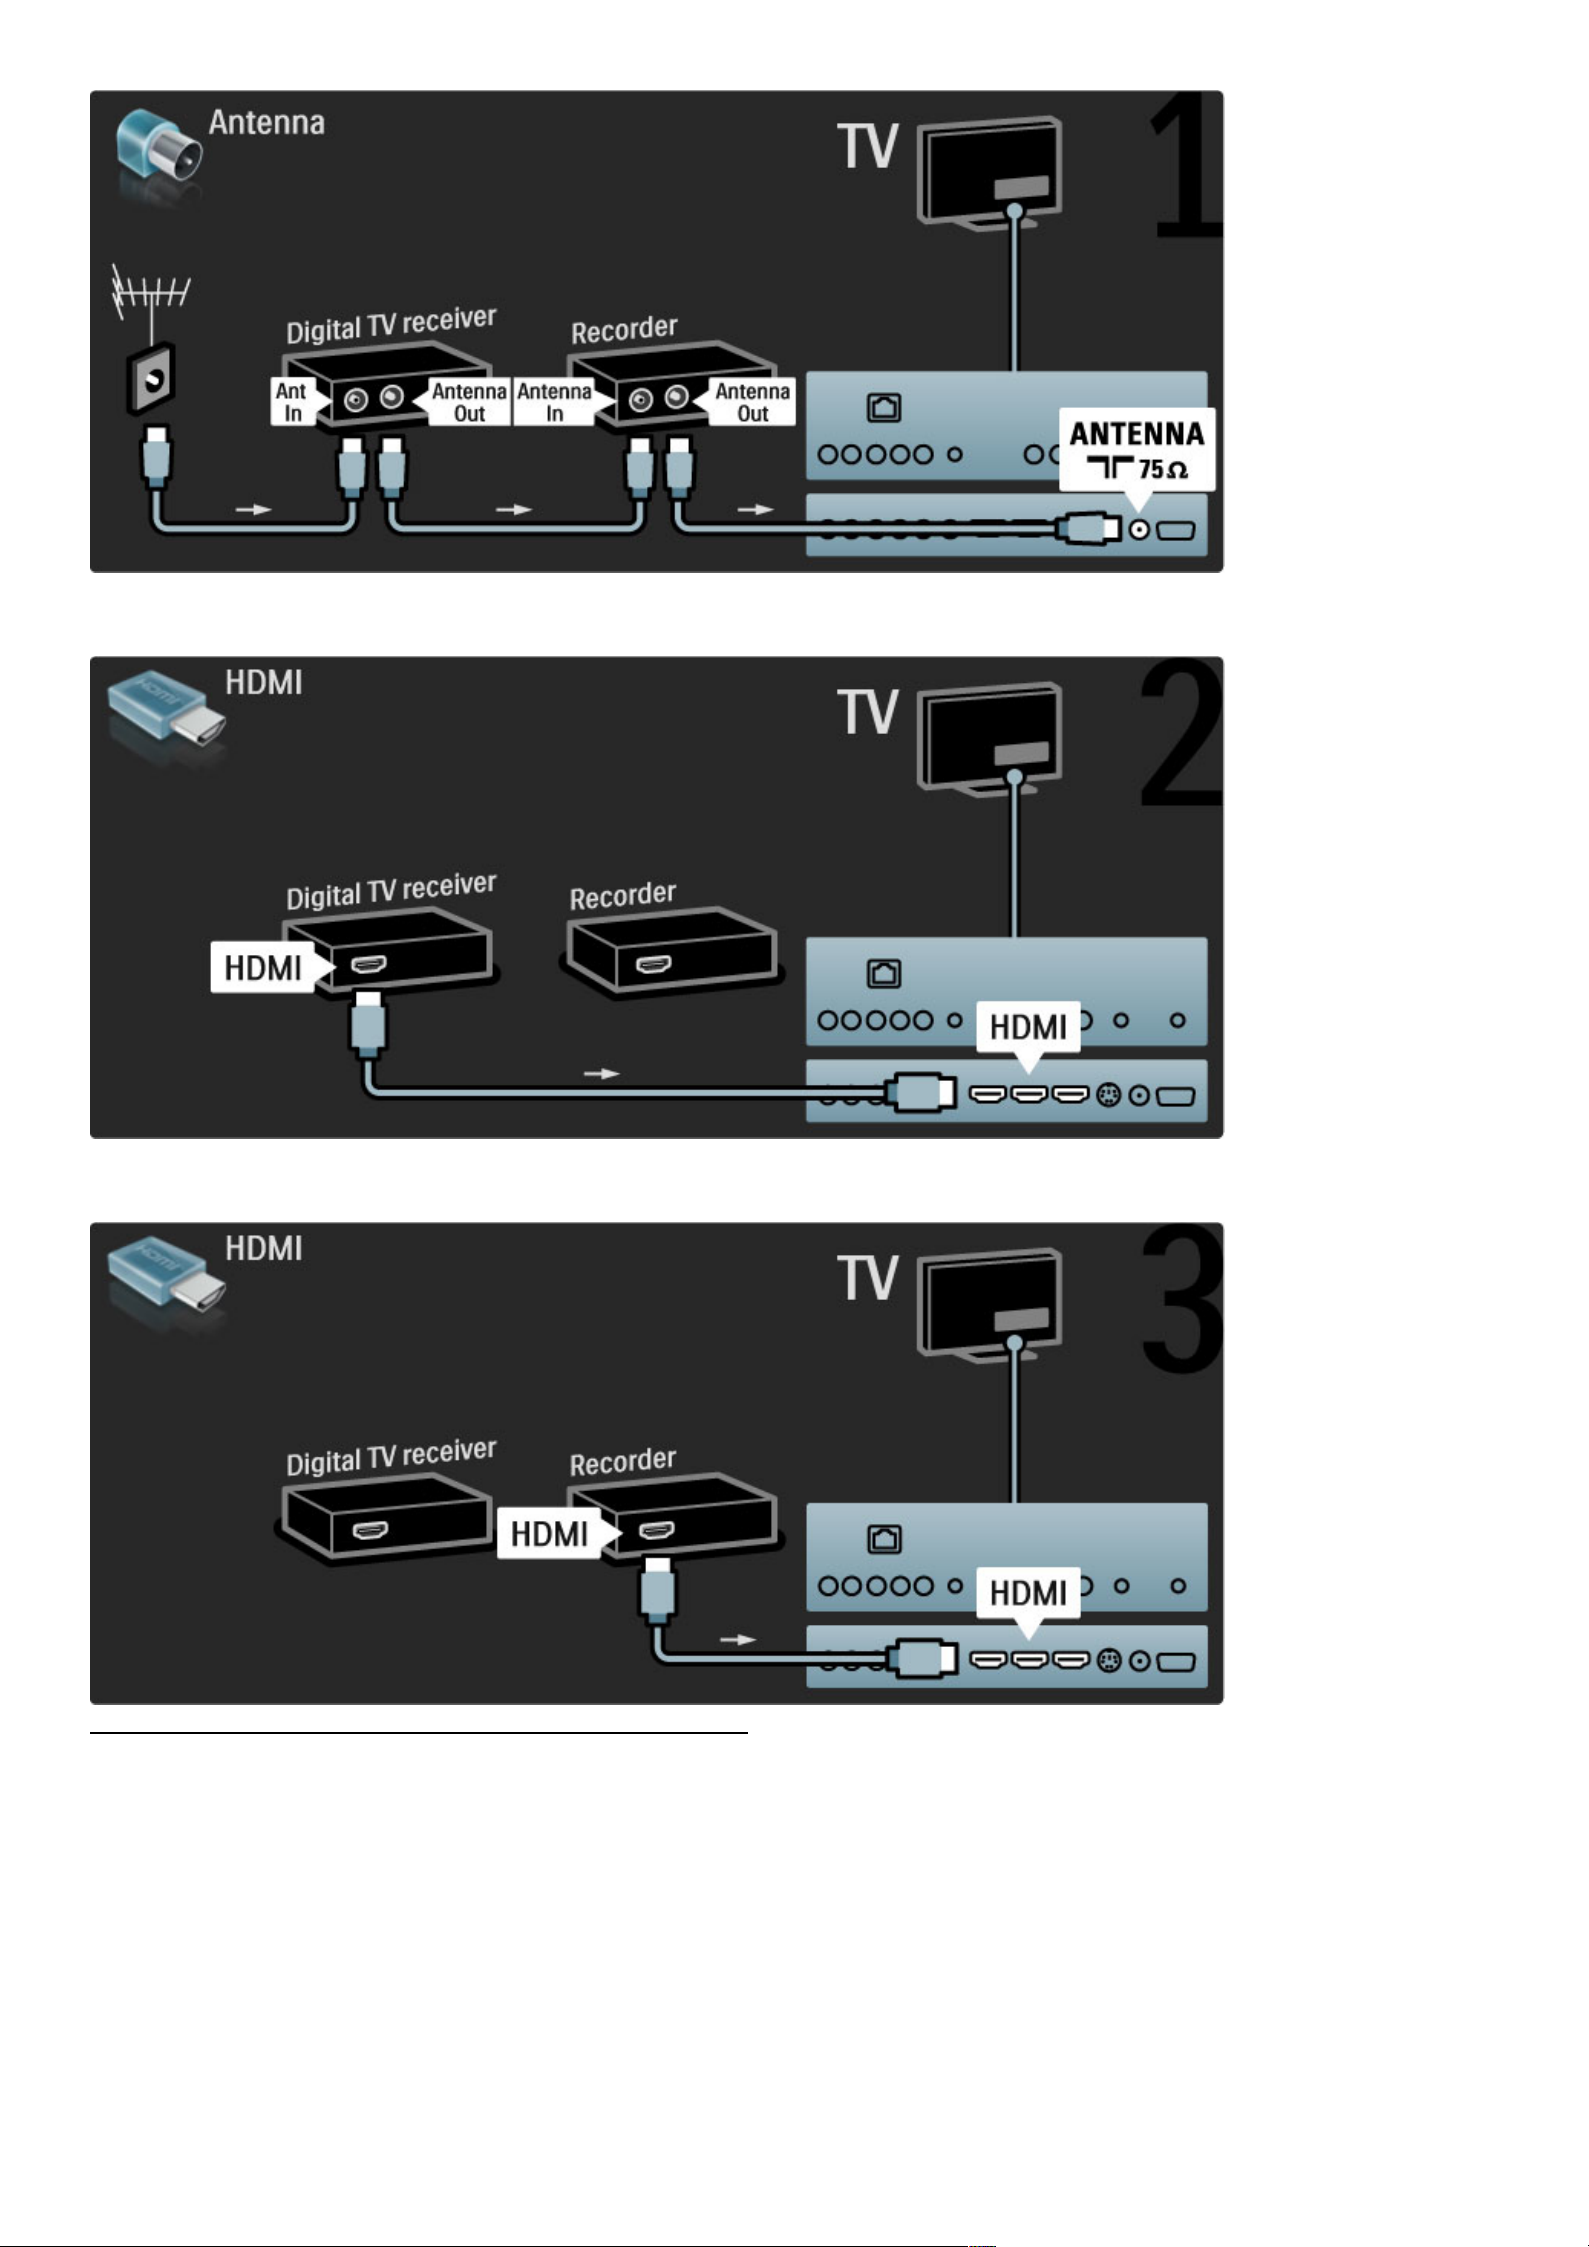
Then use an HDMI cable to connect the digital receiver to the TV.
Finally, use an HDMI cable to connect the Disc Recorder to the TV.
Dig. receiver + Disc-R + Home Theatre
First, use 3 antenna cables to connect the devices to the TV.
60 Connections / Connect devices
Page 61
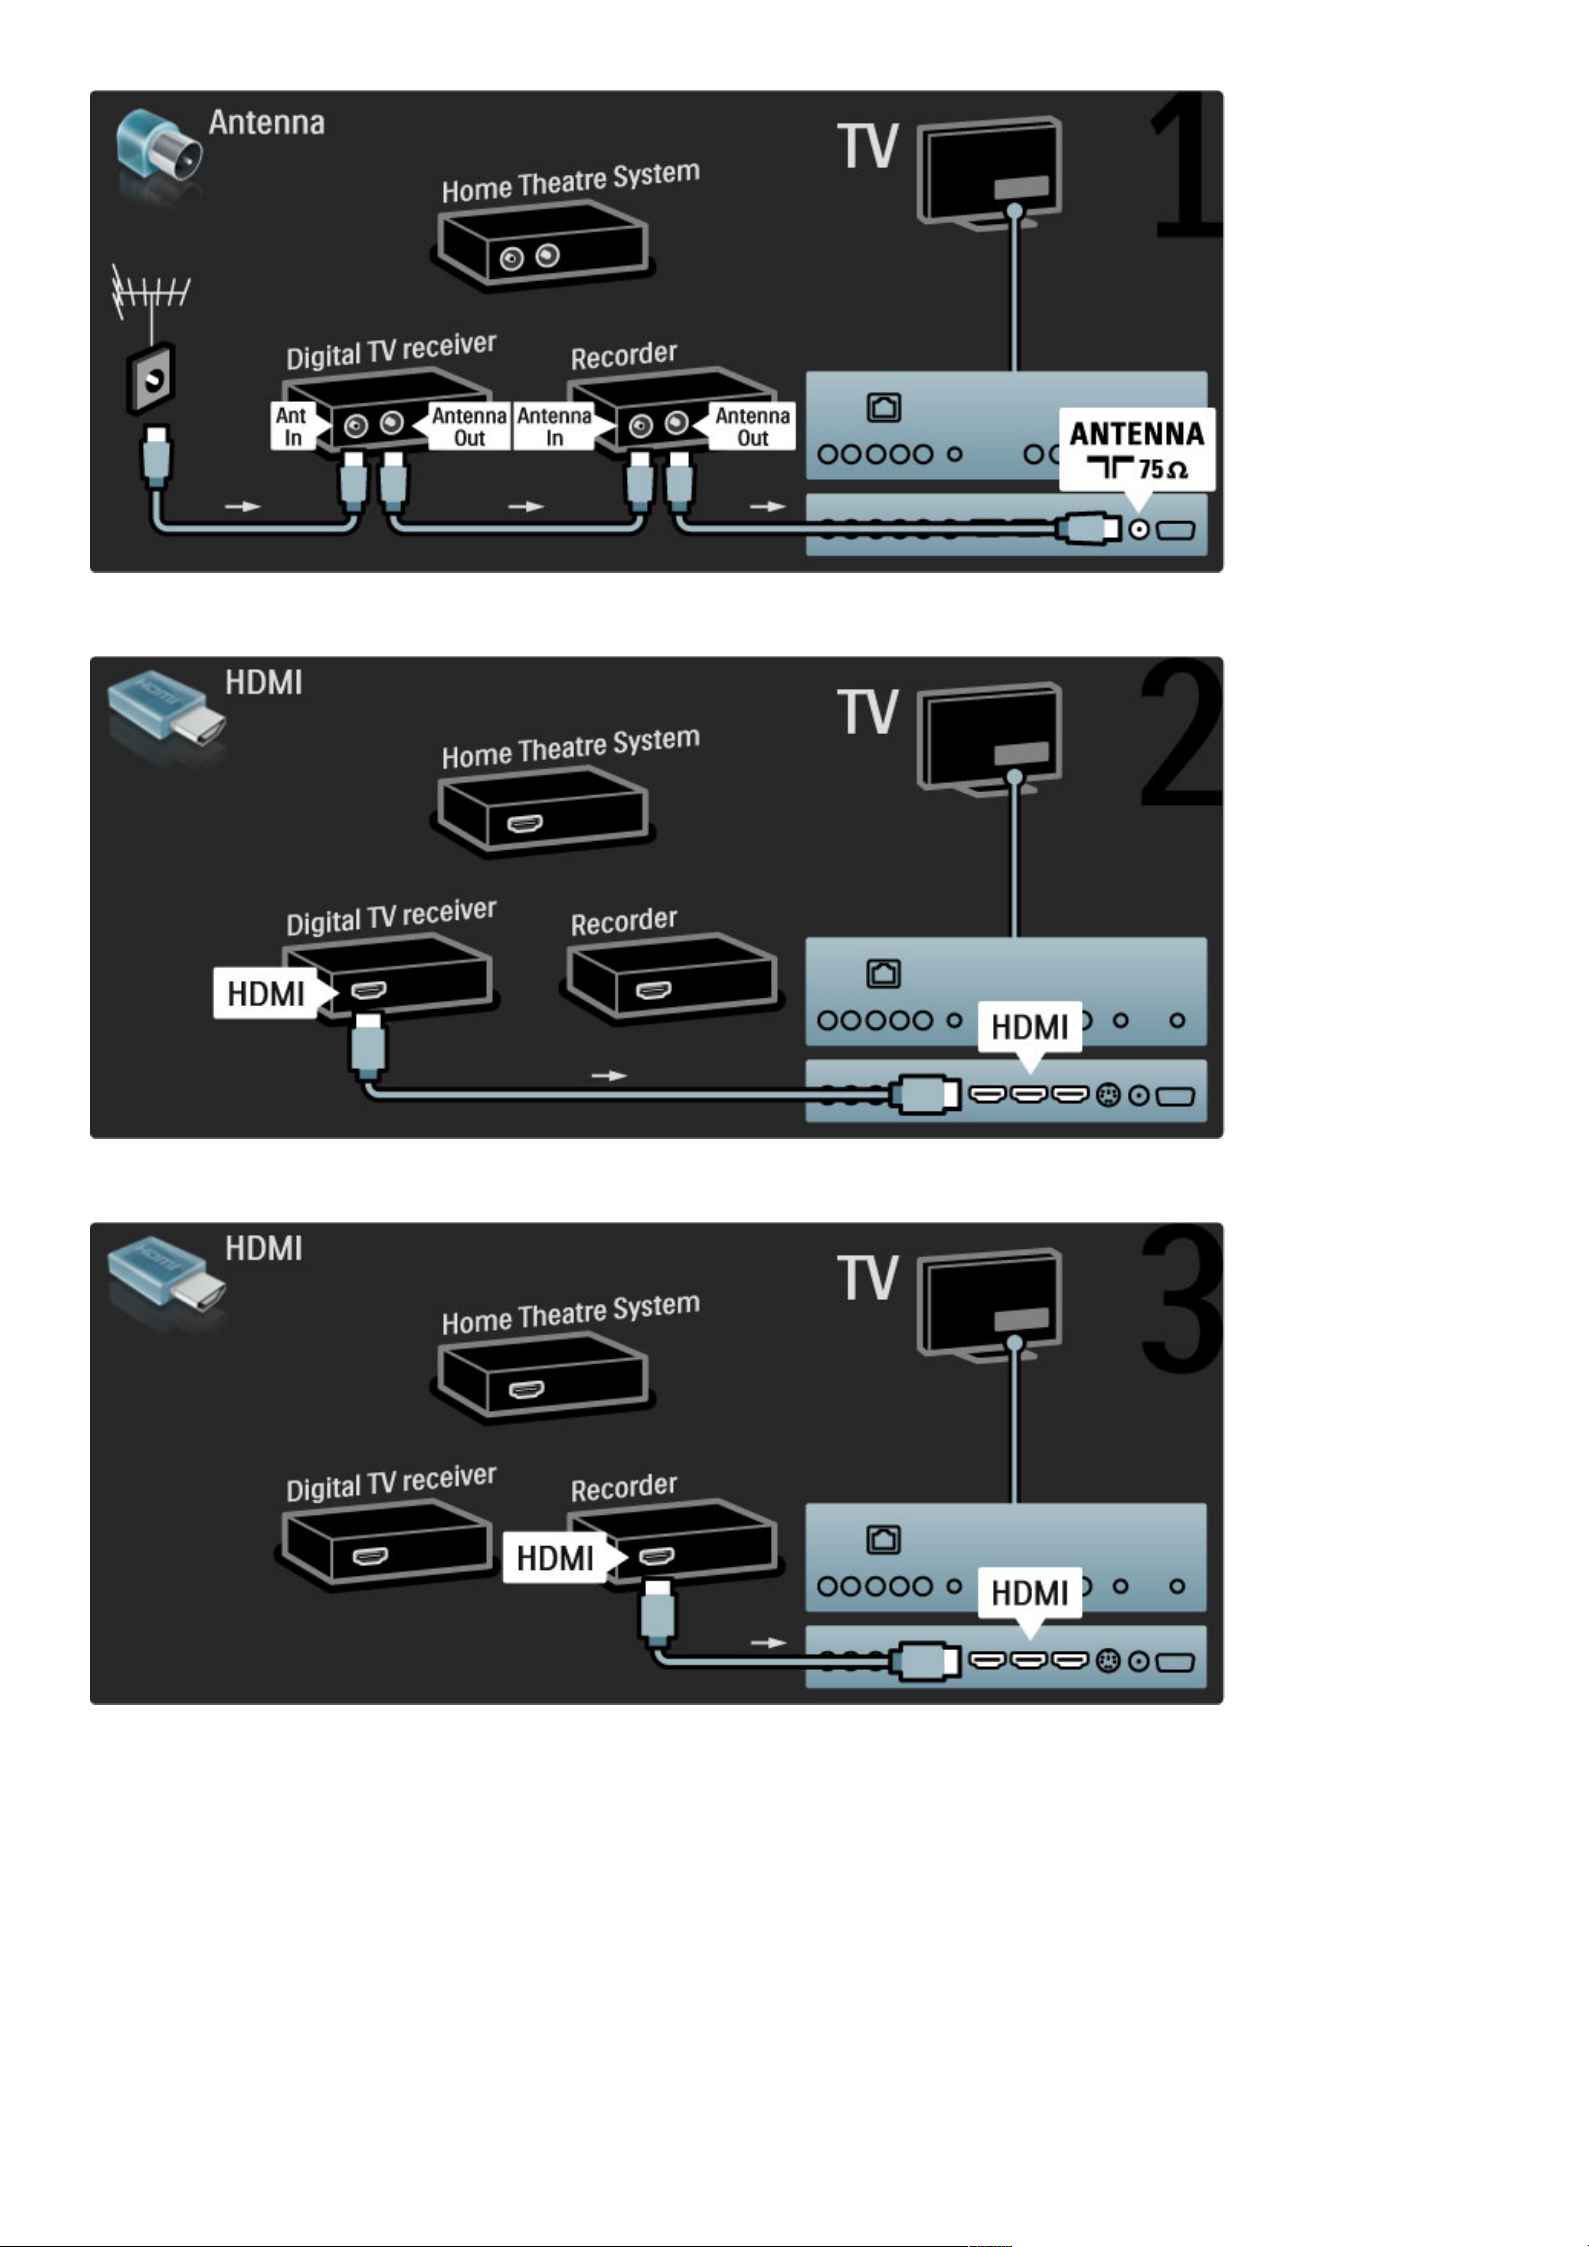
Then use an HDMI cable to connect the digital receiver to the TV.
Then use an HDMI cable to connect the Disc Recorder to the TV.
Then use an HDMI cable to connect the Home Theatre System to
the TV.
Connections / Connect devices 61
Page 62
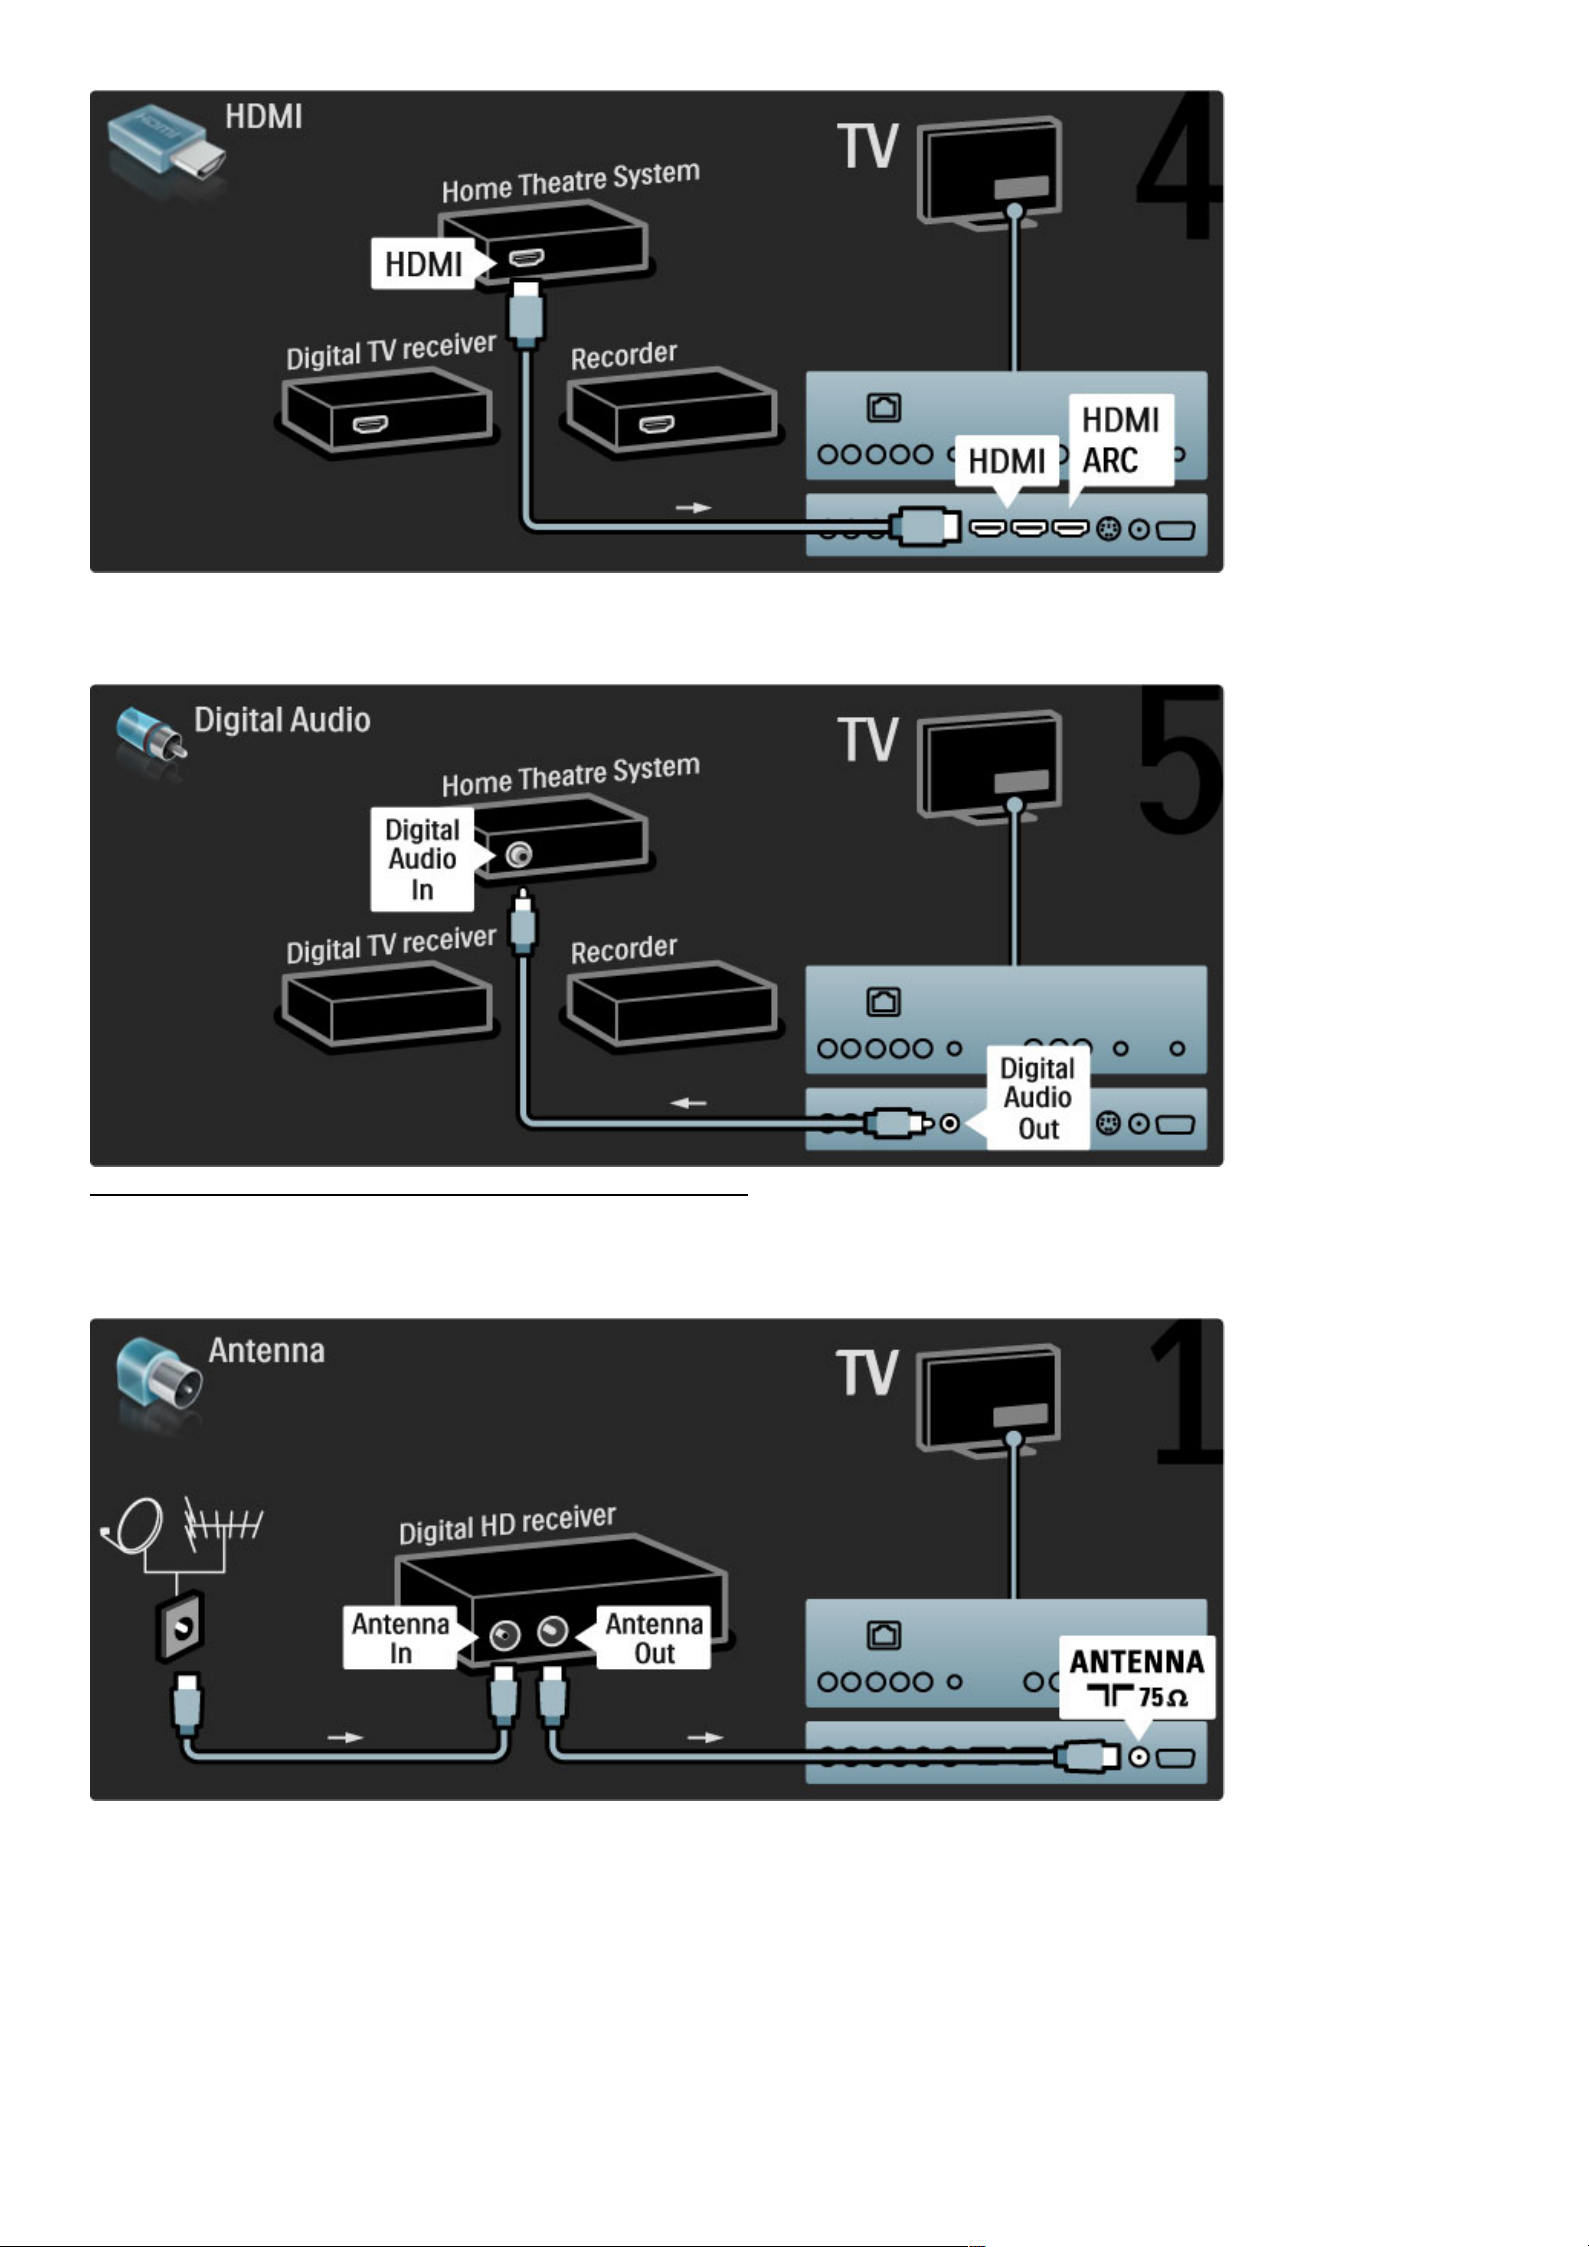
If you do not use the HDMI-ARC connection on the TV and the
device, add a digital audio cable (cinch coaxial).
Digital HD receiver
First, use 2 antenna cables to connect the device to the TV.
Use an HDMI cable to connect the device to the TV.
62 Connections / Connect devices
Page 63
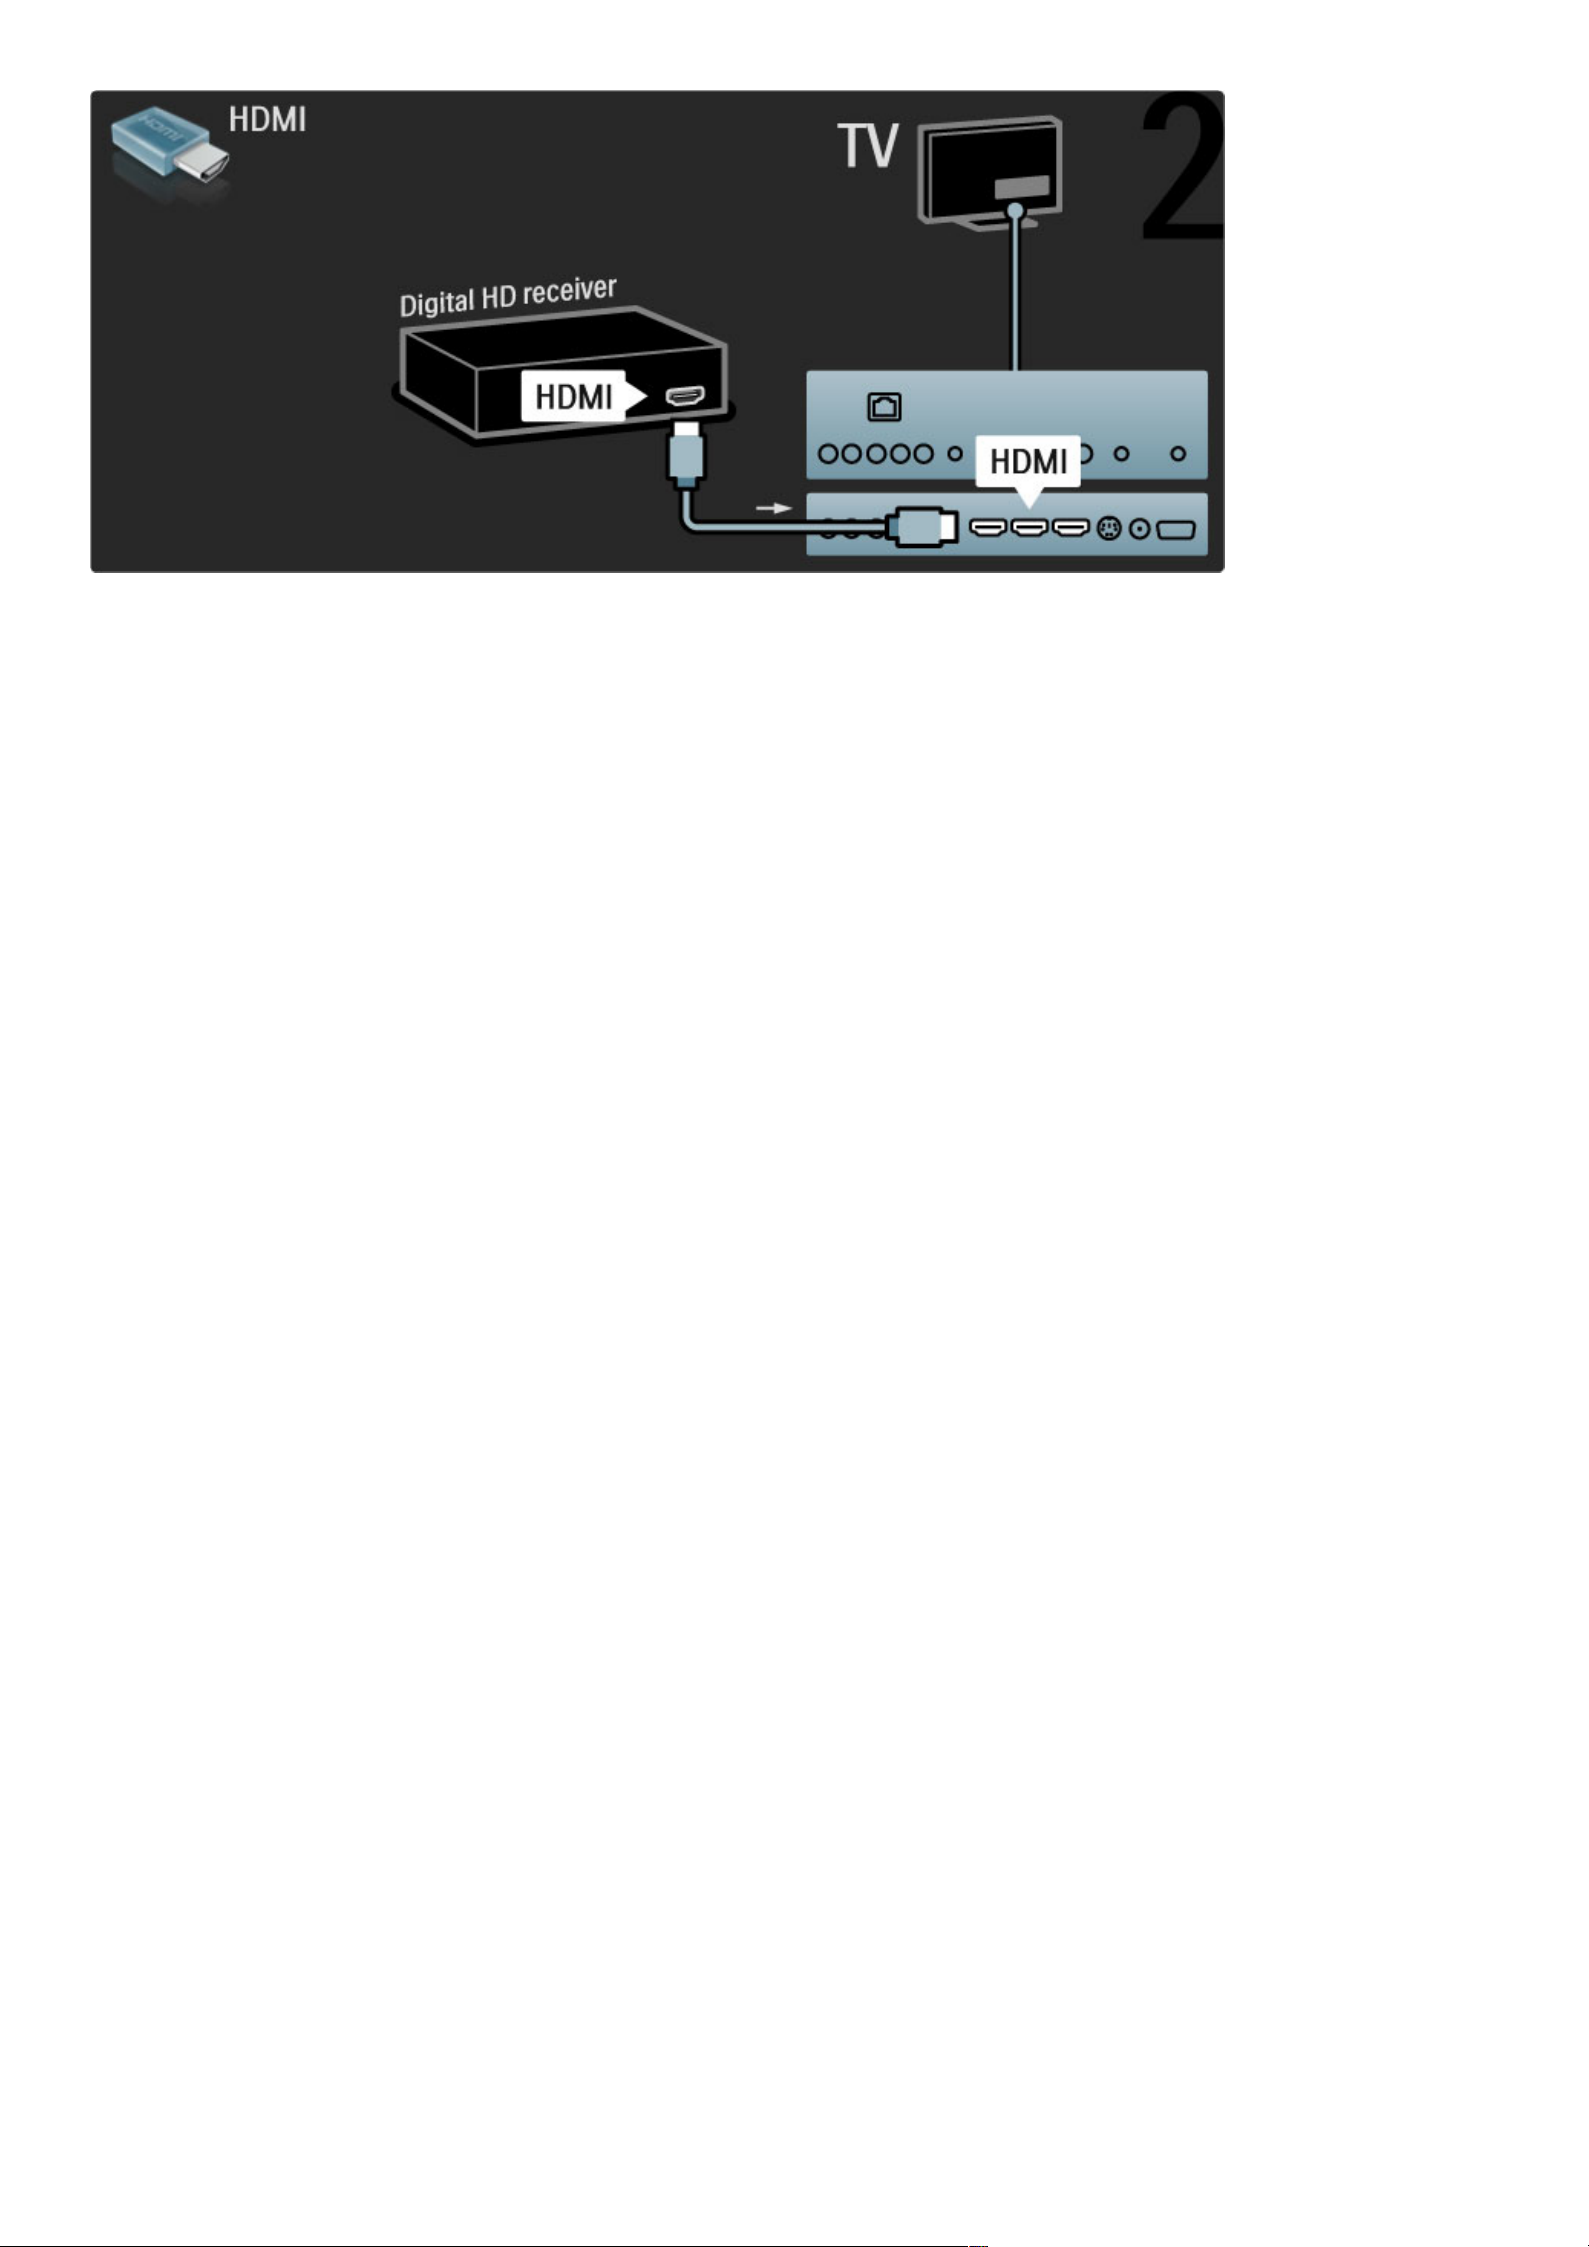
Connections / Connect devices 63
Page 64
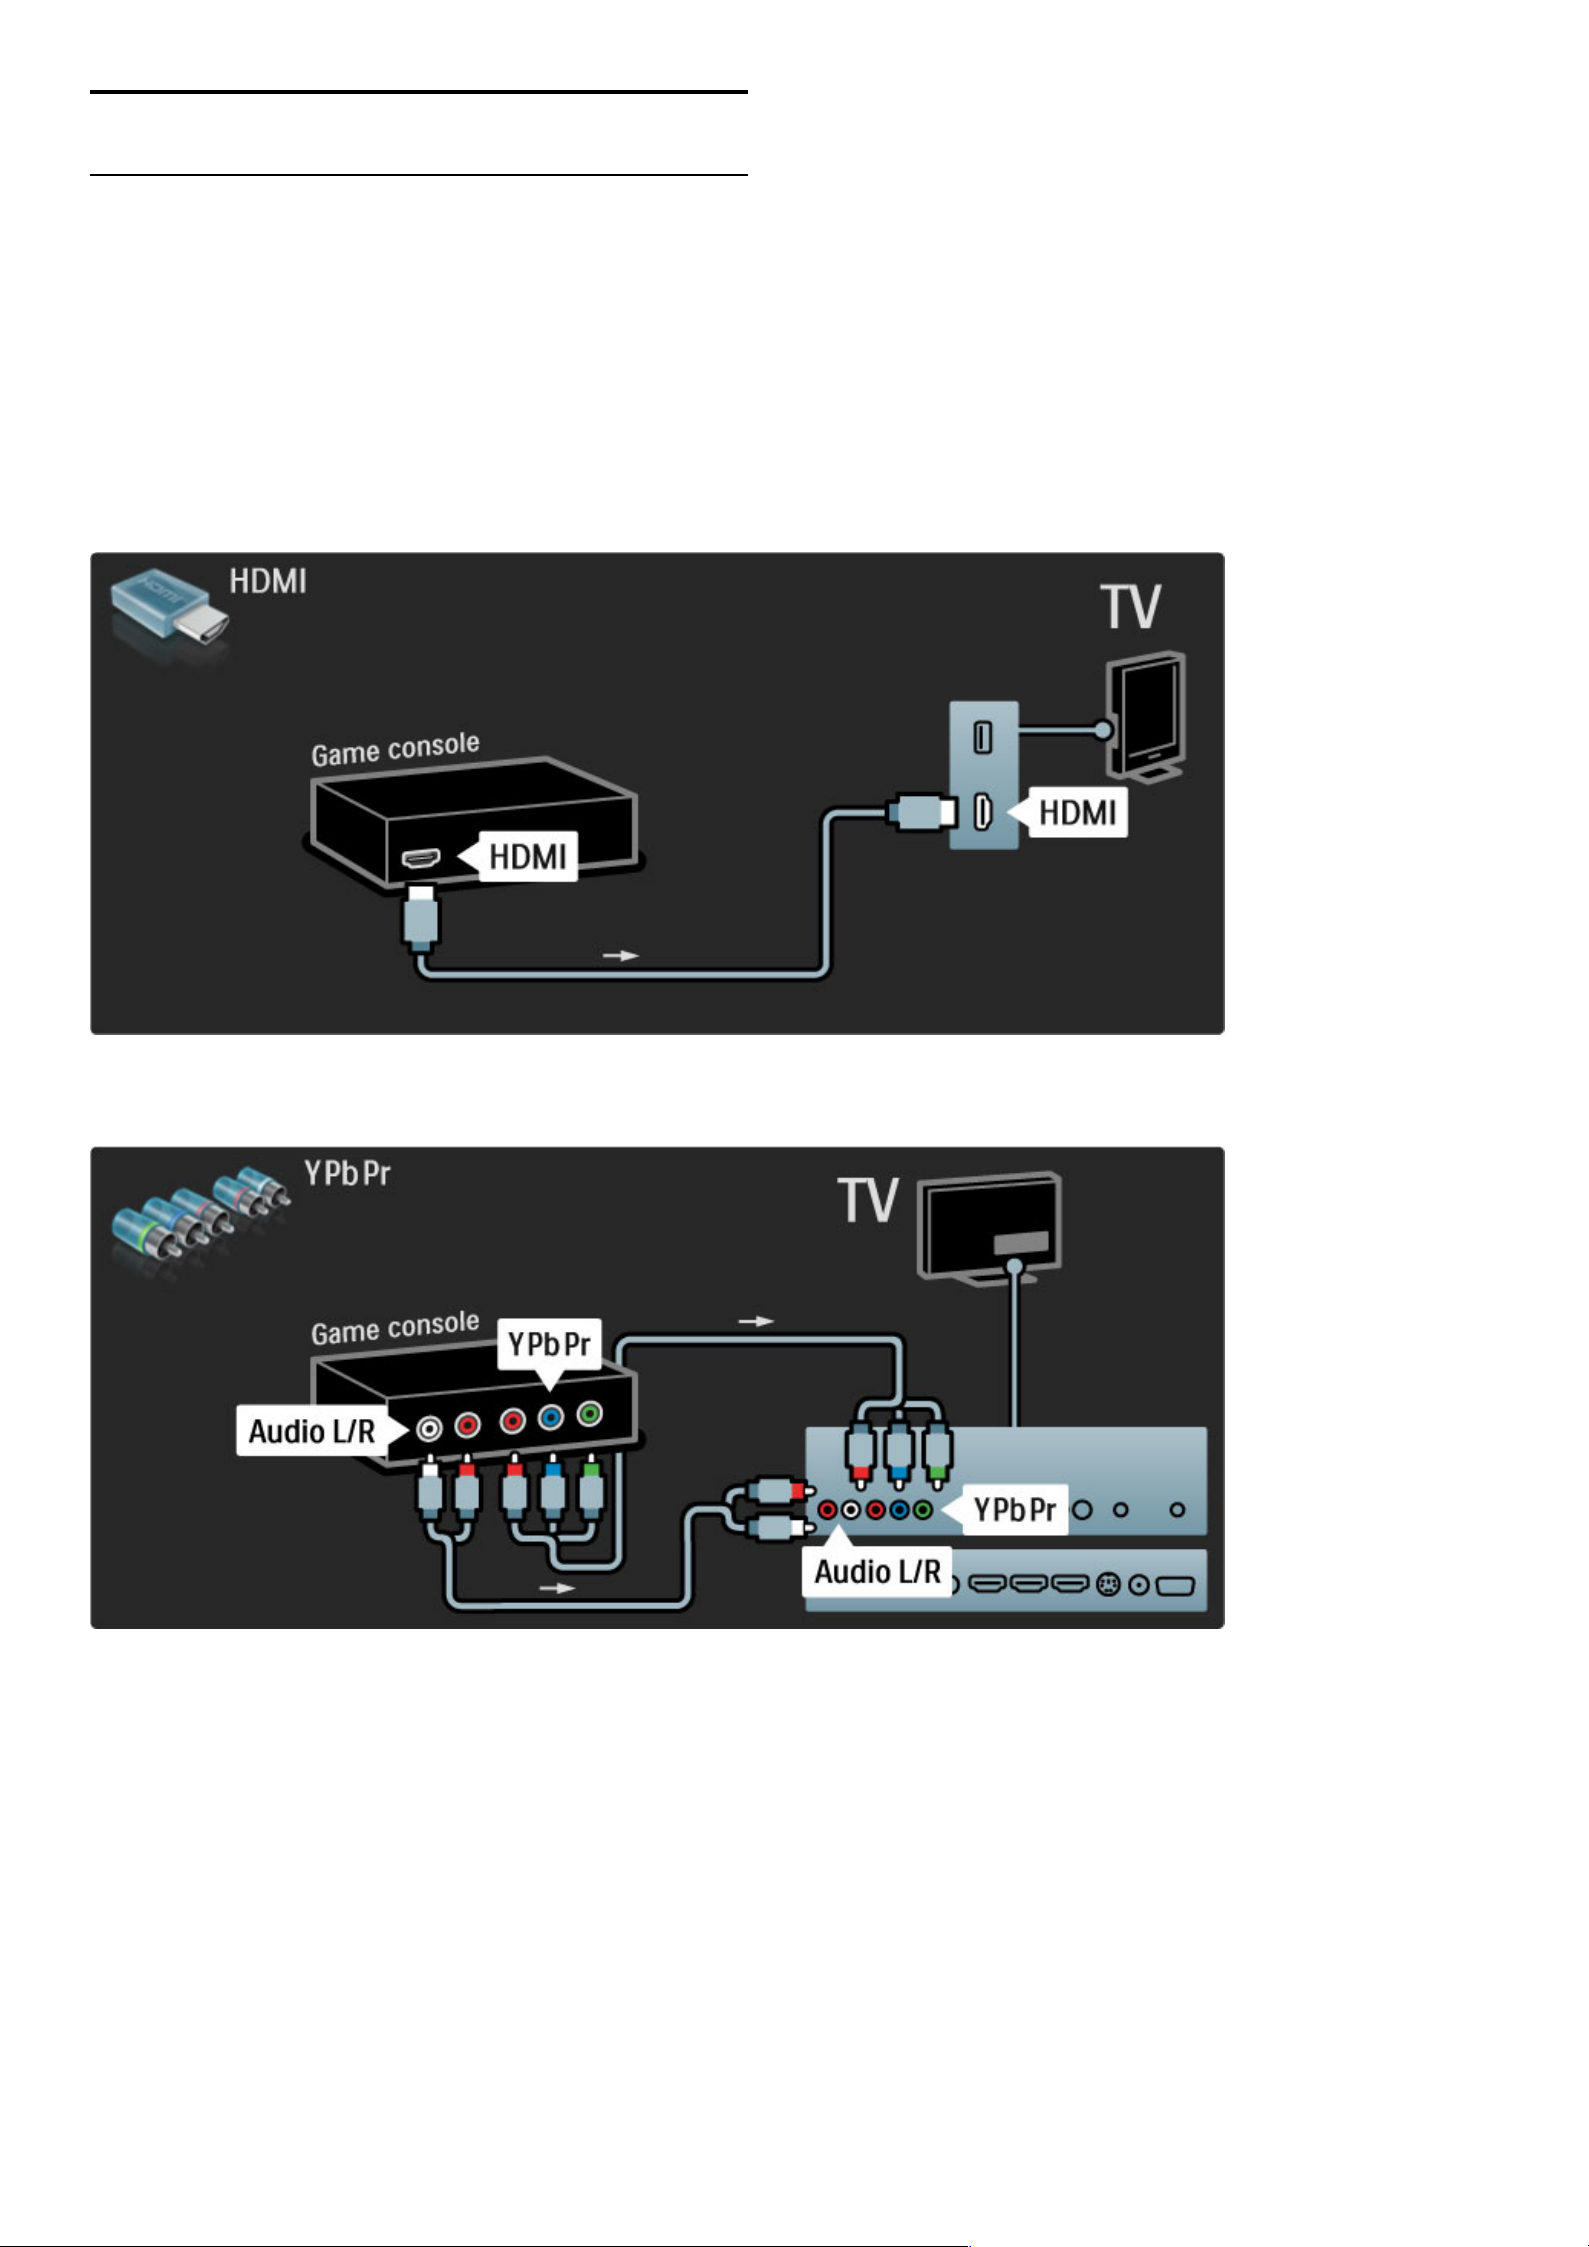
5.4 Connect more devices
Game
Connect a game console to the side or back of the TV. You can use
an HDMI, YPbPr or Video (CVBS) connection.
Picture delay
To prevent picture delay while gaming, close Help and press s
(Adjust) and select Smart picture > Game and press OK. After
gaming, do not forget to select the Smart picture you normally use
for watching TV.
Use an HDMI cable to connect the device to the side of the TV.
Or use YPbPr and Audio L/R cables to connect the device to the
TV.
Or use Video and Audio L/R cables to connect the device to the TV.
64 Connections / Connect more devices
Page 65
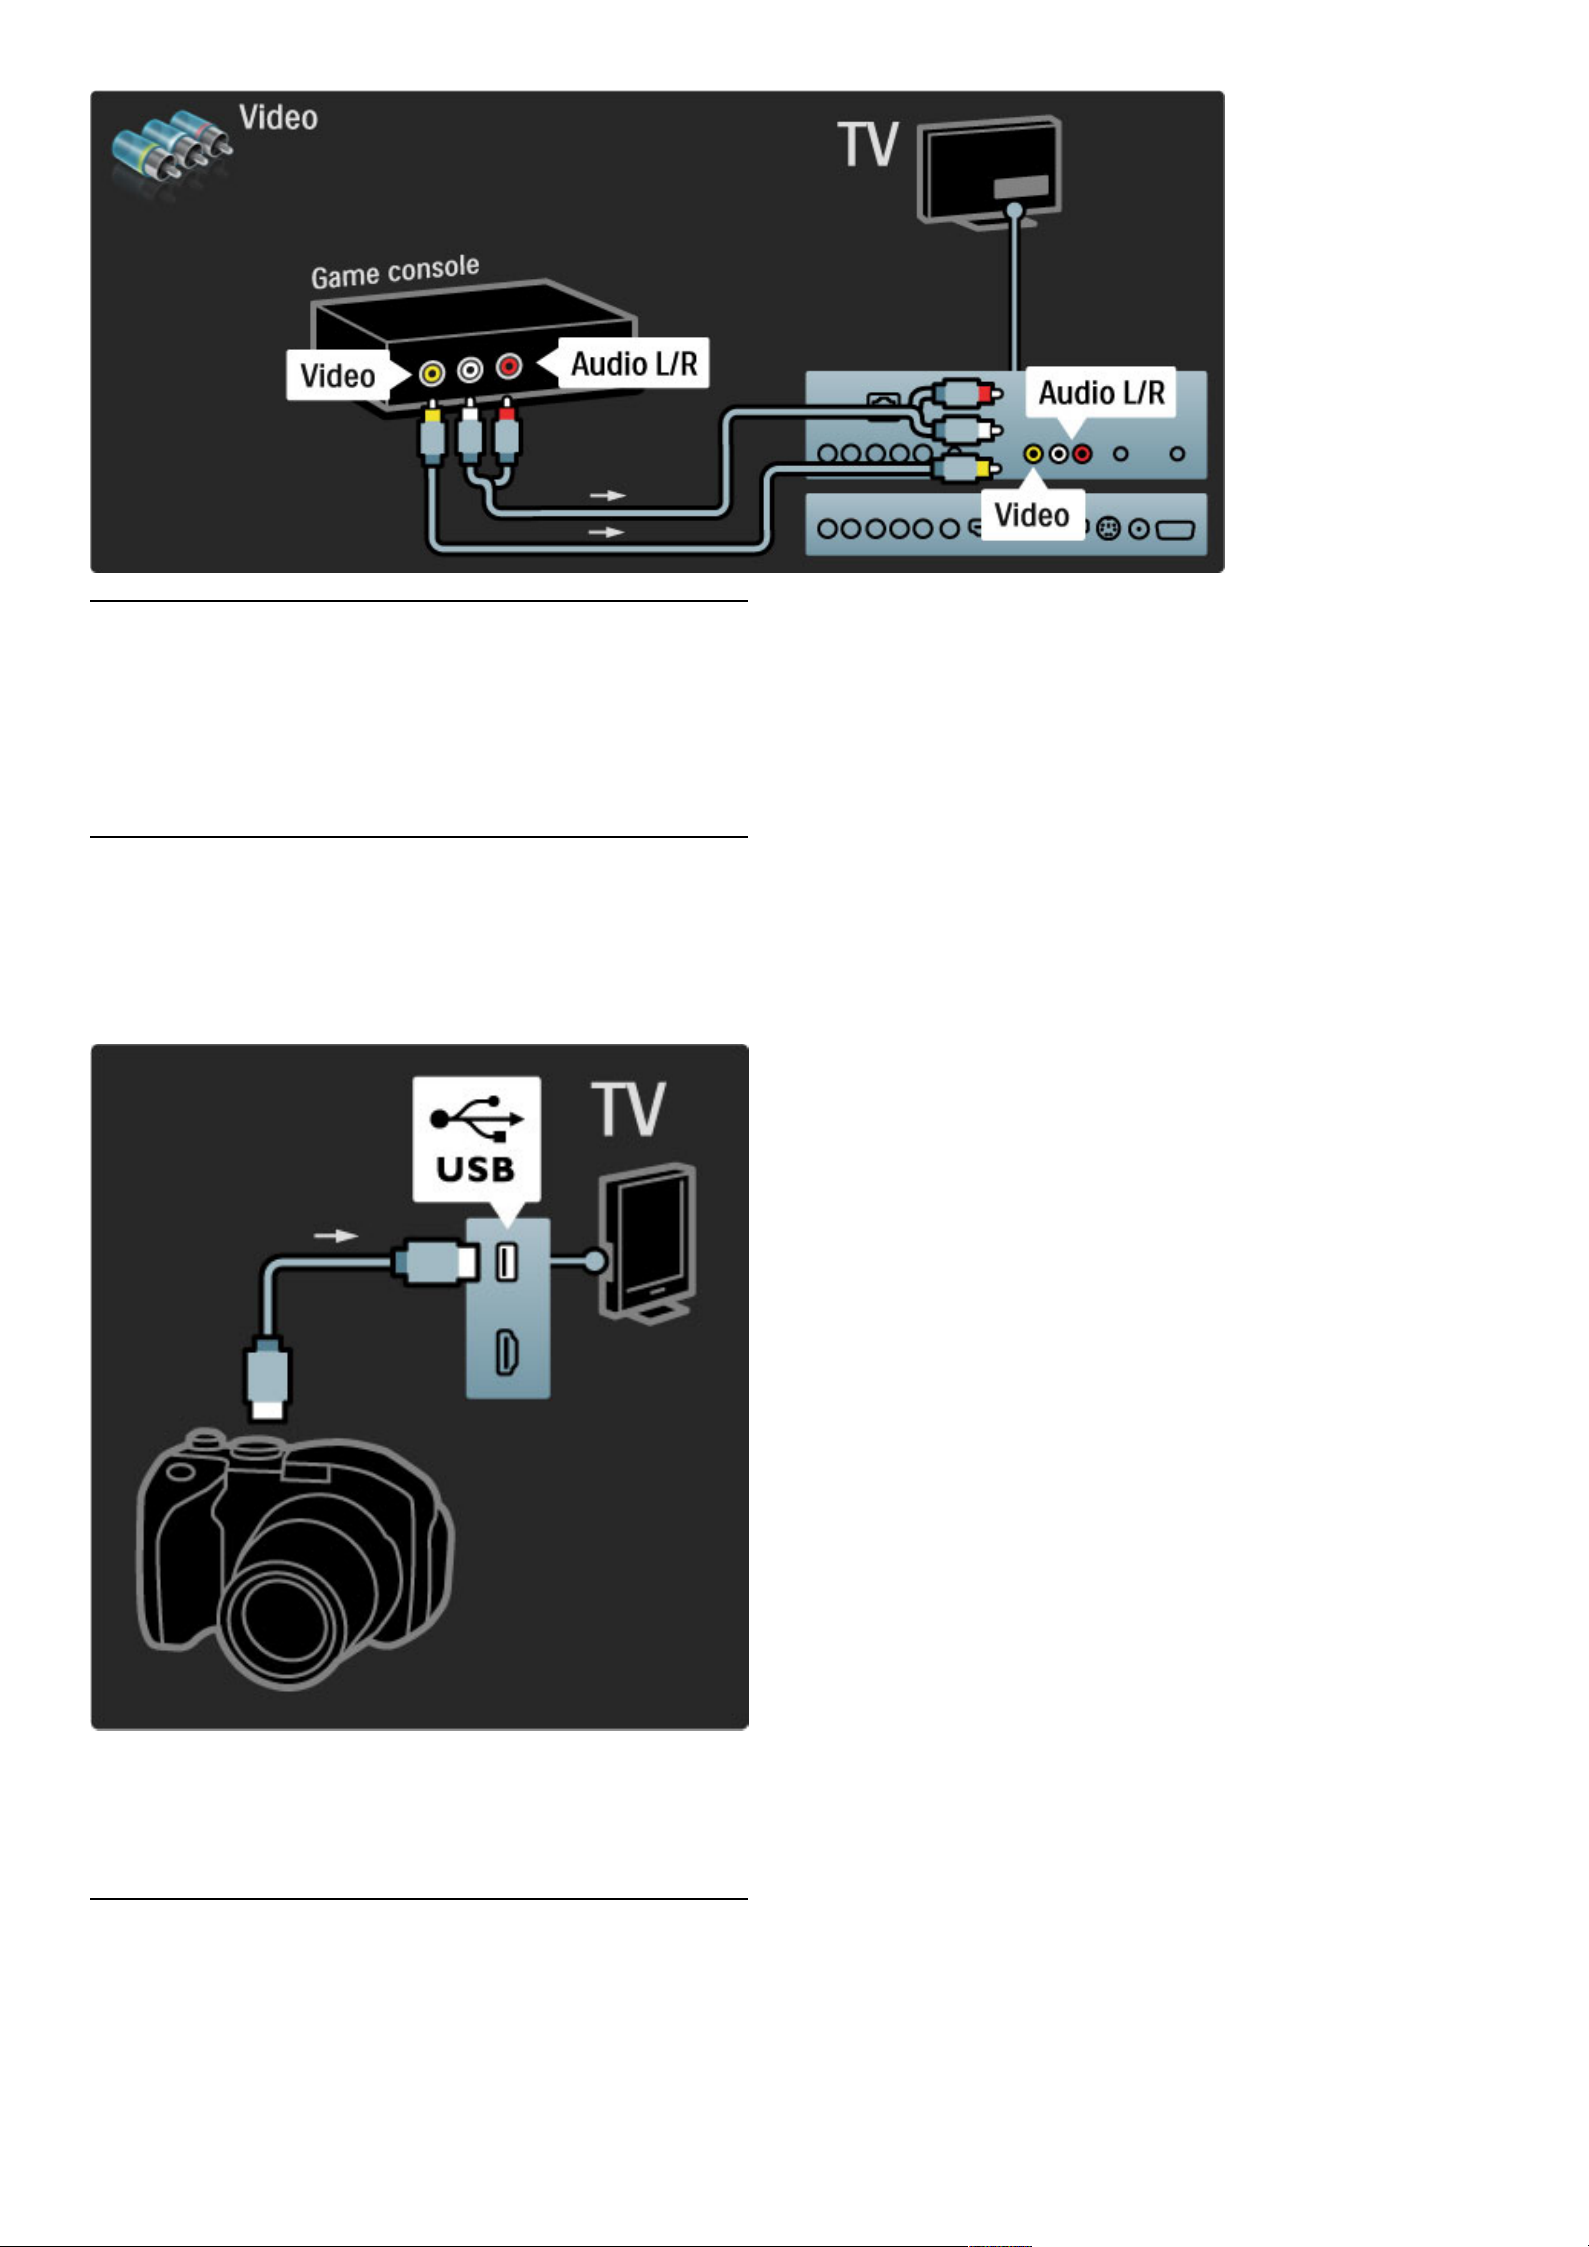
HD Game
Use an HDMI cable or YPbPr and Audio L/R cables to connect a
High Definition game console to the TV.
To connect a HD Game console, read Help > Connections >
Connect more devices > Game.
Photo camera
To view pictures stored on your digital photo camera, you can
connect the camera directly to the TV. Use the USB connection on
the side of the TV to connect. Switch on the camera after you made
the connection.
If the list with the content of the camera does not appear
automatically, your camera might need to be set to transfer its
content with PTP (Picture Transfer Protocol). Read the user manual
of the digital photo camera.
Camcorder
Connect a camcorder to the side or back of the TV. You can use an
HDMI, YPbPr or Video (CVBS) connection.
See the following pages to connect your camcorder.
Connections / Connect more devices 65
Page 66
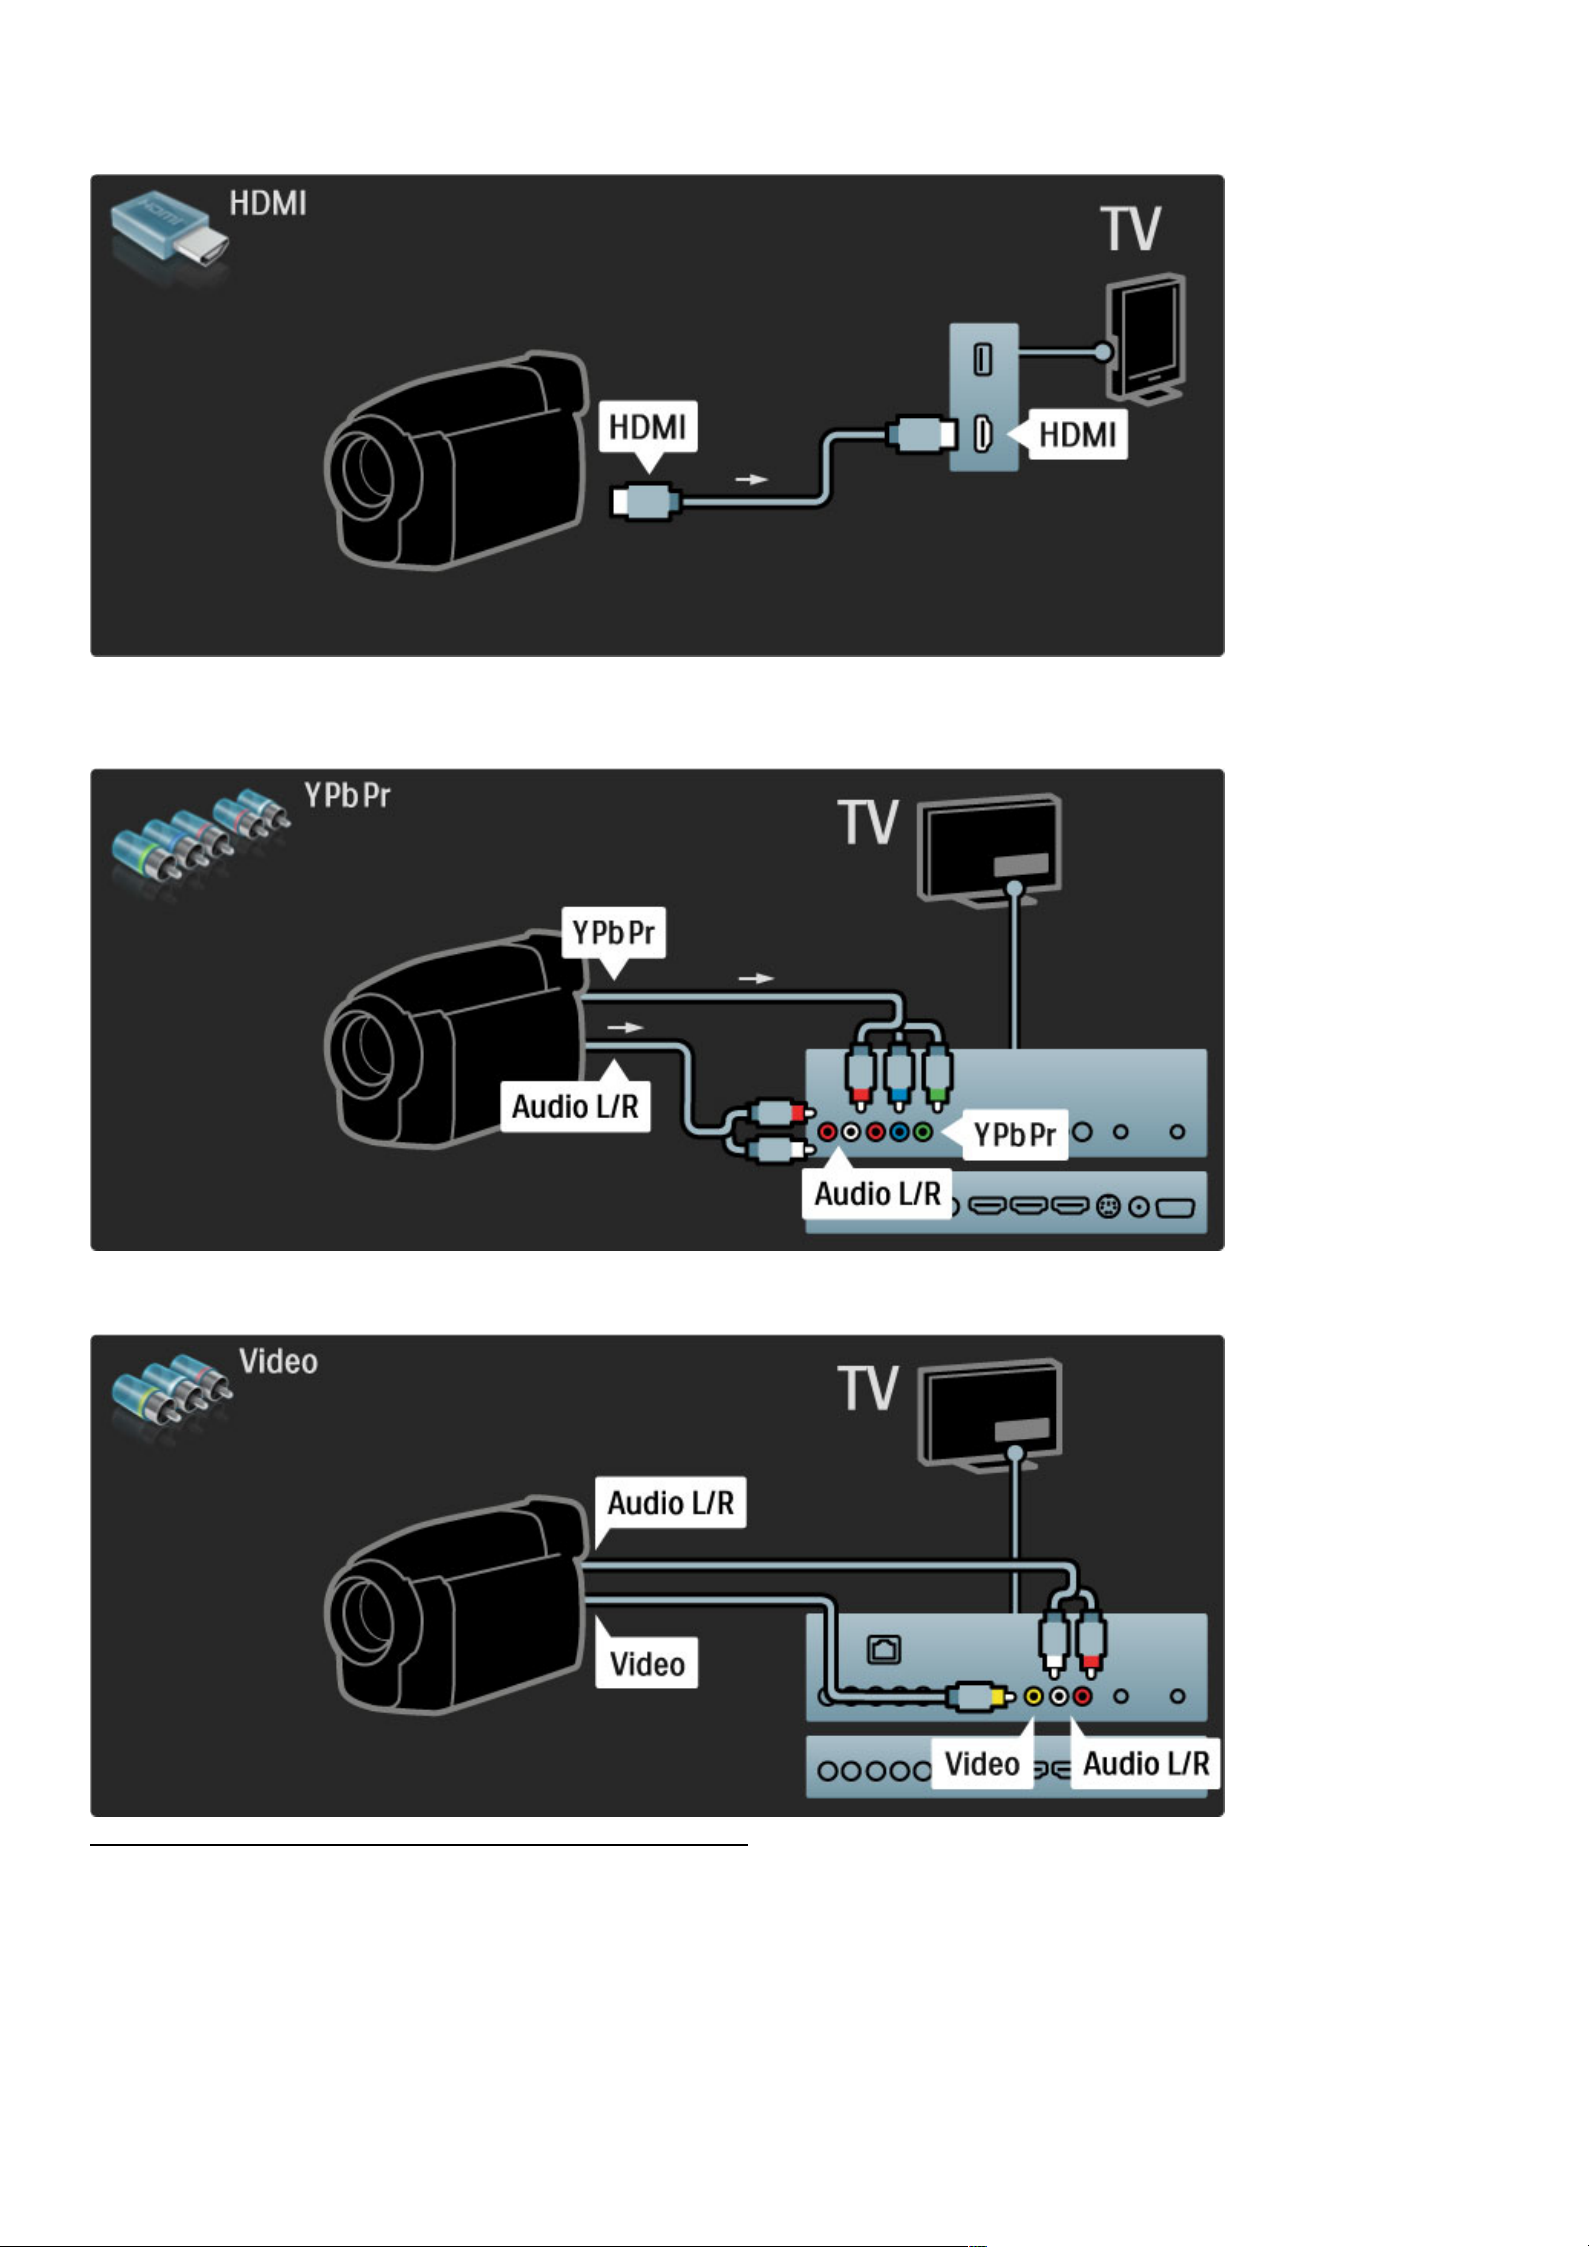
Use an HDMI cable to connect the camcorder to the side of the
TV.
Or use YPbPr and Audio L/R cables to connect the device to the
TV.
Or use Video and Audio L/R cables to connect the device to the TV.
TV as PC monitor
You can connect the TV to your computer as a PC monitor. Before
connecting the PC, set the PC monitor refresh rate to 60 Hz.
See the following pages for how to connect your computer.
Use a VGA cable to connect the PC to the VGA connector and an
audio L/R cable to connect the VGA Audio L/R to the back of the
66 Connections / Connect more devices
Page 67
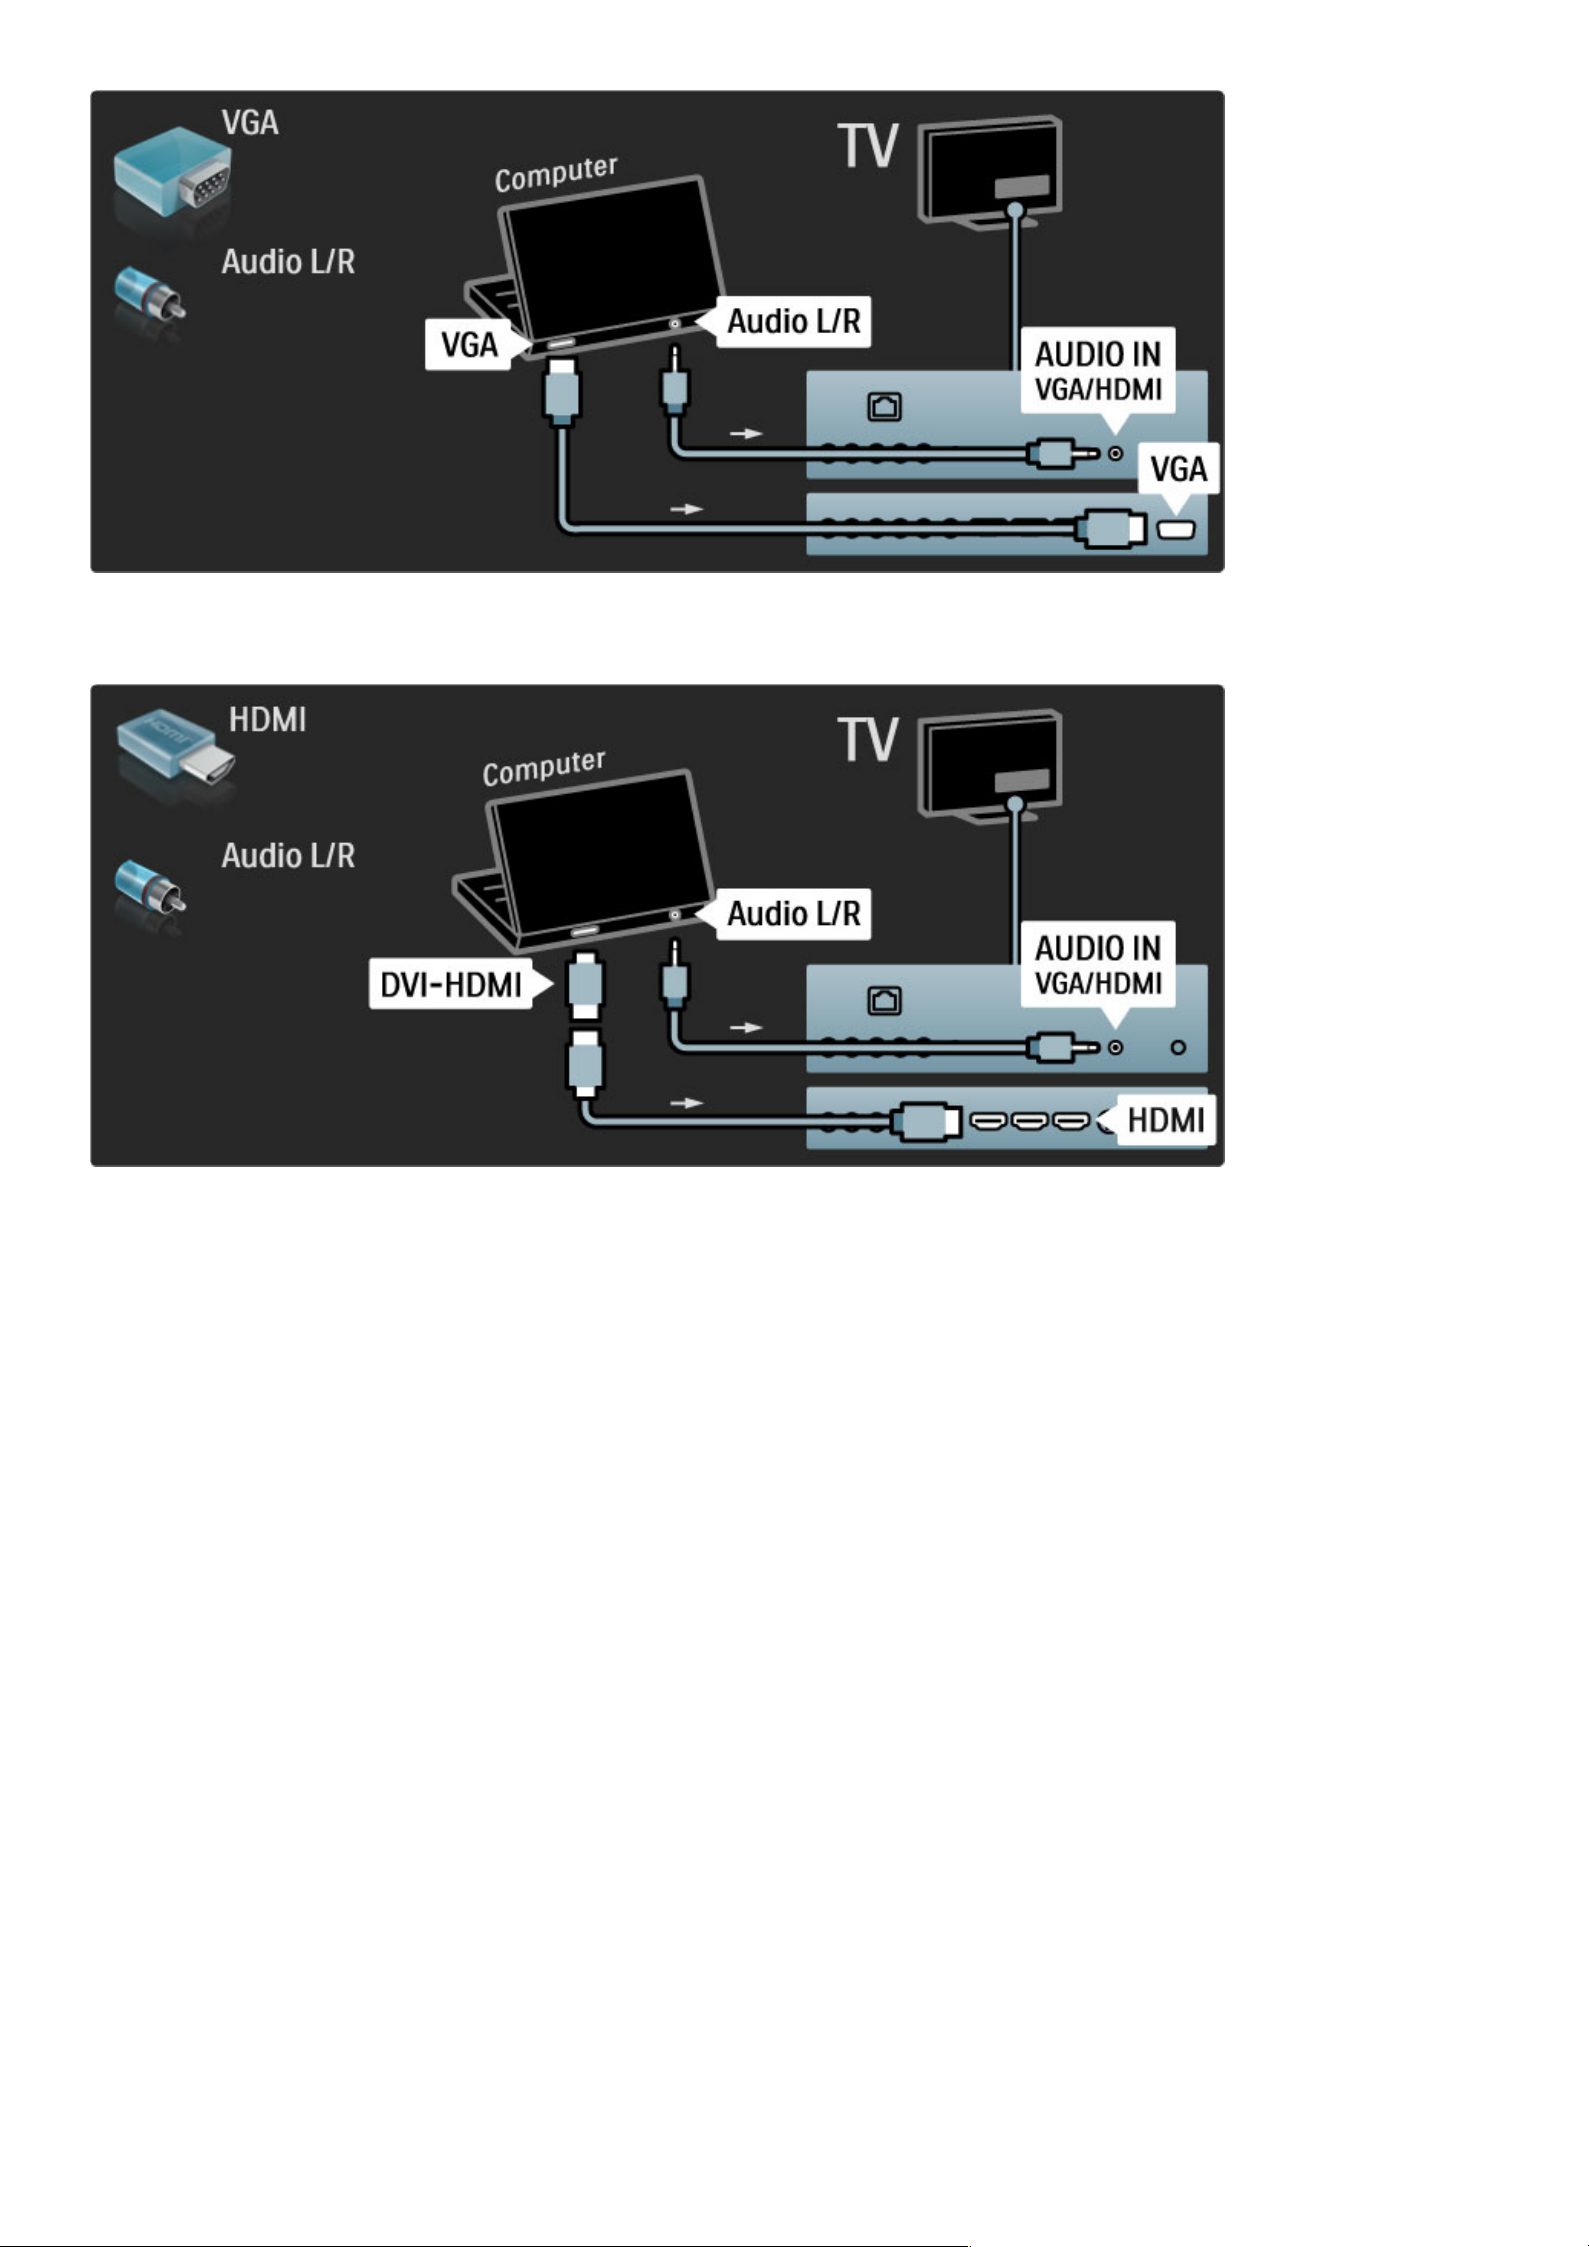
Use a DVI to HDMI adapter to connect the PC to HDMI and an
audio L/R cable to connect the Audio L/R to the back of the TV.
Ideal TV setting
Set the TV Picture format to Unscaled for the sharpest picture
quality. While watching TV, press o, select Picture format and
select Unscaled.
For a list of supported resolutions see Help > Specifications >
Display resolutions.
Connections / Connect more devices 67
Page 68
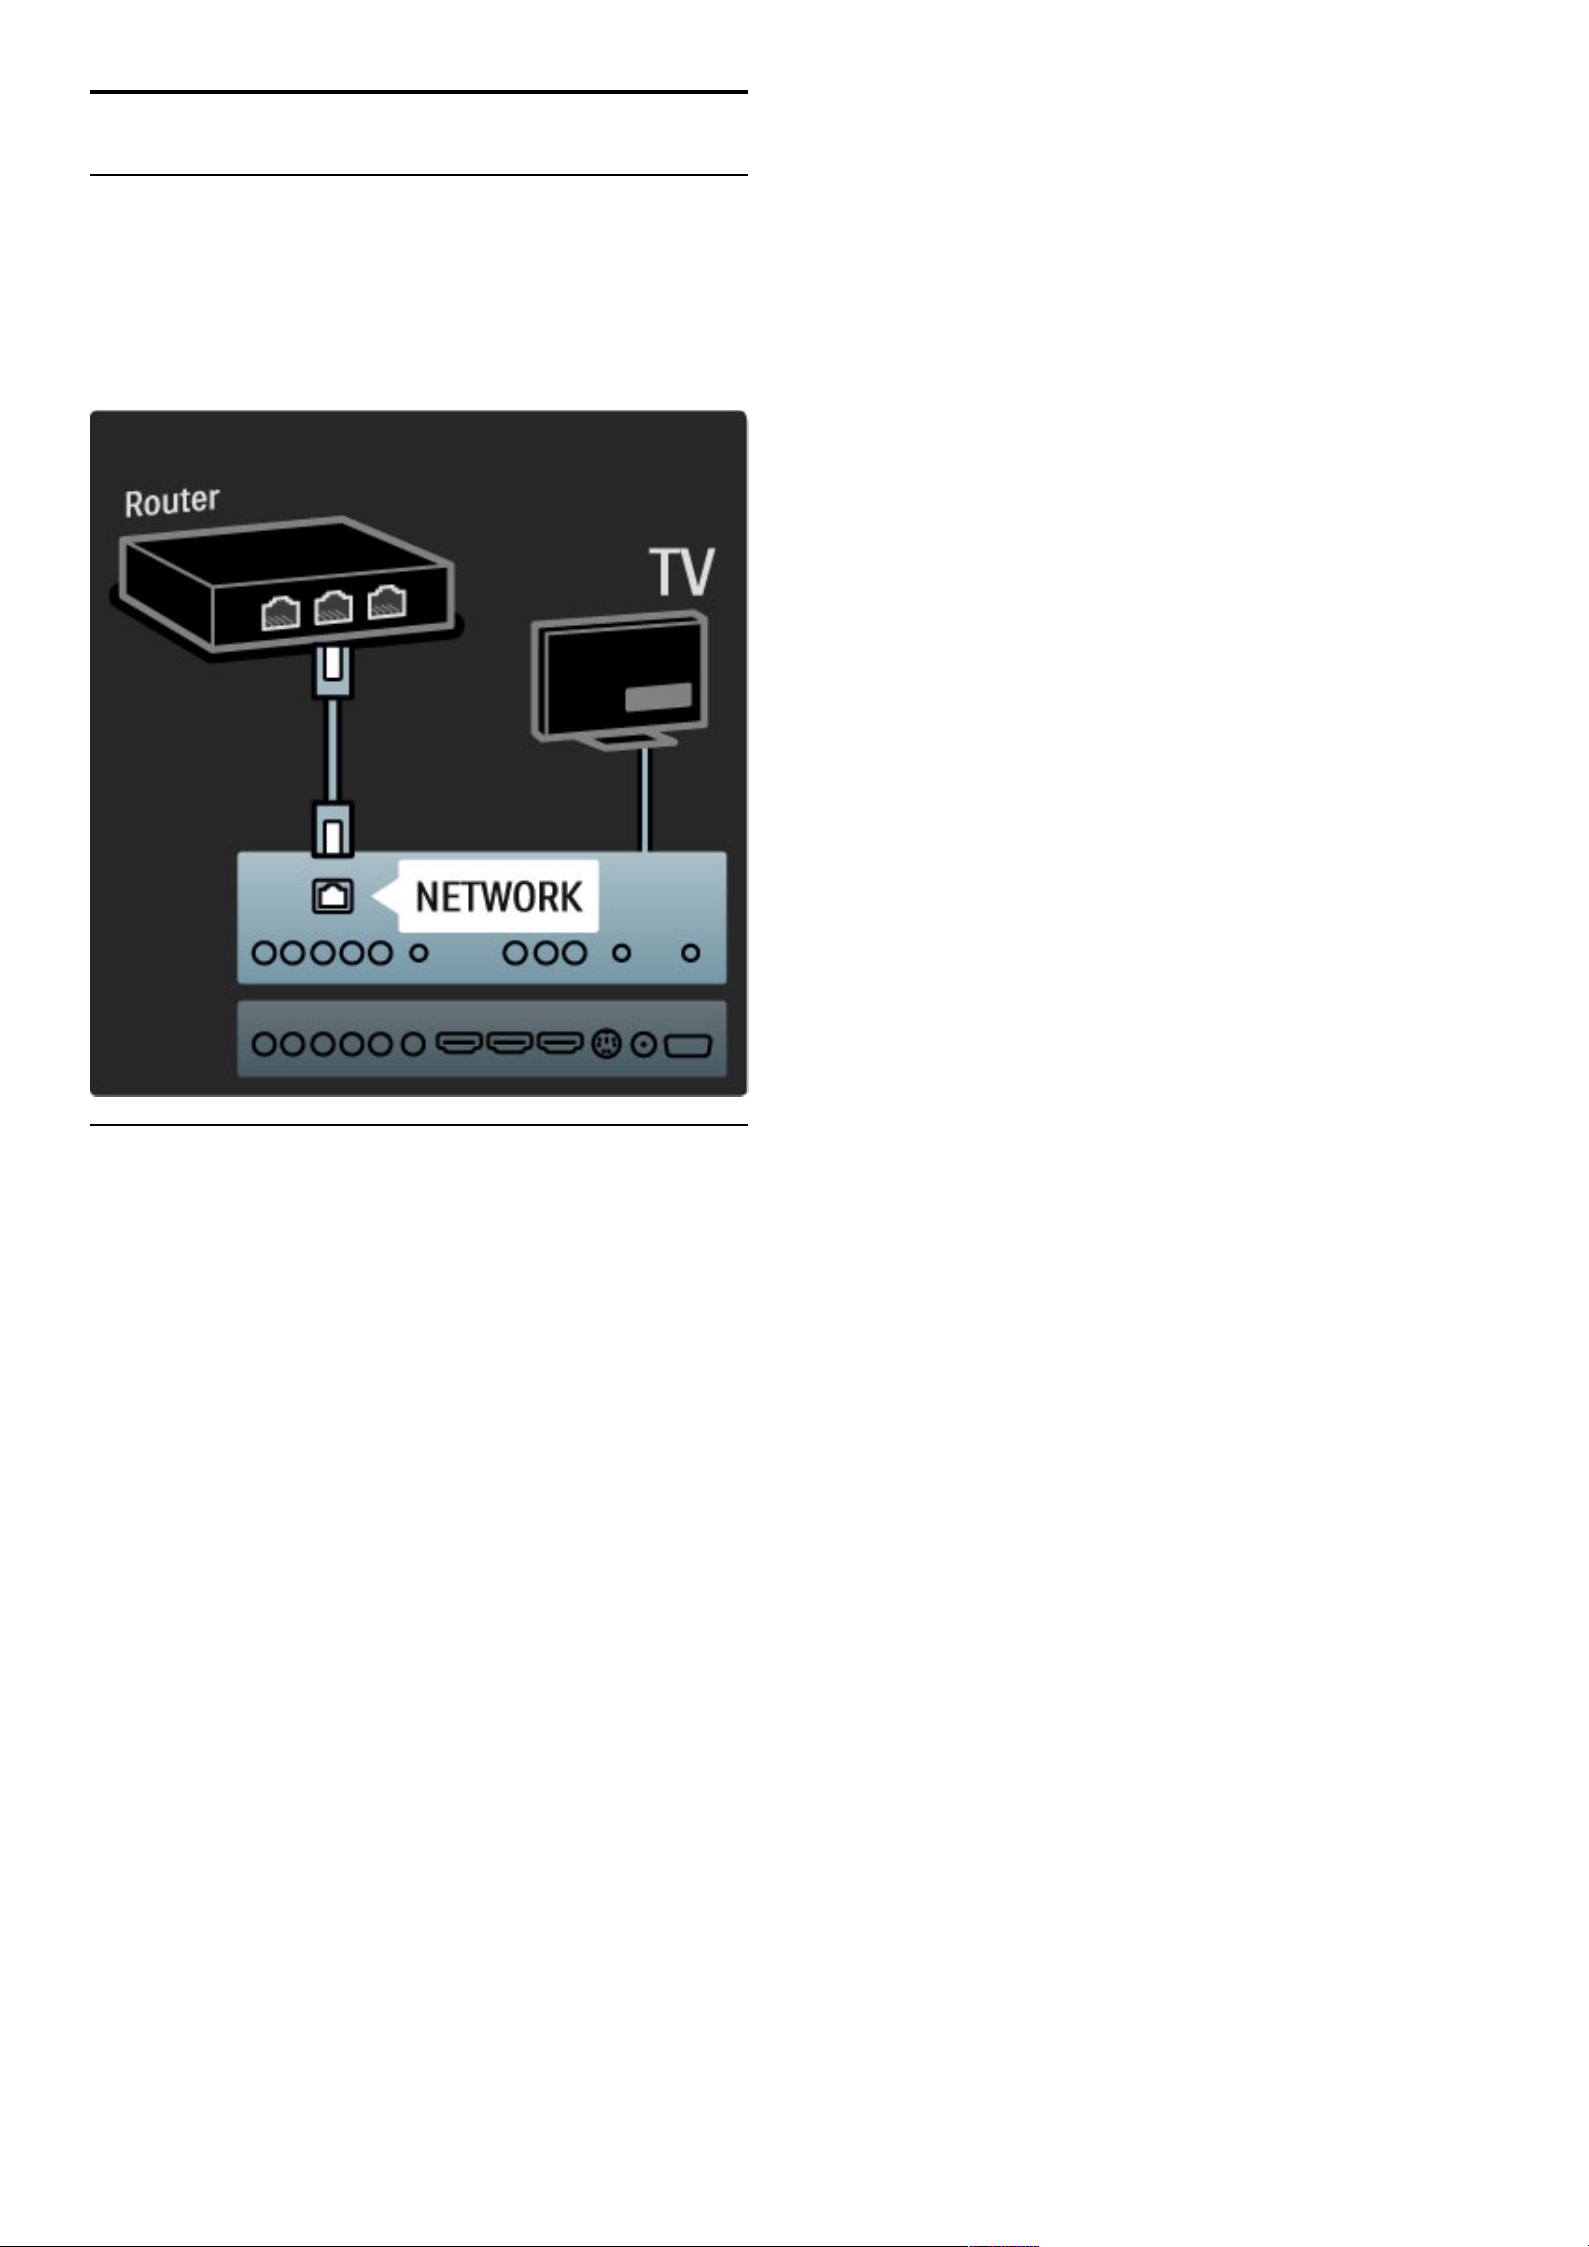
5.5 Network
Wired
To set up the wired network connection, read Help > Setup >
Network
Connect the router to the TV with a network cable. To fullfill EMC
regulations, use a shielded FTP Cat. 5E ethernet cable.
Wi-Fi Ready
This TV is Wi-Fi Ready. With the Wireless USB adapter PTA01
accessory (sold separately) you can connect the TV to your network
wirelessly. You can connect to Net TV - the best of the web on
your TV - wireless and hassle free.
Make your TV wireless
1 Switch on your wireless network router.
2 Insert the USB adapter PTA01 in the USB connection at the side
of the TV. The wireless installation starts automatically.
3 Follow the instructions on screen.
WPS - Wi-Fi Protected Setup
If your router has WPS (Wi-Fi Protected Setup), go to the router
and press the WPS button. Return to the TV within 2 minutes,
select Easy connect and press OK. The TV connects to your
network. This takes about 2 minutes. Finish the installation.
Most new wireless routers have the WPS system and carry the WPS
logo. The WPS system uses WPA security encryption and cannot be
combined with devices on your network that use the WEP security
encryption. If you still need this WEP device in your network, install
with Scan > Custom.
Scan for routers
If you have several routers in your network, you can select the
network you need. To select a specific network router, press Scan
on the first page of the installation. The routers with WPS and with
the strongest signal are shown first in the list.
68 Connections / Network
Page 69
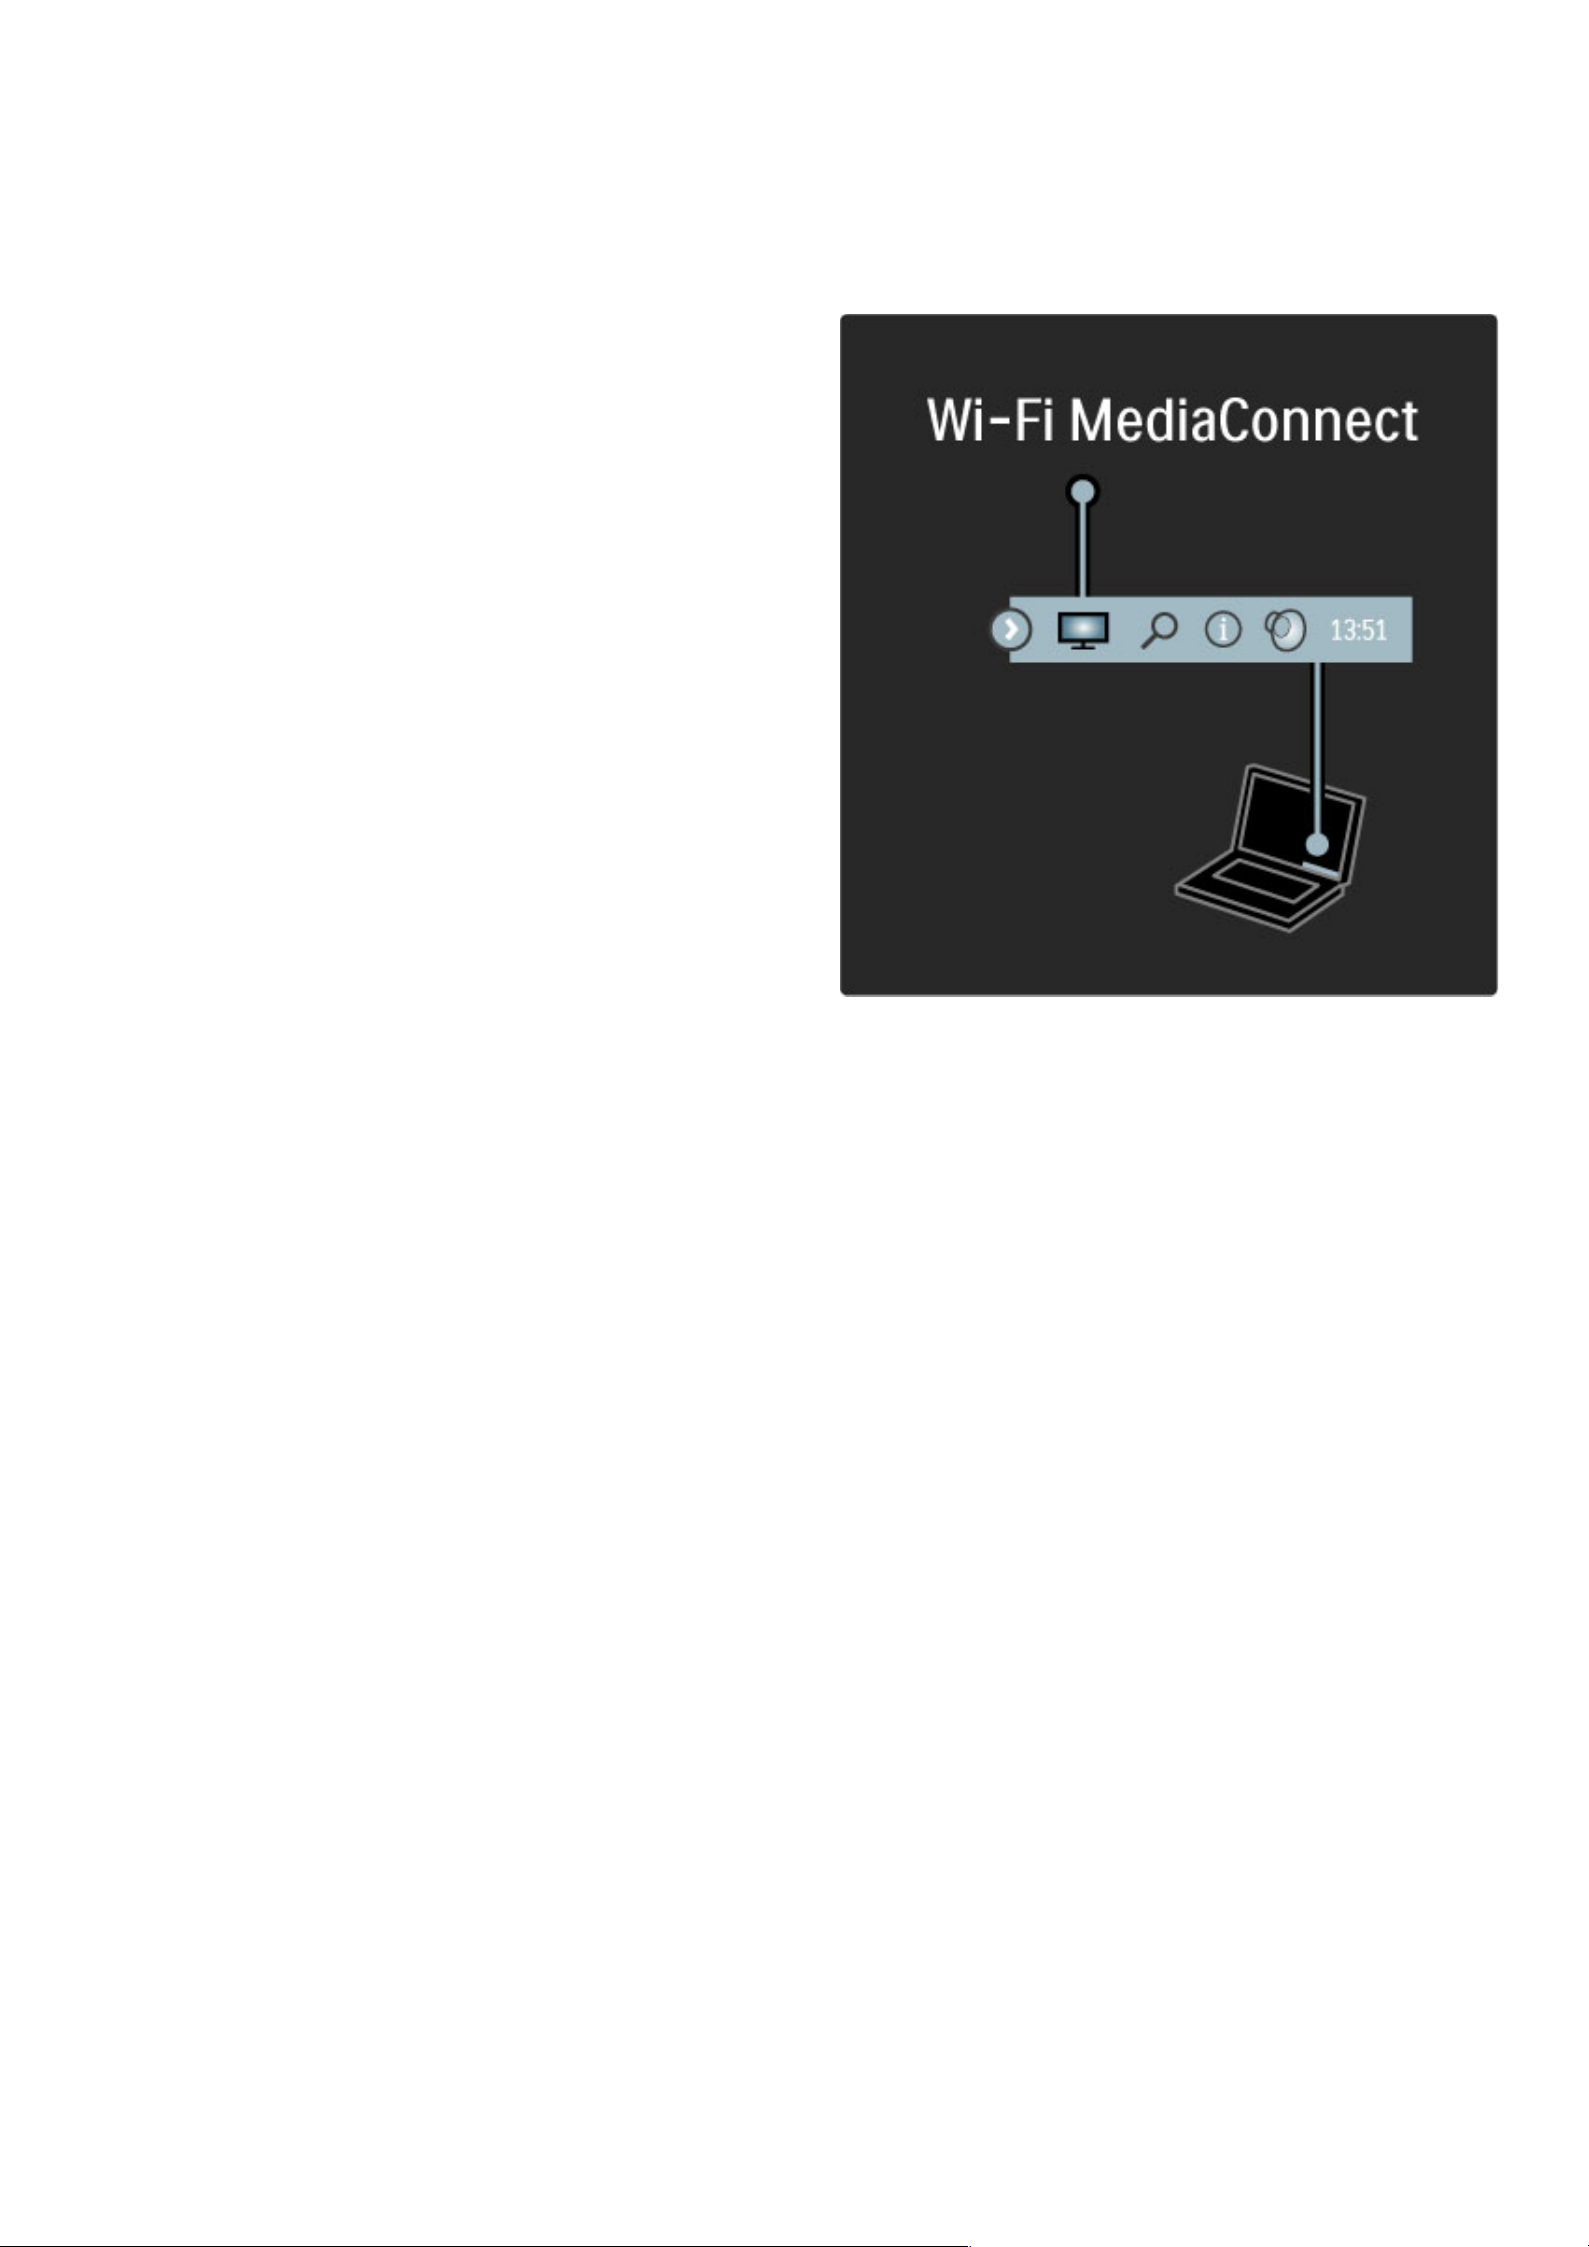
Select the router you need and press Easy connect if the router has
WPS. Or press Pin code if you can enter the PIN code in your
router software to connect. Or press Custom to enter the
encryption key manually.
PIN code
To make the secured connection with a PIN code, select PIN code
and press OK. Write down the 8 digit PIN code shown and enter it
in the router software on your PC. See the router manual where to
enter the PIN code.
Custom
To enter the encryption key (the security key) manually, select
Custom and press OK. If you have WPA security on your router,
enter the passphrase with the remote control. To open the onscreen keyboard, select the text entry field and press OK.
If you have WEP security encryption, the TV asks for the WEP
encryption key in hexadecimal numbers. Find this hexadecimal key in
the router software on your PC. Write down the first key of the
WEP keys list and enter it on TV with the remote control. If the
security key is accepted, the TV is connected with the wireless
router.
If asked, agree to the End User licence Agreement.
Attention
Leave the Wireless USB adapter permanently in the USB connection.
With the TV connected to your wireless network, the free Wi-Fi
MediaConnect software can bring up -project- your PC screen on
the TV. You can project video, music, presentations, etc. playing on
your laptop or desktop PC.
The playback of video can be affected by your PC performance and
your wireless network bandwidth.
What you need
To enjoy Wi-Fi MediaConnect, you need to install the free software
on your PC.
Install Wi-Fi MediaConnect
1 Insert the Wi-Fi MediaConnect CD-ROM in your PC. The CD-
ROM disc that came with the PTA01.
2 Your PC starts your Internet browser and opens the Wi-Fi
MediaConnect download page - www.philips.com/wifimediaconnect.
On the website, you can check the necessary PC system
requirements.
3 Enter the code printed on the CD-ROM envelope.
4 Click the 'Download now' button to download the free Wi-Fi
MediaConnect software.
5 Once downloaded, start the file 'Wi-Fi MediaConnect_setup.exe'.
Follow the instructions on screen.
TV network name
If you have more then one TV in your home network, you can
rename this TV. To rename this TV in the network, press h >
Setup > Network settings and select TV network name.
To enter the name, press OK to open the on-screen keyboard or
use the remote control keypad.
Start projecting
To start projecting the PC screen on TV, click on the small TV like
icon in the taskbar at the bottom right of the PC screen. Your PC
screen appears on your TV screen.
Stop projecting
To stop projecting, click on the TV icon again.
Wi-Fi MediaConnect Help
To read the Wi-Fi MediaConnect Help, right click the program icon
in the notification tray of the PC and select Help.
Specifics
You can project high definition (HD) or standard definition (SD)
video, depending on the processing power of your PC.
The content protection on most DVD or Blu-ray Disc movies might
restrict watching the movie on TV when the disc is playing on a PC.
The TV shows PC media files with a small delay.
Wi-Fi MediaConnect is only available for PC.
PC requirements
Windows XP, Vista, Windows 7 (PC only)
Minimum PC requirements
• Intel® Pentium Core™ 2 Duo 1.8GHz
• 512MB RAM
• 200MB free hard disk space
• Wi-Fi 802.11g
• Broadband Internet connection
Recommended PC requirements
• Intel® Pentium Core™ 2 Duo 2.1GHz
• 1GB RAM
• 200MB free hard disk space
• Wi-Fi 802.11n for router and PC
• Broadband Internet connection
Connections / Network 69
Page 70
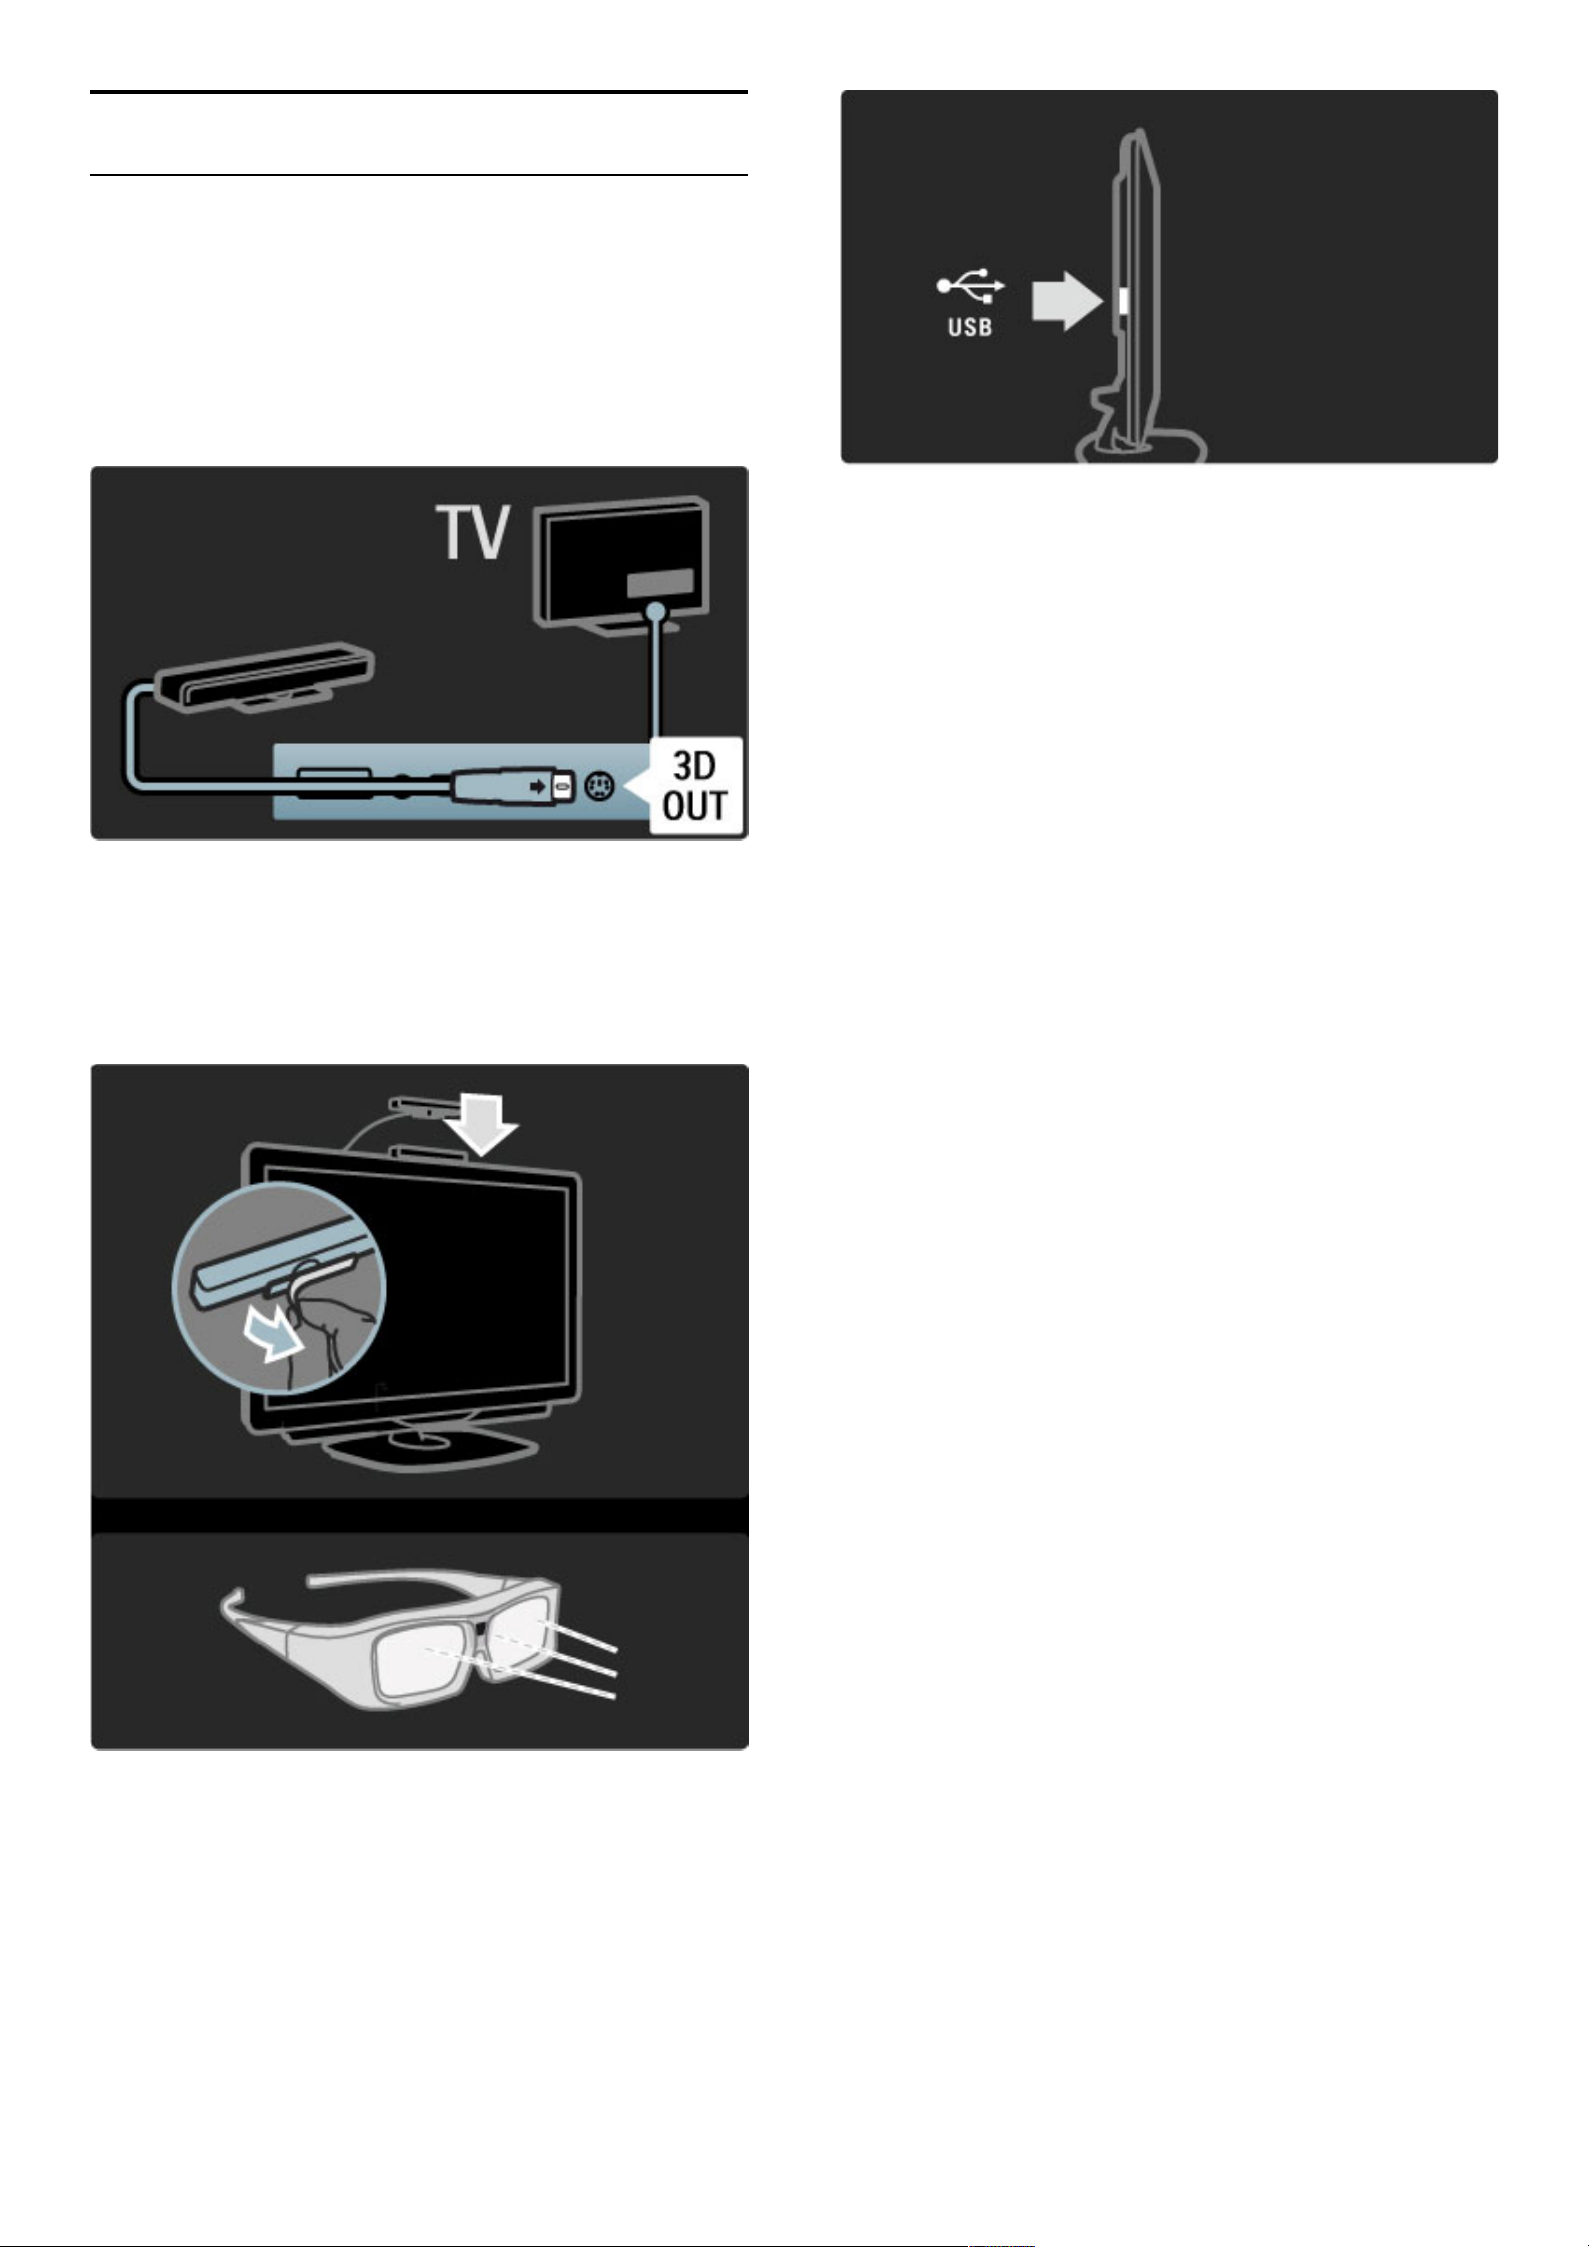
5.6 3D
3D
This TV is prepared for the 3D Full HD accessory PTA02 (sold
separately).
PTA02 Installation
1 Switch off the TV.
2 Connect the 3D transmitter to the 3D connection 3D Out on the
back of the TV.
3 Install the 3D transmitter on the top or at the bottom of the TV.
Make sure to point the transmitter directly to where you sit to
watch TV.
The small window in the middle of the glasses receives the 3D
signals from the transmitter.
Update the TV software
To prepare your TV for 3D watching, you must update the TV
software.
1 Switch on the TV.
2 Plug in the USB device in the USB connection at the side of the
TV.
3 The software update will start automatically and during the update
the TV might switch off and on again. Do not press any key on the
remote control and wait until the message ‘Operation Successful’
appears.
4 Unplug the USB device and switch the TV off and back on again.
Your TV is ready to watch 3D.
70 Connections / 3D
Page 71

6
6.1
Troubleshooting
Contact information
If the advice and suggestions in Troubleshooting do not help resolve
the problem, try switching the TV off and back on again.
Warning
If your TV breaks down, NEVER try to repair the TV yourself.
Consumer Care
If the TV problem is not solved you can call the Philips Consumer
Care hotline in your country. Look up the TV model and serial
number before you call. Find the telephone number on the
documentation that came with the TV. Or consult our website
www.philips.com/support
TV model number and serial number
Find these numbers on the packaging label or on the type label on
the back or bottom of the TV.
Troubleshooting / Contact information 71
Page 72

6.2 TV and remote control
The TV does not switch on
• Switch the TV off and on again with the switch on the bottom of
the TV.
• Check the power cable connection.
• Try using the keys on the TV to switch on.
The TV does not switch on from standby
• Check that the batteries of the remote control are not empty or
weak. Check their + / - orientation.
• Try using the keys on the TV to switch on.
The TV does not respond to the remote control
• Check that the batteries of the remote control are not empty or
weak. Check their + / - orientation.
• Clean the remote control and TV sensor lens.
• During start-up, which can take up to two minutes with connected
devices, the TV and some external devices do not immediately
respond to commands from the remote control. The device is
functioning normally and is not broken.
The TV switches off and the red light blinks
• Switch the TV off and on again with the switch at the bottom of
the TV. Check if there is enough space for ventilation. Wait until the
TV has cooled down.
If the TV does not restart from standby and the blinking occurs
again, call Consumer Care.
You forgot your code to unlock Child lock?
Read Help > More on … > Locks and timers > Child lock.
72 Troubleshooting / TV and remote control
Page 73

6.3 TV channels
Some TV channels are gone
• Check if the correct list is selected in the Channel list. With the
Channel list on screen, press o (Options) and select the list you
need with Select list.
• A channel could be hidden in the Channel list. Read more about
Channel list in Help > Use your TV > Menus > Browse.
Troubleshooting / TV channels 73
Page 74

6.4 Picture and sound
No picture
• Check if the antenna is connected properly.
• Check if the correct device is selected and connected properly.
• Check the contrast or brightness setting in h > Setup > TV
settings > Contrast or Brightness.
The picture is poor
• Bad weather can influence the picture quality.
• Check if the antenna is connected properly.
• Non-earthed audio devices, neon lights, high buildings or
mountains can influence the picture quality. Try to improve the
picture by changing the position of the antenna or placing devices
away from the TV.
-
The picture has poor colour
• Check the colour settings in h > Setup > TV settings. Or press
s (Adjust) to select a Smart picture setting.
Picture delay when a game console is connected
• To prevent picture delay, press s (Adjust), select Smart picture
> Game.
The TV does not remember my settings when I switch it back on
• Check whether the TV is set to the Home location. Press s >
Setup > TV settings > Preferences > Location.
The picture does not fit the screen
• Press s (Adjust), Picture format and select Auto fill.
The picture position on screen is not correct
• To correct a shifted picture, press s (Adjust) and select Picture
shift. Use the navigation keys to adjust the picture position. Press
OK to stop Picture shift.
• If distorted screen edges are visible, press h > Setup > TV
settings > Picture > Screen edges and use the slider bar to enlarge
the picture slightly.
There is a picture but no sound
• Check the volume is not set to 0.
• Check the sound has not been muted with m.
• Check that all cables are connected properly.
• If no sound signal is detected, the TV automatically switches off
sound. This is proper operation and is not a malfunction.
The sound is poor
• Try any Smart sound setting, press s (Adjust), Smart sound.
• Check that the sound is set to Stereo.
The sound comes from one speaker only
• Check the Balance setting. Press h > Setup > TV settings >
Sound > Balance. Use the slider bar to set the balance.
Sound delay
• If there is an audio to video sync mismatch when sound comes
from a Home Theatre System, an audio sync delay needs to be set
up. Read more about Audio to Video sync in Help > Setup >
Devices > Audio to Video sync.
74 Troubleshooting / Picture and sound
Page 75

6.5 Devices
HDMI connections
• The HDMI-HDCP procedure might take a few seconds before the
picture from a device appears.
• If the TV does not recognise the device and there is no picture, try
switching from one device to another and back again to restart the
HDCP procedure. Or switch the device off and back on again.
• If sound interruptions occur persistently, see the user manual of the
device to check the output settings. If that does not help, connect an
additional audio cable.
• If a DVI to HDMI adaptor is used, check that an additional audio
connection is in place to complete the DVI connection.
EasyLink HDMI-CEC
• Check if the connected device supports the HDMI-CEC standard
and is properly set up. Read the user manual that comes with the
device.
• Check if the HDMI cable is properly connected.
• Check if EasyLink on the TV and device is switched on.
• Make sure that the System audio control in your HDMI-CEC audio
devices is properly set up. Read the user manual that comes with
your audio device.
PC display
• The refresh rate of a PC connected to the TV with VGA or DVI
to HDMI adapter should set to 60Hz.
• Check that the correct resolution mode is selected on your PC.
See the list in Help > Specifications > Display resolutions.
Troubleshooting / Devices 75
Page 76

6.6 Multimedia
The files on my USB device are not shown
• Set your device (camera) to ‘Mass Storage Class’ compliant.
• The USB device may need specific driver software. Unfortunately,
this software cannot be downloaded to your TV.
• Not all audio and picture files are supported. See the list in Help >
Specifications > Multimedia.
Files from a USB device do not play back smoothly
• The transfer performance of the USB device limits the transfer rate.
The files on my PC are not shown
• To look for files on your home network with Browse PC, your PC
media server software should be set up to share the files with the
TV. See the list of compatible Media server software in Help >
Specifications > Multimedia.
76 Troubleshooting / Multimedia
Page 77

6.7 Network
Net TV does not work
• If the connection to the router is OK, check the router connection
to the Internet.
Browse PC or Net TV work slow
• You need a high-speed Internet connection for your router.
Troubleshooting / Network 77
Page 78

7
7.1
Specifications
Software
Software version
To view the current TV software version, press h > Setup >
Software settings and press OK. Select Current software info and
read Version:.
Open source software
This television contains open source software. Philips hereby offers
to deliver or make available, upon request, for a charge no more
than the cost of physically performing source distribution, a complete
machine readable copy of the corresponding source code on a
medium customarily used for software interchange.
This offer is valid for a period of 3 years after the date of purchase of
this product. To obtain the source code, write to . . .
Open Source Team, Philips Electronics
High Tech Campus Bld HTC-44
5600 AE Eindhoven
The Netherlands
E-mail: [email protected]
Read the Open Source Licences in Help > To begin > Open Source
Licences.
78 Specifications / Software
Page 79
7.2 Environmental
Eco-label
Philips continuously focuses on lowering the environmental impact of
its innovative consumer products. We aim our efforts towards
environmental improvements during manufacturing, reduction of
harmful substances, energy-efficient use, end-of-life instructions and
product recycling.
Thanks to our environmental effort, this TV has been awarded the
European Ecolabel —the flower- (www.ecolabel.eu).
You can find detailed information on standby energy consumption,
warranty policy, spare parts and recycling of this TV on the Philips
website for your country at www.philips.com
Energy saving
Light sensor
To save energy, the built-in ambient light sensor lowers the
brightness of the TV screen when the surrounding light darkens.
Energy saving
The Energy saving Smart picture setting, combines several TV settings
that result in saving energy.
Low standby power
The class-leading and highly advanced power circuitry brings down
the power consumption of the TV to an extremely low level,
without losing out on the constant Standby functionality.
Power management
The advanced power management of this TV ensures the most
efficient use of its energy. You can check how your personal TV
settings, the level of brightness in current onscreen pictures, and the
surrounding light conditions determine the relative power
consumption.
To check the relative power consumption, press h > Setup and
press W. Select Watch demos > Active control and press OK.
Select a Smart setting to check the corresponding values.
End of use
Disposal of your old product and batteries
Your product is designed and manufactured with high quality
materials and components, which can be recycled and reused.
When this crossed-out wheeled bin symbol is attached to a product
it means that the product is covered by the European Directive
2002/96/EC.
Please inform yourself about the local separate collection system for
electrical and electronic products.
Please act according to your local rules and do not dispose of your
old products with your normal household waste. Correct disposal of
your old product helps to prevent potential negative consequences
for the environment and human health.
Your product contains batteries covered by the European Directive
2006/66/EC, which cannot be disposed with normal household
waste.
Please inform yourself about the local rules on separate collection of
batteries because correct disposal helps to prevent negative
consequences for the environmental and human health.
Specifications / Environmental 79
Page 80

7.3 Power and reception
Power
Product specifications are subject to change without notice. For more
specification details of this product see www.philips.com/support.
Power
• Mains power : AC 100-240V +/-10%
• Ambient temperature : 5°C to 35°C
• Standby power consumtion : < 0.15W
• Power saving features : Light sensor, Eco mode, Picture mute (for
radio), Auto switch-off timer, Eco settings menu.
Reception
• Aerial input : F-type 75 ohm coaxial
• TV system : SBTVD
• Video playback : NTSC, SECAM, PAL
• Tuner bands : Hyperband, S-Channel, UHF, VHF
80 Specifications / Power and reception
Page 81

7.4 Display and sound
Display / Picture
• Diagonal size : 147cm / 58"
• Picture enhancement :
- Perfect Pixel HD Engine
- LED Pro
- 440Hz Clear LCD*
• Display type : LCD Full HD, 2D segmented LED backlight
• Panel resolution : 2560 x 1080p
• Color processing : 2250 trillion colors 17bit RGB
• Brightness : 500 cd/m2
• Dynamic contrast : 10.000.000:1
• Response time (typical) : 0,5 (BEW equiv.) ms
* 400Hz Clear LCD : displays 400 scenes per second by combining
advanced 200Hz technology with scanning backlight @ 50%
dutycycle.
Sound
• Output power (RMS) : 2 x 15W
• Dolby Digital Plus, Dolby Pulse - Dolby and the double-D symbol
are registered trademarks of Dolby Laboratories.
• Speaker types : 2 dome tweeters, 2 woofers
Specifications / Display and sound 81
Page 82

7.5 Display resolutions
Video formats
Resolution — Refresh rate
• 480i - 60 Hz
• 480p - 60 Hz
• 576i - 50 Hz
• 576p - 50 Hz
• 720p - 50 Hz, 60 Hz
• 1080i - 50 Hz, 60 Hz
• 1080p - 24 Hz, 25 Hz, 30 Hz
• 1080p - 50 Hz, 60 Hz
Computer formats
Resolution — Refresh rate
• 640 x 480p — 60 Hz (VGA/HDMI)
• 800 x 600p — 60 Hz (VGA/HDMI)
• 1024 x 768p — 60 Hz (VGA/HDMI)
• 1280 x 768p — 60 Hz (VGA/HDMI)
• 1360 x 765p — 60 Hz (VGA/HDMI)
• 1360 x 768p — 60 Hz (VGA/HDMI)
• 1280 x 1024p — 60 Hz (HDMI)
• 1920 x 1080i — 60 Hz (HDMI)
• 1920 x 1080p — 60 Hz (HDMI)
82 Specifications / Display resolutions
Page 83

7.6 Multimedia
Connections
• USB
• Ethernet LAN RJ-45
Supported USB / memory device formats
• FAT 16, FAT 32, NTFS
Playback formats
• MP3, AAC
• WMA v2 up to v9.2
• Still pictures : JPEG
• MPEG 1, MPEG 2, MPEG 4
• H.264 (MPEG-4 AVC)
• WMV9
• MPEG program and transport stream
• AVI, MP4, MKV, ASF
Supported media server software
• Windows Media Player 11 (for Microsoft Windows XP, Vista or
Windows 7)
• Google (for Windows XP)
• Twonky Media — PacketVideo 4.4.9 (for PC and Intel
MacOX)(5.0.68 MacOX)
• Sony Vaio Media Server (for Microsoft Windows XP or Vista)
• Sony PS3 media server (for Windows XP)
• Nero 8 — Nero MediaHome (for Microsoft Windows XP)
• DiXiM (for Windows XP)
• Macrovision Network Media Server(for Microsoft Windows XP)
• Fuppes (for Linux)
• uShare (for Linux)
• Philips NAS SPD8020 (v. 1.2.9.47)
• TVersity 1.7 pro (for Windows XP)
• Nokia N82, N96, N95
• Nokia N78, N80, N81, 8GB, N800, N810, N92, N93, N93i,N96
• Samsung SGH-i780
ESD regulations
This apparatus meets performance criteria A for ESD. In case the
apparatus does not recover in DLNA mode due to electrostatic
discharge, user interference is required.
Specifications / Multimedia 83
Page 84

7.7 Connectivity
TV Rear
• CVI1 : Y Pb Pr, Audio L/R
• CVI2 : Y Pb Pr, Audio L/R
• AV in : Video (CVBS), Audio L/R
• VGA (D-sub 15), Audio In (stereo mini-jack 3.5mm)
• HDMI 1 - ARC in (HDMI v1.4)
• HDMI 2 in (HDMI v1.3)
• HDMI 3 in (HDMI v1.3)
• Audio In (DVI to HDMI)(stereo mini-jack 3.5mm)
• Audio Out L/R — display synchronised (coaxial-cinch-S/PDIF)
• Headphones (stereo mini-jack 3.5mm)
• Network — (RJ45)
• 3D Out
TV Side
• HDMI Side in (HDMI v1.3)
• USB
84 Specifications / Connectivity
Page 85

7.8 Dimensions and weights
58PFL9955
Width 1459 mm
Height 668 mm
Depth 71 mm
Weight ±26 kg
. . . with TV stand
Height 735 mm
Depth 288 mm
Weight ±29 kg
UMv 3104 327 0044.3 - 100923
Specifications / Dimensions and weights 85
Page 86

Index
2
2-in-1 stand 12
A
Add your devices 25
Adjust menu 27
Ambilight 34
Ambilight colour 34
Audio Out delay 51
Auto subtitle shift 51
B
Balance 46
Black bars 31
Browse menu 25
C
Channel list 26
Channel list options 26
Channels 29
Cinema 21:9 format 32
Cinema 21:9 subtitle 32
Clear Net TV history 38
Clear Net TV memory 37
Clock 48
Closed Caption 39
Component Video YPbPr 54
Connections 54
Consumer Care 71
Current TV software 52
D
Delete a device 25
Digital audio cable 54
DVI to HDMI adapter 54
E
Eco settings 46
Encryption method 69
ESD 83
F
Favourite channels 29
G
Gamma 46
Ginga 40
H
HD TV 10
HD video clip 10
HDMI connection 54
HDMI-ARC (Audio Return Channel) 54
HDMI-CEC 50
Headphone volume 46
Hidden channels 27
Home menu 25
Home network 49
I
Infrared sensor 23
Interactive TV 40
Internet websites 37
L
Lock code 43
M
Media server software 49, 83
Music with photos 41
N
Net TV 36
Net TV lock 36
O
On-screen keyboard 27
Open source software 78
Options menu 27
P
Parental rating 43
Perfect Pixel HD Engine 46
Picture delay 64
Picture settings 46
Picture shift 28
Pixel Plus link 51
Play videos 41
Power consumption 79
R
Radio channels 29
Reception quality 48
Rename a channel 26
Rename a device 25
Reorder a channel 26
Router 49
S
Screen edges 46
Search 21
Select list 26
Smart sound 31
Sound settings 46
Surround sound 28
T
TV tour 7
U
Universal access 45
Update channels 48
V
Video (CVBS) connection 54
Video selection 29
View photos 41
W
Wall colour 34
Watch TV 29
WEP security encryption 69
Wired network 49
Wired network connection 68
WPA security encryption 68
WPS (Wi-Fi Protected Setup) 68
Index 86
Page 87

Philips Consumer Lifestyle
Philips Consumer Lifestyle BV. Tussendiep 4 9206 AD Drachten Netherlands.
(Report No. / Numéro du Rapport) (Year in which the CE mark is affixed)
(Année au cours de laquelle le marquage CE a été apposé)
EC DECLARATION OF CONFORMITY
(DECLARATION DE CONFORMITE CE)
We / Nous, PHILIPS CONSUMER LIFESTYLE BV.
(Name / Nom de l’entreprise)
TUSSENDIEP 4, 9206 AD DRACHTEN, NETHERLANDS
(address / adresse)
declare under our responsibil ity that the electrical product:
(Déclarons sous notre propre responsabilité que le produit électrique:)
(brand name, nom de la marque) (Type version or model, référence ou modèle)
(product description, description du produit)
to which this declaration relates is in conformity with the following standards:
(Auquel cette déclaration se rapporte, est conforme aux normes harmonisées suivantes)
(title, number and date of issue of the standard / titre, numéro et date de parution de la norme)
following the provisions of LVD, EMC, EuP and R&TTE Directives
(Conformément aux exigences essentielles de)
and is produced by a manufa cturing organisation on ISO9001 level.
(Et sont fabriqués conformément à une qualité au moins conforme à la norme ISO 9001)
Brugge, Jan Laurent, Approbation Mgr.
(place, date / lieu, date) (signature, name and function / signature, nom et fonction )
AGB32-JLA-15.1005 CE2010
Philips 32/40/46PFL9705H/12 H/60 K/02 M/08, 58PFL9955H/12
LCD Television Receiver with integrated Wi-Fi module WUS-N11
EN60065:2002+A1:2006, A11:2008
EN55013:2001+A1:2003, A2:2006
EN55020:2007
EN61000-3-2:2006, -3-3:1995+A1:2001
EN61000-4-2:1995+A1:1998, A2:2001
2010-05-06
EN61000-4-3:2006, -4-4:2004
EN300328: V1.7.1
EN301489-17: V1.8.1+V1.3.2:2008
EN62311:2008
EN62087:2003
EN55022:2006
EN55024:1998+A1:2001, A2:2003
Page 88
!"#$%"#&'(%&)(*+,-(./0+1+2-(./0+#"#+%"#&'(%&)/**/0+1+3)4/'5/' &' (.*,%6/+7,*8/'
3**+'/.,0&/'/8+(#8+)#'/.,0&/'/8+&'(8/-(' 90+('/+:'":/' &;+"<+&6/,'+'/0:/%&,5/+"=#/' 0>
?:/%,<,%(&,"#0+('/+0)@A/%&+&"+%6(#./+=,&6")&+#"&,%/
B' ( 8/ -( ' 9 0+ ('/ +& 6/+ :' ":/ ' & ;+ " <+ C" # ,# 9* , A9 / +D 6, * ,: 0+ E */ %& ' "# ,% 0 +! >F>+ "' +&6 /, '+' /0 :/% &, 5/+ "=# /' 0
GHIH+J+C"#,#9*,A9/+D6,*,:0+E*/%&'"#,%0+!>F>++3**+',.6&0+'/0/'5/8
===>:6,*,:0>%"-
K"#&(%&+,#<"'-(&,"#
!"#$%&'%(+ HLHH+LLLL+MNOG++P.'(&),&"Q
)$*#'+,-,)$*#'./$+ HLHH+LH+IRH++P.'(&,0+1+.'(&),&Q
)"(0'*+ HLHH+MHI+HGHO
+ ?("+D()*"++PIIQ+GIGI+HGHO
ǎȇǸǭǽǵȌ+ SONRG+TLR+RR+RU
ǙDzǾǿDzǺǽǭǴǰǻǯǻǽ
ćHVNiUHSXEOLND+ LHH+ITGLTH++P7/V:*(&#W+6"5"'Q
12'%(,-,+ THHL+LHH+HHL
'DQPDUN+ ONGN+LMNR++P*"9(*&+":9(*8Q
3$/&42*(%5+ HLHH+HHH+MNGH++P9"0&/#*"0Q
ƆƫƫƜƤơ+ H+HLHH+OIGG+IGLH
ƋƫƞƳƧƷƹƱƟƲƷƱƝƹƳƧ
(VSDxD+ RHH+LHH+UNN++P.'(&),&"Q
(VWRQLD+ UHHLUHH++P*"%(*Q
6"(%4$+ HLHN+HGN+NIH++P.'(&),&Q
+UYDWVND+ HI+UTHO+MMU++PX"9(*#,+:"V,5Q
7&(*'(+ LHH+HLL+MMT++P.'(&),&"Q
7"$*(%5+ HIUH+II+IUI++P<'//Q
1RUWKHUQ,UHODQG+HLHH+HNN+ULLG
.DǴDǷFǿDǺ+ HHM+MGM+GNH+UU+IM++P*"9(*Q
8(&9'(+ NGM+OMURI++P*"%(*Q
8'&2/(%'(+ UMGGLLRU++P*"%(*Q
/X[HPERXUJ/X[HPEXUJ
+ HLHH+GU+NNH++P9"0&/#*"0+1+.'(&),&Q
0DJ\DURUV]iJ+ HU+LHHIL+ILR++P2#.;/#/0+6Y5Z0Q
:$5$"*(%5+ HLHH+HGO+HHMU++P.'(&,0Q
1RUJH+ GGMH+LIII++P*"9(*0(-&(*/Q
gVWHUUHLFK+ HLHH+ILH+HIU++P9"0&/#*"0Q
3ROVND SRãĀF]HQLHORNDOQH
3RUWXJDO+ LHH+MLH+RHO++P.'Z&,0Q
5RPüQl+ HLHH+LRTRIH++P.'(&,0Q
ǝǻǾǾǵȌ
0RǾǷǯǭǙDzǾǿǺȈǶǴǯǻǺǻǷ
ǙDzǾǿǺȈǶǴǯǻǺǻǷ
6XLVVH6FKZHL]6YL]]HUD
+++++HLHH+HHG+HNH++P9"0&/#*"0+1+.'(&),&+1+.'(&),&"Q
ǞǽǮǵȔǭ+ SOLI+IIT+TTH+LTI++PX"9(*#,+:"V,5Q
6ORYDNLD+ HLHH+HHTNOM++P7/V:*(&#W+6"5"'Q
6ORYHQLMD+ HHOLU+I+GLH+RN+HH++PX"9(*#,+9*,%Q
6XRPL+ HR+GOIIOTIN++P:(,9(**,0:)6/*)Q
;9$"'#$+ HL+NMRG+RIHH++P*"9(*0(-&(*Q
<2('*(%5,-, , UU+G+UNG+LUNG
7UNL\H ŔHKLULoLDUDPD
8QLWHG.LQJGRP+ HLHH+OOI+UHIN++P&"**+<'//Q
 Loading...