

Page 1
Register your product and get support at …
www.philips.com/welcome
EN User manual
ZH
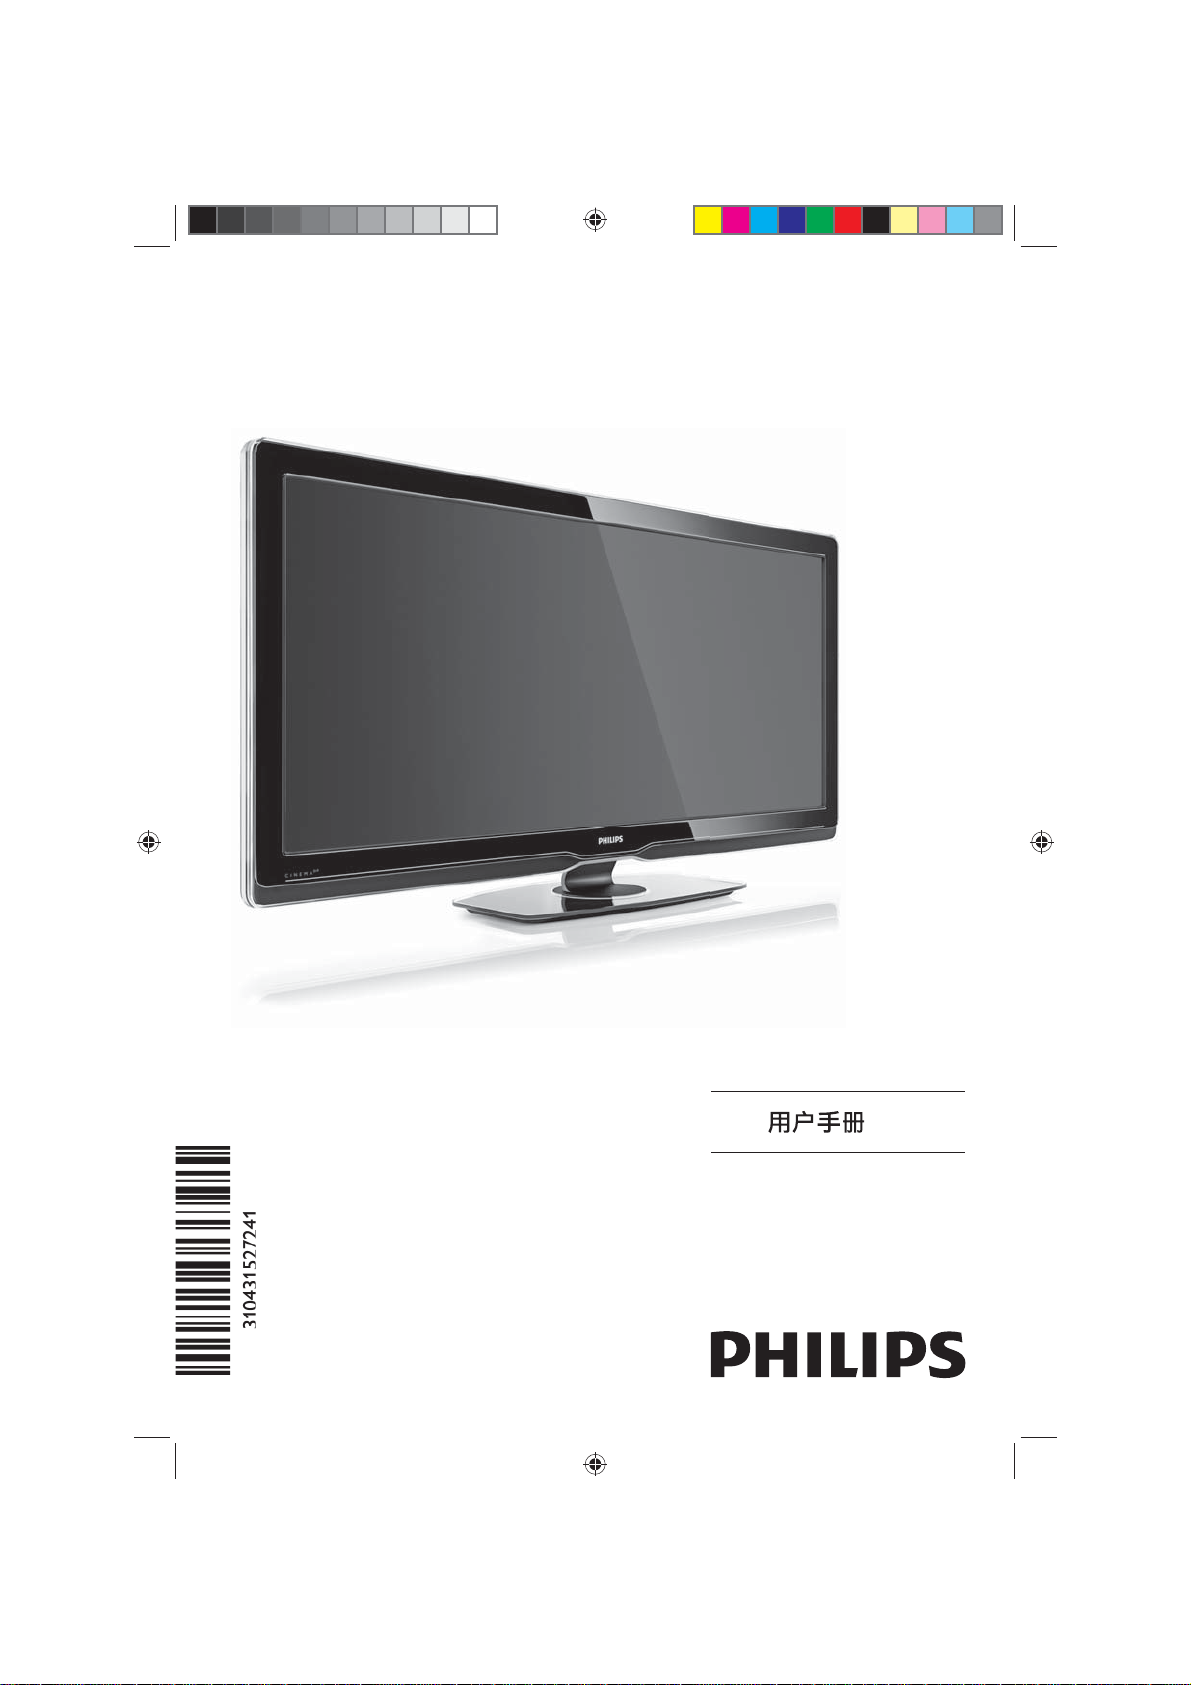
56PFL9954H
UM_Bombay_56PFL9954_cover.indd 1UM_Bombay_56PFL9954_cover.indd 1 2009-07-01 11:19:042009-07-01 11:19:04
Page 2
LCD TV (Mainstream, High End and BDS)
Environmental Information
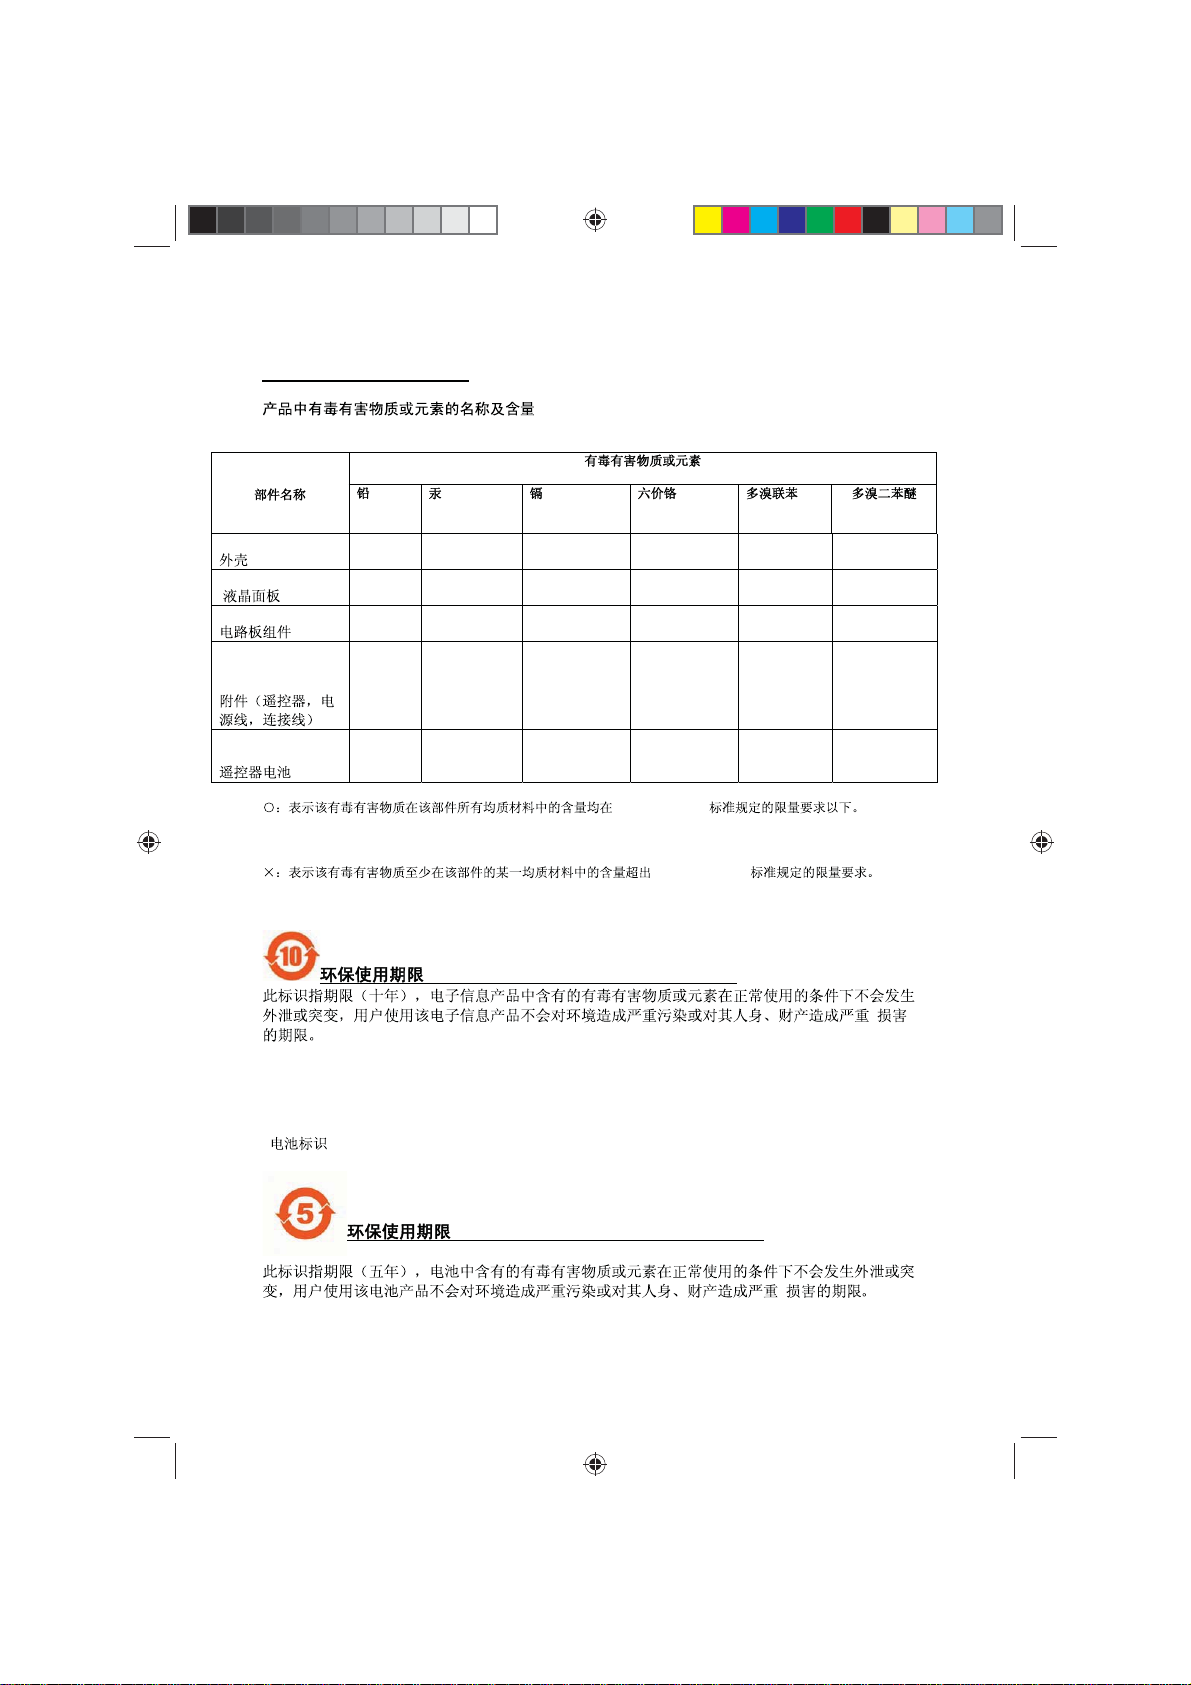
Names and Contents of Toxic or Hazardous Substances or Elements
Hazardous/Toxic Substance
Name of the Pa rt s
Housing O O O O O O
(Pb,
Lead)
(Hg,Mercury) (Cd,Cadmium) (Chromium 6+) (PB B ) )
(PBDE
LCD Pane l
PWBs X O O O O O
Accessories
(Remote control &
cables)
Batteries in Remote
Control
O: Indicates that this toxic or hazardous substance contained in all of the homogeneous
materials for this part is below the limit requirement in SJ/T11363 – 2006.
X: Indicates that this toxic or hazardous substance contained in at least one of the
homogeneous materials used for this part is above the limit requirement in SJ/T11363 - 2006.
X X O O O O
X O O O O O
X O O O O O
SJ/T11363 - 2006
SJ/T11363 – 2006
Environmental Protection Use Period
This logo refers to the period ( 10 years ) during which the toxic or hazardous substances or elements contained
in electronic information products will not leak or mutate so that the use of these [substances or elements] will
not result in any severe environmental pollution, any bodily injury or damage to any assets.
______________________________________________________
Battery labeling logo
Environmental Protection Use Period
This logo refers to the period ( 5 years ) during which the toxic or hazardous substances or elements contained in
the battery will not leak or mutate so that the use of these [substances or elements] will not result in any severe
environmental pollution, any bodily injury or damage to any assets.
UM_Bombay_56PFL9954_cover.indd 2UM_Bombay_56PFL9954_cover.indd 2 2009-07-01 11:19:092009-07-01 11:19:09
Page 3

Table of content
1 Get started 2
1.1 Important 2
1.2 Keys on the TV 4
1.3 Wall mounting 6
1.4 Product highlights 8
1.5 User manual 9
2 Use your TV 10
2.1 Remote control 10
2.2 Menus 20
2.3 Watch TV 22
2.4 Use Ambilight 24
2.5 Watch a connected device 24
2.6 Watch TV using a digital receiver 25
2.7 HTR9900 and BDP9100 25
2.8 Net TV 26
3 More on ... 31
3.1 Teletext 31
3.2 Favourite channels 32
3.3 Programme guide 33
3.4 Timers and locks 33
3.5 Subtitles and languages 34
3.6 Multimedia 35
3.7 Universal access 36
4 Setup 37
4.1 Picture / Sound / Ambilight 37
4.2 Channels 39
4.3 Network 41
4.4 Other devices 43
4.5 Software update 43
5 Connections 45
5.1 First connections 45
5.2 About cables 45
5.3 Connect devices 48
5.4 More devices 59
5.5 EasyLink HDMI -CEC 65
5.3 Common interface CAM 65
5.7 Network 66
6 Troubleshooting 67
6.1 Contact information 67
6.2 TV and remote control 67
6.3 TV channels 67
6.4 Picture 67
6.5 Sound 68
6.6 Devices 68
6.7 Multimedia 69
6.8 Network 69
7 Technical data 70
7.1 Power and reception 70
7.2 Display and sound 70
7.3 Display resolutions 70
7.4 Multimedia 70
7.5 Connectivity 71
7.6 Dimensions 71
8 Index 72
UM_Bombay_56PFL9954_en.indd 1UM_Bombay_56PFL9954_en.indd 1 2009-06-30 10:19:292009-06-30 10:19:29
1
Page 4

1 Get started
1.1 Important
1.1.1 Enjoy HD TV
This TV can display High Defi nition programmes,
but to enjoy HD TV you need to get
programmes in HD fi rst. If you are not watching
HD programmes, the picture quality will be that
of a normal TV.
1.1.2 Safety
Make sure you have read and understood all
instructions before using your TV. The warranty
becomes invalid if any damage is caused by failure
to follow instructions.
Risk of electric shock or fi re!
• Never expose the TV or remote control to
rain, water or excessive heat.
• Never place liquid containers, such as vases,
near the TV. If liquids are spilt on or into the
TV, disconnect the TV from the power outlet
immediately. Contact Philips Consumer Care to
have the TV checked before use.
• Never place the TV, remote control or
batteries near naked fl ames or other heat
sources, including direct sunlight.
• Keep candles and other naked fl ames away
from this product at all times.
• Never insert objects into the ventilation slots
or other openings on the TV.
• Ensure power plugs do not come under heavy
force. Loose power plugs can cause arcing and
are a fi re hazard.
• Never place the TV or any objects on the
power cord.
• When disconnecting the power cord, always
pull the plug, never the cord.
Risk of injury or damage to the TV!
• Two people are required to lift and carr y a TV
that weighs more than 25 kg.
• If you mount the TV on a stand, only use the
supplied stand. Secure the stand to the TV
2
tightly. Place the TV on a fl at, level surface that
can support the weight of the TV.
• When mounting the TV on a wall, ensure that
the wall mount can safely bear the weight
of the TV set. Koninklijke Philips Electronics
N.V. bears no responsibility for improper wall
mounting that results in accident, injury or
damage.
Risk of injury to children!
Follow these precautions to prevent the TV from
toppling over and causing injury to children:
• Never place the TV on a surface covered by a
cloth or other material that can be pulled away.
• Ensure that no part of the TV hangs over the
edge of the mounting surface.
• Never place the TV on tall furniture, such as a
bookcase, without anchoring both the furniture
and TV to the wall or a suitable suppor t.
• Educate children about the dangers of climbing
on furniture to reach the TV.
Risk of overheating!
Always leave a space of at least 10cm around
the TV for ventilation. Ensure curtains or other
objects never cover the ventilation slots on the
TV.
Lightning storms
Disconnect the TV from the power outlet and
antenna before lightning storms. During lightning
storms, never touch any part of the TV, power
cord or antenna cable
Risk of hearing damage!
Avoid using earphones, headphones at high
volumes or for prolonged periods of time.
Low temperatures
If the TV is transported in temperatures below
5°C, unpack the TV and wait until the TV
temperature matches the room temperature
before connecting the TV to the mains.
UM_Bombay_56PFL9954_en.indd 2UM_Bombay_56PFL9954_en.indd 2 2009-06-30 10:19:322009-06-30 10:19:32
Page 5
1.1.3 Position the TV
Carefully read the safety precautions before
positioning the TV.
• Position the TV where light does not shine
directly on the screen.
• Dim lighting conditions in the room for best
Ambilight effect.
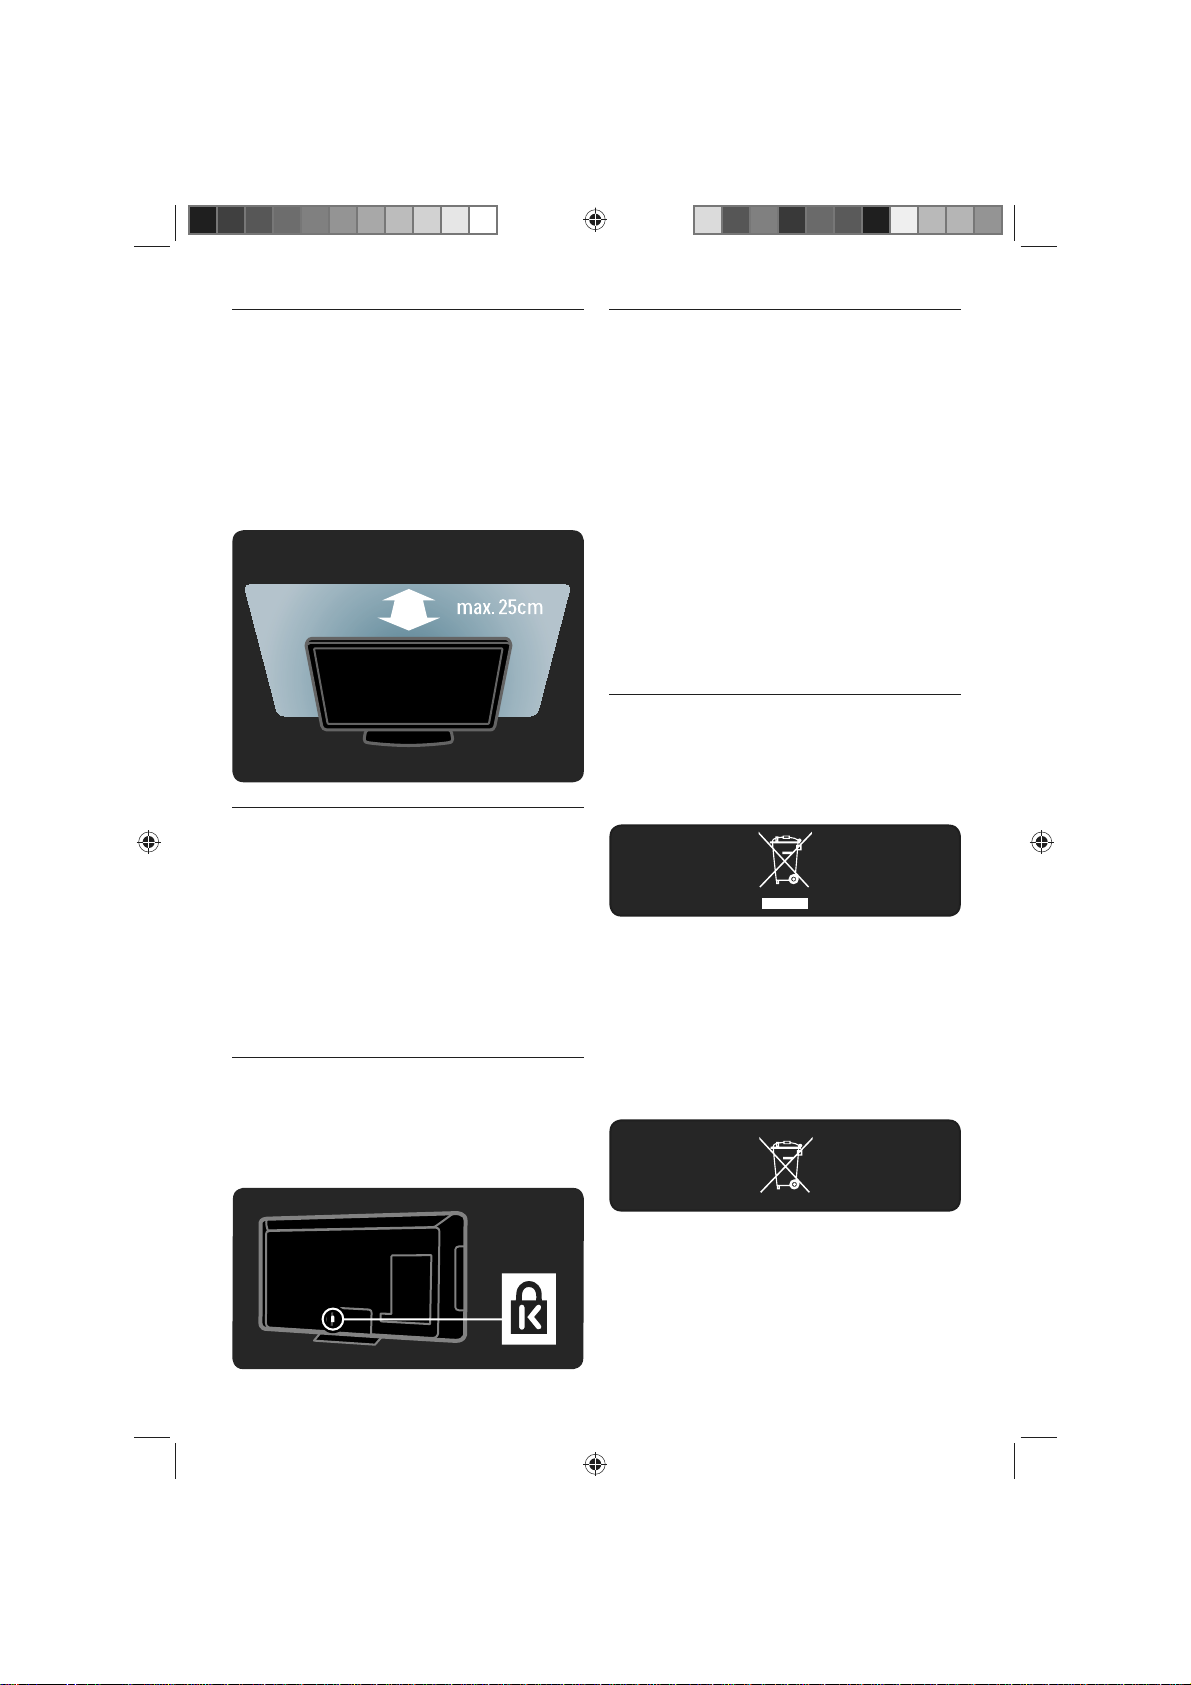
• Position the TV up to 25 cm away from the
wall for the best Ambilight effect.
1.1.4 Viewing distance
Position the TV at the ideal viewing distance.
Benefi t more from HD TV picture or any picture
without straining your eyes. Find the ‘sweet spot’,
right in front of the TV, for the best possible TV
experience and relaxed viewing.
The ideal distance to watch TV from is three
times its diagonal screen size. While seated,
your eyes should be level with the centre of the
screen.
1.1.5 Security slot
Your TV is equipped with a Kensington security
slot at the back of the TV.
Purchase a Kensington anti-theft lock (not
supplied) to secure the TV.
1.1.6 Screen care
• Risk of damage to the TV screen! Never touch,
push, rub or strike the screen with any object.
• Unplug the TV before cleaning.
• Clean the TV and frame with a soft damp
cloth. Never use substances such as alcohol,
chemicals or household cleaners on the TV.
• To avoid deformations and colour fading, wipe
off water drops as soon as possible.
• Avoid stationary images as much as possible.
Stationary images are images that remain
onscreen for extended periods of time.
Stationary images include onscreen menus,
black bars, time displays, etc. If you must use
stationary images, reduce screen contrast and
brightness to avoid screen damage.
1.1.7 End of use
When this crossed-out wheeled bin symbol is
attached to a product it means that the product
is covered by the European Directive
2002/96/EC.
Please inform yourself about the local separate
collection system for electrical and electronic
products. Please act according to your local rules
and do not dispose of your old products with
your normal household waste. Correct disposal
of your old product helps to prevent potential
negative consequences for the environment and
human health.
Your product contains batteries covered by the
European Directive 2006/66/EC, which cannot
be disposed with normal household waste. Please
inform yourself about the local rules on separate
collection of batteries because correct disposal
helps to prevent negative consequences for the
environmental and human health.
UM_Bombay_56PFL9954_en.indd 3UM_Bombay_56PFL9954_en.indd 3 2009-06-30 10:19:332009-06-30 10:19:33
3
Page 6
1.1.8 ECO - Green
This TV has features that contribute to energyeffi cient use.
Energy effi ciency features
• Ambient light sensor
To save energy, the built-in Ambient light
sensor lowers the brightness of the TV screen
when the surrounding light darkens.
• Energy saving
The Energy saving setting of the TV combines
several TV settings that result in saving energy.
See the Smart settings in the Setup menu.
• Low standby power consumption
The class-leading and highly-advanced power
circuitry brings down the power consumption
of the TV to an extremely low level, without
losing out on the constant Standby functionality
Power management
The advanced power management of this TV
ensures the most effi cient use of its energy. You
can check how your personal TV settings, the
level of brightness in current onscreen pictures,
and the surrounding light conditions determine
the relative power consumption.
Press Demo,
select Active control and press OK.
Your current TV setting is highlighted. You
can change to another setting to check the
responding values.
cor
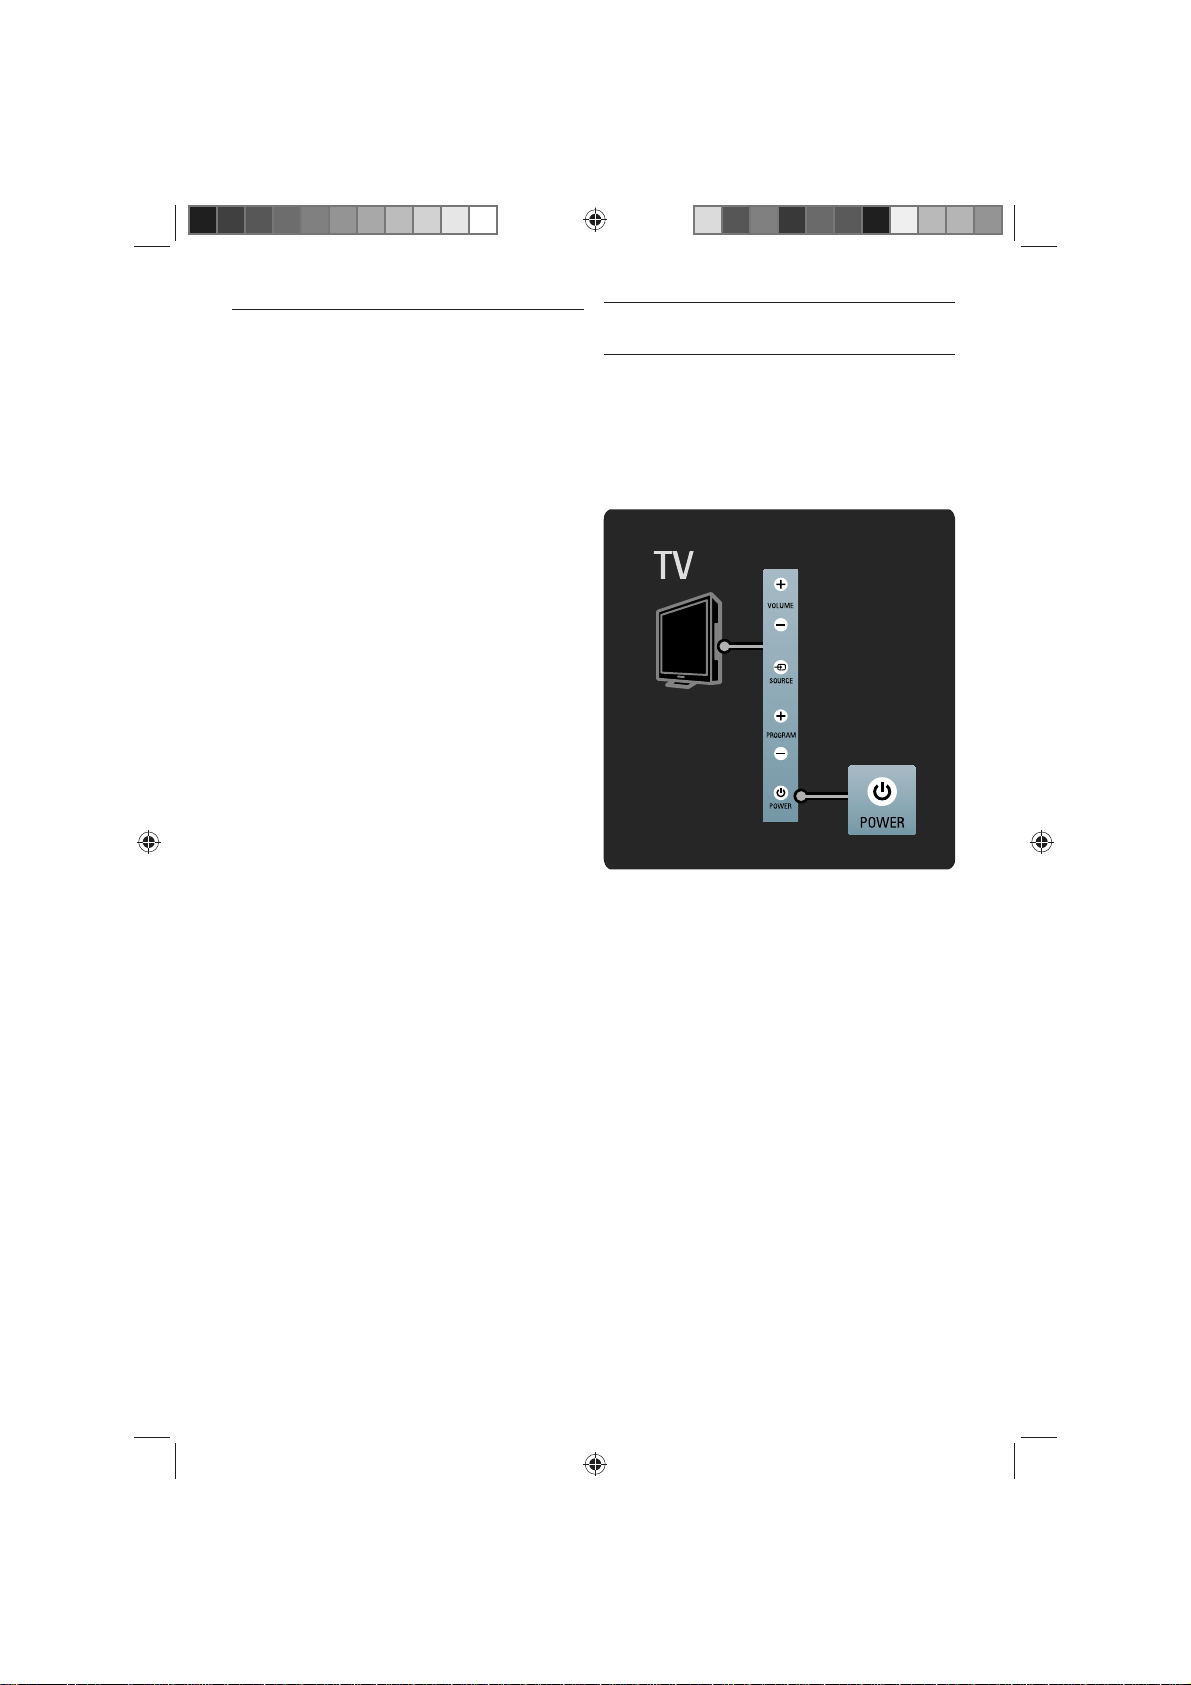
1.2. Keys on the TV
1.2.1 Switch on
It takes a couple of seconds for the TV to start
up.
If the red standby indicator is off, press O at the
right of the TV to switch it on.
Press O again to switch off.
The white LED fl ashes during star t-up and
switches off completely when the TV is ready for
use. The Ambilight shows the TV is on.
You can set the white LED on permanently or set
ightness. Press h > Setup > Installation >
its br
Preferences > LightGuide brightness.
4
UM_Bombay_56PFL9954_en.indd 4UM_Bombay_56PFL9954_en.indd 4 2009-06-30 10:19:332009-06-30 10:19:33
Page 7
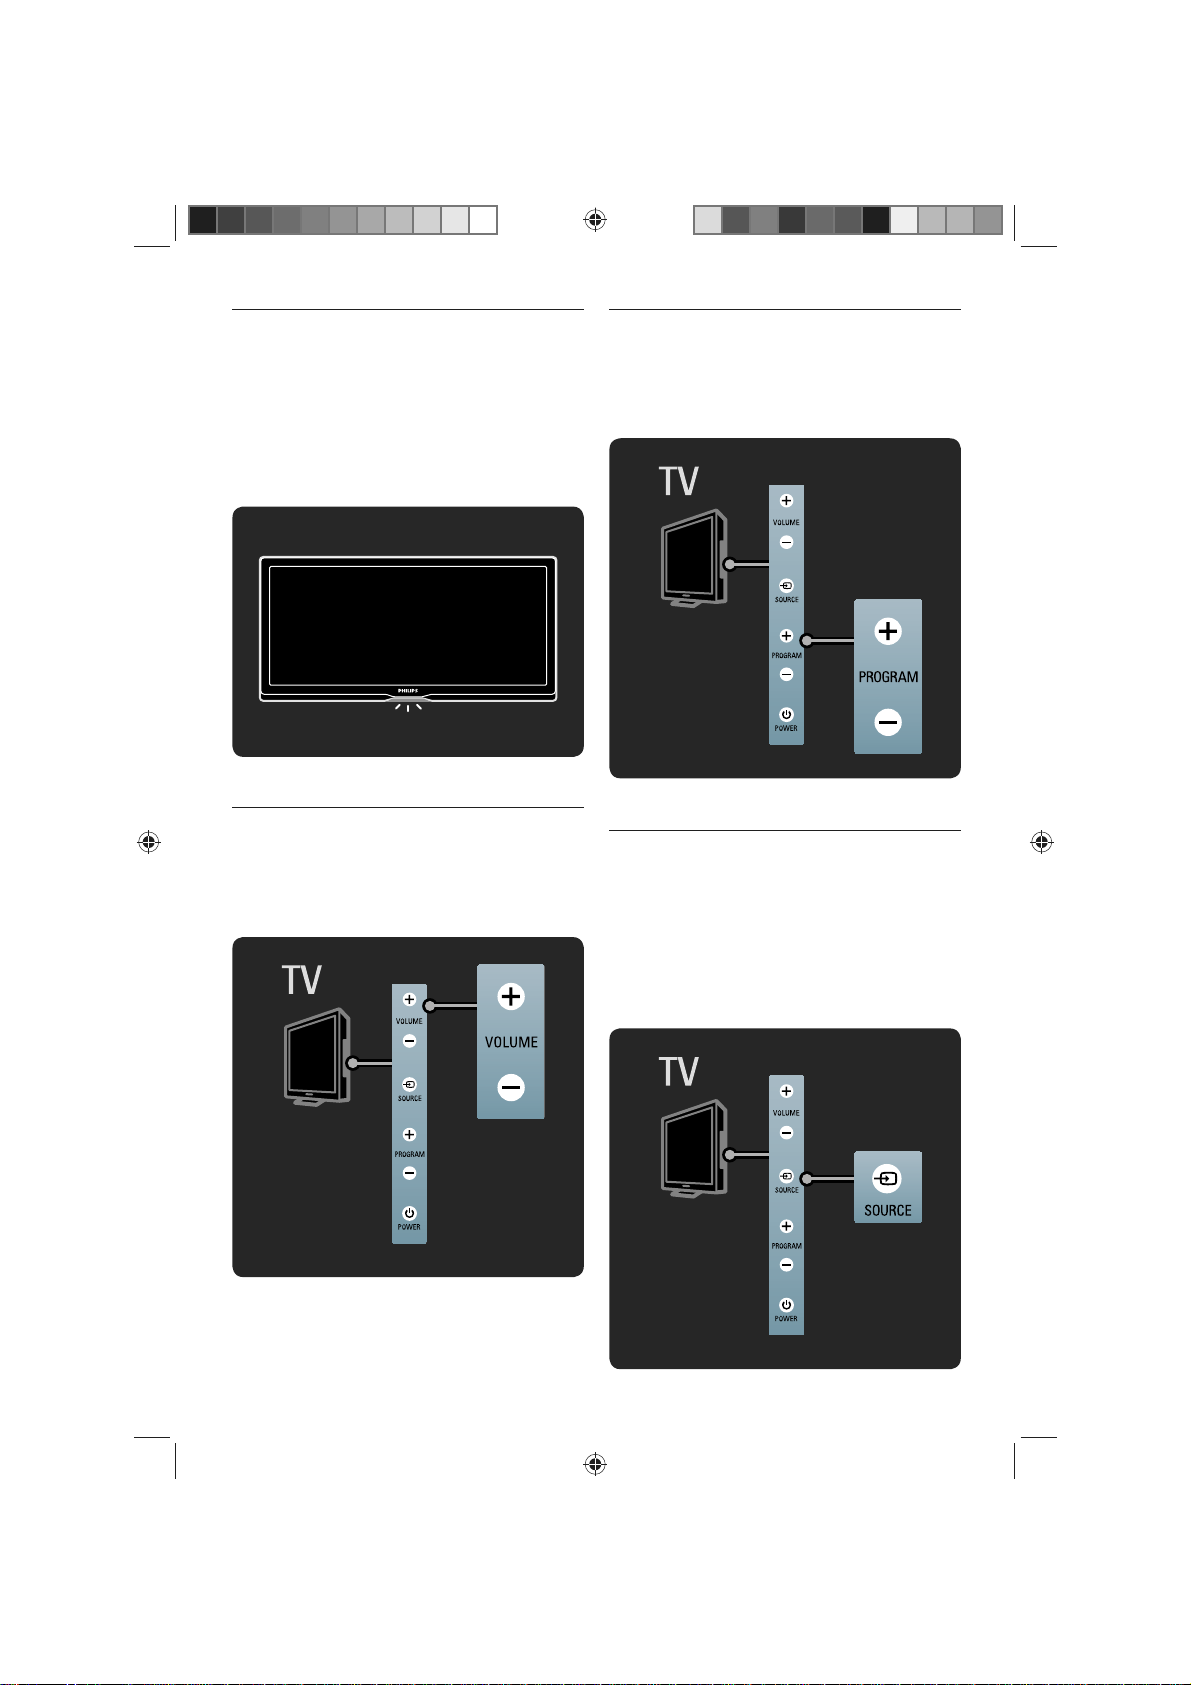
1.2.2 LightGuide
The LightGuide at the front of the TV indicates
whether the TV is on or is star ting up.
In the Setup menu, you can set the LightGuide
brightness or let it switch off after start up.
Press h > Installation > Pr
eferences >
LightGuide brightness.
1.2.3 Volume
eys on the side of the TV allow basic TV
The k
control.
You can adjust the volume with Volume + / - on
the side of the
TV.
1.2.4 Programme
The keys on the side of the TV allow basic TV
control.
You can switch TV channels with Pr
ogram + / -
on the side of the TV.
1.2.5 Sour
ce
The keys on the side of the TV allow basic TV
control.
o open the Source list to select a connected
T
device, press Source s.
Press Source s again to select a connected
device in the list. After a few seconds the TV
switched to the selected device.
UM_Bombay_56PFL9954_en.indd 5UM_Bombay_56PFL9954_en.indd 5 2009-06-30 10:19:332009-06-30 10:19:33
5
Page 8

1.2.6 IR sensor
Always take care to point the remote control at
the remote control infra red sensor on the front
of the TV.
1.3 Wall mounting
1.3.2 Wall mounting
‹ Caution
Wall mounting the TV requires special skills and
should only be performed by qualifi ed personnel.
The TV wall mounting should meet safety
standards according to the TV’s weight.
Koninklijke Philips Electronics N.V. bears no
responsibility for improper mounting or any
mounting that results in accident or injury.
You must read the safety precautions before
positioning the TV.
Wall mounting
The instructions on how to wall mount the TV
are also mentioned in the Start guide that comes
with the TV.
1.3.1 VESA info
Your TV is prepared for VESA compliant wall
mounting. A VESA wall mount bracket is not
included.
Use the following VESA code to purchase the
bracket.
VESA MIS-F 400, 400, 8
When mounting the TV on a wall, always use all
4 fi xing points on the back of the TV. Use a screw
length as shown in the drawing.
To wall mount the TV, use the bracket and the
2 small plastic tubes (spacers) included in the
packaging. Follow the instructions.
The TV is mounted at the correct height if your
eyes are level with the centre of the screen when
you sit down.
6
UM_Bombay_56PFL9954_en.indd 6UM_Bombay_56PFL9954_en.indd 6 2009-06-30 10:19:342009-06-30 10:19:34
Page 9
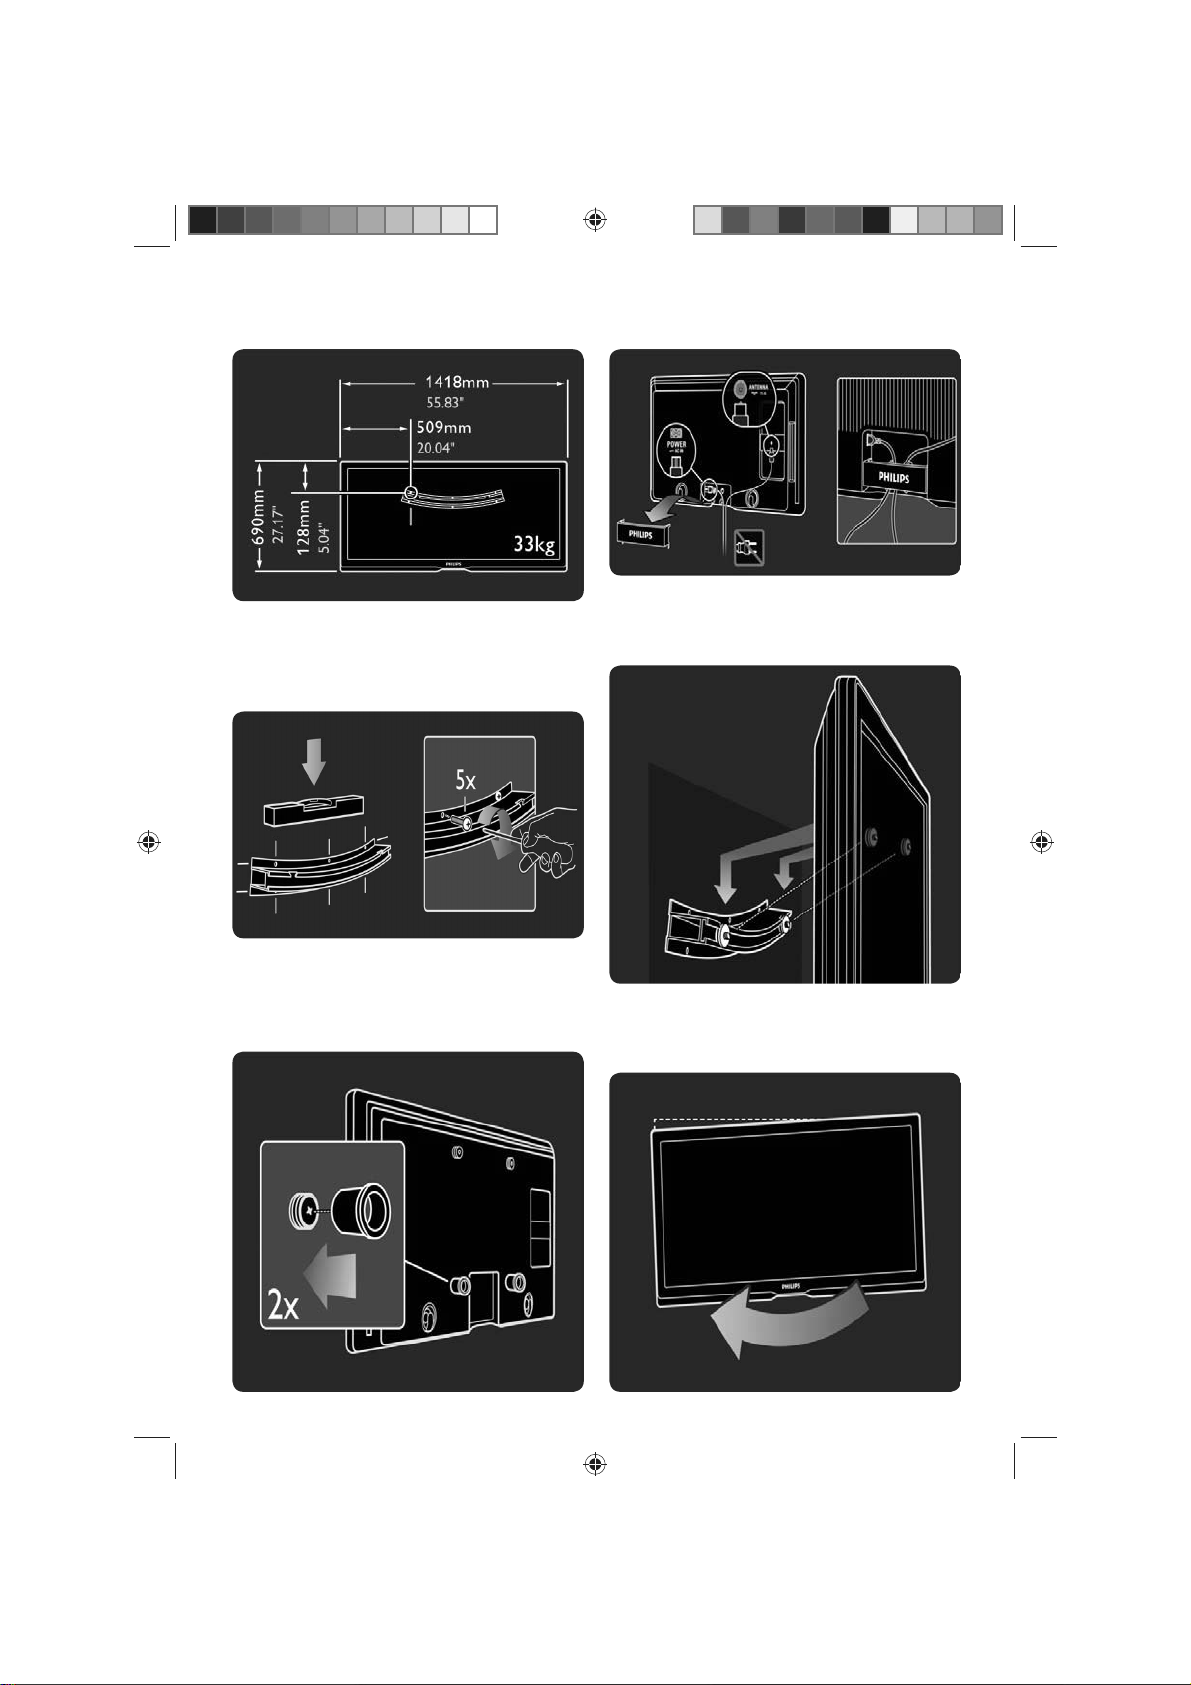
1 Calculate the TV’s ideal position.
2 Position and level the wall mount bracket and
fi x the bracket fi rmly to the wall.
4 Connect all cables.
5 Lift the TV into the wall mount bracket.
3 Mount the 2 spacers on the 2 lower discs at
the back of the TV.
6 You can slide and level the TV on the bracket.
UM_Bombay_56PFL9954_en.indd 7UM_Bombay_56PFL9954_en.indd 7 2009-06-30 10:19:352009-06-30 10:19:35
7
Page 10
1.3.3 TV stand
This Cinema 21:9 TV is ideal for wall mounting.
However, if you would prefer to mount the
TV on a TV stand, you can order the matching
Cinema 21:9 tabletop swivel stand.
Philips Cinema 21:9 - ST 569954
Order this stand at your local dealer or online.
1.4 Product highlights
1.4.2 Ambilight
Ambilight is the lighting technology that emanates
from the back of the television onto the wall. This
innovative technology automatically adjusts the
colour and brightness of the light to match the
TV picture.
This creates an unprecedented improvement
in viewing experience. The light also reduces
eyestrain thus providing a more relaxing viewing
experience.
1.4.1 Cinema 21:9
This Cinema 21:9 TV perfectly matches the
iginal movie format and is equipped with
or
a full High Defi nition (HD) display. A full HD
2560x1080p, the highest resolution of HD
sources.
This display offers a brilliant fl ickerfree
progressive scan picture with optimum brightness
and superb colours. Advanced formatting
technology continuously analyses the incoming
signals and progressively stretches non 21:9
images to full screen and avoids distortion.
The ultimate cinematic experience
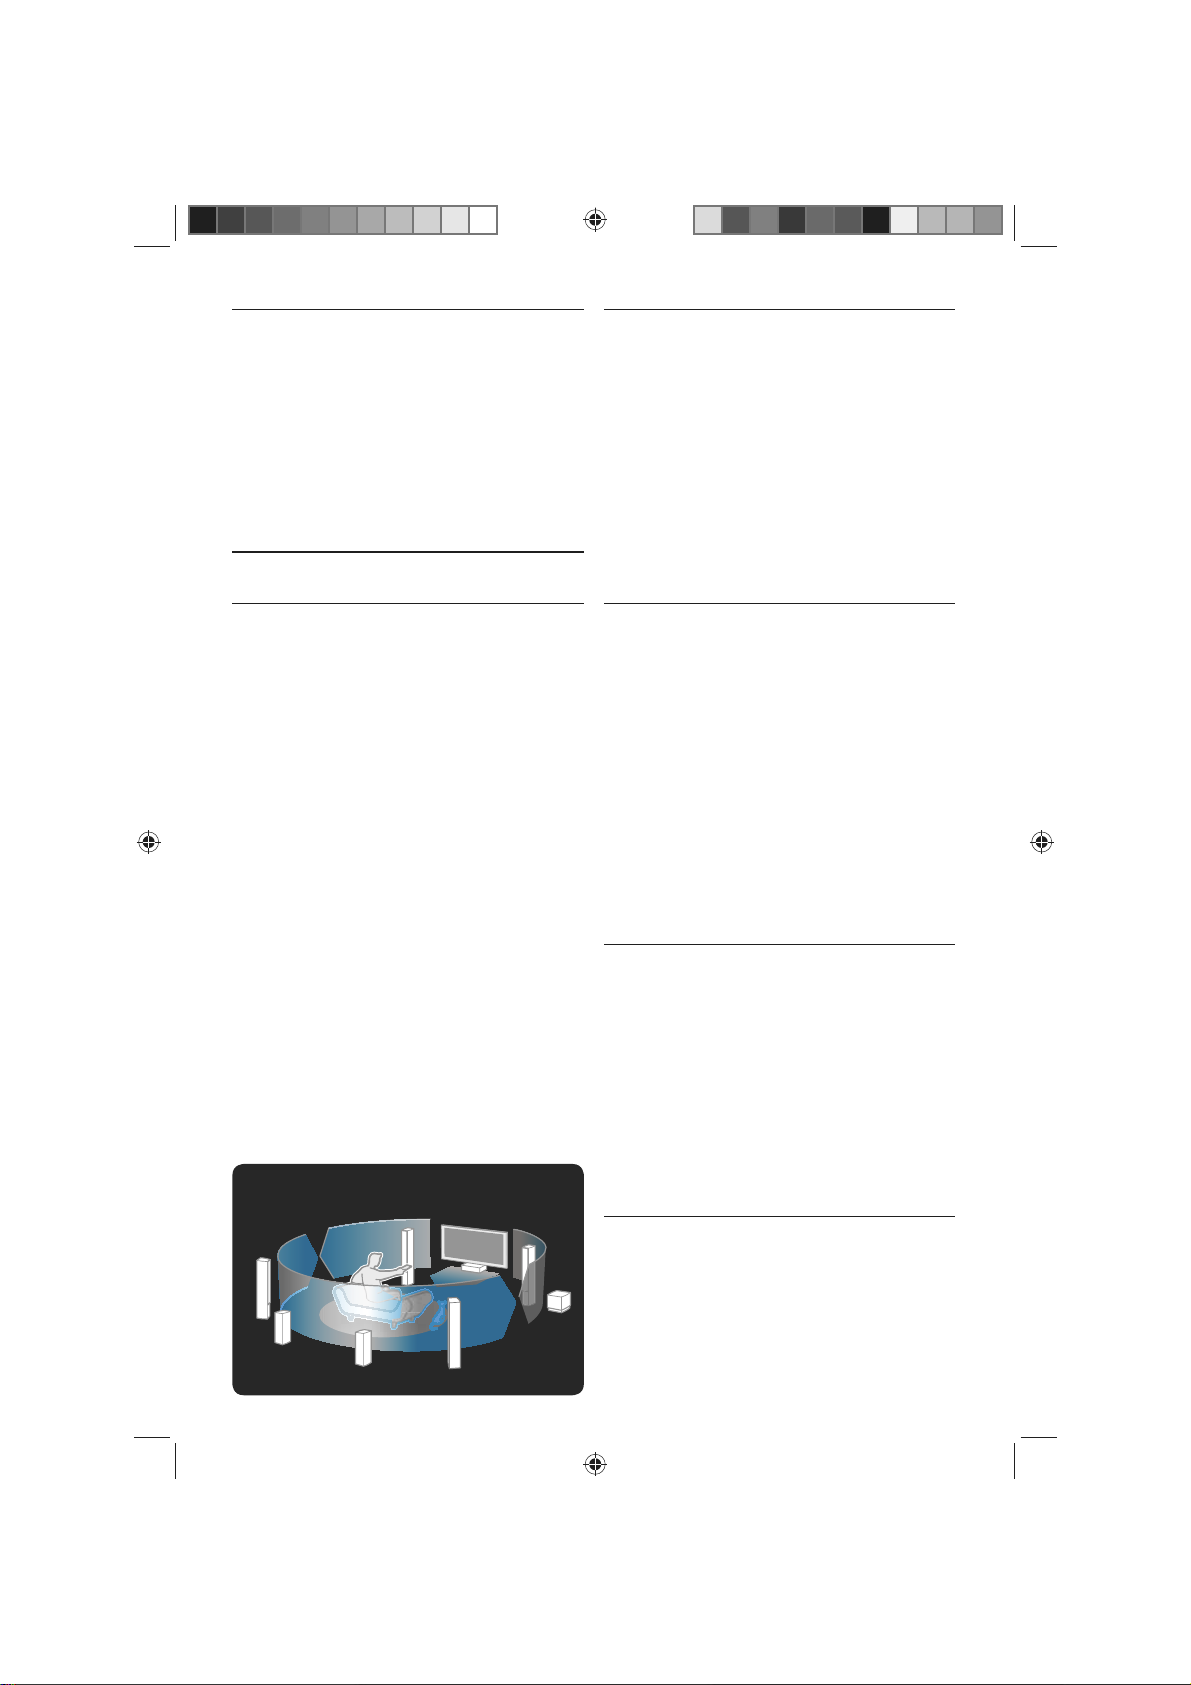
The Philips Home Theatre Receiver HTR9900
and Blu-ray Disc player BDP9100 together
with your Cinema 21:9 TV create the ultimate
cinematic experience in your home.
The cinematic 7.1 channel surround sound from
the 7 speakers and a subwoofer combined with
the unrivalled High Defi nition pictures from
the matching Blu-ray Disc player complete your
cinema feeling.
Ask your Philips dealer for a demonstration.
1.4.3 DVB-T and DVB-C integrated tuner
Next to normal analogue TV broadcast your
TV can receive digital terrestrial (DVB-T) and in
certain countries also digital cable (DVB-C) TV
and radio broadcasts.
DVB — Digital Video Broadcasting gives you
better picture and better sound quality.
Some broadcasters have several audio (speech)
and/or teletext languages available.
Verify if the TV supports DVB-T or DVB-C in
your country. Check the ‘Digital TV Country
Compatibility’ sticker on the back of the TV.
1.4.4 Programme guide
The Programme guide is an onscreen guide
to scheduled TV programmes. This guide is
provided by digital broadcasters or the Net TV
online service. You can read the programme
summary, set a message to remind you when
the programme starts or select programmes by
genre.
Read 3.3 Programme guide.
1.4.5 Wireless network
Simply link up this TV to your wireless network
at home. There is no need for a network cable.
Enjoy your pictures, videos and music fi les from
your PC on a big screen.
8
UM_Bombay_56PFL9954_en.indd 8UM_Bombay_56PFL9954_en.indd 8 2009-06-30 10:19:362009-06-30 10:19:36
Read 4.3 Network.
Page 11
1.4.6 Net TV
You can link up your TV to Net TV.
The Net TV star t page offers you movies,
pictures, music, infotainment, games and many
more, all set up for your TV screen.
To enjoy Net TV you need to connect the TV to
a router connected to the Internet.
Read more on Net TV in 2.8 Net TV.
1.5 User manual
This TV has a built in user manual (only in
English).
This manual contains all of the information
needed to install and operate this TV.
You can open or close the user manual with the
yellow e key on the remote control.
Read more on connecting to a router in 4.3
Network.
1.4.7 USB and PC network connection
View or play your own multimedia fi les (photos,
music, videos, …) from the USB connection on
the side of the TV.
Connect the TV to a home PC network and
enjoy watching multimedia fi les stored on your
PC.
1.4.8 Universal remote control
Your TV remote control is a universal remote
control that can operate other devices such as
DVD players and recorders, digital receivers
(STB) or Home Theatre Systems (HTS) from
Philips or other brands.
Read more on Universal remote control in
2.1.2 Universal RC setup.
Before you carry out the instructions, close the
manual with the yellow e key.
When you open the manual again, it opens on
the same page you left it.
UM_Bombay_56PFL9954_en.indd 9UM_Bombay_56PFL9954_en.indd 9 2009-06-30 10:19:362009-06-30 10:19:36
9
Page 12
2 Use your TV
2.1 Remote control
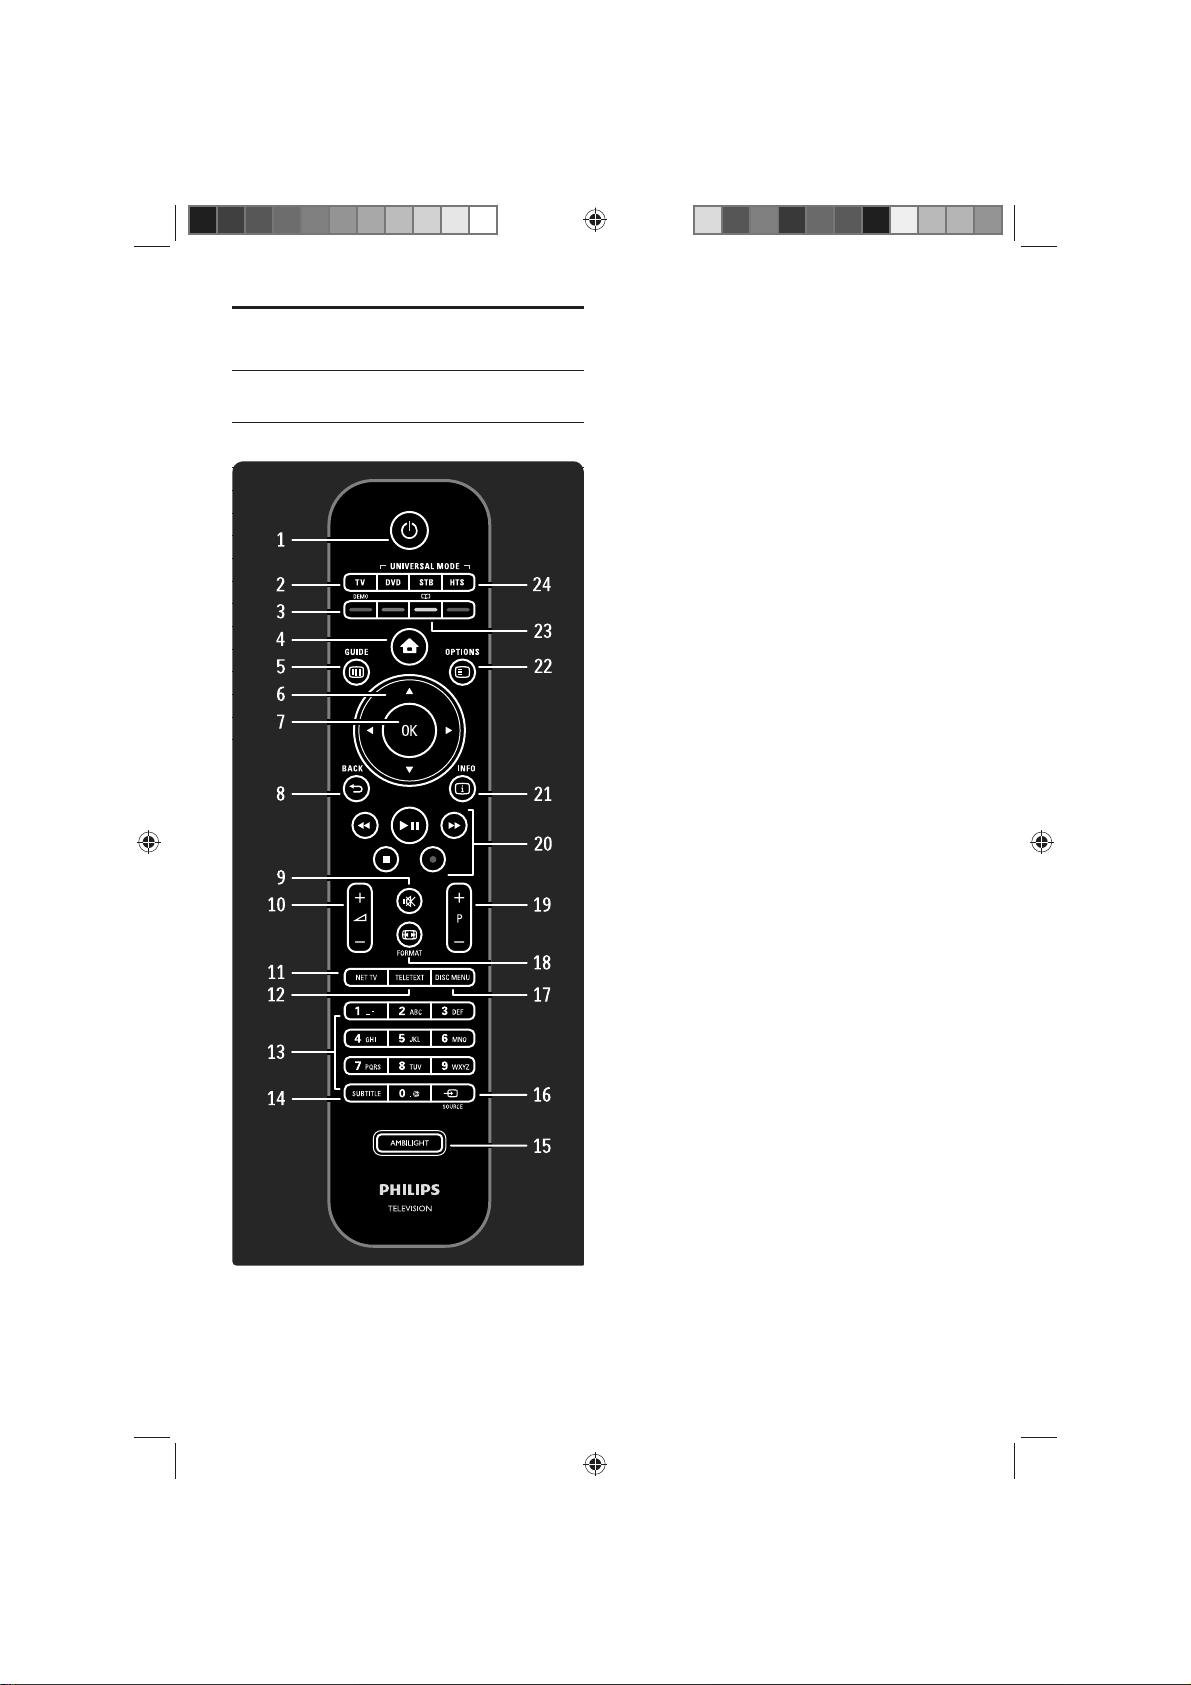
2.1.1 Remote control overview
1 Standby O
To switch the TV on or back to standby.
2 TV key
To set the remote control in TV mode.
3 Colour keys
Easy selection of teletext pages
To open or close the Demo menu (red key)
4 Home h
To open or close the Home menu.
5 Guide g
To open or close the Programme Guide.
To open or close the content list when you
browse multimedia content.
6 Navigation key
To navigate up, down, left or right.
7 OK key
To open or close the channel overview
To activate a selection
8 Back b
To go back or close a menu without changing
a setting.
To go back to the previous TV channel or the
previous teletext page.
To go back to the previous Net TV page.
9 Mute m
To mute the sound or restore it.
10 Volume V
To adjust the volume.
11 Net TV
To open or close the Net TV start page.
12 Teletext
To switch teletext on or off.
13 Number keys
To select a TV channel or enter digits.
14 Subtitle
To open the subtitle on / off menu.
15 Ambilight
To switch Ambilight on or off.
10
UM_Bombay_56PFL9954_en.indd 10UM_Bombay_56PFL9954_en.indd 10 2009-06-30 10:19:372009-06-30 10:19:37
Page 13
16 Source s
To select a connected device from the
Source list.
17 Disc menu
To show the disc menu of a disc player
connected with an HDMI cable with EasyLink
set to On.
18 Format f
To select a picture format.
19 Channel / Programme up and down
To switch to the next or previous channel in
the channel overview.
To switch to the next or previous teletext
page.
20 Audio Video keys T, P, Q, S, R
To play multimedia fi les.
To operate a disc player connected with
EasyLink HDMI-CEC.
21 Info i
To open or close channel or programme
information, if available.
22 Options o
To open or close the options menu which
shows the available options.
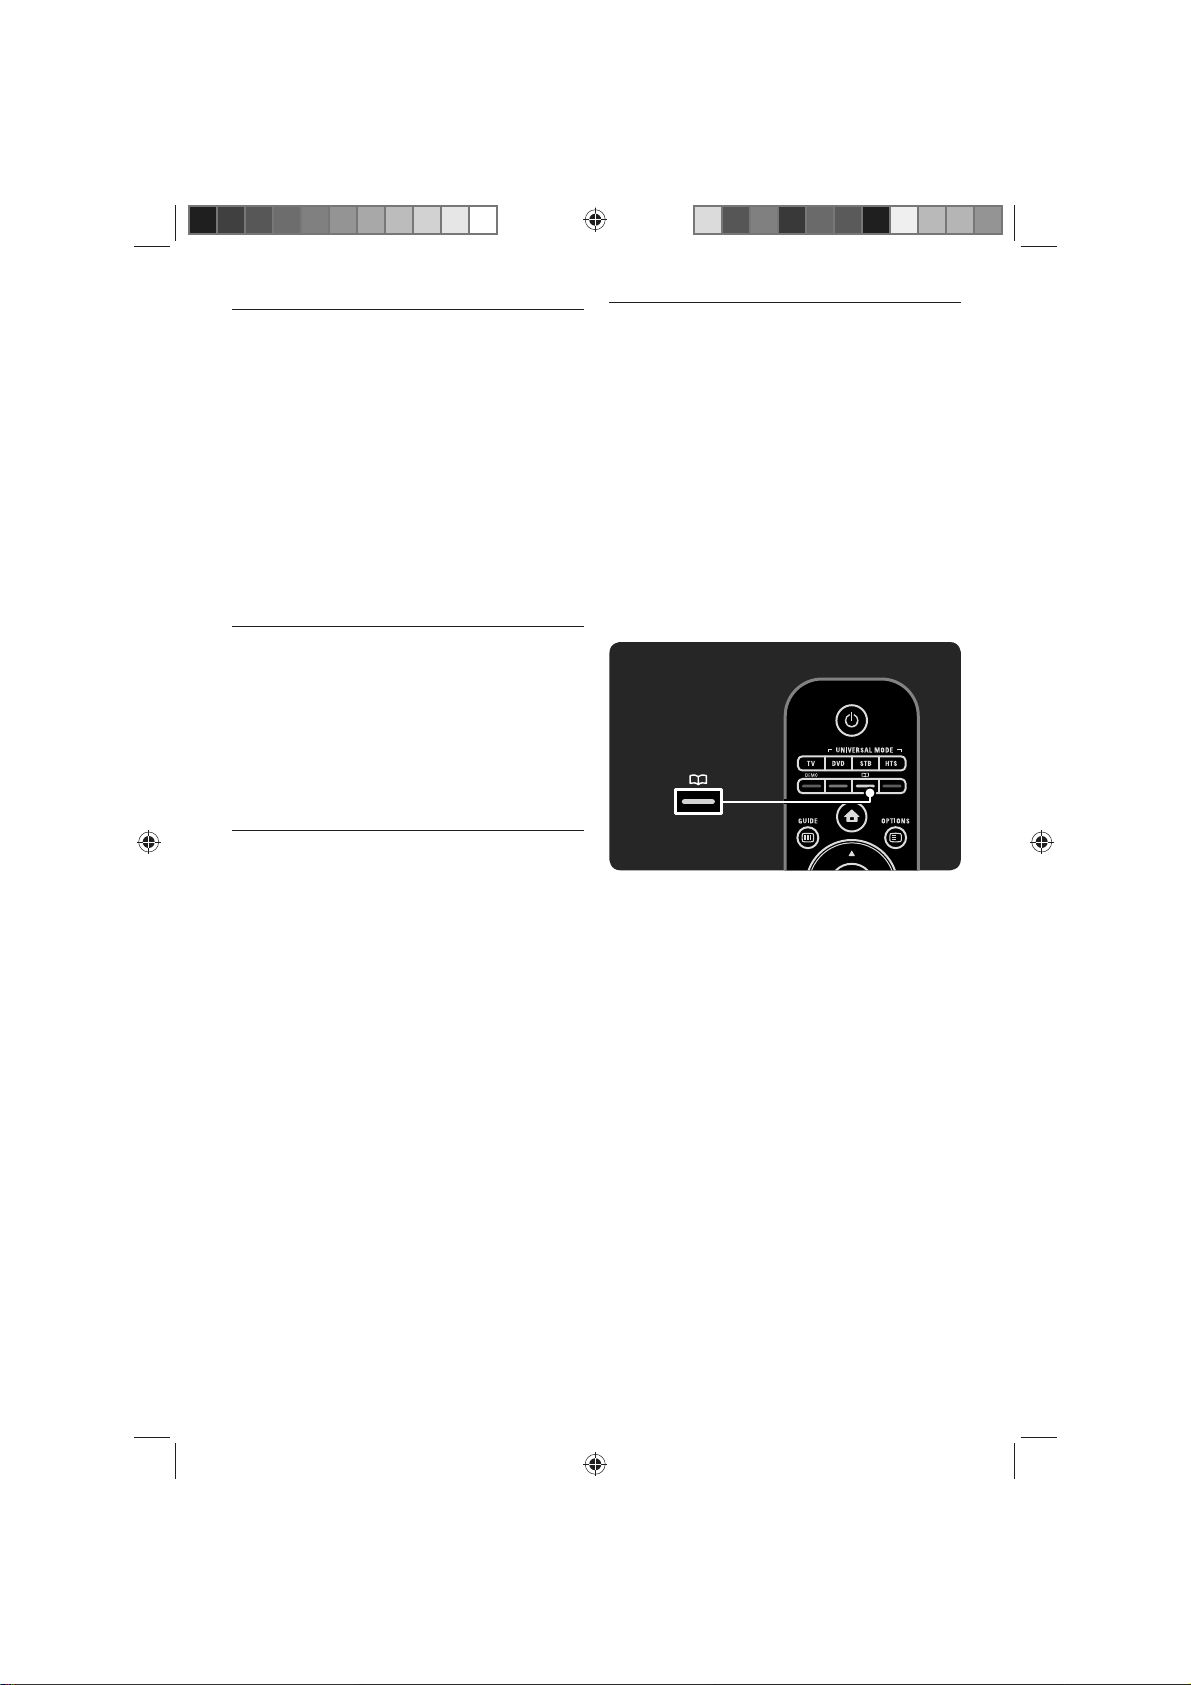
23 User manual e (yellow key)
To open or close the user manual.
24 DVD, STB and HTS keys
Universal remote control keys.
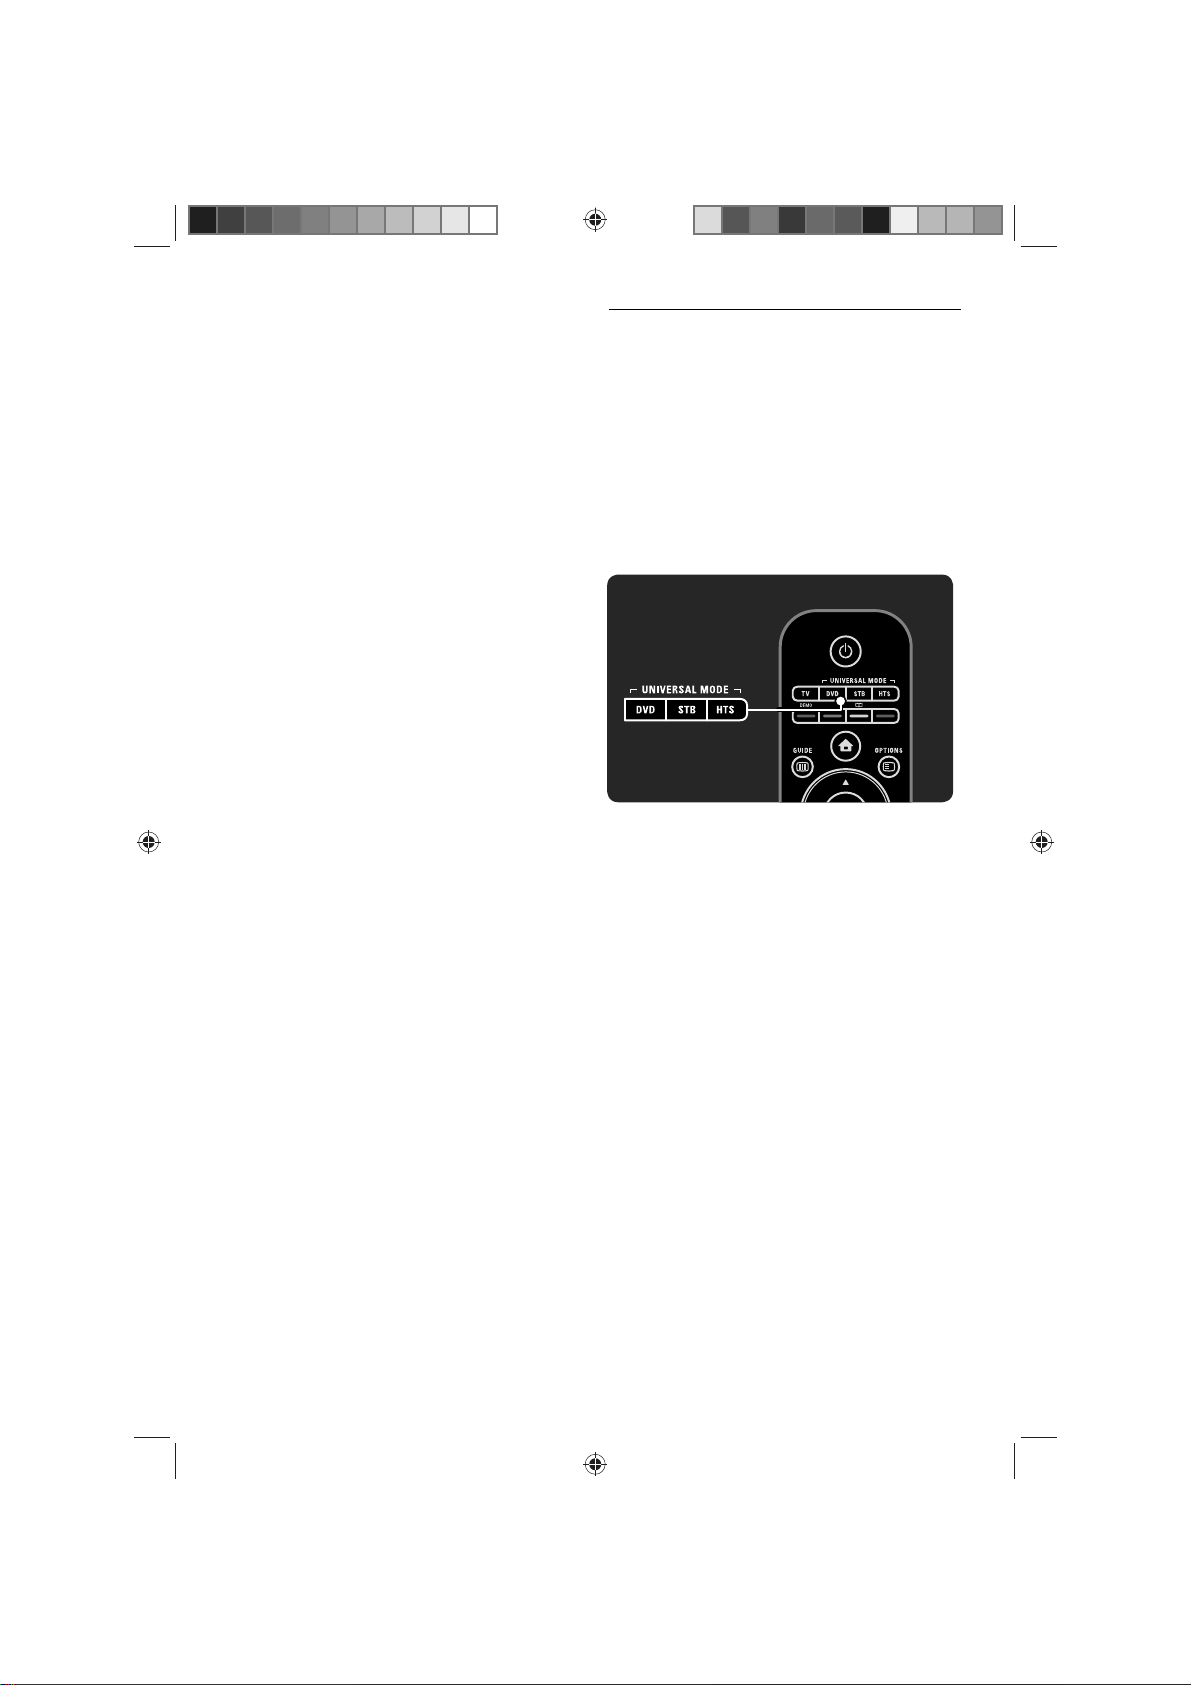
2.1.2 Universal remote control
Your TV remote control can control other
devices such as a DVD player or a Home Theatre
System from Philips or other brands.
To operate a device with the TV remote control,
you need to set up one of the Universal mode
keys for your particular device.
Once setup is complete, the Universal mode key
sets the remote control to operate the device
but the TV screen will not switch to that device.
DVD, STB or HTS key
Use the
• DVD key to operate a DVD player or Blu-ray
Disc,
• STB key for a set-top box or digital cable
receiver
• HTS key for a Home Theatre System.
As long as the key blinks, you can control the
device with the relevant keys on the remote
control.
To return to normal TV control, press TV.
When no key is pressed for 30 seconds, the
remote control switches back to TV control.
11
UM_Bombay_56PFL9954_en.indd 11UM_Bombay_56PFL9954_en.indd 11 2009-06-30 10:19:372009-06-30 10:19:37
Page 14

Setup for a particular device
To star t the Universal mode key setup in the
Home menu, press h > Setup > Installation >
ersal remote control and press OK.
Univ
Follow the instructions on screen.The TV will
or a suitable RC code for your device.
search f
When an RC code is found, you can try out the
remote control keys for this device. If not all keys
work, you can continue the search.
In some cases, there are no suitable RC codes
available for some devices.
Manual setup
You can manually enter an RC code to set up a
Universal mode key. Look up the appropriate RC
code in the Universal RC code list in this user
manual. In the list, look for the type of device
and brand you need. Some brands have several
RC codes available. When setup is performed
manually, try to operate the device with the
relevant keys. If the device does not respond or
operates incorrectly and there is more than 1
code available, you can restart the manual setup
using another RC code.
‹ Warning
To avoid the loss of stored Universal remote
control codes, do not leave the remote control
without battery power for more than 5 minutes.
Also during the replacement of the batteries, do
not press any remote control key.
Dispose of batteries according to the end of use
directives. Read 1.1.7 End of use.
2.1.3 Universal RC code list
Use Manual setup to enter an RC code from the
list hereafter. Read 2.1.3 Universal RC code list.
To setup the DVD key, fi rst fi nd the RC code
for your DVD or Blu-ray Disc player in the DVD
codes list.
See the lists for Digital receiver or Satellite
receiver to setup the STB key.
To setup the HTS key, see the list for Home
Theatre System.
Write down the codes for your brand and device
and try out the codes one by one until the setup
is successful.
To enter an RC code manually
1 Press the Universal mode key you want to
set up, DVD, STB or HTS and press this key
together with the OK key for 4 seconds
simultaneously. All 4 keys light up for 1
second and the key you are setting stays lit.
2 Enter the 4-number RC code you found in
the list.
3 If the code is accepted, all 4 keys blink 3
times. If you entered a code that does not
exist, all keys blink for 2 seconds. You can reenter a code.
4 If the code is accepted, the Universal mode
key is set up.
12
UM_Bombay_56PFL9954_en.indd 12UM_Bombay_56PFL9954_en.indd 12 2009-06-30 10:19:382009-06-30 10:19:38
Page 15

DVD codes
DVD player, DVD Recorder,
DVD-R HDD, Blu-ray Disc
player
Philips - 0000, 0001, 0002, 0003, 0004,
0005, 0006, 0007, 0008, 0009, 0010, 0012,
0064, 0065, 0066, 0067, 0094, 0098, 0103,
0122, 0131, 0132, 0140, 0143, 0144, 0170,
0174, 0175, 0177, 0180, 0190, 0206, 0240,
0255, 0264, 0287, 0293, 0295, 0296, 0302,
0309, 0316, 0317, 0318, 0325, 0327, 0333,
0334
Philips Magnavox - 0094
4Kus - 0287
Acoustic Solutions - 0011
AEG - 0135
Airis - 0290
Aiwa - 0113, 0163, 0312, 0343
Akai - 0097
Akura - 0281
Alba - 0112, 0121, 0124, 0127, 0138
Alize - 0285
Amitech - 0135
AMOi - 0225
AMW - 0114, 0354
Andersson - 0355
Apex - 0107
Asono - 0290
ATACOM - 0290
Avious - 0288
Awa - 0114
Bang and Olufsen - 0291
Basic Line - 0356
CAT - 0272, 0273
Celestron - 0363
Centrex - 0158
Centrum - 0273, 0364
Baze - 0288
BBK - 0290
Bellagio - 0114
Best Buy - 0277
Boghe - 0289
BOSE - 0352, 0353, 0357, 0358, 0359,
0360, 0361, 0362
Bosston - 0271
Brainwave - 0135
Brandt - 0047, 0145, 0264
Britannia - 0268
Bush - 0121, 0127, 0134, 0169, 0176, 0265,
0267, 0275, 0279, 0288
Cambridge Audio - 0270
CGV - 0135, 0270
Cinetec - 0114
CineVision - 0278
Classic - 0104
Clatronic - 0275, 0288, 0365
Coby - 0284
Conia - 0265
Continental Edison - 0114
Crown - 0135, 0145
Crypto - 0280
C-Tech - 0142
CVG - 0135
CyberHome - 0061, 0062, 0063
Daenyx - 0114
Daewoo - 0092, 0114, 0135, 0186, 0193,
0195, 0348
Dalton - 0283
Dansai - 0135, 0269
Daytek - 0114, 0133, 0366
Dayton - 0114
DEC - 0275
Decca - 0135
Denon - 0118, 0205, 0209, 0214
Denon - 0118, 0205, 0209, 0214
Denver - 0124, 0203, 0275, 0281, 0284
Denzel - 0266
Desay - 0274
Diamond - 0142, 0270
Digitor - 0282
Digix Media - 0367
DK Digital - 0134, 0300
Dmtech - 0091, 0368
Dual - 0266, 0369
DVX - 0142
Easy Home - 0277
Eclipse - 0270
E-Dem - 0290
Electrohome - 0135
Elin - 0135
Elta - 0093, 0135, 0152, 0285
Eltax - 0297, 0366
Emerson - 0101
Enzer - 0266
Euroline - 0370
Finlux - 0135, 0270, 0288, 0371
Fintec - 0135, 0372
Fisher - 0102
Futronic - 0373
Gericom - 0158
Giec - 0289
Global Solutions - 0142
Global Sphere - 0142
Go Video - 0095
GoldStar - 0033
Goodmans - 0085, 0112, 0121, 0127, 0158,
0171, 0200, 0216, 0239, 0246, 0275, 0279,
0289
Graetz - 0266
Grundig - 0098, 0158, 0162, 0173
Grunkel - 0135, 0286
GVG - 0135
H and B - 0275, 0276
Haaz - 0142, 0270
Harman/Kardon - 0350
HiMAX - 0277
Hitachi - 0022, 0095, 0106, 0121, 0172,
0188, 0202, 0218, 0266, 0277, 0311
Hoeher - 0290
Home Tech Industries - 0290
Humax - 0221
Hyundai - 0224, 0286, 0374
Infotech - 0375
Innovation - 0099, 0100, 0106
Jamo - 0376
JBL - 0377
Jeutech - 0271
JVC - 0054, 0055, 0056, 0057, 0058, 0059,
0060, 0079, 0080, 0081, 0082, 0141, 0153,
0157, 0161, 0164, 0165, 0166, 0167, 0247,
0248, 0249, 0250, 0251, 0252, 0253, 0254,
0264, 0301, 0337
Kansai - 0284
KEF - 0378
Kennex - 0135
Kenwood - 0159, 0220, 0308, 0379
KeyPlug - 0135
Kiiro - 0135
Kingavon - 0275
Kiss - 0266, 0276
Koda - 0275
KXD - 0277
Lawson - 0142
Lecson - 0269
Lenco - 0135, 0275, 0288
Lenoxx - 0380
LG - 0031, 0032, 0033, 0071, 0101, 0117,
0137, 0204, 0229, 0234, 0258, 0313, 0329,
0330, 0331, 0336
Life - 0099, 0100
Lifetec - 0099, 0100, 0106
Limit - 0142
Linn - 0381
Liteon - 0287
Loewe - 0098, 0175, 0213, 0382
LogicLab - 0142
Lumatron - 0383
Luxor - 0158
Magnavox - 0264, 0275, 0293
Magnex - 0288
Magnum - 0106
Majestic - 0284
Marantz - 0009, 0103, 0211, 0212
Marquant - 0135
Matsui - 0145, 0235
MBO - 0110
Mecotek - 0135
Mediencom - 0268
Medion - 0099, 0100, 0106, 0279, 0384
Metz - 0096
MiCO - 0270, 0289, 0385
Micromaxx - 0099, 0100, 0106
Micromedia - 0264
Micromega - 0009
Microstar - 0099, 0100, 0106
Minoka - 0135
Minowa - 0288
Mirror - 0279
Mivoc - 0386
Mizuda - 0275, 0277
Monyka - 0266
Mustek - 0104, 0112, 0304
Mx Onda - 0270
Mystral - 0286
NAD - 0109, 0387
Naiko - 0135, 0158
Nakamichi - 0111, 0388
Neufunk - 0266
13
UM_Bombay_56PFL9954_en.indd 13UM_Bombay_56PFL9954_en.indd 13 2009-06-30 10:19:382009-06-30 10:19:38
Page 16

Nevir - 0135
Next Base - 0226
NU-TEC - 0265
Omni - 0268
o - 0215, 0264, 0293
Onky
Oopla - 0287
Optim - 0269
Optimus - 0294
Orava - 0275
Orbit - 0114
Orion - 0176
Oritron - 0100
P and B - 0275
Pacifi c - 0142
Palladium - 0389
Palsonic - 0267
Panasonic - 0026, 0027, 0028, 0029, 0030,
0118, 0120, 0125, 0126, 0128, 0129, 0130,
0189, 0201, 0241, 0243, 0244, 0245, 0259,
0260, 0261, 0298, 0303, 0319, 0320, 0321,
0322, 0323, 0326, 0335, 0342, 0344
peeKTON - 0290, 0390
Pensonic - 0227
Phonotrend - 0288
Pioneer - 0034, 0035, 0036, 0037, 0038,
0039, 0040, 0072, 0073, 0074, 0075, 0096,
0115, 0119, 0154, 0155, 0156, 0191, 0192,
0196, 0197, 0198, 0236, 0294, 0314, 0332
Pointer - 0135
Polaroid - 0222
Portland - 0135
Powerpoint - 0114
Proline - 0158
Promax - 0223
Prosonic - 0135, 0284
Provision - 0275
Raite - 0266
REC - 0267, 0268
RedStar - 0135, 0281, 0284, 0391
Reoc - 0142
Revoy - 0276
Rimax - 0285
Roadstar - 0121, 0267, 0275
Ronin - 0114
Rowa - 0158, 0265
Rownsonic - 0273
Saba - 0047, 0145
Sabaki - 0142
Saivod - 0135
Sampo - 0105
Samsung - 0022, 0023, 0024, 0025, 0076,
0077, 0078, 0095, 0123, 0136, 0151, 0184,
0194, 0207, 0217, 0307, 0340, 0341, 0349
Sansui - 0135, 0142, 0270, 0392
Sanyo - 0147, 0150, 0181, 0185, 0306
ScanMagic - 0112
Scientifi c Labs - 0142
Scott - 0124, 0283
Seeltech - 0290
SEG - 0090, 0114, 0121, 0142, 0179, 0266
Sharp - 0099, 0109, 0149, 0168, 0178,
0199, 0210, 0230, 0231, 0256, 0257, 0262
Sherwood - 0108
Sigmatek - 0277, 0290
14
Silva - 0281
Singer - 0142, 0270
Skymaster - 0104, 0142
Skyworth - 0281
Slim Art - 0135
SM Electronic - 0142
Sontech - 0286
Sony - 0013, 0014, 0015, 0016, 0017, 0018,
0019, 0020, 0021, 0068, 0069, 0070, 0113,
0116, 0139, 0146, 0148, 0183, 0232, 0242,
0299, 0305, 0310, 0324, 0328, 0346
Soundmaster - 0142
Soundmax - 0142
Spectra - 0114
Standard - 0142
Star Cluster - 0142
Starmedia - 0275, 0290
Sunkai - 0135
Supervision - 0142
Synn - 0142
T.D.E. Systems - 0286
T+A - 039
Tatung - 0135
TCM - 0023, 0099, 0100, 0106, 0292, 0397
Teac - 0096, 0142, 0208, 0265, 0394
Tec - 0281
Technics - 0118
Technika - 0135, 0288
Telefunken - 0273
Tensai - 0135
Tevion - 0099, 0100, 0106, 0142, 0283
Thomson - 0046, 0047, 0048, 0049, 0050,
0051, 0052, 0053, 0083, 0084, 0233, 0263,
0339, 0347
Tokai - 0266, 0281
Top Suxess - 0290
Toshiba - 0012, 0041, 0042, 0043, 0044,
0045, 0086, 0087, 0088, 0089, 0094, 0182,
0187, 0219, 0237, 0238, 0264, 0293, 0345
TRANS-continents - 0114, 0288
Transonic - 0288
Trio - 0135
TruVision - 0277
TSM - 0290
Umax - 0285
Union - 0351
United - 0288
Universum - 0395
Viewmaster - 0290
Vtrek - 0280
Waitec - 0290
Welltech - 0289
Wharfedale - 0142, 0270
Wintel - 0271
Woxter - 0285, 0290
Xbox - 0048
Xenon - 0228
Xlogic - 0135, 0142
XMS - 0135, 0267
Xoro - 0289, 0396
Yakumo - 0158
Yamada - 0114, 0158, 0285, 0287
Yamaha - 0009, 0118, 0120, 0315, 0338
Yamakawa - 0114, 0266
Yukai - 0112, 0160
Zenith - 0101, 0264, 0293
STB Digital receiver
STB codes
Philips - 0432, 0436, 0437, 0439, 0506
ABC - 0448
ADB - 0461, 0462
Alcatel - 0463, 0540
Allegro - 0464
Amstrad - 0431, 0449
Andover - 0452
Arcon - 0431
Atlanta - 0465
Auna - 0466
Axis - 0431
BBT - 0467
Belgacom TV - 0468
Bell Atlantic - 0453
Birmingham Cable Communications - 0451
British Telecom - 0448
BT Cable - 0448
Cabletime - 0538
Clyde - 0454
Clyde Cablevision - 0443
Comcrypt - 0442, 0469
Connect TV - 0470
Coship - 0471
Cryptovision - 0444, 0472
Daehan - 0473
Decsat - 0474
Digi1 - 0475
Eastern - 0476
Electricord - 0477
Electus - 0455
Fastweb - 0478
Fidelity - 0431
Filmnet - 0442
Filmnet Cablecrypt - 0445, 0539
Filmnet Comcrypt - 0445
Finlux - 0434
Foxtel - 0449
France Telecom - 0437, 0439, 0479
Freebox - 0450, 0480
GC Electronics - 0481
GE - 0482
GEC - 0443, 0454
General Instrument - 0433, 0448, 0483
Golden Channel - 0461
Gooding - 0432
Grundig - 0431, 0432
Hirschmann - 0434
Hitachi - 0484
HomeChoice - 0441, 0485
Humax - 0486, 0487
HyperVision - 0435
ITT Nokia - 0434
Jerrold - 0433, 0448, 0536
Jiuzhou - 0488
JVC - 0432
Kabel Deutschland - 0489, 0490
Kansalaisboksi - 0491
UM_Bombay_56PFL9954_en.indd 14UM_Bombay_56PFL9954_en.indd 14 2009-06-30 10:19:382009-06-30 10:19:38
Page 17

LG Alps - 0492
Macab - 0439
Maestro - 0493
vox - 0494
Magna
Maspro - 0432
Matav - 0462
Matsui - 0432
Maxdome - 0489
Medion - 0495
Minerva - 0432
Mnet - 0442, 0539
Mood - 0496
Motorola - 0497
Movie Time - 0447
Mr Zapp - 0439
Multichoice - 0442
NEC - 0498
Neuf Telecom - 0533
Nokia - 0434, 0499
Noos - 0439
Northcoast - 0500
Novaplex - 0501
Now - 0502
NTL - 0456
Omniview - 0503
Ono - 0457, 0504
Orange - 0534
Pace - 0535
Pacifi c - 0505
Palladium - 0432
Pioneer - 0431
Prelude - 0507
Protelcon - 0508
PVP Stereo Visual Matrix - 0536
Regency - 0509
Sagem - 0439
Samsung - 0440, 0502
SAT - 0431
Satbox - 0458
Satel - 0459
Scientifi c Atlanta - 0446
Seam - 0510
Sharp - 0511
SingTel - 0512
SkyCable - 0513
Skyworth - 0514
Starcom - 0448
Stargate - 0515
Stellar One - 0516
TaeKwang - 0517
Tandy - 0518
Tatung - 0519
Teknika - 0520
Tele+1 - 0442, 0445, 0539
Telefonica - 0460
Telegent - 0521
Telenet - 0522
Telepiu - 0442, 0539
Thomson - 0438
Timeless - 0476
Tiscali - 0523
Tocom - 0524
Torx - 0448
Tudi - 0435
Uniden - 0525
United Cable - 0536
Universal - 0526
Universum - 0432, 0434
Videoway - 0537
VideoWorks - 0527
Vidtech - 0528
Viewstar - 0529
Vision - 0530
Visionetics - 0531
Visiopass - 0434, 0437, 0439
Wittenberg - 043
Zenith - 0532
Satellite receiver
STB codes
Philips - 0000, 0001, 0002, 0008, 0020,
0054, 0065, 0069, 0070, 0072, 0075, 0077,
0111, 0119, 0136, 0140, 0144, 0155, 0156,
0159, 0163, 0165, 0388, 0390, 0391, 0392,
0396, 0410, 0412, 0420, 0422, 0423, 0427
AB Sat - 0163, 0164, 0173, 0425
Action - 0187
ADB - 0175, 0188
Aegir - 0189
AGS - 0163
Akai - 0054, 0391
Akura - 0190
Alba - 0015, 0019, 0020, 0021, 0023, 0044,
0067, 0164, 0234, 0412
Aldes - 0021, 0023, 0024, 0234, 0395
Allantide - 0191
Allegro - 0192
Allsat - 0040, 0054, 0193, 0384, 0390, 0391
Allsonic - 0010, 0023, 0028, 0395, 0402
Alltech - 0164, 0414
Alpha - 0391
Altai - 0403
Amino - 0194
Amitronica - 0164
Ampere - 0153, 0403
Amstrad - 0026, 0055, 0074, 0108, 0153,
0158, 0164, 0169, 0195, 0394, 0399, 0403,
0415, 0417, 0421, 0426
Amway - 0196
Anglo - 0164
Ankaro - 0010, 0023, 0028, 0164, 0197,
0392, 0395, 0402
AntSat - 0198
Anttron - 0019, 0023, 0390, 0412
AnySat - 019
Apollo - 0019
Arcon - 0027, 0041, 0153, 0419
Arion - 0200
Ariza - 0201
Armstrong - 0026, 0391
Arrox - 0202
ASA - 0404
Asat - 0054, 0391
ASCI - 0203
ASLF - 0164
AST - 0031, 0204, 0397
Astacom - 0163, 0420
Aston - 0022, 0205
Astra - 0026, 0029, 0030, 0050, 0161, 0164,
0206, 0387, 0400, 0407
Astratec - 0207
Astro - 0010, 0023, 0024, 0028, 0033, 0155,
0156, 0158, 0161, 0208, 0388, 0402, 0412
Atlanta - 0209
AudioTon - 0023, 0040, 0412
Aurora - 0168, 0210
Austar - 0071, 0168, 0211
Avalon - 0403
Axiel - 0163
Axil - 0212
Axis - 0010, 0028, 0030, 0036, 0401, 0402,
0407
B and K - 0213
Barcom - 0027
BeauSAT - 0212
BEC - 0214
Beko - 0215
Belgacom TV - 0216
Belson - 0217
Benjamin - 0218
Best - 0010, 0027, 0028, 0402
Best Buy - 0219
Big Brother - 0191
Blackbird - 0220
Blaupunkt - 0033, 0155, 0388
Blue Sky - 0164, 0169
Boca - 0026, 0050, 0153, 0164, 0221, 0378,
0410, 0416
Boom - 0222
BOSE - 0223
Boston - 0153, 0163, 0224
Brain Wave - 0035, 0398, 0419
Brandt - 0056
Broadcast - 0034, 0400
Broco - 0164, 0407
BSkyB - 0074, 0084, 0426
BT - 0066, 0163
BT Satellite - 0420
Bubu Sat - 0164
Bush - 0020, 0044, 0090, 0234, 0384, 0390
BVV - 0419
Cable Innovations - 0225
Cambridge - 0158, 0226, 0416
Camundosat - 0227
Canal Digital - 0176, 0180, 0181
Canal Satellite - 0005, 0156, 0396, 0427
Canal+ - 0156, 0228
CCI - 0229
cello - 0230
CellularVision - 0231
Century - 0232
CGV - 0233
Channel Master - 0021, 0234
Chaparral - 0052, 0235
CHEROKEE - 0163, 0173
Chesley - 0212
Chess - 0154, 0160, 0164, 0221
Chili - 0236
Churchill - 0237
15
UM_Bombay_56PFL9954_en.indd 15UM_Bombay_56PFL9954_en.indd 15 2009-06-30 10:19:382009-06-30 10:19:38
Page 18

Citizen - 0238
CityCom - 0020,
0037, 0071, 0152, 0161,
0165, 0423
Clatronic - 0035, 0398
Clemens Kamphus - 0046
CNT - 0024
Colombia - 0153
Columbia - 0153
COLUMBUS - 0043
Comag - 0153, 0221, 0239
Commander - 0392
Commlink - 0023, 0395
Comtec - 0036, 0395, 0401
Condor - 0010, 0028, 0161, 0240, 0402
Connexions - 0010, 0032, 0402, 0403
Conrad - 0010, 0152, 0153, 0158, 0161,
0402, 0409, 0410
Conrad Electronic - 0161, 0164
Contec - 0036, 0037, 0401, 0410
Continental Edison - 0241
Cosat - 0040
Coship - 0212
Crown - 0026, 0242
CyberHome - 0243
Cybermaxx - 0062
Cyrus - 0174
Daeryung - 0032
Daewoo - 0066, 0164, 0244
Dansat - 0384, 0390
D-Box - 0245, 0429
DDC - 0021, 0234
Decca - 0038
Delega - 0021
Demo - 0246
Dew - 0036, 0401
DGStation - 0086
Diamond - 0039
Digenius - 0247
Digiality - 0161, 0248
Digiline - 0249
DigiO2 - 0250
Digipro - 0170
DigiQuest - 0251
DigitAll World - 0252
Digiturk - 0253
Dilog - 0254
DiPro - 0212
Discoverer - 0154, 0160
Discovery - 0163
Diseqc - 0163
Diskxpress - 0027
Distratel - 0169
Distrisat - 0391
Ditristrad - 0040
DNR - 0419
DNT - 0032, 0054, 0391, 0403
Dong Woo - 0049
Drake - 0041, 0255
DStv - 0168, 0256
Dual - 0257
Dune - 0010, 0402
Dynasat - 0162
DynaStar - 0258
Echostar - 0032, 0164, 0173, 0403, 0427,
16
0428
EIF - 0259
Einhell - 0019, 0023, 0026, 0153, 0158,
0164, 0394, 0395
Elap - 0163, 0164
Electron - 0260
Elekta - 0024
Elsat - 0164, 0417
Elta - 0010, 0019, 0028, 0040, 0054, 0261,
0391, 0402
Emanon - 0019
Emme Esse - 0010, 0028, 0046, 0162,
0402, 0428
Engel - 0164, 0262
Ep Sat - 0020
Erastar - 0263
EURIEULT - 0013, 0108, 0169
Euro1 - 0264
Eurocrypt - 0387
Eurodec - 0060, 0265
Europa - 0158, 0161, 0391, 0392, 0410
European - 0064
Europhon - 0153, 0161
Europlus - 0266
Eurosat - 0026
Eurosky - 0010, 0026, 0028, 0152, 0153,
0158, 0161, 0402
Eurospace - 0042
Eurostar - 0026, 0152, 0161, 0162, 0165,
0430
Euskaltel - 0267
Eutelsat - 0164
Eutra - 0414
Exator - 0019, 0023, 0412
Fast - 0268
Fenner - 0010, 0154, 0160, 0164
Ferguson - 0020, 0060, 0114, 0384, 0390
Fidelity - 0158, 0394, 0415
Finepass - 0269
Finlandia - 0020, 0387
Finlux - 0020, 0387, 0405, 0409
FinnSat - 0036, 0060, 0270
Flair Mate - 0164
Fortec Star - 0198
Foxtel - 0071, 0168, 0172
Fracarro - 0271, 0428
France Satellite/TV - 0043
Freecom - 0019, 0045, 0155, 0158
Freesat - 0108, 0414
FTE - 0047, 0402, 0410, 0416
FTEmaximal - 0010, 0164
Fuba - 0010, 0019, 0027, 0028, 0029, 0032,
0033, 0043, 0054, 0152, 0155, 0387, 0402,
0403
Fugionkyo - 0170
Fujitsu - 0182
Galaxi - 0027
Galaxis - 0010, 0023, 0028, 0030, 0036,
0040, 0044, 0059, 0071, 0127, 0152, 0168,
0395, 0401, 0402, 0407
Galaxisat - 0397
Gardiner - 0165
Gecco - 0272
General Instrument - 0273
Gensat - 0274
Geotrack - 0275
Globo - 0276
GMI - 0026
Goldbox - 0156, 0396, 0427
Golden Interstar - 0277
GoldStar - 0045
Gooding - 0159
Goodmans - 0015, 0016, 0020, 0044
Gould - 0278
Granada - 0387
Grandin - 0013, 0385
Grothusen - 0019, 0045
Grundig - 0020, 0023, 0033, 0055, 0074,
0099, 0100, 0101, 0109, 0133, 0148, 0155,
0158, 0159, 0168, 0169, 0388, 0399, 0422,
0426
G-Sat - 0390
Hanseatic - 0160, 0279, 0411
Haensel and Gretel - 0153, 0161
Hantor - 0019, 0035, 0049, 0398
Hanuri - 0024
Harting und Helling - 0046
Hase and Igel - 0419
Hauppauge - 0089, 0113
Heliocom - 0161, 0280
Helium - 0161
Hinari - 0021, 0234, 0390
Hirschmann - 0010, 0033, 0046, 0098,
0108, 0155, 0158, 0161, 0163, 0388, 0403,
0404, 0406, 0409
Hisawa - 0035, 0398
Hitachi - 0020, 0281
Hivion - 0282
HNE - 0153
Homecast - 0283
Houston - 0040, 0284, 0392
Humax - 0011, 0012, 0050, 0071, 0085,
0086, 0094, 0097, 0121, 0122, 0123, 0124,
0128, 0129, 0149
Huth - 0023, 0026, 0034, 0035, 0036, 0040,
0046, 0153, 0161, 0171, 0392, 0395, 0398,
0400, 0401, 0410
Hypson - 0013
ID Digital - 0071
Imex - 0013
Imperial - 0044
Ingelen - 0108
Innovation - 0028, 0059, 0062
InOutTV - 0285
International - 0153
Interstar - 0170
Intertronic - 0026, 0286
Intervision - 0040, 0161, 0413
Inverto - 0287
InVideo - 0179
IRTE - 0288
ITT Nokia - 0020, 0387, 0404, 0409, 0429
Janeil - 0289
Jazztel - 0290
Johansson - 0035, 0398
JOK - 0163, 0418, 0420
JSR - 0040
JVC - 0015, 0159, 0291
UM_Bombay_56PFL9954_en.indd 16UM_Bombay_56PFL9954_en.indd 16 2009-06-30 10:19:392009-06-30 10:19:39
Page 19

Kamm - 0164
Kaon - 0292
Kathrein - 0033,
0037, 0047, 0052, 0054,
0068, 0073, 0080, 0091, 0092, 0093, 0095,
0118, 0120, 0130, 0131, 0152, 0155, 0163,
0164, 0165, 0173, 0388, 0391, 0406, 0412,
0423
Kathrein Eurostar - 0152
Kenwood - 0176, 0293
Key West - 0153
Klap - 0163
Kolon - 0177
Konig - 0161, 0294
Kosmos - 0045, 0046, 0047, 0295, 0406
KR - 0023, 0412, 0414
Kreatel - 0296
Kreiselmeyer - 0033, 0155, 0388
K-SAT - 0164
Kyostar - 0019, 0153, 0297, 0412
L and S Electronic - 0010, 0153
Lasat - 0010, 0024, 0028, 0048, 0049, 0050,
0056, 0152, 0153, 0154, 0161, 0401, 0402,
0416
Lemon - 0419
Lenco - 0010, 0019, 0045, 0051, 0152,
0161, 0164, 0257, 0392, 0402, 0407, 0419
Leng - 0035
Lennox - 0040
Lenson - 0158
Lexus - 0391
LG - 0045, 0208
Life - 0059
Lifesat - 0010, 0028, 0059, 0062, 0153,
0154, 0160, 0164, 0402, 0411
Lifetec - 0028, 0059, 0062
Lion - 0042, 0191
Loewe - 0147
Lorenzen - 0153, 0161, 0298, 0392, 0419,
0421
Lorraine - 0045
Lupus - 0010, 0028, 0402
Luxor - 0158, 0387, 0399, 0409, 0429
Luxorit - 0299
LuxSAT - 0300
Lyonnaise - 0060
M and B - 0160, 0411
M Technologies - 0301
Macab - 0060
Macom - 0183
Manata - 0013, 0153, 0163, 0164, 0420
Manhattan - 0020, 0024, 0040, 0163, 0420
Marann - 0302
Marantz - 0054
Marks and Spencer - 0303
Mascom - 0024, 0406
Maspro - 0020, 0052, 0155, 0159, 0164,
0386, 0388, 0414, 0419
Master’s - 0037
Matsui - 0155, 0159, 0163, 0234, 0388,
0420
Max - 0161
Maxi - 0304
MB - 0160, 0411
Mediabox - 0156, 0396, 0427
Mediamarkt - 0026
Mediasat - 0030, 0156, 0158, 0396, 0407,
0427
Medion - 0010, 0028, 0059, 0062, 0132,
0153, 0164, 0402
Medison - 0164
Mega - 0054, 0391
Melectronic - 0165
Meta - 0305
Metronic - 0013, 0014, 0019, 0023, 0024,
0027, 0164, 0165, 0169, 0306, 0385, 0395,
0412, 0423
Metz - 0033, 0155, 0388
Micro Com - 0089
Micro electronic - 0158, 0161, 0164
Micro Technology - 0042, 0164, 0407
Micromaxx - 0010, 0028, 0059, 0062
Micronik - 0307
Microstar - 0028, 0059, 0062
Microtec - 0164
Minerva - 0033, 0159
Mitsubishi - 0020, 0033
Mitsumi - 0050
Mogen - 0308
Morgan Sydney - 0061
Morgan’s - 0026, 0050, 0054, 0153, 0164,
0391, 0410, 0416
Motorola - 0167
Multichoice - 0168, 0175
Multiscan - 0309
Multistar - 0047, 0049
Multitec - 0154
Muratto - 0045, 0397
Mustek - 0310
Mysat - 0164
National Microtech - 0311
Navex - 0035, 0398
NEC - 0053, 0312, 0389
Nesco - 0313
Neta - 0314
Netgem - 0315
Network - 0390
Neuhaus - 0030, 0040, 0158, 0161, 0164,
0392, 0407, 0410, 0419
Neusat - 0164, 0419
Newave - 0316
NextWave - 0025, 0171, 0262
Nikko - 0026, 0164
Nokia - 0020, 0082, 0083, 0104, 0143,
0145, 0387, 0404, 0409, 0429
Nomex - 0063
Nordmende - 0019, 0020, 0021, 0024,
0060, 0234, 0398
Nova - 0168
Novis - 0035, 0398
Now - 0317
NTC - 0046
Numericable - 0380
Oceanic - 0039, 0042
Octagon - 0019, 0023, 0036, 0392, 0401,
0412
Okano - 0026, 0046, 0047
Ondigital - 0393
Optex - 0037, 0040
Optus - 0156, 0168, 0171
Orbit - 0031, 0381
Orbitech - 0019, 0154, 0156, 0158, 0408,
0410
Origo - 0042, 0157
Oritron - 0318
Osat - 0023, 0399
Otto Versand - 0033
Oxford - 0178
Pace - 0020, 0033, 0044, 0055, 0074, 0088,
0102, 0110, 0112, 0116, 0125, 0134, 0135,
0163, 0173, 0319, 0384, 0390, 0393, 0426
Pacifi c - 0039, 0320
Packsat - 0163
Pal - 0321
Palcom - 0021, 0029, 0043, 0234, 0322
Palladium - 0026, 0158, 0159
Palsat - 0154, 0158
Paltec - 0029
Panasat - 0168
Panasonic - 0020, 0055, 0074, 0078, 0142,
0426
Panda - 0020, 0155, 0161, 0384, 0387
Pansat - 0323
Pantech - 0324
Patriot - 0153, 0163
Philon - 0325
Phoenix - 0036, 0044, 0390, 0401
Phonotrend - 0020, 0023, 0040, 0046,
0395
Pioneer - 0087, 0156, 0326, 0427
Polsat - 0060
Polytron - 0037
Praxis - 0327
Predki - 0035, 0398
Preisner - 0153, 0328, 0403, 0410, 0416
Premiere - 0040, 0071, 0156, 0396, 0427
Priesner - 0026
Profi - 0051
Profi le - 0163
Promax - 0020
Prosat - 0021, 0023, 0044, 0234, 0395,
0413
Prosonic - 0421
Protek - 0039, 0329
Provision - 0024
Pye - 0159
Pyxis - 0166
Quadral - 0010, 0021, 0023, 0028, 0163,
0173, 0234, 0395, 0402, 0410, 0413, 0420
Quelle - 0033, 0152, 0161, 0394
Quiero - 0060
Radiola - 0054, 0391
Radix - 0032, 0079, 0108, 0330, 0403, 0414
Rainbow - 0023, 0412, 0414
Rediffusion - 0053
Redpoint - 0030, 0407
RedStar - 0010, 0028, 0402
Regency - 0331
RFT - 0023, 0054, 0391, 0392, 0395, 0408
Roadstar - 0164
Roch - 0013
Rockdale - 0184
Rover - 0010, 0164, 0413
17
UM_Bombay_56PFL9954_en.indd 17UM_Bombay_56PFL9954_en.indd 17 2009-06-30 10:19:392009-06-30 10:19:39
Page 20

Ruefach - 0051
Saba - 0024,
0042, 0056, 0152, 0161, 0163,
0169, 0390, 0418, 0419, 0420
Sabre - 0020
Sagem - 0005, 0060, 0146, 0332, 0424
Sakura - 0036, 0044, 0401
Salora - 0053, 0387
Samsung - 0017, 0018, 0019, 0076, 0081,
0096, 0137
Sansui - 0333
Sanyo - 0334
SAT - 0021, 0031, 0158, 0397, 0415
Sat Cruiser - 0171
Sat Partner - 0019, 0023, 0024, 0035, 0045,
0046, 0158, 0398
Sat Team - 0164
Satcom - 0034, 0160, 0161, 0400, 0411
SatConn - 0335
Satec - 0164, 0390
Satelco - 0010, 0402
Satford - 0034, 0400
Satline - 0413
Satmaster - 0034, 0400
Satplus - 0154
Satstar - 0336
Schacke - 0412
Schneider - 0028, 0059, 0062, 0154, 0163,
0422
Schwaiger - 0037, 0039, 0153, 0154, 0160,
0161, 0169, 0390, 0410, 0411
Scientifi c Atlanta - 0337
SCS - 0152
Sedea Electronique - 0153, 0170
Seemann - 0026, 0030, 0032, 0402, 0407
SEG - 0010, 0019, 0028, 0035, 0160, 0398,
0402, 0411, 0421
Seleco - 0040, 0428
Septimo - 0169
Servi Sat - 0013, 0164
Setec - 0338
Sharp - 0115
Siemens - 0033, 0133, 0155, 0339, 0383,
0388, 0416
Silva - 0045
SilverCrest - 0340
Simz - 0341
Skantin - 0164
Skardin - 0030, 0407
Skinsat - 0158
SKR - 0164
SKT - 0342
SKY - 0084, 0167
Sky Digital - 0055
Sky New Zealand - 0343
Sky Television - 0344
Skymaster - 0003, 0004, 0023, 0138, 0139,
0154, 0160, 0164, 0395, 0411, 0413, 0430
Skymax - 0054, 0391
SkySat - 0154, 0158, 0160, 0161, 0164
Skyvision - 0040
SL - 0153, 0419
SM Electronic - 0154, 0164
Smart - 0108, 0152, 0153, 0164, 0345
18
Sogo - 0346
Sonaecom - 0347
Sony - 0055, 0156
SR - 0026, 0050, 0153
Star Clusters - 0348
Star Trak - 0349
Star View - 0350
Starland - 0164
Starring - 0035, 0398
Start Trak - 0019
Strong - 0010, 0019, 0023, 0028, 0045,
0168, 0170, 0271, 0402
STVI - 0013
Sumida - 0026
Sunny Sound - 0010, 0402
Sunsat - 0164, 0351, 0407
Sunstar - 0010, 0026, 0050, 0153, 0402
Sunstech - 0352
Super Sat - 0162
Super Track - 0353
SuperGuide - 0354
Supermax - 0171
SVA - 0355
Swisstec - 0303
Systec - 0153, 0356
S-ZWO - 0357
TaeKwang - 0358
Tandberg - 0060
Tandy - 0023
Tantec - 0020, 0043
Tatung - 0038
TBoston - 0359
TCM - 0028, 0059, 0062, 0379
Techniland - 0034, 0400
TechniSat - 0007, 0008, 0009, 0032, 0154,
0156, 0158, 0391, 0408
Technology - 0168
Technomate - 0277
Technosat - 0171
Technosonic - 0360
TechnoTrend - 0133
Technowelt - 0153, 0161, 0169
Teco - 0026, 0050
Tee-Comm - 0185
Telanor - 0021
Telasat - 0152, 0160, 0161, 0411
Teleciel - 0412
Telecom - 0164
Teledirekt - 0390
Telefunken - 0019, 0056, 0163, 0420
Teleka - 0023, 0026, 0032, 0158, 0161,
0403, 0406, 0412, 0419
Telemaster - 0024
Telemax - 0048
Telesat - 0160, 0161, 0411
Telestar - 0154, 0156, 0158
Teletech - 0430
Televes - 0020, 0061, 0153, 0158, 0345
Telewire - 0040
Tempo - 0171
Tevion - 0028, 0059, 0062, 0164
Thomson - 0006, 0020, 0057, 0060, 0103,
0106, 0117, 0141, 0150, 0151, 0152, 0156,
0161, 0163, 0164, 0396
Thorens - 0039, 0361
Thorn - 0020
Tioko - 0037, 0153
Tokai - 0391
Tonna - 0020, 0034, 0040, 0158, 0164,
0400
To p fi eld - 0126, 0362, 0382
Toshiba - 0363
TPS - 0058, 0364
Tratec - 0365
Triad - 0031, 0045, 0366, 0397
Triasat - 0158, 0405
Triax - 0033, 0056, 0152, 0153, 0158, 0164,
0405
Turnsat - 0164
Tvonics - 0114, 0367, 0368
Twinner - 0013, 0061, 0153, 0164
UEC - 0168, 0172
Uher - 0154
Uniden - 0415
Unisat - 0026, 0036, 0153, 0391, 0401
Unitor - 0027, 0035
Universum - 0033, 0152, 0155, 0159, 0161,
0388, 0404, 0415, 0421
Unnisat - 0369
Vantage - 0370
Variosat - 0033, 0155, 0388
Vector - 0042
Vega - 0010
Ventana - 0054, 0391
Vestel - 0421
Via Digital - 0057
Viasat - 0173, 0371
Viewstar - 0372
Vision - 0373
Visionic - 0170
Visiosat - 0035, 0040, 0163, 0164, 0418
Viva - 0392
Vivanco - 0064
Vivid - 0172
Vortec - 0019, 0374, 0393
VTech - 0031, 0165, 0397, 0418, 0423
Watson - 0375
Wela - 0410
Welltech - 0154
WeTeKom - 0154, 0158, 0160
Wevasat - 0020
Wewa - 0020
Winersat - 0035, 0398
Wintergarten - 0395
Wisi - 0020, 0031, 0032, 0033, 0155, 0158,
0161, 0388, 0397, 0403, 0410, 0418
Woorisat - 0024
World - 0398
Worldsat - 0163, 0376
Xcom Multimedia - 0186
Xoro - 0377
Xrypton - 0010, 0402
XSat - 0164, 0173
Zaunkonig - 0419
Zehnder - 0010, 0024, 0027, 0028, 0047,
0105, 0107, 0152, 0165, 0397, 0402, 0421,
0423
UM_Bombay_56PFL9954_en.indd 18UM_Bombay_56PFL9954_en.indd 18 2009-06-30 10:19:392009-06-30 10:19:39
Page 21

Zenith - 0167
ell - 0071
Zinw
Zodiac - 0023, 0412
Zwergnase - 0026
HTS - Home Theatre System
Amplifi er
HTS codes
Philips - 0000, 0001, 0002, 0003, 0009,
0011, 0022, 0029, 0030, 0031, 0032, 0039,
0044, 0046, 0118, 0119, 0120, 0130, 0131,
0132, 0133, 0137, 0144, 0145, 0146, 0147,
0148, 0189, 0219, 0220
Aiwa - 0006, 0025, 0160, 0161, 0221, 0222,
0227, 0247, 0248
Akai - 0259, 0260
Alba - 0171
AMW - 0069
Andersson - 0070
Basic Line - 0071
BOSE - 0067, 0068, 0072, 0073, 0074,
0075, 0076, 0077
Bush - 0051, 0261, 0262, 0263
Celestron - 0078
Centrum - 0079
Clatronic - 0080
Daewoo - 0060
Daytek - 0081
Denon - 0126, 0127, 0128, 0129, 0138,
0139, 0264, 0265, 0266
Denver - 0156, 0157, 0176, 0177
Digix Media - 0082
DK Digital - 0007
Dmtech - 0083
Dual - 0084
Eltax - 0004, 0081
Euroline - 0085
Finlux - 0086
Fintec - 0087
Futronic - 0088
Goodmans - 0174, 0175, 0267, 0268
Harman/Kardon - 0064
Hitachi - 0024, 0166, 0167, 0168
Hyundai - 0089
Infotech - 0090
Jamo - 0091
JBL - 0092
JVC - 0008, 0016, 0020, 0050, 0123, 0124,
0125, 0187, 0188, 0190, 0191, 0209, 0210,
0223, 0224, 0225, 0236
KEF - 0093
Kenwood - 0019, 0094, 0164, 0165, 0213,
0214, 0243, 0244, 0249, 0250, 0251
Lenoxx - 0095
LG - 0026, 0041, 0042, 0043, 0048, 0049,
0062, 0065, 0169, 0170, 0178, 0179, 0180,
0181
Linn - 0096
Loewe - 0097
Lumatron - 0098
Magnavox - 0011, 0118, 0132
Medion - 0099
MiCO - 0100
Mivoc - 0101
Mustek - 0013
NAD - 0102
Nakamichi - 0103
Palladium - 0104
Panasonic - 0005, 0010, 0012, 0020, 0021,
0033, 0034, 0035, 0036, 0037, 0053, 0054,
0063, 0141, 0142, 0143, 0217, 0218, 0228,
0229, 0240, 0241
peeKTON - 0105
Pioneer - 0027, 0045, 0047, 0153, 0154,
0155, 0200, 0201, 0256
Redstar - 0106
Saba - 0172, 0173
Samsung - 0018, 0056, 0057, 0061, 0158,
0159
Sansui - 0085
Sanyo - 0015, 0017, 0149, 0150, 0151,
0246
Sharp - 0134, 0135, 0136, 0194, 0195,
0196, 0213, 0214, 0234, 0235
Sony - 0006, 0014, 0023, 0038, 0040, 0113,
0114, 0115, 0116, 0117, 0152, 0182, 0183,
0184, 0185, 0186, 0197, 0202, 0203, 0204,
0205, 0206, 0207, 0208, 0215, 0216, 0230,
0237, 0238, 0239, 0242, 0245, 0253, 0254,
0255
T+A - 0107
TCM - 0111, 0273, 0274, 0275, 0276
Teac - 0108, 0121, 0122, 0269, 0270, 0271,
0272
Technics - 0005, 0020, 0112, 0140, 0142,
0211, 0212, 0226
Thomson - 0055, 0059, 0152, 0192, 0193,
0197, 0198, 0199, 0231, 0232, 0233, 0252
Toshiba - 0058
Union - 0066
Universum - 0109
Xoro - 0110
Yamaha - 0028, 0052, 0162, 0163, 0257,
0258
19
UM_Bombay_56PFL9954_en.indd 19UM_Bombay_56PFL9954_en.indd 19 2009-06-30 10:19:392009-06-30 10:19:39
Page 22
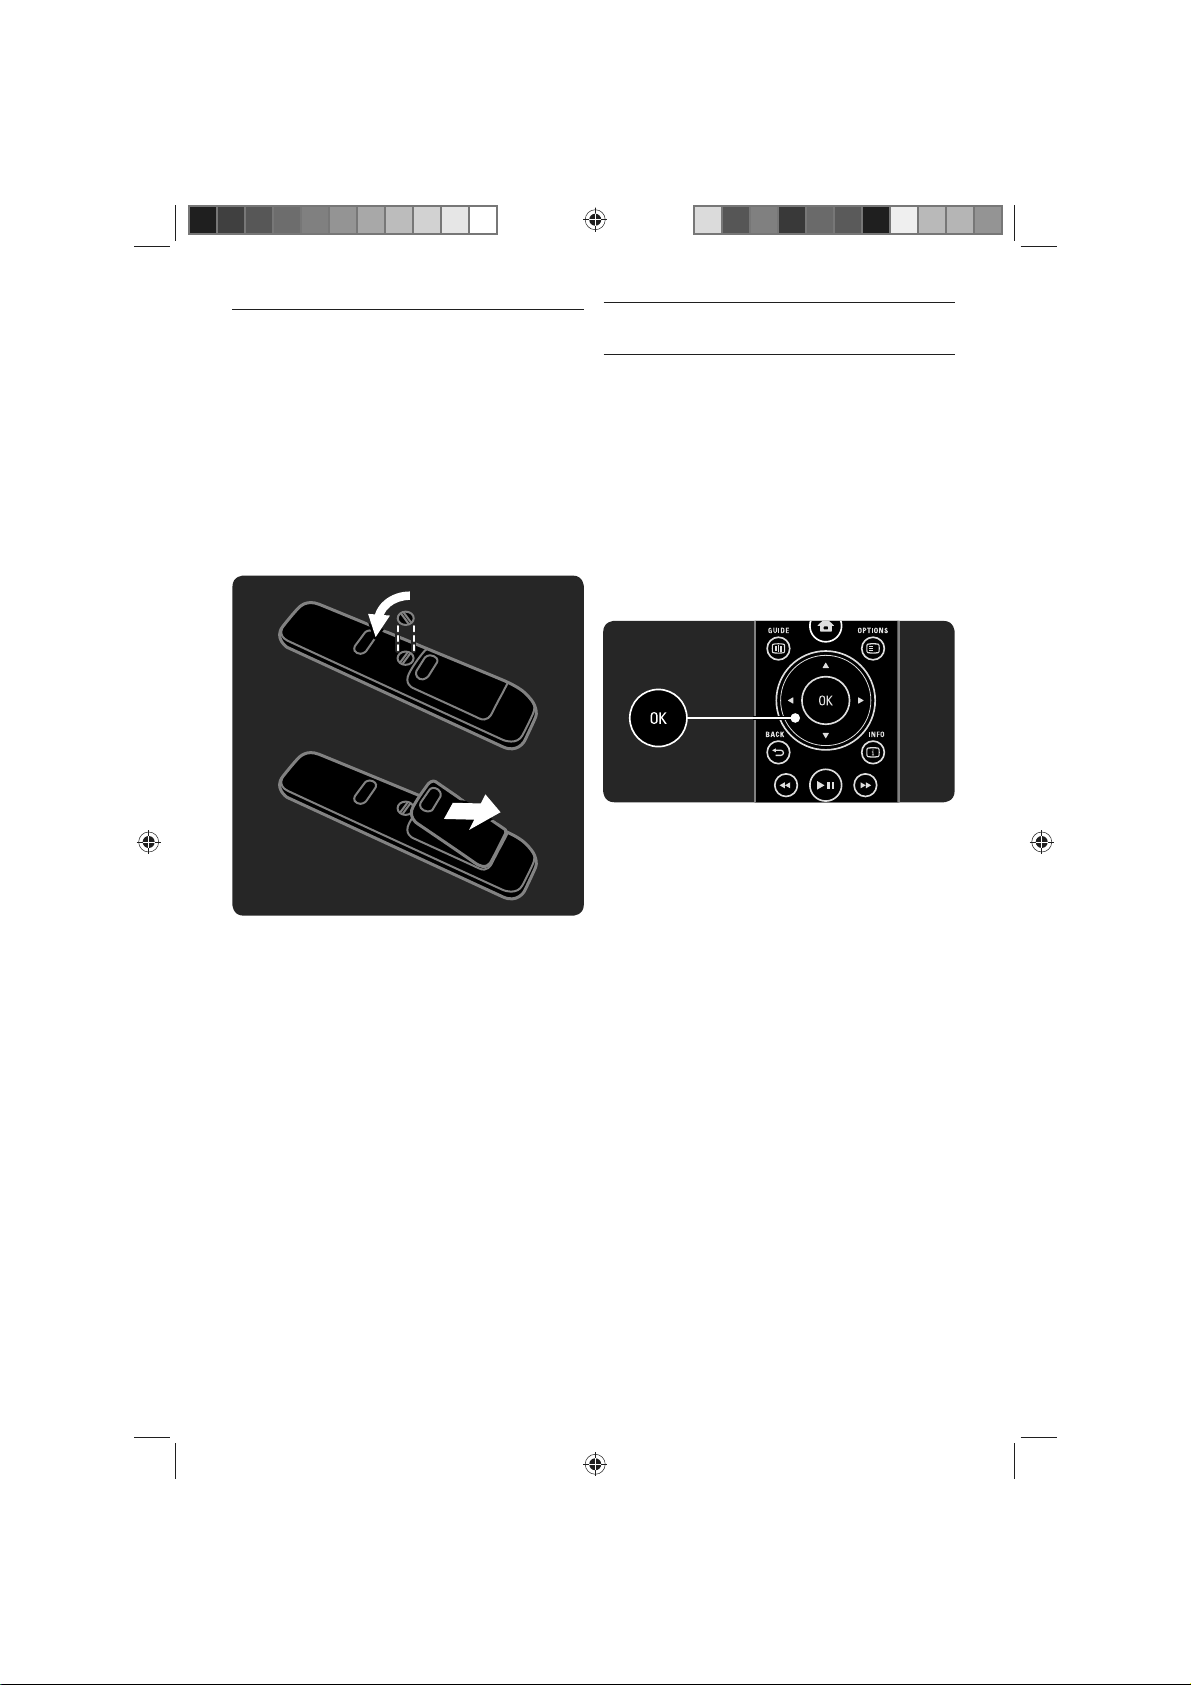
2.1.4 Batteries
Open the battery cover on the back of the
remote control to insert the 3 batteries supplied
(Type AAA-LR03-1.5V).
Make sure the + and - ends of the batteries line
up correctly (+ and - are marked inside).
Remove the batteries if you are not using the
remote control for a long time.
Dispose of batteries according to the end of use
directives. Read 1.1.7 End of use.
2.2 Menus
2.2.1 Channel overview
While watching TV, press OK to open the
Channel overview. This overview shows the TV
channels and possible radio stations installed on
your TV.
Navigate to a channel or station with the u or
v, w or x keys. Press OK to watch or listen to
the selected channel or station.
Press Back b to close the channel o
without changing the channel.
verview
20
With the Channel o
can press Options o to access the f
verview on screen you
ollowing
functions:
• Select list
Select which channels are shown in the Channel
overview. When a fi lter is set in the Channel
overview, press P+/- to go through the channels
ltered overview, while watching TV.
of the fi
• Mark as favourite
When a channel is highlighted in the Channel
overview, you can set it as a favourite channel.
Read 3.2 Favourite channels.
• Reorder
You can reposition channels within the overview.
1 Select Reor
der in the Options o menu to
start reordering channels.
2 Highlight a channel and press OK.
Reposition the channel where you want it
3
with the navigation keys.
4 Press OK to confi rm the position.
UM_Bombay_56PFL9954_en.indd 20UM_Bombay_56PFL9954_en.indd 20 2009-06-30 10:19:392009-06-30 10:19:39
Page 23

You can highlight another channel and do the
.
same
To stop Reorder, press Options o and select
eorder.
Exit r
• Rename
ou can rename a channel.
Y
1 In the channel overview, navigate to the
channel you want to rename.
2 Select Rename in the Options o men
u.
3 Use the navigation keys to position the
highlight. Press Back b to delete a character.
Use the remote control number pad as
you do for SMS/text messaging to select a
character. Use the 0 number key to select a
special character. Select Clear to clear all text.
4 Select Done and press OK to end Rename.
• Hide channel
Select this option when you want to hide a
channel in the Channel o
verview. When you hide
a channel, it will be hidden next time you open
the Channel overview.
To unhide hidden channels select the Show
hidden channels from the Options o menu.
• Show hidden channels
You can show all channels, including all hidden
channels. You can unhide or hide channels.
1 Select Show hidden channels from the
Options o menu.
2 Navigate to a channel.
3 Press Options o and select Hide or
Unhide channel.
You can navigate to another channel and do the
same.
To exit the Show hidden channels view, select
Exit hidden channels in the Options o menu.
The overview is adapted the next time you open
it.
2.2.2 Home
The Home menu lists the activities you can do
with your TV.
Press h to open the Home menu.
To star t an activity, highlight the desired item with
the navigation keys and press OK.
You can add an activity, always linked to a device,
with the Ad
d your devices item.
To exit the Home menu, press h again.
Add your devices
2.2.3
When you have connected a device to the TV,
always add this device as an item in the Home
menu. With this item in the Home menu, you can
easily switch the TV to this device.
In the Home menu, select Add your devices and
press OK.
Follow the instructions on screen.
The TV asks you to select the device and the
connector to which the device is connected.
From now on, this device is added to the Home
menu.
To remove a device item from the Home menu,
select the item, press Options o and select
Remove device in the list. Press OK.
2.2.4 Setup
The Setup item in the Home men
u holds most
TV settings.
In the Setup menu you can ...
• set picture, sound or Ambilight settings
• set some special feature
• update or re-install TV channels
• connect to a network
• update the TV software
• ...
In the Home menu, select Setup and press OK.
Select an item with the w or x, u or v k
eys
and press OK.
To close the Setup menu, press Back b.
21
UM_Bombay_56PFL9954_en.indd 21UM_Bombay_56PFL9954_en.indd 21 2009-06-30 10:19:402009-06-30 10:19:40
Page 24

2.2.5 Options
The Options menu offers convenient settings
related to what is on screen.
Press Options o in an
y circumstance to see
which options are available.
2.3 Watch TV
2.3.1 Switch TV channels
To switch TV channels, press P + or - on the
remote control. You can use the number keys if
you know the channel number.
To exit, press Options o again.
2.2.6 Guide g
ou can view a list of scheduled TV programmes
Y
with the Guide menu (only for digital broadcast).
Also, use the Guide key to view the list of your
photos, music or videos from a connected PC
network or USB memory device.
While watching TV, press Guide g to open the
amme guide, if this information is available.
Progr
To switch back to the previous viewed channel,
press Back b.
If digital broadcasting is a
vailable, digital radio
stations are installed during installation. Switch to
a radio channel as you would do for TV channels.
Radio stations usually start from channel number
400 onwards.
Channel overview
While watching TV, press OK to open the
Channel overview. Select the channel with the
navigation keys and press OK to switch to the
channel.
To close the channel overview without changing
the channel, press Back b.
2.3.2 Programme info
When watching a digital TV channel, information
on the cur
rent and next programme is available.
While watching TV, press Info i to open the
programme information on the channel you are
watching.
To close the programme information, press Info
i again.
When the programme information is on screen,
press Options o to access information on the
quality of the digital channel you are watching.
When browsing your PC network or a USB
memory device, press Guide g to show the
content.
Switch to standby
2.3.3
If the TV is on, press O on the remote control
to switch to standby.
The red standby indicator is on.
Read 3.3 Pr
22
UM_Bombay_56PFL9954_en.indd 22UM_Bombay_56PFL9954_en.indd 22 2009-06-30 10:19:402009-06-30 10:19:40
ogramme guide or 3.6 Multimedia.
Although the TV consumes very little power
when in standby, energy continues to be
consumed.
Page 25

When the TV is not in use for an extended
period of time, we advise to switch the TV off
with the O key on the TV and to unplug the TV
mains cord from the mains outlet.
If you can not locate your remote control and
you want to switch the TV to Standby, press O
on the side of the TV. This switches off your TV.
To switch the TV back on, press O again.
2.3.4 Smart Settings
You can set the TV to the predefi ned setting that
is best for what you’re watching at the moment.
Each setting combines picture, sound and
Ambilight.
While watching TV, press Options o and select
e and sound. Press OK.
Pictur
Select Smart settings and press OK.
Select a setting from the list and press OK.
• Personal — Sets the TV to your personal
preferences set in the Picture, Sound and
Ambilight menus in the Setup menu.
• Vivid — Rich and dynamic settings, ideal for
daylight use.
• Standard — Factory standard settings.
• Cinema — Ideal settings for watching movies.
• Game — Ideal settings for gaming.
• Energy saving — with the most energy
conscious settings.
2.3.5 Pictur
e format
If black bars appear in the screen, adjust the
picture format. Ideally change the picture format
to a format that fi lls the screen.
While watching TV, press F
ormat f to switch
on the Picture format menu, select an available
ormat and press OK.
picture f
You can select the following picture format
settings ...
Auto format
Enlarges the picture automatically to fi ll the
screen. Minimal picture distortion, subtitles
remain visible.
Not fi t for PC.
In the Setup > Pictur
e > Auto format mode
menu you can select 2 Auto format settings
• Auto-fi ll, to fi ll the screen as much as possible.
• Autozoom, to keep the original picture format,
black bars may be visible.
Non-automatic picture formats are ...
• Cinema 21:9
Sets the picture in cinema 21:9 format for
original 21:9 movies.
• Cinema 21:9 subtitle
Sets the picture in cinema 21:9 format but
subtitles in the bottom black bar are visible.
• Super zoom
Sets the picture in cinema 21:9 format with
minimal distortion for 16:9 broadcast.
• Unscaled
• Super zoom 16:9
Sets the picture in 16:9 format with minimal
distortion for 4:3 broadcast.
• 4:3
Only for PC. Sets the picture in 4:3 format.
• 16:9
Sets the picture in 16:9 format for HD 16:9
broadcast.
vie expand 16:9
• Mo
Removes the top and bottom black bars from
a 16:9 picture. Not fi t for HD..
• Unscaled
Only for PC and HD. Maximum sharpness, no
tion. Black bars may appear.
distor
If subtitles are hidden in a programme, press u
to shift the picture upwards.
23
UM_Bombay_56PFL9954_en.indd 23UM_Bombay_56PFL9954_en.indd 23 2009-06-30 10:19:402009-06-30 10:19:40
Page 26

2.4 Use Ambilight
2.4.1 Ambilight on
With Ambilight, you will enjoy a more relaxed
viewing experience and improved perceived
picture quality.
Dim the lighting conditions in the room for the
best Ambilight effect.
To switch Ambilight on or off, press Ambilight on
the remote control.
‹ Caution
o avoid bad infrared remote control reception,
T
place your devices out of sight of Ambilight.
Dynamic speed
To adjust the speed at which Ambilight responds
to the onscreen images, press Ambilight for 3
seconds.
Adjust the dynamic speed with the onscreen
slider bar
• Relax
• Dynamic sets Ambilight to change quickly and
To change the dynamic speed, Active mode
needs to be set to a value greater than zero.
Press h > Setup > Ambilight > Active mode.
2.4.2 Ambilight
In the Ambilight menu you can set or adjust the
following Ambilight settings …
While watching TV, press h > Setup >
Ambilight.
• Ambilight
• Active mode
Adjusts the speed at which Ambilight responds
• Brightness
Changes the light output of Ambilight.
.
ed sets Ambilight to change softly and
smoothly.
is more responsive.
settings
Switches Ambilight on or off.
to the onscreen images.
• Colour
Sets the Ambilight colour to either dynamic
behaviour (Active mode) or one of the
predefi ned Ambilight constant colours.
• Custom allows fi ne tuning of a constant colour.
• Custom colour
To set a Custom colour select Custom in
Colour
• Separation
Sets the difference in colour level between the
lights at each side of the TV.
Separation off gives a dynamic but uniform
Ambilight colour.
2.4.3 LoungeLight
When the TV is in standby, you can switch
Ambilight on and create an Ambilight
LoungeLight effect in your room.
To switch Ambilight on while the TV is in standby,
press Ambilight on the remote control.
o change the LoungeLight colour scheme, press
T
Ambilight for 3 seconds.
2.5 Watch a connected device
When you have added a connected device
as an item to the Home menu, you can easily
and directly select that device to watch its
programme.
To add the device to the Home menu, read
2.2.3 Add your devices.
To watch TV from a connected device, press h
and select the device item in the Home menu.
Press OK.
If the connected device is not in the Home menu,
select the device from the Source menu.
Press Sour
the side of the TV, to show the source list.
Select the device or its connector and press OK.
ce s on the remote control, or at
24
UM_Bombay_56PFL9954_en.indd 24UM_Bombay_56PFL9954_en.indd 24 2009-06-30 10:19:412009-06-30 10:19:41
Page 27

2.6 Watch TV using a digital receiver
HTR9900 - 7.1 channel surround
When you watch TV using a digital receiver, with
a subscription from a cable or satellite company,
connect the receiver and add the receiver to the
Home menu.
To add the receiver to the Home menu, read
2.2.3 Add your devices.
To watch the receiver programme, switch on the
receiver. If the receiver programme does not
appear automatically, press h and select the
receiver item in the Home menu. Press OK.
Use the remote control of the digital receiver to
select TV channels.
2.7 HTR9900 and BDP9100
2.7.1 Benefi ts
This Home Theatre Receiver and Blu-ray Disc
Player combination brings you the cinematic
experience at your home. Both devices and
your Cinema 21:9 TV work together but need a
specifi c setup.
2.7.2 Setup
Before you start with these setup settings,
connect the HTR and BDP to the TV, read
5.3.1 HTR9900 + BDP9100.
• Add the HTR in the TV Home Menu
Add the HTR as an item in the Home menu
with Add your devices. While watching TV,
press h and select Ad
d your devices and
press OK. Follow the onscreen instructions to
select the HTR and its connection.
• TV speakers
For best surround sound performance, switch
off the TV speakers, if they aren’t switched off
automatically. To switch off the TV speakers,
press h and select Setup > Sound > TV
speakers > Off and press OK.
• Pixel Plus link
You need to switch off the picture quality
processing of the Blu-ray Disc player.
Press h and select Installation > Preferences
> Pixel Plus link and press OK.
Select On to switch the BDP picture
processing off.
• Audio sync
On the Home Theatre Receiver set the
Audio sync delay in the Main menu to 200ms.
This setting syncronizes the sound with the
processed picture on the TV.
• Shift subtitle
Set the Blu-ray Disc player to the 21:9 TV
y format to match the TV format. In
displa
the Blu-ray Disc player settings menu, select
the video setup and look for the TV display
formats. Read the BDP9100 user manual. If the
21:9 format is set, you can shift subtitles up
from the bottom of the screen into the 21:9
picture to avoid black bars on screen.
2.7.3 Use the combination
• Watch TV channels
In the TV Home menu, select W
atch TV and
press OK.
On the HTR remote control, press Source -
TV until you hear the sound of the TV.
You can control the volume and the surround
sound with the HTR remote control.
To switch TV channels, press P + / - on the TV
remote control.
25
UM_Bombay_56PFL9954_en.indd 25UM_Bombay_56PFL9954_en.indd 25 2009-06-30 10:19:412009-06-30 10:19:41
Page 28

• Watch a Blu-ray Disc movie
In the TV Home menu, select Home Theatr
e
System and press OK.
On the HTR remote control, press Source Blu-ray player.
If subtitles are shown in black bars underneath
the picture, you can shift the subtitles up into
the picture to avoid black bars on screen. To do
this, you need to set up the Blu-ray Disc player
TV display format to 21:9 fi rst. Read 2.7.1 Shift
subtitle or read the BDP user manual.
To shift subtitles, do the following ...
On the Blu-ray Disc remote control, press
Options and select Shift subtitle and press
OK.
Now, you can shift the subtitles up into the
picture with u or v. After a while the TV
switches to full 21:9 format without black bars.
atch another connected device
• W
In the TV Home menu, select Home Theatr
e
System and press OK. On the HTR remote
control, press the appropriate Source key for
the connected device
.
• Use the universal RC
Setup the HTS and DVD Universal mode
keys
To set the TV remote control to operate both
devices, enter the specifi c RC code for the
HTS and DVD Universal mode keys.
Enter RC code 0001 for the HTS key to
operate the HTR9900.
Enter RC code 0003 for the DVD key to
operate the BDP9100.
Enter an RC code
1 Press the Universal mode key you want
to set up, HTS or DVD and press this key
together with the OK key for 4 seconds
simultaneously. All 4 keys light up for 1
second and the key you are setting stays lit.
2 Enter the 4-number RC code, 0001 for HTS
or 0003 for DVD.
3 If the code is accepted, all 4 keys blink 3 times
and the Universal mode key is set up.
For more on Universal remote control, read
chapter 2.1.2 Universal remote control.
2.8 Net TV
2.7.4 Use the universal RC
You can set up the TV remote control to operate
the volume of the Home Theatre Receiver. Also,
you can set up the TV remote control to operate
basic Blu-ray Disc functions.
• Use the HTS and DVD Universal mode keys
When these keys are set up, press HTS to
operate the Home Theatre Receiver or press
DVD to operate the Blu-ray Disc Player. As
long as the key fl ashes, you can operate the
device.
26
UM_Bombay_56PFL9954_en.indd 26UM_Bombay_56PFL9954_en.indd 26 2009-06-30 10:19:412009-06-30 10:19:41
2.8.1 Benefi ts
Net TV offers Internet services and websites
tailored for your TV. Use the TV remote control
to browse the Net TV Internet pages. You can
play movies, view pictures or listen to music,
consult infotainment, play games and much more,
all set up for your TV screen.
Specifi cs
• Because Net TV is an online system, it can be
modifi ed over time to better serve its purpose.
• Some Net TV services can be added, changed
or stopped after some time
• Net TV shows pages full screen and 1 page at a
time.
• You cannot download and save fi les nor install
plug-ins.
Page 29

2.8.2 What you need
TV
PC
Router
Internet
TV
PC
Router
Internet
To enjoy Net TV, you need to connect the TV
to a router with a high speed connection to the
Internet.
Read chapter 4.3 Network.
How to register
To register, you need an email address and a
PC connected to the Internet. If you skip the
registration at fi rst use, you can register from the
Net TV star t page later on.
Once the connection is made, select Net TV in
the Home menu to start the Net TV onscreen
.
setup
Read chapter 2.8.3 First use.
2.8.3 First use
The fi rst time you link up to Net TV, the TV asks
you to agree on the Terms of Use. When you
agree on these terms, the TV asks you to register
for Net TV. After registration, you can switch on
the Parental control setting.
Registration benefi ts
When you have registered for Net TV, the pages
you select as favourite pages or as locked pages
are stored as back-up. Also, the last 16 web
addresses (URLs) you visited are stored. You can
share these same selections with another Net TV
television if you register that TV with the same
email address. When registered, you can restore
these same selections after an accidental reset of
Net TV with Clear histor y.
To star t the Net TV registration, you need to
enter your email address on the TV screen. Use
the keypad on the remote control as you do for
SMS/text messaging to enter the address. Select
Register and press OK.
A message will show if a registration email has
been sent to y
our email address. Open the email
on your PC and click the link to the registration
form. Complete the form and click the button to
submit.
On the TV, select OK and press OK to open the
Net TV star t page.
Parental control benefi ts
With Parental control switched on ...
• you can lock and unlock services and/or
categories of services
• some services unsuitable for children are
locked from the start but can be unlocked
Specifi cs
• Only services on the Net TV pages can be
locked. Advertisements and open Internet
websites can not be locked.
• Services are locked per countr y. Categories are
locked for all countries.
Switch on Parental control
The fi rst time you open the Net TV start page,
the TV asks you to switch on the Parental control.
If you switch on Parental control, the TV asks you
to enter a personal lock/unlock code. Enter a 4
digit code as Net TV lock/unlock code. Use the
number keys on the remote control. Enter the
same code again to confi rm.
Net TV is ready to use.
UM_Bombay_56PFL9954_en.indd 27UM_Bombay_56PFL9954_en.indd 27 2009-06-30 10:19:422009-06-30 10:19:42
27
Page 30

2.8.4 Browse Net TV
To browse Net TV, press Net TV on the remote
control or select Br
owse Net TV in the Home
menu and press OK. The TV links up to Net TV
and opens the start page.
To exit Net TV, press Net TV again or press h
and select another activity.
The Net
TV start page
The Net TV star t page shows your favourite
services and some recommended ser vices. You
can browse Net TV from this page.
Select a Net TV ser vice with the u or v, w or
x keys. To open a service, press OK.
Press Back b to go back one page
.
Press Net TV to return to the Net TV start page.
owse all page
The Br
The Browse all page holds all services.
On the Browse all page, you can view the Net
TV services by category. Select a category and
press OK.
Browse another country
On the Browse all page you can switch the Net
TV country. Another country might have different
services.
Select Br
owse: ..., select another country and
press OK.
Mark favourites
You can mark up to 12 favourite services.
To mark a service as a favourite, select the
service icon and press Options o.
Select Mark
favourite and press OK.
All your favourite services are shown in the Net
TV start page. In the Browse all page favourite
services are marked with a star F.
Use the Options menu to unmark.
To mark several services as favourites in one go,
select Mark favourites on the Net TV start page
or Browse all page and press OK. Now you
can select services and mark them one by one,
with OK. You can switch to the Browse all page
if necessary. To end the Mark favourites mode,
select Done and press OK.
Only Net TV services can be marked as favourite.
ertisements and open Internet websites can
Adv
not be marked.
Open Internet websites
With Net TV you can link up to the open
Internet. You can view any website you like but
remember that most open Internet websites are
not tailored to be viewed on a TV screen and
certain necessary plug-ins (e.g. to view pages or
videos) are not available on your TV.
Enter open Internet
On the Browse all page, select Br
and press OK.
On the onscreen keyboard you
owse Internet
can enter the web address you like. Select a
character and press OK to enter the address.
Use the u or v, w or x keys to navigate to
the available links on an open Internet page, press
OK to go to the link.
Scrolling open Internet pages
Use the P+ and -]to scroll pages up or down.
28
UM_Bombay_56PFL9954_en.indd 28UM_Bombay_56PFL9954_en.indd 28 2009-06-30 10:19:422009-06-30 10:19:42
Page 31

Zoom open Internet pages
You can zoom open Internet in or out. Press
Format f.
Use the arrows up or down to zoom in or out.
Clear histor
y
You can clear the Net TV memory.
To clear the Parental control code, passwords,
cookies and history, press h > Setup >
Installation > Clear Net
TV memory.
Koninklijke Philips Electronics N.V. bears no
responsibility regarding the content and the
quality of the content pro
vided by the content
service providers.
2.8.5 Net TV - TV guide
The moment you link up with Net TV, the TV
programme guide information comes from
the Internet. However, you can switch back to
programme guide information from the digital
broadcaster.
Press h > Setup > Installation > Pr
eferences >
Programme guide and select From broadcaster.
In both cases, Philips is not responsible for the
amme guide information.
progr
2.8.6 Parental control
With Net
TV Parental control you can lock
Net TV ser vices and ser vice categories. When
a service is locked, you need to enter a code to
open the service or categor y.
To lock a ser vice, Parental control needs to be
switched on. Parental control is switched on
when a lock icon appears when you link up with
Net TV.
Switch on Parental control
If you did not switch on Parental control yet,
press Net TV. When the Net TV start page is
onscreen, press Options o and select Enable
parental control. The TV asks you to enter a
personal lock/unlock code. Enter a 4 digit code
as lock/unlock code. Use the number keys on the
remote control. Enter the same code again to
.
confi rm
Lock a service or category
On the Net TV star t page or Browse all page,
select a service or categor y. Press Options o,
select Lock ser
vice and press OK. The ser vice is
locked when a lock symbol appears on top of the
service icon.
Unlock
To unlock a ser vice or categor y, select the service
and press Options o and select Remove lock.
Specifi cs
Only services on the Net TV pages can be
•
locked. Advertisements and open Internet
websites can not be locked.
• Services are locked per country. Categories are
locked for all countries.
• The Net TV Parental control code and the
Child lock code of the TV are 2 different codes.
• When you have registered Net TV and you
switch off Parental control in the Options
menu, all locks are remembered and available
again when you switch Parental control back
on.
29
UM_Bombay_56PFL9954_en.indd 29UM_Bombay_56PFL9954_en.indd 29 2009-06-30 10:19:422009-06-30 10:19:42
Page 32

Did you forget your code ?
If you forgot your Parental control code, you can
clear the Net TV memor y and enter a new code.
Read chapter 2.8.7 Clear history.
2.8.7 Clear history
Warning
If you clear the Net TV memory with Clear
y, you need to redo the fi rst use
histor
registration when you link up to Net TV again. If
you have registered before, you can restore your
former favourite services and former locks.
You can clear the Net TV memory.
To clear the Parental control code, passwords,
cookies and history, press h > Setup >
Installation > Clear Net TV memory.
30
UM_Bombay_56PFL9954_en.indd 30UM_Bombay_56PFL9954_en.indd 30 2009-06-30 10:19:432009-06-30 10:19:43
Page 33

3 More on ...
3.1 Teletext
3.1.1 Select a teletext page
Most TV channels broadcast information through
teletext.
Press Info i when teletext is switched on.
The T.O.P. overview appears.
Select a subject and press OK to view the page.
While watching TV, press T
eletext.
To exit teletext, press Teletext again.
To select a page …
Enter the page number with the number keys.
•
• Press P +/- or u or v or b to view the next
or the previous page.
• Press a colour key to select a colour-coded
item at the bottom of the screen.
3.1.2 Select a teletext language
Some digital TV broadcasters have several
teletext languages available. You can set your
primary and secondary language.
Press h > Setup > Installation > Languages >
y or Secondary teletext and select your
Primar
preferred teletext languages.
Select teletext subpages
3.1.3
A teletext page number can hold several
subpages.
The pages are shown on a bar next to the main
page number.
Use w or x to select the subpages when they
are available on a teletext page.
3.1.4 Select T.O.P. teletext
You can easily jump from one subject to another
without using page numbers with T.O.P. teletext.
Not all channels broadcast T.O.P. teletext.
3.1.5 Search teletext
In teletext, you can quickly jump to a subject
linked to a series of page numbers. Also, you can
search for specifi c words in teletext pages.
Switch on teletext and press OK. The fi rst word
or fi rst index number of the page is highlighted
onscreen.
Jump to the next word or number on the page
with w or x, u or v.
Press OK to search for a page featuring the
highlighted word or number.
Each time you press OK, the next page featuring
the highlighted word or number is shown.
To exit Sear
ch, press u until no word or number
is highlighted.
eletext options
3.1.6 T
When in teletext, press Options o on the
remote control to rev
eal hidden info, let subpages
cycle automatically, change the character setting,
freeze a teletext page, view the TV channel and
teletext simultaneously or show a teletext page
full screen again.
Freeze page
Stop the automatic rotation of subpages or
stop the page counter when you have entered
a wrong page n
umber or when the page is not
available.
31
UM_Bombay_56PFL9954_en.indd 31UM_Bombay_56PFL9954_en.indd 31 2009-06-30 10:19:432009-06-30 10:19:43
Page 34

Dual screen / Full screen
Not available for channels with Digital Text
services.
Select Dual screen to view the TV channel and
teletext alongside each other. Select the option
Full screen to show full screen teletext again.
Reveal
Hide or unhide hidden information on a page,
such as solutions to riddles or puzzles.
Cycle subpages
If subpages are available for the selected page,
you can make subpages cycle automatically.
Language
Some languages use a different set of characters.
Switch to the other character group to show the
text correctly.
Enlarge teletext page
You can enlarge the teletext page for more
comfortable reading.
In teletext,
press f to enlarge the top part
of the page and f again to view the enlarged
lower part of the page. With u or v you can
scroll through the enlarged page.
Press f]again to return to the normal page
size.
3.1.7 Digital text (UK only)
Some digital TV broadcasters offer dedicated
digital text or interactive services on their digital
TV channels, for example BBC1. These services
include normal teletext with the number, colour
and navigation keys to select and navigate.
3.1.8 Teletext 2.5
Teletext 2.5 offers more colours and better
graphics, if broadcast by the TV channel.
Teletext 2.5 is activated as a standard factor y
setting.
To switch it off press h > Setup > Installation
eferences > Teletext 2.5.
> Pr
3.2 Favourite channels
After you have fi nished the installation, all TV
and radio channels are added to the Channel
overview.
In this overview, you can mark channels as
favourites and set the Channel overview to only
show these favourites.
While watching TV, press OK to open the
Channel o
press Options o. Select Mark as favourite to
make the highlighted channel a favourite channel.
Favourite channels are marked with a F.
Unmark the channel as favourite with Unmark
favourite.
Select list
With the Select list option in the Channel
overview, you can set the overview to show only
your favourite channels.
Read 2.2.1 Channel o
verview. With a channel highlighted,
verview.
While watching TV, press T
eletext and navigate to
select or highlight items.
Use the colour keys to select an option and press
OK to confi rm or activate. Press S to cancel
Digital text or interactive services.
Digital text services are blocked when subtitles
are broadcast and Subtitle On is set in the
Features menu. Read 3.5.1 Subtitles.
32
UM_Bombay_56PFL9954_en.indd 32UM_Bombay_56PFL9954_en.indd 32 2009-06-30 10:19:432009-06-30 10:19:43
Page 35

3.3 Programme guide
3.3.1 Switch on
The Programme guide is an onscreen guide of
scheduled TV programmes. This guide is provided
by the broadcasters or Net TV. You can set a
reminder to show a message when a programme
starts or select programmes by genre.
While watching TV, press Guide g to open the
amme guide. If available, a list of the current
Progr
TV programmes appears. It may take some time
to load this information.
• Change day
View the previous or next day’s programmes.
• More info
Opens the info screen with details and a
summary of the programme.
• Search by genre
View all programmes by genre. Select a
programme and press Info i for more info
or to set a reminder.
• List of preferred programmes
Set channels to appear in the Programme
guide list (max.
50 channels).
To exit the Programme guide, press Guide g.
Navigate through the list to select a programme.
Info i
o open the programme details and summary,
T
press Info i.
To show a message onscreen when the
programme starts, select Set reminder and
press OK. The programme is marked with ©. To
cancel the message, select Clear reminder and
press OK. To switch to the TV channel of the
programme directly, select Watch channel and
press OK.
Options o
In the Programme guide list, press Options o
to select the f
ollowing ...
• Set reminder
If a reminder is set, the option Scheduled
reminders is available with a list of all
reminders.
3.3.2 Setup
To select where the Programme guide
information comes from, press h > Setup >
Installation > Pr
eferences > Programme guide.
Automatic
Until you link up with NetTV, guide information
comes from the broadcaster. Automatic will
switch to the Internet for guide information as
soon as the TV is connected to Net TV.
Broadcaster
Guide information comes from the channel
broadcaster
.
3.4 Timers and locks
3.4.1 Sleeptimer
With Sleeptimer you can switch the TV to
standby or out of standby at a specifi ed time.
Press h > Setup > Features > Sleeptimer.
With the Sleeptimer slider bar you can set the
time up to 180 min
If set to 0 minutes, Sleeptimer is switched off.
You can always switch off your TV earlier or reset
the time during countdown.
utes in steps of 5 minutes.
33
UM_Bombay_56PFL9954_en.indd 33UM_Bombay_56PFL9954_en.indd 33 2009-06-30 10:19:442009-06-30 10:19:44
Page 36

3.4.2 Child lock
To prevent children from watching TV, you can
lock the TV or block age rated programmes.
Set your personal code
Before you set Child lock to lock the TV or set an
age rating, set your personal lock code in h >
Setup > Features > Set code. Enter the fournumber code with the number keys.
You can always change the code if necessary.
Lock
Select Lock as Child lock setting, to lock all TV
channels and the programmes from devices.
When Lock is set, you need to enter your
personal code to unlock the TV.
The lock is activated the moment you close the
u on screen or set the TV in standby.
men
Parental rating
Select Par
ental rating as Child lock setting, so
that an age can be set in the Parental rating age
list. Set the age of your child. Programmes with an
equal or higher rating will be blocked.
To set an age rating in this list, read 3.4.3 Age
rating.
Did you forget your code ?
Select Change code, press x and enter the
overriding code 8888.
Enter a new personal code and confi rm
.
The previous code is erased and the new code
is stored.
3.4.3 Age rating
Some digital broadcasters, depending on your
country, have their programmes rated.
When the rating is equal or higher than the rating
you have set for your child’s age, the programme
will be blocked.
With Parental rating selected in Child lock go to
h] > Setup > F
eatures > Parental rating and
select the age rating for programmes that are
wed to be viewed.
allo
A programme with a higher age rating will be
blocked and the TV will ask for the Lock code to
unblock the programme.
Age rating is activated the moment you close the
menu on screen or set the TV in standby.
Read 3.4.2 Child lock.
3.5 Subtitles and languages
3.5.1 Subtitles
Programme subtitles are available most of the
time. You can set subtitles to display constantly.
Depending on the channel, an analogue or
digital channel, a different method is used to set
constant subtitles.
For analogue channels
To have subtitles constantly onscreen, select an
analogue
on teletext.
Enter the three number page number of the
subtitles page, usually 888, and press Teletext
again to switch off teletext. Subtitles will show if
available.
Each analogue channel needs to be set separately.
Subtitle menu
To switch subtitles on constantly, press Subtitle.
Select Off, On or On during mute.
With On during mute, the TV displays subtitles
only when the sound is muted with m.
TV channel and press Teletext to switch
To set an age rating, press h > Setup >
eatures > Child lock and select Parental rating.
F
34
UM_Bombay_56PFL9954_en.indd 34UM_Bombay_56PFL9954_en.indd 34 2009-06-30 10:19:442009-06-30 10:19:44
Page 37

For digital channels, a preferred subtitle language
can be set.
Digital channel subtitle languages
If subtitles are available on digital channels, you
can select a preferred subtitle language from a list
of broadcast languages.
Press h > Setup > F
eatures > Subtitle
language.
Select a subtitle language from the list of available
languages and press OK.
The pref
erred subtitle languages set in the
Installation menu are overruled temporarily.
3.5.2 Audio languages
Digital TV channels can broadcast several audio
languages that go with the programme. You can
set your preferred languages to switch to when
these audio languages are broadcast.
To set your preferred audio languages, press h
> Setup > Installation > Languages > Primar
y
language. You can also set a secondary language in
the same Languages menu.
The TV will automatically switch to the languages
you set, if the language is broadcast.
To check if an audio language is available, press
Options o and select Audio language. You can
select another audio language from the list.
The TV detects the device and opens a list
showing the content of the USB device onscreen.
If the content does not show, press h >
owse USB and press OK.
Br
While the USB content list is open onscreen,
select the fi
le you want to play and press OK or
play P.
A song, a slideshow of photos or a video starts
playing.
To pause, press P again.
To jump to the next fi le
, press x or P +.
To jump to the previous fi le, press w or P -.
To fast forward a music fi le, press Q.
Press Options o to Play once, Repeat, Shuffl e,
Rotate and much more.
atch videos
W
Select a video in the Guide menu and press play
P.
To pause the video, press pause P.
To fast forward, press Q once to go slow, press
twice to go fast. Press again for normal speed.
Press Options o to change to Full scr
een,
Small screen, Play once, etc.
To exit Browse USB, press h and select
another activity or disconnect the USB memor
y
device.
Some digital TV channels broadcast special audio
and subtitles adapted f
or people that are hearing
or visually impaired. Read 3.7 Universal access.
3.6 Multimedia
3.6.2 Browse PC Network
Watch photos or play music and videos on TV
from a PC or another storage device in your
home network.
To browse your PC network, fi rst set up the
network connection, read 4.3 Network.
3.6.1 Browse USB
Watch photos or play music and videos on TV
from a USB memory device.
If the network is not installed the fi rst time
you try to Browse PC network, the Network
installation starts. Follow the instructions on
screen.
Insert a USB device in the USB connector on the
left hand side of the TV while the TV is switched
on.
35
UM_Bombay_56PFL9954_en.indd 35UM_Bombay_56PFL9954_en.indd 35 2009-06-30 10:19:442009-06-30 10:19:44
Page 38

PC Network
Press h,
select Browse PC network in the
Home menu and press OK.
With the PC and router switched on, the TV
displays the multimedia server content from your
PC.
With the PC content list open on screen, select
the fi le you want to play and press OK or play
P.
A song, a slideshow of photos or a video starts
playing.
To pause, press Pagain.
To jump to the next fi le, press x or P +.
To jump to the previous fi le, press w or P.
To fast forward a music fi le, press Q.
Press Options o to Play once, Repeat, Shuffl e,
Rotate and much more.
atch videos
W
Select a video in the Guide menu and press play
P.
To pause the video, press pause P.
To fast forward, press Q once to go slow, press
twice to go fast. Press again for normal speed.
Press Options o to change to Full scr
een,
Small screen, Play once, etc.
To exit the PC network, press h and select
another activity
.
3.7 Universal access
To verify whether a hearing impaired audio
language is available, press Options o, select
Audio language and look for an audio language
with an ear icon.
3.7.2 Visually impaired
Some digital TV channels broadcast special audio
adapted for people who are visually impaired. The
normal audio is mixed with extra commentary.
To switch on visually impaired audio, press
Options o while watching the digital TV
channel and select Visually impaired.
Select On and press OK.
The TV switches to visually impaired audio, if
vailable.
a
In the Options menu, you can set the visually
impaired audio to be heard from the Speak
ers,
the Headphones only or from both Speakers
and headphones.
Also in the Options menu, select Volume -
Visually impaired to change the volume of the
extra commentary.
To verify whether a visually impaired audio
language is available, press Options o and
select Audio language and look for an audio
language with an eye icon.
3.7.1 Hearing impaired
Some digital TV channels broadcast special audio
and subtitles adapted for people who are hearing
impaired.
To switch on hearing impaired audio and subtitles,
press h > Setup > Installation > Languages >
Hearing impair
ed. Select On and press OK.
The TV switches to hearing impaired audio and
if available.
subtitles,
36
UM_Bombay_56PFL9954_en.indd 36UM_Bombay_56PFL9954_en.indd 36 2009-06-30 10:19:442009-06-30 10:19:44
Page 39

4 Setup
4.1 Picture, Sound, Ambilight
4.1.1 Smart settings
You can set the TV to the predefi ned setting that
is best for what you’re watching at the moment.
Each setting combines picture, sound and
Ambilight.
While watching TV, press Options o and select
e and sound. Press OK.
Pictur
Select Smart settings and press OK.
Select a setting from the list and press OK.
• Personal
Sets the TV to your personal preferences set
in the Picture, Sound and Ambilight menus in
Setup.
• Vivid
Rich and dynamic settings, ideal for daylight use.
• Standard
Factory standard settings.
• Cinema
Ideal settings for watching movies.
• Game
Ideal settings for gaming
• Energy saving
With the most energy conscious settings.
4.1.2 Picture
In the Picture menu, you can adjust all picture
settings individually.
Press h > Setup > Picture.
Use w or x, u or v to select and adjust a
setting. Press OK to activate a setting.
• Settings assistant
Start the Settings assistant to guide you
through basic picture settings easily.
Follow the instructions on screen.
• Contrast
Changes the level of brightness in the picture
but the level of darkness remains the same.
• Brightness
Changes the level of light in the whole picture.
• Colour
Changes the level of saturation.
• Hue
If NTSC is broadcast, this level compensates
the colour variations.
• Sharpness
Changes the level of sharpness of fi ne details.
• Noise reduction
Filters out and reduces the noise in the picture.
Set levels to Minimum, Medium, Maximum or
Off.
• Tint
Sets the colours to Normal, Warm or Cool
(bluish). Select Custom to make your own
personal settings in the Custom menu.
• Custom tint
Use a slider bar to change the colour
temperature of the picture …
- R-WP red whitepoint
- G-WP green whitepoint
- B-WP blue whitepoint
- R-BL red blacklevel
- G-BL green blacklevel
• Perfect Pixel HD
Controls the advanced settings of the Perfect
Pixel HD Engine.
- HD Natural Motion
Removes motion judder and reproduces
smooth movement, especially in movies.
- 200 Hz Clear LCD
Gives a superior motion sharpness, better black
level, high contrast with a fl icker-free, quiet
image and a larger viewing angle.
- Advanced sharpness
Enables superior sharpness, especially on lines
and contours in the picture.
- Dynamic contrast
Sets the level at which the TV automatically
enhances the details in the dar
k, middle and
light areas of the picture.
37
UM_Bombay_56PFL9954_en.indd 37UM_Bombay_56PFL9954_en.indd 37 2009-06-30 10:19:452009-06-30 10:19:45
Page 40

- Dynamic backlight
Sets the level at which power consumption can
be reduced by dimming the brightness intensity
of the screen. Choose for the best power
consumption or for the picture with the best
brightness intensity
- MPEG artefact reduction
Smooths the digital transitions in the picture.
- Colour enhancement
Makes the colours more vivid and improves
the resolution of details in bright colours
• PC mode
Sets the TV to the ideal predefi ned computer
setting in case a computer has been connected.
• Light sensor
Adjusts the picture and Ambilight settings
automatically to the lighting conditions of the
room. Switches the Light sensor on or off.
• Picture format / auto format mode
Read 2.3.5 Picture format.
• Picture shift
To shift the picture vertically on the screen
with the cursor keys.
4.1.3 Sound
In the Sound menu you can adjust all sound
settings individually.
Press h > Setup > Sound.
Use w or x, u or v to select and adjust a
setting. Press OK to activate a setting.
• Bass
Changes the low tones of the sound. Select
each bar to change the setting.
• Treble
Changes the high tones of the sound. Use
each slider bar to change the setting.
• Volume
Changes the volume.
If you do not want the volume bar to appear,
press h > Setup > Installation > Preferences
> Volume bar. Select Off and press OK.
• Volume — visually impaired
Changes the volume of the selected visually
impaired audio language. (Only for UK.)
• Audio language
Shows the list of broadcast audio languages of
digital TV channels.
You can set your preferred audio language
in h > Setup > Installation > Languages >
Primary audio.
• Dual I/II
If broadcast is available, you can choose
between two different languages.
• Mono/stereo
If stereo broadcasting is available, you can
select Mono or Stereo for each TV channel.
• TV speakers
If you have an audio system connected to your
TV, you can switch off the TV speakers.
If your audio system supports EasyLink, read
5.5.1 EasyLink.
Select Automatic (EasyLink) to have the
sound from your TV automatically reproduced
by your audio system.
• Surround
Switches the TV automatically to the best
surround sound mode dependant on the
broadcast. Select On or Off.
• Headphones volume
Changes the volume of the headphones.
You can mute the TV speakers with m.
• Delta volume
Levels out volume differences between
channels or connected devices. First, switch
to the channel or device whose volume
difference you want to level out.
• Balance
Sets the balance of the left and right
loudspeakers to best fi t your listening position.
• Auto volume levelling
Reduces sudden volume differences like at the
beginning of commercials or when switching
from one channel to another. Select On or
Off.
38
UM_Bombay_56PFL9954_en.indd 38UM_Bombay_56PFL9954_en.indd 38 2009-06-30 10:19:452009-06-30 10:19:45
Page 41

4.1.4 Ambilight
In the Ambilight menu, you can adjust all
Ambilight settings individually.
Press h > Setup > Ambilight.
Use w or x, u or v to select and adjust a
Press OK to activate a setting.
setting.
For more on Ambilight, read 2.4 Use Ambilight.
4.1.5 Factory settings
You can return to the original factory settings.
Only picture, sound and Ambilight settings will
be reset.
Press h > Setup > Installation > Factory reset
and press OK.
4.2 Channels
4.2.1 Reorder and rename
After the fi rst installation, you might want to
reorder or rename installed channels.
Organise TV channels in the Channel overview
according to your own preference or give them
a recognisable name.
While watching TV, press OK to open the
Channel overview. The Channel overview shows
the TV channels and radio stations installed on
your TV.
To reorder or rename, press Options o and
select the option y
Reorder
You can reposition channels within the overview.
1 Select Reorder in the Options o menu to
start reordering channels.
2 Highlight a channel and press OK.
3 Reposition the channel where you want it
with the navigation keys.
4 Press OK to confi rm the position.
You can highlight another channel and do the
same.
To stop Reorder, press Options o and select
Exit reorder.
ou need.
Rename
You can rename a channel.
1 In the channel overview, navigate to the
channel you want to rename.
2 Select Rename in the Options o men
u.
3 Use the navigation keys to position the
highlight. Press Back b to delete a character.
Use the remote control number pad as
you do for SMS/text messaging to select a
character. Use the 0 number key to select a
special character.
Select Clear to clear all text.
4 Select Done and press OK to end Rename.
4.2.2 Update channels
When the
TV was switched on for the fi rst time,
a full installation of channels was performed.
You can set the TV to add or remove digital
channels automatically. You can also manually
start the channel update.
Automatic update
To set the TV to update digital TV channels
automatically, leave the TV in standby mode.
Once a day, at 6 AM, the TV updates earlier
found channels and stores new channels.
Empty channels are removed from the Channel
overview.
If a channel update has been performed, a
message shows at TV star t up.
If you do not want this message to appear, select
No in h > Setup > Installation > Channel
installation > Channel update message.
ual update
Man
To update channels yourself at any time,
press h > Setup > Installation > Channel
installation > Automatic installation and press
OK.
Start the update and select Update Channels.
The update may take a few minutes.
39
UM_Bombay_56PFL9954_en.indd 39UM_Bombay_56PFL9954_en.indd 39 2009-06-30 10:19:452009-06-30 10:19:45
Page 42

4.2.3 Reinstall channels
When the TV was switched on for the fi rst time,
a full installation of channels was performed.
You can redo this full installation all over again to
set your language, country and install all available
TV channels.
Full installation
To reinstall the TV, press h > Setup >
Installation > Channel installation >
Automatic
installation and press OK.
Start the installation and select Reinstall channels.
The update may take a few minutes.
To reorder or rename found channels, read
4.2.1 Reor
der and rename.
4.2.4 Reception quality
Digital reception quality
If you receive digital TV broadcasting (DVB) from
your own antenna (DVB-T) or use the TV tuner
to receive digital cable channels (DVB-C), you can
verify the quality and signal strength of a channel.
If the reception is poor, you can reposition your
antenna to tr
y to improve the reception. For best
results, contact a specialised antenna installer.
To verify the reception quality of such a digital
channel, select the channel, press h > Setup >
Installation > Channel installation > Reception
test > Search and press OK.
The digital frequency is shown for this channel.
If the reception is poor, you can reposition your
antenna. Select Search and press OK to verify
the signal quality of this frequency again.
You can enter a specifi c digital frequency yourself.
Select the frequency, position the arrows on a
number with x and w and change the number
with u and v.
Press Search to verify this frequency.
If you receive the channel with DVB-C, the
options Symbol rate mode and Symbol rate are
shown.
For Symbol rate mode, select Automatic unless
your cable provider supplies a specifi c symbol
rate value. You can enter this supplied value in
Symbol rate using the number keys.
4.2.5 Manual installation of analogue channels
Analogue TV channels can be manually tuned-in
channel by channel.
To star t the manual installation of analogue
channels, press h > Setup > Installation >
Channel installation > Manual install - analogue.
Follow each step in this menu. You can redo these
steps until you have all available analogue TV
channels.
1 System
If you have your own antenna, you need
to select the country or par t of the world
where the TV channel comes from. If you
receive TV channels via a cable system, you
only need to select the country or par t of
the world once.
2 Find channel
Search for an analogue TV channel. The
search starts automatically but you can
manually enter a frequency. If the channel
reception is bad, select Search next to search
again.
Select Done and press OK if you want to
store this TV channel.
3 Fine tune
Fine tune the found channel with u and v.
Press Done once the channel is fi ne tuned.
4 Store
A found channel can be stored on the
current channel number with Store current
channel or as a new channel number with
Store as new channel.
4.2.6 Fine tune analogue channels
If the reception of an analogue TV channel is
poor, you can try to fi ne tune the TV channel.
40
UM_Bombay_56PFL9954_en.indd 40UM_Bombay_56PFL9954_en.indd 40 2009-06-30 10:19:452009-06-30 10:19:45
Page 43

To fi ne tune analogue channels, press h >
Setup > nstallation > Channel installation >
Manual install - analogue > Fine tune.
Fine tune the channel with u and v.
Press Done once the channel is fi ne tuned.
You can store this fi ne tuned channel on the
current channel number with Store current
channel or as a new channel number with Store
as new channel.
4.2.7 DVB-T or DVB-C
If both DVB-T and DVB-C reception is available
in your country, and this TV is prepared for both
DVB-T and DVB-C for your country, you need
to select DVB-T or DVB-C before you install TV
channels.
To select DVB-T or DVB-C reception, press h
> Setup > Installation > Channel installation >
Antenna/Cable DVB.
Select Antenna for a DVB-T installation.
Select Cable for a DVB-C installation.
DVB-C channel installation
All DVB-C TV settings are set to automatic but
the DVB-C network might need some settings
supplied by the DVB-C provider. Enter these
settings or values when the TV asks for them.
You can install your TV for DVB-T and DVB-C.
In that case, you need to carry out two channel
installations. First, carry out an installation with
Antenna selected followed by an installation
with Cable selected. Afterwards, the Channel
overview will show both DVB-T and DVB-C TV
channels.
4.2.8 Clock settings
In some countries, digital TV broadcasts do
not send UTC — Coordinated Universal Time
information. Therefore, winter and summer time
changes might be ignored. You can correct this
with the clock settings.
If the TV shows the incorrect time, press h
> Setup > Installation > Clock > Auto clock
mode and select Manual.
In the Daylight saving menu, select Standard
time (winter) or Daylight saving time (summer)
according to your local time.
4.3 Network
4.3.1 Benefi ts
If the TV is connected to your PC network,
you can play photos, music and movies from a
computer or storage device in that network.
Once the network is installed, select Browse
PC network in the Home menu to view the PC
content.
Net TV
If the TV is connected to the PC network, which
is connected to the Internet, you can link up your
TV to Net TV. The Net TV start page offers you
movies, pictures, music, infotainment, games and
many more, all fi t for your TV screen.
Once the network is installed, select Browse
Net TV in the Home menu or simply press Net
TV on the remote control to open the Net TV
start page.
4.3.2 What you need
To connect the TV to a PC network and Internet
you need a router in your PC network. The
router needs to be set to DHCP On.
To enjoy Net TV you need to connect the TV
to a router with a high speed connection to the
Internet.
The TV connection to the router can either be
wired or wireless.
If you choose a wired connection to the router
you need a network (Ethernet) cable.
41
UM_Bombay_56PFL9954_en.indd 41UM_Bombay_56PFL9954_en.indd 41 2009-06-30 10:19:462009-06-30 10:19:46
Page 44

The PC network feature is DLNA certifi ed.
TV
PC
Router
Internet
TV
PC
Router
Internet
You can use Microsoft Windows XP or Vista, Intel
Mac OSX or Linux on your computer.
To share PC content on your TV, you need
recent media server software on your computer.
A Windows Media Player 11 or similar.
Some media server software needs to be set to
share fi les with the TV.
For the list of supported media server software,
read 7.4 Multimedia.
4.3.3 Wireless installation
The onscreen instructions help you to install the
wireless network.
Switch on your router before you start the
network installation. If your wireless network is
secured, have the encryption key ready to enter
onscreen.
To star t the wireless network installation on the
TV, press h > Setup > Installation > Netw
ork
> Network installation and press OK. Follow
the onscreen instructions.
Name and security
TV scans for your network router. Found
The
routers appear in a list on screen. If several
routers are found, select your router in the list
and press OK.
If the router name is unknown to you or you
do not recognize your router’s name, look up
the SSID (Service Set Identifi er) in the router
software on your PC.
When you have chosen your router, the TV
asks for the encryption key -the security key- to
access the router.
If you have WPA security on your router, enter
the passphrase with the characters on the
remote control. If you have WEP security, the TV
asks for the WEP encryption key in hexadecimal
numbers. Find this hexadecimal key in the router
software on your PC. Write down the fi rst key
of the WEP keys list and enter it on TV with the
remote control keypad.
If the security key is accepted, the TV is
connected with the wireless router.
Next time you start the wireless network, there
is no need to enter the security key. The TV uses
the security key you entered in the installation.
If asked for, agree to the End User License
Agreement.
4.3.4 Wired installation
The onscreen procedure helps you to install the
wired network.
Connect the router to the TV using a network
cable and switch on the router before you start
the network installation.
To star t the wired network installation, press h
> Setup > Installation > Netw
ork > Network
installation and press OK.
Follow the instructions on screen.
TV constantly searches for a network
The
connection.
If asked for, agree to the End User License
Agreement. Find the latest End User License
Agreement at www.philips.com.
42
UM_Bombay_56PFL9954_en.indd 42UM_Bombay_56PFL9954_en.indd 42 2009-06-30 10:19:462009-06-30 10:19:46
Page 45

4.3.5 Network settings
The TV’s network settings that are used to
connect to your router are standard and set to
automatic. This ensures easy connection with any
available network.
If you have problems with the network
connection, you might want to adjust the settings
so that they are appropriate for your home
network.
If you are unsure, ask someone with knowledge
of network settings to help you.
To set specifi
c network settings, press h >
Setup > Installation > Network > Network
mode and/or … > IP confi guration.
4.4 Other devices
4.4.1 Pixel Plus link
Some other devices, DVD or Blu-ray Disc players,
might have their own picture quality processing.
To avoid bad picture quality from interference
with the TV processing, the picture processing
of these devices should be discarded. With Pixel
Plus link you can discard this picture quality
processing.
Press h and select Setup > Installation >
eferences > Pixel Plus link. Select On to
Pr
discard the picture processing from connected
devices.
4.4.2 Audio
When a Home Theatre System is connected,
the picture on your TV and the sound from the
Home Theatre System should be syncronized. A
mismatch is visible in scenes with people talking.
When they fi nish sentences before their lips stop
moving, you need to adjust the Audio sync delay
on the Home Theatre System.
Consult the user manual of the Home Theatre
System.
sync
In case you cannot set this delay in the Home
Theatre System or the maximum setting is
insuffi cient, you can consider to switch off the
HD Natural Motion picture processing of the TV.
Press h > Setup > Pictur
e > Perfect Pixel HD
> HD Natural Motion.
4.5 Software update
4.5.1 From the Internet
In some cases, it might be necessary to update
the TV software. If your TV is connected to
a router, which is connected to the Internet,
you can update the TV software directly from
the Internet. You need a high speed Internet
connection.
Press h > Setup > Softwar
now and press OK.
Select Internet and press OK.
Follow the instructions on screen.
When the update is done
and back on again automatically. Wait for the TV
to switch back on; do not use the Power switch
O on the TV.
If the TV is connected to the Internet, the TV
displays a message about the availability of new
software at start up.
4.5.2 With a USB memory device
In some cases, it might be necessary to update
the TV software. Start the software update on
the TV. Then, download the TV software from
the Internet onto your PC. Use a USB memory
device to upload the software from your PC to
the TV.
Preparation
You need a PC with a high speed Internet
connection. You will need a USB memory device
with 256 Mb free space and make sure that
the write protection is switched off. Some USB
memory devices might not work with the TV.
e update > Update
, the TV switches off
43
UM_Bombay_56PFL9954_en.indd 43UM_Bombay_56PFL9954_en.indd 43 2009-06-30 10:19:462009-06-30 10:19:46
Page 46

1 Identifi cation
Press h > Setup > Softwar
e update >
Update now and press OK. Select USB and
press OK.
Follow the onscreen instructions.
The TV will ask to insert the USB device into
the USB connector at the side of the TV.
2 Download from PC to USB
Once the TV identifi cation fi le is written to
the USB device, insert the USB into your
PC that is connected to the Internet. On
the USB device, locate the fi le update.htm
and double-click it. Click on Send ID. If new
software is available it will download to the
USB device
.
3 Download from USB to TV
Insert the USB memory device back into
the TV. Follow the onscreen instructions to
start the new TV software update. The TV
switches off for 10 seconds and back on
again. Please wait.
Do not …
• use the remote control
• remove the USB device from the TV during
the software update
If a power cut occurs during the update, never
ve the USB memory device from the TV.
remo
When the power returns, the update continues.
At the end of the update, the message
Operation successful appears on screen.
Remove the USB device and press O on the
remote control.
Do not …
• press O twice
• use the O switch on the
TV
The TV switches off (for 10 seconds) and back
on again. Please wait.
Now the new TV software update is fi nished
You can use the TV again.
44
UM_Bombay_56PFL9954_en.indd 44UM_Bombay_56PFL9954_en.indd 44 2009-06-30 10:19:462009-06-30 10:19:46
Page 47

5 Connections
5.1 First connections
5.1.1 Power cable
Make sure the power cable is securely inserted in
the TV. Make sure that the power plug in the wall
socket is accessible at all times.
When disconnecting the power cable, always pull
the plug, never the cable.
Although this TV has a very low standby power
consumption, unplug the power cable to save
energy if you do not use the TV for a long time.
5.2 About cables
5.2.1 Cable quality
Before you connect devices to the TV, verify
which connectors are available on the device.
Connect the device to the TV with the highest
quality connection available. Good quality cables
ensure a good transfer of picture and sound.
The connections shown in this user manual
are recommendations for the cases most used.
Other solutions are possible.
Read more on specifi c cable types and available
connections in 5.2.2 HDMI… etc.
Add your devices
When you have connected a device to the TV,
always add this device as an item in the Home
menu. With this item in the Home menu, you can
easily switch the TV to this device.
5.1.2 Antenna cable
Locate the antenna connection at the back of
the TV. Insert the antenna cable securely in the
Antenna a sock
et.
To add a new device, press h > Ad
devices. Follow the instructions on screen.
5.2.2 HDMI
An HDMI connection has the best picture and
sound quality
One HDMI cable combines video and audio
signals.Use HDMI for High Defi nition (HD) TV
signals.
An HDMI cable transfers picture and sound
signals in only one direction, the opposite to a
scart cable.
Do not use an HDMI cable longer than 5 m.
.
d your
45
UM_Bombay_56PFL9954_en.indd 45UM_Bombay_56PFL9954_en.indd 45 2009-06-30 10:19:472009-06-30 10:19:47
Page 48

HDMI supports HDCP (High-bandwidth Digital
Contents Protection). HDCP is a copy protection
signal that comes with HD content (DVD disc or
Blu-ray Disc).
DVI to HDMI
Use a DVI to HDMI adaptor if your device has
only a DVI connection. Use one of the HDMI
connectors and add an Audio L/R cable to DVI
x HDMI, Audio In L/R for sound, at the back of
the TV.
EasyLink
HDMI with EasyLink offers easy operating of your
connected devices when these have the HDMI
CEC standard.
Read 5.5 EasyLink HDMI-CEC.
5.2.3 YPbPr — Component video
Use the Component Video YPbPr connection
together with an Audio Left and Right connection
for sound.
Match the YPbPr connector colours with the
cable plugs when you connect. YPbPr can handle
High Defi nition (HD) TV signals.
5.2.4 Scart
A scart cable combines video and audio signals.
Scart connectors can handle RGB video signals
but cannot handle High Defi nition (HD) TV
signals.
5.2.5 S-Video
Use an S-Video cable together with an Audio
Left and Right (cinch) cable.
Match the Audio connectors’ colours with the
cable plugs when you connect.
46
UM_Bombay_56PFL9954_en.indd 46UM_Bombay_56PFL9954_en.indd 46 2009-06-30 10:19:472009-06-30 10:19:47
Page 49

5.2.6 Video
Use a Video (cinch) cable together with an Audio
Left and Right (cinch) cable.
Match the Audio connectors’ colours with the
cable plugs when you connect.
5.2.7 VGA
Use a VGA cable (DE15 connector) to connect
a computer to the TV. With this connection you
can use the TV as a computer monitor. You can
add an Audio Left and Right cable for sound.
Read 5.4.6 TV as PC monitor.
47
UM_Bombay_56PFL9954_en.indd 47UM_Bombay_56PFL9954_en.indd 47 2009-06-30 10:19:482009-06-30 10:19:48
Page 50

5.3 Connect devices
HTR
TV
Game
Digital
Receiver
Blu-ray Disc
5.3.1 HTR9900 + BDP9100
The HTR is the centre of the HTR, BDP and TV combination. As the HTR is the centre, connect all
your audio and video devices (Digital receiver, Game console, ...) to the HTR, not to the TV.
When the HTR is connected to the TV, add the HTR as an item in the TV Home menu with Add your
devices. While watching TV, press h and select Ad
instructions to select the HTR and its connection.
st, connect your antenna to the TV Antenna connector.
Fir
d your devices and press OK. Follow the onscreen
48
UM_Bombay_56PFL9954_en.indd 48UM_Bombay_56PFL9954_en.indd 48 2009-06-30 10:19:482009-06-30 10:19:48
Page 51

Then, use 2 HDMI cables to connect the BDP to the HTR and the HTR to the TV.
Finally, use a digital audio cable to connect the HTR to the TV.
49
UM_Bombay_56PFL9954_en.indd 49UM_Bombay_56PFL9954_en.indd 49 2009-06-30 10:19:492009-06-30 10:19:49
Page 52

5.3.2 DVD player
Use an HDMI cable to connect the DVD player to an HDMI connector on the back of the TV.
50
UM_Bombay_56PFL9954_en.indd 50UM_Bombay_56PFL9954_en.indd 50 2009-06-30 10:19:492009-06-30 10:19:49
Page 53

5.3.3 DVD Home Theatre System
First, use an HDMI cable to connect the device to the TV.
Finally, use a digital audio cinch cable to connect the device to the TV or alternatively, use the analogue
Audio Out L/R.
If there is no digital audio output on the Home Theatre System, you can use the TV’s analogue Audio
Out L/R connection.
Audio and Video synchronisation
If the sound does not match with the video on screen, you can set a delay on most DVD Home
Theatre Systems to match the sound and video.
Do not connect the audio signal from a DVD player or other device directly to the Home Theatre
System. Always lead the sound through the TV fi rst.
51
UM_Bombay_56PFL9954_en.indd 51UM_Bombay_56PFL9954_en.indd 51 2009-06-30 10:19:492009-06-30 10:19:49
Page 54

5.3.4 DVD Recorder
First, use 2 antenna cables to connect the antenna to the DVD Recorder and the TV.
Finally, use a scart cable to connect the DVD Recorder to a scart connector on the back of the TV.
52
UM_Bombay_56PFL9954_en.indd 52UM_Bombay_56PFL9954_en.indd 52 2009-06-30 10:19:502009-06-30 10:19:50
Page 55

5.3.5 Digital receiver or Satellite receive
/
/
First, use 2 antenna cables to connect the antenna to the receiver and the TV.
Finally, use a scart cable to connect the receiver to the back of the TV
53
UM_Bombay_56PFL9954_en.indd 53UM_Bombay_56PFL9954_en.indd 53 2009-06-30 10:19:502009-06-30 10:19:50
Page 56

5.3.6 Digital receiver and DVD Recorder
First, use 3 antenna cables to connect the digital receiver and the DVD Recorder to the TV.
Then use a scart cable to connect the digital receiver to the TV.
54
UM_Bombay_56PFL9954_en.indd 54UM_Bombay_56PFL9954_en.indd 54 2009-06-30 10:19:512009-06-30 10:19:51
Page 57

Finally, use 2 scart cables to connect the 2 devices and the TV.
55
UM_Bombay_56PFL9954_en.indd 55UM_Bombay_56PFL9954_en.indd 55 2009-06-30 10:19:512009-06-30 10:19:51
Page 58

5.3.7 Digital receiver, DVD Recorder and Home Theatre System
.
First, use 3 antenna cables to connect the 2 devices and the TV.
Then use a scart cable to connect the digital receiver to the TV.
56
UM_Bombay_56PFL9954_en.indd 56UM_Bombay_56PFL9954_en.indd 56 2009-06-30 10:19:522009-06-30 10:19:52
Page 59

Then use 2 Scart cables to connect the Digital receiver to the DVD Recorder and the DVD Recorder
to the TV.
Then use an HDMI cable to connect the Home Theatre System to the TV
57
UM_Bombay_56PFL9954_en.indd 57UM_Bombay_56PFL9954_en.indd 57 2009-06-30 10:19:522009-06-30 10:19:52
Page 60

Finally, use a digital audio cinch cable to connect the Home Theatre System to the TV.
5.3.8 Blu-ray Disc player
Use an HDMI cable to connect the Blu-ray Disc player to an HDMI connector on the back of the TV.
58
UM_Bombay_56PFL9954_en.indd 58UM_Bombay_56PFL9954_en.indd 58 2009-06-30 10:19:532009-06-30 10:19:53
Page 61

5.4 More devices
5.4.1 Digital HD receiver
First, use 2 antenna cables to connect the Digital HD receiver to the TV.
Use an HDMI cable to connect the Digital HD receiver to the TV.
59
UM_Bombay_56PFL9954_en.indd 59UM_Bombay_56PFL9954_en.indd 59 2009-06-30 10:19:542009-06-30 10:19:54
Page 62

5.4.2 Game console
The most practical connections for a game console are at the side of the TV. You can use an HDMI,
S-Video or Video connection but never connect the S-Video and Video at the same time.
If you use an HDMI or YPbPr connection, you can use the connectors at the back of the TV.
See the next pages for how to connect your games console.
Picture delay
To prevent picture delay, set the TV to Game.
Press Options o and select Pictur
e and sound. Press OK.
Select Smart settings and press OK.
Select Game and press OK.
The most practical connections for a game console are at the side of the TV.
Use an HDMI or the EXT3 (YPbPr and
Audio L/R) cable to connect the game console to the back of
the TV.
60
UM_Bombay_56PFL9954_en.indd 60UM_Bombay_56PFL9954_en.indd 60 2009-06-30 10:19:542009-06-30 10:19:54
Page 63

5.4.3 HD Game console
Use an HDMI cable or YPbPr cables to connect a High Defi nition game console to the TV.
Read also 5.4.2 Game console.
5.4.4 Photo camera
To view pictures stored on your digital photo camera, you can connect the camera directly to the TV.
Use the USB connection at the side of the TV to connect. Switch on the camera after you made the
connection.
If the list with the content of the camera does not show automatically, your camera might need to be
set to transfer its content with PTP – Picture Transfer Protocol. Read the user manual of the digital
photo camera.
61
UM_Bombay_56PFL9954_en.indd 61UM_Bombay_56PFL9954_en.indd 61 2009-06-30 10:19:552009-06-30 10:19:55
Page 64

5.4.5 Camcorder
The most practical connection for a camcorder is at the side of the TV. You can use an HDMI, S-Video
or Video connection but never connect the S-Video and Video at the same time.
See the next pages for how to connect your camcorder.
The most practical connection for a camcorder is at the side of the TV.
Use an HDMI or the EXT3 (YPbPr and Audio L/R) cable to connect the camcorder to the back of the
TV.
62
UM_Bombay_56PFL9954_en.indd 62UM_Bombay_56PFL9954_en.indd 62 2009-06-30 10:19:552009-06-30 10:19:55
Page 65

5.4.6 TV as PC monitor
You can connect the TV to your computer as a PC monitor.
Before connecting the PC, set the PC monitor refresh rate to 60 Hz.
You can connect the PC to the side of the TV or alternatively to the back. See the next pages to
connect your computer.
Supported PC resolutions
For a list of supported resolutions see Technical data > Display resolutions.
Use a DVI to HDMI adapter to connect the PC to HDMI and an audio L/R cable to connect the Audio
L/R to the side of the TV.
Use a VGA cable to connect the PC to the VGA connector and an audio L/R cable to connect the
VGA Audio L/R to the back of the TV.
63
UM_Bombay_56PFL9954_en.indd 63UM_Bombay_56PFL9954_en.indd 63 2009-06-30 10:19:552009-06-30 10:19:55
Page 66

5.4.7 Decoder
Use a scart cable to connect a decoder which decodes analogue antenna channels. Use the EXT1 or
EXT2 connectors at the back of the TV.
You have to assign the TV channel as a channel to be decoded. Then assign the connection where the
decoder is connected.
Press h > Setup > Installation > Decoder.
Select Channel to set the channel that you want to
decode. Select Status to set the connector you use for the decoder.
64
UM_Bombay_56PFL9954_en.indd 64UM_Bombay_56PFL9954_en.indd 64 2009-06-30 10:19:562009-06-30 10:19:56
Page 67

5.5 EasyLink HDMI-CEC
5.5.1 EasyLink
If a device is equipped with the HDMI-CEC
standard, the device and the TV can work
together.
Connect the TV to the device using an HDMI
cable. The TV comes with EasyLink set to On.
o switch EasyLink off, press h > Setup >
T
Installation > Preferences > EasyLink.
With EasyLink, the following functions are
available:
• One touch play
Insert a disc and press Play on the device. The
TV switches on from standby mode and shows
the disc programme automatically.
• System standby
Press O on the TV remote control for 2
seconds to switch the connected devices into
standby mode.
• System audio control
If you connect an audio system, you can
listen to the audio from the TV through the
audio system. The TV speakers are muted
automatically.
The TV comes with the speakers set to
EasyLink (Automatic). To switch the TV
speakers off or permanently on, press h >
Setup > Sound >
Make sure that all HDMI-CEC settings are
ly set up on the device. EasyLink might
proper
not work with devices from other brands.
Naming of HDMI-CEC on other brands
The HDMI-CEC functionality has different names
with different brands. Some examples of name
are: Anynet, Aquos Link, Bravia Theatre Sync, Kuro
Link, Simplink, Viera Link, ...
Not all brands are fully compatible with EasyLink.
TV speakers.
5.5.2 EasyLink Remote Control
First read 5.5.1 EasyLink, before you go on with
EasyLink Remote control.
With EasyLink Remote control, the TV remote
control commands are sent directly to the device
you are watching on TV. There is no need to
select the device on the remote control fi rst.
Caution
This is an advanced setting. Verify if all devices are
suited for this setting. Unsuited devices will not
respond. Try out this function fi rst, before you
switch on EasyLink Remote control permanently.
o switch EasyLink Remote control on, press h
T
> Setup > Installation > Preferences > EasyLink
Remote control.
Except for the Home h key, all remote control
commands will try to operate the device. Some
commands might not work with the device.
To switch back to TV control, press h and
select Watch TV.
To control another device, press h and select
the other device
.
5.6 Common interface CAM
5.6.1 Conditional Access Module
Scrambled digital TV channels can be decoded
with a Conditional Access Module (CAM). Digital
TV service operators provide the CAM when
you subscribe to their services. Contact a digital
TV service operator for more information and
terms & conditions.
Insert a CAM
Switch off the TV before inser ting a CAM.
Look on the CAM for the correct method of
insertion. Incorrect insertion can damage the
CAM and the TV.
Look for the common interface slot on the side
of the TV. Gently insert the CAM as far as it will
go and leave it in the slot permanently.
It can take a few minutes before the CAM is
activated. Removing the CAM will deactivate the
service on TV.
65
UM_Bombay_56PFL9954_en.indd 65UM_Bombay_56PFL9954_en.indd 65 2009-06-30 10:19:562009-06-30 10:19:56
Page 68

Watching a CAM service
If a CAM is inser ted and subscription fees have
been paid, the TV shows the programme from
the digital TV ser vice provider. The applications,
their function, the content and the onscreen
messages all come from the CAM service.
5.7 Network
5.7.1 Wireless network connection
To set up the wireless network connection, read
all chapters in 4.3 Network.
CAM settings
To set passwords or PIN codes for the CAM
service, press h > Setup > F
eatures >
Common Interface. Select the CAM provider
and press OK.
Common Interface Plus CI+
5.6.2
This TV can handle the CI+ conditional access.
CI+ allows service providers to offer premium
HD digital programmes with a high level of copy
protection.
To inser t a CI+ CAM, read chapter 5.6.1
Conditional Access Module.
5.7.2 Wired network connection
To set up the wired network connection, read all
chapters in 4.3 Network.
Connect the router to the TV using a network
cable and switch on the router before you start
the network installation.
66
UM_Bombay_56PFL9954_en.indd 66UM_Bombay_56PFL9954_en.indd 66 2009-06-30 10:19:562009-06-30 10:19:56
Page 69

6 Troubleshooting
6.1 Contact information
Warning
If your TV breaks down, NEVER try to repair the
TV yourself.
If the advice and suggestions in Troubleshooting
do not help resolve the problem, try switching
the TV off and back on again.
Consumer Care
If the TV problem is not solved you can call the
Philips Consumer Care hotline in your country.
Find the telephone number on the printed
documentation that came with the TV.
Or consult our website www.philips.com/
support.
TV model number and serial number
Find these numbers on the packaging label or on
the type label on the back or bottom of the TV.
6.2 TV and remote control
The TV does not switch on
• Verify the power cable connection.
• Verify that the batteries of the remote control
are not empty or weak. Verify their + / orientation.
• Unplug the power cable, wait for a minute and
plug it back in. Try switching it on again.
• You can use the buttons on the TV to switch
the TV on.
The TV does not respond to the remote
control
• Verify that the batteries of the remote control
are not empty or weak. Verify their + / orientation.
• Clean the remote control and TV sensor lens.
• Verify if EasyLink Remote control is set to Off
• During the warming-up time of the TV, which
is about two minutes, it is possible that the TV
and some external devices do not immediately
respond to commands from the remote
control. The device is functioning normally and
is not broken.
The TV switches off and the red light blinks
• Unplug the power cable, wait a minute and plug
it back in. Verify if there is enough space for
ventilation. Wait until the TV has cooled down.
If the TV does not restart from standby and
the blinking occurs again, call Consumer Care.
You forgot your code to unlock Child lock
• Read 3.4.2 Child lock.
6.3 TV channels
Some TV channels are gone
• Verify if the correct list for the Channel
overview is selected. Read 2.2.1 Channel
overview.
• A channel could be hidden in the Channel
overview. Read 2.2.1 Channel overview.
No digital channels found during installation
• Verify if the TV suppor ts DVB-T or DVB-C in
your country. Check the ‘Digital TV Country
Compatibility’ sticker on the back of the TV.
6.4 Picture
LightGuide is on but there is no picture
• Verify if the antenna is connected properly.
• Verify if the correct device is selected.
The sound is on, but there is no picture
• Verify the contrast or brightness setting in the
menu.
The TV picture is poor
• Verify if the antenna is connected properly.
• Non-earthed audio devices, neon lights, high
buildings or mountains can infl uence the
picture quality. Try to improve the picture by
changing the position of the antenna or placing
devices away from the TV.
67
UM_Bombay_56PFL9954_en.indd 67UM_Bombay_56PFL9954_en.indd 67 2009-06-30 10:19:572009-06-30 10:19:57
Page 70

• Verify that the correct TV system is chosen in
the Manual installation menu.
• If only a certain channel is poor, tr y to fi ne
tune this channel with the Fine tune menu.
Read 4.2.5 Manual install - analogue.
The picture has poor colour
• Verify the colour settings in the Picture menu.
Select any of the Smart settings in the Setup
menu.
• Verify the connections and cables of the
connected devices.
Picture delay when a game console is connected
• To prevent picture delay, set the TV to game
mode. Select Game in the Smar
t settings in the
Setup menu.
The TV does not remember my settings when I
switch it back on
• Check whether the TV is set to Home in
the Home menu > Setup > Installation >
Preferences > Location menu.
The picture does not fi
t the screen; it is either
too big or too small
• Press f and select a more fi tting picture
format in the Picture format menu.
The picture position on screen is not correct
• Some picture signals from some devices do
not fi t the screen properly. You can move the
picture with the cursor keys on the remote
control. Check the signal output of the device.
The sound is poor
• Verify that the sound is set to Ster
eo.
• Select any of the Smart settings in h > Setup
> Smart settings.
The sound comes from one speaker only
• Verify that the Balance is not set to extreme
left or right.
Sound delay when a DVD Home Theatre
System device is connected
• Read the user manual of the DVD device to
adjust the audio sync delay. If you cannot set a
delay, switch off HD Natural Motion in h >
Setup > Picture > Perfect Pixel HD.
6.6 Devices
HDMI connections
• The HDMI-HDCP procedure might take a few
seconds before the TV shows the picture from
a device.
• If the TV does not recognise the device and
the screen shows no picture, try switching
from one device to another and back again to
restart the HDCP procedure.
• If sound interruptions occur persistently, see
the user manual of the device to verify the
output settings. If that does not help, connect
an additional audio cable.
• If a DVI to HDMI adaptor is used, verify that
an additional audio connection is in place to
complete the DVI connection.
HDMI with EasyLink
6.5 Sound
• Verify if the connected device supports the
HDMI-CEC standard and is properly set up.
There is a picture but no sound
• Verify the volume is not set to 0.
• Verify the sound has not been muted with m.
• Verify that all cables are connected properly.
• If no sound signal is detected, the TV
automatically switches off the sound. This is
proper operation and is not a malfunction.
Read the user manual that comes with the
device.
• Verify if the HDMI cable is properly connected.
• Verify if EasyLink is activated in h > Setup >
Installation > Pr
eferences >EasyLink.
• Make sure that the System audio control in
our HDMI-CEC audio devices is properly set
y
up. Read the user manual that comes with your
68
UM_Bombay_56PFL9954_en.indd 68UM_Bombay_56PFL9954_en.indd 68 2009-06-30 10:19:572009-06-30 10:19:57
audio device.
Page 71

EasyLink Remote control
• Some devices have identical functionality but
do not support the specifi c remote control
commands. Read 5.5.2 EasyLink RC.
The PC display on my TV is not stable or is not
synchronised (with TV as PC monitor)
• Set the refresh rate of your PC to 60Hz.
• Verify that the correct resolution mode
is selected on your PC. Read 7.3 Display
resolutions.
HTR9900, BDP9100 and TV combination
• If the HTR sound is not the TV sound, select
the correct source on the HTR remote
control.
• The HTR9900 does not suppor t EasyLink
(HDMI-CEC).
6.7 Multimedia
USB device content is not shown
• Set your device (camera) to ‘Mass Storage
Class’ compliant.
• The USB device may need specifi c driver
software. Unfortunately, this software cannot
be downloaded to your TV.
• Not all audio and picture fi les are supported.
Read 7 Technical data.
6.8 Network
Wireless network not found or distorted.
• Microwave ovens, Dect phones or other WiFi
11b devices in your neighbourhood might
disturb the wireless network.
• Make sure that the fi rewalls in your network
allow access to the TV wireless connection.
• If the wireless network does not work
properly in your home, try the wired network
installation. Read 4.3 Network.
Net TV does not work
• If the connection to the router is OK, verify
the router connection to the Internet.
Browse PC and Net TV work slow
• Look in your wireless router’s user manual for
information on indoor range, transfer rate and
other factors of signal quality.
• You need a high speed Internet connection for
your router.
USB device content does not play back
smoothly
• The transfer performance of the USB device
limits the transfer rate.
PC fi les are not shown in the Browse PC
network menu
• Verify that fi les have been added in the PC
folder.
• Not all fi le formats are supported. Read 7.4
Multimedia.
• You have to set the PC media server to share
fi les with the TV. Read 4.3.2 What you need.
PC fi les do not play
• Read 7.4 Multimedia.
UM_Bombay_56PFL9954_en.indd 69UM_Bombay_56PFL9954_en.indd 69 2009-06-30 10:19:572009-06-30 10:19:57
69
Page 72

7 Technical data
7.1 Power and reception
Product specifi cations are subject to change
without notice.
For more specifi cation details of this product see
www.philips.com/support.
Power
• Mains power : AC220-240V +/-10%
• Ambient temperature : 5°C to 35°C
• Power and standby power consumption, see
the technical specifi cation on www.philips.com.
Reception
• Antenna input : 75ohm coaxial (IEC75)
• TV system : DVB COFDM 2K/8K,
• Video playback : NTSC, SECAM, PAL
• DVB : DVB-T, DVB-C, MHEG 4
(see selected countries on the TV typeplate)
• Tunerbands : VHF, UHF, S-Channel, Hyperband
7.2 Display and sound
7.3 Display resolutions
Supported display resolutions
Video formats
Resolution — Refresh rate
• 480i - 60 Hz
• 480p - 60 Hz
• 576i - 50 Hz
• 576p - 50 Hz
• 720p - 50 Hz, 60 Hz
• 1080i - 50 Hz, 60 Hz
• 1080p - 24 Hz, 25 Hz, 30 Hz
• 1080p - 50 Hz, 60 Hz
Computer formats
Resolution — Refresh rate
• 640 x 480p — 60 Hz (VGA/HDMI)
• 600 x 800p — 60 Hz (VGA/HDMI)
• 1024 x 768p — 60 Hz (VGA/HDMI)
• 1280 x 768p — 60 Hz (VGA/HDMI)
• 1360 x 765p — 60 Hz (VGA/HDMI)
• 1360 x 768p — 60 Hz (VGA/HDMI)
• 1280 x 1024p — 60 Hz (HDMI)
• 1920 x 1080i — 60 Hz (HDMI)
• 1920 x 1080p — 60 Hz (HDMI)
Picture / Display
• Display type: LCD Full HD W-UXGA
• Length of diagonal : 56 inch / 142cm
• Aspect ratio : 2.39:1 / 21:9
• Panel resolution : 2560x1080p
• Perfect Pixel HD picture enhancement
• 1080p 24/25/30/50/60Hz processing
• 200Hz Clear LCD
Sound
• Output power (RMS) : 2 x 15 W
• Vir tual Dolby Digita
• BBE
70
UM_Bombay_56PFL9954_en.indd 70UM_Bombay_56PFL9954_en.indd 70 2009-06-30 10:19:572009-06-30 10:19:57
7.4 Multimedia
Connections
• USB
• Ethernet UTP5
• Wi-Fi 802.11g (built-in)
Supported USB / memory device formats
• FAT 16, FAT 32, NTFS
Playback formats
• MP3
• Still pictures : JPEG
• MPEG 1, MPEG 2, MPEG 4
• MPEG program stream PAL
• AVI
• H.264 (MPEG-4 AVC)
• WMA v2 up to v9.2
• WMV9
Page 73

Supported media server software
• Windows Media Player 11 (for Microsoft
Windows XP or Vista)
• Google (for XP)
• Twonky Media — PacketVideo 4.4.9 (for PC
and Intel MacOX)
• Sony Vaio Media Server (for Microsoft
Windows XP or Vista)
• TVersity v.0.9.10.3 (for Microsoft Windows XP)
• Nero 8 — Nero MediaHome (for Microsoft
Windows XP)
• DiXiM (for Microsoft Windows XP)
• Macrovision Network Media Server(for
Microsoft Windows XP)
• Fuppes (for Linux)
• uShare (for Linux)
• Philips NAS SPD8020 (v. 1.2.9.47)
7.5 Connectivity
Rear
• EXT1 (scart): Audio L/R, CVBS in, RGB
• EXT2 (scart): Audio L/R, CVBS in, RGB
• EXT3:Y Pb Pr, Audio L/R
• VGA, Audio L/R
• HDMI 1 in (HDMI 1.3a for all HDMI
connections)
• HDMI 2 in
• HDMI 3 in
• HDMI 4 in
• Audio In L/R (DVI to HDMI)
• Audio Out L/R — display synchronised
• Digital Audio out (coaxial-cinch-S/PDIF) display
synchronised
• Network — (RJ45)
7.6 Dimensions and weights
56PFL9954
Width 1418 mm
Height 694 mm
Depth 105 mm
Weight ±32 kg
… with TV stand
Height 745 mm
Depth 324 mm
Weight ±38 kg
Side
• HDMI side in
• S-Video in (Y/C)
• Video in (CVBS)
• Audio L/R in
• Headphones (stereo mini jack)
• USB
• Common interface slot
71
UM_Bombay_56PFL9954_en.indd 71UM_Bombay_56PFL9954_en.indd 71 2009-06-30 10:19:582009-06-30 10:19:58
Page 74

8 Index
A
Add your devices 21
Age rating 34
Ambilight 24
Antenna cable 45
Anti-theft lock 3
Audio languages 35
Audio sync 43
B
Batteries 20
Browse Net TV 28
Browse PC Network 35
Browse USB 35
C
Cable quality 45
Camcorder 62
Channel overview 20
Channels 22
Child lock 34
Clear history 30
Clock settings 41
Common Interface Slot 65
Conditional Access Module 65
D
Decoder 64
DHCP 41
Digital frequency 40
Digital reception quality 40
DLNA certifi ed 42
DVB-C 41
DVB-T 41
DVD Recorder 52
E
EasyLink 65
EasyLink Remote Control 65
ECO-green 4
End of use 3
F
Factory settings 39
72
Fine tune 40
G
Game console 60
Guide 22
H
HD Game console 61
HDMI connection 45
Hearing impaired 36
High Defi nition 2
Highest quality connection 45
Home 21
I
Infra red sensor 6
L
LightGuide 5
LoungeLight 24
M
Manual installation 40
N
Net TV 26
Net TV lock 27
Net TV ser vices 28
Network settings 43
O
Options 22
P
Perfect Pixel HD Engine 37
Photo camera 61
Picture format 23
Pixel Plus link 43
Position the TV 3
Power cable 45
Programme guide 33
Programme info 22
R
Reinstall channels 40
Remote control overview 10
Rename / Reorder 39
S
Safety 2
Scart 46
Screen care 3
Security slot 3
Settings assistant 37
Setup 21
Sleeptimer 33
Smart Settings 23
Standby 22
Subtitles 34
S-Video 46
Switch on 4
T
T.O.P. teletext 31
Teletext 31
Teletext language 31
Teletext options 31
Teletext subpages 31
TV as PC monitor 63
TV stand 8
U
Universal RC code list 13
Universal remote control 11
Update channels 39
V
VESA 6
VGA 47
Video 47
Viewing distance 3
Visually impaired 36
Volume 5
W
Wall mounting 6
Wired installation 42
Wireless installation 42
Y
YPbPr - Component video 46
UM_Bombay_56PFL9954_en.indd 72UM_Bombay_56PFL9954_en.indd 72 2009-06-30 10:19:582009-06-30 10:19:58
Page 75

UM_Bombay_56PFL9954_cover.indd 3UM_Bombay_56PFL9954_cover.indd 3 2009-07-01 11:19:102009-07-01 11:19:10
Page 76

Contact information
Type nr. :
/
Product nr. :
/
The corresponding telephone numbers and addresses are given in the supplied Worldwide
guarantee booklet.
9
Printed in Belgium
UM_Bombay_56PFL9954_cover.indd 4UM_Bombay_56PFL9954_cover.indd 4 2009-07-01 11:19:102009-07-01 11:19:10
 Loading...