

Philips 55PUT6703, 65PUT6703 User Manual

Register your product and get support at
www.philips.com/TVsupport
6703 series
User Manual
55PUT6703
65PUT6703

Contents
1 Get Support 3
1.1 Identify and Register your TV 3
1.2 TV Help and User Manual 3
1.3 On-line Help and User Manual 3
1.4 Consumer Care / Repair 3
2 Software 4
2.1 Update Software 4
2.2 Software Version 4
3 Quick Guide 5
3.1 Remote Control 5
3.2 IR sensor 6
3.3 Joysticker - Local Control 6
4 Setting Up 7
4.1 Read Safety 7
4.2 TV Placement 7
4.3 Turn on TV 7
5 Connections 9
5.1 Connectivity guide 9
5.2 Antenna 9
5.3 Video Device 9
5.4 Audio Device 10
5.5 Mobile Device 10
5.6 Other Device 12
6 Switch Source 14
6.1 Source List 14
6.2 Rename Device 14
7 Channels 15
7.1 About Channels and Switch Channels 15
7.2 Install Channel 15
7.3 Channel List 17
7.4 Favorite Channels 18
7.5 Text / Teletext 19
8 TV guide 21
8.1 What You Need 21
8.2 Using the TV Guide 21
9 Recording and Pause TV 23
9.1 Recording 23
9.2 Pause TV 24
10 Videos, Photos and Music 25
10.1 From a USB Connection 25
10.2 Photos 25
10.3 Videos 25
10.4 Music 26
11 Open TV Setting Menus 27
11.1 Home Menu Overview 27
11.2 Frequent settings and All settings 27
11.3 All Settings 27
12 Network 36
12.1 Home Network 36
12.2 Connect to Network 36
12.3 Network settings 37
13 Smart TV 39
13.1 Setup Smart TV 39
13.2 Smart TV Start Page 39
13.3 App Gallery 39
14 Video on Demand 40
15 Ambilight 41
15.1 Ambilight Style 41
15.2 Ambilight Brightness, Saturation 41
15.3 Ambilight+hue 41
15.4 Advanced Ambilight Settings 43
16 Netflix 44
17 Environmental 45
17.1 Energy Label 45
17.2 End of Use 45
18 Specifications 46
18.1 Power 46
18.2 Reception 46
18.3 Display Resolution 46
18.4 Supported Input Resolution - Video 46
18.5 Supported Input Resolution - Computer 46
18.6 Sound 47
18.7 Multimedia 47
18.8 Connectivity 47
19 Troubleshooting 48
19.1 Tips 48
19.2 Switch On 48
19.3 Remote Control 48
19.4 Channels 48
19.5 Picture 49
19.6 Sound 50
19.7 HDMI - UHD 50
19.8 USB 50
19.9 Wi-Fi and Internet 50
19.10 Wrong Menu Language 51
20 Safety and Care 52
20.1 Safety 52
20.2 Screen Care 53
21 Terms of Use 54
22 Copyrights 55
22.1 MHL 55
22.2 HDMI 55
22.3 Dolby Audio 55
22.4 DTS HD 55
22.5 Wi-Fi Alliance 55
22.6 Other Trademarks 55
23 Open Source 56
23.1 Open Source Software 56
23.2 Open Source License 56
24 Disclaimer regarding services and/or
software offered by third parties 60
Index 61
2

1
1.3
Get Support
1.1
Identify and Register your TV
Identify your TV - TV model number and serial
number
You might be asked to provide the TV product model
number and serial number. Find these numbers on
the packaging label or on the type label on the back
or bottom of the TV.
Register your TV
Register your TV and enjoy a range of benefits
including full support (including downloads),
privileged access to information about new products,
exclusive offers and discounts, the chance to win
prizes and even participate in special surveys about
new releases.
Go to www.philips.com/TVsupport
On-line Help and User
Manual
To solve any Philips TV related problem, you can
consult our online support. You can select your
language and enter your product model number.
Go to www.philips.com/TVsupport.
On the support site you can find your country's
telephone number to contact us as well as answers to
frequently asked questions (FAQs). In some countries,
you can chat with one of our collaborators and ask
your question directly or send a question by email.
You can download new TV software or the manual to
read on your computer.
For more TV troubleshooting and frequently asked
questions (FAQs)...
Go
to http://philips-tvconsumercare.kxondemand.com/
portal/en/ModelSelect
1.2
TV Help and User Manual
Settings > Help
You can use the Help function to diagnose and get
more information about your TV.
• How to - You can see instructions on how to
install channels, sort channels, update TV software,
connect external devices and use Smart functions on
your TV.
• Check the TV - You can check if the picture, sound
and Ambilight* are working fine while playing a short
video clip.
• Check the Network - Check the Network
Connection.
• Update software - Check available software
updates.
• User manual - Read the user manual for TV
information.
• Troubleshooting - Find a solution for frequently
asked questions.
• Factory settings - Reset all settings to factory
settings.
• Reinstall TV - Reinstall and redo the complete TV
installation.
• Contact info - Shows the telephone number or web
address for your country or region.
TV Help on your tablet, smartphone or computer
To carry out extended sequences of instructions more
easily, you can download the TV Help in PDF format
to read on your smartphone, tablet or
computer. Alternatively, you can print the relevant
Help page from your computer.
To download the Help (user manual) go
to www.philips.com/TVsupport
1.4
Consumer Care / Repair
For support and repair, call the Consumer Care
hotline in your country. Our service engineers will take
care of a repair, if necessary.
Find the telephone number in the printed
documentation that came with the TV.
Or consult our
website www.philips.com/TVsupport and select
your country if needed.
TV model number and serial number
You might be asked to provide the TV product model
number and serial number. Find these numbers on
the packaging label or on the type label on the back
or bottom of the TV.
Warning
Do not attempt to repair the TV yourself. This may
cause severe injury, irreparable damage to your TV or
void your warranty.
3

2
Software
2.1
Update Software
Search for Updates
Update from Internet
(Home) > Settings > Update software > Search
for updates > Internet
Look for a software update yourself.
back on again. Please wait.
Do not . . .
• use the remote control
• remove the USB memory device from the TV
• press twice
• press the power switch on the TV
The TV switches itself off (for 10 seconds) and then
back on again. Please wait.
The TV software has been updated. You can use the
TV again.
To prevent an accidental update of the TV software,
delete the autorun.upg file from the USB memory
device.
• If the TV is connected to the Internet, you may
receive a message to update the TV software. You
need a high-speed (broadband) Internet
connection. If you receive this message, we
recommend you to carry out the update.
• During the software update, there is no picture and
the TV will switch off and on again. This might happen
several times. The update can take a few minutes.
• Wait until the TV picture comes back up. Do not
press the power switch on the TV or on the
remote control during the software update.
Update from USB
(Home) > Settings > Update
software > Search for updates > USB
• You need a computer with a high-speed Internet
connection and a USB memory device to upload the
software on the TV.
• Use a USB memory device with 512MB free space.
Make sure that write protection is switched off.
1 - Start the update on TV
Select Update software > Search for updates >
USB, then press OK.
2 - Identify the TV
Insert the USB memory into one of the USB
connections of the TV.
Select Start and press OK. An identification file is
written on the USB memory device.
3 - Download the TV software
- Insert the USB memory into your computer.
- On the USB memory device, locate the
file update.html and double click it.
- Click on Send ID.
- If new software is available, download the .zip file.
- After the download, unzip the file and copy the
file autorun.upg onto the USB memory device.
- Do not place this file in a folder.
4 - Update the TV software
Insert the USB memory into the TV again. The update
starts automatically.
The TV switches itself off for 10 seconds and then
Local Updates
(Home) > Settings > Update
software > Search for updates > USB > Local
updates.
For dealers and expert users.
2.2
Software Version
(Home) > Settings > Update
software > Current software Info
To view the current TV software version.
4
3
To open or close the TV Guide.
Quick Guide
3.1
Remote Control
Batteries and Cleaning
Replace batteries
If the TV does not react on a key press on the remote
control, the batteries might be empty.
To replace the batteries, open the battery
compartment on the back of the remote control.
1 - Slide the battery door in the direction shown by
the arrow.
2 - Replace the old batteries with 2 Alkaline,
type AAA-R03-1.5V batteries. Make sure the + and
the - ends of the batteries line up correctly.
3 - Reposition the battery door and slide it back until
it clicks.
• Remove the batteries if you are not using the remote
control for a long time.
• Safely dispose of your old batteries according to the
end of use directions.
Cleaning
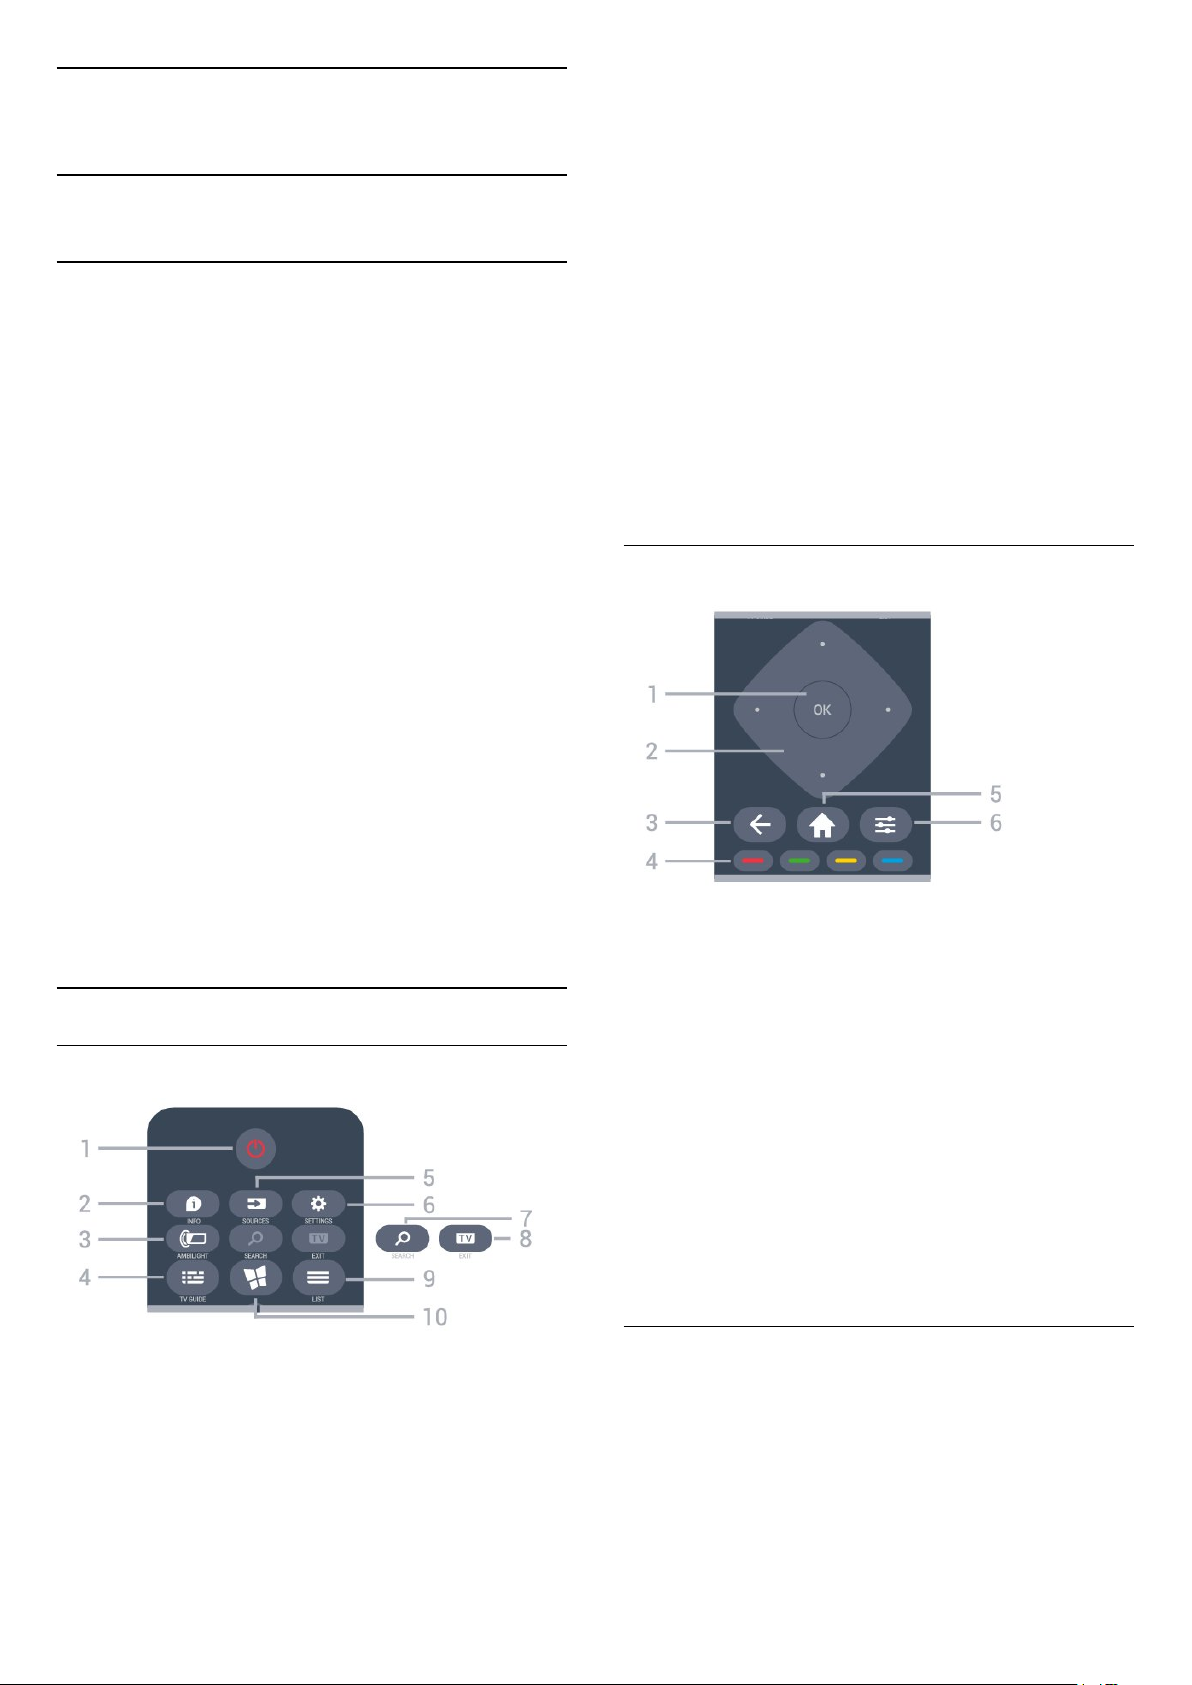
5 - SOURCES
To open or close the Sources menu.
6 - SETTINGS
To open the Quick settings menu.
7 - SEARCH
To open the Smart TV searches page.
8 - EXIT
To switch back to watch TV. To stop an interactive TV
application.
9 - LIST
To open or close the channel list.
10 - SMART TV
To open the Smart TV start page.
Middle
Your remote control is treated with a scratch-resistant
coating.
To clean the remote control, use a soft damp cloth.
Never use substances such as alcohol, chemicals or
household cleaners on the remote control.
Key Overview
Top
1 - Standby / On
To switch the TV on or back to Standby.
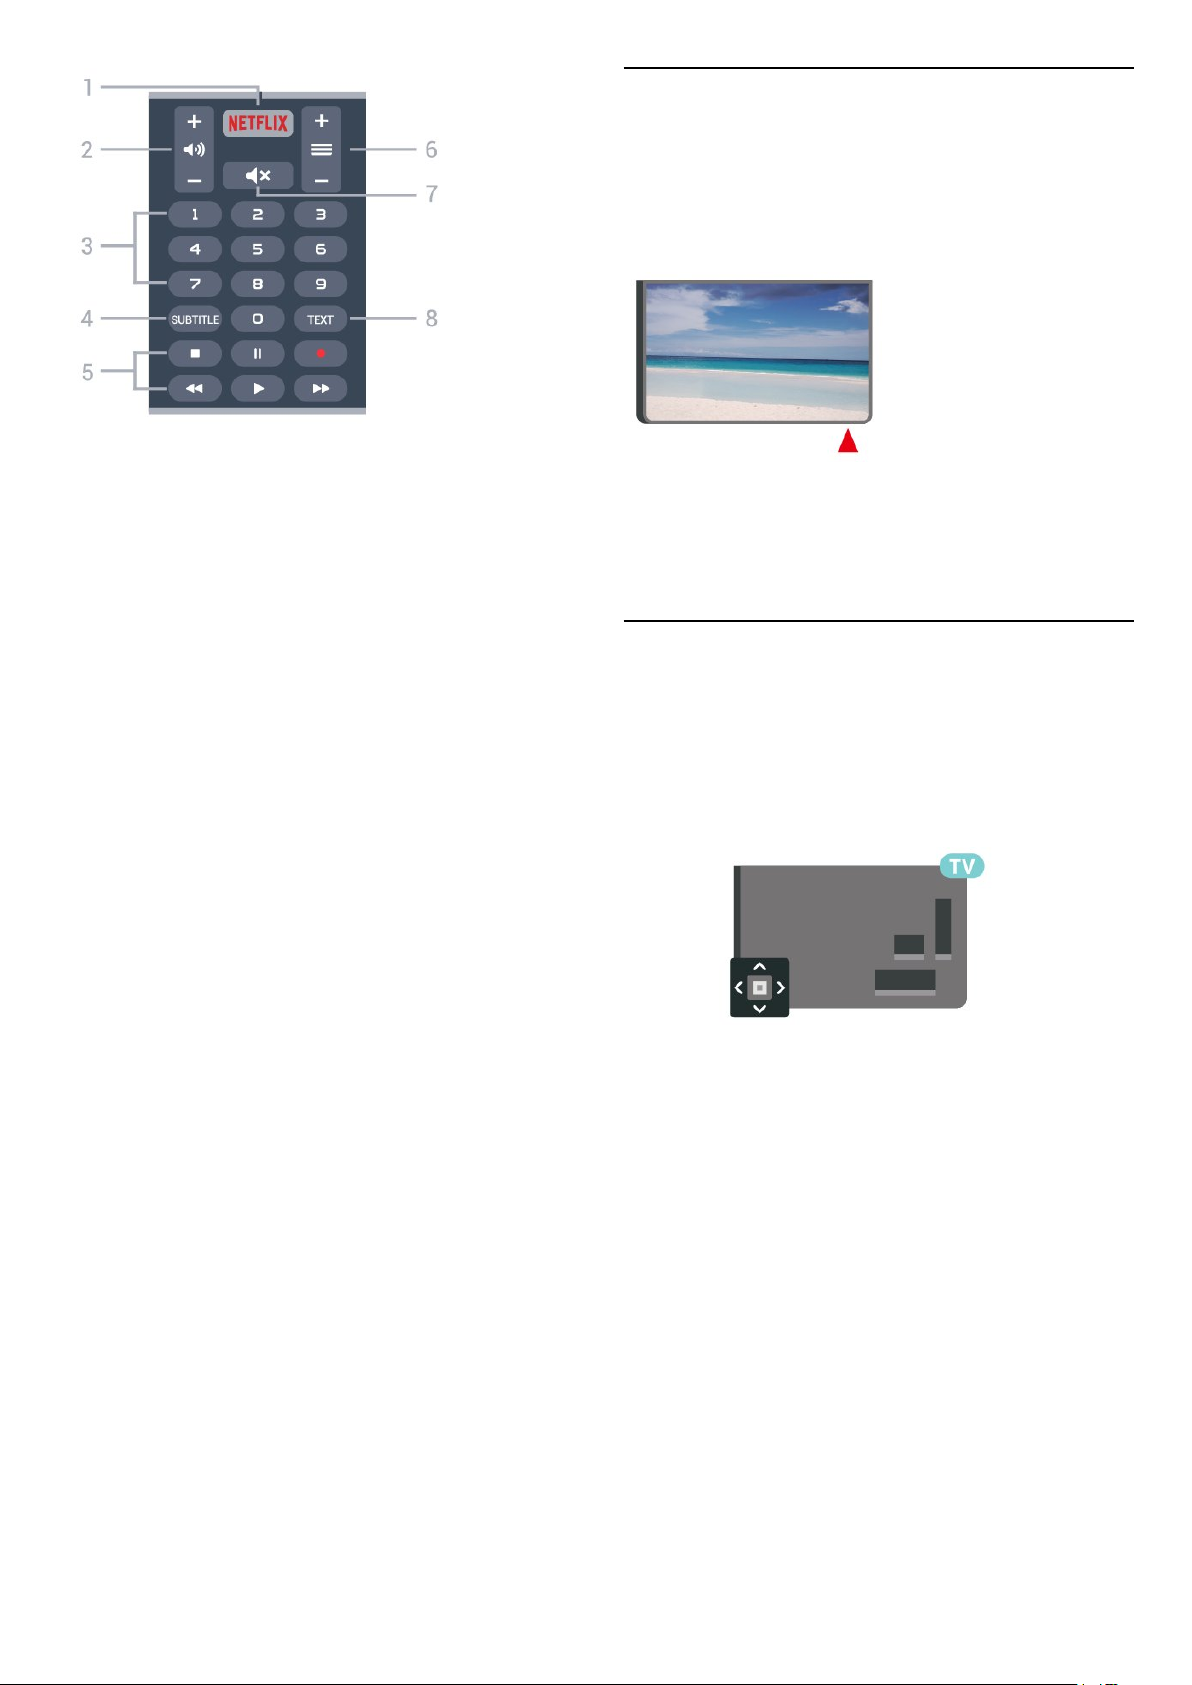
1 - OK key
To confirm a selection or setting.
2 - Arrow / navigation keys
To navigate up, down, left or right.
3 - BACK
To close a menu without changing a setting.
4 - Color keys
Direct selection of options
5 - HOME
To open the Home menu.
6 - OPTIONS
To open or close the Options Menu.
Bottom
2 - INFO
To open or close programme info.
3 - AMBILIGHT
To select one of the Ambilight style.
4 - TV GUIDE
5
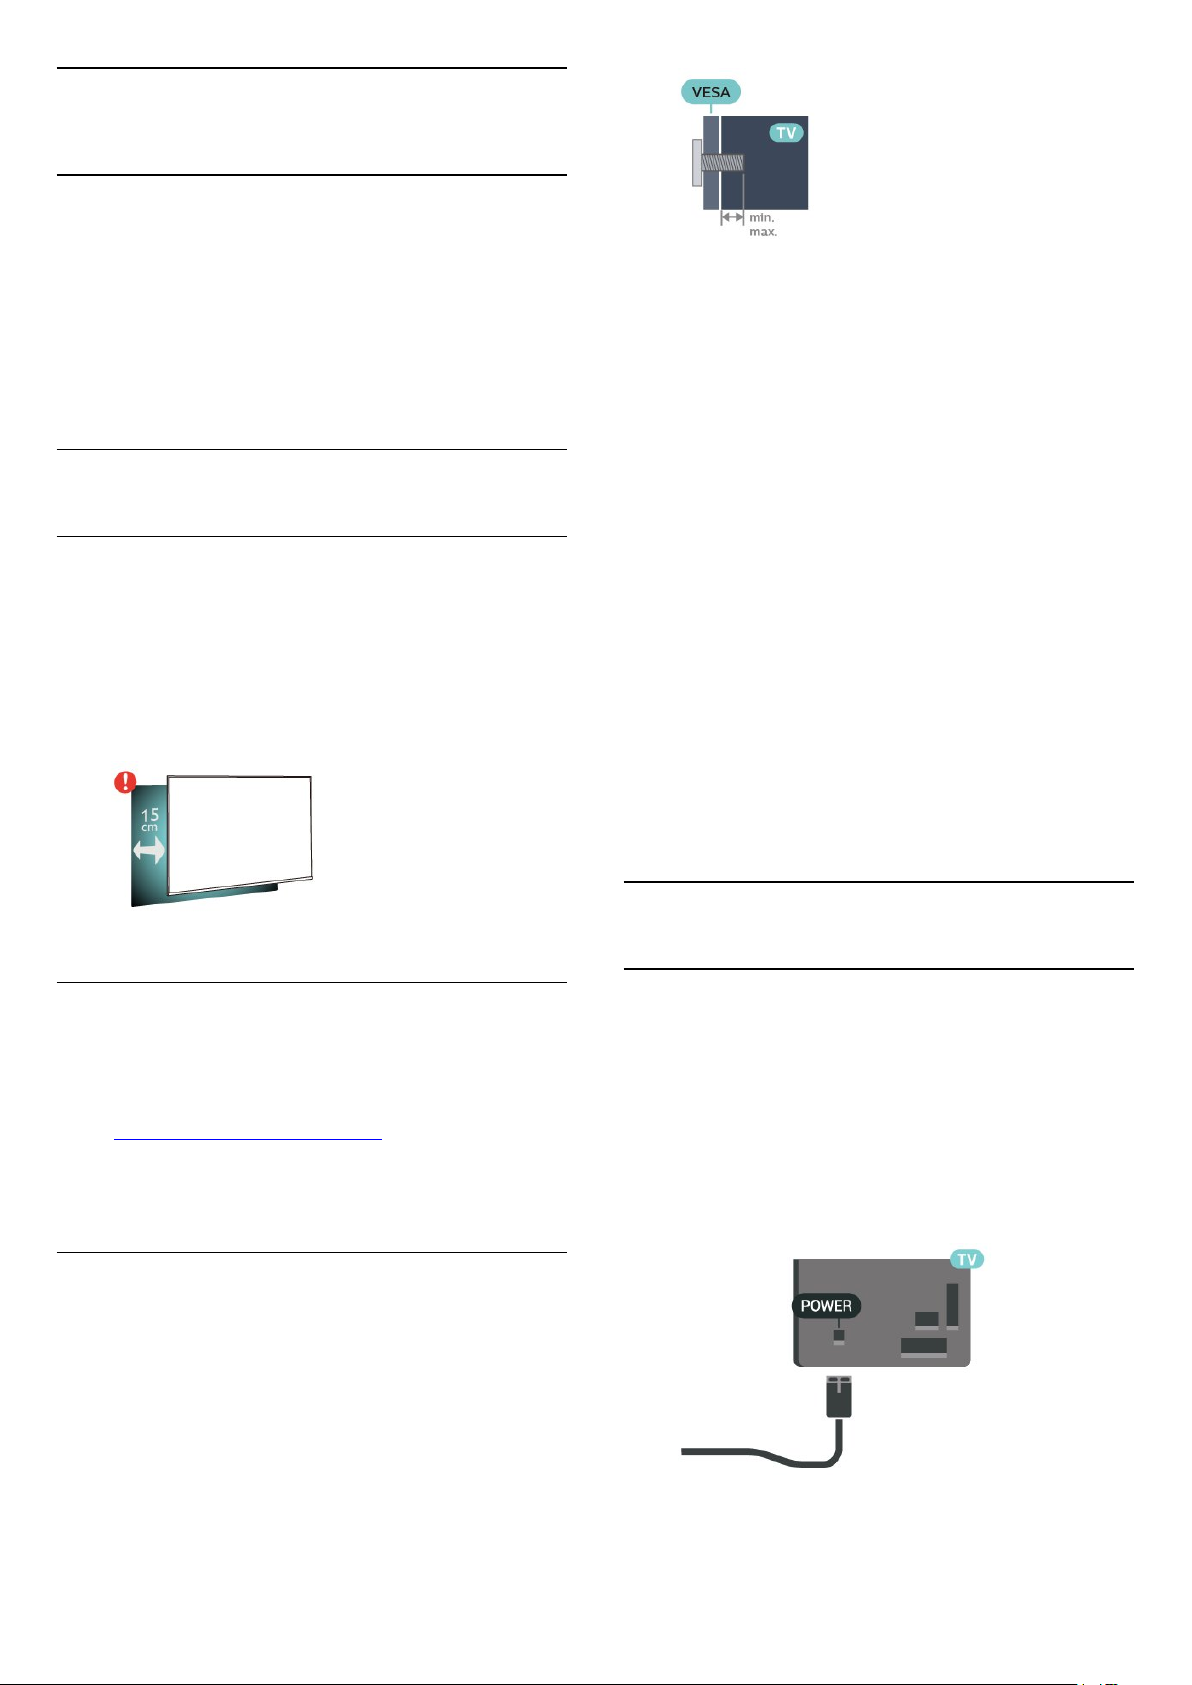
1 -
To open the Netflix App directly. With the TV switched
on or from standby.
• If you have a Netflix membership subscription, you
can enjoy Netflix on this TV. Your TV must be
connected to the Internet.
• To open Netflix, press to open the Netflix
App. You can open Netflix immediately from a TV in
standby.
www.netflix.com
2 - Volume
To adjust the volume level.
3.2
IR sensor
The TV can receive commands from a remote control
that uses infrared (IR) to send commands. If you use
this kind of remote control, always point it at the
infrared sensor on the front of the TV.
Warning
Do not put any objects in front of IR sensor of the TV
as it may block the IR signal.
3.3
Joysticker - Local Control
Keys on TV
If you lost the remote control or its batteries are
empty, you can still do some basic TV operations.
3 - Number keys
To select a channel directly.
4 - SUBTITLE
To switch subtitles on, off or to show automatically.
5 - Playback and Record
• Play , to playback.
• Pause , to pause playback
• Stop , to stop playback
• Rewind , to rewind
• Fast forward , to go fast forward
• Record , to start recording
6 - Channel
To switch to the next or previous channel in the
channel list. To start the next or previous chapter on a
disc.
7 - Mute
To mute the sound or to restore it.
8 - TEXT
To open or close Text/Teletext.
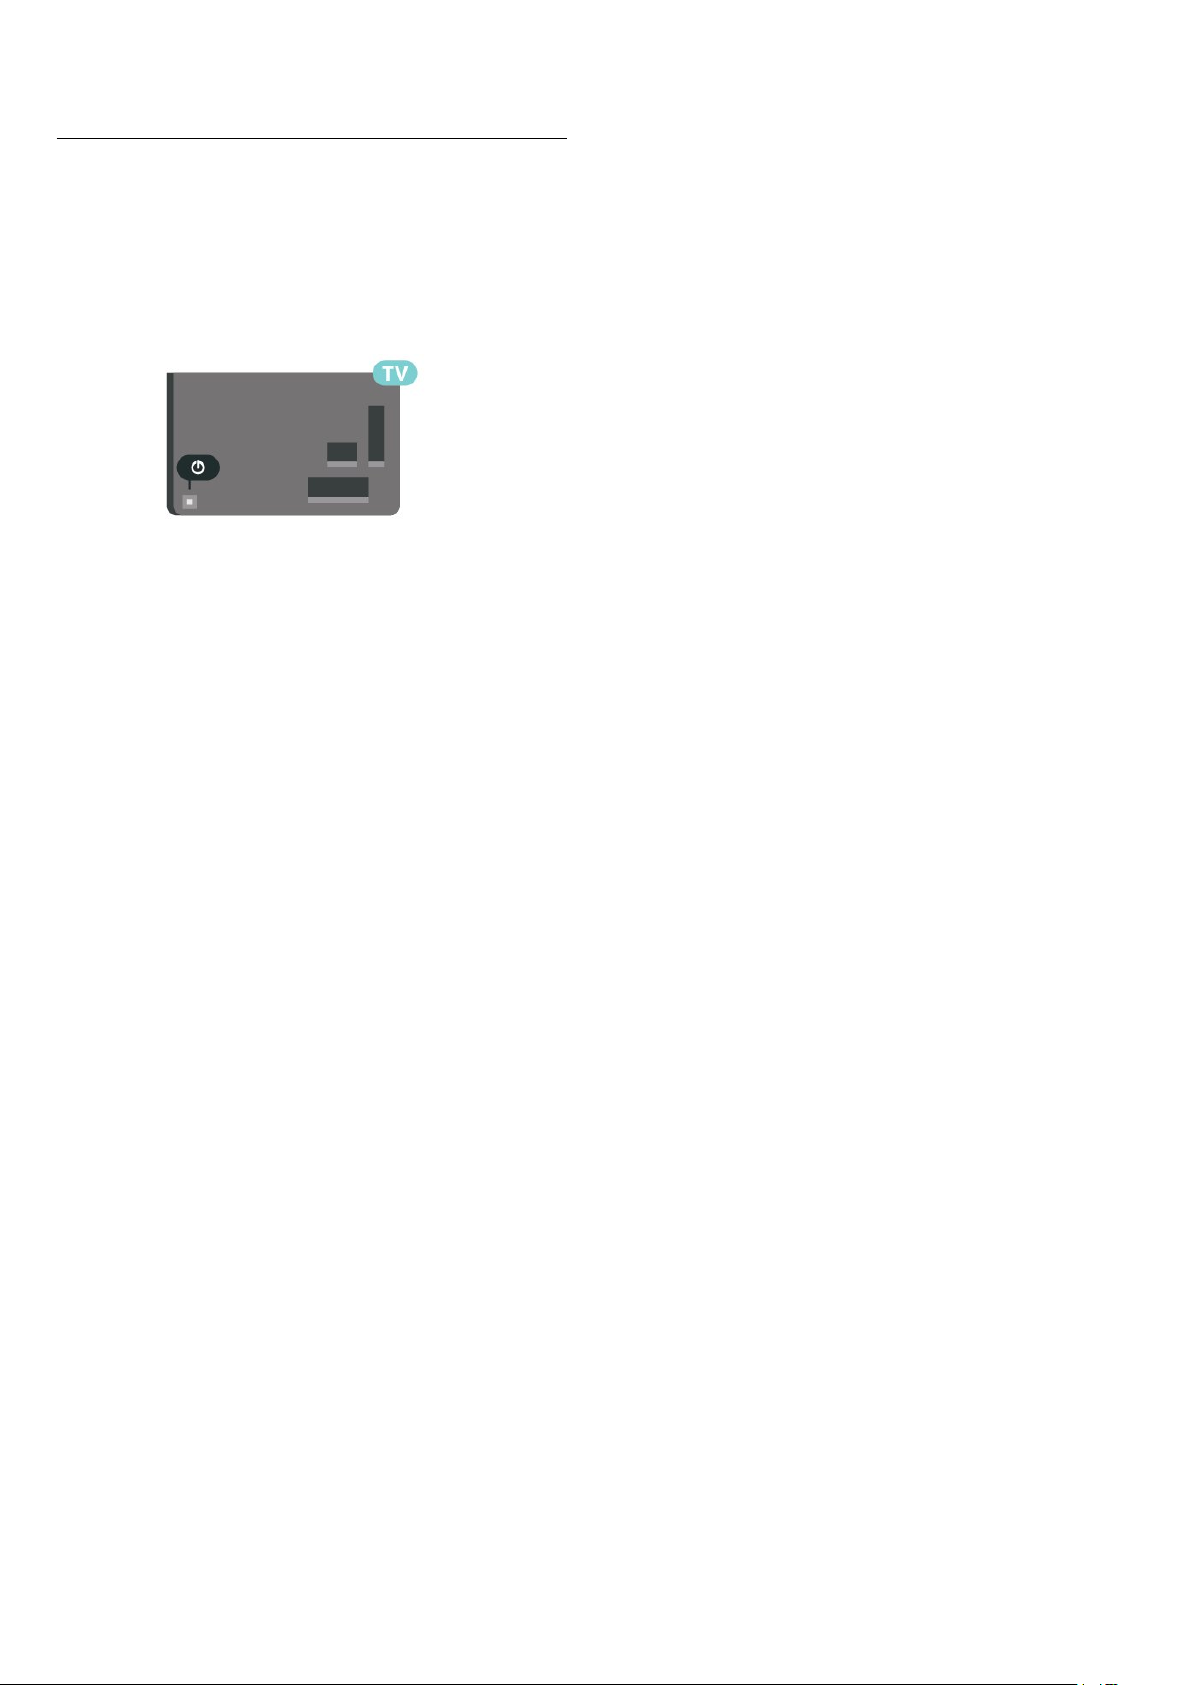
To open the basic menu…
1 - With the TV switched on, press the joystick key on
the back of the TV to bring up the basic menu.
2 - Press left or right to
select Volume, Channel, or Sources.
Select Demo to start a demo movie.
3 - Press up or down to adjust the volume or tune to
the next or previous channel. Press up or down to go
through the list of sources, including the tuner
selection.
The menu will disappear automatically.
6
4
Setting Up
4.1
Read Safety
Read the safety instructions first before you use the
TV.
To read the instructions, in Help > User manual,
press the color key Keywords and look
up Safety and Care.
4.2
TV Placement
Tips on Placement
• Position the TV where light does not shine directly
on the screen.
• Position the TV up to 6 inches away from the wall.
• The ideal distance to watch Ultra HD TV is 2 to 5
times of its screen height. When seated, your eyes
should be level with the center of the screen.
• 55PUx6703
VESA MIS-F 300x200, M6 (Minimum 10 mm,
Maximum 14 mm)
• 65PUx6703
VESA MIS-F 400x200, M6 (Minimum 10 mm,
Maximum 16 mm)
Preparation
First remove the 4 plastic screw caps out of the
threaded bushes on the back of the TV.
Make sure that the metal screws, to mount the TV to
the VESA-compliant bracket, go about 10mm deep
inside the threaded bushes of the TV.
Caution
Wall mounting the TV requires special skills and
should only be performed by qualified personnel. The
TV wall mounting should meet safety standards
according to the TVs weight. Also read the safety
precautions before positioning the TV.
TP Vision Europe B.V. bears no responsibility for
improper mounting or any mounting that results in
accident or injury.
TV Stand
You can find the instructions for mounting the TV
stand in the Quick Start Guide that came with the TV.
In case you lost this guide, you can download it
from www.philips.com/TVsupport.
Use the model number of the TV to look for
the Quick Start Guide to download.
Wall Mounting
Your TV is also prepared for a VESA-compliant wall
mount bracket (sold separately).
Use the following VESA code when purchasing the
wall mount . . .
4.3
Turn on TV
Connect Power Cable
• Insert the power cable into the POWER connector
on the back of the TV.
• Make sure the power cable is securely inserted in
the connector.
• Make sure that the power plug, in the wall socket, is
accessible at all times.
• When you unplug the power cable, always pull the
plug, never pull the cable.
Although this TV has a very low standby power
consumption, unplug the power cable to save energy
7
if you do not use the TV for a long period of time.
On or Standby
Before you switch on the TV, make sure you plugged
in the mains power in the POWER connector on the
back of the TV.
Switch On
• Press the small joystick key on the back of the TV.
Switch to standby
To switch the TV to standby, press on the remote
control. You can also press the small joystick key on
the back of the TV.
In standby mode, the TV is still connected to the
mains power but consumes very little energy.
To switch off the TV completely, disconnect the
power plug.
When disconnecting the power plug, always pull the
power plug, never the cord. Ensure that you have full
access to the power plug, power cord and outlet
socket at all times.
8
5
Connections
5.1
Connectivity guide
Always connect a device to the TV with the highest
quality connection available. Also, use good quality
cables to ensure a good transfer of picture and
sound.
When you connect a device, the TV recognizes its
type and gives each device a correct type name. You
can change the type name if you wish. If a correct
type name for a device is set, the TV automatically
switches to the ideal TV settings when you switch to
this device in the Sources menu.
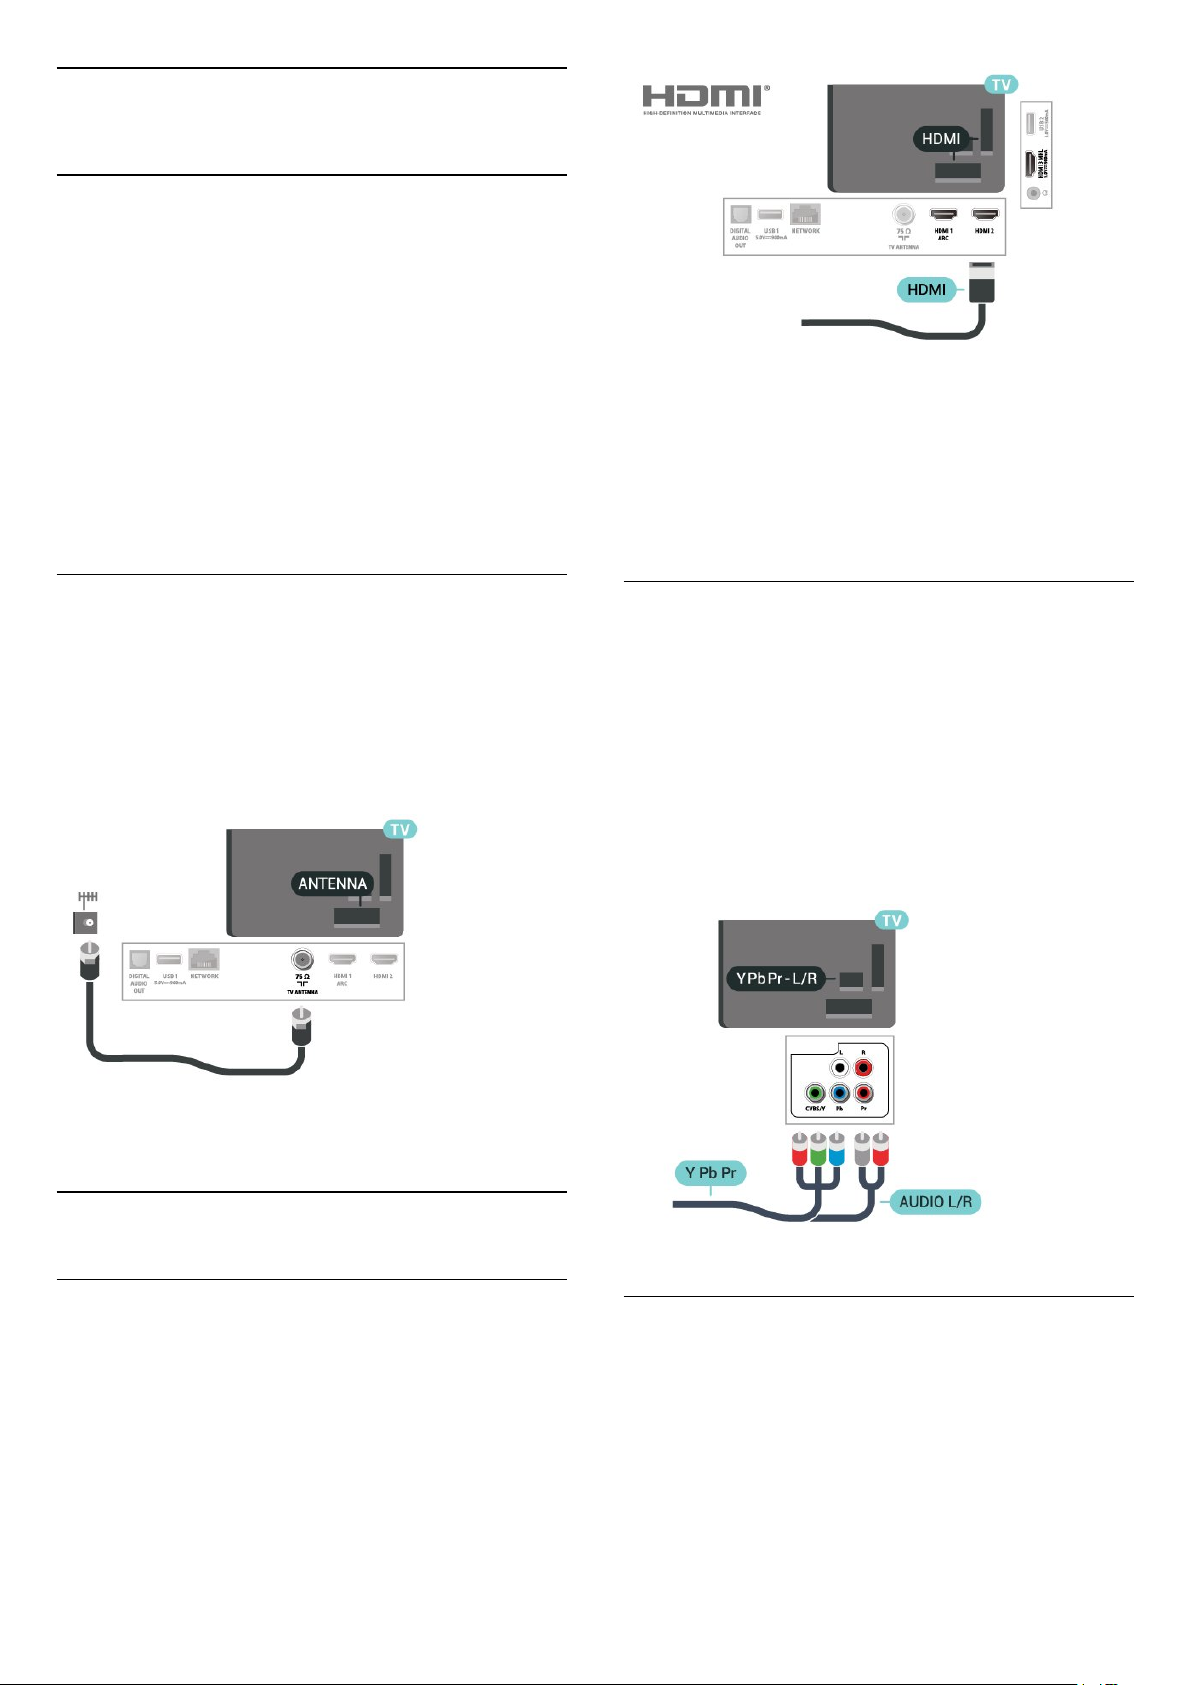
5.2
Antenna
Insert the antenna plug firmly into
the Antenna socket at the back of the TV.
You can connect your own antenna or an antenna
signal from an antenna distribution system. Use an
IEC Coax 75 Ohm RF antenna connector.
Copy protection
HDMI ports support HDCP (High-bandwidth Digital
Content Protection). HDCP is a copy protection signal
that prevents copying content from a DVD disc or Bluray Disc. Also referred to as DRM (Digital Rights
Management).
Component
Y Pb Pr - Component Video is a high quality
connection.
The YPbPr connection can be used for High Definition
(HD) TV signals. Next to the Y, Pb and Pr signals, add
the Audio Left and Right signals for sound.
Match the YPbPr (green, blue, red) connector colors
with the cable plugs when you connect.
Use an Audio L/R cinch cable if your device also has
sound.
5.3
Video Device
HDMI
An HDMI connection has the best picture and sound
quality.
For best signal quality transfer, use a High speed
HDMI cable and do not use an HDMI cable longer
than 5 m, and also connect devices supporting HDR
on HDMI 2 or HDMI 3.
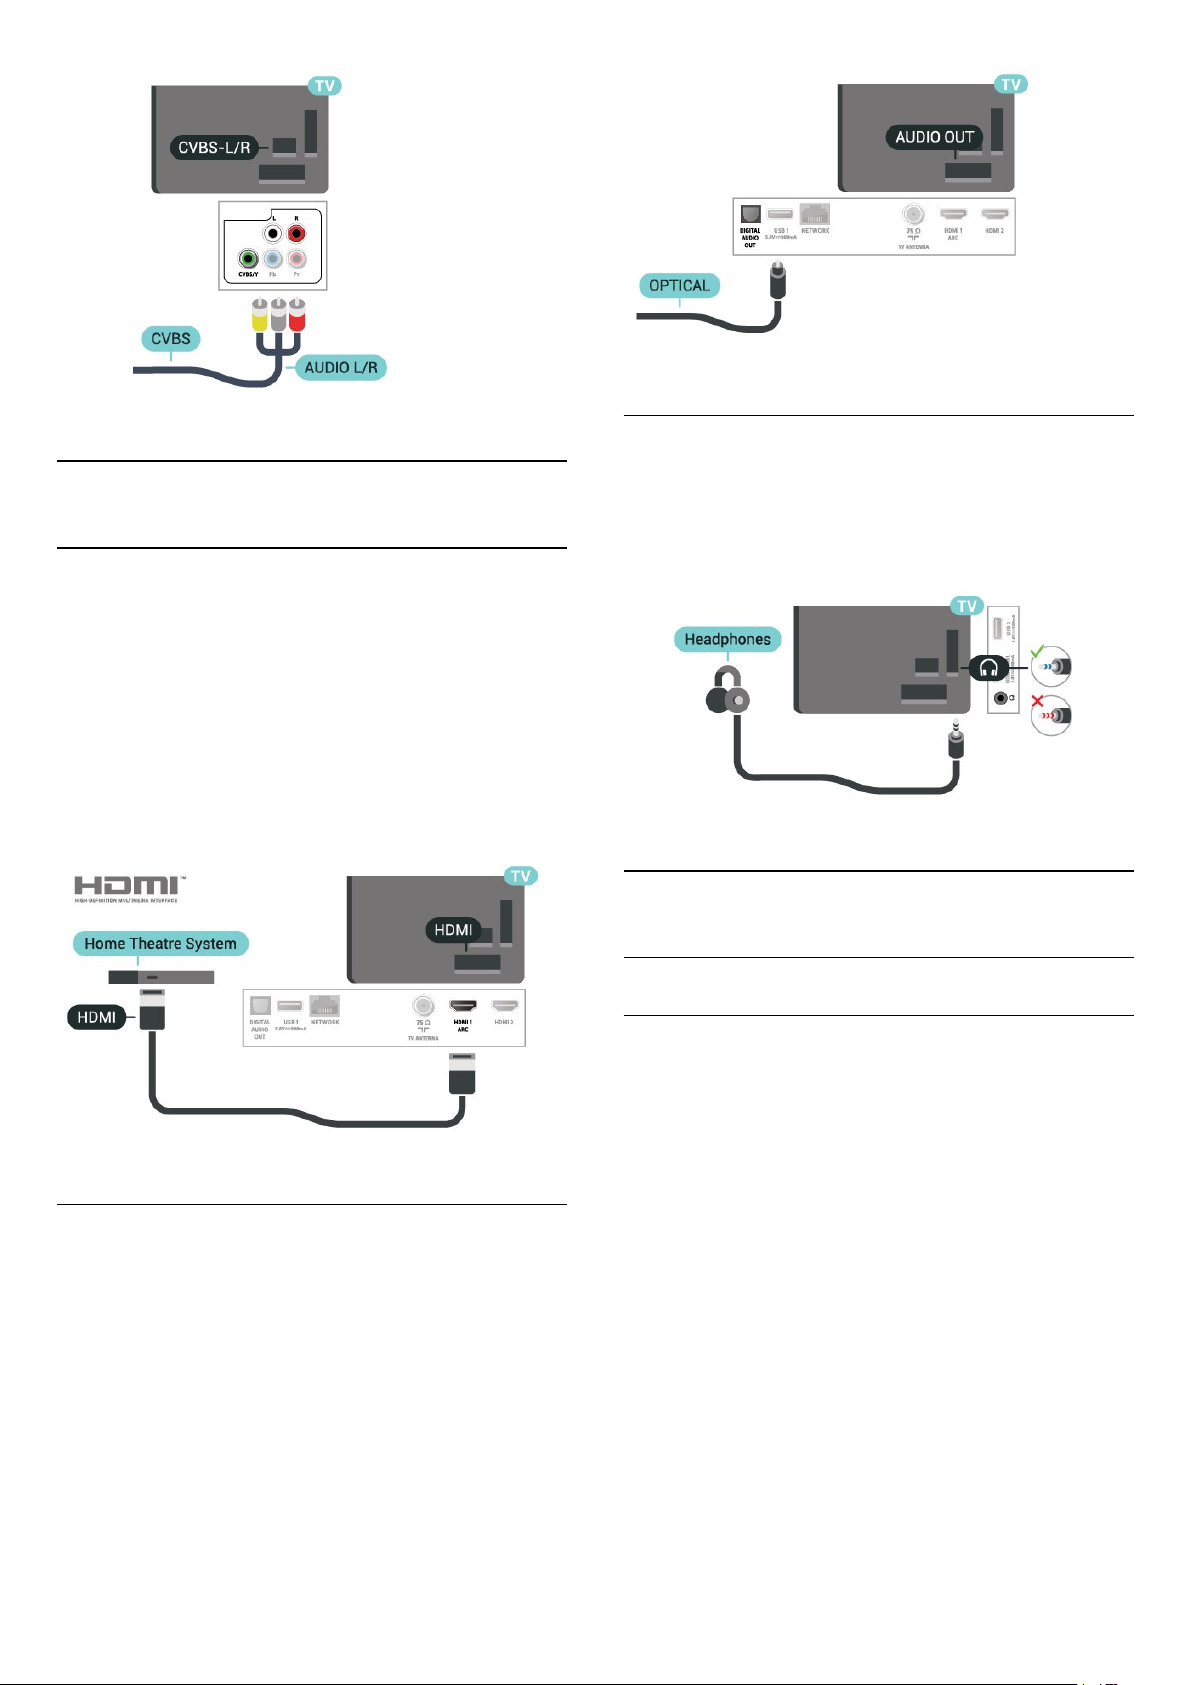
Composite
CVBS - Composite Video is a standard time quality
connection. Next to the CVBS signal adds the Audio
Left and Right signals for sound.
• Y shares the same jack with CVBS.
• Component and Composite share audio jacks.
9
5.4
Audio Device
HDMI ARC
Only HDMI 1 on the TV has HDMI ARC (Audio
Return Channel).
If the device, typically a Home Theater System (HTS),
also has the HDMI ARC connection, connect it
to HDMI 1 connection on this TV. With the HDMI
ARC connection, you do not need to connect the
extra audio cable that sends the sound of the TV
Picture to the HTS. The HDMI ARC connection
combines both signals.
Headphones
You can connect a set of headphones to
the connection on the side of the TV. The
connection is a mini-jack 3.5mm. You can adjust the
volume of the headphones separately.
5.5
Mobile Device
Wi-Fi Direct / Miracast
Digital Audio Out - Optical
Audio Out - Optical is a high quality sound
connection.
This optical connection can carry 5.1 audio channels.
If your device, typically a Home Theater System
(HTS), has no HDMI ARC connection, you can use this
connection with the Audio In - Optical connection on
the HTS. The Audio Out - Optical connection sends
the sound from the TV to the HTS.
About Wi-Fi Miracast
You can view your photos or play your music and
videos from a mobile device on your TV with Wi-Fi
Miracast™. The mobile device and the TV should be
within range, which usually means being in the same
room.
Check if your mobile device is ready for Miracast.
Your TV is a Wi-Fi CERTIFIED Miracast™ device.
With Miracast™, you can watch and share the screen
of your smartphone, tablet or computer on your TV
screen wirelessly. You can stream videos (audio and
video), and share photos or anything else that's on
the device screen. No need to connect the device to
your home network. Both the TV and the device must
be Wi-Fi CERTIFIED Miracast™ devices and have
Miracast switched on.
Miracast on this TV is subject to the HDCP protocol
and cannot display copy-protected premium content
sent by a device. The maximum video resolution
10
supported is 720p for 2.4GHz Wi-Fi or 1080p for 5GHz
Wi-Fi.
For more information on Wi-Fi CERTIFIED Miracast™
go to www.wi-fi.org
Wi-Fi®, the Wi-Fi CERTIFIED logo, the Wi-Fi logo are
registered trademarks of the Wi-Fi Alliance. Wi-Fi
CERTIFIED Miracast™, Miracast™ are trademarks of
the Wi-Fi Alliance.
Screen Delay
The normal delay when sharing a screen with
Miracast is about 1 second. The delay might be longer
if you are using older devices with less processing
power.
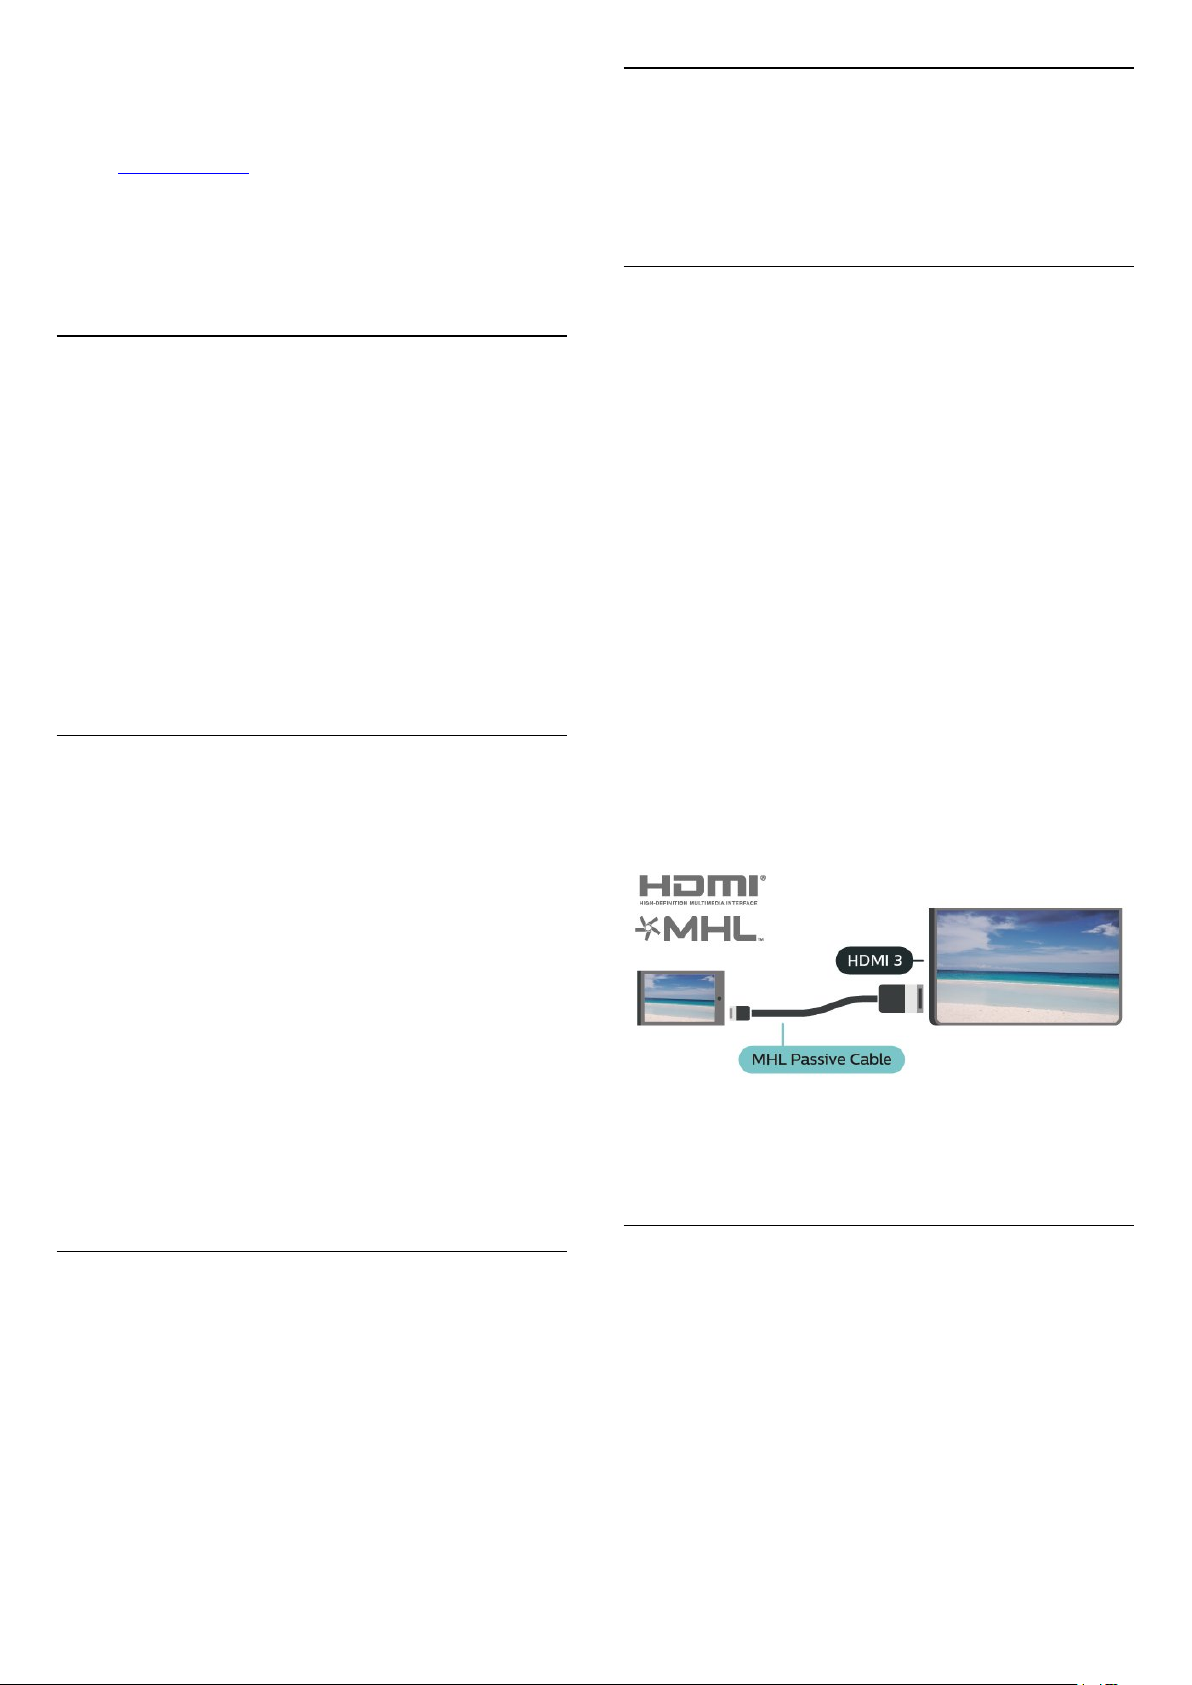
MHL
Using Miracast
Switch on Miracast
Press SOURCES > Miracast
Share a Screen on TV
1 - Activate Miracast (Screen mirroring) on your
mobile device.
2 - On your mobile device, select the TV. (This TV will
be displayed as TV model name)
3 - Select the TV name on your mobile device, after
connection, you can enjoy using Miracast.
Stop Sharing
You can stop sharing a screen from the TV or the
mobile device.
From the device
With the application you use to start Miracast, you
can disconnect and stop watching the screen of the
device on TV. The TV will switch back to the last
selected programme.
This TV is MHL™ compliant.
If your mobile device is also MHL compliant, you can
connect your mobile device with a MHL cable to the
TV. With the MHL cable connected you can share
what's on your mobile device on the TV screen. Your
mobile device charges its battery at the same time.
The MHL connection is ideal for watching movies or
playing games from your mobile device on TV for a
longer time.
Charging
With the MHL cable connected, your device will
charge while the TV is switched on (not in standby).
MHL Cable
You need a passive MHL cable (HDMI to Micro USB)
to connect your mobile device to the TV. You might
need an extra adapter to connect to your mobile
device. To connect the MHL cable to the TV use
the HDMI 3 MHL connection.
From the TV
To stop watching the screen of the device on TV, you
can . . .
• press EXIT to watch a TV broadcast
• press (Home) to start another activity on TV
• press SOURCES to open the Sources menu
and select a connected device.
Reset Wi-Fi Miracast connection
All previously connected devices are stored in the WiFi Miracast list of connections.
To clear all connected Miracast devices…
(Home) > Settings > All
settings > Network > Reset Wi-Fi Miracast
connection.
MHL, Mobile High-Definition Link and the MHL Logo
are trademarks or registered trademarks of the MHL,
LLC.
Apps - Philips TV Remote App
With the TV Remote App, you master your media
around you. Send photos, music or videos to your big
TV screen or watch any of your TV channels live on
your tablet or phone. Look up what you want to
watch on the TV Guide and watch it on your phone or
TV. With the TV Remote App you can use your phone
as a remote control*.
Download the Philips TV Remote App from your
favorite app store today.
The Philips TV Remote App is available for iOS and
11

Android and is free of charge.
* When use your phone as a remote control, TV
cannot be switched on or off via your phone.
5.6
Other Device
USB Flash Drive
You can view photos or play your music and videos
from a connected USB flash drive. Insert a USB flash
drive in one of the USB connections on the TV while
the TV is switched on.
The TV detects the flash drive and opens a list
showing its content.
If the contents list does not appear automatically,
press SOURCES and select USB.
1 - Connect the USB Hard Drive to one of
the USB connections on the TV. Do not connect
another USB device to the other USB ports when
formatting.
2 - Switch on the USB Hard Drive and the TV.
3 - When the TV is tuned to a digital TV channel,
press (Pause). Trying to pause will start the
formatting.
Follow the instructions on screen.
When the USB Hard Drive is formatted, leave it
connected permanently.
For more information on watching or playing content
from a USB flash drive, in Help, press the color
key Keywords and look up Photos, Videos and
Music.
USB Hard Drive
Installation
If you connect a USB Hard Drive, you can pause or
record a TV broadcast. The TV broadcast must be a
digital broadcast (DVB broadcast or similar).
Before you can pause or record a broadcast, you
must connect and format a USB Hard Drive.
Formatting removes all files from the USB Hard Drive.
To Pause
To pause a broadcast, you need a USB-compatible
Hard Drive with a minimum of 4GB of disk space.
To Record
To pause and record a broadcast, you need a
minimum of 250GB disk space. If you want to record
a broadcast with TV guide data from the Internet, you
need to have the Internet connection installed on
your TV before you install the USB Hard Drive.
Warning
The USB Hard Drive is formatted exclusively for this
TV, you cannot use the stored recordings on another
TV or PC. Do not copy or change recording files on
the USB Hard Drive with any PC application. This will
corrupt your recordings. When you format another
USB Hard Drive, the content on the former will be lost.
A USB Hard Drive installed on your TV will need
reformatting for use with a computer.
To read the instructions, in Help, press the color
key Keywords and look up USB Hard Drive.
Formatting
Before you can pause or record a broadcast, you
must connect and format a USB Hard Drive.
Formatting removes all files from the USB Hard
Drive. If you want to record broadcasts with TV Guide
data from the Internet, you must setup the Internet
connection first before you install the USB Hard Drive.
Warning
The USB Hard Drive is formatted exclusively for this
TV, you cannot use the stored recordings on another
TV or PC. Do not copy or change recording files on
the USB Hard Drive with any PC application. This will
corrupt your recordings. When you format another
USB Hard Drive, the content on the former will be lost.
A USB Hard Drive installed on your TV will need
reformatting for use with a computer.
To format a USB Hard Drive…
1 - Connect the USB Hard Drive to one of
12

the USB connections on the TV. Do not connect
another USB device to the other USB ports when
formatting.
2 - Switch on the USB Hard Drive and the TV.
3 - When the TV is tuned to a digital TV channel,
press (Pause). Trying to pause will start the
formatting. Follow the instructions on screen.
4 - The TV will ask if you want to use the USB Hard
Drive to store apps. Select Agree if you do.
5 - When the USB Hard Drive is formatted, leave it
connected permanently.
13

6
Switch Source
6.1
Source List
• To open the sources menu, press SOURCES .
• To switch to a connected device, select the device
with the arrows (left) or (right) and press OK.
• To close the source menu without switching to a
device, press SOURCES again.
6.2
Rename Device
(Home) > Settings > All settings > General
settings > Input sources
• To edit the input sources names from the source list.
1 - Select one of the device and press OK.
2 - Select Edit and press OK.
3 - Follow the on screen instructions to rename the
device name.
14

7
for channels
Channels
7.1
About Channels and Switch
Channels
To watch TV channels
• Press . The TV tunes to the TV channel you last
watched.
• Press (Home) > Watch TV > Channels and
press OK.
• Press + or - to switch channels.
• If you know the channel number, type in the number
with the number keys. Press OK after you entered
the number to switch channels.
• To switch back to the previously tuned channel,
press BACK .
To switch to a channel from a channel list
• While watching a TV channel, press LIST to
open the channel lists.
• The channel list can have several pages with
channels. To view the next or previous page,
press + or -.
• To close the channel lists without switching
channels, press LIST again.
Channel icons
After an Automatic channel update of the channel list,
newly found channels are marked with a (star).
If you lock a channel, it will be marked with
a (lock).
Radio channels
If digital broadcasting is available, digital radio
stations are installed during installation. Switch to a
radio channel just like you switch to a TV channel.
This TV can receive digital television standard time
DVB. TV may not work properly with some operators
of digital television , non-compliance with
requirements of the standard in full.
7.2
Install Channel
1 - Select Start now and press OK.
2 - Select Update channels to only add new digital
channels.
3 - Select Start and press OK to update channels.
This can take a few minutes.
Quick reinstall
(Home) > Settings > Install
Channels > Antenna/Cable Installation > Search
for channels
1 - Select Start now and press OK.
2 - Select Quick reinstall to install all channels again
with default settings.
3 - Select Start and press OK to update channels.
This can take a few minutes.
Advanced reinstall
(Home) > Settings > Install
Channels > Antenna/Cable Installation > Search
for channels
1 - Select Start now and press OK.
2 - Select Advanced reinstall to do a full re-
installation which takes you through each step.
3 - Select Start and press OK to update channels.
This can take a few minutes.
Automatically Search for channels
(Home) > Settings > Install
Channels > Antenna/Cable Installation > Automatic
channel update
If you receive digital channels, you can set the TV to
automatically update the list with new channels.
Alternatively, you can start a channel update yourself.
Automatic channel update
Once a day, at 6 AM, the TV updates the channels
and stores new channels. New channels are stored in
the All channels list but also in the New channels list.
Empty channels are removed.
If new channels are found or if channels are updated
or removed, a message is shown at TV start up. The
TV must be in standby to automatically update
channels.
Antenna/Cable Installation
Manually Search for Channels and Channel Settings
Search for Channels
Update channels
(Home) > Settings > Install
Channels > Antenna/Cable Installation > Search
Channel Update Message
(Home) > Settings > Install
Channels > Antenna/Cable Installation > Channel
update message
When new channels are found or if channels are
updated or removed, a message is shown at TV start
up. To avoid this message to appear after every
channel update, you can switch it off.
15

Digital: Reception Test
(Home) > Settings > Install
Channels > Antenna/Cable Installation > Digital:
reception test
The digital frequency is shown for this channel. If the
reception is poor, you can reposition your antenna.
To check the signal quality of this frequency again,
select Search and press OK.
To enter a specific digital frequency yourself, use the
remote control digit keys. Alternatively, select the
frequency, position the arrows on a number
with and and change the number
with and . To check the frequency,
select Search and press OK.
Channel Logos
(Home) > Settings > All settings > Channels
> Channel logos
In some countries, the TV can show the channel
logos. If you do not want these logos to appear, you
can switch them off.
settings > Channels > Expert mode
settings > Channel list copy > Current version
Upload a Channel List
To not Installed TVs
Depending on whether your TV is already installed or
not, you must use a different method to upload a
channel list.
To a TV that is not yet installed
1 - Plug in the power plug to start the installation and
select language and country. You can skip the
channel search. Finish the installation.
2 - Plug in the USB flash drive that holds the channel
list of the other TV.
3 - To start the channel list upload,
press (Home) > Settings > All settings
> Channels > Expert mode settings > Channel List
Copy > Copy to TV and press OK. Enter your PIN
code if necessary.
4 - The TV notifies you if the channel list is copied to
the TV successfully. Unplug the USB flash drive.
Channel List copy
Introduction
Channel list copy is intended for dealers and expert
users.
With Channel list copy, you can copy the channels
installed on one TV onto another Philips TV of the
same range. With Channel list copy, you avoid the
time-consuming channel search by uploading a
predefined channel list on a TV. Use a USB flash drive
of minimum 1 GB.
Conditions
• Both TVs must be from the same year range.
• Both TVs have the same hardware type. Check the
hardware type on the TV type plate on the back of
the TV. Typically noted as Q . . . LA
• Both TVs have compatible software versions.
Copy a Channel List, Check Channel List Version
Copy a channel list to USB flash drive
(Home) > Settings > All settings
> Channels > Expert mode settings > Channel list
copy > Copy to USB
To Installed TVs
Depending on whether your TV is already installed or
not, you must use a different method to upload a
channel list.
To an already installed TV
1 - Verify the country setting of the TV. (To verify this
setting, see chapter Re-install channels. Start this
procedure until you reach the country setting.
Press BACK to cancel the installation.)
If the country is correct continue with step 2.
If the country is not correct, you need to start a
reinstallation. See chapter Re-install channels and
start the installation. Select the correct country and
skip the channels search. Finish the installation. When
done, continue with step 2.
2 - Plug in the USB flash drive that holds the channel
list of the other TV.
3 - To start the channel list upload,
press (Home) > Settings > All
settings > Channels > Expert mode
settings > Channel List Copy > Copy to TV and
press OK. Enter your PIN code if necessary.
4 - The TV notifies you if the channel list is copied to
the TV successfully. Unplug the USB flash drive.
Check channel list version
(Home) > Settings > All
16

Channel Options
Dual I-II
Open Options
While watching a channel, you can set some options.
Depending on the type of channel you are watching
or depending on the TV settings you made, some
options are available.
To open the options menu…
1 - While watching a channel, press OPTIONS.
2 - Press OPTIONS again to close.
Subtitles
To switch on Subtitles, press SUBTITLE.
You can switch
subtitles Subtitle on or Subtitle off . Alternatively
you can select Automatic.
Automatic
If language information is part of the digital broadcast
and the broadcast programme is not in your language
(the language set on TV), the TV can show subtitles
automatically in one of your preferred subtitle
languages. One of these subtitle languages must also
be part of the broadcast.
You can select your preferred subtitle languages
in Subtitle language.
This option is available if an audio signal contains two
audio languages, but one or both languages has no
language indication.
Mono / Stereo
You can switch the sound of an analog channel to
Mono or Stereo.
To switch to Mono or Stereo…
Tune to an analog channel.
1 - Press OPTIONS, select Mono/Stereo and
press (right).
2 - Select Mono or Stereo and press OK.
3 - Press (left) repeatedly if necessary, to close
the menu.
Status
Select Status to view technical information on the
channel or a connected device you are watching.
Universal Access
Only available when Universal access is set to On.
(Home) > Settings > All settings > Universal
access > Universal access > On.
Subtitles Language
If none of the preferred subtitle languages are
available, you can select another subtitle language. If
no subtitle languages are available, you cannot select
this option.
To read more information, in Help, press the color
key Keywords and look up Subtitle Language.
Audio Language
If none of the preferred audio languages are
available, you can select another audio language if
available. If no audio languages are available, you
cannot select this option.
To read more information, in Help, press the color
key Keywords and look up Audio Language.
To read more information, in Help, press the color
key Keywords and look up Universal Access.
Share
Enables the user to communicate his activity with his
social networks (such as Twitter or email).
Video Selection
Digital TV channels can offer multi video signals (multifeed broadcast), different camera viewpoints or
angles of the same event or different programmes on
one TV channel. The TV shows a message if any such
TV channels are available.
17

7.3
Channel List
Search Channels
LIST > OPTIONS > Search channel
Open Channel List
To open the current channel list…
1 - Press , to switch to TV.
2 - Press LIST to open the current channel list.
3 - Press OPTIONS > Select channel list, and
select one channel list you want to watch.
4 - Press LIST again to close the channel list.
Channel List Options
Open Option Menu
To open the channel list option menu...
• Press , to switch to TV.
• Press LIST to open the current channel list.
• Press OPTIONS , and select one of options.
• Press LIST again to close the channel list.
Select Channel Filter
LIST > OPTIONS > Digital
Select one of channel combinations showing in the
channel list.
You can search for a channel to find it in a long list of
channels.
1 - Press , to switch to TV.
2 - Press LIST to open the current channel list.
3 - Press OPTIONS > Search channel, and
press OK.
4 - In the typing field, press OK to open on-screen
keyboard, or press BACK to hide the on-screen
keyboard.
5 - Use navigation keys to select a character, then
press OK.
- Press (red) key to enter with lower-case
- Press (green) key to enter with upper-case
- Press (yellow) key to enter number and
symbol
- Press (blue) key to delete a character
6 - Select Done when complete the editing.
7 - Press LIST again to close the channel list.
Lock or Unlock Channel
LIST > OPTIONS > Lock channel, Unlock
channel
To prevent children from watching a channel, you can
lock a channel. To watch a locked channel, you must
enter the 4 digit Child Lock PIN code first. You
cannot lock programmes from connected devices.
The locked channel will have next to the channel
logo.
Create or Edit Favorites Channel List
LIST > OPTIONS > Create favorites list
Select a channel then press OK to add in a favorites
channel list, once completed, press Done.
LIST > OPTIONS > Edit favorites
Select a channel then press OK to add in or remove
from a favorites channel list, once completed, press
Done.
Select Channel Range
LIST > OPTIONS > Select channel range
Select a range of channels in a favorites channel list,
once completed, press OK.
Select Channel List
LIST > OPTIONS > Select channel list
Select a range of channels in a favorites channel list,
once completed, press OK.
Remove Favorite List
LIST > OPTIONS > Remove favorite list
To remove existing favorite list, select Yes.
7.4
Favorite Channels
About favorite Channels
You can create a favorite channel list that only holds
the channels you want to watch. With the Favorite
channel list selected, you will only see your favorite
channels when you switch through channels.
18

Create a favorites List
Text Pages
1 - While watching a TV channel, press LIST to
open the channel list.
2 - Select the channel, and press Mark as
favorites to mark as favorite.
3 - The selected channel is marked with a .
4 - To finish, press BACK . The channels are
added to the Favorites list.
Remove Channel from the Favorites
List
To remove a channel from the favorites list, select the
channel with , then press Unmark as
favorites again to unmark as favorites.
Reorder Channels
You can reorder — reposition — channels in the
Favorite channel list.
1 - While watching a TV channel,
press LIST > OPTIONS > Select channel
list.
2 - Select Antenna favorite or Cable Favorite, and
press OK.
3 - Select the channel to reorder and press OK.
4 - Press the Navigation buttons to move the
highlighted channel to another location and
press OK.
5 - Once completed, press OK.
7.5
Text / Teletext
Subtitles from Text
If you tune to an analog channel, you need to make
the subtitles available for each channel manually.
1 - Switch to a channel and press TEXT to open
Text.
2 - Enter the page number for subtitles, usually 888.
3 - Press TEXT again, to close Text.
To open Text/Teletext press TEXT, while you are
watching TV channels.
To close Text, press TEXT again.
Select a Text page
To select a page . . .
1 - Enter the page number with the number keys.
2 - Use the arrow keys to navigate.
3 - Press a color key to select a color-coded subject
at the bottom of the screen.
Text sub-pages
A Text page number can hold several subpages. The
subpage numbers are shown on a bar next to the
main page number.
To select a subpage, press or .
T.O.P. Text pages
Some broadcasters offer T.O.P. Text.
To open T.O.P. Text pages within Text,
press OPTIONS and select T.O.P. overview.
Text Options
In Text/Teletext, press OPTIONS to select the
following…
• Freeze page
To stop the automatic rotation of subpages.
• Dual screen / Full screen
To show the TV channel and Text next to each other.
• T.O.P. overview
To open T.O.P. Text.
• Enlarge
To enlarge the Text page for comfortable reading.
• Reveal
To unhide hidden information on a page.
• Cycle subpages
To cycle subpages when these are available.
• Language
To switch the group of characters that Text uses to
display correctly.
• Text 2.5
To activate the Text 2.5 for more colors and better
graphics.
If you select On in the Subtitle menu when watching
this analog channel, subtitles will be shown if
available.
To know if a channel is analog or digital, switch to the
channel and press INFO .
Text Setup
Text language
Some digital TV broadcasters have several Text
languages available.
Set teletex preference language
(Home) > Settings > All settings > Region and
19
 Loading...