

Page 1

Register your product and get support at
www.philips.com/welcome
6031S series
User Manual
Bedienungsanleitung
43PUS6031S
49PUS6031S
55PUS6031S
Page 2

Contents
Safety Information ..................................................2
Markings on the Product.........................................2
Environmental Information......................................3
Features .................................................................4
Accessories Included..............................................4
Standby Notications .............................................. 4
TV Control & Operation .......................................... 4
Inserting the Batteries into the Remote .................. 5
Connect Power ...................................................... 5
Antenna Connection ............................................... 5
Notication ..............................................................5
Specication ...........................................................6
Remote Control ......................................................7
Connections............................................................8
Switching On/Off .....................................................9
First Time Installation..............................................9
Media Playback via USB Input ............................. 10
Recording a Programme ...................................... 11
Timeshift Recording ..............................................11
Instant Recording ................................................. 11
Watching Recorded Programmes .......................11
Recording Conguration ....................................... 12
Media Browser Menu............................................12
CEC and CEC RC Passthrough ........................... 12
TV Menu Contents................................................13
General TV Operation ..........................................17
Using the Channel List .........................................17
Conguring Parental Settings ............................... 17
Electronic Programme Guide (EPG) ....................17
Teletext Services ..................................................18
Software Upgrade.................................................18
Troubleshooting & Tips .........................................19
PC Input Typical Display Modes ...........................20
AV and HDMI Signal Compatibility .......................20
Supported Video File Formats for USB Mode ......21
Supported Picture File Formats for USB Mode .... 21
Supported Audio File Formats for USB Mode ......22
Supported DVI Resolutions .................................. 23
Connectivity ..........................................................24
Wireless Connectivity ........................................... 25
Wireless Display ................................................... 26
Audio Video Sharing .............................................27
Nero MediaHome Installation ............................... 27
Internet Portal .......................................................28
HBBTV System.....................................................29
English - 1 -
Page 3
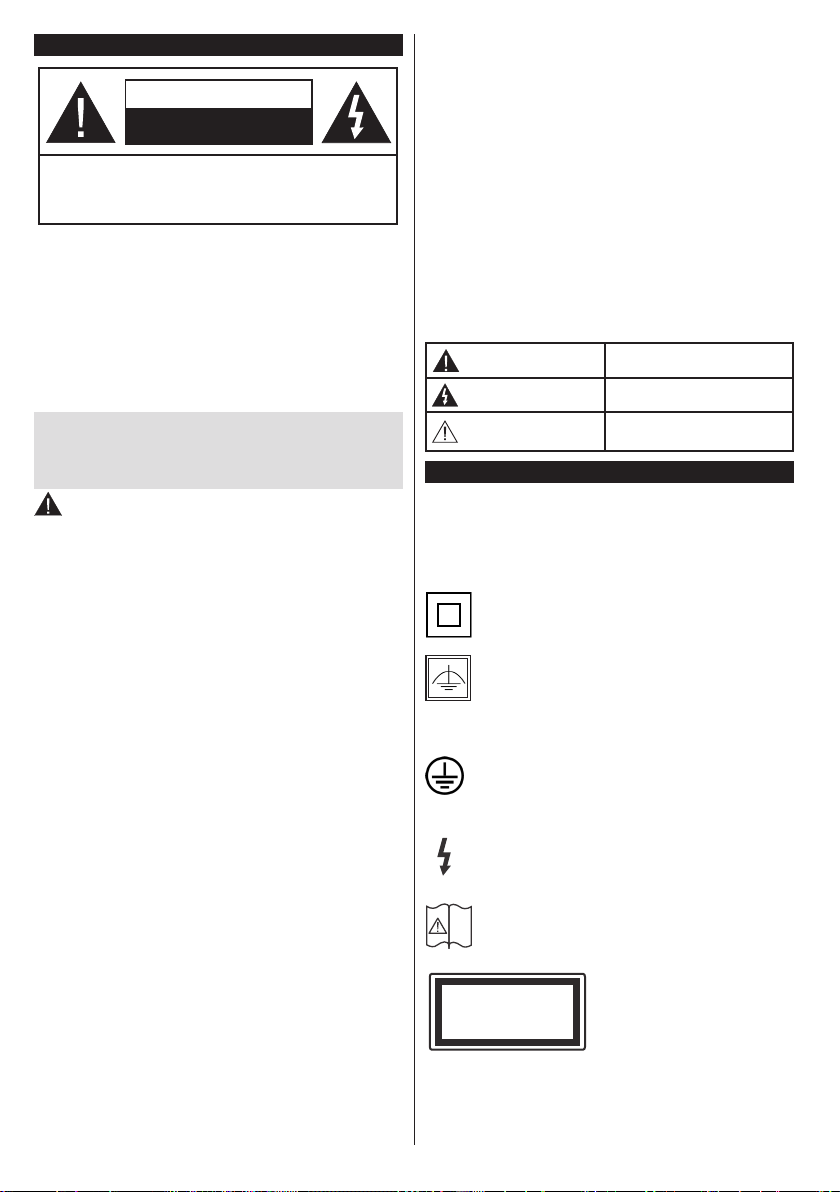
Safety Information
CAUTION
RISK OF ELECTRIC SHOCK
DO NOT OPEN
CAUTION: TO REDUCE THE RISK OF ELECTRIC SHOCK DO
In extreme weather (storms, lightning) and long inactivity
periods (going on holiday) disconnect the TV set from the
mains.
The mains plug is used to disconnect TV set from the mains
and therefore it must remain readily operable. If the TV set is
not disconnected electrically from the mains, the device will
still draw power for all situations even if the TV is in standby
mode or switched off.
Note: Follow the on screen instructions for operating the
related features.
NOT REMOVE COVER (OR BACK).
NO USER-SERVICEABLE PARTS INSIDE. REFER
SERVICING TO QUALIFIED SERVICE PERSONNEL.
IMPORTANT - Please read these
instructions fully before installing or
operating
WARNING: Never let people (including
children) with reduced physical, sensory or
mental capabilities or lack of experience and / or
knowledge use electrical devices unsupervised.
• Use this TV set at an altitude of less than 2000
meters above the sea level, in dry locations and in
regions with moderate or tropical climates.
• The TV set is intended for household and similar
general use but may also be used in public places.
• For ventilation purposes, leave at least 5cm of free
space around the TV.
• The ventilation should not be impeded by covering
or blocking the ventilation openings with items, such
as newspapers, table-cloths, curtains, etc.
• The power cord plug should be easily accessible. Do
not place the TV, furniture, etc. on the power cord.
A damaged power cord/plug can cause re or give
you an electric shock. Handle the power cord by the
plug, do not unplug the TV by pulling the power cord.
Never touch the power cord/plug with wet hands
as this could cause a short circuit or electric shock.
Never make a knot in the power cord or tie it with
other cords. When damaged it must be replaced,
this should only be done by qualied personnel.
• Do not expose the TV to dripping or splashing of
liquids and do not place objects lled with liquids,
such as vases, cups, etc. on or over the TV (e.g.,
on shelves above the unit).
• Do not expose the TV to direct sunlight or do not
place open ames such as lit candles on the top of
or near the TV.
• Do not place any heat sources such as electric
heaters, radiators, etc. near the TV set.
• Do not place the TV on the floor and inclined
surfaces.
• To avoid danger of suffocation, keep plastic bags
out of the reach of the babies, children and domestic
animals.
• Carefully attach the stand to the TV. If the stand is
provided with screws, tighten the screws rmly to
prevent the TV from tilting. Do not over-tighten the
screws and mount the stand rubbers properly.
• Do not dispose of the batteries in fire or with
hazardous or ammable materials.
Warning: Batteries must not be exposed to excessive
heat such as sunshine, re or the like.
Caution
Risk of electric shock
Maintenance
Serious injury or death risk
Dangerous voltage risk
Important maintenance
component
Markings on the Product
The following symbols are used on the product as
a marker for restrictions and precautions and safety
instructions. Each explanation shall be considered
where the product bears related marking only. Note
such information for security reasons.
Class II Equipment: This appliance is
designed in such a way that it does not require
a safety connection to electrical earth.
Class II Equipment With Functional
Earthing: This appliance is designed in such
a way that it does not require a safety
connection to electrical earth, the earth connection is
used for functional purposes.
Protective Earth Connection: The marked
terminal is intended for connection of the
protective earthing conductor associated with
the supply wiring.
Hazardous Live Terminal: The marked
terminal(s) is/are hazardous live under normal
operating conditions.
Caution, See Operating Instructions: The
marked area(s) contain(s) user replaceable
i
coin or button cell batteries.
Class 1 Laser Product:
CLASS 1
LASER PRODUCT
This product contains Class
1 laser source that is safe
under reasonably foreseeable
conditions of operation.
English - 2 -
Page 4

WARNING
Do not ingest the battery, Chemical Burn Hazard
This product or the accessories supplied with the
product may contain a coin/button cell battery. If the
coin/button cell battery is swallowed, it can cause
severe internal burns in just 2 hours and can lead
to death.
Keep new and used batteries away from children.
If the battery compartment does not close securely,
stop using the product and keep it away from
children.
If you think batteries might have been swallowed or
placed inside any part of the body, seek immediate
medical attention.
WALL MOUNTING WARNINGS
• Read the instructions before mounting your TV
on the wall.
• The wall mount kit is optional. You can obtain from
your local dealer, if not supplied with your TV.
• Do not install the TV on a ceiling or on an inclined
wall.
• Use the specied wall mounting screws and other
accessories.
• Tighten the wall mounting screws rmly to prevent
the TV from fall. Do not over-tighten the screws.
WARNING
Never place a television set in unstable or inclined
locations. A television set may fall, causing serious
personal injury or death. Many injuries, particularly
to children, can be avoided by taking simple
precautions such as;
• Using cabinets or stands recommended by the
manufacturer of the television set.
• Only using furniture that can safely support the
television set.
• Ensuring the television set is not overhanging the
edge of the supporting furniture.
• Not placing the television set on tall furniture
(for example, cupboards or bookcases) without
anchoring both the furniture and the television set
to a suitable support.
• Not standing the television set on cloth or other
materials placed between the television and
supporting furniture.
• Educating children about the dangers of climbing
on furniture to reach the television set or its
controls. If your existing television set is being
retained and relocated, the same considerations
as above should be applied.
English - 3 -
WARNING
Apparatus connected to the protective earthing
of the building installation through the MAINS
connection or through other apparatus with a
connection to protective earthing – and to a
television distribution system using coaxial cable,
may in some circumstances create a re hazard.
Connection to a television distribution system has
therefore to be provided through a device providing
electrical isolation below a certain frequency range
(galvanic isolator, see EN 60728-11)
Environmental Information
This television is designed to be environment friendly.
To reduce energy consumption, you can follow these
steps:
If you set the Energy Saving to Minimum, Medium,
Maximum or Auto the TV will reduce the energy
consumption accordingly. If you like to set the
Backlight to a xed value set as Custom and adjust
the Backlight (located under the Energy Saving
setting) manually using Left or Right buttons on the
remote. Set as Off to turn this setting off.
Note: Available Energy Saving options may differ depending
on the selected Mode in the Picture menu.
The Energy Saving settings can be found in the
Picture menu. Note that some picture settings will
be unavailable to be changed.
If pressed Right button while Auto option is selected or
Left button while Custom option is selected, “Screen
will be off in 15 seconds.” message will be displayed
on the screen. Select Proceed and press OK to turn
the screen off immediately. If you don’t press any
button, the screen will be off in 15 seconds. Press
any button on the remote or on the TV to turn the
screen on again.
Page 5
Note: Screen Off option is not available if the Mode is set
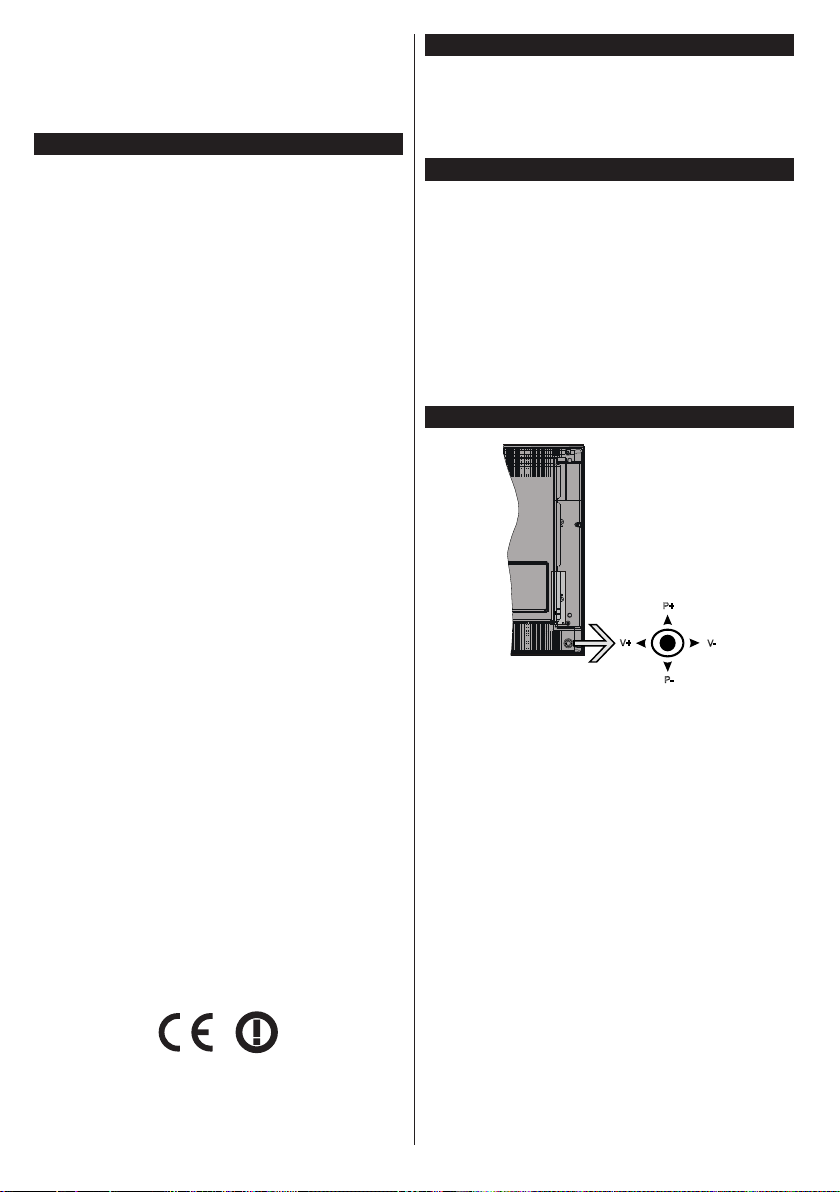
P+
V+
V-
P-
to Game.
When the TV is not in use, please switch off or
disconnect the TV from the mains plug. This will also
reduce energy consumption.
Features
• TV supports Ultra HD (Ultra High Denition - also
known as 4K) which provides resolution of 3840 x
2160 (4K:2K). It equals 4 times the resolution of Full
HD TV by doubling the pixel count of the Full HD TV
both horizontally and vertically. Ultra HD contents are
supported from HDMI, USB inputs and over DVB-T2
and DVB-S2 broadcasts.
• Remote controlled colour TV
• Fully integrated digital terrestrial/cable/satellite TV
(DVB-T-T2/C/S-S2)
• Fransat Installation Option
• HDMI inputs to connect other devices with HDMI
sockets
• USB input
• OSD menu system
• Scart socket for external devices (such as DVD
Players, PVR, video games, etc.)
• Stereo sound system
• Teletext
• Headphone connection
• Automatic programming system
• Manual tuning
• Automatic power down after up to eight hours.
• Sleep timer
• Child lock
• Automatic sound mute when no transmission.
• NTSC playback
• AVL (Automatic Volume Limiting)
• PLL (Frequency Search)
• PC input
• Game Mode (Optional)
• Picture off function
• Programme recording
• Programme timeshifting
• Ethernet (LAN) for Internet connectivity and service
• 802.11 a/b/g/n built in WIFI Support
• Audio Video Sharing
• HbbTV
Accessories Included
• Remote Control
• Batteries: 2 x AAA
• Instruction Book
• Quick Start Guide
Standby Notications
If the TV does not receive any input signal (e.g. from
an aerial or HDMI source) for 5 minutes, it will go
into standby. When you next switch-on, the following
message will be displayed: “TV switched to stand-by
mode automatically because there was no signal
for a long time.” Press OK to continue.
If the TV is on and it isn’t being operated for a while
it will go into standby. When you next switch-on, the
following message will be displayed. “TV switched to
stand-by mode automatically because no operation
was made for a long time.” Press OK to continue.
TV Control & Operation
The joystick allows you to control the Volume /
Programme / Source and Standby-On functions of
the TV.
Note: The position of the joystick may differ depending on
the model.
To change volume: Increase the volume by pushing
the joystick right. Decrease the volume by pushing
the joystick left.
To change channel: Scroll through the stored
channels by pushing the joystick up or down.
To change source: Press the centre of the joystick
in, the sources list will appear on the screen. Scroll
through the available sources by pushing the joystick
up or down.
To turn the TV off: Press the centre of the joystick in
and hold it down for a few seconds, the TV will turn
into standby mode.
To turn on the TV: Press the centre of the joystick
in, the TV will turn on.
Note: Main menu OSD cannot be displayed via control button.
English - 4 -
Page 6
Operation with the Remote Control
Press the Menu button on your remote control to
display main menu screen. Use the directional buttons
to select a menu tab and press OK to enter. Use the
directional buttons again to select or set an item. Press
Return/Back or Menu button to quit a menu screen.
Input Selection
Once you have connected external systems to your
TV, you can switch to different input sources. Press the
Source button on your remote control consecutively
to select the different sources.
Changing Channels and Volume
You can change the channel and adjust the volume
by using the Volume +/- and Programme +/- buttons
on the remote.
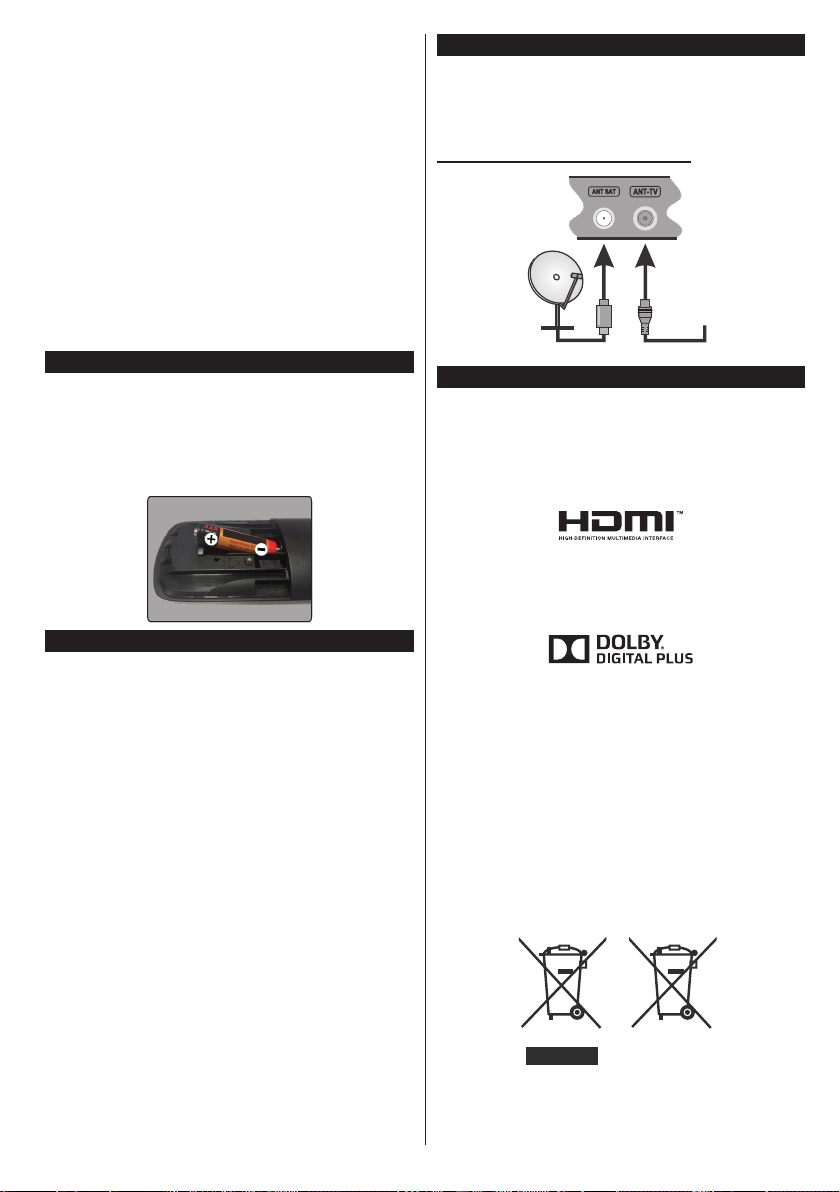
Inserting the Batteries into the Remote
Remove the back cover to reveal the battery
compartment. Insert two size AAA batteries. Make
sure the (+) and (-) signs match (observe correct
polarity). Do not mix old and new batteries. Replace
only with same or equivalent type. Place the cover
back on.
Connect Power
IMPORTANT: The TV set is designed to operate on
220-240V AC, 50 Hz socket. After unpacking, allow
the TV set to reach the ambient room temperature
before you connect the set to the mains. Plug the
power cable to the mains socket outlet.
Antenna Connection
Connect the aerial or cable TV plug to the AERIAL
INPUT (ANT-TV) socket or satellite plug to the
SATELLITE INPUT (ANT SAT) socket located on the
rear bottom side of the TV.
Rear bottom side of the TV
satellite
aerial
or
cable
Notication
TRADEMARK ACKNOWLEDGMENT
The terms HDMI and High-Definition Multimedia
Interface, and the HDMI Logo are trademarks or
registered trademarks of HDMI Licensing LLC in the
United States and other countries.
Manufactured under license from Dolby Laboratories.
Dolby, Dolby Audio and the double-D symbol are
trademarks of Dolby Laboratories.
YouTube and the YouTube logo are trademarks of
Google Inc.
Information for Users on Disposal of Old
Equipment and Batteries
[European Union only]
Equipment bearing these symbols should not be
disposed as general household waste.
You should look for appropriate recycling facilities and
systems for the disposal of these products.
Notice: The sign Pb below the symbol for batteries indicates
that this battery contains lead.
English - 5 -
Battery
Products
Page 7

Specication
TV Broadcasting
Receiving Channels VHF (BAND I/III) - UHF (BAND U) - HYPERBAND
Digital Reception
Number of Preset
Channels
Channel Indicator On Screen Display
RF Aerial Input 75 Ohm (unbalanced)
Operating Voltage 220-240V AC, 50Hz.
Audio German+Nicam Stereo
Display 43” 49” 55”
Audio Output Power
(WRMS.) (10% THD)
Power Consumption (W) 120W 135W 140W
Weight (Kg) 11,55 kg 13,55 kg 17,35 kg
TV Dimensions DxLxH
(with foot) (mm)
TV Dimensions DxLxH
(without foot) (mm)
Operation temperature
and operation humidity
PAL BG/I/DK/LL’
SECAM BG/DK
Fully integrated digital terrestrial-cable-satellite TV(DVB-T-C-S)
(DVB-T2, DVB-S2 compliant)
10.000
2x10W 2x10W 2x10W
221x965x623 mm 221x1099x685 mm 221x1238x764 mm
57(min)/89(max) x965x568 mm 58(min)/93(max)x1099x642,5 mm 60(min)/93(max)x1238x722 mm
0ºC up to 40ºC, 85% humidity max
English - 6 -
Page 8
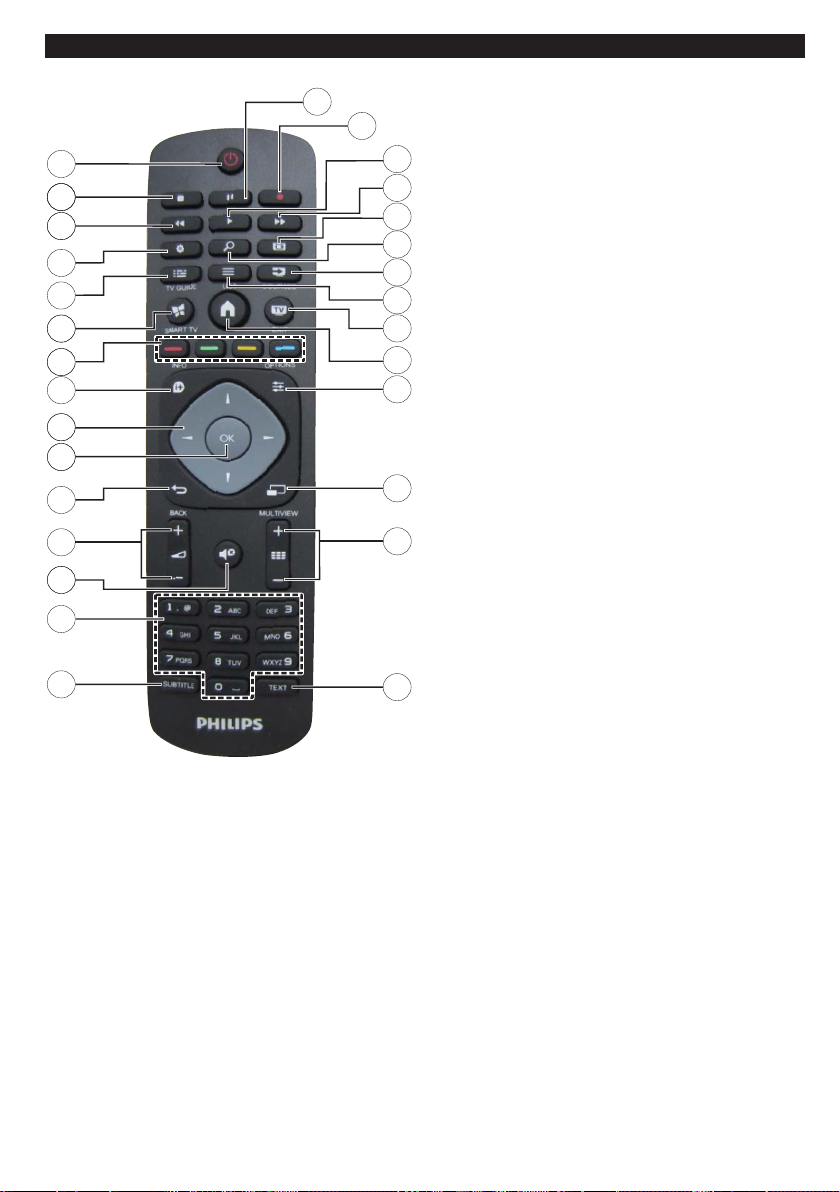
Remote Control
1
2
2
33
4
5
6
6
7
7
8
9
9
1010
11
12
13
13
15
16
18
17
19
20
22
23
24
25
27
28
21
26
29
14
1. Standby: Switches On / Off the TV
2. Stop: Stops the media being played
3. Rapid reverse: Moves frames backwards in media
such as movies
4. Settings: Opens the settings menu
5. EPG (Electronic programme guide): Displays the
electronic programme guide
6. Internet: Opens the portal page, where you can reach
many web based applications
7. Coloured Buttons: Follow the on-screen instructions
for coloured button functions
8. Info: Displays information about on-screen content,
shows hidden information (reveal - in TXT mode)
9. Directional buttons: Helps navigate menus, content
etc. and displays the subpages in TXT mode when
pressed Right or Left
10. OK: Conrms user selections, holds the page (in TXT
mode), views channel list (DTV mode)
11. Back/Return: Returns to previous screen, opens index
page (in TXT mode)
12. Volume +/-
13. Mute: Completely turns off the volume of the TV
14. Numeric buttons: Switches the channel, enters a
number or a letter in the text box on the screen, switches
the TV on when in standby mode.
15. Subtitles: Turns subtitles on and off (where available)
16. Text: Displays teletext (where available), press again
to superimpose the teletext over a normal broadcast
picture (mix)
17. Programme +/-: Programme up-down, Page up-down (in
TXT mode), switches the TV on when in standby mode
18. No function
19. Quick Menu: Displays a list of menus for quick access
20. Menu: Displays TV menu
21. TV: Switches to TV Source, closes the Portal page
22. List: Views channel list
23. Source: Shows all available broadcast and content
sources
24. Google Search: Opens the Google website on the TV
browser
25. Screen: Changes the aspect ratio of the screen
26. Rapid advance: Moves frames forward in media such
as movies
27. Play: Starts to play selected media
28. Record: Records programmes
29. Pause: Pauses the media being played, starts timeshift
recording
English - 7 -
Page 9

Connections
ideo
Connector Type Cables Device
Scart
Connection
(back)
YPBPR
YPbPr Video
Connection
/ V
AUDIO IN
SPDIF
BACK AV
R
/ Video
L
HEADPHONE
LAN
(back)
HDMI
Connection
(bottom&side)
VGA
Connection
(bottom)
PC/YPbPr/
Back AV
Audio
Connection
(back)
SPDIF
(Optical Out)
Connection
(bottom)
Back AV
(Audio/Video)
Connection
(back)
Headphone
Connection
(side)
USB
Connection
(back&side)
CI
Connection
(side)
Ethernet
Connection
(bottom)
Subwoofer
Connection
(back)
YPbPr Connection Cable
YPbPr/PC Audio Cable
Audio Video Cable
LAN / Ethernet Cable
CAM
module
NOTE: When connecting a
device via the YPbPr or Back
AV input, you must use the
connection cables to enable
connection. See the illustrations
on the left side. | To enable
PC/YPbPr audio, you will need
to use the Back Audio inputs
with a YPbPr/PC audio cable
for audio connection. | If an
external device is connected via
the SCART socket, the TV will
automatically switch to AV mode.|
When receiving DTV channels
(Mpeg4 H.264) or while in Media
Browser mode, output will not be
available via the scart socket. |
When using the wall mounting
kit (available from third party
in the market, if not supplied),
we recommend that you plug all
your cables into the back of the
TV before mounting on the wall.
| Insert or remove the CI module
only when the TV is SWITCHED
OFF. You should refer to the
module instruction manual for
details of the settings. | The USB
2.0 inputs on the back side and
on the left side of the TV support
devices up to 500mA. Connecting
devices that have current value
above 500mA may damage your
TV. If available, for the optional
USB 3.0 input on the left side of
the TV, which will be positioned
above the other USB input, this
limit value is 1A. | By connecting
an HDMI cable to your TV, you
have to use only a shielded
(high grade) HDMI cable with
ferrites to guarantee a sufcient
immunity and emission against
parasitic frequency radiation. And
make sure to use a High-Speed
HDMI cable that can transmit
high denition signals, such as
4K contents, for trouble-free
transmission.
If you want to connect a
device to the TV, make
sure that both the TV
and the device are turned off
before making any connection.
After the connection is done, you
can turn on the units and use
them.
English - 8 -
Page 10

Switching On/Off
To Switch the TV On
Connect the power cord to a power source such as a
wall socket (220-240V AC, 50 Hz).
To switch on the TV from standby mode either:
• Press the Standby button, Programme +/- or a
numeric button on the remote control.
• Press the centre of the joystick on the TV in or push
it up/down until the TV comes on from standby.
To Switch the TV Off
Press the Standby button on the remote control or
press the centre of the joystick on the TV in and hold
it down for a few seconds, the TV will switch into
standby mode.
To power down the TV completely, unplug the
power cord from the mains socket.
Note: When the TV is switched into standby mode, the
standby LED can blink to indicate that features such as
Standby Search, Over Air Download or Timer is active. The
LED can also blink when you switch on the TV from standby
mode.
First Time Installation
Note: If you are going to perform FRANSAT installation, insert
the FRANSAT card (optional) into the Conditional Access
terminal of your TV before switching on your TV.
When turned on for the first time, the language
selection screen is displayed. Select the desired
language and press OK.
On the next screen, set your preferences using the
directional buttons.
Note: Depending on the Country selection you may be asked
to set and conrm a PIN at this point. The selected PIN cannot
be 0000. You have to enter it if you are asked to enter a PIN
for any menu operation later.
About Selecting Broadcast Type
Digital Aerial: If Digital Aerial broadcast search
option is turned on, the TV will search for digital
terrestrial broadcasts after other initial settings are
completed.
Digital Cable: If Digital Cable broadcast search
option is turned on, the TV will search for digital cable
broadcasts after other initial settings are completed.
According to your other preferences a conrmation
message may be displayed before starting to search.
Select YES and press OK to proceed. To cancel
operation, select NO and press OK. You can select
Network or set values such as Frequency, Network
ID and Search Step. When nished, press OK button.
Note: Searching duration will change depending on the
selected Search Step.
Satellite: If Satellite broadcast search option is
turned on, the TV will search for digital satellite
broadcasts after other initial settings are completed.
Before satellite search is performed some settings
English - 9 -
should be made. Before the satellite search starts,
a menu will be displayed where you can select to
start a Fransat installation. Set the Install Type as
Operator and than set the Satellite Operator as the
related Fransat operator. Then press the OK button
to start Fransat installation. You can select to start an
automatic or manual installation.
Press OK to proceed. Fransat Installation will be
performed and broadcasts will be stored (if available).
If you set the Install Type as Standard, you can
continue with regular satellite installation and watch
satellite channels.
You can start a Fransat installation at any time later
from the Installation>Automatic channel scan>
Satellite menu.
There are three types of antenna selection. You can
select Antenna Type as Direct, Single Satellite
Cable or DiSEqC switch by using “ ” or “ ” buttons.
• Direct: If you have a single receiver and a direct
satellite dish, select this antenna type. Press OK to
continue. Select an available satellite on the next
screen and press OK to scan for services.
• Single Satellite Cable: If you have multiple
receivers and a single satellite cable system, select
this antenna type. Press OK to continue. Congure
settings by following instructions on the next screen.
Press OK to scan for services.
• DiSEqC switch: If you have multiple satellite dishes
and a DiSEqC switch, select this antenna type.
Press OK to continue. You can set four DiSEqC
options (if available) on the next screen. Press OK
button to scan the rst satellite in the list.
TKGS installation
If desired, you can start a TKGS Installation if the
Satellite broadcast search option is turned on. Before
the satellite search starts, a menu will be displayed
where you can select to start a TKGS Installation.
Set the Install Type as Operator and than set the
Satellite Operator as TKGS. Then press the OK
button to start TKGS Installation. Set your antenna
type as described abow. You can select to install HD
or SD channels during the installation. This selection
can be done later too using the Preferred List option
under the Installation>TKGS Installation menu.
The selection will be activated, after switching the
TV off and back on again or after a manual update
as described below.
If wanted TKGS Installation can be applied manually
after the First Time Installation. Press the Menu
button. Highlight Installation and press OK. In the
sub menu highlight Satellite Settings and press OK.
Then select Antenna Installation. After the antenna
type is selected and other satellite settings are made
press the RED button to start a TKGS Installation.
Page 11

The second way to apply TKGS installation manually
after the First Time Installation is starting an
update. To do this press the Menu button and select
Installation>TKGS Installation>Start Update. But
to be able to do so the Satellite Settings should be
done rst.
To use the update options of TKGS
TKGS feature keeps your satellite channel lists upto-date in three different ways.
Standby: While going into standby mode, the TV
controls the TKGS table version number whether it is
the last version or not. If any changes are detected,
TV starts to update. On the next switch-on a message
will be displayed to inform the user about the changes.
Background: When a channel is opened which isn’t
dened in the TKGS channel lists, the TV controls
the TKGS table version number whether it is the last
version or not. If any changes are detected, TV starts
to update. When the update is completed a message
will be displayed to inform the user about the changes.
Manual: An update can be started manually any
time. Press the Menu button. Highlight Installation
and press OK. In the sub menu highlight TKGS
Installation and press OK. Than select Start Update
and press OK.
Analogue: If Analogue broadcast search option is
turned on, the TV will search for analogue broadcasts
after other initial settings are completed.
Additionally you can set a broadcast type as your
favourite one. Priority will be given to the selected
broadcast type during the search process and the
channels of it will be listed on the top of the Channel
List. When nished, press OK to continue.
A dialogue screen asking to activate parental control
will be displayed. If you select Yes, parental restriction
options will be displayed. Congure as desired and
press OK when nished. Select No and press OK
to advance, if you don’t want to activate parental
restrictions.
You can activate Store Mode option at this point.
This option will congure your TV’s settings for store
environment and depending on the TV model being
used, the supported features of it may be displayed
on the top of the screen as an info banner. This option
is intended only for store use. It is recommended to
select Home Mode for home use. This option will be
available in Settings>More menu and can be turned
off/on later.
Press OK button on the remote control to continue
and the Network/Internet Settings menu will be
displayed, if you conrm the previously displayed
message asking whether you want to do the network
settings. Please refer to Connectivity section to
congure a wired or a wireless connection. After the
settings are completed press OK button to continue.
English - 10 -
To skip to the next step without doing anything select
No and press the OK button when the message is
displayed asking whether you want to do the network
settings.
After the initial settings are completed TV will start
to search for available broadcasts of the selected
broadcast types.
After all the available stations are stored, scan results
will be displayed. Press OK to continue. The Edit
Channel List menu will be displayed next. You can
edit the channel list according to your preferences or
press the Menu button to quit and watch TV.
While the search continues a message may appear,
asking whether you want to sort channels according
to the LCN(*). Select Yes and press OK to conrm.
(*) LCN is the Logical Channel Number system that organizes
available broadcasts in accordance with a recognizable
channel number sequence (if available).
Note: Do not turn off the TV while initializing first time
installation. Note that, some options may not be available
depending on the country selection.
In the TKGS system, channels can be blocked by the service
provider and Audio/Video transmission will not be available
from these channels.
Using SatcoDX Feature
You can perform SatcoDX operations using the
Installation>Satelite Settings menu. In the SatcoDX
menu, there are two options regarding to the SatcoDx.
You can download or upload SatcoDX data. In order
to perform these functions a USB device must be
connected to the TV.
You can upload current services and related satellites
& transponders in TV, to a USB device.
Additionally you can download one of the SatcoDx
les stored in USB device, to the TV.
When you select one of these les, all services and
related satellites and transponders in the selected
le will be stored in the TV. If there are any installed
terrestrial, cable and/or analog services, they will be
kept and only satellite services will be removed.
Afterwards, check your antenna settings and make
changes if necessary. An error message stating “No
Signal” may be displayed if the antenna settings are
not congured properly.
Media Playback via USB Input
You can connect 2.5” and 3.5” inch (hdd with external power
supply) external hard disk drives or USB memory stick to your
TV by using the USB inputs of the TV.
IMPORTANT! Back up the les on your storage devices
before connecting them to the TV. Manufacturer will
not be responsible for any le damage or data loss.
Certain types of USB devices (e.g. MP3 Players)
or USB hard disk drives/memory sticks may not be
compatible with this TV. The TV supports FAT32
Page 12

and NTFS disk formatting but recording will not be
available with NTFS formatted disks.
While formatting USB hard drives which have
more than 1TB (Tera Byte) storage space you may
experience some problems in the formatting process.
Wait a little while before each plugging and unplugging
as the player may still be reading les. Failure to do
so may cause physical damage to the USB player
and the USB device itself. Do not pull out your drive
while playing a le.
You can use USB hubs with your TV’s USB inputs.
External power supplied USB hubs are recommended
in such a case.
It is recommended to use the TV’s USB input(s)
directly, if you are going to connect a USB hard disk.
Note: When viewing image les the Media Browser menu
can only display 1000 image les stored on the connected
USB device.
Recording a Programme
IMPORTANT: When using a new USB hard disk
drive, it is recommended that you rst format the disk
using your TV’s Format Disk option in the Media
Browser>Settings>Recording Settings menu.
To record a programme, you should rst connect a
USB disk to your TV while the TV is switched off. You
should then switch on the TV to enable the recording
feature.
To use recording your USB drive should have 2 GB
free space and be USB 2.0 compatible. If available,
USB 3.0 compatible devices can be used too with the
optional USB 3.0 input on the side of the TV, which
will be positioned above the other USB input. If the
USB drive is not compatible an error message will
be displayed.
To record long duration programmes such as movies,
it is recommended to use USB Hard disk drives
(HDD’s).
Recorded programmes are saved into the connected
USB disk. If desired, you can store/copy recordings
onto a computer; however, these les will not be
available to be played on a computer. You can play
the recordings only via your TV.
Lip Sync delay may occur during the timeshifting.
Radio record is supported. The TV can record
programmes up to ten hours.
Recorded programmes are split into 4GB partitions.
If the writing speed of the connected USB disk is not
sufcient, the recording may fail and the timeshifting
feature may not be available.
It is recommended to use USB hard disk drives for
recording HD programmes.
Do not pull out the USB/HDD during a recording. This
may harm the connected USB/HDD.
If the AC cord is unplugged while there is an active
USB-recording timer setting, it will be cancelled.
Multipartition support is available. A maximum of two
different partitions are supported. The rst partition of
the USB disk is used for PVR ready features. It also
must be formatted as the primary partition to be used
for the PVR ready features.
Some stream packets may not be recorded because
of signal problems, as a result sometimes videos may
freeze during playback.
Record, Play, Pause, Display (for PlayListDialog) keys
can not be used when teletext is on. If a recording starts
from timer when teletext is on, teletext is automatically
turned off. Also teletext usage is disabled when there
is an ongoing playback.
While recording a programme in the background you
can use menu options, switch to another source or use
Media Browser functions, such as viewing pictures,
playing video and music les, and even play back the
ongoing recording.
Timeshift Recording
Press Pause button while watching a broadcast to
activate timeshifting mode. In timeshifting mode, the
programme is paused and simultaneously recorded
to the connected USB disk.
Press Play button again to resume the paused
programme from where you stopped. Press the Stop
button to stop timeshift recording and return to the
live broadcast.
Timeshift cannot be used while in radio mode.
You cannot use the timeshift fast reverse feature before
advancing the playback with the fast forward option.
Instant Recording
Press Record button to start recording an event
instantly while watching a programme. You can press
Record button on the remote control again to record
the next event after selecting the next programme
from within the EPG. Press Stop button to cancel
instant recording.
You can not switch broadcasts during the recording
mode. While recording a programme or during the
timeshifting, a warning message appears on the screen
if your USB device speed is not sufcient.
Watching Recorded Programmes
Select Recordings from the Media Browser menu.
Select a recorded item from the list (if previously
recorded). Press the OK button to view the Play
Options. Select an option then press OK button.
Note: Viewing main menu and menu items will not be
available during the playback.
Press the Stop button to stop a playback and return
to the Recordings.
Slow Forward
If you press Pause button while watching recorded
programmes, the slow forward feature will be
available. You can use Rapid advance button to
English - 11 -
Page 13
slow forward. Pressing Rapid advance button
consecutively will change slow forwarding speed.
Recording Conguration
Select the Recording Settings item in the Media
Browser>Settings menu to congure the recording
settings.
Format Disk: You can use the Format Disk feature
for formatting the connected USB disk. Your PIN is
required to use the Format Disk feature.
Note: Default PIN can be set to 0000 or 1234. If you have
dened the PIN(is requested depending on the country
selection) during the First Time Installation use the PIN
that you have dened.
IMPORTANT: Formatting your USB drive will erase
ALL the data on it and it’s le system will be converted
to FAT32. In most cases operation errors will be xed
after a format but you will lose ALL your data.
If “USB disk writing speed too slow to record”
message is displayed on the screen while starting a
recording, try restarting the recording. If you still get
the same error, it is possible that your USB disk does
not meet the speed requirements. Try connecting
another USB disk.
Media Browser Menu
You can play photo, music and movie les stored on a
USB disk by connecting it to your TV. Connect a USB
disk to one of the USB inputs located on the side of
the TV. Pressing the Menu button while in the Media
Browser mode will access the Picture, Sound and
Settings menu options. Pressing the Menu button
again will exit from this screen. You can set your Media
Browser preferences by using the Settings menu.
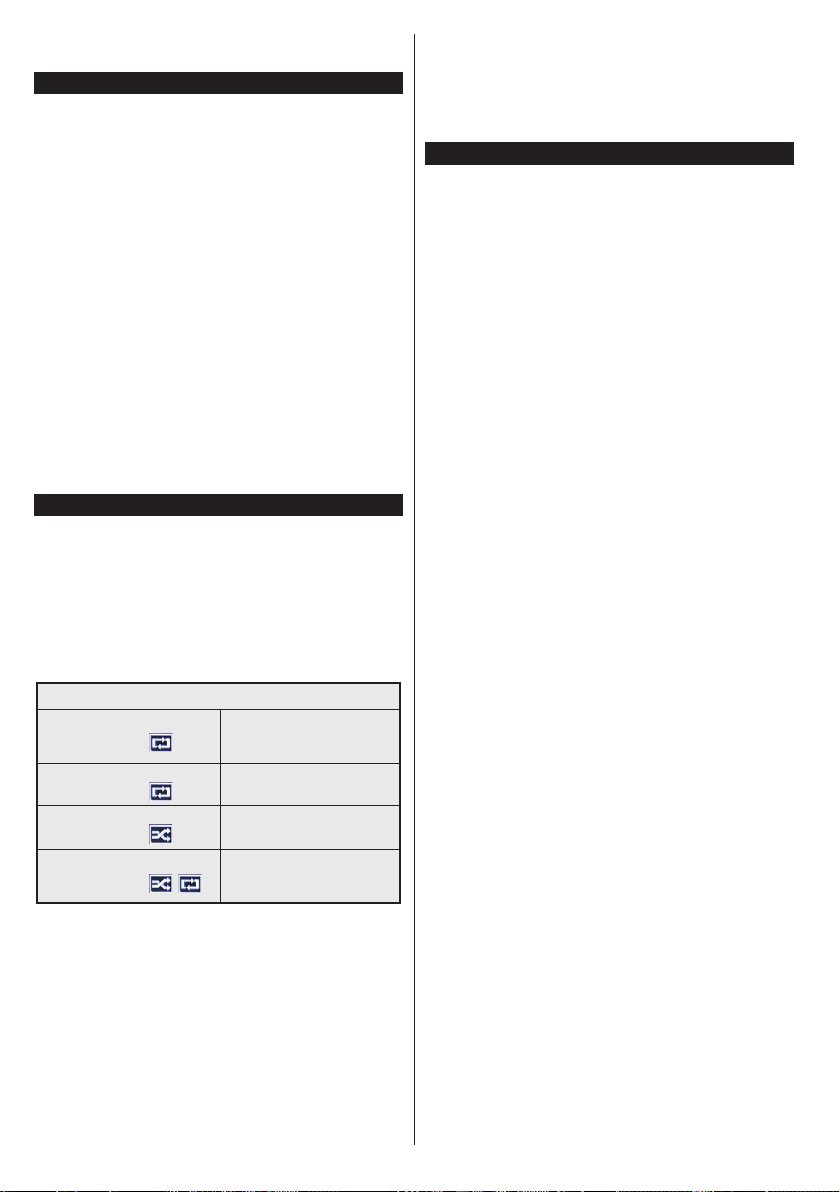
Loop/Shufe Mode Operation
Start playback with the Play
button and activate
Start playback with the OK
button and activate
Start playback with the Play
button and activate
Start playback with the Play
button and activate ,
All les in the list will be
continuously played in original
order
The same le will be played
continuously (repeat)
All les in the list will be
played once in random order
All les in the list will be
continuously played in the
same random order.
Custom Boot Up Logo
You can personalize your TV and see your favorite
image or photo on the screen each time your TV boots
up. To do this, copy your favorite image les into a USB
disk and open them from the Media Browser menu.
When you have chosen the desired image, highlight it
and press OK to view it in full screen. Press OK again
to choose the image as custom logo. A conrmation
message will be displayed. Select Yes and press OK
again. If the image is suitable(*) you will see it on the
screen during the TV’s next boot up.
Note: If you perform a First Time Installation the TV will
return to using the default logo, if any.
(*) Images must have an aspect ratio between 4:3 to 16:9
and they must be in .jpeg, .jpg or .jpe le formats. The image
cannot be set as boot logo, which’s resolution doesn’t appear
on the info banner.
CEC and CEC RC Passthrough
This function allows to control the CEC-enabled
devices, that are connected through HDMI ports by
using the remote control of the TV.
The CEC option in the Settings>More menu should
be set as Enabled at rst. Press the Source button
and select the HDMI input of the connected CEC
device from the Sources List menu. When new CEC
source device is connected, it will be listed in source
menu with its own name instead of the connected
HDMI ports name(such as DVD Player, Recorder
1 etc.).
The TV remote is automatically able to perform the
main functions after the connected HDMI source has
been selected.
To terminate this operation and control the TV via
the remote again, press Quick Menu button on the
remote, highlight the CEC RC Passthrough and
set as Off by pressing Left or Right button. This
feature can also be enabled or disabled under the
Settings>More menu.
The TV supports also ARC(Audio Return Channel)
feature. This feature is an audio link meant to replace
other cables between the TV and the audio system
(A/V receiver or speaker system).
When ARC is active, TV does not mute its other audio
outputs automatically. So you need to decrease TV
volume to zero manually, if you want to hear audio
from connected audio device only (same as other
optical or co-axial digital audio outputs). If you want
to change connected device’s volume level, you
should select that device from the source list. In that
case volume control keys are directed to connected
audio device.
Note: ARC is supported only via the HDMI2 input.
System Audio Control
Allows an Audio Amplier/Receiver to be used with
the TV. The volume can be controlled using the
remote control of the TV. To activate this feature set
the Speakers option in the Settings>More menu as
Amplier. The TV speakers will be muted and the
sound of the watched source will be provided from
the connected sound system.
Note: The audio device should support System Audio Control
feature and CEC option should be set as Enabled.
English - 12 -
Page 14
TV Menu Contents
Picture Menu Contents
Mode
Picture Zoom
Contrast
Brightness
Sharpness
Colour
Energy Saving
Backlight
You can change the picture mode to suit your preference or requirements. Picture mode can
be set to one of these options: Cinema, Game(optional), Sports, Dynamic and Natural.
Sets the desired image size format.
Adjusts the light and dark values on the screen.
Adjusts the brightness values on the screen.
Sets the sharpness value for the objects displayed on the screen.
Sets the colour value, adjusting the colours.
For setting the Energy Saving to Custom, Minimum, Medium, Maximum, Auto,
Screen Off or Off.
Note: Available options may differ depending on the selected Mode.
This setting controls the backlight level. The backlight function will be inactive if the
Energy Saving is set to an option other then Custom.
Advanced Settings
Dynamic Contrast
Noise Reduction
Colour Temp
White Point
Film Mode
Skin Tone
Colour Shift
HDMI Full Range
PC Position
Autoposition
H Position
V Position
Dot Clock
Phase
Reset
While in VGA (PC) mode, some items in Picture menu will be unavailable. Instead, VGA mode settings will be added to the Picture
Settings while in PC mode.
You can change the dynamic contrast ratio to desired value.
If the signal is weak and the picture is noisy, use the Noise Reduction setting to reduce
the amount of noise.
Sets the desired colour temperature value. Cool, Normal, Warm and Custom options are
available.
If the Colour Temp option is set as Custom, this setting will be available. Increase the
‘warmth’ or ‘coolness’ of the picture by pressing Left or Right buttons.
Films are recorded at a different number of frames per second to normal television programmes.
Turn this feature on when you are watching lms to see the fast motion scenes clearly.
Skin tone can be changed between -5 and 5.
Adjust the desired colour tone.
While watching from a HDMI source, this feature will be visible. You can use this feature to
enhance blackness in the picture.
Appears only when the input source is set to VGA/PC.
Automatically optimizes the display. Press OK to optimize.
This item shifts the image horizontally to the right hand side or left hand side of the screen.
This item shifts the image vertically towards the top or bottom of the screen.
Dot Clock adjustments correct the interference that appear as vertical banding in dot
intensive presentations like spreadsheets or paragraphs or text in smaller fonts.
Depending on the input source(computer etc.) you may see a hazy or noisy picture on the
screen. You can use phase to get a clearer picture by trial and error.
Resets the picture settings to factory default settings (except Game mode).
English - 13 -
Page 15

Sound Menu Contents
Volume
Equalizer
Balance
Headphone
Sound Mode
AVL (Automatic
Volume Limiting)
Headphone/Lineout
Dynamic Bass
Surround sound
Digital Out
Adjusts the volume level.
Selects the equalizer mode. Custom settings can be made only when in User mode.
Adjusts whether the sound comes from the left or right speaker.
Sets headphone volume.
Please ensure before using headphones that the headphone volume is set to a low
level, to prevent damage to your hearing.
You can select a sound mode (If the viewed channel supports).
Sets the sound to obtain xed output level between programmes.
When you connect an external amplier to your TV using the headphone jack, you
can select this option as Lineout. If you have connected headphones to the TV, set
this option as Headphone.
Please ensure before using headphones that this menu item is set to Headphone.
If it is set to Lineout, the output from the headphone socket will be set to maximum
which could damage your hearing.
Enables or disables the Dynamic Bass.
Surround sound mode can be changed as On or Off.
Sets digital out audio type.
English - 14 -
Page 16
Settings Menu Contents
Conditional Access
Hard of Hearing
More
HBBTV
Language
Parental
Timers
Date/Time
Sources
Network/Internet
Settings
Accessibility
Audio
Description
Menu Timeout
Software
Upgrade
Application
Version
Subtitle Mode
Auto TV OFF
Biss Key
Store Mode
Controls conditional access modules when available.
You may set a different language depending on the broadcaster and the country.
Enter correct password to change parental settings. You can easily adjust Menu
Lock, Maturity Lock, Child Lock or Guidance in this menu. You can also set a
new PIN or change the Default CICAM PIN using the related options.
Note: Some menu options may not be available depending on the country selection in the First Time
Installation. Default PIN can be set to 0000 or 1234. If you have dened the PIN(is requested depending on
the country selection) during the First Time Installation use the PIN that you have dened.
Sets sleep timer to turn off the TV after a certain time. Sets timers for selected
programmes.
Sets date and time.
Enables or disables selected source options. There are Regular, Enhanced and
Disabled options available for HDMI sources. Regular and Enhanced options are
affecting the colour settings of the selected HDMI source. To be able to watch 4K images
from an HDMI source related source setting should be set as Enhanced if the connected
device is HDMI 2.0 compatible. Set as Regular if the connected device is HDMI 1.4
compatible. Set acoordingly or disable the related HDMI source by setting as Disabled.
Displays network/internet settings.
Displays accessibility options of the TV.
Enables any special feature sent from the broadcaster.
A narration track will be played for the blind or visually impaired audience. Press OK
to see all available Audio Description menu options. This feature is available only if
the broadcaster supports it.
Note: Audio description sound feature is not available in recording or time shifting mode.
Displays other setting options of the TV.
Changes timeout duration for menu screens.
You can enable or disable this feature by setting it as On or Off.
Ensures that your TV has the latest rmware. Press OK to see the menu options.
Displays current software version.
This option is used to select which subtitle mode will be on the screen (DVB subtitle /
Teletext subtitle) if both is available. Default value is DVB subtitle. This feature is available
only for the country option of Norway.
Sets the desired time for the TV to automatically go into standby mode when not
being operated.
Biss is a satellite signal scrambling system that is used for some broadcasts. If you need to enter
Biss key on a broadcast, you can use this setting. Highlight Biss Key and press OK to enter
keys on the desired broadcast.
Select this mode for store display purposes. Whilst Store Mode is enabled, some
items in the TV menu may not be available.
English - 15 -
Page 17

Audio Video
Virtual Remote
Installation Menu Contents
List
Sharing
Power Up Mode
CEC
CEC Auto Power
On
Speakers
Audio Video Sharing feature allows you to share les stored on your smartphone or tablet
pc. If you have a compatible smartphone or tablet pc and the appropriate software is installed,
you can share/play photos on your TV. See instructions of your sharing software for more
information. Audio Video Sharing mode will not be available with internet portal feature.
This setting congures the power up mode preference. Last State and Standby
options are available.
Enable or disable the virtual remote feature.
With this setting you can enable and disable CEC functionality completely. Press Left
or Right button to enable or disable the feature.
This function allows the connected HDMI-CEC compatible device to turn on the TV
and switch to its input source automatically. Press Left or Right button to enable or
disable the feature.
To hear the TV audio from the connected compatible audio device set as Amplier.
You can use the remote control of the TV to control the volume of the audio device.
TKGS
Installation
Automatic
channel scan
(Retune)
Manual
channel scan
Network
channel scan
Analogue ne
tune
Satellite
Settings
Installation
Settings
Clear Service
Select Active
Network
First time
installation
Displays TKGS Installation menu options. This option may not be available according to
the selected Satellite Operator in the First Time Installation. If not, re-do the First Time
Installation and select the Satellite Operator as TKGS.
Displays automatic tuning options. Digital Aerial: Searches and stores aerial DVB stations.
Digital Cable: Searches and stores cable DVB stations. Analogue: Searches and stores
analogue stations. Satellite: Searches and stores satellite stations.
This feature can be used for direct broadcast entry.
Searches for the linked channels in the broadcast system. Digital Aerial: Searches for aerial
network channels. Digital Cable: Searches for cable network channels.
You can use this setting for ne tuning analogue channels. This feature is not available if no
analogue channels are stored.
Displays satellite settings. Satellite list: Displays available satellites. You can Add, Delete
satellites or Edit satellite settings on the list. Antenna installation: You can change satellite
anntenna settings and/or start a satellite scan. SatcoDX: You can upload or download SatcoDX
data using the related options.
Displays installation settings menu. Standby Search (Optional): Your TV will search for new
or missing channels while in standby. Any new found broadcasts will be shown.
Use this setting to clear channels stored. This setting is visible only when the Country option
is set to Denmark, Sweden, Norway or Finland.
This setting allows you to select only the broadcasts within the selected network to be listed
in the channel list. This feature is available only for the country option of Norway.
Deletes all stored channels and settings, resets TV to factory settings.
English - 16 -
Page 18

General TV Operation
Using the Channel List
The TV sorts all stored stations in the Channel List.
You can edit this channel list, set favourites or set
active stations to be listed by using the Channel
List options. Press the OK/List button to open the
Channel List. You can lter the listed channels by
pressing the Blue button or open the Edit Channel
List menu by pressing the Green button in order to
make advanced changes in the current list.
Note: The commands Move, Delete and Edit name in the
Edit Channel List menu may not be available according to
Opreting Mode setting in the TKGS Installation menu. To
get rid of all restrictions on conguring the channel list set this
option to TKGS Off. Move and Edit Name commands will be
still available if this option is set to Customizable.
Managing the Favourite Lists
You can create four different lists of your favourite
channels. Enter the Channel List in the main menu
or press the Green button while the Channel List
is displayed on the screen in order to open the Edit
Channel List menu. Select the desired channel on
the list. You can make multiple choices by pressing
the Yellow button. Then press the OK button to open
the Channel Edit Options menu and select Add/
Remove Favourites option. Press the OK button
again. Set the desired list option to On. The selected
channel/s will be added to the list. In order to remove
a channel or channels from a favourite list follow the
same steps and set the desired list option to Off.
You can use the Filter function in the Edit Channel
List menu to lter the channels in the Channel list
permanently according to your preferences. Using this
Filter option, you can set one of your four favourite
lists to be displayed everytime the Channel list is
opened. The ltering function in the Channel list
menu will only lter the currently displayed Channel
list in order to nd a channel and tune in to it. This
changes will not remain the next time the Channel
list is opened.
Furthermore, you can filter channels according
to categories using the Channel list lter menu.
Highlight Favourites option and select the desired
channel category using the left/right directional
buttons. The channels will be ltered according to the
selected category.
Conguring Parental Settings
The Parental Settings menu options can be used to
prohibit users from viewing of certain programmes,
channels and using of menus. These settings are
located in the Settings>Parental menu.
To display parental lock menu options, a PIN number
should be entered. After coding the correct PIN
number, Parental Settings menu will be displayed.
Menu Lock: This setting enables or disables access
to all menus or installation menus of the TV.
Maturity Lock: If this option is set, TV gets the
maturity information from the broadcast and if this
maturity level is disabled, disables access to the
broadcast.
Note: If the country option in the First Time Installation is
set as France, Italy or Austria, Maturity Lock’s value will be
set to 18 as default.
Child Lock: If this option is set to ON, the TV can only
be controlled by the remote control. In this case the
control buttons on the TV will not work.
Internet Lock: If this option is set to ON, the open
browser application in the portal will be disabled. Set
to OFF to release the application again.
Set PIN: Denes a new PIN number.
Default CICAM PIN: This option will appear as greyed
out if no CI module is inserted into the CI slot of the
TV. You can change the default PIN of the CI CAM
using this option.
Note: Default PIN can be set to 0000 or 1234. If you have
defined the PIN(is requested depending on the country
selection) during the First Time Installation use the PIN that
you have dened.
Some options may not be available depending on the country
selection in the First Time Installation.
Electronic Programme Guide (EPG)
Some channels send information about their
broadcast schedules. Press the Epg button to view
the Programme Guide menu.
There are 3 different types of schedule layouts
available, Timeline Schedule, List Schedule and
Now/Next Schedule. To switch between them follow
the instructions on the bottom of the screen.
Timeline Schedule
Zoom (Yellow button): Press the Yellow button to
see events in a wider time interval.
Filter (Blue button): Views ltering options.
Select Genre (Subtitles button): Displays Select
Genre menu. Using this feature, you can search the
programme guide database in accordance with the
genre. Info available in the programme guide will be
searched and results matching your criteria will be
highlighted.
Options (OK button): Displays event options.
Event Details (Info button): Displays detailed
information about selected programmes.
Next/Prev Day (Programme +/- buttons): Displays
the programmes of previous or next day.
Search (Text button): Displays Guide Search menu.
Now (Swap button): Displays current event of the
highlighted channel.
Rec./Stop (Record button): The TV will start to
record the selected programme. You can press again
to stop the recording.
English - 17 -
Page 19

IMPORTANT: Connect a USB disk to your TV while the TV
is switched off. You should then switch on the TV to enable
the recording feature.
Note: Switching to a different broadcast is not available
during a recording.
List Schedule(*)
(*) In this layout option, only the events of the highlighted
channel will be listed.
Prev. Time Slice (Red button): Displays the
programmes of previous time slice.
Next/Prev Day (Programme +/- buttons): Displays
the programmes of previous or next day.
Event Details (Info button): Displays detailed
information about selected programmes.
Filter (Text button): Views ltering options.
Next Time Slice (Green button): Displays the
programmes of next time slice.
Options (OK button): Displays event options.
Rec./Stop (Record button): The TV will start to
record the selected programme. You can press again
to stop the recording.
IMPORTANT: Connect a USB disk to your TV while the TV
is switched off. You should then switch on the TV to enable
the recording feature.
Note: Switching to a different broadcast is not available
during a recording.
Now/Next Schedule
Navigate (Directional buttons): Press the
Directional buttons to navigate through the channels
and programmes.
Options (OK button): Displays event options.
Event Details (Info button): Displays detailed
information about selected programmes.
Filter (Blue button): Views ltering options.
Rec./Stop (Record button): The TV will start to
record the selected programme. You can press again
to stop the recording.
IMPORTANT: Connect a USB disk to your TV while the TV
is switched off. You should then switch on the TV to enable
the recording feature.
Note: Switching to a different broadcast is not available
during a recording.
Programme Options
Use the directional buttons to highlight a programme
and press OK button to display Event Options menu.
The following options are available.
Select Channel: Using this option, you can switch to
the selected channel.
Record / Delete Rec. Timer: Select the Record
option and press the OK button. If the programme
is going to be broadcasted at a future time, it will be
added to Timers list to be recorded. If the selected
programme is being broadcasted at the moment,
recording will start immediately.
To cancel an already set recording, highlight that
programme and press the OK button and select
the option Delete Rec. Timer. The recording will be
cancelled.
English - 18 -
Set Timer on Event / Delete Timer on Event: After
you have selected a programme in the EPG menu,
press the OK button. Select Set Timer on Event
option and press the OK button. You can set a timer
for future programmes. To cancel an already set timer,
highlight that programme and press the OK button.
Then select Delete Timer on Event option. The timer
will be cancelled.
Notes: You cannot switch to any other channel while there is
an active recording or timer on the current channel.
It is not possible to set timer or record timer for two or more
individual events at the same time interval.
Teletext Services
Press the Text button to enter. Press again to activate
mix mode, which allows you to see the teletext page and
the TV broadcast at the same time. Press once more
to exit. If available, sections in the teletext pages will
become colour-coded and can be selected by pressing
the coloured buttons. Follow the instructions displayed
on the screen.
Digital Teletext
Press the Text button to view digital teletext information.
Operate it with the coloured buttons, cursor buttons
and the OK button. The operation method may differ
depending on the contents of the digital teletext. Follow
the instructions displayed on the digital teletext screen.
When the Text button is pressed again, the TV returns
to television broadcast.
Software Upgrade
Your TV is capable of nding and updating the rmware
automatically via the broadcast signal or via Internet.
Software upgrade search via user interface
On the main menu select Settings and then More.
Navigate to Software upgrade and press the OK
button. In Upgrade options menu select Scan for
upgrade and press OK button to check for a new
software upgrade.
If a new upgrade is found, it starts to download
the upgrade. After the download is completed
confirm the question asking about rebooting the
TV by pressing the OK to continue with the reboot
operation.
3 AM search and upgrade mode
Your TV will search for new upgrades at 3:00 o’clock if
Automatic scanning option in the Upgrade options
menu is set to Enabled and if the TV is connected
to an aerial signal or to Internet. If a new software is
found and downloaded successfully, it will be installed
at the next power on.
Note: Do not unplug the power cord while led is blinking
during the reboot process. If the TV fails to come on after the
upgrade, unplug, wait for two minutes then plug it back in.
Page 20

Troubleshooting & Tips
Tv will not turn on
Make sure the power cord is plugged in securely to
wall outlet. Check if batteries are exhausted. Press
the Power button on the TV.
Poor picture
• Check if you have selected the correct TV system.
• Low signal level can cause picture distortion. Please
check antenna access.
• Check if you have entered the correct channel
frequency if you have done manual tuning.
• The picture quality may degrade when two devices
are connected to the TV at the same time. In such
a case, disconnect one of the devices.
No picture
• This means your TV is not receiving any transmission.
Make sure the correct source has been selected.
• Is the antenna connected properly?
• Is the antenna cable damaged?
• Are suitable plugs used to connect the antenna?
• If you are in doubt, consult your dealer.
No sound
• Check if the TV is muted. Press the Mute button or
increase the volume to check.
• Sound may be coming from only one speaker. Check
the balance settings from Sound menu.
Remote control - no operation
• The batteries may be exhausted. Replace the
batteries.
Input sources - can not be selected
• If you cannot select an input source, it is possible
that no device is connected. If not;
• Check the AV cables and connections if you have
tried to connect a device.
• Check the AV cables and connections if you are
trying to switch to the input source dedicated to the
connected device.
Recording unavailable
To record a programme, you should rst connect a
USB disk to your TV while the TV is switched off.
You should then switch on the TV to enable recording
feature. If you cannot record, try switching off the TV
and then re-inserting the USB device.
USB is too slow
If a “USB disk writing speed too slow to record”
message is displayed on the screen while starting a
recording, try restarting the recording. If you still get
the same error, it is possible that your USB disk does
not meet the speed requirements. Try connecting
another USB disk.
English - 19 -
Page 21

PC Input Typical Display Modes
The following table is an illustration of some of the
typical video display modes. Your TV may not support
all resolutions.
Index Resolution Frequency
1 640x350 85Hz
2 640x480 60Hz
3 640x480 72Hz
4 640x480 75Hz
5 800x600 56Hz
6 800x600 60Hz
7 800x600 72Hz
8 800x600 75Hz
9 1024x768 60Hz
10 1024x768 70Hz
11 1024x768 75Hz
12 1024x768 85Hz
13 1152x864 75Hz
14 1280x768 60Hz
15 1280x768 75Hz
16 1280x960 60Hz
17 1280x960 75Hz
18 1280x1024 60Hz
19 1280x1024 75Hz
20 1360x768 60Hz
21 1366x768 60Hz
22 1400x1050 59Hz
23 1400x1050 60Hz
24 1400x1050 75Hz
25 1440x900 60Hz
26 1440x900 75Hz
27 1600x1200 60Hz
28 1680x1050 59Hz
29 1680x1050 60Hz
30 1920x1080 60Hz
AV and HDMI Signal Compatibility
Source Supported Signals Available
PAL O
EXT
(SCART)
Back AV
YPbPr
HDMI
(X: Not Available, O: Available)
SECAM O
NTSC4.43 O
NTSC3.58
RGB 50/60 O
PAL O
SECAM O
NTSC4.43 O
NTSC3.58 O
480i, 480p 60Hz O
576i, 576p 50Hz O
720p 50Hz,60Hz O
1080i 50Hz,60Hz O
480i 60Hz O
480p 60Hz O
576i, 576p 50Hz O
720p 50Hz,60Hz O
1080i 50Hz,60Hz O
24Hz,
1080p
3840x2160p
4096x2160p
25Hz,
30Hz,
50Hz,
60Hz
24Hz,
25Hz,
30Hz,
50Hz,
60Hz
24Hz,
25Hz,
30Hz,
50Hz,
60Hz
O
O
O
In some cases a signal on the TV may not be displayed
properly. The problem may be an inconsistency with
standards from the source equipment (DVD, Set-top
box, etc. ). If you do experience such a problem please
contact your dealer and also the manufacturer of the
source equipment.
English - 20 -
Page 22

Supported Video File Formats for USB Mode
Video Codec Resolution Bit Rate Container
MPEG1/2
MPEG4
XviD MP4 (.mp4, .mov), AVI (.avi), MKV (.mkv), ASF (.asf)
Sorenson H.263 FLV (.v), AVI (.avi), SWF(.swf)
H.263 MP4 (.mp4, .mov), 3GPP (.3gpp, .3gp), AVI (.avi), MKV (.mkv)
H.264
Motion JPEG 720P@30fps 10Mbps
VP8 1080P@30fps 20Mbps MKV (.mkv), WebM (.webm)
HEVC 4K2K@60fps 160Mbps
VP9 4K2K@30fps 100Mbps MKV (.mkv), WebM (.webm)
1080Px2@30fps,
1080P@60fps
3840x2160@30fps,
1080P@60fps
40Mbps
135Mbps
MPEG program stream (.DAT, .VOB, .MPG, .MPEG), MPEG
transport stream (.ts, .trp, .tp), MP4 (.mp4, .mov), 3GPP (.3gpp,
.3gp), AVI (.avi), MKV (.mkv), ASF (.asf)
MPEG program stream (.MPG, .MPEG), MP4 (.mp4, .mov),
3GPP (.3gpp, .3gp), AVI (.avi), MKV (.mkv), ASF (.asf)
FLV (.v), MP4 (.mp4, .mov), 3GPP (.3gpp, .3gp), MPEG
transport stream (.ts, .trp, .tp), ASF (.asf), AVI (.avi), MKV (.mkv)
AVI (.avi), 3GPP (.3gpp, .3gp), MP4 (.mp4, .mov), MKV (.mkv),
ASF (.asf)
MP4 (.mp4, .mov), MKV (.mkv), MPEG transport stream (.ts, .trp,
.tp)
Supported Picture File Formats for USB Mode
Image Photo Resolution (width x height) Remark
JPEG
PNG
Base-line 15360x8640
Progressive 1024x768
non-interlace 9600x6400
interlace 1200x800
The limit for max resolution depends on
DRAM size
BMP 9600x6400
English - 21 -
Page 23

Supported Audio File Formats for USB Mode
Audio Codec Sample rate Bit Rate Container
MPEG1/2 Layer1 16KHz ~ 48KHz
MPEG1/2 Layer2 16KHz ~ 48KHz
MPEG1/2 Layer3 16KHz ~ 48KHz
AC3
EAC3
AAC, HEAAC 8KHz ~ 48KHz
WMA 8KHz ~ 48KHz
WMA 10 Pro M0 48KHz < 192kbps
WMA 10 Pro M1 48KHz < 384kbps
WMA 10 Pro M2 96KHz < 768kbps
32KHz, 44.1KHz,
48KHz
32KHz, 44.1KHz,
48KHz
G711 A/mu-law 8KHz
8KHz, 11.025KHz,
LBR (cook)
22.05KHz,
44.1KHz
32Kbps ~
448Kbps
8Kbps ~
384Kbps
8Kbps ~
320Kbps
32Kbps ~
640Kbps
32Kbps ~ 6
Mbps
128bps ~
320Kbps
64Kbps ~
128Kbps
6Kbps ~
128Kbps
MP3 (.mp3), AVI (.avi), ASF (.asf), Matroska (.mkv, .mka),
MPEG transport stream (.ts, .trp, .tp), MPEG program stream
(.DAT, .VOB, .MPG, .MPEG), WAV (.wav)
MP3 (.mp3), AVI (.avi), ASF (.asf), Matroska (.mkv, .mka),
MPEG transport stream (.ts, .trp, .tp), MPEG program stream
(.DAT, .VOB, .MPG, .MPEG), WAV (.wav)
MP3 (.mp3), AVI (.avi), ASF (.asf), Matroska (.mkv, .mka), 3GPP
(.3gpp, .3gp), MP4 (.mp4, .mov, m4a), MPEG transport stream
(.ts, .trp, .tp), MPEG program stream (.DAT, .VOB, .MPG,
.MPEG), FLV (.v), WAV (.wav), SWF (.swf)
AC3 (.ac3), AVI (.avi), Matroska (.mkv, .mka), 3GPP (.3gpp,
.3gp), MP4 (.mp4, .mov, m4a), MPEG transport stream (.ts, .trp,
.tp), MPEG program stream (.DAT, .VOB, .MPG, .MPEG)
EAC3 (.ec3), 3GPP (.3gpp, .3gp), MP4 (.mp4, .mov, m4a),
MPEG transport stream (.ts, .trp, .tp), MPEG program stream
(.DAT, .VOB, .MPG, .MPEG)
AAC (.aac), AVI (.avi), Matroska (.mkv, .mka), 3GPP (.3gpp,
.3gp), MP4 (.mp4, .mov, m4a), MPEG transport stream (.ts, .trp,
.tp), MPEG program stream (.DAT, .VOB, .MPG, .MPEG), FLV
(.v), RM (.ra)
ASF (.wma, .asf), AVI (.avi), Matroska (.mkv, .mka)
WAV (.wav), AVI (.avi), Matroska (.mkv, .mka), 3GPP
(.3gpp, .3gp), MP4 (.mp4, .mov, m4a)
RM (.ra)
FLAC 8KHz~96KHz < 1.6Mbps Matroska (.mkv, .mka)
English - 22 -
Page 24

Supported DVI Resolutions
When connecting devices to your TV’s connectors by using DVI converter cable(DVI to HDMI cable - not
supplied), you can refer to the following resolution information.
56Hz 60Hz 66Hz 70Hz 72Hz 75Hz
640x480
800x600
1024x768
1280x768
1280x960
1360x768
1366x768
1280x1024
1400x1050
1600x900
þ þ þ
þ þ
þ þ þ
þ þ
þ
þ
þ
þ þ þ
þ
þ
English - 23 -
Page 25

Connectivity
Wired Connectivity
To Connect to a Wired Network
• You must have a modem/router connected to an
active broadband connection.
• Ensure that Nero Media Home software is installed
to your PC (for Audio Video Sharing function). See
“Nero Media Home Installation” section.
• Connect your PC to your modem/router. This can
be a wired or wireless connection.
• Connect your TV to your modem/router via an
ethernet cable. There is a LAN port at the rear
(back) of your TV.
Broadband ISP connection
LAN (ethernet) cable
LAN input on the rear
side of the TV
• To access and play shared les, you must select the
Media Browser. Press the Menu button and select
Media Browser. Press OK to continue. Select the
desired le type and press OK. You must always
use the Media Browser screen to access and play
shared network les.
• PC/HDD/Media Player or any other devices that are
compatible should be used with a wired connection
for higher playback quality.
To congure wired settings please refer to the
Network/Internet Settings section in the Settings
Menu.
• You might be able to connect your TV to your LAN
depending on your network’s conguration. In such
a case, use an ethernet cable to connect your TV
directly to the network wall outlet.
network
wall socket
LAN input on the rear
side of the TV
Conguring Wired Device Settings
Network Type
The Network Type can be selected as Wired Device,
Wireless Device or Disabled, in accordance with the
active connection to the TV set. Select this as Wired
Device if you are connecting via an ethernet.
Internet Speed Test
Highlight Internet Speed Test and press the OK but-
ton. TV will check the internet connection bandwidth
and display the result when complete.
Advanced Settings
Highlight Advanced Settings and press the OK
button. On the next screen you can change the IP
and DNS settings of the TV. Highlight the desired one
and press Left or Right button to change the setting
from Automatic to Manual. Now you can enter the
Manual IP and / or Manual DNS values. Select the
related item in the drop down menu and enter the
new values using the numeric buttons of the remote.
Press the OK button to save settings when complete.
English - 24 -
Page 26

Wireless Connectivity
To Connect to a Wireless Network
The TV cannot connect to the networks with a hidden
SSID. To make your modem’s SSID visible, you should
change your SSID settings via the modem’s software.
To Connect to a wireless LAN, you should perform
the following steps:
1. Ensure that Nero Media Home software is
installed to your PC (for Audio Video Sharing
function).
2. To congure your wireless settings please refer
to the Network/Internet Settings section in the
Settings Menu.
Broadband
ISP
connection
A Wireless-N router (IEEE 802.11a/b/g/n) with
simultaneous 2.4 and 5 GHz bands is designed to
increase bandwidth. These are optimized for smoother
and faster HD video streaming, le transfers and
wireless gaming.
• Use a LAN connection for quicker file sharing
between other devices like computers.
• The frequency and channel differ depending on the area.
• The transmission speed differs depending on the
distance and number of obstructions between the
transmission products, the conguration of these
products, the radio wave conditions, the line trafc
and the products that you use. The transmission may
also be cut off or may get disconnected depending
on the radio wave conditions, DECT phones or any
other WiFi 11b appliances. The standard values of
the transmission speed are the theoretical maximum
values for the wireless standards. They are not the
actual speeds of data transmission.
• The location where the transmission is most effective
differs depending on the usage environment.
• The Wireless feature of the TV supports 802.11 a,b,g
& n type modems. It is highly recommended that you
should use the IEEE 802.11n communication protocol
in order to avoid any possible problems while watching
videos.
• You must change your modem’s SSID when there are
any other modems around with the same SSID. You
English - 25 -
can encounter connection problems otherwise. Use
a wired connection if you experience problems with a
wireless connection.
Conguring Wireless Device Settings
Open the Network/Internet Settings menu and select
Network Type as Wireless Device to start connection
process.
The TV will scan the wireless networks automatically.
A list of available networks will be displayed. Please
select your desired network from the list.
Note: If the modem supports N mode, you should set N
mode settings.
If the selected network is protected with a password,
please enter the correct key by using the virtual
keyboard. You can use this keyboard via the directional
buttons and the OK button on the remote control.
Wait until the IP address is shown on the screen.
This means that the connection is now established.
To disconnect from a wireless network, highlight
Network Type and press Left or Right buttons to set
as Disabled.
Highlight Internet Speed Test and press the OK button
to check your internet connection speed. Highlight
Advanced Settings and press the OK button to open
the advanced setting menu. Use directional and numeric
buttons to set. Press the OK button to save settings
when complete.
Other Information
The status of the connection will be displayed as
Connected or Not Connected and the current IP
address, if a connection is established.
Connecting to your mobile device via WiFi
• If your mobile device has WiFi feature, you can connect
it to your TV via a router, in order to access the content
in your device. For this, your mobile device must have
an appropriate sharing software.
• Connect to your router following the steps stated above
in the Wireless Connectivity section.
• Afterwards, engage your mobile device with the router
and then activate the sharing software on your mobile
device. Then, select les that you want to share with
your TV.
• If the connection is established correctly, you will be
able to access the shared les from your mobile device
via the Media Browser of your TV.
• Enter the Media Browser menu and the playback
device selection OSD will be displayed. Select your
mobile device and press the OK button to continue.
• If available, you can download a virtual remote
controller application from the server of your mobile
device application provider.
Note: This feature may not be supported on all mobile
devices.
Page 27

Wireless Display
Wireless Display is a standard for streaming video and
sound content by Wi-Fi Alliance. This feature provides
the ability to use your TV as wireless display device.
Using with mobile devices
There are different standards which enable sharing of
screens including graphical, video and audio content
between your mobile device and TV.
Plug the wireless USB dongle to TV rst, if the TV
doesn’t have internal WiFi feature.
Then press the Source button on the remote and
switch to Wireless Display source.
A screen appears stating that the TV is ready for
connection.
Open the sharing application on your mobile device.
These applications are named differently for each
brand, please refer to the instruction manual of your
mobile device for detailed information.
Scan for devices. After you select your TV and
connect, the screen of your device will be displayed
on your TV.
Note: This feature can be used only if the mobile device
supports this feature. Scanning and connecting processes
differ according to the programme you use. Android based
mobile devices should have the software version V4.2.2
and above.
Connectivity Troubleshooting
Wireless Network Not Available
• Ensure that any rewalls of your network allow the
TV wireless connection.
• Try searching for wireless networks again, using the
Network/Internet Settings menu screen.
If the wireless network does not function properly, try
using the wired network in your home. Refer to the
Wired Connectivity section for more information on
the process.
If the TV does not function using the wired connection,
check the modem (router). If the router does not
have a problem, check the internet connection of
your modem.
Connection is Slow
See the instruction book of your wireless modem to
get information on the internal service area, connection
speed, signal quality and other settings. You need to
have a high speed connection for your modem.
Distruption during playback or slow
reactions
You could try the following in such a case:
Keep at least three meters distance from microwave
ovens, mobile telephones, bluetooth devices or any
other Wi-Fi compatible devices. Try changing the active
channel on the WLAN router.
Internet Connection Not Available / Audio Video
Sharing Not Working
If the MAC address (a unique identier number) of
your PC or modem has been permanently registered,
it is possible that your TV might not connect to
the internet. In such a case, the MAC address is
authenticated each time when you connect to the
internet. This is a precaution against unauthorized
access. Since your TV has its own MAC address,
your internet service provider cannot validate the MAC
address of your TV. For this reason, your TV cannot
connect to the internet. Contact your internet service
provider and request information on how to connect
a different device, such as your TV, to the internet.
It is also possible that the connection may not be
available due to a firewall problem. If you think
this causes your problem, contact your internet
service provider. A rewall might be the reason of a
connectivity and discovery problem while using the
TV in Audio Video Sharing mode or while browsing
via Audio Video Sharing feature.
Invalid Domain
Ensure that you have already logged on to your PC
with an authorized username/password and also
ensure that your domain is active, prior to sharing
any les in your media server program on your PC. If
the domain is invalid, this might cause problems while
browsing les in Audio Video Sharing mode.
Using Audio Video Sharing Network Service
Audio Video Sharing feature uses a standard that eases
the viewing process of digital electronics and makes
them more convenient to use on a home network.
This standard allows you to view and play photos, music
and videos stored in the media server connected to your
home network.
1. Nero Media Home Installation
The Audio Video Sharing feature cannot be used if the
server programme is not installed onto your PC or if
the required media server software is not installed
onto the companion device. Please prepare your PC
with the Nero Media Home programme. For more
information about the installation, please refer to the
“Nero Media Home Installation” section.
2. Connect to a Wired or Wireless Network
See the Wired/Wireless Connectivity chapters for
detailed conguration information.
3. Play Shared Files via Media Browser
Select Media Browser by using the directional buttons
from the main menu and press OK. The media browser
will then be displayed.
English - 26 -
Page 28

Audio Video Sharing
Audio Video Sharing support is only available in the
Media Browser Folder mode. To enable folder mode,
go to the Settings tab in the main media browser screen
and press OK. Highlight View Style and set to Folder
using the Left or Right butt ons. Select the desired media
type and press OK.
If sharing congurations are set properly, Device
Selection screen will be displayed after selecting the
desired media type. If available networks are found,
they will be listed on this screen. Select media server
or network that you want to connect to using the Up
or Down buttons and press OK. If you want to refresh
the device list, press the Green button. You can press
Menu to exit.
If you select the media type as Videos and choose
a device from the selection menu. Then select the
folder with video les in it on the next screen and all
the available video les will be listed.
To play other media types from this screen, you can go
back to main Media Browser screen and select the
media type as desired and then perform the network
selection again. Or press the Blue button to switch to
next media type quickly without changing the network.
Refer to the Media Browser menu section for further
information on le playback.
Subtitle les do not work if you watch videos from
your network through Audio Video Sharing feature.
You can connect only one television to the same
network. If a problem occurs with the network, please
switch your television off at the wall socket and back
on again. Trick mode and jump are not supported with
the Audio Video Sharing feature.
Note: There may be some PC’s which may not be able to
utilize the Audio Video Sharing feature due to administrator
and security settings (such as business PC’s).
For best home network streaming with this TV, the Nero
software should be installed.
Nero MediaHome Installation
To install Nero MediaHome, please proceed as
follows:
Note: The Audio Video Sharing feature cannot be used if
the server programme is not installed onto your PC or if
the required media server software is not installed onto the
companion device.
1. Enter the link below completely in the adress-
bar of your web browser.
http://www.nero.com/mediahome-tv
2. Click the Download button on the opening page.
The installation le will be downloaded onto your
PC.
3. After the download is completed, double click on
the installation le to start the installation. The
installation wizard will guide you through the
installation process.
4. The prerequisites screen will be displayed rst.
The installation wizard checks the availability
of required third-party software on your PC. If
applications are missing they are listed and must
be installed before continuing installation.
5. Click the Install button. The integrated serial will
be displayed. Please do not change the displayed
serial.
6. Click the Next button. The License Conditions
(EULA) screen will be displayed. Please read
the license agreement carefully and select the
appropriate check box if you agree to the terms of
the agreement. Installation is not possible without
this agreement.
7. Click the Next button. On the next screen you can
set your installation preferences.
8. Click the Install button. The installation begins
and nishes automatically. A progress bar will
indicate the state of the installation process.
9. Click the Finish button. The installation is
completed. You will be directed to the web site of
the nero software.
10. A shortcut is now placed on your desktop.
Congratulations! You successfully installed Nero
MediaHome on your PC.
Run Nero MediaHome by double clicking on the shortcut
icon.
English - 27 -
Page 29

Internet Portal
HINT: A broadband internet connection is required for
high quality viewing the contents and for proper operation
of the internet portal.
Portal feature adds your TV a feature that allows you to
connect a server on the Internet and view the content
provided by this server over your Internet connection.
Portal feature allows you to view the music, video, clip
or web content with dened short-cuts. Whether you
can view this content without interruption depends
on the connection speed provided by your internet
service provider.
Press the Internet button on your remote control
to open internet portal. Before connecting to the
portal, your prior consent to the Smart TV Terms of
Use and Smart TV Cookies Consent will be asked.
You need to accept to continue. Highlight Accept and
then on the next screen OK options located on the
bottom left side of the screen and press OK button
on the remote to proceed.
A conrmation screen will be displayed next, asking
whether you want to activate parental control in order
to lock 18+ related apps. Highlight Cancel and press
OK to continue without locking these kind of apps.
Highlight Enable and press OK if you want to activate
parental control. You will be asked to dene a four
digit code to access the locked apps in the future. You
should enter the code twice for conrmation.
When portal is opened you will see icons of the
available applications on the portal screen. Scroll
down to see all available apps. Use the directional
buttons on your remote to navigate through the
portal. Move the focus to the desired item and press
OK to start the applicaton. Press Back button to
return back to the previous screen. Use the coloured
buttons on the remote for some operations related to
the highlighted app. If available, the options for each
coloured button will be displayed at bottom left corner
of the screen.
You can use the App Gallery to add more apps to your
portal page. Press the Green button to change the
country in order to see available local applications.
Press Blue button to switch on/off the app locking.
You can perform searches within the portal in order to
nd an app. Move the focus to the search box on the
upper right corner of the screen and press OK. Type a
key word to start a search. Results will be listed below
the search box. Press the Back button to close the
virtual keyboard and select the desired result using
the directional buttons.
You can use the web browser application to visit any
desired website on the internet and perform internet
searches.
You can access to the Picture and Sound menu
options by pressing the Menu button on the remote
English - 28 -
and make adjustments without needing to return to
the Live TV mode.
Follow the on-screen instructions at the bottom of the
screen for available button functions.
Press the TV button to quit the Internet portal mode.
PIP Window (depending on the portal service)
Current source content will be displayed in the
background of the portal interface on the home screen.
In some sub-menus screen image may be displayed
in a small PIP window.
If you switch to portal mode while watching TV
channels, current programme will be displayed in the
background or in the PIP window.
Notes:
Possible application dependent problems may be caused by
the content service provider.
Portal service content and the interface may be changed at
any time without prior notice.
Third party internet services may change, be discontinued or
restricted at any time.
Page 30

HBBTV System
HbbTV (Hybrid Broadcast Broadband TV) is a
new industry standard that seamlessly combines
TV services delivered via broadcast with services
delivered via broadband and also enables access
to Internet only services for consumers using
connected TVs and set-top boxes. Services
delivered through HbbTV include traditional
broadcast TV channels, catch-up services,
video-on-demand, EPG, interactive advertising,
personalisation, voting, games, social networking
and other multimedia applications.
HbbTV applications are available on channels
where they are signalled by the broadcaster
(currently various channels on Astra broadcast
HbbTV applications). The broadcaster marks one
application as “autostart” and this one is started
by the platform automatically. The autostart
applications are generally launched with a small
red button icon to notify the user that there is an
HbbTV application on that channel. Press the red
button to open the application page. After the page
is displayed you can go back to the initial red button
icon state by pressing the red button again. You can
toggle between the red button icon mode and full
UI mode of the application via pressing red button.
It should be noted that the red button switching
capability is provided by the application and some
application may behave differently.
If you switch to another channel while an HbbTV
application is active (either in red button icon mode
or full UI mode), the following scenarios can occur.
• The application can continue running.
• The application can be terminated.
• The application can be terminated and another
autostart red button application can be launched.
HbbTV allows the applications to be retrieved both
from broadband or broadcast. The broadcaster
may enable both ways or one of them. If the
platfrom does not have an operational broadband
connection, the platform can still launch applications
transmitted on broadcast.
The autostart red button applications generally
provide links to other applications. An example of
this is shown below. The user then can switch to
other applications by using the links provided. The
applications should provide a way to terminate
themselves, usually Exit button is used for this.
Figure a: Start bar application
Figure b: EPG application, broadcast video is shown
on the left bottom, can be terminated by pressing 0.
HbbTV applications use keys on the remote control
to interact with the user. When an HbbTV application
is launched, the control of some keys are owned
by the application. For example, numeric channel
selection may not work on a teletext application
where the numbers indicate teletext pages.
HbbTV requires AV streaming capability for the
platform. There are numerous applications providing
VOD (video on demand) and catch-up TV services.
The user can use play, pause, stop, forward, and
rewind keys on the remote control to interact with
the AV content.
Note: You can enable or disable this feature from the More
menu in Settings menu.
English - 29 -
Page 31

A B C D E
English
VESA WALL MOUNT MEASUREMENTS
Hole Pattern Sizes (mm)
Screw Sizes Length (X)
Thread (Y)
Deutsch
MASSANGABE N FÜR VESA- WANDMONTAGE Lochmustergrö ßen (mm)
Schraubengröß en
Länge (X) Gewinde (Y)
VESA WALL MOUNT MEASUREMENTS
W
H
A
B
Hole Paern
Sizes (mm)
(43" / 49")
W H
200 200
C Screw Sizes
D Length (X)
min. (mm) 10
max. (mm) 13
E Thread (Y) M6
VESA WALL MOUNT MEASUREMENTS (55")
A
B
Hole Paern
Sizes (mm)
W H
400 200
C Screw Sizes
D Length (X)
min. (mm) 10
max. (mm) 13
E Thread (Y) M6
English - 30 -
Page 32

Inhalt
Sicherheitsinformationen ...................................... 32
Kennzeichnungen auf dem Gerät ......................... 33
Umweltinformationen ............................................ 35
Funktionen ............................................................35
Zubehör im Lieferumfang .....................................36
Standby-Meldungen .............................................36
TV-Steuerung & Betrieb........................................36
Einlegen der Batterien in die Fernbedienung ....... 36
Stromversorgung Anschließen ............................ 36
Anschluss der Antenne ......................................... 37
Benachrichtigung .................................................. 37
Technische Daten ................................................. 38
Fernbedienung .....................................................39
Anschlüsse ...........................................................40
Ein-/Ausschalten...................................................41
Erste Installation ................................................... 41
Medien Abspielen über USB Eingang ..................43
Aufzeichnung einer Sendung ...............................43
Timeshift-Aufnahme .............................................44
Instant Recording .................................................44
Aufgenommene Sendungen ansehen ................. 44
Aufnahmekonguration.........................................44
Menü Medienbrowser ........................................... 45
CEC und CEC RC Passthrough ........................... 45
TV-Menüinhalte ....................................................46
Allgemeine Bedienung..........................................51
Verwendung der Programmliste ...........................51
Einstellung der Kindersicherungseinstellungen .... 51
Elektronischer Programmführer (EPG) ................51
Teletext-Dienste .................................................... 52
Softwareaktualisierung ......................................... 53
Fehlerbehebung & Tipps ......................................53
Typische Anzeigemodi PC-Eingang .....................54
AV- und HDMI-Signalkompatibilität ....................... 54
Im USB-Modus Unterstützte Videodateiformate ...55
Im USB-Modus Unterstützte Bilddateiformate ...... 55
Im USB-Modus Unterstützte Audiodateiformate ...56
Unterstützte DVI-Auösungen .............................. 57
Konnektivität .........................................................58
Internet Portal .......................................................62
HBBTV-System.....................................................63
Deutsch - 31 -
Page 33

Sicherheitsinformationen
VORSICHT
STROMSCHLAGGEFAHR
NICHT ÖFFNEN
VORSICHT: UM DAS RISIKO AUF EINEN ELEKTRISCHEN
Ziehen Sie bei extremen Wetterbedingungen (Stürme,
Blitzschlag) und wenn das TV-Gerät über einen langen
Zeitraum nicht benutzt wird (im Urlaub) den Gerätenetzstecker.
DerNetzstecker wird verwendet, um das TV-Gerät vom Netz
zu trennen, und muss daher stets gut zugänglich sein. Wenn
das Gerät nicht vollständig vom Netz getrennt wird, wird es
auch im Standby-Modus oder sogar im ausgeschalteten
Zustand weiter Strom ziehen.
Hinweis: Für die entsprechenden Eigenschaften befolgen
Sie bitte die Instruktionen auf dem Bildschirm.
SCHOCK ZU REDUZIEREN, DEN DECKEL (ODER
DAS RÜCKTEIL) NICHT ENTFERNEN
IN DIESEM GERÄT BEFINDEN SICH KEINE
TEILE, DIE VOM BENUTZER GEWARTET
WERDEN KÖNNEN. ÜBERLASSEN SIE
WARTUNGSARBEITEN QUALIFIZIERTEN
KUNDENDIENST-MITARBEITERN.
WICHTIG - Bitte lesen Sie sich diese
Anleitung vollständig vor der Installation
oder Inbetriebnahme durch
WARNUNG: Lassen Sie niemals Personen
(einschließlich Kindern) mit eingeschränkten
physischen, sensorischen oder geistigen
Fähigkeiten bzw. mit mangelnder Erfahrung und/
oder fehlenden Kenntnissen unbeaufsichtigt
elektrische Geräte benutzen!
• Dieses TV-Gerät ist für den Einsatz in einer Höhe von
weniger als 2000 Metern über dem Meeresspiegel,
an einem trockenen Standort und in Regionen mit
gemäßigtem oder tropischem Klima vorgesehen.
• Das Gerät ist für den Einsatz im Haushalt und
vergleichbare Nutzung vorgesehen, jedoch ist der
Einsatz an öffentlichen Orten zulässig.
• Lassen Sie für Lüftungszwecke mindestens 5 cm
Abstand um das TV-Gerät herum.
• Die Ventilation darf nicht durch Abdecken oder
Verstellen der Ventilationsöffnungen durch
Gegenstände wie Zeitungen, Tischdecken, Gardinen
o.ä. behindert werden.
• Der Stecker des Stromkabels sollte leicht zugänglich
sein. Stellen Sie keine Gegenstände auf das
Netzkabel (weder das Gerät selbst, noch Möbel
usw.), und klemmen Sie das Kabel nicht ein.
Beschädigungen am Netzkabel/Netzstecker
können zu Bränden oder Stromschlägen führen.
Handhaben Sie das Netzkabel immer am Stecker,
trennen Sie das TV-Gerät nicht durch Ziehen
des Netzkabels vom Netz. Berühren Sie niemals
das Netzkabel / den Stecker mit nassen Händen,
da dies einen Kurzschluss oder elektrischen
Deutsch - 32 -
Schlag verursachen kann. Machen Sie niemals
Knoten in das Netzkabel, und binden Sie es nie
mit anderen Kabeln zusammen. Wenn es beschädigt
ist, muss das Kabel ersetzt werden. Diese Arbeit darf
ausschließlich durch eine qualizierte Fachkraft
ausgeführt werden.
• Setzen Sie das TV-Gerät möglichst keinen
tropfenden oder spritzenden Flüssigkeiten aus, und
stellen Sie keine mit Flüssigkeiten gefüllte Objekte,
wie z. B. Vasen, Tassen usw. auf dem bzw. oberhalb
(z. B. in Regalfächern darüber) des TV-Geräts ab.
• Setzen Sie das TV-Gerät nicht direkter
Sonneneinstrahlung aus, und stellen Sie keine
offenen Flammen (wie z. B. erleuchtete Kerzen) auf
oder neben das TV-Gerät.
• Stellen Sie keine Hitzequellen, wie z. B. Elektroheizer,
Radiatoren usw. in die unmittelbare Nähe des
Geräts.
• Stellen Sie das TV-Gerät nicht auf dem Fußboden
oder geneigte Unterlagen.
• Um Erstickungsgefahr zu vermeiden, müssen Sie
Kunststofftüten aus der Reichweite von Säuglingen,
Kindern und Hautieren halten.
• Befestigen Sie den Ständer sorgfältig am TV-Gerät
Sollten der Ständer mit Schrauben geliefert worden
sein, müssen Sie die Schrauben fest nachziehen,
um das TV-Gerät vor dem Kippen zu bewahren.
Ziehen Sie die Schrauben nicht zu fest und
montieren Sie die Gummistopfen vorschriftsmäßig.
• Entsorgen Sie die Batterien niemals im offenen
Feuer oder zusammen mit gefährlichen bzw.
entammbaren Stoffen.
Warnung: Batterien dürfen nicht zu großer Hitze wie
direkter Sonneneinstrahlung, Feuer oder Vergleichbarem ausgesetzt werden.
Vorsicht
Gefahr eines
Stromschlags
Wartung
Schweres oder tödliches
Verletzungsrisiko
Gefährliches
Spannungsrisiko
Wichtige
Wartungskomponente
Page 34

Kennzeichnungen auf dem Gerät
Die folgenden Symbole werden auf dem Gerät als
Kennzeichnungen für Einschränkungen und
Vorsichtsmaßnahmen sowie Sicherheitshinweise
verwendet. Jede Kennzeichnung ist nur dann zu
beachten, wenn diese auf dem Gerät angebracht
worden ist. Beachten Sie diese Informationen aus
Sicherheitsgründen.
Gerät der Schutzklasse II: Dieses Gerät
ist so aufgebaut, das es keinen Schutzleiter
(elektrische Erdung) für die Verbindung zum
Stromnetz erfordert.
Gerät der Schutzklasse II Mit Funktionalem
Schutzleiter: Dieses Gerät ist so aufgebaut,
das es keinen Schutzleiter (elektrische
Erdung) für die Verbindung zum Stromnetz
erfordert. Der Schutzleiter dient funktionalen Zwecken.
Schutzleiter (Erdung) Die markierte Klemme
ist für den Anschluss an den mit der Stromleitung
verbundenen Schutzleiter (Erdung)
vorgesehen.
Lebensgefährdende Klemme: Die
markierte(n) Klemme(n) ist/sind im normalen
Betriebszustand lebensgefährdend.
Vorsicht. Bitte beachten Sie die
Bedienungsanleitung: Der markierte
i
Bereich bzw. die markierten Bereiche
enthalten durch den Benutzer auszutauschende
Knopfzellenbatterien.
Gerät der Laserklasse 1
CLASS 1
LASER PRODUCT
Dieses Gerät enthält eine
Laserquelle der Klasse 1,
die unter vernünftigerweise
vorhersehbaren
Betriebsbedingungen
ungefährlich ist.
WARNUNG
Batterien dürfen nicht verschluckt werden, es
besteht chemische Verätzungsgefahr.
Dieses Gerät bzw. das zum Gerät mitgelieferte
Zubehör enthält möglicherweise eine
Knopfzellbatterie. Wenn die Knopfzellenbatterie
verschluckt wird, führt dies innerhalb 2 Stunden
zu schweren internen Verätzungen mit möglicher
Todesfolge.
Halten Sie gebrauchte und neue Batterien von
Kindern fern.
Wenn das Batteriefach nicht sicher geschlossen.
stoppen Sie die Verwendung des Geräts und halten
Sie Kinder fern.
Falls Sie den Verdacht haben, dass Batterien
verschluckt wurden oder in irgendeinen Körperteil
platziert wurde, suchen Sie sofort medizinische
Hilfe auf.
WARNUNG
Stellen Sie das TV-Gerät niemals auf eine instabile
oder geneigte Unterlage. Andernfalls könnte das
TV-Gerät umfallen und dabei ernste Verletzungen
mit möglicher Todesfolge verursachen. Viele
Verletzungen, insbesondere bei Kindern, können
vermieden werden, wenn die folgenden einfachen
Vorsichtsmaßnahmen getroffen werden;
• Verwenden Sie nur vom Hersteller des TV-Geräts
empfohlene TV-Möbel oder Standfüße.
• Verwenden Sie nur Möbelstücke, die das Gewicht
des TV-Geräts sicher tragen können.
• Stellen Sie sicher, dass das TV-Gerät nicht über
die Ränder des Möbelstücks hinausragt.
• Stellen Sie das TV-Gerät nicht auf hohe
Möbelstücke (z. B. Regale oder Bücherregale),
ohne das Möbelstück selbst und das TV-Gerät
an einem sicheren Halt abzustützen.
• Stellen Sie das TV-Gerät nicht auf Textilien oder
andere Materialien zwischen dem TV-Gerät und
dem Möbelstück.
• Klären Sie Ihre Kinder darüber auf, dass es
gefährlich ist, auf hohe Möbelstücke zu klettern,
um das TV-Gerät oder die Fernbedienung zu
erreichen. Wenn Sie Ihr vorhandenes TV-Gerät
weiterhin nutzen und an einen neuen Platz
stellen, sind die gleichen Vorsichtsmaßnahmen
zu beachten.
Deutsch - 33 -
Page 35

WARNHINWEISE ZUR WANDMON-
TAGE
• Lesen Sie sich die Bedienungsanleitung durch,
bevor Sie das Gerät an der Wand befestigen.
• Das Set für Wandbefestigung ist optional. Sie
können es bei Ihrem lokalen Händler kaufen, falls
es nicht dem Gerät gekauft wurde.
• Installieren Sie das TV-Gerät nicht an der Decke
oder einer geneigten Wand.
• Verwenden Sie für die Wandmontage nur die
dazu vorgesehenen Schrauben und Zubehörteile
• Ziehen Sie die Schrauben zu Wandmontage fest
nach, um das TV-Gerät vor dem Herabfallen zu
bewahren. Ziehen Sie die Schrauben nicht zu
stark an.
WARNUNG
Der Anschluss von Geräten, die über die
Netzverbindung oder andere Geräte an die
Schutzerdung des Gebäudes angeschlossen
sind, über Koaxialkabel an ein TV-Verteilersystem
kann unter Umständen eine mögliche Feuergefahr
darstellen. Eine Verbindung über einen
Kabelverteilersystem ist nur dann zulässig, wenn
die Vorrichtung eine Isolierung unterhalb eines
gewissen Frequenzbereichs liefert (Galvanische
Isolation, siehe EN 60728-11)
Deutsch - 34 -
Page 36

Umweltinformationen
Bei der Entwicklung dieses Fernsehgeräts wurde auf
eine umweltfreundliche Funktionsweise Wert gelegt.
Um den Energieverbrauch zu senken, gehen Sie
wie folgt vor:
Wenn Sie die Energiespar-Option auf Minimum,
Medium, Maximum oder Auto einstellen, wird das
TV-Gerät seinen Energieverbrauch unverzüglich
entsprechend anpassen. Wenn Sie das Backlight auf
einen festen Wert wie Benutzerdeniert stellen und
das Backlight (angesiedelt unter den EnergiesparEinstellungen) mit Hilfe der Links- oder Rechts-Taste
der Fernbedienung manuell anpassen möchten.
Stellen Sie diese Einstellung zum Abschalten auf Aus.
Hinweis: Die verfügbaren Energiespar-Optionen können
abhängig vom gewählten Modus im Bild-Menü variieren.
Die Energiespar-Einstellungen nden sich im BildMenü. Ist dies nicht der Fall, können die Einstellungen
nicht geändert werden.
Wenn die Rechte Taste bei gewählter Auto-Option
bzw. die Linke Taste bei gewählter BenutzerdeniertOption gedrückt wird, wird die Meldung „Der
Bildschirm schaltet sich in 15 Sekunden aus” auf
dem Bildschirm angezeigt. Wählen Sie Fortfahren
und drücken Sie OK, um den Bildschirm umgehend
auszuschalten. Wenn Sie keine Taste drücken, wird der
Bildschirm nach 15 Sekunden ausgeschaltet. Drücken
Sie eine beliebige Taste auf der Fernbedienung
oder auf dem TV-Gerät, um den Bildschirm wieder
einzuschalten.
Hinweis: Die Bildschirm Aus-Option is nicht verfügbar, wenn
der Modus auf Spielen gestellt ist.
Schalten Sie das Gerät aus oder ziehen Sie den
Netzstecker, wenn das TV-Gerät nicht verwendet wird.
Dies wird auch den Energieverbrauch reduzieren.
Funktionen
• Das TV-Gerät unterstützt Ultra HD (Ultra High
Definition - auch als 4K bezeichnet), das eine
Auösung von 3840 x 2160 (4K:2K) bietet. Dies
entspricht 4 der vierfachen Full HD TV-Auösung,
indem die Pixelzahl sowohl horizontal als vertikal
verdoppelt wird. Ultra HD-Inhalte werden durch
HDMI, USB-Anschlüsse sowie über DVB-T2- und
DVB-S2-Sender unterstützt.
• Fernbedienbares Farbfernsehgerät
• Vollintegriertes digitales terrestrisches/Kabel-/
Satelliten-TV (DVB-T-T2/C/S-S2)
• Fransat-Installationsoption
• HDMI Eingänge, um andere Geräte mit HDMI-
Anschlüssen zu verbinden
• USB-Eingang*
• OSD-Menüsystem
• Scart-Buchsen für externe Geräte (wie Video,
Videospiele, Stereoanlage usw.)
• Stereo-Audiosystem
• Teletext
• Kopfhöreranschluss
• Automatische Programmierung
• Manuelle Sendereinstellung
• Automatische Abschaltung nach bis zu acht Stunden
• Ausschalttimer
• Kindersicherung
• Automatische Stummschaltung, wenn keine
Übertragung stattndet.
• NTSC-Wiedergabe.
• AVL (Automatische Lautstärkebegrenzung)
• PLL (Frequenzsuche)
• PC-Eingang
• Spielemodus (Optional)
• Bild-Aus-Funktion
• Aufnahme von Sendungen
• Programm-Timeshift-Aufnahme
• Ethernet (LAN) für Internetverbindungen und
-Dienste
• 802.11 a/b/g/n eingebaute WLAN-Unterstützung
• Audio/Video-Sharing
• HbbTV
Deutsch - 35 -
Page 37

Zubehör im Lieferumfang
P+
V+
V-
P-
• Fernbedienung
• Batterien: 2 x AAA
• Handbuch
• Schnellstart Anleitung
Standby-Meldungen
Wenn das Fernsehgerät für 5 Minuten kein
Eingangssignal (z.B. von einer Antenne oder HDMI-
Quelle) empfängt, schaltet es sich auf Standby. Beim
nächsten Einschalten wird die folgende Meldung
angezeigt: Das TV-Gerät hat sich automatisch in
den Stand-by-Modus geschaltet, da für längere
Zeit Signal empfangen wurde. Drücken Sie OK,
um fortzufahren.
Das eingeschaltete Gerät stellt sich, wenn es eine
Zeitlang nicht bedient wurde, auf Stand-by. Beim
nächsten Einschalten wird die folgende Meldung
angezeigt. Das TV-Gerät hat sich automatisch in
den Stand-by-Modus geschaltet, da es für längere
Zeit nicht bedient wurde. Drücken Sie OK, um
fortzufahren.
TV-Steuerung & Betrieb
Der Joystick ermöglicht es Ihnen, die Lautstärke /
Programme / Quellen und Standby-Ein-Funktionen
des Fernsehers zu steuern.
Hinweis: Abhängig vom jeweiligen Modell kann sich der
Joystick an einer anderen Stelle benden.
Um die Lautstärke zu ändern: Erhöhen Sie die
Lautstärke, indem Sie den Joystick nach rechts
drücken. Verringern Sie die Lautstärke, indem Sie
den Joystick nach links drücken.
Um den Kanal zu wechseln: Sie können durch
die gespeicherten Kanäle scrollen, indem Sie den
Joystick nach oben bzw. nach unten drücken.
Um die Signalquelle zu ändern: Drücken Sie zweimal
auf die Mitte des Joysticks, um die Quellenliste wird
auf den Bildschirm aufzurufen. Sie können durch die
verfügbaren Quellen scrollen, indem Sie den Joystick
nach oben bzw. nach unten drücken.
Das TV-Gerät ausschalten: Halten Sie die Mitte des
Joysticks für ein paar Sekunden nach unten gedrückt,
bis das TV-Gerät sich in den Standby-Modus schaltet.
Das TV-Gerät einschalten: Drücken Sie die Mitte des
Joysticks und das TV-Gerät schaltet sich ein.
Hinweis: Hauptmenü-OSD kann nicht über die Steuertaste
aufgerufen werden.
Steuerung über die Fernbedienung
Drücken Sie die Menu-Taste auf der Fernbedienung,
um den Hauptmenübildschirm aufzurufen. Verwenden
Sie die Richtungstasten, um eine Menü-Registerkarte
zu wählen und drücken Sie OK, um diese aufzurufen.
Benutzen Sie die Richtungstasten, um ein Element
auszuwählen. Drücken Sie die Return/Back-Taste
bzw. die Menu-Taste, um einen Menü-Bildschirm zu
verlassen.
Eingangsauswahl
Sobald Sie ein externes System an Ihr Gerät
angeschlossen haben, können Sie zwischen den
verschiedenen Eingangsquellen schalten. Drücken
Sie auf Ihrer Fernbedienung hintereinander die
Source-Taste, um die verschiedenen Signalquellen
auszuwählen.
Kanäle wechseln und Lautstärke ändern
Mit den Volumen +/- und Programme+/--Tasten der
Fernbedienung können Sie die Programme wechseln
und die Lautstärke anpassen.
Einlegen der Batterien in die Fernbedienung
Entfernen Sie die hintere Abdeckung Ihrer
Fernbedienung, um das Batteriefach zu öffnen.
Legen Sie zwei AAA-Batterien ein. Vergewissern
Sie sich, dass die (+) und (-) Zeichen sich einander
entsprechen (korrekte Polarität). Verwenden Sie
niemals alte und neue Batterien zusammen. Ersetzen
Sie diese ausschließlich durch solche des gleichen
oder eines gleichwertigen Typs. Setzen Sie die
Abdeckung wieder auf.
Stromversorgung Anschließen
WICHTIG: Das Gerät ist nur für den Betrieb mit 220240V Wechselspannung bei einer Frequenz von
50 Hz ausgelegt. Nach dem Auspacken sollten Sie
das TV-Gerät sich an die Raumtemperatur anpassen
lassen, bevor Sie es mit der Stromversorgung
verbinden. Stecken Sie das Stromversorgungskabel
in die Steckdose.
Deutsch - 36 -
Page 38

Anschluss der Antenne
Schließen Sie die Antenne oder den Kabel-TV-Stecker
an die ANTENNENEINGANG (ANT-TV)-Buchse oder
den Satellitenstecker an die SATELLITENEINGANG
(ANT-SAT)-Buchse auf der Rückseite des TV-Gerätes.
Rückseite des TV-Gerätes
Satellit
Antenne
oder
Kabel
Benachrichtigung
MARKENZEICHEN-ANERKENNUNG
Die Bezeichnungen HDM und High-Definition
Multimedia Interface, sowie das HDMI-Logo sind
Markenzeichen oder eingetragene Markenzeichen
der HDMI Licensing LLC in den USA und anderen
Ländern.
Hergestellt unter der Lizenz der Dolby Laboratories.
Dolby, Dolby Audio und das Doppel-D-Symbol sind
Warenzeichen der Dolby Laboratories.
YouTube und das YouTube-Logo sind Marken von
Google Inc.
Verbrauchrerinformationen zur Entsorgung von
Altgeräten und Batterien
[Nur Europäische Gemeinschaft]
Geräte, die diese Symbole tragen, dürfen nicht als
Haushaltsmüll entsorgt werden.
Für die Entsorgung dieser Produkte müssen Sie
sich nach geeigneten Recycling-Einrichtungen oder
Systeme umsehen.
Hinweis: Das unten abgebildete Pb-Symbol für Akkus zeigt
an, dass dieser Akku Blei enthält.
Produkte
Batterie
Deutsch - 37 -
Page 39

Technische Daten
TV-Übertragung
Empfangskanäle VHF (BAND I/III) - UHF (BAND U) - HYPERBAND
Digitaler Empfang
Anzahl der
voreingestellten
Kanäle
Kanalanzeige Bildschirmanzeige
RF-Antenneneingang 75 Ohm (nicht geregelt)
Betriebsspannung 220-240V AC, 50 Hz.
Audio German+Nicam Stereo
Bildschirm 43” 49” 55”
AudioAusgangsleistung
(wrms.) (10% THD)
Leistungsaufnahme
(W)
Gewicht (kg) 11,55 kg 13,55 kg 17,35 kg
TV-Abmessungen
TxBxH (Mit Standfuß)
(mm)
TV-Abmessungen
TxBxH (ohne Standfuß)
(mm)
Betriebstemperaturen
und
Betriebsfeuchtigkeit
PAL BG/I/DK/LL’
SECAM BG/DK
Vollintegriertes Digital-/Kabel/Satelliten TV (DVB-T-C-S)
(DVB-T2, DVB-S2 kompatibel)
10.000
2x10W 2x10W 2x10W
120W 135W 140W
221x965x623 mm 221x1099x685 mm 221x1238x764 mm
57(min)/89(max) x965x568 mm 58(min)/93(max)x1099x642,5 mm 60(min)/93(max)x1238x722 mm
0ºC bis 40ºC, max. 85% Feuchtigkeit
Deutsch - 38 -
Page 40

1
2
2
33
4
5
6
6
7
7
8
9
9
1010
11
12
13
13
15
16
18
17
19
20
22
23
24
25
27
28
21
26
29
14
Fernbedienung
1. Standby: Schaltet des Fernsehgerät Ein / Aus
2. Stopp: Stoppt die gespielte Medien
3. Schneller Rücklauf: Bewegt Einzelbilder rückwärts in
Medien wie Filme
4. Einstellungen: Öffnet das Menu Einstellungen
5. EPG (Elektronischer Programmführer): Zeigt den
Elektronischer Programmführer
6. Internet: Öffnet die Portalseite, wo Sie auf viele Web-
basierte Anwendungen zugreifen können
7. Farbtasten: Folgen Sie der Anleitung zu den Farbtasten
auf dem Bildschirm
8. Info: Zeigt Informationen über auf dem Bildschirm
gezeigte Inhalte, zeigt versteckte Informationen (revealim TXT-Modus)
9. Navigationstasten: Hilft durch Menüs, Inhalte usw. zu
browsen und zeigt die Unterseiten in TXT-Modus, wenn
Rechts oder Links gedrückt wird
10. OK: Bestätigt Benutzerauswahl, hält die Seite (im TXT-
Modus), zeigt die Kanalliste ein (DTV-Modus)
11. Zurück/Rücklauf: Kehrt zum vorherigen Bildschirm
zurück, öffnet die Index-Seite (im TXT-Modus)
12. Lautstärke +/-
13. Stummschaltung: Schaltet die Lautstärke des
Fernsehgeräts ganz aus
14. Nummerntasten: Wechselt den Kanal, gibt eine
Nummer oder einen Buchstaben in das Textfeld auf
dem Bildschirm ein, schaltet das TV-Gerät aus den
Standby-Modus ein.
15. Untertitel: Schaltet Untertitel ein-und aus (sofern
verfügbar)
16. Text: Zeigt Teletext an (sofern verfügbar), erneut
drücken, um den Videotext über das normale Fernsehbild
(Mix) zu überlagern
17. Programme +/-: Programm hoch-unten, Seite hoch-
unten (im TXT-Modus) schaltet das TV-Gerät in den
Standby-Modus.
18. Keine Funktion
19. Schnellmenü: Zeigt eine Liste der Menüs für schnellen
Zugriff
20. Menü: Zeigt das TV-Menü
21. Fernsehen Schaltet auf TV-Quelle, schließt die
Portalseite
22. Liste: Zeigt die Kanalliste an
23. Quelle: Zeigt alle verfügbaren Sender-und Inhalt-
Quellen
24. Google Suche: Öffnet die Google-Internetseite im
TV-Browser
25. Bildschirm: Ändert das Seitenverhältnis des Bildschirms
26. Schneller Vorlauf: Bewegt Einzelbilder vorwärts in
Medien wie Filme
27. Wiedergeben: Beginnt das Abspielen von ausgewählten
Media
28. Aufnahme: Nimmt Programme auf
29. Pause: Hält die Mediawiedergabe an (Pause), startet
Timeshift-Aufnahme
Deutsch - 39 -
Page 41

Anschlüsse
ideo
Stecker Typ Kabel Gerät
SCART-
Anschluss
(Rückseite)
YPBPR
YPbPr-Video-
Anschluss
/ V
AUDIO IN
SPDIF
RÜCKLAUF
AV
R
/ Video
L
KOPFHÖRER
LAN
(Rückseite)
HDMI-
Anschluss
(unten &
seitlich)
VGA-
Anschluss
(unten)
PC/YPbPr/
Back AV
Audio-
Anschluss
(Rückseite)
SPDIFAnschluss
(Optischer
Ausgang)
(Unten)
Back AV
(Audio/
Video)-
Anschluss
(Rückseite)
KopfhörerAnschluss
(Seite)
USB-
Anschluss
(Rückseite &
seitlich)
CI-
Anschluss
(seitlich)
Ethernet
Anschluss
(unten)
Subwoofer-
Anschluss
(Rückseite)
YPbPr-Anschlusskabel
YPbPr/PC Audio-Kabel
Audio-/Video-Kabel
LAN/Ethernet-Kabel
Deutsch - 40 -
HINWEIS:Wenn Sie ein Gerät
über YPbPr- bzw. den rückseitigen
AV-Eingang anschließen, müssen Sie
die mitgelieferten Anschlusskabel
benutzen, um die Verbindung zu
aktivieren. Siehe die Abbildung auf
der linken Seite. | Um PC/YPbPrAudio zu aktivieren, müssen Sie den
Audio-Eingang an der Rückseite mit
einem YPbPr/PC-Audio-Kabel für den
Audio-Anschluss verwenden. | Wenn
eine externes Gerät über die SCARTBuchse angeschlossen wird, schaltet
das TV-Gerät automatisch in den
AV-Modus.| Während des Empfangs
von DTV Kanälen (Mpeg4 H.264)
oder im Mediabrowser-Modus ist
keine Ausgabe über die SCARTBuchse möglich. | Bei Verwendung
des Wandmontage-Kits (erhältlich bei
verschiedenen Drittanbietern, falls
nicht mitgeliefert), empfehlen wir Ihnen,
bevor Sie das TV-Gerät an die Wand
montieren, alle Kabel an die Rückseite
des TV-Gerätes anzuschließen. |
Sie dürfen nur dann das CI-Modul
einsetzen oder herausnehmen, wenn
das TV-Gerät ABGESCHALTET ist.
Für die genaue Einstellung verweisen
wir auf das Handbuch zum Modul. | Die
USB 2.0-Eingänge an der Rückseite
sowie seitlich am TV-Gerät unterstützen
bis Geräte bis zu 500mA. Ein Anschluss
von Geräten, deren Wert mehr als
500mA beträgt, kann zu Schäden am
Fernseher führen.Sofern verfügbar
beträgt der Grenzwert für den optionale
USB 3.0-Eingang an der linken Seite
des TV-Geräts, der sich oberhalb
des anderen USB-Eingangs bendet,
1A.Beim Anschluss eines HDMI-Kabels
an Ihr TV-Gerät, dürfen Sie nur ein
geschirmtes HDMI-Kabel (hoher Grad)
mit Ferriten verwenden, um eine
ausreichende Immunität und Emission
gegen parasitäre Frequenzstrahlung
zu gewährleisten.Achten Sie für eine
CAM
störungsfreie Übertragung darauf, ein
module
High-Speed HDMI-Kabel zu verwenden,
das High Denition-Signale, wie z.B.
4K-Inhalte, übermitteln kann.
Wenn Sie ein externes Gerät
an das Fernsehgerät
anschließen wollen,
vergewissern Sie sich, dass sowohl
der Fernseher als auch das externe
Gerät ausgeschaltet sind. Sind beide
Geräte ausgeschaltet, können Sie
das externe Gerät anschließen.
Nachdem Sie alle Geräte
angeschlossen haben können Sie die
Geräte wieder anschalten.
Page 42

Ein-/Ausschalten
Um das TV-Gerät einzuschalten
Verbinden Sie das Stromversorgungskabel mit einer
Stromquelle wie z.B. einer Wandsteckdose (220-240V
AC, 50 Hz).
Um das TV-Gerät aus dem Standby einzuschalten:
• Drücken Sie entweder die Standby-Taste,
Programme +/- oder eine Zifferntaste auf der
Fernbedienung.
• Drücken Sie auf Mitte des Joysticks am TV-Gerät,
bzw. ziehen Sie diesen nach oben oder nach unten,
bis das Gerät sich aus dem Standby-Modus wieder
einschaltet.
Um das TV-Gerät auszuschalten
Um das Fernsehgerät in den Standby-Modus zu
schalten, drücken Sie entweder auf die StandbyTaste der Fernbedienung oder halten Sie die Mitte des
Joysticks am TV-Gerät für einige Sekunden gedrückt.
Ziehen Sie den Netzstecker, um das TV-Gerät ganz
auszuschalten.
Hinweis: Wenn das TV-Gerät im Standby-Modus ist, kann die
Standby-LED blinken um anzuzeigen, dass Funktionen wie
Standby-Suche, Over-Air-Softwareaktualisierung oder Timer
eingeschaltet sind. Die LED kann auch blinken, wenn Sie das
TV-Gerät aus dem Standby-Modus einschalten.
Erste Installation
Hinweis: Wenn Sie vorhaben, eine FRANSAT Installation
durchzuführen, legen Sie die FRANSAT-Karte (optional) in
den Conditional Access-Eingang Ihres TV-Gerätes, bevor
Sie Ihren Fernseher einschalten.
Nach dem Einschalten zum ersten Mal, erscheint das
"Sprachauswahl"-Menü. Wählen Sie die gewünschte
Sprache und drücken Sie OK.
Passen Sie dann auf dem nächsten Bildschirm mit
Hilfe der Navigationstasten Ihre Einstellungen an.
Hinweis: Je nach eingestellter Länderauswahl werden
Sie möglicherweise an dieser Stelle aufgefordert, eine
PIN einzurichten und zu bestätigen. Die ausgewählte PINNummer darf nicht 0000 lauten. Wenn Sie aufgefordert
werden, müssen Sie später eine PIN für jede Menübedienung
eingeben.
Über die Sendertypauswahl
Antenne Digital: Wenn die Suchoption Digitalantenne
eingestellt wurde, sucht das TV-Gerät nach digitalen
terrestrischen Sendern, sobald die Ersteinstellungen
vorgenommen worden sind.
Digitalkabel: Wenn die Suchoption Digitalkabel
eingestellt wurde, sucht das TV-Gerät nach digitalen
Kabelsendern, sobald die Ersteinstellungen
vorgenommen worden sind. Abhängig von
Ihren Einstellungen wird möglicherweise eine
Bestätigungsaufforderung angezeigt, bevor die
Suche startet. Wählen Sie JA und drücken Sie OK,
um fortzufahren. Um die Aktion zu beenden, wählen
Deutsch - 41 -
Sie NEIN und drücken auf OK. Sie können entweder
Netzwerk auswählen oder Werte wie z.B. Frequenz,
Netzwerk ID und Suchschritte einstellen. Drücken
Sie OK, wenn Sie fertig sind.
Hinweis: Die Suchdauer ändert sich entsprechend den
jeweils ausgewählten Suchschritten.
Satellit: Wenn die Suchoption Satellit eingestellt
wurde, sucht das TV-Gerät nach digitalen
Satellitensendern, sobald die Ersteinstellungen
vorgenommen worden sind. Vor dem Ausführen
der Satellitensuche müssen einige Einstellungen
vorgenommen werden. Vor dem Starten der
Satellitensuche wird ein Menü angezeigt, in dem
Sie eine Fransat-Installation auswählen und diese
starten können. Stellen Sie die Installationsart auf
Betreiber, und stellen Sie als Satellitenbetreiber
den zugehörigen Fransat-Betreiber ein. Drücken Sie
dann die Taste OK, um die Fransat-Installation zu
starten. Sie können zwischen der automatischen bzw.
manuellen Installation wählen.
Drücken Sie OK, um fortzufahren. Die FransatInstallation wird ausgeführt und Sendungen werden
gespeichert (falls vorhanden).
Wenn Sie die Installationsart auf Standard einstellen,
können Sie mit der regulären Satelliteninstallation
fortfahren und Satellitenkanäle ansehen.
Sie können eine Fransat-Installation
auch zu einem späteren Zeitpunkt über
das Menü Installation>Automatischer
Sendersuchlauf>Satellit starten.
Es stehen drei Antennentypen zur Auswahl. Sie
können als Antennentyp Direkt, Einkabellösung
oder DiSEqC-Schalter mit den Tasten „ “ oder „
“ auswählen.
•Direkt: Bei der direkten Verbindung Ihres
Fernsehgerätes zu einem LNB wählen Sie Direkt.
Drücken Sie OK um fortzufahren. Wählen Sie einen
verfügbaren Satelliten und drücken Sie OK um den
Scan, d.h. die Suche, zu starten.
•Einkabellösung: Wählen Sie diesen Antennentyp,
wenn Sie mehrere Receiver und ein Einzelkabel
Satellit-System verwenden. Drücken Sie OK um
fortzufahren. Kongurieren Sie die Einstellungen,
indem Sie den Anweisungen auf dem Bildschirm
folgen. Drücken Sie OK um den Scan, d.h. die
Suche, zu starten.
•DiSEqC-Schalter: Wenn Sie mehrere
Satellitenschüsseln und einen DiSEqC-Schalter
besitzen, wählen Sie diesen Antennentyp. Drücken
Sie OK um fortzufahren. Auf dem nächsten
Bildschirm können Sie vier DiSEqC Optionen
(sofern verfügbar) einstellen. Drücken Sie die
OK-Taste, um den ersten Satelliten auf der Liste
zu scannen.
Page 43

TKGS-Installation
Wenn gewünscht, können Sie eine TKGS-Installation
starten, wenn die Satellitenübertragungssuchoption
eingeschaltet ist. Bevor die Satellitensuche startet,
wird ein Menü angezeigt, in dem Sie die Option,
TKGS-Installation starten, auswählen können Stellen
Sie den Installationstyp als Betreiber ein, und
stellen Sie dann den Satellitenbetreiber als TKGS
ein.Klicken Sie auf die OK-Taste, um die TKGS-
Installation zu starten.Stellen Sie Ihren Antennentyp,
wie oben beschrieben, ein Sie können dann zwischen
der Installation von HD oder SD-Kanälen wählen.
Diese Auswahl kann auch später erfolgen mit Hilfe der
Option Bevorzugte Liste im MenüInstallation>TKGS
Installation. Die Auswahl wird aktiviert, nachdem das
Fernsehgerät ausgeschaltet und wieder eingeschaltet
wurde oder nach einer manuellen Aktualisierung, wie
unten beschrieben.
Falls gewünscht, kann die TKGS-Installation auch
manuell nach der Erstinstallation angewandt
werden. Drücken Sie die Taste Menu. Markieren Sie
Installation und drücken Sie OK. In dem Untermenü
markieren Sie Satelliteneinstellungen und drücken
OK. Wählen Sie dann Antenneninstallation .
Nachdem der Antennentyp ausgewählt wurde und
weitere Satelliteneinstellungen erfolgt sind, drücken
Sie die ROTE Taste, um eine TKGS-Installation zu
starten.
Eine weitere Möglichkeit zur manuellen Durchführung
der TKGS-Installation nach der Erstinstallation ist
die Ausführung einer Aktualisierung. Drücken Sie dafür
die Menu-Taste und wählen Sie Installation>TKGS
Installation>Start Update.Um dies jedoch tun zu
können, müssen zuerst dieSatelliteneinstellungen
erfolgen.
Nutzung der Aktualisierungsoptionen von
TKGS
Die TKGS-Funktion sorgt auf drei verschiedene
Weisen dafür, dass Ihre Satellitenkanallisten immer
aktuell sind.
Standby: Wenn Sie in den Standby-Modus schalten,
prüft das TV-Gerät die TKGS-Tabellenversionsnummer,
um festzustellen, ob es sich um die letzte Version
handelt. Wenn Änderungen festgestellt werden,
startet das TV-Gerät ein Update.Beim nächsten
Einschalten wird eine Nachricht angezeigt, die den
Benutzer über die Änderungen informiert.
Hintergrund: Wenn ein Kanal geöffnet wird, der
nicht in der TKGS-Kanalliste deniert ist, prüft das
TV-Gerät die TKGS-Tabellenversionsnummer,
um festzustellen, ob es sich um die letzte Version
handelt.Wenn Änderungen festgestellt werden, startet
das TV-Gerät ein Update.Wenn die Aktualisierung
abgeschlossen wurde, wird eine Nachricht angezeigt,
die den Benutzer über die Änderungen informiert.
Deutsch - 42 -
Manuell: Eine Aktualisierung kann jederzeit manuell
durchgeführt werden. Drücken Sie die Taste Menu.
Markieren Sie Installation und drücken Sie OK. In
dem Untermenü markieren Sie TKGS-Installation
und drücken OK.Wählen Sie dann Aktualisierung
starten, und drücken Sie OK.
Analog: Wenn die Suchoption Analog eingestellt
wurde, sucht das TV-Gerät nach analogen Sendern,
sobald die Ersteinstellungen vorgenommen worden
sind.
Zusätzlich können Sie einen Sendertyp als Ihren
Favoriten einstellen. Dem ausgewählten Sendertyp
wird für den Suchvorgang Priorität gegeben und
die entsprechenden Sender werden am Anfang
der Senderliste aufgeführt. Drücken Sie nach dem
Abschluss des Vorgangs OK, um fortzufahren.
Ein Dialog-Bildschirm mit der Frage ob Sie die
elterliche Aufsicht aktivieren möchten wird angezeigt.
Wenn Sie Ja wählen, werden die elterlichen
Einschränkungsoptionen angezeigt. Kongurieren
Sie, wie gewünscht, und drücken Sie OK,, wenn
Sie fertig sind. Wählen Sie Nein, und drücken Sie
OK um fortzufahren, wenn Sie keine elterliche
Einschränkungen vornehmen wollen.
Sie können an dieser Stelle die Option Ladenmodus
aktivieren. Diese Option wird die Einstellungen
Ihres TV-Gerätes für die Aufstellung in Geschäften
kongurieren, und in Abhängigkeit von jeweiligen
TV-Modells werden die unterstützten Funktionen
des TV-Gerätes am oberen Bildschirmrand als
Banner-Information angezeigt. Diese Option ist
nur zur Verwendung in Geschäften gedacht. Es
wird empfohlen für die Verwendung zu Hause den
Home Modus auszuwählen. Diese Option ist in
Einstellungen>Sonstige Einstellungen verfügbar
und kann später ein- bzw. ausgeschaltet werden.
Drücken Sie die OK-Taste auf der Fernbedienung, um
fortzufahren. Nun wird das Menü Netzwerk/Internet-
Einstellungen angezeigt, wenn Sie die zuvor
erscheinende Meldung mit der Frage bestätigen, ob
Sie die Netzwerkeinstellungen vornehmen wollen.
Lesen Sie dazu die Abschnitte Konnektivität, um
eine kabelgebundene oder kabellose Verbindung zu
kongurieren. Nach dem Abschluss der Einstellungen
drücken Sie OK, um fortzufahren. Um den nächsten
Schritt ohne Änderungen zu überspringen, wählen
Sie Nein, und drücken die OK-Taste, sobald
die Meldung mit der Frage erscheint, ob Sie die
Netzwerkeinstellungen vornehmen wollen.
Nachdem die Ersteinstellungen vorgenommen
wurden, startet Ihr TV-Gerät die Suche nach
verfügbaren Sendern unter den ausgewählten
Sendertypen.
Nachdem alle verfügbaren Sender gespeichert sind,
werden die Suchergebnisse angezeigt. Drücken
Sie OK um fortzufahren. Die Menü Programmliste
Page 44

bearbeiten wird als Nächstes angezeigt. Sie können
die Kanalliste gemäß Ihren Wünschen bearbeiten
oder die Menu-Taste zum Verlassen drücken und
fernsehen.
Während die Suche andauert, erscheint eine Meldung
mit der Nachfrage, ob Sie Kanäle gemäß der LKN(*)
sortieren möchten. Wählen Sie Ja und drücken Sie
OK um fortzufahren.
(*) LKN steht für „Logisches Kanalnummernsystem“,
das verfügbare Sender gemäß einer erkennbaren
Kanalnummersequenz sortiert (wenn verfügbar).
Hinweis: Schalten Sie das Gerät während der Erstinstallation
nicht ab. Bitte beachten Sie, dass einige Funktionen unter
Umständen nicht in allen Ländern verfügbar sind.
Im TKGS-System können Kanäle durch den Dienstanbieter
blockiert werden, sodass eine Audio/Videoübertragung für
diese Kanäle nicht verfügbar ist.
Nutzung der SatcoDX-Funktion
Sie können das Menü Installation>Satelliteneinst
ellungen verwenden, um die SatcoDX-Operationen
durchzuführen. Für SatcoDX gibt es im SatcoDXMenü zwei Optionen.
Sie können SatcoDX-Dateien hoch-oder runterladen.
Um diese Funktionen nutzen zu können, muss ein
USB-Gerät an den Fernseher angeschlossen werden.
Sie können die aktuellen Dienste und damit
verbundene Satelliten & Transponder vom TV-Gerät
auf ein USB-Gerät laden.
Des Weiteren können Sie eine auf dem USB-Gerät
gespeicherte SatcoDX Datei auf das TV-Gerät
übertragen.
Wenn Sie eine Liste auf den Fernseher übertragen,
werden alle Dienste und die damit verbundenen
Satelliten- und Transponder-Einstellungen übertragen
und gespeichert. Jegliche schon vorhandenen
terrestrischen, Digital Kabel oder analoge Dienste
werden gespeichert und nicht überschrieben.
Lediglich Satellitendienste werden überschrieben.
Anschließend überprüfen Sie Ihre AntennenEinstellungen und nehmen Sie ggf. Änderungen
vor. Sollte die Antenneneinstellungen nicht korrekt
konguriert sein wird die Fehlermeldung „Kein Signal“
erscheinen.
Medien Abspielen über USB Eingang
Über die USB-Eingänge am TV-Gerät können Sie 2.5 "und
3.5" Zoll (HDD mit externer Stromversorgung), externe
Festplatten oder einen USB-Speicherstick an das TV-Gerät
anschließen.
WICHTIG! Sichern Sie die Dateien Ihres
Speichergerätes, bevor Sie es mit dem Gerät
verbinden. Der Hersteller übernimmt keinerlei Haftung
für beschädigte Dateien oder Datenverluste. Unter
Umständen sind bestimmte Arten von USB-Geräten
(z. B. MP3-Player) oder USB-Festplattenlaufwerke/Speichersticks mit diesem TV-Gerät nicht kompatibel.
Deutsch - 43 -
Das Fernsehgerät unterstützt FAT32 und NTFS
Formatierung der Festplatte, aber die Aufnahme
wird mit NTFS formatierenden Festplatten nicht
verfügbar sein.
Bei der Formatierung einer USB-Festplatte mit
mehr als 1TB (Terra Byte) Speicherplatz können
möglicherweise Probleme beim Formatierungsprozess
auftreten.
Warten Sie jeweils etwas vor dem Anschließen bzw.
Trennen, da der Player eventuell noch Daten ausliest.
Andernfalls können Schäden am USB-Player und
USB-Gerät verursacht werden. Ziehen Sie niemals
während des Aufnehmens oder Abspielens Ihr Gerät
heraus.
Sie können USB-Hubs mit den USB-Eingängen
Ihres TV-Gerätes benutzen. In einem solchen Fall
sind USB-Hubs mit externer Stromversorgung zu
empfehlen.
Es wird empfohlen, den USB-Eingang/die USBEingänge direkt zu verwenden, wenn Sie eine USBFestplatte anschließen werden.
Hinweis: Wenn Sie Bilddateien ansehen, kann das MedienBrowser-Menü nur die ersten 1000 Bilder anzeigen, die auf
dem angeschlossenen USB-Gerät gespeichert sind.
Aufzeichnung einer Sendung
WICHTIG: Wenn Sie eine USB Festplatte verwenden,
wird empfohlen, dass Sie die Festplatte zunächst mit
Hilfe der Option Festplatte formatieren im Menü Me
diabrowser>Einstellungen>Aufnahmeeinstellung
en des TV-Geräts formatieren.
Um ein Programm aufzunehmen, sollten Sie zuerst
eine USB-Festplatte an das TV-Gerät anschließen,
wenn dieses ausgeschaltet ist. Schalten Sie dann das
TV-Gerät ein, um die Aufnahmefunktion zu aktivieren.
Ein für Speicherung von Aufnahmen verwendetes
USB Laufwerk sollte über mindestens 2 GB freien
Speicherplatz verfügen und USB 2.0 kompatibel sein.
Sofern verfügbar können USB 3.0-kompatible Geräte
ebenfalls mit dem optionalen USB 3.0-Eingang an
der Seite des TV-Geräts genutzt werden, der sich
oberhalb des anderen USB-Eingangs bendet. Wenn
das USB Laufwerk nicht kompatibel ist, wird eine
Fehlermeldung angezeigt.
Aus diesem Grund empfehlen wir, für die Aufnahme
von längeren Sendungen wie z.B. Filmen stets USBFestplattenlaufwerke (HDD) zu verwenden.
Aufgezeichnete Sendungen werden auf der
angeschlossenen USB-Festplatte abgespeichert.
Falls gewünscht können Sie diese gespeicherten
Aufnahmen mit einem PC kopieren oder sichern.
Sie können Sie aber nicht auf einem Computer
abspielen. Sie können sich die Aufnahmen nur über
Ihr Fernsehgerät ansehen.
Aufgrund der Zeitversetzung können Verzögerung bei
der Lippensynchronisation auftreten. Die Aufnahme
von Radioprogrammen wird nicht unterstützt. Das
Page 45

TV-Gerät kann Sendungen mit einer Länge von bis
zu zehn Stunden aufzeichnen.
Die aufgezeichneten Sendungen werden in 4 GB
Partitionen aufgeteilt.
Wenn die Schreibgeschwindigkeit der
angeschlossenen USB-Festplatte nicht ausreicht,
funktioniert die Aufnahme u. U. nicht bzw. steht die
Timeshifting-Funktion nicht zur Verfügung.
Aus diesem Grund empfehlen wir, für die Aufnahme
von HD-Programmen stets USB-Festplattenlaufwerke
zu verwenden.
Trennen Sie während der Aufnahme die USB-HDD
nicht vom Gerät ab. Dies kann Schäden am TV-Gerät
und der USB-HDD verursachen.
Wenn der Netzstecker bei eingestelltem Timer für eine
USB-Aufnahme gezogen wird, wird dieser Vorgang
abgebrochen.
Die Multipartitionsunterstützung ist verfügbar. Maximal
zwei Partitionen werden unterstützt. Für die PVRReady-Funktionen wird die erste Partition der USBFestplatte verwendet. Sie muss als primäre Partition
formatiert werden, damit die PVR-Ready-Funktionen
verwendet werden können.
Manchmal werden wegen Signalproblemen
Streampakete nicht aufgezeichnet, was dazu führen
kann, dass das Video während des Abspielens
einfriert.
Bei eingeschaltetem Teletext können die Tasten
Aufnahme, Wiedergabe, Pause, Anzeigen (für den
Wiedergabelistendialog) nicht verwendet werden.
Wenn die Aufzeichnung über einen Timer gestartet
wird, während der Teletext eingeschaltet ist, wird
dieser automatisch ausgeschaltet. Ebenso wird die
Teletextfunktion bei einer laufenden Wiedergabe
deaktiviert.
Sie können bei einer im Hintergrund laufenden
Aufnahme verschiedene Menüoptionen weiter
nutzen, wie beispielsweise auf eine andere Quelle
schalten oder andere Mediabrowser-Funktionen,
wie z.B. Bilder anzeigen, Video- und Musikdateien
abspielen, nutzen, und sogar die laufende Aufnahme
wiedergeben.
Timeshift-Aufnahme
Um den Timeshifting-Modus zu aktivieren, drücken
Sie die Pause-Taste, während Sie eine Sendung
ansehen. Im Timeshifting-Modus wird das Programm
angehalten und gleichzeitig auf dem angeschlossenen
USB-Laufwerk gespeichert.
Drücken Sie die Wiedergabe-Taste, um das
angehaltene Programm vom Zeitpunkt der Pause
an anzusehen. Drücken Sie die Stopp-Taste, um
die Timeshift-Aufnahme zu beenden und zur LiveSendung zu wechseln.
Timeshift kann nicht im Radio-Modus verwendet
werden.
Sie können die Timeshift-Rücklauf-Funktion nicht
benutzen bevor Sie mit der schnellen Vorlauf-Option
die Wiedergabe vorwärts abspielen.
Instant Recording
Drücken Sie die Aufnahme-Taste, um die Aufnahme
einer Sendung beim Ansehen sofort zu starten. Sie
können die Aufnahme-Taste auf der Fernbedienung
nochmals drücken, um die nächste Sendung im
EPG aufzuzeichnen, nachdem Sie das nächste
Programm im Programmführer (EPG) ausgewählt
haben. Drücken Sie Stopp-Taste, um die Aufnahme
sofort abzubrechen.
Sie können im Aufnahme-Modus die Sendung
nicht wechseln. Während der Aufzeichnung eines
Programms oder während Timeshifting, erscheint
eine Warnmeldung auf dem Bildschirm, wenn
die Geschwindigkeit Ihres USB-Gerätes nicht
ausreichend ist.
Aufgenommene Sendungen ansehen
Wählen Sie Aufnahmen im Mediabrowser-Menü.
Wählen Sie eine Aufnahme aus der Liste (sofern Sie
schon eine Aufnahme durchgeführt haben). Drücken
Sie OK, um die Wiedergabeoptionen anzuzeigen.
Wählen Sie eine Option und drücken Sie die OKTaste.
Hinweis: Während der Wiedergabe ist das Aufrufen des
Hauptmenüs und der Menüpunkte nicht möglich.
Drücken Sie die Stopp-Taste, um die TimeshiftAufnahme zu beenden und auf Aufnahmen wechseln.
Langsamer Vorlauf
Wenn Sie die Pause-Taste drücken, während Sie
die aufgezeichneten Programmen ansehen, ist die
langsame Vorwärts-Funktion verfügbar. Sie können
die Schneller Vorlauf-Taste für ein langsames
Vorlaufen nutzen. Durch wiederholtes Drücken der
Schnellvorlauf-Taste können Sie die langsame
Vorlaufgeschwindigkeit ändern.
Aufnahmekonguration
Um die Aufnahmeeinstellungen festzulegen, wählen
Sie die Option Aufnahmeeinstellungen im Menü
Mediabrowser>Setup.
Festplatte formatieren: Sie können diese Funktion
Festplatte formatieren zur Formatierung einer
angeschlossenen USB-HDD verwenden. Ihre PIN
wird benötigt, um die Funktion Festplatte formatieren
zu verwenden.
Hinweis: Die Standard-PIN kann auf 0000 oder 1234
eingestellt sein. Wenn Sie während der Erstinstallation
die PIN deniert haben (dies wird je nach Ländereinstellung
gefordert), benutzen Sie die PIN, die Sie deniert haben.
WICHTIG: Das Formatieren Ihres USB-Laufwerks
löscht ALLE darauf befindlichen Daten und das
Dateisystem wird zu FAT32 umgewandelt. In den
meisten Fällen können so Laufwerksfehler repariert
Deutsch - 44 -
Page 46

werden, aber nach der Formatierung sind ALLE Ihre
Daten gelöscht.
Wenn beim Starten der Aufzeichnung die Meldung
„Die Schreibgeschwindigkeit des USB-Festplatte
zum Aufnehmen zu langsam“ auf dem Bildschirm
erscheint, versuchen Sie den Vorgang erneut zu
starten. Wenn diese Fehlermeldung weiterhin
angezeigt wird, ist Ihre USB-Festplatte möglicherweise
nicht schnell genug. Versuchen Sie ein anderes USBLaufwerk anzuschließen.
Menü Medienbrowser
Sie können auf einer USB-Festplatte gespeicherte
Foto-, Musik- und Videodateien wiedergeben, wenn
Sie diese an Ihr TV-Gerät anschließen. Schließen
Sie eine USB-Festplatte an den USB-Eingang
seitlich am TV-Gerät an. Wenn Sie die Menü-Taste
im Medienbrowser-Modus drücken, gelangen Sie
zu den Menüoptionen Bild, Ton und Einstellungen.
Drücken Sie die Menu-Taste, um diesen Bildschirm
zu verlassen. Sie können Ihre MedienbrowserPräferenzen auch im Menü Einstellungen festlegen.
Endlos/Zufallswiedergabe
Starten Sie die Wiedergabe mit
der Play-Taste und aktivieren
Sie
Starten Sie die Wiedergabe mit
der OK-Taste und aktivieren
Sie
Starten Sie die Wiedergabe mit
der Play-Taste und aktivieren
Sie
Starten Sie die Wiedergabe mit
der Play-Taste und aktivieren
Sie ,
Alle Dateien dieser Liste
gemäß der dortigen
Reihenfolge in einer
Endlosschleife abgespielt.
Die gleiche Datei wird in einer
Endlosschleife (Wiederholung)
wiedergegeben.
Alle Dateien auf der Liste
werden einmal in zufälliger
Reihenfolge wiedergegeben
Alle Dateien dieser Liste
werden in zufälliger
Reihenfolge in einer
Endlosschleife abgespielt.
Angepasstes Boot-up-Logo
Sie können Ihr TV-Gerät persönlicher gestalten und
bei jedem Hochfahren Ihre Lieblingsbilder oder Fotos
auf dem TV-Bildschirm ansehen. Speichern Sie dafür
die Dateien Ihrer Lieblingsbilder auf einen USB-Stick
und öffnen Sie diesen über das Mediabrowser-Menü.
Sobald Sie das gewünschte Bild ausgewählt haben,
markieren Sie dieses und drücken Sie dann auf OK
um es im Vollbild anzuzeigen. Drücken Sie erneut auf
OK um das Bild als individuelles Logo zu wählen. Zur
Bestätigung wird eine Meldung angezeigt: Wählen
Sie JA und drücken Sie erneut OK. Wenn das Bild
geeignet(*) ist, werden Sie es beim nächsten Neustart
Ihres TV-Gerätes auf dem Bildschirm sehen.
Hinweis: Wenn Sie eine Erstinstallation (auch als FTI
bezeichnet) durchführen, wird das TV-Gerät zum StandardLogo zurückkehren.
(*) Bilder müssen ein Seitenverhältnis zwischen 4:3 bis 16:9
haben und im .jpeg, .jpg oder .jpe Dateiformat sein. Das Bild
kann nicht als Boot-Logo eingestellt werden, wenn seine
Auösung nicht im Info-Banner erscheint.
Deutsch - 45 -
CEC und CEC RC Passthrough
Mit dieser Funktion lassen sich CEC-fähige Geräte,
die über einen HDMI-Anschluss angeschlossen sind,
über die Fernbedienung des Fernseher steuern.
Die CEC-Option im Menü Einstellung>Sonstige
Einstellungen muss vorher aktiviert werden.
Drücken Sie die Taste Quelle und wählen Sie den
HDMI-Eingang des angeschlossenen CEC-Geräts
im Menü Quellenliste. Wenn eine neue CEC-Quelle
angeschlossen wurde, wird es im Menü Quelle
mit dem eigenen Namen anstatt mit dem HDMIPortnamen (DVD Player, Recorder 1, usw.), an den
es angeschlossen ist, aufgeführt.
Die Fernbedienung des TV-Geräts kann automatisch
die wichtigsten Funktionen ausführen, nachdem die
HDMI-Quelle ausgewählt wurde.
Um diesen Vorgang zu beenden und erneut die
Steuerung des TV-Geräts über die Fernbedienung
zu tätigen, drücken Sie die Schnell-Menü-Taste
auf der Fernbedienung, markieren Sie den CEC
RC-Passthrough und setzen Sie mit der Links-oder
Rechts-Taste auf Aus. Diese Funktion kann auch
unter dem Menüpunkt Einstellungen/Sonstige
Einstellungen aktiviert werden.
Das TV-Gerät unterstützt auch die Funktion ARC
(Audio Return Channel). Diese Funktion ist ein AudioLink, um andere Kabel zwischen dem Fernseher und
der Audioanlage (A / V-Receiver oder LautsprecherSystem) zu ersetzen.
Bei aktivierten ARC schaltet das TV-Gerät seine
anderen Audio-Ausgänge nicht automatisch stumm.
Das heißt, dass Sie die TV-Lautstärke manuell auf
Null reduzieren müssen, wenn Sie den Ton des
angeschlossenen Audiogeräts (bzw. andere optische
oder koaxiale Digital-Audio-Ausgänge) hören wollen.
Wenn Sie die Lautstärke des angeschlossenen
Geräts ändern möchten, sollten Sie dieses Gerät
aus der Quellenliste wählen. In diesem Fall sind die
Lautstärke-Steuertasten auf das angeschlossene
Audio-Gerät gerichtet.
Hinweis: ARC wird nur über den HDMI2-Eingang unterstützt.
Systemeigene Audiosteuerung
Ermöglicht die Verwendung eines Audioverstärkers
bzw. Audioreceivers zusammen mit dem Fernseher.
Die Lautstärke kann mit Hilfe der Fernbedienung des
Fernsehers geregelt werden. Um diese Funktion zu
aktivieren stellen Sie die Option Lautsprecher im
Menü Einstellungen>Sonstige Einstellungen auf
Verstärker. Die Fernseherlautsprecher werden auf
stumm gestellt und Ton des empfangenen Programms
wird durch das angeschlossene Soundsystem
geliefert.
Hinweis: Das Audiogerät sollte die System Audio ControlFunktion unterstützen und die CEC-Option sollte auf Aktiviert
gesetzt werden.
Page 47

TV-Menüinhalte
Bilder Menü Inhalt
Oberächenfarbe
Farbdeckung
Auto-Position
Sie können den Bildmodus ändern um es nach Ihren Wünschen oder
Modus
Bildformat
Kontrast
Helligkeit
Schärfe
Farbe
Energiesparen
Backlight
Erweiterte Einstellungen
Dynamischer Kontrast
Rauschunterdrückung
Farbtemperatur
Weißpunkt
Film-Modus
HDMI Full Range
PC Position
H Stellung
V Stellung
Dot Uhr
Phase
Zurücksetzen
Im des VGA (PC)-Modus stehen einige der Optionen im Bild-Menü nicht zur Verfügung. Stattdessen werden die VGA-ModusEinstellungen im PC-Modus zu den Bildeinstellungen hinzugefügt.
Anforderungen anzupassen. Der Bildmodus kann auf eine dieser Optionen
eingestellt werden: Kino , Spielen (optional), Sport , Dynamisch und Natürlich
.
Stellt das gewünschte Bildgrößenformat ein.
Verändert auf dem Bildschirm die Werte für Dunkel und Hell.
Stellt die Helligkeit des Bildschirms ein.
Stellt die Schärfe der am Bildschirm dargestellten Objekte ein.
Stellt die Farbwerte und damit die Farbe ein.
Wählen Sie für die Einstellung der Energiespar-Optionen
entwederBenutzerdeniert, Minimum, Medium, Maximum, Auto, Bildschirm
Aus oder Aus.
Hinweis: Die verfügbaren Optionen können abhängig vom gewählten Modus variieren.
Mit dieser Einstellung wird die Hintergrundbeleuchtung geregelt. Die BacklightFunktion ist deaktiviert, wenn die Energiespar-Option nicht auf Benutzerdeniert
eingestellt ist.
Sie können das dynamische Kontrastverhältnis auf den gewünschten Wert ändern.
Wenn das Sendersignal schwach oder verrauscht ist, können Sie mit der Option
Rauschreduktion das Bildrauschen verringern.
Stellt den gewünschten Farbtemperaturwert ein. Die Optionen Kalt, Normal, Warm
und Benutzerdeniert sind verfügbar.
Wenn die Farbtemperatur-Option auf Benutzerdeniert eingestellt ist, steht diese
Einstellung zur Verfügung. Verändern Sie den „Wärme“- oder „Kälte“-Grad des Bildes
durch das Drücken der Links- bzw. Rechts-Taste
Filme werden mit einer unterschiedlichen Anzahl von Bildern je Sekunde bis zu
normalen Fernsehprogrammen aufgezeichnet. Schalten Sie diese Funktion ein, wenn
Sie sich schnell bewegende Szenen eines Films klarer sehen möchten.
Die Balance kann zwischen -5 und 5 eingestellt werden.
Stellt den gewünschten Farbton ein.
Wenn der Fernsehempfang von einer HDMI-Quelle erfolgt, wird diese Funktion sichtbar.
Sie können mit Hilfe dieser Funktion die Schwärze des Bildschirms verbessern.
Erscheint nur, wenn die Eingangsquelle auf VGA/PC gesetzt ist.
Passt den Bildschirm automatisch an. Zur Optimierung müssen Sie OK drücken.
Mit dieser Option können Sie das Bild auf die rechte oder linke Seite des Bildschirms
verschieben.
Diese Einstellung verschiebt das Bild vertikal auf dem Bildschirm nach Oben oder
Unten.
Die Pixelfrequenz Einstellung korrigiert die als vertikale Streifen in Pixel-intensiven
Darstellungen wie Tabellen oder Absätzen oder Text in kleinen Schriften auftauchen.
Abhängig von der Eingangsquelle (Computer etc.) ist es möglich, dass Sie ein
verschwommenes oder rauschendes Bild auf dem Bildschirm sehen. Sie können mit
der Phase versuchen, ein klareres Bild zu bekommen.
Setzt die Bildeinstellungen auf die Werksteinstellungen zurück (mit Ausnahme des
Spiele-Modus).
Deutsch - 46 -
Page 48

Inhalt des Tonmenüs
Lautstärke
Equalizer
Balance
Kopfhörer
Sound-Modus
AVL (Automatische
Lautstärkebegrenzung)
Kopfhörer / Lineout
Dynamischer Bass
Surround-Klang
Digitaler Ausgang
Stellt die Lautstärke ein.
Wählt den Equalizer-Modus. Die Einstellungen können nur im Benutzer-Modus
vorgenommen werden.
Stellt ein, ob der Ton entweder aus dem linken oder rechten Lautsprecher
kommt.
Stellt die Lautstärke für den Kopfhörer ein.
Bevor Sie den Kopfhörer benutzen, vergewissern Sie sich bitte, ob die
Kopfhörerlautstärke auf ein niedriges Niveau gesetzt ist, um Gehörschäden zu
vermeiden.
Sie können einen Sound-Modus auswählen (falls der gewählte Kanal es
unterstützt).
Diese Funktion stellt den Ton so ein, dass zwischen den Programmen ein
konstanter Ausgangspegel erhalten bleibt.
Wenn Sie einen externen Verstärker an Ihren Fernseher anschließen, durch
Benutzen des Kopfhöreranschlusses, können Sie diese Option als Lineout
festlegen. Wenn Sie einen Kopfhörer an den Fernseher angeschlossen haben,
legen Sie diese Option als Kopfhörer fest.
Bevor Sie einen Kopfhörer benutzen, vergewissern Sie sich, dass dieser
Menüpunkt auf Kopfhörer eingestellt ist. Wenn Lineout eingestellt ist, wird die
Ausgabe der Kopfhörerbuchse auf Maximum gestellt, was das Gehör schädigen
könnte.
Aktiviert oder deaktiviert den Dynamischen Bass.
Der Surround-Modus kann auf Ein oder Aus gestellt werden.
Stellt den Audiotyp für den Digitalausgang ein.
Deutsch - 47 -
Page 49

Inhalt des Einstellungsmenüs
Bedingter Zugang
Datum und Zeit
Zugänglichkeit
Mehr
Sprache
Kindersicherung
Timer
Quellen
Netzwerk-/Internete
Instellungen
Für Schwerhörige
Audio Beschreibung
Hier nehmen Sie Einstellungen für die Module des bedingten Zugriffs, sofern
vorhanden, vor.
Abhängig von der Fernsehanstalt und dem Land können Sie hier verschiedene
Sprachen einstellen.
Geben Sie das richtige Passwort ein, um die Einstellungen für die
Kindersicherung zu ändern. In diesem Menü können Sie die Menüsperre,
die Altersfreigabe, die Kindersicherungbzw. Programmempfehlung ganz
einfach einstellen. Sie können außerdem eine neue PIN einstellen oder die
standardmäßige CICAM-PIN mit Hilfe der entsprechenden Optionen ändern.
Hinweis: Einige Funktionen sind je nach bei der Erstinstallation festgelegten Länderauswahl
möglicherweise nicht verfügbar. Die Standard-PIN kann auf 0000 oder 1234 eingestellt sein. Wenn Sie
während der Erstinstallation die PIN deniert haben (dies wird je nach Ländereinstellung gefordert),
benutzen Sie die PIN, die Sie deniert haben.
Stellt den Schlaftimer ein, um das TV-Gerät nach einer gewissen Zeit
auszuschalten. Legt die Timer für ausgewählte Programme fest.
Stellt das Datum und die Uhrzeit ein.
Schaltet die gewählten Quellenoptionen ein oder aus. Für HDMI-Quellen sind
die Optionen Regulär, Verbessert und Deaktiviert verfügbar. Die Optionen
Regulär und Verbessert haben Auswirkungen auf die Farbeinstellungen der
ausgewählten HDMI-Quelle. Um 4K-Bilder von HDMI-Quelle anzeigen zu können,
müssen die entsprechenden Einstellungen für Quellen auf Verbessert gestellt,
wenn die angeschlossene HDMI 2.0-kompatibel ist. Wählen Sie Regulär, wenn
die angeschlossene HDMI 1.4-kompatibel ist. Wählen Sie die entsprechende
Einstellung bzw. deaktivieren Sie die jeweilige HDMI-Quelle indem Sie Deaktiviert
wählen.
Zeigt Netzwerk-/Internete instellungen an.
Zeigt die Zugänglichkeitsoptionen des TV Geräts an.
Aktiviert eine spezielle Funktion, die vom Sender gesendet wird.
Für Blinde oder Sehbehinderte wird eine Nacherzählung der gezeigten
Handlung abgespielt. Drücken Sie OK um alle verfügbaren Audio
Beschreibung-Menüoptionen anzuzeigen. Diese Funktion ist nur verfügbar,
wenn der Kanalbetreiber sie anbietet.
Hinweis: Die Audiobeschreibung Ton Funktion ist im Aufnahme- oder Time-ShiftingModus nicht verfügbar.
Zeigt weitere Einstellungsoptionen für das TV-Gerät an.
Deutsch - 48 -
Page 50

Menü-
Einblendungsdauer
Verändert die Timeout-Zeit zwischen den Menübildschirmen.
HBBTV
Softwareaktualisierung
Anwendungsversion
Untertitel-Modus
Automatische TV
Abschaltung nach
Biss Schlüssel
Ladenmodus
Video-Audio-Sharing
Einschalt Modus
Virtuelle
Fernbedienung
CEC
CEC Automatisches
Einschalten
Lautsprecher
Sie können diese Funktion aktivieren bzw. deaktivieren, indem Sie diese auf Ein
bzw. Aus stellen.
Stellt sicher, dass die Firmware des TV-Geräts stets auf dem neusten Stand ist.
Drücken Sie OK, um die Menüoptionen anzuzeigen.
Zeigt die aktuelle Software-Version an.
Diese Option wird verwendet, um den auf dem Bildschirm angezeigten UntertitelModus (DVB-Untertitel / Teletext-Untertitel) auszuwählen, wenn beide verfügbar
sind. Als Standard ist die Option DVB-Untertitel eingestellt.Diese Funktion ist nur
verfügbar, wenn als Länderoption Norwegen festgelegt wurde.
Einstellung der gewünschten Zeit, wann das Gerät automatisch auf Standby
geht, wenn es nicht bedient wird.
Biss ist ein Satelliten Signal Verschlüsselungssystem, das für einige Sendungen
verwendet wird. Wenn Sie bei einer Sendung einen BISS-Schlüssel eingeben
müssen, können Sie diese Einstellung verwenden. Markieren Sie Biss-Schlüssel
und drücken Sie die OK-Taste, um den Schlüssel für die gewünschte Sendung
einzugeben.
Wählen Sie diesen Modus, um das Gerät im Laden auszustellen. Bei
aktivierten Vorführ-Modus sind einige Elemente im TV-Menü möglicherweise
nicht verfügbar.
Die Video-Audio-Sharing-Funktion gestattet Ihnen das Teilen von auf Ihrem
Smartphone oder Tablet-PC gespeicherten Dateien. Sofern Sie ein kompatibles
Smartphone bzw. einen Tablet-PC besitzen und die geeignete Software installiert
ist, können Sie dort gespeicherte Bilder auf dem TV-Gerät teilen/anzeigen. Für
weitere Informationen, beachten Sie die Anweisungen Ihrer Sharing-Software.
Der Video-Audio-Sharing-Modus wird mit der Internetportal-Funktion nicht
verfügbar sein.
Diese Einstellung konguriert die Einschalt Modus. Die Optionen Letzter
Zustand und Standby sind verfügbar.
Aktivieren oder Deaktivieren der virtuellen Fernbedienung.
Mit dieser Einstellung können Sie die CEC-Funktion aktivieren oder vollständig
deaktivieren. Drücken Sie die Links oder Rechts-Taste, um die Funktion zu
aktivieren oder deaktivieren.
Diese Funktion ermöglicht es, mit dem angeschlossenen, HDMI-CEC-kompatiblen
Gerät den Fernseher einzuschalten und automatisch auf die Eingangsquelle
umzuschalten.Drücken Sie die Links oder Rechts-Taste, um die Funktion zu
aktivieren oder deaktivieren.
Um den TV-Ton über eine angeschlossene, kompatible Lautsprecheranlage
zu hören, stellen Sie Verstärker ein. Die Lautstärke der externen
Lautsprecheranlage kann mit Hilfe der Fernbedienung des TV Geräts geregelt
werden.
Deutsch - 49 -
Page 51

Inhalt Menü Installation
TKGS-Installation
Automatischer
Sendersuchlauf
(Umschalten)
Manuelle Kanalsuche
Netzwerk Sendersuchlauf
Analoge Feinabstimmung
Satelliteneinstellungen
Installationseinstellungen
Serviceliste löschen
Aktives Netzwerk
auswählen
Erstinstallation
Zeigt die Menüoptionen für TKGS-Installation an. Diese Option ist möglichweise
gemäß dem bei der Erstinstallation festgelegten Satellitenbetreiber nicht
verfügbar. Wenn nicht, führen Sie die Erstinstallation erneut durch und wählen
Sie den Satellitenbetreiber als TKGS.
Zeigt die Optionen für den automatischen Sendersuchlauf an.
Digitalantenne: Sucht und speichert DVB Sender. Digitalkabel: Sucht und
speichert DVB-Kabelsender. Analog: Sucht und speichert analoge Sender.
Satellit: Sucht und speichert Satellitensender.
Diese Funktion kann zur unmittelbaren Eingabe der Senderdaten verwendet
werden.
Sucht nach den verknüpften Kanälen des Rundfunksystems. Digitalantenne:
Sucht nach Sendern des Antennennetzwerks. Digitalkabel: Sucht nach
Sendern des Kabelnetzwerks.
Sie können diese Funktion zur Feinabstimmung von analogen Kanälen
verwenden. Diese Funktion steht nicht zur Verfügung, wenn keine digitalen
Kanäle abgespeichert sind.
Legt die Satelliteneinstellungen fest. Satellitenliste: Zeigt die verfügbaren
Satelliten an. Sie können Satelliten Hinzufügen, löschen oder
Satelliteneinstellungen auf der Liste Bearbeiten. Antenneninstallation:
Sie können die Satellitenantenneneinstellungen ändern und/oder eine neue
Satellitensuche starten. SatcoDX: Sie können mit Hilfe der entsprechenden
Optionen SatcoDX-Daten hoch- bzw. herunterladen.
Zeigt das Menü Installationseinstellungen an. Standby-Suche (optional): Ihr
Fernsehgerät sucht im Standby nach neuen oder fehlenden Sendern. Gefundene
neue Sender werden angezeigt.
Verwenden Sie diese Einstellung, um die gespeicherten Kanäle zu löschen. Diese
Einstellung ist nur sichtbar, wenn in der Länder-Option Dänemark, Schweden,
Norwegen oder Finnland eingestellt ist.
Diese Einstellung erlaubt es Ihnen, nur die Sendungen der ausgewählten
Netzwerke in der Senderliste anzeigen zu lassen. Diese Funktion ist nur
verfügbar, wenn als Länderoption Norwegen festgelegt wurde.
Löscht alle gespeicherten Kanäle und Einstellungen, setzt das TV-Gerät auf
die Werkseinstellungen zurück und beginnt die Erstinstallation.
Deutsch - 50 -
Page 52

Allgemeine Bedienung
Verwendung der Programmliste
Das Gerät sortiert alle gespeicherten Fernsehsender in
eine Programmliste. Sie können diese Programmliste
verändern, Favoriten einstellen oder mit der
Programmliste-Option aktive Senderauswahlen
einstellen. Drücken Sie die Taste OK/Liste, um
die Programmliste zu öffnen. Sie können die
aufgelisteten Sender ltern, indem Sie entweder die
Blaue Taste drücken oder das Menü Programmliste
bearbeiten durch das Drücken der Grünen Taste
öffnen, um weitere Änderungen an der aktuellen Liste
vorzunehmen.
Die Favoritenlisten verwalten.
Sie können vier verschiedene Listen mit Ihren
bevorzugten Sendern erstellen. Gehen Sie zur
Programmliste im Hauptmenü oder drücken Sie
die Grüne Taste, während die Programmliste
auf dem Bildschirm angezeigt wird, um das Menü
Programmliste bearbeiten zu öffnen. Wählen Sie
den gewünschten Sender auf der Liste. Sie können
eine Mehrfachauswahl vornehmen, indem Sie die
Gelbe Taste drücken. Drücken Sie die OK-Taste,
um das Menü Kanal-Bearbeitungsoptionen zu
bearbeiten und wählen Sie die Option Favoriten
hinzufügen/entfernen. Drücken Sie die OK-Taste
noch einmal. Stellen Sie die gewünschte Listenoption
auf Ein. Alle gewählten Sender werden zur Liste
hinzugefügt. Um einen oder mehrere Sender von
einer Favoritenliste zu entfernen, führen Sie diese
Schritte in der gleichen Reihenfolge durch und stellen
die gewünschten Listenoption auf Aus.
Sie können die Filter-Funktion im Menü
Programmliste bearbeiten nutzen, um die Sender
in der Programmliste entsprechend Ihren Wünschen
dauerhaft zu ltern. Mit Hilfe dieser Filter-Option
können Sie eine der vier Favoritenliste festlegen,
die angezeigt immer wird, wenn die Programmliste
geöffnet wird. Die Filterungsfunktion im Menü
Programmliste filtert nur die aktuell angezeigte
Programmliste, um einen Sender zu nden und
diesen einzuschalten. Diese Änderungen werden
nicht für das nächste Mal, wenn die Senderliste
geöffnet wird, gespeichert.
Einstellung der Kindersicherungseinstellungen
Die Optionen des KindersicherungseinstellungenMenü dient dazu, einzelnen Nutzer den Zugang zu
bestimmten Programmen, Sendern und zur Nutzung
der Menüs zu verwehren. Diese Einstellungen
benden sich im Menü System>Kindersicherung.
Um die Menüoptionen der Kindersicherung
anzuzeigen, muss eine PIN eingegeben werden.
Nach der Eingabe der richtigen PIN werden die
Kindersicherungseinstellungen angezeigt.
Menüsperre: Diese Einstellung aktiviert bzw.
deaktiviert den Zugang zu allen Menüs bzw.
Installationsmenüs des TV-Geräts.
Jugendschutz-Sperre: Ist diese Option
eingestellt, bezieht das Fernsehgerät vom Sender
Altersinformationen. Ist die entsprechende Altersstufe
im Gerät deaktiviert, wird der Zugriff auf die Sendung
gesperrt.
Hinweis: Wenn bei der Erstinstallation in der
Ländereinstellung Frankreich, Italien oder Österreich
festgelegt wurde, ist der Wert für die Jugendschutz-Sperre
standardmäßig auf 18 gesetzt.
Kindersicherung: Wenn diese Option auf EIN gestellt
ist, kann das TV-Gerät nur über die Fernbedienung
gesteuert werden. In diesem Fall sind die Steuertasten
am TV-Gerät deaktiviert.
Internetsperre: Wenn diese Option auf EIN gestellt
ist, wird im Internetportal die App zum Öffnen des
Browsers deaktiviert.Stellen Sie AUS ein, um die App
wieder freizugeben.
PIN einstellen: Legt eine neue PIN-Nummer fest.
Standardmäßige CICAM-PIN: Diese Option
erscheint als ausgegraut, wenn kein CI-Modul in
den CI-Schlitz des TV-Geräts eingesteckt wurde. Sie
können die voreingestellte PIN der CI-CAM mit Hilfe
dieser Option ändern.
Hinweis: Die Standard-PIN kann auf 0000 oder 1234
eingestellt sein.Wenn Sie während der Erstinstallation die
PIN deniert haben (dies wird je nach Ländereinstellung
gefordert), benutzen Sie die PIN, die Sie deniert haben.
Einige Funktionen sind je nach bei der Erstinstallation
festgelegten Länderauswahl möglicherweise nicht verfügbar.
Elektronischer Programmführer (EPG)
Einige Sender übermitteln Informationen zu ihren
Programmen. Drücken Sie die Taste Epg, um das
Programmführer-Menü aufzurufen.
Es stehen 3 Anzeigetypen für die
Programminformationen zur Verfügung:
Programmzeitleiste, Sendungenliste und Jetzt/
Nächste Sendung. Um zwischen diesen zu
wechseln, befolgen Sie die Anweisungen am unteren
Bildschirmrand.
Zeitleiste
Zoom (Gelbe taste): Drücken Sie die gelbe Taste,
um das Programm für einen größeren Zeitraums
anzuzeigen.
Filter (Blaue taste): Zeigt die Filteroptionen an.
Genre Auswählen (Untertitel-Taste): Zeigt das Menü
Genre Auswählen an: Mit dieser Funktion können Sie
die EPG-Datenbank nach einem bestimmten Genre
durchsuchen. Die im EPG verfügbaren Informationen
werden durchsucht und die Ergebnisse, die zu Ihren
Suchkriterien passen, hervorgehoben.
Optionen (OK-taste): Zeigt Ereignisoptionen an.
Deutsch - 51 -
Page 53

Progammdetails (Info-taste): Zeigt ausführliche
Informationen über die gewählten Programme an.
Nächster/Vorheriger Tag (Programme +/- tasten):
Zeigt die Programme des vorherigen bzw. des
nächsten Tages an.
Suchen (Text-taste): Zeigt das Menü Führer-Suche
an.
Jetzt (Swap-taste): Zeigt das aktuelle Ereignis des
markierten Kanals.
Rec./Stop (Aufnahme-taste): Das TV-Gerät zeichnet
das ausgewählte Programm auf. Drücken Sie die
Taste nochmals, um die Aufnahme abzubrechen.
WICHTIG: Die USB-Festplatte sollte nur dann angeschlossen
oder entfernt werden, wenn das TV-Gerät ausgeschaltet ist.
Schalten Sie dann das TV-Gerät ein, um die Aufnahmefunktion
zu aktivieren.
Hinweis: Während der Aufnahme können Sie nicht auf einen
anderen Sender umschalten.
Sendungenliste (*)
(*) In dieser Anzeigeoption werden nur die die Sendungen
der markierten Kanäle aufgeführt.
Vorherig Zeitabschnitt (Rote taste): Zeigt die
Programme des vorhergehenden Zeitabschnitts an.
Nächster/Vorheriger Tag (Programme +/- tasten):
Zeigt die Programme des vorherigen bzw. des
nächsten Tages an.
Progammdetails (Info-taste): Zeigt ausführliche
Informationen über die gewählten Programme an.
Filter (Text-taste): Zeigt die Filteroptionen an.
Nächster Zeitabschnitt (Grüne taste): Zeigt die
Programme des nächsten Zeitabschnitts an.
Optionen (OK-Taste): Zeigt Ereignisoptionen an.
Aufn./Stopp (Aufnahme-taste): Das TV-Gerät
zeichnet das ausgewählte Programm auf. Drücken Sie
die Taste nochmals, um die Aufnahme abzubrechen.
WICHTIG: Die USB-Festplatte sollte nur dann angeschlossen
oder entfernt werden, wenn das TV-Gerät ausgeschaltet ist.
Schalten Sie dann das TV-Gerät ein, um die Aufnahmefunktion
zu aktivieren.
Hinweis: Während der Aufnahme können Sie nicht auf einen
anderen Sender umschalten.
Jetzt/Nächste Sendung
Navigieren (Navigationstasten): Drücken Sie
die Navigationstasten, um durch die Kanäle bzw.
Programme zu navigieren.
Optionen (OK-taste): Zeigt Ereignisoptionen an.
Progammdetails (Info-taste): Zeigt ausführliche
Informationen über die gewählten Programme an.
Filter (Blaue taste): Zeigt die Filteroptionen an.
Aufn./Stopp (Aufnahme-taste): Das TV-Gerät
zeichnet das ausgewählte Programm auf. Drücken Sie
die Taste nochmals, um die Aufnahme abzubrechen.
WICHTIG: Die USB-Festplatte sollte nur dann angeschlossen
oder entfernt werden, wenn das TV-Gerät ausgeschaltet ist.
Schalten Sie dann das TV-Gerät ein, um die Aufnahmefunktion
zu aktivieren.
Hinweis: Während der Aufnahme können Sie nicht auf einen
anderen Sender umschalten.
Programmoptionen
Benutzen Sie die Navigationstasten, um ein Programm
zu markieren und drücken Sie die OK-Taste, um das
Menü Ereignis-Optionen anzuzeigen. Folgende
Optionen stehen zur Auswahl.
Kanal auswählen: Mit dieser Option können Sie zum
gewählten Kanal umschalten.
Aufnahme einstellen / Löschen. Timer: Wählen
Sie die Option Aufnahme und drücken Sie die
Taste OK. Wenn das Programm zu einem späteren
Zeitpunkt ausgestrahlt wird, wird es auf die TimerListe aufgenommen, um aufgezeichnet zu werden.
Wenn das ausgewählte Programm in diesem Moment
ausgestrahlt, wird die Aufnahme sofort gestartet.
Um eine programmierte Aufnahme zu löschen,
markieren Sie das Programm und drücken Sie die
OK.-Taste. Wählen Sie die Option "Aufn. Timer
löschen. Die Aufzeichnung wird gelöscht.
Timer für Ereignis /Timer für Ereignis löschen:
Drücken Sie die OK-Taste, nachdem Sie ein
Programm im EPG-Menü ausgewählt haben. Wählen
Sie die Option Timer für Ereignis Einstellen und
drücken Sie die OK-Taste. Sie können einen Timer
für zukünftige Programme einstellen. Um einen schon
eingestellten Timer zu löschen, markieren Sie die
Sendung und drücken die OK-Taste. Wählen Sie
die Option Timer für Ereignis Löschen. Der Timer
wird gelöscht.
Hinweise: Sie können nicht auf einen anderen Kanal
schalten, während auf dem eingestellten Kanal eine
Aufnahme bzw. ein Timer aktiv ist.
Es ist nicht möglich Timer oder Aufnahme für zwei oder
mehrere gleichzeitige Sendungen programmieren.
Teletext-Dienste
Drücken Sie zum Öffnen die Text-Taste. Drücken Sie
erneut, um den Misch-Modus einzuschalten, der es Ihnen
ermöglicht die Teletext-Seite und die Fernsehsendung
gleichzeitig zu sehen. Drücken Sie nochmals diese Taste,
um den Modus wieder zu verlassen. Sofern vorhanden,
werden die Abschnitte einer Teletextseite farbcodiert
und können dann durch Drücken der entsprechenden
Farbtaste ausgewählt werden.Folgen Sie den auf dem
Bildschirm angezeigten Anweisungen.
Digitaler Teletext
Drücken Sie die Text-Taste, um die digitalen TeletextInformationen anzuzeigen. Steuern Sie diese Information
über die Farbtasten, die Cursortasten und die OK-Taste.
Die Bedienfunktion kann je nach Inhalt des digitalen
Teletexts unterschiedlich sein. Folgen Sie den
Anweisungen, die auf dem Bildschirm des digitalen
Teletexts angezeigt werden. Wenn Sie wieder auf die
Text-Taste drücken, schaltet das TV-Gerät auf normalen
Fernsehbetrieb zurück.
Deutsch - 52 -
Page 54

Softwareaktualisierung
Ihr TV-Gerät kann automatisch Aktualisierungen für
die Firmware über die Sendesignale oder das Internet
nden und installieren.
Suche nach Softwareaktualisierungen
über die Benutzerschnittstelle
Wählen Sie im Hauptmenü Einstellungen und
dann Sonstige Optionen aus. Gehen Sie zu
Software Upgrade und drücken Sie die OK-Taste.
Im Menü Upgrade-Optionen wählen Sie Upgrades
suchen und drücken Sie die OK Taste, um nach
Softwareaktualisierungen zu suchen.
Wird eine neue Softwareaktualisierung gefunden,
beginnt das Gerät mit dem Herunterladen. Bestätigen
Sie nach dem Abschluss des Downloads die Frage
nach einem Neustart des TV-Geräts, indem Sie OK
für die Fortsetzung des Neustarts drücken.
3 Hintergrundsuche und
Aktualisierungsmodus
Wenn Ihr Fernsehgerät mit einem Empfangssignal
oder dem Internet verbunden und die Option
Automatische Suche im Menü Upgrade Optionen
auf Aktiviert eingestellt ist, wird es um 3:00 Uhr
nachts nach neuen Aktualisierungen suchen. Wenn
eine neue Software gefunden und erfolgreich
heruntergeladen wurde, wird diese nach dem
nächsten Einschalten installiert.
Hinweis: Ziehen Sie nicht den Netzstecker, solange während
des Neustarts die LED blinkt. Wenn das Gerät nach der
Aktualisierung nicht einschaltet, stecken Sie es aus und
stecken es nach zwei Minuten wieder ein.
Fehlerbehebung & Tipps
Das TV-Gerät schaltet sich nicht ein
Vergewissern Sie sich, dass das Netzkabel sicher
in die Steckdose.eingesteckt ist. Überprüfen Sie
Batterien, ob sie leer sind. Drücken Sie die Netztaste
am TV-Gerät.
Schlechte Bildqualität
• Haben Sie das richtige Empfangssystem
ausgewählt?
• Niedriger Signalpegel kann Bildverzerrungen
verursachen. Bitte prüfen Sie den Antennenzugang.
• Überprüfen Sie, ob Sie die richtige Frequenz
eingegeben haben.
• Die Bildqualität kann sich verschlechtern, wenn
zwei Zusatzgeräte gleichzeitig an das TV-Gerät
angeschlossen werden. Trennen Sie in diesem Fall
eines der Zusatzgeräte wieder ab.
Kein Bild
• Dies bedeutet, dass Ihr Fernsehgerät keine
Übertragung empfängt. Stellen Sie sicher, dass die
richtige Eingangsquelle ausgewählt ist.
Deutsch - 53 -
• Ist die Antenne richtig angeschlossen?
• Ist das Antennenkabel beschädigt?
• Wurden geeignete Stecker verwendet, um die
Antenne anzuschließen?
• Wenn Sie nicht sicher sind, fragen Sie Ihren Händler.
Kein Ton
• Sehen Sie nach, ob das Fernsehgerät stumm
geschaltet ist. Drücken Sie die Stumm-Taste oder
erhöhen Sie zur Prüfung die Lautstärke.
• Es könnte sein, dass der Ton nur aus einem
Lautsprecher kommt Überprüfen Sie die BalanceEinstellung im Ton -Menü.
Fernbedieinung - keine Funktion
• Möglicherweise sind die Batterien leer. Ersetzen
Sie diese.
Eingangsquellen - können nicht
ausgewählt werden
• Wenn Sie keine Eingabequelle wählen können,
haben Sie wahrscheinlich kein Gerät angeschlossen.
Wenn nicht;
• Wenn Sie ein Gerät angeschlossen haben,
überprüfen Sie die AV-Kabel und deren Anschluss.
• Prüfen Sie die AV-Kabel und deren Anschlüsse,
wenn Sie versuchen, die dem angeschlossenen
Gerät zugewiesene Eingangsquelle einzuschalten.
Aufnahme nicht verfügbar
Um ein Programm aufzunehmen, sollten Sie zuerst
eine USB-Festplatte an das TV-Gerät anschließen,
wenn dieses ausgeschaltet ist. Schalten Sie dann das
TV-Gerät ein, um die Aufnahmefunktion zu aktivieren.
Wenn die Aufnahme nicht funktioniert, schalten Sie
versuchsweise das TV-Gerät aus und schließen dann
das USB-Gerät erneut an.
USB ist zu langsam
Wenn beim Starten der Aufzeichnung die Meldung
„Die Schreibgeschwindigkeit des USB-Festplatte
zum Aufnehmen zu langsam“ auf dem Bildschirm
erscheint, versuchen Sie den Vorgang erneut zu
starten. Wenn diese Fehlermeldung weiterhin
angezeigt wird, ist Ihre USB-Festplatte möglicherweise
nicht schnell genug. Versuchen Sie es mit einer
anderen USB-HDD.
Page 55

Typische Anzeigemodi PC-Eingang
Signale
In der folgenden Tabelle werden einige der üblichen
Modi zur Videoanzeige dargestellt. Unter Umständen
unterstützt Ihr TV nicht alle Auösungen.
Index Auösung Frequenz
1 640x350 85Hz
2 640x480 60Hz
3 640x480 72Hz
4 640x480 75Hz
5 800x600 56Hz
6 800x600 60Hz
7 800x600 72Hz
8 800x600 75Hz
9 1024x768 60Hz
10 1024x768 70Hz
11 1024x768 75Hz
12 1024x768 85Hz
13 1152x864 75Hz
14 1280x768 60Hz
15 1280x768 75Hz
16 1280x960 60Hz
17 1280x960 75Hz
18 1280x1024 60Hz
19 1280x1024 75Hz
20 1360x768 60Hz
21 1366x768 60Hz
22 1400x1050 59Hz
23 1400x1050 60Hz
24 1400x1050 75Hz
25 1440x900 60Hz
26 1440x900 75Hz
27 1600x1200 60Hz
28 1680x1050 59Hz
29 1680x1050 60Hz
30 1920x1080 60Hz
AV- und HDMI-Signalkompatibilität
Quelle
Unterstützte
Verfügbar
PAL O
EXT
(SCART)
SECAM O
NTSC4.43 O
NTSC3.58
RGB 50/60 O
PAL O
RÜCKLAUF
AV
SECAM O
NTSC4.43 O
NTSC3.58 O
480i, 480p 60Hz O
576i, 576p 50Hz O
YPbPr
720p
1080i
50Hz,
60Hz
50Hz,
60Hz
O
O
480i 60Hz O
480p 60Hz O
576i, 576p 50Hz O
720p
1080i
50Hz,
60Hz
50Hz,
60Hz
O
O
24Hz,
25Hz,
HDMI
1080p
30Hz,
50Hz,
O
60Hz
24Hz,
25Hz,
3840x2160p
30Hz,
O
50Hz,
60Hz
24Hz,
25Hz,
4096x2160p
30Hz,
O
50Hz,
60Hz
(X: Nicht verfügbar, O: Verfügbar)
In einigen Fällen kann unter Umständen ein Signal
nicht richtig auf dem TV angezeigt werden. Das
Problem kann durch eine Inkompatibilität in den
Standards des Quellgeräts verursacht werden (DVD,
Set-Top etc.). Wenn so etwas bei Ihnen auftritt, sollten
Sie sich mit dem Händler und auch dem Hersteller des
Ausgangsgerätes in Verbindung setzen.
Deutsch - 54 -
Page 56

Im USB-Modus Unterstützte Videodateiformate
Video-Codec Auösung Bitrate Behälter
MPEG1/2
MPEG4
XviD MP4 (.mp4, .mov), AVI (.avi), MKV (.mkv), ASF (.asf)
Sorenson H.263 FLV (.v), AVI (.avi), SWF (.swf)
H.263 MP4 (.mp4, .mov), 3GPP (.3gpp, .3gp), AVI (.avi), MKV (.mkv)
H.264
Motion JPEG 720P@30fps 10Mbps
VP8 1080P@30fps 20Mbps MKV (.mkv), WebM (.webm)
HEVC 4K2K@60fps 160Mbps
VP9 4K2K@30fps 100Mbps MKV (.mkv), WebM (.webm)
1080Px2@30fps,
1080P@60fps
3840x2160@30fps,
1080P@60fps
40Mbps
135Mbps
MPEG Programmstream (.DAT, .VOB, .MPG, .MPEG), MPEG
Transportstream (.ts, .trp, .tp), MP4 (.mp4, .mov), 3GPP (.3gpp,
.3gp), AVI (.avi), MKV (.mkv), ASF (.asf)
MPEG Programmstream (.MPG, .MPEG), MP4 (.mp4, .mov),
3GPP (.3gpp, .3gp), AVI (.avi), MKV (.mkv), ASF (.asf)
FLV (.v), MP4 (.mp4, .mov), 3GPP (.3gpp, .3gp), MPEG
Transportstream (.ts, .trp, .tp), ASF (.asf), AVI (.avi), MKV (.mkv)
AVI (.avi), 3GPP (.3gpp, .3gp), MP4 (.mp4, .mov), MKV (.mkv),
ASF (.asf)
MP4 (.mp4, .mov), MKV (.mkv), MPEG Transportstream (.ts, .trp,
.tp)
Im USB-Modus Unterstützte Bilddateiformate
Bild Foto Auösung(BreitexHöhe) Hinweis
JPEG
PNG
Baseline 15360x8640
Progressiv 1024x768
non-interlace 9600x6400
Interlace 1200x800
Die Obergrenze für die maximale Auösung
ist abhängig von der DRAM-Größe.
BMP 9600x6400
Deutsch - 55 -
Page 57

Im USB-Modus Unterstützte Audiodateiformate
Audio-Codec Sample-Rate Bitrate Behälter
MPEG1/2 Layer1 16KHz ~ 48KHz
MPEG1/2 Layer2 16KHz ~ 48KHz
MPEG1/2 Layer3 16KHz ~ 48KHz
AC3
EAC3
AAC, HEAAC 8KHz ~ 48KHz
WMA 8KHz ~ 48KHz
WMA 10 Pro M0 48KHz < 192kbps
WMA 10 Pro M1 48KHz < 384kbps
WMA 10 Pro M2 96KHz < 768kbps
32KHz, 44,1KHz,
48KHz
32KHz, 44,1KHz,
48KHz
G711 A/mu-law 8KHz
8KHz, 11.025KHz,
LBR (cook)
22.05KHz,
44.1KHz
32Kbps ~
448Kbps
8Kbps ~
384Kbps
8Kbps ~
320Kbps
32Kbps ~
640Kbps
32Kbps ~ 6
Mbps
128bps ~
320Kbps
64Kbps ~
128Kbps
6Kbps ~
128Kbps
MP3 (.mp3), AVI (.avi), ASF (.asf), Matroska (.mkv, .mka),
MPEG Tansportstream (.ts, .trp, .tp), MPEG Programmstream
(.DAT, .VOB, .MPG, .MPEG), WAV (.wav)
MP3 (.mp3), AVI (.avi), ASF (.asf), Matroska (.mkv, .mka),
MPEG Tansportstream (.ts, .trp, .tp), MPEG Programmstream
(.DAT, .VOB, .MPG, .MPEG), WAV (.wav)
MP3 (.mp3), AVI (.avi), ASF (.asf), Matroska (.mkv, .mka), 3GPP
(.3gpp, .3gp), MP4 (.mp4, .mov, m4a), MPEG Transportstream
(.ts, .trp, .tp), MPEG Programmstream (.DAT, .VOB, .MPG,
.MPEG), FLV (.v), WAV (.wav), SWF (.swf)
AC3 (.ac3), AVI (.avi), Matroska (.mkv, .mka), 3GPP (.3gpp,
.3gp), MP4 (.mp4, .mov, m4a), MPEG Transportstream (.ts, .trp,
.tp), MPEG Programmstream (.DAT, .VOB, .MPG, .MPEG)
EAC3 (.ec3), 3GPP (.3gpp, .3gp), MP4 (.mp4, .mov, m4a),
MPEG Transportstream (.ts, .trp, .tp), MPEG program stream
(.DAT, .VOB, .MPG, .MPEG)
AAC (.aac), AVI (.avi), Matroska (.mkv, .mka), 3GPP (.3gpp,
.3gp), MP4 (.mp4, .mov, m4a), MPEG Transportstream (.ts, .trp,
.tp), MPEG Programmstream (.DAT, .VOB, .MPG, .MPEG), FLV
(.v), RM (.ra)
ASF (.wma, .asf), AVI (.avi), Matroska (.mkv, .mka)
WAV (.wav), AVI (.avi), Matroska (.mkv, .mka), 3GPP
(.3gpp, .3gp), MP4 (.mp4, .mov, m4a)
RM (.ra)
FLAC 8KHz~96KHz < 1.6Mbps Matroska (.mkv, .mka)
Deutsch - 56 -
Page 58

UnterstützteDVI-Auösungen
Wenn Sie Zusatzgeräte über das DVI-Adapterkabel (DVI zu HDMI, nicht im Lieferumfang enthalten) an die
Anschlüsse Ihres TV-Gerätes anschließen, können Sie die folgenden Auösungsrichtwerte verwenden.
56Hz 60Hz 66Hz 70Hz 72Hz 75Hz
640x480
800x600
1024x768
1280x768
1280x960
1360x768
1366x768
1280x1024
1400x1050
1600x900
þ þ þ
þ þ
þ þ þ
þ þ
þ
þ
þ
þ þ þ
þ
þ
Deutsch - 57 -
Page 59

Konnektivität
Drahtgebundene Konnektivität
Verbindung mit einem drahtgebundenen
Netzwerk herstellen
• Sie müssen über ein Modem bzw. einen Router mit
einem aktiven Breitbandanschluss verfügen.
• Stellen Sie sicher, dass die Nero Media Home
Software auf Ihrem Rechner installiert ist (für die
Audio-Video-Sharing-Funktion). Siehe dazu den
Abschnitt „Nero Media Home Installation“.
• Ihren PC mit einem Modem/Router verbinden. Dies
kann eine drahtgebundene oder eine drahtlose
Verbindung sein.
• Verbinden Sie Ihren Fernseher mit Ihrem Modem /
Router über ein Ethernet-Kabel. An der Rückseite
Ihres TV-Geräts bendet sich ein LAN-Eingang.
Breitband ISP-Verbindung
LAN (Ethernet)Kabel
LAN-Eingang an der
Rückseite des TV-Geräts
• Um auf gemeinsam genutzte Dateien zugreifen
zu können, müssen Sie den Medienbrowser
auswählen. Drücken Sie die Menu-Taste, und
wählen Sie Medienbrowser. Drücken Sie OK
um fortzufahren. Wählen Sie den gewünschten
Dateityp, und drücken Sie OK. Sie müssen immer
den Medienbrowser-Bildschirm benutzen, um
Zugriff auf gemeinsamgenutzte Netzwerk-Dateien
zu haben und diese wiederzugeben.
• PC/HDD/Media Player oder andere kompatible
Geräte sollten für eine bessere Wiedergabequalität
mit einer drahtgebundenen Verbindung verwendet
werden.
Um die Einstellungen für eine drahtgebundene
Verbindung zu konfigurieren, gehen Sie bitte
zum Abschnitt Netzwerk-/Interneteinstellungen
im Menü Einstellungen.
• Abhängig von Ihrer Netzwerkkonguration können
Sie möglicherweise Ihren Fernseher mit Ihrem
LAN verbinden. Verwenden Sie in diesem Fall ein
Ethernet-Kabel, um Ihren Fernseher direkt mit der
Netzwerk-Steckdose zu verbinden.
Deutsch - 58 -
Netzwerk-
Wandsteckdose
LAN-Eingang an der
Rückseite des TV-Geräts
KongurationderEinstellungenfür
drahtgebundene Geräte
Netzwerktyp
Als Netzwerktyp können Sie Drahtgebundenes
Gerät, Drahtloses Gerät oder aber Deaktiviert
auswählen, entsprechend der aktiven Verbindung zum
TV-Gerät. Wählen Sie die Option Drahtgebundenes
Gerät, wenn Sie die Einstellung über ein Ethernet
herstellen.
Internetgeschwindigkeitstest
Wählen Sie die Option Internetgeschwindigkeitstest, und drücken Sie die OK-Taste. Das TV-Gerät
überprüft nun die Internetverbindungsbandbreite und
zeigt anschließend die Resultate an.
Erweiterte Einstellungen
Markieren Sie Erweiterte Einstellungen, und drücken Sie die OK-Taste. Auf dem nächsten Bildschirm
können Sie die IP- und DNS-Einstellungen des TVGeräts ändern. Markieren Sie gewünschten Optionen,
und drücken Sie die Links- oder Rechts-Taste, um
die Einstellung von Automatisch auf Manuell zu
ändern. Sie können nun die Manuelle IP und / oder
die Manuellen DNS-Werte eingeben. Wählen Sie
den entsprechenden Punkt im Dropdown-Menü, und
geben Sie die neuen Werte mit Hilfe der nummerischen Tasten der Fernbedienung ein. Klicken Sie auf
die OK-Taste, um zum Abschluss die Änderungen
zu speichern.
Drahtlose Verbindung
Anschluss an ein kabelgebundenes
Netzwerk
Der Fernseher kann keine Verbindung zu einem
Netzwerk mit versteckter SSID herstellen. Um die
SSID Ihres Modems sichtbar zu machen, müssen
Sie die SSID-Einstellungen über die Modem-Software
ändern.
Für den Anschluss an ein WLAN, führen Sie
folgende Schritte durch:
1. Stellen Sie sicher, dass die Nero Media Home
Software auf Ihrem Rechner installiert ist (für
die Audio-Video-Sharing-Funktion).
Page 60

2. Um die Einstellungen für drahtlose
Verbindungen zu kongurieren, gehen Sie
bitte zum Abschnitt Netzwerk/InternetEinstellungenim Menü Einstellungen.
Breitband
ISPVerbindung
Ein WLAN-N-Router (IEEE 802.11a/b/g/n) mit den
simultanen Frequenzbändern von 2.4 und 5 GHz ist
darauf ausgelegt, eine größtmögliche Bandweite zu
ermöglichen. Optimiert für zügiges und schnelleres
HD-Video-Streaming, schnellere Dateiübertragung
sowie Online-Spiele (Wireless-Gaming).
• Für schnelleres File-Sharing zwischen anderen
Geräten wie Computer, verwenden Sie eine LANVerbindung.
• Die Frequenz und der Kanal unterscheiden sich je
nach Gebiet.
• Die Übertragungsgeschwindigkeit ist abhängig von
der Entfernung und Anzahl der Hindernisse zwischen
der übertragenen Produkte, die Konguration dieser
Produkte, die Funkwellen, der Linienverkehr und
die Produkte, die Sie verwenden. Abhängig von
den Funkwellen der DECT-Telefone oder anderen
WLAN 11b-Geräten, kann die Übertragung auch
abgebrochen oder unterbrochen werden. Die
Richtwerte der Übertragungsgeschwindigkeit
sind die theoretischen Maximalwerte für die
Wireless-Standards. Sie sind nicht die tatsächlichen
Geschwindigkeiten der Datenübertragung.
• Welcher Ort die beste Übertragungsqualität bietet,
hängt von den jeweiligen Bedingungen ab.
• Die WLAN-Funktion des TV-Geräts unterstützt
Modems des Typs 802.11 a, b, g & n. Es
wird dringend empfohlen, dass Sie das IEEE
802.11n-Kommunikationsprotokoll nutzen, um
Probleme bei der Videowiedergabe zu vermeiden.
• Sie müssen die SSID Ihres Modems ändern,
wenn in der Umgebung andere Modems mit der
gleichen SSID vorhanden sind. Sonst können
Verbindungsprobleme auftreten. Wenn Sie Probleme
mit der drahtlosen Verbindung haben, benutzen Sie
eine drahtgebundene Verbindung.
Kongurationderkabelgebundenen
Geräte-Einstellungen
Öffnen Sie das Menü Netzwerk-/
Interneteinstellungen, und wählen Sie die Option
Drahtloses Gerät als Netzwerktyp, um den
Verbindungsvorgang zu starten.
Das TV-Gerät sucht nun automatisch nach
Drahtlosnetzwerken. Eine Liste der verfügbaren
Netzwerke wird angezeigt. Bitte wählen Sie aus der
Liste das gewünschtes Netzwerk.
Hinweis: Wenn das Modem den N-Modus unterstützt, sollten
Sie die N-Modus-Einstellungen bevorzugen.
Falls das gewählte Netzwerk passwortgeschützt,
geben Sie dieses bitte über die virtuelle Tastatur ein.
Sie können diese Tastatur über die Navigationstasten
und die OK-Taste auf der Fernbedienung steuern.
Warten Sie, bis die IP-Adresse auf dem Bildschirm
angezeigt wird.
Dies bedeutet, dass die Verbindung nun hergestellt ist.
Um die Drahtlosverbindung zu trennen, markieren Sie
Netzwerktyp und drücken Sie die Links oder RechtsTaste, um diese Option auf Deaktiviert zu setzen.
Wählen Sie die Option Internetgeschwindigkeitstest,
und drücken Sie die OK-Taste, um Ihre
Internetgeschwindigkeit zu testen. Markieren Sie
Erweiterte Einstellungen und drücken Sie die
OK-Taste, um das Menü Erweiterte Einstellungen
zu öffnen. Nehmen Sie die Einstellungen mit Hilfe
der Navigations- und der Nummerischen Tasten vor.
Klicken Sie auf die OK-Taste, um zum Abschluss die
Änderungen zu speichern.
Andere Informationen
Der Status der Verbindung wird als Verbunden oder
Nichtverbunden angezeigt, wie auch die aktuelle IP-
Adresse, wenn eine Verbindung herstellt worden ist.
Ihr Mobilgerät über WLAN verbinden
• Wenn Ihr Mobilgerät WLAN-fähig ist, können Sie es
über einen Router an Ihren Fernseher anschließen,
um auf die dort verfügbaren Inhalte zuzugreifen.
Dazu muss Ihr Mobilgerät über eine geeignete
Sharing-Software verfügen.
• Um die Verbindung zu Ihrem Router herzustellen,
folgen Sie den Schritten im Abschnitt Drahtlose
Verbindung oben.
• Anschließend verbinden Sie Ihr Mobilgerät mit dem
Router und aktivieren dann die Sharing-Software
auf dem Mobilgerät. Dann wählen Sie die Dateien,
welche Sie mit Ihrem Fernseher teilen möchten.
• Wenn die Verbindung korrekt aufgebaut ist,
sollten Sie jetzt über den Medienbrowser Ihres
Fernsehers Zugriff auf die freigegebenen Dateien
Ihres Mobilgeräts haben.
Deutsch - 59 -
Page 61

• Gehen Sie zum Medienbrowser-Menü und die
Bildschirmanzeige „Auswahl Wiedergabegerät“
erscheint. Wählen Sie Ihr Mobilgerät, und drücken
Sie OK, um fortzufahren.
• Falls verfügbar, können Sie eine virtuelle
Fernbedienung-Anwendung vom Server Ihres
Anbieters für Mobilgeräte-Apps herunterladen.
Hinweis: Diese Funktion wird möglicherweise nicht für
alle Mobilgeräte unterstützt.
Drahtlosanzeige
Wireless Display ist ein Standard zum Streamen von
Video und Sound-Inhalten von Wi-Fi Alliance. Diese
Funktion sorgt dafür, dass Sie Ihren TV als Wireless
Display nutzen können.
Verwendung mit mobilen Geräten
Es gibt verschiedene Standards die es ermöglichen
Bildschirme ihres mobilen Geräts und TVs zu teilen,
einschließlich Grak-, Video- und Audio-Inhalten.
Stecken Sie den WLAN-USB Dongle zuerst an den
TV, falls dieser nicht über internes WLAN verfügt.
Drücken Sie dann die Quelle-Taste auf der
Fernbedienung und wechseln Sie zur Wireless
Display-Quelle.
Ein Bildschirm erscheint, der besagt, dass der TV
bereit zur Verbindung ist.
Öffnen Sie die Sharing-Anwendung auf Ihrem mobilen
Gerät. Diese Anwendungen heißen bei jeder Marke
anders, bitte sehen Sie im Handbuch Ihres mobilen
Geräts hinsichtlich weiterer Informationen nach.
Scannen Sie nach Geräten. Nachdem Sie Ihren TV
gewählt und verbunden haben, wird der Bildschirm
Ihres Geräts auf Ihrem TV angezeigt werden.
Hinweis: Diese Funktion kann nur genutzt werden, wenn
das mobile Gerät dieses Feature unterstützt. Die Scan und
Verbindungsprozesse unterscheiden sich je nach von Ihnen
verwendetem Programm. Androidbasierte mobile Geräte
sollten die Software-Version V4.2.2 und höher haben.
Fehlerbehebung - Konnektivität
WLAN-Netzwerk nicht verfügbar
• Stellen Sie sicher, dass die Firewall-Einstellungen
Ihres Netzwerks die drahtlose Verbindung Ihres
Fernsehers zulassen.
• Suchen Sie mit Hilfe der Menüanzeige Netzwerk-/
Interneteinstellungen erneut nach drahtlosen
Netzwerken.
Falls das WLAN-Netzwerk nicht richtig funktioniert,
versuchen Sie eine Verbindung über das
drahtgebundene Heimnetz zu herzustellen. Weitere
Informationen zu diesem Vorgang finden Sie im
Abschnitt Drahtgebundene Netzwerkverbindung.
Wenn sich auch keine drahtgebundene Verbindung
zum TV-Gerät herstellen lässt, überprüfen Sie das
Modem (Router). Liegt kein Problem mit dem Router
vor, überprüfen Sie die Internetverbindung des
Modems.
Verbindung ist langsam
Sehen Sie im Handbuch Ihres WLAN-Modems
nach, um Informationen über die Reichweite, die
Verbindungsgeschwindigkeit, die Signalqualität und
weitere Einstellungen zu erhalten. Sie benötigen einen
Hochgeschwindigkeitsanschluss für das Modem.
Unterbrechung während der Wiedergabe
oder verlangsamte Reaktion
Versuchen Sie in diesem Fall Folgendes:
Halten Sie mindestens drei Meter Abstand zu
Mikrowellenherden, Mobiltelefonen, BluetoothGeräten oder anderen WLAN-kompatiblen Geräten.
Versuchen Sie, den aktiven Kanal des WLAN-Routers
zu ändern.
Internetverbindung nicht verfügbar/ AudioVideo-Sharing funktioniert nicht
Wenn die MAC-Adresse (eine eindeutige
Kennnummer) Ihres PCs oder Modems dauerhaft
registriert wurde, ist es möglich, dass Ihr Fernsehgerät
möglicherweise nicht mit dem Internet Verbindung
aufnehmen kann. In einem solchen Fall wird die
MAC-Adresse jedes Mal authentiziert, wenn Sie
Verbindung zum Internet aufnehmen. Dies ist eine
Vorsichtsmaßnahme gegen unbefugten Zugriff. Da
Ihr Fernseher über eine eigene MAC-Adresse verfügt,
kann Ihr Internetdienstanbieter die MAC-Adresse
Ihres Fernsehers nicht validieren. Aus diesem
Grund kann Ihr Fernseher nicht mit dem Internet
Verbindung aufnehmen. Kontaktieren Sie Ihren
Internetdienstanbieter und lassen Sie sich erklären,
wie Sie ein anderes Gerät, wie zum Beispiel Ihr TVGerät, mit dem Internet verbinden können.
Es ist auch möglich, dass die Verbindung nicht
zugänglich ist, wegen eines Firewall Problems.
Wenn Sie denken, dass dies zu Ihrem Problem
führt, kontaktieren Sie Ihren Internetdienstanbieter.
Eine Firewall könnte z.B. Konnektivitätsprobleme
verursachen oder WLAN-Netzwerke verbergen, wenn
Sie das TV-Gerät im Audio-Video-Sharing-Modus
verwenden oder über die Audio-Video-SharingFunktion surfen möchten.
Ungültige Domain
Stellen Sie sicher, dass Sie bereits auf Ihrem PC
mit einem autorisierten Benutzernamen / Passwort
angemeldet sind und weiterhin dass Ihre Domain
im Medienserver-Programm auf Ihrem PC aktiv ist,
bevor Sie mit dem Datenaustausch beginnen. Eine
ungültige Domain kann zu Problemen beim Browsen
durch Dateien im Audio-Video-Sharing-Modus führen.
Deutsch - 60 -
Page 62

Verwendung des Audio-Video-SharingNetzwerkdienstes
Die Audio-Video-Sharing-Funktion verwendet
einen Standard, der die Darstellung von digitalen
Elektronikgeräten vereinfacht und deren Verwendung
in Heimnetzwerken erleichtert.
Mit diesem Standard können Sie auf einem im
Heimnetzwerk angeschlossenen Medienserver
gespeicherte Fotos und Videos anzeigen und
Musikdateien hören.
1. Nero Media Home Installation
Die Audio-Video-Sharing-Funktion kann nicht ohne
das auf Ihrem PC installierte Server-Programm
verwendet werden. Außerdem muss die erforderliche
Mediaserver-Software auch auf dem dazugehörigem
Gerät installiert sein. Bitte richten Sie Ihren PC mit
Hilfe der Nero Media Home Software entsprechend
ein. Für weitere Informationen über die Installation,
gehen Sie bitte zum Abschnitt „Nero Media Home
Installation“.
2. Verbindung mit einem drahtgebundenen
oder drahtlosen Netzwerk herstellen
Lesen Sie die das Thema Drahtgebundene/
Drahtlose Konnektivität betreffenden Kapitel für
ausführliche Informationen zur Konguration.
3. Wiedergabe von gemeinsam genutzten
Dateien via Medienbrowser
Wählen Sie Medienbrowser aus dem Hauptmenü,
indem Sie die Richtungstasten benutzen.
Anschließend drücken Sie OK. Der Medienbrowser
wird dann angezeigt.
Video-Audio-Sharing
Audio-Video-Sharing-Unterstützung ist nur möglich
im Medienbrowser-Ordner-Modus. Um den OrdnerModus zu aktivieren, gehen Sie zu Einstellungen im
Medienbrowser-Hauptbildschirm und drücken Sie OK.
Markieren Sie Anzeigeart, und stellen Sie mit Hilfe
der Links- oder Rechts-Taste die Option Ordner
ein. Wählen Sie den gewünschten Medientyp und
drücken Sie OK.
Wenn die gemeinsame Konguration richtig eingestellt
ist, erscheint die Anzeige Geräte-Auswahl nach
der Auswahl des gewünschten Medientyps. Wenn
verfügbare Netzwerke gefunden wurden, werden sie
auf diesem Bildschirm angezeigt. Wählen Sie mit Hilfe
der mit den Auf- bzw. Ab-Tasten den gewünschten
Medienserver bzw. das gewünschte Netzwerk
und drücken Sie OK. Wenn Sie die Geräte-Liste
aktualisieren möchten, drücken Sie die Grüne Taste.
Zum Verlassen drücken Sie die Menu-Taste.
Stellen Sie als Medientyp Videos ein und wählen
Sie ein Gerät im Auswahl-Menü. Wählen Sie dann
auf dem nächsten Bildschirm den Ordner mit den
Videodateien, und alle verfügbaren Videodateien
werden angezeigt.
Deutsch - 61 -
Um andere Medientypen aus dieser Anzeige
wiederzugeben, können Sie zum Hauptmenü des
Medienbrowser zurückgehen, den gewünschten
Medientyp wählen und die Netzwerk-Auswahl
wiederholen. Oder Sie drücken die Blaue Taste,
um zum nächsten Medientyp zu wechseln, ohne
das Netzwerk zu ändern. Weitere Informationen zur
Wiedergabe von Dateien nden Sie im Menüabschnitt
Mediabrowser.
Wenn Sie Videos aus Ihrem Netzwerk mit Hilfe der
Audio-Video-Sharing-Funktion abspielen, können
Untertitel nicht angezeigt werden.
Sie können nur ein TV-Gerät mit demselben
Netzwerk verbinden. Trennen Sie im Falle von
Netzwerkproblemen Ihr TV-Gerät vom Netz und
stellen Sie anschließend die Verbindung wieder her.
Trick-Modus und Springen werden von der AudioVideo-Sharing-Funktion nicht unterstützt.
Hinweis: Bei manchen PCs kann die Audio-Video-SharingFunktion möglicherweise aufgrund der Administrator- und
Sicherheitseinstellungen (wie z. B. beruich genutzte Geräte)
nicht verwendet werden.
Um im Heimnetzwerk die bestmögliche Streamingqualitiät
auf dieses TV-Gerät zu erzielen, muss die Nero Software
installiert werden.
Nero MediaHome Installation
Um Nero MediaHome zu installieren, gehen Sie
bitte wie folgt vor:
Hinweis: Die Audio-Video-Sharing-Funktion kann nicht ohne
das auf Ihrem PC installierte Server-Programm verwendet
werden. Außerdem muss die erforderliche MediaserverSoftware auch auf dem dazugehörigem Gerät installiert sein.
1. Geben Sie den unten aufgeführten Link
vollständig in die Adressleiste Ihres
Webbrowsers ein.
http://www.nero.com/mediahome-tv
2. Klicken Sie auf die Schaltäche Download auf
der sich öffnenden Seite. Die Installationsdatei
wird nun auf Ihren Computer heruntergeladen.
3. Nachdem der Download abgeschlossen wurde,
doppelklicken Sie auf die Installationsdatei, um
die Installation zu starten. Der InstallationsAssistent wird Sie durch den Installationsprozess
führen.
4. Die folgende Meldung zu den
Installationsvoraussetzungen wird nun angezeigt.
Der Installationsassistent prüft die Verfügbarkeit
der erforderlichen Drittanbieter-Software auf
Ihrem PC.Eventuelle fehlende Programme
werden aufgelistet und müssen vor dem
Fortfahren mit diesem Setup, installiert werden.
5. Klicken Sie auf die Schaltäche Installieren. Die
integrierte Seriennummer wird nun angezeigt.
Bitte ändern Sie die angezeigte Seriennummer
nicht.
Page 63

6. Klicken Sie auf die Schaltfläche Weiter. Die
Lizenzbedingungen (EULA) werden angezeigt.
Bitte lesen Sie die Lizenzvereinbarung sorgfältig
durch und wählen Sie das entsprechende
Kontrollkästchen, wenn Sie mit den Bedingungen
der Vereinbarung einverstanden sind. Die
Installation ist ohne diese Vereinbarung nicht
möglich.
7. Klicken Sie auf die Schaltfläche Weiter. Auf
dem nächsten Bildschirm können Sie die
Installationsvoreinstellungen vornehmen.
8. Klicken Sie auf die Schaltäche Installieren.
Die Initialisierung startet und wird automatisch
abgeschlossen. Ein Fortschrittsbalken informiert
Sie über den Status des Installationsprozesses.
9. Klicken Sie auf die Schaltäche Fertig stellen.
Die Installation wurde vollständig durchgeführt.
Sie werden nun auf die Website der NeroSoftware weitergeleitet.
10. Eine Verknüpfung auf Ihrem Desktop wurde
angelegt.
Glückwunsch! Sie haben Nero MediaHome
erfolgreich auf Ihrem PC installiert.
Starten Sie Nero MediaHome durch einen Doppelklick
auf Verknüpfungsicon.
Internet Portal
TIPP:Eine Breitbandinternetverbindung ist für den Empfang
von Inhalten in hoher Qualität sowie für das ordnungsgemäße
Funktionieren des Internet-Portals erforderlich.
Mit der Portal-Funktion können Ihren Fernseher via
Internet mit einen Server zu verbinden, um die dort
vorhandenen Inhalte über Ihre Internet-Verbindung
aufzurufen. Die Portal-Funktion ermöglicht es Ihnen,
Musikdateien, Videos, Clips oder Web-Inhalte mit
denierten Tastenkürzeln aufzurufen. Ob Sie diesen
Inhalt ohne Unterbrechung anzeigen können ist
abhängig von der Verbindungsgeschwindigkeit Ihres
Internet Service Providers.
Drücken Sie die Internet-Taste auf der
Fernbedienung, um das Internet-Portal aufzurufen.
Vor der Herstellung der Verbindung mit dem Portal
wird um Ihre Zustimmung zu den Smart TV-
Nutzungsbedingungen und Ihre Zustimmung zu
Smart-TV-Cookies gebeten. Sie müssen zustimmen,
um fortzufahren. Markieren Sie Zustimmen und dann
auf dem nächsten Bildschirm die Option OK links
unten auf der Bildäche, und drücken Sie dann die
OK-Taste auf der Fernbedienung, um fortzufahren.
Ein Bestätigungsbildschirm wird als Nächstes mit
der Frage angezeigt, ob Sie die Kindersicherung
aktivieren möchten, um Apps mit der Freigabe 18+
zu sperren. Markieren Sie Abbrechen und drücken
Sie OK, wenn Sie fortfahren möchten, ohne diese
Art von Apps zu sperren. Wählen Sie Aktivieren,
und drücken Sie OK, wenn Sie die Kindersicherung
Deutsch - 62 -
aktivieren wollen. Sie werden aufgefordert, einen
vierstelligen Zugangscode zu erstellen, um zukünftig
auf die gesperrten Apps zugreifen zu können. Sie
müssen den Code zur Bestätigung zweimal eingeben.
Wenn Portal geöffnet wurde, werden Ihnen die
Icons der verfügbaren Apps werden auf der PortalSeite angezeigt. Scrollen Sie nach unten, um alle
verfügbaren Apps anzuzeigen. Navigieren Sie mit
Hilfe der Richtungstasten Ihrer Fernbedienung im
Portal. Bewegen Sie den Zeiger auf das gewünschte
Element und drücken Sie OK, um die Anwendung
zu starten. Drücken Sie die Back-Taste, um auf
die vorherige Ansicht zurückzukehren. Nutzen Sie
die Farbtasten der Fernbedienung für bestimmte
Vorgänge im Zusammenhang mit der markierten
App. Sofern verfügbar, werden die Optionen für jede
Farbtaste unten links auf dem Bildschirm angezeigt.
Sie können die App-Galerie nutzen, um weitere Apps
zu Ihrer Portalseite hinzuzufügen. Drücken Sie die
Grüne Taste, um das Land zu ändern und sich so
die verfügbaren lokalen Apps anzeigen zu lassen.
Drücken Sie die blaue Taste, um die Sperrung der
App ein- bzw. auszuschalten.
Sie können im Portal eine Suche durchführen, um eine
bestimmte App zu nden. Bewegen Sie den Zeiger
auf das Suchfeld oben in der rechten Bildschirmecke,
und drücke Sie OK. Geben Sie einen Suchbegriff ein,
um die Suche zu starten Die Suchergebnisse werden
unterhalb des Suchfelds angezeigt. Drücken Sie die
Back-Taste, um die virtuelle Tastatur zu schließen,
und wählen Sie das gewünschte Ergebnis mit Hilfe
der Richtungstasten.
Sie können die Webbrowser-App verwenden, um jede
gewünschte Internetseite aufzurufen und Suchen im
Internet auszuführen.
Sie können auf die Menüoptionen Bild und Ton durch
Drücken der Menu-Taste auf der Fernbedienung
zugreifen und dort Einstellungen vornehmen, ohne in
den Live-TV-Modus zurückgehen zu müssen.
Folgen Sie den Anweisungen unten auf dem
Bildschirm, um die verfügbaren Tastenfunktionen
zu nutzen.
Drücken Sie die TV-Taste, um den Internet-PortalModus zu verlassen.
PIP-Fenster (abhängig vom Portaldienst)
Der aktuelle Quelleninhalt wird im Hintergrund der
Benutzeroberäche der Startseite des Internet-Portals
angezeigt. In einigen Untermenü-Bildschirmen kann
möglicherweise ein kleines PIP-Fenster angezeigt
werden.
Wenn Sie beim Fernsehen zum Portal-Modus
umschalten, wird das aktuelle Programm im
Hintergrund bzw. im PIP-Fenster angezeigt.
Hinweise:
Page 64

Mögliche mit den Apps auftretende Probleme könnten durch
den Inhalt-Service-Anbieter verursacht sein.
Inhalte und Benutzeroberächen der Portaldienste können
jederzeit ohne vorherige Ankündigung geändert werden.
Internetdienste Drittanbieter können sich ändern, abgebrochen
oder jederzeit eingeschränkt werden.
HBBTV-System
HbbTV (Hybrid Broadcast-Breitband-TV) ist ein
neuer Industriestandard, der nahtlos über den
Fernsehempfang bereitgestellte TV-Dienste mit
solchen, die über Breitband verfügbar sind, verbindet
und den Zugriff auf reine Internetdienste über
die angeschlossen Fernsehgeräte und Set-TopBoxen ermöglicht. Dienste über HbbTV schließen
herkömmliche Rundfunk-TV-Kanäle, Catch-UpFernsehen, Video-On-Demand, EPG, interaktive
Werbung, Personalisierung, Abstimmungen,
Spiele, Soziale Netzwerke und andere MulimediaAnwendungen mit ein.
HbbTV-Anwendungen sind über Kanäle verwendbar,
wenn der Rundfunksender diese Signale ausstrahlt
(im Moment zahlreiche Kanäle über Astra Rundfunk
HbbTV-Anwendungen) Der Rundfunksender markiert
einen der Anwendungen als "Autostart"-Anwendung,
die von der Plattform automatisch gestartet wird. Die
Autostart-Apps sind generell mit einem kleinen roten
Punktsymbol markiert, um dem Benutzer anzuzeigen,
dass hier eine HbbTV-App auf diesem Kanal zur
Verfügung steht. Drücken Sie auf den roten Punkt
drücken, um die Seite der App zu öffnen. Nachdem
die Seite angezeigt wird, kann der Benutzer zum
ursprünglichen Status des roten Punktsymbols
zurückkehren, indem er erneut auf den roten Punkt
drückt. Der Benutzer kann zwischen dem roten
Punksymbolmodus und dem vollen UI-Modus der
Anwendung hin- und herspringen, indem er den roten
Punkt drückt. Es sollte beachtet werden, dass das
Umschalten über den roten Punkt je nach Anwendung
auch anders funktionieren kann.
Schaltet der Benutzer in einen anderen Kanal,
während die HbbTV-Anwendung aktiv ist, (entweder
mit dem roten Punkt-Modus oder über den vollen UIModus) kann folgendes passieren.
• Die Anwendung kann weiter laufen.
• Die Anwendung kann beendet werden.
• Die Anwendung kann beendet werden und eine
andere Autostart-Rote-Punkt-Anwendung kann
gestartet werden.
HbbTV macht es möglich, dass die Anwendungen
über Breitband oder Broadcast wieder gefunden
werden können. Der Sender kann entweder beide
Möglichkeiten aktivieren oder eine von ihnen. Hat die
Plattform keine betriebsbereite Breitband-Verbindung,
kann die Plattform immer noch die Anwendungen über
Broadcast übermitteln.
Die roten Autostart-Punkt-Anwendungen liefern im
Allgemeinen Links zu anderen Anwendungen. Ein
Beispiel hierfür ist unten dargestellt. Der Benutzer
kann dann zu anderen Anwendungen schalten, indem
er die zur Verfügung stehenden Links verwendet. Die
Anwendungen verfügen in der Regel über eine Option
zum Beenden, normalerweise müsste das über die
Schaltäche Exit gehen.
Abbildung a: Startleiste Anwendung
Abbildung b: Die ARD-EPG-Anwendung, Broadcast-
Video, wird über die linke Taste angezeigt, und kann
über das Drücken der Taste 0 beendet werden.
HbbTV-Anwendungen verwenden Schlüssel auf der
Fernbedienung, um mit dem Benutzer interagieren
zu können. Wird eine HbbTV-Anwendung gestartet
wird, werden manche Schlüssel über die Anwendung
gesteuert. Beispielswiese kann die numerische
Kanalauswahl möglicherweise in einer TeletextAnwendung nicht mehr laufen, bei der die Nummer
die Teletext-Seiten anzeigen.
Für das HbbTV ist eine AV-Streaming-Fähigkeit
der Plattform erforderlich. Es gibt zahlreiche
Anwendungen, die VOD liefern (Video-On-Demand/
auf Abruf) und Catch-Up-TV-Dienste. Der Benutzer
kann die Schlüssel Pause, Stopp, Vorwärts und
Rückwärtsspulen an der Fernbedienung verwenden,
um mit dem AV-Inhalt interagieren zu können.
Hinweis:Sie können diese Funktion über das Menü Weitere
Einstellungen im Menü Einstellungen aktivieren bzw.
deaktivieren.
Deutsch - 63 -
Page 65

 Loading...