

Page 1

TPH17.2A
Chassis name Platform Model name
50PUD6172/30
TPH17.2A LA V553
55PUD6172/30
Published by Amy.ma 1751 Quality Subject to modification 3122 785 20540
2017 © TP Vision Netherlands B.V.
All rights reserved. Specifications are subject to change without notice. Trademarks are the
property of Koninklijke Philips Electronics N.V. or their respective owners.
TP Vision Netherlands B.V. reserves the right to change products at any time without being obliged to adjust
earlier supplies accordingly.
PHILIPS and the PHILIPS’ Shield Emblem are used under license from Koninklijke Philips Electronics N.V.
2017-Dec-22
Page 2

1.Product information……….……………………………………………………………………………………3
2.Connections overview……..…..…..………………..…………………………………………………………4
3.Mechanical Instructions………………….…………………………………………………………………….5
Cable dressing (50" 6172 series)………………………………………………………………………………5
Cable dressing (55" 6172 series)………………………………………………………………………………5
Assembly/Panel Removal ………………………………………………………………………………………6
4.Service Modes…………….……………….………………….…………………………………………….….11
5.Software upgrading, Error Code and Panel Code………...……………………………………………..13
6.Circuit Descriptions…..……………………….………………………………………………………………15
7.IC Data Sheet……...……………………………………………………………………………………….…..20
8.Circuit Diagrams……………...……………………………………………………………………………….25
8.1 A 715G8962 PSU…………………………………………………………………..……………………25
8.2 A 715G8967 PSU…………………………………………………………………..……………………29
8.3 B 715G9225 SSB………………………………………………………………………………………..33
8.4 J 715G8623 IR/LED Panel…………………………………………..…………………………………46
8.5 E 715G7088 Keyboard control panel………………………………………………………………47
9.Styling Sheet……………….…………………….………………………………………………………….48
6172 series 50"………………………………………………………………………………………………48
6172 series 55"………………………………………………………………………………………………49
Published by Amy.ma 1751 Quality Subject to modification 3122 785 20540
2017 © TP Vision Netherlands B.V.
All rights reserved. Specifications are subject to change without notice. Trademarks are the
property of Koninklijke Philips Electronics N.V. or their respective owners.
TP Vision Netherlands B.V. reserves the right to change products at any time without being obliged to adjust
earlier supplies accordingly.
PHILIPS and the PHILIPS’ Shield Emblem are used under license from Koninklijke Philips Electronics N.V.
2017-Dec-22
Page 3

1. Product information
Product information may be subject to change without prior
notice. For detailed product information, please go to
www.philips.com/support
Display & Sound
Intrinsic resolution
• 3840 x 2160
Sound power
• 8W x 2
Supported input signal formats
Video formats
Resolution — Refresh rate
• 480i - 60 Hz
• 480p - 60 Hz
• 576i - 50 Hz
• 576p - 50 Hz
• 720p - 50 Hz, 60 Hz
• 1080i - 50 Hz, 60 Hz
• 1080p - 24 Hz, 25 Hz, 30 Hz, 50 Hz, 60 Hz
• 4K x 2K - 30 Hz, 23.98 Hz, 25 Hz, 50 Hz/60 Hz
Computer formats
Resolution — Refresh rate
• 640 x 480 - 60 Hz
• 800 x 600 - 60 Hz
• 1024 x 768 - 60 Hz
• 1280 x 1024 - 60 Hz
• 1920 x 1080 - 60 Hz
Dimensions and Weights
50PUD6172
• without TV stand:
Width 1127.54 mm - Height 666.63 mm – Depth
85.9mm - Weight: 11.1 kg
• with TV stand:
Width 1127.54 mm - Height 716.91 mm – Depth
262.47mm - Weight: 11.46 kg
55 PUD6172
• without TV stand:
Width 1241 mm - Height 730.36 mm – Depth
87.72 mm – Weight: 13.4 kg
• with TV stand:
Width 1241 mm - Height 781.91 mm - Depth
262.74 mm – Weight: 13.6 kg
Connectivity
TV Side
• USB x 2
• HDMI 1 (MHL)
• Antenna (75 ohm)
TV Bottom
• HDMI 2
• HDMI 3 (ARC)
• COAXIAL
• Network
• CVBS, Audio L/R
• Serv.U
Multimedia
Supported storage devices: USB (Supports FAT 32/FAT 16
USB storage devices.)
Playback formats
Video formats: MPEG-1, MPEG-2 MP@HL, MPEG-4
SP@L0-3, ASP@L0-5, H.264 MP, HP@Level 4.1, VC1
(AP), H263, MJPEG, AVS baseline@level 6.0, H265
Audio formats: WMA, WMAPro, MPEG, AAC, AC3,
EAC3, Vorbis
Image formats: png, jpeg, bmp
Power supply/ tuner/ reception/
transmission
Power supply
• Mains: 220V~, 50Hz
• Standby power consumption: ≤0.5W
• Ambient temperature : 5°C to 45°C
• Power consumption:
– 50PUD6172/30: 130W
– 55PUD6172/30: 150W
Tuner/ reception/ transmission
Antenna input: 75ohm coaxial (IEC75)
TV system: PAL I, DTMB
Video Play: NTSC, PAL
Tuner bands: UHF, VHF
Page 4

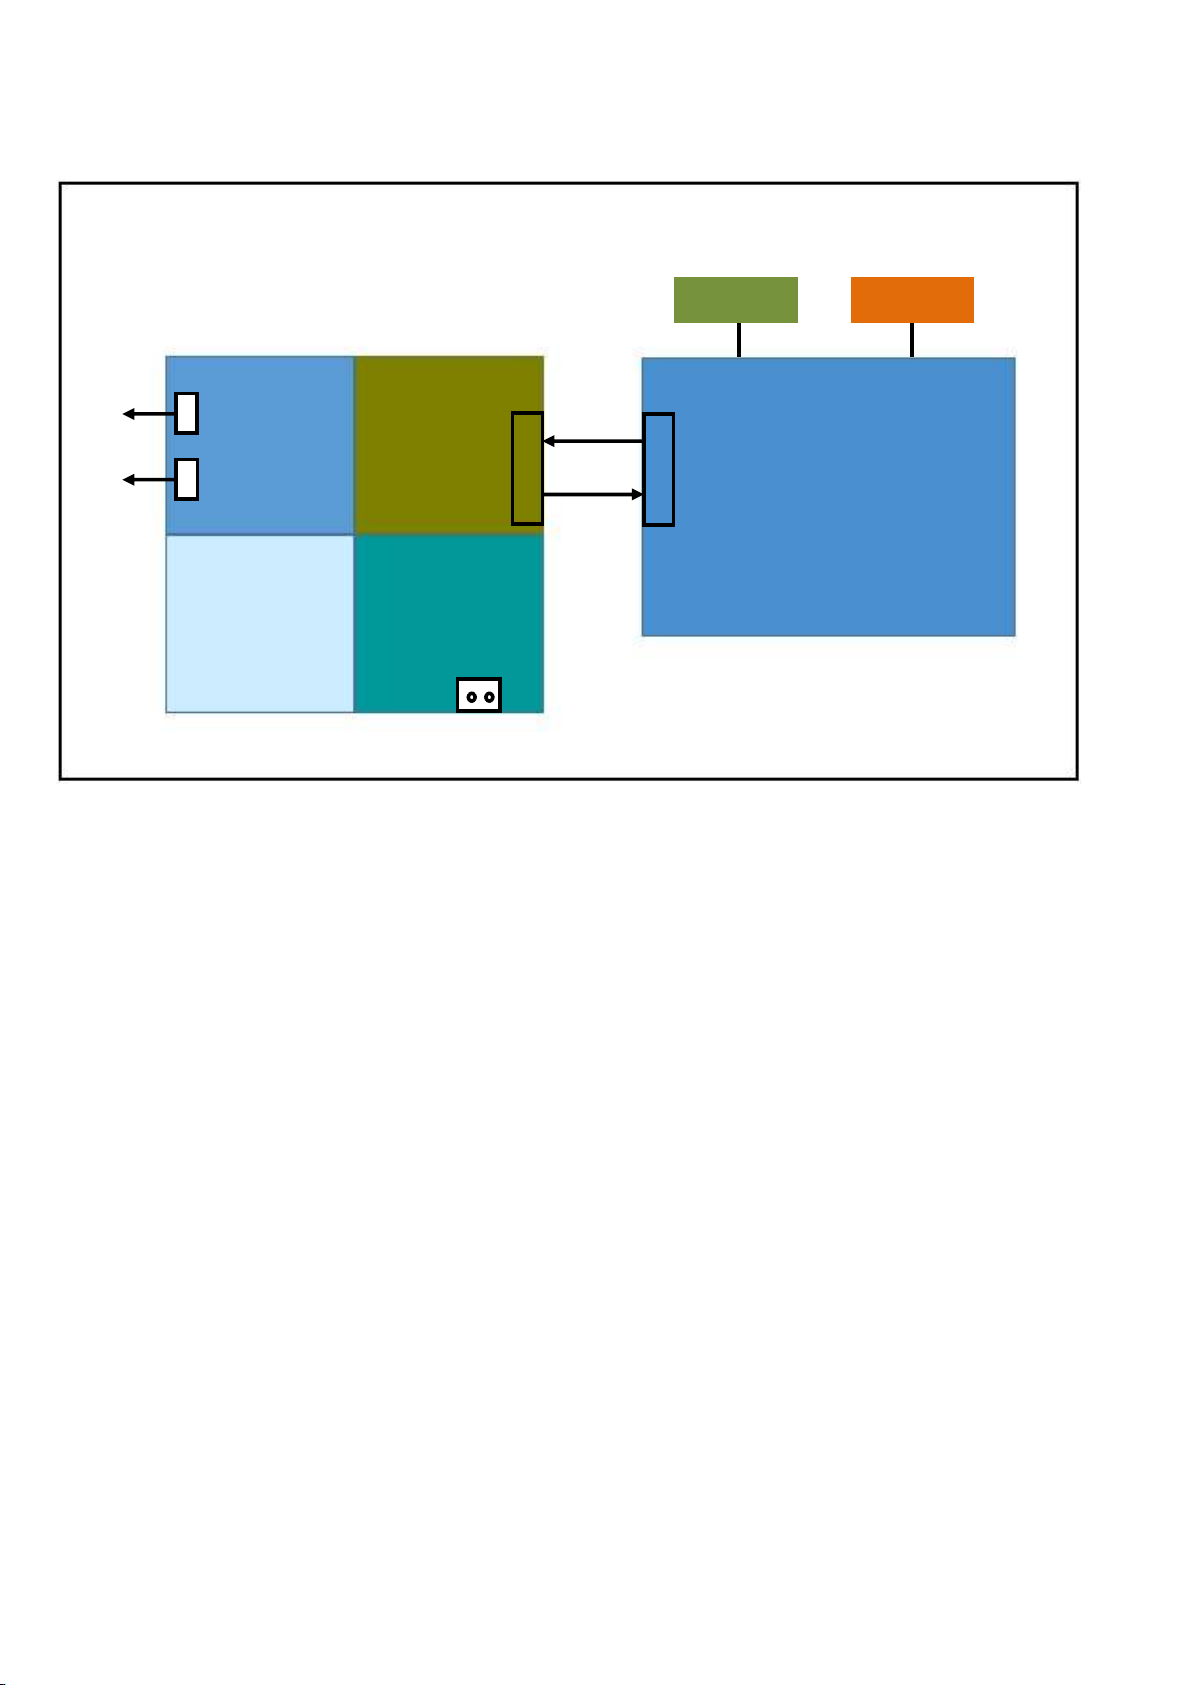
2. Connections Overview
SCALER
USB
HDMI
SERV.U
CVBS, Audio L/R
NETWORK
(For 715G9225M)
COAXIAL
HDMI
Antenna
Page 5

3. Mechanical Instructions
ECN701
MAIN POWER
KEY BOARD
(1057)
MAIN POWER
SSB
SSB
W
W
ECN
109
ECN
110
ECN
110
ECN
701
ECN
109
3.1 Cable Dressing
WIFI
Module
A
SUPPLY
(1054)
CN9102
CN8601
Cable dressing (50" 6172 series)
CN601
CN109
CN701
CN101
CN110
B
(1053)
E
WIFI
Module
A
CN9101
SUPPLY
(1054)
CN8603
Cable dressing (55" 6172 series)
CN601
CN109
CN701
CN101
B
CN110
(1053)
Page 6

Key board
IR Module
SPEAKER
SPEAKER
ECN
601 to spk
ECN
101 to IR&Key
E
(1057)
3.2 Assembly/Panel Removal
3.2.1 Stand removal
1. Remove the fixation screws [1] that secure the stand
2. Take the stand bracket out from the set.
1
1
Back cover overview(50/55” 6172 series)
J
(1056)
1
1
3.2.2 IR board Control Unit
1. Unplug the connector from the SSB.
Caution: be careful, as these are very fragile connectors!
2. Remove all the fixation screws [1] and connector [2] from the IR board control unit.
When defective, replace the whole unit.
2
1
Page 7

2
2
3
3.2.3 Rear Cover
Warning: Disconnect the mains power cord before removing the rear cover.
1. Remove fixation screws [2] that secure the back cover.
2. Unplug connector [3] carefully, as the speaker, IR board & Key board are catch on back cover.
3. Gently lift the rear cover from the TV. Make sure that wires and cables are not damaged while lifting the rear cover from the set.
2
2
2
2
2
2
2
2
3
(6172 series)
Page 8

3 3
3.2.3 Keyboard Control Unit
1. Release the connector [2] from the SSB Board.
Caution: be careful, the Keyboard is catch on the Back cover, please be careful to avoid damage the fragile connectors!
2. Remove all the fixation screws[1] and the cable from the keyboard control panel and take it out from the Back cover
When defective, replace the whole unit.
1
2
3.2.4 Small Signal Board (SSB)
Caution: it is mandatory to remount all different screws at their original position during re-assembly. Failure to do so may result in damaging the
SSB.
1. Release the clips from the LVDS connector that connect with the SSB[1].
Caution: be careful, as these are very fragile connectors!
2. Unplug all other connectors [2] .
3. Remove all the fixation screws from the SSB [3].
4. The SSB can now be shifted from side connector cover, then lifted and taken out of the I/O bracket.
3
3
1
2
3
1
3
Page 9

1
3.2.5 Power Supply Unit (PSU)
Caution: it is mandatory to remount all different screws at their original position during re-assembly. Failure to do so may result in damaging the
PSU.
1. Gently unplug all connectors from the PSU.
2. Remove all fixation screws from the PSU.
3. The PSU can be taken out of the set now.
3.2.7 Speakers
1. Gently release the tapes that secure the speaker cables.
2. Unplug the speaker connector from the SSB.
3. Take the speakers out.
When defective, replace the both units.
3.2.8 WIFI module
1. Unplug the connector [1] from the SSB..
2. Remove fixation screw [2] that secure the WIFI module,
3. Remove fixation screw [3] and take WIFI module out of FRAME COVER PCB
When defective, replace the whole unit.
2
3
Page 10

3.2.9 LCD Panel
1. Remove the SSB as described earlier.
2. Remove the PSU as described earlier.
3. Remove the keyboard control panel as described earlier.
4. Remove the stand bracket as described earlier.
5. Remove the IR/LED as described earlier.
6. Remove the fixations screws that fix the metal clamps to the front bezel. Take out those clamps.
7. Remove all other metal parts not belonging to the panel.
8. Lift the LCD Panel from the bezel.
When defective, replace the whole unit.
Page 11

4. Service Modes
4.1 Service Modes
The Service Mode feature is split into following parts:
Factory Mode.
Customer Service Mode (CSM).
Factory mode offer features, which can be used by the Service engineer to repair/align a TV set. Some features are:
Make alignments (e.g. White Tone).
Display information.
The CSM is a Service Mode that can be enabled by the consumer. The CSM displays diagnosis information, which the customer can forward to the
dealer or call centre. The information provided in CSM and the purpose of CSM is to:
Increase the home repair hit rate.
Decrease the number of nuisance calls.
Solved customers’ problem without home visit.
4.2 Factory mode:
Purpose
To perform extended alignments.
How to Activate the Factory mode
To activate the Factory mode, use the following method:
Press the following key sequence on the remote control transmitter: from the “option” press “1999”, directly followed by the “Back/Return”
button. Do not allow the display to time out between entries while keying the sequence.
After entering the Factory mode, we can see many items displayed, use the UP/DOWN keys to display the next/previous menu items
Factory mode overview
How to Exit the Factory mode
Select “EXIT” from the menu and press the “OK” button.
Note: When the TV is switched “off” by a power interrupt, or normal switch to “stand-by” while in the factory mode, the TV will show up in “normal
operation mode” as soon as the power is supplied again. The error buffer will not be cleared.
Page 12

4.3 Customer Service Mode (CSM)
Purpose
The call centre can instruct the customer (by telephone) to enter CSM in order to identify the status of the set. This helps the call centre to diagnose
problems and failures in the TV set before making a service call.
The CSM is a read-only mode; therefore, modifications are not possible in this mode.
How to Activate CSM
To activate CSM, press the following key sequence on a standard remote control transmitter: from the “option” press“123654” (do not allow the
display to time out between entries while keying the sequence). After entering the Customer Service Mode, the following items are displayed. Use
the Right/Left keys to display the next/previous menu items
Note: Activation of the CSM is only possible if there is no (user) menu on the screen!
CSM Overview
How to Navigate
By means of the “CURSOR-DOWN/UP” knob (or the scroll wheel) on the RC-transmitter, can be navigated through the menus.
How to Exit CSM
To exit CSM, use one of the following methods.
Press the MENU/HOME button on the remote control transmitter.
Press the POWER button on the remote control transmitter.
Press the POWER button on the television set.
Page 13
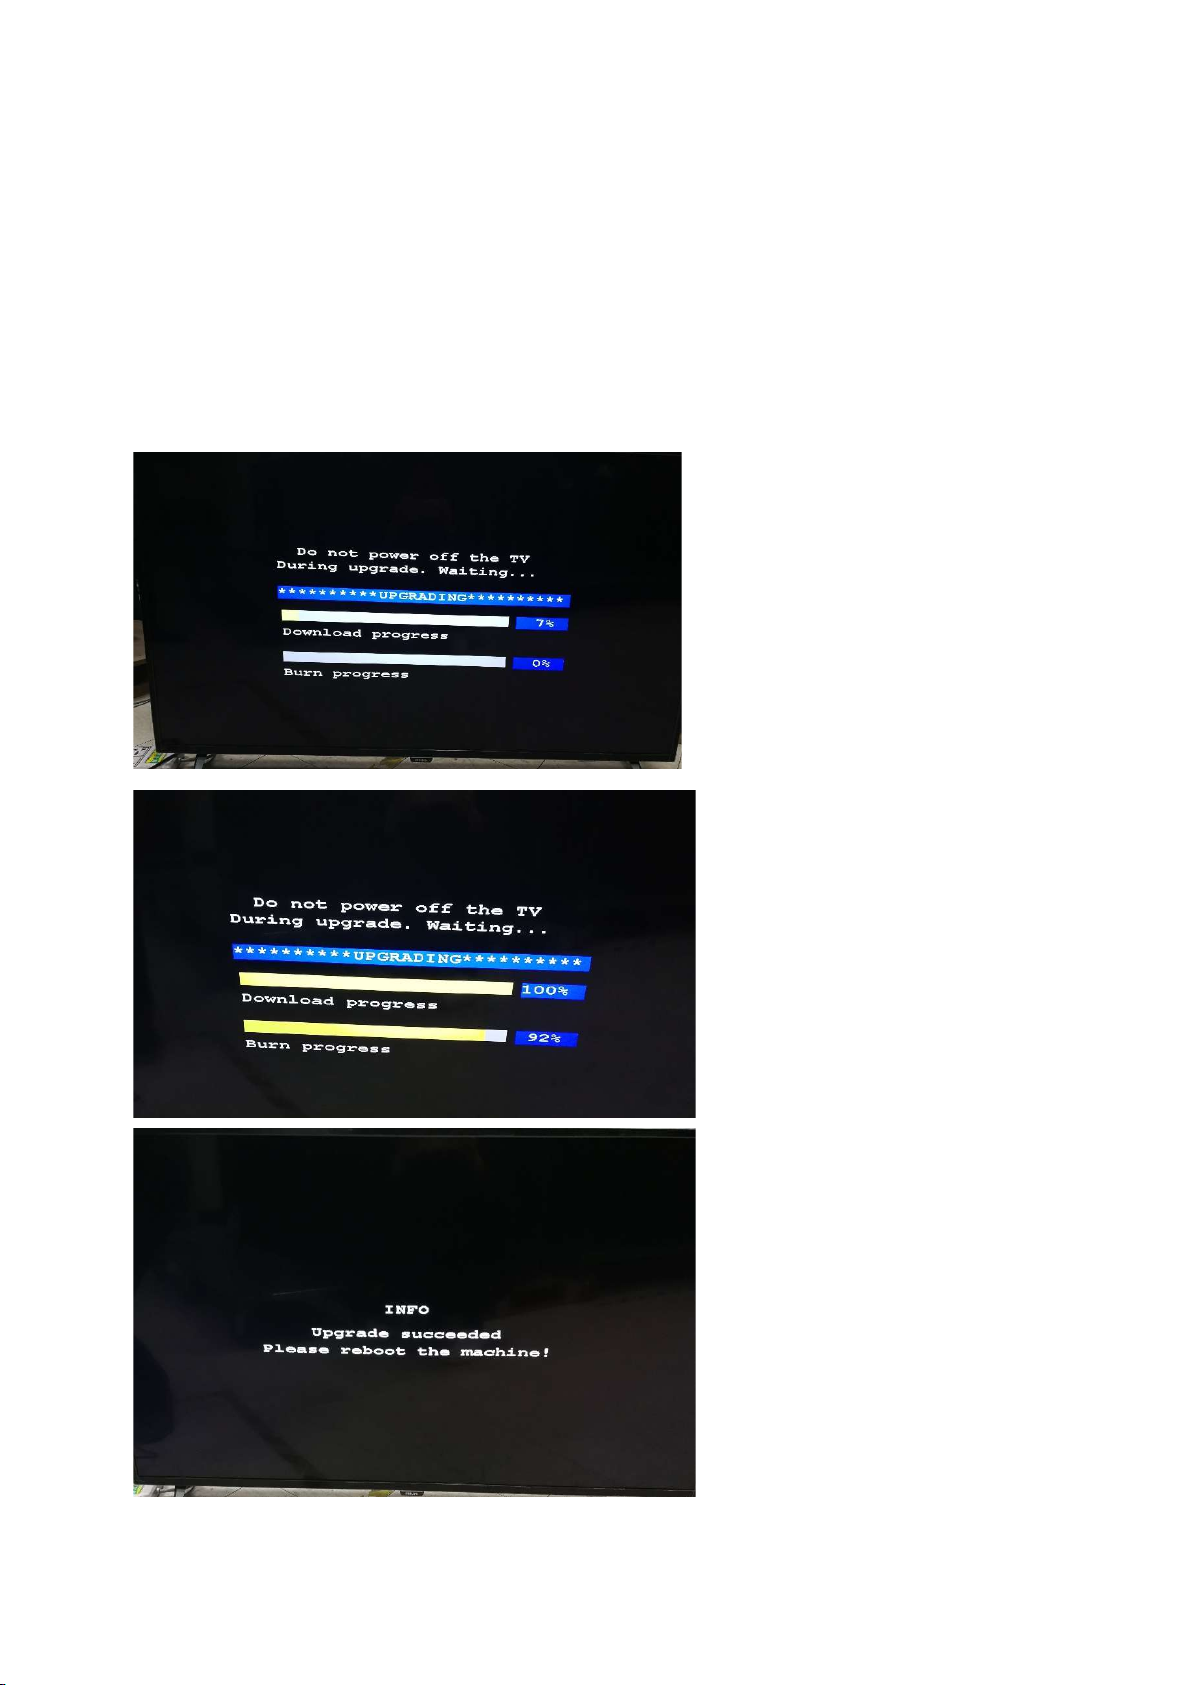
5. Software Upgrading, Error code and Panel Code
5.1 Software Upgrading
Step 1: Ready for F/W Upgrade
1. Prepare a USB memory.
2. Copy the software(.bin file) to USB flash disk (root directory).
3. Switch off the TV and Insert the USB memory stick that contains the software update files in TV’s USB 2 port.
Step 2: F/W Upgrade
1. Power off then power on the TV. The TV will detect the USB memory stick automatically. Then a window jumps out as below:
2. When the TV software is updated, please reboot the TV. Remove your USB flash drive.
3. We can enter in CSM mode to check the current software version.
Caution: Please make sure that software upgrade is finished before unplug the USB and AC power!
Page 14

Step 3: Check the SW version
1. After burning software, restart the TV.
2. Press “Option+123654”, enter Customer Service Mode to check if the software version is correct.
Page 15

6. Circuit Descriptions
6.1 Introduction
The TPH17.2A LA is a new chassis launched in AP in 2017. The whole range is covered by V553 platform. The major deltas versus its predecessor
support DVB-C; DVB-T2, WIFI/multi-media, Video out.
The TPH17.2A LA chassis comes with the following stylings:
series xxPUD6172/xx
6.1.1 Implementation
Key components of this chassis are:
SCALER Hi3751ARQCV5530D00 LQFP216
AUDIO AD52580-QG28NAR (AF) 15W E-TSSOP
EMMC THGBMDG5D1LBAIT 4GB FBGA153
Silicon Tuner R842
6.1.2 Block diagram (For 715G9225)
Page 16
6.2 Power Supply
CN701
12V
AUDIO
AMP
(for 715G8967P)
DIM
Main filter
Power architecture of this platform.
LVDS
12V
Display power
CN8601
(for 715G8962P)
CN8603
Platform power
ON/OFF
PS_ON
Platform
12V
HI3751V553
PFC
12V_A
AC-input +
For 50”, 55”
AC IN
6.2.1 Power Supply Unit
All power supplies are a black box for Service. When defective, a new board must be ordered and the defective one must be returned, unless the main fuse
of the board is broken. Always replace a defective fuse with one with the correct specifications! This part is available in the regular market.
Consult the Philips Service web portal for the order codes of the boards.
Important delta’s with the platform are:
• New power architecture for LED backlight
• “Boost”-signal is now a PWM-signal + continuous variable
The control signals are:
• PS-ON
• Lamp “on/off”
• DIM (PWM) (not for PSDL)
In this manual, no detailed information is available because of design protection issues.
• +12 output (on-mode)
• +12V_audio (audio AMP power)
• Output to the display; in case of
- IPB: High voltage to the LCD panel
- PSL and PSLS (LED-driver outputs)
- PSDL (high frequent) AC-current.
6.2.2 Diversity
The diversity in power supply units is mainly determined by the diversity in displays.
The following displays can be distinguished:
• CCFL/EEFL backlight: power panel is conventional IPB
• LED backlight:
- side-view LED without scanning: PSL power panel
- side-view LED with scanning: PSLS power panel
Page 17

- direct-view LED without 2D-dimming: PSL power panel
- direct-view LED with 2D-dimming: PSDL power panel.
PSL stands for Power Supply with integrated LED-drivers.
PSLS stands for a Power Supply with integrated LED-drivers with added Scanning functionality (added microcontroller).
PSDL stands for a Power Supply for Direct-view LED backlight with 2D-dimming.
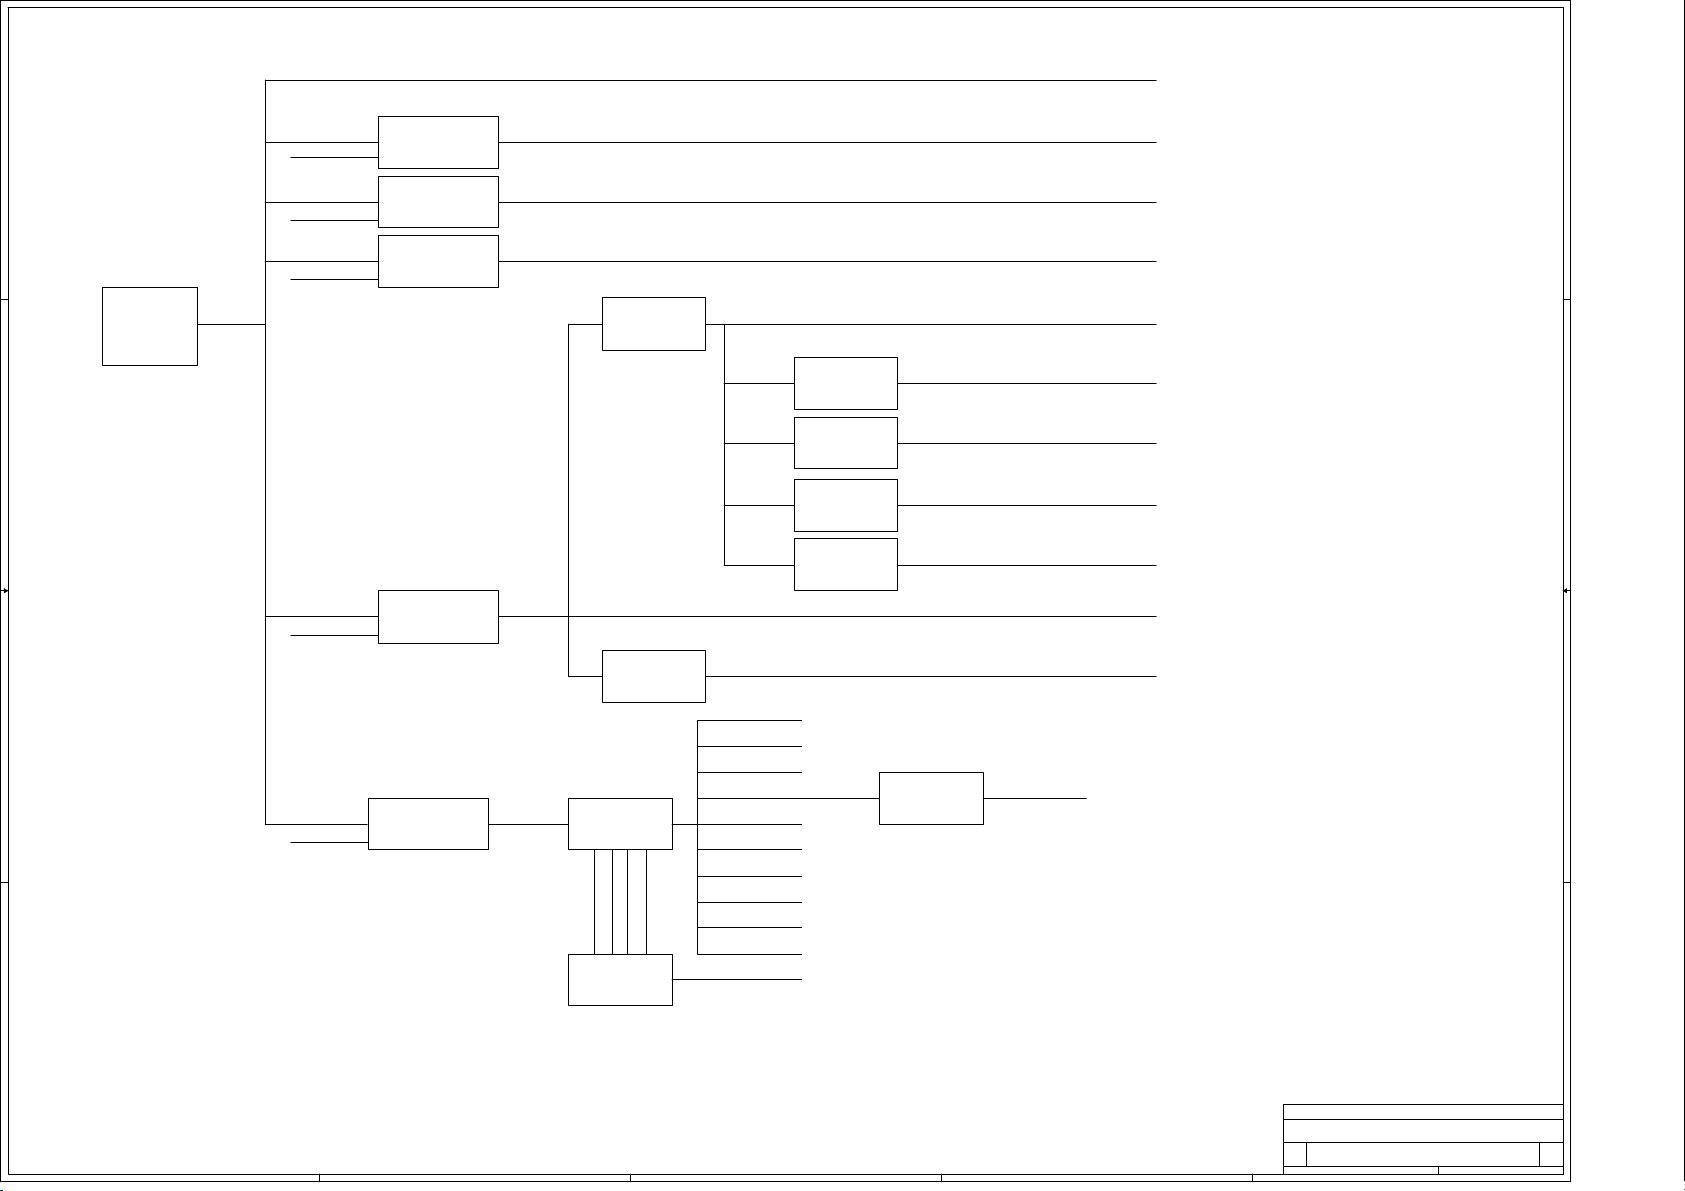
6.3 DC/DC Converters
The on-board DC/DC converters deliver the following voltages(depending on set execution):
•+5V-SB, permanent voltage for the Stand-by Power system
• +3V3-STANDBY,voltage for IR/Key board
• +12V, input from the power supply for the panel common(active mode)
• +12V, input from the power supply for LNB supply
• +3V3-EMMC, +V-EMMC-IO, voltage for EMMC when TV on
• +1V5-DDR, voltage for DDR
• TUNER_3V3, supply voltage for tuner
• +5V-SW, input intermediate supply voltage for USB Power
• +12V-AUDIO1 for the AUDIO AMP
• +3V3-WIFI,voltage for WIFI
6.3.1 Power tree (For 715G9225M)
Page 18
5
4
3
2
1
Power tree
1A max
12V0
AMP
D D
DDR_PWREN
STB
MP1652
DC/DC 2.0A
MP1653
DC/DC 3.0A
DC/DC 2.0A
STB
MP1653
12V0
365mA max(SOC)
895mA max
2135mA max
PMOS ?A
IRF7416
?A max
1V5_DDR3/1V2_DDR4
DDR & DDR PHY
CPU_1V1
CPU
VDD_1V1
Core & QAM & AFE & FE & HDMI
5V0
USB2.0 & CI &MHL
VBUS
SGM2551A
C C
LDO
AZ1117
LDO
AZ1117
LDO
AZ1084
STB
DC/DC 5A
DS6206B
5V_SB
2.7A max
LDO 1A
?A max
AZ1117
USB3.0
3V3_TUN
Tuner
DVDD18
EMMC
3V3
FE & EEPROM & EMMC & VBO & CI
5V_SB
HDMI
3V3_SB
HDMI & KEY & IR & UART
VGH
B B
VGH_ODD
VGH_EVEN
PMU_EN
PMOS 4A
IRF7416
VCC_PANEL
TCON
PMU
RT6937
VCC33 VCC18
VGL1
VGL2
LDO
AZ1117
VCOM1
VCOM2
SWG
SWO
SWI
SS
HAVDD
VCC12
BOOST
RT8509
AVDD
A A
Title
Title
Title
<Title>
<Title>
<Title>
Size Document Number Rev
Size Document Number Rev
Size Document Number Rev
<Doc> <RevCode>
C
<Doc> <RevCode>
C
<Doc> <RevCode>
C
Date: Sheet of
Date: Sheet of
5
4
3
2
Date: Sheet of
1
0 14Friday, November 03, 2017
0 14Friday, November 03, 2017
0 14Friday, November 03, 2017
Page 19
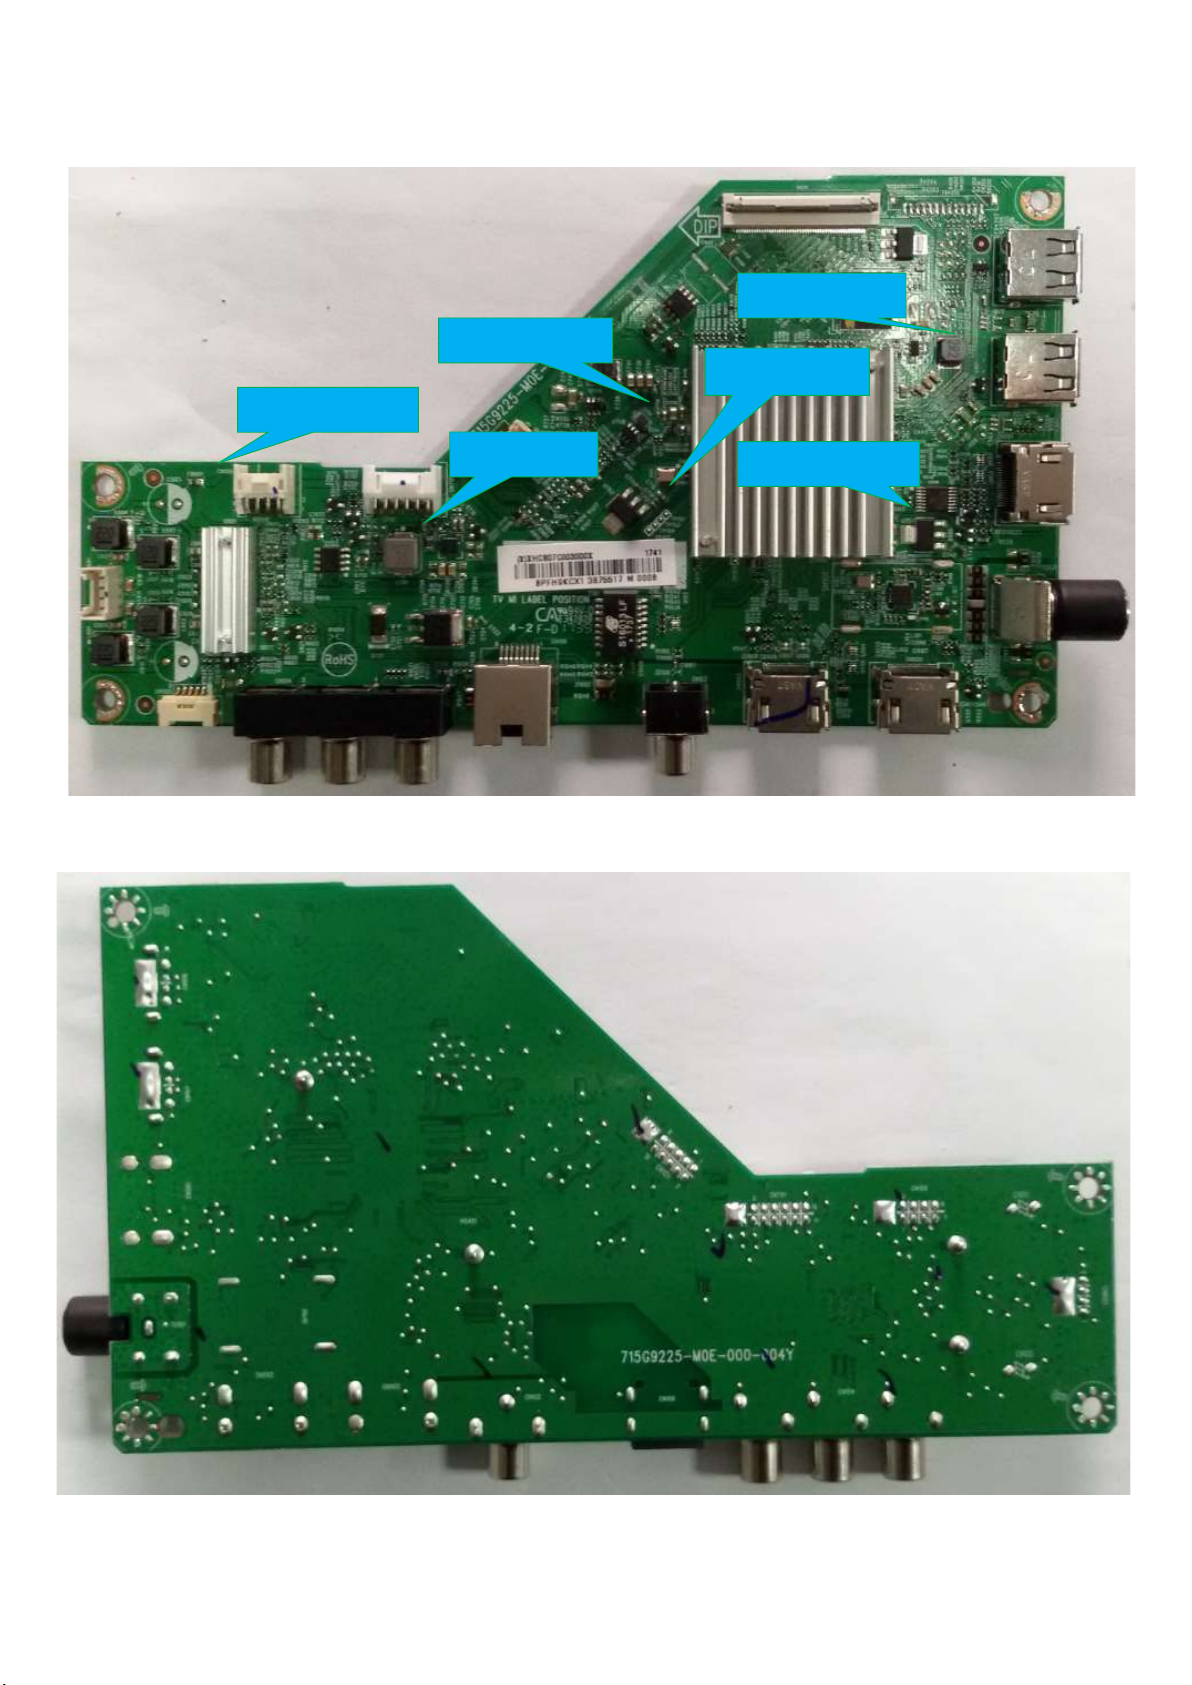
6.3.2 Power layout SSB
L702 CPU_0.9V
L704 +1.5V_DDR
C718 +3.3V_SB
FB601 AMP_12V
L701 +5V_SB
Power SSB Top View(For 715G9225M)
C750 +3.3V_TUN
Power SSB Bottom View(For 715G9225M)
Page 20
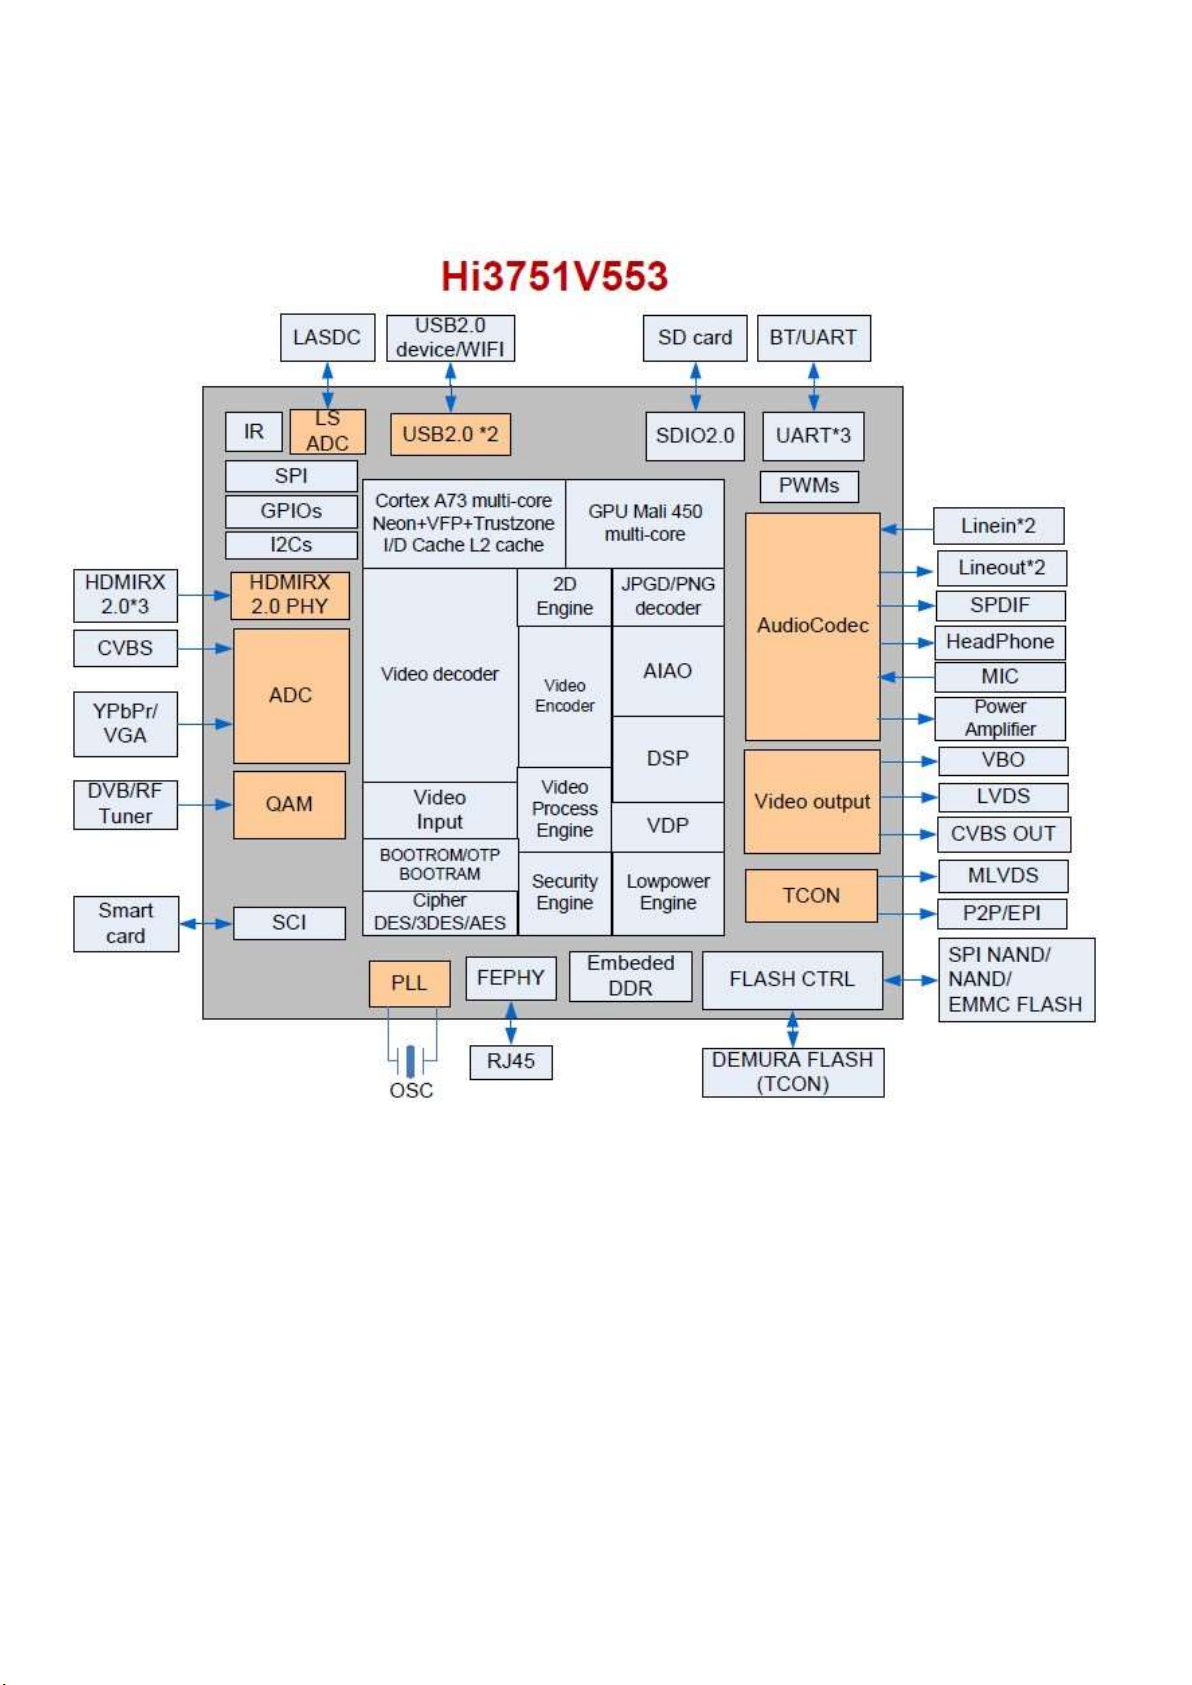
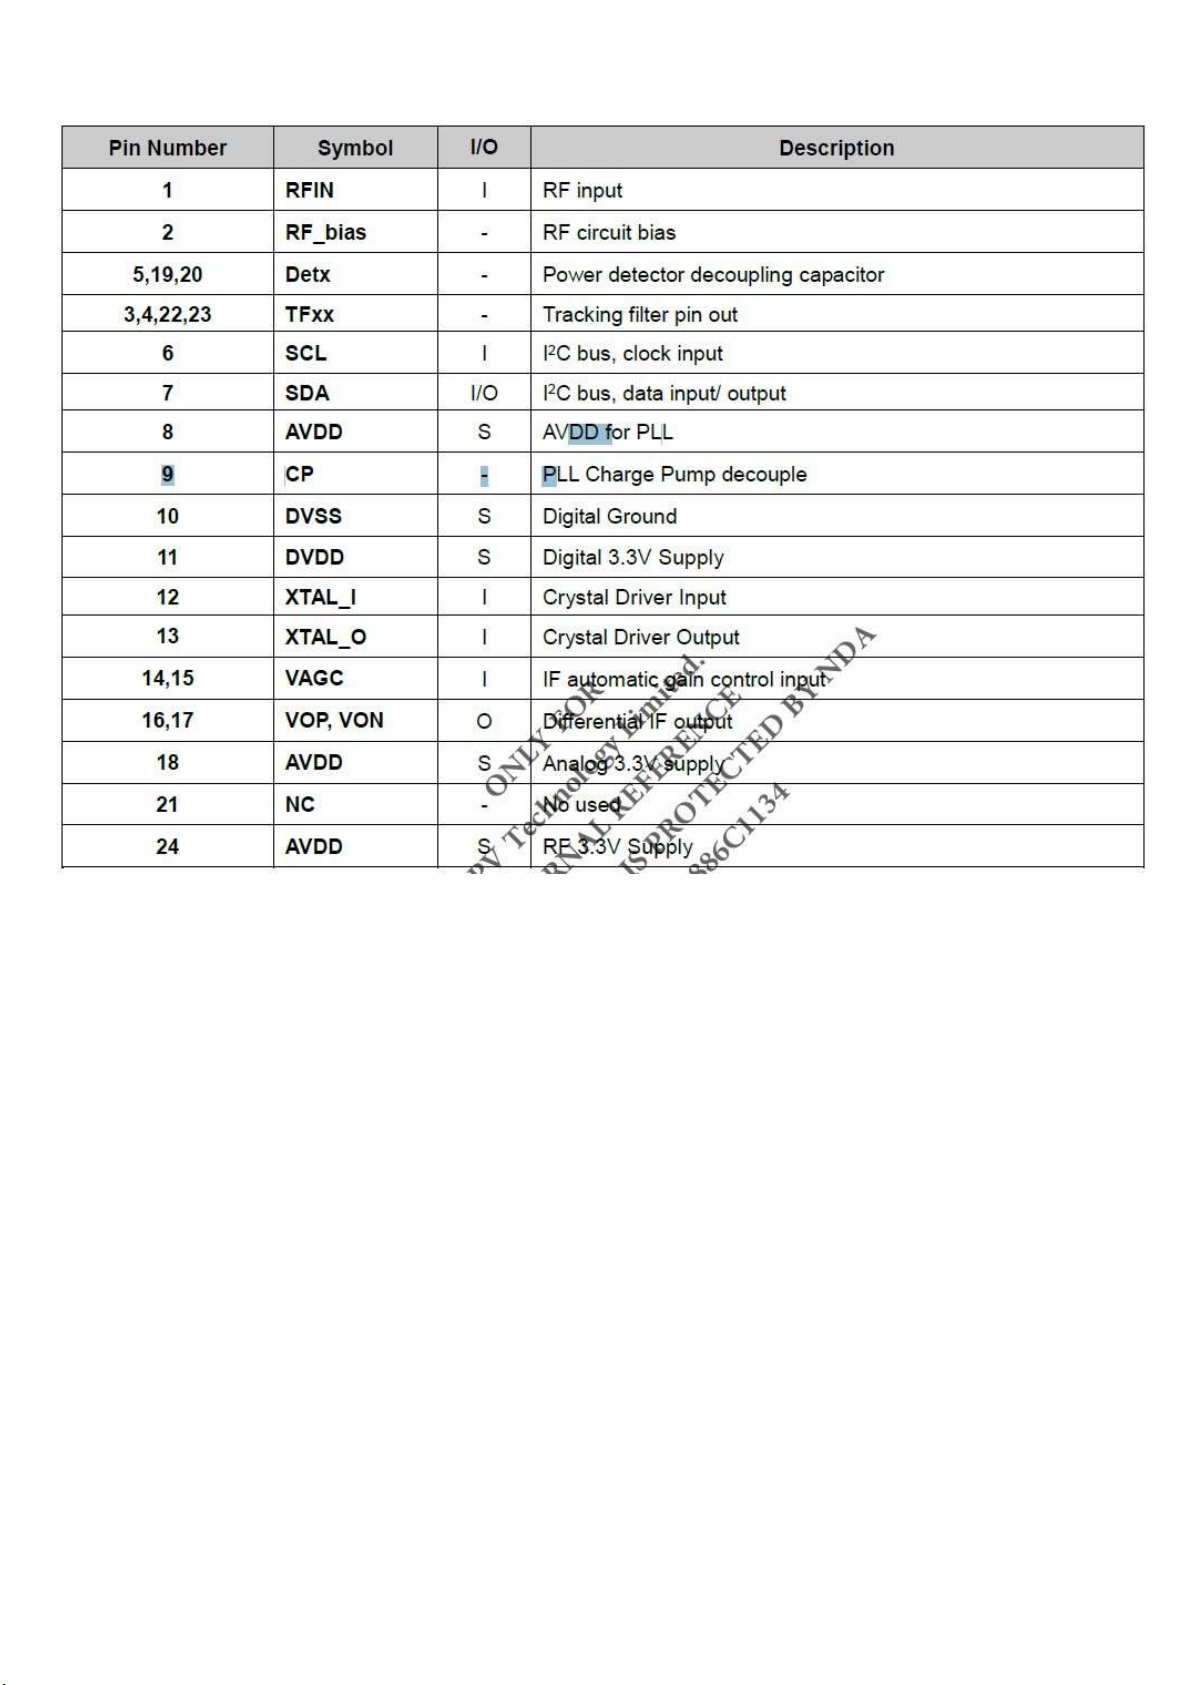
7. IC Data Sheets
7.1 HI3751V553 (IC U401)
Page 21
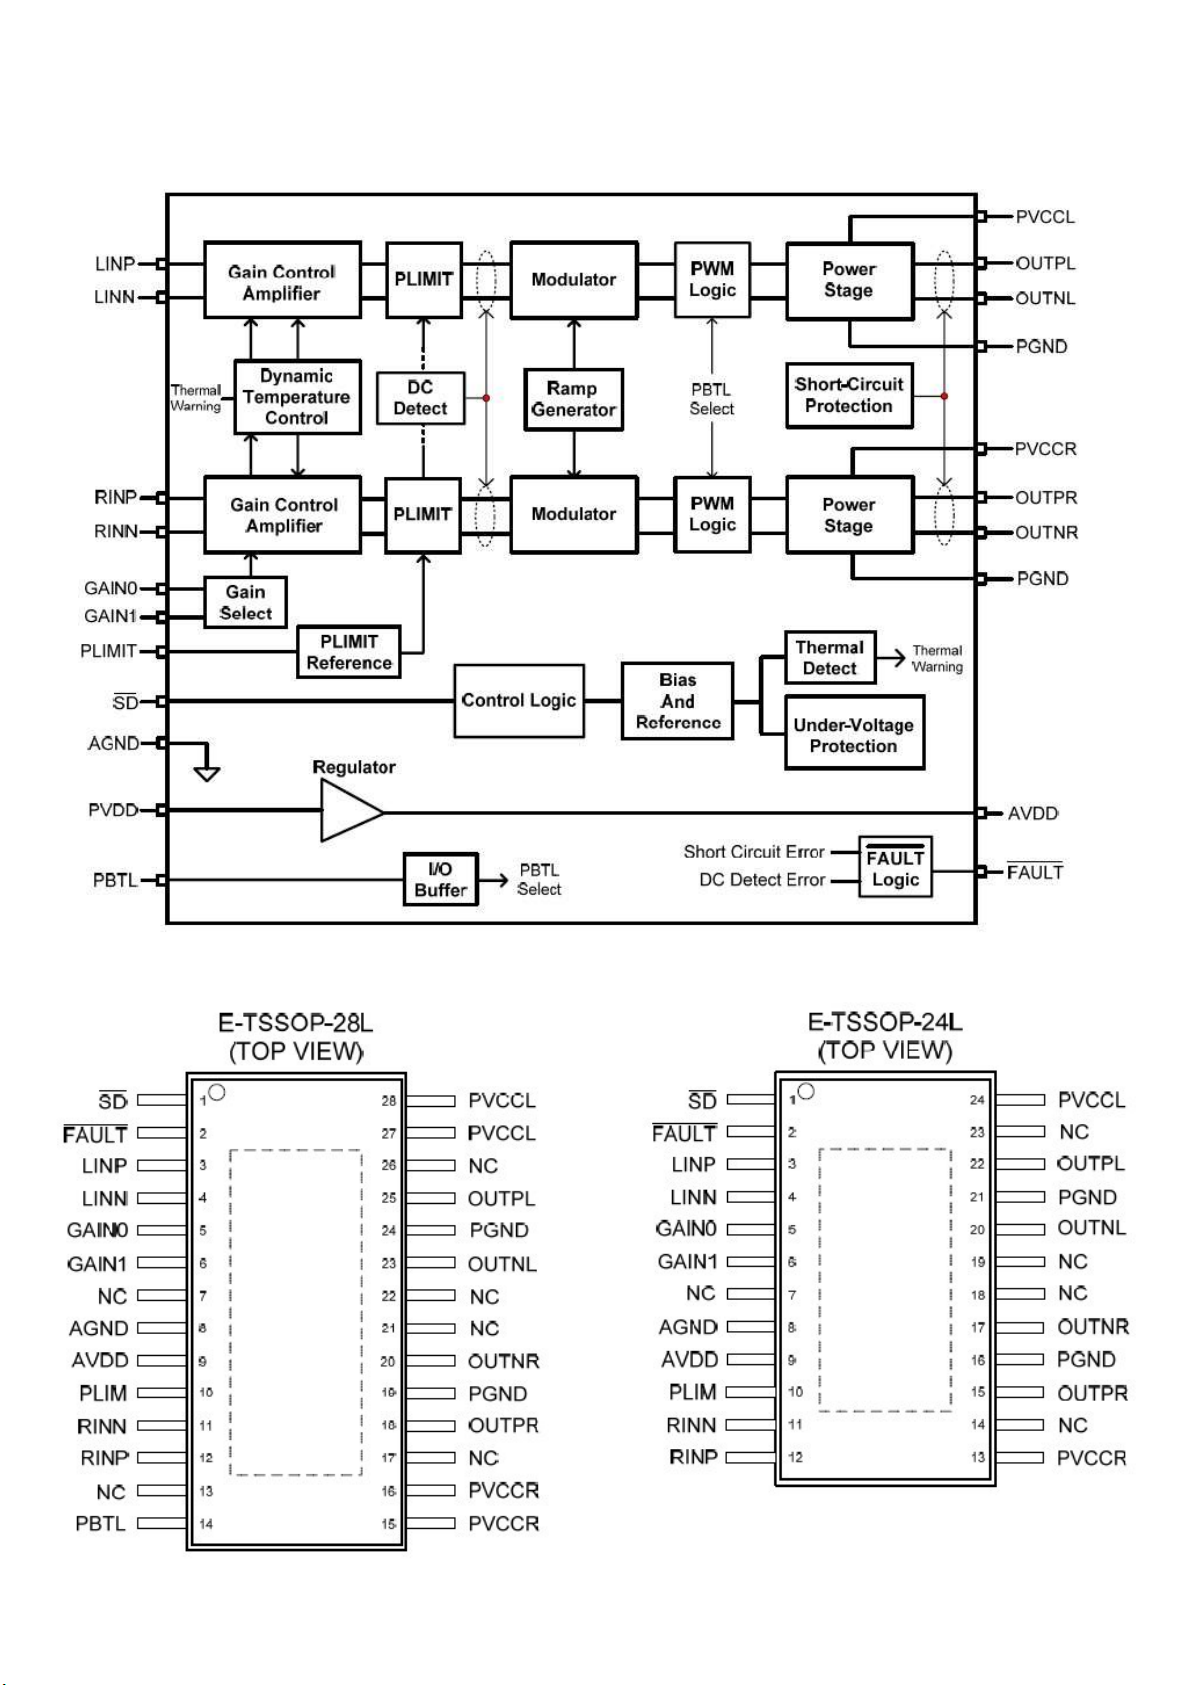
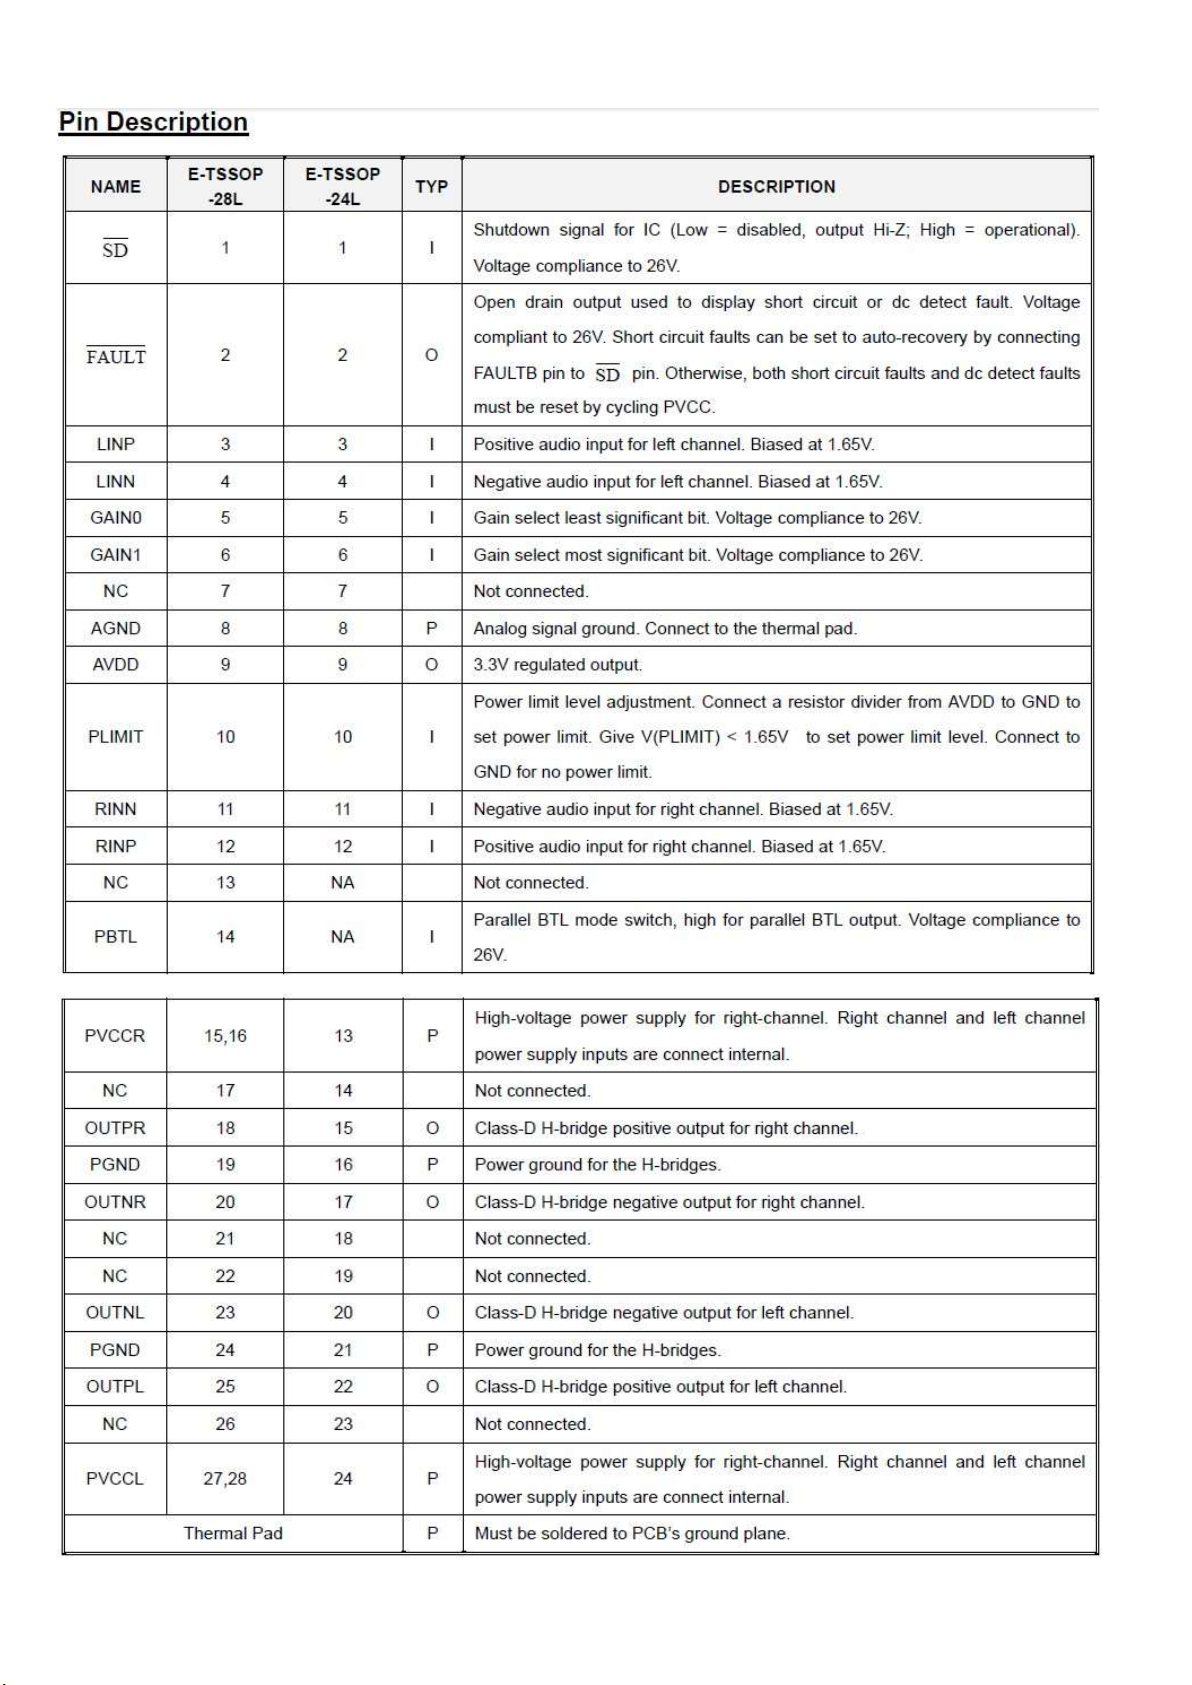
7.2 AD52580 (IC U601)
Page 22
Page 23
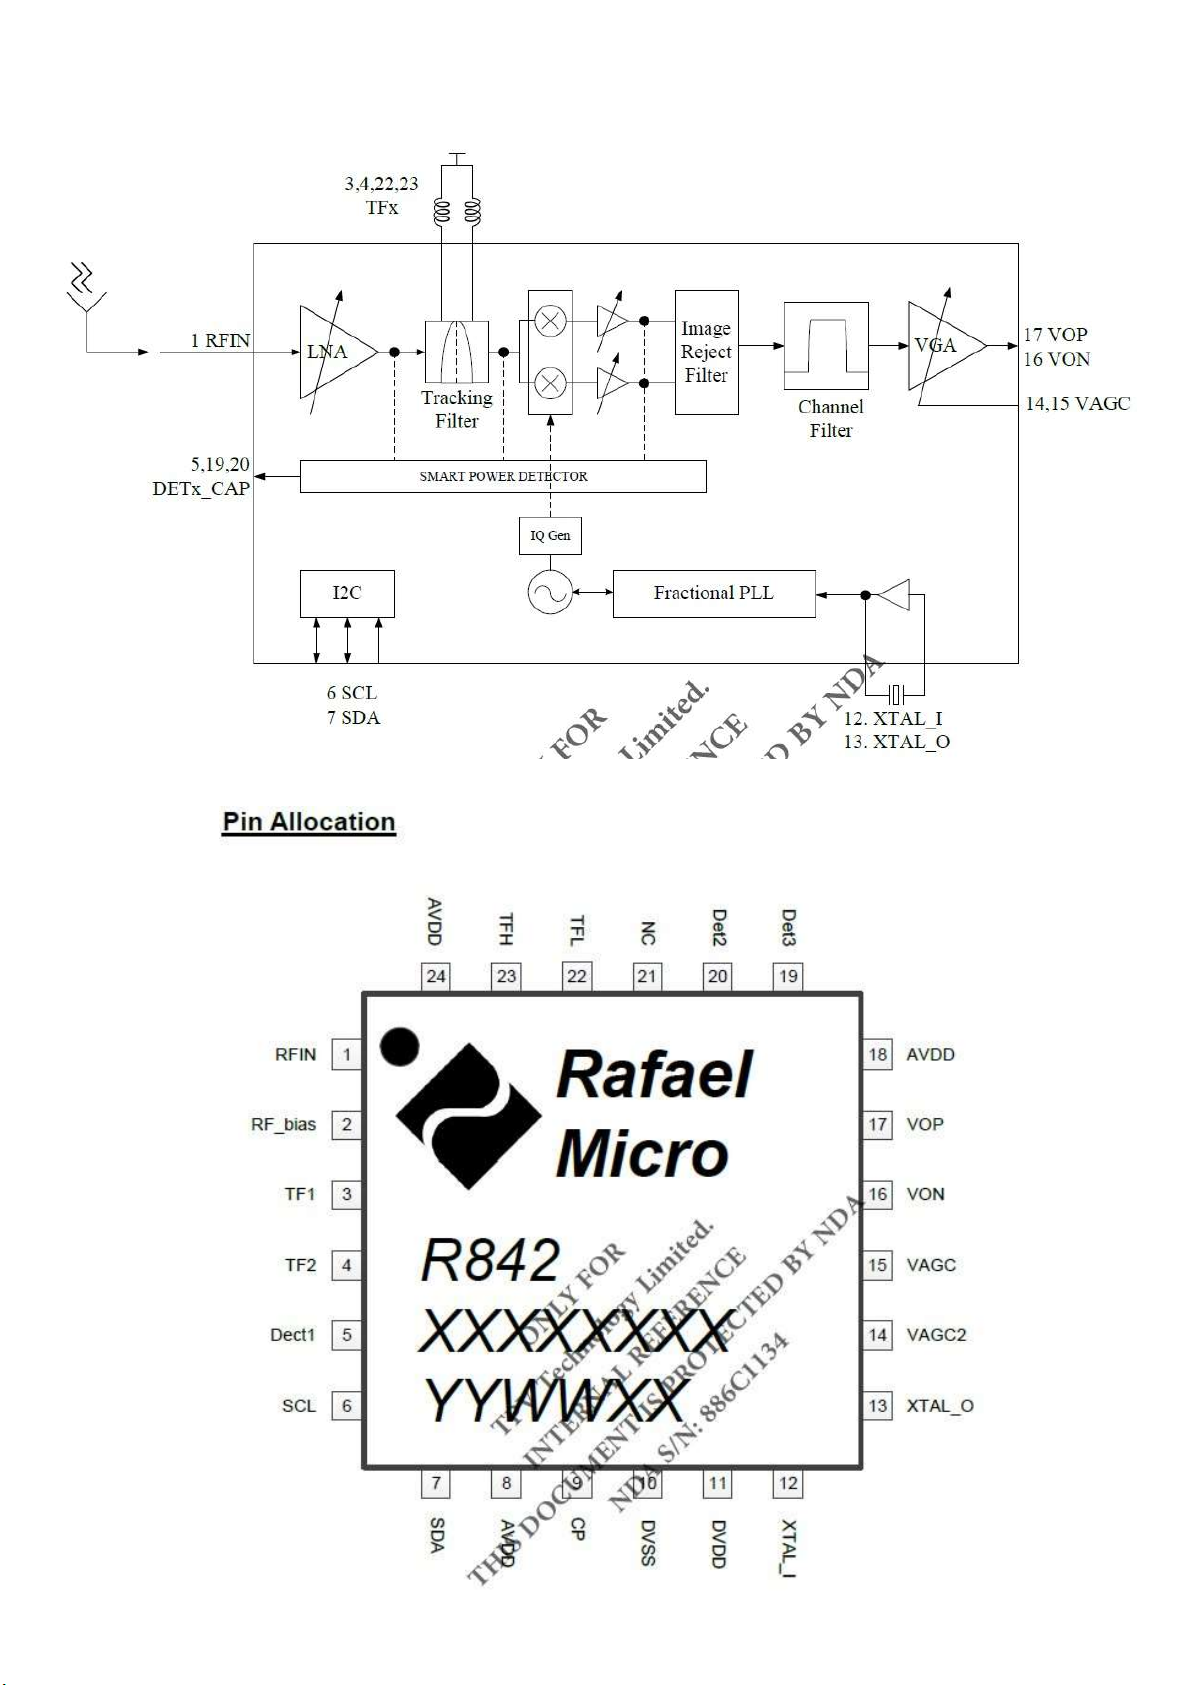
7.3 R842 (IC U106)
Page 24
Page 25
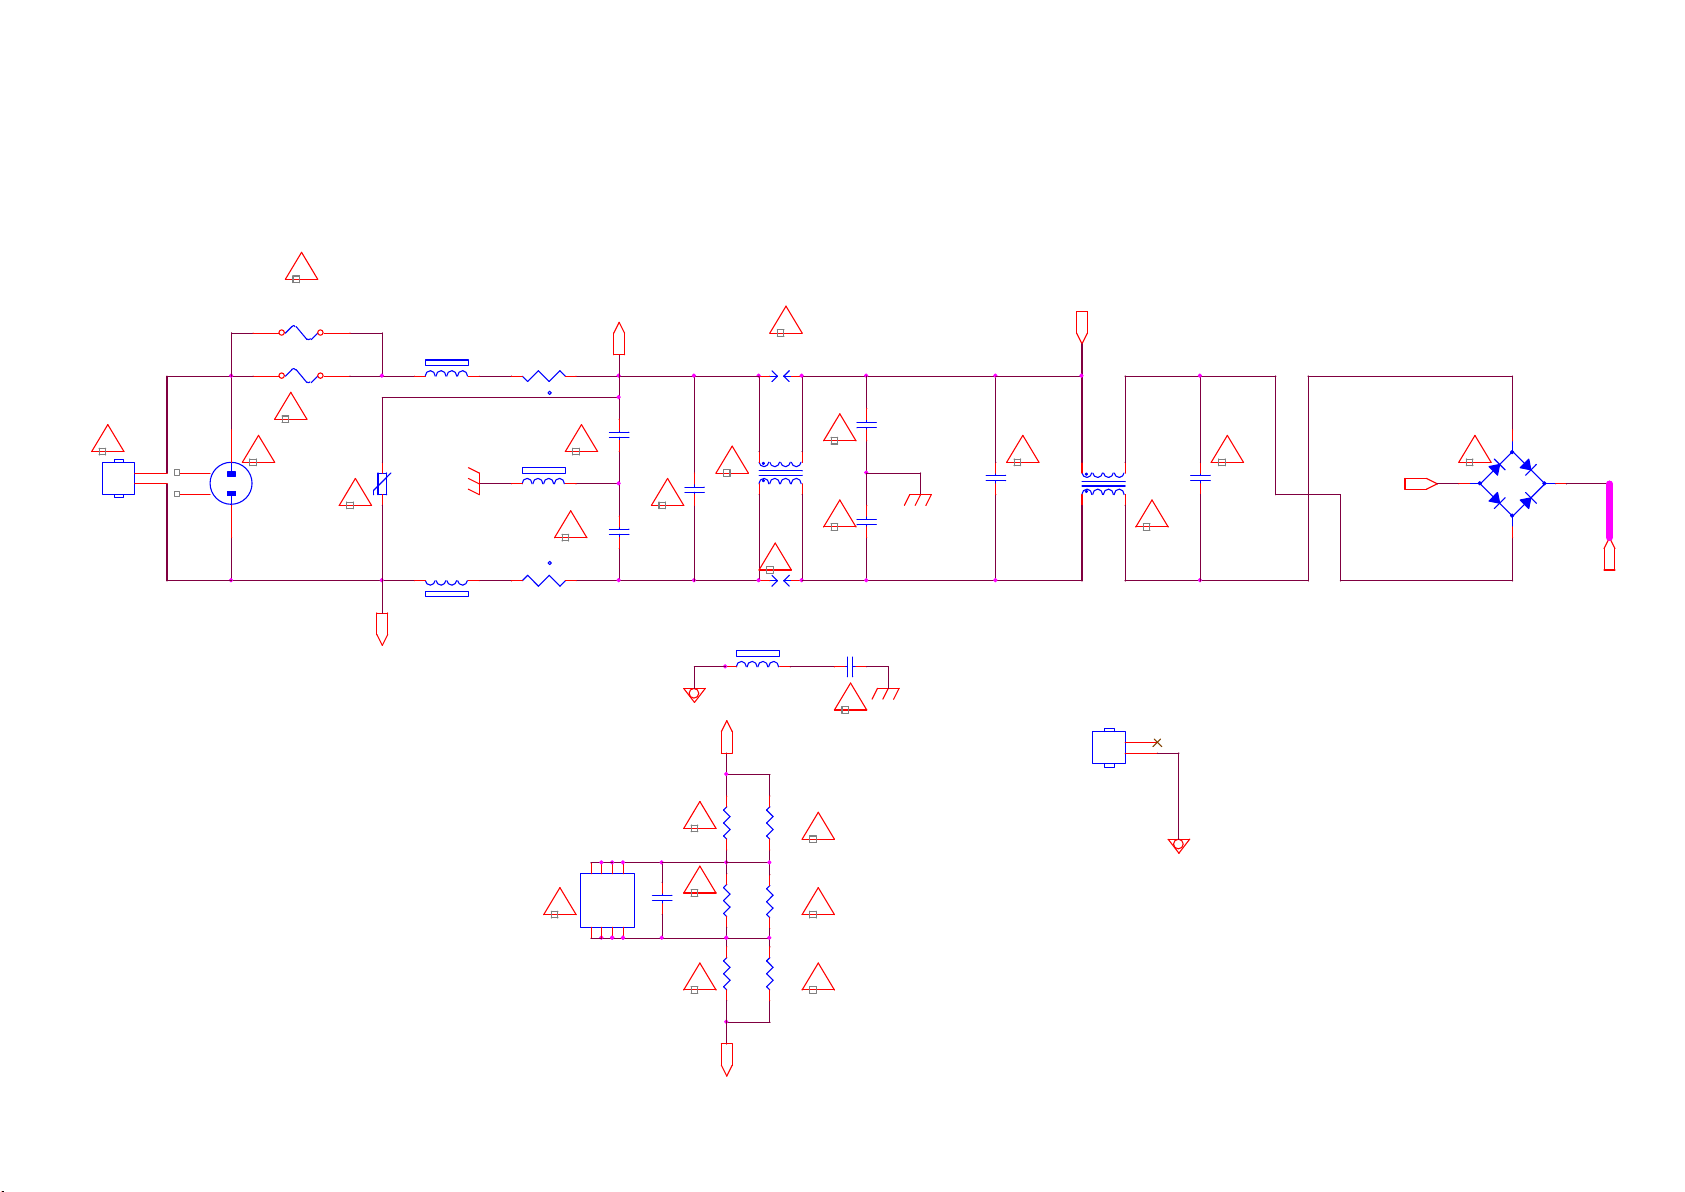
8.Circuit Diagrams
8.1 A 715G8962 PSU (For 50” 6172 Series)
8-1-1 AC Input
!
T5AH/250V
F9903
NC
FB9901
BEAD
1 2
RV9901
680V
FB9902
1 2
N
BEAD
!
NC
CN9905
F9901
T5AL/250V
5A 250V
!
12
3
1
2
4
AC 2P
CN9901
!
NR9902
1 2
1R5
FB9905
1 2
127R
NR9901
1R5
1 2
L
!
SG9901
DSPL-501N-A21F
BR
t
C9913
!
!
C9923
NC
220PF 250V
C9914
220PF 250V
!
C9902
470NF 275V
1
2
L9902
17mH
4
3
C9903
220NF 305V
Rsen-
!
C9911
!
22pF 5% 250V
!
!
t
C9912
22pF 5% 250V
!
C9901
470NF 275V
FB9903
NC
1 2
1
2
L9901
17mH
4
3
!
SG9902
DSPL-501N-A21F
2
!! !
4
BD9901
TS10K80-01
+
-
1
3
Vsin
N
R9906
510K
U9901
NC
1
4
3
D12D1
NC
!
NC
NC5D26D27NC
8
!
!
C9908
NC/ 47PF
R9904
510K
R9902
510K
!
R9905
510K
HS9901
HEAT SIN K
1
2
!
R9903
510K
!
R9901
510K
!!
L
Page 26
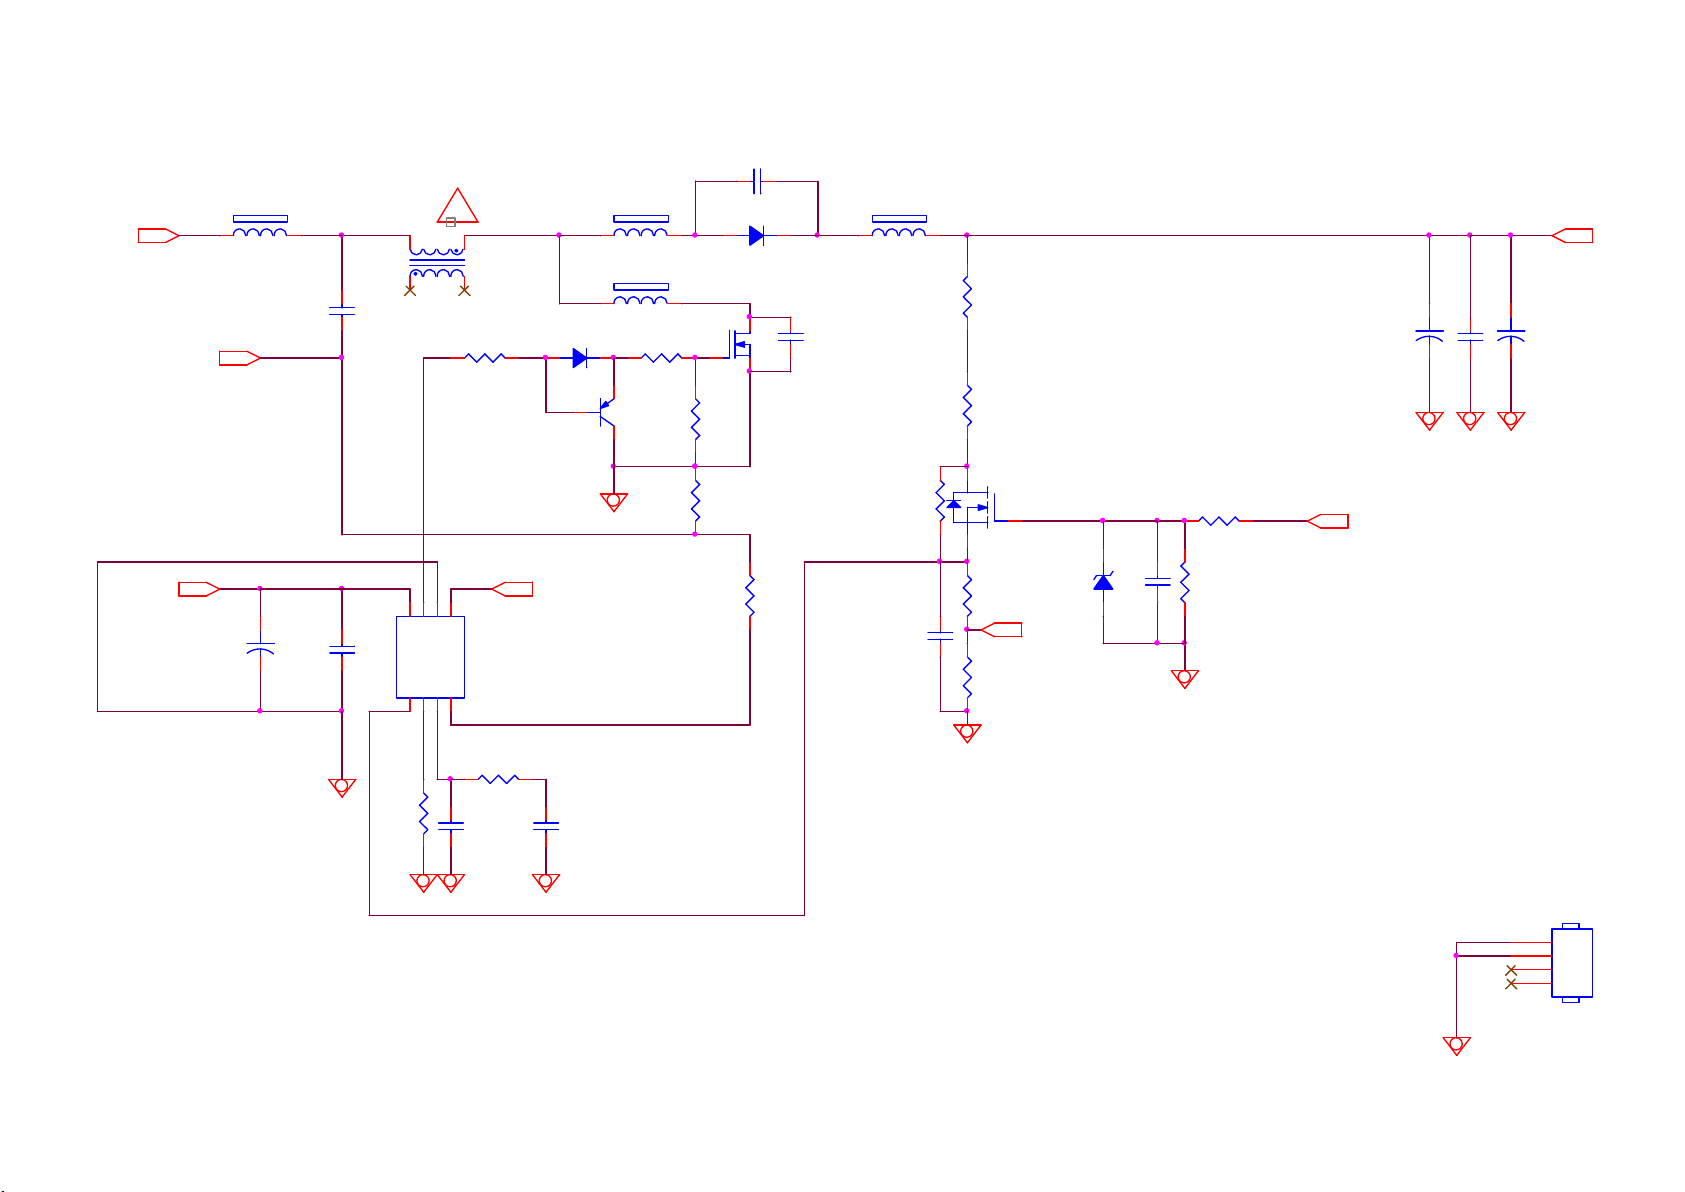
8-1-2 PFC with LD7592GS
Vsin
1 2
FB9801
127R
Rsen-
C9801
47PF
FB9802
EQ32
C9804
MPP 0. 47F 10%
31
!
4
L9801
300uH
5
R9803
51 OHM 1/ 4W
D9804
SS1060FL
Q9803
MMBT2907A
BEA D
1 2
FB9805
BEA D
1 2
STF24NM60N
R9802
51 OHM +-5% 1/ 8W
R9805
10KOHM
D9801
FMNS-1106S
Q9801
R9808
0.082R
1:50K
C9817
220PF
FB9803
BEA D
1 2
1.5M 1%
1.5M 1%
R9818
NC/ 0R05 1/4W
R9804
R9806
HV
56UF 450V
+
C9803
3
Q9802
BSS127
1
2
R9817
10K 1/4W
VCC_ON
+
C9805 56UF 450V
C9802 10NF 1KV
VCC_ON PFC_OV P
C9806
10uF/50V
+
C9809
100N 50V
6
8
5
OVP
OUT7VCC
GND
INV1RAMP2COMP3CS
4
R9813
24K OHM 1% 1/8W
47N 50V
U9801
LD7592
10K 1/8W
R9814
C9812
C9813
0.47UF 50V
R9800
1K5 1% 1/ 8W
C9810
470PF 50V
R9812
1K +-1% 1/8W
PFC_OV P
R9811
18K +-1% 1/8W
C9814
ZD9801
NC
100N 50V
1 2
R9816
100K 1/8W
HS9801
1
2
3
4
HEAT SIN K
For Q9801, D9802
Page 27
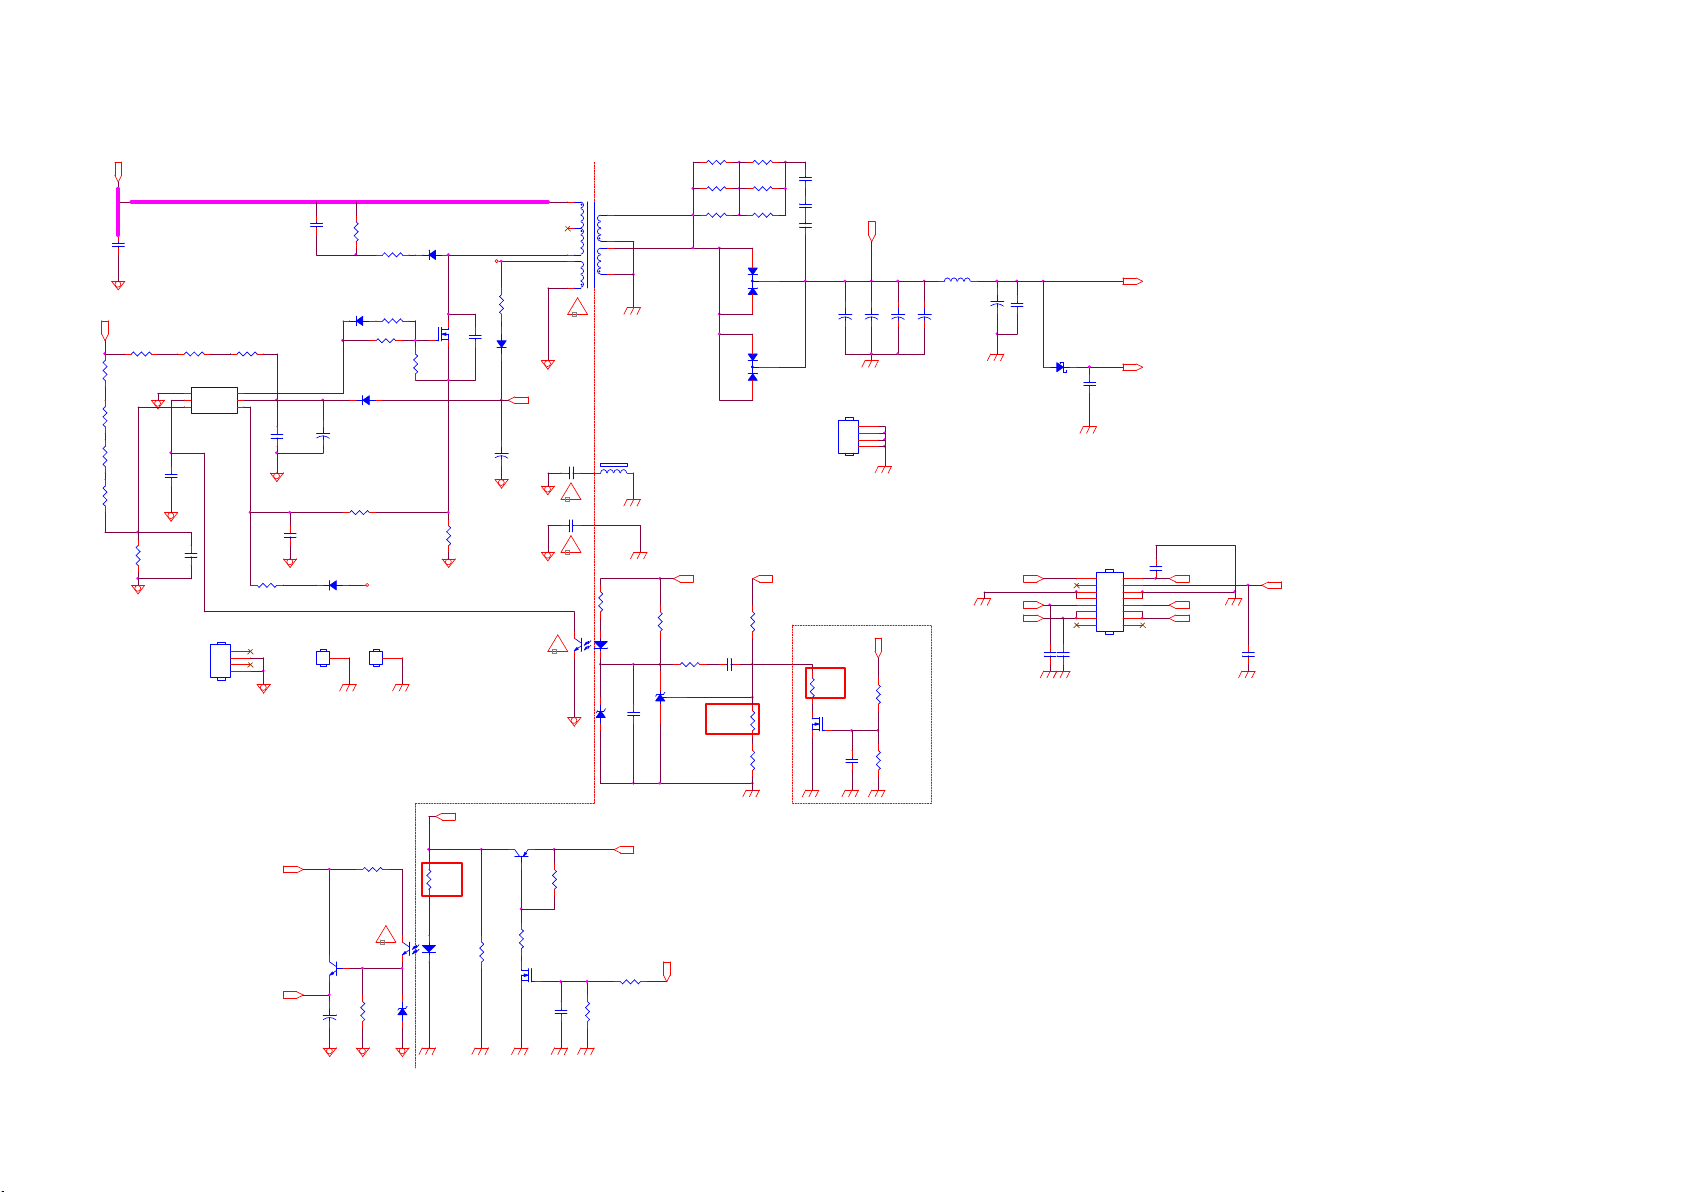
8-1-3 Main Power
HV
C9113
1NF
BR
From AC L
R9113
4.7M 1%
R9114
3.6M 1%
R9105
200K 1%
R9127
200K 1%
R9141
120K OHM 1% 1/8W
ON/1.05V
OFF/0.8V
V/1.414
1.5M 1%
R9156
1M +-1% 1/4W
C9144
1NF 50V
R9157
U9101
1
GND
2
COMP
BNO3CS
LD5537
C9103
2.2nF 50V
20K +-1% 1/4W
OUT
VCC
HS9101
HEAT SINK
For Q9101
R9158
6
5
4
R9117
NC/75 KOH M +-1% 1/8W
1
2
3
4
C9111
1.5NF
C9139
100N 50V
C9102
470PF 50V
GND1
GND
R91 47
82K 2W
D9103
SS1060FL
C9147
+
4.7uF 50V
R9103
200 OHM 1/4W
D9106
NC/BAV21W-G
1
R91 42
22R 5%
R9104
22 1/8W 5%
R9106
100OHM
R9107
10K OHM +-5% 1/8W
D9105
1N4148W
CS_OVP
GND2
1
GND
D9102
SARS01-V1
CS_OVP
Q9101
STF24NM65N
R9101
0.24R 2W
C9115
100PF
R9112
3.3 OHM 1/4W
D9104
FR107G-A0
+VCC1
C9145
47UF 50V
+
5
4
3
2
1
C9922
470PF 250V
!
C9920
470PF 250V
!
!
T9102
POWER X'FMR
!
1 2
12
43
1 2
COLDHOT
10
6
9
7
FB9904
BEAD
R9119
1K5 1% 1/8W
U9102
EL817M(X)
ZD9106
BZT52-B15
C9143
1uF
27 OHM 1/4W
27 OHM 1/4W
27 OHM 1/4W
12VS
R9118
1K OHM +-5% 1/8W
R9121
1K 1/8W 1%
U9103
AS431AN-E1
1K5 1% 1/8W
R9108
R9109
R9110
C9118
470NF 50V
2K2 1/8W 1%
R9115
R9116
R9132
27 OHM 1/4W
R9133
27 OHM 1/4W
R9134
27 OHM 1/4W
D9107
3
FCH20E10
2
1
D9108
3
FCH20E10
2
1
12VS
R9120
9.1K 1%
C9136
2N2 50V
C9137
2N2 50V
C9138
12VS
2N2 50V
+
C9106 470UF 25V
HS9102
HEAT SINK
For D9107
R9129
6.2K OHM +-1% 1/8W
Q9106
2N7002K
L9105
1
2
3
4
C9140
DV5
1N 50V
R9130
100K 1%
R9131
100K 1/8W 1%
3UH
C9110
+
BL_ON/OFF
+12V_A
+12V
C9134
2N2 50V
1 2
D9109
SR34H-NC
C9141
1uF
C9142
1uF 50V
150UF 25V
+
C9109 470UF 25V+C9108 470UF 25V+C9107 470UF 25V
+12V
+12V_A
C9135
2N2 50V
CN9102
15
13
11
9
7
5
3
1
CONN
C9119
1N 50V
16
14
12
10
8
6
4
2
DIM
+12V_A
+12V
C9146
100NF 50V
PS_ON
+VCC1
Q9401
BTC4672M3
VCC_ON
C9401
+
10uF/50V
R9402
20K 1/8W 1%
R9401
3K
!
U9401
EL817M(X)
Standby
DV5
Q9402
MMBT3906
23
R9404
10K 1/4W
1
R9405
10K OHM
R9406
1K5 1% 1/8W
Q9403
L2N7002KSLT1G
C9402
100N 50V
R9407
100 OHM 1/4W
R9408
510K 1% 1/8W
R9403
1K 1/4W
12
43
ZD9401
BZT52-B16
1 2
ぃ筿溃,э
12VS
PS_ON
120R
Standby
筿溃
.
Page 28
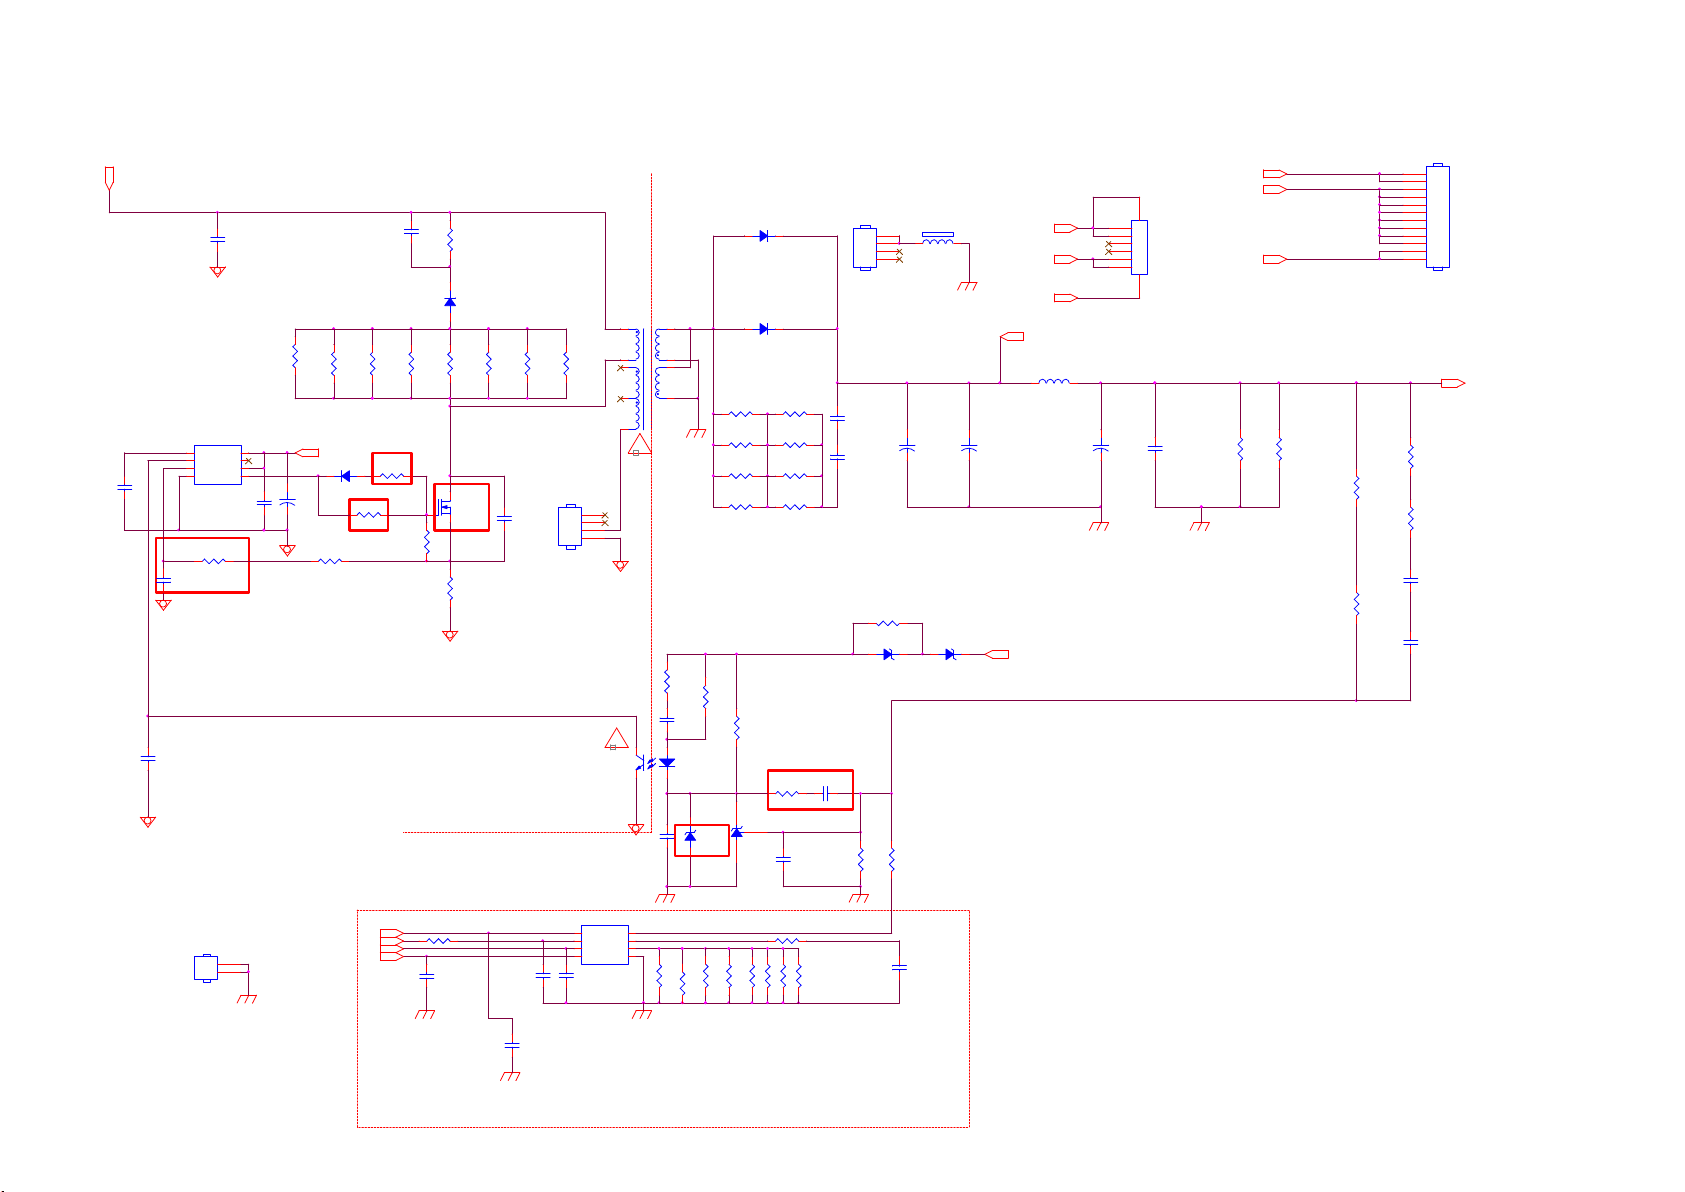
8-1-4 LED
HV
C8610
470NF 50V
C8637
470P 50V
C8601
1N 50V
C8617
1NF
1
2
3
CT
FB
CS
GND4OUT
U8601
VCC
NC
VCC
PF6002AS
R8603
470 OHM 1/4W
8
7
6
5
C8602
100N 50V
CN8601
R8616
47K 1/8W 1%
R8612
36K 1/8W 1%
1
2
3
4
5
6
7
8
9
10
11
12
CONN
+VLED
R8628
NC
R8629
NC
C8635
NC
C8636
NC
+VLED
HOT
C8620
1.5NF
R8657
160R 1%
D8606
R8602
47OHM +-5% 1/8W
160R 1%
R8601
22R
R8604
10K OHM 5% 1/ 8W
R8655
160R 1%
R8654
160R 1%
VCC_ON
SS1060FL
+
C8640
10uF/50V
JR8601
0R05 1/4W
R86 06
82K 2W
D8603
SARS01-V1
R8658
R8659
200 OHM 1/4W
R8660
200 OHM 1/4W
R8662
200 OHM 1/4W
R8663
200 OHM 1/4W
C8603
NC/47PF
HS8603
For Q8601
HEAT SINK
1
2
3
4
EL817M(X)
Q8601
STF24NM65N
R8617
0R18 5%
COLD
new part(EQ33)
T8601
POWER X'FMR
1
11
8
4
122
5
7
6
!
R8615
1K OHM +-5% 1/8W
C8633
4N7 50V
!
12
43
U8603
C8625
ZD8603
NC
BZT52-B27
1 2
D8601
FMXA-1104S
D8602
FMXA-1104S
R8620
300 OHM 1/4W
R8621
300 OHM 1/4W
R8637
300 OHM 1/4W
R8639
300 OHM 1/4W
R8609
1K OHM +-5% 1/8W
R8610
3K9 1/8W 5%
20K 1/4W
U8604
AS431AN-E1
C8624
100P 50V
12
12
R8622
300 OHM 1/4W
R8623
300 OHM 1/4W
R8638
300 OHM 1/4W
R8640
300 OHM 1/4W
R8611
C8638
0.1uF 50V
R8613
9K1 1/8W 1%
HS8604
HEAT SINK
For
D8601/D8602
C8611
100PF 500V
C8612
100PF 500V
NC/0R05 1/4W
1 2
FB8601
BEAD
1
2
1 2
3
4
+
C8605
+
120uF 100V
R8635
ZD8605
BZT52-B4V7
ZD8606
1 2
BZT52-B4V7
VLED
R8613+R8616+R8612=9.1K+36K+47K=25~38.7V
R8614
13K 1/8W 1%
C8606
120uF 100V
VLED
+VLED
-VLED-1
+VLED
VLED
L8601
3UH
+
1
2
3
4
5
6
C8609
220uF 50V
78
CN8602
CONN
C8626
2.2NF
-VLED-1
+VLED
R8651
100K
For LPB fun ction
+24V for PSU function
R8652
100K
HS8601
For U8605
HEAT SINK
R8618
10K 1/4W
DIM
BL_ON/OFF
12VS
1
2
-VLED-1
C8634
NC
C8618
NC
U8605
1
DIM
2
EN
3
VCC
LED4GND
TPV101AD
C8613
100N 50V
COMP
ISET
8
7
GM
6
R8624 1.2R 1%
R8625 1.2R 1%
5
R8626 1.2R 1%
R8627 1.2R 1%
R8619
0 OHM +-5% 1/8W
R8630 1.2R 1%
R8631 1.2R 1%
R8632 1.2R 1%
R8633 1.2R 1%
C8614
1uF
One channel 1.94A:1.2Rx8
C8622
NC
Page 29
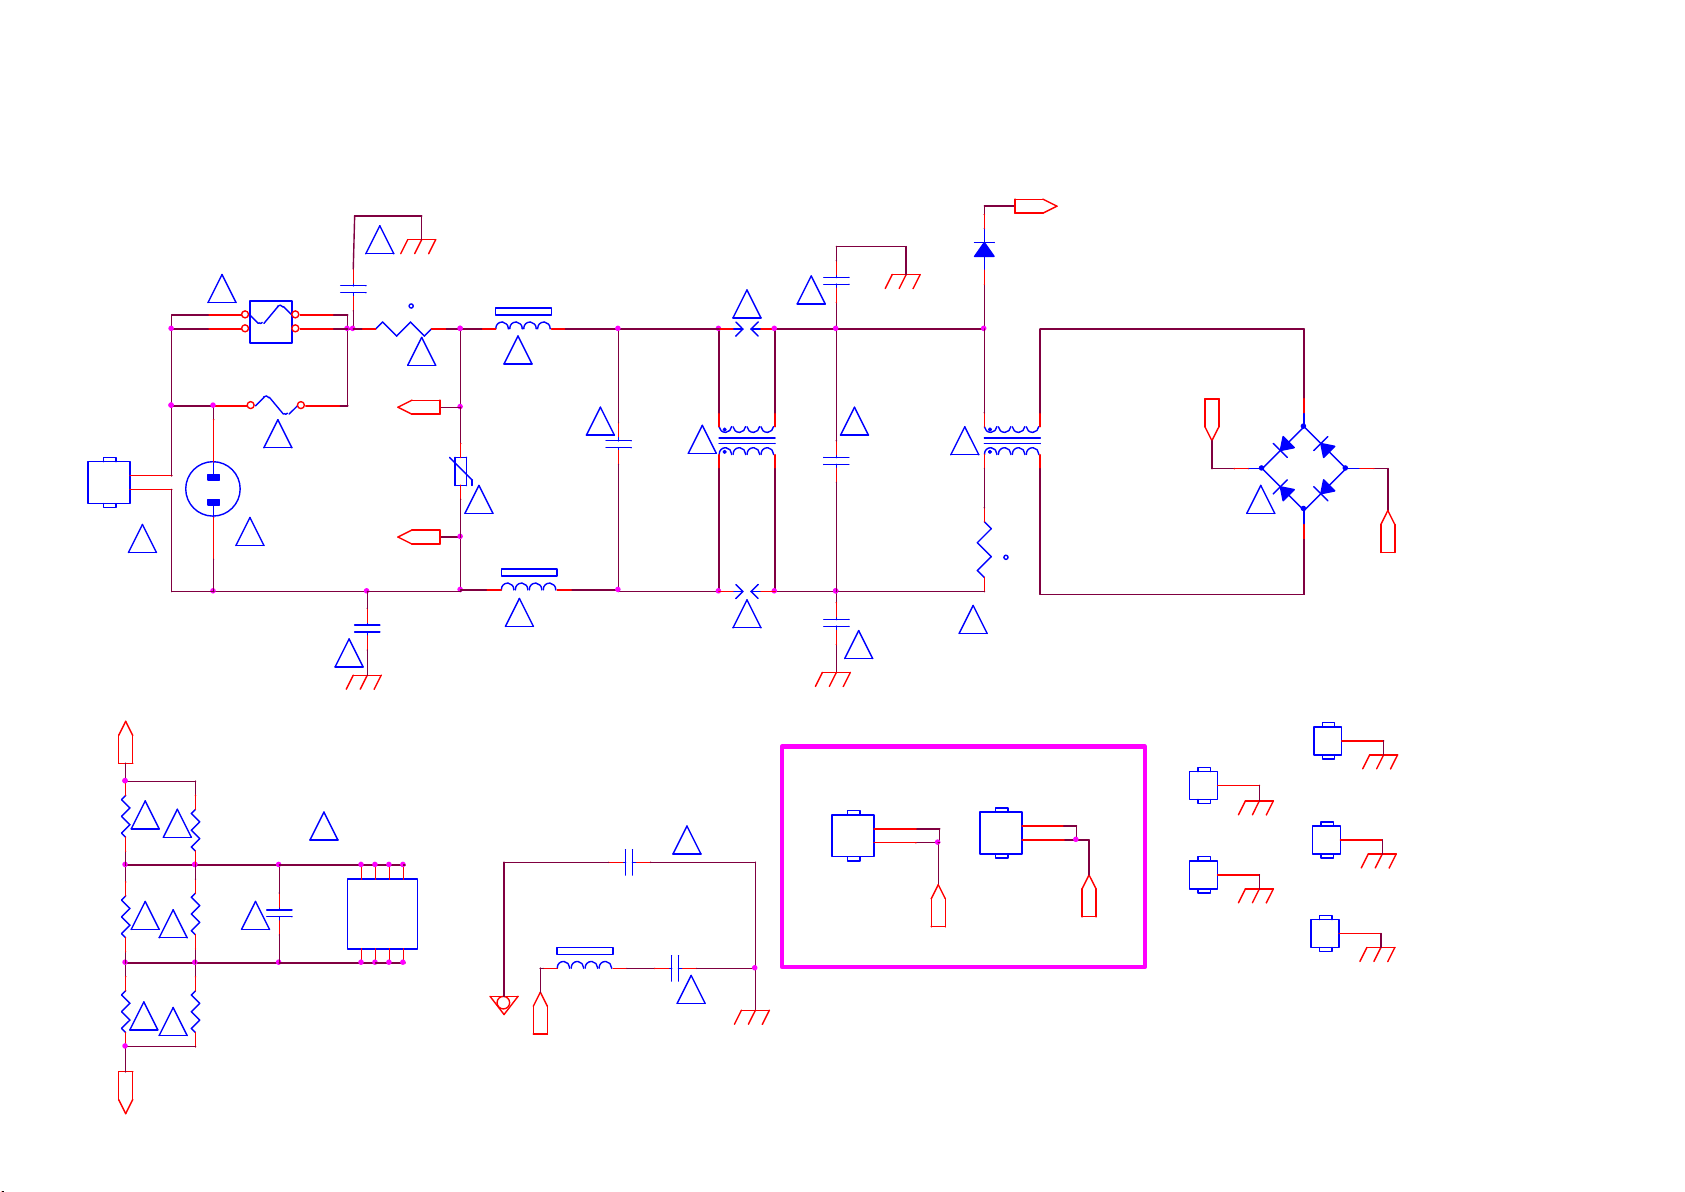
8.2 A 715G8967 PSU (For 55” 6172 Series)
8-2-1 AC Input
CN9901
NC / CON N
1
2
!
N
750K +-5% 1/4W
R9901
!
750K +-5% 1/4W
R9903
!
750K +-5% 1/4W
R9905
!
L
!
!
!
!
12
R9902
R9904
R9906
F9902
FUSE
T5AH/250V
CN9902
AC 2P
!
750K +-5% 1/4W
750K +-5% 1/4W
!
750K +-5% 1/4W
12
34
F9901
NC / 5A 250V
!
!
C9900
NC / 47pF
!
C9911
22pF 250V
1 2
NR9901
2R
!
L
RV9901
680V
N
C9912
22pF 250V
!
U9901
NC / HF 81GS Z
3
1
4
L12L1
NC
NC
NC5L26L27NC
8
t
FB9901
900R
1 2
!
!
FB9902
900R
1 2
!
Rsen-
!
C9915
470PF 250V
FB9903
127R
1 2
C9901
0.47uF 305V
C9917
470PF 250V
!
SG9902
DSPL-501N-A21F
4
!
1
SG9901
DSPL-501N-A21F
!
!
!
C9913
220PF 250V
D9901
PG4007
!
3
L9901
2
220PF 250V
22mH
C9914
!
!
0.47uF 305V
C9902
X90G20100080000ABF : 52mm*10mm
X90G201001500000HG : 52mm*20mm
For BD9901
1
2
HS9901
NC / HEAT SI NK
Rsen-
NR9902
2R
4
!
1
12
t
!
HS9902
NC / HEAT SI NK
3
2
1
2
L9902
22mH
BR
Rsen-
VSIN
GND1
1
GND2
1
1
!
GND
GND
+
BD9901
3
TS10P06G-05
-
2
GND3
1
GND4
1
GND5
1
4
Rsen-
GND
GND
GND
Page 30
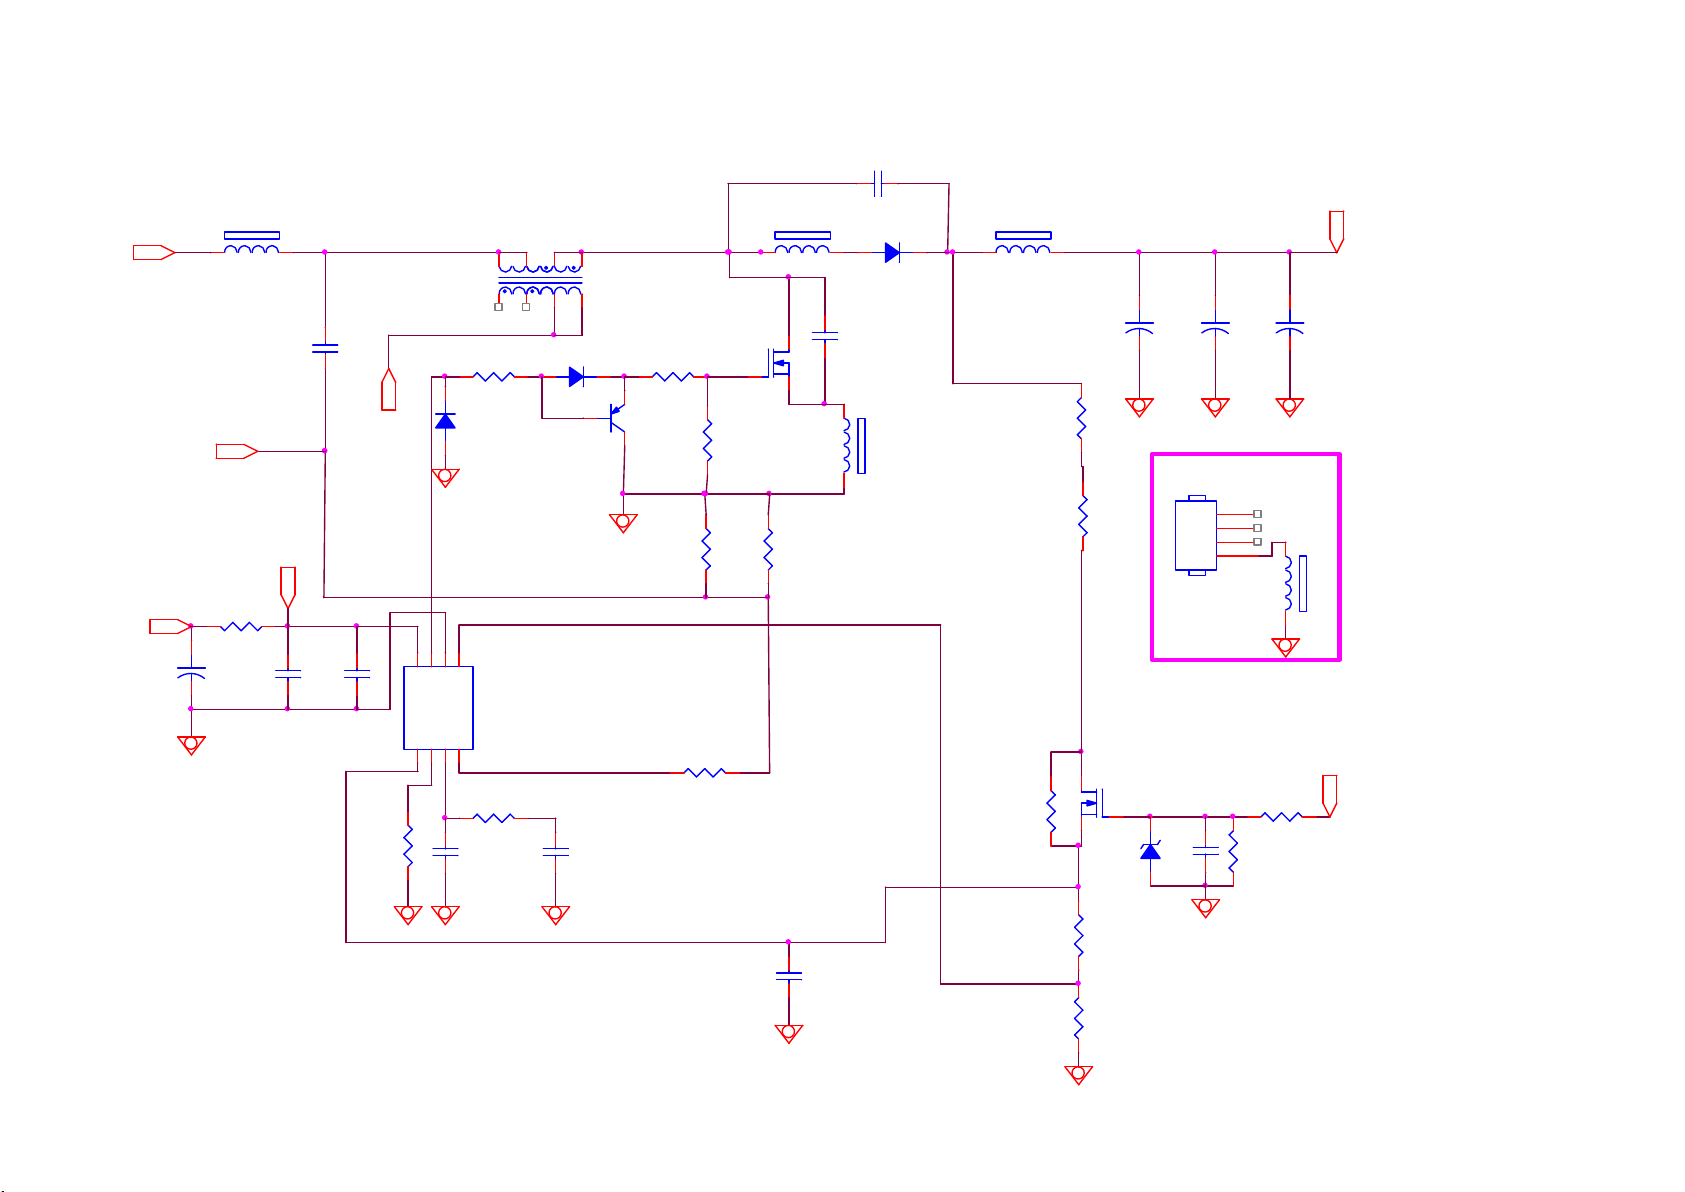
8-2-2 PFC with LD7592GS
C9804
47PF
Vsin
PFC_VCC
C9808
22UF 50V
Rsen-
+
1 2
FB9801
127R
C9800
1UF 450V
PFC_VC
R9832
0R05
C9809
100N 50V
C9815
100N 50V
Rsen-
8
INV1RAMP2COMP3CS
240uH
6
OUT7VCC
L9802
3 4
R9803
68R 1% 1/4W
D9805
SS1060FL
5
OVP
GND
U9801
LD7592
4
10K 1/8W 1%
R9814
5
1
3 4
Q9803
MMBT2907A
5
L9801
240uH
1
D9804
SS1060FL
R9802
27R 1%
R9899
2K49 1/8W 1%
Q9801
TK13A60D
R9805
10K OHM
R9808
0.1R 2W
FB9802
BEAD
1 2
R9809
0.1R 2W
D9801
FMNS-1106S
C9817
100PF
FB9804
BEAD
12
FB9803
BEAD
1 2
R9804
1.5M 1%
R9806
1.5M 1%
R9818
NC
+
C9801
47UF 450V
HEAT SIN K
Q9802
MTN127KN3
+
47UF 450V
HS9801
For Q9801
10K OHM
C9802
1
2
3
4
R9817
+
C9803
47UF 450V
FB9805
BEAD
12
PFC_V C
HV
R9813
10K OHM 1% 1/8W
C9812
47N 50V
C9813
0.47UF 50V
C9810
470PF 50V
NC
ZD9801
1 2
R9812
1K +-1% 1/ 8W
R9811
18K 1%
C9814
R9816
100P 50V
100K 1/8W
Page 31
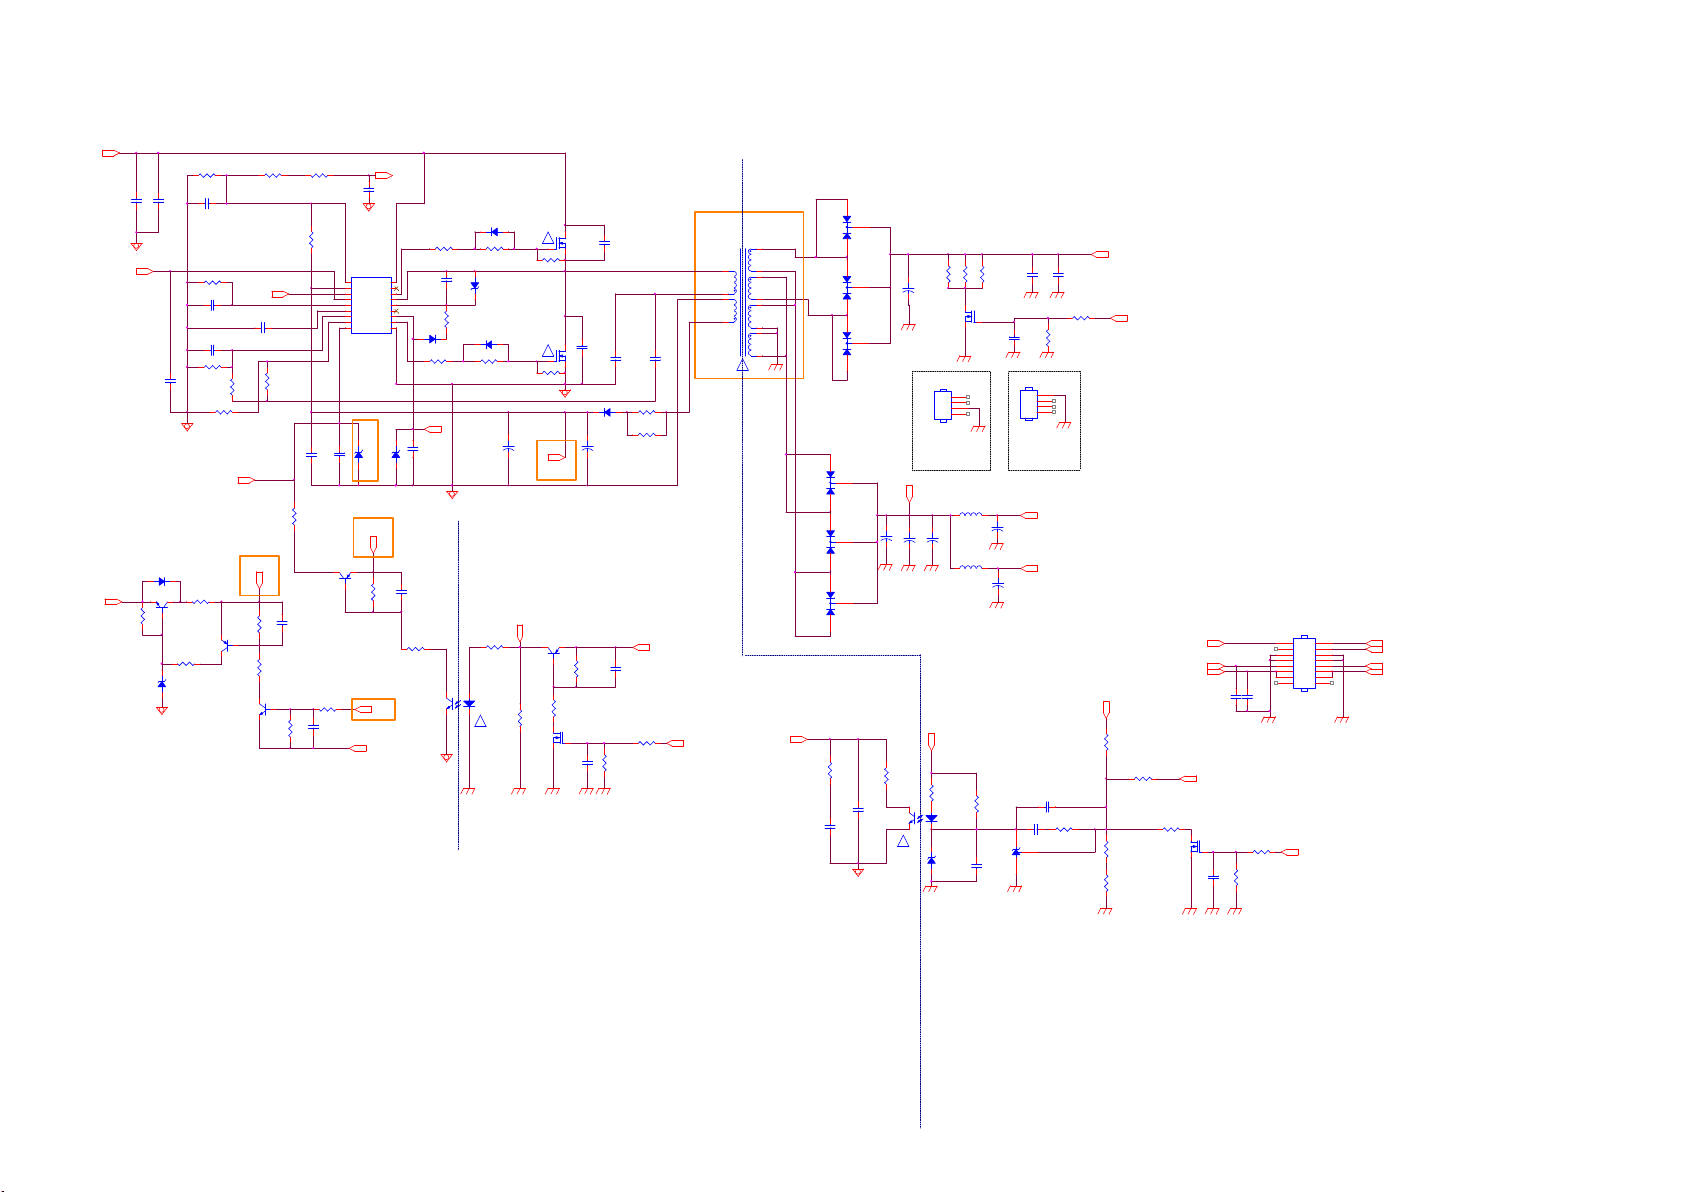
8-2-3 LLC with SSC3S921
HV
ADJ
PFC_VCC
100K 1/8W 1%
R9166
BZT52-B16
C9101
NC / 1NF
ZD9152
C9104
10N 50V
D9106
1N4148W
Q9105
BTD2150AM3
1 2
C9103
2.2NF
0 OHM 5% 1/8W
R9168
2K2 1/8W 1%
R9103
100K 1/8W 1%
C9102
330nF
R9104
51K 1/8W 1%
C9105
220NF 50V
C9107
220P 50V
R9105
180R 1%
100K 1/8W 1%
R9165
R9180
STB
Q9106
MMBT3906
FB_LLC
0.47UF 50V
R9106
120R 1/8W 1%
VCC1
2M 5% 1/4W
C9106
100K 1/8W 1%
R9102
R9112
R9113
Q9107
BC847C
10M
R9122
C9118
0.47UF 50V
R9169
100K 1/8W 1%
C9109
10N 50V
1
2
3
4
5
6
7
8
C9110
Q9104
MMBT3906
U9101
VSEN
VCC
FB
ADJ
CSS
CL
RC
PL
SB9GND
SSC3S921
ZD9142
4N7 50V
1 2
REG
BZT52-B6V2
REG
ADJ
BR
C9100
1NF
ST
NC
VGH
VS
VB
NC
REG
VGL
ZD9141
R9147
47K 1/8W 1%
18
C9114
17
100N 50V
16
15
14
13
12
11
10
D9101
UF1010G
C9115
2U2 25V
BZT52-B15
1 2
C9128
10N 50V
R9148
10K OHM
IN4148W R HG
R9118
100 OHM 1%
10 OHM 1% 1/8W
12
ZD9101
BZT52-B15G
R9120
2R2 1%
D9103
IN4148W RHG
R9115
R9114
10 OHM 1% 1/8W
100 OHM 1%
REG
100UF 50V
HOT COLD
2Kohm 1/4W +/ -1%
12
43
U9103
EL817M(X)
!
COLDHOT
D9104
Q9101
TK10A50D
R9117
R9146
!
R9119
10K 1/8W 1%
Q9102
TK10A50D
!
R9116
10K 1/8W 1%
+
C9117
VCC1
DV5
Q9142
2SA1797
R9145
10K OHM
R9143
10K 1/4W
Q9141
2N7002K
C9141
R9144
1.5K OHM
100N 50V
C9111
100PF
FR107G-A0
+
C9116
100UF 50V
C9119
100PF
C9112
27nF
R9108
D9105
ohm 5% 1/4
R9109
ohm 5% 1/4
C9148
100NF 250V
R9141
100R 1%
R9142
510K 1% 1/8W
C9113
100PF
12VS
EE42 (H=15mm)
Lp=550uH, Lk=80uH
4
2
14
13
PS_ON
T9101
6
8
7
5
9
11
12
10
!
FB_LLC
3
1
1
3
1
3
1
2
D9122
FMEN-2308
3
1
2
D9123
NC / FMEN-2308
3
3
2
D9121
FMEN-2308
1
R9164
C9156
2
D9125
FMET-24010
2
D9126
NC / FMET-24010
2
D9124
FMET-24010
4K7 1/8W 1%
47N 50V
+24V
R9183
R9185
R9186
30K 1/4W
C9189
HS9121
HEAT SINK
50mm * 25mm
For D9124 &
D9125 &
D9126
+
C9133
470UF 25V
+
C9131
470UF 25V
100N 50V
C9124
100nF 50V
1
2
3
4
+12V
60W = 12V * 5.0A
+12V_A
15W = 12V * 1.5A
+
12VS
C9132
+
C9121
1500uF 35V
50mm * 25mm
For D9121 &
D9122 &
D9123
6.5A
+
470UF 25V
C9126
NC / 2200uF 25V
30K 1/4W
HS9111
HEAT SINK
+
C9127
1
2
3
4
470UF 25V
30K 1/4W
Q9181
MTE1K8N25KM3-0-T2-G
L9131
3UH
L9132
3UH
12VS
0R05
R9163
R9162
R9161
1.5K OHM
4.7K 1/4W
12
43
1N 50V
C9155
U9104
EL817M(X)
!
ZD9153
BZT52-B13G
1 2
C9157
1UF 50V
C9153
100N 50V
U9150
AS431AN-E1
C9152
47N 50V
C9125
R9182
510K 1% 1/8W
R9160
12K 1/8W 1%
100nF 50V
R9181
100 OHM 1%
+24V
4A
DV5
R9156
36K 1/4W
R9154
12K 1/8W 1%
R9158
1.8K OHM 1% 1/8W
R9159
51OHM 1% 1/8W
CN9101
CONN
16
BL_ON/OFF DIM
+12V_A
+12V
C9172
100NF 250V
15
14
13
12
11
10
9
8
7
6
5
4
3
2
1
C9173
100NF 250V
12VS
Q9151
2N7002K
R9153
43K 1%
R9151
DV5
100R 1%
C9151
R9152
100N 50V
510K 1% 1/8W
PS_ON
+12V_A
+12V
R9101
2M 5% 1/4W
NC
R9107
R9111
100K 1%
C9129
10N 50V
100K 1/8W 1%
R9167
100K 1/8W 1%
Page 32
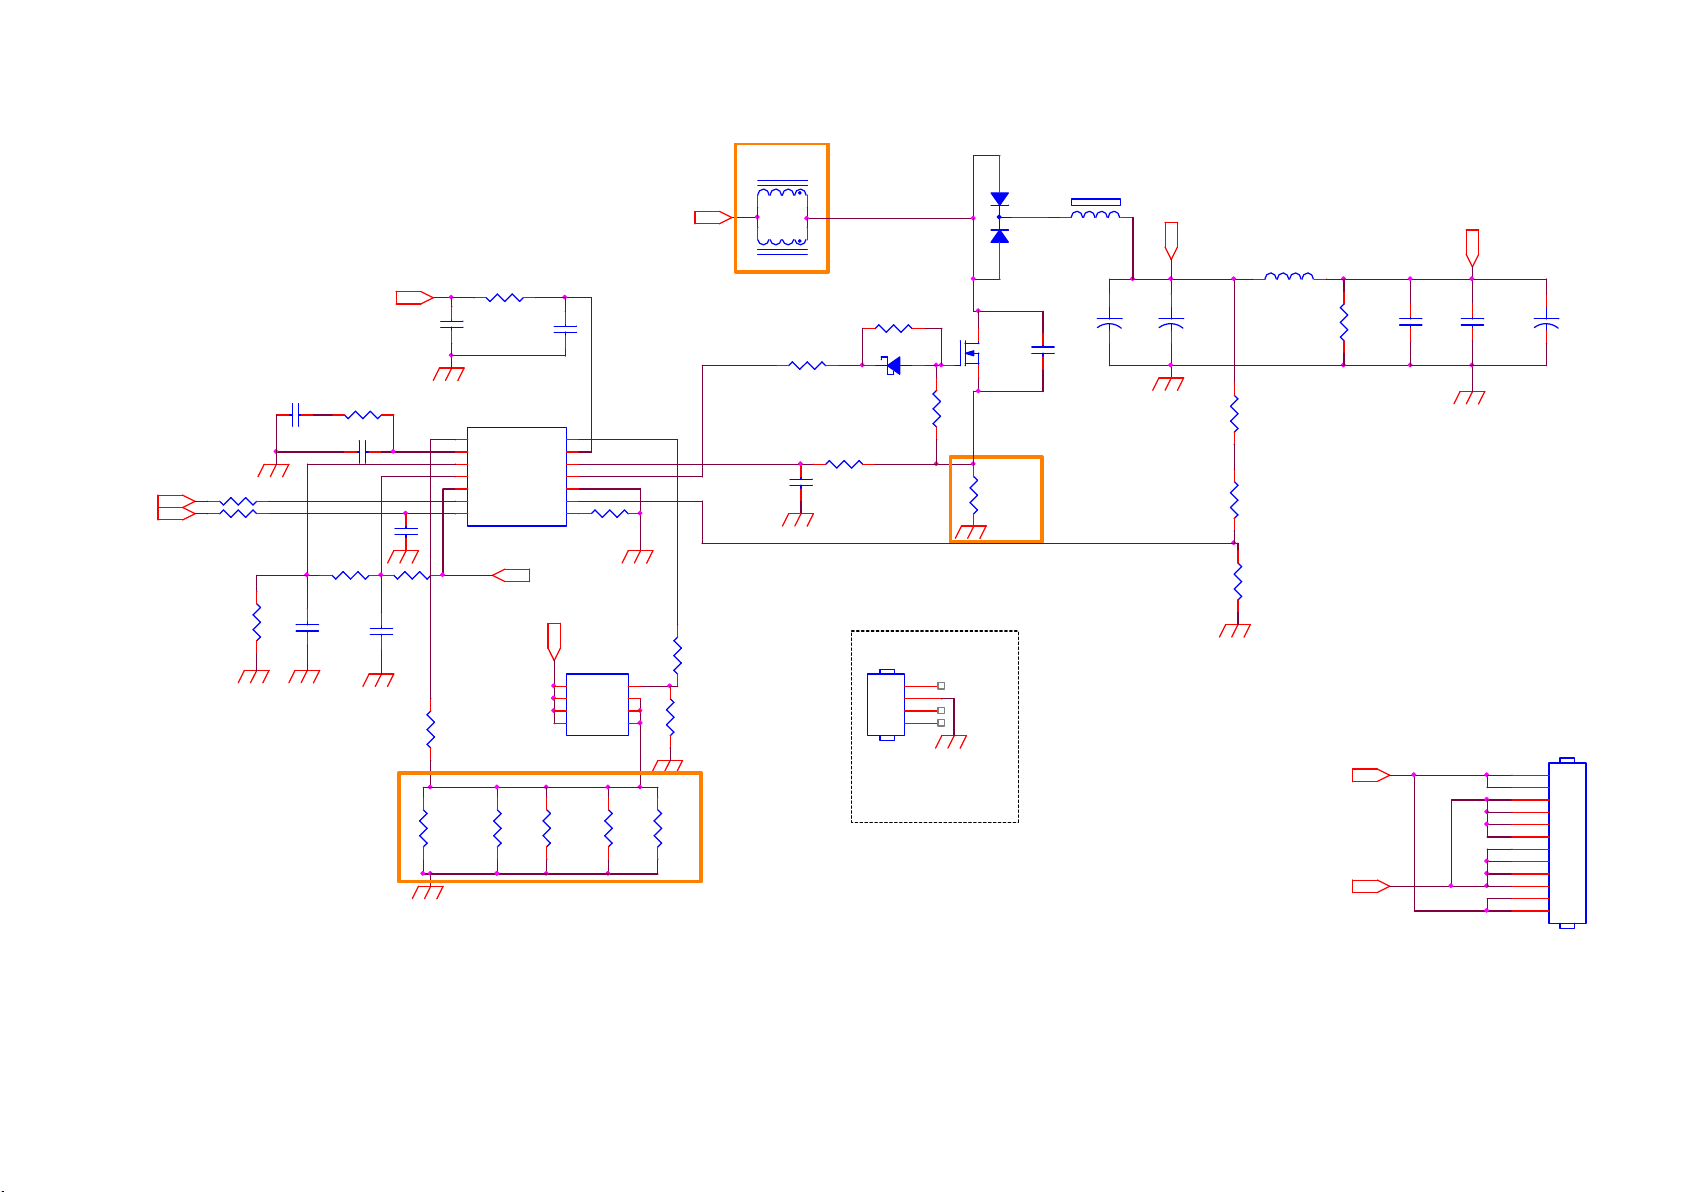
8-2-4 Driver with PF7909S
R8655=5.1R
R8655=3.3R
BL_ON/OFF
DI M
R8609
R8610 10K OHM
R8627
9.53K 1/ 8W
C8604
100N 50V
10K OHM
12VS
R8615
10K 1/8W 1%
C8605
10N 50V
R8626
150K 1% 1/8W
C8611
100NF 50V
ILED: 2.5 A
R8651=0.27R
R8652=0.27R
R8653=3.3R
R8654=3.3R
R8628
200K 1/8W 1%
C8603
1UF 50V
R8655
3.3R 1%
C8601
10UF 25V
14
13
12
11
10
9
8
C8602
1N 50V
R8630
100R 1%
R8631
0.005R 1%
C8612
100nF 50V
U8601
PF7909S
DIMOUT
FB
GM
ADIM
VREF
FLAG
EN
DIM
R8654
3.3R 1%
ILED: 2 A
R8651=0.33R
R8652=0.33R
R8653=5.1R
R8654=5.1R
VCC
CS
OUT
GND
OVP
RT
180K 1% 1/ 8W
FLAG
-VLED
5
6
7
8
R8653
3.3R 1%
1
2
3
4
5
6
7
R8624
Q8603
MTB30N06Q8
G
D
S
D
S
D
S
D
R8652
0.27R
+24V
4
3
2
1
R8651
0.27R
1
2
L8602
33ohm 1/ 4W +/ -5%
C8606
470pF 50V
R8613
100R 1%
R8608
10K OHM 5% 1/ 8W
L8601
NC / 33uH
3
1
33uH
R8616
R8617
0R05 1/ 8W
D8101
SCS160P
R8620
1K1/4W
HS8601
HEAT SIN K
55mm * 35mm
For Q8601
D8601
12
R8623
10K OHM
1
2
3
4
D8601
3
FMET-24010
2
1
Q8601
MTE65N 15FP
R8601
0R05 5%
1 2
FB8601
BEAD
C8608
220uF 50V
C8607
47PF
VLED
+
150K 1% 1/8W
150K 1% 1/8W
C8609
220uF 50V
+
R8618
R8619
VLED: 36V-43.2V
ILED: 2.5A Max
L8611
3UH
C8614
R8621
100NF 250V
47K +-1% 1/4W
OVP = 49.375V
R8625
16K 1% 1/ 8W
+VLED
-VLED
+VLED
C8613
100NF 250V
12
11
10
9
8
7
6
5
4
3
2
1
+
C8615
220uF 50V
CN8603
CONN
Page 33
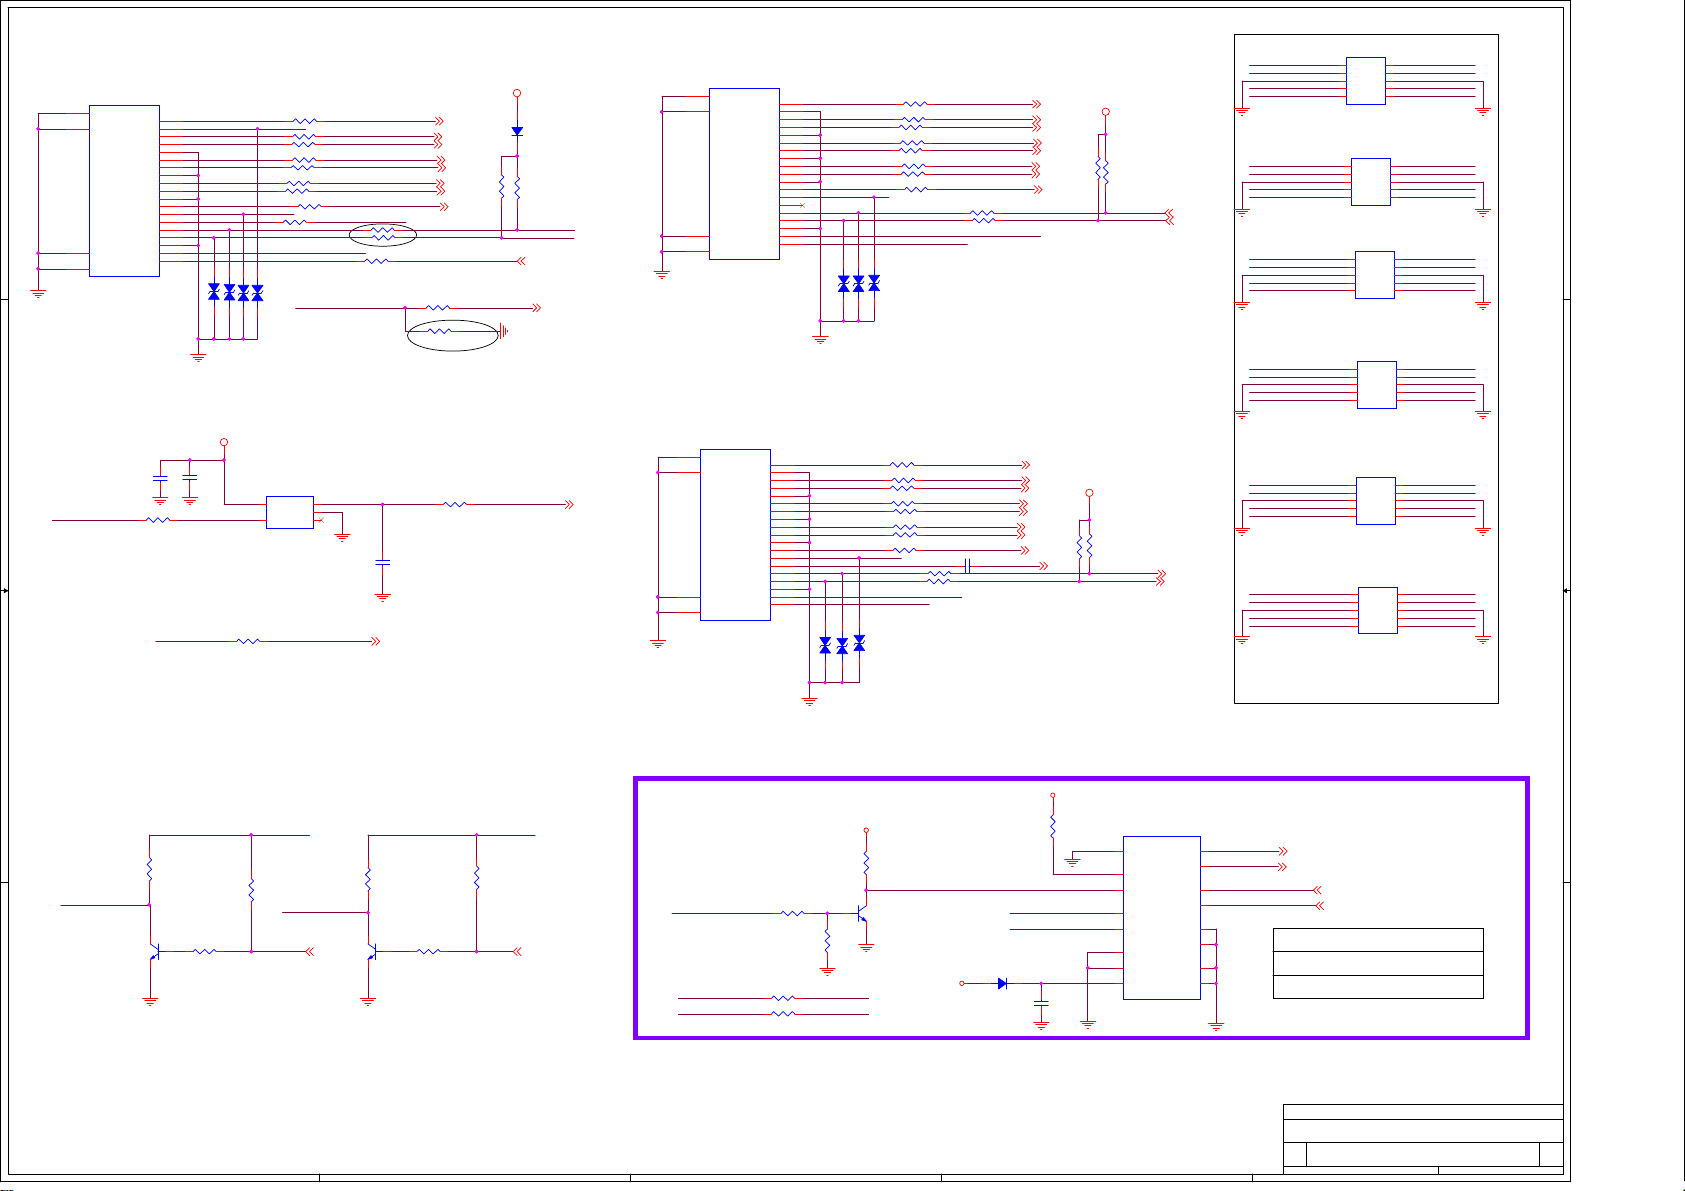
5
HDMI1(MHL)---8.3 B 715G9225 SSB
CN501
20
SHLD0
22
23
21
SHLD2
SHLD3
SHLD1
HDMI 19P
D D
TMDSD2+
DSHLD0
TMDSD2-
TMDSD1+
DSHLD1
TMDSD1-
TMDSD0+
DSHLD2
TMDSD0-
TMDSC+
CSHLD0
TMDSC-
DDC_GND
VCC5
1
2
3
4
5
6
7
8
9
10
11
12
13
CEC
14
NC
15
SCL
16
SDA
17
18
19
HPD
HDMI_R0X2P
MHL_CD_SENSE_CTRL
HDMI_R0X2N
HDMI_R0X1P
HDMI_R0X1N
HDMI_R0X0P
HDMI_R0X0N
HDMI_R0XCP
HDMI_R0XCN
CEC
MLVG0402
MLVG0402
1 2
1 2
1 2
ZD501 MLVG0402
ZD503
ZD502
MHL 2.0 Switch Circuit
NC/1UF 25V
C501
NC/100 OHM 1/16W
CEC
5V0
C502
NC/100N 16V
R543
5
4
100 OHM 1/16W
C C
MHL_CD_SENSE
R535
2R2 +-5% 1/16W
R501
2R2 +-5% 1/16W
R504
R506
2R2 +-5% 1/16W
R509 2R2 +-5% 1/16W
R510
2R2 +-5% 1/16W
R515
2R2 +-5% 1/16W
R518
2R2 +-5% 1/16W
R520 2R2 +-5% 1/16W
100 OHM 1/16W
R522
DDC0B_SCL
DDC0B_SDA
VBUS_HDMI0_5V0
MLVG0402
HDMI0_HTP/CBUS
1 2
ZD504
U501
NC/STMPS2171STR
1
OUT
IN
2
GND
FAULT3EN
HDMI_CEC
HDMI0_RX2P
HDMI0_RX2N
HDMI0_RX1P
HDMI0_RX1N
HDMI0_RX0P
HDMI0_RX0N
HDMI0_RXCP
HDMI0_RXCN
UART_SEL
R524
10 OHM 1/16W
10 OHM 1/16W
R525
R526 33 OHM 1/16W
R527
R528
Cancel MHL Function, change
R528 from 300k to 0 ohm on
5/24'17
VBUS_HDMI0_5V0
C503
NC/10UF 16V
HDMI_CEC
4
HDMI0_RX2P
HDMI0_RX2N
HDMI0_RX1P
HDMI0_RX1N
HDMI0_RX0P
HDMI0_RX0N
HDMI0_RXCP
HDMI0_RXCN
CBUS_PAD
MHL_CD_SENSEMHL_CD_SENSE_CTRL
100 OHM 1/16W
0R05 OHM
R532
5.1R 1/16W
R516
MHL_5V_VBUS
5V_SB
D501
BAS316WS
R517
10K 5% 1/16W
10K 5% 1/16W
HDMI0-SCL/RX
HDMI0-SDA/TX
CBUS_PAD
MHL_CD_SENSE
MHL_5V_VBUS
HDMI2
CN502
20
SHLD0
TMDSD2+
22
DSHLD0
SHLD2
TMDSD2TMDSD1+
DSHLD1
TMDSD1TMDSD0+
DSHLD2
TMDSD0-
TMDSC+
CSHLD0
TMDSC-
DDC_GND
23
SHLD3
21
SHLD1
HDMI 19P
HDMI3(ARC)
CN503
20
SHLD0
TMDSD2+
22
DSHLD0
SHLD2
TMDSD2TMDSD1+
DSHLD1
TMDSD1TMDSD0+
DSHLD2
TMDSD0-
TMDSC+
CSHLD0
TMDSC-
DDC_GND
23
21
SHLD3
SHLD1
HDMI 19P
VCC5
3
HDMI_R1X2P
HDMI_R1X2N
HDMI_R1X1P
HDMI_R1X1N
HDMI_R1X0P
HDMI_R1X0N
HDMI_R1XCP
HDMI_R1XCN
CEC
MLVG0402
1 2
ZD505
HDMI_R2X2N
HDMI_R2X1N
HDMI_R2X0P
MLVG0402
MLVG0402
1 2
1 2
ZD508
ZD509
R502
R503
R505
R507
R508
R511
R514
R519
DDC1B_SCL
DDC1B_SDA
HDMI1-HOTPLUG
MLVG0402
MLVG0402
1 2
1 2
ZD507
ZD506
R529
R530
R531
R533
R534
R536
R537
R540
CEC
ARC-PAD
DDC2B_SCL
DDC2B_SDA
HDMI2_5V0
MLVG0402
HDMI2-HOTPLUG
1 2
ZD510
HDMI1_RX2P
2R2 +-5% 1/16W
HDMI1_RX2N
2R2 +-5% 1/16W
HDMI1_RX1P
2R2 +-5% 1/16W
HDMI1_RX1N
2R2 +-5% 1/16W
HDMI1_RX0P
2R2 +-5% 1/16W
HDMI1_RX0N
2R2 +-5% 1/16W
HDMI1_RXCP
2R2 +-5% 1/16W
2R2 +-5% 1/16W
2R2 +-5% 1/16W
2R2 +-5% 1/16W
2R2 +-5% 1/16W
2R2 +-5% 1/16W
2R2 +-5% 1/16W
2R2 +-5% 1/16W
2R2 +-5% 1/16W
R541 100 OHM 1/16W
R542
HDMI1_RXCN
2R2 +-5% 1/16W
R521 100 OHM 1/16W
R523
HDMI1_5V0
HDMI2_RX2P
HDMI2_RX2N
HDMI2_RX1P
HDMI2_RX1N
HDMI2_RX0P
HDMI2_RX0N
HDMI2_RXCP
HDMI2_RXCN
C504
1UF 25V
100 OHM 1/16W
100 OHM 1/16W
HDMI2_RX2P
HDMI2_RX2N
HDMI2_RX1P
HDMI2_RX1N
HDMI2_RX0P
HDMI2_RX0N
HDMI2_RXCP
HDMI2_RXCN
ARC_PAD
1
2
3
4
5
6
7
8
9
10
11
12
13
CEC
14
NC
15
SCL
16
SDA
17
18
VCC5
19
HPD
1
HDMI_R2X2P
2
3
4
HDMI_R2X1P
5
6
7
8
9
HDMI_R2X0N
10
HDMI_R2XCP
11
12
HDMI_R2XCN
13
CEC
14
NC
15
SCL
16
SDA
17
18
19
HPD
HDMI1_RX2P
HDMI1_RX2N
HDMI1_RX1P
HDMI1_RX1N
HDMI1_RX0P
HDMI1_RX0N
HDMI1_RXCP
HDMI1_RXCN
ARC_PAD
2
HDMI1_5V0
HDMI2_5V0
R538
R539
10K 5% 1/16W
10K 5% 1/16W
HDMI2_SCL
HDMI2_SDA
R512
R513
10K 5% 1/16W
10K 5% 1/16W
HDMI1_SCL
HDMI1_SDA
HDMI1_SCL
HDMI1_SDA
HDMI2_SCL
HDMI2_SDA
1
U502
1
10
HDMI_R0X2PHDMI_R0X2P
CH1
NC
2
9
HDMI_R0X2NHDMI_R0X2N
CH2
NC
3
8
GND
GND
4
7
HDMI_R0X1PHDMI_R0X1P
CH3
NC
6
HDMI_R0X1NHDMI_R0X1N
CH45NC
NC/AZ1143-04F.R7G
U503
1
HDMI_R0X0P HDMI_R0X0P
HDMI_R0X0N HDMI_R0X0N
HDMI_R0XCP HDMI_R0XCP
HDMI_R0XCN HDMI_R0XCN
HDMI_R1X2P HDMI_R1X2P
HDMI_R1X2N HDMI_R1X2N
HDMI_R1X1P HDMI_R1X1P
HDMI_R1X1N HDMI_R1X1N
HDMI_R2X0P HDMI_R2X0P
HDMI_R2X0N HDMI_R2X0N
HDMI_R2XCP HDMI_R2XCP
HDMI_R2XCN HDMI_R2XCN
CH1
NC
2
CH2
NC
3
GND
GND
4
CH3
NC
CH45NC
NC/AZ1143-04F.R7G
U504
1
CH1
2
CH2
3
GND
GND
4
CH3
CH45NC
NC/AZ1143-04F.R7G
U505
1
CH1
2
CH2
3
GND
GND
4
CH3
CH45NC
NC/AZ1143-04F.R7G
U506
1
CH1
2
CH2
3
GND
GND
4
CH3
CH45NC
NC/AZ1143-04F.R7G
U507
1
CH1
2
CH2
3
GND
GND
4
CH3
CH45NC
NC/AZ1143-04F.R7G
10
9
8
7
6
10
NC
9
NC
8
7
NC
6
10
HDMI_R1X0PHDMI_R1X0P
NC
9
HDMI_R1X0NHDMI_R1X0N
NC
8
7
HDMI_R1XCPHDMI_R1XCP
NC
6
HDMI_R1XCNHDMI_R1XCN
10
HDMI_R2X2PHDMI_R2X2P
NC
9
HDMI_R2X2NHDMI_R2X2N
NC
8
7
HDMI_R2X1PHDMI_R2X1P
NC
6
HDMI_R2X1NHDMI_R2X1N
10
NC
9
NC
8
7
NC
6
B B
D502
BAS316
5V_SB
HDMI0-SCL/RXUART_SEL
HDMI0-SDA/TX
10K 5% 1/16W
C505
100NF 16V
R544
U508
6
/E
S1
9
S1
S0
10
S0
3
2Z
13
1Z
8
GND
7
VEE
16
VCC
2
74HC4052PW
4
HDMI0_SCL
2Y3
11
1Y3
2
2Y2
15
1Y2
5
2Y1
14
1Y1
1
2Y0
12
1Y0
HDMI0_SCL
HDMI0_SDA
HDMI0_SDA
UART1_RXD
UART1_TXD
UART1_RXD
UART1_TXD
HDMI
S0
pin14
H
NC
L H
+12V
Title
Title
Title
<Title>
<Title>
<Title>
Size
Document Number Rev
Size Document Number Rev
Size Document Number Rev
<Doc> <RevCode>
C
<Doc> <RevCode>
C
<Doc> <RevCode>
C
Date: Sheet of
Date: Sheet of
Date: Sheet of
S1
H
CHANNEL
HDMI function
Debug mode
1
2 2Friday, November 03, 2017
2 2Friday, November 03, 2017
2 2Friday, November 03, 2017
HTP & ARC & CEC & MHL_5V
HDMI1_5V0
R545
1K 1/16W
HDMI1-HOTPLUG
Q502
MMBT3904
A A
R552
10K 5% 1/16W
5
R546
10K 5% 1/16W
HDMI2-HOTPLUG
HDMI1_HTP
Q503
MMBT3904
R547
1K 1/16W
R553
10K 5% 1/16W
HDMI2_5V0
R548
10K 5% 1/16W
HDMI2_HTP
4
HDMI2_HTPHDMI1_HTP
Factory UART & I2C Switch IC
to HDMI Pin-14
HDMI0-SCL/RX
HDMI0-SDA/TX
R550
60.4K 1%
40.2K 1/16W 1%
R554
NC/0R05 1/16W
R555
NC/0R05 1/16W
3
R551
HDMI0_SCL
HDMI0_SDA
5V_SB
R549
10K 1% 1/16W
Q501
LMBT3904LT1G
5V_SB
Page 34
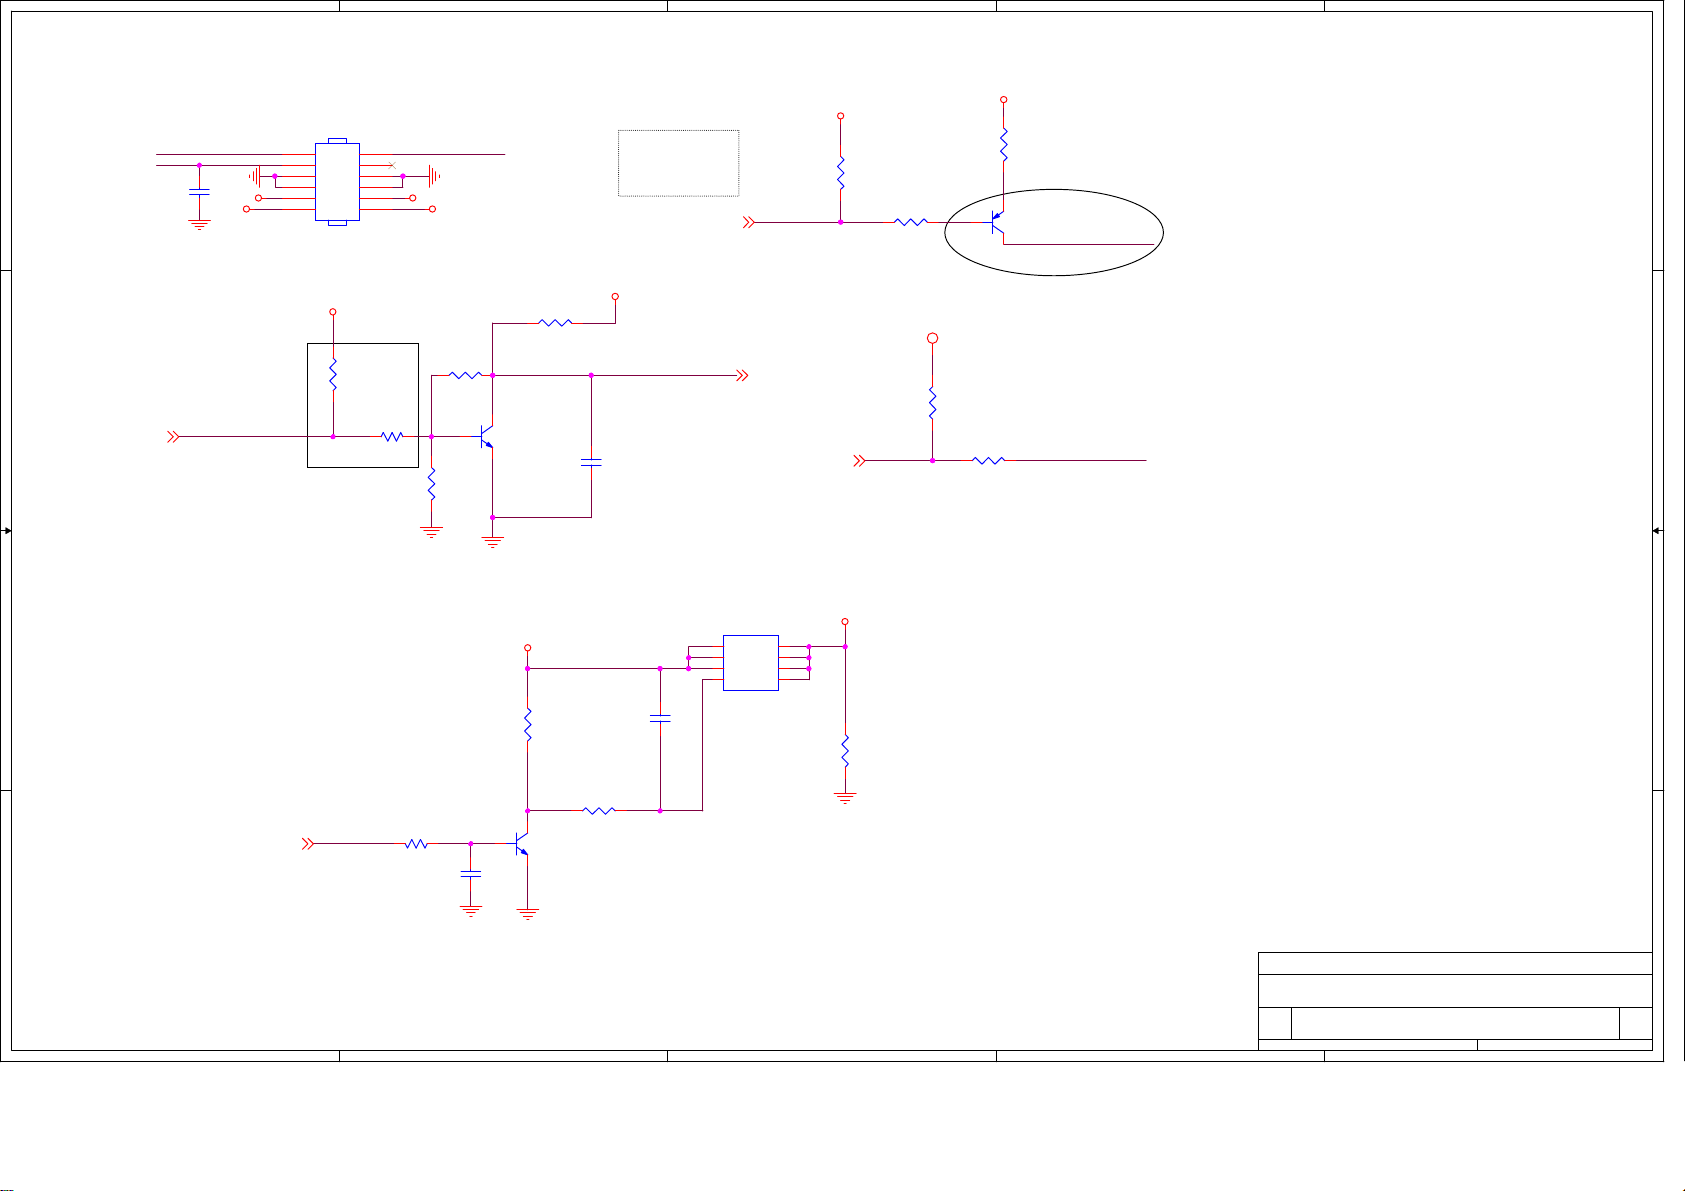
5
4
3
2
1
Power Connector
8
7
6
5
3V3
STB_PWR
5V0
R701
10K
4.7K1/16W
R703
3V3_SB
STB_PWR STB_ON
R712
NC/10KOHM
CN701
D D
C C
BRI_PWM0/BOOT_SEL0
B B
PWM_OUT BL_ON_OFF
STB_ON
C701
NC/100N 50V
AMP_12V AMP_12V
12V0 12V0
BRI_PWM0/BOOT_SEL0
11
9
7
5
3
1
CONN
3V3
12
10
8
6
4
2
R705
1K 1/16W
R708
10K 5% 1/16W
R706
NC/0R05 OHM
R709
NC/4.7K1/16W
Q702
MMBT3904
5V_SB
R704
R711
47K
10K
BL_ON/OFF:
Inverter on: Low
Inverter off: High
3V3
C702
10NF 50V
PWM_OUT
C703
220NF 25V
BLK_ON
PWM_OUT
Q703
1
S
2
S
3
S
4
G
MTP9435BDYAQ8
BLK_ON
D
D
D
D
R707
4.7K 1/16W
R710
3V3
R702
0R05 OHM
MMBT3906
Q701
100 OHM 1/16W
BL_ON_OFF
4
R713 150K
Q704
MMBT3904
Title
Title
Title
<Title>
<Title>
<Title>
Document Number Rev
Size Document Number Rev
Size Document Number Rev
Size
<Doc> <RevCode>
B
<Doc> <RevCode>
B
<Doc> <RevCode>
B
Date: Sheet of
Date: Sheet of
3
2
Date: Sheet of
2 3Friday, November 03, 2017
2 3Friday, November 03, 2017
2 3Friday, November 03, 2017
1
R714
STB_PWR
A A
5
STB_PWR
4.7K1/16W
C704
NC/1UF 25V
Page 35
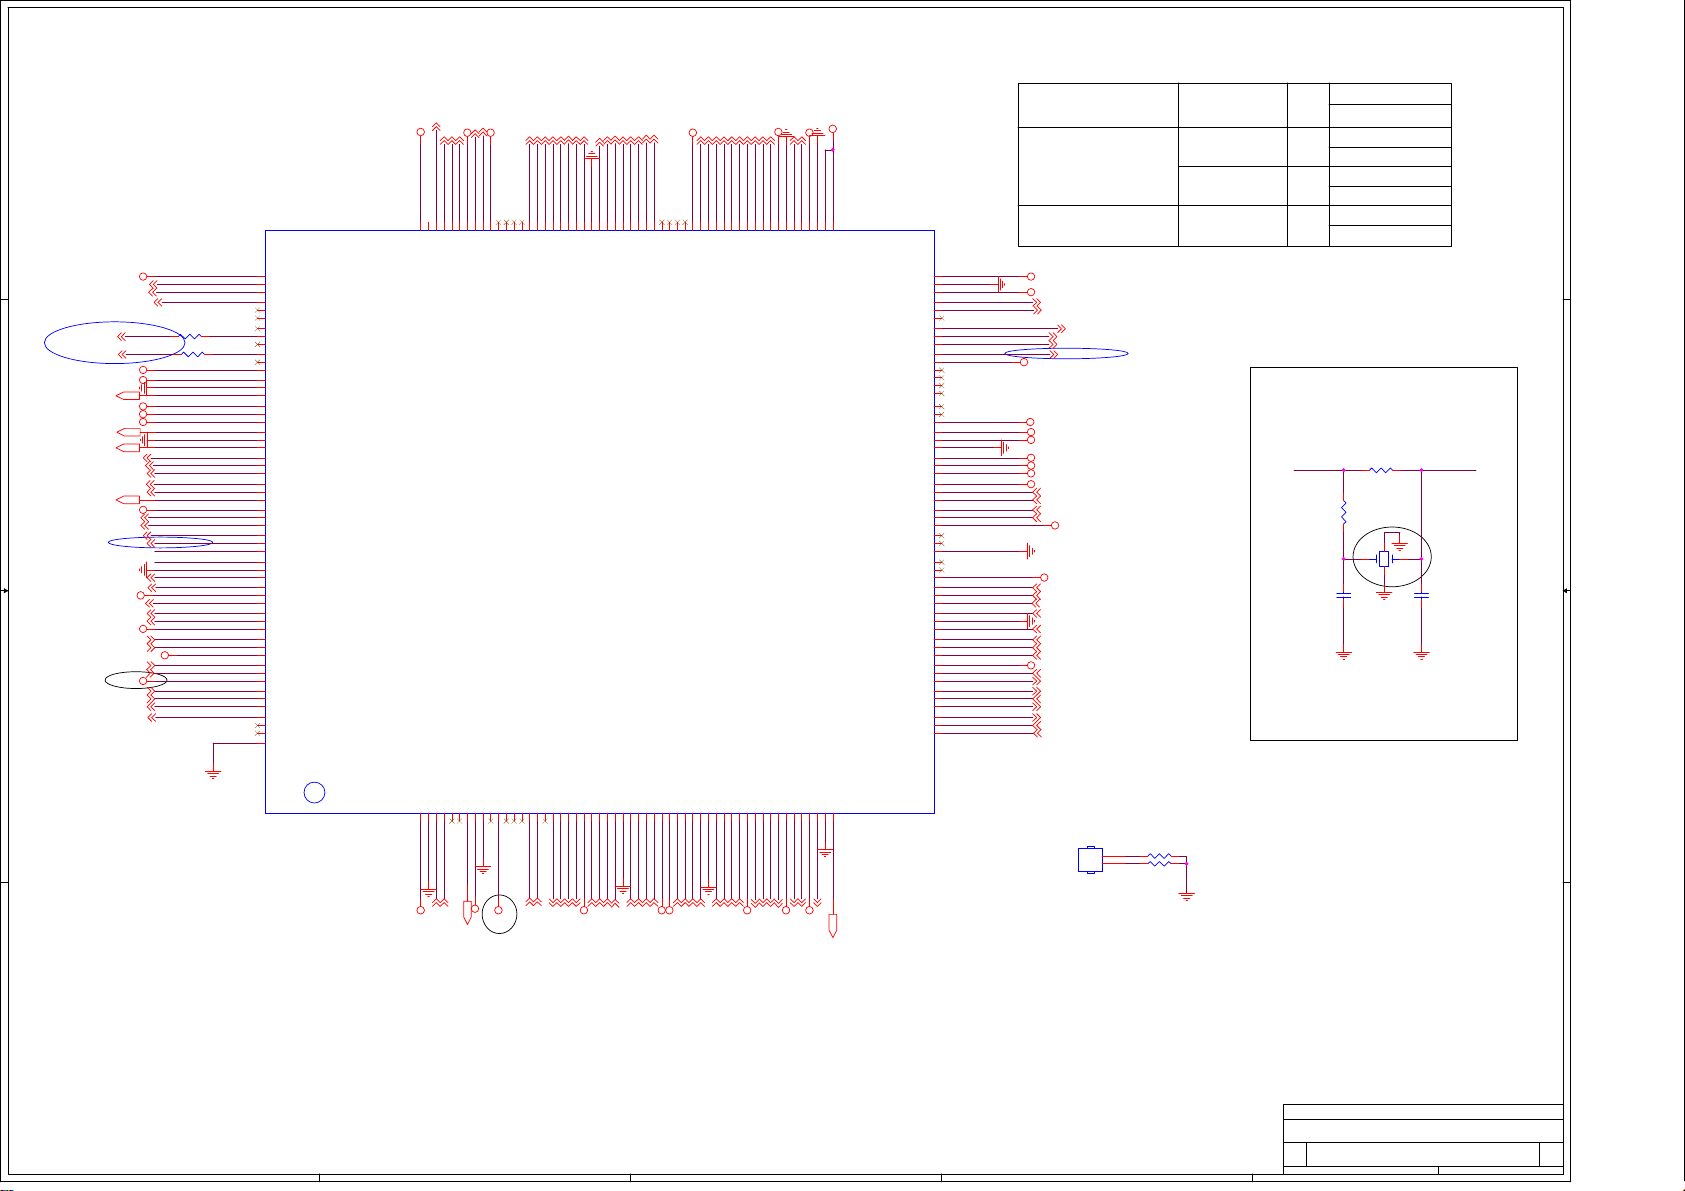
5
4
3
2
1
STRAP CONFIGURATION
0:NORMAL FUNCTION
EN_3D/P2P_SDLOCK
CKV4/VBO_HPN
VDD_0V9
D D
SOC
161
162
VDD_6
100 OHM 1/16W
100 OHM 1/16W
163
VDD_7
164
GPIO0_0/TP/SYNC_3D_OUT/UART2_RXD
165
GPIO0_1/POL/SYNC_3D_IN/UART2_TXD
166
GPIO14_6/PWR_EN/PMU_EN
167
GPIO0_3/STV2/LHSYNC
168
GPIO0_4/CKV0/LVSYNC
169
GPIO1_5/MCLK/SPI_CSN/BRI_PWM1
170
GPIO1_2/OE1/SPI_CLK
171
GPIO1_4/GCLK/SPI_DIN/BRI_PWM2
172
GPIO1_3/OE2/SPI_DOUT/BRI_PWM3
173
GPIO0_2/STV1/VSYNC_GLSS
174
VDDIO_DDR1_1
175
VDDIO_CK_DDR1
176
AVSS33_DDR1_PLL
177
AVDD33_DDR1_PLL
178
VDDIO_DDR1_2
179
VDDIO_DDR1_3
180
VDDIO_DDR1_4
181
AVDD33_PLL
182
AVSS_PLL
183
AVDD09_PLL
184
STANDBY/STB_GPIO18_0
185
IRIN/STB_GPIO18_1
186
LED_PWM/STB_GPIO18_2
187
LS_ADC1/STB_GPIO18_4
188
LS_ADC0/STB_GPIO18_3
189
LDO_DECAP
190
DVDD33_STB
191
UART1_TXD/UART0_TXD/VGA_DDC_SCL/DBGI2C_SDA
192
UART1_RXD/UART0_RXD/VGA_DDC_SDA/DBGI2C_SCL
193
AMP_MUTE/FUNC_SEL/STB_GPIO19_4
194
STB_GPIO19_1
195
XIN
196
XOUT
197
VSS
198
JTAG_TDI/I2S1_DOUT0/GPIO2_3
199
JTAG_TCK/I2S1_BCLK/GPIO2_1
200
DVDD33_3
201
JTAG_TMS/I2S1_WS/GPIO2_2
202
JTAG_TRSTN/I2S1_MCLK/GPIO2_0
203
JTAG_TDO/SPDIF_OUT/GPIO3_2
204
VDD_8
205
USB2_DM0
206
USB2_DP0
207
AVDD33_USB_2
208
FE_RN
209
FE_RP
210
AVDD33_FE
211
FE_TN
212
FE_TP
213
LINEOUT_L2/I2C0_SCL
214
LINEOUT_R2/I2C0_SDA
215
EARPHONE_OUTL/LINEOUT_L3
216
EARPHONE_OUTR/LINEOUT_R3
217
EPAD
VDD_0V9
STB_PWR
LED_PWM
LS_ADC1
LS_ADC0
3V3_SB
LED_R
3V3
VDD_0V9
USB2_DM0
USB2_DP0
FE_RN
FE_RP
3V3
FE_TN
FE_TP
SPK_R
TP/SYNC_3D_OUT
POL/SYNC_3D_IN
R419
SPI_CLK
SPI_DATA
AVDD33_DDR1_PLL
AVDD33_PLL
AVDD09_PLL
STB_PWR
IRIN
LED_PWM
LS_ADC1
LS_ADC0
LDO_DECAP
UART1_TXD
UART1_RXD
AMP_MUTE/FUNC_SEL
LED_R
XIN
XOUT
I2S_DOUT/JTAG_TDI
I2S_BCLK/JTAG_TCK
I2S_WS/JTAG_TMS
I2S_MCLK/JTAG_TRSTN
SPDIF_OUT/JTAG_TDO
USB2_DM0
USB2_DP0
3V3
FE_TN
FE_TP
SPK_L
SPK_L
SPK_R
TCON_PWR/PMU_RST
R420
IRIN
FE_RN
FE_RP
TP/SYNC_3D_OUT
POL/SYNC_3D_IN
TCON_PWR/PMU_RST
SPI_CLK6
SPI_DATA6
DDR_1V5
DDR_1V5
DDR_1V5
DDR_1V5
DDR_1V5
C C
UART1_TXD
UART1_RXD
AMP_MUTE/FUNC_SEL
I2S_DOUT/JTAG_TDI
I2S_BCLK/JTAG_TCK
I2S_WS/JTAG_TMS
I2S_MCLK/JTAG_TRSTN
SPDIF_OUT/JTAG_TDO
B B
CKV3/VBO_LOCKN
3V3
3V3
EPI9-
EPI7+
EPI9+
EPI8-
CKV1/VBO_SDA
CKV2/VBO_SCL
CKV5/LD_EN
CKV3/VBO_LOCKN
CKV1/VBO_SDA
CKV2/VBO_SCL
CKV4/VBO_HPN
CKV5/LD_EN
EN_3D/P2P_SDLOCK
160
159
152
154
158
155
157
156
153
AVDD33_TX
DVDD33_TCON
GPIO1_1/CKV5/LD_EN
GPIO1_0/CKV4/VBO_HPN
GPIO0_7/CKV3/VBO_LOCKN
GPIO0_6/CKV2/LCK/I2C1_SCL
GPIO0_5/CKV1/LDE/I2C1_SDA
GPIO14_5/EN_3D/P2P_SDLOCK
GPIO1_6/EO/SCN_EN/P2P_SDLOCK_BAK
EPI8+
EPI9+
EPI8+
EPI8-
EPI9-
145
147
149
146
148
150
151
COMBTX_TX3P
COMBTX_TX2P
COMBTX_TX1P
COMBTX_TX3N
COMBTX_TX2N
COMBTX_TX1N
COMBTX_TX0N/HPN
COMBTX_TX0P/LOCKN
EPI4-
EPI7-
EPI6-
EPI3-
EPI6+
EPI5-
EPI5+
EPI4+
EPI7+
EPI6-
EPI5-
EPI4+
EPI4-
EPI5+
EPI6+
EPI7-
143
144
COMBTX_TX4N
EPI3-
136
138
141
135
137
139
142
140
AVSS_TX
COMBTX_TX7P
COMBTX_TX6P
COMBTX_TX5P
COMBTX_TX4P
COMBTX_TX8N
COMBTX_TX7N
COMBTX_TX6N
COMBTX_TX5N
VDD_0V9
EPI2-
EMMC_DQ6
EPI2+
EPI3+
EPI2+
EPI2-
EPI3+
134
EMMC_DQ6
126
129
131
132
133
128
130
127
AVDD09_TX
COMBTX_TX9P
COMBTX_TX8P
COMBTX_TX9N
COMBTX_TX11P
COMBTX_TX10P
COMBTX_TX11N
COMBTX_TX10N
EMMC_DQ6/NAND_DQ0/SFC_DOI
EMMC_DQS
EMMC_DQ5
EMMC_RESETN
EMMC_DQ3
EMMC_DQ4
EMMC_DQ0
EMMC_DQ1
EMMC_DQ2
EMMC_DQ7
EMMC_DQ1
EMMC_DQS
EMMC_RESETN
EMMC_DQ5
EMMC_DQ3
EMMC_DQ4
EMMC_DQ0
EMMC_DQ2
EMMC_DQ7
125
117
121
123
124
120
118
122
119
EMMC_DQS/SFC_WPN_IO2
EMMC_DQ3/NAND_DQ6/SFC_DIO
EMMC_DQ4/NAND_DQ5/SFC_CLK
EMMC_DQ1/NAND_DQ3/GPIO15_7
EMMC_DQ2/NAND_DQ2/GPIO16_1
EMMC_DQ7/NAND_DQ1/GPIO16_2
EMMC_DQ5/NAND_DQ7/SFC_CS0N
EMMC_RSTN/NAND_WEN/GPIO16_3
EMMC_DQ0/NAND_DQ4/SFC_HOLDN_IO3
U401
HI3751V553
QFP-216
DVDD33_18
VDD_0V9
EMMC_CLK
EMMC_CCMD
EMMC_CCMD
EMMC_CLK
114
113
109
110
112
115
111
116
VDD_5
GND_2
DVDD33_18
VSS_EMMC
DVDD_CPU_3
GPIO15_5/BRI_PWM0/BOOT_SEL0
EMMC_CMD/NAND_RDY/GPIO16_0
EMMC_CLK/NAND_REN/SFC_CS1N
CPU_0V9
DVDD_CPU_1
DVDD_CPU_2
GPIO_PWM1/SD_CPWR1
GPIO_PWM0/BOOT_SEL1
SD_D2/GPIO8_1/NAND_ALE
SD_D0/GPIO7_7/NAND_CLE
SD_D1/GPIO8_0/NAND_CSN
MHL_CD_SENSE/GPIO4_2
GND_1
VDD_4
CPU_PWM/GPIO15_3
CORE_PWM/GPIO15_4
GPIO15_6/BLK_ON
DVDD33_2
SD_D3/GPIO8_2
SD_CMD/GPIO7_6
SD_CDZ/GPIO7_4
SD_CLK/GPIO7_3
VDDIO_DDR0_4
VDDIO_DDR0_3
AVDD33_DDR0_PLL
AVSS33_DDR0_PLL
VDDIO_CK_DDR0
VDDIO_DDR0_2
VDDIO_DDR0_1
VDD_3
USB2_DP1
USB2_DM1
USB3_DM
USB3_DP
AVDD33_USB_1
USB3_RXN
USB3_RXP
AVSS_USB3
USB3_TXN
USB3_TXP
AVDD09_HDMI_3
HDMI0_RX2P
HDMI0_RX2N
HDMI0_RX1P
HDMI0_RX1N
AVSS_HDMI_3
HDMI0_RX0P
HDMI0_RX0N
HDMI0_RXCP
HDMI0_RXCN
AVDD33_HDMI_3
HDMI_CEC/GPIO4_3
HDMI0_SCL/GPIO3_7
HDMI0_SDA/GPIO4_0
MHL_5V_VBUS
CBUS_PAD
QAMAD_VINPI
QAMAD_VINNI
108
107
106
105
CPU_PWM
104
CORE_PWM
103
102
USB3_PWREN/BOOT_SEL1
101
BRI_PWM0/BOOT_SEL0
100
BLK_ON
99
AMBI_ON_OFF
98
97
96
95
94
93
92
91
90
89
88
87
86
85
84
83
USB2_DP1
82
USB2_DM1
81
USB3_DM
80
USB3_DP
79
78
77
76
75
74
73
72
HDMI0_RX2P
71
HDMI0_RX2N
70
HDMI0_RX1P
69
HDMI0_RX1N
68
67
HDMI0_RX0P
66
HDMI0_RX0N
65
HDMI0_RXCP
64
HDMI0_RXCN
63
62
HDMI_CEC
61
HDMI0_SCL
60
HDMI0_SDA
59
MHL_CD_SENSE
58
MHL_5V_VBUS
57
CBUS_PAD
56
IFN
55
FUNCTION MODE
BOOT DEVICE SEL
SPI NAND SEL
CPU_0V9
VDD_0V9
CPU_PWM
CORE_PWM
3V3
DDR_1V5
DDR_1V5
AVDD33_DDR0_PLL
DDR_1V5
DDR_1V5
DDR_1V5
VDD_0V9
USB2_DP1
USB2_DM1
USB3_DM
USB3_DP
VDD_0V9
HDMI0_RX2P
HDMI0_RX2N
HDMI0_RX1P
HDMI0_RX1N
HDMI0_RX0P
HDMI0_RX0N
HDMI0_RXCP
HDMI0_RXCN
3V3_SB
HDMI_CEC
HDMI0_SCL
HDMI0_SDA
MHL_CD_SENSE
MHL_5V_VBUS
CBUS_PAD
IFP
IFN
IFP
USB3_PWREN/BOOT_SEL1
BRI_PWM0/BOOT_SEL0
BLK_ON
AMBI_ON_OFF
3V3
FUNC_SEL
BOOT_SEL1
BOOT_SEL0
SPINAND_SEL
DS
DS
US
US
SMD XTAL
1:TEST FUNCTION
00:SPI NAND
01:EMMC
10:NAND
11:SPI NOR
0:NORMAL
1:MIRCON
R402
1M 1/16W
R403
100 OHM 1/16W
1
3
X401
24.000Mhz
2 4
C402
18PF 50V
C403
18PF 50V
XINXOUT
LINEIN_L23LINEIN_R24LINEIN_L15LINEIN_R1
VDD_1
YP/CVBS1
6
AVREF
7
8
AVSS_FAE
AVDD33_AFE
9
11
10
YN12PBP13PRP14CVBS015CVBS_VCOM16VDAC_OUT17HDMI2_HTP/GPIO5_118GPIO5_419HDMI2_SDA/GPIO4_720HDMI2_SCL/GPIO4_6
AVDD33_AUDIO1AVSS33_AUCODEC
2
AVREF
LINEIN_L2
LINEIN_R2
3V3
LINEIN_L2
LINEIN_R2
A A
5
CVBS0
VDD_0V9
3V3
CVBS0
4
HDMI2_RXCN23HDMI2_RXCP24HDMI2_RX0N25HDMI2_RX0P
HDMI2_RX1N28HDMI2_RX1P29HDMI2_RX2N30HDMI2_RX2P
HDMI1_RXCN34HDMI1_RXCP35HDMI1_RX0N36HDMI1_RX0P
HDMI1_RX1N39HDMI1_RX1P40HDMI1_RX2N41HDMI1_RX2P
AVDD33_HDMI_1
AVSS_HDMI_1
22
21
HDMI2_SDA
HDMI2_HTP
HDMI2_SCL
WIFI_PWREN
HDMI2_RXCN
CVBS_VCOM
HDMI2_RXCP
3V3_SB
HDMI2_SCL
HDMI2_HTP
HDMI2_SDA
CVBS_VCOM
HDMI2_RXCP
HDMI2_RXCN
WIFI_PWREN
AVDD09_HDMI_132AVDD33_HDMI_2
27
33
26
31
37
HDMI2_RX1N
HDMI2_RX1P
HDMI2_RX2N
HDMI2_RX2P
HDMI1_RXCN
HDMI1_RXCP
HDMI1_RX0N
HDMI2_RX0N
HDMI2_RX0P
HDMI2_RX1P
HDMI2_RX0P
HDMI2_RX1N
HDMI2_RX0N
HDMI1_RX0P
3V3_SB
VDD_0V9
HDMI2_RX2P
HDMI1_RX0P
HDMI2_RX2N
HDMI1_RX0N
HDMI1_RXCP
HDMI1_RXCN
HDMI1_SCL/GPIO4_445HDMI1_SDA/GPIO4_546HDMI1_HTP/GPIO5_047VDD_248RF_SDA/GPIO5_649RF_SCL/GPIO5_750DVDD33_151RF_AGC/GPIO5_5
AVSS_HDMI_2
AVDD09_HDMI_243ARC_PAD
38
44
42
HDMI1_SCL
HDMI1_SDA
ARC_PAD
HDMI1_RX1N
HDMI1_RX1P
HDMI1_RX2N
HDMI1_RX2P
VDD_0V9
ARC_PAD
HDMI1_SCL
HDMI1_SDA
HDMI1_RX1P
HDMI1_RX2P
HDMI1_RX1N
HDMI1_RX2N
QAMAD09_LDO
AVSS_QAMAD
53
52
54
RF_SDA
RF_SCL
RF_AGC
HDMI1_HTP
QAMAD_LDO
VDD_0V9
3V3
RF_SDA
RF_SCL
RF_AGC
HDMI1_HTP
3
HS401
HEAT SINK
2
R417
1
0R05 OHM
2
R418
0R05 OHM
Title
Title
Title
<Title>
<Title>
<Title>
Document Number Rev
Size Document Number Rev
Size Document Number Rev
Size
<Doc> <RevCode>
C
<Doc> <RevCode>
C
<Doc> <RevCode>
C
Date: Sheet of
Date: Sheet of
Date: Sheet of
1
2 4Friday, November 03, 2017
2 4Friday, November 03, 2017
2 4Friday, November 03, 2017
Page 36
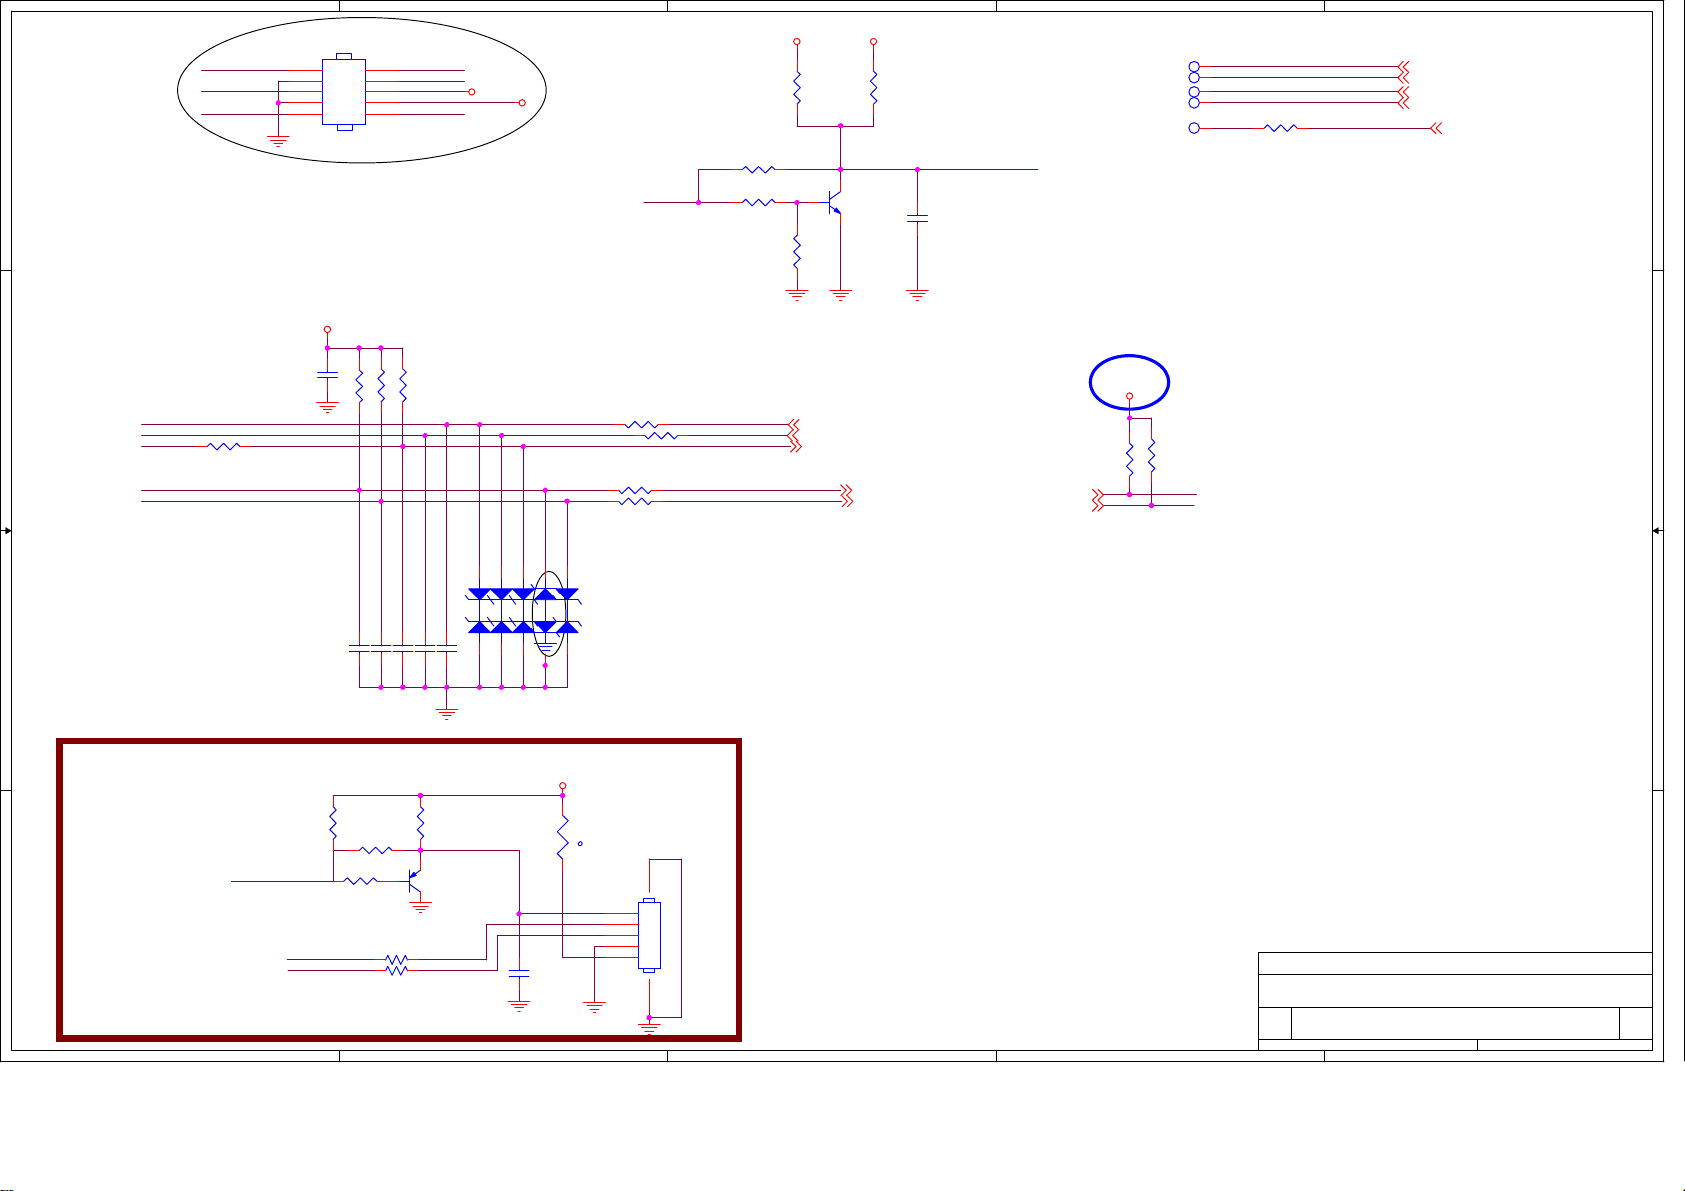
5
CN101
C1004
100NF 25V
2
4
6
8
10
3V3_SB
LED-B
LOGO-PWM
D D
C C
LED-R
LED-B
R1012 100R 1/16W 1%
KEY0
KEY1
CONN
1
3
5
7
9
R1007 6K8 1/10W 1%
LED-R
IR
KEY0KEY1
R1008 NC/6K8 1/10W 1%
R1009 NC/10K 1%
4
3V3_SB
3V3
R1001
NC/100R 1/8W 5%
R1004 100 OHM 1/16W
LED_PWM
R1010 100 OHM 1/16W
R1011 NC/10 OHM
R1013 100R 1/16W 1%
R1014 NC/100R 1/16W 1%
R1005 NC/1K 1/16W 5%
IRINIR
LED_R
LED_PWM
LS_ADC0
LS_ADC1
3
5V0 3V3
Q101
NC/MMBT3904
R1006
NC/100K1/16W
LED_R
LED_PWM
IRIN
LS_ADC0
LS_ADC1
Lighting LOGO
R1002
NC/100R 1/8W 5%
LOGO-PWM
C1003
NC/10uF 16V
UART
4.7K1/16W
UART1_RXD
UART1_TXD
5V_SB
R1016
2
JTAG
TP101
TP102
TP103
TP104
TP105
4.7K1/16W
R1017
1
1
1
1
R1003
1
I2S_MCLK/JTAG_TRSTN
I2S_DOUT/JTAG_TDI
I2S_WS/JTAG_TMS
I2S_BCLK/JTAG_TCK
SPDIF_OUT/JTAG_TDO
33 OHM 1/16W
1
I2S_MCLK/JTAG_TRSTN
I2S_DOUT/JTAG_TDI
I2S_WS/JTAG_TMS
I2S_BCLK/JTAG_TCK
SPDIF_OUT/JTAG_TDO
ZD103 NC/AZ5123-01H
12
12
5V_SB
12
C1012
NC/100P 50V
ZD105 NC/AZ5123-01H
12
ZD104
AZ5125-01H.R7G
TH101
PTCR
t
67
CN103
1
CONN
2
3
4
5
Title
Title
Title
<Title>
<Title>
<Title>
Document Number Rev
Size Document Number Rev
Size Document Number Rev
Size
<Doc> <RevCode>
B
<Doc> <RevCode>
B
<Doc> <RevCode>
B
Date: Sheet of
Date: Sheet of
3
2
Date: Sheet of
2 6Friday, November 03, 2017
2 6Friday, November 03, 2017
2 6Friday, November 03, 2017
1
ZD101 NC/AZ5123-01H
ZD102 NC/AZ5123-01H
12
12
C1007 100N 50V
C1008 NC/100N 50V
B B
C1011 NC
C1010 NC
C1009 100pF 50V
ITV Port
R1021
NC/10K
R1023
UART1_RXD
UART1_TXD
NC/100R 1/16W 5%
R1024
100OHM
R1025
R1026
IRIN
A A
5
R1022
10K
MMBT3906
Q102
100OHM
100OHM
RC_IR_OUT
4
Page 37
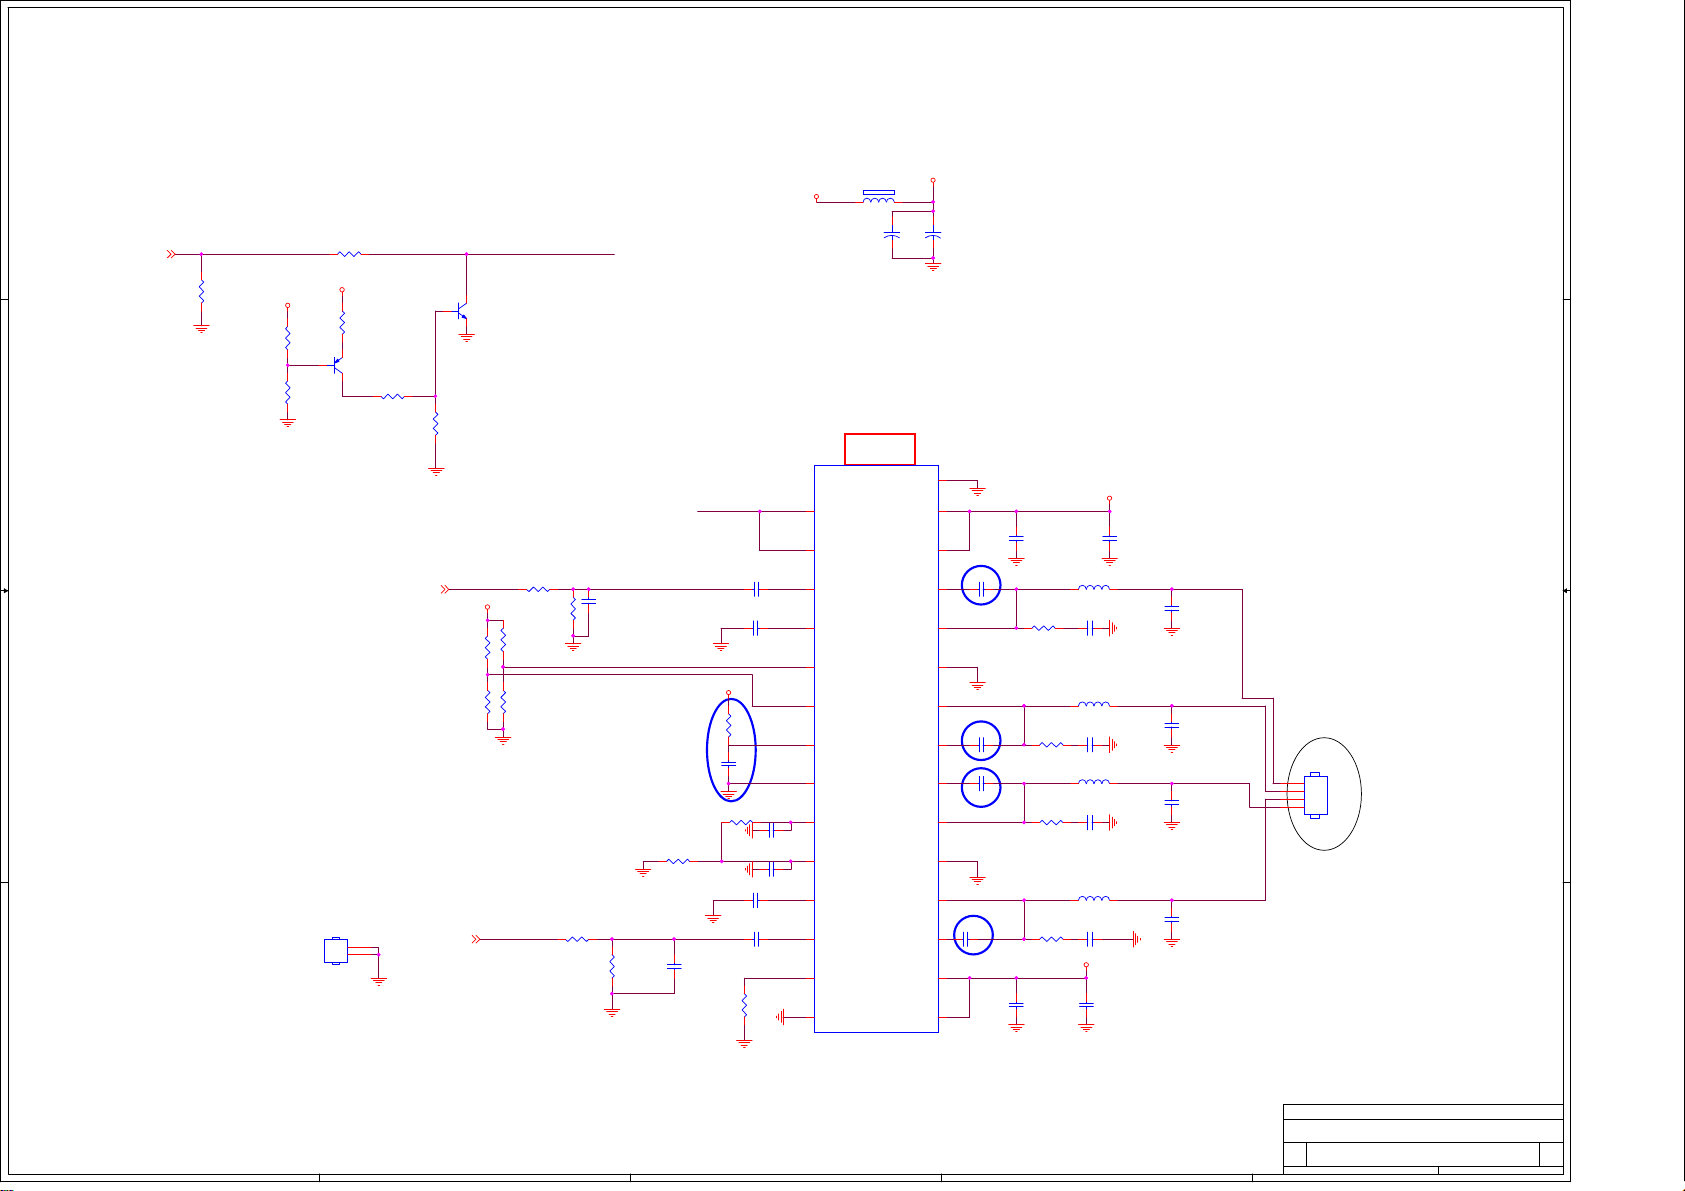
AMP
5
4
3
2
1
D D
1
2
3
4
5
6
7
8
9
U601
SDZ
FAULTZ
LINP
LINN
GAIN0
GAIN1
AVCC
AGND
GVDD
PLIMIT
RINN
RINP
NC
PBTL
AD52580
FB601
1 2
120R 6A
1.2A Max
AMP_12V
AMP_MUTE
Low: Mute disablde
AMP_MUTE_OUT
C604 2.2UF 16V
C609 2.2UF 16V
PVDD
R615
NC/10 OHM 1/8W
C614
NC/1UF 10% 16V
R617 100K 1/16W
C620 2.2UF 16V
C622 2.2UF 16V
High: Mute enable
A_VDD
C618
1UF 10V
10
C619
1UF 10V
11
12
13
R623
NC
14
1K 1/16W
R604
R605
AMP_12V
R602
HS601
NC
3V3
R603
1K
Q601
MMBT3906
R606 1K
1
2
SPK_L
R607
10K
SPK_R
SPK_L
Q602
MMBT3904
5V0
R611
R613
SPK_R
AMP_MUTE/FUNC_SEL
C C
B B
A A
AMP_MUTE/FUNC_SEL
R601
10K
301K 1%
100K 1/16W
R612
10K 5% 1/16W
R614
NC/0R05 OHM
AMP_MUTE_OUT
R608
560R 1/16W 5%
R609
NC/1K 1/10W
NC/10K+-5%1/16W
0R05 OHM
R620 560R 1/16W 5%
C607
2.2nF 50V
R622
NC/1K 1/10W
AV_L_OUT#
R619 27K 1/16W 5%
AV_R_OUT#
C625
2.2nF 50V
+
C601
NC/100UF 35V
Thermal Pad
PVCCL
PVCCL
OUTPL
OUTNL
OUTNR
OUTPR
PVDD
BSPL
PGND
BSNL
BSNR
PGND
BSPR
PVCC
PVCC
+
NC/100UF 35V
C602
29
28
27
26
C606 NC/220NF 25V
25
24
23
22
C612 NC/220NF 25V
21
C615 NC/220NF 25V
20
19
18
17
C623 NC/220NF 25V
16
15
C603
100N 16V
R610
10 OHM 1/16W
10 OHM 1/16W
10 OHM 1/16W
10 OHM 1/16W
C626
100N 16V
R616
R618
R621
PVDD
L601
22uH
C610
330pF 50V
L602
22uH
C613 330pF 50V
L603
22uH
C617 330pF 50V
L604
22uH
C624 330pF 50V
PVDD
C627
10uF 16V
C605
10uF 16V
C608
2.2nF 50V
C611
2.2nF 50V
C616
2.2nF 50V
C621
2.2nF 50V
L+
L-
CONN
R-
R+
4
3
2
1
CN601
Title
Title
Title
<Title>
<Title>
<Title>
Size Document Number Rev
Size Document Number Rev
Size Document Number Rev
<Doc> <RevCode>
C
<Doc> <RevCode>
C
<Doc> <RevCode>
C
Date: Sheet of
Date: Sheet of
5
4
3
2
Date: Sheet of
1
2 2Friday, November 03, 2017
2 2Friday, November 03, 2017
2 2Friday, November 03, 2017
Page 38
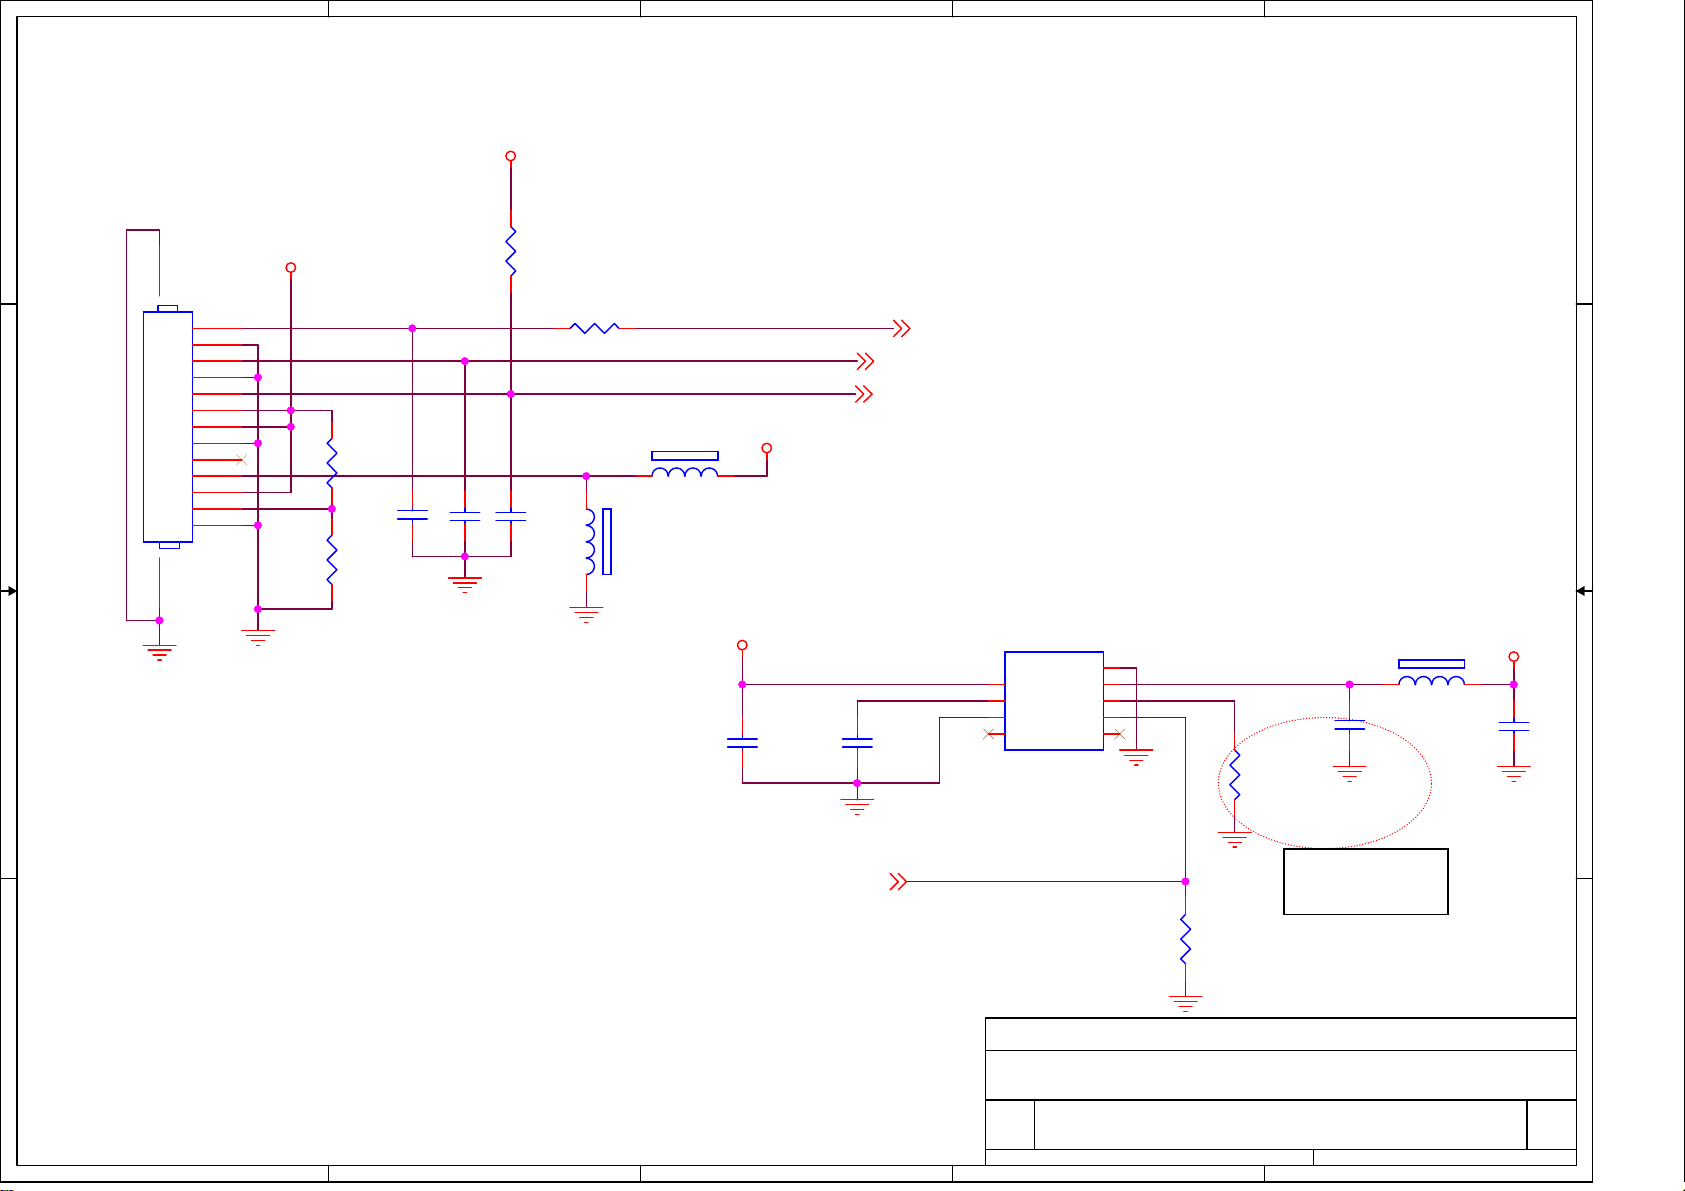
5
4
3
2
1
AmbiLight
3V3
D D
2K16 AL3
LED_VCC
CN4201
1415
CONN
1
2
3
4
5
6
7
8
C C
9
10
11
12
13
R4203
NC/0R05 OHM
C4201
R4204
0R05 OHM
1NF
C4202
22PF 50V
311GW125D13ACL
B B
R4201
10K
R4202 100R 1/16W 1%
FB4201
1 2
C4203
22PF 50V
1 2
NC/120R 3A
FB4202
NC/120R 3A
12V0
LS_ADC0
SPI_CLK
SPI_DATA
3V3
C4204
10UF 16V
LS_ADC0 6
SPI_CLK 6
SPI_DATA 6
AL Protection
U4201
APL3546A KAI-TRG
1
2
3
C4205
22NF 25V
GND
VIN
VOUT
SS
ISET
GND
NC4NC
EN
9
8
7
6
5
R4205
270KOHM +-1% 1/10W
FB4203
1 2
300R
C4206
10UF 16V
LED_VCC
C4207
10UF 16V
AMBI_ON_OFF6
A A
5
4
3
AMBI_ON_OFF
R4206
10K
Title
Title
Title
Size Document Number Rev
Size Document Number Rev
Size Document Number Rev
Date: Sheet of
Date: Sheet of
Date: Sheet of
<Title>
<Title>
<Title>
<Doc> <RevCode>
A
<Doc> <RevCode>
A
<Doc> <RevCode>
A
2
270K ---> 1.8A
2 2Friday, November 03, 2017
2 2Friday, November 03, 2017
2 2Friday, November 03, 2017
1
Page 39
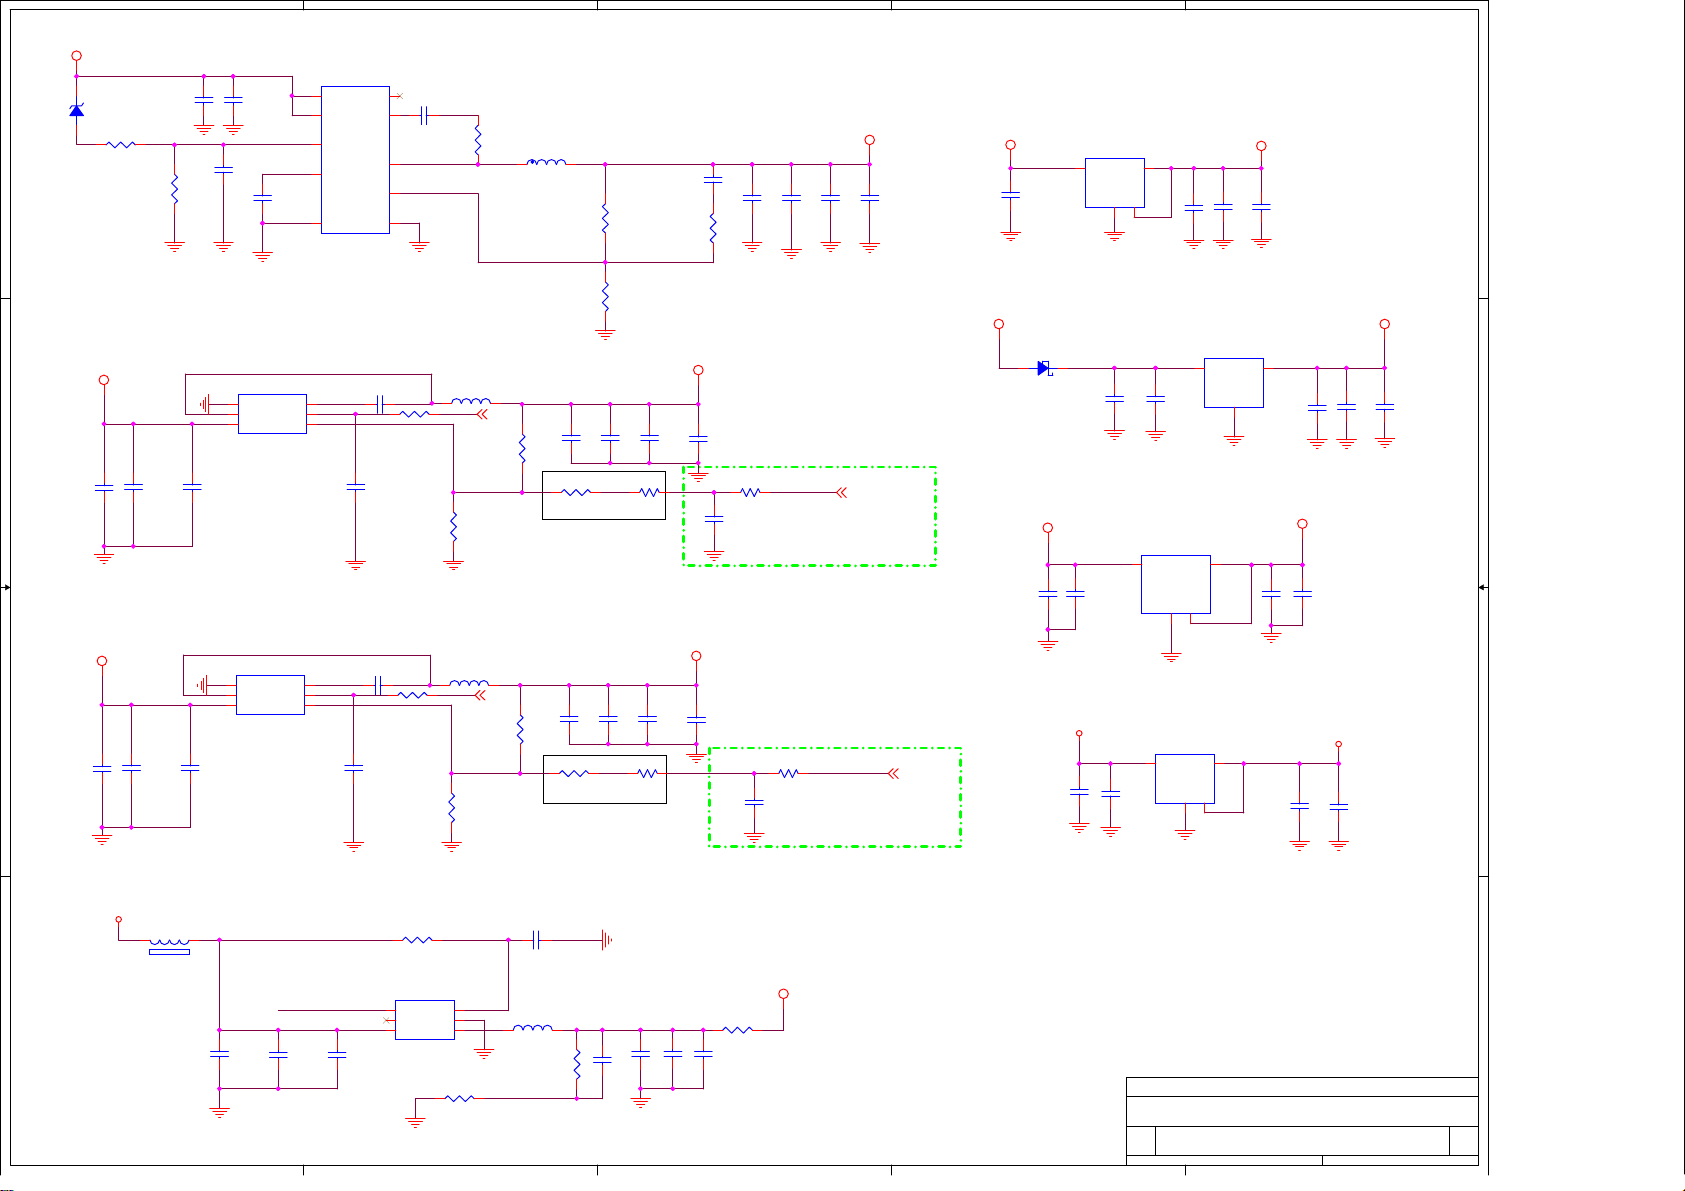
5
4
3
2
1
12V0
ZD701
BZX84B6V8
1 3
D D
R716 10K+-5%1/16W U702
R717
62K 1/16W 1%
12V0
C C
C729
10UF 25V
12V0
B B
C743
10UF 25V
Big plane
U701
8
C710
IN
7
IN
1
EN
5
VC
9
GND
SY8366QNC
C705
NC/10uF 16V
C0805 C0805
C706
10uF 16V
C708
NC/100N16V C712
2.2UF 10V
Vref=0.768
U704
1
GND
2
SW
VIN3VFB
VBST
6
5
EN
4
TPS563201DDCR 3A
C730
NC/10uF 25V
C731
100N16V
Vref=0.768
U706
C744
NC/10uF 25V
1
GND
2
SW
VIN3VFB
TPS563201DDCR 3A
C745
100N16V
VBST
6
5
EN
4
2
PG
6
BS
10
LX
4
FB
3
ILMT
C719100N16V
R721 1K
C732
220nF 16V
30K 1%
C738100N16V
R727 1K
C746
220nF 16V
30K 1%
C707
0.1uF
Big plane
L702 2.2UH
STB_PWR
R726
L703 2.2UH
STB_PWR
R732
R715
2.2R 1%
STB_PWR
R722
12K 1% 1/16W
R2
STB_PWR
R728
12K 1% 1/16W
R2
Vout = 0.6Vx (1+(R1/R2 )=5.2V
2.2uH
L701
2.2UH
R1
R723
R1
R2
C725
22UF
3K3 1%
Big plane
R718
105K 1%
R720
13.7K 1/16W 1%
C726
22UF
R724
110K 1%
R3
C727
22UF
C709
2N2 50V
R719
1K1/10W
CPU_0V9
C1
VDD_0V9
C740
22UF
R729
110K 1%
C741
22UF
R1
R731
C739
22UF
3K3 1%
R3
C1
C711
22UF
6.3V
C0805 C0805
MIN=0.82; MAX=1.17
C728
100N16V
R4
R725
C742
100N16V
CPU_PWM
1KOHM +-1% 1/16W
C733
2.2uF 6.3V
R4
R730
1KOHM +-1% 1/16W
C747
2.2uF 6.3V
22UF
NC/22UF
6.3V
Close to HI3751
CORE_PWM
5V_SB
C713
C714
NC/22UF
6.3V
6.3V
C0805
C0805
CPU_PWM
Close to HI3751
CORE_PWM
5V_SB
C715
1UF 10V
5V0
1 2
D701 SM260A
5V0
C734
2.2UF 10V
C748
100N16V
5V0
LD1117AG33AA3AR
VI3VO
C735
100N16V
2
GND14
4
C720
100N16V
U705
3
VIN
AZ1117CH-1.8TRE1
C749
2.2UF 10V
C716
10UF
UZ1084G33TN3R
3
VIN
C721
1UF 10V
2
VOUT
4
ADJ(GND)
4
1
U707
LD1117AG33AA3AR
VI3VO
GND14
4
2
3V3_SB
C717
100N16V
U703
VOUT
GND
1
C718
1UF 10V
2
DVDD33_18
C736
10UF
C750
10UF
C722
10UF
C737
100N16V
3V3_TUN
C751
C723
100N16V
3V3
C724
100N16V
1UF 10V
5V_SB
FB701
12
120R 3A
A A
C753
1UF 10V
5
DDR_PWR_FB
C754
100N16V
C755
2.2uF 6.3V
R733
4.7K1/16W
U708
SY8009BABC
6
FB
5
NC
4
IN
GND
EN
LX
R736
22K 1%
C752 1UF 10V
1
2
L704 4.7uH
3
R735
33K 1%
DDR_PWR_FB
C756
22PF 50V
Vout= 0.6x(1+33K/22K)= 1.5V
4
C757
10UF
C758
100N16V
R734
C759
47UF 6.3V
DDR_1V5
0R05OHM1/8W
3
Title
Title
Title
<Title>
<Title>
<Title>
Size Document Number Rev
Size Document Number Rev
Size Document Number Rev
<Doc> <RevCode>
Custom
<Doc> <RevCode>
Custom
<Doc> <RevCode>
Custom
Date: Sheet of
Date: Sheet of
2
Date: Sheet of
3 3Friday, November 03, 2017
3 3Friday, November 03, 2017
3 3Friday, November 03, 2017
1
Page 40
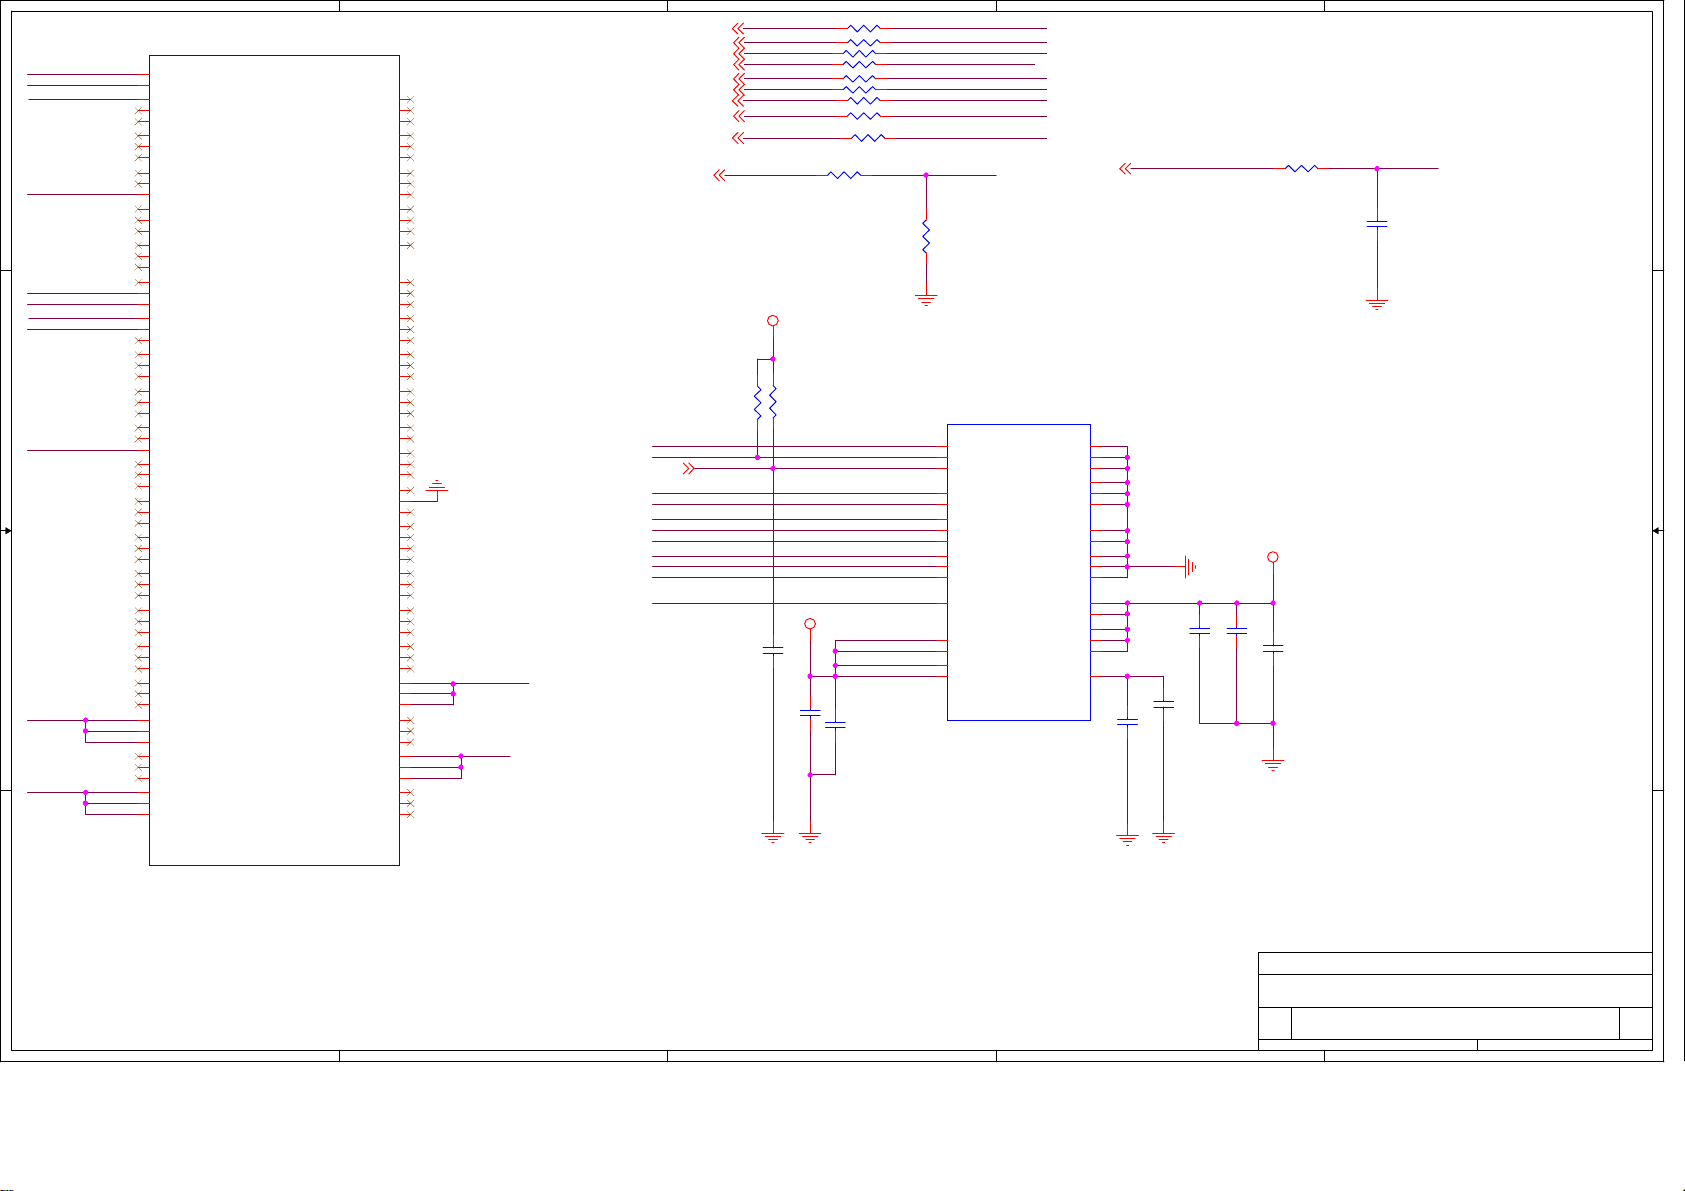
5
EMMC
A10
A11
A12
A13
A14
B10
B11
B12
B13
B14
C10
C11
C12
C13
C14
D12
D13
D14
E12
E13
E14
F12
F13
F14
G12
G13
G14
H12
H13
H14
A1
NC_1
A2
NC_2
A8
NC_3
A9
NC_4
NC_5
NC_6
NC_7
NC_8
NC_9
B1
NC_10
B7
NC_11
B8
NC_12
B9
NC_13
NC_14
NC_15
NC_16
NC_17
NC_18
C1
NC_19
C3
NC_20
C5
NC_21
C7
NC_22
C8
NC_23
C9
NC_24
NC_25
NC_26
NC_27
NC_28
NC_29
NC_30
NC_31
NC_32
NC_33
NC_34
NC_35
NC_36
NC_37
NC_38
NC_39
NC_40
NC_41
NC_42
NC_43
NC_44
NC_45
NC_46
NC_47
NC_48
NC_49
NC_50
NC_51
NC_52
NC_53
NC_54
NC_55
NC_56
NC_57
NC_58
NC_59
NC_60
NC_61
NC_62
U402B
EMMC5_0
D1
D2
D3
D4
E1
E2
E3
F1
F2
F3
G1
G2
H1
H2
H3
J1
J2
J3
RFU/NC_13
RFU/NC_12
RFU/NC_11
RFU/NC_10
RFU/NC_9
RFU/NC_8
RFU/NC_7
RFU/NC_6
RFU/NC_5
RFU/NC_4
RFU/NC_3
RFU/NC_2
RFU/NC_1
NC_107
NC_106
NC_105
NC_104
NC_103
NC_102
NC_101
NC_100
NC_99
NC_98
NC_97
NC_96
NC_95
NC_94
NC_93
NC_92
NC_91
NC_90
NC_89
NC_88
NC_87
NC_86
NC_85
NC_84
NC_83
NC_82
NC_81
NC_80
NC_79
NC_78
NC_77
NC_76
NC_75
NC_74
NC_73
NC_72
NC_71
NC_70
NC_69
NC_68
NC_67
NC_66
NC_65
NC_64
NC_63
P10
P7
K10
K7
K6
G10
G3
F10
E10
E9
E8
E5
A7
P14
P13
P12
P11
P9
P8
P2
P1
N14
N13
N12
N11
N10
N9
N8
N7
N6
N3
N1
M14
M13
M12
M11
M10
M9
M8
M7
M3
M2
M1
L14
L13
L12
L3
L2
L1
K14
K13
K12
K3
K2
K1
J14
J13
J12
EMMC_DAT3
EMMC_DAT4
EMMC_DAT7
D D
EMMC_DAT7
VDDI
EMMC_DAT5
EMMC_DAT6
DVDD33_18
C C
EMMC_DAT5
B B
EMMC_DS
EMMC_RESETN
4
EMMC_CMD
EMMC_CK
EMMC_CCMD
EMMC_DQS
EMMC_RESETN
EMMC_DQ6
EMMC_DQ7
EMMC_DQ2
EMMC_DQ1
EMMC_DQ0
EMMC_DQ4
EMMC_DQ3
EMMC_DQ5
EMMC_CK
EMMC_CMD
EMMC_DAT0
EMMC_DAT1
EMMC_DAT2
EMMC_DAT3
EMMC_DAT4
EMMC_DAT5
EMMC_DAT6
EMMC_DAT7
EMMC_DS
EMMC_DQ6
EMMC_DQ7
EMMC_DQ2
EMMC_DQ1
EMMC_DQ0
EMMC_DQ4
EMMC_DQ3
EMMC_DQ5
EMMC_CCMD
EMMC_DQS
DVDD33_18
R416
R415
47K 1/16W
10K 5% 1/16W
C406
NC/100NF 16V
3
R401
R404
R405
R406
R407
R408
R409
R410
R411 0R05 OHM
R412
EMMC_RESETN
3V3
C408
C409
100NF 16V
2.2uF 6.3V
0R05 OHM
0R05 OHM
0R05 OHM
0R05 OHM
0R05 OHM
0R05 OHM
0R05 OHM
0R05 OHM
0R05 OHM
EMMC_DAT6
EMMC_DAT7
EMMC_DAT2
EMMC_DAT1
EMMC_DAT0
EMMC_DAT4
EMMC_DAT3
EMMC_DAT5
EMMC_CMD
EMMC_DS
R414
NC/33 OHM 1/16W
KLM4G1FEPD-B031
M6
CLK
M5
CMD
K5
RSTN
A3
DAT0
A4
DAT1
A5
DAT2
B2
DAT3
B3
B4
B5
B6
H5
E6
F5
J10
K9
DAT4
DAT5
DAT6
DAT7
DS
VCC_1
VCC_2
VCC_3
VCC_4
U402A
EMMC5_0
EMMC_CLK
VSS_6
VSS_5
VSS_4
VSS_3
VSS_2
VSS_1
VSSQ_5
VSSQ_4
VSSQ_3
VSSQ_2
VSSQ_1
VCCQ_5
VCCQ_4
VCCQ_3
VCCQ_2
VCCQ_1
VDDI
J5
A6
K8
H10
G5
E7
P6
P4
N5
N2
C4
P5
P3
N4
M4
C6
C2
2
R413
33 OHM 1/16W
EMMC_CKEMMC_CLK
C401
NC/10PF 50V
1
DVDD33_18
C404
C405
C407
VDDI
2.2uF 6.3V
C411
100NF 16V
C410
2.2uF 6.3V
100NF 16V
1UF 6.3V
A A
Title
Title
Title
<Title>
<Title>
<Title>
Document Number Rev
Size Document Number Rev
Size Document Number Rev
Size
<Doc> <RevCode>
B
<Doc> <RevCode>
B
<Doc> <RevCode>
B
Date: Sheet of
Date: Sheet of
5
4
3
2
Date: Sheet of
3 4Friday, November 03, 2017
3 4Friday, November 03, 2017
3 4Friday, November 03, 2017
1
Page 41
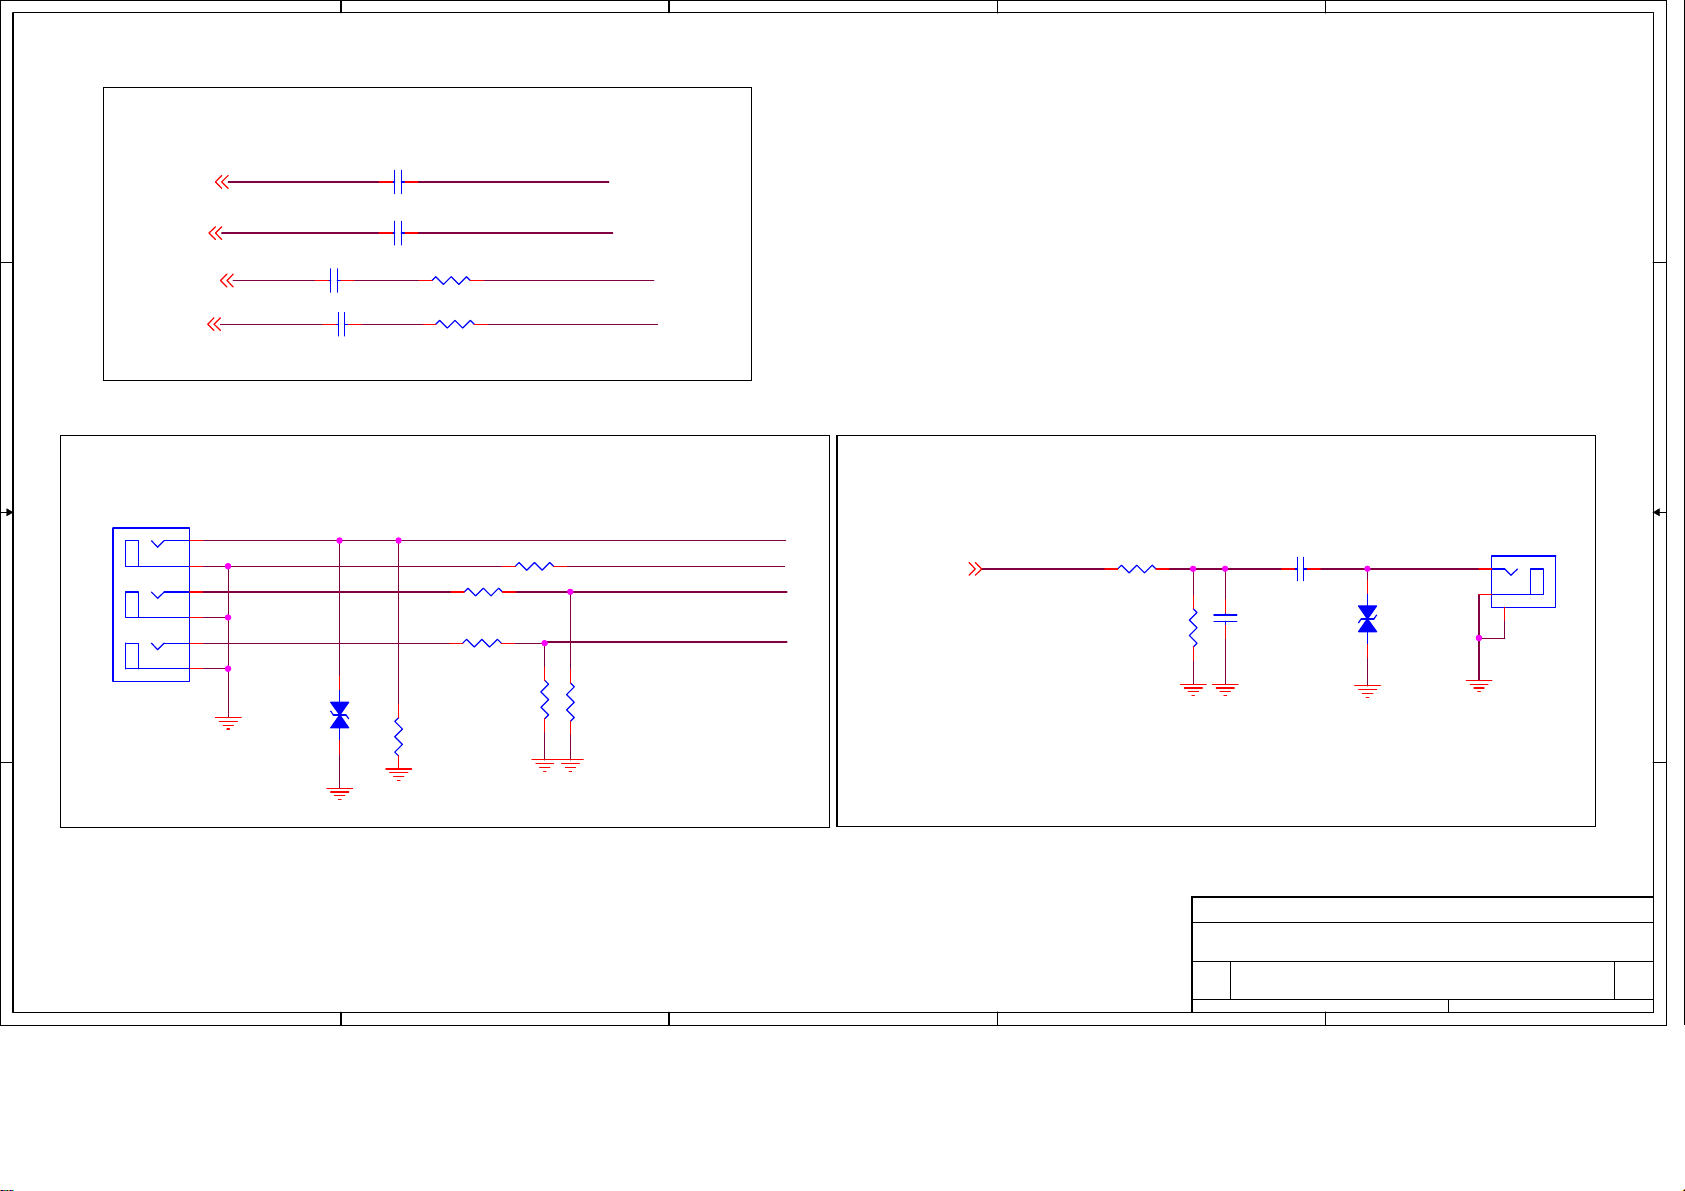
5
<RevCode>
<RevCode>
<RevCode>
4
3
2
1
Closed to Scaler
D D
C1013
C1014
2.2uF 6.3V
2.2uF 6.3V
AV_AUIN_L2
LINEIN_L2
LINEIN_R2
LINEIN_L2
LINEIN_R2 AV_AUIN_R2
CVBS0
CVBS_VCOM
C C
CVBS0
C1018
47NF 16V
47NF 16V
C1016
33 OHM 1/16W
R1027
R1028 68 OHM 5% 1/16W
CVBS0_IN
CVBS_NCVBS_VCOM
AV IN
CN104
A
B
B B
C
RCA JACK
2
1
4
3
6
5
AV_AUIN_L
AV_AUIN_R
CVBS0_IN
R1030 0R05 OHM
R1031
R1033 10K 5% 1/16W
VPORT0603100KV05
75OHM +-5% 1/10W
1 2
ZD108
R1036
10K 5% 1/16W
R1034
10K 5% 1/16W
CVBS_N
AV_AUIN_L2
AV_AUIN_R2
R1035
10K 5% 1/16W
SPDIF_OUT/JTAG_TDO
SPDIF_OUT/JTAG_TDO
R1101
100OHM1/16W
R1102
100OHM1/16W
C1088
330PF 50V
C1087
100NF 16V
12
ZD109
MLVG0402
CN102
RCA CONN 3P
2
1
3
A
A A
Title
Title
Title
<Title>
<Title>
<Title>
Document Number Rev
Size Document Number Rev
Size Document Number Rev
Size
<Doc>
Custom
<Doc>
Custom
<Doc>
Custom
Date: Sheet of
Date: Sheet of
5
4
3
Date: Sheet of
2
3 6Friday, November 03, 2017
3 6Friday, November 03, 2017
3 6Friday, November 03, 2017
1
Page 42
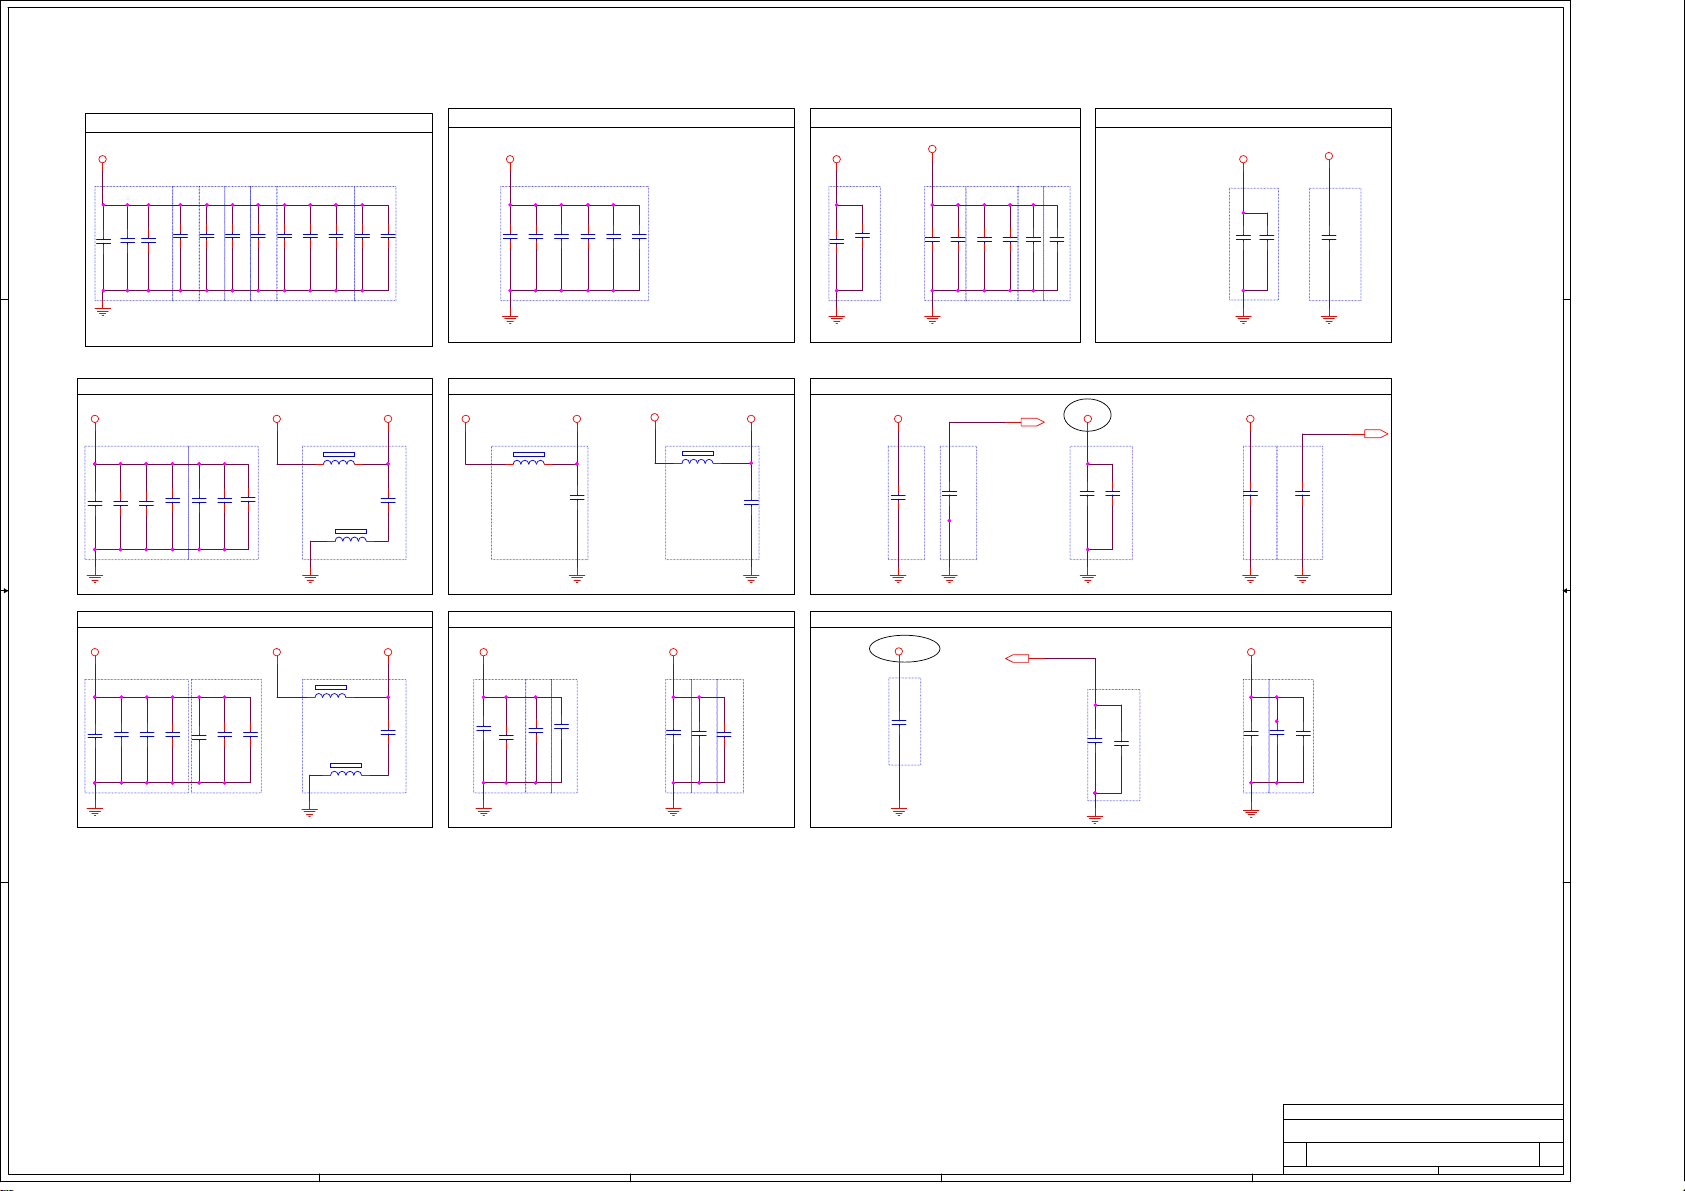
5
Power for SOC Top
4
3
2
1
VDD
D D
CPU_0V9VDD_0V9
DVDD33 & DVDD33_18CPU
DVDD33_18
3V3
DVDD33_18 DVDD33
C424
22UF 20% 6.3V
1 2
HDMI_0V9
C4661UF 6.3V
FB402
120R
P_108/109/110
C425
10uF 6.3V
C4671UF 6.3V
C4261UF 10V
P_181
C4681UF 6.3V
P_116
C4281UF 10V
C4271UF 10V
C4291UF 10V
FB403
1 2
120R
AVDD09_PLL
P_183
C4501UF 6.3V
VDD_0V9
C4491UF 6.3V
C431100NF 16V
C430
2.2uF 6.3V
STB & FE & AUDIO
3V3_SB
C4511UF 6.3V
STB_3V3
P_98
C432
100NF 16V
C4332.2uF 6.3V
LDO_DECAP
C452
2.2uF 6.3V
C4341UF 6.3V
P_51
P_156P_200
C437
C435100NF 16V
C4361UF 6.3V
2.2uF 6.3V
AFE & QAMAD & USB
3V3_SB
C469
100NF 16V
HDMI_3V3
C4701UF 6.3V
C4711UF 6.3V
3V3
C472
2.2uF 6.3V
AFE_3V3
P_11P_22 P_33P_63P_32 P_43P_73P_177P_174/175P_178/179/180
QAMAD_LDO
P_94P_27P_48P_84P_106
P_163/162
C418
C417
C415
C413
C414
C412
1UF 6.3V
10UF 6.3V 20%
C416
1UF 6.3V
2.2uF 6.3V
1UF 6.3V
C419
100NF 16V
100NF 16V
10UF 6.3V 20%
DDR0
DDR_1V5
C C
C441
1UF 6.3V
P_85/86/87
C442
1UF 6.3V
P_90/91
C445
C44410UF 6.3V 20%C460
C443
1UF 6.3V
10UF 6.3V 20%
3V3 3V3 3V3
P_89
C447
C446
100NF 16V
100NF 16V
DDR1
3V3
C4581UF 6.3V
C4591UF 6.3V
B B
C4571UF 6.3V
10UF 6.3V 20%
C463
C462
C461
100NF 16V
100NF 16V
10UF 6.3V 20%
P_112
C4222.2uF 6.3V
C420
100NF 16V
1 2
FB405
1 2
120R
1 2
C423
C421
1UF 6.3V
100NF 16V
AVDD33_DDR0_PLL AVDD33_PLL
FB401
120R
C448
FB404
1UF 6.3V
1 2
120R
AVDD33_DDR1_PLL
C4641UF 6.3V
FB406
120R
PLL
HDMI
VDD_0V9
C465
100NF 16V
3V3
C4531UF 6.3V
FE_3V3
P_54
C473
2.2uF 6.3V
C454100NF 16V
C474100NF 16V
TX & TCON
VDD_0V9
C438100NF 16V
AUDIO_3V3
C4551UF 6.3V
3V3DDR_1V5
USB_3V3
P_95
C475
2.2uF 6.3V
C4391UF 6.3V
P_39/40
C4761UF 6.3V
3V3
AVDD33_TX
P_153P_127
C440100NF 16V
AVREF
P_7P_1P_210P_189P_190
C456
10uF 6.3V
C477100NF 16V
A A
Title
Title
Title
<Title>
<Title>
<Title>
Size Document Number Rev
Size Document Number Rev
Size Document Number Rev
<Doc> <RevCode>
C
<Doc> <RevCode>
C
<Doc> <RevCode>
C
Date: Sheet of
Date: Sheet of
5
4
3
2
Date: Sheet of
1
4 4Friday, November 03, 2017
4 4Friday, November 03, 2017
4 4Friday, November 03, 2017
Page 43
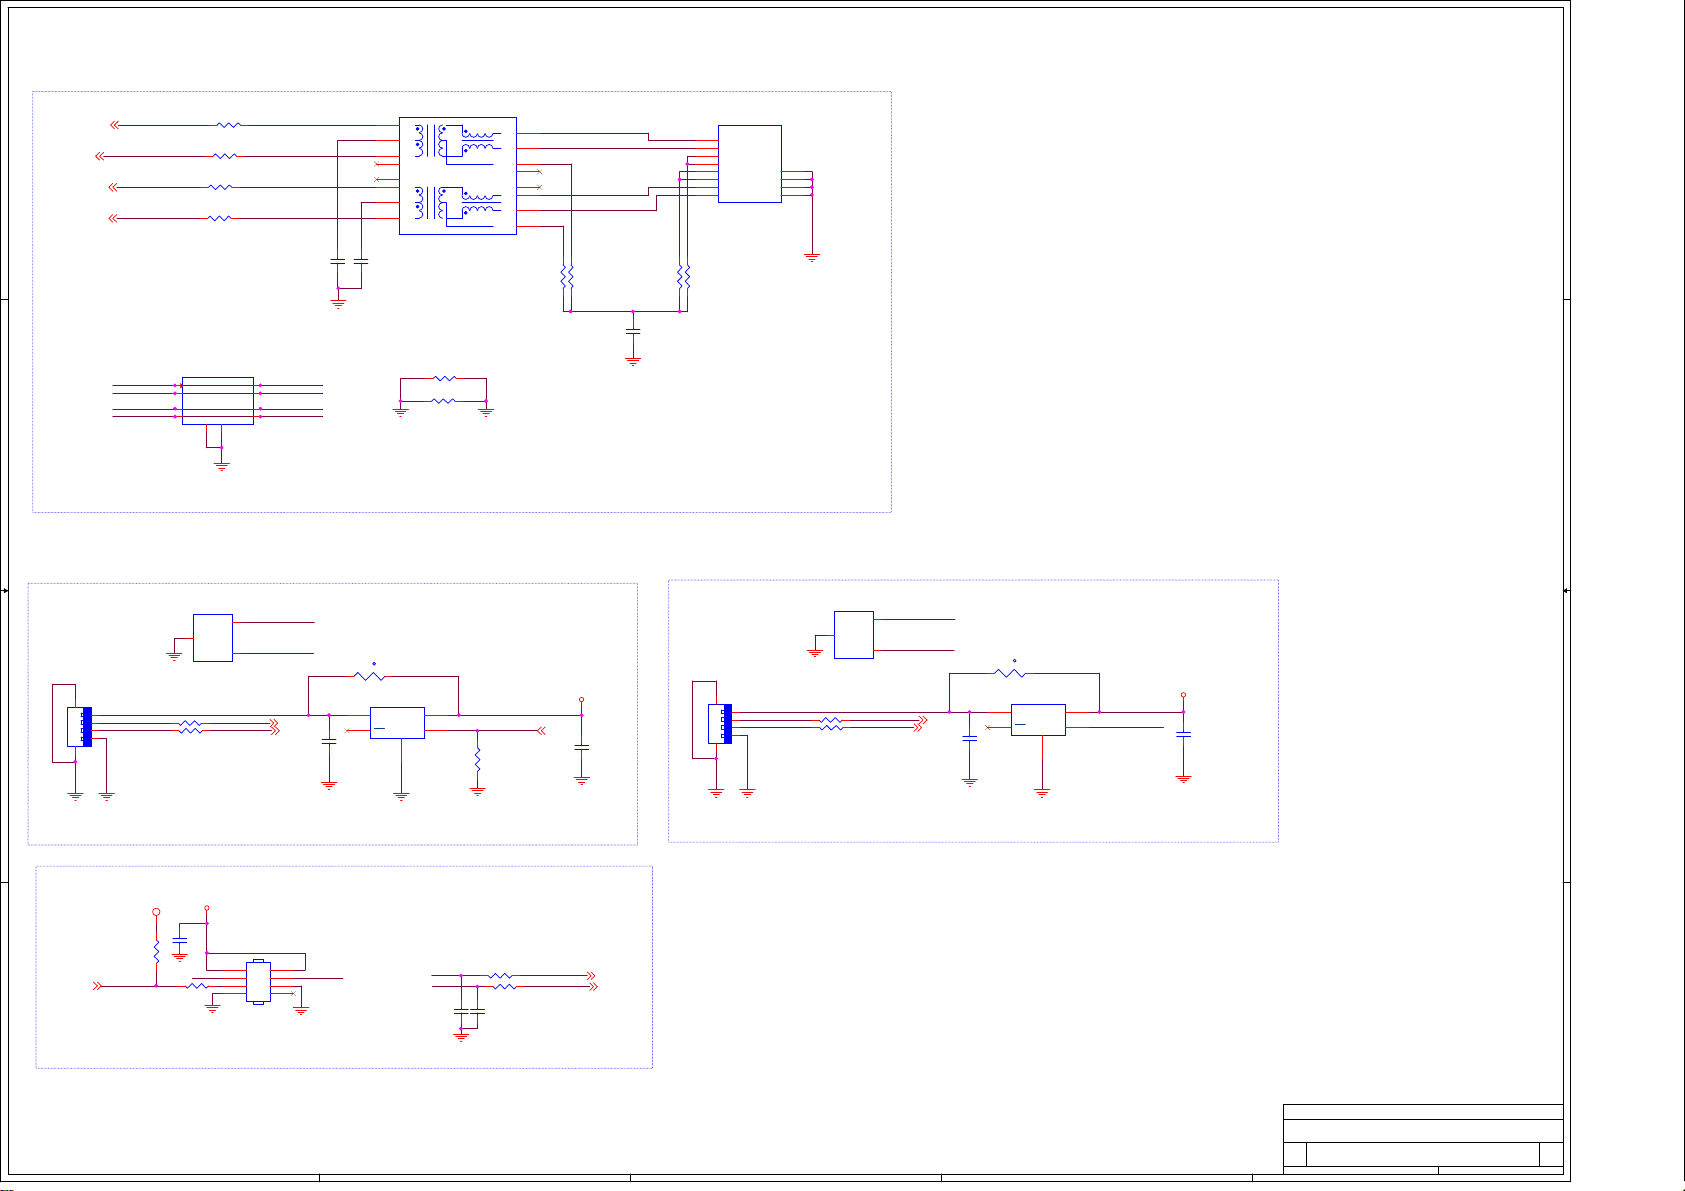
5
4
3
2
1
100M ETHERNET
T101
S16013 LF
C1021
100N16V
1
2
3
4
5
6
7
8
TD+
TCT
TDNC1
NC2
RD+
RCT
RD-
R1047 0R05
R1048 0R05
1206
TX+
TX-
TCM
NC4
NC3
RX+
RX-
TCM-
75 OHM +-1% 1/10W
N_GND
16
14
15
13
12
11
9
10
R1043
RJ45_FE_TX+
RJ45_FE_TX-
RJ45_FE_RX+
RJ45_FE_RX-
R1044
75 OHM +-1% 1/10W
C1022
1NF 2KV
R1045
75 OHM +-1% 1/10W
N_GND
CN106
1
TX+
2
TX-
4
NC1
5
NC2
7
NC3
Chassis1
8
NC4
Chassis2
3
RX+
Chassis4
6
RX-
Chassis3
RJ45 8P
R1046
75 OHM +-1% 1/10W
12
11
10
9
N_GND
FE_TP
FE_TP
D D
C C
FE_TN
FE_RP
FE_RN
FE_TN
FE_RP
FE_RN
FE_RN
FE_RP
FE_TN
FE_TP
R1039 2R2 +-5% 1/16W
R1040 2R2 +-5% 1/16W
R1041 2R2 +-5% 1/16W
R1042 2R2 +-5% 1/16W
U102
NC/AZ1045-04F.R7G
1
IN1
2
IN2
4
IN3
5
IN4
GND
GND
3
8
C1020
100N16V
10
FE_RN
NC
9
FE_RP
NC
7
FE_TN
NC
6
FE_TP
NC
USB2.0
U101
2
USB3_DM_CONN
I/O
3
GND
1
USB3_DP_CONN
I/O
AZC199-02S.R7G
USB2.0
1
USB3_VBUS
1234
2
USB3_DM_CONN
3
USB3_DP_CONN
B B
CN107
USB CONN
4
6 5
WIFI
WIFI_PWREN
A A
WIFI_PWREN
3V3
R1054
10K 5% 1/16W
100 OHM 1/16W
R1051 5.1R 1/16W
5
R1049 5.1R 1/16W
5V0
C1027
10UF
R1056
USB3_DM
USB3_DP
CN109
2
4
6
8
CONN
USB3_DM
USB3_DP
1
3
5
7
TH102
PTCR
t
1 2
U104
NC/G5250K1T1U
5
OUT
3
C1023
OC
10UF
WIFI_DMWIFI_DP
GND
2
4
IN
1
USB3_PWREN/BOOT_SEL1
EN
WIFI_DM
WIFI_DP
C1028
NC/4P7 50V
500mA
R1053
NC/10K 5% 1/16W
R1055 0R05 OHM
R1057 0R05 OHM
C1029
NC/4P7 50V
4
5V0
USB3_PWREN/BOOT_SEL1
C1026
1UF 25V
USB2_DM0
USB2_DM0
USB2_DP0
USB2_DP0
USB2.0
6 5
CN108
USB CONN
USB2.0
1
USB2_VBUS
1234
2
USB2_DM1_CONN
3
USB2_DP1_CONN
4
3
U103
3
GND
AZC199-02S.R7G
R1050 5.1R 1/16W
R1052 5.1R 1/16W
I/O
I/O
2
1
USB2_DM1
USB2_DP1
USB2_DM1_CONN
USB2_DP1_CONN
USB2_DM1
USB2_DP1
C1024
10UF
TH103
PTCR
1 2
5
OUT
3
OC
t
U105
NC/G5250K1T1U
IN
EN
GND
2
500mA
4
1
USB3_PWREN/BOOT_SEL1
2
5V0
C1025
1UF 25V
Title
Title
Title
<Title>
<Title>
<Title>
Document Number Rev
Size Document Number Rev
Size Document Number Rev
Size
<Doc> <RevCode>
C
<Doc> <RevCode>
C
<Doc> <RevCode>
C
Date: Sheet of
Date: Sheet of
Date: Sheet of
1
4 6Friday, November 03, 2017
4 6Friday, November 03, 2017
4 6Friday, November 03, 2017
Page 44
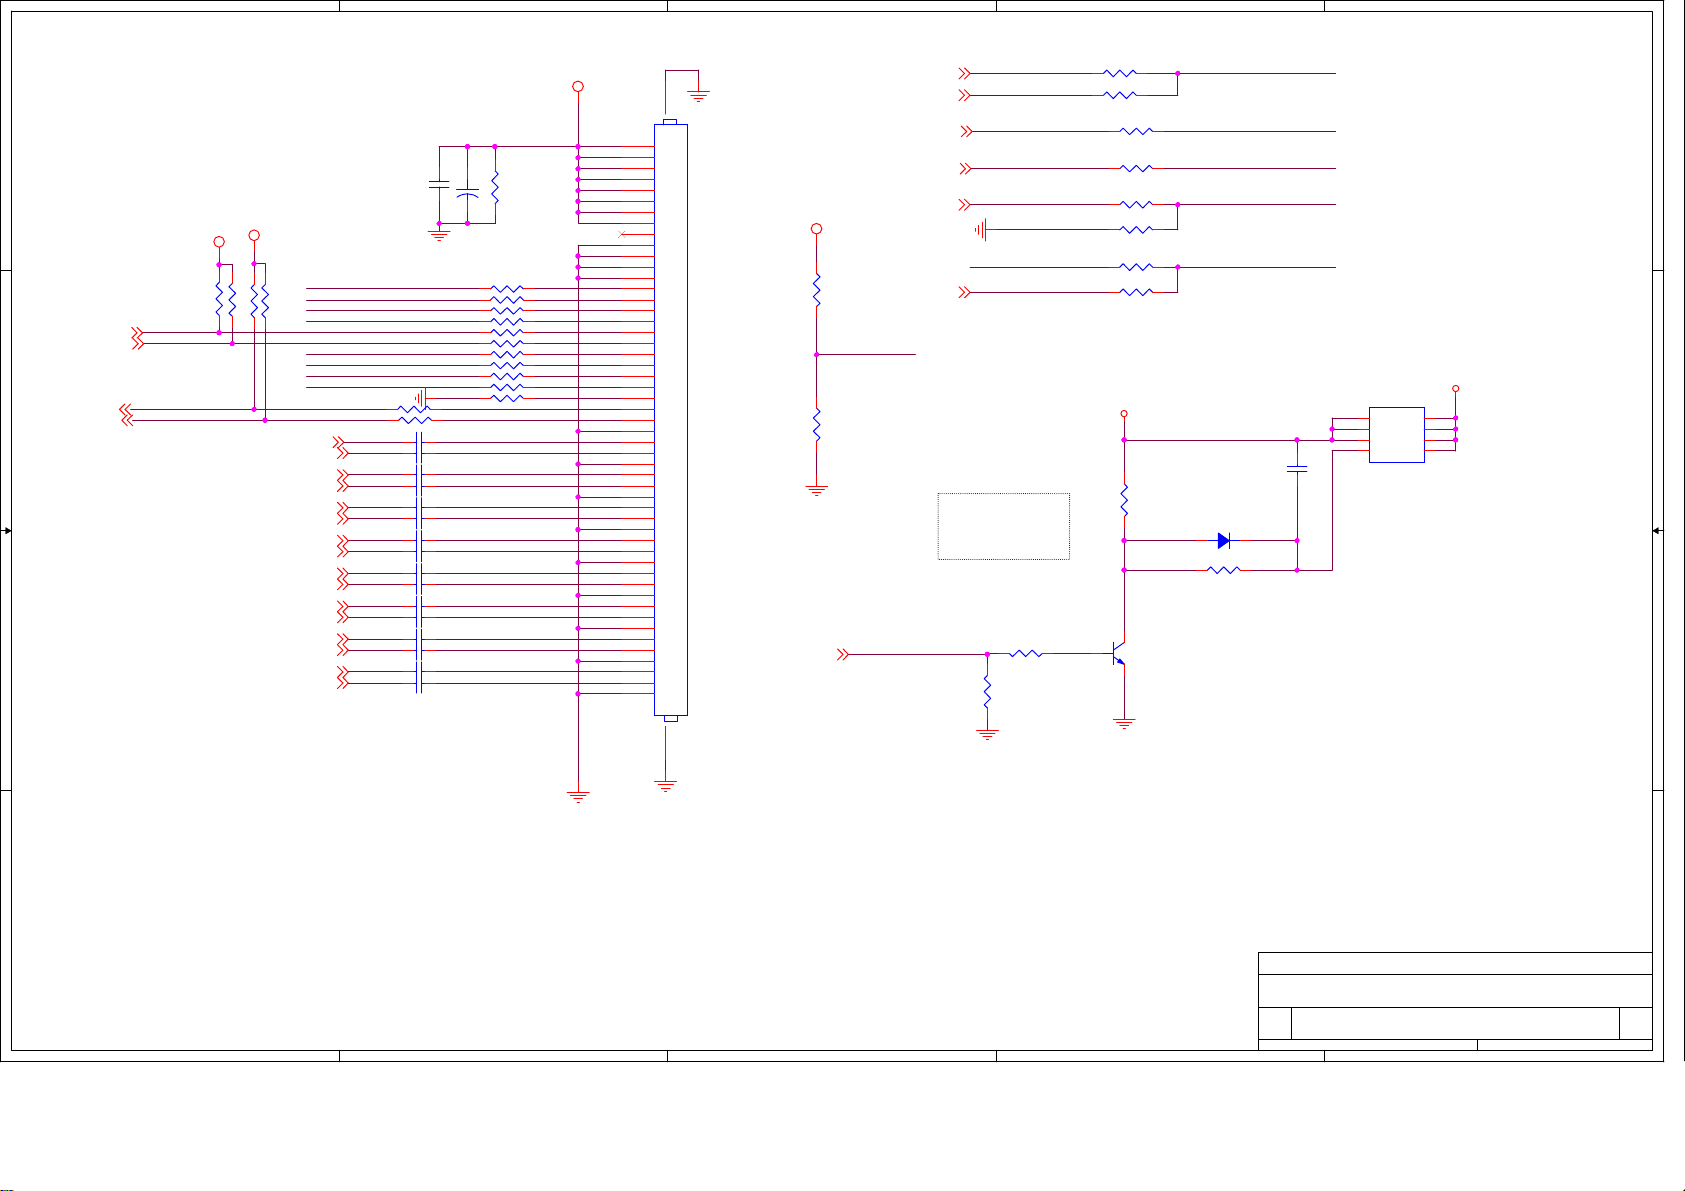
5
4
3
2
1
VCC_PANEL
CN110
CONN
D D
3V3
3V3
R1068
R1069
10K 5% 1/16W
10K 5% 1/16W
CKV1/VBO_SDA
CKV2/VBO_SCL
C C
CKV4/VBO_HPN
CKV3/VBO_LOCKN
B B
CKV1/VBO_SDA
CKV2/VBO_SCL
CKV4/VBO_HPN
CKV3/VBO_LOCKN
10K 5% 1/16W
10K 5% 1/16W
GND/PWM_TIN
SYNC_3D_IN/PWM_OUT
R1063
TP/SYNC_3D_OUT
R1070
EN_3D/P2P_SDLOCK
CKV1/VBO_SDA
CKV2/VBO_SCL
WP/NC
BIT_SEL/3D_EN
NC/LD_EN/L/R_O
AGP/NSB/L/R_I
EPI9EPI9+
EPI8EPI8+
EPI7EPI7+
EPI6EPI6+
EPI5EPI5+
EPI4EPI4+
EPI3EPI3+
EPI2EPI2+
R1083
R1084 100 OHM 1/16W
EPI9- VO_TX0N
EPI9+
EPI8-
EPI8+
EPI7- VO_TX2N
EPI7+
EPI6-
EPI6+
EPI5-
EPI5+
EPI4EPI4+
EPI3EPI3+
EPI2-
EPI2+
C1031 NC
+
100 OHM 1/16W
C1033100NF 16V
C1034100NF 16V
C1035100NF 16V
C1037100NF 16V
C1038100NF 16V
C1039100NF 16V
C1040100NF 16V
C1041100NF 16V
C1042100NF 16V
C1043100NF 16V
C1044100NF 16V
C1045100NF 16V
C1046100NF 16V
C1047100NF 16V
C1048100NF 16V
C1049100NF 16V
C1032 NC/220u F 25V
R1066
2.2K 1/4W
R1064 100 OHM 1/16W
R1073 NC/100 OHM 1/16W
R1074 NC/100 OHM 1/16W
R1075 NC/100 OHM 1/16W
R1076 NC/100 OHM 1/16W
R1077 NC/100 OHM 1/16W
R1078 NC/100 OHM 1/16W
R1079 NC/100 OHM 1/16W
R1080 100 OHM 1/16W
R1081 NC/100 OHM 1/16W
R1082 0R05 OHM
HPN
LOCKN
VO_TX0P
VO_TX1N
VO_TX1P
VO_TX2P
VO_TX3N
VO_TX3P
VO_TX4N
VO_TX4P
VO_TX5N
VO_TX5P
VO_TX6N
VO_TX6P
VO_TX7N
VO_TX7P
51
50
49
48
47
46
45
44
43
42
41
40
39
38
37
36
35
34
33
32
31
30
29
28
27
26
25
24
23
22
21
20
19
18
17
16
15
14
13
12
11
10
9
8
7
6
5
4
3
2
1
TCON_PWR/PMU_RST
3V3
POL/SYNC_3D_IN
PWM_OUT
TP/SYNC_3D_OUT
EN_3D/P2P_SDLOCK
PWM_OUT
R1071
NC/10K 5% 1/16W
CKV5/LD_EN
WP/NC
R1085
NC/10K 5% 1/16W
TCON_PWR/PMU_RST
POL/SYNC_3D_IN
PWM_OUT
TP/SYNC_3D_OUT
EN_3D/P2P_SDLOCK
PWM_OUT
POL/SYNC_3D_IN
CKV5/LD_EN
OPWRSB_PWR
Normal:High
Stand_By:Low
R1088
4.7K 1/16W
R1089
10K 5% 1/16W
R1058 NC/0R05 OHM
R1059 NC/0R05 OHM
R1060 NC/0R05 OHM
R1065 NC/0R05 OHM
R1061 NC/0R05 OHM
R1062 0R05 OHM
R1067 NC/0R05 OHM
R1072 0R05 OHM
12V0
R1086
47K
D102
R1087 150K
Q104
MMBT3904
SYNC_3D_IN/PWM_OUT
AGP/NSB/L/R_I
BIT_SEL/3D_EN
GND/PWM_TIN
NC/LD_EN/L/R_O
C1036
220NF 25V
BAS316WS
VCC_PANEL
Q103
1
S
D
2
S
D
3
S
D
4
G
D
MTP9435BDYAQ8
8
7
6
5
52 53
A A
Title
Title
Title
<Title>
<Title>
<Title>
Document Number Rev
Size Document Number Rev
Size Document Number Rev
Size
<Doc> <RevCode>
B
<Doc> <RevCode>
B
<Doc> <RevCode>
B
Date: Sheet of
Date: Sheet of
5
4
3
2
Date: Sheet of
5 6Friday, November 03, 2017
5 6Friday, November 03, 2017
5 6Friday, November 03, 2017
1
Page 45
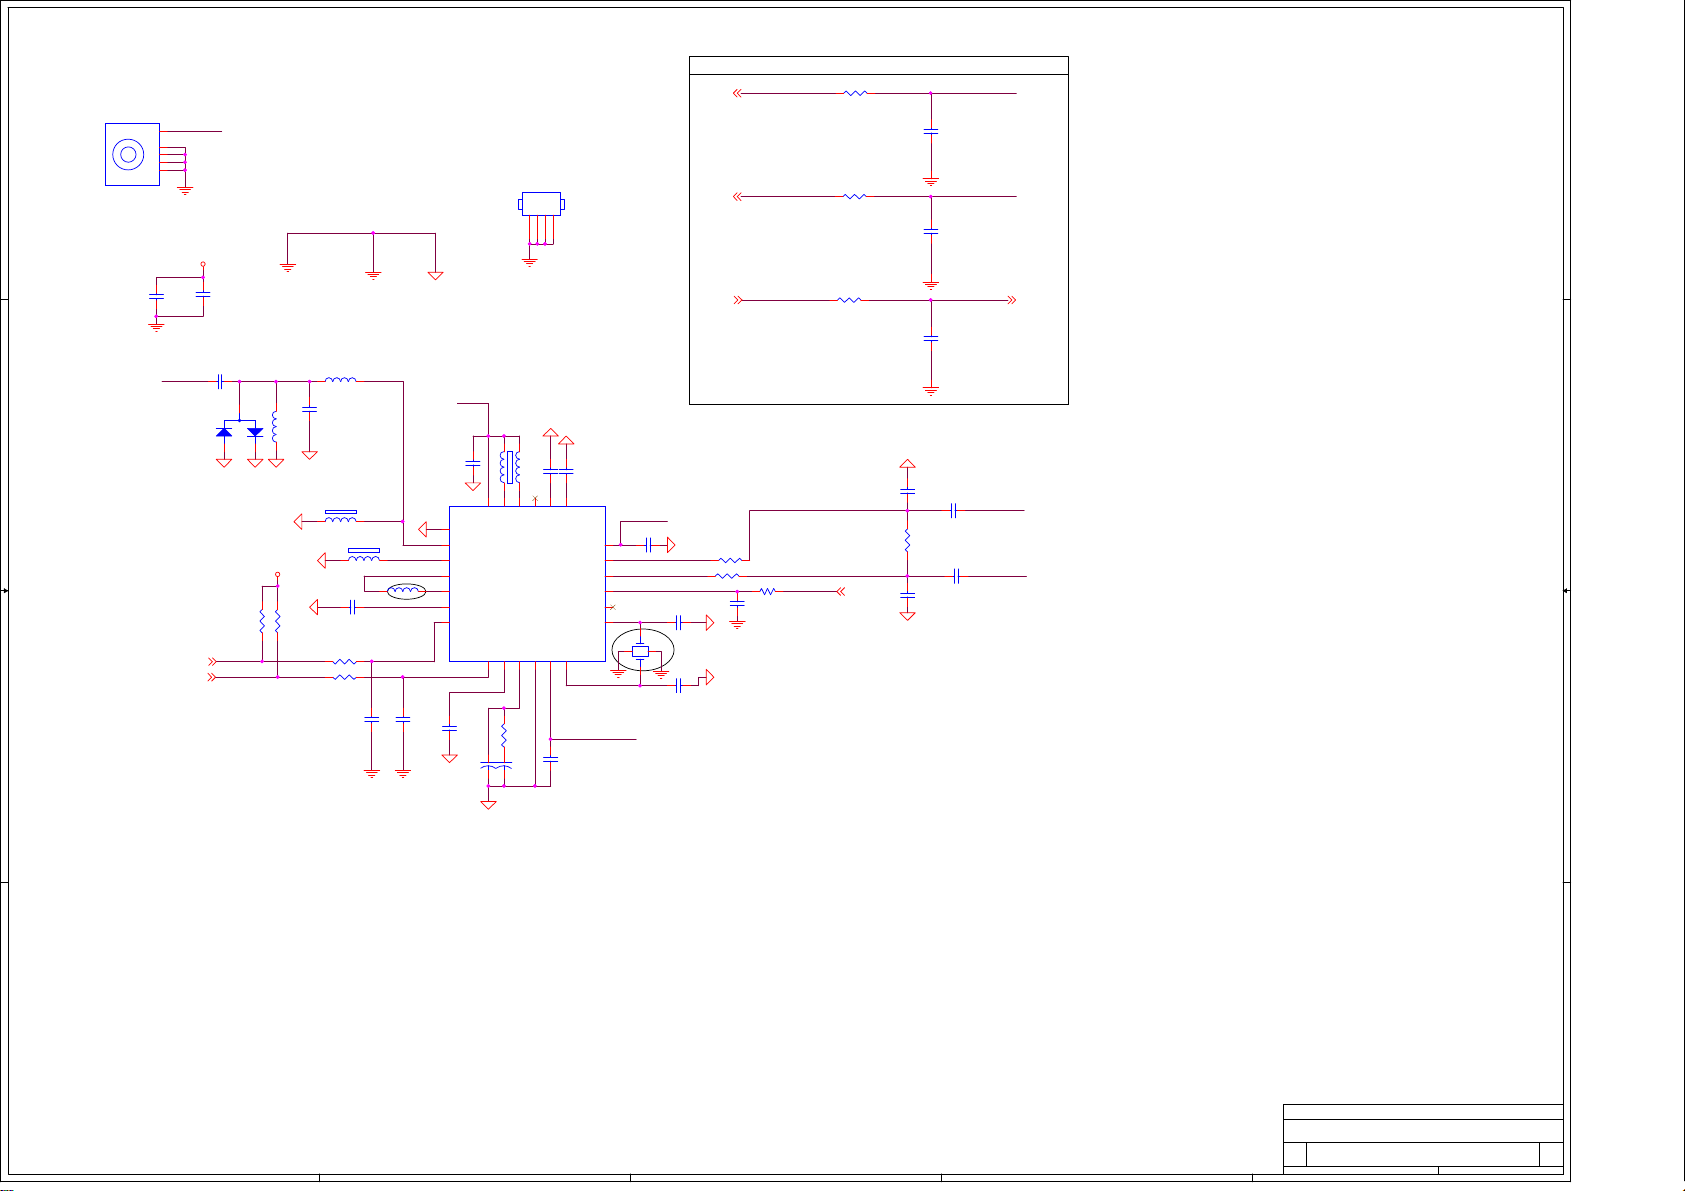
5
4
3
2
1
Close to Scaler
IFP
IFP
RF CONN
5
RF_IN
4
TU101
3
2
1
C1062
10UF
RF_IN
VDD3V
RFGND
470PF 50V
RF_SCL
RF_SDA
3V3_TUN
100N 16V
C1065
C1063
3
BAV99
D101
1
R1096
4.7K1/16W
RF_SCL
RF_SDA
RFGND
L107
2
3V3_TUN
L101
6.8nH
C1066
1.8 pF 50V
NC/0.33uH
close to D403(BAV99)
close to D403(BAV99)
L104
1 2
1000R
1 2
C1073
R1097
47NF 16V
4.7K1/16W
R1098 100OHM
R1099100OHM
L105
1000R
C1077
39pF 50V
L106 180nH
T_SCL
T_SDA
39pF 50V
C1078
25
C1079
100NF 16V
100NF 16V
U106
GND
1
RFIN
2
RFIN2
3
TF1
4
TF2
5
DECT1
6
SCL
330PF 50V
VDD3V
C1067
C1080
Shield Cover
SH101
L103
1000R
L102 68nH
1 2
22
24
23
TFL
TFH
AVDD
SDA
AVDD
8
7
9
R1100
1.8KOHM 5% 1/16W
C1081
6.8nF 50V
123
IFN
IFN
4
NC/SHIELD
RF_AGC RF_AGC_TUXG
RF_AGC
C1069
22N 25V
C1068 22NF 25V
21
20
R842
19
VBG
GPIO
DET2
DVSS10CP
DVDD11XTAL_I
12
C1082
100NF 16V
AVDD
VAGC
VAGC2
XTAL_O
VDD3V
VDD3V
C1070 1NF
18
17
AIF+
VOP
16
AIF-
VON
15
IF_AGC
14
13
2 4
R1093
0R05 OHM
R1094
R1095
C1074
100N 16V
C1075
1
NC/10PF 50V
24.000Mhz
C1076
3
X101
NC/10PF 50V
close Tuner
0R05 OHM
RF_AGC_TUXG
100OHM
D D
C C
B B
100 OHM 1/16W
R1090
R1091
100 OHM 1/16W
R1092 10K 5% 1/16W
RF_AGC_TUXG
C1053
33PF 50V
C1061
33PF 50V
C1064
47NF 16V
C1071
NC/56pF 50V
C1085 100NF 16V
R140
NC/470R 1/16W 5%
C1086 100NF 16V
C1072
NC/56pF 50V
IF_P
IF_N
RF_AGC_TUXG
IF_P
IF_N
A A
Title
Title
Title
<Title>
<Title>
<Title>
Document Number Rev
Size Document Number Rev
Size Document Number Rev
Size
<Doc> <RevCode>
C
<Doc> <RevCode>
C
<Doc> <RevCode>
C
Date: Sheet of
Date: Sheet of
5
4
3
2
Date: Sheet of
1
6 6Friday, November 03, 2017
6 6Friday, November 03, 2017
6 6Friday, November 03, 2017
Page 46
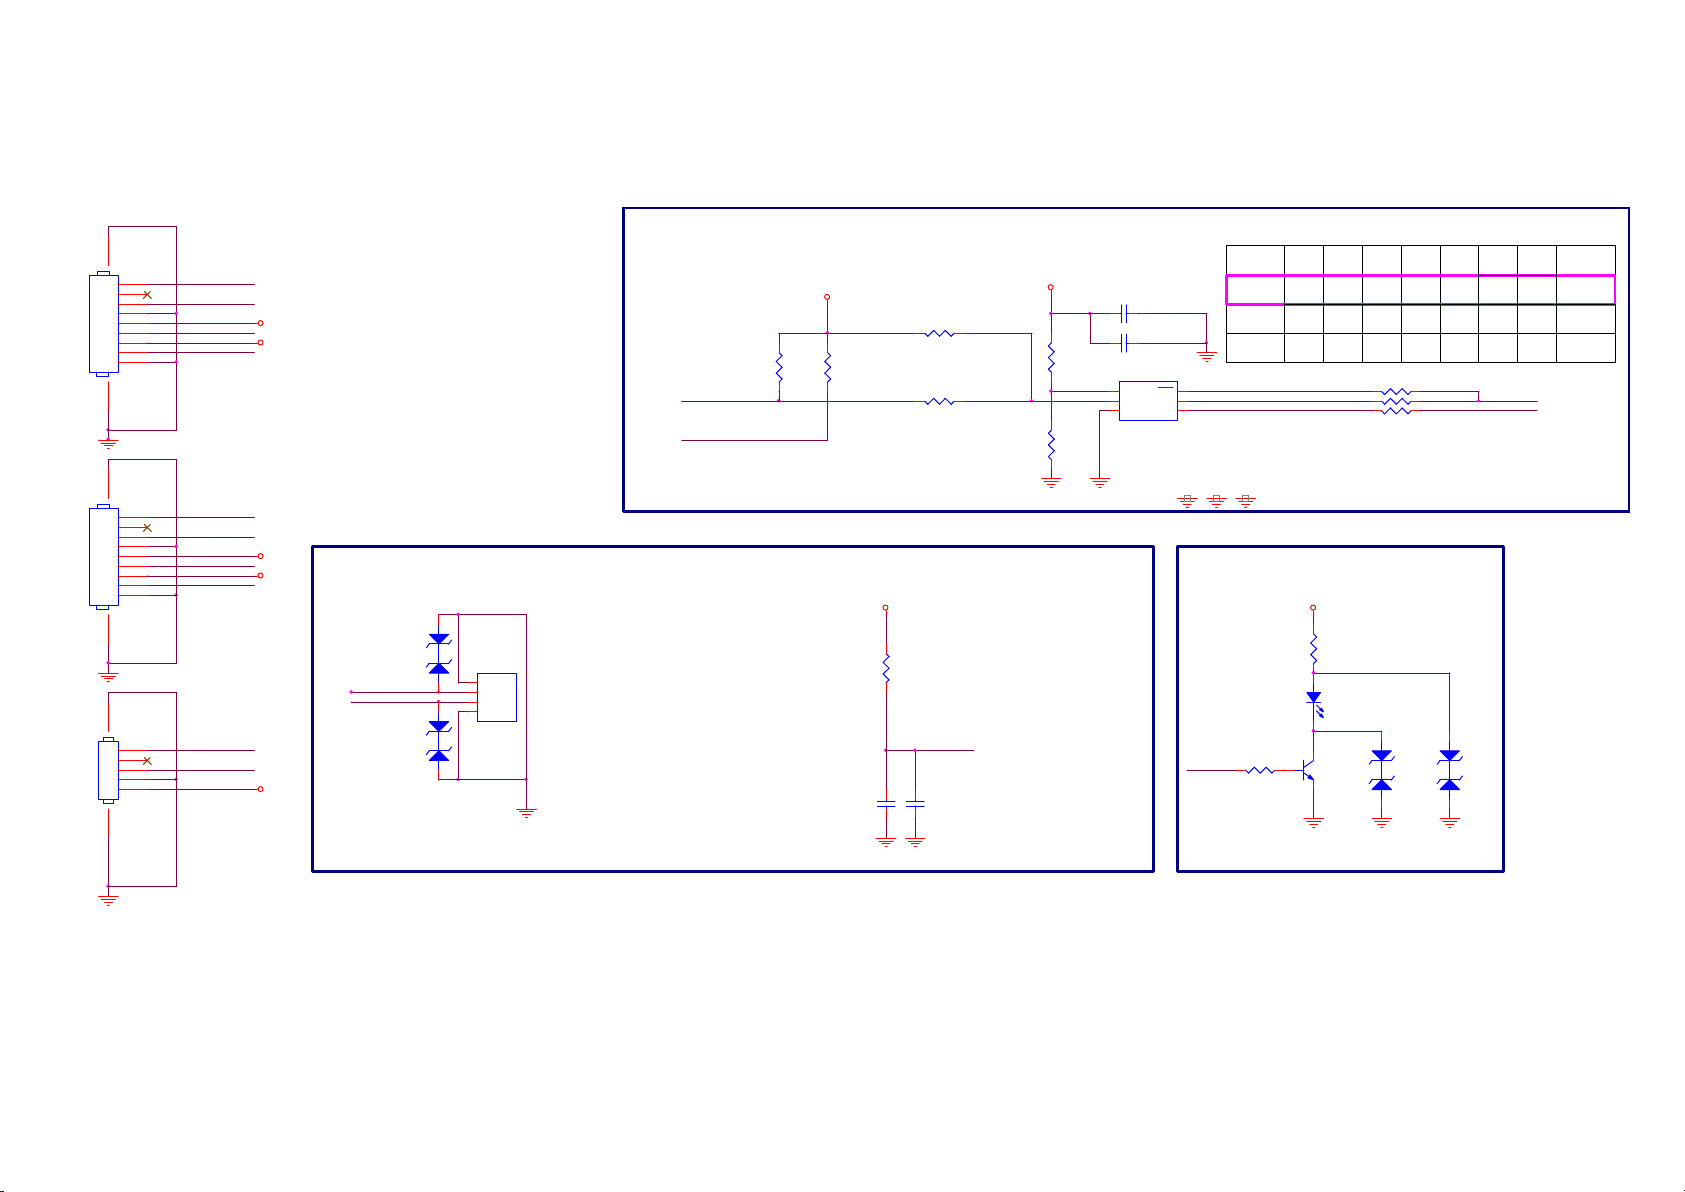
8.4 J 715G8623 IR/LED Panel
8-4-1 IR BOARD
CN201
10 11
10 11
CN203
67
CONN
1
2
3
4
5
6
7
8
9
NC/C ONN
CN202
1
2
3
4
5
6
7
8
9
NC/C ONN
1
2
3
4
5
LED_R
RC-I R
LS_SCL
LS_SDA
LED_R
RC-I R
LS_SCL
LS_SDA
LED_R
RC-I R
3V3SB
DVD3V3
3V3SB
DVD3V3
ZD200 ZD201 near U212 pin
3V3SB
IR_power
RC-I R
ZD200
AZ5123-01H
ZD201
AZ5123-01H
12
1 2
U212
1
GND
2
VCC
3
Vout
4
GND
TSOP75436TR
Light Sensor
LS_SCL
LS_SDA
DVD3V3
R225 0R05 1/16W
R222
R221
R226 NC/0 R05 1/16W
10K 1/16W 5%
10K 1/16W 5%
DVD3V3
R223
R224
0R05 1/16W
NC/ 0R05 1/16W
C222 1uF 10V
C221 100N 16V
U221
JSA-1130
1
ADDR
INT
2
VDD
SDA
GND3SCL
6
5
4
R223
NC 0x44
JSA-1130
JSA-1130 0RNC0R
TSL25715
Digital Light Sensor
R225R224 R227R226
NCNC0R0R
0R0RNCNC0R
R227 NC/ 0R05 1/16W
R228 0R05 1/16W
R229 0R05 1/16W
R228
NC
LS_SDA
LS_SCL
R229
0R0R
0R0R
NC
I2C ADDR
0x45NCNC
0x29
Standby LED
C211
1UF 6.3V
3V3SB
R211
100R 1/16 W 5%
C212
NC/ 1UF 6.3V
IR Receiver
IR_power
LED_R
1K 1/16W 5%
LED201
GPSS008RC4
Red
R202
3V3SB
R201
10K 1/16W 5%
12
Q201
BC847BW
ZD202
NC/ AZ5123-01H
1 2
ZD203
NC/ AZ5123-01H
1 2
ZD202 ZD203 near LED201
Page 47
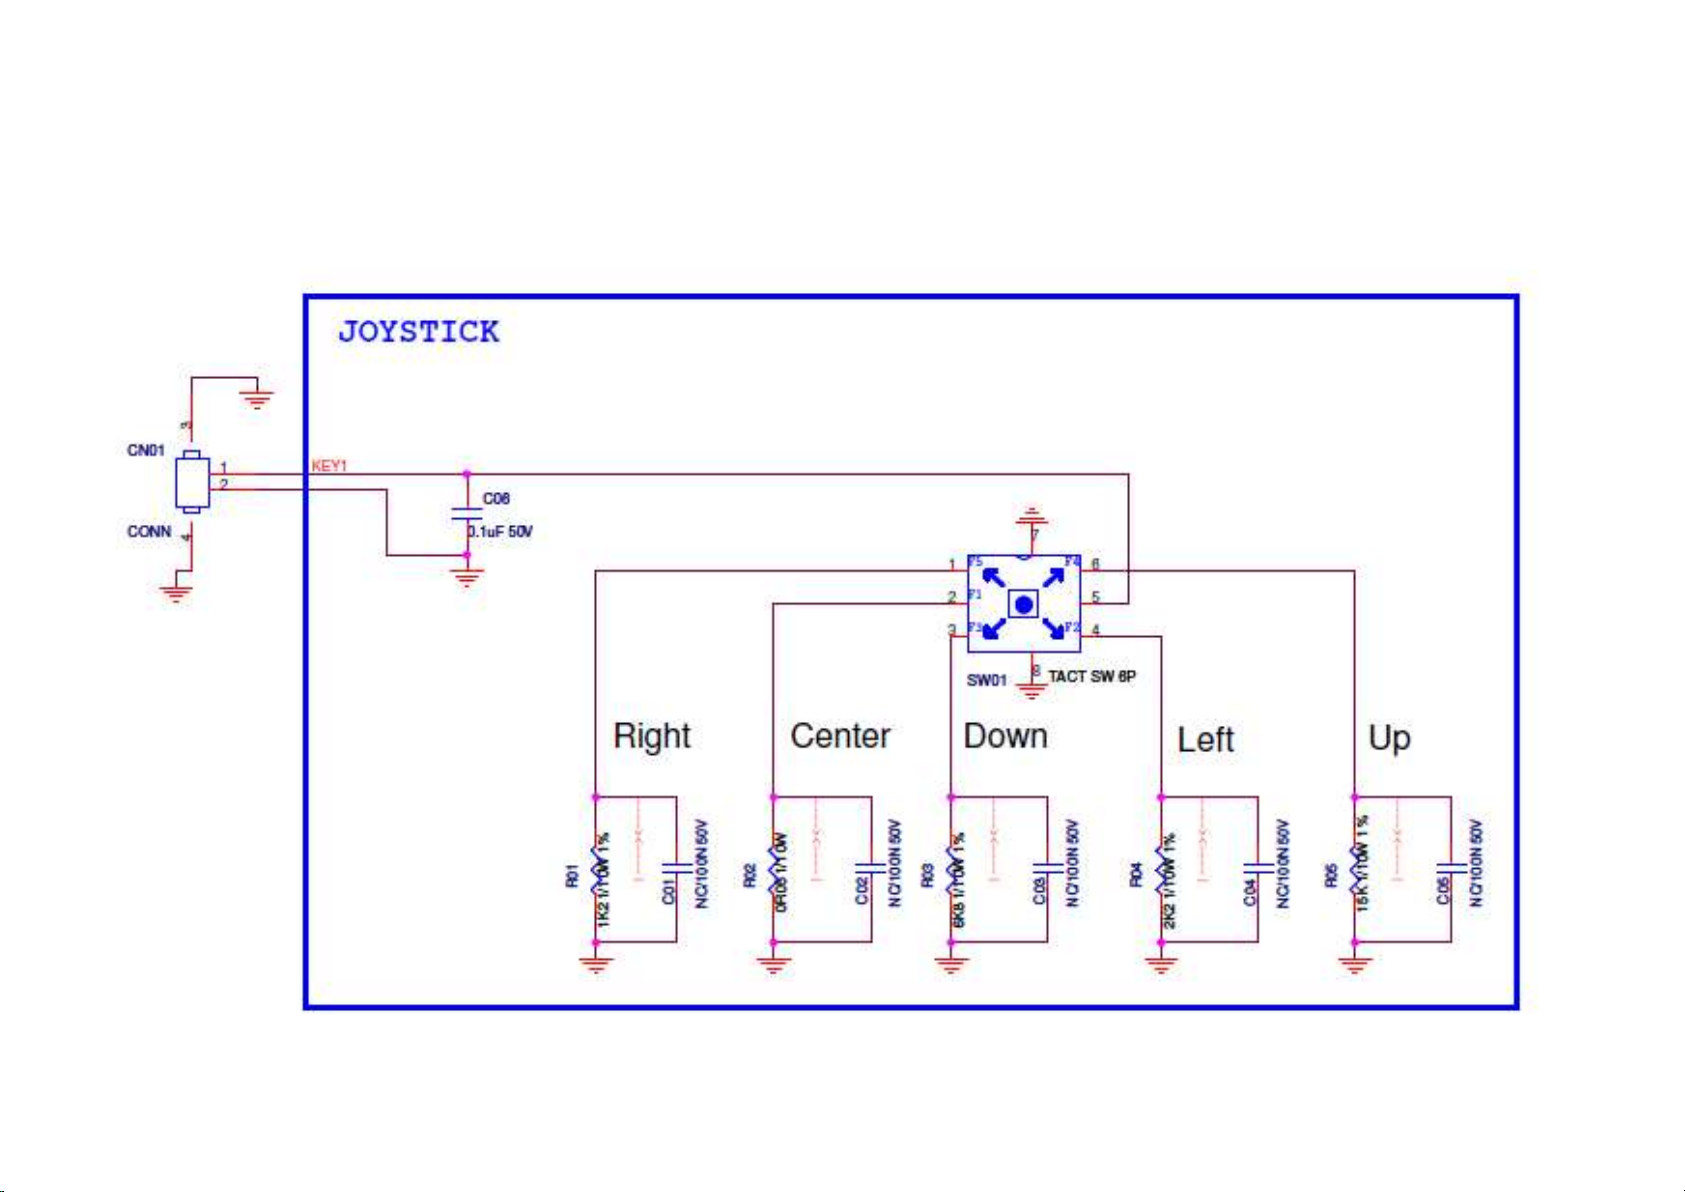
8.5 E 715G7088 Keyboard control panel
8-5-1 Key BOARD
Page 48
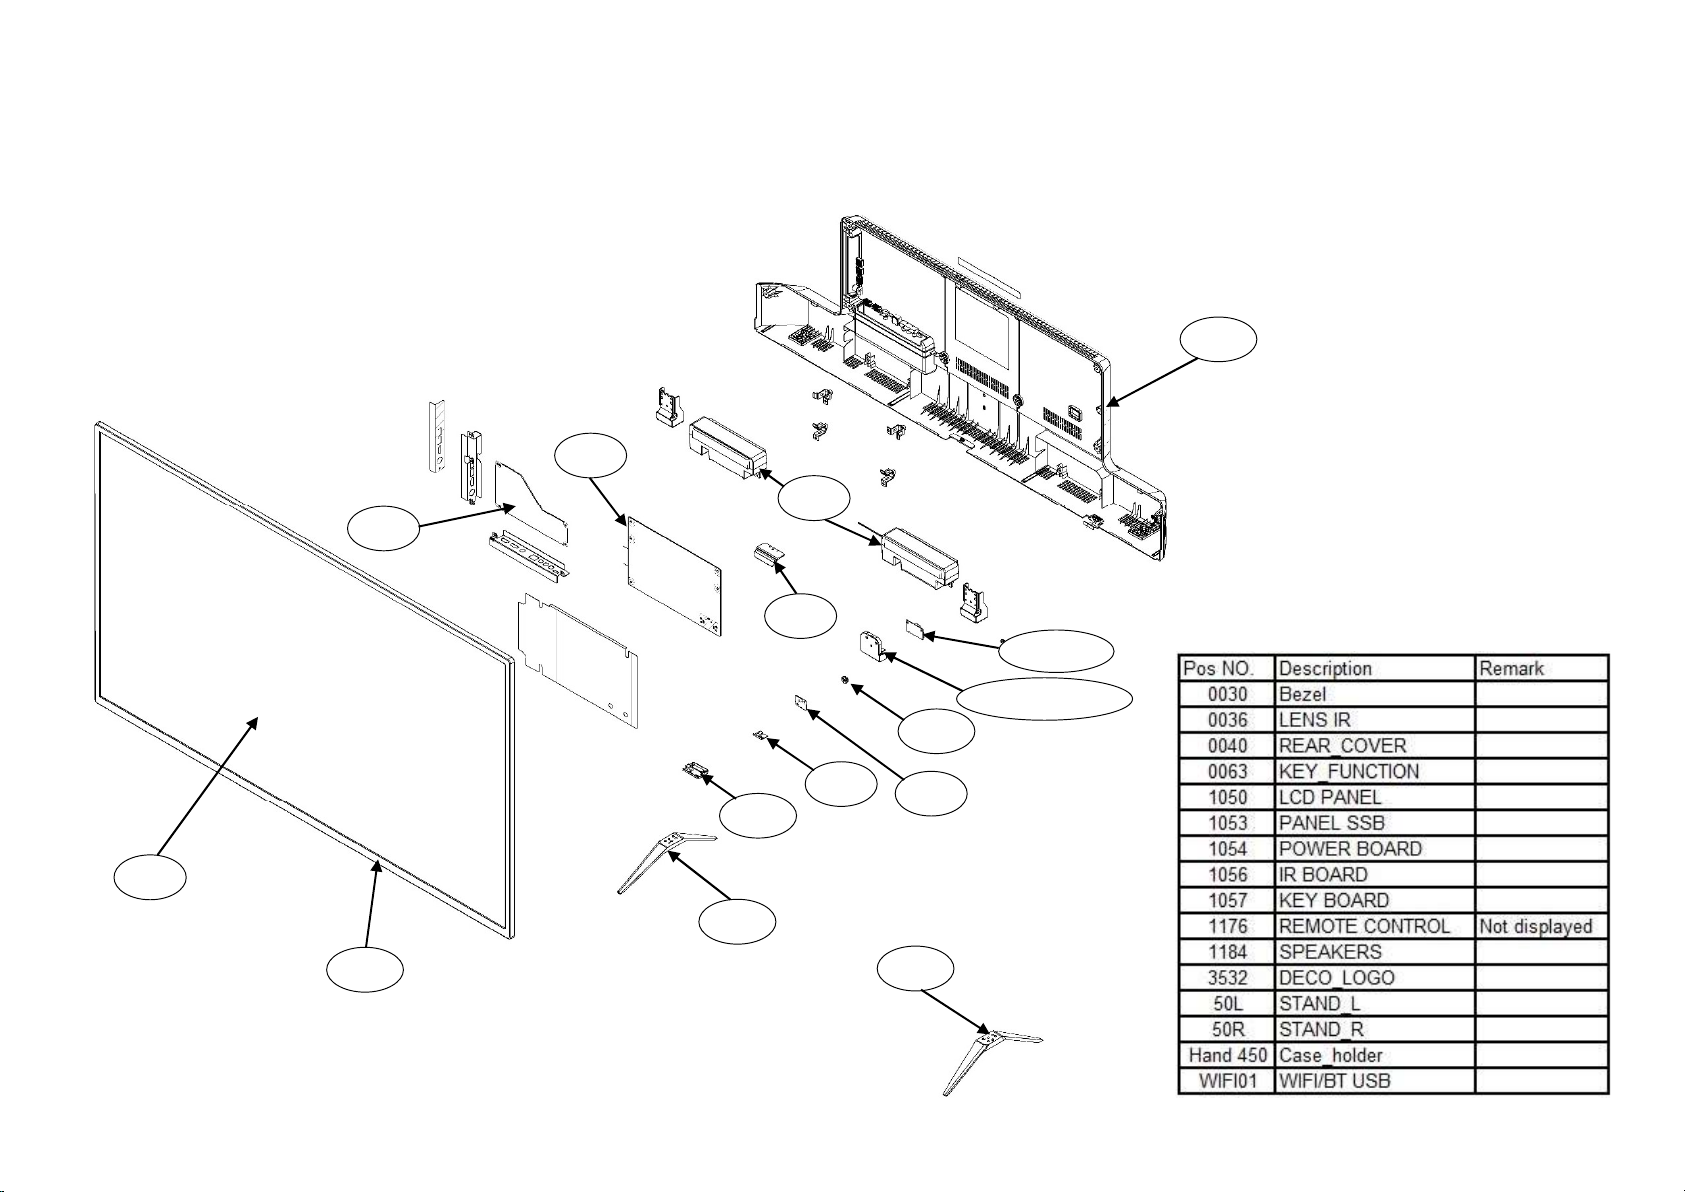
9. Styling Sheets
1050
50L
50R
WIFI01
Hand 450
63
1057
1056 36
1053
1054
3532
1184
40
30
9.1 6172 series 50"
Page 49
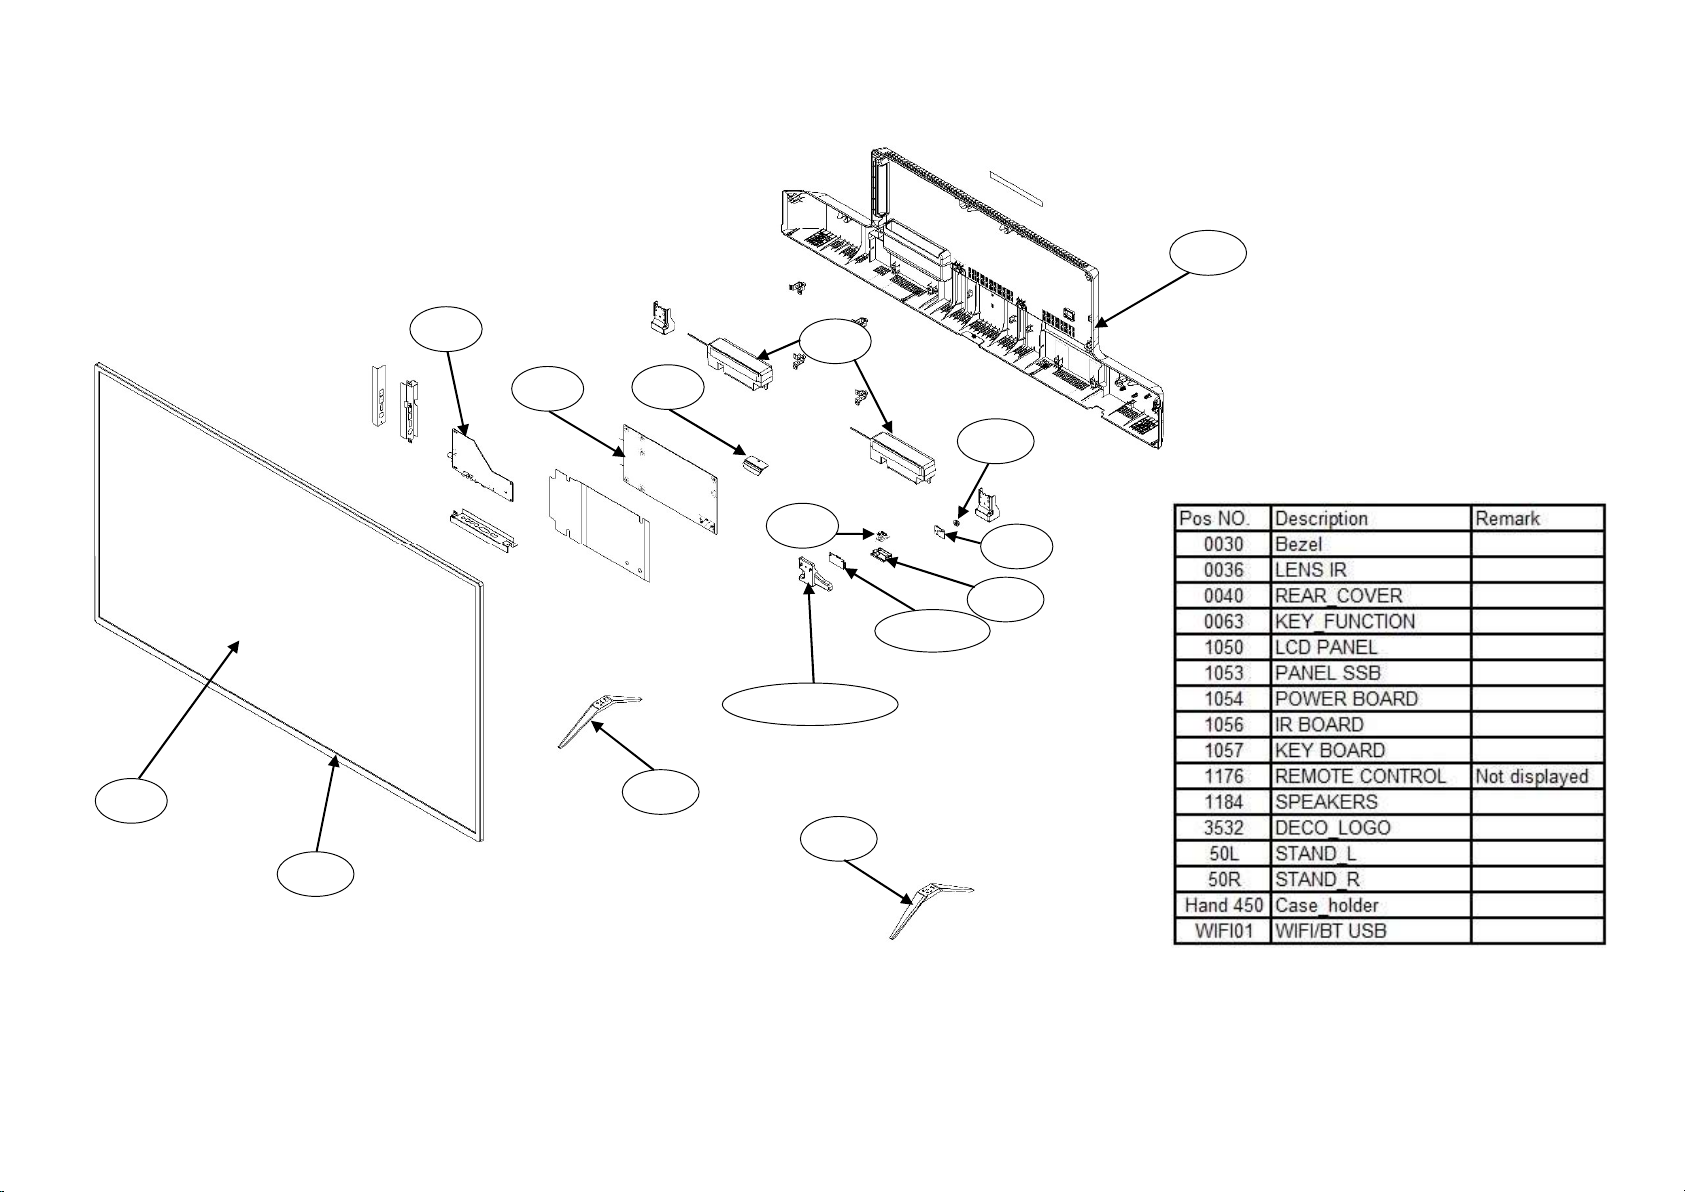
9.2 6172 series 55”
1050
50L 50R
1053
1054
1056
36
WIFI01
Hand 450
63
1057
3532
1184
40
30
 Loading...