

Page 1
52MF437S
ENGLISH
52"
52"
52"
HD Flat TV
HD Flat TV
HD Flat TV
FRANÇAIS
ESPAÑOL
FrançaiseEspañol
For Customer Use / Àl’usage du client /
Para Uso del Cliente
Model/Modle/Modelo No.
Serial/Srie/Serie No.
3139 125 39202
:
:
Page 2

Return your Product Registration Card or register online at
www.magnavox.com/usasupport today to get the very most from your purchase.
Registering your model with MAGNAVOX makes you eligible for all of the valuable benefits listed below, so don’t miss out.
Complete and return your Product Registration Card at once, or register online at www.magnavox.com/usasupport to ensure:
* Proof of Purchase
Returning the enclosed card guarantees that
your date of purchase will be on file, so no
additional paperwork will be required from
you to obtain warranty service.
* Product Safety Notification
By registering your product you’ll receive
notification - directly from the manufacturer
- in the rare case of a product recall or safety
defect.
Congratulations on your purchase, and
welcome to the “family!”
Dear MAGNAVOX product owner:
Thank you for your confidence in MAGNAVOX. You’ve selected
one of the best-built, best-backed products available today. We’ll do
everything in our power to keep you happy with your purchase for
many years to come.
As a member of the MAGNAVOX “family,” you’re entitled to
protection by one of the most comprehensive warranties and
outstanding service networks in the industry. What’s more, your
purchase guarantees you’ll receive all the information and special
offers for which you qualify, plus easy access to accessories from our
convenient home shopping network.
* Additional Benefits of
Product Ownership
Registering your product guarantees that
you’ll receive all of the privileges to which
you’re entitled, including special money-saving
offers.
Know these
safety symbols
This “bolt of lightning” indicates uninsulated material within
your unit may cause an electrical shock. For the safety of
everyone in your household, please do not remove product
covering.
The “exclamation point” calls attention to features for which
you should read the enclosed literature closely to prevent
operating and maintenance problems.
Warning: To reduce the risk of fire or electric shock, this apparatus
should not be exposed to rain or moisture and objects filled with
liquids, such as vases, should not be placed on this apparatus.
Most importantly, you can count on our uncompromising
commitment to your total satisfaction.
All of this is our way of saying welcome - and thanks for investing in
a MAGNAVOX product.
P.S. To get the most from your MAGNAVOX
purchase, be sure to complete and return your
Product Registration Card at once, or register online
at:
www.magnavox.com/usasupport
CAUTION: To prevent electric shock, match wide blade of plug to
wide slot, fully insert.
ATTENTION : Pour éviter les chocs électriques, introduire la lame
la plus large de la fiche dans la borne correspondante de la prise et
pousser jusqu’au fond.
For Customer Use
Enter below the Serial No., which is located on the rear of the
cabinet. Retain this information for future reference.
Model No.
Serial No.
Page 3

Page 4
IMPORTANT SAFETY INSTRUCTIONS
Read before operating equipment
1. Read these instructions.
2. Keep these instructions.
3. Heed all warnings.
4. Follow all instructions.
5. Do not use this apparatus near water.
6. Clean only with a dry cloth.
7. Do not block any of the ventilation openings. Install in accordance with the
manufacturers instructions.
8. Do not install near any heat sources such as radiators, heat registers, stoves,
or other apparatus (including amplifiers) that produce heat.
9. Do not defeat the safety purpose of the polarized or grounding-type plug. A
polarized plug has two blades with one wider than the other. A grounding
type plug has two blades and third grounding prong.The wide blade or third
prong are provided for your safety. When the provided plug does not fit into
your outlet, consult an electrician for replacement of the obsolete outlet.
10. Protect the power cord from being walked on or pinched particularly at plugs,
convenience receptacles, and the point where they exit from the apparatus.
11. Only use attachments/accessories specified by the manufacturer.
12. Use only with a cart, stand, tripod, bracket, or table specified by the
manufacturer, or sold with the apparatus. When a cart is used, use
caution when moving the cart/apparatus combination to avoid injury
from tip-over.
information, please contact your local authorities or the Electronic Industries
Alliance: www.eiae.org.
16. Damage Requiring Service - The appliance should be serviced by qualified
service personnel when:
A. The power supply cord or the plug has been damaged; or
B. Objects have fallen, or liquid has been spilled into the appliance; or
C. The appliance has been exposed to rain; or
D. The appliance does not appear to operate normally or exhibits a marked
change in performance; or
E. The appliance has been dropped, or the enclosure damaged.
17. Tilt/Stability - All televisions must comply with recommended international
global safety standards for tilt and stability properties of its cabinets design.
• Do not compromise these design standards by applying excessive pull force to
the front, or top, of the cabinet which could ultimately overturn the product.
• Also, do not endanger yourself, or children, by placing electronic equipment/
toys on the top of the cabinet. Such items could unsuspectingly fall from the
top of the set and cause product damage and/or personal injury.
18. Wall or Ceiling Mounting - The appliance should be mounted to a wall or
ceiling only as recommended by the manufacturer.
19. Power Lines - An outdoor antenna should be located away from power lines.
20. Outdoor Antenna Grounding - If an outside antenna is connected to the
receiver, be sure the antenna system is grounded so as to provide some
protection against voltage surges and built up static charges.
Section 810 of the National Electric Code, ANSI/NFPA No. 70-1984, provides
information with respect to proper grounding of the mats and supporting
structure grounding of the lead-in wire to an antenna-discharge unit, size
of grounding connectors, location of antenna-discharge unit, connection to
grounding electrodes and requirements for the grounding electrode. See
Figure below.
13. Unplug this apparatus during lightning storms or when unused for long periods
of time.
21. Objects and Liquid Entry - Care should be taken so that objects do not fall and
liquids are not spilled into the enclosure through openings.
a) Warning: To reduce the risk of fire or electric shock, this apparatus should
14. Refer all servicing to qualified service personnel. Servicing is required when the
apparatus has been damaged in any way, such as power-supply cord or plug
not be exposed to rain or moisture and objects filled with liquids, such as
vases should not be placed on this apparatus.
is damaged, liquid has been spilled or objects have fallen into apparatus, the
apparatus has been exposed to rain or moisture, does not operate normally,
or has been dropped.
22. Battery Usage CAUTION - To prevent battery leakage that may result in
bodily injury, property damage, or damage to the unit:
• Install all batteries correctly, with + and - alignment as marked on the unit.
15. This product may contain lead or mercury. Disposal of these materials may
be regulated due to environmental considerations. For disposal or recycling
EXAMPLE OF ANTENNA GROUNDING AS PER NATIONAL ELECTRICAL CODE (NEC)
GROUND CLAMP
ELECTRIC SERVICE EQUIPMENT
• Do not mix batteries (old and new or carbon and alkaline, etc.)
• Remove batteries when the unit is not used for a long time.
ANTENNA LEAD IN WIRE
ANTENNA DISCHARGE UNIT
(
NEC SECTION 810-20)
GROUNDING CONDUCTORS
NEC SECTION 810-21)
(
GROUND CLAMPS
POWER SERVICE GROUNDING ELECTRODE SYSTEM
(NEC ART 250, PART H)
Note to the CATV system installer: this reminder is provided to call the CATV system installer’s attention to Article 820-40 of the NEC
that provides guidelines for proper grounding and, in particular, specifies that the cable ground shall be connected to the grounding system of the
building, as close to the point of cable entry as practical.
Page 5

Content
1 Safety warnings . . . . . . . . . . . . . . . . . . . . . . . . . . . . . . . . . 2
1.2 Care of the screen . . . . . . . . . . . . . . . . . . . . . . . . . . . . . . . . . 2
1.3 Warning concerning stationary images on the TV screen . . 2
1.4 Mounting . . . . . . . . . . . . . . . . . . . . . . . . . . . . . . . . . . . . . . . . . 2
1.5 Electric, Magnetic and Electromagnetic Fields . . . . . . . . . . . . 2
1.6 Pixel characteristics . . . . . . . . . . . . . . . . . . . . . . . . . . . . . . . . . 3
1.7 VESA Compliance Information for Professional Installation . . 3
1.8 Kensington Security Slot . . . . . . . . . . . . . . . . . . . . . . . . . . . . . 3
2 Getting started . . . . . . . . . . . . . . . . . . . . . . . . . . . . . . . . . 4
2.1 Connection overview . . . . . . . . . . . . . . . . . . . . . . . . . . . . . . . . 4
3 Use of the Remote Control . . . . . . . . . . . . . . . . . . . . . . . 6
3.1 Widescreen picture format . . . . . . . . . . . . . . . . . . . . . . . . . . 7
3.2 Buttons on the left of the TV . . . . . . . . . . . . . . . . . . . . . . . . . 7
3.3 Turn the TV on . . . . . . . . . . . . . . . . . . . . . . . . . . . . . . . . . . . . 7
4 First time installation . . . . . . . . . . . . . . . . . . . . . . . . . . . 8
5 How to navigate through the menus . . . . . . . . . . . . . . . 9
5.1 Introduction . . . . . . . . . . . . . . . . . . . . . . . . . . . . . . . . . . . . . . . 9
5.2 Use of the TV menu settings . . . . . . . . . . . . . . . . . . . . . . . . . 9
5.2.1 Adjust viewing and listening settings . . . . . . . . . . . . . . . . . . . . . 9
5.2.2 Adjust Picture menu settings . . . . . . . . . . . . . . . . . . . . . . . . . . 10
5.2.3 Adjust Sound menu settings . . . . . . . . . . . . . . . . . . . . . . . . . . . 11
6 Adjust feature menu settings . . . . . . . . . . . . . . . . . . . 12
6.1 Closed captions . . . . . . . . . . . . . . . . . . . . . . . . . . . . . . . . . . . 12
6.2 Caption service . . . . . . . . . . . . . . . . . . . . . . . . . . . . . . . . . . . 12
6.3 Digital caption service . . . . . . . . . . . . . . . . . . . . . . . . . . . . . . 13
6.4 Digital caption options . . . . . . . . . . . . . . . . . . . . . . . . . . . . . . 13
6.5 Sleeptimer . . . . . . . . . . . . . . . . . . . . . . . . . . . . . . . . . . . . . . . 13
6.6 Child lock . . . . . . . . . . . . . . . . . . . . . . . . . . . . . . . . . . . . . . . 13
6.7 Set/Change PIN . . . . . . . . . . . . . . . . . . . . . . . . . . . . . . . . . . . 15
6.8 On timer . . . . . . . . . . . . . . . . . . . . . . . . . . . . . . . . . . . . . . . . 16
6.9 Demo . . . . . . . . . . . . . . . . . . . . . . . . . . . . . . . . . . . . . . . . . . . 16
7 How to search for and store TV channels . . . . . . . . . . 16
7.1 Installation menu . . . . . . . . . . . . . . . . . . . . . . . . . . . . . . . . . . 16
7.2 Select your language . . . . . . . . . . . . . . . . . . . . . . . . . . . . . . . . 16
7.3 Store TV channels . . . . . . . . . . . . . . . . . . . . . . . . . . . . . . . . . 17
7.4 Set your preferences . . . . . . . . . . . . . . . . . . . . . . . . . . . . . . . 18
7.5 Select your connections . . . . . . . . . . . . . . . . . . . . . . . . . . . . 19
7.6 Set your clock . . . . . . . . . . . . . . . . . . . . . . . . . . . . . . . . . . . . 19
7.7 Reset AV settings . . . . . . . . . . . . . . . . . . . . . . . . . . . . . . . . . 20
10 To connect and operate accessory devices . . . . . . . . . 23
10.1 Side panel overview . . . . . . . . . . . . . . . . . . . . . . . . . . . . . . . . 23
10.2 To make video and audio connections . . . . . . . . . . . . . . . . . 24
10.3 Connect a recorder (VCR / DVD-R) . . . . . . . . . . . . . . . . . . 25
10.4 Connect a recorder and a second A/V device . . . . . . . . . . . 25
10.5 Connect a DVD player/recorder, Set top box,
gameconsole,... with a HDMI connector . . . . . . . . . . . . . . . 25
10.6 Connect a DVD player/recorder, Set top box,
gameconsole,... with a DVI connector . . . . . . . . . . . . . . . . . 25
10.7 Connect a DVD player with a S-VIDEO connector . . . . . . . . 26
10.8 Connect a recorder and Set top
cable box with RF output . . . . . . . . . . . . . . . . . . . . . . . . . . . . 26
10.9 Connect a satellite receiver or Set top cable box
with A/V outputs . . . . . . . . . . . . . . . . . . . . . . . . . . . . . . . . . . 26
10.10 Connect a satellite receiver or Set top
box and a recorder with A/V outputs . . . . . . . . . . . . . . . . . . 26
10.11 Connect digital source devices with Video
Component Output connectors (YPbPr) . . . . . . . . . . . . . . . 26
10.12 Connect a Home theater amplifier . . . . . . . . . . . . . . . . . . . 27
10.13 Connect a PC . . . . . . . . . . . . . . . . . . . . . . . . . . . . . . . . . . . . . 27
11 Problems . . . . . . . . . . . . . . . . . . . . . . . . . . . . . . . . . . . . 28
12 Glossary . . . . . . . . . . . . . . . . . . . . . . . . . . . . . . . . . . . . . 29
13 Recycling. . . . . . . . . . . . . . . . . . . . . . . . . . . . . . . . . . . . . 29
14 Product information . . . . . . . . . . . . . . . . . . . . . . . . . . . .29
Annex
1 - Magnavox TV Slideshow Format with background music . . . . . . 30
2 - Magnavox TV - Digital camera and USB issues . . . . . . . . . . . . . 31
3 - Issues referring to connected peripherals with a
HDMI connector . . . . . . . . . . . . . . . . . . . . . . . . . . . . . . . . . . . . . 32
4 - Software update . . . . . . . . . . . . . . . . . . . . . . . . . . . . . . . . . . . . . . 33
Index . . . . . . . . . . . . . . . . . . . . . . . . . . . . . . . . . . . . . . . . . . . . . . . . 35
ENGLISH
8 Create your favorite list . . . . . . . . . . . . . . . . . . . . . . . . . 20
8.1 Select a channel from the displayed list . . . . . . . . . . . . . . . . . 20
8.2 Select another favorite channel list . . . . . . . . . . . . . . . . . . . 20
8.3 Create or modify a favorite list . . . . . . . . . . . . . . . . . . . . . . . 20
9 Multimedia browser . . . . . . . . . . . . . . . . . . . . . . . . . . . . . 21
9.1 To view content from a USB device . . . . . . . . . . . . . . . . . . 21
9.2 Multimedia Browser menu . . . . . . . . . . . . . . . . . . . . . . . . . . 21
Manufactured under license from Dolby Laboratories. ‘Dolby’ ‘Pro Logic’
and the double-D symbol are trademarks of Dolby Laboratories.
1
Page 6

_________________________
4" - 6"4" - 6"4" - 6"
4" - 6"
4" - 6"
_________________________
HD programming
You must get HD programming to get an HD picture !
Call your Cable or Satellite service to order HDTV Programming.
_________________________
1 Safety warnings
_________________________
1.1 General
Do not insert the power plug in a wall socket or hang the TV to
the wall before all connections are made.
- Place or hang the TV wherever you want, but make sure that air can
circulate freely through the ventilation slots. Leave at least 4” to 6” free
all around the TV.
- Do not place the TV on a carpet.
1.3 Warning concerning stationary images on the TV
screen
A characteristic of LCD Panels is that displaying the same image for a
long time can cause a permanent after-image to remain on the screen.
Normal use of the TV should involve the showing of pictures that
contain constantly moving and changing images that fill the screen.
Examples of stationary images (this is not an all-inclusive list, you may
encounter others in your viewing):
- TV menus;
- Black bars: when black bars appear at the left and right side of the
screen, it is recommended to change to a picture format so that the
picture fills the entire screen;
- TV channel logo: present a problem if they are bright and stationary.
Moving or low-contrast graphics are less likely to cause uneven aging of
the screen;
- Stock market stickers: presented at the bottom of the TV screen;
- Shopping channel logos and pricing displays: bright and shown
constantly or repeatedly in the same location on the TV screen.
Examples of still pictures also include logos, computer images, time
display, teletext and images displayed in 4:3 mode, static images or
characters, etc.
Reduce contrast and brightness when viewing. When the same image
is displayed for 10 minutes, brightness will be reduced automatically.
Once burn-in occurs it will never disappear completely.
!
Carefully pay attention to these remarks. The warranty does not
apply to damage caused by not taking into account the above
mentioned warnings on stationary images.
_________________________
- Do not install the TV in a confined space such as a book case or a
similar unit.
- To prevent any unsafe situations, no naked flame sources, such as
lighted candles, should be placed in the vicinity.
- Avoid heat, direct sunlight and exposure to rain or water.
- The equipment shall not be exposed to dripping or splashing.
- To prevent damaging the power (AC) cord which could cause a fire or
electric shock, do not place the TV on the cord.
_________________________
1.2 Care of the screen
Do not remove the protective sheet until you have completed the stand/
wall mounting and connection.
Please, handle with care. Use only the soft cloth supplied to clean the
glossy black front of the TV.
Do not touch, push or rub or strike the screen with anything hard as this
may scratch, mar or damage the screen permanently.
And please do not rub with dust clothes with chemical treatment.
Do not touch the surface with bare hands or greasy cloth (some
cosmetics are detrimental to the screen). Unplug the TV before cleaning
the screen.
When the surface becomes dusty, please wipe gently with absorbent
cotton or other soft materials like chamois soaks. Do not use acetone,
toluene and alcohol because they cause chemical damage. Do not use
liquid cleaners or aerosol cleaners. Wipe off saliva or water drops
as soon as possible. Their long time contact with the screen causes
deformations and color fading.
1.4 Mounting
Installing the TV requires special skills that should only be performed by
qualified personnel. You should not attempt to do the work yourself.
Magnavox bears no responsibility for improper mounting or mounting
that results in accident or injury. Make sure that the wall mount is being
fixed securely enough so that it meets safety standards.
!
If the TV is mounted on a swivel base or swivel arm, ensure no strain
is placed on the power cord when the TV is swivelled. Strain on the
power cord can loosen connections. This may cause arcing and result in
fire.
________________________
1.5 Electric, Magnetic and Electromagnetic Fields (EMF)
- Magnavox manufactures and sells many products targeted at consumers,
which, like any electronic apparatus, in general have the ability to emit
and receive electromagnetic signals.
- One of Magnavox’ leading Business Principles is to take all necessary
health and safety measures for our products, to comply with all
applicable legal requirements and to stay well within the EMF standards
applicable at the time of producing the products.
- Magnavox is committed to develop, produce and market products that
cause no adverse health effects.
- Magnavox confirms that if its products are handled properly for their
intended use, they are safe to use according to scientific evidence
available today.
- Magnavox plays an active role in the development of international
EMF and safety standards, enabling Magnavox to anticipate further
developments in standardization for early integration in its products.
2
Page 7
_________________________
0
0
6
8
M
0
0
4
1.6 Pixel characteristics
Your TV display is made with high-precision technology with a high
number of color pixels. Although it has effective pixels of 99,999% or
more, black dots or bright points of light (red, green or blue) may appear
constantly on the screen. This is a structural property of the display
(within common industry standards) and is not a malfunction.
______________________
1.7 VESA Compliance Information for Professional
Installation
!
Caution
Consult a Home Theater installation professional.
Improper mounting could result in severe injury or damage.
Magnavox bears no responsibility for improper mounting or mounting
that results in accident or injury.
Your TV is prepared for VESA compliant wall mounting.
This bracket is not included. Use a VESA compliant bracket with code
VESA MIS-F, 600, 400, M8.
Consult your dealer for more information.
1. Locate the VESA screwholes on the back of the TV.
1.8 Kensington Security Slot (if present)
Your TV is equipped with a Kensington Security Slot, to
prevent it from getting stolen.
An anti-theft Kensington lock has to be purchased separately.
The Kensington lock is a plastic-coated steel cable with a lock.
One end has to be fixed to the opening of the TV and locked with a
special button. The other end is attached to a fixed point.
® Kensington and MicroSaver are registered US trademarks of ACCO
World Corporation with issued registrations and pending applications in
other countries throughout the world. All other registered and unregistered
trademarks are the property of their respective owners.
ENGLISH
4x
2. Should the plastic discs obstruct the VESA bracket, you can unscrew
these 4 discs.
4x
VESA, FDMI and the VESA Mounting Compliant logo are trademarks of the
Video Electronics Standards Association.
_______________________
3
Page 8
_________________________
VIDEO
S VIDEO
AUDIO
L
R
BSU
L
R
AUDIO
YPbPr
VIDEO
Y
S VIDEO
AUDIOLR
Pb Pr
VIDEO L RAUDIO
AV 3
AV 1
AV 2
14
13
12
3
2
1
ANTENNA
SERVICE
UART
AUDIO OUT
L
R
ANALOG
AUDIO IN
OUT
IN
DIGITAL
AUDIO
L
R
DISPLAY SYNCHRONIZED
HDMI 1AV 1 HDMI 1
HDMI 2AV 2 HDMI 2
HDMI 3AV 3 HDMI 3
DISPLAY
SYNC.
++
HDMI 1 HDMI 2 HDMI 3
42"-47"-52"
10 9 8 7 6 5 4 11
2 Getting started
Welcome to the growing family of owners of Magnavox.
_________________________
2.1 Connection overview
There is a wide range of audio and video devices that can be
connected to your TV. See Chapter 10 To connect and
operate accessory devices.
Before installing your TV or before hanging it on the wall, first
connect your accessory devices.
!
Do not insert the power plug into the mains at the bottom of the TV
and in a wall socket before all connections are made.
_________________________
2.1.1 Back connections
1-2-3
AV1 - AV2 - AV3
To connect devices with
- an S-Video connector and L and R audio cables
- devices with 3 separate Component Video Output
connectors (YPbPr) and Analog L and R audio cables
- devices with Video and Audio L and R AV cables.
4-5-6
HDMI *
To connect a device with a HDMI connector. If the accessory
device has a DVI output only, see Chapter 10.7.
7 Analog Audio In L/R
Analog audio for devices connected to a HDMI connector.
8 Digital Audio Out
To connect a digital Home theater amplifier.
9 Digital Audio In
10 Audio Out L/R
11 Service UART
For use only by authorized service personnel.
For installers/integrators: Do not connect RS232 without
level shifter.
_________________________
2.1.2 Side connections
12 To connect devices with Video or S-Video and Audio Left and
Right AV cables.
(For ex. camera, camcorder, game, audio,...)
13 To connect your headphone.
14 To connect a USB device.
* According to your type of set, 2 or 3 HDMI connectors are
available.
4
4
Page 9
_________________________
2.1.3 Connect to the TV
Your Magnavox Digital TV will allow you to enjoy digital programs
directly from your cable or off air.
Connect directly to the TV or connect via your current cable box or
Satellite Receiver box.
________________________
2.1.3.1 Directly to the TV (you will not be able to receive pay
channels)
Watching Cable TV programs that don’t require the cable
box
Since you’ve connected the cable TV signal directly to the TV’s tuner,
you can also watch the unscrambled programs by simply tuning to
the desired channel. You must first use Autoprogram, however, to
store channels in the TV’s memory. See Chapter 7.3.
This connection will supply stereo sound to the TV if it is being
broadcast by the station you are watching.
_________________________
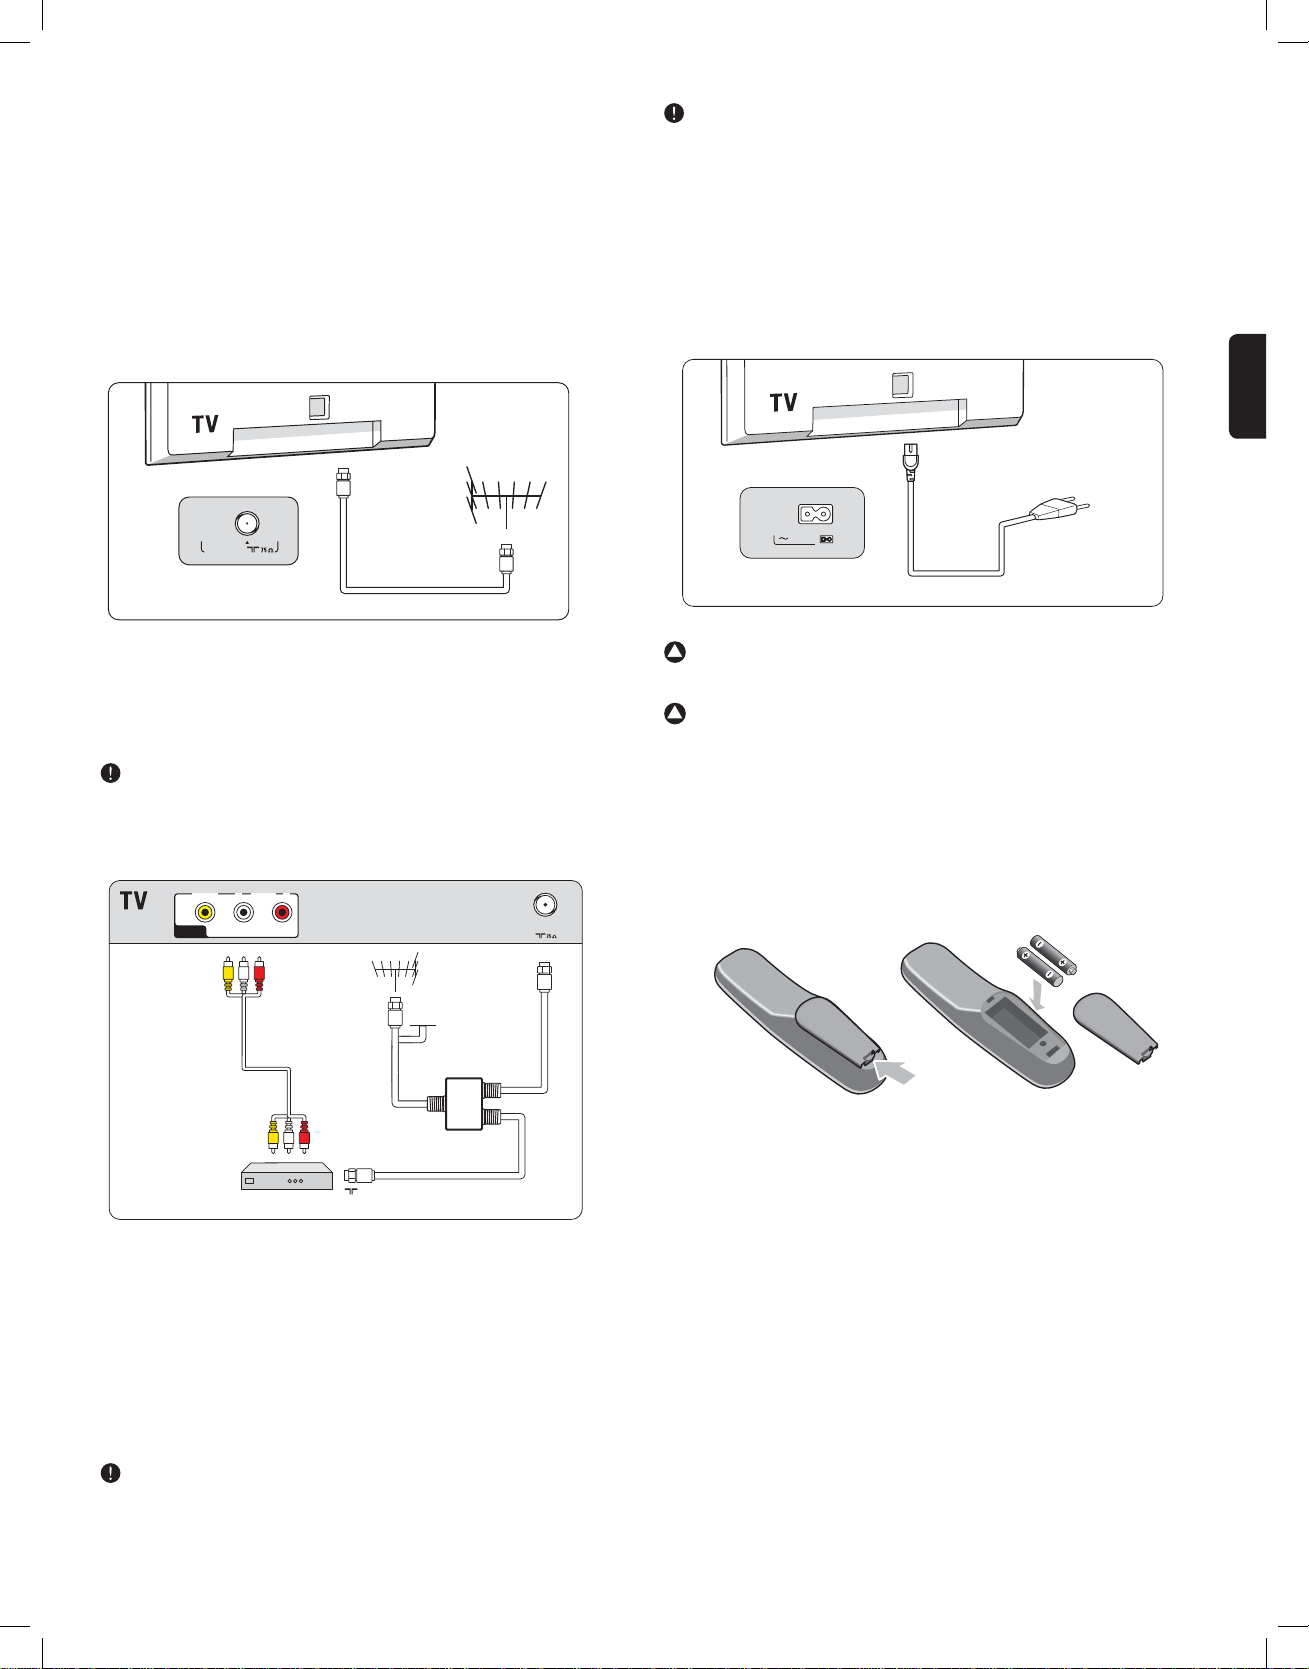
2.1.4 Connect the mains
ENGLISH
ANTENNA
1. Connect the cable TV signal or the incoming antenna signal to the
ANTENNA : 75 Ω jack at the bottom of the TV.
2. See Chapter 7.3 Store TV channels for details on using
Autoprogram to store channels in the TV’s memory.
- Broadcasters are in the middle of a transition from analog to digital
TV. This means that a given broadcaster will have two channels on
the air, one analog and one digital.
- This connection will supply stereo sound to the TV if it is being
broadcast by the station you are watching.
VIDEO L RAUDIO
AV 2
L + R + VIDEO
AV2
CABLE
SIGNAL
ANTENNA
SPLITTER
MAINS
!
Verify that the power supply voltage corresponds to the voltage
printed on the sticker at the back of the TV. Contact your local
dealer if your power supply is different.
!
Ensure the power cord is fully inserted in the TV mains socket and
the wall socket.
_________________________
2.1.5 Remote control
Insert the 2 batteries supplied (Type R03-1,5V).
Be sure the (+) and (-) ends of the batteries line up correctly (inside of
case is marked.)
OUT
Set top box
RF IN
________________________
2.1.3.2 Via a cable box or Satellite box
1. Maintain the connection of the TV cable of your home into your
cable box (or satellite receiver box).
2. Connect your Cable box (or satellite receiver box) to the back of
the TV using the best connection options. See Chapter 10.2 To
make audio and video connections.
3. Select the source using the
4. Press the
OK button to confirm your selection.
AV button on the remote control.
For more information, please refer to your cable box (or satellite
receiver box) manual.
5
5
Page 10
_________________________
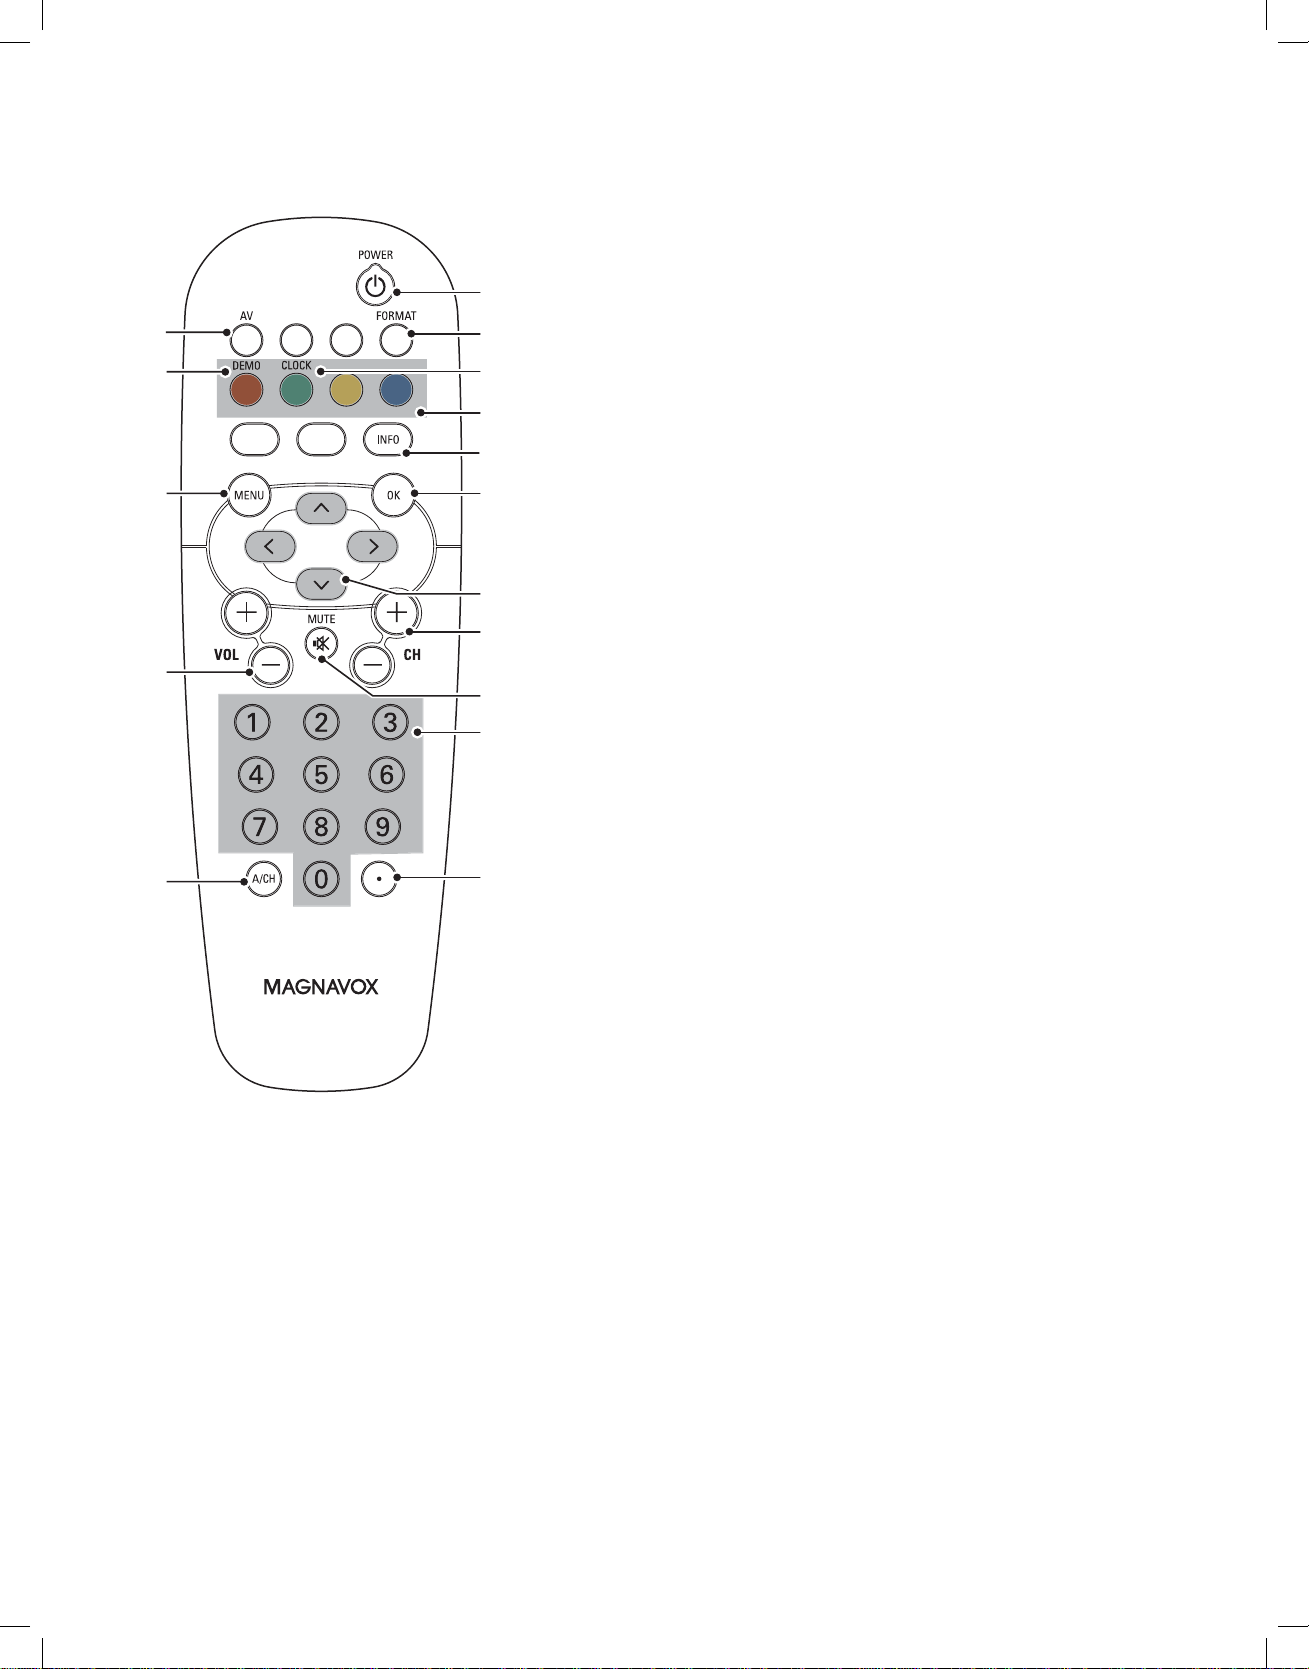
3 Use of the remote control
2
5
1 POWER Press to turn the TV on/off.
2
1
3
4
6
7
AV Press repeatedly to select AV1, AV2, AV3, HDMI 1,
HDMI 2, HDMI 3, Side or TV channels according to
where you connected the accessory devices.
3
FORMAT See Chapter 3.1 Widescreen picture format.
4
CLOCK No function
5
DEMO Demo on/off.
11
16
9
8
6 Color buttons
When functions are attached to the color buttons, the
color buttons are shown on screen.
7
INFO Display information: Press to display (when available)
10
information about the selected TV channel and program
or accessory device. The quality and accuracy of the
12
information on the information banner are transmitted
from broadcasters. You may see a difference in broadcast
time if the broadcaster is from a different time zone area.
13
Display clock: Select to activate/de-activate the clock
display on the screen.
14
8
OK - To activate a setting.
- To display the list of channels stored (according to the
selection made in the Installation mode - Antenna or
Cable, see Chapter 7.3 Store TV channels).
- Starts playing content in the Multimedia Browser
application. See Chapter 9 Multimedia browser.
15
9
MENU Settings menu on/off. See Chapter 5.2 Use of the TV
menu settings.
10 Cursor buttons
Press the cursor buttons up/down, left/right to navigate
through the menus.
11
VOLUME Press + or - to adjust the volume.
Due to the sensitivity of the remote control, you may experience a
delayed operation at start up of the TV. After a short while your remote
control will work smoothly.
6
12 Channel selection
- To browse through the TV channels or sources stored
and marked in the selected Favorite channels list. See
Chapter 8 Create your favorite list;
- To quickly browse through the list in the menus;
- To select between Antenna or Cable TV channels, first
make your selection in the Installation menu, Channel
installation, Installation mode, see Chapter 7.3 Store TV
channels.
13
MUTE Interrupt the sound or restore it.
14 Numeric buttons
To select a TV channel.
15 • Type the dot (•) for digital channels.
16
A/CH Press to alternate between the currently viewed channel
and the previously viewed channel.
Page 11
_________________________
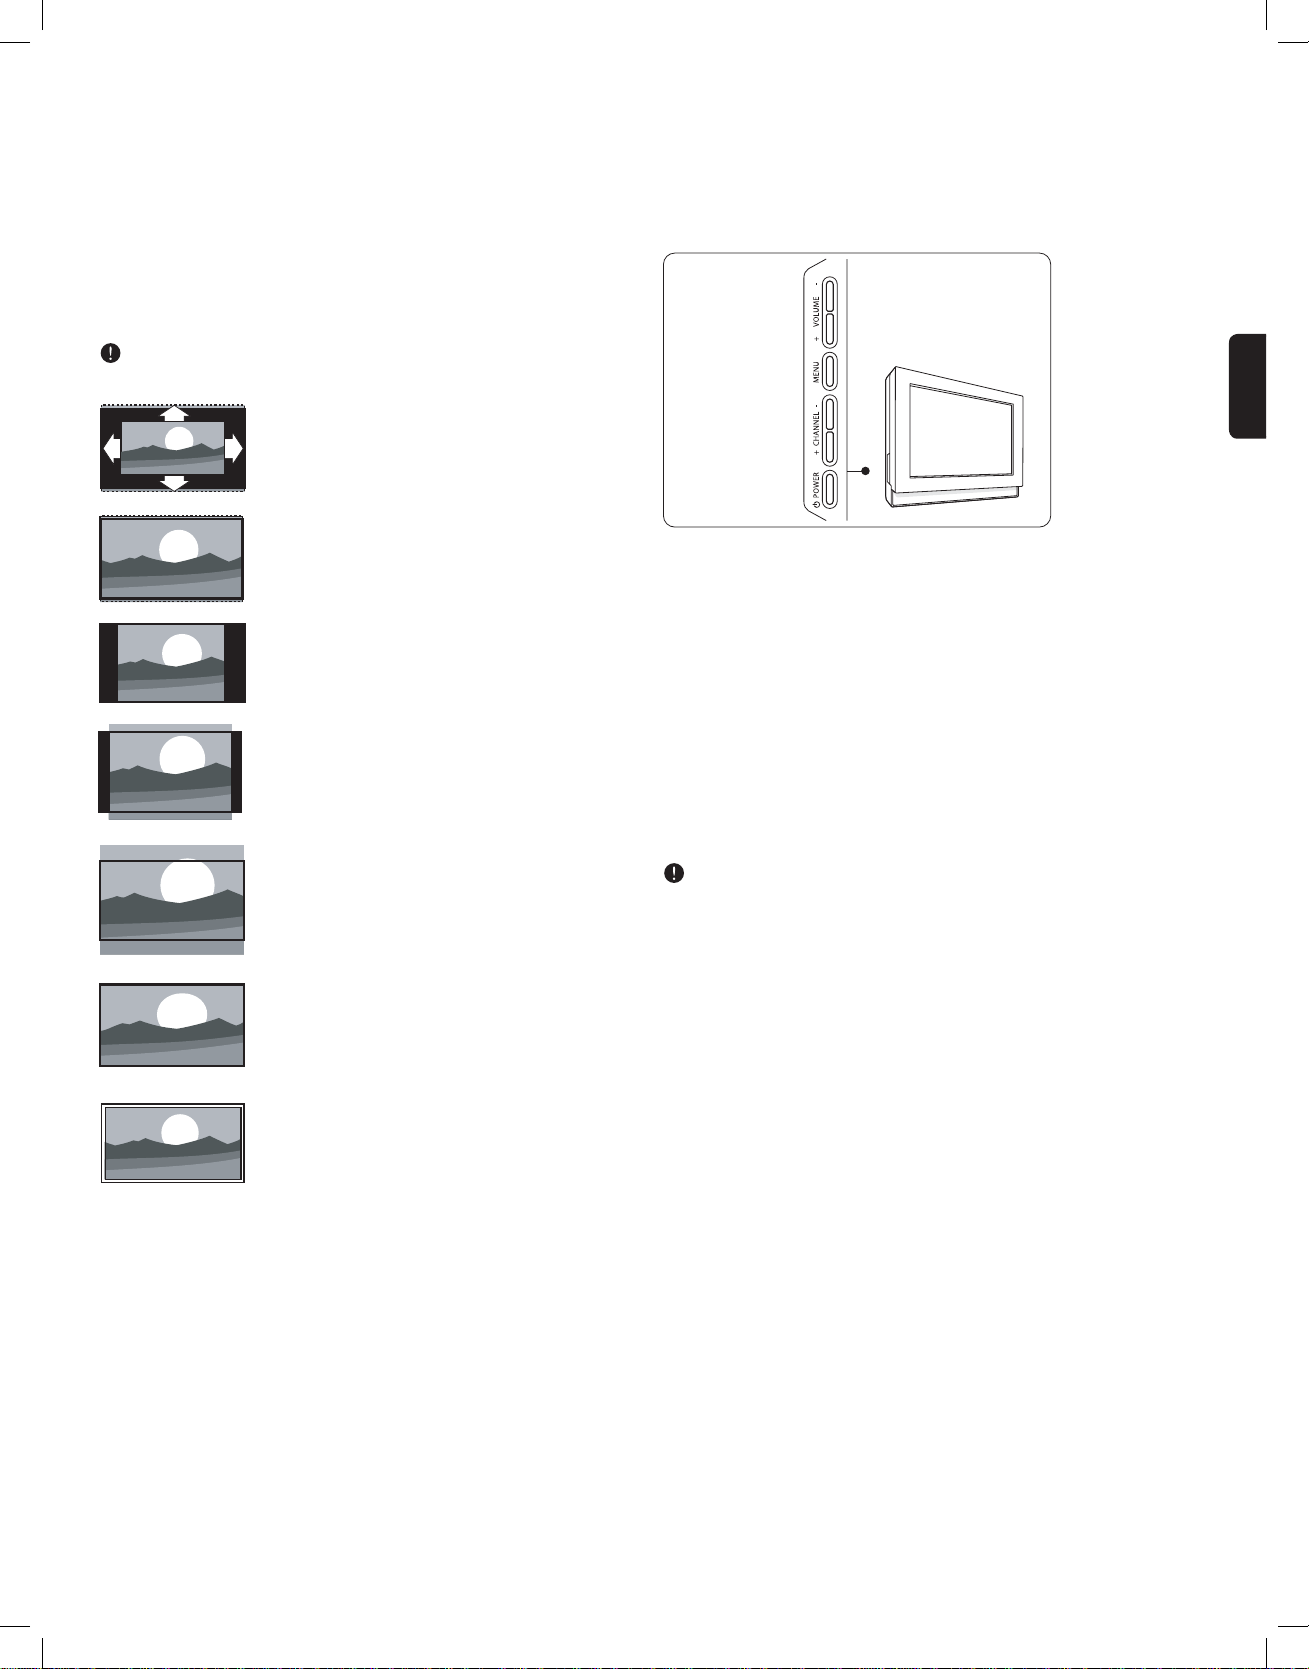
3.1 Widescreen picture format
Avoid black bars on the sides or on top and bottom of the picture.
Change the picture format to a format that fills the screen.
1. Press
2. Press Î or ï to select an available picture format.
3. Press Î to shift the picture upwards to make partly covered subtitles
The format Automatic is recommended for minimal distortion.
FORMAT to switch on the Picture format menu.
visible.
Tip
_________________________
3.2 Buttons on the left of the TV
Should your remote be lost or broken you can still change some of the
basic settings with the buttons on the left side of your TV.
Automatic (Not for PC.)
Enlarges the picture automatically to fill the
screen. Subtitles remain visible.
Super zoom (Not for HD.)
Removes the black bars on the side of 4:3
broadcasts. There is a minimal distortion.
4:3 (Not for HD.)
Shows the classical 4:3 format.
Movie expand 14:9 (Not for HD.)
Scales classical 4:3 format to 14:9.
Movie expand 16:9 (Not for HD.)
Scales classical 4:3 format to 16:9.
Press the
The
without the remote control.
Use the
Use the
and sources stored and marked in the Favorite channel lists.
_________________________
POWER . switch to turn the TV on.
MENU button can be used to summon or exit the TV menu
VOLUME + and - buttons to adjust the volume.
CHANNEL + and - buttons to browse through the TV channels
3.3 Turn the TV on
•
Press the . POWER switch at the left side of the TV.
> An indicator on the front of the TV lights up.
•
Press the
control.
The first time (and only the first time) you turn on your TV, you
see a welcome screen followed by the installation procedure. See
Chapter 4 First time installation.
+ CH - button or the POWER button on the remote
ENGLISH
Wide screen
Stretches 4:3 format to 16:9.
Unscaled (Only for HD and PC.)
Maximum sharpness. Distortion may appear on
borders. Black bars may appear with pictures
from your PC.
Note
Do not forget to name the connection in the Connections menu. See
chapter 7.5 Select your connections.
7
Page 12
_________________________
4 First time installation
The installation procedure consists of a series of screens that will guide
you through the installation of your TV. Follow the instructions on
screen.
If the TV has already been installed before and/or you want to change
the First time installation settings, proceed with Chapter 5.2 Use of
the TV menu settings.
Step 1 - Select your on-screen language
After the Welcome screen you are asked to select a language of the
TV's on-screen menus. The text of the header and the info on screen
continuously change language.
Menu language
Please select your
language.....
using cursor up and down
NEXT
English
Français
Español
Português
.............
Step 3 - Settings assistant: select your TV settings
The Settings assistant will help you to select your preferred picture and
sound settings. Finally you will arrive at a complete setting which satisfies
you.
1. Press the green color button on your remote control to enter the
Settings assistant menu.
Installation
This will help you to install the following sections:
Television installation
Settings assistant
Previous Next
2. Select your location with the cursor up/down.
Settings assistant
Please select your location before continuing:
Home
Retail store
SkipPrevious Next Stop
1. Press the cursor up/down to highlight your language.
2. Press the
OK button on the remote control.
3. Follow the instructions on screen to proceed.
Step 2 - Complete the initial TV installation procedure
1. Press the green color button on your remote control to start the
television installation.
Television installation
Installation mode
Antenna
Cable
Previous Next
Please select your
installation mode.
2. Select Cable or Antenna in the Installation mode and press the
green color button.
> When Antenna is selected, the TV will detect antenna signals
and will search for antenna TV (NTSC and ATSC) channels
available in your local area.
> When Cable is selected, the TV will detect cable company
supplied signals and will search for cable TV (NTSC, ATSC, QAM
modulated) channels available in your area.
3. Press the green color button on your remote control to start the
Automatic channel installation.
> All available TV channels are searched for and stored
automatically. This will take a few minutes. When the search is
complete, the menu will indicate the number of digital and analog
channels found.
> If you choose Home it will start display the Settings assistant.
> If you choose Retail store it will skip the Settings assistant.
The TV parameters for Picture and Sound will then be set to
predefined fixed settings.
3. Press the green color button again to proceed.
4. Use the cursor left/right to each time select your preferred screen.
5. Press the green color button to each time confirm your selection and
to jump to the following screen.
> The following items will be presented sequentially.
In the header it is mentioned how many screens have been
completed and how many screens there are in total.
6. When finished, press the green color button twice to store all the
settings and to return to the TV installation menu.
When you skip or stop the Settings Assistant, the Standard settings
Magnavox selected for you will be chosen.
7. Press the red color button to finish the First time installation
procedure and to display the first stored TV channel.
At any time you can change or reset your settings or adjust individual
settings for Picture and Sound in the TV Settings menu. See Chapter
5.2.1 Adjust viewing and listening settings.
To control the settings of special TV functions, features and
accessory devices, see Chapter 6 Adjust Feature menu settings.
If you choose to install the channels at a later time, see Chapter
7.3 Store TV channels to select Autoprogram to scan available
channels.
4. Press the red color button when the search is completed.
8
Page 13
_________________________
5 How to navigate through the menus
_________________________
5.1 Introduction
A lot of guiding instructions, help texts and messages will be displayed on
your TV when you use the menus or when you try to execute an action.
Read the help texts which are being displayed on the specific item
highlighted.
The color buttons at the bottom of the screen refer to the different
actions which may be executed.
Press the corresponding color button on the remote control to perform
the required or desired action.
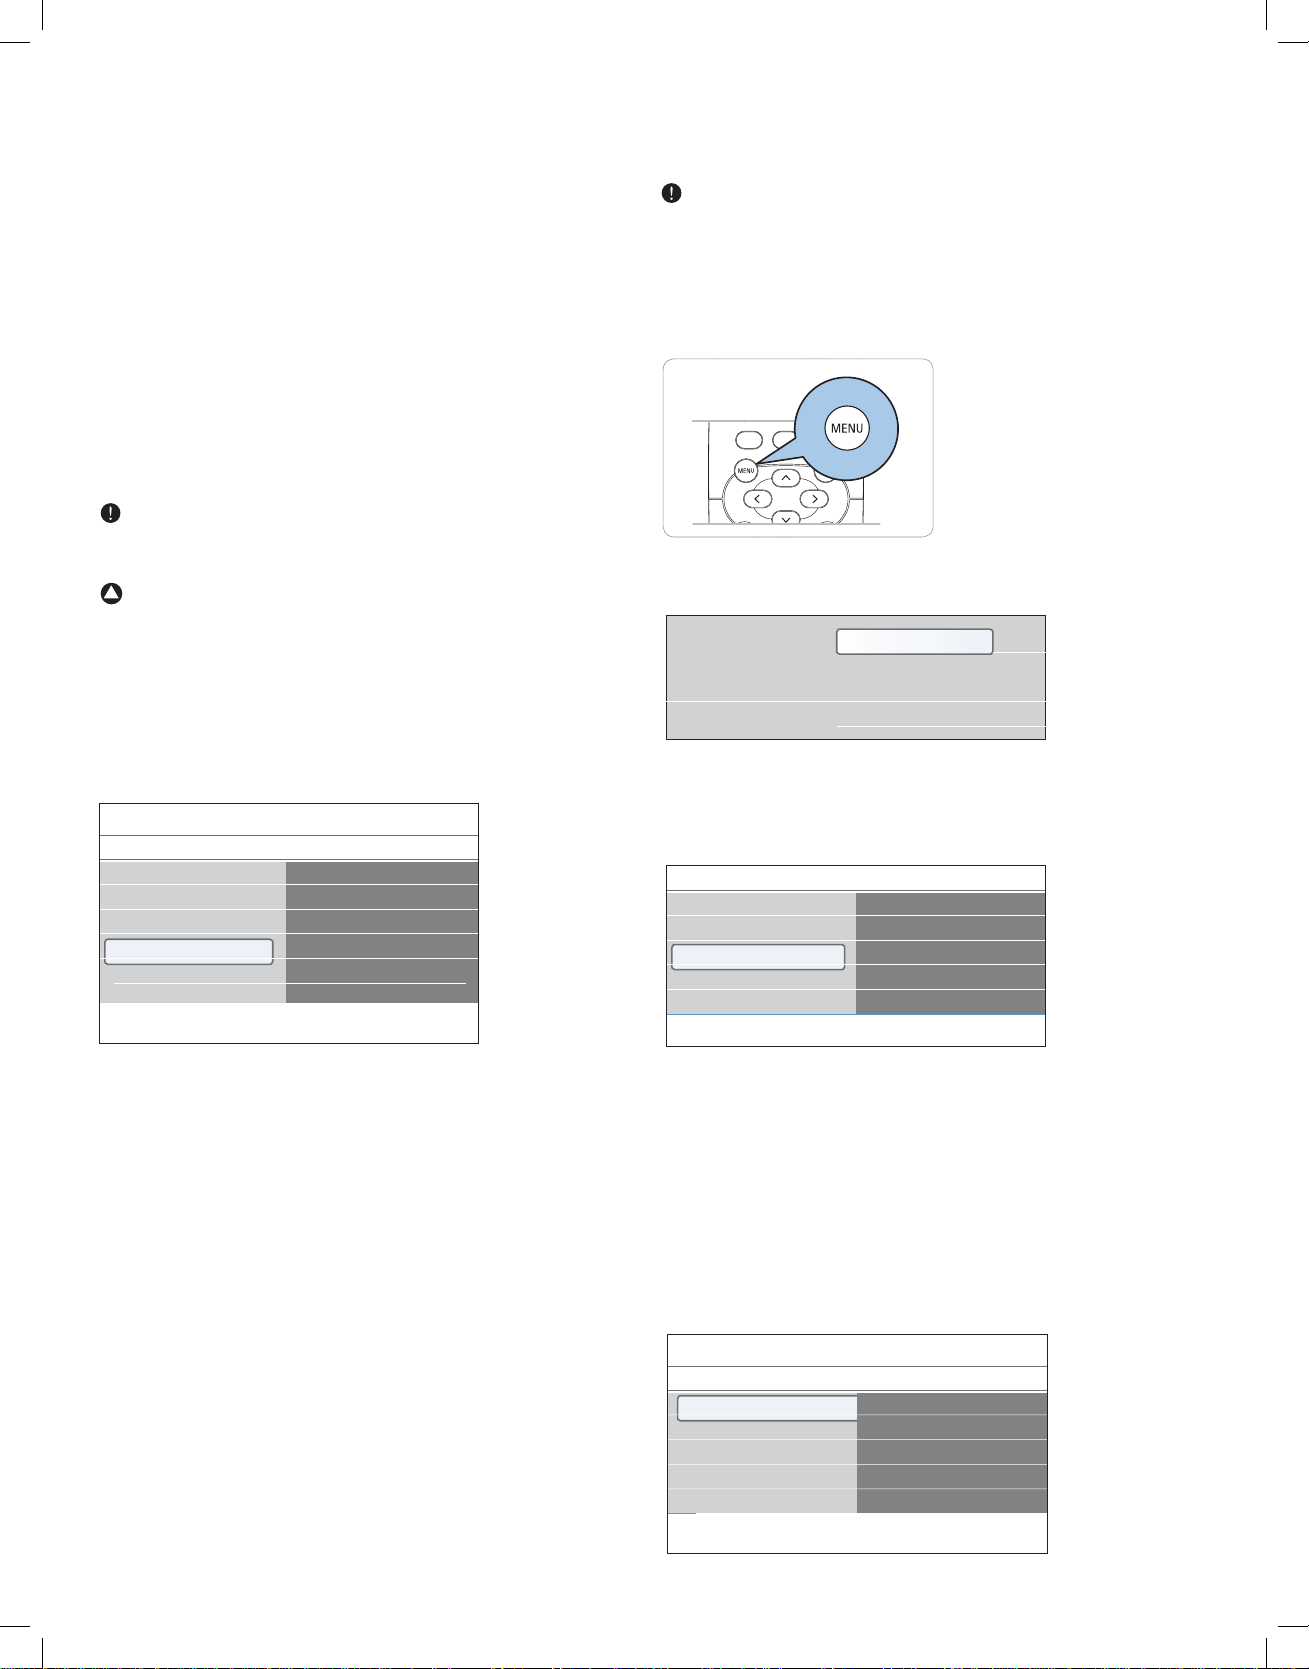
1. Press the
MENU button on the remote control.
- to reset your picture and sound settings to the factory standard
settings;
- to update your TV software.
- Software update allows you to update your current software.
5. Press the cursor right to enter the highlighted menu item.
> The content of the right panel is moved to the left panel and the
right panel now shows the content of the newly highlighted item
in the left panel.
In some cases it is important that the picture can be watched while
you adjust the settings. This means that when the highlight is on the
right side panel, the other menu items hide away. When the cursor
left is pressed, the hidden menu items reappear and the highlight
moves to the left panel.
6. Press the
MENU button to exit the main menu.
_________________________
5.2 Use of the TV menu settings
The TV menu allows you to access and change settings and preferences
in case you want to change the First time installation settings and/or
you want to control the settings of special TV functions, features and
peripheral equipment.
_________________________
ENGLISH
> The main menu appears on the screen.
Television
Multimedia
TV menu
Channel list
Program guide
USBdevice 1
- TV menu allows you to access the TV menu. See below.
- Channel list allows you to access the TV channel list and to
create up to four favorite lists with your preferred TV channels. See
Chapter 8 - Create your favorite channel list.
- Program guide allows you to access detailed information about
individual digital TV programs.
- Multimedia allows you to access the Multimedia browser
application. It lets you display your personal multimedia (pictures,
audio) files. Multimedia is only present when a USB device is
connected. See Chapter 9 Multimedia browser.
2. Use the cursor up/down to highlight and select a menu item.
3. Use the cursor right to enter the highlighted menu item.
> The right panel shows the content of the highlighted menu item.
4. Use the cursor up/down to select a menu item.
TV menu
TV settings
Features
Installation
Software update
Info
TV settings
Settings assistant
Reset to standard
Picture
Sound
5.2.1 Adjust viewing and listening settings
1. Press the
MENU button on the remote control.
> The main menu appears on the screen.
Television
Multimedia
TV menu
Channel list
Program guide
USBdevice 1
2. Select TV menu and press the cursor right.
> The TV menu is displayed.
TV menu
TV settings
Features
Installation
Software update
Info
TV settings
Settings assistant
Reset to standard
Picture
Sound
3. Select TV settings and press the cursor right.
> The TV settings menu is moved to the left.
4. Press the
MENU button to exit the menu.
To make it easier to change the settings of the TV, there are 3 ways of
doing it. See further.
- TV settings allows you to adjust your preferred picture and sound
settings
- Features allows you to control the settings of special TV features
- Installation allows you
- to select your menu language;
- to search for and store your TV channels;
- to do a weak ATSC digital channel installation;
- to set or adjust various special functions;
- to select connected peripheral equipment;
9
Page 14
A. Change settings in an easy-to-use manner with the Settings
assistant
Each time you've made a selection, press the green color button to
confirm your selection.
1. Select Settings assistant and press the cursor right.
> By means of several split screens/full screens you are prompted
to select your preferred picture and sound settings to finally arrive
at a complete setting which satisfies you. See Chapter 4 First time
installation, Step 3 - Settings assistant.
2. Press the green color button to return to the TV menu again.
B. Use of the Standard settings
This allows you to reset your settings for viewing and listening to
predefined factory settings.
1. Select Reset to standard and press the cursor right.
> A menu appears which allows you to select one of the standard
settings for viewing and listening.
TV menu
TV settings
Settings assistant
Reset to standard
Picture
Sound
Info
Reset to standard
Current
Natural
Vivid
Movie
TV menu
TV settings
Settings assistant
Reset to standard
Picture
Sound
Info
Picture
Contrast
Brightness
Color
Tint
Sharpness
Color temperature
Perfect Pixel HD
Dynamic contrast
Noise reduction
MPEG artefact reduction
Color enhancement
Active Control
Light sensor
Picture format
Contrast
Adjusts the intensity of bright parts in the picture but keeps the dark
parts unchanged.
Brightness
Adjusts the light output of the complete picture, which will mainly affect
the darker areas of the picture.
- Current shows your current settings for viewing and listening.
- If you select Natural, it allows you to set your picture and sound
settings to the recommended standard values. In most cases this
will give the best balanced viewing experience.
- If you select Vivid, it allows you to set your picture and sound
settings to rich values, making use of the TV capabilities to its full
extend.
- If you select Movie, it allows you to set your picture and sound
settings to the purest representation of the original source content.
2. Press the green color button to store the selected setting.
C. Individual settings for picture and sound
Select Picture or Sound and press the cursor right.
•
> A menu appears which allows you to fine tune the picture and
sound settings.
> To adjust the Picture settings, see Chapter 5.2.2 Adjust picture
menu settings.
> To adjust the Sound settings, see Chapter 5.2.3 Adjust sound
menu settings.
_________________________
5.2.2 Adjust Picture menu settings
The picture menu contains the settings that affect the quality of the
picture.
1. Press the
MENU button on the remote control.
> The main menu appears.
2. Select TV menu and press the cursor right.
> The TV menu is moved to the left.
3. Select TV settings and press the cursor right.
> The TV settings menu is moved to the left panel.
4. Select Picture and press the cursor right.
> The Picture menu is moved to the left panel.
5. Use the cursor up/down to select the Picture menu items.
6. Press the cursor right to enter the selected Picture menu item.
7. Use the cursor buttons to adjust the settings.
8. Press the cursor left to return to the Picture menu.
Color
Adjusts the saturation level of the colors to suit your personal
preference.
Tint
Allows you to select the color mix (tint) of the picture.
Sharpness
Adjusts the sharpness of fine details in the picture.
Color temperature
Increases or decreases Warm (red) and Cool (blue) colors to suit
personal preferences.
Select Cool to give the white colors a blue, Normal to give the
•
white colors a neutral, Warm to give the white colors a red tint.
Select Custom to make customized settings.
•
1. Press the green color button.
> The Custom color temperature screen appears. This allows
you to fine tune the white point (
WP) and black level (BL) of the
picture.
2. Use the cursor buttons to select and adjust the settings of:
R-WP: allows you to customize the color temperature by adjusting
the red whitepoint of the picture.
G-WP: allows you to customize the color temperature by adjusting
the green whitepoint of the picture.
B-WP: allows you to customize the color temperature by adjusting
the blue whitepoint of the picture.
R-BL: allows you to customize the color temperature by adjusting
the red blacklevel of the picture.
G-BL: allows you to customize the color temperature by adjusting
the green blacklevel of the picture.
3. Use the color buttons to reset to the predefined settings.
4. Press the red color button or the cursor left to return to the Picture
menu.
10
Page 15
Perfect Pixel HD
Perfect Pixel HD is the most ideal setting as it fully processes the image
to make every single pixel the best it can be, improving contrasts,
sharpness, picture depth, color reproduction and brilliance from every
source, including High Definition.
Select On or Off to activate/de-activate Perfect Pixel HD.
•
Dynamic contrast
Automatically makes the contrast in the darker and the brighter picture
areas more noticeable as the image on the screen changes.
Normally select Medium. It may be preferred to select Minimum,
•
Maximum or Off.
Noise reduction
Noise reduction automatically filters out and reduces the image noise.
This improves picture quality when receiving weak signals.
Select Off, Minimum, Medium or Maximum according to the
•
image noise in the picture.
TV menu
TV settings
Settings assistant
Reset to standard
Picture
Sound
Info
Sound
Equalizer
Volume
Balance
Audio language
Alternate audio
Mono/Stereo
Sound mode
Headphone volume
Auto volume leveling
Delta volume
Auto surround
ENGLISH
MPEG artifact reduction
MPEG artifact reduction On smoothens the transitions on digital
content.
Select On or Off.
•
Color enhancement
Automatically controls green enhancement and blue stretch. It makes the
colors more vivid.
Select Off, Minimum, Medium or Maximum.
•
Active control
The TV continuously measures and corrects all incoming signals in order
to provide the best picture possible.
Select On or Off to activate/de-activate Active control.
•
Light sensor
Light sensor On automatically adjusts the picture settings for best
viewing dependent on the lighting conditions in the room.
Select On or Off.
•
Picture format
See chapter 3.1 Widescreen picture format above.
_________________________
5.2.3 Adjust sound menu settings
The sound menu contains the settings that affect the quality of the sound.
1. Press the
MENU button on the remote control.
> The main menu appears.
2. Select TV menu and press the cursor right.
> The TV Menu is moved to the left.
3. Select TV settings and press the cursor right.
> The TV settings menu is moved to the left panel.
4. Select Sound and press the cursor right.
> The Sound menu is moved to the left panel.
5. Use the cursor up/down to select the Sound menu items.
6. Press the cursor right to enter the selected Sound menu item.
Equalizer
Allows you to select one of the predefined settings for the equalizer:
Standard, Speech, Multimedia or Music.
TV menu/TV settings
Sound
Equalizer
Volume
Balance
Audio language
Alternate audio
Mono/Stereo
.....
Info
Equalizer
3
1,5kHz 5kHz
Use the color buttons to select.
Use the cursor buttons to adjust the frequency response of the sound to
match your personal taste.
Volume
Allows you to adjust the sound output level.
Balance
Allows you to adjust the output of the right and left speakers to obtain
the best stereo reproduction for your listening position.
Audio language
Allows you to select an audio language out of the list of the available
broadcasted languages.
If there is more than one variant for an audio language, then select
one of the variants. To permanently change the audio language, use the
Language menu in the Installation menu, see Chapter 7.2 Select your
language.
Dependent on the input signal, one or more menu items may not be
selectable.
7. Use the cursor buttons to adjust the settings.
8. Press the cursor left to return to the Sound menu.
Alternate audio (only selectable with analog broadcast signals)
Gives you the possibility to swap between the Main and Second audio
Program (SAP) when it is available.
Mono/Stereo
Allows you to select, per TV channel, Mono or Stereo sound when
analog stereo broadcasts are available.
11
Page 16
________________________
Sound mode
Allows you to select the modes for more spatial or surround sound
reproduction dependent on the broadcasted signals or signals from
external inputs received.
Headphone volume
Allows you to control the level of sound through the headphones.
Auto Volume Leveling
Automatically reduces the volume differences between channels and
programs, providing a more constant overall level. This will also reduce
the dynamics of sound.
Delta volume
Allows you to correct for any permanent volume differences between
TV channels or external sources.
You may change channels with the numeric buttons or the CH- or +
button.
Auto surround
When turned On, this allows the TV to automatically turn to the best
surround sound mode the broadcaster transmits.
6 Adjust Feature menu settings
The Features menu allows you to control the settings of special TV
functions, features and accessory equipment.
1. Press the
> The main menu appears.
2. Select TV menu and press the cursor right.
> The TV Menu is moved to the left.
3. Select Features and press the cursor right.
> The Features menu is moved to the left panel.
TV menu
TV settings
Features
Installation
Software update
Info
4. Use the cursor up/down to select the Features menu items.
5. Press the cursor right to enter the selected Features menu item.
6. Use the cursor buttons to adjust the settings.
7. Press the cursor left to return to the Features menu.
_________________________
MENU button on the remote control.
Features
Closed captions
Caption service
Digital caption service
Digital caption options
Sleeptimer
......
6.1 Closed captions
This displays the transmitted CC- or CS-text on the screen according to
your chosen CC or CS service in the Caption or Digital caption service
menu below. This text can either be permanently displayed (assuming
that the service is available in the broadcast) or only when mute is active.
1. Press the cursor right after having selected Closed captions.
2. Select On, Off or On during mute.
_________________________
6.2 Caption service
This allows you to select the Closed Captions service levels of analog
broadcasting to be displayed.
Closed Captioning allows you to read the voice content of television
programs on the TV screen. Designed to help the hearing impaired, this
feature uses on-screen ‘text boxes’ to show dialogue and conversations
while the TV program is in progress.
Captions will appear on the screen during captioned broadcasts.
1. Select Caption service.
2. Press the cursor right.
3. Select the desired Caption service:
>
CC 1, 2, 3 or 4
Dialogue (and descriptions) for the action on the captioned TV
program shows on screen.
Usually CC 1 is the most used. CC 2 may be used for alternate
languages if they are being transmitted.
>
T 1, 2, 3 or 4
Often used for channel guide, schedules, bulletin board
information for Closed Captions programs, news, weather
informations or stock market reports.
Not all Caption services are necessarily being used by a TV channel
during the transmission of a Closed Caption program.
12
Page 17
_________________________
6.3 Digital caption service
This allows you to configure the way you choose to view the digital
captioning.
•
Select one of the digital service channels made available by the
caption provider.
There are 6 standard services.
-
CS 1 is designated as the Primary Caption Service. This service
contains the verbatim, or near-verbatim captions for the primary
language being spoken in the accompanying program audio.
-
CS 2 is designated as the Secondary Language Service. This service
contains captions in a secondary language which are translations of
the captions in the primary Caption Service.
- The other service subchannels are not pre-assigned. It is up to the
discretion of the individual caption provider to utilize the remaining
service channels.
- This television provides display of television closed captioning
conforming with the EIA-608 standard and in accordance with
Sections 15.119 of the FCC rules.
- The captions do not always use correct spelling and grammar. Not
all TV programs and product commercials are made for broadcast
with Closed Caption informations included. Refer to your area’s TV
program listings for the TV channels and times of Closed Caption
shows. The captioned programs are usually noted in the TV listings
with service marks such as ‘CC’.
_________________________
6.4 Digital caption options
This allows you to modify how digital captions are displayed on your TV.
- Text
Select this option to select the text color or the opacity of the text
box of caption display according to your own preference.
•
Select a color and one of the opacity options.
- Background
Select this option to select the character background color or one
of the background opacity options of caption display according to
your own preference.
Select a color and one of the opacity options.
•
- Edge type
Allows you to select the edge type of caption display according to
your own preference.
Select a type.
•
- Edge color
Allows you to select the edge color of caption display according to
your own preference.
Select a color.
•
_________________________
6.5 Sleeptimer
This sets a time period after which the TV automatically turns to
standby.
1. Select Sleeptimer.
2. Press the cursor right.
3. Select a value with the cursor up/down. The list will have values from
0 to 180 minutes. You can always turn off your TV earlier or select
another time set.
ENGLISH
TV menu
Features
Closed captions
Caption service
Digital caption service
Digital caption options
Sleeptimer
Child lock
Set/Change PIN
On timer
Demo
Info
•
Select from the following options to change the visual
Digital caption options
Reset to default
Size
Style
Text color
Text opacity
Background color
Background opacity
Edge type
Edge color
characteristics of your TV’s digital captioning.
- Reset to default
Select this option to reset the digital caption options back to the
captions provider default settings.
•
Press the cursor right and press the
OK button to confirm.
- Size
Select this option to select the size of caption display according to
your own preference.
Select Default (Automatic), Small, Standard or Large.
•
_________________________
6.6 Child lock
With a 4-digit code, you are able to lock TV channels and external
sources to prevent children from watching certain programs.
1. Select Child lock.
TV menu
Features
Closed captions
Caption service
Digital caption service
Digital caption options
Sleeptimer
Child lock
Set/Change PIN
On timer
Demo
Info
2. Press the cursor right to enter the Child lock menu.
3. Enter your 4-digit code.
Child lock
Lock after
Channel lock
TV ratings lock
Movie ratings lock
- Style
Select this option to select the font style of caption display
according to your own preference.
Select Default, Monospaced serif, Serif, Monospaced sans
•
serif, Sans serif, Casual, Cursive or Small caps.
You have to re-enter your code each time you enter the Child
lock menu.
4. Select one of the menu items of the Child lock menu and press the
cursor right.
13
Page 18
_________________________
Age-based rating Content-based rating
6.6.1 Lock after
Lock after is only selectable if time and date are known. See
Chapter 7.6 - Set your Clock.
This allows you to prevent the viewing of the selected channel after
a selectable time delay. Locked channels can still be tuned, but the
picture is blanked and the audio is muted.
TV menu / Features
Child lock
Lock after
Channel lock
TV ratings lock
Movie ratings lock
Region ratings lock
Info
Lock after
Timer
Time
1. Press the cursor right and select Timer On or Off.
> When set to On this allows you to set the clock.
2. Select Time and press the cursor right.
> This allows you to set the time after which the lock is set.
3. Select
AM or PM to select the correct period of the day.
4. Enter the time with the digit or the cursor buttons.
_________________________
6.6.2 Channel lock
This allows you to completely lock a certain TV channel or external
source.
Select the channels or subchannels you want to lock.
•
All None
None None
TV-Y None)
TV-Y7 (FV) Fantasy Violence
TV-G None)
TV-PG (D) Dialog
(L) Language
(S) Sex
(V) Violence
TV-14 (D) Dialog
(L) Language
(S) Sex
(V) Violence
TV-MA (L) Language
(S) Sex
(V) Violence
When All has been selected, all items in the age-based and in the
contents-based lists are locked.
If, while All is selected, any other item, either an age-based or contentbased item, is unselected, then All is automatically unselected.
No rating is the selection for items that either have no rating
information or have a rating of None. Both will be locked.
When an item on the age-based list is selected, all items below that item
of the same group are locked as well.
When you select a content-based rating, all identical content-based
ratings in the older age-based categories are also selected.
You can lock/unlock any number of ratings on the list without reentering your code.
Each ratings item has a box-graphics in front of it to indicate whether or
not programs carrying that rating are currently locked.
_________________________
6.6.3 TV ratings lock
Your TV is equipped with a V-chip. This allows you to control access
to individual programs based on their movie and TV ratings. All
settings apply to all AV inputs, except HDMI. The program content
advisory data are sent by the broadcaster or program provider.
1. Select TV ratings lock with the cursor down.
TV menu / Features
Child lock
Lock after
Channel lock
TV ratings lock
Movie ratings lock
Region ratings lock
Info
TV ratings lock
All
None
TV-Y
TV-Y7
TV-G
TV-PG
TV-14
TV-MA
> A list appears, showing the age-based TV ratings and a
corresponding content-based ratings list.
2. Press the cursor right to enter the list.
3. Select an age-based TV rating with the cursor up/down, and enter, if
present, the list with content-based ratings with the cursor right, and
select one content-based rating.
4. Press
5. Select another content-based rating if you like and press
OK to activate/de-activate the selected rating.
OK again.
TV ratings
TV-Y appropriate for children of all ages with themes and elements
suitable for children aged 2-6
TV-Y7 programs designed for children age 7 and older
TV-Y7-FV programs include fantasy violence more intense than
other programs in the TV-Y7 category
TV-G programs suitable for all ages. These programs contain little
or no violence, no strong language and little or no sexual dialogue or
situations
TV-PG programs contain elements that some parents may find
unsuitable for younger children and which may need parental
guidance. The program may contain moderate violence, sexual
dialogue and/or situations and some strong language.
TV-14 programs contain elements that may not be suitable for
children under 14 years of age.
These programs include one or more of the following: intense
violence, intense sexual situations, suggestive dialogue and strong
language.
TV-MA programs are designed to be viewed by adults and may be
unsuitable for children under the age of 17. These programs may
contain graphic violence, explicit sexual activity and/or crude or
indecent language.
14
Page 19
_________________________
6.6.4 Movie ratings lock
This function allows you to control access to individual movies based on
their MPAA ratings (Motion Picture Association of America).
1. Select Movie ratings lock with the cursor down. A list appears,
showing all valid MPAA content ratings.
_________________________
6.6.5 Region ratings lock (if present)
This allows you to control access to individual programs based on their
broadcasted regional rating.
1. Select Region ratings lock with the cursor down.
> A list appears, showing all valid region ratings.
TV menu / Features
Child lock
Lock after
Channel lock
TV ratings lock
Movie ratings lock
Region ratings lock
Info
Movie ratings lock
All
NR
G
PG
PG-13
R
NC-17
X
2. Press the cursor right to enter the list.
3. Select a movie rating with the cursor up/down.
4. Press
OK to activate/de-activate the selected rating.
Each rating item has a box-graphic in front of it to indicate whether or
not programs carrying that rating are currently locked.
When All has been selected, all items on the movie ratings list become
selected. (All movies are locked.)
If, while All is selected, any other item is unselected, then All is
automatically unselected.
When any other item has been selected, all ratings below are selected as
well, thus all movies with those ratings will be locked.
Movie ratings
NR not rated
G movies with a mild content, suitable for all ages
PG movies for which parental guidance is recommended. They may
contain a few racy or violent scenes or maybe some bad language
PG-13 movies for which parental guidance may be recommended if
under age 13
R restricted. The movies usually contain offensive sex or bad language
and may be unsuitable for children under the age of 17. Parental
guidance or permission needed.
NC-17 even with parental permission, forbidden under age 17. More
offensive sex, violence or bad language.
X movies which generally focus on sex, violence and/or bad language.
Also known as pornography.
TV menu / Features
Childlock
Lock after
Channel lock
TV ratings lock
Movie ratings lock
Region ratings lock
Info
TV ratings lock
Please enter your PIN.
2. Press the cursor right to enter the list.
3. Select a region rating with the cursor up/down.
4. Press the
5. Select another region rating if you like and press
OK button to activate the selected rating.
OK again.
6. Press the cursor left to return to the Child lock menu.
_________________________
6.7 Set / Change PIN
This allows you to set or change the personal 4-digit access code that is
used in the different lock functions of the TV.
1. Select Set or Change PIN with the cursor down.
TV menu
Features
Closed captions
Caption service
Digital caption service
Digital caption options
Sleeptimer
Child lock
Set/Change PIN
On timer
Demo
Info
> If no PIN-code exists yet, the menu item is set to Set PIN.
Follow the instructions on screen.
> If a PIN-code has previously been entered, the menu item is set
to Change PIN. Follow the instructions on screen.
2. Enter your PIN with the digit buttons.
All number combinations from 0000 to 9999 are valid numbers.
3. The Menu preferences menu reappears with a message confirming
that the PIN has been created.
Set/Change PIN
Please enter yoru current
PIN.
ENGLISH
Important: you have forgotten your PIN !
1. Select Change PIN in the Features menu.
2. Press the cursor right to enter the overriding PIN code 0-7-1-1.
3. Enter a new personal 4-digit PIN code. The previous code is erased
an the new PIN-code is stored.
15
Page 20
________________________
6.8 On timer
From standby, this automatically turns the TV to the specified channel
number, at a specified time.
1. Select On timer.
2. Press the cursor right to enter the On timer menu.
3. Select Timer and press the cursor right.
4. Select On.
5. Select Channel and then the TV channel you want your TV to turn
to on a selected time and day
6. Select Day and then a day of the week or select Daily.
7. Select Time and enter the time with the digit buttons or with the
cursor up/down.
8. Press the
OK button to activate.
9. Press the cursor left to return to the Features menu or press the
MENU button to turn off the menu.
From now on, your TV will automatically turn to the selected
channel, on the selected day, at the selected time, until the On timer
function is turned off again.
!
Only one On timer can be set.
_________________________
7 How to search for and store TV channels
You will need this chapter only if you want to change the installation
settings.
_________________________
7.1 Installation menu
This menu will adjust settings related to the installation of the TV
channels.
1. Press the
> The main menu appears.
MENU button on the remote control.
________________________
6.9 Demo
This allows you to get an idea of the features that are part of the
television.
1. Select Demo.
TV menu
Features
......
Set/Change PIN
On timer
Demo
Info
2. Press the cursor right.
3. Select a desired demo.
4. Press the
OK button to start the demo.
> The selected demo is played once.
5. Press the red color button to stop the demo and to return to the
demo menu.
6. Press the red color button to exit the demo menu.
Demo
Perfect Pixel HD
Settings assistant
Active Control
Television
Multimedia
TV menu
Channel list
Program guide
USBdevice 1
2. Select TV menu and press the cursor right.
> The TV menu is moved to the left.
3. Select Installation and press the cursor right.
> The Installation menu is moved to the left panel.
TV menu
TV settings
Features
Installation
Software update
Info
Installation
Language
Channel installation
Preferences
Connections
......
4. Use the cursor up/down to select the Installation menu items.
5. Press the cursor right to enter the selected Installation menu item.
6. Use the cursor button to make a selection.
7. Press the
OK button to activate or to confirm.
8. Press the cursor left to return to the Installation menu or press the
MENU button to turn off the menu.-
_________________________
16
7.2 Select your language
This allows you to select your menu language out
of the list of the available languages.
TV menu
Installation
Language
Channel installation
Preferences
Connections
.........
Info
Language
English
Français
Español
Português
Page 21

_________________________
7.3 Store TV channels
After language is set correctly, you can now search for and store the TV
channels.
1. Select Channel installation and press the cursor right.
2. Select Autoprogram.
TV menu / Installation
Channel installation
Autoprogram
Installation update
Weak channel installat..
Installation mode
Channel edit
Info
3. Press the cursor right.
4. Press the
OK button.
5. Select Cable or Antenna in the Installation mode.
TV menu/Installation
Installation mode
Antenna
Cable
Previous
Next
> When Antenna is selected, the TV will detect antenna signals and
will search for antenna TV (NTSC and ATSC) channels available in
your local area.
> When Cable is selected, the TV will detect cable company
supplied signals and will search for cable TV (NTSC, ATSC, QAM
modulated) channels available in your area.
Make sure that registration with your cable TV provider and
connection of equipment are completed.
6. Press the green corresponding color button on the remote control
for ‘Next’.
All channels must be unlocked in order to autoprogram. If requested,
enter your PIN code to unlock all channels. See Chapter 6 Adjust
features menu settings.
7. Press the green corresponding color button on the remote control
for “Start” to start autoprogramming.
> The menu screen disappears and the progress of
autoprogramming is displayed.
The progress bar indicates the number of analog and digital TV
channels found.
> When Autoprogramming is complete, a message appears
confirming the completion and the TV switches to the first
installed TV channel.
8. Press the red color button to finish.
Don’t forget !
- When interrupted, the updated channel information is retained as well
as the not yet updated old channel information.
- Background autoprogramming occurs only when the TV is turned on.
- Channel information of an ATSC channel is updated only for the ATSC
channel currently tuned.
- Once you have searched for as well the available Antenna as well as the
Cable TV channels, they are stored in the memory.
Autoprogram
Start now
Please select your
installation mode.
Channel tuning
After the installation of the TV channels has been done, always make
a selection in the Installation menu, Installation mode between Antenna
or Cable whether you want to watch Antenna TV channels or Cable TV
channels.
!
If you make use of a signal splitter do not forget to put the switch in
the corresponding position.
Available channels:
- Cable (analog NTSC or digital QAM): max. from 1 to 135
- Terrestrial (analog NTSC or digital ATSC): max. from 2 to 69
If a tuned channel is not yet in the master channel map, the TV will
attempt to tune the channel and it will be added to the map.
If the channel is not acquired, a message will appear that the channel is
not available.
When you tune an audio-only digital subchannel, a display appears with
the message Audio only.
Subchannel selections
The new standards employed with digital broadcasting make it possible
to receive multiple program channels under a single major channel
number which can be selected by pressing the digit channel number
entry.
Digital Channel selection delay
Due to the tuning complexity of subchannel digital programming, the
time to select and view a digital channel may take slightly longer than
what the viewer is normally accustomed to (as compared to analog
channel programs).
Digital channel broadcasts contain program and system data information
that must be processed before the channel selection can be displayed.
_________________________
7.3.1 Installation update
This allows you to automatically tune to and update all available channels,
without altering the sorting of existing channels.
TV menu / Installation
Channel installation
Autoprogram
Installation update
Weak channel installat..
Installation mode
Channel edit
Info
Installation update
Start now
- New channels found will not be added to any favorite list.
- Already installed channels will not be renumbered.
_______________________
7.3.2 Weak channel installation
This allows you to manually tune weak ATSC channels in order to adjust
the antenna and thus optimize signal quality for that channel. This only
available for TV channels installed via an antenna connection.
1. Select a channel in the displayed list of TV channels (in the antenna
mode).
2. The signal strength is displayed and updated continuously as you
rotate the antenna.
ENGLISH
17
Page 22
_________________________
_________________________
7.3.3 Installation mode
This allows you to select the already stored terrestrial or cable TV
channels. Choose for Antenna or Cable whether these signals are
present.
_________________________
7.3.4 Channel edit
This allows you to rename, to reshuffle and to uninstall or reinstall the
stored channels.
< Press the corresponding color button and follow the on screen
instructions.
TV menu / Installation
Channel installation
Autoprogram
Installation update
Weak channel installat..
Installation mode
Channel edit
Info
Channel edit
0
1
2
3
4
......
_________________________
7.3.4.1 Rename
This allows you to change the name stored in the memory or to assign a
name to a channel for which a name has not yet been entered.
1. Select the channel you want to rename.
2. Press the red color button on your remote control.
3. Select the characters with the cursor up/down. Select the following
position with the cursor right.
4. Press the green color button or the
OK button when finished.
7.4 Set your preferences
This menu contains items that can set or adjust various special TV
functions and that will typically be accessed only occasionally.
TV menu
Installation
Language
Channel installation
Preferences
Connections
Clock
Reset AV settings
Info
_________________________
7.4.1 Select your location
This allows you to select the location of your TV.
If you choose for Retail shop it will result in fixed settings of picture
and sound.
The location Home will give full flexibility to change any predefined
settings for picture and sound.
_________________________
7.4.2 Select the volume bar
This allows you to select the display of the volume bar.
1. Select Volume bar.
2. Press the cursor right to select On or Off.
Select On to activate the temporarily display of the volume bar.
_________________________
Preferences
Location
Volume bar
Show emergency alerts
Downloaded rating table
- Press the yellow color button to delete all characters. The cursor
is positioned at the beginning again;
- Press the blue color button to delete the character the cursor is
positioned. Enter a new character with the cursor up/down;
- A name can be given to the channel numbers 0 to 999;
- Space, numbers and other special characters are located between Z
and A.
5. Select another channel number and repeat steps 2 to 5.
_________________________
7.3.4.2 Uninstall - reinstall
This allows you to uninstall a stored channel so that it is no longer
possible to tune to. This also allows you to reinstall an earlier uninstalled
channel.
1. Select the channel you want to uninstall.
2. Press the green color button to uninstall the selected channel.
> The uninstalled channel is indicated in the list by an icon in front
of the uninstalled channel.
3. Press the green color button again to reinstall the uninstalled channel.
Uninstalled channels are not reinstalled during an installation update.
7.4.3 Show emergency alerts (EAS)
This allows you to select the alert priority level of the information
disseminated by the cable operator. The standard SCTE18 defines an
Emergency Alert signalling method for use by cable TV systems to signal
emergencies to digital devices such as digital Cable boxes, digital TVs and
digital VCRs.
The Emergency alert signalling scheme defined in the standard allows a
cable operator to disseminate emergency alert information related to
state and local-level emergencies and warnings in a cost-effective and
efficient way, while minimizing disruption of programming.
An Emergency alert message will have one of the following priorities:
Low, Medium, High or Maximum.
The Emergency alert message with priority High or Maximum will always
be presented. Low or Medium will be present or ignored depending on
the selected setting.
!
When the TV clock is undefined (See Chapter 7.6 Set your clock),
the Emergency Alert will be ignored.
The Emergency Alert message display will contain following information:
- The Emergency Alert text
- The start time + date
- The end time + date.
1. Select Show emergency alerts in the Preferences menu.
2. Press the cursor right and select one of the Emergency alerts
options:
- Always, when you always want the Emergency alert messages to
be displayed when available;
- Skip low priority, when you want the messages with low level to
be ignored;
- Skip low/medium priority, when you only want the messages
with high priority to be displayed.
18
Page 23
- Emergency Alert Signalling is not possible:
- with multimedia browser;
- with analog video sources.
- You always have the possibility to remove the message from the
screen.
- The message display will overlap whatever menu element or other
message is on the screen.
_________________________
7.4.4 Downloaded rating table
This allows you to add region ratings lock options next to your current
ones.
TV menu / Installation
Preferences
Location
Volume bar
Show emergency alerts
Downloaded rating table
Info
!
Before activating, please ensure regional ratings are broadcasted.
Downloaded rating table
Off
On
_________________________
7.5 Select your connections
This allows you to identify the type of accessory device you have
connected to each particular input and output.
1. Select Connections.
Menu TV
Installation
Language
Channel installation
Preferences
Connections
Clock
Reset AV settings
Info
2. Press the cursor right to enter the list of types of external inputs.
3. Select the appropriate input with the cursor up/down.
> When you select
Side,
AUDIO IN L/R or DIGITAL AUDIO IN a list appears
allowing you to identify which type of accessory device is
attached to this input.
4. Press the cursor right again to enter the list of types of devices
connected to the selected input.
5. Select the accessory device with the cursor up/down.
Digital Audio In
If an accessory device has a digital audio output, you can connect this
with a single cable to the TV’s
In the Connections menu, assign the
corresponding external input to which your accessory device is
connected.
Connections
AV1
AV2
AV3
HDMI 1
HDMI 2
HDMI 3
Side
AUDIO IN L/R
DIGITAL AUDIO IN
AV1, AV2, AV3, HDMI 1, HDMI 2, HDMI 3,
DIGITAL AUDIO IN jack.
DIGITAL AUDIO IN to the
In addition to accepting audio input via Digital Audio In, the TV can
output encoded Dolby Digital audio via the
DIGITAL AUDIO OUT
connector to an external amplifier or receiver.
If your amplifier or receiver has a matching connector for Digital Audio
In, you can connect it with a single cable to the TV’s digital audio out.
See Chapter 10.2 To make Video and Audio connections, Home
theater amplifier.
_________________________
7.6 Set your clock
This allows you to set the time and day.
Adjusting the clock is necessary for the correct working of Lock
after (See Chapter 6 Adjust feature menu settings) features.
TV menu
Installation
Language
Channel installation
Preferences
Connections
Clock
Reset AV settings
Info
_________________________
7.6.1 Auto clock mode
1. Select Clock in the Installation menu.
2. Press the cursor right to select the Auto clock mode.
3. Press the cursor right to instruct the TV to get the time
automatically or manually.
Most of the TV channels are not transmitting clock information.
There are few cable channels but they are at the end of the channel ring.
There is no clock transmission in antenna channels. In such cases either
clock extraction is taking a long time or there is no clock.
_________________________
7.6.2 Auto clock channel (only available when Auto clock mode is set
to Automatic)
With the cursor buttons, select the channel number on which time
can be found by the TV. Typically time can be found on PBS (Public
Broadcasting System) as well as some other channels.
_________________________
7.6.3 Time - Day (only available when Auto clock mode is set to
Manual)
With the cursor buttons, select and enter the correct time and day.
If Auto clock mode Manual has been selected, and no clock search
has been done, the system will keep the entered time and day.
_________________________
7.6.4 Time zone (only available when Auto clock mode is set to
Automatic)
This function allows you to select your local time zone. Broadcasted time
information will correct the clock display for your local time.
1. Select Time zone with the cursor down.
2. Press the cursor right to select your local time zone.
_________________________
Clock
Auto clock mode
Auto clock channel
Time
Day
Time zone
Daylight saving
ENGLISH
19
Page 24
7.6.5 Daylight saving (only available when Auto clock mode is set to
Automatic)
Daylight saving time is automatically set by specially broadcasted signals.
This menu item allows you to disable the automatic setting of daylight
saving time. This is useful if you live in an area or state where daylight
saving is not applied, but you receive channels from other areas where
daylight saving signals are broadcasted.
1. Select Daylight saving with the cursor down.
2. Press the cursor right to select Automatic for automatic clock
correction for daylight saving time, based on specially broadcasted
signals.
3. Select Off to disable automatic clock correction based on the
specially broadcasted signals.
Changes in Clock settings are only activated after turning the set off
and on again.
_________________________
7.7 Reset AV settings
This allows you to reset most of the predefined factory states.
1. Select Reset AV settings with the cursor down.
TV menu
Installation
Language
Channel installation
Preferences
Connections
Clock
Reset AV settings
Info
Reset AV settings
Reset
8 Create your favorite list
This allows you to select up to four favorite channels lists with your
preferred TV channels.
For example, each member of your family can create his/her own favorite
list.
When the OK button is pressed the first time after you have finished
the installation, it will bring up the full channel list. In other situations it
will bring up the last selected channel list.
All channels
AV1
AV2
HDMI
1 Analog channel 1
2 Digital channel 1
3 Digital channel 2
4 ...........
Select list
Info
_________________________
2. Press the cursor right.
3. Press the
OK button to erase settings and reset them to their default
values.-
_________________________
8.1 To select a channel from the displayed favorite
list
1. Press the OK button.
> The last selected channel list appears.
2. Use the cursor up/down to select a channel.
3. Press the
OK button to display the selected channel.
_________________________
8.2 To select another favorite channel list
1. Press the OK button.
> The last selected channel list appears.
All channels
AV1
AV2
All
HDMI
Favorites 1
1 Analog channel
Favorites 2
Favorites 3
Favorites 4
Select list
Info
2. Press the red color button to bring up the list of possible favorite
channel lists.
3. Use the cursor up/down to select a list.
4 Press the
5. Press the
OK button.
OK button again to exit.
20
Page 25
_________________________
________________________
8.3 To create or modify a favorite list
1. Press the OK button.
> The last selected channel list appears.
2. Press the red color button.
> A list with all possible favorite channel lists appears.
3. Use the cursor up/down to select a Favorites (1 to 4) channel list.
4. Press the
5. Press the green color button to enter the Edit mode.
> The selected Favorite list will bring up a full channel list.
Favorites 1
Info
6. Use the cursor up/down to select a channel.
7. Press the OK button to check or uncheck the highlighted channel
and to add it to or remove it from your selected favorite list.
8. Press the green color button again to leave the Edit mode.
> The modified favorite channel list appears.
•
> With the
9. Press the red color button to remove the channel list.
With the numeric buttons you can still select channels which are not
marked as favorite.
_________________________
OK button.
Side None
1 .....
15 .....
18 .....
25 .....
..... .....
Select list Edit list
Press the
OK button again to exit.
–CH+ button you will be able to browse through the
TV channels of the selected list.
9 Multimedia browser
The Multimedia browser lets you display pictures or play audio files
stored on a USB device. The Multimedia browser application is invoked
from the main menu.
1. Press the
Television
Multimedia
2. Select Multimedia and press the cursor right.
3. Select the USB device inserted into the USB connector at the side of
the TV.
4. Press the cursor right and select a content type.
- Following file formats can be reproduced:
for pictures: JPEG
for audio: MP3, LPCM
- Only FAT/DOS-formatted memory devices are supported.
- Magnavox can not be held responsible if your USB device is not
supported.
_________________________
9.1 To view content from a USB device
If your USB device does not fit into the USB connector at the side,
use an USB extend cable (max. 2 m) to connect the USB device to the
USB port. Ask your dealer for more information.
_________________________
9.1.1 To insert a USB device
USB devices are not supplied with this TV.
lnsert a USB device to the USB connector at the side of the TV.
When a USB device is inserted, the Multimedia browser menu is
displayed automatically. See further.
MENU button on the remote control.
TV menu
Channel list
Program guide
USBdevice 1
ENGLISH
_________________________
9.1.2 To remove the USB device
1. Press the
MENU button on the remote control to turn off the main
menu.
2. Remove the USB device.
21
Page 26
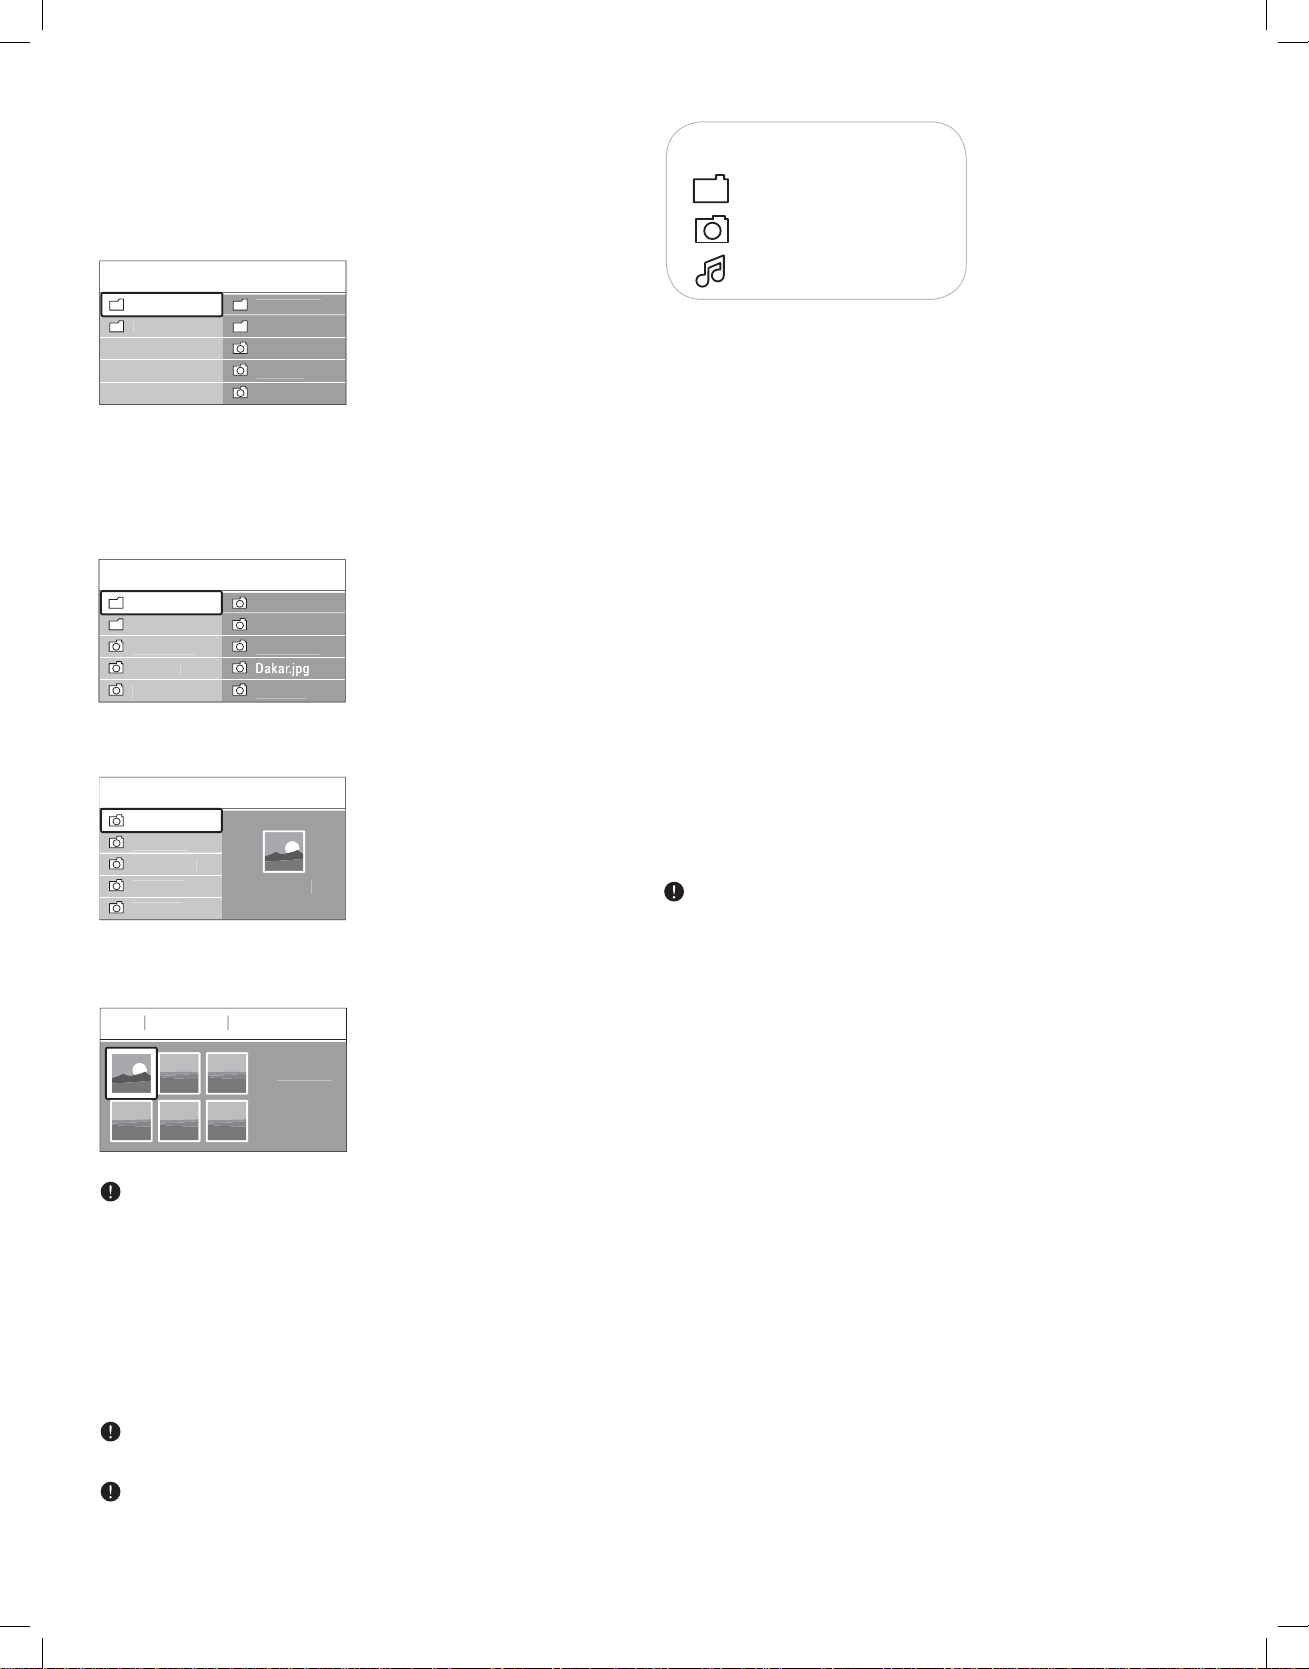
_________________________
B
e
1
6
jpg
jpg
jpg
c
e
jpg
jpg
e
1
jpg
jpg
jpg
jpg
5
jpg
1
1
1
jpg
jpg
jpg
jpg
jpg
jpg
jpg
jpg
9.2 Multimedia Browser menu
1. Insert a USB device.
2. Select the USB device under Multimedia with the cursor up/down.
Following icons may appear:
folder
pictures
US
Pictur
Musi
Pictur
Afrika_200
Paris_200
My_car.
Jean.
Mary.
> The Multimedia browser allows you to browse content stored on
the inserted USB device.
> The 2-panel browser will be shown with the left panel containing
the content types (Pictures, Music).
> The right panel will display the content that is available of the
selected content type.
Pictur
Afrika_200
Paris_200
My_car.
Jean.
Mary.
Afrika_200
Kenya.
Congo.
Victoria.
Cairo.
3. Press the cursor right to enter the content.
4. Press the cursor up/down to select a content.
Afrika_200
Kenya.
Congo.
Victoria.
Dakar.
Cairo.
Afrika_200
Kenya.
music
Function buttons at the bottom of the screen
Details
to display a description of the selected file or directory
Transitions
to select if you like to apply a transition during a slide show
Slide time
to select the duration a picture will be displayed in a slide show
Rotate
to rotate a picture
Repeat one/all
to repeat the playback of a music file
Shuffle
to shuffle music collections in a random way
Zoom
to select one of the zoom magnifications (x1, x2, x4) with the cursor
up/down.
Additionally you can shift the selected zoom window over the screen
with the cursor buttons
To rotate a picture or to select one of the zoom magnifications, first
stop the slide show with the
OK button or the blue color button.
5. Press the cursor right to enter the content.
6. Press the cursor up/down to select a file or a directory.
USBAfrika_2001Kenya.
Kenya.
Press the green color button to display all the image files in the
current directory as thumbnails when browsing pictures. Press the green
button again to display the image files in a list.
7. In case a file, directory, album or playlist is selected, press the
cursor right to enter the content or press the
OK button to start a
slide show or a loop playback of the files present.
8. Press the cursor left to keep music playing and switch back to the
Multimedia menu.
9. Press one of the color buttons on the remote control to perform
the corresponding function mentioned at the bottom of the screen.
The blue color button can, if necessary, be used to let the color
buttons reappear.
The playback will continue to play even if temporarily switched to
browser screens. The audio will be stopped when another song starts
playing, or when the end has been reached.
22
Page 27
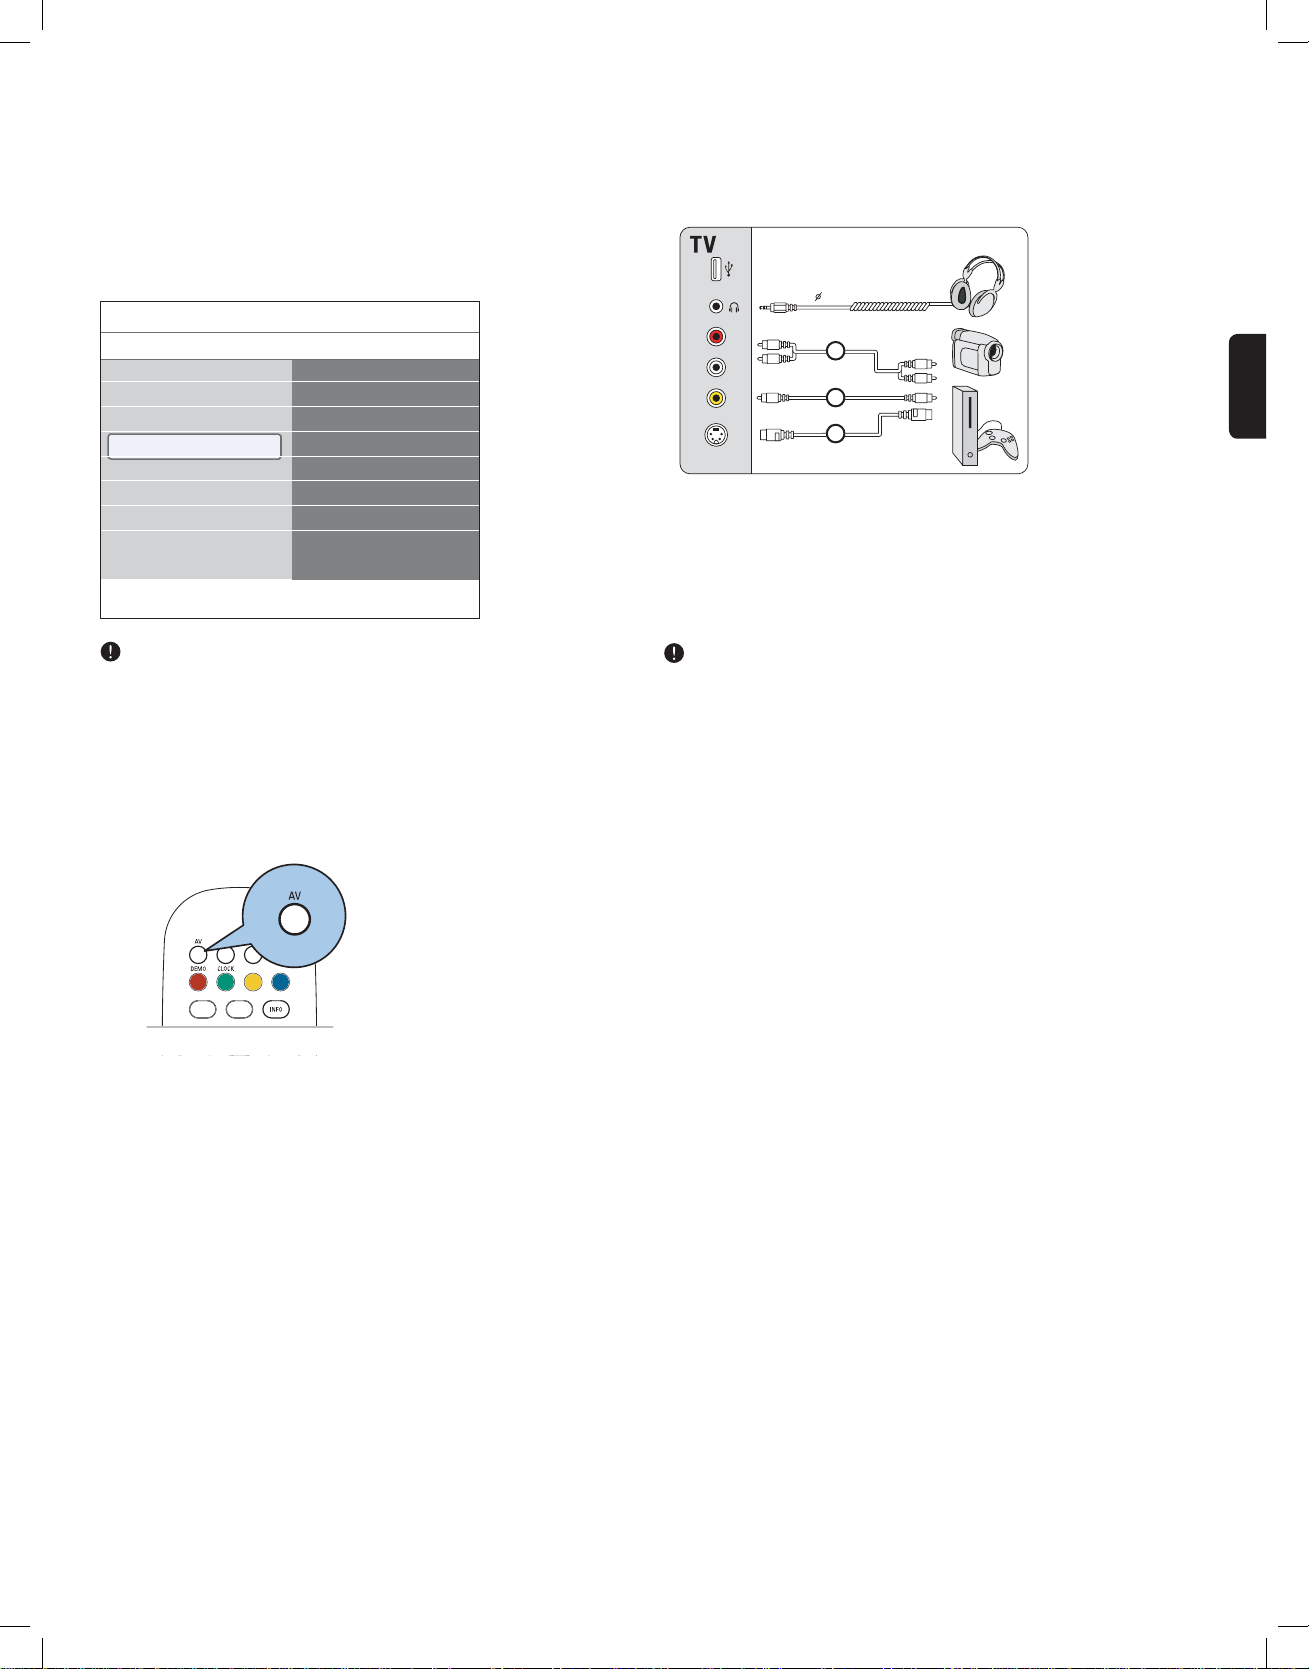
_________________________
VIDEO
S VIDEO
AUDIO
L
R
BSU
3.5 mm
S VIDEO
AUDIO L /R
AUDIO L /R
VIDEO
S VIDEO
VIDEO
2
1a
1b
10 How to connect and operate accessory
devices
1. Connect your accessory AV device. See following pages.
2. Link your devices to the connections in the Installation menu. See
Chapter 7.5 Select your connections.
TV menu
Installation
Language
Channel installation
Preferences
Connections
Clock
Reset AV settings
Info
Connections
AV1
AV2
AV3
HDMI 1
HDMI 2
HDMI 3
Side
AUDIO IN L/R
DIGITAL AUDIO IN
_________________________
10.1 Side panel overview
ENGLISH
_____________________
10.2.1 Camera, Camcorder, Game, PC
Do not connect cable 1a and 1b at the same time. This may cause
picture distortion !
In case of Digital audio connection also link the DIGITAL AUDIO
to the corresponding input.
IN
In case of Analog audio connection (via Component Video Output
(YPbPr) on
AV3 or via HDMI), also link the AUDIO IN L/R to the
corresponding input.
3. To operate the desired connected device:
- Turn on your connected device.
- Press the
AV button on the remote control.
- Select your source with the cursor up/down.
- Press the
OK button.
Caution
Before connecting a PC, set the PC monitor refresh rate to 60Hz.
_________________________
10.2.2 Headphone
Select Headphone volume in the Sound menu to adjust the headphone
volume. See Chapter 5.2.3 Adjust sound menu settings.
1. Press
MUTE on the remote control to turn off the internal
loudspeakers of the TV.
_________________________
10.2.3 USB
See Chapter 9 Multimedia browser.
23
Page 28
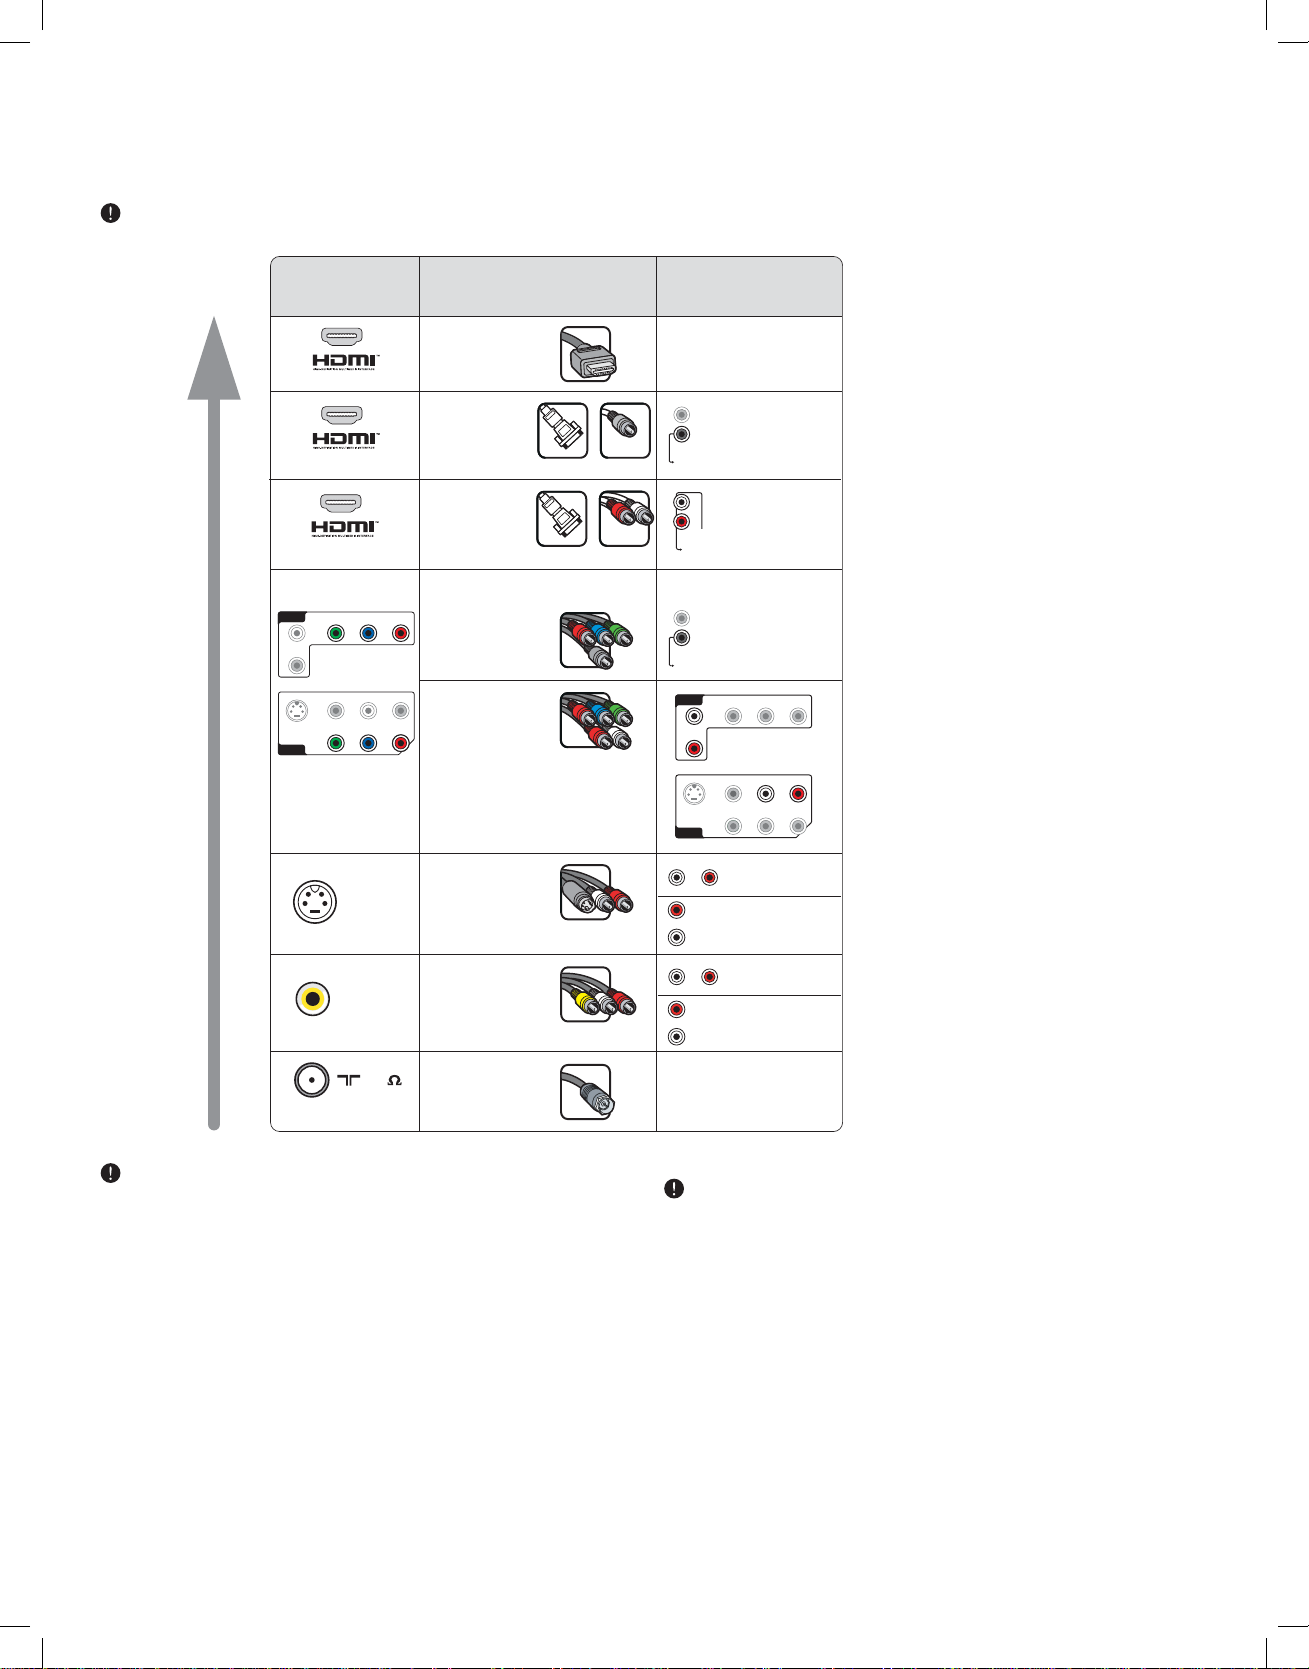
________________________
10.2 To make video and audio connections
Use the inputs that are available on your device that provide the best
video or audio performance, as below.
BEST
BEST
CONNECTOR CABLE AUDIO CONNECTION
PERFORMANCE
HDMI
(High-definition
Multimedia
Interface)
DVI to HDMI
(High-definition
Multimedia
Interface)
DVI to HDMI
(High-definition
Multimedia
Interface)
Component video
AUDIOLR
(480p,720p,480i,1080i)
- for digital audio
- for analog audio
S VIDEOS VIDEO
(AV1, Side)
AV 3
L
AUDIO
R
S VIDEO
AV 1
YPbPr
VIDEO
Y
Pb Pr
VIDEO VIDEO
75
RF/Coaxial
(AV1, AV3)
(AV1, AV3)
REQUIRED
No
DISPLAY
SYNC.
OUT
IN
DIGITAL
AUDIO
AV 1
HDMI 1
+
AV 2
HDMI 2
HDMI 3
AV 3
L
R
ANALOG
AUDIO IN
HDMI 1
+
HDMI 2
HDMI 3
DISPLAY
SYNC.
OUT
IN
DIGITAL
AUDIO
AV 1
HDMI 1
+
AV 2
HDMI 2
AV 3
AV 3
L
AUDIO
R
S VIDEO
AV 1
AUDIOLR
R
AUDIO
L
AUDIOLR
R
AUDIO
L
No
DIGITAL
AUDIO
IN
ANALOG
AUDIO
IN
DIGITAL
AUDIO
IN
YPbPr
VIDEO
AUDIOLR
Y
Pb Pr
AV1
Side
AV1
Side
- If you experience a discolored line on the left or right side of the
set, adjust the picture position to the center of the screen with the
cursor buttons.
- Cables are often color-coded to connectors. Connect red to red,
white to white....
- Component video (YPbPr) connection is necessary to view video
sources, for example digital broadcastings coming from a settop
box, in 1080i, 1080p, 720p, 480i or 480p;
- The labels for the component video sockets may differ depending
on the DVD player or the device connected. Although the
abbreviations may vary, the letters B and R stand for the blue and
red component signals, respectively, and Y indicates the luminance
signal. Refer to the DVD player’s or devices instructions for use for
definitions and connection details;
- This television is designed to accept high definition signal standards
480p, 720p, 1080p and 1080i as specified by the Electronic
Industries Association standard EIA770.3. Digital devices from
different manufacturers have the possibility of differing output
standards which may cause difficulties for the television to properly
display.
24
DVI to HDMI
- Your TV comes with all types of connectors with the exception of the
DVI connector but some of your equipment may be equipped with this
type. In this case you'll need a DVI to HDMI adapter or a HDMI to DVI
cable and separate audio cables, all available at your local dealer.
- Be sure to connect the DVI output connector first, then connect to the
HDMI input on your TV.
Page 29
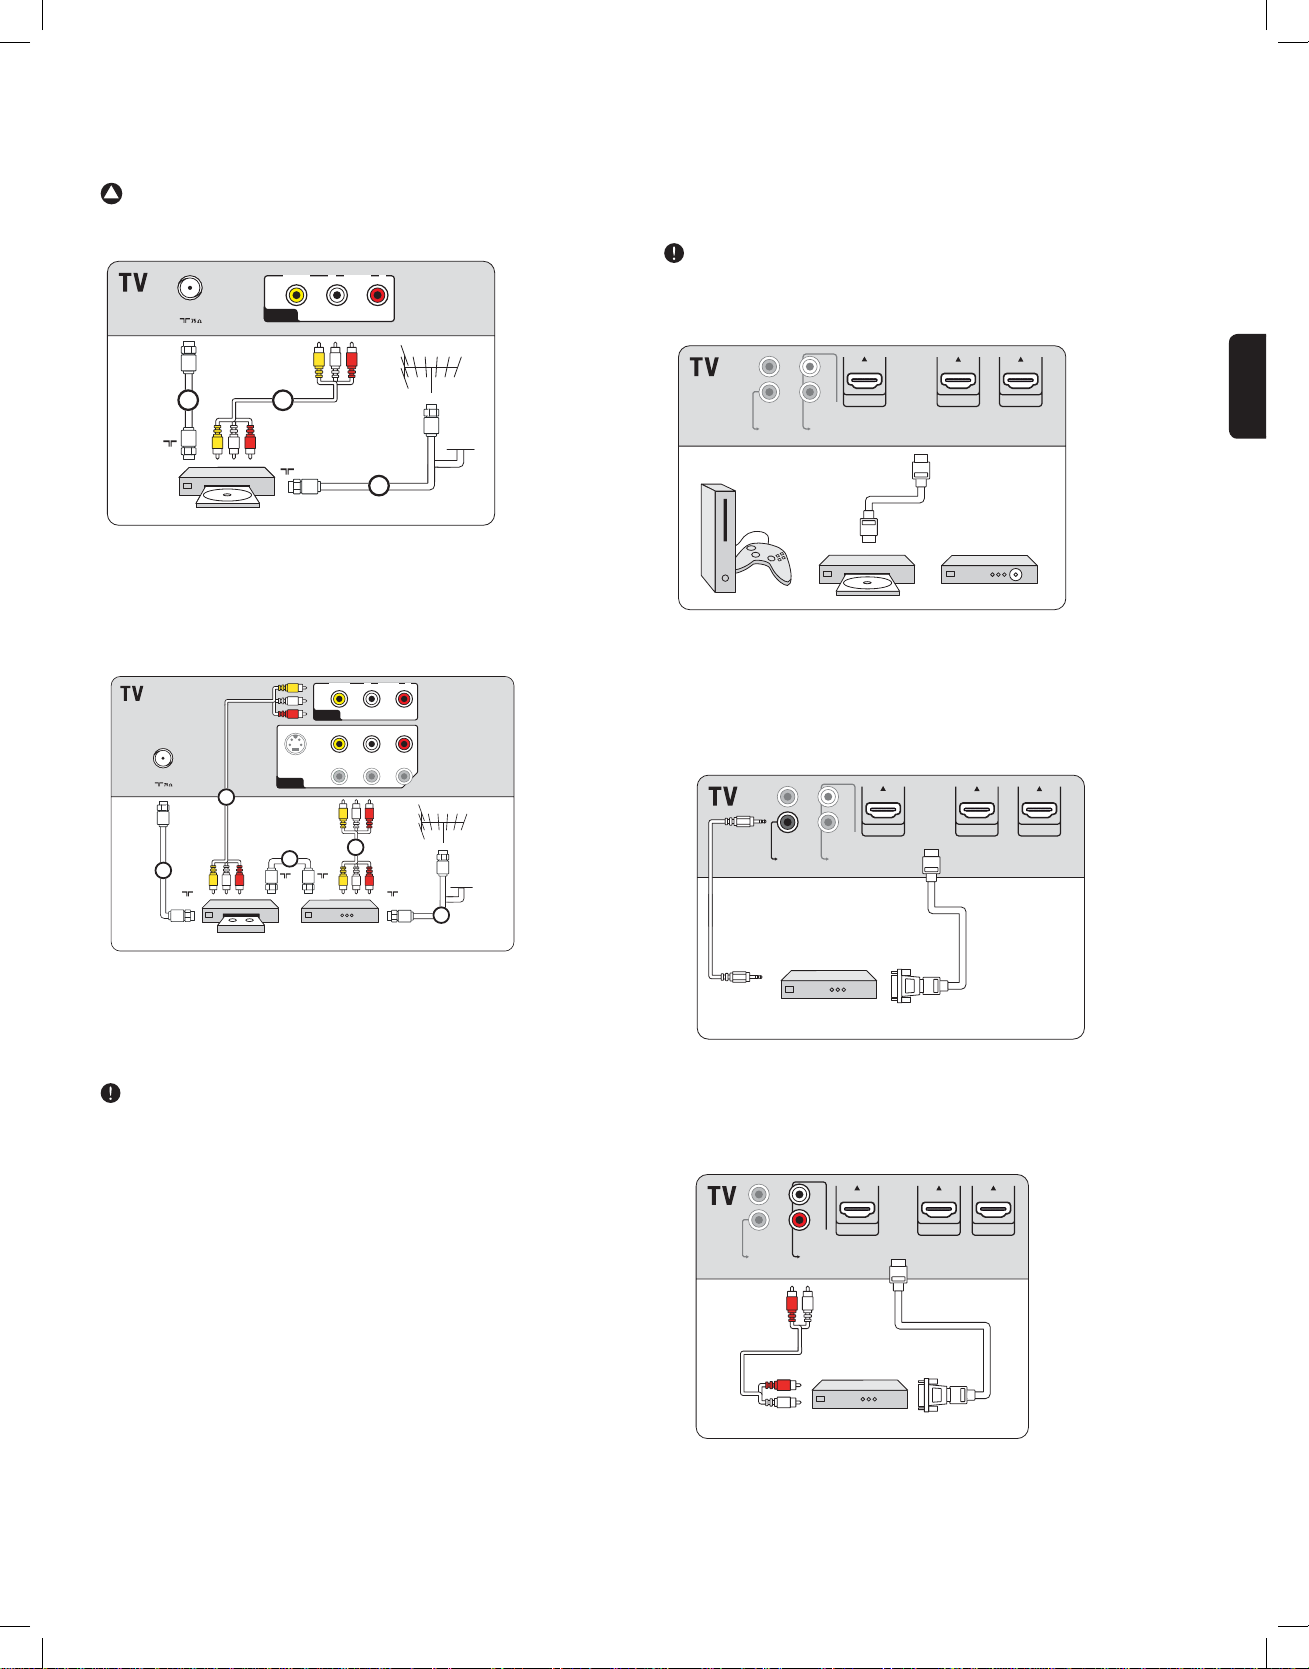
_________________________
ANTENNA
VIDEO L RAUDIO
AV 2
RF IN
RF OUT
CABLE
RECORDER
1
2
3
AV2
L + R + VIDEO
RECORDER
ANTENNA
VIDEO
Y
S VIDEO
AUDIOLR
Pb Pr
VIDEO L RAUDIO
AV 1
AV 2
OUTIN
RF OUT RF IN
CABLE
1
2
3
4
AV1
L + R + VIDEO
5
AV2
L + R + VIDEO
RF RF
HDMI 1 HDMI 2 HDMI 3
ANALOG
AUDIO IN
OUT
IN
DIGITAL
AUDIO
L
R
HDMI 1
HDMI 2
AV 1
AV 2
AV 3
HDMI 1
HDMI 2
DISPLAY
SYNC.
++
DVI
HDMI
DIGITAL
AUDIO
IN
DIGITAL
AUDIO
OUT
ANALOG
AUDIO IN
OUT
IN
DIGITAL
AUDIO
L
R
HDMI 1
HDMI 2
AV 1
AV 2
AV 3
HDMI 1
HDMI 2
DISPLAY
SYNC.
+ +
HDMI 1 HDMI 2 HDMI 3
ANALOG HDMI
AUDIO IN
DVI
HDMI 1 HDMI 2 HDMI 3
ANALOG
AUDIO IN
OUT
IN
DIGITAL
AUDIO
L
R
HDMI 1
HDMI 2
AV 1
AV 2
AV 3
HDMI 1
HDMI 2
DISPLAY
SYNC.
+ +
10.3 Connect a recorder (VCR / DVD-R)
!
Do not place your recorder too close to the screen as some
recorders may be susceptible for signals.
________________________
_______________________
10.5 Connect a DVD player/DVD recorder, Set
top box, game console,... with a HDMI (High
Definition Multimedia Interface) connector
HDMI is the leading new standard for Digital Video and audio
interconnection.
Sound and picture interruptions ? See Chapter 11 Problems.
ENGLISH
10.4 Connect a recorder (VCR / DVD-R)
and a second A/V device
If your recorder has an S-VHS video jack: for improved picture quality,
connect a S-Video cable with the
cables to the
AUDIO L and R input jacks of AV1.
When using the S-VIDEO connector do not connect any
device to the
AV1 video jack.
In case of mono equipment, only the left loudspeaker reproduces sound.
Use a mono to stereo adapter (not supplied) for sound reproduction via
all internal loudspeakers.
S-VIDEO input and connect the audio
_________________________
10.6 Connect a DVD player/DVD recorder, Set top
box, game console,... with a DVI connector
10.6.1 With DIGITAL AUDIO OUT
10.6.2 With ANALOG AUDIO OUT
25
Page 30
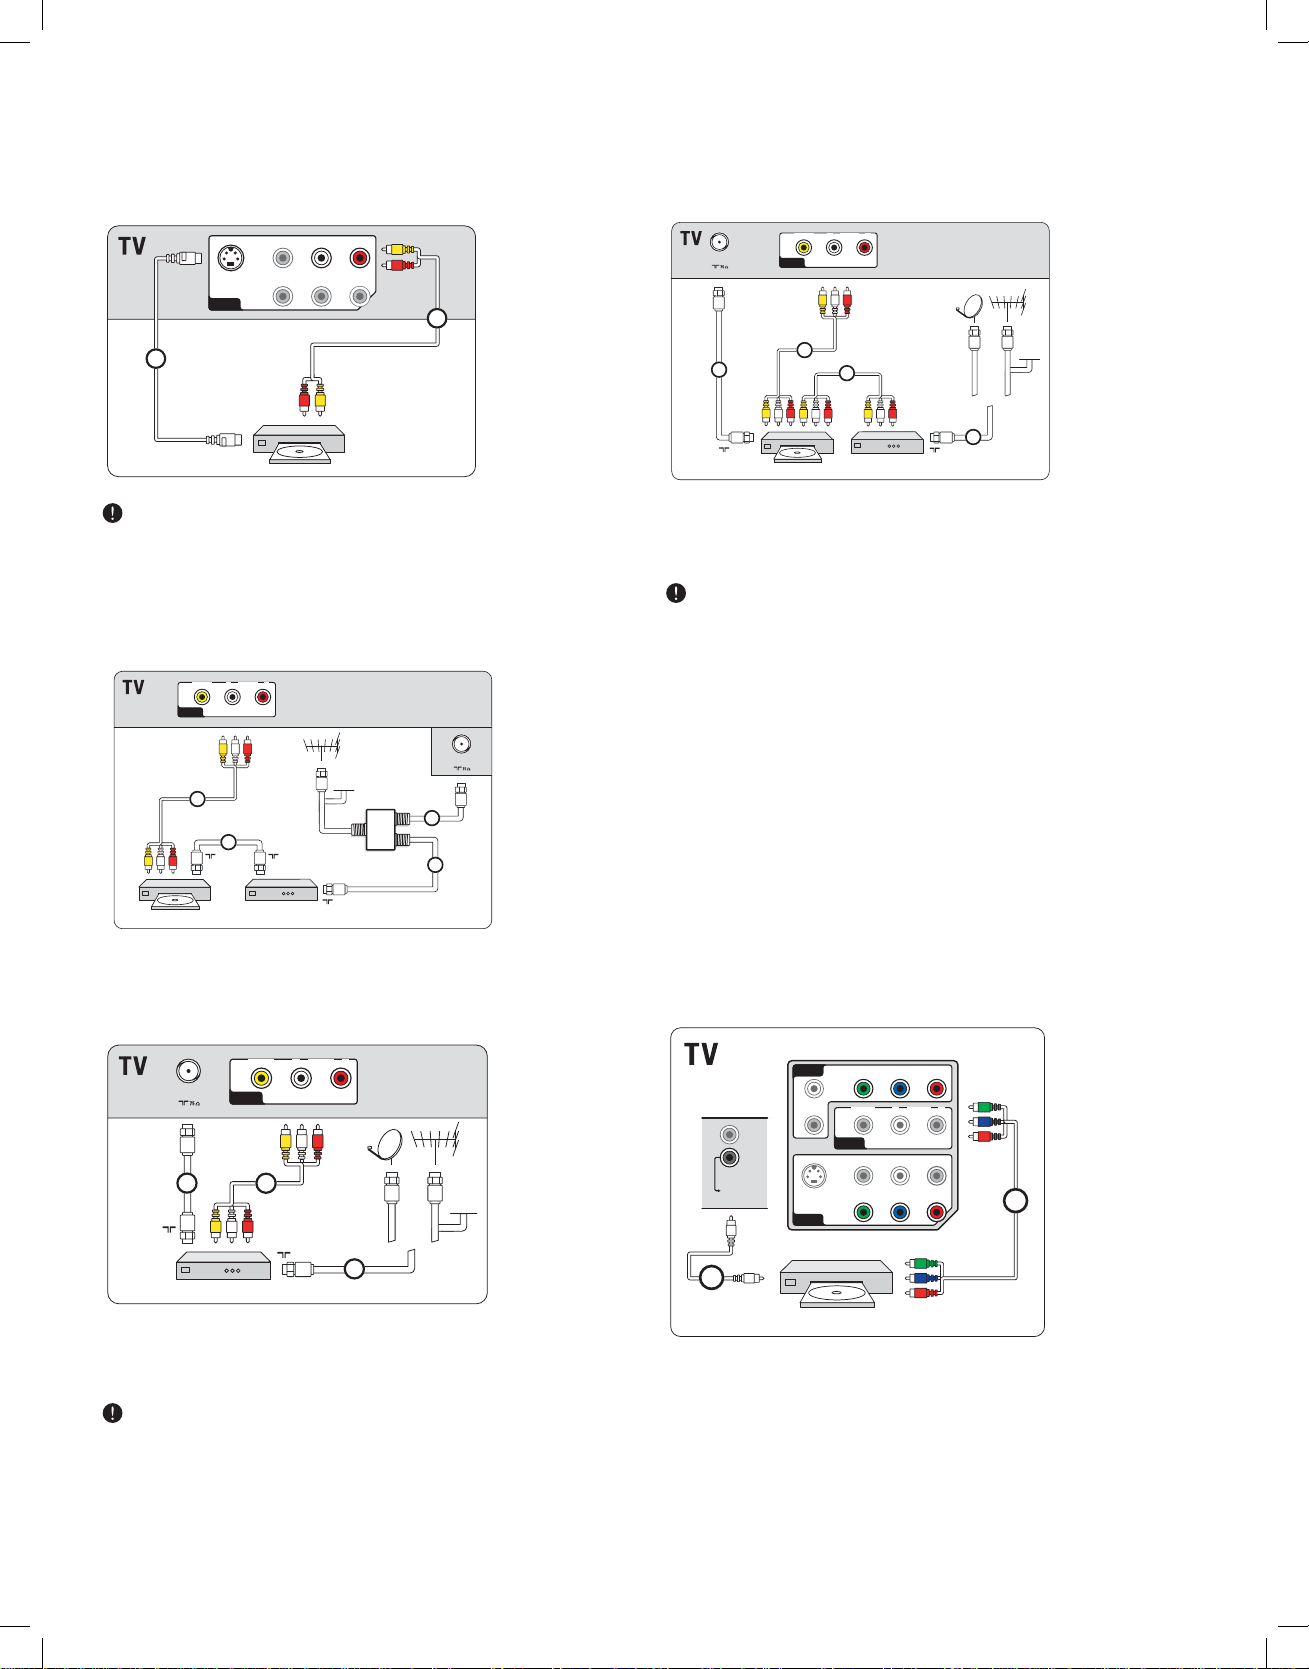
________________________
2
S VIDEO
1
AV1 : L + R
VIDEO
Y
S VIDEO
AUDIOLR
Pb Pr
AV 1
DIGITAL
AUDIO
IN
YPbPr
AV1 / AV3 :
DVD / Set top box
1
2a
OUT
IN
DIGITAL
AUDIO
AV 1
AV 2
AV 3
HDMI 1
HDMI 2
DISPLAY
SYNC.
+
L
R
AUDIO
YPbPr
VIDEO
Y
S VIDEO
AUDIOLR
Pb Pr
VIDEO L RAUDIO
AV 3
AV 1
AV 2
OUT
Set top box
CABLE
RF IN
2
RECORDER
4
AV2
L + R + VIDEO
SIGNAL
SPLITTER
OUTIN
3
RF RF
1
ANTENNA
VIDEO L RAUDIO
AV 2
ANTENNA
VIDEO L RAUDIO
AV 2
CABLE
RF IN
RF OUT
SAT / REC / Set top box
1
2
3
AV2
L + R + VIDEO
OUTOUT IN
RF OUT
2
4
SAT / Set top box
CABLE
RF IN
1
RECORDER
3
AV2
L + R + VIDEO
ANTENNA
VIDEO L RAUDIO
AV 2
________________________
10.7 Connect a DVD player
with a S-VIDEO connector
When using the S-VIDEO connector, do not connect any device to
the
AV VIDEO input that you are using.
________________________
10.8 Connect a recorder and Set top box
with RF output
10.10 Connect a satellite receiver or Set top box
and a recorder with A/V outputs
If your device has an S-VHS video jack: For improved picture quality,
connect a S-video cable with the
the audio cables to the
AUDIO L and R input jacks of AV1.
When using the S-VIDEO connector do not connect any device to
the
AV1 video jack.
In case of mono equipment, only the left loudspeaker reproduces sound.
Use a mono to stereo adapter (not supplied) for sound reproduction via
all internal loudspeakers.
________________________
S-VIDEO input of AV1 and connect
________________________
10.9 Connect a satellite receiver or Set top box
with A/V outputs
If your device has an S-VHS video jack: For improved picture quality,
connect a S-video cable with the
the audio cables to the
When using the S-VIDEO connector do not connect any device to
the
In case of mono equipment, only the left loudspeaker reproduces sound.
Use a mono to stereo adapter (not supplied) for sound reproduction via
all internal loudspeakers.
26
AV1 video jack.
AUDIO L and R input jacks of AV1.
S-VIDEO input of AV1 and connect
10.11 Connect digital source devices with
Component Video Output connectors
(YPbPr)
This TV is capable of displaying 1080i, 1080p, 720p and 480p DTV signals
when connected to a DTV tuner cable box. Select the output of the
cable box to either 1080i, 1080p, 720p or 480p. A DTV signal must be
available in your area.
________________________
10.11.1 With
DIGITAL AUDIO
Page 31

_______________________
DVD / Set top box
YPbPr
AV1 / AV3 :
1
AUDIO L + R
AV1 / AV3 :
2b
L
R
AUDIO
YPbPr
VIDEO
Y
S VIDEO
AUDIOLR
Pb Pr
VIDEO L RAUDIO
AV 3
AV 1
AV 2
HDMI 1
AUDIO OUT
L
R
ANALOG
AUDIO IN
OUT
IN
DIGITAL
AUDIO
L
R
DISPLAY SYNCHRONIZED
HDMI 1
HDMI 2
AV 1
AV 2
AV 3
HDMI 1
HDMI 2
DISPLAY
SYNC.
HDMI 2
++
DIGITAL
AUDIO
IN
DIGITAL
AUDIO
OUT
HDMI 1
AUDIO OUT
L
R
ANALOG
AUDIO IN
OUT
IN
DIGITAL
AUDIO
L
R
DISPLAY SYNCHRONIZED
HDMI 1
HDMI 2
AV 1
AV 2
AV 3
HDMI 1
HDMI 2
DISPLAY
SYNC.
HDMI 2
++
L
AUDIO OUT
L/R
/R
VIDEO
S VIDEO
AUDIO
L
R
BSU
S VIDEO
AUDIO L /R
AUDIO L /R
S VIDEO
2
S VIDEO
1
AV1 : L + R
VIDEO
Y
S VIDEO
AUDIOLR
Pb Pr
AV 1
DIGITAL
AUDIO
IN
DIGITAL
AUDIO
OUT
ANALOG
AUDIO IN
OUT
IN
DIGITAL
AUDIO
L
R
HDMI 1
HDMI 2
AV 1
AV 2
AV 3
HDMI 1
HDMI 2
DISPLAY
SYNC.
+ +
HDMI 1 HDMI 2 HDMI 3
DVI
HDMI
ANALOG
AUDIO IN
OUT
IN
DIGITAL
AUDIO
L
R
HDMI 1
HDMI 2
AV 1
AV 2
AV 3
HDMI 1
HDMI 2
DISPLAY
SYNC.
++
HDMI 1 HDMI 2 HDMI 3
10.11.2 With
ANALOG AUDIO
________________________
10.12 Connect a Home Theater Amplifier
________________________
10.12.1 Digital Home Theater Amplifier
10.13.1 Equipped with a S-VIDEO connector at the side
ENGLISH
10.13.2 Equipped with a S-VIDEO connector at the back
________________________
10.12.2 Analog Home Theater Amplifier
Due to legal requirements, it is possible that with certain copy
protected PCM audio qualities from a accessory device connected to the
HDMI input, the Digital audio signal is muted.
________________________
10.13 Connect a PC
________________________
10.13.3 Equipped with a DVI connector
10.3.4 Equipped with a HDMI connector
If necessary you can adjust the picture position to the center of the
screen with the cursor buttons.
27
Page 32

________________________
-
11 Problems
“Ghost” or double images
• This may be caused by obstruction to the antenna due to high rise
buildings or hills. Using a highly directional antenna may improve the
picture.
No power
• Verify that the TV’s AC power cord is plugged into the mains socket.
• Unplug the television, wait for 60 seconds. Then re-insert plug into the
mains socket and turn on the television again.
No picture
• Verify antenna connections at the bottom of the TV to see if they are
properly connected to the TV.
• Possible broadcast station trouble. Try another channel.
• Adjust the contrast and brightness settings.
• Verify the Closed Captions control. Some TEXT modes could block the
screen.
• Verify if you selected the correct AV source.
No picture and power turned on
• Your TV has a protective mode in case there is too much heat buildup. Verify the clearance around the vents of the device to be certain
there are no blocking walls or cabinets which would limit the air flow.
Picture position adjustment
When displaying a High Definition signal from the YPbPr inputs or
HDMI input, if necessary, you can adjust the picture position to the
center of the screen with the cursor left/right or up/down buttons on
the remote control.This may be needed due to slight differences in
output signals from different brands and types of HD sources boxes.
Most High Definition receiver boxes also have picture-positioning
controls in their menu systems. If the TV cursor controls run out
of range before the picture is correctly positioned, the receiver box
controls will need to be adjusted.
No photo, music or video play or in poor quality only
• Verify if the source complies with a supported code.
No sound
• Increase the VOLUME.
• Verify that the TV is not muted, press the
MUTE button on the
remote control.
• When no signal is detected, the TV automatically turns off the sound.
This is proper operation and does not indicate a malfunction.
Sound and picture interruptions using HDMI to HDMI
connection
• If it occurs occasionally, perhaps there is something wrong with the
broadcasted program.
• If it occurs persistently, see the manual of your connected device to
verify the necessary adjustments.
• Alternatively, connect an extra audio cable (either an analog or a digital
audio cable) from your connected device to your TV.
Verify whether you selected the connected device in the Installation
menu, Select your connections and also select the respective audio
input in the same Connections menu.
• Limit the HDMI cable length to max 5 m.
• Verify if the connected device is properly selected in the Installation
menu, Connections, according to the connection you have made
or 2.
1
HDMI
No sound when using DVI to HDMI connection
• Verify whether you properly connected the audio cable to the
DIGITAL AUDIO IN or ANALOG AUDIO IN L/R connector of the
TV.
• Verify whether you selected the connected device in the Installation
menu, Select your connections and if you linked it to
or
3, according to where you made the connection. Also verify if
you selected
DIGITAL AUDIO IN or AUDIO IN L/R in the same
HDMI 1, 2
Connections menu.
Good sound but poor color or no picture
• Adjust the contrast, color, tint and brightness setting.
• Select Reset AV settings in the Installation menu.
Snowish picture and noise
• Verify the antenna connection.
Television not responding to remote control
• Verify whether the batteries are working. Replace if necessary.
• Clean the remote control sensor lens on the monitor.
• Operating range between TV and the remote control should not be
> 240”.
• You can still use the buttons at the side of your TV.
The software will not install
Possibly the operating system is wrong.
Go to www.magnavox.com/usasupport to see which operating systems
are supported.
No stable or not synchronized VGA picture
• Check if you have selected the correct VGA mode in your PC.
Control of accessory devices
• The infrared signals of the screen may influence the reception sensibility
of other peripherals
Solution: replace the batteries of the remote control of other devices.
E.g. keep away a wireless headphone from within a radius of 50”.
Standby
Your TV consumes energy in standby mode. Energy consumption
contributes to air and water pollution.
After improper shutdown
If your TV has been shutdown in an improper way (e.g. power drop,
power cord plug out), starting up the TV again will take a longer time
than usual.
!
If your problem is not solved
-
Turn your TV off and then on again once.
Never attempt to repair a defective TV yourself.
Check with your dealer or call a TV technician.
Telephone number Magnavox Customer Care Center: 1-800705-2000)
Please, have the Model and Product number which you can find at the
back and the bottom of your television set ready, before calling.
28
Page 33

________________________
12 Glossary
_____________________
13 Recycling
1080i/p A 1080 screen uses the highest available resolution to display
both 1080i and 1080p signals in the highest possible image
quality without loss of resolution
720p Displays images using progressive scanning with 720 horizontal
lines.
ATSC Digital antenna signals with HDTV programming.
NTSC Analog signals, on cable or antenna, in Standard definition.
QAM Digital scrambled and unscrambled cable signals with HDTV
programming.
YPbPr Component video inputs.
CS Digital Caption Service
CC Analog Caption Service
DTV A new technology for transmitting and receiving broadcast
television signals. DTV provides higher resolution and improved
sound quality over analog television.
DV Digital Video (from a camera)
EAS Emergency Alert System
Method for use by cable TV systems to signal emergencies to
digital terminal devices such as digital STV, digital TV receivers
and digital VCRs. It allows a cable operator to disseminate
emergency alert information related to state and local-level
emergencies and warnings.
HDMI (High Definition Multimedia Interface)
Provides an uncompressed, all digital audio/video interface
between the TV and any HDMI-equipped audio/video
component, such as a set top box, DVD player and AV receiver.
HDMI supports enhanced or high-definition video plus twochannel digital audio.
DVI (Digital Visual Interface)
A digital interface standard created by the Digital Display
Working Group (DDWG) to convert analog signals into digital
signals to accommodate both analog and digital monitors.
S-VHS signals
There are 2 separate Y/C video signals from the S-VHS and Hi-8
recording standards. The luminance signals Y (black and white)
and chrominance signals C (color) are recorded separately on
the tape. This provides better picture quality than with standard
video (VHS and 8 mm) where the Y/C signals are combined to
provide only one video signal.
° The packaging of this product is intended to be recycled. Apply to the
local authorities for correct disposal.
________________________
13.1 Disposal of your old product
Your product is designed and manufactured with highly quality material
and components, which can be recycled and reused. Like all LCD
products, this set contains a lamp with mercury. Please inform yourself
about the local separate collection system for electrical and electronic
products. Please act according to your local rules and do not dispose of
your old products with your normal household waste.
The correct disposal of your old product will help prevent potential
negative consequences for the environment and human health.
_______________________
13.2 Disposal of batteries
The batteries supplied do not contain the heavy metals mercury and
cadmium. Please check on how to dispose of exhausted batteries
according to local regulations.
_______________________
14 Product information
- Your TV consumes energy in standby mode. Energy consumption
contributes to air and water pollution. Very low standby power
consumption.
- Specifications: see the product leaflet on
www.magnavox.com/usasupport.
- If you need further assistance, please call the local customer support
service. The corresponding telephone numbers and addresses are given
in the supplied Worldwide guarantee booklet.
________________________
14.1 Magnavox on-line support
The website for support: www.magnavox.com/usasupport offers you
all information you need to optimally enjoy your TV, and to make your
home entertainment experience even more enjoyable. Please visit www.
magnavox.com/usasupport and enter your modelnumber to view:
- FAQ (Frequently Asked Questions)
- Latest updated user manuals
- Firmware upgrade files for your TV
- Product information
- ...
ENGLISH
29
Page 34

Annex 1 - Magnavox TV Slideshow Format
with background music
Magnavox can’t be held responsible for any problems that may occur
as a result of the content in this document. Errors reported to
Magnavox will be adapted and published as soon as possible.
Introduction
This document explains how to make a Magnavox slideshow file with
background audio.
Be aware that the content of this document is addressing technical or
software skilled users.
To start the slideshow open the slideshow file in the Multimedia browser
of your TV.
1. Press the
a USB device and turned on the TV.
MENU button on the remote control after having inserted
- It is preferable that URL’s referencing PM content are based on a
relative path starting from the directory where the slideshow is stored.
This path includes the device or drive name of the PM.
An absolute path to content will also be supported.
- relative path:
pictures\test1.jpg, tamper.jpg, ..\new\bird.jpg, …
- absolute path:
USB1:\pictures1\foo_bar.jpg, C:\f1.jpg, \organization.jpg, …
General Format
The format and syntax below will be used to create the slideshow file
(simple ascii text) with the extension .alb (.ALB). Examples: slshow1.alb,
summer_holiday_2004.ALB, test.alb, …
Television
Multimedia
TV menu
Channel list
Program guide
2. Select Multimedia and press the cursor right.
3. Go to where you stored the slideshow file (.alb) on your portable
memory.
4. Select the slideshow file and press the
OK button to start the slide
show.
General Rules
- The slideshow will use plain ASCII XML syntax to allow the creation
and editing of the slideshow files using simple tools.
- All references to network content must be based on the global address
of the content.
- Content on a Portable Memory (PM) doesn't have a global address; as
a result content from a PM can never be referenced from a slideshow
not stored on the PM itself.
- To maintain portability, a slideshow stored on a PM should ONLY
reference content on the same PM. Referencing global addresses
can result in inconsistencies if the PM is used on a non-networked
CE device. The latter is however not forbidden, it is only a
recommendation.
The following syntax should be used to create the text file:
<?xml version="1.0" encoding="ISO-885h9-1" ?>
<magnavox-slideshow version="1.0" >
<title>Title of the slideshow</title>
<audio>audio_url</audio>
<slide-duration>30</slide-duration>
<slides>
<slide>slide_1_url</slide>
<slide>slide_2_url</slide>
<slide>slide_3_url</slide>
<slide>slide_4_url</slide>
<slide>slide_5_url</slide>
<slide>slide_6_url</slide>
...
<slide>slide_N-1_url</slide>
<slide>slide_N_url</slide>
</slides>
</magnavox-slideshow>
Supported XML-tags
The following table gives a description of the XML syntax.
Tag Name Use Description
magnavox-slideshow mandatory Magnavox slideshow signature including the version.
title optional The title of the playlist.
audio optional The audio-URL following this tag will define the music playing in the background during the slideshow.
A single song or playlist (.m3u & .pls) are the only valid audio references. Other reference will not result
in any audio playback. If a single song is referenced the song will be repeated forever. If a playlist is
referenced the playlist will be played in sequence with a repeat at the end of the playlist.
slide-duration optional The default display time (in 0,1 second) of a slide. The TV application isn’t obliged to support this tag.
The TV application can force the use of one or multiple predefined display times.
slides mandatory Identifies the slides to show.
slide optional Identifies the URL of the individual slide.
30
Page 35

Annex 2 - Magnavox TV - Digital camera and USB issues
- The software of your TV is updatable. If you have problems first
check if you have the latest software installed on your TV. The latest
software, together with instructions, can be found on the Magnavox
support website. Use the type number of your TV to find this
documentation and other related files.
- Magnavox can’t be held responsible neither for any errors in the
content of this document nor for any problems as a result of the
content in this document. Errors reported to Magnavox will be
adapted and published as soon as possible.
Digital Camera Issues
If a USB connection between your digital camera and the TV isn’t
working, you can try the solutions below to resolve your problem.
- Make sure your digital camera is turned on and verify if the
configuration of your digital camera is correct (see the manual of your
digital camera for more information).
- Some digital cameras allow you to turn off the USB interface. Make
sure that the USB interface is turned on before connecting to the TV.
- If you have a digital camera with only internal memory (no removable
memory) you can try to copy the content manually to a USB memory
device using a personal computer.
- Some digital cameras allow you to switch between PTP (Picture
Transfer Protocol) or “PC Link” and USB Mass Storage. Make sure
that you select USB Mass Storage or “PC Drive” on your digital
camera.
- If your camera supports different interface settings be sure to try them
one by one or contact the reseller of your camera to find out the
correct setting.
ENGLISH
USB Memory Device Issues
- Devices connected to the USB port of your TV must be “Mass Storage
Class” compliant. If your device (digital camera. MP3 player, …) is not
“Mass Storage Class” compliant it will not be detected by the content
browser of the TV.
- The following subsets of the Mass Storage Class specification are
supported:
The implementation of the TV is based on the “Universal Serial Bus
Mass Storage Class Specification Overview” (v1.2, June 23, 2003)
including all documents referenced by the document. The document
can be found on the USB standardization website (www.usb.org).
Full support of the USB Mass Storage Class Bulk-Only Transport
(bInterfaceProtocol = 50h).
Full support of SubClass Code = 05h; SFF-8070i spec.
Full support of SubClass Code = 06h; SCSI transparent command set.
- For large USB memory devices, when you are in the Content Browser,
it may take a long time before you can access your files.
31
Page 36

Annex 3 - Issues referring to connected accessory devices with a HDMI or
Component Video output connector
The HDMI IN and Component Video connectors allow the following TV and monitor modes:
HD Standard Definition TV (SDTV) 640x480i 60 Hz
720x480i 60 Hz
720x576i 50 Hz
Enhanced Definition TV (EDTV) 640x480p 60 Hz
720x480p 60 Hz
720x576p 50 Hz
High Definition TV (HDTV) 1920x1080i 50/60 Hz
1920x1080p 24/25/30/35/60 Hz
1280x720p 50/60 Hz
The
HDMI IN connectors allow the following PC modes:
PC 640x480 60 Hz
800x600 60 Hz
1024x768 60 Hz
1280x768 60 Hz
1360x768 60 Hz
1920x1080 60 Hz
- If necessary, you can adjust the picture position to the center of the screen with the cursor buttons.
- Due to legal requirements, it is possible that with certain copy protected PCM audio qualities from a an accessory device connected to the
HDMI input, the Digital audio output signal is muted.
- Proper working is only guaranteed with HDMI compliant consumer products. Limit the cable length to maximum 5 m.
- In case no signal is detected from your HDMI devices, turn off the HDMI device and then on again.
32
Page 37

Annex 4 - Software update
Operation Successful! Re
P
r
ogrammin
g
________________________
How to update the TV software
_________________________
Use of the Update assistant
Magnavox continuously tries to improve its products and it wants you to
profit of that even after your purchase.
Therefore it allows you to update your TV software using a USB
memory device (not supplied).
Note
The device must have at least 48Mb free space. Make sure the write
protection is turned off.
Step 1 USB Memory device to TV
1. Select TV menu and press the cursor right.
> The TV menu appears.
2. Select Software update and press the cursor right.
> The Software update menu appears.
TV menu
Software update
Update assistant
Current software info
Local updates
Update assistant
Start now
1. Insert the USB memory device in the
USB slot of the TV.
2. The TV turns off. The screen stays black for about 10 seconds.
Please, wait and do not use the
POWER switch on the TV.
3. The update process starts automatically. Please wait.
ENGLISH
Info
3. Select Update assistant and press the cursor right.
4. Press the
OK button to activate.
5. Insert a USB memory device to the USB connector at the side of the
TV.
> The main menu appears.
6. Press the green color button to proceed.
> A message appears the TV has successfully written an
identification file to the USB memory device.
7. Press the green color button again to finish.
8. Remove the USB memory device from the TV.
Step 2 USB Memory device to PC
1. Insert the USB memory device into a PC linked to the internet.
2. Locate and open the file “update.htm” on your device.
3. Follow the instructions on the page displayed.
> The software update is downloaded on the USB memory device
(on condition the software version is newer than the one
currently installed).
4. Remove the USB memory device from your PC.
Step 3 USB Memory device back to TV
!
- do not remove the USB portable memory device during the
software update procedure;
- in case of a power drop during the update procedure, don’t remove
the USB portable memory from the TV. The TV will continue the
update as soon as the power comes back.
4. The update is finished when the message ‘Operation successful’
appears on the screen.
5. Remove the USB memory device from the TV.
33
Page 38

6. Press the POWER button on the remote control. Do not press
more than once.
Do not use the POWER switch on the TV.
7. The TV turns off. The screen stays black for about 10 seconds.
Please, wait.
8. The TV turns back on again.
The update is done.
_________________________
Local updates
For Service use only.
9. Once the upgrade is finished, use your PC to remove the TV
software from your USB portable memory.
________________________
Verifying the version of the TV software
Updating software is only possible if the version of the new available
software is different from the current one. You can verify your current
software version.
1. Select Software update in the TV menu.
2. Press the cursor right.
> The Software update menu moves to the left panel.
TV menu
Software update
Update assistant
Current software info
Local updates
Info
Current software info
Version:
JX31......
Release
.........
3. Select Current software info to observe the version and the
description of the current software.
34
Page 39

______________________
Index
A
Autoprogram 17
Auto surround 12
Alternate audio 11
Antenna 5
Auto volume levelling 12
B
Balance 11
Batteries 5,29
Button
cursor 6
MENU 6
MUTE 6
OK 6
POWER 6
Brightness 10
C
Cable 5
Care of the screen 2
Clock 19
Closed captions 12
service 13
options 13
Camera 23
Channels
uninstall 18
edit 18
installation 17
store 17
Code
Set 15
Change 15
Color 10
buttons 6
temperature 10
Connections 19
side 23
audio/video 24
Connector
HDMI 25
Contrast 10
D
Daylight saving 19
Delta volume 12
Demo 16
DVD
recorder 25
player 25
E
Emergency alert signalling 18
F
Features menu 12
H
Headphone 23
volume 12
Home theater amplifier 27
I
Installation 16
Weak channel 17
First time 8
K
Kensington lock 3
L
Language 16
audio 11
Lock 13
after 14
channels 14
TV ratings 14
movie ratings 15
region ratings 15
M
Multimedia browser 21
N
Navigate through the menus 9
Noise reduction 11
O
On timer 16
Overview
side panel 23
P
PC 27
Picture
menu 10
Problems 28
R
Recorder 25
Remote control 6
Recycling 29
Reset AV settings 20
S
Safety warnings 2
Satellite receiver 26
Set top box 25
Sharpness 10
Sleeptimer 13
Software update 33
Sound
menu 11
mode 12
U
USB
connector 23
device 21
V
VCR 25
Video comp. connectors 26
Volume 6,11
W
Widescreen picture format 7
ENGLISH
G
Game 23,25
Getting started 4
Glossary 29
T
Time zone selection 19
Tint 10
Turn the TV on 7
TV menu settings 9
35
Page 40

Need help ?
Online help
www.magnavox.com/usasupport
1 800 705 2000
Please, have the Model and Serial Number ready before your call.
You can find these numbers on the packaging label or on the back and
bottom of your TV.
Model:
Serial No: ______________________________________
Regulatory Notices - Federal Communications Commission
Notice
This equipment has been tested and found to comply with the limits for
a Class B digital device, pursuant to part 15 of the FCC Rules. These
limits are designed to provide reasonable protection against harmful
interference in a residential installation. This equipment generates, uses,
and can radiate radio frequency energy and, if not installed and used
in accordance with the instructions, may cause harmful interference
to radio communications. However, there is no guarantee that
interference will not occur in a particular installation. If this equipment
does cause harmful interference to radio or television reception, which
can be determined by turning the equipment off and on, the user is
encouraged to try to correct the interference by one or more of the
following measures:
Reorient or relocate the receiving antenna.
Increase the separation between the equipment and the receiver.
Connect the equipment into an outlet on a circuit different from that
to which the receiver is connected.
Consult the dealer or an experienced radio or television technician for
help.
Modifications The FCC requires the user to be notified that any changes or
modifications made to this device that are not expressly approved
by Magnavox Consumer Electronics may void the user’s authority to
operate the equipment.
Cables Connections to this device must be made with shielded cables with
metallic RFI/EMI connector hoods to maintain compliance with FCC
Rules and Regulations.
Canadian notice This Class B digital apparatus meets all requirements of the Canadian
Interference-Causing Equipment Regulations.
Avis Canadien Cet appareil numérique de la classe B respecte toutes les exigences du
Règlement sur le matériel brouilleur du Canada.
36
Page 41

Page 42

Retournez votre carte d’enregistrement de produit ou enregistrez-vous en ligne à
www.magnavox.com/usasupport le plus tôt possible pour profiter pleinement de votre achat.
L’enregistrement de votre modèle auprès de MAGNAVOX confirme votre éligibilité à tous les bénéfices mentionnés ci-dessous. Remplissez et
retournez votre carte d’enregistrement de produit le plus tôt possible ou enregistrez-vous en ligne à www.magnavox.com/usasupport pour assurer:
* Preuve d’achat
* Avis sur la sécurité des
produits
Retournez la carte d’enregistrement ci-incluse
afin de garantir que la date d’achat de votre
produit sera classée dans nos dossiers et
éviter ainsi le besoin de remplir d’autres
formulaires afin d’obtenir votre service de
garantie.
En enregistrant votre produit, vous serez avisé
- directement par le fabriquant - de toutes
défectuosités compromettant la sécurité ou
de tout retrait du produit du marché.
Nous vous félicitons de votre achat et vous
souhaitons la bienvenue dans la “famille !”
Cher propriétaire d’un produit MAGNAVOX:
Merci de votre confiance en MAGNAVOX. Vous avez choisi un
produit de fabrication et de garantie supérieures parmi les meilleurs
disponibles sur le marché. Et nous ferons tout en notre pouvoir pour
que vous soyez pleinement satisfait de votre achat pour des années à
venir.
En tant que membre de la “famille” MAGNAVOX, vous avez droit à
une protection inégalée par l’une des garanties les plus complètes de
l’industrie ainsi qu’à des réseaux de services sans pareil.
De plus, votre achat garantit que vous recevrez toutes les
informations et offres spéciales auxquelles vous avez droit, ainsi qu’un
accès facile à toute une gamme d’accessoires disponibles via notre
réseau de téléachat.
Mais ce qui est encore plus important, vous pouvez compter sur
notre engagement total quand il s’agit de votre entière satisfaction.
C’est notre façon de vous souhaiter la bienvenue et de vous
remercier de votre investissement dans un produit MAGNAVOX.
* Bénéfices additionnels
L’enregistrement de votre produit garantit
que vous bénéficierez de tous les privilèges
auxquels vous avez droit y compris des offres
rabais spéciales.
Sachez reconnaître ces symboles de sécurité
AVIS
RISQUE DE CHOCS ÉLECTRIQUES
Attention: Afin de prévenir le risque de chocs électriques
Toute réparation devrait être confiée à un personnel qualifié.
Ce symbole “d’éclair” s’applique aux matériaux non isolés
présents dans votre appareil et pouvant causer un choc
électrique. Pour assurer la sécurité des membres de votre
famille, veuillez ne pas enlever le couvercle de votre produit.
Les “points d’exclamation” ont pour but d’attirer votre
attention sur des caractéristiques à propos desquelles vous
devez lire soigneusement la documentation accompagnant
l’appareil afin d’éviter tout problème d’exploitation ou
d’entretien.
Avertissement: Afin de réduire les risques d’incendie ou de choc
électrique, ne pas exposer cet appareil à la pluie ni à l’humidité et les
objets remplis de liquide, comme des vases, ne doivent pas être placés
sur le dessus de l’appareil.
CAUTION: To prevent electric shock, match wide blade of plug to
wide slot, fully insert.
ATTENTION : Pour éviter les chocs électriques, introduire la lame
la plus large de la fiche dans la borne correspondante de la prise et
pousser jusqu’au fond.
NE PAS OUVRIR
ne pas retirer les vis.
P.S.: Pour bénéficier aux maximum de votre produit
MAGNAVOX, assurez-vous de remplir et de retourner
votre carte d’enregistrement de produit le plus tôt
possible ou enregistrez-vous en ligne à
www.magnavox.com/usasupport
Visitez notre site sur le Web à http://www.magnavox.com/usasupport
À l’usage du client
Entrez ci-dessous le numéro de série qui se trouve à l’arrière du
boîtier du dispositif. Conservez ces informations pour référence
ultérieure.
No. de modèle:
No. de série:
Page 43

Page 44

CONSIGNES DE SÉCURITÉ IMPORTANTES
Veuillez lire ces consignes avant de faire fonctionner cet appareil
1. Lire ces instructions.
2. Conservez ces instructions.
3. Obéir à tous les avertissements.
4. Suivre toutes les instructions.
5. Éviter d’utiliser cet appareil à proximité de l’eau.
6. Nettoyer à l'aide d'un linge sec seulement.
7. Ne pas boucher les orifices de ventilation. Effectuer l'installation selon les instructions du
fabricant.
8. Ne pas installer l'appareil près d'une source de chaleur comme un radiateur, un registre de
chaleur, une cuisinière ou tout autre appareil (y compris les amplificateurs) qui dégage de la
chaleur.
9. Ne pas contourner la mesure de sécurité de la fiche polarisée ou de mise à la terre. Une
fiche polarisée est dotée de deux lames dont l'une est plus large que l'autre. Une fiche
avec mise à la terre est dotée de deux lames auxquelles s'ajoute une troisième broche de
mise à la terre. La lame large, la troisième broche, est fournie pour votre sécurité. Si la
fiche fournie ne rentre pas dans votre prise secteur, consultez un électricien qui changera
votre prise murale obsolète.
10. Protéger le cordon d'alimentation pour éviter que l'on marche dessus ou qu'il soit plié en particulier
au niveau de la fiche, des prises de courant de commodité et à l'endroit où il sort de l'appareil.
11. Utiliser uniquement des équipements/accessoires spécifiés par le fabricant.
12. L'appareil ne doit être utilisé qu'avec le chariot, socle, trépied, support ou
table spécifié par le fabricant ou vendu avec l'appareil. Un appareil utilisé en
combinaison avec un chariot doit être déplacé avec soin afin d'éviter les risques
de blessures occasionnées par le renversement de l'appareil.
13. Débrancher cet appareil durant les orages électriques ou lorsqu'il n'est pas utilisé pour une
période de temps prolongée.
14. L'entretien ou la réparation de l'appareil doit être effectué par du personnel qualifié
uniquement. Il faut faire réparer l'appareil dès que celui-ci est endommagé d'une façon
quelconque, qu'il s'agisse du cordon ou de la fiche d'alimentation, si du liquide a été
renversé ou des objets sont tombés dans l'appareil, s'il a été exposé à la pluie ou à une
humidité excessive, s'il ne fonctionne pas normalement ou s'il a subi un choc.
15. Ce produit peut contenir du plomb ou du mercure. La mise au rebut de ces substances
peut être réglementée par suite de considérations environnementales. Pour de plus
amples informations concernant la mise au rebut ou le recyclage de l'appareil, contacter
les autorités locales ou l'Electronic Industries Alliance : www.eiae.org.
16. Dommages nécessitant des réparations - L'appareil doit être réparé par du
personnel qualifié lorsque:
A. Le cordon ou la fiche d'alimentation est endommagé ; ou
B. Des objets sont tombés dans l'appareil ou du liquide a été renversé à l'intérieur ; ou
C. L'appareil a été exposé à la pluie ; ou
D. L'appareil semble ne pas fonctionner correctement ou présente un changement de
performance marqué ; ou
E. L'appareil a subi un choc ou le boîtier est endommagé.
17. Inclinaison/stabilité - Tous les postes de télévision doivent répondre aux normes de
sécurité internationales globales recommandées, relativement aux propriétés d'inclinaison
et de stabilité du boîtier.
• Il ne faut pas compromettre ces normes de construction en exerçant une force excessive
sur la partie avant ou supérieure, susceptible d'entraîner le renversement de l'appareil.
• De plus, ne pas mettre vos enfants ni vous-même en danger, en plaçant des appareils
électroniques ou des jouets sur le dessus du poste. Ces objets pourraient tomber du
téléviseur et entraîner des dommages ou des blessures..
18. Montage mural ou montage au plafond - Si l'appareil doit être monté au mur ou au
plafond, l'installation doit être effectuée selon les recommandations du fabricant.
19. Lignes électriques - Une antenne extérieure doit être installée loin des lignes
électriques.
20. Mise à la terre d'une antenne extérieure - Si une antenne extérieure est connectée
au récepteur, s'assurer que le système d'antenne est mis à la terre de façon à fournir une
protection contre les surcharges de courant et les charges statiques accumulées. L'article
810 du Code national de l'électricité, ANSI/NFPA No. 70-1984, offre des informations
relatives à la mise à la terre correcte du mât et des structures de support, la mise à la
terre de la descente d'antenne vers un dispositif de décharge, la taille des connecteurs
de mise à la terre, l'emplacement du dispositif de décharge d'antenne, le raccordement
des conducteurs de terre ainsi qu'aux exigences relatives au conducteur de terre. Voir la
figure ci-dessous.
21. Pénétration d'objets et de liquide - Prendre tous les soins nécessaires pour éviter
que des objets tombent ou que des liquides coulent dans le boîtier à travers les orifices.
a) Avertissement : Afin de réduire les risques d'incendie ou de choc électrique, ne pas
exposer cet appareil à la pluie ni à l'humidité et ne pas placer d'objets remplis de liquide,
comme des vases, sur le dessus de l'appareil.
22. MISE en garde concernant les piles - Pour prévenir la fuite des piles pouvant
entraîner des blessures, des dégâts matériels ou endommager l'appareil :
• Installer toutes les piles de façon à ce qu'elles correspondent aux bornes + et -, tel
qu'indiqué sur le dispositif.
• Ne pas mélanger les piles (neuves et usagées ou carbone et alcaline, etc.).
• Retirer les piles du boîtier lorsque la télécommande n'est pas utilisée pendant une période
de temps prolongée.
EXEMPLE DE MISE A LA TERRE D'UNE ANTENNE SUIVANT LES RECOMMANDATIONS DU NATIONAL ELECTRICAL CODE (NEC)
ATTACHE DE TERRE
EQUIPEMENT DE SERVICE ELECTRIQUE
FIL D'ENTREE DE L'ANTENNE
UNITE DE DECHARGE DE L'ANTENNE
(
SECTION NEC 810-20)
CONDUCTEURS DE MISE A LA TERRE
(SECTION NEC 810-21)
ATTACHES DE TERRE
SYSTEME ELECTRODE DE TERRE POUR SOURCE
ELECTRIQUE
(NEC ART 250, PART H)
Remarque pour les installateurs de système de câble : Ce rappel s'adresse aux installateurs de système de câble afin d'attirer leur attention
sur l'article 820-40 du code NEC qui indique la marche à suivre pour une mise à la terre adéquate et, en particulier, spécifie que le câble de masse
doit être raccordé au système de mise à la terre du bâtiment, aussi près que possible du point d'entrée du câble.
Page 45

Sommaire
1 Avertissements relatifs à la sécurité . . . . . . . . . . . . 2
1.1 Généralités . . . . . . . . . . . . . . . . . . . . . . . . . . . . . . . . . . . . . . 2
1.2 Soin de l’écran . . . . . . . . . . . . . . . . . . . . . . . . . . . . . . . . . . . 2
1.3 Avertissement concernant les images fixes sur l’écran
du téléviseur . . . . . . . . . . . . . . . . . . . . . . . . . . . . . . . . . . . 3
1.4 Fixation . . . . . . . . . . . . . . . . . . . . . . . . . . . . . . . . . . . . . . . 3
1.5 Electric, Magnetic and Electromagnetic Fields . . . . . . . . . . . 3
1.6 Caractéristiques des pixels . . . . . . . . . . . . . . . . . . . . . . . . 3
1.7 Information de conformité VESA pour installation
professionnelle . . . . . . . . . . . . . . . . . . . . . . . . . . . . . . . . . . 3
1.8 Kensington Security Slot . . . . . . . . . . . . . . . . . . . . . . . . . . 3
2 Se préparer . . . . . . . . . . . . . . . . . . . . . . . . . . . . . . . . . 4
2.1 Aperçu des connexions . . . . . . . . . . . . . . . . . . . . . . . . . . . 4
3 Utilisation de la télécommande . . . . . . . . . . . . . . . . 6
3.1 Format plein écran . . . . . . . . . . . . . . . . . . . . . . . . . . . . . . 7
3.2 Boutons sur le côté gauche du téléviseur . . . . . . . . . . . . . 7
3.3 Mise sous tension du téléviseur . . . . . . . . . . . . . . . . . . . . 7
10 Comment brancher et utiliser les appareils A/V . 23
10.1 Aperçu du panneau latéral . . . . . . . . . . . . . . . . . . . . . . . . 23
10.2 Faire les branchements vidéo et audio . . . . . . . . . . . . . . 24
10.3 Brancher un enregistreur (VCR / DVD-R) . . . . . . . . . . 25
10.4 Brancher un enregistreur et un deuxième appareil . . . . 25
10.5 Brancher un lecteur/enregistreur DVD, Câblosélecteur,
console de jeux,... avec un connecteur HDMI . . . . . . . . 25
10.6 Brancher un lecteur/enregistreur DVD, Câblosélecteur,
console de jeux,... avec un connecteur DVI . . . . . . . . . . . 25
10.7 Brancher un lecteur DVD avec un connecteur S-VIDEO 26
10.8 Brancher un enregistreur et un câblosélecteur
aux sorties RF . . . . . . . . . . . . . . . . . . . . . . . . . . . . . . . . . . 26
10.9 Brancher un récepteur satellite ou câblosélecteur
aux sorties AV . . . . . . . . . . . . . . . . . . . . . . . . . . . . . . . . . 26
10.10 Brancher un récepteur satellite ou câblosélecteur
et un enregistreur aux sorties AV . . . . . . . . . . . . . . . . . . 26
10.11 Brancher des sources numérique avec des connecteurs
Video Component Output (YPbPr) . . . . . . . . . . . . . . . . 26
10.12 Brancher un amplificateur Cinémamaison . . . . . . . . . . . . 27
10.13 Brancher un ordinateur . . . . . . . . . . . . . . . . . . . . . . . . . . 27
FRANÇAIS
4 Première installation . . . . . . . . . . . . . . . . . . . . . . . . 8
5 Comment naviguer dans les menus . . . . . . . . . . . . . 9
5.1 Introduction . . . . . . . . . . . . . . . . . . . . . . . . . . . . . . . . . . . . 9
5.2 Utilisation des réglages du menu TV . . . . . . . . . . . . . . . . 9
5.2.1 Ajuster les paramètres de visualisation et d’écoute . . . . . . 9
5.2.2 Ajuster les réglages du menu Image . . . . . . . . . . . . . . . . . 10
5.2.3 Ajuster les réglages du menu Son . . . . . . . . . . . . . . . . . . . 11
6 Régler le menu des fonctions . . . . . . . . . . . . . . . . 12
6.1 Sous-titres codés . . . . . . . . . . . . . . . . . . . . . . . . . . . . . . 12
6.2 Service sous-titres . . . . . . . . . . . . . . . . . . . . . . . . . . . . . . 12
6.3 Service sous-titres numériques . . . . . . . . . . . . . . . . . . . . 13
6.4 Options sous-titres numériques . . . . . . . . . . . . . . . . . . . 13
6.5 Arrêt programmé . . . . . . . . . . . . . . . . . . . . . . . . . . . . . . 13
6.6 Verrouillage . . . . . . . . . . . . . . . . . . . . . . . . . . . . . . . . . . . . 13
6.7 Introduire/Changer code . . . . . . . . . . . . . . . . . . . . . . . . . 15
6.8 Minuterie marche . . . . . . . . . . . . . . . . . . . . . . . . . . . . . . . 16
6.9 Démo . . . . . . . . . . . . . . . . . . . . . . . . . . . . . . . . . . . . . . . . 16
7 Recherche et mémorisation des chaînes . . . . . . . . 16
7.1 Menu Installation . . . . . . . . . . . . . . . . . . . . . . . . . . . . . . . 16
7.2 Sélection de la langue . . . . . . . . . . . . . . . . . . . . . . . . . . . . 16
7.3 Mémorisation des chaînes de télévision . . . . . . . . . . . . . 17
7.4 Définition des préférences . . . . . . . . . . . . . . . . . . . . . . . 18
7.5 Sélection des connexions . . . . . . . . . . . . . . . . . . . . . . . . 19
7.6 Réglage de l’horloge . . . . . . . . . . . . . . . . . . . . . . . . . . . . 19
7.7 Rétablir les réglages AV . . . . . . . . . . . . . . . . . . . . . . . . . 20
11 Problèmes . . . . . . . . . . . . . . . . . . . . . . . . . . . . . . . . 28
12 Glossaire . . . . . . . . . . . . . . . . . . . . . . . . . . . . . . . . . . 29
13 Recyclage . . . . . . . . . . . . . . . . . . . . . . . . . . . . . . . . . 29
14 Information du produit . . . . . . . . . . . . . . . . . . . . . . . 29
Annexe
1 - Téléviseur Magnavox - Format diaporama avec
musique d’atmosphère . . . . . . . . . . . . . . . . . . . . . . . . . . . . 30
2 - Téléviseur Magnavox - Caméra numérique et ports USB . 31
3 - Question liées au branchement de périphériques
à l’aide d’un connecteur HDMI . . . . . . . . . . . . . . . . . . . . . . 32
4 - Mettre à niveau le logiciel du TV . . . . . . . . . . . . . . . . . . . . . . 33
Indexe . . . . . . . . . . . . . . . . . . . . . . . . . . . . . . . . . . . . . . . . . . . . 35
8 Création d’une liste de favoris . . . . . . . . . . . . . . . . . 20
8.1 Sélectionner une chaîne à partir de la liste des favoris . 20
8.2 Sélectionner une autre liste des favoris . . . . . . . . . . . . . 20
8.3 Créer ou modifier une liste de favoris . . . . . . . . . . . . . . 20
9 Navigateur multimédia . . . . . . . . . . . . . . . . . . . . . . . 21
9.1 Afficher le contenu d’un périphérique USB . . . . . . . . . . 21
9.2 Menu Navigateur multimédia . . . . . . . . . . . . . . . . . . . . . 21
Fabriqué sous licence de Dolby Laboratories. ‘Dolby’ ‘Pro Logic’ et le
symbole double-D sont des arques de commerce de Dolby Laboratories.
1
Page 46

_________________________
4" - 6"4" - 6"4" - 6"
4" - 6"
4" - 6"
Programmation HD
Une programmation HD est nécessaire pour obtenir une image HD !
Contactez le câblo-opérateur ou le fournisseur de télévision par satellite
de votre région pour commander la programmation HDTV.
__________________________
Lorsque la surface devient poussiéreuse, essuyez-la légèrement avec du
coton absorbant ou un autre matériau doux. N’utilisez pas d’acétone, de
toluène ou d’alcool sous peine de dommages chimiques. N’utilisez pas de
nettoyant liquide ou en aérosol. Essuyez toutes gouttes (eau ou salive)
éventuellement projetées sur l’écran le plus rapidement possible. Les
laisser en contact prolongé avec l’écran entraînera des déformations et
un estompage des couleurs.
_________________________
1 Avertissements relatifs à la sécurité
_________________________
1.1 Généralités
N’insérez pas la fiche d’alimentation électrique dans une prise
murale ou ne suspendez pas le téléviseur à un mur avant que tous les
branchements ne soient faits.
- Placez ou suspendez le téléviseur là où vous le désirez, mais assurezvous que l’air peut circuler librement par les fentes de ventilation.
Laissez un espace d’au moins 10 à 15 cm (4 à 6 po) autour du
téléviseur.
- Ne posez pas votre téléviseur sur un tapis.
- N’installez pas le téléviseur dans un espace confiné, comme par
exemple une bibliothèque ou toute unité murale similaire.
- Pour éviter toute situation peu sûre, aucune flamme nue (par exemple
des bougies allumées) ne doit être placée sur le téléviseur ou à
proximité .
- Évitez toute exposition à la chaleur, aux rayons directs du soleil et à la
pluie ou à l’eau.
- L’équipement ne doit pas être exposé à des fuites d’eau ou des
éclaboussures.
- Afin d’éviter tout endommagement du cordon d’alimentation (AC) qui
pourrait entraîner des risques d’incendie ou d’électrocution, ne placez
jamais le téléviseur sur le cordon.
_________________________
1.2 Soin de l’écran
1.3 Avertissement concernant les images fixes sur
l’écran
Une caractéristique des écrans LCD est que l’affichage prolongé d’une
même image peut entraîner la permanence d’une post-image à l’écran.
L’utilisation normale du téléviseur est celle qui consiste à afficher des
images en mouvement constant et à changer des images qui remplissent
l’écran. Exemples d’images stationnaires (cette liste n’est pas exhaustive,
vous pouvez expérimenter d’autres cas de figure):
- Menus TV;
- Barres noires : Lorsque des barres noires apparaissent sur la gauche et
la droite de l’écran, il est recommandé de passer à un format d’image
qui remplit tout l’écran;
- Logo des chaînes TV : Ces derniers présentent un problème s’ils
sont lumineux et statiques. Les graphiques en mouvement ou à faible
contraste sont moins susceptibles d’accélérer le vieillissement inégal de
l’écran;
- Vitrophanies boursières : présentées dans le bas de l’écran du
téléviseur;
- Logos des chaînes d’achats et affichage des prix: lumineux et affichés
en permanence ou de façon répétée au même endroit sur l’écran du
téléviseur. D’autres exemples d’images fixes sont les logos, les images
d’ordinateur, l’affichage de l’heure, le télétexte et les images affichées en
mode 4:3, les images ou les caractères statiques, etc.
Diminuer le contraste et la lumière lors de la visualisation. Lorsque
l’affichage prolongé d’une même image pendant 10 minutes, la lumière
sera diminuée automatiquement. Une image rémanente ne disparaîtra
jamais complètement une fois apparue.
!
Vous devez tenir le plus grand compte de ces remarques car le
remplacement d’un écran marqué dans les conditions ci-dessus ne
peut engager la garantie.
_________________________
1.4 Fixation
L’installation du téléviseur requiert des compétences spécifiques et
ne doit être effectuée que par du personnel qualifié. N’essayez pas de
l’effectuer vous-même. Magnavox décline toute responsabilité en cas de
montage incorrect ou susceptible de causer un accident ou des blessures.
Vérifiez si le montage mural est suffisamment solide pour satisfaire aux
normes de sécurité.
Ne pas enlever la feuille de protection avant d’avoir entièrement installée
le support sur pied ou le support mural et toutes les connexions.
Veuillez manipuler avec soin. Utilisez exclusivement le chiffon doux fourni
pour nettoyer la face avant noire brillante du téléviseur.
Ne pas toucher, frapper ou frotter l’écran avec quoi que ce soit de
dur, ce qui pourrait rayer et abîmer l’écran de façon permanente. Ne
pas frotter l’écran avec un chiffon contenant un produit chimique. Ne
pas toucher l’écran avec les mains nues ou avec un tissu gras (certains
cosmétiques sont dangereux pour l’écran).
Débranchez le téléviseur avant tout nettoyage.
2
!
Si le téléviseur est monté sur un plateau ou un bras pivotant,
s’assurer que le câble d’alimentation ne subisse aucune tension lors du
pivotement du téléviseur. Une tension exercée sur le câble d’alimentation
pourrait desserrer les connexions, ce qui pourrait causer la formation
d’arcs et provoquer un incendie.
_________________________
1.5 Electric, Magnetic and Electromagnetic Fields (EMF)
- Magnavox fabrique et vend de nombreux produits de consommation
qui ont, comme tous les appareils électriques, la capacité d’émettre et
de recevoir des signaux électromagnétiques.
- L’un des principes fondamentaux adoptés par la société Magnavox
consiste à prendre toutes les mesures qui s’imposent en matière de
sécurité et de santé, conformément aux dispositions légales en cours,
pour respecter les normes sur les champs électriques, magnétiques
et électro-magnétiques en vigueur au moment de la fabrication de ses
produits.
Page 47

- Magnavox s’est engagé à développer, produire et commercialiser des
0
0
6
8
M
0
0
4
produits ne présentant aucun effet nocif sur la santé.
- Magnavox confirme qu’un maniement correct de ses produits et leur
usage en adéquation avec la raison pour laquelle ils ont été conçus
garantissent une utilisation sûre et fidèle aux informations scientifiques
disponibles à l’heure actuelle.
- Magnavox joue un rôle actif dans le développement des normes
internationales relatives à la sécurité et aux champs électromagnétiques
(EMF); cet engagement lui permet d’anticiper les évolutions ultérieures
en matière de normalisation afin de les intégrer avant l’heure dans ses
produits.
_________________________
1.6 Caractéristiques des pixels
L’écran de votre TV est fabriqué selon une technologie de haute
précision et possède un grand nombre de pixels de couleur. Même s’il
possède un nombre effectif de pixels de 99,999% ou davantage, des
points noirs ou points lumineux brillants (rouges, verts ou bleus) peuvent
constamment apparaître à l’écran. Ceci est une caractéristique propre à
l’écran (dans les limites des normes industrielles courantes) et n’est pas
un dysfonctionnement.
_________________________
1.7 Information de conformité VESA pour installation
professionnelle
!
Attention
Consultez un professionnel de l’installation des cinémas maison. Un
montage incorrect pourrait causer des blessures ou dommages graves.
Magnavox n’est aucunement responsable d’un mauvais montage ou d’un
montage qui entraîne des accidents ou des blessures.
Votre téléviseur est adapté à un montage mural conformément à la
norme VESA. Ce support n’est pas inclus. Utilisez un support VESA
portant le code VESA MIS-F, 600, 400, M8.
Renseignez-vous auprès de votre revendeur.
_________________________
1.8 Kensington Security Slot (si présent)
Votre téléviseur est équipé d’une fente de sécurité Kensington
qui a pour but d’en prévenir le vol.
Il est possible de se procurer séparément un verrou Kensington.
Le verrou Kensington est un câble d’acier recouvert de plastique
accompagné d’un verrou. Une extrémité du câble doit être fixée à
l’ouverture sur le téléviseur et verrouillée à l’aide d’un bouton spécial.
L’autre extrémité est attachée à un point fixe.
® Kensington et MicroSaver sont des marques de commerce enregistrées
aux É.-U. d’ACCO World Corporation; enregistrements émis et demandes en
instance dans d’autres pays partout dans le monde. Toutes les autres marques
de commerce enregistrées ou non appartiennent à leurs propriétaires respectifs.
FRANÇAIS
1. Localisez les 4 trous de vis VESA à l’arrière du téléviseur.
4x
2. Si les disques en plastique obstruent le support VESA, vous pouvez
dévisser les 4 disques.
4x
VESA, FDMI and the VESA Mounting Compliant logo are trademarks of the
Video Electronics Standards Association.
3
Page 48

_________________________
VIDEO
S VIDEO
AUDIO
L
R
BSU
L
R
AUDIO
YPbPr
VIDEO
Y
S VIDEO
AUDIOLR
Pb Pr
VIDEO L RAUDIO
AV 3
AV 1
AV 2
14
13
12
3
2
1
ANTENNA
SERVICE
UART
AUDIO OUT
L
R
ANALOG
AUDIO IN
OUT
IN
DIGITAL
AUDIO
L
R
DISPLAY SYNCHRONIZED
HDMI 1AV 1 HDMI 1
HDMI 2AV 2 HDMI 2
HDMI 3AV 3 HDMI 3
DISPLAY
SYNC.
++
HDMI 1 HDMI 2 HDMI 3
42"-47"-52"
10 9 8 7 6 5 4 11
2 Se préparer
Bienvenue à la grande famille des propriétaires de produits Magnavox.
_________________________
2.1 Aperçu des connexions
Vous pouvez brancher une large gamme d’appareils électroniques
sur votre téléviseur. Se reporter à la Rubrique 10 Comment
brancher et utiliser les appareils A/V.
Avant d’installer le téléviseur ou de le suspendre au mur, branchez
d’abord les accessoires.
!
Ne pas insérer la fiche d’alimentation dans l’alimentation principale
dans le bas du téléviseur et dans une prise murale avant que tous les
branchements ne soient faits.
_________________________
2.1.1 Connexions arrière
1-2-3
AV1 - AV2 - AV3
Pour connecter des appareils avec
- une prise S-Video et des câbles audio L et R (gauche et
droite)
- des appareils ayant trois prises vidéo en composantes
(YPbPR) et des câbles audio analogiques L et R (gauche et
droite)
- des appareils avec des câbles vidéo et audio L et R (gauche et
droite).
4-5-6
HDMI (haute définition) * Pour connecter un appareil avec
une prise HDMI. Si l’appareil est muni uniquement d’une sortie
DVI, se reporter au Chapitre 10.7.
7 Analog Audio In L/R (Entrée audio G/D)
Les appareils audio analogiques connectés à une prise HDMI.
8 Digital Audio Out (Sortie audio numérique)
Pour connecter un amplificateur de cinémamaison.
9 Digital Audio In
10 Audio Out L/R
11 Service UART
Pour utilisation uniquement par un personnel d’entretien
autorisé.
Pour installateurs/intégrateurs: Ne pas connecter le RS232
sans appareil de rétablissement de niveau zéro.
4
_________________________
2.1.2 Connexions latérales
12 Pour connecter des appareils vidéo ou S-Vidéo et des câbles
AV Audio L et R (gauche et droite). (Par ex., : caméra,
caméscope, console de jeu, audio, etc.)
13 Pour connecter des écouteurs.
14 Pour connecter un appareil USB.
,
* En fonction du type de l’appareil, 2 ou 3 connecteurs HDMI
sont disponibles.
Page 49

_________________________
2.1.3 Se brancher au téléviseur
Pour obtenir de plus amples renseignements, veuillez vous reporter
au manuel du câblosélecteur (ou du récepteur satellite).
Votre téléviseur numérique Magnavox vous permettra d’écouter des
émissions en format numérique directement à partir du câble ou en
mode de réception d’antenne.
Branchez-vous directement au téléviseur, au câblosélecteur ou au
récepteur satellite.
_________________________
2.1.3.1 Directement au téléviseur (impossible de capter des chaînes
de télévision payante)
ANTENNA
1. Branchez le signal de câblodistribution ou le signal d’antenne a la
prise
ANTENNA 75 Ω :dans la partie inférieure du téléviseur.
2. Reportez-vous à la rubrique 7.3 Mémorisation des chaînes de
télévision pour obtenir davantage de détails sur l’utilisation de la
Programmation auto pour la mémorisation des chaînes.
Les organismes de télédiffusion passent actuellement de l’analogique
au numérique. Du coup, il arrive fréquemment qu’un télédiffuseur
diffuse deux chaînes, l’une analogique et l’autre numérique.
- Ce branchement fournira du son stéréo au téléviseur si la chaîne que
vous regardez en diffuse.
_________________________
Visualisation de programmes de télévision par câble ne
nécessitant pas le câblosélecteur
Étant donné que vous avez connecté le signal TV par câble directement
au syntoniseur du téléviseur, vous pouvez aussi regarder des programmes
en clair en vous syntonisant simplement sur la chaîne voulue. Vous devez
toutefois utiliser au préalable la Programmation auto pour mémoriser
les chaînes dans le téléviseur. Se reporter à la Rubrique 7.3. Ce
branchement fournira du son stéréo au téléviseur si la chaîne que vous
regardez en diffuse.
_________________________
2.1.4 Brancher l’alimentation principale
MAINS
!
Assurez-vous que la tension d’alimentation correspond à la tension
indiquée sur l’étiquette à l’arrière du téléviseur. Communiquez avec
votre vendeur local si la tension est différente.
!
S’assurer que le câble d’alimentation est complètement inséré dans le
secteur du téléviseur et dans la prise murale.
_________________________
2.1.5 Télécommande
Introduisez les deux piles fournies (Type R03-1,5V).
FRANÇAIS
2.1.3.2 Par l’entremise d’un câblosélecteur ou d’un récepteur
satellite
VIDEO L RAUDIO
AV 2
L + R + VIDEO
AV2
CABLE
SIGNAL
OUT
Set top box
RF IN
ANTENNA
SPLITTER
1. Laissez le câble de téléviseur de votre résidence dans le
câblosélecteur (ou le récepteur satellite).
2. Branchez le boîtier décodeur (ou récepteur satellite) à l’arrière du
téléviseur en utilisant l’option de la meilleure connexion. Se reporter
à la rubrique 10.2 Faire les branchements vidéo et audio.
3. Sélectionnez la source en utilisant le bouton
4. Appuyez sur le bouton
OK pour confirmer la sélection.
AV de la télécommande.
Assurez-vous que les extrémités (+) et (-) des piles sont correctement
alignées (repère à l’intérieur du boîtier.)
5
Page 50

_________________________
3 Utilisation de la télécommande
1
2
5
9
11
3
4
6
7
8
10
12
13
14
1
POWER Appuyez pour allumer/éteindre.
2
AV Appuyez de manière répétée afin de sélectionner AV1, AV2,
AV3, HDMI 1, HDMI 2, HDMI 3, Side ou Chaînes de télévision
en fonction du branchement des périphériques.
3
FORMAT Se reporter à la rubrique 3.1 Format d’image.
4
CLOCK Sans fonction.
5
DEMO Dêmo marche/arrêt.
6 Boutons colorés Les boutons colorés s’affichent à l’écran lorsque
des fonctions y sont associées.
7
INFO
Affichage d’informations Appuyez pour afficher (si disponibles)
les informations de la chaîne et du programme sélectionnés ou de
l’appareil accessoire.
Affichage de l’horloge: Sélectionner pour activer/désactiver
l’affichage de l’horloge à l’écran.
8
OK - Permet d’activer un réglage.
- Permet d’afficher la liste des chaînes mémorisées (conformément
à la sélection effectuée en mode Installation - Antenne ou Câble,
se reporter à la rubrique 7.3 Mémorisations des chaînes de
télévision).
- Débute la lecture du contenu affiché par le navigateur multimédia.
Se reporter à la rubrique 9 Navigateur multimédia.
16
15
9
MENU Menu réglages Marche/Arrêt. Se reporter à la rubrique 5.2
Utilisation des réglages du menu TV.
10 Boutons du curseur Appuyez sur les boutons haut/bas et gauche/
droite du curseur pour naviguer dans les menus.
11
VOLUME Appuyez sur + ou - pour régler le volume.
12 Sélection des chaînes
- Permet de naviguer dans les chaînes de télévision ou les sources
enregistrées et marquées dans la liste des chaînes favorites (se
reporter à la Rubrique 8 Création d’une liste de favoris;
- Permet de naviguer rapidement dans la liste des menus;
- Pour choisir entre les chaînes de télévision par antenne ou par câble,
vous devez d’abord effectuer votre sélection dans le menu Réglages,
se reporter à la Rubrique 7.3 Mémorisation des chaînes de
télévision.
13
MUTE Permet de couper/rétablir le son.
14 Boutons numériques Permet de sélectionner une chaîne de
télévision.
15 • Tapez le point (•) pour les chaînes numériques.
16
A/CH Appuyez sur ce bouton pour basculer de la chaîne
actuellement visualisée à la chaîne visualisée précédente et vice versa.
Dû à la sensibilité de la télécommande, vous pouvez constater un retard
au démarrage de la TV. Mais après quelques instants votre télécommande
marchera de nouveau parfaitement.
6
Page 51

_________________________
_________________________
3.1 Format plein écran
Cette fonction vous permet de supprimer les barres noires situées sur
les côtés ou en haut et en bas de l'image. Vous pouvez changer le format
de l'image afin que celle-ci remplisse tout l'écran.
1. Appuyez sur
2. Appuyez sur Î ou ï pour sélectionner l'un des formats d'image
disponibles.
3. Si nécessaire, appuyez sur Î pour faire apparaître les sous-titres.
Conseil: Le réglage Automatique est recommandé pour réduire la
distorsion.
FORMAT pour accéder au menu Format d'image.
Automatique (Pas pour PC)
Élargit automatiquement l'image afin qu'elle
remplisse tout l'écran. Les sous-titres restent
visibles.
Panoramique (Pas pour HD)
Supprime les barres noires situées sur les côtés
de l'image en diffusion 4:3. La distorsion est
minime.
3.2 Boutons sur le côté gauche du téléviseur
Si vous perdez ou cassez votre télécommande, vous pouvez toujours
modifier certains réglages de base au moyen des boutons situés sur le
côté gauche du téléviseur.
Appuyez sur l’interrupteur
tension (ON).
Le bouton
MENU peut être utilisé pour «appeler» le menu Réglages sans
la télécommande.
Utiliser les boutons + et - du
boutons + et - du
CHANNEL pour visualiser les chaînes de télévision et
sources stockées et inscrites dans les listes de chaînes favorites (Favorite).
_________________________
POWER . pour mettre le téléviseur sous
VOLUME pour ajuster le volume et les
FRANÇAIS
4:3 (Pas pour HD)
Affiche le format usuel 4:3.
Ext. image 14:9 (Pas pour HD)
Redimensionne le format 4:3 pour obtenir un
format 14:9.
Ext. image 16:9 (Pas pour HD)
Redimensionne le format 4:3 pour obtenir un
format 16:9.
Plein écran 16:9
Étire le format 4:3 pour obtenir un format
16:9.
3.3 Mise sous tension du téléviseur
•
Appuyez sur l’interrupteur . du côté gauche du téléviseur.
> Un voyant s’allume sur l’avant du téléviseur.
•
Appuyez sur le bouton
télécommande.
La toute première fois (uniquement la première fois) où vous mettre
le téléviseur sous tension, vous verrez un écran de bienvenue
suivi de la procédure d’installation. Reportez-vous à la rubrique 4
Installation initiale.
+CH- ou sur le bouton POWER de la
Non mis à l’échelle (HD et PC uniquement)
Définition maximum. Les bords peuvent
être distordus. Des barres noires peuvent
apparaître sur les images provenant de votre
PC.
Remarque: N'oubliez pas d'attribuer un nom à la connexion dans le
menu Connexions. Voir section 7.5 Sélection des connexions.
7
Page 52

_________________________
4 Première installation
Cette procédure se compose d'une série d'écrans qui indiquent les
étapes à suivre pour installer le téléviseur. Suivez les instructions à
l'écran.
Si le téléviseur a déjà fait l'objet d'une installation et/ou si vous
souhaitez modifier les réglages de première installation, passez à la
Rubrique 5.2 Utilisation des réglages du menu TV.
Étape 1 - Sélectionnez la langue d’affichage à l’écran
Après l'écran de bienvenue, vous êtes invité à sélectionner la langue
d'affichage des menus. La langue du titre et des informations affichées
change continuellement.
Langue des menus
Veuillez sélectionner votre
langue en
utilisant le curseur de
direction haut/bas
Suivant
1. Appuyez sur les curseurs haut et bas pour sélectionner votre langue.
2. Appuyez sur le bouton
3. Suivez les instructions à l'écran pour continuer.
Étape 2 - Terminez la procédure initiale d’installation du
téléviseur
1. Appuyez sur le bouton vert de la télécommande pour démarrer
l'installation des chaînes.
Installation
Mode installation
Antenne
Câble
Précédent Suivant
2. Sélectionnez Câble ou Antenne dans le mode d’installation et
appuyez sur le bouton vert.
> Lorsque vous sélectionnez Antenne, le téléviseur détectera
les signaux d’antenne et recherchera les chaînes de télévision
hertziennes (NTSC et ATSC) disponibles dans votre zone.
> Lorsque vous sélectionnez Câble le téléviseur détectera les
signaux émis par votre câblopérateur et recherchera les chaînes de
télévision par câble (NTSC, ATSC, QAM modulé) disponibles dans
votre zone.
3. Appuyez sur le bouton vert de la télécommande pour démarrer
l'installation automatique des chaînes.
> Toutes les chaînes de télévision sont recherchées et mémorisées
automatiquement. Ce processus prend quelques minutes. Une
fois la recherche terminée, le menu indique le nombre de chaînes
numériques et analogiques trouvées.
English
Français
Español
Português
.............
OK de votre télécommande.
Veuillez sélectionner
votre mode d’installation
Étape 3 - Assistant configuration: sélection des paramètres TV
L’assistant de paramétrage assiste dans la sélection des paramètres
préférés d’image, de son et de luminosité. Enfin, on obtiendra un
paramétrage complet satisfaisant.
1. Appuyez sur le bouton vert de la télécommande pour accéder au
menu de l'Assistant configuration.
Installation
L'assistant va vous aider à installer les sections-suivantes :
Télévision
Assistant configuration
Précédent Suivant
2. Sélectionnez votre lieu d'installation à l'aide du curseur haut et bas.
Assistant configuration
Sélectionnez votre endroit a vant de poursuivr e:
Maison
Magasin
SauterPrécédent Suivant Stop
> L'Assistant configuration s'affiche lorsque vous choisissez Maison.
> L'Assistant configuration est ignoré si vous choisissez Magasin.
Les paramètres TV de l'image et du son seront réglés sur une
valeur prédéfinie.
3. Appuyez sur le bouton vert pour continuer.
4. Appuyez à chaque fois sur le curseur gauche et droit pour
sélectionner l'écran de votre choix.
5. Appuyez à chaque fois sur le bouton vert pour confirmer votre
sélection et passer à l'écran suivant.
> Les éléments suivants se présenteront les uns après les autres.
L'en-tête indique le nombre d'écrans traités ainsi que le nombre
d'écrans total.
6. Une fois terminé, appuyez deux fois sur le bouton vert pour
mémoriser les réglages et retourner au menu Installation TV.
Si vous ignorez ou arrêtez l'Assistant configuration, les réglages
standard choisis pour vous par Magnavox sont sélectionnés d'office.
7. Appuyez sur le bouton rouge pour terminer la procédure de
première installation et afficher la première chaîne TV mémorisée.
Vous pouvez modifier ou réinitialiser tous les réglages ou un
réglage en particulier pour les rubriques Image et Son dans le
menu Paramètres TV. Se reporter à la rubrique 5.2.1
paramètres de visualisation et d’écoute
.
Ajuster les
Pour modifier les réglages des fonctions TV spéciales, des options
et des accessoires, se reporter à la rubrique 6 Modification des
réglages du menu Options.
Si vous choisissez d’installer les chaînes plus tard, se reporter à la
rubrique 7.3, Mémorisation des chaînes de télévision pour
sélectionner Programmation auto pour rechercher les chaînes
disponibles.
4. Appuyez sur le bouton rouge une fois la recherche terminée.
8
Page 53

_______________________
5 Comment naviguer dans les menus
_______________________
5.1 Introduction
Des instructions, des textes d'aide et des messages s'affichent sur votre
téléviseur lorsque vous utilisez les menus ou essayez d'effectuer une
opération. Veuillez suivre les instructions et lire les textes d'aide relatifs à
l'élément mis en surbrillance.
Les boutons de couleur en bas de l'écran correspondent aux différentes
opérations pouvant être exécutées.
Appuyez sur le bouton de couleur correspondante de la télécommande
pour effectuer l'opération demandée.
- Installation vous permet de
- sélectionner la langue du menu;
- rechercher et mémoriser vos chaînes de TV;
- procéder à une installation de base des chaînes numériques ATSC;
- définir ou modifier différentes options spéciales;
- sélectionner des équipements périphériques connectés;
- rétablir les préréglages d'usine d'image et de son;
- mettre à jour le logiciel du téléviseur.
- Mise à niveau logiciel permet de mettre à jour le logiciel.
5. Utilisez le curseur droit pour accéder à l'option de menu en
surbrillance.
> Le contenu du panneau droit s'affiche dans le panneau gauche-; le
panneau droit indique alors le contenu de la nouvelle option mise
en surbrillance dans le panneau gauche.
1. Appuyez sur le bouton
MENU de la télécommande.
> Le menu principal s'affiche à l'écran.
Télévision
Multimédia
Menu TV
Liste des chaînes
Guide des programmes
Périphérique USB 1
- Menu TV vous permet d'accéder au menu TV. Voir ci-dessous.
- Liste des chaînes vous permet d'accéder à la liste des chaînes
de télévision et de créer jusqu'à quatre-listes de favoris pour
vos chaînes de télévision préférées. Se reporter à la rubrique 8 -
Création d’une liste de favoris.
- Guide des programmes permet d’afficher des informations
détaillées au sujet des émissions numériques de télévision.
- Multimédia vous permet d'accéder au navigateur multimédia. Vous
pouvez ainsi afficher vos fichiers multimédias personnels (vidéo,
images, audio). L'option Multimédia est uniquement disponible
lorsqu'un périphérique USB est connecté. Se reporter à la rubrique
9 Navigateur Multimédia.
2. Sélectionnez une rubrique du menu en le mettant en surbrillance à
l'aide du curseur haut et bas.
3. Utilisez le curseur droit pour accéder à l'élément de menu en
surbrillance.
> Le panneau droit indique le contenu de l'option de menu mise en
surbrillance.
4. Sélectionnez une rubrique du menu à l'aide du curseur haut et bas.
Dans certains cas, il est important de pouvoir visualiser l'image
pendant les réglages. En effet, lorsque le panneau droit est en
surbrillance, les autres options de menu sont masquées. Si vous
appuyez sur le curseur gauche, les options de menu masquées
réapparaissent et le panneau gauche est de nouveau mis en
surbrillance.
6. Appuyez sur le bouton
MENU pour quitter le menu principal.
_________________________
5.2 Réglages du menu TV
Le menu TV vous permet d'accéder aux réglages et aux préférences
et de les modifier, au cas où vous souhaiteriez modifier les réglages
de première installation et/ou contrôler les réglages des fonctions TV
spéciales, des options et des périphériques.
_________________________
5.2.1 Ajuster les paramètres de visualisation et d’écoute
1. Appuyez sur le bouton
> Le menu principal s'affiche à l'écran.
Télévision
Multimédia
2. Sélectionnez Menu TV et appuyez sur le curseur droit.
> Le menu TV s'affiche.
Menu TV
Paramètres TV
Options
Installation
Mise à niveau logiciel
MENU de la télécommande.
Menu TV
Liste des chaînes
Guide des programmes
Périphérique USB 1
Paramètres TV
Assistant configuration
Remettre aux valeurs sta..
Image
Son
FRANÇAIS
Menu TV
Paramètres TV
Options
Installation
Mise à niveau logiciel
Info
Paramètres TV
Assistant configuration
Remettre aux valeurs sta..
Image
Son
- Paramètres TV vous permet de définir les réglages de l'image et du
son à votre convenances
- Options vous permet de contrôler les réglages des options TV
spéciales
Info
3. Sélectionnez Paramètres TV et appuyez sur le curseur droit.
> Le menu Paramètres TV passe à gauche.
4. Appuyez sur le bouton
MENU pour quitter le menu.
Trois méthodes différentes permettent de faciliter la modification des
réglages du téléviseur.
9
Page 54

A. L'Assistant configuration vous permet de modifier vos
réglages en toute simplicité
Appuyez sur le bouton vert après chaque sélection pour la valider.
1. Sélectionnez Assistant configuration et appuyez sur le curseur
droit.
> Vous êtes invité à sélectionner vos réglages d'image et du son
sur différents écrans divisés ou pleins, afin d'obtenir un réglage
correspondant à vos préférences. Voir Rubrique 4 Première
installation, Étape 3 - Assistant configuration.
2. Appuyez sur le bouton vert pour retourner au menu TV.
B. Utilisation de réglages standard
Cette option vous permet de sélectionner un des réglages de
visualisation et d’écoute standard.
1. Sélectionnez Remettre aux valeurs standard et appuyez sur le
curseur droit.
> Vous voyez apparaître un menu qui vous permet de sélectionner
un des préréglages d’usine de visualisation et d’écoute.
Menu TV
Paramètres TV
Remettre aux valeurs sta..
Image
Son
Remettre aux valeurs st..
Actuels
Naturel(le)
Vive
Film
8. Appuyez sur le curseur gauche pour revenir au menu Image.
Menu TV
Paramètres TV
Assistant configuration
Remettre aux valeurs sta..
Image
Son
Info
Image
Contraste
Lumière
Couleur
Teinte
Définition
Température couleur
Perfect Pixel HD
Contraste dynamique
Réduction sonore
Réduction artefact MPEG
Couleurs renforcées
Active Control
Senseur lumière
Format d’image
Contraste
Permet de régler l'intensité des zones vives de l'image en laissant les
zones sombres inchangées.
Info
> Actuels affiche vos réglages de visualisation et d’écoute actuels.
> En sélectionnant Naturel(le), vous affecterez aux réglages
d'image et de son les valeurs standards recommandées. Ce
réglage offre dans la plupart des cas un affichage parfaitement
équilibré.
> En sélectionnant Vive, vous affecterez des valeurs riches aux
réglages d'image et de son et bénéficierez ainsi pleinement des
caractéristiques techniques de votre téléviseur.
> En sélectionnant Film, vous obtiendrez des réglages d'image
et de son recréant le plus fidèlement possible le contenu de la
source.
2. Appuyez sur le bouton vert pour mémoriser le réglage sélectionné.
C. Réglages individuels de l’image et du son
Sélectionnez Image ou Son, puis appuyez sur le curseur droit.
•
> Un menu permettant le réglage fin de l'image et du son s'affiche.
> Pour modifier les réglages de l'image, voir Rubrique 5.2.2
Ajuster les réglages du menu Image.
> Pour modifier les réglages de l'image, voir Rubrique 5.2.3
Ajuster les réglages du menu Son.
_________________________
5.2.2 Ajuster les réglages du menu Image
Le menu Image contient les réglages qui influent sur la qualité de l'image.
1.
Appuyez sur le bouton MENU de la télécommande.
> Le menu principal s'affiche.
2. Sélectionnez Menu TV et appuyez sur le curseur droit.
> Le menu TV passe à gauche.
3. Sélectionnez Paramètres TV et appuyez sur le curseur droit.
> Le menu Paramètres TV passe dans le panneau de gauche.
4. Sélectionnez Image et appuyez sur le curseur droit.
> Le menu Image passe dans le panneau de gauche.
5. Appuyez sur les curseurs haut et bas pour sélectionner les options
du menu Image.
6. Appuyez sur le curseur droit pour accéder à une option du menu
Image.
7. Modifiez les réglages à l'aide du curseur.
Lumière
Permet de régler le niveau de luminosité de l'image entière, ce qui
affectera principalement les zones les plus sombres de l'image.
Couleur
Permet de régler le niveau de saturation des couleurs selon vos
préférences personnelles.
Teinte
Vous permet d’ajuster les couleurs (tons) de l’image.
Définition
Permet de régler la netteté des détails de l'image.
Température couleur
Permet d'augmenter ou de diminuer les réglages de couleur Chaud
(rouge) et Froid (bleu) selon vos préférences personnelles
Sélectionnez Froid pour donner aux couleurs blanches une teinte
•
bleue, Normal pour leur donner une teinte neutre et Chaud pour
leur donner une teinte rouge.
Sélectionnez Sur mesure pour effectuer un réglage personnalisé
•
dans l'option de menu Température couleur sur mesure.
1. Appuyez sur le bouton vert.
> La boîte de dialogue Température couleur sur mesure
s’affiche à l’écran. Cette option permet de peaufiner le point
blanc (
WP) et le niveau de noir (BL) de l’image.
2. Sélectionnez et modifiez les réglages suivants à l'aide du curseur:
R-WP-: vous permet de personnaliser le température couleur en
modifiant le niveau de rouge du point blanc de l'image.
G-WP-: vous permet de personnaliser le température couleur en
modifiant le niveau de vert du point blanc de l'image.
B-WP-: vous permet de personnaliser le température couleur en
modifiant le niveau de bleu du point blanc de l'image.
R-BL-: vous permet de personnaliser le température couleur en
modifiant le rouge du niveau de noir de l'image.
G-BL-: vous permet de personnaliser le température couleur en
modifiant le vert du niveau de noir de l'image.
3. Utiliser les boutons de couleur pour réinitialiser les paramètres
prédéfinis.
4. Appuyez sur le bouton rouge ou sur le curseur gauche pour revenir
au menu Image.
10
Page 55

Perfect Pixel HD
Le réglage Perfect Pixel HD est idéal. L'image est entièrement traitée
afin d'optimiser chaque pixel, améliorant ainsi le contraste, la définition,
l'intensité, ainsi que la reproduction et la vivacité des couleurs pour
chaque source, y compris la Haute définition.
•
Sélectionnez Marche ou Arrêt pour activer/désactiver Perfect Pixel
HD.
Contraste dynamique
Cette option renforce automatiquement le contraste dans les zones
d'image plus sombres et plus vives alors que l'image à l'écran change.
Dans la plupart des cas, sélectionnez Médium. Il peut être
•
souhaitable de choisir Minimum, Maximum ou Arrêt.
Réduction sonore
Réduction sonore filtre et diminue automatiquement le bruit des images.
La qualité de l'image est donc améliorée lorsque les signaux sont faibles.
Sélectionnez Arrêt, Minimum, Médium ou Maximum en
•
fonction du niveau de bruit de l'image.
Réduction artefact MPEG
Réduction artefact MPEG activée permet de fluidifier les transitions des
contenus numériques.
Sélectionnez Marche ou Arrêt.
•
Couleurs renforcées
Permet de contrôler automatiquement le renforcement du vert et
l'étirement du bleu. Les couleurs sont plus vives.
Sélectionnez Arrêt, Minimum, Médium ou Maximum.
•
Active Control
Le téléviseur mesure et corrige en permanence tous les signaux qu'il
reçoit afin d'obtenir la meilleure image possible.
Sélectionnez Marche ou Arrêt pour activer/désactiver la fonction
•
Active Control.
Senseur lumière
Lorsqu'il est activé, le senseur de lumière définit automatiquement l'image
afin de garantir un affichage parfait en fonction des conditions d'éclairage
de la pièce.
Sélectionnez Marche ou Arrêt.
•
Format d'image
Se reporter à la Rubrique 3.1 Format plein écran.
_________________________
5.2.3 Ajuster les réglages du menu Son
Le menu Son contient les réglages qui influent sur la qualité du son.
1. Appuyez sur le bouton
MENU de la télécommande.
> Le menu principal s'affiche.
2. Sélectionnez Menu TV et appuyez sur le curseur droit.
> Le menu TV passe à gauche.
3. Sélectionnez Paramètres TV et appuyez sur le curseur droit.
> Le menu Paramètres TV passe dans le panneau de gauche.
4. Sélectionnez Son et appuyez sur le curseur droit.
> Le menu Son passe dans le panneau de gauche.
5. Appuyez sur les curseurs haut et bas pour sélectionner les options
du menu Son.
6. Appuyez sur le curseur droit pour accéder à une option du menu
Son.
Menu TV
Paramètres TV
Assistant configuration
Remettre aux valeurs st..
Image
Son
Info
Son
Égaliseur
Volume
Balance
Langue audio
Changer audio
Mono/Stéréo
Mode son
Volume du casque
Ajust. autom. du volume
Delta volume
Auto surround
Égaliseur
Permet de sélectionner un des paramètres prédéfinis pour l’égalisateur:
Standard, Parole, Multimédia ou Musique.
Menu TV/Paramètres TV
Son
Égaliseur
Volume
Balance
Langue audio
Changer audio
Mono/Stéréo
.....
Info
Égaliseur
3
1,5kHz 5kHz
Utiliser les boutons de couleur pour effectuer la sélection.
Utiliser les boutons de curseur pour ajuster la réponse de fréquence au
choix convenable.
Volume
Permet de régler le niveau sonore.
Balance
Permet de régler la sortie audio des haut-parleurs gauche et droit pour
obtenir une reproduction stéréo optimale.
Langue audio
Permet de sélectionner une langue son dans la liste des langues
disponibles pour l'émission numérique en cours.
Si plusieurs langues son sont disponibles, sélectionnez-en une. Pour
modifier la langue son de manière définitive, utilisez le menu Langue
du menu Installation, voir Rubrique 7.2 Sélectionnez votre
langue.
Changer audio (uniquement sélectionnable avec des signaux
analogiques)
Vous offre la possibilité d’alterner entre le programme audio Principal ou
Secondaire. (SAP) si disponible.
FRANÇAIS
selon le signal d'entrée, il est possible que certaines options de
menu ne puissent pas être sélectionnées.
7. Modifiez les réglages à l'aide du curseur.
8. Appuyez sur le curseur gauche pour revenir au menu Son.
Mono/Stéréo
Permet de sélectionner, pour chaque chaîne, un son Mono ou Stéréo,
lorsqu'une émission analogique est disponible en stéréo.
11
Page 56

_________________________
Mode son
Permet de sélectionner les modes de reproduction spatial ou surround
selon les signaux de diffusion ou les signaux d'entrées externes reçus.
Volume du casque
Permet de contrôler le volume sonore du casque.
Ajustement automatique du volume
Réduit automatiquement les différences de volume entre chaînes et
programmes, offrant un niveau général plus constant. Réduit également la
dynamique du son.
Delta volume
Permet de rectifier toute différence de volume permanente entre chaînes
ou sources externes.
Changer les chaînes à l’aide des boutons numériques ou du bouton
CH- ou +.
Auto surround
Lorsque cette fonction est réglée sur Marche, le téléviseur sélectionne
automatiquement le meilleur mode de son surround émis par le
télédiffuseur.
6 Utilisation du menu Options
Le menu Options permet de configurer des fonctions TV spéciales, des
options et des périphériques.
1. Appuyez sur le bouton
> Le menu principal s'affiche.
2. Sélectionnez Menu TV et appuyez sur le curseur droit.
> Le menu TV passe à gauche.
3. Sélectionnez Options sur et appuyez sur le curseur droit.
> Le menu Options passe dans le panneau de gauche.
Menu TV
Paramètres TV
Options
Installation
Mise à niveau logiciel
Info
4. Appuyez sur les curseurs haut et bas pour sélectionner les options
du menu Options.
5. Appuyez sur le curseur droit pour accéder à une option du menu
Options.
6. Modifiez les réglages à l'aide du curseur.
7. Appuyez sur le curseur gauche pour revenir au menu Options.
_________________________
MENU de la télécommande.
Options
Sous-titres codés
Service sous-titres
Service sous-titres numér.
Options sous-titres numér.
Arrêt programmé
........
6.1 Sous-titres codés
Affiche sur l’écran du téléviseur le texte CC ou CS diffusé suivant le
service CC ou CS choisi dans le menu Service sous-titres ou sous-titres
numériques ci-dessous. Ce texte peut soit être affiché en permanence
(en assumant que ce service est disponible dans la diffusion), soit
seulement lorsque l’option Suppression du son est activée.
1. Appuyez sur le curseur droit après avoir sélectionné Sous-titres
codés.
2. Sélectionnez Marche, Arrêt ou Actif sans son.
_________________________
6.2 Service sous-titres
Vous permet de sélectionner les niveaux du service Sous-titres de
télédiffusion analogique à afficher. Les sous-titres codés vous permettent
de lire le contenu vocal des programmes de télévision sur votre écran
TV. Cette fonction, à l’intention des malentendants, utilise des ‘boîtes de
texte’ à l’écran pour afficher les dialogues et les conversations en même
temps que le programme de télévision. Les sous-titres codés apparaissent
à l’écran durant les télédiffusions à sous-titres.
1. Sélectionnez Service sous-titres.
2. Appuyez sur le curseur droit.
3. Sélectionnez le Service sous-titres désiré :
> CC 1, 2, 3 ou 4
Dialogue (et descriptions) des actions d’un programme de
télévision à sous-titrage codé à l’écran. En général, CC 1 est le
mode le plus utilisé. CC 2 peut être utilisé pour des langues
alternatives si elles sont transmises.
> T 1, 2, 3 ou 4
Souvent utilisés comme guide de chaînes, horaires, affichage
d’informations sur les émissions sous-titrées, nouvelles, météo et
bourse.
Les services de sous-titrage codé ne sont pas tous utilisés
nécessairement par une chaîne de télévision lors de la transmission
d’une émission sous-titrée.
12
Page 57

_________________________
6.3 Service sous-titres numériques
Vous permet de choisir comment vous souhaitez visualiser les sous-titres
numériques.
•
Sélectionnez l’une des chaînes de service numériques proposées par
le fournisseur des sous-titres. Il existe six services standards.
- Le CS 1 est le «Primary Caption Service». Ce service contient des
sous-titres in extenso ou presque dans la langue principale parlée
dans l’audio d’accompagnement.
- Le CS 2 est le «Secondary Language Service». Ce service contient
des sous-titres dans une langue secondaire, qui sont des traductions
des sous-titres du CS 1.
- Les autres sous-chaînes de service ne sont pas pré-attribuées. Leur
utilisation est à la discrétion du fournisseur des sous-titres.
- Ce téléviseur fournit des fonctions de sous-titrage codé répondant
aux normes EIA-608 et selon les articles 15.119 des règlements de
FCC.
- L’orthographe et la grammaire des sous-titres ne sont pas toujours
parfaites. Toutes les émissions de télévision et toutes les publicités
de produits ne sont pas conçues pour être diffusées avec des
informations de sous-titrage. Consultez les listes d’émissions de
télévision de votre zone pour connaître les chaînes proposant des
émissions sous-titrées et les horaires de diffusion. Les programmes
sous-titrés sont en général marqués dans les listes de programmes
de télévision par un signe tel que « CC ».
_________________________
6.4 Options sous-titres numériques
Vous permet de modifier l’affichage des sous-titres numériques sur votre
téléviseur.
Menu TV
Options
Sous-titres codés
Service sous-titres
Service sous-titres num.
Options sous-titres num.
Arrêt programmé
Verrouillage
Changez code
Minuterie marche
Demo
Info
•
Sélectionnez l’une des options suivantes pour changer les
caractéristiques visuelles des sous-titres numériques sur votre
téléviseur.
- Rétablir les valeurs par défaut
Sélectionnez cette option pour rétablir les options de sous-titrage
numérique aux valeurs par défaut du fournisseur des sous-titres.
•
Appuyez sur le curseur droit et sur le bouton
la sélection.
- Taille
Sélectionnez cette option pour sélectionner la taille d’affichage des
sous-titres selon vos préférences.
Sélectionnez Par défaut (Automatique), Petit, Standard ou
•
Grand.
- Style
Sélectionnez cette option pour sélectionner le style de l’affichage
des sous-titres selon vos préférences.
Sélectionnez Par défaut, Monospaced serif, Serif,
•
Monospaced sans serif, Sans serif, Par hasard, Italique ou
Petites capitales.
Options sous-titres numér.
Rétablit val. par défaut
Taille
Style
Couleur du texte
Opacité du texte
Couleur de fond
Opacité de fond
Type de bord
Couleur du bord
OK pour confirmer
- Texte
Sélectionnez cette option pour sélectionner la couleur du texte ou
l’opacité de l’affichage des sous-titres selon vos préférences.
•
Sélectionnez une couleur et une des options d’opacité.
- Fond
Sélectionnez cette option pour sélectionner la couleur de fond des
caractères ou l’une des options d’opacité du fond de l’affichage des
sous-titre selon vos préférences.
Sélectionnez une couleur et une des options d’opacité.
•
- Type de bord
Vous permet de sélectionner le type de bord de l’affichage titres
selon vos préférences.
Sélectionnez un type.
•
- Couleur du bord
Vous permet de sélectionner la couleur du bord de l’affichage titres
selon vos préférences.
Sélectionnez une couleur.
•
_________________________
6.5 Arrêt programmé
Programme une durée après laquelle le téléviseur passera
automatiquement en position de veille.
1. Sélectionnez Arrêt programmé.
2. Appuyez sur le curseur droit.
3. Sélectionnez une valeur avec le curseur haut/bas. La liste comporte
des valeurs de 0 à 180 minutes.
Vous pouvez toujours arrêter votre téléviseur plus tôt ou
sélectionner une autre heure.
_________________________
6.6 Verrouillage
Un code à quatre-chiffres vous permet de verrouiller les chaînes de
télévision et les sources externes afin d'interdire certaines émissions aux
enfants.
1. Sélectionnez Verrouillage.
TV menu
Features
Sous-titres codés
Service sous-titres
Service sous-titres num.
Options sous-titres num.
Arrêt programmé
Verrouillage
Changez code
Minuterie marche
Demo
Info
2. Appuyez sur le curseur droit pour entrer dans le menu Verrouillage.
3. Saisissez votre code à 4-chiffres.
Vous devez saisir votre code chaque fois que vous accédez au
menu Verrouillage
4. Sélectionnez l'une des options du menu Verrouillage, puis appuyez sur
le curseur droit.
Verrouillage
Verrouiller après
Verrouillage de chaîne
Verrou qualifications TV
Verrou qualitifaction ciné
Verrous régionaux
FRANÇAIS
13
Page 58

________________________
6.6.1 Verrouiller après
Verrou après ne peut être sélectionnée que si l’heure et la date sont
connue. Voir Rubrique 7.6 - Horloge.
4. Appuyez sur
OK pour activer/désactiver la qualification sélectionnée.
5. Sélectionnez une autre qualification selon le contenu, au besoin, et
appuyez sur
Cote en fonction de l’age Cote en fonction du contenu
OK de nouveau.
Vous permet d’empêcher la visualisation de la chaîne sélectionnée après
une certaine période de temps. Il reste possible de se syntoniser sur les
chaînes verrouillées mais l’image est blanche et le son muet.
Menu TV / Options
Verrouillage
Verrouiller après
Verrouillage de chaîne
Verrou qualifications TV
Verrou qualifaction Ciné
Verrous régionaux
Info
Verrouiller après
Minuteur
Heure
1. Appuyez sur le curseur droit et sélectionnez Minuteur Marche ou
Arrêt.
> Lorsqu’il est réglé à Marche cela vous permet de régler l’heure.
2. Sélectionnez Heure et appuyez sur le curseur droit.
> Vous permet de préciser l’heure à laquelle le verrouillage sera
activé.
3. Sélectionnez
AM ou PM pour choisir la période appropriée de la
journée.
4. Entrez l’heure avec les chiffres ou les boutons du curseur.
_________________________
6.6.2 Verrouillage de chaîne
Ceci vous permet de verrouiller complètement une chaîne télévisée
ou une source externe donnée.
•
Sélectionnez les chaînes ou les sous-chaînes que vous voulez
verrouiller.
_________________________
6.6.3 Verrou qualifications TV
Votre téléviseur est équipé d’une puce antiviolence. Vous permet de
contrôler l’accès aux programmes personnels sur la base de leurs
qualifications (films et TV). Tous les paramètres s’appliquent à toutes
les entrées AV (HDMI exceptée). Des informations sur le contenu des
programmes sont envoyées par le télédiffuseur ou le fournisseur de
programmes.
1. Sélectionnez Verrou qualificat. TV à l’aide du curseur bas.
Menu TV / Options
Verrouillage
Verrouiller après
Verrouillage de chaîne
Verrou qualifications TV
Verrou qualifications ci..
Verrous régionaux
Info
Verrou qualifications TV
Tous
Aucun(e)
TV-Y
TV-Y7
TV-G
TV-PG
TV-14
TV-MA
> Une liste est affichée, indiquant la qualification des émissions TV
selon l’âge ainsi qu’une liste de qualifications correspondantes
basées sur le contenu.
2. Appuyez sur le curseur droit pour entrer dans la liste.
3. Sélectionnez une qualification TV selon l’âge avec le curseur haut/bas,
et entrez dans la liste, si elle est présente, avec qualification selon le
contenu à l’aide du curseur droit puis sélectionnez une qualification
selon le contenu.
Tous Aucun(e)
Aucun(e) Aucun(e)
TV-Y Aucun(e)
TV-Y7 (FV) Fantaisie Violence
TV-G Aucun(e)
TV-PG (D) Dialogue
(L) Langue
(S) Contenu sexuel
(V) Violence
TV-14 (D) Dialogue
(L) Langue
(S) Contenu sexuel
(V) Violence
TV-MA (L) Language
(S) Sex
(V) Violence
Lorsque Tous est sélectionné, tous les éléments de la liste selon le
contenu et selon l’âge sont verrouillés.
Si, lorsque Tous est sélectionné, tout autre élément, classé selon l’âge
ou selon le contenu, est désélectionné, alors Tous est automatiquement
désélectionné.
Aucun(e) est la sélection pour les éléments ne disposant d’aucune
information de qualification ou disposant d’une qualification de Aucun(e).
Les deux seront verrouillés.
Lorsqu’un élément de la liste selon l’âge est sélectionné, tous les
éléments en dessous de cet élément du même groupe sont également
verrouillés.
Lorsque vous sélectionnez une qualification selon le contenu, toutes les
qualifications au contenu identique dans les catégories des plus jeunes
sont également sélectionnées.
Vous pouvez verrouiller/déverrouiller toutes les qualifications de la
liste sans devoir entrer votre code de nouveau.
Chaque élément de qualification est accompagné d’un graphique encadré
servant à indiquer si le programme portant cette qualification est
présentement verrouillé.
Qualifications (cotes) TV
TV-Y Approprié pour les enfants sans limite d’âge avec des thèmes
et des éléments qui conviennent à des enfants de 2 à 6 ans
TV-Y7 Programmes conçus pour les enfants de 7 ans et plus
TV-Y7-FV Programmes contenant de la violence imaginaire plus
intense que dans les programmes de la catégorie TV-Y7
TV-G Programmes convenant à tous les âges. Ces programmes
contiennent peu ou pas de violence, pas de langage offensif et peu ou
pas de dialogue ou situation sexuelle
TV-PG Programmes contenant des éléments que certains parents
jugent inappropriés pour les enfants plus jeunes et pouvant nécessiter
une surveillance parentale. Le programme peut contenir des
situations de violence et des dialogue sexuel modérés ainsi qu’un
langage offensif.
TV-14 Programmes contenant des éléments pouvant ne pas être
appropriés à des enfants de moins de 14 ans.
Ces programmes comportent un ou plusieurs des éléments suivants :
Violence intense, situations sexuelles intenses, dialogues suggestifs et
langage offensif.
14
Page 59

TV-MA Programmes destinés à un public adulte et pouvant ne
pas être appropriés pour des enfants de moins de 17 ans. Ces
programmes peuvent contenir de la violence graphique, des activités
sexuelles explicites ou encore un langage indécent.
_________________________
6.6.4 Verrou qualifications Ciné
Cette fonction vous permet de contrôler l’accès à des films individuels
selon leur qualification MPAA (Motion Picture Association of America).
1. Sélectionnez Verrou qualif. Ciné à l’aide du curseur bas.
> Une liste, indiquant toutes les qualifications valides selon le
contenu MPAA, s’affiche.
Menu TV / Options
Verrouillage
Verrouiller après
Verrouillage de chaîne
Verrou qualifications TV
Verrou qualifications ci..
Verrous régionaux
Info
Verrou qualifications ciné
Tous
NR
G
PG
PG-13
R
NC-17
X
_________________________
6.6.5 Verrous régionaux (le cas échéant)
Celle-ci vous permet de contrôler l’accès aux programmes individuels
selon leur qualification régionale de diffusion.
1. Sélectionnez Verrous régionaux à l’aide du curseur bas.
> Une liste, indiquant toutes les qualifications valides pour la
région, s’affiche.
Menu TV / Options
Verrouillage
Verrouiller après
Verrouillage de chaîne
Verrou qualifications TV
Verrou qualifications ci..
Verrous régionaux
Info
Verrous régionaux
Veuillez introduire votre
code.
2. Appuyez sur le curseur droit pour entrer dans la liste.
3. Sélectionnez une qualification de région avec le curseur haut/bas.
4. Appuyez sur le bouton
OK pour activer la qualification sélectionnée.
5. Sélectionnez une autre qualification selon la région et appuyez sur
OK de nouveau.
6. Appuyez sur le curseur gauche pour retourner au menu Verrouillage.
_________________________
FRANÇAIS
2. Appuyez sur le curseur droit pour entrer dans la liste.
3. Sélectionnez une qualification de cinéma avec le curseur haut/bas.
4. Appuyez sur
OK pour activer/désactiver la qualification sélectionnée.
Chaque élément de qualification est accompagné d’un graphique encadré
servant à indiquer si le programme portant cette qualification est
présentement verrouillé.
Lorsque Tous est sélectionné, tous les éléments de la liste de
qualification cinéma sont sélectionnés. (Tous les films sont verrouillés.)
Si, lorsque Tous est sélectionné, tous les autres éléments sont
désélectionnés, alors Tous est automatiquement désélectionné.
Lorsque NR a été sélectionné, aucun autre élément n’est sélectionné.
Lorsque tout autre élément a été sélectionné, toutes les qualifications
suivantes sont également sélectionnées, de sorte que tous les films
portant cette qualification seront verrouillés.
Qualifications Ciné
NR Sans qualification
G Films au contenu modéré, appropriés à tous les âges.
PG Films pour lesquels une surveillance parentale est recommandée.
Ceux-ci peuvent contenir certaines scènes corsées ou violentes ou
quelquefois un langage grossier.
PG-13 Films pour lesquels une surveillance parentale est
recommandée dans le cas d’enfants de moins de 13 ans.
R Réservé aux adultes. Ces films contiennent généralement des
scènes sexuelles offensantes ou un langage grossier et peuvent
être inappropriés aux jeunes de moins de 17 ans. Surveillance ou
autorisation parentale nécessaire.
NC-17 Même avec autorisation parentale, interdit aux moins de
17 ans. Contiennent davantage de scènes sexuelles offensantes, de
violence ou de langage grossier.
X Films qui se concentrent généralement sur le sexe, la violence ou
un langage grossier. Connu également sous le nom de pornographie.
6.7 Introduisez / Changez code
Vous permet d’introduire ou de changer le code d’accès personnel
à quatre chiffres utilisé dans les diverses fonctions de verrouillage du
téléviseur.
1. Sélectionnez Introduisez ou Changez code à l’aide du curseur
bas.
Menu TV
Sous-titres codés
Service sous-titres
Service sous-titres num.
Options sous-titres num.
Arrêt programmé
Verrouillage
Changez code
Minuterie marche
Demo
Info
> Si aucun code n’a encore été créé, l’élément de menu indique
Introduisez code. Suivez les instructions à l’écran.
> Si un code a déjà été composé, l’élément de menu indique
Changez code. Suivez les instructions à l’écran.
2. Entrez votre code à l’aide des boutons numériques.
Toutes les combinaisons de chiffres de 0000 à 9999 sont valables.
3. Le menu ‘Options’ apparaît à nouveau, avec un message confirmant
que le code a été créé.
Important: vous avez oublié votre code !
1. Sélectionnez Changer code dans le menu Préférences et appuyez
sur le curseur droit.
2. Appuyez sur le curseur droit pour entrer le code de contournement
0-7-1-1.
3. Appuyez de nouveau sur le curseur et entrez un nouveau code
personnel à quatre chiffres. Le code précédent est effacé et le
nouveau est mis en mémoire.
Intro/Changez code
Veuillez introduire votre
code actuel
15
Page 60

________________________
_________________________
6.8 Minuterie marche
En mode de veille, le téléviseur passe automatiquement sur la chaîne
définie à l'heure précisée.
1. Sélectionnez Minuterie marche.
2. Appuyez sur le curseur droit pour entrer dans le menu Minuterie
marche.
3. Sélectionnez Minuteur et appuyez sur le curseur droit.
4. Sélectionnez Marche.
5. Sélectionnez Chaîne, puis choisissez la chaîne TV que vous souhaitez
visualiser à la date et à l'heure indiquées.
6. Sélectionnez Jour, puis indiquez un jour de la semaine ou choisissez
Quotidiennement.
7. Sélectionnez Heure et entrez l'heure à l'aide des boutons
numériques ou du curseur haut et bas.
8. Appuyez sur le bouton
OK pour activer l'option.
9. Appuyez sur le curseur gauche pour revenir au menu Options ou
appuyez sur le bouton
MENU pour fermer le menu.
Dès maintenant, votre TV s’allumera automatiquement à la chaîne
sélectionnée, le jour choisi, à l’heure choisie, jusqu’à ce que la fonction
Minuterie marche soit éteinte
!
Vous ne pouvez régler qu’une seule Minuterie marche.
________________________
6.9 Démo
Vous permet de vous familiariser avec les fonctions du téléviseur.
1. Sélectionnez téléviseur Démo.
Menu TV
Options
......
Intro/Changer code
Minuterie marche
Démo
Info
2. Appuyez sur le curseur droit.
3. Sélectionnez la Démo souhaitée.
4. Appuyez sur OK pour lancer la Démo.
> La Démo sélectionnée est exécutée une fois.
5. Appuyez sur le bouton rouge pour arrêter la Démo et revenir au
menu Démo.
6. Appuyez sur le bouton rouge pour quitter la le menu Démo.
Démo
Perfect Pixel HD
Assistant configuration
Active Control
7 Recherche et mémorisation des chaînes de
télévision
Cette rubrique ne vous est utile que si vous souhaitez modifier les
réglages d’installation.
_________________________
7.1 Menu Installation
Ce menu permet de modifier les réglages liés à l'installation des chaînes
de télévision.
1. Appuyez sur le bouton
> Le menu principal s'affiche.
Télévision
Multimédia
2. Sélectionnez Menu TV et appuyez sur le curseur droit.
> Le menu TV passe à gauche.
3. Sélectionnez Installation et appuyez sur le curseur droit.
> Le menu Installation passe dans le panneau de gauche.
Menu TV
Paramètres TV
Options
Installation
Mise à niveau logiciel
Info
4. Appuyez sur le curseur haut et bas pour sélectionner les options du
menu Installation.
5. Appuyez sur le curseur droit pour accéder à une option du menu
Installation.
6. Modifiez les réglages à l'aide des boutons de curseur.
7. Appuyez sur le bouton
8. Appuyez sur le curseur gauche pour retourner au menu Installation
ou appuyez sur le bouton
_________________________
7.2 Sélection de la langue
MENU de la télécommande.
Menu TV
Liste des chaînes
Guide des programmes
Périphérique USB 1
Installation
Langue
Installation chaînes
Préférences
Connexions
......
OK pour activer l'option.
MENU pour fermer le menu.
16
Ce menu vous permet de sélectionner la langue de votre choix pour les
menus, l'audio et les sous-titres.
Menu TV
Installation
Langue
Installations chaînes
Préférences
Connexions
.......
Info
Langue
English
Français
Español
Português
Page 61

________________________
7.3 Mémorisation des chaînes TV
Après avoir sélectionné la langue, il est possible de rechercher et de
mémoriser les chaînes de télévision.
1. Sélectionnez Installation chaînes et appuyez sur le curseur droit.
2. Sélectionnez Programmation automatique.
Menu TV / Installation
Installation chaînes
Programmation auto
Mise à jour installation
Installation chaîne faible
Mode installation
Éditer chaîne
Info
3. Appuyez sur le curseur droit.
4. Appuyez sur le bouton
5. Sélectionnez Câble ou Antenne dans le Mode installation.
Programmation auto
Démarrer
OK.
• Pour les chaînes ATSC, les informations sur les chaînes ne sont mises
à jour que pour la chaîne ATSC sur laquelle vous êtes couramment
syntonisé.
• Une fois la recherche de toutes les chaînes de diffusion par câble ou
antenne effectuée, elles sont mises en mémoire.
Syntonisation des chaînes
Dès que l’installation des chaînes de télévision est terminée, vous
devez faire une sélection dans le menu d’installation entre «Antenne»
et «Câble» selon que vous désirez regarder des chaînes de télévision
diffusées par antenne ou par câble.
!
Si vous utilisez un dispositif d’aiguillage de signaux, n’oubliez pas de
placer l’interrupteur à la position correspondante.
Chaînes disponibles :
- Câble (NTSC analogique ou MAQ numérique) : max. de 1 à 135
- Terrestre (NTSC analogique ou ATSC numérique) : max. de 2 à 69
Si une chaîne syntonisée ne figure pas déjà dans la carte des chaînes
maîtresses, le téléviseur essaiera de syntoniser la chaîne qui sera ensuite
ajoutée à la carte. Si la chaîne n’est pas acquise, un message indiquant
qu’elle n’est pas disponible s’affichera.
Lorsque vous vous syntonisez sur une sous-chaîne audio ne diffusant
que du son, le message Uniquement audio s’affiche.
FRANÇAIS
Menu TV / Installation
Mode installation
Antenne
Câble
Précédent
Sélectionnez votre
mode d’installation
Suivant
> Lorsque vous sélectionnez Antenne, le téléviseur détectera
les signaux d’antenne et recherchera les chaînes de télévision
hertziennes (NTSC et ATSC) disponibles dans votre zone.
> Lorsque vous sélectionnez Câble le téléviseur détectera les
signaux émis par votre câblopérateur et recherchera les chaînes
de télévision par câble (NTSC, ATSC, QAM modulé) disponibles
dans votre zone.
Assurez-vous de vous être enregistré correctement auprès de
votre fournisseur de TV par câble et d’avoir branché correctement
l’équipement.
6. Appuyez sur le bouton correspondant de couleur verte sur la
télécommande pour Suivant.
Déverrouillez toutes les chaînes pour pouvoir procéder à la
programmation automatique. Si nécessaire, introduisez votre code. Se
reporter à la rubrique 6 Ajuster les réglages du menu Options.
7. Appuyez sur le bouton correspondant de couleur verte sur la
télécommande pour Démarrer afin de lancer la programmation
automatique.
> L’écran de menu affiché est remplacé par la progression
de l’opération de programmation automatique. La barre
de progression indique le nombre de chaînes de télévision
analogiques et numériques trouvées.
> Une fois la Programmation automatique terminée, un message
confirmant la bonne fin de l’opération s’affiche et le téléviseur
bascule sur la première chaîne de télévision installée.
8. Appuyez sur le bouton rouge pour finir.
N’oubliez pas
• En cas d’interruption, les informations à jour des chaînes sont
conservées ainsi que celles des anciennes informations sur les chaînes.
• La programmation automatique en arrière-plan n’est effectuée que
lorsque le téléviseur est mis sous tension.
Sélection de sous-chaînes
Les nouvelles normes appliquées en diffusion numérique font qu’il est
maintenant possible de recevoir plusieurs chaînes sous un seul numéro
de chaîne principal qui peut être sélectionné en appuyant sur le numéro à
accès direct de la télécommande.
Délai de sélection des chaînes numériques
Compte-tenu de la complexité de la syntonisation de la programmation
des sous-chaînes numériques, le temps nécessaire pour sélectionner et
afficher une chaîne numérique pourra être légèrement supérieur à ce à
quoi l’utilisateur est habitué (avec les chaînes analogiques).
Les chaînes numériques peuvent fournir des informations sur les
émissions et le système, qui doivent être traitées avant l’affichage de la
chaîne sélectionnée.
_________________________
7.3.1 Mise à jour de l'installation
Ceci permet de syntoniser et de mettre à jour toutes les chaînes
existantes, sans modifier le tri des chaînes existantes.
Menu TV / Installation
Installation chaînes
Programmation auto
Mise à jour installation
Installation chaîne faible
Mode installation
Éditer chaîne
Info
Mise à jour installation
Démarrer
- Les nouvelles chaînes ne seront pas ajoutées à une liste de favoris.
- Les chaînes déjà installées conserveront leur ancien numéro.
_________________________
7.3.2 Installation chaîne faible
Vous permet d’optimiser la qualité du signal des chaînes ATSC faibles en
ajustant manuellement l’antenne. Cette option est uniquement disponible
pour les chaînes de télévision installées par le biais du branchement d’une
antenne.
1. Sélectionnez une chaîne dans la liste affichée des chaînes de télévision
(en mode antenne).
2. L’intensité du signal s’affiche et est mise à jour au fur et à mesure que
vous faites tourner l’antenne.
17
Page 62

_________________________
_________________________
7.3.3 Mode installation
Vous permet de sélectionner les chaînes TV par voie terrestre ou par
câble déjà mémorisées. Choisissez Antenne ou Câble selon les signaux
affichés.
_________________________
7.3.4 Éditer chaîne
Cette option permet de renommer, de modifier l'ordre, de
désinstaller ou de réinstaller les chaînes mémorisées.
Appuyez sur le bouton coloré correspondant et suivez les
•
instructions à l'écran.
Menu TV / Installation
Installation chaînes
Programmation auto
Mise à jour installation
Installation chaîne faible
Mode installation
Éditer chaîne
Info
Éditer chaîne
0
1
2
3
4
......
_________________________
7.3.4.1 Renommer
Vous permet de modifier le nom enregistré dans la mémoire ou
d'attribuer un nom à une chaîne TV sans nom.
1. Sélectionnez la chaîne que vous souhaitez renommer.
2. Appuyez sur le bouton rouge de la télécommande.
3. Sélectionnez les caractères à l'aide des curseurs haut et bas.
Sélectionnez la position suivante avec le curseur droit.
4. Appuyez sur le bouton vert ou le bouton
OK lorsque vous avez
terminé.
- Appuyez sur le bouton jaune pour supprimer tous les caractères.
Le curseur revient au début.
- Appuyez sur le bouton bleu pour supprimer le caractère sur lequel
le curseur est positionné. Entrez un nouveau caractère à l'aide des
curseurs haut/bas.
- Il est possible d'attribuer un nom aux chaînes numérotées de 0 à 999.
- Les espaces, les chiffres et les autres caractères spéciaux se trouvent
entre Z et A.
5. Sélectionnez un autre numéro de chaîne, puis répétez les étapes-2 à
5.
_________________________
7.3.4.2 Désinstaller - Réinstaller
Vous permet de désinstaller une chaîne ou une source externe
mémorisée afin qu'elle ne soit plus disponible. Vous permet également de
réinstaller une chaîne précédemment désinstallée.
1. Sélectionnez la chaîne que vous souhaitez désinstaller.
2. Appuyez sur le bouton vert pour désinstaller la chaîne sélectionnée.
> Une icône est placée devant la chaîne désinstallée dans la liste.
3. Appuyez à nouveau sur le bouton vert pour réinstaller la chaîne
désinstallée.
Les chaînes désinstallées ne seront pas réinstallées lors d'une mise à
jour de l'installation.
7.4 Définition des préférences
Ce menu contient les options permettant de régler différentes fonctions
TV spéciales rarement utilisées.
Menu TV
Installation
Langue
Channel installation
Préférences
Connexions
Horloge
Rétablit réglages AV
Info
Préférences
Région
Barre volume
Montrer les alertes d’ur..
Table cotes téléchargée
_________________________
7.4.1 Sélection du lieu d'installation
Permet de sélectionner le lieu où le téléviseur est utilisé.
Si vous sélectionnez Magasin, les réglages de l'image et du son ne seront
pas modifiables.
L'option Maison vous permet de modifier tous les réglages prédéfinis de
l'image et du son, pour plus de souplesse.
_________________________
7.4.2 Sélectionnez la barre de volume
Permet de sélectionner l'affichage de la barre de volume.
1. Sélectionnez Barre volume.
2. Appuyez sur le curseur droit pour sélectionner Marche ou Arrêt.
Marche pour activer l’affichage temporaire de la barre du volume.
_________________________
7.4.3 Montrer les alertes d’urgence (EAS)
Vous permet de sélectionner le niveau de priorité de l’information
diffusée par la société de télédistribution. La norme SCTE18 définit une
méthode de signalisation des alertes d’urgence pouvant être utilisée
par les systèmes de télédiffusion par câble pour signaler des urgences
aux services numériques tels que les récepteurs HD, les téléviseurs
numériques et les magnétoscopes numériques.
Le modèle de signalisation des alertes d’urgence défini dans la norme
permet à une société de télédistribution de diffuser des informations
d’alerte d’urgence relatives à des urgences et des avertissements de
niveaux fédéral et local de façon efficace et peu coûteuse tout en
minimisant l’interruption des programmes. Tout message d’alerte
d’urgence a l’une des priorités suivantes : Low, Medium, High ou
Maximum.
Un message d’alerte d’urgence de priorité High ou Maximum sera
toujours présenté. Un message Low ou Medium sera présenté ou ignoré
selon le réglage sélectionné.
!
Lorsque l’horloge du téléviseur n’est pas défini (se reporter à la
rubrique 7.6 Horloge), les alertes d’urgence ne seront pas présentées.
L’affichage d’un message d’alerte d’urgence contiendra les informations
suivantes:
- le texte de l’alerte d’urgence;
- la date de début;
- la date de fin.
1. Sélectionnez Montrer les alertes d’urgence dans le menu
Préférences.
2. Appuyez sur le curseur droit et sélectionnez l’une des options
d’alerte d’urgence :
- Toujours,quand vous voulez que les messages d’alerte d’urgence
disponibles soient toujours affichés ;
18
Page 63

- Sauter priorité faible quand vous voulez que les messages de
niveau de priorité faible soient ignorés ;
- Sauter priorité faible/moyenne, quand vous voulez que seuls les
messages de priorité élevée soient affichés.
- La signalisation des alertes d’urgence n’est pas possible :
- en cas de navigation dans le contenu;
- avec des sources vidéo analogiques.
- Vous avez toujours la possibilité d’éliminer le message de l’écran.
- L’affichage du message chevauchera tout élément de menu ou autre
message se trouvant à l’écran.
_________________________
7.4.4 Table cotes téléchargée
Vous permet d’ajouter des options de verrouillage des cotes régionales
aux options actuelles.
Menu TV / Installation
Préférences
Région
Barre volume
Montrer les alertes d’urg..
Table cotes téléchargées
Info
!
Avant d’activer cette option, assurez-vous que les cotes régionales
Table cotes téléchargées
Marche
Arrêt
sont diffusées.
_________________________
7.5 Sélection des connexions
(
DIGITAL AUDIO IN) à l’entrée externe correspondante à laquelle le
périphérique est branché. Le téléviseur peut diffuser un son numérique
par le biais du connecteur
DIGITAL AUDIO OUT branché à un
amplificateur ou un récepteur externe.
Si votre amplificateur ou votre récepteur dispose d’un connecteur
approprié pour Digital Audio In, vous pouvez le brancher au moyen d’un
simple câble à la sortie Digital Audio Out du téléviseur.
rubrique 10.2 Faire les branchements vidéo et audio, Amplificateur
cinemamaison.
Se reporter à la
_________________________
7.6 Réglage de l’horloge
Vous permet de régler l’heure et le jour.
Le réglage de l’horloge est requis pour que la fonction de
verrouillage fonctionne de manière appropriée (Voir Rubrique 6
le menu des fonctions
Menu TV
Installation
Langue
Installation chaînes
Préférences
Connexions
Horloge
Rétablit réglages d’usine
Info
).
Horloge
Mode horloge auto
Chaîne horloge auto
Heure
Jour
Fuseau horaire
Heure d’été
_________________________
Régler
FRANÇAIS
Ce menu vous permet de sélectionner les périphériques que vous avez
connectés aux entrées/sorties externes.
1. Sélectionnez Connexions.
Menu TV
Installation
Langue
Installation chaînes
Préférences
Connexions
Horloge
Rétablit réglages d’usine
Info
Connexions
AV1
AV2
AV3
HDMI 1
HDMI 2
HDMI 3
Side
AUDIO IN L/R
DIGITAL AUDIO IN
2. Appuyez sur le curseur droit pour entrer dans la liste des types
d’entrées externes.
3. Sélectionnez l’entrée appropriée avec le curseur haut/bas.
> Lorsque vous sélectionnez
, HDMI 3, Side, AUDIO IN L/R ou DIGITAL AUDIO IN,
2
AV1, AV2, AV3, HDMI 1, HDMI
une liste s’affiche pour vous permettre d’identifier quel type de
périphérique est branché à cette entrée.
4. Appuyez à nouveau sur le curseur droit pour entrer dans la liste des
types de périphériques branchés à l’entrée sélectionnée.
5. Sélectionnez le périphérique avec le curseur haut/bas.
Digital Audio In
Si un accessoire comprend une sortie audio numérique, vous pouvez le
brancher au moyen d’un simple câble à la sortie
DIGITAL AUDIO IN
du téléviseur. Au menu Connexions, assignez l’entrée audio numérique
7.6.1 Mode horloge auto
1. Sélectionnez Horloge dans le menu Installation.
2. Appuyez sur le curseur droit pour sélectionner le Mode horloge
auto.
3. Appuyez sur le curseur droit pour que le téléviseur affiche l’heure
automatiquement ou manuellement.
La plupart des chaînes ne transmettent pas d’informations de
nature temporelle. Quelques chaînes par câble le font, mais elles se
situent habituellement à la fin de la boucle des chaînes. L’heure n’est pas
transmise par les chaînes à antenne. Dans ces cas, soit la récupération de
l’heure est trop longue soit il n’y a pas d’horloge.
_________________________
7.6.2 Chaîne horloge auto (disponible uniquement lorsque le mode
Horloge auto est réglé à automatique)
En utilisant les boutons du curseur, choisissez le numéro de chaîne
où le téléviseur peut trouver l’affichage de l’heure. Habituellement,
vous pouvez trouver l’affichage de l’heure sur PBS (Public Broadcasting
System), ainsi que sur certaines autres chaînes.
_________________________
7.6.3 Heure - Jour (disponible uniquement lorsque le Mode horloge
auto est sur Manuel)
En utilisant les boutons du curseur, sélectionnez et introduisez l’heure et
le jour corrects. Si le Mode horloge auto Manuel est sélectionné et
s’il n’y a pas eu de recherche de l’heure, le système conservera l’heure et
le jour introduits.
_________________________
7.6.4 Fuseau horaire (disponible uniquement lorsque le Mode horloge
auto est sur Automatique)
Cette fonction vous permet de sélectionner votre fuseau horaire local.
L’information de temps transmise adaptera l’affichage de l’horloge à votre
heure local.
1. Sélectionnez Fuseau horaire à l’aide du curseur bas.
2. Appuyez sur le curseur droit pour sélectionner votre fuseau horaire.
19
Page 64

_________________________
_________________________
7.6.5 Heure d’été (disponible uniquement lorsque le Mode horloge
auto est sur Automatique)
L’heure avancée est réglée automatiquement au moyen de signaux
spéciaux. Cette option du menu vous permet de désactiver le réglage
automatique de l’heure avancée. Cela peut être utile lorsque vous habitez
dans une région ou un pays où l’heure avancée n’est pas appliquée, mais
où vous recevez des canaux d’autres régions où les signaux pour l’heure
avancée sont transmis.
1. Sélectionnez Heure d’été à l’aide du curseur bas.
2. Appuyez de nouveau sur le curseur droit pour sélectionner
Automatique pour la correction automatique de l’horloge en
fonction de l’heure avancée, d’après les signaux spéciaux diffusés.
3. Sélectionnez Arrêt pour désactiver la correction automatique de
l’horloge par les signaux spéciaux.
Les changements dans les réglages de l’horloge ne sont activés
qu’après être passé en mode de veille.
_________________________
7.7 Rétablir réglages AV
Vous permet de rétablir la plupart des réglages de l’image et du son aux
réglages de l’usine.
1. Sélectionnez Rétablit réglages AV à l’aide du curseur bas.
Menu TV
Installation
Langue
Installation chaînes
Préférences
Connexions
Horloge
Rétablit réglages d’usine
Info
2. Appuyez sur le curseur droit.
3. Appuyez sur le bouton
réinitialiser à leurs valeurs par défaut.
Rétablit réglages d’usine
Rétablir
OK pour effacer les réglages et les
8 Création d’une liste de favoris
Permet de créer jusqu'à-quatre listes de favoris pour vos chaînes TV
préférées. Par exemple, chaque membre de votre famille peut créer sa
liste de favoris personnelle.
La première fois que vous appuyez sur le bouton OK après
l'installation, la liste complète des chaînes s'affiche. Par la suite, la
dernière liste de chaînes sélectionnée s'affiche.
Toutes chaînes
AV1
AV2
HDMI
1 Chaîne analogique 1
2 Chaîne numérique 1
3 Chaîne numérique 2
4 ...........
Sélect liste
Info
________________________
8.1 Pour sélectionner une chaîne à partir de la liste des
favoris
1. Appuyez sur le bouton OK.
> La dernière liste de chaînes sélectionnée s'affiche.
2. Sélectionnez une chaîne à l'aide des boutons de curseur.
3. Appuyez sur le bouton
_________________________
OK pour afficher la chaîne sélectionnée.
20
8.2 Pour sélectionner une autre liste des favoris
1. Appuyez sur le bouton OK.
> La dernière liste de chaînes sélectionnée s'affiche.
Toutes chaînes
AV1
AV2
Tou(te)s
HDMI
Favoris 1
1 Analog channel
Favoris 2
Favoris 3
Favoris 4
Sélect. liste
Info
2. Appuyez sur le bouton rouge pour faire apparaître la liste des listes
de chaînes préférentielles possibles.
3. Sélectionnez une liste à l'aide des boutons de curseur.
4. Appuyez sur le bouton
5. Appuyez sur le bouton
OK.
OK pour quitter le menu.
Page 65

_________________________
8.3 Pour créer une liste de favoris ou pour modifier la
liste
1. Appuyez sur le bouton OK.
> La dernière liste de chaînes sélectionnée s'affiche.
2. Appuyez sur le bouton rouge.
> Une liste de toutes les chaînes préférentielles possibles apparaît.
3. Utilisez le curseur haut/bas pour sélectionner une liste de chaînes
préférentielles (1 à 4).
4. Appuyez sur le bouton
5. Appuyez sur le bouton vert pour entrer dans le mode Edit.
> La liste préférentielle sélectionnée va faire apparaître une liste
complète des chaînes.
Favoris - Liste 1
Side Aucun(e)
1 .....
15 .....
18 .....
25 .....
..... .....
Sélect. liste Modifier liste
Info
6. Sélectionnez une chaîne à l'aide des boutons de curseur.
7. Appuyez sur le bouton
surbrillance afin de l'ajouter ou de la supprimer de la liste des favoris.
8. Appuyez à nouveau sur le bouton vert pour quitter le mode Edit.
> La liste modifiée des chaînes préférentielles apparaît.
Appuyez à nouveau sur le bouton
•
> Le bouton
–CH+ vous permettra de parcourir les chaînes TV de
la liste sélectionnée.
9. Appuyez sur le bouton rouge pour enlever la liste de chaînes.
Les boutons numériques vous permettent de sélectionner les chaînes
ne figurant pas parmi vos favoris.
_________________________
OK.
OK pour cocher ou décocher la chaîne en
OK pour sortir.
9 Navigateur multimédia
Vous permet d’afficher des images ou de lire des fichiers son stockés
sur un périphérique USB. Le navigateur multimédia est accessible à
partir du menu Mon contenu lorsqu’un périphérique USB est branché au
téléviseur.
1. Appuyez sur le bouton
Télévision
Multimédia
2. Appuyez sur le curseur droit pour sélectionner Multimedia.
3. Sélectionnez le périphérique USB branché au connecteur USB sur le
côté du téléviseur.
4. Appuyez sur le curseur droit et sélectionnez un type de contenu.
- Les formats de fichiers suivants peuvent être reproduits :
Fichiers image: JPEG
Fichiers audio: MP3, LPCM
- Seuls les périphériques de mémoire formatés FAT/DOS sont supportés.
- La société Magnavox ne peut être tenue responsable si votre
périphérique USB n’est pas supporté.
_________________________
9.1 Pour afficher le contenu d’un périphérique USB
à Si votre périphérique USB ne s’insère pas dans le port USB sur le
côté du téléviseur, servez-vous d’une rallonge USB (max. 2m / 78”)
pour brancher le périphérique au port USB. Demandez de plus amples
renseignements à votre fournisseur.
_________________________
9.1.1
Pour insérer un périphérique USB
Aucun périphérique USB n’est fourni avec ce téléviseur.
Insérez un périphérique USB dans le connecteur USB sur le côté gauche
du téléviseur.
Quand un périphérique USB est inséré, le menu Navigateur Multimédia
s’affiche automatiquement. Voir plus loin.
_________________________
MENU de la télécommande.
Menu TV
Liste des chaînes
Guide des programmes
Périphérique USB 1
FRANÇAIS
9.1.2
Pour retirer le périphérique USB
1. Appuyez sur le bouton MENU de la télécommande pour quitter le
menu principal.
2. Retirez le périphérique USB.
21
Page 66

_________________________
jpg
jpg
9.2 Menu Navigateur multimédia
1. Insérez un péripérique USB.
2. Sélectionnez le périphérique USB dans le menu Multimédia à l'aide du
curseur haut/bas.
La lecture se poursuivra même si vous basculez temporairement sur
les écrans de navigation. Le son s’arrêtera lorsque la lecture d’un autre
contenu commencera ou à la fin du diaporama.
Les icônes suivantes peuvent apparaître
dossier
images
musique
> Le navigateur Multimédia vous permet de parcourir le contenu du
périphérique USB inséré.
> Le navigateur à deux panneaux affiche le contenu dans le panneau
de gauche (musique, images).
> Le panneau de droite affiche le contenu du type sélectionné.
3. Appuyez sur le curseur droit pour accéder au contenu.
4. Sélectionnez le contenu à l'aide du curseur haut et bas.
5. Appuyez sur le curseur droit pour accéder au contenu.
6. Appuyez sur le curseur haut et droit pour sélectionner un fichier ou
un répertoire.
Boutons de fonction au bas de l’écran
Détails
pour afficher la description du fichier ou du répertoire sélectionné
Transitions
pour sélectionner une transition durant le diaporama
Tempo défilement
pour sélectionner la durée d’affichage d’une image dans un diaporama
Rotation
pour faire tourner une image
Répéter un/tous
pour répéter la lecture d’un fichier musical
Aléatoire
pour mélanger de façon aléatoire les collections musicales
Zoom
permet de sélectionner l'agrandissement souhaité (x-1, x-2, x-4)
à l'aide des curseurs haut/bas. Vous pouvez également déplacer la
fenêtre du zoom dans l'écran à l'aide du curseur
Pour faire pivoter une image ou pour sélectionner une des options
de zoom, arrêtez d'abord le diaporama en appuyant sur le bouton
ou le bouton bleu.
OK
USBAfrika_2001Kenya.
Kenya.
Appuyez sur le bouton de couleur vert pour afficher tous les fichiers
d’image dans le répertoire en miniature lors de la navigation dans les
images. Appuyez à nouveau sur le bouton vert pour afficher les fichiers
d’images dans la listet.
7. Lorsqu'un fichier, répertoire, un album ou une liste est
sélectionné(e), appuyez sur le curseur droit pour accéder au contenu
ou sur le bouton
OK pour lancer un diaporama ou lire les fichiers
présents en boucle.
8. Appuyez sur le curseur gauche pour continuer à lire les fichiers audio
et passer au menu Multimédia.
9. Appuyez sur l'un des boutons de couleur de la télécommande pour
exécuter la fonction correspondante mentionnée au bas de l'écran.
Le bouton de couleur bleue peut, au besoin, être utilisé pour faire
apparaître à nouveau les boutons de couleur.
22
Page 67

________________________
VIDEO
S VIDEO
AUDIO
L
R
BSU
3.5 mm
S VIDEO
AUDIO L /R
AUDIO L /R
VIDEO
S VIDEO
VIDEO
2
1a
1b
_________________________
10 Faire les branchements vidéo et audio
1. Connecter l'appareil AV accessoire. Consulter les pages suivantes.
2. Relier les appareils aux prises dans le menu d’installation. Se
reporter au Chapitre 7.5, Sélection des connexions.
Menu TV
Installation
Langue
Installation chaînes
Préférences
Connexions
Horloge
Rétablit réglages d’usine
Info
En présence d’une connexion audio numérique, relier également
DIGITAL AUDIO IN dans l’entrée HDMI correspondante.
En présence d’une connexion audio analogique (par Component
Video Output (YPbPr) d’
dans l’entrée correspondante.
3. Pour faire fonctionner l’appareil connecté souhaité :
- Mettre l’appareil sous tension.
- Appuyer sur le bouton
Connexions
AV1
AV2
AV3
HDMI 1
HDMI 2
HDMI 3
Side
AUDIO IN L/R
DIGITAL AUDIO IN
AV3 ou par HDMI), relier AUDIO IN L/R
AV de la télécommande.
10.1 Aperçu du panneau latéral
_____________________
10.1.1 Caméra, Caméscope, Jeu, Ordinateur
) Ne pas connecter les câbles 1a et 1b en même temps. Cela peut
produire des distorsions dans l’image !
!
Attention
Avant de connecter un ordinateur, réglez la fréquence de
rafraîchissement du moniteur de l’ordinateur à 60Hz.
_________________________
10.1.2 Casque
À partir du menu Son, sélectionnez Volume du casque pour régler
le volume du casque. Se reporter à la rubrique 5.2.3 Ajuster les
réglages du menu Son.
FRANÇAIS
- Sélectionner votre source à l’aide du curseur (haut/bas).
- Appuyez le bouton
OK.
!
Appuyez sur le bouton MUTE de la télécommande pour mettre hors
service les HP internes de votre téléviseur.
_________________________
10.2.3 USB
Se reporter à la rubrique 9 Navigateur multimédia.
23
Page 68

_________________________
10.2 Faire les branchements vidéo et audio
Utilisez les entrées qui sont disponibles sur l’équipement et qui
fournissent le meilleur rendement vidéo/audio, comme suit
MEILLEUR
à - Si vous voyez une ligne décolorée à la gauche ou à la droite de
l’écran, vous pouvez ajuster la position de l’image au centre de l’écran à
l’aide des curseurs.
- Les câbles sont souvent chromocodés aux connecteurs. Branchez le
rouge avec le rouge, le blanc avec le blanc, etc....
- Le branchement de composant vidéo (YPbPr) est nécessaire pour
afficher les sources vidéo, par exemple les diffusions numériques
provenant d’un boîtier intégré, en 1080i, 1080p, 720p, 480i ou 480p;
- Les étiquettes des fiches des composants vidéo peuvent différer selon
le lecteur DVD ou l’appareil branché. Bien que les abréviations puissent
varier, les lettres B et R représentent les signaux composants bleus et
rouges, respectivement, et Y indique le signal de la luminance. Référezvous aux directives du lecteur DVD pour les définitions et les détails de
branchement;
- Ce téléviseur est conçu pour accepter des normes de signaux haute
définition 480p, 720p, 1080p et 1080i telles que spécifiées par la norme
EIA770.3 de l’Electronic Industries Association.
Les appareils numériques de divers fabricants peuvent avoir différentes
normes de sortie, ce qui peut causer des problèmes d’affichage.
24
DVI à HDMI
- Votre téléviseur est livré avec plusieurs types de connecteurs, à
l’exception du connecteur DVI, mais certains de vos appareils peuvent
déjà posséder un tel connecteur. Si tel est le cas, vous devrez vous
procurer auprès de votre fournisseur local un adaptateur DVI / HDMI
ou un câble HDMI / DVI et des câbles audio distincts.
- Assurez-vous de brancher d’abord le connecteur de sortie DVI, puis
branchez l’entrée HDMI sur le téléviseur.
Page 69

_________________________
ANTENNA
VIDEO L RAUDIO
AV 2
RF IN
RF OUT
CABLE
RECORDER
1
2
3
AV2
L + R + VIDEO
RECORDER
ANTENNA
VIDEO
Y
S VIDEO
AUDIOLR
Pb Pr
VIDEO L RAUDIO
AV 1
AV 2
OUTIN
RF OUT RF IN
CABLE
1
2
3
4
AV1
L + R + VIDEO
5
AV2
L + R + VIDEO
RF RF
HDMI 1 HDMI 2 HDMI 3
ANALOG
AUDIO IN
OUT
IN
DIGITAL
AUDIO
L
R
HDMI 1
HDMI 2
AV 1
AV 2
AV 3
HDMI 1
HDMI 2
DISPLAY
SYNC.
++
DVI
HDMI
DIGITAL
AUDIO
IN
DIGITAL
AUDIO
OUT
ANALOG
AUDIO IN
OUT
IN
DIGITAL
AUDIO
L
R
HDMI 1
HDMI 2
AV 1
AV 2
AV 3
HDMI 1
HDMI 2
DISPLAY
SYNC.
+ +
HDMI 1 HDMI 2 HDMI 3
ANALOG HDMI
AUDIO IN
DVI
HDMI 1 HDMI 2 HDMI 3
ANALOG
AUDIO IN
OUT
IN
DIGITAL
AUDIO
L
R
HDMI 1
HDMI 2
AV 1
AV 2
AV 3
HDMI 1
HDMI 2
DISPLAY
SYNC.
+ +
______________________
10.3 Brancher un enregistreur (VCR / DVD-R)
!
Évitez de placer votre enregistreur trop près de l’écran étant donné
que certains enregistreurs sont sensibles aux signaux de l’image.
________________________
10.4 Brancher un enregistreur (VCR / DVD-R)
et un deuxième appareil A/V
10.5 Brancher un lecteur/enregistreur DVD, un
câblosélecteur, une console de jeu,... avec un
connecteur HDMI (High Definition Multimedia
Interface
HDMI est le nouveau standard de pointe pour l’interconnexion de
vidéo et de son numérique.
Interruptions de son et d’image ? Se reporter à la rubrique 11
Problèmes.
FRANÇAIS
_________________________
10.6 Brancher un lecteur/enregistreur DVD, un
câblosélecteur, une console de jeu,... avec un
connecteur DVI
Si votre enregistreur dispose d’une prise S-VHS: Pour une meilleure
qualité d’image, branchez un câble S-Vidéo à l’entrée
branchez les câbles audio aux prises d’entrées
S-VIDEO et
AUDIO L et R de AV1.
Lorsque vous utilisez le connecteur S-VIDEO ne branchez pas de
périphérique dans la prise
AV1 VIDEO.
En cas d’équipement mono, seul le haut-parleur gauche diffuse des sons.
Utilisez un adaptateur mono/stéréo (non fourni) pour une reproduction
sonore via tous les haut-parleurs internes.
10.6.1 Avec DIGITAL AUDIO OUT
10.6.2 Avec ANALOG AUDIO OUT
25
Page 70

________________________
2
S VIDEO
1
AV1 : L + R
VIDEO
Y
S VIDEO
AUDIOLR
Pb Pr
AV 1
DIGITAL
AUDIO
IN
YPbPr
AV1 / AV3 :
DVD / Set top box
1
2a
OUT
IN
DIGITAL
AUDIO
AV 1
AV 2
AV 3
HDMI 1
HDMI 2
DISPLAY
SYNC.
+
L
R
AUDIO
YPbPr
VIDEO
Y
S VIDEO
AUDIOLR
Pb Pr
VIDEO L RAUDIO
AV 3
AV 1
AV 2
OUT
Set top box
CABLE
RF IN
2
RECORDER
4
AV2
L + R + VIDEO
SIGNAL
SPLITTER
OUTIN
3
RF RF
1
ANTENNA
VIDEO L RAUDIO
AV 2
ANTENNA
VIDEO L RAUDIO
AV 2
CABLE
RF IN
RF OUT
SAT / REC / Set top box
1
2
3
AV2
L + R + VIDEO
OUTOUT IN
RF OUT
2
4
SAT / Set top box
CABLE
RF IN
1
RECORDER
3
AV2
L + R + VIDEO
ANTENNA
VIDEO L RAUDIO
AV 2
________________________
10.7 Brancher un lecteur DVD avec un connecteur
S-VIDEO
Lorsque vous utilisez le connecteur S-VIDEO ne branchez pas de
périphérique dans la prise
AV1 VIDEO.
________________________
10.8 Brancher un enregistreur et un câblosélecteur avec
sortie RF
10.10 Brancher un récepteur satellite ou un
câblosélecteur avec sorties A/V
Si votre enregistreur dispose d’une prise S-VHS: Pour une meilleure
qualité d’image, branchez un câble S-Vidéo à l’entrée
et branchez les câbles audio aux prises d’entrées
AV1.
Lorsque vous utilisez le connecteur S-VIDEO ne branchez pas de
périphérique dans la prise
AV1 VIDEO.
En cas d’équipement mono, seul le haut-parleur gauche diffuse des sons.
Utilisez un adaptateur mono/stéréo (non fourni) pour une reproduction
sonore via tous les haut-parleurs internes.
________________________
S-VIDEO de AV1
AUDIO L et R de
___________________
10.9 Brancher un récepteur satellite ou un câblosélecteur
avec sorties A/V
Si votre enregistreur dispose d’une prise S-VHS: Pour une meilleure
qualité d’image, branchez un câble S-Vidéo à l’entrée
et branchez les câbles audio aux prises d’entrées
AV1.
Lorsque vous utilisez le connecteur S-VIDEO ne branchez pas de
périphérique dans la prise
En cas d’équipement mono, seul le haut-parleur gauche diffuse des sons.
Utilisez un adaptateur mono/stéréo (non fourni) pour une reproduction
sonore via tous les haut-parleurs internes.
26
AV1 VIDEO.
S-VIDEO de AV1
AUDIO L et R de
10.11 Brancher des appareils numérique munis de
connecteurs Component Video Output (YPbPr)
Ce téléviseur est en mesure d’afficher des signaux DTV 1080i, 1080p,
720p et 480p lorsqu’il est branché à un syntoniseur câblé DTV.
Sélectionnez la sortie du syntoniseur câblé 1080i, 1080p, 720p ou 480p.
Le signal DTV doit cependant être disponible dans votre région.
________________________
10.11.1 Avec
DIGITAL AUDIO
Page 71

________________________
DVD / Set top box
YPbPr
AV1 / AV3 :
1
AUDIO L + R
AV1 / AV3 :
2b
L
R
AUDIO
YPbPr
VIDEO
Y
S VIDEO
AUDIOLR
Pb Pr
VIDEO L RAUDIO
AV 3
AV 1
AV 2
VIDEO
S VIDEO
AUDIO
L
R
BSU
S VIDEO
AUDIO L /R
AUDIO L /R
S VIDEO
2
S VIDEO
1
AV1 : L + R
VIDEO
Y
S VIDEO
AUDIOLR
Pb Pr
AV 1
DIGITAL
AUDIO
IN
DIGITAL
AUDIO
OUT
ANALOG
AUDIO IN
OUT
IN
DIGITAL
AUDIO
L
R
HDMI 1
HDMI 2
AV 1
AV 2
AV 3
HDMI 1
HDMI 2
DISPLAY
SYNC.
+ +
HDMI 1 HDMI 2 HDMI 3
DVI
HDMI
ANALOG
AUDIO IN
OUT
IN
DIGITAL
AUDIO
L
R
HDMI 1
HDMI 2
AV 1
AV 2
AV 3
HDMI 1
HDMI 2
DISPLAY
SYNC.
++
HDMI 1 HDMI 2 HDMI 3
HDMI 1
AUDIO OUT
L
R
ANALOG
AUDIO IN
OUT
IN
DIGITAL
AUDIO
L
R
DISPLAY SYNCHRONIZED
HDMI 1
HDMI 2
AV 1
AV 2
AV 3
HDMI 1
HDMI 2
DISPLAY
SYNC.
HDMI 2
++
DIGITAL
AUDIO
IN
DIGITAL
AUDIO
OUT
HDMI 1
AUDIO OUT
L
R
ANALOG
AUDIO IN
OUT
IN
DIGITAL
AUDIO
L
R
DISPLAY SYNCHRONIZED
HDMI 1
HDMI 2
AV 1
AV 2
AV 3
HDMI 1
HDMI 2
DISPLAY
SYNC.
HDMI 2
++
L
AUDIO OUT
L/R
/R
10.11.2 Avec
ANALOG AUDIO
________________________
10.13.2 Équipé d’un connecteur S-VIDEO à l’arrière
________________________
10.12 Connexion d’un amplificateur de cinémamaison
________________________
10.12.1 Amplificateur de cinémamaison numérique
________________________
10.12.2 Amplificateur de cinémamaison analogique
FRANÇAIS
_______________________
10.13.3 Équipé d’un connecteur DVI
À cause d’exigences légales, il est possible qu’avec certaines qualités
audio PCM protégées contre la copie en provenance d’un périphérique
connecté à l’entrée
_______________________
10.13 Brancher un ordinateur
________________________
10.13.1 Équipé d’un connecteur S-VIDEO lateral
HDMI, le signal « Digital audio output » soit muet.
________________________
10.13.2 Équipé d’un connecteur HDMI
Si nécessaire, vous pouvez ajuster la position de l’image au centre de
l’écran à l’aide du boutons du curseur.
27
Page 72

________________________
11 Problèmes
Images fantômes ou doubles
• Peuvent être causées par un élément obstruant l’antenne comme un
gratte-ciel ou des montagnes/collines. L’utilisation d’une antenne à
grande directivité peut améliorer l’image.
Pas de courant
• S’assurer que le cordon d’alimentation c.a. est branché dans la prise
murale.
• Débrancher le téléviseur et attendre 60 secondes. Rebrancher la fiche
dans la prise murale et remettre le téléviseur sous tension.
Pas d’image
• Vérifier les connexions de l’antenne au bas du téléviseur et s’assurer
qu’elles sont effectuées correctement.
• Problème pouvant venir de la station de diffusion. Essayer une autre
chaîne.
• Régler les réglages de contraste et de lumière. Essayer un autre réglage
«auto image».
• Vérifier les commandes de sous-titrage. Certains modes TEXTE
pourraient bloquer l’écran.
• Vérifier si la source AV sélectionnée est la bonne.
Pas d’image et téléviseur sous tension
• Votre téléviseur possède un mode protection en cas de surchauffe.
Vérifier l’espace libre autour des sorties de l’appareil pour vous assurer
qu’aucun mur ou meuble ne gêne la circulation de l’air..
Réglage de la position de l’image
Lors de l’affichage d’un signal HD par les entrées YPbPr ou HDMI,
au besoin, il est possible d’ajuster la position de l’image au centre
de l’écran à l’aide des curseurs gauche/droit ou haut/bas de la
télécommande. Cela peut être requis compte tenu de légères
différences au niveau des signaux de sortie des divers types ou marques
de boîtiers source HD.
La plupart des récepteurs haute définition comprennent également
des commandes de positionnement de l’image dans leurs menus. Si les
commandes par curseur du téléviseur sont hors de portée avant que
l’image ne soit correctement positionnée, il sera nécessaire de régler
les commandes du récepteur.
Aucune lecture de photo, musique ou vidéo ou lecture de
qualité médiocre
• Vérifier si la source est conforme à un code supporté.
Pas de son en connexion DVI-HDMI
• Vérifiez que le câble audio soit correctement raccordé au connecteur
DIGITAL AUDIO IN ou ANALOG AUDIO IN L/R de votre TV.
• Vérifiez si vous avez bien sélectionné l’équipement connecté dans le
menu Installation, Sélectionnez vos connexions et si vous avez fait
la relation avec
effectué. Vérifiez également si vous avez sélectionné
ou AUDIO IN L/R dans le même menu Connexions.
IN
HDMI 1, 2 ou 3, conformément au raccordement
DIGITAL AUDIO
Bonne qualité de son, couleur de qualité médiocre ou pas
d’image
• Ajuster les réglages de contraste, de couleur, de teinte et de la lumière.
• Sélectionnez Rétablit les réglages AV dans le menu Installation.
Image enneigée et bruit
• Vérifier la connexion d’antenne.
Téléviseur ne répond pas à la télécommande
• Vérifier si les piles fonctionnent. Les remplacer au besoin.
• Nettoyer la lentille du capteur du moniteur de la télécommande.
• La distance de fonctionnement entre le téléviseur et la télécommande
ne doit pas dépasser > 6,1 mètres (240 po).
• Vous pouvez toujours utiliser les boutons situés sur le côté gauche du
téléviseur.
Le logiciel ne s’installe pas
Il est possible que le système d’exploitation soit erroné. Allez à
www.magnavox.com/usasupport pour voir les systèmes d’exploitation qui
sont supportés.
Pas d’image stable ou synchronisée VGA
• Vérifier si vous avez sélectionné le mode VGA approprié sur
l’ordinateur.
Contrôle des périphériques
• Les signaux infrarouges de l’écran peuvent influencer la sensibilité de
réception d’autres périphériques
Solution: Remplacer les piles de la télécommande ou changer la position
des autres appareils. Par exemple, garder les écouteurs sans fil hors d’un
rayon de 1,27 mètres (50 po).
Après un arrêt inapproprié
Si votre téléviseur n’a pas été arrêté correctement (par ex. : chute de
courant, débranchement du cordon d’alimentation), le démarrage du
téléviseur peut prendre plus de temps qu’à l’habitude.
Aucun son
• Augmenter le VOLUME.
• S’assurer que le téléviseur n’est pas actif sans son, appuyer sur le
bouton
MUTE de la télécommande.
• Lorsqu’aucun signal n’est détecté, le téléviseur coupe le son
automatiquement. Il ne s’agit pas là d’un mauvais fonctionnement mais
d’une fonction du système.
Interruptions de son et d’image en utilisant la connexion HDMIHDMI
• Si ce problème est occasionnel, peut-être y a-t-il un problème au niveau
du programme diffusé.
• Si ce problème persiste, voir le manuel de votre appareil branché pour
vérifier les ajustements nécessaires.
• Sinon, branchez un câble audio supplémentaire (soit analogique,
soit numérique) entre votre périphérique branché
et votre TV. Vérifiez si vous avez sélectionné le périphérique connecté
dans le menu Installation, Sélectionnez vos connexions et sélectionnez
l’entrée audio correspondante dans le même menu Connexions..
• Limitez la longueur du câble HDMI à 5 m. maximum.
• Vérifiez si l’équipement connecté est bien sélectionné dans le menu
Installation, Connexions, conformément au raccordement
ou
3 effectué.
HDMI 1, 2
28
Toujours pas de résultats
Mettez votre téléviseur hors service. Remettez-le en service.
N’essayez jamais de réparer vous-même une panne de
téléviseur.
Consultez votre revendeur ou un technicien.
Numéro de téléphone du Centre de service à la clientèle de
Magnavox :
1 800 705 2000
Avant d’appeler, notez le modèle et le numéro de série complet de
votre téléviseur, lesquels sont inscrits sur une étiquette collée au dos
de l’appareil ou sur l’emballage.
Page 73

________________________
12 Glossaire
Ecran 1080p Un écran 1080p utilise la plus haute résolution disponible
afin d'afficher aussi bien des signaux 1080i que 1080p, avec une
qualité d'image optimale et sans perte de résolution.
Signaux 1080i/p 1080i est le signal HDTV existant avec 1080 lignes
horizontales. 1080p est le horizontales. 1080p est le signal HDTV le
plus récent et de la meilleure qualité disponible.
720p Affiche des images à l’aide d’un balayage progressif avec 720 lignes
horizontales.
ATSC Signaux d’antenne numérique avec programmation HDTV.
NTSC Signaux analogiques, sur câble ou antenne, en définition Standard.
QAM Signaux de câble numériques décryptés avec programmation
HDTV.
YPbPr Entrées de composant vidéo.
CS Service sous-titres numériques
CC Service sous-titres analogiques
DTV Nouvelle technologie pour la transmission et la réception des
signaux de télévision. DTV offre une résolution plus élevée et une
meilleure qualité de son par rapport à la télévision analogique.
DV Vidéo numérique (à partir d’un caméra)
EAS Emergency Alert System - La norme SCTE18 définit une méthode
de signalisation des alertes d’urgence pouvant être utilisée par les
systèmes de télédiffusion par câble pour signaler des urgences aux
services numériques tels que les boîtiers numériques se posant
sur le téléviseur, les téléviseurs numériques et les magnétoscopes
numériques. Le modèle de signalisation des alertes d’urgence défini
dans la norme permet à une société de télédistribution de diffuser
des informations d’alerte d’urgence relatives à des urgences et des
avertissements de niveaux fédéral et local.
de très haute qualité, lesquels peuvent être recyclés et réutilisés.
Comme tous les produits LCD, cet appareil contient une petite quantité
de mercure. Veuillez vous informer au sujet des systèmes de collecte
distincts pour les produits électriques et électroniques. Veuillez agir
conformément à la réglementation locale et ne pas jeter vos anciens
produits avec vos rebuts domestiques courants. L’aliénation appropriée
de votre ancien produit aidera à prévenir les conséquences négatives
possibles sur l’environnement et la santé humaine.
________________________
13.2 Aliénation des piles
Les piles livrées ne contiennent pas de métaux lourds comme le mercure
et le cadmium. Informez-vous sur les dispositions en vigueur dans votre
pays pour la mise au rebut des piles usées.
________________________
14 Information sur le produit
- Votre TV consomme de l’énergie en veille. Cette consommation
contribue à la pollution de l’air et de l’eau. Très faible consommation de
courant en mode veille.
- Spécifications : Se reporter à la brochure sur le produit à l’adresse
www. magnavox. com/usasupport.
- Si vous avez besoin d’aide, veuillez communiquer avec le service de
soutien à la clientèle de votre pays. Les numéros de téléphone et
les adresses correspondants sont indiqués dans le livret de garantie
mondiale ci-joint.
________________________
14.1 Soutien technique en ligne de Magnavox
Le site Web du soutien technique : www.magnavox.com/usasupport vous
offre toutes les informations qu’il vous faut pour jouir de votre téléviseur
et rendre votre expérience de divertissement maison des plus agréables.
Visitez le www.magnavox.com/usasupport et entrez votre numéro de
modèle pour visualiser:
- la FAQ (Foire aux questions)
- les dernières versions des manuels de l’utilisateur
- les fichiers de mise à jour du micrologiciel pour votre téléviseur
- des informations sur les produits
- ...
FRANÇAIS
HDMI (High Definition Multimedia Interface) - Offre une interface non
comprimée, audio/vidéo numérique, entre le téléviseur et toute
composante audio/vidéo équipée HDMI, telle qu’un téléviseur, un
lecteur DVD et un récepteur AV. Le HDMI supporte la vidéo haute
définition ou à définition renforcée, plus l’audio numérique à deux
chaînes.
DVI (Digital Visual Interface) - Norme d’interface numérique créée par le
Digital Display Working Group (DDWG) pour convertir les signaux
analogiques en signaux numériques afin de convenir aux moniteurs
analogiques et numériques.
Signaux S-VHS
Les normes d’enregistrement S-VHS et Hi-8 utilisent 2 signaux vidéo
Y/C séparés. Les signaux de luminance Y (noir et blanc) et les signaux
de chrominance C (couleur) sont enregistrés séparément sur la
bande vidéo. Ceci offre une meilleure qualité d’image que le support
standard (VHS ou 8 mm) où les signaux Y/C sont combinés afin de
produire un seul signal vidéo.
_______________________
13 Recyclage
° L’emballage de ce produit est conçu pour être recyclé.
Communiquez avec les autorités locales pour l’élimination appropriée.
________________________
13.1 Aliénation de votre ancien téléviseur
Ce produit est conçu et fabriqué avec des matériaux et des composants
29
Page 74

Annexe 1 - Téléviseur Magnavox - Format diaporama
avec musique d’atmosphère
diaporama est enregistré. Ce chemin comprend le nom du périphérique
ou du disque de la MP.
Magnavox décline toute responsabilité en cas de problème dérivant
du contenu de ce document. Les erreurs signalées à Magnavox seront
adaptées et publiées sur le site web de support de Magnavox dès que
possible.
Introduction
Ce document explique comment faire un fichier de diaporama Magnavox
avec musique d’atmosphère.
Soyez toutefois conscient que le contenu de ce document s’adresse à des
utilisateurs compétents sur le plan technique et en matière de logiciels.
Pour lancer le diaporama, ouvrez le fichier de diaporama dans le
navigateur multimédia de votre téléviseur.
1. Appuyez sur le bouton
MENU de la télécommande après avoir
inséré un périphérique USB et mis le téléviseur sous tension.
Télévision
Multimedia
Menu TV
Liste des chaînes
Guide programme
2. Sélectionnez Multimédia et appuyez sur le curseur droit.
3. Accédez à l’emplacement où vous avez enregistré le fichier de
diaporama (.alb) sur la carte mémoire portative.
4. Sélectionnez le fichier de diaporama et appuyez sur le bouton ok
pour lancer le diaporama.
Un nom d’accès absolu est également supporté.
- nom d’accès relatif :
pictures\test1.jpg, tamper.jpg, ..\new\bird.jpg, …
- chemin d’accès absolu : USB1:\pictures1\foo_bar.jpg, C:\f1.jpg, \
organization.jpg, …
Format générique
Le format et la syntaxe ci-dessous seront utilisés pour créer le fichier
de diaporama (texte ascii simple) avec l’extension .alb (.ALB). Exemples :
slshow1.alb, vacances_été_2004.ALB, test.alb, …
La syntaxe suivante doit être utilisée pour créer le fichier texte :
<?xml version="1.0" encoding="ISO-885h9-1" ?>
<magnavox-slideshow version="1.0" >
<title>Title of the slideshow</title>
<audio>audio_url</audio>
<slide-duration>30</slide-duration>
<slides>
<slide>slide_1_url</slide>
<slide>slide_2_url</slide>
<slide>slide_3_url</slide>
<slide>slide_4_url</slide>
<slide>slide_5_url</slide>
<slide>slide_6_url</slide>
...
<slide>slide_N-1_url</slide>
<slide>slide_N_url</slide>
</slides>
</magnavox-slideshow>
Règles générales
- Le mode diaporama utilisera une syntaxe de base ASCII XML pour
permettre la création et l’édition des fichiers de diaporama à l’aide
d’outils de base.
- Toute référence au contenu du réseau doit être basée sur l’adresse
globale du contenu.
- Le contenu sur une carte mémoire portative ne dispose pas d’une
adresse globale ; par conséquent, le contenu d’une MP ne peut jamais
être référencé à partir d’un diaporama ou enregistré sur la MP même.
- Afin de maintenir la portabilité, le diaporama enregistré sur la MP
ne doit faire référence qu’au seul contenu sur la même MP. Le
référencement d’adresses globales peut entraîner des incohérences si la
MP est utilisée sur un périphérique CE non réseauté. La chose n’est pas
interdite, il ne s’agit que d’une recommandation.
- Il est préférable que le contenu de la MP qui fait référence à une URL
soit basé sur un chemin relatif à partir du répertoire dans lequel le
Balises XML supportées
Le tableau ci-dessous donne une description de la syntaxe XML.
Nom de la balise Utilisation Description
magnavox-slideshow obligatoire Signature diaporama Magnavox, y compris la version.
title facultative Titre de la liste de lecture.
audio facultative L’URL audio qui suit cette balise définit la musique d’atmosphère qui joue pendant la présentation du
diaporama. Une seule chanson ou une liste de lecture (.m3u et .pls) sont les seules références audio
valides. Toute autre référence ne permettra pas la lecture de fichiers audio. Si une seule chanson est
référencée, cette dernière se répétera à l’infini. Si une liste de lecture est référencée, la liste de lecture
sera lue de façon séquentielle et reprendra à la fin de la liste.
slide-duration facultative Tempo d’affichage par défaut d’une diapositive (en 0,1 seconde). L’application TV n’est pas tenue de
supporter cette balise. L’application V peut forcer l’utilisation d’un ou plusiers
tempo prédéfinis.
slides obligatoire Identifie les diapositives à présenter.
slide facultative Identifie l’URL de chaque diapositive.
30
Page 75

Annexe 2 - Téléviseur Magnavox - Caméra numérique et
ports USB`
- Le logiciel sur le téléviseur est ouvert. Si vous avez des problèmes,
vérifiez tout d’abord si vous disposez de la plus récente version du
logiciel installée sur votre téléviseur. Le plus récent logiciel, ainsi que les
instructions, sont disponibles sur le site web de support de Magnavox.
Servez-vous du numéro type de votre téléviseur pour trouver la
documentation et tous les fichiers connexes.
- Magnavox décline toute responsabilité en cas d’erreurs dans le contenu
de ce document ou de problèmes dérivant du contenu de ce document.
Les erreurs signalées à Magnavox seront adaptées et publiées sur le site
web de support de Magnavox dès que possible.
Questions liées aux caméras numériques
Si une connexion USB entre la caméra numérique et le téléviseur ne
fonctionne pas, vous pouvez tenter d’appliquer les solutions ci-dessous
pour résoudre le problème.
- Assurez-vous que votre caméra numérique est sous tension et vérifiez
si la configuration de la caméra numérique est correcte (se reporter
au manuel accompagnant la caméra numérique pour de plus amples
informations).
- Certaines caméras numériques vous permettent de mettre l’interface
USB hors tension. Assurez-vous que l’interface USB est sous tension
avant de brancher la caméra au téléviseur.
- Si vous avez une caméra numérique avec une mémoire interne
uniquement (mémoire amovible), vous pouvez essayer d’en copier
manuellement le contenu sur un dispositif de mémoire USB à l’aide d’un
ordinateur personnel.
- Certaines caméras numériques vous permettent de commuter entre
PTP (Picture Transfer Protocol) ou « PC Link » et mémoire USB de
grande capacité. Assurez-vous de sélectionner mémoire USB de grande
capacité ou «PC Drive» sur votre caméra numérique.
- Si votre caméra supporte divers réglages d’interface, assurez-vous de
les essayer un par un ou de contacter le revendeur de la caméra pour
tenter de connaître le réglage approprié.
FRANÇAIS
Questions liées à la mémoire USB de grande capacité
- Les périphériques connectés au port USB de votre téléviseur doivent
être conformes « mémoire de grande capacité ». Si votre périphérique
(caméra numérique, lecteur MP3, etc.) n’est pas conforme « mémoire
de grande capacité », il ne sera pas détecté par le navigateur de
contenu du téléviseur.
- Les sous-ensembles suivants de spécifications relatives à la mémoire de
grande capacité sont supportés :
La mise en oeuvre du téléviseur repose sur l’« Universal Serial Bus
Mass Storage Class Specification Overview » (v1.2, 23 juin 2003), y
compris tous les documents référencés par ce document. Le document
est disponible sur le site web de normalisation USB (www.usb.org).
Support complet de l’USB Mass Storage Class Bulk-Only Transport
(bInterfaceProtocol = 50h).
Support complet du SubClass Code = 05h ; SFF-8070i spec.
Support complet du SubClass Code = 06h ; Ensemble de commandes
transparentes SCSI.
- Dans le cas des périphériques dont la mémoire USB est assez grande,
lorsque vous vous trouvez dans le navigateur de contenu, il est possible
qu’il faille beaucoup de temps avant de pouvoir accéder aux fichiers.
31
Page 76

Annexe 3 - Questions liées au branchement de périphériques à l’aide d’un connecteur HDMI ou des
connecteurs Component Video Output
Le connecteur HDMI IN ou les connecteurs Component Video Output permettent les modes d’affichage suivants sur téléviseur :
HD TV à définition standard (SDTV) 640x480i 60 Hz
720x480i 60 Hz
720x576i 50 Hz
Enhanced Definition TV (EDTV) 640x480p 60 Hz
720x480p 60 Hz
720x576p 50 Hz
Télévision haute définition (HDTV) 1920x1080i 50/60 Hz
1920x1080p 24/25/30/35/60 Hz
1280x720p 50/60 Hz
Le connecteur
PC 640x480 60 Hz
800x600 60 Hz
1024x768 60 Hz
1280x768 60 Hz
1360x768 60 Hz
1920x1080 60 Hz
- Si nécessaire, vous pouvez ajuster la position de l’image au centre de l’écran à l’aide des curseurs.
- À cause d’exigences légales, il est possible qu’avec certaines qualités audio PCM protégées contre la copie en provenance d’un périphérique
connecté à l’entrée
- Le bon fonctionnement n’est garanti qu’avec les produits conformes HDMI. La longueur de câble doit être limitée à 5m maximum.
- Si aucun signal n’était détecté par votre périphérique HDMI, mettez ce dernier hors tension puis de nouveau sous tension.
HDMI IN permet les modes PC suivants:
HDMI, le signal « Digital audio output » soit muet.
32
Page 77

Annexe 4 - Mettre à niveau le logiciel du téléviseur
Operation Successful! Re
ogrammin
g
________________________
Comment mettre à niveau le logiciel du téléviseur
_________________________
Utilisation de l’Assistant de mise à jour
Magnavox souhaite vous faire bénéficier de l'amélioration constante de
ses produits, même après votre achat. Pour mettre à jour le logiciel de
votre téléviseur, vous avez besoin d'un périphérique de stockage USB
(non fourni).
Remarque
Le dispositif doit avoir un espace libre d’au moins 48 Mb. Assurez-vous
que la protection contre l’écriture est désactivé.
Étape 1 Dispositif de mémoire USB à un téléviseur
1. Sélectionnez Menu TV et appuyez sur le curseur droit.
> Le menu TV apparaît.
2. Sélectonnez Mise à niveau logiciel et appuyez sur le curseur droit.
> Le menu Mise à niveau logiciel apparaît.
Menu TV
Mise à niveau logiciel
Assistant de mise à jour
Info logiciel actuel
Mises à jour locales
Assistant de mise à jour
Démarrer
1. Branchez le clé USB dans le connecteur
USB du téléviseur.
2. Le téléviseur s’éteint. L’écran reste noir pendant environ 10
secondes. Attendre et ne pas utiliser l’interrupteur
POWER sur le
téléviseur.
3. La mise à jour se lance automatiquement. Attendez svp.
FRANÇAIS
Info
3. Sélectionnez Assistant de mise à jour et appuyez sur le curseur
droit.
4. Appuyez sur le bouton
5. Branchez un clé USB dans le connecteur
OK pour activer.
USB situé sur le côté du
téléviseur.
> Le menu principal s’affiche.
6. Appuyer sur le bouton vert pour poursuivre.
> Un message s’affiche. Il indique l'inscription réussie dans le
téléviseur d'un fichier d'identification dans le dispositif de
mémoire USB.
7. Appuyer de nouveau sur le bouton vert pour terminer.
8. Retirer le dispositif de mémoire USB du téléviseur.
Étape 2 Dispositif de mémoire USB à un PC
1. Connecter le clé USB sur un PC relié à internet.
2. Repérer et ouvrir le fichier “update.htm” dans le dispositif de
mémoire USB.
3. Suivre les instructions affichées dans la page affichée.
> La mise à jour du logiciel est téléchargée vers le dispositif de
mémoire USB (à condition que la version téléchargée du logiciel
soit plus récente que celle installée).
4. Retirer le dispositif de mémoire USB de l’ordinateur.
Étape 3 Dispositif de mémoire USB au téléviseur
4. La mise à jour est finie quand le message ‘Operation successful’
apparaît sur l’écran.
5. Retirez le clé USB du téléviseur.
!
- il est interdit de retirer la carte mémoire portative pendant la
procédure de mise à niveau du logiciel;
- en cas de panne de courant pendant une procédure de mise à
niveau, n’essayez pas de retirer la carte mémoire portative du
téléviseur. Le téléviseur continuera la mise à niveau dès que le
courant sera rétabli.
33
Page 78

6. Appuyez sur le bouton POWER de la télécommande. N’appuyez
pas plus d’une seule fois.
N’utilisez pas le bouton POWER du téléviseur.
7. Le téléviseur s’éteint. L’écran reste noir pendant environ 10
secondes. Attendez svp.
_______________________
Mises à niveau locales
Pour l’utilisation du personnel de service uniquement.
8. Le téléviseur se met en service de nouveau. La mise à jour est
terminée.
9. Une fois la mise à jour terminée, utiliser l'ordinateur pour supprimer
le logiciel du dispositif de mémoire USB.
________________________
Vérifier la version du logiciel du téléviseur
La mise à jour est effectuée uniquement si la version du nouveau logiciel
disponible est différente de la version actuellement utilisée. Vous pouvez
vérifier la version actuelle de votre logiciel.
1. Sélectionnez Mise à niveau logiciel dans le Menu TV, Installation.
2. Appuyez sur le curseur droit.
> Le menu Mise à niveau logiciel passe dans le panneau de gauche.
Menu TV / Installation
Mise à niveau logiciel
Assistant de mise à jour
Info logiciel actuel
Mises à jour locales
Info logiciel actuel
Version:
JX31......
Release
.........
Info
3. Sélectionnez Info logiciel actuel pour obtenir la version et la
description du logiciel installé.
34
Page 79

________________________
Indexe
A
Ajustement autom. volume 12
Amplificateur de cinémamaison 27
Antenne 5
Arrêt programmé 13
Auto surround 12
Avertissements relatifs à la sécurité 2
B
Balance 11
Bouton
curseur 6
MENU 6
MUTE 6
OK 6
POWER 6
C
Câble 5
Câblosélecteur 25
Caméra 23
Caméscope 23
Casque 23
volume 12
Changer audio 11
Code
Changer 15
Introduire 15
Chaînes
éditer 18
installation 17
verrouillage 14
sintonisation 16
Connecteurs latéraux 23
Contraste dynamique 10
Couleur 10
boutons 6
température 10
Comp. video connectors 26
Connecteur
HDMI 25
Connexions 19
audio/vidéo 24
Contraste 10
D
Définition 10
Delta volume 12
Démo 16
Désinstaller les chaînes 18
DVD
enregistreur 25
lecteur 25
E
Enregistreur 25
J
Jeu 23,25
G
Glossaire 29
H
Heure d’été 19
Horloge 19
I
Image
menu 10
Installation 16
Installation chaîne faible 17
L
Langue 16
Langue audio 11
Lumière 10
M
Mémorisation des chaînes 17
Menu Options 12
Minuterie marche 16
Mise à niveau logiciel 33
N
Navigateur multimédia 21
Naviguer dans les menus 9
O
Ordinateur 27
P
Piles 5,29
Première installation 8
Problèmes 28
Programmation auto 17
R
Récepteur satellite 26
Recyclage 29
Réduction sonore 11
Rétablir réglages AV 20
S
Se préparer 4
Signalisation des alerte d’urgence 18
Son
menu 11
mode 12
Soin de l’écran 2
Sous-titres 12
service 13
options 13
T
Teinte 10
Télécommande 6
Mise en service du téléviseur 7
Réglages menu TV 9
U
USB
connecteur 23
appareil 21
V
Verrou kensington 3
Verrouiller 13
après 14
Verrous
qualifications ciné 15
qualifications tv 14
régionaux 15
Volume 6,11
VCR 25
FRANÇAIS
F
Format plein écran 7
Fuseau horaire 19
35
Page 80

Besoin d’aide ?
Aide en ligne
www.magnavox.com/usasupport
1 800 705 2000
Conservez le modèle et le numéro de série de votre téléviseur à portée
de main avant d’appeler le Service Consommateurs.
Vous les trouverez sur l’emballage ou à l’arrière et en dessous de
l’appareil.
Modèle:
Numéro de série: ______________________________________
Avis réglementaires - Avis de la Federal Communications
Commission
Cet équipement a été testé et jugé compatible avec les limites
s’appliquant aux appareils numériques de Classe B, conformément à la
partie 15 des règles du FCC. Ces limites ont été définies pour fournir
une protection raisonnable contre les interférences nuisibles dans le
cadre d’une installation résidentielle. Cet équipement génère, utilise
et peut émettre de l’énergie radiofréquence et, s’il n’est pas installé ni
utilisé conformément aux instructions, peut causer des interférences
gênantes pour les communications radio. Rien ne garantit toutefois que
des interférences ne surviendront pas dans une installation particulière.
Si cet équipement cause des interférences gênantes pour la réception
de la radio ou de la télévision, ce qui peut être déterminé en mettant
l’équipement hors, puis sous tension, l’utilisateur devrait essayer de
corriger ces interférences en prenant une ou plusieurs des mesures
suivantes :
Réorientez ou déplacez l’antenne de réception.
Augmentez la distance entre l’équipement et le récepteur.
Connectez l’équipement à une prise d’un circuit autre que celui auquel
le récepteur est branché.
Consultez votre revendeur ou un technicien de radiotélévision
expérimenté.
Modifications La FCC requiert que l’utilisateur soit informé que tous les changements
ou modifications apportés à ce périphérique sans l’autorisation
expresse de Magnavox peuvent annuler le droit de l’utilisateur à utiliser
l’équipement.
Câbles Les connexions à cet appareil doivent être effectuées avec des câbles
blindés avec des boîtiers de connecteur RFI/EMI métalliques afin de
conserver la conformité avec les règles et réglementations du FCC.
Canadian notice This Class B digital apparatus meets all requirements of the Canadian
Interference-Causing Equipment Regulations.
Avis Canadien Cet appareil numérique de la classe B respecte toutes les exigences du
Règlement sur le matérielouilleur du Canada.
36
Page 81

Un (1) an de main d’œuvre & Un (1) an de pièces & Un (1) an pour la réparation de l’écran
MAGNAVOX
PR EUVE D’ACHAT :
COUVER TURE :
EXCLUSIONS DE LA COUVERTUR E DE GARANTIE
POUR OBTENIR UN SERVICE S OUS GARANTIE AUX ÉTATS-UNIS, À
PORTO R ICO OU DANS LES ILES VIERGES…
POUR OBTENIR UN SERVICE S OUS GARANTIE AU CANADA…
Garantie limitée MAGNAVOX
garantit que ce produit est exempt de défaut de
fabrication, au niveau des matériaux et de la main
d’œuvre, sous des conditions d'utilisation normale établies
telles que :
Vous devez posséder une preuve de la date d’achat pour
obtenir la réparation du produit. Un reçu de vente ou tout
autre document indiquant le nom du produit et la date
d’achat du produit ainsi que le nom du revendeur du produit
est considéré comme preuve susante.
(Si le produit est déterminé comme étant défectueux)
MAIN D’OEUVRE : Pour une période de un (1) an à partir de la
date d’achat, Magnavox réparera ou remplacera le produit, à
son choix, sans frais, ou payera les frais de réparation de tout
centre de service autorisé Magnavox. Après la période de un
(1) an, Magnavox ne sera plus responsable pour les charges
encourues.
PIÈCES : Pour une période de un (1) an à partir de la date
d’achat, Magnavox fournira, sans frais, des éléments neufs
ou refaits à neuf en échange d’éléments défectueux. Les
centres de services autorisés Magnavox fourniront le retrait
et l’installation des pièces pendant un (1) an.
ÉCRAN : Pour une période de un (1) an à partir de la date
d’achat, Magnavox fournira, sans frais, un écran neuf ou
refait à neuf en échange de l’écran défectueux. Les centres
de services autorisés Magnavox fourniront le retrait et
l’installation des pièces sous la garantie de main d’œuvre
spéciée. (Les écrans plasma comprennent une garantie de
trente (30) jours de garantie de remplacement.)
Contactez le centre de service à la clientèle au :
1-800-705-2000
1-800-661-6162 (Francophone)
1-800-705-2000 (Anglophone ou hispanophone)
L'ÉTENDUE DE LA RESPONSABILITÉ DE MAGNAVOX SOUS
CETTE GARANTIE
LIMITÉE EST LA RÉPARATION OU LE REMPLACEMENT.
MAGNAVOX NE PEUT ÊTRE TENUE RESPONSABLE DE TOUT
DOMMAGE, DIRECT, INDIRECT, OU CONSÉCUTIF DE CE PRODUIT
OU DE TOUTE VIOLATION DE LA GARANTIE EXPRESSE OU
IMPLICITE SUR CE PRODUIT. À L’EXCEPTION DE CERTAINES
INTERDICTIONS DE LA LOI LOCALE, TOUTE GARANTIE IMPLICITE
SUR LA MISE EN MARCHÉ OU LE FONCTIONNEMENT DANS UN
BUT PARTICULIER DE CE PRODUIT EST LIMITÉ À LA DURÉE DE LA
GARANTIE COUVRANT CE PRODUIT.
Certains états ne permettent pas l’exclusion ou la limitation
directe ou consécutive sur les dommages causés ou les
limitations sur la durée de la gara ntie implicite ; dans ces cas les
limites ou exclusions évoquées par la présente peuvent ne pas
s’appliquer à vous. De plus, si vous passez un accord de service
avec un centre agréé MAGNAVOX dans les quatre vingt dix (90)
jours de la date d’achat, les limites sur la garantie implicite ne
s’appliquent pas.
Cette garantie ne couvre pas :
gLes frais de main d’œuvre pour l’installation ou le réglage du
produit, l’ajustement des contrôles personnalisés sur le produit
et l’installation ou la répa ration des systèmes d’antenne
extérieurs au produit.
gLa réparation et/ou le remplacement des pièces à cause d’une
mauvaise installation, la connexion à une mauvaise source
d’alimentation, l’abus, la négligence, la mauvaise utilisation,
un accident, une réparation non autorisée ou toute cause hors
du contrôle de Magnavox.
gUn produit qui requiert une modication ou une adaptation
pour lui permettre de fonctionner dans n’importe quel pays
autre que celui pour lequel il a été conçu, fabriqué, approuvé
et/ou autorisé ou la réparati on de produits endommagés par
ces modications.
gDes dommages sur le produit suite ŕ son envoi dans un
emballage inapproprié ou les coûts associés à l’emballage
gPerte du produit durant un envoi sans preuve de signature de
réception ou de reçu.
gProduit utilisé dans un but commercial ou institutionnel
(incluant mais non limité à la location).
gProduit vendu TEL QUEL ou REMIS À NEUF.
Cette garantie vous donne des droits légaux spéciques. Toutefois, vous pouvez avoi r d'autres droits également, lesquels vari ent d'un
état/province à l'autre.
Magnavox, P.O. Bo x 671539, Marietta, GA. 30006-0026
Garantie 4835 710 28300)
Page 82

Devuelva su Tarjeta de registro de producto o regístrese en línea en
www.magnavox.com/usasupport hoy mismo para aprovechar al máximo su compra.
Al registrar su modelo con Magnavox usted cumplirá con los requisitos para obtener todos los valiosos beneficios que se indican a continuación, ¡no selos pierda!
Complete y devuelva su Tarjeta de registro de producto o regístrese en línea en www.magnavox.com/usasupport para asegurarse de:
* Comprobante de compra
* Seguridad del producto
Notificación
La devolución de la tarjeta incluida garantiza
que se archive la fecha de compra, de modo
que no necesitará más papeleo para obtener
el servicio de garantía.
Al registrar su producto, recibirá la
notificación (directamente del fabricante) en
el raro caso de un retiro de productos o de
defectos en la seguridad.
¡Felicitaciones por su compra
y bienvenido a la “familia”!
Estimado proprietario de un producto
MAGNAVOX:
Gracias por su confianza en MAGNAVOX. Usted ha escogido uno de los
productos mejor construidos y con mejor respaldo disponible hoy en día.
Haremos todo lo que esté a nuestro alcance por mantenerle satisfecho
con su compra durante muchos años.
Como miembro de la “familia” MAGNAVOX, usted tiene derecho a estar
protegido con una de las garantías más completas y redes de servicio más
sobresalientes de la industria. Lo que es más: su compra le garantiza que
recibirá toda la información y ofertas especiales a las que tiene derecho,
además de un fácil acceso a los accesorios desde nuestra cómoda red de
compra desde el hogar.
* Beneficios adicionales
Registrar su producto garantiza que recibirá
todos los privilegios o las cuáles tiene
derecho, incluyendo las ofertas especiales para
ahorrar dinero.
Conozca estos
símbolos de seguridad
Este “relámpago” indica material no aislado dentro de la unidad
que puede causar una descarga eléctrica. Para la seguridad de
todos en su hogar, por favor no retire la cubierta del producto.
El “signo de exclamación” llama la atención hacia las funciones
sobre las que debería leer con atención en la literatura adjunta
para evitar problemas operativos y de mantenimiento.
Advertencia: Para reducir el riesgo de incendios o de descarga
eléctrica, este aparato no se debe exponer a la lluvia ni a la humedad, y
no se le deben colocar encima objetos llenos de líquido como jarrones.
Y lo que es más importante: usted puede confiar en nuestro irrestricto
compromiso con su satisfacción total.
Todo esto es nuestra manera de decirle bienvenido y gracias por invertir
en un producto MAGNAVOX.
P.S.: Para aprovechar al máximo su compra
MAGNAVOX, asegúrese de llenar y de devolver
inmediatamente su Tarjeta de registro del producto o
regístrese en línea en
www.magnavox.com/usasupport
Visite nuestro sitio en el World Wide Web en http://www.magnavox.com/usasupport
PRECAUCIÓN: Para evitar descargas eléctricas haga que la paleta
ancha del enchufe coincida con la ranura ancha e introdúzcala hasta el
fondo.
ATTENTION : Pour éviter les chocs électriques, introduire la lame
la plus large de la fiche dans la borne correspondante de la prise et
pousser jusqu’au fond.
Sólo para uso del cliente
Escriba a continuación el N° de serie, el cual se ubica en la parte
posterior del gabinete. Guarde esta información para futura
referencia.
N° de modelo:
N° de serie:
Page 83

Page 84

INSTRUCCIONES DE SEGURIDAD IMPORTANTES
Lea antes de operar el equipo
1. Lea estas instrucciones.
2. Guarde estas instrucciones.
3. Preste atención a todas las advertencia.
4. Siga todas las instrucciones.
5. No use este aparato cerca del agua.
6. Límpielo solamente con un paño seco.
7. No bloquee ninguno de los orificios de ventilación. Instálelo de acuerdo con las
instrucciones de los fabricantes.
8. No lo instale cerca de fuentes de calor, tales como radiadores, compuertas de tiro
(registros) de calor, estufas u otros aparatos (incluidos amplificadores) que generen calor.
9. No anule el objetivo de seguridad del enchufe polarizado o de conexión a tierra. Un
enchufe polarizado tiene dos paletas, una más ancha que la otra. Un enchufe de conexión
a tierra tiene dos paletas y una tercera espiga de conexión a tierra. La paleta más ancha o
la tercera espiga es entregada para su seguridad. Si el enchufe suministrado no se ajusta a
su tomacorriente, consulte a un electricista que reemplace el tomacorriente obsoleto.
10. Evite pisar o apretar el cable de suministro eléctrico, especialmente en los enchufes,
tomacorrientes y el punto en que salen del aparato.
11. Sólo use aditamentos o accesorios specificados por el fabricante.
12. Utilice sólo con un carro, soporte, trípode, repisa o mesa especificados
por el fabricante o que se vendan junto con el aparato. Si usa el carro, tenga precaución
cuando mueva la combinación carro/aparato para evitar lesiones si éste se vuelca.
13. Desenchufe este aparato durante las tormentas eléctricas o cuando no se use durante
largos períodos.
D. El aparato parece no funcionar normalmente o su rendimiento ha cambiado
notoriamente; o
E. Se ha dejado caer el aparato o se ha dañado la caja.
17. Inclinación/estabilidad - Todos los televisores deben cumplir con las normas de
seguridad generales recomendadas internacionalmente en cuanto a las propiedades de
inclinación y estabilidad del diseño de su gabinete.
• No comprometa estas normas de diseño aplicando una fuerza de tracción excesiva a la
parte delantera o superior del gabinete lo que finalmente puede hacer que el producto
se vuelque.
• Además, no se ponga en peligro usted mismo o a sus niños colocando equipos
electrónicos o juguetes sobre el gabinete. Dichos artículos pueden caer
inesperadamente desde la parte superior del producto y dañar el producto y/o causar
lesiones personales.
18. Montaje en la pared o cielorasso - El aparato se debe montar en una pared o
cielorraso únicamente como lo recomienda el fabricante.
19. Líneas de energía eléctrica - Una antena exterior se debe ubicar lejos de las líneas de
energía.
20. Conexión a tierra de la antena exterior - Si se conecta una antena exterior o
un sistema de cable al producto, asegúrese de que la antena o el sistema de cable
estén conectados a tierra para proporcionar cierta protección contra sobrevoltajes y
acumulación de cargas electrostáticas. En la Sección 810 del Código Eléctrico Nacional,
ANSI/NFPA No. 70-1984, se proporciona información sobre la adecuada conexión
a tierra de las esteras y estructuras de apoyo, conexión a tierra del alambre de
acometida a una unidad de descarga de antena, tamaño de los conectores de conexión
a tierra, ubicación de la unidad de descarga de antena, conexión a los electrodos y sus
requerimientos del electrodo de conexión a tierra. Vea la Figura que aparece más abajo.
14. Deje que personal calificado realice todo el servicio. Es necesario que el aparato reciba
servicio si se ha dañado en algún modo, como cuando se daña el cable o enchufe de
suministro de corriente, se ha derramado líquido u objetos han caído dentro él, cuando el
aparato ha estado expuesto a lluvia o humedad, no opera bien o se ha caído.
15. Es posible que este producto contenga plomo y mercurio. La eliminación de estos
materiales podría estar regulada debido a consideraciones medioambientales. Para
obtener información acerca de la eliminación o del reciclaje, póngase en contacto con sus
autoridades locales o con la Alianza de Industrias Electrónicas: www.eiae.org.
16. Daños que requieran servicio - El aparato debe recibir servicio de personal de
servicio calificado cuando:
A. Se ha dañado el cable de alimentación o el enchufe; o
B. Han caído objetos o se ha derramado líquido dentro del aparato; o
C. El aparato ha quedado expuesto a la lluvia; o
EJEMPLO DE CONEXIÓN A TIERRA DE LA ANTENA SEGÚN NEC, CÓDIGO ELÉCTRICO NACIONAL
ABRAZADERAS DE TIERRA
CAJA DE LA ENTRADA DEL SUMINISTRO ELECTRICO
21. Entrada de objetos y líquidos - Se debe tener cuidado de que no caigan objetos
dentro de los orificios de la caja ni se derramen líquidos a través de ellos.
a) Advertencia: Para reducir el riesgo de incendios o de descarga eléctrica, este aparato
no se debe exponer a la lluvia ni a la humedad, y no se le deben colocar encima objetos
llenos de líquidos de como jarrones.
22. Uso de las baterías PRECAUCIÓN - Para evitar escapes de las baterías que pueden
resultar en lesiones corporales, daño a la propiedad o a la unidad:
• Instale correctamente todas las baterías, con los polos + y - alineados como está
marcado en la unidad.
• No mezcle las baterías (nuevas con antiguas o de carbon con alcalinas, etc.)
• Retire las baterías cuando no use la unidad por un largo tiempo..
CONDUCTOR DE ENTRADA DE LA ANTENA
UNIDAD DE DESCARGA DE LA ANTENA
(NEC SECTION 810-20)
CONDUCTOR DE TIERRA
NEC SECTION 810-21)
(
ABRAZADERAS DE TIERRA
SISTEMA DE ELECTRODO DE PUESTA A TIERRA DEL
SUMINISTRO ELECTRICO (
NEC ART 250, PART H)
Nota para el instalador del sistema CATV: Se hace este recordatorio para llamar la atención del instalador del sistema de CATV sobre el
Artículo 820-40 de donde se proporcionan instrucciones para la apropiada conexión a tierra y, en particular, se especifica que la tierra de los cables
se conectará al sistema de conexión a tierra del edificio tan cerca del punto de entrada como sea posible.
22
Page 85

Índice
1 Advertencias de seguridad . . . . . . . . . . . . . . . . . . . . . 2
1.2 Cuidado de la pantalla . . . . . . . . . . . . . . . . . . . . . . . . . . . . 2
1.3 Advertencia respecto a las imágenes fijas en la pantalla . . 2
1.4 Montaje . . . . . . . . . . . . . . . . . . . . . . . . . . . . . . . . . . . . . . . 2
1.5 Campos eléctricos, magnéticos y electromagnéticos . . . 2
1.6 Características de los píxeles . . . . . . . . . . . . . . . . . . . . . . 3
1.7 Información para el cumplimiento de VESA para
una instalación profesional . . . . . . . . . . . . . . . . . . . . . . . . . 3
1.8 Cierre de seguridad Kensington . . . . . . . . . . . . . . . . . . . . 3
2 Introducción . . . . . . . . . . . . . . . . . . . . . . . . . . . . . . . . 4
2.1 Descripción de las conexiones . . . . . . . . . . . . . . . . . . . . . 4
3 Uso del Control Remoto RC . . . . . . . . . . . . . . . . . . . 6
3.1 Formato de pantalla panorámica . . . . . . . . . . . . . . . . . . . . 7
3.2 Botones situados a la izquierda del televisor . . . . . . . . . . 7
3.3 Encienda el televisor . . . . . . . . . . . . . . . . . . . . . . . . . . . . . . 7
4 Instalación por primera vez . . . . . . . . . . . . . . . . . . . 8
5 Desplazamiento por los menús . . . . . . . . . . . . . . . . . 9
5.1 Introducción . . . . . . . . . . . . . . . . . . . . . . . . . . . . . . . . . . . 9
5.2 Uso de los ajustes del menú TV . . . . . . . . . . . . . . . . . . . . 9
5.2.1 Ajuste la configuración de video y audio . . . . . . . . . . . . . . . 9
5.2.2 Ajustes del menú Imagen . . . . . . . . . . . . . . . . . . . . . . . . . . 10
5.2.3 Ajustes del menú Sonido . . . . . . . . . . . . . . . . . . . . . . . . . . 11
6 Ajustes del menú Opciones . . . . . . . . . . . . . . . . . 12
6.1 Subtítulos . . . . . . . . . . . . . . . . . . . . . . . . . . . . . . . . . . . . . 12
6.2 Servicio de subtítulos . . . . . . . . . . . . . . . . . . . . . . . . . . . 12
6.3 Servicio de subtítulos digitales . . . . . . . . . . . . . . . . . . . . 13
6.4 Opciones de subtítulos digitales . . . . . . . . . . . . . . . . . . . 13
6.5 Temporizador . . . . . . . . . . . . . . . . . . . . . . . . . . . . . . . . . 13
6.6 Bloqueo infantil . . . . . . . . . . . . . . . . . . . . . . . . . . . . . . . . 13
6.7 Ajustar/Cambiar código . . . . . . . . . . . . . . . . . . . . . . . . . 15
6.8 Programador . . . . . . . . . . . . . . . . . . . . . . . . . . . . . . . . . . 16
6.9 Demo . . . . . . . . . . . . . . . . . . . . . . . . . . . . . . . . . . . . . . . . 16
10 Realizar y utilizar conexiones de vídeo y audio . . 23
10.1 Descripción del panel lateral . . . . . . . . . . . . . . . . . . . . . . 23
10.2 Realizar conexiones de vídeo y audio . . . . . . . . . . . . . . . 24
10.3 Conectar un grabador (VCR / DVD-R) . . . . . . . . . . . . . 25
10.4 Conectar un grabador y otro dispositivo A/V . . . . . . . . . 25
10.5 Conectar un reproductor/grabador de DVD, un caja
de cable, un juego... con conector HDMI . . . . . . . . . . . . 25
10.6 Conectar un reproductor/grabador de DVD, un caja
de cable, un juego... con conector DVI . . . . . . . . . . . . . . 26
10.7 Conector un reproductor de DVD con
conector S-VIDEO . . . . . . . . . . . . . . . . . . . . . . . . . . . . . . 26
10.8 Conecte un grabador y caja de cable con salida de RF . 26
10.9 Conecte un receptor satelital o caja de cable con
salidas de A/V . . . . . . . . . . . . . . . . . . . . . . . . . . . . . . . . . . 26
10.10 Conecte un receptor satelital o caja de cable y
un grabador con salidas de A/V . . . . . . . . . . . . . . . . . . . . 26
10.11 Conecte dispositivos de fuente digital con conectores
de Video Component Output (YPbPr) . . . . . . . . . . . . . 26
10.12 Conectar un amplificador para Home theater . . . . . . . . 27
10.13 Conectar un PC . . . . . . . . . . . . . . . . . . . . . . . . . . . . . . . . 27
11 Problemas . . . . . . . . . . . . . . . . . . . . . . . . . . . . . . . . 28
12 Glosario . . . . . . . . . . . . . . . . . . . . . . . . . . . . . . . . . . 29
13 Reciclado . . . . . . . . . . . . . . . . . . . . . . . . . . . . . . . . . 29
14 Información del producto . . . . . . . . . . . . . . . . . . . . . 29
Apéndice
1 - Formato de presentación de TV Magnavox con música
de fondo . . . . . . . . . . . . . . . . . . . . . . . . . . . . . . . . . . . . . . . . 30
2 - Cámara digital de TV Magnavox y temas de USB . . . . . . . . . 31
3 - Temas referentes a periféricos conectados a un
conector HDMI . . . . . . . . . . . . . . . . . . . . . . . . . . . . . . . . . . . 32
4 - Cómo actualizar el software del TV . . . . . . . . . . . . . . . . . . 33
ESPAÑOL
7 Búsqueda y memorización de canales de TV . . . . 16
7.1 Menú Instalación . . . . . . . . . . . . . . . . . . . . . . . . . . . . . . . 16
7.2 Seleccione su idioma . . . . . . . . . . . . . . . . . . . . . . . . . . . . 16
7.3 Memorización de canales de TV . . . . . . . . . . . . . . . . . . . 17
7.4 Ajuste de preferencias . . . . . . . . . . . . . . . . . . . . . . . . . . 18
7.5 Selección de conexiones . . . . . . . . . . . . . . . . . . . . . . . . . 19
7.6 Ajuste su reloj . . . . . . . . . . . . . . . . . . . . . . . . . . . . . . . . . 19
7.7 Borrar ajustes AV . . . . . . . . . . . . . . . . . . . . . . . . . . . . . . 20
8 Creación de la lista de favoritos . . . . . . . . . . . . . . . . 20
8.1 Seleccionar un canal de la lista mostrada . . . . . . . . . . . . 20
8.2 Seleccionar otra lista de canales favoritos . . . . . . . . . . . 20
8.3 Crear/modificar una lista de favoritos . . . . . . . . . . . . . . . 20
9 Navegador Multimedia . . . . . . . . . . . . . . . . . . . . . . . 21
9.1 Para visualizar el contenido del dispositivo USB . . . . . . 21
9.2 Menú del Navegador multimedia . . . . . . . . . . . . . . . . . . 21
Índice . . . . . . . . . . . . . . . . . . . . . . . . . . . . . . . . . . . . . . . . . . . . . . 35
Fabricado bajo licencia de Dolby Laboratories.
‘Dolby’ ‘Pro Logic’ y el símbolo con una doble D son marcas comerciales de Dolby Laboratories.
1
Page 86

_________________________
4" - 6"4" - 6"4" - 6"
4" - 6"
4" - 6"
_________________________
Programación HD
Es necesario que obtenga programación HD para obtener una
imagen HD ! Llame a su proveedor de Cable o Satélite para ordenar
programación HD.
_________________________
1 Advertencias de seguridad
_________________________
1.1 General
No inserte el conector de alimentación en un tomacorriente ni
cuelgue el televisor en la pared antes de realizar todas las conexiones.
- Coloque o cuelgue el televisor donde desee, pero asegúrese de que el
aire circula libremente a través de las ranuras de ventilación. Deje al
menos de 4 a 6 pulgadas alrededor de la TV.
- No coloque el televisor sobre tapetes.
- No instale el televisor en un lugar cerrado como libreros o muebles
similares.
- Con el fin de evitar situaciones de riesgo, no coloque velas encendidas
ni otras fuentes de calor junto al equipo.
- Evite el calor y la exposición directa a la luz solar, a la lluvia o al agua.
- El equipo no se debe exponer a salpicaduras ni goteos.
- Para evitar que el cable de alimentación (CA) se dañe, lo que podría
provocar incendios o descargas eléctricas, no apoye el televisor sobre
el cable.
_________________________
1.3 Advertencia respecto a las imágenes fijas en la
pantalla
Es característico de las pantallas de LCD que cuando muestran una
imagen fija durante mucho tiempo puede quedar un rastro permanente
de la misma en la pantalla. El uso normal de los televisores supone la
reproducción de imágenes con movimiento y cambios constantes que
llenan toda la pantalla.
Ejemplos de imágenes fijas (no es una lista que los incluya todos, pueden
aparecer otros):
- Menús TV;
- Franjas negras: si aparecen franjas negras a la izquierda y a la derecha
de la pantalla, es recomendable cambiar el formato de la imagen, para
que ésta cubra toda la pantalla;
- Logotipo del canal de TV: es un problema si es brillante y permanece
fijo. Es menos probable que los gráficos en movimiento o con bajo
contraste puedan producir el envejecimiento irregular de la pantalla;
- Indicadores del mercado de valores: se presentan en la parte inferior de
la pantalla;
- Logotipos de canales de compras y listas de precios: son brillantes y
se muestran de manera permanente o repetida en el mismo punto de
la pantalla del televisor. Entre las imágenes fijas también puede haber
logotipos, imágenes de PC, indicaciones de hora, teletexto e imágenes
mostradas en modo 4:3, imágenes o caracteres estáticos, etc.
Reduzca el contraste y el brillo durante la visualización. Cuando
muestran una imagen fija durante 10 minutos, el brillo se reduzca
automáticamente. Una vez que se produzca el quemado, ya nunca
desaparece por completo.
!
Preste mucha atención. La garantía no es aplicable en aquellos casos
en que se hayan producido daños por no haber tenido en cuenta
los consejos de seguridad que sobre imágenes fijas se han dado
anteriormente.
_________________________
1.4 Montaje
La instalación del televisor requiere conocimientos especiales y sólo
debe realizarla personal especializado. No debe intentar dicha tarea
personalmente. Magnavox no se hace responsable del montaje incorrecto
ni de montajes que provoquen accidentes o lesiones. Cerciórese de que
el sistema de montaje esté bien fijado y cumpla las normas de seguridad.
1.2 Cuidado de la pantalla
No retire la hoja protectora hasta que haya terminado el montaje y
efectuado todas las conexiones.
Frágil. Utilice únicamente el paño suave incluido para limpiar la parte
frontal (negra brillante) del televisor. No toque, presione, frote ni golpee
la pantalla con ningún elemento duro, ya que podría rayarla, deteriorarla
o dañarla de manera permanente.
Además, no la limpie con paños para polvo que contengan productos
químicos. No toque la superficie con las manos desnudas ni con paños
aceitosos (algunos cosméticos pueden afectar a la pantalla).
Desconecte el televisor antes de limpiar la pantalla.
Cuando la pantalla tenga polvo acumulado, límpiela suavemente con
algodón absorbente u otro material suave. No use acetona, tolueno ni
alcohol, porque pueden causar daños químicos. No utilice líquidos ni
aerosoles limpiadores. Elimine de inmediato cualquier salpicadura de agua
o saliva. Si permanecen largo tiempo adheridas a la pantalla, provocan
deformaciones y desvanecimiento del color.
2
!
Si la TV está instalada sobre una base giratoria, asegúrese de que el
cable de alimentación no quede tenso cuando la TV gira. La tensión en el
cable de alimentación puede aflojar las conexiones; esto puede causar la
formación de un arco eléctrico y provocar un incendio.
________________________
1.5 Campos eléctricos, magnéticos y electromagnéticos
(EMF)
- Magnavox fabrica y vende muchos productos dirigidos a consumidores
que, como cualquier aparato electrónico, tienen la capacidad de emitir y
recibir señales electromagnéticas.
- Uno de los principios centrales de negocio de Magnavox es llevar a
cabo las medidas de seguridad necesarias para nuestros productos
para así cumplir con los requisitos legales y mantenerse dentro de los
estándares EMF que están en vigor en el momento de fabricar dichos
productos.
- Magnavox se compromete a desarrollar, producir y comercializar
productos que no tengan efectos adversos en la salud de las personas.
- Magnavox asegura que si sus productos se manipulan de forma correcta
y se utilizan para el uso para el que fueron diseñados, serán seguros
según la evidencia científica disponible en el momento de fabricación.
- Magnavox juega un papel activo en el desarrollo de estándares EMF
y de seguridad internacionales, lo que le permite anticipar nuevos
desarrollos en la estandarización para así integrarlos temprano en sus
productos.
Page 87

_________________________
0
0
6
8
M
0
0
4
1.6 Características de los píxeles
______________________
1.8 Cierre de seguridad Kensington (se presente)
La pantalla de su TV está fabricada con tecnología de alta precisión
usando un elevado número de píxeles de color. Aunque tiene píxeles
efectivos de 99,999% o más, pueden aparecer de forma constante
puntitos negros o brillantes de luz (rojo, verde o azul) en la pantalla. Es
una característica estructural del sitio web (dentro de los estándares
comunes del sector) y no se trata de un fallo.
______________________
1.7 Información para el cumplimiento de VESA para
una instalación profesional
!
Precaución
Consulte a un profesional en la instalación de equipo audiovisual.
Un montaje de pared inadecuado puede resultar en lesiones o daños
severos.
Magnavox no acepta ninguna responsabilidad por un montaje inadecuado
o un montaje que pueda causar accidentes o lesiones.
El televisor está preparado para montaje en pared compatible con VESA.
No se incluye el soporte. Utilice un soporte compatible con VESA con
código VESA MIS-F, 600, 400, M8. Solicite información a su distribuidor.
1. Localice los cuatro orificios para tornillos VESA en la parte posterior
del televisor.
Su televisor está provisto de un Cierre de seguridad
Kensington para impedir que sea robado. Se debe comprar un
cierre antirrobo Kensington en forma separada.
El Cierre de seguridad Kensington es un cable de acero revestido
de plástico con un cierre. Se debe fijar un extremo a la abertura del
televisor y cerrar con un botón especial. El otro extremo está fijado a
un punto fijo.
® Kensington y MicroSaver son marcas comerciales registradas de los
Estados Unidos de ACCO World Corporation con registros emitidos y
solicitudes en trámite en otros países de todo el mundo. Todas las otras
marcas comerciales registradas y no registradas son de propiedad de sus
dueños respectivos.
ESPAÑOL
4x
2. En caso de que los discos de plástico estorben el soporte VESA,
puede destornillar los 4 discos.
4x
VESA, FDMI and the VESA Mounting Compliant logo are trademarks of the
Video Electronics Standards Association
.
3
Page 88

_________________________
VIDEO
S VIDEO
AUDIO
L
R
BSU
L
R
AUDIO
YPbPr
VIDEO
Y
S VIDEO
AUDIOLR
Pb Pr
VIDEO L RAUDIO
AV 3
AV 1
AV 2
14
13
12
3
2
1
ANTENNA
SERVICE
UART
AUDIO OUT
L
R
ANALOG
AUDIO IN
OUT
IN
DIGITAL
AUDIO
L
R
DISPLAY SYNCHRONIZED
HDMI 1AV 1 HDMI 1
HDMI 2AV 2 HDMI 2
HDMI 3AV 3 HDMI 3
DISPLAY
SYNC.
++
HDMI 1 HDMI 2 HDMI 3
42"-47"-52"
10 9 8 7 6 5 4 11
2 Introducción
Bienvenido a la creciente familia de propietarios de Magnavox.
_________________________
2.1 Descripción de las conexiones
Hay una amplia gama de equipos de audio y vídeo que se pueden
conectar al televisor. Consulte Capítulo 10 Realizar y utilizar
conexiones de vídeo y audio.
Antes de instalar su televisor o antes de colgarlo en la pared, primero
conecte los dispositivos periféricos.
!
No inserte el conector de alimentación en la red eléctrica situado
en la parte inferior de la TV y en un tomacorriente de pared antes de
realizar todas las conexiones.
_________________________
2.1.1 Conexiones posteriores
1-2-3
AV1 - AV2 - AV3
Para conectar dispositivos con
- un conector S-Video y cables de audio I (izquierdo) y D
(derecho)
- dispositivos con 3 conectores separados de salida de video
componente (YPbPr) y cables analógicos de audio I y D
- dispositivos con cables de video y audio AV I y D.
4-5-6
HDMI *
Para conectar un dispositivo con un conector HDMI. Si el
dispositivo auxiliar tiene sólo una salida DVI, consulte el
Capítulo 10.7.
7 Analog Audio In L/R (Entrada de audio I/D)
Audio analógico para dispositivos conectados a HDMI.
8 Digital Audio Out (Salida de audio digital)
Para conectar un amplificador para Home theater digital.
9 Digital Audio In
10 Audio Out L/R
11 Service UART (UART de servicio)
Uso exclusivo de personal de servicio autorizado.
Para instaladores / integradores: no conectar RS232 sin
conversor de nivel.
_________________________
2.1.2 Conexiones laterales
12 Para conectar dispositivos con cables de video o S-Video
y audio AV izquierdo y derecho. (Por ejemplo, cámara,
videocámara, juego, audio,...)
13 Para conectar sus audífonos.
14 Para conectar un dispositivo USB.
* Según el tipo de aparato, 2 o 3 conectores HDMI están
disponible.
4
Page 89

_________________________
2.1.3 Conecte al televisor
Su TV Digital Magnavox le permitirá disfrutar de programas digitales
directamente desde su cable o de canales de aire.
Conecte directamente a la TV o por medio de su caja de cable o caja de
recepción satelital actuales.
________________________
Programas de TV por cable para los que no se necesita
convertidor de señal de cable
Dado que la señal de TV por cable está conectada directamente al
sintonizador del televisor, puede ver también los programas en abierto
simplemente seleccionando el canal que desee. Sin embargo, primero
deberá utilizar la Sintonización automática para almacenar los canales en
la memoria del televisor. Consulte Capítulo 7.3.
Esta conexión suministra sonido estereofónico al televisor, si se emite
por la estación que tiene sintonizada.
_________________________
2.1.3.1 Directamente a la TV (no podrá recibir canales de pago)
1. Conecte la señal de TV por cable o la señal de entrada de la antena a
la toma
ANTENA de 75 Ω : situada en la parte inferior de la TV.
ANTENNA
2. Consulte Capítulo 7.3 Memorización de canales de TV para ver
detalles sobre el uso de Sintonización automática para almacenar
canales en la memoria del televisor.
- Las emisoras se encuentran a mitad del proceso de la transición
de televisión analógica a digital. Por lo tanto, determinadas emisoras
emiten dos canales a la vez, uno analógico y otro digital.
- Esta conexión suministra sonido estereofónico al televisor, si se emite
por la estación que tiene sintonizada.
________________________
2.1.4 Conecte la alimentación
!
Verifique que el voltaje del suministro eléctrico corresponda al
voltaje impreso en el adhesivo de la parte trasera del televisor. Contacte
a su distribuidor local si el suministro eléctrico es diferente.
MAINS
!
Asegúrese de que el cable de alimentación esté completamente
insertado en el enchufe de suministro de la TV y en el de la pared.
_________________________
2.1.5 Remote control
Instale las dos pilas (tipo R03-1,5 V) que se entregan junto con el
aparato.
ESPAÑOL
2.1.3.2 Por medio de una caja de cable o caja satelital
VIDEO L RAUDIO
AV 2
L + R + VIDEO
AV2
CABLE
SIGNAL
OUT
Set top box
RF IN
ANTENNA
SPLITTER
1. Mantenga la conexión del cable del televisor de su casa dentro de su
caja de cable (o caja de recepción satelital).
2. Conecte la caja de cable (o caja de recepción satelital) a la parte
trasera del televisor con las mejores opciones de conexión. Consulte
Capítulo 10.2 Realizar conexiones de vídeo y audio.
3. Seleccione la fuente con el botón
4. Pulse el botón
OK para confirmar su selección.
AV del control remoto.
Para obtener más información, consulte su manual de caja de cable
(o caja receptora satelital).
Asegúrese de que los extremos (+) y (-) de las pilas se alinean
correctamente (está marcado dentro del estuche.)
5
Page 90

_________________________
3 Uso del control remoto
2
5
1
POWER Pulse para encender/apagar.
2
AV Pulse repetidamente para seleccionar AV1, AV2, AV3, HDMI
, HDMI 2, HDMI 3, Lado o Canales de TV según donde haya
1
1
3
4
6
conectado los dispositivos periféricos.
3
FORMAT Consulte Capítulo 3.1 Formato de pantalla.
4
CLOCK Sin función
5
DEMO Demo encendido/apagado.
11
16
7
6 Botones de color Se existen funciones vinculadas a los botones
de color, estos se muestran en pantalla.
9
8
7
INFO
Información en pantalla: Pulse para mostrar (si está disponible)
información acerca del canal de TV y del programa o equipo
periférico seleccionado.
10
Visualización del reloj: Seleccione para activar/desactivar la
visualización del reloj en la pantalla.
12
8
OK - Para activar un ajuste.
- Para mostrar la lista de canales memorizados (de acuerdo con
13
la selección realizada en el modo Instalación - Antena o Cable,
consulte Capítulo 7.3 Memorización de canales de TV).
14
- Comienza a reproducir el contenido de la aplicación del Navegador
Multimedia. Consulte Capítulo 9 Navegador Multimedia.
9
MENU Menú de ajustes encendido/apagado.
Consulte Capítulo 5.2 Uso de los ajustes del menú TV.
10 Botones de cursor Pulse los botones de cursor arriba/abajo,
15
derecho/izquierdo para desplazarse por los menús.
11
VOLUME Pulse + o - para ajustar el volumen.
12 Selección de canales
- Para navegar por los canales de TV o fuentes memorizados y
marcados en la lista de Canales favoritos. Consulte Capítulo 8
Creación de la lista de favoritos;
- Para navegar rápidamente por la lista en los menús;
- Para seleccionar entre los canales de TV de antena o por cable, en
primer lugar haga su selección en el menú Instalación, Instalación de
canales, Modo de instalación, consulte Capítulo 7.3 Memorización
de canales de TV..
Debido a la sensibilidad del control remoto, usted puede experimentar
una operación retardada al encender su televisor. Después de un corto
tiempo su remoto trabajara adecuadamente.
6
13
MUTE Permite interrumpir el sonido o recuperarlo.
14 Botones numéricos Para seleccionar un canal de TV.
15 • Introduzca el punto (•) para los canales digitales.
16
A/CH Pulse para alternar entre el canal actual y el que vio
previamente.
Page 91

_________________________
_________________________
3.1 Formato de pantalla panorámica
Evita que aparezcan franjas negras en los lados o en la parte superior
e inferior de la imagen. Cambia el formato de la imagen de forma que
ocupe toda la pantalla.
1. Pulse
2. Pulse Î o ï para seleccionar un formato de pantalla disponible.
3. Si fuera necesario, los subtítulos se podrán hacer visibles a través del
Se recomienda el formato Automático para que la distorsión sea mínima.
FORMAT para activar el menú Formato de pantalla.
cursor Î.
Consejo
Automático (No disponible para PC)
Aumenta la imagen de forma automática para
que ocupe toda la pantalla. Seguirán viéndose los
subtítulos.
Super zoom (No disponible para alta
definición)
Elimina las franjas negras a los lados de las
emisiones 4:3. La distorsión es mínima.
4:3 (No disponible para alta definición)
Muestra el formato clásico 4:3
3.2 Botones situados en el lado izquierdo del televisor
Si el control remoto se rompe o extravía, siempre será posible modificar
determinados ajustes básicos con los botones de la parte izquierda del
televisor.
Pulse el interruptor de alimentación
POWER . para encender el
televisor.
El botón
MENU puede emplearse para acceder al menú TV sin usar el
control remoto.
Use los botones
Use los botones
VOLUME + y - para ajustar el volumen.
CHANNEL + y - para recorrer los canales de TV y las
fuentes guardados y marcados en las listas de canales favoritos.
_________________________
3.3 Encienda el televisor
ESPAÑOL
Ampliar imág. 14:9
(No disponible para alta definición)
Aumenta el formato 4:3 clásico a 14:9
Ampliar imág. 16:9
(No disponible para alta definición)
Aumenta el formato 4:3 clásico a 16:9
Pantalla panorámica
Amplía el formato 4:3 a 16:9
Sin escala (Sólo para alta definición y PC.)
Máxima nitidez. Es posible que aparezca
distorsión en los bordes. Es posible que
aparezcan franjas negras con imágenes del PC.
Pulse el interruptor de alimentación POWER . situado a la
•
izquierda del televisor.
> Se enciende un indicador en la parte frontal del televisor.
Pulse el botón
•
+CH- o el botón POWER del control remoto.
La primera vez (y sólo la primera vez) que encienda el televisor, verá
una pantalla de bienvenida seguida del procedimiento de instalación.
onsulte Capítulo 4 Instalación por primera vez.
Nota
No olvide dar un nombre a la conexión en el menú Conexiones.
Consulte la sección 7.5 Conexiones.
7
Page 92

_________________________
4 Instalación por primera vez
El procedimiento de instalación dispone de una serie de pantallas que
guían al usuario a lo largo del procedimiento. Siga las instrucciones en
pantalla.
Si ya se ha instalado el televisor antes y desea cambiar los ajustes de
la primera instalación, continúe con Capítulo 5.2 Uso de los ajustes
del menú TV.
Paso 1 - Seleccione el idioma que se mostrará en pantalla
Después de la pantalla de bienvenida, se solicita al usuario que seleccione
el idioma de los menús que se mostrarán en la pantalla del televisor. El
texto del encabezado y de la información en pantalla cambia de idioma
de manera continua.
Menú idiomas
Por favor, elija su idioma...
usando el cursor
arriba/abajo.
Siguiente
1. Pulse el cursor arriba/abajo y resalte el idioma que desee.
2. Pulse el botón
OK del control remoto.
3. Siga las instrucciones en pantalla para continuar.
Paso 2 - Complete el procedimiento de instalación inicial del
televisor
1. Pulse el botón verde del control remoto para iniciar la instalación de
canales.
Instalación
Modo de instalación
Antena
Cable
Anterior Siguiente
2. Seleccione Cable o Antena en el modo Instalación y pulse el botón
verde.
> Si selecciona Antena el televisor detectará las señales de antena
y buscará los canales de televisión de antena (NTSC y ATSC)
disponibles en su zona.
> Si selecciona Cable el televisor detectará las señales
suministradas por la compañía de cable y buscará los canales de
televisión por cable (NTSC, ATSC, Modulación QAM) disponibles
en su zona.
3. Pulse el botón verde del control remoto para iniciar la instalación
automática de canales.
> Se efectúa una búsqueda de todos los canales de TV disponibles
y se memorizan automáticamente. El proceso tardará unos
minutos. Una vez completada la búsqueda, el menú indicará el
número de canales digitales y analógicos encontrados.
English
Français
Español
Português
.............
Seleccione su modo de
instalación
Paso 3 - Asistente de ajustes: selección de configuraciones de
TV
El Asistente de configuración le ayudará a seleccionar los valores de
imagen y sonido de su preferencia. Finalmente, logrará una configuración
que le dejará satisfecho.
1. Pulse el botón verde del control remoto para acceder al menú
Asistente de ajustes.
Instalación
El asistente le ayudará a instalar los siguientes capítulos:
Televisión
Assistente de ajustes
Anterior Siguiente
2. Seleccione su ubicación con el cursor arriba/abajo.
Asistente de ajustes
Por favor, seleccione su localización antes de continuar:
Casa
Tienda
OmitirAnterior Siguiente Parar
> Si selecciona Casa se mostrará el Asistente de ajustes.
> Si selecciona Tienda, se omitirá el Asistente de ajustes.
Los parámetros de TV para Imagen y Sonido se cambiarán por
ajustes fijos predefinidos.
3. Vuelva a pulsar el botón verde para continuar.
4. Utilice el cursor izquierdo/derecho para seleccionar su pantalla
preferida.
5. Pulse el botón verde para confirmar la selección y pasar a la pantalla
siguiente.
> Se mostrarán las opciones siguientes en orden. En el encabezado
se indica cuántas pantallas se han completado y cuántas pantallas
hay en total.
6. Al terminar, vuelva a pulsar el botón verde para guardar todos los
ajustes y volver al menú de instalación del TV.
Si omite o detiene el Asistente de ajustes, se seleccionarán los ajustes
estándar de Magnavox.
8. Pulse el botón rojo para finalizar el procedimiento de Instalación por
primera vez y mostrar el primer canal de TV guardado.
Puede cambiar o restablecer en cualquier momento toda la
configuración o ajustar una configuración individual para Imagen y
Sonido en el menú Configuraciones TV. Consulte Capítulo 5.2.1
Ajuste la configuración de video y audio.
Si desea controlar los ajustes de funciones de TV especiales, de
opciones y de equipos periféricos, consulte Capítulo 6 Ajustes del
menú Opciones.
Si elige instalar los canales en otro momento, consulte Capítulo 7.3
Memorización de canales de TV para seleccionar Instalación
automática para buscar canales disponibles.
4. Una vez completada la búsqueda, vuelva a pulsar el botón rojo.
8
Page 93

________________________
5 Desplazamiento por los menús
________________________
5.1 Introducción
Cuando se utilizan los menús o se intenta ejecutar alguna acción, aparece
gran cantidad de instrucciones, textos y mensajes de ayuda en la pantalla
del televisor.
Lea los textos de ayuda que se muestran sobre la opción resaltada.
Los botones de colores de la parte inferior de la pantalla hacen
referencia a diferentes acciones que pueden ejecutarse.
Pulse el botón de color correspondiente del control remoto para
ejecutar la acción requerida o deseada.
1. Pulse el botón
MENU del control remoto.
- Instalación permite
- seleccionar preferencias de idioma;
- buscar y memorizar canales de TV;
- instalar canales digitales ATSC de recepción débil;
- establecer o ajustar diversas funciones especiales;
- seleccionar equipos periféricos conectados;
- restablecer los ajustes predeterminados de fábrica de imagen y
sonido;
- Actualización de software le permite actualizar el software
actual.
5. Utilice el cursor derecho para acceder a la opción de menú resaltada.
> El contenido del panel derecho se desplaza al panel izquierdo y el
panel derecho muestra el contenido de la opción que se acaba de
resaltar en el panel izquierdo.
En algunos casos es importante ver la imagen mientras se realizan
los ajustes. Esto quiere decir que cuando el elemento resaltado
se encuentre en el panel derecho, las demás opciones de menú
permanecerán ocultas. Al volver a pulsar el cursor izquierdo,
reaparecerán las opciones de menú ocultas y la barra de resalte se
desplazará al panel izquierdo.
> Aparece el menú principal en la pantalla.
Televisión
Multimedia
Menú TV
Lista de canales
Guía de programas
Dispositivo USB 1
- Menú TV permite acceder al menú de TV. Véase a continuación.
- Lista de canales permite acceder a la lista de canales de TV
y crear hasta cuatro listas de favoritos con sus canales de TV
preferidos. Consulte Capítulo 8 - Cree su lista de canales
favoritos.
- Guía de programas le permite obtener información detallada
sobre programas de TV digital.
- Multimedia permite acceder a la aplicación Navegador multimedia.
Permite mostrar sus archivos multimedia personales (video,
imagenes, audio). Multimedia sólo aparece si se ha conectado un
dispositivo USB. Consulte Capítulo 9 Navegador Multimedia.
2. Utilice el cursor arriba/abajo para resaltar y seleccionar una opción
del menú.
3. Utilice el cursor derecho para acceder a la opción de menú resaltada.
> El panel derecho muestra el contenido de la opción de menú
resaltada.
4. Pulse el cursor arriba/abajo para seleccionar una opción del menú.
6. Pulse el botón
MENU para salir del menú principal.
_________________________
5.2 Uso de las opciones de Menú TV
Menú TV permite acceder y cambiar ajustes y preferencias, tanto si
desea cambiar los ajustes de Instalación por primera vez como si desea
controlar los ajustes de funciones de TV especiales y equipos periféricos.
_________________________
5.2.1 Ajuste la configuración e video y audio
1. Pulse el botón
> Aparece el menú principal en la pantalla.
Televisión
Multimedia
2. Seleccione Menú TV y pulse el cursor derecho.
> Aparece Menú TV.
Menú TV
Configuraciones TV
Opciones
Instalación
Actualización software
MENU del control remoto.
Menú TV
Lista de canales
Guía de programas
Dispositivo USB 1
Configuraciones TV
Assistente de ajustes
Reinicie a estándar
Imagen
Sonido
ESPAÑOL
Menú TV
Configuraciones TV
Opciones
Instalación
Actualización software
Info
Configuraciones TV
Assistente de ajustes
Reinicie a estándar
Imagen
Sonido
- Configuraciones TV permite ajustar la configuración preferida
de imagen y sonido.
- Opciones permite controlar el ajuste de funciones de TV
especiales.
Info
3. Seleccione Configuraciones TV y pulse el cursor derecho.
> El menú Configuraciones TV se desplaza a la izquierda.
4. Pulse el botón
MENU para salir del menú.
Existen 3 maneras de cambiar los ajustes de TV. Vea más adelante.
9
Page 94

A. Cambie los ajustes de manera sencilla con el Asistente de
ajustes
Cada vez que efectúe una selección, pulse el botón verde para confirmar.
1. Seleccione Asistente de ajustes y pulse el cursor derecho.
> Se presentará una serie de pantallas divididas o completas que
le solicitarán que seleccione su imagen preferida y los ajustes de
sonido, hasta conseguir una configuración completa a su gusto.
Consulte Capítulo 4 Instalación por primera vez, Paso 3 -
Asistente de ajustes.
2. Pulse el botón verde para volver a Menú TV.
B. Uso de Reinicie a estándar
Esto le permite seleccionar uno de los ajustes estándares para video y
audio.
1. Seleccione Reinicie a estándar y pulse el cursor a la derecha.
> Aparece un menú que le permite seleccionar uno de los ajustes
predefinidos de fábrica para video y audio.
Menú TV
Configuraciones TV
Assistente de ajustes
Reinicie a estándar
Imagen
Sonido
Imagen
Contraste
Brillo
Color
Tono
Realce
Temperatura color
Perfect Pixel HD
Contraste dinámico
Reducción del ruido
Artifacto de reducc. MPEG
Realce del color
Active Control
Senzor de luz
Formato de pantalla
Menú TV
Configuraciones TV
Assistente de ajustes
Reinicie a estándar
Imagen
Sonido
Info
Reinicie a estándar
Actual
Natural
Vivo
Cine
- Actual muestra los ajustes actuales para video y audio.
- Si selecciona Natural, puede ajustar la configuración de imagen y
sonido con los valores estándar recomendados. En la mayoría de los
casos, esta elección proporcionará la visión más equilibrada posible.
- Si selecciona Vivo, puede ajustar la configuración de imagen y sonido
con valores ricos que utilicen toda la capacidad del televisor al
máximo.
- Si selecciona Cine, puede ajustar la configuración de imagen y sonido
a la representación más pura del contenido de la fuente original.
2. Pulse el botón de color verde para guardar el ajuste seleccionado.
C. Ajustes individuales de imagen y sonido
Seleccione Imagen o Sonidoy pulse el cursor derecho.
•
> Aparece un menú que permite realizar la sintonía fina de los
ajustes de imagen y sonido.
> Si desea realizar ajustes de imagen, consulte Capítulo 5.2.2
Ajustes del menú Imagen.
> Si desea realizar ajustes de sonido, consulte Capítulo 5.2.3
Ajustes del menú Sonido.
_________________________
5.2.2 Ajustes del menú Imagen
El menú imagen contiene los ajustes que afectan a la calidad de la imagen.
1. Pulse el botón
MENU del control remoto.
> Aparece el menú principal en la pantalla.
2. Seleccione Menú TV y pulse el cursor derecho.
> Menú TV se desplaza a la izquierda.
3. Seleccione Configuraciones TV y pulse el cursor derecho.
> El menú Configuraciones TV se desplaza al panel izquierdo.
4. Seleccione Imagen y pulse el cursor derecho.
> El menú Imagen se desplaza al panel izquierdo.
5. Utilice el cursor arriba/abajo para seleccionar las opciones del menú
Imagen.
6. Pulse el cursor derecho para acceder a la opción del menú Imagen
seleccionada.
7. Utilice los botones de cursor para ajustar la configuración.
8. Pulse el cursor izquierdo para volver al menú Imagen.
Info
Contraste
Permite ajustar la intensidad de las partes brillantes de la imagen, sin
afectar a las zonas oscuras.
Brillo
Permite ajustar la salida de luz de toda la imagen, que afecta
principalmente a las zonas más oscuras de la imagen.
Color
Permite ajustar el nivel de saturación de los colores para adecuarlo a los
gustos personales.
Tono
Este control permite seleccionar la mezcla de color (tonalidad) de la
imagen.
Realce
Ajusta el realce de detalles en la imagen.
Temperatura del color
Aumenta o reduce los colores Cálido (rojo) y Frío (azul) para
adaptarlos a los gustos personales.
Seleccione Frío para dar un tono azulado a los blancos, Normal
•
para dar un tono neutro a los blancos, Cálido para dar un tono rojo
a los blancos.
Seleccione Personalizado para efectuar ajustes personalizados.
•
1. Pulse el botón verde.
> Aparece la pantalla Temperatura color personalizado. Ésta
le permite ajustar detalladamente el punto blanco (
de negro (
BL) de la imagen.
WP) y el nivel
2. Utilice el cursor para seleccionar y ajustar las opciones de:
R-WP: permite personalizar el temperatura del color mediante el
ajuste del punto blanco rojo de la imagen.
G-WP: permite personalizar el temperatura del color mediante el
ajuste del punto blanco verde de la imagen.
B-WP: permite personalizar el temperatura de color mediante el
ajuste del punto blanco azul de la imagen.
R-BL: permite personalizar el temperatura de color mediante el
ajuste del nivel de negro rojo de la imagen.
G-BL: permite personalizar el temperatura de color mediante el
ajuste del nivel de negro verde de la imagen.
3. Utilice los botones de colores para restablecer los ajustes
predefinidos.
4. Pulse el botón rojo o el cursor izquierdo para volver al menú Imagen.
10
Page 95

Perfect Pixel HD
Perfect Pixel HD es el mejor ajuste, ya que procesa la imagen por
completo para optimizar al máximo cada píxel, mejorando el contraste, la
nitidez, la profundidad, la reproducción del color y el brillo del contenido
procedentes de todas las fuentes, incluida la alta definición.
•
Seleccione Encendido o Apagado para activar/deactivar Perfect
Pixel HD.
Contraste dinámico
Resalta automáticamente el contraste en las zonas más oscuras y más
claras de la imagen cuando cambia la imagen de la pantalla.
Normalmente, seleccione Medio. Algunos usuarios pueden preferir
•
seleccionar Mínimo, Máximo o Apagado.
Reducción del ruido
Reducción del ruido filtra y reduce automáticamente el ruido de imagen.
Esto mejora la calidad de la imagen al recibir señales débiles.
Seleccione Apagado, Mínimo, Medio o Máximo según el ruido
•
de imagen.
Artifacto de reducción MPEG
La activación de la reducción MPEG suaviza las transiciones de contenido
digital.
Seleccione Encendido o Apagado.
•
Realce del color
Controla automáticamente el realce y suaviza los verdes y azules. Da
vivacidad a los colores.
Seleccione Apagado, Mínimo, Medio o Máximo.
•
Active Control
El televisor mide continuamente todas las señales y corrige las de entrada
para proporcionar la mejor calidad de imagen posible.
Seleccione Encendido o Apagado para activar/deactivar Active
•
Control.
Sensor de luz
Si se activa el sensor de luz, se ajustan automáticamente las opciones de
imagen para lograr la mejor visión posible según la iluminación de la sala.
Seleccione Encendido o Apagado.
•
Formato de pantalla
Consulte Capítulo 3.1 Formato de pantalla panorámica.
_________________________
5.2.3 Ajustes del menú Sonido
El menú sonido contiene los ajustes que afectan a la calidad del sonido.
1. Pulse el botón
MENU del control remoto.
> Aparece el menú principal en la pantalla.
2. Seleccione Menú TV y pulse el cursor derecho.
> Menú TV se desplaza a la izquierda.
3. Seleccione Configuraciones TV y pulse el cursor derecho.
> El menú Configuraciones TV se desplaza al panel izquierdo.
4. Seleccione Sonido y pulse el cursor derecho.
> El menú Sonido se desplaza al panel izquierdo.
5. Utilice el cursor arriba/abajo para seleccionar las opciones del menú
Sonido.
6. Pulse el cursor derecho para acceder a la opción del menú Sonido
seleccionada.
Dependiendo de la señal de entrada, es posible que no se pueda
seleccionar una o más opciones de menú.
Menú TV
Configuraciones TV
Assistente de ajustes
Reinicie a estándar
Imagen
Sonido
Info
Sonido
Ecualizador
Volumen
Balance
Idioma audio
Alternar audio
Mono/Estéreo
Modo sonido
Volumen auricular
Nivelador autom. de vol.
Nivelador de volumen
Surround automático
Ecualizador
Le permite seleccionar una de las configuraciones predefinidas para el
ecualizador: Estándar, Voz, Multimedia o Música.
Menú TV/Configuraciones TV
Sonido
Ecualizador
Volumen
Balance
Idioma audio
Alternar audio
Mono/Estéreo
.....
Info
Ecualizador
3
1,5kHz 5kHz
Use los botones de color para realizar una selección.
Use los botones de cursor para ajustar la respuesta de frecuencia del
sonido conforme a su gusto personal.
Volumen
Permite ajustar el nivel de salida de sonido.
Balance
Con esta opción se ajusta la salida de los altavoces derecho e izquierdo,
para obtener la mejor reproducción estereofónica teniendo en cuenta su
posición de escucha.
Idioma audio
Permite seleccionar un idioma de audio de la lista de idiomas disponibles
para el programa digital actual.
Si hay más de una opción de idioma audio, seleccione una.
Si desea cambiar permanentemente el idioma audio, utilice el menú
Idioma del menú Instalación, consulte Capítulo 7.2 Seleccione su
idioma.
Alternar audio (únicamente se puede seleccionar con señales de
transmisión analógicas)
Le ofrece la oportunidad de cambiar entre los programas Programa de
Audio Principal o Secundario (SAP) cuando está disponible.
ESPAÑOL
7. Utilice los botones de cursor para ajustar la configuración.
8. Pulse el cursor izquierdo para volver al menú Sonido.
11
Page 96

________________________
Mono/Estéreo
Permite seleccionar, por canal de TV, sonido Mono o Estéreo cuando
están disponibles retransmisiones en estéreo.
Modo sonido
Permite seleccionar los modos para reproducción de más sonido espacial
o surround dependiente de las señales de transmisión o señales de
entradas externas recibidas.
Volumen auricular
Permite controlar el nivel de sonido de los auriculares.
Nivelador automático del volumen
Se reducen automáticamente las diferencias de volumen entre canales y
programas, ofreciendo un nivel general más constante. También reduce la
dinámica del sonido.
Nivelador de volumen
Permite corregir cualquier diferencia de volumen permanente entre los
canales de TV o las fuentes externas.
Puede cambiar de canal con los botones numéricos o con el botón
CH - o +.
Surround automático
Si está ajustado como Encendido, permite al TV cambiar
automáticamente al mejor modo de sonido surround transmitido.
6 Ajustes del menú Opciones
El menú Opciones permite controlar los ajustes de funciones de TV
especiales, opciones y equipos periféricos.
1. Pulse el botón
> Aparece el menú principal.
2. Seleccione Menú TV y pulse el cursor derecho.
> Menú TV se desplaza a la izquierda.
3. Seleccione Opciones y pulse el cursor derecho.
> El menú Opciones se desplaza al panel izquierdo.
Menú TV
Configuraciones TV
Opciones
Instalación
Actualización software
Info
4. Utilice el cursor arriba/abajo para seleccionar los ajustes del menú
Opciones.
5. Pulse el cursor derecho para acceder a la opción del menú Opciones
seleccionada.
6. Utilice el cursor para ajustar la configuración.
7. Pulse el cursor izquierdo para volver al menú Opciones.
MENU del control remoto.
Opciones
Subtítulos
Servicio de subtítulos
Servicio de subtítulos dig.
Opciones de subtítulos
dig.
Temporizador
_________________________
6.1 Subtítulos
Esta opción permite ver en pantalla el texto CC o CS transmitido, según
el servicio CC o CS seleccionado en el menú Servicio de subtítulos o
Servicio de subtítulos digitales a continuación. Dicho texto puede verse
permanentemente en pantalla (suponiendo que el servicio esté disponible
en la transmisión) o sólo cuando se desactiva el sonido.
1. Pulse el cursor derecho después de seleccionar Subtítulos.
2. Seleccione Encendido, Apagado o Pantalla sin sonido.
_________________________
6.2 Servicio de subtítulos
Esta opción permite seleccionar niveles de Servicio de subtítulos para las
emisiones analógicas.
Subtítulos permite leer el contenido de voz de los programas de
televisión en la pantalla del televisor. Esta función, diseñada para personas
con problemas auditivos, utiliza ‘cuadros de texto’ en pantalla para
mostrar diálogos y conversaciones mientras se emite el programa de TV.
Los textos aparecen en pantalla durante las transmisiones subtituladas.
1. Seleccione Servicio de subtítulos.
2. Pulse el cursor derecho.
3. Seleccione el Servicio de subtítulos que desee:
>
CC 1, 2, 3 o 4
En la pantalla aparecen el diálogo (y las descripciones) de la
acción del programa de TV subtitulado. Generalmente CC 1 es
el más usado. CC 2 se puede usar para idiomas alternativos, si se
transmiten.
>
T 1, 2, 3 o 4
A menudo se usan para guías de canales, programaciones,
información de tableros de avisos de programas con subtítulos,
noticias, información del tiempo o informes de bolsa.
Los canales de TV no utilizan necesariamente todos los Servicios de
subtítulos durante la transmisión de programas subtitulados.
12
Page 97

_________________________
6.3 Servicio de Subtítulos digitales
Esta función permite configurar la visualización de subtítulos digitales.
•
Seleccione uno de los canales con servicio digital que pone a
disposición el proveedor de subtítulos. Existen 6 servicios estándar.
- El CS 1 está designado como servicio de subtítulos principal. Este
servicio ofrece subtítulos literales, o casi literales, del principal
idioma que se habla en el programa de sonido adjunto.
- El CS 2 está designado como servicio de subtítulos secundario.
Este servicio ofrece subtítulos en un idioma secundario, que son
traducciones de los subtítulos del servicio principal.
- Los demás subcanales de servicio no están asignados previamente.
El uso de los demás canales de servicio depende de la decisión del
proveedor de subtítulos.
- Este televisor proporciona visualización de subtítulos de televisión
de acuerdo con la norma EIA-608 y las secciones 15.119 de las normas
de la FCC.
- Los subtítulos no siempre carecen de errores ortográficos o gramaticales.
No todos los programas ni anuncios comerciales de TV se elaboran para
su emisión con información de subtítulos incluida. Consulte la lista de
programas de TV de su zona para ver los canales de TV y horarios en
los que se ofrecen subtítulos. Los programas con subtítulos se suelen
identificar en las listas de TV con marcas de servicio como ‘CC’.
_________________________
6.4 Opciones de Subtítulos digitales
Esta función permite modificar el modo de visualización de los subtítulos
digitales.
Menú TV
Opciones
Subtítulos
Servicio de subtítulos
Servicio de subtítulos dig.
Opciones de subtítulos d.
Temporizador
Bloqueo infantil
Determin./Cambiar código
Programador
Demo
Info
•
Seleccione entre las opciones siguientes para cambiar las
características visuales del subtitulado digital del televisor.
- Reiniciar a valores por defecto
Seleccione esta opción para recuperar los ajustes por defecto de
los subtítulos digitales, establecidos por el proveedor.
•
Pulse el cursor derecho y pulse el botón
- Tamaño
Con esta opción puede seleccionar el tamaño de la visualización de
los subtítulos según sus preferencias.
Seleccione Por defecto (Automático), Pequeño, Estándar o
•
Grande.
Opciones de subtítulos dig.
Reiniciar a valores por def..
Tamaño
Estilo
Color del texto
Opacidad del texto
Color de fondo
Opacidad de fondo
Tipo de borde
Color bordes
OK para confirmar.
- Color del texto
Esta opción permite seleccionar el color del texto o la opacidad del
recuadro de texto de los subtítulos según sus preferencias.
•
Seleccione un color y una de las opciones de opacidad.
- Color de fondo
Esta opción permite seleccionar el color de fondo de los caracteres
o una de las opciones de opacidad de fondo de los subtítulos en
función de sus preferencias.
Seleccione un color y una de las opciones de opacidad.
•
- Tipo de borde
Le permite seleccionar el tipo de borde para subtítulos de acuerdo
a sus preferencias.
Seleccione un tipo.
•
- Color bordes
Le permite seleccionar el color del bordes para subtítulos de
acuerdo a sus preferencias.
Seleccione un color.
•
_________________________
6.5 Temporizador
Permite establecer un período de tiempo después del cual el televisor
cambia automáticamente al modo “en espera”.
1. Seleccione Temporizador.
2. Pulse el cursor derecho.
3. Seleccione un valor con el cursor arriba/abajo. La lista muestra
valores desde 0 hasta 180 minutos.
En todo caso, siempre podrá apagar el televisor antes del tiempo
señalado o seleccionar otro ajuste de tiempo.
_________________________
6.6 Bloqueo infantil
Con un código de 4 dígitos, puede bloquear canales de TV y fuentes
externas para evitar que los niños vean determinados programas.
1. Seleccione Bloqueo infantil.
Menú TV
Opciones
Subtítulos
Servicio de subtítulos
Servicio de subtítulos dig.
Opciones de subtítulos d.
Temporizador
Bloqueo infantil
Determin./Cambiar código
Programador
Demo
Info
2. Pulse el cursor derecho para acceder al menú Bloqueo infantil.
3. Introduzca el código de 4 dígitos.
Bloqueo infantil
Bloquear después
Bloqueo de canales
Niveles bloqueo TV
Películas prohibidas
ESPAÑOL
- Estilo
Con esta opción puede seleccionar el estilo de tipo de letra de los
subtítulos, de acuerdo con sus preferencias.
Seleccione Por defecto, Serif no proporcional, Serif, Sans
•
serif no proporcional, Sans serif, Casual, En cursiva o
Mayúsculas pequeñas.
Debe reintroducir el código cada vez que acceda al menú
Bloqueo infantil.
4. Seleccione una de las opciones de Bloqueo infantil y pulse el cursor
derecho.
13
Page 98

_________________________
Basado en edad clasificación Basado en contenido clasificación
6.6.1 Bloquear después
Bloquear después se puede seleccionar si la fecha y la hora son
conocidas. Consulte Capítulo 7.6 - Ajuste su reloj.
Esta opción permite activar el bloqueo infantil a partir del momento
seleccionado. Los canales bloqueados se pueden sintonizar, pero carentes
de imagen y sonido.
Menú TV / Opciones
Bloqueo infantil
Bloquear después
Bloqueo de canales
Niveles bloqueo TV
Películas prohibidas
Clasificación regional
Info
Bloquear después
Temporizador
Tiempo
1. Pulse el cursor derecho y seleccione Temporizador encendido o
Apagado.
> Cuando está en Encendido esta función permite ajustar el reloj.
2. Seleccione Tiempo y pulse el cursor derecho.
> Esta permite ajustar la hora para activar el bloqueo.
3. Seleccione
AM o PM para elegir el período correcto del día.
4. Introduzca la hora con los botones numéricos o de cursor.
_________________________
6.6.2 Bloqueo de canales
Esta permite bloquear completamente un canal de TV o equipo externo
determinado.
Seleccione los canales o subcanales que desee bloquear.
•
_________________________
6.6.3 Niveles bloqueo TV
Su televisor está equipado con un V-chip. Permite controlar el acceso
a programas individuales basado en la clasificación de película y TV. Los
ajustes se aplican a todas las entradas AV, excepto HDMI. La emisora o
el proveedor del programa envía la información sobre el contenido de los
programas.
1. Seleccione Niveles bloqueo TV con el cursor abajo.
Menú TV / Opciones
Bloqueo infantil
Bloquear después
Bloqueo de canales
Niveles bloqueo TV
Películas prohibidas
Clasificación regional
Info
Niveles bloqeo TV
Todo
No
TV-Y
TV-Y7
TV-G
TV-PG
TV-14
TV-MA
> Aparece una lista con las clasificaciones de TV basadas en la edad
del público y la correspondiente lista de clasificaciones basadas en
el contenido.
2. Pulse el cursor derecho para acceder a la lista.
3. Seleccione una clasificación de TV basada en la edad con el cursor
arriba/abajo y acceda a la lista de clasificaciones basadas en contenido,
si la hay, con el cursor derecho para seleccionar una clasificación.
4. Pulse
OK para activar/desactivar la clasificación seleccionada.
5. Si lo desea, seleccione otra clasificación basada en contenido y oprima
OK nuevamente.
Todo No
No No
TV-Y No
TV-Y7 (FV) Fantasia Violencia
TV-G No
TV-PG (D) Diálogo
(L) Idioma
(S) Sexo
(V) Violencia
TV-14 (D) Diálogo
(L) Idioma
(S) Sexo
(V) Violencia
TV-MA (L) Idioma
(S) Sexo
(V) Violencia
Cuando se ha seleccionado Todo se bloquean todos los elementos de
las listas basadas en edad y en contenido.
Si mientras está seleccionado Todo se anula la selección de algún
elemento basado en edad o contenido, se anula automáticamente la
selección de Todo.
Sin clasificación es la selección de los elementos que no tienen
información de clasificación o están clasificados como Ninguna. Los dos
tipos de elementos se bloquean.
Si se selecciona un elemento de la lista basada en edad, también se
bloquean todos los elementos que dependan de éste o que pertenezcan
al mismo grupo. Si se selecciona una clasificación basada en contenido,
también se seleccionan todas las clasificaciones idénticas basadas en
contenido que estén debajo del límite de edad.
Puede bloquear/desbloquear cualquier número de clasificaciones en la
lista sin volver a introducir el código.
Cada elemento de clasificación presenta un cuadro gráfico delante que
indica si los programas que tienen esa clasificación están actualmente
bloqueados o no.
Niveles TV
TV-Y apto para niños de todas las edades con temas y elementos
adecuados para niños de 2 a 6 años de edad.
TV-Y7 programas aptos para niños de 7 años en adelante.
TV-Y7-FV programas que contienen Fantasía violencia más intensa
que otros programas de la categoría TV-Y7.
TV-G programas que contienen elementos que algunos padres
pueden considerar inadecuados para niños pequeños y que pueden
necesitar guía paterna. El programa puede contener violencia,
diálogos y/o escenas sexuales moderados y algún grado de lenguaje
fuerte.
TV-PG programas que contienen elementos que algunos padres
pueden considerar inadecuados para niños pequeños y que pueden
necesitar guía paterna. El programa puede contener violencia,
diálogos y/o escenas sexuales moderados y algún grado de lenguaje
fuerte
TV-14 programas que contienen elementos que pueden ser
inadecuados para menores de14 años de edad.
Entre estos programas se cuentan uno o más de los siguientes: gran
carga de violencia, escenas sexuales intensas, diálogos sugerentes y
lenguaje agresivo..
TV-MA programas destinados a adultos que pueden no ser
indicados para menores de 17 años. Son programas que pueden
14
Page 99

________________________
6.6.4 Películas prohibidas
Esta función permite controlar el acceso a determinadas películas
en función de su clasificación determinada por la MPAA (Asociación
Cinematográfica de Estados Unidos).
1. Seleccione Películas prohibidas con el cursor abajo. Aparece una
lista con todas las clasificaciones de contenido válidas de la MPAA.
Menú TV / Opciones
Bloqueo infantil
Bloquear después
Bloqueo de canales
Nivels bloqueo TV
Películas prohibidas
Clasificación regional
Info
Películas prohibidas
Todo
NR
G
PG
PG-13
R
NC-17
X
1. Seleccione Clasificación regional con el cursor abajo.
> Aparece una lista con todas las clasificaciones regionales válidas.
2. Pulse el cursor derecho para acceder a la lista.
Menú TV / Opciones
Bloqueo infantil
Bloquear después
Bloqueo de canales
Nivels bloqueo TV
Películas prohibidas
Clasificación regional
Info
Clasificación regional
Introduzca su código
actual.
3. Seleccione una clasificación de región con el cursor arriba/abajo.
4. Pulse el botón OK para activar la clasificación seleccionada.
5. Si lo desea, seleccione otra clasificación de región y pulse
OK
nuevamente.
6. Pulse el cursor izquierdo para volver al menú Bloqueo infantil.
2. Pulse el cursor derecho para acceder a la lista.
3. Seleccione una clasificación de película con el cursor arriba/abajo.
4. Pulse
OK para activar/desactivar la clasificación seleccionada.
Cada elemento de clasificación presenta un cuadro gráfico delante que
indica si los programas que tienen esa clasificación están actualmente
bloqueados o no.
Cuando se ha seleccionado Todo se seleccionan todos los elementos de
la lista de clasificación de películas. (Se bloquean todas las películas.)
Si mientras está seleccionado Todo se anula la selección de algún
elemento, entonces la selección de Todo se anula automáticamente.
Si se ha seleccionado cualquier otro elemento, también se seleccionan
todas las clasificaciones debajo de éste y, por lo tanto, se bloquean todas
las películas con esas clasificaciones.
Clasificación de películas
NR sin clasificación
G películas con contenido moderado, aptas para todas las edades
PG películas para las que se recomienda guía paterna. Pueden
contener algunas escenas atrevidas o violentas, o quizá lenguaje
obsceno
PG-13 películas para las que se recomienda guía paterna para
menores de 13 años
R con reservas. Películas que suelen contener sexo ofensivo o
lenguaje obsceno y pueden ser inadecuadas para menores de 17 años.
Se necesita guía o autorización paterna.
NC-17 películas prohibidas para menores de 17 años, aunque
cuenten con autorización paterna. Sexo más ofensivo, violencia o
lenguaje obsceno.
X las películas que en general se tratan de sexo, violencia y/o lenguaje
abusivo. También se clasifican como pornografía.
_________________________
6.6.5 Clasificación regional (si está presente)
Esto permite controlar el acceso a programas individuales basado en
clasificaciones regionales transmitidas.
_________________________
6.7 Ajustar/Cambiar código
Esta función permite ajustar o cambiar el código de acceso personal de 4
dígitos que se usa en las diversas funciones de bloqueo del televisor.
1. Seleccione Ajustar o Cambiar código con el cursor abajo.
Menú TV
Opciones
Subtítulos
Servicio de subtítulos
Servicio de subtítulos dig.
Opciones de subtítulos...
Temporizador
Bloqueo infantil
Ajustar/Cambiar código
Programador
Demo
Info
> Si aún no existe código, la opción de menú aparece en Ajustar
código. Siga las instrucciones en pantalla.
> Si ha introducido un código anteriormente, la opción del menú
aparece en Cambiar código. Siga las instrucciones en pantalla.
2. Introduzca su código con los botones numerales. Todas las
combinaciones de números de 0000 a 9999 son válidas.
3. El menú de Opciones vuelve a aparecer con un mensaje confirmando
la creación de un código.
Importante: ¡Si ha olvidado su código!
1. Seleccione Cambiar código en el menú Opciones y pulse el cursor
derecho.
2. Pulse el cursor derecho para introducir el código de cancelación
0-7-1-1.
3. Vuelva a pulsar el cursor e introduzca un nuevo código personal de 4
dígitos. Se borra el código anterior y se almacena el nuevo.
Ajustar/Cambiar código
Introduzca su código
actual.
ESPAÑOL
15
Page 100

________________________
_________________________
6.8 Programador
Desde el modo en espera, la TV cambiará automáticamente al número
de canal elegido a la hora especificada.
1. Seleccione Programador.
2. Pulse el cursor derecho para acceder al menú Programador.
3. Seleccione Temporizador y pulse el cursor derecho.
4. Seleccione Encendido.
5. Seleccione Canal y, a continuación, el canal de TV al que desee
cambiar a una hora y día seleccionados.
6. Seleccione Día y, a continuación, un día de la semana o seleccione
Diario.
7. Seleccione Hora e introduzca la hora con los botones numéricos o
con el cursor arriba/abajo.
8. Pulse el botón
OK para activar.
9. Pulse el cursor izquierdo para volver al menú Opciones o pulse el
botón
MENU para desactivar el menú.
De ahora, su TV cambiará automáticamente al canal seleccionado, en
el día seleccionado, en el tiempo seleccionado, hasta el programador es
apagada otra vez.
!
Sólo se puede establecer un único ajuste de Programador.
________________________
6.9 Demo
Permite hacerse una idea de las opciones que ofrece el televisor.
1. Seleccione Demo.
7 Búsqueda y memorización de canales de
TV
Este capítulo sólo es necesario si desea cambiar los ajustes de
instalación.
_________________________
7.1 Menú Instalación
Este menú ajustará la configuración relacionada con la instalación de los
canales de TV.
1. Pulse el botón
> Aparece el menú principal en la pantalla.
Televisión
Multimedia
MENU del control remoto.
Menú TV
Lista de canales
Guía de programa
Dispositivo USB 1
Menú TV
Opciones
......
Determin./Cambiar código
Programador
Demo
Info
Demo
Perfect Pixel HD
Asistente de ajustes
Active Control
2. Pulse el cursor derecho.
3. Seleccione la demostración que prefiera.
4. Pulse el botón
OK para iniciar la demostración.
> La demostración seleccionada se ejecutará sólo una vez.
5. Pulse el botón rojo para salir de la demostración y volver al modo
Demo.
6. Pulse el botón rojo para salir del menú Demo.
2. Seleccione Menú TV y pulse el cursor derecho.
> Menú TV se desplaza a la izquierda.
3. Seleccione Instalación y pulse el cursor derecho.
> El menú Instalación se desplaza al panel izquierdo.
Menú TV
Configuraciones TV
Opciones
Instalación
Actualización software
Info
Instalación
Idioma
Instalación de canales
Preferencias
Conexiones
........
4. Utilice el cursor arriba/abajo para seleccionar las opciones del menú
Instalación.
5. Pulse el cursor derecho para acceder a la opción del menú
Instalación seleccionada.
6. Utilice los botones de cursor para realizar una selección.
7. Pulse el botón
OK para activar o confirmar.
8. Pulse el cursor izquierdo para volver al menú Instalación o pulse el
botón
MENU para desactivar el menú.-
_________________________
7.2 Seleccione su idioma
Este menú permite seleccionar el idioma del menú de una lista de idiomas
disponibles.
Menú TV
Instalación
Idioma
Instalación canales
Preferencias
.........
Info
Idioma
español
Français
Español
Português
16
 Loading...