


Philips TV software upgrade with USB portable memory
Introduction
Philips offers software upgrade capability for your TV using USB portable memory.
After you have completed software upgrade, your TV will typically perform better.
What improvements are made depends on the upgrade software you are using as well as the software
your TV contained before the upgrade.
You can execute the software upgrade procedure yourself.
Be aware that the content of this document is addressing technical or software skilled users.
Preparing a portable memory for software upgrade
For the procedure you will require:
• A personal computer with web browsing capability.
• An archive utility that supports the ZIP-format (e.g. WinZip for Windows or StuffIt for Mac OS).
• A preferably empty USB memory stick.
Note: Only FAT/DOS-formatted portable memory is supported.
• Select the latest software upgrade file and download it to your PC.
• Decompress the ZIP-file and copy the file “autorun.upg” to the root directory of the USB
portable memory.
Verifying the version of the TV software
Before starting the software upgrade procedure, it is advised to check what the current TV software is.
(1) Select Software Upgrade in the Installation menu.
(2) Press the cursor right.
The Software Upgrade menu moves to the left panel.
(3) Select Current Software Info to observe the version and the description of the current s oftware.
Automatic software upgrade procedure
For automatic software upgrade copy the “autorun.upg” file in the root directory of the USB portable memory.
(1) Power off your TV and remove all memory devices.
(2) Insert the USB portable memory that contains the downloaded software upgrade.
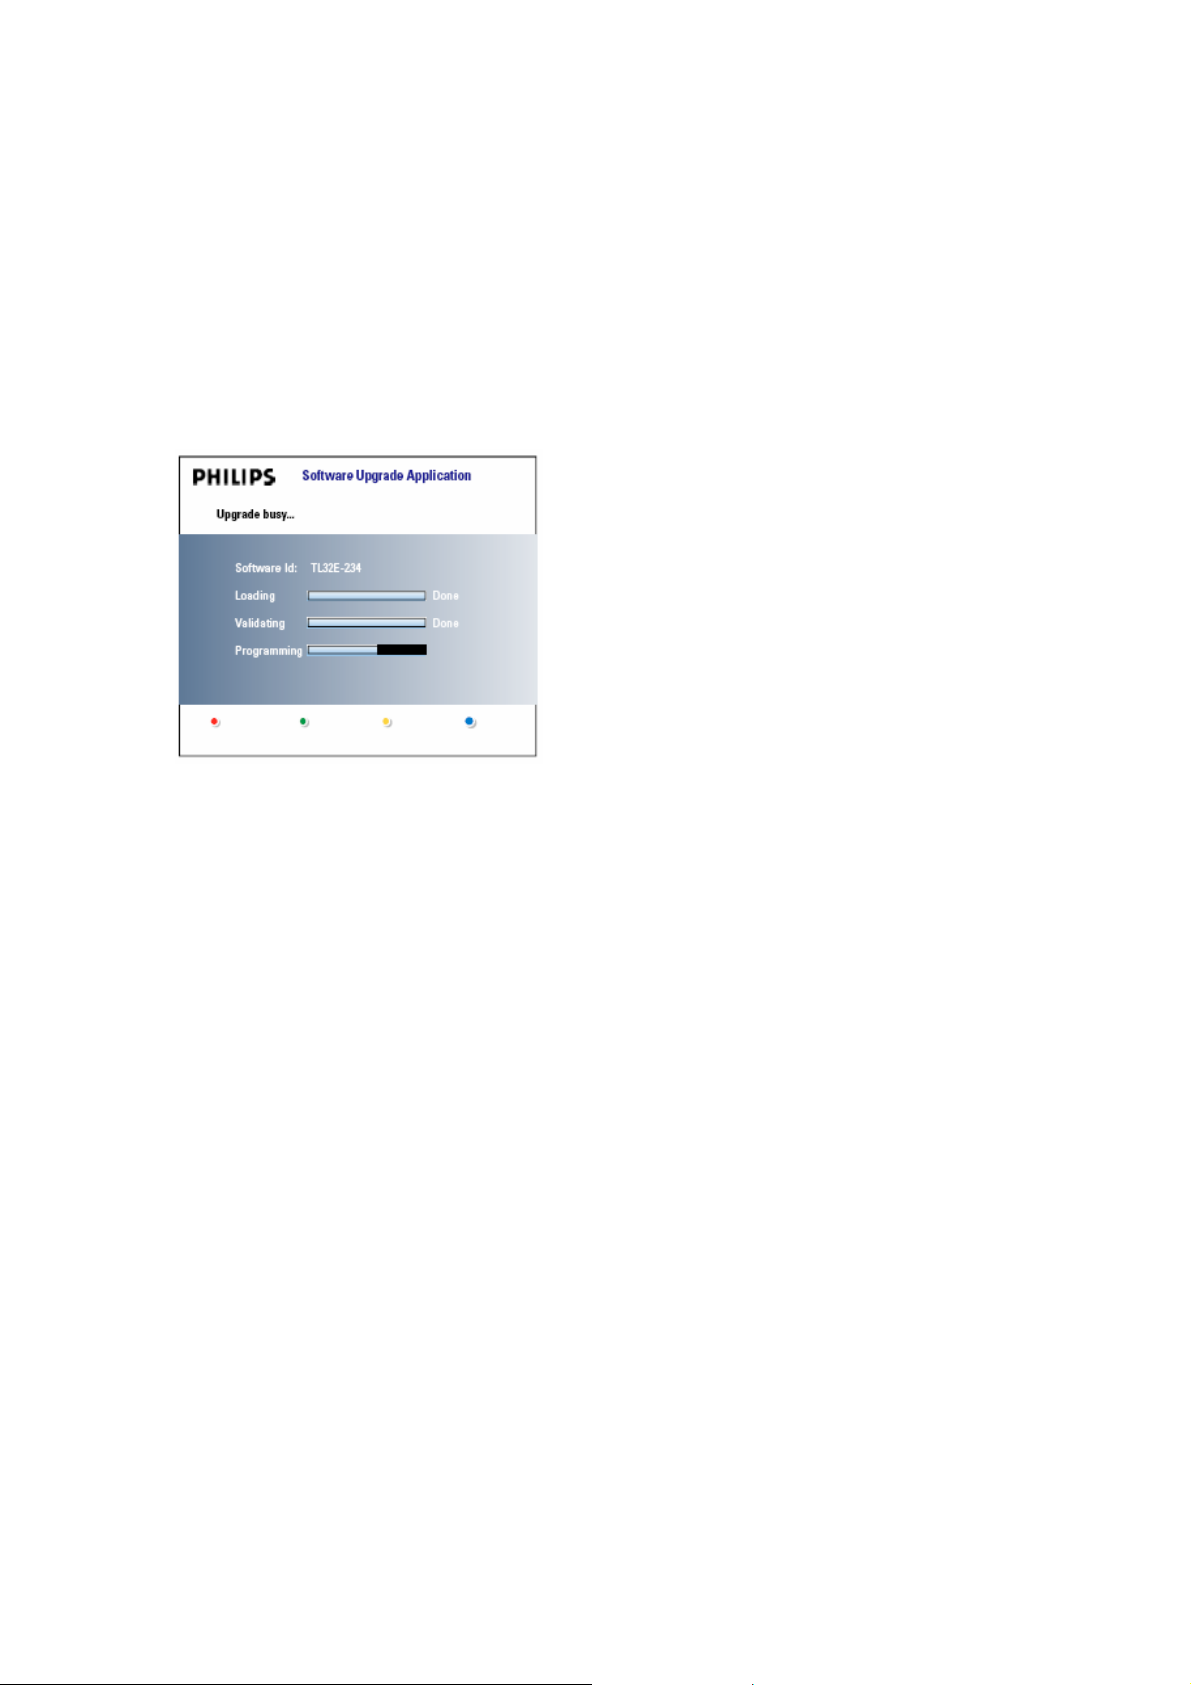
(3) Switch on your TV with the power switch at the right side of the TV.
(4) At startup the TV will scan the USB portable memory until it finds the update content. The TV will automatically go
to the upgrade mode. After a few seconds it will display the status of the upgrade procedure.
Warning:
• You are not allowed to remove the USB portable memory during the software upgrade procedure!
• In case of a power drop during the upgrade procedure, don’t remove the USB portable memory from the TV.
The TV will continue the upgrade as soon as the power comes back.
• If you try to upgrade to a software version lower than the current version, a confirmation will be asked.
Downgrading to older software should only be done in case of real necessity.
• If an error occurs during the upgrade you should retry the procedure or contact your dealer.
(5) When the software upgrade was successful, remove the USB portable memory and restart your TV with the
power switch at the right side of the TV.
Your TV will start up with the new software.
Note: Once the upgrade is finished use your PC to remove the TV software from your USB portable memory.

Manual software upgrade procedure
For a manual software upgrade copy the “autorun.upg” file in a directory called “Upgrades” located in the root of the
USB portable memory.
(1) Insert the portable memory that contains the downloaded software upgrade.
(2) The TV will automatically start the content browser menu. Exit the menu by pressing the MENU key.
(3) Select Software Upgrade in the Installation menu. Go to Local upgrades.
The TV will list all compatible images available on the USB port able memory and display the data for each
selected upgrade image.
(4) Select the correct upgrade image and press the red color button to start the upgrade.
Your TV will restart and will automatically go to the upgrade mode. After a few seconds it will display the status of
the upgrade procedure.
Warning:
If you try to upgrade to a software version equal or lower than the current version, a confirmation will be asked.
Downgrading to older software should only be done in case of real necessity.
(5) When the software upgrade was successful, remove the USB portable memory and restart your TV with the
power switch at the right side of the TV.
Your TV will start up with the new software.

Software History
The following improvements have been made as according to the software version.
Note : Unless stated, the Latest software does incorporate improvements from older software
versions
ED10U_1.2.0.0_07895
1. Some channels not available after turn ON.
2. Delta volume changes not remembered.
3. Preferred channel changes not remembered.
4. Green or yellow static (sometime snowy) on HDMI picture.
5. Picture and sound loss for 5-10 seconds (with green LED still ON) and back to normal.
6. Audio loss in all inputs and can be recovered when main switch ON and OFF.
7. Turning to unknown channel when go to standby after cable installation.
8. TV set turn ON by itself/ green LED light up and goes off when set is ON.
9. Digital sub channels getting unlocked automatically if tuning to another sub channel in the same major
channel.
10. Include the possibility to download the rating table (RRT5 capability) for digital programs.
ED10U_1.1.0.1_07894
1. Removes undesired contents from display. This applies to all formats (ie. Automatic, Super Zoom, etc)
Eg: Lines found at the top of the screen when connected to DVD or cable box via HDMI or YPbPr.
2. Minimise stray reflections off the top part of the display.
ED10U_1.1.0.0_07893
1. Improves Audio drop-outs. Though it can be recovered by changing channels, this software
eliminates the hassle.
2. Improves the handling of crackling and buzzing sound when the set is in high volume.
3. Solved the possibility of sudden menu popping up by itself.
4. Improves Virtual Dolby effect.
5. Shorten the time of On-Screen Display (OSD) retaining on the screen.
 Loading...