

Page 1

Register your product and get support at
www.philips.com/welcome
7272 series
User Manual
49PUS7272
55PUS7272
Page 2

Contents
1 What's new 4
1.1 All-in-one source menu 4
1.2 Top picks 4
1.3 Media browser 5
2 Setting Up 6
2.1 Read Safety 6
2.2 TV Stand and Wall Mounting 6
2.3 Tips on Placement 6
2.4 Power Cable 6
2.5 Antenna Cable 7
2.6 Satellite Dish 7
3 Remote Control 8
3.1 Key Overview 8
3.2 Voice Search 9
3.3 Using Remote Control Keyboard 9
3.4 IR Sensor 10
3.5 Batteries 11
3.6 Cleaning 11
4 Switching On and Off 12
4.1 On or Standby 12
4.2 Keys on TV 12
5 Channels 13
5.1 Satellite Installation 13
5.2 Antenna/Cable Installation 15
5.3 Channel List Copy 17
5.4 About Channels 18
6 Connect Devices 25
6.1 About Connections 25
6.2 HDMI Ports 25
6.3 Y Pb Pr - Component 27
6.4 Scart 27
6.5 Audio Out - Optical 27
6.6 CAM with Smart Card - CI+ 27
6.7 Home Theatre System - HTS 28
6.8 Smartphones and Tablets 29
6.9 Blu-ray Disc Player 29
6.10 DVD Player 30
6.11 Bluetooth - Speakers and Gamepads 30
6.12 Headphones 31
6.13 Game Console 31
6.14 Gamepad 32
6.15 USB Hard Drive 32
6.16 USB Keyboard 33
6.17 USB Flash Drive 34
6.18 Photo Camera 34
6.19 Camcorder 34
6.20 Computer 35
7 Connect your Android TV 36
7.1 Network and Internet 36
7.2 Google Account 38
7.3 Philips App Gallery 39
7.4 Android Settings 39
7.5 Home Menu 40
8 Apps 41
8.1 About Apps 41
8.2 Google Play 41
8.3 Start or Stop an App 42
8.4 Lock Apps 42
8.5 Manage Apps 43
8.6 Storage 44
9 Internet 45
9.1 Start Internet 45
9.2 Options on Internet 45
10 TV Menu 46
10.1 About TV Menu 46
10.2 Open TV Menu 46
11 Sources 47
11.1 Switch to a device 47
11.2 Options for a TV Input 47
11.3 Device Name and Type 47
11.4 Computer 47
12 Settings 49
12.1 Frequent Settings 49
12.2 Picture 49
12.3 Sound 53
12.4 Ambilight Settings 56
12.5 Eco Settings 58
12.6 General Settings 59
12.7 Clock, Region and Language 61
12.8 Universal Access 64
12.9 Child Lock 65
13 Videos, Photos and Music 66
13.1 From a USB Connection 66
13.2 From a Computer or NAS 66
13.3 From a Cloud Storage Service 66
13.4 Favourites, Most Popular, Last Played menu
66
13.5 Play your Videos 66
13.6 View your Photos 67
13.7 Play your Music 67
14 TV Guide 69
14.1 What You Need 69
14.2 TV Guide Data 69
14.3 Using the TV Guide 69
15 Recording and Pause TV 71
15.1 Recording 71
15.2 Pause TV 72
16 Smartphones and Tablets 73
16.1 Philips TV Remote App 73
16.2 Google Cast 73
16.3 AirPlay 73
16.4 MHL 73
17 Games 74
17.1 What You Need 74
17.2 Play a Game 74
18 Ambilight 75
18.1 Ambilight Style 75
18.2 Ambilight Off 75
18.3 Ambilight Settings 75
19 Top Picks 77
19.1 About Top Picks 77
19.2 Now on TV 77
19.3 TV on Demand 77
19.4 Video on Demand 77
20 Netflix 79
2
Page 3

21 Multi View 80
21.1 Text and TV 80
21.2 HDMI and TV 80
21.3 Nettv and TV 80
21.4 Nettv and HDMI 80
22 Software 81
22.1 Update Software 81
22.2 Software Version 81
22.3 Open Source Software 81
22.4 Open Source License 81
22.5 Announcements 109
23 Specifications 110
23.1 Environmental 110
23.2 Power 110
23.3 Operating System 110
23.4 Reception 110
23.5 Display Type 111
23.6 Display Input Resolution 111
23.7 Dimensions and Weights 111
23.8 Connectivity 111
23.9 Sound 111
23.10 Multimedia 111
24 Help and Support 113
24.1 Register your TV 113
24.2 Using Help 113
24.3 Troubleshooting 113
24.4 Online Help 115
24.5 Support and Repair 115
25 Safety and Care 116
25.1 Safety 116
25.2 Screen Care 117
26 Terms of Use 118
26.1 Terms of Use - TV 118
26.2 Terms of Use - Philips App Gallery 118
27 Copyrights 119
27.1 MHL 119
27.2 Ultra HD 119
27.3 HDMI 119
27.4 Dolby Digital Plus 119
27.5 DTS Premium Sound ™ 119
27.6 Microsoft 119
27.7 Wi-Fi Alliance 119
27.8 Kensington 120
27.9 Other Trademarks 120
28 Disclaimer regarding services and/or
software offered by third parties 121
Index 122
3
Page 4
1
What's new
1.1
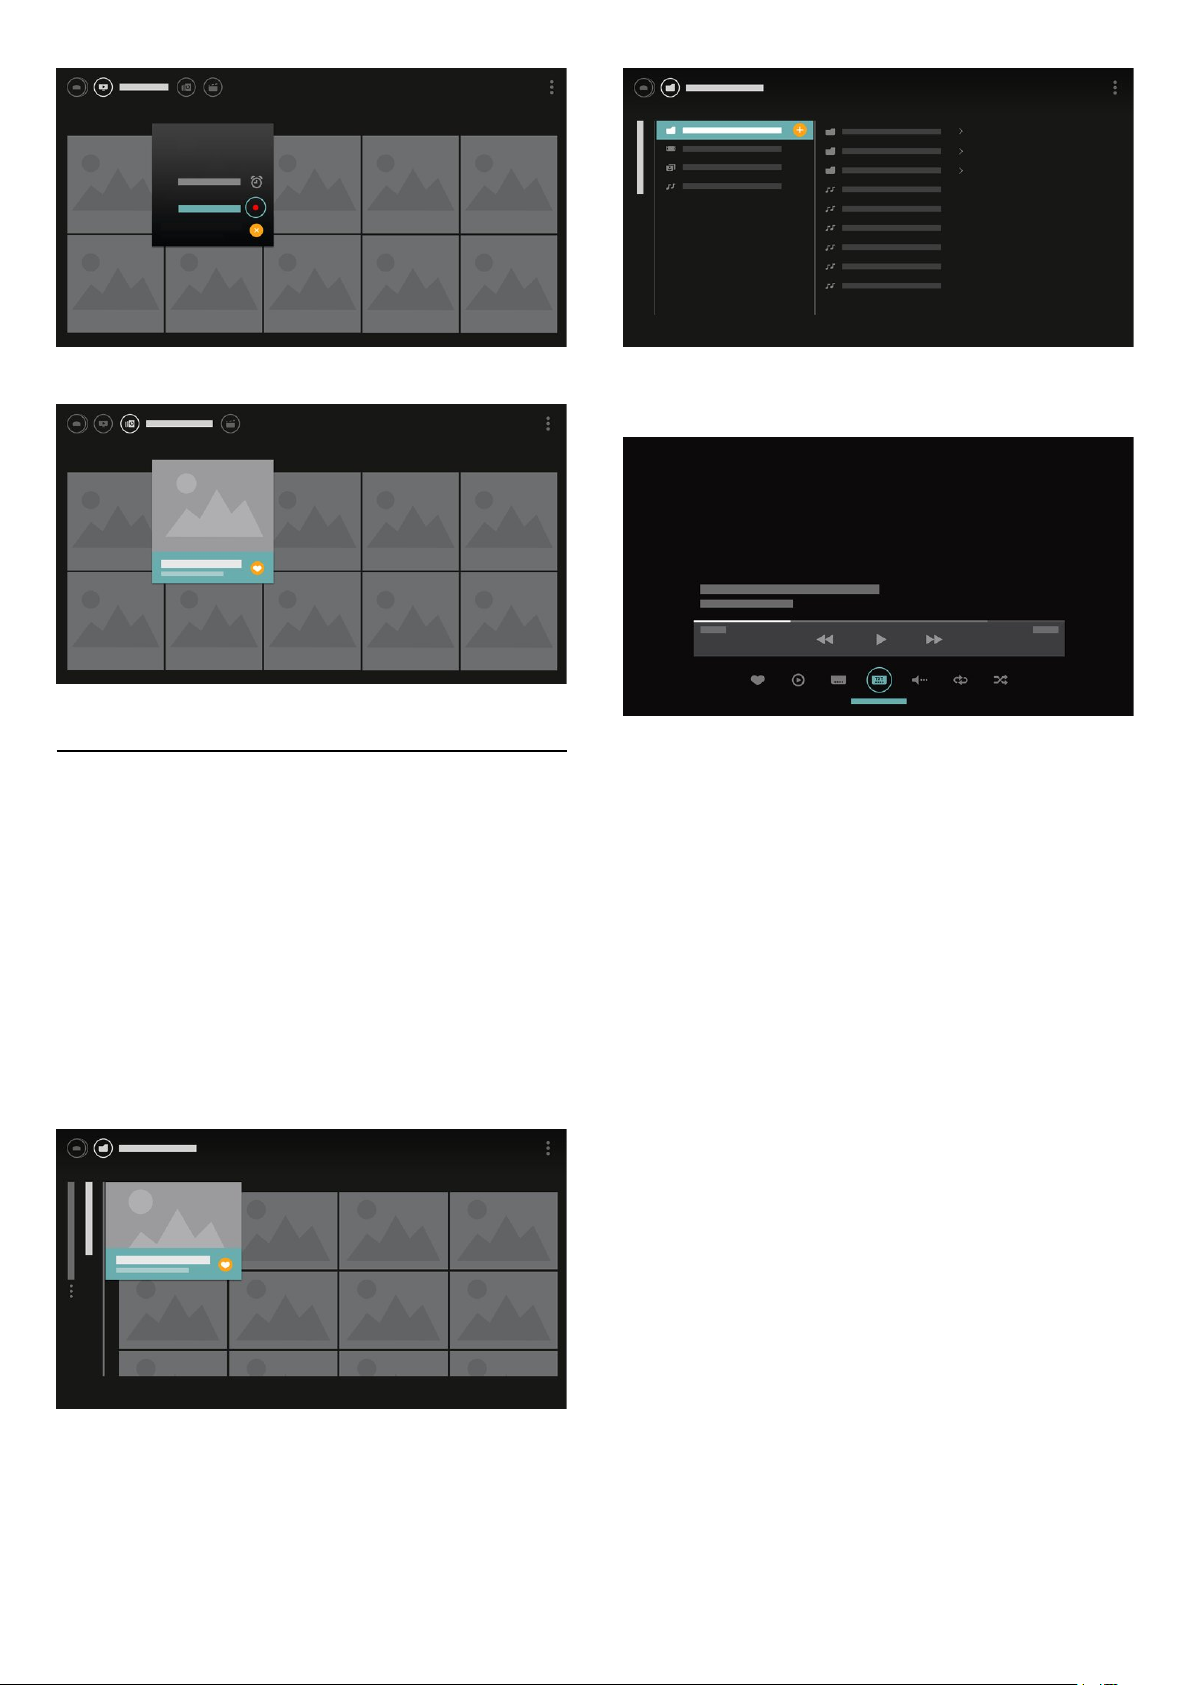
All-in-one source menu
About All-in-one source menu
For the first time you press SOURCES, you can
see instructions how to set your source menu.
The improved source menu contains normal source
menu, easily open TV Guide, and also you can
use (plus key) to set a reminder or schedule a
recording in TV Guide.
An all-in-one Sources menu, a restyled TV guide and
a new easy programme browser.
Your list of favourite channels is now part of
the Sources menu. Same for the channel lists of
both tuners Antenna/Cable and
The new Sources menu will have all connected
devices in the list but also all tuners, so in the
Sources menu the user will find all possible ‘sources’
for TV.
Satellite.
Improved TV guide
A clear and better looking TV guide. Select a
programme and read the programme info or
press to set a reminder or schedule a recording.
Switch from tuner, channel, and TV
guide
Select a tuner source and press to open the list of
channels. Press again to open the TV guide
to see what’s on. Press to return to the list of
channels.
1.2
Top picks
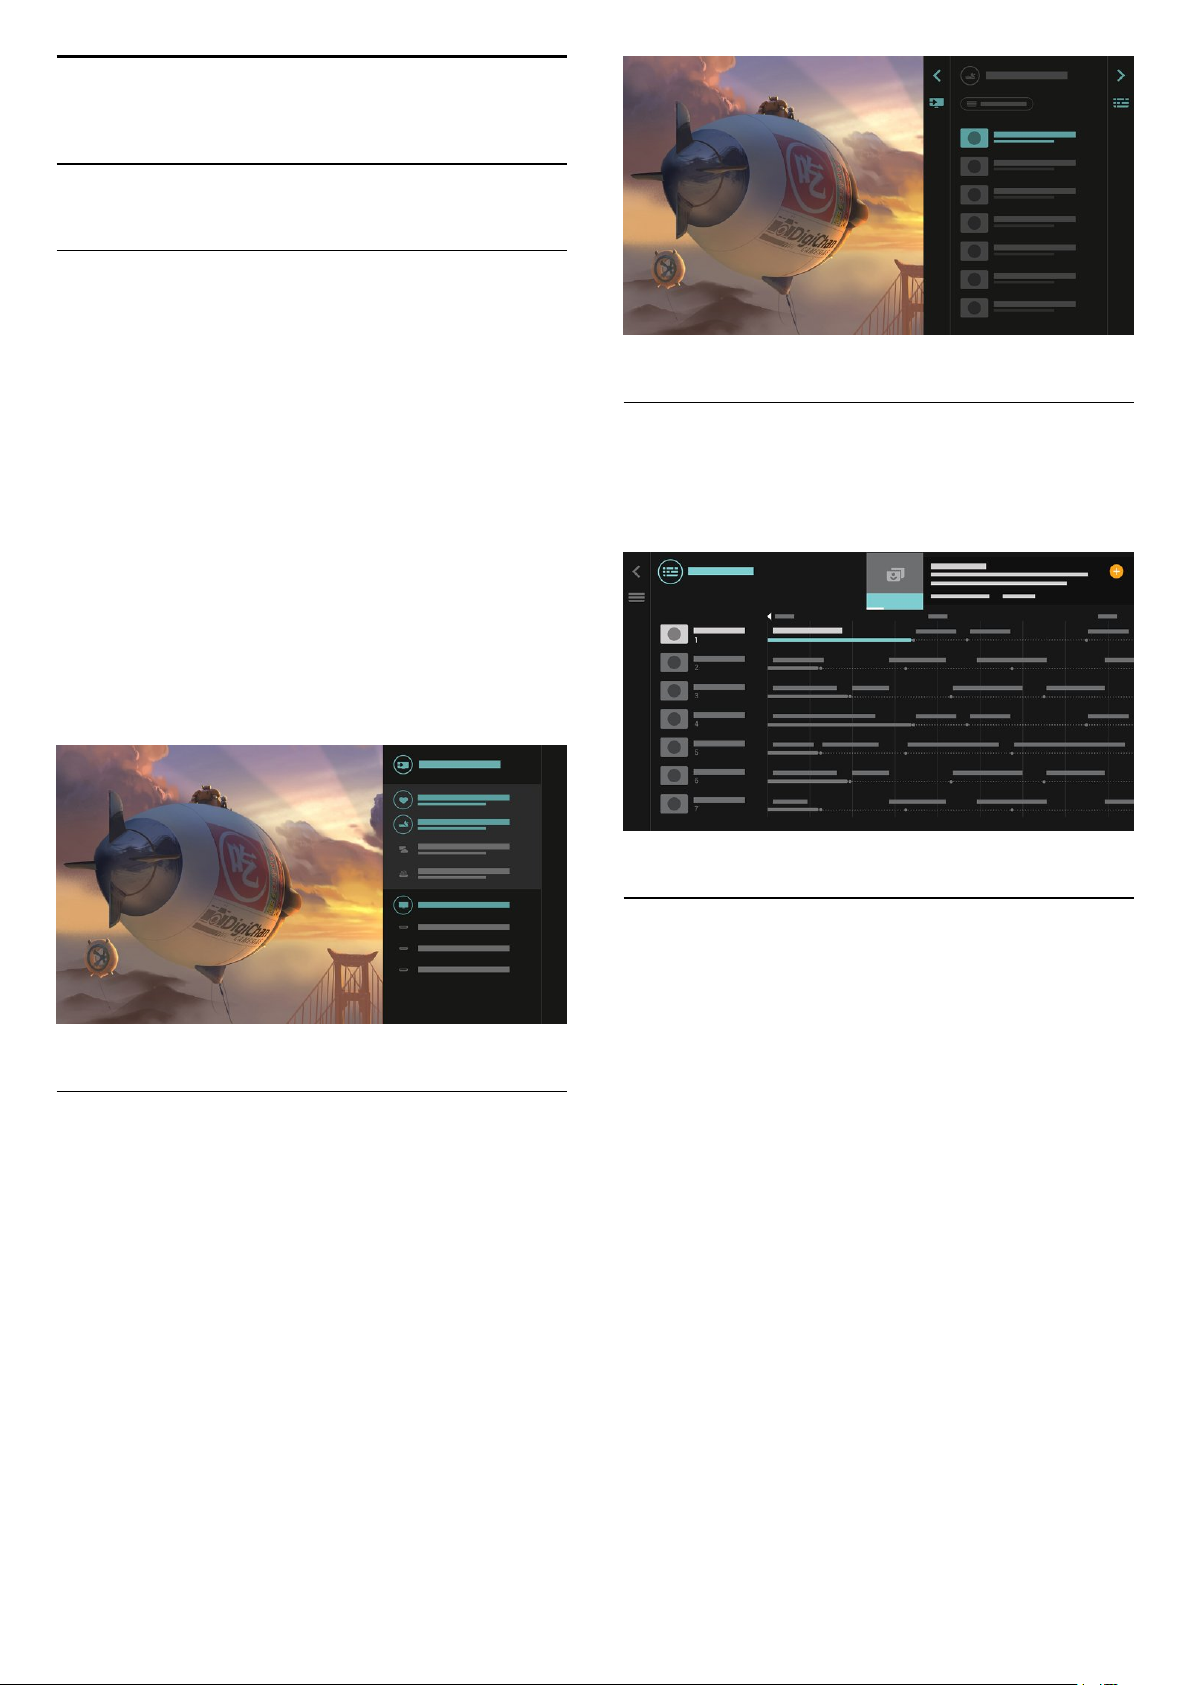
With TOP PICKS your TV recommends current
TV programmes, the latest rental videos and Online
TV services for you to watch.
1 - Press TOP PICKS.
2 - Select one programme and use (plus key) to
schedule a recording, set a reminder or watch the
programme.
3 - Use Arrow / navigation keys to select 3 dots on
the right-top of the screen, then press OK to
open OPTIONS menu.
Select to record, or select to set a reminder
4
Page 5
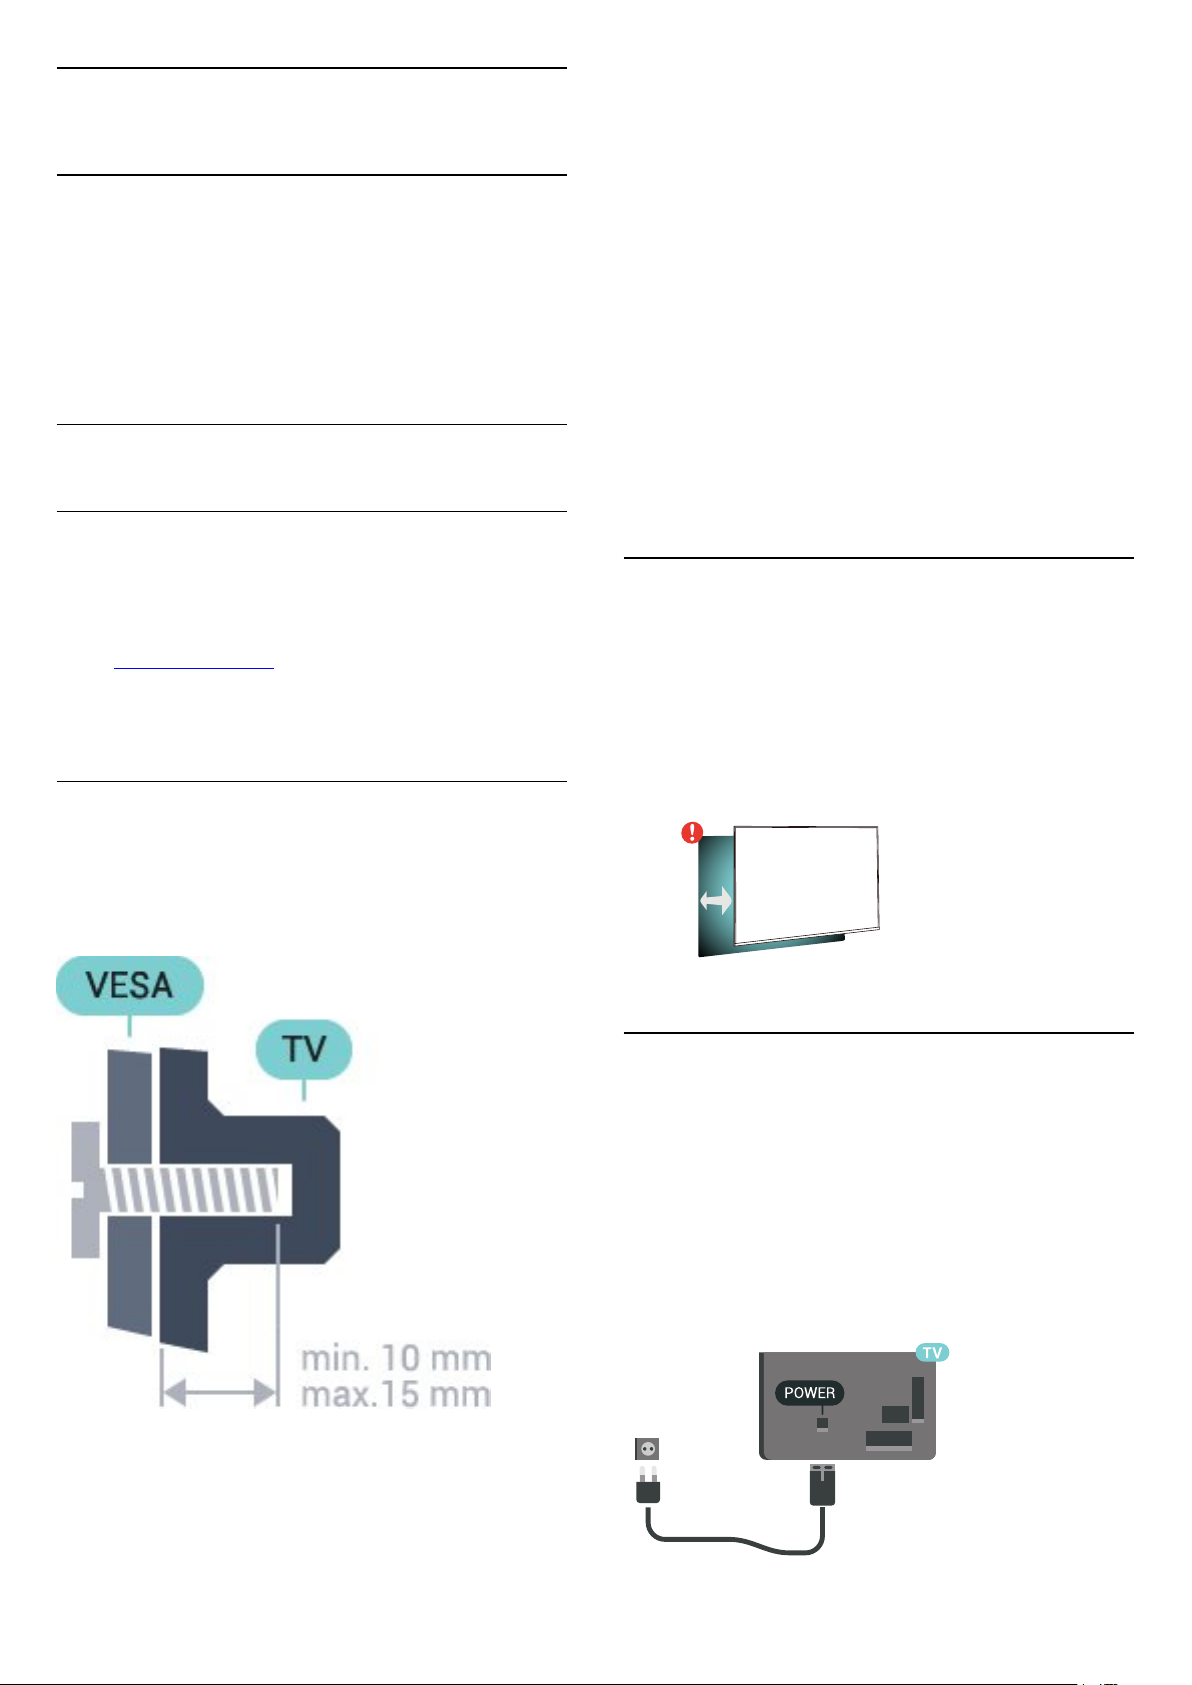
Select to mark as favourites
1.3
Media browser
Browse your media as you like it or mark any channel,
song or photo as a favourite easily.
1 - Press (plus key) to mark any video, song or
photo as a favourite.
2 - You can view videos, songs, and photos in grid
view or list view.
3 - Use Arrow / navigation keys to select 3 dots on
the right-top of the screen, then press OK to
open OPTIONS menu.
4 - When playing, there is a secondary control bar on
the bottom of the screen, use the arrows
and OK key to select what you want.
Grid view
List view
5
Page 6
2
Setting Up
2.1
Read Safety
Read the safety instructions first before you use the
TV.
For more information, in Help, select Keywords and
look up Safety Instructions.
2.2
TV Stand and Wall Mounting
TV Stand
You can find the instructions for mounting the TV
stand in the Quick Start Guide that came with the TV.
In case you lost this guide, you can download it
from www.philips.com.
Use the model number of the TV to look for
the Quick Start Guide to download.
Wall Mounting
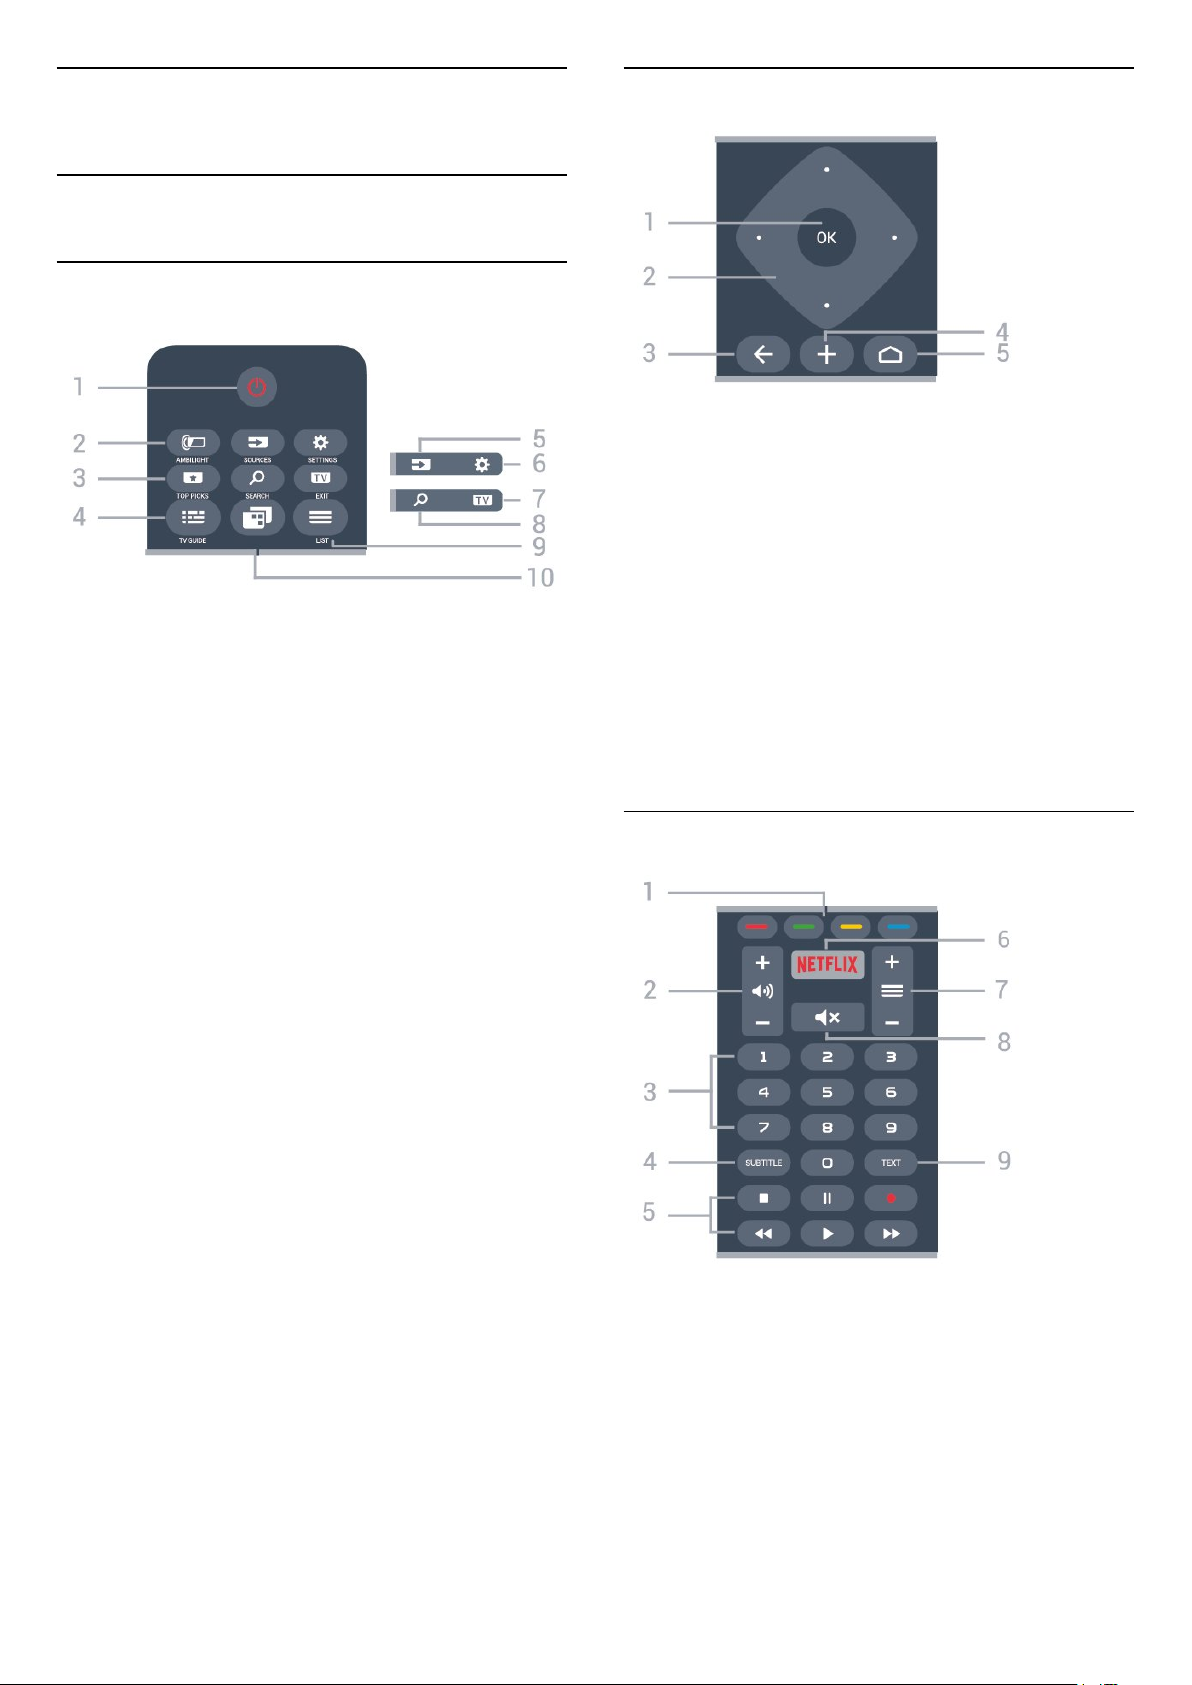
VESA MIS-F 400x200, M6
Preparation
First remove the 4 plastic screw caps out of the
threaded bushes on the back of the TV.
Make sure that the metal screws, to mount the TV to
the VESA-compliant bracket, go about 10mm deep
inside the threaded bushes of the TV.
Caution
Wall mounting the TV requires special skills and
should only be performed by qualified personnel. The
TV wall mounting should meet safety standards
according to the TVs weight. Also read the safety
precautions before positioning the TV.
TP Vision Europe B.V. bears no responsibility for
improper mounting or any mounting that results in
accident or injury.
2.3
Tips on Placement
• Position the TV where light does not shine directly
on the screen.
• Position the TV up to 15 cm away from the wall.
• The ideal distance to watch TV is 3 times its diagonal
screen size. When seated, your eyes should be level
with the centre of the screen.
Your TV is also prepared for a VESA-compliant wall
mount bracket (sold separately).
Use the following VESA code when purchasing the
wall mount . . .
15
cm
2.4
Power Cable
• Insert the power cable into the POWER connector
on the back of the TV.
• Make sure the power cable is securely inserted in
the connector.
• Make sure that the power plug, in the wall socket, is
accessible at all times.
• When you unplug the power cable, always pull the
plug, never pull the cable.
• 43PUS7202
VESA MIS-F 200x200, M6
• 49PUS7272
VESA MIS-F 400x200, M6
• 55PUS7272
6
Page 7

Although this TV has a very low standby power
consumption, unplug the power cable to save energy
if you do not use the TV for a long period of time.
2.5
Antenna Cable
Insert the antenna plug firmly into
the Antenna socket at the back of the TV.
You can connect your own antenna or an antenna
signal from an antenna distribution system. Use an
IEC Coax 75 Ohm RF antenna connector.
Use this antenna connection for DVB-T and DVB-C
input signals.
2.6
Satellite Dish
Attach the satellite F-type connector to the satellite
connection SAT at the back of the TV.
7
Page 8
3
Remote Control
3.1
Key Overview
Top
1 - Standby / On
To switch the TV on or back to Standby.
2 -
To select one of the Ambilight style.
3 - TOP PICKS
To open the menu with recommended programmes,
Video on Demand (Rental Videos) or Online TV
(Catch Up TV).
If available.
AMBILIGHT
Middle
1 - OK key
To confirm a selection or setting.
2 - Arrow / navigation keys
To navigate up, down, left or right.
3 - BACK
To switch back to the previous channel you selected.
To return to previous menu.
To go back to the previous App/Internet page.
4 - OPTIONS
To open or close the Options menu.
5 - HOME
To open the Home menu.
Bottom
4 - TV GUIDE
To open or close the TV Guide.
5 - SOURCES
To open or close the Sources menu.
6 - SETTINGS
To open the Frequent Settings.
7 - EXIT
To switch back to watching TV. To leave an interactive
TV application.
8 - SEARCH
To open the searches page.
9 - LIST
To open or close the channel list.
10 - TV Menu
To open the TV Menu with typical TV functions.
1 -
Direct selection of options.
2 -
To adjust the volume level.
3 - Number keys
To select a channel directly.
Volume
Colour keys
4 - SUBTITLE
To switch Subtitles on, off or on during mute.
8
Page 9

5 - Playback and Record
• Play , to playback.
• Pause , to pause playback
• Stop , to stop playback
• Rewind , to rewind
• Fast forward , to go fast forward
• Record , to start recording
6 -
To open the Netflix App directly. With the TV switched
on or from standby.
7 - Channel
To switch to the next or previous channel in the
channel list. To open the next or previous page in
Text/Teletext. To start the next or previous chapter on
a disc.
or tablet, then your Android TV will show a code on
the screen.
5 - Enter the code on your Android smartphone or
tablet to pair to your Android TV.
*You need an Android phone or tablet running
Android 4.3 or higher to use the Android TV Remote
Control app.
**The name of your Android TV is depends on the
name you set in TV Network Name. The pre-set
name is model name of this TV.
.
Using Voice Search
8 -
To mute the sound or to restore it.
9 - TEXT
To open or close Text/Teletext.
3.2
Mute
Voice Search
Download App from Google play
Use your Android smartphone or tablet as a remote
for your Android TV. Easily switch between d-pad,
touchpad, and gamepad modes to navigate content
and play games on your Android TV device. Tap the
microphone to start a voice search, or use the
keyboard to input text on Android TV.
To get started, connect your Android phone or tablet
to the same network as your Android TV device or
find your Android TV via bluetooth.
Works with all Android TV devices.
*You need an Android phone or tablet running
Android 4.3 or higher to use the Android TV Remote
Control app.
Pairing with Your TV
There is no microphone on your remote control, if you
want to use voice search, you must install Android
TV Remote Control app on your Android smartphone
or tablet first.
You can search for videos, music or anything else on
the Internet with the icon at the top of the Home
menu. You can start using Voice Search any
time. Alternatively, you can use the remote control
keyboard to enter text.
To use Voice Search…
1 - Tap icon on your smartphone to start a voice
search.
2 - The icon is red on screen, the microphone is
active.
3 - Speak out clearly what you are looking for. It
might take some time for the results to appear.
4 - In the screen with search results, you can select
the item you want.
See also www.support.google.com/androidtv
Voice Search settings
You can set the language you like to use with Voice
Search.
To set the language for Voice Search…
1 - Press , select All Settings and press OK.
2 - Select Android Settings and press OK.
3 - Select Preferences > Speech and
press OK.
4 - Select the language you want to use and
press OK.
5 - Press BACK to go back one step or
press EXIT to close the menu.
1 - On your Android smartphone or tablet, search
"Android TV Remote Control" in Google Play store.
2 - Download and install Android TV Remote
Control app* on your Android smartphone or
tablet .
3 - Connect your Android smartphone or tablet to
the same network as your Android TV device.
4 - Select "PhilipsTv"** on your Android smartphone
9
Page 10
3.3
Using Remote Control
Keyboard
moment.
* Your remote control has a Qwerty / Azerty or a
Qwerty / Cyrillic keyboard, depending on your region.
Writing Text
With the keyboard on the back of the remote control,
you can write text in any text field on screen.
To write text…
1 - Select a text field if it is not yet selected.
2 - Turn the remote control keyboard facing upwards
to activate the keyboard keys. Hold the remote
control with two hands and type with both thumbs.
3 - Press OK to confirm the text.
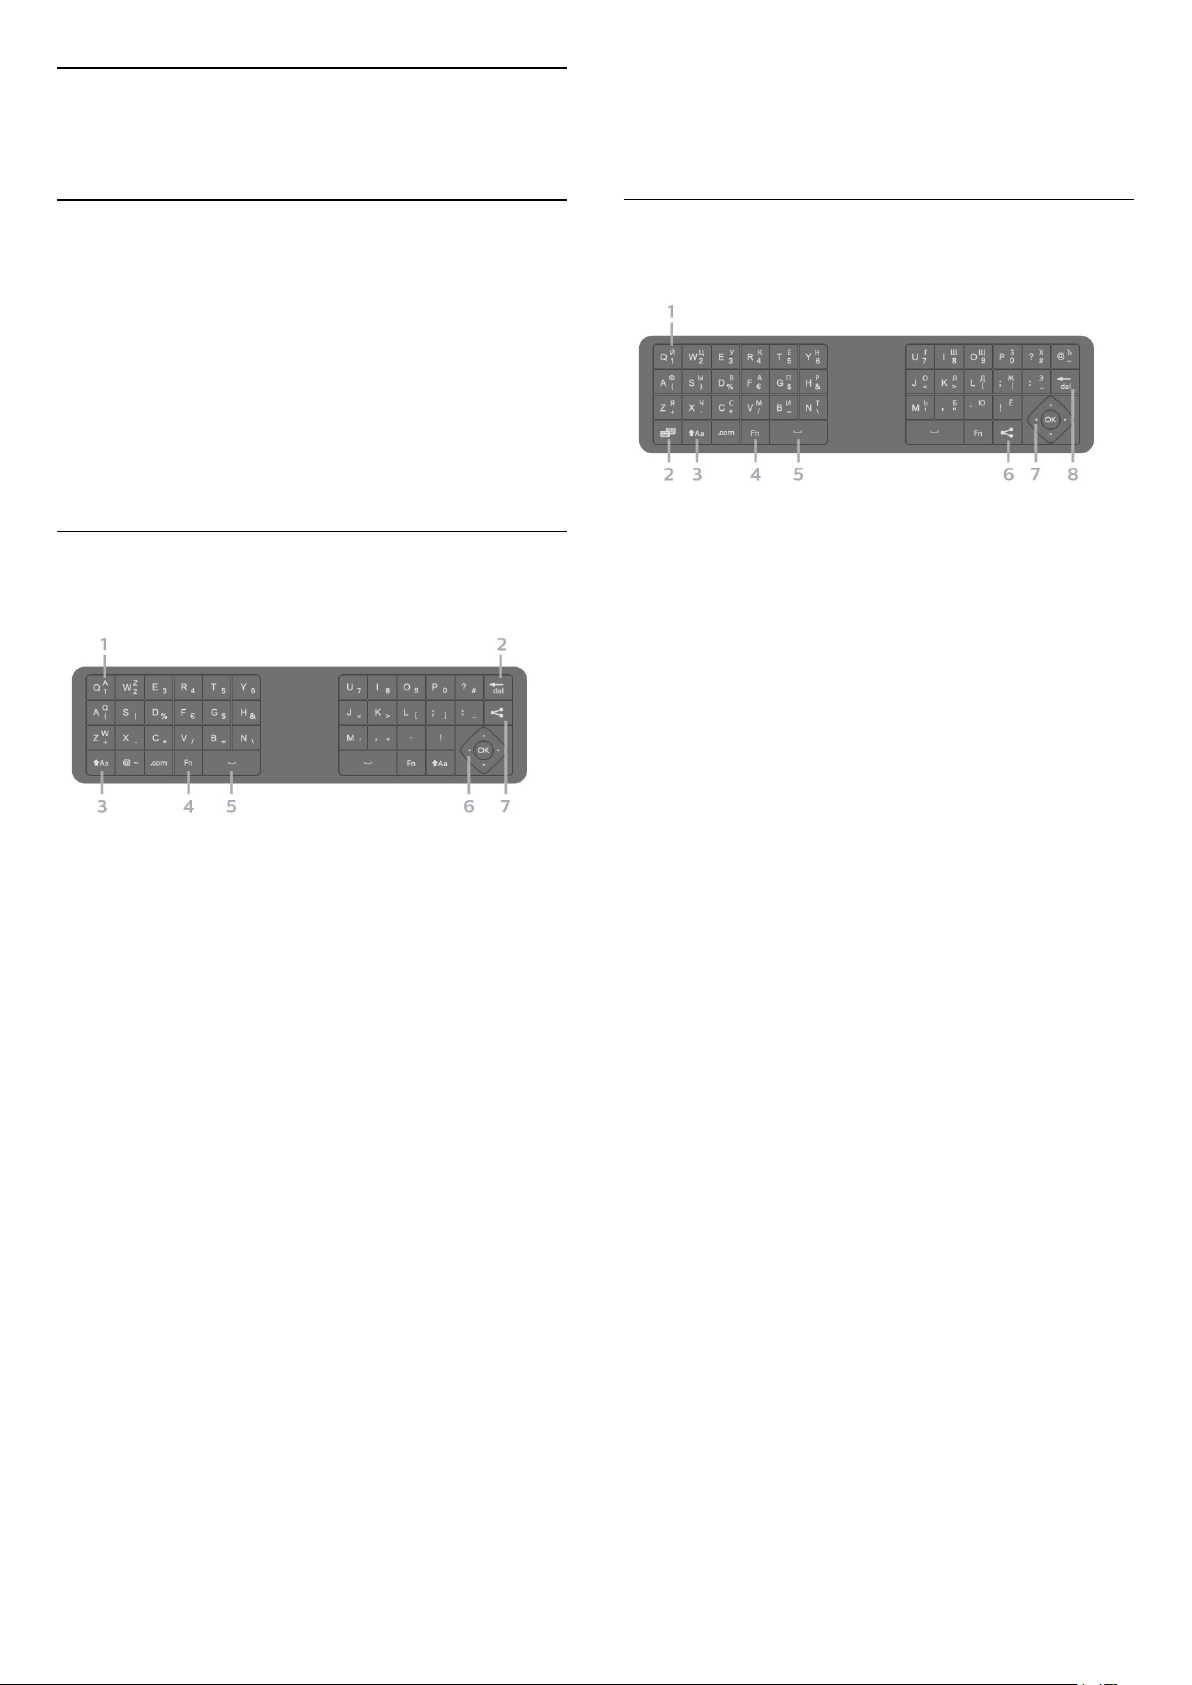
Overview - Qwerty and Azerty
Overview of a Qwerty/Azerty keyboard.*
1 - Azerty character
Character position if the keyboard layout is set to
Azerty.
2 Delete a character.
3 To type uppercase characters.
• To type several uppercase characters consecutively,
press and hold the key while typing.
• To type uppercase constantly, press the key
for 2 seconds to switch the keyboard in uppercase
mode.
• To switch out of uppercase mode, press
the key again. If no keys are pressed for 20
seconds, the uppercase mode switches off
automatically.
4 - Fn key
To type a number or punctuation character.
• To type a number or punctuation character, press
the Fn key just before you type the number or
punctuation character you need.
Shift
Overview - Qwerty and Cyrillic
Overview of a Qwerty/Cyrillic keyboard.*
1 - Cyrillic characters
Characters available when the keyboard is switched
to Cyrillic.
2 - Cyrillic keyboard switch
To switch the keyboard to the Cyrillic characters or
back to Qwerty.
3 To type uppercase characters.
• To type several uppercase characters consecutively,
press and hold the key while typing.
• To type uppercase constantly, press the key
for 2 seconds to switch the keyboard in uppercase
mode.
• To switch out of uppercase mode, press
the key again. If no keys are pressed for 20
seconds, the uppercase mode switches off
automatically.
4 - Fn key
To type a number or punctuation character.
• To type a number or punctuation character, press
the Fn key just before you type the number or
punctuation character you need.
5 - Spacebar
6 - Share this
To share online what you are watching at the
moment.
7 - Navigation and OK
8 -
Delete a character.
* Your remote control has a Qwerty / Azerty or a
Qwerty / Cyrillic keyboard, depending on your region.
Shift
5 - Spacebar
6 - Navigation and OK
7 - Share this
To share online what you are watching at the
10
Page 11
3.4
IR Sensor
The TV can receive commands from a remote control
that uses IR (infrared) to send commands. If you use
such a remote control, always make sure you point
the remote control at the infrared sensor on the front
of the TV.
Warning
Do not put any objects in front of IR sensor of the TV,
it may block the IR signal.
3.5
Batteries
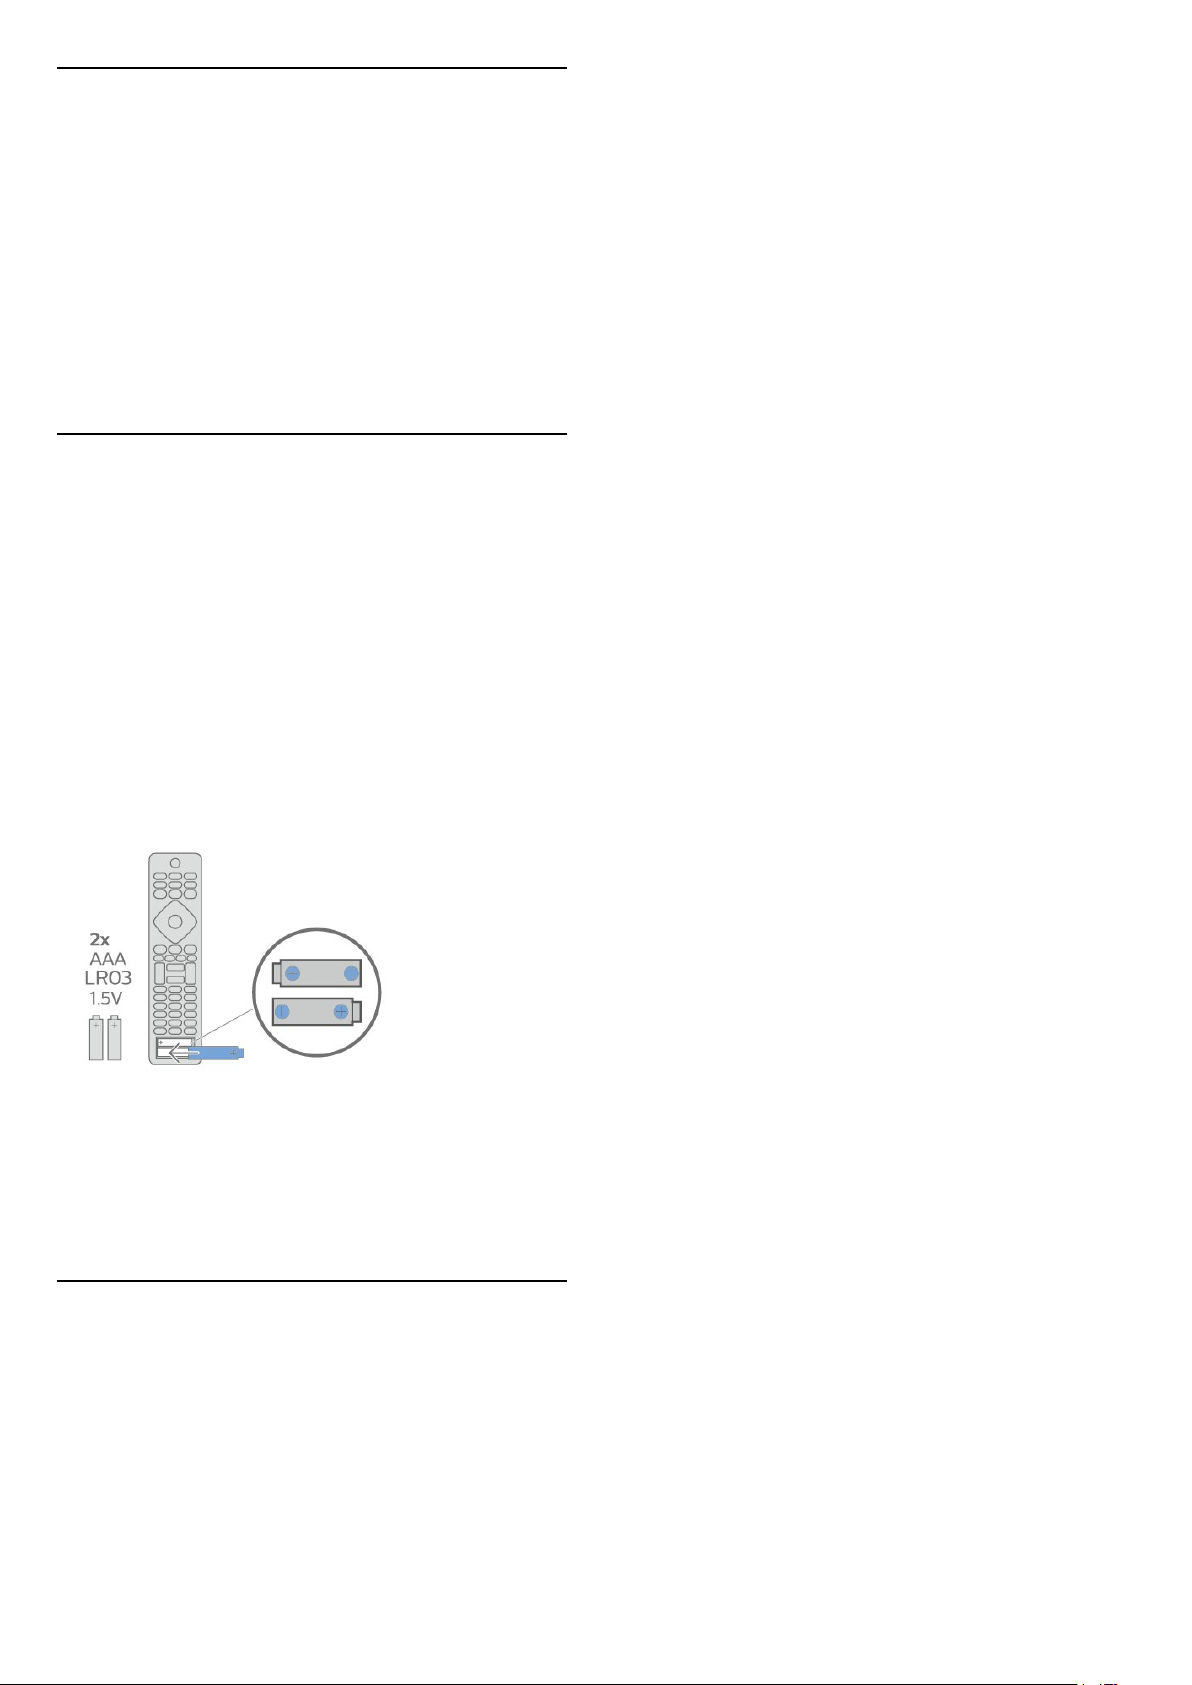
Replace batteries
If the TV does not react on a key press on the remote
control, the batteries might be empty.
To replace the batteries, open the battery
compartment on the front-bottom of the remote
control.
1 - Slide the battery door in the direction shown by
the arrow.
2 - Replace the old batteries with 2
type AAA-LR03-1.5V batteries. Make sure the + and
the - ends of the batteries line up correctly.
3 - Reposition the battery door and slide it back until
it clicks.
• Remove the batteries if you are not using the remote
control for a long time.
• Safely dispose of your old batteries according to the
end of use directions.
3.6
Cleaning
Your remote control is treated with a scratch-resistant
coating.
To clean the remote control, use a soft damp cloth.
Never use substances such as alcohol, chemicals or
household cleaners on the remote control.
11
Page 12
4
Switching On and
Off
4.1
On or Standby
Make sure the TV is connected to the mains AC
power. Connect the supplied power cord to the AC
in connector at the back of the TV. The indicator light
at the bottom of the TV lights up.
Switch on
Press on the remote control to switch the TV
on. Alternatively, press HOME. You can also
press the small joystick key on the back of the TV to
switch the TV on in case you can't find the remote
control or its batteries are empty.
Switch to standby
movie.
4 - The menu will disappear automatically.
To switch the TV on standby, select and press the
joystick key.
To switch the TV to standby, press on the remote
control. You can also press the small joystick key on
the back of the TV.
In standby mode, the TV is still connected to the
mains power but consumes very little energy.
To switch off the TV completely, disconnect the
power plug.
When disconnecting the power plug, always pull the
power plug, never the cord. Ensure that you have full
access to the power plug, power cord and outlet
socket at all times.
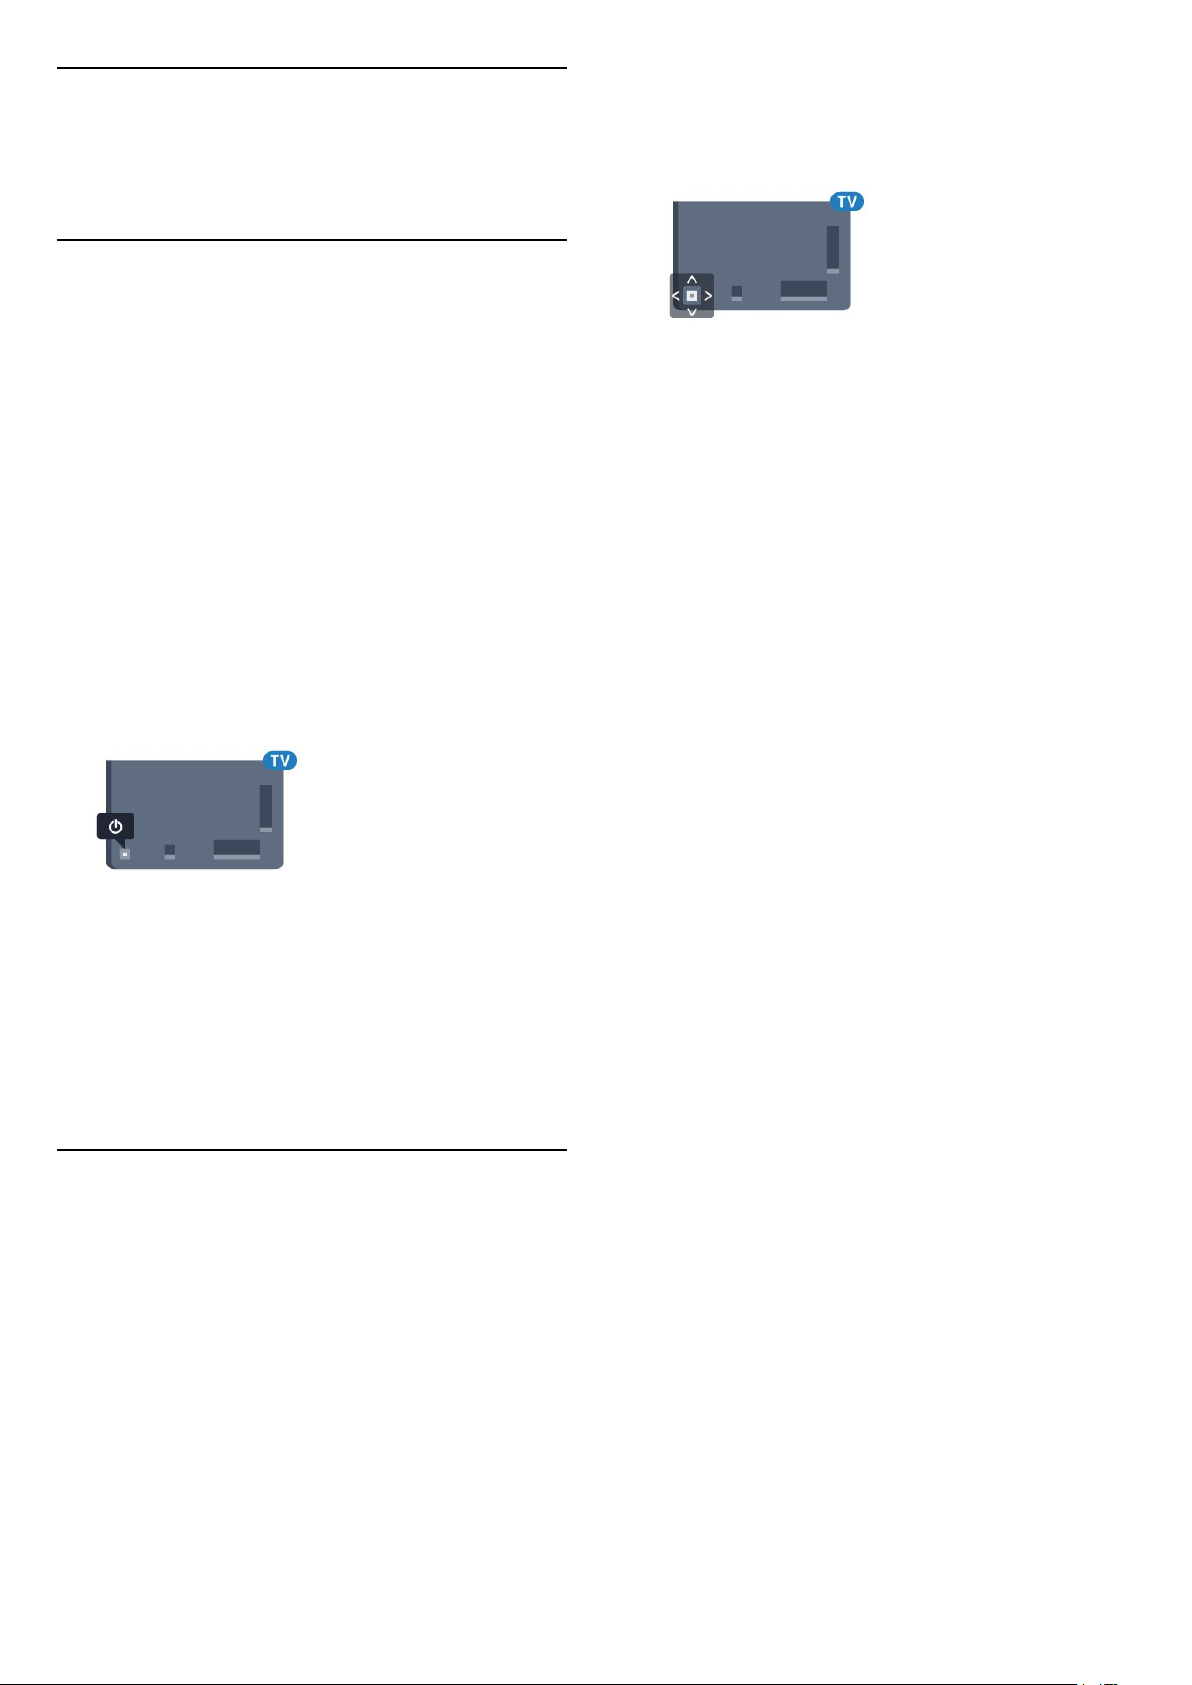
4.2
Keys on TV
If you lost the remote control or its batteries are
empty, you can still do some basic TV operations.
To open the basic menu…
1 - With the TV switched on, press the joystick key on
the back of the TV to bring up the basic menu.
2 - Press left or right to
select Volume, Channel or Sources.
Select Demo, to start a demo movie.
3 - Press up or down to adjust the volume or tune to
the next or previous channel. Press up or down to go
through the list of sources, including the tuner
selection. Press the joystick key to start the demo
12
Page 13

5
Satellite Installation Settings
Channels
5.1
Satellite Installation
About Installing Satellites
Up to 4 Satellites
You can install up to 4 satellites (4 LNBs) on this TV.
Select the exact number of satellites you wish to
install at the start of the installation. This will speed up
the installation.
Unicable
You can use a Unicable system to connect the
antenna dish to the TV. You can select Unicable for 1
or for 2 satellites at the start of the installation.
Start the Installation
Make sure your satellite dish is connected correctly
and is perfectly aligned before you start the
installation.
The satellite installation settings are preset according
your country. These settings determine how the TV
searches and installs satellites and its channels. You
can always change these settings.
To change the satellite installation settings…
1 - Start the satellite installation.
2 - On the screen where you can start searching for
satellites, select Settings and press OK.
3 - Select the number of satellites you want to install
or select one of the Unicable systems. When you
select Unicable, you can choose the User Band
Numbers and enter the User Band Frequencies for
each tuner.
4 - When you're done, select Next and press OK.
5 - On the Settings menu, press OK to return to the
screen to start searching for satellites.
Homing Transponder and LNB
In some countries, you can adjust the expert settings
for homing transponder and each LNB. Only use or
change these settings when a normal installation fails.
If you have non-standard satellite equipment, you
can use these settings to overrule the standard
settings. Some providers might give you some
transponder or LNB valeus which you can enter here.
To start the satellite installation…
1 - Press , select All Settings and press OK.
2 - Select Channels > Satellite Installation. Enter
your PIN code if necessary.
3 - Select Search for Satellite.
4 - Select Search. TV will search for satellites.
5 - Select Configure. The TV shows the current
satellite installation setup.
If you want to change this setup, select Settings.
If you don't want to change the setup, select Search.
Go to step 7.
6 - In Installation System, select the number of
satellites you want to install or select one of the
Unicable systems. When you select Unicable, you
can choose the User Band Numbers and enter the
User Band Frequencies for each tuner. You can find
user band in unicable router. In some countries, you
can adjust some expert settings for each LNB
in More Settings.
7 - The TV will search for the satellites available on
the alignment of your antenna dish. This may take a
few minutes. If a satellite is found, its name and
reception strength are shown on screen.
8 - When the TV found the satellites you need,
select Install.
9 - If a satellite offers Channel Packages, the TV will
show the available packages for that satellite. Select
the package you need.
10 - To store the satellite setup and installed
channels and radio stations, select Done.
Satellite CAMs
If you use a CAM – a Conditional Access Module with
a smart card – to watch satellite channels, we
recommend to do the satellite installation with the
CAM inserted in the TV.
Most CAMs are used to descramble channels.
Newest generation CAMs (CI+ 1.3 with Operator
Profile), can install all the satellite channels by
themselves on your TV. The CAM will invite you to
install its satellite(s) and channels. These CAMs not
only install and descramble the channels but also
handle regular channel updates.
Channel Packages
Satellite operators can offer channel packages that
bundle free channels (free-to-air) and offer a sorting
that suits a country. Some satellites offer subscription
packages - a collection of channels you pay for.
13
Page 14

Unicable Setup
Add a Satellite
The Unicable System
You can use a Single Cable system, MDU or Unicable
system to connect the antenna dish to the TV. A
Single Cable system uses one cable to connect the
satellite dish to all satellite tuners in its system. A
Single Cable system is typically used in apartment
buildings. If you use a Unicable system, the TV will ask
you to assign a user band number and corresponding
frequency during the installation. You can install 1 or 2
satellites with Unicable on this TV.
If you notice some missing channels after a Unicable
installation, another installation might have been
done at the same moment on the Unicable system.
Do the installation again to install the missing
channels.
User Band Number
In a Unicable system, each connected satellite tuner
must be numbered (e.g. 0, 1, 2 or 3 etc.).
You can find the available user bands and their
number on the Unicable switchbox. User band is
sometimes shortened as UB. There are Unicable
switchboxes that offer 4 or 8 user bands. If you select
Unicable in the settings, the TV will ask you to assign
the unique user band number for each built-in
satellite tuners. A satellite tuner cannot have the same
user band number as another satellite tuner in the
Unicable system.
User Band Frequency
Next to the unique user band number, the built-in
satellite receiver needs the frequency of the selected
user band number. These frequencies are mostly
shown next to the user band number on a Unicable
switchbox.
You can add an additional satellite to your current
satellite installation. The installed satellites and their
channels remain untouched. Some satellite operators
do not allow adding a satellite.
The additional satellite should be seen as an extra, it
is not your main satellite subscription or not the main
satellite of which you use its channel package.
Typically, you would add a 4th satellite when you
have 3 satellites already installed. If you have 4
satellites installed, you might consider removing one
first to be able to add a new satellite.
Setup
If you currently have only 1 or 2 satellites installed, the
current installation settings might not allow adding an
extra satellite. If you need to change the installation
settings, you must redo the complete satellite
installation. You cannot use Add satellite if a change
of settings is needed.
To add a satellite…
1 - Press , select All Settings and press OK.
2 - Select Channels > Satellite Installation.
3 - Select Search for satellite.
4 - Select Add Satellite. The current satellites are
shown.
5 - Select Search. The TV will search for new
satellites.
6 - If the TV has found one or more satellites,
select Install. The TV installs the channels of the
found satellites.
7 - Select Finish and press OK to store the
channels and radio stations.
Remove a Satellite
Manual Channel Update
You can always start an channel update yourself.
To start a channel update manually…
1 - Press , select All Settings and press OK.
2 - Select Channels > Satellite Installation.
3 - Select Search for Channels.
4 - Select Update Channels. The TV will start
updating. The update may take a few minutes.
5 - Follow the instructions on screen. The update
may take a few minutes.
6 - Select Finish and press OK.
You can remove one or more satellites from your
current satellite installation. You remove the satellite
and its channels. Some satellite operators do not
allow removing a satellite.
To remove satellites…
1 - Press , select All Settings and press OK.
2 - Select Channels > Satellite Installation.
3 - Select Search for satellite.
4 - Select Remove Satellite. The current satellites
are shown.
5 - Select a satellite and press OK to mark or
unmark them to remove.
6 - Press (left) repeatedly if necessary, to close
the menu.
14
Page 15

Manual Installation
Problems
Manual Installation is intended for expert users.
You can use Manual Installation to quickly add new
channels from a satellite transponder. You need to
know the frequency and polarization of the
transponder. The TV will install all channels of that
transponder. If the transponder was installed before,
all its channels - the former and the new ones - are
moved to the end of the channel list All.
You cannot use Manual installation if you need to
change the number of satellites. If this is needed, you
have to do a complete installation with Install
Satellites.
To install a transponder…
1 - Press , select All Settings and press OK.
2 - Select Channels > Satellite Installation.
3 - Select Manual Installation and press (right)
to enter the menu.
4 - If you have more than 1 satellite installed,
select LNB for which you want to add channels.
5 - Set the Polarisation you need. If you set
the Symbol Rate Mode to Manual, you can enter
the symbol rate in Symbol Rate manually.
6 - Press the arrows (up) or (down) to adjust
the frequency, and select Done.
7 - Select Search and press OK. The signal
strenght is shown on screen.
8 - If you want to store the channels of a new
transponder, select Store and press OK.
9 - Press (left) repeatedly if necessary, to close
the menu.
Homing Transponder and LNB
The TV cannot find the satellites I want or the TV
installs the same satellite twice
• Make sure that the correct number of satellites is set
in Settings at the start of the installation. You can set
the TV to search for One, Two or 3/4 satellites.
A dual head LNB cannot find a second satellite
• If the TV finds one satellite but cannot find a second
one, turn the dish a few degrees. Align the dish to get
the strongest signal on the first satellite. Check the
signal strength indicator of the first satellite on screen.
With the first satellite set at the strongest signal, select
Search again to find the second satellite.
• Make sure the settings are set to Two Satellites.
Changing the installation settings did not solve my
problem
• All settings, satellites and channels are only stored
at the end of the installation when you finish.
All satellite channels are gone
• If you use a Unicable system, make sure you
assigned two unique user band numbers for both
built-in tuners in the Unicable settings. It might be
that another satellite receiver in your Unicable system
is using the same user band number.
Some satellite channels seem to have disappeared
from the channel list
• If some channels seem to be gone or displaced, the
broadcaster might have changed the transponder
location of these channels. To restore the channel
positions in the channel list, you can try an update of
the channel package.
In some countries, you can adjust the expert settings
for homing transponder and each LNB. Only use or
change these settings when a normal installation fails.
If you have non-standard satellite equipment, you
can use these settings to overrule the standard
settings. Some providers might give you some
transponder or LNB valeus which you can enter here.
LNB Power
By default, LNB Power is set to On.
22 kHz Tone
By default, the Tone is set to Auto.
Low LO Frequency / High LO Frequency
The local oscillator frequencies are set to standard
values. Adjust the values only in case of exceptional
equipment that needs different values.
I cannot remove a satellite
• Subscription packages do not allow removing a
satellite. To remove the satellite, you have to do a
complete installation again and select another
package.
Sometimes the reception is poor
• Check if the satellite dish is solidly mounted. Strong
winds can move the dish.
• Snow and rain can degrade the reception.
5.2
Antenna/Cable Installation
15
Page 16

Update Channels
Reinstall All Channels
Automatic Channel Update
If you receive digital channels, you can set the TV to
automatically update these channels.
Once a day, at 6 AM, the TV updates the channels
and stores new channels. New channels are stored in
the Channels List and are marked with a .
Channels without a signal are removed. The TV must
be in standby to automatically update channels. You
can switch off Automatic Channel Update.
To switch off the automatic update…
1 - Press , select All Settings and press OK.
2 - Select Channels > Antenna/Cable Installation.
3 - Enter your PIN code if necessary.
4 - Select Automatic Channel Update.
5 - Select Off.
6 - Press (left) to go back one step or
press BACK to close the menu.
When new channels are found or if channels are
updated or removed, a message is shown at TV start
up. To avoid this message to appear after every
channel update, you can switch it off.
To switch off the message…
1 - Press , select All Settings and press OK.
2 - Select Channels > Antenna/Cable Installation.
3 - Enter your PIN code if necessary.
4 - Select Channel Update Message.
5 - Select Off.
6 - Press (left) to go back one step or
press BACK to close the menu.
In certain countries, the Automatic channel update is
done while watching TV or on any moment when the
TV is in standby.
Manual Channel Update
You can always start an channel update yourself.
To start a channel update manually…
1 - Press , select All Settings and press OK.
2 - Select Channels > Antenna/Cable Installation.
3 - Enter your PIN code if necessary.
4 - Select Search for Channels.
5 - Select Start.
6 - Select Update Digital Channels, select Next.
7 - Select Start to update the digital channels. This
can take a few minutes.
8 - Press (left) to go back one step or
press BACK to close the menu.
You can reinstall all channels and leave all other TV
settings untouched.
If a PIN code is set, you will need to enter this code
before you can reinstall channels.
To reinstall channels…
1 - Press , select All Settings and press OK.
2 - Select Channels > Antenna/Cable Installation.
3 - Enter your PIN code if necessary.
4 - Select Search for Channels.
5 - Select Start and press OK.
6 - Select Reinstall Channels, select Next and
press OK.
7 - Select the country where you are now and
press OK.
8 - Select Next and press OK.
9 - Select the type of installation you want, Antenna
(DVB-T) or Cable (DVB-C) and press OK.
8 - Select Next and press OK.
11 - Select the type of channels you want, Digital
and Analogue Channels or Only Digital
Channels and press OK.
8 - Select Next and press OK.
13 - Select Start and press OK to update the
digital channels. This can take a few minutes.
14 - Press (left) to go back one step or
press BACK to close the menu.
DVB-T or DVB-C
DVB Settings
Network Frequency Mode
If you intend to use the fast Quick Scan method
in Frequency Scan to search for channels,
select Automatic. The TV will use 1 of the predefined
network frequencies (or HC - homing channel) as
used by most cable operator in your country.
If you received a specific network frequency value to
search for channels, select Manual.
Network Frequency
With the Network Frequency Mode set to Manual,
you can enter the network frequency value received
from your cable operator here. To enter the value, use
the number keys.
16
Page 17

Frequency Scan
Select the method of searching for channels. You can
select the faster Quick Scan method and use the
predefined settings used by most cable operator in
your country.
If this results in having no channels installed or if
some channels are missing, you can select the
extended Full Scan method. This method will take
more time to search for and install channels.
signal quality of this frequency. The test result is
shown on screen. You can reposition the antenna or
check the connections to possibly improve the
reception.
7 - You can also change the frequency
yourself. Select the frequency number one by one
and use the (up) or (down) keys to change
the value. Select Search and press OK to test the
reception again.
8 - Press (left) repeatedly if necessary, to close
the menu.
Frequency Step Size
The TV searches for channels in steps of 8MHz.
If this results in having no channels installed or if
some channels are missing, you can search in smaller
steps of 1MHz. Using the 1MHz steps will take more
time to search for and install channels.
Digital Channels
If you know your cable operator is not offering digital
channels, you can skip searching for digital channels.
Analogue Channels
If you know your cable operator is not offering
analogue channels, you can skip searching for
analogue channels.
Free / Scrambled
If you have a subscription and a CAM - Conditional
Access Module for pay TV services, select Free +
Scrambled. If you did not subscribe to pay TV
channels or services, you can select Free
Channels Only .
Manual Installation
Analogue TV channels can be manually installed,
channel by channel.
To install analogue channels manually…
1 - Press , select All Settings and press OK.
2 - Select Channels > Antenna/Cable Installation.
Enter your PIN code if necessary.
3 - Select Analogue: Manual Installation.
• System
To set up the TV system, select System.
Select your country or the part of the world where
you are now and press OK.
• Search Channel
To find a channel, select Search Channel. You can
enter a frequency yourself to find a channel or let the
TV search for a channel. Press (right) to
select Search to search for a channel
automatically. The found channel is shown on screen
and if the reception is poor, press Search again. If
you want to store the channel, select Done and
press OK.
• Store
You can store the channel on the current channel
number or as a new channel number.
Select Store Current Channel or Store as New
Channel. The new channel number is shown briefly.
Reception Quality
You can check the quality and signal strength of a
digital channel. If you have your own antenna, you
can reposition the antenna to try and improve the
reception.
To check the reception quality of a digital channel…
1 - Tune to the channel.
2 - Press , select All Settings and press OK.
3 - Select Channels > Antenna/Cable Installation.
Enter your PIN code if necessary.
4 - Select Digital: Reception Test.
5 - Select Search. The digital frequency is shown
for this channel.
6 - Select Search again and press OK to check the
You can redo these steps until you have found all
available analogue TV channels.
5.3
Channel List Copy
Copy a Channel List
To copy a channel list…
1 - Switch on the TV. This TV should have channels
installed.
2 - Plug in a USB flash drive.
3 - Press , select All Settings and press OK.
4 - Select Channels > Channel List Copy.
5 - Select Copy to USB. You might be asked to enter
17
Page 18

the Child Lock PIN code to copy the channel list.
6 - When copying is done, unplug the USB flash
drive.
7 - Press (left) repeatedly if necessary, to close
the menu.
Now you can upload the copied channel list onto
another Philips TV.
Channel List version
Check the current version of the channel list...
1 - Press , select All Settings and press OK.
2 - Select Channels and press (right) to enter
the menu.
3 - Select Channel List Copy and select Current
Version, then press OK.
4 - Press (left) repeatedly if necessary, to close
the menu.
done, continue with step 2.
2 - Plug in the USB flash drive that holds the channel
list of the other TV.
3 - To start the channel list upload, press ,
select All Settings and press OK.
4 - Select Channels > Channel List Copy > Copy
to TV. Enter your PIN code if necessary.
5 - The TV notifies you if the channel list is copied to
the TV successfully. Unplug the USB flash drive.
5.4
About Channels
Channel Lists
About Channel Lists
After a channel installation, all channels appear on
the channel list. Channels are shown with their name
and logo if this information is available.
Upload a Channel List
To not Installed TVs
Depending on whether your TV is already installed or
not, you must use a different method to upload a
channel list.
To a TV that is not yet installed
1 - Plug in the power plug to start the installation and
select language and country. You can skip the
channel search. Finish the installation.
2 - Plug in the USB flash drive that holds the channel
list of the other TV.
3 - To start the channel list upload, press ,
select All Settings and press OK.
4 - Select Channels > Channel List Copy > Copy
to TV. Enter your PIN code if necessary.
5 - The TV notifies you if the channel list is copied to
the TV successfully. Unplug the USB flash drive.
To Installed TVs
Depending on whether your TV is already installed or
not, you must use a different method to upload a
channel list.
To an already installed TV
1 - Verify the country setting of the TV. (To verify this
setting, see chapter Reinstall All Channels. Start this
procedure until you reach the country setting.
Press BACK to cancel the installation.)
If the country is correct continue with step 2.
If the country is not correct, you need to start a
reinstallation. See chapter Reinstall All Channels and
start the installation. Select the correct country and
skip the channels search. Finish the installation. When
For each type of tuner - Antenna/Cable (DVB-T/C) or
Satellite (DVB-S) - there is a channel list with all
installed channels. You can only filter this list to show
TV or only Radio channels. Or when you have several
satellites installed, you can filter the channels per
satellite.
With a channel list selected, press the
arrows (up) or (down) to select a channel,
then press OK to watch the selected channel. You
only tune to the channels in that list when
using
Channel icons
After an Automatic Channel Update of the channel
list, newly found channels are marked with
a (star).
If you lock a channel, it will be marked with
a (lock).
The 3 most popular channels being watched by
others at this moment are marked with a 1, 2 or 3.
Radio stations
If digital broadcasting is available, digital radio
stations are installed during installation. Switch to a
radio channel just like you switch to a TV channel. A
Cable (DVB-C) channel installation usually places
radio stations from channel number 1001 onwards.
This TV can receive digital television standard DVB .
TV may not work properly with some operators of
digital television , non-compliance with requirements
of the standard in full.
or
keys.
18
Page 19

Open a Channel List
Next to the list with all channels for each tuner,
Antenna/Cable or Satellite tuner, you can select a
filtered list or you can select one of the favourite lists
you created.
To open the current channel list…
1 - Press , to switch to TV.
2 - Press LIST* or OK to open the current
channel list.
3 - Press BACK to close the channel list.
To select one of the channel lists…
1 - With a channel list open on screen.
2 - Select the list name at the top of the channel list
and press OK to open the list menu.
3 - In the list menu, select one of the available
channel lists and press OK.
Tip
You can easily switch between the two tuners in
the Sources menu.
Press SOURCES and select Watch TV to switch
to the Antenna/Cable tuner. Select Watch
Satellite to switch to the satellite tuner.
The TV will always open the last selected channel list
for the selected tuner.
* If LIST key is available on your remote control
Filter a Channel List
You can filter a list with all channels. You can set the
channel list to show only TV channels or only Radio
stations. For Antenna/Cable channels you can set the
list to show the Free-to-Air or the Scrambled
channels. When you have several satellites installed,
you can filter the satellite channel list per satellite.
To set a filter on a list with all channels…
1 - Press .
2 - Press OK to open the current channel list.
3 - Select at the upper right corner and press OK.
4 - Select Search Channel and press OK to open
a text field.You can use the remote control keyboard
(if available) or the onscreen keyboard to enter text.
5 - Enter a number, a name or part of a name and
select Apply and press OK. The TV will search for
matching channel names in the list you selected.
Search results are listed as a channel list - see the list
name at the top. The search results disappear once
you select another channel list or close the list with
search results.
Watching channels
Tune to a Channel
To start watching TV channels, press . The TV
tunes to the channel you last watched.
Switch Channels
To switch channels, press or .
If you know the channel number, type in the number
with the number keys. Press OK after you entered
the number to switch immediately.
If the information is available from the Internet, the TV
shows the current programme name and details
followed by the next programme name and details.
Previous channel
To switch back to the previously tuned channel,
press BACK.
You can also tune to channels from a Channel List.
Lock a Channel
1 - Press .
2 - Press OK to open the current channel list.
3 - With a channel list open on screen, select the list
name at the top of the channel list and press OK to
open the list menu.
4 - In the list menu, select the list you want to filter.
5 - Press (left) to go back one step or
press to close the menu.
Search for a Channel
You can search for a channel to find it in a long list of
channels.
The TV can search for a channel within one of the 3
main channel lists - the Antenna, Cable or Satellite
channel list.
To search for a channel…
Lock and Unlock a Channel
To prevent children from watching a channel, you can
lock a channel. To watch a locked channel, you must
enter the 4 digit Child Lock PIN code first. You
cannot lock programmes from connected devices.
To lock a channel…
1 - Press .
2 - Press OK to open the channel list. If necessary
change the channel list.
3 - Select at the upper right corner and press OK.
4 - Select Lock/UnLock and press OK.
5 - Enter your 4 digit PIN code if the TV asks for it.
6 - Select the channel you want to lock and
press OK. A locked channel is marked with
a (lock).
7 - Press (left) to go back one step or
press BACK to close the menu.
19
Page 20

To unlock a channel…
1 - Press .
2 - Press OK to open the channel list. If necessary
change the channel list.
3 - Select at the upper right corner and press OK.
4 - Select Lock/UnLock and press OK.
5 - Enter your 4 digit PIN code if the TV asks for it.
6 - Press (left) to go back one step or
press BACK to close the menu.
If you lock or unlock channels in a channel list, you
only have to enter the PIN code just once until you
close the channel list.
Parental Rating
To prevent children from watching a programme not
suitable for their age, you can set an age rating.
Digital channels can have their programmes age
rated. When the age rating of a programme is equal to
or higher than the age you have set as age rating for
your child, the programme will be locked. To watch a
locked programme, you must enter the Parental
Rating code first.
To set an age rating…
1 - Press , select All Settings and press OK.
2 - Select Child Lock > Parental Rating.
3 - Enter a 4-digit Child lock code. If you did not set
a code yet, select Set Code in Child Lock. Enter a
4-digit Child lock code and confirm. Now you can set
an age rating.
4 - Back in Parental Rating, select the age.
5 - Press (left) repeatedly if necessary, to close
the menu.
To switch off the parental age rating, select None.
However, in some countries you must set an age
rating.
For some broadcasters/operators, the TV only locks
programmes with a higher rating. The parental age
rating is set for all channels.
Rename Channel
While watching a channel, you can rename channel.
To rename a channel…
1 - While watching a channel, press OPTIONS.
2 - Select
Preferences > Rename Channel.
3 - Use the keyboard on the back of the remote
control to delete the current name and enter a new
name.
Common Interface
If you installed a CAM in one of the Common
Interface slots, you can view the CAM and operator
information or do some CAM related settings.
To view the CAM information…
1 - Press SOURCES.
2 - Select the channel type you are using the CAM
for, Watch TV or Watch Satellite.
3 - Press OPTIONS and
select
Preferences > Common Interface.
4 - Select the appropriate Common Interface slot
and press (right).
5 - Select the TV operator of the CAM and press OK.
The following screens come from the TV operator.
HbbTV on this Channel
If you want to avoid access to HbbTV pages on a
specific channel, you can block the HbbTV pages for
this channel only.
1 - Tune to the channel of which you want to block
the HbbTV pages.
2 - Press OPTIONS,
select Preferences > HbbTV on this Channel and
press (right).
3 - Select Off and press OK.
4 - Press (left) to go back one step or
press BACK to close the menu.
Channel Options
Open Options
While watching a channel, you can set some options.
Depending on the type of channel you are watching
or depending on the TV settings you made, some
options are available.
To open the options menu…
1 - While watching a channel,
press OPTIONS >
Preferences.
2 - Press OPTIONS again to close.
To block HbbTV on TV completely…
1 - Press , select All Settings and press OK.
2 - Select General Settings > Advanced > HbbTV.
3 - Select Off and press OK.
4 - Press (left) to go back one step or
press BACK to close the menu.
Channel Info
You can view the technical characteristics of a
particular channel, like digital or sound type, etc.
To view the technical information on a channel…
1 - Tune to the channel.
2 - Press OPTIONS, select
20
Preferences and
Page 21

press OK.
3 - Select Channel Info and press OK.
4 - To close this screen, press OK.
Programme Info
View programme details
To call up the details of the selected programme…
1 - Tune to the channel.
2 - Press OPTIONS, select
press OK.
3 - Select Programme Info and press OK, you can
see progrmme information.
4 - Press BACK to close.
Mono / Stereo
You can switch the sound of an analogue channel to
Mono or Stereo.
To switch to Mono or Stereo…
1 - Tune to an analoge channel.
2 - Press OPTIONS, and
select
press (right).
3 - Select Mono or Stereo and press OK.
4 - Press (left) to go back one step or
press BACK to close the menu.
Preferences > Mono/Stereo and
Preferences and
4 - While watching a channel, press OPTIONS.
5 - Select
6 - Select one item in the list and press OK.
7 - Select Map Channel.
8 - Once completed, you will see the mapped
channel information in the programme.
Change Logo
If there is no programme information in the beginning,
you can get more programme information using
below steps.
1 - Press TV GUIDE, and use navigation keys to
select at the middle and press OK.
2 - Select TV Guide > From the Broadcaster and
press OK.
3 - Select one of channels in TV guide, then
press OK to watch the selected channel.
4 - While watching a channel, press OPTIONS.
5 - Select
6 - Select one item in the list and press OK.
7 - Select Change Logo.
8 - Once completed, you will see the mapped
channel information in the programme.
Preferences > Map Channel.
Preferences > Change Logo.
Favourite Channels
About Favourite Channels
Video Selection
Digital TV channels can offer multi video signals (multifeed broadcast), different camera viewpoints or
angles of the same event or different programmes on
one TV channel. The TV shows a message if any such
TV channels are available.
Dual I-II
If an audio signal contains two audio languages but
one language or both has no language indication, this
option is available.
Map Channel
If there is no programme information in the beginning,
you can do map channel to get more programme
information.
1 - Press TV GUIDE, and use navigation keys to
select at the middle and press OK.
2 - Select TV Guide > From the Internet and
press OK.
3 - Select one of channels in TV guide, then
press OK to watch the selected channel.
In a favourite channel list, you can collect the
channels you like.
You can create 8 lists of favourite channels for easy
channel zapping. You can name each Favourites List
individually. Only in a Favourites List you can reorder
channels.
With a Favourites List selected, press the
arrows (up) or (down) to select a channel,
then press OK to watch the selected channel. You
only tune to the channels in that list when
using
Create a Favourites List
To create a favourite channels list from channel list...
1 - Press , to switch to TV.
2 - Press LIST (if available) or OK to open the
current channel list.
3 - Select at the upper right corner and press OK.
4 - Select Create Favourites list and press OK.
5 - In the list at the left, select a channel you want as
a favourite and press OPTIONS. Channels come in
the list at the right in the order you add them. To
undo, select the channel in the list at the left and
press OPTIONS again. You can also select a
range of channels by pressing (down) to select
or
keys.
21
Page 22

the last channel of the range you want to add and
then press OK.
6 - To finish adding channels, press BACK.
7 - The TV will ask to rename the Favourites List.
You can use the on-screen keyboard
or press BACK to hide the on-screen keyboard,
then use the keyboard on the back of the remote
control (if available) to enter new name.
If the channel list is long, alternatively, you can select
any channel, then press OPTIONS to open option
menu, then select Create Favourites
list and press OK.
To create a new favourite channels list by copying
existing favourite channel list...
1 - Press , to switch to TV.
2 - Press LIST (if available) or OK to open the
current channel list.
3 - Select at the upper right corner and press OK.
4 - Select Duplicate Favourites list and press OK.
5 - In the list at the left, select a channel you want as
a favourite and press OPTIONS. Channels come in
the list at the right in the order you add them. To
undo, select the channel in the list at the left and
press OPTIONS again. You can also select a
range of channels by pressing (down) to select
the last channel of the range you want to add and
then press OK.
6 - To finish adding channels, press BACK.
7 - The TV will ask to rename the Favourites List.
You can use the on-screen keyboard
or press BACK to hide the on-screen keyboard,
then use the keyboard on the back of the remote
control (if available) to enter new name.
marked at the left.
Rename a Favourites List
You can only rename a Favourites List.
To rename a Favourites List…
1 - Press SOURCE.
2 - Select Favourites.
3 - Select at the upper right corner and press OK.
4 - Select Rename Favourite List and press OK.
5 - Use the on-screen keyboard
or press BACK to hide the on-screen keyboard,
then use the keyboard on the back of the remote
control (if available) to enter new name.
6 - When done, turn the remote control,
select Close and press OK.
7 - Press BACK to close the channel list.
Remove a Favourites List
You can only remove a Favourites List.
To remove a Favourites List…
1 - Press SOURCE.
2 - Select Favourites.
3 - Select at the upper right corner and press OK.
4 - Select Remove Favourite List and press OK.
Reorder Channels
Only in a Favourites List you can change the
sequence of channels (reorder).
You can add a range of channels in one go or start
a Favourites List by duplicating the channel list with
all channels and removing the channels you do not
want.
Add a Range of Channels
To add a consecutive range of channels to
a Favourites List in one go, you can use Select
Range.
To add a range of channels…
1 - Press SOURCE.
2 - Select Favourites.
3 - Open the Favourites List where you want to
add a range of channels.
4 - Select at the upper right corner and press OK.
5 - Select Edit Favourites List and press OK.
6 - In the list at the left select the first channel of the
range you want to add and press OK.
7 - Press (down) to select the last channel of the
range you want to add and then press OK.
8 - Select Add and press OK. The channels are
To change the sequence of channels…
1 - Press SOURCES, and select Favourites.
2 - Open the Favourites List you want to reorder.
3 - Select at the upper right corner and press OK.
4 - Select Reorder Channels and press OK.
5 - In the Favourites List, select the channel you
want to reorder and press OK. (The channel will be
marked with grey box)
6 - With the (up) or (down) keys move the
channel where you want it.
7 - Press OK to confirm the new location.
8 - You can reorder channels with the same method
until you close the Favourites List with
the BACK key.
22
Page 23

Text / Teletext
Text Pages
To open Text/Teletext press TEXT, while you are
watching TV channels.
To close Text, press TEXT again.
3 - Press BACK to hide the device keys.
4 - To close Text, press BACK again.
Digital Text (UK only)
Some digital broadcasters offer dedicated Digital Text
or interactive TV on their digital TV channels. This
includes normal Text using the number, colour and
arrow keys to select and navigate.
Select a Text page
To select a page . . .
1 - Enter the page number with the number keys.
2 - Use the arrow keys to navigate.
3 - Press a colour key to select a colour-coded
subject at the bottom of the screen.
Text sub-pages
A Text page number can hold several subpages. The
subpage numbers are shown on a bar next to the
main page number.
To select a subpage, press or .
T.O.P. Text pages
Some broadcasters offer T.O.P. Text.
To open T.O.P. Text pages within Text,
press OPTIONS and select T.O.P. Overview.
Favourite pages
The TV makes a list of the last 10 Text pages you
opened. You can easily reopen them again in the
Favourite Text pages column.
1 - In Text, select (heart) in the top left corner of
the screen to show the column of favourite pages.
2 - Press (down) or (up) to select a page
number and press OK to open the page.
You can clear the list with the option Clear Favourite
Pages.
Search Text
To close Digital Text, press BACK.
Text Options
In Text/Teletext, press OPTIONS to select the
following…
• Freeze page
To stop the automatic rotation of subpages.
• Dual screen / Full screen
To show the TV channel and Text alongside each
other.
• T.O.P. overview
To open T.O.P. Text.
• Enlarge
To enlarge the Text page for comfortable reading.
• Reveal
To unhide hidden information on a page.
• Cycle subpages
To cycle subpages when these are available.
• Hide/Show Favourite Pages
To hide or show the list of favourite pages.
• Clear Favourite Pages
To clear the list of favourite pages.
• Language
To switch the group of characters that Text uses to
display correctly.
• Text 2.5
To activate the Text 2.5 for more colours and better
graphics.
You can select a word and scan Text for all
occurences of this word.
1 - Open a Text page and press OK.
2 - Select a word or number with the arrow keys.
3 - Press OK again to jump immediately to the next
occurence of this word or number.
4 - Press OK again to jump to the subsequent
occurence.
5 - To stop searching, press (up) until nothing is
selected.
Text from a connected device
Some devices that receive TV channels can also offer
Text.
To open Text from a connected device . . .
1 - Press SOURCES, select the device and
press OK.
2 - While watching a channel on the device,
press OPTIONS, select Show Device Keys and
select the key and press OK.
Text Setup
Text language
Some digital TV broadcasters have several Text
languages available.
To set your primary and secondary Text language . . .
1 - Press , select All Settings and press OK.
2 - Select Region and Language and
press (right) to enter the menu.
3 - Select Language > Primary Text or Secondary
Text.
4 - Select your preferred Text languages.
5 - Press (left) repeatedly if necessary, to close
the menu.
Text 2.5
If available, Text 2.5 offers more colours and better
graphics. Text 2.5 is activated as a standard factory
setting.
23
Page 24

To switch off Text 2.5…
1 - Press TEXT.
2 - With Text/Teletext open on screen,
press OPTIONS.
3 - Select Text 2.5 > Off and press OK.
4 - Press (left) repeatedly if necessary, to close
the menu.
24
Page 25
6
6.2
Connect Devices
6.1
About Connections
Connectivity Guide
Always connect a device to the TV with the highest
quality connection available. Also, use good quality
cables to ensure a good transfer of picture and
sound.
When you connect a device, the TV recognizes its
type and gives each device a correct type name. You
can change the type name if you wish. If a correct
type name for a device is set, the TV automatically
switches to the ideal TV settings when you switch to
this device in the Sources menu.
If you need help to connect several devices to the TV,
you can visit the Philips TV connectivity guide. The
guide offers information on how to connect and
which cables to use.
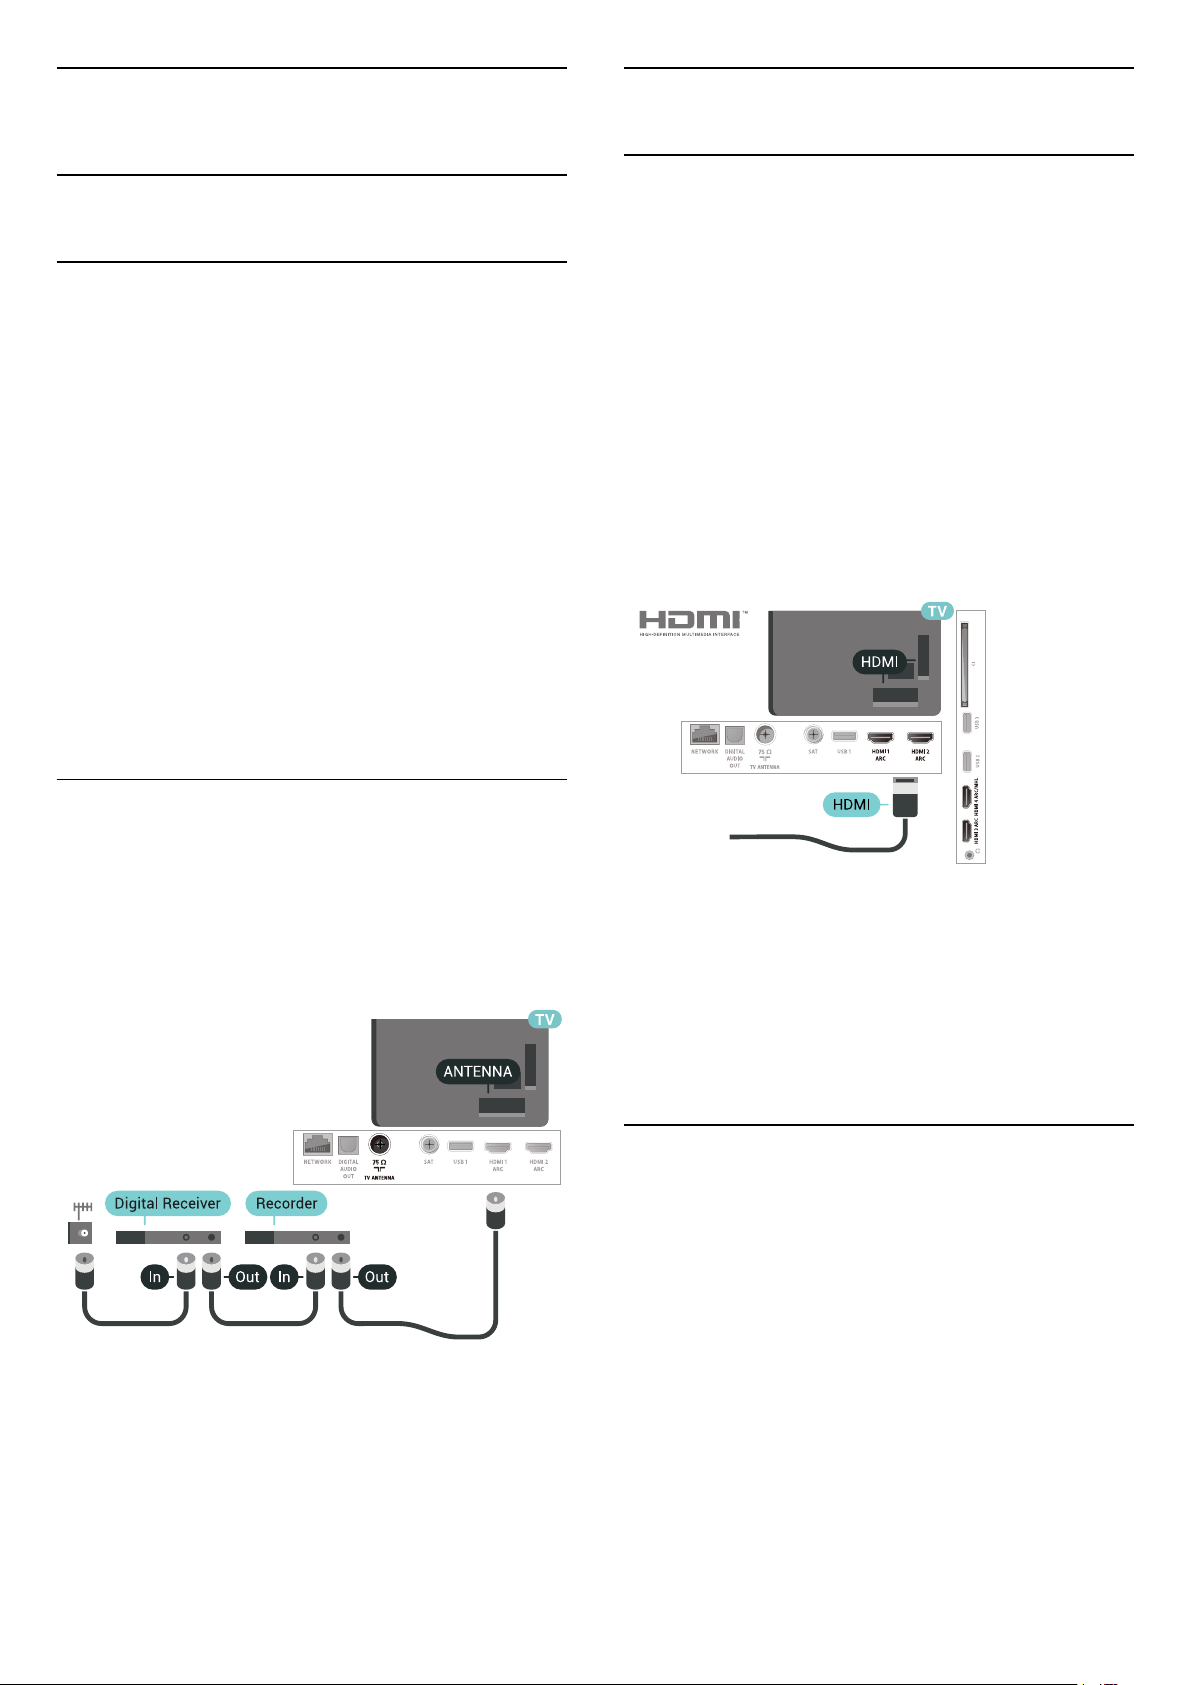
HDMI Ports
HDMI Quality
An HDMI connection has the best picture and sound
quality. One HDMI cable combines video and audio
signals. Use an HDMI cable for TV signal.
For best signal quality transfer, use a High speed
HDMI cable and do not use an HDMI cable longer
than 5 m.
If a device connected with HDMI is not working
correctly, check if a different HDMI Ultra HD setting
can solve this problem. For more information,
in Help, select Keywords and look up HDMI Ultra
HD.
Go to www.connectivityguide.philips.com
Antenna Port
If you have a Set-top box (a digital receiver) or
Recorder, connect the antenna cables to run the
antenna signal through the Set-top box and/or
Recorder first before it enters the TV. In this way, the
antenna and the Set-top box can send possible
additional channels to the Recorder to record.
Copy protection
HDMI cables support HDCP 2.2 (High-bandwidth
Digital Content Protection). HDCP is a copy protection
signal that prevents copying content from a DVD disc
or Blu-ray Disc. Also referred to as DRM (Digital
Rights Management).
HDMI ARC
All of the HDMI connections on the TV have HDMI
ARC (Audio Return Channel).
If the device, typically a Home Theatre System (HTS),
also has the HDMI ARC connection, connect it to any
of the HDMI connections on this TV. With the HDMI
ARC connection, you do not need to connect the
extra audio cable that sends the sound of the TV
picture to the HTS. The HDMI ARC connection
combines both signals.
You can use any HDMI connection on this TV to
connect the HTS but ARC is only available for 1
device/connection at a time.
25
Page 26

HDMI MHL
With HDMI MHL, you can send what you see on your
Android smartphone or tablet to a TV screen.
The HDMI 4 connection on this TV
incorporates MHL 2.0 (Mobile High-Definition Link).
This wired connection offers great stability and
bandwidth, low latency, no wireless interference and
good quality sound reproduction. On top of that, the
MHL connection will charge the battery of your
smartphone or tablet. Although connected, your
mobile device will not be charging when the TV is on
standby.
Inform yourself about what passive MHL cable is
suited for your mobile device. In particular, with the
HDMI connector for the TV on one side, the type of
connector you need to connect to your smartphone
or tablet.
MHL, Mobile High-Definition Link and the MHL Logo
are trademarks or registered trademarks of the MHL,
LLC.
the TV and the connected device.
With EasyLink you can operate a connected device
with the TV remote control. EasyLink uses HDMI CEC
(Consumer Electronics Control) to communicate with
the connected devices. Devices must support HDMI
CEC and must be connected with an HDMI
connection.
EasyLink setup
The TV comes with EasyLink switched on. Make sure
that all HDMI CEC settings are properly set up on the
connected EasyLink devices. EasyLink might not work
with devices from other brands.
HDMI CEC on other brands
The HDMI CEC functionality has different names on
different brands. Some examples are: Anynet, Aquos
Link, Bravia Theatre Sync, Kuro Link, Simplink and
Viera Link. Not all brands are fully compatible with
EasyLink.
Example HDMI CEC branding names are property of
their respective owners.
HDMI CEC - EasyLink
An HDMI connection has the best picture and sound
quality. One HDMI cable combines video and audio
signals. Use an HDMI cable for High Definition (HD)
TV signals. For best signal quality transfer, use a High
speed HDMI cable and do not use an HDMI cable
longer than 5 m.
DVI to HDMI
If you still own a device that only has a DVI
connection, you can connect the device to any of
the HDMI connection with a DVI to HDMI adapter.
Use a DVI to HDMI adapter if your device only has a
DVI connection. Use one of the HDMI connections
and add an Audio L/R cable (mini-jack 3.5mm)
to Audio IN for sound, on the back of the TV.
EasyLink HDMI CEC
If your devices are connected with HDMI and have
EasyLink, you can operate them with the TV remote
control. EasyLink HDMI CEC must be switched On on
26
Page 27
Copy Protection
DVI and HDMI cables support HDCP (High-bandwidth
Digital Content Protection). HDCP is a copy protection
signal that prevents copying content from a DVD disc
or Blu-ray Disc. Also referred to as DRM (Digital
Rights Management).
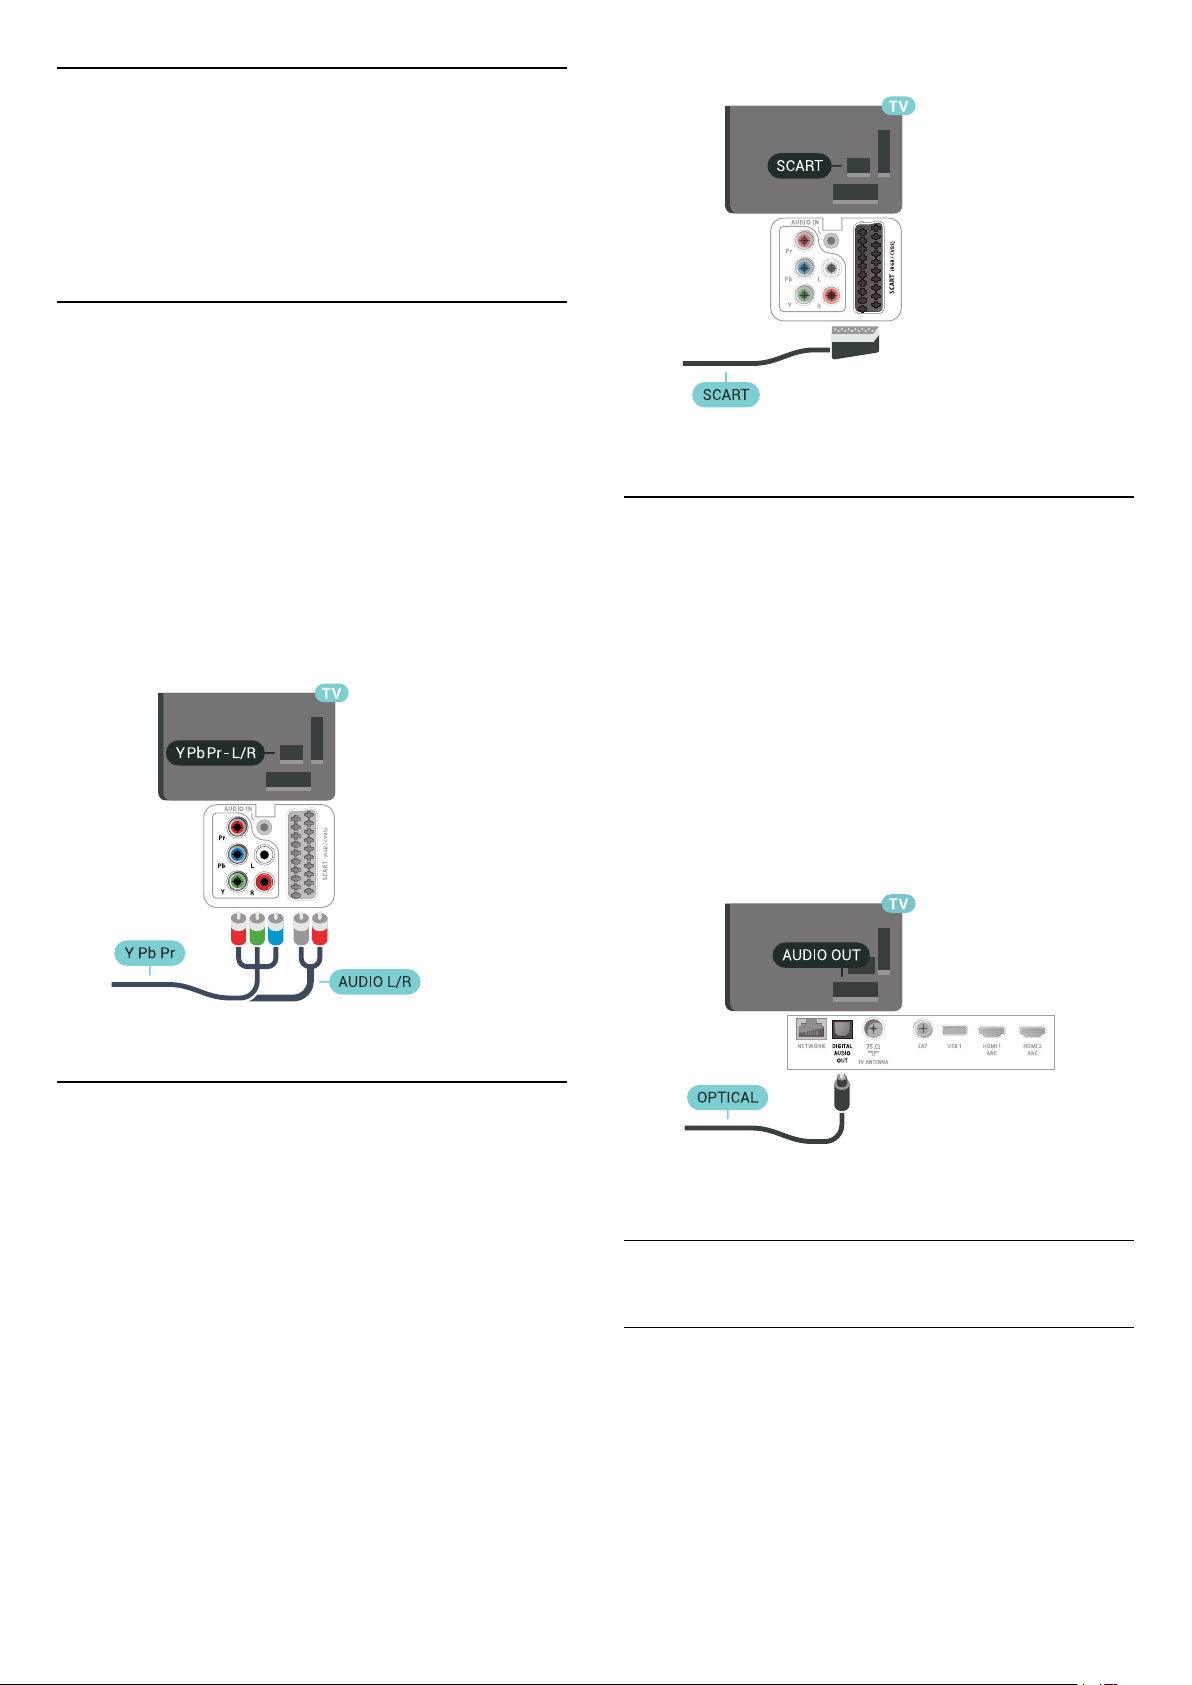
6.3
Y Pb Pr - Component
Y Pb Pr - Component Video is a high quality
connection.
The YPbPr connection can be used for High Definition
(HD) TV signals. Next to the Y, Pb and Pr signals add
the Audio Left and Right signals for sound.
6.5
Match the YPbPr (green, blue, red) connector colours
with the cable plugs when you connect.
Use an Audio L/R cinch cable if your device also has
sound.
6.4
Audio Out - Optical
Audio Out - Optical is a high quality sound
connection.
This optical connection can carry 5.1 audio channels.
If your device, typically a Home Theatre System
(HTS), has no HDMI ARC connection, you can use this
connection with the Audio In - Optical connection on
the HTS. The Audio Out - Optical connection sends
the sound from the TV to the HTS.
Scart
SCART is a good quality connection.
The SCART connection can be used for CVBS and
RGB video signals but cannot be used for High
Definition (HD) TV signals. The SCART connection
combines video and audio signals. The SCART
connection also supports NTSC playback.
6.6
CAM with Smart Card - CI+
About CI+
Note: Not support for countries in Asia Pacific,
Middle East, and Africa.
27
Page 28

CI+
This TV is ready for the CI+ Conditional Access .
With CI+ you can watch premium HD programmes,
like movies and sports, offered by digital TV operators
in your region. These programmes are scrambled by
the TV operator and descrambled with a prepaid CI+
module.
Digital TV operators provide a CI+ module
(Conditional Access Module - CAM) and an
accompanying smart card, when you subscribe to
their premium programmes. These programmes have
a high level of copy protection.
Contact a digital TV operator for more information on
terms & conditions.
Smart Card
Digital TV operators provide a CI+ module
(Conditional Access Module - CAM) and an
accompanying smart card, when you subscribe to
their premium programmes.
Insert the smart card into the CAM module. See the
instruction you received from the operator.
To insert the CAM in the TV…
1 - Look on the CAM for the correct method of
insertion. Incorrect insertion can damage the CAM
and TV.
2 - While looking at the back of the TV, with the front
of the CAM facing towards you, gently insert the CAM
into the slot COMMON INTERFACE.
3 - Push the CAM in as far as it will go. Leave it in the
slot permanently.
When you switch on the TV, it may take a few minutes
before the CAM is activated. If a CAM is inserted and
subscription fees are paid (subscription methods can
differ), you can watch the scrambled channels
supported by the CAM smart card.
The CAM and smart card are exclusively for your TV. If
you remove the CAM, you will no longer be able to
watch the scrambled channels supported by the
CAM.
Passwords and PIN codes
For some CAMs, you must enter a PIN code to watch
its channels. When you set the PIN code for the CAM,
we recommend you to use the same code you are
using to unlock the TV.
To set the PIN code for the CAM…
1 - Press SOURCES .
2 - Select the channel type you are using the CAM
for Watch TV.
3 - Press OPTIONS and select Common
Interface.
4 - Select the TV operator of the CAM. The following
screens come from the TV operator. Follow the onscreen instruction to look up the PIN code setting.
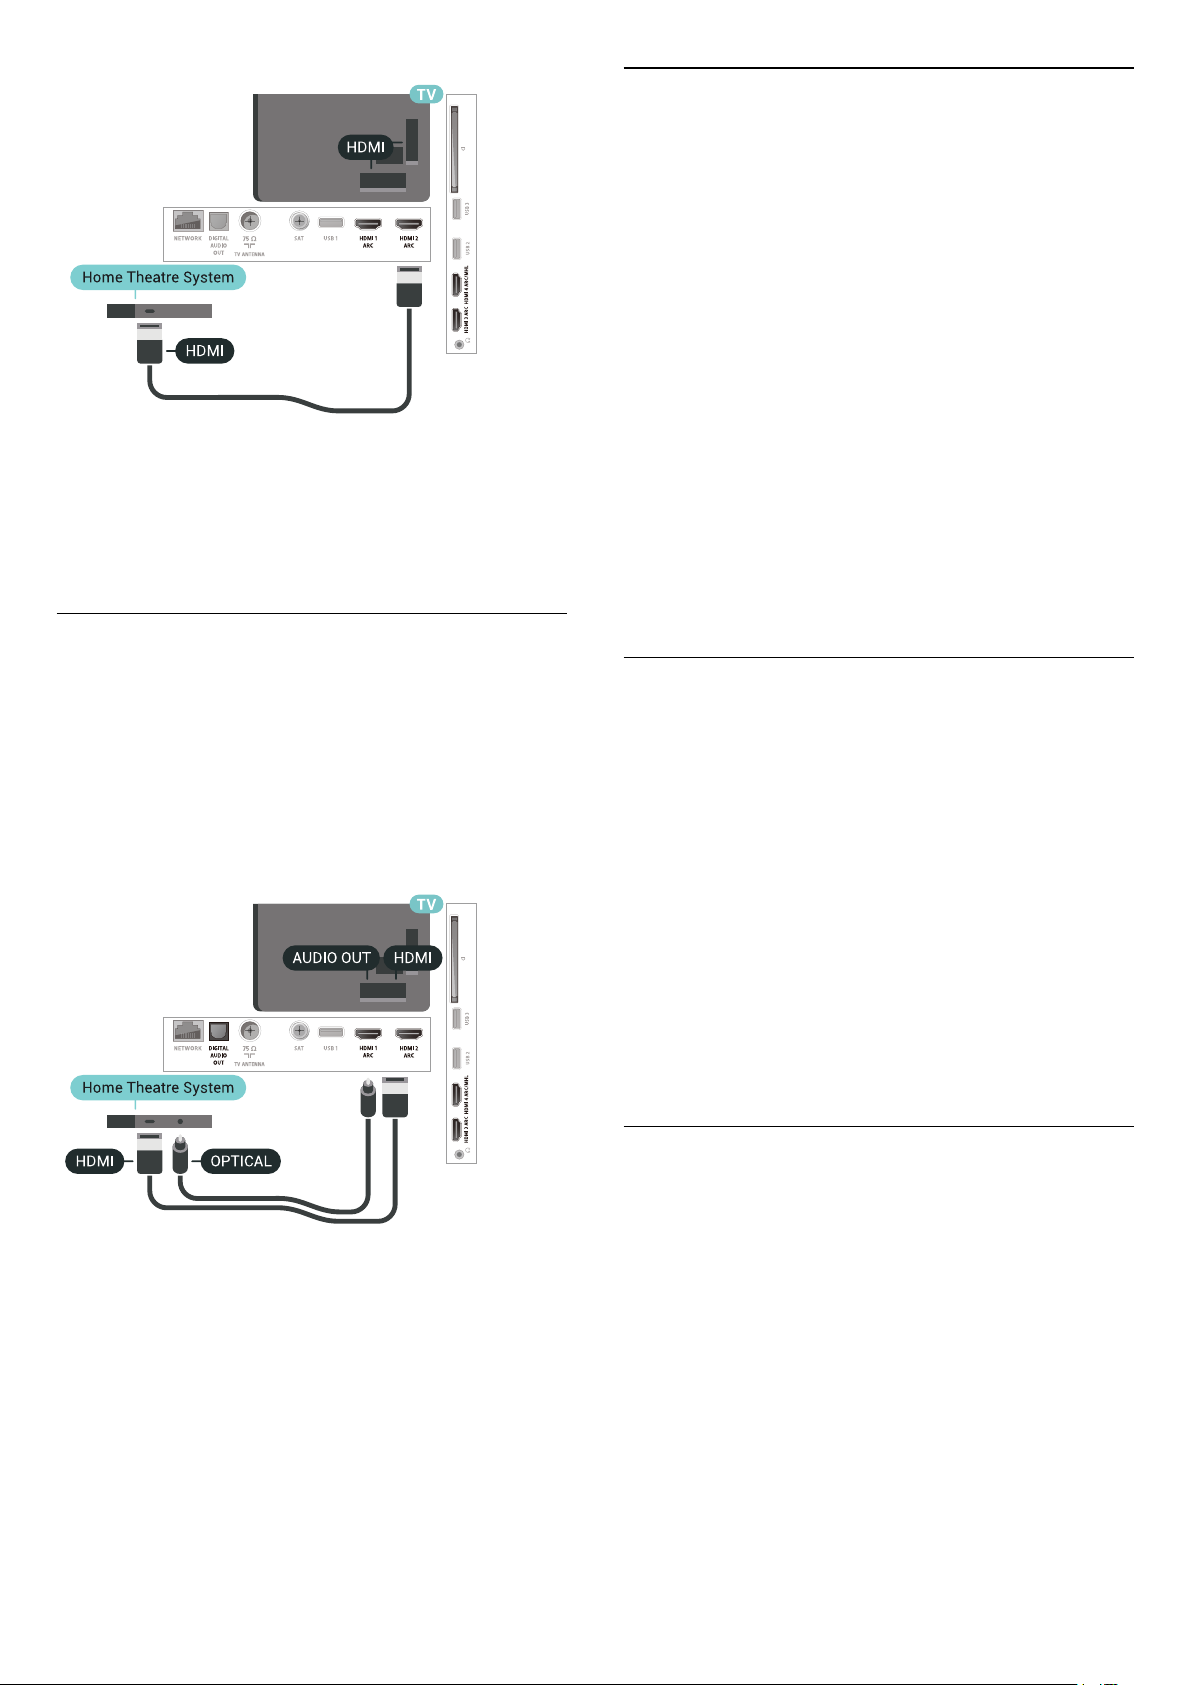
6.7
Home Theatre System - HTS
Connect with HDMI ARC
Use an HDMI cable to connect a Home Theatre
System (HTS) to the TV. You can connect a Philips
Soundbar or an HTS with a built-in disc player.
HDMI ARC
If your Home Theatre System has an HDMI ARC
connection, you can use any HDMI connection on the
TV to connect. With HDMI ARC, you do not need to
connect the extra audio cable. The HDMI ARC
connection combines both signals.
All HDMI connections on the TV can offer the Audio
Return Channel (ARC) signal. But once you have
connected the Home Theatre System, the TV can
only send the ARC signal to this HDMI connection.
28
Page 29
Problems with HTS sound
Sound with loud noise
If you watch a video from a plugged in USB flash drive
or connected computer, the sound from your Home
Theatre System might be distorted. This noise is heard
when the audio or video file has DTS sound but the
Home Theatre System has no DTS sound processing.
You can fix this by setting the Audio Out Format of
the TV to Stereo (uncompressed).
Press for All
Settings > Sound > Advanced > Audio Out
Format.
Audio to video synchronisation (sync)
If the sound does not match the video on screen, you
can set a delay on most Home Theatre Systems with
a disc player to match the sound with the video.
Connect with HDMI
Use an HDMI cable to connect a Home Theatre
System (HTS) to the TV. You can connect a Philips
Soundbar or an HTS with a built-in disc player.
If the Home Theatre System has no HDMI ARC
connection, add an optical audio cable (Toslink) to
send the sound of the TV picture to the Home Theatre
System.
No sound
If you cannot hear the sound from the TV on your
Home Theatre System, check if you connected the
HDMI cable to an HDMI ARC connection on the
Home Theatre System. All HDMI connections on the
TV are HDMI ARC connections.
6.8
Smartphones and Tablets
To connect a smartphone or tablet to the TV, you can
use a wireless or wired connection.
Wireless
For a wireless connection, on your smartphone or
tablet download the Philips TV Remote App from
your favourite app store.
Wired
For a wired connection, use the HDMI 4 MHL
connection on the back of the TV. For more
information, in Help, select Keywords and
look up HDMI MHL for more information.
Audio to video synchronisation (sync)
If the sound does not match the video on screen, you
can set a delay on most Home Theatre Systems with
a disc player to match the sound with the video..
6.9
Blu-ray Disc Player
Use a High speed HDMI cable to connect the Bluray Disc player to the TV.
29
Page 30
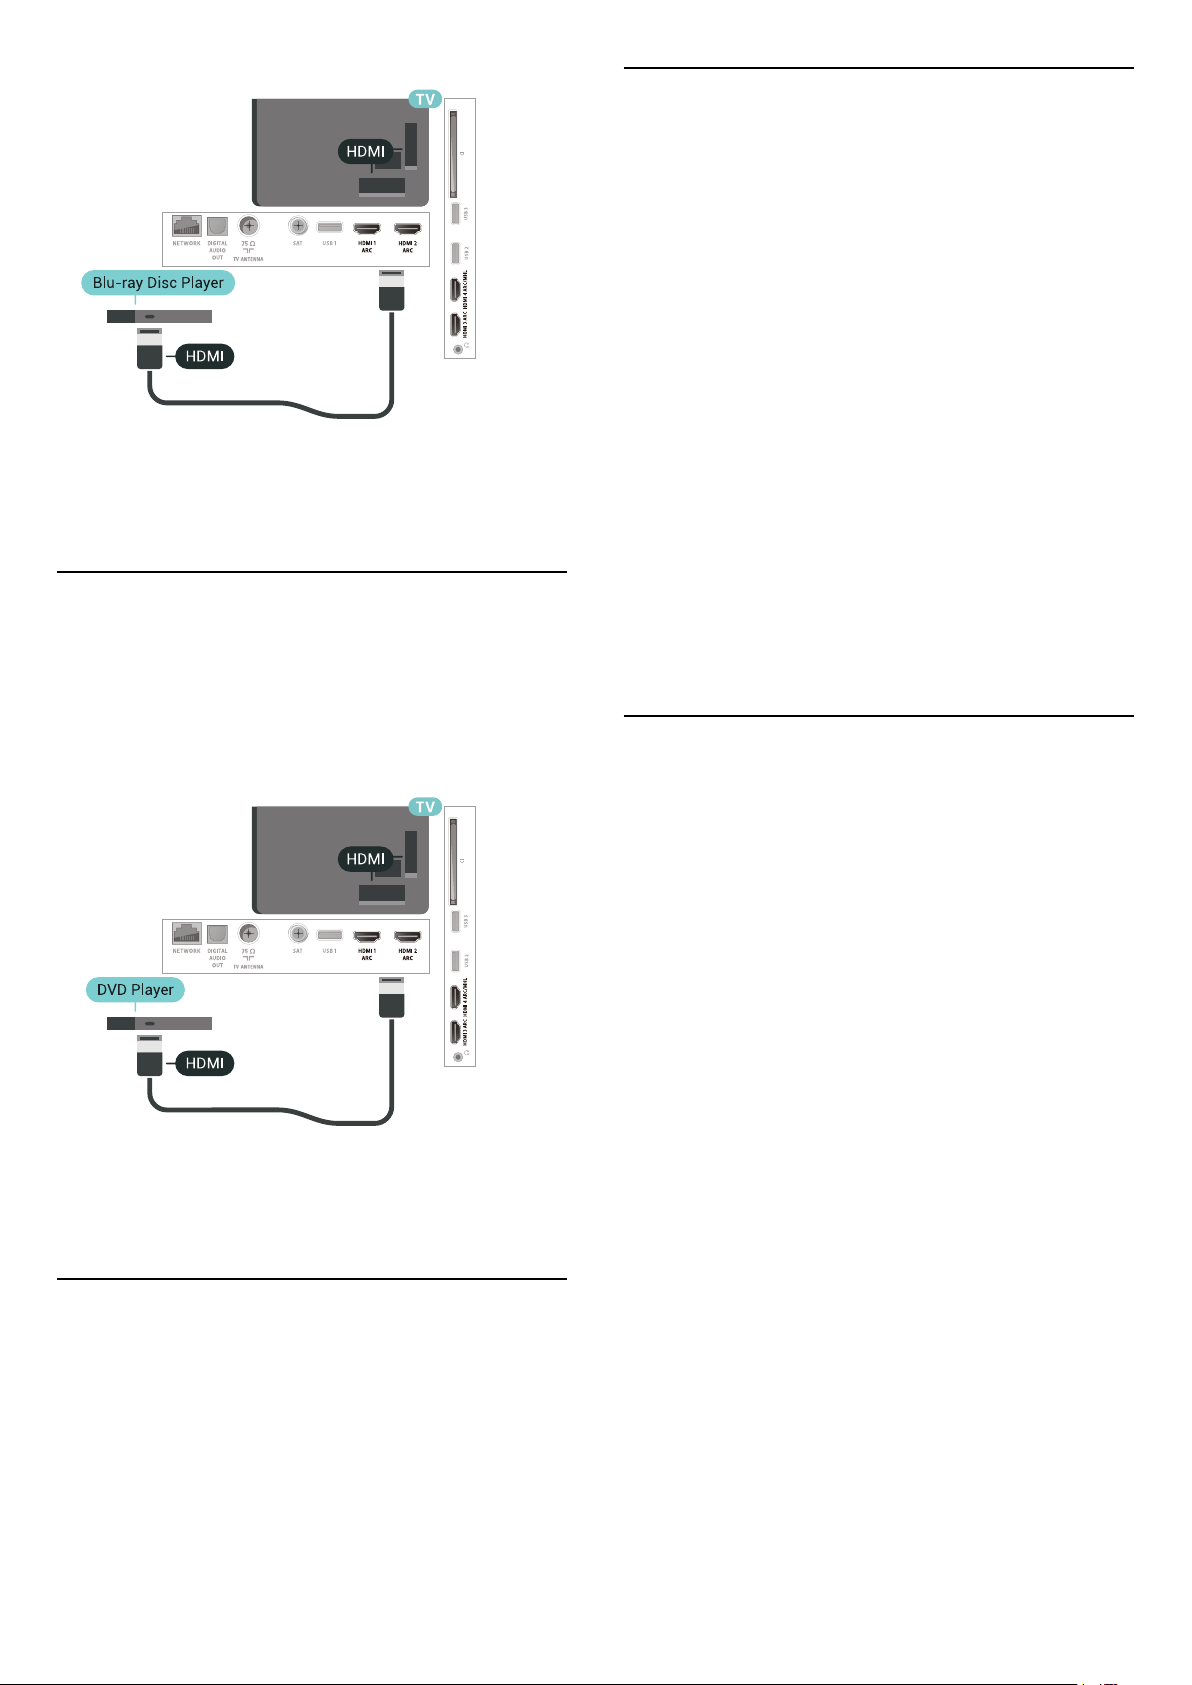
If the Blu-ray Disc player has EasyLink HDMI CEC,
you can operate the player with the TV remote
control.
6.10
DVD Player
Use an HDMI cable to connect the DVD player to the
TV.
Alternatively, you can use a SCART cable, if the
device has no HDMI connection.
What You Need
You can connect a wireless device with Bluetooth® to
this TV – a wireless speaker, a subwoofer, a sound
bar or headphones. You can also connect a wireless
gamepad with Bluetooth LE.
To play the TV sound on a wireless speaker, you must
pair the wireless speaker with the TV. You can pair
some wireless speakers and a maximum of 4
Bluetooth LE (low energy) devices. The TV can only
play the sound on one speaker at a time. If you
connect a subwoofer, the sound is played on the TV
and the subwoofer. If you connect a sound bar the
sound is played on the sound bar only.
Attention - Audio to Video syncronisation
Many Bluetooth speaker systems have a high, so
called, 'latency'. High latency means that the audio
lags behind the video, causing unsynchronised 'lip
sync'. Before you purchase a wireless Bluetooth
speaker system, inform yourself about the newest
models and look for a device with a low latency
rating. Ask your dealer for advice.
Pairing a Device
If the DVD player is connected with HDMI and has
EasyLink CEC, you can operate the player with the TV
remote control.
6.11
Bluetooth - Speakers and
Gamepads
Position the wireless speaker within a distance of 5
meters from the TV. Read the user manual of the
device for specific information on pairing and on
wireless range. Make sure the Bluetooth setting on TV
is switched on.
Once a wireless gamepad is paired, you can use it.
When a wireless speaker is paired, you can select it to
play the TV sound. When a device is paired, you do
not need to pair it again unless you remove the
device.
To pair a wireless speaker with the TV…
1 - Switch on the wireless speaker and place it within
range of the TV.
2 - Press , select All Settings and press OK.
3 - Select Wireless and Networks and
press (right) to enter the menu.
4 - Select Bluetooth > Search Bluetooth Device.
5 - Select Start and press OK. Follow the
instuctions on screen. You will pair the device with the
TV and the TV will store the connection. You might
need to unpair a paired device first if the maximum
number of paired devices was reached.
6 - Select the type of device (headphone,
subwoofer, …).
7 - Press (left) repeatedly if necessary, to close
the menu.
30
Page 31

Select a Device
Once a wireless Bluetooth speaker is paired, you can
select it to play the TV sound.
To select a speaker to play the TV sound…
1 - Press , select Speakers and press OK.
2 - Select the loudspeaker system you want.
3 - Press (left) repeatedly if necessary, to close
the menu.
Remove a Device
You can connect or disconnect a wireless Bluetooth
device. When a Bluetooth device is connected, you
can use the gamepad or hear the TV sound through
the wireless speaker. You can also remove a wireless
Bluetooth device. If you remove a Bluetooth device,
the device will be unpaired.
3 - Press (left) repeatedly if necessary, to close
the menu.
6.13
To remove or disconnect a wireless device…
1 - Press , select All Settings and press OK.
2 - Select Wireless and Networks.
3 - Select Bluetooth > Remove Device.
4 - In the list, select the wireless device.
5 - Select Disconnect or Remove.
6 - Select OK.
7 - Press (left) repeatedly if necessary, to close
the menu.
Bluetooth On or Off
To connect wireless Bluetooth devices, make sure
Bluetooth is switched on.
To switch Bluetooth on…
1 - Press , select All Settings and press OK.
2 - Select Wireless and Networks.
3 - Select Bluetooth > Bluetooth On/Off.
4 - Select On or Off.
5 - Press (left) repeatedly if necessary, to close
the menu.
Game Console
HDMI
For best quality, connect the game console with a
High speed HDMI cable to the TV.
6.12
Headphones
You can connect a set of headphones to
the connection on the back of the TV. The
connection is a mini-jack 3.5mm. You can adjust the
volume of the headphones separately.
To adjust the volume…
1 - Press , select Headphone Volume.
2 - Press the arrows (up) or (down) to adjust
the value.
Y Pb Pr
Connect the game console with a component video
cable (Y Pb Pr) and an audio L/R cable to the TV.
31
Page 32

6.14
Gamepad
Connect a Gamepad
To play games from the Internet on this TV, you can
connect a selected range of wireless Gamepads. You
can use Gamepads with a USB nano receiver or
gamepads with Bluetooth.
To connect a Gamepad with a USB nano receiver…
1 - Plug in the small nano receiver in one of the USB
connections on the side of the TV. The wireless nano
receiver comes with the Gamepad.
2 - If the Gamepad is switched on, you can use the
Gamepad.
Scart
Connect the game console to the TV with a
composite cable (CVBS) and an audio L/R cable to
the TV.
If your game console only has Video (CVBS) and
Audio L/R output, use a Video Audio L/R to SCART
adapter (sold separately) to connect to the SCART
connection.
You can connect a second Gamepad in the second
USB connection on the side of the TV.
Problems
To solve possible interference with other wireless
devices on TV…
• Use a USB extension cord and move the nano
receiver about 1 meter away from the TV.
• Alternatively, you can use a powered USB hub
connected to the TV and plug in the nano receivers in
the USB hub.
6.15
USB Hard Drive
What You Need
If you connect a USB Hard Drive, you can pause or
record digital TV broadcasts (DVB broadcasts or
similar).
Best Setting
Before you start playing a game from a connected
game console, we advice you to set the TV in the
ideal setting Game.
To set the TV to the ideal setting…
1 - Press , select All Settings and press OK.
2 - Select Picture and press (right) to enter the
menu.
3 - Select Picture Style > Game.
4 - Press (left) repeatedly if necessary, to close
the menu.
Minimum Disk Space
• To Pause
To pause a broadcast, you need a USB 2.0
compatible Hard Drive with a minimum of 4GB disk
space.
• To Record
To pause and record a broadcast, you need a
minimum of 250GB disk space.
32
Page 33
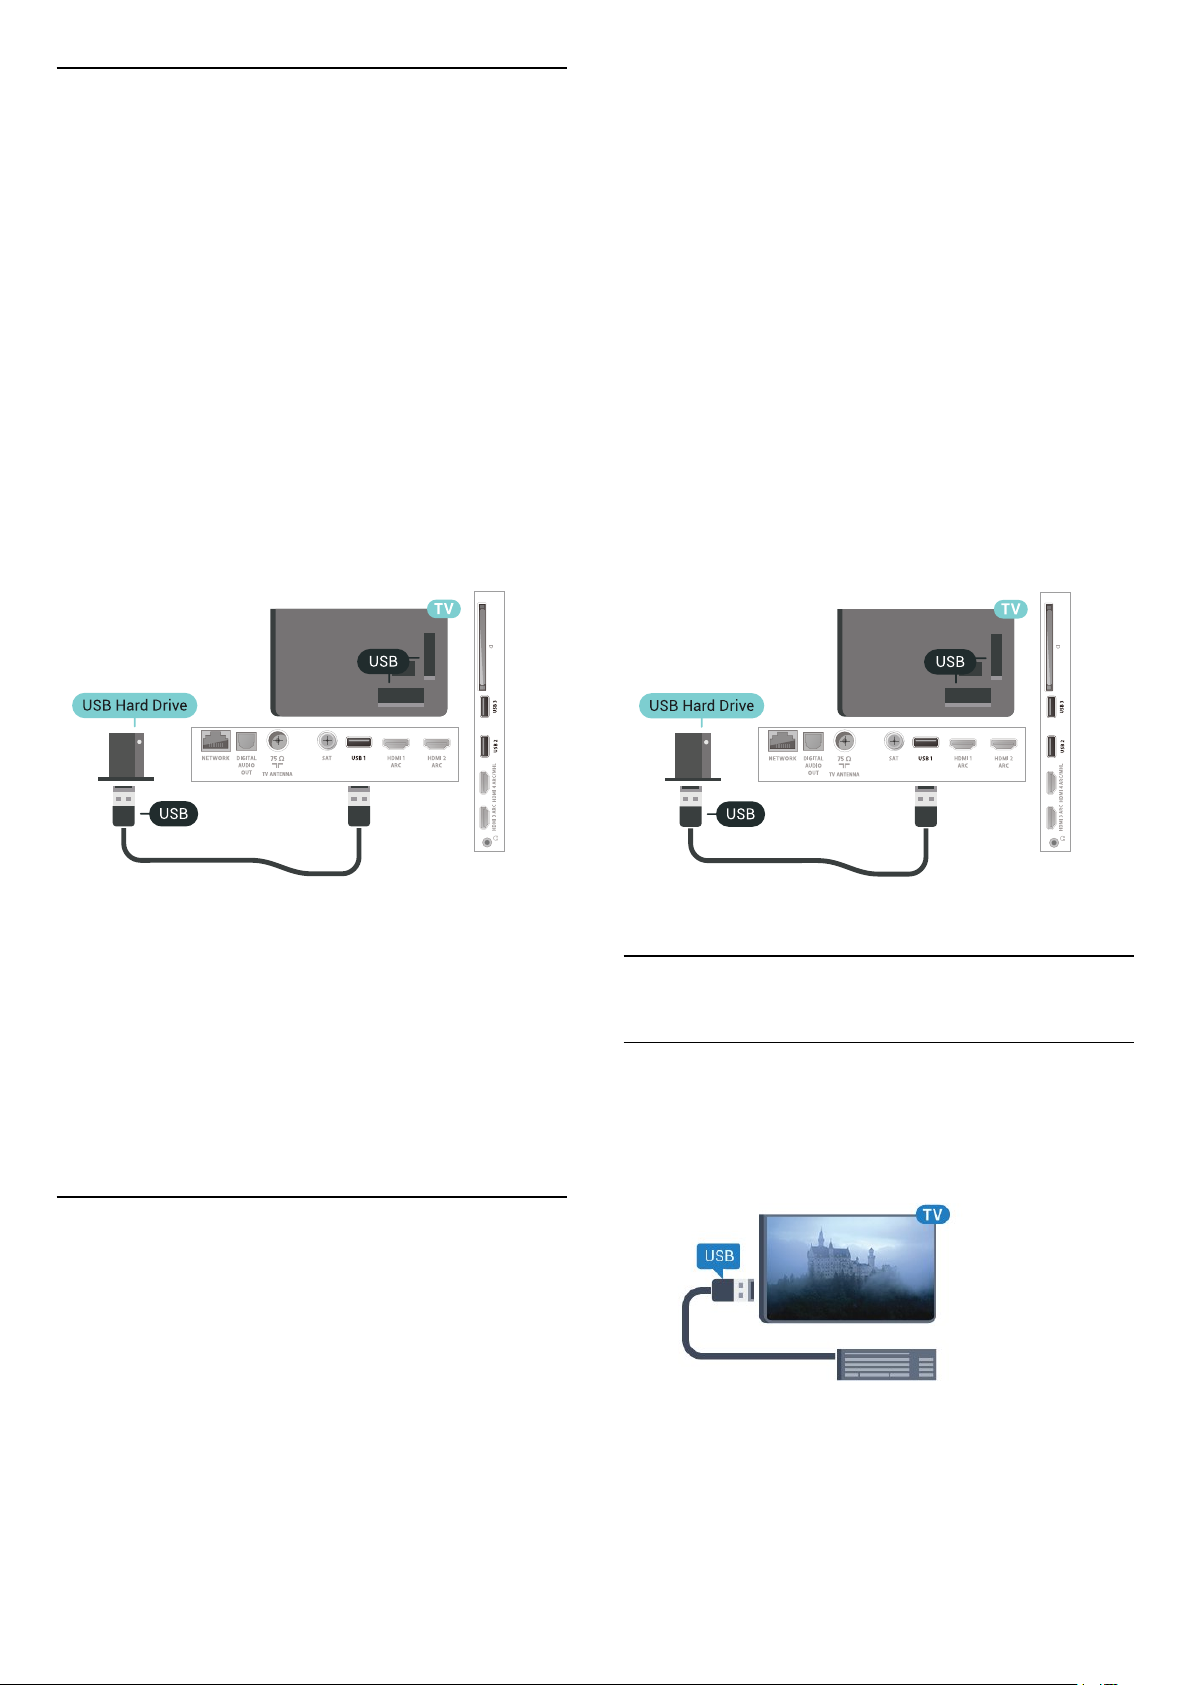
Installation
Before you can pause or record a broadcast, you
must connect and format a USB Hard Drive.
Formatting removes all files from the USB Hard Drive.
corrupt your recordings. When you format another
USB Hard Drive, the content on the former will be lost.
A USB Hard Drive installed on your TV will need
reformatting for use with a computer.
To format a USB Hard Drive…
1 - Connect the USB Hard Drive to one of
the USB connections on the TV. Do not connect
another USB device to the other USB ports when
formatting.
2 - Switch on the USB Hard Drive and the TV.
3 - When the TV is tuned to a digital TV channel,
press (Pause). Trying to pause will start the
formatting.
Follow the instructions on screen.
When the USB Hard Drive is formatted, leave it
connected permanently.
1 - Connect the USB Hard Drive to one of
the USB connections on the TV. Do not connect
another USB device to the other USB ports when
formatting.
2 - Switch on the USB Hard Drive and the TV.
3 - When the TV is tuned to a digital TV channel,
press (Pause). Trying to pause will start the
formatting. Follow the instructions on screen.
4 - The TV will ask if you want to use the USB Hard
Drive to store apps, agree to the question if you do.
5 - When the USB Hard Drive is formatted, leave it
connected permanently.
Warning
The USB Hard Drive is formatted exclusively for this
TV, you cannot use the stored recordings on another
TV or PC. Do not copy or change recording files on
the USB Hard Drive with any PC application. This will
corrupt your recordings. When you format another
USB Hard Drive, the content on the former will be lost.
A USB Hard Drive installed on your TV will need
reformatting for use with a computer.
Formatting
Before you can pause or record a broadcast, or store
apps, you must connect and format a USB Hard
Drive. Formatting removes all files from the USB Hard
Drive. If you want to record broadcasts with TV Guide
data from the Internet, you must setup the Internet
connection first before you install the USB Hard Drive.
Warning
The USB Hard Drive is formatted exclusively for this
TV, you cannot use the stored recordings on another
TV or PC. Do not copy or change recording files on
the USB Hard Drive with any PC application. This will
6.16
USB Keyboard
Connect
Connect a USB keyboard (USB-HID type) to enter text
on your TV.
Use one of the USB connections to connect.
33
Page 34

Configure
Install the keyboard
To install the USB keyboard, switch on the TV and
connect the USB keyboard to one of
the USB connections on the TV. When the TV
detects the keyboard for the first time, you can select
your keyboard lay-out and test your selection. If you
select a Cyrillic or Greek keyboard layout first, you
can select a secondary Latin keyboard layout.
To change the keyboard layout setting when a layout
was selected…
1 - Press , select All Settings and press OK.
2 - Select General Settings and press (right) to
enter the menu.
3 - Select USB Keyboard Settings to start the
keyboard setup.
Special Keys
Keys for entering text
• Enter key = OK
• Backspace = delete character before cursor
• Arrow keys = navigate within a text field
• To switch between keyboard layouts, if a secondary
layout is set, press the Ctrl + Spacebar keys
simultaneously.
Keys for apps and Internet pages
• Tab and Shift + Tab = Next and Previous
• Home = scroll to the top of the page
• End = scroll to the bottom of the page
• Page Up = jump one page up
• Page Down = jump one page down
• + = zoom in one step
• - = zoom out one step
• * = fit the web page to the screen width
6.17
USB Flash Drive
The TV detects the flash drive and opens a list
showing its content.
If the contents list does not appear automatically,
press SOURCES and select USB.
To stop watching the USB flash drive content,
press EXIT or select another activity.
To disconnect the USB flash drive, you can pull out
the flash drive anytime.
For more information on watching or playing content
from a USB flash drive, in Help,
select Keywords and look up Photos, Videos and
Music.
6.18
Photo Camera
To view photos stored on your digital photo camera,
you can connect the camera directly to the TV.
Use one of the USB connections on the TV to
connect. Switch on the camera after you made the
connection.
If the contents list does not appear automatically,
press SOURCES , and select USB.
Your camera might need to be set to transfer its
content with PTP (Picture Transfer Protocol). Read
the user manual of the digital photo camera.
You can view photos or play your music and videos
from a connected USB flash drive.
Insert a USB flash drive in one of
the USB connections on the TV while the TV is
switched on.
For more information on viewing photos, in Help,
select Keywords and look up Photos, Videos and
Music.
6.19
Camcorder
34
Page 35

HDMI
For best quality, use an HDMI cable to connect the
camcorder to the TV.
Audio Video LR / Scart
With DVI to HDMI
Alternatively, you can use a DVI to HDMI adapter
(sold separately) to connect the PC to HDMI and an
audio L/R cable (mini-jack 3.5mm) to AUDIO IN L/R
on the back of the TV.
You can use an HDMI, YPbPr or SCART connection to
connect your camcorder. If your camcorder only has
Video (CVBS) and Audio L/R output, use a Video
Audio L/R to SCART adapter (sold separately) to
connect to the SCART connection.
6.20
Computer
Connect
You can connect your computer to the TV and use
the TV as a PC monitor.
Ideal Setting
If you connect a computer, we advice you to give the
connection, on which the computer is connected, the
correct device type name in the Source menu. If you
then switch to Computer in the Source menu, the TV
is set to the ideal Computer setting automatically.
To set the TV to the ideal setting…
1 - Press , select All Settings and press OK.
2 - Select Picture and press (right) to enter the
menu.
3 - Select Advanced > Computer.
4 - Select On or Off.
5 - Press (left) repeatedly if necessary, to close
the menu.
With HDMI
Use an HDMI cable to connect the computer to the
TV.
35
Page 36

7
Connect your
Android TV
7.1
Network and Internet
Make sure Wi-Fi is switched on before you try to
make the connection…
1 - Press , select All Settings and press OK.
2 - Select Wireless and Networks and
press (right).
3 - Select Wired or Wi-Fi > Wi-Fi On/Off.
4 - If it is switched off, select On and press O.
WPS
Home Network
To enjoy the full capabilities of your Philips Android
TV, your TV must be connected to the Internet.
Connect the TV to a home network with a high-speed
Internet connection. You can connect your TV
wirelessly or wired to your network router.
Connect to Network
Wireless Connection
What You Need
To connect the TV to the Internet wirelessly, you need
a Wi-Fi router with a connection to the Internet.
Use a high-speed (broadband) connection to the
Internet.
If your router has WPS, you can directly connect to
the router without scanning for networks. If you have
devices in your wireless network that use the WEP
security encryption system, you cannot use WPS.
1 - Press , select All Settings and press OK.
2 - Select Wireless and Networks and
press (right) to enter the menu.
3 - Select Wired or Wi-Fi > Connect to Network.
4 - Select WPS.
5 - Go to the router, press the WPS button and return
to the TV within 2 minutes.
6 - Select Connect to make the connection.
7 - A message will be shown when the connection is
successful.
WPS with PIN Code
If your router has WPS with a PIN code, you can
directly connect to the router without scanning for
networks. If you have devices in your wireless
network that use the WEP security encryption system,
you cannot use WPS.
Make the Connection
Wireless
To make a wireless connection…
1 - Press , select All Settings and press OK.
2 - Select Wireless and Networks and
press (right) to enter the menu.
3 - Select Wired or Wi-Fi > Connect to Network.
4 - Select Wireless.
5 - In the list of found networks, select on your
wireless network. If your network is not in the list
because the network name is hidden (you switched
off the SSID broadcast of the router), select Add New
Network to enter the network name yourself.
6 - Depending on the type of router, enter your
encryption key - WEP, WPA or WPA2. If you entered
the encryption key for this network before, you can
select OK to make the connection immediately.
7 - A message will be shown when the connection is
successful.
Wi-Fi On/Off
1 - Press , select All Settings and press OK.
2 - Select Wireless and Networks and
press (right) to enter the menu.
3 - Select Wired or Wi-Fi > Connect to Network.
4 - Select WPS with PIN code.
5 - Write down the 8-digit PIN code shown on
screen and enter it in the router software on your PC.
Consult the router manual on where to enter the PIN
code in the router software.
6 - Select Connect to make the connection.
7 - A message will be shown when the connection is
successful.
Problems
Wireless network not found or distorted
• Microwave ovens, DECT phones or other Wi-Fi
802.11b/g/n devices in your proximity might disturb
the wireless network.
• Make sure that the firewalls in your network allow
access to the TV's wireless connection.
• If the wireless network does not work properly in
your home, try the wired network installation.
36
Page 37

Internet does not work
• If the connection to the router is OK, check the
router connection to the Internet.
The PC and Internet connection are slow
• Look in your wireless router's user manual for
information on indoor range, transfer rate and other
factors of signal quality.
• Use a high-speed (broadband) Internet connection
for your router.
DHCP
• If the connection fails, you can check the DHCP
(Dynamic Host Configuration Protocol) setting of the
router. DHCP should be switched on.
Wired Connection
Network Settings
View Network Settings
You can view all current network settings here. The IP
and MAC address, signal strength, speed, encryption
method, etc.
To view the current network settings…
1 - Press , select All Settings and press OK.
2 - Select Wireless and Networks and
press (right) to enter the menu.
3 - Select Wired or Wi-Fi > View Network Settings.
4 - Press (left) repeatedly if necessary, to close
the menu.
What You Need
To connect the TV to the Internet, you need a
network router with a connection to the
Internet. Use a high-speed (broadband) connection
to the Internet.
Make the Connection
To make a wired connection…
1 - Connect the router to the TV with a network cable
(Ethernet cable**).
2 - Make sure that the router is switched on.
3 - Press , select All Settings and press OK.
4 - Select Wireless and Networks and
press (right) to enter the menu.
5 - Select Wired or Wi-Fi > Connect to Network.
6 - Select Wired. The TV constantly searches for
the network connection.
7 - A message will be shown when the connection is
successful.
If the connection fails, you can check the DHCP
setting of the router. DHCP should be switched on.
**To fulfill EMC regulations, use a shielded FTP Cat.
5E Ethernet cable.
Network Configuration
If you are an advanced user and want to install your
network with Static IP addressing, set the TV to Static
IP.
To set the TV to Static IP…
1 - Press , select All Settings and press OK.
2 - Select Wireless and Networks and
press (right) to enter the menu.
3 - Select Wired or Wi-Fi > Network
Configuration and press OK.
4 - Select Static IP and press OK to enable Static
IP Configuration.
5 - Select Static IP Configuration and configure the
connection.
6 - You can set the number for IP
Address, Netmask, Gateway, DNS 1, or DNS 2.
7 - Press (left) repeatedly if necessary, to close
the menu.
Switch On with Wi-Fi (WoWLAN)
You can switch this TV on from your smartphone or
tablet if the TV is in Standby. The setting Switch On
with Wi-Fi (WoWLAN) must be switched on.
To switch on WoWLAN…
1 - Press , select All Settings and press OK.
2 - Select Wireless and Networks and
press (right) to enter the menu.
3 - Select Wired or Wi-Fi > Switch On with Wi-Fi
(WoWLAN).
4 - Select On.
5 - Press (left) repeatedly if necessary, to close
the menu.
37
Page 38

Switch on Wi-Fi connection
You can switch on or off Wi-Fi connection on your
TV.
To switch on Wi-Fi…
1 - Press , select All Settings and press OK.
2 - Select Wireless and Networks and
press (right) to enter the menu.
3 - Select Wired or Wi-Fi > Wi-Fi On/Off.
4 - Select On.
5 - Press (left) repeatedly if necessary, to close
the menu.
4 - Enter the name with the remote control
keyboard.
5 - To finish, select .
6 - Press (left) repeatedly if necessary, to close
the menu.
Clear Internet Memory
With Clear Internet Memory you clear your Philips
server registration and parental rating settings, your
video store app logins, all Philips App Gallery
favourites, Internet bookmarks and history. Interactive
MHEG applications can also save so-called 'cookies',
on your TV. These files will also be cleared.
Digital Media Renderer - DMR
If your media files do not play on your TV, make sure
that the Digitial Media Renderer is switched on. As a
factory setting, DMR is switched on.
To switch on DMR…
1 - Press , select All Settings and press OK.
2 - Select Wireless and Networks and
press (right) to enter the menu.
3 - Select Wired or Wi-Fi > Digital Media Renderer
- DMR.
4 - Select On.
5 - Press (left) repeatedly if necessary, to close
the menu.
Wi-Fi Smart Screen
To watch digital TV channels on your smartphone or
tablet with the Philips TV Remote App, you must
switch on Wi-Fi Smart Screen. Some scrambled
channels might not be available on your mobile
device.
To clear the Internet memory…
1 - Press , select All Settings and press OK.
2 - Select Wireless and Networks and
press (right) to enter the menu.
3 - Select Wired or Wi-Fi > Clear Internet Memory.
4 - Select OK to confirm.
5 - Press (left) repeatedly if necessary, to close
the menu.
File Sharing
The TV can connect to other devices in your wireless
network, like your computer or smartphone. You can
use a computer with Microsoft Windows or Apple OS
X.
On this TV, you can open photos, music and videos
stored on your computer. Use any recent DLNA
certified media server software.
7.2
To switch on Wi-Fi Smart Screen…
1 - Press , select All Settings and press OK.
2 - Select Wireless and Networks and
press (right) to enter the menu.
3 - Select Wired or Wi-Fi > Wi-Fi Smart Screen.
4 - Select On.
5 - Press (left) repeatedly if necessary, to close
the menu.
TV Network Name
If you have more than one TV in your home network,
you can give the TV a unique name.
To change the TV name…
1 - Press , select All Settings and press OK.
2 - Select Wireless and Networks and
press (right) to enter the menu.
3 - Select Wired or Wi-Fi > TV Network Name.
Google Account
Sign In
To enjoy the full capabilities of your Philips Android
TV, you can sign in to Google with your Google
Account.
By signing in you'll be able to play your favourite
games across phone, tablet and TV. You'll also get
customised video and music recommendations on
your TV home screen as well as access to YouTube,
Google Play and other apps.
Sign In
Use your existing Google Account to sign in to
Google on your TV. A Google Account consists of an
email address and a password. If you don't have an
Google Account yet, use your computer or tablet to
create one (accounts.google.com). To play games
with Google Play, you need a Google+ profile. If you
38
Page 39

did not sign in during the first TV installation, you can
always sign in later.
To sign in after you did the TV installation…
1 - Press , select All Settings and press OK.
2 - Select Android Settings and press OK.
3 - Press (down) and select Personal > Add
account and press OK.
4 - Press OK on SIGN IN.
5 - With the remote control keyboard, enter your
email address and press the small OK key at the
right of the keyboard.
6 - Enter your password and press the same
small OK key to sign in.
7 - Press (left) repeatedly if necessary, to close
the menu.
If you want to sign in with another Google Account,
first sign out and sign in with the other account.
Android Settings
You can set or view several Android specific settings
or information. You can find the list of apps installed
on your TV and the storage space they need. You can
set the language you like to use with Voice
Search. You can configure the onscreen keyboard or
allow apps to use your location. Explore the different
Android settings. You can go
to www.support.google.com/androidtv for more
information on these settings.
To open these settings…
1 - Press , select All Settings and press OK.
2 - Select Android Settings.
3 - Explore the different Android settings.
4 - Press BACK if necessary, to close the menu.
Collection > App Gallery and press OK.
3 - Select an app icon and press OK.
4 - Select Install and press OK.
Terms of Use
To install and use the Philips App Gallery apps, you
must agree to the Terms of Use. If you did not agree
to these terms during the first TV installation, you can
always agree to them later. The moment you agree to
the Terms of Use, some apps will be available
immediately and you can browse the Philips App
Gallery to install other apps.
To agree on the Terms of Use after you did the TV
installation…
1 - Press HOME and select Philips
Collection > App Gallery and press OK to open
the App Gallery.
2 - You can select Terms of Use, then press OK to
read.
3 - Select Accept and press OK. You cannot undo
this approval.
4 - Press BACK to close the menu.
Privacy Settings
You can set some privacy settings for the Philips App
Gallery apps.
• You can allow technical statistics to be send to
Philips.
• You can allow personal recommendations.
• You can allow cookies.
• You can switch on the Child Lock for 18+ rated apps.
To set the Philips App Gallery privacy settings…
7.3
Philips App Gallery
Philips Apps
Connect the TV to the Internet to enjoy apps selected
by Philips. The Philips App Gallery apps are made
specially for TV. Downloading and installing App
Gallery apps is free of charge.
The Philips App Gallery collection of apps can differ
per country or region.
Some App Gallery apps are pre-installed on your TV.
To install other apps from the App Gallery, you will be
asked to agree to the Terms of Use. You can set the
Privacy Settings according to your preference.
To install an app from the App Gallery…
1 - Press HOME.
2 - Scroll down and select Philips
1 - Press HOME and select Philips
Collection > App Gallery and press OK to open
the App Gallery.
2 - You can select Privacy Policy, then press OK.
3 - Select each setting and press OK to allow or
disallow. You can read about each setting in detail.
4 - Press BACK to close the menu.
7.4
Android Settings
You can set or view several Android specific settings
or information. You can find the list of apps installed
on your TV and the storage space they need. You can
set the language you like to use with Voice
Search. You can configure the onscreen keyboard or
allow apps to use your location. Explore the different
Android settings. You can go
to www.support.google.com/androidtv for more
39
Page 40

information on these settings.
To open these settings…
1 - Press , select All Settings and press OK.
2 - Select Android Settings.
3 - Explore the different Android settings.
4 - Press BACK if necessary, to close the menu.
7.5
Open the Home Menu
To open the Home menu and open an item…
1 - Press HOME.
2 - Select an item and press OK to open or start it.
3 - Press BACK to close the Home menu
without starting anything.
Home Menu
About the Home Menu
To enjoy the benefits of your Android TV, connect the
TV to the Internet.
Like on your Android smartphone or tablet, the Home
menu is the centre of your TV. From the Home menu
you can start any application, switch to a TV channel,
rent a movie, open a website or switch to a
connected device. Depending on your TV setup and
your country the Home menu can contain different
items.
The Home menu is organised in rows…
Recommendations
The first row suggests popular videos, music videos or
Internet hits. You can set the Privacy settings in Terms
of Use to allow suggestions based on your personal
viewing habits.
Philips Collection
This row contains suggestions from Apps.
Apps
The row of Apps contain all Apps that come with the
TV and the Apps you download from the Google Play
store yourself. In this row you will also find the Apps
for TV, like Watch TV, Sources, Media and others.
Apps you started recently will appear in front of the
row.
Games
From here, you can start a game on TV. If you
download a game, it will appear in this row.
Search and Voice Search
You can search for videos, music or anything else on
the Internet with the icon in the Home menu. You
can use the speak out or type what you are looking
for.
Restricted Profile
You can restrict the use of certain apps by switching
the TV to a restricted profile. This restricted profile will
only allow the use of apps which you have selected.
You can only switch out of this profile with a PIN
code.
With the TV switched to a restricted profile you
cannot…
• Find or open apps which are marked as Not allowed
• Access the Google Play Store
• Purchase through Google Play Movies & TV, nor
Google Play Games
• Use third-party apps that don't use the Google signin
With the TV switched to a restricted profile you can…
• Watch content already rented or purchased from
Google Play Movies & TV
• Play games already purchased and installed from
Google Play Games
• Access the following settings: Wi-Fi network, Speech
and Accessibility
• Add Bluetooth accessories
The Google Account on TV will stay logged in. Using a
restricted profile doesn't change the Google Account.
Settings
From here, you can open a selection of settings.
However, to find all settings, press and select All
Settings. You can also open Help here.
See also www.support.google.com/androidtv
40
Page 41

8
Apps
repeatedly or press EXIT.
Some Google Play products and features aren't
available in all countries.
8.1
About Apps
You can find all installed apps in
the Apps section of the Home menu.
Like apps on your smartphone or tablet, the apps on
your TV offer specific functions for an enriched TV
experience. Apps like YouTube, games, video stores
or weather forecasts (a.o.). You can use the Internet
app to surf the Internet.
Apps can come from the Philips App Gallery or
the Google Play™ Store . To get you started, some
practical apps are pre-installed on your TV.
To install apps from the Philips App Gallery or the
Google Play Store, the TV must be connected to the
Internet. You must agree to the Terms of Use to use
apps from the App Gallery. You must sign in with a
Google Account to use the Google Play apps and
Google Play Store.
8.2
Google Play
Movies and TV
With Google Play Movies & TV, you can rent or buy
movies and TV shows to watch on TV.
What You Need
• your TV must be connected with the Internet
• you must sign in with your Google Account on TV
• add a credit card to your Google Account to
purchase movies and TV shows
To rent or buy a movie or TV show…
1 - Press HOME.
2 - Scroll down and select Apps > Google Play
Movies & TV and press OK.
3 - Select a movie or TV show and press OK.
4 - Select the purchase you want and press OK. You
will be taken through the purchase procedure.
To watch a rented or bought movie or TV show…
1 - Press HOME.
2 - Scroll down and select Apps > Google Play
Movies & TV and press OK.
3 - Select the movie or TV show from your library in
the app, select the titel and press OK.
4 - You can use
the (stop), (pause), (rewind) or (fast
forward) keys on the remote control.
5 - To stop the Movies & TV app, press BACK
Find more information on
support.google.com/androidtv
Music
With Google Play Music, you can play your favourite
music on TV.
With Google Play Music you can buy new music on
your computer or mobile device. Or, on your TV, you
can sign up for All Access, the Google Play Music
subscription. Alternatively, you can play the music
you already own, stored on your computer.
What You Need
• your TV must be connected with the Internet
• you must sign in with your Google Account on TV
• add a credit card to your Google Account to take a
music subscription
To start Google Play Music…
1 - Press HOME.
2 - Scroll down and select Apps > Google Play
Music and press OK.
3 - Select the music you want and press OK.
4 - To stop the Music app, press BACK
repeatedly or press EXIT.
Some Google Play products and features aren't
available in all countries.
Find more information on
support.google.com/androidtv
Games
With Google Play Games, you can play games on TV.
Online or offline.
You can see what your friends are playing currently or
you can join the game and compete. You can track
your achievements or start wherever you left off.
What You Need
• your TV must be connected with the Internet
• you must sign in with your Google Account on TV
• add a credit card to your Google Account to
purchase new games
Start the Google Play Games app to select and install
new game apps on your TV. Some games are free of
charge. A message appears if a particular game needs
a gamepad to play the game.
To start or stop a Google Play Game…
1 - Press HOME.
2 - Scroll down and select Apps > Google Play
41
Page 42

Games and press OK.
3 - Select a game to play or select a new game to
install and press OK.
4 - When done, press BACK repeatedly or
press EXIT or stop the app with its dedicated
exit/stop button.
The games you install will also appear in the row of
Games in the Home menu
Some Google Play products and features aren't
available in all countries.
Find more information on
support.google.com/androidtv
Google Play Store
Payments
To make a payment on Google Play on TV, you must
add a form of payment - a credit card (outside the
United States) - to your Google Account. When you
purchase a movie or TV show, you will be charged on
this credit card.
To add a credit card …
1 - On your computer, go to accounts.google.com
and sign in with the Google Account you will use with
Google Play on TV.
2 - Go to wallet.google.com to add a card to your
Google Account.
3 - Enter your credit card data and accept the terms
and conditions.
From the Google Play Store you can download and
install new apps. Some apps are free of charge.
What You Need
• your TV must be connected with the Internet
• you must sign in with your Google Account on TV
• add a credit card to your Google Account to
purchase apps
To install a new app…
1 - Press HOME.
2 - Scroll down and select Apps > Google Play
Store and press OK.
3 - Select the app you want to install and press OK.
4 - To close the Google Play Store, press BACK
repeatedly or press EXIT.
Parental controls
In the Google Play Store, you can hide apps
according to users/buyers maturity. You need to enter
a PIN code to select or change the level of maturity.
To set the parental control…
1 - Press HOME.
2 - Scroll down and select Apps > Google Play
Store and press OK.
3 - Select Settings > Parental controls.
4 - Select the level of maturity you want.
5 - On request, enter the PIN code.
6 - To close the Google Play Store, press BACK
repeatedly or press EXIT.
Some Google Play products and features aren't
available in all countries.
Find more information
on support.google.com/androidtv
8.3
Start or Stop an App
You can start an app from the Home menu.
To start an app…
1 - Press HOME.
2 - Scroll down to Apps and select the app you
want and press OK.
3 - To stop an app, press BACK or press EXIT
or stop the app with its dedicated exit/stop button.
8.4
Lock Apps
About App Locks
You can lock apps unsuited for children. You can lock
18+ rated apps from the App Gallery or set up a
restricted profile in the Home menu.
18+
The 18+ app lock will ask for a PIN code when you try
to start an 18+ rated app. This lock is only valid for 18+
rated apps from the Philips App Gallery.
Restricted profile
You can set up a restructed profile for the Home
menu where only the apps you allow are available.
You need to enter a PIN code to set up and switch on
the restricted profile.
Google Play Store - Maturity
In the Google Play Store, you can hide apps
according to users/buyers maturity. You need to enter
a PIN code to select or change the level of maturity.
The level of maturity will determine which apps are
available for instalation.
42
Page 43

For more information, in Help, select Keywords and
look up Google Play Store for more information.
Lock 18+ rated apps
You can lock 18+ rated apps from the Philips App
Gallery. This setting controls the 18+ setting in the
Philips App Gallery Privacy Settings.
To lock 18+ rated apps…
7 - Select Allowed apps and press OK.
8 - In the list of available apps, select an app and
press OK to allow or not allow this app.
9 - Press BACK to go back one step or
press EXIT to close the menu.
Now you can enter the restricted profile.
With the PIN code, you can always change the PIN
code or edit the list of allowed or not allowed apps.
1 - Press , select All Settings and press OK.
2 - Select Child Lock, select App Lock.
3 - Select On.
4 - Press (left) repeatedly if necessary, to close
the menu.
Restricted Profile
About Restricted Profile
You can restrict the use of certain apps by switching
the TV to a restricted profile. The Home menu will
only show the apps you allowed. You need a PIN
code to switch out of the restricted profile.
With the TV switched to a restricted profile you
cannot…
• Find or open apps which are marked as Not allowed
• Access the Google Play Store
• Purchase through Google Play Movies & TV, nor
Google Play Games
• Use third-party apps that don't use the Google signin
With the TV switched to a restricted profile you can…
• Watch content already rented or purchased from
Google Play Movies & TV
• Play games already purchased and installed from
Google Play Games
• Access the following settings: Wi-Fi network, Speech
and Accessibility
• Add Bluetooth accessories
The Google Account on TV will stay logged in. Using a
restricted profile doesn't change the Google Account.
Set Up
To set up the restricted profile…
1 - Press , select All Settings and press OK.
2 - Select Android Settings and press OK.
3 - Press (down) and
select Personal > Security & restrictions and
press OK.
4 - Select Restricted Profile and press OK.
5 - Select Settings and press OK.
6 - Enter a PIN code with the remote control.
Enter
To enter (switch to) the restricted profile…
1 - Press , select All Settings and press OK.
2 - Select Android Settings and press OK.
3 - Press (down) and
select Personal > Security & restrictions and
press OK.
4 - Select Enter restricted profile and press OK.
5 - Enter a PIN code with the remote control.
6 - Press BACK to go back one step or
press EXIT to close the menu.
You can see when a restricted profile is entered if an
icon appears in the Home screen. Scroll down
to Settings and scroll to the far right.
Exit
To exit the restricted profile…
1 - Press HOME, scroll down
to Settings and scroll far right.
2 - Select Restricted Profile and press OK.
3 - Select Exit restricted profile and press OK.
4 - Enter the PIN code. The TV will exit the restricted
profile.
8.5
Manage Apps
If you stop an app and return to the Home menu, the
app is not really stopped. The app is still running in
the background to be readily available when you start
it again. To run fluently, most apps need to save some
data in the cache memory of the TV. It might be good
to stop an app completely or clear the cache data of
a particular app to optimise the overall performance
of apps and to keep memory usage low on your
Android TV. Also, it is best to uninstall apps that you
are not using anymore.
To open the list of downloaded and system apps…
1 - Press , select All Settings and press OK.
2 - Select Android Settings and press OK.
3 - Select Device > Apps and press OK.
4 - Select an app and press OK. If the app is still
43
Page 44

running, you can force it to stop or you can clear the
cache data. You can uninstall apps you downloaded.
5 - Press BACK to go back one step or
press EXIT to close the menu.
If you are using a USB Hard Drive to store apps, you
can move the app from the USB Hard Drive to the TV
memory or vice versa.
8.6
Storage
You can see how much storage space - the internal
TV memory - you are using for your apps, videos,
music, etc. You can see how much free space you still
have available for installing new apps. Check your
storage if apps start to run slow or in case of app
trouble.
To see how much storage you are using…
1 - Press , select All Settings and press OK.
2 - Select Android Settings and press OK.
3 - Select Device > Storage & reset and
press OK.
4 - View the storage usage of the TV memory.
5 - Press BACK to go back one step or
press EXIT to close the menu.
USB Hard Drive
If you connect a USB Hard Drive, you can use the
drive to extent the TV memory to store more apps.
The TV will try to store new apps on the USB Hard
Drive first. Some apps do not allow to be stored on a
USB Hard Drive.
44
Page 45

9
Internet
9.1
Start Internet
You can browse the Internet on your TV. You can
view any Internet website but most of them are not
prepared for a TV screen.
• Some plug-ins (e.g. to view pages or videos) are not
available on your TV.
• You cannot send or download files.
• Internet pages are shown one page at a time and
full screen.
To start the Internet browser…
1 - Press HOME.
2 - Scroll down and
select Apps > Internet and press OK.
3 - Enter an Internet address and select ,
press OK.
4 - To close Internet, press HOME or
EXIT.
9.2
Options on Internet
Some extras are available for the Internet.
To open the extras…
1 - With the website open, press OPTIONS.
2 - Select one of the items and press OK.
3 - Press (left) repeatedly if necessary, to close
the menu.
Enter Address
To enter a new Internet address.
Show Favourites
To view the pages you marked as favourites.
Reload Page
To load the Internet page again.
Zoom Page
Use the slider bar to set the zoom percentage.
Security Info
To view the security level of the current page.
Mark as Favourite
To mark the current page as a favourite.
Subtitles
To select subtitles if available.
45
Page 46

10
TV Menu
10.1
About TV Menu
If the TV cannot be connected with the Internet, you
can use the TV Menu as your Home menu.
In the TV Menu, you will find every TV function.
10.2
Open TV Menu
To open TV Menu and open an item…
1 - Press to open TV Menu.
2 - Select an item and press OK to open or start it.
3 - Press BACK to close TV Menu without
starting anything.
46
Page 47

11
11.3
Sources
11.1
Switch to a device
From the list of Sources, you can switch to any of the
connected devices. You can switch to a tuner to
watch TV, open the content of a connected USB Flash
Drive or see the recordings you made on a connected
USB Hard Drive. You can switch to your connected
devices to watch their programme, a digital receiver or
a Blu-ray Disc player.
To switch to a connected device…
1 - Press SOURCES to open the Sources menu.
2 - Select one of the item in the source list and
press OK. The TV will show the programme or
content of the device.
3 - Press SOURCES again to close the menu.
One Touch Play
With the TV in standby, you can switch on a disc
player with your TV remote control.
To switch on both disc player and TV from standby
and start playing the disc immediately,
press (play) on the TV remote control. The device
must be connected with an HDMI cable and both TV
and device must have HDMI CEC switched on.
Device Name and Type
When you connect a new device to the TV and the TV
detects the device, you can assign an icon that fits the
device type. If you connect a device with an HDMI
cable and HDMI CEC, the TV detects the device type
automatically and the device gets an appropriate
icon.
The device type determines picture and sound styles,
resolution values, specific settings or the position
within the Sources menu. You don't have to worry
about the ideal settings.
Rename or Change Type
You can always change the name or change the type
of a connected device. Look for the icon at the
right of the device name in the Sources menu. Some
TV input sources do not allow a name change.
To change the device type…
1 - Select the device in the Sources menu.
2 - Press OPTIONS.
3 - Press BACK to hide the onscreen keyboard.
4 - Press (down) to find all available device
types. Select the type you want and press OK.
5 - If you want to reset the type of the device to the
original connector type, select Reset and press OK.
6 - Select Close and press OK to close this menu.
11.2
Options for a TV Input
Some TV input devices offer specific settings.
To set the options for a specific TV input…
1 - Press SOURCES.
2 - Select the TV input in the list and press OK.
3 - Press OPTIONS. You can set the options for
the selected TV input here.
4 - Press OPTIONS again to close the Options
menu.
Possible options…
Controls
With this option you can operate the connected
device with the TV remote control. The device must
be connected with an HDMI cable and both TV and
device must have HDMI CEC switched on.
Device Info
Open this option to view information on the
connected device.
To change the device name…
1 - Select the device in the Sources menu.
2 - Press OPTIONS.
3 - Press BACK to hide the on-screen keyboard.
4 - Use the keyboard on the back of the remote
control to delete the current name and enter a new
one.
5 - If you want to reset the name of the device to the
original connector name, select Reset and
press OK.
6 - Select Close and press OK to close this menu.
11.4
Computer
If you connect a computer, we advice you to give the
connection, on which the computer is connected, the
correct device type name in the Source menu. If you
then switch to Computer in the Source menu, the TV
is set to the ideal Computer setting automatically.
To set the TV to the ideal setting…
1 - Press , select All Settings and press OK.
2 - Select Picture and press (right) to enter the
menu.
3 - Select Advanced > Computer.
47
Page 48

4 - Select On or Off.
5 - Press (left) repeatedly if necessary, to close
the menu.
48
Page 49

12
Customise a Style
Settings
12.1
Frequent Settings
The most frequently used settings are bundled in
the Frequent Settings menu.
To open the menu…
1 - Press .
2 - Select the setting you want to adjust and
press OK.
3 - Press BACK, if you do not want to change
anything.
12.2
Picture
Picture Style
Select a Style
For easy picture adjustment, you can select a preset
Picture Style.
Any picture setting you adjust, like Colour or Contrast,
is stored in the currently selected Picture Style. It
allows you to customise each style.
Only the style Personal can save its settings for
each source in the Sources menu.
Restore a Style
With a Picture Style selected, you can adjust any
picture setting in All Settings > Picture…
The selected style will store the changes you made.
We recommend to adjust the picture settings for the
style Personal only. The Picture Style - Personal can
save its settings for each individual source in Sources
menu.
To restore the style to its original setting…
1 - While watching a TV channel, press .
2 - Select Picture Style, and select the Picture Style
you want to restore.
3 - Select Restore Style, and press OK. The style is
restored.
4 - Press (left) repeatedly if necessary, to close
the menu.
1 - While watching a TV channel, press .
2 - Select Picture Style, and select one of the styles
in the list.
3 - Press (left) repeatedly if necessary, to close
the menu.
The available styles are…
• Personal - The picture preferences you set during
the first start up.
• Vivid - Ideal for daylight viewing
• Natural - Natural picture settings
• Standard - Most energy conscious setting - Factory
setting
• Movie - Ideal for watching movies
• Photo - Ideal for viewing photos
• Game - Ideal for gaming
• ISF Day - For ISF Calibration
• ISF Night - For ISF Calibration
The styles for HDR content are...
• HDR Personal
• HDR Vivid
• HDR Natural
• HDR Standard
• HDR Movie
• HDR Photo
• ISF Day
• ISF Night
• HDR Game
Home or Shop
If the Picture Style is switched back to Vivid every
time you switch on the TV, the TV location is set
to Shop. A setting meant for in-store promotion.
To set the TV for Home use…
1 - Press , select All Settings and press OK.
2 - Select General Settings and press (right) to
enter the menu.
3 - Select Location > Home.
4 - Press (left) repeatedly if necessary, to close
the menu.
Picture Settings
Colour
With Colour, you can adjust the colour saturation of
the picture.
To adjust the colour…
1 - Press , select All Settings and press OK.
2 - Select Picture and press (right) to enter the
menu.
3 - Select Colour and press (right) .
4 - Press the arrows (up) or (down) to adjust
the value.
5 - Press (left) repeatedly if necessary, to close
the menu.
49
Page 50

Contrast
With Contrast, you can adjust the contrast of the
picture.
To adjust the contrast…
1 - Press , select All Settings and press OK.
2 - Select Picture and press (right) to enter the
menu.
3 - Select Contrast and press (right).
4 - Press the arrows (up) or (down) to adjust
the value.
5 - Press (left) repeatedly if necessary, to close
the menu.
2 - Select Picture and press (right) to enter the
menu.
3 - Select Advanced > Computer.
4 - Select On or Off.
5 - Press (left) repeatedly if necessary, to close
the menu.
Colour Settings
Colour Enhancement
With Colour Enhancement, you can enhance the
colour intensity and the details in bright colours.
To adjust the level…
Sharpness
With Sharpness, you can adjust the level of
sharpness in fine detail of the picture.
To adjust the sharpness…
1 - Press , select All Settings and press OK.
2 - Select Picture and press (right) to enter the
menu.
3 - Select Sharpness and press (right).
4 - Press the arrows (up) or (down) to adjust
the value.
5 - Press (left) repeatedly if necessary, to close
the menu.
Brightness
With Brightness, you can set the level of brightness
of the picture signal.
To adjust the sharpness…
1 - Press , select All Settings and press OK.
2 - Select Picture and press (right) to enter the
menu.
3 - Select Brightness and press (right).
4 - Press the arrows (up) or (down) to adjust
the value.
5 - Press (left) repeatedly if necessary, to close
the menu.
1 - Press , select All Settings and press OK.
2 - Select Picture and press (right) to enter the
menu.
3 - Select Advanced > Colour > Colour
Enhancement.
4 - Select Maximum, Medium, Minimum or Off.
5 - Press (left) repeatedly if necessary, to close
the menu.
Colour Temperature
With Colour Temperature, you can set the picture to
a preset colour temperature or select Custom to set
a temperature setting yourself with Custom Colour
Temperature. Colour Temperature and Custom
Colour Temperature are settings intended for expert
users.
To select a preset…
1 - Press , select All Settings and press OK.
2 - Select Picture and press (right) to enter the
menu.
3 - Select Advanced > Colour > Colour
Temperature.
4 - Select Normal, Warm or Cool. Or
select Custom if you want to customise a colour
temperature yourself.
5 - Press (left) repeatedly if necessary, to close
the menu.
Advanced Picture Settings
Computer
If you connect a computer, we advice you to give the
connection, on which the computer is connected, the
correct device type name in the Source menu. If you
then switch to Computer in the Source menu, the TV
is set to the ideal Computer setting automatically.
To set the TV to the ideal setting…
1 - Press , select All Settings and press OK.
Custom Colour Temperature
With Custom Colour Temperature, you can set a
colour temperature yourself. To set a custom colour
temperature, first select Custom in the Colour
Temperature menu. Custom Colour Temperature is a
setting intended for expert users.
To set a custom colour temperature…
1 - Press , select All Settings and press OK.
2 - Select Picture and press (right) to enter the
menu.
50
Page 51

3 - Select Advanced > Colour > Custom Colour
Temperature.
4 - Press the arrows (up) or (down) to adjust
the value. WP is white point and BL is black
level. You can also select one of the presets in this
menu.
5 - Press (left) repeatedly if necessary, to close
the menu.
3 - Select Advanced > Colour > Colour control.
4 - Select Saturation, and press (right).
5 - Press the arrows (up) or (down) to adjust
the value.
6 - Press (left) repeatedly if necessary, to close
the menu.
Reset All
Colour Control Settings
ISF Colour Control
With ISF Colour Control, an ISF expert can calibrate
the colour reproduction of the TV. Colour Control is
an ISF expert setting.
Get the most out of your TV display with ISF®
Calibration. Ask a ISF calibration expert to come to
your home and set the TV to the most optimal picture
setting. Additionally the expert can set an ISF
Calibration for Ambilight.
Ask your dealer for an ISF Calibration.
Calibration benefits are…
• better picture clarity and sharpness
• better detail in bright and dark parts
• deeper and darker blacks
• better colour purity and quality
• reduced energy consumption
The ISF Calibration expert stores and locks the ISF
settings as 2 picture styles.
When the ISF Calibration is done, press and
select Picture Style and select ISF Day or ISF
Night. Select ISF Day to watch TV during bright light
conditions or select ISF Night when it's dark.
With Reset All, you can reset all value to default.
To reset all value in Colour Control menu…
1 - Press , select All Settings and press OK.
2 - Select Picture and press (right) to enter the
menu.
3 - Select Advanced > Colour > Colour control.
4 - Select Reset All.
5 - Press (left) repeatedly if necessary, to close
the menu.
ISF RGB Only Mode
RGB Only Mode is an ISF expert setting to switch to
RGB colours. To adjust values in RGB Only
Mode menu, first set ISF Day or ISF Night in the
Picture Style menu.
To adjust RGB Only Mode value…
1 - Press , select All Settings and press OK.
2 - Select Picture and press (right) to enter the
menu.
3 - Select Advanced > Colour > RGB Only Mode.
4 - Select Red, Green, Blue, or Off to turn off
RGB mode.
5 - Press (left) repeatedly if necessary, to close
the menu.
Hue
To adjust Hue value…
1 - Press , select All Settings and press OK.
2 - Select Picture and press (right) to enter the
menu.
3 - Select Advanced > Colour > Colour control.
4 - Select Hue, and press (right).
5 - Press the arrows (up) or (down) to adjust
the value.
6 - Press (left) repeatedly if necessary, to close
the menu.
Saturation
To adjust Saturation value…
1 - Press , select All Settings and press OK.
2 - Select Picture and press (right) to enter the
menu.
Contrast Settings
Contrast Modes
With Contrast Mode, you can set the level at which
power consumption can be reduced by dimming the
intensity of the screen. Choose for the best power
consumption or for the picture with the best intensity.
To adjust the level…
1 - Press , select All Settings and press OK.
2 - Select Picture and press (right) to enter the
menu.
3 - Select Advanced > Contrast > Contrast Mode.
4 - Select Standard, Best Power, Best Picture,
or Off.
5 - Press (left) repeatedly if necessary, to close
the menu.
51
Page 52

Dynamic Contrast
With Dynamic Contrast, you can set the level at
which the TV automatically enhances the details in
the dark, middle and light areas of the picture.
4 - Press the arrows (up) or (down) to adjust
the value.
5 - Press (left) repeatedly if necessary, to close
the menu.
To adjust the level…
1 - Press , select All Settings and press OK.
2 - Select Picture and press (right) to enter the
menu.
3 - Select Advanced > Contrast > Dynamic
Contrast.
4 - Select Maximum, Medium, Minimum or Off.
5 - Press (left) repeatedly if necessary, to close
the menu.
Video Contrast
With Video Contrast, you can decrease the range of
the video contrast.
To adjust the level…
1 - Press , select All Settings and press OK.
2 - Select Picture and press (right) to enter the
menu.
3 - Select Advanced > Contrast > Video Contrast.
4 - Press the arrows (up) or (down) to adjust
the value.
5 - Press (left) repeatedly if necessary, to close
the menu.
Light Sensor
The Light Sensor adjusts the picture settings
automatically to the lighting conditions of the room.
You can switch Light Sensor on or off.
Sharpness Settings
Ultra Resolution
With Ultra Resolution, you switch on a superior
sharpness in line edges and contours.
To switch on or off…
1 - Press , select All Settings and press OK.
2 - Select Picture and press (right) to enter the
menu.
3 - Select Advanced > Sharpness > Ultra
Resolution.
4 - Select On or Off.
5 - Press (left) repeatedly if necessary, to close
the menu.
Noise Reduction
With Noise Reduction, you can filter out and reduce
the level of image noise.
To adjust the noise reduction…
1 - Press , select All Settings and press OK.
2 - Select Picture and press (right) to enter the
menu.
3 - Select Advanced > Sharpness > Noise
Reduction.
4 - Select Maximum, Medium, Minimum or Off.
5 - Press (left) repeatedly if necessary, to close
the menu.
To switch on or off…
1 - Press , select All Settings and press OK.
2 - Select Picture and press (right) to enter the
menu.
3 - Select Advanced > Contrast > Light Sensor.
4 - Select On or Off.
5 - Press (left) repeatedly if necessary, to close
the menu.
Gamma
With Gamma, you can set a non-linear setting for
picture luminance and contrast. Gamma is a setting
intended for expert users.
To adjust the level…
1 - Press , select All Settings and press OK.
2 - Select Picture and press (right) to enter the
menu.
3 - Select Advanced > Contrast > Gamma.
MPEG Artefact Reduction
With MPEG Artefact Reduction, you can smoothen
the digital transitions in the picture. MPEG artefacts
are mostly visible as small blocks or jagged edges in
images.
To reduce the MPEG artefacts…
1 - Press , select All Settings and press OK.
2 - Select Picture and press (right) to enter the
menu.
3 - Select Advanced > Sharpness > MPEG
Artefact Reduction.
4 - Select Maximum, Medium, Minimum or Off.
5 - Press (left) repeatedly if necessary, to close
the menu.
52
Page 53

Motion Settings
Advanced
Perfect Natural Motion
With Perfect Natural Motion, you can reduce the
motion judder, visible in movies on TV. Perfect Natural
Motion makes any movement smooth and fluent.
To adjust the motion judder…
1 - Press , select All Settings and press OK.
2 - Select Picture and press (right) to enter the
menu.
3 - Select Advanced > Motion > Perfect Natural
Motion.
4 - Select Maximum, Medium, Minimum or Off.
5 - Press (left) repeatedly if necessary, to close
the menu.
Clear LCD
With Clear LCD, you switch on a superior motion
sharpness, better black level, high contrast with a
flicker-free, quiet image and a larger viewing angle.
To switch on or off…
1 - Press , select All Settings and press OK.
2 - Select Picture and press (right) to enter the
menu.
3 - Select Advanced > Motion > Clear LCD.
4 - Select On or Off.
5 - Press (left) repeatedly if necessary, to close
the menu.
If the two basic settings are inadequate to format the
picture you want, you can use the advanced settings.
With the advanced settings you manually format the
picture on your screen.
You can zoom, stretch and shift the picture until it
shows what you need – e.g. missing subtitles or
scrolling text banners. If you format the picture for a
specific Source – like a connected game console –
you can return to this setting the next time you use
the game console. The TV stores the last setting you
did for each connection.
To format the picture manually…
1 - While watching a TV channel, press (if
available on your remote control) or press .
2 - Select Advanced and press OK.
3 - Use Shift, Zoom, Stretch or Original to adjust
the picture.
4 - Alternatively, select Last Setting and
press OK to switch to the format you stored before.
5 - Or select Undo to return to the setting the
picture had when you opened Picture Format.
• Shift – Select on the arrows to shift the picture. You
can only shift the picture when it is zoomed in.
• Zoom – Select on the arrows to zoom in.
• Stretch – Select on the arrows to stretch the
picture vertically or horizontally.
• Undo – Select to return to the picture format you
started with.
• Original – Shows the original format of the
incoming picture. This is a 1:1 pixel on pixel format.
Expert mode for HD and PC input.
Picture Format
Basic
If the picture is not filling the whole screen, if black
bars are showing on the top or bottom or at both
sides, you can adjust the picture to fill the screen
completely.
To select one of the basic settings to fill the screen…
1 - While watching a TV channel, press (if
available on your remote control) or press .
2 - Select Picture Format > Fill Screen, Fit to
Screen or Wide Screen.
3 - Press (left) repeatedly if necessary, to close
the menu.
• Fill Screen – automatically enlarges the picture to
fill the screen. Picture distortion is minimal, subtitles
remain visible. Not suitable for PC input. Some
extreme picture formats can still show black bars.
• Fit to Screen – automatically zooms in the picture
to fill the screen without distortion. Black bars may be
visible. Not suitable for PC input.
• Wide Screen – automatically zooms in the picture
to wide screen.
Quick Picture Setting
During the first installation, you did some picture
settings in a few easy steps. You can redo these steps
with Quick Picture Setting. To do these steps, make
sure the TV can tune to a TV channel or can show a
programme from a connected device.
To set the picture in a few easy steps…
1 - Press , select All Settings and press OK.
2 - Select Picture and press (right) to enter the
menu.
3 - Select Quick Picture Setting.
4 - Select Start. Use the navigation keys to select
your choice.
5 - Finally, select Finish.
6 - Press (left) repeatedly if necessary, to close
the menu.
53
Page 54

12.3
Sound
Sound Style
Select a Style
For easy sound adjustment, you can select a preset
setting with Sound Style.
1 - While watching a TV channel, press .
2 - Select Sound and press (right) to enter the
menu.
3 - Select Sound Style, and select one of the styles
in the list.
4 - Press (left) repeatedly if necessary, to close
the menu.
The available styles are…
• Personal - The sound preferences you set during
the first start up.
• Original - Most neutral sound setting
• Movie - Ideal for watching movies
• Music - Ideal for listening to music
• Game - Ideal for gaming
• News - Ideal for speech
2 - Select Sound and press (right) to enter the
menu.
3 - Select Bass and press (right).
4 - Press the arrows (up) or (down) to adjust
the value.
5 - Press (left) repeatedly if necessary, to close
the menu.
Treble
With Treble, you can adjust the level of high tones in
the sound.
To adjust the level…
1 - Press , select All Settings and press OK.
2 - Select Sound and press (right) to enter the
menu.
3 - Select Treble and press (right).
4 - Press the arrows (up) or (down) to adjust
the value.
5 - Press (left) repeatedly if necessary, to close
the menu.
Headphone Volume
With Headphones Volume, you can set the volume
of a connected headphone separately.
Restore a Style
With a Sound Style selected, you can adjust any
sound setting in Setup > Sound…
The selected style will store the changes you made.
We recommend to adjust the sound settings for the
style Personal only. The Sound Style - Personal can
save its settings for each individual source in Sources
menu.
To restore the style to its original setting…
1 - While watching a TV channel, press .
2 - Select Sound and press (right) to enter the
menu.
3 - Select Sound Style , and select the
Sound Style you want to restore.
4 - Select Restore Style. The style is restored.
5 - Press (left) repeatedly if necessary, to close
the menu.
Sound Settings
Bass
With Bass, you can adjust the level of low tones in
the sound.
To adjust the volume…
1 - Press , select All Settings and press OK.
2 - Select Sound and press (right) to enter the
menu.
3 - Select Headphones Volume.
4 - Press the arrows (up) or (down) to adjust
the value.
5 - Press (left) repeatedly if necessary, to close
the menu.
Subwoofer Volume
If you connect a wireless Bluetooth subwoofer, you
can slightly increase or decrease the volume of the
subwoofer.
To adjust the volume a little…
1 - Press , select All Settings and press OK.
2 - Select Sound and press (right) to enter the
menu.
3 - Select Subwoofer Volume.
4 - Press (up) or (down) to adjust the value.
5 - Press (left) repeatedly if necessary, to close
the menu.
To adjust the level…
1 - Press , select All Settings and press OK.
54
Page 55

Surround Mode
With Surround Mode, you can set the sound effect of
the TV speakers.
To set the surround mode…
1 - Press , select All Settings and press OK.
2 - Select Sound and press (right) to enter the
menu.
3 - Select Surround Mode.
4 - Select Stereo or Incredible Surround.
5 - Press (left) repeatedly if necessary, to close
the menu.
TV Placement
As part of the first installation, this setting is set to
either On a TV stand or On the Wall. If you have
changed the placement of the TV since then, adjust
this setting accordingly for best sound reproduction.
1 - Press , select All Settings and press OK.
2 - Select Sound and press (right) to enter the
menu.
3 - Select TV Placement.
4 - Select On a TV stand or On the Wall.
5 - Press (left) repeatedly if necessary, to close
the menu.
1 - Press , select All Settings and press OK.
2 - Select Sound and press (right) to enter the
menu.
3 - Select Advanced > Clear Sound.
4 - Select On or Off.
5 - Press (left) repeatedly if necessary, to close
the menu.
Audio Out Format
If you have a Home Theatre System (HTS)
with multichannel sound processing capabilities like
Dolby Digital, DTS® or similar, set the Audio Out
Format to Multichannel. With Multichannel, the TV
can send the compressed multichannel sound signal
from a TV channel or connected player to the Home
Theatre System. If you have a Home Theatre System
without multichannel sound processing, select Stereo.
To set the Audio Out Format…
1 - Press , select All Settings and press OK.
2 - Select Sound and press (right) to enter the
menu.
3 - Select Advanced > Audio Out Format.
4 - Select Multichannel or Stereo.
5 - Press (left) repeatedly if necessary, to close
the menu.
Advanced Sound Settings
Auto Volume Levelling
With Auto Volume Levelling, you can set the TV to
automatically level out sudden volume differences.
Typically at the beginning of adverts or when you are
switching channels.
To switch on or off…
1 - Press , select All Settings and press OK.
2 - Select Sound and press (right) to enter the
menu.
3 - Select Advanced and press (right) to enter
the menu.
4 - Select Auto Volume Levelling and
press (right) to enter the menu.
5 - Select On or Off.
6 - Press (left) repeatedly if necessary, to close
the menu.
Clear Sound
With Clear Sound, you improve the sound for
speech. Ideal for news programmes. You can switch
the speech improvement on or off.
Audio Out Levelling
Use the Audio Out Levelling setting to level the
volume (loudness) of the TV and the Home Theatre
System when you switch over from one to another.
Volume differences can be caused by differences in
sound processing.
To level the difference in volume…
1 - Press , select All Settings and press OK.
2 - Select Sound and press (right) to enter the
menu.
3 - Select Advanced > Audio Out Levelling.
4 - If the volume difference is large, select More. If
the volume difference is small, select Less.
5 - Press (left) repeatedly if necessary, to close
the menu.
Audio Out Levelling affects both the Audio Out Optical and HDMI ARC sound signals.
Audio Out Delay
If you set an Audio sync delay on your Home Theatre
System, to synchronise the sound with the picture,
you must switch off Audio Out Delay on the TV.
To switch off Audio Out Delay…
To switch on or off…
1 - Press , select All Settings and press OK.
2 - Select Sound and press (right) to enter the
55
Page 56

menu.
3 - Select Advanced > Audio Out Delay.
4 - Select Off.
5 - Press (left) repeatedly if necessary, to close
the menu.
Ambilight Style
For more information, in Help, select Keywords and
look up Ambilight Style.
Audio Out Offset
If you cannot set a delay on the Home Theatre
System, you can set a delay on the TV with Audio
Out Offset.
To synchronise the sound on the TV…
1 - Press , select All Settings and press OK.
2 - Select Sound and press (right) to enter the
menu.
3 - Select Advanced > Audio Out Offset.
4 - Use the slider bar to set the sound offset.
5 - Press (left) repeatedly if necessary, to close
the menu.
Speakers
Select your Speakers
In this menu you can switch the TV speakers on or off.
If you connect a Home Theatre System or a wireless
Bluetooth speaker, you can select which device is
playing the TV sound. All available loudspeaker
systems are shown in this list.
If you use an HDMI CEC connection for an audio
device (like a Home Theatre System), you can select
EasyLink Autostart. The TV will switch on the audio
device, send the TV sound to the device and switch
off the TV speakers.
To set the TV speakers…
Ambilight Settings
Ambilight Brightness
With Ambilight Brightness, you can set the level of
brightness of the Ambilight.
To adjust the level…
1 - Press , select All Settings and press OK.
2 - Select Ambilight and press (right) to enter
the menu.
3 - Select Brightness.
4 - Press the arrows (up) or (down) to adjust
the value.
5 - Press (left) repeatedly if necessary, to close
the menu.
Ambilight Saturation
With Ambilight Saturation, you can set the level of
colour saturation of the Ambilight.
To adjust the level…
1 - Press , select All Settings and press OK.
2 - Select Ambilight and press (right) to enter
the menu.
3 - Select Saturation.
4 - Press the arrows (up) or (down) to adjust
the value.
5 - Press (left) repeatedly if necessary, to close
the menu.
1 - Press , select All Settings and press OK.
2 - Select Sound and press (right) to enter the
menu.
3 - Select Advanced and press (right) to enter
the menu.
4 - Select Speakers and press (right) to enter
the menu.
5 - Select On, Off, or EasyLink Autostart .
6 - Press (left) repeatedly if necessary, to close
the menu.
12.4
Ambilight Settings
Advanced Ambilight Settings
Wall Colour
With Wall Colour, you can neutralise the influence of
a coloured wall on the Ambilight colours. Select the
colour of the wall behind the TV and the TV will
modify the Ambilight colours to appear as they are
intended.
To select the colour of the wall . . .
1 - Press , select All Settings and press OK.
2 - Select Ambilight and press (right) to enter
the menu.
3 - Select Advanced > Wall Colour.
4 - In the colour palette, select the colour that
matches the colour of the wall behind the TV.
5 - Press (left) repeatedly if necessary, to close
the menu.
56
Page 57

TV Switch Off
With TV Switch Off, you can set Ambilight to switch
off immediately or slowly fade out when you switch
off the TV. The slow fade out gives you some time to
switch on the lights in your living room.
To select the way how Ambilight switches off…
1 - Press , select All Settings and press OK.
2 - Select Ambilight and press (right) to enter
the menu.
3 - Select Advanced > TV Switch Off.
4 - Select Fade Out to Off or Immediate Switch
Off.
5 - Press (left) repeatedly if necessary, to close
the menu.
ISF Tuning
When an ISF expert calibrates the TV, a static
Ambilight colour can be calibrated. You can select
any colour you want to calibrate. With the ISF
Calibration done, you can select the static ISF colour.
To select the ISF static colour…
Press (Ambilight) and select ISF and press OK.
To adjust the ISF tuning…
1 - Press , select All Settings and press OK.
2 - Select Ambilight and press (right) to enter
the menu.
3 - Select Advanced > ISF Tuning.
4 - Press (left) repeatedly if necessary, to close
the menu.
To reset the ISF tuning…
1 - Press , select All Settings and press OK.
2 - Select Ambilight and press (right) to enter
the menu.
3 - Select Advanced > Reset ISF Settings.
4 - Press (left) repeatedly if necessary, to close
the menu.
outlet.
2 - Connect the Philips Hue Bridge to the same
router you are using for the TV — use an Ethernet
cable to connect.
3 - Switch on the Hue bulbs.
To start the configuration…
1 - Press , select All Settings and press OK.
2 - Select Ambilight > Ambilight+hue.
3 - Select Configure.
4 - Select Start and press OK. The TV will search
for the Philips Hue Bridge. If the TV is not yet
connected to your network, the TV will start the
network setup first. If the Philips Hue Bridge appears
in the list …
go to Step 2 - Hue Bridge.
For more info on connecting the TV to your home
network, in Help, select Keywords and
look up Network, wireless.
Step 2 - Hue Bridge
In the next step, you will link up the TV with
the Philips Hue Bridge.
The TV can only be linked up to one Hue Bridge.
To link the Hue Bridge…
1 - With the TV connected to your home network, it
will show the available Hue Bridges. If the TV did not
find your Hue Bridge yet, you can select Scan
again and press OK.
If the TV found the only Hue Bridge you have, select
the Hue Bridge name and press OK.
If you have more than one Hue Bridge available,
select the Hue Bridge you want to use and press OK.
2 - Select Start and press OK.
3 - Now go to the Philips Hue Bridge and press the
link button in the middle of the device. This will link
the Hue Bridge with the TV. Do this within 30
seconds. The TV will confirm if a Hue Bridge is now
linked to the TV.
4 - Select OK and press OK.
With the Philips Hue bridge linked to the TV, go to
page Hue bulbs.
Ambilight + Hue
Configure
Step 1 - Network
In this first step, you will prepare the TV to find
the Philips Hue Bridge. The TV and the Philips Hue
Bridge must use the same network.
Setting up…
1 - Connect the Philips Hue Bridge to the power
Step 3 - Hue Bulbs
In the next step, you will select the Philips Hue
bulbs that have to follow the Ambilight.
You can select a maximum of 9 Philips Hue bulbs for
Ambilight+hue.
To select the bulbs for Ambilight+hue…
1 - In the list, mark the bulbs that have to follow the
Ambilight. To mark a bulb, select the bulb name and
press OK. When you mark a bulb, the bulb will blink
once.
57
Page 58

2 - When you’re done, select OK and press OK.
Step 4 - Configure Bulb
In the following step, you will configure each Philips
Hue bulb.
To configure each Hue bulb…
1 - Select a bulb to configure and press OK. The
bulb you selected is flashing.
2 - Select Start and press OK.
3 - First indicate where you placed the bulb relative
to the TV. A correct setting of the Angle will send the
correct Ambilight colour to the bulb. Select the slider
bar to adjust the position.
4 - Secondly, indicate the Distance between the
bulb and the TV. The further away from the TV, the
weaker the Ambilight colour. Select the slider bar to
adjust the distance.
5 - Finally, set the Brightness of the bulb. Select
the slider bar to adjust the brightness.
6 - To stop configuring this bulb, select OK and
press OK.
7 - In the Configure Ambilight+hue menu, you can
do the same for each bulb.
8 - When all Ambilight+hue bulbs are configured,
select Finish and press OK.
Ambilight+hue is ready for use.
Switch Off
Lounge Light+hue
If you installed Ambilight+hue, you can let the hue
bulbs follow Lounge Light from Ambilight. The Philips
hue lamps will expand the Lounge Light effect across
the room. The hue bulbs are switched on and
automatically set to follow Lounge Light when you
configure Ambilight+hue. If you do not want the hue
bulbs to follow Lounge Light, you can switch the
bulbs off.
To switch the hue bulbs off…
1 - Press , select All Settings and press OK.
2 - Select Ambilight and press (right) to enter
the menu.
3 - Select Ambilight+hue > Lounge Light+hue.
4 - Select Off.
5 - Press (left) repeatedly if necessary, to close
the menu.
View Configuration
With View Configuration, you can view current setup
of the Ambilight+hue, network, the Bridge and bulbs.
To view Ambilight+hue configuration...
1 - Press , select All Settings and press OK.
2 - Select Ambilight and press (right) to enter
the menu.
3 - Select Ambilight+hue > View Configuration.
4 - Press (left) repeatedly if necessary, to close
the menu.
To switch off Ambilight+hue...
1 - Press , select All Settings and press OK.
2 - Select Ambilight and press (right) to enter
the menu.
3 - Select Ambilight+hue.
4 - Select Off or On.
5 - Press (left) repeatedly if necessary, to close
the menu.
Immersion
With Immersion, you can adjust how accurate the
Hue bulbs follow the Ambilight.
To adjust Ambilight+hue immersion...
1 - Press , select All Settings and press OK.
2 - Select Ambilight and press (right) to enter
the menu.
3 - Select Ambilight+hue > Immersion.
4 - Press the arrows (up) or (down) to adjust
the value.
5 - Press (left) repeatedly if necessary, to close
the menu.
Reset Configuration
To reset Ambilight+hue...
1 - Press , select All Settings and press OK.
2 - Select Ambilight and press (right) to enter
the menu.
3 - Select Ambilight+hue > Reset Configuration.
The configuration is reset.
4 - Press (left) repeatedly if necessary, to close
the menu
12.5
Eco Settings
Energy Saving
Eco settings bundles the settings that help the
environment.
Energy Saving
If you select Energy Saving, the TV switches to Picture
Style - Standard automatically, the most ideal energy
conscious setting for the picture.
58
Page 59

To set the TV in Energy Saving…
1 - Press , select All Settings and press OK.
2 - Select Eco Settings and press (right) to
enter the menu.
3 - Select Energy Saving, the Picture Style is set to
Standard automatically.
4 - Press (left) repeatedly if necessary, to close
the menu.
1 - Press , select All Settings and press OK.
2 - Select Eco Settings and press (right) to enter
the menu.
3 - Select Switch Off Timer.
4 - Press the arrows (up) or (down) to adjust
the value. The value 0 deactivates the automatic
switch off.
5 - Press (left) repeatedly if necessary, to close
the menu.
Screen Off
If you only listen to music, you can switch off the TV
screen to save energy.
To only switch off the TV screen…
1 - Press , select All Settings and press OK.
2 - Select Eco Settings and press (right) to
enter the menu.
3 - Select Screen Off. The screen will switch off.
4 - Press (left) repeatedly if necessary, to close
the menu.
To switch the screen back on, press any key on the
remote control.
Light Sensor
To save energy, the built-in ambient light sensor
lowers the brightness of the TV screen when the
surrounding light darkens. The built-in light sensor
automatically adjusts the picture, together with
Ambilight, to the lighting conditions of the room.
12.6
General Settings
USB Hard Drive
To set up and format a USB Hard Drive...
1 - Press , select All Settings and press OK.
2 - Select General Settings and press (right) to
enter the menu.
3 - Select USB Hard Drive.
4 - Select Start, then follow the instructions on
screen.
5 - Press (left) repeatedly if necessary, to close
the menu.
For more information on how to install a USB Hard
Drive, in Help, select Keywords and look up USB
Hard Drive, installation or Installation, USB Hard
Drive.
USB Keyboard Settings
To activate the light sensor…
1 - Press , select All Settings and press OK.
2 - Select Eco Settings and press (right) to
enter the menu.
3 - Select Light Sensor. The icon is shown in
front of Light Sensor when it is active.
4 - Press (left) repeatedly if necessary, to close
the menu.
Switch Off Timer
If the TV receives a TV signal but you don't press a
key on the remote control during a 4 hour period, the
TV switches off automatically to save energy. Also, if
the TV does not receive a TV signal nor a remote
control command for 10 minutes, the TV switches off
automatically.
If you use the TV as a monitor or use a digital receiver
to watch TV (a Set-Top Box - STB) and you do not
use the remote control of the TV, you should
deactivate this automatic switch off.
To install the USB keyboard, switch on the TV and
connect the USB keyboard to one of
the USB connections on the TV. When the TV
detects the keyboard for the first time, you can select
your keyboard lay-out and test your selection. If you
select a Cyrillic or Greek keyboard layout first, you
can select a secondary Latin keyboard layout.
To change the keyboard layout setting when a layout
was selected…
1 - Press , select All Settings and press OK.
2 - Select General Settings and press (right) to
enter the menu.
3 - Select USB Keyboard Settings to start the
keyboard setup.
To deactivate the Switch Off Timer …
59
Page 60

Philips Logo Brightness
EasyLink
You can switch off or adjust the brightness of the
Philips logo on the front of the TV.
To adjust or switch off…
1 - Press , select All Settings and press OK.
2 - Select General Settings and press (right) to
enter the menu.
3 - Select Philips Logo Brightness, and
press (right) to enter the menu.
4 - Select Minimum, Medium, Maximum,
or Off to switch off the lighting of the logo.
5 - Press (left) repeatedly if necessary, to close
the menu.
Home or Shop
EasyLink
To switch off EasyLink completely…
1 - Press , select All Settings and press OK.
2 - Select General Settings and press (right) to
enter the menu.
3 - Select EasyLink, press (right) and
select EasyLink one step further.
4 - Select Off.
5 - Press (left) repeatedly if necessary, to close
the menu.
EasyLink Remote Control
To switch off EasyLink remote control…
1 - Press , select All Settings and press OK.
2 - Select General Settings and press (right) to
enter the menu.
3 - Select EasyLink > Easylink Remote Control.
4 - Select Off.
5 - Press (left) repeatedly if necessary, to close
the menu.
If the TV is installed in a shop, you can set the TV to
display an in store promotion banner. Picture
Style is set to Vivid automatically. Switch Off
Timer is switched off.
To set the TV to Shop location…
1 - Press , select All Settings and press OK.
2 - Select General Settings and press (right) to
enter the menu.
3 - Select Location > Shop.
4 - Press (left) repeatedly if necessary, to close
the menu.
If you use the TV at home, set the TV in Home
location.
Shop Setup
If the TV is set to Shop, you can set the availablility of
a specific demo for in store use.
1 - Press , select All Settings and press OK.
2 - Select General Settings and press (right) to
enter the menu.
3 - Select Shop Setup and press (right) to enter
the menu.
4 - Change the settings according to your
preference.
5 - Press (left) repeatedly if necessary, to close
the menu.
HDMI Ultra HD
This TV can display Ultra HD signals. Some devices connected with HDMI - do not recognise a TV with
Ultra HD and might not work correctly or show
distorted picture or sound. To avoid the
malfunctioning of such a device, you can set the
signal quality to a level the device can handle. If the
device is not using Ultra HD signals, you can switch
off Ultra HD for this HDMI connection.
The setting UHD 4:4:4/4:2:2 allows UHD YCbCr 4:4:4
/ 4:2:2 signals. The setting UHD 4:2:0 allows UHD
YCbCr 4:2:0 signals.
To set the signal quality…
1 - Press , select All Settings and press OK.
2 - Select General Settings and press (right) to
enter the menu.
3 - Select HDMI Ultra HD.
4 - Select UHD 4:4:4/4:2:2, UHD
4:2:0 or UHD Off .
5 - Press (left) repeatedly if necessary, to close
the menu.
If the picture and sound of a device connected
to HDMI 1 or HDMI 2 is distorted, connect the
device to HDMI 3 or HDMI 4 on this TV.
For more information, in Help, select Keywords and
look up Problems, HDMI or Problems,
HDMI Connection .
60
Page 61

Advanced Settings
TV Guide
The TV Guide receives information (data) from
broadcasters or from the Internet. In some regions
and for some channels, TV Guide information might
not be available. The TV can collect TV Guide
information for the channels that are installed on the
TV. The TV cannot collect the TV Guide information
from channels viewed from a digital receiver or
decoder.
The TV comes with the information set to From the
Broadcaster.
If TV Guide information comes from the Internet, the
TV Guide can also list analogue channels next to the
digital channels. The TV Guide menu also shows a
small screen with the current channel.
From the Internet
If the TV is connected to the Internet, you can set the
TV to receive the TV Guide information from the
Internet.
To set the TV Guide information…
1 - Press , select All Settings and press OK.
2 - Select General Settings and press (right) to
enter the menu.
3 - Select Advanced > TV Guide > From the
Internet.
4 - Press (left) repeatedly if necessary, to close
the menu.
Channel Logos
In some countries, the TV can show the channel
logos.
If you do not want these logos to appear, you can
switch them off.
To switch off the logos…
enter the menu.
3 - Select Advanced > HbbTV.
4 - Select On or Off.
5 - Press (left) repeatedly if necessary, to close
the menu.
If you want to avoid access to HbbTV pages on a
specific channel, you can block the HbbTV pages for
this channel only.
1 - Tune to the channel of which you want to block
the HbbTV pages.
2 - Press OPTIONS, select
Preferences > HbbTV on this Channel.
3 - Select Off.
Factory Settings
You can set the TV back to the original TV settings
(the factory settings).
To switch back to the original settings…
1 - Press , select All Settings and press OK.
2 - Select General Settings and press (right) to
enter the menu.
3 - Select Factory Settings.
4 - Select OK.
5 - Press (left) repeatedly if necessary, to close
the menu.
Reinstall TV
You can redo a full TV installation. The TV is
completely reinstalled.
To redo a full TV installation…
1 - Press , select All Settings and press OK.
2 - Select General Settings and select Reinstall
TV.
3 - Follow the instructions on screen. The installation
may take a few minutes.
1 - Press , select All Settings and press OK.
2 - Select General Settings and press (right) to
enter the menu.
3 - Select Advanced > Channel Logos and
press (right) to enter the menu.
4 - Select Off.
5 - Press (left) repeatedly if necessary, to close
the menu.
HbbTV
If a TV channel offers HbbTV pages, you must first
switch on HbbTV in the TV settings to view the pages.
1 - Press , select All Settings and press OK.
2 - Select General Settings and press (right) to
12.7
Clock, Region and Language
Menu Language
To change the language of the TV menus and
messages…
1 - Press , select All Settings and press OK.
2 - Select Region and Language and
press (right) to enter the menu.
3 - Select Language > Menu Language.
4 - Select on the language you need and press OK.
5 - Press (left) repeatedly if necessary, to close
the menu.
61
Page 62

Language preferences
Subtitles from Text
Audio Language Settings
Digital TV channels can broadcast audio with several
spoken languages for a programme. You can set a
preferred primary and secondary audio language. If
audio in one of these languages is available, the TV
will switch to this audio.
If none of the preferred audio languages is available,
you can select another audio language which is
available.
To set the primary and secondary audio language…
1 - Press , select All Settings and press OK.
2 - Selec Region and Language nd press (right)
to enter the menu.
3 - Select Languages > Primary
Audio or Secondary Audio.
4 - Select on the language you need.
5 - Press (left) repeatedly if necessary, to close
the menu.
Subtitles
Switch On
To switch on Subtitles, press SUBTITLE.
You can switch subtitles On, Off or On During
Mute.
Or to show subtitles automatically when the
broadcasted programme is not in language – the
language set for the TV – select Automatic. This
setting will also show Subtitles automatically when
you mute the sound.
Subtitle Language Settings
If you tune to an analogue channel, you need to
make the subtitles available for each channel
manually.
1 - Switch to a channel and press TEXT to open
Text.
2 - Enter the page number for subtitles, usually 888.
3 - Press TEXT again, to close Text.
If you select On in the Subtitle menu when watching
this analogue channel, subtitles will be shown if
available.
Text / Teletext Languages
Text Pages
To open Text/Teletext press TEXT, while you are
watching TV channels.
To close Text, press TEXT again.
Select a Text page
To select a page . . .
1 - Enter the page number with the number keys.
2 - Use the arrow keys to navigate.
3 - Press a colour key to select a colour-coded
subject at the bottom of the screen.
Text sub-pages
A Text page number can hold several subpages. The
subpage numbers are shown on a bar next to the
main page number.
To select a subpage, press or .
T.O.P. Text pages
Some broadcasters offer T.O.P. Text.
To open T.O.P. Text pages within Text,
press OPTIONS and select T.O.P. overview.
Digital channels can offer several subtitle languages
for a programme. You can set a preferred primary and
secondary subtitle language. If subtitles in one of
these languages are available, the TV will show the
subtitles you selected.
If none of the preferred subtitle languages are
available, you can select another subtitle language
which is available.
To set the primary and secondary subtitle language…
1 - Press , select All Settings and press OK.
2 - Select Region and Language and
press (right) to enter the menu.
3 - Select Languages > Primary
Subtitles or Secondary Subtitles.
4 - Select on the language you need.
5 - Press (left) repeatedly if necessary, to close
the menu.
Favourite pages
The TV makes a list of the last 10 Text pages you
opened. You can easily reopen them again in the
Favourite Text pages column.
1 - In Text, select the star in the top left corner of
the screen to show the column of favourite pages.
2 - Press (down) or (up) to select a page
number and press OK to open the page.
You can clear the list with the option Clear favourite
pages.
Search Text
You can select a word and scan Text for all
occurences of this word.
1 - Open a Text page and press OK.
2 - Select a word or number with the arrow keys.
3 - Press OK again to jump immediately to the next
occurence of this word or number.
62
Page 63

4 - Press OK again to jump to the subsequent
occurence.
5 - To stop searching, press (up) until nothing is
selected.
Text from a connected device
Some devices that receive TV channels can also offer
Text.
To open Text from a connected device . . .
1 - Press
2 - While watching a channel on the device,
press OPTIONS, select Show device keys and
select the key and press OK.
3 - Press BACK to hide the device keys.
4 - To close Text, press BACK again.
Digital Text (UK only)
Some digital broadcasters offer dedicated Digital Text
or interactive TV on their digital TV channels. This
includes normal Text using the number, colour and
arrow keys to select and navigate.
select the device and press OK.
,
3 - Select Language > Primary Text or Secondary
Text.
4 - Select your preferred Text languages.
5 - Press (left) repeatedly if necessary, to close
the menu.
Text 2.5
If available, Text 2.5 offers more colours and better
graphics. Text 2.5 is activated as a standard factory
setting.
To switch off Text 2.5…
1 - Press TEXT.
2 - With Text/Teletext open on screen,
press OPTIONS.
3 - Select Text 2.5 > Off.
4 - Press (left) repeatedly if necessary, to close
the menu.
Clock
To close Digital Text, press BACK.
Text Options
In Text/Teletext, press OPTIONS to select the
following…
• Freeze page
To stop the automatic rotation of subpages.
• Dual screen / Full screen
To show the TV channel and Text alongside each
other.
• T.O.P. overview
To open T.O.P. Text.
• Enlarge
To enlarge the Text page for comfortable reading.
• Reveal
To unhide hidden information on a page.
• Cycle subpages
To cycle subpages when these are available.
• Language
To switch the group of characters that Text uses to
display correctly.
• Text 2.5
To activate the Text 2.5 for more colours and better
graphics.
Date and Time
Automatic
The standard setting for the TV clock is Automatic.
The time information comes from the broadcasted
UTC - Coordinated Universal Time information.
If the clock is not correct, you can set the TV clock
to Country Dependent. For some countries, you can
select a specific time zone or set a time offset. In
some countries, for some network operators, the
clock settings are hidden to avoid an incorrect clock
setting.
To set the TV clock…
1 - Press , select All Settings and press OK.
2 - Select Region and Language and
select Clock > Auto Clock Mode.
3 - Select Automatic or Country Dependent.
4 - Press (left) to go back one step.
Manual
If none of the automatic settings display the time
correctly, you can set the time manually.
Text Setup
Text language
Some digital TV broadcasters have several Text
languages available.
To set your primary and secondary Text language . . .
1 - Press , select All Settings and press OK.
2 - Select Region and Language and
press (right) to enter the menu.
However, if you schedule recordings from the TV
Guide, we recommend not to change the time and
date manually. In some countries, for some network
operators, the clock settings are hidden to avoid an
incorrect clock setting.
To set the TV clock manually (if available)…
1 - Press , select All Settings and press OK.
2 - Select Region and Language and
select Clock > Auto Clock Mode and press OK.
3 - Select Manual and press OK.
4 - Press (left) and select Date or Time.
63
Page 64

5 - Press (up) or (down) to adjust the value.
6 - Press (left) to go back one step.
the menu.
Time Zone
For some countries, you can select specific time
zones to set the TV clock correctly.
To set the time zone (if available)…
1 - Press , select All Settings and press OK.
2 - Select Region and Language and
press (right) to enter the menu.
3 - Select Clock > Time Zone.
4 - According to your country, you can select a time
zone or set a time offset to correct the TV clock.
5 - Press (left) repeatedly if necessary, to close
the menu.
Sleep Timer
With the Sleep Timer, you can set the TV to switch to
Standby automatically after a preset time.
To set the Sleep Timer…
1 - Press , select All Settings and press OK.
2 - Select Region and Language and
press (right) to enter the menu.
3 - Select Clock > Sleep Timer.
4 - With the slider bar you can set the time to up to
180 minutes in increments of 5 minutes. If set to 0
minutes, the Sleep Timer is switched off. You can
always switch off your TV earlier or reset the time
during the countdown.
5 - Press (left) repeatedly if necessary, to close
the menu.
Hard of Hearing
Some digital TV channels broadcast special audio and
subtitles adapted for the hard of hearing or deaf
people. With Hearing impaired switched on, the TV
automatically switches to the adapted audio and
subtitles, if available. Before you can switch
on Hearing impaired, you have to switch
on Universal Access.
To switch on Hearing impaired…
1 - Press , select All Settings and press OK.
2 - Select Universal Access and press (right) to
enter the menu.
3 - Select Hearing impaired and press (right) to
enter the menu.
4 - Select On.
5 - Press (left) repeatedly if necessary, to close
the menu.
Audio Description
Switch On
Digital TV channels can broadcast special audio
commentary describing what is happening on
screen.
To be able to set the visually impaired audio and
effects, you have to switch on Audio
Description first.
Also, before you can switch on Audio Description,
you have to switch on Universal Access in setup
menu.
12.8
Universal Access
Switch On
With Universal Access switched on, the TV is
prepared for use for the deaf, hard of hearing, blind or
partially sighted people.
Switch on
If you did not switch on Universal Access during the
installation, you can still switch it on in Universal
Access menu.
To switch on Accessibility…
1 - Press , select All Settings and press OK.
2 - Select Universal Access and press (right) to
enter the menu.
3 - Select Universal Access one step further.
4 - Select On.
5 - Press (left) repeatedly if necessary, to close
With Audio Description, a narrator's commentary is
added to the normal audio.
To switch on the commentary (if available)…
To switch on Audio Description…
1 - Press , select All Settings and press OK.
2 - Select Universal Access and press (right) to
enter the menu.
3 - Select Audio Description and press (right) to
enter the menu.
4 - Select Audio Description one step further.
5 - Select On.
6 - Press (left) repeatedly if necessary, to close
the menu.
Mixed Volume
You can mix the volume of the normal audio with the
audio commentary.
To mix the volume…
64
Page 65

1 - Press , select All Settings and press OK.
2 - Select Universal Access and press (right) to
enter the menu.
3 - Select Audio Description > Mixed Volume.
4 - Press the arrows (up) or (down) to adjust
the value.
5 - Press (left) repeatedly if necessary, to close
the menu.
Audio Effect
Some audio commentary can hold extra audio
effects, like stereo or fading sound.
To switch on Audio effects (if available)…
1 - Press , select All Settings and press OK.
2 - Select Universal Access and press (right) to
enter the menu.
3 - Select Audio Description > Audio Effects.
4 - Select On.
5 - Press (left) repeatedly if necessary, to close
the menu.
App Lock
For more information, in Help, select Keywords and
look up APP lock for more information.
Set Code / Change Code
The Child Lock PIN code is used to lock or unlock
channels or programmes.
To set the lock code or to change the current code…
1 - Press , select All Settings and press OK.
2 - Select Child Lock and press (right) to enter
the menu.
3 - Select Set Code or Change Code .
4 - Enter a 4 digit code of your choice. If a code is set
already, enter the current Child Lock code and then
enter the new code twice.
5 - Press (left) repeatedly if necessary, to close
the menu.
The new code is set.
Speech
The audio commentary can also hold subtitles for the
words which are spoken.
To switch on these subtitles (if available) . . .
1 - Press , select All Settings and press OK.
2 - Select Universal Access and press (right) to
enter the menu.
3 - Select Audio Description > Speech.
4 - Select Descriptive or Subtitles.
5 - Press (left) repeatedly if necessary, to close
the menu.
12.9
Child Lock
Parental Rating
To set a minumum age to watch rated programmes...
1 - Press , select All Settings and press OK.
2 - Select Child Lock and press (right) to enter
the menu.
3 - Select Parental Rating, and select one of the
age in the list.
4 - Press (left) repeatedly if necessary, to close
the menu.
Forgotten your Child Lock PIN code?
If you forgot your PIN code, you can override the
current code and enter a new code.
1 - Press , select All Settings and press OK.
2 - Select Child Lock and press (right) to enter
the menu.
3 - Select Change Code.
4 - Enter the overriding code 8888.
5 - Now enter a new Child Lock PIN code and enter it
again to confirm.
6 - Press (left) repeatedly if necessary, to close
the menu.
The new code is set.
65
Page 66

13
Videos, Photos and
Music
4 - To stop playing videos, photos and music,
press EXIT.
13.3
From a Cloud Storage Service
13.1
From a USB Connection
You can view your photos or play your music and
videos from a connected USB flash drive or USB Hard
Drive.
With the TV switched on, plug in a USB flash drive or a
USB Hard Drive to one of the USB connections. The
TV detects the device and will list your media files.
If the list of files does not appear automatically…
1 - Press SOURCES, select USB and
press OK.
2 - Select USB Devices and press (right)
to browse your files in the folder structure you have
organised on the drive.
3 - To stop playing videos, photos and music,
press EXIT.
Warning
If you try to pause or record a programme with a USB
Hard Drive connected, the TV will ask you to format
the USB Hard Drive. This formatting will delete all
current files on the USB Hard Drive.
You can view photos or play music and videos you
uploaded on a storage service in the online cloud*.
With the Cloud Explorer app you can connect to
Cloud Hosting Services. You can use your login and
password to connect.
1 - Press HOME.
2 - Scroll down and select Apps >
Explorer and press OK.
3 - Select the hosting service you need.
4 - Connect and sign in to the hosting service with
your login and password.
5 - Select the photo or video you want to play and
press OK.
6 - Press (left) to go back one step or
press BACK to close the menu.
* A storage service like Dropbox™.
13.4
Cloud
Favourites, Most Popular,
Last Played menu
13.2
From a Computer or NAS
You can view your photos or play your music and
videos from a computer or a NAS (Network Attached
Storage) in your home network.
The TV and computer or NAS must be in the same
home network. On your computer or NAS, you need
to install Media Server Software. Your Media Server
must be set to share your files with the TV. The TV
shows your files and folders as they are organised by
the Media Server or as they are structured on your
computer or NAS.
The TV does not support subtitles on video streams
from a computer or NAS.
If the Media Server supports searching for files, a
search field is available.
To browse and play the files on your computer…
1 - Press SOURCES, select Network and
press OK.
2 - Select SimplyShare Devices and
press (right) to select the device you need.
3 - You can browse and play your files.
View favourite files
1 - Press SOURCES, select USB and
press OK.
2 - Select USB Devices and select
Favourites.
3 - You can view all favourite files in the list.
View most popular files
1 - Press SOURCES, select USB and
press OK.
2 - Select USB Devices and select Most
popular.
3 - Press OK to view files in the list or
press OPTIONS to clear the list of most popular.
View last played files
1 - Press SOURCES, select USB and
press OK.
2 - Select USB Devices and select Last
played.
3 - Press OK to view files in the list or
press OPTIONS to clear the list of last played.
66
Page 67

13.5
Play your Videos
Control Bar
To show or hide the control bar when a video is
playing, press INFO* or OK.
1 - Progress bar
2 - Playback control bar
- : Jump to the previous video in a folder
- : Jump to the next video in a folder
: Rewind
-
: Fast forward
-
: Pause the playback
-
1 - Playback control bar
- : Jump to the previous photo in a folder
- : Jump to the next photo in a folder
: Pause the slideshow playback
-
2 - Mark as favourites
3 - Start a slideshow
4 - Rotate the photo
5 - Shuffle: play your files in a random order
6 - Repeat: plays all photos in this folder once or
continuously
7 - Stop the music playing in the background
8 - Set the speed of the slide show
* If INFO key is available on your remote control
3 - Mark as favourites
4 - Play all videos
5 - Subtitle: switch subtitles On, Off or On During
Mute.
6 - Subtitle language: select a Subtitle Language
7 - Audio language: select an audio language
8 - Shuffle: play your files in a random order
9 - Repeat: plays all videos in this folder once or
continuously
* If INFO key is available on your remote control
13.6
View your Photos
Control Bar
To show or hide the control bar when a slideshow is
playing, press INFO* or OK.
13.7
Play your Music
Control Bar
To show or hide the control bar when a music is
playing, press INFO* or OK.
1 - Progress bar
2 - Playback control bar
- : Jump to the previous music in a folder
- : Jump to the next music in a folder
: Rewind
-
: Fast forward
-
: Pause the playback
-
3 - Mark as favourites
67
Page 68

4 - Play all music
5 - Shuffle: play your files in a random order
6 - Repeat: plays all music in this folder once or
continuously
* If INFO key is available on your remote control
68
Page 69

14
TV Guide
14.1
What You Need
With the TV Guide you can view a list of the current
and scheduled TV programmes of your channels.
Depending on where the TV guide information (data)
is coming from, analogue and digital channels or only
digital channels are shown. Not all channels offer TV
Guide information.
The TV can collect TV Guide information for the
channels that are installed on the TV. The TV cannot
collect the TV Guide information for channels viewed
from a digital receiver or decoder.
14.2
Internet or vice versa. The TV might have switched
to From the Internet automatically.
To make the recordings available in the list of
recordings, switch to the setting that was selected
when the recordings were made.
14.3
Using the TV Guide
Open the TV Guide
To open the TV Guide, press TV GUIDE. The TV
Guide shows the channels of the selected tuner.
Press TV GUIDE again to close.
The first time you open the TV Guide, the TV scans all
TV channels for programme information. This may
take several minutes. TV Guide data is stored on TV.
TV Guide Data
The TV Guide receives information (data) from
broadcasters or from the Internet. In some regions
and for some channels, TV Guide information might
not be available. The TV can collect TV Guide
information for the channels that are installed on the
TV. The TV cannot collect the TV Guide information
from channels viewed from a digital receiver or
decoder.
The TV comes with the information set to From the
Broadcaster.
If TV Guide information comes from the Internet, the
TV Guide can also list analogue channels next to the
digital channels. The TV Guide menu also shows a
small screen with the current channel.
From the Internet
If the TV is connected to the Internet, you can set the
TV to receive the TV Guide information from the
Internet.
To set the TV Guide information…
Tune to a Programme
From the TV Guide, you can tune to a current
programme.
To switch to the programme (channel), select the
programme and press OK.
View programme details
To call up the details of the selected programme…
1 - Press OPTIONS, and select Preferences.
2 - Select Channel Info, and press OK.
3 - Press BACK to close.
Change Day
The TV Guide can show the scheduled programmes
for the upcoming days (maximum up to 8 days).
1 - Press TV GUIDE.
2 - Select Now and press OK.
3 - Select the day you need.
1 - Press , select All Settings and press OK.
2 - Select General Settings and press (right) to
enter the menu.
3 - Select Advanced > TV Guide > From the
Internet and press OK.
4 - Press (left) repeatedly if necessary, to close
the menu.
Missing recordings
When some recordings seem to have disappeared
from the list of recordings, the TV Guide info (data)
might have changed. Recordings made with the
setting From the Broadcaster become invisible in
the list if you switch the setting to From the
Set a Reminder
You can set a reminder for a programme. A message
will alert you at the start of the programme. You can
tune to this channel immediately.
In the TV Guide a programme with a reminder is
marked with a (clock).
To set a reminder…
1 - Press TV GUIDE and select an upcoming
programme.
2 - Press OPTIONS.
69
Page 70

3 - Select Set Reminder and press OK.
4 - Press BACK to close the menu.
To clear a reminder…
1 - Press TV GUIDE and select a programme
with the reminder.
2 - Press OPTIONS.
3 - Select Clear Reminder and press OK.
4 - Press BACK to close the menu.
Search by Genre
If the information is available, you can look up
scheduled programmes by genre like movies, sports,
etc.
To search for programmes by genre…
1 - Press TV GUIDE.
2 - Use navigation keys to select at the middle
and press OK.
3 - Select Search by Genre and press OK.
4 - Select the genre you want and press OK. A list
with the found programmes appears.
5 - Press BACK to close the menu.
Set a Recording
You can set a recording in the TV Guide*.
In the TV Guide, a programme set to be recorded is
marked with .
To record a programme…
1 - Press TV GUIDE and select a future or
ongoing programme.
2 - Press OPTIONS, select Record.
3 - Press BACK to close the menu.
* See chapter Recording and Pause TV for more
information.
70
Page 71

15
Recording and
Pause TV
15.1
Recording
What You Need
You can record a digital TV broadcast and watch it
later.
To record a TV programme you need…
1 - Press TV GUIDE.
2 - Use navigation keys to select Now, and
press OK.
3 - Select Now, Later, Tomorrow or the day you
need, and press OK or BACK to close the
menu.
4 - Select the programme you wish to record,
press OPTIONS, select Record, and
press OK. The programme is scheduled for
recording. A warning will show automatically when
overlapping recordings are scheduled. If you plan to
record a programme in your absence, remember to
leave the TV switched to Standby and the USB Hard
Drive switched on.
5 - Press BACK to close the menu.
• a connected USB Hard Drive formatted on this TV
• digital TV channels installed on this TV
• to receive channel information for the on screen TV
Guide
• a reliable TV clock setting. If you reset the TV clock
manually, recordings may fail.
You cannot record when you are using Pause TV.
In terms enforcement of copyright legislation, some
DVB providers can apply different restriction by
means of DRM (Digital Right Management)
technology. In case of broadcasting protected
channels, recording, record validity or number of
views may be restricted. Recording may be
completely prohibited. In case of trying to record a
protected broadcasting or play back an expired
recording, an error message can appear.
Record a Programme
Record Now
To record the programme you are watching right now,
press (Record) on the remote control. The
recording will start immediately.
To stop the recording, press (Stop).
When TV Guide data is available, the programme you
are watching will be recorded from the moment you
pressed the recording key until the programme
ends. If no TV Guide data is available, the recording
will only last 30 minutes. You can adjust the end time
of the recording in the list of Recordings.
Schedule a Recording
You can schedule a recording of an upcoming
programme for today or a few days from today
(maximum of 8 days away). The TV will use the data
from the TV Guide to start and end the recording.
Recording Conflicts
When two scheduled recordings are overlapping in
time, there is a recording conflict. To solve a recording
conflict, you can adjust the start and end time of one
or both scheduled recordings.
To adjust the start or end time of a scheduled
recording…
1 - Press SOURCES, and select Recordings.
2 - At the top of the screen,
select Scheduled and press OK.
3 - In the list of scheduled recordings and reminders,
select Recordings and press OK to view the
scheduled recordings only.
4 - Select the scheduled recording that conflicts with
another scheduled recording and press OPTIONS.
5 - Select Adjust Time, and press OK.
6 - Select the start or end time and change the time
with the (up) or (down) keys.
Select Apply and press OK.
7 - Press BACK to close the menu.
Auto End Margin
You can set the time margin that the TV will add
automatically at the end of each scheduled recording.
To set the automatic end time margin…
1 - Press SOURCES, and select Recordings.
2 - Use navigation keys to select at the upper right
corner and press OK.
3 - Select Auto End Margin and press OK.
4 - Press (up) or (down) and press OK to
set the time margin added to a recording
automatically. You can add up to 45 minutes to a
recording.
5 - Press BACK to close the menu.
To record a programme…
71
Page 72

Manual Recording
You can schedule a recording that is not linked to a
TV programme. You set the tuner type, channel and
the start and end time yourself.
For more information, in Help, select Keywords and
look up USB Hard Drive, installation or Installation,
USB Hard Drive.
To schedule a recording manually…
1 - Press SOURCES, and select Recordings.
2 - At the top of the screen, select Scheduled .
3 - Use navigation keys to select at the upper right
corner, and press OK.
4 - Select Schedule and press OK.
5 - Select the tuner from where you want to record
and press OK.
6 - Select the channel to record from and press OK.
7 - Select the day of the recording and press OK.
8 - Set the start and end time of the recording. Select
a button and use the (up) or (down) keys to
set the hours and minutes.
9 - Select Schedule and press OK to schedule the
manual recording.
The recording will appear in the list of scheduled
recordings and reminders.
Watch a Recording
To watch a recording…
1 - Press SOURCES, and select Recordings.
2 - In the list of recordings, select the recording you
need and press OK to start watching.
3 - You can use the
keys (pause), (play), (rewind), (fast
forward) or (stop).
4 - To switch back to watch TV, press EXIT.
15.2
Pause TV
Pause a Programme
To pause and resume a broadcast…
• To pause a broadcast, press (Pause). A progress
bar at the bottom of the screen appears briefly.
• To call up the progress bar, press (Pause) again.
• To resume watching, press (Play).
With the progress bar on screen, press (Rewind)
or press (Forward) to select from where you want
to start viewing the paused broadcast. Press these
keys repeatedly to change speed.
You can pause a broadcast for a maximum time span
of 90 minutes.
To switch back to the live TV broadcast,
press (Stop).
Replay
Since the TV stores the broadcast you are watching,
you can mostly replay the broadcast for a few
seconds.
To replay a current broadcast…
1 - Press (Pause)
2 - Press (Rewind). You can
press repeatedly to select from where you want
to start viewing the paused broadcast. Press these
keys repeatedly to change speed. At one point you
will reach the start of the broadcast storage or the
maximum time span.
3 - Press (Play) to watch the broadcast again.
4 - Press (Stop) to watch the broadcast live.
What You Need
You can pause a digital TV broadcast and resume
watching it a bit later.
To pause a TV programme you need…
• a connected USB Hard Drive formatted on this TV
• digital TV channels installed on this TV
• to receive channel information for the on screen TV
Guide
With the USB Hard Drive connected and formatted,
the TV continuously stores the TV broadcast you are
watching. When you switch to another channel, the
broadcast of the former channel is cleared. Also
when you switch the TV to standby the broadcast is
cleared.
You cannot use Pause TV when you are recording.
72
Page 73

16
Cast to Your TV
Smartphones and
Tablets
16.1
Philips TV Remote App
The new Philips TV Remote App on your smartphone
or tablet is your new TV buddy.
With the TV Remote App, you master your media
around you. Send photos, music or videos to your big
TV screen or watch any of your TV channels live on
your tablet or phone. Look up what you want to
watch on the TV Guide and watch it on your phone or
TV. With the TV Remote App you can use your phone
as a remote control.
Download the Philips TV Remote App from your
favourite app store today.
The Philips TV Remote App is available for iOS and
Android and is free of charge.
To cast an app to the TV screen…
1 - On your smartphone or tablet, open an app that
supports Google Cast.
2 - Tab the Google Cast icon.
3 - Select the TV you would like to cast to.
4 - Press play on your smartphone or tablet. What
you selected should start playing on TV.
16.3
AirPlay
To add the AirPlay functionality to your Android TV,
you can download and install one of the several
Android apps that do just that. You can find several of
these apps in the Google Play Store.
16.4
MHL
This TV is MHL™ compliant.
16.2
Google Cast
What You Need
If an app on your mobile device has Google Cast, you
can cast your app on this TV. On the mobile app, look
for the Google Cast icon. You can use your mobile
device to control what's on TV. Google Cast works on
Android and iOS.
Your mobile device must be connected to the same
Wi-Fi home network as your TV.
Apps with Google Cast
New Google Cast apps come available every
day. You can already try it with YouTube, Chrome,
Netflix, Photowall … or Big Web Quiz for
Chromecast. See also google.com/cast
Some Google Play products and features aren't
available in all countries.
Find more information
on support.google.com/androidtv
If your mobile device is also MHL compliant, you can
connect your mobile device with a MHL cable to the
TV. With the MHL cable connected you can share
what's on your mobile device on the TV screen. Your
mobile device charges its battery at the same time.
The MHL connection is ideal for watching movies or
playing games from your mobile device on TV for a
longer time.
Charging
With the MHL cable connected, your device will
charge while the TV is switched on (not in standby).
MHL Cable
You need a passive MHL cable (HDMI to Micro USB)
to connect your mobile device to the TV. You might
need an extra adapter to connect to your mobile
device. To connect the MHL cable to the TV use
the HDMI 4 MHL connection.
MHL, Mobile High-Definition Link and the MHL Logo
are trademarks or registered trademarks of the MHL,
LLC.
73
Page 74

17
Games
17.1
What You Need
On this TV, you can play games…
• from the App Gallery in the Home menu
• from the Google Play Store in the Home menu
• from a connected Game Console
Games from the App Gallery or the Google Play Store
must be downloaded and installed on TV before you
can play them. Some games need a gamepad to play.
To install game apps from the Philips App Gallery or
the Google Play Store, the TV must be connected to
the Internet. You must agree to the Terms of Use to
use apps from the App Gallery. You must sign in with
a Google Account to use the Google Play apps and
Google Play Store.
17.2
Play a Game
From the Home menu
To start a game from the Home menu…
1 - Press HOME.
2 - Scroll down to Games , select a game and
press OK.
3 - Press BACK repeatedly or
press EXIT or stop the app with its dedicated
exit/stop button.
From a Game Console
To start a game from a Game Console…
1 - Switch on the Game Console.
2 - Press SOURCES and select a game console
or the name of the connection.
3 - Start the game.
4 - Press BACK repeatedly or
press EXIT or stop the app with its dedicated
exit/stop button.
For more information, in Help, select Keywords and
look up Game Console, connect.
74
Page 75

18
Ambilight
18.1
Ambilight Style
Follow Video
You can set Ambilight to follow the video or the audio
dynamics of a TV programme. Alternatively, you can
set Ambilight to show a preset colour style or you can
switch Ambilight off.
If you select Follow Video, you can select one of the
styles that follow the dynamics of the picture on your
TV screen.
To set the Ambilight Style…
1 - Press AMBILIGHT.
2 - Select Follow Video.
3 - Select the style you want.
4 - Press (left) to go back one step or
press BACK to close the menu.
The available Follow Video styles are…
• Standard - Ideal for day to day TV watching
• Natural - Follows the picture or sound as truthful
as possible
• Immersive - Ideal for action movies
• Vivid - Ideal for daylight conditions
• Rhytm - Based on audio dynamics
• Party - A mix of all Follow Audio styles, one after
the other
Follow Colour
You can set Ambilight to follow the video or the audio
dynamics of a TV programme. Alternatively, you can
set Ambilight to show a preset colour style or you can
switch Ambilight off.
If you select Follow Colour, you can select one of the
preset colour styles.
To set the Ambilight Style…
1 - Press AMBILIGHT.
2 - Select Follow Colour.
3 - Select the style you want.
4 - Press (left) to go back one step or
press BACK to close the menu.
The available Follow Colour styles are…
• Hot Lava - Red colour variations
• Deep Water - Blue colour variations
• Fresh Nature - Green colour variations
• ISF Warm White - Static colour
• Cool White - Static colour
Follow App
• Game - Ideal for gaming
• Comfort - Ideal for a quiet evening
• Relax - Ideal for a lounge feeling
Follow Audio
You can set Ambilight to follow the video or the audio
dynamics of a TV programme. Alternatively, you can
set Ambilight to show a preset colour style or you can
switch Ambilight off.
If you select Follow Audio, you can select one of the
styles that follow the dynamics of the sound.
To set the Ambilight Style…
1 - Press AMBILIGHT.
2 - Select Follow Audio.
3 - Select the style you want.
4 - Press (left) to go back one step or
press BACK to close the menu.
The available Follow Audio styles are…
This function is available when you control Ambilight
with an app.
To set the Ambilight Style…
1 - Press AMBILIGHT.
2 - Select Follow App.
3 - Follow the on-screen instruction.
4 - Press (left) to go back one step or
press BACK to close the menu.
18.2
Ambilight Off
To switch off Ambilight…
1 - Press AMBILIGHT.
2 - Select Off.
3 - Press (left) to go back one step or
press BACK to close the menu.
• Lumina - Mixes audio dynamics with video colours
• Colora - Based on audio dynamics
• Retro - Based on audio dynamics
• Spectrum - Based on audio dynamics
• Scanner - Based on audio dynamics
75
Page 76

18.3
Ambilight Settings
For more information, in Help, select Keywords and
look up Ambilight, Settings for more information.
76
Page 77

19
Using Now on TV
Top Picks
19.1
About Top Picks
With Top Picks your TV recommends…
• current TV programmes in Now on TV
• the latest rental videos in Video on Demand
• online TV services (Catch Up TV) in TV on
Demand
To enjoy Top Picks, connect your TV to the
Internet. Make sure you agree to the Terms of Use.
The Top Picks information and services are only
available in selected countries.
Terms of Use
To allow the TV to make these recommendations, you
must agree to the Terms of Use. To get personalised
recommendations based on your viewing habits,
make sure you checked the box for Serving your
personalized viewing recommendations .
To open the Terms of Use…
1 - Press TOP PICKS.
2 - Use navigation keys to select at the upper right
corner, select Terms of Use and press OK.
To open Now on TV…
1 - Press TOP PICKS to open the Top Picks
menu.
2 - Select Now on TV at the top of the screen
and press OK.
3 - Select More to open TV guide.
When you open Now on TV, the TV may need a few
seconds to refresh the page information.
19.3
TV on Demand
About TV on Demand
With TV on Demand , you can watch TV
programmes you missed or watch your favourite
programmes whenever it suits you best. This service is
also called Catch Up TV, Replay TV or Online TV.
Programmes available on TV on Demand are free to
watch.
You can let TV on Demand do some personalised
recommendations of programmes, based on the TV
installation and the programmes you watch regularly.
The icon will only appear at the top of the screen
when TV on Demand is available.
19.2
Now on TV
About Now on TV
With Now on TV , the TV recommends the most
popular programmes to watch at this moment.
The recommended programmes are selected from
the channels you installed. The selection is made
from channels of your country. Also, you can let Now
on TV do some personalised recommendations for
you, based on programmes you watch regularly.
To make the Now on TV information available…
• the Now on TV information must be available in your
country.
• the TV must have channels installed.
• the TV must be connected to the Internet.
• the TV Clock must be set to Automatic or Country
Dependent.
• you must accept the Terms of Use (You might have
accepted already when you connected to the
Internet.).
Using TV on Demand
To open TV on Demand…
1 - Press TOP PICKS to open the Top Picks
menu.
2 - Select TV on Demand at the top of the
screen and press OK.
3 - Select All Broadcast and press OK. You can
select a specific broadcaster if more than one is
available.
4 - Press BACK to close.
When you open TV on Demand, the TV may need a
few seconds to refresh the page information.
Once a programme started, you can use
the (Play) and (Pause) keys.
19.4
Video on Demand
77
Page 78

About Video on Demand
With Video on Demand , you can rent movies
from an online rental video store.
You can let Video on Demand do some personalised
recommendations of movies, based on your country,
the TV installation and the programmes you watch
regularly.
The icon will only appear at the top of the screen
when Video on Demand is available.
Payment
When you rent or buy a movie, you can pay the video
store securely with your credit card. Most video
stores ask you to create a login account the first time
you rent a movie.
Internet Traffic
Streaming a lot of videos may cause you to exceed
your monthly Internet traffic limit.
Using Video on Demand
To open Video on Demand…
1 - Press TOP PICKS to open the Top Picks
menu.
2 - Select Video on Demand at the top of the
screen and press OK.
3 - Select All Stores, Recommended,
or Popular for your preference.
4 - Press BACK to close.
When you open Video on Demand, the TV may need
a few seconds to refresh the page information.
You can select a specific video store if more than one
is available.
To rent a movie…
1 - Navigate the highlight on a movie poster. Limited
info will show after some seconds.
2 - Press OK to open the movie page of the video
store for a synopsis of the movie.
3 - Confirm your order.
4 - Make the payment on TV.
5 - Start watching. You can use the (Play)
and (Pause) keys.
78
Page 79

20
Netflix
If you have a Netflix membership subscription, you
can enjoy Netflix on this TV. Your TV must be
connected to the Internet. In your region, Netflix
might only come available with future software
updates.
To open Netflix, press
App. You can open Netflix immediately from a TV in
standby.
www.netflix.com
to open the Netflix
79
Page 80

21
Multi View
3 - Select Multi View: On on screen. The channel
you were watching appears in the small screen.
4 - Press or to switch channels in the
small screen.
21.1
Text and TV
You can watch a TV channel in the small screen of
Multi View when you're watching Text.
To watch a TV channel while watching Text…
1 - Press Multi View * or press to open TV
Menu.
2 - Select Multi View, and press OK.
3 - Select Multi View: On on screen. The channel
you were watching appears in the small screen.
To hide the small screen, select Multi View: Off on
screen.
* If Multi View key is available on your remote
control
21.2
HDMI and TV
You can watch a TV channel in the small screen of
Multi View when you're watching video from a
connected HDMI device.
To watch a TV channel while watching video from
connected HDMI device*…
1 - Press Multi View * or press to open TV
Menu.
2 - Select Multi View, and press OK.
3 - Select Multi View: On on screen. The channel
you were watching appears in the small screen.
To hide the small screen, select Multi View: Off on
screen.
Note: Not every Nettv app can support Multi View
with a TV channel, if the app cannot support Multi
View, then TV will show a message: Multi View is not
supported.
* If Multi View key is available on your remote
control
21.4
Nettv and HDMI
You can watch a Nettv app in App Gallery in the
small screen of Multi View when you're watching
video from a connected HDMI device.
1 - Press Multi View * or press to open TV
Menu.
2 - Select Multi View, and press OK.
3 - Select Multi View: On on screen.
To hide the small screen, select Multi View: Off on
screen.
Note: Not every Nettv app can support Multi View
with a TV channel, if the app cannot support Multi
View, then TV will show a message: Multi View is not
supported.
* If Multi View key is available on your remote
control
To hide the small screen, select Multi View: Off on
screen.
Note: You can only watch TV channel image in Multi
view mode, the audio of TV channel will be mute.
* If Multi View key is available on your remote
control
21.3
Nettv and TV
You can watch a TV channel in the small screen of
Multi View when you're watching a Nettv app in App
Gallery.
To watch a TV channel while watching a Nettv app in
App Gallery*…
1 - Press Multi View * or press to open TV
Menu.
2 - Select Multi View, and press OK.
80
Page 81

22
Software
22.1
Update Software
Update from Internet
If the TV is connected to the Internet, you may receive
a message to update the TV software. You need a
high-speed (broadband) Internet connection. If you
receive this message, we recommend you to carry out
the update.
With the message on screen, select Update and
follow the instructions on-screen.
You can also look for a software update yourself.
During the software update, there is no picture and
the TV will switch off and on again. This might happen
several times. The update can take a few minutes.
Wait until the TV picture comes back up. Do not press
the power switch on the TV or on the remote
control during the software update.
To look for a software update yourself…
1 - Press , select All Settings and press OK.
2 - Select Update Software > Search for Updates.
3 - Select Internet.
4 - The TV will look for an update on the Internet.
5 - If an update is available, you can update the
software right away.
6 - A software update can take several minutes. Do
not press the key on the TV or remote control.
7 - When the update is done, the TV will return to the
channel you were watching.
1 - Insert the USB flash drive into your computer.
2 - On the USB flash drive, locate the
file update.htm and double click it.
3 - Click Send ID.
4 - If new software is available, download the .zip
file.
5 - After the download, unzip the file and copy the
file autorun.upg onto the USB flash drive. Do not
place this file in a folder.
Update the TV software
1 - Insert the USB flash drive into the TV again. The
update starts automatically.
2 - A software update can take several minutes. Do
not press the key on the TV or remote control. Do
not remove the USB flash drive.
3 - When the update is done, the TV will return to the
channel you were watching.
If a power cut occurs during the update, never
remove the USB flash drive from the TV. When the
power returns, the update will continue.
To prevent an accidental update of the TV software,
delete the autorun.upg file from the USB flash drive.
22.2
Software Version
To view the current TV software version…
1 - Press , select All Settings and press OK.
2 - Select Update Software > Current Software
Info and press OK.
3 - The version, release notes and creation date are
shown. Also, the Netflix ESN Number is shown if
available.
4 - Press (left) repeatedly if necessary, to close
the menu.
Update from USB
It might be necessary to update the TV software.
You need a computer with an high-speed Internet
connection and a USB flash drive to upload the
software on the TV. Use a USB flash drive with at least
500MB free space. Make sure that write protection is
switched off.
To update the TV software…
1 - Press , select All Settings and press OK.
2 - Select Update Software > Search for Updates.
3 - Select USB and press OK.
Identify the TV
1 - Insert the USB flash drive into one of the USB
connections of the TV.
2 - Select Write to USB and press OK. An
identification file is written on the USB flash drive.
Download the software
22.3
Open Source Software
This television contains open source software. TP
Vision Europe B.V. hereby offers to deliver, upon
request, a copy of the complete corresponding
source code for the copyrighted open source
software packages used in this product for which such
offer is requested by the respective licences.
This offer is valid up to three years after product
purchase to anyone in receipt of this information.
To obtain the source code, please write in English to .
. .
open.source@tpvision.com
81
Page 82

22.4
Open Source License
About Open Source License
README for the source code of the parts of TP Vision
Netherlands B.V. TV software that fall under open
source licenses.
This is a document describing the distribution of the
source code used on the TP Vision Netherlands B.V.
TV, which fall either under the GNU General Public
License (the GPL), or the GNU Lesser General Public
License (the LGPL), or any other open source license.
Instructions to obtain copies of this software can be
found in the Directions For Use.
TP Vision Netherlands B.V. MAKES NO WARRANTIES
WHATSOEVER, EITHER EXPRESS OR IMPLIED,
INCLUDING ANY WARRANTIES OF
MERCHANTABILITY OR FITNESS FOR A PARTICULAR
PURPOSE, REGARDING THIS SOFTWARE. TP Vision
Netherlands B.V. offers no support for this software.
The preceding does not affect your warranties and
statutory rights regarding any TP Vision Netherlands
B.V. product(s) you purchased. It only applies to this
source code made available to you.
Open Source
Android (6+)
This tv contains the Android Marshmello Software.
Android is a Linux-based operating system designed
primarily for touchscreen mobile devices such as
smartphones and tablet computers. This software will
also be reused in TPVision Android based TV's.The
original download site for this software is :
https://android.googlesource.com/This piece of
software is made available under the terms and
conditions of the Apache license version 2, which can
be found below. Android APACHE License Version 2
(http://source.android.com/source/licenses.html) This
includes all external sources used by offical Android
AOSP.
Software Foundation, but the instance of code that it
refers to (the linux kernel) is copyrighted by me and
others who actually wrote it. Also note that the only
valid version of the GPL as far as the kernel is
concerned is _this_ particular version of the license (ie
v2, not v2.2 or v3.x or whatever), unless explicitly
otherwise stated. Linus Torvalds"
libcurl (7.21.7)
libcurl is a free and easy-to-use client-side URL
transfer library, supporting DICT, FILE, FTP, FTPS,
Gopher, HTTP, HTTPS, IMAP, IMAPS, LDAP, LDAPS,
POP3, POP3S, RTMP, RTSP, SCP, SFTP, SMTP,
SMTPS, Telnet and TFTP. libcurl supports SSL
certificates, HTTP POST, HTTP PUT, FTP uploading,
HTTP form based upload, proxies, cookies,
user+password authentication (Basic, Digest, NTLM,
Negotiate, Kerberos), file transfer resume, http proxy
tunneling and more!The original download site for this
software is : http://curl.haxx.se/libcurl/COPYRIGHT
AND PERMISSION NOTICECopyright (c) 1996 - 2010,
Daniel Stenberg, daniel@haxx.se.All rights
reserved.Permission to use, copy, modify, and
distribute this software for any purposewith or
without fee is hereby granted, provided that the
above copyrightnotice and this permission notice
appear in all copies.THE SOFTWARE IS PROVIDED
"AS IS", WITHOUT WARRANTY OF ANY KIND,
EXPRESS ORIMPLIED, INCLUDING BUT NOT LIMITED
TO THE WARRANTIES OF
MERCHANTABILITY,FITNESS FOR A PARTICULAR
PURPOSE AND NONINFRINGEMENT OF THIRD
PARTY RIGHTS. INNO EVENT SHALL THE AUTHORS
OR COPYRIGHT HOLDERS BE LIABLE FOR ANY
CLAIM,DAMAGES OR OTHER LIABILITY, WHETHER IN
AN ACTION OF CONTRACT, TORT OROTHERWISE,
ARISING FROM, OUT OF OR IN CONNECTION WITH
THE SOFTWARE OR THE USEOR OTHER DEALINGS
IN THE SOFTWARE.Except as contained in this notice,
the name of a copyright holder shall notbe used in
advertising or otherwise to promote the sale, use or
other dealingsin this Software without prior written
authorization of the copyright holder.
linux kernel (3.10.79)
This tv contains the Linux Kernel.The original
download site for this software is :
http://www.kernel.org/.This piece of software is made
available under the terms and conditions of the GPL
v2 license, which can be found below. Additionally,
following exception applies : "NOTE! This copyright
does *not* cover user programs that use kernel
services by normal system calls - this is merely
considered normal use of the kernel, and does *not*
fall under the heading of "derived work". Also note
that the GPL below is copyrighted by the Free
libfreetype (2.4.2)
FreeType is a software development library, available
in source and binary forms, used to render text on to
bitmaps and provides support for other font-related
operationsThe original download site for this software
is : https://github.com/julienr/libfreetypeandroidFreetype License
libjpeg (8a)
This package contains C software to implement JPEG
image encoding, decoding, and transcoding.This
software is based in part on the work of the
82
Page 83

Independent JPEG Group.----------------------The
authors make NO WARRANTY or representation,
either express or implied,with respect to this software,
its quality, accuracy, merchantability, orfitness for a
particular purpose. This software is provided "AS IS",
and you,its user, assume the entire risk as to its
quality and accuracy.This software is copyright (C)
1991-1998, Thomas G. Lane.All Rights Reserved
except as specified below.Permission is hereby
granted to use, copy, modify, and distribute
thissoftware (or portions thereof) for any purpose,
without fee, subject to theseconditions:(1) If any part
of the source code for this software is distributed,
then thisREADME file must be included, with this
copyright and no-warranty noticeunaltered; and any
additions, deletions, or changes to the original
filesmust be clearly indicated in accompanying
documentation.(2) If only executable code is
distributed, then the accompanyingdocumentation
must state that "this software is based in part on the
work ofthe Independent JPEG Group".(3) Permission
for use of this software is granted only if the user
acceptsfull responsibility for any undesirable
consequences; the authors acceptNO LIABILITY for
damages of any kind.These conditions apply to any
software derived from or based on the IJG code,not
just to the unmodified library. If you use our work, you
ought toacknowledge us.Permission is NOT granted
for the use of any IJG author's name or company
namein advertising or publicity relating to this
software or products derived fromit. This software
may be referred to only as "the Independent JPEG
Group'ssoftware".We specifically permit and
encourage the use of this software as the basis
ofcommercial products, provided that all warranty or
liability claims areassumed by the product vendor.
libpng (1.4.1)
libpng is the official Portable Network Graphics (PNG)
reference library (originally called pnglib). It is a
platform-independent library that contains C
functions for handling PNG images. It supports almost
all of PNG's features, is extensible.The original
download site for this software is :
https://github.com/julienr/libpng-androidlibpng
license
dvbsnoop (1.2)
dvbsnoop is a DVB / MPEG stream analyzer
program.For generating CRC32 values required for
composing PAT, PMT, EIT sectionsThe original
download site for this software is : https://github.com
/a4tunado/dvbsnoop/blob/master/src/misc/crc32.cG
PL v2
http://dvbsnoop.sourceforge.net/dvbsnoop.html
ezxml (0.8.6)
ezXML is a C library for parsing XML documents.The
original download site for this software is :
http://ezxml.sourceforge.net.Copyright 2004, 2005
Aaron Voisine. This piece of software is made
available under the terms and conditions of the MIT
license, which can be found below.
gSoap (2.7.15)
The gSOAP toolkit is an open source C and C++
software development toolkit for SOAP/XML Web
services and generic (non-SOAP) C/C++ XML data
bindings.Part of the software embedded in this
product is gSOAP software. Portions created by
gSOAP are Copyright 2001-2009 Robert A. van
Engelen, Genivia inc. All Rights Reserved. THE
SOFTWARE IN THIS PRODUCT WAS IN PART
PROVIDED BY GENIVIA INC AND ANY EXPRESS OR
IMPLIED WARRANTIES, INCLUDING, BUT NOT
LIMITED TO, THE IMPLIED WARRANTIES OF
MERCHANTABILITY AND FITNESS FOR A
PARTICULAR PURPOSE ARE DISCLAIMED. IN NO
EVENT SHALL THE AUTHOR BE LIABLE FOR ANY
DIRECT, INDIRECT, INCIDENTAL, SPECIAL,
EXEMPLARY, OR CONSEQUENTIAL DAMAGES
(INCLUDING, BUT NOT LIMITED TO, PROCUREMENT
OF SUBSTITUTE GOODS OR SERVICES; LOSS OF
USE, DATA, OR PROFITS; OR BUSINESS
INTERRUPTION) HOWEVER CAUSED AND ON ANY
THEORY OF LIABILITY, WHETHER IN CONTRACT,
STRICT LIABILITY, OR TORT (INCLUDING
NEGLIGENCE OR OTHERWISE) ARISING IN ANY WAY
OUT OF THE USE OF THIS SOFTWARE, EVEN IF
ADVISED OF THE POSSIBILITY OF SUCH DAMAGE.
restlet (2.1.7)
Restlet is a lightweight, comprehensive, open source
REST framework for the Java platform. Restlet is
suitable for both server and client Web applications. It
supports major Internet transport, data format, and
service description standards like HTTP and HTTPS,
SMTP, XML, JSON, Atom, and WADL.The original
download site for this software is :
http://restlet.orgThis piece of software is made
available under the terms and conditions of the
Apache License version 2.
FaceBook SDK (3.0.1)
This TV contains Facebook SDK. The Facebook SDK
for Android is the easiest way to integrate your
Android app with Facebook's platform. The SDK
provides support for Login with Facebook
authentication, reading and writing to Facebook APIs
and support for UI elements such as pickers and
dialogs.The original download site for this software is :
83
Page 84

https://developer.facebook.com/docs/androidThis
piece of software is made available under the terms
and conditions of the Apache License version 2.
ffmpeg (2.1.3)
This TV uses FFmpeg. FFmpeg is a complete, cross-
platform solution to record, convert and stream audio
and video.The original download site for this software
is : http://ffmpeg.orgThis piece of software is made
available under the terms and conditions of the GPL
v2 license, which can be found below.
gson (2.3)
This TV uses gson. Gson is a Java library that can be
used to convert Java Objects into their JSON
representation. It can also be used to convert a JSON
string to an equivalent Java object. Gson can work
with arbitrary Java objects including pre-existing
objects that you do not have source-code of.The
original download site for this software is :
https://code.google.com/p/google-gson/This piece
of software is made available under the terms and
conditions of the Apache License 2.0
This software includes an implementation of the AES
Cipher, licensed by Brian GladmanThe original
download site for this software is :
http://www.gladman.me.uk/This piece of software is
licensed by Brian Gladman
libUpNp (1.2.1)
TomCrypt (1.1)
iwedia stack is using tomcrypt for sw decryptionThe
original download site for this software is : http://man
pages.ubuntu.com/manpages/saucy/man3/libtomcry
pt.3.htmlThis piece of software is made available
under the terms and conditions of the DO WHAT THE
FUCK YOU WANT TO PUBLIC LICENSE
u-boot (2011-12)
U-boot is a boot loader for embedded boards based
on ARM, MIPS and other processors, which can be
installed in a boot ROM and used to initialize and test
the hardware or to download and run application
codeThis piece of software is made available under
the terms and conditions of the GPL v2 license, which
can be found below.
AsyncHttpclient (1.4.6)
The original download site for this software is :
http://loopj.com/android-async-http/This piece of
software is made available under the terms and
conditions of the APACHE LICENSE 2.0
httpclient-4.4.1.1 (4.4.1.1)
This is needed to import
cz.msebera.android.httpclient used by
AssyncHttpClientThe original download site for this
software is : http://mvnrepository.com/artifact/cz.mse
bera.android/httpclient/4.4.1.1This piece of software is
made available under the terms and conditions of the
APACHE LICENSE 2.0
The original download site for this software is :
http://upnp.sourceforge.net/This piece of software is
made available under the terms and conditions of the
BSD.
live555 (0.82)
Live555 provides RTP/RTCP/RTSP client.The original
download site for this software is :
http://www.live555.comThis piece of software is
made available under the terms and conditions of the
LGPL v2.1 license, which can be found below.
dnsmasq
Dnsmasq is a lightweight, easy to configure DNS
forwarder and DHCP serverThe original download site
for this software is : https://android.googlesource.com
/platform/external/dnmasqThis piece of software is
made available under the terms and conditions of the
GPL v2 license, which can be found below.
Jackson Parser (2.x)
Ipepg client uses Jackson Parser for string
manipualation.The original download site for this
software is : https://github.com/FasterXML/jacksoncoreThis piece of software is made available under
the terms and conditions of the APACHE LICENSE 2.0
Opera Web Browser (SDK 3.5)
This TV contains Opera Browser Software.
dlmalloc (2.7.2)
Opera uses Doug Lea's memory allocatorThe original
download site for this software is :
http://gee.cs.oswego.edu/dl/html/malloc.html
double-conversion
Opera uses double-conversion library by Florian
Loitsch, faster double : string conversions (dtoa and
84
Page 85

strtod).The original download site for this software is :
http://code.google.com/p/doubleconversionCopyright 2006-2011, the V8 project
authors. All rights reserved.Redistribution and use in
source and binary forms, with or withoutmodification,
are permitted provided that the following conditions
aremet: * Redistributions of source code must retain
the above copyright notice, this list of conditions and
the following disclaimer. * Redistributions in binary
form must reproduce the above copyright notice, this
list of conditions and the following disclaimer in the
documentation and/or other materials provided with
the distribution. * Neither the name of Google Inc. nor
the names of its contributors may be used to endorse
or promote products derived from this software
without specific prior written permission.THIS
SOFTWARE IS PROVIDED BY THE COPYRIGHT
HOLDERS AND CONTRIBUTORS"AS IS" AND ANY
EXPRESS OR IMPLIED WARRANTIES, INCLUDING,
BUT NOTLIMITED TO, THE IMPLIED WARRANTIES OF
MERCHANTABILITY AND FITNESS FORA
PARTICULAR PURPOSE ARE DISCLAIMED. IN NO
EVENT SHALL THE COPYRIGHTOWNER OR
CONTRIBUTORS BE LIABLE FOR ANY DIRECT,
INDIRECT, INCIDENTAL,SPECIAL, EXEMPLARY, OR
CONSEQUENTIAL DAMAGES (INCLUDING, BUT
NOTLIMITED TO, PROCUREMENT OF SUBSTITUTE
GOODS OR SERVICES; LOSS OF USE,DATA, OR
PROFITS; OR BUSINESS INTERRUPTION) HOWEVER
CAUSED AND ON ANYTHEORY OF LIABILITY,
WHETHER IN CONTRACT, STRICT LIABILITY, OR
TORT(INCLUDING NEGLIGENCE OR OTHERWISE)
ARISING IN ANY WAY OUT OF THE USEOF THIS
SOFTWARE, EVEN IF ADVISED OF THE POSSIBILITY
OF SUCH DAMAGE.
EMX (0.9c)
Opera uses EMX, which is an OS/2 port of the gcc
suite. Opera uses modified versions of the sprintf and
sscanf methods from this C library.* The emx libraries
are not distributed under the GPL. Linking an *
application with the emx libraries does not cause the
executable * to be covered by the GNU General
Public License. You are allowed * to change and copy
the emx library sources if you keep the copyright *
message intact. If you improve the emx libraries,
please send your * enhancements to the emx author
(you should copyright your * enhancements similar to
the existing emx libraries).
freetype (2.4.8)
Opera uses freetype FreeType 2 is a software-font
engine that is designed to be small, efficient, highly
customizable and portable, while capable of
producing high-quality output (glyph images).The
original download site for this software is : http://ww
w.freetype.org/freetype2/index.htmlFreetype License
HKSCS (2008)
Opera uses HKSCS: The Government of the Hong
Kong Special Administrative Region HKSCS
mappingsThe original download site for this software
is : http://www.ogcio.gov.hkBefore downloading the
Software or Document provided on this Web page,
you should read the following terms (Terms of Use).
By downloading the Software and Document, you are
deemed to agree to these terms.1. The Government of
the Hong Kong Special Administrative Region
(HKSARG) has the right to amend or vary the terms
under this Terms of Use from time to time at its sole
discretion.2. By using the Software and Document,
you irrevocably agree that the HKSARG may from
time to time vary this Terms of Use without further
notice to you and you also irrevocably agree to be
bound by the most updated version of the Terms of
Use.3. You have the sole responsibility of obtaining
the most updated version of the Terms of Use which
is available in the "Digital 21" Web site (http://www.og
cio.gov.hk/en/business/tech_promotion/ccli/terms/t
erms.htm).4. By accepting this Terms of Use, HKSARG
shall grant you a non-exclusive license to use the
Software and Document for any purpose, subject to
clause 5 below.5. You are not allowed to make copies
of the Software and Document except it is incidental
to and necessary for the normal use of the Software.
You are not allowed to adapt or modify the Software
and Document or to distribute, sell, rent, or make
available to the public the Software and Document,
including copies or an adaptation of them.6. The
Software and Document are protected by copyright.
The licensors of the Government of Hong Kong
Special Administrative Region are the owners of all
copyright works in the Software and Document. All
rights reserved.7. You understand and agree that use
of the Software and Document are at your sole risk,
that any material and/or data downloaded or
otherwise obtained in relation to the Software and
Document is at your discretion and risk and that you
will be solely responsible for any damage caused to
your computer system or loss of data or any other
loss that results from the download and use of the
Software and Document in any manner whatsoever.8.
In relation to the Software and Document, HKSARG
hereby disclaims all warranties and conditions,
including all implied warranties and conditions of
merchantability, fitness for a particular purpose and
non-infringement.9. HKSARG will not be liable for any
direct, indirect, incidental, special or consequential
loss of any kind resulting from the use of or the
inability to use the Software and Document even if
HKSARG has been advised of the possibility of such
loss.10. You agree not to sue HKSARG and agree to
indemnify, defend and hold harmless HKSARG, its
officers and employees from any and all third party
claims, liability, damages and/or costs (including, but
not limited to, legal fees) arising from your use of the
85
Page 86

Software and Document, your violation of the Terms
of Use or infringement of any intellectual property or
other right of any person or entity.11. The Terms of Use
will be governed by and construed in accordance
with the laws of Hong Kong.12. Any waiver of any
provision of the Terms of Use will be effective only if
in writing and signed by HKSARG or its
representative.13. If for any reason a court of
competent jurisdiction finds any provision or portion
of the Terms of Use to be unenforceable, the
remainder of the Terms of Use will continue in full
force and effect.14. The Terms of Use constitute the
entire agreement between the parties with respect to
the subject matter hereof and supersedes and
replaces all prior or contemporaneous
understandings or agreements, written or oral,
regarding such subject matter.15.In addition to the
licence granted in Clause 4, HKSARG hereby grants
you a non-exclusive limited licence to reproduce and
distribute the Software and Document with the
following conditions:(i) not for financial gain unless it
is incidental;(ii) reproduction and distribution of the
Software and Document in complete and unmodified
form; and(iii) when you distribute the Software and
Document, you agree to attach the Terms of Use and
a statement that the latest version of the Terms of
Use is available from the "Office of the Government
Chief Information Officer" Web site (http://www.ogcio
.gov.hk/en/business/tech_promotion/ccli/terms/term
s.htm).
IANA (Dec 30 2013)
Opera uses Internet Assigned Numbers Authority:
Character encoding tag names and numbers.The
original download site for this software is :
https://www.iana.org
ICU (3)
Opera uses ICU : International Components for
Unicode: Mapping table for GB18030The original
download site for this software is : http://site.icu-proj
ect.org/http://source.icuproject.org/repos/icu/icu/trunk/license.html
MozTW (1.0)
Opera uses MoxTW : MozTW project: Big5-2003
mapping tables.The original download site for this
software is : https://moztw.orgThis piece of software
is made available under the terms and conditions of
CCPL
NPAPI (0.27)
Opera uses NPAPI : Netscape 4 Plugin API: npapi.h,
npfunctions.h, npruntime.h and nptypes.h. Distributed
as part of the Netscape 4 Plugin SDK.The original
download site for this software is : wiki.mozilla.orgThis
piece of software is made available under the terms
and conditions of mozilla public licencse (MPL) as
described below.
openssl (1.0.0g)
Opera uses OpenSSL, developed by the OpenSSL
project and based on SSLeay.The original download
site for this software is : www.openssl.orgOpenSSL
license
Unicode (4.0)
Opera uses Unicode : Data from the Unicode
character database.The original download site for this
software is : www.unicode.orghttp://www.unicode.org
/copyright.html
Webp (0.2.0)
Opera uses Webp : libwebp is a library for decoding
images in the WebP format. Products may use it to
decode WebP images. The turbo servers will
eventually re-decode images to WebP.The original
download site for this software is :
https://developers.google.com/speed/webp/?csw=1
https://chromium.googlesource.com/webm/libwebp/
Additional IP Rights Grant (Patents)"This
implementation" means the copyrightable works
distributed byGoogle as part of the WebM
Project.Google hereby grants to you a perpetual,
worldwide, non-exclusive,no-charge, royalty-free,
irrevocable (except as stated in this section)patent
license to make, have made, use, offer to sell, sell,
import,transfer, and otherwise run, modify and
propagate the contents of thisimplementation of VP8,
where such license applies only to those
patentclaims, both currently owned by Google and
acquired in the future,licensable by Google that are
necessarily infringed by thisimplementation of VP8.
This grant does not include claims that would
beinfringed only as a consequence of further
modification of thisimplementation. If you or your
agent or exclusive licensee institute ororder or agree
to the institution of patent litigation against anyentity
(including a cross-claim or counterclaim in a lawsuit)
allegingthat this implementation of VP8 or any code
incorporated within thisimplementation of VP8
constitutes direct or contributory patentinfringement,
or inducement of patent infringement, then any
patentrights granted to you under this License for this
implementation of VP8shall terminate as of the date
such litigation is filed.
Zlib (1.2.3)
86
Page 87

Opera uses zlib as compression libraryThe original
download site for this software is :
http://zlib.netCopyright (C) 1995-2004 Jean-loup
Gailly and Mark Adler This software is provided 'as-is',
without any express or implied warranty. In no event
will the authors be held liable for any damages arising
from the use of this software. Permission is granted to
anyone to use this software for any purpose,
including commercial applications, and to alter it and
redistribute it freely, subject to the following
restrictions: 1. The origin of this software must not be
misrepresented; you must not claim that you wrote
the original software. If you use this software in a
product, an acknowledgment in the product
documentation would be appreciated but is not
required. 2. Altered source versions must be plainly
marked as such, and must not be misrepresented as
being the original software. 3. This notice may not be
removed or altered from any source distribution. Jeanloup Gailly jloup@gzip.org Mark Adler
madler@alumni.caltech.edu
designed to make sure that you have the freedom to
distribute copies of free software (and charge for this
service if you wish), that you receive source code or
can get it if you want it, that you can change the
software or use pieces of it in new free programs; and
that you know you can do these things.
To protect your rights, we need to make restrictions
that forbid anyone to deny you these rights or to ask
you to surrender the rights. These restrictions
translate to certain responsibilities for you if you
distribute copies of the software, or if you modify it.
For example, if you distribute copies of such a
program, whether gratis or for a fee, you must give
the recipients all the rights that you have. You must
make sure that they, too, receive or can get the
source code. And you must show them these terms
so they know their rights.
We protect your rights with two steps: (1) copyright
the software, and (2) offer you this license which
gives you legal permission to copy, distribute and/or
modify the software.
TPVision is grateful to the groups and individuals
above for their contributions.
_________________________________
GNU GENERAL PUBLIC LICENSE
Version 2, June 1991
Copyright (C) 1989, 1991 Free Software Foundation,
Inc.
51 Franklin Street, Fifth Floor, Boston, MA
02110-1301, USA
Everyone is permitted to copy and distribute verbatim
copies
of this license document, but changing it is not
allowed.
Preamble
The licenses for most software are designed to take
away your freedom to share and change it. By
contrast, the GNU General Public License is intended
to guarantee your freedom to share and change free
software--to make sure the software is free for all its
users. This General Public License applies to most of
the Free Software Foundation's software and to any
other program whose authors commit to using it.
(Some other Free Software Foundation software is
covered by the GNU Lesser General Public License
instead.) You can apply it to your programs, too.
When we speak of free software, we are referring to
freedom, not price. Our General Public Licenses are
Also, for each author's protection and ours, we want
to make certain that everyone understands that there
is no warranty for this free software. If the software is
modified by someone else and passed on, we want
its recipients to know that what they have is not the
original, so that any problems introduced by others
will not reflect on the original authors' reputations.
Finally, any free program is threatened constantly by
software patents. We wish to avoid the danger that
redistributors of a free program will individually obtain
patent licenses, in effect making the program
proprietary. To prevent this, we have made it clear
that any patent must be licensed for everyone's free
use or not licensed at all.
The precise terms and conditions for copying,
distribution and modification follow.
TERMS AND CONDITIONS FOR COPYING,
DISTRIBUTION AND MODIFICATION
Activities other than copying, distribution and
modification are not covered by this License; they are
outside its scope. The act of running the Program is
not restricted, and the output from the Program is
covered only if its contents constitute a work based
on the Program (independent of having been made
by running the Program). Whether that is true
depends on what the Program does.
You may charge a fee for the physical act of
transferring a copy, and you may at your option offer
warranty protection in exchange for a fee.
a) You must cause the modified files to carry
prominent notices stating that you changed the files
and the date of any change.
b) You must cause any work that you distribute or
publish, that in whole or in part contains or is derived
87
Page 88

from the Program or any part thereof, to be licensed
as a whole at no charge to all third parties under the
terms of this License.
c) If the modified program normally reads commands
interactively when run, you must cause it, when
started running for such interactive use in the most
ordinary way, to print or display an announcement
including an appropriate copyright notice and a
notice that there is no warranty (or else, saying that
you provide a warranty) and that users may
redistribute the program under these conditions, and
telling the user how to view a copy of this License.
(Exception: if the Program itself is interactive but does
not normally print such an announcement, your work
based on the Program is not required to print an
announcement.)
These requirements apply to the modified work as a
whole. If identifiable sections of that work are not
derived from the Program, and can be reasonably
considered independent and separate works in
themselves, then this License, and its terms, do not
apply to those sections when you distribute them as
separate works. But when you distribute the same
sections as part of a whole which is a work based on
the Program, the distribution of the whole must be on
the terms of this License, whose permissions for other
licensees extend to the entire whole, and thus to
each and every part regardless of who wrote it.
Thus, it is not the intent of this section to claim rights
or contest your rights to work written entirely by you;
rather, the intent is to exercise the right to control the
distribution of derivative or collective works based on
the Program.
In addition, mere aggregation of another work not
based on the Program with the Program (or with a
work based on the Program) on a volume of a storage
or distribution medium does not bring the other work
under the scope of this License.
a) Accompany it with the complete corresponding
machine-readable source code, which must be
distributed under the terms of Sections 1 and 2 above
on a medium customarily used for software
interchange; or,
b) Accompany it with a written offer, valid for at least
three years, to give any third party, for a charge no
more than your cost of physically performing source
distribution, a complete machine-readable copy of
the corresponding source code, to be distributed
under the terms of Sections 1 and 2 above on a
medium customarily used for software interchange;
or,
c) Accompany it with the information you received as
to the offer to distribute corresponding source code.
(This alternative is allowed only for noncommercial
distribution and only if you received the program in
object code or executable form with such an offer, in
accord with Subsection b above.)
The source code for a work means the preferred form
of the work for making modifications to it. For an
executable work, complete source code means all the
source code for all modules it contains, plus any
associated interface definition files, plus the scripts
used to control compilation and installation of the
executable. However, as a special exception, the
source code distributed need not include anything
that is normally distributed (in either source or binary
form) with the major components (compiler, kernel,
and so on) of the operating system on which the
executable runs, unless that component itself
accompanies the executable.
If distribution of executable or object code is made by
offering access to copy from a designated place, then
offering equivalent access to copy the source code
from the same place counts as distribution of the
source code, even though third parties are not
compelled to copy the source along with the object
code.
If any portion of this section is held invalid or
unenforceable under any particular circumstance, the
balance of the section is intended to apply and the
section as a whole is intended to apply in other
circumstances.
It is not the purpose of this section to induce you to
infringe any patents or other property right claims or
to contest validity of any such claims; this section has
the sole purpose of protecting the integrity of the free
software distribution system, which is implemented
by public license practices. Many people have made
generous contributions to the wide range of software
distributed through that system in reliance on
consistent application of that system; it is up to the
author/donor to decide if he or she is willing to
distribute software through any other system and a
licensee cannot impose that choice.
This section is intended to make thoroughly clear
what is believed to be a consequence of the rest of
this License.
Each version is given a distinguishing version number.
If the Program specifies a version number of this
License which applies to it and "any later version",
you have the option of following the terms and
conditions either of that version or of any later version
published by the Free Software Foundation. If the
Program does not specify a version number of this
License, you may choose any version ever published
by the Free Software Foundation.
NO WARRANTY
________________________________
GNU LESSER GENERAL PUBLIC LICENSE
Version 2.1, February 1999
88
Page 89

Copyright (C) 1991, 1999 Free Software Foundation,
Inc.
which gives you legal permission to copy, distribute
and/or modify the library.
51 Franklin Street, Fifth Floor, Boston, MA
02110-1301 USA
Everyone is permitted to copy and distribute verbatim
copies
of this license document, but changing it is not
allowed.
[This is the first released version of the Lesser GPL. It
also counts as the successor of the GNU Library
Public License, version 2, hence the version number
2.1.]
Preamble
The licenses for most software are designed to take
away your freedom to share and change it. By
contrast, the GNU General Public Licenses are
intended to guarantee your freedom to share and
change free software--to make sure the software is
free for all its users.
This license, the Lesser General Public License,
applies to some specially designated software
packages--typically libraries--of the Free Software
Foundation and other authors who decide to use it.
You can use it too, but we suggest you first think
carefully about whether this license or the ordinary
General Public License is the better strategy to use in
any particular case, based on the explanations below.
When we speak of free software, we are referring to
freedom of use, not price. Our General Public
Licenses are designed to make sure that you have the
freedom to distribute copies of free software (and
charge for this service if you wish); that you receive
source code or can get it if you want it; that you can
change the software and use pieces of it in new free
programs; and that you are informed that you can do
these things.
To protect your rights, we need to make restrictions
that forbid distributors to deny you these rights or to
ask you to surrender these rights. These restrictions
translate to certain responsibilities for you if you
distribute copies of the library or if you modify it.
For example, if you distribute copies of the library,
whether gratis or for a fee, you must give the
recipients all the rights that we gave you. You must
make sure that they, too, receive or can get the
source code. If you link other code with the library,
you must provide complete object files to the
recipients, so that they can relink them with the library
after making changes to the library and recompiling it.
And you must show them these terms so they know
their rights.
We protect your rights with a two-step method: (1) we
copyright the library, and (2) we offer you this license,
To protect each distributor, we want to make it very
clear that there is no warranty for the free library.
Also, if the library is modified by someone else and
passed on, the recipients should know that what they
have is not the original version, so that the original
author's reputation will not be affected by problems
that might be introduced by others.
Finally, software patents pose a constant threat to the
existence of any free program. We wish to make sure
that a company cannot effectively restrict the users of
a free program by obtaining a restrictive license from
a patent holder. Therefore, we insist that any patent
license obtained for a version of the library must be
consistent with the full freedom of use specified in
this license.
Most GNU software, including some libraries, is
covered by the ordinary GNU General Public License.
This license, the GNU Lesser General Public License,
applies to certain designated libraries, and is quite
different from the ordinary General Public License.
We use this license for certain libraries in order to
permit linking those libraries into non-free programs.
When a program is linked with a library, whether
statically or using a shared library, the combination of
the two is legally speaking a combined work, a
derivative of the original library. The ordinary General
Public License therefore permits such linking only if
the entire combination fits its criteria of freedom. The
Lesser General Public License permits more lax
criteria for linking other code with the library.
We call this license the "Lesser" General Public
License because it does Less to protect the user's
freedom than the ordinary General Public License. It
also provides other free software developers Less of
an advantage over competing non-free programs.
These disadvantages are the reason we use the
ordinary General Public License for many libraries.
However, the Lesser license provides advantages in
certain special circumstances.
For example, on rare occasions, there may be a
special need to encourage the widest possible use of
a certain library, so that it becomes a de-facto
standard. To achieve this, non-free programs must be
allowed to use the library. A more frequent case is
that a free library does the same job as widely used
non-free libraries. In this case, there is little to gain by
limiting the free library to free software only, so we
use the Lesser General Public License.
In other cases, permission to use a particular library in
non-free programs enables a greater number of
people to use a large body of free software. For
example, permission to use the GNU C Library in nonfree programs enables many more people to use the
whole GNU operating system, as well as its variant,
the GNU/Linux operating system.
89
Page 90

Although the Lesser General Public License is Less
protective of the users' freedom, it does ensure that
the user of a program that is linked with the Library
has the freedom and the wherewithal to run that
program using a modified version of the Library.
The precise terms and conditions for copying,
distribution and modification follow. Pay close
attention to the difference between a "work based on
the library" and a "work that uses the library". The
former contains code derived from the library,
whereas the latter must be combined with the library
in order to run.
TERMS AND CONDITIONS FOR COPYING,
DISTRIBUTION AND MODIFICATION
A "library" means a collection of software functions
and/or data prepared so as to be conveniently linked
with application programs (which use some of those
functions and data) to form executables.
The "Library", below, refers to any such software
library or work which has been distributed under
these terms. A "work based on the Library" means
either the Library or any derivative work under
copyright law: that is to say, a work containing the
Library or a portion of it, either verbatim or with
modifications and/or translated straightforwardly into
another language. (Hereinafter, translation is included
without limitation in the term "modification".)
"Source code" for a work means the preferred form of
the work for making modifications to it. For a library,
complete source code means all the source code for
all modules it contains, plus any associated interface
definition files, plus the scripts used to control
compilation and installation of the library.
Activities other than copying, distribution and
modification are not covered by this License; they are
outside its scope. The act of running a program using
the Library is not restricted, and output from such a
program is covered only if its contents constitute a
work based on the Library (independent of the use of
the Library in a tool for writing it). Whether that is true
depends on what the Library does and what the
program that uses the Library does.
You may charge a fee for the physical act of
transferring a copy, and you may at your option offer
warranty protection in exchange for a fee.
?a) The modified work must itself be a software
library.
?b) You must cause the files modified to carry
prominent notices stating that you changed the files
and the date of any change.
?c) You must cause the whole of the work to be
licensed at no charge to all third parties under the
terms of this License.
?d) If a facility in the modified Library refers to a
function or a table of data to be supplied by an
application program that uses the facility, other than
as an argument passed when the facility is invoked,
then you must make a good faith effort to ensure that,
in the event an application does not supply such
function or table, the facility still operates, and
performs whatever part of its purpose remains
meaningful.
(For example, a function in a library to compute
square roots has a purpose that is entirely welldefined independent of the application. Therefore,
Subsection 2d requires that any application-supplied
function or table used by this function must be
optional: if the application does not supply it, the
square root function must still compute square roots.)
These requirements apply to the modified work as a
whole. If identifiable sections of that work are not
derived from the Library, and can be reasonably
considered independent and separate works in
themselves, then this License, and its terms, do not
apply to those sections when you distribute them as
separate works. But when you distribute the same
sections as part of a whole which is a work based on
the Library, the distribution of the whole must be on
the terms of this License, whose permissions for other
licensees extend to the entire whole, and thus to
each and every part regardless of who wrote it.
Thus, it is not the intent of this section to claim rights
or contest your rights to work written entirely by you;
rather, the intent is to exercise the right to control the
distribution of derivative or collective works based on
the Library.
In addition, mere aggregation of another work not
based on the Library with the Library (or with a work
based on the Library) on a volume of a storage or
distribution medium does not bring the other work
under the scope of this License.
Once this change is made in a given copy, it is
irreversible for that copy, so the ordinary GNU
General Public License applies to all subsequent
copies and derivative works made from that copy.
This option is useful when you wish to copy part of
the code of the Library into a program that is not a
library.
If distribution of object code is made by offering
access to copy from a designated place, then offering
equivalent access to copy the source code from the
same place satisfies the requirement to distribute the
source code, even though third parties are not
compelled to copy the source along with the object
code.
However, linking a "work that uses the Library" with
the Library creates an executable that is a derivative
of the Library (because it contains portions of the
Library), rather than a "work that uses the library". The
executable is therefore covered by this License.
Section 6 states terms for distribution of such
90
Page 91

executables.
When a "work that uses the Library" uses material
from a header file that is part of the Library, the object
code for the work may be a derivative work of the
Library even though the source code is not. Whether
this is true is especially significant if the work can be
linked without the Library, or if the work is itself a
library. The threshold for this to be true is not
precisely defined by law.
If such an object file uses only numerical parameters,
data structure layouts and accessors, and small
macros and small inline functions (ten lines or less in
length), then the use of the object file is unrestricted,
regardless of whether it is legally a derivative work.
(Executables containing this object code plus
portions of the Library will still fall under Section 6.)
Otherwise, if the work is a derivative of the Library,
you may distribute the object code for the work under
the terms of Section 6. Any executables containing
that work also fall under Section 6, whether or not
they are linked directly with the Library itself.
You must give prominent notice with each copy of the
work that the Library is used in it and that the Library
and its use are covered by this License. You must
supply a copy of this License. If the work during
execution displays copyright notices, you must
include the copyright notice for the Library among
them, as well as a reference directing the user to the
copy of this License. Also, you must do one of these
things:
?a) Accompany the work with the complete
corresponding machine-readable source code for the
Library including whatever changes were used in the
work (which must be distributed under Sections 1 and
2 above); and, if the work is an executable linked with
the Library, with the complete machine-readable
"work that uses the Library", as object code and/or
source code, so that the user can modify the Library
and then relink to produce a modified executable
containing the modified Library. (It is understood that
the user who changes the contents of definitions files
in the Library will not necessarily be able to recompile
the application to use the modified definitions.)
?b) Use a suitable shared library mechanism for
linking with the Library. A suitable mechanism is one
that (1) uses at run time a copy of the library already
present on the user's computer system, rather than
copying library functions into the executable, and (2)
will operate properly with a modified version of the
library, if the user installs one, as long as the modified
version is interface-compatible with the version that
the work was made with.
?d) If distribution of the work is made by offering
access to copy from a designated place, offer
equivalent access to copy the above specified
materials from the same place.
?e) Verify that the user has already received a copy of
these materials or that you have already sent this user
a copy.
For an executable, the required form of the "work that
uses the Library" must include any data and utility
programs needed for reproducing the executable
from it. However, as a special exception, the materials
to be distributed need not include anything that is
normally distributed (in either source or binary form)
with the major components (compiler, kernel, and so
on) of the operating system on which the executable
runs, unless that component itself accompanies the
executable.
It may happen that this requirement contradicts the
license restrictions of other proprietary libraries that
do not normally accompany the operating system.
Such a contradiction means you cannot use both
them and the Library together in an executable that
you distribute.
?a) Accompany the combined library with a copy of
the same work based on the Library, uncombined
with any other library facilities. This must be
distributed under the terms of the Sections above.
?b) Give prominent notice with the combined library
of the fact that part of it is a work based on the
Library, and explaining where to find the
accompanying uncombined form of the same work.
If any portion of this section is held invalid or
unenforceable under any particular circumstance, the
balance of the section is intended to apply, and the
section as a whole is intended to apply in other
circumstances.
It is not the purpose of this section to induce you to
infringe any patents or other property right claims or
to contest validity of any such claims; this section has
the sole purpose of protecting the integrity of the free
software distribution system which is implemented by
public license practices. Many people have made
generous contributions to the wide range of software
distributed through that system in reliance on
consistent application of that system; it is up to the
author/donor to decide if he or she is willing to
distribute software through any other system and a
licensee cannot impose that choice.
This section is intended to make thoroughly clear
what is believed to be a consequence of the rest of
this License.
?c) Accompany the work with a written offer, valid for
at least three years, to give the same user the
materials specified in Subsection 6a, above, for a
charge no more than the cost of performing this
distribution.
Each version is given a distinguishing version number.
If the Library specifies a version number of this
License which applies to it and "any later version",
you have the option of following the terms and
conditions either of that version or of any later version
91
Page 92

published by the Free Software Foundation. If the
Library does not specify a license version number,
you may choose any version ever published by the
Free Software Foundation.
notice shall be included
in all copies or substantial portions of the Software.
NO WARRANTY
_______________________________
BSD LICENSE
Redistribution and use in source and binary forms,
with or without modification, are permitted provided
that the following conditions are met:
THIS SOFTWARE IS PROVIDED BY THE REGENTS
AND CONTRIBUTORS ``AS IS'' AND ANY EXPRESS OR
IMPLIED WARRANTIES, INCLUDING, BUT NOT
LIMITED TO, THE IMPLIED WARRANTIES OF
MERCHANTABILITY AND FITNESS FOR A
PARTICULAR PURPOSE ARE DISCLAIMED. IN NO
EVENT SHALL THE REGENTS OR CONTRIBUTORS BE
LIABLE FOR ANY DIRECT, INDIRECT, INCIDENTAL,
SPECIAL, EXEMPLARY, OR CONSEQUENTIAL
DAMAGES (INCLUDING, BUT NOT LIMITED TO,
PROCUREMENT OF SUBSTITUTE GOODS OR
SERVICES; LOSS OF USE, DATA, OR PROFITS; OR
BUSINESS INTERRUPTION) HOWEVER CAUSED AND
ON ANY THEORY OF LIABILITY, WHETHER IN
CONTRACT, STRICT LIABILITY, OR TORT (INCLUDING
NEGLIGENCE OR OTHERWISE) ARISING IN ANY WAY
OUT OF THE USE OF THIS SOFTWARE, EVEN IF
ADVISED OF THE POSSIBILITY OF SUCH DAMAGE.
______________________________
MIT LICENSE
Permission is hereby granted, free of charge, to any
person obtaining
a copy of this software and associated
documentation files (the
"Software"), to deal in the Software without
restriction, including
without limitation the rights to use, copy, modify,
merge, publish,
distribute, sublicense, and/or sell copies of the
Software, and to
permit persons to whom the Software is furnished to
do so, subject to
the following conditions:
The above copyright notice and this permission
THE SOFTWARE IS PROVIDED "AS IS", WITHOUT
WARRANTY OF ANY KIND,
EXPRESS OR IMPLIED, INCLUDING BUT NOT
LIMITED TO THE WARRANTIES OF
MERCHANTABILITY, FITNESS FOR A PARTICULAR
PURPOSE AND NONINFRINGEMENT.
IN NO EVENT SHALL THE AUTHORS OR COPYRIGHT
HOLDERS BE LIABLE FOR ANY
CLAIM, DAMAGES OR OTHER LIABILITY, WHETHER
IN AN ACTION OF CONTRACT,
TORT OR OTHERWISE, ARISING FROM, OUT OF OR
IN CONNECTION WITH THE
SOFTWARE OR THE USE OR OTHER DEALINGS IN
THE SOFTWARE.
_____________________________
Apache
License
Version 2.0,
January 2004
http://www.apache.org/licenses/
TERMS AND CONDITIONS FOR USE,
REPRODUCTION, AND DISTRIBUTION
1. Definitions.
"License" shall mean the terms and conditions
for use, reproduction,
and distribution as defined by Sections 1
through 9 of this document.
"Licensor" shall mean the copyright owner or
entity authorized by
the copyright owner that is granting the
License.
"Legal Entity" shall mean the union of the
acting entity and all
other entities that control, are controlled by, or
are under common
control with that entity. For the purposes of
92
Page 93

this definition,
"control" means (i) the power, direct or
indirect, to cause the
separable from, or merely link (or bind by
name) to the interfaces of,
the Work and Derivative Works thereof.
direction or management of such entity,
whether by contract or
otherwise, or (ii) ownership of fifty percent
(50%) or more of the
outstanding shares, or (iii) beneficial
ownership of such entity.
"You" (or "Your") shall mean an individual or
Legal Entity
exercising permissions granted by this License.
"Source" form shall mean the preferred form
for making modifications,
including but not limited to software source
code, documentation
source, and configuration files.
"Object" form shall mean any form resulting
from mechanical
transformation or translation of a Source form,
including but
not limited to compiled object code,
generated documentation,
and conversions to other media types.
"Contribution" shall mean any work of
authorship, including
the original version of the Work and any
modifications or additions
to that Work or Derivative Works thereof, that
is intentionally
submitted to Licensor for inclusion in the Work
by the copyright owner
or by an individual or Legal Entity authorized
to submit on behalf of
the copyright owner. For the purposes of this
definition, "submitted"
means any form of electronic, verbal, or
written communication sent
to the Licensor or its representatives, including
but not limited to
communication on electronic mailing lists,
source code control systems,
and issue tracking systems that are managed
by, or on behalf of, the
Licensor for the purpose of discussing and
improving the Work, but
excluding communication that is
conspicuously marked or otherwise
"Work" shall mean the work of authorship,
whether in Source or
Object form, made available under the
License, as indicated by a
copyright notice that is included in or attached
to the work
(an example is provided in the Appendix
below).
"Derivative Works" shall mean any work,
whether in Source or Object
form, that is based on (or derived from) the
Work and for which the
editorial revisions, annotations, elaborations,
or other modifications
represent, as a whole, an original work of
authorship. For the purposes
of this License, Derivative Works shall not
include works that remain
designated in writing by the copyright owner
as "Not a Contribution."
"Contributor" shall mean Licensor and any
individual or Legal Entity
on behalf of whom a Contribution has been
received by Licensor and
subsequently incorporated within the Work.
2. Grant of Copyright License. Subject to the terms
and conditions of
this License, each Contributor hereby grants to
You a perpetual,
worldwide, non-exclusive, no-charge, royalty-
free, irrevocable
copyright license to reproduce, prepare
Derivative Works of,
publicly display, publicly perform, sublicense,
and distribute the
Work and such Derivative Works in Source or
93
Page 94

Object form.
3. Grant of Patent License. Subject to the terms
and conditions of
this License, each Contributor hereby grants to
You a perpetual,
worldwide, non-exclusive, no-charge, royaltyfree, irrevocable
(except as stated in this section) patent license
to make, have made,
use, offer to sell, sell, import, and otherwise
transfer the Work,
where such license applies only to those
patent claims licensable
by such Contributor that are necessarily
infringed by their
Contribution(s) alone or by combination of
their Contribution(s)
with the Work to which such Contribution(s)
was submitted. If You
institute patent litigation against any entity
(including a
cross-claim or counterclaim in a lawsuit)
alleging that the Work
or a Contribution incorporated within the Work
constitutes direct
or contributory patent infringement, then any
patent licenses
granted to You under this License for that
Work shall terminate
as of the date such litigation is filed.
(c) You must retain, in the Source form of any
Derivative Works
that You distribute, all copyright, patent,
trademark, and
attribution notices from the Source form
of the Work,
excluding those notices that do not
pertain to any part of
the Derivative Works; and
(d) If the Work includes a "NOTICE" text file as
part of its
distribution, then any Derivative Works
that You distribute must
include a readable copy of the
attribution notices contained
within such NOTICE file, excluding those
notices that do not
pertain to any part of the Derivative
Works, in at least one
of the following places: within a NOTICE
text file distributed
as part of the Derivative Works; within
the Source form or
documentation, if provided along with
the Derivative Works; or,
within a display generated by the
Derivative Works, if and
wherever such third-party notices
normally appear. The contents
4. Redistribution. You may reproduce and
distribute copies of the
Work or Derivative Works thereof in any
medium, with or without
modifications, and in Source or Object form,
provided that You
meet the following conditions:
(a) You must give any other recipients of the
Work or
Derivative Works a copy of this License;
and
(b) You must cause any modified files to carry
prominent notices
stating that You changed the files; and
of the NOTICE file are for informational
purposes only and
do not modify the License. You may add
Your own attribution
notices within Derivative Works that You
distribute, alongside
or as an addendum to the NOTICE text
from the Work, provided
that such additional attribution notices
cannot be construed
as modifying the License.
You may add Your own copyright statement to
Your modifications and
may provide additional or different license
terms and conditions
for use, reproduction, or distribution of Your
94
Page 95

modifications, or
for any such Derivative Works as a whole,
provided Your use,
reproduction, and distribution of the Work
otherwise complies with
the conditions stated in this License.
5. Submission of Contributions. Unless You
explicitly state otherwise,
any Contribution intentionally submitted for
inclusion in the Work
by You to the Licensor shall be under the
terms and conditions of
this License, without any additional terms or
conditions.
Notwithstanding the above, nothing herein
shall supersede or modify
the terms of any separate license agreement
you may have executed
with Licensor regarding such Contributions.
6. Trademarks. This License does not grant
permission to use the trade
names, trademarks, service marks, or product
names of the Licensor,
except as required for reasonable and
customary use in describing the
origin of the Work and reproducing the
content of the NOTICE file.
7. Disclaimer of Warranty. Unless required by
applicable law or
agreed to in writing, Licensor provides the
Work (and each
Contributor provides its Contributions) on an
"AS IS" BASIS,
WITHOUT WARRANTIES OR CONDITIONS OF
ANY KIND, either express or
implied, including, without limitation, any
warranties or conditions
of TITLE, NON-INFRINGEMENT,
MERCHANTABILITY, or FITNESS FOR A
PARTICULAR PURPOSE. You are solely
responsible for determining the
appropriateness of using or redistributing the
Work and assume any
risks associated with Your exercise of
permissions under this License.
8. Limitation of Liability. In no event and under no
legal theory,
whether in tort (including negligence),
contract, or otherwise,
unless required by applicable law (such as
deliberate and grossly
negligent acts) or agreed to in writing, shall
any Contributor be
liable to You for damages, including any
direct, indirect, special,
incidental, or consequential damages of any
character arising as a
result of this License or out of the use or
inability to use the
Work (including but not limited to damages for
loss of goodwill,
work stoppage, computer failure or
malfunction, or any and all
other commercial damages or losses), even if
such Contributor
has been advised of the possibility of such
damages.
9. Accepting Warranty or Additional Liability. While
redistributing
the Work or Derivative Works thereof, You may
choose to offer,
and charge a fee for, acceptance of support,
warranty, indemnity,
or other liability obligations and/or rights
consistent with this
License. However, in accepting such
obligations, You may act only
on Your own behalf and on Your sole
responsibility, not on behalf
of any other Contributor, and only if You agree
to indemnify,
defend, and hold each Contributor harmless
for any liability
incurred by, or claims asserted against, such
Contributor by reason
of your accepting any such warranty or
additional liability.
END OF TERMS AND CONDITIONS
APPENDIX: How to apply the Apache License to
95
Page 96

your work.
the file png.h that is
To apply the Apache License to your work,
attach the following
boilerplate notice, with the fields enclosed by
brackets "[]"
replaced with your own identifying
information. (Don't include
the brackets!) The text should be enclosed in
the appropriate
comment syntax for the file format. We also
recommend that a
file or class name and description of purpose
be included on the
same "printed page" as the copyright notice
for easier
identification within third-party archives.
Copyright [yyyy] [name of copyright owner]
Licensed under the Apache License, Version 2.0
(the "License");
you may not use this file except in compliance
with the License.
included in the libpng distribution, the latter shall
prevail.
COPYRIGHT NOTICE, DISCLAIMER, and LICENSE:
If you modify libpng you may insert additional notices
immediately following
this sentence.
This code is released under the libpng license.
libpng versions 1.2.6, August 15, 2004, through 1.4.1,
February 25, 2010, are
Copyright (c) 2004, 2006-2007 Glenn RandersPehrson, and are
distributed according to the same disclaimer and
license as libpng-1.2.5
with the following individual added to the list of
Contributing Authors
Cosmin Truta
You may obtain a copy of the License at
http://www.apache.org/licenses/LICENSE-2.0
Unless required by applicable law or agreed to in
writing, software
distributed under the License is distributed on an
"AS IS" BASIS,
WITHOUT WARRANTIES OR CONDITIONS OF ANY
KIND, either express or implied.
See the License for the specific language
governing permissions and
limitations under the License.
_____________________________
This copy of the libpng notices is provided for your
convenience. In case of
any discrepancy between this copy and the notices in
libpng versions 1.0.7, July 1, 2000, through 1.2.5 October 3, 2002, are
Copyright (c) 2000-2002 Glenn Randers-Pehrson,
and are
distributed according to the same disclaimer and
license as libpng-1.0.6
with the following individuals added to the list of
Contributing Authors
Simon-Pierre Cadieux
Eric S. Raymond
Gilles Vollant
and with the following additions to the disclaimer:
There is no warranty against interference with your
enjoyment of the
library or against infringement. There is no
warranty that our
efforts or the library will fulfill any of your
particular purposes
or needs. This library is provided with all faults,
and the entire
96
Page 97

risk of satisfactory quality, performance, accuracy,
and effort is with
the user.
Tim Wegner
The PNG Reference Library is supplied "AS IS". The
Contributing Authors
libpng versions 0.97, January 1998, through 1.0.6,
March 20, 2000, are
Copyright (c) 1998, 1999 Glenn Randers-Pehrson, and
are
distributed according to the same disclaimer and
license as libpng-0.96,
with the following individuals added to the list of
Contributing Authors:
Tom Lane
Glenn Randers-Pehrson
Willem van Schaik
libpng versions 0.89, June 1996, through 0.96, May
1997, are
Copyright (c) 1996, 1997 Andreas Dilger
Distributed according to the same disclaimer and
license as libpng-0.88,
with the following individuals added to the list of
Contributing Authors:
John Bowler
Kevin Bracey
Sam Bushell
Magnus Holmgren
Greg Roelofs
Tom Tanner
and Group 42, Inc. disclaim all warranties, expressed
or implied,
including, without limitation, the warranties of
merchantability and of
fitness for any purpose. The Contributing Authors
and Group 42, Inc.
assume no liability for direct, indirect, incidental,
special, exemplary,
or consequential damages, which may result from the
use of the PNG
Reference Library, even if advised of the possibility of
such damage.
Permission is hereby granted to use, copy, modify,
and distribute this
source code, or portions hereof, for any purpose,
without fee, subject
to the following restrictions:
be misrepresented as being the original source.
source or altered source distribution.
The Contributing Authors and Group 42, Inc.
specifically permit, without
fee, and encourage the use of this source code as a
component to
libpng versions 0.5, May 1995, through 0.88, January
1996, are
Copyright (c) 1995, 1996 Guy Eric Schalnat, Group 42,
Inc.
For the purposes of this copyright and license,
"Contributing Authors"
is defined as the following set of individuals:
Andreas Dilger
Dave Martindale
Guy Eric Schalnat
Paul Schmidt
supporting the PNG file format in commercial
products. If you use this
source code in a product, acknowledgment is not
required but would be
A "png_get_copyright" function is available, for
convenient use in "about"
boxes and the like:
printf("%s",png_get_copyright(NULL));
Also, the PNG logo (in PNG format, of course) is
supplied in the
97
Page 98

files "pngbar.png.jpg" and "pngbar.jpg (88x31) and
"pngnow.png.jpg" (98x31).
which do not fall under their own explicit
license. The license
Libpng is OSI Certified Open Source Software. OSI
Certified Open Source is a
certification mark of the Open Source Initiative.
Glenn Randers-Pehrson
glennrp at users.sourceforge.net
February 25, 2010
_____________________________
This software is based in part on the work of the
FreeType Team.
----------------------
The FreeType Project
LICENSE
----------------------------
2006-Jan-27
Copyright 1996-2002,
2006 by
David Turner, Robert Wilhelm, and
Werner Lemberg
Introduction
============
The FreeType Project is distributed in several
archive packages;
some of them may contain, in addition to the
FreeType font engine,
various tools and contributions which rely on, or
relate to, the
FreeType Project.
This license applies to all files found in such
packages, and
affects thus the FreeType font engine,
the test programs,
documentation and makefiles, at the very least.
This license was inspired by the BSD,
Artistic, and IJG
(Independent JPEG Group) licenses, which all
encourage inclusion
and use of free software in commercial and
freeware products
alike. As a consequence, its main points are that:
o We don't promise that this software works.
However, we will be
interested in any kind of bug reports. (`as is'
distribution)
o You can use this software for whatever you
want, in parts or
full form, without having to pay us. (`royaltyfree' usage)
o You may not pretend that you wrote this
software. If you use
it, or only parts of it, in a program, you
must acknowledge
somewhere in your documentation that
you have used the
FreeType code. (`credits')
We specifically permit and encourage the
inclusion of this
software, with or without modifications, in
commercial products.
We disclaim all warranties covering The
FreeType Project and
assume no liability related to The FreeType Project.
Finally, many people asked us for a
preferred form for a
credit/disclaimer to use in compliance with this
license. We thus
encourage you to use the following text:
98
Page 99

"""
this license, you must contact us to verify this.
Portions of this software are copyright ?<year>
The FreeType
Project (www.freetype.org). All rights reserved.
"""
Please replace <year> with the value from the
FreeType version you
actually use.
Legal Terms
===========
--------------
Throughout this license, the terms `package',
`FreeType Project',
and `FreeType archive' refer to the set of
files originally
The FreeType Project is copyright (C) 1996-2000
by David Turner,
Robert Wilhelm, and Werner Lemberg. All rights
reserved except as
specified below.
--------------
THE FREETYPE PROJECT IS PROVIDED `AS IS'
WITHOUT WARRANTY OF ANY
KIND, EITHER EXPRESS OR IMPLIED,
INCLUDING, BUT NOT LIMITED TO,
WARRANTIES OF MERCHANTABILITY AND
FITNESS FOR A PARTICULAR
PURPOSE. IN NO EVENT WILL ANY OF THE
AUTHORS OR COPYRIGHT HOLDERS
BE LIABLE FOR ANY DAMAGES CAUSED BY THE
USE OR THE INABILITY TO
USE, OF THE FREETYPE PROJECT.
distributed by the authors (David Turner,
Robert Wilhelm, and
Werner Lemberg) as the `FreeType Project', be they
named as alpha,
beta or final release.
`You' refers to the licensee, or person using the
project, where
`using' is a generic term including compiling the
project's source
code as well as linking it to form a `program' or
`executable'.
This program is referred to as `a program
using the FreeType
engine'.
This license applies to all files distributed in
the original
FreeType Project, including all source
code, binaries and
documentation, unless otherwise stated in
the file in its
original, unmodified form as distributed in the
original archive.
If you are unsure whether or not a particular file
is covered by
-----------------
This license grants a worldwide, royalty-free,
perpetual and
irrevocable right and license to use, execute,
perform, compile,
display, copy, create derivative works of,
distribute and
sublicense the FreeType Project (in both source
and object code
forms) and derivative works thereof for any
purpose; and to
authorize others to exercise some or all of the
rights granted
herein, subject to the following conditions:
o Redistribution of source code must retain
this license file
(`FTL.TXT') unaltered; any additions,
deletions or changes to
the original files must be clearly indicated in
accompanying
documentation. The copyright notices
of the unaltered,
original files must be preserved in all
99
Page 100

copies of source
files.
o Redistribution in binary form must provide a
disclaimer that
Project, you indicate that you understand and
accept all the terms
of this license.
-----------
states that the software is based in part of
the work of the
FreeType Team, in the distribution
documentation. We also
encourage you to put an URL to the FreeType
web page in your
documentation, though this isn't mandatory.
These conditions apply to any software derived
from or based on
the FreeType Project, not just the unmodified
files. If you use
our work, you must acknowledge us. However,
no fee need be paid
to us.
--------------
Neither the FreeType authors and contributors
nor you shall use
the name of the other for commercial, advertising,
or promotional
There are two mailing lists related to FreeType:
o freetype@nongnu.org
Discusses general use and applications of
FreeType, as well as
future and wanted additions to the library
and distribution.
If you are looking for support, start in this
list if you
haven't found anything to help you in the
documentation.
o freetype-devel@nongnu.org
Discusses bugs, as well as engine
internals, design issues,
specific licenses, porting, etc.
Our home page can be found at
purposes without specific prior written permission.
We suggest, but do not require, that you use one
or more of the
following phrases to refer to this software in your
documentation
or advertising materials: `FreeType Project',
`FreeType Engine',
`FreeType library', or `FreeType Distribution'.
As you have not signed this license, you are
not required to
accept it. However, as the FreeType
Project is copyrighted
material, only this license, or another one
contracted with the
authors, grants you the right to use, distribute,
and modify it.
Therefore, by using, distributing, or modifying
the FreeType
http://www.freetype.org
--- end of FTL.TXT ---
_____________________________
MOZILLA PUBLIC
LICENSE
Version 1.1
---------------
1.0.1. "Commercial Use" means distribution or
otherwise making the
100
 Loading...