

Page 1
Page 2

Contents
Important ................................................................. 2
Safety Information ................................................... 2
Markings on the Product.......................................... 2
Remote Control ....................................................... 4
Energy efciency ..................................................... 5
TV scroll button........................................................ 5
Switching on/off ....................................................... 5
First time installation ................................................ 5
Play media les from a USB drive ........................... 6
Media browser menu ............................................... 6
CEC ......................................................................... 7
Change TV settings ................................................. 7
Display options ........................................................ 7
Sound options.......................................................... 7
Conguring parental settings ................................... 7
Electronic program guide (EPG).............................. 8
Update your TV ....................................................... 8
Troubleshooting & Tips ............................................ 9
PC Input Typical Display Modes ..............................9
AV and HDMI Signal Compatibility ..........................9
Supported File Formats for USB Mode ................. 10
English - 1 -
Page 3

Important
‘Read and understand all information in this manual
and in the accompanying Safety booklet before you
install and use your TV. If damage is caused by
failure to follow these instructions, the warranty does
not apply.’
Disposal of old Equipment and Batteries
Please do not disposed this TV or battery as general
household waste. If you want to dispose this product
or battery, please consider the collection systems or
facilities for appropriate recycling.
Notice: The sign Pb below the symbol for batteries indicates
that this battery contains lead.
Safety Information
IMPORTANT - Please read these instructions
and the accompanying Safety booklet fully
before installing or operating
• Use this TV set at an altitude of less than 2000 meters
above the sea level, in dry locations and in regions
with moderate or tropical climates.
• To avoid danger of suffocation, keep plastic bags
out of the reach of the babies, children and domestic
animals.
• Carefully attach the stand to the TV. If the stand is
provided with screws, tighten the screws rmly to
prevent the TV from tilting. Do not over-tighten the
screws and mount the stand rubbers properly.
• The TV set is intended for household and similar
general use but may also be used in public places.
Products
Battery
Markings on the Product
The following symbols are used on the product as a
marker for restrictions and precautions and safety
instructions. Each explanation shall be considered
where the product bears related marking only. Note
such information for security reasons.
Class II Equipment: This appliance is
designed in such a way that it does not require
a safety connection to electrical earth.
Class II Equipment With Functional
Earthing: This appliance is designed in such
a way that it does not require a safety
connection to electrical earth, the earth
connection is used for functional purposes.
Protective Earth Connection: The marked
terminal is intended for connection of the
protective earthing conductor associated with
the supply wiring.
Hazardous Live Terminal: The marked
terminal(s) is/are hazardous live under normal
operating conditions.
Caution, See Operating Instructions: The
marked area(s) contain(s) user replaceable
i
coin or button cell batteries.
Class 1 Laser Product:
CLASS 1
LASER PRODUCT
This product contains
Class 1 laser source that
is safe under reasonably
foreseeable conditions of
operation.
English - 2 -
Page 4

WARNING
Do not ingest the battery, Chemical Burn Hazard
This product or the accessories supplied with the
product may contain a coin/button cell battery. If the
coin/button cell battery is swallowed, it can cause
severe internal burns in just 2 hours and can lead
to death.
Keep new and used batteries away from children.
If the battery compartment does not close securely,
stop using the product and keep it away from
children.
If you think batteries might have been swallowed or
placed inside any part of the body, seek immediate
medical attention.
WARNING
Never place a television set in unstable or inclined
locations. A television set may fall, causing serious
personal injury or death. Many injuries, particularly
to children, can be avoided by taking simple
precautions such as;
• Using cabinets or stands recommended by the
manufacturer of the television set.
• Only using furniture that can safely support the
television set.
• Educating children about the dangers of climbing
on furniture to reach the television set or its
controls. If your existing television set is being
retained and relocated, the same considerations
as above should be applied.
WARNING
Apparatus connected to the protective earthing of
the building installation through the MAINS connec
tion or through other apparatus with a connection
to protective earthing – and to a television distri
bution system using coaxial cable, may in some
circumstances create a re hazard. Connection
to a television distribution system has therefore to
be provided through a device providing electrical
isolation below a certain frequency range (galvanic
isolator, see EN 60728-11)
-
-
WALL MOUNTING WARNINGS
• Read the instructions before mounting your TV
on the wall.
• The wall mount kit is optional. You can obtain from
your local dealer, if not supplied with your TV.
• Do not install the TV on a ceiling or on an inclined
wall.
• Use the specied wall mounting screws and other
accessories.
• Tighten the wall mounting screws rmly to prevent
the TV from fall. Do not over-tighten the screws.
English - 3 -
Page 5
Use Your TV
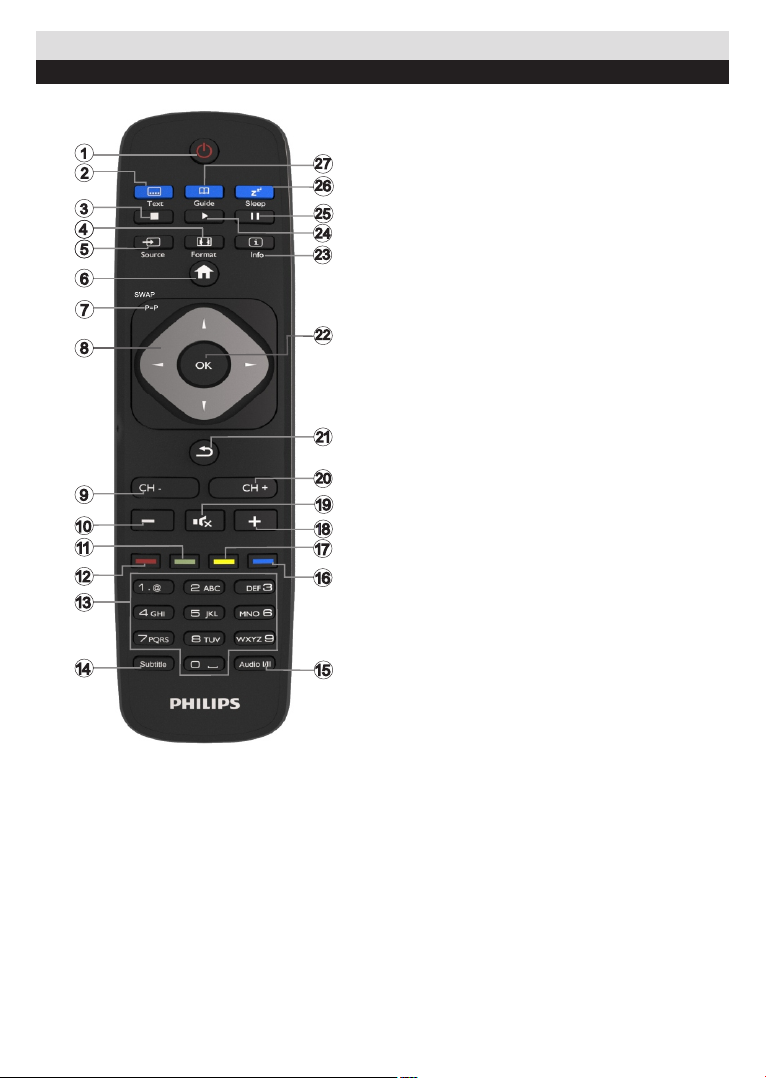
Remote Control
Teletext
Press Text button to enter. Press again to activate
mix mode. Press once more to exit. Follow the instructions displayed on the screen.
Digital teletext
Press Text button to view digital teletext information.
Operate it with the colored buttons, cursor buttons
and OK button. The operation method may differ
depending on the contents of the digital teletext. Follow
the instructions displayed on digital teletext screen.
1. Standby: Switches On / Off the TV
2. Text: Displays teletext (where available), press again
to superimpose the teletext over a normal broadcast
picture (mix)
3. Stop: Stops the media being played
4. Screen: Changes the aspect ratio of the screen
5. Source: Shows all available broadcast and content
sources
6. Menu: Displays TV menu
7. Swap: Quickly cycles between previous and current
channels or sources
8. Navigation buttons: Helps navigate menus, content etc.
and displays the subpages in TXT mode when pressed
Right or Left
9. Programme - / Page +
10. Volume -
11. Green button: Follow the on-screen instructions for
coloured button functions
12. Red button: Follow the on-screen instructions for
coloured button functions
13. Numeric buttons: Switches the channel, enters a
number or a letter in the text box on the screen.
14. Subtitles: Turns subtitles on and off (where available)
15. Language: Switches between sound modes (analogue
TV), displays and changes audio/subtitle language (digital
TV, where available)
16. Blue button: Follow the on-screen instructions for
coloured button functions
17. Yellow button: Follow the on-screen instructions for
coloured button functions
18. Volume +
19. Mute: Completely turns off the volume of the TV
20. Programme + / Page -
21. Return/Back: Returns to previous screen, opens index
page (in TXT mode)
22. OK: Conrms user selections, holds the page (in TXT
mode), views channel list
23. Info: Displays information about on-screen content,
shows hidden information (reveal - in TXT mode)
24. Play: Starts to play selected media
25. Pause: Pauses the media being played
26. Sleep: Sets your TV to shut down automatically
27. EPG (Electronic programme guide): Displays the
electronic programme guide
Note: The Remote Control range is approximately 7m / 23ft.
English - 4 -
Page 6

Notications, features and accessories
Energy efciency
This TV is designed with energy efcieny features:
• Energy Saving: You can apply a combination of
energy saving picture settings. While you watch TV,
press the Menu button and, the Energy Saving
settings can be found in the Picture section of the
Main Menu.
• Picture off mode: If you only want to listen to audio
from the TV, you can switch off the display. Other
functions continue to operate normally. While you
watch TV, press Menu button and select Picture, and
from there select the Energy Saving option. Press
Right button while Auto option is selected or Left
button while Custom option is selected. A message
will be displayed on the screen. Select Proceed and
press OK to turn the screen off immediately. If you
don’t press any button, the screen will be off in 15
seconds. Press any button on the remote or on the
TV to turn the screen on again.
Note: Screen Off option is not available if the Mode is set to
Game. Disconnect your TV from the mains plug in case your
TV is going to be inactive for a long time.
TV scroll button
The TV Scroll button on the side of the TV allows you
to control the volume, change channels and put the
TV into standby.
To change volume: Increase the volume by scrolling
up. Decrease the volume by scrolling down.
To change channel:
• Press the middle of the scroll button in, the channel
information banner will appear on screen.
• Scroll through the stored channels by pushing the
button up or down.
To change source:
• Press the middle of the button in twice(for the second
time in total), the source list will appear on screen.
• Scroll through the available sources by pushing the
button up or down.
English - 5 -
To switch the TV to standby: Press the middle of the
button in and hold it down for a few seconds, the TV
will turn into standby mode.
To switch the TV on from standby: Press the middle
of the button in, the TV will turn on.
Notes:
If you turn the TV off, this circle starts again beginning with
the volume setting.
Main menu OSD cannot be displayed via control button.
Switching on/off
To switch the TV on
To switch on the TV from standby mode either:
• Press the Standby button, Programme +/- or a
numeric button on the remote control.
• Press the middle of the side function switch on
the TV in.
Note: If the TV has been left on and not been operated for a
while, the TV will go into standby. When you next switch-on,
the following message will be displayed. “Standby Cause No
Operation”, Press OK to continue.
To switch the TV off
• Press the Standby button on the remote control
or press the middle of the side function switch on
the TV in and hold it down for a few seconds, the TV
will switch into standby mode.
Note: To power down the TV completely, unplug the power
cord from the mains socket.
First time installation
You will see the language selection screen when you
rst turn on your TV. Select your preferred language
and press OK.
Note: Depending on the Country selection you may be asked
to set and conrm a PIN at this point. The selected PIN cannot
be 0000. You have to enter it if you are asked to enter a PIN
for any menu operation later.
If a USB device is connected to the TV, you can press the
GREEN button on the remote before continuing, in order to
load the NVRAM data (service list, preferences, etc.) from
the USB device which is uploaded from another Philips Hotel
TV. Refer to the “Copy To USB” and “Copy From USB”
sections under the Hotel Mode title on the pages at the end
of this manual.
If the correct software update file is pre-installed in the
USB device, you can press the RED button on the remote
before continuing, in order to upgrade your TV’s software.
The software update le should be named as “VES171HE_
upgrade.bin” or “philips_upgrade_mb140.bin”.
Software upgrade via an USB device can be done anytime by
using the hidden key combination, “Menu-1-5-0-5”.
On the next screen, set your preferences using the
directional buttons and when nished, press OK to
continue.
You can set up your TV by following the First Time
Installation (FTI) screen with the following selections.
Page 7

Digital Aerial installation
If Digital Aerial broadcast search option is turned on,
the TV will search for digital terrestrial broadcasts after
other initial settings are completed.
Digital Cable installation
If Digital Cable broadcast search option is turned
on, the TV will search for digital cable broadcasts
after other initial settings are completed. According
to your other preferences a conrmation message
may be displayed before starting to search. For
automatic installation in case your Cable network
supplier supports a Network-ID based installation (e.g.
Unitymedia), select Yes and press OK.
In case your Cable network supplier does not support a
Network-ID based installation please select No, press
OK and follow the instruction on the screen.
You can also select frequency ranges from this screen.
Enter the frequency range manually by using the
numeric buttons.
Note: Searching duration will change depending on the
selected Search Step.
Analogue installation
If Analogue broadcast search option is turned on, the
TV will search for analogue broadcasts after other initial
settings are completed.
Additionally you can set a broadcast type as your
favourite one. Priority will be given to the selected
broadcast type during the search process and the
channels of it will be listed on the top of the Channel
List. When nished, press OK to continue.
Home Mode / Store Mode selection screen follows. It
is recommended to select Home Mode for home use.
After the initial settings are completed TV will start
to search for available broadcasts of the selected
broadcast types.
While the search continues a message may
appear, asking whether you want to sort channels
according to the LCN(*). Select Yes and press
OK to conrm.
(*) LCN is the Logical Channel Number system that organizes
available broadcasts in accordance with a recognizable
channel number sequence (if available).
After all the available stations are stored, scan results
will be displayed. Press OK to continue. The Edit
Channel List will be displayed next. Press Menu
button to quit Edit Channel List and watch TV.
Note: Do not turn off the TV while initializing first time
installation. Note that, some options may not be available
depending on the country selection.
Play media les from a USB drive
You can play photo, music and movie les stored on a
USB disk by connecting it to your TV. Connect a USB
disk to one of the USB inputs located on the side of
the TV. Pressing the Menu button while in the Media
Browser mode will access the Picture, Sound and
Settings menu options. Pressing the Menu button
again will exit from this screen. You can set your Media
Browser preferences by using the Settings menu.
To enable Auto Play feature highlight this option in
the Settings menu and set as On using the directional
buttons. When this feature is enabled, the TV detects
connected USB devices and searchs for media les.
Photo les are searched rst. If no photo les are
found, the program searchs for Video les. If no Video
les are found, the program searchs for Audio les.
After nding a le to play, the format of this le will
be selected as a constant choice and each le with
this format will be played in an innite loop. Using the
remote control to exit etc. will interrupt the playing of
the le(s) and break the play loop.
When the TV cannot nd any media les, the main
media browser menu will be displayed on the screen.
Set the View Style as Flat to make all les searched
in all sub-folders in the USB device.
Note: If the TV is in standby mode, this feature will not be
available.
IMPORTANT! Back up your les before making any
connections to the TV. The manufacturer will not be
responsible for any le damage or data loss. Certain
types of USB devices, for example, MP3 players
or USB hard disk drives/memory sticks may not be
compatible with this TV.
Media browser menu
Loop/Shufe Mode Operation
Start playback with the Play
button and activate
Start playback with the OK
button and activate
Start playback with the Play
button and activate
Start playback with the Play
button and activate ,
All les in the list will be
continuously played in original
order
The same le will be played
continuously (repeat)
All les in the list will be
played once in random order
All les in the list will be
continuously played in the
same random order
English - 6 -
Page 8

CEC
This function allows to control the CEC-enabled
devices, that are connected through HDMI ports by
using the remote control of the TV.
The CEC option in the Settings>More menu should be
set as Enabled at rst. Press the Source button and
select the HDMI input of the connected CEC device
from the Sources list menu. When new CEC source
device is connected, it will be listed in source menu
with its own name instead of the connected HDMI ports
name(such as DVD Player, Recorder 1 etc.).
The TV remote is automatically able to perform the
main functions after the connected HDMI source has
been selected.
To terminate this operation and control the TV via the
remote again, press and hold the “0-Zero” button on the
remote control for 3 seconds. This feature can also be
enabled or disabled under the Settings>More menu.
The TV supports also ARC(Audio Return Channel)
feature. This feature is an audio link meant to replace
other cables between the TV and the audio system
(A/V receiver or speaker system).
When ARC is active, TV does not mute its other audio
outputs automatically. So you need to decrease TV
volume to zero manually, if you want to hear audio from
connected audio device only (same as other optical or
co-axial digital audio outputs). If you want to change
connected device’s volume level, you should select
that device from the source list. In that case volume
control keys are directed to connected audio device.
Note: ARC is supported only via the HDMI1 input.
System Audio Control
Allows an Audio Amplier/Receiver to be used with
the TV. The volume can be controlled using the
remote control of the TV. To activate this feature set
the Speakers option in the Settings>More menu as
Amplier. The TV speakers will be muted and the
sound of the watched source will be provided from the
connected sound system.
Note: The audio device should support System Audio Control
feature and CEC option should be set as Enabled.
Change TV settings
To access the options listed below;
1- Press the Menu button
2- Highlight your selection
3- Press OK to conrm
Display options
Mode: Changes the picture mode to one of the
following: Cinema, Game(*), Sports, Dynamic and
Natural.
(*) Game mode option may not be available depending on the
current source selection.
Contrast: Sets the light and dark values of the image.
Brightness: Sets the brightness value of the image.
Sharpness: Sets the sharpness value. A high
sharpness value may result in a clearer, crisper image
depending on the content.
Colour: Sets the color value.
Backlight: Controls the brightness of the backlight.
The backlight function will be inactive if the Energy
Saving is set to an option other then Custom.
Sound options
Volume: Adjusts volume level.
Equalizer: Changes the equalizer mode.
Balance: Adjusts whether the sound is coming mainly
from the right or left speakers.
Headphone: Sets headphone volume. This option
will be inactive if the Headphone/Lineout option is
set to Lineout.
Sound mode: Sets the preferred sound mode.
AVL: Sets a limit to maximum volume output.
Headphone/Lineout: This option should be set to
Headphone if you have headphones or Lineout if you
have external amplier connected to the headphone
jack.
Dynamic bass: Enables or disables the Dynamic
Bass. Increases the range of bass.
Digital Out: Sets digital out audio type.
Conguring parental settings
This feature is for restricting access to selected
content. It is controlled by a pin number dened by you.
These settings are located in the Settings>Parental
menu.
Note: Default PIN can be set to 0000 or 1234. If you have
defined the PIN(is requested depending on the country
selection) during the First Time Installation use the PIN that
you have dened.
Some options may not be available depending on the country
selection in the First Time Installation.
Menu lock: Menu lock setting enables or disables
the menu access.
Maturity lock (optional): If this option is set, TV gets
the maturity information from the broadcast and if
this maturity level is disabled, disables access to the
broadcast.
English - 7 -
Page 9

Note: If the country option in the First Time Installation is
set as France, Italy or Austria, Maturity Lock’s value will be
set to 18 as default.
Child lock (optional): When Child Lock is set, the TV
can only be controlled by the remote control. In this
case the control panel buttons will not work.
Guidance (optional): This setting enables or disables
access some of the MHEG applications. Disabled
applications can be released by entering the right PIN.
Set PIN: Denes a new PIN number.
Default CICAM PIN: This option will appear as greyed
out if no CI module is inserted into the CI slot of the
TV. You can change the default PIN of the CI CAM
using this option.
Electronic program guide (EPG)
Some channels send information about their broadcast
schedules. Press the Epg button to view the EPG
menu.
There are 3 different types of schedule layouts
available, Timeline Schedule, List Schedule and
Now/Next Schedule. To switch between them follow
the instructions on the bottom of the screen.
Timeline Schedule
Zoom (Yellow button): Press the Yellow button to
see events in a wider time interval.
Filter (Blue button): Views ltering options.
Highlight Genre (Subtitles button): Displays
Highlight Genre menu. Using this feature, you can
search the program guide database in accordance
with the genre. Info available in the program guide
will be searched and results matching your criteria
will be highlighted.
Options (OK button): Displays event options.
Event Details (Info button): Displays detailed
information about selected events.
Next/Prev Day (Program +/- buttons): Displays the
events of previous or next day.
Search (Text button): Displays Guide Search menu.
Now (Swap button): Displays current event of the
highlighted channel.
List Schedule(*)
(*) In this layout option, only the events of the highlighted
channel will be listed.
Prev. Time Slice (Red button): Displays the events
of previous time slice.
Next/Prev Day (Program +/- buttons): Displays the
events of previous or next day.
Event Details (Info button): Displays detailed
information about selected events.
Filter (Text button): Views ltering options.
Next Time Slice (Green button): Displays the events
of next time slice.
Options (OK button): Displays event options.
Now/Next Schedule
Options (OK button): Displays event options.
English - 8 -
Event Details (Info button): Displays detailed
information about selected events.
Filter (Blue button): Views ltering options.
Event Options
In EPG menu, press the OK button to open the Event
Options menu.
Select Channel: In EPG menu, using this option, you
can switch to the selected channel.
Set Timer on Event / Delete Timer on Event: After
you have selected an event in the EPG menu, press the
OK button. Select the Set Timer on Event option and
press the OK button. You can set a timer for future events.
To cancel an already set timer, highlight that event and
press the OK button. Then select Delete Timer on Event
option. The timer will be cancelled.
Update your TV
Navigate on your main menu, choose Settings>More,
the version of the current software is displayed.
CAUTION: Do not install a lower version of software
than the current version installed on your product. TP
Vision cannot be held liable or be made responsible for
problems caused by a software downgrade.
Update with USB
Before you update the software, make sure that you
have:
• A USB storage device that has at least 256
megabytes of storage space, is FAT32 or DOS
formatted and has its write protection disabled.
• Access to a computer with a USB connector and
Internet access.
Navigate to www.philips.com/support, and follow
the software update instructions.
Automatic update from digital broadcast
While the TV is connected to an aerial signal. If
Automatic scanning in the Upgrade options menu
is Enabled, the TV wakes up at 03:00 and searches
broadcast channels for new software upgrades. If
new software is found and downloaded successfully,
the next time the TV powers up , it will have the new
software version. To open the Upgrade options menu,
enter the Settings>More menu, highlight Software
upgrade and press the OK button.
Note: Do not unplug the power cord while led is blinking during
the reboot process. If the TV fails to come on after the upgrade
unplug the TV for 2 minutes and plug in again.
Page 10

Troubleshooting & Tips
Source
Supported Signals
Available
Tv will not turn on
Make sure the power cord is plugged in securely to
wall outlet. Check if batteries are exhausted. Press the
Power button on the TV.
Poor picture
• Check if you have selected the correct TV system.
• Low signal level can cause picture distortion. Please
check antenna access.
• Check if you have entered the correct channel
frequency if you have done manual tuning.
• The picture quality may degrade when two devices
are connected to the TV at the same time. In such a
case, disconnect one of the devices.
No picture
• This means your TV is not receiving any transmission.
Make sure the correct source has been selected.
• Is the antenna connected properly?
• Is the antenna cable damaged?
• Are suitable plugs used to connect the antenna?
• If you are in doubt, consult your dealer.
No sound
• Check if the TV is muted. Press the Mute button or
increase the volume to check.
• Sound may be coming from only one speaker. Check
the balance settings from Sound menu.
Remote control - no operation
• The batteries may be exhausted. Replace the
batteries.
Input sources - can not be selected
• If you cannot select an input source, it is possible
that no device is connected. If not;
• Check the AV cables and connections if you are
trying to switch to the input source dedicated to the
connected device.
PC Input Typical Display Modes
The following table is an illustration of some of the
typical video display modes. Your TV may not support
all resolutions. Your TV supports up to 1920x1080.
Index Resolution Frequency
1 640x480 60 Hz
2 800x600 56 Hz
3 800x600 60 Hz
4 1024x768 60 Hz
5 1024x768 66 Hz
6 1280x768 60 Hz
7 1280x960 60 Hz
8 1280x1024 60 Hz
9 1360x768 60 Hz
10 1400x1050 60 Hz
11 1600x1200 60 Hz
12 1920x1080 60 Hz
AV and HDMI Signal Compatibility
PAL O
EXT
(SCART)
Side AV
PC/YPbPr
HDMI
SECAM O
NTSC4.43 O
NTSC3.58 O
RGB 50/60 O
PAL O
SECAM O
NTSC4.43 O
NTSC3.58 O
480i, 480p 60Hz O
576i, 576p 50Hz O
720p 50Hz,60Hz O
1080i 50Hz,60Hz O
480i, 480p 60Hz O
576i, 576p 50Hz O
720p 50Hz,60Hz O
1080i 50Hz,60Hz O
1080p
24Hz, 25Hz,
30Hz, 50Hz,
60Hz
O
English - 9 -
Page 11

Supported File Formats for USB Mode
Media Extension Format Notes
Video .mpg,
Audio .mp3 MPEG1 Layer
Picture
Subtitle .sub, .srt - -
.mpeg
.vob MPEG2
.mp4 MPEG4, Xvid,
.mkv H.264,
.avi MPEG2,
.v H.264/VP6/
.mp4, .mov,
.3gpp, .3gp,
MPEG
transport
stream,
.ts,.trp, .tp,
.mkv
.3gp MPEG4 , H.264 1920x1080 @ 30P
(works
only with
video
les)
.jpeg
.bmp
MPEG1-2 MPEG1: 768x576 @ 30P, MPEG2:1920x1080 @ 30P
H.264
MPEG4,VC-1
MPEG4, Xvid,
H.264
Sorenson
HEVC/H.265 1080P@60fps - 50Mbps
2/3
AC3 32Kbps ~ 640Kbps (Bit rate) / 32kHz, 44.1kHz, 48kHz (Sampling rate)
AAC 16Kbps ~ 576Kbps (Bit rate) / 48kHz, 44.1kHz, 32kHz, 24kHz, 22.05kHz,
EAC3 32Kbps ~ 6Kbps (Bit rate) / 32kHz, 44.1kHz, 48kHz (Sampling rate)
LPCM Unsigned 8bit PCM, Signed/Unsigned 16bit PCM (big / little endian), 24bit
IMA-ADPCM/
MS-ADPCM
LBR 32Kbps ~ 96Kbps (Bit rate) / 32kHz, 44.1kHz, 48kHz (Sampling rate)
Baseline Resolution(WxH): 17000x10000
Progressive Resolution(WxH): 4000x4000
- Resolution(WxH): 5760x4096
1920x1080 @ 30P
H.264/VP6: 1920x1080 @ 30P
Sorenson: 352x288 @ 30P
Layer2: 32Kbps ~ 448Kbps (Bit rate) / 32kHz, 44.1kHz, 48kHz, 16kHz,
22.05kHz, 24kHz (Sampling rate)
Layer3: 32Kbps ~ 320Kbps (Bit rate) / 32kHz, 44.1kHz, 48kHz, 16kHz,
22.05kHz, 24kHz, 8kHz, 11.025kHz, 12kHz (Sampling rate)
16kHz, 12kHz, 11.025kHz, 8kHz (Sampling rate)
PCM (big endian), DVD LPCM 16/20/24bit (Bit rate)
/ 6kHz, 8kHz, 11.025kHz, 12kHz, 16kHz, 22.05kHz, 24kHz, 32kHz,
44.1kHz, 48kHz , 88.2kHz, 96kHz, 176.4kHz, 192kHz (Sampling rate)
384Kbps (Bit rate) / 8KHz ~ 48Khz (Sampling rate)
English - 10 -
Page 12

Specication
TV Broadcasting
Receiving Channels VHF (BAND I/III) - UHF (BAND U) - HYPERBAND
Digital Reception
Number of Preset
Channels
Channel Indicator On Screen Display
RF Aerial Input 75 Ohm (unbalanced)
Operating Voltage 220-240V AC, 50Hz.
Audio German+Nicam Stereo
Operation temperature
and operation humidity
Display 22” 24” 32”
Audio Output Power
(WRMS.) (10% THD)
Power Consumption (W)
Weight (Kg)
TV Dimensions DxLxH
(with foot) (mm)
TV Dimensions DxLxH
(without foot) (mm)
Display 39” 43” 48”
Audio Output Power
(WRMS.) (10% THD)
Power Consumption (W)
Weight (Kg)
TV Dimensions DxLxH
(with foot) (mm)
TV Dimensions DxLxH
(without foot) (mm)
PAL BG/I/DK/LL’
SECAM BG/DK
Fully integrated digital terrestrial-cable-satellite TV(DVB-T-C-S)
(DVB-T2, compliant)
1.000
0ºC up to 40ºC, 85% humidity max
2x2,5W 2x2,5W 2x6W
45W 45W 65W
3,35 kg 3,40 kg 5,45 kg
134,2x516,4x352,5 mm 134x554,4x370,6 mm 184,9x734,8x476,2 mm
34,7 x516x317,4 mm
2 x 8W 2x8W 2x8W
75W 75W 75W
9,20 kg 9,20 kg 10,60 kg
219,9 x 889,2 x 563,1 mm 219,9x974,2x614,8 mm 219,9x1092,7x680,7 mm
78,8/97,4 x 889,2 x 523,1 mm
35,2(min)/61,2(max)x554.4x336,2 mm76,8(min)/89,2(max)x734,8x437,5
64(min)/93(max)x974,2x572mm
mm
80,5(min)/108,7(max)x1092,7x641,8
mm
Display 49”
Audio Output Power
(WRMS.) (10% THD)
Power Consumption (W)
Weight (Kg)
TV Dimensions DxLxH
(with foot) (mm)
TV Dimensions DxLxH
(without foot) (mm)
2x8W
75W
11,20 kg
219,9x1111,4x691,5 mm
59,5(min)/91,2(max)x1111,4x652,9mm
English - 11 -
Page 13

VESA WALL MOUNT MEASUREMENTS
W
H
A B C D E
English VESA WALL MOUNT MEASUREMENTS
Hole Pattern Sizes (mm)
Thread (Y)
Deutsch MASSANGABEN FÜR VESA-WAN DMONTAGE Lochmuste rgrößen (mm)
Länge (X) G ewinde (Y)
Français DIMENSION S DU SUPPORT DE FIXATION MURAL E VESA Dimensions des modèles de trous de montage (mm)
Longueur (X) F iletage (Y)
Italiano Misurazioni installazione a paret e VESA Dimensioni schema foro (mm)
Lunghezza (X) Filettatura (Y)
Português MEDIÇÕES DE MONTAGEM MURAL VESA Dimensões do molde de furação (mm)
Compriment o (X) Rosca (Y)
Español MEDIDAS DEL MONTAJE DE PARED VESA
Tamaño s de patrón pa ra agujero (mm)
Longitud (X) Rosca (Y)
Türkçe VESA DU VARA MONTAJ APAR ATI ÖLÇ ÜLERİ Açılacak Delik Ölçüleri (mm)
Uzunluk (X) Yüzey (Y)
Eλληvικ ΔΙΑΣΤΑΣΕΙΣ ΒΑΣΗΣ ΤΟΙΧΟΥ VE SA
Μεγέθη σχήματος οπών (mm)
Μήκος (X) Σπείρωμα (Y)
Polski WYMIARY DO MONTAŻU NAŚCIENNEGO VESA Rozmiary szablonu otworów (mm)
Długość (mm) Gwint (Y)
čeština ROZMĚRY DRŽÁKU NA ZEĎ VESA Rozměry velikosti děr (mm)
Délka (X) Závi t (Y)
Magyar VESA FALI TARTÓ MÉRETEK Lyukak méretének nagysága(mm)
Hossz (X) Menet (Y)
Română MĂSURĂTORI SUPORT PERETE VESA
Dimensiuni tipa r gaură (mm)
Lungime (X) Filet (Y)
Svenska VESA VÄGGMON TERIN GSMÅTT Hålmönsterstorlear (mm)
Längd (X) Tr åd (Y)
Nederlands VESA WANDMONTAGE METINGEN
Grootte booropening (mm)
Lengte (X) Dr aad (Y)
Suomi VESA- SEINÄASEN NUKSEN MI TAT Reikäkuv ion koot (mm)
Pituus (x) Kierre (Y)
Norsk VESA VE GGMONTERI NGSMÅL Hullmønster størrelser (mm)
Lengde (x) Tråd (Y)
Dansk VE SA VÆGMONTER INGS-MÅL Hulmønster-størrelser (mm)
Længde(X) T råd (Y)
Русский РАЗМЕРЫ НАСТЕННОГО КРЕПЛЕНИЯ VESA Размеры системы отверстий
Длина(Х) Резьба (Y)
беларуская ПАМЕРЫ НАС ЦЕННАГА МАЦАВ АННЯ VESA Памеры сістэмы адтулін
Даўжыня (X) Разьба (Y)
македонски
МЕРКИ ЗА МОНТИРАЊЕ НА ЅИД ЗА „ВЕСА“ Шема на големини на дупката (мм)
Должина (Х)
Навој (Y)
український РОЗ МІРИ НАСТІННОГО КРІ ПЛЕННЯ VESA Відс тань між кріпильними отворами , мм
Довжина (X) Діаметр різ ьби (Y)
Srpski DIMENZIJE VE SA ZIDNOG NOSAČA Dimenzije ša blona za buše nje
Dužina (X) Na voj (Y)
Slovenčina ROZMERY DRŽIAKA NA STENU VESA Rozmery veľkosti dier (mm)
Dĺžka (X) Závit (Y)
Slovenščina
MERE STENSKEGA NOSILCA VESA Velikosti vzorc a lukenj (mm)
Dolžina (X) Navoj (Y)
Hrvatski VESA MJERE ZIDNOG DRŽAČA Veličine uzorka otvora (mm)
Dužina (X) Na voji (Y)
Bosanski DIMENZIJE VESA ZIDNOG NOSAČA Dimenz ije šablona za bušenje
Dužina (X) Na voj (Y)
Български РАЗМЕ РИ ЗА КОМПЛЕ КТ ЗА МОНТАЖ НА С ТЕНА VESA
Размери на отвора (mm)
Дължинаt (X) Резба (Y)
Lietuvių VESA TVIRTINIMO PRIE SIENOS MATAVIMAI Ango s šablono dydis (mm)
Ilgis (X) Sriegis (Y)
Latviešu VESA SI ENAS STIPRI NĀJUMA IZMĒ RI Caurumu šabl ona izmērs (mm)
Garums (X) Vītne (Y)
Eesti VESA SEINALE KINNITAMISE MÕÕDUD Kruvi suuruse mõõt (mm)
Kõrgus(x) Keere (Y)
Shqip PËRMASAT E NJËSISË SË MONTIMIT NË MUR VESA
Madhësitë modele të vrimave (mm)
Gjatësia (X) Filetimi (Y)
يبرع VESA )(
)X( )Y(
תירבע VESA )"(
)X( )Y(
یسراف VESA ) (
)X( )Y(
A
B
Hole Paern
Sizes (mm)
(39” / 43’’ / 48’’ / 49”)
W H
200 200
C Screw Sizes
D Length (X)
min. (mm) 10
max. (mm) 13
E Thread (Y) M6
VESA WALL MOUNT MEASUREMENTS
A
B
Hole Paern
Sizes (mm)
(22" / 24’’)
W H
75 75
C Screw Sizes
D Length (X)
min. (mm) 5
max. (mm) 8
E Thread (Y) M6
VESA WALL MOUNT MEASUREMENTS
A
B
Hole Paern
Sizes (mm)
(32")
W H
200 100
C Screw Sizes
D Length (X)
min. (mm) 5
max. (mm) 8
E Thread (Y) M6
English - 12 -
Screw Sizes Length (X)
Schraubengrö ßen
Dimensions des vis
Dimensioni vite
Tamanho s do paraf uso
Tamaño s de tornillo
Vida Ölçüleri
Μεγέθη β ιδών
Rozmiary wkręt ów
Rozměry š roubů
Csavar méret
Dimensiuni şuruburi
Skruvstorlekar
Schroefgroote
Ruuvinkoo t
Skruestørrelser
Skruestørrelser
Размеры винтов
Памеры вінтоў
Големина на шрафот
Розміри гвинтів
Dimenzije zavrtnjeva
Rozmery skrutiek
Velikosti vijakov
Veličine vijka
Dimenzije vijaka
Размер на болта
Varžtų dydis
Skrūvju izmēri
Kruvi suurus
Madhësitë e vidhave
Page 14

 Loading...