

Philips 55PP9527, 46PP9527 User Manual

3135 035 21751
46PP9527
55PP9527
Rear-projection TV
Rear-projection TV
with HD Input
with HD Input

2
CONTENTS
Setup and Installation
Product Highlights . . . . . . . . . . . . . . . . . . . . . . . . . . . . .3
Installing the TV . . . . . . . . . . . . . . . . . . . . . . . . . . . . . . .4
Using the TV keys . . . . . . . . . . . . . . . . . . . . . . . . . . . . .5
Using the Remote Control Keys . . . . . . . . . . . . . . . .6–7
Operation
Using the Menus
Overview . . . . . . . . . . . . . . . . . . . . . . . . . . . . . . . . . .8
Install . . . . . . . . . . . . . . . . . . . . . . . . . . . . . . . . . . .9–10
Picture . . . . . . . . . . . . . . . . . . . . . . . . . . . . . . . . . . .13
Sound . . . . . . . . . . . . . . . . . . . . . . . . . . . . . . . . . . . .12
Features . . . . . . . . . . . . . . . . . . . . . . . . . . . . . . . . . .13
General . . . . . . . . . . . . . . . . . . . . . . . . . . . . . . . . . . .14
Souce and Converge . . . . . . . . . . . . . . . . . . . . . . . . .15
Demo . . . . . . . . . . . . . . . . . . . . . . . . . . . . . . . . . . . .16
Using Picture-in-Picture . . . . . . . . . . . . . . . . . . . . . . . .17
Using Teletext (if provided) . . . . . . . . . . . . . . . . . . . .18-19
Peripheral Equipment
Connecting Peripheral Equipment . . . . . . . . . . . . . .20-26
Selecting Connected Equipment for Viewing . . . . . . . .27
General Information
Care, Cleaning, and Tips . . . . . . . . . . . . . . . . . . . . . . . .28
Before Calling Service . . . . . . . . . . . . . . . . . . . . . . . . .29
Index . . . . . . . . . . . . . . . . . . . . . . . . . . . . . . . . . . . . . .30
Specifications . . . . . . . . . . . . . . . . . . . . . . . . . . . . . . . .31
International Guarantee Conditions . . . . . . . . . . . . . . .32
Consumer Information Centres . . . . . . . . . . . . . . .33-36
SAFETY INFORMATION
Disconnect mains plug when :
• the red light below the TV screen is flashing continuously
• a bright white line is displayed across the screen
• cleaning the TV screen (never use abrasive cleaning agents; use a slightly damp chamois leather or soft cloth)
• a lightning storm is occurring
• the set is left unattended for a prolonged period.
Never attempt to repair a defective TV yourself. Always consult a skilled service person.
Battery Usage CAUTION :
To prevent battery leakage which may result in bodily injury or damage to the remote :
• Install ALL batteries correctly, + and – as marked on the remote control.
• Do not mix batteries : (OLD and NEW or CARBON and ALKALINE, etc.).
• Remove batteries when the remote is not used for a long time.
Thank you for purchasing this television set. You are now the proud owner of a Philips TV, which promises full value to
you as a customer. Please read this manual carefully and thoroughly for help with installation and operation.

3
PRODUCT HIGHLIGHTS
Active Control, APAC, Easy Tune, Incredible Surround, and IntelliSense are trademarks of Philips Consumer Electronics North America.
IntelliSense is a registered trademark of Philips Consumer Electronics North America. Copyright 2002 Philips Consumer Electronics.
*Manufactured under license from Dolby Laboratories. “Dolby” and the double-D symbol are trademarks of Dolby Laboratories.
Philips HD Pix Optics System answers the demand for extreme resolution HD with cutting-edge processing and display technolo-
gy, including microphosphor CRTs, hybrid projection lenses, first-surface mirrors, fine-pitched lenticular screens, and Philips wideband amplifier.
Auto IntelliSense®Focus Automatically adjusts the picture convergence at the push of a key.After reviewing a special test pattern,
optical sensors send position information to the controller, which then corrects the picture.Auto IntelliSense
®
Focus responds to
the natural and man-made magnetic field conditions where the projection TV is located, so you always enjoy the best possible picture.
100Hz Digital Scan eliminates picture flickering and line jitter, offering a stable picture for relaxed viewing (no eye strain).The
100Hz digital scan option can be selected in the onscreen menu.
Progressive Scan
doubles the number of visible picture lines per field by displaying all picture frame lines at once. This minimizes
the visibility of the scan lines.The progressive scan can be selected in the onscreen menu.
High-definition Inputs allow you to connect digital equipment with 1080i and 480p signals for 60Hz and 576p signals for 50Hz.The AV4
sockets are for YPbPr or RGB+HV sync connections.The AV5 sockets are for RGB (or YPbPr with adapter) DB15 connections, plus audio.
Component Video Inputs
support advanced video input—such as DVD video—for superb colour performance.
Active Control™continuously measures and corrects all incoming signals with automatic digital noise reduction and auto sharp-
ness to provide the best possible picture.
Automatic Phosphor Aging Compensation (APAC™) functions like a screen saver for your TV. Nonmoving images can be bad
for a television screen. If a video image remains stationary, it can eventually leave a permanent after-image.Video games and the stationary black bars around some movies are examples of sources of concern. Philips APAC technology addresses this problem.
Periodically, APAC automatically shifts your television picture in increments that are very small and yet large enough to blur image
retention that can lead to screen burn. Coupled with the Philips Auto Screen Format feature, APAC helps provide you protection
from the dreaded screen burn.
Protective Screen Filter (if provided; availability varies) gives the best possible picture while still protecting your investment. Specifically
formulated by Philips for HD displays, this protective screen filter helps prevent accidental damage to the delicate front lenticular screen.
Dolby* Virtual Surround
uses two speakers to simulate the surround effect produced by a multichannel system.
Digital Comb Filter
makes the finest colour details purer and sharper. It eliminates disturbing cross-colour (Moiré) effects between
different colours that you normally see with striped clothing worn on camera. The digital comb filter works by electronically separating the chroma (colour) and luminance (black and white) components of the TV signal, preventing cross-colour interference.
Dual-window, Two-tuner Picture-in-picture (PIP)
allows you to watch two shows, side by side. No video recorder is necessary for
tuning PIP pictures.Your set’s two separate tuners let you select two shows and display both in windows of equal proportion.
Supporting Features
• Digital Colour Transient Improvement (CTI)
• Digital Histogram
• Picture Freeze
• Auto Aspect Ratio Adaptation (and 4:3, expand 4:3, panorama, wide screen)
• Incredible Surround™
• Automatic Volume Leveler (AVL)
• Independent Headphone Volume Control
• Easy Tune™ (Auto Search,Auto Tune, and Auto Install)
• Alternate Channel
• Smart Surf
• Low-power standby (<1 W)

1
The major benefit of this projection television is its large viewing screen.To see
the large screen at its best, test various
locations in the room to find the optimal
spot for viewing.
Be sure to allow a minimum of 15 cm
of space around the TV.
To avoid cabinet warping, cabinet color
changes, and increased chance of set
failure, do not place the TV where temperatures can become excessively
hot—for example, in direct sunlight or
near a heating appliance.
Magnetic fields, such as those of external
speakers, may cause the picture to distort if the speakers are placed too close
to the television. Move the magnetic field
source away from the TV until there is
no picture distortion.
2
Insert the aerial plug firmly into the
ANTENNA IN 75Ω socket at the rear
of the set.
3
Insert the mains plug in the wall socket. Refer to the back of the TV set for
the correct operation voltage. Consult
your local dealer if your main supply is
different. To prevent damaging the
mains (AC) cord, which could cause
hazard, do not place the TV on the
cord.
4
Remove the cover of the battery compartment on the remote control. Insert
the two batteries supplied
(Type R6-1.5V).
The batteries supplied do not contain
the heavy metals mercury and cadmium. Nevertheless, in many countries
exhausted batteries may not be disposed of with your household waste.
Please check on how to dispose of
exhausted batteries according to local
regulations.
See the battery caution statement on
page 2.
Note : This remote control functions
with TVs that use the RC5 signalling
standard.
5
Switch the TV on : Press the mains
power switch on the front of the TV. If
Standby key is lighted, press the CH
+/– keys, digit keys, or the Standby
key on the remote control. Or press the
CHANNEL or Standby keys on the
front of the TV.
4
INSTALLING THE TV
15 cm
Do not place
the TV in
direct
sunlight or
near a heating appliance.
15 cm
15 cm
V
O
L
U
M
E
C
H
A
N
N
E
L
I
N
T
E
L
L
I
S
E
N
SE
M
E
N
U
P
O
W
E
R
Mains Power
Key
Standby
Key
ANTENNA IN 75Ω
Socket on the rear of
the TV
VOLUME
fifi%%
Thefifikey adjusts the sound volume
softer.The%%key adjusts the sound
volume louder. When using the on-
screen menu, press Volume
fifi or%%
to navigate right and left and down.
5
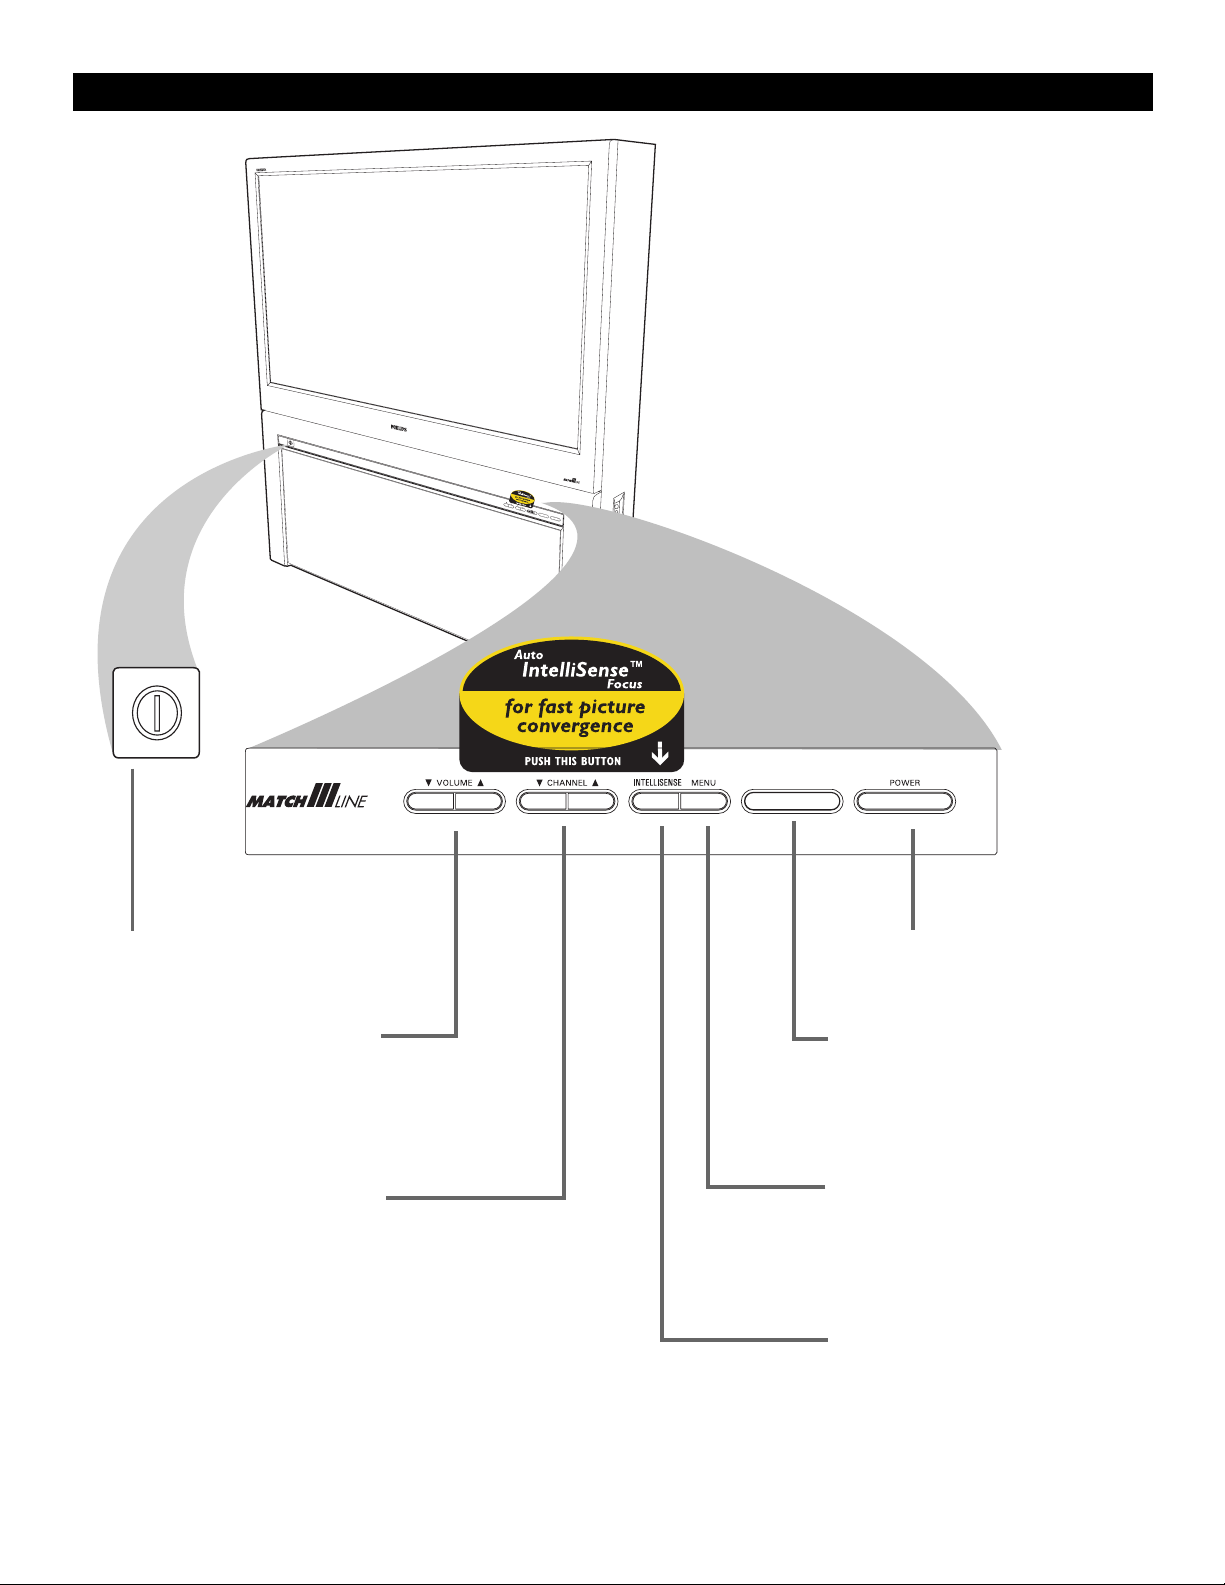
USING THE TV KEYS
MAINS POWER KEY
Switches the mains power on or off.
REMOTE SENSOR
Receives infrared commands to activate controls when the remote-control handset is aimed at it and remote
keys are pushed.
CHANNEL
%%fifi
Thefifikey selects channels in descending order.The
%%
key selects channels in
ascending order. When using the onscreen menu, press Channel
%% orfifi
to navigate up and down.
IntelliSense
When pressed, automatically adjusts
the set’s picture convergence using
the Auto IntelliSense
®
focus feature.
STANDBY
Switches the TV on or
activates standby mode.
MENU
Press to activate th on-screen menu.
Navigate the menu by using the
Volume and Channel buttons.
V
O
LU
M
E
C
H
A
NN
E
L
I
N
T
E
L
L
IS
E
N
S
E
M
E
N
U
P
O
W
E
R

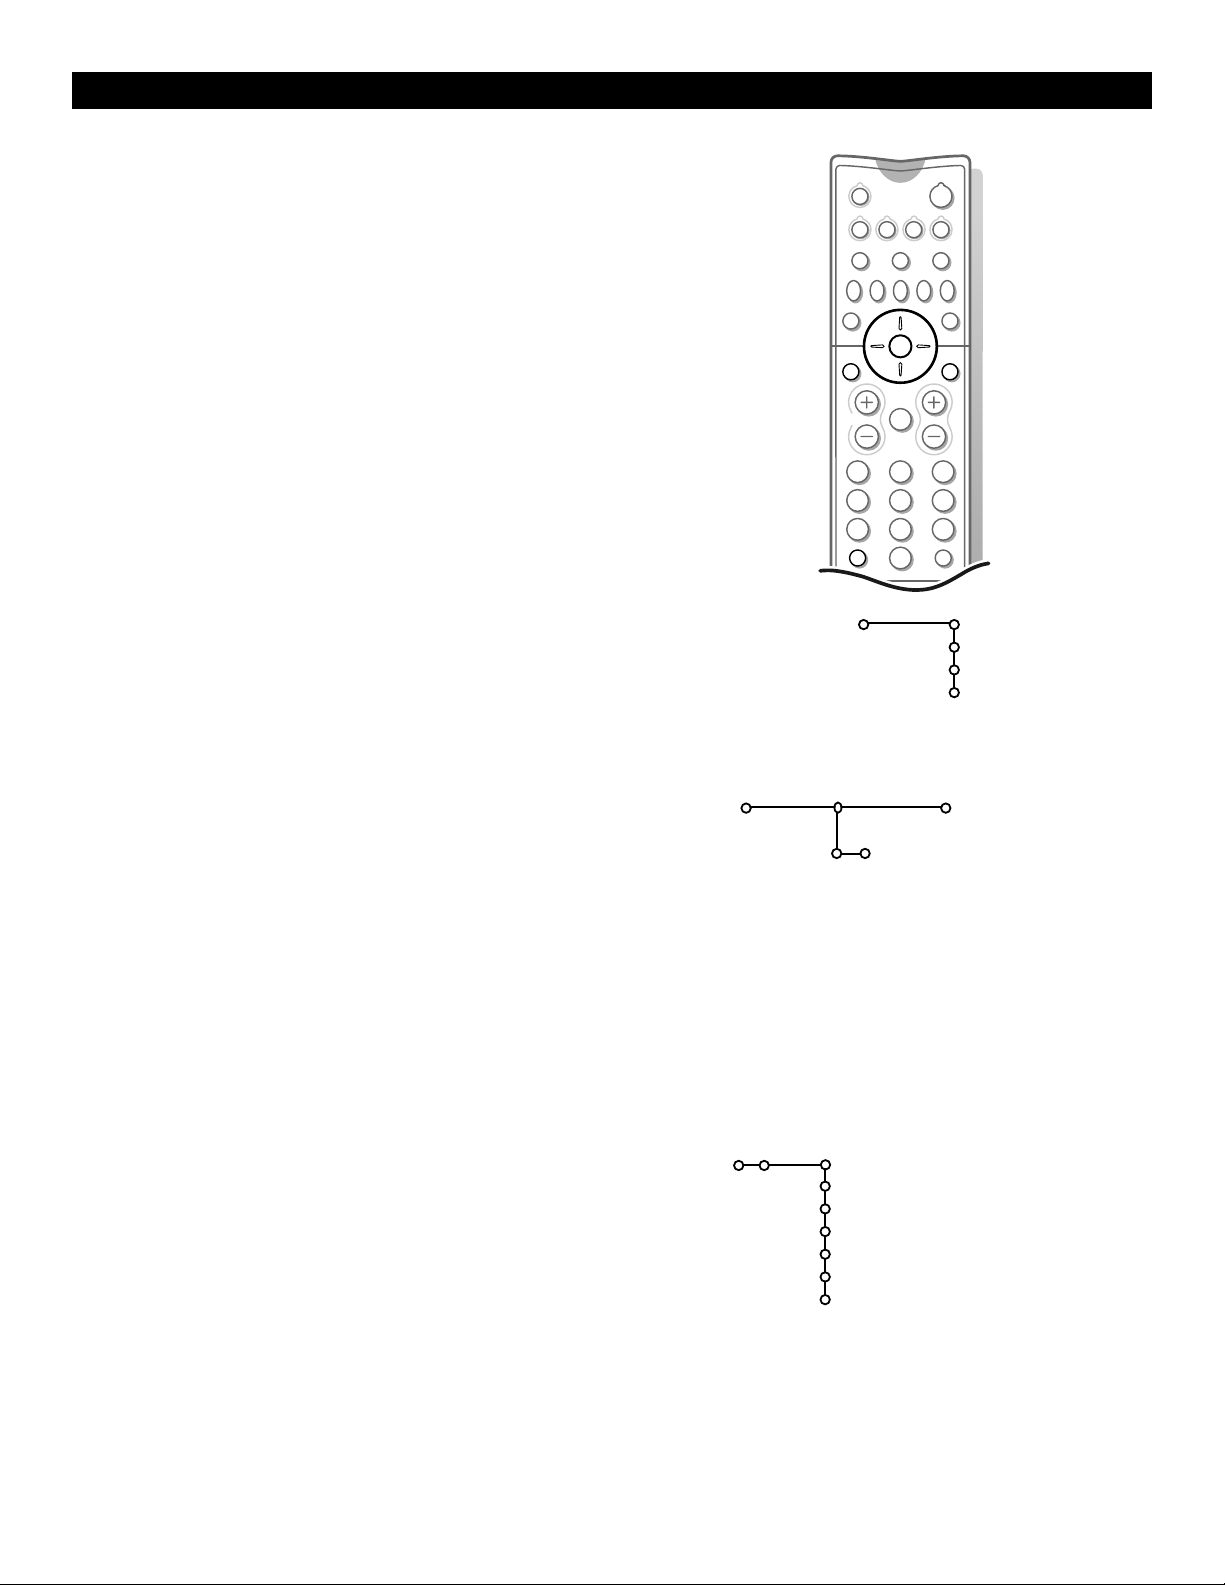
6
SELECT ACCESSORY
Press to select the AV input for the device you want to use: AV1, AV2,
AV3, AV4, or side
ACCESSORY MODE
Press to control an accessory device with the remote control. You can
control a video recorder, DVD, amplifier, or other auxiliary device
(CD or SAT). A green indicator lights up. To return to TV mode press
the button again, or wait for the light to go out.
PICTURE-IN-PICTURE (PIP)
Press to access the Picture-in-Picture and Dual-window features.
FREEZE
Press to freeze the main picture when PIP is off. In teletext mode,
press to hold a page.
VCR BUTTONS
Use with a Video recorder. Press ®®to record, ÒÒand ††to search,
‡‡
to stop and ππto play.
PIXEL PLUS™
Press to see a demonstration of Pixel Plus. The Left half of the screen
has Pixel Plus and Digital Natural Motion turned on and right half of
the screen has Pixel Plus and Digital Natural Motion turned off. Press
the button again to switch the demonstration off.
CURSOR LEFT
Press to navigate the menus and adjust the settings.
OK
Press to activate or select menu choices
VOLUME +/–
Increases or decreases volume.
DIGITS 0-9
Press to select a channel. For Channels with two digits, you must
press the second digit within 2 seconds.
i+ (STATUS/EXIT)
• Press to display information about the current channel and programme, or .when navigating the On-Screen-Display menus. information about the selected item.
TIME DISPLAY
Press to display the time.
SURROUND MODE
Press to select the surround sound mode:
Dolby* Virtual
Dolby Virtual uses two speakers to simulate the surround effect produced by a multichannel system.
Incredible Surround™
• The Incredible Surround™ feature provides the feeling that the speakers are
farther apart to enhance the home-cinema effect.
SMART SOUND
Press to select a preset sound setting.
ACTIVE CONTROL™
Press to select the Active Control level (Off, Minimum, medium,
Maximum). Active Control monitors the incoming signal and the surrounding ambient light to provide the best picture by constantly adjusting the contrast, dynamic contrast, brightness, and colour picture settings.
*Manufactured under license from Dolby Laboratories. “Dolby”
and the double-D symbol are trademarks of Dolby Laboratories.
Pixel Plus, Incredible Surround, and Active Control are trademarks
of Philips Consumer Electronics. Copyright 2003 Philips
Consumer Electronics. All rights reserved.
USING THE REMOTE CONTROL KEYS
v
VCR DVD AMP AUX
Sb fi
Ò
V
PIXEL
PLUS
OK
®
‡π
¬
B
†
b
MENU
Ï
CH
213
546
879
i
Q q c
0
U
ZOOM
ACTIVE
SMART
CONTROL
Ma
h
0
h
SMART

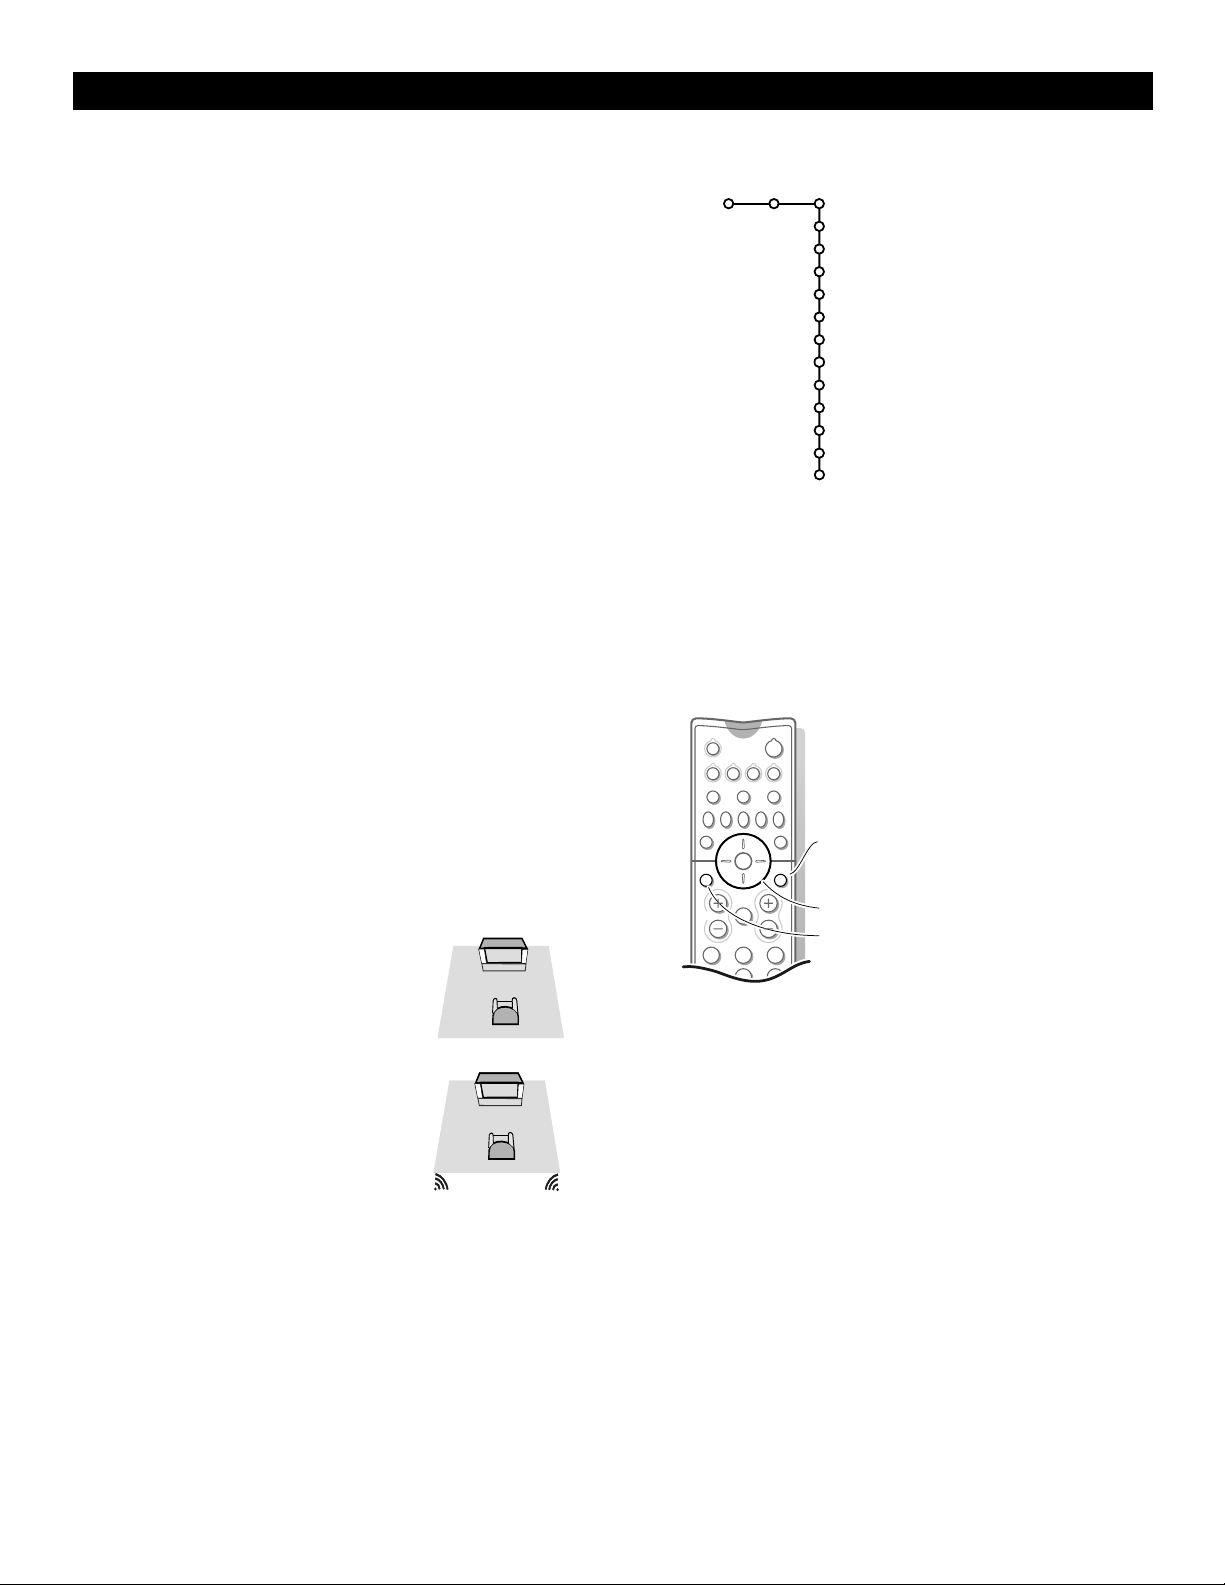
7
STANDBY
• Switches the set on and off from standby mode. (The red light indicator lights up when the set is in standby mode.)
No Function
CURSOR UP
Press to navigate the menus and adjust the settings.
TELETEXT ON/OFF
Press to access Teletext information (if provided).
CURSOR RIGHT
Press to navigate the menus and adjust the settings.
CURSOR DOWN
Press to navigate the menus and adjust the settings.
MENU ON/OFF
Press to turn the on-screen menu on and off.
MUTE
Press to mute the sound. To restore the sound, press the key again.
CHANNEL +/–
Press to select channels in ascending and descending order.
SMART SURF
Press to use the Smart Surf feature. If you have Smart Surf set to 2channels, it will return you to the previously viewed channel. If
Smart Surf is set to 9-channel a menu appears with the 9 previously
viewed channels.
TELETEXT ENLARGE
Press to enlarge the teletext page.
PICTURE FORMAT
Press to select a picture format. A menu appears with the following
options: Automatic, Super Zoom, 4:3, Movie Expand 14:9, Movie
Expand 16:9, 16:9 Subtitle;e, and Wide Screen. Press the button to
scroll through the choices.
No Function
ACTIVE CONTROL™
Press to switch the Active Control™ feature on or off. When Active
Control™ is on, it measures and corrects all incoming signals to provide the best picture-quality settings, controlling Sharpness and Noise
Reduction continuously and automatically. The onscreen Active
Control™ display items cannot be selected. See page 22.
SMART PICTURE
Press to select from a list of preset picture options.
USING THE
REMOTE
C
ONTROL KEYS
v
VCR DVD AMP AUX
B
V
PIXEL
PLUS
OK
®
i
Sb fi
Ò
‡π
¬
†
b
MENU
Ï
CH
213
546
879
0
0
U
ZOOM
Q q c
SMART
Ma
ACTIVE
CONTROL
h
h
SMART

8
USING THE
MENUS
:OVERVIEW
213
546
B
w
b
Ï
VCR DVD AMP AUX
¬V CH
Sb fi
OK
MENU
PIXEL
PLUS
OK key to activate
cursor to select
adjustments
return or switch
main menu
on/off
1
Press the MENU Ï key on the remote control
to summon the main menu.
Note: Should your remote control be lost or broken you
can still use the keys on the front of the TV. See p. 8.
2
Press the cursor button up or down to select the
TV, Settings, Install or Demo menu.
Note: Sometimes not all the menu items are visible on
the screen. Press the cursor down to reveal all items.
3
Use the cursor button left or right to select the
menu item.
4
Use the cursor button up or down again to select
the control you want to select or to adjust. For
instance, see Picture menu.
5
Press the MENU Ï key to turn off the main
menu.
The menu system
Pipes, balls and a puck
The hierarchy of menus and controls is represented by an
animated visual mechanism of pipes, balls and a puck.The
animated mechanism constantly shows the current whereabouts in the menu structure.
The puck surrounds the ball indicating the user’s current
position in the menu hierarchy.The puck is always present
when the menu system is displayed.
The puck is divided into 4 parts.They correspond to the
directional controls (up/down, left/right) on the remote control.The arrows on the cursor indicate which directions to
choose.
When menu items cannot can fit on the TV display, only a
portion is shown.
Those omitted are indicated by a cluster of.
Direct selection and control
Menu items are controlled as soon as they are selected.
Only a few items require information with the OK key.
List controls
A list control is used to select one or more items from a
list of options. Press the right key to move the puck into
the list.At least one item is the current value and is highlighted.
Moving the puck up or down with the up/down key causes
the list to move up or down.
pipes
puck
balls
Picture Sound Features
Digital options
100 Hz Dig. Scan
Pixel Plus
Double lines
TV
9
USING THE MENUS :INSTALL
Language
English
....
.....
Install
1
Press the MENU Ï key on the remote control.
When you switch on your TV for the first time and no channels are stored so far, the menu Language automatically
appears on the screen. This menu also has an additional
item Exit with which the menu can be dismissed. The
explanation appears in different languages one at a time.
Choose your preferred language and press the OK key on
the remote control. Proceed with the Install menu.
2
Use the cursor down to select Install.
3
Use the cursor right to select Language.
Follow the instructions on screen.
4
Use the cursor up/down to select your preferred
language and press the OK key to confirm your
selection.
5
Proceed with the Install menu.
Automatic install
Install Start
Install
You can now search for and store the TV channels in
two different ways: using Automatic Installation or
Manual Installation (tuning-in channel by channel).
Select your choice with the cursor right.
Note: Channel numbers and names will always be written in
Latin characters, even when a language has been selected
which uses other characters.
Automatic Channel installation
1
Select Automatic installation in the Install menu.
Note: All channels must be unlocked in order to autoprogram. If requested, enter your PIN to unlock all channels.
(See TV, Features menu, Child lock, p. 13.)
2
Press the cursor down.
The autoprogramming option label
Start appears.
3
Press the cursor right.
4
The message Searching appears and the progress
of autoprogramming is displayed.
When the Automatic installation is complete, the puck
navigates to Install again.
The programme list is automatically filled with all the
programme numbers of the TV channels transmitted.
Manual Channel installation
1
Select Manual installation in the Install menu.
2
Press the cursor down.
Follow the instructions on screen.
Note: Search or direct selection of a TV channel. If you know
the frequency, enter the 3 digits of the frequency directly with
the digit keys 0 to 9 (e.g. 048). Press the cursor down to proceed.
3
Repeat to search for another TV channel.
Searching for and storing TV channels is
done channel by channel.You must go
through every step of the Manual
Installation menu
Manual install
Install
System
Programme
Search
Fine tune
Antenna level
Store
w
VCR DVD AMP AUX
Sb fi
PIXEL
PLUS
OK
B
b
MENU
Ï
¬V CH
213
546
879
i
0
0

10
U
SING THE MENUS
:INSTALL
It is possible to change the name stored in the
memory or to assign a name to a TV channel
for which a name has not yet been entered.A
name with up to 5 letters or numbers can be
given to the programme numbers 0 to 99. For
example SUPER, BBC1,... Before programme
number 0 you can also enter a name for the
peripherals that are connected to an external
input.
Give name
1
Select Give Name in the Install menu and press the
cursor down.
2
Select the programme number.
Note: keep the cursor up/down pressed to scroll
through the programme list quickly.
3
Press the cursor right. A keyboard appears on the
screen. Only European characters are displayed.
Note:
- Dependent on the language selected in the language
menu, the key Special is available or not.
- When you select Arabic, you can toggle the Special key
to display Arabic or English characters.The Shift key is
changed to More. Press the More key to toggle between
part 1, 2 or 3 of the Arabic character sets.
Press the cursor right to enter the keyboard.
Press the cursor up/down, left/right to select the first
character and press OK. Repeat for every character you
want to enter.
Select Space to enter a space; Delete to erase the
highlighted character in the name entered; Shift to display
upper- or undercast characters on the keyboard; Special
to display special characters on the keyboard. Press OK
to confirm.
4
Press the cursor left repeatedly when you have finished naming the selected channel or peripheral.
5
Select another programme number and repeat steps
3 to 5.
Reshuffle the programme list
According to your preference you can change the
order of the stored TV channels.
1
Select Reshuffle in the Install menu and press the
OK key.
2
Follow the instructions on screen.
Select Favourite TV channels
1
Select Favourite programmes in the Install
menu.
2
Select your programme number with the cursor
up/down.
3
Select Ye s or No with the cursor right.
4
Repeat 2 and 3 for every TV channel or external
you want to make a favourite or a non-favourite TV
channel or external.
VCR1
BBC1
BBC2
CNN
TVE
π.....
pπ
® Space ® Delete
ABCDEFG 1 23
HIJKLMN 4 56
OPQRSTU 7 89
VWXYZ 0
® Shift (® Special)
VCR1
BBC1
BBC2
CNN
TVE
π.....
π
Reshuffle Favorite channels
pπ
Yes • No
Yes • No
Yes • No
Yes • No
Yes • No
Yes • No
π
Favorite channels
pπ
Reshuffle Favorite channels
VCR1
BBC1
BBC2
CNN
TVE
2

11
USING THE
MENUS :PICTURE
Picture Sound Features
Smart picture
Contrast
Brightness
Colour
Sharpness
Tint
Digital options
Dynamic contrast
DNR
Colour enhancement
(Hue)
Picture format
TV
OK key to acti-
vate
cursor to select
adjustments
return or switch
main menu on/off
Picture menu
Use the Picture menu to adjust picture settings. Use the on-
screen Menu-Info i for more information about the menu
items.
1
Press the MENU Ï key on the remote control to
summon the main menu.
2
Press the cursor right to select Picture.
3
Select the menu items in the Picture menu with the
cursor up/down.
4
Adjust the settings with the cursor left/right or enter
the list of submenu items with the cursor right.
5
Select a submenu item with the cursor up/down.
The modified adjustments for Contrast, Brightness,
Colour, Sharpness,Tint, Digital options and Dynamic
Contrast are automatically stored.
Select
Factory settings in the Setup menu, General, to
restore the predefined factory settings, see p. 14.
Digital options with PAL signals
Although Pixel Plus is the most ideal setting, it may be
preferable, dependent on your own preference, to select
Double lines, or 100 Hz Digital Scan.
•
100 Hz Dig. Scan 100 Hz + Dig. Scan (Field and line flick-
er reduction) without motion compensation.
•
Pixel Plus creates near High Definition performance
inside the TV on the basis of a regular input signal.
The number of lines are increased and the number of pixels on a line are doubled in combination with Digital
Natural Motion.As such Pixel Plus enhances both regular
broadcast signals and DVD or Digital TV input towards
unparalleled sharpness and depth, near High Definition
and natural detail.
•
Double Lines provides for a doubling of vertical and hori-
zontal resolution which adds astonishing sharpness and a
total absence of visible picture lines.
Motion compensation reduces jitter and offers smooth,
yet sharp motion reproduction.
Digital options with NTSC signals
•
Progressive Scan line doubling eliminates line flicker.
•
Pixel Plus
Note:
- Pixel Plus is not active when Multipip,Teletext (Except when
Subtitling is activated) or Teletext Dual screen is selected.
- When having selected Pixel Plus, the size of the menus on
screen is reduced.This is a normal behaviour.
- Interference, caused by fluorescent lights just above the TV, may
occur when having selected Pixel Plus.
w
VCR DVD AMP AUX
PIXEL
PLUS
OK
B
Sb fi
b
MENU
Ï
¬V CH
213
546
12
U
SING THE MENUS :SOUND
Surround Modes
Dependent on the sound signal broadcasted, select one of
the Surround modes.
Incredible Surround™ enhances stereo
programs by making the sound broader and
fuller
Dolby* virtual creates a virtual surround
sound experience from two speakers.
Dolby Virtual retains all the original multichannel audio information and provides the
listener with the sensation of being surrounded by additional speakers.
Sound menu
Use the Sound menu to adjust sound settings. Use the on-
screen Menu-Info i for more information about the menu
items.
1
Press the MENU Ï key on the remote control to
summon the main menu.
2
Press the cursor right to select Sound.
3
Select the menu items in the Sound menu with the
cursor up/down and adjust the settings with the cursor left/right.
Remember, control settings are at normal mid-range
levels when the bar scale is centred.
Note:
- Smart Sound allows you to select from a list a preset sound
settings.
- Dual X is only available with dual sound transmission.
- Mono/Stereo is only selectable in case of analogue stereo transmission.
- Nicam/Analogue is only selectable in case of Nicam transmission.
- AVL (Automatic Volume Leveller) Automatically controls the volume level to avoid excessive level differences, especially when
switching to another channel or during commercial breaks.
- Surround modes can not be modified when a headphone has
been connected.
Sound
Smart sound
Equalizer
Volume
Balance
Loudness
Headphone volume
Surround mode
Dual I-II
Mono/Stereo
Nicam/Analogue
AVL
Delta volume
TV
OK key to acti-
vate
cursor to select
adjustments
return or switch
main menu on/off
w
VCR DVD AMP AUX
PIXEL
PLUS
OK
B
Sb fi
b
MENU
Ï
¬V CH
213
546
 Loading...