

Page 1

3135 035 20472
55PP8620
46PP8621
Rear-projection TV
Rear-projection TV
with HD Input
with HD Input
Page 2

2
CONTENTS
Setup and Installation
Product Highlights . . . . . . . . . . . . . . . . . . . . . . . . . . . . .3
Installing the TV . . . . . . . . . . . . . . . . . . . . . . . . . . . . . . .4
Using the TV keys . . . . . . . . . . . . . . . . . . . . . . . . . . . . .5
Using the Remote Control Keys . . . . . . . . . . . . . . . .6–7
Operation
Using the Menus
Overview . . . . . . . . . . . . . . . . . . . . . . . . . . . . . . . . . .8
Install . . . . . . . . . . . . . . . . . . . . . . . . . . . . . . . . . . .8–13
Picture . . . . . . . . . . . . . . . . . . . . . . . . . . . . . . . . .14–17
Sound . . . . . . . . . . . . . . . . . . . . . . . . . . . . . . . . . . . .18
Features . . . . . . . . . . . . . . . . . . . . . . . . . . . . . . .19–22
Using Program List . . . . . . . . . . . . . . . . . . . . . . . . . . .23
Using Smart Surf . . . . . . . . . . . . . . . . . . . . . . . . . . . . .23
Using Smart Picture and Smart Sound . . . . . . . . . . . . .24
Using the Sleep Timer . . . . . . . . . . . . . . . . . . . . . . . . .25
Using PIP (Picture-in-Picture) . . . . . . . . . . . . . . . . . . . .26
Using T eletext (if provided) . . . . . . . . . . . . . . . . . . .27–28
Peripheral Equipment
Connecting Peripheral Equipment . . . . . . . . . . . . .29–37
Selecting Connected Equipment for Viewing . . . . . . . .38
General Information
Care,Cleaning, and Tips . . . . . . . . . . . . . . . . . . . . . . . .39
Before Calling Service . . . . . . . . . . . . . . . . . . . . . . . . .40
Index . . . . . . . . . . . . . . . . . . . . . . . . . . . . . . . . . . . . . .41
Specifications . . . . . . . . . . . . . . . . . . . . . . . . . . . . . . . .42
International Guarantee Conditions . . . . . . . . . . . . . . .43
Consumer Information Centres . . . . . . . . . . . . . . .44–47
SAFETY
INFORMATION
Disconnect mains plug when :
• the red light below the TV screen is flashing continuously
• a bright white line is displayed across the screen
• cleaning the TV screen (never use abrasive cleaning agents; use a slightly damp chamois leather or soft cloth)
• a lightning storm is occurring
• the set is left unattended for a prolonged period.
Never attempt to repair a defective TV yourself. Always consult a skilled service person.
Battery Usage CAUTION :
To prevent battery leakage which may result in bodily injury or damage to the remote :
• Install ALL batteries correctly, + and – as marked on the remote control.
• Do not mix batteries : (OLD and NEW or CARBON and ALKALINE, etc.).
• Remove batteries when the remote is not used for a long time.
Thank you for purchasing this television set. You are now the proud owner of a Philips TV, which promises full value to
you as a customer. Please read this manual carefully and thoroughly for help with installation and operation.
Page 3

3
PRODUCT HIGHLIGHTS
Active Control, APAC, Easy Tune, Incredible Surround, and IntelliSense are trademarks of Philips Consumer Electronics North America.
IntelliSense is a registered trademark of Philips Consumer Electronics North America. Copyright 2002 Philips Consumer Electronics.
*Manufactured under license from Dolby Laboratories. “Dolby” and the double-D symbol are trademarks of Dolby Laboratories.
Philips HD Pix optics system answers the demand for extreme resolution HD with cutting-edge processing and display tech-
nology, including microphosphor CRTs, hybrid projection lenses, first-surface mirrors, fine-pitched lenticular screens, and Philips
wideband amplifier.
Auto IntelliSense®Focus Automatically adjusts the picture convergence at the push of a key. After reviewing a special test pat-
tern, optical sensors send position information to the controller, which then corrects the picture. Auto IntelliSense
®
Focus responds to
the natural and man-made magnetic field conditions where the projection TV is located, so you always enjoy the best possible picture.
100Hz Digital Scan eliminates picture flickering and line jitter, offering a stable picture for relaxed viewing (no eye strain). The
100Hz digital scan option can be selected in the onscreen menu.
Progressive Scan doubles the number of visible picture lines per field by displaying all picture frame lines at once. This mini-
mizes the visibility of the scan lines. The progressive scan can be selected in the onscreen menu.
High-definition Inputs allow you to connect digital equipment with 1080i and 480p signals for 60Hz and 576p signals for 50Hz. The
AV4 sockets are for YPbPr or RGB+HV sync connections. The AV5 sockets are for RGB (or YPbPr with adaptor) DB15 connections, plus
audio.
Component Video Inputs support advanced video input—such as DVD video—for superb colour performance.
Active Control™continuously measures and corrects all incoming signals with automatic digital noise reduction and auto sharp-
ness to provide the best possible picture.
Automatic Phosphor Aging Compensation (APAC™) functions like a screen saver for your TV. Nonmoving images
can be bad for a television screen. If a video image remains stationary, it can eventually leave a permanent after-image. Video games
and the stationary black bars around some movies are examples of sources of concern. Philips APAC technology addresses this problem. Periodically, APAC automatically shifts your television picture in increments that are very small and yet large enough to blur
image retention that can lead to screen burn. Coupled with the Philips Auto Screen Format feature, APAC helps provide you protection from the dreaded screen burn.
Protective Screen Filter (if provided;availability varies) gives the best possible picture while still protecting your investment.
Specifically formulated by Philips for HD displays, this protective screen filter helps prevent accidental damage to the delicate front lenticular screen.
Dolby*Vir tual Surround
uses two speakers to simulate the surround effect produced by a multichannel system.
Digital Comb Filter makes the finest colour details purer and sharper. It eliminates disturbing cross-colour (Moiré) effects
between different colours that you normally see with striped clothing worn on camera. The digital comb filter works by electronically separating the chroma (colour) and luminance (black and white) components of the TV signal, preventing cross-colour interference.
Dual-window, Two-tuner Picture-in-picture (PIP)
allows you to watch two shows, side by side. No video recorder is necessary
for tuning PIP pictures. Your set’s two separate tuners let you select two shows and display both in windows of equal proportion.
Supporting Features
• Digital Colour Transient Improvement (CTI)
• Digital Histogram
• Picture Freeze
• Auto Aspect Ratio Adaptation (and 4:3,expand 4:3,panorama,wide screen)
• Incredible Surround™
• Automatic Volume Leveler (AVL)
• Independent Headphone Volume Control
• Easy Tune™ (Auto Search,Auto Tune, and Auto Install)
• Alternate Channel
• Smar t Surf
• Low-power standby (<1 W)
Page 4

1
The major benefit of this projection television is its large viewing screen. To
see the large screen at its best, test various locations in the room to find the
optimal spot for viewing.
Be sure to allow a minimum of 15 cm
of space around the TV.
To avoid cabinet warping, cabinet color
changes, and increased chance of set
failure, do not place the TV where temperatures can become excessively
hot—for example, in direct sunlight or
near a heating appliance.
Magnetic fields, such as those of external speakers, may cause the picture to
distort if the speakers are placed too
close to the television. Move the magnetic field source away from the TV
until there is no picture distortion.
2
Insert the aerial plug firmly into the
ANTENNA IN 75Ω socket at the rear
of the set.
3
Insert the mains plug in the wall socket. Refer to the back of the TV set for
the correct operation voltage. Consult
your local dealer if your main supply is
different. To prevent damaging the
mains (AC) cord, which could cause
hazard, do not place the TV on the
cord.
4
Remove the cover of the battery compartment on the remote control. Insert
the two batteries supplied
(Type R6-1.5V).
The batteries supplied do not contain
the heavy metals mercury and cadmium. Nevertheless, in many countries
exhausted batteries may not be disposed of with your household waste.
Please check on how to dispose of
exhausted batteries according to local
regulations.
See the battery caution statement on
page 2.
Note : This remote control functions
with TVs that use the RC5 signalling
standard.
5
Switch the TV on : Press the mains
power switch on the front of the TV. If
Standby key is lighted, press the CH
+/– keys, digit keys, or the Standby
key on the remote control. Or press the
CHANNEL or Standby keys on the
front of the TV.
4
INSTALLING THE TV
15 cm
Do not place
the TV in
direct
sunlight or
near a heating appliance.
15 cm
15 cm
Intelli
Sense
>
?
+
A
-
A
VOLUME
CHANNEL
MENU
Intelli
Sense
>
?
+
A
-
A
VOLUME
CHANNEL
MENU
Mains Power
Key
Standby
Key
ANTENNA IN 75Ω
Socket on the rear of
the TV
Page 5
5
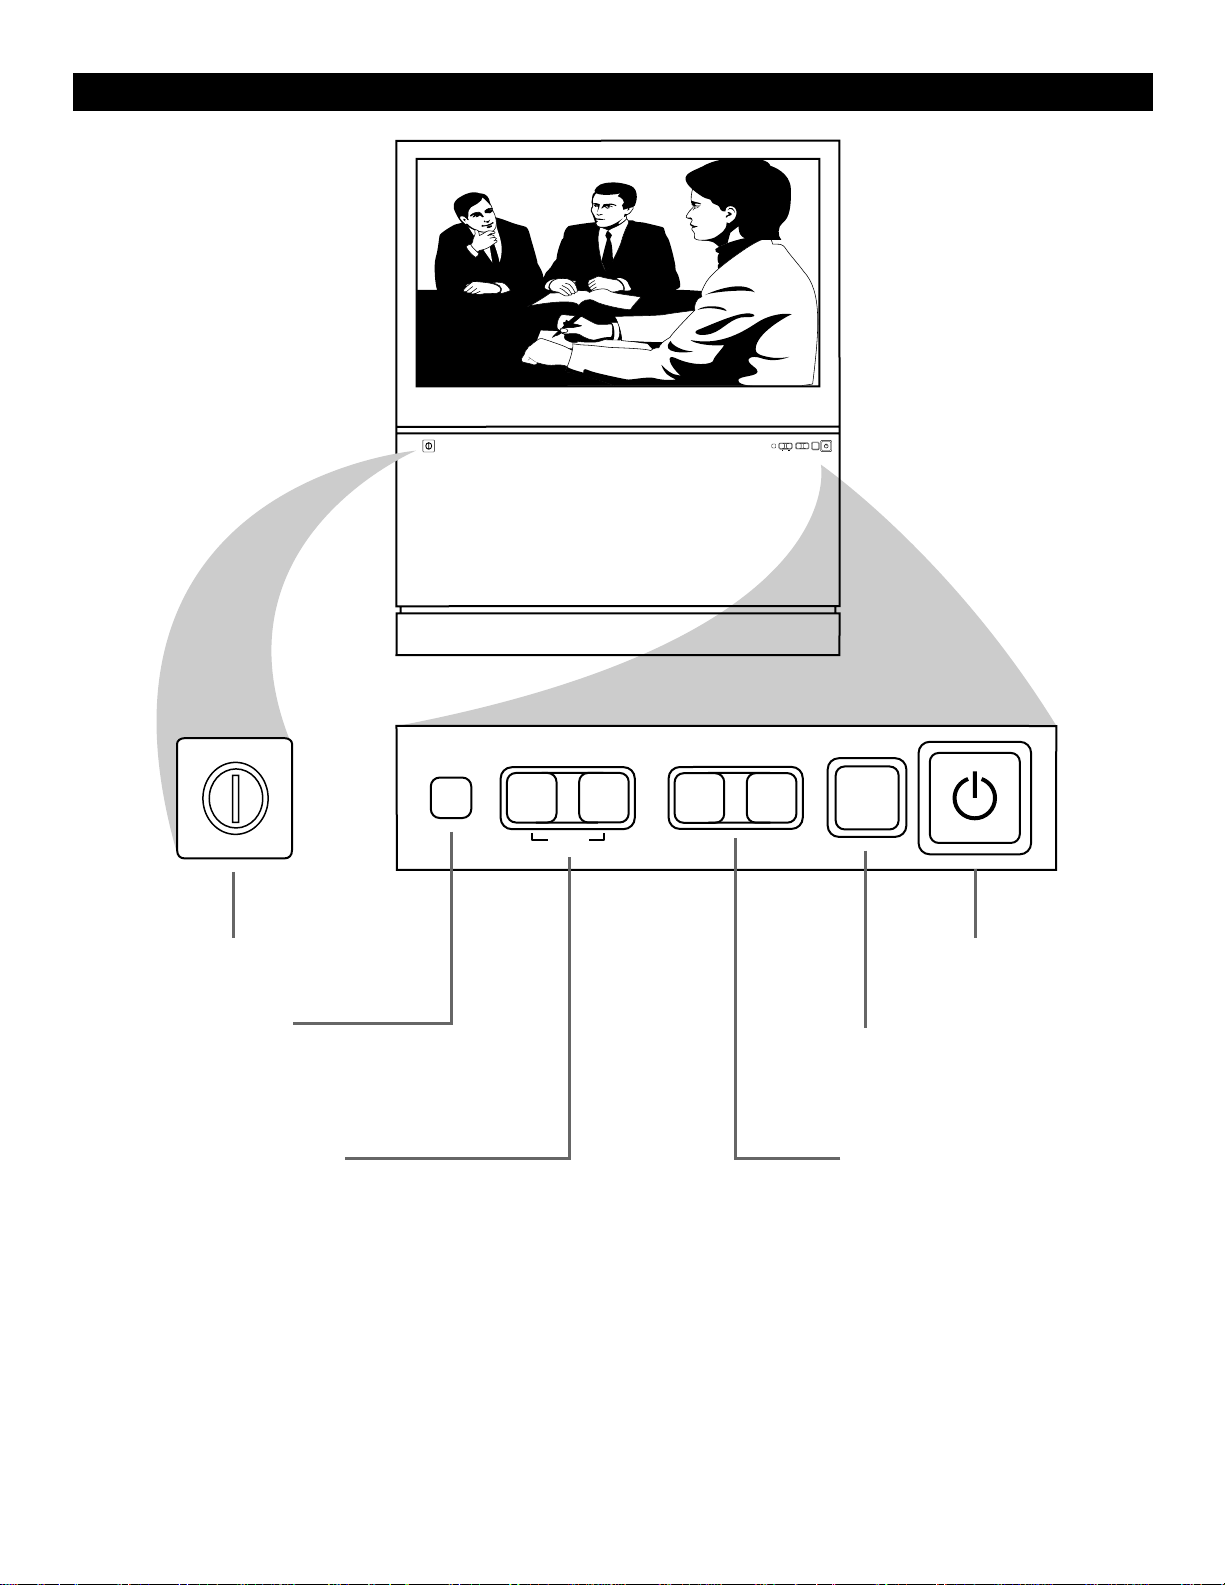
USING THE TV KEYS
MAINS POWER KEY
Switches the mains power on or off.
REMOTE SENSOR
Receives infrared commands to activate controls when the remote-control
handset is aimed at it and remote keys
are pushed.
V OLUME
-
AA+AA
/ MENU
The -A key adjusts the sound volume
softer. The +A key adjusts the sound
volume louder. Pressing -A and +A
simultaneously displays the onscreen
TV menu. With a menu item selected,
pressing the -A or +A key allows
entry to the item. Pressing -A and +A
simultaneously and repeatedly exits
the onscreen menu.
CHANNEL
%%fifi
The fifikey selects channels in
descending order. The
%%
key selects
channels in ascending order. When
the onscreen menu is displayed,
pressing
fifi
or %%selects the next item
in the menu. Also, use either of these
keys to switch the TV on from
Standby mode.
IntelliSense
When pressed, automatically adjusts
the set’s picture convergence using
the Auto IntelliSense
®
focus feature.
STANDBY
Switches the TV on or
activates standby mode.
VOLUME
CHANNEL
Intelli
-
+
>
A
A
Sense
?
MENU
-
A
VOLUME
MENU
+
A
?
CHANNEL
>
Intelli
Sense
Page 6
6
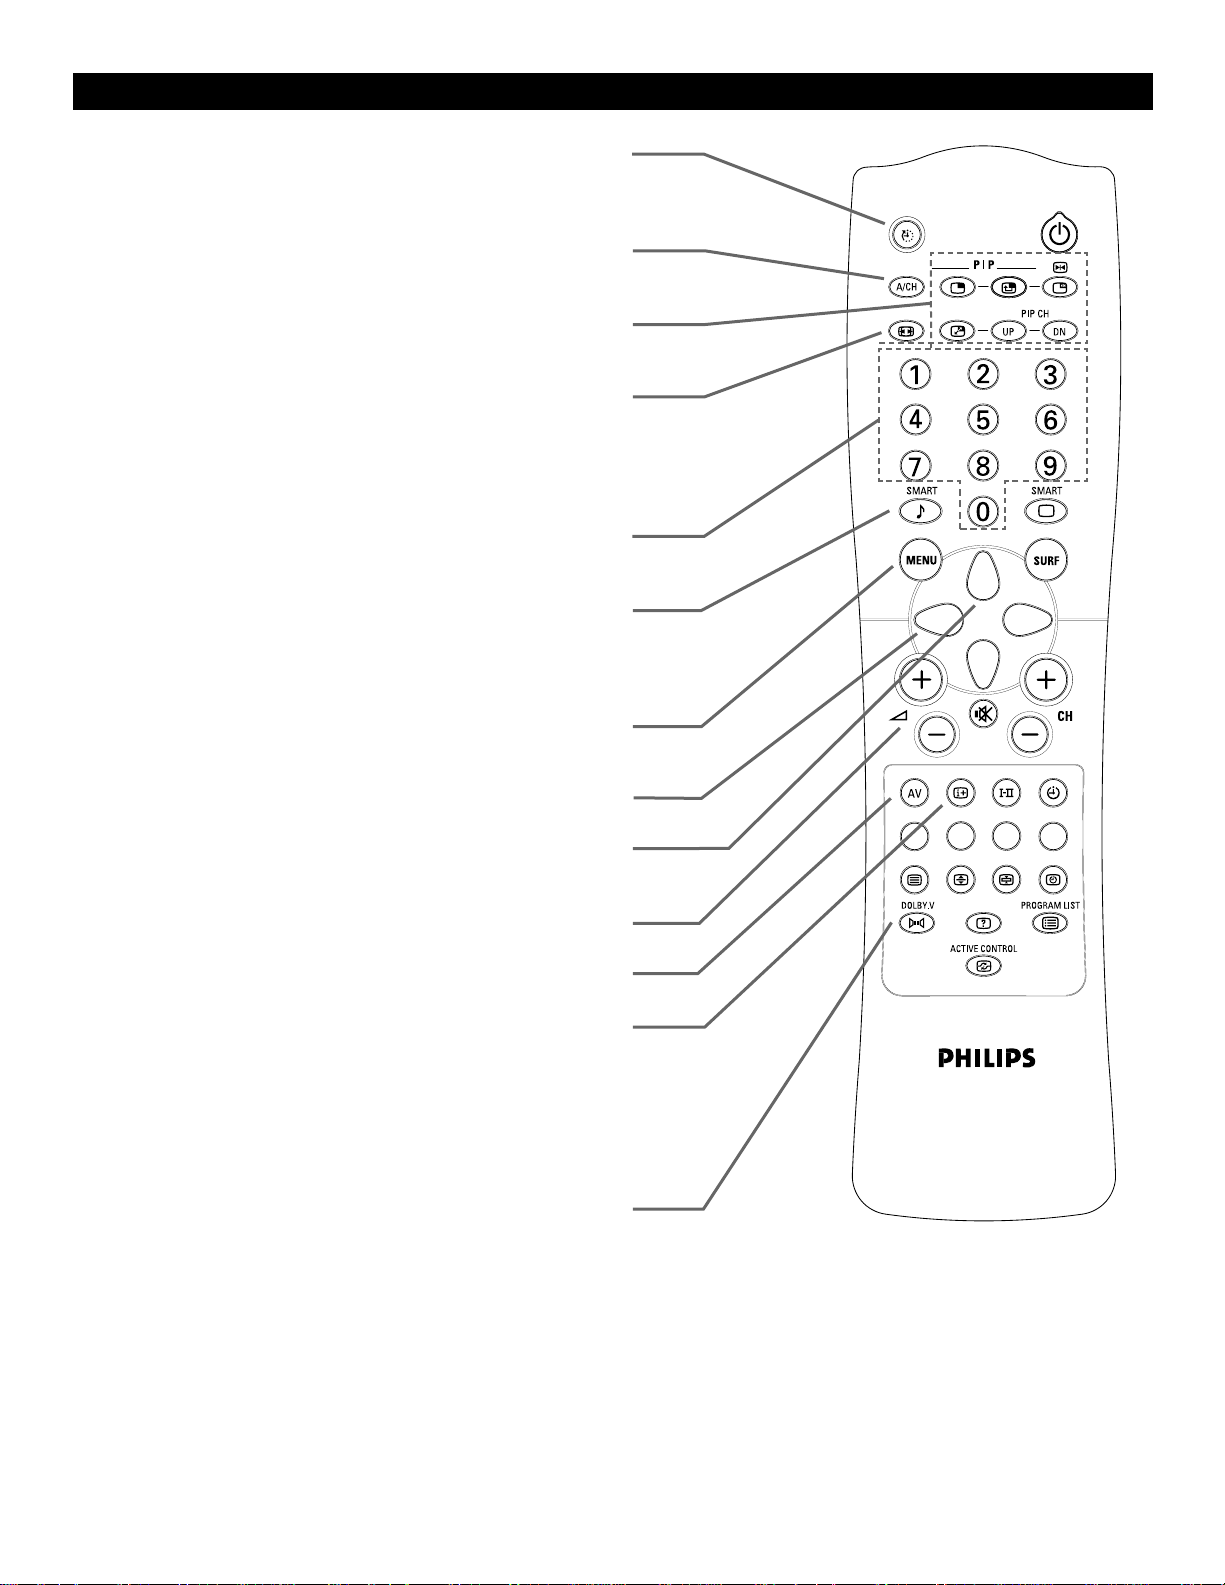
SLEEP TIMER
Allows you to select a time period after which the set will automatically switch to standby mode. Choose 15, 30, 45, 60, 90, 120, 180, or 240
minutes. See page 25.
A/CH (Alternate Channel)
Allows you to alternate between the last viewed channel and the present channel.
PICTURE-IN-PICTURE (PIP)
Allows you to access the Picture-in-Picture and Dual-window features.
See page 26.
FORMAT
Each press selects another picture format. For AV1, CVI, AV2, or
AV3, the options are 4:3, Auto, Expand 4:3, Panorama, and
Widescreen. For the AV4 and AV5 sources,
no screen format options
are available through the TV; control the format at the source (DVD player
or digital set-top box).
DIGIT (0–9)
Allows you to select a channel. Note : For a two-digit number, the second digit must be entered before the “–” sign disappears.
SMART SOUND
Allows you to select from three predefined optimal settings—Voice,
Music, and Theatre—and a Personal setting based on your own selections through the onscreen Sound menu. Press the key repeatedly to
select a setting. See page 24.
MENU
Displays the main menu. Also allows you to go backwards in the
menu system.
CURSOR LEFT
Allows you to access the menus and adjust the settings.
CURSOR UP
Allows you to select the next or previous item in the menu and to
select a screen format. See page 22.
VOLUME +/–
Increases or decreases volume.
AV
Allows you to select the different signal sources connected to the TV.
i+ (STATUS/EXIT)
• Displays the channel number, sound and colour transmission
modes, status of the sleep timer, channel name (if the channel has
been named), and the current time (if the time has been set).
• Allows you to navigate or make adjustments in multipoint-conver-
gence mode.
• Allows you to switch the menu off.
DOLBY V (with Dolby* Surround Signals)
Allows you to select various factory surround-sound listening modes :
Dolby Virtual (Virtual Dolby Surround)
Dolby Virtual uses two speakers to simulate the surround effect produced by a multichannel system.
Incredible Surround™
• In Stereo sound mode—when switched on, the Incredible Surround™ fea-
ture provides the feeling that the speakers are farther apart to enhance the
home-cinema effect.
• In Mono sound mode—when switched on, the Incredible Surround feature
enables you to hear a spatial sound effect.
*Manufactured under license from Dolby Laboratories. “Dolby”
and the double-D symbol are trademarks of Dolby Laboratories.
USING THE REMOTE CONTROL KEYS
Page 7
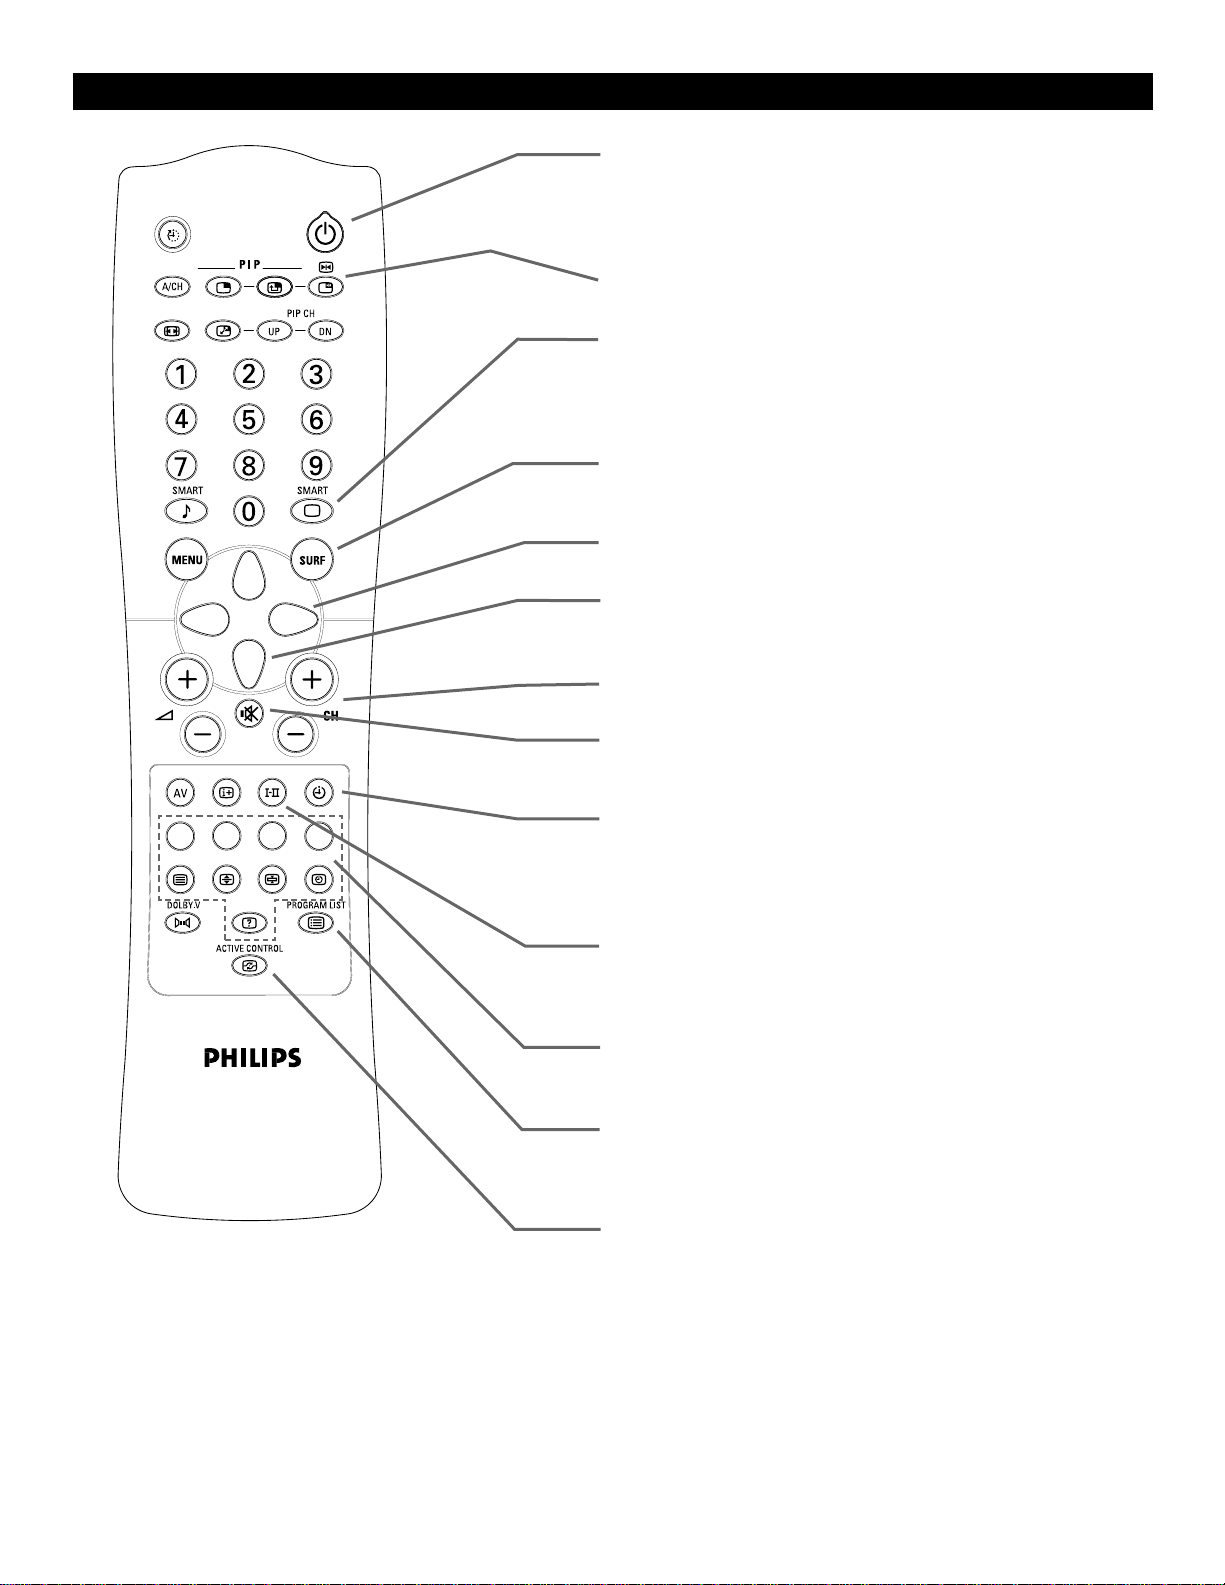
7
STANDBY
• Switches the set off temporarily to standby mode. (The red light
indicator lights up when the set is in standby mode.)
• To switch the set on from standby mode, press the Standby,
Channel +/–, or Digit (0–9) keys.
FREEZE
Allows you to freeze the main picture when PIP is off.
SMART PICTURE
Allows you to select from four predefined optimal settings—Rich,
Natural, Soft, and Multimedia—and a Personal setting based on
choices you make through the onscreen Picture menu. See
page 24.
SURF
Allows you to select up to 10 channels and quickly view them. See
page 23.
CURSOR RIGHT
Allows you to access the menus and adjust the settings.
CURSOR DOWN
Allows you to select the next or previous item in the menu or to select
a screen format. See page 22.
CHANNEL +/–
Allows you to select channels in ascending and descending order.
MUTE
Allows you to mute the sound. To restore the sound, press the key
again.
TIMER
Allows you to access the onscreen Timer menu, through which you
can set the TV’s clock and the Timer. The Timer can be set to switch
to another channel at a specified time while you are watching another
channel or when the set is in standby mode.
I–II
Allows you to switch from stereo to mono sound during stereo transmission or to choose between language I or language II during dual
sound transmission.
TELETEXT
Allows you to access Teletext information (if provided) See
pages 27–28.
PROGRAM LIST
Allows you to navigate through a list of installed programmes for a
quick overview of the channels and to activate the channel you have
selected. See page 23.
ACTIVE CONTROL™
Allows you to switch the Active Control™ feature on or off. When
Active Control™ is on, it measures and corrects all incoming signals
to provide the best picture-quality settings, controlling Sharpness and
Noise Reduction continuously and automatically. The onscreen Active
Control™ display items cannot be selected. See page 22.
USING THE
REMOTE
CONTROL KEYS
Page 8

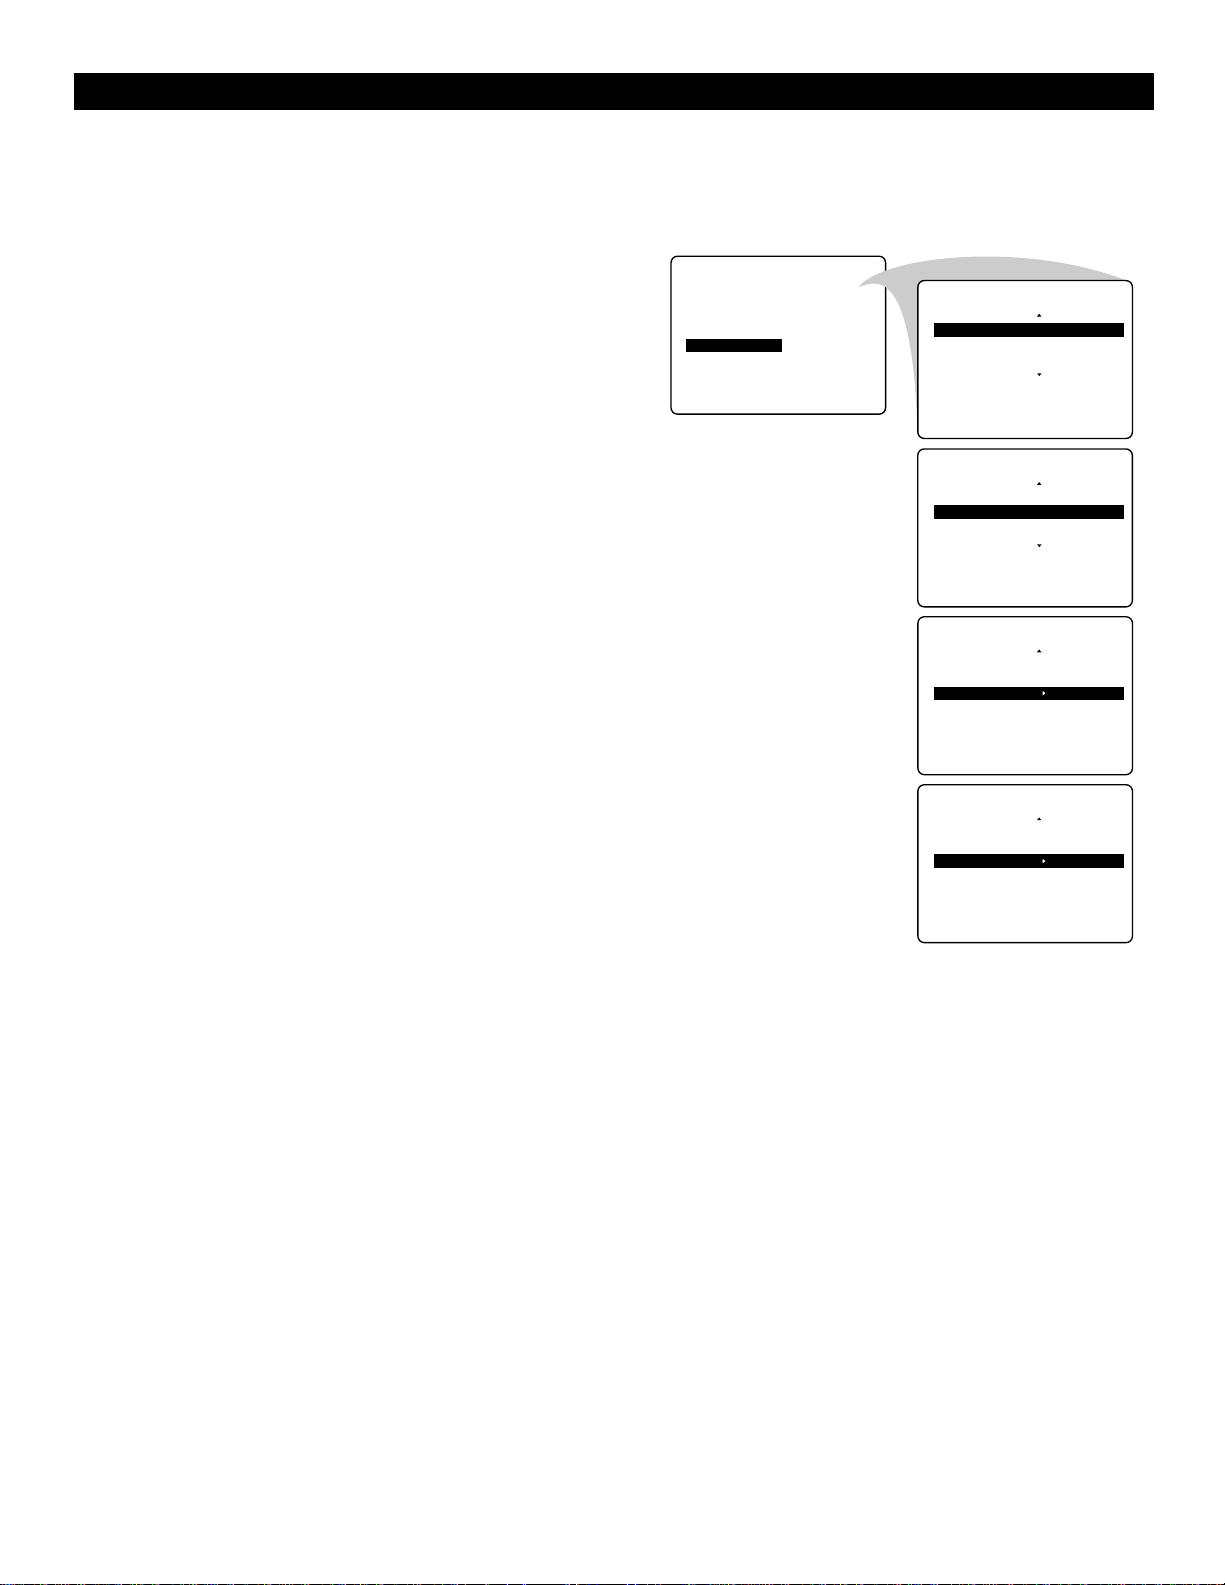
1
Press the MENU key to display/cancel the main menu.
2
Use the cursor in the up/down directions to select a menu
item.
Note : Sometimes not all the menu items are visible on the
screen; press the cursor up/down until you can see the item
you desire.
3
Use the cursor in the left/right directions to display the
menu and adjust the settings.
4
Press the MENU key to return.
5
Press the m key to switch the menu off.
Note : If no action is executed, the menu automatically dis-
appears after about 20 seconds.
8
USING THE MENUS :OVERVIEW
Selecting the Menu Language
Note : The menu languages available vary by model.
1
Press the MENU key.
2
Select INSTALL with the cursor down.
3
Press the cursor right to select LANGUAGE.
4
Press the cursor right again.
5
Select your language with the cursor up/down.
From this point on, all onscreen displays will appear in the
language that you have chosen.
Now you can search for and store the TV channels in two
different ways : with Auto Store or Manual Store (tuning in
channel by channel).
USING THE MENUS :INSTALL
Select
menu
item
Return
Switch
menu
off
PICTURE BRIGHTNESS
•
SOUND COLOUR
•
FEATURES CONTRAST
•
INSTALL SHARPNESS
•
COLOUR TEMP
PICTURE LANGUAGE
•
SOUND AUTO STORE
•
FEATURES MANUAL STORE
•
INSTALL SORT
•
INSTALL
LANGUAGE
AUTO STORE B.MELAYU
•
MANUAL STORE
•
SORT
•
CHANNEL EDIT
•
•
INSTALL
LANGUAGE
AUTO STORE B.MELAYU
•
MANUAL STORE
•
SORT
•
CHANNEL EDIT
•
•
CHANNEL EDIT
ENGLISH
•
ENGLISH
•
Page 9

9
Tuning Channels Automatically
1
Select AUTO STORE in the INSTALL menu.
2
Press the cursor right to start the searching. All the TV channels
are searched for and stored automatically.
3
When the tuning is completed, press the MENU key to
return to the INSTALL menu or press the m key to switch
the menu off.
Note : Channel numbers will always be written in Latin
characters, even when a language that uses other characters
has been selected.
USING THE MENUS :INSTALL
Tuning Channels Manually
Manual tuning allows you to store channel by channel. You must go
through every step of the manual store menu.
1
Select MANUAL STORE in the INSTALL menu.
2
Press the cursor right to enter the menu.
3
Select COLOUR SYSTEM and press the cursor right.
If AUTO is selected, the respective colour system will be
automatically selected according to the transmission system.
Note : If reception is poor, select another colour system
with the cursor up/down.
4
Press the MENU key or the cursor left.
5
Select SOUND SYSTEM and press the cursor right.
If AUTO is selected, the respective sound system will be
automatically selected according to the transmission system.
Note : If the reception is poor, select another sound system
with the cursor up/down.
6
Press the MENU key or the cursor left.
7
Select SEARCH and press the cursor left or right to start
the searching. Searching stops once a transmitting channel is
found
.
Note : If the reception is poor, select another colour and/or
sound system.
Continue to the next page.
INSTALL
LANGUAGE
•
AUTO STORE•SEARCH
•
MANUAL STORE
•
SORT
•
CHANNEL EDIT
•
•
INSTALL
LANGUAGE
AUTO STORE•SEARCHING
•
MANUAL STORE PLEASE WAIT
•
SORT CHAN.FOUND 8
•
CHANNEL EDIT 048 31 MHZ
•
•
PICTURE BRIGHTNESS
•
SOUND COLOUR
•
FEATURES CONTRAST
•
INSTALL SHARPNESS
•
COLOUR TEMP
PICTURE LANGUAGE
•
SOUND AUTO STORE
•
FEATURES MANUAL STORE
•
INSTALL SORT
•
INSTALL
LANGUAGE COLOUR SYSTEM
•
AUTO STORE SOUND SYSTEM
•
MANUAL STORE SEARCH
•
SORT CHANNEL
•
CHANNEL EDIT FINE TUNE
•
•
INSTALL
MANUAL STORE
COLOUR SYSTEM
•
SOUND SYSTEM
•
SEARCH
CHANNEL
•
STORE
•
•
•
INSTALL
MANUAL STORE
COLOUR SYSTEM
•
SOUND SYSTEM
•
SEARCH
CHANNEL
•
STORE
•
•
•
CHANNEL EDIT
048.31MHZ
•
196.25MHZ
•
Page 10

8
Select CHANNEL.
9
Key in the desired channel number with the digit keys or
with the cursor left/right.
10
Press the cursor down.
In case of poor reception, you can improve the reception by
adjusting the frequency using FINE TUNE.
11
Select FINE TUNE and press the cursor left/right to adjust.
12
In rare cases, certain TV channels may reproduce distorted
or unstable pictures.
Select PLL (Phase Locked Loop) to switch to the setting 2
with the cursor left/right to restore the picture for the respective transmission.
13
Select STORE.
14
Press the cursor right.
The message STORED appears and the search menu item is
highlighted again.
15
Now repeat steps 7–14 to continue searching for another
transmitting channel.
16
Press the MENU key to return to the INSTALLmenu or
press the m key to switch the menu off.
10
USING THE MENUS :INSTALL
INSTALL
MANUAL STORE
COLOUR SYSTEM
•
SOUND SYSTEM
•
SEARCH
•
CHANNEL
STORE
•
•
•
INSTALL
MANUAL STORE
•
SOUND SYSTEM
•
SEARCH
•
CHANNEL
•
STORE
•
G
FINE TUNE
•
INSTALL
MANUAL STORE
•
•
SEARCH
•
CHANNEL
•
STORE
•
FINE TUNE
•
G
PLL
INSTALL
MANUAL STORE
COLOUR SYSTEM
•
SOUND SYSTEM
•
SEARCH
•
CHANNEL
•
G
STORE
•
•
•
•
‰
•
18
F
2
INSTALL
MANUAL STORE
COLOUR SYSTEM
•
SOUND SYSTEM
•
SEARCH
•
CHANNEL
•
G
STORE
•
•
‰
STORED
•
Page 11
11
Sorting Channels
According to your preference, you can change the order of the stored
TV channels.
1
Select SORT in the INSTALL menu.
2
Press the cursor right to enter the menu.
3
Key in the channel number in the FROM column you
want to swap from. Use the digit keys or the cursor
left/right.
4
Press the cursor down and select TO.
5
Key in the channel number in the TO column you want to
swap to.
6
Press the cursor down and select EXCHANGE.
7
Press the cursor right.
The message EXCHANGED appears and the selected
channels are exchanged.
8
Repeat steps 3–7 until all TV channels are allocated as you
like.
9
Press the MENU key to return to the INSTALL menu or
press the m key to switch the menu off.
USING THE MENUS :INSTALL
INSTALL
LANGUAGE FROM
•
AUTO STORE TO
•
MANUAL STORE EXCHANGE
•
G
F
SORT
•
G
CHANNEL EDIT
•
•
INSTALL
SORT
G
FROM
TO
•
EXCHANGE
•
INSTALL
SORT
FROM
•
G
TO
EXCHANGE
•
INSTALL
SORT
FROM
•
TO
•
G
EXCHANGE
INSTALL
SORT
FROM
•
TO
•
G
EXCHANGE
‰
8
•
‰
6
•
‰
EXCHANGED
•
‰
•
Page 12

12
Editing Channels
This feature allows you to edit or skip channels from the channel list
that have bad or weak signals or channels that you do not watch
often.
Note : Once a channel is skipped, you cannot select it with the CH –
or + key. You can only access the channel with the digit keys.
1
Select CHANNEL EDIT in the INSTALL menu.
2
Press the cursor right to enter the channel list.
3
Select the channel you want to skip with the cursor
up/down.
4
Press the cursor right to skip the selected channel.
The message SKIPPED is displayed.
5
Press the cursor up/down to select another channel and
repeat step 4.
6
Press the cursor left or the MENU key to return to the
INSTALL menu or the m key to switch the menu off.
Note : To add back channels to the list, repeat steps 1–4 and
press the m key to switch the menu off.
USING THE MENUS :INSTALL
INSTALL
LANGUAGE 3
•
AUTO STORE 4
•
MANUAL STORE 5
•
G
SORT 6
•
G
F
CHANNEL EDIT
•
•
INSTALL
LANGUAGE 3
•
AUTO STORE 4
•
‰
7
•
MANUAL STORE 5
•
G
SORT 6
•
G
G
CHANNEL EDIT
•
INSTALL
LANGUAGE 3
•
AUTO STORE 4
•
MANUAL STORE 5
•
G
SORT 6
•
G
G
CHANNEL EDIT
•
F
7
•
F
7 SKIPPED
•
Page 13

13
Naming Channels
It is possible to assign a name to a TV channel. This feature allows
you to enter a name or modify an existing name of a channel, including peripherals.
Note : Even when you have selected another language in the
LANGUAGE menu, only the English language character set is
offered to enter names to the TV channels stored.
1
Select a TV channel or peripheral you want to assign a name
or modify the existing name.
2
Select NAME in the INSTALL menu.
3
Press the cursor right to enter the menu.
4
Key in the selected character with the cursor up/down.
5
Move to the next character with the cursor right and key in
the next character. You can key in up to a maximum of five
characters.
6
Press the MENU key to store the named channel.
USING THE MENUS :INSTALL
INSTALL
•
AUTO STORE
•
MANUAL STORE
•
SORT
•
G
CHANNEL EDIT
•
G
G
NAME
‰
PERSONAL
•
INSTALL
•
AUTO STORE
•
MANUAL STORE
•
SORT
•
G
CHANNEL EDIT
•
G
G
NAME
INSTALL
•
AUTO STORE
•
MANUAL STORE
•
SORT
•
G
CHANNEL EDIT
•
G
G
NAME
INSTALL
•
AUTO STORE
•
MANUAL STORE
•
SORT
•
G
CHANNEL EDIT
•
G
G
NAME
INSTALL
•
AUTO STORE
•
MANUAL STORE
•
SORT
•
G
CHANNEL EDIT
•
G
G
NAME
‰
PERSONAL
•
‰
-
•
‰
CNN
•
‰
PERSONAL
•
Page 14

14
USING THE MENUS :PICTURE
Picture Menu Items
Brightness
Allows you to adjust the brightness levels of the picture.
Colour
Allows you to adjust the colour saturation of the picture.
Contrast
Allows you to adjust the contrast levels of the picture.
Sharpness
Allows you to adjust the edge definition of the picture to improve details.
Hue (only with NTSC signals)
Allows you to adjust the colour mix of the picture.
Colour T emperature
Offers the options Normal, W arm, and Cool. Make your selection with the
cursor left/right. Normal keeps whites white. Warm makes whites reddish.
Cool makes whites bluish.
Digital Options
Digital Scan eliminates picture flickering and line jitter, offering a stable
picture for relaxed viewing (no eye strain). Progressive doubles the number
of visible picture lines per field by displaying all picture frame lines at once.
This minimizes the visibility of the scan lines. Auto detects the input signal
and provides the appropriate mode for the best picture performance. Choose
Digital Scan for PAL 50Hz signals and Progressive Scan for NTSC 60Hz
signals.
Dynamic Contrast
Automatically makes the contrast in the darker and the brighter picture
areas more noticeable as the image on screen changes. Normally, select
MED. In certain circumstances it may be preferable to select MIN, MAX,
or OFF .
IntelliSense
When activated, automatically adjusts picture convergence in 20 seconds or
less.
Manual Converge
Allows you to make additional picture convergence adjustments to suit personal preferences to to further fine-tune the picture.
Note : The picture settings Brightness, Colour, Contrast, Sharpness (Hue),
and Colour Temperature are stored separately for channels 0–11 and for
the external sources.
Accessing the Menu
1
Press the MENU key to display the main menu.
2
Select PICTURE.
3
Press the cursor right to access the PICTURE submenu.
4
Use the cursor in the up/down directions to select an item.
5
Use the cursor in the left/right directions to make adjustments or settings.
6
Press the MENU key to return or press the m key to switch
the menu off.
Select
menu
item
Return
Switch
menu
off
F
PICTURE BRIGHTNESS
•
SOUND COLOUR
•
FEATURES CONTRAST
•
G
INSTALL SHARPNESS
•
G
EDIT COLOUR TEMP
PICTURE
G
BRIGHTNESS F30
COLOUR
•
CONTRAST
•
G
SHARPNESS
•
G
COLOUR TEMP
•
•
•
PICTURE
•
•
COLOUR TEMP CONVERGE RED
•
DIGITAL OPTIONS CONVERGE BLUE
•
DYNAMIC CONTRAST MULTIPOINT RED
•
G
INTELLISENSE MULTIPOINT BLUE
•
F
MANUAL CONVERGE SAVE MULTIPOINT
•
Page 15

15
USING THE MENUS :PICTURE
Using Auto IntelliSense
®
Your projection TV has three color projection tubes : one for red, one for
green, and one for blue. When mixed in proper proportion, the beams of
light coming from the tubes can produce any color. To create a clear picture, however, these color beams must be precisely aligned. This alignment is called convergence. Bumps and vibrations, moving the set, or the
presence of magnetic fields can cause the color beams to become improperly aligned, or misconverged, resulting in a fuzzy picture. Using the
Auto IntelliSense
®
feature, you can automatically adjust convergence in
20 seconds or less.
Note : Allow the TV to warm up for 20 minutes before using Auto
IntelliSense
®
.
Activating Auto IntelliSense
®
Through the Onscreen Menu
1
Select INTELLISENSE in the PICTURE menu.
2
Press the cursor left or right to activate Auto IntelliSense®.
Picture convergence will be adjusted automatically in 20
seconds.
Activating Auto IntelliSense
®
Using the TV Key
With the TV on, press the IntelliSense key on the front of the TV.
Picture convergence will be adjusted automatically in 20 seconds.
Note : You can also manually adjust picture convergence to suit your
personal preferences or to further fine-tune the picture. See the next
section on using the MANUAL CONVERGE controls.
Press to begin
automatic
picture
convergence
F
PICTURE BRIGHTNESS
•
SOUND COLOUR
•
FEATURES CONTRAST
•
G
INSTALL SHARPNESS
•
G
EDIT COLOUR TEMP
PICTURE
G
BRIGHTNESS F30
COLOUR
•
CONTRAST
•
G
SHARPNESS
•
G
COLOUR TEMP
•
•
•
PICTURE
SHARPNESS
•
COLOUR TEMP
•
DIGITAL OPTIONS
•
DYN. CONTRAST
•
G
INTELLISENSE
IntelliSense Focus In Progress
‰
•
TV Keys
VOLUME
CHANNEL
Intelli
+A-
>
A
Sense
?
MENU
VOLUME
-
+
A
A
MENU
?
CHANNEL
Intelli
>
Sense
Page 16

16
USING THE MENUS :PICTURE
Using Manual Converge : Converge Red/Blue
Using the Auto IntelliSense®feature, you can automatically adjust convergence in 20 seconds or less (see the previous page). Also, if you
desire, you can use the Manual Converge controls to make additional
convergence adjustments to suit your personal preferences or to further
fine-tune the picture.
Note : Allow the TV to warm up for 20 minutes before adjusting convergence.
1
Select MANUAL CONVERGE in the PICTURE menu.
2
Press the cursor down and select either CONVERGE RED
or CONVERGE BLUE.
Note : If various images in the picture have red outlines,
select CONVERGE RED. If various images in the picture
have blue outlines, select CONVERGE BLUE.
3
Use the cursor right, left, up, or down to adjust the cross
hair until the color outline is gone. The adjustment is automatically saved in the TV’s memory when you exit the
adjust mode.
4
Press the MENU key to return or the m key to switch the
menu off.
Check the TV picture. If any color outlines remain around
the images, use the MULTIPOINT RED (for red outlines)
or MULTIPOINT BLUE (for blue outlines) control. See
the next section for instructions for using those controls.
PICTURE
MANUAL CONVERGE
G
CONVERGE RED
CONVERGE BLUE
•
MULTIPOINT RED
•
MULTIPOINT BLUE
•
SAVE MULTIPOINT
•
•
•
‰
•
Converge Red
Converge Red
Page 17

17
USING THE MENUS :PICTURE
Using Manual Converge : Multipoint Red/Blue
The Multipoint Red/Blue convergence controls allow you to adjust
picture convergence at specific points on the TV screen.
Note : Allow the TV to warm up for 20 minutes before adjusting
convergence. Adjust Converge Red or Converge Blue before using
the Multipoint Red/Blue controls. See the previous page.
1
Select MULTIPOINT RED or MULTIPOINT BLUE in
the MANUAL CONVERGE menu.
2
Press the cursor right to enter navigate mode.
3
Use the cursor left, right, up, or down to move to a cross
hair that has a color outline.
4
Press the m (Status/Exit) key to enter adjust mode.
5
Use the cursor left, right, up, or down to adjust the cross
hair until the color outline is gone.
6
Press the m key to return to navigate mode.
7
Repeat steps 3–6 until all misaligned cross hairs have been
adjusted. Then press the MENU key.
8
For your multipoint adjustments to be stored in the TV’s
memory, you must activate SAVE MULTIPOINT.
Note : If you are not satisfied with the adjustments you just
made and want to start over, you can use the UNDO
MULTIPOINT control. This control allows you to undo
the adjustments, but only if you use it before saving.
To save your multipoint adjustments : Select SAVE
MULTIPOINT and press the cursor left or right.
To undo your multipoint adjustments : Select UNDO
MULTIPOINT and press the cursor left or right.
To restore the TV’s picture convergence to factory settings,
select RESTORE FACTORY and press the cursor left or
right.
9
Press the MENU key to return or the m key to switch the
menu off.
PICTURE
MANUAL CONVERGE
CONVERGE RED
•
CONVERGE BLUE
•
G
MULTIPOINT RED
MULTIPOINT BLUE
•
SAVE MULTIPOINT
•
•
•
to Navigate EXIT to Adjust
to Adjust EXIT to Navigate
‰
•
to Navigate EXIT to Adjust
to Adjust EXIT to Navigateto Navigate EXIT to Adjust
to Adjust EXIT to Navigate
PICTURE
MANUAL CONVERGE
CONVERGE RED
•
CONVERGE BLUE
•
G
MULTIPOINT RED
MULTIPOINT BLUE
•
SAVE MULTIPOINT
•
•
•
‰
•
PICTURE
MANUAL CONVERGE
CONVERGE RED
•
CONVERGE BLUE
•
MULTIPOINT RED
•
MULTIPOINT BLUE
•
G
SAVE MULTIPOINT
•
•
PICTURE
MANUAL CONVERGE
•
CONVERGE BLUE
•
MULTIPOINT RED
•
MULTIPOINT BLUE
•
SAVE MULTIPOINT
•
G
UNDO MULTIPOINT
•
PICTURE
MANUAL CONVERGE
•
•
MULTIPOINT RED
•
MULTIPOINT BLUE
•
SAVE MULTIPOINT
•
UNDO MULTIPOINT
•
G
RESTORE FACTORY
SAVE MULTIPOINT
‰
•
UNDO MULTIPOINT
‰
•
RESTORE FACTORY
‰
•
PICTURE
MANUAL CONVERGE
CONVERGE RED
•
CONVERGE BLUE
•
MULTIPOINT RED
•
MULTIPOINT BLUE
•
G
SAVE MULTIPOINT
•
•
OR
PICTURE
MANUAL CONVERGE
•
CONVERGE BLUE
•
MULTIPOINT RED
•
MULTIPOINT BLUE
•
SAVE MULTIPOINT
•
G
UNDO MULTIPOINT
•
OR
PICTURE
MANUAL CONVERGE
•
•
MULTIPOINT RED
•
MULTIPOINT BLUE
•
SAVE MULTIPOINT
•
UNDO MULTIPOINT
•
G
RESTORE FACTORY
‰
STORED
•
‰
RESTORED
•
‰
RESTORED
•
Page 18

18
USING THE MENUS :SOUND
Sound Menu Items
Treble
Attenuates or amplifies the high-frequency response of the audio output signal.
Bass
Attenuates or amplifies the low-frequency response of the audio output signal.
Balance
Adjusts the balance of the right and left speaker’s sound output.
AVL (Automatic Volume Leveller)
Automatically controls the volume level to avoid excessive level differences, especially when switching to another channel or during
commercial breaks.
Headphone
Allows you to adjust the volume and balance of the headphone.
1
Select HEADPHONE.
2
Press the cursor right.
3
Select VOLUME or BALANCE with the cursor up/down.
4
Press the cursor left/right to adjust.
5
Press the MENU key to return.
Accessing the Menu
1
Press the MENU key to display the main menu.
2
Select SOUND with the cursor down.
3
Press the cursor right to access the SOUND submenu.
4
Use the cursor in the up/down directions to select an item.
5
Use the cursor in the left/right directions to make adjustments or settings.
6
Press the MENU key to return or press the m key to switch
the menu off.
Select
menu
item
Return
Switch
menu
off
F
PICTURE BRIGHTNESS
•
SOUND COLOUR
•
FEATURES CONTRAST
•
G
INSTALL SHARPNESS
•
G
EDIT COLOUR TEMP
PICTURE TREBLE
•
F
SOUND BASS
•
FEATURES BALANCE
•
G
INSTALL AVL
•
G
EDIT HEADPHONE
SOUND
G
TREBLE
BASS
•
BALANCE
•
G
AVL
•
G
HEADPHONE
•
•
F
59
SOUND
•
BASS
•
BALANCE
•
AVL
•
G
HEADPHONE
•
G
G
BASS BOOST
F
OFF
•
Page 19

19
USING THE MENUS :FEATURES
Accessing the Menu
1
Press the MENU key to display the main menu.
2
Select FEATURES with the cursor down.
3
Press the cursor right to access the FEATURES submenu.
4
Use the cursor in the up/down directions to select an item.
5
Use the cursor in the left/right directions to make settings.
6
Press the MENU key to return or press the m key to switch
the menu off.
Activating the Timer
The Timer feature allows you to set the timer to switch to another
channel at a specified time while you are watching a channel or
when the TV is in standby mode. You can also set the TV to switch
off automatically at a specific time by setting a Stop Time.
1
Select TIMER in the FEATURES menu.
2
Press the cursor right to enter the Timer.
Setting the Timer
1
Press the cursor right again to enter TIME mode.
2
Key in the current time with the digit keys.
You must use 24-hour, or military, time. For example : 2:15
p.m. is 14:15.
If you entered an incorrect digit :
Complete the actual time with arbitrary numbers, then start
again.
3
Press the cursor left to exit TIME mode.
Continue to the next page.
Select
menu
item
Return
Switch
menu
off
F
PICTURE BRIGHTNESS
•
SOUND COLOUR
•
FEATURES CONTRAST
•
G
INSTALL SHARPNESS
•
G
EDIT COLOUR TEMP
PICTURE TIMER
•
SOUND CHILD LOCK
•
F
FEATURES PIP
•
INSTALL FORMAT
•
G
EDIT ACTIVE CTRL
FEATURES
F
TIMER TIME
•
CHILD LOCK START TIME
•
PIP STOP TIME
•
FORMAT CHANNEL
•
G
E
ACTIVE CTRLDIACTIVATE
•
FEATURES
TIMER
•
CHILD LOCK
•
PIP
•
FORMAT
•
G
G
G
ACTIVE CTRL
EDIT
‰
ON
•
FEATURES
TIMER
G
TIME
START TIME
•
STOP TIME
•
G
CHANNEL
•
G
ACTIVATE
•
•
‰
•
--:--
FEATURES
TIMER
G
TIME
START TIME
•
STOP TIME
•
G
CHANNEL
•
ACTIVATE
•
•
‰
14:15
•
Page 20

20
Setting Start Time
1
Select START TIME with the cursor down.
2
Press the cursor right to enter the START TIME mode.
3
Key in the time you want the programme to be switched on.
4
Press the cursor left to exit START TIME mode.
Setting Stop Time
1
Select STOP TIME with the cursor down.
2
Press the cursor right to enter the STOP TIME mode.
3
Key in the time you want the programme to be switched off.
4
Press the cursor left to exit STOPTIME mode.
Selecting the Channel
1
Select CHANNEL with the cursor down.
2
Select the channel you want to switch to.
Activating the Timer
1
Select ACTIVATE with the cursor down.
2
Press the cursor right to enter the ACTIVATE mode to acti-
vate the timer.
3
Using the cursor right, select ONCE or DAILY, according to
if you want to activate the timer on the selected channel and
the selected time every day or only once.
Displaying the Time
1
Select DISPLAY with the cursor down.
2
Press the cursor right to select ON or OFF, according to if
you want to display the current time on the TV screen or not.
3
Press the MENU key to return or the m key to switch the
menu off.
USING THE MENUS :FEATURES
FEATURES
TIMER
TIME
•
G
START TIME
STOP TIME
•
G
CHANNEL
•
G
ACTIVATE
•
•
FEATURES
TIMER
TIME
•
START TIME
•
G
STOP TIME
G
CHANNEL
•
G
ACTIVATE
•
•
FEATURES
TIMER
TIME
•
START TIME
•
STOP TIME
•
G
CHANNEL
ACTIVATE
•
•
FEATURES
TIMER
TIME
•
START TIME
•
STOP TIME
•
CHANNEL
•
G
ACTIVATE
•
G
ACTIVATE
G
ACTIVATE
OR
OR
‰
--:--
•
‰
--:--
•
‰
3
•
‰
OFF
•
‰
ONCE
•
‰
DAILY
•
FEATURES
TIMER
TIME
•
G
START TIME
STOP TIME
•
G
CHANNEL
•
ACTIVATE
•
•
FEATURES
TIMER
TIME
•
START TIME
•
G
STOP TIME
G
CHANNEL
•
ACTIVATE
•
•
FEATURES
TIMER
TIME
•
START TIME
•
STOP TIME
•
G
CHANNEL
ACTIVATE
•
•
FEATURES
TIMER
•
START TIME
•
STOP TIME
•
CHANNEL
•
ACTIVATE
•
G
DISPLAY
‰
12:30
•
‰
16:00
•
‰
12:30
•
‰
13:30
•
‰
18:00
•
‰
8
•
‰
ON
•
Page 21

Activating the Child Lock
The Child Lock feature allows you to lock channels to prevent children from watching certain programmes.
Entering the Access Code
1
Select CHILD LOCK in the FEATURES menu.
2
Press the cursor right to enter the ACCESS CODE.
3
Key in the access code 0711 (the default access code).
A message INCORRECT will appear.
4
Key in access code 0711 a second time.
The message CORRECT will appear and make the Child
Lock menu accessible.
Changing the Access Code
1
Select CHANGE CODE to enter an access code of your
choice.
2
Press the cursor right to enter the CHANGE CODE mode.
3
Key in the access code of your choice and confirm it again.
The message CORRECT will appear.
Activating the Child Lock
1
Select LOCK CHANNEL in the CHILD LOCK menu.
Note : Enter the access code if requested. See above.
2
Press the cursor right to enter the LOCK CHANNEL
mode.
3
Use the cursor up/down to select the channel you want to
lock.
4
Press the cursor right to lock the channel.
A keylock symbol will appear beside the locked channel.
From now on the locked channel(s) can be accessed only
via the remote control.
5
Repeat steps 1–4 to unlock a locked channel.
To clear all locked channels at once, select CLEAR ALL in
the CHILD LOCK menu and press the cursor right.
The message CLEARED will appear.
6
Press the MENU key to return or the m key to switch the
menu off.
21
USING THE MENUS :FEATURES
FEATURES
TIMER ACCESS CODE
•
CHILD LOCK ----
•
PIP
•
FORMAT
•
G
ACTIVE CTRL
•
EDIT
FEATURES
TIMER ACCESS CODE
•
G
CHILD LOCK XXXX
PIP CORRECT
•
FORMAT
•
G
ACTIVE CTRL
•
EDIT
FEATURES
CHILD LOCK
LOCK CHANNEL ENTER
•
G
CHANGE CODE
CLEAR ALL XXXX
•
FEATURES
CHILD LOCK
LOCK CHANNEL CONFIRM
•
G
CHANGE CODE
CLEAR ALL XXXX
•
F
•
F
•
NEW CODE
CODE
CORRECT
FEATURES
TIMER ACCESS CODE
•
G
CHILD LOCK XXXX
PIP INCORRECT
•
FORMAT
•
G
ACTIVE CTRL
•
EDIT
FEATURES
CHILD LOCK
LOCK CHANNEL ENTER
•
G
CHANGE CODE
CLEAR ALL ----
•
G
FEATURES
CHILD LOCK
LOCK CHANNEL CONFIRM
•
G
CHANGE CODE
CLEAR ALL XXXX
•
FEATURES
CHILD LOCK
LOCK CHANNEL
G
CHANGE CODE 3
•
CLEAR ALL 4
•
G
F
•
F
•
F
•
NEW CODE
CODE
2
5
6
FEATURES
CHILD LOCK
LOCK CHANNEL
G
CHANGE CODE 4
•
CLEAR ALL 5
•
G
FEATURES
CHILD LOCK
LOCK CHANNEL
•
CHANGE CODE
•
G
CLEAR ALL
G
F
3 Ç
•
6
7
F
CLEARED
•
6
FEATURES
CHILD LOCK
LOCK CHANNEL
•
CHANGE CODE
•
G
CLEAR ALL
G
F
•
6
Page 22

Using the Keys on the TV
Should your remote control be lost or broken, you can still change
some of the basic picture and sound settings with the keys on the front
of the TV.
1
Press the VOL
-
AA
and
+
AA
keys simultaneously to
display/cancel the main menu.
2
Press the CH
%%fifi
keys to select a menu item.
3
Press the VOL
-
AA
or
+
AA
key to display the submenu and
adjust the settings.
4
Press the VOL
-
AA
and
+
AA
keys simultaneously and repeated-
ly to return to the main menu or to back out of the menu.
When the menu is not being displayed, the CH
%%fifi
keys
enable you to select TV channels, and the VOL
-
AA
and
+
AA
keys allow you to adjust the volume.
22
USING THE MENUS :FEATURES
Selecting the Screen Format
The TV’s Screen Format options allow you flexibility in viewing
video sources. Select a screen format using the v or cursor up/down
keys or the onscreen menu. To use the onscreen menu :
1
Select FORMAT in the FEATURES menu.
2
Press the cursor right repeatedly to cycle through the different screen formats and select your desired format. The
options for AV1, CVI, AV2, and AV3 are :
• 4:3 shows the picture in conventional picture size. Black
bars appear on the left and right sides.
• AUTO format makes the picture fill the screen as much as
possible, eliminating or reducing the size of black bars.
• EXPAND 4:3 zooms the picture horizontally and vertically.
• PANORAMAstretches the outer parts of the picture hori-
zontally and causes some vertical expansion.
• WIDE SCREEN expands the picture horizontally with no
vertical expansion.
For AV4 and AV5, no screen formats are available through
the TV; make adjustments through the set-top box or DVD
player you have connected.
Switching Active Control™ on
Turn Active Control™ on using the key or the onscreen menu. To
use the onscreen menu :
1
Select ACTIVE CTRL in the FEATURES menu.
2
Press the cursor right to select ON to activate automatic control of Sharpness and Noise Reduction.
3
Press the m key to switch the menu off.
For A V1,CVI,AV2,
or AV3 Sources :
For A V4 and AV5 Sources :
No picture format options are available through the TV.
Control the screen format at the source (DVD player or
digital set-top box).
FEATURES
TIMER
•
CHILD LOCK
•
PIP
•
G
FORMAT
G
G
ACTIVE CTRL
•
G
FORMAT
G
FORMAT
G
FORMAT
G
FORMAT
OR
OR
OR
OR
‰
4:3
•
‰
AUTO
•
‰
EXPAND 4:3
•
‰
PANORAMA
•
‰
WIDE SCREEN
•
•
FEATURES
TIMER
•
CHILD LOCK
•
PIP
•
FORMAT
•
G
G
G
ACTIVE CTRL
EDIT
G
ACTIVE CTRL
OR
‰
ON
•
‰
OFF
•
Page 23

23
USING
PROGRAM LIST
USING SMART SURF
The Program List feature allows you to navigate a list of installed
channels, receive a quick overview of those available, and activate
the channel you desire.
1
Press the PROGRAM LIST b key.
2
Cursor down to cycle through the list of installed channels
and highlight the channel number you want to activate.
The appearance of lock symbol means that a channel is
blocked by the Child Lock feature. See page 21.
3
Cursor right to activate the channel you have selected.
4
Press the m key to switch the menu off.
Adding Channels to the Surf List
You can select a list or series of previously viewed channels with the
SURF key. This feature allows you to switch between different TV
programmes that currently interest you. You can have up to 10 channels in the SURF list. Five channels are shown in the list at one time.
Cursor down/up as necessary to see all the channels in the list.
1
Select a channel you want to add to the Surf list.
2
Press the SURF key.
3
Cursor right to add the selected channel to the Surf list.
4
Repeat steps 1–3 to add more channels to the Surf list.
5
Press the m key to switch the menu off.
6
Press the SURF key repeatedly to cycle through channels.
Deleting Channels to the Surf List
1
Press the SURF key.
2
Press the SURF key again as many times as necessary to
select the channel you want to delete from the Surf list.
3
Cursor right to delete the channel from the list.
4
To delete more channels, repeat the steps above.
PROGRAM LIST
7 ACTIO
8 DRAMA
9 VIOLE Ç
‰
10 ROMAN
•
11 - - - - -
12
SURF
F
12 ADD?
•
SURF LIST EMPTY
12
SURF
F
12 DELETE?
•
24
SURF
12
F
24 ADD?
•
24
SURF
12
F
24 DELETE?
•
7
SURF
8
11
15
4
F
7 DELETE?
•
Page 24

24
USING SMART PICTURE AND SMART SOUND
The Smart Picture feature offers you a choice of five picture settings :
Personal, Rich, Natural, Soft, and Multimedia. Smart Sound offers
you a choice of four sound settings : Personal, Voice, Music, and
Theatre.
Press the SMART ` Picture or SMART ± Sound key on the
remote control repeatedly to cycle through the settings and select your
desired mode.
Smart Picture ``Options
Personal
Picture settings are based on your preference.
Rich
Emphasizes very vibrant colours. This option is desirable for AV
mode in a brightly lighted room.
Soft
Emphasizes “warm” colours. This option is desirable for a dimly
lighted room and gives a cinema-like effect when the light is
switched off.
Multimedia
Emphasizes “soft” colours. This option is desirable for playing computer games.
Smart Sound ±±Options
Personal
Sound settings are based on your preferences.
Voice
Brings voices to the forefront, emphasizing them. Moves music to the
background.
Music
Emphasizes music over voices.
Theatre
Provides a balance between voices and music.
Note : The PERSONAL settings are the ones that you make using the
PICTURE or SOUND menus. These are the only Smart Picture and
Smart Sound settings that can be changed. All others are set at the
factory.
BRIGHTNESS 50
COLOUR 50
CONTRAST 50
SHARPNESS 84
BRIGHTNESS 34
COLOUR 34
CONTRAST 78
SHARPNESS 28
BRIGHTNESS 50
COLOUR 40
CONTRAST 40
SHARPNESS 70
PERSONAL
NATURAL
MULTIMEDIA
BRIGHTNESS 34
COLOUR 34
CONTRAST 89
SHARPNESS 84
BRIGHTNESS 34
COLOUR 34
CONTRAST 53
SHARPNESS 28
RICH
SOFT
PERSONAL
TREBLE 59
BASS 72
MUSIC
TREBLE 62
BASS 69
VOICE
TREBLE 56
BASS 47
THEATRE
TREBLE 59
BASS 72
Page 25

25
USING THE SLEEP TIMER
Have you ever fallen asleep in front of the TV? Using the Sleep
Timer, you can program your TV to turn off while you sleep. This
feature allows you to set your TV to turn off within a certain amount
of time : 15, 30, 45, 60, 90, 120, 180, or 240 minutes.
Press the Sleep Timer key on the remote control. The Sleep Timer
onscreen display will appear on screen. Then within five seconds,
press the Sleep Timer key again as many times as necessary to select
the amount of time you want to pass before the TV will turn itself off.
An onscreen countdown will appear during the last minute before the
TV switches off. Ten seconds before the Sleep Timer switches the TV
off, GOOD BYE will be displayed on the TV screen.
Notes:
• To see how many minutes remain before the TV shuts itself off,
press the m key.
• Changing the channel or volume during the last minute of a Sleep
Timer setting will cancel Sleep.
The options are 15,30,45,
60,90,120,180, or 240
minutes.
During the last minute of a
Sleep Timer setting, a countdown will be displayed on
screen.
During the last 10 seconds
of a Sleep Timer setting,
“GOOD BYE” will be displayed on screen.
SLEEP OFF
SLEEP OFF
SLEEP 15
TV SWITCHING OFF 59
GOOD BYE
TV SWITCHING OFF 9
Page 26

26
USING PICTURE-IN-PICTURE (PIP)
The Picture-in-Picture (PIP) feature allows you to call up a subscreen
within your main screen to watch two channels or a channel and a
peripheral at the same time.
The Dual-window feature allows you to divide the main screen into
two subscreens so that two channels or a channel and an external
source can be watched simultaneously.
1
Press the n key on the remote control to switch PIP on.
2
Press the n key a second time to change the normal-size
PIP screen to a smaller size.
3
Press the n key a third time to switch to the Dual-window
screen.
4
To switch PIP off, press the n key a fourth time.
Moving the PIP screen
Press the o key.
Each time you press this key, the PIPwindow moves to
another corner of the main screen.
Freezing the PIP screen
Press the r key.
The picture in the PIP window stands still.
Press the r key again to unfreeze the PIP screen.
Switching Screens
Press the p key.
The main screen and the PIP window exchange places.
Selecting PIP Channels and External Sources
Press the keys PIP CH UP/DN to select a PIP TV channel
or external source in ascending or descending order.
Selecting Dual Window Channels
1
Press the CH +/– key to cycle through the TV channels in
the left picture.
2
Press the PIP CH UP/DN keys to cycle through the channels in the right picture.
Adjusting the PIP Hue Setting
1
Select PIP in the FEATURES menu.
2
Press the cursor right to enter the PIP menu.
3
Press the cursor left/right to adjust the HUE setting.
4
Press the MENU key to return or the m key to switch the
menu off.
Page 27

27
USING TELETEXT (IF PROVIDED)
Many TV channels broadcast information via teletext. Each channel
that broadcasts teletext transmits a page with information on how to
use its teletext system. Look for the teletext page with the main index
(usually p. 100).
Depending on the TV channel, teletext is transmitted in different systems. The colours used in the options line correspond with the colour
keys of your remote control.
About T eletext
Easy Text considerably reduces the waiting time (on condition that
the teletext broadcast of the particular TV channel is received for at
least half a minute) by :
• a direct selection of previous and following pages that are in transmission and of the pages referred to in the options line at the bottom of the teletext screen;
• a habit watcher list : frequently used pages are put automatically
in a list of preferred pages so that they are immediately available;
• the precapturing of the page numbers referred to in the displayed
page; and
• the precapturing of all the subpages.
Switching Teletext on and off
1
Press the bbkey to switch the teletext on.
The main index page appears on the screen together with
two information lines at the top and one option line at the
bottom of the screen.
2
Press the bbkey again to overlay the teletext page on the
TV programme.
3
Press the bbkey once again to switch the teletext off.
Selecting a Teletext Page
With the digit keys
Enter the desired page number with the digit keys.
The page counter seeks the page or the page appears immedi-
ately when the page number has been stored in the memory.
A message appears when you have entered a nonexistent or
incorrect page number. Page numbers beginning with 0 or 9
do not exist. Choose another number.
With the option line
Use the colour keys—which correspond to the coloured
options at the bottom of the screen—to select the desired
subject.
If the option line is not on the screen, press the selected
colour key TWICE.
Continue to the next page.
Colour keys
to select
Page 28

28
USING TELETEXT (IF PROVIDED)
Quickly Running Through the Teletext Pages
Press the cursor up/down or the CH +/– keys to run through
the previous or the following pages.
Selecting the Index Teletext Page
Press the m key to return to the main index (usually
p. 100).
Selecting Subpages
When a selected teletext page consists of different subpages,
one of the subpages appears on the screen.
Arrows in front of the page number indicate that other subpages are available.
The other subpages can be selected in two ways :
With the cursor left/right
The other subpage numbers appear in white as soon as the
transmission has found them. They are stored in the memory
so that they are available while the teletext page is on
screen.
Use the cursor left/right to select the previous or the following subpage.
With the yyKey
• Enter the subpage number yourself :
Press y. Enter the desired subpage with the digit keys : for
example, 3 for the third page of seven subpages.
The TV searches for the selected subpage.
• To rotate subpages automatically :
Press y again to cancel the entered digit key for the sub-
page.
Now the subpages rotate automatically.
Press y again to select the subpages with the cursor
left/right again.
Using Special Teletext Functions
Enlarge
Press h repeatedly to display the upper part and the lower
part, and then to return to the normal page size. When the
upper part is displayed, you can scroll the text, line by line
using the cursor up/down.
Reveal
Press e to reveal/conceal the hidden information, such as
solutions to riddles and puzzles.
To select
pages
For future use
Cursor to
select pages
Page 29

29
CONNECTING PERIPHERAL EQUIPMENT
You can connect a wide range of video and audio equipment to your TV
in various ways. This page and the next one provide an overview of signal compatibilities and the types of equipment you can connect to the
sockets. Connection examples follow on subsequent pages. As necessary,
also refer to the handbook for peripheral equipment.
Overview :Standard Inputs/Outputs
1
ANTENNA IN 75Ω socket—compatible with the broadcast standard in your area. Use to connect radio-frequency (RF) signals
from VHF/UHF antennas or a cable system.
2
YPbPr (component video input [CVI] sockets)—compatible
with 480i and 576i signals. Use to connect equipment having component video outputs, such as DVD players, laser-disc players,
video-game players, satellite receivers, or other equipment. Use the
INPUT-AV 1 L(eft) and R(ight) AUDIO sockets for sound connections.
3
S-VIDEO (super video) sockets—compatible with 480i and 576i
signals. Use to connect peripherals having Super VHS (S-VHS)
outputs, such as VCRs, DVD players, laser-disc players, videogame players, satellite receivers, or other equipment.
4
VIDEO (composite) sockets
(INPUT-A V
1, INPUT-AV 2, and TV’s side socket panel
[AV3])—compatible with 480i and 576i signals. Use to connect
peripherals having composite video outputs, such as VCRs, videogame players, or other equipment.
5
AUDIO inputs (INPUT-AV1, INPUT-AV 2, and TV’s side
socket panel [AV3])—use to connect from the audio output sock-
ets on VCRs, DVDs, or other peripherals.
6
MONITOR OUT (VIDEO/AUDIO)—use to connect to a VCR
to record programmes from the TV. Or use the AUDIO outputs to
connect to an audio hi-fi system.
7
AMP SWITCH, CENTER
CHANNELAMP INPUT, and
SUBWOOFER Output—use to make optional surround-sound
connections.
8
n Headphone socket (stereo, 3.5 mm)—use to connect head-
phones for personal listening. The headphone impedance must be
between 8 and 4000 Ohms.
1
ANTENNA IN 75Ω
3
4
5
S-VIDEO
L
VIDEO
AUDIO
AMP SWITCH
EXT INT
+
CENTER CHANNEL AMP INPUT
6
INPUT-AV 1
Pb
L
Pr
R
SIDE OF TV
4
REAR OF TV
7
_
4
INPUT-AV 2 SUBWOOFERMONITOR
OUT
Y
2
AUDIO
VIDEO
L
R
S-VIDEO
5
L
AV5-RGB, 480p/1080i-60Hz, 576p-50Hz
AV4-480p/1080i-60Hz, 576p-50Hz
G/Y
R/Pr
B/Pb
7
V
SYNC
H
3
AUDIO
AUDIO
L
R
L
R
3
G
5
8
Note : The
side panel is
AV3.
Page 30

30
CONNECTING PERIPHERAL EQUIPMENT
The AV4 and AV5 sockets allow you to connect digital equipment with
1080i/480p (60Hz) or 576p (50Hz) signal output.
Overview : High-definition Inputs
1
AV4—use to connect digital equipment with a 1080i/480p
(60Hz) or 576p (50Hz) signal output, such as digital set-top
boxes or DVD players with progressive-scan capability. You
can connect equipment with YPbPr component video or RGB
outputs to the AV4 sockets. H and V Sync connections may or
may not be required for RGB connections. Use the AV4 L(eft)
and R(ight) AUDIO sockets for sound connections.
See the handbook for the device you are connecting.
2
AV5—use to connect digital equipment with a 1080i/480p
(60Hz) or 576p (50Hz) signal output, such as digital set-top
boxes or DVD players. The AV5 socket accepts a DB15 connector. Note, however, that adaptors can also be used to connect
from component video output to this DB15 socket. Use the AV5
L(eft) and R(ight) sockets for sound connections.
See the handbook for the device you are connecting.
High-definition Inputs—Video Synchronizing Reference
Input
Video Description
Accepts Video Sync
according to :
AV4, AV5
480p (60Hz)
1080i (60Hz)
576p (50Hz)
EIA/CEA-770.2-C
EIA/CEA-770.3-C
ITU-R BT.1358
REAR OF TV
CENTER CHANNEL AMP INPUT
INPUT-AV 1
VIDEO
L
AUDIO
R
AMP SWITCH
EXT INT
+
Y
Pb
Pr
2
_
AV5-RGB, 480p/1080i-60Hz, 576p-50Hz
1
AV4-480p/1080i-60Hz, 576p-50Hz
G/Y
INPUT-AV 2 SUBWOOFERMONITOR
OUT
VIDEO
S-VIDEO
L
L
AUDIO
R
R/Pr
B/Pb
V
SYNC
AUDIO
H
L
L
AUDIO
R
R
ANTENNA IN 75Ω
S-VIDEO
L
Page 31

31
CONNECTING PERIPHERAL EQUIPMENT
Video Recorder :Playback
1
Connect the RF cable to the RF socket on your video recorder.
2
Connect
another RF cable from the output of your video
recorder to the ANTENNA IN 75Ω socket on your TV.
3
Better playback quality can be obtained if you also connect the
Video, Audio Left and Right (only for stereo equipment) cables
to the VIDEO and AUDIO L (mono) and R inputs of
INPUT-AV 2.
Note : In case of mono equipment, only the left loudspeaker
reproduces sound. Use a mono-to-stereo adaptor (not supplied)
for sound reproduction via the internal loudspeakers.
The MONITOR OUT connectors can be used for daisy chaining or recording programmes from your TV. See page 32.
S-VHS-Video quality with an S-VHS video recorder is obtained
by connecting the S-VHS-Video cable with the S-VIDEO input
instead of connecting the video recorder to the VIDEO input.
See the handbook for the video recorder.
If You Do Not Make the Video and Audio
Connections in Step 3 Above :
Search for and store the test signal of the video recorder.
1
Unplug the RF cable from the RF socket of your video recorder.
2
Switch on your TV and put the video recorder on the test signal or
play a prerecorded tape. See the handbook for your video
recorder.
3
Search for the test signal of your video recorder in the same way
you searched for and stored the TV signals. See pages 9 and 10.
4
Store the test signal under programme number 0 or between 90
and 99.
5
Replace the RF cable in the RF socket of your video recorder
after you have stored the test signal.
AMP SWITCH
ANTENNA IN 75Ω
EXT INT
AV5-RGB, 480p/1080i-60Hz, 576p-50Hz
_
+
CENTER CHANNEL AMP INPUT
AV4-480p/1080i-60Hz, 576p-50Hz
G/Y
R/Pr
INPUT-AV 2 SUBWOOFERMONITOR
INPUT-AV 1
OUT
Y
B/Pb
VIDEO
VIDEO
S-VIDEO
S-VIDEO
L
Pb
L
V
L
L
L
L
SYNC
AUDIO
AUDIO
AUDIO
AUDIO
Pr
H
R
R
R
R
CABLE
AMP SWITCH
ANTENNA IN 75Ω
EXT INT
+
CENTER CHANNEL AMP INPUT
INPUT-AV 1
Y
VIDEO
S-VIDEO
Pb
L
L
2
VIDEO RECORDER
3
A/V OUT
AUDIO
Pr
R
RF INRF OUT
REAR OF TV
AV5-RGB, 480p/1080i-60Hz, 576p-50Hz
_
AV4-480p/1080i-60Hz, 576p-50Hz
G/Y
R/Pr
INPUT-AV 2 SUBWOOFERMONITOR
OUT
AUDIO
B/Pb
VIDEO
S-VIDEO
L
V
L
R
L
SYNC
AUDIO
H
R
1
L
AUDIO
R
Page 32

32
Video Recorder :Recording
To record S-VHS quality, connect an S-VHS peripheral directly to the
video recorder.
Recording a TV Programme
1
Select the channel number on your video recorder.
2
Set your video recorder to record.
See the handbook for your video recorder.
Switching channel numbers on your TV does not disturb recording.
Recording a Programme on Your Video Recorder Connected
to MONITOROUT from Audio/Video Equipment Connected
to AV1,AV2,or to the Sockets on the Side of the TV (AV3)
1
Switch on the equipment.
2
Select the correct external source on your TV and on your
video recorder.
3
Set your video recorder to record.
You record what you are watching on the screen.
Do not switch channel numbers and do not switch off your TV
when you are recording.
CONNECTING PERIPHERAL EQUIPMENT
Page 33

33
CONNECTING PERIPHERAL EQUIPMENT
Video Recorder and Other A/V Peripherals
1
Connect the RF cable to the RF socket on your A/V peripheral
equipment.
2
To obtain better picture quality, also connect the Video and
Audio left and Audio right (only for stereo equipment) cables to
the VIDEO and AUDIO L(mono) and AUDIO R input of the
INPUT-AV 2 sockets.
Note :
In case of mono equipment, only the left loudspeaker
reproduces sound. Use a mono-to-stereo adaptor (not supplied)
for sound reproduction via the internal loudspeakers.
3
Connect the RF output of the A/V peripheral equipment to the
RF input on the video recorder.
4
When a video recorder is not connected to MONITOR OUT
on your TV, you can record a programme only from the aerial
or from the cable system.
Only when a video recorder is connected to MONITOR OUT
is it possible to record a programme from other equipment connected to the TV. See page 32.
Connect Video and Audio left (mono) and Audio right cables
from the video recorder A/V inputs to the VIDEO and
AUDIO L (mono) and AUDIO R sockets of the MONITOR
OUT on your TV.
5
Connect from the RF output on the video recorder to the
ANTENNA IN 75Ω socket on your TV.
DVD Player
Note : Progressive-scan DVD players can be connected to the AV4 or
AV5 inputs only.
1
Connect the cables of your DVD player with component video
output to the Y-Pb-Pr INPUT-AV 1 sockets on your TV.
2
Connect the cables from the Video and Audio (L and R) outputs
on the DVD player to the INPUT-AV 1 VIDEO and AUDIO L
(mono) and R inputs on your TV.
See the handbook for your DVD player.
Note : The names of the component video sockets may differ
depending on the DVD player or digital source equipment used.
For example, besides YPbPr, you may see R-Y/B-Y/Y or
CrCbY. Although abbreviations and terms may vary, the letters
B and R stand for the blue and red color component signal connectors, respectively. The Y indicates the luminance signal. If
necessary, see the handbook for the digital equipment for more
information.
AMP SWITCH
ANTENNA IN 75Ω
EXT INT
AV5-RGB, 480p/1080i-60Hz, 576p-50Hz
_
+
CENTER CHANNEL AMP INPUT
AV4-480p/1080i-60Hz, 576p-50Hz
G/Y
R/Pr
INPUT-AV 2 SUBWOOFERMONITOR
INPUT-AV 1
OUT
Y
B/Pb
VIDEO
VIDEO
S-VIDEO
S-VIDEO
L
Pb
L
V
L
L
L
L
SYNC
AUDIO
AUDIO
AUDIO
AUDIO
Pr
H
R
R
R
R
CABLE
REAR OF TV
AMP SWITCH
ANTENNA IN 75Ω
EXT INT
+
CENTER CHANNEL AMP INPUT
INPUT-AV 1
OUT
Y
VIDEO
S-VIDEO
Pb
L
L
5
4
AUDIO
Pr
R
AV5-RGB, 480p/1080i-60Hz, 576p-50Hz
_
AV4-480p/1080i-60Hz, 576p-50Hz
G/Y
INPUT-AV 2 SUBWOOFERMONITOR
AUDIO
R/Pr
B/Pb
VIDEO
S-VIDEO
L
V
L
R
L
SYNC
2
AUDIO
H
R
1
L
AUDIO
R
A/V IN A/V OUT
RF INRF OUT
RF OUT RF IN
3
A/V PERIPHERAL
VIDEO RECORDER
ANTENNA IN 75Ω
+
CENTER CHANNEL AMP INPUT
INPUT-AV 1
VIDEO
S-VIDEO
L
L
AUDIO
R
REAR OF TV
AMP SWITCH
EXT INT
AV5-RGB, 480p/1080i-60Hz, 576p-50Hz
_
AV4-480p/1080i-60Hz, 576p-50Hz
G/Y
R/Pr
INPUT-AV 2 SUBWOOFERMONITOR
OUT
Y
B/Pb
VIDEO
S-VIDEO
L
Pb
V
L
L
L
SYNC
AUDIO
AUDIO
AUDIO
Pr
H
R
R
R
AMP SWITCH
ANTENNA IN 75Ω
2
A/V OUT
S-VIDEO
L
VIDEO
AUDIO
+
CENTER CHANNEL AMP INPUT
INPUT-AV 1
L
R
EXT INT
Y
Pb
Pr
OUT
_
AV4-480p/1080i-60Hz, 576p-50Hz
INPUT-AV 2 SUBWOOFERMONITOR
VIDEO
S-VIDEO
L
L
1
AUDIO
R
COMPONENT VIDEO
AV5-RGB, 480p/1080i-60Hz, 576p-50Hz
G/Y
R/Pr
B/Pb
V
L
SYNC
AUDIO
H
R
OUT
L
AUDIO
R
DVD PLAYER
Page 34

34
CONNECTING PERIPHERAL EQUIPMENT
S-Video Equipment
Note : Progressive-scan DVD players can be connected to the AV4 or
AV5 inputs only.
1
Connect an S-VIDEO cable to the INPUT-AV 2 S-VIDEO
input.
2
Connect the audio cables to the equipment’s AUDIO L (mono)
and AUDIO R sockets and to the INPUT-AV2 AUDIO L
(mono) and AUDIO R sockets on your TV.
AV4 and AV5 Digital High-definition Inputs
When you have digital equipment with 1080i or 480p signal output
(60Hz) or 576p signal output (50Hz), connect it to the AV4 or AV 5
inputs on your TV. Examples of such equipment are digital set-top boxes
and progressive-scan DVD players.
Connecting to AV4
Connect digital equipment with component video output (usually labeled
Y-Pb-Pr) or with RGB output (phono-type connectors) to the AV4
inputs for video and audio left and right. Also connect to the H and V
SYNC inputs on the TV if required for your digital equipment.
Note : The AV4 sockets are compatible with some digital equipment hav-
ing RGB outputs with “sync on green” or RGB with “separate H and V
sync.” Output standards for digital equipment, however, may vary by
manufacturer. No industry standards have been established for HD television RGB signal systems, timing, synchronization, and signal strengths. If
the digital equipment you want to connect to your TV offers both component video and RGB outputs, component video is the suggested connection to use. See the handbook for the digital equipment.
Connecting to AV5
Connect digital equipment with RGB or Y-Pb-Pr output to the AV5
inputs for video and audio left and right. ADB15 cable or adaptor cable
with a DB15 connector is required.
Note : The AV 5 input cannot be used to connect a computer or any other
VGA device.
Notes regarding connecting to eitherAV4 or AV5 :
• For connections to either AV4 or AV5, be sure the TV’s color-space
setting matches the output (Y-Pb-Pr or RGB) of the digital equipment
you have connected to the AV4 or AV5 inputs. See instructions for
setting the TV’s color space on page 37.
• See the handbook for the high-definition equipment.
• If you notice scrolling images, wrong colors or no color, no picture or
even combinations of these on your screen, check to see if the connections have been done properly.
ANTENNA IN 75Ω
+
CENTER CHANNEL AMP INPUT
INPUT-AV 1
VIDEO
S-VIDEO
L
L
AUDIO
R
REAR OF TV
AMP SWITCH
EXT INT
AV5-RGB, 480p/1080i-60Hz, 576p-50Hz
_
AV4-480p/1080i-60Hz, 576p-50Hz
G/Y
R/Pr
INPUT-AV 2 SUBWOOFERMONITOR
OUT
Y
B/Pb
VIDEO
S-VIDEO
L
Pb
V
L
L
L
SYNC
AUDIO
AUDIO
AUDIO
Pr
H
R
R
R
AMP SWITCH
ANTENNA IN 75Ω
EXT INT
+
CENTER CHANNEL AMP INPUT
INPUT-AV 1
OUT
Y
VIDEO
S-VIDEO
Pb
L
L
AUDIO
2
Pr
R
AV5-RGB, 480p/1080i-60Hz, 576p-50Hz
_
AV4-480p/1080i-60Hz, 576p-50Hz
G/Y
INPUT-AV 2 SUBWOOFERMONITOR
AUDIO
R/Pr
B/Pb
VIDEO
S-VIDEO
L
V
L
R
L
L
SYNC
AUDIO
AUDIO
H
R
R
1
S-VIDEO OUTAUDIO OUT
DVD PLAYER
AV4-480p/1080i-60Hz, 576p-50Hz
G/Y
R/Pr
B/Pb
V
L
SYNC
AUDIO
H
R
AV5-RGB, 480p/1080i-60Hz, 576p-50Hz
AUDIO
REAR OF TV
VIDEO
S-VIDEO
L
+
CENTER CHANNEL AMP INPUT
INPUT-AV 1
L
AUDIO
R
AMP SWITCH
EXT INT
OUT
Y
Pb
Pr
_
INPUT-AV 2 SUBWOOFERMONITOR
VIDEO
L
AUDIO
R
AV5-RGB, 480p/1080i-60Hz, 576p-50Hz
AV4-480p/1080i-60Hz, 576p-50Hz
G/Y
R/Pr
S-VIDEO
L
B/Pb
V
L
L
SYNC
AUDIO
AUDIO
H
R
R
ANTENNA IN 75Ω
REAR OF TV
VIDEO
S-VIDEO
L
+
CENTER CHANNEL AMP INPUT
INPUT-AV 1
L
AUDIO
R
AMP SWITCH
EXT INT
OUT
Y
Pb
Pr
_
INPUT-AV 2 SUBWOOFERMONITOR
VIDEO
L
AUDIO
R
AV5-RGB, 480p/1080i-60Hz, 576p-50Hz
AV4-480p/1080i-60Hz, 576p-50Hz
G/Y
R/Pr
S-VIDEO
L
B/Pb
V
L
L
SYNC
AUDIO
AUDIO
H
R
R
ANTENNA IN 75Ω
L
R
Page 35

35
Additional Audio Connections :External Hi-fi
If you would like to hear TV programmes through your audio hi-fi
system, your TV offers this capability.
1
Connect the audio cables to the AUDIO L and R input sockets
of your amplifier and to the AUDIO L (mono) and R
MONITOR OUT sockets of the TV.
2
Turn the TV and audio system on.
3
Control the volume of the hi-fi system at the hi-system’s amplifier.
Volume adjustments made to the TV do not affect the volume
of the hi-fi system.
CONNECTING PERIPHERAL EQUIPMENT
Camera and Camcorder
Connect your camera or camcorder to sockets at the side of your TV.
1
Connect the equipment to the VIDEO or S-VIDEO socket.
Note : S-VHS quality with an S-VHS camcorder is obtained by
connecting an S-VIDEO cable with the S-VIDEO socket
instead of making a connection to the VIDEO socket.
2
Connect the equipment to the AUDIO L socket for mono or
both the AUDIO L and R for stereo.
Headphone
1
Insert the plug into the headphone socket ; at the right side of
the TV.
2
Press H on the remote control to switch off the internal loudspeakers of the TV.
Notes :
• The headphone impedance must be between 8 and 4000 Ohms.
• The headphone socket has a 3.5 mm socket.
• In the SOUND menu, select HEADPHONE to adjust the headphone volume and balance.
TYPICAL
CAMCORDER
SIDE OF TV
S-VIDEO
or
1
1
2
VIDEO
AUDIO
R
G
L
SIDE OF TV
S-VIDEO
G
VIDEO
L
AUDIO
R
1
AMP SWITCH
ANTENNA IN 75Ω
EXT INT
_
+
CENTER CHANNEL AMP INPUT
INPUT-AV 2 SUBWOOFERMONITOR
INPUT-AV 1
OUT
Y
VIDEO
S-VIDEO
Pb
L
L
AUDIO
AUDIO
Pr
R
REAR OF TV
HI-FI AMPLIFIER
AV5-RGB, 480p/1080i-60Hz, 576p-50Hz
AV4-480p/1080i-60Hz, 576p-50Hz
G/Y
R/Pr
B/Pb
VIDEO
S-VIDEO
L
V
L
L
L
SYNC
AUDIO
AUDIO
H
R
R
R
AMP SWITCH
ANTENNA IN 75Ω
EXT INT
+
CENTER CHANNEL AMP INPUT
INPUT-AV 1
OUT
Y
VIDEO
S-VIDEO
Pb
L
L
1
AUDIO
Pr
R
AV5-RGB, 480p/1080i-60Hz, 576p-50Hz
_
AV4-480p/1080i-60Hz, 576p-50Hz
G/Y
R/Pr
INPUT-AV 2 SUBWOOFERMONITOR
B/Pb
VIDEO
S-VIDEO
L
V
L
AUDIO
R
L
L
SYNC
AUDIO
AUDIO
H
R
R
Page 36

36
CONNECTING PERIPHERAL EQUIPMENT
Additional Audio Connections :Surround Sound
Your TV has extra sockets that allow you to connect to an external
audio amplifier system and powered subwoofer. This connection will
provide a surround-sound experience similar to a movie theatre or
concert hall.
1
Connect speaker wires from the Center Speakers Output of the
surround-sound amplifier to the corresponding (+, –) CENTER
CHANNEL AMP INPUT sockets on the TV.
2
Connect audio cables from the AUDIO L and R MONITOR
OUT sockets of the TV to the AUDIO L and R inputs sockets
on the surround-sound amplifier.
3
Connect speaker wires from the surround-sound amplifier’s
front and surround-sound speaker sockets to the front and surround-sound speakers.
4
Connect an audio cable from the SUBWOOFER output of the
TV to the Low Level Input sockets on the powered subwoofer.
5
Adjust volume for the surround-sound amplifier and powered
subwoofer at those pieces of equipment.
ANTENNA IN 75Ω
+
CENTER CHANNEL AMP INPUT
INPUT-AV 1
VIDEO
S-VIDEO
L
L
AUDIO
R
REAR OF TV
1
AMP SWITCH
EXT INT
AV5-RGB, 480p/1080i-60Hz, 576p-50Hz
_
AV4-480p/1080i-60Hz, 576p-50Hz
G/Y
R/Pr
INPUT-AV 2 SUBWOOFERMONITOR
OUT
Y
B/Pb
VIDEO
S-VIDEO
L
Pb
V
L
L
L
SYNC
AUDIO
AUDIO
AUDIO
Pr
H
R
R
R
AMP SWITCH
ANTENNA IN 75Ω
EXT INT
+
CENTER CHANNEL AMP INPUT
INPUT-AV 1
OUT
Y
VIDEO
S-VIDEO
Pb
L
L
2
AUDIO
Pr
R
AV5-RGB, 480p/1080i-60Hz, 576p-50Hz
_
AV4-480p/1080i-60Hz, 576p-50Hz
G/Y
R/Pr
INPUT-AV 2 SUBWOOFERMONITOR
B/Pb
VIDEO
S-VIDEO
L
V
L
AUDIO
R
L
L
SYNC
AUDIO
AUDIO
H
R
R
3 3
AMPLIFIER
Note: The gray circle indicates the primary viewing area.
Front
Speaker
Powered
Subwoofer
TV
(Center Speakers)
4
POWERED
SUBWOOFER
Front
Speaker
Rear
Speaker
Rear
Speaker
Page 37

37
CONNECTING PERIPHERAL EQUIPMENT
Setting the AV4 and AV5 Color Space
The term colour space refers to how colours are defined and appear
on your TV. When making connections to the AV4 or AV5 sockets,
you will need to be sure the TV’s color space is set to match the output of the peripheral you have connected.
1
Press the AV key on the remote control as many times as necessary to select the high-definition input you desire, AV4 or AV5.
2
Press the MENU key to display the menu.
3
Press the cursor right to enter the INSTALL menu.
4
Cursor down until the high-definition input (AV4 or AV5) is
selected.
5
The current colour-space setting appears to the right of AV4 or
AV5. To change the setting cursor left or right.
6
Press the m key to switch the menu off.
2
5
1
AV4
6
OR
AV5
4
3
PICTURE LANGUAGE
•
SOUND AUTO STORE
•
FEATURES MANUAL STORE
•
‰
INSTALL SORT
•
For AV4:
INSTALL
•
AUTO STORE
•
MANUAL STORE
•
SORT
•
CHANNEL EDIT
•
G
AV4
G
For AV5:
INSTALL
•
AUTO STORE
•
MANUAL STORE
•
SORT
•
CHANNEL EDIT
•
G
AV5
G
OR
AV4
OR
AV5
CHANNEL EDIT
‰
YPbPr
•
‰
RGB
•
‰
RGB
•
‰
YPbPr
•
Page 38

38
SELECTING CONNECTED EQUIPMENT FOR VIEWING
Equipment Connected with an Aerial Cable Only
Select the channel number under which you have stored the test signal
with the digit keys.
Equipment Connected to the back or to the side
of the TV (AV3)
Press the AV key repeatedly to select AV1, CVI, A V2, AV3, A V4, or
AV5, according to where you connected your equipment at the back or
the side of your TV.
Select CVI to view the playback of DVD discs if you used the compo-
nent video input sockets of INPUT-AV 1 (Y-Pb-Pr and AUDIO L
[mono] and R inputs).
TV Channels
Enter the channel number of the TV channel you want to watch with the
digit keys.
Page 39

39
WARNING Concerning Stationar y Images on the TV Screen :
Do not leave stationary or “letterbox” images on screen for extended periods of time.This can cause
uneven picture-tube aging.
Normal use of the TV should involve the showing of pictures that contain constantly moving and changing images that fill the
screen. Be careful not to leave nonmoving images on screen for extended periods of time or to display the same images on screen
too frequently, because subtle ghost images can be left on the picture tubes. Avoid showing the same stationary images more than
15 percent of your total viewing in any one week. Sources of stationary images may be DVD discs, laser discs, video games, CD-i
discs, videotapes, digital television boxes, broadcast channels, cable channels, satellite channels, and others. Here are some exam-
ples of stationary images (this is not an all-inclusive list; you may encounter others in your viewing) :
• DVD menus—listings of DVD disc content
•“Letterbox” black borders—black bars shown along the edges of the picture when a widescreen (16:9) movie is played on TV
• Video-game images and scoreboards
• Television station logos—present a problem if they are bright and stationary; moving or low-contrast graphics are less likely to
cause uneven aging of the picture tube
• Stock-market tickers—presented at the bottom of the TV screen
• Shopping channel logos and pricing displays—bright and shown constantly or repeatedly in the same location on the TV
screen.
All picture tubes age with use, with their light output diminishing over time. But by maintaining normal use—mixing television
picture types—you will create conditions for the tubes to age at an even rate. The result will be a TV picture that is evenly bright
over the entire screen.
P
LACEMENT OF THE TV
• See page 4.
C
LEANING
• To avoid possible shock hazard, be sure the TV is unplugged from the electrical outlet before cleaning.
• Regularly dust the TV with a dry, nonscratching duster to keep the TV clean.
• When cleaning the TV, take care not to scratch or damage the screen surface. Avoid wearing jewelry or using anything abrasive.
Do not use household cleaners. Wipe the front screen with a clean cloth dampened with water. Use even, easy, vertical strokes
when cleaning.
• Gently wipe the cabinet surfaces with a clean cloth or sponge dampened in a solution of cool, clear water and a mild soap or
detergent. Use a clean, dry cloth to dry the wiped surfaces.
• Occasionally vacuum the ventilation holes or slots in the back cover of the set.
• Never use thinners, insecticide sprays, or other chemicals on or near the cabinet, as they might cause permanent marring of the
cabinet finish.
T
IPS
• Do not leave your set on standby mode for a prolonged period of time. Switch the set off to allow it to be demagnetised. A
demagnetised set supports good picture quality.
• Do not shift or move the set around when it is switched on. Unevenness in colour in some parts of the screen may occur.
E
ND-OF-LIFE DISPOSAL OF THETV
Philips is paying much attention to making its products environmentally friendly. Your new TV contains materials that can be recycled and reused. Specialised companies can dismantle your discarded TV at the end of its life, concentrating on the reusable materials and minimising the amount of materials to be disposed. Please be sure to dispose of your old TV according to local regulations.
D
ISPOSAL OF EXHAUSTED BATTERIES
The batteries supplied do not contain the heavy metals mercury and cadmium. Nevertheless, in many countries exhausted batteries
may not be disposed of with your household waste. Please ensure you dispose of exhausted batteries according to local regulations.
CARE,CLEANING,AND TIPS
Page 40

40
BEFORE CALLING SERVICE
TV remote control does not
work
• Check that the batteries are installed correctly.
• Replace the batteries, if necessary.
• Clean the remote control and the remote-sensor window on the TV.
• Be no farther than 6 meters from the TV when using the remote control and aim the remote
toward the TV’s remote-sensor window.
• If the remote still will not work, use the keys on the TV.
No power
• Check that the TV’s power cord is plugged into the mains socket. If there is still no power, disconnect the plug. Wait for 60 seconds and reinsert the plug and then switch on the TV again.
• See if the outlet is controlled by a wall switch.
• If you are using an AC power strip, be sure the fuse on the power strip is not blown.
No picture
• Check the antenna connection at the rear of the TV to see if it is properly connected to the TV
input terminal.
• The broadcast station may be experiencing difficulty. Try another channel.
• Adjust the contrast and brightness settings or select another picture setting with the Smart Picture
key on the remote control.
• If using peripheral equipment through the A/V inputs, be sure it is properly connected.
• Be sure you have selected the correct signal source for viewing.
• If you are attempting to view a picture from a progressive-scan-capable DVD player connected to
the AV4 or AV5 sockets, be sure you have switched the DVD player to progressive-scan mode.
• If you are using an HD receiver, be sure its output is set correctly (to HD or SD), based on the
connection to the TV you have made.
Snowish picture and noise
• Check the antenna connection.
Colour patch (unevenness)
• Switch off the TV by the mains power key. Wait for 20 minutes before switching on again.
• Be sure you have made connections correctly.
• If you have connected digital equipment to the AV4 or AV5 sockets, check the colour-space setting
on the equipment or TV and change the setting on either if necessary.
• Check to be sure the TV is not placed too near speakers or magnetic objects.
• Adjust the TV’s convergence.
Horizontal dotted lines
• This may be caused by electrical interference from appliances such as hair dryers or vacuum
cleaners or other sources such as neon lights. Turn off the appliance or move the TV.
One white line across the screen
• Switch the TV off immediately and consult a qualified service person.
Good picture but no sound
• Increase the volume.
• Check that the TV is not muted; press the H key on the remote control.
• When no signal is detected, the TV automatically switches off the sound. This is proper operation
and does not indicate a malfunction.
• Check the transmission system’s sound settings on the set.
Good sound but poor colour or
no picture
• Adjust the contrast and brightness setting or select another picture setting with the Smart Picture
key on the remote control.
• Check the transmission system’s colour settings on this set.
Poor picture
• Poor picture quality sometimes occurs when an S-VHS camera or camcorder has been connected
to the side panel (AV3) of the TV when another peripheral is connected to AV1 or AV2 simultaneously. In this case, switch off one of the other peripherals.
Double images or “ghost” images
• High-rise building or hills may be obstructing reception. Try using a highly directional antenna to
improve the picture.
NICAM sound distortion
(crackling noise)
• This could be due to antenna siting or reflected signal.
• Switch over to “MONO” by pressing the I-II key on the remote control.
If your problem is not solved, switch the TV off and then back on again once. Never attempt to repair a defective TV yourself. Check with
your dealer or call a TV technician.
motpmyS odottahW
Page 41

41
INDEX
*Manufactured under license from Dolby Laboratories. “Dolby” and the double-D symbol are trademarks of Dolby Laboratories.
a active control,7,22
automatic tuning of channels,9
b bilingual broadcast (I-II key),7
c camcorder, 35
child lock,21
d dolby* virtual, 6
dual window, 26
DVD, 33–34
dynamic contrast,14
e editing channels, 12
f freeze, 7, 26
frequency, 10
h headphone,35
hue, 14
i information on screen (i+ key), 6
interrupt the sound (mute key), 7
m manual installation, 9–10
menu language, 8
n naming channels, 13
p picture adjustments, 14
picture-in-picture (pip),26
pip position,26
r recording, 32–33
s screen format,22
sleeptimer, 25
smart picture and smart sound, 24
sorting channels, 11
sound adjustments,18
stereo (I-II key), 7
storing TV channels, 9–10
S-VHS,32, 35
Switching the TV on,4
t teletext,27–28
troubleshooting (before calling service),40
v video recorder, 31–33
volume,6
Page 42

42
SPECIFICATIONS
These technical specifications are subject to change without notice.
*The options of Auto, Progressive, Digital Scan, or 100Hz can be selected in the TV’s onscreen Picture menu through the Digital Options item.
**Manufactured under license from Dolby Laboratories. “Dolby” and the double-D symbol are trademarks of Dolby Laboratories.
Product Type
Rear-projection TV with HD Input
Picture
• Picture screen diameter :
55PP8620 : 140 cm (55 in.)
46PP8621 : 117 cm (46 in.)
• Visible screen size :
55PP8620 : 140 cm (55 in.)
46PP8621 : 117 cm (46 in.)
• 100Hz digital scan*
• Progressive scan*
• Digital comb filter
• Dynamic contrast
• Colour enhancements : green/blue stretch
• Digital colour transient improvement (CTI)
• Digital histogram
• Active Control™
– Auto Sharpness
– Auto Dynamic Noise Reduction
• Digital Noise Reduction (DNR)
• Tint control (three modes)
Sound
• Dolby** Virtual Surround processing
• Incredible Surround™
• Speakers : 5 cm x 5 cm (2 in. x 2 in.) tweeter
5 cm x 12.7 cm (2 in. x 5 in.) woofer
• Smart Sound (four modes) :Theatre,Voice, Music, Personal
• Stereo : digital NICAM
• Sound output : 2 x 15 W, 50Hz–10 kHz at 5% THD
(flat response) 8-ohm load
• Bass Boost
• Center channel input
• Subwoofer out
Ease of Use
• Smart Picture (five modes)
• Smart Sound (four modes)
• Dual-language onscreen display and menu control
• Sleeptimer and Timer
• Childlock
• 100 presets
• Favorite Programme List
• Remote control
Connectivity
• Rear : MONITOR OUT—CVBS and audio L/R
INPUT-AV 1—CVBS, S-Video, and audio L/R
Component video input (CVI)—YPbPr and audio L/R
INPUT-AV 2—CVBS, S-Video, and audio L/R
AV 4—YPbPr (or RGB+HV)
accepting 480p/1080i-60Hz (EIA/CEA-770.2(&3)-C) and
576p-50Hz (ITU-R BT.1358); and audio L/R
AV 5—RGB (or YPbPr with adaptor)
accepting 480p/1080i-60Hz (EIA/CEA-770.2(&3)-C) and
576p-50Hz (ITU-R BT.1358); and audio L/R
ANTENNA IN 75Ω—coaxial
CENTER CHANNEL AMP INPUT and AMP SWITCH
SUBWOOFER output
• Side :AV3—CVBS, S-Video, and Audio L/R; stereo headphone
out (3.5 mm socket)
Reception
• Tuning system : PLL
• Colour transmission system (off-air) :
PAL B/G/I/D/K, SECAM B/G/D/K, NTSC M
• A/V connections : NTSC 3.58/4.43, PAL60
• Stereo sound transmissions systems (off-air) :
NICAM B/G/I/D/K, 2CS B/G/D/K
• Channel selections :VHF, UHF, S-channels, hyperband
Miscellaneous
• Ambient temperature : +5/+45ºC
• Mains : refer to the specification at the rear of the set
• Power consumption : refer to the specification at the rear of
the set
• Product dimensions : (W x D x H cm)
55PP8620 : 133.6 x 65.02 x 144.78
46PP8621 : 113 x 60 x 134
• Product weight :
55PP8620 : 86.4 kg (190 lb)
46PP8621 : 80 kg (176 lb)
•
Carton dimensions : (W x D x H cm)
55PP8620 : 144.78 x 81.28 x 151.76
46PP8621 : 125 x 71 x 140
• Carton weight :
55PP8620 : 15.9 kg (35 lb)
46PP8621 : 11 kg (24 lb)
Page 43

43
INTERNATIONAL GUARANTEE CONDITIONS
This product is guaranteed by Philips for a period of one year after the date of purchase against defects due to faulty
workmanship or materials. The guarantee covers both parts and labour.
Service under guarantee is only provided upon presentation of reasonable evidence (e.g., completed guarantee card or purchase
receipts) that the date of the claim is within the guarantee period.
The guarantee is not valid if the defect is due to accidental damage (including in transport), misuse or neglect and in case of alterations or repair carried out by unauthorised persons.
The guarantee may not apply if the product requires modifications or adaptation to enable it to operate in any country other than
the country for which it was designed, manufactured, approved and/or authorised or if any damage results from these modifications.
Service (during and after guarantee) is available in all countries where this product is officially distributed by Philips. In countries
where Philips does not distribute the product, the local Philips Service organisation will also provide service, although there may
be a delay if the appropriate spare parts and technical manual are not readily available.
These statements do not affect your statutory rights as a consumer.
In the event of difficulty, please contact the Philips Information Centre in any country (see enclosed addresses).
C
ONDICIONES DE GARANTIAS INTERNATIONALES
Philips garantiza este producto durante 1 año,a partir de la fecha de adquisición,contra defectos debidos a una imperfecta fabricación o malos materiales.Esta garantía cubre tanto las piezas de recambio como la mano de obra.
Las reparaciónes que pudieran producírse durante el período de vigencia de la presente garantía se efectuarán solo si presenta una
razonable evidencia (por ejemplo, mediante la presente garantía, debidamente cumplimentada, o la factura de compra), de que la
fecha de la queja está dentro del período de garantía.
Esta garantía no tendrá validez si el defecto es debido a un deterioro accidental; un uso inadecuado o un mal trato y en el caso de
modificaciónes o reparaciónes efectuadas por personal no autorizado.
El servicio (durante y despues de la garantía) está disponible en todos los países donde el producto es ofícialmente distribuido por
Philips.
En países donde Philips no distribuya el producto, la organización local de Servicio Philips dará también el servicio necesario,
aunque puede producirse una demora si los adecuados recambios no están fácilmente disponibles.
En todo caso, el titular de la garantía tiene todos los derechos mínimos reconocidos por la Ley. En el caso de cualquier dificultad,
por favor dirijase al : Centro de Information al Consumidor (vease lista adjunta).
Page 44

44
WESTERN EUROPE
AUSTRIA
Philips Kunden Information
Triesterstrasze 64
A-1100 Wien
Phone (01) 0660/6201
Fax (01) 60101 1312
BELGIUM
Philips Consumer Products
Léon Grosjeanlaan 2
B-1140 Brussel
Phone (02) 702 03 03
Fax (02) 702 02 60
GERMANY
Philips Infocenter
Consumer Electronics
Alexanderstraße 1
D-20099 Hamburg
Phone (0180) 535 6767
Fax (040) 2852 2310
Datex J*32400#
DENMARK
Philips Konsument Elektronik A/S
Philips Kundecenter
Prags Boulevard 80
DK-2300 København.S.
Phone 3288 3200
Fax 3288 3908
FINLAND
Philipsin Asiakaspalvelu
Sinikalliontie 3
P.O.Box 75
SF-02630 Espoo
Phone (90) 61580 230
Fax (90) 61580 910
FRANCE
Service Consommateurs Philips
Rue des Vieilles Vignes
Croissy Beaubourg
B.P.49
F-77423 Marne la Vallée,Cedex 2
Phone (01) 64805454
Fax (01) 64613348
GREECE
Philips S.A.Hellenique
25th March Street 15
P.O.Box 3153
G-10210 Athens
Phone (01) 4894301 880
Fax (01) 4894344
IRELAND
Philips Electronics Ireland Ltd
Newstead
Clonskeagh
Dublin 14
Phone (01) 7640000
Fax (01) 7640175
ITALY
Philips S.P.A.
Servicio Consumatori Philips
Piazza IV Novembre,3
I-20124 Milano
Phone 167 820026 (linea verde)
Fax (02) 67522660
LUXEMBURG
Philips Luxemburg S.A.
19-21,rte. d’Arlon
L-8001 Strassen
Phone 44 38 38 1
Fax 45 39 88
the NETHERLANDS
Philips Consumenten Belangen
Antwoordnummer 500
NL-5600VB Eindhoven
Phone 06 8406
Fax (040) 2785187
NORWAY
Norsk A/S Philips
Philips Kundetjenste
Sandstuveien 70
Postboks 1
Manglerud
N-0680 Oslo 6
Phone (022) 748250
Fax (022) 748511
PORTUGAL
Centro de Informação aos
Consumidores
Estrada da Outurela 118
P-2795 Carnaxide
Lisboa
Phone (01) 416 30 63 / 416 69 61
Fax (01) 416 30 73
SPAIN
Philips Servicio Atención al Cliente
Bernardino Obregón,26
E-28012 Madrid
Phone (91) 5300777
Fax (91) 4678925
SWEDEN
Philips Kundtjänst
Kottbygatan 7.Kista
S-16485 Stockholm
Phone (08) 632 2250
Fax (08) 632 2771
SWITZERLAND
Philips Info Centre
c/o SERLOG Servizio + Logistica S.A.
Fegistrasze 5
CH-8957 Spreitenbach
Phone (056) 4177270
Fax (056) 4177575
CONSUMER INFORMATION CENTRES
Page 45

45
CONSUMER INFORMATION CENTRES
UNITED KINGDOM
Philips Consumer Helpdesk
P.O.Box 298
420 London Road
Croydon-Surrey CR9 3QR
Phone (0181) 665 6350
Fax (0181) 6894312
EASTERN EUROPE
CZECH REPUBLIC
Philips Service
V Mezihorí 2
180 00 Prage
Phone (02) 6831581
Fax (02) 66310852
HUNGARY
Philips Markaszerviz
Kinizsi U 30-36
Budapest 1092
Phone (01) 2164428
Fax (01) 2187885
POLAND
Philips Polska CE
UL.Marszalkowska 45/49
00-648 Warsza wa
Phone (02) 6286070
Fax (02) 6288228
RUSSIA
Philips Representation Office
UI.Usacheva 35A
119048 Moscow
Phone (095) 247 9125
Fax (095) 247 9134
TURKEY
Türk Philips Ticaret A.S.
Talatpasa Caddesi No 5
80640-Gültepe/Istanbul
Phone (0800) 211 40 36
Fax (0212) 281 18 09
LA TIN AMERICA
ANTILLES
Philips Antillana N.V .
Kaminda A.J.E.K usters 4
Zeelandia
P.O.Box 3523-3051
Willemstad,Curacao
Phone (09) 612799
Fax (09) 612772
ARGENTINA
Philips Argentina S.A.
Centro de Información al Usarío
Vedia 3892
1430-Buenos Aires
Phone (01) 5442047
Fax (01) 5452928
BRASIL
Philips da Amazona Indústria
Electrônica Ltda.
Rua Jacerú,151-Brooklin
04705-000
Sao Paulo-SP.
Phone 800123123
Fax (011- 5315973
CHILI
Philips Chilena S.A.
Avenida Santa Maria 0760
P.O.Box 2687
Santiago de Chile
Phone (02) 730 2000
Fax (02)777 6730
COLOMBIA
Industrias Philips de Colombia
S.A.Division de Servicio
Calle 13,No 51-39
Apartado 4282, Bogota
Phone (01) 2600600
9800 18971 (toll free)
Fax (01) 2616308
MEXICO
Consumer Information Centre
Norte 45 No.669
Col.Industrial V allejo
C.P. 02300-Mexico,D.F.
Phone (05) 3687788/9180050462
Fax (05) 7284272
PARAGUAY
Philips del Paraguya S.A.
Avenida Artigas 1519
Casilla de Correos 605
Asuncion
Phone (021) 211666
Fax (021) 213007
PERU
Philips Peruana S.A.
Customer Desk
Comandante Espinar 719
Casilla 1841
Lima.18
Phone (014) 479783
Fax (014) 468949
URUGUAY
Ind.Philips del Uruguay S.A.
Avenida Uruguay 1287
Customer Help Desk
11100 Montevideo
Phone (02) 923392
Fax (02) 920752
Page 46

46
VENEZUELA
Industrias Venezolanas Philips S.A.
Apartado Postal 1167
Caracas 1010-A
Phone (02) 2377575
Fax (02) 2376420
NORTH AMERICA
CANADA
Consumer Service Division
4977 Levy Street
Ville St.Laurent
Quebec H4R2N9
Phone (514) 9560120
Fax (514) 9560828
USA
Philips Consumer Electronics
P.O.Box 520890
Miami,FL 33152
Phone :(402) 536-4171
PACIFIC
AUSTRALIA
Philips Consumer Service
Customer Information Centre
3 Figtree Drive
Homebush Bay NSW 2140
Phone (02) 131124
Fax (02) 7467970
NEW ZEALAND
Philips New Zealand Ltd.
Consumer Help Desk
2 Wagener Place
Mt.Albert
P.O.Box 1041
Auckland
Phone 0800 658 224 (toll free)
Fax (09) 849 7858
ASIA
BANGLADESH
Philips Service Centre
100 Kazi Nazrul Islam
Avenue Kawran Bazar C/A
Dhaka-1215
Phone (02) 812909
Fax (02) 813062
CHINA
Philips Service Logistic Centre
385 Hong Cao Road
Shanghai 200233
Phone (021) 4726839
Fax (021) 4726843
Philips Authorized Ser vice Centre
801 Dong Feng Road East
Guangzhou 510080
Phone (020) 7766990
Fax (020) 7766990
Philips Authorized Ser vice Centre
Bejing Jing Pu Elec. Service Station
6/F Guo Hu Department Store
Xan W u Men W est Street
Bejing 100053
Phone (01) 3021589
Fax (01) 3021589
Philips Authorized Ser vice Centre
148 Fu Jian Road M.
Shanghai 200001
Phone (021) 3281005/38275
Fax (021) 3281005
HONG KONG
Philips Electronics Hong Kong Limited
Consumer Service
10/F.,Flat A, Park Sun Building
103-107 Wo Yi Hop Road
Kwai Chung,N.T.
Phone 2619-9663
Fax 2485-3574
INDIA
Philips India
Consumer Relation Centre
Bandbox House
254-D Dr.A. Besant Road
Worli
Bombay 400 025
Phone (022) 4926611
Fax (022) 4941698
Consumer Relation Centre
7 Justice Chandra Madhab Road
Calcutta 700 020
Phone (033) 747333
Fax (033) 4753839
INDONESIA
P.T.Philips Development Corporation
Consumer Electronics Service
Philips House 5th floor,
JI.HR.Rasuna Said Kav. 3-4
Jakarta 12950
Phone (021) 5201122
Fax (021) 5205190
CONSUMER INFORMATION CENTRES
Page 47

47
CONSUMER INFORMATION CENTRES
JAPAN
Philips Consumer Electronics
1-11-9,Ebisuminami
Shibuya-Ku
Tokyo 150
Phone (03) 3719 2235
Fax (03) 3715 9992
KOREA
Philips Korea Ltd. - Philips House
C.P.O.Box 3680
260-199
Itaewon-Dong
Yongsan-Ku
Seoul 140-202
Phone (02) 5961195/1196
(02) 5967632/76325
Fax (02) 5959688
MALAYSIA
Philips Malaysia Sdn.Berhad
Service Dept.
No.51,sect.13 Jalan University
4620 Petaling Jaya,Selangor
P.O.Box 12163
50768 Kuala Lumpur
Phone (03) 7562144
Fax (03) 7560761
PAKISTAN
Philips Electr. Ind. of Pakistan Ltd.
Service Centre
Mubarak Manzil
39 Garden Road
Karachi-3
Phone (021) 7737411 16
Fax (021) 7726504
Philips Consumer Service Centre
168-F Adamjee Road
Rawalpindi Cantt.
Phone (051) 580902 3
Fax (051) 584944
PHILIPPINES
Philips Electronics and Lighting Inc.
106 Valer o St.Salcedo-Village
Makati,Metro Manilla
Phone (02) 8100161
Fax (02) 8173474
SINGAPORE
Philips Singapore Private Ltd.
Consumer Service Dept.
Lorong 1,Toa Payoh
P.O.Box 340
Singapore 319762
Phone 3502000
Fax 2508037
TAIWAN
Philips T aiwan Ltd.
Consumer Products Division
4F-1,5,Lane 768,Pateh Rd, Sec 4
P.O.Box 22978
Taipei
Phone (02) 7882856
Fax (02) 7882851
THAILAND
Philips Electronics (Thailand) Ltd.
Philips Service Centre
209/2 Sanpavut Road
Bangna
Bangkok 10260
Phone (02) 3980141/3980790
Fax (02) 3983319
AFRICA
MOROCCO
Philips Electronique Maroc.
304,BD Mohamed V.
Casablanca
Phone (02) 302992
Fax (02) 303446
SOUTH AFRICA
South Africa Philips
S.V. Div.195 Main R.D.
Martindale
Johannesburg
P.O.Box 58088
Newville 2114
Phone (011) 4705911
Fax (011) 4705250
MIDDLE EAST
Philips Export B.V.
P.O.Box 17078
Jebel Ali
Dubai
United Arab Emirates
Phone (04) 313377
Fax (04) 836128
Page 48

48
 Loading...