

Page 1
Register your product and get support at
www.philips.com/welcome
32PFL7403
42PFL5603
47PFL5603
42PFL5403
EN LCD television
________________________________
Downloaded From TV-Manual.com Manuals
Page 2

Downloaded From TV-Manual.com Manuals
Page 3
Ta b le of contents
1 Important 3
1.1 Safety 3
1.2 Care of the screen 3
1.3 Recycling 3
2Your TV 4
2.1 Television overview 4
2.2 Product highlights 5
3 Getting started 5
3.1 Position the TV 5
3.2 Wall mounting - VESA 6
3.3 Remote control batteries 7
3.4 Antenna cable 7
3.5 Power cable 7
4 Use your TV 8
4.1 Turn on or off - Standby 8
4.2 Watch TV 8
4.3 Watch channels from a digital receiver 9
4.4 Watch connected devices 9
4.5 Watch a DVD 9
4.6 Select a Teletext page 9
5 Use more of your TV 10
5.1 Remote Control 10
5.2 TV menus 11
5.3 Picture and sound settings 13
5.4 Teletext 16
5.5 Create favourite channel lists 17
5.6 Electronic Programme Guide 18
5.7 Timers and locks 19
5.8 Subtitles 20
5.9 Watch and play photos, MP3... 21
5.10 Listen to digital radio channels 22
5.11 Software update 23
7 Connections (DVD, receiver, ...) 28
7.1 Connections overview 28
7.2 About connections 29
7.3 Connect your devices 31
7.4 Setup devices 34
8Technical data 36
9Troubleshooting 37
10 Index 39
ENGLISH
6 Channel installation 25
6.1 Automatic channel installation 25
6.2 Manual channel installation 26
6.3 Rearrange stored channels 26
6.4 Channel management 27
6.5 Digital reception test 27
6.6 Factory settings 27
Ta ble of contents 1
Downloaded From TV-Manual.com Manuals
Register your product and get support at
www.philips.com/welcome.
Page 4

2008 © Koninklijke Philips Electronics
N.V. All rights reserved. Specifications
are subject to change without notice.
Tr ademarks are the property of
Koninklijke Philips Electronics N.V. or
their respective owners.
Philips reserves the right to change
products at any time without being
obliged to adjust earlier supplies
accordingly.
The material in this manual is believed
adequate for the intended use of the
system. If the product, or its individual
modules or procedures, are used for
purposes other than those specified
herein, confirmation of their validity
and suitability must be obtained. Philips
warrants that the material itself does
not infringe any United States patents.
No further warranty is expressed or
implied.
Warranty
No components are user-serviceable.
Do not open or remove covers and
do not insert objects in the ventilation
slots or insert objects not suitable for
the specific connectors. Repairs may
only be done by Philips Service
Centres and official repairshops. Failure
to do so shall void any warranty, stated
or implied.
Any operation expressly prohibited in
this manual, any adjustments, or
assembly procedures not
recommended or authorised in this
manual shall void the warranty.
years after the date of purchase of this
product.
To obtain the source code, write to
Philips Innovative Applications N.V.
Ass. to the Development Manager
Pathoekeweg 11
B-8000 Brugge
Belgium
Compliance with EMF
Koninklijke Philips Electronics N.V.
manufactures and sells many products
targeted at consumers, which, like any
electronic apparatus, in general have
the ability to emit and receive
electromagnetic signals.
One of Philips’ leading Business
Principles is to take all necessary
health and safety measures for our
products, to comply with all applicable
legal requirements and to stay well
within the EMF standards applicable at
the time of producing the products.
Philips is committed to develop,
produce and market products that
cause no adverse health effects.
Philips confirms that if its products are
handled properly for their intended
use, they are safe to use according to
scientific evidence available today.
Philips plays an active role in the
development of international EMF and
safety standards, enabling Philips to
anticipate further developments in
standardisation for early integration in
its products.
Copyrights
VESA, FDMI and the VESA
Mounting Compliant logo are
trademarks of the Video Electronics
Standards Association.
Manufactured under license
from Dolby Laboratories. ‘Dolby’, ‘Pro
Logic’ and the double D symbol
are trademarks of Dolby Laboratories.
Manufactured under
license from BBE Sound, Inc. Licensed
by BBE, Inc under one or more of the
following US patents: 5510752,
5736897. BBE and BBE symbol are
registered trademarks of BBE Sound
Inc.
The “HD Tick” Logo is a
trademark of AEEMA.
Windows Media is either a registered
trademark or trademark of Microsoft
Corporation in the United States
and/or other countries
® Kensington and MicroSaver are
registered US trademarks of ACCO
Wor ld Corporation with issued
registrations and pending applications
in other countries throughout the
world.
G,
Pixel characteristics
This LCD product has a high number
of colour pixels. Although it has
effective pixels of 99,999% or more,
black dots or bright points of light
(red, green or blue) may appear
constantly on the screen.This is a
structural proper ty of the display
(within common industry standards)
and is not a malfunction.
Open source software
This television contains open source
software. Philips hereby offers to
deliver or make available, upon
request, for a charge no more than the
cost of physically performing source
distribution, a complete machinereadable copy of the corresponding
source code on a medium customarily
used for software interchange.
This offer is valid for a period of 3
2
Downloaded From TV-Manual.com Manuals
All other registered and unregistered
trademarks are the proper ty of their
respective owners.
Page 5
1 Important
Read this user manual before you start to use this
product.
Pay attention to this section and closely follow the
instructions. The warranty does not apply to
damage caused by not taking into account the
instructions.
1.1 Safety
•To avoid short circuit, do not expose the product
to rain or water.
•To avoid a risk of fire or electric shock do not
place naked flame sources (e.g. lighted candles)
close to the TV.
• Leave a space of at least 10cm (4 inches) all
around the TV for ventilation.
• Keep away from radiators or other heat sources.
• Do not install the TV in a confined space such as
a book case. Make sure that curtains, cupboards
and so on cannot obstruct the air flow through
the ventilation slots.
•To prevent damage, do not insert any object into
the ventilation slots.
• Make sure the TV cannot fall down. Place the TV
on a solid and flat surface and only use the stand
provided with the TV.
•To prevent damaging the mains cord, do not
place the TV, or anything else, on the cord.
Damage the cord may cause a fire or electric
shock.
• When mounted on a swivel stand or VESA wall
bracket avoid force coming on the mains plugs.
Mains plugs that are partly loosened can cause
arcing or fire.
• Stationary images
Avoid stationary images as much as possible. If
you cannot, reduce screen contrast and
brightness to prevent damage to the screen.
Stationary images are images that remain on the
screen for a long time. Examples of stationary
images are: on screen menus, teletext pages, black
bars, stock market information,TV channel logos,
time displays, and so on.
1.3 Recycling
•Take the packaging to your local recycling centre.
• Dispose old batteries safely according local
regulations.
• This product is designed and manufactured for
material recycling and re-use.
• Do not dispose this product with other
household waste. Inform yourself or ask your
dealer about local environmentally safe recycling
and local regulations. Uncontrolled waste disposal
harms the environment and human health.
(EEC 2002/96/EC)
ENGLISH
1.2 Care of the screen
• Unplug the TV before cleaning.
• Clean the surface with a soft damp cloth. Do not
apply any other substance (chemical or
household cleaning agent).This may damage the
screen.
• Do not touch, push or rub or strike the screen
with anything hard as this may scratch, mar or
damage the screen permanently.
•To avoid deformations and colour fading, wipe off
water drops as soon as possible.
Important 3
Downloaded From TV-Manual.com Manuals
Page 6
2Your TV
OK
EXIT
MENU
P
123
456
7809
BROWSE
BACK
GUIDE
DEMO
MHEG
CANCEL
TELETEXT
SOURCE
SUBTITLE
INFO
OPTION
1
2
3
8
4
5
7
6
1
2
4
3
POWER
PROGRAM
MENU
VOLUME
5
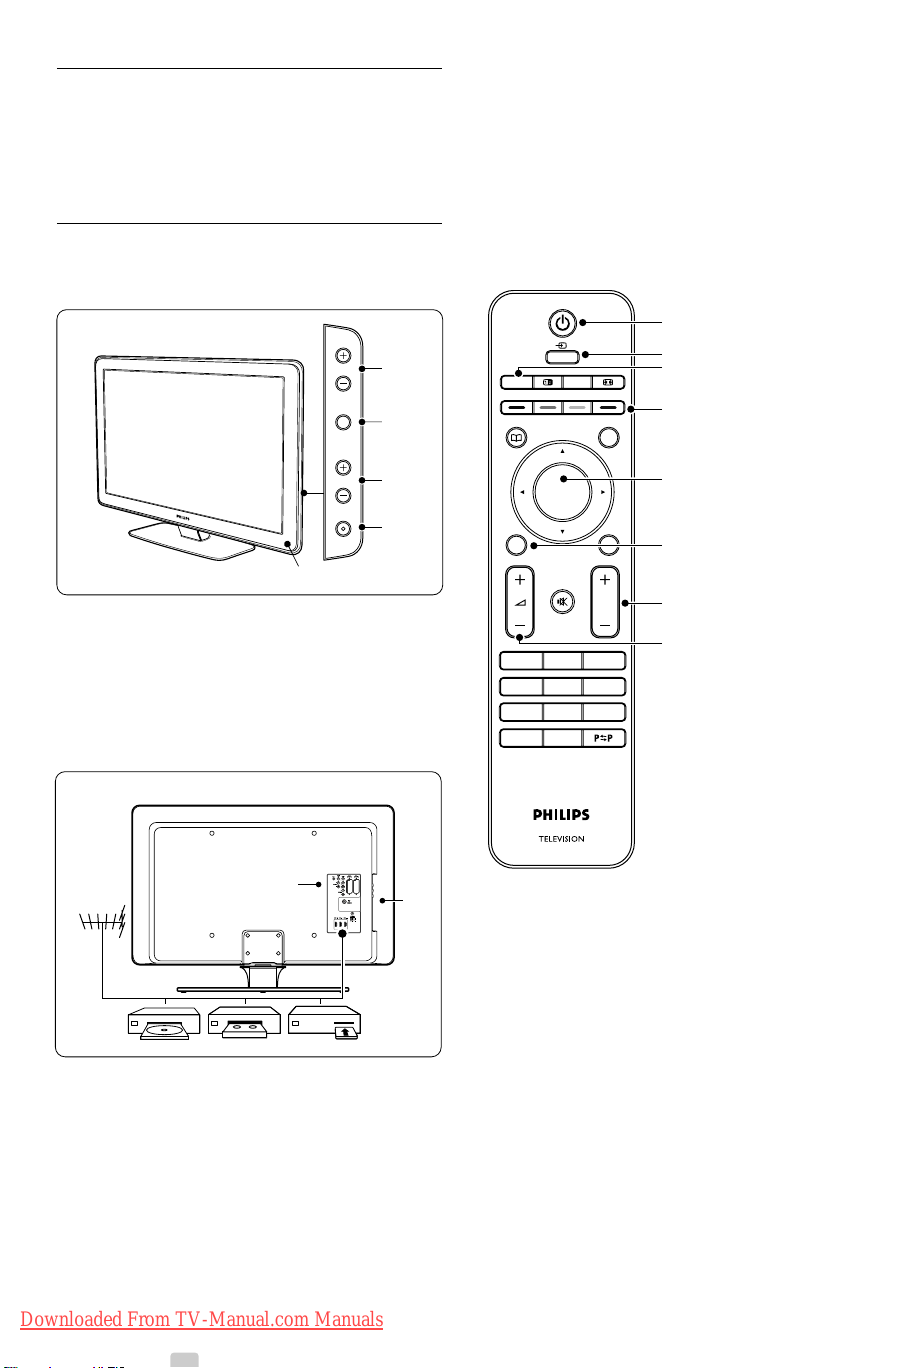
This section gives you an overview of the controls
and functions of this TV.
2.1 Television overview
Control
1Power switch
2 Program/Channel up and down
3 Menu
4Volume up and down
5 Remote control sensor
Remote control
Connectors
1 Back connectors
2 Side connectors
2
1
1Turn On or switch to Standby
2 Source
3Teletext
4 Colour keys
5Navigation keys
6 Menu On or Off
7 Program/Channel up + and down 8Volume up + or down -
For more info see section 7 Connections.
For more info see section 5.1 Remote control
overview.
4 Your TV
Downloaded From TV-Manual.com Manuals
Page 7
2.2 Product highlights
Your new TV is equipped with some of the most
modern audio or video innovations.
Your TV offers the following advantages ...
Full High Definition LCD display
(42-47PFL5603D only)
A full HD resolution of 1920x1080p, the highest
resolution of HD sources. It offers a brilliant flickerfree progressive scan picture with optimum
brightness and superb colours.
Pixel Plus
Offers perfect picture quality from any source.
100Hz Clear LCD
100Hz Clear LCD gives a superior motion
sharpness, better black level,high contrast with a
flicker-free, quiet image and a larger viewing angle.
DVB-T integrated tuner
Next to normal analogue TV broadcast your TV
receives digital terrestrial TV and radio broadcasts.
Digital broadcasting Australia : see www.dba.org.au
Electronic Programme Guide - EPG
The EPG shows the scheduled digital TV
programmes on screen.The guide can remind you
when programmes start, switch the TV on, etc.
HDMI connectors
HDMI connectors for highest quality high definition
connectivity.
3 Get started
This section helps you with the positioning and the
first time installation of the TV.
3.1 Position the TV
Carefully read the safety precautions in section 1.1
Safety before you position the TV.
• Large screen TVs are heavy. Carry and handle the
TV with at least two persons.
• The ideal distance from which to watch TV is
three times its diagonal screen size.
•Position the TV where light does not fall directly
on the screen.
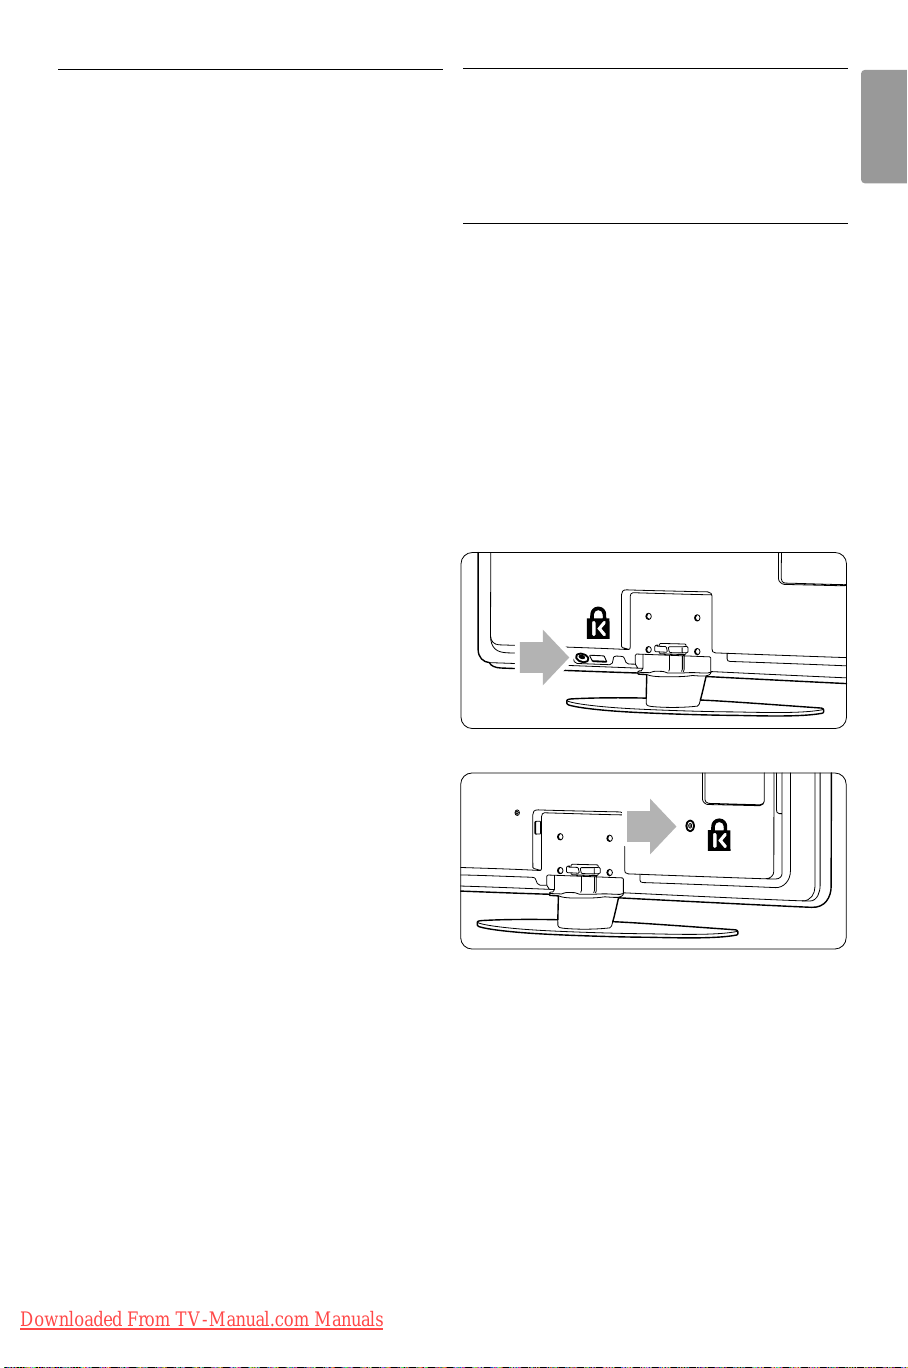
•Your TV is equipped with a Kensington Security
Slot at the back of the TV for an anti-theft lock
(not supplied).
On 32”TV model.
ENGLISH
USB connection
Multimedia connection for instantly view or play
your photos or music.
On 42” and 47” TV model.
Your TV 5
Downloaded From TV-Manual.com Manuals
Page 8
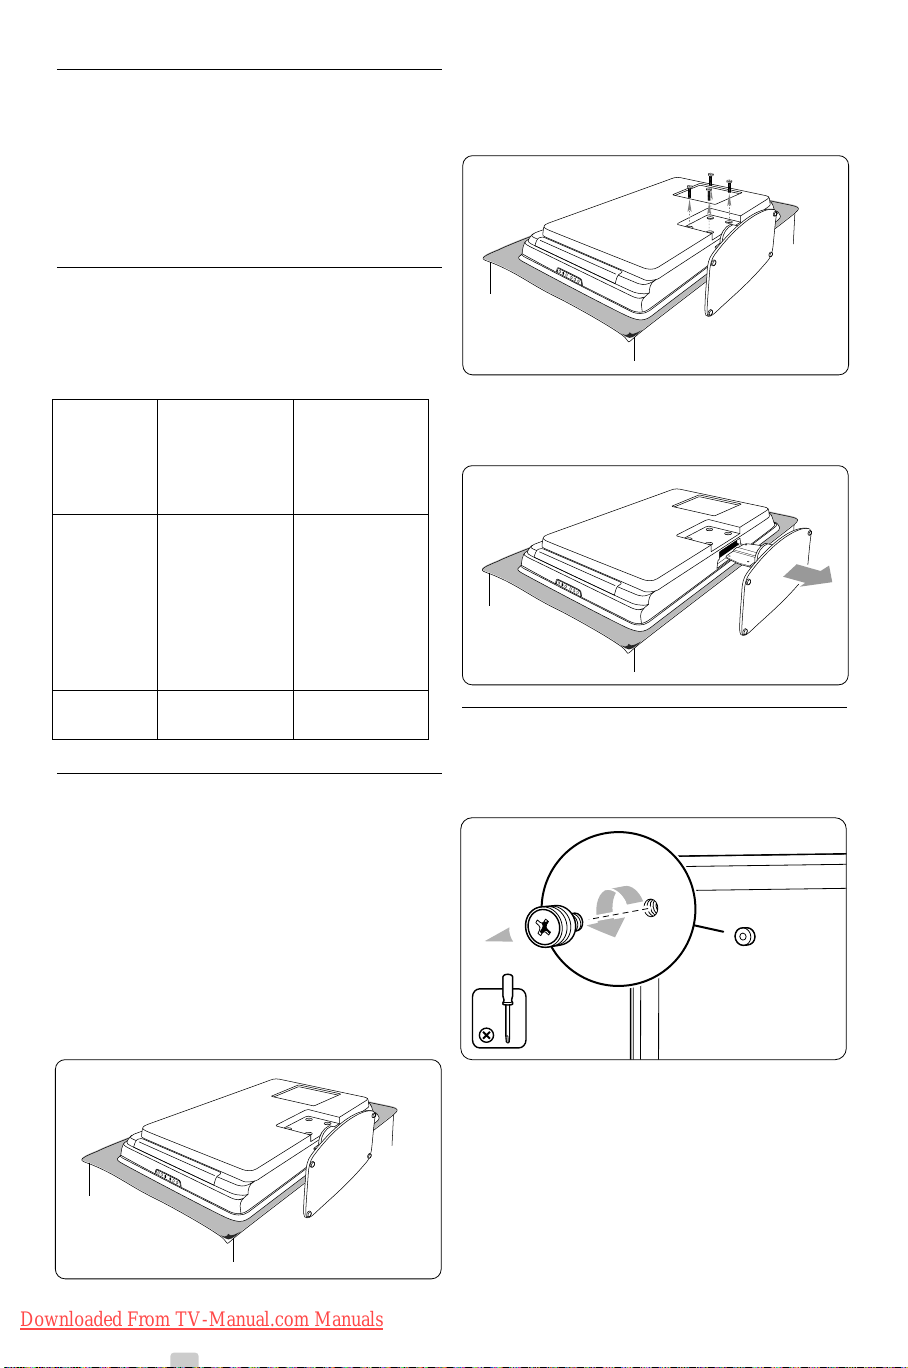
3.2 Wall mounting - VESA
4x
) Warning
Wall mounting of the TV should only be performed
by qualified installers. Koninklijke Philips Electronics
N.V. bears no responsibility for improper mounting
that results in accident or injury.
Step 1 Purchase a VESA-compatible wall
bracket
Depending on the size of your TV screen,
purchase one of the following wall brackets:
TV VESA- Special
screen compatible instructions
size wall bracket
(inches/ type
cm) (millimeters)
32”/81cm Adjustable The VESA-
300 x 300 compatible
bracket must
be adjusted
to 200 x
300 before
securing to
the TV
42”/107cm Fixed 400 x 400 None
or larger
Step 2 Remove the TV stand
® Using a cross-head screwdriver (not supplied),
unscrew the four bolts that secure the stand to
the TV.
ÒFirmly pull the stand from the bottom of the
TV. Place both the stand and bolts in a secure
location for future reinstallation.
Step 3 Secure the VESA-compatible wall
bracket to the TV
‡ Locate the four mounting nuts at the back of
the TV.
rNote
These instructions are only applicable to TV models
with mounted stands. If your TV stand is not
mounted, skip to Step 3 Secure the VESA-
compatible wall bracket to the TV.
‡ Carefully place the TV face down on a flat,
stable surface that is covered by soft cloth.The
cloth should be thick enough to protect your
screen.
® Continue with the instructions provided with
your VESA-compatible wall bracket.
rNote
When securing the VESA-compatible wall bracket
to your TV, use M6 bolts for 32 inch models or
M8 bolts for larger models (bolts not supplied).
6 Your TV
Downloaded From TV-Manual.com Manuals
Page 9
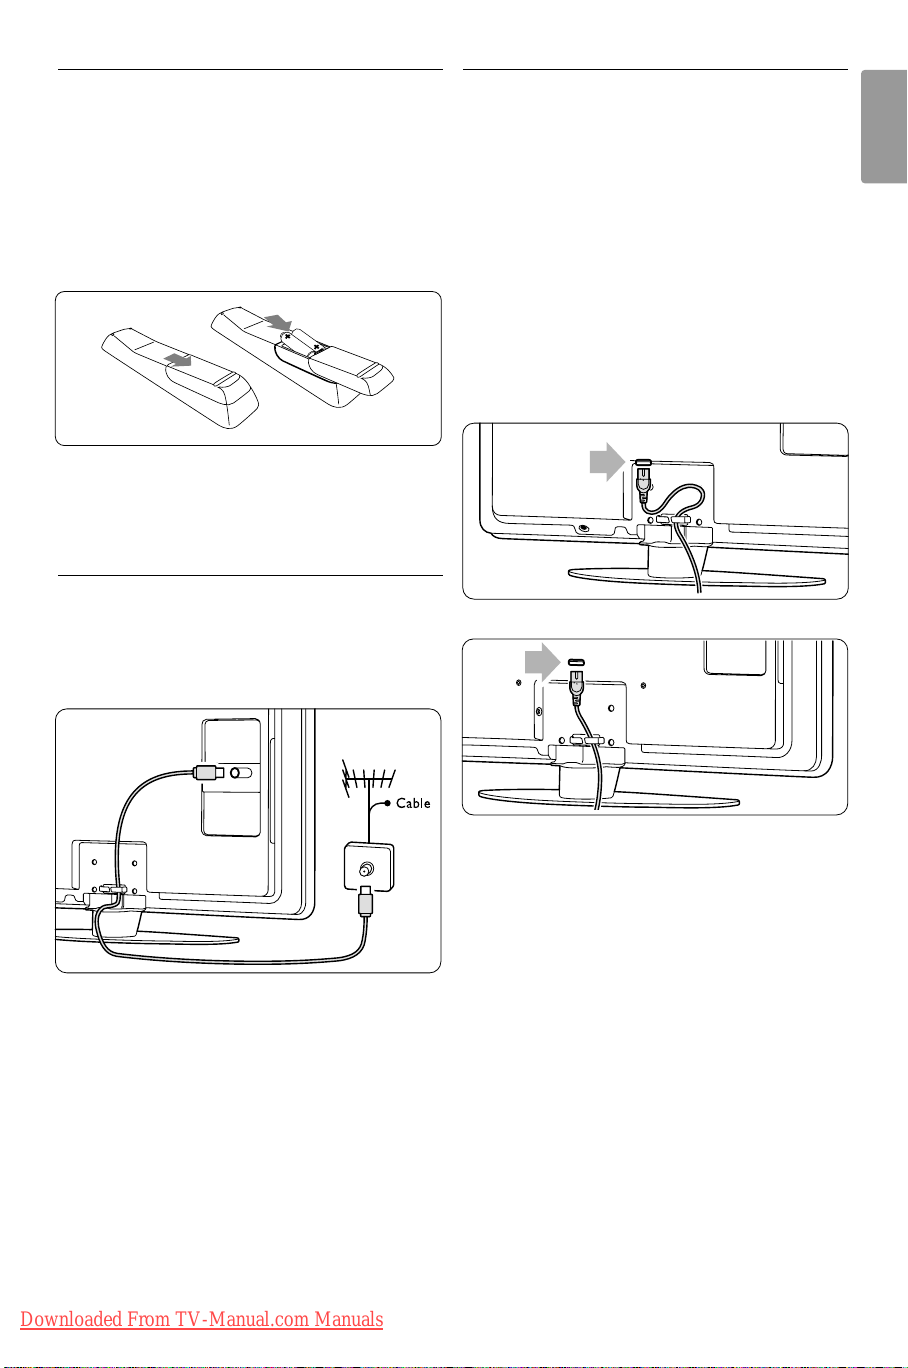
3.3 Remote control batteries
3.5 Power cable
‡ Open the battery cover on the back of the
remote control.
® Insert the 2 batteries supplied (Type AAA-
LR03-1,5V). Make sure the + and - ends of the
batteries line up correctly (inside of case is
marked.)
ÒClose the cover.
rNote
Remove the batteries if not using the remote
control for an extended period of time.
3.4 Antenna cable
‡ Locate the antenna connection at the back of
the TV.
® Insert the antenna cable tightly into the
Antenna x socket.
Keep the mains plug at the wall socket accessible at
all time.
The TV is never powered off completely and
consumes energy unless the mains cord is physically
unplugged.
Although this TV has a very low standby power
consumption, unplug the mains cord if you do not
use the TV for a long time to save energy.
‡ Verify that your mains voltage corresponds with
the voltage printed on the sticker at the back of
the TV. Do not insert the mains cord if the
voltage is different.
® Insert the mains cord tightly.
On 32”TV model.
ENGLISH
On 42” and 47” TV models.
rNote
The location of the mains connector varies
according to the TV model.
Your TV 7
Downloaded From TV-Manual.com Manuals
Page 10
4 Use your TV
POWER
PROGRAM
MENU
VOLUME
4.2 Watch TV
Learn how to operate your TV for daily use.
4.1 Turn on or off - Standby
rNote
The TV may take up to 15 seconds to turn on.
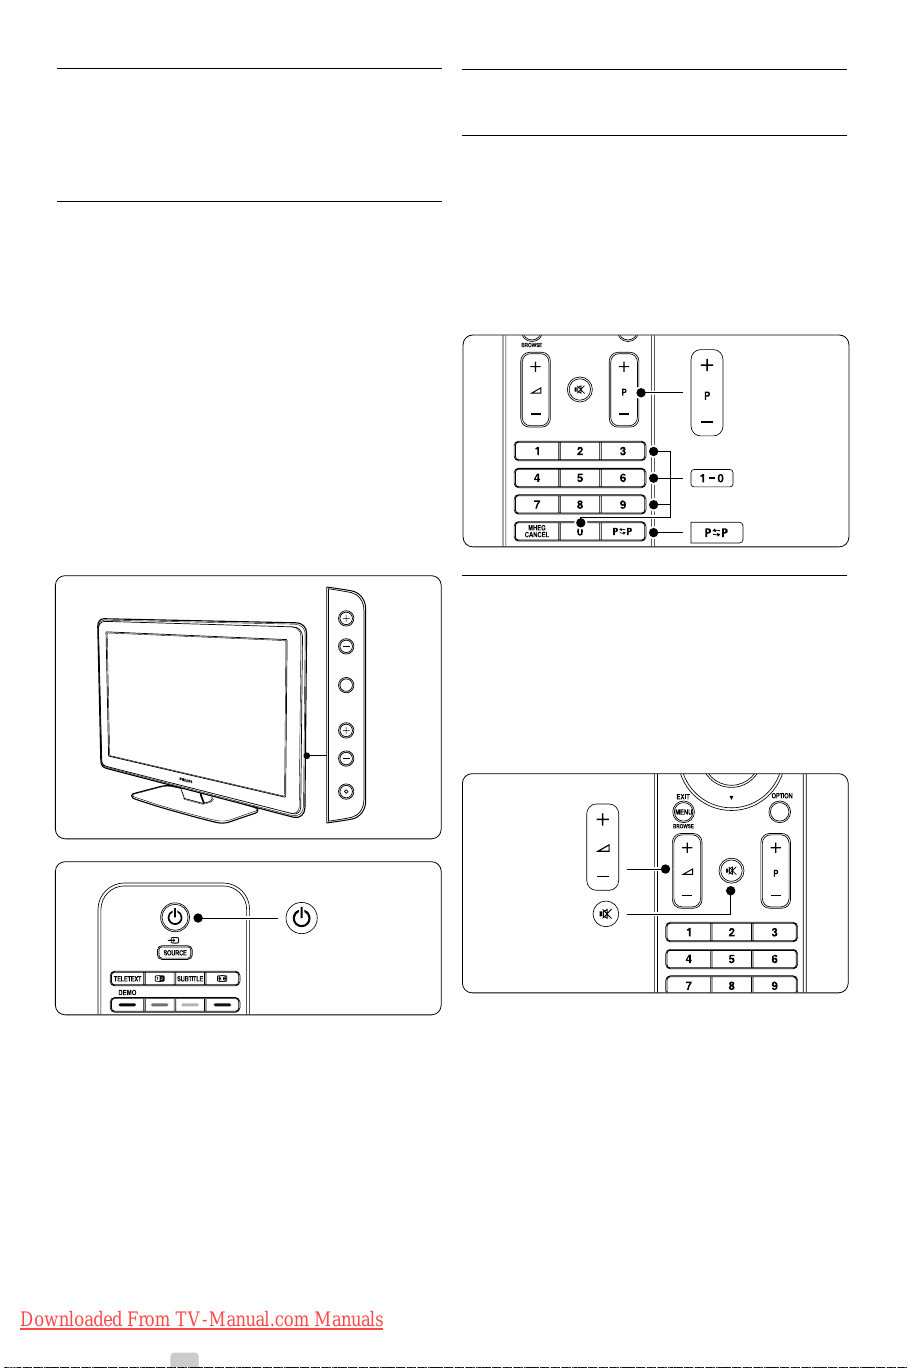
To turn on the TV:
• Press B Power at the right of the TV if the
standby indicator is off.
• Press B on the remote control if the standby
indicator is on.
To switch to standby:
• Press B on the remote control.
To turn off:
• Press B Power at the side of the TV.
4.2.1 Switch channels
‡ To switch TV channels:
• Press a number (1 to 999) or press P+ or P-
on your remote control.
• Press
Program/Channel - or + on the side
controls of the TV.
® Press R to return to the previously viewed TV
channel or connected device.
4.2.2 Adjust volume
‡ To adjust the volume:
• Press V + or - on the remote control
• Press Volume + or - on the side controls
of your TV.
® To m ute the sound:
• Press ¬.
• Press ¬ again to restore the sound.
8 Use your TV
Downloaded From TV-Manual.com Manuals
Page 11
4.3 Watch channels from a
digital receiver
‡ Switch on the digital receiver.
The picture from your receiver automatically
appears on the screen.
® Use the remote control of your digital receiver
to select TV channels.
If the picture does not appear:
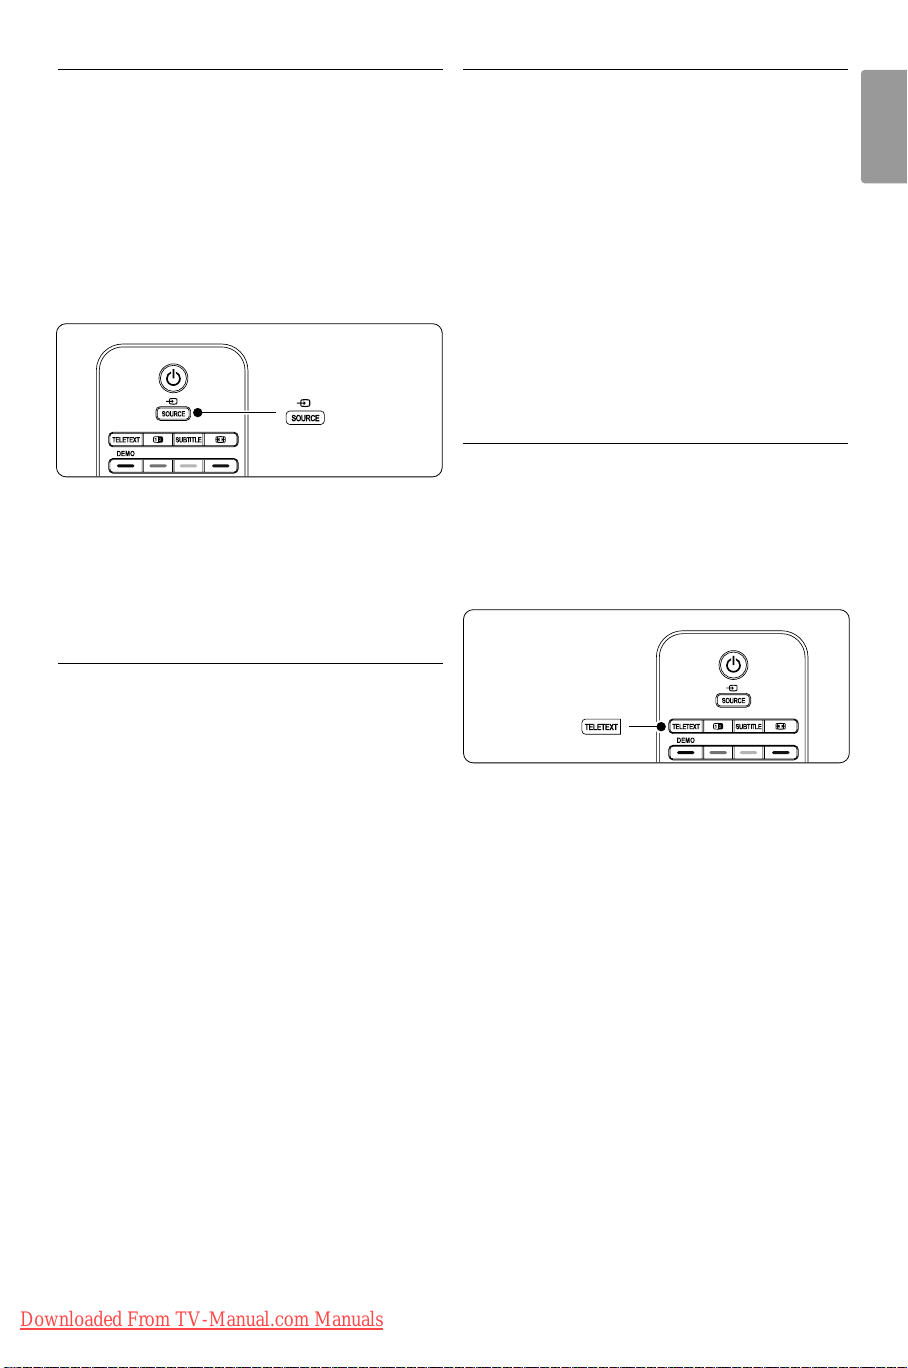
‡ Press the Source v key.
4.5 Watch a DVD
‡ Switch on your DVD player.
® Insert a DVD disc in your player.
The DVD picture automatically appears on the
screen.
ÒPress Play πon the DVD player.
If the picture does not appear:
‡ Press the Source v key.
® Press o or œ to select where you connected
your DVD player.
ÒPress
† Press Play π.
OK.
Wait a few seconds until the picture appears.
4.6 Select a Teletext page
ENGLISH
® Press o or œ to select where you connected
your digital receiver.
ÒPress
rNote
When you did not connect your devices yet, go to
section 7 Connections.
OK.
4.4 Watch connected devices
‡ Switch on the device.
The picture from your device automatically
appears on the screen.
If the picture does not appear:
® Press the Source v key.
ÒPress o or œ to select where you connected
your device.
† Press
rNote
When you did not connect your devices yet, go to
section 7 Connections.
OK.
Most TV channels broadcast information through
Teletext.
To watch Teletext:
‡ Press Teletext.
The main index page appears.
® To select a page of your choice:
• Enter the page number with the number keys.
• Press P- or P+ or o or œ or the g key to
view the next or the previous page.
•Press a colour key to select one of the colour
coded items at the bottom of the screen.
•Press R to return to the previously viewed
page.
ÒPress Teletext again to switch Teletext off.
For more information on teletext, see section 5.4
Teletext.
Use your TV
Downloaded From TV-Manual.com Manuals
9
Page 12
5 Use more of your TV
This section helps you perform advanced TV
operations including how to:
• use the menus
• adjust picture and sound settings
• make use of Teletext
• create favourite channel lists
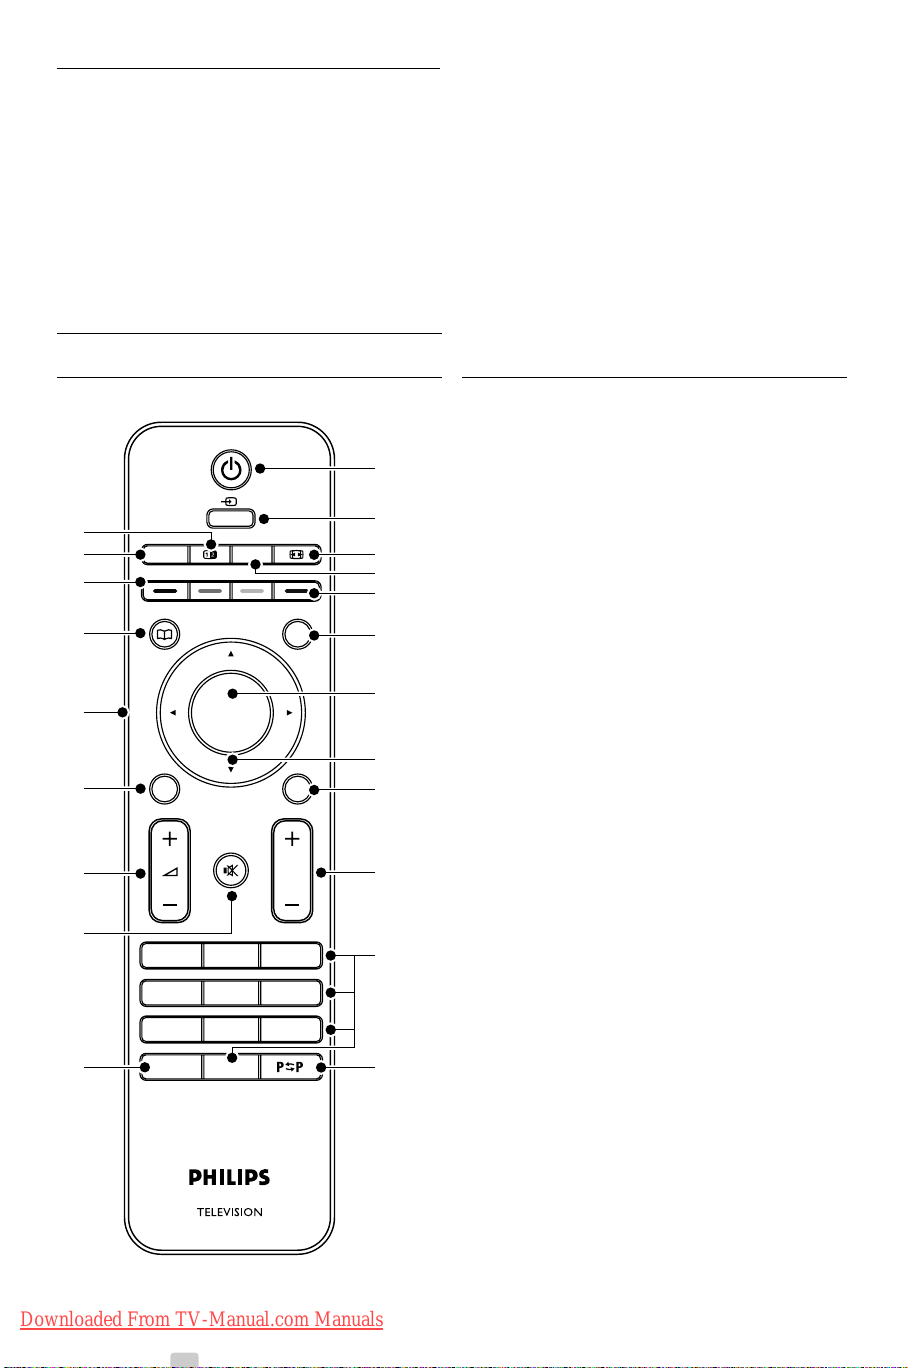
5.1 Remote control
5.1.1 Remote control overview
21
20
19
18
17
16
15
14
13
TELETEXT
DEMO
GUIDE
BACK
EXIT
MENU
BROWSE
CANCEL
SOURCE
SUBTITLE
INFO
OK
OPTION
P
123
456
7809
MHEG
1
2
3
4
5
6
7
8
9
10
11
12
• make advantage of Electronic Programme Guide
• set locks and timers
• set subtitles and select a subtitle language
• view your photos or play your favourite music
from a USB memory device.
1 Standby B
To switch the TV on or back to standby.
2 Source v
•To switch the Source menu on or off.
•To select a connected device or to return to
TV.
3 Widescreen Picture format q
To select a picture format
4 Subtitle
To activate or deactivate the subtitle mode.
5 Colour keys
• Easy selection of teletext pages.
• Easy selection of tasks.
6 Info
To show channel or programme information if
available.
7
OK
•To display the channel list.
•To activate a setting.
8 Navigation key
To navigate (o, œ, p, π) or turn left or right
to go through lists or settings.
9 Option
To switch the Quick access menu on or off.
10 +P- Channel up or down
To switch to the next or previous channel in
the channel list.
11 Number keys
To select a TV channel.
12 Previous channel R
To return to the previously viewed channel
13 MHEG Cancel
no function
14 Mute ¬
To m ute the sound or restore it.
15 Volume
V
To adjust the volume.
16 Menu
To switch the menu on or off.
10 Use more of your TV
Downloaded From TV-Manual.com Manuals
Page 13
17 Back key
on
a
u
C
t
e
g
e
To select the previous programme or the
previous TXT page.
To remove the channel list.
18 Guide a
To switch on or off the Electronic Programme
Guide.
19 Demo
To switch the Demo menu on and to get a
demonstration of the features of the TV.
20 Teletext
To switch teletext on or off.
21 Dual screen b
To show teletext on the right and the picture
on the left of the screen.
See section 10 Index to find the section in the
manual about a specific remote control key.
5.2 TV menus
With the on screen menus you install your TV,
adjust picture and sound settings and access
features.This section gives an overview of the
menus and describes how to navigate.
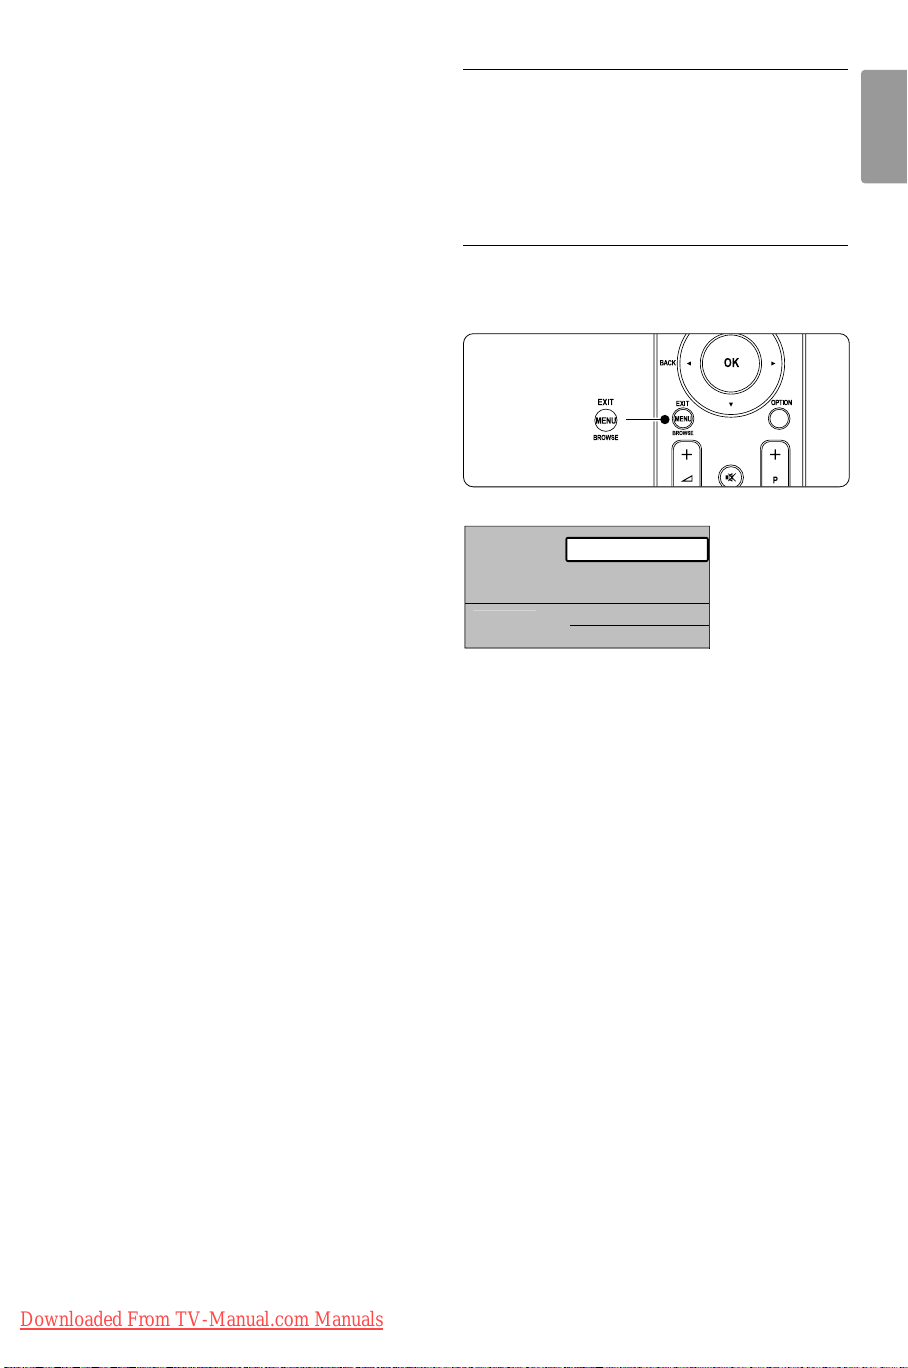
5.2.1 The menu
‡ Press Menu to show the main menu.
® Press Menu to quit the menu.
ENGLISH
Televisi
Multimedi
men
hannel lis
Programm
uid
The main menu offers the following items:
• TV menu
Select this menu for installation, picture and
sound settings and other feature settings.
• Channel list
Select this item to show the Channel list.
Create your Favourite channel lists here.
•Programme guide
Available when digital channels are installed, this
item shows information about the digital
programmes.
According to the type of Electronic Programme
Guide, you can also access the table of scheduled
Digital TV programmes and easily select and tune
to a desired programme. See section 5.6
Electronic Programme Guide.
• Multimedia
Select this item to view photos or play music
stored on a USB device. See section 5.9 View and
play photos, MP3, ...
Use more of your TV
Downloaded From TV-Manual.com Manuals
11
Page 14
u
t
e
d
es
e
on
t
w
d
e
e
C
t
C
r
ue
d
t
t
e
e
C
t
C
r
ue
t
90
52
0
C
t
e
C
t
C
r
ue
t
98
52
0
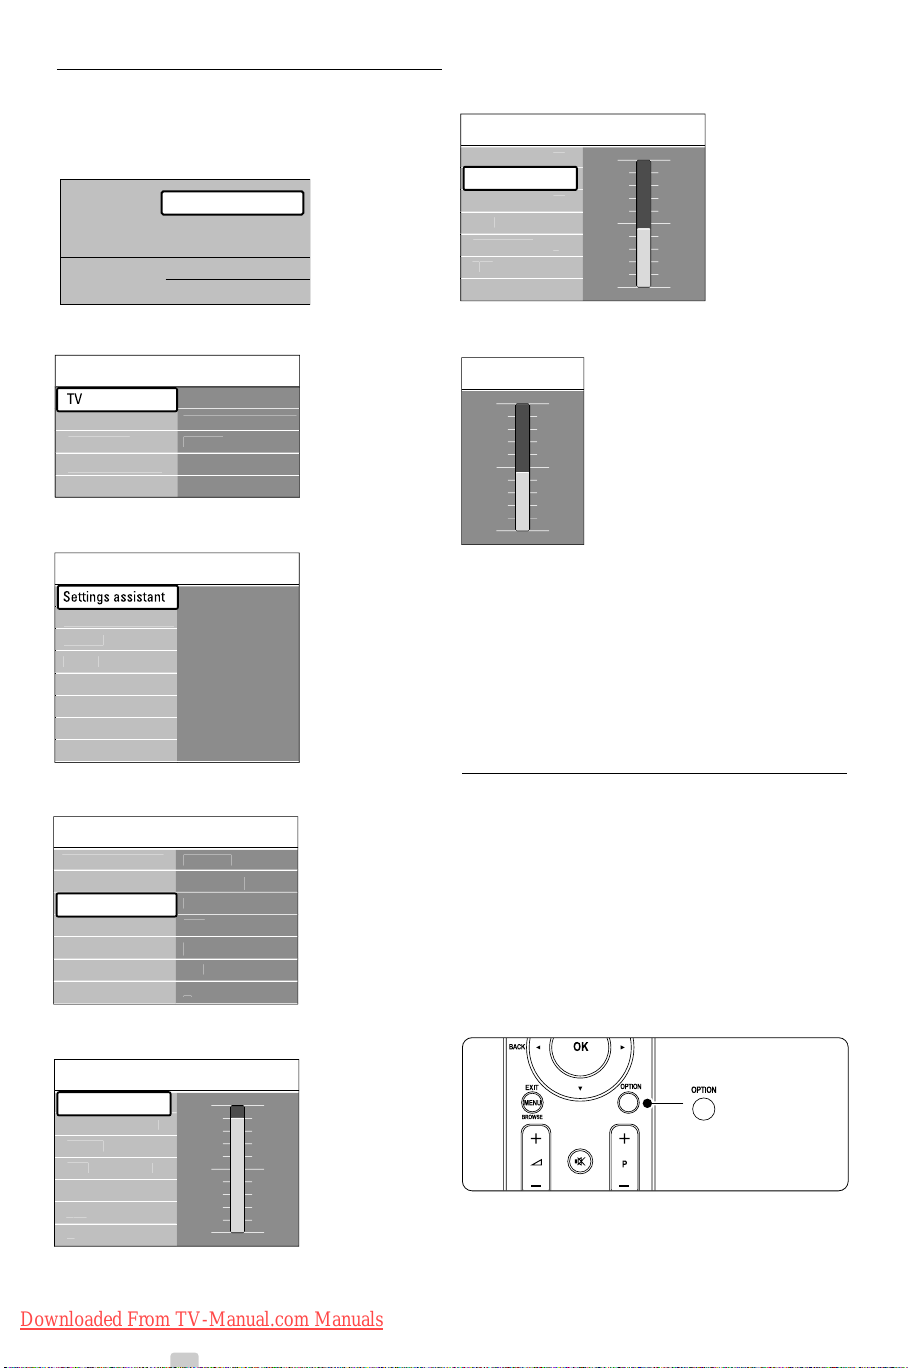
5.2.2 Use of the menu
Learn to use the menus with this example.
‡ Press Menu.
The main menu appears on the screen.
Television
Multimedia
TV menu
Channel list
Programme guide
◊Press œ to select Brightness.
Pictur
ontras
Brightness
olou
H
Sharpness
in
Brightness
® Press π to enter the TV menu.
men
settings
Featur
Installati
Software updat
TV settings
Settings assistan
Reset smart settings
Pictur
Soun
ÒPress π to enter the TV settings menu.
TV settings Settings assistan
Reset smart settings
Pictur
Soun
Start no
† Press œ to select Picture.
TV settings Pictur
Settings assistan
Reset smart settings
Pictur
Soun
ontras
Brightness
olou
H
Sharpness
in
º Press π to enter the picture settings.
‹Press π to enter the Brightness setting.
Brightness
≈Press o or œ to adjust the setting.
ÚPress p to return to the Picture settings or
press Menu to quit the menu.
rNote:
More choices come available when digital channels
are installed and broadcasted.
5..2.3 Quick access menu
The Quick access menu gives direct access to some
often needed menu items.
When digital channels are installed and broadcasted
the relevant digital options are shown in the menu.
‡ Press Option on the remote control.
® Press o or œ to select an option.
ÒPress
OK to show the selected option menu.
† Press o, œ, p, π to adjust the settings in the
menu.
º Press Option to quit the menu.
Pictur
ontras
Brightness
olou
H
Sharpness
in
ontras
• Audio language
See section 5.3.5 Adjust sound settings.
12 Use more of your TV
Downloaded From TV-Manual.com Manuals
Page 15
• Subtitle language
e
C
t
r
ue
d
us
HD Natural Motion
t
t
100Hz Clear LCD
Noise reduction
.
C
at
ol
r
t
e
access
e
ge
ge
r
at
k
See section 5.8.3 Select a digital subtitle language.
• Subtitle
See section 5.8 Subtitles.
• Picture format
See section 5.3.4 Widescreen picture format.
• Equalizer
See section 5.3.5 Sound settings.
• Clock
Display the clock
‡ Press
OK to display the clock permanently.
® Press Option and press o or œ to select
Clock again.
ÒPress
Quick
Audio langua
Subtitle langua
Subtitl
Picture form
Equalize
OK to hide the clock.
loc
5.3 Picture and Sound settings
This section describes how to adjust picture and
sound in the menus.
5.3.2 Reset smart settings
Sets the TV to one of the predefined settings. Each
setting combines picture and sound.
‡ Press Menu on the remote control and select
TV menu > TV settings > Reset smart settings
and press π to enter the list.
® Press o or œ to select a setting.
ÒPress the green key to store your selection.
† Press Menu to quit the menu.
Standard settings: Current, Standard,Vivid, Movie
5.3.3 Picture settings
This section describes how to adjust all picture
settings individually.
‡ Press Menu.
® Select Picture and press π to enter the list.
ÒPress o or œ to select a setting.
rNote:
Not all menu items are available on all models.To
verify availability, refer to the product leaflet at
www. philips.com/support.
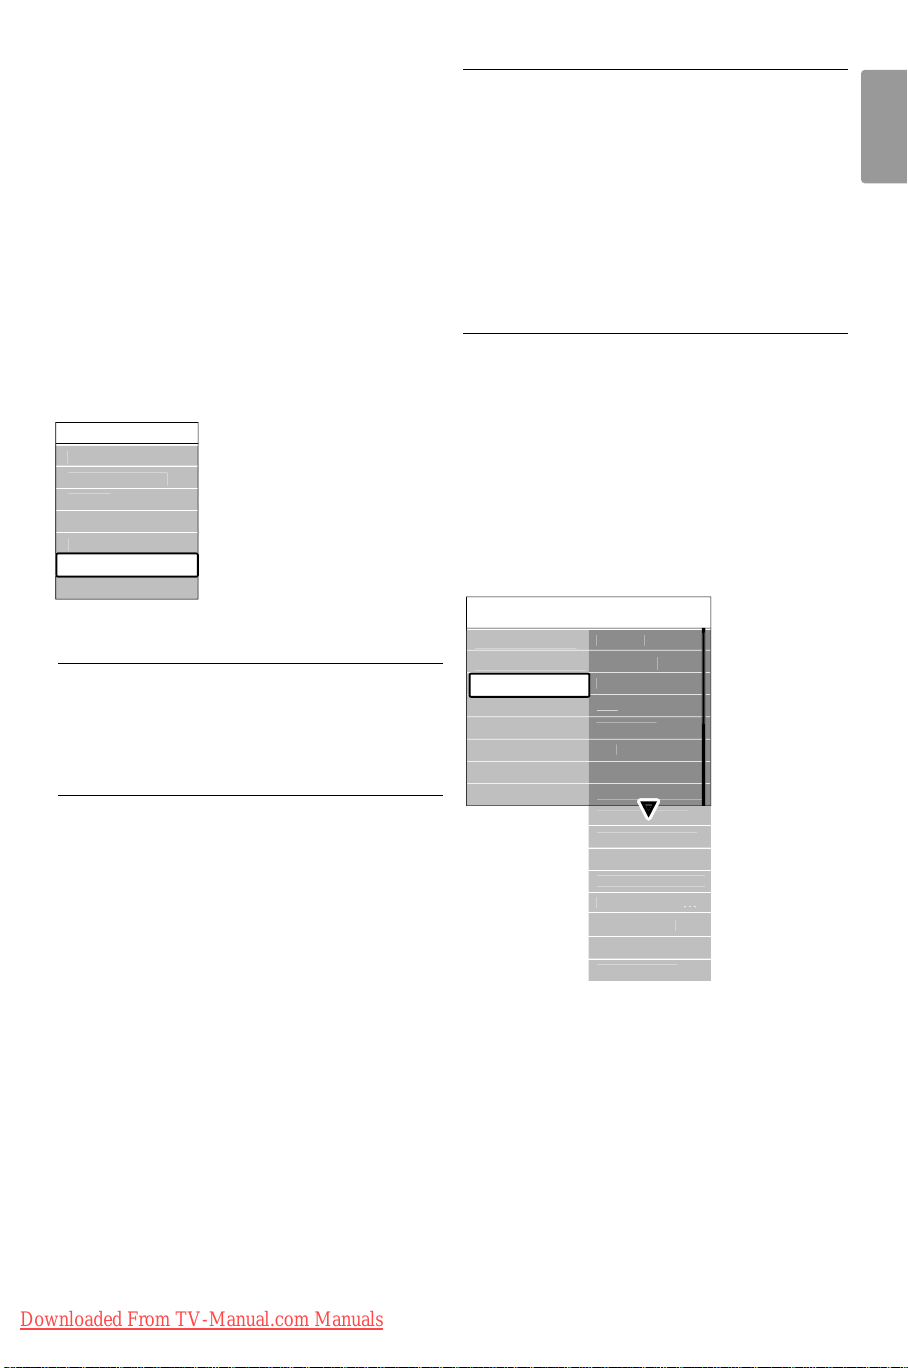
TV settings Pictur
Settings assistan
Reset smart settings
Pictur
Soun
ontras
Brightness
Colou
H
Sharpness
in
Pixel Pl
ENGLISH
5.3.1 Settings assistant
Use the Settings assistant to guide you through
Dynamic contras
basic picture and sound settings in an easy way.
‡ Press Menu on the remote control and select
TV menu > TV settings > Settings assistant and
press π to enter.
® Press
OK.
ÒPress the green key on the remote control to
MPEG artefact red
olour enhanc
Active contr
Light senso
Picture form
start the assistant.
† Press p or π to select the left or right side to
make your choice.
º Press the green key to go to the next setting.
You will go through several settings.When
finished the TV will ask you to store these
settings.
◊Press the green key to store all your settings.
‹Press Menu to quit the menu.
• Contrast
Changes the level of bright parts in the picture
but keeps the dark parts unchanged.
• Brightness
Changes the level of light of the total picture.
• Colour
Changes the level of saturation.
• Hue
If NTSC is broadcasted, this level compensates
the colour variations.
Use more of your TV 13
Downloaded From TV-Manual.com Manuals
Page 16
• Sharpness
Changes the level of sharpness of fine details.
• Tint
Sets the colours to Normal, Warm (reddish) or
Cool (bluish). Select Custom to make a setting of
your own in the Custom menu.
•Custom
Press the green key to select each bar to
change the value of:
- R-WP red whitepoint
- G-WP green whitepoint
- B-WP blue whitepoint
- R-BL red blacklevel
- G-BL green blacklevel
• Pixel Plus
Controls the advanced settings of the Pixel Plus
Engine, resulting in best sharpness, contrast,
colour and motion.
• HD Natural Motion (if present)
Removes motion judder and reproduces smooth
movement especially in movies.
• 100 Hz Clear LCD (if present)
Gives a superior motion sharpness, better black
level, high contrast with a flicker-free, quiet image
and a larger viewing angle.
• Dynamic contrast
Sets the level at which the TV automatically
enhances the details in dark, middle and light
areas of the picture.
• Noise reduction
Filters out and reduces the noise in the picture.
Set the level to Minimum, Medium, Maximum or
Off.
• MPEG artefact reduction
Smooths the digital transitions in the picture.
• Colour enhancement
Makes the colours more vivid and improves the
resolution of details in bright colours
• Active control
Corrects all incoming signals in order to provide
the best picture possible.
Switches Active control on or off.
• Light sensor
Adjusts the picture settings on the lighting
conditions of the room. Switches Light sensor on
or off.
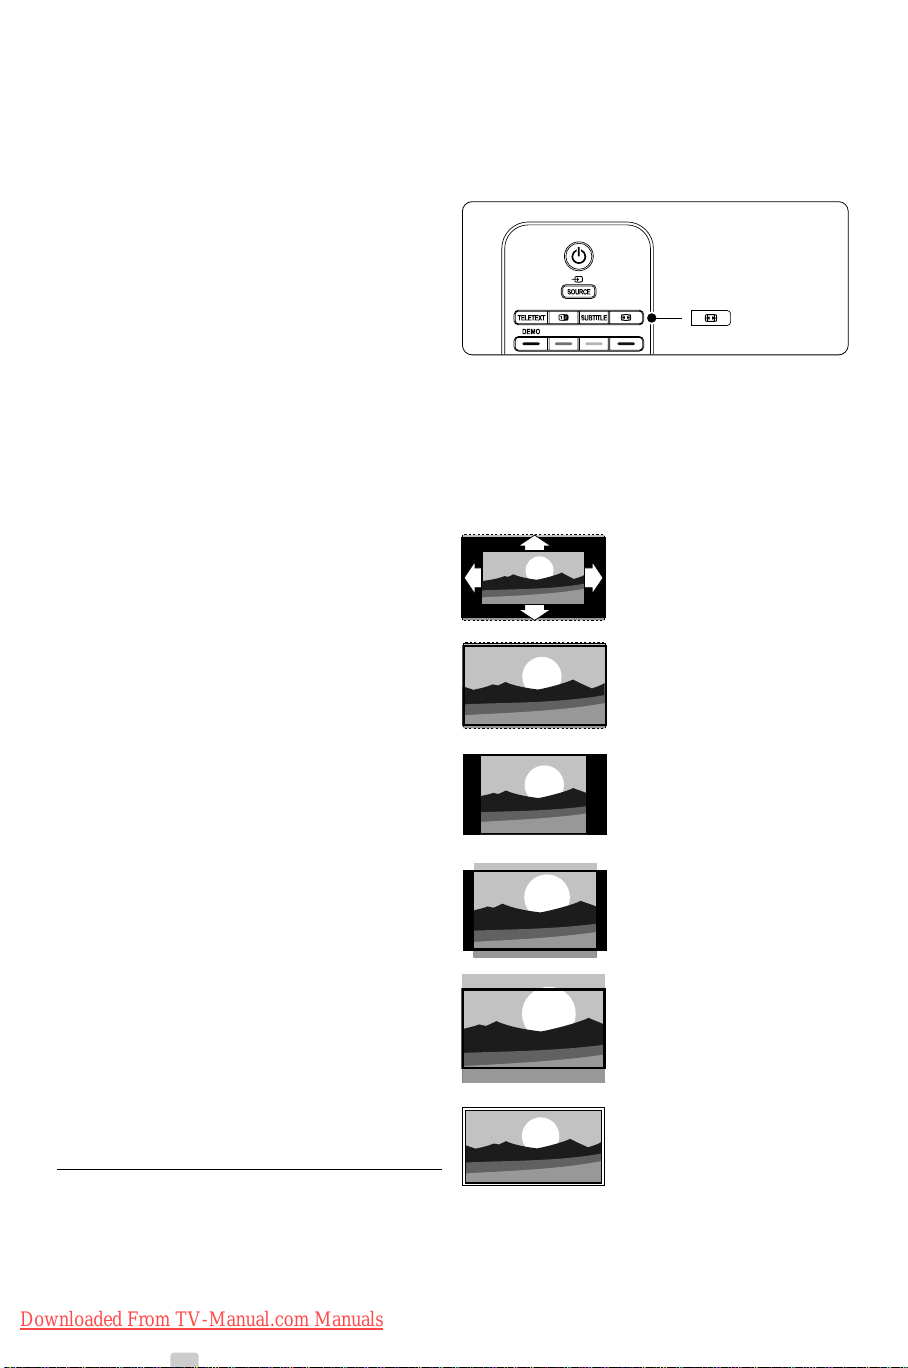
• Picture format / Auto format mode
See section 5.3.4 Widescreen picture format.
‡ Press Menu on the remote control and select
TV menu > TV settings > Picture > Picture
format and press π to enter the list.
® Press o or œ to select an available picture
format.
ÒPress o to shift the picture upwards to make
partly covered subtitles visible.
à Tip
The Auto format setting is recommended for
minimal distortion .
Auto format (Not for PC.)
Enlarges the picture
automatically to fill the
screen. Subtitles remain
visible.
Super zoom (Not for HD.)
Removes the black bars on
the side of 4:3 broadcasts.
There is a minimal distortion.
4:3 (Not for HD.)
Shows the classical 4:3
format.
Movie expand 14:9
(Not for HD.)
Scales classical 4:3 format to
14:9.
Movie expand 16:9
(Not for HD.)
Scales classical 4:3 format to
16:9.
Wide screen
Stretches 4:3 format to 16:9.
5.3.4 Widescreen picture format
Avoid black bars on the sides or on top and
bottom of the picture. Change the picture format
to a format that fills the screen.
14 Use more of your TV
Downloaded From TV-Manual.com Manuals
Page 17
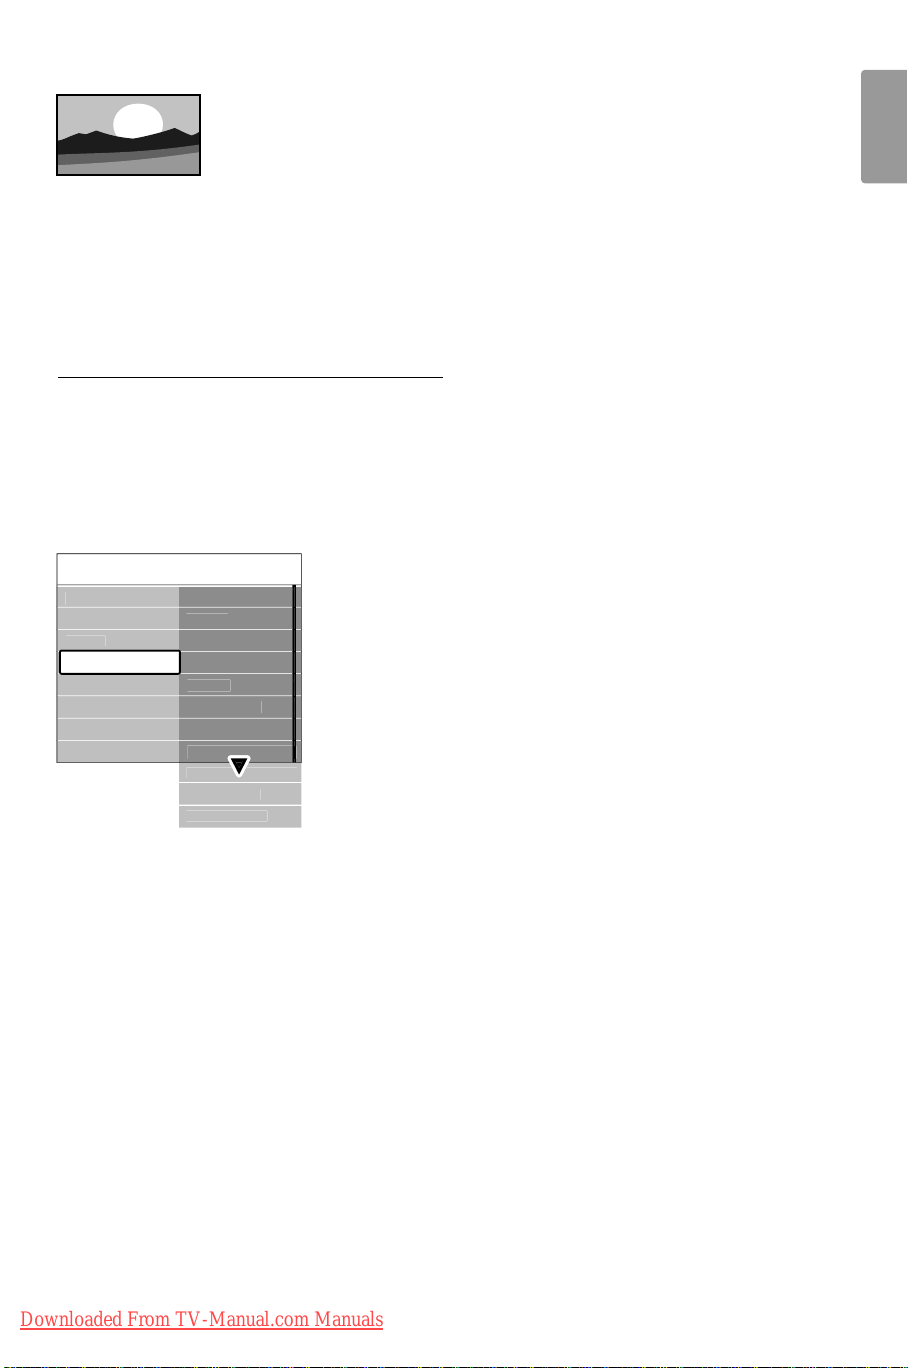
Unscaled
d
r
e
ce
ge
e
I
o
Auto volume level...
e
d
d
t
e
(Only for HD and PC.)
Maximum sharpness.
Distortion may appear on
borders. Black bars may
appear with pictures from
your PC.
rNote
Do not forget to name the connection in the
Connection menu. See section 7.4.1 Assign devices
to connectors.
5.3.5 Sound settings
This section describes how to adjust all sound
settings.
‡ Press Menu on the remote control and select
TV menu > TV settings > Sound and press π
to enter the list.
® Press o or œ to select a setting.
TV settings Soun
Settings assistan
Reset smart settings
Pictur
Soun
Equalize
Volum
Balan
Audio langua
Dual I/I
Mono/Stere
Surround mod
Delta volum
Auto surroun
• Equalizer
Changes the bass and treble of the sound. Select
each bar to change the setting. See also section
5.2.3 Quick access menu.
•Volume
Changes the volume.
When adjusting the volume with V a volume
bar appears. If you don’t want it to appear go to
TV menu > Installation > Preferences and press
π to enter the list and select Volume bar off.
‡ Press o or œ to select Volume bar.
® Press π to enter.
ÒSelect On to activate the temporarily display of
the volume bar when adjusting the volume.
• Balance
Sets the balance of the left and right
loudspeakers to fit best your listening position.
• Audio language
A list of audio languages for the current
programme may be available when digital
channels are installed and broadcasted.
See also section 5.2.3 Quick access menu.
To permanently change the audio language, see
section 6 Channel installation.
• Dual I/II
If broadcasted, you can choose between two
different languages.
• Mono/stereo
If stereo broadcasting is available, you can select
Mono or Stereo per TV channel.
• Surround mode
To select a more spatial sound if broadcasted or
if available from a connected device.
• Headphone volume
Changes the volume of the headphone.
You can mute the TV speakers with ¬ on the
remote control.
• Automatic volume leveller
Reduces sudden volume differences like at the
beginning of commercials or when switching from
one channel to another.
Select on or off.
• Delta volume
Levels out volume differences between channels
or connected devices.
‡ Switch to the channel or device you want to
level out the volume difference.
® Select Delta volume in the Sound menu and
change the volume level.
• Auto surround
Switches the TV automatically to the best
surround sound mode broadcasted.
Select on or off.
ENGLISH
Use more of your TV 15
Downloaded From TV-Manual.com Manuals
Page 18
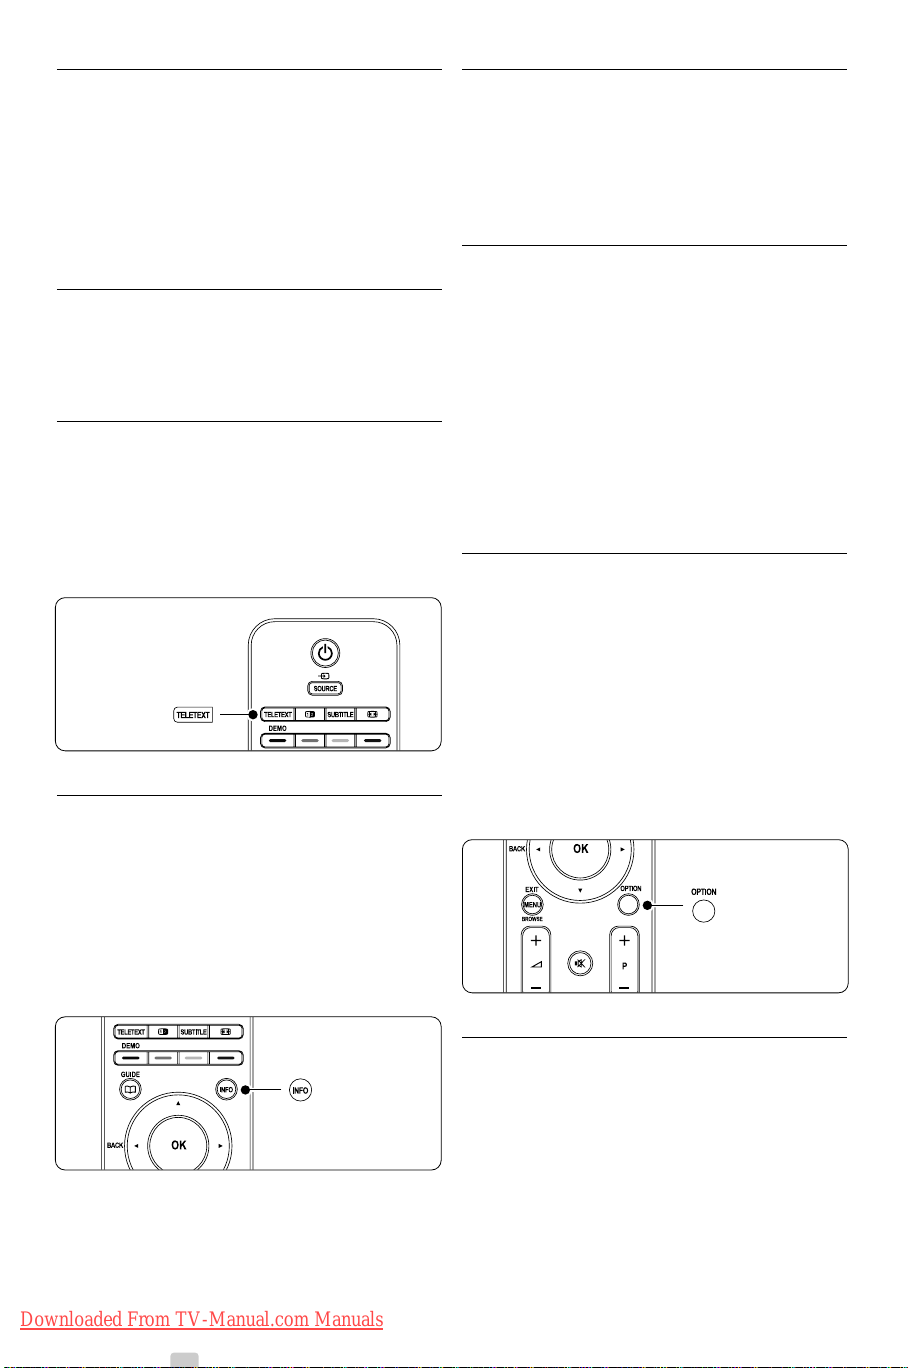
5.4 Teletext
Your TV has a 1200 pages memory that stores
broadcasted teletext pages and subpages to reduce
waiting time.
To select a teletext page see section 4.6 Select a
Teletext page.
5.4.1 Select a teletext language
Some digital TV broadcasters offer the possibility to
select your preferred teletext language. See section
6.1 Automatic installation.
5.4.2 Select pagenumber subpages
A teletext page number can hold several subpages.
The pages are shown on a bar next to the main
pagenumber.
‡ Press Teletext
® Select a teletext page.
ÒPress p or π to select a subpage.
5.4.3 Select T.O.P. teletext broadcasts
T. O.P. teletext (Table of Pages) is not broadcast by
all TV channels. You can easily jump from one
subject to another without using pagenumbers.
‡ Press Teletext.
® Press Info.
The T.O.P. overview appears.
ÒUse p or π, o or œ to select a subject.
† Press
.
OK to view the page.
5.4.4 Dual screen teletext
View the TV channel and teletext next to each
other.
‡ Press b for Dual screen teletext.
® Press Teletext again to show normal teletext.
ÒPress Teletext to switch off teletext.
5.4.5 Search teletext
Quickly jump to a subject linked to a series of
pagenumbers or search for specific words in
teletext pages.
‡ Press Teletext.
® Press
ÒPress p or π, o or œ to jump to the next
† Press
º Press o until no word or number is highlighted
5.4.6 Enlarge teletext pages
For a more comfortable reading, you can enlarge
the teletext page.
‡ Press Teletext and select a teletext page.
® Press Option to enlarge the top part of the
ÒPress Option again to view the enlarged lower
† Press o or œ to scroll through the enlarged
º Press Option again to return to the normal
OK to highlight the first word or number.
word or number on the page.
OK to search a page which holds the
highlighted word or number.
to quit Search.
page.
part of the page.
page.
page size.
5.4.7 Teletext menu
With the options in the teletext menu you can
reveal hidden info, let cycle subpages automatically
and change the character setting.
•Reveal
Hide or unhide hidden information on a page,
such as solutions to riddles or puzzles.
• Cycle subpages
If subpages are available for the selected page,
you can make subpages cycle automatically.
16 Use more of your TV
Downloaded From TV-Manual.com Manuals
Page 19
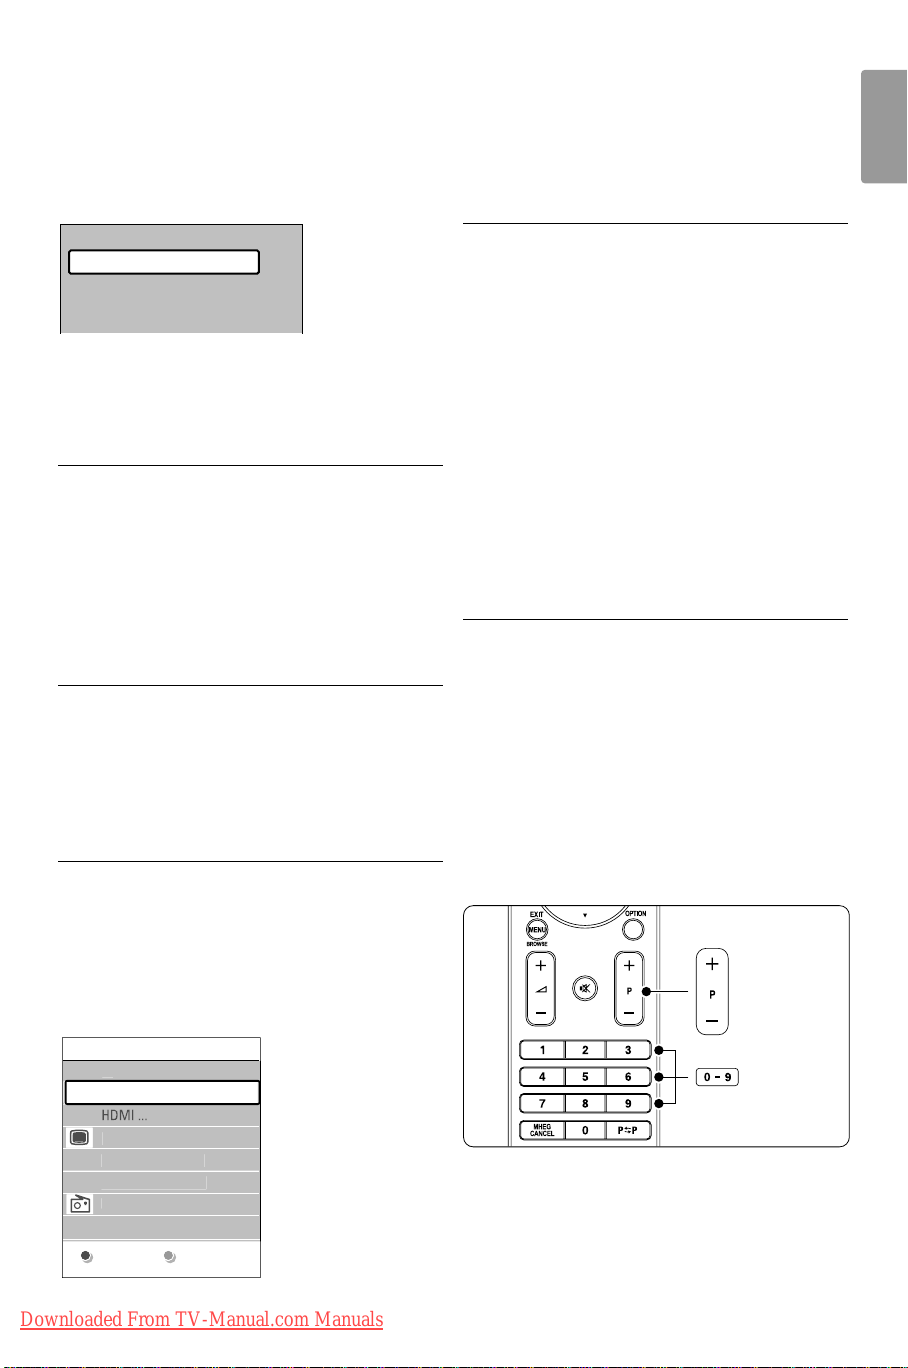
• Language
s
3
2
1
1
1
t
Teletext menu
Reveal
Language
Gr. II
Off
Cycle subpages
Off
Some languages use a different set of characters.
Switch to the other group to show the text
correctly.
‡ Press Teletext.
® Press Menu.
ÒPress o or œ to select an option.
† Press
OK to change a setting.
º Press Menu to quit the teletext menu.
◊Press Teletext to switch off teletext.
5.4.8 Teletext 2.5
If broadcasted by the TV channel this teletext offers
more colours and better graphics.
Teletext 2.5 is switched on as a factory setting.
‡ Press Menu on the remote control and select
Setup > Installation > Preferences > Teletext
2.5 and press π to enter the list.
® Select on or off.
5.5 Create favourite channel
lists
View the All channels list or set up a Favourite list
of your own with your preferred TV channels and
radio stations.
5.5.1 Select a favourite list
You can select one of the favourite channel lists.
‡ Press
OK.
The first time after you have finished the
installation, the All channels list is shown. In
other situations, it brings up the last selected
favourite list.
® Press the red key to show all favourite lists.
ÒPress o or œ to select a list.
† Press
OK.
The selected favourite list appears.
º Press
OK again to quit.
5.5.2 To set up a favourite list
Create or modify your own favourite list.
‡ Press
OK.
The last selected list appears.
® Press the red key to show all favourite lists.
ÒPress o or œ to select a list.
† Press
OK.
º Press the green key to enter the Edit mode.
The selected list brings up a full channel list.
◊Press o or œ to highlight a channel.
‹Press
OK to mark (or unmark) the highlighted
channel.The channel is added to (or removed
from) the selected list.
≈Press the green key again to leave the Edit
mode.
The modified channel list appears again.
5.5.3 Select a channel from a favourite list
‡ Press
OK.
The last selected channel list appears.
® Use o or œ to highlight a channel.
ÒPress
OK.
The TV tunes to that channel.
à Tip
• Use
-P+ to go through the TV channels of the
selected favourite list.
• With the number keys you can still select
channels which are not marked as favourite.
ENGLISH
All channel
EXT
1 Analogue channel
2 Digital channel
3 Digital channel
4 Radio channel
Downloaded From TV-Manual.com Manuals
Select lis
Use more of your TV 17
Page 20
5.6 Electronic Programme
on
y
d
h
e
.
a
on
e
.
Programme guide Tue., 12 Sep
09:55
BBC ONE
BBC TWO
five
BBC THREE
OUR
09:50 Tweenies
09:00 The Wright Stuff
05:32 This is BBC THREE
05:3
OUR
09:20
g
12:30 Commonwealth
10:15 Something Special
10:30 Trisha Goddard
12:00 This is BBC THREE
OUR
addio
Around Next
07:50 Commonwealth
ch
o
.
26 BBC1 Tue., 12 Sep 09:17
Title : Commonwealth Games
Info: 7:50 - 12:30 : 280 min
..........
t
.
t
Guide - EPG -
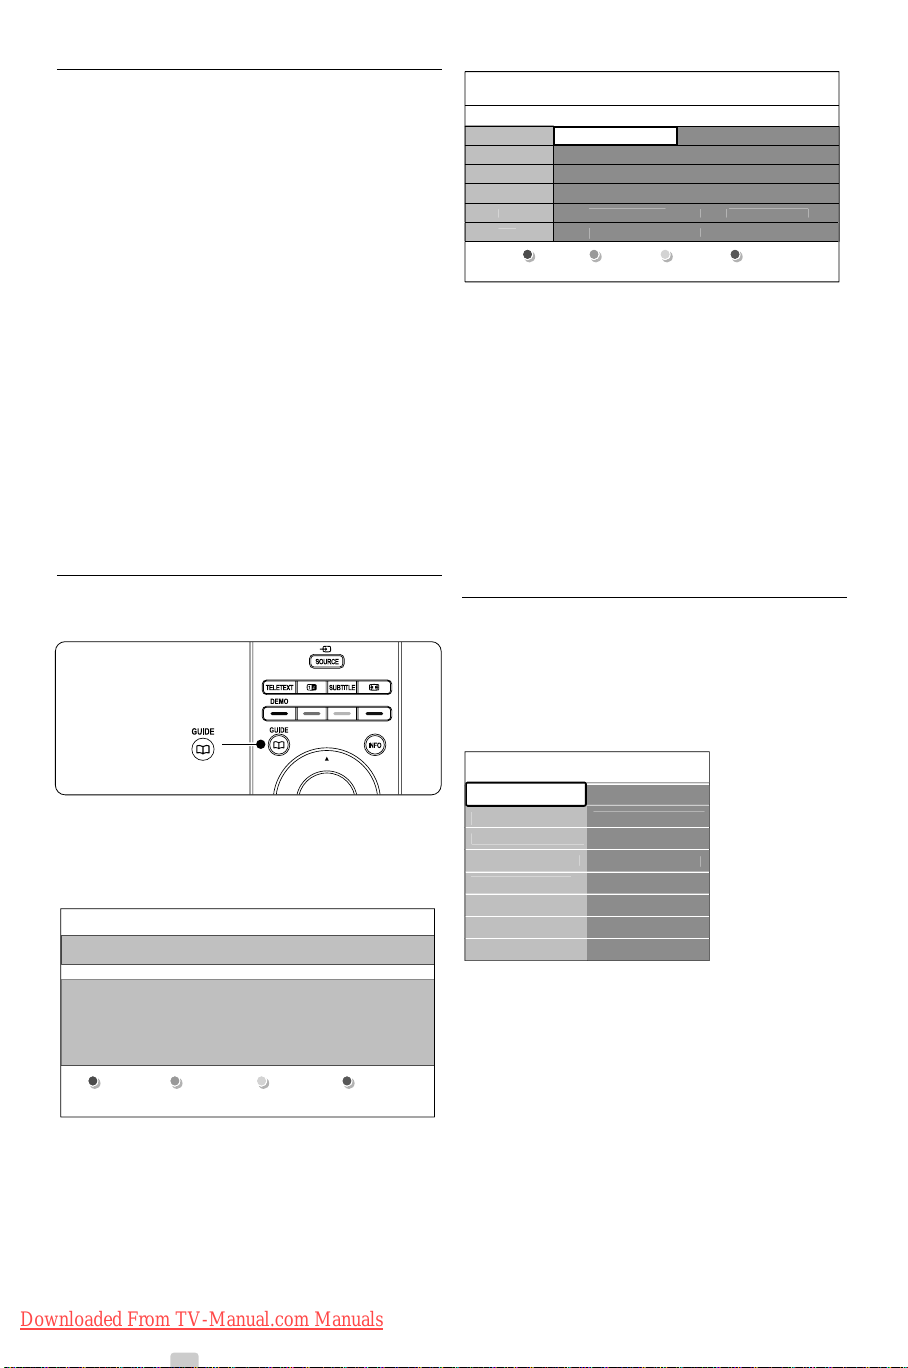
The Electronic Programme guide is an on screen
guide to scheduled digital TV programmes.
You can navigate, select and view programmes by
time, title or genre.There are two types of EPG,
‘Now and Next’ and ‘7 or 8 day’ EPG.
When digital channels are installed and
broadcasted, EPG is available. ‘Now and Next’ is
always available but the ‘7 or 8 day’ EPG is only
available in some countries.
With the EPG menu you can...
• see a list of current broadcasted programmes
• see the next programme
• group programmes by genre
• set reminders when programmes will star t
• set up preferred EPG channels
• etc.
5.6.1 Switch on EPG
‡ Press a.The following type of EPG appears:
BBC F
2 This is BBC F
Moonlightin
RemindWat
13:50 Anastasia 0010 - EEN
12:00 This is BBC F
10:15 D
Jump to ..
Inf
® Use the colour keys to activate the available
actions at the bottom of the screen.
• Next: to show information about the next
programme.
• Remind: to mark or unmark a programme as a
reminder.
• Watch: to watch or listen to a current
programme.
• Jump to...: to jump to the next or previous day.
• Info: to display information on a selected
programme (if available).
ÒPress a to quit the EPG.
5.6.2 More on ‘7 or 8 day’ EPG
Search by genre, scheduled reminders, etc. are
managed in the Programme guide menu.
‡ Press a on the remote control.
® Press Menu.
The Programme guide menu appears.
Programme guideWhat's
12:30 South Toda
11:50 Working Lunc
11:55 Melrose Plac
13:00 In aller Freun
‘Now and Next’ EPG
Detailed information about the current programme
is shown.
What's
Search by genr
Scheduled remind..
Preferred EPG ch..
Acquire EPG dat
ÒPress o or œ to select a menu option.
† Press π to enter.
º Press o or œ to make a selection.
◊Press
Exi
Press -P+ to change channel
Or
‘7 or 8 day’ EPG
It may take some time to receive the EPG data.
Downloaded From TV-Manual.com Manuals
The list of TV programmes will show.
18 Use more of your TV
Nex
‹Press a to quit the EPG.
rNote
Only channels marked as Preferred EPG channels
appear in the Programme guide menu
OK to activate or press the green key to
watch
Page 21
5.7 Timers and locks
k
k
er
k
g
ock
k
k
This section describes how to switch the TV on or
off at a specified time and to lock or unlock the TV.
5.7.1 Automatically switch to standby
Sleeptimer switches the TV to standby after a time.
‡ Press Menu on the remote control and select
Features > Sleeptimer and press π to enter
the sleeptimer bar.
® Press o or œ to set the time up to 180
minutes in steps of 5 minutes. If set to 0
minutes, the Sleeptimer is switched off.
You can always switch off your TV earlier or reset
the time during countdown.
5.7.2 Automatically switch the TV on
On timer switches the TV on automatically to a
specified channel at a specified time, from standby.
‡ Press Menu on the remote control and select
Features > On timer and press π to enter the
On timer menu.
® Use p or π, o or œ to select and enter the
menu items one by one to set a channel, a day
of the week or daily, and a starting time.
ÒPress
† Press Menu to quit the menu.
à Tip
To switch off the On timer, select Off in the On
timer menu.
5.7.3 Lock TV channels and programmes
Lock TV channels and/or programmes from
connected devices to prevent children from
watching them. Lock and unlock with a four number
code.
Set or change your code
‡ Press Menu on the remote control and select
® Enter your code with the number keys.
Did you forget your code ?
‡ Select Change code.
® Press π.
OK to confirm.
Features > Set or Change code and press π to
enter your code.
The Features menu reappears with a message
confirming that your code has been created or
changed.
ÒEnter the overriding code 8-8-8-8.
† Enter a new personal code.
º Confirm your new entered code.
The previous code is erased and the new code
is stored.
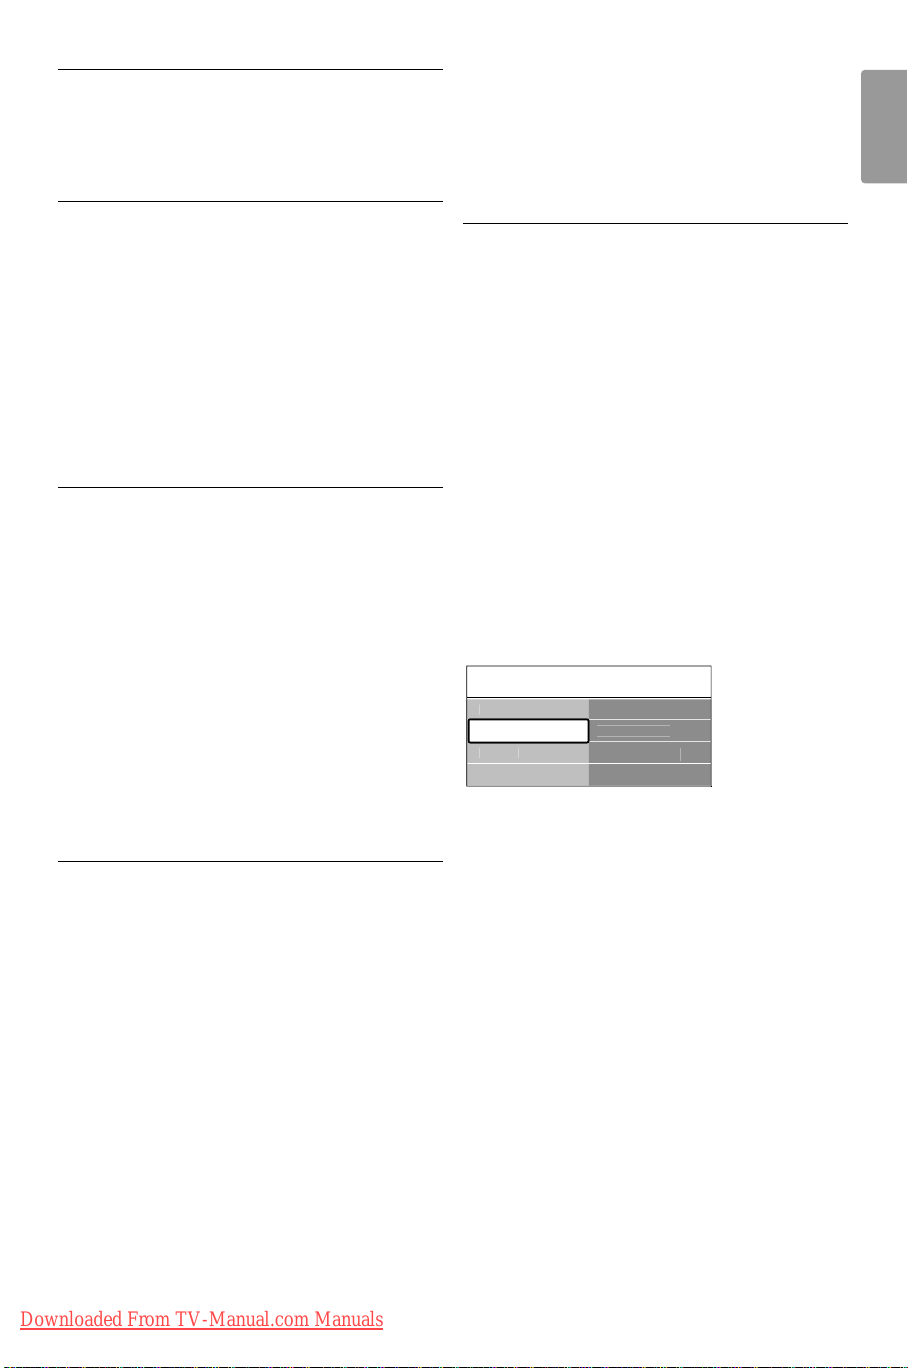
5.7.4 Activate or deactivate Child lock
Set your code and you can:
• Lock all channels and devices,
• Lock specific channels and devices,
• Set a time after which all channels and devices
are locked,
• Set the maximum allowed parental rating for
digital channels that are installed and broadcast.
‡ Press Menu.
® Select Features > Child lock and press π.
ÒEnter your code with the number keys.
† Select one of the options.
º Press π.
Lock or unlock all channels and connected devices
‡ Select Lock or Unlock.
Lock a certain programme or all channels from a
certain time
hild loc
L
ustom loc
nloc
ustom loc
Lock aft
hannel loc
Parental ratin
‡ Select Custom lock.
® Press π to enter the Custom lock menu.
ÒPress π again to enter the Lock after menu.
† Select On to switch on the Timer lock.
º Press p.
◊Select Time.
‹Press π.
≈Enter the time with o or œ and π.
ÚPress
OK.
Lock one or more channels and connected devices
‡ Select Custom lock.
® Press π to enter.
ÒPress o or œ to select Channel lock.
† Press π.
º Press o or œ to select the channel(s) you
want to lock or unlock.
◊Each time press
OK to lock or unlock the
channel.
ENGLISH
Use more of your TV 19
Downloaded From TV-Manual.com Manuals
Page 22
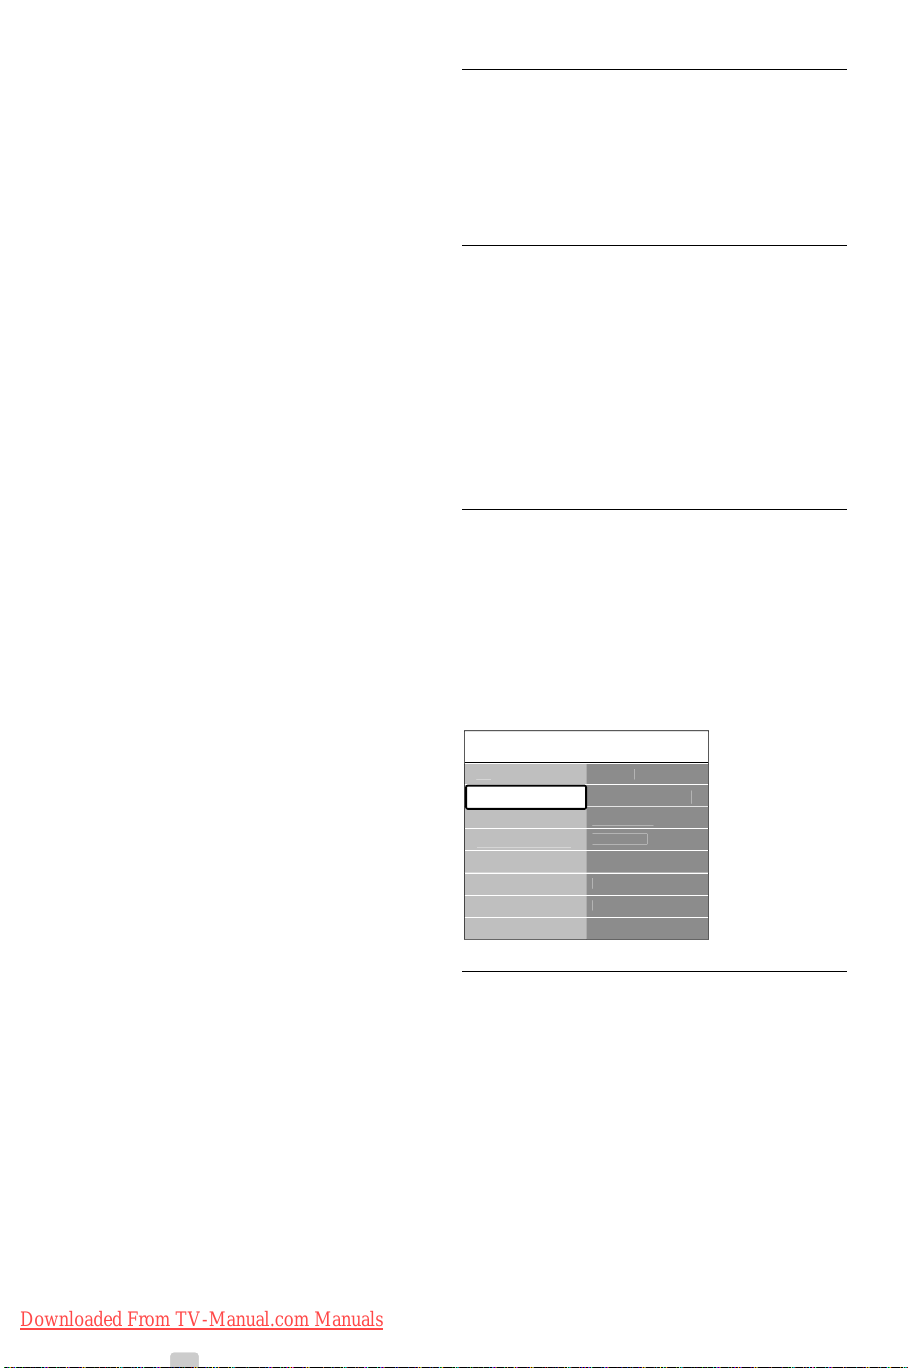
Set an age rating to a digital programme
uFeatures
e
ge
r
k
e
r
o
es
on
e
Some digital broadcasters have their programmes
rated (depending on your country).When the
rating is higher than your child’s age, the
programme will be locked.
‡ Select Custom lock.
® Press π to enter.
ÒPress o or œ to select Parental rating.
† Press π.
º Press o or œ to select an age rating.
◊Press Menu to quit the Child lock menu.
5.8 Subtitles
For each TV channel, subtitles can be set, coming
from Teletext or DVB-T (digital) broadcasts.
If digital channels are installed and broadcasted, you
can select your preferred subtitle language.
5.8.1 Subtitling from analogue TV channels
‡ Select an analogue TV channel.
® Press Teletext to switch on Teletext.
ÒEnter the three number pagenumber of the
subtitle page.
† Press Teletext to switch off Teletext.
rNote
The Teletext subtitle page of analogue channels
must be stored for each TV channel separately.
5.8.2 Activate or deactivate subtitling
‡ Press Menu on the remote control and select
Features > Subtitle and press π to enter the
list.
® Press o or œ to select On to show the
subtitles always or On during mute to show the
subtitles only when the sound is muted with the
¬ key on the remote control.
ÒPress p to return to the Features menu.
men
settings
Featur
Installati
Software updat
Subtitl
Subtitle langua
Sleeptime
hild loc
Set/Change cod
n time
Dem
5.8.3 Select a digital subtitle language
If subtitle broadcasting is available with digital
channels, you can select a preferred subtitle
language out of a list of broadcasted languages.The
preferred subtitle languages set in the Installation
menu are overruled temporarily.
‡ Press Menu on the remote control and select
Features > Subtitle language and press π to
enter the list of available languages.
® Press o or œ to select a subtitle language.
ÒPress
20 Use more of your TV
Downloaded From TV-Manual.com Manuals
OK.
Page 23
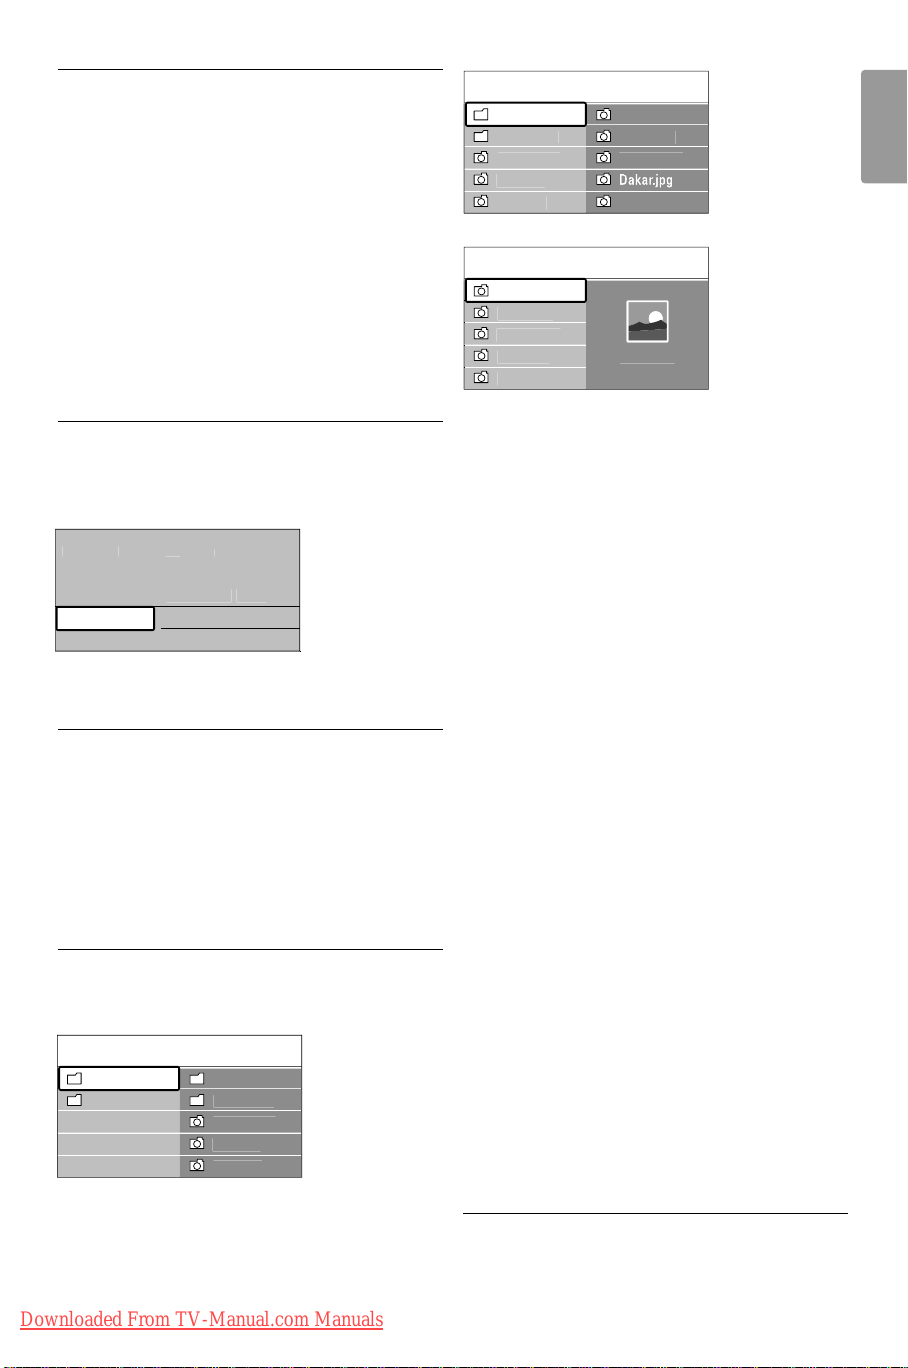
5.9 View and play: photos,
B
e
1
6
jpg
jpg
jpg
c
e
on
a
u
t
e
jpg
jpg
e
1
jpg
jpg
jpg
jpg
5
jpg
1
1
1
jpg
jpg
jpg
jpg
jpg
jpg
MP3, ...
Watch pictures or listen to music stored on a USB
device (not supplied with the TV). Watch your
pictures as a slideshow or listen to a self made
music playlist.
Pictur
Afrika_200
Paris_200
My_car.
Jean.
Mary.
Afrika_200
Kenya.
Congo.
Victoria.
Cairo.
ENGLISH
rNote
Philips can not be held responsible if your USB
device is not supported nor shall Philips accept any
liability for damage or loss of stored data. See
section 8 Technical data for the playback formats
supported.
5.9.1 Insert a USB device
Insert a device at the side of the TV while the TV is
switched on.
The main menu appears automatically and the
Televisi
Multimedi
men
hannel lis
Programmeuid
name of the USB device is highlighted next to
Multimedia.
5.9.2 Remove the USB device
ç Caution
To avoid damaging the USB device always quit the
menu on screen and wait five seconds before you
remove the USB device.
‡ Press Menu to quit the menu.
® Remove the USB device.
5.9.3 View your pictures
The Multimedia menu shows the files you have
stored on your USB device.
US
Pictur
Musi
Pictur
Afrika_200
Paris_200
My_car.
Jean.
Mary.
Afrika_200
Kenya.
Congo.
Victoria.
Dakar.
Cairo.
Afrika_200
Kenya.
album on the USB device.
† Press
OK to view the picture or to start a
slideshow of the pictures in the album.
º Press
OK to pause the slideshow. Press again to
restart.
◊Press one of the colour keys on the remote
control to perform the corresponding function
shown at the bottom of the screen.
Press the blue key to stop the show and to see
more functions.
If the function bar at the bottom disappeared,
press any colour key to let it reappear.
‹Press p and select another picture or another
album.
Slideshow settings
• Details / More details
Shows the picture name, date, size and next
picture in the slideshow.
• Transitions
Shows the list of available transition styles of the
pictures.
Press navigation key up or down to select and
press
OK to activate.
• Slide time
Sets the time lag for the picture transitions:
Short, Medium or Long.
• Rotate
To rotate a picture.
• Zoom
Show a list of available zoom magnifications to
select.
• Start/Show
To stop and restart the slideshow.
‡ Press π to enter the Multimedia menu.
Picture is highlighted.
® Press π to enter the Picture folder.
ÒPress o or œ to select a picture or a picture
Use more of your TV 21
Downloaded From TV-Manual.com Manuals
5.9.4 Thumbnails
View the pictures of a selected album in an
overview.
Page 24
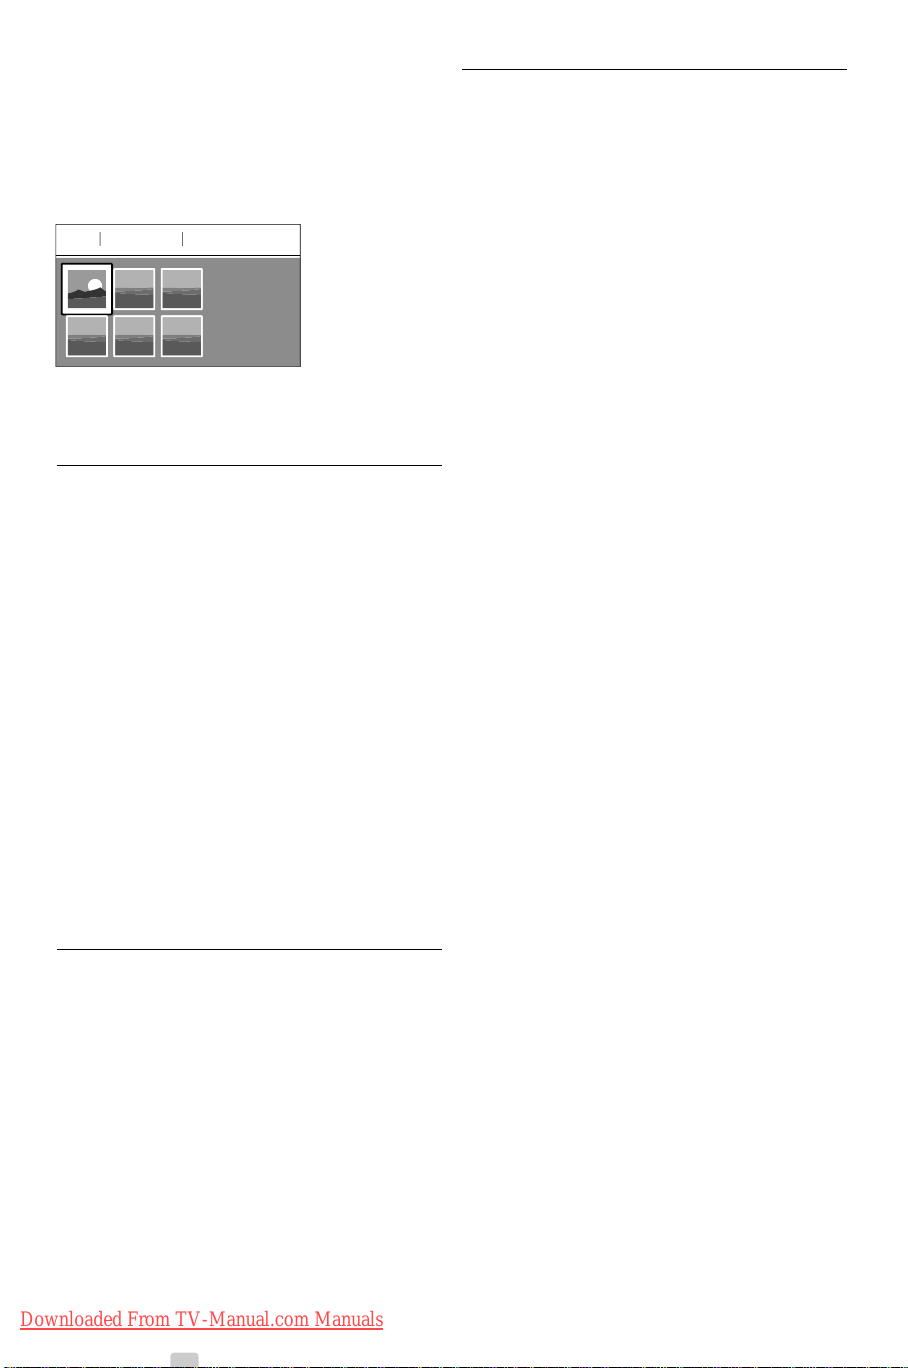
‡ Select a picture album.
jpg
jpg
® Press π to enter the picture list.
ÒPress the green key.
† Press o, œ, p , π to highlight a picture.
º Press
OK to view the picture.
◊Press p to return to the thumbnail overview.
USBAfrika_2001Kenya.
Kenya.
‹Press the green key again to go back to the
picture list.
Listen to music
Find your songs in the Music album of the
Multimedia menu.
‡ Highlight Music in the Multimedia menu.
® Press π to enter the Music folder.
ÒPress o or œ to select a song or a music
album.
† Press
OK to play the selected song or to play a
song followed by the next song in the same
album.
5.10 Listen to digital radio
channels
If digital broadcasting is available, digital radio
channels are installed during installation.
To listen to a digital radio channel:
‡ Press
® Use the number keys to select a radio channel
ÒPress
OK on the remote control.
The All channels menu is displayed.
available from channel number 400 onwards.
To reorder see section 6.3.3 Reorder the
channels.
OK.
Music settings
• Details
Shows the file name.
• Repeat one/all
Repeat all songs in the album until you stop a
song or only repeat the one song selected until
you stop the song.
• Shuffle
Play songs in a random sequence.
Slideshow with background music
Watch a slideshow of your stored pictures
accompanied with your stored background music.
‡ Select an album of songs first and press
OK.
® Highlight the Picture folder and select an album
of pictures and press
OK.
22 Use more of your TV
Downloaded From TV-Manual.com Manuals
Page 25
5.11 Software update
u
e
.
t
t
es
on
e
BSU
BSU
Philips continuously tries to improve its products. It
may be recommended for you to update the TV’s
software.To update your TV software you need a
USB Memory device (not supplied).
rNote
The device must have at least 48Mb free space.
Make sure the write protection is turned off.
Some USB devices do not work with our TV.
Contact your dealer.
5.11.2 Software download from the PC
to the USB device
‡ Insert the USB memory device into a PC linked
to the internet.
® Locate and open the file “update.htm” on your
USB device.
ÒRead the instructions on screen and click on
the Send
ID button.
The software update is downloaded on the
USB memory device.
† Remove the USB memory device from your
PC.
ENGLISH
5.11.1 Update assistant
The Update assistant helps you to update the TV’s
software.
TV identification
The TV will identify itself to your USB memory
device.
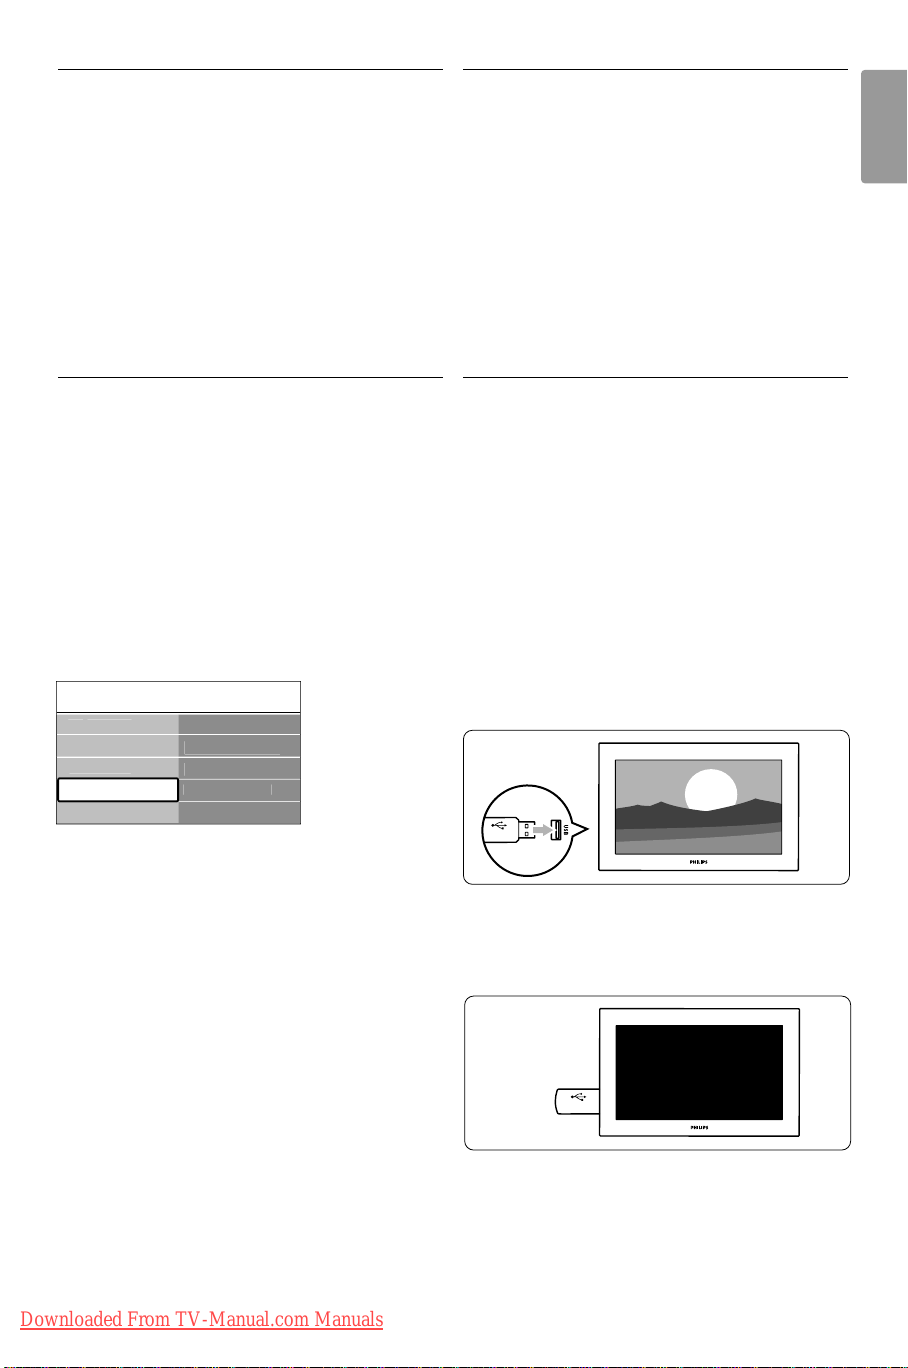
‡ Switch the TV on.
® Press Menu.
ÒPress π.
† Press o or œ to select Software update.
º Press π.
◊Press o or œ to select Update assistant.
men
settings
Featur
Installati
Software updat
Software updat
urrent software..
Update assistan
Local updates
Announcemen
‹Press π.
≈Press
OK to activate.
Ú Insert a USB memory device to the USB
connector at the side of the TV.
The main menu appears.
œ Press the green key to proceed.
A message appears the TV has successfully
written the identification file to the USB
memory device.
πPress the green key again to finish.
Y Remove the USB memory device from the TV.
5.11.3 Transfer of the downloaded
software update to the TV
The downloaded software on the USB memory
device must now be uploaded to your TV.
ç Caution
• Do not remove the USB memory device during
the software update.
• If a power drop occurs during the update, do not
remove the USB memory device from the TV.
The TV will continue the update as soon as the
power comes back.
‡ Insert the USB memory device to the USB
connector at the side of the TV.
® The TV switches off. The screen stays black for
about 10 seconds. Wait and do not use the
power switch B on the TV.
Use more of your TV 23
Downloaded From TV-Manual.com Manuals
Page 26
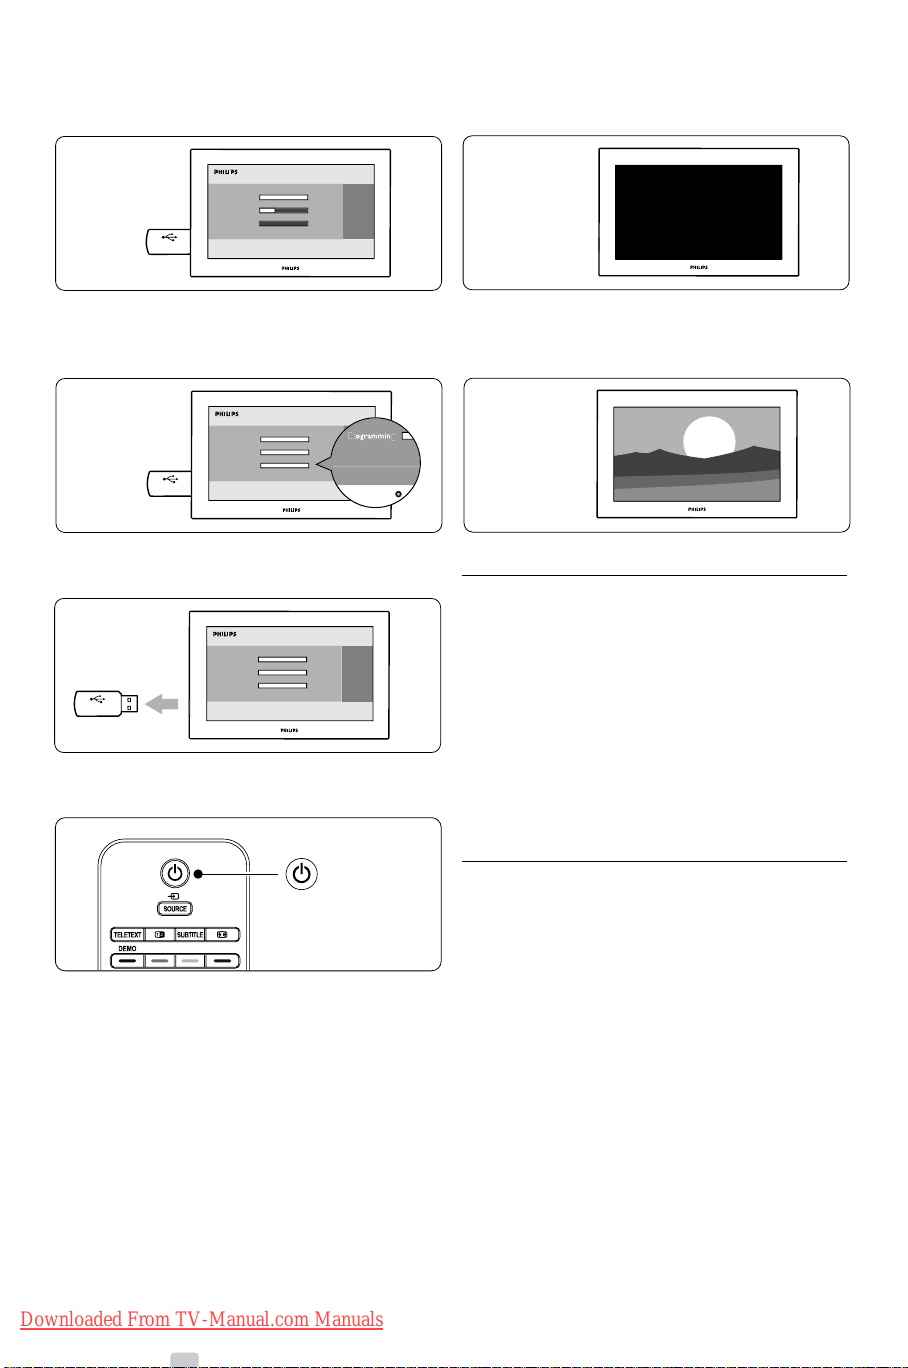
Ò The update process starts automatically. Please
S
Operation Successful! Re
g
S
BSU
wait.
◊The TV switches off.The screen stays black for
about 10 seconds. Please, wait.
The update is finished when the message
‘Operation successful’ appears on the screen.
† Remove the USB memory device from the TV.
º Press B on the remote control.
rNote
Do not press more than once and do not use the
Power B switch on the TV.
‹The TV switches back on again.The update is
done.
5.11.4 Verify the current software version
Updating software is only possible if the version of
the new available software is different from the
current one.You can verify your current software
version.
‡ Select Software update in the TV menu.
® Press π.
ÒPress o or œ to select Current software info.
The version and the description of the current
software appears.
5.11.5 Software update by digital broadcast
(DVB-T)
Your TV might receive new software from the
digital broadcast system automatically.
If you receive an update message on screen it is
strongly advised to update the software
immediately - select Now.
Select Later, if you want to be reminded later on.
Select Cancel to quit the update (not
recommended). If you cancelled the update you can
still update yourself from the TV menu > Software
update > Local update.
24 Use more of your TV
Downloaded From TV-Manual.com Manuals
Page 27
6 Channel installation
on
ge
audio
sub
es
d
e
.
ces
on
e
.
a
ueensland
a
a
a
y
e
.
ces
The first time you switched on your TV you’ve
selected the language of the TV menus and allthe
available channels have been installed.
This chapter will help you if you find it necessary to
re-do the initial installation or if you want to tune in
a new analogue TV channel.
rNotes:
-You do not have to follow every step described if
it is not necessary.
- Re-installation will modify the All channels list and
new added channels will not be added to any
favourite list.
6.1 Automatic installation
This section describes how to search for and store
all available channels automatically.
Step 1 Menu language
Sets the language of the TV menus.
Go to a next step if your language settings are
correct.
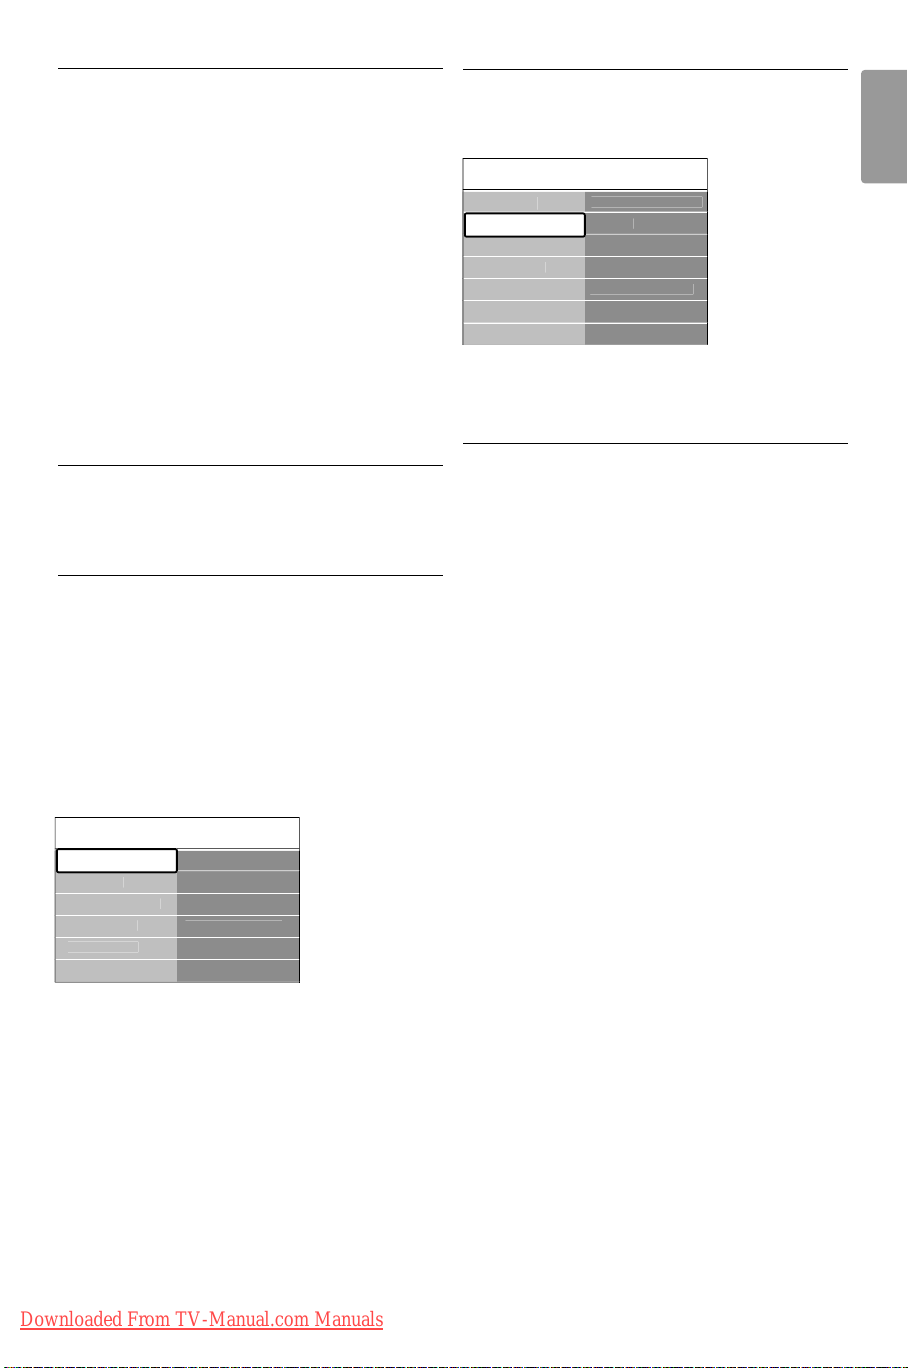
‡ Press Menu on the remote control and select
TV menu > Installation > Languages and press
π to enter Menu language.
® Press o or œ to select your language.
ÒPress
† Press p to return to the Installation menu.
Installati
Languages
Time zon
Preferen
Factory settings
OK to confirm.
hannel install..
onnections
Languages
Menu langua
Preferred
Preferred
Hearing impaire
titl
Step 2 Time zone selection
‡ Press œ to select Time zone.
® Press π to enter the list.
Installati
Languages
Time zon
hannel install..
Preferen
onnections
Factory settings
Time zon
New South Wales..
Victori
Q
South Australi
Western Australi
Tasmani
Northern Territor
ÒPress o or œ to select your time zone.
† Press p to return to the Installation menu.
Step 3 Install TV and radio channels
Your TV will search for and store all available digital
and non-digital TV channels and all available digital
radio channels.
‡ Press œ to select Channel installation.
® Press π to enter the Channel installation menu.
Automatic installation is highlighted.
ÒPress π to select Start now.
† Press
OK.
º Press the green key to start.
The installation may take a few minutes.
◊When the channel search is completed, press
the red key to return to the Installation menu.
‹Press Menu to quit the TV menu.
à Tip
When digital TV channels are found, the list of
installed channels may show some empty channel
numbers.
If you want to rename, reorder or uninstall stored
channels, see section 6.3 Rearrange channels.
ENGLISH
The Languages menu also offers the following
language settings when digital channels are installed
and broadcasted.
• Preferred audio
Select one of the available audio languages as
preferred language.
• Preferred subtitles
Select one of the available subtitle languages as
preferred language. See section 5.8 Subtitles.
• Hearing impaired
Select On to display the hearing impaired subtitle
version of your preferred audio or subtitle
language when available.
Channel installation
Downloaded From TV-Manual.com Manuals
25
Page 28
6.2 Analogue: Manual installation
.
m
h
e
.
.
e
.
ge
You can tune-in analogue TV channels channel by
channel manually with Manual installation.
6.2.1 Select the system
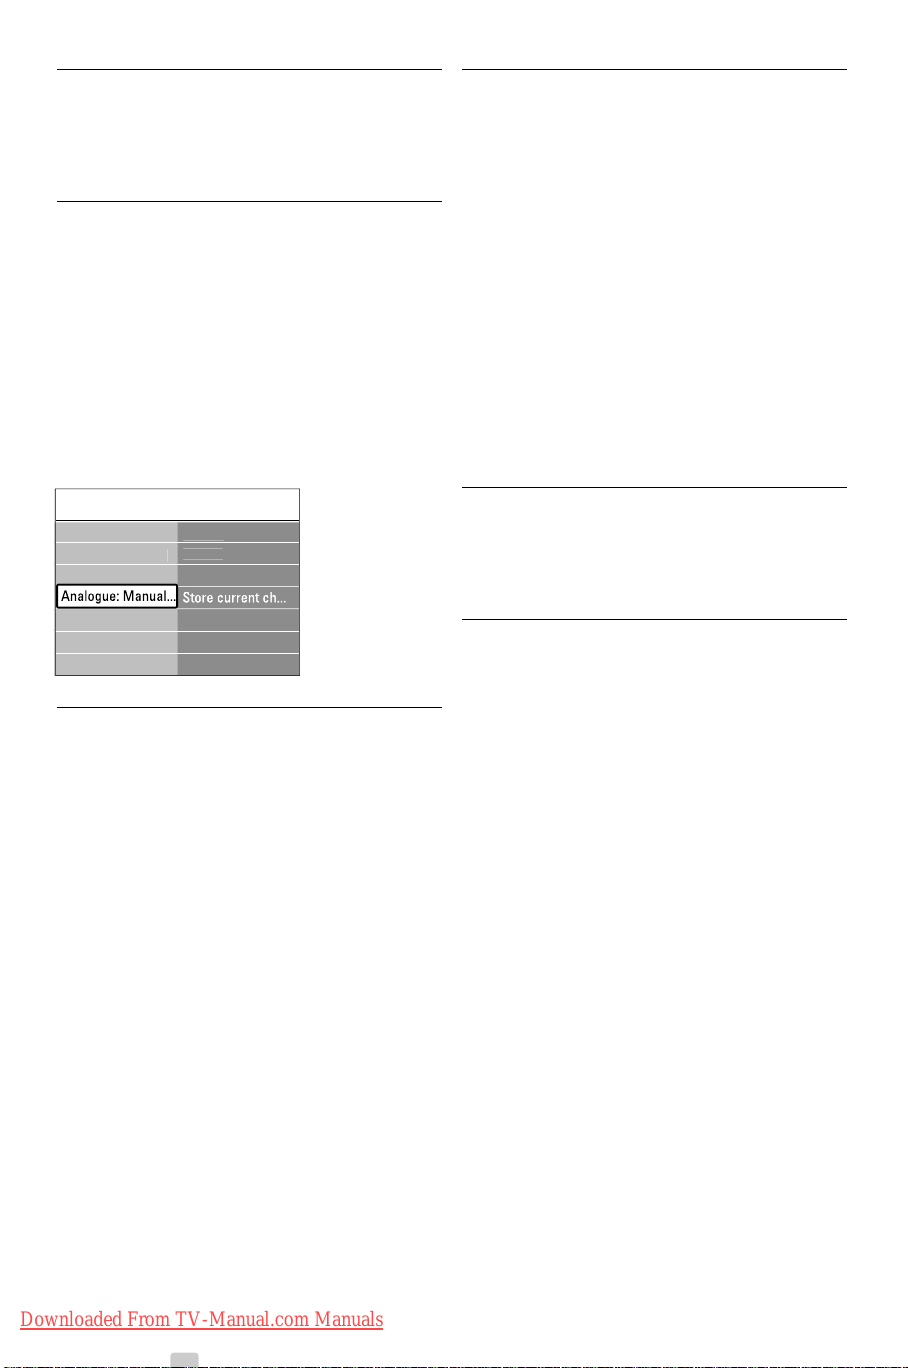
‡ Press Menu on the remote control and select
TV menu > Installation > Channel installation >
Analogue: Manual installation.
® Press π to enter the Manual installation menu.
System is highlighted.
ÒPress π to enter the System list.
† Press o or œ to select your TV system: PAL
BG 5.5 MHz, PAL I 6.0 MHz, PAL DK 6.5 MHz
or NTSC M 4.5 MHz.
º Press p to return to the Manual installation
menu.
6.2.3 Fine tune a channel
Fine tune a found channel when the reception is
poor.
‡ Press Menu on the remote control and select
TV menu > Installation > Channel installation >
Analogue: manual installation > Fine tune.
® Press π to enter the Fine tune menu.
ÒPress o or œ to adjust the frequency
† Press p when you finished fine tuning.
º Select Store current channel to store the fine
tuned channel under the current channel
number.
◊Press π to enter.
‹Press
OK.
Done appears.
≈Press Menu to quit the Channel installation
menu.
hannel install...Analogue: Manual..
Automatic install..
Installation updat
Digital: Test recept..
Rearran
Syste
Searc
Fine tun
Store as new ch..
6.2.2 Search for and store a new channel
‡ Press Menu on the remote control and select
TV menu > Installation > Channel installation >
Analogue: manual installation > Search.
® Press π to enter the Search menu.
ÒPress the red key to enter the frequency
yourself or press the green key to search for a
next channel.
à Tip
If you know the frequency, enter the three numbers
of the frequency with the number keys of the
remote control.
† Press p when the new channel has been
found.
º Select Store as new channel to store the new
channel under a new channel number.
◊Press π to enter.
‹Press
OK.
Done appears.
≈Press Menu to quit the channel installation
menu.
6.3 Rearrange stored channels
To rename, reorder, uninstall or reinstall stored
channels.
6.3.1 Rename a channel
Assign or change a channel name to a channel for
which a name has not yet been entered.
‡ Press Menu on the remote conrol and select TV
menu > Installation > Channel installation >
Rearrange.
® Press π to enter the channel list.
ÒPress o or œ in the channel list to select the
channel you want to rename.
† Press the red key.
º Press navigation key p or π to select a
character or o or œ to change the characters.
Space, numbers and other special characters
are located between z and A.
◊Press the green key or
à Tip
With the yellow key all characters can be deleted.
With the blue key you can delete the character
which is highlighted.
OK to finish.
26 Channel installation
Downloaded From TV-Manual.com Manuals
Page 29

6.3.2 Uninstall or reinstall a channel
To uninstall a stored channel so that it is no longer
possible to tune to.
Reinstall an earlier uninstalled channel.
‡ Press Menu on the remote conrol and select TV
menu > Installation > Channel installation >
Rearrange.
® Press π to enter the channel list.
ÒPress o or π in the channel list to select the
channel you want to uninstall or reinstall.
† Press the green key to uninstall or reinstall the
channel.
º Press Menu to quit the menu.
6.3.3 Reorder the channels
Change the order of the stored channels.
‡ Press Menu on the remote conrol and select TV
menu > Installation > Channel installation >
Rearrange.
® Press π to enter the channel list.
ÒPress o or œ in the channel list to select the
channel you want to reorder.
† Press the yellow key to move up the highlighted
channel in your channel list.
º Press the blue key to move down the
highlighted channel in your channel list.
◊Press Menu to quit the menu.
6.5 Digital reception test
If you receive Digital TV broadcasting you can check
the quality and signal strength of a specific channel.
‡ Select a channel.
® Press Menu on the remote control and select
TV menu > Installation > Channel installation >
Digital:Test reception.
ÒPress π to enter
† Press
º Press the green key to start or directly enter
◊Press the yellow key to store the frequency if
‹Press the red key to return to the Channel
≈Press Menu to quit the menu.
à Tip
To achieve the best results, contact a specialised
antenna installer.
OK.
The channel frequency, the network name, the
signal quality and strength appear.
the frequency of the channel you want to test.
If the signal quality and strength are poor,
reposition the antenna.
the signal quality and strength are good.
installation menu.
6.6 Factory settings
ENGLISH
6.4 Automatic
channel management
Once a day, at 5 AM, all available TV channels are
updated automatically.The update is done if your
TV is in standby.
Earlier stored channels not found by the update will
be removed from the channel list.
You can do this update yourself anytime.
‡ Press Menu on the remote control and select
TV menu > Installation > Channel installation >
Installation update.
® Press π to enter the Installation update menu.
ÒPress
† Press the green key to start.
º When the update is completed, press the red
◊Press Menu to quit the menu.
OK.
The update starts and may take a few minutes.
key to return to the Channel installation menu.
If you are lost in the picture and sound settings, you
can reset the TV to the factory settings of picture
and sound.
‡ Press Menu on the remote control and select
TV menu > Installation > Factory settings.
® Press π to enter the Factory settings menu.
ÒPress
† Press Menu to quit the menu.
rNote
The channel installation settings are not changed.
OK.
Channel installation
Downloaded From TV-Manual.com Manuals
27
Page 30
7 Connections
7.1 Connection overview
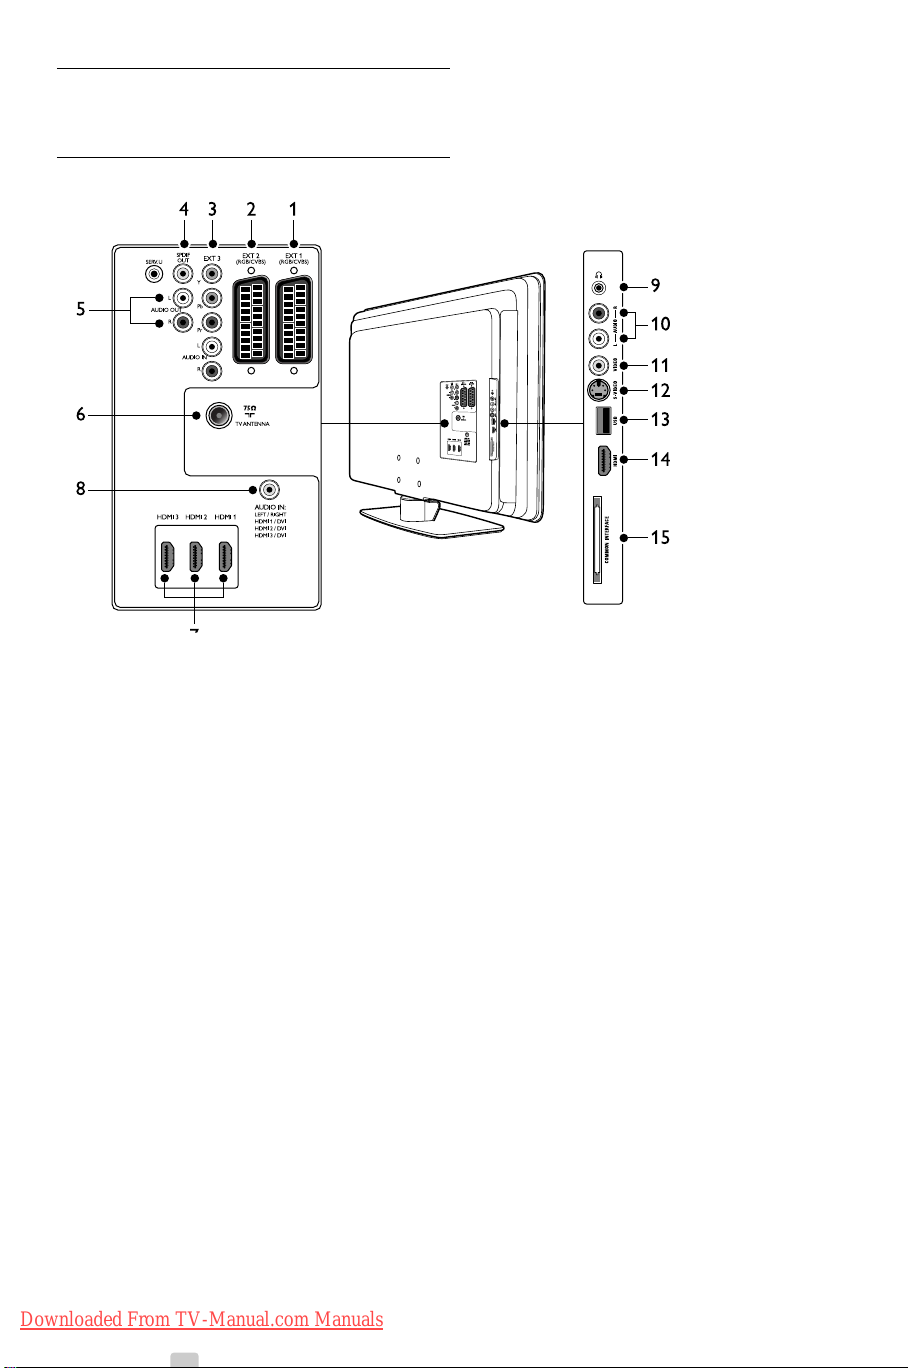
Back connectors
1 EXT 1
First SCART connector for DVD players,VCRs,
digital receivers, game consoles and other SCART
devices. Supports Audio L/R, CVBS in/out, RGB.
2 EXT 2
Second SCART connector. Supports Audio L/R,
CVBS in/out, RGB.
3 EXT 3
Component video (Y Pb Pr) and Audio L/R input
connectors for DVD players, digital receivers,
game consoles and other component video
devices.
4 SPDIF OUT
SPDIF sound output connector for home theatres
and other audio systems.
5 AUDIO OUT L/R
Sound output cinch connectors for home
theatres or other audio systems.
6 TV ANTENNA
7 HDMI 1/2/3
HDMI input connectors for Blu-ray Disc players,
digital receivers, game consoles and other highdefinition devices.
rNote
The number of HDMI connectors available may
vary according to your TV model.
8
AUDIO IN
Mini-jack connector for PC audio in (when
connecting a PC via a DVI-HDMI adaptor).
Side connectors
9 Headphones
Stereo mini-jack.
10 AUDIO L/R
Audio L/R input connectors for composite and
S-Video devices.
11 VIDEO
Video input cinch connector for composite
devices.
12 S-VIDEO
S-Video input connector for S-Video devices.
13 USB
USB connector for storage devices.
14 HDMI
Additional HDMI connector for mobile highdefinition devices.
15 COMMON INTERFACE
Slot for Conditional Access Modules.
Not currently supported by service providers in
Australia.
28 Connections
Downloaded From TV-Manual.com Manuals
Page 31
7.2 About connections
VIDEO
AUDIO L
AUDIO R
7.2.1 What you need to know
Connect your device with the highest possible
quality connection.
Look for the highest quality connection on your
device. Use that connection to your TV.
HDMI - Highest quality ★★★★★
An HDMI connection has the best picture and
sound quality. One cable combines video and audio
signals. Use HDMI for HD ( High Definition) TV
signals. HDMI with EasyLink offers easy operating
of your connected devices when these have the
HDMI CEC standard. See section 7.2.2 EasyLink
A device connected with HDMI to the TV can only
send out audio and video signals to your TV.The
device cannot receive or record audio and video
from your TV.
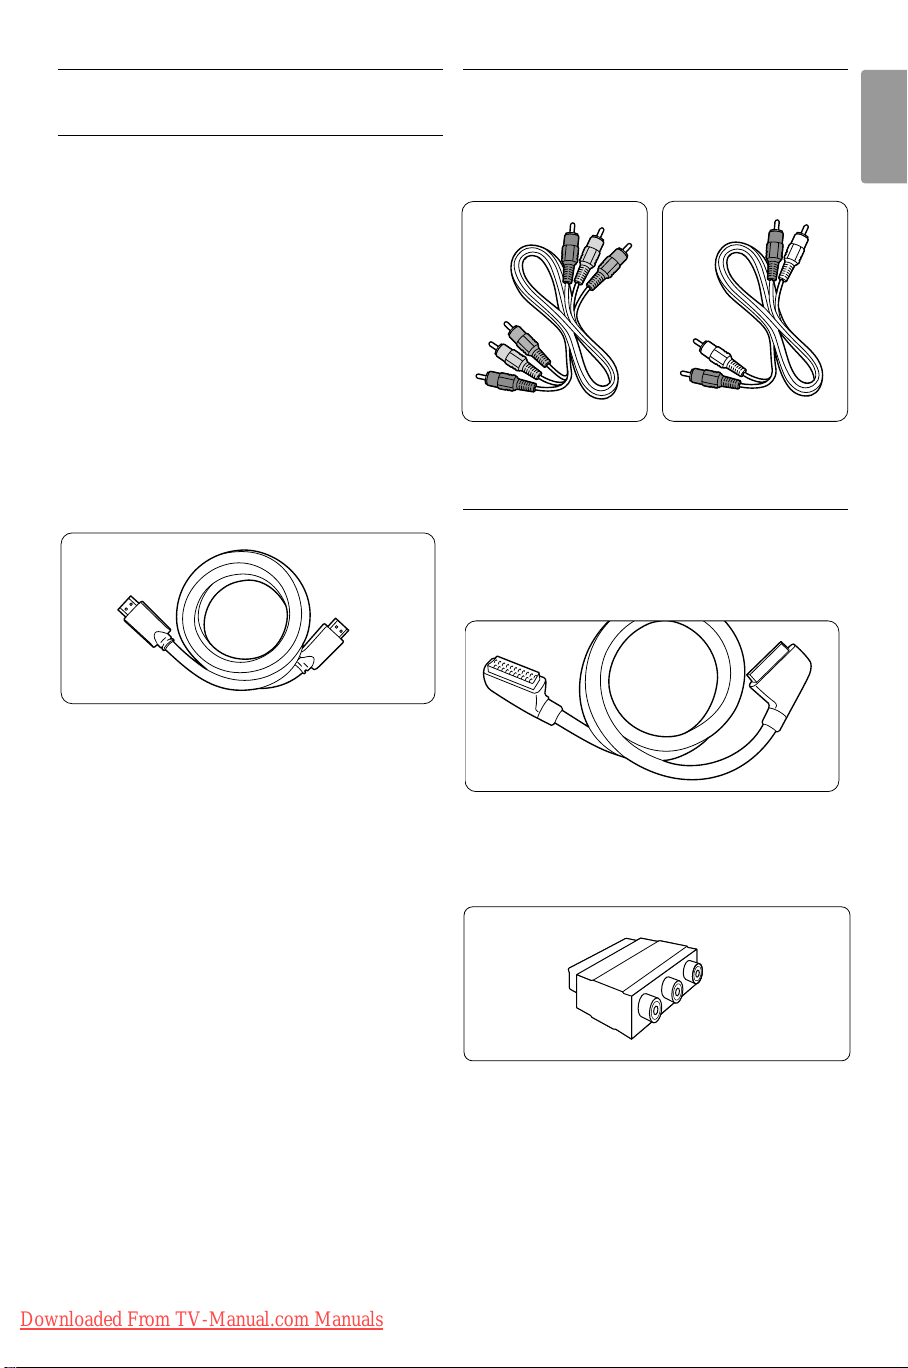
YPbPr – Higher quality ★★★★
Use the Component Video YPbPr connections
together with Audio Left and Right. Match the cable
colours when you connect.
YPbPr can handle HD TV signals.
Component Video Audio L/R cable
YPbPr cable - Red, White
- Red, Green, Blue
Scart - Good quality ★★★
One cable combines video and audio signals.
Scart connectors can handle RGB video but no HD
TV signals.
ENGLISH
HDMI cable (max. 5m)
à Tip
DVI to HDMI – Higher quality ★★★★
Use a DVI to HDMI adaptor if your device has only
a DVI connection.
Connect an Audio L/R cable to Audio In (HDMI to
DVI) for sound.
You need to assign this Audio In (HDMI to DVI)
connector to the HDMI 1, 2 or 3 connector you
are using for this device. See section 7.4.2 Audio
setup.
r Note
HDMI supports HDCP (High-bandwidth Digital
Contents Protection). HDCP is a copy protection
signal that comes with HD content (DVD disc or
Blu-ray Disc).
Connections
Downloaded From TV-Manual.com Manuals
Scart cable
Use the supplied scart to cinch adaptor to connect
devices to EXT 1 or 2.
29
Page 32
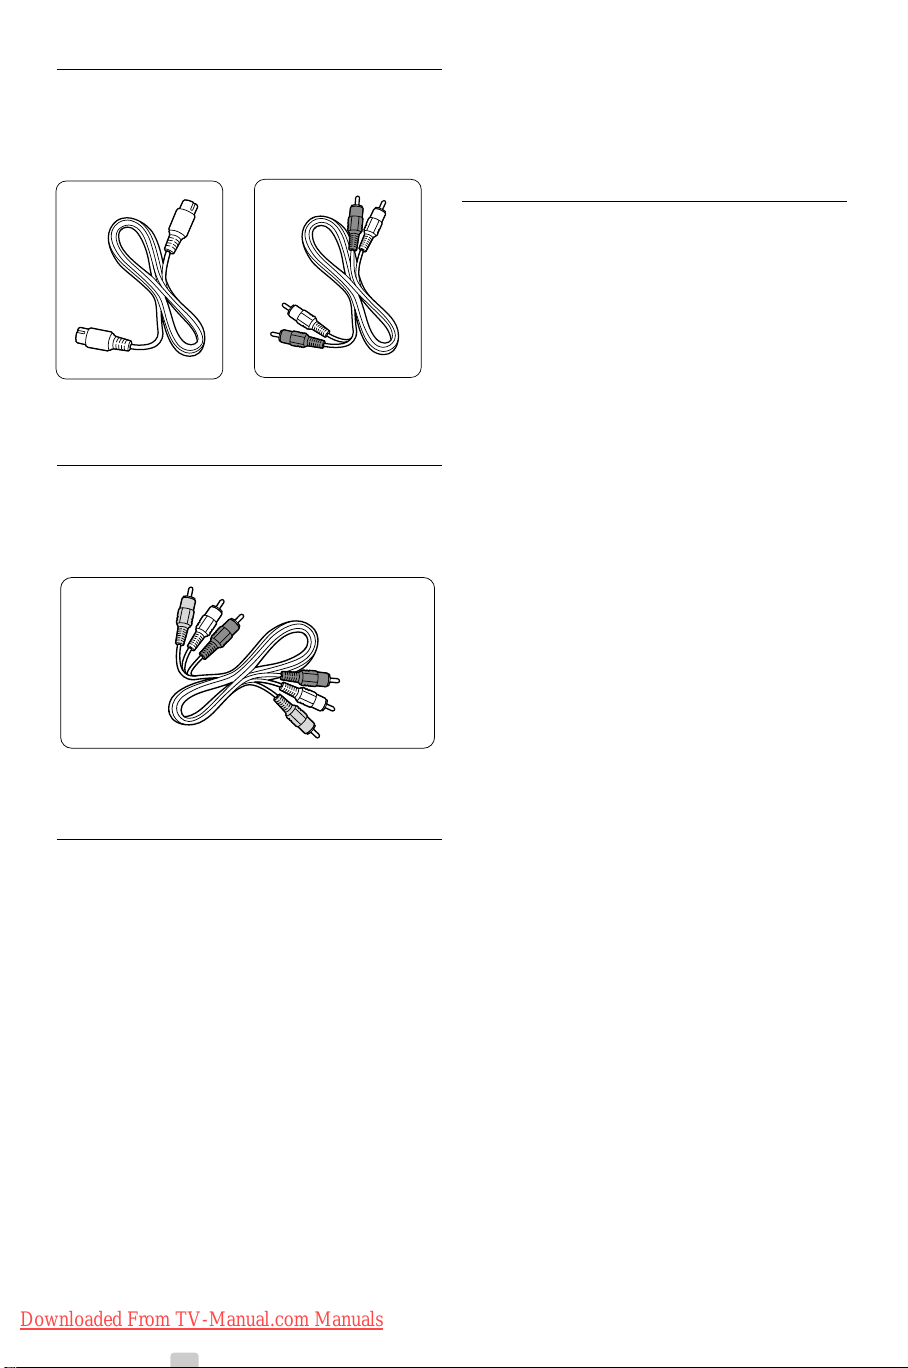
S-Video - Good quality ★★
Use an S-Video cable together with an Audio L/R
(cinch) cable. Match the cable colours when you
connect.
An S-Video cable Audio L/R cable
- Red, White
Video - Basic quality ★
Use a Video (cinch) cable together with an Audio
L/R (cinch) cable. Match the cable colours when
you connect.
System standby
Press the B key on the remote control for more
than 2 seconds to switch the connected devices in
standby.
7.2.3 Display synchronised audio out
For the best match of image and sound in speech
on screen, connect a Home Theatre System to
Audio Out L/R or SPDIF OUT. See diagram 7.3.7.
Do not connect the audio signal of a DVD player,
digital receiver or other audio/video device directly
to the Home Theatre System.
Combined Video - yellow and Audio L/R cable
- red and white
7.2.2 HDMI with EasyLink
Connected devices that are compliant with the
HDMI CEC standard can work together.
‡ Press Menu > TV menu > Installation >
Preferences and press π to enter the list.
® Press o or œ to select EasyLink.
ÒPress π to enter.
† Press o or œ to select On or Off.
º Select On to activate EasyLink.
EasyLink might not work with devices from other
brands.
One touch play
Insert a DVD disc and press Play. The TV switches
on from standby and shows the DVD programme
automatically.
30 Connections
Downloaded From TV-Manual.com Manuals
Page 33
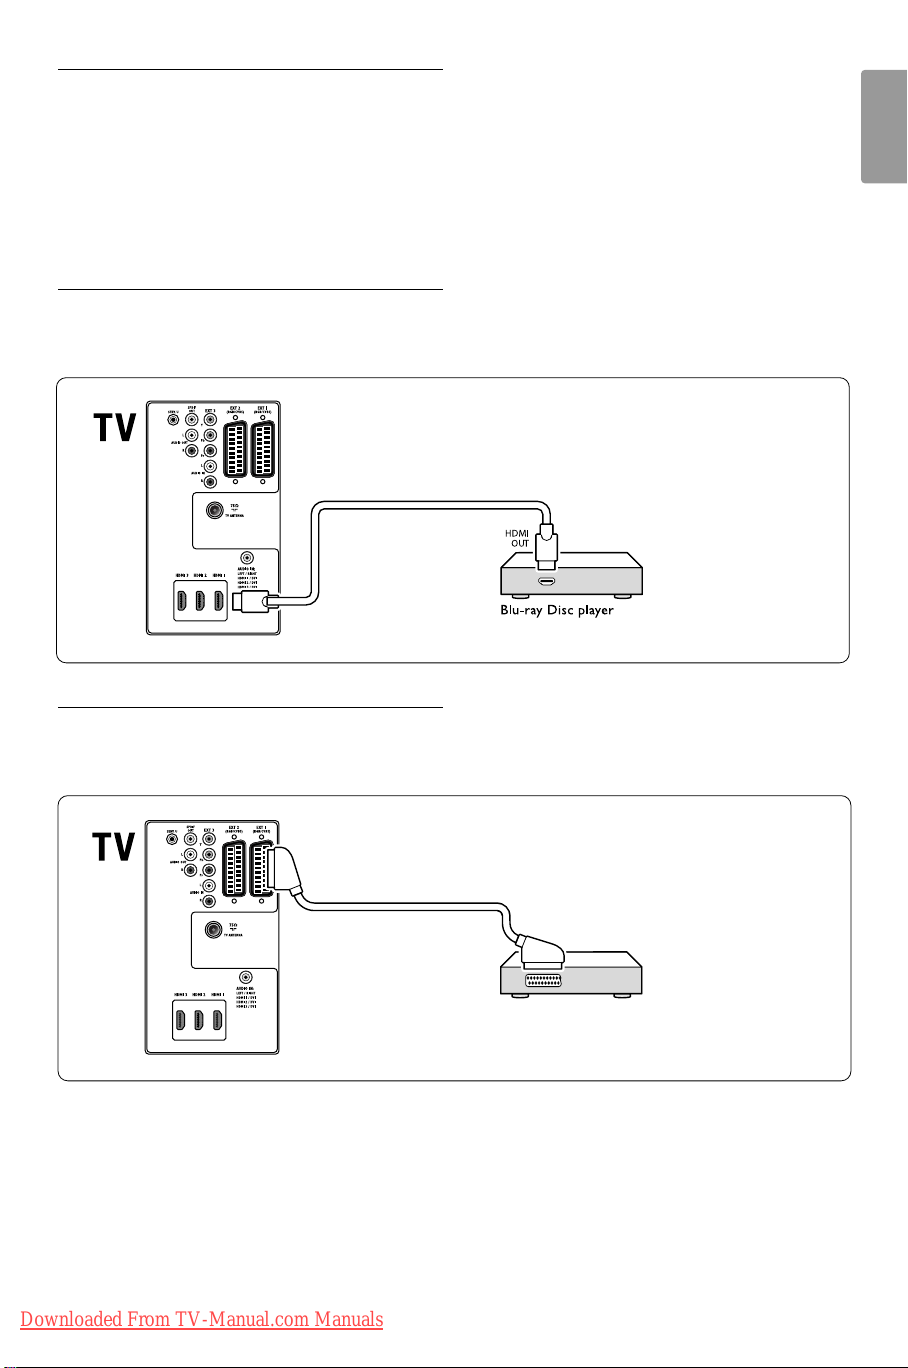
7.3 Connect your devices
DVD Player
The connections shown in this section are
recommendations for the most used cases. Other
solutions are possible.
When a device is connected the TV needs to know
what connection you made. See section 7.5 Setup
devices.
7.3.1 Blu-ray Disc player
For full high-definition video, connect a HDMI cable
as illustrated:
ENGLISH
7.3.2 DVD player
For DVD video, connect a SCART cable as
illustrated:
Connections
Downloaded From TV-Manual.com Manuals
31
Page 34
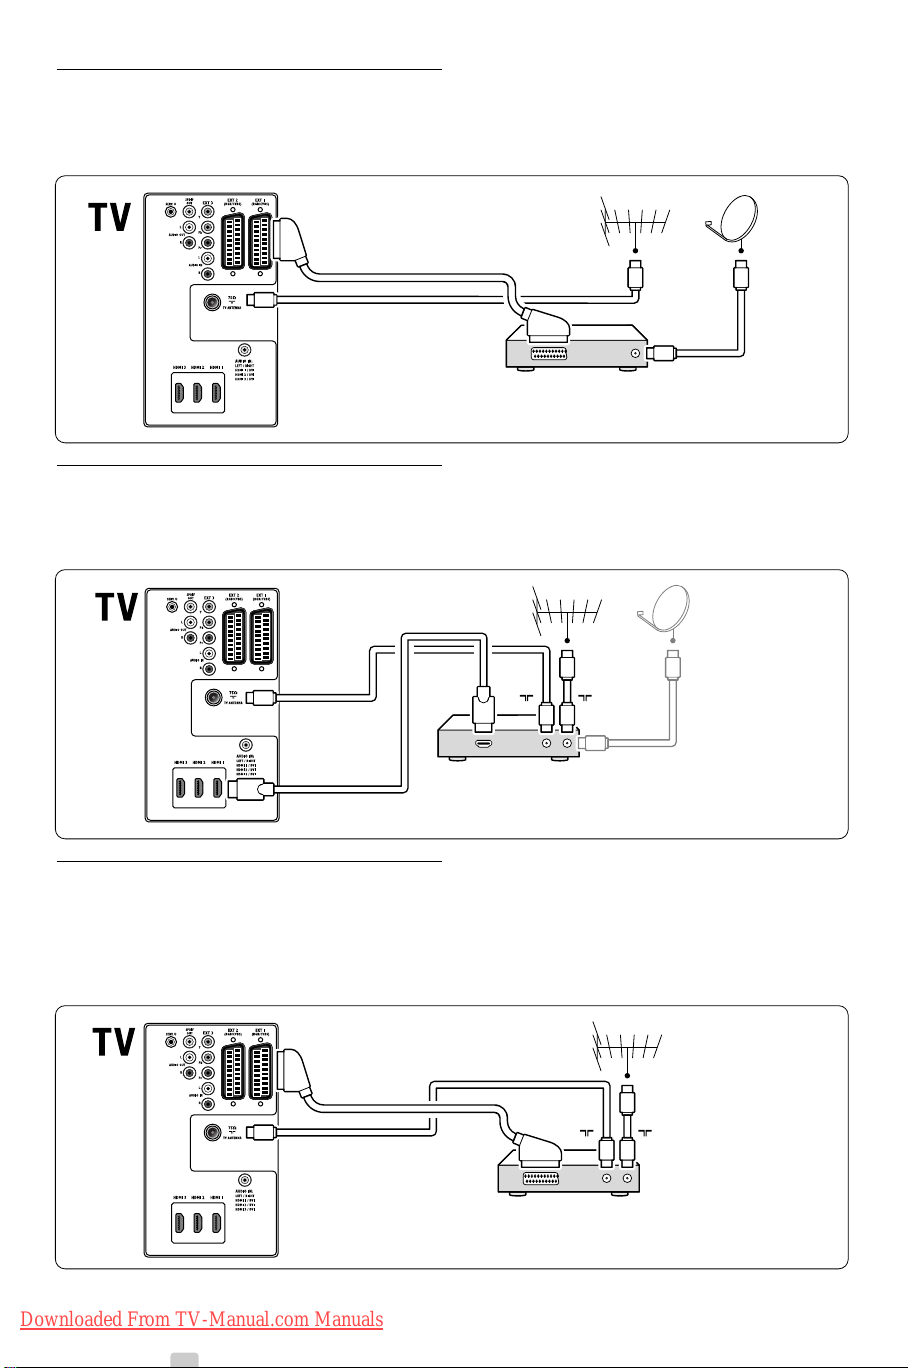
7.3.3 Satellite receiver
Satellite receiver
HD Digital receiver / HD Satellite receiver
IN
OUTOUT
HDMI
DVD Recorder / Digital receiver
IN
OUT
To receive analogue channels via antenna and digital
channels via a satellite receiver, connect an antenna
cable and SCART cable as illustrated:
7.3.4 HD digital receiver
To receive analogue channels via antenna and digital
channels via a HD digital receiver, connect two
antenna cables and HDMI cable as illustrated:
7.3.5 Combined DVD recorder and digital
receiver
To receive analogue channels via antenna and
record programs on a combined DVD recorder
and digital receiver, connect two antenna cables and
one SCART cable as illustrated:
32 Connections
Downloaded From TV-Manual.com Manuals
Page 35
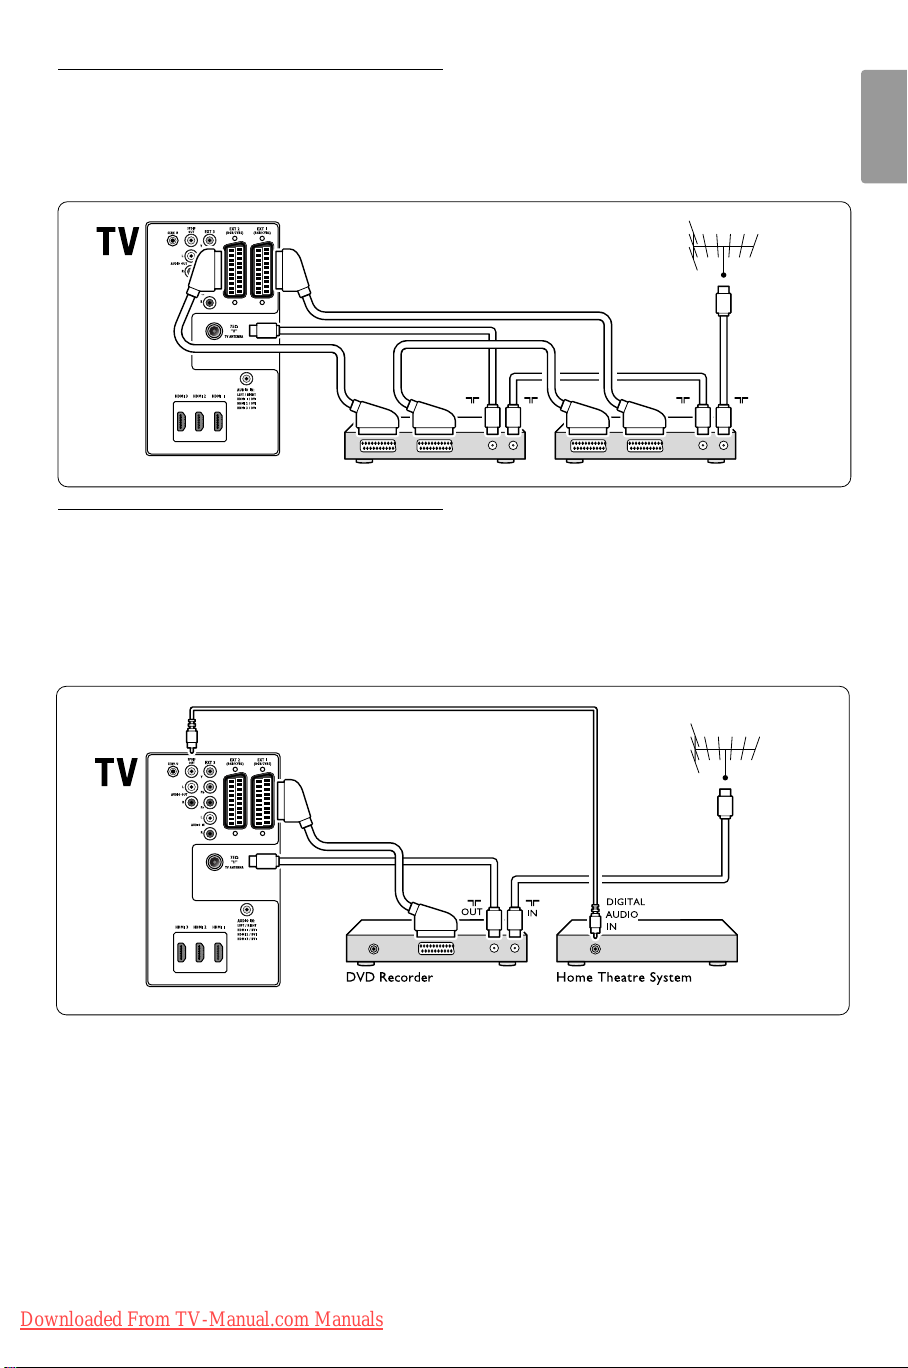
7.3.6 Separate DVD recorder and receiver
DVD Recorder Receiver / Cable box
ININ OUT
OUT
To receive analogue channels via antenna and
record programmes on a separate DVD recorder
and receiver, connect three antenna cables and
three SCART cables as illustrated.
7.3.7 DVD recorder and home theatre
system
To receive analogue channels via antenna,
output sound to a home theatre system and
record programmes on a DVD recorder,
connect two antenna cables, one SCART cable
and two digital audio cables as illustrated:
ENGLISH
Connections
Downloaded From TV-Manual.com Manuals
33
Page 36
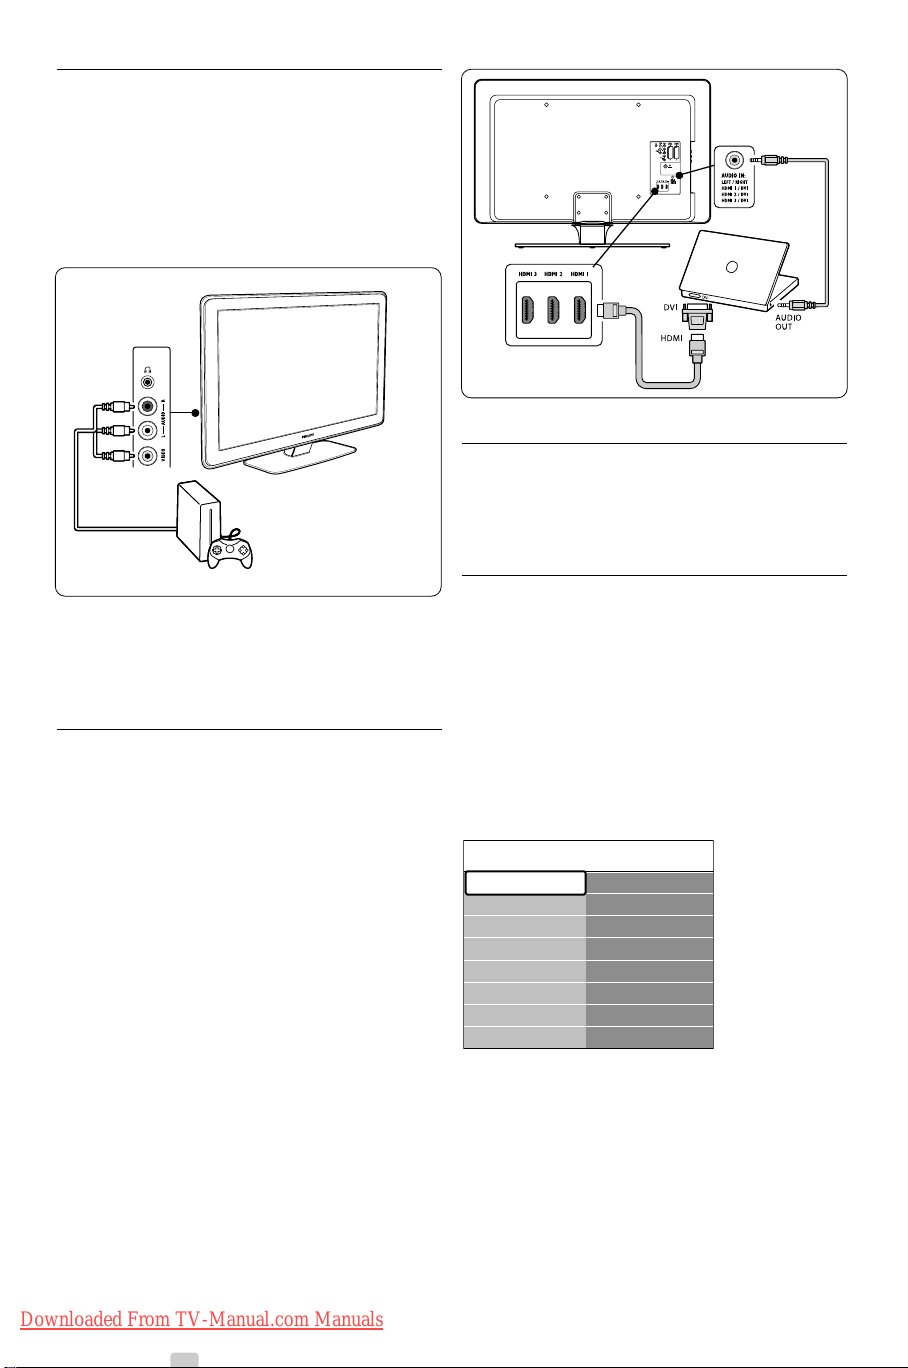
7.3.8 Game console or camcorder
The most practical connection for a mobile
game console or camcorder may be at the side
of the TV.You can, for example, connect the
game console or camcorder to VIDEO/S-Video
and AUDIO L/R connnectors at the side of
the TV. A HDMI connector is also available for
high-definition devices.
7.4 Setup devices
When all devices are connected, you must select
the type of device attached to each connector.
7.4.1 Assign devices to connectors
A permanent game console or camcorder can
be connected to a HDMI connector or EXT 3
(component) connectors at the back of the TV.
7.3.9 Personal Computer
Before connecting the PC:
• Set the PC monitor refresh rate to 60Hz. See
Section 8 Technical specifications for a list of
computer resolutions.
• Change the TV picture format to Unscaled as
described in Section 5.3.4. Change picture
format.
To connect a PC to the back of the TV
‡ Using a HDMI to DVI cable or a HDMI-to-DVI
adaptor (attached to a HDMI cable), connect a
HDMI connector on the back of your TV to the
DVI connector on your PC.
® Connect an audio cable from your PC to the
AUDIO IN mini-jack connector at the back of
the TV.
rNote
You must assign the AUDIO IN mini-jack connector
to the HDMI connector as described in Section
7.4.3 Assign the AUDIO IN mini-jack connector.
For easy selection and best signal handling,
assign the device connected to the connectors
on your TV.
‡ Press Menu and select TV menu >
Installation > Connections.
® Press π to enter the list.
ÒPress œ or o to select a connector.
† Press π to enter the list.
Connections EXT 1
EXT 1
EXT 2
EXT 3
HDMI 1
HDMI 2
HDMI 3
Side
...
None
DVD
Blu-ray
HDD/DVDR
HD rec.
Game
VCR
...
º Press œ or o to select the device attached to
the connector.
◊Press
OK to select the device.
‹Repeat the procedure until all devices are
correctly assigned to connectors.
≈Press Menu to exit.
34 Connections
Downloaded From TV-Manual.com Manuals
Page 37
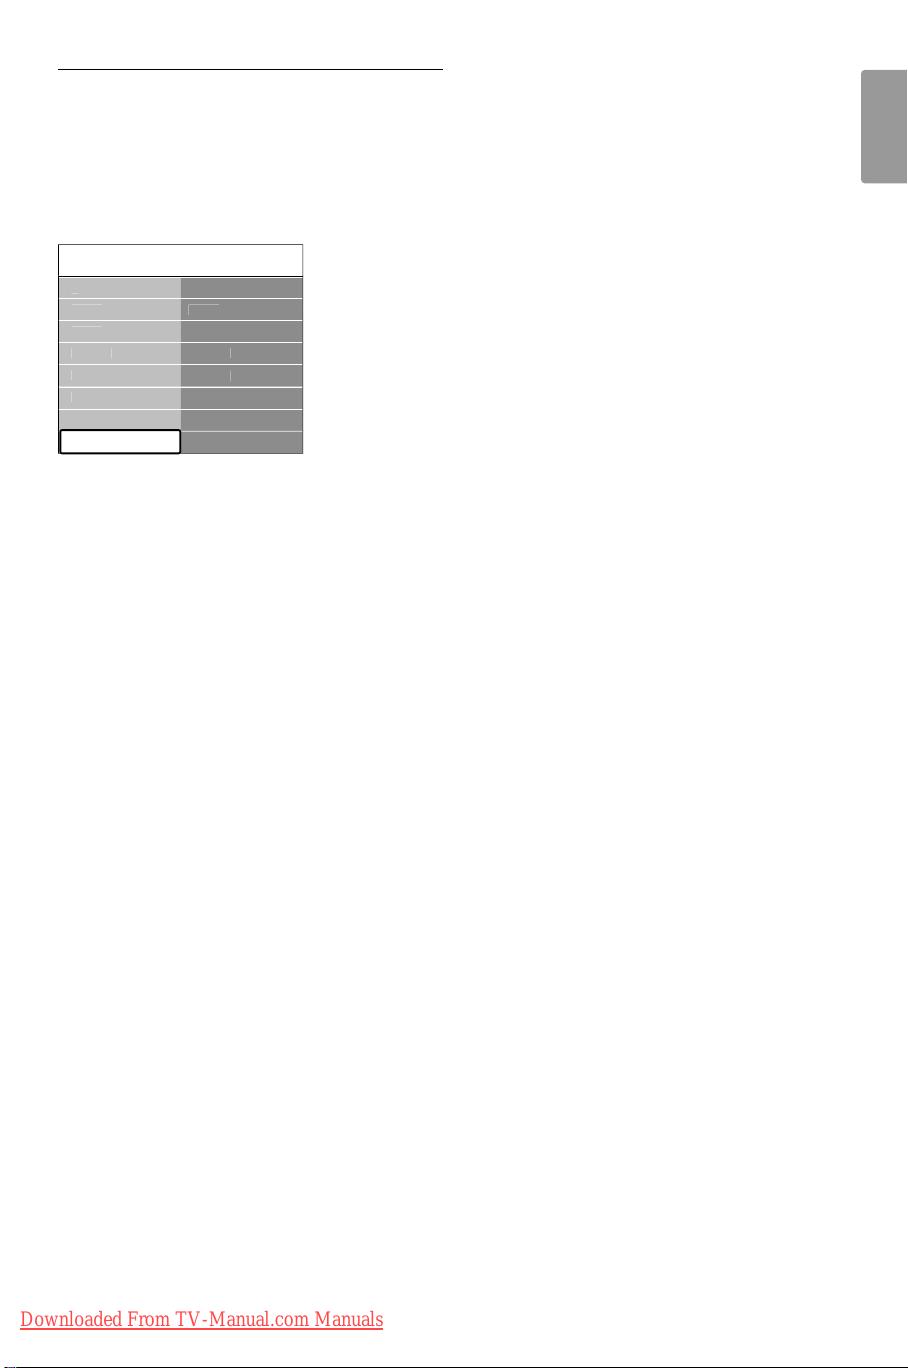
7.4.2 Assign the AUDIO IN mini-jack
/R
e
3
3
3
3
e
/R
connector
If you connect audio from a PC to the AUDIO IN
mini-jack connector at the back of the TV, you must
associate it to the HDMI connector.
‡ Press Menu and select TV menu > Installation >
Connections > Audio In L/R.
onnections AUDIO IN L
Non
EXT
EXT
HDMI
HDMI
Sid
AUDIO IN L
® Press π to enter the list.
ÒPress œ or o to select the HDMI connector
used by the PC.
† Press Menu to exit.
ENGLISH
Connections
Downloaded From TV-Manual.com Manuals
35
Page 38

8Technical data
Supported display resolutions
• Computer formats
Resolution Refresh rate
640 x 480 60Hz
800 x 600 60Hz
1024 x 768 60Hz
1920 x 1080i 60Hz (not for 32PFL7403D)
1920 x 1080p 60Hz (not for 32PFL7403D)
• Video formats (via HDMI/DVI input)
Resolution Refresh rate
480i 60Hz
480p 60Hz
576i 50Hz
576p 50Hz
720p 50Hz, 60Hz
1080i 50Hz, 60Hz
1080p 24Hz, 25Hz, 30Hz
1080p 50Hz, 60Hz
Tuner / Reception / Transmission
• Antenna input: 75ohm coaxial (IEC75)
• TV system: DVB COFDM 2K/8K
• Video playback: NTSC, SECAM, PAL
• DVB Terrestrial
(see listed countries on the back of the TV)
Connections (Side)
• Headphone out (stereo mini-jack)
• AUDIO L/R in
• Video (CVBS) in
• S-Video
• USB
• HDMI
• Common Interface (CAM slot)
Not currently supported by service providers in
Australia.
Power
• Mains power: AC 220-240V (±10%)
• Power and standby power consumption: See
technical specifications at www.philips.com
• Ambient temperature: 5°C - 35°C
Specifications are subject to change without notice.
For detailed specifications of this product go to
www.philips.com/support.
Multimedia
• Connection: USB
• Playback formats: MP3, Linear PCM, slide show
(.alb), JPEG
Remote control
• Type: RCYKF230-002B
RC2143604/01 (For 32PFL7403)
• Batteries: 2 x AAA size (LR03 type)
Connections (Rear)
• EXT 1 (SCART): Audio L/R, CVBS in/out, RGB
• EXT 2 (SCART): Audio L/R, CVBS in/out, RGB
• EXT 3: Component (Y Pb Pr), Audio L/R in
• HDMI 1/2/3
rNote
The number of HDMI connectors available may vary
according to your TV model.
• SPDIF OUT: Digital audio out (coaxial-cinch-
S/PDIF). Display synchronised.
• AUDIO OUT L/R: Analogue audio out.
• TV ANTENNA
• AUDIO IN: Mini-jack audio in for PC DVI-HDMI
connections.
36 Technical data
Downloaded From TV-Manual.com Manuals
Page 39

9Troubleshooting
Te levision and remote control
The TV does not switch on
•Verify the mains cord connection.
•Verify if the batteries of the remote control are
flat or weak.Verify their + / - orientation.
You can use the keys on the TV to switch the TV
on.
• Unplug the mains cord, wait for one minute and
plug in the mains again.
The TV does not react on the remote control
•Verify if the batteries of the remote control are
not empty or weak.Verify their + / - orientation.
• Clean the remote control and TV sensor lens.
• Use the side control keys to change some of the
basic settings of picture and sound.
‡ Press Volume - and + to adjust the volume.
® Press Program/Channel - and + to go through
the channels marked as favourites.
ÒPress Menu to show the main menu.
Press Program/Channel - and + to select and
adjust picture and sound menu items.
The red light on the TV blinks
• Unplug the mains cord for half a minute and
insert it again.Verify if there is enough space for
ventilation.Wait until the TV has cooled down.
When the TV does not restar t to standby and
the blinking occurs again, call our Customer
Support Centre.
You forgot your code to unlock Child lock
• See section 5.8.3 Set code / Change code.
Wrong language in the TV menu ?
Follow these steps to change the language.
‡ Press Menu on the remote control.
® Press π.
ÒUse œ to highlight the third line.
† Press π three times.
º Press œ or o to select your language.
◊Press
‹Press Menu to quit the menus.
OK.
TV channels
Some TV channels are gone
•Verify if the correct channel list is chosen.
•A channel could be uninstalled in the Rearrange
menu.
Picture
The blue light is on, but there is no picture
•Verify if the antenna is connected properly.
•Verify if the correct device is selected.
The sound is on, but there is no picture
•Verify the contrast or brightness setting in the
menu.
The TV picture is poor
•Verify if the antenna is connected properly.
• Loudspeakers, non-earthed audio devices, neon
lights, high buildings or mountains can influence
the picture quality.Try to improve the picture by
changing the antenna direction or place devices
away from the TV.
•Verify if the correct TV system is chosen in the
Manual installation menu.
• If only a certain channel is poor, try to fine tune
this channel in the Fine tune menu. See section
6.2.3.
The picture has poor colour
•Verify the colour settings in the Picture menu.
Select any of the Reset to standard settings in
the Reset smart settings menu. See section 5.3.2.
•Verify the connections and cables of the
connected devices.
The TV did not remember my settings when I
switch back on
•Verify if the TV is set to Home in the TV menu >
Installation > Preferences > Location menu.
The picture does not fit the screen, it is too big or
too small
• Select a more fitting picture format in the Picture
format menu.
See section 5.3.4 Widescreen picture format.
• Name your connected device in the Connections
menu to obtain the best signal handling.
See section 7.4.1 Assign devices to connectors.
The picture position on screen is not correct
• Some picture signals from some devices do not
fit the screen correctly.You can shift the picture
ENGLISH
Troubleshooting
Downloaded From TV-Manual.com Manuals
37
Page 40

with the navigation key left, right or up,down on
the remote control. Check the signal output of
the device.
Sound
There is a picture but no sound
•Verify the volume is not set to 0.
•Verify the sound has not been muted with the
¬ key.
•Verify if all cables are connected properly.
• If no sound signal is detected, the TV
automatically switches off the sound.
This is proper operation and does not indicate
malfunction.
USB connection
The TV does not show the USB device content
• Set your device (camera) to ‘Mass Storage Class’
compliant.
• The USB device may need specific driver
software. Unfortunately this software can not be
downloaded to your TV.
I can not see my files in the Multimedia menu.
• Not all audio and picture files are supported. See
section 8 Technical data.
Audio and picture files do not playback smoothly
• The transfer performance of the USB device
limits the transfer rate.
The sound is poor
Personal computer
•Verify if the sound is set to Stereo.
•Verify the Equalizer settings.
• Select any of the Reset to standards settings in
the Reset smart settings menu. See section 5.3.2.
The PC display on my TV is not stable or is not
synchronised
•Verify if the correct resolution mode is selected
on your PC. See section 8 Technical data.
The sound comes from one speaker only
•Verify if the Balance is not set to extreme left or
right.
If your problem is not solved
Switch your TV off and on again. If the problem is
not solved, call the Customer Support Centre or
HDMI connections
Tr ouble with devices connected with HDMI
• The HDMI - HDCP procedure might take a few
consult our website www.philips.com/support.
See the Customer Support Centre telephone
numbers on the last page of this user manual.
seconds before the TV shows the picture from a
device.
• If the TV does not recognise the device and the
screen shows no picture, try switching from one
device to another and back again to restart the
HDCP procedure.
Please, have the TV Model and Product Number
ready before you call.
You can find these numbers on the packaging label
or on the typelabel on the back and bottom of the
TV.
• If sound interruptions occur persistently, see the user
manual of the device to verify the output settings. If
that does not help, connect an additional audio
cable.
) Warning
Never try to repair the TV yourself.
• If a DVI to HDMI adaptor is used, verify if an
additional audio connection is in place to complete
the DVI connection.
• HDMI with EasyLink does not work
-Verify if the connected device supports the HDMI
CEC standard. See the user manual that comes
with the device.
-Verify if the HDMI cable is properly connected.
-Verify if Easylink is activated in the TV menu,
Installation, Preferences menu.
- Ensure that the System audio control in your
HDMI CEC audio devices is properly set up. See
the user manual that comes with your audio
device.
38 Troubleshooting
Downloaded From TV-Manual.com Manuals
Page 41
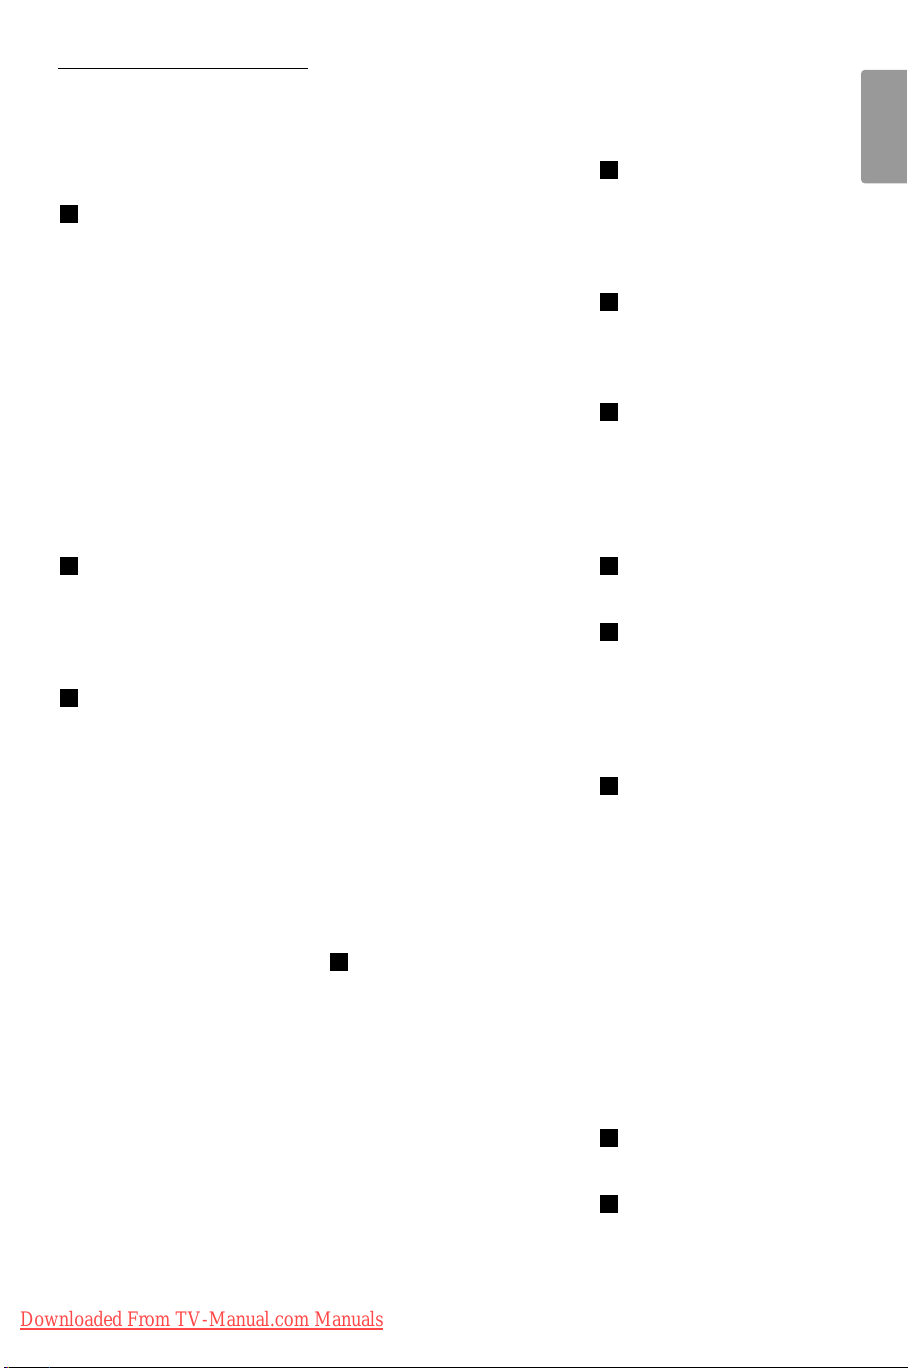
10 Index
100 Hz Clear LCD 5,14
A
Active Control 14
All channels list 17
Analogue
Channel installation 26
Fine tune channels 26
Antenna
Connect 7
Assign
Devices 35
Audio language 15
Automatic
Channel installation 25
Surround 15
Volume leveling 15
B
Back connectors 4
Balance
Sound 15
Brightness 13
C
Care
Environment 3
Screen 3
Channels
All channels list 17
Change 8
Favorite lists
Select 17
Setup 17
Use 17
Installation
Automatic 25
Manual 26
Rearrange 26
Rename 26
Test digital reception 27
Uninstall 27
Update channel list 27
Child lock
Lock all channels/devices 19
Lock from a certain time 19
Lock one or more
channel/device 19
Set/change code 19
Set parental rating 19
Clock 13
Colour enhancement 14
Component cable 29
Composite 29
Connections
Back connectors 28
Cable quality
Component 29
Composite 29
HDMI 28
SCART 29
S-Video 29
Devices
Blu-ray Disc player 31
DVD player 31
DVD recorder/Digital
receiver 32
DVD recorder/Home
theatre system 33
DVD recorder/Receiver 32
Game console/
camcorder 34
HD digital receiver 32
PC 34
Satellite receiver 32
USB 21
Philips Easylink
Enable/disable 30
Use 30
Setup devices
Assign channel decoder 30
Assign to connectors 29
Side connectors 28
Contrast 13
Custom tint 14
D
Delta volume 15
Devices
Watch 8
Digital
Radio 22
Teletext 16
Dual I/II 15
Dual screen teletext 16
Dynamic contrast 14
ENGLISH
E
Electronic Programme Guide
Use 18
Environmental care 3
Equalizer 15
F
Factory setting 27
Favorite lists 17
Fine tune channels 27
H
HDCP 28
HDMI cable 28
Hearing impaired 25
Home mode 16
Hue 13
K
Kensington lock 5
L
Language
Audio 15
Menus 25
Subtitles 21
Light sensor 14
M
Mains
Connect 7
Manual channel installation 27
Menus
Child lock 19
Language 26
Main
Access 11
Use 11
Quick access 12
Use 12
Teletext menu 16
Mono sound 15
Mute 10
N
Noise reduction 12
O
On timer 19
Index
Downloaded From TV-Manual.com Manuals
39
Page 42

P
Parental rating 20
Philips EasyLink 30
Photos and music
Connect USB device 26
Listen to music 22
View photos 21
View slide show with music
22
Picture
Adjust settings
Active Control 14
Brightness 13
Colour 13
Colour enhancement 14
Contrast 13
Custom tint 14
Dynamic contrast 14
Hue 13
Light sensor 14
Noise reduction 14
Sharpness 13
Tint 13
Change format 15
Use Settings assistant 13
Use smart settings
Current 13
Movie 13
Standard 13
Vivid 13
Position TV 5
Power
Connect 7
Q
Quick access menu 12
R
Radio channels 22
Rearrange channels 27
Recycling product 3
Remote control
Advanced use 10
Basic use 4
Batteries 7
Rename channels 27
Reset to factory settings 28
S
Safety information 3
SCART cable 29
Screen care 3
Settings
Picture
Adjust settings 13
Change format 14
Use Settings assistant 13
Use smart settings 13
Sound
Adjust settings 15
Setup devices 34
Sharpness 13
Side
Connectors 4
Controls 4
Sleeptimer 19
Smart settings
Current 13
Movie 13
Standard 13
Vivid 13
Software update
Check availability 23
Check version 24
Update (analogue) 24
Update (digital) 24
Sound
Adjust settings
Audio language 15
Automatic volume
leveling 15
Auto surround 15
Balance 15
Delta volume 15
Dual I/II 15
Equalizer 15
Headphone volume 15
Mono/Stereo 15
Surround mode 15
Volume 15
Stereo sound 15
Subtitles
Analogue TV 20
Digital TV 20
Language 20
Surround sound
Auto 15
Mode 15
S-Video 29
Switch TV
Off 8
On 8
On from standby 8
To standby 8
System selection 26
T
Technical specifications 36
Teletext
Advanced use 16
Cycle subpages 16
Digital teletext 16
Dual screen 16
Enlarge 16
Language 16
Reveal 16
Search 16
Select subpages 16
Teletext 2.5 17
T. O.P broadcasts 16
Timers
On timer 19
Sleeptimer 19
Time zone 25
Tint 13
T. O.P. teletext 16
Troubleshooting 37
TV
Channel installation 25
Channels
Change 8
Favorite lists 17
Child lock 19
Connect
Antenna 7
Mains 7
Connections
Back 28
Devices 31
Quality 29
Side 28
Electronic Programme
Guide 18
Get started 5
Main menus
Access 11
Use 12
Overview 4
Photos and music 21
Position 5
Ideal distance 5
Quick access menu
Use 12
Remote control
Advanced use 10
Basic use 4
Batteries 7
Reset to factory setting 27
Side controls 4
Software update 23
40 Index
Downloaded From TV-Manual.com Manuals
Page 43
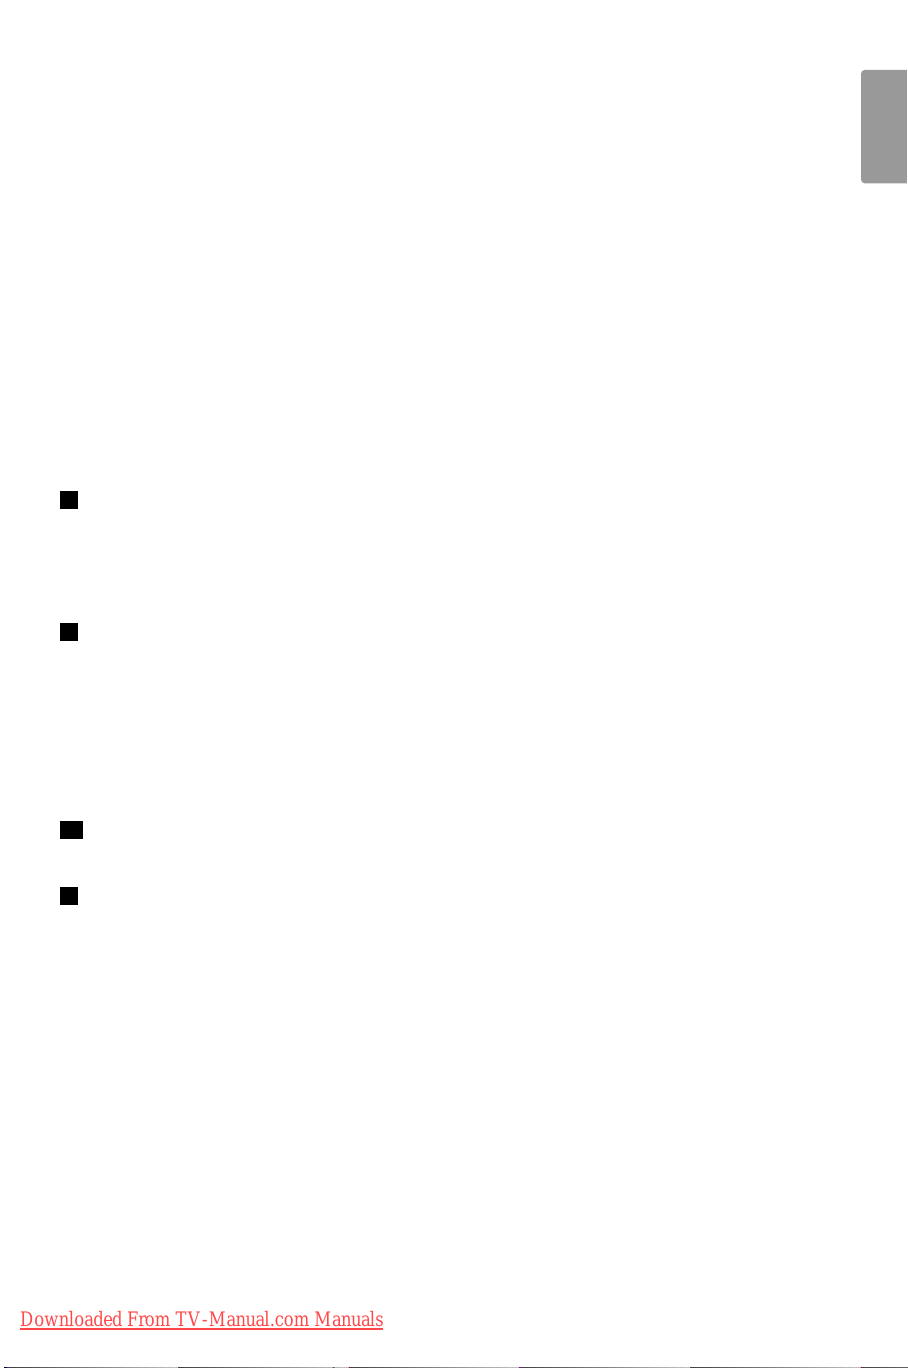
Stand 6
Subtitles 20
Switch
Off 8
On 8
On from standby 8
To standby 8
Teletext
Advanced use 16
Basic use 9
Timers
On timer 19
Sleeptimer 19
Volume 8
Wall mount 6
Watch
Channels 9
Devices 9
U
Uninstall channels 27
USB device
Connect 21
Disconnect 21
V
VESA wall bracket 6
Video formats 36
Volume
Adjust 8, 15
Automatic leveling 2115
Delta 15
Headphone 15
ENGLISH
W
Wall mount TV 6
Y
Y Pb Pr 29
index
Downloaded From TV-Manual.com Manuals
41
Page 44

Downloaded From TV-Manual.com Manuals
Page 45

Downloaded From TV-Manual.com Manuals
Page 46
Printed in Belgium
Contact information
Type no.
Product no.
Australia
1300 363 391
Downloaded From TV-Manual.com Manuals
 Loading...