

Page 1
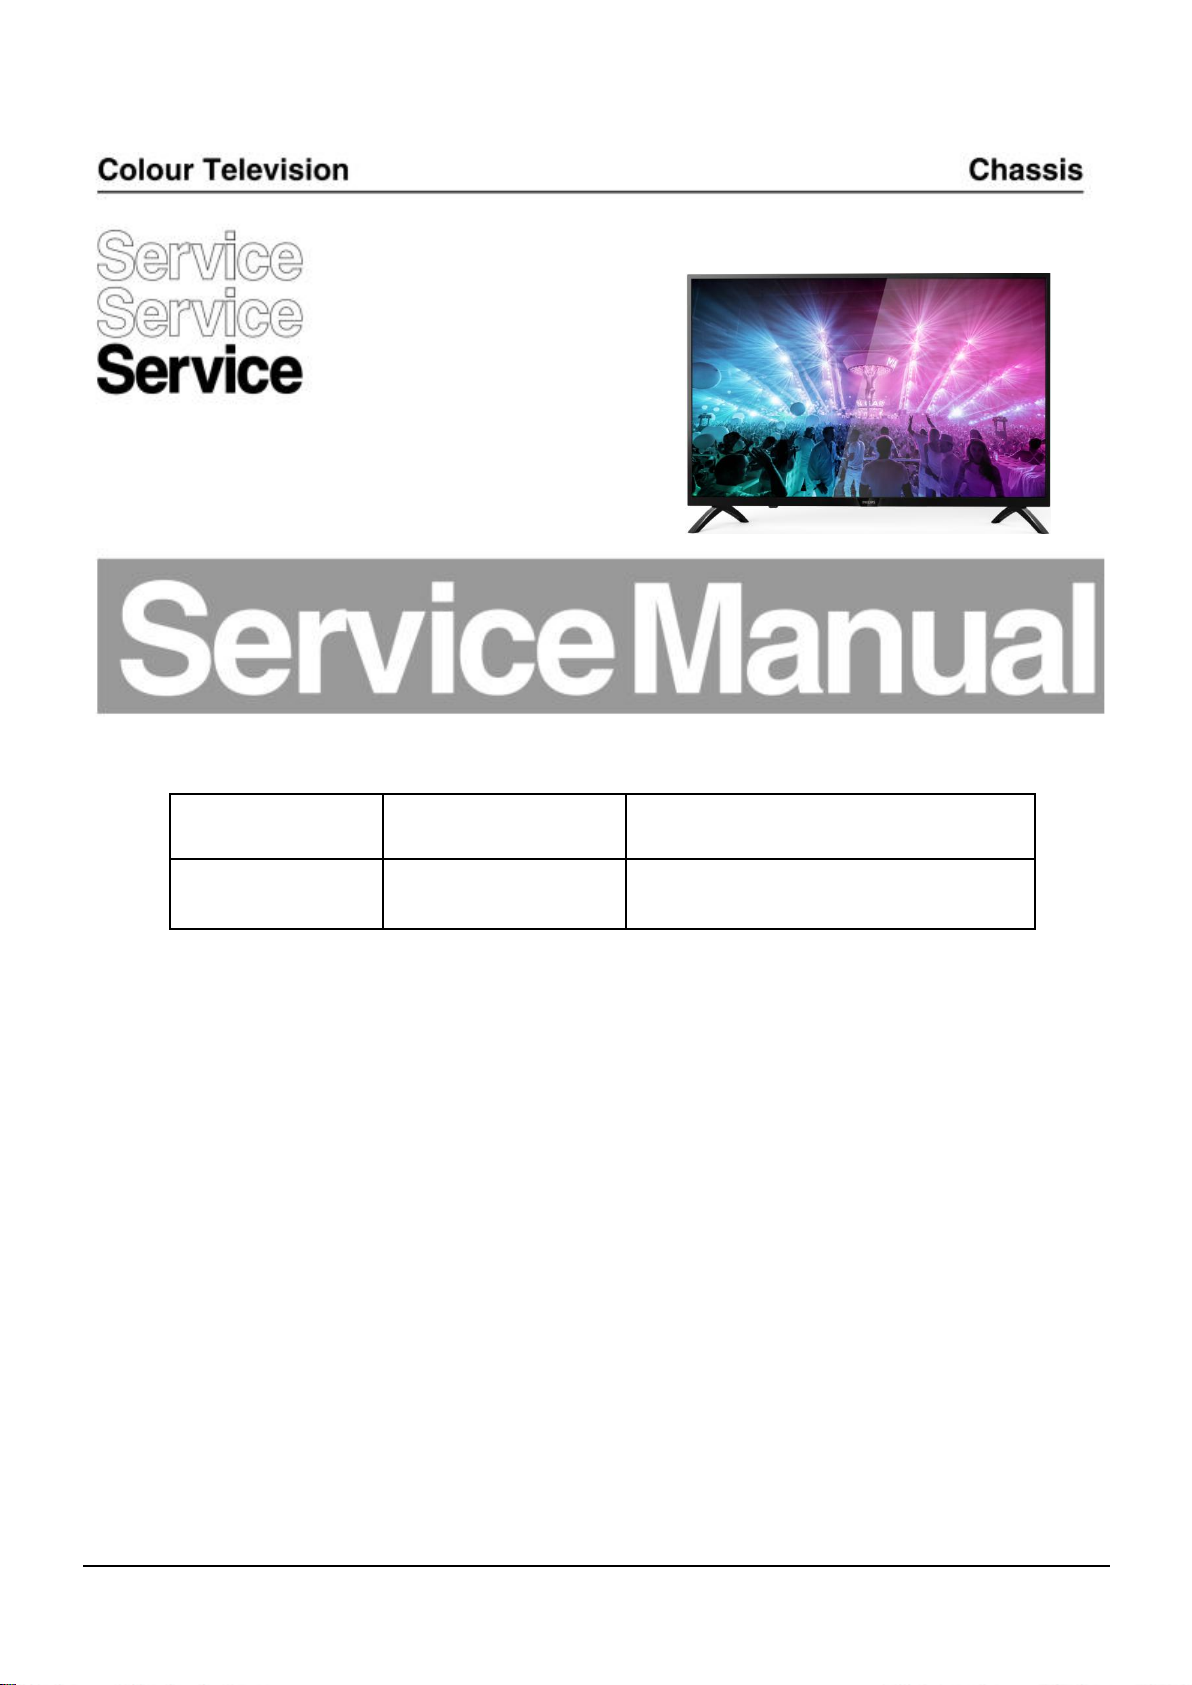
4082
Chassis name Platform Model name
4082 MSD3463 43PFH4082/96
Published by Yingqun.Wen 4082 Quality Subject to modification
2017 © TP Vision Netherlands B.V.
All rights reserved. Specifications ar e subject to change without n otice. Tra demarks are the
property of Koninklijke Philips Elec tronics N .V. or their respective ow ners.
TP Vision Netherlands B.V. re serves the right to change pr oducts a t a ny time without being ob liged to a djust
earlier supplies accordingly.
PHILIPS and the PHILIPS’ Shield Emblem are used under lic ense f rom Koninklijke Philips Electronics N.V.
2017-Nov-25
Page 2

1.Product inforamtion……….……………………………………………………………………………………3
2.Connections overview……..…..…..………………..…………………………………………………………6
3.Mechanical Instructions………………….…………………………………………………………………….7
Cable dressing (43" 4082 series)………………………………………………………………………………7
Assembly/Panel Removal ………………………………………………………………………………………7
4.Factory Modes…………….……………….………………….…………………………………………….….15
5.So ft wa r e up gr ad in g an d Pa n e l Cod e ………… … .. . ……… ……… …… …… … …… … … … … .. 17
6.Circuit Descriptions…..……………………….………………………………………………………………19
7.IC Data Sheet……...……………………………………………………………………………………….…..25
8.Circuit Diagrams……………...……………………………………………………………………………….27
9.Styling Sheet……………….…………………….……………………………………………………………..35
4082 series 43"……………………………………………………………………………………………….35
Published by Yingqun.wen 4082 Quality Subject to modification
2017 © TP Vision Netherlands B.V.
All rights reserved. Specifications ar e subject to change without n otice. Tra demarks are the
property of Koninklijke Philips Elec tronics N .V. or their respective ow ners.
TP Vision Netherlands B.V. re serves the right to change pr oducts a t a ny time without being ob liged to a djust
earlier supplies accordingly.
PHILIPS and the PHILIPS’ Shield Emblem are used under lic ense f rom Koninklijke Philips Electronics N.V.
2017-July-19
Page 3
1. Product information
Product information is subject to change without notice.
For detailed product information,please visit www.philips.com/support
Display Type
Diagonal screen size
• 43PFH4082/96: 42.51 inch
Display resolution
• 43PFH4082/96 : 1920*1080p
Input resolution
• 800 x 600p - 60 Hz
• 1024 x 768p - 60 Hz
• 1280 x 768p - 60 Hz
• 1360 x 765p - 60 Hz
• 1360 x 768p - 60 Hz
• 1280 x 1024p - 60 Hz
• 1920 x 1080p - 60 Hz23.5
Video formats Resolution — Refresh rate
• 480i, 480p,576i, 576p,720p,1080i,1080p(24/25/30/50/60Hz)
Computer formats Resolutions (amongst others)
720*400@70HZ
640*480@60HZ
800*600@60HZ
1024*768@60HZ
1360*768@60HZ
1280*720@60HZ
1280*960@60HZ
1280*1024@60HZ
1600*900@60HZ
1920*1080@60HZ
Dimensions and Weights
43PFH4082/96
• without TV stand:
Width 969mm - Height 578 mm - Depth 83mm - Weight 7.4kg
• with TV stand:
Width 969 mm - Height 625mm - Depth 226mm - Weight 7.5kg
Connectivity
TV*2/USB*2/VGA*1
I/O port to be clearly indicated
Playback YES
Component (HD/SD)@24p/50/60 (HD/SD)@24p/50/60
HDMI Number 3
HDMI 1
HDMI 2
HDMI 3
HDMI 4 NA
HDCP v2.2 (on HDMI 2.0 port) YES
HDMI ARC HDMI-3
/HDMI*3/YPBPR&AV-IN*1/Earphone
*1/Coaxial-OUT*1/PC audio*1/Audio
in*1
HDMI 1.4 /up to 2k@60hz
4:4:4 down
HDMI 1.4 /up to 2k@60hz
4:4:4 down
HDMI 1.4 /up to 2k@60hz
4:4:4 down
3
Page 4
PC input (VGA)
AV (input)
Headphone
VGA
YES
YES
Video and Audio out NA
Digital audio out (SPDIF)
co-axial/Optical
Co-axial Out
RJ45 NA
DLNA/ Certification NA
WiFi NA
EasyLink (HDMI-CEC) YES
Antenna Tuner /Satellite tuner Antenna Tuner(down)
Wireless connections N/A
Wi-Fi Band Concurrent N/A
Bluetooth for subwoofer/RC (do not claim
N/A
commercially)
MHL(Version ) HDMI-1
Sound
Mono/Stereo/Virtual Surround Mono/Stereo/Virtual Surround
Output Power (10% THD) RMS (RMS Watts) 16W
Speaker configuration 8W+8W
Speaker system (Number of on board Speakers ) 2.0
Speaker type built-in(normal)
Auto Volume Levelier / Auto Volume Levelier + N/A
Dolby Digital DecoderType(DD/DD+) N/A
DTS Studio Sound N/A
DTS 2.0+ Digital out N/A
SPL (>= 84dB @ 2m) 78dB @ 2m
Acoustic frequence range 160~8K HZ<=16dB
Multimedia
Video Playback Formats MPEG-1/MPEG-2/MPEG-4 H.264
FLV/RV8/RV9/RV10
Subtitles Formats Support
Music Playback Formats
SRT、ASS
MP3,AAC
Picture Playback Formats
JPG、JPEG、BMP、PNG
Pause TV/USB recording (PVR) YES
Time shift YES
PIP/POP NA
USB USB2.0(*2)
USB Harddisk Format (Power) FAT/NTFS (500mA)
4
Page 5

Power
Product specifications are subject to change without
notice. For more specification details of this product,
see www.philips.com/support
Power
• Mains power : AC 100-240V 50/60Hz
• Standby Energy Consumption:≤0.5W
• Ambient temperature : 5°C to 40°C
5
Page 6
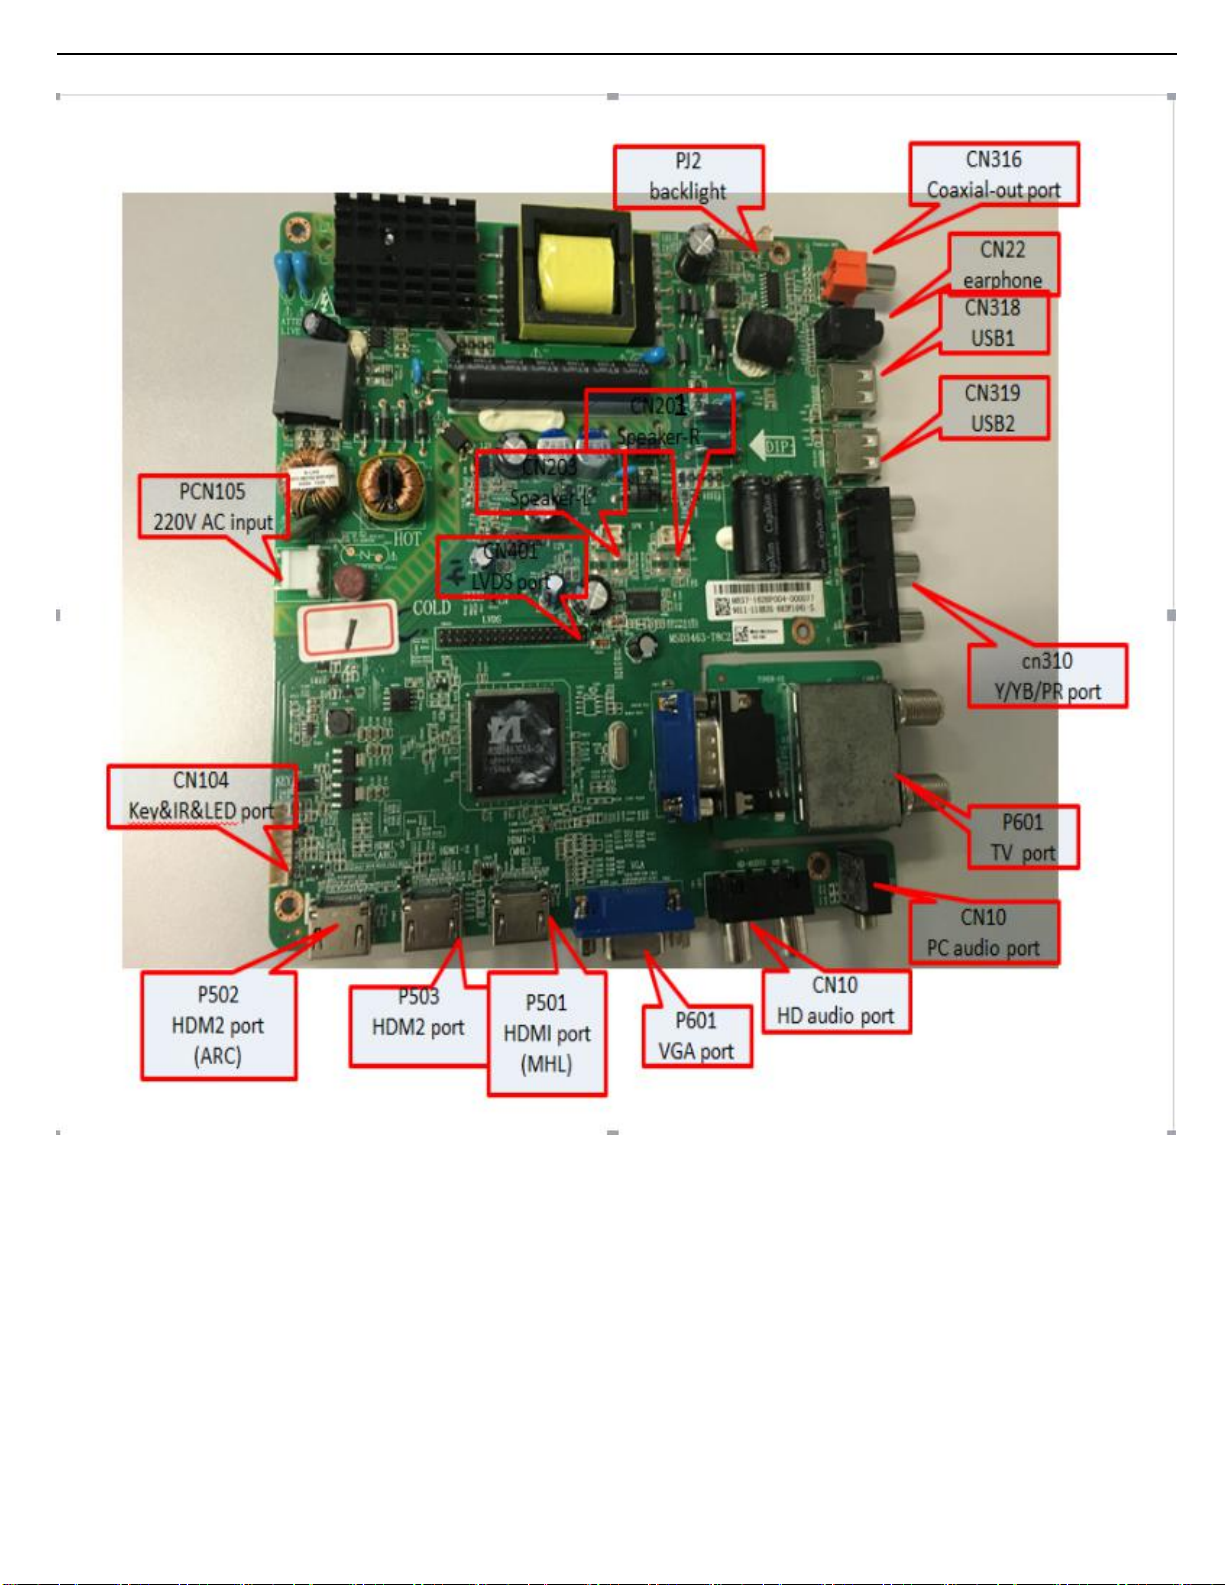
2. Connections Overview
6
Page 7
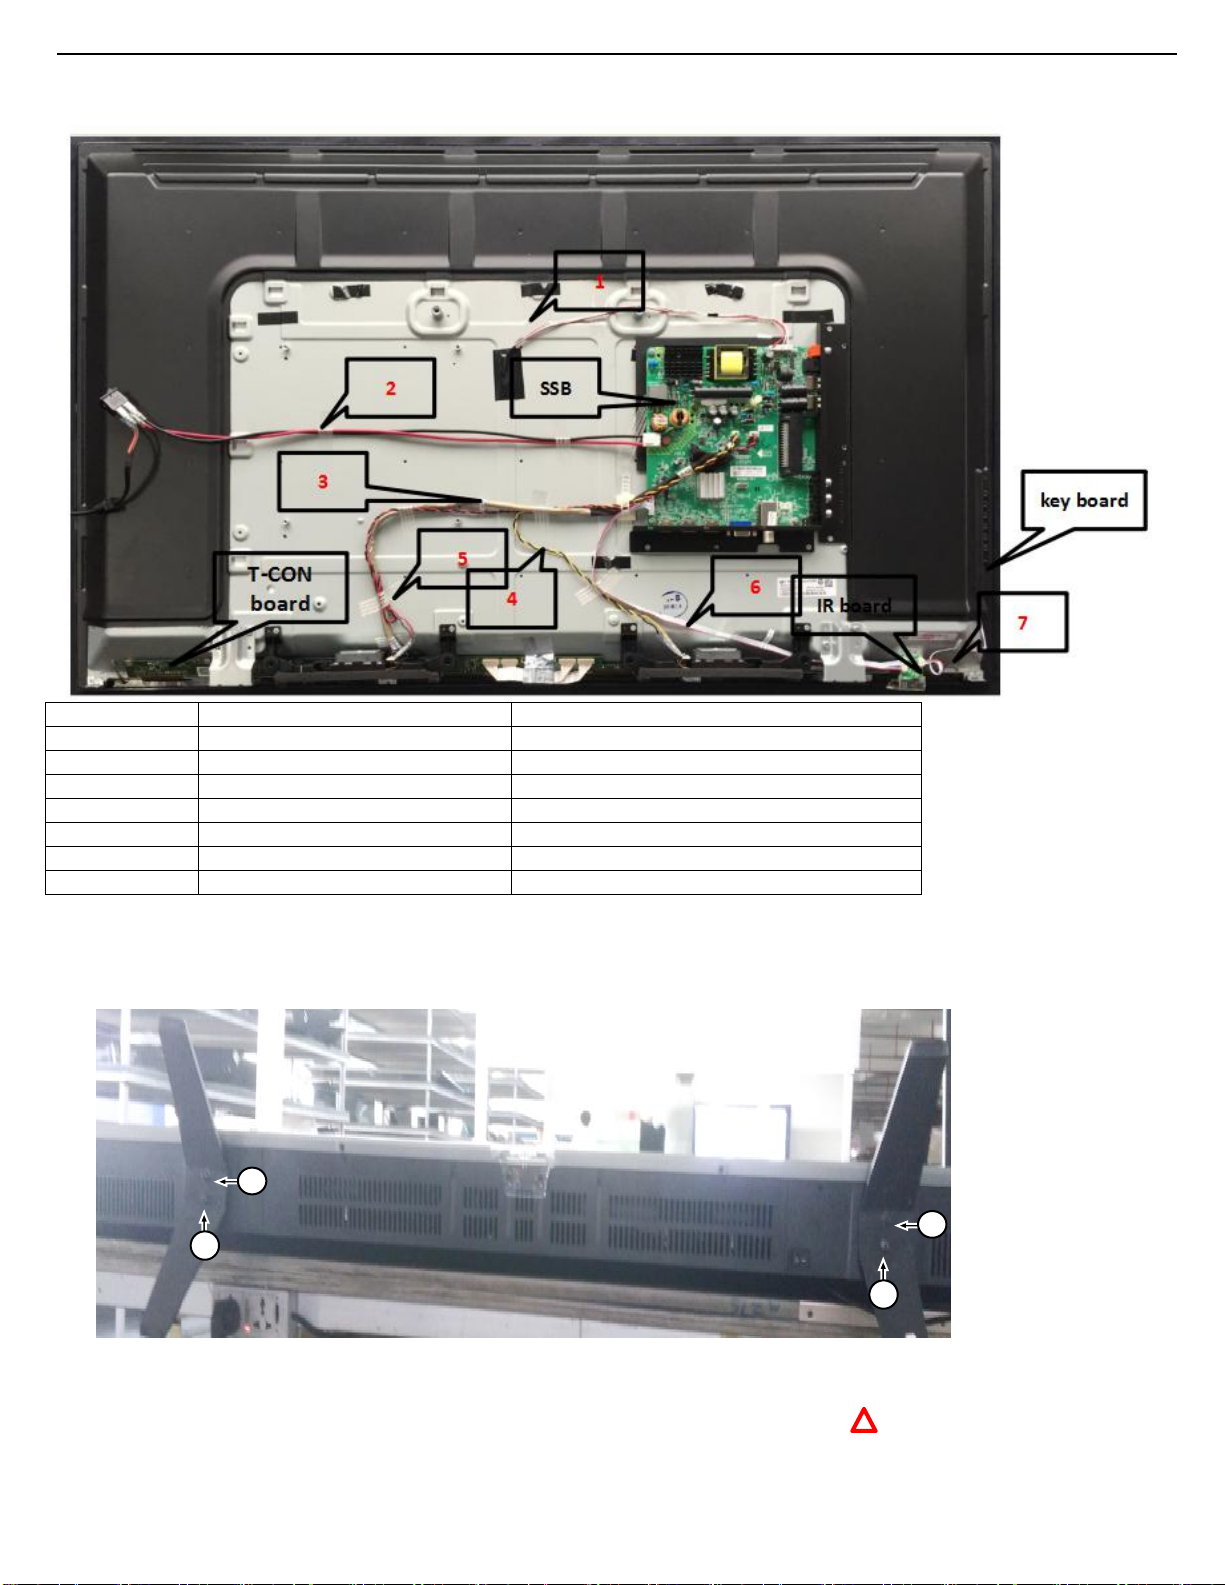
3. Mechanical Instructions
3.1 Cable Dressing
Serial no part description function
1 Backlight wire Connect to PJ2
2 Power wire Connect to PCN105
3 LVDS wire Cn401 to T-CON board
4 Speaker wire CN203 to speaker (yellow black wire)
5 Speaker wire CN201 to speaker (red black wire)
6 two-terminal wire CN104 to IR board
7 two-terminal wire IR Board to key board
3.2 Assembly/Panel Removal
3.2.1 Stand removal1. Remove the fixation screws [1] that secure the stand
2. Take the stand bracket out from the set.
1
1
1
1
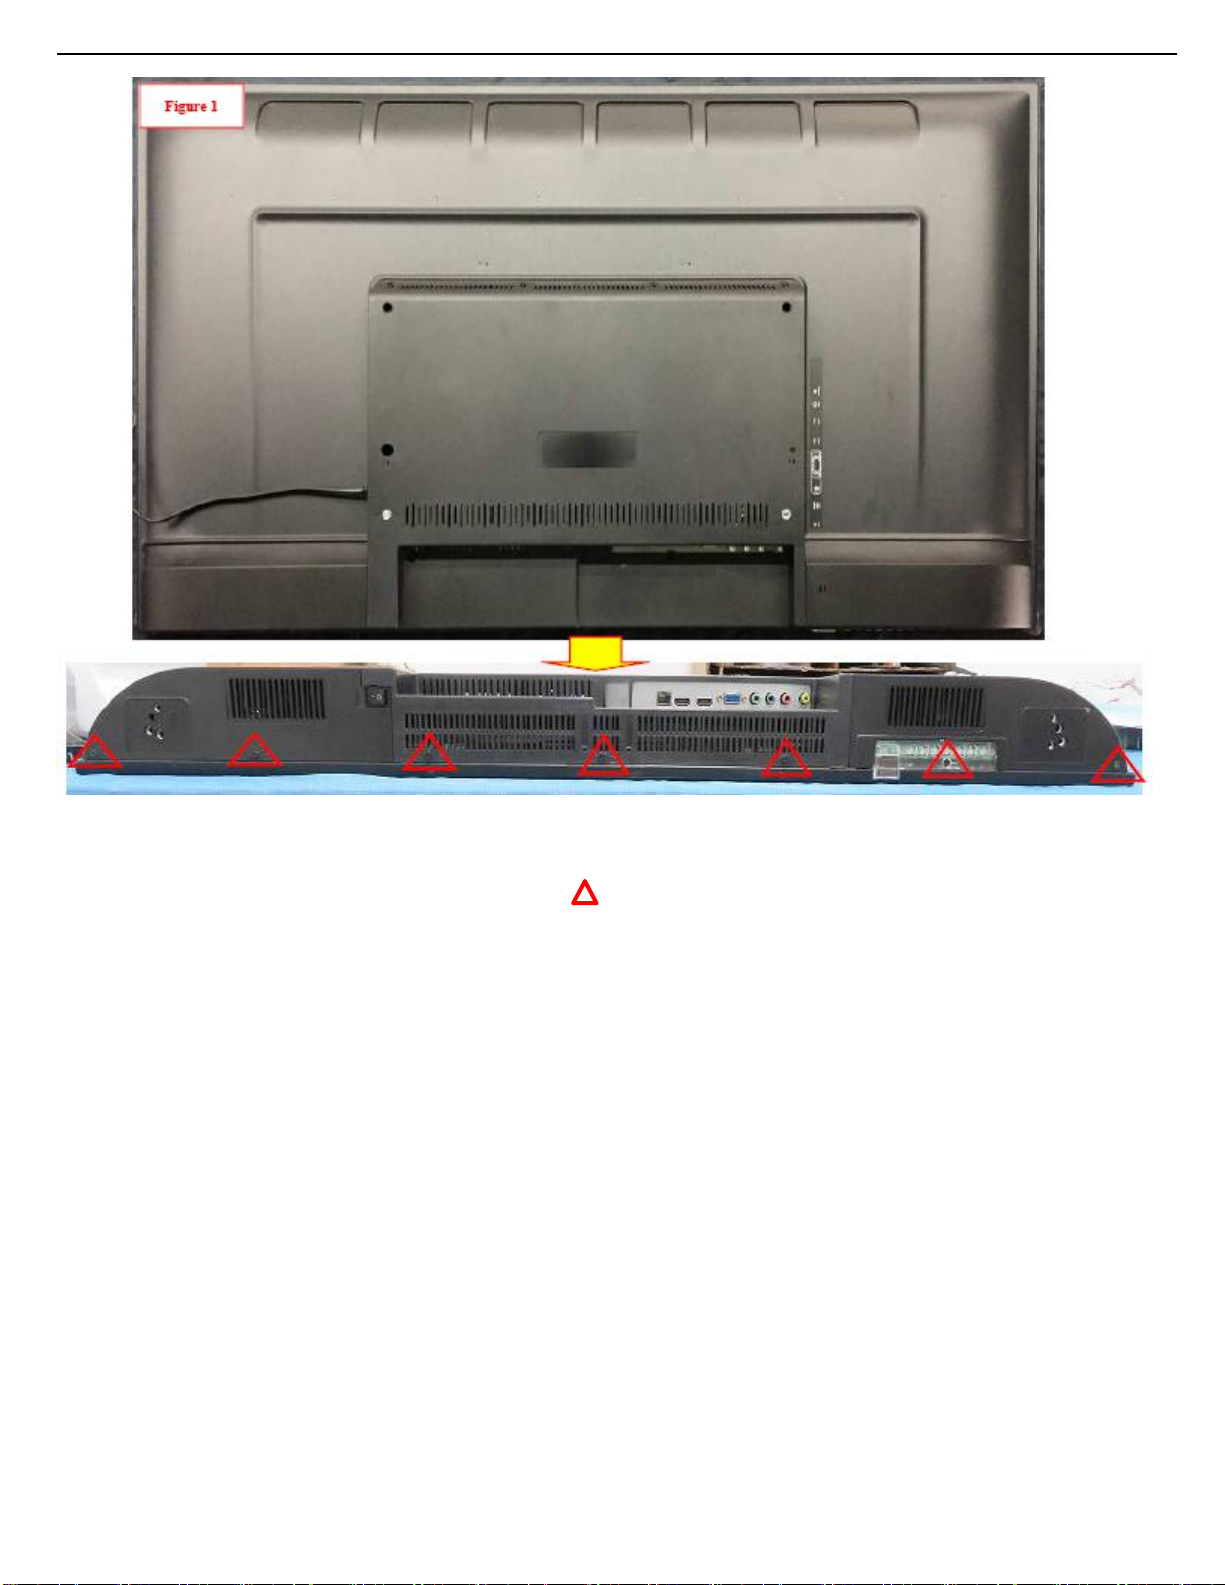
3.2.2 Disassemble Back Cover-1
1. Use electric screwdriver to dismantle 7PCS Ф3×6mm screws from back cover. Figure 1
2. Put removed screws at appointed material box.Do not mix it with others material
3. After self-check OK,flow it into next station by foot switch.
7
Page 8
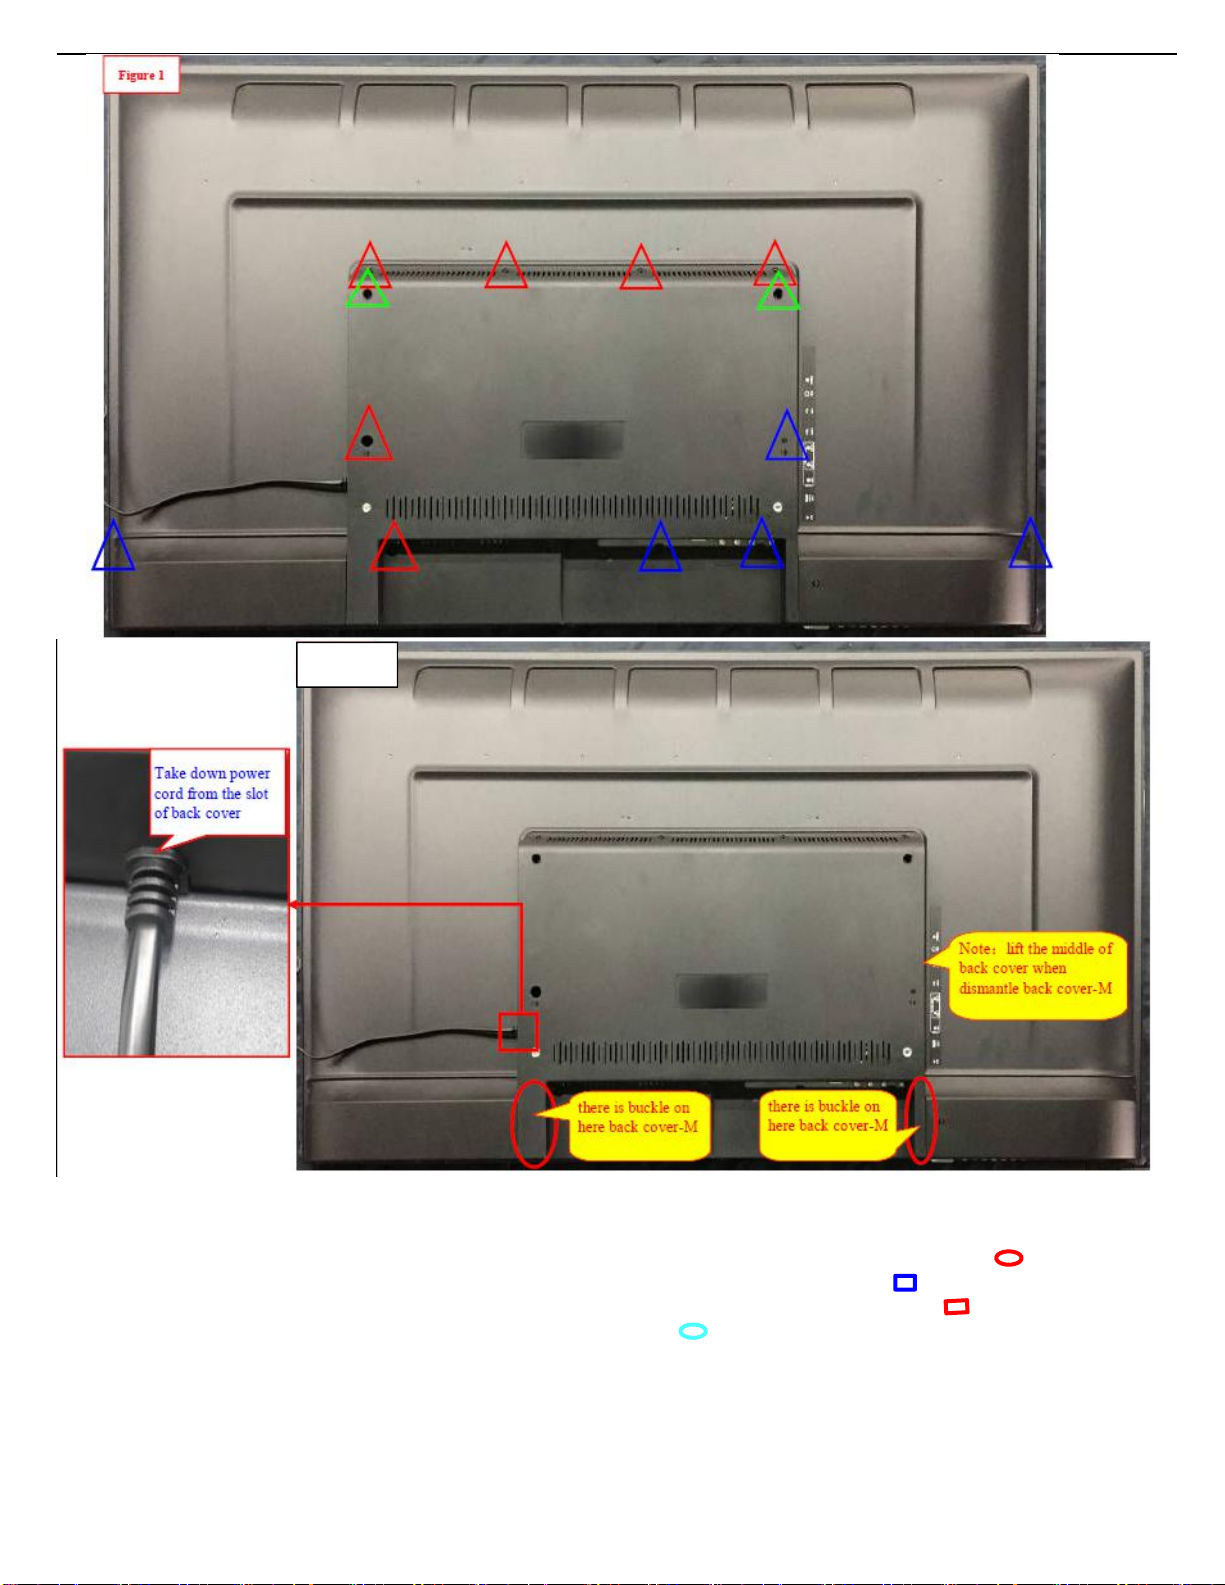
3.2.3 Disassemble Back Cover-2
1. Take off screws with electric screwdriver. Figure 1
2. Categorize and place removed screws at the appointed material box. Do not mix with other material.
3. Both hands respectively grasp the middle of left and right sides of back cover-M,lift the right side of back cover to separate the
4. After self-check OK,flow it into next station by foot switch.
buckle on lower right side of back cover-M,from back cover-L.Then Pushing back cover-M toward right and up to make the
buckle on the lower left side of back cover-M separate from back cover-R. Take out power cord from the slot and then take
down back cover-M and put it on the mat of circulated cart. Figure 2
8
Page 9
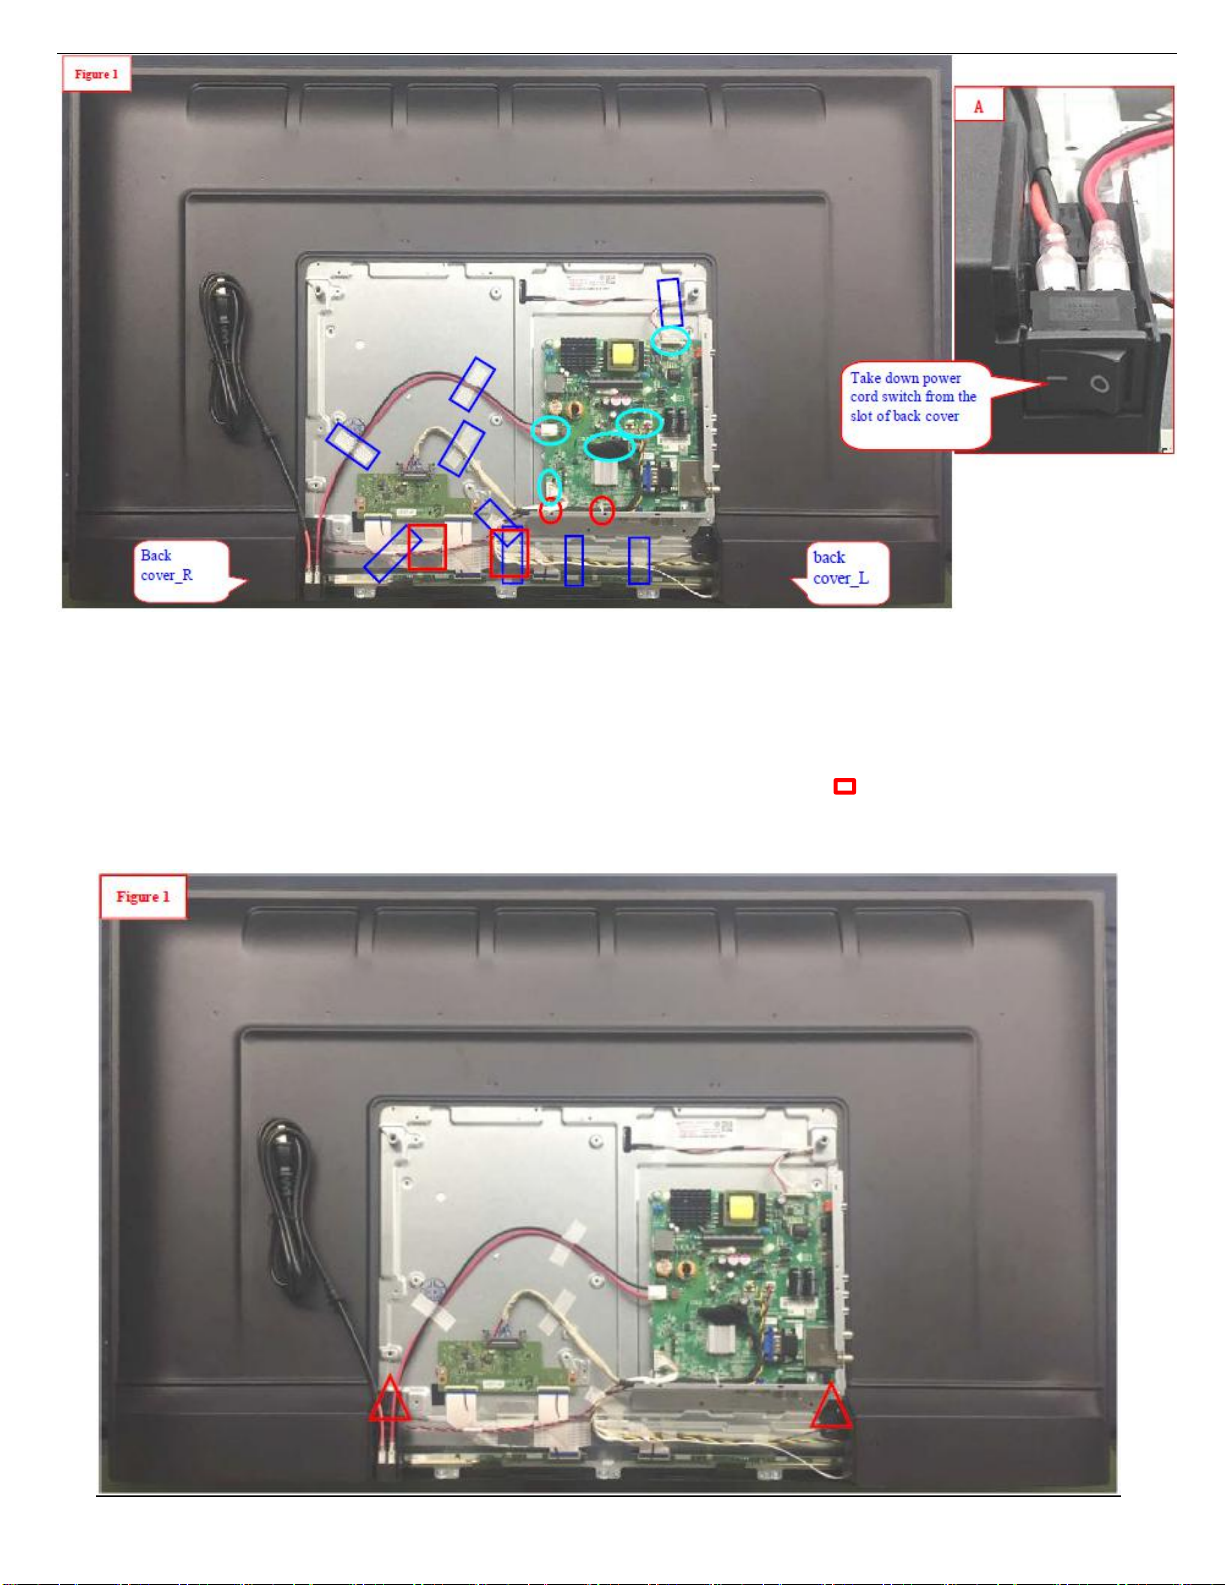
3.2.4 Disassemble Wire
Figure 2
1. Use diagonal pliers to cut off 2pcs cable ties from the baffle and place them at appointed position. Figure 1
2. As figure show,tear off fabric tapes from wires and place them at appointed position. Figure 1
3. As Figure show,tear off aluminum foil from FFC wire and place them at appointed position. Figure 1
4. Unplug all wire terminals from motherboard connector. Figure 1
5. Unplug rocker power switch and power cord from the slot of back cover. Figure1/A
6. Take down power cord and LVDS wire,categorize and place them at appointed position orderly
9
Page 10
3.2.5 Dismantle left/right back cover
1. Use electric screwdriver to dismantle 2pcs Ф3×6mm screws from back cover. Figure 1
2. Place removed screws at the appointed material box. Do not mix with other material
3. Take down back cover-L and back cover-R respectively,and place them at appointed position.
4. After self-check OK,flow it into next station by foot switch.
.
10
Page 11
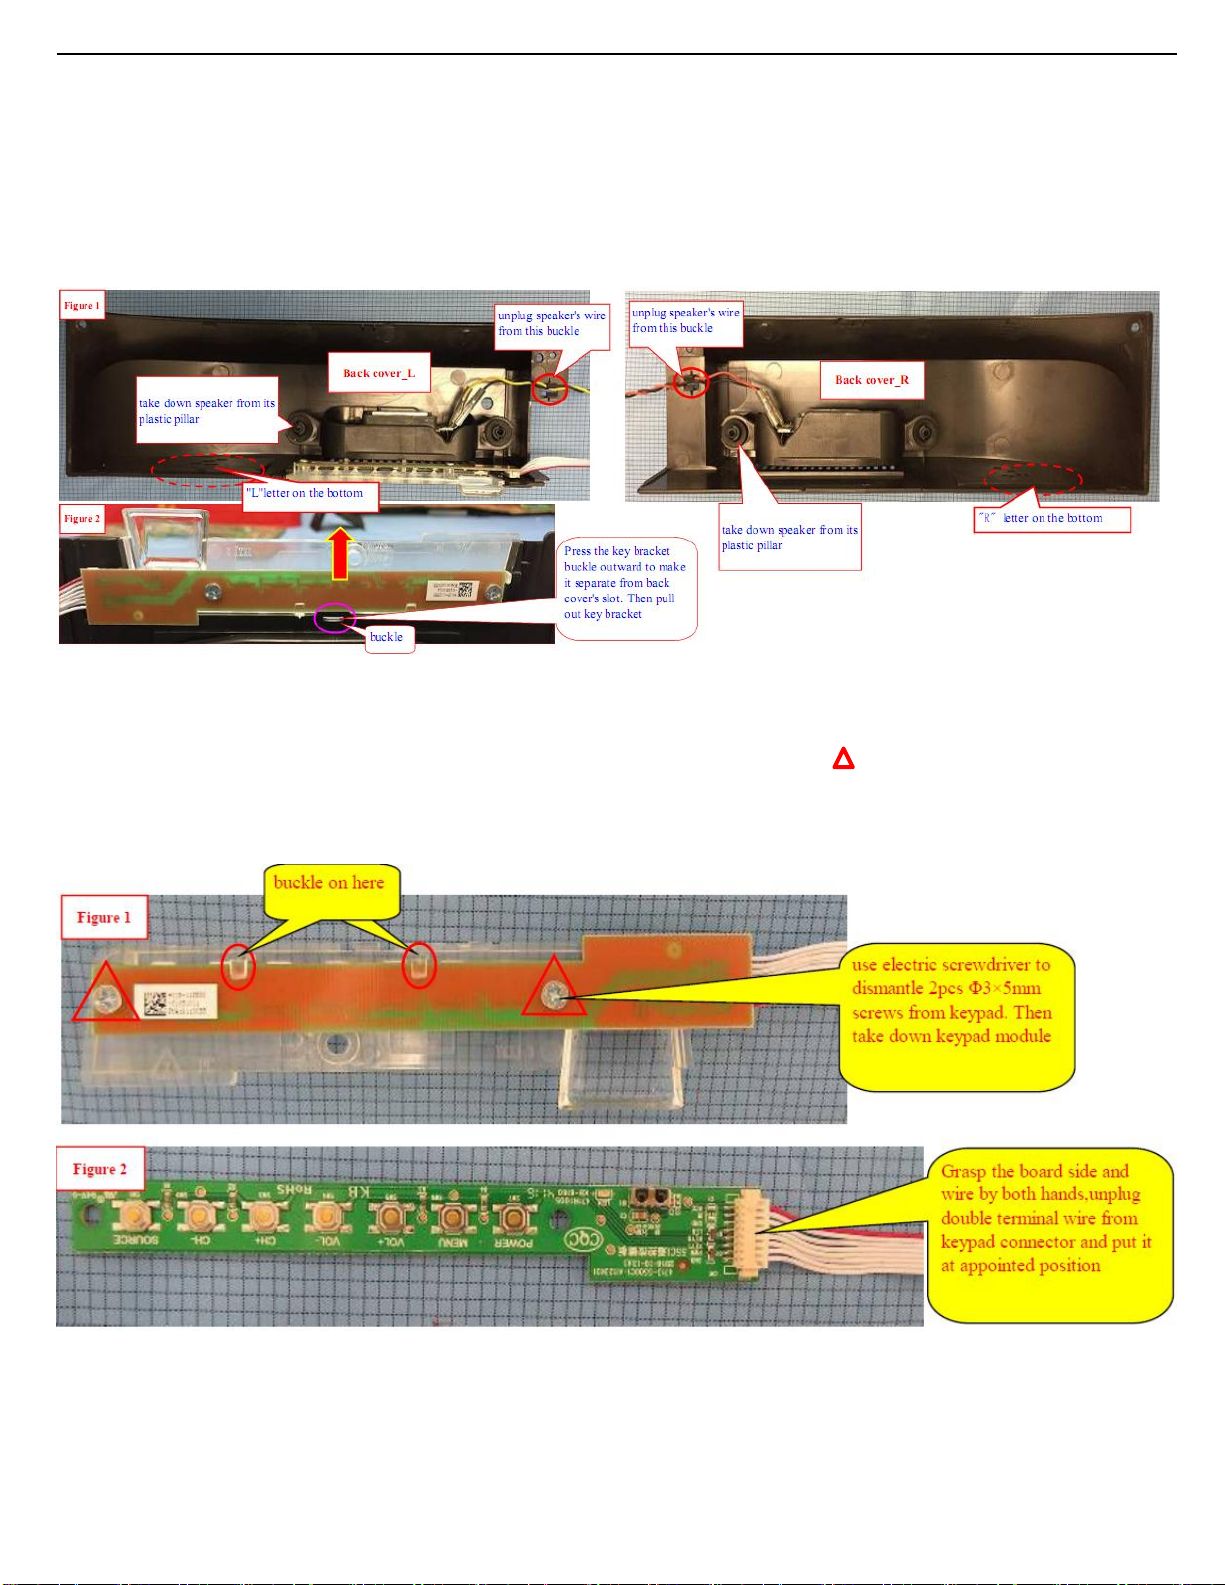
3.2.6 Dismantle speaker & key module
1. Unplug speaker's wire from the buckle of back cover-L,as Figure1 show. Then take down speaker from its plastic pillar. Figure 1
2. Unplug speaker's wire from back cover-R by the same way. Figure 1
3. Press the key bracket buckle outward to make it separate from back cover's slot.Then pull out key bracket. Figure 2
4. Categorize and place removed speaker at appointed position orderly.
5. Place removed key module,back cover-L,back cover-R at the appointed position orderly.
3.2.7 Dismantle keypad module
1. Use electric screwdriver to dismantle 2pcs Φ3×5mm screws from keypad. Figure 1
2. Place removed screws at the appointed material box. Do not mix with other material.
3. Place removed key bracket at the appointed position orderly.
4. Unplug double terminal wire from keypad connector. Figure 2
5. Place removed keypad and wire at the appointed position orderly.
11
Page 12
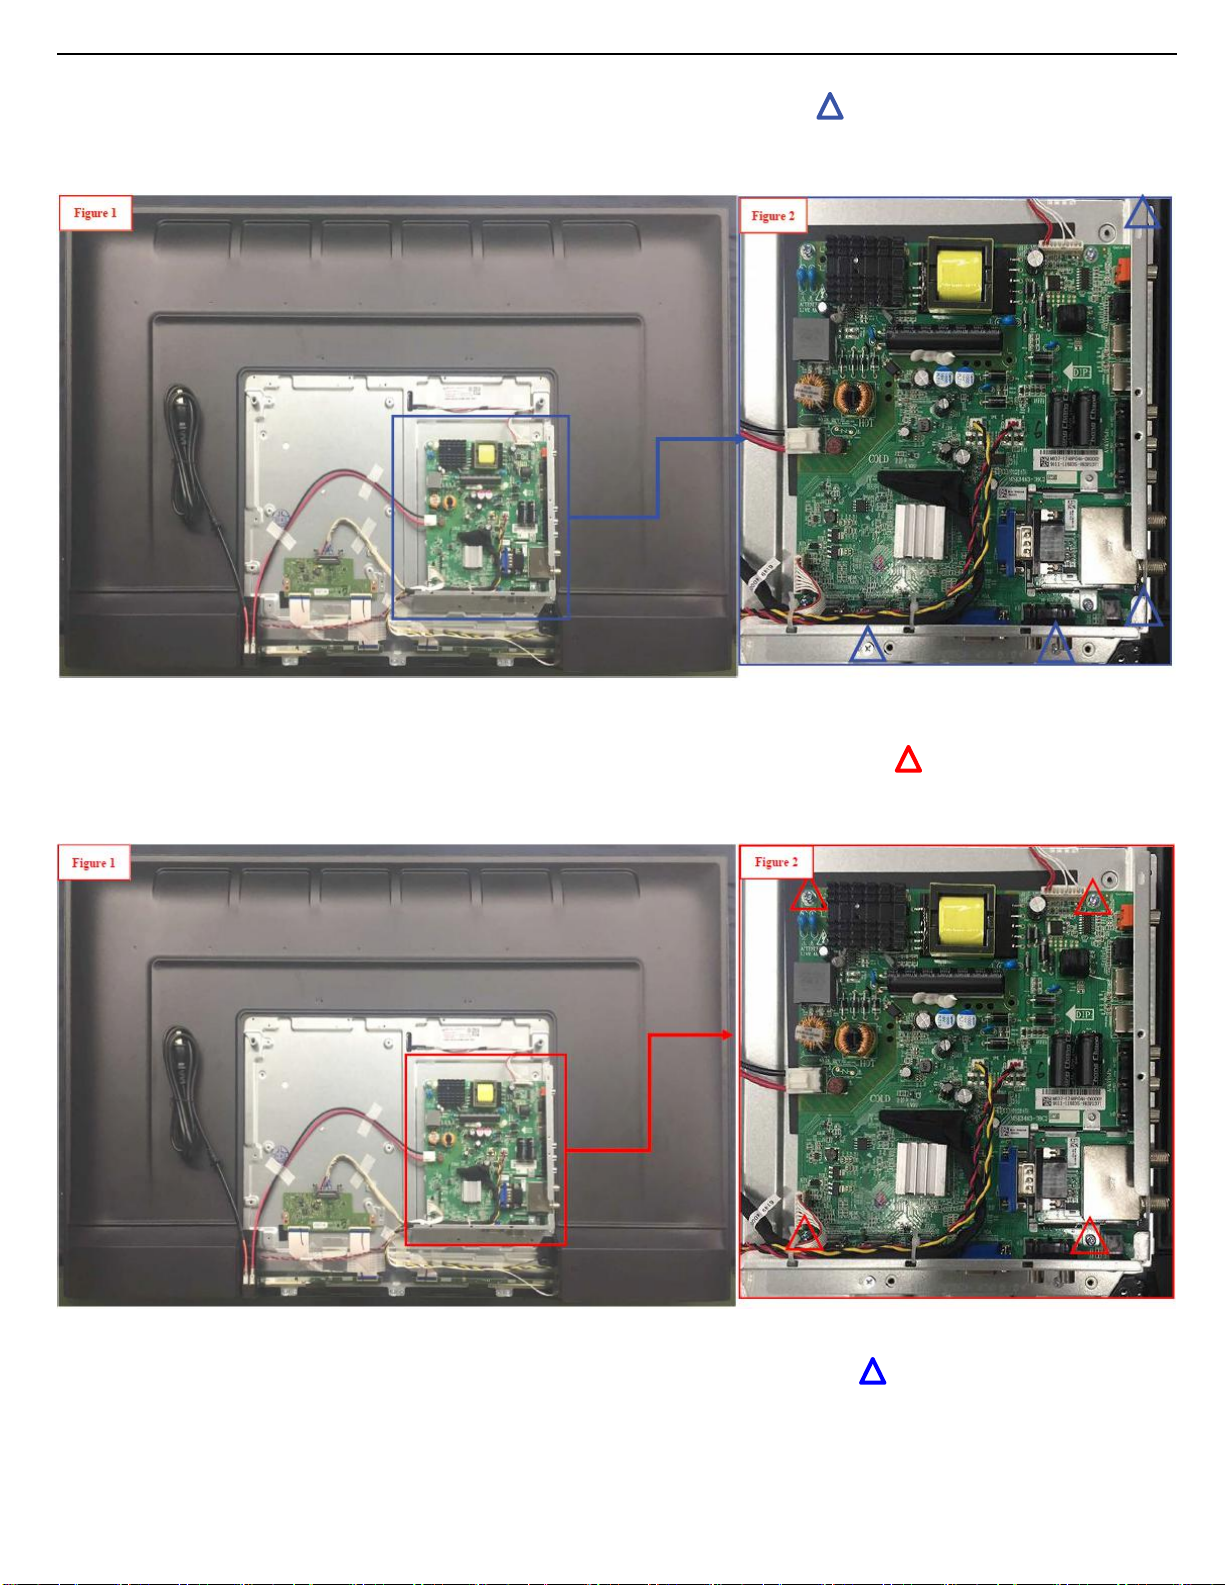
3.2.8 Dismantle IO baffle
1. Use electric screwdriver to dismantle 4pcs Ф3×3mm screws from IO baffle. Figure 2
2. Put removed screws in the material box. Do not mix with other materials.
3. Take down IO baffle from right side and lower side,and place them at appointed position orderly.
4. After self-check OK,flow it into next station by foot switch.
3.2.9 Dismantle motherboard
1. Use electric screwdriver to dismantle 4PCS M3×7mm screws from motherboard. Figure 2.
2. Put removed screws in the material box. Do not mix with other materials.
3. Place motherboard on the ESD tray.
4. After self-check OK,flow it into next station by foot switch.
3.2.10 Dismantle base support
1. Use electric screwdriver to dismantle 8pcs Φ4×6mm screws from base support. Figure 1
2. Put removed screws in the material box. Do not mix with other materials.
3. Put removed base support at the appointed position orderly
12
Page 13
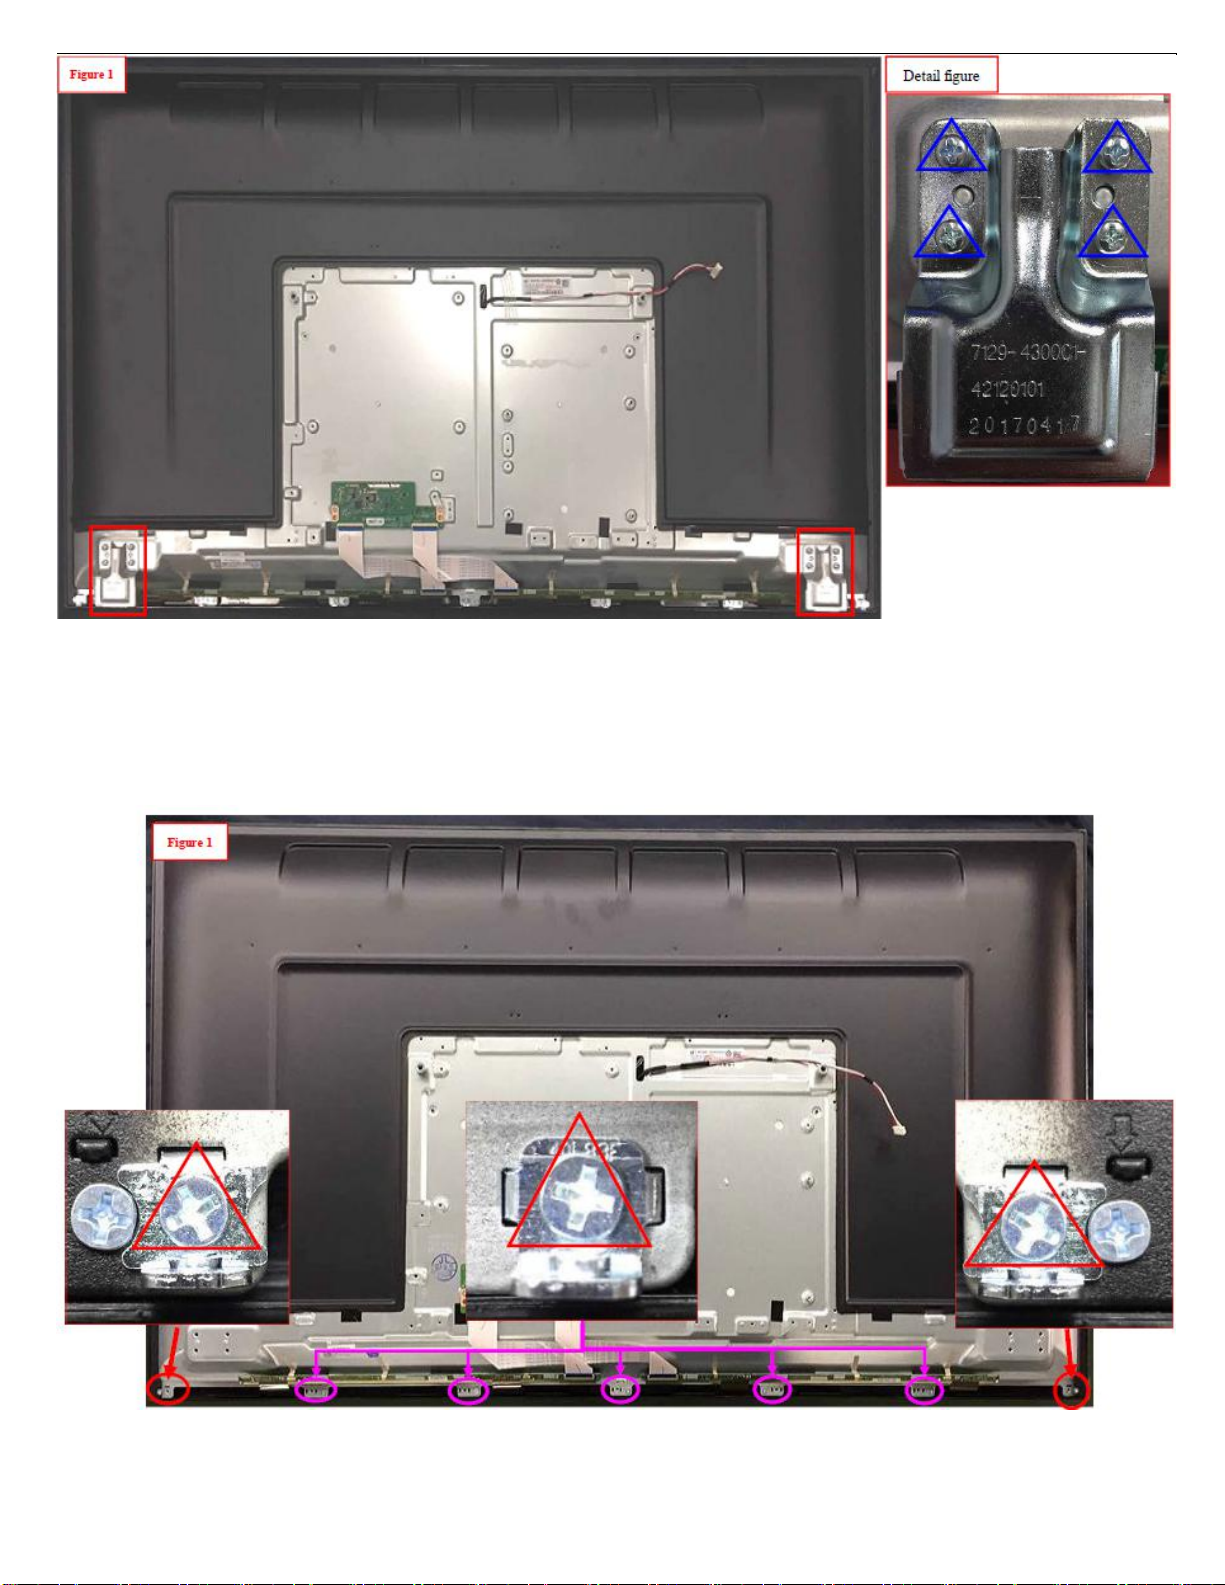
3.2.11 Dismantle lower bracket
1. Use electric screwdriver to dismantle 7pcs Ф3×3mm screws from lower bracket. Figure 1
2. Put removed screws in the material box. Do not mix with other materials.
3. Take down lower hardware and hardware bracket,put them at appointed position orderly.
3.2.12 Dismantle mylar film and hexagonal screw
1. Tear off mylar film from back plate,as figure show. Figure 1/A
13
Page 14
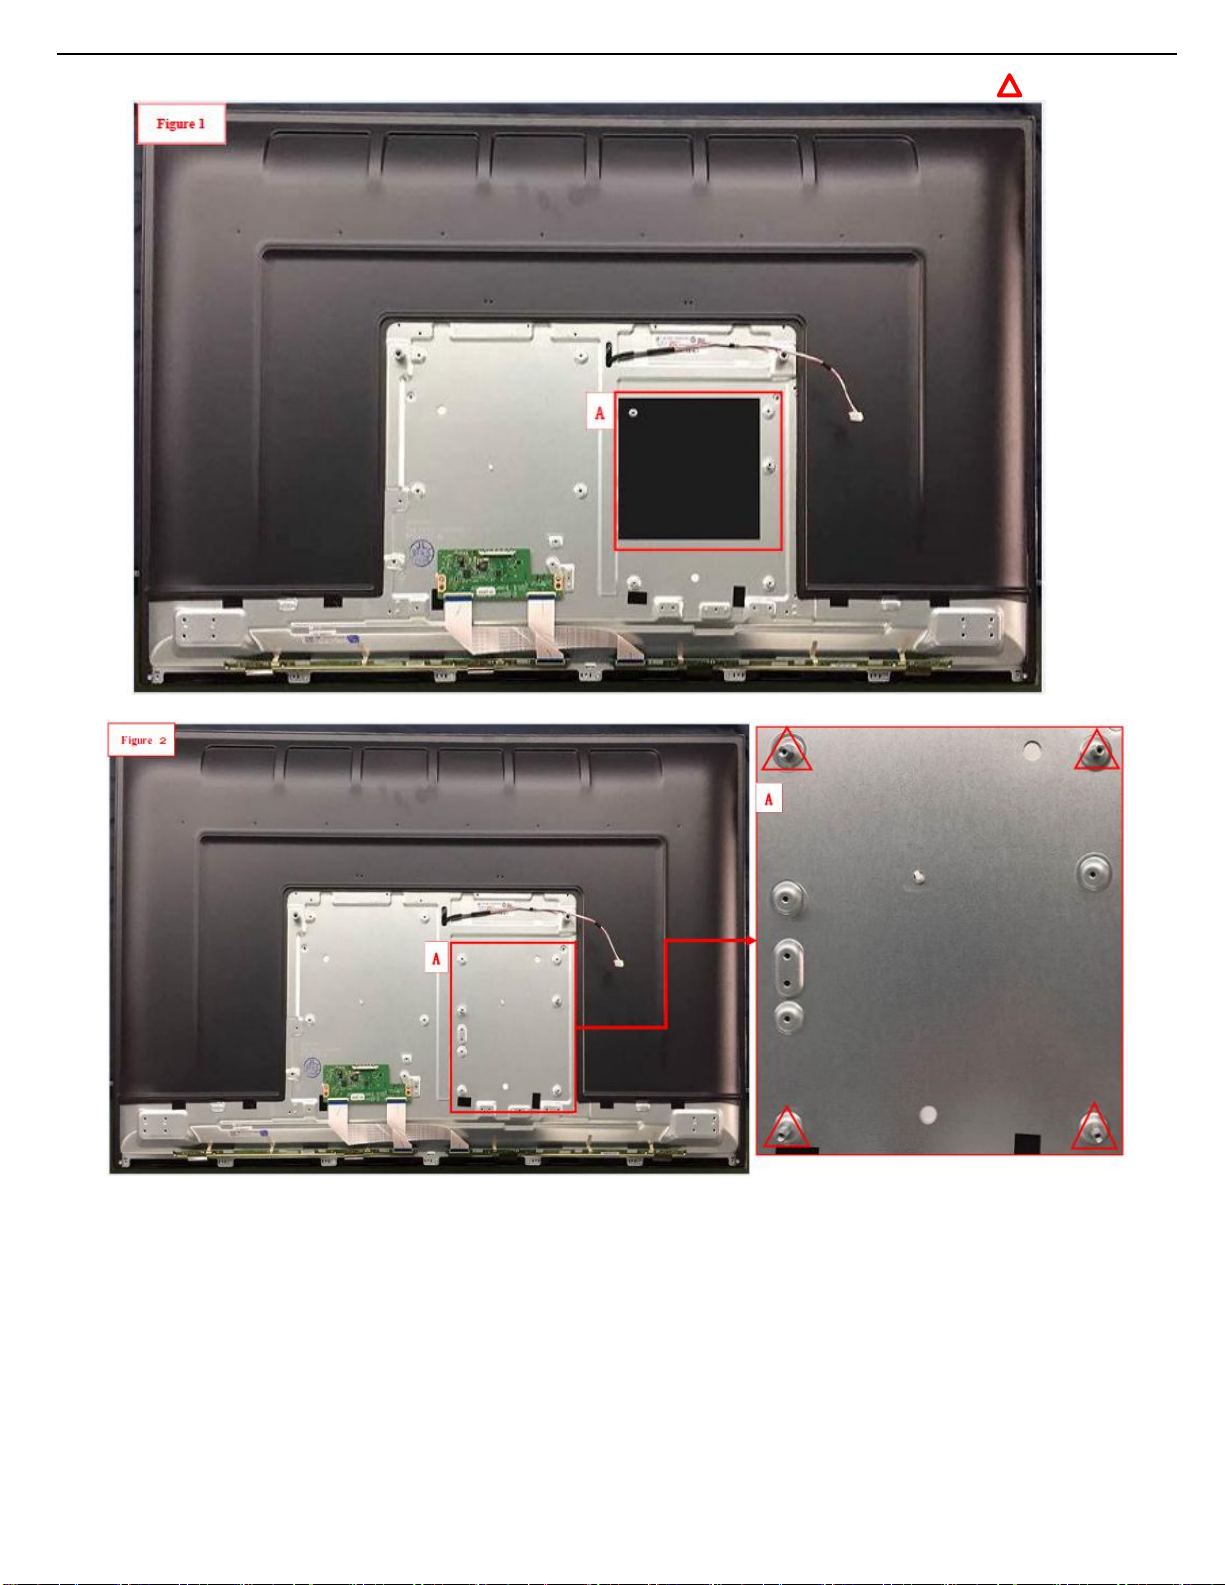
2. Tear off mylar film and put it at appointed position.
3. Remove the keyboard control panel as described earlier.
4. Remove the stand bracket as described earlier.
5. Remove the IR/LED as described earlier.
6.
Remove the fixations screws that fix the metal clamps to the front bezel. Take out those clamps.
7.
Remove all other metal parts not belonging to the panel.
8. Lift the LCD Panel from the bezel.
3. Use electric screwdriver to dismantle 4pcs hexagonal screws from back plate,as figure show. Figure 2/A
3.2.13 LCD Panel
1. Remove the SSB as described earlier.
2. Remove the PSU as described earlier.
When defective, replace the whole unit.
14
Page 15
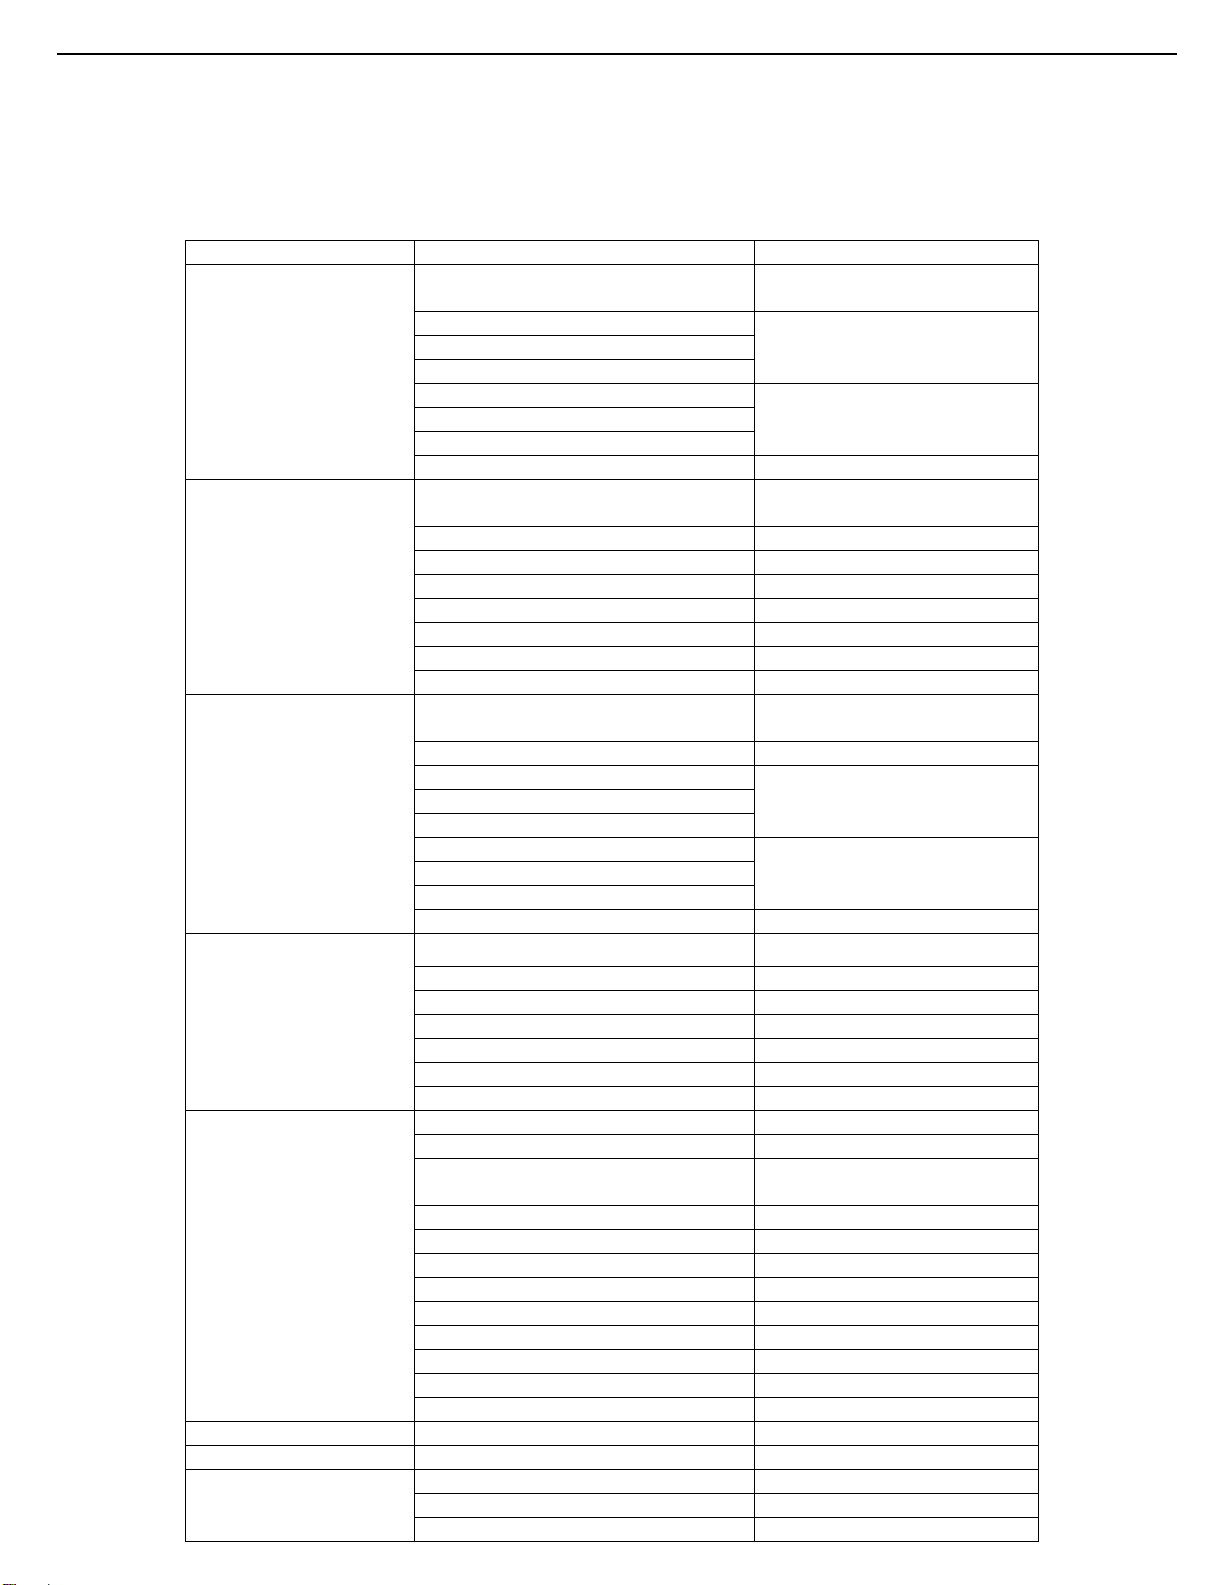
4. Factory Mode
To perform extended alignments.
yadj
y
py
p
p
p
p
g
g
Purpose
Press the following key sequence on a standard RC transmitter: “1999” directly followed by MENU,
Primary menu Secondary menu Value,remark
ADC ADJUST
PICTURE MODE
W/B ADJUST
SSC
Spectial set
Qmap adjsut PQ setting
PEQ PEQsetting
other
MDOE
R-GAIN
G-GAIN
B-GAIN
R-OFFSET
G-OFFSET
B-OFFSET
AUTO ADC ADC automaticall
MODE
PICTURE MODE D
BRIGHTNESS BRIGHTNESS
CONTRAST CONTRAST
COLOR COLOR
SHARPNESS SHARPNESS
TINT TINT
Copyall No function
Source
TEMPERATURE Cool, Standard, Warm
R-GAIN
G-GAIN
B-GAIN
R-OFFSET
G-OFFSET
B-OFFSET
Co
all No function
MIU Enable DDR spectrum enable
MIU0 Span Exhibition frequentlywide
MIU Ste
LVDS enable LVDS spectrum enable
LVDS Span Exhibition frequentlywide
LVDS Ste
LVDS swin
2HOUR OFF 2hourspower off enable
WDT on/off
WHITE PATTER
GE/GOP PATTERN
BMAP PATTERN
Restore user default Factory reset
PVR_RECORD ALL PVR Record on/off
Power on/off/Mem
Mirror Enable Mirror Enable enable
Ageing mode Ageing mode enable
Auto Volume on/off
PVR Encrypt on/off
Test pattern
UART DEBUG DEBUG ON/OFF
HDMI CEC/ARC CEC/ARC ON/OFF
15
VGA/YPBPR(SD)/YPBPR(HD)
,Selection
Front-end gain adjustment
Clamp level adjustment
ust
VGA/HDMI1/HDMI2/HDMI3/
DTV/ATV/AV/YPBPR
namic/Standard/Sotf/User
VGA/HDMI1/HDMI2/HDMI3/
DTV/ATV/AV/YPBPR
White level adjustment
Black level adjustment
Spread spectrum ste
Spread spectrum ste
LVDS swin
OFF/White/Red/Green/Blue/Bla
ck/192Grey
Page 16
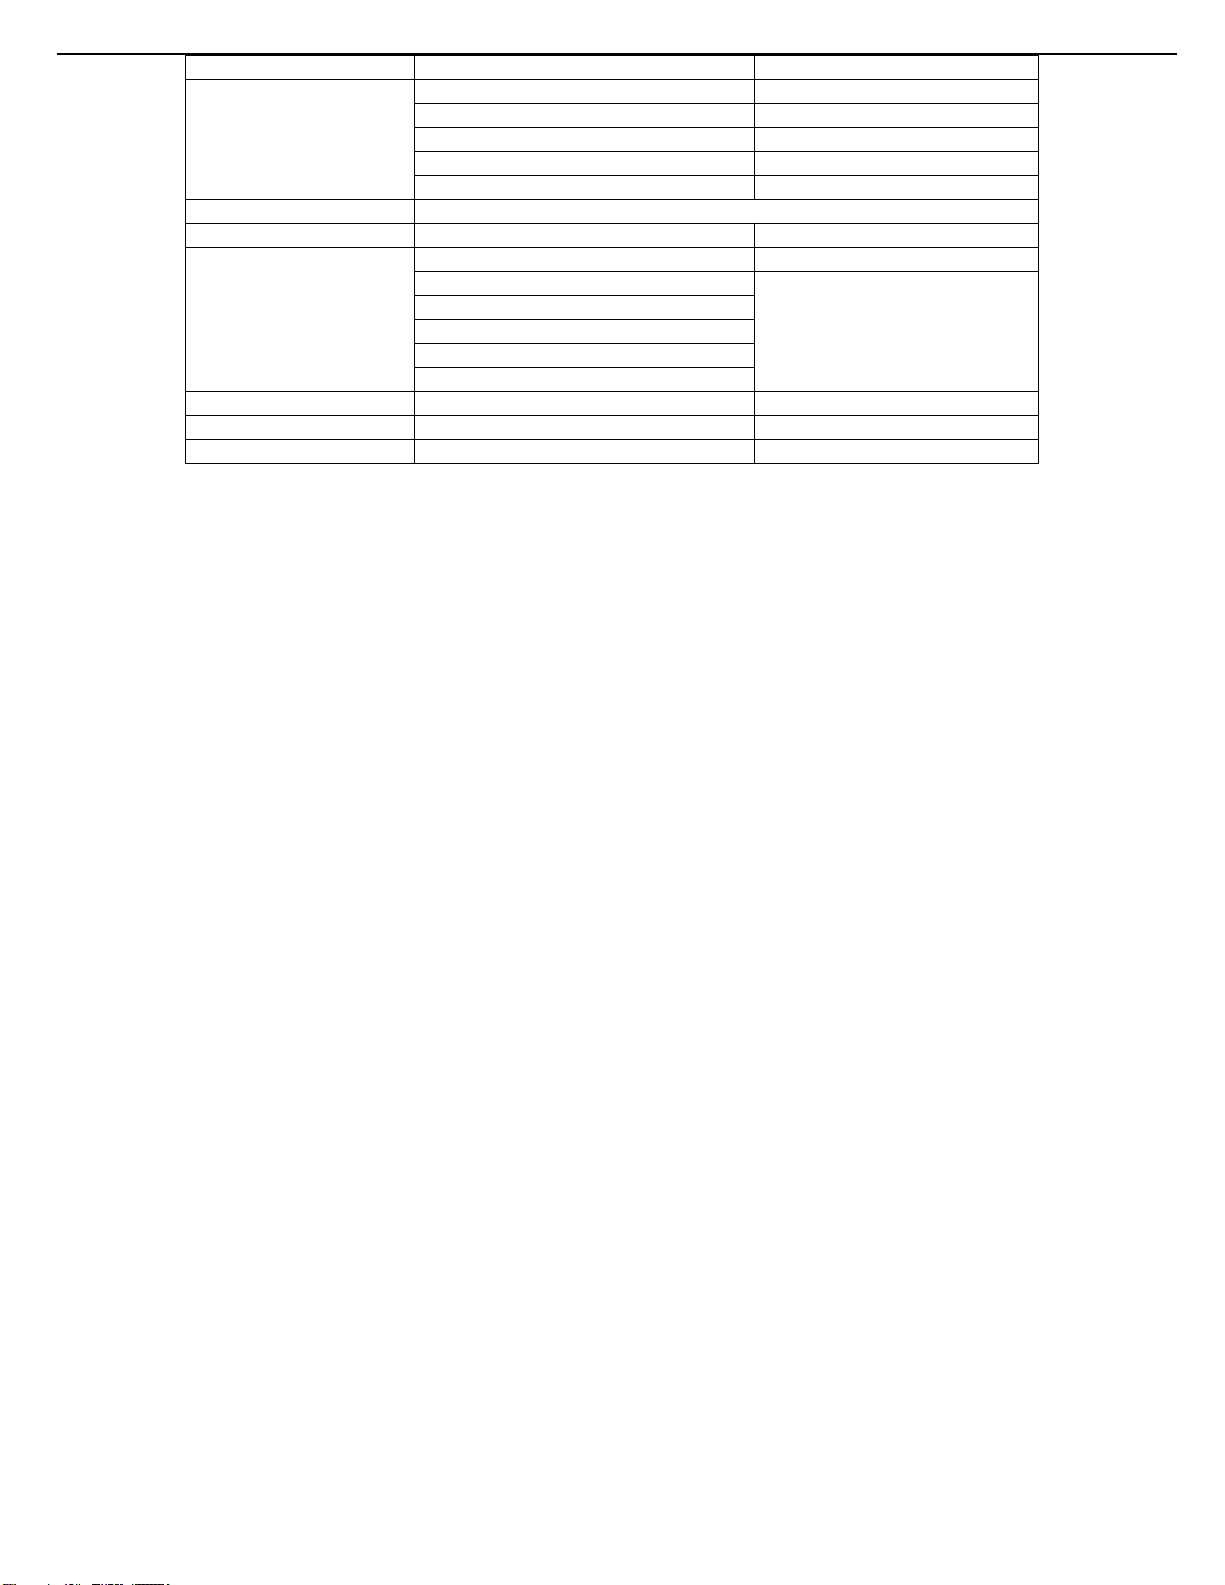
Backlight Adjust backlight
Overscan_resolution Reselution select
Overscan_hsize Adjust overscan H size
OverScan
HDCPKeyusb upgrade HDCPKeyusb upgrade
SW information SW information
Non-linear
Channel table1 KTC factoryFrequecytable set
Channel table2 KTC factoryFrequecytable set
Channel dvbt KTC factory Frequecy table set
Overscan_hposition Adjust overscan Hposition
Overscan_vsize Adjust overscan V size
Overscan_vposition Adjust overscal Vposition
MODE Feature Selection
OSD 0
OSD 25
OSD 50
OSD 75
OSD 100
Curve adjustment
16
Page 17
5. Software Upgrading and Panel Code
5.1 Software Upgrading
1). Changed the file name to "MERGE.bin", then stored software in the FAT32 format blank U disk.
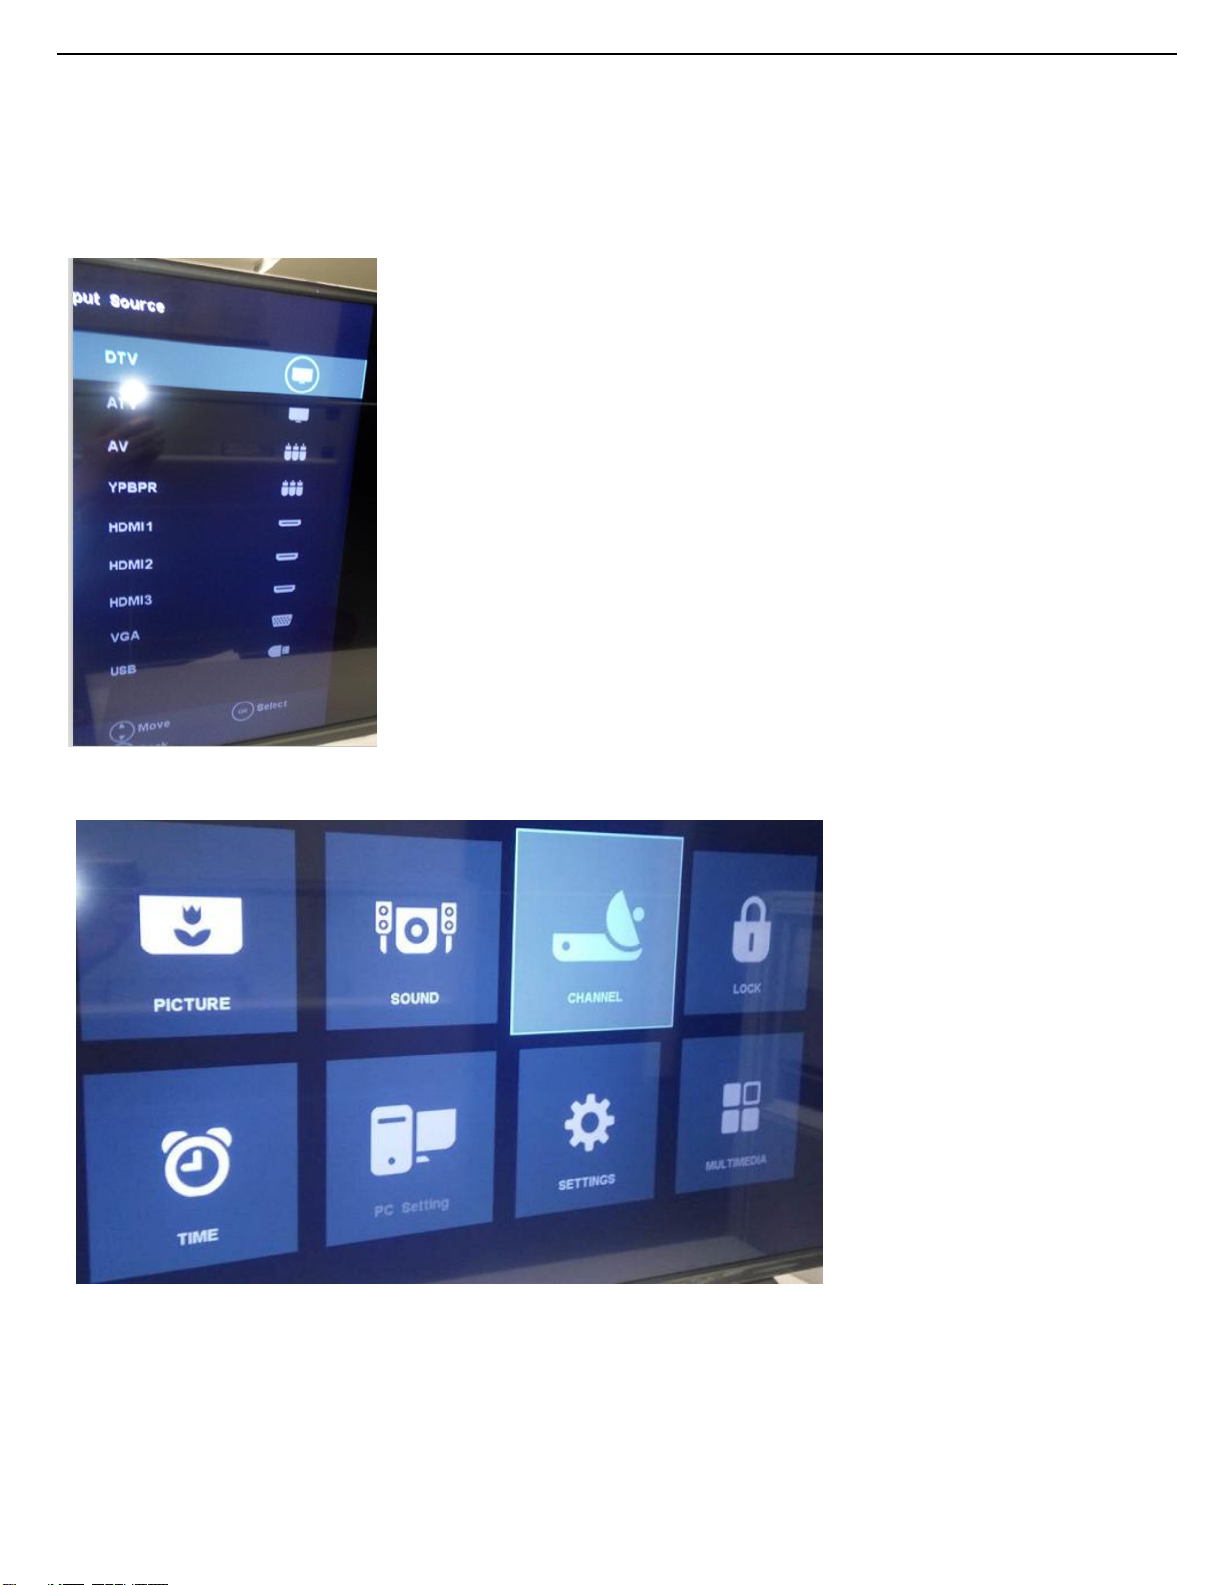
2). Insert USB flash disk into the USB upgrade port, upgrade the software according to the following the operating instructions:
Select AIR or DTV signal source, press Menu key to pop up the main menu, then choose.
Operations and procedure of software upgrading:
Select CHANNEL, press right key or OK key to enter.
17
Page 18
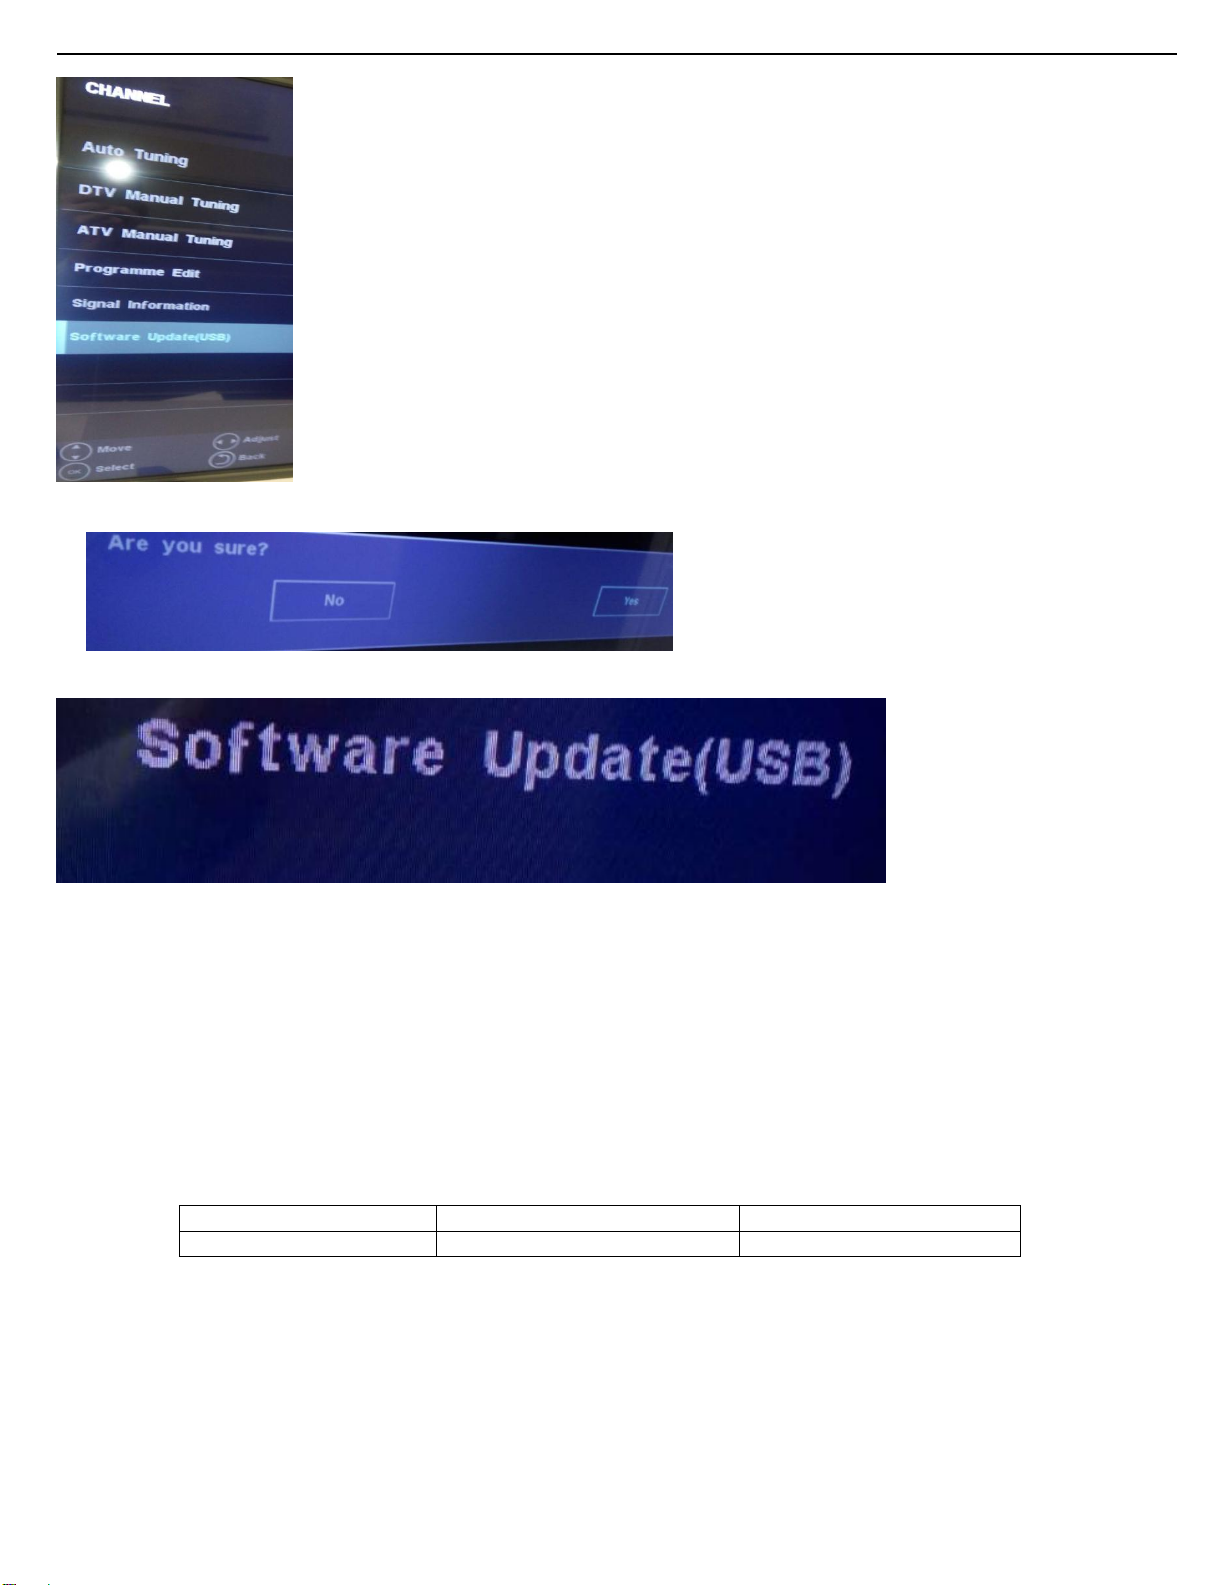
Select Software Update(USB), press right key or OK key to enter.
5.1.4 Notice:
①. When the machine Upgrading (U disk light flash), do not remove U disk or switch off the power, otherwise it will
②. The machine must be power off when inserted or pulled out U disk, to avoid U disk or damage the machine.
5.2 Panel Code
Software update menu will pop up when press confirm key, then select “Yes” to confirm:
The process of software updating:
Method 2:Keep pressing VOL+ and CH+ keys on the machine panel, power on the machine, the standby light flashes quickly after
about 5 seconds, standby light extinguish and turn into lighting after about a minute, means that the upgrade is completed.
destroy the software and lead can not upgrade.
Press the following key sequence on a standard RC transmitter: “1999” directly followed by MENU, can see the panel type
information from factory menu, see the Panel PN from the configuration table
CTN_ALT BOM# Panel Type Panel PN
43PFH4082/96 K430WDK3-LA260A4 7422-430LGK-385AK041-F
18
Page 19
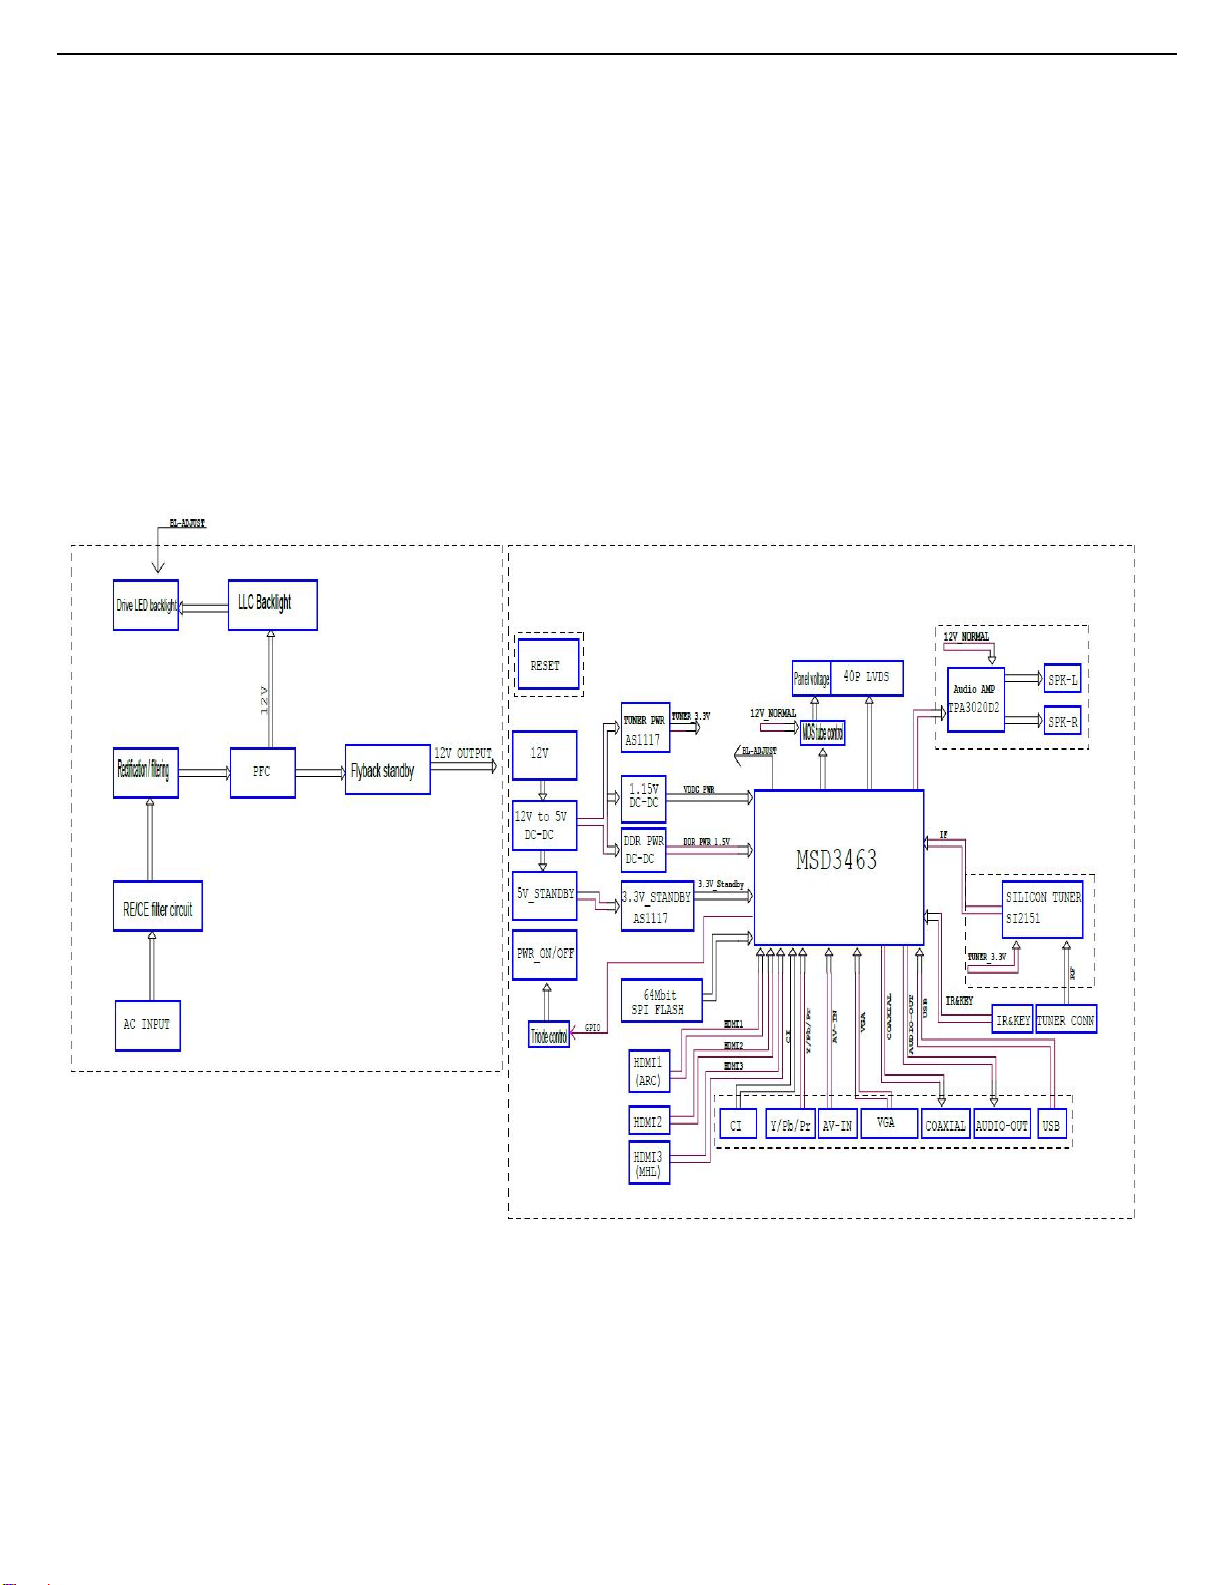
6. Circuit Descriptions
Series 4082 43PFH4082/96
TUNER POWER AS1117
VDDC POWER
MSD3463GSA-Z1 T8C2
DDR POWER 1.5V
3.3V STANDBY AS1117
64 Mbit SPI FLASH
HDMI1 ARC
HDMI2 PORT
HDMI3 MHL
6.1 Introduction
The 4082 is covered by MSD3463 platform. The major deltas versus its predecessor support DVB-T, with also multi-media, Video out
The 4082 chassis comes with the following stylings:
6.1.1 Implementation
Key components of this chassis are:
6.1.2 Block diagram
19
Page 20
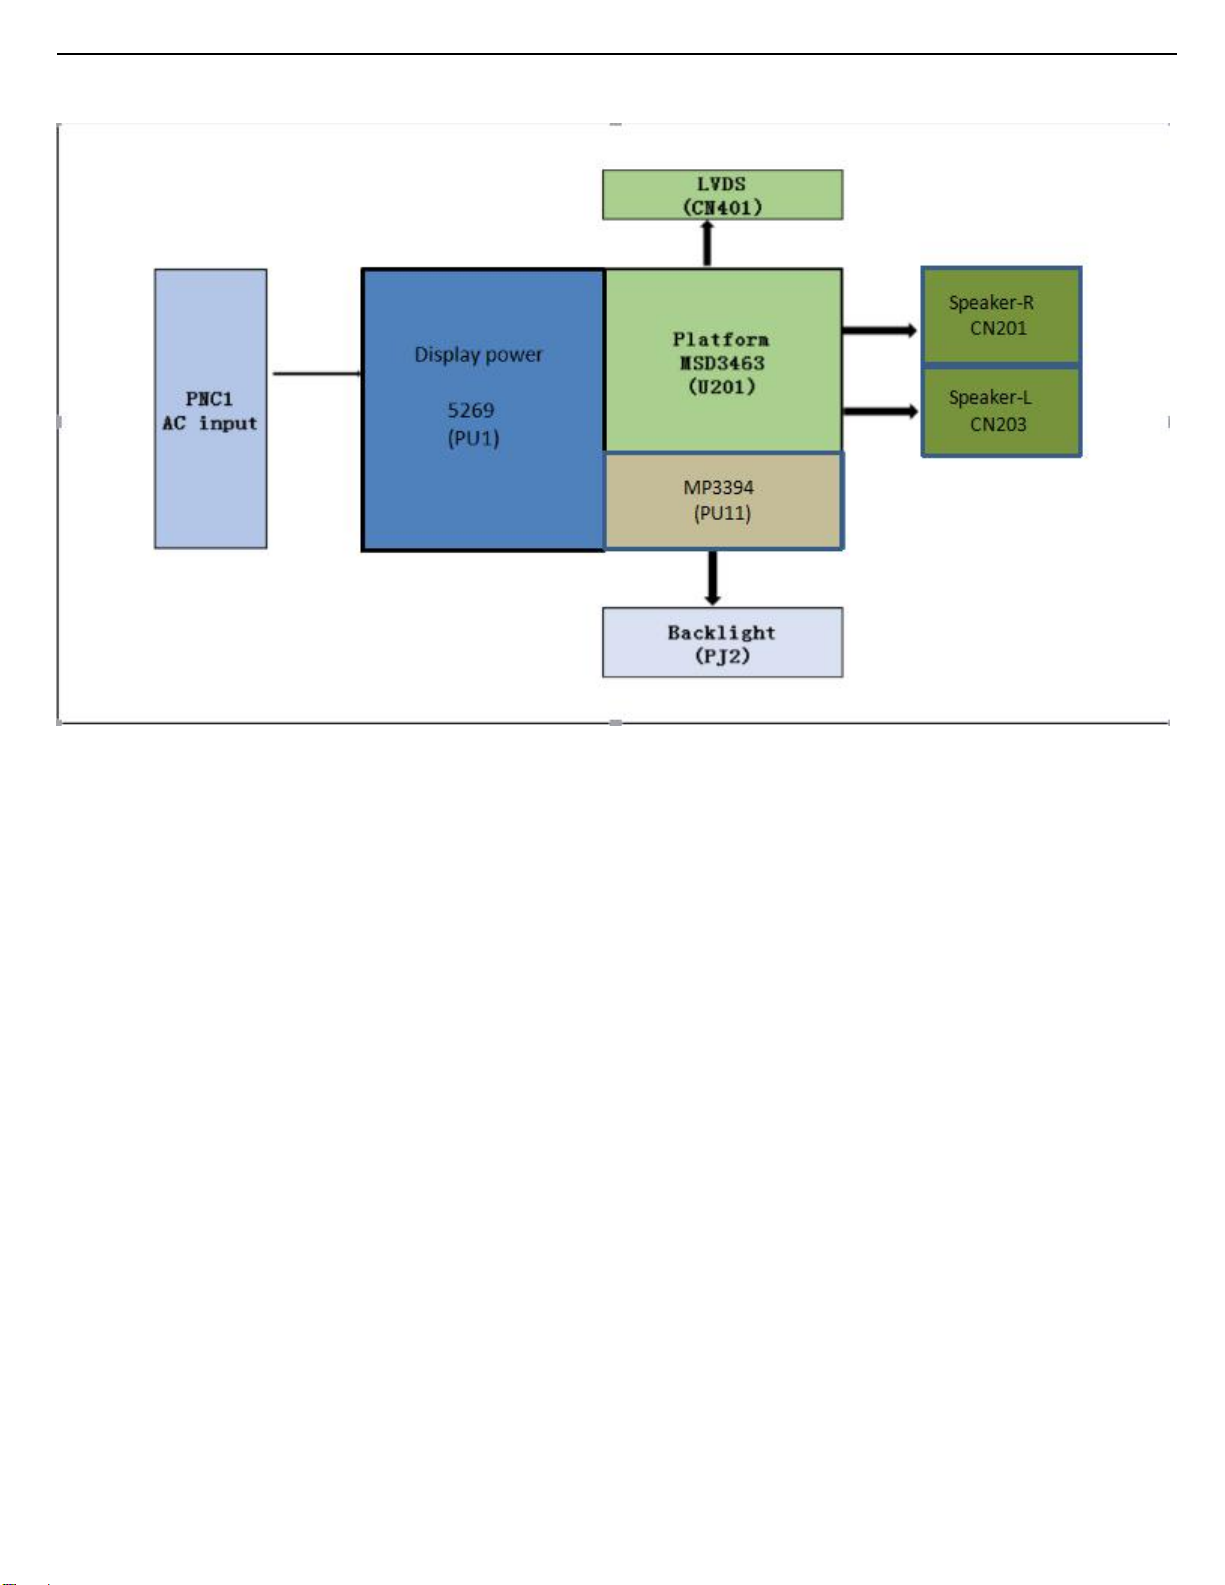
6.2 Power Supply
Power architecture of this platform.
6.2.1 Power Supply Unit
All power supplies are a black box for Service. When defective, a new board must be ordered and the defective one must be returned,
unless the main fuse of the board is broken. Always replace a defective fuse with one with the correct specifications! This part is available
in the regular market.
Consult the Philips Service web portal for the order codes of the boards.
Important delta’s with the platform are:
• New power architecture for LED backlight
• “Boost”-signal is now a PWM-signal + continuous variable
The control signals are:
• PS-ON
• Lamp “on/off”
• DIM (PWM) (not for PSDL)
In this manual, no detailed information is available because of design protection issues.
• +12 output (on-mode)
• +12V_audio (audio AMP power)
• Output to the display; in case of
- IPB: High voltage to the LCD panel
- PSL and PSLS (LED-driver outputs)
- PSDL (high frequent) AC-current.
6.2.2 Diversity
The diversity in power supply units is mainly determined by the diversity in displays.
The following displays can be distinguished:
• CCFL/EEFL backlight: power panel is conventional IPB
• LED backlight:
- side-view LED without scanning: PSL power panel
- side-view LED with scanning: PSLS power panel
- direct-view LED without 2D-dimming: PSL power panel
- direct-view LED with 2D-dimming: PSDL power panel.
PSL stands for Power Supply with integrated LED-drivers.
PSLS stands for a Power Supply with integrated LED-drivers with added Scanning functionality (added microcontroller).
PSDL stands for a Power Supply for Direct-view LED backlight with 2D-dimming.
20
Page 21
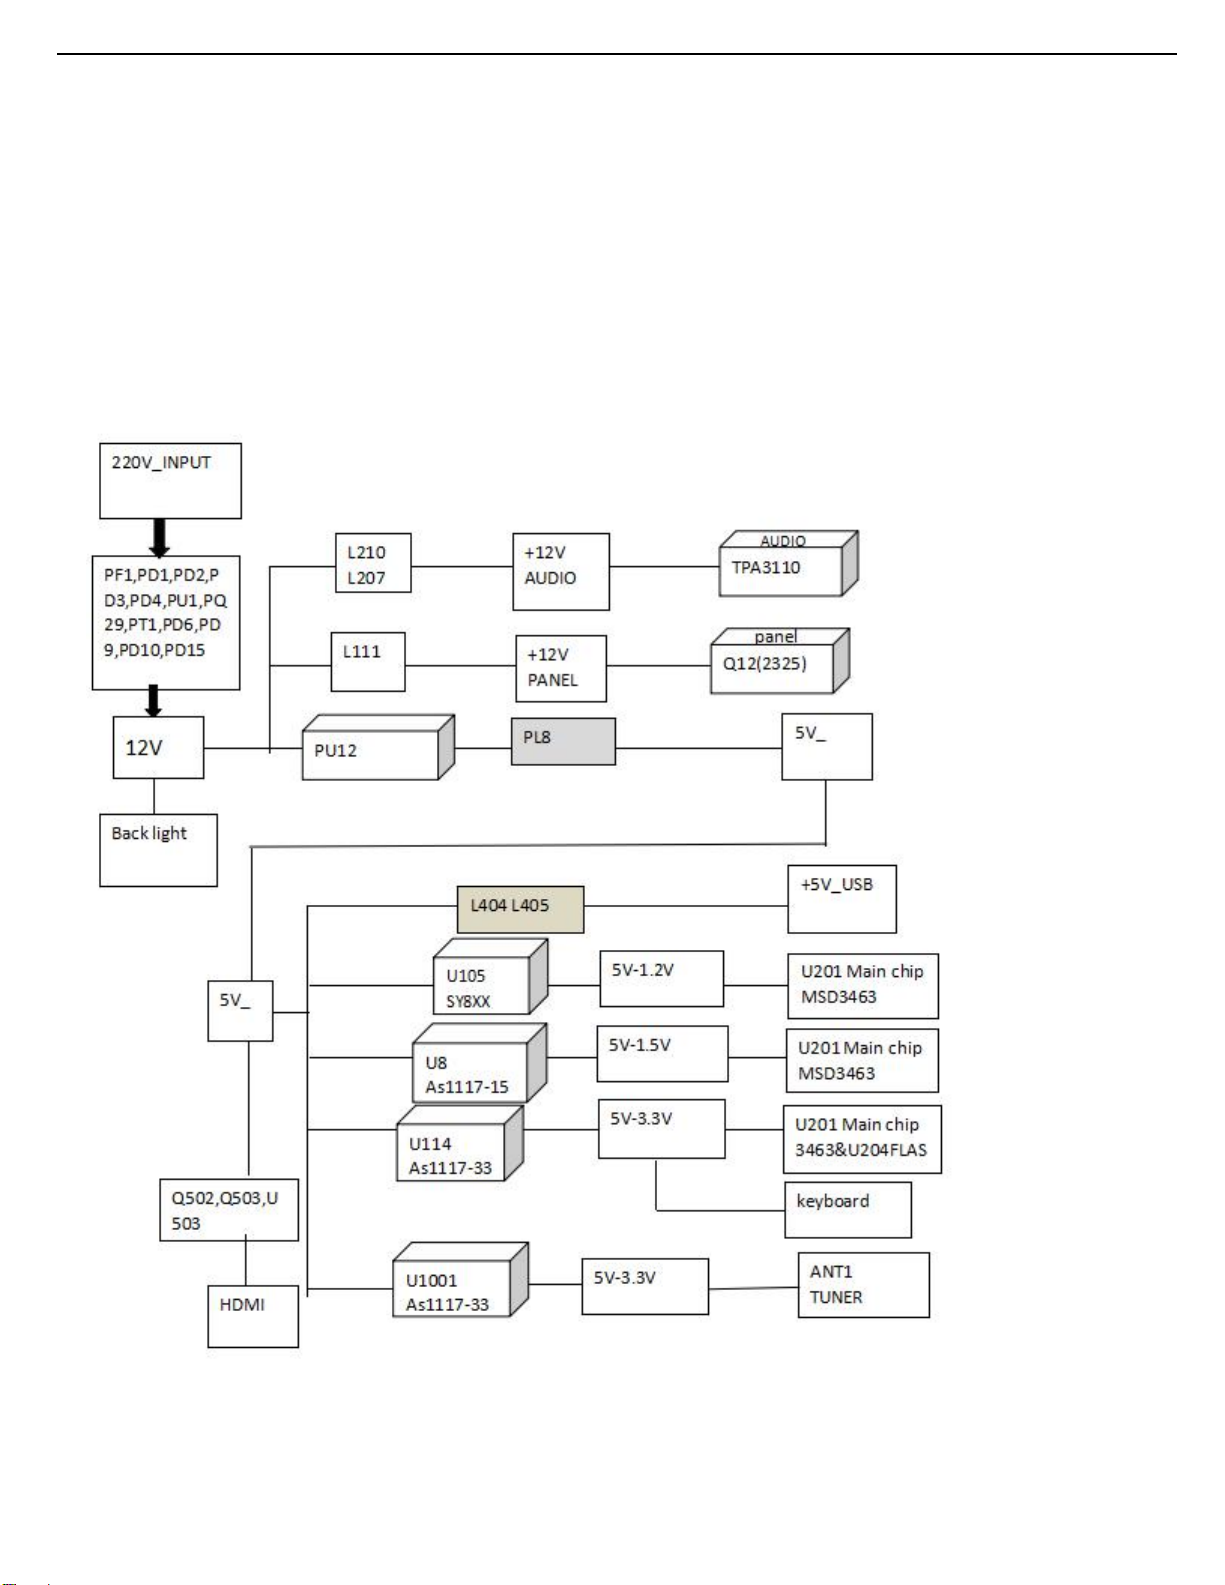
6.3 DC/DC Converters
The on-board DC/DC converters deliver the following voltages(depending on set execution):
• +5V-SB, permanent voltage for the Stand-by Power system
• +3V3-STANDBY,voltage for IR/Key board
• +12V, input from the power supply for the panel common(active mode)
• +3V3-EMMC, +V-EMMC-IO, voltage for EMMC when TV on
• +1V5-DDR, +VREF-A2-DQ,, +VREF-A2-CA, voltage for DDR
• TUNER_3V3, supply voltage for tuner
• +5V-SW, input intermediate supply voltage for USB Power
• +12V-AUDIO1 for the AUDIO AMP
• +3.3VA_T2, +1.2V_T2 voltage for Demodulator IC channel decoder
6.3.1 Power Tree
21
Page 22
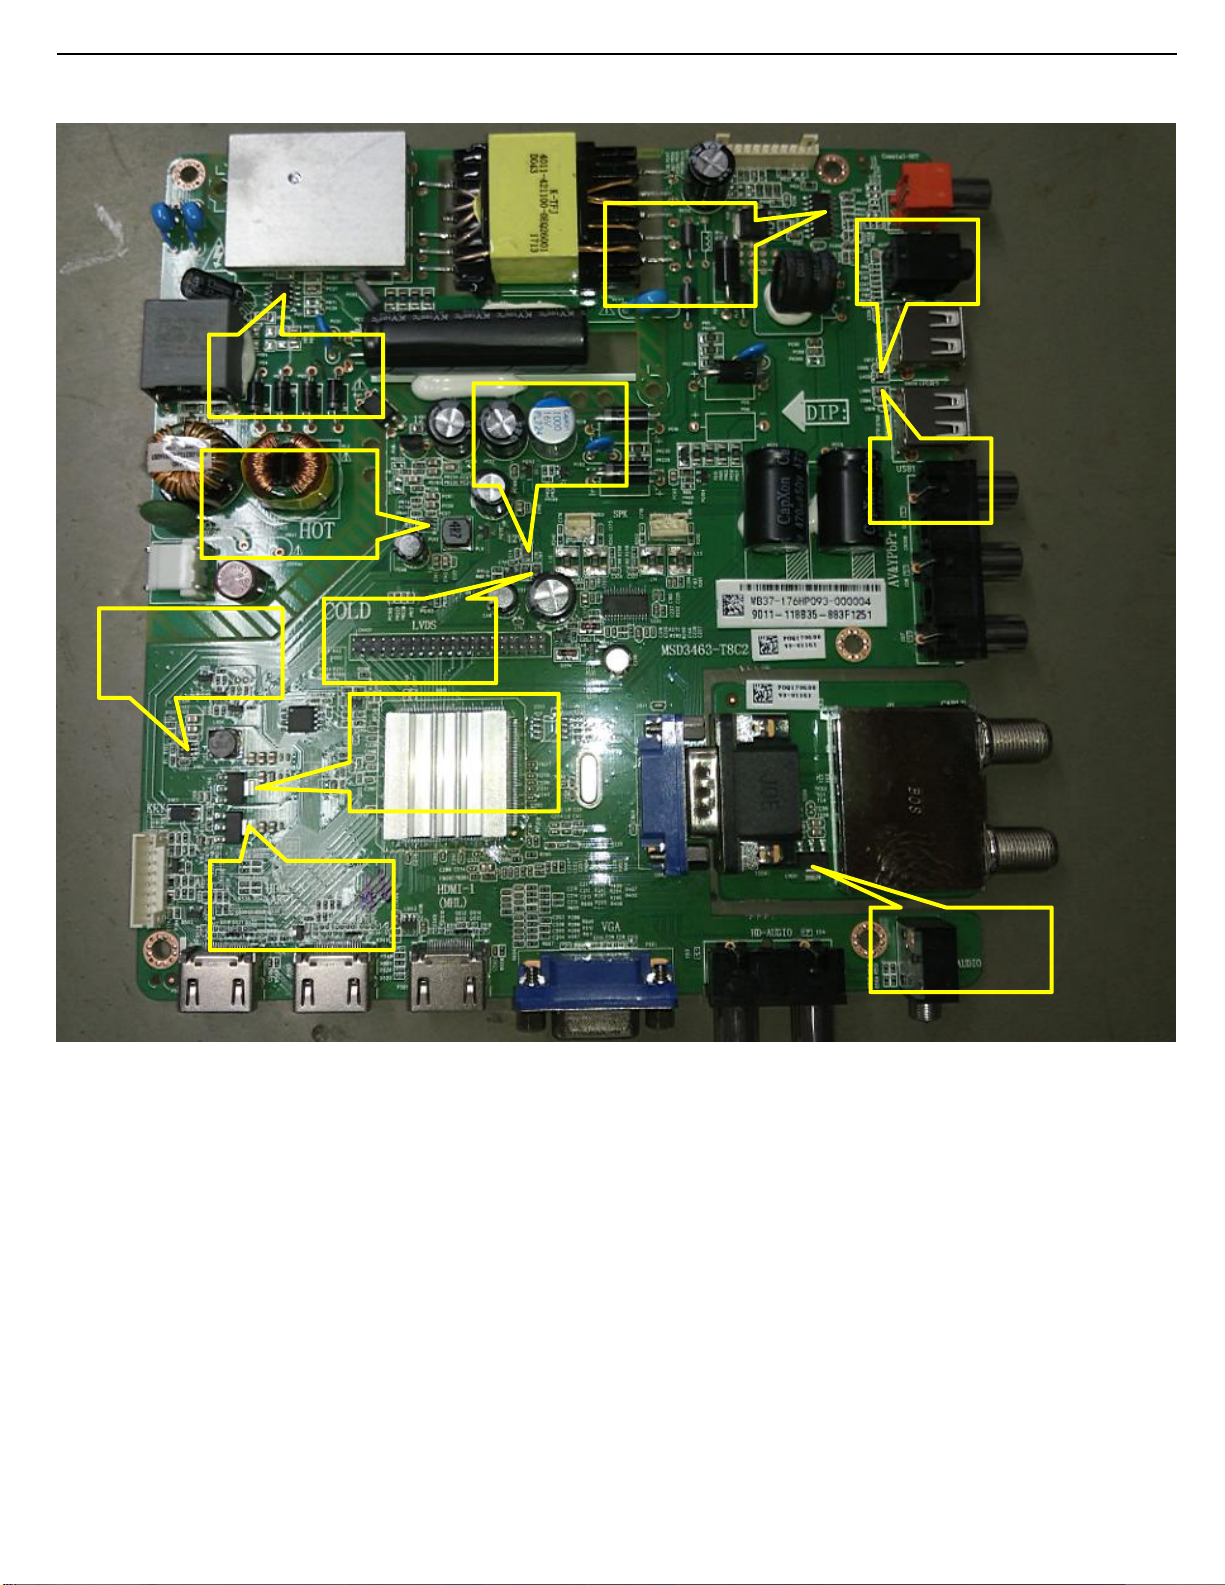
6.3.2 Power layout SSB
Main power
chip 5269
PU12
Change 12V
to5V
L111 12V
for Panel
PU11 Back
light
MP3394S
L405 5V
for USB
L404 5V
for USB
U105 1.2V for
MSD3463
L207 L210
12V for Audio
U114 3.3V for
MSD3463&FLASH
U8 1.5V for
MSD3463
6.4 Front-End Analogue and DVB-T; reception
6.4.1 DVB-T part
The Front-End for analogue tuner consist of the following key components:
• TUNER POWER SUPPLY IC AMS1117-3.3V
• CUP MSD3463 Processor
• TUNER SI2151 Processor
Below find a block diagram of the front-end application for CN1 part.
U1001 3.3V
for Tuner
22
Page 23
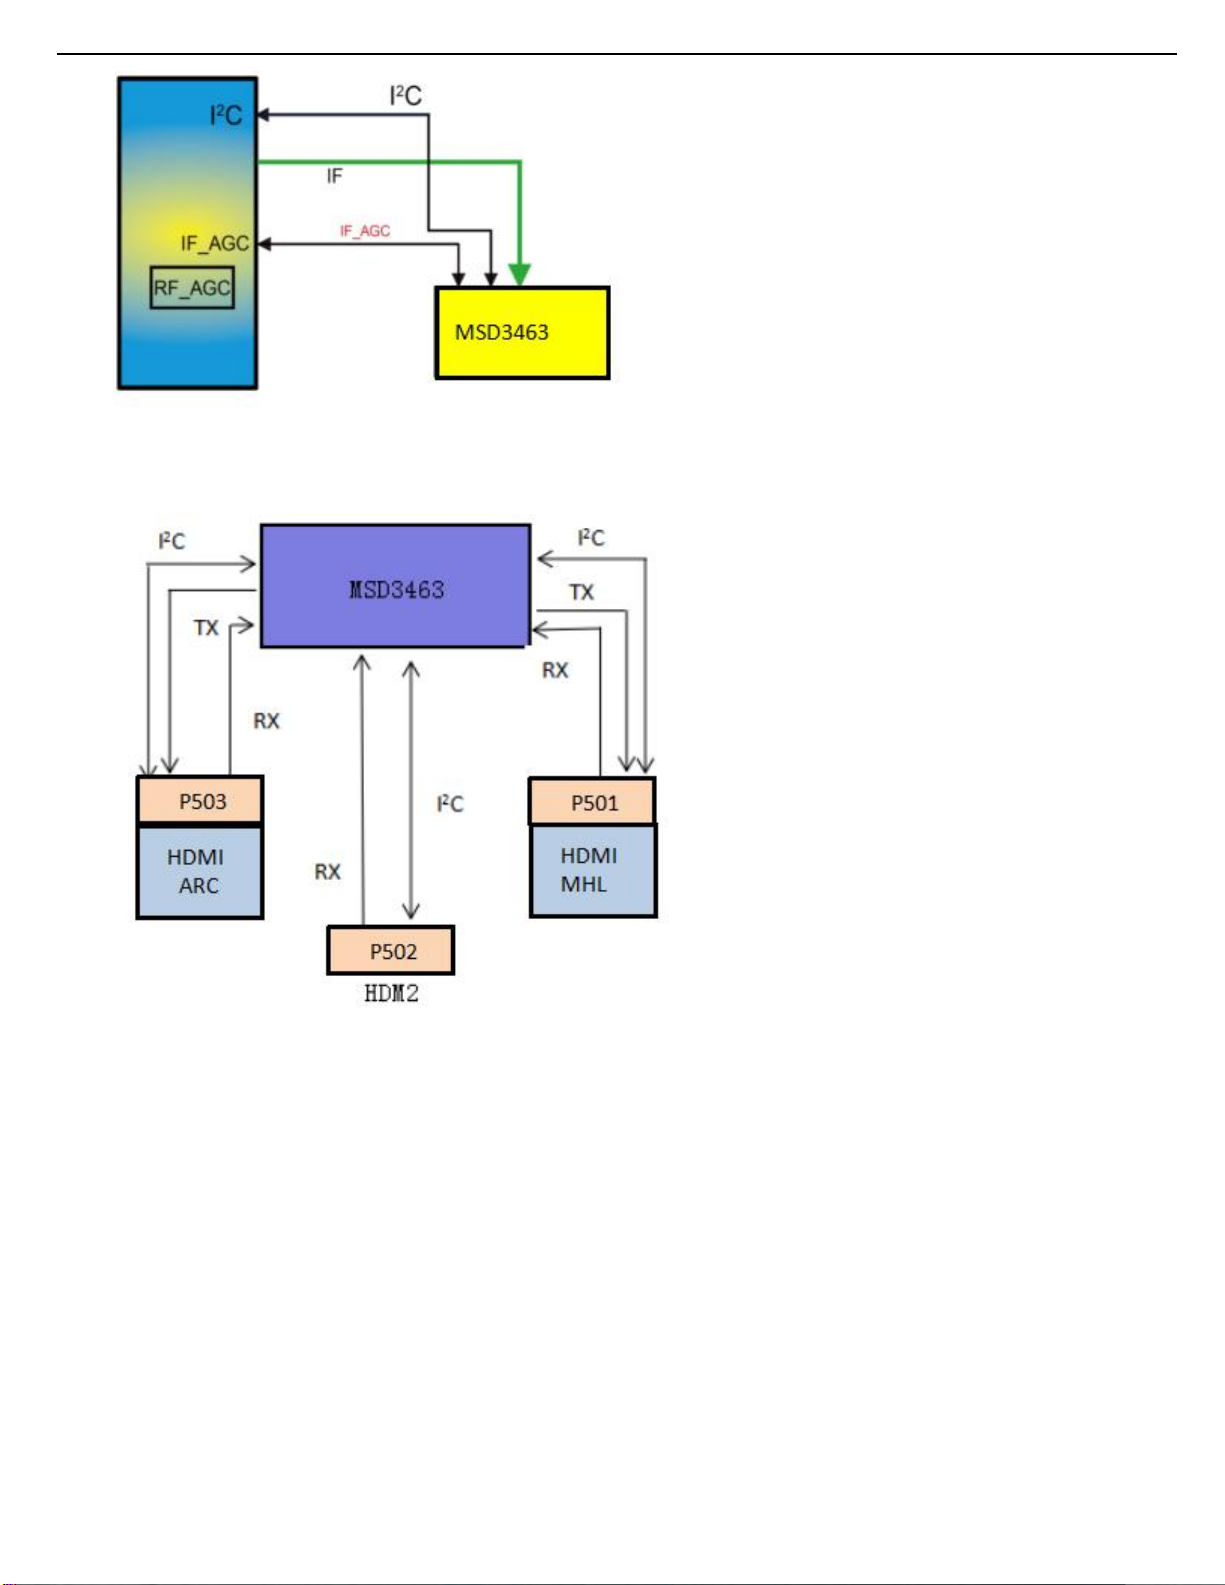
SI2151
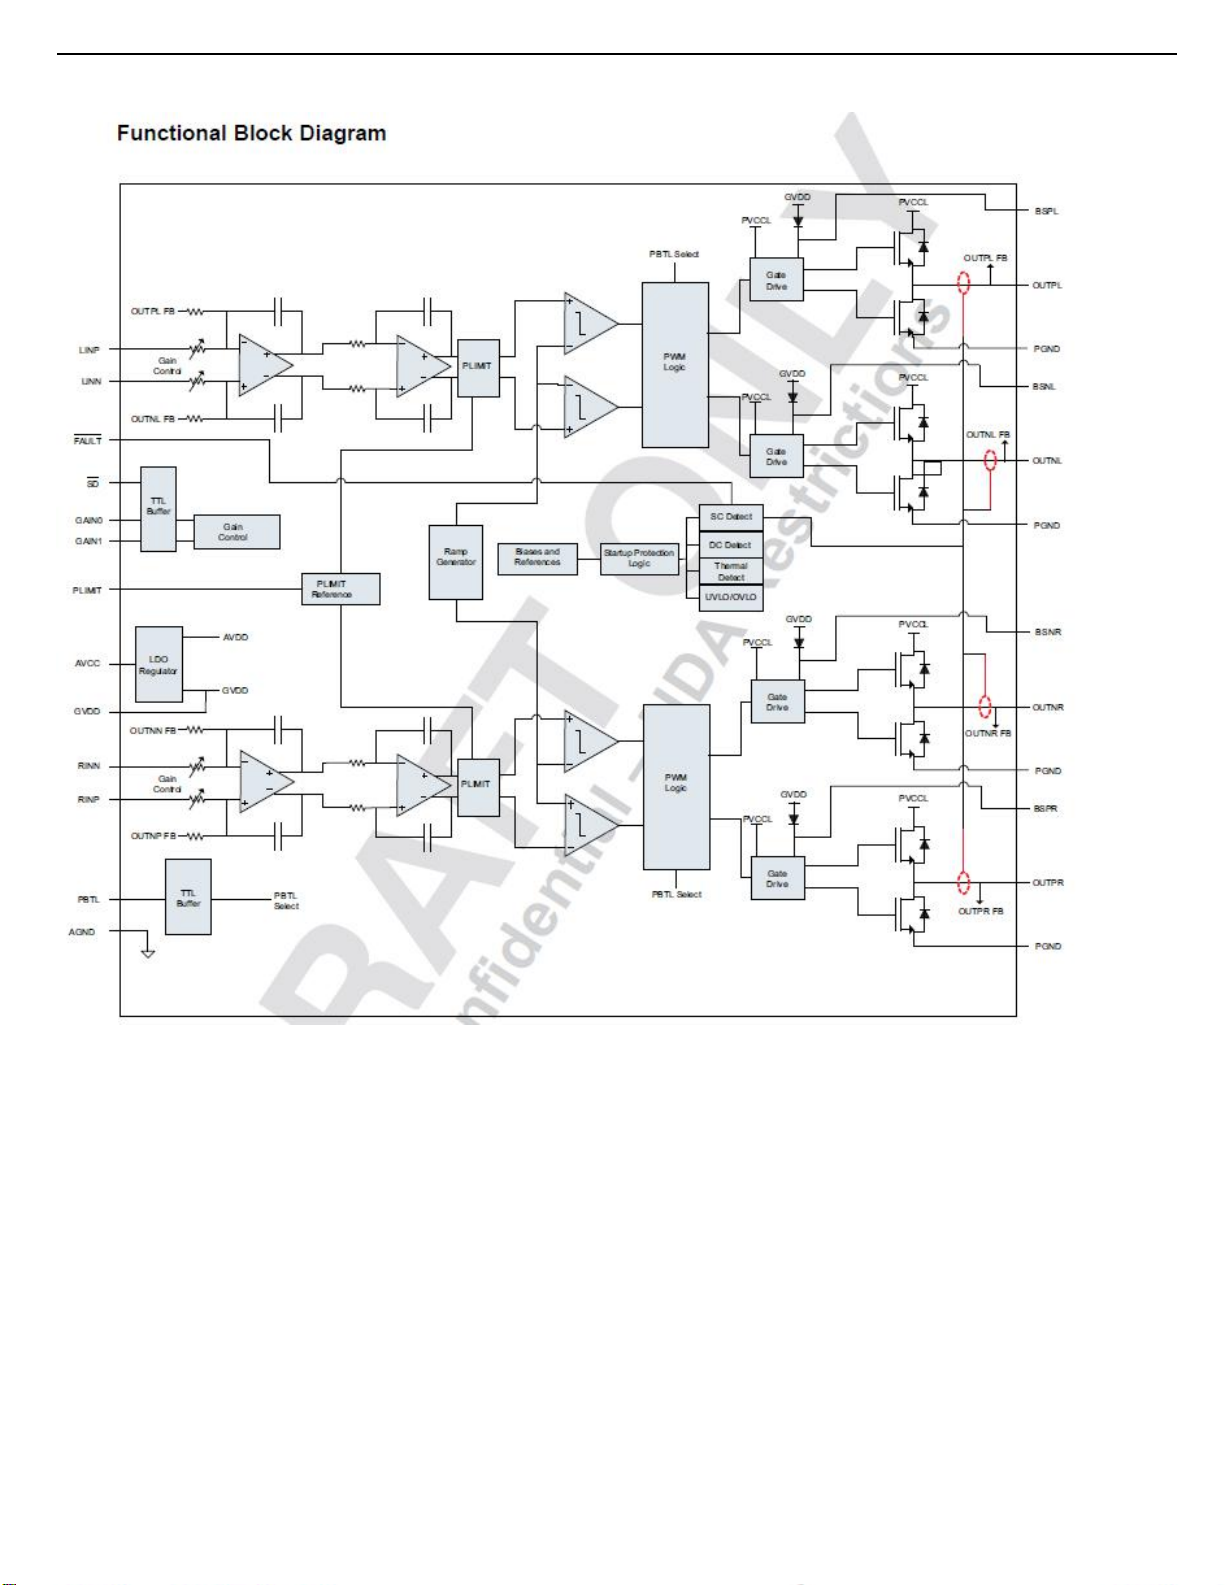
6.5 HDMI
Refer to below for the application.
The following HDMI connector can be used:
• HDMI 1: HDMI input ( TV digital interface support
HDMI1.4a) with digital audio/PC DVI input/MHL/CEC
• HDMI 2: HDMI input ( TV digital interface support HDCP)
with digital audio/PC DVI input/CEC
• HDMI 3: HDMI input ( TV digital interface support
HDMI1.4a) with digital audio/PC DVI input/CEC/ARC
• +5V detection mechanism
• Stable clock detection mechanism
• HPD control
• Sync detection
• TMDS output control
• CEC control
• ARC control
• MHL control
23
Page 24

6.6 Video and Audio Processing - MSD3463
The MSD3463 is the main audio and video processor (or System-on-Chip) for this platform. It has the following features:
1. Worldwide multi-standard analog TV demodulator
2.PAL/SECAM/DVB-T/DVB-T2 /DVB-C demodulators
3.1920*1080@60Hz direct drive
4. Powerful CPU core
5. A transport de-multiplexer
6. A muti-standard video decoder
7. Rich format audio codec
8. HDMI1.4 receiver
9. MHL input
10. 2D converter
11. PWM dimming (LED backlight)
12. Two-link LVDS,
1 OVERVIEW
The MediaTek MSD3463family consists of a DTV front-end demodulator, a backend decoder and a TV controller and offers high
integration for advanced applications. It integrates a transport de-multiplexer, a high definition video decoder, an audio decoder, a -link
LVDS transmitter, and a NTSC/PAL/SECAM TV decoder .The MSD3463 enables consumer electronics manufacturers to build high
quality,
low cost and feature-rich DTV.
World-Leading Audio/Video Technology: The MSD3463 supports Full MPEG2/4/H.264 video decoder standards, and JPEG. The
MSD3463 also supports MediaTek MDDiTM de-interlace solution which can reach very smooth picture quality for motions.
The special color processing technology provides a natural, deep colors and true studio quality video. Moreover, theMSD3463 family has
built-in high resolution and high-quality audio codec.
Rich Features for High Value Products: The MSD3463 family enables true single-chip experience. It integrates high-quality HDMI1.4,
high speed VGA ADC, a-link LVDS, USB2.0 receiver , and ATSC/DVB-T/DVBC/DTMB/ISDB-T demodulators.
All New FHD@60Hz Experience: The MSD346 family provides consumers with FHD 60Hz direct drive.
WW Common Platform Capability: The MSD3463 family supports ATSC, DVB-T, DVB-C, and ISDB-T demodulation functions. It
reserves transport stream inputs for external demodulators for other countries or areas. TV maker can easily port the same UI to worldwide
TV models. First-class adjacent and co-channel rejection capability grants excellent reception.Professional error-concealment provides
stable, smooth and mosaic-free video quality.
21
Page 25
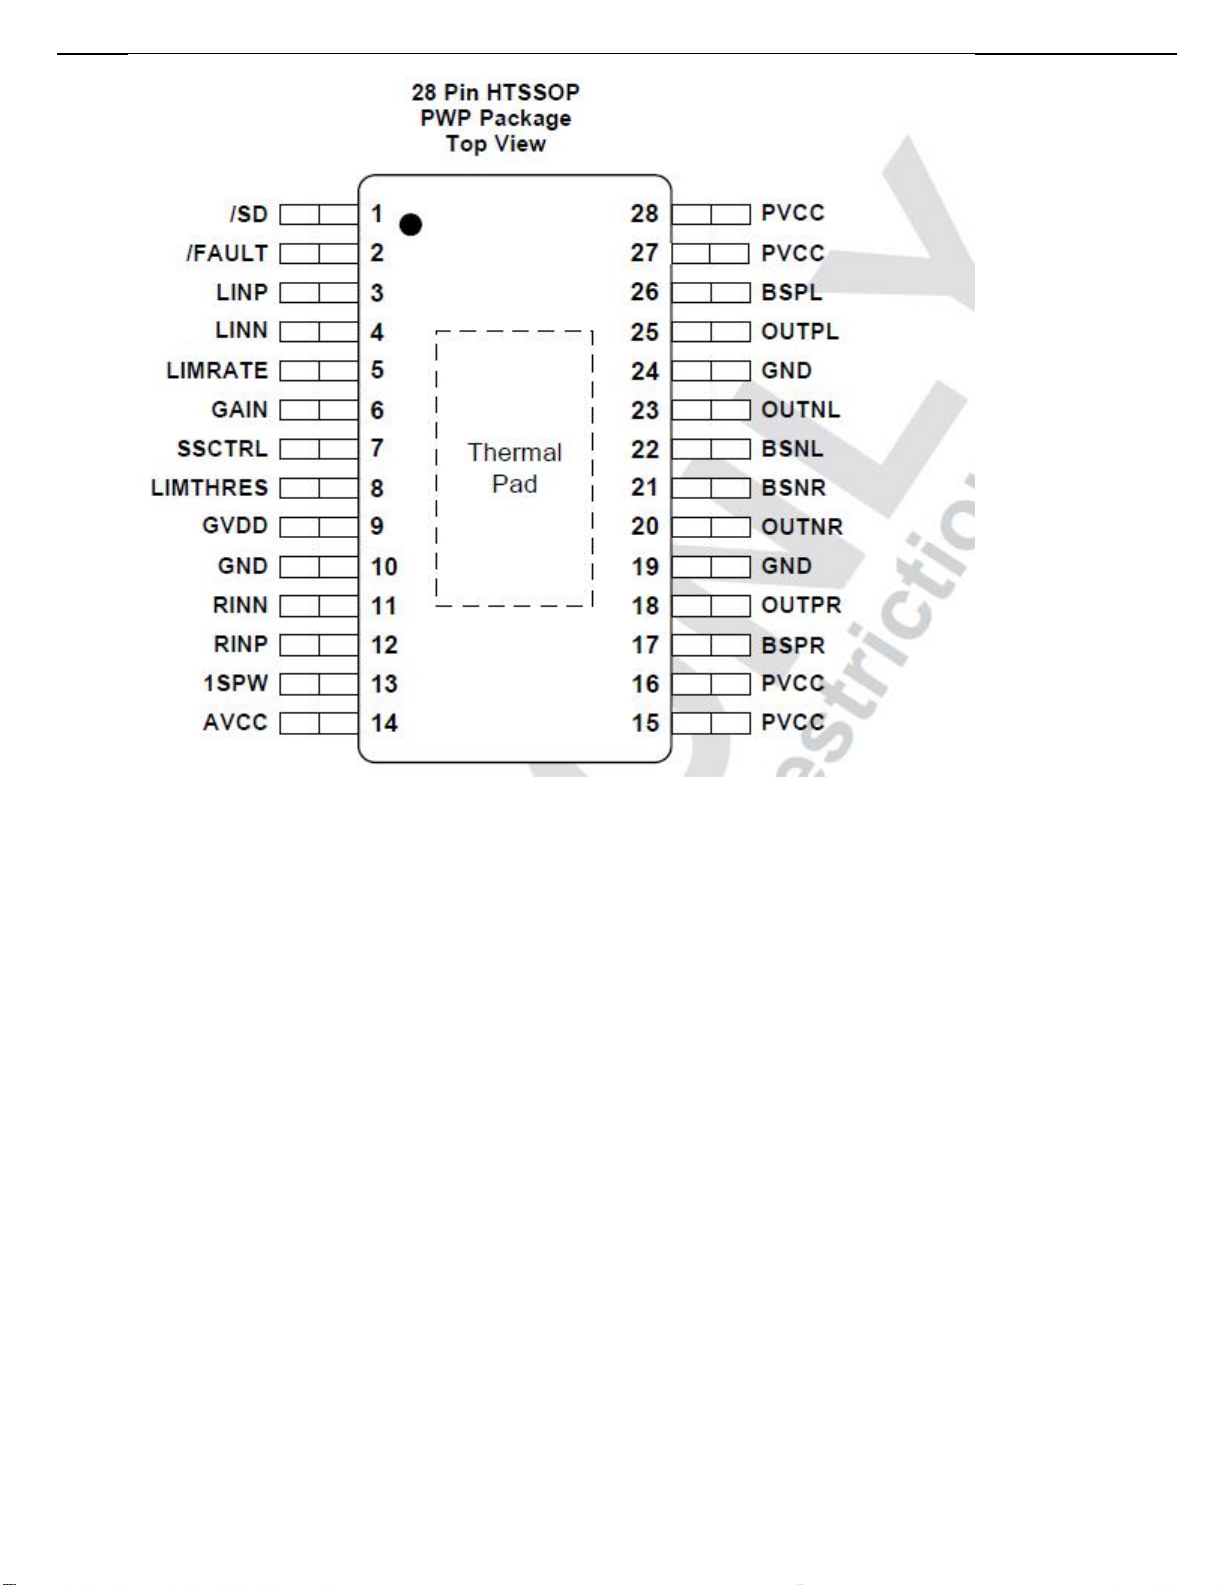
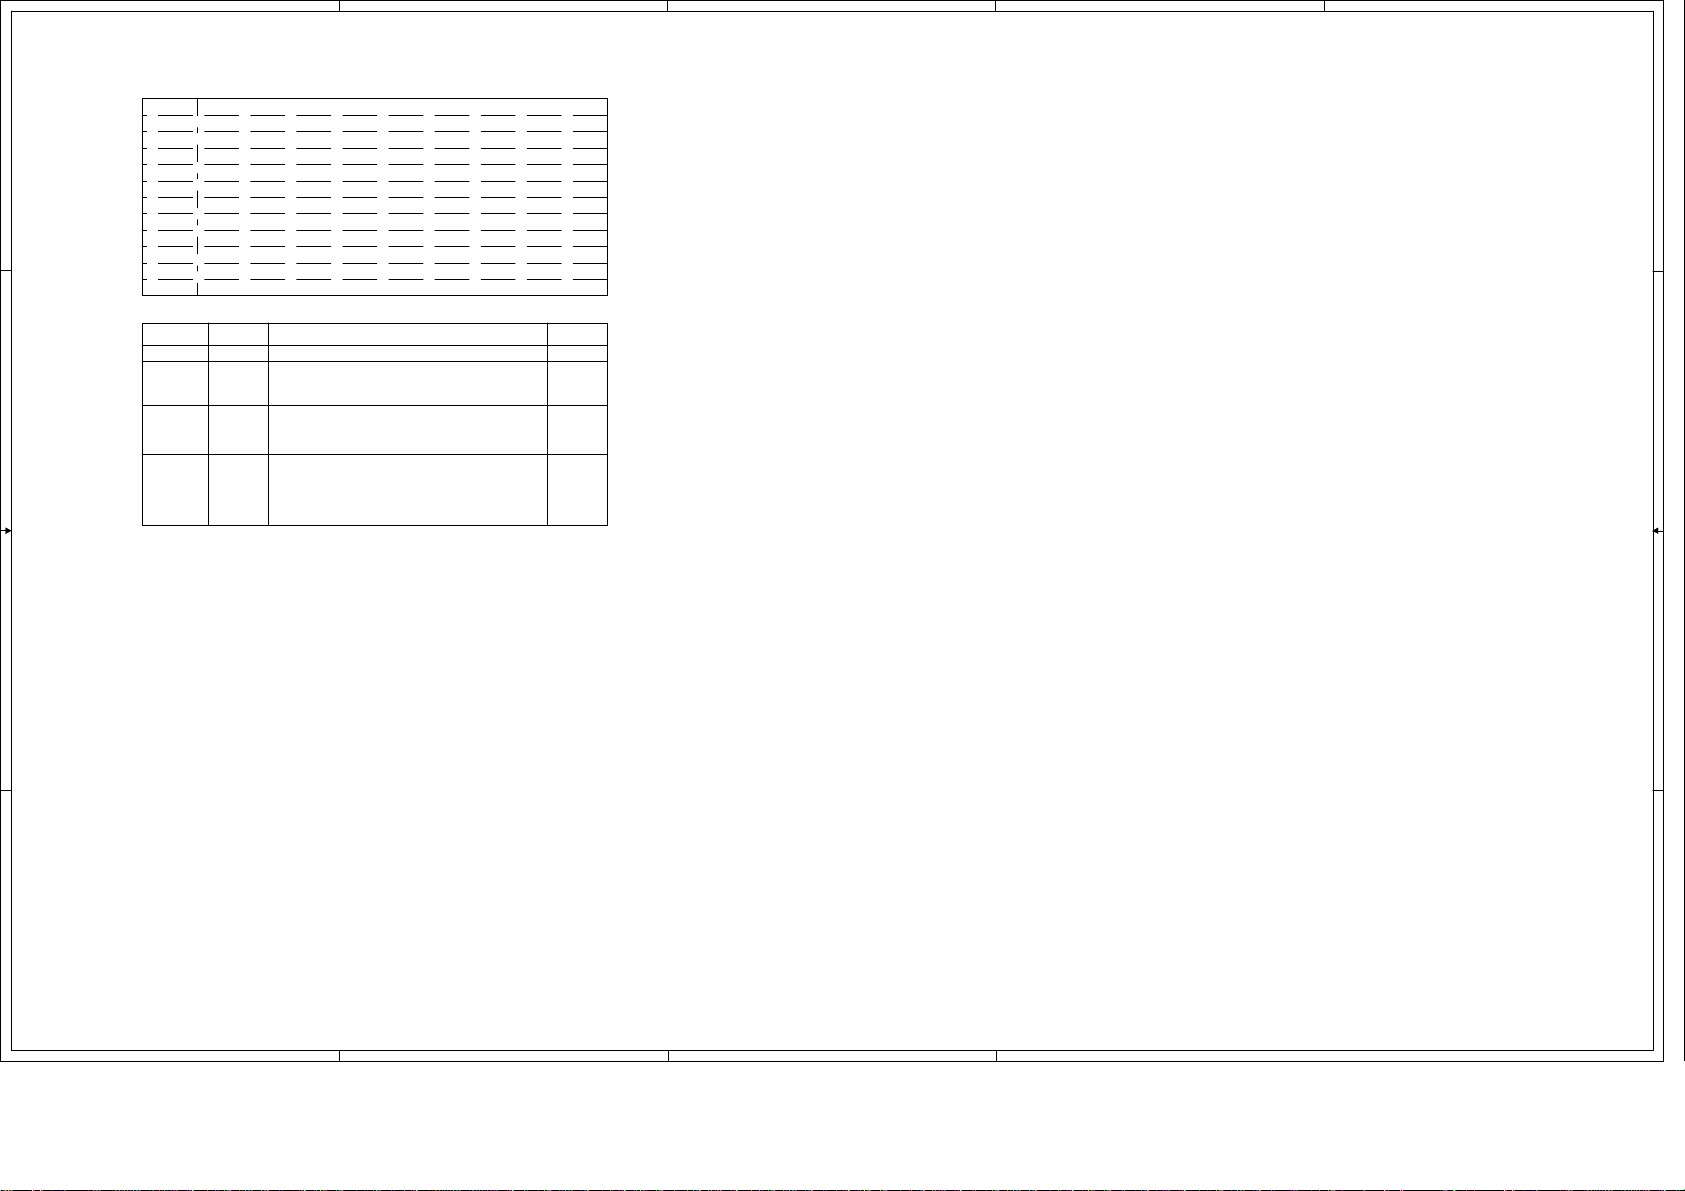
7. IC Data Sheets
25
Page 26
26
Page 27
5
4
3
2 1
8. Circuit Diagrams
MSD3463-T8C2 Three in One board Circuit Diagrams VER:A1.0 2015-11-10
PAGE
1 Index&History Rev
D D
2
3
4
5
6
7
8
Block Diagram
Power & LED Driver
System Power
MSD3463
Video&VGA&USB&Amplify &LVDSpage
HDMI page
Tuner page
Content
History Rev
C C
B B
Rev
Ver:A1.011/10/2015
DescriptionDATE
Author
ZHQINGFirst Version Release
A
This document for ShenZhen KTC Technology CO., Ltd and presented party internal use only,
Do not spread to third party without the written permission.
5
4
3
Copyright@ ShenZhen KTC Technology Co., LTD
27
Page 28
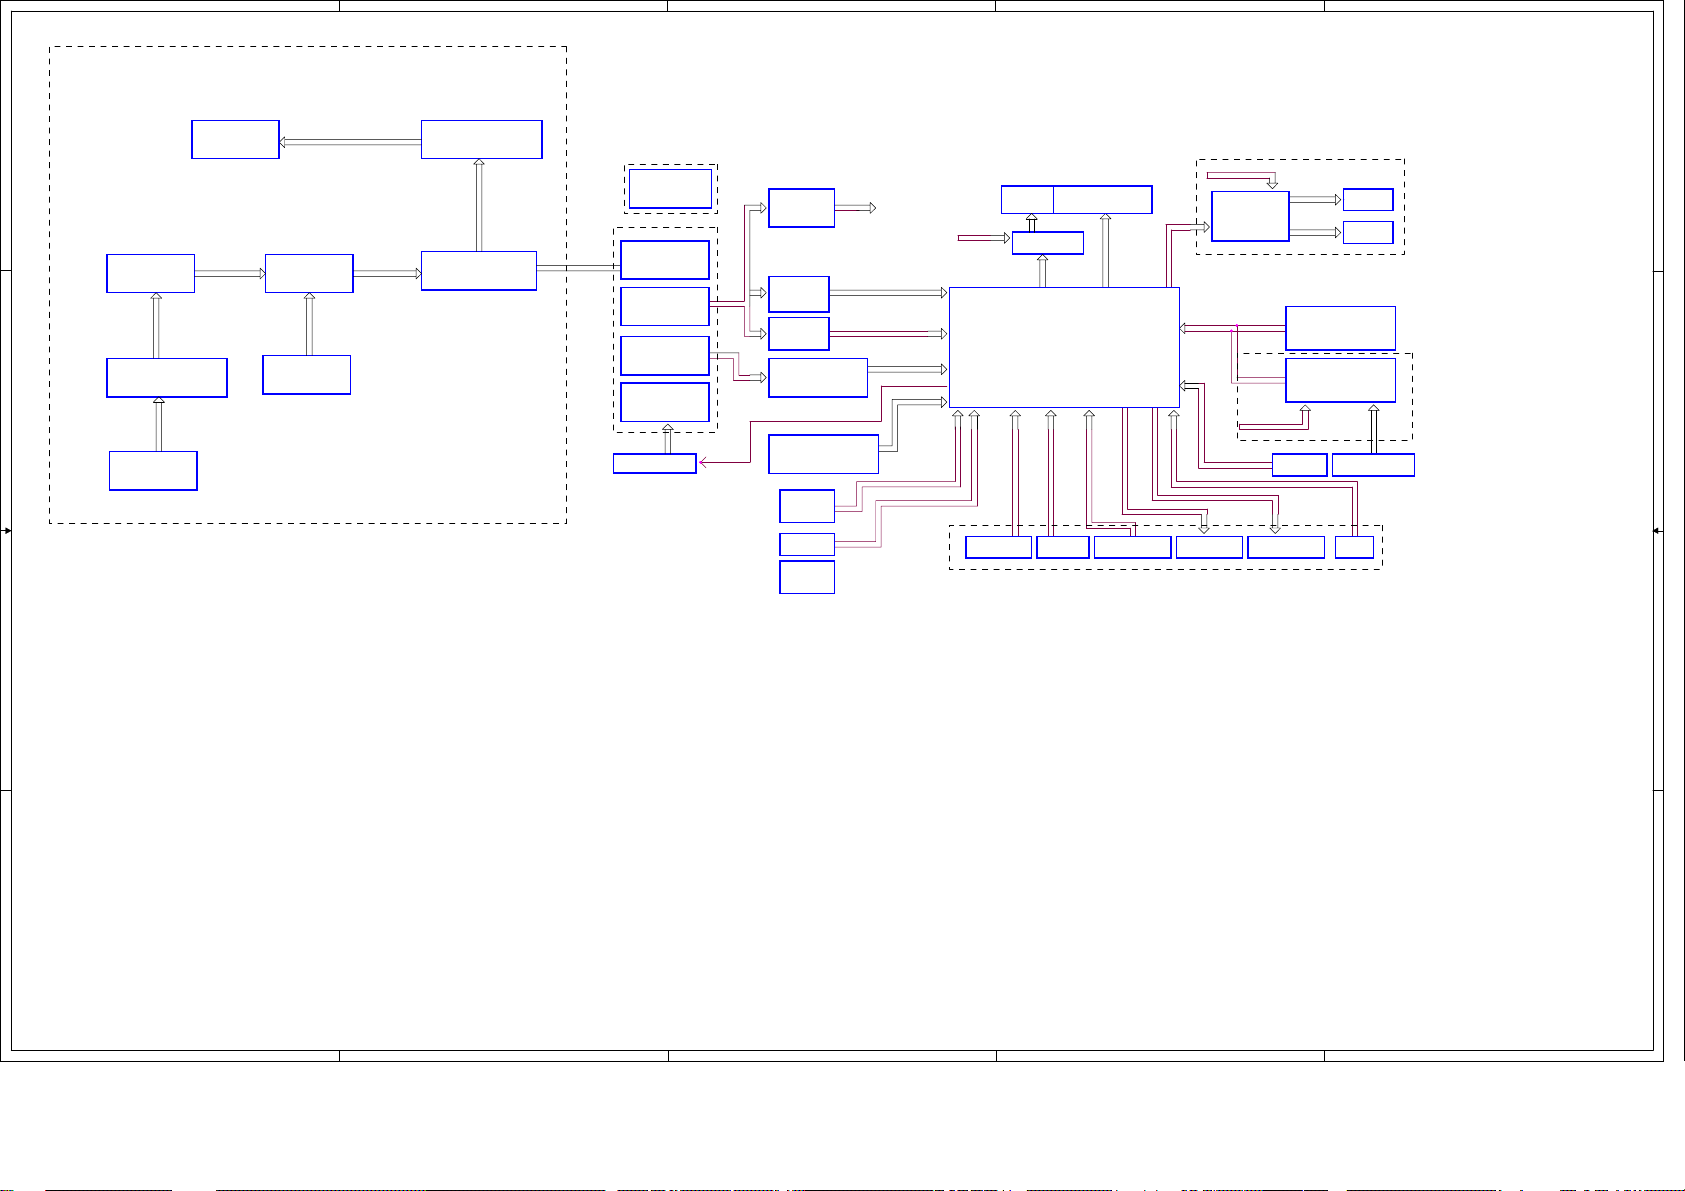
5
4
3
2
1
D D
Rectification
RE/CE Filter circuit
C C
Drive LED Backlight
DC/DC convert
PWM control
AC INPUT
B B
BOOST switching circuit
12V
12V OUTPUT
Output filtering circuit
RESET
12V_NORMAL
5V_NORMAL
5V_STANDBY
PWR_ON/OFF
Triode control
GPIO
1.15V
DC-DC
TUNER_3.3V
TUNER PWR
AS1117
DDR PWR
DC-DC
3.3V_STANDBY
AS1117
64Mbit
SPI FLASH
HDMI1
(MHL)
HDMI2
HDMI3
(ARC)
VDDC PWR
DDR PWR 1.5V
3.3V_Standby
HDMI1
HDMI2
12V_NORMAL
optional
Y/Pb/Pr
Panel Voltage
40P LVDS
MOS tube control
MSD3463
AV-IN
Y/Pb/Pr
12V_NORMAL
Audio AMP
TPA3020
IF
DVB-S/S2 TUNER
SPK-L
SPK-R
AV2012
SILICON TUNER
SI2151
TUNER_3.3V
IR&KEY
COAXIAL
USB
AV-OUT
COAXIAL
VGA
VGA
IR&KEY
VEDIO-OUT
RF
TUNER CONN
USBAV-IN
A
This document for ShenZhen KTC Technology CO., Ltd and presented party internal use only,
Do not spread to third party without the written permission.
5
4
3
2
Copyright@ ShenZhen KTC Technology Co., LTD
1
28
Page 29
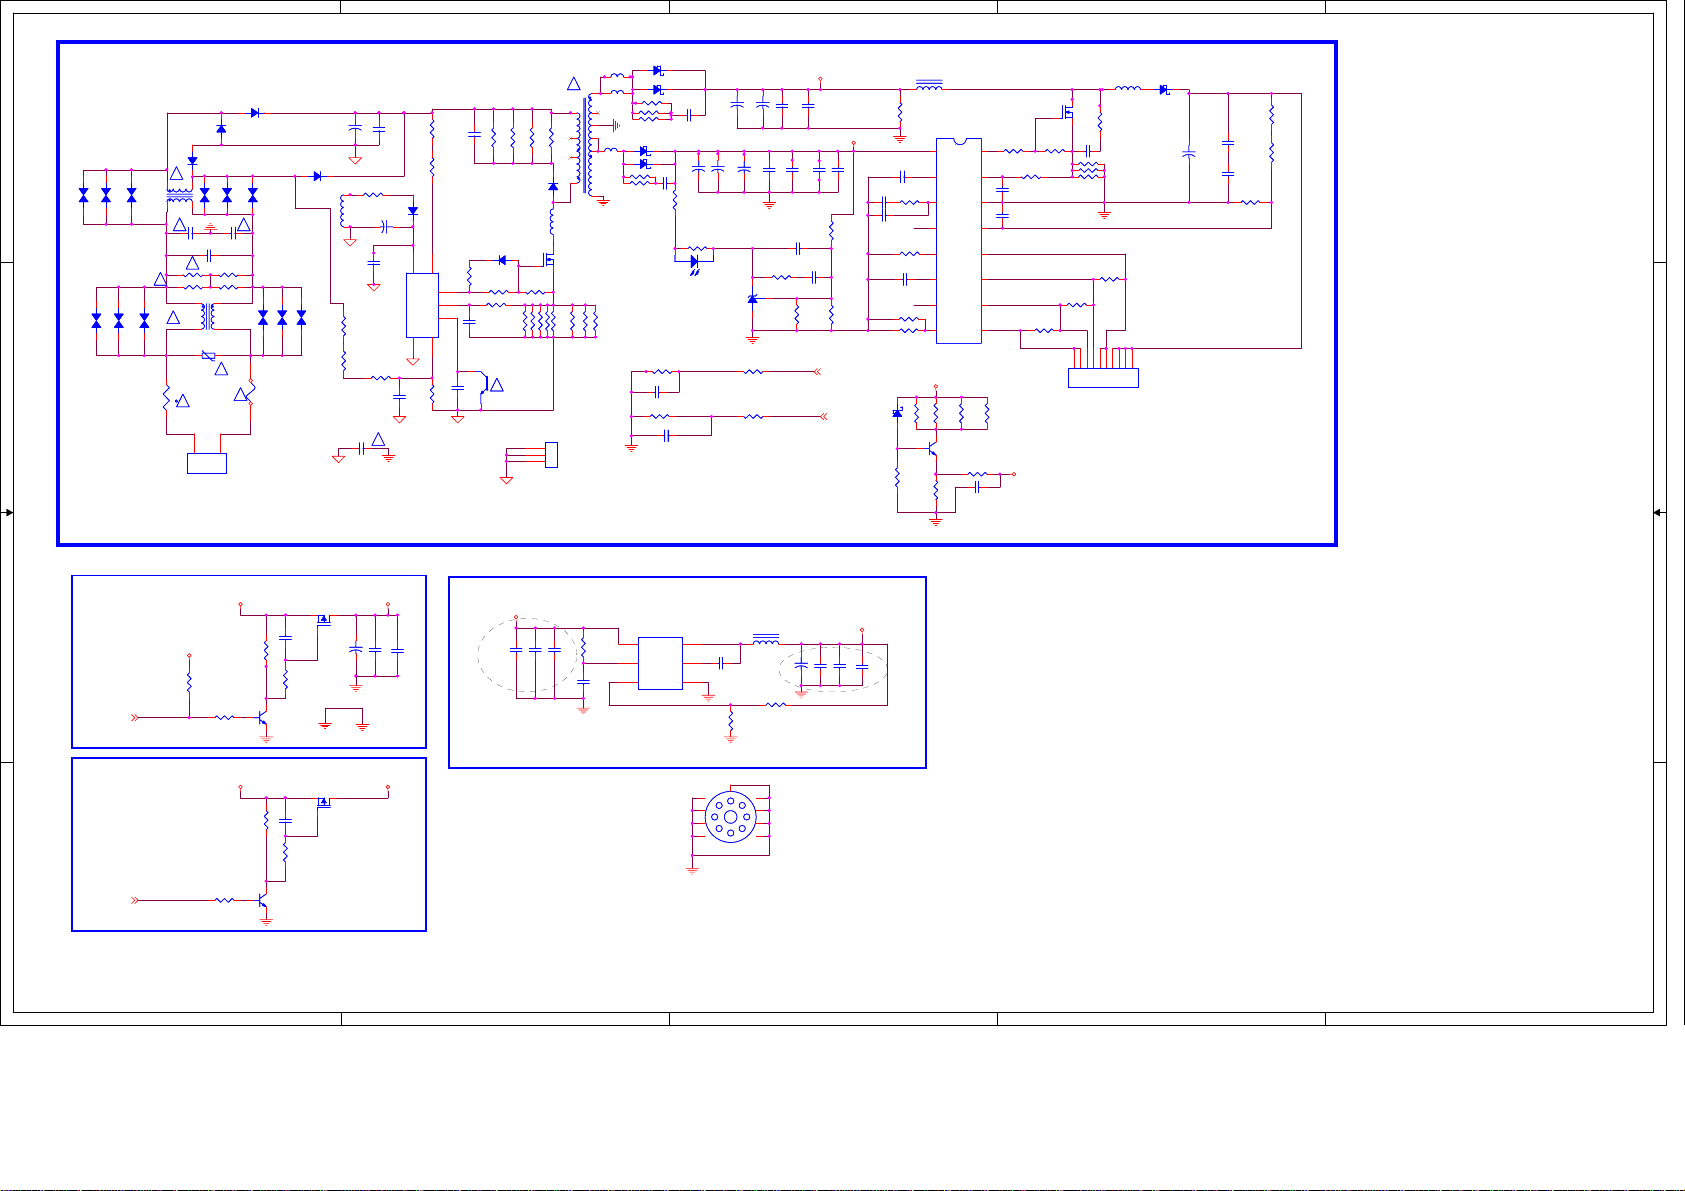
5
PD3
PD3
RL207
RL207
PD2
PD2
RL207
!!
2 3
1 4
!!
PCY2 471/400VPCY2 471/400V
!!
PRXC1MΩ PRXC1MΩ
PRXA1MΩ PRXA1MΩ
PL1
PL1
!!
TBD
TBD
!!
t
t
PD4
PD4
RL207
RL207
R344_1
R344_1
0.68UF/275V
0.68UF/275V
PRV1NCPRV1
NC
1
PCN105PCN105
放电针
放电针
PCY1 471/400VPCY1 471/400V
PCX1
PCX1
PRXD 1MΩPRXD 1MΩ
PRXB 1MΩPRXB 1MΩ
13
24
!!
331
RL207
R345_1
R345_1
放电针
放电针
!!
!!
R346_1
R346_1
放电针
放电针
R63
R63
放电针
放电针
PF1
PF1
3.15AL/250Vac
3.15AL/250Vac
放电针
放电针
R64
R64
D D
R48
R48
R62
R62
R18
R18
放电针
放电针
放电针
放电针
放电针
放电针
PL2
PL2
TBD
TBD
!!
R345_2
R345_2
R346_2
R346_2
R344_2
R344_2
放电针
放电针
放电针
放电针
放电针
放电针
C C
2.5Ω/5A
2.5Ω/5A
PNTC
PNTC
放电针
放电针
+
+
PEC9
PEC9
82uF/450V
82uF/450V
PD1
PD1
PGND
RL207
RL207
PR2490ΩPR249
0Ω
1
1
PT1B
PT1B
EFD30
EFD30
2
2
PGND
PGND
PR84NCPR84
NC
PR73NCPR73
NC
PCY3
PCY3
102/400V
102/400V
PGND
PU1
PU1
OB5269CP
OB5269CP
PR72NCPR72
NC
R65
R65
102/1kV
102/1kV
PEC10
PEC10
47uF/50V
47uF/50V
PC46
PC46
10nF
10nF
!!
AGND
PR262
PR262
PC01
PC01
27K
27K
222/400V
222/400V
PR264
PR264
27K
27K
PD23M7PD23
M7
+
+
6
8
HV
VDD
5
GATE
3
CS
2
FB
RT1GND
4
PGND
PR71NCPR71
PC39NCPC39
NC
NC
PGND
PGND
4
PD9 SR5200PD9 SR5200
PL3PL3
1 2
!!
9
1 2
9
PT1A
PT1A
EFD30
EFD30
4
12
4
12
8
8
PR6
PR6
PR7
PR7
PR9
PR9
PR8
PR8
10
PR2581RPR258
6
10
6
360K
360K
PL16PL16
5
1 2
5
11
11
3
3
7
7
AGND
PL13PL13
1 2
PQ29
PQ29
7S60
7S60
PR2NCPR2
PR4NCPR4
NC
NC
NC
NC
1R
PR260NCPR260
PR3NCPR3
PR2591RPR259
PH14
PH14
CON3
CON3
PC02
PC02
PR267NCPR267
NC
PU7A
PU7A
PC817C
PC817C
3
PC37
PC37
10nF
10nF
PC87
PC87
100PF
100PF
4
PR261
PR261
47Ω
47Ω
PR255
PR255
470Ω
470Ω
360K
360K
360K
360K
360K
360K
PD7
PD7
RL207
RL207
PD25NCPD25
NC
PR270
PR270
10kΩ
10kΩ
1R
1R
1R
PR2561RPR256
PR2571RPR257
!!
1
2
3
PGND
PL18PL18
PR230
PR230
PR229 47ΩPR229 47Ω
AGND
AGND
PD6
PD6
PR5 47ΩPR5 47Ω
PR239 47ΩPR239 47Ω
PR238
PR238
SR5100
SR5100
47Ω
47Ω
PC67
PC67
PR60
PR60
PC68NCPC68
47Ω
47Ω
PD10
PD10
PD15PD15
1nF/1kV
1nF/1kV
PR58
PR58
SR5200
SR5200
1nF/1kV
1nF/1kV
PC82
PC82
470uF/25V
470uF/25V
PR2311KPR231
1K
1
20k
20k
0.1uF
0.1uF
24k
24k
NC
PC86
PC86
PEC6
PEC6
PU7B
PU7B
PC817C
PC817C
PR232NCPR232
+
+
+
+
PEC2
PEC2
PEC5
PEC5
1000uF/50V
1000uF/50V
1000uF/50V
1000uF/50V
PEC7
PEC7
PEC8
PEC8
+
+
+
+
+
+
470uF/25V
470uF/25V
470uF/25V
470uF/25V
AGND
NC
2
2
PU8PU8
3
1
AGND
PR1 1kPR1 1k
EN
DIM
PR62 68KPR62 68K
PR2331KPR233
3
PL19
PR268NCPR268
AGND
PC69
PC69
470nF
470nF
PC65
PC65
PR501kPR50
1uF
1uF
PC60
PC60
1uF
1uF
PR51
PR51
510kΩ
510kΩ
PC62
PC62
100k
100k
PR49 TBDPR49 TBD
PR52 TBDPR52 TBD
R88
R88
10k
10k
PL19
68uH
68uH
NC
PU11
PU11
MP3394S
MP3394S
15
Vin
16
Vcc
1k
1
Comp
EN
2
EN
5
Osc
7
Bosc
DIM
3
Dbrt
Iset6LED4
+30V
PR572KPR57
PD11
PD11
2K
36V
36V
PQ104
PQ104
PR64
PR64
47Ω
47Ω
14
Gate
13
Isence
PC59
PC59
100pF
100pF
4
GND
PC71
PC71
100pF
100pF
12
OVP
11
LED1
10
LED2
9
LED3
8
PR612KPR61
PR592KPR59
PR632KPR63
2K
2K
2K
222
222
PR69NCPR69
NC
PC93
PC93
1uF/25V
1uF/25V
+12V
PR68
PR68
100R
100R
PR65
PR65
PR66
PR66
47Ω
47Ω
PRJ1PRJ1
PQ8
PQ8
AOD478
AOD478
PC64NCPC64
NC
10kΩ
10kΩ
AGND
PRJ2PRJ2
10
10Pin_2.0mm PJ210Pin_2.0mm PJ2
+30V
PC88
PC88
PC90
PC90
1UF/35V
1UF/35V
10nF
10nF
+12V
12V
PC261
1K
PR234
PR234
PC261
PC91
PC91
PC97
PC97
1UF/25V
1UF/25V
1UF/25V
1UF/25V
10UF/16V
10UF/16V
PR236
PR236
PC188NCPC188
10k
10k
NC
PC193
PC193
0.22uF/50V
0.22uF/50V
PR235
PR235
5.1k
5.1k
5.1K
5.1K
BL-ON/OFF 4
BL-ADJUST 4
PC89
PC89
10NF
10NF
PL15PL15
1 2
PR67NCPR67
NC
PR30A0.22ΩPR30A 0.22Ω
PR30B0.22ΩPR30B 0.22Ω
PR30C0.22ΩPR30C0.22Ω
2
PD12
PD12
TBD
TBD
PR54
PR54
TBD
TBD
PC47NCPC47
PR55
+
+
PEC11
PEC11
47uF/100V
47uF/100V
PRJ3PRJ3
123456789
PR55
NC
TBD
TBD
PC36NCPC36
NC
PR56
PR56
2.2K
2.2K
1
AGND
PQ112
PQ103
PQ103
MMBT3904
MMBT3904
Q3
MMBT3904Q3MMBT3904
PR227
PR227
100K
100K
PC165
PC165
0.22uf
0.22uf
PC166
PC166
0.22uF
0.22uF
PR201
PR201
100K
100K
PQ112
ME2325
ME2325
1
SOT23
PQ113
PQ113
ME2325
ME2325
1
SOT23
32
470uF/16V
470uF/16V
32
+12V
CA9
CA9
+
+
C144
C144
C140
C140
10uF
10uF
0.1uF
0.1uF
PC61
PC61
PC56
PC56
10uF/16V
10uF/16V
10uF/16V
10uF/16V
靠近
DC-DC
Vout=0.765V*(1+R1/R2)
4
PC57
PC57
PR74
PR74
10K
10K
0.1uF
0.1uF
PC70
PC70
0.1uF
0.1uF
12V TO 5V Power
PU12
PU12
2
3
SW
VIN
6
5
VBST
EN
1
4
GND
VFB
TPS563200
TPS563200
FB
PC58 0.1uFPC58 0.1uF
H1NCH1
5
4
3
2
NC
1
PR41
PR41
10K 1%
10K 1%
R2
9
8
7
6
PL8 4.7uH/3APL8 4.7uH/3A
100uF/16V
100uF/16V
PR53 56K 1%PR53 56K 1%
R1
12
+5V_Standby
PCA6
PCA6
C141
C141
C142
C142
+
+
C137
C137
0.1uF
0.1uF
10uF
10uF
10uF
10uF
靠近
DC-DC
This document for ShenZhen KTC Technology CO., Ltd and presented party internal use only,
Do not spread to third party without the written permission.
3
2
Copyright@ ShenZhen KTC Technology Co., LTD
1
5V
B B
TO MASTER CHIP
PWR_ON/OFF5
12V
A A
TO MASTER CHIP
PWR_ON/OFF5
+5V_Standby +5V_Normal
PR228
+5V_Standby
PR228
10K
10K
PR17
PR17
4.7K
4.7K
PR198
PR198
4.7K
4.7K
+12V +12V_NORMAL
PR200
PR200
10K
10K
PR199
PR199
4.7K
4.7K
5
29
Page 30
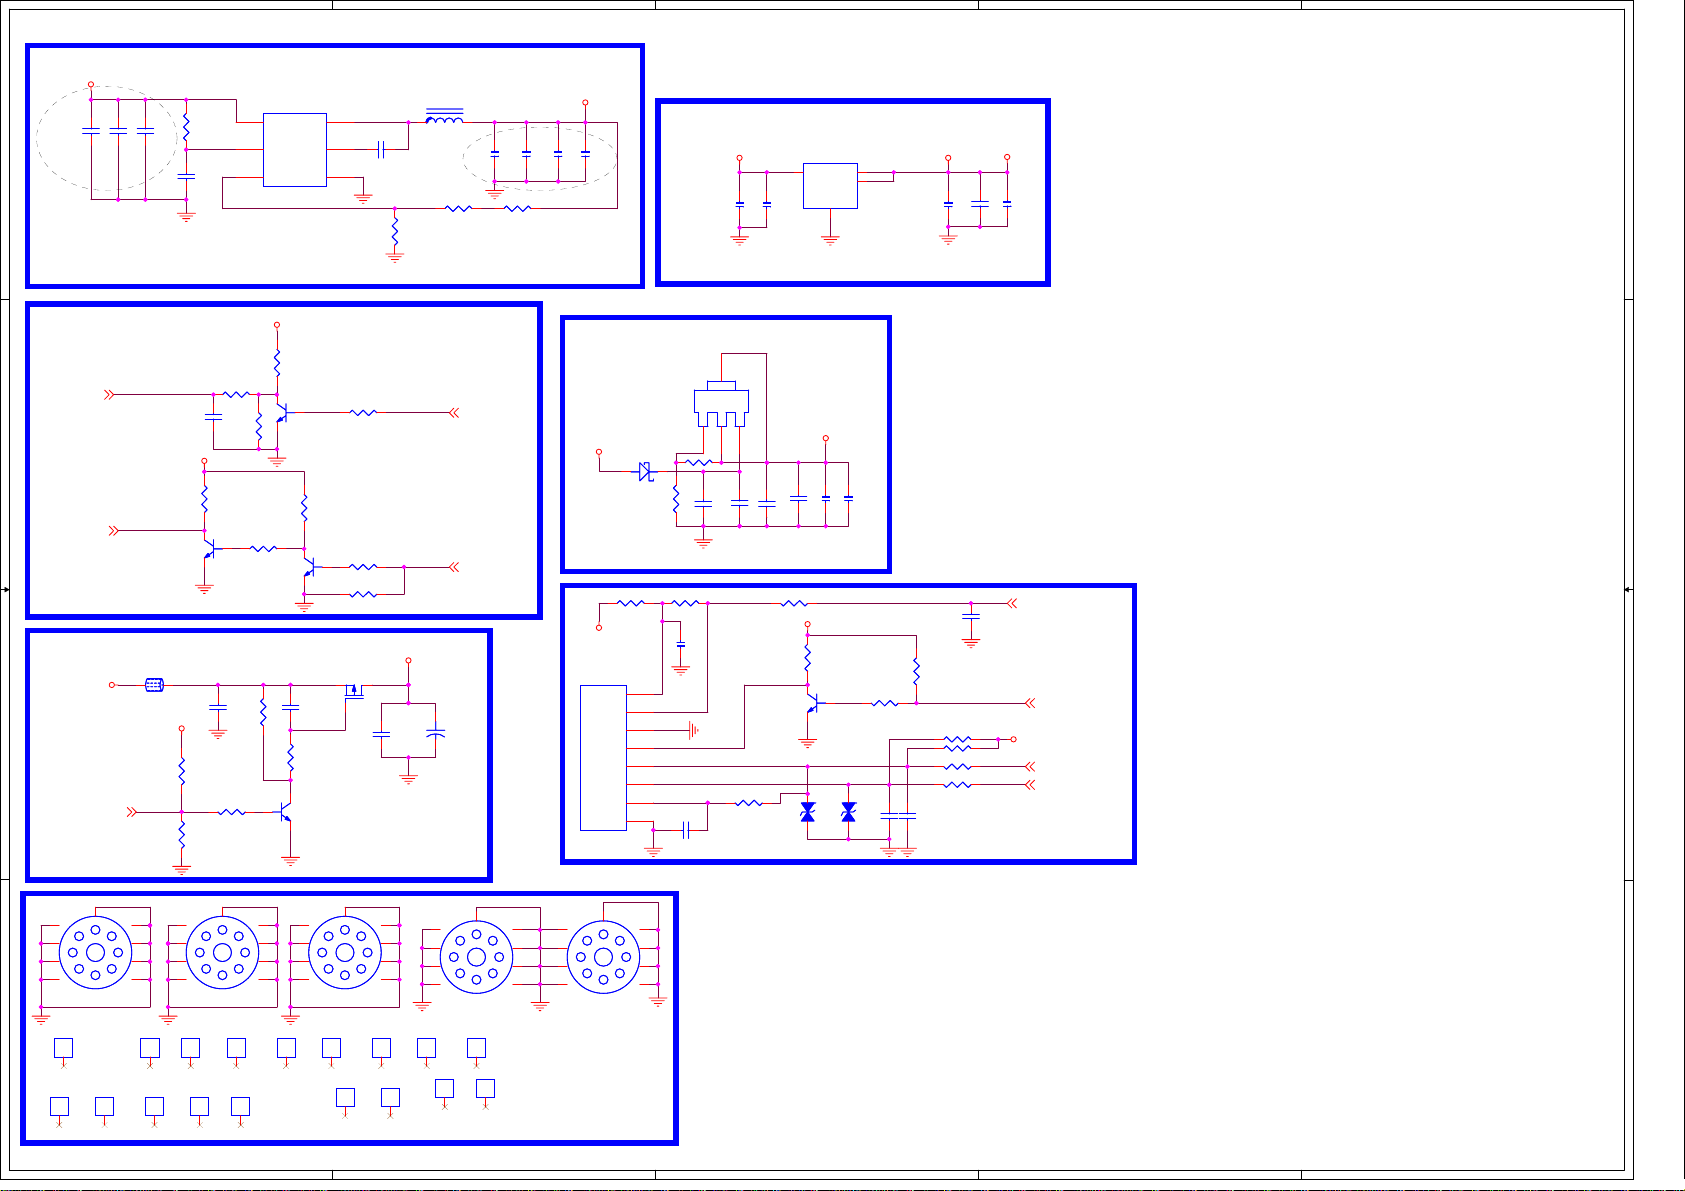
5
4
3
2
1
1.2V 2A for VDDC
+5V_Standby
C133
C133
C128
C128
10uF
10uF
10uF
靠近
DC-DC
BL-ADJUST3
BL-ON/OFF3
10uF
BL-ADJUST
BL-ON/OFF
D D
C C
Power for panel
+12V
L111
L111
B B
PANEL_ON/OFF5
Support H.265 need 1.2V, MAX 2A
U105
C74
C74
0.1uF
0.1uF
U105
3
VIN
EN
5
EN
4
VFB
TPS562200
TPS562200
FB
+5V_Normal
R611KR61
1K
R531K R531K
Q1
R51
R51
3904Q13904
2 3
SAMSUNG panel 0~3.3V R34=10K
NC/10K
NC/10K
LG/CMO/AU panel 0~5V,R34 NC
R59 4.7KR59 4.7K
1
R41
R41
10K
10K
Q9
1
3904Q93904
2
SW
C121 0.1uFC121 0.1uF
6
VBST
1
GND
Inverter controler
1
10K
10K
Q11
Q11
3904
3904
2 3
VCC_P
C75
C75
0.22uF
0.22uF
PANEL_ON
R60
R60
100K
100K
2 3
R43
R43
R58 4.7KR58 4.7K
1
R57 10KR57 10K
Q12
Q12
ME2325
ME2325
R524.7K R524.7K
C129
C129
R123
R123
10K
10K
0.1uF
0.1uF
C134
C134
0.1uF
0.1uF
Vout=0.765V*(1+R1/R2)
C77
C77
2.2uF/DC
2.2uF/DC
+5V_Normal
R56
R56
4.7K
4.7K
Q10
Q10
3904
3904
2 3
0805_BEAD/12V
0805_BEAD/12V
PANEL_ON/OFF
+5V_Standby
R44
R44
4.7K
4.7K
R40
R40
10K/NC
10K/NC
屏
屏
R42 4.7KR42 4.7K
R121
R121
10K 1%
10K 1%
R2
"VBL_CTRL" IO
"VBL_CTRL" IO
Panel_VCC
C76
C76
0.1uF
0.1uF
L104
L104
3.3uH/2A
3.3uH/2A
R122 5.6K 1%R122 5.6K 1%
R1
BRI_ADJ 5
VBL_CTRL 5
CA8
CA8
+
+
100uF/16V
100uF/16V
C119
C119
22uF
22uF
R1 100R 1%R1 100R 1%
C120
C120
22uF
22uF
+1.15V_VDDC
C132
C132
C122
10uF
10uF
靠近
DC-DC
C122
0.1uF
0.1uF
+5V_Standby
C166
C166
2.2uF
2.2uF
+3.3V_STANDBY & +3.3V_NORMAL
1.5V Normal Power for DDR3
4
U8
U8
AS1117-ADJ
AS1117-ADJ
ADJ
OUT
ADJ
OUT
IN
IN
3
2
+5V_Normal
+5V_Standby
+5V_IN
IR_IN
GND
LED
KEY0
KEY1
PWR
GND
8pin/2.0MM
8pin/2.0MM
CN104
CN104
D103M7D103
M7
R168 10RR168 10R
1
2
3
4
5
6
7
8
1
R2
R32 470RR32 470R
R38
R1
100R
100R
R38
C69
C69
0.1uF
0.1uF
C68
C68
2.2uF
2.2uF
Vout=1.25V*(1+R1/R2)
IR-in
R157
R157
10K
10K
0.1uF
0.1uF
C181
C181
IR_5V
IR-in
LED+
KEY0-in
KEY1-in
KEY_POWER
R194 1KR194 1K
C174 0.1uFC174 0.1uF
AMS1117-3.3
AMS1117-3.3
3
VIN
C168
C168
0.1uF
0.1uF
C70
C70
C78
C78
2.2uF
2.2uF
0.1uF
0.1uF
R167 100RR167 100R
+5V_Standby
R1822KR182
Q112
Q112
3904
3904
2 3
ED14
ED14
0.1pF
0.1pF
U114
U114
VOUT
VOUT
ADJ
1
+1.5V_DDR
C131
C131
10uF
10uF
2K
1
ED13
ED13
0.1pF
0.1pF
2
4
C127
C127
22uF
22uF
R126 4.7KR126 4.7K
C179
C179
0.1uF
0.1uF
Imax=350mA
+3.3V_Standby
C71
C71
C169
C169
2.2uF
2.2uF
0.1uF
0.1uF
IRIN
C148
C148
33pF
33pF
R183
R183
4.7K
4.7K
R159 4.7KR159 4.7K
R155 4.7KR155 4.7K
R171 1KR171 1K
R142 1KR142 1K
C150
C150
0.1uF
0.1uF
IR&KEY Connector
+3.3V_Normal
C130
C130
10uF
10uF
IRIN 5
LED
+3.3V_Standby
LED 5
KEY_SAR0 5
KEY_SAR1 5
H12NCH12
1
5
9
4
8
3
7
2
6
NC
A A
1
H26NCH26
NC
H11NCH11
1
5
9
4
8
3
7
2
6
NC
1
H24NCH24
NC
1
1
H20NCH20
H23NCH23
NC
NC
Test Point & MARK
1
3.5mm/nc
3.5mm/nc
C10
C10
1
3.5mm/nc
3.5mm/nc
C12
C12
1
3.5mm/nc
3.5mm/nc
C14
C14
5
1
3.5mm/nc
3.5mm/nc
C15
C15
3.5mm/nc
3.5mm/nc
1
C16
C16
H25NCH25
1
5
9
4
8
3
7
2
1
NC
隔离柱孔
隔离柱孔
6
1
H17NCH17
1
H31
H31
/NC
/NC
隔离柱孔
隔离柱孔
NC
1
H29NCH29
NC
H2NCH2
1
5
9
4
8
3
7
2
NC
1
H19NCH19
NC
NC
1
1
H15
H15
/NC
/NC
6
1
H28NCH28
H27NCH27
NC
1
SN2NCSN2
SNNCSN
NC
NC
4
H3NCH3
1
5
9
4
8
3
7
2
NC
6
This document for ShenZhen KTC Technology CO., Ltd and presented party internal use only,
3
30
Do not spread to third party without the written permission.
2
Copyright@ ShenZhen KTC Technology Co., LTD
1
Page 31
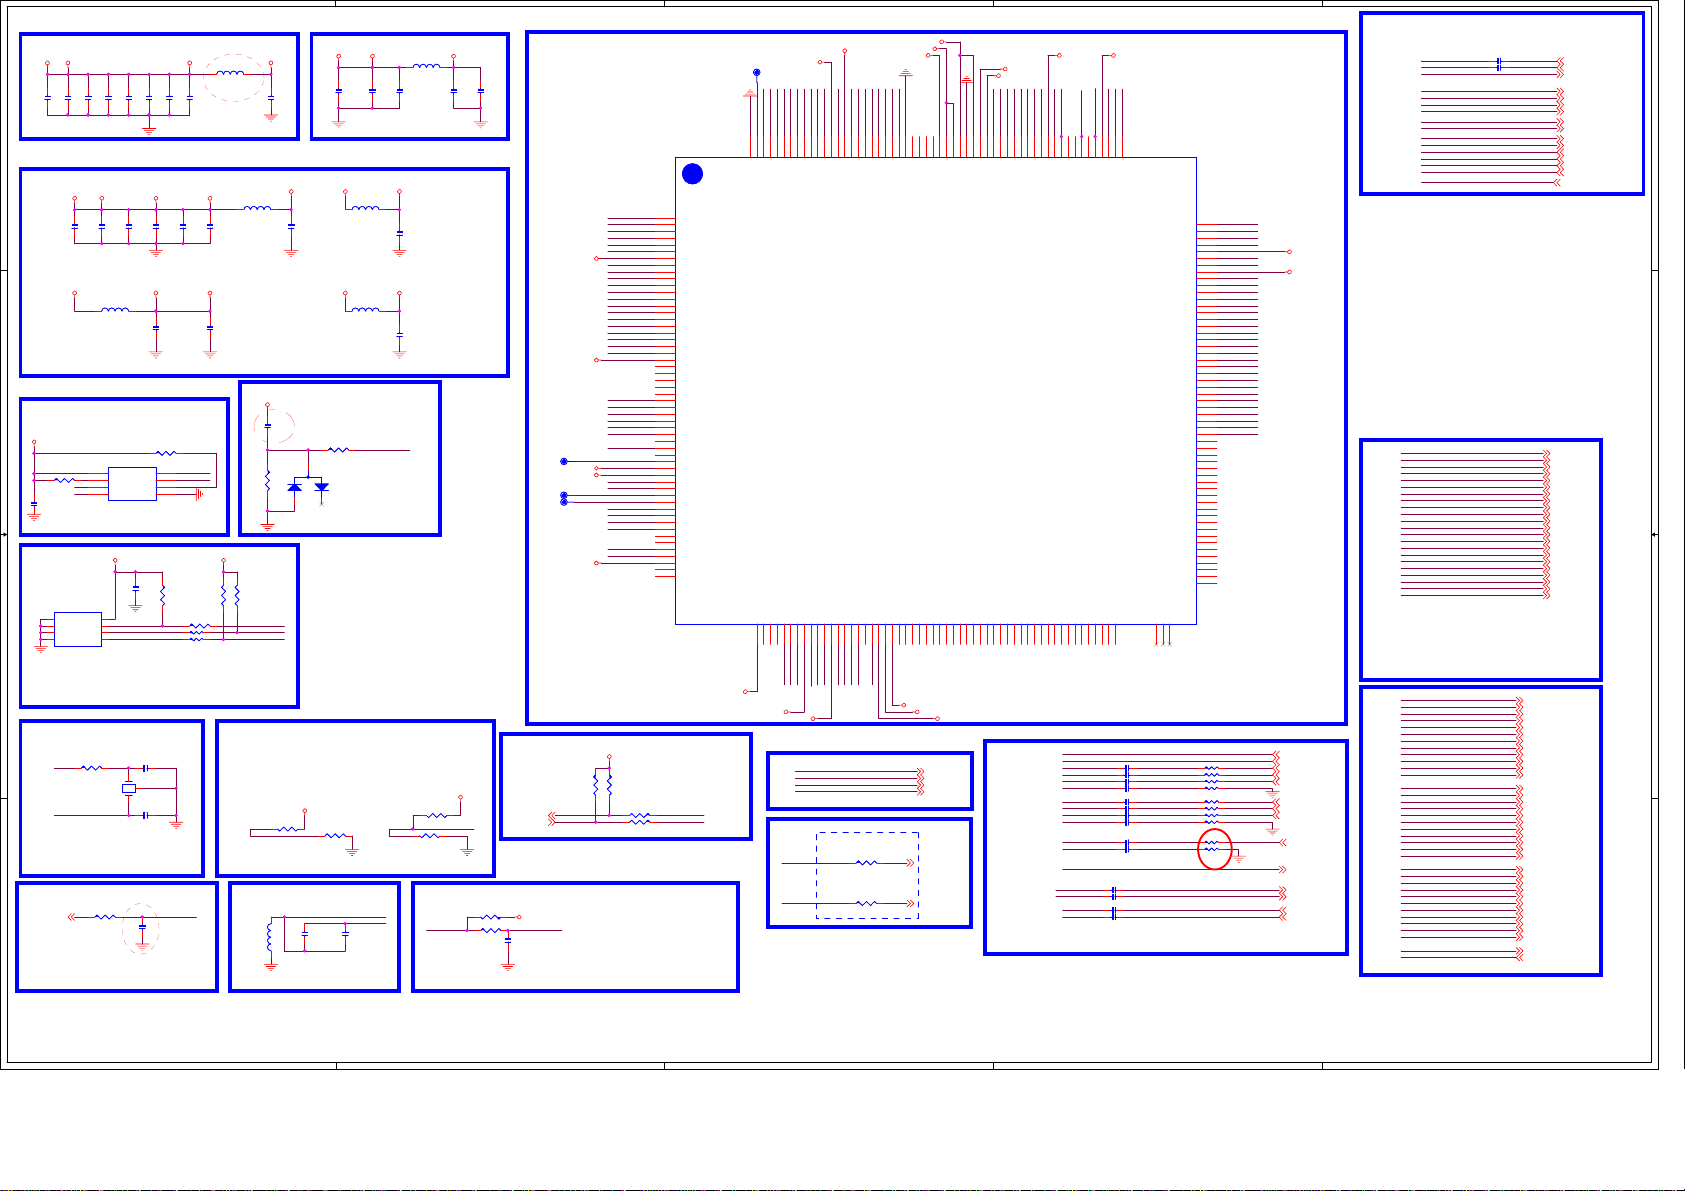
5
CORE POWER
+1.15V_VDDC
C236
C236
C238
C238
C239
C239
C240
2.2uF
2.2uF
D D
C240
0.1uF
0.1uF
0.1uF
0.1uF
0.1uF
0.1uF
AVDDL_DVI
FB2050RFB205
0R
C243
C243
C241
C241
C244
C244
C245
C245
0.1uF
0.1uF
0.1uF
0.1uF
不能省掉!
0.1uF
0.1uF
0.1uF
0.1uF
DVDD_DDRVDDC
C246
C246
0.1uF
0.1uF
DDR3 POWER
AVDD_DDR_CMD AVDD_DDR_DATA
+1.5V_DDR
FB212 0RFB212 0R TP6TP6
C251
C251
C249
C249
0.1uF
0.1uF
2.2uF
2.2uF
C252
C252
0.1uF
0.1uF
Standby Power 3.3V
C279
C279
0.1uF
0.1uF
C288
C288
0.1uF
0.1uF
100MHZ/300mA/600R
100MHZ/300mA/600R
FB202
FB202
AVDD_MOD1
+5V_Standby
C280
C280
0.1uF
0.1uF
C285
C285
2.2uF
2.2uF
R272 1KR272 1K
3
D202
D202
R269
R269
100K
100K
BAV99
BAV99
1
2
AVDD_MOD
C277
C277
0.1uF
0.1uF
C289
C289
0.1uF
0.1uF
R263 10KR263 10K
1
CE#
2
SO
3
WP#
VSS4SI
AVDD3P3_ADC
C278
C278
0.1uF
0.1uF
AVDD_AU33AVDD_EAR33 AVDD_DADC
SPI_CSN
SPI_DO
SPI_WP
AVDD_ETH
+3.3V_Standby
C290
C290
C292
C292
C274
C274
0.1uF
0.1uF
0.1uF
0.1uF
2.2uF
2.2uF
+3.3V_Standby
100MHZ/300mA/600R
100MHZ/300mA/600R
FB207
FB207
C C
SPI NOR FLASH
+3.3V_Standby
U204
U204
8
SPI_CLK
SPI_DI
7
6
5
VDD
HOLD#
SCK
MX25L6406E
MX25L6406E
R264 0RR264 0R
C282
C282
0.1uF
0.1uF
Software must be protected
U203
U203
NC/24C32
NC/24C32
1
A0
2
A1
3
A2
GND4SDA
+3.3V_Normal
VCC
WP
SCL
8
7
6
5
C261
C261
NC/0.1uF
NC/0.1uF
EEPROM_WP
TUNER_SCL
TUNER_SDA
EEPROM
B B
C1
XTALO
R266 100RR266 100R
C281 8pFC281 8pF
12
Y201
Y201
3
24MHZ/8PF
24MHZ/8PF
XTALI
NOTE:
The crystal frequency deviation need be less 30PPM, delete 1M resistance
C284 8pFC284 8pF
C2
Crystal
R230 150R/optical:10RR230 150R/optical:10R
SPDIF_OUT6
A A
SPDIF OUT
C235
C235
NC/33pF
NC/33pF
Close to MSTAR IC
R235
R235
NC/4.7K
NC/4.7K
R234 NC/0RR234 NC/0R
R1048 100RR1048 100R
R1047 100RR1047 100R
SPDIF-OUT
+3.3V_TU_S
R55
R55
R54
R54
4.7K
4.7K
4.7K
4.7K
MHL_VBUS-EN
M-SCL
M-SDA
CHIP_CONFIG[1:0]
{PAD_PWM1, PAD_PWM0}
2'b01 Boot from SPI_NOR Flash
2'b10 Boot from ROM
+3.3V_Standby
R255
R255
R249 10K/NCR249 10K/NC
PWM1
10K
10K
C232
C232
FB201
FB201
0.1uF
150mA/1K
150mA/1K
0.1uF
Close to MSTAR IC
with width trace
AVDD_DMPLL
+3.3V_Standby
100MHZ/300mA/600R
100MHZ/300mA/600R
FB211
FB211
C293
C293
0.1uF
0.1uF
+3.3V_Standby
100MHZ/300mA/600R
100MHZ/300mA/600R
FB209
FB209
C291
C291
0.1uF
0.1uF
System-RST
RESET
IC Configuration Selection
+3.3V_Standby
R254 10KR254 10K
BRI_ADJ-PWM0
R251 10K/NCR251 10K/NC
AUVRM
C234
C234
10uF
10uF
AUVAG
IFAGC-T IFAGC_T
IF AGC
C253
C253
0.1uF
0.1uF
R226 10KR226 10K
R228 0RR228 0R
4
IC
C259
C259
2.2uF
2.2uF
HDMI1_RX0N
1
2
3
4
5
6
7
8
9
10
11
12
13
14
15
16
17
18
19
20
21
22
23
24
25
26
27
28
29
30
31
32
33
34
35
36
37
38
39
40
41
42
43
44
45
46
47
48
49
50
51
52
53
54
ISP AND VGA EDID
R270100R R270100R
R271100R R271100R
RX0N_B
RX0P_B
RX1N_B
RX1P_B
RX2N_B
RX2P_B
AVDD_MOD
RXCN_A
RXCP_A
RX0N_A
RX0P_A
RX1N_A
RX1P_A
RX2N_A
RX2P_A
HSYNC0
BIN0P
GIN0P
GIN0M
RIN0P
VSYNC0
AVDD3P3_ADC
BIN1P
GIN1P
GIN1M
RIN1P
VSYNC1
BIN2P
GIN2P
GIN2M
RIN2P
PANEL_ON/OFF
CVBS0
CVBS1
VCOM
CVBS_OUT1
CVBS_OUT2
VDDC
AVDD_AU33
AUVRM
VAG
LINEIN_L2
LINEIN_R2
LINEIN_L3
LINEIN_R3
LINEIN_L4
LINEIN_R4
LINEOUTR3
LINEOUTL3
EARPHONE_OUTL
EARPHONE_OUTR
AVDD33_EAR
QP_S
QM_S
U201 MSD3463GSA
U201 MSD3463GSA
UART_TX
UART_RX
DEBUG
UART-TX6
UART-RX6
+3.3V_TU_S
C262
C262
22nF
22nF
AVDD_MOD
MHL Port
AVDD3P3_ADC
SAR1-->
SC-HSYNC
TP8TP8
VDDC
AVDD_AU33
TP7TP7
TP5TP5
AVDD_EAR33
1
1
1
+5V_Standby
R268
R268
4.7K
4.7K
HDMI1_RX0P
HDMI1_RX1N
HDMI1_RX1P
HDMI1_RX2N
HDMI1_RX2P
HDMI2_CLKN
HDMI2_CLKP
HDMI2_RX0N
HDMI2_RX0P
HDMI2_RX1N
HDMI2_RX1P
HDMI2_RX2N
HDMI2_RX2P
VGA_HS
BIN0
GIN0P
GIN0M
RIN0
VGA_VS
BIN2
GIN2P
GIN2M
RIN2
PANEL_ON/OFF
CVBS0
VCOM0
AUVRM
AUVAG
AUL3
AUR3
AUL4
AUR4
AMP-AUOUTL
AMP-AUOUTR
MUST pull high to 5VSTB
R267
R267
4.7K
4.7K
AVDD_DADC
1
HDMI1_CLKP
HDMI1_CLKN
216
215
217
218
GND
EPAD
RXCP_B
AVDD3P3_DADC
IP_S56IM_S57IFAGC_S58IFAGC_T59IP_T60IM_T61AVDD3P3_DMPLL62XIN63XOUT64VDDC66GPIO44/TX167GPIO45/RX168PWR_ON/OFF69GPIO48/DISEQC71VDDIO_CMD73VDDC74AVDD_MOD75PCM_RESET/EJ_RSTZ76PCM_IRQA_N77PCM_CD_N78PCM_REG_N79PCM_CE_N80PCM_OE_N81PCM_WE_N82PCM_WAIT_N83PCM_IORD_N84PCM_IOWR_N85PCM_D086PCM_D187PCM_D288PCM_D3
55
AVDD_DMPLL
3
AVDD5V_MHL
AVDDL_DVI
HDMI0_RX2P
HDMI0_RX2N
214
213
RX2P_D
RXCN_B
IFAGC-T
HDMI0_RX0P
HDMI0_RX1P
HDMI0_RX0N
HDMI0_RX1N
212
211
210
RX1P_D
RX0P_D
RX2N_D
RX1N_D
VIFM
VIFP
XTALI
VDDC
USB1_DP
USB1_DM
USB0_DP
USB0_DM
AVDD_ETH
ARC
HDMI_CEC
HDMI0_CLKN
HDMI2_HPDIN
AVDD5V_MHL
HDMI0_CLKP
HDMI0_HPDIN
HDMI1_HPDIN
208
205
204
200
209
207
206
203
202
201
ARC
RX0N_D
RXCP_D
RXCN_D
AVDD_5V
HOTPLUG_A
HOTPLUG_B
HOTPLUG_D
VDDC/AVDDL_DVI
MSD3463GSA
MSD3463GSA
GPIO68/MHL_VBS65VBL_CTRL70GPIO49/I2S_OUT_WS
72
XTALO
M-SDA
M-SCL
HDMI0_DEC
VBL_CTRL
PWR_ON/OFF
MHL_VBUS-EN
Audio Line Out
AMP-AUOUTR
R285 0RR285 0R
AMP-AUOUTL
R299 0RR299 0R
close to IC
AVDD_DDR_DATA
AVDD_DDR_CMD
HDMI1_SCL
HDMI2_SCL
HDMI1_SDA
HDMI2_SDA
195
197
196
199
198
CEC
DDCDB_CLK
DDCDA_CLK
DDCDB_DAT
DDCDA_DAT
AVDD_MOD
193RP192
194
TP
TN
GND-EFUSE
VDDC
AMP-INR 6
AMP-INL 6
191
190
RN
AVDD_ETH
AVDD_DDR_CMD
USB1_DP 6
USB1_DM 6
USB0_DP 6
USB0_DM 6
189
VDDIO_DRAM
188
187
VDDIO_DRAM
KEY_SAR1
182
185
184
183
186
GND
AVDD_MOD
VDDIO_DATA
VDDIO_DATA
DVDD_DDR_DATA
89
AUDIO LINE IN
AVDD_MOD1
DVDD_DDR
HDMI0_SCL
MHL_CABLE-DET
KEY_SAR0
HDMI0_SDA
SPI_DO
UART_RX
UART_TX
SPDIF-OUT
181
177
176
174
180
178
173
175
179
SAR1
SAR0
VDDC
MHL_DET
DDCA_CK
DDCA_DA
DDCDD_CLK
DDCDD_SDA
GPIO96/SPDIF_OUT
PCM_D4/EJ_TCK90PCM_D5/EJ_TDO91PCM_D6/EJ_TDI92PCM_D7/EJ_TRSTN93PCM_A1494PCM_A1395PCM_A12/EJ_DINT96PCM_A1197PCM_A1098PCM_A999PCM_A8
VGA
YPBPR
AV
SPDIF OUT
VDDC
VDDC
SPI_CSN
SPI_CLK
SPI_DI
PWM1
System-RST
BRI_ADJ-PWM0
166
163
165
164
172
170
169
168
171
167
VDDC
PWM1
PWM0
RESET
NAND_CLE
GPIO0/TX2/I2S_OUT_MCK
SPI-NAND_WP/NAND_WP
GPIO2/RX2/I2S_OUT_BCK
GPIO56/I2S_OUT_SD
SPI-NAND_HOLDN/NAND_WEZ
AVDDL_MOD/VDDC
SPI_DI/SPI-NAND_DI/NAND_REZ
SPI_CK/SPI-NAND_CK/NAND_ALE
SPI_CS/SPI-NAND_CS/NAND_CEZ
SPI_DO/SPI-NAND_DO/NANAD_RBZ
B_ODD[4]/LVACLK+
PCM_A0
PCM_A7
PCM_A6/EJ_TMS
PCM_A5
PCM_A4
PCM_A3
PCM_A2
PCM_A1
108
100
101
102
103
104
105
106
107
VGA_HS
VGA_VS
RIN0
C203 47nFC203 47nF
BIN0
C204 47nFC204 47nF
GIN0P
C205 47nFC205 47nF
GIN0M
C206 47nFC206 47nF
RIN2
C211 47nFC211 47nF
BIN2
C212 47nFC212 47nF
GIN2P
C213 47nFC213 47nF
GIN2M
C214 47nFC214 47nF
CVBS0
C216 47nFC216 47nF
VCOM0
C217 47nFC217 47nF
SPDIF_OUT
AUL3
C224 2.2uFC224 2.2uF
AUR3
C222 2.2uFC222 2.2uF
AUR4
C220 2.2uFC220 2.2uF
AUL4
C221 2.2uFC221 2.2uF
Audio Line IN
YPBPR/AV
2
R_ODD[5]/LVB0-
R_ODD[4]/LVB0+
AVDD_MOD
R_ODD[3]/LVB1-
R_ODD[2]/LVB1+
R_ODD[1]/LVB2R_ODD[0]/LVB2+
G_ODD[7]/LVB3G_ODD[6]/LVB3+
G_ODD[5]/LVB4G_ODD[4]/LVB4+
G_ODD[3]/LVA0G_ODD[2]/LVA0+
G_ODD[1]/LVA1G_ODD[0]/LVA1+
B_ODD[7]/LVA2B_ODD[6]/LVA2+
B_ODD[5]/LVACLK-
B_ODD[3]/LVA3B_ODD[2]/LVA3+
B_ODD[1]/LVA4B_ODD[0]/LVA4+
DP_P0
DM_P0
DP_P1
DM_P1
TS1_D0
TS1_D1
TS1_D2
TS1_D3
TS1_D4
TS1_D5
TS1_D6
TS1_D7
TS1_VLD
TS1_SYNC
TS1_CLK
TS0_D0
TS0_D1
TS0_D2
TS0_D3
TS0_D4
TS0_D5
TS0_D6
TS0_D7
TSO_VLD
TS0_SYNC
TS0_CLK
1K1K2T2T3C
3C
IRIN
R286 33RR286 33R
R287 33RR287 33R
R288 33RR288 33R
R289 68RR289 68R
R294 33RR294 33R
R295 33RR295 33R
R296 33RR296 33R
R297 68RR297 68R
R241 150RR241 150R
R242 180RR242 180R
1
OTHER
VIFP
VIFM
IFAGC_T
PANEL_ON/OFF
PWR_ON/OFF
BRI_ADJ-PWM0
VBL_CTRL
TUNER_SCL
TUNER_SDA
AMP-MUTE
HDMI0_DEC
IRIN
KEY_SAR0
KEY_SAR1
LED
ARC_DET
IRIN
162
LED
161
ARC_DET
160
AMP-MUTE
159
158
RXO0-
157
RXO0+
156
155
RXO1-
154
RXO1+
153
RXO2-
152
RXO2+
151
RXO3-
150
RXO3+
149
RXO4-
148
RXO4+
147
RXE0-
146
RXE0+
145
RXE1-
144
RXE1+
143
RXE2-
142
RXE2+
141
RXEC-
140
RXEC+
139
RXE3-
138
RXE3+
137
RXE4-
136
RXE4+
135
USB0_DP
134
USB0_DM
133
USB1_DP
132
USB1_DM
131
130
129
128
127
126
125
124
123
122
121
120
119
118
117
116
115
114
113
112
111
110
109
AV-IN
VDDC
AVDD_MOD
VGA-HSYNC 6
VGA-VSYNC 6
VGA-R 6
VGA-B 6
VGA-G 6
YPbPr-PR 6
YPbPr-PB 6
YPbPr-Y 6
AV-IN 6
SPDIF_OUT 6
PC_LIN
PC_RIN
AV-RIN 6
AV-LIN 6
RXO0RXO0+
RXO1RXO1+
RXO2RXO2+
RXO3RXO3+
RXO4RXO4+
RXE0RXE0+
RXE1RXE1+
RXE2RXE2+
RXECRXEC+
RXE3RXE3+
RXE4RXE4+
HDMI0_RX0N
HDMI0_RX0P
HDMI0_RX1N
HDMI0_RX1P
HDMI0_RX2N
HDMI0_RX2P
HDMI0_CLKN
HDMI0_CLKP
HDMI0_SCL
HDMI0_SDA
HDMI0_HPDIN
ARC
HDMI1_RX0N
HDMI1_RX0P
HDMI1_RX1N
HDMI1_RX1P
HDMI1_RX2N
HDMI1_RX2P
HDMI1_CLKN
HDMI1_CLKP
HDMI1_SCL
HDMI1_SDA
HDMI1_HPDIN
HDMI2_RX0N
HDMI2_RX0P
HDMI2_RX1N
HDMI2_RX1P
HDMI2_RX2N
HDMI2_RX2P
HDMI2_CLKN
HDMI2_CLKP
HDMI2_SCL
HDMI2_SDA
HDMI2_HPDIN
HDMI_CEC
MHL_CABLE-DET
C2540.1uF C2540.1uF
C2500.1uF C2500.1uF
HDMI0_HPDIN 7
HDMI1_HPDIN 7
HDMI2_HPDIN 7
MHL_CABLE_DET 7
ARC_DET 7
RXO0- 6
RXO0+ 6
RXO1- 6
RXO1+ 6
RXO2- 6
RXO2+ 6
RXO3- 6
RXO3+ 6
RXO4- 6
RXO4+ 6
RXE0- 6
RXE0+ 6
RXE1- 6
RXE1+ 6
RXE2- 6
RXE2+ 6
RXEC- 6
RXEC+ 6
RXE3- 6
RXE3+ 6
RXE4- 6
RXE4+ 6
HDMI0_RX0N 7
HDMI0_RX0P 7
HDMI0_RX1N 7
HDMI0_RX1P 7
HDMI0_RX2N 7
HDMI0_RX2P 7
HDMI0_CLKN 7
HDMI0_CLKP 7
HDMI0_SCL 7
HDMI0_SDA 7
HDMI0_ARC 7
HDMI1_RX0N 7
HDMI1_RX0P 7
HDMI1_RX1N 7
HDMI1_RX1P 7
HDMI1_RX2N 7
HDMI1_RX2P 7
HDMI1_CLKN 7
HDMI1_CLKP 7
HDMI1_SCL 7
HDMI1_SDA 7
HDMI2_RX0N 7
HDMI2_RX0P 7
HDMI2_RX1N 7
HDMI2_RX1P 7
HDMI2_RX2N 7
HDMI2_RX2P 7
HDMI2_CLKN 7
HDMI2_CLKP 7
HDMI2_SCL 7
HDMI2_SDA 7
HDMI_CEC 7
DIF+ 8
DIF- 8
IFAGC_T 8
PANEL_ON/OFF 4
PWR_ON/OFF 3
BRI_ADJ 4
VBL_CTRL 4
TUNER_SCL 8
TUNER_SDA 8
AMP_MUTE 6
HDMI0_DEC 7
IRIN 4
KEY_SAR0 4
KEY_SAR1 4
LED 4
LVDS
PCMCIA
HDMI
This document for ShenZhen KTC Technology CO., Ltd and presented party internal use only,
Do not spread to third party without the written permission.
5
4
3
2
Copyright@ ShenZhen KTC Technology Co., LTD
31
Page 32
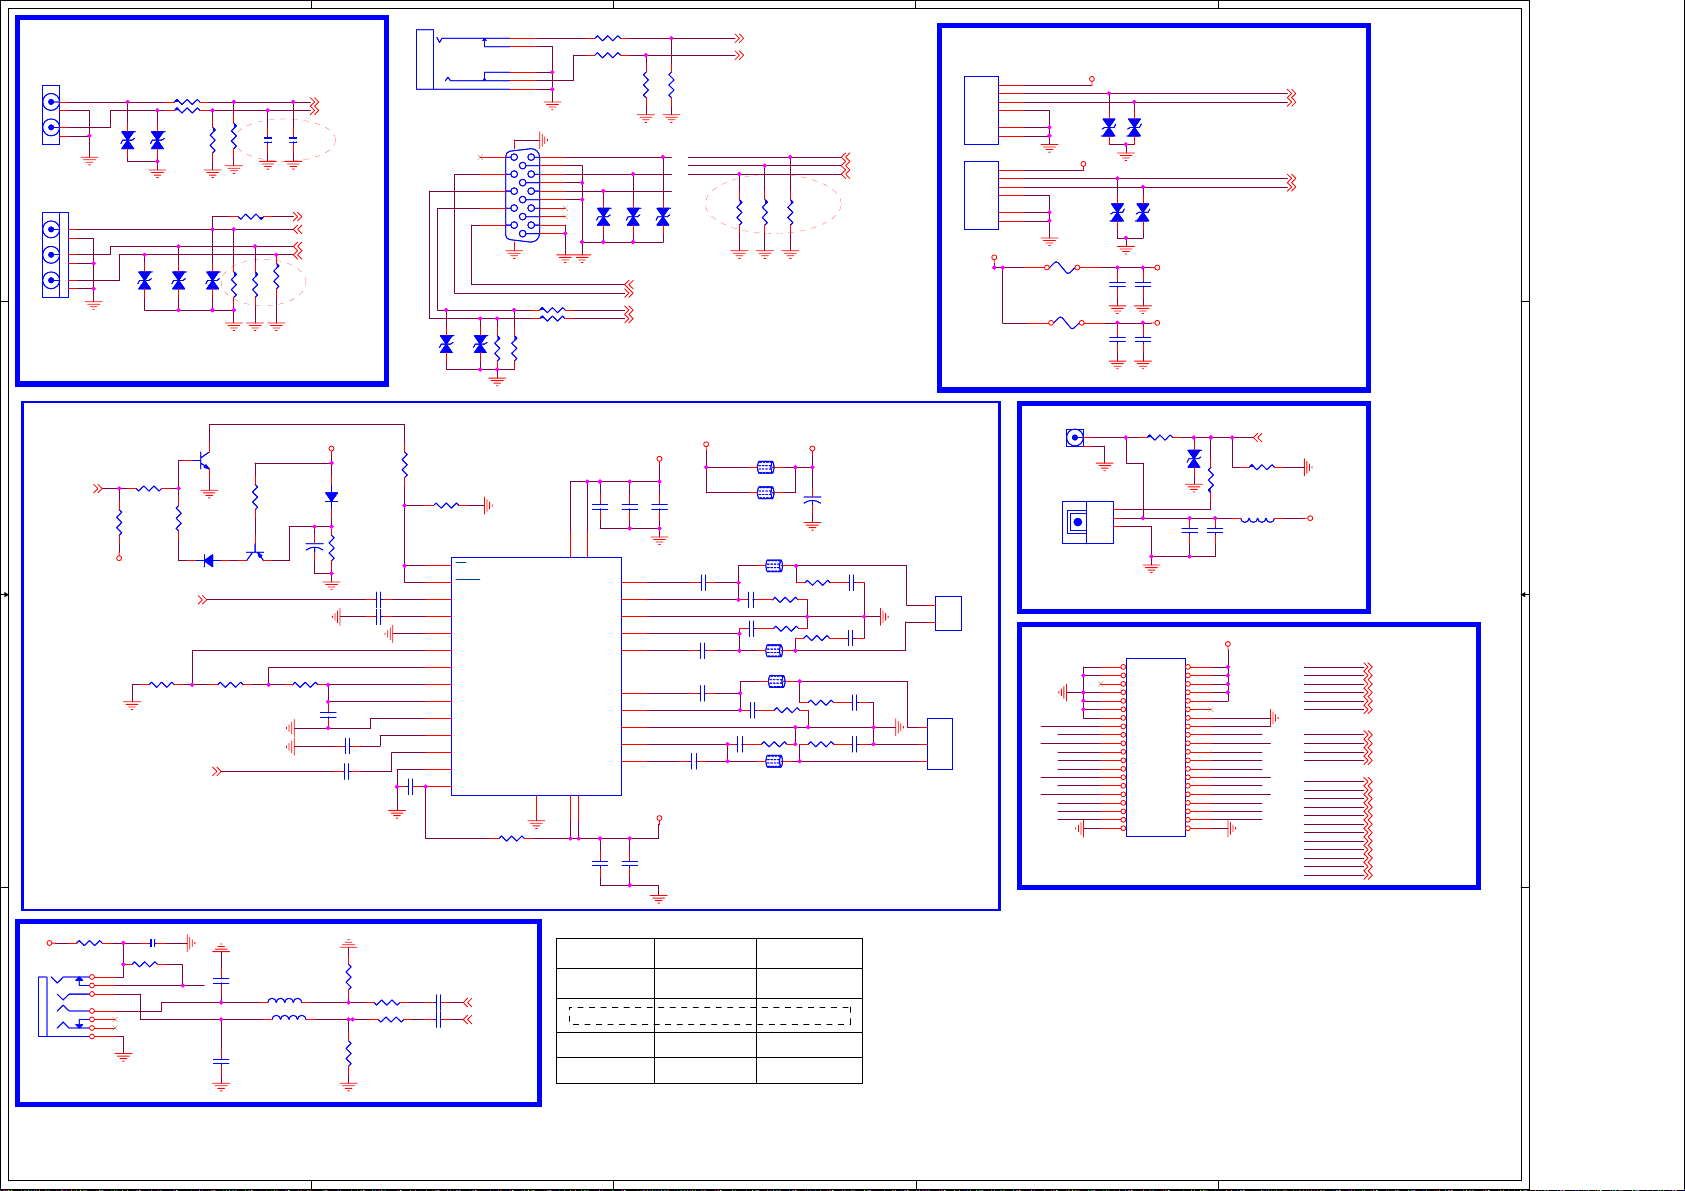
5
YPBPR & VIDEO
CN5
CN5
1
3
2
4
NC/1pF
CN308
CN308
AMP_MUTE5
L:ON
H:MUTE
NC/1pF
+3.3V_Standby
YPBPR&AV_AUDIO_IN
YPBPR&AV_AUDIO_IN
D D
AV_IN
AV_IN
C C
B B
AUDIO AMP
R401 10KR401 10K
R402 10KR402 10K
ED4
ED4
ED3
ED3
NC/1pF
NC/1pF
ED5
ED5
ED6
ED6
NC/1pF
NC/1pF
NC/1pF
NC/1pF
Close to Mstar IC
R274 10kR274 10k
R284
R284
4.7k
4.7k
AMP-INL5
R282 33KR282 33K
AMP-INR5
ED7
ED7
NC/1pF
NC/1pF
1
2 3
R248
R248
10K
10K
D204 1N4148D204 1N4148
R279 33KR279 33K
R403
R403
12K
12K
Q27
Q27
3904
3904
R404
R404
12K
12K
R408 0RR408 0R
R405
R405
R406
R406
75R
75R
75R
75R
R238
R238
10K
10K
1
Q206
Q206
3906
3906
C408
C408
NC/300pF
NC/300pF
R407
R407
75R
75R
MUTE
23
C409
C409
NC/300pF
NC/300pF
AV-IN 5
YPbPr-Y 5
YPbPr-PB 5
YPbPr-PR 5
AMP_12V
C296
C296
100uF/16V
100uF/16V
R250 33KR250 33K
AV-LIN 5
AV-RIN 5
Close to
Mstar IC
D205
D205
1N4148
1N4148
R236
R236
100k
100k
C319 0.47uFC319 0.47uF
C320 0.47uFC320 0.47uF
C145
C145
1uF
1uF
C228 0.47uFC228 0.47uF
C227 0.47uFC227 0.47uF
RIN_N
RIN_P
C237
C237
ED12
ED12
NC/1pF
NC/1pF
NC/1pF
NC/1pF
R280
R280
100R
100R
R281 470K/ncR281 470K/nc
L:SHUTDOWN
SD
1
2
LIN_P
3
LIN_N
4
5
6
7
8
9
10
11
12
13
14
1uF
1uF
4
CN10 PHONEJACKCN10 PHONEJACK
1617
11
12
13
14
15
R607
R607
ED11
ED11
10K
10K
U202
U202
SD
FAULT
LINP
LINN
LIMRATE
GAIN
SSCTRL
LIMTHRES
GVDD
AGND
RINN
RINP
1SPW
AVCC
TPA3140D2
TPA3140D2
R252 10RR252 10R
1
3
4
2
5
P601
P601
1
6
2
7
3
8
4
9
5
10
VGA-W
VGA-W
R605 100RR605 100R
R606 100RR606 100R
R608
R608
10K
10K
GND
29
R509 10KR509 10K
R513 10KR513 10K
ED10
ED10
NC/1pF
NC/1pF
DDC-SCL-D
DDC-SDA-D
27
28
PVCC
PVCC
BSPL
OUTPL
PGND
OUTNL
BSNL
BSNR
OUTNR
PGND
OUTPR
BSPR
PVCC16PVCC
15
NC/1pF
NC/1pF
C184
C184
1nF
1nF
C185
C185
1nF
1nF
VGA-R
VGA-G
VGA-B
ED9
ED9
NC/1pF
NC/1pF
UART-RX 5
UART-TX 5
VGA-VSYNC 5
VGA-HSYNC 5
C321
C321
100nF
100nF
26
25
24
23
22
21
20
19
18
17
C225
C225
100nF
100nF
R516
R516
12K
12K
ED8
ED8
AMP_12V
OUTPL
OUTNL
OUTNR
OUTPR
AMP_12V
R517
R517
12K
12K
VGA-B
VGA-G
VGA-R
Close to Mstar IC
+12V_NORMAL
C317
C317
10uF/16V
10uF/16V
0.22uF
0.22uF
C322
C322
C189 330pFC189 330pF
C305 0.22uFC305 0.22uF
C307
C307
0.22uF
0.22uF
C183 330pFC183 330pF
C306 0.22uFC306 0.22uF
3
PC_LIN
PC_RIN
R609
R609
R610
R610
75R
75R
75R
75R
L207
L207
0805_BEAD
0805_BEAD
L210
L210
0805_BEAD
0805_BEAD
L12 600R@100MHzL12 600R@100MHz
R283
R283
10R
10R
R290
R290
C190 330pFC190 330pF
10R
10R
L11
L11
600R@100MHz
600R@100MHz
600R@100MHz
600R@100MHz
L14
L14
R258
R258
C182 330pFC182 330pF
10R
10R
R261
R261
10R
10R
L23
L23
600R@100MHz
600R@100MHz
R611
R611
75R
75R
AMP_12V
C223
C223
470uF/16V
470uF/16V
R240
R240
47R
47R
R243
R243
47R
47R
R253
R253
R262
R262
47R
47R
47R
47R
C176
C176
C175 1nFC175 1nF
C178 1nFC178 1nF
C180
C180
VGA-B 5
VGA-G 5
VGA-R 5
VGA
1nF
1nF
1nF
1nF
ROUT+
LOUT+
LOUT-
ROUT-
1
2
3
3Pin/2.0mm
3Pin/2.0mm
-
GND
+
CN203CN203
2
1
CN201
CN201
VCC
GND
SHIELD
SHIELD
CN318
CN318
VCC
GND
SHIELD
SHIELD
CN319
CN319
+5V_Normal
D+
D+
D-
D-
2
USB ESD
1
2
3
4
5
6
USB_4P
USB_4P
1
2
3
4
5
6
USB_4P
USB_4P
+5V_USB1
NC/1pF
NC/1pF
+5V_USB2
L4046V/1.1A L4046V/1.1A
L4056V/1.1A L4056V/1.1A
Coaxial
Coaxial
CN316
CN316
SPDIFOUT
1
2
SPDIF
VCC
GND
CN6 SPDIF/NCCN6 SPDIF/NC
D701
D701
D704
D704
NC/1pF
NC/1pF
C618
C618
0.1uF
0.1uF
C617
C617
0.1uF
0.1uF
1
2
3
NC/1pF
NC/1pF
Coaxial /OPTICAL OUT
CN401
CN401
40PIN/2.0mm
40PIN/2.0mm
5
7
9
11
13
B3_RXE4- B2_RXE4+
15
B3_RXE3-
17
B5_RXEC-
19
B7_RXE2-
21
G1_RXE1-
23
G3_RXE0-
25
G7_RXO4-
27
G7_RXO3-
29
B5_RXEC- B4_RXEC+
31
R3_RXO2-
33
R5_RXO1-
35
R7_RXO0-
37
39
LVDS
分布电容要求
<2pF
USB0_DM
D703
D703
D705
D705
NC/1pF
NC/1pF
C604
C604
10uF
10uF
C605
C605
10uF
10uF
+5V_USB1
+5V_USB2
USB0_DP
USB1_DM
USB1_DP
USB2.0 INTERFACE
R419 0RR419 0R
ED1
NC/1pF
NC/1pF
GND1VCC
GND3VCC
VCC
NC
VCC
GND
GND
VCC
GND
P_PWM
GND
GND
E4E3-
EC+
ECE2E1E0O4O3-
OC+
OCO2O1O0-
GND
GND
ED1
E4+
E3+
E2+
E1+
E0+
O4+
O3+
O2+
O1+
O0+
C4
0.1uF/ncC40.1uF/nc
Panel_VCC
2
4
6
8
10
12
14
16
18
20
22
24
26
28
30
32
34
36
38
40
R417 75R/optical:10KR417 75R/optical:10K
R418
R418
optical:0R
optical:0R
L2 FB/NCL2 FB/NC
C3
2.2uF/ncC32.2uF/nc
B2_RXE3+
B4_RXEC+
B6_RXE2+
G0_RXE1+
G2_RXE0+
G6_RXO4+
G6_RXO3+
R2_RXO2+
R4_RXO1+
R6_RXO0+
1
USB0_DM 5
USB0_DP 5
USB1_DM 5
USB1_DP 5
SPDIF_OUT 5
+5V_Normal
Net to other page
R7_RXO0-
RXO0- 5
R6_RXO0+
RXO0+ 5
R5_RXO1-
RXO1- 5
R4_RXO1+
RXO1+ 5
R3_RXO2-
RXO2- 5
R2_RXO2+
RXO2+ 5
G7_RXO3-
RXO3- 5
G6_RXO3+
RXO3+ 5
G7_RXO4-
RXO4- 5
G6_RXO4+
RXO4+ 5
G3_RXE0-
RXE0- 5
G2_RXE0+
RXE0+ 5
G1_RXE1-
RXE1- 5
G0_RXE1+
RXE1+ 5
B7_RXE2-
RXE2- 5
B6_RXE2+
RXE2+ 5
B5_RXEC-
RXEC- 5
B4_RXEC+
RXEC+ 5
B3_RXE3-
RXE3- 5
B2_RXE3+
RXE3+ 5
B3_RXE4-
RXE4- 5
B2_RXE4+
RXE4+ 5
R276 47KR276 47K
5
4
2
3
6
7
1
C410 0.1uF/ncC410 0.1uF/nc
R291 0R/ncR291 0R/nc
MUTE
E_AMP-L
E_AMP-R
C327
C327
4.7nF
4.7nF
C328
C328
4.7nF
4.7nF
FB1
FB1
FB2
FB2
100MHZ/300mA/600R
100MHZ/300mA/600R
100MHZ/300mA/600R
100MHZ/300mA/600R
R2771kR277
1k
R19 68RR19 68R
R20 68RR20 68R
R2781kR278
1k
C326 10ufC326 10uf
C329 10ufC329 10uf
AMP-INL 5
AMP-INR 5
+5V_Normal
CN22
CN22
A A
EARPHONE
EARPHONE
Power amplifier magnification adjustment
GAIN1(PIN6) GAIN0(PIN5)
0
01
1
1
0
0
AMP GAIN(db)
20
26
32
361
EARPHONE OUT
This document for ShenZhen KTC Technology CO., Ltd and presented party internal use only,
32
5
4
3
Do not spread to third party without the written permission.
Copyright@ ShenZhen KTC Technology Co., LTD
2
1
Page 33
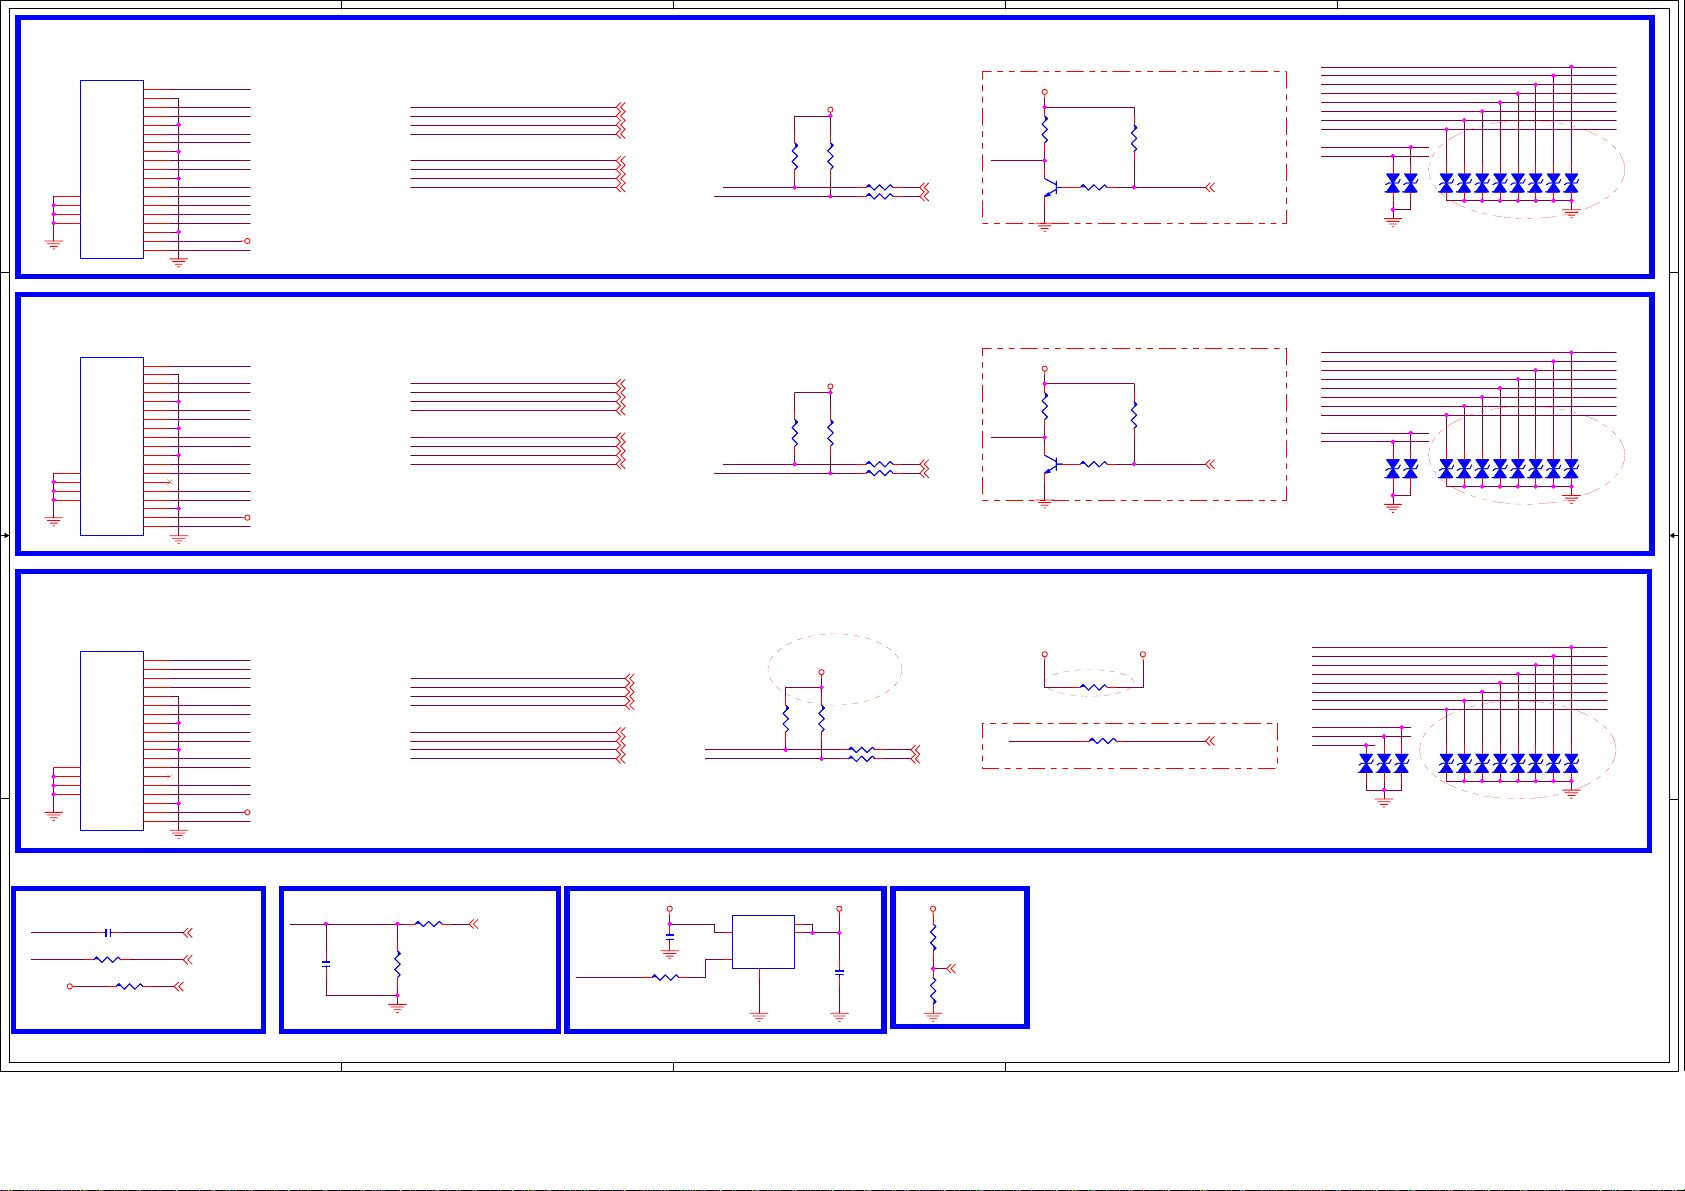
5
4
3
2
1
HDMI1(ARC)
P502
P502
DATA2+
DATA2 SHIELD
DATA2-
DATA1+
DATA1 SHIELD
D D
DATA0 SHIELD
CLK SHIELD
20
GND1
21
GND2
22
GND3
23
GND3
DDC/CEC GND
+5V POWER
DAT1A-
DATA0+
DATA0-
CLK+
CLKCEC
HOT PLUG
HDMI-W
HDMI-W
SCL
SDA
NC
HDMI0-RX2P
1
2
HDMI0-RX2N
3
HDMI0-RX1P
4
5
HDMI0-RX1N
6
HDMI0-RX0P
7
8
HDMI0-RX0N
9
HDMI0-CLKP
10
11
HDMI0-CLKN
12
CEC
13
HDMI-ARC
14
HDMI0-SCL
15
HDMI0-SDA
16
17
18
19
HDMI0-HPD
HDMI0/5V
HDMI0_RX2PHDMI0-RX2P
HDMI0_RX2NHDMI0-RX2N
HDMI0_RX1PHDMI0-RX1P
HDMI0_RX1NHDMI0-RX1N
HDMI0_RX0PHDMI0-RX0P
HDMI0_RX0NHDMI0-RX0N
HDMI0_CLKPHDMI0-CLKP
HDMI0_CLKNHDMI0-CLKN
HDMI0_RX2P 5
HDMI0_RX2N 5
HDMI0_RX1P 5
HDMI0_RX1N 5
HDMI0_RX0P 5
HDMI0_RX0N 5
HDMI0_CLKP 5
HDMI0_CLKN 5
HDMI0-SCL
HDMI0-SDA
HDMI0/5V
R523
R523
10K
10K
R525
R525
10K
10K
R528 33RR528 33R
R531 33RR531 33R
HDMI0_SCL 5 HDMI0_HPDIN 5
HDMI0_SDA 5
HDMI0-HPD
Q502
Q502
3904
3904
HDMI0/5V
32
R5191KR519
1K
R521
R521
10K
10K
R529
R529
1
4.7K
4.7K
HDMI0_HPDIN
HDMI0-RX2P
HDMI0-RX2N
HDMI0-RX1P
HDMI0-RX1N
HDMI0-RX0P
HDMI0-RX0N
HDMI0-CLKP
HDMI0-CLKN
HDMI0-SCL
HDMI0-SDA
1pF
1pF
D528
D528
D520
D520
D521
D521
NC/1pF
NC/1pF
D522
D522
NC/1pF
NC/1pF
D523
NC/1pF
NC/1pF
NC/1pF
NC/1pF
D517
D517
D518
D518
D519
NC/1pF
NC/1pF
NC/1pF
NC/1pF
D519
NC/1pF
NC/1pF
NC/1pF
NC/1pF
D527
D527
1pF
1pF
D524
D524
D523
HDMI2
P503
P503
DATA2+
DATA2 SHIELD
DATA2-
DATA1+
C C
DATA1 SHIELD
DATA0 SHIELD
CLK SHIELD
20
GND1
21
GND2
22
GND3
23
GND3
DDC/CEC GND
+5V POWER
DAT1A-
DATA0+
DATA0-
CLK+
CLKCEC
HOT PLUG
HDMI-W
HDMI-W
SCL
SDA
NC
HDMI1-RX2P
1
2
HDMI1-RX2N
3
HDMI1-RX1P
4
5
HDMI1-RX1N
6
HDMI1-RX0P
7
8
HDMI1-RX0N
9
HDMI1-CLKP
10
11
HDMI1-CLKN
12
CEC
13
14
HDMI1-SCL
15
HDMI1-SDA
16
17
18
19
HDMI1-HPD
HDMI1/5V
HDMI1_RX2PHDMI1-RX2P
HDMI1_RX2NHDMI1-RX2N
HDMI1_RX1PHDMI1-RX1P
HDMI1_RX1NHDMI1-RX1N
HDMI1_RX0PHDMI1-RX0P
HDMI1_RX0NHDMI1-RX0N
HDMI1_CLKPHDMI1-CLKP
HDMI1_CLKNHDMI1-CLKN HDMI1_HPDIN
HDMI1_RX2P 5
HDMI1_RX2N 5
HDMI1_RX1P 5
HDMI1_RX1N 5
HDMI1_RX0P 5
HDMI1_RX0N 5
HDMI1_CLKP 5
HDMI1_CLKN 5
HDMI1-SCL
HDMI1-SDA
HDMI1/5V
R541
R541
10K
10K
R542
R542
10K
10K
R551 33RR551 33R
R550 33RR550 33R
HDMI1_SDA 5
HDMI1-HPD
Q503
Q503
3904
3904
HDMI1/5V
32
R5461KR546
1K
R545
R545
10K
10K
R547
R547
1
4.7K
4.7K
HDMI1_HPDIN 5HDMI1_SCL 5
HDMI1-RX2P
HDMI1-RX2N
HDMI1-RX1P
HDMI1-RX1N
HDMI1-RX0P
HDMI1-RX0N
HDMI1-CLKP
HDMI1-CLKN
HDMI1-SCL
HDMI1-SDA
1pF
1pF
D531
D531
D534
D537
D537
D533
D533
NC/1pF
NC/1pF
D538
D538
NC/1pF
NC/1pF
D534
NC/1pF
NC/1pF
D536
D536
NC/1pF
NC/1pF
D532
D532
D530
D530
D535
NC/1pF
NC/1pF
NC/1pF
NC/1pF
D535
NC/1pF
NC/1pF
NC/1pF
NC/1pF
D529
D529
1pF
1pF
HDMI3(MHL)
P501
P501
B B
DATA2 SHIELD
DATA1 SHIELD
DATA0 SHIELD
CLK SHIELD
20
GND1
21
GND2
22
GND3
23
GND3
DDC/CEC GND
+5V POWER
DATA2+
DATA2-
DATA1+
DAT1A-
DATA0+
DATA0-
CLK+
CLKCEC
HOT PLUG
HDMI-W
HDMI-W
SCL
SDA
NC
1
2
3
4
5
6
7
8
9
10
11
12
13
14
15
16
17
18
19
HDMI2-RX2P
MHL-CD-SENSE
HDMI2-RX2N
HDMI2-RX1P
HDMI2-RX1N
HDMI2-RX0P
HDMI2-RX0N
HDMI2-CLKP
HDMI2-CLKN
CEC
HDMI2-SCL
HDMI2-SDA
HDMI2-HPD
MHL Signal:
CMR:24.57 ~35.54Ω
DMR:95.3~115
HDMI2/5V
R538
R538
10K
10K
+5V_Standby
R539
R539
10K
10K
R543 33RR543 33R
R544 33RR544 33R
HDMI2_SCL 5
HDMI2_SDA 5
HDMI2_RX1NHDMI2-RX1N
HDMI2_RX1PHDMI2-RX1P
HDMI2_RX2NHDMI2-RX2N
,
HDMI2_RX2PHDMI2-RX2P
HDMI2_RX0PHDMI2-RX0P
HDMI2_RX0NHDMI2-RX0N
HDMI2_CLKPHDMI2-CLKP
HDMI2_CLKNHDMI2-CLKN
HDMI2_RX1N 5
HDMI2_RX1P 5
HDMI2_RX2N 5
HDMI2_RX2P 5
HDMI2_RX0P 5
HDMI2_RX0N 5
HDMI2_CLKP 5
HDMI2_CLKN 5
HDMI2-SCL
HDMI2-SDA
HDMI2/5V
R665 10RR665 10R
HDMI2-HPD HDMI2_HPDIN
AVDD5V_MHL
R548 33RR548 33R
此
HDMI port IC内置hotplug
HDMI2_HPDIN 5
HDMI2-RX2P
HDMI2-RX2N
HDMI2-RX1P
HDMI2-RX1N
HDMI2-RX0P
HDMI2-RX0N
HDMI2-CLKP
HDMI2-CLKN
HDMI2-SCL
HDMI2-SDA
HDMI2-HPD
D516
D539
D539
D526
D526
D525
D525
1pF
1pF
1pF
1pF
1pF
1pF
D509
D509
NC/1pF
NC/1pF
D510
D510
NC/1pF
NC/1pF
D511
D511
NC/1pF
NC/1pF
D512
D512
NC/1pF
NC/1pF
NC/1pF
NC/1pF
D513
D513
D514
D514
NC/1pF
NC/1pF
D515
D515
NC/1pF
NC/1pF
D516
NC/1pF
NC/1pF
CEC & ARC
HDMI0_ARCHDMI-ARC
A A
C501 2.2uFC501 2.2uF
CEC HDMI_CEC
R554 200RR554 200R
HDMI0/5V
R555 100R/ncR555 100R/nc
HDMI0_ARC 5
HDMI_CEC 5
ARC_DET 5
MHL
MHL-CD-SENSE
C502
C502
47nF
47nF
R549 100RR549 100R
R556
R556
300K
300K
MHL_CABLE_DET 5
MHL_CABLE_DET
+5V_Standby
C1409
C1409
10uF
10uF
R5621KR562
1K
GND
VOUT
VOUT
SGM2554A
SGM2554A
5
1
HDMI2/5V
U503
U503
3
IN
4
EN
2
ARC DETECT
R552
R552
10K
10K
C1408
C1408
10uF/6.3V
10uF/6.3V
R553
R553
20K
20K
HDMI0/5V
HDMI0_DEC 5
This document for ShenZhen KTC Technology CO., Ltd and presented party internal use only,
Do not spread to third party without the written permission.
Copyright@ ShenZhen KTC Technology Co., LTD
5
4
3
2
33
Page 34
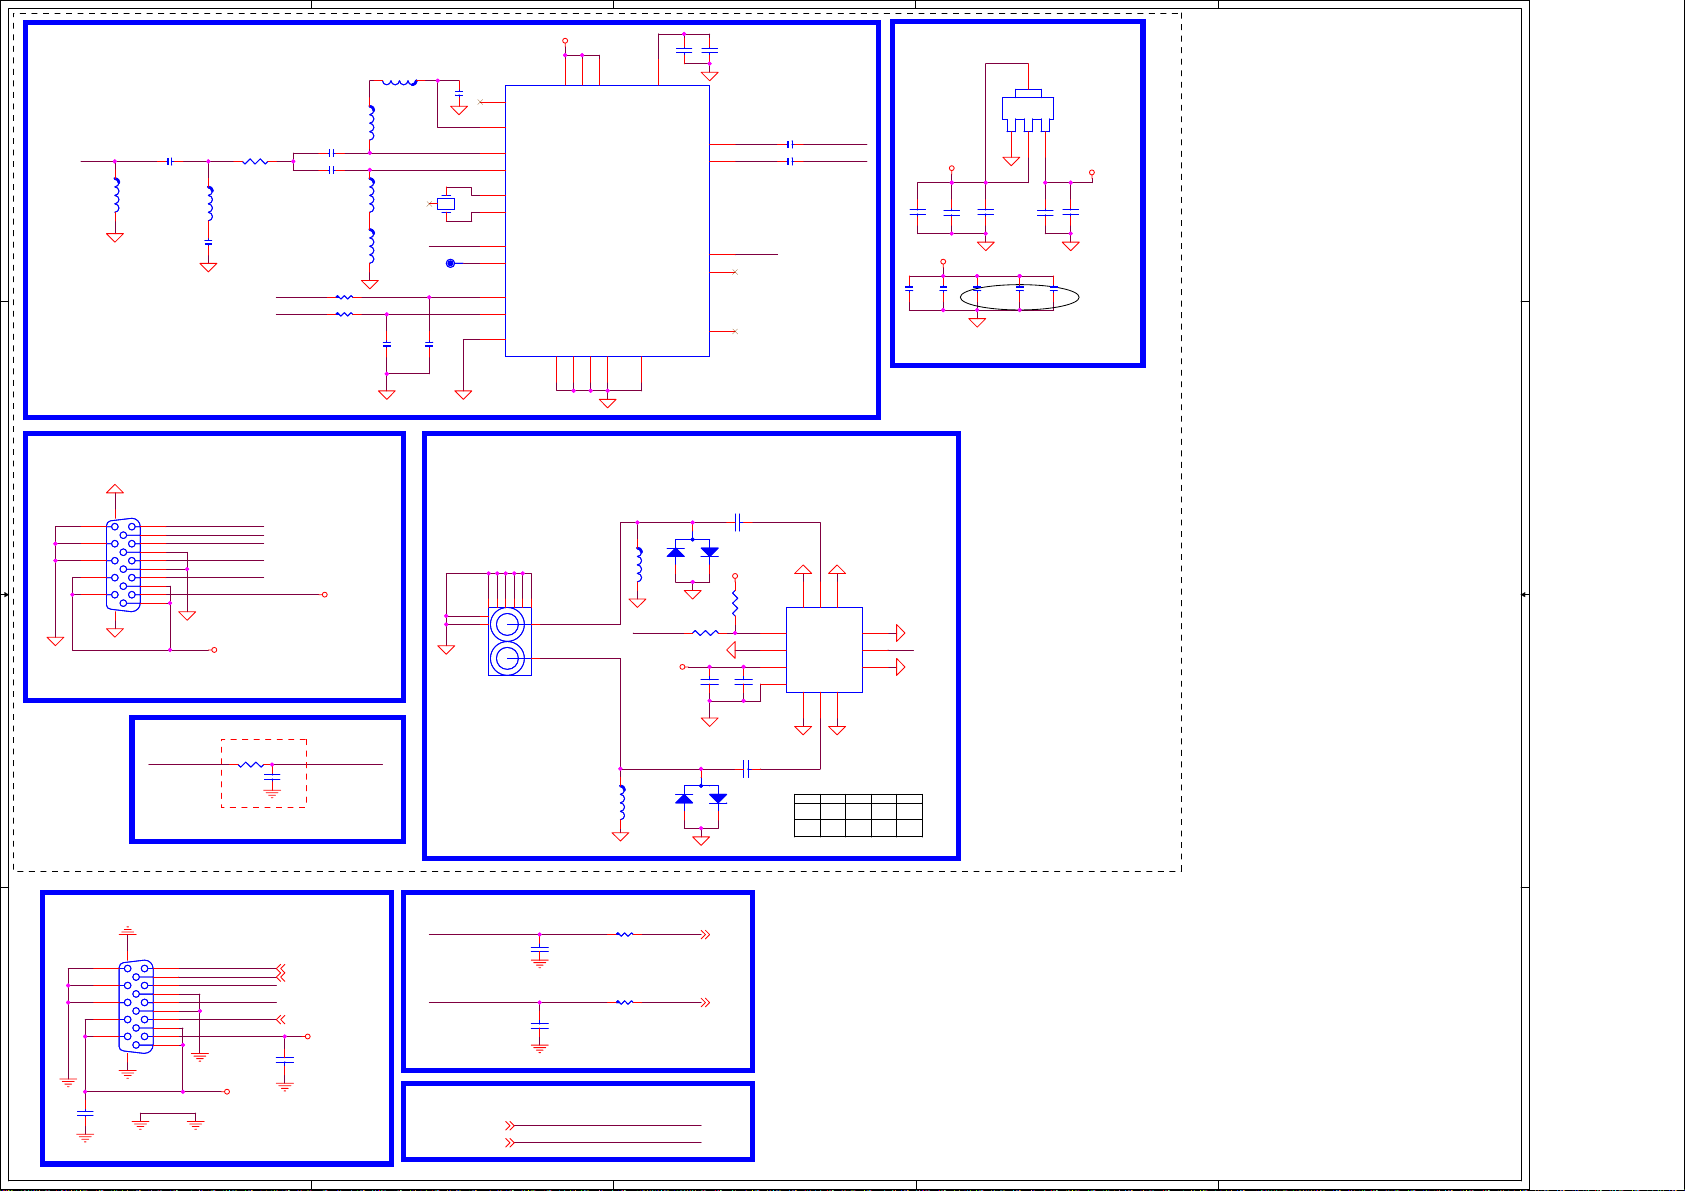
5
TL1
TL1
270nH
270nH
TL2
TL2
270nH
270nH
T_SCL-T
T_SDA-T
TC5 39pFTC5 39pF
TC8 39pFTC8 39pF
TR2 100RTR2 100R
TR3 100RTR3 100R
270nH
270nH
TL5
TL5
270nH
270nH
TL6
TL6
GND_TUNER
TC19
TC19
33pF
33pF
GND_TUNER
TL3
TL3
270nH
270nH
TC6 47pFTC6 47pF
D D
TL4
TL4
180nH
180nH
TC13
TC13
180pF
180pF
GND_TUNER
TR1 0RTR1 0R
TUNER
Si2151
GND_TUNER GND_TUNER
GND_TUNER
3
RF_SW
TP1TP1
TC20
TC20
33pF
33pF
4
TC1
TC1
1nF
1nF
TY1
TY1
1 2
24MHZ/8pF
24MHZ/8pF
18
19
20
22
13
14
24
1
1
3
2
23
I2CAddr:0xC0
U2
U2
NC
RF_REF
RF_IP
RF_IN
XTAL_I
XTAL_O
GPIO1
GPIO2
SCL
SDA
ADDR
+3.3V_TU
17
3.3V
GND
6
15
3.3V
Si2151
Si2151
GND8GND
16
GND_TUNER
9
3.3V
GND21GND_EPAD
3
TC2
TC2
TC3
TC3
1nF
1nF
1uF
1uF
7
GND_TUNER
1.8V
AGC1
AGC2
XOUT
IF_P
IF_N
11
10
5
4
12
IF-
TC4 0.1uFTC4 0.1uF
IF+
TC7 0.1uFTC7 0.1uF
IF_AGC_T
T_IF-IN+
T_IF-IN-RF_IN
TUNER POWER
+3.3V_TU
GND_TUNER
TC55
TC55
TC56
TC56
0.1uF
0.1uF
10uF
10uF
GND_TUNER GND_TUNER
TC60
TC60
TC61
TC61
0.1uF
0.1uF
1nF
1nF
GND_TUNER
TC59
TC59
10uF
10uF
TC54
TC54
10uF
10uF
+3.3V_TU
ADJ
ADJ
U1001
U1001
4
AS1117L-3.3
AS1117L-3.3
OUT
OUT
TC62
TC62
1nF
1nF
IN
IN
321
TC57
TC57
0.1uF
0.1uF
2
400mA
+5V_Normal_T
TC58
TC58
10uF
10uF
TC63
TC63
1nF
1nF
1
Close to Tuner Si2151
25
C C
GND_TUNER
TCON1
TCON1
1617
11
12
13
14
15
VGA_
VGA_
GND_TUNER
B B
GND_TUNER
T_SDA-T
1
T_SCL-T
6
T_IF-IN-
2
7
T_IF-IN+
3
8
4
9
5
10
公座
公座
T_IFAGC-T#
GND_TUNER
+5V_Normal_T
TR4 100RTR4 100R
Close Tuner
TC21
TC21
0.1uF
0.1uF
+3.3V_TU
IF_AGC_TT_IFAGC-T#
GND_TUNER
10
9
90
90
F Conn
F Conn
JT1
JT1
1
CABLE
RF_Air
RF_Cable
AIR
5274863
AGC
GND_TUNER
RF SWITCH
[DVB_T+ISDB]
3
TL7
TL7
270nH
270nH
1
GND_TUNER
GND_TUNER
RF_SW
TR17 100RTR17 100R
GND_TUNER
+3.3V_TU
TC50
TC50
0.1uF
0.1uF
GND_TUNER
TL8
TL8
270nH
270nH
1
GND_TUNER
改用
TC52 180pFTC52 180pF
TD3
TD3
BAV99
BAV99
+3.3V_TU
2
TR19
TR19
300K
300K
TC51
TC51
1nF
1nF
TC53 180pFTC53 180pF
3
2
150pf
RF_AIR#
GND_TUNER
10
11
12
13
PE42750
PE42750
GND_TUNER GND_TUNER
RF_Cable#
改用
150pf
TD4
TD4
BAV99
BAV99
C2
C1
VCC
P
9
8
GND
GND1RF12GND
GND_TUNER
7
RF2
GND
GND
RFC
GND
3
GND
TU2
TU2
6
GND_TUNER
RF_IN
5
4
GND_TUNER
RF2RF1
C2C1
HIGHGND
OFF
ONONLOW
OFF
DVB-C/T/T2 DIF
CON2
CON2
1617
11
12
13
14
C813
C813
2.2uF
2.2uF
15
VGA
VGA
A A
SDA-T
1
SCL-T
6
IF-IN-
2
7
IF-IN+
3
8
IFAGC-T#
4
9
5
10
5
+5V_Normal
SDA-T 5
SCL-T 5
IFAGC_T 5
+3.3V_TU_S
C804
C804
0.1uF
0.1uF
IF-IN- DIF-
I2C
TUNER_SDA5
TUNER_SCL5
4
C39
C39
NC/33pF
NC/33pF
C41
C41
NC/33pF
NC/33pF
L8 0RL8 0R
L9 0RL9 0R
DIF+IF-IN+
SDA-T
SCL-T
DIF- 5
DIF+ 5
34
3
This document for ShenZhen KTC Technology CO., Ltd and presented party internal use only,
Do not spread to third party without the written permission.
2
Copyright@ ShenZhen KTC Technology Co., LTD
1
Page 35
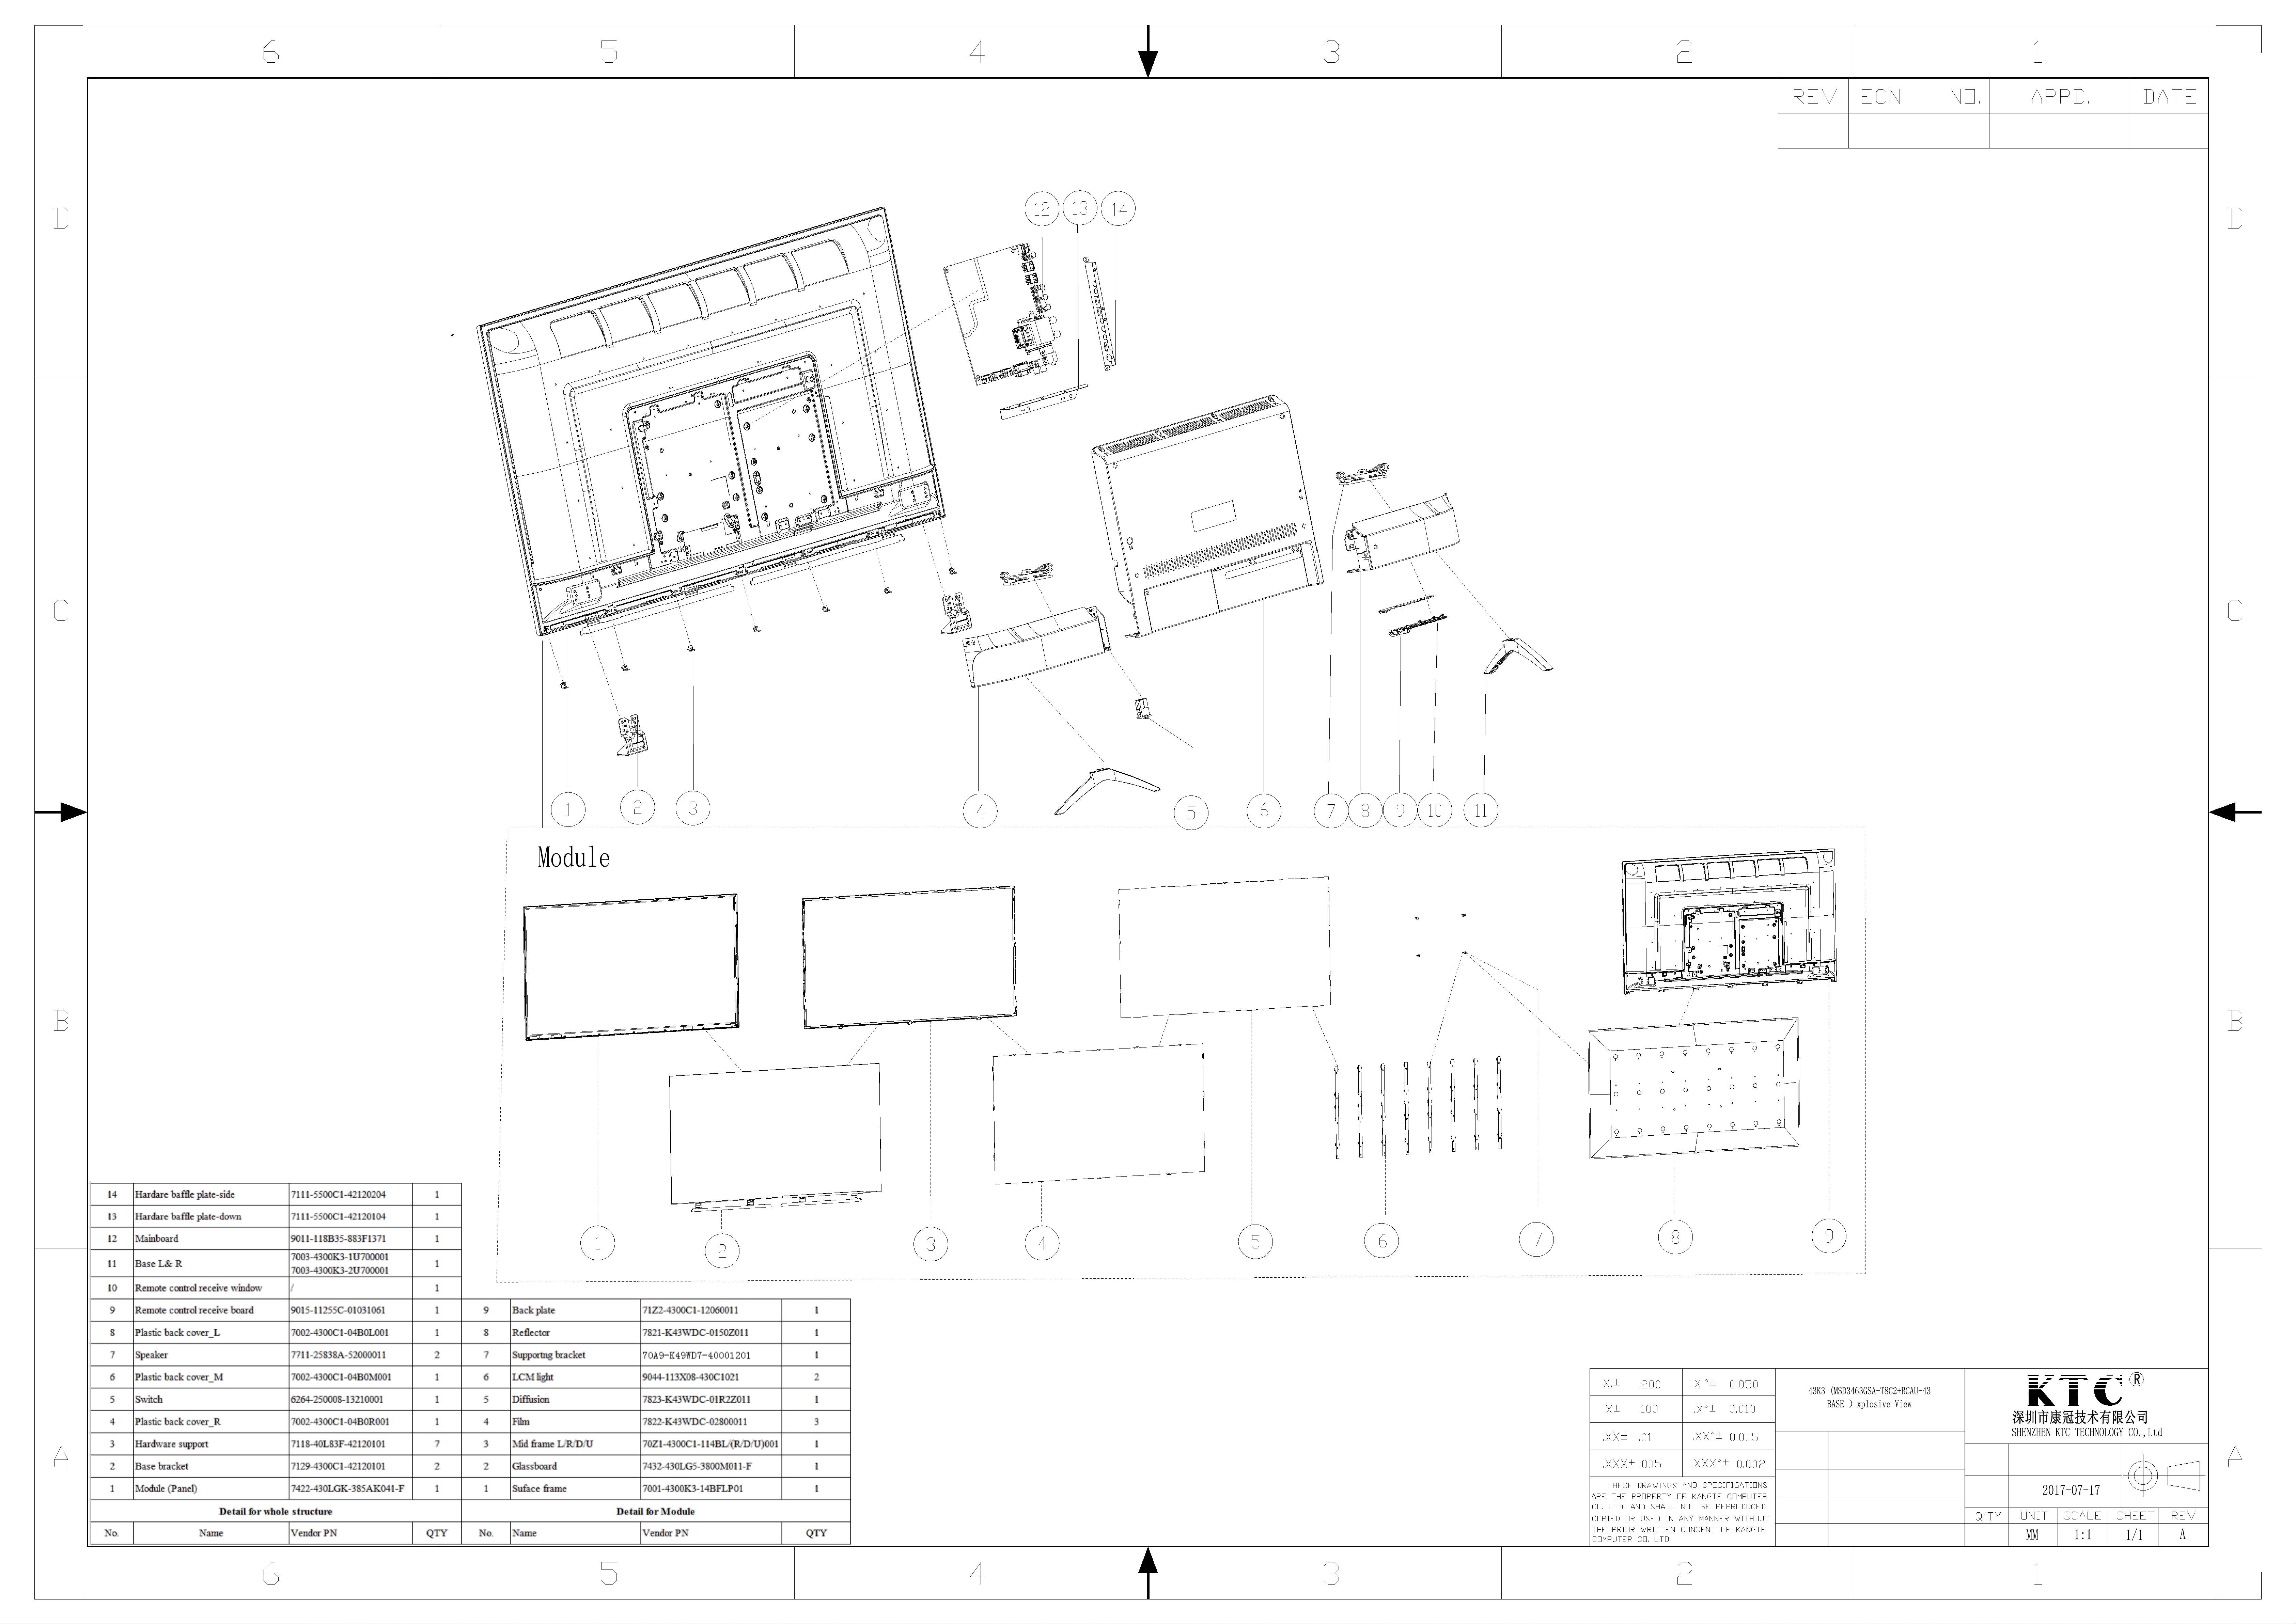
9. Styling Sheet
4082 series 43"
35
 Loading...